

Page 1
ANALOG/PCM DRUM MACHINE
USER MANUAL
Page 2

UNO Drum
Table of Contents
English 1
Table of Contents 2
Introduction 4
In the box 4
Register your UNO Drum 5
Precautions 5
1 – Installation and setup 7
2 – Turning the unit ON/OFF - Calibration process 9
3 – Overview 10
3.1 – Interface and Terms conventions 11
4 – Front panel interface 12
4.1 – Editing Matrix 13
4.1.1 – Drum Row 13
4.1.2 – FX Row 16
4.1.3 – SEQ Row 26
4.2 – Master Section 28
4.3 – Play/Program Section 31
5 – Programming a Sequence 33
5.1 – Insert a trig 33
5.2 – Automate a trig 33
5.3 – Automate a pattern 33
5.4 – Using the Element pads 34
6 – Presets 35
6.1 – Loading a KIT or a PATTERN 35
6.2 – Store a KIT or a PATTERN 35
6.3 – Factory Presets 35
7 – MIDI Implementation 36
7.1 – General 36
7.2 – Control External Devices with UNO Drum 36
7.3 – Control UNO Drum from External Devices 36
7.4 – Connecting UNO Drum to a computer via MIDI 36
7.5 – Connecting UNO Drum to a computer via USB 36
7.6 – Setting the MIDI Channel 37
7.7 – Setting the Sync Mode 37
7.8 – MIDI Soft Thru 37
7.9 – MIDI Interface Mode 37
7.10 – Element Mapping 37
7.11 – Pad note out 38
7.12 – Program Change 38
7.13 – MIDI Implementation Chart 39
2
Contents
Page 3

UNO Drum
8 – Specifications 43
9 – Troubleshooting 45
10 – Support 46
10.1 – User Area 46
3
Contents
Page 4
UNO Drum
Introduction
Thank you for purchasing UNO Drum.
In the box
Your package contains:
• UNO Drum
• USB cable
• 4 AA Batteries
• MIDI cables
• Quick Start Guide
• Registration Card
4
Introduction
Page 5

UNO Drum
Register your UNO Drum
By registering, you can access technical support, activate your warranty and receive free JamPoints™ which will
be added to your account. JamPoints™ allow you to obtain discounts on future IK purchases! Registering also
keeps you informed of all the latest software updates and IK products.
Register at: www.ikmultimedia.com/registration
Precautions
Locations
Using the unit in the following locations can result in a malfunction.
• In direct sunlight
• Location of extreme temperature or humidity
• Excessively dusty or dirty locations
• Locations of excessive vibration
• Close to magnetic fields
Power Supply
Please use only the USB cable provided with the unit, and connect the same cable to a correct USB port in the
device or USB power adapter.
UNO Drum works with both Ni-MH and Alkaline. Ni-MH batteries are tested to last for about 2.5 hours of
continuous use, while Alkaline batteries last about 1.5 hours of continuous use.
Interference with other electrical devices
Radios and televisions placed nearby may experience reception interference. Operate the unit at a suitable
distance from radios and televisions.
Handling
To avoid breakage, do not apply excessive force to the knobs and capacitive controls.
Care
If the exterior becomes dirty, wipe it with a clean and dry cloth. Do not use liquid cleaners such as benzene or
thinner, or cleaning compounds of flammable polishes.
Keep this manual
After read, please keep this manual for later reference.
Keep foreign matter out of your unit
Never set any container with liquid in it near this unit. If liquid gets into the unit, it could cause a breakdown, fire,
or electrical shock.
5
Introduction
Page 6

UNO Drum
Be careful not to let metal objects get into the equipment. If something does slip into the unit, unplug the USB
cable, then contact your nearest IK Multimedia dealer or the store where the equipment was purchased.
Specification subject to change
The information contained in this manual is believed to be correct at the time of printing. However, IK Multimedia
reserves the right to change or modify any of the specifications without notice or obligation to update existing
units.
6
Introduction
Page 7
UNO Drum
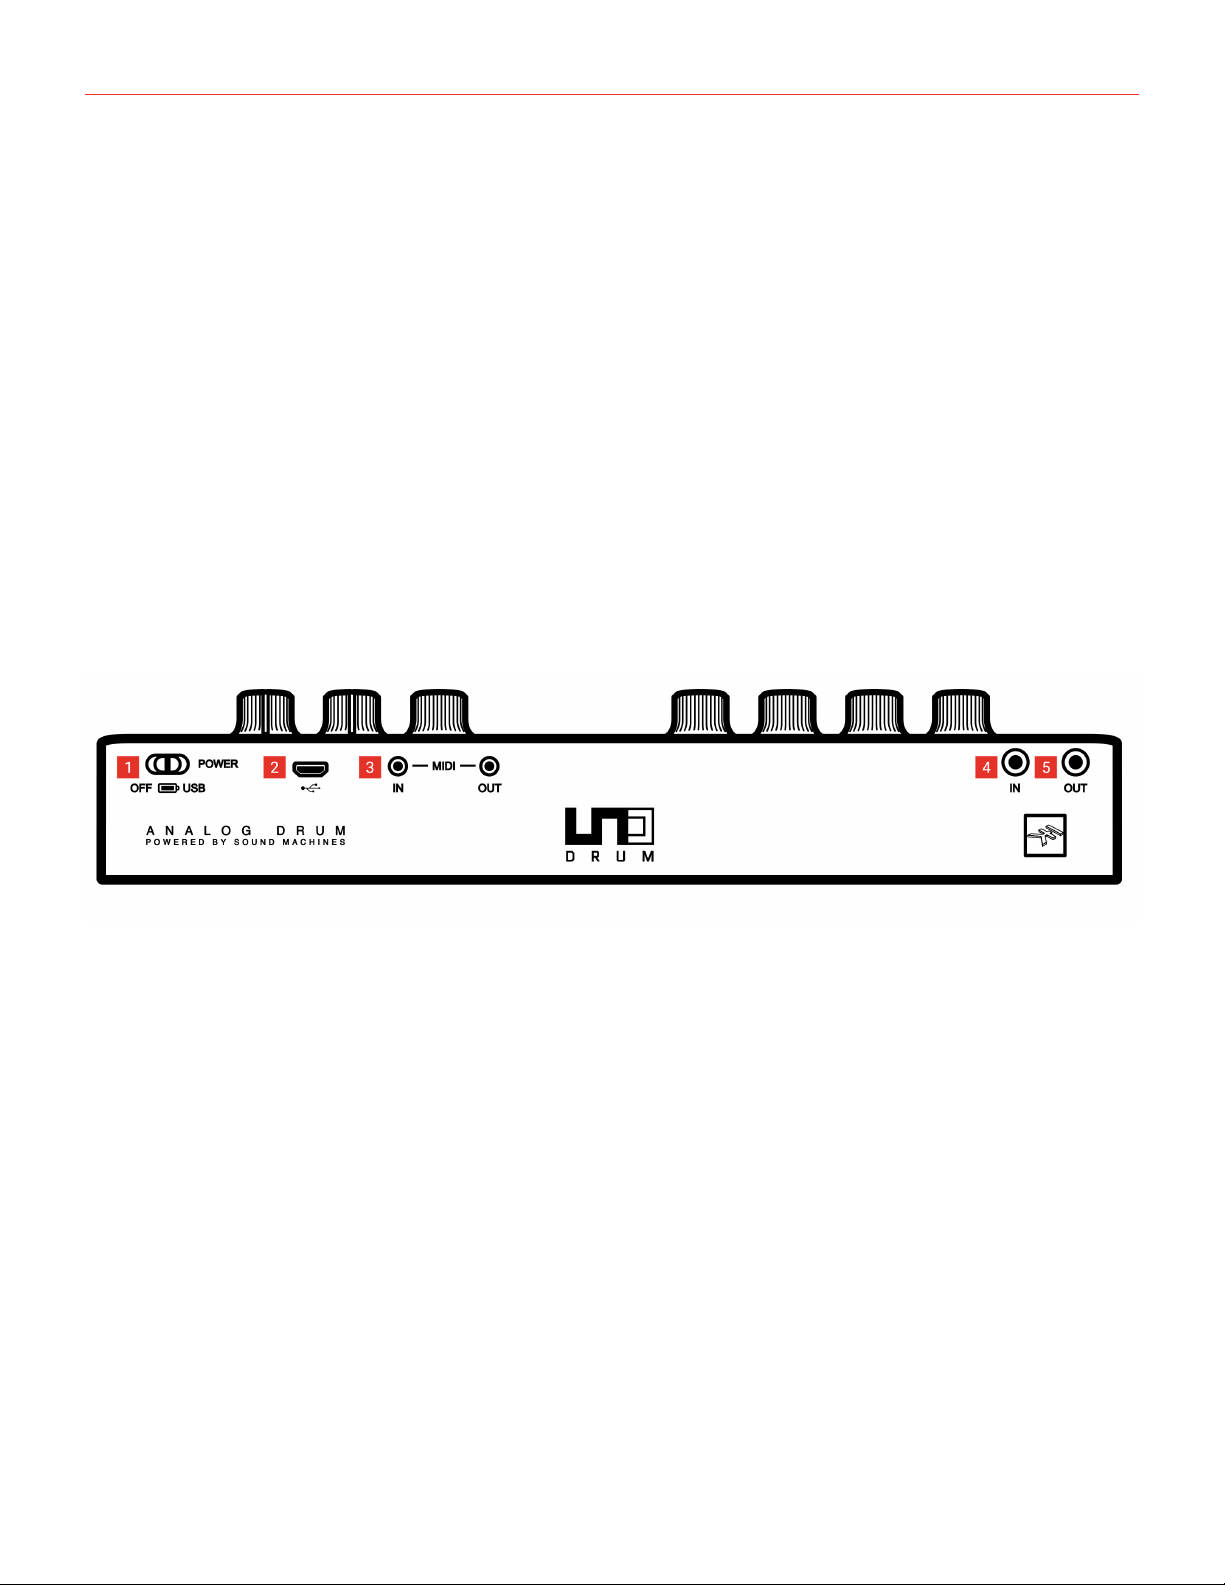
1 – Installation and setup
Please note: To prevent malfunction and equipment failure, always turn down the volume and turn off all the
units before making any connections.
UNO Drum can be powered by the USB bus or by 4 x AA batteries (Alkaline or Ni-MH).
USB: When connected to a USB host (MAC, Windows), all of the required power is typically provided by
the host. If the connected host is not capable of providing the required power, batteries may be needed (for
example, using an iOS device with a camera connection kit).
IMPORTANT: If the power switch is set to the Battery position but USB power is connected, note that the low
battery “BAT” indicator will not appear on the display when the batteries reach a low level, but the unit will still
be under battery power and will eventually shut off. Set the switch to the USB position to avoid this.
1 - Power switch
This switch turns the power on and off. The unit can be powered by 4 x AA batteries or by USB.
Ni-MH batteries are tested to last for about 2.5 hours of continuous use, while Alkaline batteries last about 1.5
hours of continuous use.
2 - Micro USB port
Connect the UNO Drum to a Host such as a Mac/PC or iOS device with a Lightning to USB Camera Adapter or
power supply (for example a USB power adapter or USB power bank).
3 - MIDI IN/OUT ports
The MIDI ports works with the included 2.5mm micro plugs to MIDI DIN adapters.
4 - Audio IN
Connect another UNO unit or any external mono audio source. Please note that the signal coming in the Audio
in will be effected by the internal Analog Compressor when active
7
1- Installation and setup
Page 8

UNO Drum
5 - Audio OUT
Connect the UNO Drum output to an external amp, mixer, or audio interface or to your headphones with stereo
mini-plug here.
8
1- Installation and setup
Page 9

UNO Drum
2 – Turning the unit ON/OFF - Calibration process
When the unit is powered ON, it automatically starts the first tuning and capacitance sensing.
Do not press buttons or put objects on the unit during the calibration as this will incorrectly calibrate the
capacitance sensing system. In case of incorrect calibration of the capacitance sensing system, please power
off the unit, and then turn it on again to repeat the process.
Various noises and calibration sounds might be audible during the startup of the unit, so we recommend turning
the volume down while starting up.
9
2- Turning the unit ON/OFF - Calibration process
Page 10

UNO Drum
3 – Overview
UNO Drum is the ultimate beat creation station for anyone and everyone to create warm, punchy, high-quality,
and inspiring grooves. Made in collaboration with Italian analog specialist Soundmachines, UNO Drum follows
the acclaimed UNO Synth, combining massive analog tone with digital flexibility and convenience.
UNO Drum makes it easy to program and perform using the widest sonic palette to add professional drum
grooves to your music.
UNO Drum features:
12 Killer sounding elements
• 6 fat, punchy analog voices
• Up to 12 PCM voices
• Analog drive and compressor
• 100 drum kits
Wider sonic-palette
• Analog character with digital flexibility
• Suits more music styles
• From Electronic to Hip-Hop, from Indie to Pop
Easy-to-use and perform
• 12 multi-touch, double-velocity pads
• 4 dynamic sound controls
• 5 performance effects
Fully programmable
• 64-step sequencer
• Up to 8 parameters per step
• 100 drum patterns
Integrates in any live, studio or mobile set-up
• MIDI and USB in/out
• Audio in to daisy chain other devices
• Ultra-portable and lightweight
• Battery or USB powered
10
3 – Overview
Page 11

UNO Drum
3.1 – Interface and Terms conventions
Element: is the drum part, such as the kick, the snare, the hi hats, etc. An element can be an analog element or
a PCM element.
Sound: is the sound of the element. Each element has 5 sounds available and 6 of the available 60 are analog.
Kit: a Kit is a combination of element and sounds that are edited and stored as a preset.
Element Pattern: is the pattern relative to an element.
Pattern: is the global pattern, comprehensive of all the elements patterns, saved as a preset.
Song: is a chain of up to 64 patterns repeating themselves in loop.
Alternative function: these functions are activated with the ALT button and can be global parameters or
secondary functions.
11
3 – Overview
Page 12
UNO Drum
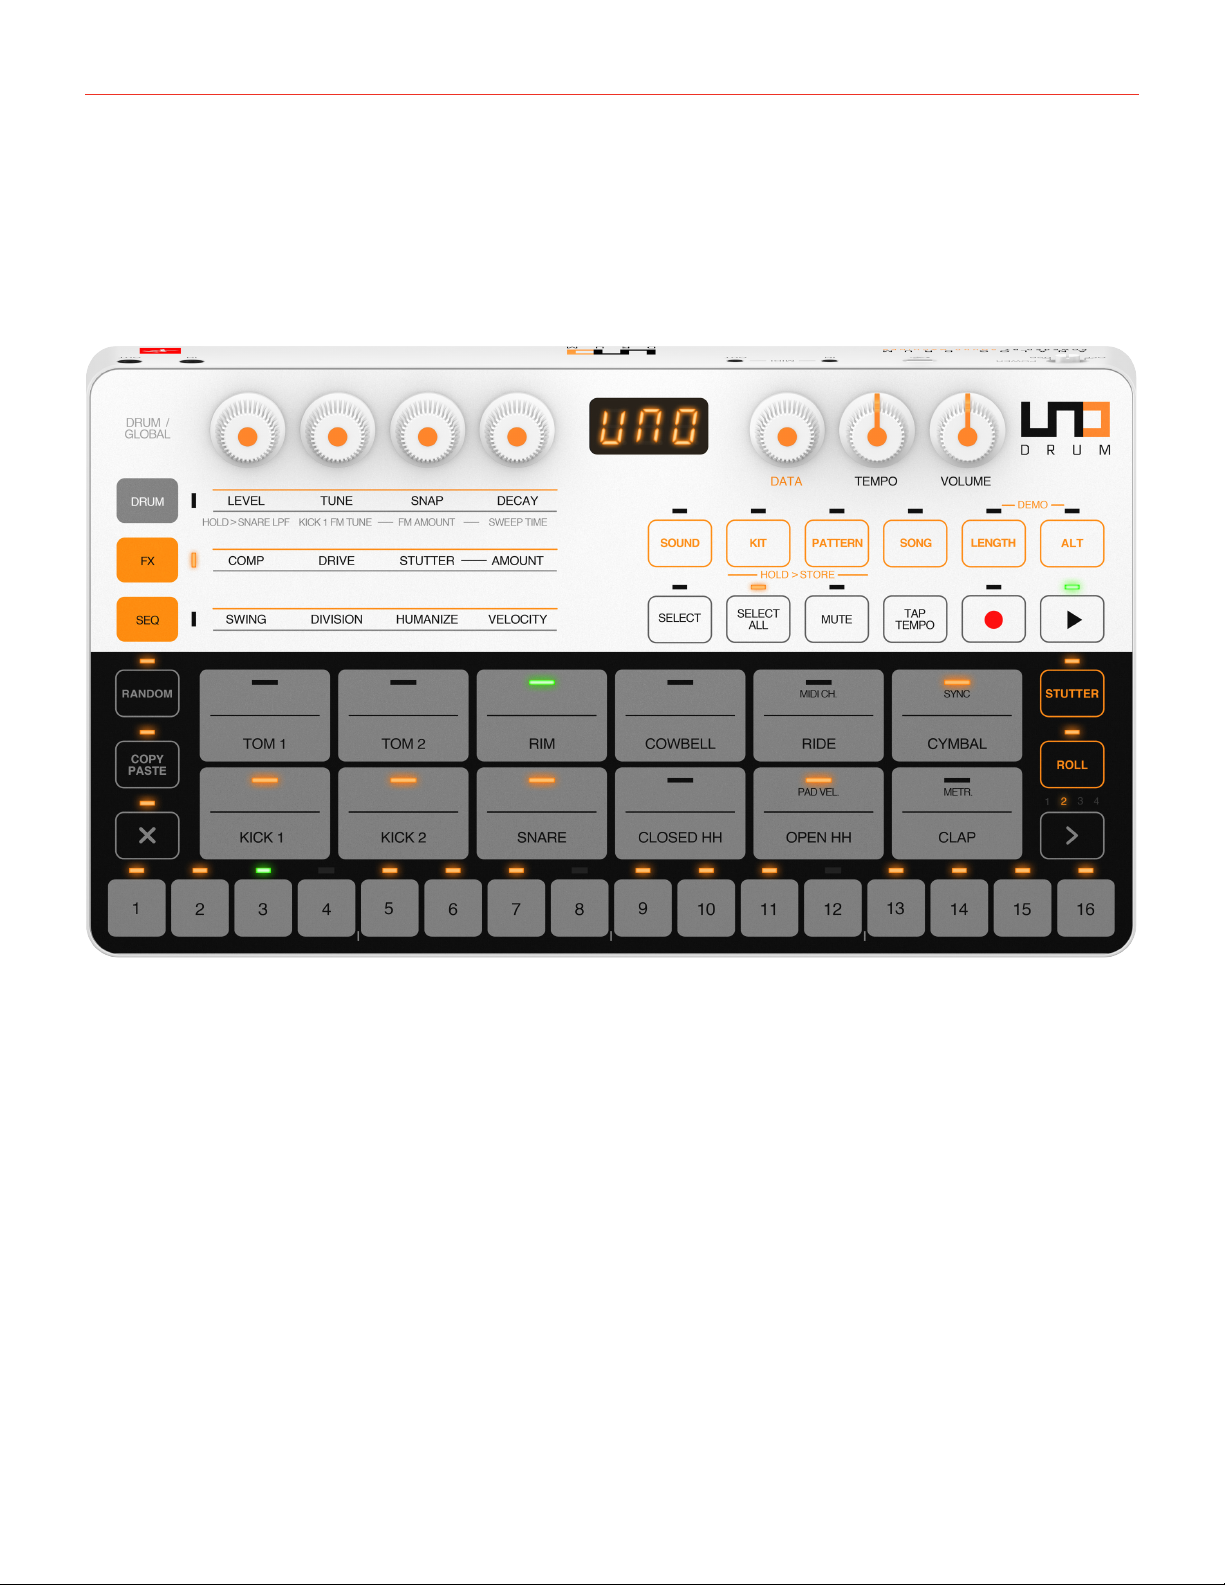
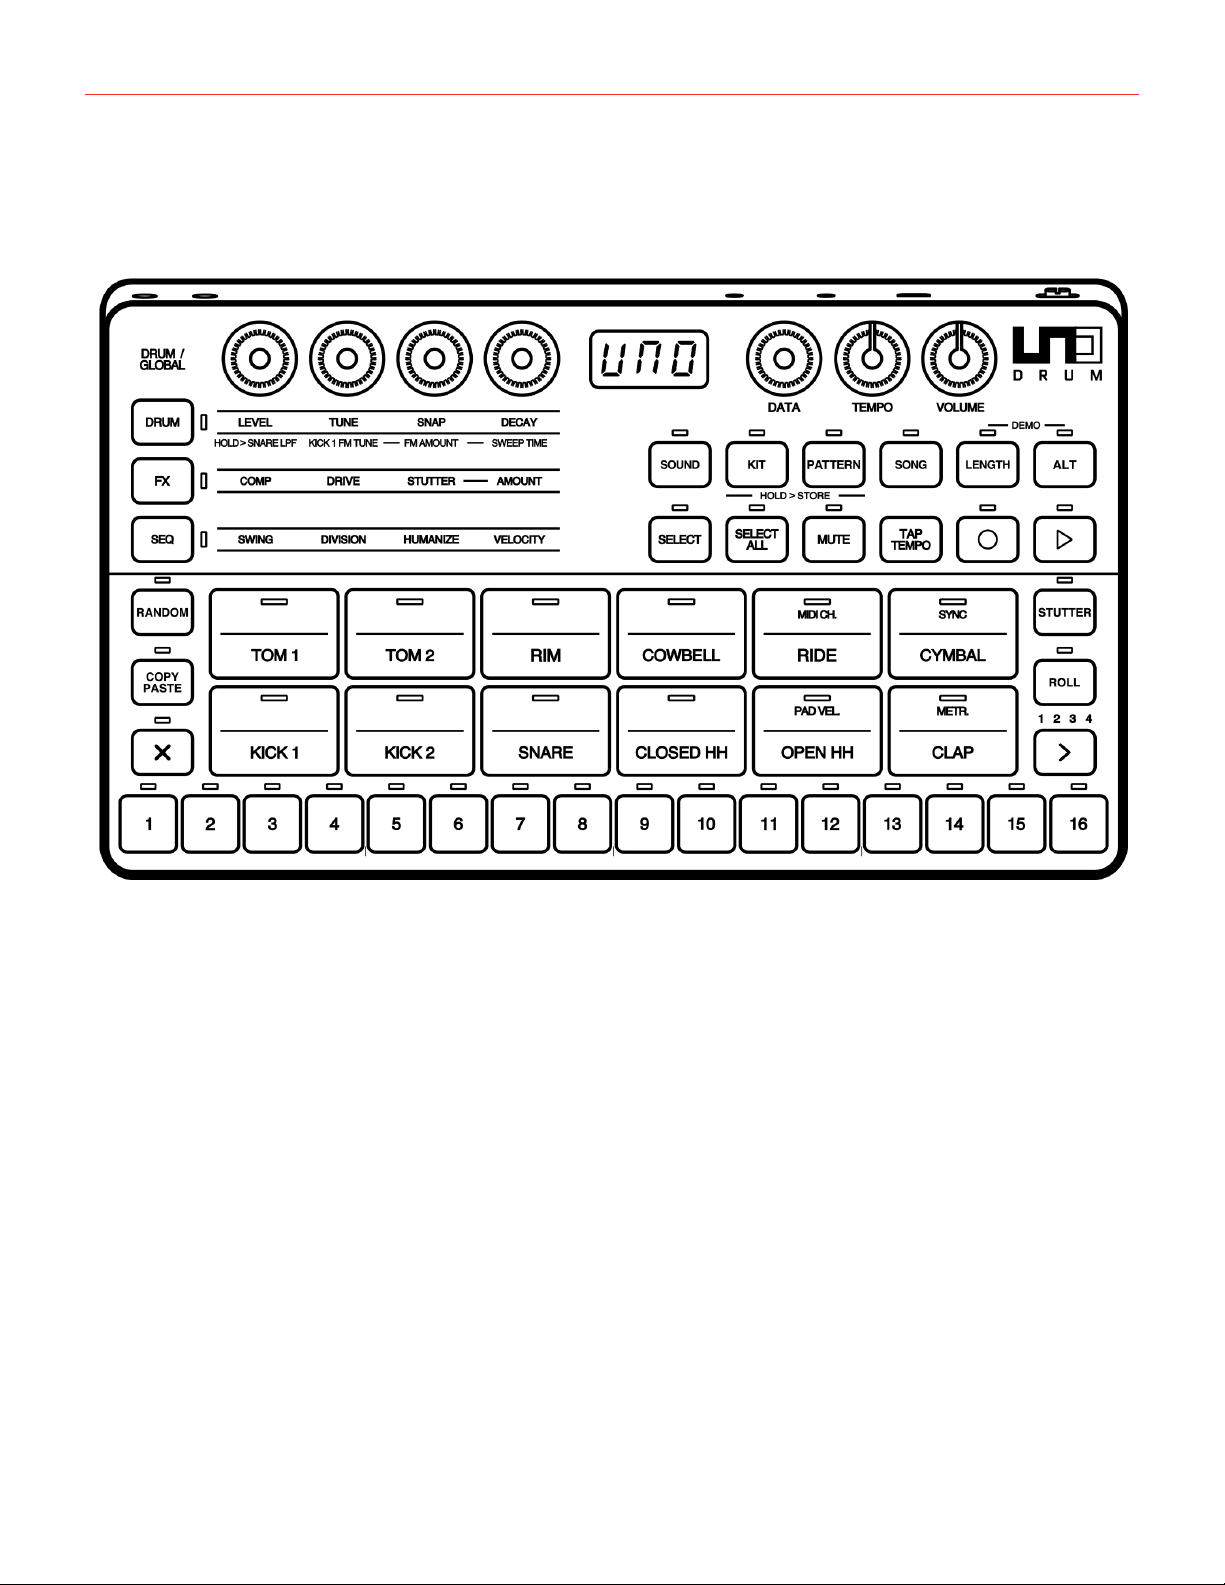
4 – Front panel interface
For an easier explanation we can divide the front panel in 3 parts, which are meant to cooperate together: the
Editing Matrix, the Master Section, and the Play/Program section.
12
4 – Front panel interface
Page 13
UNO Drum
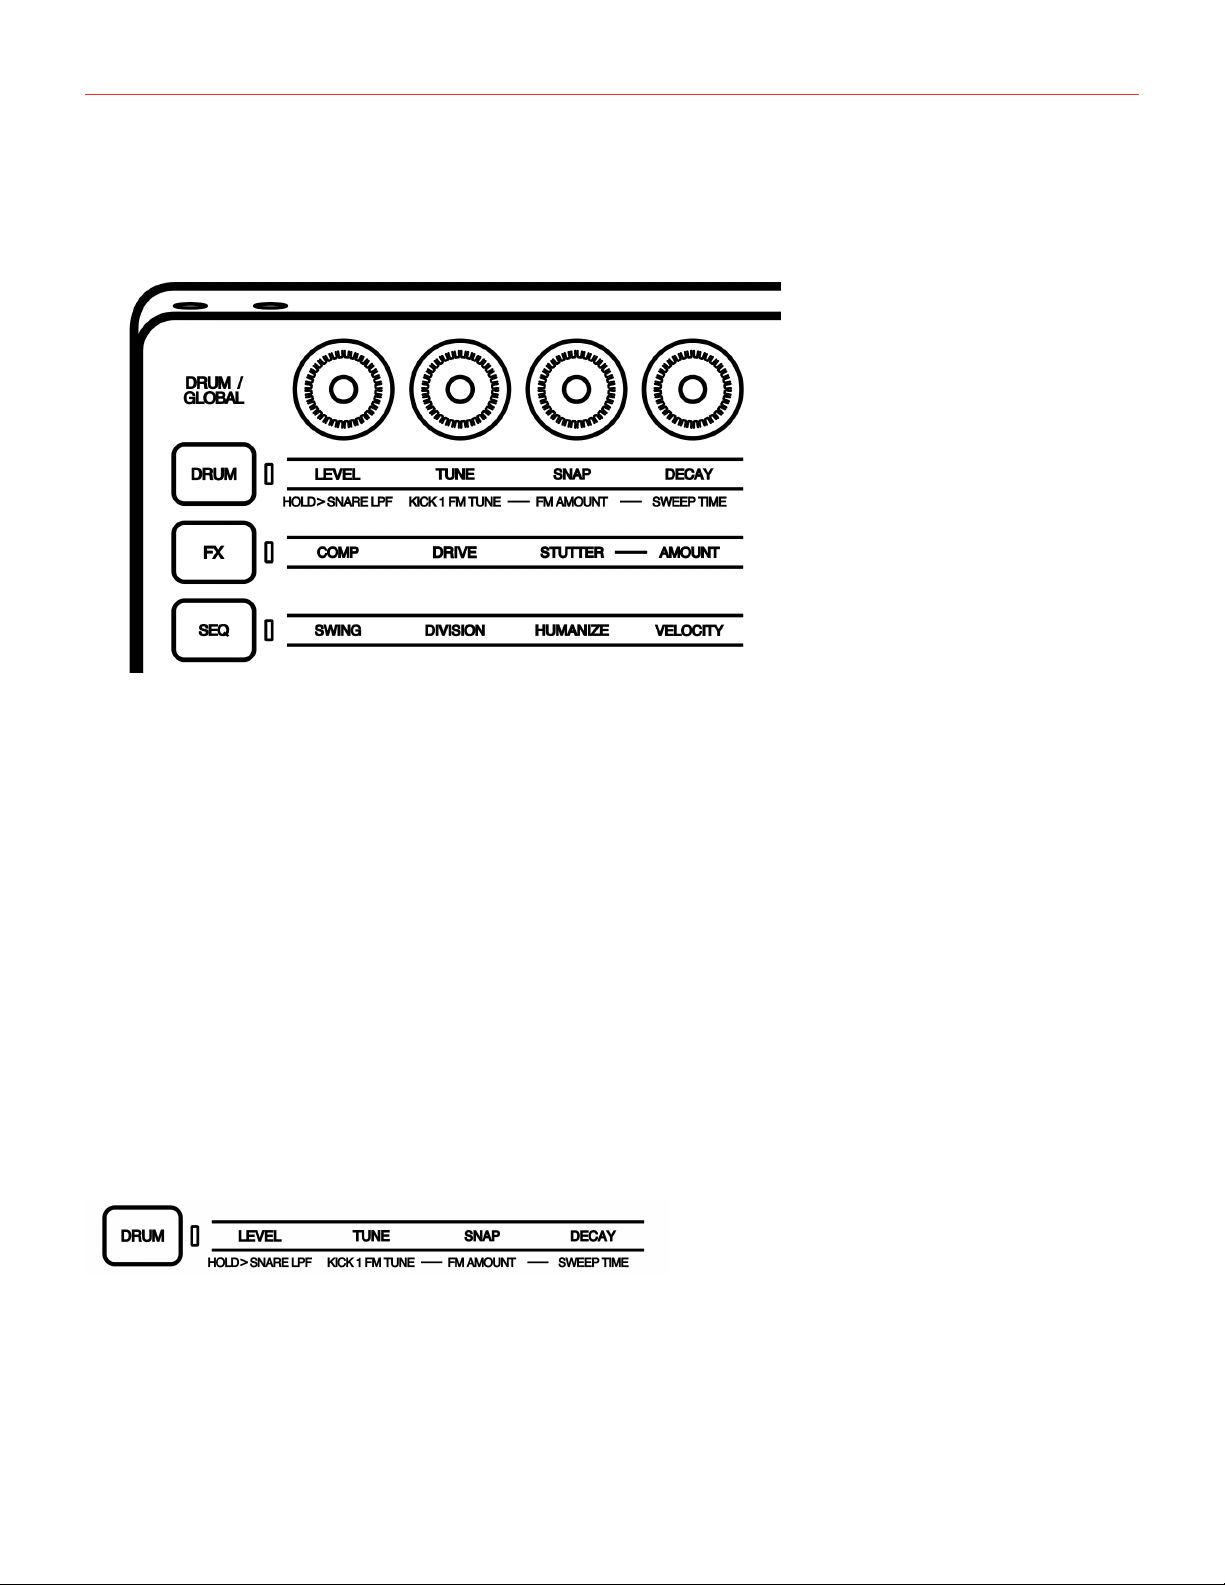
4.1 – Editing Matrix
The editing matrix is composed in 4 endless encoders and 3 cap-sense buttons.
The cap-sense button activates the encoder, which will edit the parameters described in the labeled row at the
right of the button and under the encoder. The row is shown as selected when the relative LED of the button is
lit.
All of the endless encoders have a RELATIVE behavior, meaning that the values are changing smoothly from the
saved value or current value regardless of the knob position, creating no jump in values.
The first row, named DRUM, has a second function which it activates after holding the button for 1.5 seconds;
after those 1.5 seconds the encoders will adjust the parameters according to the label.
All the matrix buttons are exclusive toggles, meaning that only one button at the time can be selected and it is
not possible to de-select a button but instead select another to change selection.
Each row has its own type of controls and parameter values.
4.1.1 – Drum Row
The DRUM row is an element related row and it is strictly linked to the elements PADs.
Once a PAD is selected (a selection of an element is made by pressing the relative PAD on the Play/Program
section) the relative element controls can be modified in this row.
13
4 – Front panel interface
Page 14
UNO Drum
Each of the 6 analog elements have their own parameters while the PCM element have the same type of
controls.
Each elements parameter is different based on its electronics and musical nature:
Analog Sounds:
KICK1: (Modern type sound with FM modulation)
Tune: adjust the tuning of the carrier from around 30Hz to around 100Hz
Decay: adjust the decay time
FM Tuning: adjust the tuning of the modulator
FM Amount: adjust the amount of the FM modulation
Sweep Time: adjust the sweep time of the carrier and the modulator
Snap: adjust the volume of the added initial transient
Level: adjust element volume
KICK2: (Vintage type with add on transient)
Tune: adjust the tuning from around 31Hz to around 80Hz
Decay: adjust the decay time
Snap: adjust the volume of the added initial transient
Level: adjust element volume
SNARE (Vintage modern style)
Tune: adjust the tuning of the body part of the snare
Decay: adjust the decay time
Snap: adjust the style and volume of the initial transient
14
4 – Front panel interface
Page 15

UNO Drum
Snare LPF: Adjust the LPF placed on the noise generator recreating the snare to increase or decrease its
harmonic content. Since the LPF is added only in the White Noise part, as soon as you start decreasing the
harmonic content also the decay will start to decrease until only the body part of the snare remains.
Level: adjust element volume
CLAP
Decay: adjust the decay between 8 hard selections
Level: adjust element volume
OH/CH (open and closed hi hats)
Tune: Select the type of metal noise between 4 selections.
Decay: adjust the decay time
Level: adjust element volume
PCM sounds:
On UNO Drum the PCM sounds are vintage style samples, giving an old school vibe to the entire machine. For
the PCM sounds the engine operate at 32kHz and 12 bit. The controls are:
Tune: adjust the speed reading of the PCM samples. On the display values are showed from 0 to 127, where
0 is the minimum reading speed value, 64 is the normal speed value and the default and 127 is the maximum
reading speed.
Decay: Reduce the decay time of the amp envelope, meaning that the maximum value of 127 corresponds to
the max length of the sample. Note that the decay is linked proportionally to the TUNE control, meaning that
changing the tune will change the decay time accordingly.
Level and Velocity controls are common for all element, and are single edit for each element. They are shown
and controlled with values between 0 and 127.
All the controls of the Drum row can be saved in a KIT, and can be recorded in an element pattern both in real
time and per-step.
15
4 – Front panel interface
Page 16

UNO Drum
4.1.2 – FX Row
The FX row is a global row, meaning the listed parameters will affect the master output of the UNO Drum.
COMP: abbreviation for compressor, it is an Audio Effect positioned in the master output. This control adjusts
the threshold of the analog master compressor circuit.
Values goes from 0 to 127 adjusting the amount of compression and auto make-up.
The compressor values cannot be recorded in an element pattern or a pattern.
The compressor values is stored in a KIT.
DRIVE: is an Audio Effect positioned in the master out. This control adjust the amount of distortion given by the
analog drive circuit.
Values go from 0 to 127 adjusting the amount of distortion.
The drive value cannot be recorded in an element pattern or a pattern.
The drive values is stored in a KIT.
The following 2 controls are the settings for the MIDI effect, STUTTER. This control adjusts the parameters for
the momentary button STUTTER, which is located in the Play/Program section.
When the stutter button is pressed the selected type and amount are enabled from the first step played after the
press of the button.
STUTTER and STUTTER AMOUNT: the STUTTER is a MIDI Effect. This control decides between the 10 types
of stutter available and stutter type is strictly linked to the amount value and the result changes in relation with
the recorded pattern and on when the button STUTTER is pressed.
16
4 – Front panel interface
Page 17

UNO Drum
The 10 stutter types are:
TYPE 1 (Loop 8): the selection on the display shows “1”. This type repeats 8 steps in a loop from the first
available after the press of the stutter button. In this case the AMOUNT controls the number of element affected
by the stutter from the Kick1 to all the 12 elements as showed in the picture showing the example when starting
from step 1. Amount range is 0-12.
17
4 – Front panel interface
Page 18

UNO Drum
TYPE 2 (Loop 4): the selection on the display shows “2”. This type repeats 4 steps in a loop from the first
available after the press of the stutter button. In this case the AMOUNT controls the number of element affected
by the stutter from the Kick1 to all the 12 elements as showed in the picture showing the example when starting
from step 1.Amount range is 0-12.
18
4 – Front panel interface
Page 19

UNO Drum
TYPE 3 (Loop triplets 1): the selection on the display shows “3”. This type repeats 3 steps in a loop from the first
available after the press of the stutter button. In this case the AMOUNT controls the number of element affected
by the stutter from the Kick1 to all the 12 elements are shown in the picture as an example when starting from
step 1. Amount range is 0-12.
19
4 – Front panel interface
Page 20

UNO Drum
TYPE 4 (Loop triplets 2): the selection on the display shows “4”. This type repeats 6 steps in a loop from the
first available after the press of the stutter button. In this case the AMOUNT controls the number of elements
affected by the stutter from the Kick1 to all of the 12 elements, as shown in the example when starting from step
1. Amount range is 0-12.
20
4 – Front panel interface
Page 21

UNO Drum
TYPE 5 (Fill style 1): the selection on the display shows “5”. This type adds a pre-programmed pattern of 16
steps to the current pattern of elements, starting from the first step available, as showed in the picture.
In this case, the AMOUNT controls the number of elements affected by the stutter from Kick1 to all of the 12
elements as shown in the picture. Amount range is 0-12.
The type is effected by the swing and the division, but not the pattern length and velocity which is fixed at 127.
21
4 – Front panel interface
Page 22

UNO Drum
TYPE 6 (Fill style 2): the selection on the display shows “6”. This type adds a pre-programmed pattern of 16
steps to the current element pattern starting from the first step available, as showed in the picture.
In this case the AMOUNT controls the number of elements affected by the stutter from Kick1 to all the 12
elements as shown in the picture. Amount range is 0-12.
The type is effected by the swing and division, but not the pattern length and velocity which is fixed at 127.
22
4 – Front panel interface
Page 23

UNO Drum
TYPE 7 (Tune UP): the selection on the display shows “7”. This type overlaps the Tune parameters of the
effected element going from value 0 to 127 in 8 steps (at the double of the speed of the sequence).
In this case the AMOUNT controls the number of element affected by the stutter from the Closed and Open
HiHats to all the 12 elements as shown in the picture. Amount range is 0-12.
The type is effected by the swing, division, the velocity, and the pattern length.
23
4 – Front panel interface
Page 24

UNO Drum
TYPE 8 (Tune DOWN): the selection on the display shows “8”. This type overlaps the Tune parameters of the
effected element going from values 127 to 0 in 8 steps (at the double of the speed of the sequence).
In this case the AMOUNT controls the number of elements affected by the stutter from the Closed and Open
HiHats to all the 12 elements as shown in the picture. Amount range is 0-12.
The type is effected by the swing, division, the velocity, and the pattern length.
24
4 – Front panel interface
Page 25

UNO Drum
TYPE 9 (Madness 1): the selection on the display shows “9”. This type repeats 4 steps in a loop from the
first available after the press of the stutter button at the double of the speed of the sequence. In this case the
AMOUNT controls the amount of steps from 50% to 100% of the steps independently from the loop that will
have a random Velocity, Decay, and Tune.
TYPE 10 (Madness 2): the selection on the display shows “10”. This type repeats 3 steps in a loop from the
first available after the press of the stutter button at the double of the speed of the sequence. In this case the
AMOUNT controls the amount of steps from 50% to 100% of the steps independently from the loop that will
have a random Velocity, Decay, and Tune plus adding a roll of 4 steps at the end of the 16 step pattern.
25
4 – Front panel interface
Page 26

UNO Drum
4.1.3 – SEQ Row
The SEQ row is a global row, meaning the effects will affect the master settings of the UNO Drum’s digital
sequencer with the exception of the velocity. This adjusts the velocity of each element per step when the
recording is active.
SWING: MIDI Effect - adjusts the amount of swing percentage applied to every second step, assuming 16 step
in a 16th note swing.
Those percentages pertain to the degree that every second 16th note is positioned in relation to the beats either
side of it. So 50% swing refers to straight timing, where every second step is played exactly half way between
the two beats either side of it.
The Values goes from 50 to 70.
DIVISION: MIDI Effect - The UNO sequence can have different division from the usual 4/4, and can be selected
between:
8th note triplet (3/4) - Three steps will be one beat, meaning that there is 1 bar in 12 steps. The length of the
pattern is not automatically cut when this scale is selected. To cut the length of the pattern to 12 steps, the
LENGTH function on the master section has to be used. The fact that we have 64 steps available on a pattern
gives the possibility to create up to 5 complete bars. To program correct triplet scales, the user has to select the
length of the pattern accordingly.
26
4 – Front panel interface
Page 27

UNO Drum
16th note triplet (6/8) - Six steps will be one beat, meaning that 12 steps will be half of a bar. The length of
the pattern is not automatically cut when this scale is selected. To cut the length of the pattern to 12 steps,
the LENGTH function on the master section must be used. Having 64 steps available on a pattern gives the
possibility to create up to 2 complete bars. To program a correct triplet scale the user has to select the length of
the pattern accordingly.
16th note - Four steps will be one beat (the default and the usual 4/4), meaning that 16 steps will be 1 bar.
Since we have 64 steps available on a pattern, the possibility to create up to 4 complete bars is available. To
program correct triplet scales the user has to select the length of the pattern accordingly.
32nd note - Eight steps will be one beat, meaning that 16 steps will be half of a bar. Since we have 64 steps
available on a pattern we have the possibility to create up to 2 complete bars. To program correct triplet scales
the user has to select the length of the pattern accordingly.
Note that having the same BPM, the playback of the sequencer will change its speed accordingly to the
selected division.
27
4 – Front panel interface
Page 28

UNO Drum
HUMANIZE: MIDI effect - adjust the amount of randomness and probability, changing the velocity of the steps
in the pattern and slightly moving the recorded steps further from their relative position.
Each time a pattern is repeated, the humanize will change its internal values.
VELOCITY: MIDI Effect - controls the velocity to VCA of each element per step, in turn affecting the element
pattern.
Velocity values goes from 0 to 127, and can only be modified with the per-step recording by holding the step to
modify the parameter.
4.2 – Master Section
The Master section can be identified as the section where all the “global” parameters are controlled and the
management of the memory (kit, patterns, and song) can be controlled.
Here a DATA ENCODER is used to insert a value. Most times a value is automatically set when it is inserted
without the need for confirmation (exemption is made for the Storing function).
Looking at the controls we can instantly notice that 2 colors are used for the functions: Orange and Black. The
orange controls are the controls that work directly and only with the Data Encoder, and the black controls are
independent from the data encoder.
28
4 – Front panel interface
Page 29

UNO Drum
The Orange functions are:
SOUND: when pressed the display shows the actual drum sound for the selected element between 1 and 5.
UNO Drum has 6 analog sound and 54 PCM sounds. That means that each element has 5 different sound to
tweak. To select a sound for an element, select the element then SOUND and use the DATA ENCODER to select
between the 5 possible sounds.
KIT: when pressed the display shows the actual selected KIT between 1 and 100. A KIT is a combination of
sounds, sound types (if analog or PCM) and their relative values, meaning that the KIT stores also the Element
parameters. Kits can be recalled by pressing KIT and selecting the kit number via the DATA ENCODER or via the
MIDI Program Change.
PATTERN: when pressed the display shows the actual selected PATTERN between 1 and 100. A pattern is the
composition of all the single element patterns. A pattern length can be from 1 to 64 steps and is determined by
the LENGTH function. All elements shares the same pattern length. To select a pattern press PATTERN and use
the DATA ENCODER to select between the 100 available patterns.
SONG: when pressed the display will show “SNG” to indicate song mode is active. In Song mode it is possible
to chain up to 64 patterns, determined with the LENGTH function between 1 and 64. When the chain is active,
the steps of the sequencer become the patterns to chain. By default, the patterns are empty. Holding the step
gives the possibility to enter the pattern number to insert in the step.
• To insert a pattern, hold the step. The display will show the pattern number inserted (default is “- - -“
meaning no pattern is insert) and to modify use the DATA ENCODER. When the step is released, the
display will show “SNG” again.
• To delete a selection, press the steps again. To cancel an entire chain, hold CLEAR and press SONG.
When clear is pressed the display will show “CLR” blinking 3 times.
ALT: When the button is LIT and active the pads are bypassed and not playing or selecting the elements,
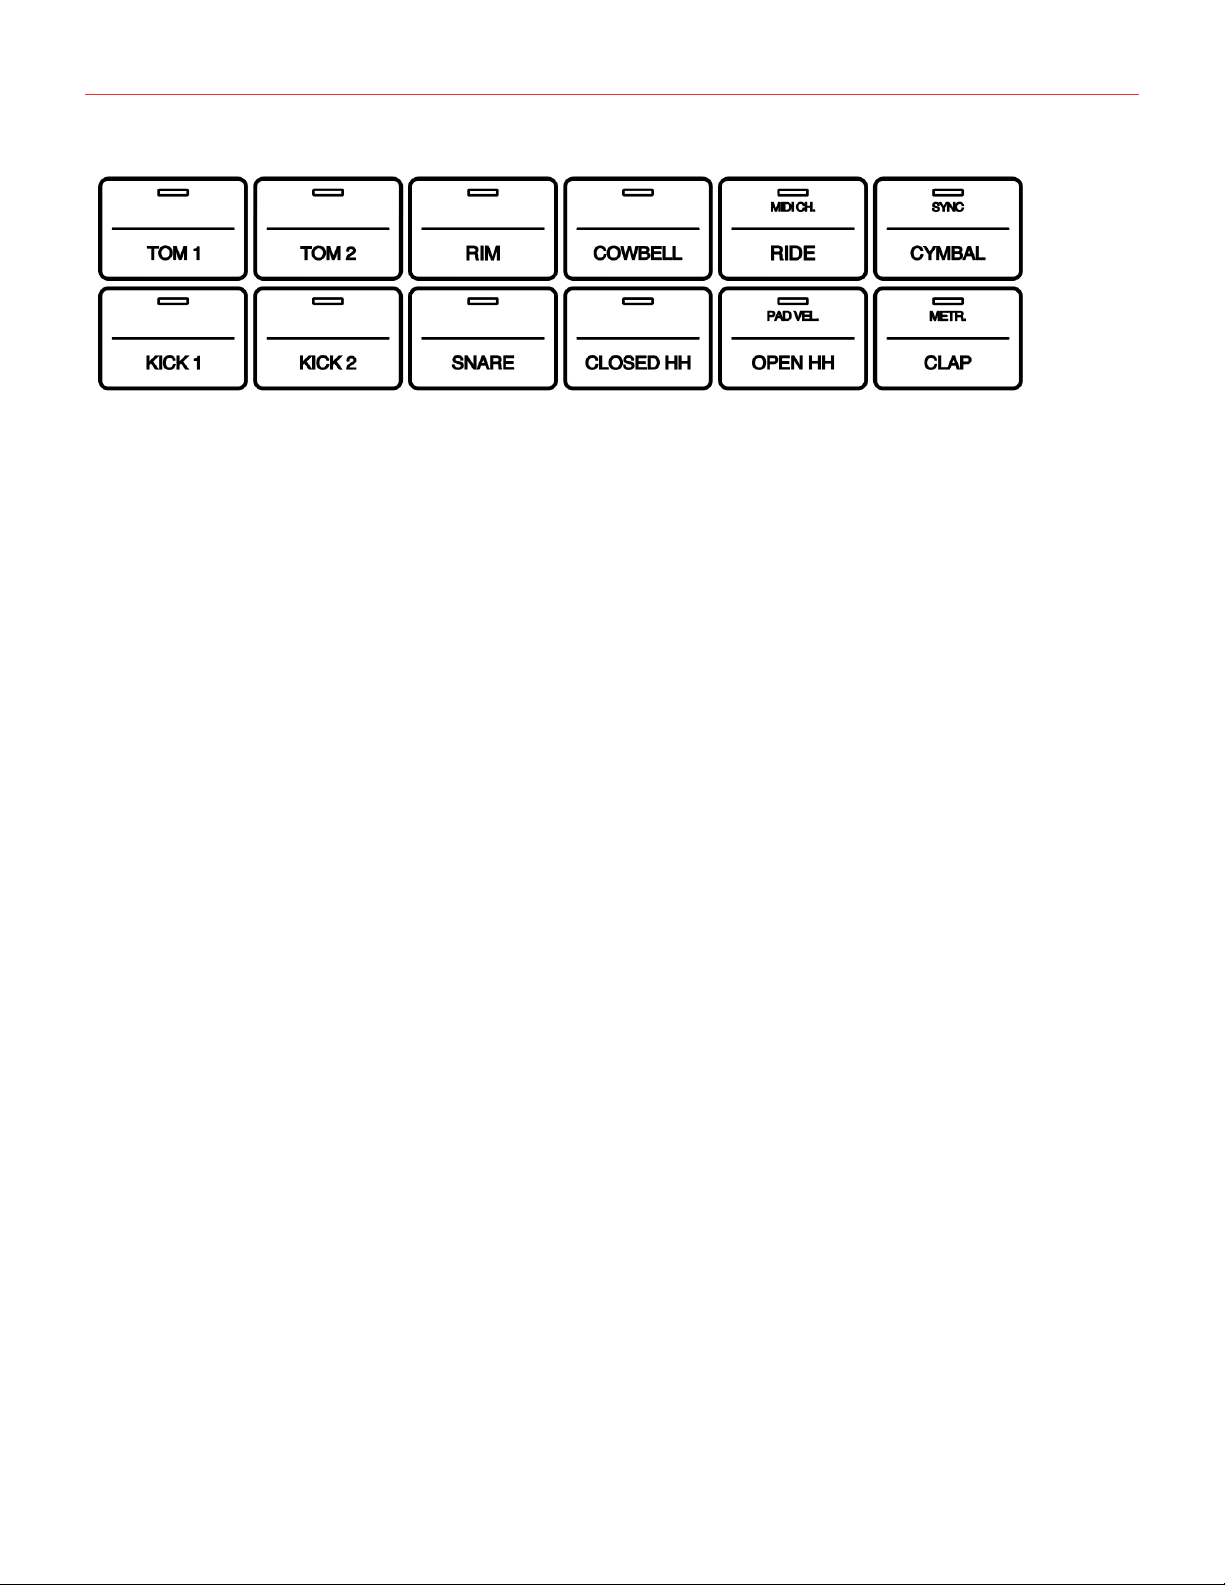
instead the last 4 pads on the right (Ride, Cymbal, Open Hat and Clap) will select the alternate functions:
• MIDI CH (Ride pad): select the MIDI channels of the unit between 1 and 16 using the data encoder. On the
first selection, the Orange LED is lit and is selecting the MIDI in channel; the display will show an “i.” and
the number of the channel. Press the pad a second time and the LED will become orange, the display will
show an “O.” and the selected MIDI OUT channel. For UNO Drum the default channels are both 10.
• SYNC (Cymbal Pad): set the MIDI CLOCK settings - default is Internal (INT), but with the DATA ENCODER it
will toggle between external MIDI (EXT) and external USB (USB).
• PAD VEL (Open HH pad): this function enables or disables the 2 velocity sections of the pads. By default, it
is set to send fixed value of 127, and when ON it will send HIGH velocity at 127 and LOW velocity at 100.
• METRONOME (Clap Pad): Activate the metronome during the recording. Using the DATA ENCODER it is
possible to select between “OFF”, “ON”, or “PLY”. OFF means the metronome is off in all situations. ON
means the metronome is on and hearable only when in real-time recording. PLY means the metronome
is always on, both in real-time recording and in Playback. The metronome is also affected by the division
chosen for a pattern.
• TEMPO KNOB LOCK: holding ALT and pressing the TAP TEMPO will lock the TEMPO Knob, this means
that it will only be possible to use the tempo knob when holding the TAP TEMPO. Repeat the operation to
29
4 – Front panel interface
Page 30

UNO Drum
unlock the knob. When locked the display blinks “LOC”, when unlocked it blinks “UnL”.
LENGTH: this function gives the possibility to select the length of a pattern between 1 to 64 steps. By default,
the pattern is set to be 16 steps but length can be changed in real-time and have odd number of measures.
When it is used during a playback, the length will be affected.
DEMO: Press ALT+LENGTH to activate the playback of 20 KITS on 20 Patterns.
The “Home” button of these functions is SOUND, meaning that when any other orange button is deselected, the
selection goes back to SOUND.
The Black buttons are toggle buttons which enable or disable direct functions:
SELECT ALL: enable this function to select all of the elements at once and then make tweaks or effects on
all the elements at the same time. Possible tweaks are: Mute, roll, random, and all the parameters showed on
the DRUM row. When the function is activated it is not possible to change the sounds of all elements using the
SOUND button. If the SOUND button is pressed when the select all function is active, the function is disabled
and the last element selection becomes active.
SELECT: When active it disables the playback of the Pads and maintains the selection of the relative element.
MUTE: When active it disables the playback of the Pads and the selection will MUTE or UNMUTE the selected
pads. Muted pads are lit in RED while playing pads are unlit.
TAP TEMPO: Tap tempo function gives the possibility to adjust the tempo without touching the tempo knob.
The tempo value will start blinking on the display from the 3rd tap on. A minimum of 3 taps is always required to
change tempo. When there is no Tap after 5 seconds the display will go back to the last selected parameter.
REC: the self-explanatory recording button works for both step by step and live recording. It enables the
sequencer to record changes, step tweaks, and live playing. Inserting an element on a step is not intended as a
recording, but the tweak of its parameters is (see programming and recording sequence section).
PLAY: start the playback of the selected pattern
Apart from the Buttons and the DATA ENCODER, we also have 2 direct controls knobs: these direct functions
are the VOLUME and the TEMPO Knob.
The VOLUME knob controls the master volume of the unit.
The TEMPO knob adjusts the master tempo of the unit from 30 to 299 bpm. When the unit is connected via
MIDI or USB, it is possible to decide to use the internal clock or external clock.
30
4 – Front panel interface
Page 31

UNO Drum
If the Clock is set to MIDI or USB and a clock signal is received, the knob selects as follow:
1:1: normal tempo (if a tempo of 120 bpm is received, units will play at 120 bpm)
1/2: one half tempo (if a tempo of 120 bpm is received, units will play at 60 bpm)
1/4: one quarter tempo (if a tempo of 120 bpm is received, units will play at 30 bpm)
UNO will automatically transmit MIDI Beat Clock and sequence start/stop messages from its MIDI Out to allow
the synching of two or more UNO units simply by patching the MIDI Out from the master unit to the MIDI in of
the slave unit.
4.3 – Play/Program Section
The PLAY/PROGRAM is where the triggers are, such as the PADS, the SEQUENCER, and the relatively fast
controls. This section can be divided in 4 parts.
On the right of this section, the 3 editing buttons in a grey outline are located, and they are RANDOM, COPY/
PASTE and CLEAR.
RANDOM: MIDI Effect - the random function gives the possibility to randomize an elements pattern each time it
is pressed.
• To randomize an Elements pattern, hold RANDOM and select an element. A random pattern will populate
the sequence. The function will randomize not only the step position but also the velocity of the steps.
• To randomize all the element patterns, hold RANDOM and press SELECT ALL. Now all the elements will be
randomized.
COPY/PASTE: this function gives the possibility to copy steps and patterns.
• To copy and paste a step, REC needs to be active. Hold COPY/PASTE and press desired step to copy it.
The button will now blink to indicate that the buffer is full. To paste it in another step, hold the destination
step and press COPY/PASTE again. It is possible to Paste the same Step on the element pattern until the
buffer is cleared with the CLEAR button.
• To COPY/PASTE the element pattern hold COPY/PASTE and press the element pad you want to copy
(display will show “EL” blinking 3 times, then goes back to the last showed parameter). The button will now
blink to indicate that the buffer is full. Change pattern pressing PATTERN and using the DATA ENCODER.
Press COPY/PASTE again to paste the pattern in the element.
• To copy and paste a Global pattern in song mode, REC needs to be inactive and SONG needs to be
active. Hold COPY/PASTE and press the step where the source pattern is located. The button will now
blink to indicate that the buffer is full. Hold the destination step where you want to copy a pattern and press
COPY/PASTE to paste the pattern in the step.
31
4 – Front panel interface
Page 32

UNO Drum
CLEAR: the clear button is the way to delete what has been programmed or recorded on the sequencer. It is
possible to delete a steps parameter recording, a pattern, an element parameter setting, an entire kit, or a chain.
• To clear the parameters on a step, hold CLEAR and press the desired step.
• To clear an element pattern, hold CLEAR and double-tap the element you want to clear. To clear all the
element patterns, hold CLEAR and press PATTERN.
• To Clear the element parameters stored in a kit and reset it to its default stage, select the element you want
to reset, hold CLEAR and press SOUND.
• To Clear or reset a KIT, load the desired kit and hold CLEAR and press SELECT ALL. All sound will be set
to 1 and parameters to their relative defaults.
• To Clear the SONG, hold CLEAR and press SONG.
• To Clear the COPY/PASTE buffer, hold CLEAR and press COPY/PASTE.
• To Recall a KIT after it has been hardly modified, press SELECT ALL and then hold CLEAR and press KIT.
On the center of this section we have the PADS, used to play the elements live and select them.
Each pad is divided in 2, which are the 2 velocity level available for each pad to be live played and give a more
realistic feeling. HIGH Velocity is 127 and LOW velocity is 100.
The pad velocity split is OFF by default and will output velocity 127.
The selection of an element is made every time a pad is pressed in any of the 2 velocity pats.
The bottom row of 16 buttons is where the sequencer is located, composed by the 16 step buttons.
When an element is selected, the LEDs will show element, pattern, and the transport moving. Pressing a step
will insert the element on that step. To remove it simply press it again.
When an element is selected and the REC button is lit, it is also possible to save parameters in that step.
On the right, there are 3 elements - STUTTER, ROLL and PAGE.
STUTTER: MIDI Effect - the stutter is a global effect, meaning that it affects all the elements. The button on the
right activates the stutter. Its effect is momentary and its parameters are set on the FX row.
ROLL: MIDI Effect - the roll effects is an Element effect, meaning that affect only the selected element or
elements. The rolls effect consists of repeating the elements in loop from when the button is pressed until it
is released. It is possible to change the roll type up to 4 types: roll 8th note, 8th-note triplets, 16thnote, and
32ndnote. After the first rolls, other 4 types called FILLS will be selected. To select a roll type, turn the DATA
ENCODER while holding the ROLL button. The roll effect is affected but the Swing amount.
PAGE (right pointing arrow): When the pattern length is different from 16, the page button gives the possibility
to visualize steps from 17 to 32 on page 2, 33 to 48 on page 3, and 49 to 64 on page 4. The LED showing the
relative page will light accordingly to the selection.
32
4 – Front panel interface
Page 33

UNO Drum
5 – Programming a Sequence
The sequencer can manually program one element at the time, after the selection of the element.
Note: An element pattern can be randomized using the RANDOM button.
5.1 – Insert a trig
To insert a trig in an element pattern, select the element and press the steps where you want to insert a trig. The
inserted trig will have the HIGH velocity value of the Pad which is 127.
Holding the element while inserting a trig will have the LOW velocity value of the pad which is 100.
To remove a trig, press the step again. To change the velocity value from HIGH to LOW, hold the element pad
and press the step. To change Velocity value from LOW to HIGH press the step once to delete it and again to
insert the trig.
When a trig is deleted the automated parameters on the step are also deleted.
5.2 – Automate a trig
A step where a trig is inserted can store up to 8 parameters depending on the element. Automation on a trig can
be inserted only when REC is active. The PLAYback can be ON or OFF independently. Hold the step you want
to automate and move the desired parameter (which can be on the DRUM row or the VELOCITY located in the
SEQ row).
To remove an automated trig, it is necessary to press CLEAR + the desired step. Remove and reinsert the trig
while the sequencer REC is OFF.
5.3 – Automate a pattern
An element pattern can be automated when the REC is active and the PLAYback is ON.
Select an element to tweak the desired parameter in the DRUM row or the VELOCITY in the SEQ row during the
playback.
The recording is stopped when REC is pressed again.
A ROLL effects can be recorded in the pattern.
33
5 – Presets
Page 34

UNO Drum
5.4 – Using the Element pads
The pads can be used to play the drum machine without recording - like an MPC live playing or to record
patterns.
When the REC function is inactive, the pads will only play the Elements without recording them.
When the REC function is active and the sequencer is in Playback, the pads will record the trigger quantized on
the sequencer and with different velocity depending on where the pad is played (if the double velocity feature is
active, which is off by default).
34
5 – Presets
Page 35

UNO Drum
6 – Presets
UNO Drum can store Kits and Patterns, up to 100 preset each.
A KIT is the possibility to save the composition of types of sounds and relative parameters.
A PATTERN is the possibility to save the group of elements patterns.
To store a preset hold KIT or PRESET then select the desired preset slot with the DATA ENCODER and then
press KIT or PRESET again to store it.
NOTE: The DEMO it is the perfect way to discover the powerful feature of the UNO Drum simply by listening. To
activate the demo, press LENGTH and ALT simultaneously.
6.1 – Loading a KIT or a PATTERN
Every time the UNO Drum is powered, the last KIT or PATTER selected is loaded.
To select other KITs or PATTERNs, simply press the KIT or PATTERN button and use the data encoder to load
the desired KIT or PATTERN.
6.2 – Store a KIT or a PATTERN
After the KIT or the Pattern has been modified and the desired sound is reached, it is possible to save them as
presets in the slots 1 through 100.
To save a KIT, hold the KIT button for 1.5 seconds until the preset number blinks on the display.
To overwrite the current preset, simply press KIT again, and the display will show “SAV” and the preset number
will stop blinking.
To store the KIT in another slot, select the new slot with the data encoder, then press the KIT again.
To save a PATTERN follow the above instruction but using the PATTERN button instead of the KIT.
6.3 – Factory Presets
UNO Drum comes with a collection of 100 ready-to-use Kit and 100 ready-to-use Patterns to inspire your
creativity.
35
6 – The Arpeggiator
Page 36

UNO Drum
7 – MIDI Implementation
7.1 – General
MIDI stands for Musical Instrument Digital Interface, and is the worldwide standard for exchanging musical data
between electronic musical instruments and computers.
When MIDI cables are used to connect two or more MIDI devices, performance data can be exchanged
between the devices, even if they were made by different manufacturers.
The UNO Drum transmits the front panel knobs or buttons movement via continuous controller (CC) messages
to let you control other external MIDI devices.
As each parameter and control on the synth has its own unique Control Change number, it is possible to
completely control the unit via external controllers or computers.
MIDI data can also be exchanged between the UNO Drum and your computer using the provided USB cable in
addition to the MIDI DIN ports.
It is possible to synchronize the UNO Drum’s tempo to the MIDI clock of an external MIDI sequencer or other
device.
7.2 – Control External Devices with UNO Drum
If you want to use the UNO Pads, controls, and sequencer to play sounds on or to control an external
instrument, connect the UNO Drum MIDI OUT connector to the external instrument MIDI IN connector using a
MIDI cable.
7.3 – Control UNO Drum from External Devices
If you want to play or control the UNO Drum from another MIDI keyboard, pad controller, sequencer or other
external device, connect the MIDI OUT connector of the external MIDI device to the UNO Drum’s MIDI IN jack
with a MIDI cable.
7.4 – Connecting UNO Drum to a computer via MIDI
You may want to play the UNO Drum and record your performance on a computer (connected using a MIDI
interface) and/or play the UNO Drum while monitoring what you recorded. You also may want to use the UNO
Drum as both an input device for playing notes and as a tone generator. In all of these cases, connect the MIDI
OUT connector to the MIDI IN connector on both the UNO Drum and the computer.
7.5 – Connecting UNO Drum to a computer via USB
The UNO Drum is recognized as a standard USB device, so the installation of proprietary drivers is not needed.
The USB MIDI has both IN and OUT capabilities and can be used as a MIDI Interface.
36
7 – The Sequencer
Page 37

UNO Drum
7.6 – Setting the MIDI Channel
To select the MIDI channels, press the ALT button, and then the RIDE pad. MIDI channels can be selected
between 1 and 16 using the data encoder.
The default MIDI IN and OUT channel is the 10.
Press once for the input channel (the display will show an “i” and the channel number to indicate the input is
selected) and twice for the output channel (the display will show and “o” and the channel number to indicate the
output is selected).
7.7 – Setting the Sync Mode
To adjust the MIDI sync mode, Press ALT and then the CYMBAL pad. The default sync is internal (INT), meaning
the internal tempo of the UNO Drum is used. The data encoder allows the selection of external MIDI (EXT),
meaning the MIDI clock received from the MIDI IN DIN connector decides the tempo of the UNO Drum, or
external USB (USB), meaning the MIDI clock received from the USB connector sets the tempo of the UNO
Drum.
7.8 – MIDI Soft Thru
The MIDI Soft Thru functionality allows messages from the MIDI IN DIN of the unit to be passed through to
the MIDI OUT DIN. When disabled, MIDI IN data is not passed to the MIDI OUT. MIDI Soft Thru is enabled by
default and can be disabled via MIDI SysEx.
7.9 – MIDI Interface Mode
As stated before, UNO Drum can act as a MIDI USB interface for your computer to fit perfectly in both studio
and live setups.
When the MIDI Interface Mode is enabled, the MIDI messages coming in via the USB are sent to the MIDI
OUT DIN of the unit, and similarly, the MIDI messages coming in from the MIDI IN DIN are sent to the USB
connection.
When the function is disabled, the above connection is not made.
The MIDI Interface Mode it is enabled by default and can be disabled by MIDI SysEx.
7.10 – Element Mapping
By default, each element has a NOTE to which they respond to, which is:
KICK 1: note C2 (36)
KICK 2: note B1 (35)
SNARE: note D2 (38) + note E2 (40)
CLAP: note D#2 (39)
RIM: note C#2 (37)
37
7 – The Sequencer
Page 38

UNO Drum
CLOSED HAT: note F#2 (42)
OPEN HAT: note A#2 (46)
TOM1: note F2 (41)
TOM2: note G2 (43)
CYMBAL: note C#3 (49)
RIDE: note D#3 (51)
COWBELL: note G#3 (56)
7.11 – Pad note out
The PADs send out MIDI notes with a fixed gate (meaning a fixed time between a note ON and note OFF
message).
7.12 – Program Change
On the drum machine, KITs are recalled by MIDI Program Change. Program Change 0 will recall KIT 1 (for
consistency with UNO Synth).
38
7 – The Sequencer
Page 39

UNO Drum
7.13 – MIDI Implementation Chart
UNO Drum MIDI Implementation Chart V 1.0
MIDI Implementation Chart v. 1.0 (Page 1 of 4)
Manufacturer: IK Multimedia Model: UNO Drum Version:1.0 Date: 9 May 2019
1. Basic Information
MIDI channels
Note numbers
Program change
Bank Select response? (Yes/No)
If yes, list banks utilized in remarks column
Modes supported : Mode 1: Omni-On, Poly (Yes/No)
Mode 2: Omni-On, Mono (Yes/No)
Mode 3: Omni-Off, Poly (Yes/No)
Mode 4: Omni-Off, Mono (Yes/No)
Multi Mode (Yes/No)
Note-On Velocity (Yes/No)
Note-Off Velocity (Yes/No)
Channel Aftertouch (Yes/No)
Poly (Key) Aftertouch (Yes/No)
Pitch Bend (Yes/No)
Active Sensing (Yes/No)
System Reset (Yes/No)
Tune Request (Yes/No)
Universal System Exclusive: Sample Dump Standard (Yes/No)
Device Inquiry (Yes/No)
File Dump (Yes/No)
MIDI Tuning (Yes/No)
Master Volume (Yes/No)
Master Balance (Yes/No)
Notation Information (Yes/No)
Turn GM1 System On (Yes/No)
Turn GM2 System On (Yes/No)
Turn GM System Off (Yes/No)
DLS-1 (Yes/No)
File Reference (Yes/No)
Controller Destination (Yes/No)
Key-based Instrument Ctrl (Yes/No)
Master Fine/Coarse Tune (Yes/No)
Other Universal System Exclusive
Manufacturer or Non-Commercial System Exclusive
NRPNs (Yes/No)
RPN 00 (Pitch Bend Sensitivity) (Yes/No)
RPN 01 (Channel Fine Tune) (Yes/No)
RPN 02 (Channel Coarse Tune) (Yes/No)
RPN 03 (Tuning Program Select) (Yes/No)
RPN 04 (Tuning Bank Select) (Yes/No)
RPN 05 (Modulation Depth Range) (Yes/No)
2. MIDI Timing and Synchronization
MIDI Clock (Yes/No)
Song Position Pointer (Yes/No)
Song Select (Yes/No)
Start (Yes/No)
Continue (Yes/No)
Stop (Yes/No)
MIDI Time Code (Yes/No)
MIDI Machine Control (Yes/No)
MIDI Show Control (Yes/No)
If yes, MSC Level supported
3. Extensions Compatibility
General MIDI compatible? (Level(s)/No)
Is GM default power-up mode? (Level/No)
DLS compatible? (Levels(s)/No)
(DLS File Type(s)/No)
Standard MIDI Files (Type(s)/No)
Transmit/Export Recognize/Import Remarks
1-16 1-16
0-127 0-127
0-99 0-99 Displayed as “1-100”, Memorized
No
No
No
No
Yes
No
YesYes
NoNo
NoNo
NoNo
NoNo
NoNo
NoNo
NoNo
NoNo
YesYes
NoNo
NoNo
NoNo
YesYes
NoNo
YesYes
NoNo
YesYes
NoNo
NoNo
NoNo
NoNo
NoNo
NoNo
Memorized
39
7 – The Sequencer
Page 40

UNO Drum
UNO Drum MIDI Implementation Chart V 1.0
MIDI Implementation Chart v. 1.0 (Page 2 of 4)
Manufacturer: IK Multimedia Model: UNO Drum Version:1.0 Date: 9 May 2019
Control # Function Transmitted (Y/N) Recognized (Y/N) Remarks
0 Bank Select (MSB)
1 Modulation Wheel (MSB)
2 Breath Controller (MSB)
3
4 Foot Controller (MSB)
5 Portamento Time (MSB)
6 Data Entry (MSB)
7 Channel Volume (MSB)
8 Balance (MSB)
9
10 Pan (MSB)
11 Expression (MSB)
12 Effect Control 1 (MSB)
13 Effect Control 2 (MSB)
14
15
16 General Purpose Controller 1 (MSB)
17 General Purpose Controller 2 (MSB)
18 General Purpose Controller 3 (MSB)
19 General Purpose Controller 4 (MSB)
20
21
22
23
24
25
26
27
28
29
30
31
32 Bank Select (LSB)
33 Modulation Wheel (LSB)
34 Breath Controller (LSB)
35
36 Foot Controller (LSB)
37 Portamento Time (LSB)
38 Data Entry (LSB)
39 Channel Volume (LSB)
40 Balance (LSB)
41
42 Pan (LSB)
43 Expression (LSB)
44 Effect Control 1 (LSB)
45 Effect Control 2 (LSB)
46
47
48 General Purpose Controller 1 (LSB)
49 General Purpose Controller 2 (LSB)
50 General Purpose Controller 3 (LSB)
51 General Purpose Controller 4 (LSB)
52
53
54
55
56
57
58
59
60
61
62
No No
No No
No No
No No
No No
No No
No No
Yes Yes
No No
Yes Yes Swing Amount
No No
No No
Yes Yes Sequencer Division
Yes Yes Pattern Length (max 64)
No No
No No
No No
Yes Yes
Yes Yes
No No
Yes Yes
Yes Yes Kick 1 Tune
Yes Yes Kick 1 Snap
Yes Yes Kick 1 Decay
Yes Yes Kick 1 FM Tune
Yes Yes Kick 1 FM Amount
Yes Yes Kick 1 Sweep Time
Yes Yes
Yes Yes Kick 2Tune
Yes Yes Kick 2Snap
Yes Yes Kick 2Decay
Yes Yes Snare Level
Yes Yes Snare Tune
Yes Yes Snare Snap
Yes Yes Snare Decay
Yes Yes Snare LPF
No No
Yes Yes Clap Level
Yes Yes Clap Decay (8 selections)
Yes Yes Closed Hat Level
Yes Yes Closed Hat Tune (4 selections)
Yes Yes Closed Hat Decay
Yes Yes Open Hat Level
Yes Yes Open Hat Tune (4 selections)
Yes Yes Open Hat Decay
Yes Yes Rim Level
Yes Yes Rim Tune
Yes Yes Rim Decay
Yes Yes Tom 1 Level
Yes Yes Tom 1 Tune
Yes Yes Tom 1 Decay
Yes Yes Tom 2 Level
Yes Yes Tom 2 Tune
Yes Yes Tom 2 Decay
Yes Yes Cowbell Level
Yes Yes Cowbell Tune
Yes Yes Cowbell Decay
Yes Yes Ride Level
Yes Yes Ride Tune
Yes Yes Ride Decay
Yes Yes Cymbal Level
Yes Yes Cymbal Tune
Yes Yes Cymbal Decay
Output Level
Compressor Amount
DriveAmount
Kick 1 Level
Kick 2 Level
40
7 – The Sequencer
Page 41

UNO Drum
UNO Drum MIDI Implementation Chart V 1.0
MIDI Implementation Chart v. 1.0 (Page 3 of 4)
Manufacturer: IK Multimedia Model: UNO Drum Version:1.0 Date: 9 May 2019
Control # Function Transmitted (Y/N) Recognized (Y/N) Remarks
64 Sustain Pedal
65 Portamento On/Off
66 Sostenuto
67 Soft Pedal
68 Legato Footswitch
69 Hold 2
70 Sound Controller 1 (default: Sound Variation)
71 Sound Controller 2 (default: Timbre / Harmonic Quality)
72 Sound Controller 3 (default: Release Time)
73 Sound Controller 4 (default: Attack Time)
74 Sound Controller 5 (default: Brightness)
75 Sound Controller 6 (GM2 default: Decay Time)
76 Sound Controller 7 (GM2 default: Vibrato Rate)
77 Sound Controller 8 (GM2 default: Vibrato Depth)
78 Sound Controller 9 (GM2 default: Vibrato Delay)
79 Sound Controller 10 (GM2 default: Undefined)
80 General Purpose Controller 5
81 General Purpose Controller 6
82 General Purpose Controller 7
83 General Purpose Controller 8
84 Portamento Control
85
86
87
88
89
90
91 Effects 1 Depth (default: Reverb Send)
92 Effects 2 Depth (default: Tremolo Depth)
93 Effects 3 Depth (default: Chorus Send)
94 Effects 4 Depth (default: Celeste [Detune] Depth)
95 Effects 5 Depth (default: Phaser Depth)
96 Data Increment
97 Data Decrement
98 Non-Registered Parameter Number (LSB)
99 Non-Registered Parameter Number(MSB)
100 Registered Parameter Number (LSB)
101 Registered Parameter Number(MSB)
102
103
104
105
106
107
108
109
110
111
112
113
114
115
116
117
118
119
120 All Sound Off
121 Reset All Controllers
122 Local Control On/Off
123 All Notes Off
124 Omni Mode Off
125 Omni Mode On
126 Poly Mode Off
No No
No No
No No
No No
No No
No No
Yes Yes Stutter Type (10 selections)
Yes Yes Stutter Amount
Yes Yes Stutter ON/OFF
Yes Yes Roll Type
Yes Yes Roll ON/OFF
Yes Yes Pad Double Velocity ON/OFF
Yes Yes Metronome ON/OFF/PLAY
Yes Yes Pad Note Length
No No
No No
No No
No No
No No
No No
No No
No No
No No
No No
No No
No No
No No
No No
No No
No No
No No
No No
No No
No No
No No
No No
No No
No No
No No
No No
No No
No No
No No
No No
No No
No No
No No
No No
No No
No No
No No
No No
No No
No No
No No
No No
No No
No No
No No
No No
No No
No No
No No
No No
No No
No No
Yes Yes
No No
No No
No No
41
7 – The Sequencer
Page 42

UNO Drum
UNO Drum MIDI Implementation Chart V 1.0
MIDI Implementation Chart v. 1.0 (Page 4 of 4)
Manufacturer: IK Multimedia Model: UNO Drum Version:1.0 Date: 9 May 2019
Sytem Exclusive Message
F0 00 21 1A 02 02 11 01 7F F7 Enter Setup Mode (send this message beforany of the following operation)
F0 00 21 1A 02 02 21 00 06 00 F7 Program Change Receive OFF
F0 00 21 1A 02 02 21 00 06 01 F7 Program Change Receive ON (default)
F0 00 21 1A 02 02 21 00 08 00 F7 Program Change Send OFF
F0 00 21 1A 02 02 21 00 08 01 F7 Program Change Send ON (default)
F0 00 21 1A 02 02 21 00 07 00 F7
F0 00 21 1A 02 02 21 00 07 01 F7
F0 00 21 1A 02 02 21 00 0B 00 F7
F0 00 21 1A 02 02 21 00 0B 01 F7
Function
MIDI Soft Thru OFF
MIDI Soft Thru ON (default)
MIDI Interface Mode OFF
MIDI Interface Mode ON (default)
42
7 – The Sequencer
Page 43

UNO Drum
8 – Specifications
Synthesis
• Type: Analog/PCM
• Polyphony: 11 voices
• Kick 1 (analog): Level, Tune, Snap, Decay, FM Tune, FM amount, Sweep time
• Kick 2 (analog): Level, Tune, Snap, Decay
• Snare (analog): Level, Tune, Snap, Decay, LPF
• Closed HH: Level, Tune, Decay
• Open HH: Level, Tune, Decay
• Clap: Level, Decay
• PCM: Level, Tune, Decay
• All element are Velocity responsive
Preset
• 100 Kits
• 100 Patterns
Keyboard and controls
• 5 Encoders (4 matrix, 1 global)
• 2 Knobs (fixed)
• 12 Multi-Touch Element Pads with 2 velocity.
• 17 Sequencer buttons
• 17 Utility and effects buttons
Sequencer
• 64-step sequencer
• Real-time and step recording with parameter recording
• Up to 8 parameter recording per-step
• Selectable length between 1 and 64 steps
• 4 Division: 16th, 32th, 3/4 and 6/8
• Swing function
Effects
• Analog master compressor
• Analog master drive
• Random
• Stutter with 10 types and adjustable amount
• Roll with 4 roll types and 4 fills
43
8 – MIDI Implementation
Page 44

UNO Drum
UNO Synth Output
1/8” TRS
to TRS 1/4”
Balanced Input
Tip Ring Sleeve TipRingSleeve
Tip
Tip
Ring
Ring
Sleeve
Sleeve
UNO Synth Output
to XLR
Connections
• Audio Out: Mini-jack 3.5mm stereo (mono summed)
• Audio In: Mini-jack 3.5mm stereo (mono summed)
• 2 x MIDI 2.5mm mini-jack to DIN cables (IN/OUT)
• 1 Micro USB*
Power
• 4x AA Batteries (Alkaline, Ni-Mh)
• Micro USB connector
Package includes
• UNO Drum
• 1x Micro USB to USB cable
• 2x MIDI jack 2.5mm to DIN cables
• 4x AA batteries (Alkaline)
Dimensions
• Size: 25.6cm/10.1” x 15cm/8.9” x 4.9cm/1.93”
• Weight: 400g/14.1oz (excluded batteries)
*USB power has inherent ground noise, so when connecting the UNO Drum directly to your computer via USB,
you may hear more noise and interference than when the synth is connected to a USB wall charger or running via
batteries. With the direct computer connection, you can reduce the USB ground noise and other interference by
either using a USB isolator or a custom TRS cable into a balanced input on your preamp or audio interface where
the ground is not connected at the balanced input side.
UNO Synth Output
Tip Ring Sleeve TipRingSleeve
1/8” TRS
Tip
Ring
Sleeve
Tip
Ring
Sleeve
to TRS 1/4”
Balanced Input
Tip Ring Sleeve
44
1/8” TRS
Tip
Ring
Sleeve
Balanced Input
1 2
3
8 – MIDI Implementation
Page 45

UNO Drum
9 – Troubleshooting
There is excessive noise or interference in the audio.
If your UNO Drum is connected to your computer via the UNO Drum’s USB port, the ground noise and
interference from the USB may be increased. The easiest way to avoid this is to instead power the UNO
Drum using a standard wall charger or with batteries and then use the 2.5mm to MIDI DIN cables for the MIDI
connection to your computer. Alternatively, if you want to maintain the USB connection to the UNO Drum itself,
you can reduce the USB noise and interference by either using a USB isolator or a custom TRS cable into a
balanced input on your preamp or audio interface where the ground is not connected balanced at the input side.
See the cable wiring image on the Specs page.
Where can I find my IK product Serial Number?
The Serial Number is written on the Registration Card (included with your IK product).
IMPORTANT: the number zero can easily be identified in your Serial Number because it is crossed by a line.
Why is the Authorization Manager rejecting my Serial Number?
Probably because of a typo, here are some common errors:
• Typing a 0 (“zero” number) instead of an O (“o” letter).
• Typing 1 (“one” number) instead of an I (“i” letter).
• Typing 2 (“two” number) instead of a Z (“z” letter).
• Typing 5 (“five” number) instead of an S (“s” letter).
• Typing 8 (“eight” number) instead of a B (“b” letter).
• Typing a “.” (point) instead of a “-” (minus).
Suggestions:
• If possible, please copy and paste the information.
• Cut off all the leading and trailing spaces.
• Please type all codes in UPPERCASE during the installation and registration process.
• Check that the Serial Number that you are entering is in correlation with the product installed.
I need to log in into the User Area but I forgot my User Name and Password. What should I do?
You can retrieve your User Area login details in two different ways:
• Run the Authorization Manager and follow the steps until you reach the login page. Here you just have to
click on the ‘Forgot password?’ button and submit your email address. Your login details will be sent to your
email account. In case you have checked the ‘Remember me’ checkbox before and are not able to access
the login page, just click on the LOGOUT button.
• Go to www.ikmultimedia.com, click on ‘I forgot my username and/or password’ and submit your email
address. Your login details will be sent to your email account.
45
9 – Troubleshooting
Page 46

UNO Drum
10 – Support
For any questions you may have, please refer to the FAQ webpage at: www.ikmultimedia.com/faq
Here you will find answers to the most commonly asked questions.
To submit a Technical Support Form, go to: www.ikmultimedia.com/support
For warranty information, please visit: www.ikmultimedia.com/warranty
For other requests such as Product, Sales, or Web info, please go to: www.ikmultimedia.com/contact-us
10.1 – User Area
The User Area is a special section of our website specifically designed for our users.
Here you can easily edit your personal data, manage your product authorizations and licenses, and download
the latest IK products updates.
Access your User Area to be able to:
• Edit your Personal data.
• View and download the latest product updates, free content, and Sound Libraries.
• Access any current Promotions.
• View exclusive offers and pricing.
• Manage your earned JamPoints.
• View your Orders.
• Share your AmpliTube presets.
• Download firmware and hardware drivers.
• Access the IK Forum and more.
To access the User Area go to:
www.ikmultimedia.com/userarea
To access your User Area, please login with your User Name and Password created upon registration and
emailed to your registered email address. If you need to update your Password, you may do so at the User Area
login.
46
10 - Support
Page 47

IK Multimedia Production Srl
Via dell’Industria, 46,
41122 Modena
Italy
IK Multimedia US, LLC
590 Sawgrass Corporate Pkwy.
Sunrise, FL 33325
USA
IK Multimedia Asia
TB Tamachi Bldg. 1F, MBE #709
4-11-1 Shiba
Minato-ku, Tokyo 108-0014
Japan
www.ikmultimedia.com
UNO® Drum is a registered trademark property of IK Multimedia Production Srl. All other product names and images, trademarks and
artists names are the property of their respective owners, which are in no way associated or affiliated with IK Multimedia. Product names
are used solely for the purpose of identifying the specific products that were studied during IK Multimedia’s sound model development
and for describing certain types of tones produced with IK Multimedia’s digital modeling technology. Use of these names does not imply
any cooperation or endorsement.
All specifications are subject to change without further notice.
Document Version: 1.0
Release date: 2019/07/01
© 2019 IK Multimedia. All rights reserved.
 Loading...