

Page 1
USB Audio Interface + Modeling Software
User Manual
Page 2
StealthPlug™ CS
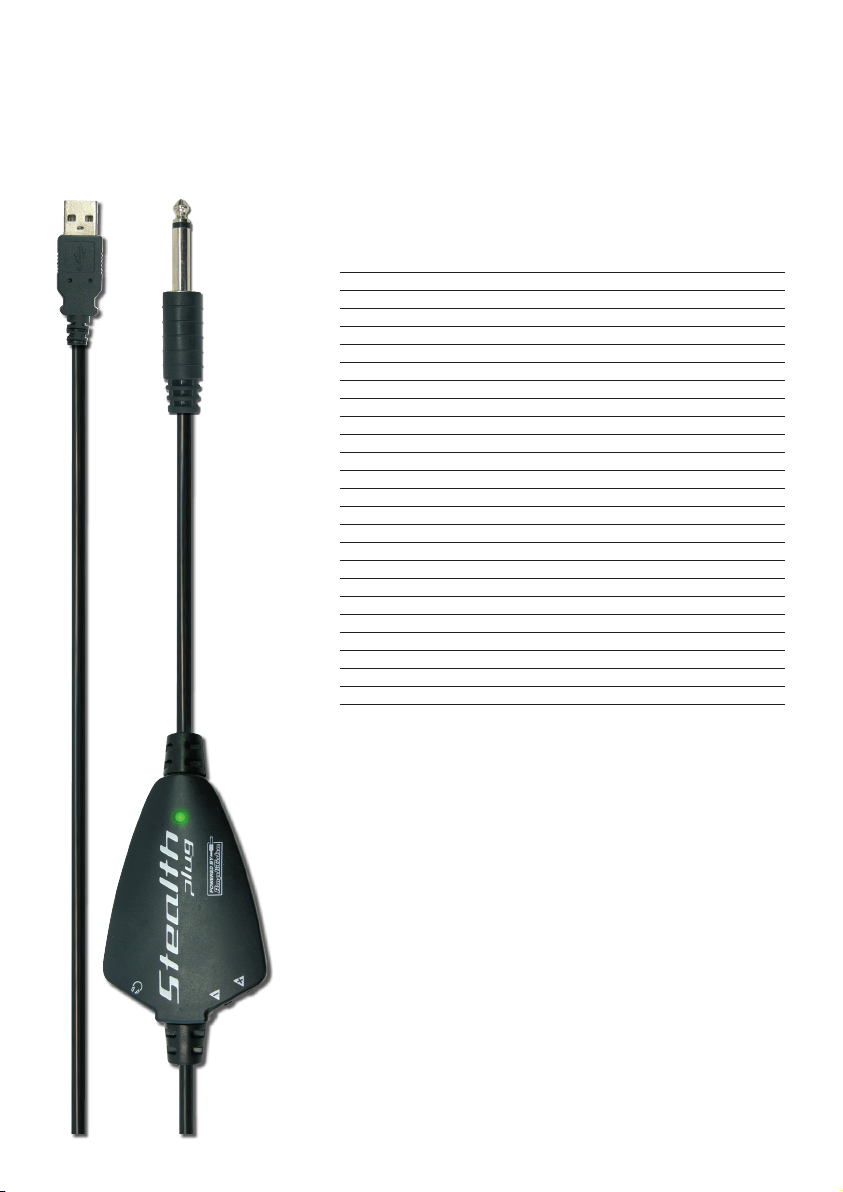
Chapter 1 Technical Specifications
Input Frequency Response 20Hz-15kHz, +0.4dB/-3.2dB
20Hz-20kHz, +0.4dB/-5.3dB
Input Impedance >1MΩ
Input THD 0.02%
Input SNR 80dB (A-weighted)
Preamp Gain 0dB to +20dB (adjustable)
Output Frequency Response 40Hz-20kHz, -0.8dB/+0.2dB
20Hz-20kHz, -2.6dB/+0.2dB
Output Impedance 16Ω
Output THD 0.02%
Output SNR 82dB (A-weighted)
Output Max Power 45mW into 32Ω
Output Max Level +3.8dBu (1.2VRMS) into 32Ω_
A/D - D/A converter 16 bit
Sampling Frequency up to 48KHz
Connections INPUT 1/4” mono (TS) phone plug
OUTPUT 1/8” stereo (TRS) phone jack
USB series “A” plug
Controller/Switch 2 x buttons (VOLUME)
Display 1 x LED (RED/GREEN)
BUS power USB 1.0/2.0 port
Power Consumption 0.5W
Dimensions (W x H x D) 53x105x16.2 mm (2.08x4.1x0.63")
Cable length 2.5 m USB/25 cm audio (8.2'/0.82')
Weight 160 gr
Specifications and design may change without notice.
User Manual 2
Page 3

Chapter 2 StealthPlug Installation
StealthPlug™ CS
2.1 Mac® OS X Installation
1. DO NOT connect the StealthPlug to the computer yet.
2. Insert the Installer CD into your computer drive.
3. Double click the file named ‘Install AmpliTube’ to install, register
and authorize the AmpliTube software.
4. No drivers are needed for the Mac; Simply connect StealthPlug to
an available USB port.
5. Load AmpliTube from: /Applications/AmpliTube.
6. Once loaded, click Settings > Audio Setup. Select Input and Output
drivers to StealthPlug.
IMPORTANT: For best performance, DO NOT connect the StealthPlug
to a USB hub.
2.2 Windows® Installation
1. DO NOT connect the StealthPlug to the computer yet.
2. Insert the Installer CD into your computer drive.
3. Double click the file named ‘Install AmpliTube’ to install, register
and authorize the AmpliTube software and the necessary driver.
Follow the on-screen steps, and connect StealthPlug to an available
USB port after the installation process has finished.
4. Load AmpliTube from:
Start/Programs/IK Multimedia/AmpliTube.
5. Once loaded, click Settings > Audio Setup. Select ASIO and set Input
and Output to StealthPlug.
IMPORTANT: For best performance, DO NOT connect the StealthPlug
to a USB hub.
ENGLISH
ESPAÑOLITALIANODEUTSCHFRANÇAISJAPANESE
2.3 Windows® Uninstall
• In the “Start” menu, select “Control Panel”.
• Double-click “Add or Remove Programs”. A list of your system’s
installed software will be displayed.
• Select “StealthPlug” and click the “Remove” button. All the
StealthPlug components will be removed from your system.
User Manual 3
Page 4
StealthPlug™ CS
Chapter 3 Connect the StealthPlug
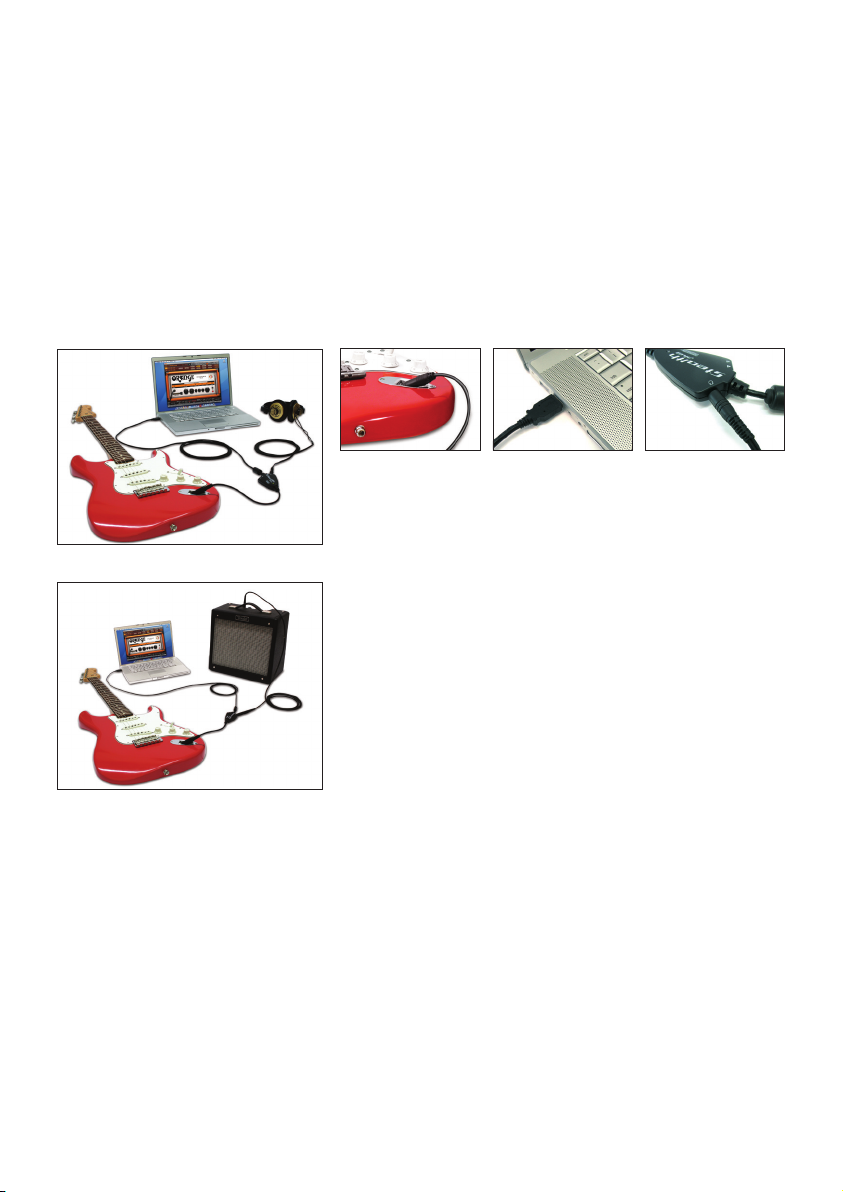
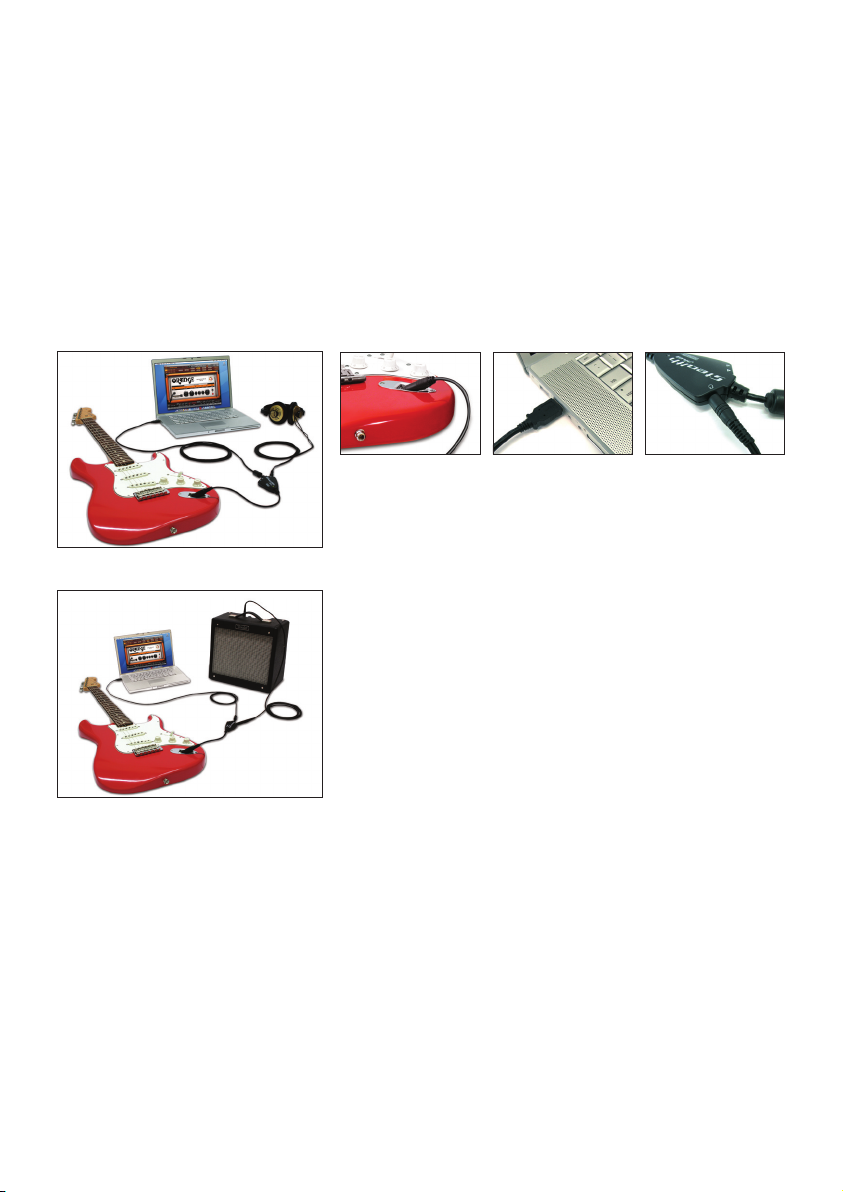
3.1 How to connect the StealthPlug
Using the StealthPlug is so easy that you can be ready to rock in less
than 30 seconds… Now, just follow these 3 simple steps:
1. Plug the 1/4” guitar jack in to your instrument.
2. Connect the USB connector to one of your computer’s free USB
ports.
3. Plug your headphones into the 1/8” stereo output.
Fig. 1. Guitar, laptop and headphones
This set-up allows you the maximum mobility when used with a laptop
computer (fig 1). In addition, you can use the 1/8” stereo output to send
the signal to powered speakers, to a stereo system or to a mixer. Using
a 1/8" stereo to 1/4" mono adapter you can also connect your guitar
amplifier (fig 2).
Fig. 2. Guitar, laptop and guitar amplifier
User Manual 4
Page 5
StealthPlug™ CS
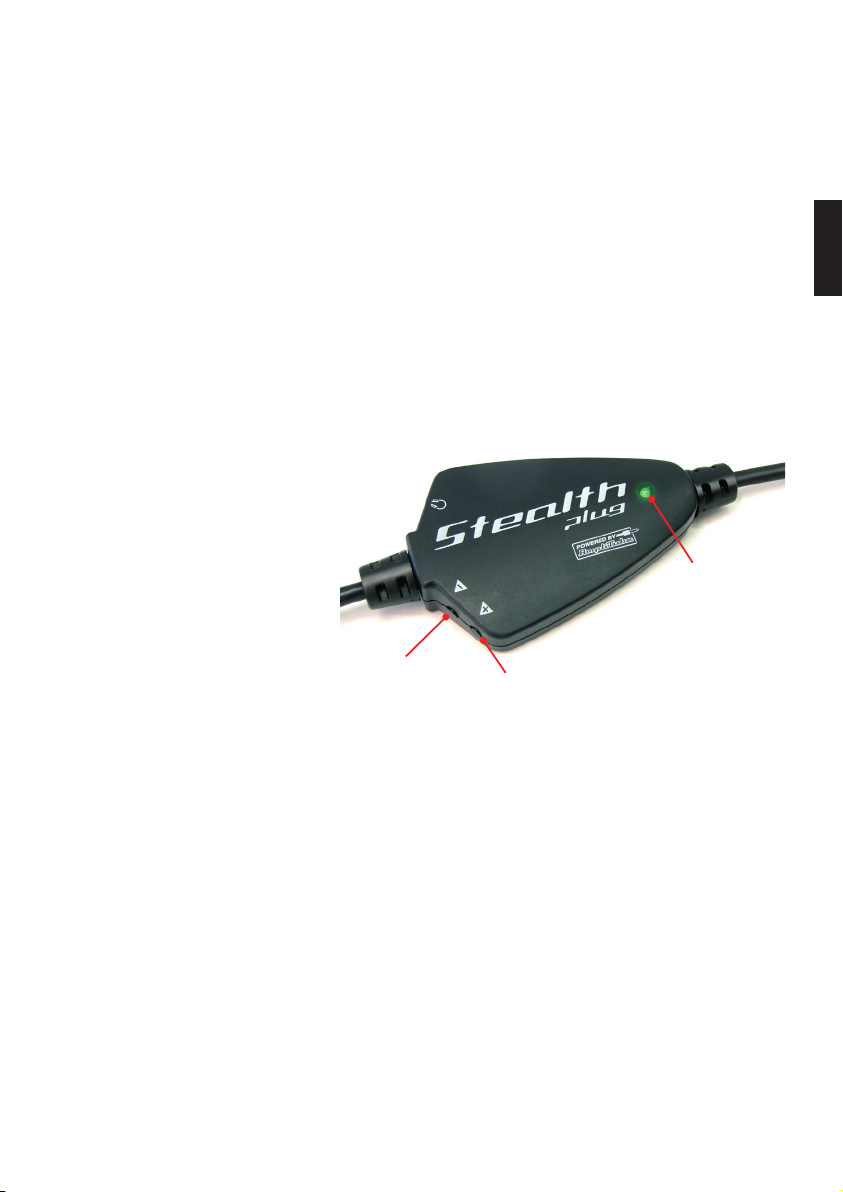
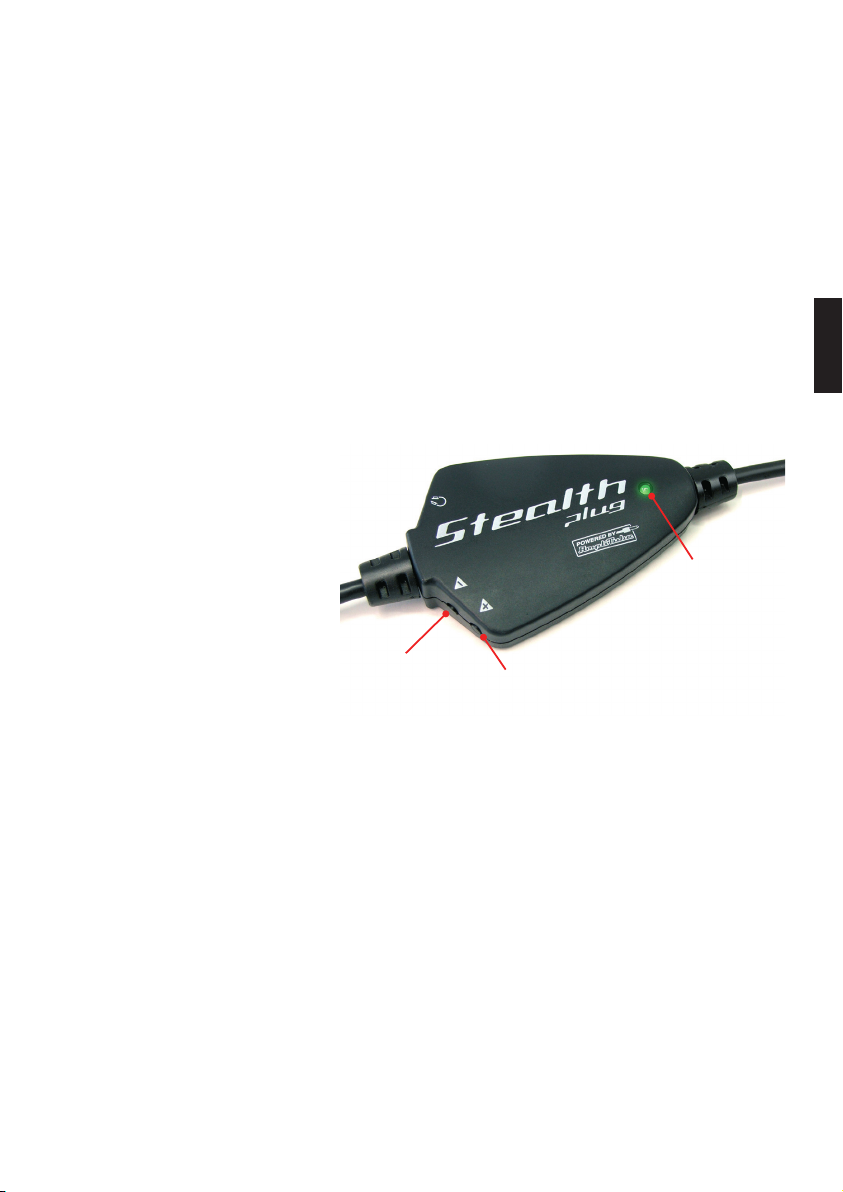
3.2 Controls and Indications
- LED: shows the status of the StealthPlug. When the StealthPlug is con-
nected to a USB port and in normal operation, the LED will be GREEN.
When the StealthPlug is in suspend/power saving mode, the LED will
be RED.
IMPORTANT: as soon as you plug the USB connector to the computer,
the LED quickly flashes between red and green for a few seconds. This
is absolutely normal.
- Volume Up button “+”: increases the output volume.
- Volume Down button “-”: decreases the output volume.
LED
ENGLISH
ESPAÑOLITALIANODEUTSCHFRANÇAISJAPANESE
Volume Down
User Manual 5
Volume Up
Page 6

StealthPlug™ CS
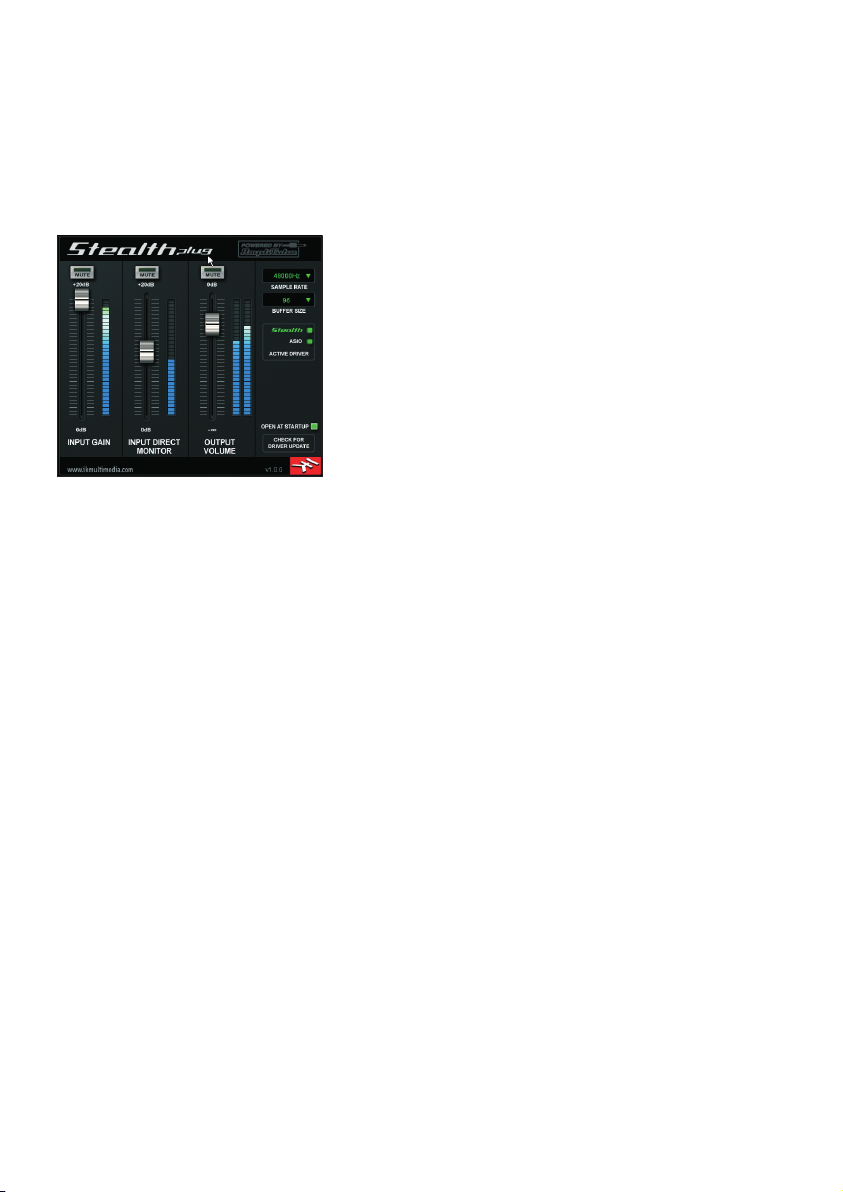
Fig. 3. Windows StealthPlug Control Panel
3.3 Windows Control Panel
In order to open the Control Panel (fig. 3), click on the “StealthPlug
icon” located in the Windows tray, (please check the Windows taskbar,
usually located at the bottom next to the clock).
Control Panel description:
- Input Gain: controls the sensitivity of the StealthPlug input. To determine
your maximum input level, play powerchords (e.g. doing strong down
strokes), and check its peak meter. Adjust the “Input Gain slider” so the peak
meter is close to the top area, like the example in fig. 3.
- Input Direct Monitor: (normally muted), sends the input signal directly to
the outputs. In fact, you are able to “monitor” your “clean” instrument at zero
latency, (if there are no audio applications open).
- Output Volume: controls the StealthPlug’s output volume. Pressing the
StealthPlug’s Volume Up “+” and down “–” buttons, will also control this
slider.
- SampleRate selection: this menu will allow you to change the StealthPlug’s
samplerate (except when the host is using the ASIO driver).
- Buffer Size: sets the StealthPlug’s input/output latency. The smaller the buf-
fer size value is, the faster the response. IMPORTANT: a small buffer size may
introduce audio pop and click noises or CPU overload. Reliable operation
highly depends on the performance and configuration of your system. Also,
if there is an open audio application that is using the StealthPlug’s ASIO driver, you will not be able to change the buffer size value from the StealthPlug’s
Control Panel. In this case, you will need to either: a) close the application
before you modify the buffer size or b) if available, enable the “Release ASIO
driver in background” option in the ASIO options of the application.
Active Drivers indications:
- Stealth: the LED will display a green light when the driver is properly
installed. This visual reference is useful for technical support purposes.
- ASIO: a green light will be displayed when there is an active audio applica-
tion currently using the StealthPlug ASIO driver.
- Open at Startup: when this option is checked (suggested), this Control Panel
will be automatically opened at Windows® startup, minimized to the tray.
- Check for Driver Update: clicking on top of this area will automatically
point you to the proper IK Multimedia webpage. From there, you will be
able to download any available update for the StealthPlug driver. If you
check on the left side of the IK Multimedia red logo, you will see the
current StealthPlug’s drivers version.
User Manual 6
Page 7
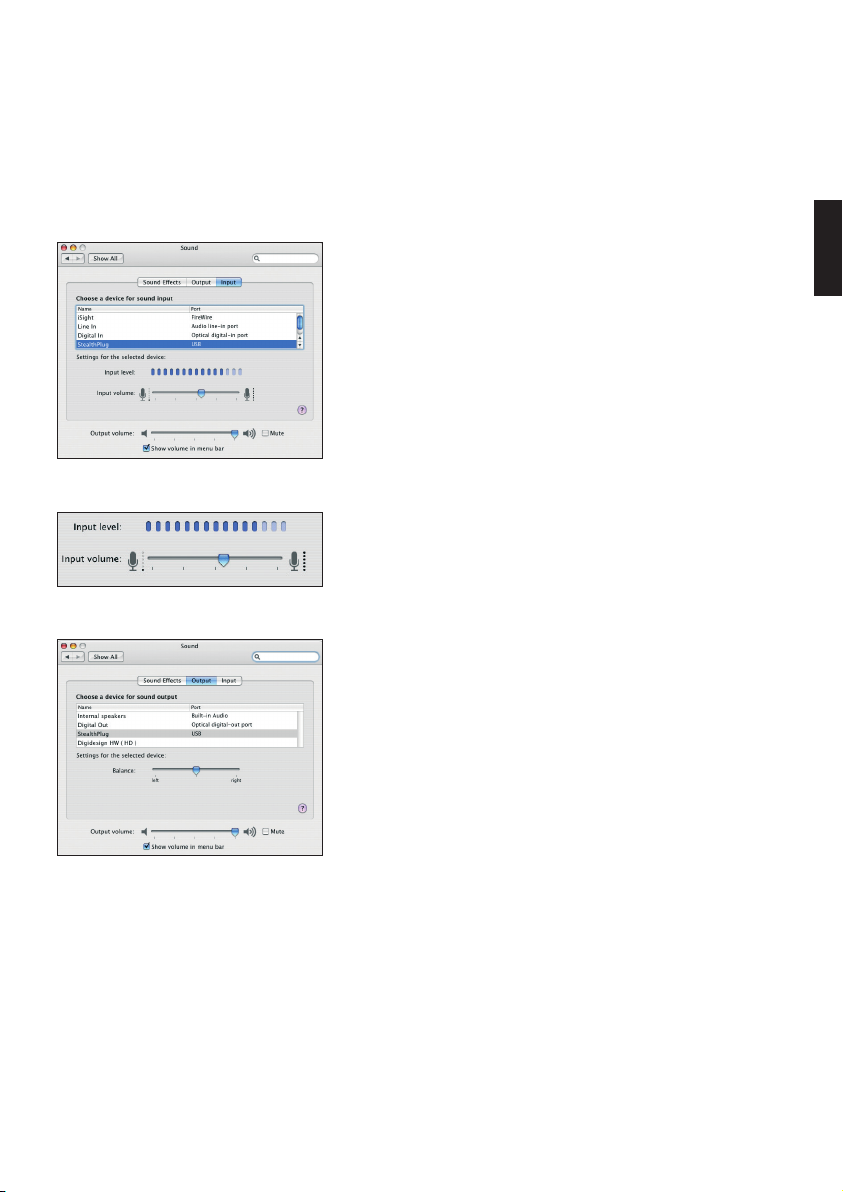
Fig. 4. Setting the StealthPlug as Input device
Fig. 5. Setting Input Level and Volume
StealthPlug™ CS
3.4 Mac Control Panel
In Mac OS X you can conveniently control your StealthPlug from the
“Sound” System Preferences. Open the System Preferences, click on
Sound to open the sound panel and then select the StealthPlug USB
device, in the “Input” section (fig. 4).
Now, set the StealthPlug input sensitivity through the “Input volume slider”.
To determine your maximum "Input level" you can play powerchords (e.g.
doing strong down strokes), and check its peak meter. Adjust the “Input volume slider” so the peak meter is close to the right area (fig. 5).
IMPORTANT: in case your audio application allows for an audio device
setting that is independent from the System setting, select the StealthPlug
from within the application “Audio and Hardware” setup. Now select the
StealthPlug USB as the “Output” device in the Sound panel, as shown in
fig. 6. The StealhPlug Volume Up “+” and down “-” buttons will control the
“Output volume slider” as well the OS X main system audio level.
ENGLISH
ESPAÑOLITALIANODEUTSCHFRANÇAISJAPANESE
Fig. 6. Setting the StealthPlug as Output device
User Manual 7
Page 8

StealthPlug™ CS
Chapter 4 Troubleshooting
• No sound
- is the LED ON? If not check that the USB is connected to a powered
and properly working USB port. For best performance, DO NOT connect
the StealthPlug to a USB Hub.
- is the LED RED? If yes, check that your computer is not in
suspend/power saving mode, the operating system has finished
loading, the StealthPlug driver is installed and enabled.
- is the LED GREEN? If yes, check your audio application set-up and
select the StealthPlug as the Input/Output device. If the problem
persists, disconnect the StealthPlug from the USB port and repeat the
driver installation procedure.
• The sound is distorted
- Lower the Input gain or the Output volume.
• The sound is too low
- Increase the Input gain or the Output volume.
• The sound is noisy
- Check the Input gain for optimal settings and do not play too close
to computer monitors, fluorescent lights like neons, transformers
and other devices that can generate noise.
• The LED is OFF
- Check the USB plug is connected to a powered and properly work-
ing USB port. For best performance, DO NOT connect the StealthPlug
to a USB Hub.
• The LED is RED
- Check that your computer is not in suspend/power saving mode,
the operating system has finished loading, the StealthPlug driver
is installed and enabled.
User Manual 8
Page 9

Chapter 5 Precautions
• Avoid using the StealthPlug in the following locations to prevent
possible damage: in extremely cold or hot locations or locations
exposed to high humidity or excessive dust.
• Do not apply excessive force to cables and switches.
• •are should be taken that objects do not fall on the enclosure and
liquids are not spilled into enclosure.
• Never open the case and tamper with the internal circuits.
• Always use a dry, soft cloth to wipe off dust and dirt. Never use
liquids or chemicals for cleaning.
• When the StealthPlug is not being used, disconnect and store it in
a safe place.
StealthPlug™ CS
ITALIANODEUTSCHFRANÇAISJAPANESE ENGLISH
User Manual 9
Page 10

StealthPlug™ CS
Capítulo 1 Especificaciones Técnicas
Respuesta de Frecuencia de Entrada 20Hz-15kHz, +0.4dB/-3.2dB
20Hz-20kHz, +0.4dB/-5.3dB
Impedancia de Entrada >1MΩ
THD de Entrada 0.02%
SNR de Entrada 80dB (A-weighted)
Ganancia de preamp 0dB to +20dB (ajustable)
Respuesta de Frecuencia de Salida 40Hz-20kHz, -0.8dB/+0.2dB
20Hz-20kHz, -2.6dB/+0.2dB
Impedancia de Salida 16Ω
THD de Salida 0.02%
SNR de Salida 82dB (A-weighted)
Max. Poder de Salida 45mW a 32Ω
Max. Nivel de Salida +3.8dBu (1.2VRMS) a 32Ω_
Convertidor A/D - D/A 16 bit
Frecuencia de Sampling hasta 48KHz
Conexiones ENTRADA 1/4” mono (TS) phone plug
SALIDA 1/8” estéreo (TRS) phone jack
USB conexión serie “A”
Controlador/Switch 2 x botones (VOLUME)
Display 1 x LED (ROJO/VERDE)
Poder de BUS Puerto USB 1.0/2.0
Consumo de energía 0.5W
Dimensiones (L x A x A) 53x105x16.2 mm (2.08x4.1x0.63")
Longitud de cable 2.5 m USB/25 cm audio (8.2'/0.82')
Peso 160 gr
Las especificaciones y diseño pueden ser modificados sin previo aviso.
10
Manual del Usuario
Page 11

Capítulo 2 Instalación
2.1 Mac® OS X
1. NO CONECTE el StealthPlug a su computadora por el momento.
2. Inserte el CD de instalación en su lector de CD.
3. Haga doble-clic en el archivo llamado “Install AmpliTube” para
instalar, registrar, y autorizar el programa AmpliTube.
4. No se necesitan drivers para Mac; simplemente conecte el
StealthPlug a un puerto USB disponible.
5. Abra AmpliTube desde este directorio: /Applications/AmpliTube.
6. Cuando esté abierto, haga clic en: Settings > Audio Setup. Seleccione
la opción StealthPlug para la sección de Input y Output.
IMPORTANTE: Para mejores resultados, NO conecte el StealthPlug a un
multiplicador de USB.
2.2 Windows®
1. NO CONECTE el StealthPlug a su computadora por el momento.
2. Inserte el CD de instalación en su lector de CD.
3. Haga doble-clic en el archivo llamado “Install AmpliTube” para
instalar, registrar, y autorizar el programa AmpliTube y el driver
necesario. Siga las instrucciones en la pantalla, y conecte el
StealthPlug a un puerto USB disponible después que termine el
proceso de instalación.
4. Abra el programa AmpliTube desde este directorio:
Start/Programs/IK Multimedia/AmpliTube.
5. Cuando esté abierto, haga clic en: Settings > Audio Setup. Seleccione
la opción StealthPlug para la sección de Input y Output.
IMPORTANTE: Para mejores resultados, NO conecte el StealthPlug a un
multiplicador de USB.
StealthPlug™ CS
ESPAÑOL
Manual del Usuario
2.3 Desinstalación en Windows®
• En el menu “Start”, seleccione “Control Panel”.
• Haga doble clic en "Add or Remove Programs". Aqui verá una lista
con todos sus programas instalados en el sistema.
• Seleccione “StealthPlug” y haga clic en el botón “Remove”.
• Todos los componentes de StealthPlug serán removidos de su
sistema.
11
Page 12
StealthPlug™ CS
Capítulo 3 Conexión
3.1 Cómo conectar StealthPlug
Usar el StealthPlug es tan fácil, que en menos de 30 segundos usted va
estar preparado para empezar a tocar su instrumento… Por favor, siga
las siguientes instrucciones:
1. Conecte el conector de guitarra 1/4" a su instrumento.
2. Conecte el conector USB a uno de sus puertos USB disponibles.
3. Conecte sus auriculares a la salida estéreo de 1/8”.
Fig. 1. Guitarra, Computadora portátil y Auriculares
Esta configuración le permite la máxima movilidad cuando se utiliza
con una computadora portátil (fig 1). Además, usted puede usar la
salida estéreo de 1/8” para enviar la señal a altavoces potenciados,
componentes estéreo o a una consola de mezcla. Si usted desea conectar su StealthPlug a su amplificador de guitarra, simplemente use un
adaptador de 1/8” estéreo a 1/4” mono (fig. 2).
Fig. 2. Guitarra, Computadora portátil y Amplificador
12
de guitarra
Manual del Usuario
Page 13
StealthPlug™ CS
3.2 Controles e Indicaciones
- LED: indica el estado del StealthPlug. Cuando el StealthPlug está
conectado a un puerto USB y funcionando normalmente, la luz se verá
VERDE. Sin embargo, cuando el StealthPlug esta en el modo de ahorro
de energía o transición, la luz se verá ROJA.
IMPORTANTE: Cuando usted conecta el conector USB a su computadora, la luz va a cambiar de forma intermitente entre el color rojo y
verde. Este comportamiento es normal.
- Botón Volume Up “+”: aumenta el volumen de salida.
- Botón Volume Down “-”: disminuye el volumen de salida.
LED
Volume Down
Volume Up
ESPAÑOL
Manual del Usuario
13
Page 14
StealthPlug™ CS
Fig. 3. Panel de Control del Stealthplug en Windows
3.3 Windows: Panel de Control
Para abrir el Panel de Control (fig. 3), haga clic en el icono “StealthPlug”
ubicado en la bandeja de entrada de Windows, (por favor analice la barra de
tareas, ubicada abajo, al lado del reloj).
Descripción del Panel de Control:
- Input Gain: controla la sensibilidad de entrada del StealthPlug. Para
determinar el máximo nivel de entrada, toque “powerchords” (por ejemplo,
tocando quintas o quintas-octavas fuertemente, con la púa hacia abajo), y
compruebe el nivel del peak meter. Ajuste el control “Input Gain” hasta que
el nivel llegue a acercarse a la parte de arriba, como en el ejemplo de la fig. 3.
- Input Direct Monitor: (normalmente silenciado), envía directamente la
señal de entrada hacia la salida. En efecto, asi podrá “monitorear” su instrumento directamente en sonido “limpio” con cero latencia (si no hay otras
aplicaciones de audio en uso).
- Output Volume: controla el volumen de salida del StealthPlug. Presionando
los botones Volume Up “+” y Volume Down “-”, también moverán este
control.
- SampleRate selection: a través de este menú usted podrá cambiar el
sample rate (excepto cuando otro programa de audio esta utilizando el
driver ASIO).
- Buffer Size: determina la latencia de entrada-salida del StealthPlug. En
cuanto el valor sea más pequeño, la respuesta será más rápida. IMPORTANTE:
valores pequeños para el buffer size pueden ocasionar ruidos de pops o
clics en el audio, o causar carga excesiva sobre el CPU. El funcionamiento y
configuración de su sistema determina el nivel de operatividad. Si una aplicación de audio esta usando el driver ASIO del StealthPlug, usted no podrá
cambiar el valor del buffer size desde el Panel de Control del StealthPlug.
En este caso, usted puede: a) cerrar la aplicación antes de modificar el valor
del buffer size, b) si está disponible, habilite la opción “Release ASIO driver
in background” bajo las opciones de ASIO de la aplicación.
Indicaciones: Active Drivers
- Stealth: la luz LED aparecerá verde cuando el driver está instalado correc-
tamente. Esta referencia visual es muy útil para el Servicio Técnico.
- ASIO: cuando una aplicación de audio está usando el driver ASIO del
StealthPlug, esta luz aparecerá verde.
- Open at Startup: cuando esta opción es seleccionada (sugerido), el Panel
de Control se abrirá automaticamente al iniciar Windows, minimizándose a
la bandeja de entrada.
- Check for Driver Update: haga clic en la parte superior de esta area para
ser dirigido automáticamente a la página web de IK Multimedia. Aquí, podrá
descargar las nuevas versiones disponibles del driver. Usted verá la versión
del driver que se está utilizando al ver el lado izquierdo del logo rojo de IK
Multimedia.
14
Manual del Usuario
Page 15
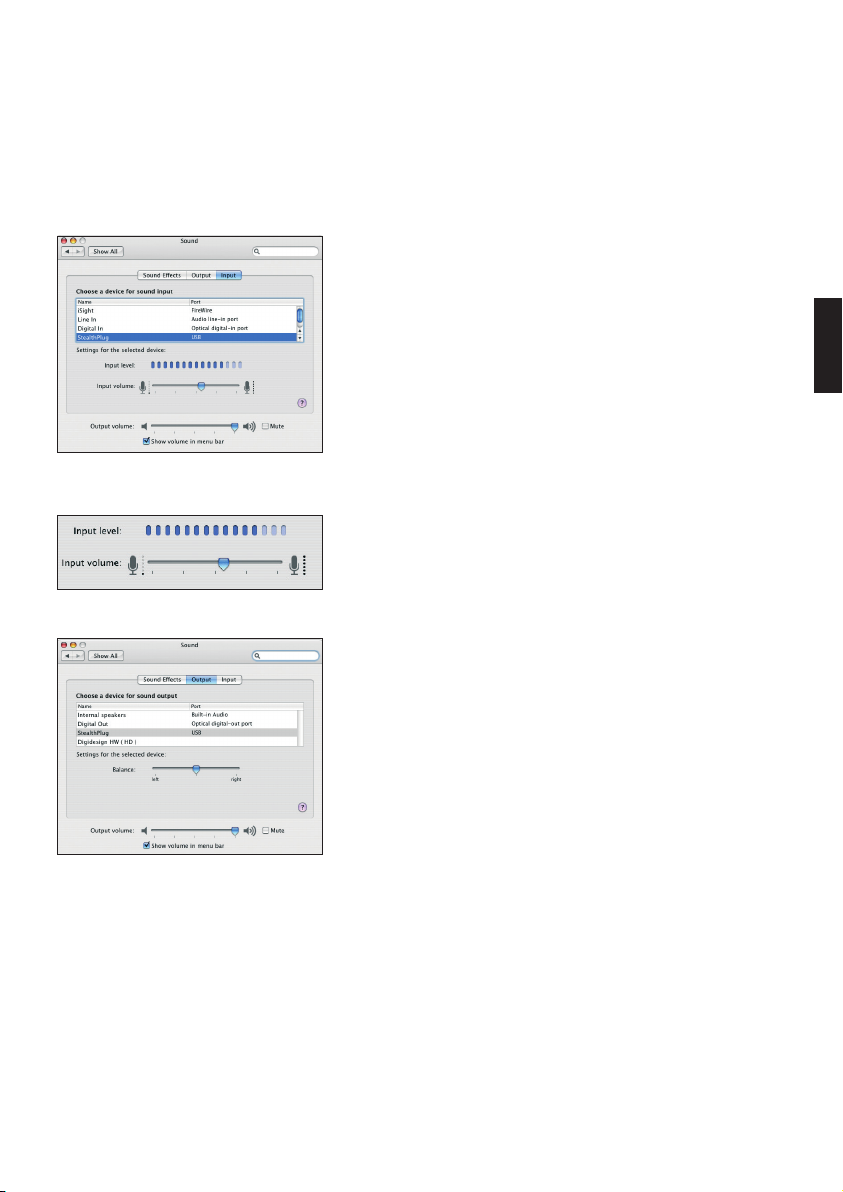
Fig. 4. Configurando el StealthPlug como dispositivo de
Fig. 5. Configurando el Nivel de Entrada y el Volumen
Entrada
StealthPlug™ CS
3.4 Mac: Panel de Control
En Mac OS X, usted puede controlar eficazmente su StealthPlug desde
“Sonido” en las Preferencias del Sistema. Abra “Preferencias del
Sistema”, haga clic en “Sonido” para abrir el panel de sonido, y luego
seleccione “StealthPlug USB” en la sección “Entrada” (fig. 4).
Ajuste el nivel de sensibilidad de entrada con el control “Volumen de
entrada”. Para determinar el máximo nivel de entrada, toque “powerchords” (por ejemplo, tocando quintas o quintas-octavas fuertemente,
con la púa hacia abajo), y compruebe el nivel de entrada (fig. 5).
IMPORTANTE: En caso que su aplicación de audio le permita hacer
ajustes independientes de las Preferencias del Sistema, seleccione
StealthPlug dentro de la opción “Audio and Hardware” de la aplicación. Luego, seleccione StealthPlug USB como el dispositivo de salida
como se ve en fig. 6. Los botones Volume Up “+” y Volume Down “-” del
StealthPlug controlarán el control de Volumen de salida, y también el
nivel de audio del sistema OS X.
ESPAÑOL
Fig. 6. Configurando el StealthPlug como dispositivo de
Salida
Manual del Usuario
15
Page 16

StealthPlug™ CS
Capítulo 4 Resolución de Problemas
• No se oye sonido
- ¿Está encendida la luz LED? Si no se enciende la luz LED, verifique
que la conexión USB esté conectada a un puerto USB potenciado y
de funcionamiento correcto. Para mejores resultados, NO conecte el
StealthPlug a un multiplicador de USB.
- ¿Está la luz LED ROJA? En caso afirmativo, verifique que la
computadora está encendida, que no esté funcionando en modo de
ahorro de energía, que el sistema operativo haya terminado de cargar,
y que el driver del StealthPlug está instalado y habilitado.
- ¿Está la luz LED VERDE? En caso afirmativo, verifique la configuración
de su aplicación de audio, y seleccione el StealthPlug como su
dispositivo de Entrada/Salida. Si el problema continúa, por favor
desconecte el StealthPlug del puerto USB y repita el proceso de
instalación del driver.
• El sonido está distorsionado
- Reduzca el Nivel de Entrada o el Volumen de Salida.
• El sonido es muy suave, débil, con poca intensidad
- Aumente el Nivel de Entrada o el Volumen de Salida.
• El sonido tiene ruido, suena sucio, etc
- Verifique el nivel de ganancia de entrada para configuración
óptima, y no toque cerca de pantallas, luces fluorescentes de neón,
transformadores eléctricos, y otras fuentes de ruido.
• No hay luz en el LED del StealthPlug
- Verifique que la conexión USB esté conectada a un puerto USB
potenciado y de funcionamiento correcto. Para mejores resultados, NO
conecte el StealthPlug a un multiplicador de USB.
• ¿La luz LED del StealthPlug está ROJA?
- Verifique que la computadora esta encendida, que no esté
funcionando en modo de ahorro de energía, que el sistema operativo
haya terminado de cargar, y que el driver del StealthPlug esté
instalado y habilitado.
16
Manual del Usuario
Page 17

Capítulo 5 Precauciones
• Para prevenir que su StealthPlug se dañe, evite usarlo en lugares
de temperaturas de frío o calor extremo, alta humedad, o polvo
excesivo.
• No fuerce excesivamente los cables o botones.
• No aplaste su StealthPlug con ningún objeto, no lo golpee. No
derrame líquido encima del dispositivo. Trátelo cuidadosamente.
• Nunca abra la unidad ni modifique los circuitos internos.
• Siempre utilice un trapo suave y seco para limpiar polvo o suciedad.
Nunca use líquidos o productos químicos de limpieza.
• Cuando usted no está usando el StealthPlug, desconéctelo y guárdelo en un lugar seguro.
StealthPlug™ CS
ESPAÑOL
Manual del Usuario
17
Page 18

StealthPlug™ CS
Capitolo 1 Specifiche Tecniche
Risposta in Frequenza di Ingresso 20Hz-15kHz, +0.4dB/-3.2dB
20Hz-20kHz, +0.4dB/-5.3dB
Impedenza di Ingresso >1MΩ
THD di Ingresso 0.02%
SNR di Ingresso 80dB (pesato-A)
Guadagno Preamplificatore 0dB to +20dB (regolabile)
Risposta in Frequenza di Uscita 40Hz-20kHz, -0.8dB/+0.2dB
20Hz-20kHz, -2.6dB/+0.2dB
Impedenza di Uscita 16Ω
THD di Uscita 0.02%
SNR di Uscita 82dB (pesato-A)
Potenza massima di Uscita 45mW su 32Ω
Livello massimo di Uscita +3.8dBu (1.2VRMS) su 32Ω
Convertitori A/D - D/A 16 bit
Frequenza di campionamento fino a 48KHz
Connessioni INGRESSO 1/4” mono (TS) phone plug
USCITA 1/8” stereo (TRS) phone jack
USB connessione serie “A”
Controlli/Pulsanti 2 x pulsanti (VOLUME)
Indicatori 1 x LED (RED/GREEN)
BUS di alimentazione USB 1.0/2.0 port
Potenza consumata 0.5W
Dimensioni (L x A x P) 53x105x16.2 mm (2.08x4.1x0.63")
Lunghezza cavo 2.5 m USB/25 cm audio (8.2'/0.82')
Peso 160 gr
Specifiche e design possono essere soggetti a modifica senza preavviso.
18
Manuale d'Uso
Page 19

StealthPlug™ CS
Capitolo 2 Installazione dello StealthPlug
2.1 Installazione in Mac® OS X
1. NON COLLEGARE StealthPlug al computer prima di avere eseguito
i passi seguenti.
2. Inserire il CD di installazione nel lettore CD del computer.
3. Fare doppio click sull’icona ‘Install AmpliTube’ per installare, registrare e autorizzare l’applicazione AmpliTube.
4. Non è necessario installare driver su Mac; è sufficiente connettere
StealthPlug a una porta USB libera.
5. Lanciare AmpliTube da: /Applicazioni/AmpliTube.
6. Una volta aperto AmpliTube, cliccare su: Settings > Audio Setup.
Selezionare StealthPlug come Input e Output.
IMPORTANTE: NON collegare lo StealthPlug ad un hub USB.
2.2 Installazione in Windows®
1. NON COLLEGARE StealthPlug al computer prima di avere eseguito
i passi seguenti.
2. Inserire il CD di installazione nel lettore CD del computer.
3. Fare doppio click sull’icona ‘Install AmpliTube’ per installare, registrare e autorizzare l’applicazione AmpliTube e i driver necessari.
Seguire le istruzioni che verranno mostrate a schermo e, una volta
terminato il processo, connettere StealthPlug a una porta USB
libera.
4. Lanciare AmpliTube da:
Start/Programmi/IK Multimedia/AmpliTube.
5. Una volta aperto AmpliTube, cliccare su:
Settings > Audio Setup. Selezionare ASIO e selezionare StealthPlug
come Input e Output.
IMPORTANTE: NON collegare lo StealthPlug ad un hub USB.
ENGLISHESPAÑOLDEUTSCHFRANÇAISJAPANESE ITALIANO
Manuale d'Uso
2.3 Disintallazione in Windows®
• Nel menu “Start”, selezionare “Control Panel”.
• Facendo doppio-click su “Add or Remove Programs”, una lista dei
software installati sul vostro sistema comparirà.
• Selezionare “StealthPlug” e fare click sul bottone “Remove”.
• Tutte le componenti dello StealthPlug verranno rimosse dal vostro
sistema.
19
Page 20

StealthPlug™ CS
Capitolo 3 Connessione dello StealthPlug
3.1 Come connettere lo StealthPlug
Usare lo StealthPlug è così facile che siete pronti a suonare in meno di
30 secondi… Basta sequire questi semplici 3 passi:
1. Connettere il jack da 1/4” al vostro strumento
2. Connettere il connettore USB ad una delle porte USB libere del
vostro computer.
3. Connettere le cuffie nell'uscita stereo con mini-jack da 1/8” .
Fig. 1. Chitarra, computer portatile e cuffie.
Con questo set-up potrete disporre della massima mobilità utilizzando
un computer di tipo portatile (fig 1). Inoltre l'uscita cuffie stereo da 1/8”
può essere utilizzata anche per mandare l'uscita a casse amplificate,
ad un sistema stereo o a un mixer. Utilizzando invece un adattatore
da 1/8" stereo a 1/4" mono potrete collegare lo StealthPlug al vostro
amplificatore (fig 2).
Fig. 2. Chitarra, computer portatile e amplificatore.
20
Manuale d'Uso
Page 21

StealthPlug™ CS
3.2 Controlli e Indicazioni
- LED: mostra lo stato dello StealthPlug. Se il driver è installato corret-
tamente il LED mostrerà una luce VERDE. Quando lo StealthPlug è in
modalità sospesa o di risparmio energetico il LED mostrerà una luce
ROSSA.
IMPORTANTE: può capitare che al momento della connessione dello
StealthPlug alla porta USB del vostro computer il LED commuti tra
VERDE e ROSSO per alcuni secondi. Questo è assolutamente normale.
- Volume Up button “+”: aumenta il volume di uscita.
- Volume Down button “-”: diminuisce il volume di uscita.
LED
Volume Down
Volume Up
ENGLISHESPAÑOLDEUTSCHFRANÇAISJAPANESE ITALIANO
Manuale d'Uso
21
Page 22

StealthPlug™ CS
Fig. 3. Pannello di Controllo StealthPlug Windows
3.3 Pannello di Controllo in Windows
In Windows, per aprire il Pannello di Controllo dello StealthPlug (fig. 3), fare
click sull'icona “StealthPlug” nel Tray di Windows o sulla Windows Taskbar
(generalmente di fianco all'orologio).
Descrizione comandi del Pannello di Controllo:
- Input Gain (Guadagno di Ingresso): controlla la sensibilità dell'Ingresso
dello StealthPlug. Per determinare il massimo livello di Ingresso, suonare
ad esempio dei powerchords (percuotere le corde con forza), e controllare il
meter relativo. Aggiustare lo slider “Input Gain” in modo che il meter indichi
vicino al massimo, come nel pannello in figura.
- Input Direct Monitor (Ingresso per Ascolto Diretto): (normalmente in mute),
invia il segnale di ingresso direttamente all'uscita. In questo modo è possibile
ascoltare direttamente il segnale pulito dello strumento con latenza zero (se
non ci sono applicazioni audio aperte).
- Output Volume (Volume di Uscita): controlla il volume di uscita della presa
cuffie dello StealthPlug. Premendo i bottoni Volume Up “+” and down “–”,
viene controllato questo slider dallo StealthPlug.
- SampleRate Selection (Selezione Frequenza di Campionamento): questo menu
permette di cambiare la frequenza di campionamento dello StealthPlug tranne
quando gli ASIO driver sono in uso.
22
- Buffer Size (Dimensione Buffer): setta la latenza di Ingresso/Uscita dello
StealthPlug. Più piccolo è il buffer, più la risposta è immediata. IMPORTANTE:
un buffer size troppo piccolo può introdurre dei disturbi audio (pop/click) e
sovraccarico della CPU. Inoltre se c'è un'applicazione audio che usa i driver
ASIO dello StealthPlug, non sarete in grado di cambiare il buffer size dal
Pannello di Controllo. In questo caso dovrete alternativamente: a) chiudere
l'applicazione prima di modificare il buffer size, b) se disponibile abilitare il
comando “Release ASIO driver in background” nelle opzioni ASIO della vostra
applicazione.
- Stealth: il LED sarà di colore VERDE quando il driver è installato correttamen-
te. Questa visualizzazione è offerta per ragioni di supporto tecnico.
- ASIO: il LED sarà di colore VERDE quando c'è un'applicazione audio che
utilizza i driver ASIO dello StealthPlug.
- Open at Startup (Apri all'avvio): quando questa opzione è selezionata (è
suggerito), il Pannello di Controllo verrà automaticamente aperto all'avvio di
Windows®, e minimizzato nel Tray.
-Check for Driver Update (Controlla Aggiornamenti Driver): facendo
click su questo verrete automaticamente rediretti alla pagina web di
IK Multimedia dove scaricare gli aggiornamenti del driver disponibili.
Facendo click sulla sinistra del logo IK Multimedia red logo, vedrete la
versione corrente del driver dello StealthPlug.
Manuale d'Uso
Page 23

Fig. 4. Settaggio dello StealthPlug come dispositivo di
Fig. 5. Settaggio del livello di Ingresso e del Volume.
Ingresso
StealthPlug™ CS
3.4 Pannello di Controllo in Mac
In Mac OS X è possibile usare il pannello di controllo “Sound” delle
preferenze di sistema per controllare lo StealthPlug. Aprire le "System
Preferences", e fare click su Sound per aprire il "Sound Panel" e selezionare StealthPlug come dispositivo USB nella sezione di Ingresso (fig. 4).
Ora, regolare la sensibilità di Ingresso dello StealthPlug attraverso lo slider
di “Input volume”. Per determinare il massimo livello di ingresso, suonare
ad esempio dei powerchords (percuotere le corde con forza), e controllare
il meter relativo. Aggiustare lo slider di “Input volume” (fig. 5) in modo
che il meter si accenda verso la destra. IMPORTANTE: nel caso la vostra
applicazione audio permetta l'uso di dispositivi audio indipendenti dai
settaggi del sistema, selezionare lo StealthPlug dall'interno della parte di
settaggio “Audio and Hardware” dell'applicazione stessa.
Ora selezionare lo StealthPlug come dispositivo “Output” USB nel
pannello "Sound", come mostrato in fig. 6. I bottoni di Volume “+” e “-”
dello StealthPlug controlleranno lo slider di “Output volume” e l'audio
principale del sistema, nello stesso tempo.
ENGLISHESPAÑOLITALIANODEUTSCHFRANÇAISJAPANESE
Fig. 6. Settaggio dello StealthPlug come dispositivo di Uscita
Manuale d'Uso
23
Page 24

StealthPlug™ CS
Capitolo 4 Guida rapida alla risoluzione dei problemi
• Non c'è suono
- il LED è acceso? Se no, contollare che il connettore USB sia
propriamente connesso ad una presa funzionante con alimentazione.
Per prestazioni ottimali non connettere lo StealthPLug ad un Hub USB.
- il LED è ROSSO? Se sì, controllare che il computer non sia in
modalità sospesa o di risparmio energetico, il sistema operativo sia
lanciato completamente e i driver dello StealthPlug siano installati e
funzionanti.
- il LED è VERDE? Se sì, controllare che la vostra applicazione audio sia
settata con lo StealthPlug come dispositivo di Ingresso/Uscita.
• Il suono è distorto
- Abbassare il guadagno di Ingresso (Input Gain) o il volume di Uscita
(Output Volume).
• Il suono è troppo basso
- Alzare il guadagno di ingresso (Input Gain) o il volume di Uscita
(Output Volume).
• Il suono contiene rumore di fondo
- Controllare che il guadagno di ingresso (Input Gain) disponga degli
adeguati settaggi. Non suonare troppo vicino agli altoparlanti collegati
al computer, a luci fluorescenti come neon, trasformatori o altri
dispositivi che possono generare rumore.
24
• Il LED è spento
- Contollare che il connettore USB sia propriamente connesso ad una
presa funzionante con alimen tazione. Per prestazioni ottimali non
connettere lo StealthPLug ad un Hub USB.
• Il LED è ROSSO
- Controllare che il computer non sia in modalità sospesa o di risparmio
energetico, il sistema operativo sia lanciato completamente e i driver
dello StealthPlug siano installati e funzionanti.
Manuale d'Uso
Page 25

Capitolo 5 Precauzioni
• Evitare di usare lo StealthPlug in luoghi estremamente caldi o freddi o in luoghi esposti a eccessiva umidità o polvere.
• Non applicare una forza eccessiva ai cavi e ai pulsanti.
• Prestare cura affinchè oggetti non cadano o liquidi non vengano
rovesciati sul contenitore.
• Mai aprire il contenitore ed accedere o modificare il circuito interno.
• Usare sempre un panno secco e soffice per la pulizia del contenitore.
Non usare detergenti liquidi o solventi.
• Nel caso lo StealthPlug non venga usato disconnetterlo e riporlo in
un luogo sicuro.
StealthPlug™ CS
ITALIANO
Manuale d'Uso
25
Page 26

StealthPlug™ CS
Kapitel 1 Technische Daten
Eingangsfrequenzbereich 20Hz-15kHz, +0.4dB/-3.2dB
20Hz-20kHz, +0.4dB/-5.3dB
Eingangsimpedanz >1MΩ
Eingangs THD 0.02%
Eingangs SNR(Signalrauschspannungsabstand) 80dB (A-gewichtet)
Vorverstärker Gain 0dB to +20dB (einstellbar)
Ausgangsfrequenzbereich 40Hz-20kHz, -0.8dB/+0.2dB
20Hz-20kHz, -2.6dB/+0.2dB
Ausgangsimpedanz 16Ω
Ausgangs THD 0.02%
Ausgangs SNR (Signalrauschspannungsabstand) 82dB (A-gewichtet)
Maximale Ausgangsleistung 45mW an 32Ω
Maximale Ausgangspegel +3.8dBu (1.2VRMS) an 32Ω_
A/D - D/A Wandler 16 bit
Samplerate bis zu 48KHz
Anschlüsse EINGANG 1/4” Mono TS-Stecker
AUSGANG 1/8” Stereo TRS-Klinke
USB Standard A-Stecker
Controller/Schalter 2 x Tasten (VOLUME)
Display 1 x LED (ROT/GRÜN)
BUS Versorgung USB 1.0/2.0 port
Stromverbrauch 0.5W
Abmessungen (W x H x T) 53x105x16.2 mm (2.08x4.1x0.63")
Kabellänge 2.5 m USB/25 cm audio (8.2'/0.82')
Gewicht 160 gr
Spezifikationen und Design können sich ohne gesonderte Ankündigung
ändern.
26
Benutzerhandbuch
Page 27

Kapitel 2 StealthPlug Installation
2.1 Mac® OS X Installation
1. Schließen Sie das StealthPlug noch NICHT an Ihren Computer an.
2. Legen Sie die Installations-CD in das CD-Laufwerk ein.
3. Doppelklicken Sie auf die Datei “Install AmpliTube” um AmpliTube
und die notwendigen Treiber zu installieren, zu registrieren und zu
autorisieren.
4. Keine zusätzlichen Treiber werden unter Mac benötigt. Schließen
Sie das StealthPlug einfach an ein freies USB-Port an.
5. Laden Sie AmpliTube von: /Programme/AmpliTube.
6. Nachdem Sie AmpliTube geladen haben, klicken Sie auf:
Settings > Audio Setup. Stellen Sie die Eingangs- und
Ausgangstreiber auf StealthPlug.
WICHTIGER HINWEIS: Bitte das StealthPlug NICHT an einen USB Hub
anschließen
2.2 Windows® Installation
1. Schließen Sie das StealthPlug noch NICHT an Ihren Computer an.
2. Legen Sie die Installations-CD in das CD-Laufwerk ein.
3. Doppelklicken Sie auf die Datei ”Install AmpliTube” um AmpliTube
und die notwendigen Treiber zu installieren, zu registrieren und zu
autorisieren. Folgen Sie den Online-Anleitungen und schließen Sie
das StealthPlug an ein freies USB-Port an, nachdem die Installation
beendet ist.
4. Laden Sie AmpliTube von:
Start/Programme/IK Multimedia/AmpliTube.
5. Nachdem Sie AmpliTube geladen haben, klicken Sie auf:
Settings > Audio Setup. Wählen Sie ASIO und stellen Sie die
Eingangs- und Ausgangstreiber auf StealthPlug.
StealthPlug™ CS
DEUTSCH
Benutzerhandbuch
WICHTIGER HINWEIS: Bitte das StealthPlug NICHT an einen USB Hub
anschließen
2.3 Windows® Deinstallation
• Im “Start” Menü, selektieren Sie “Systemsteuerung”.
• Doppelklicken Sie auf “Programme Zufügen/Entfernen”. Eine Liste
von den in Ihrem System installierten Softwareprogrammen wird
aufgezeigt.
• Selektieren Sie “StealthPlug” und klicken Sie auf “Entfernen”. Alle
StealthPlug Komponente werden von Ihrem System entfernt.
27
Page 28

StealthPlug™ CS
Kapitel 3 StealthPlug anschließen
3.1 Wie Sie das StealthPlug anschließen
Die Benutzung von StealthPlug ist so einfach, dass Sie bereits im
Handumdrehen rocken können... Folgen Sie bitte diesen drei einfachen
Schritten:
1. Schließen Sie das 1/4” Gitarrenkabel an Ihr Instrument an.
2. Schließen Sie den UBS Stecker an ein freies UBS Port Ihres
Computer an.
3. Stecken Sie Ihre Kopfhörer in den 1/8” Stereo Eingang ein.
Fig. 1. Gitarre, Laptop und Kopfhörer
Fig. 2. Gitarre, Laptop und Gitarrenverstärker
Dieses Setup erlaubt die maximale Tragbarkeit in Verbindung mit einem
Laptop Computer (fig. 1). Zusätzlich haben Sie die Möglichkeit, den 1/8”
Stereo Ausgang dazu zu benutzen, das Signal zu aktiven Lautsprechern,
zu einer Stereoanlage oder einen Mischer zu senden. Wenn Sie einen
1/8” Stereo auf 1/4” Mono Adapter verwenden, haben Sie auch die
Möglichkeit, Ihren Gitarrenverstärker anzuschließen (fig 2).
28
Benutzerhandbuch
Page 29

StealthPlug™ CS
3.2 Steuerung und Angaben
- LED: zeigt den Status des StealthPlugs an. Wenn das StealthPlug an
ein USB Port angeschlossen und im Normalbetrieb ist, leuchtet das
LED GRÜN. Wenn das StealthPlug im Stromspar-/Suspend Modus ist,
leuchtet das LED ROT.
WICHTIGER HINWEIS: Wenn Sie den USB Stecker an Ihren Computer
anschließen, blinkt das LED kurz grün und rot. Dieses ist vollkommen
normal.
- Volumen Up Taste “+”: erhöht die Ausgangslautstärke.
- Volumen Down Taste “-”: setzt die Ausgangslautstärke ab.
LED
DEUTSCH
Benutzerhandbuch
Volume Down
Volume Up
29
Page 30

StealthPlug™ CS
Fig. 3. Windows StealthPlug Systemsteuerung
3.3 Windows Systemsteuerung
Um die Systemsteuerung zu öffnen (fig. 3), klicken Sie auf “StealthPlug icon”, das
sich in der Windows Ablage befindet, (prüfen Sie in der Windows Task-Leiste
nach. In der Regel befindet sie sich auf dem Bildschirm unten neben der Uhr).
Beschreibung von Systemsteuerung:
- Input Gain: stellt die Empfindlichkeit des StealthPlug Eingangs ein. Um
den maximalen Ausgangspegel festzulegen, spielen Sie Powerchords (d.h.
spielen Sie starke down strokes), und prüfen Sie den Höchstwert. Stellen Sie
den “Input Gain Slider” nah zum Maximum genau wie im obigen Beispiel.
- Input Direct Monitor: (normalerweise muted), sendet das Eingangssignal
direkt zu den Ausgängen. Vielmehr sind Sie zusätzlich in der Lage, Ihre
“cleanen” Instrumente mit Zero Latenz zu “kontrollieren” (wenn keine AudioAnwendungen geöffnet sind).
- Output Volume: stellt die Ausgangslautstärke von StealthPlug ein. Wenn Sie
StealthPlugs Volume Up “+” und down “–” Tasten drücken, wird auch dieser
Schieber kontrolliert.
- SampleRate selection: dieses Menü erlaubt die Einstellung der StealthPlug
Samplerate (außer wenn der Host einen ASIO Treiber verwendet).
- Buffer Size: stellt die Eingangs-/Ausgangslatenz von StealthPlug ein. Je
kleiner die Buffergröße, desto schneller die Reaktion. WICHTIGER HINWEIS:
eine kleinere Buffergröße kann Knackgeräusche erzeugen oder zu einer
CPU-Überlastung führen. Ein zuverlässiger Betrieb hängt sehr von der
Leistung und Konfiguration Ihres Systems ab. Falls eine geöffnete AudioAnwendung StealthPlugs ASIO Treiber benutzt, wird es nicht möglich sein,
die Buffergröße in der StealthPlugs Systemsteuerung zu ändern. In diesem
Falle müssen Sie entweder a) die Anwendung schließen, bevor Sie die
Buffergröße einstellen wollen oder b) falls möglich, aktivieren Sie “ASIO
Treiber im Hintergrund freigeben” in den ASIO Optionen der Anwendung.
Anzeigen von aktiven Treibern:
30
- Stealth: das LED zeigt grün, wenn der Treiber ordnungsgemäß installiert ist.
Diese Anzeige ist nützlich für den technischen Support.
- ASIO: ein grünes Licht wird gezeigt, wenn eine aktive Audio Anwendung den
ASIO Treiber des StealthPlug gegenwärtig verwendet.
- Open at Startup: wenn diese Option angehakt ist (empfohlen), wird diese
Systemsteuerung automatisch beim Windows® Start up geöffnet, minimiert
in der Bodenleiste.
- Check for Driver Update: wenn Sie auf diesen Bereich klicken, werden
Sie automatisch auf die richtige IK Multimedia Webseite geführt. Alle
verfügbaren Treiber Updates für StealthPlug werden dort verfügbar
sein. Sie können die aktuelle Version des Treibers auf der linken Seite
des roten IK Multimedialogos verifizieren.
Benutzerhandbuch
Page 31

Fig. 4. Auswahl von StealthPlug als Eingangsgerät
Fig. 5. Einstellen des Input Levels und der Lautstärke
StealthPlug™ CS
3.4 Mac Systemsteuerung
Im Mac OS X können Sie das StealthPlug bequem über
Systemeinstellungen > Ton steuern. Öffnen Sie Systemeinstellungen,
klicken Sie auf Ton, um das Soundpanel zu öffnen und wählen Sie das
StealthPlug USB Gerät in der “Eingabe”-Sektion aus (fig. 4).
Dann können Sie die Eingangsempfindlichkeit des StealthPlug mit dem
Schieberegler für die Eingangslautstärke einstellen. Um den maximalen Ausgangspegel festzulegen, spielen Sie Powerchords (d.h. spielen
Sie starke down strokes), und prüfen Sie den Höchstwert. Stellen Sie
den Schieberegler für die Eingangslautstärke so ein, dass der Gipfel
nah zu der rechten Seite ist (fig. 5).
WICHTIGER HINWEIS: Falls Ihre Audio Anwendung eine Audio Gerät
Auswahl erlaubt, die unabhängig von Systemeinstellungen ist, selektieren Sie das StealthPlug innerhalb von “Audio and Hardware”
Setup der Anwendung. Dann wählen Sie das StealthPlug USB als
Ausgangsgerät im Sound Panel wie beschrieben in fig. 6. Die Volume
Up “+” and down “-” Tasten des StealthPlug steuern den Schieberegler
für die Ausgangslautstärke sowie den Audiopegel des OS X Systems.
DEUTSCH
Fig. 6. Auswahl von StealthPlug als Ausgangsgerät
Benutzerhandbuch
31
Page 32

StealthPlug™ CS
Kapitel 4 Finden und Beseitigen von Problemen
• Kein Sound
- Leuchtet das LED? Falls nicht, stellen Sie sicher, dass der USB
Stecker an einem mit Strom versorgten und funktionierenden USB
Port angeschlossen ist. Schließen Sie das StealthPlug NICHT an
einen USB Hub an.
- Ist das LED ROT? Falls ja, stellen Sie sicher, dass Ihr Computer
sich nicht im Suspend/Stromsparmodus befindet und dass das
Betriebssystem komplett geladen ist und der StealthPlug Treiber
installiert und aktiviert ist.
- Leuchtet das LED GRÜN? Falls ja, prüfen Sie Ihr Audio Anwendungs
Setup und selektieren Sie das StealthPlug als das Eingangs-/
Ausgangsgerät. Falls das Problem weiterhin bestehen bleibt,
ziehen Sie das StealthPlug vom USB Port ab und wiederholen Sie
die Installation.
• Verzerrter Sound
- Setzen Sie “Input gain” oder “Output Volume” herab.
• Sound ist zu schwach
- Erhöhen Sie “Input gain” oder “Output Volume”.
• Rauschender Sound
- Überprüfen Sie die optimalen Werte des “Input Gain” und spielen
Sie nicht in der unmittelbaren Nähe von Computer Monitoren,
Glimmer- und Neonlichten, Wandlern und anderen Geräten, die
Geräusche verursachen können.
32
• Das LED ist OFF
- Stellen Sie sicher, dass der USB Stecker an einem mit Strom
versorgten und funktionierenden USB Port angeschlossen ist.
Schließen Sie das StealthPlug NICHT an einen USB Hub an.
• Das LED ist ROT
- Stellen Sie sicher, dass Ihr Computer sich nicht im Suspend/
Stromsparmodus befindet und dass das Betriebssystem komplett
geladen ist und der StealthPlug Treiber installiert und aktiviert ist.
Benutzerhandbuch
Page 33

Kapitel 5 Sicherheitsmassnahmen
• Verwenden Sie das StealthPlug nicht an folgenden Orten:
Extrem kalte/heiße Orte mit hoher Luftfeuchtigkeit oder starker
Staubentwicklung.
• Verwenden Sie nicht übermäßige Kraft auf Kabel und Schieber.
• Lassen Sie keine Gegenstände oder Flüssigkeit auf das Gerät fallen.
• Niemals das Gehäuse öffnen und interne Verschaltungen verändern.
• Benutzen Sie immer einen trockenes, weiches Tuch um Staub und
Schmutz zu entfernen. Verwenden Sie keine Lösungsmittel oder
Chemikalien zur Reinigung.
• Wenn nicht im Betrieb, ziehen sie das StealthPlug ab und bewahren
Sie es an einem sicheren Ort auf.
StealthPlug™ CS
DEUTSCH
Benutzerhandbuch
33
Page 34

StealthPlug™ CS
Chapitre 1 Spécifications
Réponse en fréquence d’entrée 20Hz-15kHz, +0.4dB/-3.2dB
20Hz-20kHz, +0.4dB/-5.3dB
Impédance d’entrée >1MΩ
THD d’entrée 0.02%
SNR d’entrée 80dB (A-weighted)
Gain du Préampli 0dB to +20dB (ajustable)
Réponse en fréquence de sortie 40Hz-20kHz, -0.8dB/+0.2dB
20Hz-20kHz, -2.6dB/+0.2dB
Impédance de sortie 16Ω
THD de sortie 0.02%
SNR de sortie 82dB (A-weighted)
Puissance Max de sortie 45mW en 32Ω
Niveau Max de sortie +3.8dBu (1.2VRMS) en 32Ω_
Convertisseur A/N -N/A 16 bit
Fréquence d’échantillonnage jusqu’à 48KHz
Connections Entrée 1/4” mono (TS) jack
Sortie 1/8” stéréo (TRS) mini jack
USB prise séries “A”
Contrôleur/Interrupteur 2 x boutons (VOLUME)
Affichage 1 x LED (ROUGE/VERTE)
Puissance de BUS port USB 1.0/2.0
Consommation en Puissance 0.5W
Dimensions (L x H x P) 53x105x16.2 mm (2.08x4.1x0.63")
Longueur du câble 2.5 m USB/25 cm audio (8.2'/0.82')
Poids 160 gr
Les spécifications et le design peuvent faire l’objet de changements sans préavis.
34
Manuel d’Utilisation
Page 35

StealthPlug™ CS
Chapitre 2 Installation du StealthPlug
2.1 Installation sur Mac® OS X
1. NE PAS connecter le StealthPlug à l’ordinateur avant de suivre les
étapes suivantes.
2. Insérez le CD d’installation dans le lecteur CD de l’ordinateur.
3. Double-cliquez sur le fichier ‘Install AmpliTube’ pour installer, enregistrer et autoriser le logiciel AmpliTube.
4. Aucun pilote n’est nécessaire pour Mac. Connectez simplement le
StealthPlug à un port USB disponible.
5. Lancez AmpliTube depuis : /Applications/AmpliTube.
6. Une fois lancé, cliquez sur : Settings > Audio Setup. Sélectionnez
StealthPlug comme périphérique d’entrée et de sortie.
IMPORTANT: ne pas connecter le StealthPlug à un hub USB.
2.2 Installation sur Windows®
1. NE PAS connecter le StealthPlug à l’ordinateur avant de suivre les
étapes suivantes.
2. Insérez le CD d’installation dans le lecteur CD de l’ordinateur.
3. Double-cliquez sur le fichier ‘Install AmpliTube’ pour installer, enregistrer et autoriser le logiciel AmpliTube, et les pilotes nécessaires.
Suivez toutes les étapes de l’installation et connectez le StealthPlug
à un port USB disponible APRÈS avoir terminé l’installation.
4. Lancez AmpliTube depuis :
Menu Démarrer/Programmes/IK Multimedia/AmpliTube.
5. Une fois lancé, cliquez sur : Settings > Audio Setup. Choisissez
ASIO, et sélectionnez StealthPlug comme périphérique d’entrée et
de sortie.
FRANÇAIS
Manuel d’Utilisation
IMPORTANT: ne pas connecter le StealthPlug à un hub USB.
2.3 Désinstallation sur Windows®
• Dans le menu “Démarrer”, choisissez “Panneau de configuration”.
• Double cliquez sur “Ajout / Suppression de Programmes”. Une liste
des logiciels installés sur votre système s’affichera.
• Sélectionnez “StealthPlug” et cliquez sur le bouton “Supprimer”.
Tous les composants du StealthPlug seront désinstallés de votre
ordinateur.
35
Page 36

StealthPlug™ CS
Chapitre 3 Branchement du StealthPlug
3.1 Comment connecter le StealthPlug
Utiliser le SteathPlug est si simple que vous pouvez être prêt à jouer en
moins de 30 secondes... Suivez simplement ces 3 étapes:
1. Branchez le jack pour guitare (1/4”) à votre instrument.
2. Connectez la prise USB à un des ports USB libres de votre ordinateur.
Fig. 1. Guitare, ordinateur portable, et écouteurs
3. Branchez votre casque audio dans la prise de sortie stéréo (1/8”).
Cette configuration permet la plus grande mobilité lorsque l’ordinateur
est un portable (fig 1). De plus, vous pouvez utiliser la sortie stéréo
(1/8”) pour envoyer le signal de sortie vers des enceintes amplifiées,
vers une chaine stéréo ou vers un mixeur. En utilisant un adaptateur de
mini jack à gros jack, vous pouvez aussi vous connecter à votre ampli
guitare (fig 2).
Fig. 2. Guitare, ordinateur portable et ampli guitare
36
Manuel d’Utilisation
Page 37

StealthPlug™ CS
3.2 Voyants et boutons
- Diode: indique l’état du StealthPlug. Lorsque le StealthPlug est
connecté à un port USB et fonctionne normalement, la diode est VERTE.
Lorsque le StealthPlug n’est pas opérationnel ou lorsqu’il est en mode
standby, la diode est ROUGE.
IMPORTANT: Lorsque vous connectez la prise USB à votre ordinateur,
la diode clignote rapidement entre vert et rouge pour un temps bref.
C’est tout-à-fait normal .
- Volume Up Bouton “+”: augmente le volume de sortie.
- Volume Down Bouton “-”: diminue le volume de sortie.
Diode
Volume Down
Volume Up
FRANÇAIS
Manuel d’Utilisation
37
Page 38

StealthPlug™ CS
Fig. 3. Panneau de contrôle du StealthPlug sous
Windows
3.3 Le Panneau de Contrôle sous Windows
Pour ouvrir le Panneau de Contrôle ci-dessous (fig. 3), cliquez sur l’icone
“StealthPlug” située dans le plateau à icones de Windows (d’ordinaire à coté
de l’horloge de la barre des taches de Windows).
Description du Panneau de Contrôle:
- Input Gain: contrôle la sensibilité de l’entrée du StealthPlug. Pour détermi-
ner votre gain d’entrée maximum, jouez des accords violents, et vérifiez le
vumètre. Ajustez le potentiomètre “Input Gain” de façon à-ce-que le vumètre
soit proche du maximum comme dans l’exemple ci-dessus.
- Input Direct Monitor: (normalement muet), envoie le signal d’entrée direc-
tement sur la sortie. Il est ainsi possible de contrôler le signal direct sans la
moindre latence (s’il n’y a pas d’application audio ouverte).
- Output Volume: contrôle le volume de sortie du StealthPlug. Les buttons “+”
et “–” sur l’appareil contrôlent aussi ce paramètre.
- SampleRate selection: ce menu vous permet de changer la fréquence
d’échantillonnage du StealthPlug (sauf lorsque le pilote ASIO est en cours
d’utilisation par une application).
- Buffer Size: règle la latence d’entrée/sortie du StealthPlug. Plus la taille du
buffer est basse, plus la réponse est rapide. IMPORTANT: un buffer trop petit
peut entrainer des bruits et artefacts, ou une surcharge du processeur. Le
bon fonctionnement de l’appareil dépend beaucoup de la performance et
de la configuration de votre système. De plus, si une application audio est
ouverte et utilise le pilote ASIO du StealthPlug, vous ne pourrez pas changer
la taille du buffer depuis le panneau de contrôle du StealthPlug. Dans ce
cas, vous devrez soit: a) fermer l’application avant de modifier la taille du
buffer, soit b) si disponible, libérer le pilote ASIO depuis les options ASIO de
l’application si celle-ci le permet.
Indication d’activité des pilotes:
- Stealth: la diode est allumée en vert lorsque le pilote est correctement
installé et l’appareil est connecté. Cette référence visuelle est utile dans le cas
d’une assistance technique.
- ASIO: la diode est allumée en vert lorsqu’une application audio active est en
train d’utiliser le pilote ASIO du StealthPlug.
- Open at Startup: lorsque cette option est sélectionnée (recommandé), le
Panneau de Contrôle se lance automatiquement au démarrage de Windows,
minimisé dans le plateau à icones.
- Check for Driver Update: en cliquant sur cet espace, votre navigateur
par défaut ouvrira automatiquement une page web d’IK Multimedia
depuis laquelle vous pourrez télécharger les éventuelles mises-à-jour
du pilote du StealthPlug. Sur le Panneau de Contrôle, vous pouvez voir
la version actuellement installée du pilote sur la gauche du logo rouge
d’IK Multimedia.
38
Manuel d’Utilisation
Page 39

Fig. 4. Sélectionner le StealthPlug comme dispositif
Fig. 5. Régler le niveau d’entrée et le volume
d’entrée
StealthPlug™ CS
3.4 Le Panneau de Contrôle sous Mac
Sous Mac OS X vous pouvez facilement contrôler votre StealthPlug
depuis le panneau “Son” des préférences du système. Ouvrez System
Preferences, cliquez sur “Son” pour ouvrir le panneau de contrôle
du son et sélectionnez ensuite le StealthPlug USB dans la section
“Entrée” (fig. 4).
Sélectionnez maintenant la sensibilité d’entrée avec le potentiomètre
“Volume d’entrée”. Pour déterminer votre gain d’entrée maximum,
jouez des accords violents, et vérifiez le vumètre. Ajustez le potentiomètre de “Volume d’entrée” de façon à-ce-que le vumètre soit proche
du maximum (fig. 5).
IMPORTANT: si votre application audio permet de régler un dispositif
audio indépendamment des réglages du système, sélectionnez le
StealthPlug depuis le menu “Audio and Hardware” de l’application.
Sélectionnez maintenant le StealthPlug USB comme dispositif de
sortie dans le panneau “Sound” comme sur la fig. 6. Les boutons du
StealhPlug “+” et “-” contrôlent le “Volume de sortie” ainsi que le
niveau audio général d’OS X.
Fig. 6. Sélectionner le StealthPlug comme dispositif
de sortie
Manuel d’Utilisation
FRANÇAIS
39
Page 40

StealthPlug™ CS
Chapitre 4 Résolution des problèmes
• • Pas de son
- la diode est-elle allumée? Si non, vérifiez que la prise USB soit
branchée à un port USB alimenté et fonctionnant. Pour un meilleur
fonctionnement, NE BRANCHEZ PAS le StealthPlug à un hub USB.
- la diode est-elle ROUGE? Si oui, vérifiez que votre ordinateur n’est
pas en mode standby, que le système d’exploitation a fini de se charger,
et que le pilote du StealthPlug est correctement installé et activé.
- la diode est-elle VERTE? Si oui, vérifiez que votre application est
configurée pour utiliser le StealthPlug comme interface d’entrée/
sortie. Si le problème persiste, débranchez le StealthPlug du port USB
et recommencez la procédure d’installation.
• • Le son est saturé
- Abaissez le gain d’entrée ou le volume de sortie.
• • Le son est trop faible
- Augmentez le gain d’entrée ou le volume de sortie.
• • Le son est bruité
- Vérifiez que le gain d’entrée soit réglé de façon optimale et ne jouez
pas trop prêt d’écrans d’ordinateur, ni de néons, transformateurs ou
de quelconques appareils susceptibles de générer des interférences.
40
• • La diode est ETEINTE
- Vérifiez que la prise USB soit branchée à un port USB alimenté et
fonctionnant. Pour un meilleur fonctionnement, NE BRANCHEZ PAS
le StealthPlug à un hub USB.
• • La diode est ROUGE
- Vérifiez que votre ordinateur n’est pas en mode standby, que
le système d’exploitation a fini de se charger, et que le pilote du
StealthPlug est correctement installé et activé.
Manuel d’Utilisation
Page 41

Chapitre 5 Précautions
• Evitez d’utiliser le StealthPlug dans les endroits suivants afin d’éviter d’éventuels dommages: dans les endroits extrêmement chauds
ou froids et les endroits sujets à l’humidité ou à une poussière
excessive.
• Ne forcez pas excessivement sur les boutons et les câbles.
• Faites attention à-ce-qu’aucun objet ne tombe sur l’appareil et à-cequ’aucun liquide ne pénètre à l’intérieur de l’appareil.
• N’ouvrez jamais l’appareil pour accéder aux circuits internes.
• Utilisez toujours un tissu sec et doux pour nettoyer l’appareil. Ne
jamais utiliser de liquides ni de produits chimiques pour le nettoyage.
• Lorsque vous n’utilisez pas le StealthPlug, débranchez-le mettez-le
dans un endroit sur.
StealthPlug™ CS
Manuel d’Utilisation
FRANÇAIS
41
Page 42

StealthPlug™ CS
本ユーザーガイドでは、StealthPlug本体およびドライバーの使い方を説明いたします。
付属のソフトウェアの使い方に関しては、別途ディスクに収録されたPDF版ソフトウェ
ア・ユーザーガイドを参照してください。
Chapter1 仕様
インプット周波数レンジ 20Hz-15kHz,+0.4dB/-3.2dB
20Hz-20kHz,+0.4dB/-5.3dB
インプット・インピーダンス >1MΩ
インプットTHD 0.02%
インプットS/N比 80dB(A-weighted)
プリアンプ・ゲイン 0dBto+20dB(adjustable)
アウトプット周波数レンジ 40Hz-20kHz,-0.8dB/+0.2dB
20Hz-20kHz,-2.6dB/+0.2dB
アウトプット・インピーダンス 16Ω
アウトプットTHD 0.02%
アウトプットS/N比 82dB(A-weighted)
アウトプット最大出力 45mWinto32Ω
アウトプット最大レベル +3.8dBu(1.2VRMS)into32Ω_
AD/DAコンバーター 16bit
サンプリング周波数 最高48KHz
接続端子 インプット モノラル標準プラグ(1/4"TS)
アウトプット ステレオ・ミニ・プラグ(1/8"TRS)
USB USBシリーズAプラグ
コントローラー/スイッチ 2xボタン(VOLUME)
ディスプレイ 1xLED(RED/GREEN)
バスパワー USB1.0/2.0ポート
消費電力 0.5W
サイズ(幅/高さ/奥行き) 53x105x16.2mm(2.08x4.1x0.63")
ケーブル長 2.5mUSB/25cmaudio(8.2'/0.82')
重量 160gr
仕様およびデザインは予告無く変更となる場合があります。
User Manual 42
Page 43

Chapter2 ドライバのインストール
2.1Mac®OSXでのセットアップ
1. StealthPlugは、ソフトウェアのインストールが完了するまで接続しないでください。
2. インストーラー・ディスクをコンピュータのドライブに挿入してください。
3. InstallAmpliTubeをダブル・クリックしてAmpliTubeをインストール、ユーザー登
録、オーサライズしてください。各手順の詳細はディスクに収録された「インストー
ル&オーサライズ」PDFガイドを参照してください。
4. StealthPedalをコンピュータのUSB端子に接続してください(Macの場合、特別にド
ライバーをインストールしませんが、コンピュータ再起動することをお勧めします)。
5. AmpliTube(/Applications/AmpliTube)を起動してください。
6. AmpliTubeのSettingsからAudioSetupを開いたら、Input、Outputデバイス欄で
StealthPlugを選択してください。
重要:StealthPlugは、USBハブではなく、コンピュータのUSB端子に直接接続してくだ
さい。
2.2Windows®でのセットアップ
1. StealthPedalは、ソフトウェアのインストールが完了するまで接続しないでください。.
2. インストーラー・ディスクをコンピュータのドライブに挿入してください。
3. InstallAmpliTubeをダブル・クリックしてAmpliTubeをインストール、ユーザー登
録、オーサライズしてください。各手順の詳細はディスクに収録された「インストー
ル&オーサライズ」PDFガイドを参照してください。
4. コンピュータ再起動後、StealthPlugをコンピュータのUSB端子に接続してください。
5. AmpliTube(Start/Programs/IKMultimedia/AmpliTube)を起動してください。
6. AmpliTubeのSettingsからAudioSetupを開いたら、ドライバー欄でASIOを選択し
て、Input、Outputデバイス欄でStealthPlugを選択してください。
StealthPlug™ CS
重要:StealthPlugは、USBハブではなく、コンピュータのUSB端子に直接接続してくだ
さい。
2.3Windows®でのアンインストール
1. “スタート・メニュー”にて「コントロール・パネル」を開いてください。
2. “プログラムの追加と削除”をダブルクリックしてください。インストールされたソフト
ウェアのリストが表示されます。
3. “StealthPlug”を選択して、“削除”ボタンをクリックしてください。StealthPlug関連書
類がシステムから削除されます。
User Manual 43
日本語
Page 44

StealthPlug™ CS
Chapter3 StealthPlugを接続する
3.1StealthPlugの接続方法
簡単です。下記3ステップで接続してください。
1. StealthPlugの「標準プラグ」を、ギター/ベースに接続する。
2. StealthPlugの「USBプラグ」を、コンピュータ本体のUSBポートに接続する。
3. StealthPlugの「オーディオ・アウト端子(ステレオ・ミニ・プラグ仕様)」にヘッドフォン、
アンプ内蔵スピーカーなどを接続する。
Fig. 1. Guitar, laptop and headphones
ラップトップ・コンピュータとヘッドフォンを利用すれば、どこでも楽しめるモバイル・ア
ンプ&エフェクト・システムができあがります(Fig.1)
オーディオ・アウト端子に、ステレオ・ミニ>モノラル標準変換アダプターやケーブルを
接続すれば、ギター・アンプで再生することもできます(Fig.2)。
Fig. 2. Guitar, laptop and guitar amplifier
User Manual 44
Page 45

StealthPlug™ CS
3.2LED表示とボリューム・ボタン
LED:StealthPlugをコンピュータ本体のUSBポートに接続し、通常に動作している時は
「緑」、サスペンド(省エネルギー)・モードになっている時などは「赤」になります。
* 注意 : StealthPlugをUSBポートに接続した直後は、数秒間「赤/緑」で点滅します。異
常ではありませんので、しばらくお待ちください。
ボリューム・ボタン:アウトプット・ボリュームを操作します。「+」ボタンを押すと大き
く、「-」ボタンを押すと小さくなります。
LED
ボリューム・ダウン
ボリューム・アップ
User Manual 45
日本語
Page 46

StealthPlug™ CS
Fig. 3. Windows StealthPlug Control Panel
3.3Windowsコントロール・パネル
• StealthPlugをコンピュータ本体のUSBポートに接続してください。
• Windows画面右下「タスクトレイ」(IME、時計、音量調節等があるところ)にある
「StealthPlug」のアイコンをダブルクリックすると、「StealthPlug」コントロール・パ
ネルが開きます。
*タスクトレイにアイコンが見あたらない場合は、ドライバーのインストール先の
「StealthPlugControlPanel」をダブルクリックして下さい。
C:¥ProgramFiles¥IKMultimedia¥StealthPlug¥StealthPlugControlPanel
コントロール・パネルの説明:
• InputGain:StealthPlugのインプットの感度を調整します。ギターのボリュームを最
大にして、最も強いコード・ストロークを繰り返した時、メーターが最大値でクリップ
しないように、フェーダーを調整してください。
• InputDirectMonitor:ギターから入力された信号を、そのままダイレクトにアウト
プットで再生するダイレクト・モニターのレベルを調整します。コンピュータを経由
せず、レイテンシーの無い音をモニターしたい時に利用してください。デフォルトでは
「Mute」(ミュート)設定になっています。
• OutputVolume:StealthPlugのアウトプット・ボリュームを調整します。StealthPlug
本体の「+」/「-」ボタンは、この値をリモートでコントロールします。
• SampleRate:StealthPlugのサンプル・レートを選択します。ASIOホスト・アプリケー
ション使用時は、ホスト・アプリケーションのオーディオ設定が優先されます。
• BufferSize:StealthPlugのバッファー・サイズを設定します。
*バッファー・サイズは小さいほど、レイテンシー(入力/出力音間の遅延)の少ない演奏
が可能となりますが、CPU負荷が高くなります。
*ASIOホスト・アプリケーション使用時は、ホスト・アプリケーションのオーディオ設定
画面にてバッファー・サイズを選択するか、「StealthPlug」コントロール・パネルを開
く前に、ホスト・アプリケーションを終了してください。
*ホスト・アプリケーションには「ReleaseASIOdriverinbackground」を選択すること
で、本コントロール・パネルでの調整が可能となるものもあります。
• Stealth:StealthPlugのドライバが正しくインストールされている場合、LED「■」が
緑色に点灯します。
• ASIO:StealthPlugASIOドライバを使用しているアプリケーションがある時、LED「■
」が緑色に点灯します。
• OpenatStartup:Onにすると、Windows起動時にStealthPlugが自動的に起動し
て、画面下のトレイに表示されます。On/Off設定は、LED「■」クリックで切り替わり
ます。
• CheckforDriverUpdate:インターネットに接続している時にこのボタンをクリッ
クすると、StealthPlugの最新版ドライバをダウンロード可能なページに接続しま
す。現在インストールされたドライバのバージョンは、画面下の「IK」ロゴ左に表示
されます。
User Manual 46
Page 47

Fig. 4. Setting the StealthPlug as Input device
Fig. 5. Setting Input Level and Volume
StealthPlug™ CS
3.4MacOSXコントロール・パネル
• StealthPlugをMac本体のUSBポートに接続してください。
• アップル・メニューの「システム環境設定」を開き、「サウンド」をクリックしてくださ
い。
• 「入力」タブをクリックして、「名前」欄から「StealthPlug」を選択してください(Fig.
4)。
• 「入力音量」フェーダーで、StealthPlugインプットの感度を調整します。ギターのボ
リュームを最大にして、最も強いコード・ストロークを繰り返した時、メーターが最大
値でクリップしないように、フェーダーを調整してください(Fig.5)。
• 「出力」タブをクリックして、「名前」欄から「StealthPlug」を選択してください(Fig.
6)。
• 「主音量」フェーダーで、StealthPlugのアウトプット・ゲインを調整します。
StealthPlug本体の「+」/「-」ボタンは、この値をリモートでコントロールします。
*CoreAudio対応ホスト・アプリケーションには、独自の「オーディオ・ハードウェア
設定」画面を備えたものが多くあります。その場合、その画面のオーディオI/O欄で
「StealthPlugUSB」を選択してください。
Fig. 6. Setting the StealthPlug as Output device
User Manual 47
日本語
Page 48

StealthPlug™ CS
Chapter4 トラブルシューティング
Q:音が出ません。
• StealthPlug本体のLEDが消えている:StealthPlugがコンピュータ本体のUSBポー
トに接続されていることを確認してください。USBハブでの使用は、推奨していま
せん。
• StealthPlug本体のLEDが「赤」:「コンピュータが省エネルギー・モードになっていな
いか」、「OSが起動中ではないか」をお確かめください。
• StealthPlug本体のLEDが「緑」:ASIO/CoreAudioアプリケーションのオーディオ設
定画面、MacOSXシステム環境設定「サウンド」などで「StealthPlugUSB」が選択さ
れていることを、ご確認ください。
• StealthPlugコントロールパネル(Windows)、システム環境設定「サウンド」のイン
プット、アウトプット欄が絞られたり、「Mute」スイッチが入っていないか、お確かめ
ください。
Q:エフェクト非使用時でも、音が歪む。
• 本マニュアル「Chapter3」を参照のうえ、インプット/アウトプット・ゲインを正しく調
整してください。
Q:音が小さすぎる。
• 本マニュアル「Chapter3」を参照のうえ、インプット/アウトプット・ゲインを正しく調
整してください。
Q:ノイズが大きい。
• ギターのボリュームを上げた後、本マニュアル「Chapter3」を参照のうえ、インプッ
ト/アウトプット・ゲインを正しく調整してください。ブーンというノイズの場合は、ケ
ーブルおよび演奏位置を、コンピュータのディスプレイ、蛍光灯、ACアダプターなど
から離してください。
Q:StealthPlug本体のLEDが点灯しない。
• StealthPlugを、コンピュータ本体の、バスパワー供給可能なUSBポートに接続したこ
とをお確かめください。USBハブへの接続は、推奨していません。特に、セルフ・パワ
ードでない(バスパワーで作動する)USBハブは、絶対に使用しないでください。
Q:StealthPlug本体のLEDが「赤」く点灯したまま。
• 「コンピュータが省エネルギー・モードになっていないか」、「OSが起動中ではな
いか」、「ドライバが正しくインストールされているか(Windows)」をお確かめく
ださい。
User Manual 48
Page 49

Chapter5 警告
• 極度に寒い場所、暑い場所、湿度の高い場所、ほこりの多い場所での使用は、避け
て下さい。
• 濡れた手でStealthPlug本体、USBポート、ギター接続端子に触れないで下さい。
• StealthPlug本体、ケーブル、ボタンには、必要以上に強い力や衝撃を与えないでく
ださい。
• StealthPlug本体の上に物が落下したり、液体がかからないようにしてください。
• StealthPlug本体のケースを空けたり、内部を改造しないでください。
• ほこりや汚れを除去する時は、必ず乾いた柔らかい布をお使いください。液体、化学
成分を含んだものは、使わないで下さい。
• StealthPlugを使わない時は、USBポート、ギター、再生装置から取り外し、安全な冷
暗所にて保管してください。
StealthPlug™ CS
User Manual 49
日本語
Page 50

StealthPlug™ and AmpliTube® are trademarks property of IK Multimedia Srl. All other product
names and images, trademarks and artists names are the property of their respective owners,
which are in no way associated or affiliated with IK Multimedia. Mac and the Mac logo are
trademarks of Apple Computer, Inc., registered in the U.S. and other countries. Windows and the
Windows logo are trademarks or registered trademarks of Microsoft Corporation in the United
States and/or other countries. QuickTime and the QuickTime logo are trademarks or registered
trademarks of Apple Computer, Inc., used under license therefrom.
www.stealthplug.com
IK Multimedia Production Srl, Via dell’Industria 46, 41122, Modena, Italy.
Phone: +39-059-285496, Fax: +39-059-2861671
IK Multimedia US LLC, 1153 Sawgrass Corporate Pkwy. Sunrise, FL 33323
Phone: (954) 846-9101, Fax: (954) 846-9077
www.ikmultimedia.com
This equipment has been tested and found to comply with the limits for a Class B digital device
NOTE:
pursuant to Part 15 of FCC Rules. Operation is subject to the following two conditions: (1) This
device may not cause harmful interference, and (2) this device must accept any interference
received, including interference that may cause undesired operation.
All specifications are subject to change without further notice.
PN: MNU-SPGCS-0001
 Loading...