Ik Multimedia iRig PRO QUICK START GUIDE

Universal Audio/MIDI Interface for iPhone, iPod touch, iPad and Mac

QUICK START GUIDE

GUIDE DE PRISE EN MAIN RAPIDE

GUÍA RÁPIDA DE INICIO

GUIDA RAPIDA

KURZANLEITUNG

Ik Multimedia iRig PRO QUICK START GUIDE

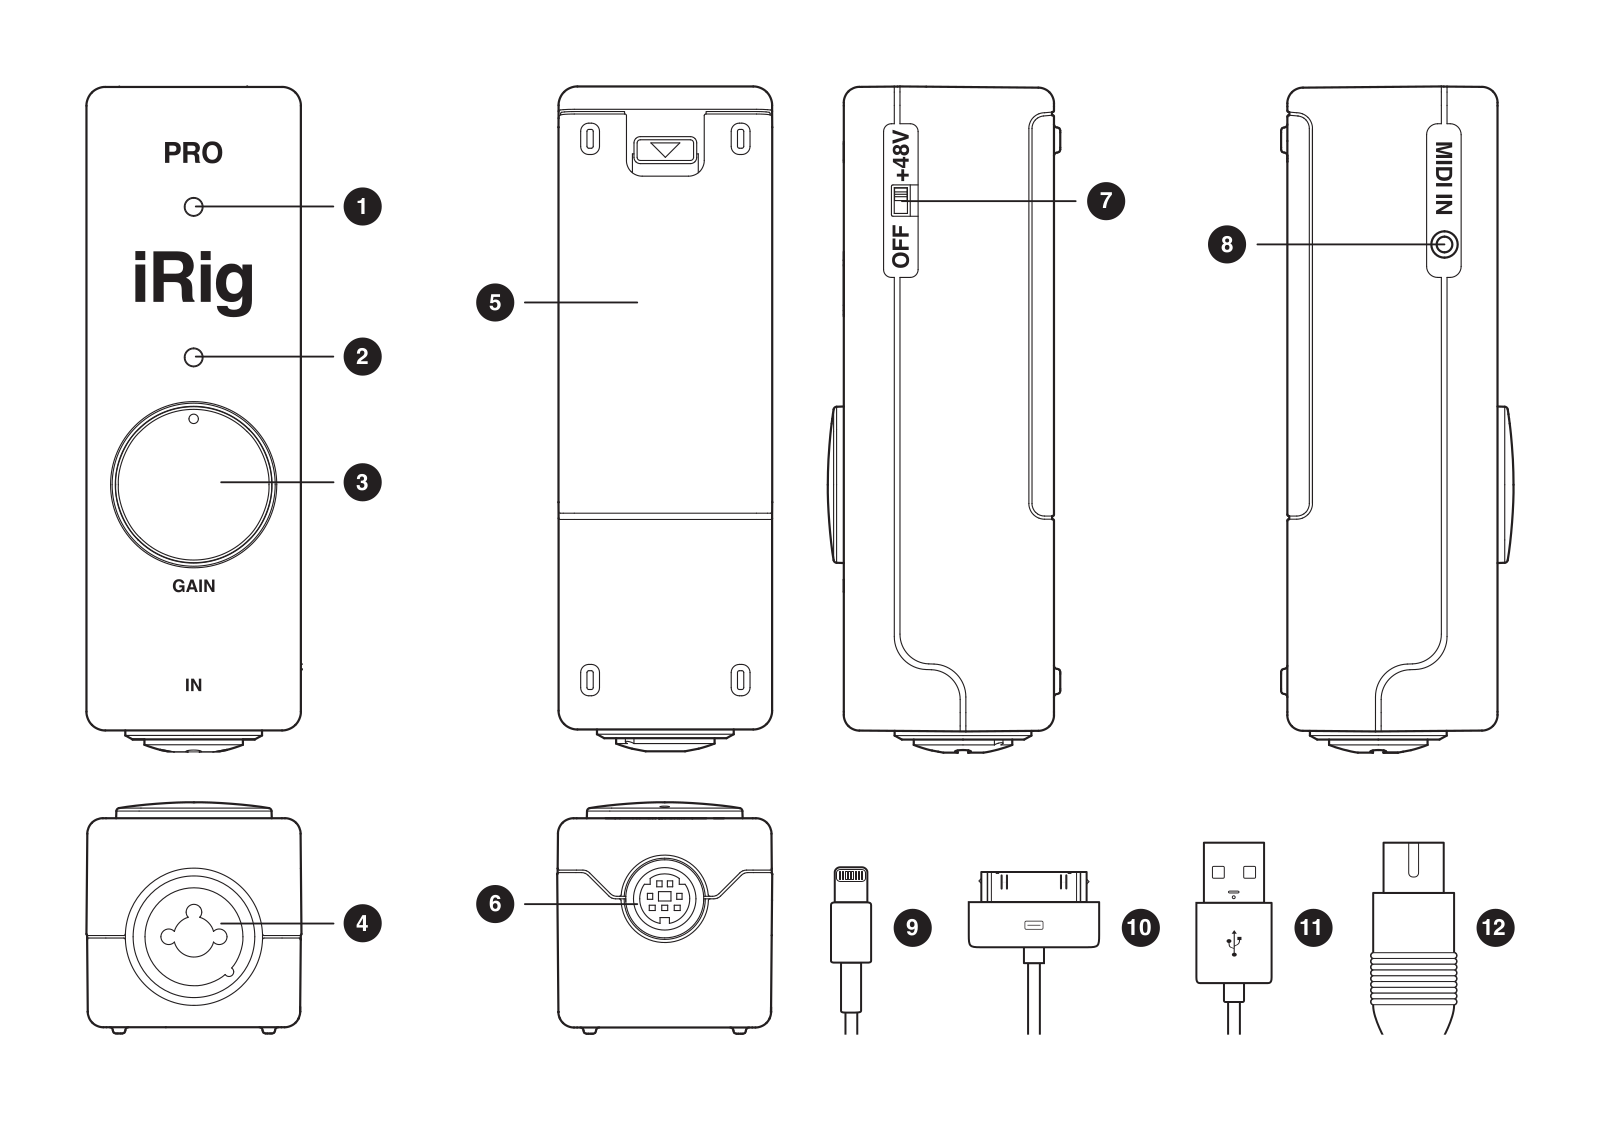
1

7


8


5

2


3


4

6

10

11

12

9

ENGLISH

ITALIANO


1.

Phantom / MIDI LED

1.

LED Phantom / MIDI

1.

/ MIDI LED

2.

Power /Audio Level LED

2.

LED Power / LivelloAudio

2.

/ LED

3.

GAIN control

3.

Controllo GAIN

3.


4.

Microphone / Instrument input

4.

Ingresso Microfono / Strumento

4.

/

5.

Battery compartment

5.

Alloggiamento Batteria

5.


6.

Mini DIN connector for iOS/USB cables

6.

Connettore Mini DIN per cavi iOS/USB

6.

Mini DIN iOS/USB

7.

Phantom Power switch

7.

InterruttoreAlimentazione Phantom

7.


8.

MIDI connector

8.

Connettore MIDI IN

8.

MIDI

9.

Lightning cable

9.

Cavo Lightning

9.

Lightning

10.

30-pin cable

10.

Cavo 30-pin

10.

30-pin

11.

USB cable

11.

Cavo USB

11.

USB

12.

MIDI cable

12.

Cavo MIDI

12.

MIDI

FRANÇAIS

DEUTSCH

1.

Voyant Fantôme / MIDI

1.

Phantom / MIDI LED

2.

VoyantAlimentation / NiveauAudio

2.

Power /Audio Level LED

3.

Contrôle de GAIN

3.

GAIN-Regler

4.

Entrée Micro / Instrument

4.

Eingang für Mikrofon / Instrument

5.

Compartiment à Pile

5.

Batteriefach

6.

ConnecteurMiniDINpourcâblesiOS/USB

6.

Mini-DIN-Anschluss für iOS/USB-Kabel

7.

Interrupteur alimentation fantôme

7.

Schalter für Phantomspeisung

8.

Connecteur MIDI

8.

MIDI-Anschluss

9.

Câble Lightning

9.

Lightning-Kabel

10.

Câble 30-pin

10.

30-Pin-Kabel

11.

Câble USB

11.

USB-Kabel

12.

Câble MIDI

12.

MIDI-Kabel

ESPAÑOL


1.

Luz LED Phantom / MIDI

1.

/ MIDI LED

2.

Luz LED de Nivel deAudio / Potencia

2.

/ LED

3.

Control GAIN

3.

GAIN

4.

Entrada de Micrófono / Instrumento

4.

/

5.

Compartimiento de batería

5.


6.

Conexión Mini DIN para cables iOS/USB

6.

iOS/USB Mini DIN

7.

Interruptor de potencia Phantom Power

7.


8.

Conexión MIDI

8.

MIDI

9.

Cable Lightning

9.

Lightning

10.

Cable 30-pin

10.

30pin

11.

Cable USB

11.

USB

12.

Cable MIDI

12.

MIDI

<![if ! IE]>

<![endif]>ENGLISH

iRig PRO

Thank you for purchasing iRig PRO, the high-quality universal Audio/MIDI interface for iPhone, iPod touch, iPad and Mac.

Your package contains:

iRig PRO

Lightning cable

30-pin cable

USB cable

2.5mm-jack-to-MIDI cable

9V Battery

Quick Start Guide

Registration Card

iRig PRO is the universal high-quality digital audio and MIDI interface for your iPhone, iPod touch, iPad and Mac. iRig PRO allows you to connect microphones, instruments and MIDI devices, opening endless recording and control possibilities for your mobile audio rig.

Features

iRig PRO is designed to bring high-end, professional-quality audio recording or performing to the mobile world.

iRig PRO is compatible with dynamic, ribbon and condenser microphones, as well as guitars, basses, and other instrument-level sources. It features a pristine, highdefinition, low-noise, discrete microphone-and-instrument

preamplifier, paired with a high-end 24-bit A/D converter. The result is crystal-clear signal that’s free from noise and crosstalk.

iRig PRO is compatible with professional condenser microphones that are powered by +48V phantom power.

In addition to its Microphone/Instrument input, iRig PRO sports a convenient MIDI input port, useful to connect a standard MIDI keyboard for playing virtual instruments like SampleTank, or for controlling apps like AmpliTube with a pedal board.

A preamp gain control allows you to dial in the perfect input level for your microphone or instrument, and two multicolor status LEDs give a clear indication about the correct input gain setting, phantom power status, and incoming MIDI messages.

iRig PRO is designed primarily for use with microphones, guitars and basses as audio sources, but its preamp can also handle a wide range of instrument signals including acoustic instruments equipped with piezo pickups or contact transducers, synthesizers and more.

iRig PRO is equipped with a professional Neutrik® Combo® input connector for a quality and secure connection that will last with time.

Four cables are included: Lightning and 30-pin for connecting to iOS devices, USB for Mac and 2.5mm to MIDI for connecting controllers.

iRig PRO is bus powered, meaning it gets its power from the deviceit’spluggedinto.Italsohasa9Vbatterycompartment, but you only need a battery if you’re using a condenser microphone requiring phantom power. In all other instances, iRig PRO doesn’t need the battery to operate.

Register your iRig PRO

By registering, you can access technical support, activate your warranty and receive free JamPoints™ which will be added to your account. JamPoints™ allow you to obtain discounts on future IK purchases! Registering also keeps you up-to-date with product news and update information.

Register at: www.ikmultimedia.com/registration

Installation and setup

Insert the included 9V battery in the battery compartment

(5) on the bottom side of iRig PRO. Depending on the battery brand and model, it may be necessary to close the compartment to keep the battery in place. This is normal, and it doesn’t interfere with the proper operation. If you don’t plan on using condenser microphones that require phantom power, you can skip installing the battery.

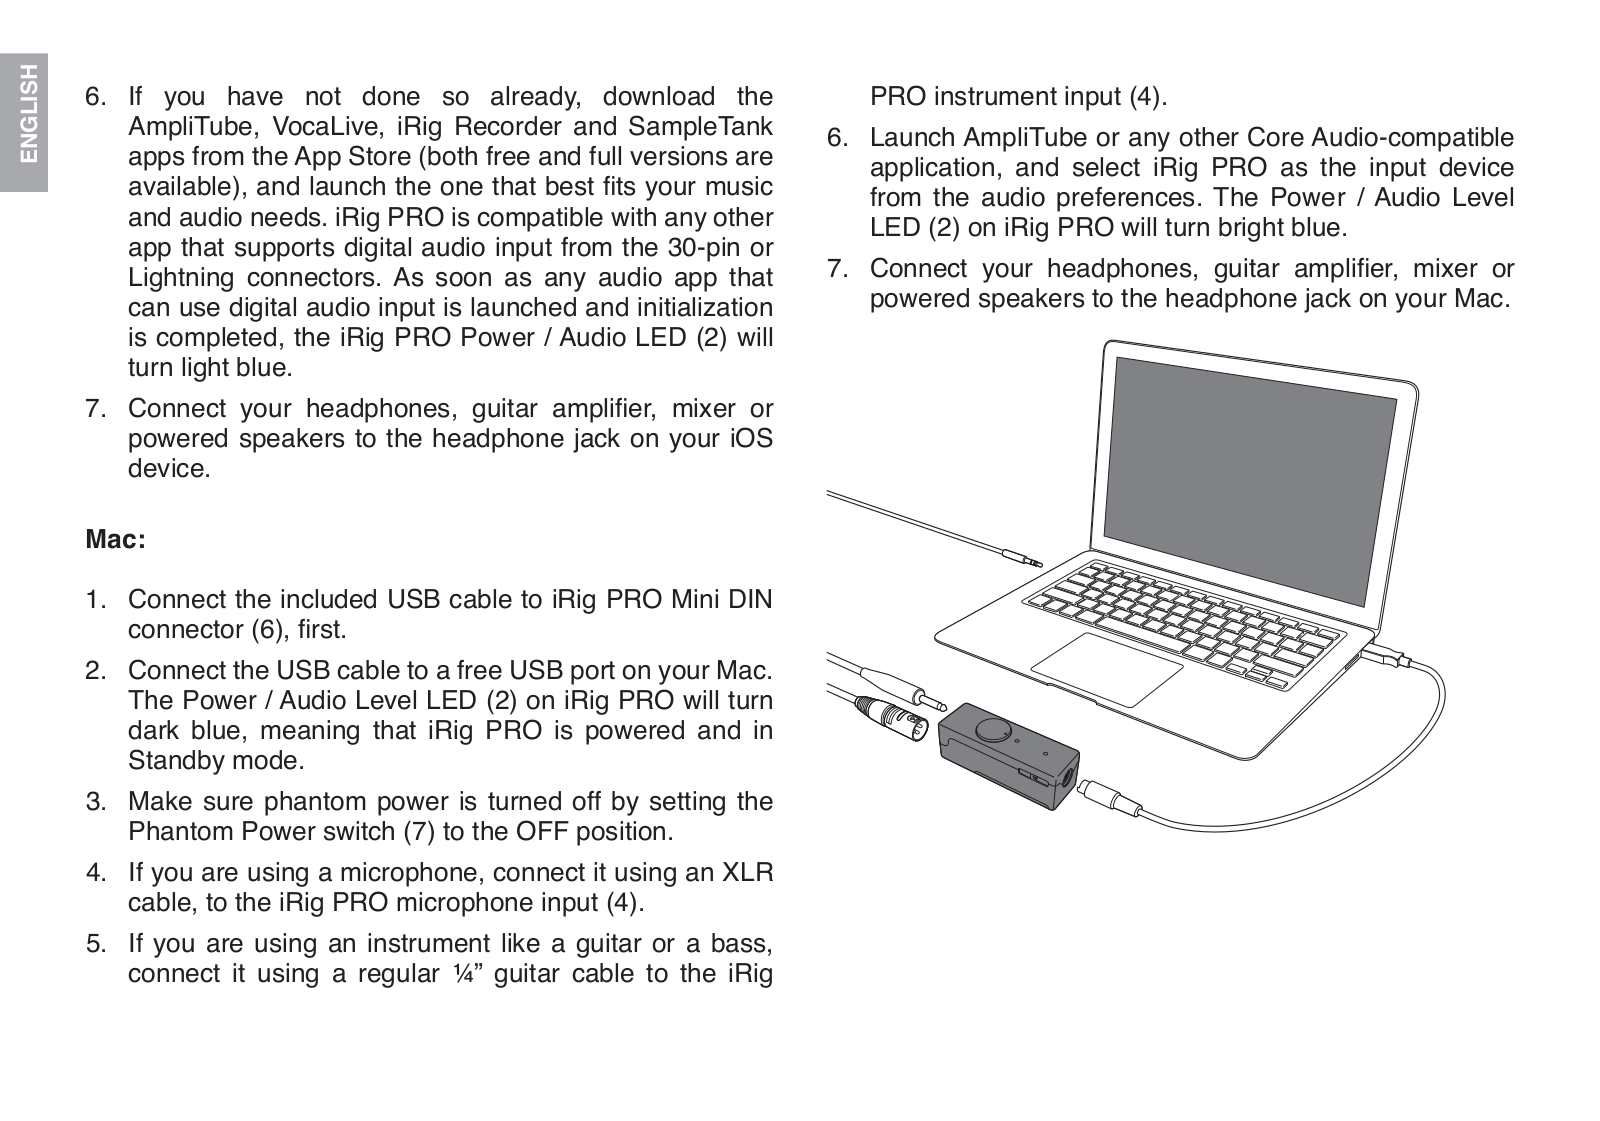
iOS Devices:

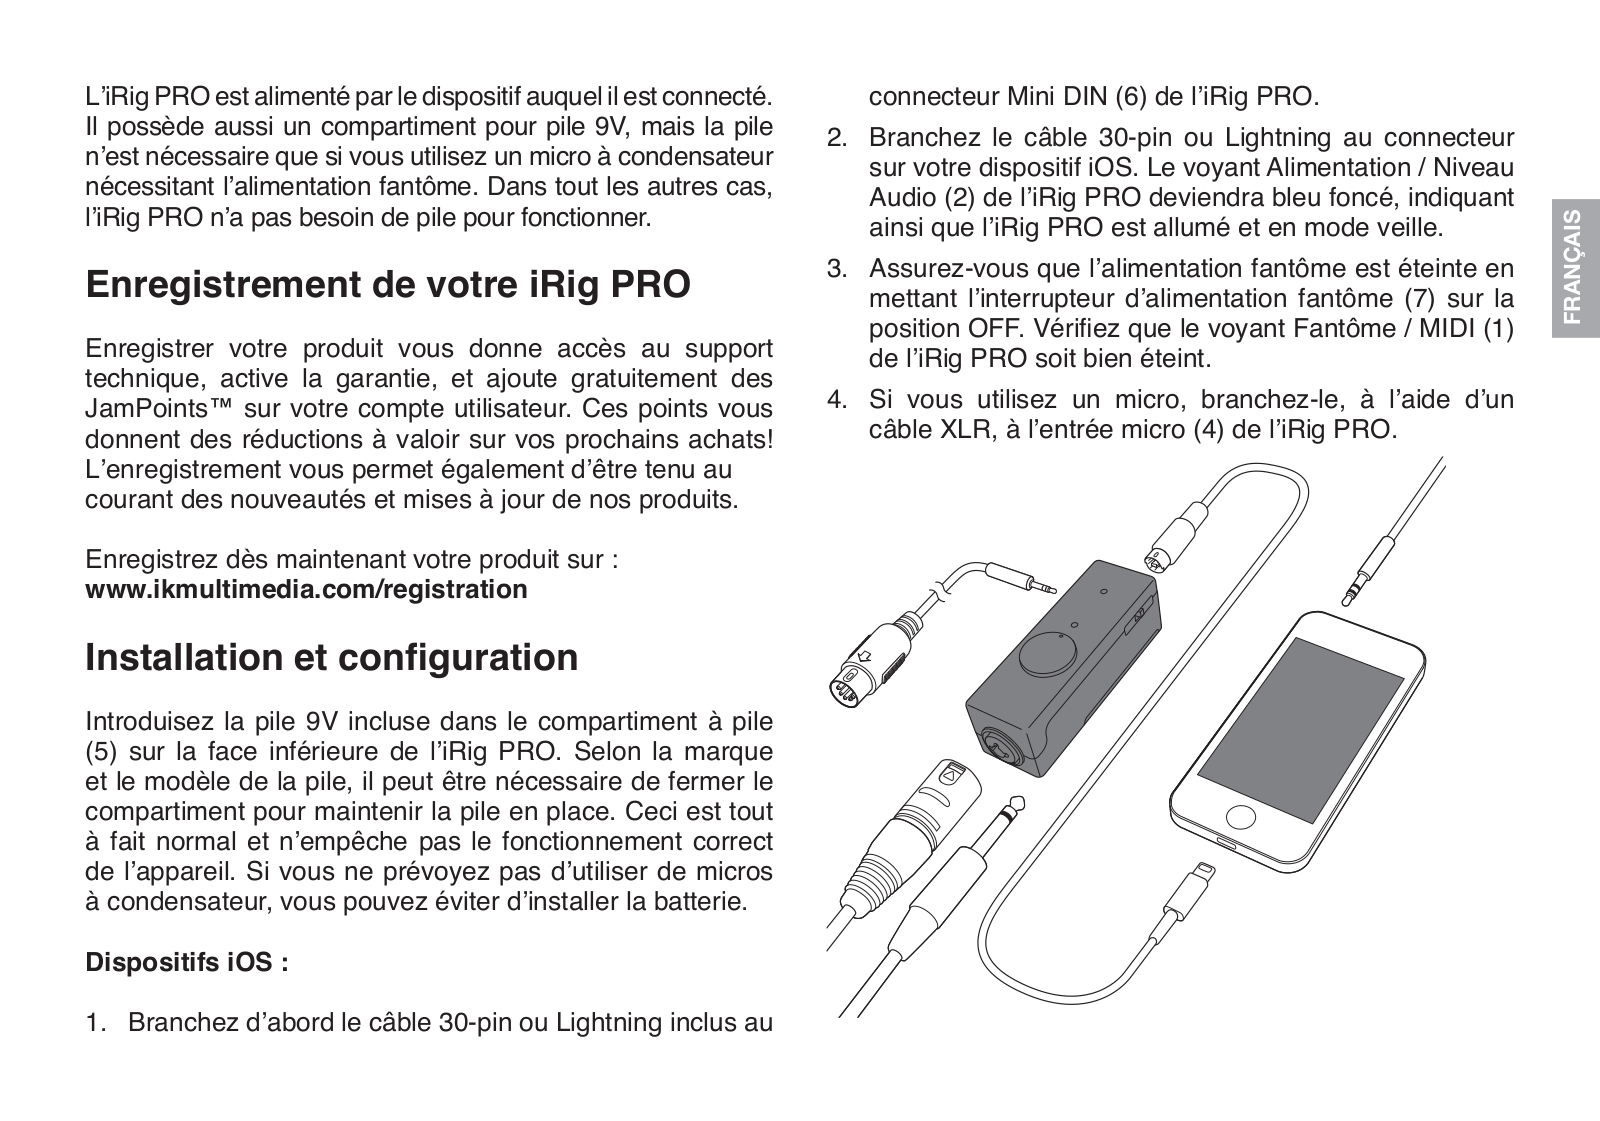
1.Connect the included 30-pin or Lightning cable to iRig PRO Mini DIN connector (6) first.

2.

Connect the 30-pin or Lightning cable to the connector

<![if ! IE]>

<![endif]>ENGLISH


on your iOS device. The Power /Audio Level LED (2) on


iRig PRO will turn dark blue, meaning that iRig PRO is


powered and in Standby mode.


3.

Make sure phantom power is turned off by setting the


Phantom Power switch (7) to the OFF position. Check


that the Phantom / MIDI LED (1) on iRig PRO is off.


4.

If you are using a microphone, connect it using an XLR


cable, to the iRig PRO microphone input (4).


5.

If you are using an instrument like a guitar or a bass,


connect it using a regular ¼” plug guitar cable to the iRig


PRO instrument input (4).


8


<![if ! IE]>

<![endif]>ENGLISH

6.If you have not done so already, download the AmpliTube, VocaLive, iRig Recorder and SampleTank apps from the App Store (both free and full versions are available), and launch the one that best fits your music and audio needs. iRig PRO is compatible with any other app that supports digital audio input from the 30-pin or Lightning connectors. As soon as any audio app that can use digital audio input is launched and initialization is completed, the iRig PRO Power / Audio LED (2) will turn light blue.

7.Connect your headphones, guitar amplifier, mixer or powered speakers to the headphone jack on your iOS device.

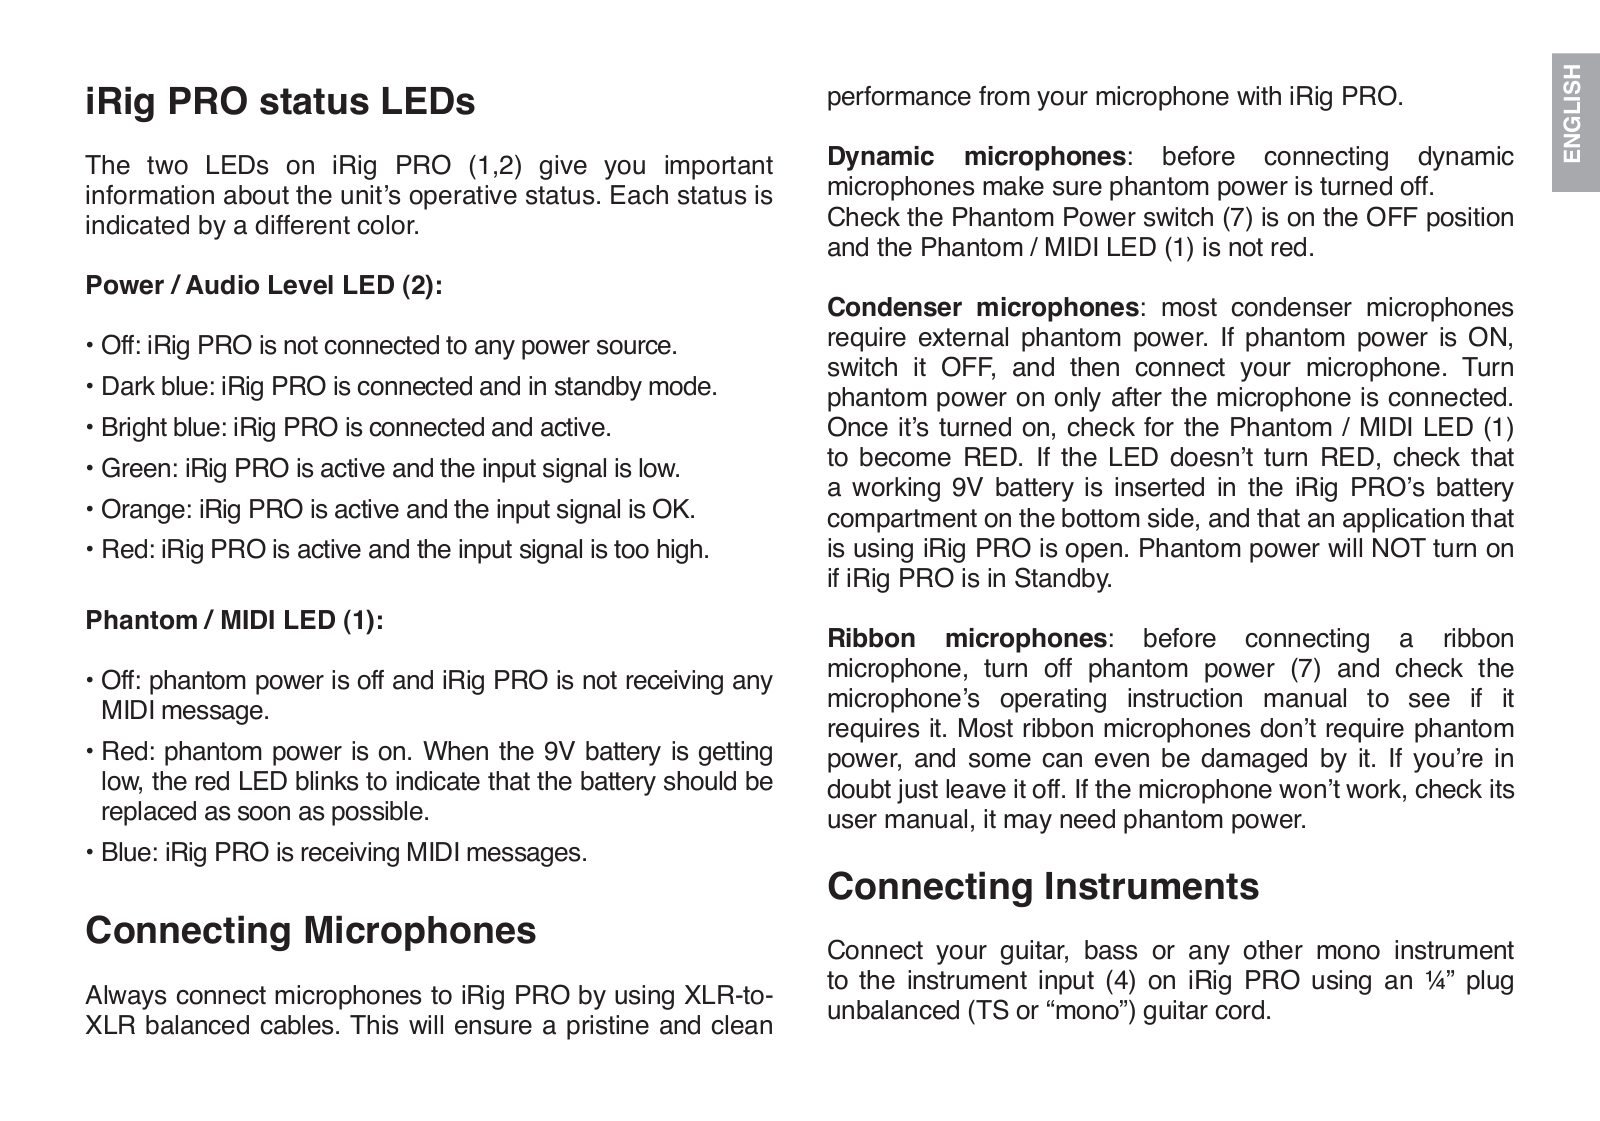
Mac:

1.Connect the included USB cable to iRig PRO Mini DIN connector (6), first.

2.Connect the USB cable to a free USB port on your Mac. The Power / Audio Level LED (2) on iRig PRO will turn dark blue, meaning that iRig PRO is powered and in Standby mode.

3.Make sure phantom power is turned off by setting the Phantom Power switch (7) to the OFF position.

4.If you are using a microphone, connect it using an XLR cable, to the iRig PRO microphone input (4).

5.If you are using an instrument like a guitar or a bass, connect it using a regular ¼” guitar cable to the iRig

PRO instrument input (4).

6.Launch AmpliTube or any other Core Audio-compatible application, and select iRig PRO as the input device from the audio preferences. The Power / Audio Level LED (2) on iRig PRO will turn bright blue.

7.Connect your headphones, guitar amplifier, mixer or powered speakers to the headphone jack on your Mac.

iRig PRO status LEDs

The two LEDs on iRig PRO (1,2) give you important information about the unit’s operative status. Each status is indicated by a different color.

Power / Audio Level LED (2):

Off: iRig PRO is not connected to any power source.

Dark blue: iRig PRO is connected and in standby mode.

Bright blue: iRig PRO is connected and active.

Green: iRig PRO is active and the input signal is low.

Orange: iRig PRO is active and the input signal is OK.

Red: iRig PRO is active and the input signal is too high.

Phantom / MIDI LED (1):

Off: phantom power is off and iRig PRO is not receiving any MIDI message.

Red: phantom power is on. When the 9V battery is getting low, the red LED blinks to indicate that the battery should be replaced as soon as possible.

Blue: iRig PRO is receiving MIDI messages.

Connecting Microphones

Always connect microphones to iRig PRO by using XLR-to- XLR balanced cables. This will ensure a pristine and clean

performance from your microphone with iRig PRO.

Dynamic microphones: before connecting dynamic microphones make sure phantom power is turned off. Check the Phantom Power switch (7) is on the OFF position and the Phantom / MIDI LED (1) is not red.

Condenser microphones: most condenser microphones require external phantom power. If phantom power is ON, switch it OFF, and then connect your microphone. Turn phantom power on only after the microphone is connected. Once it’s turned on, check for the Phantom / MIDI LED (1) to become RED. If the LED doesn’t turn RED, check that a working 9V battery is inserted in the iRig PRO’s battery compartment on the bottom side, and that an application that is using iRig PRO is open. Phantom power will NOT turn on if iRig PRO is in Standby.

Ribbon microphones: before connecting a ribbon microphone, turn off phantom power (7) and check the microphone’s operating instruction manual to see if it requires it. Most ribbon microphones don’t require phantom power, and some can even be damaged by it. If you’re in doubt just leave it off. If the microphone won’t work, check its user manual, it may need phantom power.

Connecting Instruments

Connect your guitar, bass or any other mono instrument to the instrument input (4) on iRig PRO using an ¼” plug unbalanced (TS or “mono”) guitar cord.

<![if ! IE]>

<![endif]>ENGLISH

<![if ! IE]>

<![endif]>ENGLISH

IMPORTANT: the instrument input on iRig PRO will NOT work if a cable with balanced (TRS or “stereo”) ¼” plugs is used.

ConnectingMIDIkeyboardsorcontrollers

Connect the included 2.5-mm-to-MIDI cable to the iRig PRO MIDI connector (8) and to the MIDI OUT port on your keyboard or controller.

Open a Core MIDI compatible application on your iOS device or on your Mac and set “iRig PRO” as the MIDI input device.

When iRig PRO is receiving MIDI messages the Phantom / MIDI LED will turn blue.

Setting input gain on iRig PRO

When talking or singing into your microphone, or when playing your instrument, check the iRig PRO Power / Audio Level LED (2).

If the LED is alternating between BLUE and GREEN, or is always GREEN, you should increase the iRig PRO input gain by rotating the GAIN control (3) clockwise.

If the LED is sometimes flashes RED, you should decrease the iRig PRO input gain by rotating the GAIN control (3) counter-clockwise.

When your gain setting is optimal, the LED should alternate between GREEN and ORANGE while you play or sing.

Troubleshooting

I connected iRig PRO to my iOS device, but the device doesn’t recognize it, and none of my audio apps work with it.

Remember to always connect the included 30-pin or Lightning cable to the iRig PRO before connecting it to the iOS device.

Sound is distorted.

You’re probably overloading the input. Check that the input gain on iRig PRO is set properly. If the Power / Audio Level LED(2)isredwhenyouplayyourinstrumentorsingortalkinto a mic, decrease the input gain (3) as described in this guide.

The iRig PRO Power / Audio Level LED is always dark blue and I don’t get any sound.

In order for iRig PRO to turn on, a Core Audio-compatible audio app must first be launched on your iOS device or Mac.

iOS: be sure you are using an app that works with audio input from the 30-pin or Lightning dock connector.

Mac: be sure you have set “iRig PRO” as the audio or MIDI input device on the audio app you are using.

Phantom Power doesn’t turn ON.

Check that you have inserted a working 9V battery in the iRig PRO’s battery compartment (5).

I can’t get any sound from my condenser microphone.

Your microphone may need phantom power. Turn phantom

power on by moving the iRig PRO switch (7) to the ON position and check that the Phantom / MIDI LED (1) has turned red.

I can’t get any sound from my guitar / instrument input. iRig PRO only works with ¼” MONO plugs guitar cables. Never use stereo (TRS) plugs cables as the iRig PRO instrument input will be muted.

Specifications

Instrument Input: unbalanced, Hi-Z, TS 1/4” Jack, Tip: signal / Shield: ground

Instrument Input Level: from 30 mVpp to 6.9 Vpp

Instrument Input Impedance: 620 kOhms

Microphone Input: balanced, XLR. Pin 2: hot / Pin 3: cold / Pin 1: ground

Microphone Input Level: from 6 mVpp to 1.4 Vpp

Microphone Input Impedance: approx 2 kOhms

Gain Control Range: 47 dB

Phantom Power: 48V +/-10%

Input Noise: -97 dB RMS, -105 dB(A)

Distortion (THD): 0.01%

Frequency Response: 20Hz-20kHz +/- 0.5 dB

Conversion: 24-bit A/D

Sampling Rate: 44.1 and 48 kHz

Battery: 9V (Alkaline suggested), needed for +48V phantom only

Warranty

<![if ! IE]>

<![endif]>ENGLISH


Please visit:


www.ikmultimedia.com/warranty


for the complete warranty policy.


Support and more info


www.ikmultimedia.com/support


Apple is not responsible for the operation of this device or its compliance with safety and regulatory standards.

WARNING: Permanent hearing loss may occur if earbuds or headphones are used at high volume.You can adapt over time to a higher volume of sound, which may sound normal but can be damaging to your hearing. Set your device volume to a safe level before that happens. If you experience ringing in your ears, reduce the volume or discontinue use of earbuds or headphones with your device.

<![if ! IE]>

<![endif]>FRANÇAIS

iRig PRO

Merci d’avoir acheté l’iRig PRO, l’interface Audio/MIDI universelle de haute qualité pour iPhone, iPod touch, iPad et Mac.

Contenu de la boîte :

iRig PRO

Câble Lightning

Câble 30-pin

Câble USB

Câble MIDI Jack 2.5mm

Batterie 9 volts

Guide de prise en main rapide

Carte d’enregistrement

L’iRig PRO est l’interface Audio/MIDI universelle de haute qualité pour iPhone, iPod touch, iPad et Mac. L’iRig PRO vouspermetdebrancherdesmicros,instrumentsetappareils MIDI, ouvrant d’innombrables possibilités d’enregistrement et de contrôle pour votre instrumentation mobile.

Caractéristiques

L’iRig PRO est conçu pour rendre accessible au monde mobile l’enregistrement et l’interprétation audio de haute qualité professionnelle.

L’iRig PRO est compatible avec les micros dynamiques, à ruban et à condensateur, ainsi qu’avec les guitares, basses, et autres sources au niveau instrument. Il dispose d’un pré-

ampli micro et instrument à composants discrets de haute définition et faible bruit, de paire avec un convertisseur A/N 24-bit de haute qualité. Il en résulte un signal cristallin exempt de bruit et de diaphonie.

L’iRig PRO est compatible avec les micros à condensateur professionnels utilisant l’alimentation fantôme à +48V.

Outre son entrée Micro/Instrument, l’iRig PRO présente une entrée MIDI permettant de brancher un clavier MIDI standard pour contrôler des instruments virtuels comme SampleTank, ou des apps commeAmpliTube avec un pédalier.

Un contrôle de gain du pré-ampli permet d’ajuster le niveau d’entrée pour votre micro ou instrument, et deux voyants multicolores donnent une indication claire du réglage du niveau d’entrée, de l’état de l’alimentation fantôme, et de la réception des messages MIDI.

L’iRig PRO est conçu principalement pour l’utilisation de micros, guitares et basses comme sources audio, mais son pré-ampli convient à une vaste gamme d’instruments comme les instruments acoustiques équipés de micros piézoélectriques ou capteurs de contact, synthés et autres.

L’iRig PRO est équipé d’un connecteur d’entrée professionnel Neutrik® Combo® pour une connexion fiable, de qualité et durable.

Quatre câbles sont inclus : Lightning et 30-pin pour dispositifs iOS, USB pour Mac et 2.5mm MIDI pour connecter des contrôleurs.

L’iRigPROestalimentéparledispositifauquelilestconnecté. Il possède aussi un compartiment pour pile 9V, mais la pile n’est nécessaire que si vous utilisez un micro à condensateur nécessitant l’alimentation fantôme. Dans tout les autres cas, l’iRig PRO n’a pas besoin de pile pour fonctionner.

Enregistrement de votre iRig PRO

Enregistrer votre produit vous donne accès au support technique, active la garantie, et ajoute gratuitement des JamPoints™ sur votre compte utilisateur. Ces points vous donnent des réductions à valoir sur vos prochains achats! L’enregistrement vous permet également d’être tenu au courant des nouveautés et mises à jour de nos produits.

Enregistrez dès maintenant votre produit sur : www.ikmultimedia.com/registration

Installation et configuration

Introduisez la pile 9V incluse dans le compartiment à pile

(5) sur la face inférieure de l’iRig PRO. Selon la marque et le modèle de la pile, il peut être nécessaire de fermer le compartiment pour maintenir la pile en place. Ceci est tout

àfait normal et n’empêche pas le fonctionnement correct de l’appareil. Si vous ne prévoyez pas d’utiliser de micros

àcondensateur, vous pouvez éviter d’installer la batterie.

Dispositifs iOS :

1. Branchez d’abord le câble 30-pin ou Lightning inclus au

connecteur Mini DIN (6) de l’iRig PRO.

2.

Branchez le câble 30-pin ou Lightning au connecteur


sur votre dispositif iOS. Le voyant Alimentation / Niveau


Audio (2) de l’iRig PRO deviendra bleu foncé, indiquant

<![if ! IE]>

<![endif]>FRANÇAIS


ainsi que l’iRig PRO est allumé et en mode veille.

3.

Assurez-vous que l’alimentation fantôme est éteinte en


mettant l’interrupteur d’alimentation fantôme (7) sur la


position OFF. Vérifiez que le voyant Fantôme / MIDI (1)


de l’iRig PRO soit bien éteint.


4.

Si vous utilisez un micro, branchez-le, à l’aide d’un


câble XLR, à l’entrée micro (4) de l’iRig PRO.


8


<![if ! IE]>

<![endif]>FRANÇAIS

5.Si vous utilisez un instrument tel qu’une guitare ou une basse, branchez-le à l’aide d’un jack pour guitare 6.35mm à l’entrée instrument (4) de l’iRig PRO.

6.Si vous ne l’avez pas encore fait, téléchargez les apps AmpliTube, VocaLive, iRig Recorder et SampleTank sur l’App Store (les versions full et free sont toutes deux

disponibles), et lancez celle qui correspond le mieux à vos exigences audio musicales. L’iRig PRO est compatible avec n’importe quelle autre app supportant l’entrée audionumérique des connecteurs 30-pin ou Lightning. Aussitôt qu’une app utilisant l’entrée audionumérique est lancée et que son initialisation est terminée, le voyant Alimentation / Niveau Audio (2) de l’iRig PRO deviendra bleu foncé.

7.Branchez vos écouteurs, ampli guitare, mixeur ou enceintes amplifiées à la sortie écouteurs de votre dispositif iOS.

Mac :

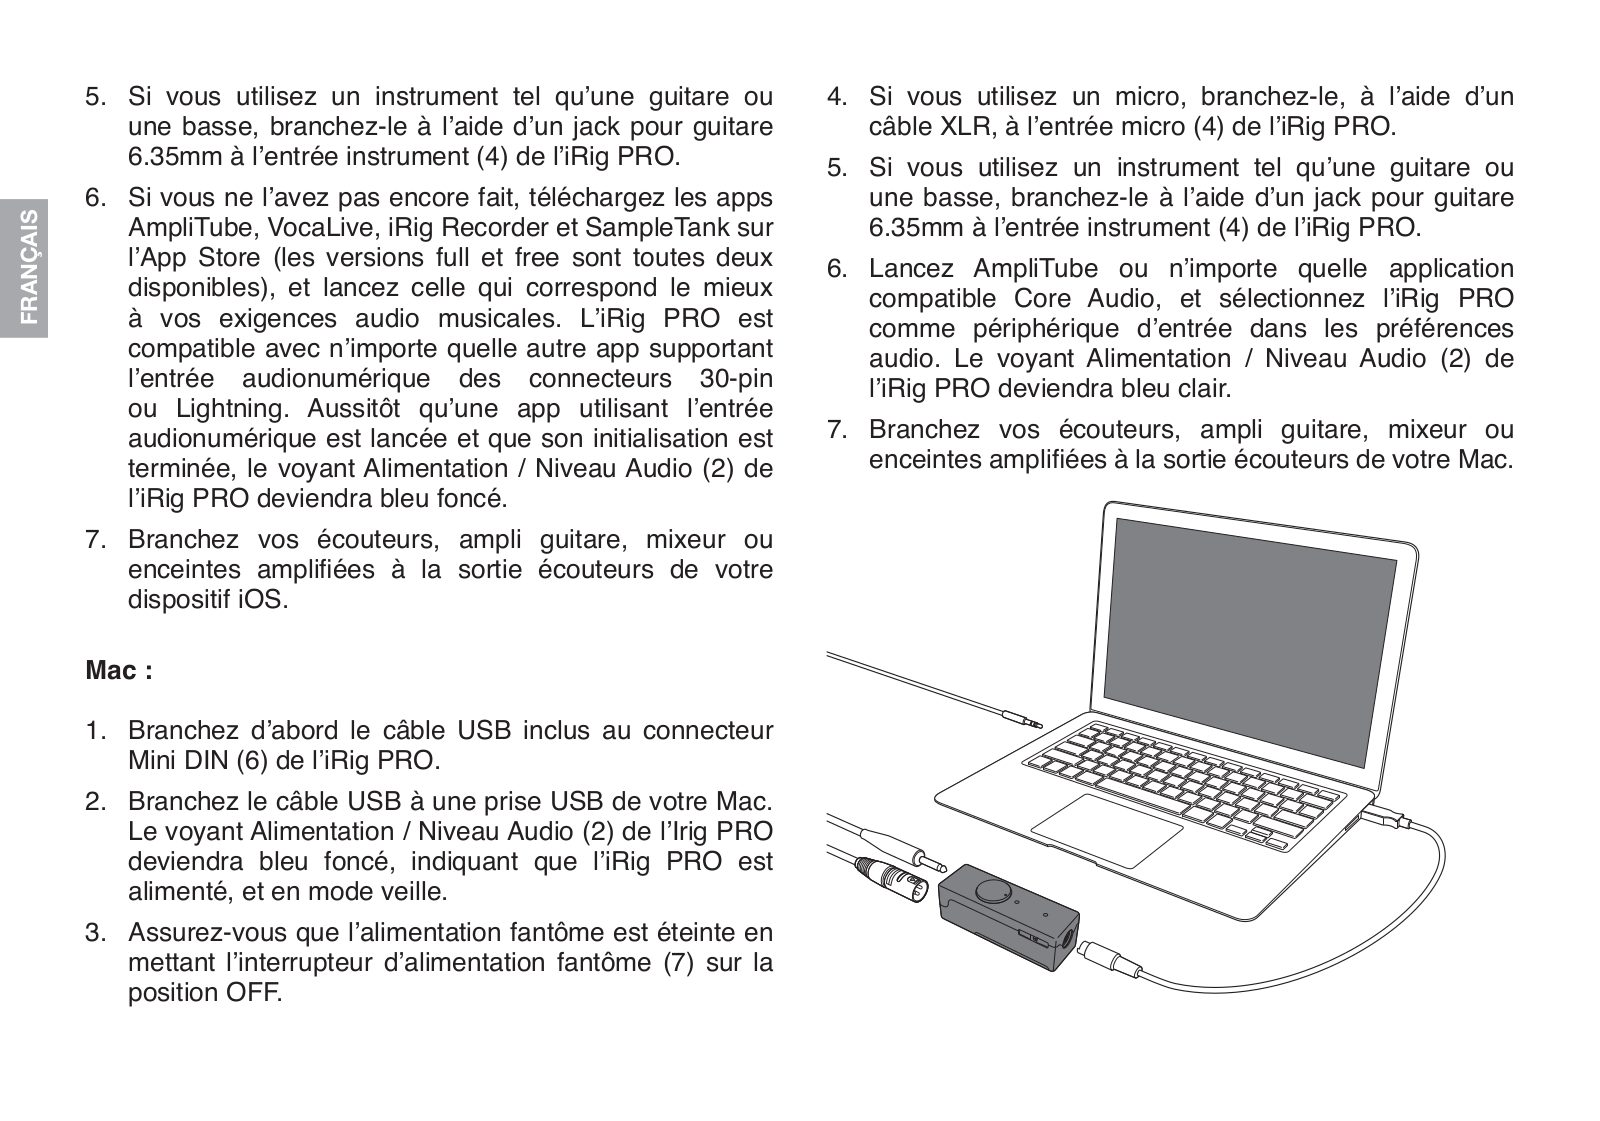
1.Branchez d’abord le câble USB inclus au connecteur Mini DIN (6) de l’iRig PRO.

2.Branchez le câble USB à une prise USB de votre Mac. Le voyant Alimentation / Niveau Audio (2) de l’Irig PRO deviendra bleu foncé, indiquant que l’iRig PRO est alimenté, et en mode veille.

3.Assurez-vous que l’alimentation fantôme est éteinte en mettant l’interrupteur d’alimentation fantôme (7) sur la position OFF.

4.Si vous utilisez un micro, branchez-le, à l’aide d’un câble XLR, à l’entrée micro (4) de l’iRig PRO.

5.Si vous utilisez un instrument tel qu’une guitare ou une basse, branchez-le à l’aide d’un jack pour guitare 6.35mm à l’entrée instrument (4) de l’iRig PRO.

6.Lancez AmpliTube ou n’importe quelle application compatible Core Audio, et sélectionnez l’iRig PRO comme périphérique d’entrée dans les préférences audio. Le voyant Alimentation / Niveau Audio (2) de l’iRig PRO deviendra bleu clair.

7.Branchez vos écouteurs, ampli guitare, mixeur ou enceintes amplifiées à la sortie écouteurs de votre Mac.

Voyants d’état de l’iRig PRO

Les deux voyants de l’iRig PRO (1,2) vous donnent des informations importantes sur l’état opérationnel de l’unité. Chaque état est indiqué par une couleur différente.

Voyant Alimentation / Niveau Audio (2) :

Éteinte : l’iRig PRO n’est connecté à aucune source d’alimentation.

Bleu foncé : l’iRig PRO est connecté, et en mode veille.

Bleu clair : l’iRig PRO est connecté et actif.

Vert : l’iRig PRO est actif et le signal d’entrée est faible.

Orange : l’iRig PRO est actif et le signal d’entrée est OK.

Rouge : l’iRig PRO est actif et le signal d’entrée est trop fort.

Voyant Fantôme / MIDI (1) :

Éteinte : l’alimentation fantôme est éteinte et l’iRig PRO ne reçoit pas de messages MIDI.

Rouge : l’alimentation fantôme est allumée. Lorsque la pile 9Vsedécharge,levoyantrougeclignotepourindiquerquela substitution de la pile est nécessaire.

Bleu : l’iRig PRO reçoit des messages MIDI.

Branchement de micros

Toujours brancher les micros à l’iRig PRO en utilisant des câbles XLR-XLR symétriques. Ceci garantira une prestation optimale de votre microphone avec l’iRig PRO.

Microsdynamiques:avantdebrancherunmicrodynamique, assurez-vous que l’alimentation fantôme soit éteinte. Vérifier que l’interrupteur Alimentation Fantôme (7) est sur la position OFF et que le voyant Fantôme / MIDI n’est pas rouge.

Microsàcondensateurs:laplupartdesmicrosàcondensateur requièrent une alimentation fantôme externe. Si l’alimentation fantôme est allumée, éteignez-là, et ensuite branchez votre micro. Allumez l’alimentation fantôme uniquement lorsque le microestdéjàconnecté.Unefoisallumée,vérifiezquelevoyant Fantôme/MIDI(1)devientROUGE.Silevoyantnedevientpas ROUGE,vérifiezqu’unepile9Venétatdefonctionnersetrouve danslecompartimentàpilesurlafaceinférieuredel’iRigPRO, et qu’une app utilisant iRig PRO est ouverte. L’alimentation fantôme de s’allume pas si l’iRig PRO est en veille.

Micros à ruban : avant de brancher un micro à ruban, éteignez l’alimentation fantôme (7) et reportez-vous au manuel de l’utilisateur du micro pour savoir s’il en a besoin. La plupart des micros à ruban n’en ont pas besoin et peuvent mêmeenêtreendommagés.Dansledoute,laissez-laéteinte. Si le micro ne fonctionne pas, vérifiez sur le manuel du micro si l’alimentation fantôme est nécessaire.

<![if ! IE]>

<![endif]>FRANÇAIS

<![if ! IE]>

<![endif]>FRANÇAIS

Branchement d’instruments

Branchez votre guitare, basse ou autre instrument mono à l’entrée instrument (4) de l’iRig PRO à l’aide d’un câble pour guitare 6.35mm asymétrique (TS ou “mono”).

IMPORTANT : l’entrée instrument de l’iRig PRO ne fonctionne pas avec les câbles symétriques 6.35mm (TRS ou stéréo).

Branchement de claviers ou contrôleurs MIDI

BranchezlecâbleMIDI2.5mminclusauconnecteurMIDI(8)de

l’iRigPROetàlapriseMIDIOUTdevotreclavieroucontrôleur.

Ouvrez une application compatible Core MIDI sur votre dispositif iOS ou sur votre Mac et sélectionnez “iRig PRO” comme périphérique d’entrée.

Lorsque l’iRig PRO recevra des messages MIDI, le voyant Alimentation Fantôme / MIDI deviendra bleu.

Réglage du gain de l’iRig PRO

Lorsque vous parlez ou chantez dans votre micro, ou lorsque vous jouez d’un instrument, vérifiez le voyant Alimentation / NiveauAudio (2) de l’iRig PRO.

• Si le voyant alterne entre BLEU et VERT, ou s’il est toujours

VERT, augmentez le gain d’entrée de l’iRig PRO en tournant le contrôle de GAIN (3) dans le sens horaire.

Si le voyant s’allume parfois en ROUGE, abaissez le gain d’entrée de l’iRig PRO en tournant le contrôle de GAIN (3) en sens antihoraire.

Lorsque le réglage du gain est optimal, le voyant devrait alterner entre VERT et ORANGE pendant que vous chantez ou jouez.

Résolution des problèmes

Je branche mon iRig PRO à mon dispositif iOS, mais le dispositif ne le reconnaît pas, et aucune de mes apps audio ne fonctionne avec lui.

Souvenez-vous de toujours brancher le câble 30-pin ou Lightning inclus à l’iRig PRO avant de le brancher au dispositif iOS.

Le son sature.

Vérifiez que le gain d’entrée de l’iRig PRO soit réglé correctement. Si le voyant Alimentation / Niveau Audio (2) est rouge lorsque vous jouez, chantez ou parlez, abaissez le gain d’entrée (3) comme décrit dans ce guide.

Le voyantAlimentation / NiveauAudio est toujours bleu foncé et aucun son n’est produit.

Pour que l’iRig PRO s’allume, une app compatible CoreAudio doit être lancée au préalable sur votre dispositif iOS ou Mac.

• iOS : assurez-vous d’utiliser une app qui fonctionne avec

l’entréeaudionumériqueduconnecteur30-pinouLightning.

Mac : assurez-vous que vous avez sélectionné “iRig PRO” comme périphérique d’entrée audio ou MIDI dans l’app audio que vous utilisez.

L’alimentation Fantôme ne s’allume pas.

Assurez-vous d’avoir inséré une pile 9V en état de fonctionner dans le compartiment à pile (5) de l’iRig PRO.

Je n’obtiens aucun son de mon micro à condensateur.

Votre micro requiert peut-être l’alimentation fantôme. Allumez l’alimentation fantôme en plaçant l’interrupteur (7) de l’iRig PRO sur la position ON. Le voyant Alimentation Fantôme / MIDI (1) doit devenir rouge.

Je n’obtiens aucun son de mon instrument.

L’iRig PRO fonctionne seulement avec les câbles guitare MONO de 6.35mm. N’utilisez pas de câble stéréo (TRS) car l’entréeinstrumentdel’iRigPROnefonctionnepasdanscecas.

Spécifications

Entrée Instrument : asymétrique, haute impédance, jack 6.35mm TS (mono), Tip: signal / Shield: masse

Niveau Entrée Instrument : de 30 mVpp à 6.9 Vpp

Impédance Entrée Instrument : 620 kOhms

Entrée Micro : symétrique, XLR. Pin 2 : positif / Pin 3 : négatif / Pin 1 : masse

Niveau Entrée Micro : de 6 mVpp à 1.4 Vpp

Impédance Entrée Micro : approx 2 kOhms

• Dynamique de Gain : 47 dB


• Alimentation Fantôme : 48V +/-10%


• Bruit d’entrée : -97 dB RMS, -105 dB(A)


• Distorsion (THD) : 0.01%


• Réponse en Fréquence : 20Hz-20kHz +/- 0.5 dB

<![if ! IE]>

<![endif]>FRANÇAIS

• Conversion : 24-bit A/D

• Échantillonnage : 44.1 et 48 kHz

• Pile:9V(Alcalineconseillée),nécessairepourl’alimentation

fantôme +48V uniquement


Garantie

Veuillez visiter : www.ikmultimedia.com/warranty pour consulter notre politique de garantie complète.

Assistance et informations

www.ikmultimedia.com/support

Apple n’est pas responsable du fonctionnement de cet appareil ni de sa conformité aux normes en vigueur.

ATTENTION: L’utilisation prolongée d’écouteurs à volume trop élevé peut causer des pertes d’audition permanentes. Il se peut qu’à la longue vous vous habituiez à un volume trop élevé qui vous semblera alors normal mais provoquera des dommages de l’ouïe. Réglez le volume de votre appareil à un niveau raisonnable avant que cela se produise. Si vous entendez siffler vos oreilles, abaissez le volume ou utilisez moins souvent des écouteurs ou un casque avec votre appareil.

Loading...
+ 33 hidden pages