

Page 1
Universal microphone interface for smartphone
and tablets
USER MANUAL
Page 2

Contents
Table of Contents
Contents 2
English 4
iRig PRE 4
Register your iRig PRE 4
Installation and setup 5
Usage tips 9
Specifications 10
Warranty 10
Support and more info 10
Français
iRig PRE 11
Enregistrement de l’iRig PRE 11
Mise en route 12
Astuces d’utilisation 16
Spécifications 17
Garantie 17
Informations et support 17
Español
iRig PRE 18
Registre su iRig PRE 18
Para Empezar 19
Consejos para el uso 23
Especificaciones 24
Garantía 24
Servicio Técnico y Más Información 24
Italiano
iRig PRE 25
Registra il tuo iRig PRE 25
Come iniziare 26
Consigli d’uso 30
Specifiche 31
Garanzia 31
Supporto e ulteriori informazioni 31
Deutsch
iRig PRE 32
Registrierung von iRig PRE 32
Erste Schritte 33
Tipps 37
Technische Daten 38
Gewährleistung 38
2
Page 3

Contents
Support und weitere Informationen 38
日本語
iRig PRE 39
オンライン・レジストレーション 39
基本的な使い方 40
使用上のヒント 44
仕様 45
保証 45
サ ポ ートと詳 細 は 45
中文 簡体字
iRig PRE 46
注册你购买的iRig PRE 46
入门指南 47
使用提示 51
技术参数 52
保修 52
获取更多信息 52
3
Page 4
English
CAUTION: RISK OF EXPLOSION IF BATTERY IS REPLACED BY AN INCORRECT TYPE. DISPOSE OF USED
BATTERIES ACCORDING TO THE INSTRUCTIONS.
CAUTION: iRig PRO can ONLY be used with:
- Consumer grade, non-rechargeable CARBON-ZINC or ALKALINE batteries.
- Consumer grade, Ni-MH rechargeable batteries up to a maximum capacity of 300mAh.
This CAUTION cancels and supersedes all other indications on compatible battery types that may appear in the
quick-start guide or elsewhere
iRig PRE
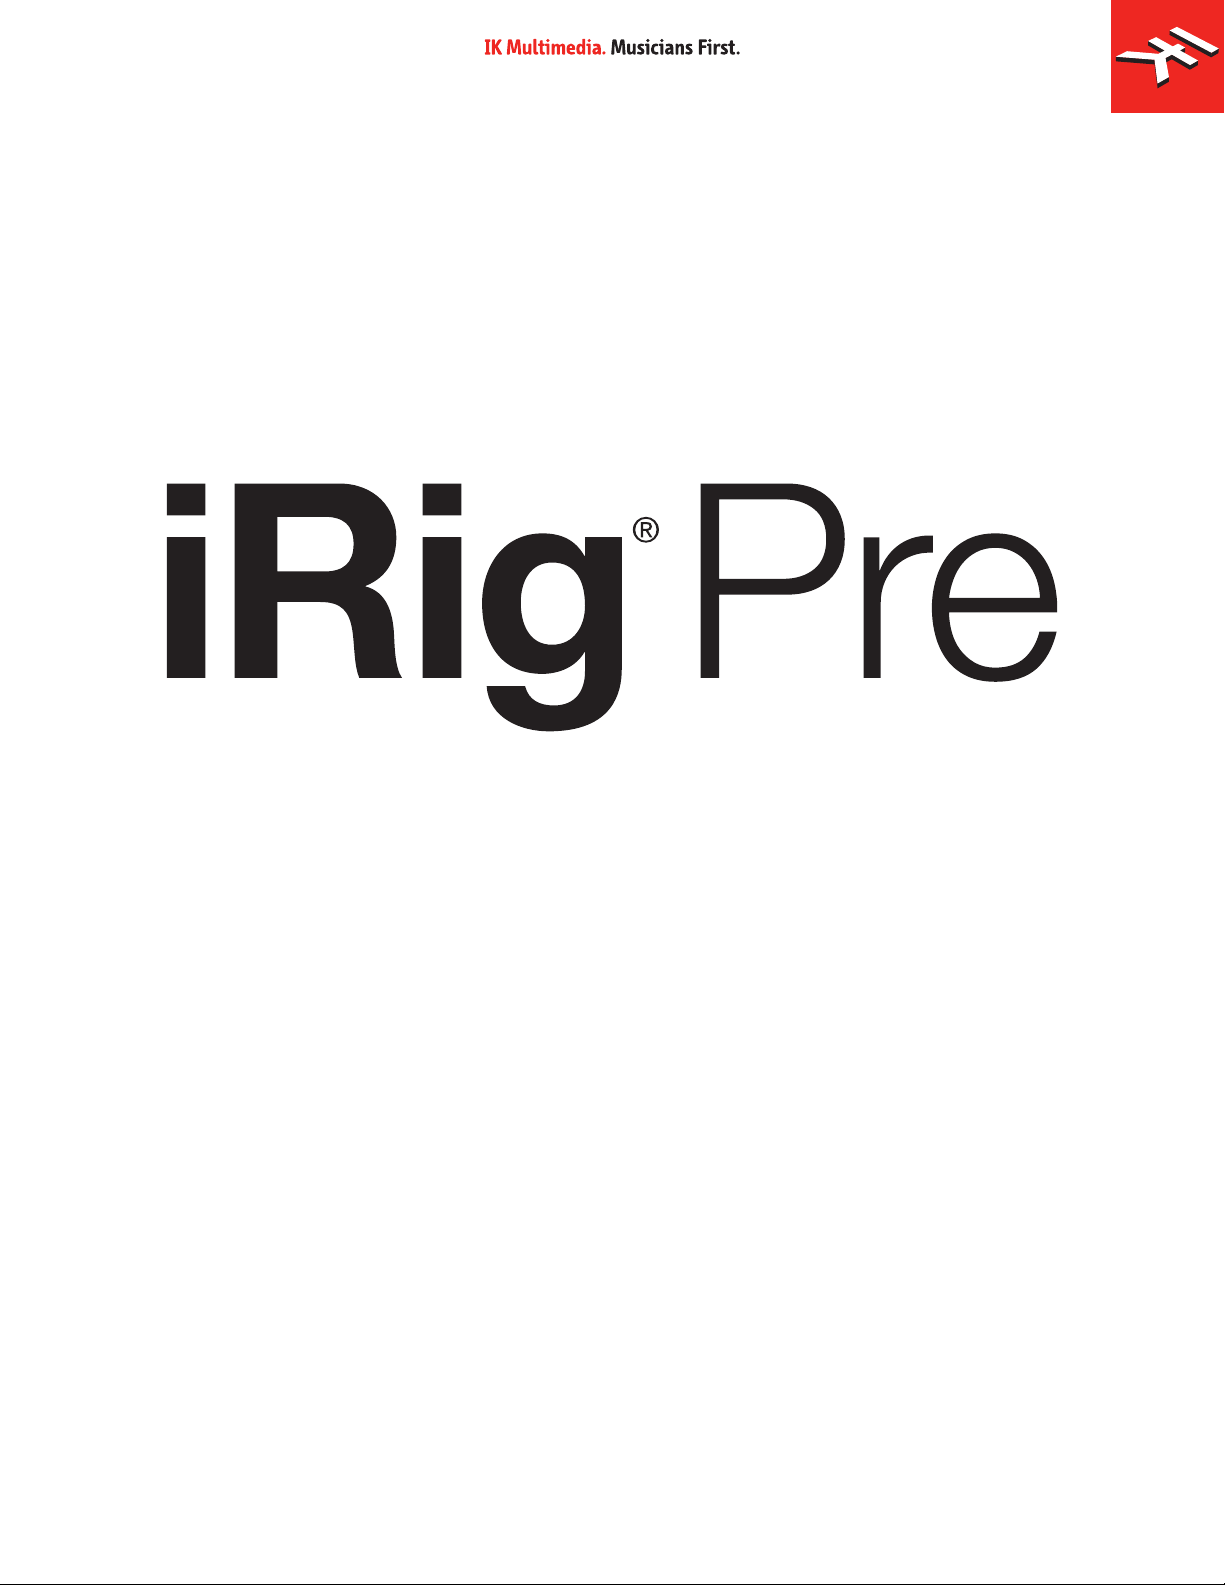
Thank you for purchasing iRig PRE.
Your package contains:
• iRig PRE
• 9V Battery
• Velcro strip
• Quick Start Guide
• Registration Card.
1x
1x
1x
iRig PRE allows you to connect any professional microphone to your iPhone, iPod touch, iPad or Android
device. Thanks to the wide gain range and integrated phantom power, you can connect any type of microphone:
Dynamic, Condenser or Ribbon
Register your iRig PRE
By registering, you can access technical support, activate your warranty and receive free JamPoints™ which will
be added to your account. JamPoints™ allow you to obtain discounts on future IK purchases! Registering also
keeps you informed of all the latest software updates and IK products.
Register at: www.ikmultimedia.com/registration
4
Page 5
English
Installation and setup
iRig PRE can be used with your iPhone, iPod touch, iPad or Android device.
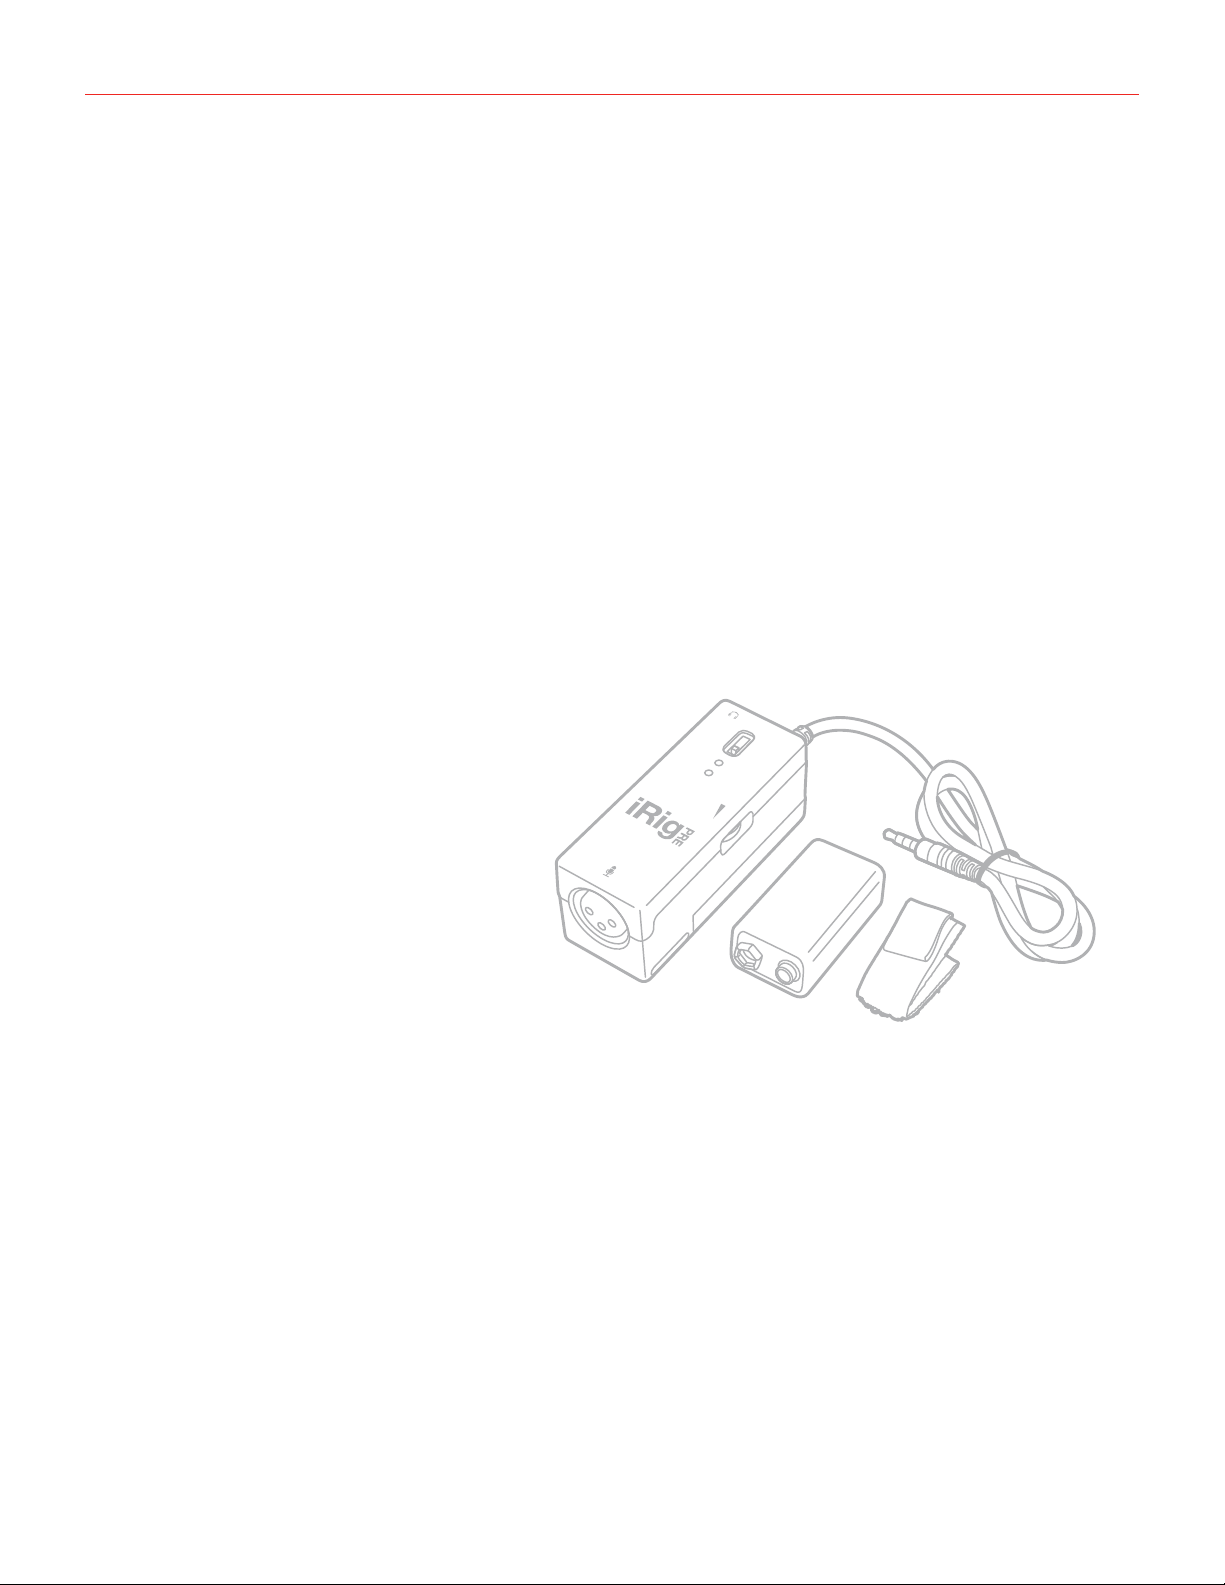
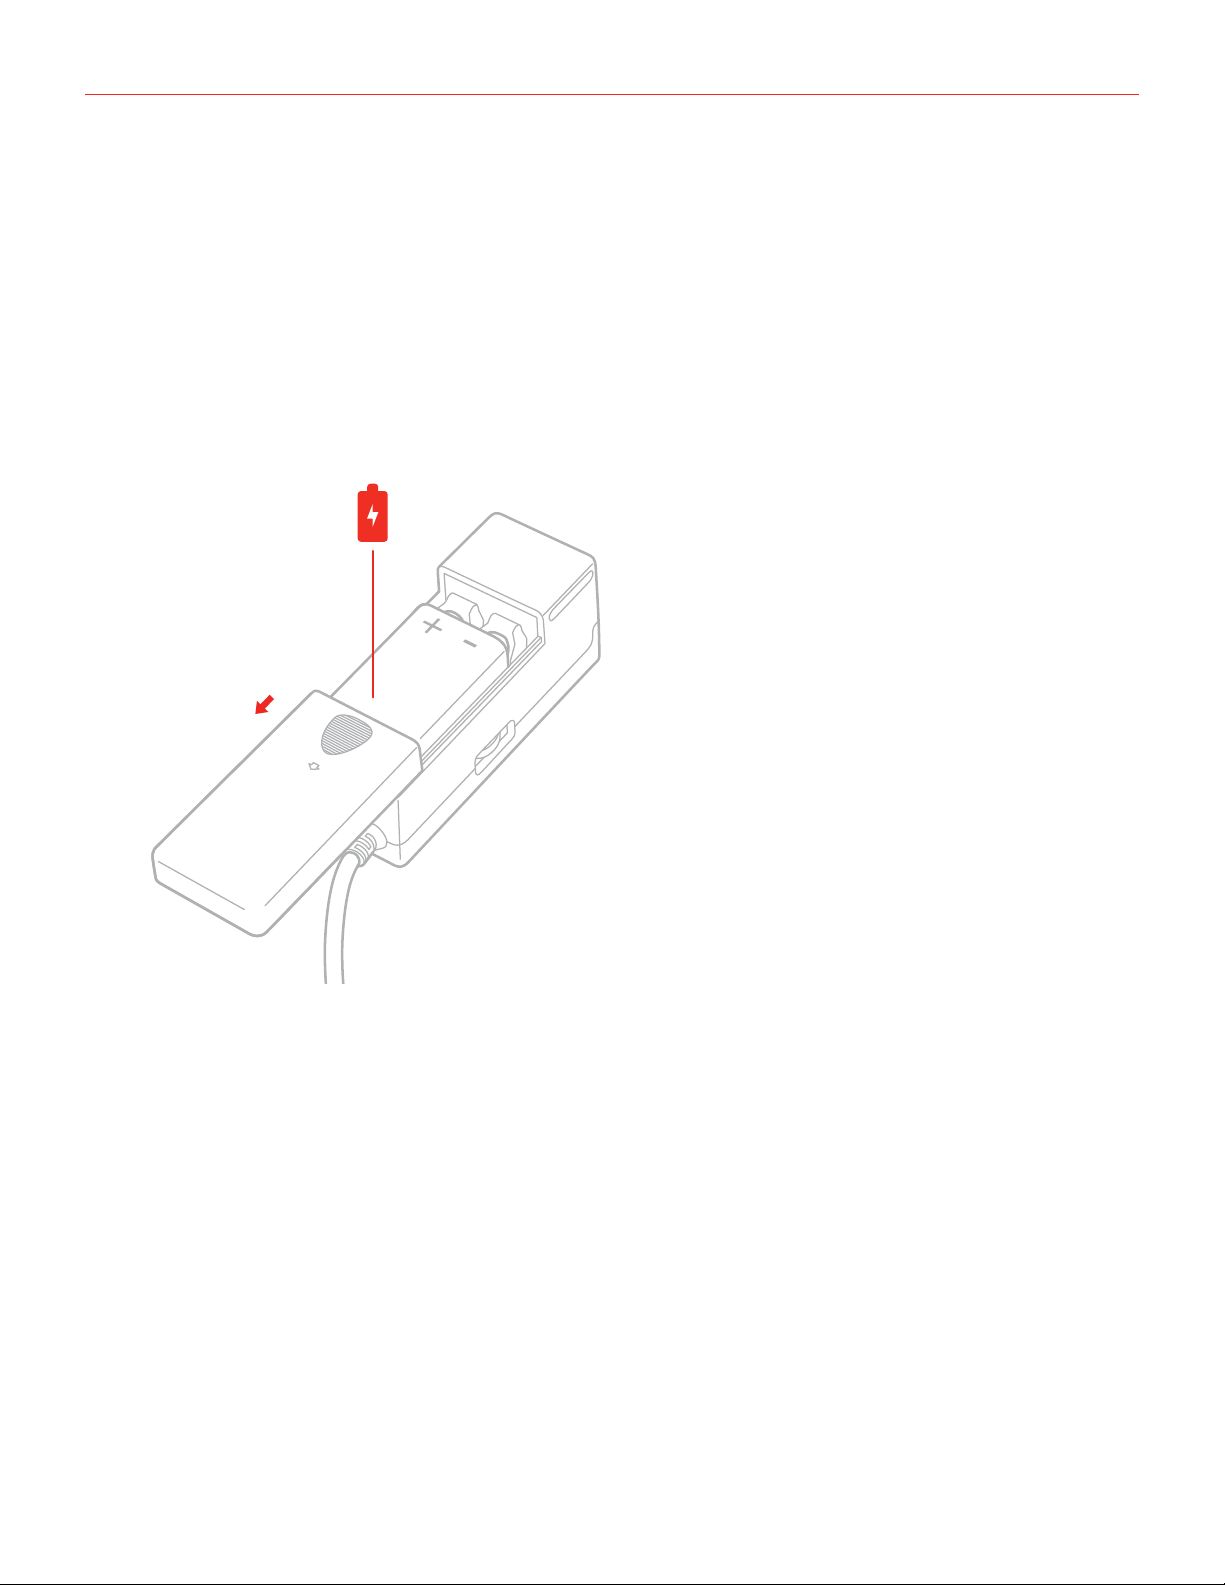
1. Insert the 9V battery into the Battery compartment on the bottom side of iRig PRE. Gently open the battery
cover by sliding it in the direction of the arrow near the “OPEN” text. Once the compartment is open, gently
push the 9V battery into place aligning + and - polarity as shown. Depending on the brand and type of
battery, it may be necessary to hold it in place while sliding in the cover again.
5
Page 6
English
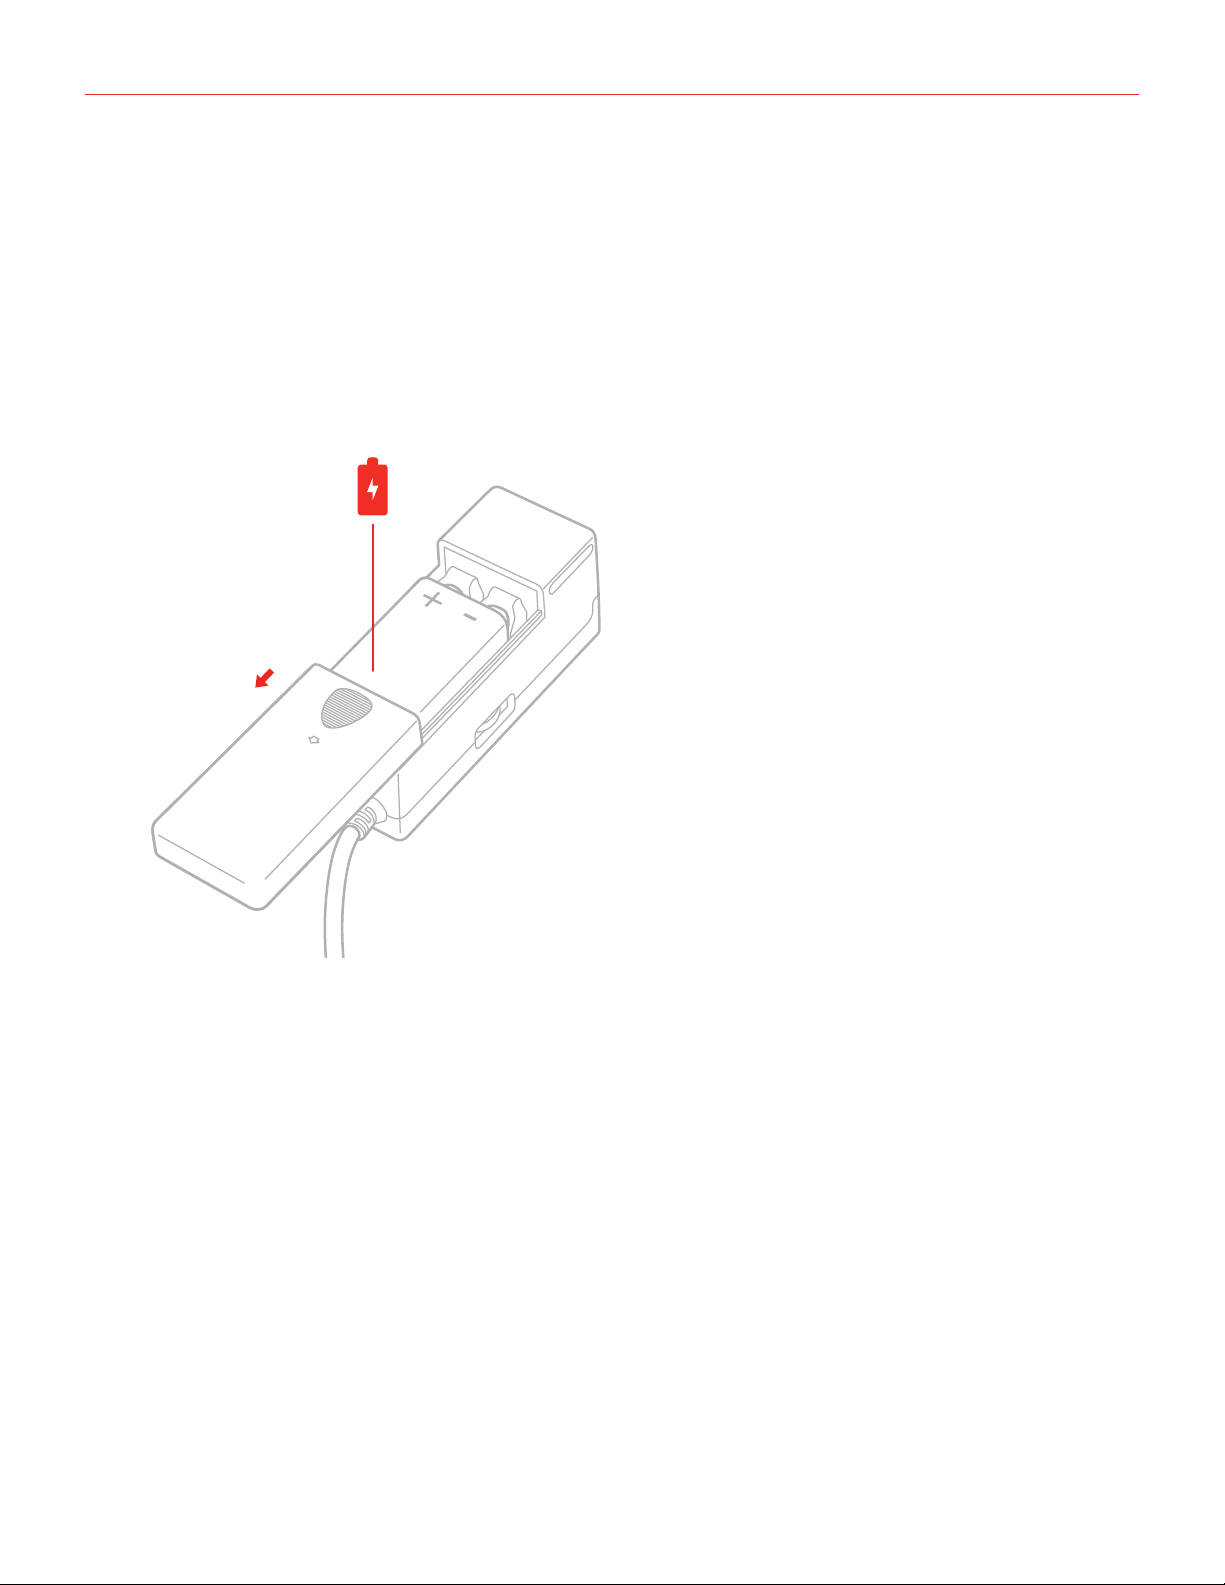
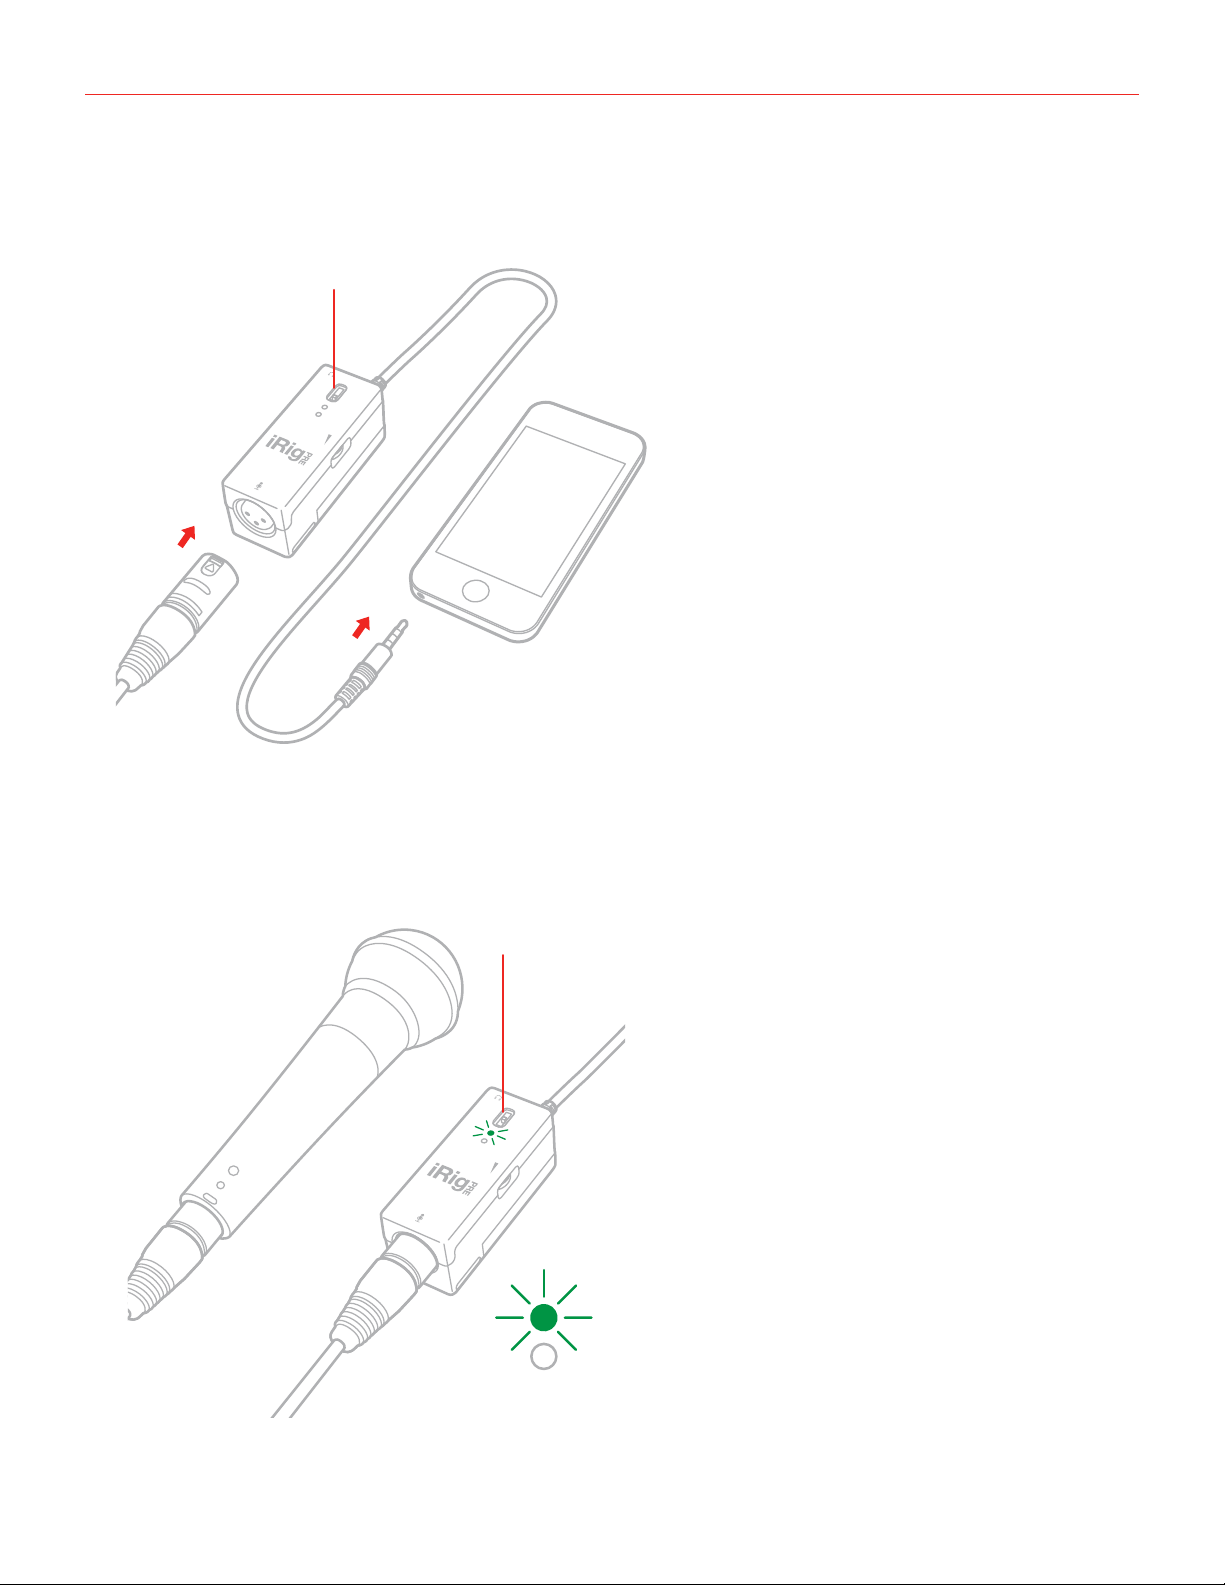
2. Connect your microphone to the XLR input connector
3. Connect iRig PRE to your mobile device headphone socket.
OFF
1
2
XLR
MIC
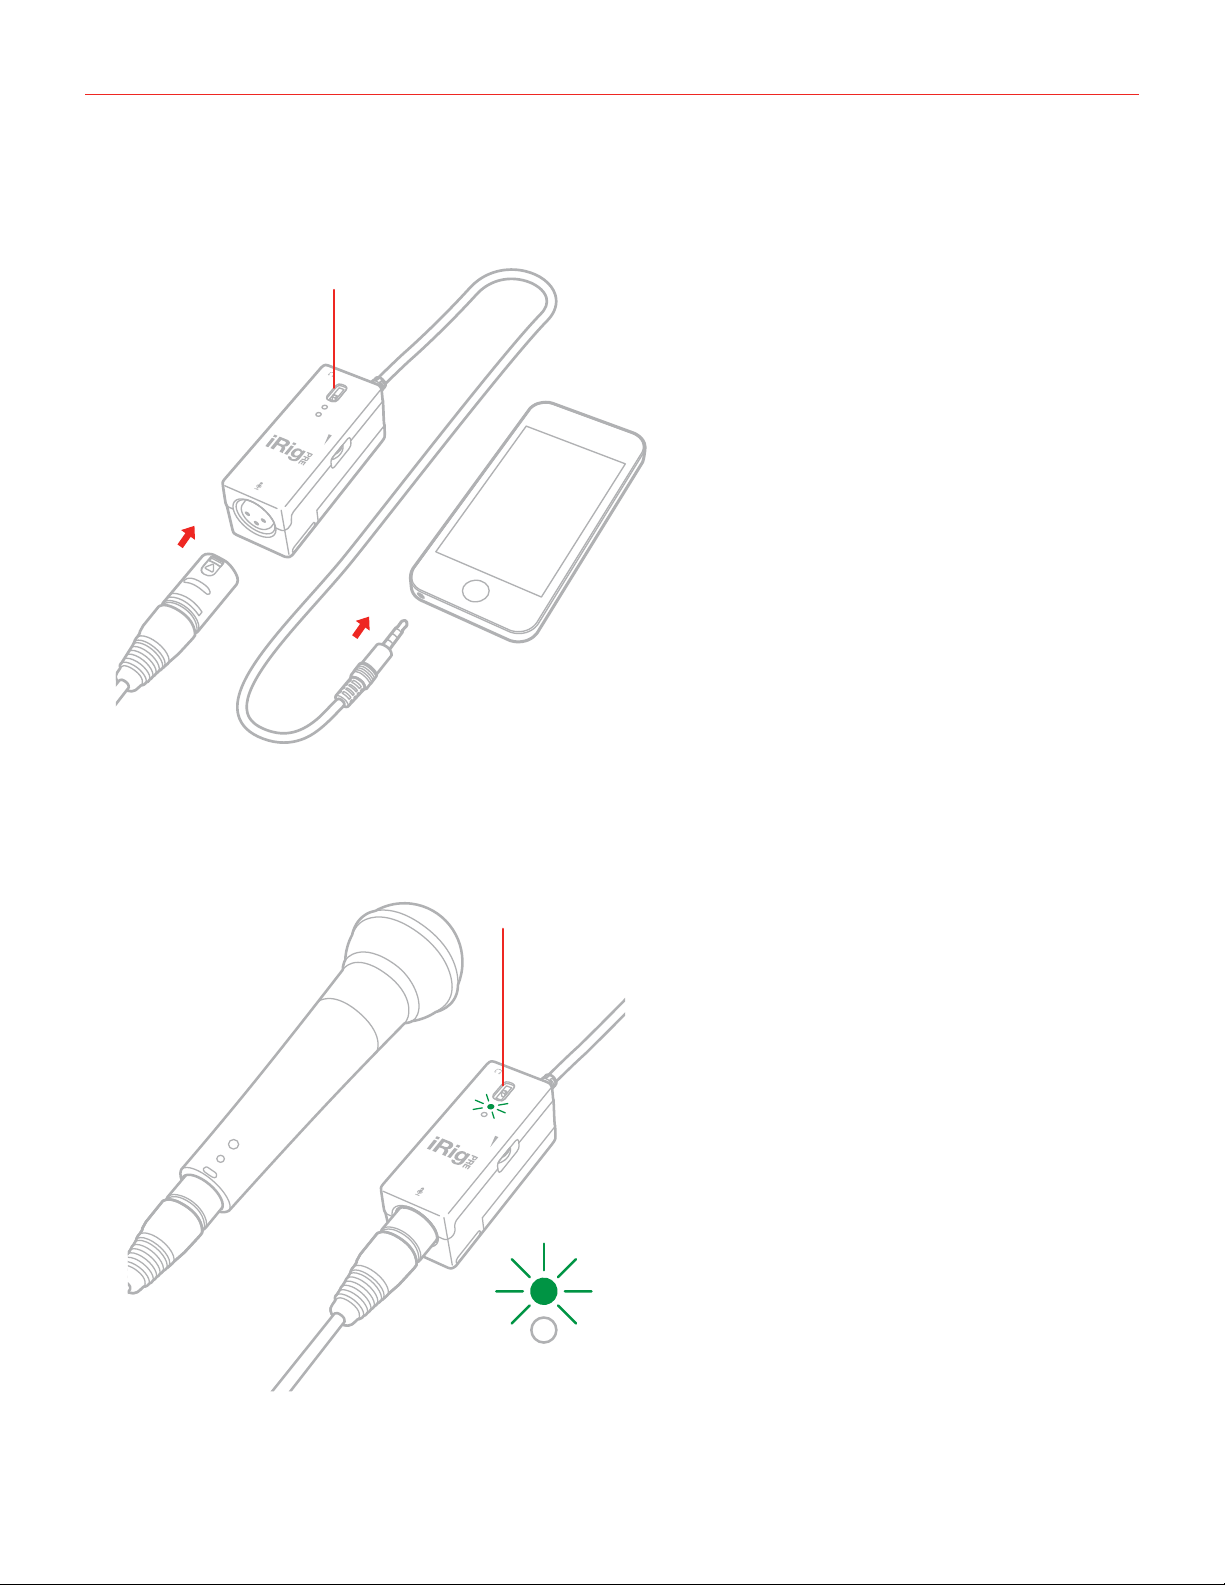
4. Turn the iRig PRE ON by sliding the power switch to the ON position. The green LED will light.
ON
6
Page 7
English
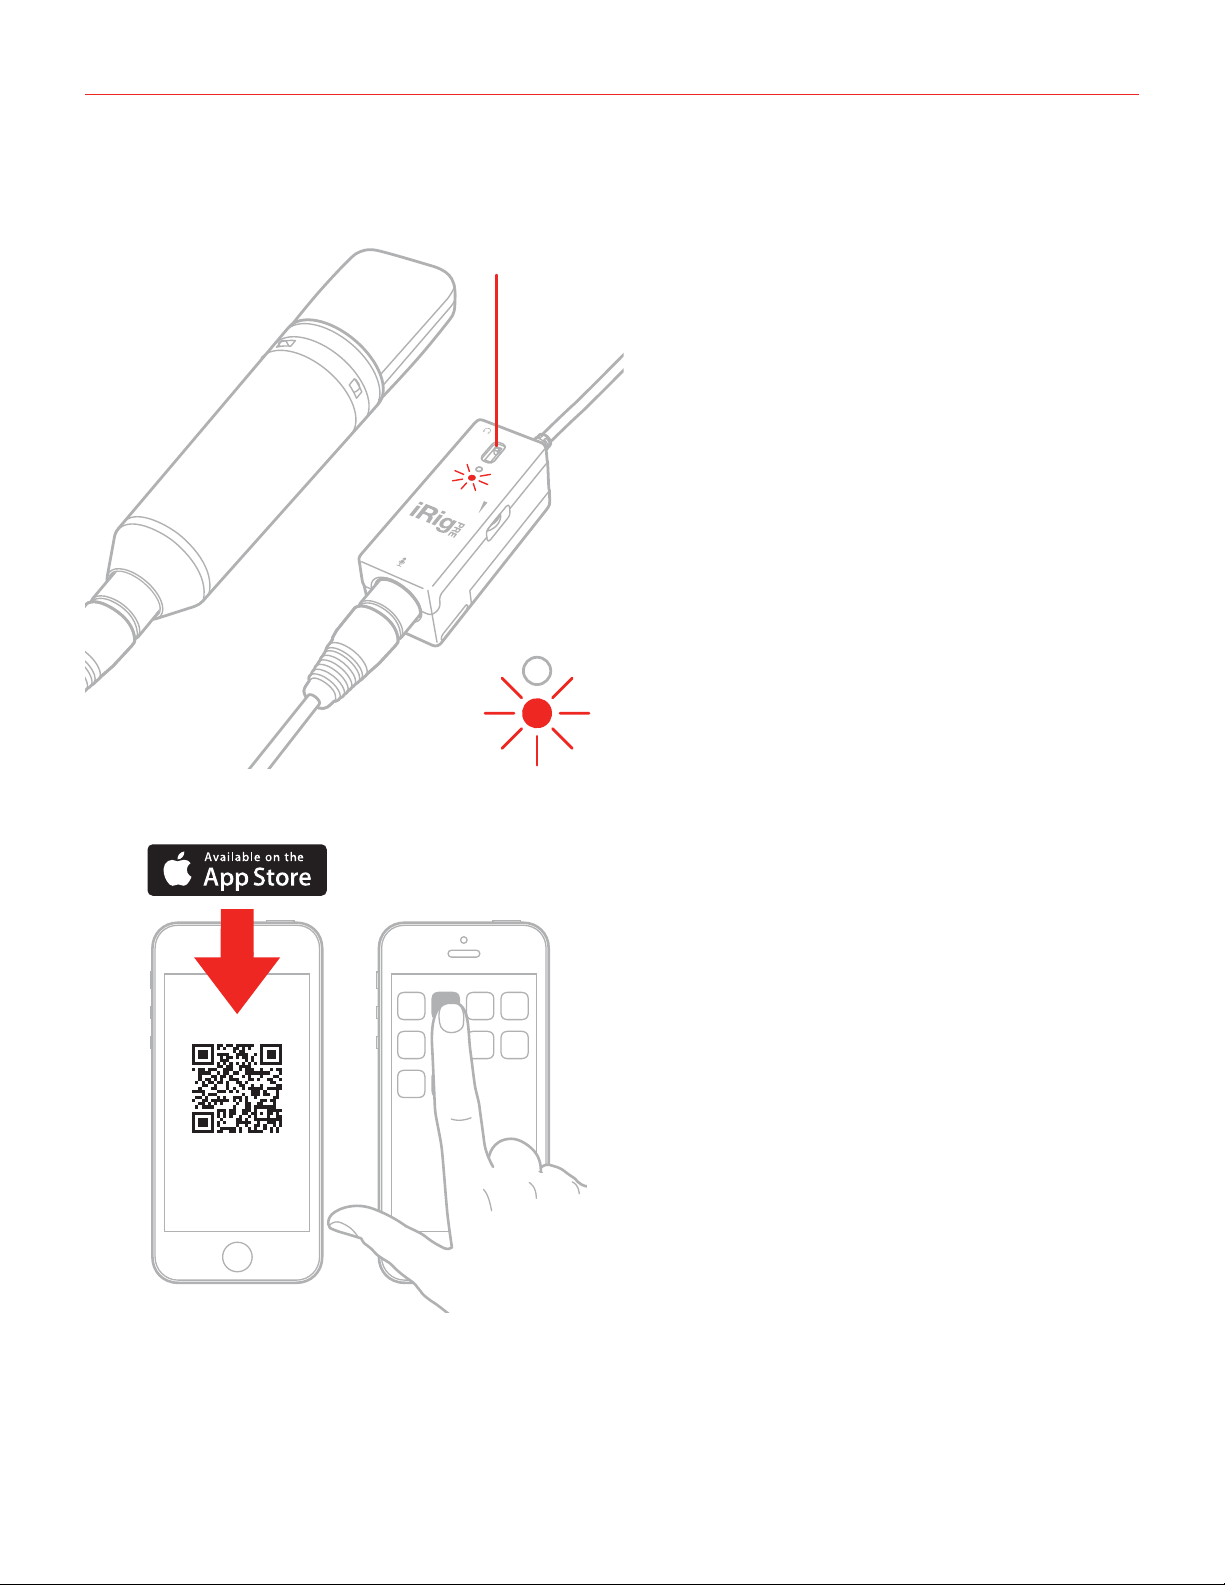
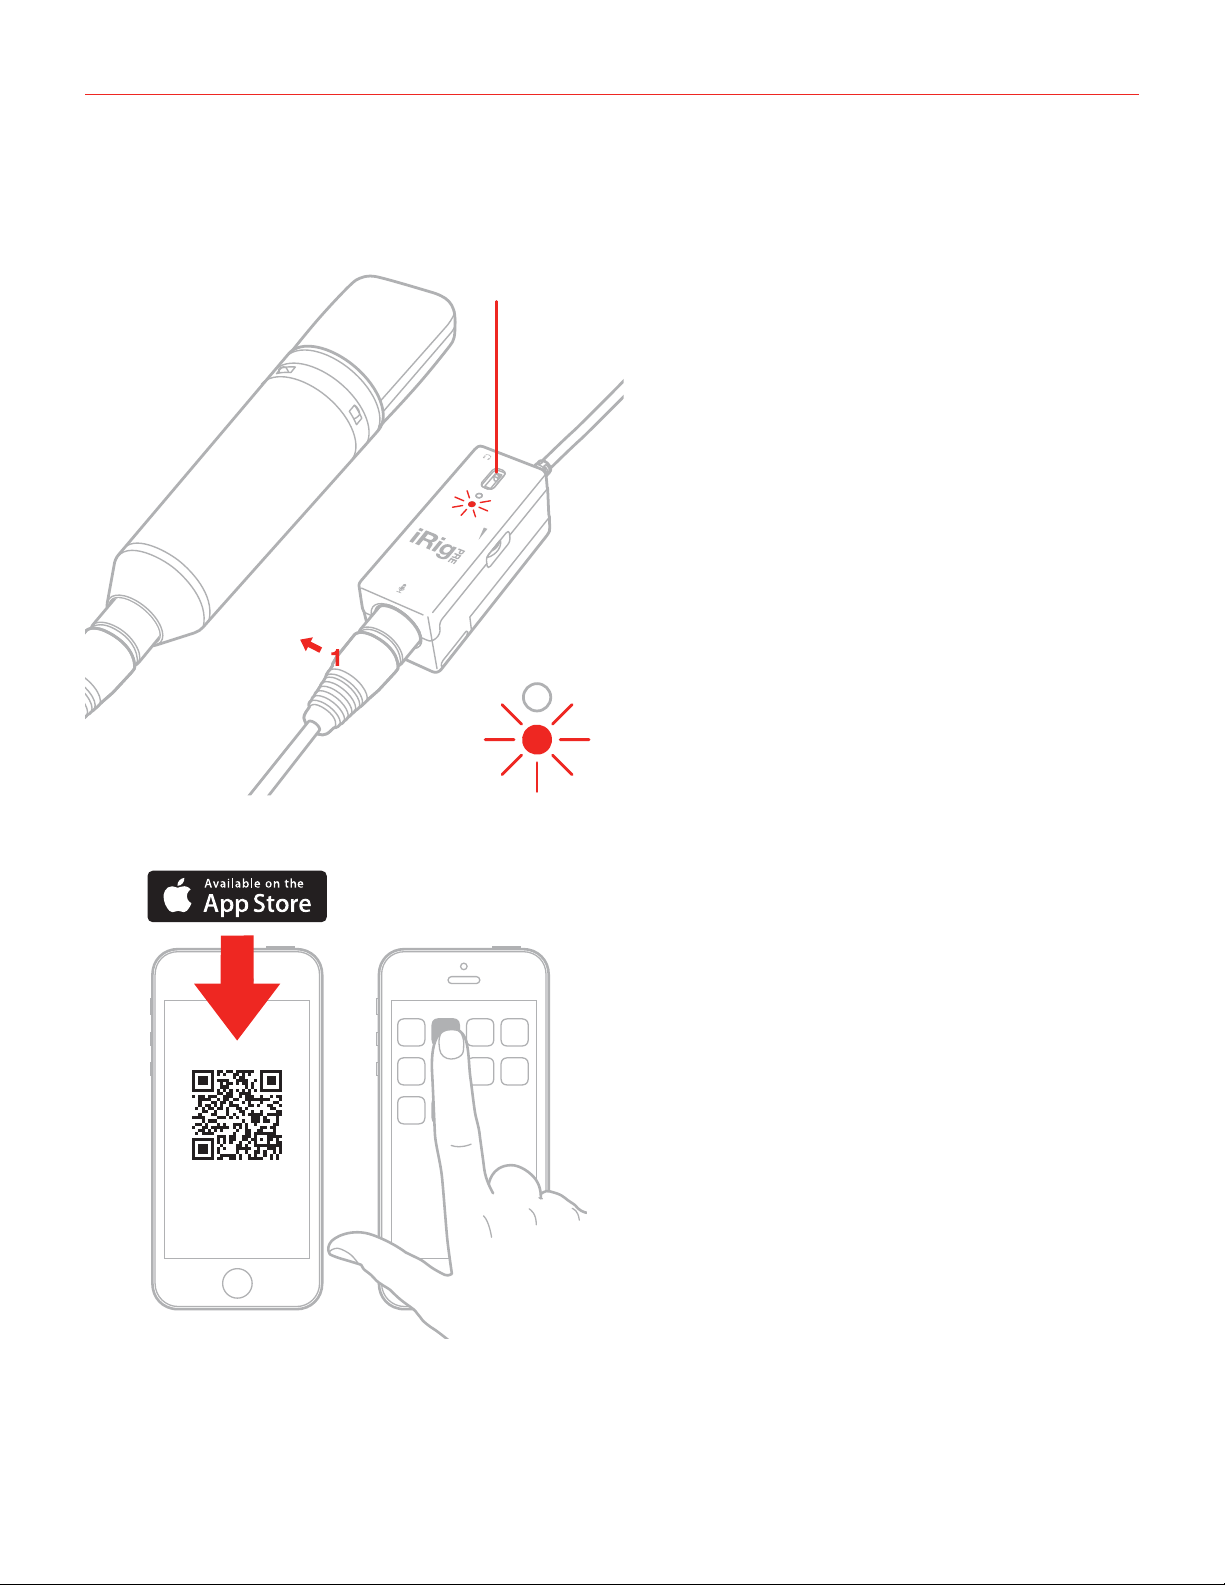
5. If you are using a microphone that needs phantom power (like most condenser microphone), slide the power
switch to the upper position (marked +48V) to turn phantom power ON. The red LED will light.
+48V
6. Download the iRig Recorder or the VocaLive apps from the App Store or from the Google Play Store, and
install them on your mobile device.
iRig Recorder
VocaLive
ikdownloads.com/irigpre
App Store is a service mark of Apple Inc.
7
Page 8

English
7. You are now able to record using your preferred microphone on your mobile device. To get optimal results,
you need to properly adjust the GAIN control. Check the input level meter on the app you are using to record
(like iRig Recorder). This level meter should peak as high as possible but should never reach the maximum
or clipping level. To increase the iRig PRE gain, rotate the knob toward the top of the unit. To decrease the
iRig PRE gain, rotate the knob toward the bottom of the unit.
8
Page 9
English
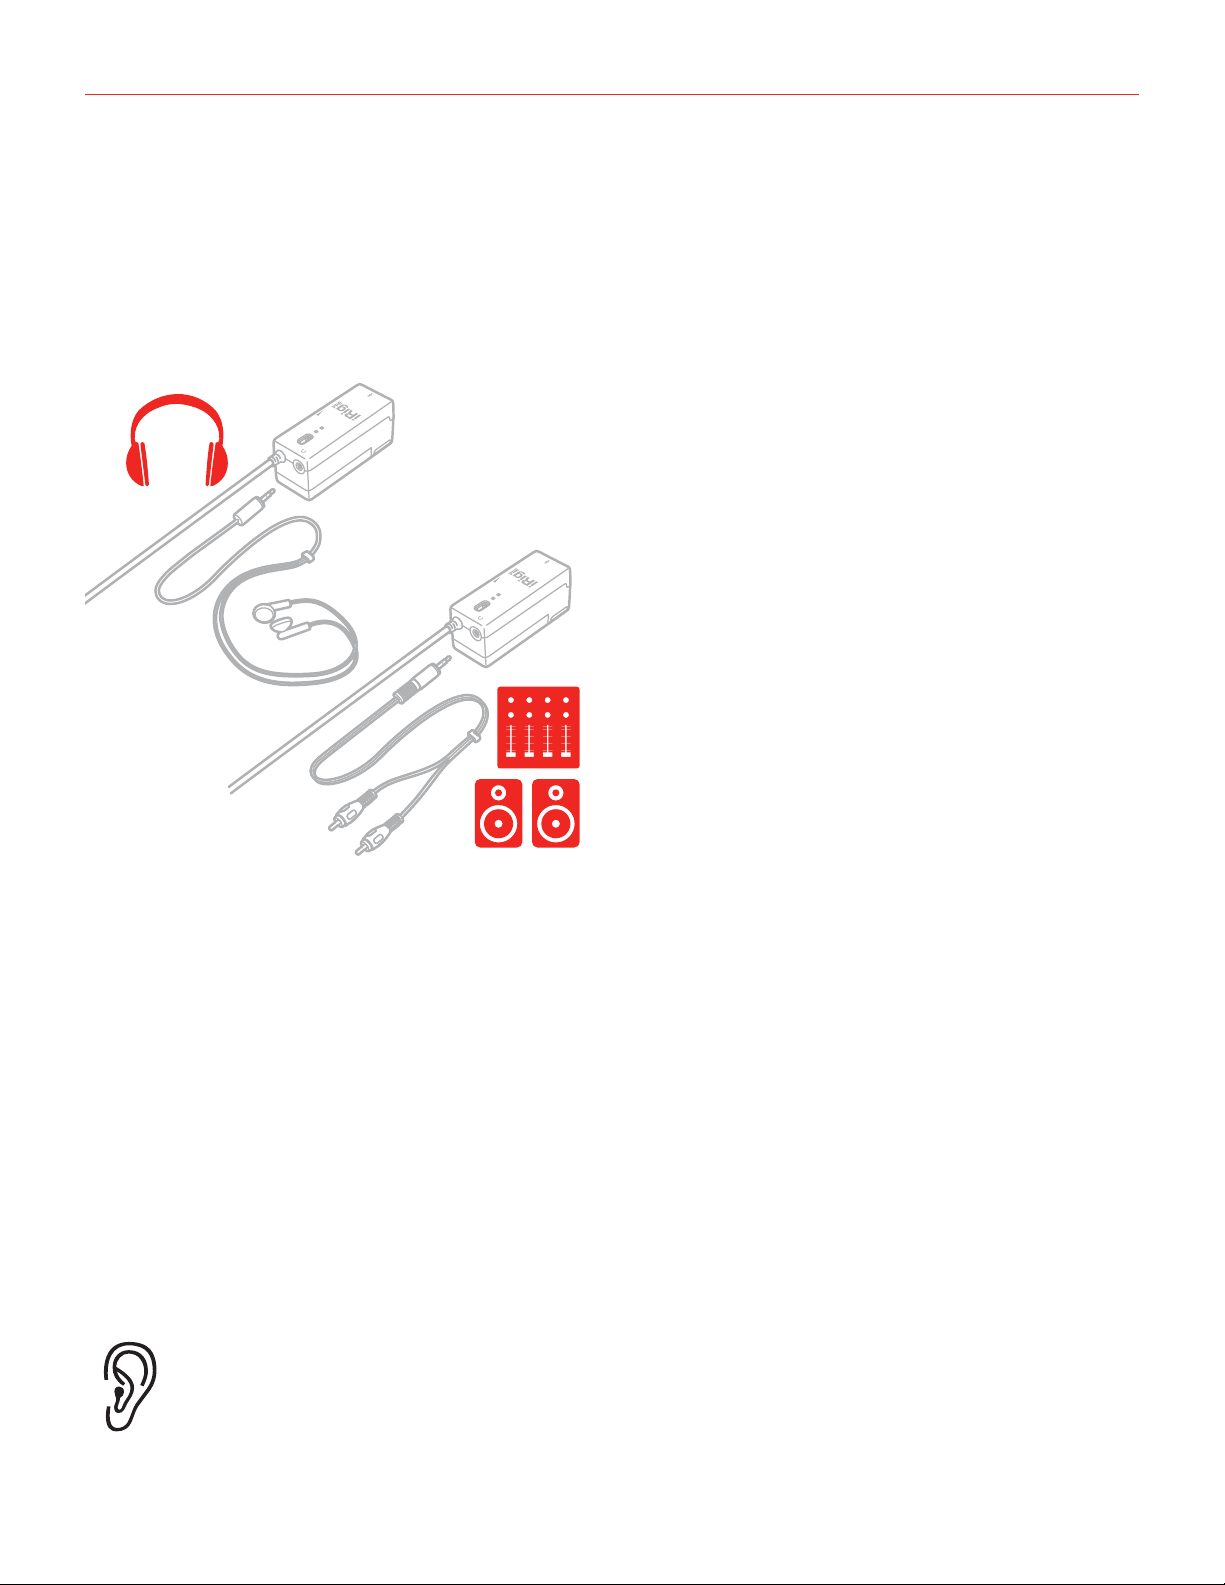
8. If you need to monitor what you are recording, connect your headphones to this socket. Remember that this
output replicates the mobile device headphone output, so you will hear audio here only with applications
that support real-time input/output pass-through like iRig Recorder.
9. If you use iRig PRE to connect a vocal microphone for vocal performance, you will need to use VocaLive
app that provides high quality effects especially tailored for vocals. In this case, connect your mixer or PA
system to this output socket.
Usage tips
• To avoid having too much noise in the recordings, always set the GAIN properly. If the GAIN is too low,
recordings will be too quite, and when boosted within the apps they will become too noisy. If the GAIN is too
high, recordings will be distorted.
• Be CAREFUL not to turn the phantom power ON with passive ribbon microphones as the current that will
flow into the ribbon element could damage it. When using ribbon mics, turn ON phantom power ONLY if the
microphone specifications clearly say it’s needed.
• If you hear feedback issues when using high GAIN settings, lower the mobile device volume with the device
volume buttons.
WARNING: Permanent hearing loss may occur if earbuds or headphones are used at high
volume. You can adapt over time to a higher volume of sound, which may sound normal but can
be damaging to your hearing. Set your device volume to a safe level before that happens. If you
experience ringing in your ears, reduce the volume or discontinue use of earbuds or headphones
with your device.
9
Page 10

English
Specifications
• Frequency response: from 20 Hz to 20 KHz +/- 1.5dB
• Noise: -98dB fullband, phantom power ON
• Max output level: 2 Vrms
• Distortion: 0.025% THD
• Phantom max current: 6mA
• Battery duration (Alkaline 9V cell): approx 30 hours when phantom power is off, approx 10 hours when
phantom power is on.
Warranty
Please visit:
www.ikmultimedia.com/warranty
for the complete warranty policy.
Support and more info
www.ikmultimedia.com/support
www.irigpre.com
10
Page 11

Français
ATTENTION: RISQUE D’EXPLOSION SI LES PILES SONT REMPLACÉES PAR D’AUTRES PILES DE TYPE
INCORRECT. JETER LES PILES USAGÉES SELON LES INSTRUCTIONS.
ATTENTION: l’iRig PRO DOIT ÊTRE UTILISÉ EXCLUSIVEMENT AVEC des piles de type suivant :
- Piles CARBON-ZINC ou ALCALINES non rechargeables.
- Batteries rechargeables Ni-MH jusqu’à une capacité maximum de 300mAh.
Cet AVIS remplace toute autre indication sur les types de batteries acceptées pouvant figurer dans le Guide de
Prise en Main Rapide ou ailleurs.
iRig PRE
Merci d’avoir acheté l’iRig PRE. Cet aperçu vous permet de commencer à utiliser rapidement votre produit.
La boîte de votre matériel doit contenir:
• iRig PRE
• Batterie 9 volts
• Bande Velcro
• Guide de démarrage rapide
• Carte d’enregistrement.
1x
1x
1x
L’iRig PRE vous permet de relier tout microphone professionnel à votre iPhone, iPod touch, iPad ou appareil
Android. Grâce à son réglage de gain étendu et à son alimentation fantôme, il vous est possible d’y connecter
n’importe quel type de microphone, aussi bien dynamique, électrostatique, qu’à ruban.
Enregistrement de l’iRig PRE
Enregistrer votre produit vous donne accès au support technique, active la garantie, et ajoute gratuitement des
JamPoints™ sur votre compte utilisateur. Ces points vous donnent des réductions à valoir sur vos prochains
achats! L’enregistrement vous permet également d’être tenu au courant des nouveautés et mises à jour de nos
produits. Enregistrez dès maintenant votre produit sur :: www.ikmultimedia.com/registration
11
Page 12
Français
Mise en route
L’iRig PRE est conçu pour être utilisé avec votre iPhone, iPod touch, iPad ou appareil Android.
1. Insérez la batterie 9 volts dans son compartiment situé sous votre iRig PRE. Ouvrez sans forcer le clapet
de la batterie en le faisant glisser dans le sens de la flèche, où figure l’inscription “OPEN”. Une fois le
compartiment ouvert, placez-y délicatement la batterie dans le sens indiqué afin de respecter la polarité. En
fonction de la marque de la batterie, il sera peut-être nécessaire de la maintenir en place lors de la fermeture
du clapet.
12
Page 13
Français
2. Branchez votre microphone sur la prise XLR input.
3. Reliez l’iRig PRE à la prise casque de votre appareil mobile.
OFF
1
2
XLR
MIC
4. Allumez votre iRig PRE en faisant glisser l’interrupteur de mise sous tension sur la position ON. La LED verte
doit s’allumer.
ON
13
Page 14
Français
5. Si vous utilisez un micro nécessitant une alimentation fantôme (comme la plupart des micros
électrostatiques), faites glisser l’interrupteur de mise sous tension sur la position suivante (marquée +48V)
afin de mettre en route l’alimentation fantôme. La LED rouge doit alors s’allumer.
+48V
6. Téléchargez les applications iRig Recorder ou VocaLive sur l’App Store ou sur le Google Play Store et
installez-les sur votre appareil mobile.
iRig Recorder
VocaLive
ikdownloads.com/irigpre
App Store is a service mark of Apple Inc.
14
Page 15

Français
7. A présent vous êtes à même d’effectuer des enregistrements à l’aide du micro que vous aurez connecté
à votre appareil mobile. Pour obtenir une qualité sonore optimale, ajustez correctement le gain d’entrée.
Contrôlez le niveau d’entrée depuis l’application que vous utilisez pour enregistrer (par exemple iRig
Recorder). L’indicateur de niveau doit moduler autant que possible tout en restant en dessous du seuil de
saturation. Pour monter le gain d’entrée sur votre iRig PRE, tournez le potentiomètre vers le haut. Pour
baisser le gain, tournez-le vers le bas.
8. Pour effectuer un monitoring en temps réel de votre source d’enregistrement, branchez un casque sur la
prise casque de l’iRig PRE. Gardez à l’esprit que cette prise duplique le signal de sortie de la prise casque
de votre appareil mobile. Seules les applications supportant le monitoring direct comme iRig Recorder
permettront d’y entendre un signal audio.
15
Page 16

Français
9. Si vous utilisez l’iRig PRE pour chanter en live avec un micro voix, utilisez l’application VocaLive qui offre
des effets de grande qualité conçus pour la voix. Dans ce cas de figure, reliez directement votre appareil au
système de sonorisation.
Astuces d’utilisation
• Pour minimiser le niveau de bruit de fond, ajustez correctement le gain d’entrée. S’il est trop bas, le niveau
du signal audio sera trop bas, et remonter le volume augmentera également le niveau du bruit de fond.
Inversement, si le gain est trop élevé, vos enregistrements seront saturés.
• Veillez à ne pas activer l’alimentation fantôme lorsque des micros à ruban sont branchés ! Le courant
électrique les endommagerait. N’utilisez l’alimentation fantôme sur de tels microphones que si leurs
spécifications le stipulent clairement.
• Si vous entendez un larsen lors du réglage du gain, baissez le volume de votre appareil mobile à l’aide de
ses propres boutons de volume.
ATTENTION: L’utilisation prolongée d’écouteurs à volume trop élevé peut causer des pertes
d’audition permanentes. Il se peut qu’à la longue vous vous habituiez à un volume trop élevé
qui vous semblera alors normal mais provoquera des dommages de l’ouïe. Réglez le volume
de votre appareil à un niveau raisonnable avant que cela se produise. Si vous entendez siffler
vos oreilles, abaissez le volume ou utilisez moins souvent des écouteurs ou un casque avec
votre appareil.
16
Page 17

Français
Spécifications
(mesures effectuées avec le gain en position moyenne)
• Réponse en fréquences : 20 Hz à 20 kHz +/- 1.5dB
• Niveau de bruit : -98 dB en pleine bande, alimentation fantôme enclenchée
• Niveau max. de sortie : 2 Vrms
• Distorsion : 0.025% THD
• Courant max de l’alimentation fantôme : 6mA
• Autonomie (batterie alkaline 9V) : environ 30 heures sans alimentation fantôme, et environ 10 heures avec
alimentation fantôme enclenchée.
Garantie
Allez sur :
www.ikmultimedia.com/warranty
pour consulter notre politique de garantie..
Informations et support
www.ikmultimedia.com/support
www.irigpre.com
17
Page 18

Español
PRECAUCIÓN: RIESGO DE EXPLOSIÓN SI LA BATERÍA SE REPONE CON EL TIPO INCORRECTO.
DISPONGA DE LAS BATERÍAS USADAS DE ACUERDO A LAS INSTRUCCIONES.
PRECAUCIÓN: iRig PRO se puede usar SÓLO con:
- Baterías de grado de consumidor no-recargables CARBÓN-ZINC o ALKALINAS.
- Baterías de grado de consumidor Ni-MH recargables a una capacidad máxima de 300mAh.
Esta PRECAUCIÓN cancela y reemplaza todas las otras indicaciones de tipos de batería que aparecen en la
guía de inicio rápido u otra documentación.
iRig PRE
Gracias por comprar iRig PRE.
Ésta es una guía básica para iniciar el uso.
Su paquete contiene:
• iRig PRE
• Batería de 9V
• Banda Velcro
• Guía Rápida de Inicio
• Tarjeta de registración.
1x
1x
1x
iRig PRE le permite conectar cualquier micrófono profesional a su iPhone, iPod touch, iPad o dispositivo
Android. Gracias a la amplia gama de ganancia y poder phantom integrado, se puede conectar cualquier tipo
de micrófono: Dinámico, Condensador o de Cinta.
Registre su iRig PRE
Al registrarse, podrá acceder soporte técnico, activar su garantía y recibir JamPoints™ gratis añadidos a su
cuenta. ¡JamPoints™ ofrece descuentos para compras de IK en el futuro! Registrarse también lo mantiene al día
con noticias sobre nuevos productos e información sobre actualizaciones.
Regístrese en: www.ikmultimedia.com/registration
18
Page 19

Español
Para Empezar
iRig PRE se puede usar con su iPhone, iPod touch, iPad o dispositivo Android.
1. Inserte la batería de 9V al compartimiento de la batería en el panel inferior del iRig PRE. Deslice
cuidadosamente la cubierta de la batería hacia la dirección de la flecha con el texto “OPEN”. Cuando el
compartimiento esté abierto, coloque la batería cuidadosamente, alineando la polaridad + y - como se
muestra aquí. Dependiendo del estilo y marca de la batería, es posible que sea necesario sostener la batería
mientras se cierra la cubierta.
19
Page 20

Español
2. Conecte su micrófono a la entrada del conector XLR.
3. Conecte iRig PRE a la salida de auriculares de su dispositivo móvil.
OFF
1
2
XLR
MIC
4. Encienda el iRig PRE deslizando el interruptor a la posición ON. La luz verde LED se encenderá.
ON
20
Page 21

Español
5. Si se está usando un micrófono que requiere poder phantom (como la mayoría de micrófonos
condensadores), deslice el interruptor a la posición superior (+48V) para encender el poder phantom. La luz
roja LED se encenderá.
+48V
6. Descargue e instale el app iRig Recorder o VocaLive del App Store o del Google Play Store a su dispositivo
móvil.
iRig Recorder
VocaLive
ikdownloads.com/irigpre
App Store is a service mark of Apple Inc.
21
Page 22

Español
7. Ahora puede grabar usando su micrófono preferido en su aparato móvil. Para el mejor resultado, se debe
ajustar el control de ganancia (GAIN) adecuadamente. Verifique el medidor de nivel de entrada que está
utilizando para grabar (como iRig Recorder). Este medidor debe llegar al mayor nivel posible, pero nunca
debe llegar al máximo nivel. Para incrementar la ganancia de iRig PRE, gire la perilla hacia arriba. Para
reducir la ganancia de iRig PRE, gire la perilla hacia abajo.
8. Si necesita monitorear el sonido que se está grabando, conecte sus auriculares a esta conexión. Recuerde
que esta salida replica la salida de auriculares del dispositivo móvil, sólo se escuchará audio de aplicaciones
que incluyen monitoreo de entrada/salida en tiempo real, como iRig Recorder.
22
Page 23

Español
9. Si está usando iRig PRE para conectar un micrófono para vocales, se necesitará usar el app VocaLive
que proporciona efectos de audio de alta calidad específicamente diseñados para vocales. En este caso,
conecte su mezclador o sistema de altavoces a esta conexión.
Consejos para el uso
• Para prevenir ruido excesivo en sus grabaciones, siempre configure la ganancia (GAIN) adecuadamente. Si
la ganancia es muy baja, las grabaciones serán más silenciosas, y cuando se incrementa el volumen en el
app tendrán mucho ruido. Si la ganancia es muy alta, las grabaciones tendrán distorsión.
• Tenga CUIDADO de no encender el poder phantom con micrófonos de cinta, ya que la corriente puede
fluir al elemento de cinta y dañarlo. Cuando se usa micrófonos de cinta, encienda el poder phantom SÓLO
cuando el micrófono lo especifica.
• Si se oye retroalimentación al usar ajustes altos de ganancia, baje el volumen del dispositivo móvil de los
botones de volumen del aparato.
AVISO: Daño permanente a los oídos puede resultar si se utilizan auriculares con niveles
de volumen muy altos. Sus oídos se pueden adaptar a niveles más altos de sonido, lo que
puede sentirse normal pero puede causar daño a los oídos. Ajuste el nivel de volumen de su
dispositivo a un nivel adecuado antes que esto ocurra. Si empieza a escuchar un zumbido en
sus oídos, reduzca el volumen o suspenda el uso de auriculares con su dispositivo.
23
Page 24

Español
Especificaciones
(medición con la perilla GAIN en posición central)
• Respuesta de frecuencia: de 20 Hz a 20 kHz +/- 1.5 dB
• Ruido: -98 dB banda entera, poder phantom ENCENDIDO
• Máximo nivel de salida: 2 Vrms
• Distorsión: 0.025% THD
• Máxima corriente de poder phantom: 6mA
• Duración de batería (célula Alcalina 9V): aprox. 30 horas sin poder phantom, aprox. 10 horas con poder
phantom encendido.
Garantía
Por favor visite:
www.ikmultimedia.com/warranty
para ver la póliza completa de garantía.
Servicio Técnico y Más Información
www.ikmultimedia.com/support
www.irigpre.com
24
Page 25

Italiano
ATTENZIONE: RISCHIO DI ESPLOSIONE SE LA BATTERIA VIENE SOSTITUITA CON UNA DI TIPO NON
CORRETTO. SMALTIRE LE BATTERIE SECONDO LE ISTRUZIONI.
ATTENZIONE: iRig PRO può essere utilizzato ESCLUSIVAMENTE con:
- Batterie non ricaricabili ZINCO-CARBONE o ALCALINE di tipo comune.
- Batterie ricaricabili Ni-MH di tipo comune con capacità masima di 300mAh.
Questa AVVERTENZA cancella e sostituisce tutte le altre indicazioni sui tipi di batterie utlizzabili che possono
apparire nella guida rapida o in qualsiasi altro luogo.
iRig PRE
Grazie per aver acquistato iRig PRE.
Questa è una breve guida per consentirti di iniziare subito a utilizzare iRig PRE.
La confezione include:
• iRig PRE
• Pila 9 volt
• Fascetta in velcro
• Guida rapida
• Cartolina di registrazione.
1x
1x
1x
iRig PRE ti consente di connettere qualsiasi microfono professionale al tuo iPhone, iPod touch, iPad o
dispositivo Android. Grazie ad un ampio intervallo di gain e alla phantom power integrata, puoi collegare
qualsiasi tipo di microfono: dinamico, a condensatore o a nastro.
Registra il tuo iRig PRE
In seguito alla registrazione hai accesso al supporto tecnico, attivi la garanzia e ricevi JamPoints™ sul tuo
account. I JamPoints™ ti permettono di ottenere sconti sui prossimi acquisti di prodotti IK! La registrazione ti
consente inoltre di essere informato tempestivamente sui nuovi prodotti e sugli aggiornamenti.
Registra il tuo iRig PRE all’indirizzo: www.ikmultimedia.com/registration
25
Page 26

Italiano
Come iniziare
iRig PRE può essere usato con il tuo iPhone, iPod touch, iPad o dispositivo Android.
1. Inserisci la batteria 9V nell’apposita sede posizionata sotto iRig PRE. Apri delicatamente il coperchio della
sede, facendolo scivolare nella direzione indicata dalla freccia vicina alla scritta “OPEN”. Dopo aver rimosso
il coperchio, inserisci la batteria 9V allineando le polarità + e – come illustrato. A seconda della marca e del
modello di batteria, potrebbe essere necessario tenerla leggermente premuta in sede mentre si chiude il
coperchio.
26
Page 27

Italiano
2. Collega il tuo microfono al connettore XLR.
3. Collega iRig PRE all’ingresso cuffie del tuo dispositivo mobile.
OFF
1
2
XLR
MIC
4. Attiva iRig PRE spostando l’interruttore su ON. Si accenderà il LED verde.
ON
27
Page 28

Italiano
5. Se stai utilizzando un microfono che necessita di phantom power (come la maggior parte dei microfoni a
condensatore), sposta l’interruttore sulla posizione più in alto (indicata con +48V) per attivare la phantom
power. Si accenderà il LED rosso.
+48V
6. Scarica le app iRig Recorder o VocaLive dall’App Store o dal Google Play Store e installale sul tuo
dispositivo mobile.
iRig Recorder
VocaLive
ikdownloads.com/irigpre
App Store is a service mark of Apple Inc.
28
Page 29

Italiano
7. Ora puoi registrare utilizzando il tuo microfono preferito con il tuo dispositivo mobile. Per ottenere il risultato
migliore, devi regolare correttamente il controllo di GAIN. Controlla il livello di input nell’app che utilizzi per
registrare (ad esempio iRig Recorder). Il livello deve essere il più alto possibile, ma non deve mai raggiungere
il livello massimo o di clipping. Per aumentare il livello di gain di iRig PRE, ruota il potenziometro GAIN verso
l’alto. Per diminuire il gain di iRig PRE, ruota il potenziometro GAIN verso il basso.
8. Se vuoi monitorare ciò che stai registrando, connetti le cuffie all’uscita di iRig PRE. Ricorda che questo
connettore replica l’uscita cuffie del tuo dispositivo mobile, perciò da qui potrai sentire l’audio solo con app
che supportano il passaggio di segnale in input/ouput in tempo reale come iRig Recorder.
29
Page 30

Italiano
9. Se vuoi connettere un microfono per voce ad iRig PRE, ti consigliamo di utilizzare l’app VocaLive, in modo
da avere a disposizione effetti di qualità professionale, creati apposta per la voce. In questo caso, connetti il
mixer o direttamente l’impianto a questa uscita.
Consigli d’uso
• Per evitare che le tue registrazioni abbiano un eccessivo rumore di fondo, assicurati sempre che il
potenziometro di GAIN sia impostato correttamente. Se il GAIN è troppo basso, il volume delle registrazioni
sarà troppo basso, e avrai troppo rumore quando ne alzerai il volume dall’app. Se il GAIN è troppo alto, le
registrazioni saranno distorte.
• ATTENZIONE: non attivare la phantom power con microfoni passivi a nastro, perché la corrente potrebbe
danneggiare il nastro del microfono. Quando utilizzi microfoni a nastro, attiva la phantom power solo quando
questo è espressamente specificato nelle istruzioni d’uso del microfono.
• Se senti feedback quando usi livelli alti di GAIN, abbassa il volume del tuo dispositivo mobile con i pulsanti
di volume del dispositivo.
ATTENZIONE: Danni permanenti all’udito possono scaturire dall’uso di auricolari e cuffie ad
alto volume. E’ possibile che con il tempo l’orecchio si adatti ad alti volumi sonori tanto da farli
apparire come normali, ma questo è dannoso per l’udito. Regolare il volume d’ascolto prima
che questo accada. Se avvertire ronzio o disturbi alle orecchie interrompete immediatamente
l’ascolto.
30
Page 31

Italiano
Specifiche
(misure effettuate con il livello di GAIN posizionato a metà)
• Risposta in frequenza: da 20 Hz a 20 kHz +/- 1.5dB
• Rumore: -98 dB fullband, con phantom power attiva
• Livello massimo di uscita: 2 Vrms
• Distorsione: 0.025% THD
• Massima corrente della phantom power: 6mA
• Durata della Batteria (Alcalina 9V): circa 30 ore con phantom power non attiva, circa 10 ore con phantom
power attiva.
Garanzia
Visita:
www.ikmultimedia.com/warranty
per le norme di garanzia.
Supporto e ulteriori informazioni
www.ikmultimedia.com/support
www.irigpre.com
31
Page 32

Deutsch
VORSICHT: EXPLOSIONSRISIKO WENN DIE BATTERIE DURCH EINEN FALSCHEN TYP ERSETZT WIRD.
ENTSORGEN SIE AUFGEBRAUCHTE BATTERIEN ENTPRECHEND DEN BEIGELEGTEN HINWEISEN.
VORSICHT: iRig PRO kann AUSSCHLIESSLICH mit folgenden Batterietypen verwendet werden:
- Herkömmlichen, nicht wiederaufladbaren ZINK-KOHLE- oder ALKALINE-Batterien
- Herkömmlichen, wiederaufladbaren NI-MH-Batterien mit maximaler Kapazität von 300mAh.
Diese WARNUNG ersetzt alle bisherigen Hinweise in Bezug auf kompatible Batterietypen, die sich im Quick
Start Guide oder an anderer Stelle befinden können.
iRig PRE
Vielen Dank für den Erwerb des iRig PRE. Diese Anleitung hilft Ihnen bei den ersten Schritten. In der Box finden
Sie:
• iRig PRE
• 9V Batterie
• Klebeband
• Kurzanleitung
• Registrierungskarte.
1x
1x
1x
Mit Hilfe von iRig PRE können Sie ein beliebiges professionelles Mikrofon an Ihr iPhone/iPod touch/iPad oder
Android-Gerät anschließen. Dank dem weiten Gain-Bereich und eingebauter Phantomspeisung kann jeder
Mikrofontyp angeschlossen werden: dynamische, Kondensator und Ribbon Mikrofone.
Registrierung von iRig PRE
Mit der Registrierung erhalten Sie technische Hilfe, Garantie und zusätzliche JamPoints. JamPoints belohnen Sie
mit Rabatten bei zukünftigen Bestellungen von IK Produkten! Die Registrierung hält Sie außerdem stets über die
neuesten Produkte und Updates auf dem Laufenden.
Registrierung: www.ikmultimedia.com/registration
32
Page 33

Deutsch
Erste Schritte
Das iRig PRE kann mit einem iPhone/iPod touch/iPad oder Android-Gerät verwendet werden.
1. Legen Sie die 9V Batterie in den dafür vorgesehenen Slot auf der Bodenplatte des Gerätes ein. Öffnen Sie
das Batteriefach vorsichtig, indem Sie es in Pfeilrichtung schieben (neben der Schrift “OPEN“). Nachdem Sie
das Fach geöffnet haben, legen Sie die 9V Batterie vorsichtig ein, wobei Sie auf die richtige + und – Polarität
achten müssen. Abhängig von der Marke und Batterietyp kann es vorkommen, dass Sie sie festhalten
müssen, wenn Sie das Fach schließen.
33
Page 34

Deutsch
2. Schließen Sie Ihr Mikrofon an die XLR-Buchse des iRig PRE an.
3. Schließen Sie das iRig PRE an die Kopfhörerbuchse von Ihrem Mobilgerät an.
OFF
1
2
XLR
MIC
4. Schalten Sie das iRig PRE an, indem Sie den ON/OFF-Schalter in die ON Stellung schieben. Die grüne LEDAnzeige wird anleuchten.
ON
34
Page 35

Deutsch
5. Falls Sie ein Mikrofon benutzen, das Phantomspeisung benötigt (wie die meisten Kondensatormikrofone),
schieben Sie den Schalter in die obere Stellung (+48V), um die Phantomspeisung zu aktivieren. Die rote
LED-Anzeige wird anleuchten.
+48V
6. Laden Sie die iRig Recorder oder VocaLive Apps im App Store oder Google Play Store herunter, und
installieren Sie sie auf Ihrem Mobilgerät.
iRig Recorder
VocaLive
ikdownloads.com/irigpre
App Store is a service mark of Apple Inc.
35
Page 36

Deutsch
7. Sie sind jetzt in der Lage, mit Ihrem Mikrofon auf Ihrem Mobilgerät aufzunehmen. Für beste Ergebnisse
achten Sie auf die korrekten GAIN-Einstellungen. Überprüfen Sie den Input-Level-Regler in der verwendeten
App (zum Beispiel iRig Recorder). Dieses Level sollte möglichst hoch sein, jedoch nicht seinen Höhepunkt
oder die Clipping-Schwelle erreichen. Um den Gain zu erhöhen, drehen Sie den Gain-Knopf in Richtung
Geräteoberteil. Um den Gain zu verringern, drehen Sie den Gain-Knopf in Richtung Geräteunterteil.
8. Wenn Sie Ihre Aufnahme über Kopfhörer in Echtzeit kontrollieren wollen, schließen Sie Ihre Kopfhörer
an diese Buchse an. Bitte beachten Sie, dass dieser Ausgang die gleichen Audiodaten wie der
Kopfhörerausgang von Ihrem Mobilgerät überträgt, so dass Sie Audio nur aus Apps hören können, die
Echtzeit-Passthrough von Input/Output unterstützen (wie zum Beispiel iRig Recorder).
36
Page 37

Deutsch
9. Wenn Sie das iRig PRE zum Anschließen eines Gesangsmikrofons während Auftritte benutzen, benötigen
Sie die VocaLive App, die hochwertige Effekte speziell für Gesang bietet. Schließen Sie Ihren Mixer oder Ihre
PA-Anlage an diese Ausgangsbuchse an.
Tipps
• Um übermäßige Geräusche in Aufnahmen zu vermeiden, stellen Sie den GAIN korrekt ein. Falls der Gain zu
niedrig ist, sind Aufnahmen zu leise und wenn Sie sie innerhalb einer App aufpeppen wollen, fangen sie an
zu rauschen. Falls der Gain zu hoch ist, werden Aufnahmen verzerrt.
• Bitte achten Sie darauf, die Phantomspeisung nicht anzuschalten, wenn Sie ein passives Ribbon-Mikrofon
benutzen, da die Stromzufuhr das Ribbon-Element beschädigen könnte. Bei Benutzung eines RibbonMikrofons die Phantomspeisung nur anschalten, wenn es von der Gebrauchsanweisung Ihres Mikrofons
ausdrücklich vorgeschrieben wird.
• Falls Sie Feedback bei hohen GAIN-Einstellungen bekommen, verringern Sie die Lautstärke Ihres
Mobilgeräts.
WARNUNG: Der Gebrauch von Kopf- oder Ohrhörern bei hoher Lautstärke kann zu
dauerhaften Gehörschäden führen, Gefahr besteht auch durch Gewöhnung an höhere
Lautstärken. Arbeiten Sie daher stets mit angepasster Lautstärke. Falls Sie ein Klingeln oder
ähnliche Ohrgeräusche vernehmen, reduzieren Sie sofort die Lautstärke oder setzen Sie die
Kopfhörer ab.
37
Page 38

Deutsch
Technische Daten
(gemessen mit GAIN in der Mittel-Stellung)
• Frequenzgang: von 20 Hz bis 20 kHz +/- 1.5dB
• Geräuschpegel: -98 dB (fullband), Phantomspeisung ON
• Maximum Output-Level: 2 Vrms
• Verzerrung: 0.025% THD
• Maximale Stromstärke (Phantomspeisung): 6mA
• Batteriedauer (Alkaline 9V Cell): Circa 30 Stunden mit abgeschalteter Phantomspeisung (OFF), circa 10
Stunden mit Phantomspeisung.
Gewährleistung
Bitte besuchen Sie
www.ikmultimedia.com/warranty
für weitere Informationen.
Support und weitere Informationen
www.ikmultimedia.com/support
www.irigpre.com
38
Page 39

日本語
警告:不適切な電池をご利用になると破裂、発火の恐れがあります。
下記以外の電池をお使いの方は、すみやかに破棄してください。
警告:iRig PROでお使いいただける電池は、下記のみです。
- 充電方式ではない民生用のマンガン乾電池、アルカリマンガン乾電池
- 最大容量300mAh以下のニッケル水素充電池
本警告は、付属のクイック・スタート・ガイドなど他の箇所に書かれた電池に関する記述を置き換え、優先されるもの
となります。.
iRig PRE
iRig PREをお買い上げいただき、ありがとうございます。ご使用になる前に、同梱物をお確かめ下さい。:
• iRig PRE本体
• 9V電池
• マジックテープ
• ク イ ッ ク・ス タ ー ト・ガ イ ド
• レジストレーション・カード.
1x
1x
1x
iRig PREがあれば、お持ちのプロフェッショナル・マイクを、iPhone、iPod touch、iPad、Android機器に接続して使える
ようになります。ゲイン調整機能とファンタム電源により、ダイナミック、コンデンサー、リボンと、あらゆる種別のマイ
クに対 応します。
.
オンライン・レジストレーション
購入後すみやかに www.ikmultimedia.com/registration にて登録してください。テクニカル・サポート、保証が有効
になる他、IK MultimediaオンラインストアでつかえるJamPoints™が提供されます。
39
Page 40

日本語
基本的な使い方
iRig PREをiPhone、iPod touch、iPad、Android機器に接続して使います。次のページの図の番号を参照しながらお読
みください。.
1. iRig PRE下部の電池ボックスに9V電池を装着します。蓋を空ける時は「OPEN」の矢印方向にスライドさせてくだ
さい。蓋が開いたら、9V電池の+/-端子を間違えないように接続してください。蓋を閉める時は矢印の逆方向にス
ライドさせてください。電池の形状により、電池を押さえながら閉める必要があるかもしれません。.
40
Page 41

日本語
2. マイクロフォンをXLRケーブルに挿して、iRig PRE下部のXLR端子に接続してください。.
3. iRig PREのミニ・ケーブルをモバイル機器のヘッドフォン端子に接続してください。.
OFF
1
2
XLR
MIC
4. iRig PREの電源スイッチをONにして、緑色のLEDが点灯したことを確認してください。
ON
41
Page 42

日本語
5. ファンタム電源が必要なコンデンサー・マイクをお使いの場合は、iRig PREの電源スイッチを「+48V」の位置に合
わせてください。赤い+48V LEDが点灯します。.
+48V
6. App StoreSM、Google PlayにてiRig Recorder、VocaLiveなど外部マイク対応アプリをダウンロードして、モバイル
機器にインストールしてください。t.
iRig Recorder
VocaLive
ikdownloads.com/irigpre
App Store is a service mark of Apple Inc.
42
Page 43

日本語
7. iRig Recorderなどのレコーディング・アプリを開いたら、マイクの前で音を出して、レベル・メーターを見ながら
iRig PRE右側のGAINダイアルを調整してください。上方向に回すとゲインが上がり、下方向に回すとゲインが絞
られます。最大の音量時にクリッピングしないように注意しながら、できるだけゲインを上げると良いでしょう。.
8. レコーディング中の音をモニターしたい時は、iRig PRE左上のヘッドフォン端子にヘッドフォンを接続してくださ
い。モバイル機器のヘッドフォン・アウトの信号がスルー出力されます。ここで音が聞けるのは、iRig Recorderな
ど、レコーディング中の入力音をリアルタイムにモニター可能なアプリの使用時に限られますのでご注意くださ
い 。.
43
Page 44

日本語
9. VocaLiveのボーカル・エフェクトをライブ・ステージでお使いの場合は、iRig PREのヘッドフォン・アウト端子に「ス
テレオ・ミニ - L/Rステレオ分岐ケーブル」を挿して、分岐側をミキサーなどのPAシステムに接続してください。モ
ノ・ケーブルを使うとフィードバックの原因になるのでご注意ください。
使用上のヒント
• レコーディング時のノイズを最小に抑えるために、iRig PREのGAINを最適な位置に調整してください。ゲイン不
足の小さな音をアプリで増幅すると、ノイズ成分の大きい音になります。逆にゲインが大きすぎると、音が割れた
り歪んだりします。
• パッシブ・リボン・マイク使用時は、誤って+48Vファンタム電源をONにしないよう注意してください。リボン部品
に電流が流れると破損する危険があります。リボン・マイク使用時は、ファンタム電源が必要な仕様かそうでない
かを慎重にお確かめください。
• iRig PREのGAINを上げた時にフィードバックが発生するようなら、再生音量をモバイル機器本体のボリューム・
ボタンで絞ってください。
警告!:ヘッドフォンを大音量で長期間続けて使用すると、恒久的な騒音性難聴になる恐れがあります。大
音量での再生を続けていると耳が慣れてくるように感じることがありますが、聴力は確実に損なわれま
す。聴力が損なわれる前に、音量を低くして下さい。耳鳴りがするようならすぐにヘッドフォン/イヤホンの
使用をやめて休息をとったのち、症状に応じて専門医の診察を受けて下さい。
44
Page 45

日本語
仕様
GAIN=中間位置にて測定
• 周波数特性:20 Hz ~ 20 kHz +/- 1.5dB
• ノイズ:-98 dB 全帯域(ファンタム電源ON)
• 最大出力レベル:2 Vrms
• 歪:0.025% THD
• ファンタム電源最大電流:6mA
• 電池駆動時間(9Vアルカリ電池使用時):約30時間(ファンタム電源OFF)、約10時間(ファンタム電源ON).
保証
保証ポリシーに関しては www.ikmultimedia.com/warranty を参照してください。
サ ポ ートと詳 細 は
www.ikmultimedia.com/support
www.irigpre.com
45
Page 46

中文 簡体字
警告:使用错误型号的电池将会有爆炸危险,废弃电池请参照说明进行处置。
警告:iRig PRO只能使用:
-消费级,不可充电的碳锌电池或碱性电池。
-消费级,最大容量为300mAh的镍氢充电电池 。
此警告替代所有出现在产品快速指南中或其他地方的电池使用说明。.
iRig PRE
感谢您购买了iRig PRE,本指南能帮助您快速了解产品的操作,包装盒内包含了以下物品:
• iRig PRE
• 9V 电池
• 尼龙搭扣
• 产品快速操作指南
• 注册卡.
1x
1x
1x
通过iRig PRE你可以连接各种专业的麦克风到您的iPhone,iPod touch,iPad或Android设备。由于拥有较宽
的增益调范围并且能提供幻象电源,您可以连接各类麦克风:电容式、动圈式以及铝带式。
注册你购买的iRig PRE
通过注册,您将可以得到技术支持和相应的保修服务,并且能免费拥有一个JamPoints™账号,通过它您可以在
以后购买IK产品时享受一定的折扣!同时还能获取相关资讯和最新动态。
注册地址: www.ikmultimedia.com/registration
46
Page 47

中文 簡体字
入门指南
iRig PRE可与iPhone,iPod touch,iPad或Android设备连接使用。
1. 安装9V电池。朝“OPEN”箭头所指的方向轻轻滑动底部侧端的电池盖,打开电池盒后按正、负极方向
安装好电池。在盖上滑盖时,若出现卡壳的情况,可能是由于电池品牌和类型的原因,请确定电池安装正确后,
再次盖上滑盖。
47
Page 48

中文 簡体字
2. 连接麦克风到卡侬端口。
3. 连接iRig PRE到移动设备耳机插孔。
OFF
1
2
XLR
MIC
4. 开启iRig PRE,将电源开关滑动到ON位置上,绿色的LED灯亮起。
ON
48
Page 49

中文 簡体字
5. 如果您使用的麦克风需要供电(如大多数的电容式麦克风),将电源开关滑至最上端(注明+48V) 的位置
上,红色的LED灯亮起。
+48V
6. 在App Store或Google Play Store软件商店下载iRig Recorder或VocaLive软件,安装在移动设备上。
iRig Recorder
VocaLive
ikdownloads.com/irigpre
App Store is a service mark of Apple Inc.
49
Page 50

中文 簡体字
7. 现在您可以选择使用喜爱的麦克风,连接到移动设备进行录音。为了得到最佳音
效,需要适当的调节增益控制。在录制时,要用到带有输入电压测试表的软件(如,iRig
Recorder)来检查电压输入值。输入值应尽可能的大,但绝不要达到最值或出现削波信号。
调高iRig PRE增益,向上方旋转该调节旋钮。调低iRig PRE增益,向下方旋转该调节旋钮。
50
Page 51

中文 簡体字
8. 如果需要对所录制的内容进行监听,可将耳机插入耳机插孔。但请注意,此输出音效是复制了移动设备
上的耳机输出,因此,只有通过使用支持实时输入/输出的应用软件如:iRig Recorder,才能听到准确的音频
效果。
9. 如果您是在演唱时使用,通过iRig PRE到声乐麦克风,需要在输出端连接混音器或PA系统。需要使用
VocaLive 软件,为您提供高品质的人声音效。
使用提示
• 为了避免在录音时出现太大的噪音,请将增益(GAIN)旋钮调至到合适值。如果增益(GAIN)设置过
低,录制的音量会很小,再通过软件调节音量会使噪音过大。如果增益(GAIN)设置过高,录音将会产生失真
效果。
• 注意:当使用铝带式麦克风时,请不用打开电源供电,因为当电流经过铝带时会损伤到铝带。因此,除
非您的麦克风有特别标明允许的情况下可开启电源使用,否则在您连接铝带式麦克风时,请关闭电源供电。
• 当使用高增益,并出现回声情况时,可以通过调低移动设备音量大小来解决。
警告:如果在使用耳机或耳麦时将音量开得过大,可导致永久性的丧失听力。虽然逐渐将音量调大有
可能会比较容易适应,但是也有可能会损伤你的听力。在播放前请将音量调至在一个合适的大小,如
果你感觉到有耳鸣,请调低音量或者停止通过耳机或耳麦。.
51
Page 52

中文 簡体字
技术参数
(增益在中间位置时,测量所得的参数)
• 频率响应:从 20 赫兹到20 千赫 +/- 1.5分贝
• 噪音范围:开启电源,-98分贝
• 最大电压:2 Vrms
• 失真范围:0.025% 谐波失真率
• 最大电流:6mA
• 电池持续时间(9V碱性电池):当供电关闭可以使用近30小时,开启供电可以使用近10小时。
保修
请浏览网页:
www.ikmultimedia.com/warranty
了解完整的质量保修条款,
获取更多信息
www.ikmultimedia.com/support
www.irigpre.com
52
Page 53

IK Multimedia
IK Multimedia Production Srl
Via dell’Industria 46, 41122 Modena, Italy
Phone: +39-059-285496 - Fax: +39-059-2861671
IK Multimedia US LLC
1153 Sawgrass Corporate Parkway, Sunrise, FL 33323
Phone: 954-846-9101 - Fax: 954-846-9077
IK Multimedia Asia
TB Tamachi Bldg. 1F, MBE #709,
4-11-1 Shiba, Minato-ku, Tokyo 108-0014
www.ikmultimedia.com/contact-us
iRig® PRE, VocaLive™ and iRig® Recorder are trademarks or registered trademarks property of IK Multimedia Srl. All other product names and images,
trademarks and artists names are the property of their respective owners, which are in no way associated or affiliated with IK Multimedia. iPad, iPhone,
and iPod touch are trademarks of Apple Inc., registered in the U.S. and other countries. App Store is a service mark of Apple Inc.. Android is a trademark
of Google Inc.. Google Play is a trademark of Google Inc.
2015/02/23
53
 Loading...