

Page 1

Digital shotgun microphone
USER MANUAL
Page 2

Contents
Table of Contents
Contents 2
English 3
iRig Mic Video 3
Register your iRig Mic Video 3
Installation and setup 4
Recording tips 8
DSLR camera setup 8
DSLR camera usage 10
DSLR camera tips 10
Using iRig Mic Video with a computer 11
Setting optimal gain on iRig Mic Video 12
Direct monitoring 12
Troubleshooting 13
Specifications 13
Warranty 14
Support and more info 14
2
Page 3

English
iRig Mic Video
Thank you for purchasing iRig Mic Video.
Your package contains:
• iRig Mic Video
1x
1x
• Lightning cable
1x
1x
1x
• USB-C cable
• OTG cable
• TRS to TRS cable (DSLR camera cable)
• Wind Shield
• Metal plates
• 1/4” thread adapter to Hot Shoe (for mounting on DSLR camera)
1x
1x
1x
1x
Compact and lightweight by design, the iRig Mic Video delivers clear, crisp, directional audio with incredible
ease of use. Its tight pickup area focuses directly in front of the microphone and reduces other surrounding
sounds, ensuring that your subject is isolated from distracting background noise.
Thanks to its neodymium magnets it easily attaches to a wide range of smartphones and tablets as well as
laptops. It sports a micro USB connector that can be used to connect to any device and an headphones out
allows you to monitoring the recorded audio.
Also, it can be mounted on a DSLR camera using the female 1/4” thread insert and, thanks to the 1/8” output
jack it is possible to record great audio directly on your camera. Plus, thanks to the CR1632 battery (not
included), it can be also used with DSLR cameras that do not provide “plug-in power” and, furthermore, the iRig
Mic Video contains a 10dB pre amplifier, boosting the mic signal allowing the user to reduce the camera’s micinput level, reducing the amount of noise generated by the camera’s lower quality audio circuitry.
Register your iRig Mic Video
By registering, you can access technical support, activate your warranty and receive free JamPoints™ which will
be added to your account. JamPoints™ allow you to obtain discounts on future IK purchases! Registering also
keeps you informed of all the latest software updates and IK products.
Register at: www.ikmultimedia.com/registration
3
Page 4

English
Installation and setup
1. Fix the metal plate in the desired position on your device. You can stick the plate on the back of the device,
or you can stick it on the back of the case, or you can insert it between the device and its case. Depending
on the position and the device you’re using, we provided two different plate sizes so you can use the one
that best fits your needs.
2. Attach the iRig Mic Video over the plate: thanks to the built-in magnets the microphone will remain fixed in
place.
4
Page 5
English
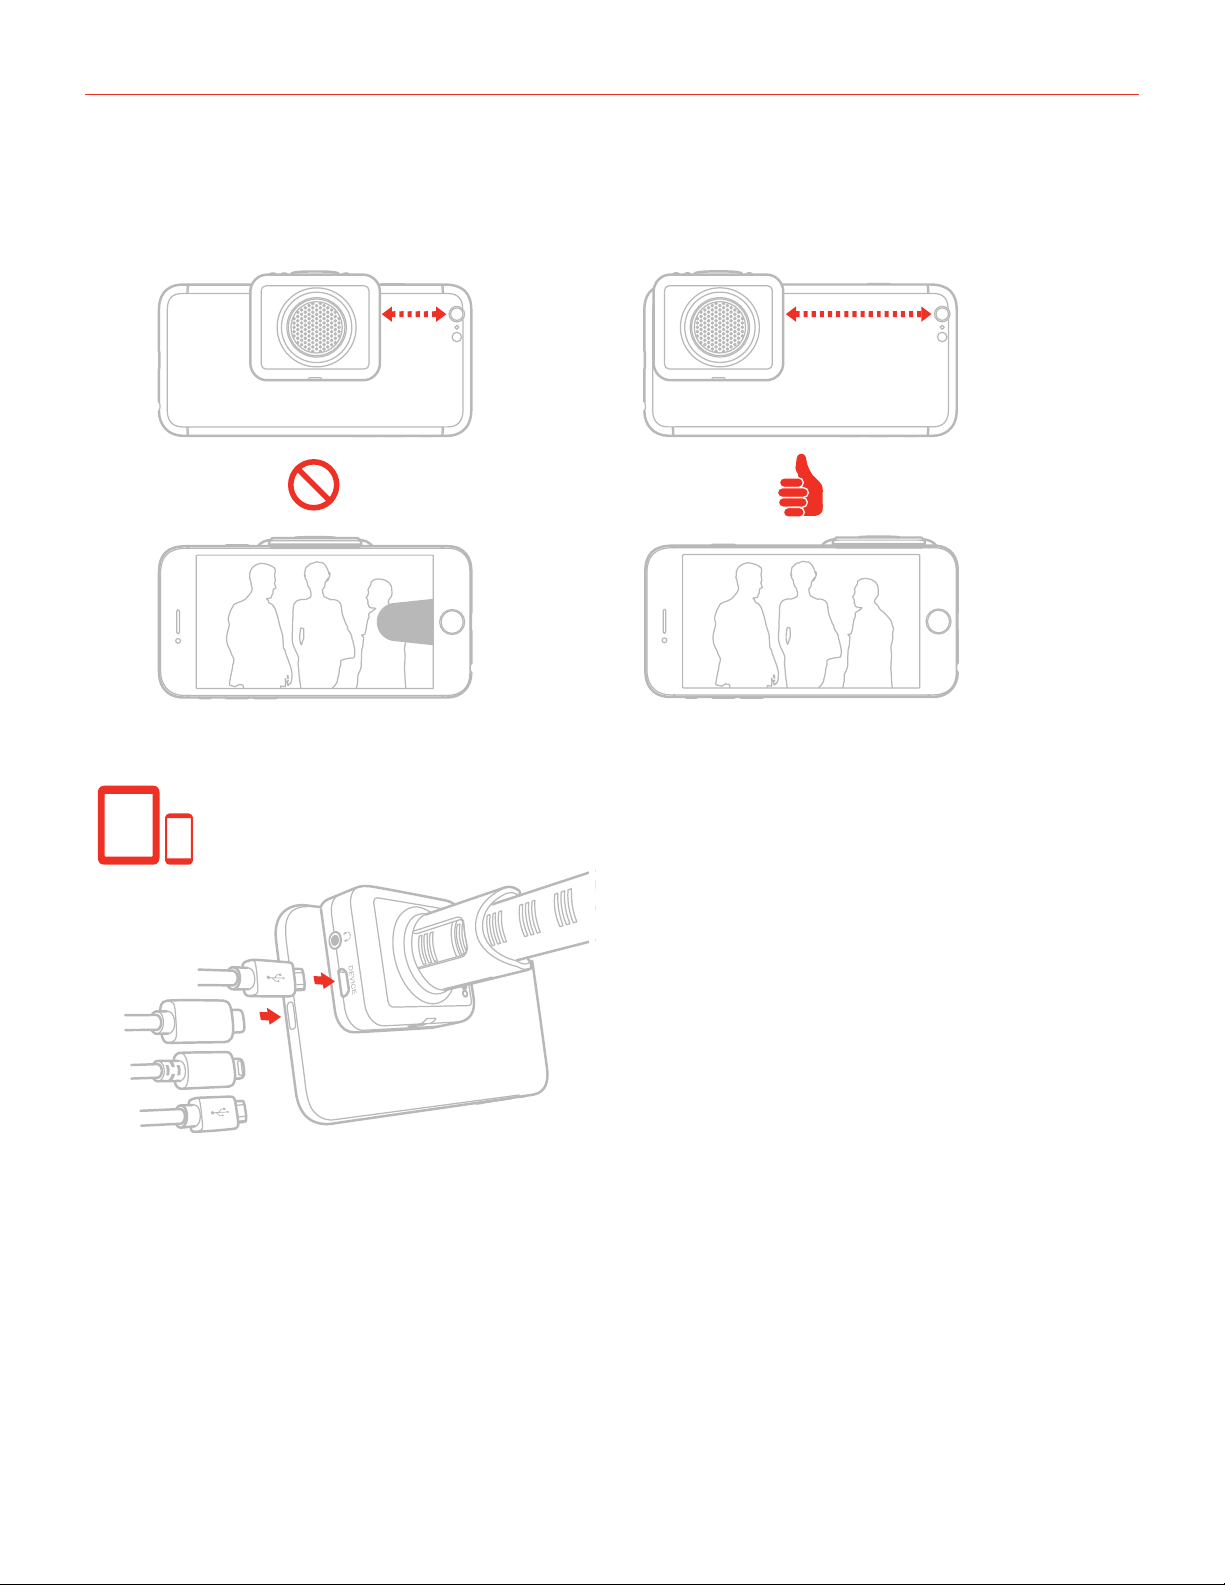
3. Make sure that you position the microphone outside the camera shooting area to avoid the acoustic tube
becoming visible in the image frame.
4. Connect the iRig Mic Video to the device with the included cables.
USB Type-C / Lightning / USB OTG
5
Page 6

English
5. Download the included App and launch it.
iRig Recorder
ikdownloads.com/irigmicvideo
6. Set your device to Airplane Mode and Do Not Disturb before recording. This allows you to record with no
audio interruptions from phone calls or app notifications.
7. Set the microphone gain with the gain thumbwheel.
BLUE
GREEN / ORANGE
RED
6
Page 7

English
8. Connect your headphones to the headphones out on iRig Mic Video. You can control its volume with the
device’s volume buttons. The Direct monitor button, allows you to activate the direct monitoring feature.
- +
9. Use the included wind shield in order to minimize environmental noises.
7
Page 8

English
Recording tips
• To avoid recording interference from phone calls, messages and various notifications, turn your device to
Airplane mode.
• Place the microphone as far as possible from the Wi-Fi and Bluetooth antenna: this will help minimize radio
interference and won’t affect device performance.
• Make sure to position the microphone outside the camera shooting area to avoid the acoustic tube
becoming visible in the image frame.
• To detach the iRig Mic Video from the metal plate, we recommend to slide the microphone instead of pulling
it perpendicularly, in order to use less force for detaching the magnet from the plate.
• Remember that the iRig Mic Video is a precision device that must be handled with care during use.
• The iRig Mic Video has a standard 1/4”-20 thread built into the bottom of the enclosure, so it is possible to
mount it on any suitable tripod stand.
• The iRig Mic Video magnetic snapping system is designed to optimally work with the included metal plates
or similar ones provided with phones and tablets covers. It is not advisable to snap the microphone on a
solid metal structure like tables or shelfs as in those a very strong force will be developed and handling the
unit will be difficult, with risk of damages.
DSLR camera setup
1. Insert the CR1632 battery (not included) into the battery compartment of iRig Mic Video. Make sure to place
the battery with correct polarity.
CR1632 BATTERY*
8
Page 9

English
2. Fix the hot-shoe adapter to the iRig Mic Video 1/4”-20 thread and then slide it into place on the camera
mount. Once the microphone is in place, secure it by tightening the ring.
3. Connect one end of the 3.5mm TRS cable into the camera’s ‘Microphone In’ socket.
4. Connect the other end of the 3.5mm TRS cable into the output socket on the microphone.
MIC
5. When using the iRig Mic Video with a DSLR camera, the microphone gain can be set only from the camera
settings. Please check your camera user’s manual in order to check if it allows you to control the external
microphone gain.
9
Page 10

English
6. When using the iRig Mic Video with a DSLR camera, you can connect a pair of headphone to the camera’s
headphones output (if present). Indeed, the iRig Mic Video built-in output can’t be used.
7. You can check the battery status by pressing the direct monitor button: if the LED next to it turns on bright
red, the battery is charged; if the LED turn on red at low intensity or does not turn on at all, then the battery
must be replaced.
DSLR camera usage
iRig Mic Video can be mounted on a DSLR camera using the female 1/4” thread insert and, thanks to the 1/8”
output jack it is possible to record great audio directly on your camera. Plus, thanks to the CR1632 battery (not
included), it can be used also with DSLR cameras that do not provide “plug-in power” and, more, the iRig Mic
Video contains a 10dB pre amplifier, boosting the mic signal allowing the user to reduce the camera’s mic-input
level, reducing the amount of noise generated by the camera’s lower quality audio circuitry.
IMPORTANT: to avoid discharging the battery, disconnect the TRS cable from the iRig Mic Video while not in
use. This will avoid the battery from discharge. We also recommend you remove the battery if storing your iRig
Mic Video for extended periods without use.
DSLR camera tips
Low level noise sound while recording.
This can be caused by the “Automatic Gain Control” or “AGC” function on the camera. This function allows
the camera to configure what it feels the best sound recording level is for a particular scene. For instance, if the
signal coming in is too quite the AGC will try to boost the sound levels making the sound more audible: if it is
increased too much (and depending on the quality of the camera microphone amplifier), the noise floor becomes
audible.
The AGC can be disabled on some cameras (please check you camera user’s manual). To help improve this
issue, the iRig Mic Video contains a 10dB preamplifier, increasing the mic signal so that the camera wont
engage its AGC.
We also suggest setting your audio levels manually to achieve an optimum signal to noise ratio and disabling the
AGC of the camera.
What cameras can support the iRig Mic Video?
The iRig Mic Video is compatible with most digital DSLR cameras and camcorders that sport an 1/8”
microphone input. The iRig Mic Video is powered by a 3V CR1632 battery: the battery will provide all the
needed power even with cameras that do not provide “plug-in power”. However, please check with your camera
manufacturer if your camera supports external microphone.
Will my iRig Mic Video fit into the hot shoe mount of my camera?
The hot-shoe adapter included with the iRig Mic Video is a standard size adapter. This standard shoe is suitable
for the majority of camera attachments. If your camera has a different, or custom adapter, please contact your
camera manufacturer.
10
Page 11

English
Using iRig Mic Video with a computer
It is possible to use iRig Mic Video with a computer equipped with an USB-A connector (cable not included) or
with USB-C connector (cable included). Once the iRig Mic Video is connected to the host, launch your audio
application and select iRig Mic Video as the input/output device from your system’s audio preferences. The 1/4”
thread underneath the microphone can be used to mount on a standard camera tripod.
11
Page 12

English
Setting optimal gain on iRig Mic Video
When using the iRig Mic Video check status LED.
BLUE
GREEN / ORANGE
RED
•IftheLEDisalternatingbetweenBLUEandGREENorisalwaysBLUEorGREEN,youshouldincreasetheiRig
Mic Video input gain.
•IftheLEDissometimesflashingREDyoushoulddecreasetheiRigMicVideoinputgain.
•Whenyourlevelsettingisoptimal,theLEDshouldalternatebetweenGREENandORANGE.
Direct monitoring
When recording an audio signal into your audio software, there is often a slight delay before it reaches the
outputs of the software and iRig Mic Video. This delay, called latency, is caused by the computer processing
required to convert and record audio. Since this delay can be distracting, iRig Mic Video provides a direct
monitoring path from the inputs to the outputs, which is activated by the Direct Monitor button. When Direct
Monitoring is enabled, the input signal is mixed with the output signal from your audio software and routed
directly to the Headphone output. This lets you hear the “live” inputs without latency. The Direct Monitor button
has no effect on what is being recorded by your software. When using the Direct Monitor feature, make sure any
software monitoring option for direct (or “low latency”) monitoring is disabled. Disabling low latency monitoring
prevents “double-monitoring” of input audio signals when using the Direct Monitoring feature. When “doublemonitoring” occurs, there will be an increase in volume and an undesirable “phasing” sound. For more details
about its monitoring function, refer to the documentation for your audio software.
12
Page 13

English
Troubleshooting
My recording is distorted.
Check that the input level on iRig Mic Video has been set properly. If the red LED is lighting when you talk or
sing decrease the input level as described in this guide.
I can’t hear anything from the headphone output.
Check that the app you’re using allows for audio-through from input to output. If not, you can activate the direct
monitor feature on iRig Mic Video.
Random noises appear during the recording.
This may be due to RF interferences: If the connected device sends or receives data wirelessly while recording,
noise could occur in the recording. We suggest to turn on Airplane mode and connect to Wi-Fi for streaming. If
the noise persists, we suggest to disable also the Wi-Fi.
The iRig Mic Video status LED is always dark blue and I don’t get any sound.
In order for iRig Mic Video to turn on, a Core Audio-compatible audio app must first be launched on your iOS
device or Mac.
iOS: Be sure you are using an app that works with digital audio input from the Lightning dock connector.
Mac: Be sure you have set “iRig Mic Video” as the audio input device on the audio app you are using.
Is the iRig Mic Video compatible with Android devices?
Yes, the iRig Mic Video is compatible with Android devices running Android 5 or later and with USB digital audio
capabilities. Micro-USB-OTG to Micro-USB cable included.
Specifications
Microphone Type: condenser, electret
Capsule Size: 0.55”
Polar Pattern: Supercardioid
Interface Type: USB digital shotgun microphone with built-in preamp
Conversion: 24-bit A/D, 24-bit D/A
Sampling Rate: 44.1 kHz, 48 kHz, 88.2 kHz and 96 kHz
Frequency Response: 20Hz - 20kHz
Maximum Sound Pressure: 125 dB
Sensitivity: -40 dB, 10 mV/Pa
Gain: adjustable over a 50 dB range
Controls: gain thumbwheel and direct monitor button
Metering: Built-in multicolor LED for status and audio level indication
Connector Type: standard Micro-USB
Headphones output: 1/8” TRS jack
DSLR camera output: 1/8” TRS jack
Power: USB powered. Battery powered (3V CR1632, not included) for DSLR operations.
Battery duration: over 50 hours use
13
Page 14

English
Warranty
Please visit:
www.ikmultimedia.com/warranty
for the complete warranty policy.
Support and more info
www.ikmultimedia.com/support
14
Page 15

IK Multimedia
IK Multimedia Production Srl
Via dell’Industria 46, 41122 Modena, Italy
Phone: +39-059-285496 - Fax: +39-059-2861671
IK Multimedia US LLC
590 Sawgrass Corporate Pkwy, Sunrise, FL 33325
Phone: (954) 846-9101 - Fax: (954) 846-9077
IK Multimedia Asia
TB Tamachi Bldg. 1F, MBE #709,
4-11-1 Shiba, Minato-ku, Tokyo 108-0014
www.ikmultimedia.com/contact-us
iRig® Mic Video is a registered trademark property of IK Multimedia Srl. All other product names and images, trademarks and artists names are the property of their respective owners, which are in no way associated or
afliated with IK Multimedia. iPad, iPhone, and iPod touch are trademarks of Apple Inc., registered in the U.S. and other countries. App Store is a service mark of Apple Inc.. Android is a trademark of Google Inc.. Google Play
is a trademark of Google Inc..
2019/09/24
15
 Loading...