


In the USA: if you experience problems with this unit,
call 732-346-0061 for GCI Technologies
customer service. Do not attempt to return
this equipment to your dealer.
Parts of the design of this product may be protected by worldwide patents. Information in this manual is subject to change without notice and does not represent a commitment on the part of
the vendor. GCI Technologies Corp. shall not be liable for any loss or damage whatsoever arising from the use of information or any error contained in this manual. No part of this manual may be
reproduced, stored in a retrieval system or transmitted, in any form or by any means, electronic, electrical, mechanical, optical, chemical, including photocopying and recording, for any purpose without
the express written permission of GCI Technologies Corp. It is recommended that all maintenance and service on this product is performed by GCI Technologies Corp. or its authorized agents. GCI
Tél: + 33 1 69 79 97 70 • Fax: + 33 1 69 79 97 80
Technologies Corp. will not accept liability for loss or damage caused by maintenance or repair performed by unauthorized personnel.
France • GSL Tecnologies S.A.R.L
2bis, rue Léon Blum, 91120 Palaiseau, France
Worldwide Headquarters
1 Mayeld Ave, Edison, NJ 08837, USA
Spain • GCI Technologies
Caspe, 172 - 1º A
08013 Barcelona, Spain
Tel: 34 93 436 37 00 • Fax: 34 93 347 69 61
Tel: (732) 346-0061 • Fax: (732) 346-0065
© GCI Technologies Corp. 2010 All Rights Reserved.
UK • GCI Technologies LTD
44 The Brambles Enterprise Centre
Waterlooville PO7 7TH, UK
Tel: 087 087 00880 • Fax: 087 087 00990
Germany • GCI Technologies GmbH
Lerchenstraße 14, 80995 München, Germany
Tel: 089 - 319 019 8 - 0 • Fax: 089 - 319 019 8-18
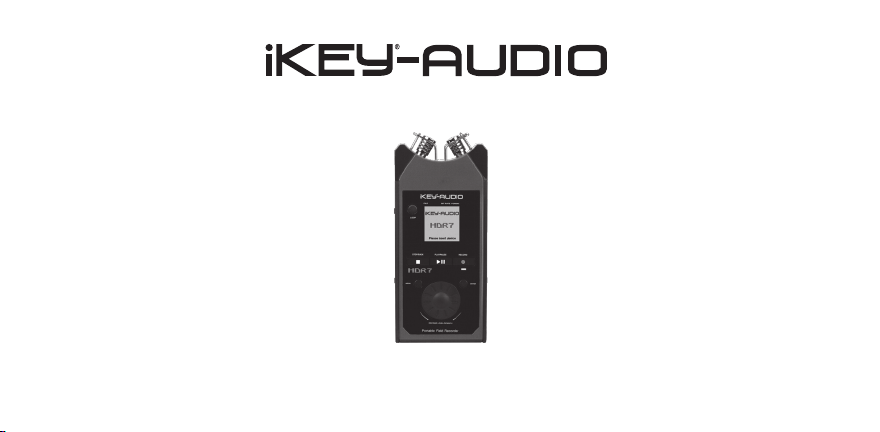
HDR7 PROFESSIONAL FIELD RECORDER
Instruction Manual | Manual de instrucciones | Manuel d’instructions | Bedienungshandbuch


en | es | fr | de
Contents | Contenidos | Sommaire | Inhaltsverzeichnis
Warning | Advertencia | Avertissement | Warnungen ....................................................
Introduction | Introducción | Introduction | Einleitung ...............................
Diagrams | Diagramas | Diagrammes | Darstellungen ...........................
Connections and System Control | Conexiones y Control de sistema
Connexions & Utilisation | Anschlüsse und Systemeinstellungen ...
Specications | Especicaciones
Caractéristiques techniques | Technische Daten ................................
Support | Servicio al cliente | Assistance | Support Kontakt ........................
Product Registration | Registro de Producto
Enregistrement du produit | Produktregistrierung ...............................................................
3
5
8
9
23
86
87
Contenidos | Sommaire | Inhaltsverzeichnis
Contents
2

PLEASE READ CAREFULLY BEFORE PROCEEDING
WARNING • ADVERTENCIA • AVERTISSEMENT • WARNUNGEN
Always follow the basic precautions listed below to avoid the possibility of serious injury or even death from
electrical shock, short-circuiting, damages, re or other hazards.
• READ INSTRUCTIONS:
- All the safety and operating instructions should be read before the product is operated.
• RETAIN INSTRUCTIONS:
- The safety and operating instructions should be retained for future reference.
-All the safety and operating instructions should be read before the product is operated.
• HEED WARNINGS:
- All warnings on the product and in the operating instructions should be adhered to.
• FOLLOW INSTRUCTIONS:
- All operating and use instructions should be followed.
• CLEANING:
- The product should be cleaned only with a polishing cloth or a soft dry cloth.
- Never clean with furniture wax, benzine, insecticides or other volatile liquids since they may corrode the
cabinet.
• WATER AND MOISTURE:
- Do not use this product near water, for example, near a bathtub, wash bowl, kitchen sink, or laundry tub; in a
wet basement; or near a swimming pool; and the like.
• DO NOT OPEN:
- Do not open the device or attempt to disassemble the internal parts or modify them in any way. The device
contains no user- serviceable parts. If it should appear to be malfunctioning, discontinue use immediately and
have it inspected by qualied IKEY-AUDIO service personnel.
• REPLACEMENT PARTS:
- When replacement parts are required, be sure the service technician has used replacement parts specied by
the manufacturer or have the same characteristics as the original part. Unauthorized substitutions may result
in re, electric shock, or other hazards.
Warning
3
Advertencia • Avertissement • Warnungen
POR FAVOR LEA DETENIDAMENTE ANTES DE PROCEDER
Siguiendo siempre las precauciones básicas indicadas a continuación para evitar la posibilidad de lesiones
serias incluso la muerte por descarga eléctrica, cortocircuito, daños, fuego u otros peligros.
• LEA LAS INSTRUCCIONES:
- Todas las instrucciones de seguridad y funcionamiento deben ser leídas antes de hacer funcionar el producto.
.• CONSERVE LAS INSTRUCCIONES:
- Las instrucciones de seguridad y funcionamiento se deben conservar para futuras consultas.Todas las instrucciones de seguridad y funcionamiento deben ser leídas antes de hacer funcionar el producto.
• PRESTEN ATENCION A LAS ADVERTENCIAS:
- Todas las advertencias e instrucciones de funcionamiento del producto deben ser tenidas en cuenta.
• SIGAN LAS INSTRUCCIONES:
- Todas las instrucciones de funcionamiento y uso deben ser seguidas.
• LIMPIEZA:
- El producto debe ser limpiado solamente con un paño limpio o un paño seco. Nunca limpien con cera para
muebles, gasolina, insecticidas u otros líquidos volátiles que puedan corroer el recinto.
• AGUA Y HUMEDAD:
- No use este producto cerca del agua, por ejemplo, cerca de la bañera, lavamanos, fregadero o la lavadora;
en un sótano húmedo, o cerca de una piscina; o parecidos.
• NO LO ABRA:
- No abra el aparato o intente desmontar las partes internas o modicarlas de alguna manera. El aparato no
contiene partes inservibles. Caso de que pareciera que no funcionara, deje de usarlo inmediatamente y haga
que sea revisado por un técnico cualicado de IKEY-AUDIO.
• PIEZAS DE RECAMBIO:
- Cuando son necesarias piezas de recambio, tengan por seguro que el servicio técnico ha usado piezas de
recambio especícas de la marca o de las mismas características como las originales. Recambios no autorizados pueden ocasionar incendios, descargas eléctricas u otros peligros.

LIRE LES INSTRUCTIONS AVANT TOUTE UTILISATION
WARNING • ADVERTENCIA • AVERTISSEMENT • WARNUNGEN
Veuillez prendre connaissance des instructions suivantes an de prévenir tout accident et/ou mauvaise
utilisation du produit. Le non respect de ces principes de base peut entraîner différents risques: bles-
sure, choc électrique , court-circuit, dommage & risque d’incendie.
• LIRE LES INSTRUCTIONS:
- Toutes les notications techniques et de sécurité doivent être lues avant utilisation du produit.
• CONSERVATION DU MANUEL D’INSTRUCTIONS:
- Le manuel d’instructions doit être conservé à l’abri pour un usage futur. Veuillez vous y reporter en cas
de nécessité et avant toute utilisation du produit.
• MISES EN GARDE:
- Vous devez prendre connaissance de toutes les mises en garde et y adhérer avant toute utilisation
du produit.
• SUIVI & RESPECT DES INSTRUCTIONS:
- Toutes les instructions de fonctionnement & d’utilisation doivent être respectées.
• ENTRETIEN/NETTOYAGE:
- Cet appareil ne doit être nettoyé qu’avec un chiffon légèrement humide ou tissu de polissage. Ne
jamais utiliser de produit de nettoyage pour meuble, benzine, insecticide ou tout autre produit volatile
qui pourrait entraîner une corrosion de l’enceinte.
• EAU & HUMIDITE:
- Ne pas utiliser cet appareil à proximité d’un robinet, d’un évier, d’une douche, d’une baignoire, d’une
piscine. Ne pas installer l’enceinte sur un sol humide.
• NE PAS OUVRIR:
- Ne pas démonter l’appareli an d’accéder aux composants internes en vue d’une éventuelle réparation/modication. Cet appareil ne contient pas de pièces/composants qui puissent être réparés par
l’utilisateur. En cas de panne/dysfonctionnement, veuillez contacter votre revendeur ou le service technique de IKEY-AUDIO au 01 69 79 97 79 (FRANCE).
• REMPLACEMENT DE PIECES DETACHEES:
En cas d’intervention technique, veillez à ce que le technicien n’utilise que des pièces d’origine ou
recommandées par le constructeur. L’utilsation de composants
non spéciés par le constructeur pourrait entrainer un mauvais fonctionnement, ainsi que divers risques
(Incendies, choc électrique, court-circuit...) & l’annulation de la garantie.
BITTE UNBEDINGT VOR INBETRIEBNAHME LESEN
Folgen Sie stets den nachfolgenden Vorsichtsmaßnahmen, um die Möglichkeit von schweren Verletzungen oder gar
eines tödlichen elektrischen Schlages sowie Kurzschluss, Beschädigung, Feuer oder anderer Gefahren zu verhindern.
• ANWEISUNGEN LESEN:
- Lesen Sie alle Sicherheits- und Bedienungsanweisungen, bevor Sie mit dem
Produkt arbeiten.
• AUFBEWAHRUNGSHINWEIS:
- Bewahren Sie alle Sicherheits- und Bedienungs an weis ungen gut auf.
• WARNHINWEISE:
- Alle Warnhinweise für das Produkt und die Bedienungsan weis ungen müssen
genau eingehalten werden.
• ANWEISUNGEN BEFOLGEN:
- Alle Anweisungen zum Betrieb des Produkts sollten be folgt werden.
• REINIGUNG:
- Das Produkt sollte nur mit einem Polier- oder einem weichen trockenen Tuch gereinigt werden. Benutzen Sie dazu
niemals Möbelwachs, Benzine, In sekten mittel oder andere üchtige Reinigungsmittel, denn Sie könnten zur Korrosion
des Gehäuses führen.
• WASSER&FEUCHTIGKEIT:
- Benutzen Sie dieses Produkt nicht in der Nähe von Was ser, z. B. in der Nähe einer Badewanne, einer Waschschüssel,
eines Küchenspül beckens, eines Waschbeckens, in einem feuchten Keller, in der Nähe eines Schwimmbeckens oder
an ähnlichen Orten.
• NICHT ÖFFNEN:
- Öffnen Sie niemals das Produkt und versuchen Sie nicht, interne Baugruppen zu entnehmen oder zu modizieren. Das
Produkt enthält keine vom Nutzer zu wechselnde Ersatzteile. Sollten Sie eine Fehlfunktion feststellen stellen Sie unverzüglich den Betrieb des Produktes ein und lassen Sie es von qualiziertem IKEY-AUDIO Servicepersonal prüfen.
• ERSATZTEILE:
- Wenn Ihr Produkt Ersatzteile benötigt, achten Sie darauf, dass der Servicetechniker nur vom Hersteller erlaubte Ersatzteile oder Ersatzteile, die gleichen Eigenschaften wie die originalen Teile aufweisen, einsetzt. Falsche Ersatzteile können
zu Bränden, elektrischen Schlägen oder anderen Risiken führen.
Advertencia • Avertissement • Warnungen
Warning
4

Introduction
Congratulations on purchasing an iKEY-AUDIO HDR7 Portable Digital Field Recorder. This device comes equipped with both a MIC
and LINE input along with two built in condenser microphones con-
gured in an X-Y pattern. Several features on the HDR7 allow for a
wealth of recordings to be made, whether it is a live performance,
lecture, meeting, or an instrument. This next generation recording device features the latest advancements in engineering and is
backed by a One year limited warranty*. Prior to use, we urge that
you carefully read all instructions.
Unpacking
Your iKEY-Audio HDR7 unit has been carefully inspected and tested
before packing and shipping. After unpacking, carefully inspect the
device for exterior damage and immediately report any physical
damage during transit to your shipping carrier. Save the shipping
boxes and all packaging materials in case the unit needs to be re-
turned to your local dealer or GCI Technologies.
Introduction
5
Introducción • Introduction • Einleitung
Additional Contents
(1) USB Cable for PC Connection
(1) User Manual
(1) SD Memory Card
(1) AC/DC adaptor
(1) Stand mount
(1) Wind Screen
Features
(4) AA Batteries
-Full color LCD screen
-Built in X – Y microphones for instant eld recording
-Records from any MONO or STEREO line source
-Records MP3 & AAC les up to 320 kbps and WAV (BWF) & AIFF
les up to 24-bit/96KHz
-Built in Limiter, Compressor, Normalize, and Auto Gain function
-Built in Tuner (Guitar or Chromatic mode)
-Recording options including Pre-recording, Marks, Noise Gate
-Record direct to the included SD card (SDHC compatible)
-Record direct to USB key drive (not included)
-1/8-inch (3.5mm Jack) stereo headphone/line output (w/ volume)
-1/8-inch (3.5mm Jack) stereo line input

-1/8-inch (3.5mm Jack) stereo microphone input
-Input gain switch with 3 input gain levels – 20 dB, 0 dB and +10
dB
-Adjustable record level with digital input VU
-Media Playback w/ Loop Section
-File operation capability
-Easily download to a computer with the included USB cable
-Stand mountable (stand included)
-AC/DC adaptor included
-Wind screen included
We Want You Listening For A Lifetime
Selecting ne audio equipment such as the unit you have just purchased is only the start of your musical enjoyment. Now it’s time
to consider how you can maximize the fun and excitement your
equipment offers. This Manufacturer and the Electronic Industries
Association’s Consumer Electronics Group want you to get the
most out of your equipment by playing it at a safe level: one
that lets the sound come through loud and clear without annoy-
ing blaring or distortion-and, most importantly, without affecting your
sensitive hearing. Sound can be deceiving. Over time your hearing
“comfort level” adapts to higher volumes of sound. So what sounds
“normal” can actually be loud and harmful to your hearing. Guard
against this by setting your equipment at a safe level BEFORE your
hearing adapts.
To establish a safe level: - Start your volume control at a low setting.
- Slowly increase the sound until you can hear it comfortably and
clearly, and without distortion. Once you have established a comfort-
able sound level: - Set the dial and leave it there. Taking a minute to
do this now will help to prevent hearing damage or loss in the future.
After all, we want you listening for a lifetime.
Used wisely, your new sound equipment will provide a lifetime of fun
and enjoyment. Since hearing damage from loud noise is often undetectable until it is too late, this Manufacturer and the Electronic
Industries Association’s Consumer Electronics Group recommend
you avoid prolonged exposure to excessive noise.
Introducción • Introduction • Einleitung
Introduction
6

This list of sound levels is included for your protection:
Sound Level (in dB):
30 Quiet library, soft whispers
40 Living room, refrigerator, bedroom away from trafc
50 Light trafc, normal conversation, quiet ofce
60 Air conditioner at 20 feet, sewing machine
70 Vacuum cleaner, hair dryer, noisy restaurant
80 Average city trafc, garbage disposals, alarm clock
at two feet
The following noises can be dangerous at extended exposure:
90 Subway, motorcycle, truck trafc, lawn mower
100 Garbage truck, chain saw, pneumatic drill
120 Rock band concert in front of speakers, thunderclap
140 Gunshot blast, jet plane
180 Rocket launch pad
Information courtesy of the Deafness Research Foundation.
Introduction
7
Introducción • Introduction • Einleitung
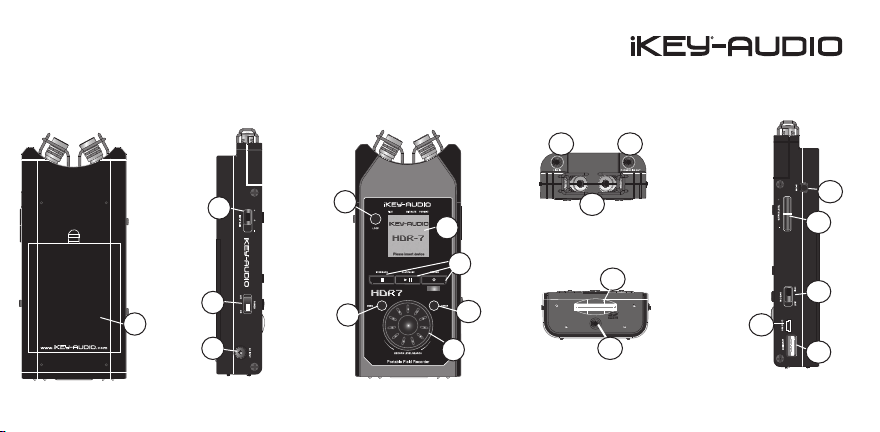
Overview of HDR7 Connections & Controls
(1) BATTERY CAVITY
(2) POWER (ON-OFF)
(3) DC POWER INPUT
(4) INPUT GAIN (- o +)
(5) LOOP
(6) LCD SCREEN
(7) STOP/BACK, PLAY/PAUSE, RECORD
(8) RECORD LEVEL/ SEARCH
(9) MENU
(10) ENTER
(11) LINE IN
(12) PHONES/ LINE OUT
(13) X-Y PATTERN MICS
(14) MIC IN
(15) OUTPUT LEVEL (- +)
(16) MIC GAIN (LOW - HIGH)
(17) USB TO PC
(18) USB INPUT
(19) STAND MOUNT
(20) SD CARD SLOT
(21) USB to PC DATA TRANSFER CABLE (included/ not pictured)
Diagramas | Diagrammes | Darstellungen
Back
Posterior
Face arrière
Rückseite
HDR7 Diagrams
Left Side
Lado Izquierdo
Côté Rauche
Links
Front
Frontal
Face Avant
Vorderseite
To p
Superior
Face Supérieure
Oben
11 12
Right Side
Lado Derecho
Côté Droit
Rechts
4
2
1
3
5
6
9
Bottom
Inferior
7
Bas
Unten
10
8
g. 1.0
13
20
17
19
Diagramas • Diagrammes • Darstellungen
Diagrams
14
15
16
18
8
G3
HDR7 Functions
The iKEY HDR7 is a portable digital recorder
that allows you to record, playback, and listen to
audio les. Along with two built-in studio quality microphones, the unit contains a mic input,
line input and a phones/ line output to provide a
range of recording options. Recorded les can
easily be transferred between the HDR7 unit
and your computer using the included USB to
PC cable or a USB memory stick.
Getting Started
To begin using the iKEY HDR7, you have to
ensure that it has a working power supply and
that the included SD card (SDHC compatible)
is connected.
Connections and System Control
9
Conexiones y Control de sistema • Connexions & Utilisation • Anschlüsse und Systemeinstellungen
Power Supply
The HDR7 works on either 4 AA batteries or the
included power supply.
A. Install the 4 AA batteries that
came with the unit by simply removing the battery cavity cover
(1) located on the back of the unit.
*Note: There is a battery life indicator on the top right of the LCD
screen (6) that drains according to
how much battery life is left
B. Connect the power adapter to
the DC input (3) located on the left
side of the unit and connect the
other end into an electrical outlet.
*Note: The unit can run continuously. It may become warm, this is not a sign of malfunction.
g. 1.1
g. 1.2
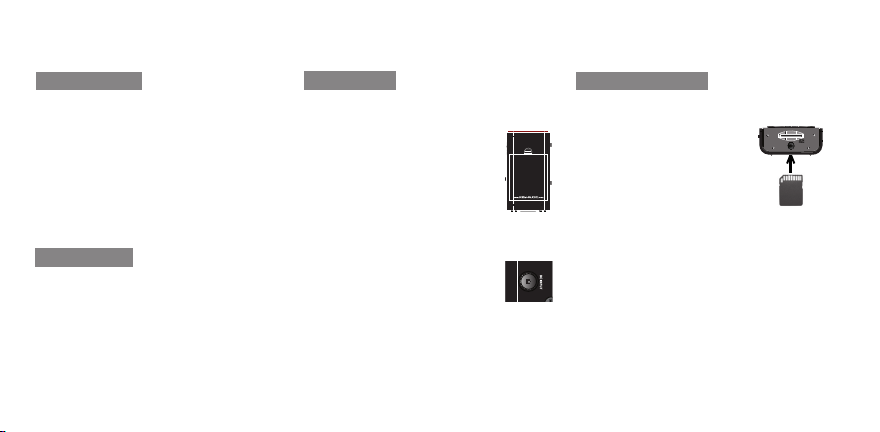
SD Card Connection
The HDR7 comes with a 1 GB SD card to store
recordings. Before turning on the unit, ensure
the card is inserted into the slot
(18) located on the bottom of
the HDR7. To connect the card,
push the card completely in the
slot until it clicks into place. DO
NOT FORCE THE CARD IN
To remove the card, slightly push the bottom of
the card. It will slide out partially, and then can
be pulled out.
*Note: If your unit is running on battery power
and you are recording, DO NOT connect the DC
power until you have stopped the recording, as it
could corrupt your le.
Insert card the way
it is shown
g. 1.3
Using the USB drive
On the right side of the device is
a USB drive slot (18) where a USB
memory stick can be connected.
The HDR7 can both read les for
playback and record directly to a
USB device connected to this area.
The HDR7 unit will only interact with one memory device at a time, and the USB drive gets
priority over the SD card. What this means is
that when a USB memory stick is connected,
only les stored on that device will be viewable.
As well, all recordings will be stored on just the
USB drive when it is connected.
When there is no USB drive connected, the
HDR7 uses the SD card to read les and store
recordings.
g. 1.4
Turning On the Unit
Now that the SD card and power source are
connected, the unit turns on by setting the
POWER (2) switch to the ON position.
Navigating the HDR7
After the unit is turned on, a menu appears list-
ing all of the les and folders on the memory
device. Use the RECORD LEVEL/SEARCH (8)
jog wheel to scroll through these folders & les
(*Note: When connecting a new SD card, no
les will be viewable as no media is yet on the
device).
Scrolling clockwise will search downwards
through the le menu & scrolling counter clockwise will search upwards. Press the PLAY/
PAUSE (7) button when a folder is highlighted
to view its contents. All recordings are stored in
the folder labeled RECORDS in the iKEY menu.
Press the STOP/BACK (7) button to return to
the previous folder.
Main Menu
Press the MENU (9) button to enter the Main
Menu where the main settings of the unit can
be adjusted appropriately. Use the jog wheel to
highlight a particular setting feature and press
the enter (10) button to view its contents and
change its values. Pressing the Menu button
again will return to the previous screen.
Features and Settings
The following items are contained in the Main
Menu and their settings can be adjusted to
change the usability of the unit.
Conexiones y Control de sistema • Connexions & Utilisation • Anschlüsse und Systemeinstellungen
Connections and System Control
9

*Note: There are two items that appear when the
power adapter is not connected, Backlight and
Bat. Type.
CONTRAST- Used to set the brightness contrast of the screen. It is set according to a per-
centage scale from 0 to 100 (darker to brighter).
Use the jog wheel to adjust the contrast.
DATE- Sets the date that is assigned to the
HDR7 and the les that the unit records. The
date is listed by day, month and then year. Use
the jog wheel to select the appropriate value.
Pressing the PLAY/ PAUSE button advances
to the next eld and pressing STOP/ BACK re-
turns to the previous one.
TIME- Represents the time setting function. To
Connections and System Control
11
Conexiones y Control de sistema • Connexions & Utilisation • Anschlüsse und Systemeinstellungen
set the time, represented as hrs (hours) - - min
(minutes) - - and A.M./P.M., select the appropriate value with the jog wheel and press PLAY/
PAUSE to advance to the next eld. Press
STOP/ BACK to return to the previous eld.
TUNER MODES- The Tuner is used to tune a
guitar connected to the HDR7. When select-
ed, two options appear, Guitar and Chromatic
(Auto). The Guitar option is meant for the more
novice guitar player, and the Chromatic is for
intended for more skilled players.
Each interface is based off of a standard
6-string guitar model with notes (low to high) EA-D-G-B-E. When a string is played, the tuner
will read if the tone is at (low), sharp (high) or
on pitch. After playing a string on your guitar,
the LCD screen (6) will read the signal as green
if your string is in tune, red if it is sharp, or yel-
low if it is at. Adjust accordingly and move
onto the next string.
In the novice Guitar interface, there is an individual screen for every corresponding string
starting with the lowest E string, going up to
the high E string. In this mode, strings can only
be tuned according to their particular screen.
When your string is in tune, press the Enter button to switch to the next string screen.
After navigating through all 6 Guitar Tuner
screens, you will nd the Chromatic (Auto)
tuning interface (intended for the more experienced guitar player). Strings are tuned just like
in the Guitar interface, however all strings are

tuned in this one screen.
RESTORE TO DEFAULT- Returns the settings of
the Main Menu features to their default values.
MOVE- Moves a le from one folder to another.
To move a particular le, ensure that it is high-
lighted, press the Menu button, select Move,
navigate to the destination folder, press Menu
again and then Paste. The le will now appear
in this folder.
COPY- Use this feature to copy a le into another folder. To copy a particular le, use the
jog wheel to ensure it is highlighted, press the
Menu button, select Copy, navigate to the folder you wish to copy it into, press Menu again
and then Paste. The le will now appear in this
folder as well.
DELETE- Used to delete a le. To delete a
particular le, use the jog wheel to ensure it is
highlighted, press the Menu button, select De-
lete. Press the PLAY-PAUSE button to conrm
your deletion, press the STOP-BACK button to
cancel
RENAME- To rename a particular le, ensure
that it is highlighted. Press the Menu button
and select Rename. The title will appear in File
Rename mode, where it can be edited. Use the
jog wheel to change the value of the highlighted
letter. To move onto the next letter, press the
Play/Pause button and to move back to the
previous letter press the STOP/BACK button.
Save by pressing enter.
SAVE AS/NORM- This feature Normalizes the
audio le and saves it. Normalize is a tool for
adjusting the volume of audio les to a standard
level. To use this feature, press the menu and
select Save As/Norm. You can choose to convert the le to a different audio format (i.e. WAV
-> AAC) or keep the same format, then press
Enter. If you choose an MP3 or AAC format, on
the next screen, you can choose a different Bit
Rate. Also on this screen is the Normalize op-
tion. Press Enter to toggle between ON/OFF.
*Note: The process to normalize a le takes a
moment depending on how long the recorded
audio is. Please exercise patience when normalizing a le.
BACKLIGHT- (appears when power adapter is
not connected)- The unit comes with a Back-
Conexiones y Control de sistema • Connexions & Utilisation • Anschlüsse und Systemeinstellungen
Connections and System Control
12
light feature, however to save energy, it deactivates after if not used. The Backlight function is used to set how long it will take for the
backlight to turn off. The options are Off, in
which the backlight is never on, On in which the
backlight is always on, and 2 s, 5 s, 10 s and 30
s, which represent how the amount of time in
seconds before the backlight turns off. To turn
the backlight on again, simply press any button
on the unit or turn the jog wheel.
*Note: When the power adapter is connected,
the backlight will always be on and there will be
no battery indicator.
BAT. TYPE- (appears when power adapter is
not connected)- This function is used to set
the battery type that you choose for the unit.
Connections and System Control
13
Conexiones y Control de sistema • Connexions & Utilisation • Anschlüsse und Systemeinstellungen
Select Alkaline for Alkaline batteries and NI-MH
Acc for Nickel batteries.
Playing Files
To engage a le, press the PLAY/PAUSE button
when it is highlighted in the le menu (*Note:
When connecting a new card no les will be
viewable as no media is yet on the device).
Pressing this button again will pause the le. To
fast-forward within a track, scroll the RECORD
LEVEL/SEARCH jog wheel clock¬wise. Conversely, to rewind, scroll the jog wheel counterclockwise.
To stop a le that is playing and return the unit
to the le menu, press the STOP/BACK (7) button (*Note: When playing or recording a track
for over one hour, the time indicator switches
from m:s (minutes seconds) to h:m (hours minutes).
Play Mode
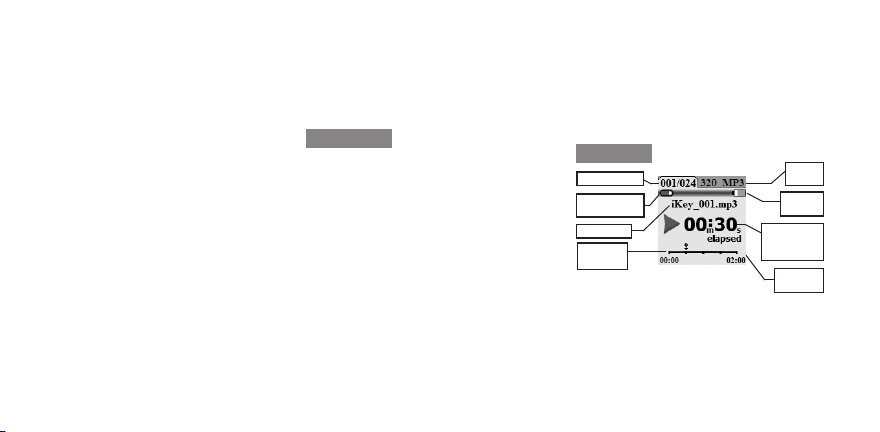
File number
SD memory
card usage
File name
Track
Display
(Unit is shown in Play Mode)
The full color LCD screen (6) displays the les,
folders, recordings, play mode, and record
mode for the HDR7 unit.
g. 1.5
File
format
Battery
life
Track time
in minutes
& seconds
Time
mode

Play Menu
In play mode, there is a Menu that allows display, playback, and sound features to be set
and controlled. To access the Play Menu, press
the Menu button when in Play Mode. The fea-
tures of the menu are listed below (*Note: These
settings can be changed by pressing the EN-
TER button when highlighted).
VU METER- The VU Meter displays the level of
the unit’s volume output and sits at the bottom
of the Play Mode and Record Mode screen.
In Play Mode, the VU Meter display can be
switched on and off by changing it’s settings in
the Play Menu. Stereo les are shown as two
bars and mono les are shown as one bar.
PLAYBACK MODE- The les that are stored
on the memory device can be played back in
a variety of ways:
PLAY ONE- A le pauses after it plays
once.
PLAY ALL- All les that are in that folder are
played once.
REPEAT ONE- One le is repeated.
REPEAT ALL- All les that are in that folder
are repeated.
TIME MODE- The time mode relates to the
length of a particular le. It is displayed in one
of two main ways, namely as REM (Remaining- how much time is left in a le) and ELA
(Elapsed- how much time has progressed).
Use the Play Menu to select the Time mode to
be displayed on the unit.
LOOP- In Play Mode, the HDR7 also allows
for a loop to be created from the engaged le.
While a le is playing, press the LOOP (5) button to set where the Loop is to begin (the unit
will display: LOOP IN SET). Pressing the LOOP
button again will set the endpoint of the Loop,
and the unit will begin playing the section of au-
dio repeatedly (the unit will display: LOOP OUT
SET - LOOP ACTIVATED).
To stop the Loop from playing and return the
le to normal play mode, press the LOOP button once more (the unit will display: LOOP IS
DEACTIVATED).
To select another Loop, repeat the process.
Conexiones y Control de sistema • Connexions & Utilisation • Anschlüsse und Systemeinstellungen
Connections and System Control
14
*Note: The LOOP function can only be used in
Play Mode
Recording with the HDR7
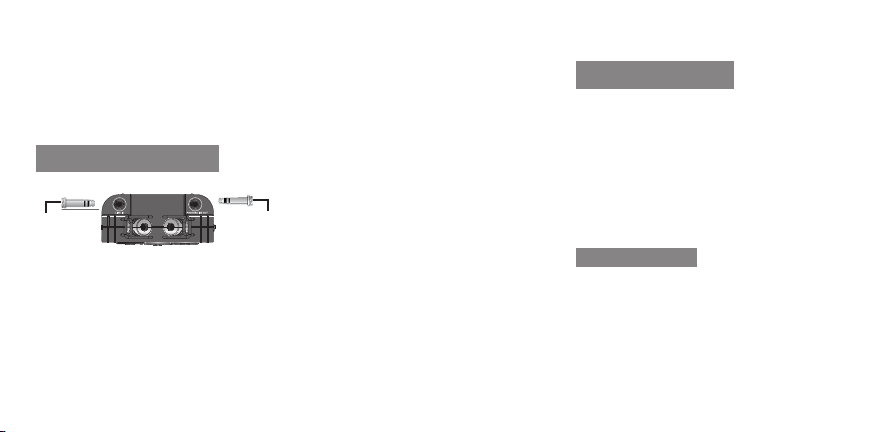
(Input / Output Connections)
LINE IN
INPUT:
LINE IN (11)- Connect a signal coming from an
external source via an 1/8” (3.5 mm) input.
MIC IN (14)- Connect a signal coming from a
mic source via an 1/8” (3.5 mm) input.
Connections and System Control
15
Conexiones y Control de sistema • Connexions & Utilisation • Anschlüsse und Systemeinstellungen
g. 1.6
PHONES/
LINE OUT
*Note: MIC and LINE signals can only be read
one at a time when recording. If they are both
connected to the unit at the same time, only the
LINE connection will be recorded.
OUTPUT:
PHONES/ LINE OUT (7)- Connect an external
output device such as headphones or speakers
via an 1/8” (3.5 mm) output to hear the signal
being passed through the unit.
*Note: Files that were recorded by the iKEY
HDR7 are named according to the format of the
le and are numbered according to the sequence
in which they were recorded. For instance,
iKEY_001.MP3, iKEY_001.WAV, iKEY_002.MP3,
iKEY_002.WAV.
Recording Using the XY
Condenser Mics
Along with the 1/8” Mic and Line inputs, the
unit also comes with two built in condenser mi-
crophones congured in an X/Y pattern. This
particular microphone pattern is effective for
capturing a range of different environments. As
well the HDR7 has a variety of recording options to allow for several different types of re-
cordings to be made (*Note- See the Channels
option in the Record Menu section below for
further detail).
Recording Options
Along with MIC/ LINE inputs and built in XY pattern microphones, the HDR7 has many recording features that can be set providing a multitude of recording options. To access these
features, the unit must rst be in Record mode
(*Note- record mode can be entered by press-

ing the RECORD (7) button).
When in record mode, press the MENU (9) but-
ton to enter the Record Menu. This is where
all of the recording features can be viewed and
set. Use the jog scroll wheel to select a spe-
cic feature and press the ENTER (10) button
to view and/ or change a particular features
settings. Listed below are all of the features
contained in the Rec Menu.
FORMAT- Select the format feature to set the
type of le you wish to record. The HDR7 can
record les in WAV, MP3, AAC, and AIFF format (*Note- Once a recording has begun, these
settings are not able to be changed). These
formats are based on different le types that
produce recordings of differing memory size,
compatibility, and quality.
*Note: Slow USB storage devices may cause issues when set to high bit rates.
Below is a brief comparison of the different
formats:
WAV- Waveform Audio Format
MP3- MPEG-1 Audio Layer 3
AAC- Advanced Audio Coding
AIFF- Audio Interchange File Format
SAMP. RATE- The sample rate represents the
number of samples per second taken from a
signal. As a sample rate goes up, so does quality, however the memory required increases as
well. For the HDR7, based upon which le format is selected, the following sample rates are
available: WAV & AIFF- 44.1 kHz / 48.0kHz/
88.2 kHz/ 96.0 kHz
*Recording Tip: Sampling rate affects the rate
at which the recorder samples the audio. As the
sampling rate increases, the length of the waveform increases, thus giving you better audio accuracy, quality, and editing ability.
BIT DEPTH- Bit depth refers to how many bits
of sound are utilized within a particular sound
sample. As is true with sample rate, a higher bit
depth represents higher quality, however more
memory is required. The following bit depth
values are available for the corresponding le
formats: WAV & AIFF 16 bit, 24 bit
*Recording Tip: The importance of bit depth in recording audio is that it determines the maximum
Conexiones y Control de sistema • Connexions & Utilisation • Anschlüsse und Systemeinstellungen
Connections and System Control
16

possible dynamic range of the signal, or the difference between the loudest possible sounds and
the lowest possible noise.
BITRATE- A bitrate represents how many bits
per second are being processed. As bitrate
increases, so too does quality. The following
bitrate values are available for the correspond-
ing le formats.
MP3 & AAC (in kbps): 64, 96, 128, 160, 192,
224, 256, 320.
CHANNELS- Recordings made with the HDR7
can have a variety of different Channel settings.
The available options are as follows:
Connections and System Control
17
Conexiones y Control de sistema • Connexions & Utilisation • Anschlüsse und Systemeinstellungen
STEREO- The L and R channels carry two
distinct signals. This option creates a stereo
image recording where each channel has a
different output based off of what the particular microphone captured.
MONO L/R SUM- A mono recording is the
same on both left and right. This particular
type of Mono recording combines the signal
captured by each microphone and outputs
the same combined result to each left and
right channel.
MONO L- Only the signal carried by the left
microphone is utilized.
MONO R- Only the signal carried by the
right microphone is utilized.
*Note: When using a mono signal source, such
as a guitar, be sure to set the unit to MONO mode
otherwise only the left channel will be recorded to
and heard upon playback.
AUTO-TRACK- To engage the Auto-track function, set it to the on position. When there is
a prolonged silence, the unit will create a new
le that will begin at the rst sample of audio
detected.
AUTO-REC- To engage the Auto-rec function,
set it to the on position. The Auto-rec functions
by automatically beginning a recording when a
signal is detected, ensuring that no memory is
wasted.
FILE PREFIX- The le prex feature is used to

add a custom dened string to a le heading.
Use the jog wheel to select a particular letter,
and press the PLAY/ PAUSE button to switch to
the next letter position.
PRE-RECORD- The Pre-record feature allows
for extra time to be included before a recording takes place. The two settings are on and
off. When engaged, the Pre-Record feature
adds 5 seconds of silence to the beginning of
a recording.
MARK TIMER- When this feature is engaged, a
marker is added to a recording in process every
time a pre-set time cycle completes. To set a
mark, press PLAY while recording.
*Note: the Mark timer function is set in 15 second
increments
FILE TIMER- The File timer function begins a
new recording at a set time increment. A new
le is started every time a cycle completes.
*Note: the Mark timer function is set in 15 second
increments
REGIONS- Regions refers to the method in
which the HDR7 stores marks and track information for use in audio editing software. There
are two types of Regions that can be selected
for use, SONY and CUE. SONY is to be used
on SONY hardware and software for their pro-
prietary format, and CUE, the most widespread
format for use with most hardware and software. This determines what information will be
stored in the text le.
BOOST 24dB- The Boost 24dB feature boosts
the level of a recording by 24 dB.
PH. POWER- Ph. Power stands for phantom
power, which is used on condensers and other
types of microphones that necessitate 3V.
DYNAMICS- This feature offers options which
are selected to affect audio signals that the unit
records. The options below each affect the signal in a different manner.
OFF- Signal is not affected at all
AGC (vocal)- Uses a mid-range frequency
compressor to enhance vocals
COMPRESSOR- Condenses the signal so it
sounds fuller while reducing dynamics
LIMITER- Used to help ensure that a le
does not reach too high of a level and be-
come distorted (clip)
Conexiones y Control de sistema • Connexions & Utilisation • Anschlüsse und Systemeinstellungen
Connections and System Control
18

*Recording Tip: Setting effects during recording
will not allow you to remove the effect later. This
could be desirable, for instance, to enhance the
signal and prevent distortion. However, effects
can be added AFTER the recording as well in audio editing software, allowing you to record a ‘dry’
signal then add dynamics processing later.
TIME MODE- The HDR7 has two main Time
Mode display settings, namely Elapsed (Ela)
and Remain (Rem). Elapsed represents how
much time has gone by in a particular recording, and Remain represents how much time is
left on the recording device.
NOISE GATE- The noise gate is used to ensure
audio below a certain threshold does not get
recorded. To engage this function, select the
Connections and System Control
19
Conexiones y Control de sistema • Connexions & Utilisation • Anschlüsse und Systemeinstellungen
on setting.
*Note: These settings cannot be changed once a
recording has begun.
Record Mode
SD memory
card usage
File name
STEREO-MONO
Signal gauge
Recording level/
Jog wheel mark
(Screen shows unit in Record Mode)
If a recording is set as stereo (pictured), there
will be two bars present in the STEREO-MONO
Signal gauge section. If it is set as mono, there
will be one bar present.
g. 1.7
File format
Battery life
Track time
in minutes
and seonds
Time mode
Setting Recording Levels
Setting recording levels properly is paramount
in order to achieve a good recording. When a
signal is too loud, distortion and clipping occurs
and creates an unusable recording. However, a
signal that is too low may sound mufed or not
be audible at all and may also be unusable.
In order to get the best recordings, you must
apply the maximum possible signal that the
HDR7 can accept without overloading (0 dB).
When a signal becomes too loud for the unit,
the Stereo-Mono Signal gauge (shown in record mode) appears Red (over 0 dB).
To nd the max possible recording level follow
these steps:
1) Raise the level to where it just begins to
overload/ distort/ clip (appear red).

2) From there slightly lower the level with the
FILE
BIT RATE
FORMAT
TIME
TUNER
FORMAT
STEREO
/MONO
LINE IN PHONES/
LINE OUT
INPUT GAIN
-
+
+
0
OUTPUT LEVEL
Rec Level Jog wheel until it does not overload (*Note: turning the jog wheel clockwise
raises the signal & counterclockwise lowers
the signal level).
The Input Gain switch (4) is also
used to get a maximum signal level.
The switch changes the overall level
of an incoming signal between 3
padded levels: –20 dB [-], 0 dB [o]
and +10 dB [+]. If a signal is too low,
try to raise it by switching from [-] to [o] or [o]
to [+]. If a signal is too high, try to lower it by
switching from [+] to [o] or [o] to [-].
g. 1.8
Optimal Clean Recording
Input Level
Signal Meters Output
Clipping/Distortion
Solution- Slightly scale back Rec. Level jog
wheel so the meter does not appear red.
Clipping at Mid-Level
Solution- Raise the Rec. Level jog wheel all the
way and lower the input gain until the signal
barely peaks and can be scaled back so it does
not appear red.
Low-Level Recording
Solution- Turn the Rec. Level jog wheel all the
way up and raise the input gain until the signal
barely peaks and can be scaled back.
*Note: If your recording is not being stored correctly, you may have to raise or lower the signal
coming from your source directly if possible.
Once your bit rate format, levels and stereo/
mono settings have been made, you are ready
to record. In record mode, simply press the
Conexiones y Control de sistema • Connexions & Utilisation • Anschlüsse und Systemeinstellungen
Connections and System Control
20

RECORD button to start recording. A light will
USB
TO PC
MIX
ON
OFF
-
+
OUTPUT LEVEL
ash below the record button to indicate that
the unit is recording.
To pause a recording, press the RECORD button again. To continue a recording, press the
RECORD button once more.
To stop recording, and return to the previous
menu, press the STOP/BACK button (*Note:
all recordings are stored in the folder labeled
RECORDS in the iKEY menu. When recording
exceeds 2 GB in size, it will continue recording
as a separate le).
Recording a File
Files recorded on the SD card can easily be
transferred between the HDR7 and your com-
Connections and System Control
21
Conexiones y Control de sistema • Connexions & Utilisation • Anschlüsse und Systemeinstellungen
puter using the included USB cable.
First, ensure your unit is powered
off. Connect the small end of the
USB cable to the USB TO PC (17)
slot on the unit, and connect the
other end to the USB port on the back of your
computer. (*Note: For best results, connect the
USB cable to the back of your computer and
do not use a hub.)
Once the cable is connected to both the unit
and the computer, turn on the HDR7. Wait for
the card to be recognized by your computer.
Mac: When an icon appears on your computer, click to view the contents of the card.
PC: Click on the USB device that appears in
g. 1.9
Transferring Files Between
the HDR7 and your Computer
the My Computer folder.
Copyng les to and from the unit is a standard
le operation. Select the desired les to be cop-
ied and drag them to the computer’s desktop
or a specic folder on the hard drive or vice
versa.
The les associated with the last recording
session will be stored as a playlist entitled
lastrec.m3u, and can be opened on the computer simply by clicking on the playlist icon, or
transferred by dragging the playlist icon to the
computer.
Safe Removal of Device
Mac: Select the iKEY HDR7 icon. Drag-and-
drop it into the trash.

PC: Click the ‘safely remove hardware’ icon
in the task bar. Choose the iKEY HDR7 as
the device to remove.
Extra Features
(OUTPUT LEVEL) Use the OUTPUT LEVEL (15)
along with the controls on your instrument to
adjust headphone level.
(MIC GAIN) The MIC GAIN (16) feature is used
to raise or lower an incoming signal by switch-
ing between the LOW and HIGH settings.
(STAND Mount) The Stand mount (19) is where
you connect your unit to a stand (Stand included).
(HOLD MODE) To engage the unit into hold
mode, press and hold the LOOP and ENTER
buttons. To turn off hold mode, press and hold
the LOOP and ENTER buttons.
Software Updates
Improvements are always being made to our
products to increase usability and functionality. Occasionally, software updates come out
for our iKEY-AUDIO Series units. Be sure to
check the iKEY-AUDIO Web site (http://www.
ikey-audio.com) regularly for updates.
To nd out what software version you have on
your unit, turn it on and as it powers up there
will be a number that appears at the top of the
LCD screen (6). This refers to the software version. If the Web site has a software update
listed whose number is higher than the one on
your unit, than this means the software on the
site is more current and should be loaded onto
your unit (*Note- Be sure to load only the software listed for your unit specically).
There are detailed instructions on how to update
your units software located on the iKEY-AUDIO
Web site, however here is a quick guide:
1) Ensure that the software update located
online is most up to date version, and that it
is not currently running on your unit.
2) Unzip and download the latest software
version onto the root directory of your SD
card.
3) Load it onto your unit making sure it is
rst powered off and then turn it on.
4) The software will update automatically.
Conexiones y Control de sistema • Connexions & Utilisation • Anschlüsse und Systemeinstellungen
Connections and System Control
22

*Note: It is very important to ensure that you use
the supplied AC power adaptor to power your
unit when updating the unit’s software. If power
is interrupted during the update your unit can become damaged.
Specications
General:
USB compatibility...................,,,.... USB 1.0, 1.1, 2.0
Power Source..................... 5V 1000mA AC adaptor
4 AA batteries (Alkaline, NI-MH)
Recording time on battery........................... 5 hours*
Display.............................................. Full-color LCD
Dimensions............. 158x73x37mm (6.2x2.9x1.5 in)
Weight.............................................. 0.3 kg (.55 lbs)
*Note: varies based on storage device and type of batteries used
Specications
23
Especicaciones • Caractéristiques techniques • Technische Daten
Audio:
Channels………………………..…........ 2 (stereo)
Recording Media...................... SD (64 MB-2GB)
SDHC (4 GB-32GB)
Any supported FAT-USB drive
Sampling Rate:............................... up to 96 kHz
Bit Depth:......................................... up to 24-bit
Dynamic Range: ..................................... 120 dB
THD+N:.................................................... -91 dB
Freq Response:..........................,. 20Hz – 20KHz
Input Impedance:………….......,....... Line: 10K Ω
Mic: 1K Ω
Nominal Input Levels:..........................................
Low Gain: 1V RMS (0 dBV)
Mid Gain: .5V RMS (-6 dBV)
High Gain: .13V RMS (-17 dBV)
Maximum Input Levels:…....................................
Low Gain: 2.5V RMS (+8 dBV)
Mid Gain: .68V RMS (-3 dBV)
High Gain: .25V RMS (-12 dBV)
Output Impedance:……………………....... 30 Ω
Maximum Output:…….......................................
Line (10K Ω): 0.7V RMS (-3 dBV)
Phones (32 Ω): 0.35V RMS (-9 dBV)
Recording Format:............. MP3: 64-320 Kbps;
AAC: 64-320 Kbps;
WAV & AIFF: Sample rate 44.1,
48.0, 88.2, 96.0 kHz/Bit depth 16, 24-bit
Please register your warranty online at
www.ikey-audio.com

en | es | fr | de
Contents | Contenidos | Sommaire | Inhaltsverzeichnis
Warning | Advertencia | Avertissement | Warnungen ....................................................
Introduction | Introducción | Introduction | Einleitung ...............................
Diagrams | Diagramas | Diagrammes | Darstellungen ...........................
Connections and System Control | Conexiones y Control de sistema
Connexions & Utilisation | Anschlüsse und Systemeinstellungen ...
Specications | Especicaciones
Caractéristiques techniques | Technische Daten ................................
Support | Servicio al cliente | Assistance | Support Kontakt .......................
Product Registration | Registro de Producto
Enregistrement du produit | Produktregistrierung ...............................................................
3
25
8
28
44
86
87
Contents | Sommaire | Inhaltsverzeichnis
Contenidos
24

Introducción
Le felicitamos por adquirir el Grabador de Campo Portátil iKEY-
AUDIO HDR-7. Este aparato viene equipado con micrófonos con
entradas MIC y de LINEA además de micrófonos de condensador
congurados con el diseño en X-Y. Varias características del HDR-7
le permiten realizar gran cantidad de grabaciones, si se trata de
una actuación en vivo, conferencia, reunión o un instrumento. Esta
nueva generación de grabadores tienen los últimos avances en y
están amparados por una garantía limitada a un año. Antes de usar,
le sugerimos que lea las instrucciones detenidamente.
Desembalaje
Su unidad iKEY-Audio HDR7 ha sido inspeccionada y probada detenidamente antes de ser empaquetada y enviada. Antes de desempaquetarla, inspeccione con cuidado el aparato por si hubiera daños exteriores y comunique inmediatamente cualquier daño físico
que se haya producido durante el transporte a su vendedor. Guarde
las cajas y cualquier material de embalaje en caso que la unidad
deba ser devuelta a su vendedor local o a GCI Technologies.
Introducción
25
Introduction • Introduction • Einleitung
Contenidos adicionales
(1) Cable USB para conexión con PC
(1) Manuel del Usuario
(1) Tarjeta de Memoria SD
(1) Adaptador AC/DC
(1) Montaje en stand
(1) Pantalla de viento
Características
(4) Pilas AA
-Pantalla LCD color
-Micrófonos construidos en X - Y para grabación de campo instantánea
-Grabaciones desde cualquier fuente MONO ó ESTEREO
-Grabaciones archivos MP3 y ACC hasta 320 Mbps y archivos AIFF
hasta 24-bit/96KHz
-Construido con Limitador, Compresor, Normalizador y función de
Auto Ganancia
-Construido con Anador (Modo Guitarra o Cromático)
-Opciones de Grabación incluyen Pre-grabación, Marcadores,
Compuerta de Ruido
-Grabación directa con la tarjeta SD incluida (compatible SDHC)

-Grabación directa en lápiz USB (no incluido)
-Salida auricular/línea de Jack 1/8-” (3.5mm)
-Entrada de línea de Jack 1/8-” (3.5mm)
-Entrada Micro estéreo de Jack 1/8-” (3.5mm)
-Botón de entrada de ganancia con tres niveles de entrada de
ganancia – 20 dB, 0 dB y +10 dB
-Nivel de grabación ajustable con entrada digital VU
-Reproducción de Medios con Sección Loop
-Capacidad de trabajar con archivos
-Fácil reproducción de las grabaciones
-Control de volumen de auriculares
-Fácil descarga a ordenador con el cable USB incluido
-Montaje en stand (stand incluido)
-Adaptador AC/DC incluido
-Pantalla de viento incluida
-Pilas incluidas
Queremos Que Oiga Durante Toda la Vida
Escogiendo un equipo de audio de calidad como la unidad que
acaba de adquirir es sólo el comienzo de su disfrute musical.
Ahora es el momento de considerar como puede maximizar la diversión y posibilidades que su equipo le ofrece. Éste fabricante y
el Grupo de Asociaciones del Consumidores quieren que saque el
máximo provecho a su equipo pero utilizándolo con un nivel seguro.
Eso es escuchar el sonido alto y claro sin un volumen excesivo y con
distorsiones y lo más importante, sin que afecte su sensibilidad auditiva. El sonido puede ser engañoso. Cada ve que escucha a un “nivel
confortable” se adapta a un volumen de sonido mayor. Así cuando
algo suena “normal” realmente puede estar alto y perjudicial para sus
oídos. Tenga cuidado con esto y establezca su equipo a un nivel seguro ANTES de que su oído se adapte.
Para establecer un nivel seguro - Empiece a establecer su control del
volumen bajo. - Lentamente incremente el sonido hasta que escuche
confortablemente y claro y sin distorsión. Una vez haya establecido
un nivel de sonido confortable: - Marque el dial y déjelo así. Gastar
un minuto para hacer esto le ayudará a prevenir daños o pérdida de
oído en el futuro. Después de todo, queremos que oiga durante toda
la vida.
Introduction • Introduction • Einleitung
Introducción
26

Usado inteligentemente, su nuevo equipo de sonido le proporcionará y vida de diversión y disfrute. Los daños auditivos debidos a ruidos altos son normalmente indetectables hasta que es
demasiado tarde. Este Fabricante y el Grupo de Asociaciones
del Consumidor recomiendan que evite la exposición prolongada al ruido excesivo. Incluimos esta lista de niveles de sonido
para su protección.
Nivel de Sonido (en Decibelios):
30 Biblioteca tranquila, susurros suaves
40 Sala de estar, nevera, dormitorio lejos del tráco
50 Tráco ligero, conversación normal, ocina tranquila
60 Aire acondicionado a 6 metros, máquina de coser
70 Aspiradora, secador de pelo, restaurante ruidoso
80 Tráco en ciudad, reloj despertador a 60 cms.
Los siguientes ruidos pueden ser peligrosos tras una continuada exposición
90 Metro, motocicleta, camiones, cortacésped
100 Camión de la basura, Motosierra, chirriar de rueda
Introducción
27
Introduction • Introduction • Einleitung
120 Concierto de rock delante de los altavoces, trueno
140 Sonido de disparo, avión jet
180 Plataforma lanzadora de cohetes
Información cortesía de la Fundación de Estudio de la Sordera.
Listado de Conexiones y Controles del HDR7
(1) CAVIDAD PARA PILAS
(2) ENCENDIDO - POWER (ON-OFF)
(3) ENTRADA ENCENDIDO DC
(4) ENTRADA DE GANACIA (- o +)
(5) LOOP
(6) PANTALLA LCD
(7) STOP/RETROCESO, PLAY/PAUSA, GRABACION
(8) NIVEL DE GRABACION/BUSQUEDA
(9) MENU
(10) ENTER
(11) ENTRADA DE LINEA
(12) SALIDA MICRO/ LINEA
(13) MICROFONOS ESTILO X-Y

(14) ENTRADA MICRO
G3
(15) NIVEL DE SALIDA (- +)
(16) GANANCIA DE MICRO (BAJA - ALTA)
(17) USB PARA PC
(18) ENTRADA USB
(19) MONTAJE EN STAND
(20) RANURA DE TARJETA SD
(21) CABLE USB para TRANSFERIR DATOS a
PC (cable incluido/ sin imagen)
Funciones del HDR7
El iKEY HDR7 es un grabador digital portátil
que le permite grabar, reproducir y escuchar
archivos de audio. Junto con dos micrófonos
incorporados con calidad de estudio, la unidad
dispone de entrada de Micro, entrada de línea
y salida micro/línea que proporcionan diversas opciones de grabación. Grabar archivos
Los archivos grabados pueden ser transferidos fácilmente entre el HDR7 y su ordenador
utilizando el cable USB incluido o un lápiz de
memoria USB.
Como Empezar
Para empezar a usar el iKEY HDR7, se tiene
que asegurar que tiene una fuente de alimentación y la tarjeta de memoria SD incluida
(SDHC compatible) conectada.
Fuente de Alimentación
El HDR7 funciona con 4 pilas AA
o con la fuente de alimentación
incluida.
A. Coloque las 4 pilas AA que
vienen con la unidad abriendo la
tapa de la cavidad de las pilas (1)
g. 1.1
localizado en la parte posterior de la unidad.
*Nota: Hay un indicador de carga de las pilas en
la parte superior derecha de la pantalla LCD (6)
que va disminuyendo de acuerdo con la cantidad de energía que le queda a las pilas
B. Conecte el aparato a la entrada
DC (3) localizado en la parte izquierda de la unidad y conecte el otro
extremo al enchufe eléctrico.
*Nota: La unidad puede funcionar de forma
contínua. Puede llegar a calentarse, pero eso no
signica que no funcione correctamente..
g. 1.2
Connections and System Control • Connexions & Utilisation • Anschlüsse und Systemeinstellungen
Conexiones y Control de sistema
28

Conexión Tarjeta SD
El HDR7 incluye una tarjeta SD de 1 GB para
guardar las grabaciones. Antes de encender
la unidad, asegúrese de que la
tarjeta está insertada en la ra-
nura (18) localizada en la parte
de abajo HDR7. Para conectar la
tarjeta, empuje la tarjeta completamente en la ranura hasta que
encaje en el espacio. NO FU-
ERCE LA TARJETA.
Para retirar la tarjeta, presione suavemente la
parte inferior de la tarjeta. Se deslizará parcialmente y luego se puede retirar.
*Nota: Si la unidad está funcionando con pilas
y usted está grabando, NO conecte la corriente
continua hasta que se haya detenido la grabación,
Conexiones y Control de sistema
29
Connections and System Control • Connexions & Utilisation • Anschlüsse und Systemeinstellungen
Inserte la tarjeta de la
manera que se muestra
g. 1.3
ya que su archivo podría resultar dañado.
Uso de la Unidad USB
En la parte derecha del dispositivo
está la ranura de la unidad USB (18)
donde el dispositivo de memoria
USB puede ser conectado. El RM3
puede a la vez leer archivos para re-
producirlos y grabar directamente a
un dispositivo USB conectado en
esa área.
La unidad de HDR7 sólo interactuará con un
dispositivo de memoria a la vez, y la unidad
USB tiene prioridad sobre la tarjeta SD. Lo
cual signica que cuando el dispositivo de
memoria USB está conectado, solamente los
archivos guardados en ese dispositivo serán
g. 1.4
visibles. Así como todas las grabaciones serán
almacenadas en la unidad USB cuando ésta
esté conectada.
Cuando no hay una unidad USB conectada, el
HDR7 usa la tarjeta SD para leer los archivos y
guardar grabaciones.
Encender la Unidad
Ahora que la tarjeta SD y la fuente de alimentación están conectadas, la unidad se puede
encender pulsando el botón POWER (2) en
posición ON.
Navegar por el HDR7
Después de encender la unidad, aparece un
menú con el listado de todos los archivos y
carpetas almacenados en la memoria. Utilice el

Jog wheel RECORD LEVEL/SEARCH (8) para
desplazarse a través de estas carpetas y archi-
vos. *Nota: Cuando conecte una nueva tarjeta
SD, no habrán archivos visibles como el medio
no está en la unidad).
El desplazamiento hacia la derecha buscará a
través del menú hacia abajo y el desplazamiento hacia la izquierda buscará hacia arriba. Pulse
PLAY/PAUSE (7) para ver el contenido de una
carpeta resaltada. Todas las grabaciones quedan almacenadas en la carpeta llamada RE-
CORDS en el menú IKEY. Pulse el botón STOP/
BACK (7) para volver a la carpeta anterior.
Menú Principal
Pulse el botón MENU (9) para entrar en el Menú
Principal donde las principales disposiciones
de la unidad pueden ser ajustadas adecu-
adamente. Use el Jog wheel para escoger una
determinada función de ajuste y pulse el botón
enter (10) para ver lo que contiene y cambiar
los valores. Pulse el botón Menú otra vez y
volverá a la pantalla previa.
Funciones y Ajustes
Los siguientes puntos están contenidos en el
Menú Principal y sus ajustes pueden ser modi-
cados para cambiar el uso de la unidad.
*Nota: Hay dos puntos que aparece cuando el
adaptador de alimentación no está conectado,
Luz de Fondo y Bat. Tipo.
CONTRASTE- Se usa para dar claridad de contraste de la pantalla. Se ajusta de acuerdo con
un porcentaje de escala de 0 a 100 (más oscuro
a más brillante). Use el Jog wheel para ajustar
el contraste.
FECHA- Ajuste la fecha que está asignada al
HDR7 y de los archivos que la unidad graba.
La fecha está indicada por día, mes y el año.
Use el Jog wheel para seleccionar el valor apropiado. Pulsando el botón PLAY/PAUSA avanza
al siguiente campo y pulsando STOP/RETRO-
CESO vuelve al campo anterior.
TIEMPO- Representa la función de ajuste de tiempo. Para ajustar el tiempo, se presenta como
hrs (horas) -- min (minutos) -- y A.M./P.M., seleccione el valor apropiado con el Jog wheel
y pulse PLAY/PAUSA para avanzar al próximo
campo. Pulse STOP/RETROCESO para volver
Connections and System Control • Connexions & Utilisation • Anschlüsse und Systemeinstellungen
Conexiones y Control de sistema
30

al campo previo.
MODOS DE AFINACIÓN- El Anador se usa
para anar una guitarra conectada al HDR7.
Cuando seleccionamos, nos aparecen dos op-
ciones, Guitarra y Cromático (Auto). La opción
Guitarra es adecuada para guitarristas novatos,
y el Cromático es más adecuado para guitarristas más experimentados.
Cada interfaz se basa en una modelo estándar
de seis cuerdas con las notas (de alto a bajo)
E-A-D-G-B-E. Cuando se toca una cuerda, el
anador leerá si el tono es plano (bajo), sostenido (alto) o entonado. Después de tocar una
cuerdo en su guitarra, la pantalla LCD iluminará
la señal en verde si su nota está anada, rojo si
es sostenida o amarilla si es plana. Ajuste con-
Conexiones y Control de sistema
31
Connections and System Control • Connexions & Utilisation • Anschlüsse und Systemeinstellungen
venientemente y sigua con la siguiente cuerda.
En la interfaz de Guitarra para principiantes,
hay una pantalla individual para cada cuerda
correspondiente, empezando con la cuerda
más baja E, subiendo hasta la cuerda más alta
E. En este modo, las cuerdas sólo pueden ser
anadas de acuerdo con su pantalla particular.
Cuando su cuerda está anada, pulse el botón
Enter para pasar a la próxima pantalla de cuerda.
Después de navegar a través de las seis pan-
tallas del Anador de Guitarras, encontrará el
interfaz del anador Cromático (Auto) (destinado a los guitarristas más experimentados).
Las cuerdas son anadas como en un interfaz
de guitarra, así que todas las cuerdas se anan
en esta pantalla.
RESTAURAR POR DEFECTO- Devuelve los
ajustes a las características del Menú Principal
a sus valores por defecto.
MOVER- Mueve un archivo desde una carpeta
a otra. Para mover un archivo particular, asegurarse que se ha marcado, pulsar el botón
Menú, seleccionar Move, navegar a la carpeta
de destino, pulsar Menú otra vez y luego Paste.
El archivo ahora aparece en esta carpeta.
COPIAR- Use esta aplicación para copiar un
archivo a otra carpeta. Para copiar un archivo
particular, use el Jog wheel y asegúrese que
está marcado, pulse el botón Menú, seleccione
Copy, navegar a la carpeta donde quiere co-

piarlo, pulse Menú otra vez y luego Paste. El
archivo aparecerá en esta carpeta también..
BORRAR- Se usa para borrar un archivo. Para
borrar un archivo particular, use el Jog wheel
y asegúrese que está marcado, pulse el botón
Menú, seleccione Delete. Pulse el botón PLAYPAUSE para conrmar la supresión, pulse el
botón STOP-BACK para cancelar.
RENOMBRAR- Para renombrar un archivo en
particular, asegurarse de que lo ha marcado.
Pulse el botón Menú y seleccione Rename. El
título aparece en modo File Rename, donde
puede ser editado. Use el Jog wheel para
cambiar las letras marcadas. Para pasar a la si-
guiente letra, pulse el botón Play/Pause y para
volver a las letras anteriores pulse el botón
STOP/BACK. Salve pulsando enter..
GUARDAR COMO + NORMALIZAR- Esta fun-
ción Normaliza el archivo de audio y lo salva.
Normalizar es una herramienta para ajustar el
volumen de archivos de audio a un nivel estándar. Para utilizar esta función, pulse el menú
y seleccione Guardar como / Norma. Puede
optar por convertir un archivo a un formato
de audio (es decir, WAV -> ACC) o mantener
el mismo formato, a continuación, pulse Intro.
Si elige un formato MP3 o AAC, en la siguiente
pantalla, puede elegir una velocidad de bits
diferente. También en esta pantalla hay la opción Normalizar. Pulse Intro para alternar entre
ON / OFF.
*Nota: El proceso para normalizar un archivo tarda un momento dependiendo de cuánto tiempo
hay de audio grabado. Por favor, tenga paciencia
cuando normalice un archivo.
ILLUMINACIÓN DE PANTALLA- (aparece
cuando el adaptador de corriente no está
conectado). La unidad viene con una función
de Iluminación de Pantalla, sin embargo para
ahorrar energía, se desactiva si no se utiliza.
La función de Backlight se usa para programar
el tiempo que tardará la luz de la pantalla en
apagarse Las opciones están en Off, el donde
la luz de la pantalla nunca está encendido, ON
donde la pantalla siempre está encendida y 2
s, 5 s, 10 s y 30 s, el cual representa cuanto
tiempo en segundos tardará la pantalla en apagarse. Para encender la luz de la pantalla otra
vez, simplemente pulse cualquier botón de la
unidad o el Jog wheel.
Connections and System Control • Connexions & Utilisation • Anschlüsse und Systemeinstellungen
Conexiones y Control de sistema
32

*Nota: Cuando el adaptador de corriente está
conectado, la luz de la pantalla estará siempre
encendida y no habrá indicador de batería.
TIPO DE PILA- (aparece cuando el adaptador
de corriente no está conectado)- Esta función
se utiliza para aplicar el tipo de pila que escoge
para la unidad. Seleccione Alcalina para pilas
alcalinas y NI-MH ACC para pilas de níquel.
Reproduciendo Archivos
Para reproducir un archivo, pulse el botón
PLAY/PAUSE cuando se destaque en el archivo
del menú
*Nota: Cuando conecte una nueva tarjeta sin archivos será visible como no hay medio conectado todavía en el dispositivo.
Conexiones y Control de sistema
33
Connections and System Control • Connexions & Utilisation • Anschlüsse und Systemeinstellungen
Pulsando de nuevo este botón se detendrá la
reproducción del archivo. Para el avance rápido
dentro de una pista desplace el Jog wheel RECORD LEVEL/SEARCH hacia la derecha. A la
inversa, para el retroceso rápido, desplace el
Jog wheel RECORD LEVEL/SEARCH hacia la
izquierda.
Para detener un archivo que se está reproduciendo, devolver la unidad al archivo de menú
pulse el botón STOP/BACK (7). (*Nota: Cuando
se reproduce o graba una pista por más de una
hora, el indicador de tiempo se muestra de m:s
(minutos segundos) a h:m (horas minutos).
Modo Reproducción
Número de
archivo
El uso de la
tarjeta de
memoria SD
Nombre del
archivo
Pista Reproducida
(La unidad se muestra en Modo Reproducción)
La pantalla LCD a todo color (6) muestra los
archivos, carpetas, grabaciones, modo de reproducción y el modo de grabación de la unidad HDR7.
g. 1.5
Formato
del archivo
Nivel de
batería
Tiempo de
la Pista en
minutos y
segundos
Modo
Tiempo
Menú Reproducción
En modo play, hay un Menú que permite el

Display, reproducir y características de sonido
para ser ajustadas y controladas. Para acceder
al Menú Play, pulse el botón Menú cuando esté
en Modo Play. Las características del menú
se listan a continuación (*Nota: Estos ajustes
pueden cambiarse pulsando el botón ENTER
cuando lo destaquemos).
VU METER- El VU Meter muestra el nivel de
salida de volumen de la unidad y se sitúa en
la parte inferior de la pantalla de Modo Play y
Modo Record. En Modo Play, la pantalla del VU
Meter se puede activar y desactivar cambiando
su conguración en el Menú Play. Archivos estéreo se muestran con dos barras y los archivos
mono se muestran con una barra.
MODO PLAYBACK- Los archivos que están
almacenados en la memoria del dispositivo
pueden ser reproducidos de diferentes man-
eras:
PLAY ONE - Un archivo individual se de-
tiene después de que se reproduce una vez
PLAY ALL - Todos los archivos son reproducidos una vez
REPEAT ONE - Se repite un archivo
REPEAT ALL - Todos los archivos se repiten
MODO TIEMPO- El Modo Tiempo se reere a la
longitud de un archivo en particular. Se muestra de dos maneras principales, esto es como
REM (Restante- cuanto tiempo le queda al archivo) y ELA (Transcurrido- cuanto tiempo ha
pasado). Use el Menú Play para seleccionar el
modo Tiempo a utilizar en la unidad.
FUNCIÓN LOOP- En Modo Play, el HDR7 también permite crear un Loop desde archivos
acoplados. Mientras un archivo se reproduce,
pulse el botón LOOP (5) para ajustar donde
empieza el Loop (la unidad mostrará: LOOP IN
SET). Pulsando el botón LOOP otra vez ajustará
el punto nal del Loop y la unidad empezará a
reproducir la sección de audio repetidamente
(la unidad mostrará: LOOP OUT SET, LOOP
ACTIVATED).
Para detener la reproducción del Loop y devolver el archivo al modo reproducción normal,
pulse el botón LOOP una vez más (la unidad
mostrará: LOOP IS DEACTIVATED).
Para seleccionar otro Loop, repita el proceso.
Connections and System Control • Connexions & Utilisation • Anschlüsse und Systemeinstellungen
Conexiones y Control de sistema
34

*Nota: La función LOOP sólo puede ser usada
en Modo Play.
Grabación con el HDR7 Disposición
(Conexiones de Entrada / Salida)
LINE IN
ENTRADA
EN LINEA (11)- Conecta una señal procedente
de una fuente externa mediante una entrada
Jack 1/8” (3.5 mm).
DE MICRO (14)- Conecta una señal procedente
de un micrófono mediante una entrada Jack
Conexiones y Control de sistema
35
Connections and System Control • Connexions & Utilisation • Anschlüsse und Systemeinstellungen
g. 1.6
PHONES/
LINE OUT
1/8” (3.5 mm).
*Nota- Las señales de MICRO y LINEA solamente
pueden ser leídas una a la vez cuando se está
grabando. Si las dos están conectadas a la unidad al mismo tiempo, solamente la conexión en
LINEA será grabada.
SALIDA
SALIDA MICRO/ LINEA (7)- Conecta un dispositivo de salida externa como unos auriculares
o altavoces mediante una salida Jack 1/8” (3.5
mm) para escuchar la señal que pasa a través
de la unidad.
*Nota: Los archivos grabados por el iKEY HDR7
son nombrados de acuerdo al formato de archivo
y numerados de acuerdo a la secuencia en el
cual ha sido grabado. Por ejemplo, iKEY_001.
MP3, iKEY_001.WAV, iKEY_002.MP3, iKEY_002.
WA V.
Grabación con el HDR7 Disposición
(Conexiones de Entrada / Salida)
Junto con las entradas de Micro y Línea 1/8”,
la unidad también incorpora dos micrófonos de
condensador congurados con diseño en X/Y.
Este particular diseño de micrófono es efectivo
para capturar una variedad de diferentes ambientes. Además el HDR7 tiene una variedad de
opciones de grabación para diferentes tipos de
grabación (*Nota- Ver la opción Canales en el
Menú Grabación a continuación para ver más
detalles).

Opciones de Grabación
Junto con las entradas de MICRO/LINEA y los
micrófonos incorporados con diseño XY, el
HDR7 tiene varias características de grabación
que se pueden establecer para proporcionar un
gran número de opciones de grabación. Para
acceder a estas características, la unidad prim-
ero debe estar en modo Grabación (*Nota- Se
puede entrar en modo Grabación pulsando el
botón RECORD (7) ).
Cuando estamos modo record, pulsamos el
botón MENU (9) para entrar en Menú de Grabación. Aquí es donde todas las características
de grabación pueden ser vistas y ajustadas.
Use el Jog whell para seleccionar una característica especíca y pulse el botón ENTER
(10) para ver y/o cambiar un particular ajuste. A
continuación detallamos todas loas caracterís-
ticas contenidas en el Menú de Grabación.
FORMATO- Selecciona el formato de función
para ajustar el tipo de archivo en que quiere
grabar. El HDR7 puede grabar archivos en WAV,
MP3, AAC, y formato AIFF (*Nota- Una vez la
grabación ha empezado, estos ajustes no
pueden ser cambiados). Estos formatos están
basados en diferentes tipos de archivos que
producen grabaciones en diferente tamaño,
compatibilidad y calidad. A continuación una
breve comparación de los diferentes formatos.
WAV- Waveform Audio Format
MP3- MPEG-1 Audio Layer 3
AAC- Advanced Audio Coding
AIFF- Audio Interchange File Format
FRECUENCIA DE MUESTREO- La frecuencia
de muestreo representa el número de muestras por segundo que se toman de una señal.
Cuando la frecuencia de muestreo sube, lo
hace la calidad y también se incrementa la memoria requerida. Para el HDR7, basado en qué
formato de archivo está activada, las siguientes
frecuencias de muestreo están disponibles:
WAV & AIFF- 44.1 kHz / 48.0kHz/ 88.2 kHz/
96.0 kHz
*Sugerencia: La velocidad de muestreo afecta
a la velocidad en la que se graban las muestras
de audio. A medida que aumenta velocidad de
muestreo, la longitud de las formas de onda se
incrementa, lo que te da mejor precisión de audio, la calidad y la capacidad de edición.
BIT DEPTH - Se reere a cuantos bits de sonido
Connections and System Control • Connexions & Utilisation • Anschlüsse und Systemeinstellungen
Conexiones y Control de sistema
36

son utilizados dentro de una particular muestra
de sonido. Como sucede con la frecuencia de
muestreo, una profundidad de bits más alta
representa mayor calidad, se requiere sin embargo más memoria. Los valores de Bit Depth
siguientes están disponibles para los formatos
de archivo correspondientes:
WAV & AIFF 16 bit, 24 bit
*Sugerencia: La importancia del Bit Depth en
grabaciones audio es que determina el máximo
número posible de señal dinámica, o la diferencia
entre los sonidos más altos posibles y los ruidos
más bajos posibles.
BITRATE- Representa cuantos bits por segundo pueden ser procesados. Cuando se
incrementa, lo hace también la calidad. Los
Conexiones y Control de sistema
37
Connections and System Control • Connexions & Utilisation • Anschlüsse und Systemeinstellungen
siguientes valores de están disponibles para
los siguientes formatos de archivo correspondientes.
MP3 & AAC: 64 kbps, 96 kbps, 128 kbps,
160 kbps, 192 kbps, 224 kbps, 256 kbps,
320 kbps
CANELES- Las grabaciones hechas con el
HDR7 pueden tener una variedad de diferentes
conguraciones de Canal. Las opciones disponibles son las siguientes:
Estéreo- Los canales L y R captan dos señales distintas. Esta opción crea un registro
de imágenes estéreo en la que cada canal
tiene una salida diferente basado en lo que
el micrófono particular captura.
Mono L/R SUM- Una grabación mono es el
mismo a izquierda y derecha. Este particular
tipo de grabación Mono combina la señal
capturada por cada micrófono y salidas la
misma combinación resulta para cada canal
izquierdo y derecho.
Mono L- Sólo la señal captada por el micrófono izquierdo es utilizada.
Mono R- Sólo la señal captada por el micrófono derecho es utilizada.
*Nota: Cuando usamos una fuente de señal
moni, como una guitarra, asegúrese de ajustar
la unidad a modo MONO de lo contrario sólo el
canal izquierdo será grabado y escuchado en la
reproducción.

AUTO-PISTA- Para utilizar la función Auto-pista, ajustar en la posición ON. Cuando hay un
silencio prolongado, la unidad creará un nuevo
archivo que se iniciará con la nueva muestra de
audio detectada.
AUTO-GRABACIÓN- Para utilizar la función
Auto-grabación, ajustar en la posición ON. Las
funciones Auto-grabación empiezan automáticamente cuando una señal de grabación es
detectada, asegurando que no se pierda memoria.
PREFIJAR ARCHIVO- La característica de prejar archivo se utiliza para añadir una cadena
personalizada denida en un archivo de partida. Use el Jog wheel para seleccionar una letra
particular y pulse el botón PLAY/PAUSE para
pasar a la siguiente posición de letra.
PRE-GRABAR- La característica de Pre-grabar
permite incluir un tiempo extra después de que
la grabación tenga lugar. Los dos ajustes son
ON y OFF. Cuando lo utilizamos, la característica de Pre-grabar añade 5 segundos de silencio
al principio de la grabación.
MARCADOR DE TIEMPO- Cuando utilizamos
esta característica, se añade un marcador a la
grabación en proceso cada vez que un tiempo
predenido de tiempo completa. Para jar una
marca manualmente, pulse PLAY mientras
graba. Todas las marcas se salvarán en un archivo .txt que comparten el mismo nombre del
archivo de audio.
*Nota: la función de Marcador de tiempo se ajus-
ta en incrementos de 15 segundos)
TEMPORIZADOR DE ARCHIVO- La función de
Temporizador de archivo empieza una nueva
grabación incrementando un tiempo ajustado.
Un nuevo archivo empieza cada vez que se
completa un ciclo.
*Nota- la función de Temporizador de archivo se
ajusta en incrementos de 15 segundos
REGIONES- Por regiones nos referimos al método por el cual el HDR7 almacena marcas e
informaciones de pista para usar en el software
de edición de audio. Hay dos tipos de Regiones
que se pueden seleccionar, SONY y CUE.
SONY es para usarse con hardware SONY y
software de su propio formato, y CUE, el formato más extendido para su uso de la mayoría
Connections and System Control • Connexions & Utilisation • Anschlüsse und Systemeinstellungen
Conexiones y Control de sistema
38

de hardware y software. Esto determina que
información será almacenada en el archivo de
texto.
AUMENTO 24dB- Aumenta el nivel de grabación por 24 dB.
ALIMENTACIÓN PHANTOM- La Alimentación
Phantom es usada en condensadores y otro
tipo de micrófonos que necesitan 3V.
DINÁMICOS- Esta característica ofrece opciones que sean seleccionadas para afectar
las señales de audio que la unidad graba. Las
opciones de abajo afectan a cada señal de
manera distinta.
Off- La señal no es afectada en absoluto
AGC (vocal)- Usa un compresor de frecuen-
Conexiones y Control de sistema
39
Connections and System Control • Connexions & Utilisation • Anschlüsse und Systemeinstellungen
cia de gama media para mejorar las voces
Compresor- Condensa la señal para que
suene más completa mientras reduce
dinámicos
Limitador- Se usa para ayudar a garantizar
que un archivo no llega demasiado alto de
un nivel y distorsione
*Sugerencia: Si ajustamos los efectos durante
la grabación no nos permitirá mover el efecto
más tarde. Esto sería deseable, por ejemplo,
para aumentar la señal y prevenir distorsiones.
No obstante, estos efectos pueden ser añadidos DESPUES de la grabación , así como en
la edición del software de audio, permitiendo
grabar una señal “seca” añadiendo dinámicos
más tarde.
MODO TIEMPO- El Modo Tiempo se reere
a la longitud de un archivo en particular. Se
muestra de dos maneras principales, esto es
como REM (Restante- cuanto tiempo le queda
al archivo) y ELA (Transcurrido- cuanto tiempo
ha pasado).
COMPUERTA DE RUIDO- La Compuerta de
ruido se usa para asegurar que cualquier ruido
alto no causa distorsión en la grabación. Para
activar esta función, selecciónela.
*Nota: Estos ajustes no se pueden cambiar una
vez la grabación ha comenzado.

Opciones de Grabación
FILE
BIT RATE
FORMAT
TIME
TUNER
FORMAT
STEREO
/MONO
LINE IN PHONES/
LINE OUT
INPUT GAIN
-
+
+
0
OUTPUT LEVEL
Uso de la
tarjeta de
memoria
Nombre del
Archivo
Medidor de
señal STEREOMONO
Nivel de Grabación/ Mar-
cador de Jog wheel
(Screen shows unit in Record Mode)
Si una grabación está jada en estéreo (imagen), habrán dos barras presentes en la sec-
ción Medidor de señal ESTEREO-MONO. Si
está jada como mono, habrá una barra presente.
g. 1.7
Ajuste de Niveles de Grabación
Formato
del archivo
Nivel de
Tiempo de
Ajustar los niveles de grabación correctamente es fundamental para lograr una buena
grabación. Cuando una señal es demasiado
fuerte, la distorsión y saturación se produce
batería
y crea un registro inutilizable. Sin embargo,
una señal que es demasiado baja puede sonar
la pista
como leve o no ser audible del todo y también
Modo
puede ser inutilizable.
Tiempo
Con el n de obtener las mejores grabaciones,
debe aplicar la máxima señal posible que el
HDR7 puede aceptar sin sobrecargar (0 dB).
Cuando una señal se vuelve demasiado fuerte
para la unidad, el indicador de señal estéreo-
mono (que se muestra en el modo de grabación) aparece Rojo (más de 0 dB).
Para encontrar el nivel máximo posible de gra-
Connections and System Control • Connexions & Utilisation • Anschlüsse und Systemeinstellungen
bación siga estos pasos:
1) Elevar el nivel hasta donde empiece la
sobrecarga / distorsión / clip (aparece en
rojo).
2) A partir de ahí incremente ligeramente el
nivel con el Jog Wheel hasta que no sobre-
cargue.
*Nota: girando la rueda hacia la derecha aumenta
la señal y hacia la izquierda baja el nivel de la
señal.
El interruptor de ganancia de entrada
(4) también se utiliza para obtener un
máximo nivel de señal. El interruptor
de cambios del nivel general de una
señal de entrada entre los 3 niveles
de relleno: -20 [dB -], 0 dB [o] y 10
dB [+]. Si una señal es demasiado baja, trate
Conexiones y Control de sistema
g. 1.8
40

de aumentar, pasando de [-] a [o] o [o] a [+]. Si
una señal es demasiado alta, trate de aminorar,
pasando de [+] a [o] o [o] a [-].
Solución- Dar marcha atrás levemente el Nivel
de Grabación con el Jog wheel para que el medidor no aparezca en rojo.
Solución- Gire con el Jog wheel el Nivel de
Grabación al máximo y disminuya la entrada de
ganancia hasta que la señal apenas de picos y
la pueda aminorar.
*Nota: Si sus grabaciones no están almacenadas
correctamente, puede que tenga que subir o bajar la señal que viene de la fuente directamente.
Grabar un Archivo
Una vez que su formato de velocidad de bits,
los niveles y ajustes estéreo / mono se han
Solución- Aumente con el Jog wheel el nivel de
grabación al máximo y aumente al máximo la
ganancia de entrada hasta que apenas surjan
picos y no aparezca en rojo.
Conexiones y Control de sistema
41
Connections and System Control • Connexions & Utilisation • Anschlüsse und Systemeinstellungen
hecho, usted está listo para grabar. En el modo
de archivo, simplemente pulse el botón RECORD para iniciar la grabación. Una luz parpadea debajo
del botón de grabación para indicar que la unidad está grabando.
Para detener una grabación, pulse el botón
RECORD.
Para continuar la grabación, pulse el botón RECORD una vez más.
Para detener la grabación y volver al menú
anterior, pulse el botón STOP / BACK (* Nota:
todas las grabaciones de almacenan en la
carpeta llamada RECORDS en el menú iKEY.
Cuando la grabación es superior a los 2 GB de
tamaño, seguirá grabando por separado como
un archivo separado).

Transferir Archivos Entre
el HDR7 y su Ordenador
Los archivos grabados con su tarjeta SD
pueden ser transferidos con facilidad entre su
HDR7 y su ordenador usando el dable USB
incluido.
Primero, asegúrese que su unidad tiene baterías.
Conecte el nal pequeño del cable USB a la ranura USB PARA PC (7) de la unidad y conecte
el otro extremo al puerto USB en la parte
trasera de su ordenador.
*Nota: Para mejor resultado, conecte el cable
USB en la parte posterior de su ordenador, no
use un conector.
Una vez el cable está conectado a la unidad y
al ordenador, encienda el HDR7. Espere que la
tarjeta sea reconocida por su ordenador:
Mac: Cuando un icono aparece en su or-
denador, haga clic en él para ver el contenido de la carpeta.
PC: Haga clic en el dispositivo USB que
aparece en la carpeta Mi PC.
Para copiar archivos desde la unidad, seleccione los archivos deseados y arrástrelos al
escritorio o a una carpeta especíca en el disco
duro.
Los archivos asociados con la última sesión
grabada se almacenarán como una lista de
reproducción titulada lastrec.m3u. Se pueden
abrir en el ordenador simplemente haciendo
clic en el icono de la lista de reproducción o
transriéndolos arrastrando el icono de la lista
de reproducción al ordenador.
Para copiar los archivos de audio desde el ordenador al iKEY HDR7, seleccione los archivos a copiar y arrástrelos al icono que aparece
cuando la unidad es conectada.
Extracción Segura del Dispositivo
Mac: Seleccione el icono del iKEY HDR7.
Arrástrelo dentro de la papelera.
Windows: Haga clic en el icono ‘quitar hardware con seguridad’ en la barra de tareas.
Elija el iKEY HDR7 como el dispositivo a
quitar.
Connections and System Control • Connexions & Utilisation • Anschlüsse und Systemeinstellungen
Conexiones y Control de sistema
42

Características Extras Actualizaciones del Software
(NIVEL DE SALIDA) Use el NIVEL DE SALIDA
(15) junto con los controles de su instrumento
para ajustar el nivel de los auriculares.
(GANANCIA DE MICRO) La GANACIA DE
MICRO (16) se usa para subir o bajar la señal
entrante conmutando entre los ajustes BAJO
y ALTO.
(Montaje en STAND) El Montaje en Stand (19)
es donde usted conecta la unidad a un stand
(Stand incluido).
(MODO ESPERA) Para situar la unidad en
modo espera, pulse y mantenga los botones de
LOOP y ENTER. Para desactivar el modo espera, pulse y mantenga los botones de LOOP
y ENTER.
Conexiones y Control de sistema
43
Connections and System Control • Connexions & Utilisation • Anschlüsse und Systemeinstellungen
En nuestros productos siempre hacemos mejoras para incrementar el uso y funcionalidad.
Regularmente, salen actualizaciones para
nuestras unidades de iKEY-AUDIO Asegúrese
de comprobar el sito Web (http://www.ikey-audio.com) regularmente para actualizaciones.
Para encontrar qué versión del software tiene
en su unidad, conéctela y cuando se enciende
aparece un número en la parte de arriba de la
pantalla LCD (6). Este número se reere a la
versión del software. Si en la página Web hay
un software actualizado el cual su número es
más alto del de su unidad, signica que el software de la página Web es más actual y debe
ser descargado en su unidad.
*Nota: Asegúrese de descargar el software especíco para su unidad.
Hay instrucciones detalladas de como actualizar el software de sus unidades en la página
Web de iKEY-AUDIO, de todas formas aquí
tiene una guía rápida:
1) Asegúrese que la actualización de soft-
ware localizada online es la versión más
reciente y no la actual que utiliza su unidad.
2) Descomprimir y descargar la versión más
reciente del software en el directorio raíz de
su tarjeta SD.
3) Cárguelo en su unidad asegurándose primero que está apagada y luego
conéctela.
4) El software se actualizará automáticamente.
*Nota: Es muy importante de que se asegure que
sus pilas están cargadas al máximo cuando actualice el software de las unidades porque una

actualización puede durar varios minutos y si sus
pilas se apagan en medio de la actualización, su
unidad puede quedar dañada.
Especicaciones
General:
Compatibilidad USB ..................... USB 1.0, 1.1, 2.0
Fuente de Alimentación.....................1000mA DC 5V
4 Pilas AA (Alcalinas, NI-MH)
Tiempo de Grabación…................................5 horas*
Display......................................... Pantalla color LCD
Dimensiones..............158x73x37mm (6.2x2.9x1.5 in)
Peso…................................................ 0.3 kg (.55 lbs)
*Nota: varia según el tipo de dispositivo de almacenamiento y las pilas usadas
Audio:
Canales…………………………........ 2 (estéreo)
Medios de Grabación................. SD (64 MB-2GB)
SDHC (4 GB-32GB)
Cualquier soporte FAT-USB
Velocidad de Muestreo:..................... más de 96 kHz
Profundidad de Bit:............................. más de 24-bit
Rango Dinámico: .......................................... 120 dB
THD+N:........................................................... -91 dB
Frecuencia de Respuesta................... 20Hz – 20KHz
Impedancia de Entrada:………............ Línea: 10K Ω
Micrófono: 1K Ω
Niveles de Entrada Nominal:.....................................
Ganancia Baja: 1V RMS (0 dBV)
Ganancia Media: 5V RMS (-6 dBV)
Ganancia Alta: .13V RMS (-17 dBV)
Niveles Máximos de Entrada:…..................................
Ganancia Baja: 2.5V RMS (+8 dBV)
Ganancia Media: .68V RMS (-3 dBV)
Ganancia Alta: .25V RMS (-12 dBV)
Impedancia de Salida:……………………....... 30 Ω
Salida Máxima:……................................................
Línea (10K Ω): 0.7V RMS (-3 dBV)
Micro (32 Ω): 0.35V RMS (-9 dBV)
Formato de Grabación:.. MP3: 128, 256, 320 Kbps;
AAC: 128, 256, 320 Kbps;
WAV & AIFF: Frecuencia de muestreo 44.1,
48.0, 88.2, 96.0 kHz/Bit Depth 16, 24-bit
Por favor registre su garantía online en
www.ikey-audio.com.
Specications • Caractéristiques techniques • Technische Daten
Especicaciones
44

Sommaire
45
Contents | Contenidos | Inhaltsverzeichnis
en | es | fr | de
Contents | Contenidos | Sommaire | Inhaltsverzeichnis
Warning | Advertencia | Avertissement | Warnungen ....................................................
Introduction | Introducción | Introduction | Einleitung ...............................
Diagrams | Diagramas | Diagrammes | Darstellungen ...........................
Connections and System Control | Conexiones y Control de sistema
Connexions & Utilisation | Anschlüsse und Systemeinstellungen ...
Specications | Especicaciones
Caractéristiques techniques | Technische Daten ................................
Support | Servicio al cliente | Assistance | Support Kontakt .....................
Product Registration | Registro de Producto
Enregistrement du produit | Produktregistrierung ...............................................................
4
46
8
49
66
86
87

Introduction
Félicitations pour votre achat de l’ENREGISTREUR/LECTEUR NUMERIQUE iKEY AUDIO HDR7! Cet appareil, destiné à
l’enregistrement & à la lecture, bénécie des progrès les plus récents en matière de technologies & bénécie d’une garantie d’un
an*. Il possède une entrée LIGNE & une entrée MICROPHONE,
associées à un couple de microphones à condensateur XY. De
ombreuses options d’enregistrement le destinent tout particulièrement aux évènements live, discours, réunion, conférence & instrument. Cette nouvelle génération d’enregistreur bénécie des toutes
dernières avancées technologiques. Le produit est couvert par une
garantie durant 1 an*. Avant toute utilisation, nous vous recomman-
dons de prendre connaissance des instructions qui suivent.
Déballage
Votre appareil iKEY AUDIO DR7 a bénécié de nombreux tests
avant de vous être expédié. Lorsque vous déballerez celui-ci,
prenez soin d’en vérier l’état et de reporter – si nécessaire – toutes
les remarques utiles à votre revendeur. Nous vous recommandons
de conserver l’emballage d’origine si l’appareil devait nous être re-
tourné.
Eléments livrés avec l’appareil
(1) Cordon USB connecter l’HDR7 à un PC
(1) Mode d’emploi
(1) Carte mémoire SD
(1) Alimentation externe AC/DC
(1) Pied support (Tripod)
(1) Bonnette anti-vent
(4) Piles AA (LR6)
Caractéristiques
- Ecran couleur LCD
- Couple de micros X- Y pour prise de son live
- Enregistrement à partir de toute source ligne MONO & STEREO
- Enregistre aux formats MP3 & AAC (Jusqu’à 320 kbps), WAV
(BWF) & AIFF (24-bits/96KHz)
- Effets & traitements intégrés: Limiteur, Compresseur, Normalize,
Correcteur Automatique de Gain (ACG)
- Accordeur électronique pour guitare (2 niveaux: débutant &
conrmé)
- Options d’enregistrement: Pré-enregistrement, Marker, Noise
Gate
Introduction • Introducción • Einleitung
Introduction
46

- Enregistre directement sur carte mémoire SD card livré avec
l’appareil (Compatible SDHC)
- Enregistre directement sur tout périphérique de stockage USB
(Clé – Disque dur…)
- Sortie casque/ligne stéréo sur Mini-Jack 3.5mm avec réglage de
volume
- Entrée ligne stéréo sur Mini-Jack 3.5mm
- Entrée microphone stéréo sur Mini-Jack 3.5mm
- Entrée avec gain réglable (-20 dB - 0 dB & +10 dB)
- Niveau d’enregistrement réglable avec VU mètre
- Possibilité de lire un passage en boucle (Loop Section)
- Edition & Gestion des chiers enregistrés
- Transfert aisé vers tout ordinateur via le cordon USB livré avec
l’appareil
- Possibilité d’installer l’appareil sur un support type (Livré avec
l’appareil)
- Appareil livré avec alimentation secteur par transformateur
externe AC
- Appareil livré avec bonnette de protection (Windscreen)
Introduction
47
Introduction • Introducción • Einleitung
Longue vie à vos oreilles!
Choisir un équipement audio de qualité tel que celui dont vous venez
de faire l’acquisition, ne représente qu’une partie des réjouissances
musicales à venir. Il est temps à présent de découvrir tout le plaisir que
vous prendrez avec cet équipement. Les fabricants et les industriels
du monde de l’électronique souhaitent que vous puissiez obtenir de
votre matériel ce qu’il a de meilleur tout en l’utilisant à un niveau sonore
modéré. Un niveau permettant au son de s’exprimer à la fois fortement
et distinctement, sans distorsion et, surtout, sans fragiliser votre capacité d’écoute. Le son peut parfois s’avérer décevant. Avec l’habitude,
le niveau d’écoute auquel vous vous sentez à l’aise vous conduira à
monter le volume. C’est ainsi qu’un niveau sonore qui peut vous sembler “ normal “ est en réalité fort et fragilise vos oreilles. Préservez-vous
de cette tendance en réglant votre matériel à un niveau raisonnable
AVANT que vos oreilles ne s’habituent.
Commencez toujours avec un réglage de volume à faible niveau, puis
augmentez celui-ci progressivement an d’atteindre le niveau audio désiré. Veillez à ne pas atteindre un niveau de distorsion qui serait préjudiciable à la qualité audio, au fonctionnement correct de l’amplicateur,
ainsi qu’à vos capacités d’écoute. Prendre le temps d’effectuer cette

opération dès à présent, vous permettra d’éviter toute fragilisation ou bien même la perte de votre capital d’écoute. Après tout,
nous souhaitons longue vie à vos oreilles !!!
Utilisé à bon escient, votre nouvel équipement audio vous of-
frira toute une vie de plaisir. Parce que les lésions auditives ne
sont détectées que lorsqu’il est déjà trop tard, le Fabricant et
l’association de consommateurs de l’industrie de l’électronique
vous recommandent d’éviter toute exposition prolongée à un
niveau sonore inadapté:
30 Bibliothèque calme, murmures…
40 Salle à vivre, réfrigérateur, chambre à coucher éloignée
de la rue
50 Trac routier léger, conversation normale, bureau calme
60 Système de climatisation situé à 6-7 mètres, machine à
coudre
70 Aspirateur, sèche-cheveux, restaurant bruyant
80 Trac routier dense, centre de tri des ordures, réveil matin
à 60 cm
Les bruits suivants peuvent être dangereux lors de toute exposition
prolongée
90 Métro, moto, camion, tondeuse à gazon
100 Camion poubelles, tronçonneuse, marteau piqueur
120 Concert de rock devant les enceintes, coup de tonnerre
140 Coup de pistolet, avion Jet
180 Fusée au décollage
Nous remercions la Fondation de Recherche contre la Surdité pour ces
informations.
Vue d’ensemble & fonctions/contrôles
détaillés du HDR7
(1) Emplacement pour piles/batteries
(2) Mise sous tension (ON-OFF)
(3) Embase pour alimentation externe AC/DC (Livrée avec
l’appareil)
(4) Réglage [- o +] du gain (INPUT GAIN)
(5) Boucle (Loop)
Introduction • Introducción • Einleitung
Introduction
48

Fonctions HDR7
G3
(6) Ecran couleur LCD
(7) Touche STOP/BACK (RETOUR) - PLAY
(LECTURE)/PAUSE
(8) RECORD (ENREGISTREMENT)/RECHERCHE (SEARCH)
(9) MENU
(10) Entrée (ENTER)
(11) Entrée ligne stéréo RCA
(12) Sortie casque/ligne Jack 6.35mm
(13) Couple micros X-Y
(14) Entrée MICROPHONE
(15) Niveau de sortie (-+)
(16) Gain micro (LOW/HIGH)
(17) Temps (TIME)
(18) USB vers PC
(19) Embase pour support/trépied à visser
(20) Cordon USB pour transfert de données
vers PC (Livré / Non représenté)
Connexions & Utilisation
49
Connections and System Control • Conexiones y Control de sistema • Anschlüsse und Systemeinstellungen
Le HDR7 d’iKEY AUDIO permet d’enregistrer,
de lire et d’écouter les chiers audio. Il possède
un couple de micros de qualité studio, une entrée micro, ainsi qu’une entrée lignée stéréo &
une sortie casque faisant ofce de sortie ligne.
De nombreuses possibilités d’enregistrement
vous sont ainsi proposées. Les enregistrements
effectués peuvent facilement être lus ou transférés du HDR7 vers votre ordinateur.
Démarrage
Avant de démarrer votre HDR7, vériez que
l’alimentation soit correctement branchée & la
carte SD (Compatible SDHC) installée convenablement.
Alimentation
Le HDR7 fonctionne de façon autonome avec 4
piles/batteries ou sur secteur via l’alimentation
externe (Fournie avec l’appareil).
A. Installez les 4 piles LR6/AA
livrées avec l’appareil dans le
compartiment prévu à cet effet.
Au préalable, enlevez le cou-
vercle (1) situé en dessous de
l’appareil.
*Note: Vous trouverez sur l’écran LCD (6) – en
haut à droite – la durée restante lorsque l’appareil
est utilisé sur batteries/piles.
B. Connectez l’alimentation externe
(Livré avec l’appareil) à l’embase située sur le côté gauche de l’appareil
DC input (3) & branchez le transformateur externe sur une prise électrique.
g. 1.1
g. 1.2

*Note: l’appareil peut fonctionner en continu. Il
peut alors devenir chaud mais cela n’altère en
rien son fonctionnement & sa abilité.
Insertion de la Carte SD
Le HDR7 est livré avec une carte
SD de 1Go permettant le stockage des enregistrements. Avant
d’allumer le HDR7, vériez que
celle-ci a correctement été in-
sérée dans le slot (18) situé
à la base de l’appareil. Pour
connecter la SD carte, veuillez l’insérer à fond
jusqu’à entendre le clic.
NOTE : NE JAMAIS FORCER LORSQUE VOUS
INSEREZ LA CARTE SD.
Insérez la carte SD tel que
cela est représenté.
g. 1.3
Pour enlever la carte, appuyez dessus an de la
débloquer (Vous entendrez de nouveau un clic).
Puis celle-ci va s’éjecter partiellement et il vous
sufra de la retirer en tirant dessus.
Utilisation avec un Périphérique
de Stockage USB
Vous trouverez sur le côté droit
de l’appareil un port USB (18)
permettant le branchement des
périphériques de stockage USB
tels que clé & disque dur. Le HDR7
peut lire les chiers stockés sur ces
mêmes périphériques.
Le HDR7 ne peut accéder qu’à un seul
périphérique de stockage simultanément. La
priorité est donnée au port USB et non au lec-
teur de carte SD. Cela signie que lorsqu’un
g. 1.4
périphérique de stockage USB est connecté,
seuls les chiers présents sur ce dernier seront
visibles & lisibles. Les enregistrements seront
aussi stockés sur ce périphérique de stockage
USB.
Lorsqu’il n’y a aucun périphérique de stockage
connecté, le HDR7 utilisera par défaut le lecteur
de carte SD pour la lecture et l’enregistrement.
Mise de l’Appareil sous Tension
Maintenant que la carte SD & l’alimentation
sont connectées, allumez l’appareil en mettant
le commutateur POWER (2) en position ON.
HDR7 & Menus de Navigation
L’appareil étant allumé, un menu apparaît avec
une liste de chiers (Files) & de dossiers (Fold-
Connections and System Control • Conexiones y Control de sistema • Anschlüsse und Systemeinstellungen
Connexions & Utilisation
50

Menu Principal
ers) présents sur le périphérique de stockage.
Utilisez la molette RECORD LEVEL/SEARCH (8)
an de naviguer dans ces chiers & dossiers.
*Note : lorsque vous utiliserez une nouvelle
carte notez qu’aucun chier ne sera visible car
aucun chier/dossier n’y aura été préalablement
stocké.
En tournant la molette dans le sens des aiguilles d’une montre vous descendez dans
l’arborescence de classement. Dans le sens
inverse, vous remontez dans l’arborescence.
Pressez la touche PLAY/PAUSE (7) lorsqu’un
dossier est surligné pour afcher son contenu.
Tous les enregistrements sont stockés dans le
dossier RECORDS (ENREGISTREMENTS) dans
le menu iKEY. Pressez la touche STOP/BACK
(7) pour retourner au dossier précédent.
Connexions & Utilisation
51
Connections and System Control • Conexiones y Control de sistema • Anschlüsse und Systemeinstellungen
Appuyez sur la touche MENU (9) an d’accéder
au menu principal et aux principaux réglages
de l’appareil. Utilisez la molette an de sélectionner la fonction souhaitée & appuyez sur la
touche ENTER (10) an de visualiser le contenu
et d’en changer les valeurs si vous le souhaitez.
Appuyez de nouveau sur la touche MENU an
de revenir à l’écran précédent.
Fonctions & Réglages
Les fonctions qui suivent sont accessibles à
partir du MAIN MENU (Menu Principal) & sont
modiables individuellement.
*Note: 2 fonctions supplémentaires apparaissent
lorsque l’appareil est utilisé sans l’alimentation
externe: Backlight (Rétro-éclairage) & Bat. Type
(Type de Batteries/Piles)
CONTRASTE- Permet de régler la luminosité
de l’écran. Ce réglage s’effectue de 0 à 100 (De
sombre à lumineux). Utilisez la molette an de
régler la luminosité (Contraste).
DATE- Réglez la date du HDR7 & le type de
chier à enregistrer. La date s’afche de la façon suivante: day (Jour) - month (Mois) - year
(Année). Utilisez la molette pour valider la
bonne valeur. Puis appuyez sur la touche PLAY/
PAUSE pour accéder au champ suivant. Ap-
puyez sur la touche STOP/BACK pour revenir
au champ précédant.
HEURE (Temps)- Permet le réglage de la fonction heure. Pour effectuer le réglage de l’heure
(Afchée en: hrs (Heures) - mns (Minutes) &
A.M/P.M. (Matin/Après-Midi)), utilisez la molette

pour valider la bonne valeur. Puis appuyez sur
la touche PLAY/PAUSE pour accéder au champ
suivant, Appuyez sur la touche STOP/BACK
pour revenir au champ précédant.
MODES TUNER (Accordeur Guitare)- Le Tuner
permet d’accorder correctement une guitare
branchée sur le HDR7. Lorsque cette fonction
a été sélectionnée, 2 options apparaissent:
Guitare & Chromatic (Auto). L’option Guitare
est recommandée pour les utilisateurs novices.
L’option Chromatic est dédiée aux guitaristes
conrmés.
Chaque interface est basée sur un écran de 6
cordes de guitare avec des notes (Basses vers
aigues) E-A-D-G-B-E. Lorsque vous jouez une
corde, le tuner analysera si la tonalité est at
(Low/Basse), sharp (Aigue) ou pitch. Après
avoir joué une corde sur votre guitare, l’écran
LCD (6) afchera le signal en vert si cette corde
est correctement accordée. L’afchera sera
rouge si trop aigu & jaune si trop basse. Accordez ainsi successivement les autres cordes.
Dans l’interface pour novice, il y a un écran indi-
viduel pour chaque corde. Celui-ci démarre à la
partie la plus basse de la corde E & va jusqu’à
la partie la plus aigue de la corde E. Dans ce
mode, les cordes peuvent uniquement être
accordées suivant ce procédé (Une corde par
écran). Lorsque la corde est accordée, pressez
la touche Format/Stéréo-Mono pour accéder à
la corde suivante.
Après avoir navigué dans les 6 écrans de corde,
vous accéderez au mode Chromatic (Auto)
dédié aux joueurs plus expérimentés. Ce pro-
cédé est identique au précédent à l’exception
du fait que l’ensemble des cordes apparaissent
dans un seul & même écran.
RESTAURATION PAR DÉFAUT- Permet de réactiver les réglages par défaut du Menu Principal.
MOVE- Permet de transférer un chier d’un
dossier vers un autre. Pour transférer un chier
particulier, assurez-vous qu’il soit en surbrillance, pressez la touche Menu, sélectionnez
Move, naviguez jusqu’au dossier de destination, appuyez une nouvelle fois sur la touche
Menu & collez-y le chier. Celui-ci apparaîtra
dorénavant dans le dossier.
Connections and System Control • Conexiones y Control de sistema • Anschlüsse und Systemeinstellungen
Connexions & Utilisation
52

COPIE- Utilisez cette fonction pour copier un
chier dans un autre dossier. Pour copier un
chier particulier, assurez-vous qu’il soit en
surbrillance, pressez la touche Copy, naviguez
jusqu’au dossier de destination, appuyez une
nouvelle fois sur la touche Menu & collez-y le
chier. Celui-ci apparaîtra aussi - dorénavant -
dans ce dossier.
DELETE (Supprimer)- Utilisez cette fonction
pour effacer un chier. Pour effacer un chier
particulier, assurez-vous qu’il soit en surbril-
lance, pressez la touche Delete, conrmez en
appuyant sur la touche PLAY/PAUSE, puis appuyez sur la touche STOP/BACK pour annuler.
RENAME (Renommer)- Utilisez cette fonction
pour renommer un chier. Pour renommer un
Connexions & Utilisation
53
Connections and System Control • Conexiones y Control de sistema • Anschlüsse und Systemeinstellungen
chier particulier, assurez-vous qu’il soit en sur-
brillance, pressez la touche Menu & sélectionnez Rename. Le titre apparaîtra alors en mode
File Rename (Renommer Fichier) & pourra être
édité. Utilisez la molette an de sélectionner
chaque lettre lorsque celle-ci est en surbril-
lance. Pour accéder à la lettre suivante, appuyez sur la touche PLAY/PAUSE. A l’inverse,
pour revenir à la lettre précédente, appuyez sur
la touche STOP/BACK.
ENREGISTRER EN TANT QUE + NORM- Cette
fonctionnalité Normalise le chier audio et
l’enregistre. Normaliser est un outil permet-
tant de régler le volume des chiers audio à un
niveau standard. Pour utiliser cette fonction,
appuyez sur la touche Menu et sélectionnez
Save As/Norm. Vous pouvez choisir de con-
vertir le chier en un format audio différent (c.à-d. WAV -> AAC par exemple) ou de garder le
même format, puis appuyez sur Enter. Si vous
choisissez un format MP3 ou AAC, sur l’écran
suivant, vous pouvez choisir un débit différent
(Bit rate). Sur cet écran se trouve aussi l’option
Normalize. Appuyez sur Enter pour sélectionner
ON ou OFF.
*Note: Le processus de normalisation (Normalize)
d’un chier nécessite du temps & dépend de la
durée de l’enregistrement audio. Merci de patienter jusqu’à la n de la procédure.
BACKLIGHT (Rétroéclairage)- (Cette fonction
n’apparaît que lorsque que l’alimentation externe n’est pas connectée) L’appareil est équipé d’une fonction rétro-éclairage permettant

- outre une économie d’énergie - de couper
l’alimentation de l’écran LCD après un certain
temps de non utilisation. Différentes options
sont disponibles: Off (L’écran LCD sera alors
toujours éteint) - On (L’écran LCD sera alors
toujours allumé) - 2s/5s/10s & 30s (Temps restant avant extinction de l’écran LCD). Pour rallumer le rétro-éclairage, il vous suft d’appuyer
sur n’importe quelle touche ou de tourner la
molette.
TYPE DE BATTERIES- (Cette fonction n’apparaît
que lorsque que l’alimentation externe n’est pas
connectée). Cette fonction permet de sélectionner le type de batteries utilisées avec l’appareil:
Alkaline & NI-MH (Batteries au nickel).
Lire un dossier
Pour lire un dossier, appuyez sur la touche
PLAY/PAUSE lorsque celui-ci est surligné dans
le menu dossier (File).
*Note: en cas d’insertion d’un nouveau périphérique
de stockage, aucun dossier ne s’afchera étant donné
l’absence de données sur ce dernier.
Une nouvelle pression sur la touche PLAY/
PAUSE mettra la lecture en mode pause. Util-
iser la molette RECORD SEARCH/LEVEL an
d’effectuer une recherche rapide avant/arrière
au sein du dossier.
Pour arrêter la lecture et revenir au menu chier
(File), appuyez sur la touche STOP/BACK (7).
*Note: lors de la lecture d’un chier ou d’un enregistrement dont la durée dépasse 1 heure,
l’indicateur de temps passera automatiquement
du mode m:s (minutes:secondes) au mode h:s
(heures: minutes).
Mode Lecture
Numéro du
chier
Utilisation
mémoire de
la carte SD
Non du
chier
Plage/
Morceau
Ecran
L’écran couleur LCD (6) du HDR7 afche les informations suivantes: chiers, dossiers, enregis-
g. 1.5
(Appareil en mode lecture)
Format
du chier
Autonomie
piles/ bat-
teries
Durée
plage
morceau
Temps
Mode
Connections and System Control • Conexiones y Control de sistema • Anschlüsse und Systemeinstellungen
Connexions & Utilisation
54

trements, mode lecture & mode enregistrement.
L’appareil comprend une fonction rétro-éclairage
permettant de couper l’alimentation de l’écran
LCD après 30 secondes maximum. Pour rallumer le rétro-éclairage, il vous suft d’appuyer sur
n’importe quelle touche ou de tourner la molette.
*Note: lorsque l’alimentation externe est connectée, la fonction rétro-éclairage fonctionnera
en permanence & il n’y aura pas d’indicateur de
charge des batteries.
Menu Play (Lecture)
En Mode Play, un Menu permet l’afchage &
le contrôle de différentes fonctions (Lecture
- Afchage - Caractéristiques audio…). Pour
accéder au Menu Play, appuyez sur la touche
Menu en mode lecture (Play Mode). Les carac-
Connexions & Utilisation
55
Connections and System Control • Conexiones y Control de sistema • Anschlüsse und Systemeinstellungen
téristiques du menu sont listées ci-dessous.
*Note: Ces réglages peuvent être modiés en appuyant sur la touche ENTER quand celui-ci est
en surbrillance.
VU METER- Le VU-mètre afche le niveau de
sortie de l’appareil en Mode Play & en Mode
Record (Enregistrement). En Mode Play, le Vumètre peut être activé ou désactivé (Il suft de
changer le réglage dans le Menu Play). Les
chiers Stéréo afchent 2 voies (Barres) & les
chiers Mono afchent 1 voie (Barre).
MODE PLAYBACK (Lecture)- Les chiers
stockés peuvent être lus de différentes façons:
Play one- Lecture unique du chier puis
mise en mode pause.
Play all- Tous les chiers sont lus une seule
fois.
Repeat one- Le chier est relu une fois.
Repeat all- Tous les chiers sont relus.
AFFICHAGE TEMPS- L’afchage temps permet
d’être informé sur la durée d’un chier particulier. 2 options d’indication sont disponibles:
REM (Remaining / Temps restant à lire) & ELA
(Elapsed / Temps écoulé depuis le début de la
lecture). Utilisez le Menu Play, puis sélectionnez
le type d’afchage souhaité à partir du menu
Time Mode.
FONCTION LOOP (Boucle)- En Mode Play, le
HDR7 peut créer une boucle (Loop) à partir d’un
morceau en cours de lecture. Durant la lecture
d’un morceau, appuyez sur la touche LOOP (5)

an de marquer le point départ de votre boucle
(L’écran LCD afche alors LOOP IN SET). Appuyez une nouvelle fois sur cette même touche
an de créer le point de sortie. L’appareil lira
alors la boucle enregistrée (L’appareil afchera:
LOOP OUT SET, LOOP ACTIVATED).
Pour stopper la boucle & revenir à la lecture
normale, appuyez sur la touche LOOP une
nouvelle fois (L’écran indiquera alors que la
BOUCLE A ETE DESACTIVEE).
Pour enregistrer une nouvelle boucle, répétez
la procédure.
*Note: La fonction boucle ne peut être utilisée
qu’en Mode Play.
Utilisation avec un Périphérique
de Stockage USB
LINE IN
Entrée
LINE IN (11)- Entrée ligne sur Mini-Jack 3.5mm
MIC IN (14)- Entrée micro sur Mini-Jack 3.5mm
*Note: les signaux MICROPHONE & LIGNE ne
peuvent être enregistrés simultanément. Si les 2
entrées sont utilisées simultanément, seul le signal LIGNE sera enregistré.
Sortie
SORTIE CASQUE/LIGNE (7)- Vous pouvez connectez un casque ou des enceintes actives via
g. 1.6
PHONES/
LINE OUT
la sortie casque sur Mini-Jack 3.5mm.
*Note: Les enregistrements effectués par le HDR7
sont nommés en fonction de leur format audio
& numérotés suivant l’ordre d’enregistrement.
Par exemple: iKEY_001.MP3, iKEY_001.WAV,
iKEY_002.MP3, iKEY_002.WAV.
Utilisation des Microphones XY
en Enregistrement
En complément des entrées Mini-Jack 3.5mm
(Microphone & Ligne), l’appareil est équipé
de deux microphones X-Y à condensateur.
Cette implantation est particulièrement ef-
cace lors de prise de son dans différents types
d’environnements. Le HDR7 possède aussi
plusieurs options d’enregistrement en fonc-
tion des besoins. (*Note- Pour plus de détails,
Connections and System Control • Conexiones y Control de sistema • Anschlüsse und Systemeinstellungen
Connexions & Utilisation
56

veuillez consulter Options de Voie/Canal dans
le Menu Enregistrement).
Options d’Enregistrement
En complément des entrées MICROPHONE/
LIGNE & des microphones XY intégrés, l’appareil
HDR7 possède plusieurs fonctions propos-
ant de multiples options d’enregistrement.
Pour accéder à ces dernières, assurez-vous
que l’appareil est bien en mode Enregistrement *Note- Pour commuter l’appareil en
mode Enregistrement, appuyez sur la touche
RECORD (7)). Avec l’appareil en mode Enregistrement, appuyez sur la touche MENU (9)
an d’accéder au Menu Enregistrement (Record Menu). L’ensemble des options y sont
présentes. Utilisez la molette an de naviguer
parmi elles & appuyez sur la touche ENTER (10)
Connexions & Utilisation
57
Connections and System Control • Conexiones y Control de sistema • Anschlüsse und Systemeinstellungen
pour accéder au réglage & modier ce dernier
si vous le souhaitez. Vous trouverez ci-après la
liste des options/fonctions disponibles dans le
menu Enregistrement.
FORMAT- Sélectionnez le format d’enregistrement que vous souhaitez utiliser. Le HDR7
peut enregistrer les ches sous différents formats audio: WAV, MP3, AAC & AIFF (*Note-
Lorsque l’enregistrement a démarré, vous ne
pouvez plus modier le format audio préalablement sélectionné). Ces formats sont basés sur
différentes caractéristiques telles que: qualité
- compression - compatibilité…). Ci-après une
description rapide de chaque format.
WAV- Format Audio Waveform
MP3- MPEG-1 Audio Layer 3
AAC- Advanced Audio Coding
AIFF- Audio Interchange File Format
TAUX d’ECHANTILLONNAGE (Samp. rate)- Le
taux d’échantillonnage consiste en un nombre
d’échantillons audio prélevés par seconde sur
un signal. Plus ce taux est élevé, plus la qualité
sera - elle aussi - élevée. Le HDR7 vous propose - en fonction de vos besoins - plusieurs
taux d’échantillonnage:
WAV & AIFF - 44.1 kHz / 48.0kHz / 88.2
kHz / 96.0 kHz
*Astuce Enregistrement: Le taux d’échantillonnage
affecte le taux auquel l’enregistreur échantillonne
le signal audio. Plus le taux d’échantillonnage
augmente, plus la longueur de la forme d’onde
augmentera elle aussi (Optimisant ainsi la qualité
audio, l’intelligibilité, la précision & les possibilités

d’édition).
PROFONDEUR DE BITS - Bits de profondeur
se réfère au nombre de bits de sons utilisés
dans un échantillon sonore particulier. Comme
c’est le cas avec un taux d’échantillonnage,
une profondeur supérieure de bits représente
une qualité supérieure, cependant plus de mémoire de traitement est alors nécessaire. Les
valeurs suivantes de profondeur de bits sont
disponibles pour les formats de chier correspondants.
WAV & AIFF 16 bits, 24 bits
*Enregistrement Astuce: L’importance de la profondeur de bits dans l’enregistrement audio est
qu’il détermine le maximum de l’échelle possible
dynamique du signal, ou la différence entre les
sons les plus forts possible et le moins de bruit
possible.
BITRATE- Représente le nombre de bits traités par seconde en cours de traitement. Avec
l’augmentation de débit, il en va de la qualité.
Les valeurs de débit suivantes sont disponibles
pour les formats de chier correspondants.
MP3 & AAC 64 kbps, 96 kbps, 128 kbps,
160 kbps, 192 kbps, 224 kbps, 256 kbps,
320 kbps
VOIES/CANAUX- Les enregistrements réalisés
avec le HDR7 peuvent avoir une variété de réglages en fonction des contextes d’utilisation.
Les options disponibles sont les suivantes:
Stéréo- Les canaux Gauche (L) & Droit (R)
transportent deux signaux distincts. Cette
option crée un enregistrement d’images
stéréo, chaque canal dispose d’une sortie
différente basée sur ce que le microphone a
notamment enregistré.
Mono Gauche (L) / Droit (R) SUM- Un enregistrement mono est identique à gauche et à
droite. A la lecture, les sorties Gauche (L) &
Droite (R) reproduisent donc strictement le
même signal.
Mono Gauche (L)- Seul le signal porté par le
microphone gauche est utilisé.
Mono Droit (R)- Seul le signal porté par le
microphone droit est utilisé.
AUTO-TRACK- Pour activer la fonction Autotrack, réglez-la sur On. En présence d’un silence prolongé, l’appareil créera un nouveau
chier qui démarrera au premier échantillon-
Connections and System Control • Conexiones y Control de sistema • Anschlüsse und Systemeinstellungen
Connexions & Utilisation
58

nage audio détecté.
AUTO-REC- Pour activer la fonction Auto-rec,
réglez-la sur On. La fonction Auto-rec démarrage automatiquement un enregistrement en
présence d’un signal audio tout en ne gaspillant
pas la capacité d’enregistrement (Mémoire).
FILE PREFIX- La fonction de préxe de chier
est utilisée pour ajouter une chaîne de car-
actères personnalisées dénies dans un chier
rubrique. Utilisez la molette pour sélectionner
une lettre particulière, et appuyez sur la touche
PLAY/PAUSE pour passer à la position de la
lettre suivante.
PRE-RECORD- La fonction de pré-enregistrement permet un délai supplémentaire pour
Connexions & Utilisation
59
Connections and System Control • Conexiones y Control de sistema • Anschlüsse und Systemeinstellungen
être inclus avant un enregistrement. Cette fonction peut être activée (On) & désactivée (Off).
Une fois activée, la fonction de pré-enregistrement ajoute 5 secondes de silence au début
d’un enregistrement.
MARK TIME- Lorsque cette fonction est ac-
tivée, un marqueur est ajouté à un enregistrement en cours à chaque fois qu’un cycle
de temps de présérie se termine. Pour insérer
manuellement un marqueur, veuillez appuyer
sur la touche PLAY durant l’enregistrement.
Tous les marqueurs sont sauvegardés dans un
chier .txt partageant le même nom que celui
du chier audio concerné.
*Note: La fonction de minuterie Mark est incrémentée par cycle de 15 secondes.
FILE TIMER- La fonction de minuterie du chier
permet de commencer automatiquement un
nouvel enregistrement avec un intervalle de
temps prédéni. Un nouveau chier est lancé à
chaque fois qu’un cycle se termine.
*Note: La fonction de minuterie Mark est incrémentée par cycle de 15 secondes minimum.
REGIONS- Régions fait référence à la méthode
utilisée par l’appareil HDR7 an d’enregistrer
les marqueurs et informations inhérentes aux
pistes audio et utilisés ultérieurement avec un
logiciel audio. Il existe deux types de régions
qui peuvent être sélectionnés pour l’utilisation,
SONY et CUE. SONY doit être utilisé sur le
matériel et les logiciels SONY pour leur format
propriétaire, et CUE, le format le plus répandu
pour une utilisation avec la plupart des maté-

riels et logiciels présents sur le marché. Ceci
détermine le type d’information stocké dans le
chier texte.
BOOST 24dB- La fonction permet d’augmenter
de 24dB le niveau audio de l’enregistrement.
ALIMENTATION FANTÔME (Ph. Power)-
L’alimentation fantôme est indispensable lors
de l’utilisation de certains microphones tels que
les modèles à condensateur (3V max.).
EFFETS DYNAMIQUES- L’appareil HDR7 est
équipé de plusieurs fonctions de traitement audio. Ces fonctions affectent le signal audio de
différente façon.
AGC (Vocal)- (Correcteur Automatique de
Gain) Optimisation des fréquences vocales
grâce à un compresseur dans les fréquenc-
es moyennes.
Compresseur- Compression du signal an
de rendre audible l’ensemble de la bande
passante mais avec une dynamique atténuée.
Limiteur- Permet de limiter le niveau audio
d’un chier lors de sa lecture.
*Astuce Enregistrement: Vous ne pourrez pas
enlever les effets ajoutés lors de l’enregistrement
plus tard. Ces traitements peuvent être recommandés pour améliorer le signal et éviter des
problèmes de distorsions. Toutefois, ces effets
de traitement audio peuvent aussi être ajoutés
ultérieurement - via un logiciel audio approprié - après l’enregistrement vous permettant
d’enregistrer un son neutre & original.
TIME MODE- L’appareil HDR7 possède 2 types
d’afchage du temps, nommés temps Ecoulé
(Elapsed) & temps Restant (Remaining).
NOISE GATE- Cette fonction est utilisée an
de s’assurer qu’aucun son important & indésirable ne vienne perturber la qualité de
l’enregistrement. Pour activer cette fonction,
veuillez l’activer dans paramètres.
*Note: ces paramètres ne peuvent plus être modiés une fois que l’enregistrement a démarré.
Connections and System Control • Conexiones y Control de sistema • Anschlüsse und Systemeinstellungen
Connexions & Utilisation
60

Mode Enregistrement
FILE
BIT RATE
FORMAT
TIME
TUNER
FORMAT
STEREO
/MONO
LINE IN PHONES/
LINE OUT
INPUT GAIN
-
+
+
0
OUTPUT LEVEL
Utilisation de la
carte mémoire SD
Nom du
chier
Enregistrement
MONO-STEREO
Réglage niveau
d’enregistrement
via molette
g. 1.7
(Ecran de l’appareil en mode enregistrement)
Si l’enregistrement en mode stéréo (Tel
qu’illustré) est activé, 2 barres de niveau audio
seront visibles dans la partie STEREO-MONO
Signal gauge section. Si le mode mono est ac-
tivé, 1 seule barre sera visible.
Connexions & Utilisation
61
Connections and System Control • Conexiones y Control de sistema • Anschlüsse und Systemeinstellungen
Format chier
Autonomie piles/
batteries
Afchage temps
en minutes &
secondes
Mode temps
Réglages du Niveau
d’Enregistrement
Un réglage correct est primordial an d’obtenir
un enregistrement de qualité optimale.
Lorsqu’un signal est trop élevé, de la distorsion apparaîtra rendant le signal inaudible. A
l’inverse en cas de signal trop faible, celui-ci - à
l’écoute - sera aussi trop faible et donc inaudible.
Pour obtenir les meilleurs enregistrements de
votre HDR7, vous devez optimiser le réglage du
niveau du signal à enregistrer (En évitant qu’il
soit trop fort ou trop faible). Lorsqu’un signal
est trop fort, le vumètre STEREO – MONO deviendra rouge (Signal supérieur à 0dB). Il faut
donc éviter d’arriver à ce niveau pour un enreg-
istrement de qualité.
Pour ajuster le réglage du niveau
d’enregistrement, veuillez suivre les étapes
suivantes :
1) Augmentez le volume jusqu’à ce
qu’apparaisse de la distorsion (Le VU-mètre
devient rouge)
2) A partir de ce niveau diminuez légèrement
à l’aide de la molette jusqu’à ce que le VUmètre n’afche plus un signal dans le rouge.
(*Note: tourner la molette dans le sens des
aiguilles d’une montre augmente le signal. A
l’inverse, il diminue.).
Le gain d’entrée (4) est aussi utilisé
an d’obtenir un signal audio le plus
élevé possible. Le commutateur
permet d’ajuster le signal maximum
suivant 3 niveaux de sensibilité: –20
dB [-], 0 dB [o] & +10 dB [+]. Si
g. 1.8

un signal audio est trop faible, augmentez ce
dernier en commutant [-] sur [o] ou [o] sur [+].
A l’inverse, si un signal est trop fort, diminuez
celui-ci en commutant [+] sur [o] ou [o] sur [-].
Solution: réduisez légèrement le niveau
d’enregistrement à l’aide de la molette an que
le vu-mètre ne soit plus dans le rouge (Distorsion).
Solution - Augmentez le niveau d’enregistrement
à l’aide de la molette à son maximum puis baissez la sensibilité du gain d’entrée an que le
vumètre n’atteigne les repères rouges que de
façon strictement occasionnelle.
Solution: Augmentez le niveau d’enregistrement
à l’aide de la molette à son maximum puis augmentez la sensibilité du gain d’entrée an que
le vumètre n’atteigne les repères rouges que de
façon strictement occasionnelle.
*Note: Si votre enregistrement n’est pas stocké
correctement, vous aurez peut être à régler directement - à la hausse ou à la baisse - le niveau
audio de la source utilisée.
Enregistrement d’un Fichier
Après avoir sélectionné le taux de compression
(Bit rate format), le niveau d’enregistrement,
réglage Mono ou Stéréo, vous pouvez démarrer l’enregistrement en appuyant sur la
touche RECORD (Enregistrement). La LED
située sous cette touche clignotera durant
l’enregistrement.
Pour mettre l’enregistrement en mode PAUSE,
pressez la touche RECORD une nouvelle fois.
Pour reprendre l’enregistrement, pressez une
nouvelle fois la touche RECORD.
Pour stopper l’enregistrement & revenir au
menu précédent, pressez la touche STOP/
BACK.
*Note: Tous les enregistrements effectués sont
stockés dans dossier nommé RECORS et
présent dans le menu iKEY. Dès qu’un enreg-
Connections and System Control • Conexiones y Control de sistema • Anschlüsse und Systemeinstellungen
Connexions & Utilisation
62

istrement atteindra la taille de 2GB, un nouveau
chier sera automatiquement créé.).
Transférer des Fichiers du
HDR7 vers votre Ordinateur
Les chiers enregistrés sur la carte SD peuvent
être facilement transférés sur tout ordinateur
via le cordon USB livré avec le HDR7.
Tout d’abord, assurez-vous que l’appareil est
bien en position OFF (Eteint).
Connectez l’extrémité du cordon USB au port
USB TO PC (17) & reliez l’autre extrémité au
port USB de votre ordinateur.
*Note: Pour de meilleurs résultats, connectez le
cordon USB directement à l’un des ports USB de
Connexions & Utilisation
63
Connections and System Control • Conexiones y Control de sistema • Anschlüsse und Systemeinstellungen
votre ordinateur sans utiliser de hub USB.
Une fois le cordon correctement branché, allumez le HDR7. Attendez que le périphérique
soit reconnu par votre ordinateur.
Mac/Apple: Lorsqu’une icône apparaît sur
votre ordinateur (Bureau), cliquez dessus
an d’accéder au contenu.
PC: Cliquez sur le périphérique USB dans le
dossier Mes Documents.
Pour copier les chiers audio de l’ordinateur sur
le HDR7, sélectionnez les chiers à copier et
faîtes les glisser sur l’icône qui apparaît lorsque
l’appareil HDR7 est connecté.
Les chiers en provenance de la dernière ses-
sion d’enregistrement seront stockés dans une
playlist nommée lastrec.m3u. Ces chiers peuvent être ouverts à partir de l’ordinateur en cli-
quant simplement dessus l’icône, ou transférés
en faisant glisser l’icône sur le bureau.
Pour copier les chiers audio de l’ordinateur sur
le HDR7, sélectionnez les chiers à copier et
faîtes les glisser sur l’icône qui apparaît lorsque
le HDR7 est connecté.
Enlever en toute Sécurité
un Périphérique USB
Mac: Sélectionnez l’icône iKEY HDR7 puis
faîtes glisser & déposer dans la poubelle.
PC: Cliquez sur l’icône ‘retirer un
périphérique en toute sécurité’ dans la barre
d’outils en bas de l’écran. Sélectionnez

iKEY HDR7 comme périphérique à retirer/
éjecter.
Fonctions Supplémentaires
(NIVEAU DE SORTIE) Utilisez le NIVEAU DE
SORTIE (15) ainsi que les contrôles de votre in-
strument pour ajuster le niveau du casque.
(GAIN MICROPHONE) La fonction GAIN MICROPHONE (16) permet d’augmenter ou
d’abaisser le gain d’un signal entrant en sélec-
tionnant LOW (Bas) ou HIGH (haut).
(EMBASE POUR TRIPOD/PIED) Permet de xer
l’appareil sur un support type tripod. Visser ce
dernier dans l’embase prévue à cet effet (19).
(Support Tripod livré avec l’appareil).
(HOLD MODE) Pour activer le blocage de
l’ensemble des touches/fonctions (HOLD),
appuyez & maintenez enfoncées les touches
LOOP & ENTER. Pour désactiver cette fonction, appuyez & maintenez enfoncées les
touches LOOP & ENTER.
Mises à jour du logiciel (Software)
Des modications & nouvelles fonctionnalités
sont à prévoir dans le temps an d’optimiser le
fonctionnement et d’enrichir les possibilités de
l’appareil. De façon occasionnelle des mises à
jour pourront être disponibles pour l’ensemble
des appareils de la gamme iKEY AUDIO Series.
Rendez vous sur le site iKEY-AUDIO (http://
www.ikey-audio.com) régulièrement an d’être
averti de la sortie des mises à jour.
Pour vérier la version du logiciel installée sur
votre appareil, mettez le sous tension. Dès que
celui-ci s’allume, un chiffre apparaîtra en haut
de l’écran LCD (6). Celui-ci indique la version
du logiciel installé.
Si le site web afche un programme avec un
chiffre supérieur à celui de votre appareil, nous
vous recommandons d’installer la mise à jour
car elle est postérieure à la version de logiciel
de votre appareil.
*Note: Soyez sûr de ne télécharger que la mise à
jour concernant votre appareil.
Les instructions détaillées sur la procédure de
mise à jour par appareil sont présentes sur le
site iKEY-AUDIO. Vous trouverez ci-après une
procédure rapide de mise à jour.
Connections and System Control • Conexiones y Control de sistema • Anschlüsse und Systemeinstellungen
Connexions & Utilisation
64

*Note: Il est important que votre appareil soit constamment alimenté via l’alimentation externe AC
lorsque vous procédez à la mise à jour. En effet,
celle-ci peut prendre plusieurs minutes et votre
appareil ne peut s’arrêter durant cette procédure
au risque d’être irrémédiablement endommagé.
1) Assurez vous que la version de la mise à
jour disponible soit la plus récente possible
et non celle déjà installée sur votre appareil.
2) Décompressez (Unzip) & téléchargez la
dernière version du logiciel disponible sur la
racine de votre carte SD (Root directory).
3) Chargez la mise à jour dans l’appareil en
ayant pris le soin de l’éteindre avant de le
rallumer.
4) La mise à jour du logiciel s’installera automatiquement.
Caractéristiques techniques
66
Specications • Especicaciones • Technische Daten
Spécications Techniques
Générales:
Compatibilité USB......................... USB 1.0, 1.1, 2.0
Alimentation..................................... 5V DC 1000mA
4 batteries/piles AA LR6 1.5V (Alkaline, NI-MH)
Autonomie sur pile......................................5 heures*
Ecran.....................................................LCD couleur
Dimensions...............158x73x37mm (6.2x2.9x1.5 in)
Poids................................................. 0.3 kg (.55 lbs)
*Note: fonction du type de périphérique utilisé, ainsi que du
type de batteries/piles
Audio:
Voies (Canaux)…………….…………........ 2 (Stéréo)
Format Media Enregistrement........ SD (64 MB-2GB)
SDHC (4 GB-32GB)
Accepte tout périphérique USB formaté en FAT
Taux d’échantillonnage:..................... jusqu’à 96 kHz
Résolution:..........................................jusqu’à 24 Bits
Gamme Dynamique: ......................................120 dB
Distorsion Harmonique Totale:....................... -91 dB
Bande Passante:................................ 20Hz – 20KHz
Impédance Entrée:…………................. Ligne: 10K Ω
Microphone: 1K Ω
Niveau Nominal en Entrée:........................................
Gain Faible (Low): 1V RMS (0 dBV)
Gain Intermédiaire (Mid): .5V RMS (-6 dBV)
Gain Elevé (High): .13V RMS (-17 dBV)
Niveau Maximum en Entrée:…..................................
Gain Faible (Low): 2.5V RMS (+8 dBV)
Gain Intermédiaire (Mid): .68V RMS (-3 dBV)
Gain Elevé (High): .25V RMS (-12 dBV)
Impédance de Sortie:……………………............ 30 Ω
Niveau de Sortie Maximum:.......................................
Ligne (10K Ω): 0.7V RMS (-3 dBV)
Casque (32 Ω): 0.35V RMS (-9 dBV)

Format Enregistrement:.. MP3 & AAC: 64-320 Kbps;
WAV & AIFF: Taux échantillonnage
44.1, 48.0, 88.2, 96.0 kHz/Résolution 16 & 24 bit
Veuillez enregistrer la garantie de votre
appareil en ligne sur le site
www.ikey-audio.com
Specications • Especicaciones • Technische Daten
Caractéristiques techniques
66

Inhaltsverzeichnis
68
Contents | Contenidos | Sommaire
en | es | fr | de
Contents | Contenidos | Sommaire | Inhaltsverzeichnis
Warning | Advertencia | Avertissement | Warnungen ....................................................
Introduction | Introducción | Introduction | Einleitung ...............................
Diagrams | Diagramas | Diagrammes | Darstellungen ...........................
Connections and System Control | Conexiones y Control de sistema
Connexions & Utilisation | Anschlüsse und Systemeinstellungen ...
Specications | Especicaciones
Caractéristiques techniques | Technische Daten ................................
Support | Servicio al cliente | Assistance | Support Kontakt .......................
Product Registration | Registro de Producto
Enregistrement du produit | Produktregistrierung ...............................................................
4
69
8
72
59
86
87

Einleitung
Glückwunsch zum Erwerb eines iKEY-AUDIO HDR7 TRAGBAREN
DIGITAL REKORDERS. Das Gerät verfügt über einen MIC und LINE
Eingang sowie zwei eingebaute Kondensatormikrofone in X-Y Anordnung. Viele Einstellmöglichkeiten erlauben verschiedenartige Anwendungen, wie zum Beispiel Live-Auftritte, Vorlesungen, Meetings
oder ein Instrument. Dieses Aufnahmegerät der neuen Generation
basiert auf aktuellsten technischen Möglichkeiten und ist mit einer
limitierten 1-Jahres-Garantie* ausgestattet. Wir empfehlen Ihnen,
vor der Verwendung des Rekorders die Bedienungsanleitung sorgfältig zu lesen.
Auspacken
Ihr iKey-Audio HDR7 wurde vor dem Einpacken und Versand sorgfältig geprüft und getestet. Prüfen Sie das Gerät nach dem Auspacken auf äußerliche Beschädigung und melden Sie jegliche Beschädigungen während des Transportweges sofort an Ihren Zusteller.
Bewahren Sie die Verpackung und das Verpackungsmaterial auf,
falls das Produkt jemals zu Ihrem Fachhändler retourniert werden
müsste.
Weiterer Verpackungsinhalt
(1) USB-Kabel für die Verbindung zum PC
(1) Bedienungsanleitung
(1) SD Speicherkarte
(1) Netzteil
(1) Tripod
(1) Windschutz
Eigenschaften
(4) AA-Batterien
-LCD-Farbdisplay
-Integrierte XY-Mikrofone für Aufnahmen im Außeneinsatz
-Aufnahme von jeder Line-Quelle(mono oder stereo)
-Aufnahme als MP3/AAC bis zu 320 kb/s oder ins WAV(BWF)/AIFFFormat bis 24 Bit / 96 kHz
-Integrierter Limiter, Kompressor, Normalizer, und Auto Gain Funktion
-Integrierter Gitarren-Tuner
-Aufnahmeoptionen wie Pre-Record, Marker oder Noise-Gate
-Aufnahme direkt auf die mitgelieferte SD-Karte (SDHC kompatibel)
- Aufnahme direkt auf einen USB-Flashspeicher (nicht im Lieferumfang)
- Kopfhörer/Line-Ausgang, 3,5 mm stereo Klinke
Introduction • Introducción • Introduction
Einleitung
69

- Line-Eingang, 3,5 mm stereo Klinke
- Mic-Eingang, 3,5 mm stereo Klinke
- Wahlschalter für Line-Eingangsvorverstärkung (-20 dB, 0 dB und
+10 dB)
- Regelbarer Aufnahmepegel und digitale Eingangs-Pegelanzeige
- Titelwiedergabe und Loop-Funktion
- Dateibearbeitungsoptionen
- Transfer der Aufnahmen zum Computer mit mitgeliefertem USBKabel
- Montage auf Tripod/Ständer (Ständer im Lieferumfang)
- Netzteil im Lieferumfang
- Wind/Pop-Schutz im Lieferumfang
Wir möchten, dass Sie ein ganzes Leben hören!
Die Wahl von exzellentem Audioequipment, so wie das Gerät, für das
Sie sich entschieden haben, sind nur der Start Ihres musikalischen
Vergnügens. Wenn Sie einige Dinge beachten, werden Sie noch mehr
Spaß und Freude mit Ihrem Equipment haben. Dieser Hersteller und
die Electronic Industries Association´s Consumer Electronics Group
Einleitung
70
Introduction • Introducción • Introduction
möchten, dass Sie alles aus Ihren Geräten herausholen, indem Sie es
mit einem sicheren Pegel betreiben. Ein Pegel, bei dem Sie den Sound
laut und klar hören, ohne lästige Störgeräusche und Verzerrungen und
- am wichtigsten - ohne Ihr Gehör zu schädigen. Sound kann täuschen.
Hören Sie über eine gewisse Zeit mit einem “ordentlichen Level”, führt
das zu größeren Lautstärken, sodass etwas, was Sie als “normal” empnden, schon zu laut sein und Ihr Gehör schädigen kann. Beugen Sie
dem vor, indem Sie Ihr Equipment auf einen sicheren Lautstärkepegel
einstellen, BEVOR Sie mit dem Hören beginnen.
So erreichen Sie einen sicheren Pegel: - Beginnen Sie klar und ohne
Verzerrungen hören. Wenn Sie einen angenehmen Pegel gefunden haben: - Belassen Sie die Regler in der gefundenen Position Nehmen Sie
sich eine Minute Zeit dafür, um Gehörschäden in der Zukunft zu verhindern, denn wir wollen, dass Sie Ihr ganzes Leben hören.
Wenn Sie Ihr Equipment mit Bedacht verwenden, werden Sie sich
ein Leben lang daran erfreuen. Da Gehörschäden aus zu lauten
Geräuschen entstehen, die leider oft erst erkannt werden, wenn es zu

spät ist, empfehlen dieser Hersteller und die Electronic Industries
Association´s Consumer Electronics Group, sich keinesfalls länger lauten Geräuschen auszusetzen. Wir haben zu Ihrem Schutz
eine Liste mit Lautstärkepegeln zusammengestellt:
30 Bibliothek, Flüstern
40 Wohnraum, Kühlschrank, Schlafzimmer
50 Leichter Verkehr, normales Gespräch, ruhiges Büro
60 Klimaanlage in 7 m Entfernung, Nähmaschine
70 Staubsauger, Haarfön, lautes Restaurant
80 Stadtverkehr, Müllhäcksler, Wecker in 60 cm Entfernung
DIE FOLGENDEN GERÄUSCHE KÖNNEN BEI LÄNGEREM KONTAKT GEFÄHRLICH SEIN
90 U-Bahn, Motorrad, LKW Verkehr, Rasenmäher
100 Müllauto, Kettensäge, Presslufthammer
120 Rockkonzert vor den Lautsprechern, Donnerschlag
140 Gewehrschuss, Düsenugzeug
180 Raketenstart
Mit freundlicher Genehmigung der Deafness Research Foundation.
Übersicht der HDR7 Anschlüsse & Bedienelemente
(1) BATTERIEFACH
(2) POWER (ON-OFF)
(3) NETZTEILEINGANG
(4) INPUT GAIN (- o +)
(5) LOOP
(6) LCD BILDSCHIRM
(7) STOP/BACK, PLAY/PAUSE, RECORD
(8) AUFNAHMEPEGEL/ SUCHE
(9) MENU
(10) ENTER
(11) LINE EINGANG
(12) KOPFHÖRER/LINE AUSGANG
(13) X-Y MIKROFONE
(14) MIC EINGANG
Introduction • Introducción • Introduction
Einleitung
71

(15) AUSGANGSPEGEL (- +)
G3
(16) MIC GAIN (LOW - HIGH)
(17) USB PC-PORT
(18) USB SPEICHERMEDIENANSCHLUSS
(19) TRIPOD/STÄNDER
(20) SD KARTENSCHLITZ
(21) USB-PC DATEN-ÜBERTRAGUNGSKABEL (im Lieferumfang/ nicht abgebildet)
HDR7 Funktionen
Der iKey-Audio HDR7 ist ein portabler Rekorder, der das Aufnehmen, Abspielen und
Anhören von Audio-Dateien erlaubt. Neben den
zwei eingebauten Mikrofonen in Studioqualität
verfügt das Gerät über einen Mic- und und
Line-Eingang, sowie einen Kopfhörer-/LineAusgang für vielfältige Anwendungen. Nach
der Aufnahme können sie die Dateien mit dem
mitgelieferten USB-Kabel einfach auf Ihren
Anschlüsse und Systemeinstellungen
72
Connections and System Control • Conexiones y Control de sistema • Connexions & Utilisation
Computer kopieren.
Vorbereitungen
Um den iKey-Audio HDR7 benutzen zu können
stellen Sie sicher, dass die Stromversorgung
bereit ist und die SD-Karte (SDHC kompatibel)
eingesetzt ist.
Stromversorgung
Der HDR7 funktioniert mit 4 AA-Batterien oder
dem mitgelieferten Netzteil.
A. Setzen Sie die Batterien in das
batteriefach auf der Rückseite
des Gerätes ein. (*Achtung: Die
Batteriespannungsanzeige oben
rechts im Display zeigt Ihnen,
wieviel Kapazität in den Batterien
verbleibt)
g. 1.1
B. Schließen Sie das Netzteilkabel am Netzteileingang (3) auf der
linken Seite an und stecken Sie die
andere Seite in Ihre Steckdose.
*Beachten: Das Gerät kann so permanent betrieben werden. Es kann warm werden, was allerdings keine Fehlfunktion ist.
g. 1.2
SD-Karte einsetzen
Im Lieferumfang des HDR7 ist
eine SD-Karte zum Speichern
der Aufnahmen enthalten. Setzen Sie die Karte in den Karten-
schlitz (18) auf der Unterseite ein,
bevor Sie das Gerät einschalten.
Führen Sie die Karte soweit in
das Gerät bis ein Klick das Einrasten der Karte bestätigt.
Schieben Sie die Karte wie
abgebildet ein
g. 1.3

Achtung: WENDEN SIE BEIM EINSETZEN
KEINE GEWALT AN.
Um die Karte zu entfernen drücken Sie sie le-
icht rein und lösen Sie den Druck wieder, um
die Karte zu entnehmen.
*Achtung: Stecken Sie beim Betrieb mit Batterien
nicht das netzteil in die Netzteilbuchse ohne das
gerät vorher auszuschalten. Sie könnten damit
die Aufnahme unterbrechen und das Material
verlieren.
Einen USB-Speicher verwenden
Am USB-Anschluss auf der rechten
Seite (18) können Sie einen USBStick anschließen. Der HDR7 kann
auf einen dort angeschlossenen
USB-Speicher aufnehmen und von
ihm wiedergeben.
g. 1.4
Der HDR7 kann nur mit einem Speichermedium arbeiten, wobei der USB-Speicher
vorzugsweise geladen wird. Sobald also ein
USB-Speicher angeschlossen ist wird nur von
diesem Speicher abgespielt oder auf ihn aufgenommen.
Wenn kein USB-Speicher angeschlossen ist
verwendet der HDR7 zur Wiedergabe und Aufnahme die eingesetzte SD-Karte.
Einschalten des Gerätes
Nachdem SD-Karte und Netzteil angeschlos-
sen sind können Sie das Gerät mit Betätigen
der POWER-Taste (2) einschalten.
Navigation durch de HDR7
Nach dem Einschalten zeigt Ihnen das Menü
die Ordner und Dateien auf Ihrem Speicher-
medium. Benutzen Sie das NAVIGATIONSRAD
(11), um durch die Ordner und Titel zu suchen.
Mit Druck auf PLAY/PAUSE (13) öffnen Sie
einen Ordner, um seinen Inhalt einzusehen.
Aufnahmen werden im Ordner RECORDS im
Oberverzeichnis IKEY abgelegt. Mit der Taste
STOP/BACK (12) gelangen Sie in das übergeordnete Verzeichnis.
Hauptmenü
Drücken Sie MENU (9), um ins Hauptmenü zu
gelangen, wo die wichtigsten Einstellungen
vorgenommen werden können. Wählen Sie
mit dem Derhrad den gwünschten Menüpunkt
und wechseln Sie in den Bearbeitungsmodus
mit Druck auf ENTER (10). Erneuter Druck auf
MENU wechselt in der vorherigen Menüpunkt.
Connections and System Control • Conexiones y Control de sistema • Connexions & Utilisation
Anschlüsse und Systemeinstellungen
73

Eigenschaften und Einstellungen
Die folgenden Einstellungen können im Hauptmenü angepasst werden.
*Achtung: Die Einstellungen Backlight und Bat.
Type erscheinen nur, wenn das Netzteil nicht angeschlossen ist.
CONTRAST- Stellen Sie hier den Kontrast des
Displays ein (0=gering, 100=hoch).
DATE- Stellen Sie hier das Datum für den HDR7
ein. Die Einstellung zeigt Tag, Monat und dann
Jahr an. Mit dem Derhrad stellen Sie eine Einstellung ein, mit Play/Pause gelangen sie zur
nächsten und mit Stop/Back wechseln zu der
vorherigen.
DATE- Stellen Sie hier das Datum für den HDR7
ein. Die Einstellung zeigt Tag, Monat und dann
Anschlüsse und Systemeinstellungen
74
Connections and System Control • Conexiones y Control de sistema • Connexions & Utilisation
Jahr an. Mit dem Derhrad stellen Sie eine Einstellung ein, mit Play/Pause gelangen sie zur
nächsten und mit Stop/Back wechseln zu der
vorherigen.
TUNER MODI- Der Tuner dient dazu, eine ange-
schlossene Gitarre zu stimmen. Es stehen zwei
Optionen zur Wahl, der Einzeltuner oder der
Automatische Tuner. Der automatische Tuner
dient eher dem fortgeschrittenen Musiker.
Die Bildschirme basieren auf einer Standard
6-saitigen Gitarre mit den Noten E-A-D-G-B-E.
Wenn eine Note gespielt wird prüft das Gerät
ob der Ton zu tief, zu hoch oder genau richtig
ist. Beim Spielen eines Tons zeigt das Display in
grün an, wenn der Ton richtig liegt und rot, wenn
er nachgestimmt werden muss. Nach dem Ein-
stellen wechseln Sie zur nächsten Saite.
Im Anfänger-Modus gibt es eine zusätzliche
Anzeige für die entsprechenden Noten die
gespielt werden. In dem Modus kannn jeweils
nur die Saite gestimmt werden die gerade aktu-
ell ausgewählt ist. Wenn die Saite gestimmt ist
wechseln Sie mit ENTER zur nächsten.
Nach der Navigation durch alle einzelnen Saiten erreichen Sie den Auto-Tuner für die fortgeschrittenen Musiker. Hier werden alle Noten auf
einem Bildschirm gestimmt.
RESTORE TO DEFAULT- Setzen Sie die Einstellungen des Hauptmenüs auf die Werkseinstellungen zurück.
MOVE- Verschieben Sie hiermit Titel von einem
Ordner in einen anderen. Wählen Sie im Datei-
Menü einen Titel aus und drücken Sie MENU,

wählen Sie MOVE, suchen Sie dann das Ziel
aus und drücken erneut MENU. Wählen Sie
dann PASTE aus, um den Titel an dem gewünschten Ort einzufügen.
COPY- Diese Funktion arbeitet wie die MOVE-
Funktion, jedoch erstellt Sie eine Kopie der
Datei und fügt Sie am Zielort ein.
DELETE- Verwenden Sie, um eine Datei zu
löschen. Wählen Sie im Dateimenü den en-
tsprechenden Titel aus und drücken Sie MENU,
wählen sie dann DELETE und bestätigen Sie
mit Play/Pause. Mit Stop-Back brechen Sie
den Vorgang ab.
RENAME- Um einen Titel neu zu benen-
nen wählen diese Funktion. Wählen Sie im
Dateimenü einen Titel an und drücken Sie dann
MENU und wählen RENAME. Im folgenden
Bildschirm können Sie nun die Buchstaben des
Dateinamens bearbeiten. Ändern Sie mit dem
Drehrad den aktuellen Buchstaben und wech-
seln Sie zum nächsten mit Play/Pause, zum
vorherigen mit Stop/Back. Speichern Sie ab
mit Druck auf ENTER.
SAVE AS + NORMALIZE- Diese Funktion normalisiert einen Titel auf einen Standard-Pegel
und speichert ihn ab. Wählen Sie einen Titel,
drücken Sie MENU, wählen Sie dann SAVE AS/
NORM. Nun können Sie auch das gewünschte
Dateiformat auswählen (z.B. WAV -> AAC) oder
behalten Sie das original Dateiformat, dann
drücken Sie ENTER. Haben Sie MP3 oder AAC
gewählt folgt ein Bildschirm zur Wahl der Kompressionsrate. Auf dem Bildschirm ist auch die
Normalisierungsfunktion an- und abschaltbar.
*Achtung: Der Normalisierungsvorgang dauert eine Weile, abhängig von der Länge des
gewählten Titels. Üben Sie dies ein paar Mal.
BACKLIGHT- (erscheint wenn das netzteil nicht
verbunden ist)- Das Gerät hat eine Display-
Hintergrundbeleuchtung. Im Batteriemodus
wird sie aber zum Stromsparen automatisch
abgeschaltet. Die Option im Menü dient dazu,
die Zeit einzustellen, nach welcher die Beleuchtung sich abschaltet. Zur Verfügung steht OFF
(immer aus), ON (immer an) und 2, 5, 10 oder
30 Sekunden nach welchen die Beleuchtung
sich abschaltet. Wenn die Beleuchtung sich
abschaltet aktivieren Sie sie erneut mit Betätigung irgendeiner Taste oder durch Derhen des
Derhrades.
*Achtung: Wenn das Netzteil angeschlossen ist
bleibt die Beleuchtung dauerhaft an und die Bat-
Connections and System Control • Conexiones y Control de sistema • Connexions & Utilisation
Anschlüsse und Systemeinstellungen
75

terieanzeige erscheint nicht.
BAT. TYPE- (erscheint, wenn das netzteil nicht
angeschlossen ist)- hier legen Sie fest, welche
Art Batterien verwendet werden. Wählen Sie
zwischen Alkali oder NiMH Acc für Akku-Betrieb.
Titel abspielen
Um die Wiedergabe eines Titels zu starten
drücken Sie PLAY/PAUSE wenn der entsprechende Titel im Dateimenü markiert ist.
Drücken Sie PLAY/PAUSE erneut, um die Wiedergabe des Titels zu pausieren. Nutzen Sie
das DERHRAD zum Vor- und Zurückspulen
durch den Titel.
Um die Wiedergabe abzubrechen und ins
Anschlüsse und Systemeinstellungen
76
Connections and System Control • Conexiones y Control de sistema • Connexions & Utilisation
Dateimenü zurückzukehren betätigen Sie
STOP/BACK (7).
Abspiel-Modus
Dateinummer
SD-Karten
Speicherplatz
Dateiname
Titelanzeige
Der Full-Colour LCD Bildschirm (6) zeigt
Dateien, Ordner, Aufnahmen, Wiedergabe- und
Aufnahmemodus für den HDR7 an.
g. 1.5
(Gerät im Play-Modus)
Dateiformat
Batterielad-
ezustand
Titelzeit
Zeit
Modus
Play Menü
Im Wiedergabemodus kommen Sie mit Druck
auf MENU in das Play-Menü. Hier stellen Sie
die Anzeige, Wiedergabemodus und Sound-
einstellungen ein. Hier listen wir die wählbaren
Optionen auf.
*Achtung: Die Einstellungen können mit Druck auf
ENTER angepasst werden.
VU METER- Die Pegelanzeige zeigt den anliegenden Aufnahmepegel an und ist im unteren
Bereich des Play- oder Record-Displays zu
sehen. Im Play-Modus können Sie es ein- oder
ausschalten. Stereo-Aufnahmen werden mit
zwei Pegelanzeigen dargestellt, mono Aufnahmen nur einer.
PLAYBACK MODE- Die Titel auf dem Speichermedium können auf verschiedene Wiesen

abgespielt werden:
PLAY ONE- Die Wiedergabe pausiert nach
der Wiedergabe eines Titels.
PLAY ALL- Die Titel des aktuellen Ordners
spielen nacheinander.
REPEAT ONE- Der gewählte Titel wird permanent wiederholt.
REPEAT ALL- Der aktuelle Ordner wird permanent wiederholt.
TIME MODE- Dies steuert den Anzeigemodus
der Zeit. REM zeigt die verbleibende Zeit des
Titels an, ELA zeigt die abgelaufene Zeit an.
LOOP FUNKTION- Im Play-Modus kannn eine
Schleife programmiert werden für den aktuel-
len Titel. Drücken während der Wiedergabe die
Loop-Taste (5) in dem Moment, wo die Schleife
anfangen soll. Das Display zeigt nun “LOOP IN
SET”. Erneuter Druck der Loop-Taste setzt den
Endpunkt der Schleife und sie wird permanent
wiederholt (das Gerät zeigt: LOOP OUT SET,
LOOP ACTIVATED).
Drücken Sie noch einmal die Loop-Taste, um
die Schleife zu verlassen (Das Display zeigt
LOOP IS DEACTIVATED).
Wiederholen Sie den Vorgang nach Belieben,
um eine neue Schleife zu programmieren.
*Achtung: Die LOOP-Funktion kannn nur im PlayModus verrwendet werden
Aufnahme-Setup des HDR7
Anschluss Eingänge & Ausgänge)
LINE IN
EINGÄNGE:
LINE EINGANG (11)- Schließen Sie hier das
Signal einer externen Line-Quelle mit 3,5
mm Klinkenanschluss an.
MIC EINGANG (14)- Schließen Sie hier das
Signal einer externen Mikrofon-Quelle mit
3,5 mm Klinkenanschluss an.
*Achtung: Es kannn nur ein Signal aufgenommen werden. Ist an beiden Eingängen etwas
angeschlossen wird nur von der LINE-Quelle
aufgenommen.
AUSGÄNGE:
KOPFHÖRER/ LINE AUSGANG (7)-
g. 1.6
PHONES/
LINE OUT
Connections and System Control • Conexiones y Control de sistema • Connexions & Utilisation
Anschlüsse und Systemeinstellungen
77

Schließen Sie hier Ihren Kopfhörer, aktive
Lautsprecher oder ähnliches mit einem
3,5 mm Klinkenstecker an, um das Signal
während der Aufnahme abzuhören.
*Achtung: Aufnahmen werden entsprechend
Ihres Aufnahmeformates bezeichnet und durchnummeriert abgelegt. (z.B. iKEY_001.MP3,
iKEY_001.WAV, iKEY_002.MP3, iKEY_002.WAV)
Aufnahme mit den X-Y
Kondensatormikrofonen
Neben MIC- und LINE-Eingang verfügt das
Gerät über zwei Kondensatormikrofone in XY-Anordnung. Mit dieser Anordnung bietet sich
das Gerät für viele verschiedene Anwendungen
an.
*Achtung: Sie nden im folgenden Abschnitt
Anschlüsse und Systemeinstellungen
78
Connections and System Control • Conexiones y Control de sistema • Connexions & Utilisation
CHANNELS im RECORD-MENÜ detaillierte
Angaben.
Aufnahmeoptionen
NEBEN DEN MIC/LINE-Eingängen und den XY-Mikrofonen stehen einige Aufnahmeoptionen
zur Verfügung, um die Einsatzmöglichkeiten
des HDR7 zu vervielfachen. Wechseln Sie in
den RECORD-Modus mit Druck auf RECORD
(7) und drücken Sie dann die Taste MENU. Es
folgt eine Auistung und Erklärung aller Option-
en im Record-Menü.
FORMAT- Stelen Sie hier das gewünschte Auf-
nahmeformat ein. Der HDR7 kann in WAV, MP3,
AAC, und AIFF aufnehmen (*Achtung- Nach
Beginn der Aufnahme können die Einstellungen
nicht verändert werden). Die Formate basieren
auf unterschiedlichen Dateitypen mit unter-
schiedlichem Speicherplatzbedarf, Kompatibil-
ität und Qualität.
*Achtung: Langsame Speichermedien können
bei der Verwendung von Formaten mit hohen
Bitraten zu Problemen führen.
Es folgt eine kurze Auistung der Formate.
WAV- Waveform Audio Format
MP3- MPEG-1 Audio Layer 3
AAC- Advanced Audio Coding
AIFF- Audio Interchange File Format
SAMP. RATE- Die Samplerate legt fest, wie
oft pro Sekunde das Signal abgetastet und die
Daten gespeichert werden. Je höher die Samplerate desto höher die Qualität und der Spe-
icherbedarf und umgekehrt. Im HDR7 stehen
je nach Aufnahmeformat folgende Abtastraten
zur Verfügung:

WAV & AIFF- 44,1 kHz / 48,0kHz/ 88,2 kHz/
96,0 kHz
*Aufnahmetipp: Je höher die Abtastrate desto
vielfältiger sind die Bearbeitungsoptionen für das
aufgenommen Material, da die Aufnahme bei
hohen Abtastraten detaillierter ist als bei niedrigeren.
BIT DEPTH- Die Auösung (Bit-Tiefe) legt fest,
wie genau das Signal abgetastet werden soll.
Je höher die Birtiefe desto höher die Qualität
und der Speicherbedarf und umgekehrt. Die
folgenden Auösungswerte stehen zur Verfügung:
WAV & AIFF 16 bit, 24 bit
*Aufnahmetipp: Mit einer höheren Auösung erweitern Sie die Bearbeitungsmöglichkeiten für
Ihr Aufnahmematrial nachhaltig, da es wiederum
detailreicher wird und auch der zur Verfügung stehende Pegel wird von der Einstellung beeinusst.
BITRATE- Die Bitrate legt fest, wieviele Bit pro
Sekunde geschrieben werden sollen. Davon
hängt dann die Kompression, der Speicherbedarf und die resultierende Qualität der Aufnahme ab. Es folgen die zur Verfügung stehenden Bitraten:
MP3 & AAC (in kbps): 64, 96, 128, 160, 192,
224, 256, 320.
CHANNELS- Es stehen zur Aufnahme folgende
Kanal-Auswahlmöglichkeiten zur Verfügung:
STEREO- Der linke und rechte Kanal wird
unabhängig voneinander aufgezeichnet und
der Pegel hängt vom jeweiligen Eingangs-
signal ab.
MONO L/R SUM- Die Signale des linken
und rechten Kanals werden kombiniert in
eine mono Datei aufgenommen.
MONO L- Nur das Signal des linken Kanals
wird in eine mono Datei aufgenommen.
MONO R- Nur das Signal des rechten Kanals
wird in eine mono Datei aufgenommen.
*Achtung: Bei der verwendung einer mono Quelle
wie einer Gitarre sollten Sie es auf mono stellen,
damit nicht ein Kanal ohne Signal aufgezeichnet
und später abgespielt wird.
AUTO-TRACK- Nach einer Pause während
der Aufnahme wird eine neue Aufnahme automatische gestartet, sobald wieder Signal
ankommt.
AUTO-REC- Wenn die Funktion aktiviert ist
beginnt der HDR7 erst mit der Aufnahme wenn
Signal anliegt, um Speicherplatz zu sparen.
Connections and System Control • Conexiones y Control de sistema • Connexions & Utilisation
Anschlüsse und Systemeinstellungen
79

FILE PREFIX- Stellen Sie hier ein, wie Ihre Titel bezeichnet werden sollen. Stellen Sie einen
Buchstaben mit dem Derhrad ein, wechseln Sie
zum nächsten mit Druck auf PLAY/PAUSE.
PRE-RECORD- Vor Beginn der Aufnahme
werden automatisch 5 Sekunden zusätzlich
aufgenommen. So verpassen Sie nie den richtigen Moment.
MARK TIMER- Wenn Sie diese Option aktiv-
ieren wird in wählbaren Abständen (15 Sekunden Schritte) ein Marker während der Auf-
nahme gesetzt und auf dem Speichermedium
als *.txt Datei abgelegt. Setzen Sie während der
Aufnahme eine manuelle Markierung mit Druck
auf PLAY.
FILE TIMER- Nach der eingestellten Zeitspanne
Anschlüsse und Systemeinstellungen
80
Connections and System Control • Conexiones y Control de sistema • Connexions & Utilisation
(15 Sekunden Schritte) wird automatisch eine
neue Aufnahme gestartet.
REGIONS- Legt die methode fest, mit welcher
die Marker und Titelinformationen geschrieben
werden, abhängig von Ihrer Audio-Bearbeitungssoftware. CUE ist das am wietesten verbreitete Format, aber zur Auswahl für entsprechende Hard- und Software steht auch das
SONY-Format.
BOOST 24dB- Diese Funktion verstärkt Ihre
Aufnahme um 24 dB.
PH. POWER- Ph. Power steht für Phantoms-
peisung zur Verwendung in Kondensatormikrofonen und liegt bei 3V.
DYNAMICS- Diese Optionen beeinussen die
Aufnahme auf verschieden Art und Weisen. Es
folgt eine Auistung der Funktionen.
Off- Signal nicht beeinusst
AGC (vocal)- Ein Kompressor mit Mittenbe-
tonung wird verwendet, um die Stimme aus
dem Signal zu ltern
Compressor- Das aufgenommene Signal
klingt satter, die Dynamik wird reduziert
Limiter- Sorgt dafür, dass die Aufnahme
nicht zu laut ist oder das Signal übersteuert
*Aufnahmetipp: Nach der Aufnahme kann der
Effekt nicht entfernt werden. Dies kann mitunter
erwünscht sein, jedoch können solche Effekte
auch nach der Aufnahme in Ihrer Audio-Bearbeitungssoftware hinzugefügt werden.
TIME MODE- Dies steuert den Anzeigemodus
der Zeit. REM zeigt die verbleibende Speicherzeit des Speichermediums an, ELA zeigt die
abgelaufene Zeit der Aufnahme an.

NOISE GATE- Das Noise Gate entfernt eventu-
FILE
BIT RATE
FORMAT
TIME
TUNER
FORMAT
STEREO
/MONO
LINE IN PHONES/
LINE OUT
INPUT GAIN
-
+
+
0
OUTPUT LEVEL
ell vorhandenes Hintergrundrauschen.
*Achtung: Diese Einstellungen können nicht
während der Aufnahme geändert werden.
Record Modus
SD-Karten
Verwendung
Dateiname
STEREO-
MONO Pegelanzeige
Pegel/Radeinstellungs-Marker
(Display gezeigt im Record-Modus)
Während einer stereo-Aufnahme werden zwei
g. 1.7
Dateiformat
Batterielad-
ezustand
Titelzeit in
Minuten
Sekunden
Zeit Modus
Pegelanzeigen dargestellt, im mono-Modus
nur eine.
Aufnahmepegel einstellen
Wenn ein Signal zu laut ist kann dies zu Verzerrung und Übersteuerung führen. Wenn das
Signal zu leise ist kann es zu einer schwachen
oder nicht hörbaren Aufnahme führen.
Um bestmögliche Aufnahmen zu erstellen müssen Sie das maximal mögliche Eingangssignal
zur Verfügung stellen, ohne die Grenzen des
und
Gerätes zu überschreiten. Wenn ein angelegtes
Signal zu laut ist wird die Pegelanzeige (im Aufnahmemodus) rot leuchten.
Folgen Sie diesen Schritten zur Einstellung des
maximalen Aufnahmepegels:
1)Erhöhen Sie den Pegel (mit dem Rad) bis
zu dem Punkt, wo es beginnt zu übersteuern
(erscheint rot in Pegelanzeige)
2)Von da an drehen Sie das Einstellrad ge-
gen den Uhrzeigersinn bis das Signal nicht
mehr übersteuert.
Der Wahlschalter für die Eingangsvorverstärkung INPUT GAIN (4) dient auch der Einstellung des maximalen Signalpegels. Der Schalter
ändert den gesamten Pegel des
angelegten Eingangssignals in drei
festgelegten Schritten: –20 dB [-], 0 dB [o] und
+10 dB [+]. Wenn ein Signal zu leise ist versuchen Sie, von - auf 0, oder von 0 auf + zu
schalten. Ist ein Signal zu laut, reduzieren Sie
es, indem Sie von + auf 0 oder von 0 auf – umschalten.
g. 1.8
Connections and System Control • Conexiones y Control de sistema • Connexions & Utilisation
Anschlüsse und Systemeinstellungen
81

bis die Aufnahme eben übersteuert und vermindern Sie nun den Pegel.
Lösung: Vermindern Sie den Aufnahmepegel
leicht, damit die Pegelanzeige nicht mehr rot
leuchtet.
Lösung- Drehen Sie das Drehrad ganz nach rechts und vermindern Sie die Vorverstärkung bis
die Aufnahme eben übersteuert. Vermindern
Sie nun den Pegel bis die Pegelanzeige nicht
mehr rot erscheint.
Lösung- Drehen Sie das Drehrad ganz nach
rechts und vermindern Sie die Vorverstärkung
Anschlüsse und Systemeinstellungen
82
Connections and System Control • Conexiones y Control de sistema • Connexions & Utilisation
*Achtung: Wenn die Aufnahme nicht zufrieden
stellend war sollten Sie den Ausgangspegel Ihrer
Klangquelle vermindern wenn möglich.
Titel aufnehmen
Nachdem die Bitraten-, Pegel- und mono/stereo-Einstellungen vorgenommen wurden sind
Sie bereit zur Aufnahme. Im Aufnahmemodus
drücken Sie die RECORD-Taste für den Beginn
der Aufnahme. Die blinkende RECORD-Taste
deutet auf die laufende Aufnahme hin.
Um die Aufnahme zu pausieren drücken Sie die
RECORD-Taste noch einmal.
Zum Fortsetzen der Aufnahme drücken Sie
erneut RECORD.
Um die Aufnahme zu beenden und zum vorherigen Menü zurückzukehren drücken Sie die
Taste STOP/BACK. (*Achtung: alle Aufnahmen
werden im Order RECORDS des iKEY Verze-
ichnisses abgelegt und durch nummeriert,
bei einer Aufnahmedauer von mehr als 2 GB
Dateigröße wird ein neuer Titel gestartet).
Transfer von Dateien zwischen
HDR7 und Computer
Dateien, welche auf die SD-Karte aufgenommen wurden können einfach mit dem mitgelieferten USB-Kabel vom HDR7 auf einen Computer kopiert werden.
Stellen Sie zunächst sicher, dass der HDR7
ausgeschaltet ist.
Verbinden Sie das kleine Ende des USB-Kabels

mit dem USB TO PC Anschluss (17) des HDR7
und das andere Ende mit einem rückseitigen
USB-Anschluss Ihres Computers.
*Achtung: Für beste Ergebnisse verwenden Sie
die USB-Anschlüsse auf der Rückseite Ihres
Computers und keinen USB-Hub/Verteiler.
Wenn das Kabel mit Computer und HDR7 ver-
bunden ist können Sie den HDR7 einschalten.
Warten Sie, bis die Karte von Ihrem Computer
erkannt wurde.
Mac: Wenn ein Icon für die Karte auf Ihrem
Desktop erscheint klicken Sie darauf, um
den Inhalt der Karte anzusehen.
Windows: Klicken Sie auf das neu erkannte
Speichermedium im Arbeitsplatz oder
„Computer“-Bereich Ihres Windows-Betriebssystems.
Um Titel vom HDR7 zu kopieren wählen Sie die
gewünschten Titel aus und ziehen Sie diese per
Drag&Drop in einen Ordner auf Ihrer Festplatte.
USB-Gerät sicher entfernen
Folgen Sie immer den folgenden Schritten, um
das Laufwerk sicher von Ihrem Computer zu
trennen.
Mac: Wählen Sie das Icon “IKEY HDR7”
und bewegen Sie es per Drag&Drop in den
Papierkorb.
Windows: Klicken Sie auf das USB-Symbol
“Sicher Entfernen” in der Taskleiste und
wählen Sie dann den “iKEY HDR7”, um ihn
zu trennen.
Extra Funktionen
(AUSGANGSPEGEL) Verwenden Sie die Tasten
(15) um die Ausgangslautstärke des HDR7 ein-
zustellen.
(MIC GAIN) Der MIC GAIN Schalter (16) dient
dazu, die Empndlichkeit des angeschlossenen
Mikrofons auf niedrig oder hoch einzustellen.
(Ständeraufnahme) Diese Schraubbuchse (19)
dient der Montage auf ein Stativ (Tripod im Lieferumfang).
(HOLD-Funktion) Der Rekorder ist mit einer
HOLD-Funktion ausgestattet, welche verhindert, dass versehentliches Drücken einer Taste
oder Drehen des Drehrads eine Einstellung
verändert. Wechseln Sie in den HOLD-Modus
indem Sie die Tasten LOOP und ENTER gleichzeitig drücken bis HOLD oben rechts im
Display erscheint.
Connections and System Control • Conexiones y Control de sistema • Connexions & Utilisation
Anschlüsse und Systemeinstellungen
83

Verlassen Sie den HOLD-Modus indem Sie
erneut LOOP und ENTER drücken.
Software Updates
Es werden immer Verbesserungen an unseren
Produkten vorgenommen, um Einsatzmöglichkeiten und Funktionalität zu erhöhen. Hin und
wieder Software Updates für unsere iKEYAUDIO Produkte veröffentlicht. Prüfen Sie
regelmäßig die iKey-Audio Webseite (http://
www.ikey-audio.com) auf verfügbare Updates.
Um die aktuell installierte Software-Version
Ihres Rekorders zu ermitteln schalten Sie ihn
ein. Während des Einschaltens erscheint eine
Nummer im oberen Bereich des Displays (6).
Diese bezeichnet die Software-Version. Wenn
auf der Webseite ein Software-Update angebo-
ten wird, dessen Versionsnummer höher als die
Caractéristiques techniques
84
Specications • Especicaciones • Technische Daten
installierte ist bedeutet dies, dass die angebo-
tene Version neuer als die installierte ist und auf
Ihren Rekorder geladen werden sollte.
*Achtung: Verwenden Sie nur Updates, die
speziell für Ihr Gerät angeboten werden.
Sie nden auf der Webseite detaillierte Anleitungen, um ein Softwareupdate zu installieren.
Hier nden Sie jedoch eine Kurzanleitung:
*Achtung: Es ist sehr wichtig, dass Sie ein
Update nur mit einer einwandfreien Stromversorgung anwenden. Das Update dauert einige
Minuten und eine Unterbrechung der Stromversorgung während des Vorganges kann das Gerät
unbrauchbar machen.
1)Vergewissern Sie sich, dass die angebotene Version neuer (höher) ist als die installierte Version
2)Laden Sie die aktuellste Version herunter
und entpacken Sie die Dateien in das
Hauptverzeichnis Ihrer SD-Karte.
3)Setzen Sie die Karte in den Rekorder ein
und schalten Sie ihn danach EIN.
4)Die Software wird automatisch geupdatet.
Technische Daten
Allgemein:
USB Standards............................... USB 1.0, 1.1, 2.0
Spannungsquelle........... 5V 1000mA AC/DC Netzteil
4 AA Batterien (Alkali, NI-MH)
Betriebsdauer im Batteriebetrieb..............5 Stunden*
Display....................................................... Farb-LCD
Abmessungen....................................158x73x37mm
Gewicht.......................................................... 0,3 kg
*Abhängig von Speichermedium und verwendetetn Batterien

Audio:
Kanäle………………………….................. 2 (stereo)
Speichermedien........................... SD (64 MB-2GB)
SDHC (4 GB-32GB)
Unterstützte FAT-Speichermedien
Abtastrate:........................................ bis zu 96 kHz
Auösung:........................................... bis zu 24-bit
Dynamikumfang: ........................................ 120 dB
Klirrfaktor (THD+N):..................................... -91 dB
Frequenzgang:................................. 20Hz – 20KHz
Eingangsimpedanz:…………............... Line: 10K Ω
Mic: 1K Ω
Nee-Eingangspegel:................................................
Low Gain: 1V RMS (0 dBV)
Mid Gain: .5V RMS (-6 dBV)
High Gain: .13V RMS (-17 dBV)
Maximale Eingangspegel:…...................................
Low Gain: 2.5V RMS (+8 dBV)
Mid Gain: .68V RMS (-3 dBV)
High Gain: .25V RMS (-12 dBV)
Ausagngsimpedanz:.……………………....... 30 Ω
Maximale Ausgangspegel:…….............................
Line (10K Ω): 0.7V RMS (-3 dBV)
Phones (32 Ω): 0.35V RMS (-9 dBV)
Aufnahmeformate:....... MP3: 128, 256, 320 Kbps;
AAC: 128, 256, 320 Kbps;
WAV & AIFF: Abtastraten 44,1;
48,0; 88,2; 96,0 kHz/Auösung 16, 24-bit
Bitte registrieren Sie Ihre Garantie unter
www.ikey-audio.com.
Specications • Especicaciones • Technische Daten
Caractéristiques techniques
85

Warranty and Repair:
All GCI products are designed and manufactured to the highest standards in the
industry. With proper care and maintenance, your product will provide years
of reliable service.
LIMITED WARRANTY
A. GCI warrants its products to be free from defects in mater ials and workmanship for One (1) year from the or iginal purchase date. Exceptions: Laser assemblies on CD Players, cartridges, and crossfaders are covered for 90 days.
B. This limited warranty does not cover damage or failure caused by abuse , misuse,
abnormal use, faulty installation, improper maintenance or any repairs other than
those provided by an authorized GCI Service Center.
C. There are no obligations of liability on the part of GCI for consequential damages arising out of or in connection with the use or performance of the product
or other indirect damages with respect to loss of property, revenues, of prot, or
costs of removal, installation, or reinstallation. All implied warranties for GCI, in-
cluding implied warranties for tness, are limited in duration to One (1) year from
the original date of purchase, unless otherwise mandated by local statutes.
RETURN/REPAIR
A. In the U.S.A., please call our helpful Customer Service Representatives at
(732)738-9003, and they will be happy to give you a Return Authorization Number
(RA#) and the address of an authorized service center closest to you.
B. After receiving an RA#, include a copy of the original sales receipt, with defective product and a description of the defect. Send by insured freight to: GCI
Sound Products Cor p, and use the address provided by your customer service
representative. Your RA# must be written on the outside of the pack
Product Registration
86
Registro de Producto • Enregistrement du produit • Produktregistrierung
age, or processing will be delayed indenitely!
C. Service covered under warranty will be paid for by GCI and returned to you.
For non-warrantied products, GCI will repair your unit after payment is received.
Repair charges do not include return freight. Freight charges will be added to
the repair charges.
D. On warranty service, you pay for shipping to GCI, we pay for return shipping
within the continental United States. Alaska, Hawaii, Puerto Rico, Canada, Bahamas, and the Vir gin Islands will be charged for freight.
E. Please allow 2-4 weeks for retur n of your product. Under normal circumstances
your product will spend no more than 10 working days at GCI. We are not
responsible for shipping times.
GCI Technologies Corp.
Worldwide Headquarters
1 Mayeld Ave
Edison, NJ 08837 USA
Tel: (732) 346-0061
Fax: (732) 346-0065
IN THE UNITED KINGDOM
In the event that you need service on your GCI product under warranty, simply
write a letter describing the problem, along with your contact information. Make
sure to enclose a copy of your receipt for proof of warranty information. A return
number is not required. You will be responsible for shipping charges to GCI UK,
and GCI UK will pay to return the unit to you if it is considered under warranty.
GCI Technologies Ltd
Unit 44 Brambles Enterprise Centre
Waterberry Drive
Waterlooville
Hampshire, P07, 7TH, UK
Tel: +44 (0) 87 087 00880
Fax: +44 (0) 87 087 00990
EN ESPAÑA
En caso de mal funcionamiento de esta unidad, por favor contacte con el Servicio
de Atención al Cliente en el teléfono 93 436 37 00 que le asesorará sobre el
procedimiento cor recto para solucionarlo. En caso de ser necesar io enviar la
unidad para su reparación, el Servicio de Atención al Cliente le proveerá de un
número de incidencia, así como de la dirección del Servicio de Asistencia Técnica
más cercano a su residencia.
GCI Technologies S.A.
Caspe, 172 - 1º A
08013 Barcelona, Spain
Tel: 34 93 436 37 00
Fax: 34 93 347 69 61
EN FRANCE
En cas de panne, merci de contacter votre revendeur. Tout appareil en panne doit
y être retourné, accompagné de sa facture d’achat, de son emballage d’or igine
et d’un descriptif de panne. L’appareil sera expédié au SAV de GCI Technologies
France. Tout produit reçu sans facture sera réparé hor s garantie. L’appareil sera
ensuite ré-expédié au revendeur.

GSI Technologies s.a.r.l
2bis, rue Léon Blum
91120 Palaiseau, France
Tél: + 33 1 69 79 97 70
Fax: + 33 1 69 79 97 80
IN DEUTSCHLAND
Die allgemeinen gesetzlichen Gewährleistungen bleiben von den Her stellergarantien unberührt. Der Garantieanspruch erlischt bei Eingriffen durch den Käufer
oder durch Dritte sowie bei unsachgemässer Behandlung. Gewährleistungsansprüche sind ausschließlich gegenüber Ihrem Fachhändler geltend zu machen.
GCI Technologies GmbH
Lerchenstraße 14
Haus 3 – 2. Stock
80995 München, Munich, Germany
Tel: +49 (0) 89 319 019 80
Fax: +49 (0) 89 319 019 819
Register your product online at www.ikeyaudio.com to be eligible for great prize give-
aways! If you do not have Internet access, ll
out the form included and mail it to the ap-
propriate address listed previously.
First and Last Name
.
.
.
Address (Number and Street) Apartment Number
.
.
.
City and State or Province
.
.
.
Country
.
.
.
Zip Code or Postal Code
.
.
.
Email Address Telephone Number
.
.
.
Date of Birth Date of Purchase
.
.
.
Purchase Price (Excluding Tax) City of Purchase
.
.
.
Model Number (Example: CDT-05)
.
.
.
Serial Number (back of unit)
.
Registro de Producto • Enregistrement du produit • Produktregistrierung
Product Registration
87
 Loading...