

Ikelite SX10 IS User Manual
Ikelite Digital Housing
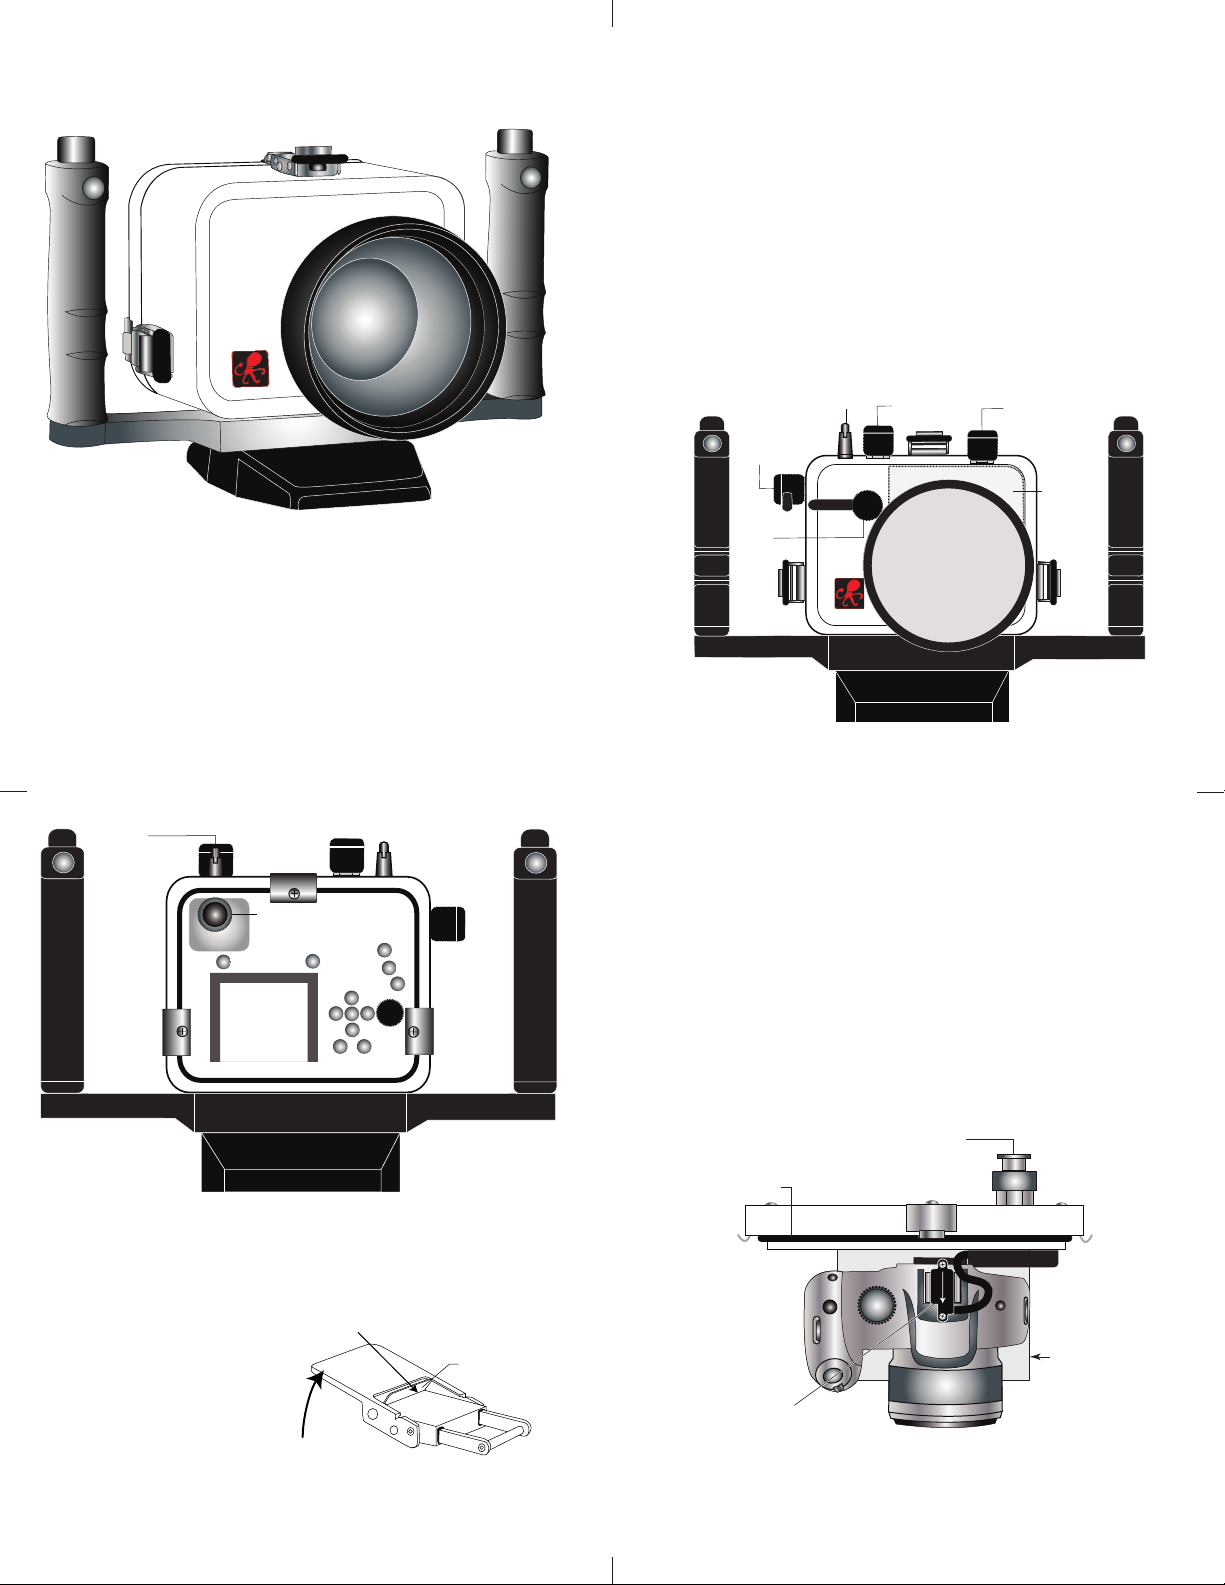
Back View
[D] +/- Exposure
[E] Frame Selector/Erase
[F] Manual Focus
[G] Macro
[H] FUNC./SET
[I] ISO
[A] Shortcut
[B] Movie
[C] Playback
B
C
D
E
F
G
H
I
K
L
H
A
TTL Connector
M
J
[J] Control Dial
[K] Self-Timer
[L] Display
[M] Menu
Flash
Button
Lift
Push For ward
Lid Snap Lock
External Strobe Connector
Waterproof Cap
(Do not remove underwater)
O-ring
Housing Back
Hot Shoe Connector
Mounting
Tray
Front View
Lid
Snap
Mode Dial
P
ower Button
F
lash Pop-Up
Control
S
hutter
Button
Zoom
Lever
Lid
Snap
Lens
Port
Internal
Housing
F
lash
Deflector
i n s t r u c t i o n m a n u a l
#6148.01 for Canon SX10 IS
Congratulations on your purchase of an Ikelite Digital Camera
Housing. Ikelite has over 45 years of experience in the underwater
photographic and lighting market. Our products are designed and
built in the USA by Ikelite for both the professional and amateur
photographer.
The clear housing permits instant visual inspection of the camera
and all sealing surfaces as well as complete monitoring of controls
and camera LCD screens.
Ikelite Digital Housings are slightly negative in salt water for
stability. This housing has been water pressure tested at the
factory to 200’ (60m).
PPlleeaassee RReeaad
d
We suggest that you read this instruction booklet thoroughly
before use. If you are new to underwater photography, be sure
to read the General and Photo Tips sections.
We also suggest that you read your camera manual thoroughly
to have a full understanding of each camera function.
IInniittiiaall CCaammeerraa SSeettuupp
1. Set ISO to 80.
2. Set camera mode dial to “A” Aperture priority.
. Set Flash Mode to “Auto” (lightning bolt in LCD).
3
4. When using external strobes, set built-in flash to “Off”.
5. For General photography, set aperture to f4.0.
6. For Macro photography, set aperture to f8.0.
7. Set White Balance to “Auto”.
8. Set Image Size to “L”.
9. Set Metering to “Center-Weighted Avg.”.
2
OOppeenniinngg tthhee HHoouussiinngg
1. Lid Snaps have a
To open, push Lid Snap
Lock forward and lift as
shown. Keep pressure
on the Lid Snap so it
does not fly open
quickly.
Some lid snaps have a
lot of spring tension once they go over center, so keep a firm
grip on the lid snap. Lid Snaps may be opened one at a time.
LLoocckk
.
3
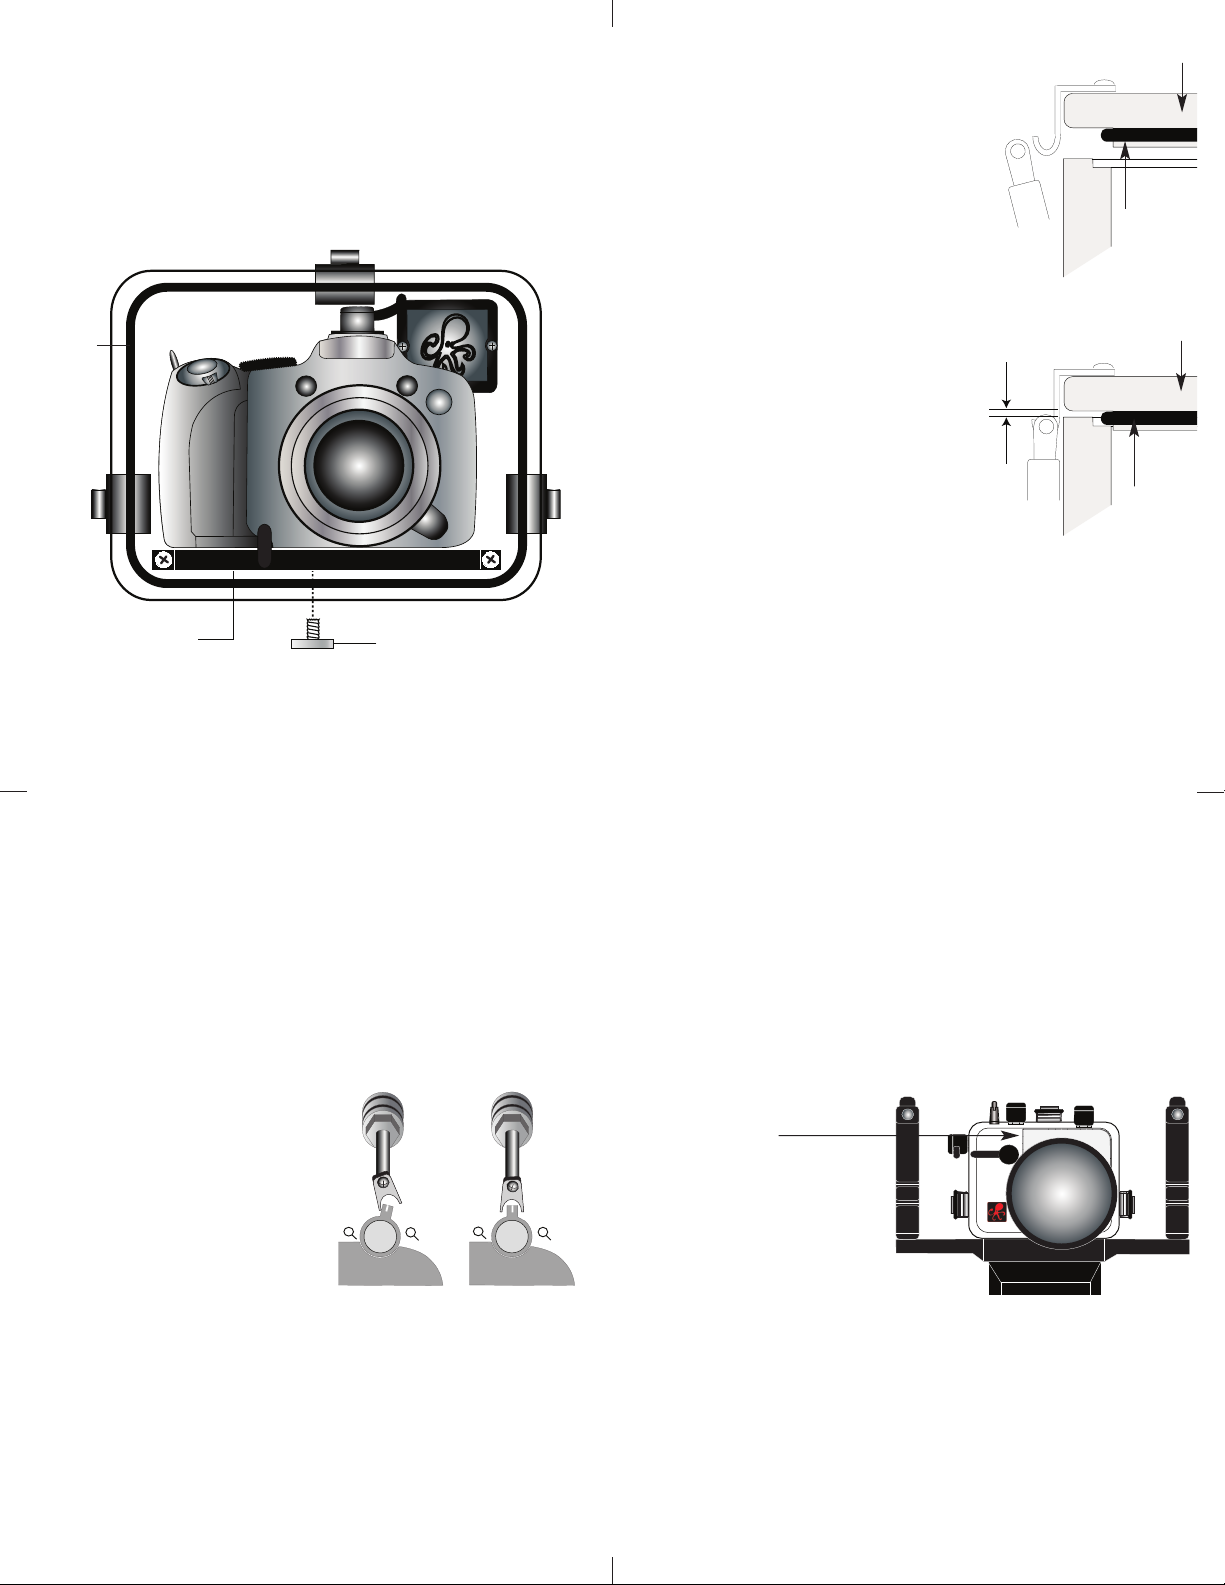
IInnssttaalllliinngg tthhee CCaammeerraa
1. Pull out on each housing control until it stops. This will get the
controls out of the way for installation of the camera.
2. Remove the back from the housing.
3. The mounting tray for the camera is secured to the housing
back. Position the camera on the tray.
4 Slide the housing Hotshoe Connector into the Camera Hothoe
Mount
((DDiiaaggrraamm AA))
This must be done before the camera is secured with the
mounting bolt
:
NNOOTTEE:
If your are using an EV Controller and NOT hard-wiring your
strobes directly to the housing, leave the housing hotshoe
disconnected from the camera and raise the camera flash. You
will also need to install the Flash Deflector
CCaauuttiioonn:
:
Do not remove the External Strobe Connector Waterproof Cap
unless an external sync cord is going to be plugged in. Do not
remove the Waterproof C ap or Sync Cord underwater.
.
Slide the connector forward until it stops.
((PPaaggee ##55 -- DDiiaaggrraamm BB)
)
.
((PPaaggee ##88)
Diagram A
4
)
.
+
-
-
+
CAMERA / MOUNT
O' Ring
Lid
Hook
Mounting Bolt
Mounting
Tray
10.0
MEGA
PIXELS
PowerShot
SX10IS
Canon
IInnssttaalllliinngg tthhee CCaammeerraa ((ccoonntt..)
)
5. Using a coin or screwdriver (preferred), secure the camera with
the mounting bolt which threads into the camera’s tripod
socket
((DDiiaaggrraamm BB))
.
CCAAUUTTIIOONN::
Some camera tripod socket threads are plastic. The mounting
tray bolt is metal. Do not cross thread or over tighten as you
may damage the camera tripod socket threads.
Diagram B
CClloossiinngg tthhee HHoouussiinng
1. Place housing face down in your
g
housing back
lap or on flat surface.
2. Check to see that there is an
o-ring on the housing back and
that it is clean and in its proper
location.
3. Guide the back into the housing
front. The o-ring should touch the
ousing all the way around. There
h
should be an even gap all the way
around between the housing and
the housing back.
. Lift the lid snaps so they are
4
extended and place each lid
housing back
snap into the corresponding hook
on the housing back.
. To close the housing, push
5
down on the lid snaps until
even gap
all 4 sides
they snap into place . Lid
snaps on opposite sides of the
housing should be closed at the
same time. Be sure they are down
far enough to engage the lock.
DDoouubbllee cchheecckk
- Once the housing is closed, check the o-ring seal.
Check the gap between the housing back and the housing. It
should be even all the way around the housing.
Look through the clear plastic back at the o-ring. You should see
a darkened area where the o-ring is compressed against the
housing back. If you do not see an even black compression seal
all the way around the back, open the lid snaps, reseat the
housing back and close the lid snaps. Visually check the seal again.
o-ring
o-ring
5
CChheecckkiinngg CCoonnttrroollss
Once the housing has been closed, make sure the housing
controls line up with the corresponding camera controls. If the
housing controls are misaligned slightly, make sure the camera
hold down bolt has been tightened down firmly so the camera
is flat against the tray.
TTuurrnn CCaammeerraa OOnn
Turn the camera on and operate each of the housing controls to
get a feel for using the camera in the housing. Take a few
pictures above water with the camera in the housing.
ZZoooomm CCoonnttrrooll
(NOTE:) After you have used the
housing's zoom control, it must be
returned to the center position to
disengage. If the housing zoom
control is pushing the zoom lever
in either direction, you may not
be able to take a picture or access
any other function because the
camera is receiving a signal from
Engaged
the engaged zoom control.
HHoouussiinngg LLeennss PPoorrtt aanndd AAcccceessssoorryy LLeennsseess
Treat the Plexiglas in the lens port as a camera lens. After use,
rinse and gently dry the lens port to avoid water spotting. To
clean, use a mild soap solution or lens cleaner.
Do not use alcohol or window cleaner on the Lens Port.
NNoo aacccceessssoorryy oorr wwiiddee--aannggllee lleennsseess ccaann bbee uusseedd wwiitthh tthhiiss
hhoouussiinngg..
7
Center Position
Disengaged
6
UUssiinngg FFllaasshh
Due to the large housing port diameter, the internal camera
flash
ccaannnnoott
be used to illuminate subjects underwater. An
internal housing flash deflector (supplied) can be installed to
the front inside area of the housing above the port opening.
The deflector will deflect the camera flash when using an EV
Manual Controller. The deflector will redirect the camera’s flash
to the EV Controller which controls the external strobe output.
To attach inside the housing, remove velcro backing, align and
attach the deflector inside the housing as shown below.
NNOOTTEE::
The deflector is
nnoott
needed when an Ikelite DS digital
strobe is connected (hard-wired) directly to the housing
(recommended).
Internal
Housing
Flash
Deflector
UUssiinngg EExxtteerrnnaall SSttrroobbeess
For the best photographic results underwater, we recommend
using Ikelite External Strobes. This housing has Conversion
Circuitry built into the housing back, eliminating the need for
an EV Controller. The Conversion Circuitry provides real Canon
TTL flash when used with an Ikelite DS Digital substrobe(s) and
the #4103.51 single or #4103.52 dual sync cord, connected
directly to the housing.
ppaaggee 1122
See
Circuitry.
for DS Substrobe compatibility with the Conversion
8
 Loading...