

Page 1

Digital Housing
Supp le me nt al I ns tr uc ti on s
6242.20 Canon S200 ULTRAcompact
Size and Weight
Width ......................6.2 in. (157mm) including controls
Height ....................4.4 in. (112mm) including controls
Depth ......................4.4 in. (112mm) including controls & lens port
Weight ....................1.4 lb (635g)
Buoyancy ................Neutrally buoyant underwater
Page 2
Initial Camera Setup (before placing camera in housing)
- Set camera mode switch to “Av” Aperture Priority.
- In MENU:
Set AF Frame to “Flexizone” and Digital Zoom to “Off.”
Set and AF-Point Zoom to “Off” and Servo AF to “On.”
Set Continuous AF to “On” and AF-assist Beam to “Off.”
In the Flash Settings menu, set the Flash Mode to “Auto.”
Set Shutter Sync to “1st-curtain.”
Set Red-Eye Correction and Red-Eye Lamp to “Off.”
Set Safety FE to “On.”
Set i-contrast to “Auto.”
Set Spot AE Point to “AF Point” and Safety Shift to “On.”
In Review image after shooting, set Display Time to “8 seconds.”
Set Blink Detection to “On” and IS Mode to “Continuous.”
Set Control Ring Func. to “STD” Default Control Av.
- In MENU:
Set Date/Time and Time Zone. Set Lens Retract to “1 min”.
Set ECO Mode to “Off.”
In Power Saving, set Auto Power Down “Off” and Display Off to “3 min.”
Insert and Format an SDHC Memory Card.
- In FUNC./SET:
Set Metering to “Center Weighted Avg.”
Set White Balance to “AWB.” For best results, use Manual White
Balance and reset for each working depth. Set ISO to “200.”
Set Drive Mode to “Single Shot ” and Aspect Ratio to “4:3.”
Set Recording Pixels to “L” and Compression to “Superfine.”
Set Movie Quality to “HD.”
- RAISE FLASH and set to forced ON (flash always fires) “ .” Flash
CANNOT be raised once camera is closed in housing.
* Camera functions not mentioned should be set to the user’s
preference.
2
Page 3
Canon
S200
Setup Notes
Set Macro Mode to “On” when shooting very close subjects.
The camera does NOT operate with “automated” flash when in the “M”
manual mode. “M” manual mode should NOT be used with the AF35
strobe.
Certain camera functions can be assigned to the Control Ring through
the camera MENU. Refer to your camera owners manual for additional
information.
To use the camera in Manual mode, rotate the Mode Dial to “Tv” and set
the shutter speed to 1/60th second or 1/125th second for fast moving
subjects. Then, rotate the Mode Dial to “M” Manual Mode. Set the
Control Ring to “STD” and adjust aperture setting as needed.
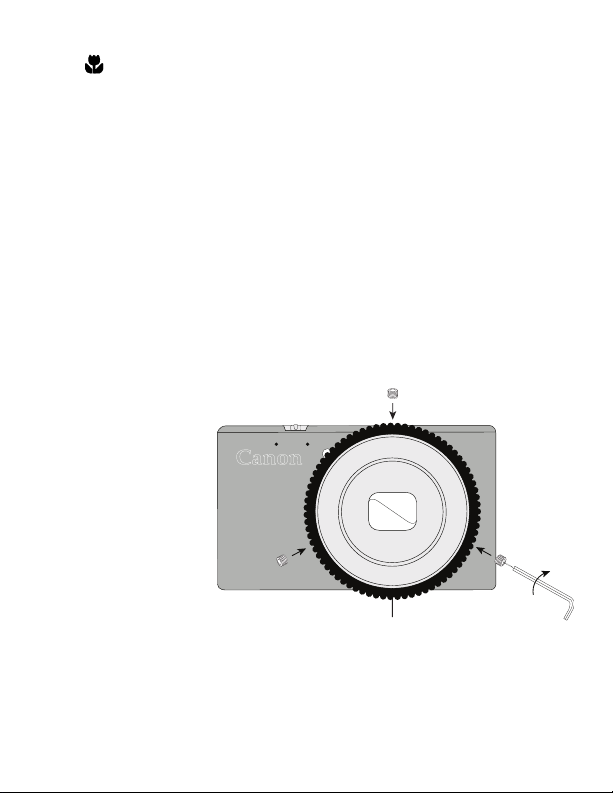
Attaching the Control Ring Gear (see illustration below)
The supplied Control Ring Gear is attached to the camera control ring by
3 small nylon hex
head Set Screws.
Place the Control
Ring Gear over the
camera’s control ring
before installing the
camera in the
housing. The gear is
a “press fit” over the
lens and goes on
either way. Gently
tighten all three hex
head screws equally
with the supplied hex
head wrench as show in the Diagram. Do not overtighten or you will
damage the gear. Make sure to test it’s function once installed.
Control Ring Gear
(properly installed)
3
Page 4

Attaching the Control Ring Gear (continued)
When installing the camera in the housing, make sure that the Control
Ring Gear meshes properly with the small black housing gear.
When removing the Gear, leave the Set Screws in the Gear. The Set
Screws are very small and easy to lose. Extra Set Screws are included
with your housing. We recommend that you leave the gear installed as it
makes rotating t
he camera control ring easier when out of the housing.
Parts of the Housing - Front View
Zoom Lever
Mode Dial
Shutter Button
Power Button
Fiber Optic Ports
Lens Port
Control Ring
Tray Mount
4
Page 5

Parts of the Housing - Back View
Latch
2
1
3
46
5
7
8
9
1. AF Frame / Single Erase
2. Movie Button
3. Exp. Comp./Up
4. Macro / MF Manual Focus / Left
5. FUNC. / SET Button
ULTRA
Made in USA
compact
6. Flash Right / Button
7. DISP. Display / Down
8. Playback Button
9. MENU Button
5
Page 6

Wide Angle, Macro, and Filters
The housing port is designed to accept 3.0-inch diameter color filters and
wide angle or macro options with 67mm threads. Ikelite offers the 6430
W-30 external wide angle conversion lens to increase your angle of
coverage. This allows you to get closer to the subject while still fitting
everything in the frame.
Vignetting will occur at widest angle camera lens setting with Wide Angle
Conversion lenses. Zoom in slightly to eliminate, or crop the image in
post processing.
Ikelite W-30 Wide Angle
Conversion Lens
NOTE: Bayonet mount lenses cannot be used with this housing.
6
Page 7

AF35 Strobe Package 4035
ikelite
35
AF
ikelite
AUTOFLASH
Ikelite strobes are much more powerful, recycle
more quickly, and eliminate more backscatter
than the camera's built-in flash.The AutoFlash
AF35 (pictured at right) is an easy and affordable
way to add a strobe to your system. The AF35 is
effective up to approximately 5 feet (1.5m) from
the subject and restores the colors that are
otherwise lost.
The AF35 is a great compliment, and an
effortless, affordable way to add a flash to your
new Ikelite point and shoot camera system.
Everything you need to get started is in the box.
Just attach it to the bottom of your housing and
start taking pictures!
AF35 AutoFlash kit includes:
- AF35 strobe
- Flex arm
- AutoFlash sensor
- Handle with rubber grip
- Tray (single or dual)
- Mounting hardware
A full range of accessories is available to support your housing. Please
visit www.ikelite.com to see the most current information about
recommended accessories for your housing.
7
Page 8

Ikelite Underwater Systems
50 West 33rd Street
Indianapolis, IN 46208 USA
www.ikelite.com
© 2014 Ikelite Underwater Systems
6242.20_Canon_S200_1-1114
 Loading...