

Ikelite 6147.16, 6183.34 Nikon P340 Instruction Manual
Digital Housing
I n s t r u c t i o n M a n u a l
6147.16 for Canon G16 Fiber Optic
Thank you for your purchase of Ikelite equipment. Please read this
instruction manual completely before attempting to operate or dive
with this product. Please refer to the back page of this manual to
register your Ikelite product.

Table of Contents
Specifications ..............................................................P. 3
Package Contents ........................................................P. 3
Preparation ..................................................................P. 3
Initial Camera Setup........................................................P. 4
Parts of the Housing - Front View ..................................P. 5
Parts of the Housing - Back View ..................................P. 6
Opening the Housing ......................................................P. 7
Installing the Camera ......................................................P. 7
Closing the Housing ........................................................P. 8
Removing the Camera from the Housing........................P. 8
Using the Camera’s Built-in Flash ..................................P. 8
Usage ............................................................................P. 9
Final Check ....................................................................P. 9
Fiber Optic Ports ............................................................P. 9
Zoom Control ..................................................................P. 9
Deflector Purpose............................................................P. 9
Deflector Removal/Installation ........................................P. 10
Diffuser Purpose - Installation/Removal ..........................P. 10
Attach Optional External Tray and Handle to Housing ..P. 11
Attach Optional Ikelite Strobe Arm to Housing Handle ..P. 11
Turn Camera On..............................................................P. 12
Entering the Water ..........................................................P. 12
Maintenance ................................................................P. 12
Lens Port ........................................................................P. 12
Lubricant..........................................................................P. 12
Housing Maintenance......................................................P. 13
2
Table of Contents
Control Maintenance ......................................................P. 14
Photo Tips ..................................................................P. 17
Troubleshooting ........................................................P. 18
Spare Parts ..................................................................P. 21
Recommended Accessories ....................................P. 21
Customer Support........................................................P. 22
Limited Warranty ........................................................P. 22
Returning Products for Service ................................P. 23
Product Registration ..................................................P. 24
- continued
Specifications
Width ......................6.8 in (173 mm) including controls
Height ....................4.9 in (124 mm) including controls
Depth ......................6.0 in (152 mm) including controls and lens port
Weight ....................3.0 lb (1.4 kg) above water
Buoyancy ................Slightly negative in freshwater
Package Contents
- Ikelite Digital Housing
- Silicone Lubricant
- Vinyl Port Cover
- Diffuser and Deflector
- Extra Control Tips
Preparation
This product has been water pressure tested at the factory and is depth
rated to 200 ft (60 m). Thoroughly inspect and immerse the empty
housing completely in water before installing a camera. If any fogging
occurs or droplets of water enter the housing, do not install a camera.
3

1
Preparation - continued
Clean the housing main o-ring and retest to make sure that it is
watertight. Refer to the Troubleshooting section, page 18.
Please read your camera manual thoroughly to have a full
understanding of each camera function.
If you are new to underwater photography, be sure to read the Photo
Tips section, page 17.
Initial Camera Setup (before placing camera in housing)
- Insert a fully charged camera battery.
- Set Mode Dial to “Av” Aperture Priority and ISO to “200.”
- Raise Flash and set to “Flash always fires .”
- In MENU:
Push button and move to the center. Set Digital Zoom to “Off.”
Set AF-Point Zoom to “Off” and Set Servo AF to “On.”
Set Continuous AF to “Off” and AF-assist Beam to “Off.”
Set MF-Point Zoom to “2X” and Safety MF to “On.”
In the Flash Control Built-in Flash Settings Menu, set Red-eye Corr.
and Red-eye Lamp to “Off.”
Set Review Image after Shooting to “4 sec.” and Display Info to “Off.”
Set Blink Detection to “Off” and IS Settings Mode to “Continuous.”
Set Spot AE Point to “Center” and Safety Shift to “Off.”
Set Shortcut Button to Custom White Balance or desired setting.
- In MENU:
Set Date/Time and Time Zone.
Set Lens retract to “1 min” and Eco Mode to “Off.”
In the Power Saving Menu, set Auto Power Down to “Off” and Display
Off to “3 min.”
Insert and Format an SDHC memory card.
- In FUNC./SET MENU:
Set DR Correction to “Off” and AWB White Balance to “Auto.”
4
Initial Camera Setup - continued
1
Set White Balance to “AWB.” For best results, use manual Custom
White Balance and reset for each working depth.
Set Drive Mode to “Single Shot .”
Set Metering to “Center Weighted Avg. ”
Set ND Filter to “Off” and Still Image Aspect Ratio to “4:3.”
Set Image Type to “JPEG 12M” and Image Compression to “L.”
Set Image Quality to “Superfine” and Movies to “FHD/60P.”
- Set Macro mode to “On” when shooting close-up. If the image
is overexposed, use “-” Flash Exposure Compensation
and/or back away, zoom in, and then reshoot.
Note: TTL Flash is NOT available when camera is in “M” Manual mode. See
your Canon camera manual for further information.
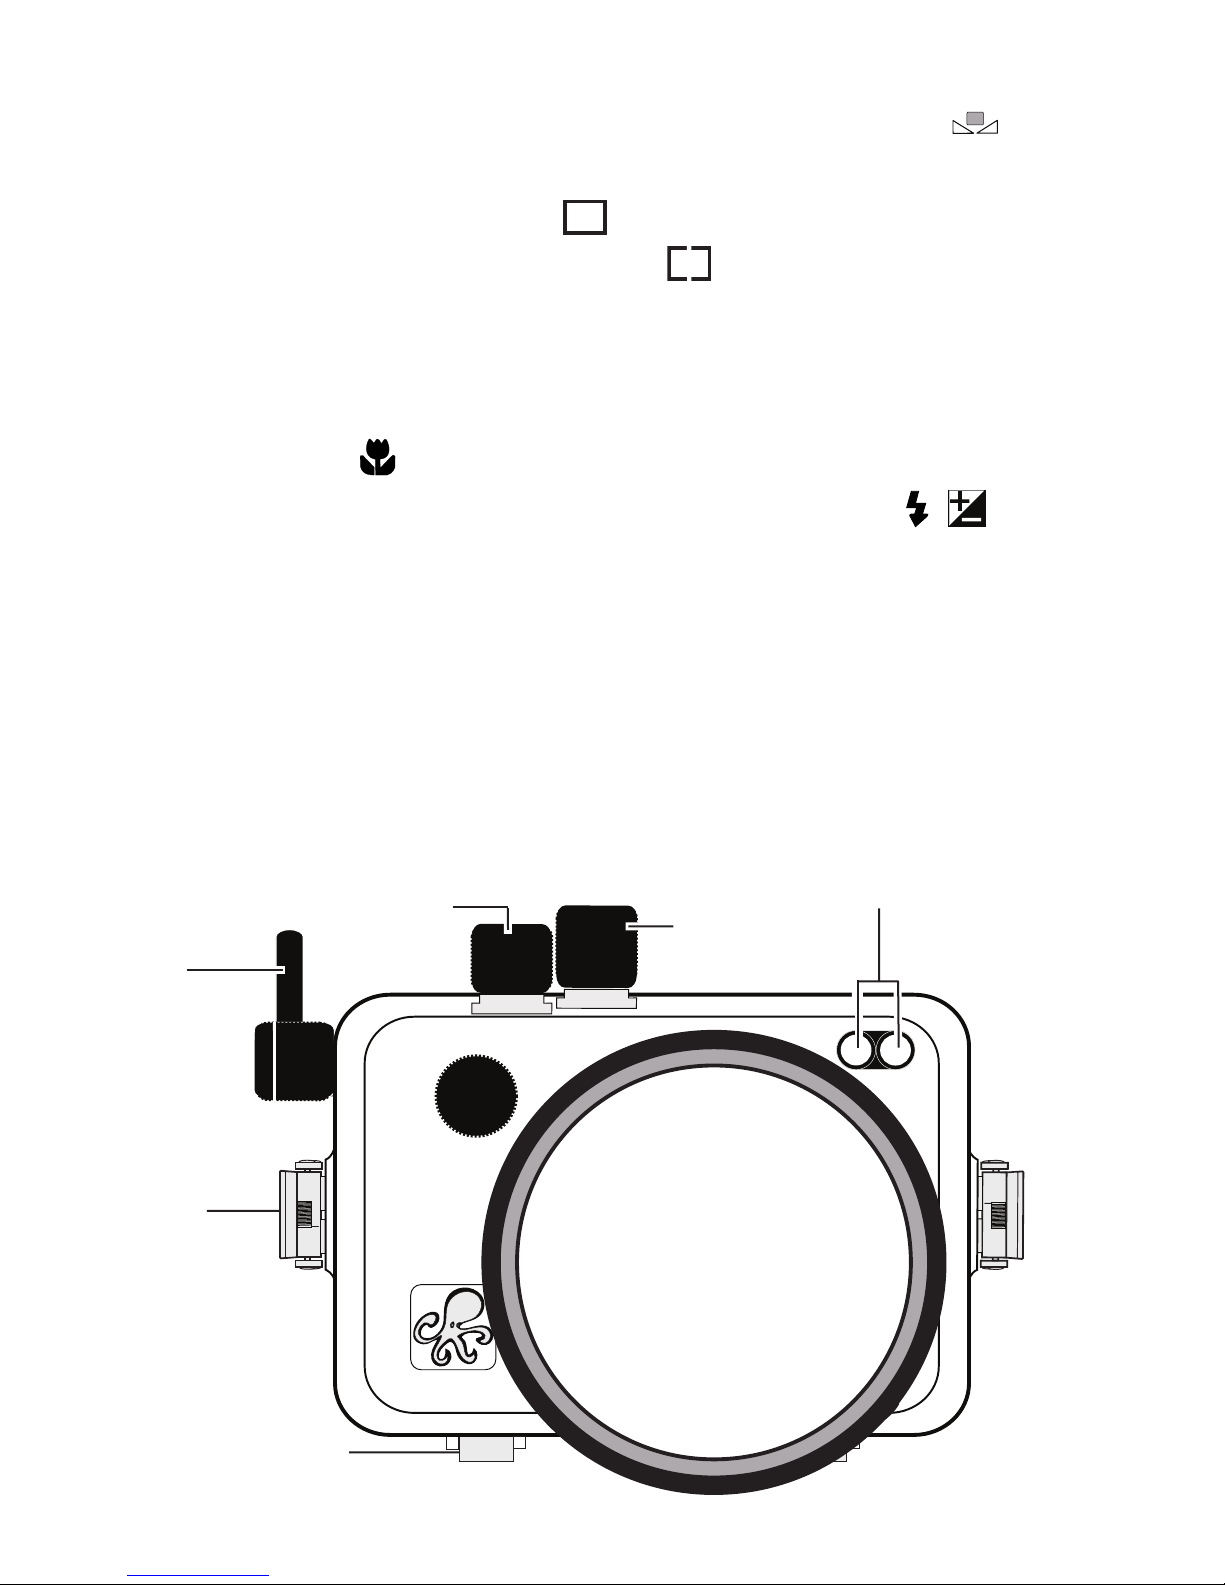
Parts of the Housing - Front View
Attach fiber optic cords to the housing Fiber Optic Ports, to fire compatible
external strobes. The Factory installed Flash Deflector, page 10, will reduce
backscatter and assist in redirecting the flash to the Fiber Optic Ports. Remove the
Deflector when using ONLY the camera flash.
Zoom
Mode Dial
Lever
Shutter
Button
Lid Snap
Lens Port
Fiber Optic Ports
External Tray Mount
5

Parts of the Housing - Back View
3
1
2
ON/OFF
(Power)
4
5
1/4-20 Tray Mounts
1. Flash Pop-up Button
2. Playback Button
3. Exp. Comp. Dial
4. MOVIE Button
5. Shortcut Button
6. ISO / Single Erase Button
6
7
8
10
12
11
15
MENU
13
Control Dial in
“disengaged”
position
9
14
12. DISP. / Down Button
13. Control Dial: (Note that a small
section of the rubber disc is
missing at the end of this
control. This is normal and
allows the user to completely
disengage the control from the
camera when not in use).
7. AE/FE Lock Button
8. MF Manual Focus / UP Button
9. Macro / Left Button
10. FUNC./SET Button
11. Flash / Right Button
6
To disengage dial from camera,
rotate Dial to 6 o’clock position
and line up dial white dot with
housing dot.
14. AF Frame Selector Button
15. MENU Button

Opening the Housing
Lid Snaps have a Lock. To open housing, push Lid Snap Lock forward
and lift as shown. Keep pressure on the
Lid Snap so it does not fly open quickly.
Push Forward
Lid Snap
Lock
Some lid snaps have a lot of spring tension once
they go over center, so keep a firm grip on the lid
snap. Lid Snaps may be opened one at a time.
Lift
Installing the Camera
1. Remove any lanyard attached to the camera.
2. Pull out on each housing control until it stops. This will get the controls
out of the way for installation of the camera.
3. Remove the back from the housing.
4. Set the housing front on a table and gently slide the camera into the
front mounting blocks, Diagram A.
5. While holding the camera in its seated position in the front mounting
blocks, rotate the housing front 90° so the port is resting against the
table top, Diagram B. CAUTION: Camera is NOT secure in the
housing until the housing back has been installed.
6. See “Closing the Housing”, page 8.
Diagram A
Mounting Block
Diagram B
7
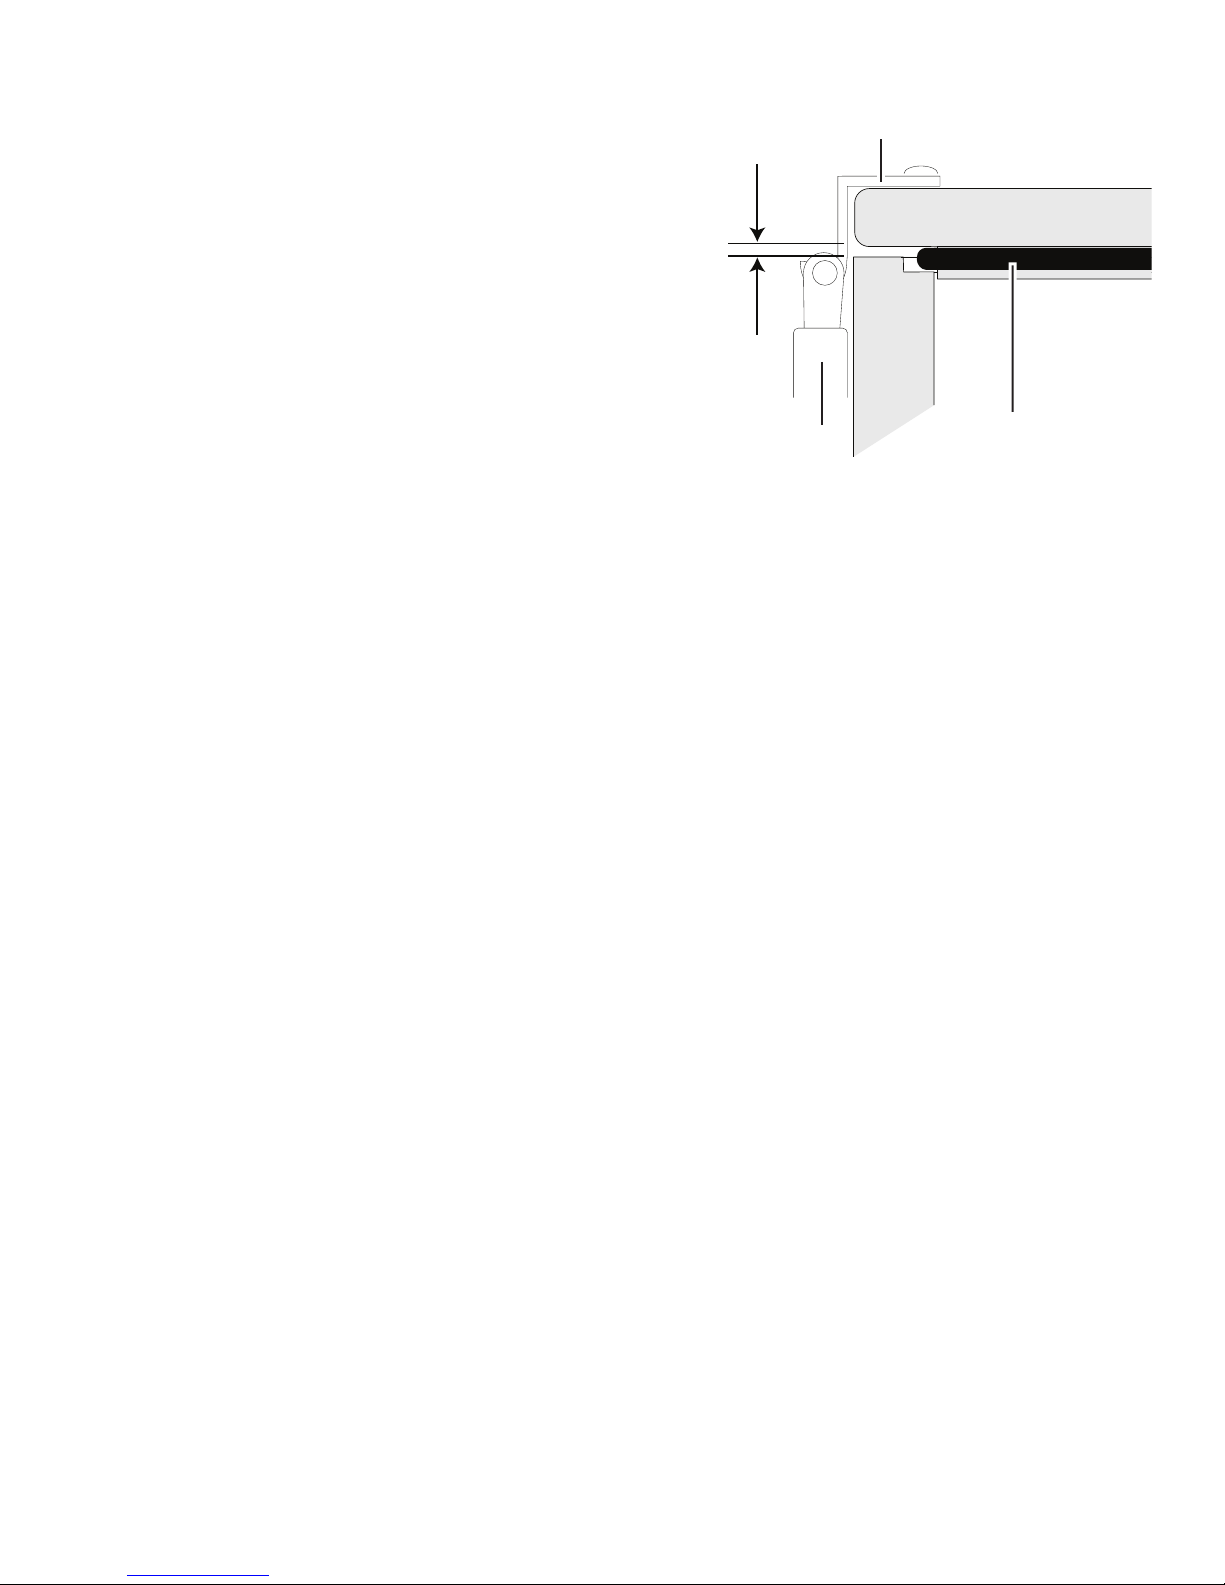
Closing the Housing
1. Check to see that there is an o-ring on the
housing back that is clean and in its proper
Lid Hook
Housing Back
location.
2. Guide the back onto the housing. The
o-ring should touch the housing all the way
around. There should be an even
gap all the way around between
the housing and the housing back.
3. Lift the lid snaps so they are extended and
Even gap on
all four sides
Lid
Snap
O-ring
place the lid snap into the corresponding hook on the housing back.
4. To close the housing, push down on the lid snaps until they snap into
place. Lid snaps on opposite sides of the housing should be closed at
the same time. Be sure they are down far enough to engage the lid-snap
lock.
Removing the Camera from the Housing.
1. Place housing face down on a table, page 7, Diagram B; remove
Housing Back.
2. Rotate housing 90°, page 7, Diagram A.
3. Tilt housing port up slightly with one hand while removing the camera
with your other hand.
Using the Camera’s Built-in Flash
If you are shooting with the camera’s built-in flash and the camera lens
is set to the widest angle, you may need to zoom the lens slightly or a
dark area may appear in a lower corner of close-up photographs. The
lens port may block some of the light. Remove the factory installed
removable Deflector and install the Diffuser (included). Zoom in slightly to
eliminate any dark areas noted in your photographs (You can test this
above water). See Diffuser Installation, page 10. For the best results, we
recommend using an external Ikelite Substrobe with the housing
Deflector installed. The camera’s built-in flash CANNOT be used with
optional Wide-Angle or Accessory lenses.
8
 Loading...