

Page 1
Vid eo H ou si ng
Supplemental Instructions - Quick Start
6086 Canon HF G30
Thank you for your purchase of Ikelite equipment. Please read the “General
Instruction Manual” and “Supplemental Instructions” completely before
attempting to operate or dive with this product.
Please refer to the back page of this manual to register your Ikelite product.
Page 2

Accessories Included
- 0200 Vinyl port cover
- UR/Pro blue water color correction filter
- 0184.1 Silicone lubricant 1cc tube
- 3/8-16 Handle mounting studs with wingnuts
Housing Specifications
Controls Provided....................................Power switch, Mode switch, Zoom
rocker, START/STOP button, Joystick toggle, SET button, Assignable button
3, Assignable button 4
Width ......................................................7.3 in (185mm) including controls
Height......................................................5.5 in (139mm) including controls
Depth ......................................................9.5 in (241mm) including controls
Weight ....................................................6.7 lb (3.0kg)
Buoyancy ................................................Neutral in freshwater
Depth Rating ..........................................200ft (60m)
Batteries ..................................................BP 820, BP 828
Blue Water Filter....
Green Water Filter ..................................6441.81
Port Outer Diameter ................................3.0 in (76mm)
Use 67mm Lenses ..................................Yes (macro only)
Use WP-80 Port ......................................No
Use Internal Wide Angle Lenses ............No
Tray Mounting ........................................3/8-16 studs with
..................................6441.41 (included)
................................................................1.75 in spacing (44.5mm)
Main O-Ring ............................................0109
2
Page 3
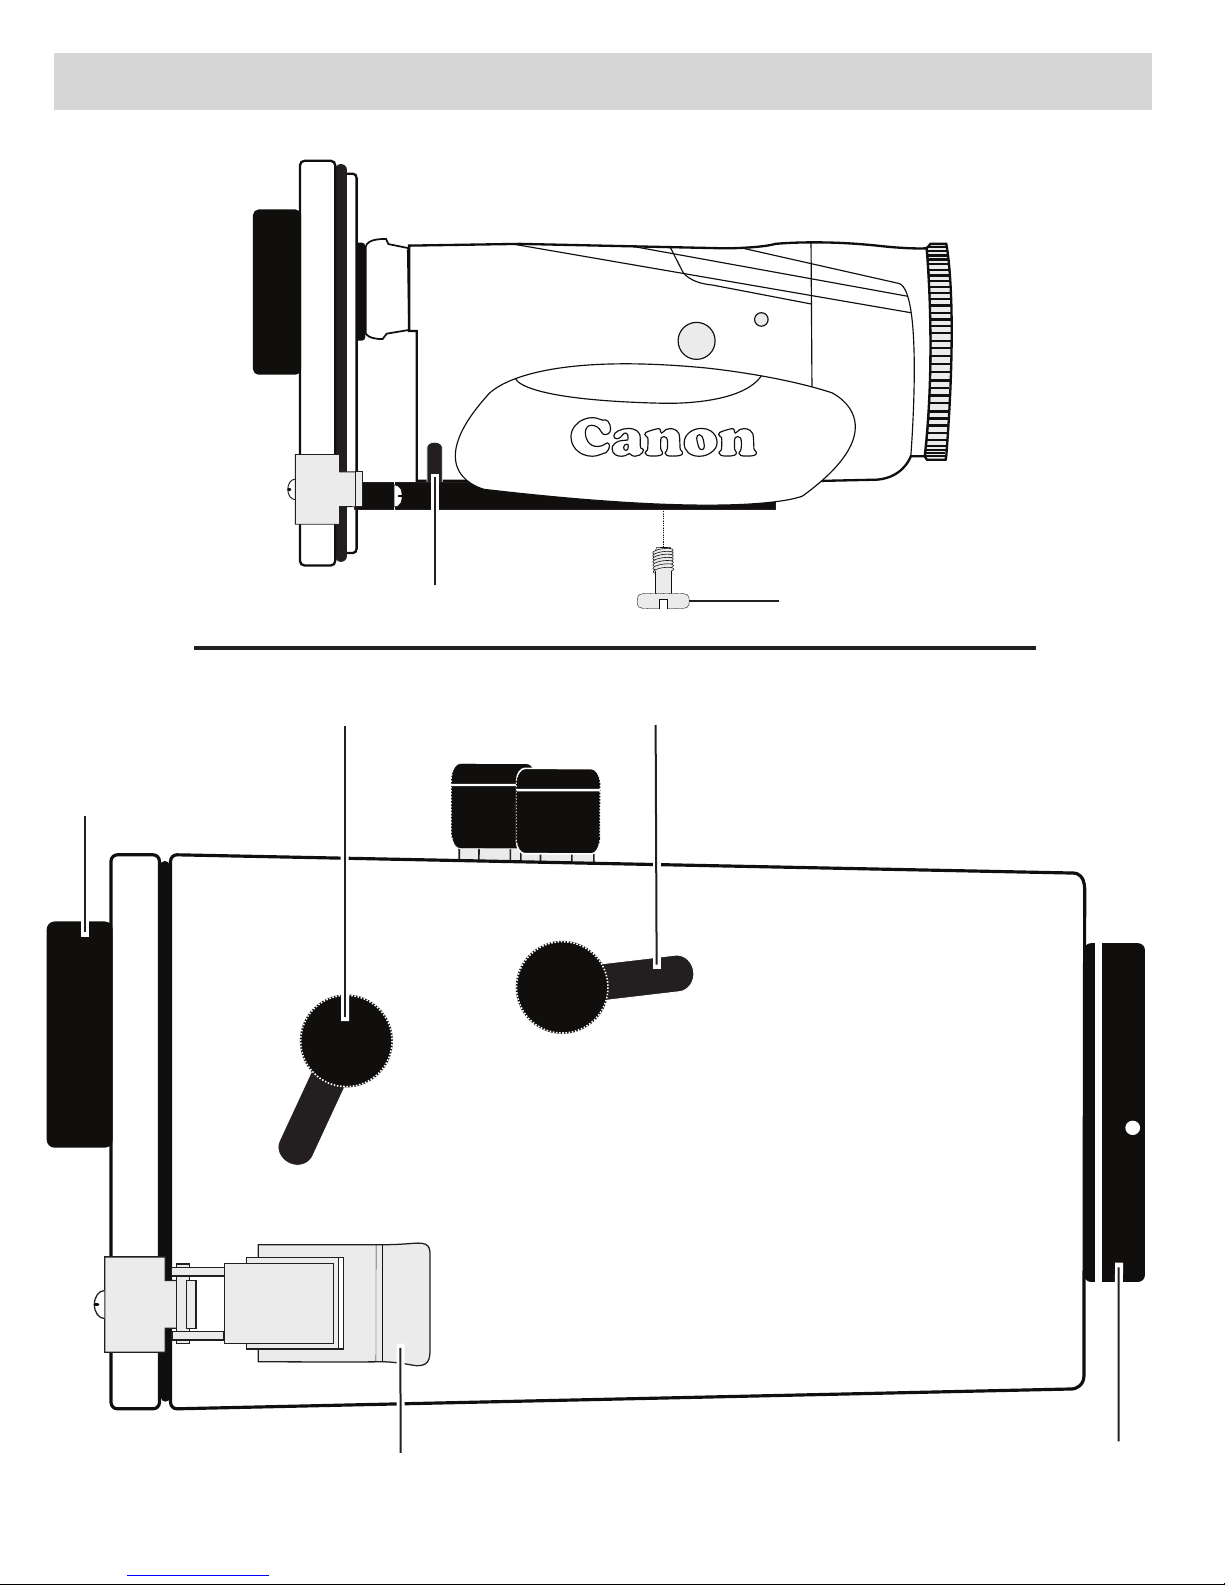
Parts of the Housing - Side View
Diagram A
Canon
Mounting BoltTray Stabilizing Pin
START/STOP Button
Super-eye Viewfinder
Zoom Rocker
Diagram B
Lid Snap
Lens Port
3
Page 4

Parts of the Housing - Back View
Diagram C
Power Switch
2
1
Mode Switch
4
5
6
1. Super-eye Viewfinder
2. Assignable Button 3
3. Assignable Button 4
4. SET Button
3
Tray Mounts
5. FUNC. Function Button
6. Joystick Control (toggles
joystick up and down ONLY)
4
Page 5

Preparation and Installation
1. Install a fully charged Canon BP 820 or BP 828 battery. Caution: Other
brand batteries are not recommended as they may interfere with the
camera mounting or housing seal.
2. Remove the camera lens cap, lens hood and cord to eliminate any
interference with the housing seal.
3. Attach Camera to Housing Tray - Diagram A, Page 3:
- Position the camera against the Tray Stabilizing Pins. The camera
should be parallel with the sides of the tray and should fit easily on the
tray.
- Tighten the Mounting Bolt into the camera base with a screwdriver
(preferred) or a coin so the camera is tight against the tray.
4. Initial Camera Settings for Underwater:
- Set Power Switch to “CAMERA.”
- Set Zoom Rocker to “Wide Angle” setting.
- Set Mode Switch to “Auto.”
5. Inserting the Camera:
- Check that the housing o-ring is clean and properly positioned on the
lip of the clear back plate.
- With the camera properly mounted to the tray, pull out the housing
controls to provide clearance for the camera.
- Align the back plate with the clear housing and slowly place the back
plate against the housing. DO NOT force this installation. If the camera
is aligned properly, it will fit easily inside the housing. The back plate
should be flat against the housing and NOT tilted on one side.
6. Slide the housing controls back in place making sure they properly align
with corresponding camera functions.
7. Close Lid Snaps simultaneously. Make sure the Snaps are down far
enough to engage the locks. Refer to Page 3 of the General Instruction
Manual.
5
Page 6

Preparation and Installation - continued
1
1
8. Operate each control to see how it works with the camera. Refer to your
camera owners manual for the proper function of each camera control.
When using the housing controls, DO NOT use excessive force to
activate a camera function which could result in damage to the camera.
Additional Information
To Take a Photo: To take a photo, toggle down to highlight “Photo”,
then press “Set.”
White Balance: For general videography, auto white balance (AWB) can
be used. For best results, use manual white balance.
Setting Manual White Balance:
BEFORE placing the camera in the housing, preset the white balance
options menu to Assignable Button 3. Please read section 4
(Customization) in your instruction manual located on your Canon CD.
This section explains assigning often used functions like white balance
to assignable buttons on the camera.
Once underwater, manual white balance can now easily be reset for
each working depth as follows:
1. Press Assignable Button 3.
2. Move toggle down to highlight icon > Press “SET.”
3. Toggle down to highlight “Set WB.” Point camera at white subject
such as a white boat bottom, sand, a white slate, or your hand > Press
“SET.” The icon will flash for about 4 seconds. Manual White
Balance is now set. Press “FUNC” button to go back to Shooting Mode.
Main Viewing:
Main viewing is done through the super-eye viewfinder. The LCD screen
can be used, however, its usage will shorten battery life.
6
Page 7

Additional Information - continued
Color Filter: An external UR/Pro underwater color correcting filter i
included with your Ikelite housing. The primary purpose of the
underwater filter is to improve color rendition underwater. Installation and
usage of the filter is described in the “General Instruction Manual.” For
best results, reset manual white balance for each working depth.
Night Diving with a Video Lite: When using an optional Video Lite at
NIGHT, set the camera to auto white balance (AWB).
Note: Other camera functions can be programmed as desired to
Assignable Button 4, Diagram C, Page 4, before placing camera in
housing.
s
Recommended Accessories
Please refer to the “General Instruction Manual” or visit www.ikelite.com
to see the most current information about recommended accessories for
your housing.
Customer Support
Please read the Maintenance and Service sections of the “General
Instruction Manual” before contacting Ikelite.
7
Page 8

Product Registration
Please go to www.ikelite.com to register your Ikelite housing within 15
days of purchase.
Ikelite Underwater Systems
50 West 33rd Street
Indianapolis, IN 46208 USA
www.ikelite.com
© 2014 Ikelite Underwater Systems
6086_Canon_HF_G30_2-0714
 Loading...