

Page 1
Latch
Button
P
US
H T
O
UNL
OC
K
Latch
Button
Latch in open
position
Ikelite Compact Video Housing
i n s t r u c t i o n m a n u a l
##55666600..0088 KKooddaakk ZZii88 PPoocckkeett VViiddeeoo CCaammeerraa
Congratulations on your purchase of an Ikelite Compact Video
ousing. Ikelite has over 45 years of experience in the underwater
H
photographic, video, and lighting market.
Our products are
esigned and built in
d
the USA by Ikelite for
both the professional
and amateur.
The clear housing
permits instant visual
inspection of the
video camera and all
sealing surfaces as
well as complete
monitoring of controls
and camera LCD
screens.
Ikelite Compact Video
Housings are neutrally
buoyant in salt water
for stability. This
housing has been
water pressure tested at the factory. All camera controls are fully
functional through the housing which is water pressure tested to
200' (60m).
HHoouussiinngg SSiizzee aanndd WWeeiigghhtt:
5.85" wide x 4.31" high x 3.2" deep (includes controls and lens port).
4.8cm x 10.9cm x 8.1cm.
1
Housing with camera weighs less than 1.30lb (0.59kg) above water.
Near neutrally buoyant underwater.
:
PPlleeaassee RReeaadd
e suggest that you read this instruction booklet thoroughly
W
before use. If you are new to underwater videography be sure
to read the General Tips and Photo Tips sections on page 13.
We also suggest that you read the Kodak Zi8 Pocket Video
amera Extended User Guide thoroughly to have a full
C
understanding of your camera operation.
CCaammeerraa SSeettuupp
- Fully charge your camera battery.
- Turn on your camera. Set the Date and Time.
- Set camera to Landscape Mode.
- Set Recording Format.
- To ensure that your camera is operating properly, try
recording and playback modes before placing your camera in
the Ikelite Compact Video Housing.
NNootteess::
- Digital still images can be grabbed from video in post production.
- The Zi8 camera features digital zoom only (not optical), which
cannot be accessed through the housing. You can digitally zoom
in post production.
((bbeeffoorree ppllaacciinngg iinn hhoouussiinngg))
2
OOppeenniinngg tthhee HHoouussiinngg
1. Place the housing face down in your lap or on a flat surface.
2. Depress opposing latch buttons simultaneously to open
housing. Once the latch is unlocked, rotate the latch handle up
and away from the housing until it stops. This motion will also
break the housing o-ring seal and open the housing back
slightly.
NNOOTTEE::
Latch must be rotated to the fully open position to assure
easy opening of the back. Rotate the hinged back to it’s open
position.
Top View
latch closed
Top View
latch opened
MMaaiinn HHoouussiinngg OO--rriinngg
Check to see that there is an o-ring on the housing back and
that it is clean, lightly lubed, and in its proper location.
Housing Back - Top View
Main Housing O-ring
OO--rriinngg MMaaiinntteennaannccee
We recommend that you clean the main housing o-ring and
o-ring channel before each day of diving.
1. To remove the o-ring, place your index finger and thumb on the
o-ring as shown (Figure A, Page #5).
2. Squeeze the o-ring into a loop by pressing down on the o-ring
and squeezing your index finger and thumb together (Figure B,
Page #5).
3. Grab the o-ring loop with your other hand and remove the
o-ring from the housing back.
4. Wipe the o-ring channel clean with a paper towel, napkin, or
lint-free wiping cloth .
5. Clean and lightly lube the o-ring. Use Ikelite lube only (supplied
with housing).
6. Very lightly lube the o-ring sealing surface on the housing front.
3
CCAAUUTTIIOONN::
main housing o-ring. This could damage the housing and o-ring,
which could result in a leak.
Never use a screwdriver or metal object to remove the
4
Page 2

Latch Button
Latch Button
P
U
S
H
T
O
U
N
L
O
C
K
Back View
Lanyard
Latch
Power
Button
MADE IN
USA
I
K
E
L
I
T
E
Start/Stop
C
a
me
ra
in
Ho
u
s
in
g
F
r
o
n
t
Ko
d
a
k
OO--rriinngg MMaaiinntteennaannccee
((ccoonntt..))
O-ring removal illustrations: Figures A & B
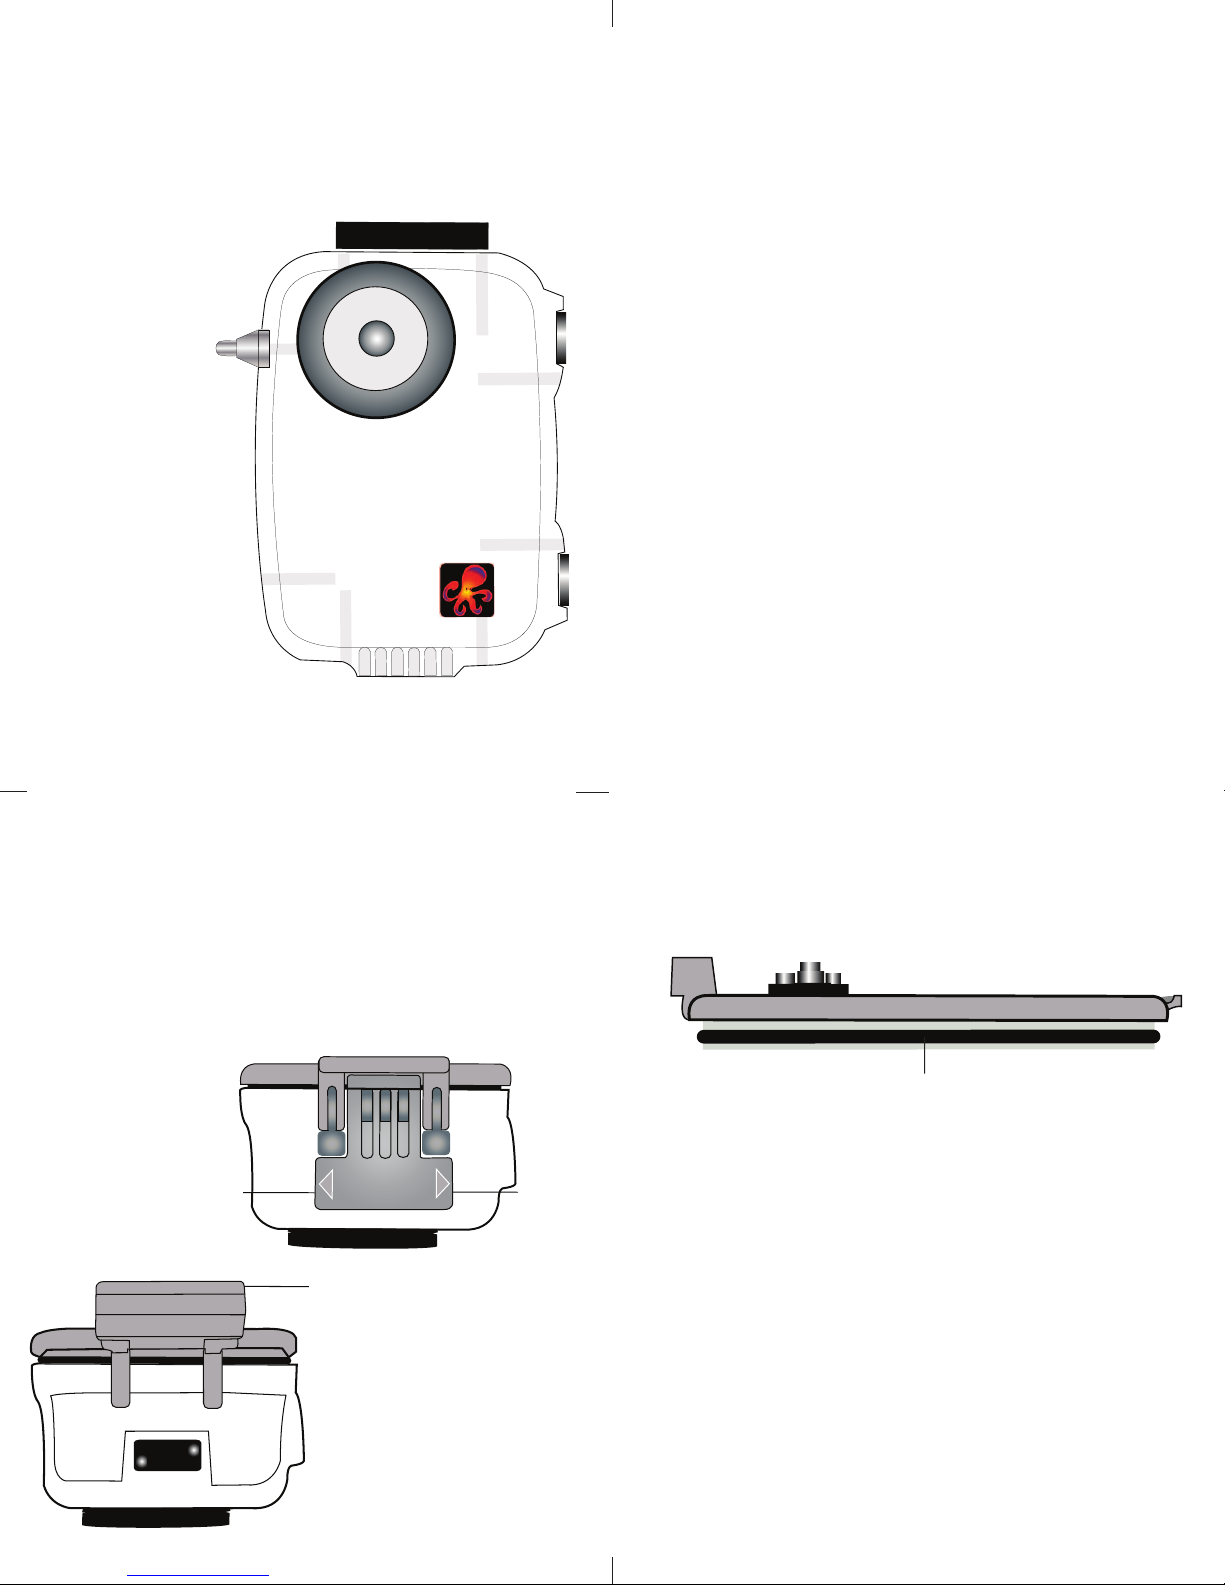
IInnssttaalllliinngg tthhee CCaammeerra
a
Place the camera face down into the front housing ribs as shown.
FFiigguurree A
FFiigguurree B
A
B
Index Finger
Index Finger
Thumb
O-ring
Squeeze Index Finger
and Thumb together
to form O-ring loop
Thumb
CClloossiinngg tthhee HHoouussiinngg
Rotate the hinged back onto the housing front. Close the latch
and make sure it locks. Latch will “click” into it’s locked position.
Latch buttons will NOT be depressed when latch is properly
locked.
Latch in “locked” position
5
HHoouussiinngg CCoonnttrroollss
7
O-ring
6
CChheecckk MMaaiinn OO--rriinngg SSeeaall aanndd CCoonnttrroollss
Once the housing has been closed, look at the main housing o-ring
seal from the “top view” as seen on page #4. Rotate the housing
360 degrees and note the o-ring seal by looking through the clear
housing. A good seal should appear as a solid black line.
Make sure the housing controls line up with the camera controls.
TTuurrnn CCaammeerraa OOnn
Turn the camera on and operate each of the housing controls to
get a feel for using the camera in the housing. Operate the camera
above water with the camera in the housing.
** YYoouu aarree nnooww rreeaaddyy ttoo sshhoooott uunnddeerrwwaatteerr vviiddeeoo!!
LLeennss PPoorrtt
Treat the optical grade Plexiglas in the lens port as a camera lens.
After use, rinse and gently dry the outside lens port to avoid water
spotting. To clean, use a mild soap solution or lens cleaner. Do not
rinse the inside port Plexiglas.
Do not use alcohol or window cleaner on the Lens Port.
UURR--PPrroo FFiilltteerr
UR-Pro Filter
The included UR/Pro color correcting filter
for tropical blue water settings, replaces
some of the reds and warm natural tones
that would otherwise be lost underwater.
Effective in relatively shallow, sunny
conditions with or without a Video Light.
The #6441.71 removable color filter is available separately for
use in green water settings.
NNOOTTEE::
Make sure no air bubbles are trapped between the UR-Pro
Filter and housing port. If so, remove the filter underwater,
wipe away the bubbles, and re-install filter on the housing port.
8
Housing
Port
Page 3

OOppttiioonnaall AAcccceessssoorriieess
I
KEL
I
TE
L
ED
PRO-V8
MMaaiinn HHoouussiinngg OO--rriinngg ##00113322..445
O-rings last for several years if properly maintained (See
housing maintenance page #12). Always carry a spare in case
your housing o-ring becomes damaged or lost.
IIkkeelliittee LLuubbee ##55002200 ((44 -- 11cccc ttuubbeess))
For light lubrication of the main housing o-ring.
IIkkeelliittee WW--2200 WWiiddee--AAnnggllee CCoonnvveerrssiioonn LLeennss ##66442200
For increased angle of coverage, color, and clarity, add the Ikelite W-20 #6420, or other 67mm
ide-angle conversion lenses. Ikelite 67mm
w
Threaded Port Adapter
attach 67mm conversion lenses to the housing
port.
##99330066..7788 6677mmmm TThhrreeaaddeedd PPoorrtt AAddaapptteerr
Allows attaching Ikelite W-20 Wide-Angle
Conversion Lens #6420 with 67mm threads.
Also allows attachment of Epoque, Type II Inon screw-on lenses,
and macro lenses or diopters with 67mm threads. Includes larger
size removable flash deflector.
##99330066..8855 BBaayyoonneett PPoorrtt AAddaapptteerr
Allows attaching INON UWL-105 AD, UWL-100 28AD, and
UFL-165AD bayonet mount lenses.
##99330066..7788
5
is required to
OOppttiioonnaall AAcccceessssoorriieess
UURR//PPrroo BBlluuee WWaatteerr FFiilltteerr ##66444411..3311
((ccoonntt..))
((iinncclluuddeedd wwiitthh hhoouussiinngg))
(#6441.42 for W-20 Accessory Lens)
The UR/Pro color correcting filter is designed to restore some of
the warm colors filtered out by the water. For use with
available light and video lite.
UURR//PPrroo GGrreeeenn WWaatteerr FFiilltteerr ##66444411..7711
(#6441.82 for W-20 Accessory Lens)
Enhances contrast and alters the color of green water to give
your subject a rich, natural tone. For use with available light
and video lite.
VViiddeeoo CCoommppaacctt TTrraayy ##99552233..5511 // DDuuaall TTrraayy ##99552233..5522 //
HHaannddllee ##99553300..11
Attaches to the Ikelite Compact Video Housing.
Allows the attachment of one or two Pro-V8
Video Lites, or the Pro Video Lite 3. Hardware
included for easy attachment to your housing.
Lites can be attached to a single or dual tray,
with or without Handle(s).
Pro-V8
Lite
Handle
#9530.1
NNOOTTEE::
Slight edge softness around the picture edges is normal in
some situations. Slight vignetting can occur with the camera in it’s
widest angle setting when using conversion lenses. Zoom in to
eliminate.
9
OOppttiioonnaall AAcccceessssoorriieess
((ccoonntt..))
PPrroo--VV88 VViiddeeoo LLiittee ##66332200
The Pro-V8 LED is the easiest and most affordable way to add
valuable light to your system.The flexible pop-bead flex arm allows
the light to be repositioned effortlessly. The included flex mount
ball attaches to the Video Compact Tray. For more light, add a
second Pro-V8 LED or the Pro Video Lite 3 system with the
#9523.52 Dual Tray. Requires the #9523.51 Video Compact Tray,
sold separately.
HHoouussiinngg wwiitthh TTrraayy aattttaacchheedd
Once the Video Compact
Tray is attached to the
housing, the Pro-V8 Flex
Arm easily attaches to the
Flex Mount Ball as shown.
Once attached, the Pro-V8
Lite can be repositioned
effortlessly.
Pro-V8 Lite
Flex Arm
Single Tray
#9523.51
Dual Tray
#9523.52
10
HHoouussiinngg MMaaiinntteennaannccee
The Ikelite Digital Housing should be given the same care and
attention as your other photographic equipment. In addition to
normal maintenance we recommend that the housing be returned
to Ikelite periodically to be checked and pressure tested.
DDoo NNoott
1.
prolonged periods. Heat may damage the camera.
DDoo NNoott
2.
3 Keep the back o-ring clean and lightly lubricated. Only apply
enough lubricant to make the o-ring feel slick.
tthhee oo--rriinngg
o-ring from drying out and reduce friction when opening and
closing the housing. Keep the area where the o-ring fits and the
sealing surface of the housing clean.
4 Rinse the housing exterior thoroughly in fresh water after each
salt water use. Dry with a soft cloth. Dry lens port to eliminate
water spotting.
After several uses in salt water, soak the housing exterior in a
mild soap solution, rinse and dry before storage. When storing
the housing, remove the back o-ring, lightly lubricate and place
in a plastic bag. Place the plastic bag with o-ring inside the
housing for safe keeping.
leave the camera and housing in direct sunlight for
ship the camera in the housing.
DDoo NNoott ssttrreettcchh
. This light coating of lubricant will help to keep the
Housing
CCoommpplleettee hhoouussiinngg aanndd ooppttiioonnaall aacccceessssoorryy iinnffoorrmmaattiioonn aavvaaiillaabbllee aatt
hhttttpp::////wwwwww..iikkeelliittee..ccoomm//wweebb__ttwwoo//kkooddaakk__zzii88..hhttmmll
11
Flex Mount
Ball
PPuusshh bbuuttttoonn ccoonnttrroollss
require no maintenance other than rinsing in
fresh water after saltwater use. If a push button control
becomes difficult to push, or if it sticks when depressed, soak
the housing in luke warm fresh water. After a few minutes
operate the push button. If this does not correct the problem,
return the housing to Ikelite for routine maintenance.
12
Page 4

GGeenneerraall TTiippss
1. Before placing your camera in the housing, it is a good idea to
immerse the closed housing in a bucket or rinse tank to make
sure it is watertight.
. Due to the power required to operate the camera and LCD
2
screen, it is a good idea to start each dive with a fully charged
camera battery.
3. As soon as you enter the water, take a moment and check the
ousing to see that it is properly sealed.
h
4. Next, check to see if there are any bubbles on the face of the
lens port. If there are, take your finger and remove them. If
there are bubbles on the lens port they can produce soft focus
pots in your video.
s
NNOOTTEE::
Fogging of the port glass may occur due to a variety of
environmental factors. To prevent fogging issues, always
ssemble the housing in a cool, dry area, and keep the housing
a
out of direct sunlight. If fogging persists, insert a fresh dessicant
packet inside the housing before each day of diving (dessicant
packages are not available from Ikelite, however most camera
stores carry them).
PPhhoottoo TTiippss
The number one rule in underwater videography is to eliminate
as much water between the camera and subject as possible. Get
as close as you can to your subjects.
IIkkeelliittee LLiimmiitteedd WWaarrrraanntty
This Ikelite product is warranted against any manufacturing
defects for a period of one year from the original date of purchase.
Defective products should be returned prepaid to Ikelite. Ikelite
will, at its discretion, repair or replace such products, and will
return to customer prepaid. All other claims of any nature are not
covered. Housing is pressure tested and warranted to 200’ (60m)
maximum underwater depth. Except as mentioned above, no other
warranty expressed or implied, applies to this Ikelite product.
y
RReettuurrnniinngg PPrroodduuccttss ffoorr SSeerrvviiccee
Ikelite is most interested in preforming any service to assure that
ll products perform as intended. For repair or service, return the
a
product to the address below with your name, address, phone
number and a brief description of the problem. Evidence of
purchase date must be provided to obtain warranty service.
Normal service time is approximately 2-3 weeks.
IIkkeelliittee UUnnddeerrwwaatteerr SSyysstteemmss
5500 WW 3333rrdd SSttrreeeett
IInnddiiaannaappoolliiss,, IINN 4466220088 UUSSAA
WWhheenn rreettuurrnniinngg pprroodduuccttss,, sseenndd ““aattttnn.. RReeppaaiirr DDeepptt..””
331177--992233--44552233
““ggeenneerraall qquueessttiioonnss”” ee--mmaaiill:: iikkeelliittee@@iikkeelliittee..ccoomm
wwwwww..iikkeelliittee..ccoomm
13
KKooddaakk ZZii88 PPoocckkeett VViiddeeoo CCaammeerraa--0022--00 551100
##
 Loading...