


November 2013
ikeOS version 5.2.2
ike User Manual
ike100
ike300
ike1000

GPS
ike
is a trademark of IKEGPS Ltd.
ActiveSync, Excel, Internet Explorer, Microsoft, Outlook, PowerPoint, Visual Studio,
Windows, Windows Media, Windows Mobile, Windows Mobile Device Center, Windows
XP, Windows Vista, Windows 7, and the Windows logo are trademarks or registered
trademarks of Microsoft Corporation in the United States and/or other countries.
The Bluetooth® word mark is owned by the Bluetooth SIG, Inc. and any use of such marks
by IKEGPS Ltd. is under license.
Acrobat and Reader are registered trademarks of Adobe Systems Incorporated in the
United States and/or other countries.
The names of actual companies and products mentioned herein may be the trademarks of
their respective owners.
© Copyright ike
GPS
. All rights reserved.
About this User Manual
This User Manual provides a combined reference for the use of ikeOS and its associated
features on ike products and Windows Mobile 6 operating system that is pre-installed on these
devices.
This document has been optimized for A5 booklet printing. Any blank pages are intentionally
inserted to allow ideal back-to-back printing or relevant pages.
Notes on Text:
WARNING! Text set off in this manner indicates that failure to follow
directions could result in user injury or unexpected data results.
CAUTION: Text set off in this manner indicates that failure to follow directions
could result in damage to equipment or loss of information.
Note: Text set off in this manner (with the finger indicator) indicates information
that may be useful to the operation of your ike unit.
620-00780 – ikeGPS User Guide
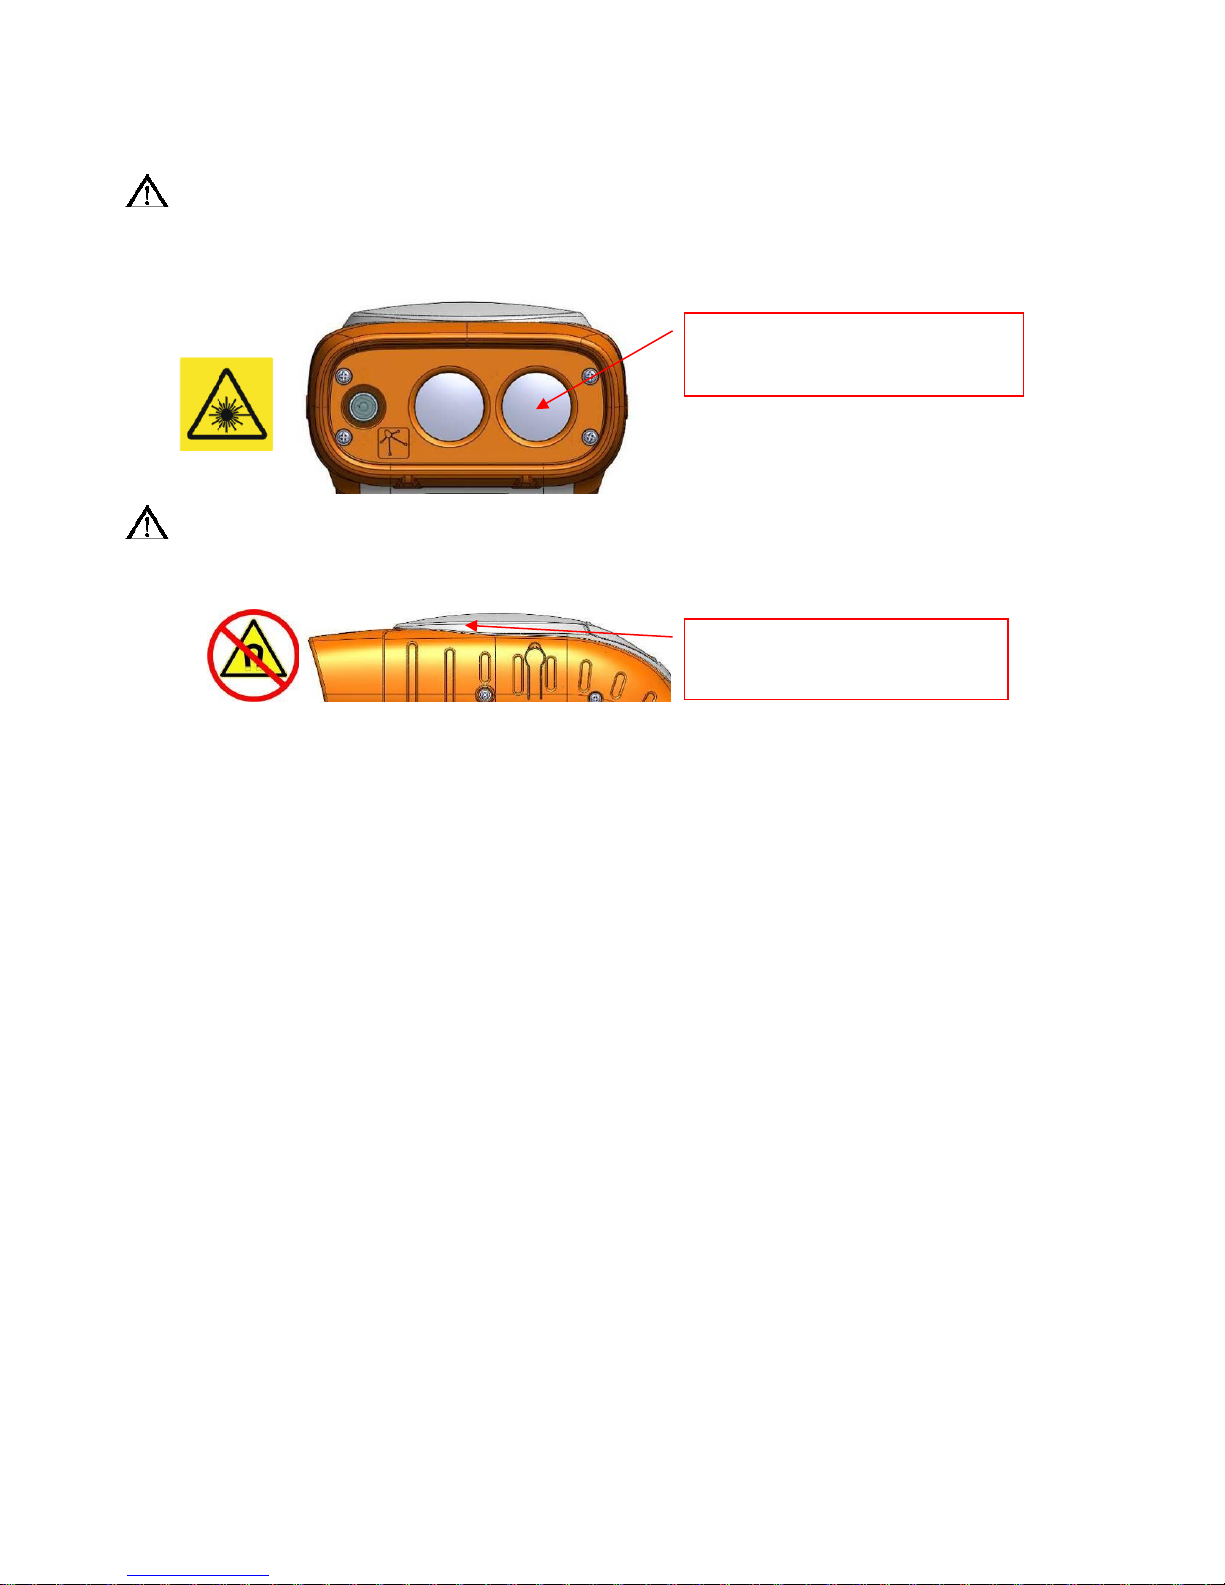
WARNING! This device contains an eye safe Class 1 laser product. Invisible laser
Laser radiation emits
from this aperture.
Magnetic compass
located here.
radiation is emitted from (and received into) the front apertures. Avoid staring
into the laser beam. This product complies with 21CFR1040.10 and IEC608251:200.
WARNING! ike contains a magnetic compass. Using the unit near magnetic (e.g.
objects containing ferrous substances) or electromagnetic fields (e.g. electrical
wires) may cause the compass bearing to be inaccurate.
620-00780 – ikeGPS User Guide

THIS PAGE INTENTIONALLY BLANK
620-00780 – ikeGPS User Guide

Contents
Introduction .................................................................................................................................................. 5
Welcome to ike ....................................................................................................................................... 5
Getting Started ........................................................................................................................................ 6
What’s in the box? .............................................................................................................................. 6
Essential Accessories ........................................................................................................................ 6
Field Accessories ............................................................................................................................... 6
ikeSolutions Accessories .................................................................................................................. 7
Anatomy of the ike unit ...................................................................................................................... 8
ike Software and Licensing ............................................................................................................. 10
Turning your ike on for the first time .............................................................................................. 10
Home screen and control buttons .................................................................................................. 12
Before field use ................................................................................................................................. 13
ikeGPS Data Capture Application.......................................................................................................... 24
Starting the ikeGPS application ......................................................................................................... 24
ikeGPS Home screen .......................................................................................................................... 25
Viewing and changing the Settings ................................................................................................... 25
GPS Settings..................................................................................................................................... 26
Antenna Settings .............................................................................................................................. 28
Camera Settings ............................................................................................................................... 29
Laser Settings ................................................................................................................................... 30
Data Settings..................................................................................................................................... 31
Changing the ‘Default’ Job name ....................................................................................................... 32
Exiting the ikeGPS application ........................................................................................................... 33
ikeTools .................................................................................................................................................. 34
Introduction ........................................................................................................................................ 34
Target Position .................................................................................................................................. 35
3-Shot Height .................................................................................................................................... 39
Missing Line ...................................................................................................................................... 42
Span Height ...................................................................................................................................... 45
Photo Only ......................................................................................................................................... 49
Local Point ......................................................................................................................................... 51
Tree Assessment ............................................................................................................................. 54
TrueSize Poles ................................................................................................................................. 60
TrueSize PLS .................................................................................................................................... 63
Data Transfer to Desktop .................................................................................................................... 66
ikeUtilities ............................................................................................................................................... 67
Compass Calibration ....................................................................................................................... 67
Diagnostics ........................................................................................................................................ 68
GPS Info ............................................................................................................................................ 69
License Manager .............................................................................................................................. 71
Zeroize ............................................................................................................................................... 72
ikePro/ikeSolutions Options .................................................................................................................... 74
ike User Manual Page 1

GPS+ ...................................................................................................................................................... 74
Custom Forms/Workflows ................................................................................................................... 74
Appendix 1: ike Maintenance and Information .................................................................................... 76
Caring for your ike ................................................................................................................................ 76
Storing your ike and battery packs ................................................................................................ 76
Protecting the touchscreen ............................................................................................................. 77
Protecting your ike against mechanical shock ............................................................................. 77
Equipment warnings ........................................................................................................................ 77
Using your ike in extreme temperatures ....................................................................................... 78
Cleaning your ike .............................................................................................................................. 78
Repairing your ike ............................................................................................................................ 79
Troubleshooting and Service Tips ..................................................................................................... 79
Troubleshooting tips......................................................................................................................... 79
Product Specifications ......................................................................................................................... 81
Accessory Information ......................................................................................................................... 82
Tripod ................................................................................................................................................. 82
Batteries ............................................................................................................................................. 82
Travel Charger .................................................................................................................................. 82
External Patch Antenna ................................................................................................................... 82
Glare Shield....................................................................................................................................... 83
Altus APS-3 GPS Receivers ........................................................................................................... 83
Other Accessories ............................................................................................................................ 83
Software Licensing ............................................................................................................................... 84
ike Software....................................................................................................................................... 84
Microsoft Software License Terms for Windows Mobile 6 Software ........................................ 84
Battery Safety ....................................................................................................................................... 88
Battery warnings ............................................................................................................................... 88
Transportation ................................................................................................................................... 88
Disposing of your ike and battery packs ....................................................................................... 88
Hardware Warranty, Software Maintenance and Support ............................................................. 88
Certifications and Classifications ....................................................................................................... 89
Laser Classification .......................................................................................................................... 89
Export Control Classification Number (ECCN) Certification ...................................................... 89
Harmonized Tariff Schedule (HTS) Classification ....................................................................... 89
Export and Trade Restrictions ........................................................................................................ 90
Additional Support ................................................................................................................................ 90
Appendix 2: Windows Mobile 6.1 Field PC Operations ...................................................................... 92
Introduction ............................................................................................................................................ 92
Overview of Windows Mobile 6 .......................................................................................................... 92
Using the documentation .................................................................................................................... 93
Getting Started ...................................................................................................................................... 93
Step 1: Install the battery ................................................................................................................ 93
Step 2: Charge the battery .............................................................................................................. 94
Step 3: Establish basic settings on the device ............................................................................ 94
ike User Manual Page 2

Step 4: Connecting to a desktop computer .................................................................................. 95
Step 5: Creating a connection to a desktop computer ............................................................... 95
Using the Hardware ............................................................................................................................. 96
Identifying button functions ................................................................................................................. 96
Customizing button functions ............................................................................................................. 97
Suspending, powering off, resetting, and restoring factory defaults ............................................ 98
Option A: ikeOS Zeroize Utility ....................................................................................................... 99
Option B: Hardware Restore .......................................................................................................... 99
Using the stylus .................................................................................................................................. 100
Using the touchscreen ....................................................................................................................... 100
Understanding LED signals .............................................................................................................. 101
Replacing the battery pack ........................................................................................................... 101
Using peripheral devices such as SD cards and USB flash drives ............................................ 102
Using ike as a Field PC ..................................................................................................................... 104
Understanding the Today screen ................................................................................................. 104
Using the Start menu ..................................................................................................................... 104
Entering information ....................................................................................................................... 105
Recognizing status icons .............................................................................................................. 106
Recognizing soft keys .................................................................................................................... 106
Dimming or turning off the backlight ............................................................................................ 107
Adjusting the backlight timer ......................................................................................................... 107
Performing Common Tasks on ike .............................................................................................. 108
Power Settings ................................................................................................................................ 108
Exploring files .................................................................................................................................. 109
Closing running programs ............................................................................................................. 110
Switching between running programs ......................................................................................... 110
Viewing memory allocation for programs ................................................................................... 110
Changing settings........................................................................................................................... 111
Using on-device help ..................................................................................................................... 111
Backing up data .............................................................................................................................. 112
Copying data from a peripheral device ....................................................................................... 114
Communicating with a Desktop Computer ................................................................................. 115
Getting to Know Programs and Settings......................................................................................... 115
Understanding Start menu programs and utilities ..................................................................... 116
Understanding applications in the Programs menu .................................................................. 117
Finding settings............................................................................................................................... 118
Using the Integrated Bluetooth® Option .......................................................................................... 119
Bluetooth drivers and profiles ....................................................................................................... 119
Identify the status of Bluetooth using Wireless Manager ......................................................... 119
Create a Bluetooth partnership .................................................................................................... 120
Bluetooth virtual COM ports ......................................................................................................... 121
Set up an outgoing Bluetooth COM port ..................................................................................... 122
Set up an incoming Bluetooth COM port .................................................................................... 123
Supported Bluetooth Profiles ........................................................................................................ 124
ike User Manual Page 3

THIS PAGE INTENTIONALLY BLANK
ike User Manual Page 4

1
Introduction
Introduction
Welcome to ike
Thank you for purchasing ike. Your ike unit is a location-based measurement device that
integrates a digital camera, compass, laser rangefinder, mobile computer, and precision GPS.
This hardware combination makes the ike a powerful measuring device.
The ike is capable of in-field measurements, assisted with augmented reality instructions and
back office measurements performed straight from and ikeGPS photos.
For additional information in regards to unit/warranty registration, tutorial videos and software
downloads visit www.ikegps.com/quickstart
www.ikegps.com/quickstart Page 5 www.ikegps.com/support

Getting Started
Model
ikeBasic
ikePro
ikeSolutions
Unit
ike300 or 1000 unit
in Orange or Grey rubber protective trim
ike300 unit in Orange or
Grey rubber protective trim
Essential Accessories
Refer Essential Accessories
Documentation Pack
User documentation and resources
Field Accessories
N/A
Refer Field
Accessories
Refer ikeSolutions
Accessories
Additional Accessories
As per order
Item
Description
Battery
Used to power the ike unit.
AC Charger and MultiCountry plug set
Multi-voltage wall charger with set of four international (US, Europe, UK
and Australasia) interchangeable plugs.
SD Card (fitted)
SD Card fitted to the ike unit. Can be removed/swapped-out by
unscrewing the SD Card access cover.
USB Cable
Cable to allow transfer of data between ike unit and Windows-based PC.
Stylus and Handstrap
Stylus to allow accurate selection/tapping of on-screen buttons
Handstrap to allow safe grip of the ike unit.
Screen Protector
Recommended additional protection for the LCD screen.
Item
Description
Hardcase
Protective hard plastic case with custom-cut foam fittings for ike Essential
and Field accessories
Softcase
Canvas cover to provide additional protection to the ike unit. Also includes
shoulder strap
Spare Battery
Additional Battery
Travel Charger
Charger adaptor to allow batteries to be charged independently of the ike
unit
Vehicle Charger Cable
Power cable to allow either ike unit or Travel Charger to be powered from
a standard vehicle ‘cigarette lighter’/accessory power socket
Glare Shield
Viewing loupe to reduce glare by shield the LCD from sunlight. Also
includes an in-built focusing ring.
What’s in the box?
Your ike unit will come with the selected colored ike model and a number of ‘Essential
Accessories’. Depending on the kit or bundle purchased, ‘Field Accessories’, solution-specific
items and/or additional items may be included.
Essential Accessories
All ikeBasic units, ikePro kits and ikeSolutions bundles are provided with a number of ‘Essential
Accessories’ to access basic functionality.
Field Accessories
In addition to the ‘Essential Accessories’, ikePro kits and ikeSolutions bundles are supplied with
a number of ‘Field Accessories’ to provide additional functionality for your ike unit.
www.ikegps.com/quickstart Page 6 www.ikegps.com/support
ikeSolutions Accessories
Item
Description
Tripod
Low magnetic signature tripod and carry case
ikeSolutions bundles are be supplied additional accessories to assist in best performance of the
ikeTools associated with each industry-specific ikeSolutions configuration.
An example configuration of an ikePro kit is depicted below.
www.ikegps.com/quickstart Page 7 www.ikegps.com/support
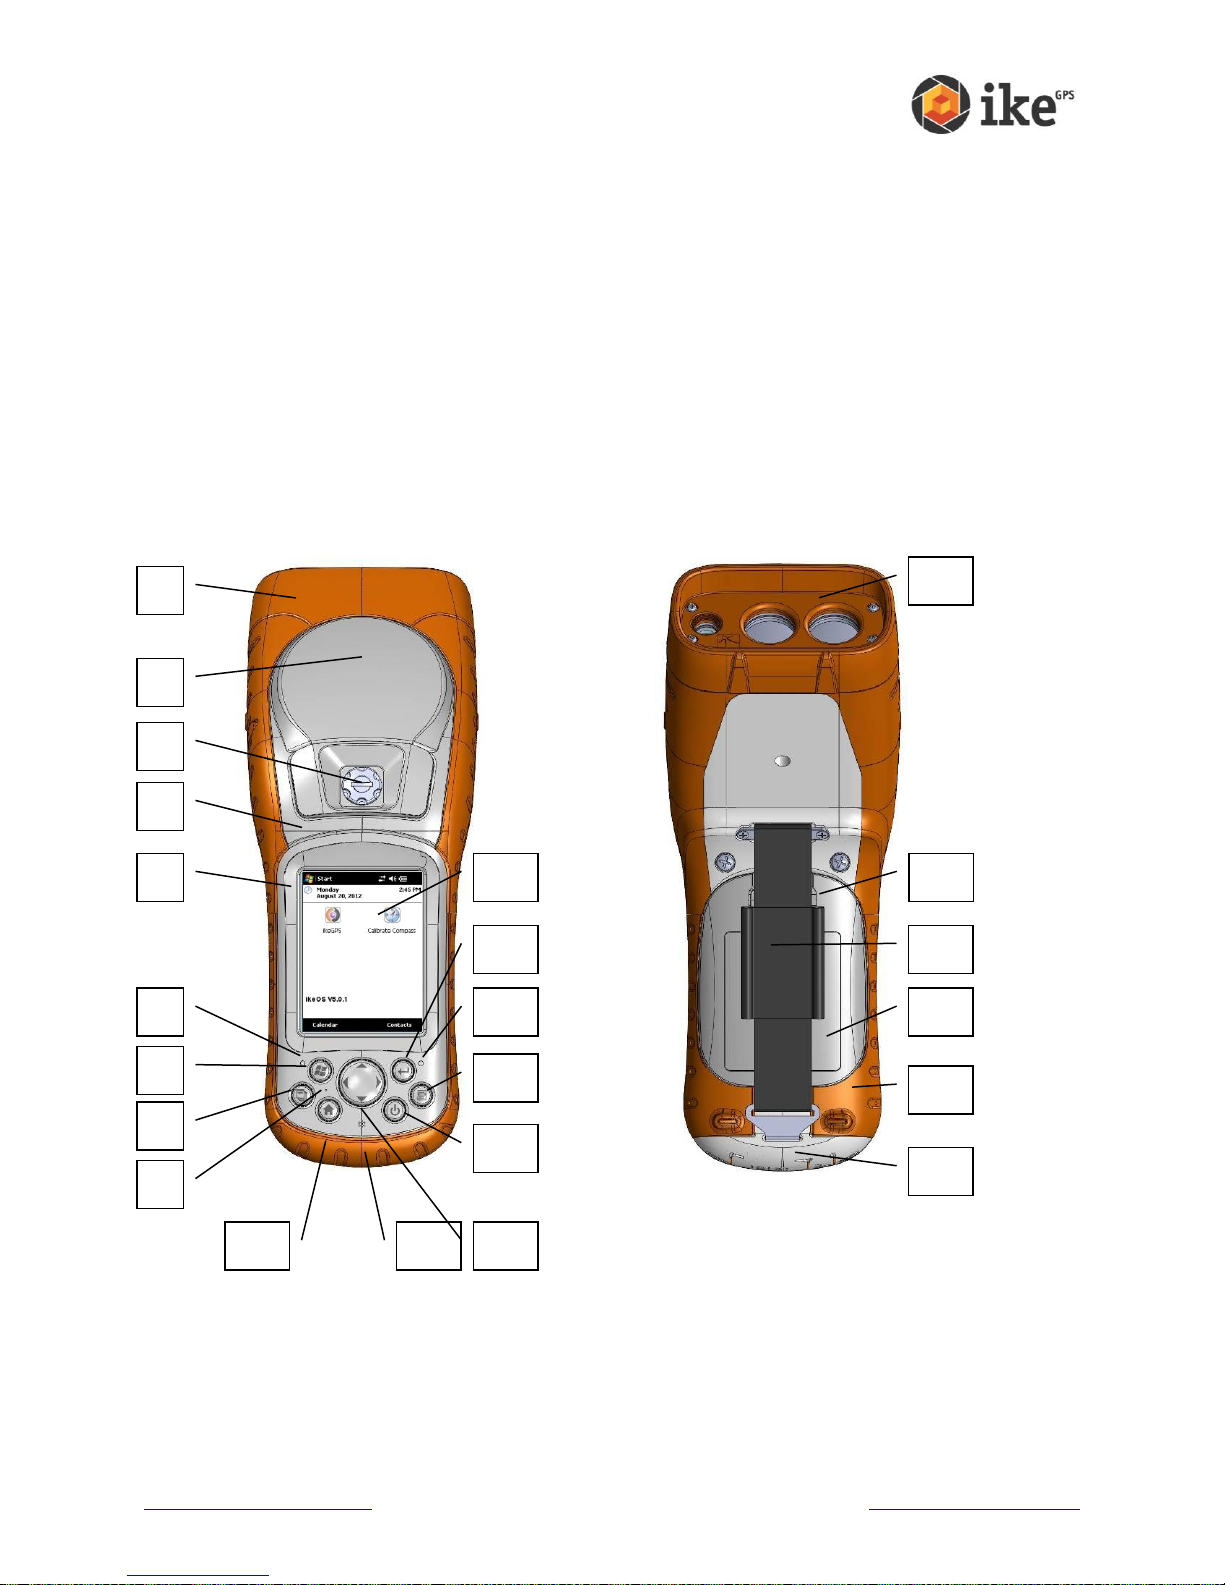
Anatomy of the ike unit
1 Elastomer overmold
2 GPS Receiver and Antenna
3 Removable SD Card Slot Cover
4 Magnesium case front
5 ike model bezel label
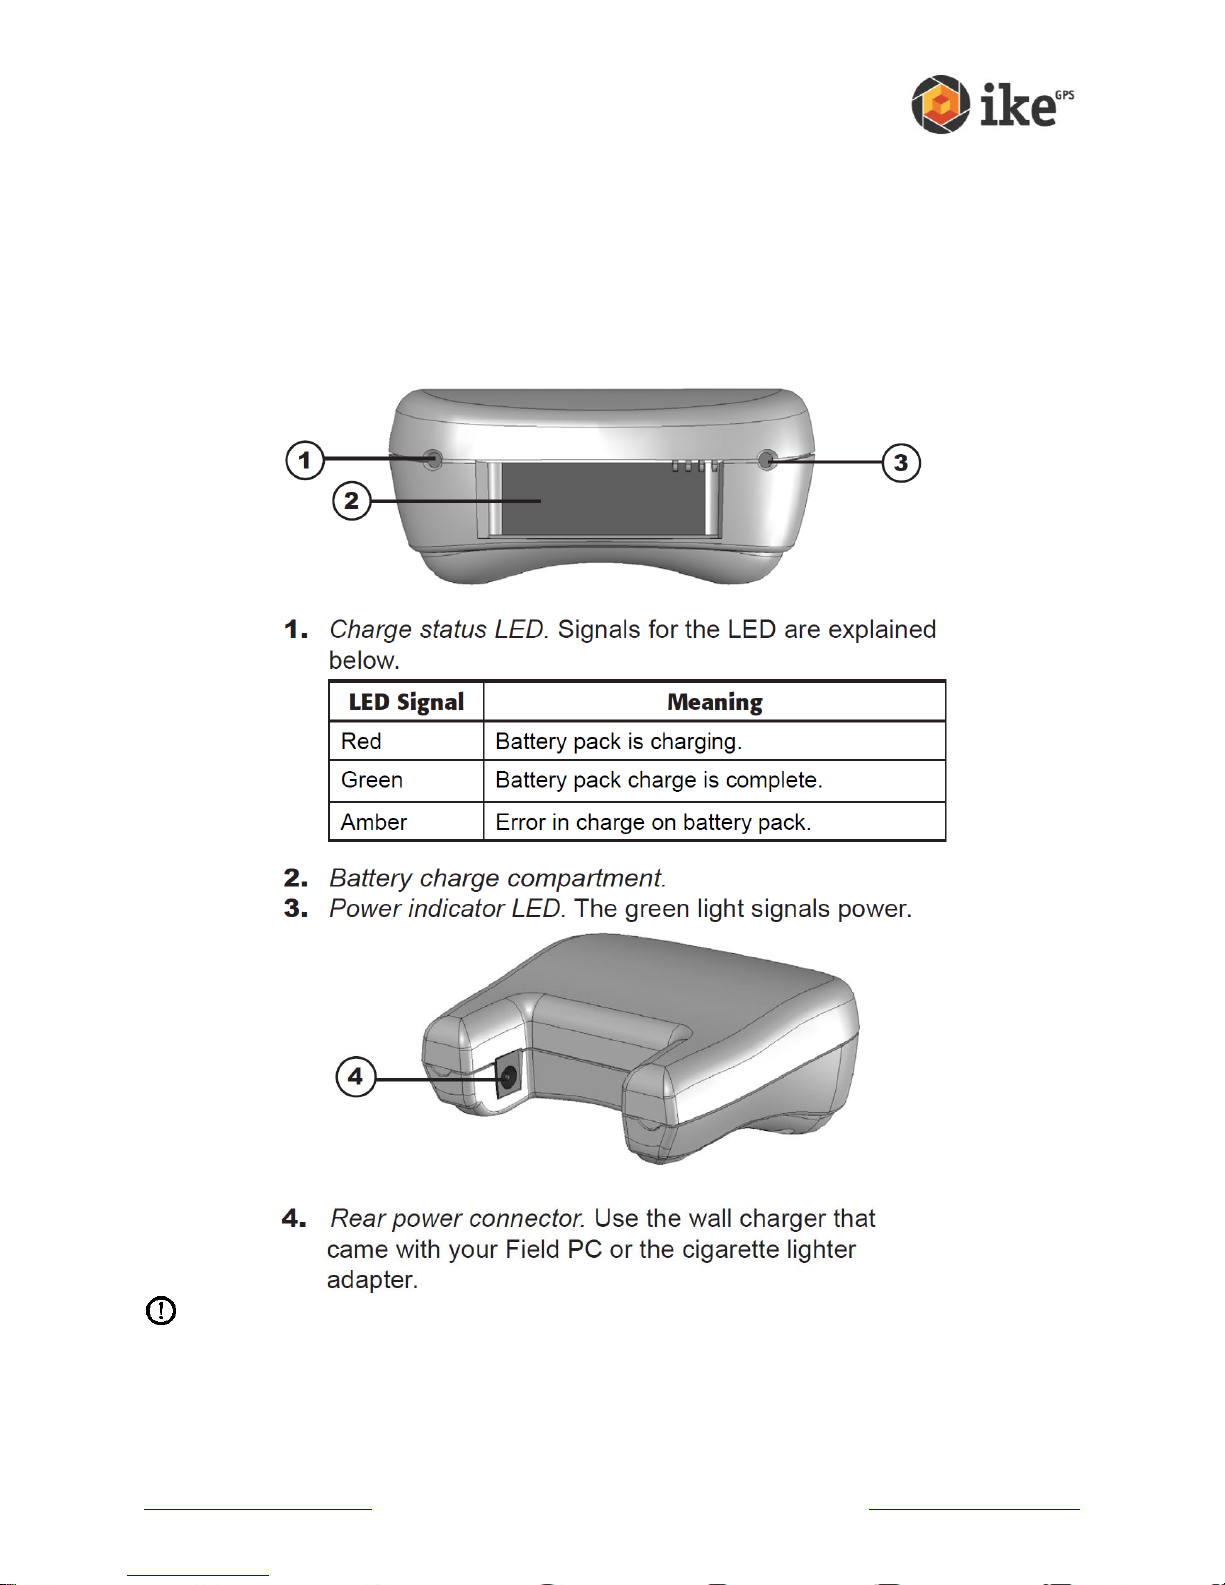
6 Charge indicator (red LED)
7 Start menu button *
8 Task Manager button *
9 Microphone
10 Today screen button *
11 Speaker
12 Four-way directional button
13 Power button
14 Context menu button *
15 Notification indicator (green LED)
16 Enter button
17 Touchscreen/LCD display
18 Laser ‘Reference Plane’ – distance
measured from this surface
19 Battery door latch
20 Hand strap
21 Battery door
22 Body molding
23 Connector Protector
1 2 5 3 4
6
8
10 9 7
11
13
12
14
17
15
19
16
20
21
22
23
18
This section illustrates the different parts of ike.
* Buttons 7, 8, 10 & 14 may be reprogrammed for alternate functions depending on application being used.
www.ikegps.com/quickstart Page 8 www.ikegps.com/support
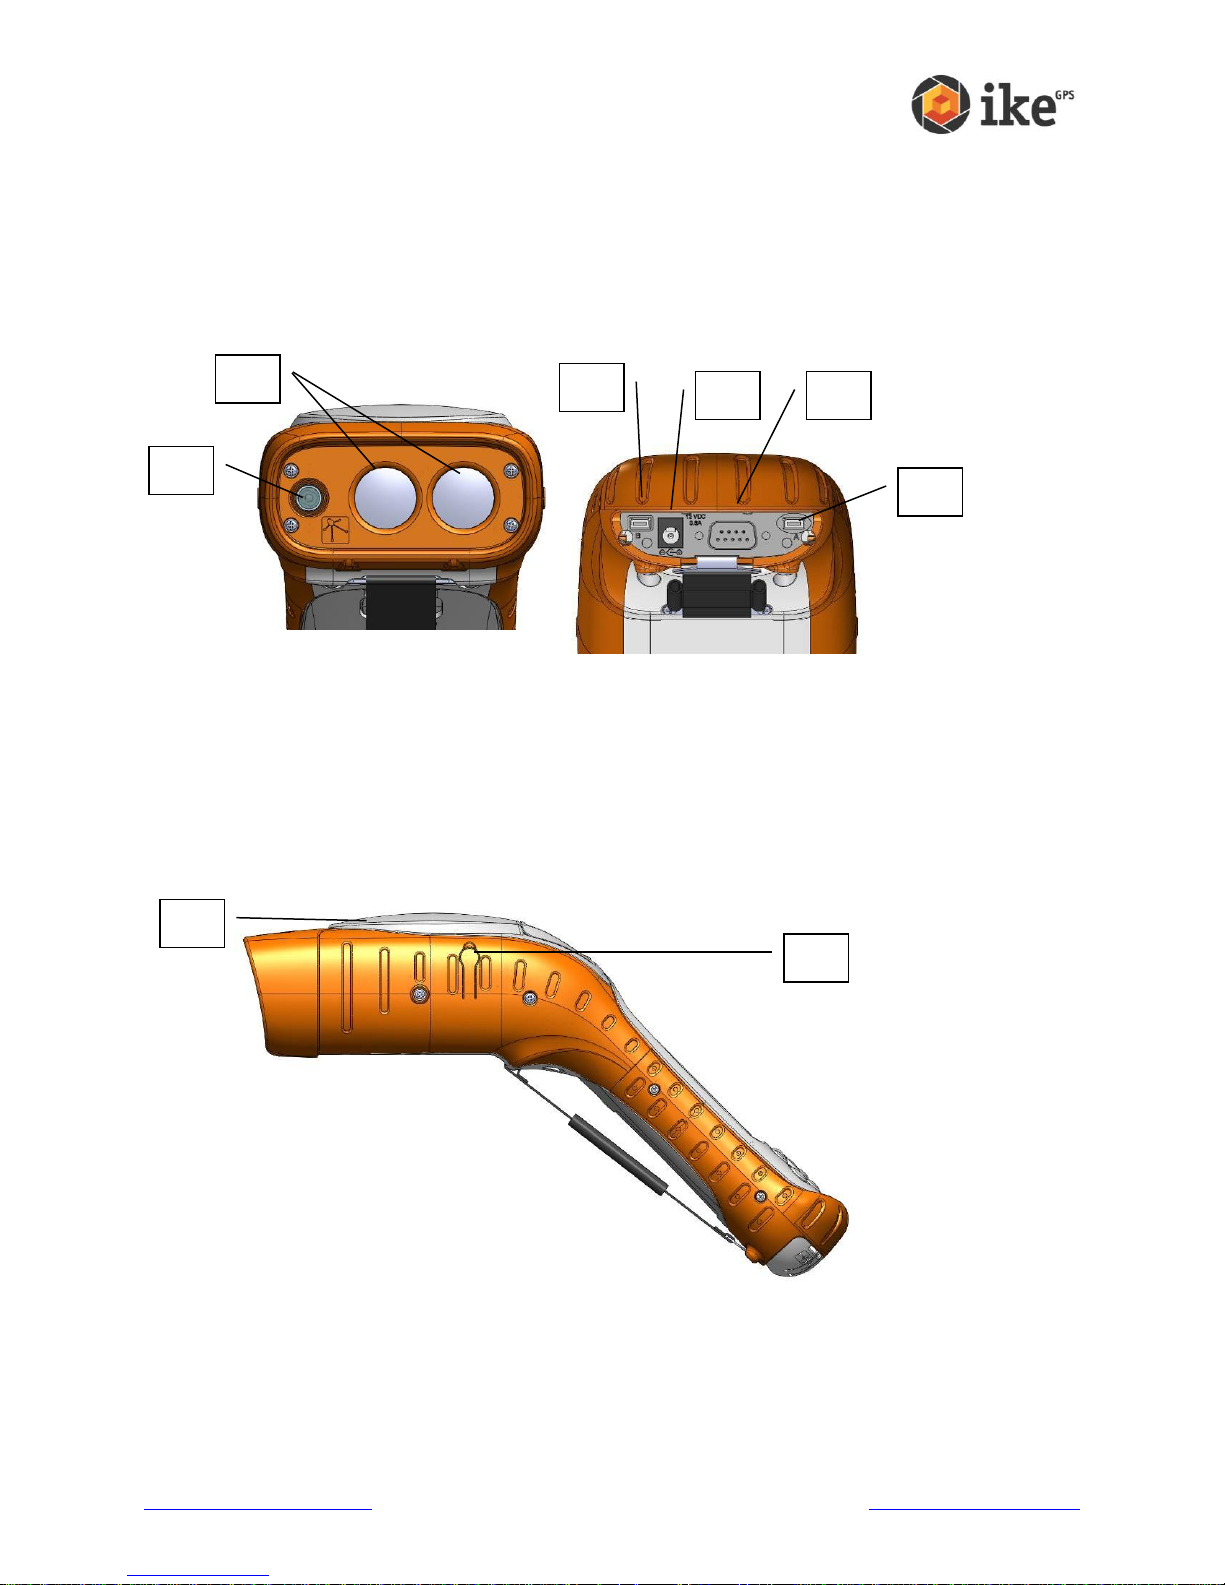
24 Digital Camera
25 Laser Distance Range Finder
This Laser Distance Range Finder
is an eye safe Class 1 laser product
which emits invisible laser radiation
from the front apertures. Avoid
staring into the laser beam.
26 USB Client (mini B)
27 12V DC jack
28 9-pin serial port
29 USB Host (mini A)
32 3D Compass
As ike contains a magnetic compass,
using the unit near magnetic or
electromagnetic fields may cause the
compass bearing to be inaccurate.
32 External Antenna Port
32
24
25
26
27
29
28
Rear - Communications module
Front - Data capture module
33
www.ikegps.com/quickstart Page 9 www.ikegps.com/support
ike Software and Licensing
Model
ikeBasic
ikePro
Mobile Software
ikeOS
ikeOS
ikeTools (Mobile)
Target Position, 3-Shot Height,
Missing Line Distance, Span Height,
Photo Only
Target Position, 3-Shot Height,
Missing Line Distance, Span Height,
Photo Only, Local Point
Desktop Software
ikeDesktop (Reports only)
ikeDesktop (Forms and Reports)
Additional
Licensing
GPS+ Positional Accuracy
Enhancement (standard with ikePro
& ikeSolutions)
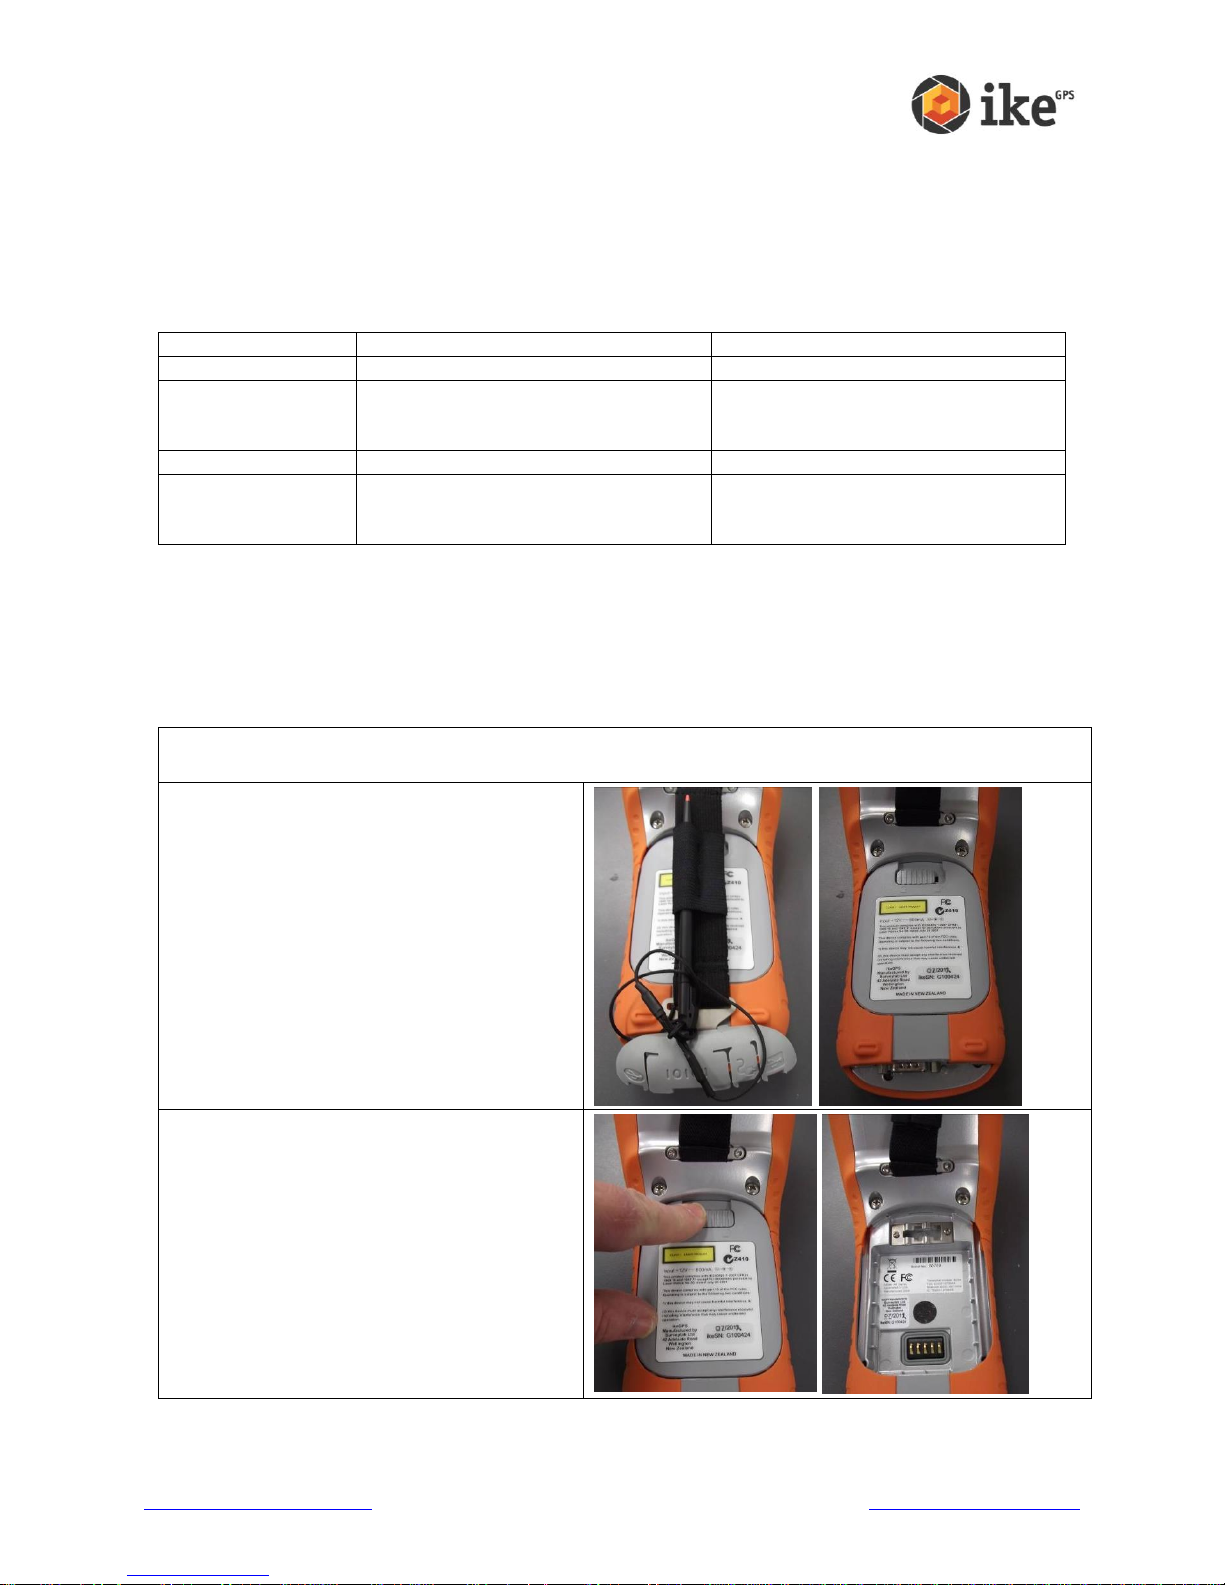
Remove the ike unit from any shipping material (presentation box for ikeBasic or hardcase for
ikePro/ikeSolutions)
Turn the ike unit over and unhook the
connector protector and handstrap and fold
away from the battery cover.
Unlock the battery cover by sliding the lock to
the right.
Remove the battery cover
For ikePro owners, you will need to open the
protective softcase’s Velcro flaps to access
the battery cover
All ike units running the ikeOS v5 software require a license applied to access the on-board
ikeTools as part of the ikeGPS application. ike units are pre-licensed with respect to customer
order prior to shipping to ensure correct licensing is applied to the purchased ike package.
Licensing controls access to ikeTools and the ability to access functionality of additional ike
enhancements and desktop software.
Additional licensing is required for ikeTools that are provided as part of ikeSolutions bundles.
More information about ikeSolutions options and the solution-specific ikeTools is available from
your ike reseller.
Turning your ike on for the first time
To use your ike unit, you need to insert the battery and charge the unit for first use.
www.ikegps.com/quickstart Page 10 www.ikegps.com/support
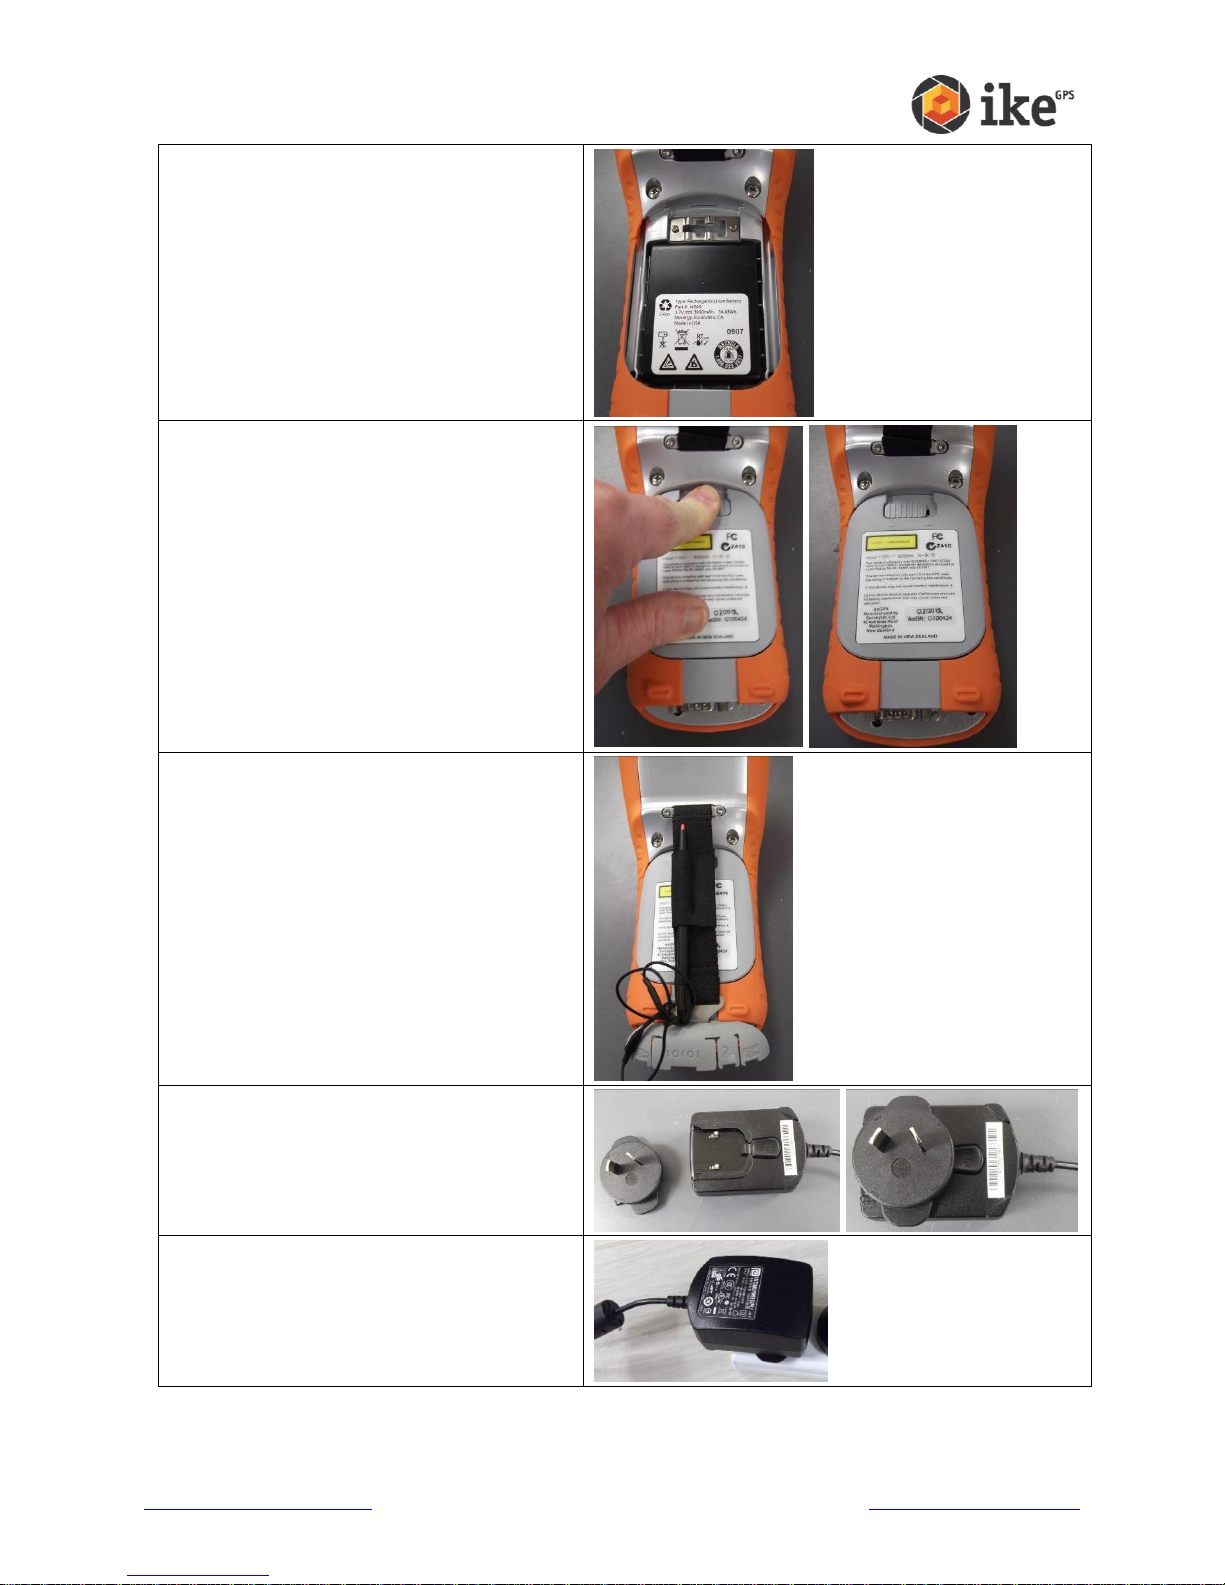
Place the battery into the battery cavity
Replace and secure (slide the lock to the left)
the battery cover
Refit the handstrap and connector protector
Fit the plug that is applicable to your
operating region to the AC charger.
Your AC charger comes with interchangeable
plugs for USA, UK, Europe and Australasia.
Connect the AC charger to the wall socket.
(Turn the wall socket on)
www.ikegps.com/quickstart Page 11 www.ikegps.com/support
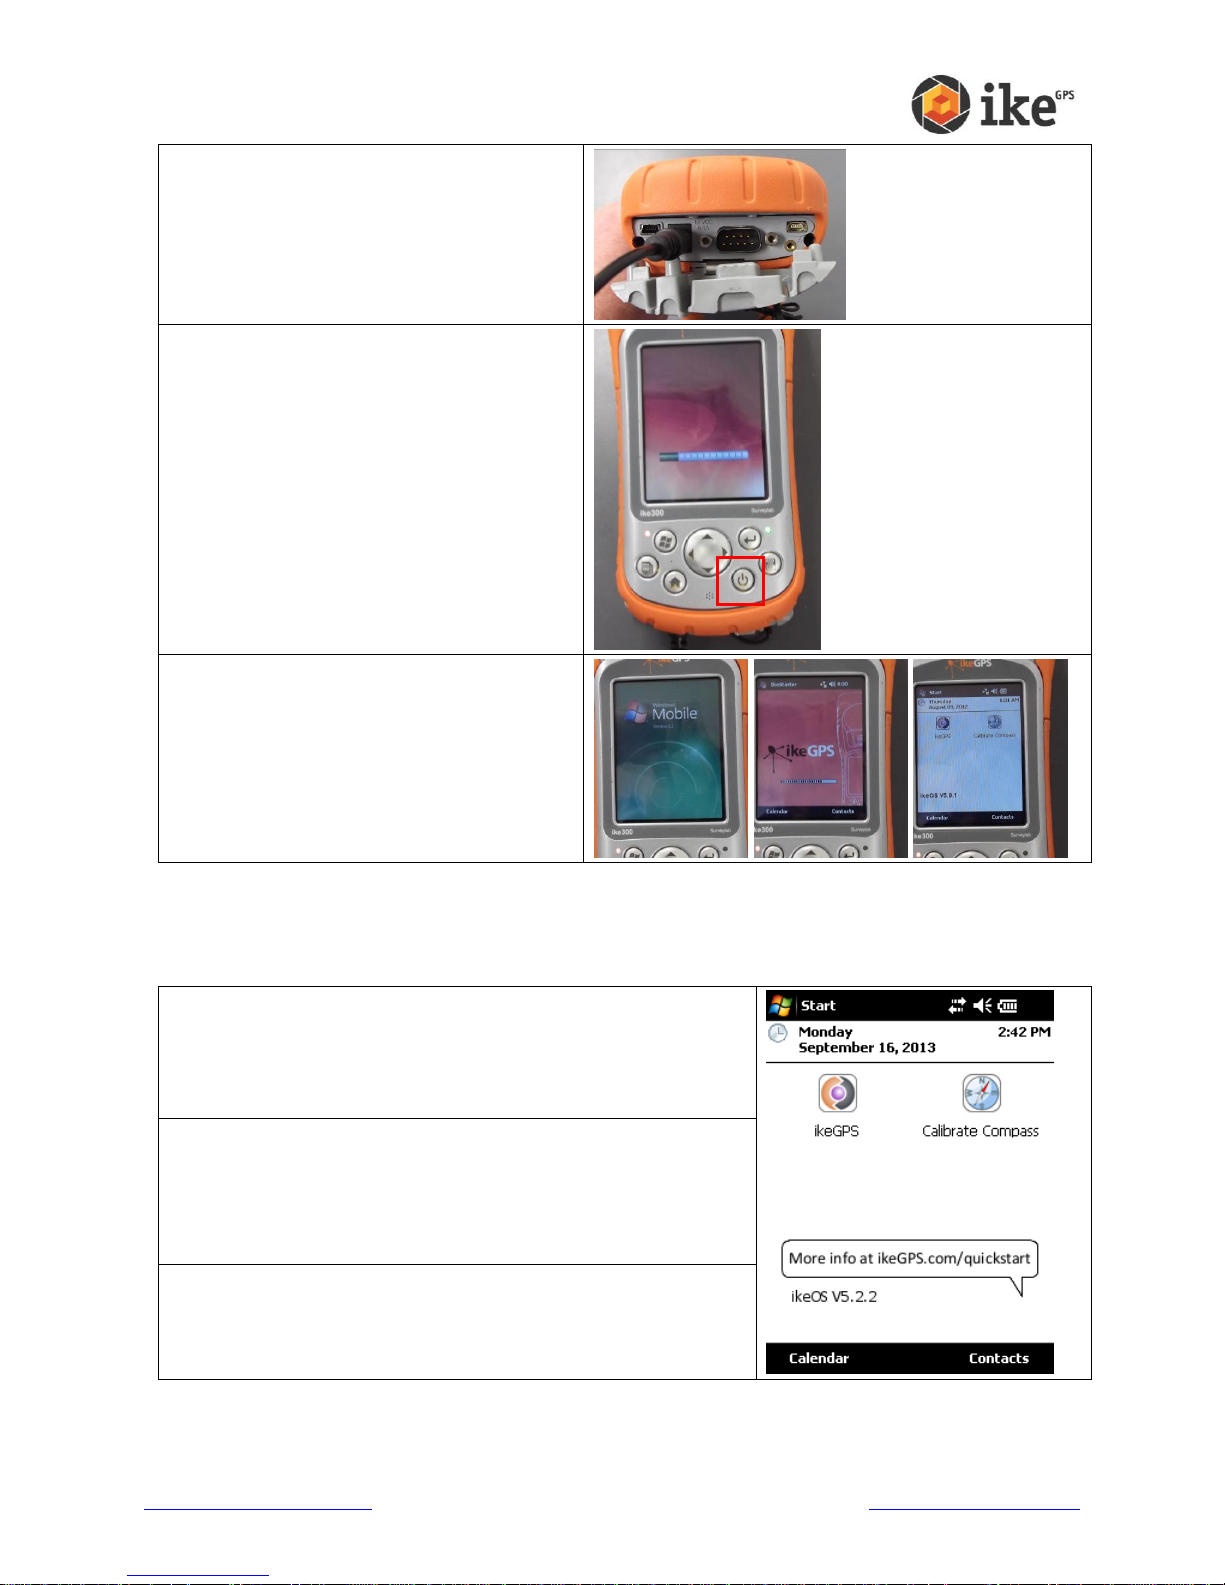
Connect the charger power tip to the ike
power socket.
The red power/charge LED should light/blink
if power is correctly applied
The ike unit may automatically power on. If it
does not, press the power button to turn the
unit on.
Allow the ike unit to fully power up past any
start-up screens and on to the ike home
screen
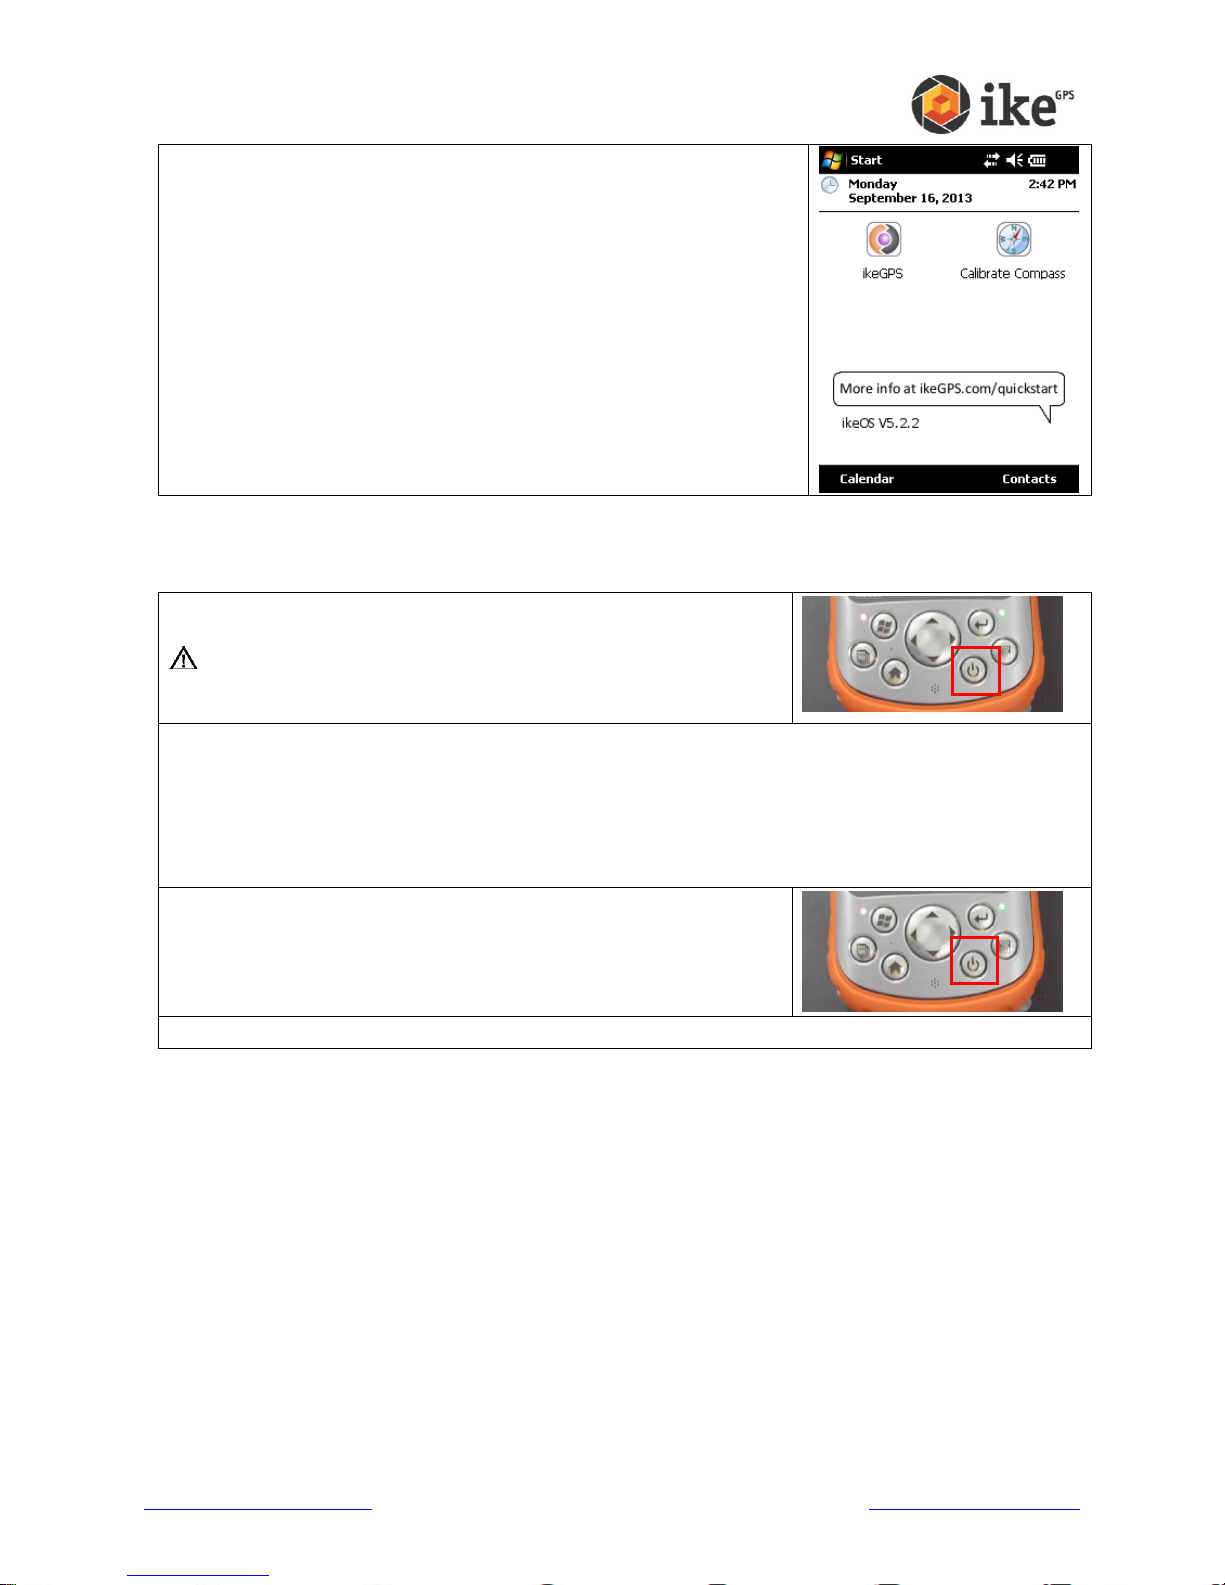
To top bar of the Home screen provides access to the Start
menu and contains icons notifying the status of system settings.
Tapping the [Start] button accesses the start menu and
underlying options.
The center part of the Home screen contains the touch buttons
to access ike applications and tools, e.g. ikeGPS and Calibrate
Compass.
The lower part of the screen contains soft-key buttons to access
common Windows Mobile functions.
Home screen and control buttons
Whenever you reset your ike unit or return to the Home screen
Home screen
www.ikegps.com/quickstart Page 12 www.ikegps.com/support
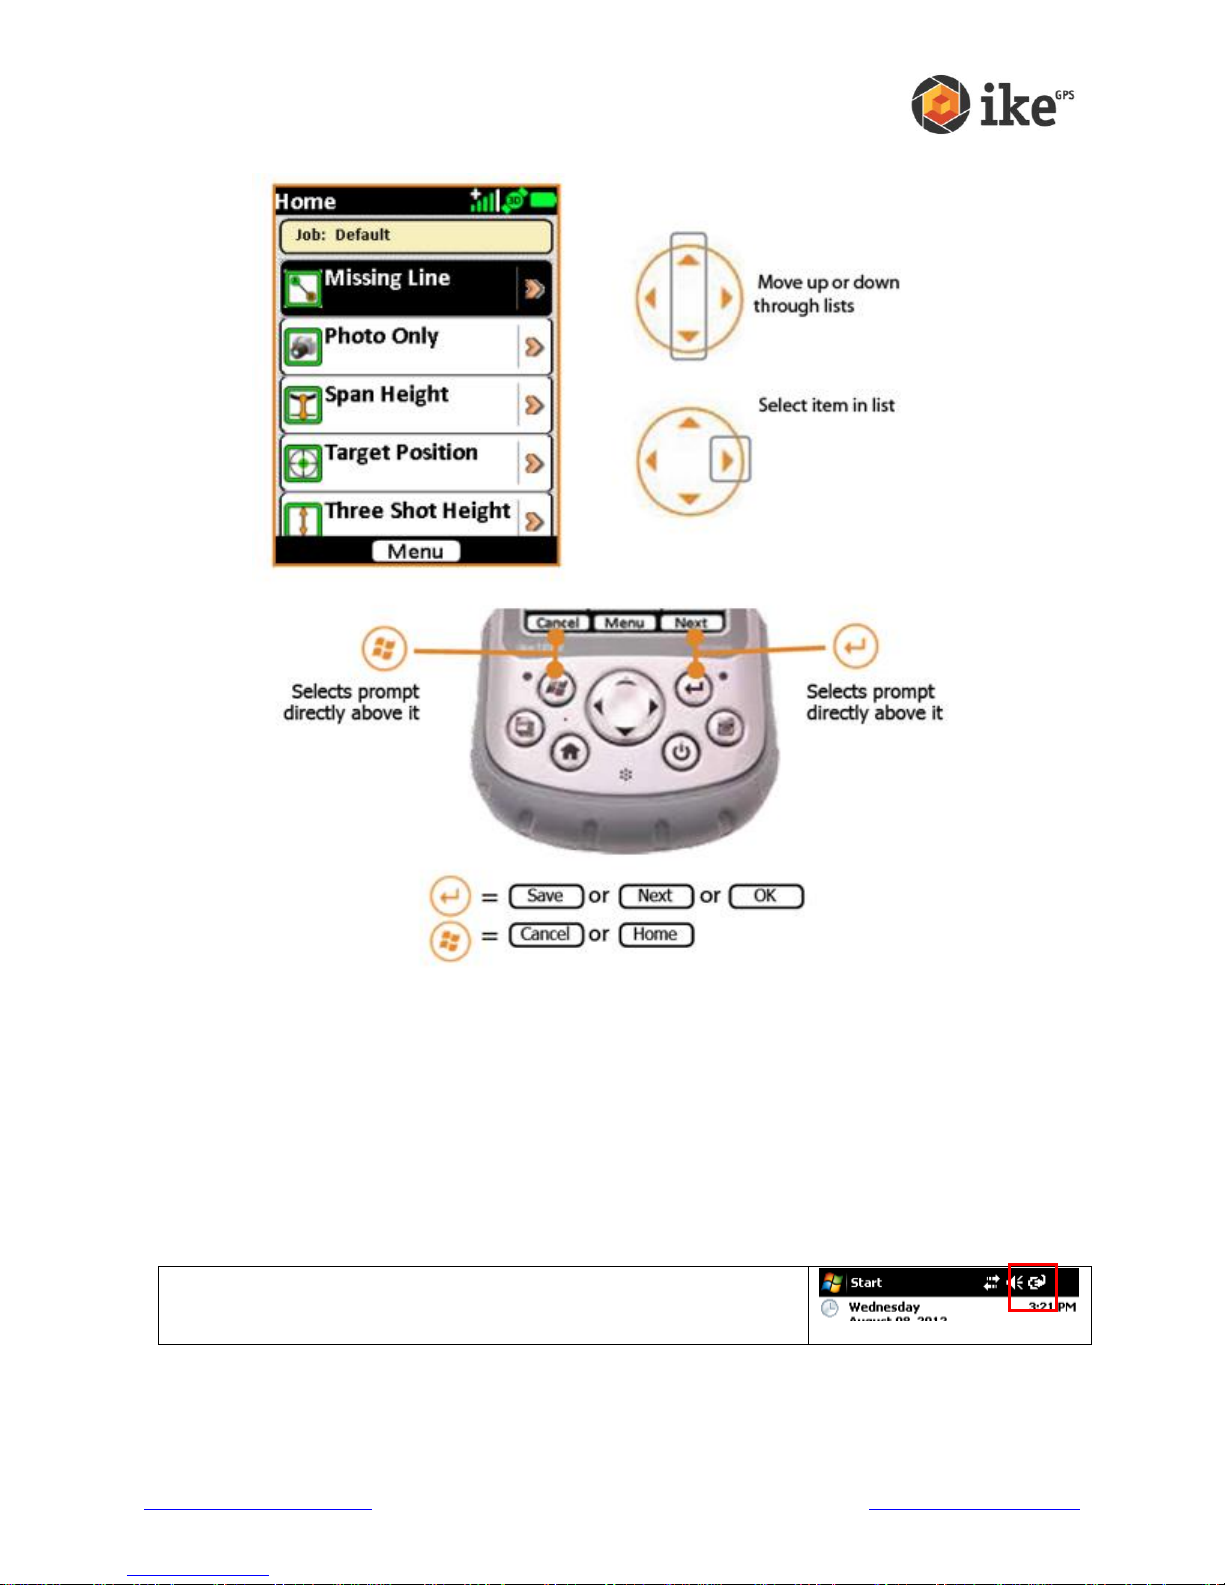
Screen Control Buttons
With the battery securely in place, and external power applied, tap the
power icon (top-right of the Home screen) to access the Power
settings.
Before field use
Once you have fully charged your ike unit we recommend that you fully charge the battery and
calibrate the compass to fine-tine the compass for your local operating area.
Installing and charging the battery
New batteries should always be fully charged in your ike units to ensure that they are
conditioned for optimal capacity.
Charging batteries in the ike unit ensure that their internal capacity gauge is correctly calibrated
to reflect the correct capacity of the battery.
www.ikegps.com/quickstart Page 13 www.ikegps.com/support

On the ‘Battery’ tab, the charge status of the battery is indicated as
follows:
The charge bar (0 to 100) indicates the level of charge. The closer
to 100 the fuller the charge
The ‘mAH consumed:’ value indicates how much capacity is still to
be charged. The lower the number the fuller the charge.
The red power/charge LED will blink if the unit is charging.
If the power/charge LED stop blinking this indicates that the charge
level is around 98%.
The ‘mAH consumed:’ value may slowly decrease as the battery
capacity is calibrated for optimal use.
Once the charge indicator (red LED) stops blinking and the ‘mAH
consumed:’ value stops decreasing then the battery has been fully
charged.
For fully-charged new batteries the ‘mAH consumed:’ value will be
near zero. For older batteries the ‘mAH consumed:’ may be above
zero due to natural charge/discharge cycle capacity degradation.
Press and hold the power button until the ‘Power Button’ options
appear, and then tap the [Reset] option. Resetting the ike unit will
reset the battery capacity
www.ikegps.com/quickstart Page 14 www.ikegps.com/support
Allow the ike unit to fully power up past any start up screens and return
to the ike home screen.
Suspend the ike unit by pressing once on the Power button. This
should cause the LCD screen to dim.
WARNING! Changing batteries should only be performed
when the unit is suspended or disconnected from external
power.
Similar to the Turning your ike on for the first time instructions, replace the battery by:
releasing the lock,
remove the battery cover
remove the existing battery
fit the new uncharged battery
replace and relock the battery cover.
Un-suspend the ike unit by pressing once on the Power button.
This should cause the LCD screen to return to the last screen.
Fully charge the new battery using the previous steps to monitor the charge status until fully charged.
If you have purchased/received any additional/spare batteries with your ike unit/kit, please
repeat the above process to ensure that the correct capacity levels are set.
www.ikegps.com/quickstart Page 15 www.ikegps.com/support
Travel Charger
The Travel Charger is an item, that is provided with ikePro & ikeSolutions kits or an optional
accessory for ikeBasic units, that lets you charge a spare battery pack on the go. Use it in your
vehicle or in your office so you always have a charged battery pack.
It is strongly recommended that all new batteries are initially fully charged in the ike unit ensure
that their internal capacity gauge is correctly calibrated to reflect the correct capacity of the
battery. After this initial full charge they can then be charged in the Travel Charger.
Device Features
CAUTION: Only use authorized devices with the Travel Charger. Failure to do so
may damage your device and void your warranty.
www.ikegps.com/quickstart Page 16 www.ikegps.com/support

Charging your Battery
Charging Time
Charge a discharged battery pack from 4 to 6 hours or until the charge indicator LED turns
green to indicate full charge.
Charging temperatures
Only charge your battery pack in temperatures between 32°F and 11113°F (0°C and 45°C). For
best results, charge the battery pack at room temperature (68°F or 20°C).
WARNING! Misusing the battery pack may cause it to overheat, rupture, or ignite
and cause serious injury. Be sure to follow these safety rules:
Do not heat the battery pack or place it in fire or direct sunshine.
Do not install the battery pack backwards.
Do not connect the battery terminals with any metal object (such as wire). Do not
solder onto the battery pack.
Do not disassemble or modify the battery pack.
In the rare event that the battery pack leaks and fluid gets into the eye, do not rub the
eye. Rinse well with water and immediately seek medical care. Your ike will naturally
pick up a magnetic signature over time that may affect the accuracy
www.ikegps.com/quickstart Page 17 www.ikegps.com/support

Compass calibration
Once you have fully charged your ike unit we recommend that you calibrate the compass to
fine-tune the compass for your local operating area.
The ‘Calibrate Compass’ utility guides the user through an in-field compass calibration process.
A video showing this process can be found at http://www.youtube.com/watch?v=KzxRBk9EjhI.
Why you should calibrate
Your ike will naturally pick up a magnetic signature over time that may affect the accuracy of the
internal digital compass.
To maintain optimum performance, a Compass Calibration application is provided on your ike
that will guide you through the steps required to measure and compensate for this magnetic
signature.
When you should calibrate
You should recalibrate the compass when you first use the device and whenever your ike has
travelled a long distance (e.g. plane flights or shipping to a new location). To ensure the highest
possible compass accuracy, it is recommended that the ike be calibrated at least once per
month.
Where you should calibrate
The Compass Calibration application should be used in a clean magnetic free environment.
This means:
Keep away from large metal objects (e.g. cars, steel poles, desk frames, filing cabinets
etc.).
Avoid wearing metallic objects (e.g. large metal watches etc.).
Keep clear of electric wires, transformers, and other electronic devices that may generate
a magnetic field.
In general, for any metallic object, stay at least twice its longest dimension away from the
object (e.g. keep at least twice the distance of the length of a 3 meter car, approximately 6
meter. Smaller metal objects have significant less impact).
Keep other magnetic objects away (e.g. sighting compasses / magnetic toys etc.).
The calibration may be performed indoors, but be aware of the cautions above. The ideal
location to perform the operation would be in the middle of a field away from any man-made
structures.
www.ikegps.com/quickstart Page 18 www.ikegps.com/support
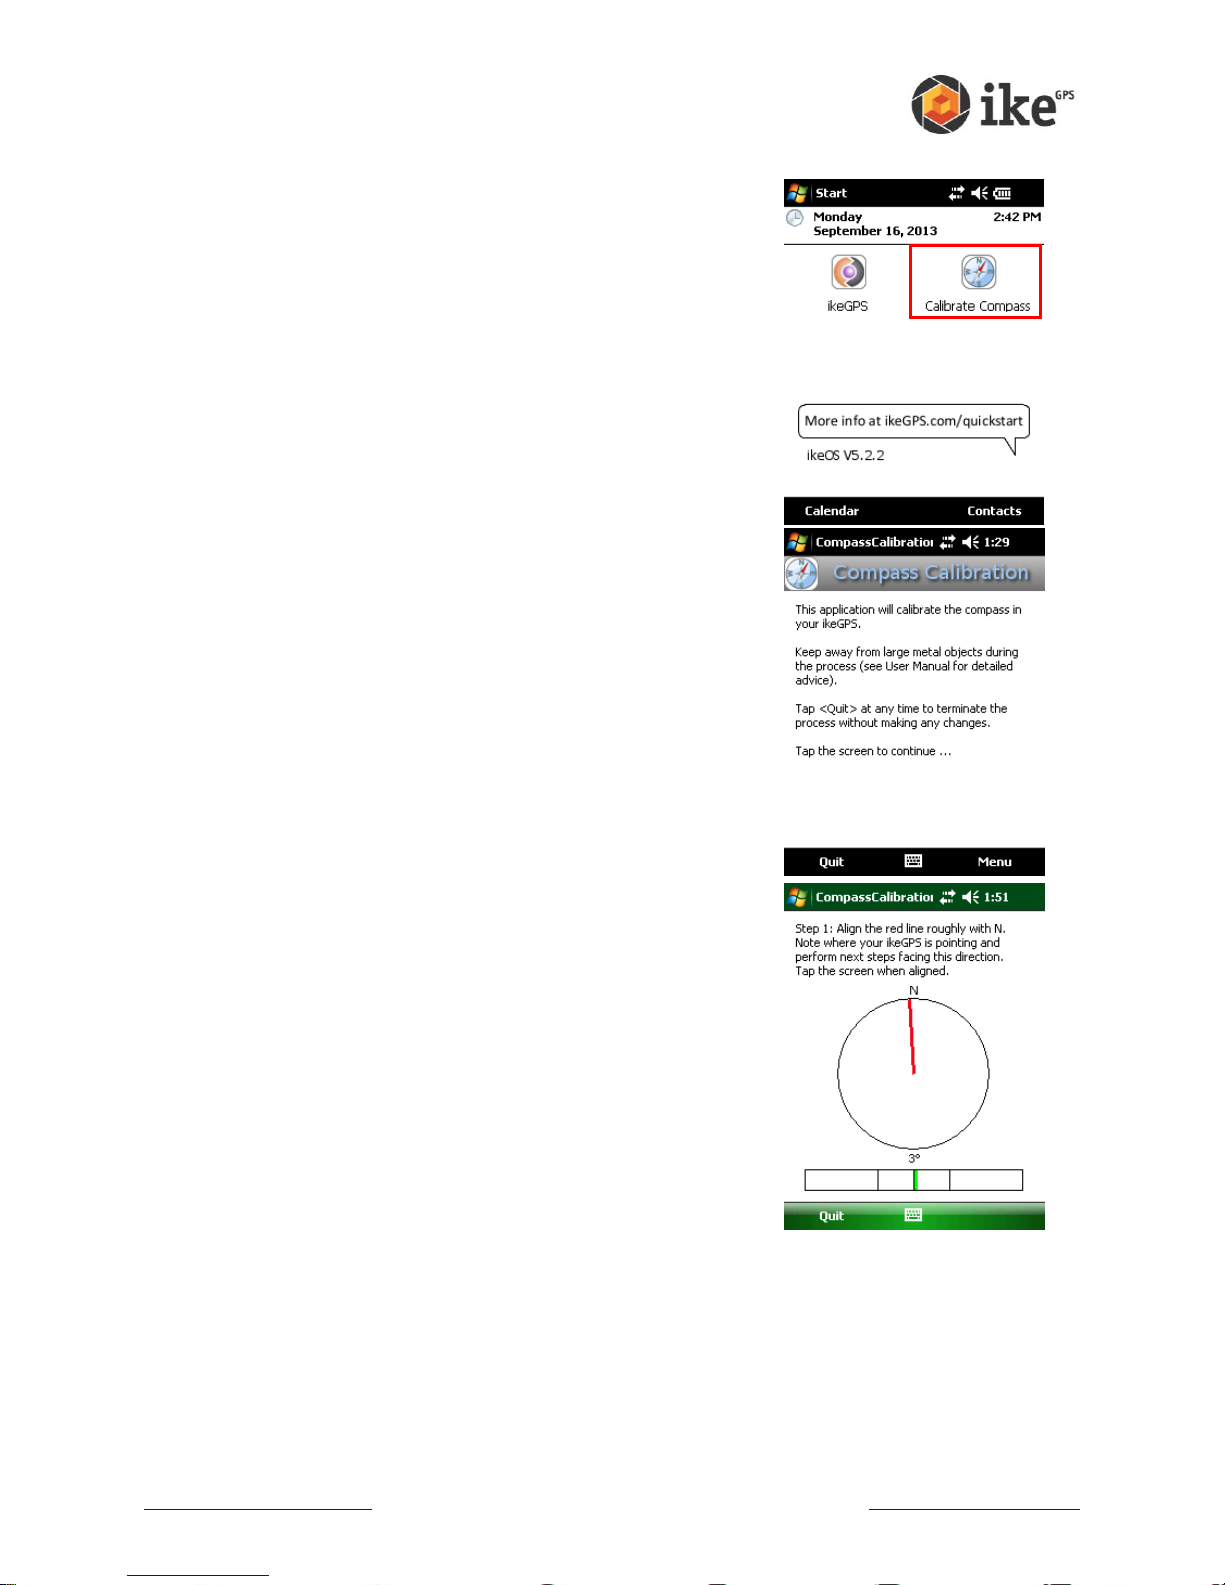
How to calibrate
To start the calibration process, tap the ‘Calibrate Compass’
icon on the main screen.
Review the ‘Compass Calibration’ welcome screen, and tap
the screen to continue.
In the align ikeGPS screen, move your ike until the red line
is best aligned with the N.
Note: The bar indicator at the bottom of the screen will
move into the green zone when correctly aligned.
www.ikegps.com/quickstart Page 19 www.ikegps.com/support
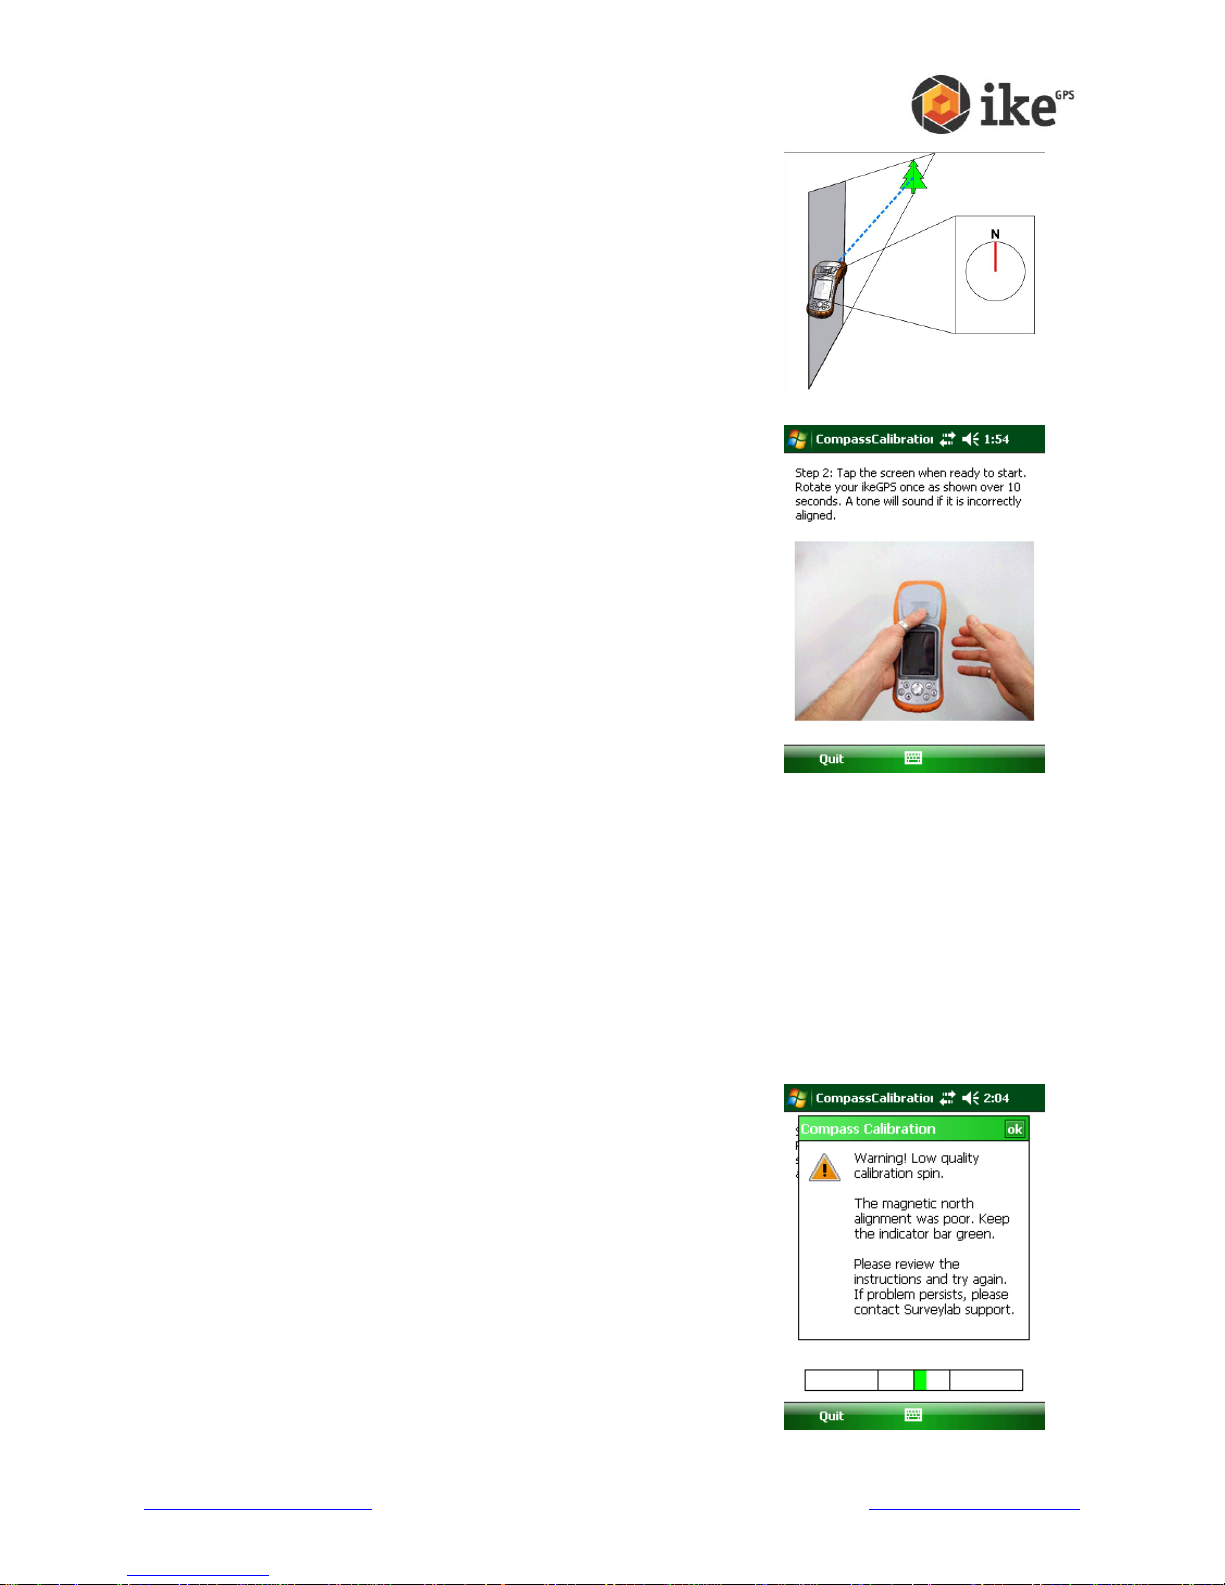
Note the direction that the ike is facing (e.g. identify a
recognizable object / landmark in this direction).
During the steps on the following pages, try to keep the
front section of the ike aligned with your reference direction
as shown.
Tap the screen to continue.
In the rotation screen, review the video which illustrates the
movement required
o The videos are taken from the user’s perspective when
facing in the reference direction.
o Note that the movements required for the compass
calibration may take a couple of attempts to master.
Don’t worry if you get it wrong, the calibration application
will prompt you to repeat any step that was not
completed correctly.
o Aim to be halfway through the rotation when the count
gets to 5.
o For each rotation, the key is to keep the ike aligned with
the reference direction as shown.
When you are ready, tap the screen to start.
You will be given a countdown ‘Ready, Set, Go’ and a 10 second count will begin for each
required rotation.
Rotate your ike smoothly in the manner shown during the 10 second count, maintaining
alignment with the direction reference noted earlier.
If you move too far from alignment you will be warned with a tone. The faster the tone
beeps, the further the ike is from the correct alignment. Use the bar indicator on the bottom
of the screen to help guide you back to the correct alignment.
Once the 10 second count has finished, the data collected will be assessed for alignment
and rotational quality.
If the ike has strayed too far from the correct alignment, the
error “The magnetic north alignment was poor. Keep the
indicator bar green.” will be displayed.
www.ikegps.com/quickstart Page 20 www.ikegps.com/support
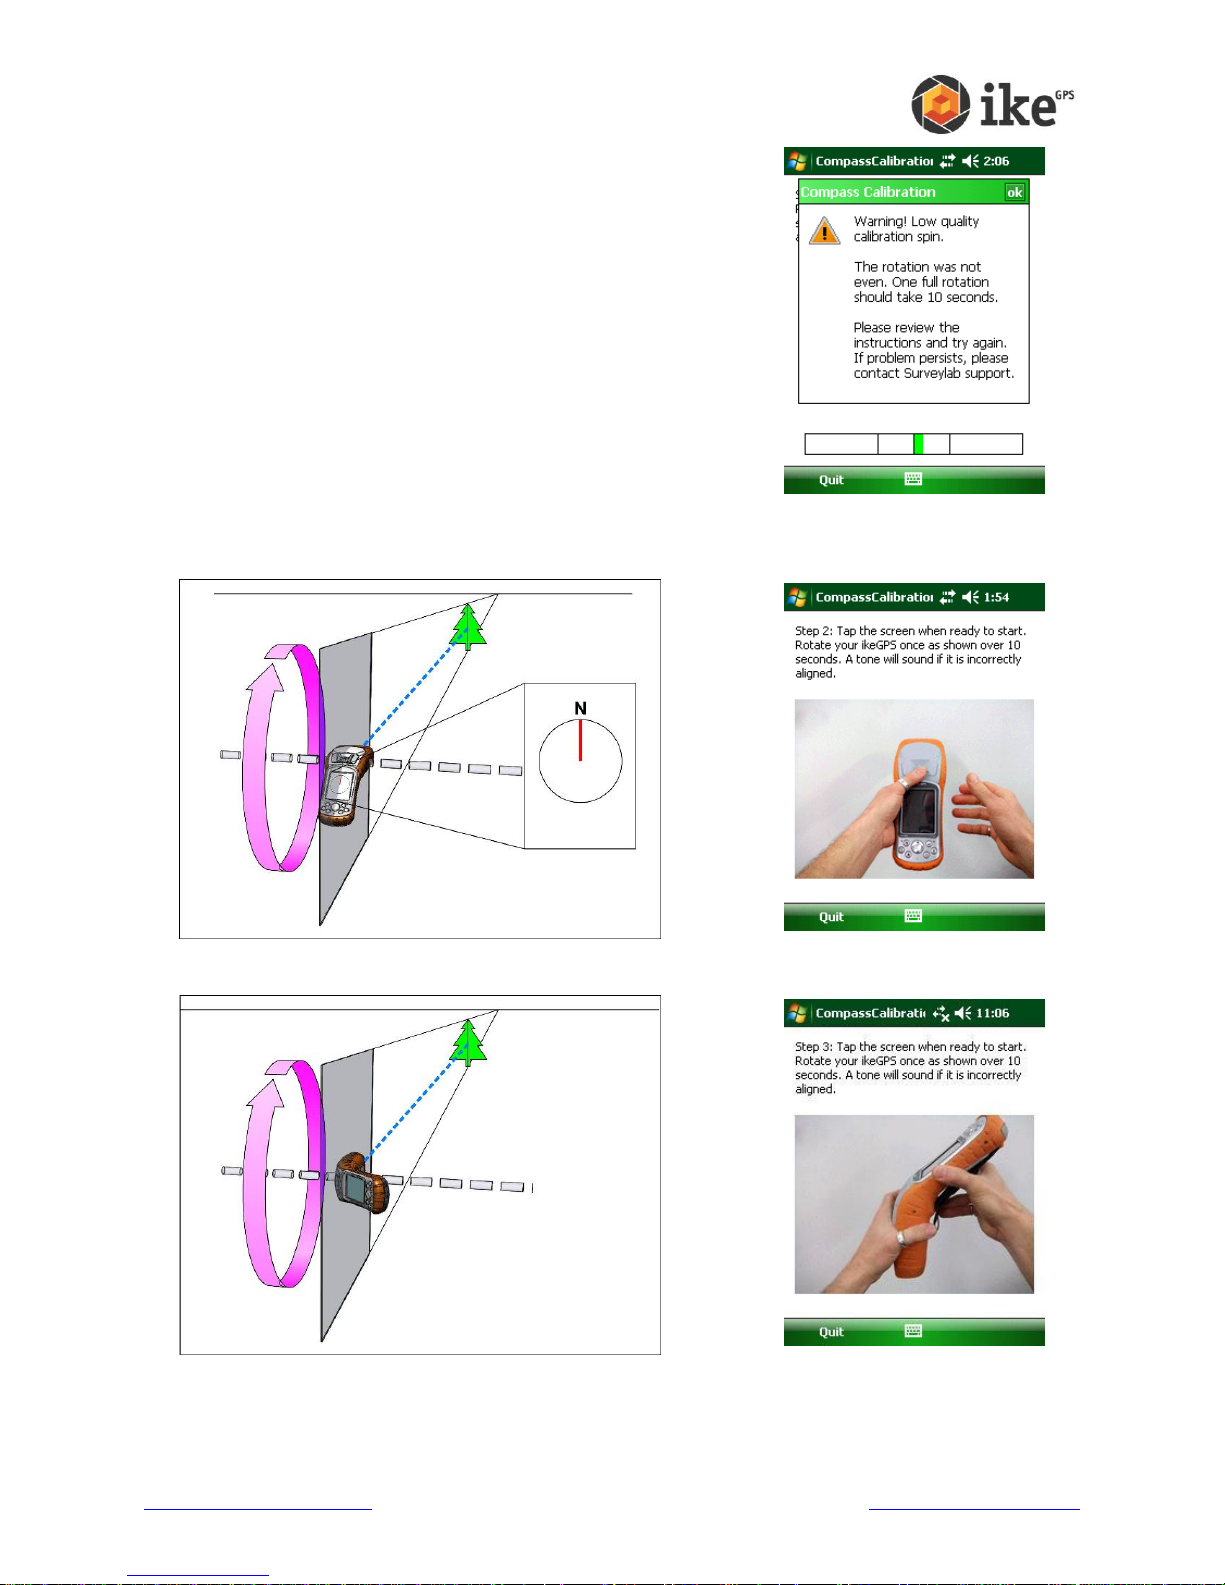
If the ike was not rotated evenly through one complete
revolution, the error “The rotation was not even. One full
rotation should take 10 seconds.” will be displayed.
Repeat the process for each of the three required orientations.
Step 2 – Rotation Orientation 1
Step 3 – Rotation Orientation 2
www.ikegps.com/quickstart Page 21 www.ikegps.com/support
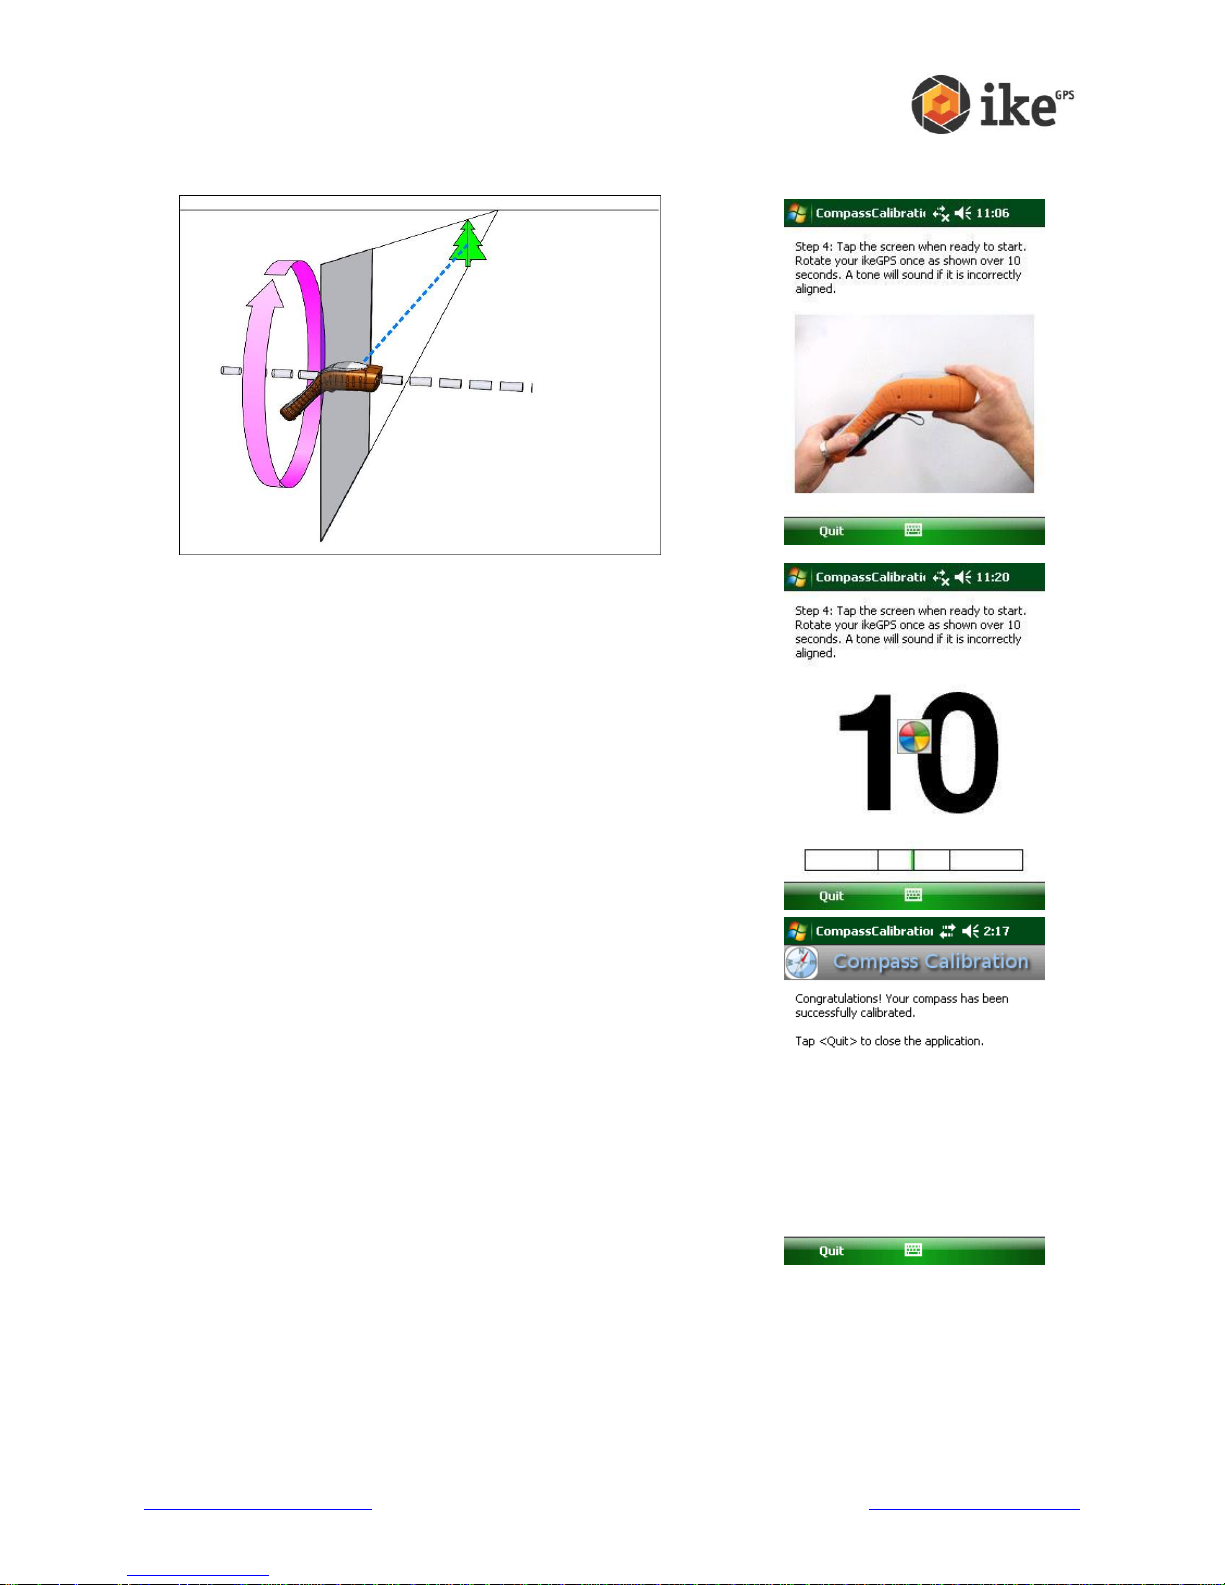
Step 4 – Rotation Orientation 3
Once you have successfully completed the three rotations,
new compass calibration parameters will be calculated and
stored.
Note: During the calculation phase the display will show
the final countdown time and this on-screen cursor will
change to the ‘working’ cursor.
A summary will be presented indicating that the process is
complete.
Tap ‘Quit’ to close the Compass Calibration application.
www.ikegps.com/quickstart Page 22 www.ikegps.com/support

2
ikeGPS Data Capture Application
ikeGPS Application
ikeTools
Data Transfer to Desktop
ikeUtilities
www.ikegps.com/quickstart Page 23 www.ikegps.com/support
ikeGPS Data Capture Application
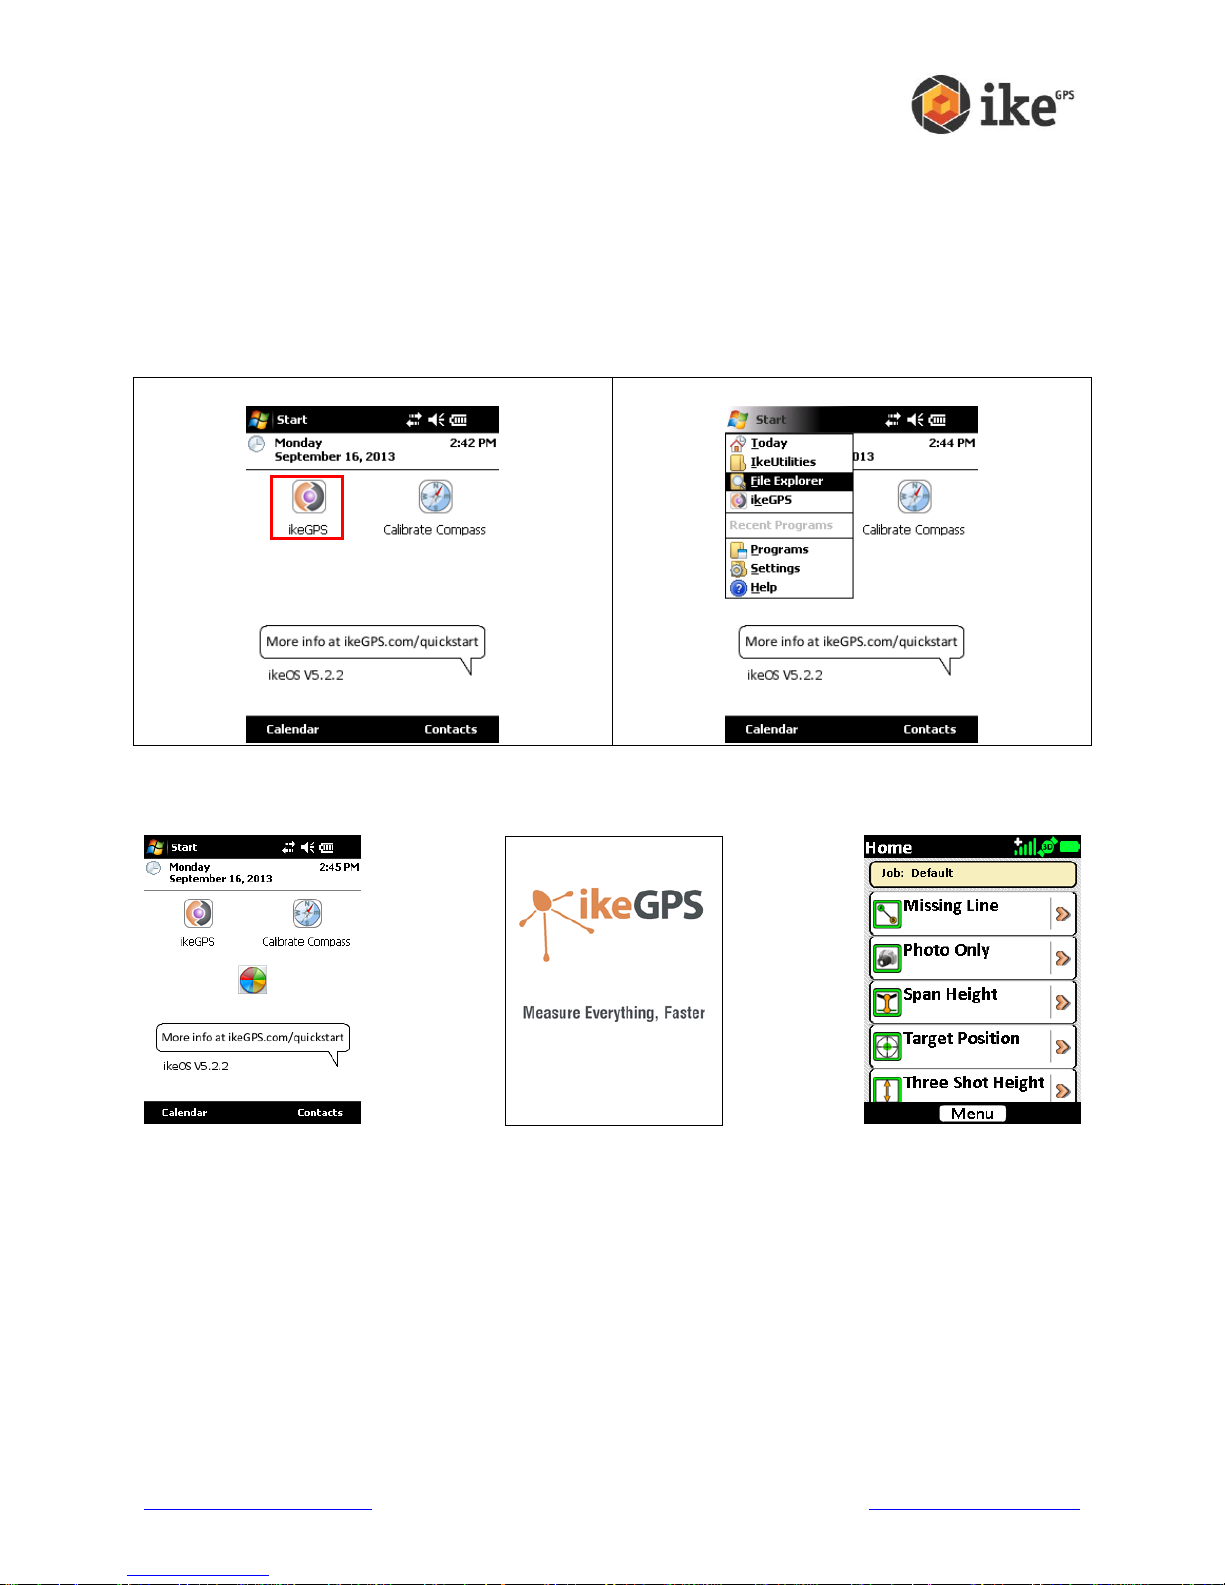
Launch ikeGPS from Home screen
Launch ikeGPS from Start menu
The ikeGPS application provides access to the ikeTools data capture modes. All ike units have
ikeGPS installed, but ikeTools are accessible dependent on product license purchased.
Starting the ikeGPS application
To start the ikeGPS application either tap the ikeGPS icon on the main Home screen, or from
the Start menu
The ikeGPS application will start and progress through the startup screen on to the Home
screen with a list of ikeTools.
www.ikegps.com/quickstart Page 24 www.ikegps.com/support
ikeGPS Home screen
1. Status
The top of the screen will show
the screen name and any
applicable status icons. In the
top-right corner, the GPS icons
will indicate the GPS signal and
the battery icon will indicate the
charge status (or remaining life)
of the battery.
2. Job Name
The current job name will
show below the status icons
3. ikeTools and Custom
Forms
The scrollable list of ikeTools
and/or custom forms will show
in the main part of the screen.
4. Action Buttons
At the bottom of the screen
action buttons will show.
Buttons will differ depending
on the options relevant to the
on-screen display.
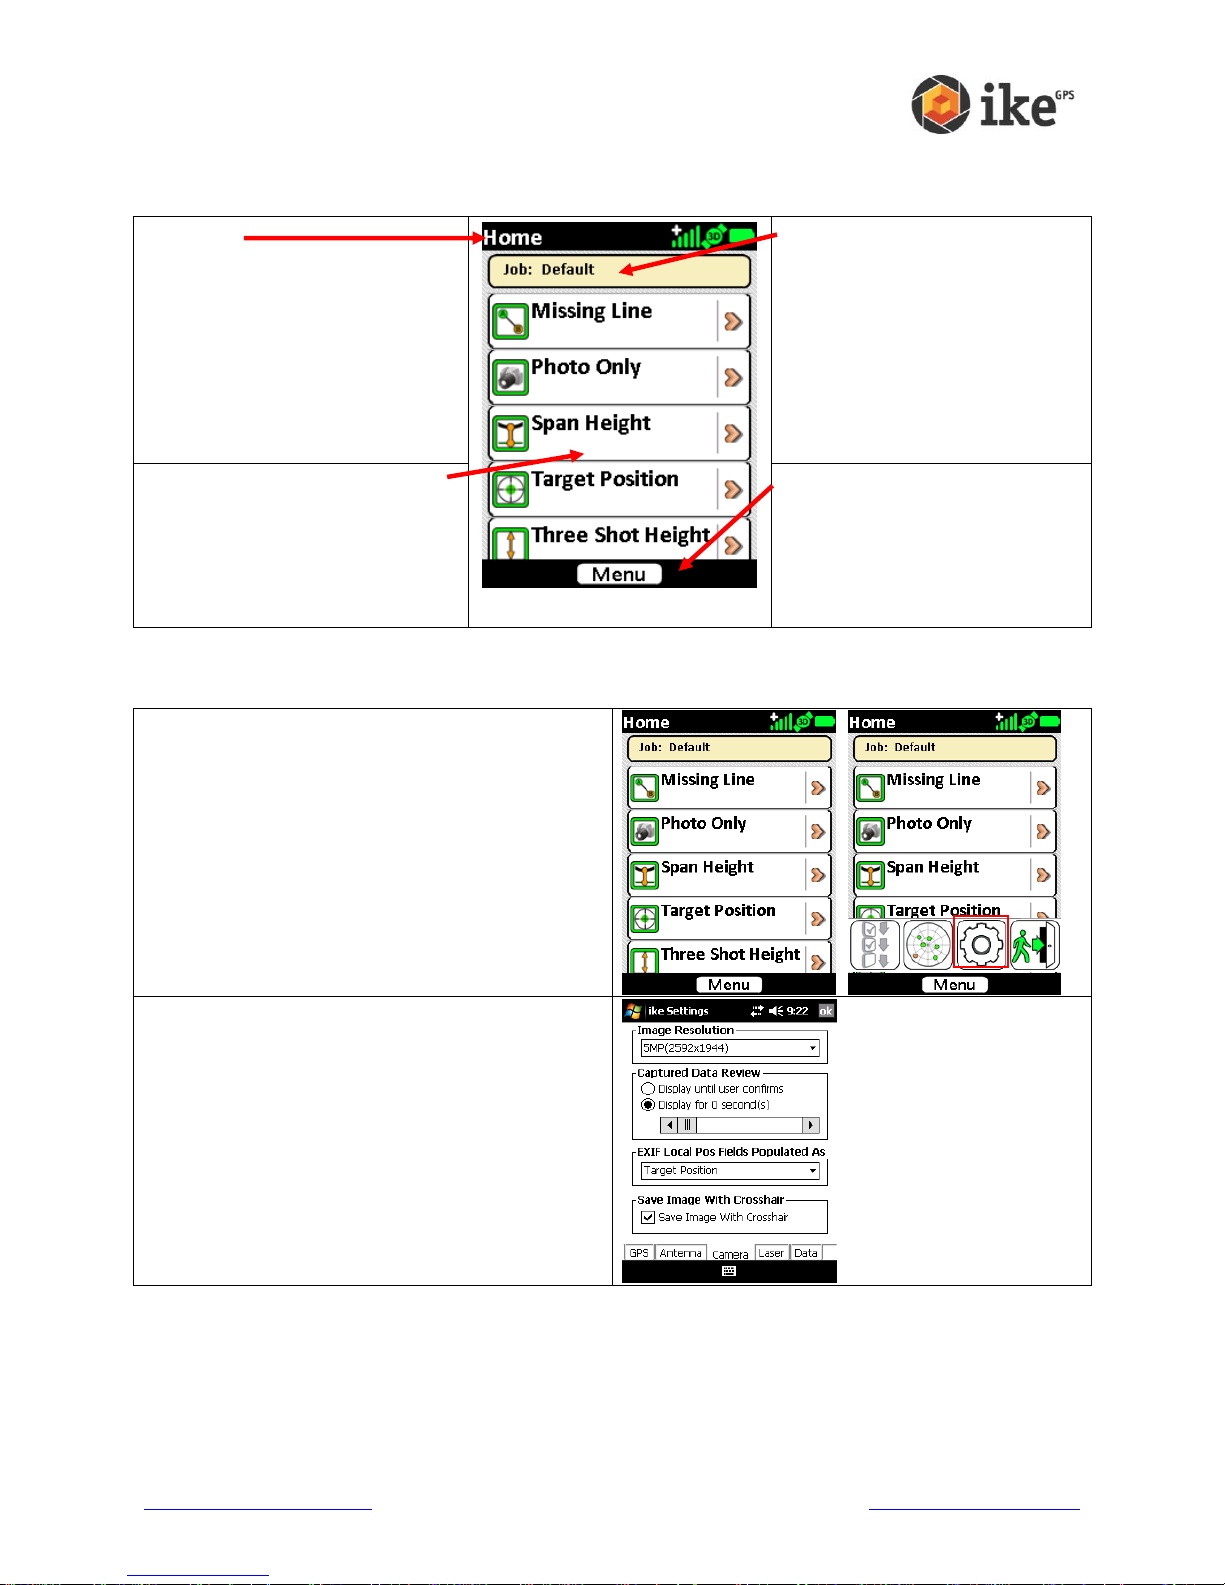
On the Home screen tap the [Menu] button to
display the available options.
Tap the settings icon to access the ‘ike
Settings’ options.
On any of the ‘ike Settings’ tabs, tapping the
[ok] button (in the top-right corner) will save
the selected settings and return to the
previous screen
The Home screen is split into four areas:
Viewing and changing the Settings
www.ikegps.com/quickstart Page 25 www.ikegps.com/support
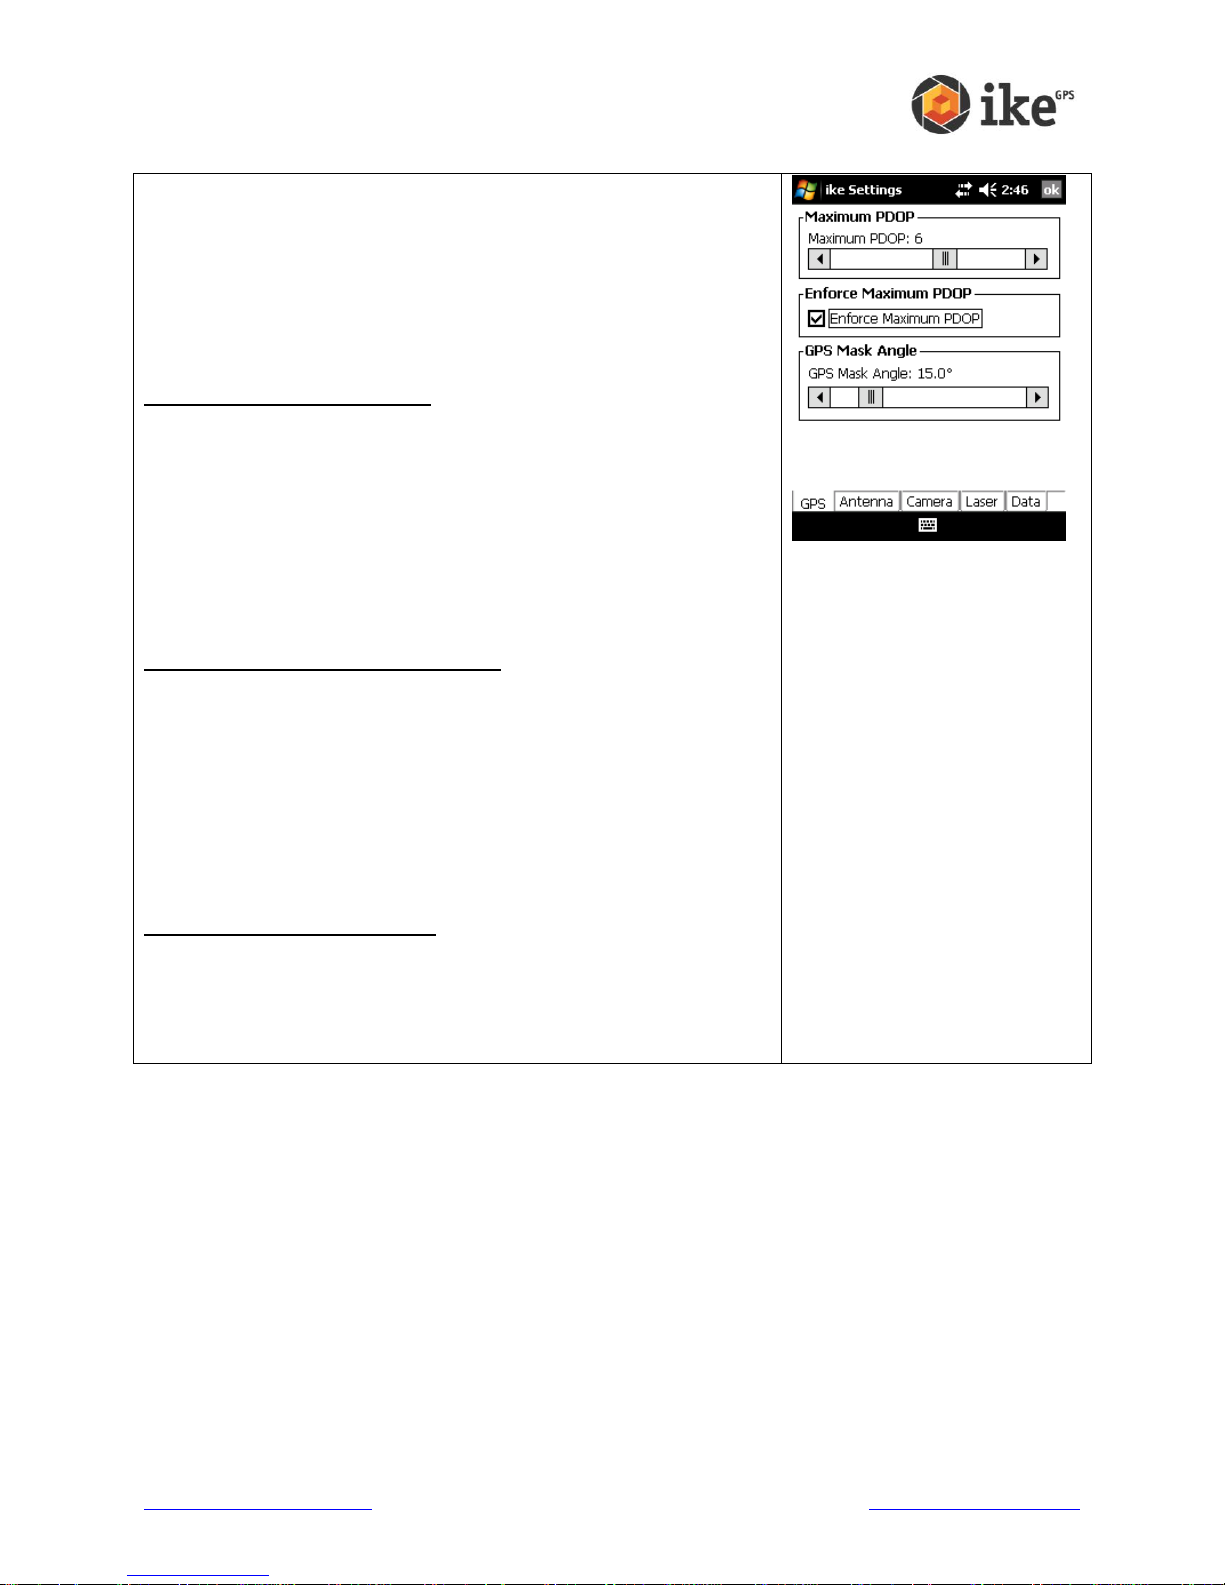
GPS Settings
This screen allows you to view and change the settings that
affect how ikeGPS operates with GPS satellites.
GPS Position Dilution of Precision (PDOP) value is a measure
of the overall accuracy of the current position. The lower this
value is then the more accurate your GPS position is likely to
be. A value of 100.0 is displayed on the targeting preview
screen when PDOP cannot be calculated.
Maximum PDOP value slider
If the current PDOP reading is above the GPS Maximum PDOP
setting, a warning will be shown on the capture preview screen
by the display of an orange border around the PDOP reading.
The Maximum PDOP setting can be adjusted by sliding the
level to the left or right to lower or increase the Maximum
PDOP. The default Maximum PDOP value is 6. A lower value
may result in more accurate the fix, but this may increase the
time to get a fix. A higher Maximum PDOP may reduce the time
to get a fix, but will likely decrease the accuracy of the fix.
Enforce Maximum PDOP checkbox
When Enforce Maximum PDOP is enabled, data capture will
not be possible if the GPS readings exceed the Maximum
PDOP. If Enforce Maximum PDOP is unchecked, then an
orange border will still show around the on-screen PDOP value
but positional readings can be taken if the maximum is
exceeded.
WARNING! If Enforce Maximum PDOP is unchecked,
positional detail of ike and target readings is may be less
accurate.
GPS Mask Angle value slider
The GPS Mask Angle default is set to 15o. Even if they are
visible, satellites that are at a lower elevation than the GPS
mask angle will not be used to calculate position. The GPS
Mask Angle can be adjusted by moving the slider bar left or
right.
www.ikegps.com/quickstart Page 26 www.ikegps.com/support

SBAS drop-down options
Hardware Revision Two ike units
Hardware Revision Two users can select their SBAS system
from the following options:
Disabled
North America (WAAS)
Europe (EGNOS)
Japan (MSAS)
India (GAGAN)
WARNING! Selecting the wrong SBAS system will make
the GPS less accurate. Anyone outside the regions
specified should set the SBAS option to ‘Disabled’.
Hardware Revision One ike units
This setting is not required Hardware Revision One ike units as
it is handled automatically.
www.ikegps.com/quickstart Page 27 www.ikegps.com/support

Antenna Settings
This screen allows you to view and change the value settings in
relation to using ike used with an external antenna.
The GPS Antenna Offset is used in conjunction with a fixedposition external antenna (on a pole or backpack) connected to
the ike units external antenna port.
The ‘Vertical (m):’ value is the distance above the ike unit
that a connected external antenna is located.
The ‘Horizontal (m):’ value is the distance to behind the ike
unit that a connected external antenna is located.
Tapping the [Save] button stores the Vertical and Horizontal
values to memory and adjusts GPS location and Laser range
calculations accordingly.
WARNING! When an external antenna is not connected to the
ike unit the GPS Antenna Offset Vertical and Horizontal values
should always be saved as 0.00
This example shows an external antenna mounted on a
backpack.
WARNING! To ensure best accuracy, it is not recommended
that a connected external antenna be secured forward or
beneath the ike unit. The Vertical offset should always be
above the ike unit, and the Horizontal offset should always be
behind the ike unit.
www.ikegps.com/quickstart Page 28 www.ikegps.com/support

Camera Settings
This screen allows you to view and change the settings for the
photos taken with ike.
The Image Resolution drop-down list shows the number of
megapixels to be used for each photo. A higher resolution will
give more detailed photos, but take up more memory storage
space. The number of options available on the Image
Resolution list depends on the model of ike unit purchased. An
Image Resolution of 3.2MP is selected by default.
Captured Data Review provides options for post-capture
review; when the:
‘Display until user confirms’ option is selected the photo
review screen is presented until the user taps the [Save]
button. When this option is selected, the ‘Retry’ option is
also available from the Review screen to allow the user to
discard the captured photo and retry the capture. This option
is enabled by default.
‘Display for X second(s)’ option is selected the photo review
screen is presented, briefly while the photo is saved, then
for the number of seconds selected on the slider. The
display time-out ranges between 0 and 5 seconds.
EXIF Local Pos Fields Populated As options
The Exchangeable Image File Format (EXIF) fields are pieces
of information stored with each photo. These use the EXIF v2.2
standard format for digital photos, such as the time and date,
but also include fields for target positional data which ikeGPS
records. With each reading, ike records both the Local position
(where your ike is physically located) and the Target position
(the object that the crosshairs are targeting.) For some
applications, such as Google Earth, it is useful to record the
GPS coordinates for the target position in the EXIF Local
Position field so that map icons will show where the object
actually is, but have an attached picture that was taken from a
distance. By default, ike sets this field to store the target
position data.
WARNING! Where the EXIF Local Position field is set as ‘Target
Position’ the EXIF will record the same value in the EXIF
Latitude / Longitude and Destination Latitude / Longitude fields.
The Save Image With Crosshair checkbox is checked by
default to allow presentation a crosshair on the captured target.
If the Save Image With Crosshair is not checked, the photo
does not save a crosshair on the target.
www.ikegps.com/quickstart Page 29 www.ikegps.com/support

Laser Settings
This screen allows you to view and change the settings in
relation to the way the laser rangefinder functions.
The Laser Mode options controls the selection between always
on (Streaming) or single target (One Shot) mode.
The ‘Streaming’ option is the default setting for where the
laser is continually firing and providing a live range distance
to target. This option is enabled by default.
The ‘One Shot’ option causes the laser rangefinder to
attempt to determine a distance only when the ‘Capture’
button is press.
Where ‘One Shot’ Laser Mode has been selected, the
capture preview Distance value will be shown as ‘Single’.
WARNING! Regardless of which the Laser Mode is
selected the laser rangefinder emits a pulse that may
cause infrared transmission detectors (e.g. speed
camera detectors) to be activated.
The Measurement Units option controls the selection between
recording distance measurement units.
‘Feet’ option displays measured distance in feet and inches
and records in decimal feet (e.g. displayed 4’6” will record
as 4.5). This option is enabled by default.
‘Meters’ option displays and records measured distance in
decimal meters.
The capture preview and review screens will present the
measured range in the ‘Distance’ panel
www.ikegps.com/quickstart Page 30 www.ikegps.com/support

Data Settings
This screen allows you to view and change the top-level Data
Folder where ike stores its Job sub-folders. The default ‘Current
Data Folder:’ directory is \SD Card\
Data Folder shows the ‘Current Data Folder:’
Tap the [Browse] button in the Data Folder box to show the
directory browser dialog. Use the folder tree view to browse and
select the required folder. Tap [Save] or [ok] to update the data
folder, or tap [Cancel] to not change the ‘Current Data Folder:’
WARNING! The Data Folder path must be a valid existing folder
on your ike unit to correctly record captured data.
Note: While it is possible to store captured data in ike internal
memory, it is recommended that data be stored on an inserted
SD card.
The XML for each Image setting allows the user to enable or
disable the generation of an XML file for each photo captured.
This option is not enabled by default.
www.ikegps.com/quickstart Page 31 www.ikegps.com/support

Changing the ‘Default’ Job name
For new units the job name will be set as ‘Default’.
As you may be operating in different areas it may
be prudent to change the name of the job to
reflect something more meaningful for the task.
Tap the current ‘Job:’ name to select and access
the Set Job menu
The virtual keyboard will appear to allow data
entry of a new job name.
Using the keyboard to enter an alpha-numeric
description of the job.
Alternatively, a list of existing jobs can be shown
by tapping the drop-down arrow to the right of
current job name field.
Tapping an existing job name will update the job
name to the selected job.
Once the correct job name is created, or selected,
and tap the [OK] button to set the job.
Tapping the [Cancel] button will return to the
Home screen.
www.ikegps.com/quickstart Page 32 www.ikegps.com/support

The application will return to the Home screen and
the Job name will be updated as selected.
Exiting the ikeGPS application
On the Home screen tap the [Menu] button to
display the available options.
Tap the exit icon to close the ikeGPS application.
At the ‘Exit ikeGPS?’ confirmation, either tap [OK]
to exit the application, or [Cancel] to return to the
Home screen
www.ikegps.com/quickstart Page 33 www.ikegps.com/support

ikeTools
1. Status
The top of the screen shows the
task name any any relevant icons
(e.g. battery level).
2. Video Preview
A streaming feed from the
camera. Most ikeTools show a
central crosshair to allow
accuracte targetting of point-ofinterest.
3. Instrument Readings
The lower section of the screen
shows the instruments in use by
the selected ikeTool.
Where any instrument does not
have a useable reading a red
border will appear around that
reading.
4. Action Buttons
At the bottom of the screen
action buttons will show. Buttons
may differ depending on the
options relevant to the on-screen
display.
Distance: The laser rangefinder distance from the ike unit to the targetted object
Bearing: The Compass bearing from the the ike unit towards the targetted object. This initially displays a
°M (Magentic) bearing, but as the GPS obtains a fix this will update to °T (True) to adjust for localised
magnetic declination/variance.
GPS Skyplot: Shows an overhead view of detected GPS satellites. The black icons indicate satellites in
use for you fix and the white icons indicate satellited available but not in use. The thicker black line
indicates the direction to north.
GPS PDOP: Shows a measure of the overall accuracy of the current position. The lower the PDOP the
greater the GPS positionmal accuracy is likely to be.
GPS Fix: This indicates the status of the GPS fix with respect to GPS coverage, PDOP and enabled ike
functionality. If the GPS+ option is installed a + symbol will be appended to the fix indicator and a
position quality graph will display.
Task Selection
Preview
Review
Additional Info
Save
Introduction
ikeTools are easy-to-use data capture modes. The specific ikeTools enabled on an ike unit are
restricted to those licensed for that individual ike unit.
The standard ikeTools have similar on-screen interfaces and start-to-finish workflows.
On-screen interface: Example data capture preview screen for Target Position
Workflow: Example workflow for Target Position ikeTool.
www.ikegps.com/quickstart Page 34 www.ikegps.com/support

Target Position
Select the Target Position ikeTool from the Home menu
Summary
Target Position is the workhorse of ike. Point ike at a remote object such as a tree, pole or
building and capture its GPS location using the on-board GPS, laser range finder and compass.
One shot and you’re on to the next object. Target Position mode is the standard mode for
capturing a single geo-referenced target and associated photo.
Step-by-step
www.ikegps.com/quickstart Page 35 www.ikegps.com/support

The default tasks for the Target Position ikeTool will be
shown. A red star will indicate the mandatory tasks.
Tap the Target Position task to start the video preview
screen
Move your ike until the crosshairs are centered on the
target object you wish to capture data on.
Check that the PDOP and GPS Fix readings are good.
The border around the instruments readouts will change
in color depending on the quality of the reading.
A red border will indicates that that reading is outside
the limits of the instrument.
An orange border indicates that the reading can be
used, but there may have been manual adjustments
made to allow capture outside the default
recommended settings.
Hold the ike unit steady, ensure you’re still on target and
tap the Next button or capture soft key.
If lighting conditions are an issue, use the Exposure
increase / decrease buttons (Right or Left arrow keys) to
either lighten or darken the target photo.
When the Right or Left arrow keys are pressed the
Manual Exposure icon will appear in the bottom-right of
the Camera Window.
Tapping the icon will return the Camera to Auto
Exposure mode and the icon will disappear.
If the photo is too dark and the target cannot be
distinguished, press the Right key to lighten the
photo.
If the photo is too light and the target cannot be
distinguished, press the Left key to darken the photo.
www.ikegps.com/quickstart Page 36 www.ikegps.com/support

The camera will click, and depending on camera
settings, will either show the review screen or revert to
the Target Position task selection screen
With the review screen enabled the screen will display a
static image of the target photo and the instrument time
at time of capture. You can tap the:
Information icon (top-left) to access
geospatial data about the target
Green ‘back’ arrow (bottom-right) to retake
the target. This will return to the preview
screen.
The information screen will provide instrument readings
in regards to the local (ike) position, target position and
other instrument readings.
Tap the Next button to save the target and continue.
Where there is a successful recording a green tick will
appear alongside the task.
From here the information can be abandoned (tap the
Home button), retaken (tap Target Position again to
delete the photo and re-enter the video preview), and
data entered into non-mandatory Label and Comment
fields.
Tap the Label task button to enter the Label entry
screen.
Tap the Comment task button to enter the Comment
entry screen.
Tap the Save button to save the target without
Label/Comments recorded and return to the Home
screen.
Tap the Home button to abandon the target and delete
the recorded data.
www.ikegps.com/quickstart Page 37 www.ikegps.com/support

On the Label screen, use the virtual keyboard to enter a
short description of the target.
Tap the Cancel button to exit the Label entry
Tap the OK button to store the Label text.
On the Comment screen, use the virtual keyboard to
enter a more detailed description of the target.
Tap the Cancel button to exit the Comment entry
Tap the OK button to store the Comment text.
Once all information is correct, tap Save to save the
target information.
Or tap Home to abandon the target and delete the
recorded data.
The Target Position ikeTool will return to the Home menu
www.ikegps.com/quickstart Page 38 www.ikegps.com/support

3-Shot Height
Select the Three Shot Height ikeTool from the Home menu
Summary
Directly measure the height of an object, such as a pole, from a remote position, even when the
base of the object is obscured.
In 3-Shot Height mode, the user is guided through a series of steps to measure the vertical
height of an object, where the base of the object is not necessarily visible.
When performing 3-Shot Height measurements, the use of an ike low magnetic signature tripod
is strongly recommended as this will assist in minimizing potential error introduced due to
changing the hand-held height of the ike during the measurement.
Step-by-step
www.ikegps.com/quickstart Page 39 www.ikegps.com/support

The default tasks for the Three Shot Height ikeTool will be
shown. A red star will indicate the mandatory tasks.
Tap the Three Shot Height task to start the video preview
screen
Aim at the ground in front of the object.
Aim at a level, flat area in front of the object to be measured
and tap the Next button to proceed.
Aim at the vertical face of the object.
Tap the Next button to proceed or tap the Previous button to
return to the previous step.
www.ikegps.com/quickstart Page 40 www.ikegps.com/support

Aim at the top.
Tap the Next button to proceed or tap the Previous button to
return to the previous step.
Take the photo. The measured height is overlaid on the
photo.
Tap the Next button to capture the photo or tap the Previous
button to return to the previous step.
The camera will click, and depending on camera settings,
will revert to the Three Shot Height selection screen. Where
there is a successful recording a green tick will appear
alongside the task.
From here the information can be abandoned (tap the Home
button), retaken (tap Three Shot Height again to delete the
photo and re-enter the video preview), and data entered into
non-mandatory Label and Comment fields.
Tap the Label task button to enter the Label entry screen.
Tap the Comment task button to enter the Comment entry
screen.
Tap the Save button to save the target without
Label/Comments recorded and return to the Home screen.
Tap the Home button to abandon the target and delete the
recorded data.
Refer to the Target Position ikeTool for instruction on adding Label and Comment
www.ikegps.com/quickstart Page 41 www.ikegps.com/support

Missing Line
Select the Missing ikeTool from the Home menu
Summary
The Missing Line mode is used to calculate the horizontal distance between any two objects.
When performing Missing Line measurements, the use of an ike low magnetic signature tripod
is strongly recommended as this will assist in minimizing potential error introduced due to
changing the hand-held height of the ike during the measurement.
Step-by-step
www.ikegps.com/quickstart Page 42 www.ikegps.com/support

The default tasks for the Missing Line ikeTool will be shown.
A red star will indicate the mandatory tasks.
Tap the Missing Line task to start the video preview screen
Aim at the start point
Confirm your targeting
Tap Next
Aim at the end point
Confirm your targeting
Tap Next
www.ikegps.com/quickstart Page 43 www.ikegps.com/support

Recompose the scene so that the superimposed line is in
the center of the image.
Tap Next to continue.
The camera will click, and depending on camera settings,
will revert to the Three Shot Height selection screen. Where
there is a successful recording a green tick will appear
alongside the task.
From here the information can be abandoned (tap the Home
button), retaken (tap Missing Line again to delete the photo
and re-enter the video preview), and data entered into nonmandatory Label and Comment fields.
Tap the Label task button to enter the Label entry screen.
Tap the Comment task button to enter the Comment entry
screen.
Tap the Save button to save the target without
Label/Comments recorded and return to the Home screen.
Tap the Home button to abandon the target and delete the
recorded data.
Refer to the Target Position ikeTool for instruction on adding Label and Comment
www.ikegps.com/quickstart Page 44 www.ikegps.com/support

Span Height
Select the Span Height ikeTool from the Home menu
Summary
In Span Height mode is used to calculate the vertical height above ground of a point on a span,
for example the mid-span height of a cable or wire.
The user is guided through a series of steps to allow a measurement of the vertical distance
between (for example) a suspended wire and the (reasonably level) ground below.
When performing span height measurements, the use of an ike low Magnetic Signature Tripod
is strongly recommended as this will assist in minimizing potential error introduced due to
changing the hand-held height of the ike during the measurement.
Step-by-step
www.ikegps.com/quickstart Page 45 www.ikegps.com/support

The default tasks for the Span Height ikeTool will be shown.
A red star will indicate the mandatory tasks.
Tap the Span Height task to start the video preview screen
Aim at the wire. At this point in the process, your ike needs a
valid GPS position, along with the angle and distance to the
wire. Once these criteria are all satisfied, the Ready to
capture indicator will turn green to indicate that it is OK to
proceed. Tap the Next button when you are happy with the
distance measurement.
Tip: The distance measured in this step is critical to
obtaining a good height measurement. Observing the laser
distance measurement at this point to ensure that you get
the expected result will help to improve the overall accuracy.
www.ikegps.com/quickstart Page 46 www.ikegps.com/support

Aim at the ground. The on screen indicators will guide you to
the spot directly below the Point of Interest on the wire.
Follow the arrows until your ike is aimed at the point on the
ground directly below the wire and the arrows disappear.
Once you are satisfied, Tap the Next button to continue.
Tip: If you are in a situation where you cannot see the point
on the ground directly below the wire, you can aim at a point
on the ground at the same height instead (only the vertical
height will be used at this stage).
Recompose your scene with the measurement
superimposed, and tap the Next button to finalize the
measurement.
www.ikegps.com/quickstart Page 47 www.ikegps.com/support

The camera will click, and depending on camera settings,
will revert to the Span Height selection screen. Where there
is a successful recording a green tick will appear alongside
the task.
From here the target position information can be abandoned
(tap the Home button), retaken (tap Span Height again to
delete the photo and re-enter the video preview), and data
entered into non-mandatory Label and Comment fields.
Tap the Label task button to enter the Label entry screen.
Tap the Comment task button to enter the Comment entry
screen.
Tap the Save button to save the target without
Label/Comments recorded.
Tap the Home button to abandon the target and delete the
recorded data and return to the Home screen.
Refer to the Target Position ikeTool for instruction on adding Label and Comment
www.ikegps.com/quickstart Page 48 www.ikegps.com/support

Photo Only
Select the Photo Only ikeTool from the Home menu
Summary
The Photo Only mode is used to capture a high resolution photo of an object. This is useful for
documenting the conditions of located or measured objects, for identifying hazards for field
crews and for including in assessments.
Step-by-step
www.ikegps.com/quickstart Page 49 www.ikegps.com/support

The default tasks for the Photo Only ikeTool will be shown.
A red star will indicate the mandatory tasks.
Tap the Photo Only task to start the video preview screen.
To use this mode, aim the ike to compose your scene as
required.
Tap the Next button.
The camera will click, and depending on camera settings,
will revert to the Photo Only selection screen. Where there
is a successful recording a green tick will appear alongside
the task.
From here the information can be abandoned (tap the Home
button), retaken (tap Photo Only again to delete the photo
and re-enter the video preview), and data entered into nonmandatory Label and Comment fields.
Tap the Label task button to enter the Label entry screen.
Tap the Comment task button to enter the Comment entry
screen.
Tap the Save button to save the target without
Label/Comments recorded.
Tap the Home button to abandon the target and delete the
recorded data.
Refer to the Target Position ikeTool for instruction on adding Label and Comment
www.ikegps.com/quickstart Page 50 www.ikegps.com/support

Local Point
Select the Local Point ikeTool from the Home menu
Summary:
The Local Point mode is an ikeTool licensed to ikePro and ikeSolutions configurations.
This ikeTool is used to capture an average GPS position over a series of 30 readings. When
used with a custom ikeDesktop form, the number of GPS readings can be adjusted to suit data
collection requirements.
Step-by-step
www.ikegps.com/quickstart Page 51 www.ikegps.com/support

The default tasks for the Local Point ikeTool will be
shown. A red star will indicate the mandatory tasks.
Tap the Local Point task to start the local point
averaging screen.
To use this mode, tap the start button to being
calculating an average position.
GPS readings will be counted down until all recordings
are completed.
www.ikegps.com/quickstart Page 52 www.ikegps.com/support

When all recordings a complete an average Latitude,
Longitude, Altitude and PDOP will be presented.
Tap Next to save the positional information
The screen will revert to the Local Point selection
screen. Where there is a successful recording a green
tick will appear alongside the task.
From here the information can be abandoned (tap the
Home button), retaken (tap Local Point again to delete
the reading and re-enter the countdown), and data
entered into non-mandatory Label and Comment fields.
Tap the Label task button to enter the Label entry
screen.
Tap the Comment task button to enter the Comment
entry screen.
Tap the Save button to save the reading without
Label/Comments recorded.
Tap the Home button to abandon the reading and
delete the recorded data.
Refer to the Target Position ikeTool for instruction on adding Label and Comment
www.ikegps.com/quickstart Page 53 www.ikegps.com/support

Tree Assessment
Select the Tree Assessment ikeTool from the Home menu
Summary
Tree Assessment mode is an ikeTool licensed to ikePro and ikeSolutions configurations.
This ikeTool is used to capture an annotated and geo-referenced 5MP photo for tree
assessments.
Step-by-step
www.ikegps.com/quickstart Page 54 www.ikegps.com/support

The default tasks for the Tree Assessment ikeTool will be
shown. A red star will indicate the mandatory tasks.
Tap the Tree Assessment task to start the video preview
screen.
To use this mode, follow the onscreen instructions to capture
the required detail.
Aim the ike at the base of the tree and tap the Next (green
arrow) button.
Aim the ike at the truck of the tree to mark the DBH
(diameter at breast height) and tap the Next (green arrow)
button.
A temporary zoomed image of the selected DBH area will be
stored for later use.
www.ikegps.com/quickstart Page 55 www.ikegps.com/support

Aim the ike at the tree and tap the Next (green arrow)
button.
Aim the ike at the left most extent of the foliage and tap the
Next (green arrow) button.
Aim the ike at the right most extent of the foliage and tap the
Next (green arrow) button.
www.ikegps.com/quickstart Page 56 www.ikegps.com/support

Adjust the left hand side of the DBH.
User the Left and Right hardware buttons to move the left
DBH marker to align with the left side of the tree trunk
Tap the Next (green arrow) button.
www.ikegps.com/quickstart Page 57 www.ikegps.com/support

Adjust the right hand side of the DBH.
User the Left and Right hardware buttons to move the right
DBH marker to align with the sight side of the tree trunk
Tap the Next (green arrow) button.
Where enabled, the Review screen will show the captured
target photo with the marked-up tree height, width and DBH.
Tap the back button (green arrow) to abandon the image
and retake the target.
Tap the Next button to save the photo and move to the task
screen.
www.ikegps.com/quickstart Page 58 www.ikegps.com/support

The camera will click, and depending on camera settings,
will revert to the Tree Assessment selection screen. Where
there is a successful recording a green tick will appear
alongside the task.
From here the information can be abandoned (tap the Home
button), retaken (tap Tree Assessment again to delete the
photo and re-enter the video preview), and data entered into
non-mandatory Label and Comment fields.
Tap the Label task button to enter the Label entry screen.
Tap the Comment task button to enter the Comment entry
screen.
Tap the Save button to save the target without
Label/Comments recorded.
Tap the Home button to abandon the target and delete the
recorded data.
Refer to the Target Position ikeTool for instruction on adding Label and Comment
www.ikegps.com/quickstart Page 59 www.ikegps.com/support

TrueSize Poles
Select the True Size Pole ikeTool from the Home menu
Summary
TrueSize Poles mode is an ikeTool licensed to the ikeSolutions Poles and ikeSolutions
Utilities Poles configurations.
This ikeTool is used to capture a calibrated, geo-referenced 5MP photo of a telecommunication
or utility pole. The photo can then be transferred to the desktop for measurement and
annotation using the desktop ikeAnnotate Poles software.
Step-by-step
www.ikegps.com/quickstart Page 60 www.ikegps.com/support

The default tasks for the True Size Pole ikeTool will be
shown. A red star will indicate the mandatory tasks.
Tap the True Size Pole task to start the video preview
screen.
To use this mode, aim the ike to compose your scene with
the pole in the center of the preview.
The vertical part of the crosshair should align with the
vertical pole
Tap the Next button to capture the target. Depending on
settings, the camera click noise will be made and either the
Review or Task screen will be displayed
Where enabled, the Review screen will show the captured
target photo.
Tap the back button (green arrow) to abandon the photo and
retake the target.
Tap the Next button to save the photo and move to the task
screen.
www.ikegps.com/quickstart Page 61 www.ikegps.com/support

The camera will click, and depending on camera settings,
will revert to the True Size Poles selection screen. Where
there is a successful recording a green tick will appear
alongside the task.
From here the information can be abandoned (tap the Home
button), retaken (tap True Size Poles again to delete the
photo and re-enter the video preview), and data entered into
non-mandatory Label and Comment fields.
Tap the Label task button to enter the Label entry screen.
Tap the Comment task button to enter the Comment entry
screen.
Tap the Save button to save the target without
Label/Comments recorded.
Tap the Home button to abandon the target and delete the
recorded data.
Refer to the Target Position ikeTool for instruction on adding Label and Comment
www.ikegps.com/quickstart Page 62 www.ikegps.com/support

TrueSize PLS
Select the True Size PLS ikeTool from the Home menu
Summary
TrueSize PLS mode is an ikeTool licensed to the ikeSolutions PLS and ikeSolutions
Utilities PLS configurations.
This ikeTool is used to capture a calibrated, geo-referenced 5MP photo of a telecommunication
or utility pole. The photo can then be transferred to the desktop for measurement and
annotation using the desktop ikeAnnotate PLS software. The annotated image is then
compatible for export into software products from Power Line Systems, Inc.
Step-by-step
www.ikegps.com/quickstart Page 63 www.ikegps.com/support

The default tasks for the True Size PLS ikeTool will be
shown. A red star will indicate the mandatory tasks.
Tap the True Size PLS task to start the video preview
screen.
To use this mode, aim the ike to compose your scene with
the pole in the center of the preview.
The vertical part of the crosshair should align with the
vertical pole
Tap the Next button to capture the target. Depending on
settings, the camera click noise will be made and either the
Review or Task screen will be displayed
Where enabled, the Review screen will show the captured
target image.
Tap the back button (green arrow) to abandon the photo and
retake the target.
Tap the Next button to save the photo and move to the task
screen.
www.ikegps.com/quickstart Page 64 www.ikegps.com/support

The camera will click, and depending on camera settings,
will revert to the True Size PLS selection screen. Where
there is a successful recording a green tick will appear
alongside the task.
From here the information can be abandoned (tap the Home
button), retaken (tap True Size PLS again to delete the
photo and re-enter the video preview), and data entered into
non-mandatory Label and Comment fields.
Tap the Label task button to enter the Label entry screen.
Tap the Comment task button to enter the Comment entry
screen.
Tap the Save button to save the target without
Label/Comments recorded.
Tap the Home button to abandon the target and delete the
recorded data.
Refer to the Target Position ikeTool for instruction on adding Label and Comment
www.ikegps.com/quickstart Page 65 www.ikegps.com/support

Data Transfer to Desktop
The Microsoft Windows® based ikeDesktop application is used to transfer data from the ike unit
to the desktop via ActiveSync® / Windows® Mobile Device Center. Once the ike data has been
transferred to the desktop, various report formats can be generated from the ikeDesktop
Reports view.
More details on transferring data and report generation using ikeDesktop can be found in the
ikeDesktop User Manual.
www.ikegps.com/quickstart Page 66 www.ikegps.com/support

ikeUtilities
These utilities are available from the Start menu on the Home
screen.
Tap Start, then select the ikeUtilities option
The list of installed IkeUtilities will be shown.
Compass Calibration is an alternate method of accessing
the same utility that is available on the Home screen.
The same procedure as documented earlier in this manual is used
for operating this utility.
Your ike unit also comes with a number of on-board utilities to assist in use of and maintain your
ike unit.
Compass Calibration
www.ikegps.com/quickstart Page 67 www.ikegps.com/support

Diagnostics
Diagnostics is an application that:
1. Shows system information in the following categories:
System Data
GPS Information
Camera Information
Data Storage Information
2. Tests communication with and reports on the following
instruments:
Compass
Laser
GPS
3. Checks Battery levels
It is advisable to soft reset the device before running this
application to ensure that no running programs may affect the test.
Please ensure that you save all data before resetting the unit.
The information available in the Diagnostics screen will also be
useful should you need to contact your ike
GPS
reseller or ike
GPS
Support for technical or user assistance with your ike unit. When
run, the Diagnostics application also stores a report (in plain text
format) in the root folder (\) of your ike unit.
running. Please ensure ikeGPS is exited before running the
Diagnostics application.
www.ikegps.com/quickstart Page 68 www.ikegps.com/support

GPS Info
This GPS Info utility allows you to see information in regards to which GPS satellites
are accessible to your ike.
This information is available from the three options on the View menu.
Skyplot
Satellite Information (Sat info)
Navigation Info (Nav info)
Skyplot
This is the default screen in GPSInfo. (If you have moved
away from it, you can return by selecting View > Skyplot.) It
shows a map of all the satellites that your ike is aware of, with
identification numbers. Solid circles mean that ike has an
active connection with the satellite.
This screen also gives information on the physical location of
your ike, based on data it receives from the GPS satellites.
The top of the screen is always North
Latitude and Longitude are the users geospatial
coordinates.
Altitude is the height above sea level in meters.
PDOP is a measure of the positional accuracy of the GPS
reading.
Nav Mode is the navigational status of GPS Fix. A 2-D (two
dimensional) fix only includes latitude and longitude data. A
3-D (three dimensional) fix also includes altitude data. The
available constellation of satellites available affects whether
altitude can be calculated.
Sat Info
This screen gives a table of all visible satellites, along with
numeric data about their location and accessibility. To access
this screen, select View > SatInfo.
Fix is a column showing which satellites are being used to
calculate the GPS position.
SV provides the Space Vehicle (or GPS satellite)
identification number.
El gives the elevation of the satellite in degrees.
Az gives the azimuth of the satellite, with true north defined
as 0° and true south defined as 180°.
SNR gives the Signal-to-Noise Ratio of communication with
the satellite. A value between 40 and 50 is considered good.
www.ikegps.com/quickstart Page 69 www.ikegps.com/support

Nav Info
This screen gives the navigational information of your ike.
Latitude and Longitude are the users geospatial
coordinates.
Altitude is the height above sea level in meters.
PDOP is a measure of the positional accuracy of the GPS
reading.
SOG gives the Speed Over Ground in meters per second.
COG gives the Course Over Ground. This value is only
meaningful if your ike is physically moving.
UTC Time gives the current Universal Time Code date and
time.
Nav Mode is the navigational status of GPS Fix. A 2-D (two
dimensional) fix only includes latitude and longitude data. A
3-D (three dimensional) fix also includes altitude data. The
available constellation of satellites available affects whether
altitude can be calculated.
This GPS Info utility also has a Config menu that allows access to the following tools:
Cold Start
Settings
Cold Start
Should your ike unit be taking a long time to get a useable GPS
fix, the GPS can be forced to restart and require a completely
fresh almanac from available satellites. A full Cold Start and
almanac refresh can take up to 30 minutes depending on local
satellite coverage.
Tapping the [Yes] button at the ‘Do you really want to cold start
the GPS?’ prompt will flush all current information in the GPS
and force it to reacquire this data. Tapping [No] will cancel the
Cold Start request.
Settings
This is a shortcut to the ike Settings ‘GPS’ tab.
www.ikegps.com/quickstart Page 70 www.ikegps.com/support

License Manager
The License Manager utility manages access to licenses to
ikeTools available via the ikeGPS application and other options
available for use on your ike unit.
ike License Files (ILF) are tailored to individual ike units – a license
file that has been generated for one unit will not function on
another unit.
The ‘Add license’ section relates to the functionality to apply
another license file to the ike unit. ike units are preinstalled with
licensing appropriate to the customer order at time of shipping.
If additional or a change to existing licensing is required, a new
license file with application instructions will be forwarded.
The ‘Current licenses’ section shows the list of licenses that are
currently installed on the ike unit.
Depending on the original licensing of the device the list of ‘Current
licenses’ will vary from unit-to-unit
www.ikegps.com/quickstart Page 71 www.ikegps.com/support

Zeroize
This utility is designed to remove all user-installed programs, settings and data,
including all ikeGPS application-specific data from the ike unit in preparation for
reinstalling or upgrading the ikeOS Software.
WARNING! Zeroizing your ike unit will remove all software and data from the
unit and render it unusable as an ike unit until ikeOS software is installed.
Please ensure you have backed up all important data (captured information,
personal data, software registration codes, etc.), and you have an appropriate
version of the ikeOS installation software before performing this function. There are
no undelete utilities to restore this data.
To Zeroize, select Start > ikeUtilities > Zeroize.
You will see the WARNING screen and message, and a choice to Confirm or Cancel the
operation.
When Confirm is tapped/selected there are no undelete utilities to restore this
data. Once the Zeroize process has begun data cannot be recovered.
The Zeroize application has two modes of for resetting the ike unit:
Mode 1: Delete Applications and ‘My Documents’ data
The default option is to delete only the ikeOS system and all
other data and applications BUT will leave data in the ‘Storage’
folder, and optionally fitted SD Card, intact.
Tapping the [Confirm] button reset the ike unit to a factory state
but retains data in the Storage folder and on a fitted SD Card.
Tapping the [Cancel] button will close the Zeroize applet.
Mode 2: Clean All
Selecting the ‘Zero Storage and SD Card Folders’ checkbox will
delete all applications and data on the ike unit.
Tapping the [Confirm] button will reset the ike unit to a factory
state. This will also delete all contents of the \Storage folder and
any fitted SD Card.
As this process deletes all data on a fitted SD card, a
Zeroize with ‘Zero Storage and SD Card Folders’ selected
may take some time depending on the size of the SD
card installed.
Tapping the [Cancel] button will close the Zeroize applet.
After Zeroize, ikeOS must be re-installed to restore full ike functionality. Any other
applications that were previously installed on the ike unit must also then be manually
reinstalled to return that functionality.
www.ikegps.com/quickstart Page 72 www.ikegps.com/support

3
ikePro/ikeSolutions Options
GPS+
Custom Forms
www.ikegps.com/quickstart Page 73 www.ikegps.com/support

ikePro/ikeSolutions Options
When installed, GPS+ appends a + symbol and
reception indicator to the targeting preview screen GPS
status.
The + symbol is also added to NAV Mode: in the GPS
information utility
ikePro kits and ikeSolutions bundles come with additional ‘Field Accessories’, GPS+ option and
the use of custom forms generated with ikeDesktop, adding further functionality to your ike unit.
GPS+
The GPS+ option is only available on ikePro and ikeSolutions configuration and enhances the
position by refining the outputs of the GPS instrument to increase the accuracy of the ike unit
position.
Custom Forms/Workflows
The ikeDesktop application allows you to build digital forms to allow capture of data that more
suits your needs. ikeDesktop also allows you to measure the height and width
ikeDesktop allows ikeTools to be used together in custom workflows to capture readings for the
objects you are targeting. Combined with the ability to add custom forms, ikeDesktop can
create powerful workflows to allow consistent day-to-day data collection for any required job.
More details on ikeDesktop can be found in the ikeDesktop User Manual.
www.ikegps.com/quickstart Page 74 www.ikegps.com/support

4
Appendix 1: ike Maintenance and
Information
Caring for your ike
Troubleshooting and Service Tips
Product Specification
Accessory Instructions
Software Licensing
Battery Safety
Hardware Warranty, Software Maintenance and Support
Certification and Classifications
Additional Support
www.ikegps.com/quickstart Page 75 www.ikegps.com/support

Appendix 1: ike Maintenance and Information
Caring for your ike
This section how to store, clean, and protect your ike unit and battery packs. Specifically, it
provides guidelines for:
storing your ike and battery packs
protecting the touchscreen
protecting your ike against mechanical shock
battery pack warning
equipment warnings
using your ike in extreme temperatures
cleaning your ike
repairing your ike
disposing of your ike and battery packs
Storing your ike and battery packs
This section describes what you need to know about storing your device and battery
packs, including:
the storage temperature range of your ike
how to store your ike for less than two weeks
how to store the device for more than two weeks
how to take your ike out of extended storage
Storage temperature range of your ike: Your ike can be stored at temperatures between
-22° F and 140° F (-30° C to 60° C).
Where possible, store your ike indoors out of direct sunlight, in a cool/non-humid location
and away from electric/magnetic materials. Doing so helps protect your device from
extreme temperature changes and helps your device run efficiently at start up.
Storing your ike for less than two weeks: If you plan to
store your device for less than two weeks, suspend the
device by following these steps:
1. As a precaution, back up your data onto a desktop
computer or an external storage device such as a SD
card. (See Using the Hardware for more instructions
on backing up your data.)
2. Leave the battery pack in the device.
3. If you plan to store the device longer than a few days, it
is a good idea to leave the device connected to the
wall charger or to make sure the battery pack is fully
charged.
4. Suspend the device.
Storing your ike for more than two weeks:
To store the device safely for longer than two weeks, follow these steps:
1. Back up your data.
www.ikegps.com/quickstart Page 76 www.ikegps.com/support

2. Press the Task Manager button to close all running application programs.
3. Charge the battery pack to full capacity (100%).
4. Unplug the wall charger. Press the Power button until the Power Button menu appears.
5. Select Power Off from the menu, and then tap OK.
6. Place your ike in a safe, dry place.
Taking your ike out of extended storage: The battery pack discharges slightly during
extended storage periods. When you are ready to use your ike again, follow these steps so
your battery pack runs efficiently:
Plug your ike into a charger.
Charge the battery pack. (To check the battery power status, tap on the battery icon
at the top of the screen.)
Only charge the battery pack in temperatures between 32°F and 104°F (0°C and 40°C).
For best results, charge the battery pack at room temperature (68°F or 20°C)
Protecting the touchscreen
Protect the touchscreen from impact, pressure, or abrasive substances that could damage
it. To further protect the touchscreen, a tested screen protector accessory is available
from your ike
GPS
reseller.
CAUTION: Be sure to replace the screen protector as often as the screen protector
manufacturer packaging directs.
To apply a screen protector, follow these steps:
1. Make sure your ike is free of oils and dirt. You can wipe it with a microfiber cloth.
2. Fit the screen protector onto your ike screen in accordance with the supplied installation
instructions.
3. Smooth the screen protector while peeling back the liner, working out air bubbles as you
go. Continue smoothing until the liner is removed.
Note: Some air bubbles may still be visible, but they fade away in a short time. You can
use a credit card to gently push out any excess air.
Protecting your ike against mechanical shock
ike is designed for protection from mechanical shock. It has been test-dropped from five
feet (1.524m) onto concrete. Shock protection is guaranteed only when the entire body
molding (including SD Card cover and Connector protector) is securely in place.
Equipment warnings
WARNING! To reduce the risk of personal injury, electrical shock, fire or damage to the
equipment:
Plug the wall charger into an electrical outlet that is easily accessible at all times.
Disconnect power from the equipment by unplugging the wall charger from the electrical
www.ikegps.com/quickstart Page 77 www.ikegps.com/support

outlet or unplugging the synchronization cable from the host computer.
Do not place anything on the wall charger cord or any of the other cables. Arrange
them so that no one may accidentally step on or trip over them.
Do not pull on a cord or cable. When unplugging the wall charger from the electrical
outlet, pull on the plug, not the cord.
Use only wall chargers intended for your ike. Using any other external power source can
damage your product and void your warranty.
Using your ike in extreme temperatures
ike operates in ranges from -22°F to 122°F (-30°C to 50°C). To help your device function
properly, store the device indoors when possible.
Other tips:
If your ike is exposed to temperatures below 14°F (-10°C), the device may slow down or
the display backlight may become dim to reduce the load on the battery power.
Extremely low or high temperatures may prevent the battery pack from charging.
Charge the battery pack in temperatures between 32°F and 104°F (0° C and 40° C).
For best results, charge the battery pack at room temperature (68°F or 20°C)
Cleaning your ike
This section explains how to clean
the touchscreen
the communications module (area housing the USB port, DC jack, and serial port)
the speaker or microphone
the display bezel
data capture module
Touchscreen: To clean the touchscreen, follow these steps:
1. Press the power button briefly to suspend the device.
2. If you applied a protector to the touchscreen, carefully remove it.
3. Apply water or a mild cleaning solution such as Windex® or 409® to a microfiber cloth
and gently wipe off the touchscreen. Other approved cleaners include Citrus Wonder®
and Citrus All Purpose Cleaner®.
CAUTION: Do not use tissues, paper towels, or harsh cleaning agents to clean the
touchscreen.
1. If you used a cleaning solution, rinse the touchscreen with water and dry it with a
microfiber cloth.
2. Press the power button to resume the device.
CAUTION: Long exposure to the following solutions may damage your device:
pine oil
oil based paint
automotive brake cleaner
isopropyl alcohol
carburetor cleaner
www.ikegps.com/quickstart Page 78 www.ikegps.com/support

In case the device is exposed to one of these solutions, wipe it off with a mild cleaning
solution.
Case overmolding: Clean the rubber overmolding that surrounds the case with a cloth
and a mild cleaning solution like 409 or Citrus Wonder. After you are done cleaning, rinse
the device with water.
Communications module (area housing the USB port, DC jack, serial port): To clean
the communications module, run it under a faucet. Use a soft toothbrush or toothpick to
clean out any remaining dirt.
Speaker and microphone: If debris gets in the speaker or microphone, use a soft bristle
brush to remove it. Do not insert any object into the speaker or microphone holes.
Display bezel. If the edge under the bezel gets dirty, use a microfiber cloth to remove the
debris. Do not remove the bezel.
Data capture module. If debris gets in the camera lens, use a soft bristle brush to
remove it. Use a soft bristle brush or microfiber cloth for removing debris or marks from
the distance finder lenses. Do not use any hard or sharp objects that may scratch the
lenses.
Repairing your ike
If your ike unit is malfunctioning or in need of repair, call your ike
GPS
reseller or service center
for assistance.
Refer to sections Preparing for a support center call and Additional Support and your
warranty information for details on support options for your ike equipment.
WARNING! Do not attempt to repair the ike device yourself. This action voids the
warranty and may result in a chargeable repair.
If your ike
GPS
reseller or service center deems that your ike unit needs to be returned for
repair assessment a Return Materials Authorization (RMA) reference will be issued.
Where RMA is issued, please ensure a printed copy of any RMA documentation is
returned with the faulty ike equipment to the address detailed in the RMA documentation.
Troubleshooting and Service Tips
This section includes some basic troubleshooting tips. It also explains what you need to do
before you call your service center for a repair.
Answers to questions about Windows Mobile may be available through the help files on
your device or on the Windows Mobile website from Microsoft. If you cannot find answers
to your questions through these methods, contact your service center. (See the section in
called Preparing for a service center call and Additional Support.)
Troubleshooting tips
This section provides solutions for the following issues:
1. The battery pack will not charge fully.
2. The touchscreen responds inaccurately to stylus taps.
www.ikegps.com/quickstart Page 79 www.ikegps.com/support

3. The screen does not calibrate correctly or completely.
4. ike runs slowly.
5. ike drops its ActiveSync connection.
6. ike locks up.
Issue 1: The battery pack will not charge to 100% or to “0 mAh Consumed”.
Solutions: Try discharging the battery pack completely. You can turn off all auto-suspend
and auto-backlight timers to drain the battery pack more quickly. Once the battery pack is
fully discharged, try charging it again.
If the battery pack does not charge to full, try repeating the full discharge and charge cycle
a few more times.
If the battery pack still does not charge to full, try using a different battery pack to confirm
that the problem is specific to the original battery pack.
Only charge the battery pack in temperatures between 32°F and 104°F (0°C and 40°C).
For best results, charge the battery pack at room temperature (68°F or 20°C).
Issue 2: The touchscreen does not respond accurately to stylus taps.
Solutions: Try recalibrating the touchscreen. (See the section called Using the
touchscreen.)
If the device is not responding to stylus taps at all and you are on the Today screen, look to
see if the device is locked. To unlock the device, press the Unlock soft key on the screen.
If the device is unlocked but the stylus continues to respond inaccurately, close all open
programs and reset the device.
Issue 3: During calibration, the screen does not respond to stylus strokes or does not
complete the calibration process.
Solutions: Check to see if there is damage or wear on any area of the touchscreen. In
case of damage, contact your service center.
Issue 4: ike runs slowly.
Solutions: It is possible that you have too many programs running. Try closing any
programs you are not using. To view and close running programs, follow these steps:
1. Press the Task Manager button. The Task Manager window appears.
2. Select the program(s) you want to close.
3. Tap End Task. This closes the program.
Issue 5: My ike quickly drops its ActiveSync connection to my desktop computer.
Solutions: Firewall programs sometimes cause ActiveSync connection problems. In these
cases, the firewall sees your ike as a strange and possibly hostile computer and prevents
the device from connecting to the desktop computer.
To allow the mobile device to connect to your desktop computer, follow these steps:
Use the serial cable to connect your device to the desktop computer. Follow the
ActiveSync wizard instructions.
If your firewall application brings up a warning message asking whether you want to allow
a connection, check the option to allow the connection and click “Yes”.
Note: If the warning message above does not appear when you try to connect to the
desktop computer but the device is still being dropped, contact your service center.
www.ikegps.com/quickstart Page 80 www.ikegps.com/support

Issue 6: Your ike locks up.
Model
ike100
ike300
ike1000
Laser Range (m)
100
300
1000
Camera Resolution (MP)
3.2
5
5
Solution: To reset the device, press and hold the Power button for 10 seconds or until the
screen goes dark. The device turns on again after a few seconds.
Issue 7: Captured data is not writing to the fitted SD Card.
Solution: Check the ike Data settings (refer section Settings – Data Folder) to ensure
that the Current Data Folder: is pointing to the \SD Card\
Note: The required folder on the SD Card must be created (via File Explorer) before the
[Save] button is used to set the Data Folder.
Product Specifications
All ike units are fitted with the same GPS receiver and digital compass.
Laser range and maximum camera resolution differs between the three ikeBasic models and
ikePro kits. ikeSolutions bundles are only available with an ike300 unit.
Full specifications of the individual instruments are available
http://www.ikegps.com/ikegps/specifications/
Key differences between the ike units are as follows:
www.ikegps.com/quickstart Page 81 www.ikegps.com/support

Accessory Information
The ike comes with a number of standard essential or field accessories depending on the model
purchased. There are a variety of optional accessories or spare parts that can be purchased to
enhance you ike user experience.
Tripod
The ike low magnetic signature tripod has been tested to ensure that it does not cause distortion
to the in-built digital compass. For more information on use of the ike Tripod please consult the
material distributed with the ike Tripod and available on the ike
Batteries
ike batteries should only be charged in or with approved ike battery charging accessories.
New batteries should always be charged in an ike unit to ensure optimal first-use calibration.
Additional information on ike batteries is available in the ‘Battery Safety’ section of this
document.
GPS
website.
Should your ike battery not be reporting a correct charge level, please refer to the Battery
Recalibration instructions available from the Support section of the ike
GPS
website.
Travel Charger
The Travel Charger is designed to be powered from either the standard ike AC Adaptor or
Vehicle Charger Cable.
It is recommended that new batteries not be charged in the Travel Charger as this will not
correctly set the optimal first-use calibration for a new battery. New batteries should be initially
charged in an ike unit. Subsequent charges can be completed in the Travel Charger.
External Patch Antenna
The External Patch Antenna provides an alternative reception GPS reception option to ensure a
GPS fix is maintained while the ike unit is travelling.
www.ikegps.com/quickstart Page 82 www.ikegps.com/support

Glare Shield
Correct placement of Glare Shield
Incorrect placement of Glare Shield
The Glare Shield provides a method of reducing the effects of harsh light sources on the ike
units LCD screen.
This accessory is designed to be placed on the bezel area surrounding the LCD screen. The
LCD screen can then viewed through the Glare Shield lens. The Glare Shield lens can then be
focused to further improve the view of the LCD screen.
Altus APS-3 GPS Receivers
The Altus APS-3x and APS3-Gx external GPS receivers have been tested to function with the
ike unit. For more details on use of Altus external GPS receivers with ike, please consult your
GPS
ike
Sales office or reseller.
Other Accessories
Other commonly used ike accessories are shown on the ike website. For more details on these
accessories, please consult your ike
GPS
Sales office or reseller.
www.ikegps.com/quickstart Page 83 www.ikegps.com/support

Software Licensing
ike Software
Use of ike software forms a legal agreement between you (either an individual or an entity), the
end user, and IKEGPS Ltd (ike
do not install this software.
GPS
ike
software is provided "as is" without warranty of any kind. To the maximum extent
permitted by applicable law, ike
any implied warranties of merchantability, fitness for a particular purpose, and non-infringement.
The entire risk arising out of the use or performance of the software and documentation remains
with recipient. to the maximum extent permitted by applicable law, in no event shall ike
liable for any consequential, incidental, direct, indirect, special, punitive, or other damages
whatsoever (including, without limitation, damages for loss of business profits, business
interruption, loss of business information, or other pecuniary loss) arising out of this agreement
or the use of or inability to use this software, even if ike
such damages.
Microsoft Software License Terms for Windows Mobile 6 Software
These license terms are a Third Party Branding Additional Rights Agreement between you,
IKEGPS Ltd (ike
GPS
) and Juniper Systems (JS). They apply to the Microsoft Windows Mobile
software (the ‘software’) included on this ike device which includes JS technology.
The software on this device includes software sub-licensed by ike
or its affiliate (JS).
The terms also apply to any
updates,
supplements,
Internet-based services, and
support services
For this software, unless other terms accompany those items. If so, those terms apply.
As described below, using some features also operates as your consent to the
transmission of certain standard computer information for Internet-based services.
By using the software, including use on this device, you accept these terms. If you do
not accept them, do not use the device or software. Instead, contact ike
its return policy for a refund or credit.
WARNING: If the software contains voice operated technologies, then operating this software
requires user attention. Diverting attention away from the road while driving can possibly cause
an accident or other serious consequence. Even occasional, short diversions of attention can
be dangerous if your attention is diverted away from your driving task at a critical time. ike
JS and Microsoft make no representations, warranties or other determinations that ANY use of
this software is legal, safe, or in any manner recommended or intended while driving or
otherwise operating a motor vehicle.
If you comply with these license terms, you have the rights below.
GPS
). If you do not agree to the terms of this Agreement, please
GPS
further disclaims all warranties; including without limitation
GPS
has been advised of the possibility of
GPS
from Microsoft Corporation
GPS
to determine
GPS
be
GPS
,
1. USE RIGHTS.
You may use the software on the device with which you acquired the software.
2. ADDITIONAL LICENSING REQUIREMENTS AND/OR USE RIGHTS.
a. Specific Use. ike
GPS
software for that use.
www.ikegps.com/quickstart Page 84 www.ikegps.com/support
has designed this device for a specific use. You may only use the

b. Included Microsoft Programs and Additional Required Licenses. Except as
provided below, these license terms apply to all Microsoft programs included with the
software. If the license terms with any of those programs give you other rights that do
not expressly conflict with these license terms, you also have those rights.
i. This agreement does not grant you any rights with respect to the Windows Mobile
Device Center, Microsoft ActiveSync or Microsoft Outlook 2007 Trial which are
subject to the licenses accompanying those items.
c. Speech Recognition. If the software includes speech recognition component(s), you
understand that speech recognition is an inherently statistical process and that
recognition errors are inherent in the process. Neither ike
GPS
, JS nor Microsoft or their
suppliers shall be liable for any damages arising out of errors in the speech recognition
process.
d. Phone Functionality. If the device software includes phone functionality, all or certain
portions of the device software may be inoperable if you do not have and maintain a
service account with a wireless telecommunication carrier (“Mobile Operator”), or if the
Mobile Operator’s network is not operating or configured to operate with the device.
3. SCOPE OF LICENSE.
The software is licensed, not sold. This agreement only gives you some rights to use the
software. ike
GPS
, JS and Microsoft reserve all other rights. Unless applicable law gives you
more rights despite this limitation, you may use the software only as expressly permitted in
this agreement. In doing so, you must comply with any technical limitations in the software
that allow you to use it only in certain ways. You may not:
work around any technical limitations in the software;
reverse engineer, decompile or disassemble the software;
make more copies of the software than specified in this agreement;
publish the software for others to copy;
rent, lease or lend the software; or
use the software for commercial software hosting services.
Except as expressly provided in this agreement, rights to access the software on this device
do not give you any right to implement Microsoft patents or other Microsoft intellectual
property in software or devices that access this device.
You may use remote access technologies in the software such as Remote Desktop Mobile
to access the software remotely from a computer or server. You are responsible for
obtaining any licenses required for use of the protocols to access other software.
4. INTERNET-BASED SERVICES.
Microsoft provides Internet-based services with the software. Microsoft may change or
cancel them at any time.
a. Consent for Internet-Based Services. The software features described below connect
to Microsoft or service provider computer systems over the Internet. In some cases, you
will not receive a separate notice when they connect. You may switch off some of these
features or not use them. For more information about these features, visit
http://go.microsoft.com/fwlink/?LinkId=81931.
By using these features, you consent to the transmission of this information. Microsoft
does not use the information to identify or contact you.
Device Information. The following features use Internet protocols, which send to the
appropriate systems device information, such as your Internet protocol address, the type
of operating system, browser and name and version of the software you are using, and
the language code of the device where you installed the software. Microsoft uses this
information to make the Internet-based services available to you.
www.ikegps.com/quickstart Page 85 www.ikegps.com/support

• Windows Mobile Update Feature. The Windows Mobile Update feature provides
you the ability to obtain and install software updates on your device if updates are
available. You may choose not to use this feature. ike
GPS
and/or JS may not
support this feature or an update for your device.
• Windows Media Digital Rights Management. Content owners use Windows
Media digital rights management technology (WMDRM) to protect their intellectual
property, including copyrights. This software and third party software use WMDRM
to play and copy WMDRM-protected content. If the software fails to protect the
content, content owners may ask Microsoft to revoke the software’s ability to use
WMDRM to play or copy protected content. Revocation does not affect other
content. When you download licenses for protected content, you agree that
Microsoft may include a revocation list with the licenses. Content owners may
require you to upgrade WMDRM to access their content. Microsoft software that
includes WMDRM will ask for your consent prior to the upgrade. If you decline an
upgrade, you will not be able to access content that requires the upgrade.
b. Misuse of Internet-based Services. You may not use these services in any way that
could harm them or impair anyone else’s use of them. You may not use the services to
try to gain unauthorized access to any service, data, account or network by any means.
5. NOTICES ABOUT THE MPEG-4 VISUAL STANDARD.
The software may include MPEG-4 visual decoding technology. This technology is a
format for data compression of video information. MPEG LA, L.L.C. requires this notice:
USE OF THIS PRODUCT IN ANY MANNER THAT COMPLIES WITH THE MPEG-4
VISUAL STANDARD IS PROHIBITED, EXCEPT FOR USE DIRECTLY RELATED TO
(A) DATA OR INFORMATION (i) GENERATED BY AND OBTAINED WITHOUT
CHARGE FROM A CONSUMER NOT THEREBY ENGAGED IN A BUSINESS
ENTERPRISE, AND (ii) FOR PERSONAL USE ONLY; AND (B) OTHER USES
SPECIFICALLY AND SEPARATELY LICENSED BY MPEG LA, L.L.C.
If you have questions about the MPEG-4 visual standard, please contact MPEG LA,
L.L.C., 250 Steele Street, Suite 300, Denver, CO 80206; www.mpegla.com.
6. DIGITAL CERTIFICATES.
The software uses digital certificates in X.509 format. These digital certificates are used
for authentication.
7. CONNECTIVITY SOFTWARE.
Your device package may include Windows Mobile Device Center or Microsoft ActiveSync
software. If it is included, then you may install and use it in accordance with the license
terms that are provided with it. If no license terms are provided, then you may install and
use only one (1) copy of the software on a single computer.
8. NETWORK ACCESS.
If you are using a network, such as an employer network, the network administrator may
limit features or functionality on your device.
9. PRODUCT SUPPORT.
Contact ike
GPS
for support options. Refer to the support information provided with the
device.
10. LINKS TO THIRD PARTY WEBSITES.
If the software provides links to third party websites, those links are provided to you only as
a convenience, and the inclusion of any link does not imply an endorsement of the third
party website by Microsoft.
www.ikegps.com/quickstart Page 86 www.ikegps.com/support

11. BACKUP COPY.
You may make one backup copy of the software. You may use it only to reinstall the
software on the device.
12. PROOF OF LICENSE.
If you acquired the software on the device, or on a disc or other media, a genuine
Certificate of Authenticity label with a genuine copy of the software identifies licensed
software. To be valid, this label must be affixed to the device, or included on or in ike
software packaging. If you receive the label separately, it is not valid. You should keep the
label on the device or packaging to prove that you are licensed to use the software. To
identify genuine Microsoft software, see http://www.howtotell.com.
13. TRANSFER TO A THIRD PARTY.
You may transfer the software only with the device, the Certificate of Authenticity label, and
these license terms directly to a third party. Before the transfer, that party must agree that
these license terms apply to the transfer and use of the software. You may not retain any
copies of the software including the backup copy.
GPS
14. NOT FAULT TOLERANT.
The software is not fault tolerant. ike
GPS
/JS installed the software on the device and is
responsible for how it operates on the device.
15. RESTRICTED USE.
The Microsoft software was designed for systems that do not require fail-safe performance.
You may not use the Microsoft software in any device or system in which a malfunction of
the software would result in foreseeable risk of injury or death to any person. This includes
operation of nuclear facilities, aircraft navigation or communication systems and air traffic
control.
16. NO WARRANTIES FOR THE SOFTWARE.
The software is provided “as is”. You bear all risks of using it. Microsoft gives no express
warranties, guarantees or conditions. Any warranties you receive regarding the device or
the software do not originate from, and are not binding on, Microsoft or its affiliates. When
allowed by your local laws, ike
GPS
, JS and Microsoft exclude implied warranties of
merchantability, fitness for a particular purpose and non-infringement.
17. LIABILITY LIMITATIONS.
You can recover from Microsoft and its affiliates only direct damages up to fifty U.S. Dollars
(U.S. $50.00), or equivalent in local currency. You cannot recover any other damages,
including consequential, lost profits, special, indirect or incidental damages.
This limitation applies to:
anything related to the software, services, content (including code) on third party
internet sites, or third party programs, and
claims for breach of contract, breach of warranty, guarantee or condition, strict liability,
negligence, or other tort to the extent permitted by applicable law.
It also applies even if Microsoft should have been aware of the possibility of the damages.
The above limitation may not apply to you because your country may not allow the
exclusion or limitation of incidental, consequential or other damages.
18. EXPORT RESTRICTIONS.
The software is subject to United States export laws and regulations. You must comply
with all domestic and international export laws and regulations that apply to the software.
These laws include restrictions on destinations, end users and end use. For additional
information, see www.microsoft.com/exporting.
www.ikegps.com/quickstart Page 87 www.ikegps.com/support

Battery Safety
This device comes with a user replaceable lithium-ion rechargeable battery. To reduce the
risk of fire or burns, do not disassemble, crush, puncture, short external contacts, or
expose the battery pack to fire.
Battery warnings
Follow these additional safety guidelines:
Use only battery packs approved for use with this device.
Do not store or leave your device or battery pack near a heat source such as a radiator,
fireplace, stove, electric heater, or other heat-generating appliance, or otherwise expose
it to temperatures in excess of 140° F (60° C).
Do not try to open the battery pack.
Do not carry a battery pack in your pocket, purse, or other container where metal objects
(such as car keys or paper clips) could short-circuit the battery pack terminals.
Keep the battery pack contacts clean. If they get dirty, wipe them off with a soft cloth.
Do not install the battery pack backwards so that the polarity is reversed.
Do not connect the positive terminal and the negative terminal of the battery pack to
each other with any metal object (such as wire).
Do not solder directly onto the battery pack.
Do not place the battery pack in direct sunshine.
In the rare event that the battery pack leaks and fluid gets into the eye, do not rub the
eye. Rinse well with water and immediately seek medical care.
Dispose of the battery pack properly. See the section below, Disposing of your ike
and battery packs for instructions.
Transportation
All ike batteries can be shipped by air in with respect to International Civil Aviation
Organization (ICAO), Section II or International Air Transport Association (IATA), Section
II packing instructions (PI) 965 (Lithium Ion batteries packed separately), 966 (Lithium Ion
batteries packed with equipment), and/or 967 (Lithium Ion batteries contained in
equipment) as appropriate.
When shipping your ike unit by air it is recommended you power off the ike unit, remove
the battery and pack the battery safely before stowing your ike unit.
Disposing of your ike and battery packs
The lithium-ion battery packs for your ike are recyclable. This product must
not be disposed of with local or municipal waste. It is your responsibility to
dispose of your waste equipment by handing it over to a designated
collection point for the recycling of waste electrical and electronic equipment.
To find the nearest battery recycling center in the USA, visit the
Call2Recycle website at http://www.call2recycle.org or call 1-800-8battery.
Hardware Warranty, Software Maintenance and Support
www.ikegps.com/quickstart Page 88 www.ikegps.com/support

A copy of the Warranty Terms and Conditions applicable to your ike configuration is included
with documentation accompanying your ike unit.
For more details browse to http://www.ikegps.com/support/warranty-terms/
Certifications and Classifications
Laser Classification
This device contains an eye safe Class 1 laser product. Invisible laser radiation is emitted from
(and received into) the front apertures. This product complies with ‘Performance Standards for
Light-Emitting Products’ (FDA 21CFR1040.10) and ‘Safety of Laser Products’ (IEC608251:200).
Export Control Classification Number (ECCN) Certification
GPS
ike
self-certifies that all ike handheld mobile GIS data collection equipment and related
accessories/software do not require permit for export and are classified under Export Control
Classification Number (ECCN) EAR99.Alternatively, ike
assistance.
Harmonized Tariff Schedule (HTS) Classification
For purposes of international shipping, ike
GPS
has determined that all of the:
ike handheld mobile GIS data collection units are classified under HTS code 9015.40* being
“Photogrammetrical Surveying Instruments and Appliances”.
ike accessory equipment and related software are classified under HTS code 9015.90*
being “Parts or Accessories for Photogrammetrical Surveying Instruments and Appliances”.
* These codes have determined after consultation with HTS listings and local customs
agents. Local classification may be different depending on determination by local importing
customs agents
GPS
can be contacted for further
www.ikegps.com/quickstart Page 89 www.ikegps.com/support

Export and Trade Restrictions
GPS
ike
will comply with listed US Anti-Terrorism, US trade embargoes, UN Security Council
sanctions, supplier-imposed restrictions and any other applicable authority trade restrictions not
sell or export to countries detailed on these lists. ike
GPS
also expects all resellers, distributors
and agents of ike product to comply with these same restrictions.
Additional Support
In the first instance please contact your ike
regards to ike
Alternatively, ike
GPS
ike
Corporate
GPS
.
GPS
can be contacted for further assistance.
1st Floor, 42 Adelaide Road
Mt. Cook, Wellington 6021
New Zealand
T: +64 4 382 8064
F: +64 4 382 8250
Sales email: sales@ikegps.com
Support email: support@ikegps.com
Also visit our website www.ikegps.com for the latest ike
updates.
GPS
supplier with any enquiries or comments in
GPS
news, documentation, and software
www.ikegps.com/quickstart Page 90 www.ikegps.com/support

Appendix 2: Windows Mobile 6.1 Field
PC Operations
www.ikegps.com/quickstart Page 91 www.ikegps.com/support

Appendix 2: Windows Mobile 6.1 Field PC Operations
Introduction
Your ike integrates a Windows Mobile 6.1 Field PC (based on Juniper Archer ultra-rugged
technology) with ike’s camera, compass, laser distance finder and GPS instrumentation to
provide a hard-wearing one stop shop for your mobile data capture needs in the most
extreme environments.
The main user interface of has been optimized to allow best access to ike functions. This
optimization has involved replacing the standard Windows Mobile ‘Today’ screen with a
layout that allows easy access to ike functions that are used on a day-to-day basis and
rationalizing the ‘Start’ menu for frequently-used ike-specific options. Screen images in
this section will appear colored with respect to the standard ‘Windows Default’ theme.
While the ike device still retains all the Windows Mobile 6.1 functionality it is primarily
designed as a data-capture device. Adjusting Windows Mobile settings may affect the
performance or functionality of your ike unit.
This appendix provides an overview of the additional Windows Mobile Field PC functions
pre-installed on the computer component of your ike device.
If you require further assistance on functionality that is not covered in this manual please
consult the following resources:
ike
Windows Mobile – The Windows Mobile pages of www.microsoft.com
GPS
– The Support pages of www.ikegps.com
Overview of Windows Mobile 6
Your ike runs the Microsoft® Windows Mobile 6 operating system, designed for mobile
devices. It comes with programs that manage the data capture capability and provides
you with familiar Microsoft programs to help you increase your productivity and manage
information effectively. For example, Microsoft Office Outlook® Mobile, similar to Microsoft
Outlook®, allows you to send and receive email, keep track of contacts, manage tasks, and
take simple notes.
Many Windows® applications are already compatible with Windows Mobile. You can use
Windows Mobile to access Word®, Excel®, and PowerPoint® files on your mobile device, or
you can use Windows Mobile® to access your email messages and contacts from your
Microsoft Outlook account.
www.ikegps.com/quickstart Page 92 www.ikegps.com/support

Using the documentation
Wh at you r eq ui re
Wh ere to f in d it
Instructions for setting up ike
This User Manual
Instructions for using external devices with your
ike
This User Manual
Instructions for basic tasks such as replacing
battery packs, resetting the device, adjusting the
backlight, or inserting memory cards
This User Manual
Instructions for using programs installed on ike
Help files located within
individual programs on ike
Windows® Mobile Device Center for Windows
Vista/7™ users
Microsoft Website - WMDC 6.1
32-bit version for 8/7/Vista
or
Microsoft Website - WMDC 6.1
64-bit version for 8/7/Vista
ActiveSync® install for Windows® XP users
Microsoft Website ActiveSync 4.5 for XP
Your ike unit is provided with reference tools that are primarily available from ike
These tools include:
This User Manual
Optional ‘ike Software CD’ containing ikeOS/software installers, user
manuals/guides, license files and other materials specific to your ike purchase.
On-device help files
Use the following chart to find the additional information you may require:
GPS
.
Getting Started
This section repeats some the instructions from the ‘Getting Started’ section of the
Introduction chapter.
Step 1: Install the battery
1. Carefully unhook and lift up the bottom hook of the hand strap.
WARNING! Releasing the hand strap hook too quickly may result in injury or
damage to the display. Use caution when undoing the hook or when holding
your ike by its hand strap.
2. Press on the battery door and slide the door latch to the right to unlock it, as shown in
the second picture.
3. Remove the battery door.
4. Insert the battery pack so battery contacts match up.
5. Insert the tabs on the bottom of the battery door into the case slots. Close the battery
door.
6. Press on the battery door. Slide the latch to the left to lock it.
7. Reattach the hand strap.
www.ikegps.com/quickstart Page 93 www.ikegps.com/support

Step 2: Charge the battery
1. Ensure the appropriate country adaptor is fitted to
the power pack
2. Mount the plug onto the wall charger (if it is not
already assembled).
3. Plug the wall charger into an outlet.
4. Plug the other end of the wall charger into the DC
jack on your ike. The device turns on after a few
seconds, and a flashing red light signals the device
is charging.
5. Charging ike for 4 hours charges it to around 95%.
1. Tap Start > Settings.
2. From the System tab, tap About
3. Select the Device ID tab at the bottom of the
screen.
4. Type in a device name. We recommend
using “SN” (serial number) and the device
serial number, which can be found by tapping
Start > Settings > System and choosing System
Configuration. An example of a device name
appears below.
6. Let the device charge for 6 hours to get a full charge. Note: If your ike suspends and
the flashing red LED turns off, the device keeps charging.
Charging temperatures: Only charge your battery pack in temperatures between
32°F and 104°F (0°C and 40°C). For best results, charge the battery pack at room
temperature (68°F or 20°C).
Step 3: Establish basic settings on the device
Using the stylus, follow the instructions on the screen to calibrate the device and establish
basic settings.
We recommend creating a name for your ike so external devices like desktop computers
or devices that use Bluetooth® technology can differentiate your ike from other devices
more easily.
To create a name, follow these steps:
www.ikegps.com/quickstart Page 94 www.ikegps.com/support

Step 4: Connecting to a desktop computer
1. Ensure Microsoft ActiveSync 4.5 is
installed on your Windows XP desktop
2. Select your language.
3. If ActiveSync 4.5 or greater has not
been installed on your desktop
computer, follow the directions on the
screen to install it.
Important: Read the following paragraph before moving connecting to a desktop computer.
If you have Microsoft Windows® Vista/7™/8™, you already have basic file
synchronization capability with your desktop computer without installing any additional
software. You can skip Steps 4 and 5. It is recommended that the latest version of
Microsoft Windows Mobile Device Center be installed to enable full data transfer facilities
between your Windows (32-bit or 64-bit) desktop operating system and the Windows
Mobile software installed on your ike unit.
Windows 8 users will also need to ensure that enable .NET Framework 3.5 from the
Control Panel “Turn Windows features on or off” options.
To access these basic sync options, connect your ike to the desktop computer using a
USB cable. For full synchronization support such as Microsoft Outlook® contacts, email,
calendar, notes, and tasks, download and install Windows Mobile Device Center
through Windows Update on the Start menu of your desktop computer.
If you have Windows® 2000 or Windows® XP, Windows Mobile® 6 requires that you use
Microsoft ActiveSync 4.1 or greater to connect to your desktop computer. ActiveSync
4.5 is available from the Microsoft website at
http://www.microsoft.com/download/en/details.aspx?id=15. Follow the next steps to
install Microsoft® ActiveSync®, which allows you to install programs onto your device
using a desktop computer.
Note: Install ActiveSync before attaching the USB cable to the desktop or ike.
Step 5: Creating a connection to a desktop computer
1. Plug USB Client end (mini B) of the USB communications cable into the USB ‘B’ port of
your ike unit.
2. Plug the USB Host end (full size A) of the USB communications cable into a USB 2.0 or
1.0 port of your desktop/laptop computer.
3. Establish an Windows Mobile Device Center/ActiveSync partnership by following the
instructions on the desktop computer screen.
Note: The first time the ike unit is connected, Windows may take some time to
identify the new device, then download and install any necessary drivers before a
You are now ready to use your ike.
www.ikegps.com/quickstart Page 95 www.ikegps.com/support
connection to the ike unit is made.

Using the Hardware
Button
Name
Function
Start menu button
Provides a menu of applications.
Task Manager button
Lets you switch between or close running
applications; allows you to view memory allocations.
Home button
Returns you to the Today screen.
Context menu button
Displays the context menu for the item selected
(similar to a right-click on desktop a computer).
Enter button
Enters the selected soft key or option.
Power button
Turns ike on and off, resets, suspends. (See more
details in the Power button functions section.)
Four-way directional button
Allows you to navigate.
This section teaches you how to use the hardware components of ike. Specifically, you
learn how to:
Identify button functions
Customize button functions
Use buttons to suspend, power off, and reset the device
Use the stylus
Use the touchscreen
Replace the battery pack
Understand LED signals
Use peripheral devices (SD cards and USB drives) with the device
Identifying button functions
The following chart shows you the names and functions of each button on the keyboard.
When ike applications are running, the standard Windows Mobile button functions may be
reassigned for ike application use. Please refer to the ike application instruction for button
use.
www.ikegps.com/quickstart Page 96 www.ikegps.com/support
 Loading...