

Page 1
VÄRDESÄTTA
Design and Quality
IKEA of Sweden
Page 2
2
3
4
5
6
8
1
9
7
11
10
Page 3

ENGLISH 4
DEUTSCH 15
FRANÇAIS 26
NEDERLANDS 37
DANSK 48
ÍSLENSKA 59
NORSK 70
Page 4

4ENGLISH
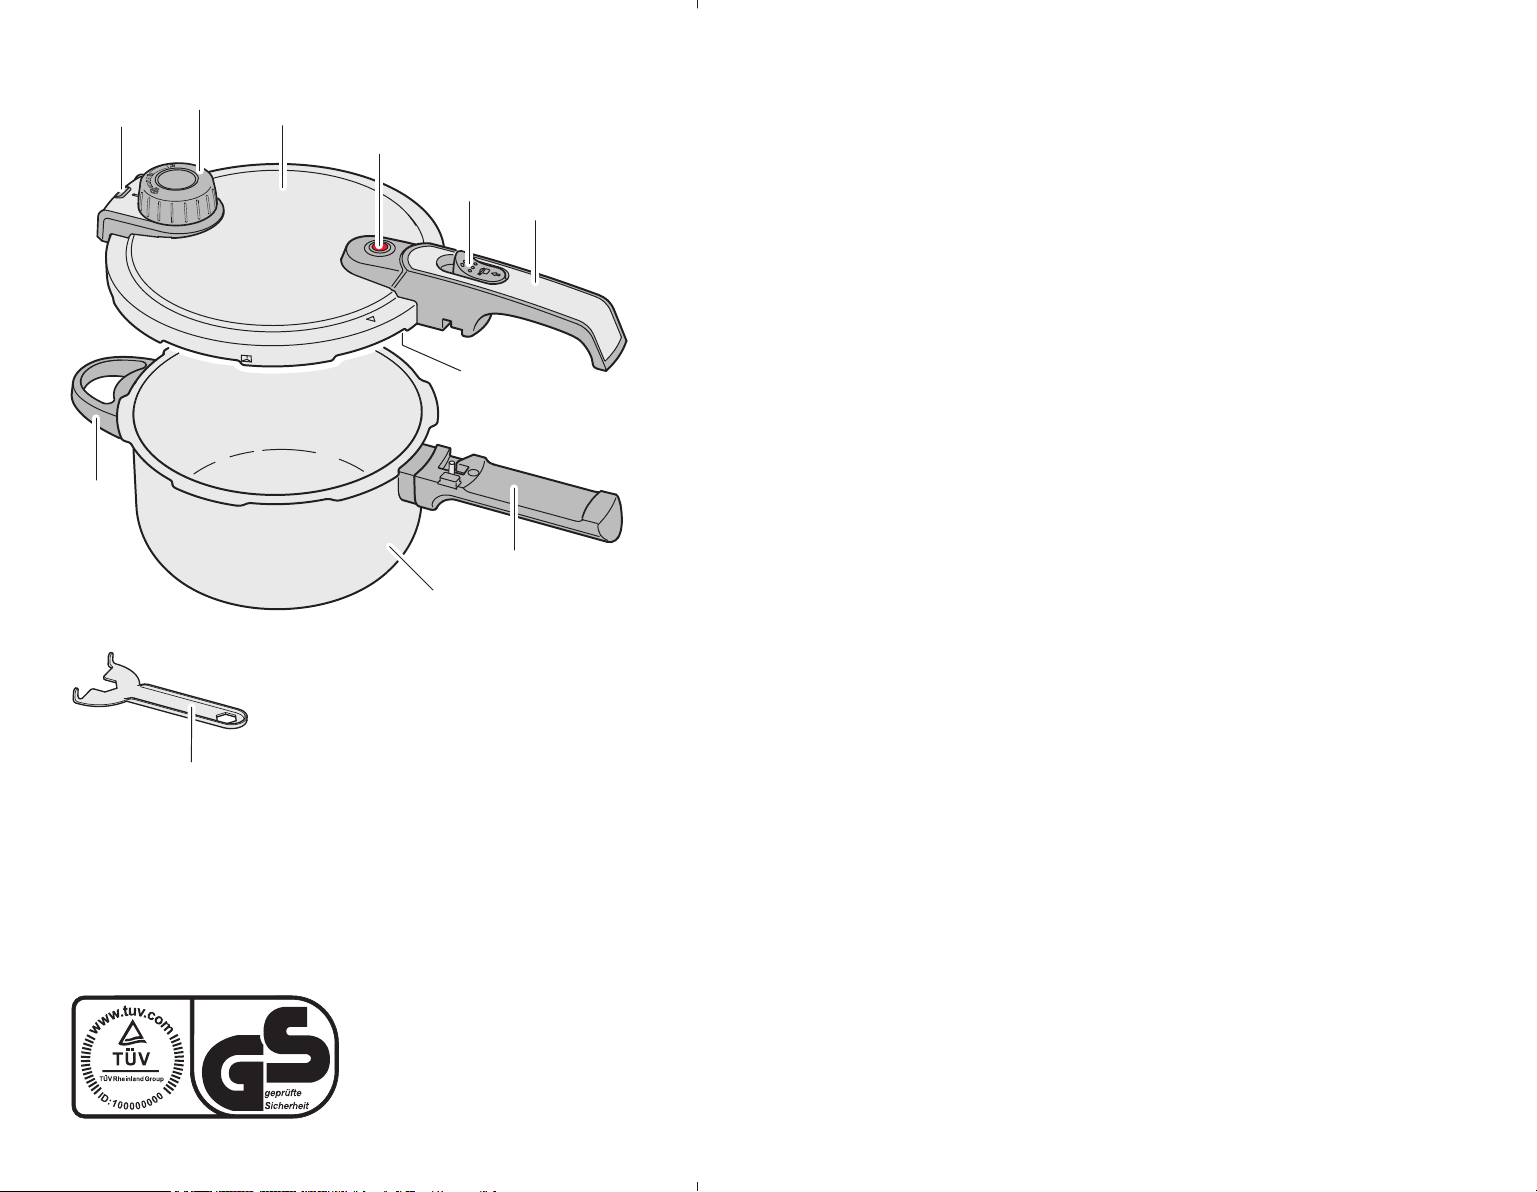
1. Name of the parts
1. Pot handle
2. Safety opening
3. Pressure regulator
4. Lid
5. Safety valve
6. Lock
7. Lid handle
8. Gasket (not visible; inside the lid)
9. Pot
10. Key
11. Pot handle
2. Important information – please read
before use
— Read all the instructions.
— Do not let children near the pressure
cooker when in use.
— Do not put the pressure cooker into a
heated oven.
— Move the pressure cooker under pres-
sure with the greatest care. Do not
touch hot surfaces. Use the handles and
knobs. If necessary, use protection.
— Do not use the pressure cooker for a
purpose other than the one for which it
is intended.
— This pressure cooker cooks under pres-
sure. Scalds may result from inappropriate use of the pressure cooker. Make
sure that the pressure cooker is properly
closed before applying heat. See section
"Instructions for use".
— Never force open the pressure cooker.
Do not open before making sure that
its internal pressure has completely
dropped. See section "Instructions for
use".
— Never use your pressure cooker without
adding water, this would seriously damage it.
— Do not ll the pressure cooker above
2/3 of its capacity (see “MAX” mark inside the pot). When cooking food that
expands during cooking, such as rice or
dehydrated vegetables, do not ll the
pressure cooker above ½ of its capacity
(see “½” mark inside the pot).
— Use the appropriate heat sources ac-
cording to the instructions for use.
— After cooking meat with a skin (e.g.
ox tongue) which may swell under the
effect of pressure, do not prick the
meat while the skin is swollen; hot wa-
ter could squirt out and you might be
scalded.
— When cooking doughy food, gently
shake the pressure cooker before opening the lid to avoid food ejection.
— Before each use, check that the valves
are not obstructed. See section "Instructions for use”.
— Never use the pressure cooker in its
pressurised mode for deep or shallow
frying of food.
— Do not tamper with any of the safety
systems beyond the maintenance in-
structions specied in the instructions
for use.
— Only use manufacturer’s spare parts in
accordance with the relevant model. If
you have any questions, please contact
your nearest IKEA store/Customer service or see www.ikea.com.
— KEEP THESE INSTRUCTIONS.
3. Technical information
Working pressure: 0,6 bar (setting 1) and
1,0 bar (setting 2).
Steam releasing pressure: 260 kpa.
Usable capacity: either 6 litres or 4 litres.
License holder: IKEA of Sweden,
Tulpanvägen 8 SE-343 81, Älmhult Sweden.
Model: 00286743, 50286745.
The pressure cooker is CE marked according
to Pressure Equipment Directive (97/23/EC).
The pressure cooker is GS certied.
4. Safety information
— The pressure cooker comes with a pres-
sure regulator in the lid which keeps the
desired pressure setting constant.
— Several safety systems ensure that your
pressure cooker will function safely,
even in the event of a technical fault.
The pressure regulator 3 ensures the
pressure remains constant within the
pressure cooker. It is possible that some
steam may continuously escape during
use. In the pressure regulator 3 there
is an additional pressure control valve
that releases the excess pressure via the
safety opening 2 if the pressure regulator malfunctions. Should both the pressure regulator 3 and the pressure control valve malfunction, the excess pressure can also escape via the safety valve
Page 5

5
5. The lock 6 can only be slid forwards
to open the pot when the pressure has
been equalised and the red safety valve
5 drops down as a result.
General safety advice
— Be sure to check before every use that
the pressure regulator 3 and the safety
valve 5 are manoeuvrable and not
blocked up (see section “Instructions for
use”).
— Always ensure that the pressure cooker
is closed correctly before putting it on
the hob (see section “Instructions for
use”).
— The pressure regulator 3 should never
be covered by any objects.
— Always ensure the safety opening 2 is
facing away from you during use and
that it is not facing where others may
pass by. In the event of a fault, a lot of
steam will escape.
— Should steam escape from the safety
valve 5 or the safety opening 2, immediately turn off the heat supply as
the pressure inside the pressure cooker
is too high. Do not continue to use the
pressure cooker until the problem has
been corrected (see section “Troubleshooting”).
— To avoid damaging the pressure cooker,
you should ensure that the pot always
contains at least 0.25 litres of liquid, so
that sufcient steam can be produced
and the pressure cooker doesn’t overheat and boil dry.
— WARNING: Repairs to the pressure
cooker may only be made by an authorised professional.
Good to know
— The pressure cooker is suitable for use
on all types of hobs, including induction
hobs.
— The pressure cooker can be used as a
traditional pot (without the lid) to brown
food before pressure cooking.
— By placing the pressure cooker on a hob
with the same or a smaller diameter you
can save energy.
— Always lift the pressure cooker when
moving it on a glass ceramic hob to
avoid the risk of scratching the hob.
— Bear in mind that the pressure cooker
gets hot during use. Always handle with
pot holders.
— Never let the pressure cooker boil dry,
this would seriously damage it.
— The pressure cooker is designed ex-
clusively for cooking, not for storing
food. Food that is stored in the pressure
cooker for a longer period may affect the
surface and take on the taste of metal.
— When the pressure cooker is used on a
gas hob make certain the ames do not
touch the handles.
5. Instructions for use
Before each use
Before cooking with the pressure cooker,
you should check all the safety functions to
avoid causing any damage to the pressure
cooker.
1. Check that the openings for the pressure
regulator 3 on the inside of the lid are
clean.
2. Should this not be the case, clean
the pressure regulator 3 (see section
“Cleaning and storing”).
3. Check that the safety valve 5 is movable
and not stuck.
4. Check that the gasket 8 is not damaged
in any way, i.e. that it is not split.
Note! Over time the gasket can become
hard and will therefore no longer provide
an air-tight seal. This will lead to steam
escaping from the rim of the lid and the
gasket will therefore require replacing.
For replacement gaskets, please contact
your nearest IKEA Store/ Customer service or visit www.ikea.com.
How to use the pressure cooker
1. Fill the pot with food and/or liquid.
Caution! Never ll the pressure cooker
with food and liquid above the “MAX”
mark on the inside of the pot. This corresponds to a maximum of 4 litres (for
pressure cooker with usable capacity of
6 litres) and maximum of 2,5 litres (for
pressure cooker with usable capacity of
4 litres). When cooking food that swells,
such as rice or pulses, you should never
ll the pot above the “½” mark on the
inside of the pot. This will prevent the
food from reaching the lid and potentially blocking the safety valve.
Page 6
6
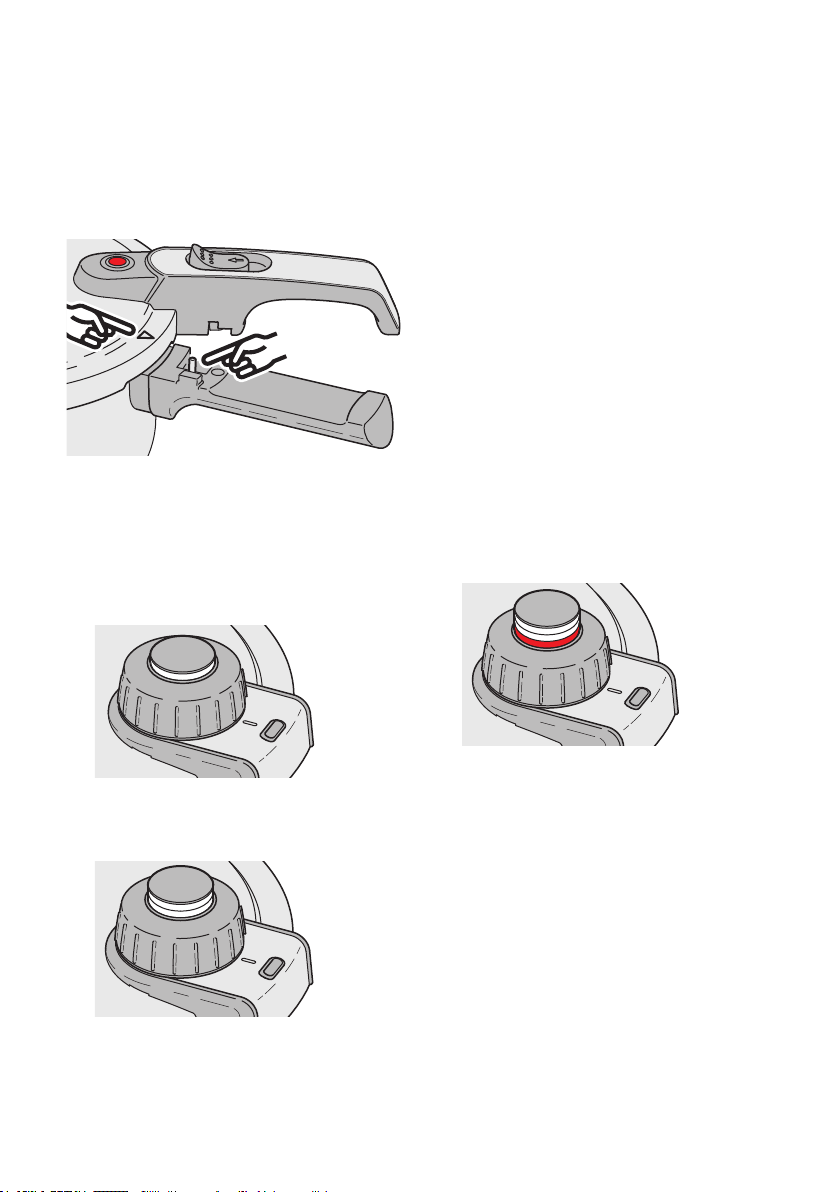
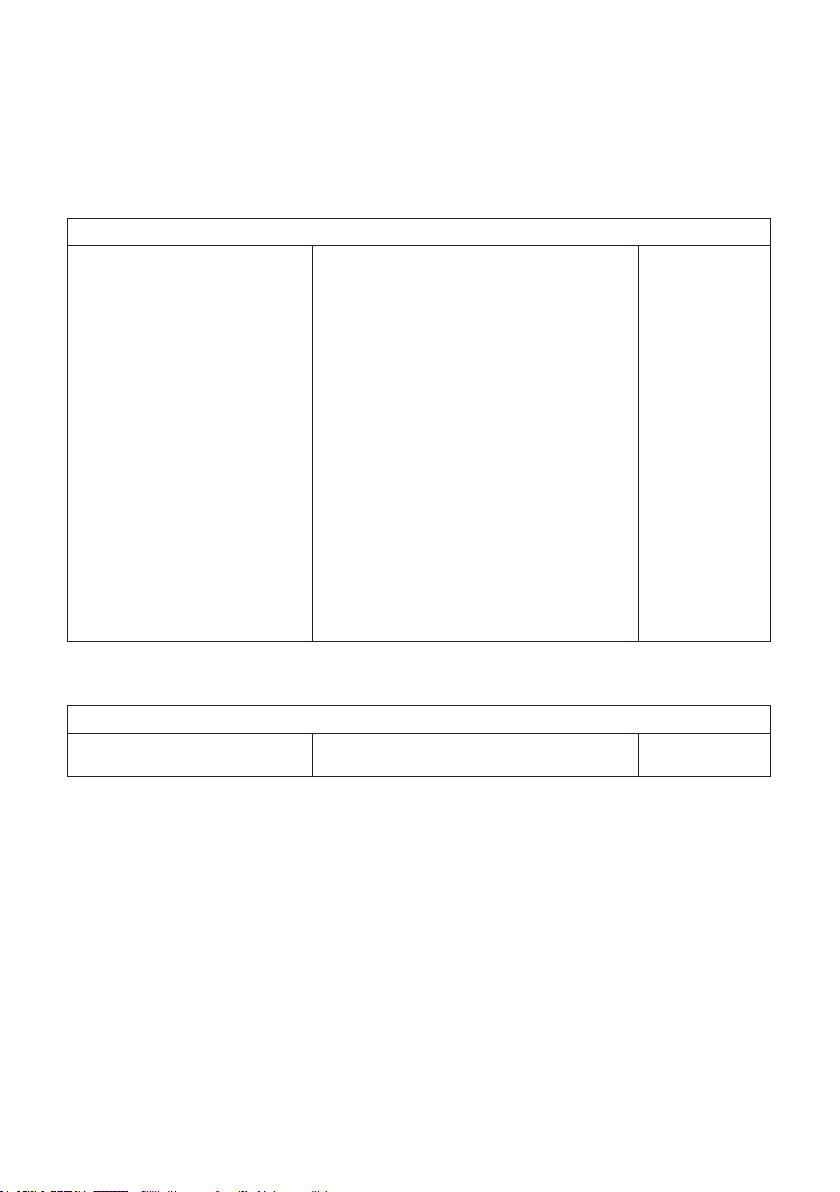
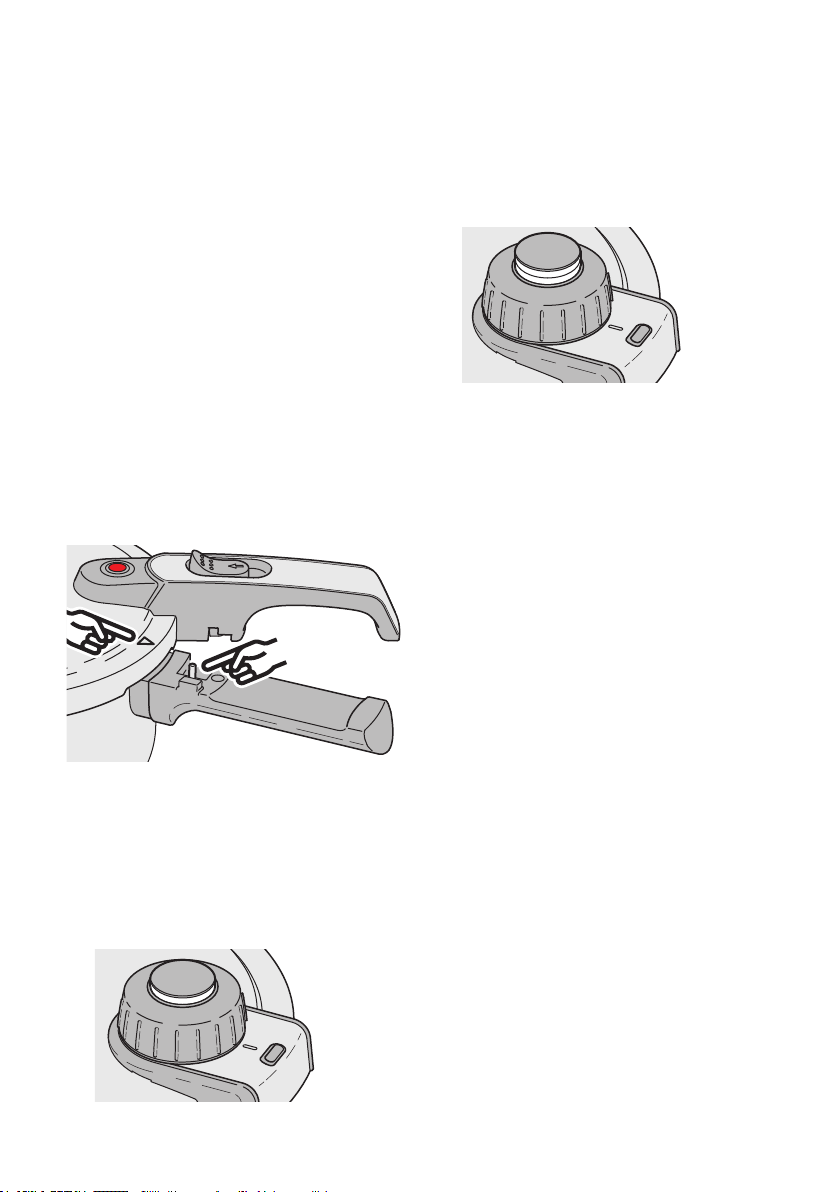
2. Place the lid 4 on the pot 9 in such a
way that the triangular mark on the lid
is pointing to the stud on the pot handle
11.
3. Turn the lid until the lid handle 7 and
the pot handle 11 are aligned and audibly click into place.
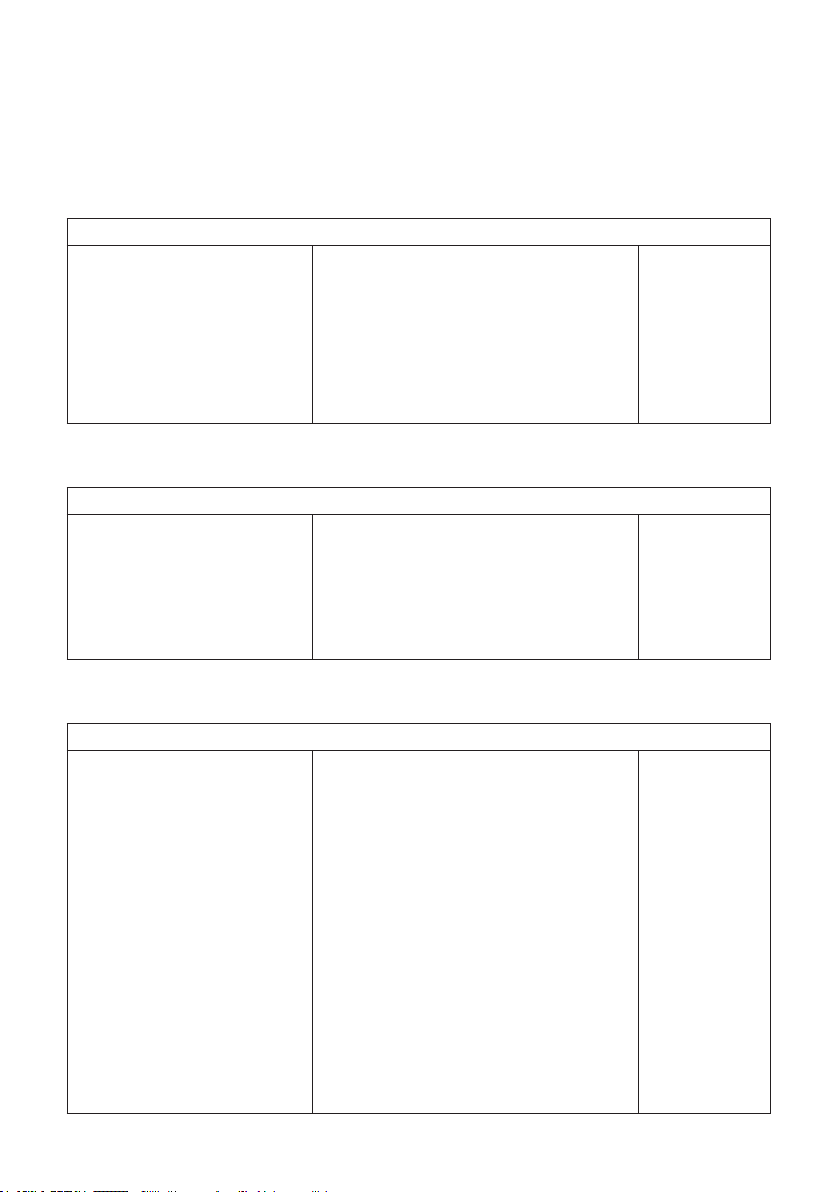
4. Choose the desired cooking setting on
the pressure regulator 3:
1; Slow cooking: the pressure regulator
will display a white ring.
2; Fast cooking: the pressure regulator
will display two white rings.
5. Place the pressure cooker on a hob
which is a similar size to the base of
the pressure cooker. Caution! The hob
should not be bigger than the base of
the pressure cooker. Otherwise this
could lead to too much heat rising up
the sides of the base, thereby damaging
the plastic handles.
6. Turn the hob onto the highest setting. As
soon as there is pressure in the pressure
cooker, the red safety valve 5 will move
upwards thereby locking the lid.
Note! At the beginning of the cooking
time, a little steam may emerge from
the safety valve.
7. As soon as steam starts to come out
of the pressure regulator 3, lower the
temperature of the hob to around 1/2
so that only a small amount of steam
comes out. If you have chosen “setting
2” for fast cooking and there are two
white rings displayed on the pressure
regulator 3 and little steam coming out,
the pressure cooker is cooking food
quickly and saving energy.
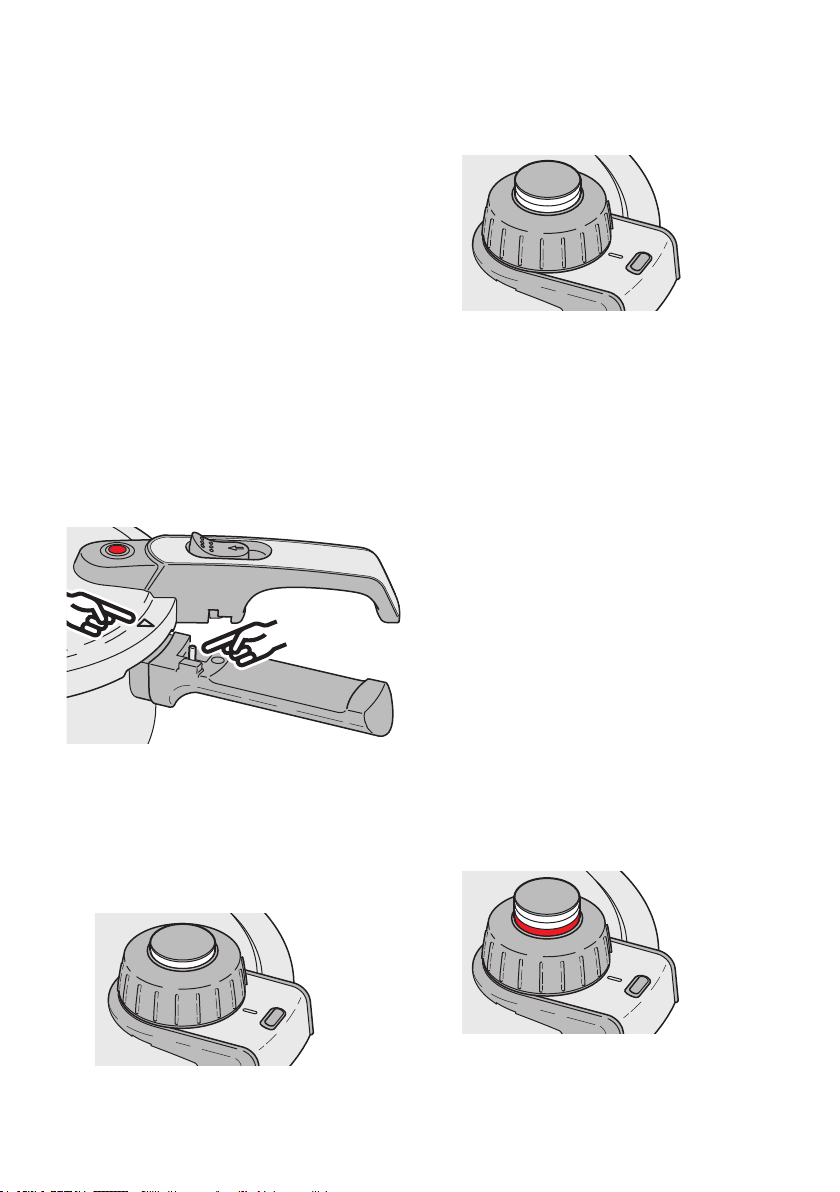
Warning! If the red ring is displayed on
the pressure regulator 3 when cooking,
the pressure is too high and you must
lower the setting on the hob.
Opening the pressure cooker
Caution! If the red safety valve 5 is still
raised, the pressure cooker is still pressurised and the lid cannot be opened. Under no
circumstances should you attempt to force
the lid open, as the sudden release of pressure could result in scalding. The pressure
cooker will only open once the red safety
valve 5 has dropped down. This can be done
either of three ways.
Never entirely immerse the pressure cooker
in water. Otherwise the pressure will instantly drop which can lead to the base as
well as the food being ruined.
Three ways to open the pressure
cooker
There are three methods to reduce pressure
in the pressure cooker in order to be able to
open it;
Page 7
7
Method 1: Releasing steam
This method requires releasing as much
steam as possible until the pressure in the
pressure cooker has decreased enough to be
able to remove the lid.
Warning! Ensure that the safety opening 2
is facing away from you when you open the
pressure cooker as this method means that
hot steam will escape from the pressure
regulator. You should therefore be careful
not to scald yourself.
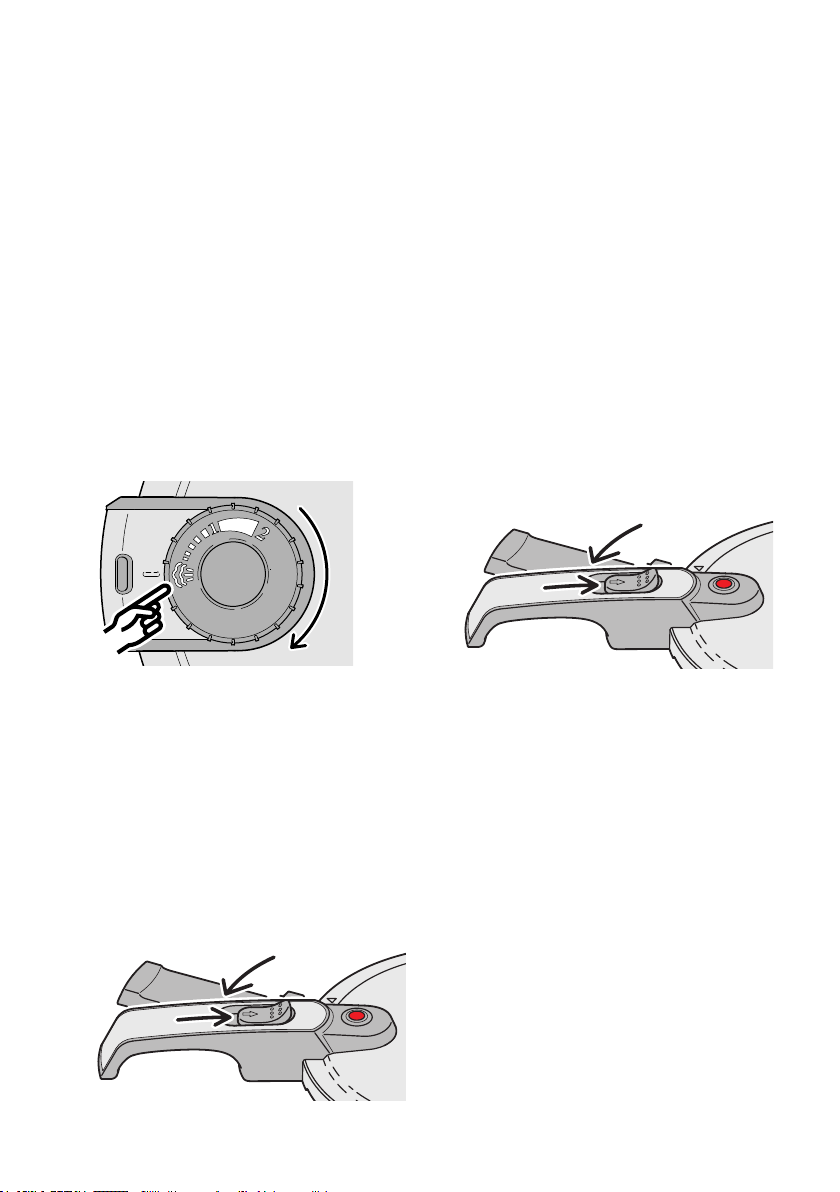
1. Remove the pressure cooker from the
hob.
2. Turn the pressure regulator 3 to the
steam releasing setting.
3. Wait until the pressure has equalised
and the red safety valve 5 falls back
down. Note! As soon as the red safety
valve 5 falls back down, the temperature
inside the pressure cooker is still almost
100 °C.
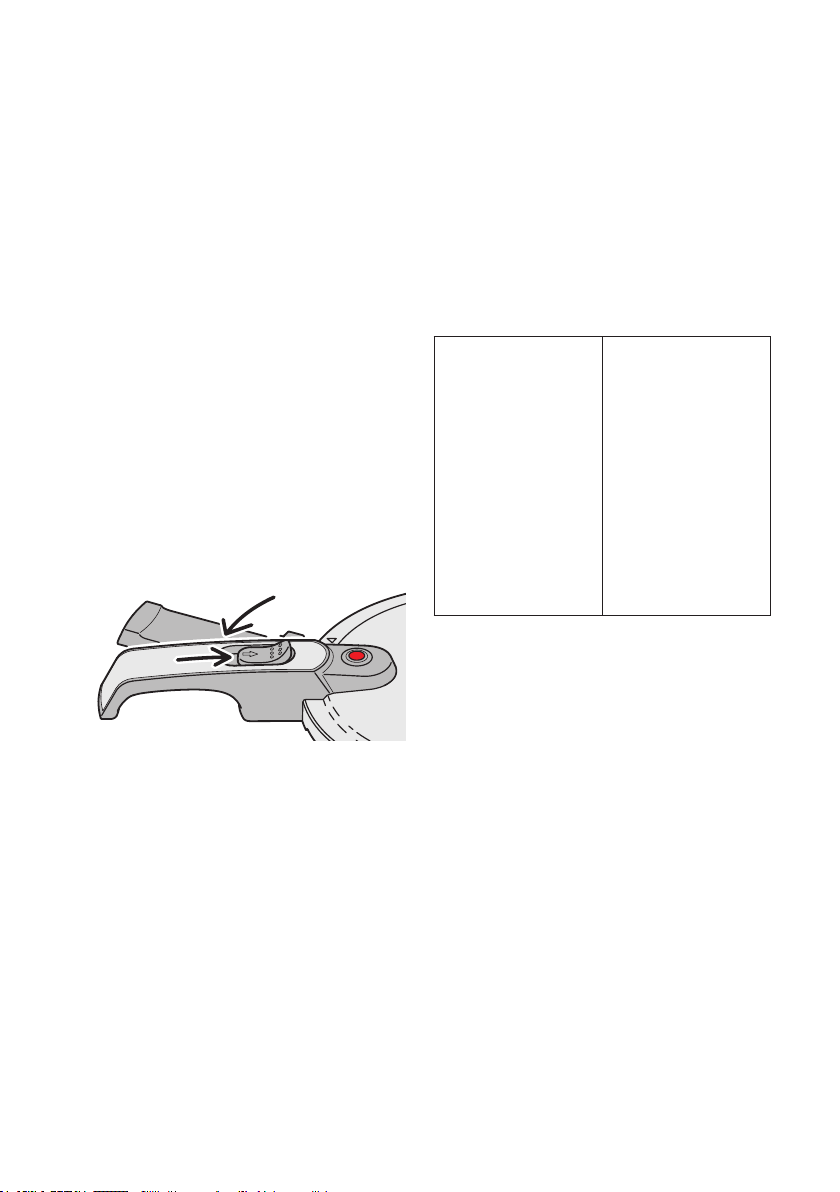
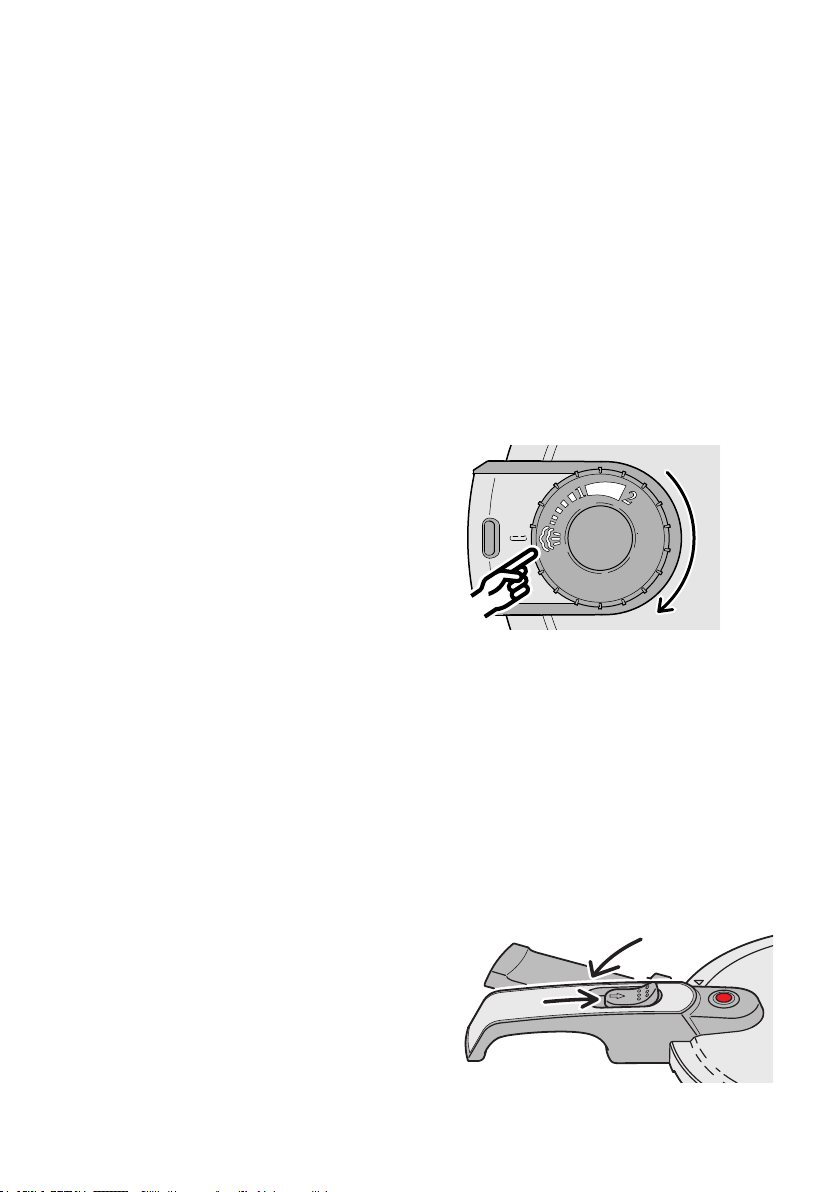
4. Slide the lock 6 forwards and turn the lid
anticlockwise at the same time, until the
triangular mark on the lid is pointing to
the stud on the pot handle 11.
Note! As soon as you slide the lock 6
forwards, some residual steam may escape.
Method 2: Saving energy
Method 2 requires the pressure cooker to
be turned off a few minutes before the food
has nished cooking, leaving the pressure
cooker on the hob. This uses the residual
heat optimally and saves energy.
1. Wait until the pressure has stabilised
and the red safety valve 5 drops down.
Note! When the safety valve 5 drops
down, the temperature inside the pressure cooker is still around 100 °C.
2. Slide the lock 6 forwards and turn the lid
anticlockwise at the same time, until the
triangular mark on the lid is pointing to
the stud on the pot handle 11.
Note: As soon as you slide the lock 6
forwards, some residual steam may escape.
3. Remove the lid from the pot.
5. Remove the lid from the pot.
Page 8
8
Method 3: Saving time
Method 3 requires you to remove the pressure cooker from the hob once the food
has nished cooking. In order to be able to
open the lid straight away, the pressure in
the base has to be released manually. This
method in particular saves time.
1. Hold the pressure cooker under running water until the safety valve 5 drops
down (the pressure of the water should
not be too high). Caution! Take care to
prevent the water jet from hitting the
pressure regulator 3 or the safety valve
5, as water might otherwise get inside
the pot and dilute your food.
2. Slide the lock 6 forwards and turn the lid
anticlockwise at the same time, until the
triangular mark on the lid is pointing to
the stud on the pot handle 11.
Note: As soon as you slide the lock 6
forwards, some residual steam may escape.
3. Remove the lid from the pot.
6. Cleaning and storing
Your pressure cooker is easy to clean and
maintain. In order to enjoy your pressure cooker for a long time, please ensure
you always observe the following cleaning
instructions.
Frequency of cleaning:
Activity Frequency
Clean pot 9
Clean pressure
regulator 3
Clean lid 4
Clean gasket 8
Replace gasket 8
How to clean the pressure cooker
Always wash the pressure cooker after use.
— The pressure cooker should always be
washed by hand.
— Do not use steel wool or anything that
may scratch the surface.
— If possible you should clean the pressure
cooker directly after use so that any leftovers do not dry and stick to the pot.
After each use
When dirty
After each use
After each use
When needed.
Contact your
nearest IKEA store/
Customer service or
visit www.ikea.com
for support.
How to clean the pot (9)
Clean the pot 9 after each use:
1. Wash the pot by hand with hot water
and a mild detergent.
2. Rinse with clean water.
3. Dry the pot with a tea towel to avoid any
water marks.
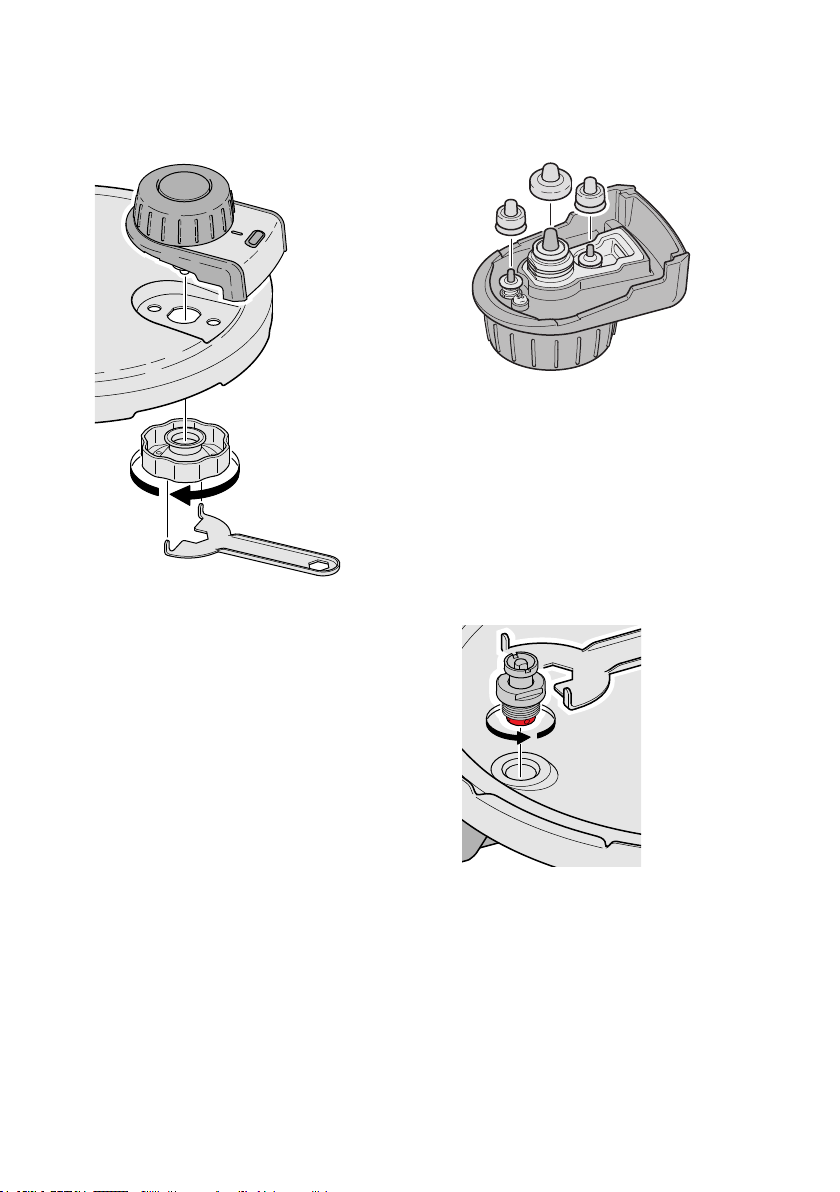
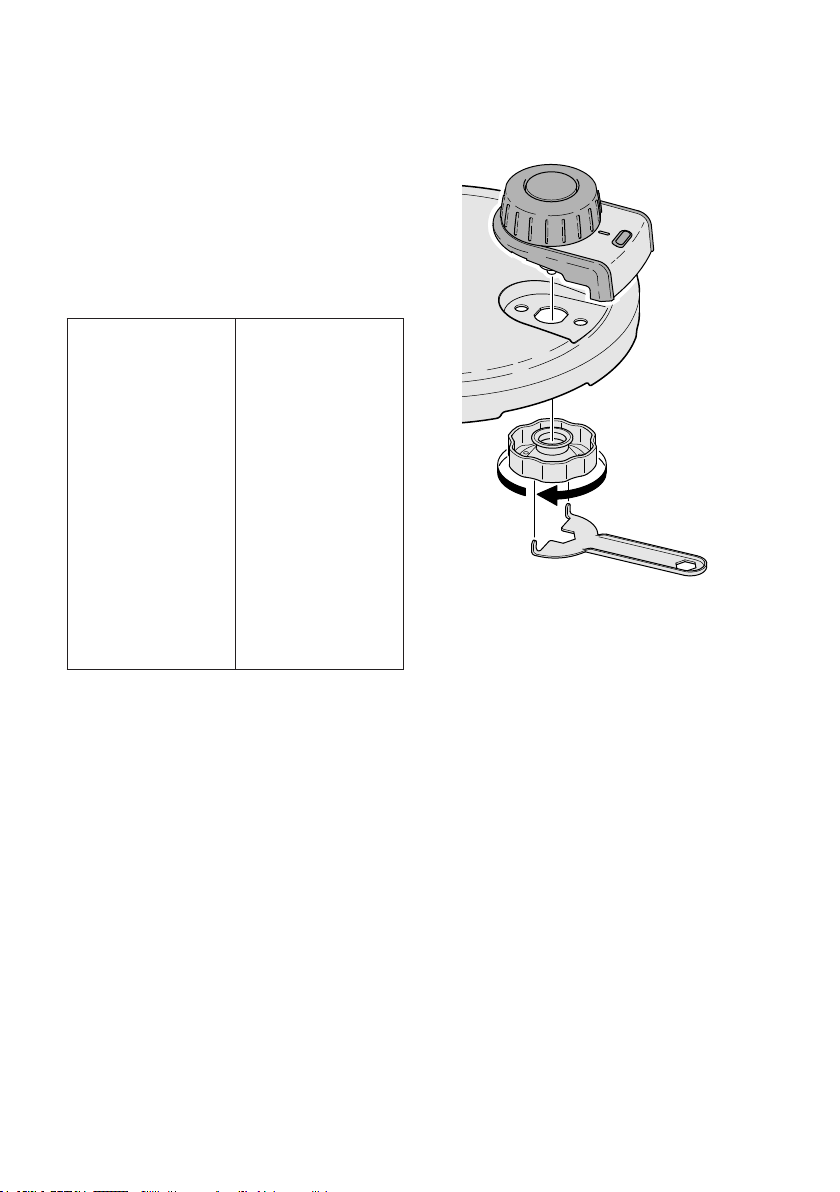
How to clean the pressure regulator (3)
1. Unscrew the union nut for the pressure
regulator 3 by turning it in an anticlockwise direction. Use the key 10 supplied
for this purpose.
Page 9
9
2. Lift the pressure regulator 3 up and out.
3. Rinse the pressure regulator with hot
water. Note! You can also use a small
amount of mild detergent and a very
soft brush if necessary.
4. Clean the lid (see section below).
5. Re-insert the pressure regulator into the
lid.
6. Tighten the union nut for the pressure
regulator 3 by screwing it in a clockwise
direction. Use the key 10 supplied for
this purpose.
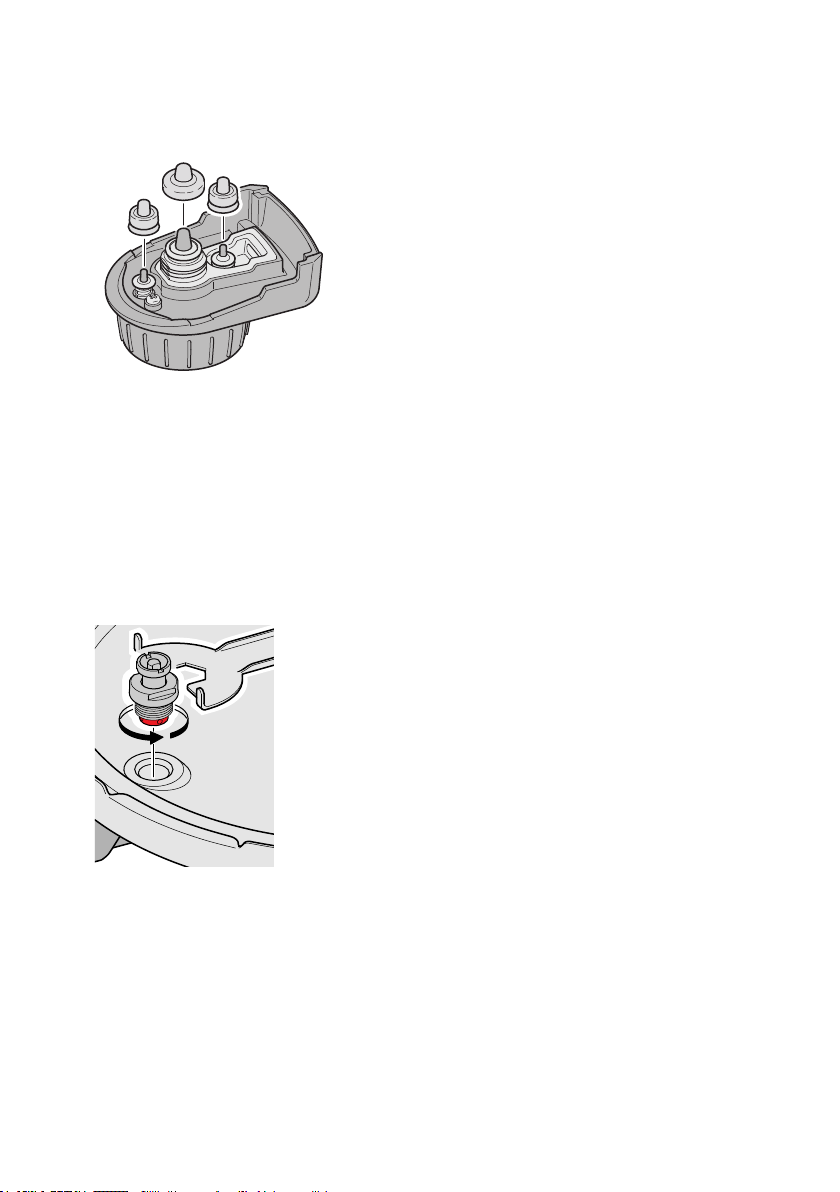
Note! If steam is escaping from the safety
opening 2 after the pressure regulator 3 has
been tted, check:
— Whether the union nut for the pressure
regulator 3 is properly tightened – the
union nut should be tightened rmly by
hand using the key 10.
— Whether the three protective caps in the
pressure regulator are defective or not
properly tted – unscrew the pressure
regulator and check the t and integrity
of the protective caps.
— If none of the above measures success-
fully remedies the malfunction, please
contact your nearest IKEA store/Customer service or see www.ikea.com for
support.
How to clean the safety valve (5)
1. Unscrew the fastening bolt for the safety
valve 5 by turning it in an anticlockwise
direction. Use the key 10 supplied for
this purpose.
2. Lift the safety valve 5 up and out.
3. Rinse the safety valve with hot water.
Note! You can also use a small amount
of mild detergent and a very soft brush
if necessary.
4. Clean the lid (see section below).
5. Re-insert the safety valve into the lid.
6. Tighten the fastening bolt for the safety
valve 5 by screwing it in a clockwise direction. Use the key 10 supplied for this
purpose.
Page 10

10
How to clean the lid (4)
Caution! The lid should not be washed in
the dishwasher.
1. Wash the lid with hot water and a mild
detergent. If the lid is particularly dirty,
soak it for a little while in water and a
mild detergent.
2. Rinse the lid under hot water.
3. Dry the lid with a tea towel to avoid any
water marks.
How to clean the gasket (8)
Note! The gasket should be replaced once
a year if you use the pressure cooker
regularly. Please contact your nearest IKEA
store/ Customer service or see www.ikea.
com for support.
1. Remove the gasket from the lid.
2. Rinse the gasket in clean, hot water.
3. Dry the gasket with a tea towel.
Note! The gasket should not be squashed
or deformed during storage. It is therefore
advisable to place the gasket back into the
lid during storage.
Storing the pressure cooker
Caution! The pressure cooker should never
be stored with the lid on. If there is no
ventilation then condensation may develop
which could lead to a build up of bad smells
and may even damage the pressure cooker.
1. Store the gasket in the lid.
2. Store the pot and the lid separately
7. Troubleshooting
Warning! As soon as uncontrolled steam
emerges, remove the pressure cooker from
the hob. The pressure cooker is not to be
used again until the error has been corrected. Only a slight emergence of steam from
the pressure regulator 3 is normal.
Page 11
What to do if:
Problem Possible cause Solution
Steam is escaping from
between the lid and the pot.
No steam is coming from the
pressure regulator.
Too much steam is coming
from the pressure regulator.
Steam is escaping from
the sides of the pressure
regulator.
Steam is escaping from the
safety opening.
The lid does not open. There is too much pressure
The pressure regulator
is displaying a red ring
underneath the two white
rings.
1. Pressure cooker not
closed correctly.
2. Gasket is dirty.
3. Gasket is broken/worn
away
1. Steam is escaping from
between the lid and the
pot.
2. Pressure regulator is
dirty.
3. Not enough liquid in the
pressure cooker.
4. Heat supply too low.
1. Heat supply too high.
2. Pressure regulator is
dirty.
The pressure regulator is not
correctly tted.
1. The protective caps in
the pressure regulator
are defective or not
properly tted.
2. The pressure regulator is
soiled.
3. The pressure regulator is
defective.
in the pressure cooker.
1. The pressure in the
pressure cooker is too
high because the heat
supply is too high.
2. The pressure regulator is
soiled, defective or not
correctly tted.
1. Close the pressure cooker
again correctly.
2. Clean the gasket.
3. Replace the gasket (1 x
year).
1. Replace the gasket (1 x
year).
2. Clean the pressure regulator
(see section “Cleaning and
storing”).
3. Slowly cool down the
pressure cooker and ll with
at least 0.25 l liquid.
4. Increase the heat supply
(turn the hob to a higher
setting).
1. Decrease the heat supply
(turn the hob to a lower
setting).
2. Clean the pressure regulator
(see section “Cleaning and
storing”).
Fit the pressure regulator
correctly and tighten the union
nut on the inside of the lid using
the key 10.
1. Check the safety caps
(see section "Cleaning and
storing”).
2. Clean the pressure regulator
(see section "Cleaning and
storing”).
3. Contact your nearest IKEA
store/Customer service
or see www.ikea.com for
support.
Follow the instructions in
section "Opening the pressure
cooker".
1. Reduce the heat supply
(turn the hob to a lower
setting).
2. Clean the pressure
regulator, check whether it
is tted correctly.
11
Page 12
8. Table of cooking times
Food Cooking time Cooking level
Fish and seafood
Fishsoup
Clams
Tuna
Squid
Conger
Lobster
Prawns
Sole
Codsh
Mussels
Hake (frozen)
Hake (fresh)
Angler sh
Trout
Salmon
16 min
2-4 min
4-5 min
6-10 min
8 min
5-10 min
4-6 min
3-7 min
4-8 min
2-3 min
3-6 min
3-4 min
5-8 min
4-7 min
5-8 min
2
2
2
2
2
2
2
2
2
2
2
2
2
2
2
Food Cooking time Cooking level
Fruit
Apricots
Cherries
Prunes
Apples
Peaches
Oranges
Pears
1-4 min
1-2 min
1-3 min
2-5 min
2-5 min
4-7 min
4-6 min
1
1
1
1
1
1
1
12
Food Cooking time Cooking level
Meat
Knuckle of pork
Mutton
Veal, schnitzel
Rabbit
Roast beef
Ham, fried
Ham, boiled
Roast pork
Ox tongue, fresh or smoked
Pork chop
Pig’s trotters
Pork loin
Stewed lamb
Leg of lamb
Roast veal
Stewed veal
Veal liver
Veal tongue
30-40 min
15 min
6 min
15-20 min
20-25 min
20-25 min
30-35 min
25-30 min
50-60 min
10-12 min
25-30 min
12-16 min
10-14 min
15-20 min
15-20 min
15-20 min
6-10 min
20-25 min
2
2
2
2
2
2
2
2
2
2
2
2
2
2
2
2
2
2
Page 13
13
Food Cooking time Cooking level
Poultry and game
Quail
Wild rabbit
Pheasant
Hare
Duck
Turkey
Partridge
Pigeon
Chicken (depending on size and
weight)
Food Cooking time Cooking level
Pulses
Beans (pre-soaked)
Peas (not pre-soaked)
Peas (pre-soaked)
Peas, green (pre-soaked)
Lentils (not pre-soaked)
Lentils (pre-soaked)
Broad beans
Chickpeas
10-15 min
20-25 min
10-15 min
25-28 min
20-25 min
20-25 min
14-18 min
12-15 min
20-25 min
15-20 min
20-25 min
10-15 min
20-25 min
15-20 min
8-10 min
5-8 min
20-27 min
2
2
2
2
2
2
2
2
2
1
1
1
1
1
1
1
1
Food Cooking time Cooking level
Soups
Bean soup (pre-soaked)
Pea soup (not pre-soaked)
Pea soup (pre-soaked)
Vegetable soup
Pearl barley
Semolina
Goulash
Porridge
Potato soup
Bone broth
Lentils (not pre-soaked)
Lentils (pre-soaked)
Minestrone
Pot-au-Feu
Beef bouillon (depending on
quantity of meat)
Stewing hen
Pasta soup
Tomato soup
Onion soup
Fish soup
15-20 min
20-25 min
10-15 min
4-8 min
18-20 min
3-5 min
15-20 min
3-4 min
5-6 min
20-25 min
15-20 min
8-10 min
6-8 min
20-25 min
35-40 min (depending of quantity of meat)
25-30 min (depending on size and age)
3-5 min
8-10 min
2-3 min
8-10 min
1
1
1
1
1
1
1
1
1
1
1
1
1
1
1
1
1
1
1
1
Page 14
14
Food Cooking time Cooking level
Vegetables
Cauliower
Cauliower, whole
Endive
Carrots
Potatoes, in skins
Potatoes, peeled
Turnip
Carrots, chopped
Peppers
Mushrooms
Brussel sprouts
Beetroot
Red cabbage, green cabbage,
savoy cabbage
Black salsify
Celery
Asparagus
Tomatoes
Artichokes
Pumpkin
Onion
Spinach
Leek
4-6 min
6-8 min
6-8 min
5-7 min
10-15 min
6-8 min
4-6 min
6 min
6-8 min
6-8 min
4-6 min
15-25 min
8-10 min
5-6 min
15-25 min
7-8 min
2-3 min
5-8 min
7-9 min
5-7 min
3-5 min
3-5 min
1
1
1
1
1
1
1
1
1
1
1
1
1
1
1
1
1
1
1
1
1
1
Food Cooking time Cooking level
Food other
Rice
Pasta
15-20 min
4-6 min
1
1
Page 15

DEUTSCH
15
1. Benennung der Teile
1. Topfgriff
2. Sicherheitsöffnung
3. Druckregler
4. Deckel
5. Sicherheitsventil
6. Verriegelung
7. Deckelgriff
8. Dichtungsring (nicht sichtbar, liegt im
Deckel)
9. Topf
10. Schlüssel
11. Topfstiel
2. Wichtige Information - vor Gebrauch
durchlesen
— Anleitung aufmerksam durchlesen.
— Kinder nicht in Nähe des Schnellkochtop-
fes lassen, während er in Gebrauch ist.
— Schnellkochtopf nicht in einen heißen
Backofen stellen.
— Unter Druck stehenden Schnellkochtopf
vorsichtig hantieren. Die Außenseite des
Topfs erhitzt sich beim Benutzen. Nur
die Griffe und den Topfstiel berühren.
Topappen benutzen.
— Schnellkochtopf nur zum Kochen benut-
zen.
— Dieses Produkt kocht unter Druckeinwir-
kung. Unsachgemäße Benutzung kann
zu Verbrühungen führen. Vor dem Erhitzen des Topfs unbedingt darauf achten,
dass der Deckel korrekt geschlossen ist.
Siehe Abschnitt „Gebrauchsanleitung“.
— Schnellkochtopf nie gewaltsam öffnen,
bevor der gesamte Druck abgebaut ist.
Informationen zum korrekten Öffnen des
Schnellkochtopfes im Kapitel „Am Ende
der Garzeit“.
— Den Schnellkochtopf nie ohne zugege-
bene Flüssigkeit benutzen, da er sonst
beschädigt wird.
— Schnellkochtopf max. bis zu 2/3 der Ka-
pazität füllen (siehe MAX“-Markierung im
Topnneren). Bei Lebensmitteln, die sich
während des Kochvorgangs ausdehnen
oder schäumen (Reis, Hülsenfrüchte o.
Ä.), den Topf nur bis zur Hälfte der Kapazität füllen (siehe „1/2“-Markierung im
Topnneren).
— Nur in Verbindung mit geeigneten Hitze-
quellen benutzen (siehe Gebrauchsanleitung).
— Fleisch mit Haut (z. B. Rinderzunge)
kann beim Garen unter Druckeinwirkung
anschwellen. In diesem Fall das Fleisch
nicht anstechen. Die kochende Flüssigkeit kann zu Verbrühungen führen.
— Beim Garen von breiigen Nahrungsmit-
teln, die viel Luft enthalten, den Schnellkochtopf vor dem Öffnen des Deckels
leicht schütteln, um Überlaufen zu verhindern.
— Vor jeder Benutzung prüfen, dass der
Dichtungsring sauber und die Ventile durchlässig sind. Siehe Abschnitt
„Schnellkochtopf vorbereiten“.
— Schnellkochtopf niemals unter Druck
zum Anbraten/Braten von Speisen benutzen.
— Abgesehen von den in der Gebrauchs-
anleitung genannten Maßnahmen sind
Änderungen an den Sicherheitssystemen
des Produkts nicht erlaubt.
— Nur Ersatzteile des Herstellers verwen-
den, die bei IKEA erhältlich und auf das
jeweilige Modell ausgelegt sind. Bei Fragen zum Produkt mit dem Kundenservice eines IKEA Einrichtungshauses oder
über www.IKEA.de Kontakt aufnehmen.
— DIESE ANLEITUNG IMMER BEFOLGEN.
3. Technische Information
Arbeitsdruck: 0,6 bar (Stufe 1) und 1,0
bar (Stufe 2).
Sicherheitsdruck: 260 kPa.
Verfügbare Kapazität: 6 Liter oder 4 Liter.
Lizenznehmer: IKEA of Sweden AB, Box
702, Tulpanvägen 8, SE-343 81, Älmhult/
Schweden.
Model: 00286743, 50286745.
Der Schnellkochtopf trägt das CE-Zeichen
gem. der Druckgeräterichtlinie (97/23/EC).
Der Schnellkochtopf ist GS-zertiziert.
4. Sicherheitsinformation
— Im Deckel des Schnellkochtopfs sorgt
ein Druckregler für die Beibehaltung des
gewünschten Drucks während der Zubereitung.
— Mehrere Sicherheitssysteme sorgen da-
für, dass das Produkt auch im Fehlerfalle
sicher arbeitet. Der Druckregler 3 sorgt
für konstanten Druck im Inneren des
Schnellkochtopfs. Bitte Vorsicht - hier
kann während des Betriebs ständig etwas Dampf austreten. Im Druckregler
Page 16

16
3 bendet sich ein zusätzliches Über-
druckventil, das den Überdruck über
die Sicherheitsöffnung 2 entlässt, falls
am Druckregler eine Funktionsstörung
auftritt. Sollten Druckregler 3 und das
Überdruckventil im Druckregler versagen, kann der Überdruck auch über
das Sicherheitsventil 5 entweichen. Die
Verriegelung 6 lässt sich zum Öffnen des
Deckels nur dann nach vorne schieben,
wenn der Druck ausgeglichen ist und
sich dadurch das rote Sicherheitsventil
5 absenkt.
Allgemeine Sicherheitshinweise
— Vor jeder Benutzung prüfen, dass der
Druckregler 3 und das Sicherheitsventil 5 leichtgängig und nicht verstopft
sind (siehe Abschnitt „Benutzung des
Schnellkochtopfs“).
— Immer darauf achten, dass der Topf
korrekt geschlossen ist, bevor er auf den
Herd gestellt wird (siehe Abschnitt „Benutzung des Schnellkochtopfs“).
— Der Druckregler 3 darf niemals abge-
deckt werden.
— Die Sicherheitsöffnung 2 während des
Gebrauchs niemals auf den Benutzer auf
oder auf eine Stelle, wo jemand vorbeikommen könnte, richten. Im Fehlerfalle
kann hier ein starker Dampfstrahl austreten.
— Sollte Dampf aus dem Sicherheitsventil
5 oder der Sicherheitsöffnung 2 austreten, sofort die Herdplatte abschalten,
da der Druck im Inneren des Topfes zu
hoch ist. Den Topf erst wieder in Betrieb
nehmen, wenn die Störung beseitigt ist
(siehe Abschnitt „Störungen und deren
Beseitigung“).
— Um Schäden am Schnellkochtopf zu ver-
hindern, muss sich immer mindestens
0,25 l Flüssigkeit im Topf benden, damit ausreichend Dampf erzeugt werden
kann und der Topf sich nicht überhitzt
oder trocken kocht.
— WARNHINWEIS: Die Reparatur des
Dampfdruckkochtopfs darf nur von autorisiertem Fachpersonal durchgeführt
werden.
Wissenswertes
— Der Schnellkochtopf ist für alle Herdar-
ten inkl. Induktionsherden geeignet.
— Das Produkt kann (ohne Deckel) wie ein
herkömmlicher Kochtopf zum Anbraten
von Speisen benutzt werden, die danach
unter Druck gegart werden.
— Den Schnellkochtopf auf einer Platte mit
dem gleichen oder geringerem Durchmesser zu benutzen spart Energie.
— Bei Glaskeramikkochfeldern den Schnell-
kochtopf zum Bewegen immer hochheben, damit keine Kratzer entstehen.
— Der Schnellkochtopf erhitzt sich bei der
Benutzung auf dem Herd. Zum Bewegen
immer Topappen benutzen.
— Niemals trocken kochen lassen, da dies
das Produkt beschädigen könnte.
— Der Schnellkochtopf ist für die Zuberei-
tung und nicht zum Aufbewahren von
Speisen gedacht. Wenn Speisen länger
darin stehen bleiben, kann das Material
beeinträchtigt werden und die Speisen
einen metallischen Geschmack annehmen.
— Bei Verwendung auf dem Gasherd dar-
auf achten, dass die Flammen die Griffe
nicht erreichen.
5. Hinweise zur Benutzung
Vor jeder Benutzung
Bevor der Schnellkochtopf benutzt wird,
sollten zur Vermeidung von Schäden am
Produkt die folgenden Sicherheitsfunktionen
geprüft werden.
1. Prüfen, ob die Öffnungen des Druckreglers 3 auf der Innenseite des Deckels
sauber sind.
2. Ist dies nicht der Fall, den Druckregler 3
reinigen (siehe Abschnitt „Reinigung und
Verwahrung“).
3. Prüfen, ob das Sicherheitsventil 5 nach
oben und unten beweglich ist und nicht
festsitzt.
4. Prüfen, dass der Dichtungsring 8 nicht
beschädigt ist. Bitte beachten: Im
Laufe der Zeit kann der Dichtungsring
verhärten und dichtet dann nicht mehr
korrekt ab. Das kann dazu führen, dass
unter dem Deckelrand Dampf austritt.
Dann muss der Dichtungsring erneuert
werden. In diesem Fall bitte mit dem
Kundenservice im nächstgelegenen IKEA
Einrichtungshaus oder über www.IKEA.
de Kontakt aufnehmen.
Page 17
17
Benutzung des Schnellkochtopfs
1. Gargut und/oder Wasser in den Topf geben. Achtung! Den Schnellkochtopf nie
über die „MAX”-Markierung im Inneren
des Topfs befüllen. Dies entspricht maximal 4 Litern (bei Schnellkochtopf mit
6 Litern Nutzinhalt) und maximal 2,5
Litern (bei Schnellkochtopf mit 4 Litern
Nutzinhalt). Bei Lebensmitteln, die sich
während des Kochvorgangs ausdehnen
oder schäumen (Reis, Hülsenfrüchte o.
Ä.), den Topf nur bis zur „1/2“-Markie-
rung im Topnneren füllen. Dadurch wird
verhindert, dass Kochgut an den Deckel
gelangt und eventuell das Sicherheitsventil verstopft.
2. Den Deckel 4 so auf den Topf 9 legen,
dass die Dreiecksmarkierung auf dem
Deckel auf den Stift im Topfstiel 11
zeigt.
3. Den Deckel drehen, bis Deckelgriff 7 und
Topfstiel 11 übereinanderstehen und
hörbar einrasten.
4. Am Druckregler 3 die gewünschte Kochstufe wählen:
1) Biogaren - am Druckregler wird ein
weißer Ring sichtbar.
2) Schnellgaren - am Druckregler werden zwei weiße Ringe sichtbar.
5. Den Schnellkochtopf auf ein Kochfeld
stellen, das den gleichen Durchmesser
hat wie das Topfunterteil. Achtung! Das
Kochfeld darf nicht größer sein als der
Boden des Schnellkochtopfs, da sonst
die vom Kochfeld aufsteigende Hitze die
Kunststoffgriffe beschädigen könnte.
6. Das Kochfeld auf höchste Stufe stellen.
Sobald Dampfdruck im Topf entsteht,
steigt das rote Sicherheitsventil 5 nach
oben und verriegelt dabei den Deckel.
Bitte beachten: zu Beginn des Kochens
kann etwas Dampf am Sicherheitsventil
austreten.
7. Sobald Dampf am Druckregler 3 austritt, die Wärmezufuhr auf etwa die
Hälfte verringern, sodass nur noch sehr
wenig Dampf am Druckregler austritt.
In diesem Moment beginnt die in den
Rezepten genannte Kochzeit. Wenn in
der „Einstellung 2“ für Schnellgaren zwei
weiße Ringe am Druckregler 3 erscheinen und nur wenig Dampf austritt, wird
die Speise schnell und Energie sparend
gegart.
Achtung! Wenn der rote Ring am
Druckregler 3 auftaucht, ist der Druck
zu hoch und die Wärmezufuhr des Kochfelds muss reduziert werden.
Page 18
18
Schnellkochtopf öffnen
Achtung! Wenn das rote Sicherheitsventil
5 noch oben ist, herrscht Druck im Topf und
der Deckel kann nicht geöffnet werden. Unter keinen Umständen versuchen, den Deckel mit Gewalt zu öffnen. Sonst könnte die
plötzliche Druckentlastung zu Verbrühungen
führen. Erst wenn das rote Sicherheitsventil
5 gesunken ist, lässt sich der Topf öffnen.
Das lässt sich auf drei Arten erreichen.
Den Topf nie ganz ins Wasser tauchen. Der
schlagartig zusammenbrechende Druck würde zu Schäden am Topf und zu zerfallendem
Gargut führen.
Drei Arten, den Schnellkochtopf zu
öffnen
Es gibt drei Möglichkeiten, den Druck im
Topf zu mindern, um ihn öffnen zu können;
Methode 1: Abdampfen
Bei dieser Methode wird solange Dampf abgelassen, bis der Druck im Topf weit genug
abgesunken ist, um den Deckel öffnen zu
können
Achtung! Darauf achten, dass die Sicherheitsöffnung 2 vom Körper abgewendet
wird, denn bei dieser Methode tritt heißer
Dampf aus dem Druckregler aus. Achte daher darauf, dich daran nicht zu verbrühen.
1. Den Schnellkochtopf vom Herd nehmen.
2. Den Druckregler 3 auf die Stellung fürs
Abdampfen drehen.
3. Abwarten bis der Druck ausgeglichen ist
und sich dadurch das rote Sicherheitsventil 5 absenkt. Hinweis: wenn das
rote Sicherheitsventil 5 sich absenkt,
beträgt die Temperatur im Inneren des
Schnellkochtopfs noch fast 100° C.
4. Die Verriegelung 6 nach vorne schieben
und gleichzeitig den Deckel gegen den
Uhrzeigersinn drehen, bis die Dreiecksmarkierung auf dem Deckel auf den Stift
im Topfstiel 11 zeigt.
Bitte beachten: Sobald die Verriegelung nach vorne geschoben wird, kann
noch etwas Restdampf austreten.
5. Den Deckel vom Topf nehmen.
Page 19

19
Methode 2: Energie sparen
Bei Methode 2 schaltet man das Kochfeld
einige Minuten vor Ende der Garzeit aus und
lässt den Schnellkochtopf auf der Herdplatte stehen. So wird die Restwärme optimal
genutzt und Energie gespart.
1. Abwarten, bis der Druck ausgeglichen ist
und das rote Sicherheitsventil 5 sich absenkt. Bitte beachten: Sobald das rote
Sicherheitsventil 5 sich absenkt, beträgt
die Temperatur im Inneren des Schnellkochtopfs noch fast 100° C.
2. Die Verriegelung 6 nach vorne schieben
und gleichzeitig den Deckel gegen den
Uhrzeigersinn drehen, bis die Dreiecksmarkierung auf dem Deckel auf den Stift
im Topfstiel 11 zeigt.
Bitte beachten: Sobald die Verriegelung nach vorne geschoben wird, kann
noch etwas Restdampf austreten.
3. Den Deckel vom Topf nehmen.
Methode 3: Zeit sparen
Bei Methode 3 nimmt man den Topf nach
dem Ende der Garzeit von der Herdplatte.
Um ihn sofort öffnen zu können, muss der
Druck im Inneren des Schnellkochtopfes
manuell abgelassen werden. Diese Methode
spart Zeit.
1. Den Schnellkochtopf unter einen nicht
zu starken Wasserstrahl halten, bis das
rote Sicherheitsventil 5 sich absenkt.
Vorsicht! Darauf achten, dass der
Wasserstrahl nicht auf den Druckregler
3 oder das Sicherheitsventil 5 trifft. Es
könnte sonst Wasser in den Topf gelangen und die Speisen verdünnen.
2. Die Verriegelung 6 nach vorne schieben
und gleichzeitig den Deckel gegen den
Uhrzeigersinn drehen, bis die Dreiecksmarkierung auf dem Deckel auf den Stift
im Topfstiel 11 zeigt.
Hinweis! Wenn die Verriegelung nach
vorne geschoben wird, kann noch etwas
Restdampf austreten.
3. Den Deckel vom Topf nehmen.
Page 20
20
6. Reinigung und Verwahrung:
Der Schnellkochtopf ist wartungsfreundlich
und leicht zu reinigen. Für lange Haltbarkeit
sollten die folgenden Reinigungsmaßnahmen
stets gründlich durchgeführt werden.
Häugkeit der Reinigung:
Aktivität Frequenz
Reinigen des Topfunterteils
Reinigen des Druckreglers 3
Reinigen des Deckels 4
Reinigen des Dichtungsrings 8
Austauschen des
Dichtungsrings 8
Reingen des Schnellkochtopfs
Den Schnellkochtopf nach jeder Benutzung
spülen.
— Der Schnellkochtopf muss immer von
Hand gespült werden.
— Keine Stahlwolle o. Ä. benutzen, was die
Oberäche angreifen könnte.
— Den Schnellkochtopf möglichst direkt
nach Gebrauch spülen, damit keine
Speisereste festtrocknen können.
Reinigen des Topfunterteils (9)
Das Topfunterteil 9 nach jedem Gebrauch
reinigen:
1. Den Topf mit warmem Wasser und mildem Spülmittel abwaschen.
2. Mit klarem Wasser abspülen.
3. Zur Vermeidung von Kalkecken mit einem Geschirrtuch abtrocknen.
Reingen des Druckreglers (3)
1. Die Mutter am Druckregler 3 gegen den
Uhrzeigersinn abschrauben. Dafür den
mitgelieferten Schlüssel 10 benutzen.
nach jeder Benutzung
bei Verschmutzung
nach jeder Benutzung
nach jeder Benutzung
Bei Bedarf. Bitte mit
dem Kundenservice
im nächstgelegenen
IKEA Einrichtungshaus oder über
www.IKEA.de Kontakt aufnehmen.
2. Den Druckregler hochziehen und herausnehmen.
3. Den Druckregler mit warmem Wasser
abspülen. Hinweis: Bei Bedarf etwas
mildes Spülmittel und eine weiche Bürste zum Säubern benutzen.
4. Den Deckel reinigen (siehe folgenden
Abschnitt).
5. Den Druckregler wieder in den Deckel
einsetzen.
6. Die Mutter am Druckregler 3 im Uhrzeigersinn festziehen. Dafür den mitgelieferten Schlüssel 10 benutzen.
Hinweis: Falls nach der Montage des
Druckreglers 3 Dampf aus der Sicherheitsöffnung 2 austritt, kontrollieren:
— dass die Mutter am Druckregler 3 kor-
rekt angezogen ist – die Mutter sollte
von Hand mit dem Schlüssel 10 gut
festgezogen werden;
— ob die drei Schutzkappen im Druckregler
defekt bzw. inkorrekt aufgesetzt sind –
den Druckregler abschrauben und den
korrekten Sitz und die Unversehrtheit
der Schutzkappen prüfen.
Page 21
21
— Wenn keine der genannten Maßnahmen
helfen, bitte mit dem Kundenservice im
nächstgelegenen IKEA Einrichtungshaus
oder über www.IKEA.de Kontakt aufnehmen.
Reinigung des Sicherheitsventils (5)
1. Die Befestigungsschraube für das Sicherheitsventil 5 gegen den Uhrzeigersinn abschrauben. Dafür den mitgelieferten Schlüssel 10 benutzen.
2. Das Sicherheitsventil 5 hochziehen und
herausnehmen.
3. Das Sicherheitsventil mit warmem
Wasser abspülen. Hinweis: Bei Bedarf
etwas mildes Spülmittel und eine weiche
Bürste zum Säubern benutzen.
4. Den Deckel reinigen (siehe folgenden
Abschnitt).
5. Das Sicherheitsventil wieder in den Deckel einsetzen.
6. Die Befestigungsschraube für das Sicherheitsventil 5 im Uhrzeigersinn festziehen. Dafür den mitgelieferten Schlüssel 10 benutzen.
Reinigen des Deckels (4)
Vorsicht! Der Deckel darf nicht in der Ma-
schine gespült werden.
1. Den Deckel mit warmem Wasser und
mildem Spülmittel abwaschen. Bei starker Verschmutzung den Deckel kurz in
Spülwasser einweichen.
2. Den Deckel mit klarem Wasser abspülen.
3. Zum Vermeiden von Kalkecken mit einem Geschirrtuch abtrocknen.
Reinigen des Dichtungsrings (8)
Hinweis: Der Dichtungsring sollte bei re-
gelmäßiger Benutzung des Schnellkochtopfs
einmal jährlich durch einen neuen ersetzen.
Für weitere Informationen bitte mit dem
Kundenservice im nächstgelegenen IKEA
Einrichtungshaus oder über www.IKEA.de
Kontakt aufnehmen.
1. Den Dichtungsring aus dem Deckel nehmen.
2. Den Dichtungsring mit warmem Wasser
abspülen.
3. Den Dichtungsring mit einem Geschirrtuch abtrocknen.
Hinweis: Der Dichtungsring darf nicht gepresst oder verformt werden. Deshalb den
Dichtungsring immer in den Deckel einlegen, bevor der Topf in den Schrank gestellt
wird.
Lagern/verwahren des Schnellkochtopfs
ACHTUNG! Der Schnellkochtopf darf nicht
in geschlossenem Zustand gelagert werden.
Ohne Belüftung könnte sich Kondenswasser
bilden, das zu Geruchsbildung oder Schäden
am Topf führen kann.
1. Den Dichtungsring in den Deckel einlegen.
2. Topfunterteil und Deckel getrennt verwahren.
7. Störungen
ACHTUNG! Sobald unkontrolliert Dampf
aus dem Schnellkochtopf austritt, sofort die
Wärmezufuhr stoppen. Der Topf darf erst
nach Beseitigung der Störung wieder benutzt werden. Lediglich ein leichter Dampfaustritt aus dem Druckregler 3 ist normal.
Page 22
Was tun, wenn:
Störung Mögliche Ursachen Beseitigung
Zwischen Deckel und Topf
entweicht Dampf.
Aus dem Druckregler entweicht kein Dampf.
Aus dem Druckregler entweicht zu viel Dampf.
Seitlich vom Druckregler entweicht Dampf.
Aus dem Sicherheitsventil
entweicht Dampf.
Der Deckel lässt sich nicht
öffnen.
Am Druckregler wird unter
den zwei weißen Ringen ein
roter Ring sichtbar.
1. Der Topf ist nicht richtig
geschlossen.
2. Der Dichtungsring ist
verschmutzt.
3. Dichtungsring ist defekt/
verschlissen.
1. Dampf entweicht zwischen Deckel und Topf.
2. Druckregler verschmutzt.
3. Zu wenig Flüssigkeit im
Topf.
4. Wärmezufuhr zu gering.
1. Wärmezufuhr zu hoch.
2. Druckregler verschmutzt.
Druckregler ist nicht korrekt
montiert.
1. Schutzkappen im Druckregler defekt oder nicht
korrekt aufgesetzt.
2. Druckregler verschmutzt.
3. Druckregler defekt.
Der Druck im Schnellkochtopf
ist zu hoch.
1. Der Druck im Topf ist zu
groß, weil die Wärmezufuhr zu hoch ist.
2. Der Druckregler ist verschmutzt, defekt oder
nicht korrekt montiert.
1. Topf korrekt schließen.
2. Dichtungsring reinigen.
3. Dichtungsring erneuern (1 x
jährlich).
1. Dichtungsring erneuern (1 x
jährlich).
2. Druckregler reinigen (siehe
Abschnitt „Reinigung und
Verwahrung“).
3. Topf langsam abkühlen lassen und mindestens 0,25 l
Flüssigkeit einfüllen.
4. Wärmezufuhr erhöhen
(Kochfeld höher stellen).
1. Wärmezufuhr senken (Kochfeld niedriger stellen).
2. Druckregler reinigen (siehe
Abschnitt „Reinigung und
Verwahrung“).
Druckregler korrekt montieren
und mit dem Schlüssel 10 die
Überwurfmutter auf der Innenseite des Deckels nachziehen.
1. Die Schutzkappen prüfen
(siehe Abschnitt "Reinigung
und Verwahrung").
2. Den Druckregler reinigen
(siehe Abschnitt "Reinigung
und Verwahrung").
3. Wenn keine der genannten
Maßnahmen helfen, bitte
mit dem Kundenservice
im nächstgelegenen IKEA
Einrichtungshaus oder über
www.IKEA.de Kontakt aufnehmen.
Die Anleitungen im Abschnitt
"Schnellkochtopf öffnen"
befolgen.
1. Wärmezufuhr senken (Kochfeld niedriger stellen).
2. Druckregler reinigen und
kontrollieren, ob er korrekt
verschraubt ist.
22
Page 23
8. Garzeiten
Speisen Kochzeit Kochstufe einstellen
Fisch und Meeresfrüchte
Fischsuppe
Muscheln
Thunsch
Tintensch
Aal
Hummer
Garneelen
Seezunge
Kabeljau
Miesmuscheln
Seehecht (gefroren)
Seehecht (frisch)
Seeteufel
Forelle
Lachs
16 Min.
2-4 Min.
4-5 Min.
6-10 Min.
8 Min.
5-10 Min.
4-6 Min.
3-7 Min.
4-8 Min.
2-3 Min.
3-6 Min.
3-4 Min.
5-8 Min.
4-7 Min.
5-8 Min.
2
2
2
2
2
2
2
2
2
2
2
2
2
2
2
Speisen Kochzeit Kochstufe einstellen
Früchte
Aprikosen
Kirschen
Paumen
Äpfel
Prsiche
Apfelsinen
Birnen
1-4 Min.
1-2 Min.
1-3 Min.
2-5 Min.
2-5 Min.
4-7 Min.
4-6 Min.
1
1
1
1
1
1
1
23
Speisen Kochzeit Kochstufe einstellen
Hülsenfrüchte
Bohnen (vorgeweicht)
Erbsen (nicht vorgeweicht)
Erbsen (vorgeweicht)
Erbsen, grüne (vorgeweicht)
Linsen (nicht vorgeweicht)
Linsen (vorgeweicht)
dicke Bohnen
Kichererbsen
15-20 Min.
20-25 Min.
10-15 Min.
20-25 Min.
15-20 Min.
8-10 Min.
5-8 Min.
20-27 Min.
1
1
1
1
1
1
1
1
Page 24
24
Speisen Kochzeit Kochstufe einstellen
Fleisch
Schweinshaxe
Lammeisch
Kalbskotelett/-schnitzel
Kaninchen
Roastbeef
Schinken, gebraten
Schinken, gekocht
Schweinebraten
Ochsenzunge, frisch oder
geräuchert
Schweinekotelett
Eisbein
Schweinelende
Lammgulasch
Lammkeule
Kalbsbraten
Kalbsfrikassee
Kalbsleber
Kalbszunge
Speisen Kochzeit Kochstufe einstellen
Suppen
Bohnensuppe (vorgeweicht)
Erbsensuppe (nicht vorgeweicht)
Erbsensuppe (vorgeweicht)
Gemüsesuppe
Graupensuppe
Grießbrei
Gulaschsuppe
Reisbrei
Kartoffelsuppe
Knochenbrühe
Linsen (nicht vorgeweicht)
Linsen (vorgeweicht)
Minestrone
Pot-au-Feu
Fleischbrühsuppe
Hühnersuppe
Nudelsuppe
Tomatensuppe
Zwiebelsuppe
Fischsuppe
30-40 Min.
15 Min.
6 Min.
15-20 Min.
20-25 Min.
20-25 Min.
30-35 Min.
25-30 Min.
50-60 Min.
10-12 Min.
25-30 Min.
12-16 Min.
10-14 Min.
15-20 Min.
15-20 Min.
15-20 Min.
6-10 Min.
20-25 Min.
15-20 Min.
20-25 Min.
10-15 Min.
4-8 Min.
18-20 Min.
3-5 Min.
15-20 Min.
3-4 Min.
5-6 Min.
20-25 Min.
15-20 Min.
8-10 Min.
6-8 Min.
20-25 Min.
35-40 Min. (abhängig von der
Menge)
25-30 Min. (abhängig von der
Größe)
3-5 Min.
8-10 Min.
2-3 Min.
8-10 Min.
2
2
2
2
2
2
2
2
2
2
2
2
2
2
2
2
2
2
1
1
1
1
1
1
1
1
1
1
1
1
1
1
1
1
1
1
1
1
Page 25

25
Speisen Kochzeit Kochstufe einstellen
Gemüse
Blumenkohl
Blumenkohl, ganz
Chicorée
Karotten
Pellkartoffeln
Kartoffeln, geschält
Kohlrabi oder weiße Rüben
Karotten, in Stücken
Paprika
Pilze
Rosenkohl
Rote Bete
Rotkohl, Weißkohl, Wirsing
Schwarzwurzel
Knollensellerie
Spargel
Tomaten
Artischocken
Kürbis
Zwiebeln
Spinat
Lauch
4-6 Min.
6-8 Min.
6-8 Min.
5-7 Min.
10-15 Min.
6-8 Min.
4-6 Min.
6 Min.
6-8 Min.
6-8 Min.
4-6 Min.
15-25 Min.
8-10 Min.
5-6 Min.
15-25 Min.
7-8 Min.
2-3 Min.
5-8 Min.
7-9 Min.
5-7 Min.
3-5 Min.
3-5 Min.
1
1
1
1
1
1
1
1
1
1
1
1
1
1
1
1
1
1
1
1
1
1
Speisen Kochzeit Kochstufe einstellen
Geügel und Wild
Wachtel
Kaninchen
Fasan
Hase
Ente
Puter
Rebhuhn
Taube
Hühnchen (abhängig von Größe
und Gewicht)
10-15 Min.
20-25 Min.
10-15 Min.
25-28 Min.
20-25 Min.
20-25 Min.
14-18 Min.
12-15 Min.
20-25 Min.
2
2
2
2
2
2
2
2
2
Speisen Kochzeit Kochstufe einstellen
andere Lebensmittel
Reis
Nudeln
15-20 Min.
4-6 Min.
1
1
Page 26

26FRANÇAIS
1. Schéma descriptif
1. Poignée de cuve
2. Orice de sécurité
3. Régulateur de pression
4. Couvercle
5. Soupape de sécurité
6. Verrou
7. Poignée longue de couvercle
8. Joint
9. Cuve
10. Clé
11. Poignée de cuve
2. Informations importantes, lire avt
utilisation
— Lire toutes les instructions.
— Ne pas laisser les enfants s’approcher de
l’autocuiseur lorsque celui-ci est utilisé.
— Ne pas mettre l’autocuiseur dans un four
chaud.
— Lorsque l’autocuiseur est sous pres-
sion, le déplacer avec prudence. Ne pas
toucher les surfaces chaudes. Utiliser
les poignées. Si nécessaire, utiliser des
maniques.
— Ne pas utiliser l’autocuiseur à d’autres
ns que celles pour lesquelles il est destiné.
— Cet autocuiseur cuit les aliments sous
pression. Des brûlures peuvent résulter
d’une mauvaise utilisation de l’autocui-
seur. Vérier que l’autocuiseur est bien
fermé avant de le poser sur une source
de chaleur. Voir chapitre « Notice d’utilisation ».
— Ne jamais forcer l’ouverture de l’autocui-
seur. Ne pas ouvrir avant de vous être
assuré que la pression intérieure est
entièrement retombée. Voir le chapitre «
Notice d’utilisation ».
— Ne jamais utiliser l’autocuiseur sans
ajouter d’eau, au risque de l’endommager sérieusement.
— Ne pas remplir l’autocuiseur au-delà des
2/3 de sa capacité (voir le repère MAX
à l’intérieur de la cuve). Pour la cuis-
son d’aliments qui gonent en cuisant,
comme le riz ou les légumes déshydratés, ne pas remplir l’autocuiseur audelà de la moitié de sa capacité (voir le
repère ½ à l’intérieur de la cuve).
— Utiliser la source de chaleur appropriée
suivant la notice d’utilisation.
— Après cuisson de viandes compor-
tant une peau supercielle (langue de
boeuf...) qui peut ener sous l’effet de la
pression, ne piquez pas la viande alors
que la peau est encore gonée : vous
risqueriez de vous brûler.
— Pour les aliments pâteux, secouer légè-
rement l’autocuiseur avant ouverture
pour éviter une projection des aliments.
— Avant utilisation, vérier que le joint est
propre et que les soupapes ne sont pas
obstruées. Voir chapitre « Notice d’utilisation ».
— Ne jamais utiliser l’autocuiseur en mode
pression pour faire frire des aliments.
— Ne pas intervenir sur les systèmes de
sécurité au-delà des consignes de nettoyage et d’entretien.
— Ne jamais utiliser l’autocuiseur en mode
pression pour faire frire des aliments.
— Utiliser uniquement des pièces déta-
chées fournies par le fabricant pour ce
modèle précis. Si vous avez des questions, merci de bien vouloir contacter
votre magasin IKEA le plus proche/le
service clientèle ou www.ikea.com/fr.
CONSERVEZ CES INSTRUCTIONS.
3. Informations techniques
Pression de fonctionnement : 0,6 bar
(mode 1) et 1,0 bar (mode 2).
Pression d’évacuation de la vapeur :
260 kpa.
Capacité utile : 6 litres ou 4 litres.
Licence : IKEA of Sweden, Tulpanvägen 8
SE-343 81, Älmhult, Suède.
Modèle : 00286743, 50286745.
Cet autocuiseur respecte les normes CE
d’après la Directive Équipements sous
pression (97/23/EC).
Cet autocuiseur est certié GS.
4. Informations de sécurité
— L’autocuiseur est équipé d’un régulateur
de pression dans le couvercle qui maintient la pression désirée à un niveau
constant.
— Plusieurs systèmes de sécurité garan-
tissent que votre autocuiseur fonctionne
en toute sécurité, même en cas de
défaut technique. Le régulateur de pression 3 garantit un niveau de pression
constant. Il est possible qu’un peu de
vapeur s’échappe en cours d’utilisation.
Page 27

27
À l’intérieur du régulateur de pression 3
se trouve une soupape additionnelle qui
libère la pression excédentaire à travers
l’orice de sécurité 2 si le régulateur
de pression ne fonctionne pas correctement. En cas de dysfonctionnement du
régulateur de pression 3 et de la soupape de contrôle de pression, la pression
excédentaire peut également s’évacuer à
travers la soupape de sécurité 5. Le verrou 6 peut uniquement être avancé pour
ouvrir l’autocuiseur lorsque la pression
s’est équilibrée et de ce fait, la soupape
de sécurité 5 rouge descend.
Conseils de sécurité
— Avant chaque utilisation, vérier que le
régulateur de pression 3 et la soupape
de sécurité 5 sont mobiles et qu’ils ne
sont pas bloqués (voir chapitre « Notice
d’utilisation »).
— Toujours vérier que l’autocuiseur est
correctement fermé avant de le poser
sur la table de cuisson (voir chapitre «
Notice d’utilisation »).
— Le régulateur de pression 3 ne doit
jamais être recouvert d’un objet.
— Vérier que l’orice de sécurité 2 se
situe toujours à l’opposé de vous et qu’il
n’est pas non plus dirigé vers des passants. En cas d’erreur, une grande quantité de vapeur pourrait s’en échapper.
— Si de la vapeur s’échappe par la soupape
de sécurité 5 ou par l’orice de sécurité
2, éteindre immédiatement la source de
chaleur car la pression à l’intérieur de
l’autocuiseur est trop forte. Ne pas utiliser l’autocuiseur tant que le problème
n’est pas résolu (voir chapitre « Que
faire si »).
— An de ne pas endommager l’autocui-
seur, vérier que la cuve contient toujours au moins 0,25 L de liquide, an
que sufsamment de vapeur puisse être
produite et que l’autocuiseur ne surchauffe pas et ne fonctionnement pas à
vide.
— ATTENTION : toute réparation de
l’autocuiseur doit être réalisée par une
professionnel agréé.
Bon à savoir
— L’autocuiseur peut être utilisé sur toutes
les tables de cuisson, y compris à induction.
— L’autocuiseur peut être utilisé comme
faitout traditionnel (sans le couvercle)
pour faire brunir les aliments avant de
les cuire sous pression.
— En plaçant l’autocuiseur sur une table de
cuisson de diamètre identique ou inférieur, vous économisez de l’énergie.
— Pour déplacer l’autocuiseur sur une table
de cuisson en vitrocéramique, toujours
le soulever pour éviter de la rayer.
— L’autocuiseur chauffe beaucoup pendant
son utilisation. Penser à le manipuler
avec des maniques.
— Ne jamais laisser l’autocuiseur fonction-
ner à vide au risque de l’endommager
sérieusement.
— L’autocuiseur est conçu exclusivement
pour la cuisson, pas pour la conservation
d’aliments. En cas de conservation prolongée d’aliments dans l’autocuiseur, la
surface peut être altérée et les aliments
peuvent prendre un goût métallique.
— Lorsque l’autocuiseur est utilisé sur une
table de cuisson au gaz, veiller à ce que
les ammes ne touchent pas les poignées.
5. Notice d’utilisation
Avant chaque utilisation
Avant d’utiliser l’autocuiseur, vérier
toutes les fonctions de sécurité pour éviter
d’endommager l’autocuiseur.
1. Vérier que les orices du régulateur de
pression 3 à l’intérieur du couvercle sont
propres.
2. Si ce n’est pas le cas, nettoyer le régulateur de pression 3 (voir chapitre « Nettoyage et stockage »)
3. Vérier que la soupape de sécurité 5 est
mobile et non coincée.
4. Vérier que le joint 8 n’est pas endommagé, c’est-à-dire fendu. Attention !
Avec le temps, le joint peut se durcir et
n’assurera pas une étanchéité à l’air. De
la vapeur s’échappera alors par le bord
du couvercle. Il faut alors remplacer le
joint. Pour le remplacement du joint,
contactez votre magasin IKEA/le service
clientèle ou rendez-vous sur www.ikea.
com/fr.
Page 28
28
Comment utiliser l’autocuiseur
1. Remplir la cuve d’aliments et/ou de
liquide. Attention ! ne jamais remplir
l’autocuiseur d’aliments ou de liquide
au-delà du repère MAX à l’intérieur de
la cuve. Ceci correspond à un volume
maximum de 4 litres (pour les autocuiseurs d’une capacité utile de 6 litres) et
de 2,5 litres (pour les autocuiseurs d’une
capacité utile de 4 litres). Pour faire
cuire des aliments qui gonent à la cuisson, comme le riz ou les légumineuses,
ne jamais remplir la cuve au-delà du
repère ½ à l’intérieur de la cuve. Cela
évitera que les aliments n’atteignent le
couvercle et puissent bloquer la soupape
de sécurité.
2. Placer le couvercle 4 sur la cuve 9 de
manière à ce que le symbole triangulaire
sur le couvercle pointe vers le goujon
sur la poignée de la cuve 11.
3. Tourner le couvercle jusqu’à ce que la
poignée du couvercle 7 et la contrepoignée 11 soient alignées et se ferment
avec un « clic » sonore.
4. Sélectionner le mode de cuisson sur le
régulateur de pression 3 :
1 ; Cuisson lente : un anneau blanc
apparait sur le régulateur de pression.
2 ; Cuisson rapide : deux anneaux
blancs apparaissent sur le régulateur de
pression.
5. Placer l’autocuiseur sur un foyer de
même diamètre que le fond de l’autocuiseur. Attention ! Le foyer ne doit pas
être plus grand que la base de l’autocuiseur. Sinon, trop de chaleur peut monter
sur les côtés de la cuve, ce qui pourrait
endommager les poignées.
6. Régler la table de cuisson sur la température la plus élevée. Dès que de la
pression se forme dans l’autocuiseur, la
soupape de sécurité rouge 5 se soulève
vers le haut, ce qui verrouille le couvercle. Attention ! En début de cuisson, il est possible qu’un peu de vapeur
s’échappe de la soupape de sécurité.
7. Dès que la vapeur commence à s’échapper du régulateur de pression 3, diminuer de moitié environ la température
de la table de cuisson de façon à ne laisser s’échapper qu’une petite quantité de
vapeur. Si vous avez choisi le mode de
cuisson « 2 » pour une cuisson rapide et
que deux anneaux blancs apparaissent
sur le régulateur de pression 3 et qu’une
petite quantité de vapeur est émise,
c’est que l’autocuiseur est en train de
faire cuire les aliments rapidement, en
économisant l’énergie.
Attention ! Si l’anneau rouge apparaît
sur le régulateur de pression 3 au cours
de la cuisson, c’est que la pression est
trop forte : il faut réduire la température
de la table de cuisson.
Page 29

Ouverture de l’autocuiseur
Attention ! Si la soupape de sécurité 5
est levée, l’autocuiseur est toujours sous
pression et ne peut être ouvert. Vous ne
devez forcer l’ouverture du couvercle sous
aucun prétexte. L’échappement soudain de
pression peut vous ébouillanter. L’autocuiseur ne pourra être ouvert qu’une fois que
la soupape de sécurité 5 est baissée. Pour
ce faire, il y a trois moyens.
Ne jamais plonger entièrement l’autocuiseur dans l’eau, parce qu’ainsi la pression
diminuerait instantanément, ce qui pourrait
endommager la base de l’autocuiseur et les
aliments.
Trois moyens d’ouvrir l’autocuiseur
Il existe trois façons de réduire la pression
dans l’autocuiseur an de pouvoir l’ouvrir ;
29
Méthode 1 : libérer la vapeur
Cette méthode consiste à libérer autant de
vapeur que possible jusqu’à ce que la pression
dans l’autocuiseur ait sufsamment baissé
pour pouvoir ouvrir le couvercle.
Attention ! Veillez à ce que l’orice de sécu-
rité 2 se trouve à l’opposé de vous lorsque
vous ouvrez l’autocuiseur car cette méthode
implique que de la vapeur chaude s’échappe
par le régulateur de pression. Soyez prudent
pour éviter de vous brûler.
1. Retirer l’autocuiseur du feu.
2. Tourner le régulateur de pression 3 an
de le positionner sur le cran de relâchement de pression.
3. Attendre que la pression soit retombée
et que la soupape rouge de sécurité 5
s’abaisse. Attention ! Lorsque cette
dernière s’abaisse, la température à l’intérieur de l’autocuiseur avoisine toujours
les 100°C.
4. Glisser le verrou 6 vers l’avant et tourner le couvercle dans le sens contraire
des aiguilles d’une montre jusqu’à ce
que le symbole triangulaire pointe vers
le goujon sur la poignée de la cuve 11.
Attention ! Lorsque vous poussez le
verrou vers l’avant, de la vapeur résiduelle peut se libérer.
5. Retirer le couvercle.
Page 30

30
Méthode 2 : économiser de l’énergie
La méthode 2 consiste à éteindre l’autocuiseur quelques minutes avant que les ali-
ments n’aient ni de cuire, tout en laissant
l’autocuiseur sur la table de cuisson. Cette
méthode permet de mettre à prot la chaleur résiduelle et d’économiser de l’énergie.
1. Attendre que la vapeur se soit stabilisé
et que la soupape de sécurité rouge 5
s’abaisse. Attention ! Lorsque la soupape de sécurité rouge 5 s’abaisse, la
température à l’intérieur de l’autocuiseur
avoisine toujours les 100°C.
2. Glisser le verrou 6 vers l’avant et tourner le couvercle dans le sens contraire
des aiguilles d’une montre jusqu’à ce
que la marque triangulaire pointe vers
le goujon sur la poignée de la cuve 11.
Attention ! Lorsque vous poussez le
verrou vers l’avant, de la vapeur résiduelle peut se libérer.
3. Retirer le couvercle.
Méthode 3 : gagner du temps
La méthode 3 consiste à retirer l’autocuiseur
du feu une fois que les aliments sont cuits.
An de pouvoir ouvrir le couvercle immédiatement, la pression dans la cuve doit
être libérée manuellement. Cette méthode
permet de gagner du temps.
1. Tenir l’autocuiseur sous le jet d’eau
froide du robinet jusqu’à ce que la soupape de sécurité 5 s’abaisse (la pression
de l’eau ne doit pas être trop forte).
Attention : évitez que le jet d’eau ne
touche le régulateur de pression 3 ou la
soupape de sécurité 5. De l’eau pourrait
alors pénétrer dans la cuve et diluer vos
aliments.
2. Glisser le verrou 6 vers l’avant et tourner le couvercle dans le sens contraire
des aiguilles d’une montre jusqu’à ce
que la marque triangulaire pointe vers
le goujon sur la poignée de la cuve 11.
Attention ! Lorsque vous poussez le
verrou vers l’avant, de la vapeur résiduelle peut se libérer.
3. Retirer le couvercle.
Page 31

31
6. Nettoyage et stockage
Cet autocuiseur est facile à nettoyer et à
entretenir. An de pouvoir l’utiliser pendant
longtemps, veuillez suivre ces conseils de
nettoyage.
Fréquence de nettoyage :
Action Fréquence
Nettoyage de la
cuve 9
Nettoyage du régulateur de pression 3
Nettoyage du couvercle
Nettoyage du joint
Remplacement du
joint d’étanchéité 8
Nettoyage de l’autocuiseur
Nettoyer l’autocuiseur après chaque
utilisation.
— L’autocuiseur doit toujours être nettoyé
à la main.
— Ne pas utiliser de la laine d’acier ou
autre grattoir qui pourrait rayer la surface.
— Si possible, nettoyer l’autocuiseur juste
après utilisation pour éviter que les
restes ne sèchent et ne collent à la cuve.
Nettoyage de la cuve (9)
Nettoyer la cuve 9 après chaque utilisation;
1. Nettoyer la cuve à la main avec de l’eau
chaude et un détergent doux.
2. Rincer à l’eau claire.
3. Essuyer la cuve à l’aide d’un torchon
pour éviter les traces d’eau.
Après chaque utilisation
Lorsqu’il est sale
Après chaque utilisation
Après chaque utilisation
Lorsque nécessaire.
Si besoin, contactez votre magasin
IKEA/le service
Clients ou rendezvous sur www.
ikea.fr.
Nettoyage du régulateur de pression
(3)
1. Dévisser l’écrou de xation du régulateur de pression 3 en le tournant dans le
sens contraire des aiguilles d’une montre
à l’aide de la clé 10, fournie à cet effet.
2. Soulever et retirer le régulateur de pression 3.
3. Rincer le régulateur de pression à l’eau
chaude. Vous pouvez aussi utiliser une
petite quantité de détergent doux et une
brosse douce si nécessaire.
4. Nettoyer le couvercle (voir partie ci-dessous).
5. Replacer le régulateur de pression dans
le couvercle.
6. Visser l’écrou de xation du régulateur
de pression 3 en le tournant dans le
sens des aiguilles d’une montre à l’aide
de la clé 10, fournie à cet effet.
NB ! Si de la vapeur s’échappe de l’orice
de sécurité 2 après que le régulateur de
pression 3 soit xé, vérier :
— Si l’écrou de xation du régulateur
de pression 3 est correctement xé -
l’écrou doit être fermement serré à la
main en utilisant la clé 10.
— Vérier si les bouchons de protection du
Page 32

32
régulateur de pression sont défectueux
ou mal xés : dévisser le régulateur de
pression et vérier que les bouchons de
protection sont bien xés et en bon état.
— Si aucune des actions ci-dessus ne ré-
sout le problème, contactez votre magasin IKEA/le service clientèle ou rendezvous sur www.ikea.com/fr
Nettoyage de la soupape de sécurité
(5)
1. Dévisser l’écrou de xation de la soupape de sécurité 5 en tournant dans le
sens contraire des aiguilles d’une montre
à l’aide de la clé 10 fournie à cet effet.
2. Soulever et retirer la soupape de sécurité 5.
3. Rincer la soupape de sécurité à l’eau
chaude. Attention ! Vous pouvez aussi
utiliser un peu de détergent et une
brosse souple si nécessaire.
4. Nettoyer le couvercle (voir paragraphe
plus bas).
5. Repositionner la soupape de protection
sur le couvercle.
6. Serrer l’écrou de xation de la soupape
de sécurité 5 en le tournant dans le sens
des aiguilles d’une montre à l’aide de la
clé 10 fournie à cet effet.
Nettoyage du couvercle (4)
Attention ! Le couvercle ne doit pas être
lavé au lave-vaisselle.
1. Nettoyer le couvercle à l’eau chaude
avec un détergent doux. Si le couvercle est très sale, le mettre à tremper
quelques instant dans de l’eau avec un
peu de détergent.
2. Rincer le couvercle à l’eau chaude.
3. Essuyer le couvercle avec un torchon
pour éviter les traces d’eau.
Nettoyage du joint (8)
Attention ! Le joint doit être remplacé une
fois par an si vous utilisez l’autocuiseur
de manière régulière. Si besoin, veuillez
contacter votre magasin IKEA/le service
Clientèle ou rendez-vous sur www.ikea.fr
1. Retirer le joint du couvercle.
2. Rincer le joint à l’eau propre et chaude.
3. Essuyer le joint avec un torchon.
Attention : le joint ne doit pas être comprimé ou déformé. Il est conseillé de remettre
le joint sur le couverture pour éviter qu’il ne
soit endommagé.
Stockage de l’autocuiseur
Attention ! L’autocuiseur ne doit jamais
être rangé avec le couvercle posé des-
sus. Sans une ventilation sufsante, de la
condensation peut se former et entraîner
de mauvaises odeurs, voire endommager
l’autocuiseur.
1. Ranger le joint dans le couvercle.
2. Ranger la cuve et le couvercle séparément.
7. En cas de problème
Attention ! Dès que de la vapeur incontrô-
lée s’échappe, retirer l’autocuiseur du feu.
L’autocuiseur ne doit pas être utilisé tant
que le problème n’a pas été résolu. Seul un
petit let de vapeur doit s’échapper du régulateur de pression 3.
Page 33

Que faire si :
Problème Cause possible Solution
De la vapeur s’échappe entre
la cuve et le couvercle.
Aucune vapeur ne s’échappe
du régulateur de pression.
Trop de vapeur s’échappe du
régulateur de pression.
De la vapeur s’échappe
des côtés du régulateur de
pression.
De la vapeur s’échappe de
l’orice de sécurité.
Le couvercle ne s’ouvre pas. La pression dans
Un anneau rouge apparaît
sous les deux anneaux blancs
du régulateur de pression.
1. L’autocuiseur n’est pas
fermé correctement.
2. Le joint est sale.
3. Le joint est fendu/usé.
1. De la vapeur s’échappe
entre le couvercle et la
cuve.
2. Le régulateur de pression
est sale.
3. Il n’y a pas assez de
liquide dans l’autocuiseur.
4. Le feu n’est pas
sufsamment fort.
1. Le feu est trop élevé.
2. Le régulateur de pression
est sale.
Le régulateur de pression
n’est pas correctement xé.
1. Les bouchons de
protection du régulateur
de pression sont
défectueux ou mal xés.
2. Le régulateur de pression
est sale.
3. Le régulateur de pression
est défectueux.
l'autocuiseur est trop forte.
1. La pression à l'intérieur
de l’autocuiseur est trop
élevée parce que le feu
est trop fort.
2. Le régulateur de pression
est sale, défectueux ou
mal xé.
1. Refermer l’autocuiseur
correctement.
2. Nettoyer le joint.
3. Remplacer le joint (1 fois
par an).
1. Remplacer le joint (1 fois
par an).
2. Nettoyer le régulateur de
pression (voir le chapitre «
Nettoyage et stockage »).
3. Faire refroidir doucement
l’autocuiseur et remplir avec
au moins 0,25 L de liquide.
4. Augmenter la chaleur du
feu.
1. Baisser le feu.
2. Nettoyer le régulateur de
pression (voir le chapitre «
Nettoyage et stockage »).
Fixer le régulateur de pression
correctement et serrer
l’écrou-raccord à l’intérieur du
couvercle à l’aide de la clé 10.
1. Vérier les bouchons de
sécurité (voir le chapitre
“Nettoyage et stockage”).
2. Nettoyer le régulateur de
pression (voir le chapitre «
Nettoyage et stockage »).
3. En cas de besoin, contactez
votre magasin IKEA/le
service Clients ou rendezvous sur www.ikea.com/fr.
Suivre les instructions dans
le chapitre “Ouverture de
l’autocuiseur”.
1. Baisser le feu.
2. Nettoyer le régulateur de
pression et vérier qu’il est
correctement installé.
33
Page 34

8. Tableau des temps de cuisson
Aliments Temps de cuisson Niveaux de cuisson
Poisson et fruits de mer
Soupe de poisson
Palourde
Thon
Calamar
Congre
Langouste
Crevettes
Sole
Morue
Moules
Merlu (surgelé)
Merlu (frais)
Baudroie
Truite
Saumon
16 min
2-4 min
4-5 min
6-10 min
8 min
5-10 min
4-6 min
3-7 min
4-8 min
2-3 min
3-6 min
3-4 min
5-8 min
4-7 min
5-8 min
2
2
2
2
2
2
2
2
2
2
2
2
2
2
2
Aliments Temps de cuisson Niveaux de cuisson
Fruits
Abricots
Cerises
Prunes
Pommes
Pêches
Oranges
Poires
1-4 min
1-2 min
1-3 min
2-5 min
2-5 min
4-7 min
4-6 min
1
1
1
1
1
1
1
34
Aliments Temps de cuisson Niveaux de cuisson
Viande
Jarret de porc
Mouton
Escalope de veau
Lapin
Rôti de bœuf
Jambon, frit
Jambon, cuit
Rôti de porc
Langue de bœuf, fraîche ou fumée
Côtelettes de porc
Pieds de porc
Échine de porc
Ragoût d'agneau
Gigot d'agneau
Rôti de veau
Ragoût de veau
Foie de veau
Langue de veau
30-40 min
15 min
6 min
15-20 min
20-25 min
20-25 min
30-35 min
25-30 min
50-60 min
10-12 min
25-30 min
12-16 min
10-14 min
15-20 min
15-20 min
15-20 min
6-10 min
20-25 min
2
2
2
2
2
2
2
2
2
2
2
2
2
2
2
2
2
2
Page 35

Aliments Temps de cuisson Niveaux de cuisson
Volaille et gibier
Lapin
Lapin sauvage
Faisan
Lièvre
Canard
Dinde
Perdrix
Pigeon
Poulet (selon le poids et la taille)
10-15 min
20-25 min
10-15 min
25-28 min
20-25 min
20-25 min
14-18 min
12-15 min
20-25 min
2
2
2
2
2
2
2
2
2
Aliments Temps de cuisson Niveaux de cuisson
Légumes secs
Haricots (pré-trempés)
Pois (non pré-trempés)
Pois (pré-trempés)
Pois, verts (pré-trempés)
Lentilles (non pré-trempées)
Lentilles (pré-trempées)
Fèves
Pois chiches
15-20 min
20-25 min
10-15 min
20-25 min
15-20 min
8-10 min
5-8 min
20-27 min
1
1
1
1
1
1
1
1
35
Aliments Temps de cuisson Niveaux de cuisson
Soupes
Soupe aux haricots (pré-trempés)
Soupe de pois (non pré-trempés)
Soupe de pois (pré-trempés)
Soupe de légumes
Orge perlée
Semoule
Goulasch
Porridge
Soupe de pommes de terre
Bouillon d’os
Lentilles (non pré-trempées)
Lentilles (pré-trempées)
Minestrone
Pot-au-feu
Bouillon de bœuf (en fonction de
la quantité de viande)
Poule à bouillir
Soupe de pâtes
Soupe de tomates
Soupe à l’oignon
Soupe de poisson
15-20 min
20-25 min
10-15 min
4-8 min
18-20 min
3-5 min
15-20 min
3-4 min
5-6 min
20-25 min
15-20 min
8-10 min
6-8 min
20-25 min
35-40 min (en fonction de la
quantité de viande)
25-30 min (en fonction de la
taille et de l'âge)
3-5 min
8-10 min
2-3 min
8-10 min
1
1
1
1
1
1
1
1
1
1
1
1
1
1
1
1
1
1
1
1
Page 36

Aliments Temps de cuisson Niveaux de cuisson
Légumes
Chou-eur
Chou-eur, entier
Endive
Carottes
Pommes de terre, avec la peau
Pommes de terre, pelées
Rutabaga
Carottes, émincées
Poivrons
Champignons
Choux de Bruxelles
Betteraves
Chou rouge, chou vert, chou de
Milan
Salsis
Céleri
Asperges
Tomates
Artichauts
Citrouille
Oignon
Épinards
Poireau
4-6 min
6-8 min
6-8 min
5-7 min
10-15 min
6-8 min
4-6 min
6 min
6-8 min
6-8 min
4-6 min
15-25 min
8-10 min
5-6 min
15-25 min
7-8 min
2-3 min
5-8 min
7-9 min
5-7 min
3-5 min
3-5 min
1
1
1
1
1
1
1
1
1
1
1
1
1
1
1
1
1
1
1
1
1
1
36
Aliments Temps de cuisson Niveaux de cuisson
Autres aliments
Riz
Pâtes
15-20 min
4-6 min
1
1
Page 37

37NEDERLANDS
1. Beschrijving van de snelkookpan
1. Handgreep van de pan
2. Veiligheidsopening
3. Drukregulator
4. Deksel
5. Veiligheidsventiel
6. Slot
7. Handgreep slot
8. Pakkingring (niet zichtbaar, zit in de
deksel)
9. Pan
10. Sleutel
11. Handgreep pan
2. Belangrijke informatie – lezen voor
gebruik
— Lees de instructies voor gebruik goed
door.
— Toezicht is vereist wanneer de snelkook-
pan wordt gebruikt in de nabijheid van
kinderen.
— Zet de snelkookpan nooit in een warme
oven.
— Wees zeer voorzichtig wanneer de
snelkookpan tijdens het gebruik moet
worden verplaatst. De buitenkant van
de snelkookpan wordt warm tijdens het
gebruik. Gebruik pannenlappen.
— Gebruik de snelkookpan uitsluitend voor
het bereiden van voedsel.
— De snelkookpan werkt onder druk. Fou-
tief gebruik kan resulteren in brandwonden. Verzeker je ervan dat de deksel
goed dicht zit voordat de pan wordt verwarmd. Zie het hoofdstuk ”Instructies
voor gebruik”.
— Probeer de deksel niet open te maken
voordat de druk volledig is gedaald. Instructies voor het openen van de deksel
staan in het hoofdstuk “Instructies voor
gebruik”.
— Gebruik de snelkookpan nooit zonder
eerst vloeistof toe te voegen, anders kan
de pan ernstig beschadigen.
— Vul de snelkookpan nooit voor meer dan
2/3 (zie de ”MAX”-markering aan de binnenkant van de pan). Bij het bereiden
van voedsel dat bij het koken schuimt of
uitzet, zoals rijst of gedroogde groente,
de pan slechts voor de helft vullen (zie
de “1/2”-markering aan de binnenkant
van de pan).
— Gebruik de juiste warmtebronnen zoals
vermeld in de gebruiksaanwijzing.
— Prik na het koken van vlees met huid
(bv. ossentong) dat als gevolg van de
druk kan opzwellen, niet in het vlees als
de huid gezwollen is; opspattend heet
water kan brandwonden veroorzaken.
— Bij het bereiden van deeggerechten of
voedsel dat veel lucht bevat, schud je de
snelkookpan voorzichtig voor het openen
van de deksel om te voorkomen dat het
eten eruit spat.
— Controleer de ventielen en pakkingen
telkens voor je de snelkookpan gebruikt.
Zie het hoofdstuk ”Instructies voor gebruik”.
— Gebruik de snelkookpan nooit onder
druk voor het frituren of bakken van
voedsel.
— Breng tijdens het onderhoud geen wij-
zigingen aan in de veiligheidssystemen
als dat niet speciek staat vermeld in de
gebruiksaanwijzing.
— Gebruik alleen reserveonderdelen die
door IKEA worden verstrekt. Voor vragen kan je contact opnemen met een
IKEA winkel bij jou in de buurt/klantenservice of kijk op IKEA.nl.
— VOLG ALTIJD DEZE INSTRUCTIES.
3. Technische informatie
Werkdruk: 0,6 bar (instelling 1) en 1,0 bar
(instelling 2).
Druk stoomuitlaat: 260 kPa.
Bruikbare capaciteit: 6 liter of 4 liter.
Licentie eigenaar: IKEA of Sweden, Tul-
panvägen 8 SE- 34 381, Älmhult, Zweden.
Model: 00286743, 50286745.
De snelkookpan is CE-gemerkt volgens de
Richtlijn drukapparatuur (97/23/EG).
De snelkookpan is GS-gecerticeerd.
4. Veiligheidsinformatie
— De snelkookpan heeft een drukregelaar
in de deksel die de gewenste druk tijdens het koken constant houdt.
— De snelkookpan heeft meerdere veilig-
heidssystemen die garanderen dat de
pan veilig werkt, ook als er een technische storing optreedt. De drukregelaar 3
garandeert dat de druk in de snelkookpan constant blijft. Denk eraan dat er
stoom uit de pan kan komen bij gebruik.
In de drukregelaar 3 zit ook nog een
drukregelventiel dat de overdruk via
Page 38

38
de veiligheidsopening afvoert wanneer
de drukregelaar niet werkt. Zouden de
drukregelaar 3 en het drukregelventiel
niet werken, dan kan de overdruk ook
via het veiligheidsventiel 5 verdwijnen.
Het slot 6 kan alleen naar voren worden
geschoven om de pan te openen wanneer de druk weer gelijkmatig is en het
veiligheidsventiel als gevolg daarvan
omlaag is gegaan.
Algemene veiligheidsadviezen
— Controleer voor elk gebruik of de
drukregelaar 3 en het veiligheidsventiel
5 zich licht op en neer kunnen bewegen
en niet worden geblokkeerd (zie het
hoofdstuk `Instructies voor gebruik’).
— Controleer altijd of de snelkookpan goed
dicht zit voor je hem gaat gebruiken
(zie het hoofdstuk `Instructies voor gebruik’).
— De drukregelaar 3 mag nooit door enig
voorwerp worden bedekt.
— Controleer zorgvuldig of de veiligheids-
opening 2 tijdens gebruik van je is afgewend en of deze ook niet een kant op
staat waar anderen kunnen passeren,.
Als er een technische storing ontstaat,
kan er veel stoom uit de snelkookpan
komen.
— Komt er stoom uit het veiligheidsven-
tiel 5 of de veiligheidsopening 2, zet
onmiddellijk de kookplaat/het fornuis
uit omdat de druk in de pan te hoog is.
Gebruik de snelkookpan daarna alleen
wanneer de storing is verholpen (zie het
hoofdstuk `Wanneer de snelkookpan
niet werkt’).
— Om schade aan de snelkookpan te voor-
komen, zorg ervoor dat er altijd minstens 0,25 liter vloeistof in de pan staat,
zodat er voldoende stoom kan worden
geproduceerd en de snelkookpan niet
oververhit raakt of droogkookt.
— WAARSCHUWING: Reparaties aan de
snelkookpan mogen uitsluitend worden
uitgevoerd door gekwaliceerd personeel.
Goed om te weten
— De snelkookpan kan worden gebruikt
op alle soorten kookplaten, inclusief inductie.
— De snelkookpan kan worden gebruikt als
een gewone pan (zonder deksel) om het
eten aan te braden voor het onder hoge
druk verder wordt bereid.
— Gebruik de snelkookpan op een kook-
plaat met dezelfde of een kleinere diameter als de pan, dat bespaart energie.
— Til de snelkookpan op als je hem op een
keramische kookplaat verplaatst, anders
kan de kookplaat beschadigen.
— De snelkookpan wordt warm bij gebruik;
gebruik een pannenlap als je hem verplaatst.
— Laat de snelkookpan niet droogkoken,
dat kan de pan ernstig beschadigen.
— De snelkookpan is bedoeld voor berei-
den, niet voor het bewaren van voedsel. Als er langere tijd voedsel in de
pan wordt bewaard, kan het oppervlak
worden aangetast en het voedsel een
metaalachtige smaak krijgen.
— Wees voorzichtig als je de pan op een
gaskookplaat gebruikt zodat de gasvlammen de handgrepen van de pan
niet raken.
5. Instructies voor gebruik
Voor elk gebruik
Voor gebruik van de snelkookpan is het
belangrijk dat je eerst alle veiligheidsfuncties controleert om beschadigingen aan de
snelkookpan te voorkomen.
1. Controleer of de openingen van de
drukregelaar 3 aan de binnenkant van
de deksel schoon zijn.
2. Reinig de drukregelaar 3 als dit niet het
geval is (zie ‘Reinigen en opbergen’).
3. Controleer of je het veiligheidsventiel
kan bewegen en of het niet vast zit.
4. Controleer of de pakkingring (het afdichtingsrubber) 8 niet beschadigd is; kijk of
deze niet gescheurd is. Na verloop van
tijd kan het rubber hard worden en sluit
het de pan niet meer luchtdicht af. Daardoor kan er stoom ontsnappen langs de
dekselrand en in dat geval moet je het
afdichtingsrubber vervangen. Neem voor
reserveonderdelen contact op met een
IKEA woonwarenhuis bij jou in de buurt
of met de klantenservice via IKEA.nl.
Zo gebruik je de snelkookpan
1. Vul de pan met voedsel en/of vloeistof.
Waarschuwing! Vul de snelkookpan nooit
met voedsel en vloeistof boven de “MAX”
markering aan de binnenkant van de
Page 39

39
pan. Dit komt overeen met maximaal
4 liter (voor de snelkookpan met een
bruikbare capaciteit van 6 liter) of maximaal 2,5 liter (voor de snelkookpan met
een bruikbare capaciteit van 4 liter). Bij
het bereiden van voedsel dat schuimt
of tijdens het koken uitzet, zoals rijst of
gedroogde groente, de pan niet hoger
vullen dan de ½ markering aan de binnenkant van de pan. Dat voorkomt dat
het voedsel kan opzwellen tot aan de
deksel, wat het veiligheidsventiel kan
blokkeren.
2. Zet de deksel 4 zo op de pan 9 dat de
triangelmarkering op de deksel in de
richting van de knop op de handgreep
van de pan 11 wijst.
3. Draai de deksel tot de handgreep van de
deksel 7 en de handgreep van de pan
11 een rechte lijn vormen. Draai tot je
een klik hoort.
4. Kies de gewenste kookinstelling op de
drukregelaar 3:
1; Langzaam koken: de drukregelaar
toont een witte ring.
2; Snel koken: de drukregelaar toont
twee witte ringen.
5. Plaats de snelkookpan op een kookplaat
met dezelfde diameter als de bodem van
de pan. Waarschuwing! De kookplaat
mag niet groter zijn dan de bodem van
de snelkookpan, anders kan de warmte
van het fornuis zich omhoog verspreiden langs de zijkanten van de pan en
daardoor de kunststof handgrepen aantasten.
6. Zet de kookplaat op de hoogste warmte.
Zo gauw er druk in de snelkookpan zit
gaat het rode veiligheidsventiel 5 omhoog, waardoor de deksel vergrendelt.
Let op! In het begin kan er wat stoom
uit het veiligheidsventiel komen.
7. Zo gauw er stoom uit de drukregelaar
3 komt, de kookplaat ongeveer de helft
lager zetten zodat er nog maar weinig
stoom uitkomt. Nu begint de bereidingstijd. Als je ”instelling 2” voor snel koken
hebt gekozen en je twee witte ringen op
drugregelaar 3 ziet en er maar weinig
stoom uitkomt, bereidt de snelkookpan
het eten snel en wordt er energie bespaard.
Waarschuwing! Als de rode ring op de
drukregelaar 3 zichtbaar is, is de druk te
hoog en moet je de temperatuur van de
kookplaat verlagen.
Page 40

40
Zo open je de snelkookpan
Pas op! Als het rode veiligheidsventiel 5
nog steeds geblokkeerd is, staat de snelkookpan nog onder druk en kan de deksel
niet geopend worden. Probeer onder geen
enkele omstandigheid de deksel te forceren
omdat abrupt drukverlies brandwonden tot
gevolg kan hebben. De snelkookpan kan
alleen geopend worden als het rode veiligheidsventiel 5 naar beneden is gezakt. Dat
kan je op drie manieren bereiken.
Dompel de snelkookpan nooit volledig onder
water. In dat geval treedt er abrupt drukverlies op en dat kan leiden tot beschadiging
van de bodem en het eten in de pan kan je
weggooien.
Drie manieren om de snelkookpan te
openen
Er zijn drie verschillende methodes om de
druk in de snelkookpan te verminderen om
deze te kunnen openen;
Methode 1: Stoom laten ontsnappen
Bij deze methode laat je zoveel mogelijk
stoom ontsnappen totdat de druk in de
snelkookpan zover gezakt is dat je de deksel
kan verwijderen.
Waarschuwing! Let erop dat de veiligheidsopening 2 niet naar jou gericht
staat bij het openen van de pan. Bij deze
methode ontsnapt de hete stoom namelijk
uit de drukregelaar. Pas op dat je je niet
verbrandt.
1. Haal de snelkookpan van de kookplaat.
2. Zet de drukregelaar 3 in de stand om
stoom te laten ontsnappen.
3. Wacht totdat de druk weer genivelleerd
is en het rode veiligheidsventiel 5 naar
beneden is gezakt. Let op! Zodra het
rode veiligheidsventiel gezakt is, is de
temperatuur in de snelkookpan nog
steeds bijna 100 °C.
4. Schuif de vergrendeling 6 naar voren en
draai tegelijkertijd de deksel tegen de
klok in totdat het driehoeksymbool op
de deksel naar de knop op de handgreep
van de pan 11 wijst. Let op! Zodra je
de vergrendeling 6 naar voren schuift,
kan er wat reststoom ontsnappen.
5. Haal de deksel van de pan.
Page 41

41
Methode 2: Energiebesparend
Bij methode 2 zet je de snelkookpan een
paar minuten voor het einde van de bereidingstijd van de ingrediënten uit en laat je
de snelkookpan op de kookplaat staan. Zo
maak je optimaal gebruik van de restwarmte en je bespaart energie.
1. Wacht totdat de druk is gestabiliseerd
en het rode veiligheidsventiel 5 naar beneden is gezakt. Let op! Zodra het rode
veiligheidsventiel gezakt is, is de temperatuur in de snelkookpan nog steeds
bijna 100 °C.
2. Schuif de vergrendeling 6 naar voren en
draai tegelijkertijd de deksel tegen de
klok in totdat het driehoeksymbool op
de deksel naar de knop op de handgreep
van de pan 11 wijst. Let op! Zodra je
de vergrendeling 6 naar voren schuift,
kan er wat reststoom ontsnappen.
3. Haal de deksel van de pan.
Methode 3: Tijdbesparend
Bij methode 3 haal je de snelkookpan na de
bereidingstijd van het eten van de kookplaat. Om de deksel meteen te kunnen
openen, moet de druk in de pan handmatig
omlaag gebracht worden. Deze methode is
vooral tijdbesparend.
1. Hou de snelkookpan onder de stromende
kraan totdat het veiligheidsventiel 5 omlaag is gezakt (let op dat de waterstraal
niet al te krachtig is). Pas op! Voorkom
dat de waterstraal de drukregelaar 3 of
het veiligheidsventiel 5 raakt omdat water in sommige gevallen in de pan kan
stromen en het eten aantast.
2. Schuif de vergrendeling 6 naar voren en
draai tegelijkertijd de deksel tegen de
klok in totdat het driehoeksymbool op
de deksel naar de knop op de handgreep
van de pan 11 wijst. Let op! Zodra je
de vergrendeling 6 naar voren schuift,
kan er wat reststoom ontsnappen.
3. Haal de deksel van de pan.
Page 42

42
6. Reinigen en opbergen
De snelkookpan is gemakkelijk te reinigen
en te onderhouden. Om lang plezier te hebben van de snelkookpan, altijd onderstaande reinigingsinstructies volgen.
Hoe vaak moet de snelkookpan worden
schoongemaakt:
Activiteit Frequentie
Reinigen van de
pan
Reinigen van de
drukregulator 3
Reinigen van de
deksel 4
Reinigen van pakkingring 8
Pakkingring vervangen 8
Reinigen van de snelkookpan
Maak de snelkookpan na gebruik altijd
schoon.
— De snelkookpan is niet vaatwasserbe-
stendig.
— Gebruik geen staalwol of iets anders
wat krassen kan veroorzaken op het oppervlak.
— Maak de snelkookpan indien mogelijk
meteen na gebruik schoon, zodat er
geen etensresten kunnen indrogen en
vastkoeken.
Reinigen van de pan (9)
Maak de pan (9) na elk gebruik schoon:
1. Was de pan af met warm water en een
mild afwasmiddel.
2. Spoel af met schoon water.
3. Droog af met een theedoek om watervlekken te voorkomen.
Na elk gebruik
Als hij vuil is
Na elk gebruik
Na elk gebruik
Indien nodig. Neem
contact op met het
dichtstbijzijnde
IKEA woonwarenhuis/Klantenservice
of ga naar ikea.nl
Reinigen van de drukregelaar (3)
1. Draai de moer van de drukregelaar 3 los
door deze tegen de klok in te draaien.
Gebruik daarvoor de meegeleverde sleutel 10.
2. Til de drukregelaar op en neem hem uit.
3. Spoel de drukregelaar af met warm water. Let op! Je kan, indien nodig, ook
een beetje mild schoonmaakmiddel en
een zachte borstel gebruiken.
4. Maak de deksel schoon (zie hieronder).
5. Plaats de drukregelaar weer in de deksel.
6. Draai de moer van de drukregelaar 3
vast door deze met de klok mee vast te
draaien. Gebruik daarvoor de meegeleverde sleutel 10.
Let op! Als er stoom ontsnapt uit de veiligheidsopening 2 na plaatsing van de drukregelaar 3, controleer je het volgende:
— Controleer of de moer van de drukrege-
laar 3 goed vastzit – draai de moer stevig handmatig vast met de sleutel 10.
— Controleer of de beschermdoppen van
de drukregelaar defect zijn of onjuist gemonteerd – draai de drukregelaar los en
controleer de pasvorm en conditie van
de beschermdoppen.
Page 43

43
— Als geen van bovenstaande maatregelen
een oplossing biedt voor het defect, adviseren we je om contact op te nemen
met een IKEA woonwarenhuis bij jou
in de buurt/Klantenservice of ga naar
IKEA.nl
Schoonmaken van het veiligheidsventiel (5)
1. Draai de bevestigingsbout van het veiligheidsventiel 5 los door hem tegen de
klok in te draaien. Gebruik daarvoor de
meegeleverde sleutel 10.
2. Til het veiligheidsventiel 5 op en neem
hem uit.
3. Spoel het veiligheidsventiel af met warm
water. Let op! Je kan, indien nodig, ook
een beetje mild schoonmaakmiddel en
een zachte borstel gebruiken.
4. Maak de deksel schoon (zie hieronder).
5. Plaats het veiligheidsventiel weer in de
deksel.
6. Draai de bevestigingsbout van het veiligheidsventiel 5 vast door hem met de
klok mee vast te draaien. Gebruik daarvoor de meegeleverde sleutel 10.
Reinigen van de deksel (4)
Waarschuwing! De deksel is niet vaatwas-
serbestendig.
1. Was de deksel af met warm water en
een mild schoonmaakmiddel. Is de deksel erg vies, leg deze dan een tijdje in
water met wat afwasmiddel.
2. Spoel de deksel af met schoon water.
3. Droog af met een theedoek om watervlekken te voorkomen.
Reinigen van de pakkingring (8)
Let op! De pakkingring moet eenmaal per
jaar worden vervangen als je de snelkookpan regelmatig gebruikt. Voor meer informatie, neem contact op met het dichtstbijzijnde IKEA woonwarenhuis/Klantenservice
of ga naar IKEA.nl
1. Haal de pakkingring uit de deksel.
2. Spoel de pakkingring af met warm water.
3. Droog de pakkingring af met een theedoek.
Let op! De pakkingring mag bij het opbergen niet worden samengeperst of vervormd.
Daarom is het goed de pakkingring bij het
opbergen van de snelkookpan terug te
plaatsen in de deksel.
Opbergen van de snelkookpan
Belangrijk! Bewaar de snelkookpan nooit
met de deksel erop. Wanneer er geen ventilatie in de pan is, kan dit leiden tot een
opeenhoping van onaangename geurtjes,
waardoor de snelkookpan kan beschadigen.
1. Bewaar de pakkingring in de deksel.
2. Bewaar pan en deksel los van elkaar.
7. Wanneer de snelkookpan niet werkt
Waarschuwing! Wanneer er ongecontro-
leerde stoom uit de snelkookpan komt, deze
van het fornuis halen. Gebruik de snelkookpan niet totdat de storing is verholpen. Het
is normaal dat er wat stoom uit de drukregulator 3 komt.
Page 44

Wat doe ik als:
Probleem Mogelijke oorzaken Maatregel
Er ontsnapt stoom tussen de
deksel en de pan.
Er komt geen stoom uit de
drukregelaar.
Er komt teveel stoom uit de
drukregelaar.
Er ontsnapt aan de zijkant
stoom uit de drukregelaar.
Er komt stoom uit het
veiligheidsventiel.
De deksel kan niet worden
geopend.
De drukregelaar toont een
rode ring onder de twee witte
ringen.
1. De snelkookpan zit niet
goed dicht.
2. De pakkingring is vuil.
3. De pakkingring is versleten.
1. Er ontsnapt stoom tussen
de deksel en de pan.
2. De drukregelaar is vuil.
3. Er zit onvoldoende vloeistof in de snelkookpan.
4. De kookplaat staat op
een te lage warmte.
1. De kookplaat staat op
een te hoge warmte.
2. De drukregelaar is vuil.
De drukregelaar zit niet op
de juiste manier vastgeschroefd.
1. De beschermkappen in
de drukregelaar zijn defect en niet correct vastgeschroefd.
2. De drukregelaar is vuil.
3. De drukregelaar is defect.
Er is teveel druk in de snelkookpan.
1. De druk in de snelkookpan is te hoog omdat de
warmte van de kookplaat
te hoog is.
2. De drukregelaar is vuil,
defect of onjuist vastgeschroefd.
1. Sluit de snelkoker op de
juiste wijze.
2. Reinig de pakkingring.
3. Vervang de pakkingring (1 x
per jaar).
1. Vervang de pakkingring (1 x
per jaar).
2. Reinig de drukregelaar (zie
het hoofdstuk “Reinigen en
opbergen”).
3. Koel de snelkoker langzaam
en vul deze met minstens
0.25 l vloeistof.
4. Verhoog de warmte van de
kookplaat.
1. Verlaag de warmte van de
kookplaat.
2. Reinig de drukregelaar (zie
het hoofdstuk "Reinigen en
opbergen").
Schroef de drukregelaar vast
en draai de moer aan de
binnenkant van de deksel aan
met behulp van sleutel 10.
1. Controleer de beschermkappen (zie het hoofdstuk "Reinigen en opbergen").
2. Reinig de drukregelaar (zie
het hoofdstuk "Reinigen en
opbergen”).
3. Neem contact op met het
dichtstbijzijnde IKEA woonwarenhuis/Klantenservice of
kijk op IKEA.nl
Volg de instructies in het
hoofdstuk "Het openen van de
snelkookpan".
1. Verlaag de warmte van de
kookplaat.
2. Reinig de drukregelaar, controleer of deze op de juiste
wijze is vastgeschroefd.
44
Page 45
8. Kooktijden
Voedsel Kooktijd Instelling voedselbereiding
Vis en schaaldieren
Vissoep
Kokkels
Tonijn
Inktvis
Paling
Kreeft
Garnalen
Zeetong
Kabeljauw
Mosselen
Heek (diepvries)
Heek (vers)
Zeeduivel
Forel
Zalm
16 min
2-4 min
4-5 min
6-10 min
8 min
5-10 min
4-6 min
3-7 min
4-8 min
2-3 min
3-6 min
3-4 min
5-8 min
4-7 min
5-8 min
2
2
2
2
2
2
2
2
2
2
2
2
2
2
2
Voedsel Kooktijd Instelling voedselbereiding
Fruit
Abrikozen
Kersen
Pruimen
Appels
Perziken
Sinaasappels
Peren
1-4 min
1-2 min
1-3 min
2-5 min
2-5 min
4-7 min
4-6 min
1
1
1
1
1
1
1
45
Voedsel Kooktijd Instelling voedselbereiding
Vlees
Varkensschenkel
Schapenvlees
Kalfsvlees/schnitzel
Konijn
Rosbief
Gebraden ham
Gekookte ham
Geroosterd varkensvlees
Ossentong, vers of gerookt
Karbonade
Varkenspootjes
Varkenslende
Lamsschotel
Lamsbout
Geroosterd kalfsvlees
Gestoofd kalfsvlees
Kalfslever
Kalfstong
30-40 min
15 min
6 min
15-20 min
20-25 min
20-25 min
30-35 min
25-30 min
50-60 min
10-12 min
25-30 min
12-16 min
10-14 min
15-20 min
15-20 min
15-20 min
6-10 min
20-25 min
2
2
2
2
2
2
2
2
2
2
2
2
2
2
2
2
2
2
Page 46

46
Voedsel Kooktijd Instelling voedselbereiding
Gevogelte en wild
Kwartel
Konijin
Fazant
Haas
Eend
Kalkoen
Patrijs
Duif
Kip (afhankelijk van grootte en
gewicht)
Voedsel Kooktijd Instelling voedselbereiding
Peulvruchten
Bonen (geweekt)
Erwten (niet geweekt)
Erwten (geweekt)
Erwten, groene (geweekt)
Linzen (niet geweekt)
Linzen (geweekt)
Tuinbonen
Kikkererwten
10-15 min
20-25 min
10-15 min
25-28 min
20-25 min
20-25 min
14-18 min
12-15 min
20-25 min
15-20 min
20-25 min
10-15 min
20-25 min
15-20 min
8-10 min
5-8 min
20-27 min
2
2
2
2
2
2
2
2
2
1
1
1
1
1
1
1
1
Voedsel Kooktijd Instelling voedselbereiding
Soep
Bonensoep (geweekt)
Erwtensoep (niet geweekt)
Erwtensoep (geweekt)
Groentesoep
Parelgort
Griesmeelpap
Goulash
Rijstepap
Aardappelsoep
Vleesbouillon
Linzensoep (niet geweekt)
Linzensoep (geweekt)
Minestronesoep
Pot-au-feu
Vleessoep
Kippensoep
Soep met pasta
Tomatensoep
Uiensoep
Vissoep
15-20 min
20-25 min
10-15 min
4-8 min
18-20 min
3-5 min
15-20 min
3-4 min
5-6 min
20-25 min
15-20 min
8-10 min
6-8 min
20-25 min
35-40 min (afhankelijk van
de hoeveelheid voedsel)
25-30 min (afhankelijk van
de grootte)
3-5 min
8-10 min
2-3 min
8-10 min.
1
1
1
1
1
1
1
1
1
1
1
1
1
1
1
1
1
1
1
1
Page 47

47
Voedsel Kooktijd Instelling voedselbereiding
Groente
Bloemkool
Bloemkool, heel
Andijvie
Wortel
Aardappel, ongeschild
Aardappel, geschild
Koolraap
Wortel, in stukken
Paprika
Paddestoelen
Spruitjes
Rode bieten
Rode kool, witte kool,
savoyekool
Schorseneren
Sellerie
Asperges
Tomaten
Artisjokken
Pompoen
Uien
Spinazie
Prei
4-6 min
6-8 min
6-8 min
5-7 min
10-15 min
6-8 min
4-6 min
6 min
6-8 min
6-8 min
4-6 min
15-25 min
8-10 min
5-6 min
15-25 min
7-8 min
2-3 min
5-8 min
7-9 min
5-7 min
3-5 min
3-5 min
1
1
1
1
1
1
1
1
1
1
1
1
1
1
1
1
1
1
1
1
1
1
Voedsel Kooktijd Instelling voedselbereiding
Overige levensmiddelen
Rijst
Pasta
15-20 min
4-6 min
1
1
Page 48

48DANSK
1. Trykkogerens dele
1. Grydens håndtag
2. Sikkerhedsåbning
3. Trykregulator
4. Låg
5. Sikkerhedsventil
6. Lås
7. Lågets håndtag
8. Forsegling (ikke synlig, er indvendigt i
låget)
9. Gryde
10. Nøgle
11. Grydens håndtag
2. Vigtig information - læs før brug
— Læs alle anvisninger.
— Lad ikke børn komme i nærheden af
trykkogeren, når den er i brug.
— Sæt ikke trykkogeren i en opvarmet
ovn.
— Trykkogeren skal yttes meget forsig-
tigt, når der er tryk på den. De varme
overader må ikke berøres. Brug knopperne og grebene. Brug evt. grydelapper.
— Brug ikke trykkogeren til andet end det
beregnede formål.
— Denne trykkoger tilbereder madvarer
under tryk. Hvis trykkogeren bruges
forkert, er der risiko for skoldning. Sørg
for, at trykkogeren er ordentligt lukket,
før du tænder for varmen. Se afsnittet
“Brugsanvisning”.
— Trykkogeren må ikke tvinges åben. Må
ikke åbnes, før det er sikkert, at trykket
indvendigt er faldet helt. Se afsnittet
“Brugsanvisning”.
— Brug aldrig trykkogeren uden at tilsætte
vand, da det kan beskadige den alvorligt.
— Fyld ikke trykkogeren mere end 2/3
op (se mærket “MAX” indvendigt i gryden). Når du tilbereder madvarer, der
udvider sig under tilberedning, f.eks.
ris eller tørrede grøntsager, må du ikke
fylde trykkogeren mere end halvt op (se
mærket “½” indvendigt i gryden).
— Brug en passende varmekilde i henhold
til brugsanvisningen.
— Når du koger kød med hud (f.eks. okse-
tunge), der kan svulme op under tryk, må
du ikke prikke hul på huden, mens den er
opsvulmet, da varmt vand kan sprøjte ud,
og det kan medføre skoldning.
— Når du tilbereder klæge madvarer, skal
du ryste trykkogeren forsigtigt, før du
åbner låget, for at undgå, at madvarerne bliver slynget ud.
— Kontrollér før hver brug, at ventilerne
ikke er tilstoppede. Se afsnittet “Brugsanvisning”.
— Brug aldrig trykkogeren under tryk til
dybstegning af madvarer.
— Sikkerhedssystemerne må ikke ændres
ud over de vedligeholdelsesanvisninger,
der er angivet i brugsanvisningen.
— Brug kun de af producentens reserve-
dele, der passer til den relevante model.
Hvis du har spørgsmål, er du velkommen til at kontakte Kundeservice i det
nærmeste varehus eller besøge IKEA.dk.
— GEM DISSE ANVISNINGER.
3. Teknisk information
Arbejdstryk: 0,6 bar (indstilling 1) og 1,0
bar (indstilling 2).
Damptryk: 260 kpa.
Kapacitet: enten 6 eller 4 liter.
Licensindehaver: IKEA of Sweden,
Tulpanvägen 8 SE-343 81, Älmhult, Sverige
Model: 00286743, 50286745.
Trykkogeren er CE-mærket i henhold til EUdirektivet vedrørende trykbærende udstyr
(97/23/EF).
Trykkogeren er GS-certiceret.
4. Sikkerhedsinformation
— Trykkogeren leveres med en trykregu-
lator i låget, som holder den ønskede
trykindstilling konstant.
— Flere forskellige sikkerhedssystemer
sørger for, at trykkogeren fungerer sikkert, også hvis der opstår en teknisk
fejl. Trykregulatoren, 3, sikrer, at trykket
forbliver konstant indvendigt i trykkogeren. Der kan slippe lidt damp ud af trykkogeren under brug. Trykregulatoren, 3,
har en ekstra kontrolventil, der udløser
det ekstra tryk via sikkerhedsåbningen,
2, hvis trykregulatoren ikke fungerer
korrekt. Hvis både trykregulatoren, 3,
og kontrolventilen ikke fungerer korrekt,
kan det overskydende tryk også blive
udløst via sikkerhedsventilen, 5. Låsen,
6, kan kun skubbes fremad for at åbne
gryden, når trykket er blevet udlignet,
og den røde sikkerhedsventil, 5, falder.
Page 49

49
Generelle sikkerhedsråd
— Kontrollér før hver brug, at trykregula-
toren, 3, og sikkerhedsventilen, 5, kan
betjenes og ikke er blokeret (se afsnittet
“Brugsanvisning”).
— Kontrollér altid, at trykkogeren er lukket
korrekt, før du sætter den på kogepladen (se afsnittet ”Brugsanvisning”).
— Trykregulatoren, 3, må aldrig være til-
dækket.
— Sørg altid for, at sikkerhedsåbningen,
2, vender væk fra dig under brug, og at
den ikke peger i en retning, hvor andre
går forbi. Hvis der opstår en fejl, bliver
der lukket meget damp ud.
— Hvis der bliver lukket damp ud fra sik-
kerhedsventilen, 5, eller sikkerhedsåbningen, 2, skal du straks slukke for
varmetilførslen, da trykket indvendigt i
trykkogeren er for højt. Du må ikke bruge trykkogeren, før problemet er blevet
løst (se afsnittet “Fejlnding”).
— For ikke at beskadige trykkogeren skal
du sørge for, at gryden altid indeholder
mindst 2½ dl væske, så der kan dannes
en tilstrækkelig mængde damp, og trykkogeren ikke overopheder og koger tør.
Godt at vide
— Trykkogeren er velegnet til brug på alle
slags kogeplader, også induktionskogeplader.
— Trykkogeren kan bruges som en traditio-
nel gryde (uden låg) til at brune madvarer, før de trykkoges.
— Hvis du bruger trykkogeren på en koge-
plade med samme eller mindre diameter, kan du spare energi.
— Løft altid trykkogeren, når du ytter den
på keramiske kogeplader, så de ikke bliver ridsede.
— Husk, at trykkogeren bliver varm under
brug. Brug altid grydelapper.
— Lad aldrig trykkogeren koge tør, da det
vil beskadige den alvorligt.
— Trykkogeren er udelukkende beregnet til
tilberedning, ikke opbevaring, af madvarer. Madvarer, der opbevares i trykkoge-
ren i længere tid, kan påvirke overaden
og tage smag af metallet.
— Hvis trykkogeren bruges på et gaskom-
fur, skal du sørge for, at ammerne ikke
rører håndtagene.
5. Brugsanvisning
Før hver brug
Før du tilbereder madvarer i trykkogeren,
skal du kontrollere alle sikkerhedsfunktioner
for at undgå at beskadige trykkogeren.
1. Kontrollér, at åbningerne i trykregulatoren, 3, indvendigt i låget er rene.
2. Hvis de ikke er rene, skal du rense trykregulatoren, 3, (se afsnittet ”Rengøring
og opbevaring”).
3. Kontrollér, at sikkerhedsventilen, 5, kan
bevæges og ikke sidder fast.
4. Kontrollér, at forseglingen, 8, ikke er
beskadiget, dvs. at den ikke er revnet.
BEMÆRK! Med tiden kan forseglingen
blive hård og giver derfor ikke længere
en lufttæt forsegling. Det kan få damp til
at slippe ud under lågets kant, og derfor
skal forseglingen udskiftes. Få oplysninger om ekstra forsegling ved at kontakte
Kundeservice i dit nærmeste IKEA varehus eller besøge IKEA.dk.
Sådan bruges trykkogeren
1. Fyld gryden med madvarer og/eller
væske. FORSIGTIG! Trykkogeren må
aldrig fyldes med madvarer og væske
over markeringen “MAX” indvendigt i
gryden. Det svarer til maks. 4 liter (i en
trykkoger med en kapacitet på 6 liter)
og maks. 2,5 liter (i en trykkoger med
en kapacitet på 4 liter). Når du tilbereder madvarer, der svulmer op, f.eks. ris
eller bælgfrugter, må du ikke fylde gryden over markeringen ”½” indvendigt i
gryden. Det forhindrer maden i at nå op
til låget og eventuelt blokere sikkerhedsventilen.
2. Læg låget, 4, på gryden, 9, så trekanten
på låget peger mod bolten på grydens
håndtag, 11.
Page 50

50
3. Drej låget, indtil håndtaget på låget, 7,
og håndtaget på gryden, 11, står lige ud
for hinanden og klikker på plads.
4. Vælg den ønskede tilberedningsmetode
på trykregulatoren, 3.
1. Langsom tilberedning: Trykregulatoren viser 1 hvid ring.
2. Hurtig tilberedning: Trykregulatoren
viser 2 hvide ringe.
5. Sæt trykkogeren på en kogeplade, der
passer i størrelsen til trykkogerens bund.
FORSIGTIG! Kogepladen må ikke være
større end trykkogerens bund. Ellers er
der risiko for, at der stiger for meget
varme op ad bundens sider, og det beskadiger plasthåndtagene.
6. Tænd kogepladen på den højeste indstilling. Så snart der er tryk på trykkogeren, bevæger den røde sikkerhedsventil,
5, sig opad og låser dermed låget. BEMÆRK! I begyndelsen af tilberedningstiden kan der slippe lidt damp ud fra
sikkerhedsventilen.
7. Så snart der begynder at komme damp
ud af trykregulatoren, 3, skal du skrue
ned for kogepladen til det halve, så der
kun kommer lidt damp ud. Hvis du har
valgt “indstilling 2” for hurtig tilberedning, der vises 2 hvide ringe på trykregulatoren, 3, og der kun kommer lidt
damp ud, tilbereder trykkogeren maden
hurtigt og energibesparende.
ADVARSEL! Hvis den røde ring vises på
trykregulatoren, 3, under tilberedningen, er trykket for højt, og du skal skrue
ned for varmen på kogepladen.
Sådan åbner du trykkogeren
FORSIGTIG! Hvis den røde sikkerhedsven-
til, 5, stadigvæk står højt, er trykkogeren
fortsat under tryk, og låget kan ikke tages
af. Du må under ingen omstændigheder
forsøge at tage låget af med magt, da den
pludselige frigivelse af tryk kan medføre
skoldning. Trykkogeren kan kun åbnes,
når den røde sikkerhedsventil, 5, er faldet.
Dette kan gøres på 3 forskellige måder.
Du må aldrig nedsænke trykkogeren fuldstændigt i vand. Hvis det sker, vil trykket
falde med det samme, og det kan ødelægge
både bunden og maden.
3 metoder til at åbne trykkogeren
Der ndes 3 metoder til at reducere trykket
i trykkogeren, så den kan åbnes.
Page 51

51
1. metode: Luk damp ud
Denne metode kræver, at der lukkes så
meget damp som muligt ud, indtil trykket
i trykkogeren er faldet nok til, at låget kan
tages af.
ADVARSEL! Sørg for, at sikkerhedsåbningen, 2, vender væk fra dig, når du åbner
trykkogeren, da denne metode betyder, at
der slipper varm damp ud fra trykregulatoren. Derfor skal du passe på ikke at blive
skoldet.
1. Tag trykkogeren af kogepladen.
2. Drej trykregulatoren, 3, til indstillingen
for at lukke damp ud.
3. Vent, indtil trykket er stabiliseret, og
den røde sikkerhedsventil, 5, falder.
BEMÆRK! Når den røde sikkerhedsventil, 5, falder, er temperaturen indvendigt
i trykkogeren stadigvæk ca. 100°.
4. Skub låsen, 6, fremad, og drej samtidig
låget mod uret, indtil trekanten på låget
peger mod bolten på grydens håndtag,
11. BEMÆRK! Så snart du skubber låsen, 6, fremad, kan der slippe lidt overskydende damp ud.
2. metode: Spar energi
2. metode kræver, at trykkogeren slukkes et
par minutter, før maden er tilberedt, og at
trykkogeren bliver stående på kogepladen.
Så udnyttes eftervarmen optimalt, og det
sparer energi.
1. Vent, indtil trykket er stabiliseret, og
den røde sikkerhedsventil, 5, falder.
BEMÆRK! Når sikkerhedsventilen, 5,
falder, er temperaturen indvendigt i
trykkogeren stadigvæk ca. 100°.
2. Skub låsen, 6, fremad, og drej samtidig
låget mod uret, indtil trekanten på låget
peger mod bolten på grydens håndtag,
11. Bemærk: Så snart du skubber låsen, 6, fremad, kan der slippe lidt overskydende damp ud.
3. Tag låget af gryden.
5. Tag låget af gryden.
Page 52

52
3. metode: Spar tid
3. metode kræver, at du ytter trykkogeren
fra kogepladen, når maden er færdigtilberedt. For at kunne åbne låget med det samme skal trykket i bunden udløses manuelt.
Denne metode er meget tidsbesparende.
4. Hold trykkogeren under rindende vand,
indtil sidderhedsventilen, 5, falder
(vandtrykket må ikke være for højt).
FORSIGTIG! Sørg for, at vandstrålen
ikke rammer trykregulatoren, 3, eller
sikkerhedsventilen, 5, da der ellers kan
komme vand ind i gryden, som fortynder
maden.
5. Skub låsen, 6, fremad, og drej samtidig
låget mod uret, indtil trekanten på låget
peger mod bolten på grydens håndtag,
11. BEMÆRK! Så snart du skubber låsen, 6, fremad, kan der slippe lidt overskydende damp ud.
6. Tag låget af gryden.
6. Rengøring og opbevaring
Trykkogeren nem at holde ren og vedligeholde. For at få glæde af trykkogeren i lang
tid skal du sørge for altid at følge rengøringsanvisningerne herunder.
Rengøring – hvor ofte?
Aktivitet Hvor ofte?
Vask gryden, 9
Rengør trykregulatoren, 3
Vask låget, 4
Rengør forsegling, 8
Udskift forseglingsring, 8
Sådan rengøres trykkogeren
Vask altid trykkogeren efter brug.
— Trykkogeren skal altid vaskes af i hån-
den.
— Brug ikke ståluld eller andet, der kan
ridse overaden.
— Vask så vidt muligt altid trykkogeren
umiddelbart efter brug, så eventuelle
madrester ikke tørrer ind og sætter sig
fast i gryden.
Efter hver brug
Når den er snavset
Efter hver brug
Efter hver brug
Efter behov. Kontakt Kundeservice
i dit nærmeste
IKEA varehus, eller
besøg IKEA.dk for
at få hjælp.
Sådan rengøres gryden, 9
Rengør gryden, 9, efter hver brug:
1. Vask gryden i hånden med varmt vand
og et mildt opvaskemiddel.
2. Skyl efter med rent vand.
3. Tør gryden med et viskestykke for at
undgå pletter.
Sådan rengøres trykregulatoren, 3
1. Løsn bolten på trykregulatoren, 3, ved
at dreje den mod uret. Brug den medfølgende nøgle, 10.
Page 53

53
2. Løft trykregulatoren, 3, op og ud.
3. Skyl trykregulatoren med varmt vand.
BEMÆRK! Du kan evt. også bruge lidt
mildt opvaskemiddel og en meget blød
børste.
4. Vask låget (se afsnittet herunder).
5. Sæt trykregulatoren tilbage i låget.
6. Spænd bolten på trykregulatoren, 3, ved
at dreje den med uret. Brug den medfølgende nøgle, 10.
BEMÆRK! Hvis der kommer damp ud af
sikkerhedsåbningen, 2, når trykregulatoren,
3, er monteret igen, skal du kontrollere
følgende:
— Er bolten på trykregulatoren ordentligt
spændt? Bolten skal spændes godt til i
hånden ved hjælp af nøglen, 10.
— Er beskyttelsesdækslerne på trykre-
gulatoren ødelagt eller ikke ordentligt
fastgjort? Skru trykregulatoren løs, og
kontrollér, at beskyttelsesdækslerne er
hele og korrekt monteret.
— Hvis ingen af ovennævnte tips løser dit
problem, er du velkommen til at kontakte Kundeservice i det nærmeste varehus
eller gå ind på IKEA.dk.
Sådan rengøres sikkerhedsventilen, 5
1. Løsn bolten på sikkerhedsventilen, 5,
ved at dreje den mod uret. Brug den
medfølgende nøgle, 10.
2. Løft sikkerhedsventilen, 5, op og ud.
3. Skyl sikkerhedsventilen med varmt
vand. BEMÆRK! Du kan evt. også bruge lidt mildt opvaskemiddel og en meget
blød børste.
4. Vask låget (se afsnittet herunder).
5. Sæt sikkerhedsventilen tilbage i låget.
6. Spænd bolten på sikkerhedsventilen,
5, ved at dreje den med uret. Brug den
medfølgende nøgle, 10.
Page 54

54
Sådan rengøres låget, 4
FORSIGTIG! Låget må ikke vaskes i
opvaskemaskinen.
1. Vask låget i varmt vand med et mildt
opvaskemiddel. Hvis låget er meget
snavset, kan du lade det ligge lidt i blød
i opvaskevandet.
2. Skyl låget under rindende varmt vand.
3. Tør låget med et viskestykke for at
undgå pletter.
Sådan rengøres forseglingen, 8
BEMÆRK! Forseglingen skal udskiftes en
gang om året, hvis du bruger trykkogeren
jævnligt. Kontakt Kundeservice i dit nærmeste IKEA varehus, eller besøg IKEA.dk for at
få hjælp.
1. Tag forseglingen ud af låget.
2. Skyl forseglingen med rent, varmt vand.
3. Tør forseglingen med et viskestykke.
BEMÆRK! Forseglingen må ikke blive klemt
eller presset ud af form under opbevaring.
Derfor anbefales det at sætte forseglingen
tilbage i låget under opbevaring.
Sådan opbevares trykkogeren
FORSIGTIG! Trykkogeren må ikke
opbevares med låget på. Hvis der ikke
er nogen luftcirkulation, kan der dannes
kondensvand, som kan medføre ubehagelig
lugt og måske beskadige trykkogeren.
1. Opbevar forseglingen i låget.
2. Opbevar gryden og låget hver for sig.
7. Fejlnding
ADVARSEL! Fjern trykkogeren fra kogepladen, så snart der bliver lukket store mængder damp ud. Trykkogeren må ikke bruges
igen, før fejlen er blevet afhjulpet. Det er
kun normalt, at der slipper en lille mængde
damp ud fra trykregulatoren 3.
Page 55

Sådan gør du, hvis:
Problem Mulig årsag Løsning
Der slipper damp ud mellem
låget og gryden.
Der kommer ingen damp fra
trykregulatoren.
Der kommer for meget damp
fra trykregulatoren.
Der slipper damp ud fra
trykregulatorens sider.
Der kommer damp ud af
sikkerhedsåbningen.
Låget ikke kan åbnes. Der er for højt tryk i
Trykregulatoren viser 1 rød
ring neden under de 2 hvide
ringe.
1. Trykkogeren er ikke
lukket korrekt.
2. Forseglingen er snavset.
3. Forseglingen er gået i
stykker/slidt.
1. Der slipper damp ud
mellem låget og gryden.
2. Trykregulatoren er
snavset.
3. Der er ikke nok væske i
trykkogeren.
4. Varmeforsyningen er
for lav.
1. Varmeforsyningen er for
høj.
2. Trykregulatoren er snavset.
Trykregulatoren er ikke
korrekt monteret.
1. Beskyttelsesdækslerne
i trykregulatoren er defekte eller ikke korrekt
monteret.
2. Trykregulatoren er snavset.
3. Trykregulatoren er defekt.
trykkogeren.
1. Trykket i trykkogeren er
for højt, fordi varmeforsyningen er for høj.
2. Trykregulatoren er snavset, defekt eller ikke korrekt monteret.
1. Luk trykkogeren korrekt.
2. Rengør forseglingen.
3. Udskift forseglingen (1 gang
om året).
1. Udskift forseglingen (1 gang
om året).
2. Rengør trykregulatoren (se
afsnittet “Rengøring og opbevaring”).
3. Lad trykkogeren køle langsomt ned, og hæld mindst
¼ liter væske i den.
4. Forøg varmeforsyningen
(skru op for varmen på kogepladen).
1. Reducer varmeforsyningen
(skru ned for varmen på
kogepladen).
2. Rengør trykregulatoren
(se afsnittet “Rengøring og
opbevaring”).
Monter trykregulatoren korrekt,
og spænd bolten indvendigt i
låget med nøglen, 10.
1. Kontrollér sikkerhedsdækslerne (se afsnittet “Rengøring og opbevaring”).
2. Rengør trykregulatoren (se
afsnittet “Rengøring og opbevaring”).
3. Kontakt Kundeservice i dit
nærmeste IKEA varehus, eller gå ind på IKEA.dk for at
få hjælp.
Følg anvisningerne i afsnittet
“Sådan åbner du trykkogeren”.
1. Reducer varmeforsyningen
(skru ned for varmen på
kogepladen).
2. Rengør trykregulatoren,
og kontrollér om den er
monteret korrekt.
55
Page 56

8. Tabel over tilberedningstider
Mad Tilberedningstid Tilberedningsniveau
Fisk og skaldyr
Fiskesuppe
Muslinger
Tun
Blæksprutte
Havål
Hummer
Rejer
Søtunge
Torsk
Blåmuslinger
Kulmule (frossen)
Kulmule (frisk)
Havtaske
Ørred
Laks
16 min.
2-4 min.
4-5 min.
6-10 min.
8 min.
5-10 min.
4-6 min.
3-7 min.
4-8 min.
2-3 min.
3-6 min.
3-4 min.
5-8 min.
4-7 min.
5-8 min.
2
2
2
2
2
2
2
2
2
2
2
2
2
2
2
Mad Tilberedningstid Tilberedningsniveau
Frugt
Abrikoser
Kirsebær
Blommer
Æbler
Ferskner
Appelsiner
Pærer
1-4 min.
1-2 min.
1-3 min.
2-5 min.
2-5 min.
4-7 min.
4-6 min.
1
1
1
1
1
1
1
56
Mad Tilberedningstid Tilberedningsniveau
Kød
Svineskank
Fårekød
Kalveschnitzel
Kanin
Roastbeef
Skinke, stegt
Skinke, kogt
Stegt svinekød
Oksetunge, fersk eller røget
Svinekotelet
Grisetæer
Flæskesteg
Braiseret lam
Lammekølle
Stegt kalv
Braiseret kalv
Kalvelever
Kalvetunge
30-40 min.
15 min
6 min.
15-20 min.
20-25 min.
20-25 min.
30-35 min.
25-30 min.
50-60 min.
10-12 min.
25-30 min.
12-16 min.
10-14 min.
15-20 min.
15-20 min.
15-20 min.
6-10 min.
20-25 min.
2
2
2
2
2
2
2
2
2
2
2
2
2
2
2
2
2
2
Page 57

57
Mad Tilberedningstid Tilberedningsniveau
Fjerkræ og vildt
Vagtel
Vild kanin
Fasan
Hare
And
Kalkun
Agerhøne
Due
Kylling (afhængigt af størrelse
og vægt)
Mad Tilberedningstid Tilberedningsniveau
Bælgfrugter
Bønner (udblødt)
Ærter (ikke udblødt)
Ærter (udblødt)
Ærter, grønne (udblødt)
Linser (ikke udblødt)
Linser (udblødt)
Hestebønner
Kikærter
10-15 min.
20-25 min.
10-15 min.
25-28 min.
20-25 min.
20-25 min.
14-18 min.
12-15 min.
20-25 min.
15-20 min.
20-25 min.
10-15 min.
20-25 min.
15-20 min.
8-10 min.
5-8 min.
20-27 min.
2
2
2
2
2
2
2
2
2
1
1
1
1
1
1
1
1
Mad Tilberedningstid Tilberedningsniveau
Supper
Bønnesuppe (udblødt)
Ærtesuppe (ikke udblødt)
Ærtsuppe (udblødt)
Grøntsagssuppe
Perlebyg
Semulje
Gullasch
Grød
Kartoffelsuppe
Suppe (kogt på ben)
Linser (ikke udblødt)
Linser (udblødt)
Minestrone
Fransk kødsuppe
Oksebouillon (afhængigt af
mængden af kød)
Hønsestuvning
Pastasuppe
Tomatsuppe
Løgsuppe
Fiskesuppe
15-20 min.
20-25 min.
10-15 min.
4-8 min.
18-20 min.
3-5 min.
15-20 min.
3-4 min.
5-6 min.
20-25 min.
15-20 min.
8-10 min.
6-8 min.
20-25 min.
35-40 min. (afhængigt af kødets
kvalitet)
25-30 min. (afhængigt af størrelse
og alder)
3-5 min.
8-10 min.
2-3 min.
8-10 min.
1
1
1
1
1
1
1
1
1
1
1
1
1
1
1
1
1
1
1
1
Page 58

58
Mad Tilberedningstid Tilberedningsniveau
Grøntsager
Blomkål
Blomkål, helt
Endive
Gulerødder
Kartoer med skræl
Kartoer, skrællede
Majroer/kålrabi
Gulerødder, hakkede
Peberfrugter
Champignon
Rosenkål
Rødbeder
Rødkål, grønkål, savoykål
Skorzonerrødder
Selleri
Asparges
Tomater
Artiskokker
Græskar
Løg
Spinat
Porrer
4-6 min.
6-8 min.
6-8 min.
5-7 min.
10-15 min.
6-8 min.
4-6 min.
6 min.
6-8 min.
6-8 min.
4-6 min.
15-25 min.
8-10 min.
5-6 min.
15-25 min.
7-8 min.
2-3 min.
5-8 min.
7-9 min.
5-7 min.
3-5 min.
3-5 min.
1
1
1
1
1
1
1
1
1
1
1
1
1
1
1
1
1
1
1
1
1
1
Mad Tilberedningstid Tilberedningsniveau
Andre madvarer
Ris
Pasta
15-20 min.
4-6 min.
1
1
Page 59

ÍSLENSKA
59
1. Hlutar
1. Handfang á potti
2. Öryggisrauf
3. Þrýstimælir
4. Lok
5. Öryggisventill
6. Lás
7. Handfang á loki
8. Þéttihringur (ekki sjáanlegur; inni í
lokinu)
9. Pottur
10. Lykill
11. Handfang á potti
2. Mikilvægt – vinsamlega lesið fyrir
notkun
— Lesið allar leiðbeiningarnar.
— Börn ættu ekki að vera nærri
hraðsuðupottinum á meðan hann er í
notkun.
— Setjið hraðsuðupottinn ekki inn í heitan
ofn.
— Farið með gát ef færa þarf
hraðsuðupottinn til á meðan í honum er
þrýstingur. Snertið ekki heita eti. Notið
handföng og hnúða. Notið pottaleppa ef
þörf krefur.
— Notið ekki hraðsuðupottinn í öðrum en
tilætluðum tilgangi.
— Þrýstingurinn í hraðsuðupottinum eldar
matvælin. Brunasár geta hlotist af
rangri notkun á pottinum. gætið þess
að hraðsuðupottinum sé rétt lokað
áður en hann er settur á hita. Sjá
„Notkunarleiðbeiningar“.
— Opnið pottinn aldrei með ai. Opnið
hann ekki fyrr en öruggt er að
þrýstingurinn í pottinum sé fallinn. Sjá
„Notkunarleiðbeiningar“.
— Notið hraðsuðupottinn aldrei án þess
að bæta í hann vatni því það skemmir
hann.
— Fyllið hraðsuðupottinn ekki meira en
sem nemur 2/3 af pottinum (sjá „MAX“ á
innanverðum pottinum). Þegar elduð eru
matvæli sem þenjast út við eldun, eins
og hrísgrjón eða ýmsar baunategundir,
ætti aldrei að fylla pottinn meira en
upp að „½“ merkinu á innanverðum
pottinum.
— Notið viðeigandi hitagjafa, í samræmi
við notkunarleiðbeiningar.
— Eftir eldun á kjöti með skinni (t.d.
nautatungu), sem getur bólgnað út við
þrýstinginn, má ekki stinga á skinnið
á meðan það er enn bólgið; heitt vatn
getur sprautast út og valdið bruna.
— Þegar elduð eru deigkennd matvæli
þarf að hrista pottinn varlega til áður en
hann er opnaður til að koma í veg fyrir
að matvælin spýtist út.
— Fyrir hverja notkun þarf að ganga
úr skugga um að ventlarnir séu ekki
stíaðir. Sjá „Notkunarleiðbeiningar“.
— Notið aldrei hraðsuðupottinn með
þrýstingi til að steikja/djúpsteikja
matvæli.
— Aldrei má eiga við öryggiskerð umfram
þær aðgerðir sem taldar eru upp í
notkunarleiðbeiningunum.
— Notið aðeins viðeigandi varahluti frá
framleiðanda. Ef þú hefur einhverjar
spurningar getur þú komið í IKEA
verslunina eða haft samband við
þjónustuver í síma 5202500.
3. Tæknilegar upplýsingar
Vinnuþrýstingur: 0,6 bör (stilling 1) og 1,0
bar (stilling 2).
Þrýstingur við gufulosun: 260 kpa.
Nýtilegt rúmtak: annað hvort 6 eða 4
lítrar.
Leysha: IKEA of Sweden, Tulpanvägen 8
SE-343 81, Älmhult Sweden.
Módel: 00286743, 50286745.
Hraðsuðupotturinn er CE merktur
samkvæmt Tilskipun um þrýstingsbúnað
(97/23/EC).
Hraðsuðupotturinn er GS vottaður.
4. Öryggisupplýsingar
— Í loki hraðsuðupottsins er þrýstingsmælir
sem heldur hælegum og stöðugum
þrýstingi.
— Mismunandi öryggisker tryggja
að hraðsuðupotturinn þinn virki á
öruggan hátt, jafnvel þótt tæknin
bili. Þrýstingsmælirinn 3 tryggir að
þrýstingurinn haldist stöðugur inni í
pottinum. Það er mögulegt að einhver
gufa stígi úr pottinum við notkun. Í
þrýstingsmælinum er aukaþrýstiventill
sem léttir á ofþrýstingi í gegnum
öryggisrauna 2 ef þrýstingsmælirinn
bilar. Ef sú staða kemur upp að bæði
Page 60

60
þrýstingsmælirinn og þrýstingsventillinn
bili, kemst gufan einnig út um
öryggisventilinn 5. Aðeins er hægt að
renna lásnum fram og opna pottinn
þegar þrýstingur hefur minnkað og rauði
öryggisventillinn 5 fellur í kjölfarið.
Almennar öryggisleiðbeiningar
— Gætið þess að athuga fyrir hverja
notkun að þrýstimælirinn 3 og
öryggisventillinn 5 séu ekki fastir eða
stíaðir (sjá „notkunarleiðbeiningar“).
— Gætið þess að hraðsuðupotturinn sé
alltaf rétt lokaður áður en hann er settur
á helluna (sjá „notkunarleiðbeiningar“).
— Þrýstimælinn 3 má aldrei hylja.
— Gætið þess að öryggisraun snúi alltaf
frá ykkur þegar potturinn er í notkun
og að hún snúi ekki að stöðum þar sem
er umgangur. Ef upp kemur vandamál
getur mikið af heitri gufu komið út um
rauna.
— Ef gufu leggur út um öryggisventilinn 5
eða öryggisrauna 2, þarf að slökkva á
hellunni tafarlaust þar sem þrýstingurinn
í pottinum er orðinn of mikill. Haldið
notkun ekki áfram fyrr en búið er að
nna orsök vandans (sjá „Vandinn
leystur“).
— Til að forðast skemmdir á
hraðsuðupottinum þarf að tryggja að í
honum sé alltaf a.m.k. 0,25 l af vökva til
að næg gufa myndist og til að potturinn
ofhitni ekki og það þurrsjóði í honum.
— VARÚÐ: Fagmanneskja þarf að sinna
viðgerðum á hraðsuðupottinum.
Gott að vita
— Hraðsuðupotturinn hentar til notkunar á
allar tegundir af hellum, þar með taldar
spanhellur.
— Hægt er að nota hraðsuðupottinn eins
og hefðbundinn pott (án loksins) til að
brúna matvæli áður en þau eru elduð
undir þrýstingi.
— Þú getur sparað orku með því að setja
hraðsuðupottinn á hellu sem hefur sama
eða minna þvermál og potturinn.
— Lyftið alltaf pottinum upp þegar hann er
færður til á keramikhelluborði svo það
rispist ekki.
— Hað í huga að hraðsuðupotturinn hitnar
við notkun. Notið alltaf pottaleppa þegar
hann er snertur.
— Gætið þess að það þurrsjóði aldrei í
pottinum, það skemmir hann.
— Hraðsuðupotturinn er aðeins ætlaður til
matreiðslu, ekki til að geyma í matvæli.
Matvæli sem geymd eru í pottinum í
lengri tíma geta haft áhrif á yrborðið og
tekið í sig málmbragð.
— Þegar hraðsuðupotturinn er notaður á
gashellur þarf að gæta þess að logarnir
snerti ekki handföngin.
5. Notkunarleiðbeiningar
Fyrir hverja notkun
Áður en matreitt er í hraðsuðupottinum ætti
að fara yr öll öryggisatriði pottsins til að
draga úr líkum á skemmdum.
1. Gættu þess að götin fyrir
þrýstingsmælinn 3 innan í pottinum séu
hrein.
2. Ef svo er ekki, þarf að þrífa
þrýstingsmælinn 3 (sjá „Þrif og
geymsla“).
3. Gættu þess að hægt sé að hreyfa
öryggisventilinn 5, að hann sé ekki
fastur.
4. Gættu þess að þéttihringurinn 8 sé ekki
skemmdur á nokkurn hátt, þ.e. að hann
ha ekki klofnað. Athugið! Hringurinn
getur harðnað með tímanum og þannig
hætt að veita loftþétta lokun. Það leiðir
til þess að gufa sleppur undan lokinu og
þá þarf að skipta um þéttihring. Hafðu
samband við IKEA verslunina til að fá
nánari upplýsingar.
Svona notar þú hraðsuðupottinn
1. Settu matvæli og /eða vökva í pottinn.
Varúð! Setjið aldrei meiri matvæli og/
eða vökva í pottinn en upp að “MAX”
merkinu á innanverðum pottinum.
Hámarkið er 4 lítrar (fyrir 6 lítra potta)
og 2,5 lítrar (fyrir 4 lítra potta). Þegar
elduð eru matvæli sem þenjast út við
eldun, eins og hrísgrjón eða ýmsar
baunategundir, ætti aldrei að fylla
pottinn meira en upp að „½“ merkinu
á innanverðum pottinum. Það hindrar
að matvælin yrfylli pottinn þegar
þau þenjast út, og stíi mögulega
öryggisventilinn.
2. Settu lokið 4 á pottinn 9 þannig að
þríhyrningurinn á lokinu vísi á pinnann/
tappann á handfangi pottsins 11.
Page 61

3. Snúðu lokinu þangað til handfang loksins
7 og handfang pottsins 10 mynda beina
línu og þau smella á réttan stað.
4. Veldu viðeigandi stillingu á
þrýstimælinum 3:
1; Hægeldun: hvítur hringur sést á
þrýstimælinum.
2; Hraðeldun: tveir hvítir hringir sjást á
þrýstimælinum.
61
komi út um öryggisventilinn.
7. Um leið og gufa byrjar að streyma
út um þrýstingsmælinn 3 má lækka
hitann undir pottinum um helming
þannig að aðeins lítið af gufu streymi
út. Ef þú hefur valið „stillingu 2“ fyrir
hraðeldun og tveir hvítir hringir sjást á
þrýstingsmælinum 3 og lítil gufa kemur
út, þá er hraðsuðupotturinn að elda
matvælin hratt og að spara orku.
Varúð! Ef þrýstingsmælirinn 3 sýnir
rauðan hring meðan á eldun stendur
er þrýstingurinn of mikill og lækka þarf
hitann á hellunni.
Hraðsuðupotturinn opnaður
Varúð! Ef rauði öryggisventillinn er enn
uppi er enn þrýstingur í pottinum og því ekki
hægt að opna lokið. Aldrei ætti að þvinga
lokið opið, þar sem hætta er á brunaslysum
ef létt er snögglega á þrýstingnum. Ekki
er hægt að opna pottinn fyrr en rauði
öryggisventillinn 5 fer niður. Það getur gerst
á þrjá vegu.
Setjið hraðsuðupottinn aldrei á kaf í vatn.
Þá fellur þrýstingurinn skyndilega sem getur
eyðilagt botninn og matvælin í pottinum.
Þrjár leiðir til að opna hraðsuðupottinn
Það eru þrjár leiðir til að létta á þrýstingi
í hraðsuðupottinum svo hægt sé að opna
hann;
5. Setjið hraðsuðupottinn á hellu sem er af
svipaðri stærð og botn hraðsuðupottsins.
Varúð! Hellan ætti ekki að vera stærri
en botn hraðsuðupottsins. Annars getur
myndast of mikill hiti meðfram hliðum
pottsins sem getur skemmt handföngin.
6. Stilltu helluna á mesta hita. Um leið og
þrýstingur myndast í pottinum færist
rauði öryggisventillinn 5 upp og læsir
þannig pottinum. Athugið! Í uppha
eldunar er eðlilegt að svolítið af gufu
Page 62

62
Leið 1: Hleypa út gufu
Þessi aðferð gengur út á að hleypa eins
mikilli gufu og mögulegt er úr pottinum
þannig að þrýstingurinn í honum lækki
nægilega mikið til að hægt sé að taka lokið
af honum.
Varúð! Gakktu úr skugga um að
öryggisraun 2 snúi frá þér þegar þú
opnar hraðsuðupottinn þar sem þessi leið
felur í sér að heit gufa streymir út um
þrýstingsmælinn. Það þarf því að passa að
brenna sig ekki.
1. Fjarlægðu hraðsuðupottinn af hellunni.
2. Snúðu þrýstingsmælinum 3 á stillinguna
sem hleypir út gufu.
3. Bíddu þar til þrýstingurinn hefur lækkað
og rauði öryggisventillinn 5 fellur
aftur niður. Athugið! Um leið og rauði
öryggisventillinn fellur aftur niður, er
hitinn í pottinum enn næstum 100°C.
4. Renndu lásnum 6 fram og snúðu
lokinu rangsælis á sama tíma þar til
þríhyrningurinn á lokinu vísar á pinnann
á handfangi loksins 11. Athugið! Um
leið og þú rennir lásnum 6 fram, gæti
afgangsgufa komið út.
Leið 2: Orkusparandi
Leið 2 krefst þess að slökkt sé undir
hraðsuðupottinum nokkrum mínútum áður
en eldunartíma er lokið og potturinn látinn
standa áfram á hellunni. Þá nýtist allur
hitinn og þú sparar orku.
1. Bíddu þar til þrýstingurinn er orðinn jafn
í pottinum og rauði öryggisventillinn
5 fellur aftur niður. Athugið! Athugið!
Þegar rauði öryggisventillinn fellur aftur
niður, er hitinn í pottinum enn 100°C.
2. Renndu lásnum 6 fram og snúðu
lokinu rangsælis á sama tíma þar til
þríhyrningurinn á lokinu vísar á pinnann
á handfangi loksins 11. Athugið! Um
leið og þú rennir lásnum 6 fram, gæti
afgangsgufa komið út.
3. Fjarlægðu lokið af pottinum.
5. Fjarlægðu lokið af pottinum.
Page 63

63
Leið 3: Tímasparandi
Leið 3 krefst þess að þú fjarlægir
hraðsuðupottinn af hellunni um leið og
eldunartíma er lokið. Til að geta opnað lokið
strax þarf að létta handvirkt á þrýstingnum í
pottinum. Þessi aðferð sparar aðallega tíma.
1. Haltu hraðsuðupottinum undir rennandi
vatni þar til öryggisventillinn 5 fellur
aftur niður (þrýstingurinn á vatninu
má ekki vera mikill). Varúð! Gætið
þess að vatnsbunan renni ekki beint á
þrýstingsmælinn 3 eða öryggisventilinn
5 þar sem vatnið gæti borist í matvælin
og þynnt þau út.
2. Renndu lásnum 6 fram og snúðu
lokinu rangsælis á sama tíma þar til
þríhyrningurinn á lokinu vísar á pinnann
á handfangi loksins 11. Athugið! Um
leið og þú rennir lásnum 6 fram, gæti
afgangsgufa komið út.
3. Fjarlægðu lokið af pottinum.
6. Þrif og geymsla
Einfalt er að þrífa og hirða um
hraðsuðupottinn. Til að hægt sé að njóta
hans um árabil, ætti alltaf að fylgja
eftirfarandi leiðbeiningum um þrif.
Tíðni þrifa:
Aðgerð Tíðni
Þrif á potti 9
Þrif á
þrýstingsmæli 3
Þrif á loki 4
Þrif á þéttihring 8
Skipt um
þéttihring 8
Svona er hraðsuðupotturinn þrinn
Þvoðu alltaf hraðsuðupottinn eftir notkun.
— Hraðsuðupottinn ætti alltaf að þvo í
höndunum.
— Notið ekki stálull eða annað sem gæti
rispað yrborðið.
— Ef mögulegt er, ætti að þvo
hraðsuðupottinn strax að notkun lokinni
svo að afgangar þorni ekki og festist við
pottinn.
Eftir hverja notkun
Þegar óhreint
Eftir hverja notkun
Eftir hverja notkun
Eftir þörfum. Hafðu
samband við IKEA
verslunina til að fá
nánari upplýsingar.
Svona þrífur þú pottinn (9)
Þrífðu pottinn 9 eftir hverja notkun:
1. Þrífðu pottinn í höndunum með heitu
vatni og mildri sápu.
2. Skolaðu með hreinu vatni.
3. Þurrkaðu pottinn með diskaþurrku til að
ekki myndist för eftir vatnstauma.
Svona þrífur þú þrýstingsmælinn (3)
1. Losaðu róna á þrýstingsmælinum 3 með
því að snúa henni rangsælis. Notaðu
meðfylgjandi lykil 10.
Page 64

64
2. Lyftu þrýstingsmælinum 3 upp og út.
3. Skolaðu þrýstingsmælinn með heitu
vatni. Athugið! Þú getur líka notað ögn
af uppþvottalegi og mjúkan bursta ef
þörf krefur.
4. Þrífðu lokið (sjá leiðbeiningar hér að
neðan).
5. Komdu þrýstingsmælinum aftur fyrir í
lokinu.
6. Festu skrúfboltann á þrýstingsmælinn 3
með því að skrúfa réttsælis. Notaðu til
þess meðfylgjandi lykil 10.
— Ef ekkert af ofantöldu dugar til að laga
vandamálið ættir þú að hafa samband
við IKEA verslunina og fá aðstoð.
Svona þrífur þú öryggisventilinn (5)
1. Losaðu skrúfboltann á öryggisventlinum
5 með því að snúa honum rangsælis.
Notaðu til þess meðfylgjandi lykil 10.
Athugið! Ef gufa kemur út um
öryggisrauna 2 eftir að búið er að koma
þrýstingsmælinum fyrir, ætti að athuga:
— Hvort skrúfboltinn á þrýstingsmælinum
3 ha verið nægilega hertur – hann þarf
að herða vel með lyklinum 10.
— Hvort öryggistapparnir í
þrýstingsmælinum séu gallaðir eða
illa festir – losaðu þrýstingsmælinn og
athugaðu hvort tapparnir sitji rétt og
hvort eitthvað sé athugavert við þá.
2. Lyftu öryggisventlinum 5 upp og út.
3. Skolaðu öryggisventilinn með heitu
vatni. Athugið! Þú getur líka notað ögn
af uppþvottalegi og mjúkan bursta ef
þörf krefur.
4. Þrífðu lokið (sjá leiðbeiningar hér að
neðan).
5. Settu öryggisventilinn aftur í lokið.
6. Festu skrúfboltann á öryggisventilinn 5
með því að skrúfa réttsælis. Notaðu til
þess meðfylgjandi lykil 10.
Page 65

65
Svona þrífur þú lokið (4)
Athugið! Lokið ætti ekki að þvo í
uppþvottavél.
1. Þvoðu lokið með heitu vatni og mildri
sápu. Ef lokið er sérstaklega óhreint má
láta það liggja svolitla stund í vatni og
mildri sápu.
2. Skolaðu lokið með heitu vatni.
3. Þurrkaðu lokið með diskaþurrku til að
koma í veg fyrir að för myndist eftir
vatnstauma.
Svona þrífur þú þéttihringinn (8)
Athugið! Ef hraðsuðupotturinn er notaður
reglulega ætti að skipta einu sinni á ári um
þéttihring. Vinsamlega hafðu samband við
IKEA verslunina til að fá nánari upplýsingar.
1. Fjarlægðu þéttihringinn úr lokinu.
2. Skolaðu hringinn með hreinu og heitu
vatni.
3. Þurrkaðu hringinn með diskaþurrku.
Athugið! Þéttihringinn má ekki brjóta
saman eða snúa upp á við geymslu. Það er
því ráðlegt að setja hann aftur í lokið áður
en potturinn er settur í geymslu.
Geymsla á hraðsuðupottinum
Varúð! Hraðsuðupottinn má aldrei geyma
með lokið alveg á. Ef ekkert loft leikur um
pottinn getur safnast upp raki sem myndar
slæma lykt og skemmir jafnvel pottinn.
1. Geymdu þéttihringinn í lokinu.
2. Geymdu pottinn og lokið í sitthvoru lagi.
7. Bilanaleit
Varúð! Ef gufa streymir viðstöðulaust
úr pottinum þarf að taka hann strax af
hellunni. Ekki má nota hraðsuðupottinn
aftur þar til gert hefur verið við pottinn.
Aðeins er eðlilegt að lítið af gufu komi út um
þrýstingsmælinn.
Page 66
Hvað skal gera ef:
Vandamál Möguleg ástæða Lausn
Gufa kemur út á milli loksins
og pottsins.
Engin gufa kemur úr
þrýstingsmælinum.
Of mikil gufa kemur úr
þrýstingsmælinum.
Gufa kemur út um hliðar
þrýstingsmælisins.
Gufa kemur út um
öryggisrauna.
Lokið opnast ekki. Það er of mikill þrýstingur í
Á þrýstingsmælinum sést
rauður hringur undir tveimur
hvítum hringjum.
1. Hraðsuðupotturinn er
ekki nógu vel lokaður.
2. Þéttihringurinn er
óhreinn.
3. Þéttihringurinn er slitinn/
eyddur.
1. Gufa kemur út á milli
loksins og pottsins.
2. Þrýstingsmælirinn er
óhreinn.
3. Ekki nægur vökvi í
hraðsuðupottinum.
4. Hiti of lágur.
1. Hiti of hár.
2. Þrýstingsmælirinn er
óhreinn.
Þrýstingsmælirinn er ekki rétt
festur á pottinn.
1. Hlífðartapparnir í
þrýstingsmælinum eru
gallaðir eða ekki rétt
festir.
2. Þrýstingsmælirinn er
óhreinn.
3. Þrýstingsmælirinn er
gallaður.
hraðsuðupottinum.
1. Þrýstingurinn í
hraðsuðupottinum er of
mikill því hitinn á hellunni
er of hár.
2. Þrýstingsmælirinn er
óhreinn, gallaður eða
ekki rétt festur.
1. Loka pottinum á réttan hátt.
2. Hreinsa þéttihringinn.
3. Skipta um þéttihringinn
1. Skipta um þéttihringinn
2. Þrífa þrýstingsmælinn (sjá
3. Kæla hraðsuðupottinn og
4. Auka hitann á hellunni.
1. Lækka hitann á hellunni.
2. Þrífa þrýstingsmælinn (sjá
Festa þrýstingsmælinn rétt á og
herða skrúfboltann á innanverðu
lokinu með lyklinum 10.
1. Fara yr öryggistappana
2. Þrífa þrýstingsmælinn (sjá
3. Hafðu samband við IKEA
Fylgdu leiðbeiningunum undir
„Hraðsuðupotturinn opnaður“.
1. Lækka hitann á hellunni.
2. Þrífa þrýstingsmælinn,
66
(árlega).
(árlega).
„Þrif og geymsla“).
fylla með a.m.k. 0,25 l af
vökva.
„Þrif og geymsla“).
(sjá „Þrif og geymsla“).
„Þrif og geymsla“).
verslunina/þjónustuver til
að fá aðstoð.
athuga hvort hann ha verið
rétt festur.
Page 67

8. Taa yr eldunartíma
Matvæli Eldunartími Stilling
Fiskur og sjávarfang
Fiskisúpa
Skelskur
Túnskur
Smokkskur
Áll
Humar
Rækjur
Lúra
Þorskur
Kræklingur
Lýsingur (frosinn)
Lýsingur (ferskur)
Skötuselur
Silungur
Lax
16 mín.
2-4 mín.
4-5 mín.
6-10 mín.
8 mín.
5-10 mín.
4-6 mín.
3-7 mín.
4-8 mín.
2-3 mín.
3-6 mín.
3-4 mín.
5-8 mín.
4-7 mín.
5-8 mín.
2
2
2
2
2
2
2
2
2
2
2
2
2
2
2
Matvæli Eldunartími Stilling
Ávextir
Apríkósur
Kirsuber
Sveskjur
Epli
Ferskjur
Appelsínur
Perur
1-4 mín.
1-2 mín.
1-3 mín.
2-5 mín.
2-5 mín.
4-7 mín.
4-6 mín.
1
1
1
1
1
1
1
67
Matvæli Eldunartími Stilling
Kjöt
Grísaskanki
Lamb
Kálfakjöt, snitsel
Kálfasteik, kanína
Roast beef
Skinka, steikt
Skinka, soðin
Grísasteik
Nautatunga, fersk eða reykt
Grísakótelettur
Grísatær
Grísalund
Soðið lambakjöt
Lambalæri
Kálfasteik
Soðið kálfakjöt
Kálfalifur
Kálfatunga
30-40 mín.
15 mín.
6 mín.
15-20 mín.
20-25 mín.
20-25 mín.
30-35 mín.
25-30 mín.
50-60 mín.
10-12 mín.
25-30 mín.
12-16 mín.
10-14 mín.
15-20 mín.
15-20 mín.
15-20 mín.
6-10 mín.
20-25 mín.
2
2
2
2
2
2
2
2
2
2
2
2
2
2
2
2
2
2
Page 68

Matvæli Eldunartími Stilling
Fuglakjöt og villibráð
Kornhæna
Villikanína
Fasani
Héri
Önd
Kalkúnn
Akurhæna
Dúfa
Kjúklingur (veltur á stærð og
þyngd)
10-15 mín.
20-25 mín.
10-15 mín.
25-28 mín.
20-25 mín.
20-25 mín.
14-18 mín.
12-15 mín.
20-25 mín.
2
2
2
2
2
2
2
2
2
Matvæli Eldunartími Stilling
Belgjurtir
Baunir (lagt í bleyti áður)
Ertur (ekki lagt í bleyti)
Ertur (lagt í bleyti áður)
Ertur, grænar (lagt í bleyti áður)
Linsubaunir (ekki lagt í bleyti)
Linsubaunir (lagt í bleyti áður)
Hestabaunir
Kjúklingabaunir
15-20 mín.
20-25 mín.
10-15 mín.
20-25 mín.
15-20 mín.
8-10 mín.
5-8 mín.
20-27 mín.
1
1
1
1
1
1
1
1
68
Matvæli Eldunartími Stilling
Súpur
Baunasúpa (lagt í bleyti áður)
Baunasúpa (ekki lagt í bleyti)
Baunasúpa (lagt í bleyti áður)
Grænmetissúpa
Bygg
Semolina
Gúllas
Hafragrautur
Kartöusúpa
Soð úr beinum
Linsubaunir (ekki lagt í bleyti)
Linsubaunir (lagt í bleyti áður)
Minestrone
Pot-au-Feu
Nautakjötssoð (veltur á magni
af kjöti)
Soðin hæna
Pastasúpa
Tómatsúpa
Lauksúpa
Fiskisúpa
15-20 mín.
20-25 mín.
10-15 mín.
4-8 mín.
18-20 mín.
3-5 mín.
15-20 mín.
3-4 mín.
5-6 mín.
20-25 mín.
15-20 mín.
8-10 mín.
6-8 mín.
20-25 mín.
35-40 mín. (veltur á magni af kjöti)
25-30 mín. (veltur á stærð og aldri)
3-5 mín.
8-10 mín.
2-3 mín.
8-10 mín.
1
1
1
1
1
1
1
1
1
1
1
1
1
1
1
1
1
1
1
1
Page 69

Matvæli Eldunartími Stilling
Grænmeti
Blómkál
Blómkál, heilt
Jólasalat
Gulrætur
Kartöur, með hýði
Kartöur, afhýddar
Næpa
Gulrætur, niðurskornar
Paprika
Sveppir
Rósakál
Rauðrófa
Rauðkál, grænkál, blöðrukál
Svört hafursrót
Seljurót
Spergill
Tómatar
Ætiþistill
Grasker
Laukur
Spínat
Blaðlaukur
4-6 mín.
6-8 mín.
6-8 mín.
5-7 mín.
10-15 mín.
6-8 mín.
4-6 mín.
6 mín.
6-8 mín.
6-8 mín.
4-6 mín.
15-25 mín.
8-10 mín.
5-6 mín.
15-25 mín.
7-8 mín.
2-3 mín.
5-8 mín.
7-9 mín.
5-7 mín.
3-5 mín.
3-5 mín.
1
1
1
1
1
1
1
1
1
1
1
1
1
1
1
1
1
1
1
1
1
1
69
Matvæli Eldunartími Stilling
Önnur matvæli
Rice
Pasta
15-20 mín.
4-6 mín.
1
1
Page 70

NORSK
70
1. Navn på delene
1. Grytehåndtak
2. Sikkerhetsåpning
3. Trykkregulator
4. Lokk
5. Sikkerhetsventil
6. Lås
7. Grytelokkhåndtak
8. Pakning (ikke synlig, er inni lokket)
9. Gryte
10. Spesialnøkkel
11. Grytehåndtak
2. Viktig informasjon – vennligst les
før bruk
— Les alle instruksjonene.
— Ikke la barn være i nærheten av trykko-
keren når den er i bruk.
— Ikke sett trykkokeren inn i en varm ovn.
— Vær svært forsiktig om du må ytte
trykkokeren når den er under trykk.
Ikke ta på varme overater. Bruk hånd-
tak og knotter. Om nødvendig, bruk
beskyttelse.
— Ikke bruk trykkokeren til annet enn det
den er beregnet for.
— Trykkokeren koker mat under trykk. Det
er fare for skålding om trykkokeren ikke
brukes som den skal. Sørg for at tryk-
kokeren er ordentlig lukket før du setter
på varme. Se avsnittet «Slik bruker du
trykkokeren ».
— Ikke tving trykkokeren åpen. Ikke åpne
den før du sjekker at det interne trykket
er helt borte. Se avsnittet « Slik åpner
du trykkokeren».
— Bruk aldri trykkokeren uten å tilsette
vann, det vil gi alvorlig skade på den.
— Ikke fyll trykkokeren over 2/3 av kapa-
siteten (se MAX-merket inni gryta). Når
du koker mat som ekspanderer under
koking, som ris eller tørkede grønnsaker,
ikke fyll trykkokeren over ½ mengde av
kapasiteten (se ½-merket inni gryta).
— Bruk riktig varmekilde i henhold til
instruksjonene i avsnittet ”Bruksanvis-
ning”.
— Etter at du har kokt kjøtt med skinn
på (for eksempel oksetunge) som kan
svelle opp under trykk, ikke pirk borti
kjøttent når skinnet er hovent. Det kan
sprute ut varmt vann og du kan bli skål-
det.
— Når du koker deigete mat, rist trykkoke-
ren lett før du åpner lokket, for å unngå
at det spruter ut mat.
— Før hver bruk, sjekk at ventilene ikke er
blokkert. Se avsnittet “Bruksanvisning”.
— Bruk aldri trykkokeren med trykk til fri-
tering eller steking av mat.
— Ikke modiser noen av sikkerhetssyste-
mene ut over vedlikeholdsinstruksjonene
som er spesisert i bruksanvisningen.
— Bruk kun produsentens reservedeler
og bruk dem til riktig modell. Dersom
du har spørsmål, vennligst kontakt ditt
nærmeste IKEA-varehus / kundeservice
eller besøk IKEA.no.
— SPAR PÅ DISSE INSTRUKSJONENE.
3. Tekniske data
Arbeidstrykk: 0,6 bar (innstilling 1) og 1,0
bar (innstilling 2).
Damputslippstrykk: 260 kpa.
Bruksvolum: enten 6 liter eller 4 liter.
Lisenseier: IKEA of Sweden, Tulpanvägen 8
SE- 34 381, Älmhult Sverige.
Modell: 00286743, 50286745.
Trykkokeren er CE-merket ifølge trykkutstyrsdirektivet (97/23/EF).
Trykkokeren er GS-sertisert.
4. Sikkerhetsinformasjon
— Trykkokeren har en trykkregulator i lok-
ket som sørger for at ønsket trykkinnstilling er konstant.
— Flere sikkerhetsinnretninger sørger for
at trykkokeren din fungerer på en sikker
måte, også ved teknisk feil. Trykkregulatoren 3 sørger for at trykket inni
trykkokeren er konstant. Det kan sive
ut litt damp når trykkokeren er i bruk.
I trykkregulatoren 3 er det en ekstra
trykkreguleringsventil som slipper ut
overtrykk via sikkerhetsåpningen 2 dersom trykkregulatoren ikke fungerer som
den skal. Skulle både trykkregulatoren
3 og trykkreguleringsventilen slutte å
fungere, kan overtrykk også slippe ut
via sikkerhetsventilen 5. Låsen 6 kan
skyves framover for å åpne lokket kun
dersom trykket har stabilisert seg. Den
røde sikkerhetsventilen 5 faller ned som
følge av dette.
Page 71

71
Generelle sikkerhetsråd
— Sjekk før hver bruk at trykkregulatoren
3 og sikkerhetsventilen 5 fungerer og
ikke er blokkert (se avsnittet ”Bruksan-
visning”).
— Pass på at trykkokeren alltid er luk-
ket på riktig måte før du setter den på
platetoppen (se avsnittet ”Bruksanvis-
ning”).
— Det må aldri ligge noe oppå trykkregu-
latoren 3.
— Når trykkokeren er i bruk, skal den alltid
plasseres slik at sikkerhetsåpningen 2
vender bort fra brukeren og andre. Der-
som noe er feilmontert, siver det ut mye
damp.
— Skru av plata umiddelbart dersom det
siver damp ut fra sikkerhetsventilen 5
eller sikkerhetsåpningen 2. Dette betyr
at trykket inni trykkokeren er for høyt.
Ikke bruk trykkokeren før du har løst
problemet (se avsnittet ”Slik løser du
problemer”).
— For å unngå skader på trykkokeren må
du passe på at det alltid er minst 0,25 li-
ter væske i den. På denne måten blir det
produsert nok damp til at trykkokeren
ikke blir for varm og koker tørr.
— ADVARSEL: reparasjoner på trykko-
keren skal kun utføres av en autorisert
fagperson.
Godt å vite
— Trykkokeren kan brukes på alle slags
platetopper, også induksjonstopper.
— Trykkokeren kan brukes som ei vanlig
gryte (uten lokk) for å brune mat før
den skal trykkokes.
— Setter du trykkokeren på ei plate med
samme eller mindre diameter, sparer du
energi.
— Løft alltid opp trykkokeren før du ytter
den på en glasskeramisk platetopp, så
unngår du å lage riper.
— Vær oppmerksom på at trykkokeren blir
svært varm når den er i bruk. Bruk alltid
grytelapper.
— La aldri trykkokeren koke tørr, da dette
vil gjøre alvorlig skade på produktet.
— Trykkokeren er beregnet utelukkende
for matlaging, ikke for matoppbevaring.
Mat som oppbevares i trykkokeren over
lengre tid, kan påvirke overaten og ta
smak av metall.
— Pass på at ammene ikke kommer i kon-
takt med håndtakene når trykkokeren
brukes på en gasstopp.
5. Bruksanvisning
Før hver bruk
Før du skal bruke trykkokeren må du sjekke
at alle sikkerhetsinnretningene fungerer, slik
at trykkokeren ikke blir ødelagt.
1. Sjekk at trykkregulatorens 3 åpninger
på innsiden av lokket er rene.
2. Rengjør trykkregulatoren 3 hvis dette
ikke er tilfellet (se avsnittet ”Rengjøring
og oppbevaring”).
3. Sjekk at sikkerhetsventilen 5 kan beveges på og ikke sitter fast.
4. Sjekk at pakningen 8 ikke har noen
skader, f.eks. i form av sprekker. Merk:
Over tid kan pakningen bli hard og ikke
lenger sørge for en lufttett forsegling.
Dette gjør at damp siver ut fra kanten
av lokket, og pakningen må erstattes
med en ny. Ta kontakt med ditt lokale
IKEA-varehus, ring kundeservice eller gå
på IKEA.no for å bestille ny pakning.
Slik bruker du trykkokeren
1. Fyll gryta med mat og/eller væske.
Advarsel! Fyll aldri trykkokeren med
mat og væske som overstiger MAXmerket på innsiden av gryta. Dette
tilsvarer maksmengden på 4 liter (for
trykkoker med bruksvolum på 6 liter)
og maksmengden på 2,5 liter (for trykkokeren med bruksvolum på 4 liter). Når
du lager mat som utvider seg, som ris
eller belgfrukter, må du ikke fylle trykkokeren mer enn opp til ½-merket på
innsiden av gryta. På denne måten unngår du at sikkerhetsventilen blir blokkert
som følge av at maten utvider seg opp
til lokket.
2. Sett lokket 4 på gryta 9 slik at trekantmerket på lokket peker mot naglen på
grytehåndtaket 11.
Page 72

3. Vri lokket til grytelokkhåndtaket 7 og
grytehåndtaket 11 står over hverandre,
og klikk på plass.
4. Velg ønsket innstilling på trykkregulatoren 3.
1. Langsom tilberedning: Trykkregulatoren viser én hvit ring.
2. Rask tilberedning: Trykkregulatoren
viser to hvite ringer.
sen av tilberedningstiden kan det sive ut
litt damp fra sikkerhetsventilen.
7. Når det begynner å komme damp ut av
trykkregulatoren 3, senker du temperaturen på plata til rundt halv effekt, slik
at det bare kommer ut litt damp. Dersom du har valgt ”innstilling 2” for rask
tilberedning og to hvite ringer vises på
trykkregulatoren 3 pluss at det kommer
ut lite damp, tilbereder trykkokeren maten raskt og sparer energi.
Advarsel! Dersom det vises en rød ring
på trykkregulatoren 3, er trykket for
høyt og du må senke temperaturen på
plata.
Slik åpner du trykkokeren
Advarsel! Dersom den røde sikkerhetsven-
tilen 5 fortsatt er hevet, er det fremdeles
trykk i trykkokeren. Lokket kan følgelig ikke
åpnes. Prøv aldri å åpne lokket med makt
ettersom den plutselige trykkfrigjøringen
kan føre til skålding. Lokket kan åpnes først
når den røde sikkerhetsventilen 5 har gått
ned. Dette kan gjøres på tre ulike måter.
Ha aldri hele trykkokeren ned i vann. Gjør
du det, senkes trykket umiddelbart, noe
som igjen kan føre til at bunnen og maten
blir ødelagt.
Tre måter å åpne trykkokeren på
Det er tre måter å redusere trykket i trykkokeren på, slik at du får åpnet lokket.
72
5. Sett trykkokeren på ei plate som er
omtrent like stor som bunnen på trykkokeren. Advarsel! Plata må ikke være
større enn bunnen på trykkokeren. Dette
kan nemlig føre til at altfor mye varme
stiger opp ved siden av bunnen og dermed ødelegger plasthåndtakene.
6. Sett plata på fullt. Når det er trykk i
trykkokeren, vil den røde sikkerhetsventilen 5 bevege seg oppover og med
dette låse lokket. Merk: Ved begynnel-
Page 73

73
Metode 1: Slipp ut dampen
Denne metoden innebærer å frigjøre så mye
damp som mulig helt til trykket i trykkokeren er så lavt at du kan ta av lokket.
Advarsel! Pass på at sikkerhetsåpningen 2
er vendt bort fra deg når du åpner trykkokeren, siden denne metoden innebærer at det
kommer varm damp ut av trykkregulatoren.
Du må derfor være forsiktig og passe på at
du ikke skålder deg.
1. Ta trykkokeren av plata.
2. Vri trykkregulatoren 3 til innstillingen for
frigjøring av damp.
3. Vent til trykket har stabilisert seg og
den røde sikkerhetsventilen 5 faller ned
igjen. Merk: Når den røde sikkerhetsventilen 5 har falt ned igjen, er temperaturen inni trykkokeren fortsatt på
rundt 100 °C.
4. Dytt låsen 6 framover og vri samtidig
lokket mot klokka helt til trekantmerket
på lokket peker mot merket på grytehåndtaket 11. Merk: Når du dytter
låsen 6 framover, kan det sive ut litt
restdamp.
Method 2: Saving energy
Metode 2 innebærer at du skrur av plata
noen minutter før maten er ferdig tilberedt
og lar trykkokeren stå på platetoppen. På
denne måten bruker du opp all restdamp og
sparer energi.
1. Vent til trykket har stabilisert seg og
den røde sikkerhetsventilen 5 faller ned.
Merk: Når sikkerhetsventilen 5 faller
ned, er temperaturen inni trykkokeren
fortsatt på rundt 100 °C.
2. Dytt låsen 6 framover og vri samtidig
lokket mot klokka helt til trekantmerket
på lokket peker mot merket på grytehåndtaket 11. Merk: Når du dytter
låsen 6 framover, kan det sive ut litt
restdamp.
3. Ta av lokket.
5. Ta av lokket.
Page 74

74
Metode 3: Spar tid
Metode 3 innebærer at du tar trykkokeren av plata med en gang maten er ferdig
tilberedt. For å kunne ta av lokket med det
samme, må trykket i gryta frigjøres manuelt. På denne måten sparer du litt tid.
1. Hold trykkokeren under rennende
vann til sikkerhetsventilen 5 faller ned
(vanntrykket må ikke være for kraftig).
Advarsel! Pass på at vannspruten ikke
kommer borti trykkregulatoren 3 eller
sikkerhetsventilen 5. Dette kan nemlig føre til at vann renner inn i gryta og
ødelegger maten.
2. Dytt låsen 6 framover og vri samtidig
lokket mot klokka helt til trekantmerket
på lokket peker mot merket på grytehåndtaket 11. Merk: Når du dytter
låsen 6 framover, kan det sive ut litt
restdamp.
3. Ta av lokket.
6. Rengjøring og oppbevaring
Det er enkelt å rengjøre og vedlikeholde
trykkokeren din. For at trykkokeren skal
holde i mange år, er det viktig at du følger
rengjøringsanvisningene.
Hyppighet på rengjøringen:
Aktivitet Hyppighet
Rengjøre gryta 9
Rengjøre trykkregulatoren 3
Rengjøre lokket 4
Rengjøre pakningen 8
Erstatte tetningsringen 8
Slik rengjør du trykkokeren
Vask alltid trykkokeren etter hver bruk.
— Trykkokeren skal vaskes opp for hånd.
— Bruk ikke stålull eller annet som kan
lage riper i overaten.
— Vask trykkokeren helst med en gang du
har brukt den, slik at ikke matrester tørker inn og setter seg fast til gryta.
Etter hver bruk
Når den er møkkete
Etter hver bruk
Etter hver bruk
Ved behov Ta kontakt med ditt lokale
IKEA-varehus, ring
kundeservice eller
gå på IKEA.no hvis
du lurer på noe.
Slik rengjør du gryta (9)
Rengjør gryta 9 etter hver bruk:
1. Vask gryta for hånd med varmt vann og
et mildt rengjøringsmiddel.
2. Skyll med rent vann.
3. Tørk gryta med et kjøkkenhåndkle for å
unngå vannekker.
Slik rengjør du trykkregulatoren (3)
1. Løsne trykkregulatorens festebolt 3 ved
å skru den mot klokka. Bruk spesialnøkkelen 10 for å gjøre dette.
Page 75

75
2. Løft trykkregulatoren 3 opp og ut.
3. Skyll trykkregulatoren med varmt vann.
Merk: Hvis nødvendig, kan du også
bruke litt mildt rengjøringsmiddel og en
veldig myk børste.
4. Rengjør lokket (se avsnittet under).
5. Sett trykkregulatoren på plass igjen.
6. Skru på plass trykkregulatorens 3 festebolt ved å skru den med klokka. Bruk
spesialnøkkelen 10 for å gjøre dette.
Merk: Dersom det kommer damp ut av sikkerhetsåpningen 2 etter at trykkregulatoren
3 er satt på plass igjen, sjekk følgende:
— Er trykkregulatorens 3 festebolt skrudd
godt nok fast? Festebolten skal skrus
godt fast ved hjelp av spesialnøkkelen
10.
— Er vernehettene i trykkregulatoren
defekte eller festet på feil måte? Skru
trykkregulatoren fra hverandre og sjekk
om vernehettene sitter og er som de
skal.
— Hvis ingen av ovennevnte løsninger
hjelper, ta kontakt med ditt lokale IKEAvarehus, ring kundeservice eller gå på
IKEA.no
Slik rengjør du sikkerhetsventilen (5)
1. Løsne sikkerhetsventilens 5 festebolt
ved å skru den mot klokka. Bruk spesialnøkkelen 10 for å gjøre dette.
2. Løft sikkerhetsventilen 5 opp og ut.
3. Skyll sikkerhetsventilen under varmt
vann. Merk: Hvis nødvendig, kan du
også bruke litt mildt rengjøringsmiddel
og en veldig myk børste.
4. Rengjør lokket (se avsnittet under).
5. Sett sikkerhetsventilen på plass igjen.
6. Skru på plass sikkerhetsventilens 5 festebolt ved å skru den med klokka. Bruk
spesialnøkkelen 10 for å gjøre dette.
Page 76

76
Slik rengjør du lokket (4)
Advarsel! Lokket må ikke vaskes i opp-
vaskmaskin.
1. Vask lokket for hånd med varmt vann
og et mildt rengjøringsmiddel. Er lokket
veldig møkkete, kan du legge det litt i
bløt i varmt såpevann.
2. Skyll lokket under varmt vann.
3. Tørk lokket med et kjøkkenhåndkle for å
unngå vannekker.
Slik rengjør du pakningen (8)
Merk: Pakningen må skiftes ut årlig dersom
du bruker trykkokeren regelmessig. Ta
kontakt med ditt lokale IKEA-varehus, ring
kundeservice eller gå på IKEA.no hvis du
lurer på noe.
1. Fjern pakningen fra lokket.
2. Skyll pakningen under rent, varmt vann.
3. Tørk pakningen med et kjøkkenhåndkle.
Merk: Pakningen må ikke ligge i klem ved
oppbevaring. Derfor anbefaler vi å sette
pakningen tilbake på lokket ved oppbevaring.
Slik oppbevarer du trykkokeren
Advarsel! Trykkokeren skal ikke oppbe-
vares med lokket på. Er det ikke god nok
ventilasjon, kan det utvikles kondens. Dette
kan i sin tur føre til vond lukt, men også
skader på trykkokeren.
1. Oppbevar pakningen festet til lokket.
2. Oppbevar gryta og lokket separat.
7. Om trykkokeren ikke fungerer
Advarsel! Dersom ukontrollerbar damp
kommer ut fra trykkokeren, ta den bort fra
plata. Trykkokeren skal ikke brukes før feilen er rettet opp. Det er bare normalt at litt
damp lekker ut fra trykkregulatoren 3.
Page 77

Hva gjør jeg dersom:
Problem Mulig årsak Løsning
Det kommer ut damp mellom
lokket og gryta.
Det kommer ikke damp ut fra
trykkregulatoren.
Det kommer for mye damp ut
fra trykkregulatoren.
De lekker ut damp fra sidene
av trykkregulatoren.
Det lekker ut damp fra
sikkerhetsåpningen.
Lokket lar seg ikke åpne. Det er for mye trykk i
Det vises en rød ring under
de to hvite ringene på
trykkregulatoren.
1. Trykkokeren er ikke
lukket riktig.
2. Pakningen er møkkete.
3. Pakningen er ødelagt/
slitt.
1. Det lekker ut damp mellom lokket og gryta.
2. Trykkregulatoren er møkkete.
3. Ikke nok væske i trykkokeren.
4. Plata er stilt på for lav
varme.
1. Plata er stilt på for høy
varme.
2. Trykkregulatoren er
møkkete.
Trykkregulatoren er ikke
skrudd fast riktig.
1. Vernehettene i trykkregulatoren er defekte eller
festet på feil måte.
2. Trykkregulatoren er møkkete.
3. Trykkregulatoren er defekt.
trykkokeren.
1. Trykket i trykkokeren er
for høyt fordi plata er
stilt på for høy varme.
2. Trykkregulatoren er møkkete, defekt eller ikke
festet riktig.
1. Lukk trykkokeren igjen, på
riktig måte.
2. Rengjør pakningen.
3. Skift pakningen (1 gang
per år)
1. Skift pakningen (1 gang
per år).
2. Rengjør trykkregulatoren
(se avsnittet “Rengjøring og
oppbevaring”).
3. La trykkokeren avkjøle seg
sakte og fyll den med minst
0,25 l væske.
4. Øk varmetilførselen (skru
opp varmen på plata).
1. Reduser varmetilførselen
(skru ned varmen på plata).
2. Rengjør trykkregulatoren
(se avsnittet “Rengjøring og
oppbevaring”).
Fest trykkregulatoren på riktig
måte og stram mutteren på innsiden av lokket med spesialnøkkelen 10.
1. Sjekk vernehettene (se avsnittet “Rengjøring og oppbevaring”).
2. Rengjør trykkregulatoren
(se avsnittet “Rengjøring og
oppbevaring”).
3. Kontakt ditt nærmeste
IKEA-varehus, ring kundeservice eller besøk IKEA.no
hvis du lurer på noe.
Følg instruksjonene i avsnittet
“Slik åpner du trykkokeren“.
1. Reduser varmetilførselen
(skru ned varmen på plata).
2. Rengjør trykkregulatoren,
sjekk om den er festet
riktig.
77
Page 78

8. Tabell over koketid
Mat Koketid Innstilling
Fisk og sjømat
Fiskesuppe
Muslinger
Tunsk
Blekksprut
Ål
Hummer
Reker
Sjøtunge
Torsk
Blåskjell
Lysing (frossen)
Lysing (fersk)
Breiabb
Ørret
Laks
16 min
2–4 min
4–5 min
6–10 min
8 min
5–10 min
4–6 min
3–7 min
4–8 min
2–3 min
3–6 min
3–4 min
5–8 min
4–7 min
5–8 min
2
2
2
2
2
2
2
2
2
2
2
2
2
2
2
Mat Koketid Innstilling
Frukt
Aprikoser
Kirsebær
Svisker
Epler
Fersken
Appelsiner
Pærer
1–4 min
1–2 min
1–3 min
2–5 min
2–5 min
4–7 min
4–6 min
1
1
1
1
1
1
1
78
Mat Koketid Innstilling
Kjøtt
Svineknoke
Fårekjøtt
Kalv, snitsel
Kanin
Roast beef
Stekt esk
Kokt skinke
Svinesteik
Oksetunge, fersk eller røkt
Svinekoteletter
Syltelabb
Svinekam
Lammegryte
Lammesteik
Kalvsteik
Kalvegryte
Kalvelever
Kalvetunge
30–40 min
15 min
6 min
15–20 min
20–25 min
20–25 min
30–35 min
25–30 min
50–60 min
10–12 min
25–30 min
12–16 min
10–14 min
15–20 min
15–20 min
15–20 min
6–10 min
20–25 min
2
2
2
2
2
2
2
2
2
2
2
2
2
2
2
2
2
2
Page 79

Mat Koketid Innstilling
Fugl og vilt
Vaktel
Kanin
Fasan
Hare
And
Kalkun
Rapphøne
Due
Kylling (avhengig av størrelse
og vekt)
10–15 min
20–25 min
10–15 min
25–28 min
20–25 min
20–25 min
14–18 min
12–15 min
20–25 min
2
2
2
2
2
2
2
2
2
Mat Koketid Innstilling
Belgfrukter
Bønner (bløtlagte)
Bønner (ikke bløtlagte)
Erter (bløtlagte)
Erter, grønne (bløtlagte)
Linser (ikke bløtlagte)
Linser (bløtlagte)
Bondebønner
Kikerter
15–20 min
20–25 min
10–15 min
20–25 min
15–20 min
8–10 min
5–8 min
20–27 min
1
1
1
1
1
1
1
1
79
Mat Koketid Innstilling
Suppe
Bønnesuppe (bløtlagt)
Ertesuppe (ikke bløtlagt)
Ertesuppe (bløtlagt)
Grønnsakssuppe
Perlegryn
Semule
Goulash
Risgrøt
Potetsuppe
Buljong
Linsesuppe (ikke bløtlagt)
Linsesuppe (bløtlagt)
Minestronesuppe
Pot-au-Feu
Kjøttsuppe
Hønsesuppe
Suppe med pasta
Tomatsuppe
Løksuppe
Fiskesuppe
15–20 min
20–25 min
10–15 min
4–8 min
18–20 min
3–5 min
15–20 min
3–4 min
5–6 min
20–25 min
15–20 min
8–10 min
6–8 min
20–25 min
35–40 min (avhengig av kjøttmengde)
25–30 min (avhengig av størrelse og alder)
3–5 min
8–10 min
2–3 min
8–10 min
1
1
1
1
1
1
1
1
1
1
1
1
1
1
1
1
1
1
1
1
Page 80

Mat Koketid Innstilling
Grønnsaker
Blomkål
Blomkål, hel
Endivie
Gulrøtter
Poteter, med skall
Poteter, skrelte
Nepe
Gulrøtter, delte
Paprika
Sopp
Rosenkål
Rødbeter
Rødkål, hvitkål, savoykål
Skorsonerrot (svartrot)
Selleri
Asparges
Tomat
Artisjokk
Gresskar
Løk
Spinat
Purre
4–6 min
6–8 min
6–8 min
5–7 min
10–15 min
6–8 min
4–6 min
6 min
6–8 min
6–8 min
4–6 min
15–25 min
8–10 min
5–6 min
15–25 min
7–8 min
2–3 min
5–8 min
7–9 min
5–7 min
3–5 min
3–5 min
1
1
1
1
1
1
1
1
1
1
1
1
1
1
1
1
1
1
1
1
1
1
80
Mat Koketid Innstilling
Annen mat
Ris
Pasta
© Inter IKEA Systems B.V. 2014
15–20 min
4–6 min
1
1
AA-1212564-1
 Loading...