

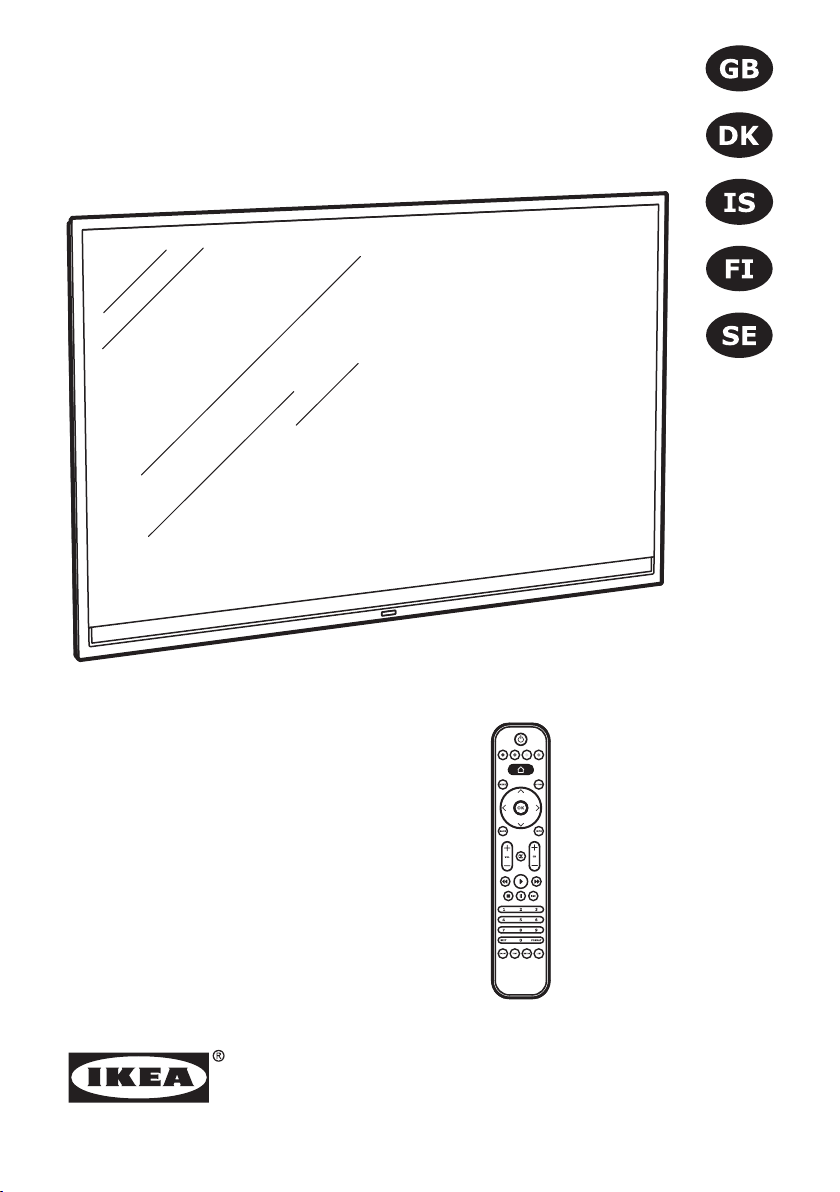
UPPLEVA
Design and Quality
IKEA of Sweden


Initial setup Language
Please select your language:
English
Hrvatski
Dansk
Automatic search
Automatic update
Analogue manual scan
Antenna manual installation
Clean channel list
...
...
...
...
...
Figure 1
Picture Options SetupSound
Picture preset
Brightness
Contrast
Saturation
Sharpness
Back light
Subtitle
Digital subtitle language
Digital subtitle language 2nd
Subtitle type
Select
Personal
On
English
English
Normal
Next
100
100
Figure 2
3D mode
50
50
5
3D-to-2D
Depth of field
Protrude
Distance to TV
Image safety
2D-to-3D
Off
16
16
10
Middle
Figure 4Figure 3
Figure 5

ENGLISH 6
DANSK 47
ÍSLENSKA 88
SUOMI 129
SVENSKA 171

ENGLISH 6
Contents
1 Safety and important information ...................................................................... 8
Use .....................................................................................................................8
Power ..................................................................................................................8
Environment/Surroundings .....................................................................................8
Attaching/Placing the TV ........................................................................................9
Care ....................................................................................................................9
Multi product user manual ......................................................................................9
Disposal of your old product and batteries ..............................................................10
Copyright notice .................................................................................................. 11
Notice for Trademark ........................................................................................... 11
2 Product overview ............................................................................................. 12
a. Included in the box .......................................................................................... 12
b. TV sockets ...................................................................................................... 14
c. Remote control ................................................................................................ 16
3 Preparation ...................................................................................................... 18
a. Prepare the remote control ...............................................................................18
4 Connections ..................................................................................................... 19
a. Connecting antenna / satellite / set-top box / CI+/CAM-card ................................. 19
b. Connecting to a sound system ........................................................................... 23
I. UPPLEVA sound system .............................................................................23
II. Other sound system ................................................................................. 23
c. Connecting a gaming console or DVD player ........................................................ 23
d. Connecting a PC .............................................................................................. 24
e. Connecting a camera........................................................................................24
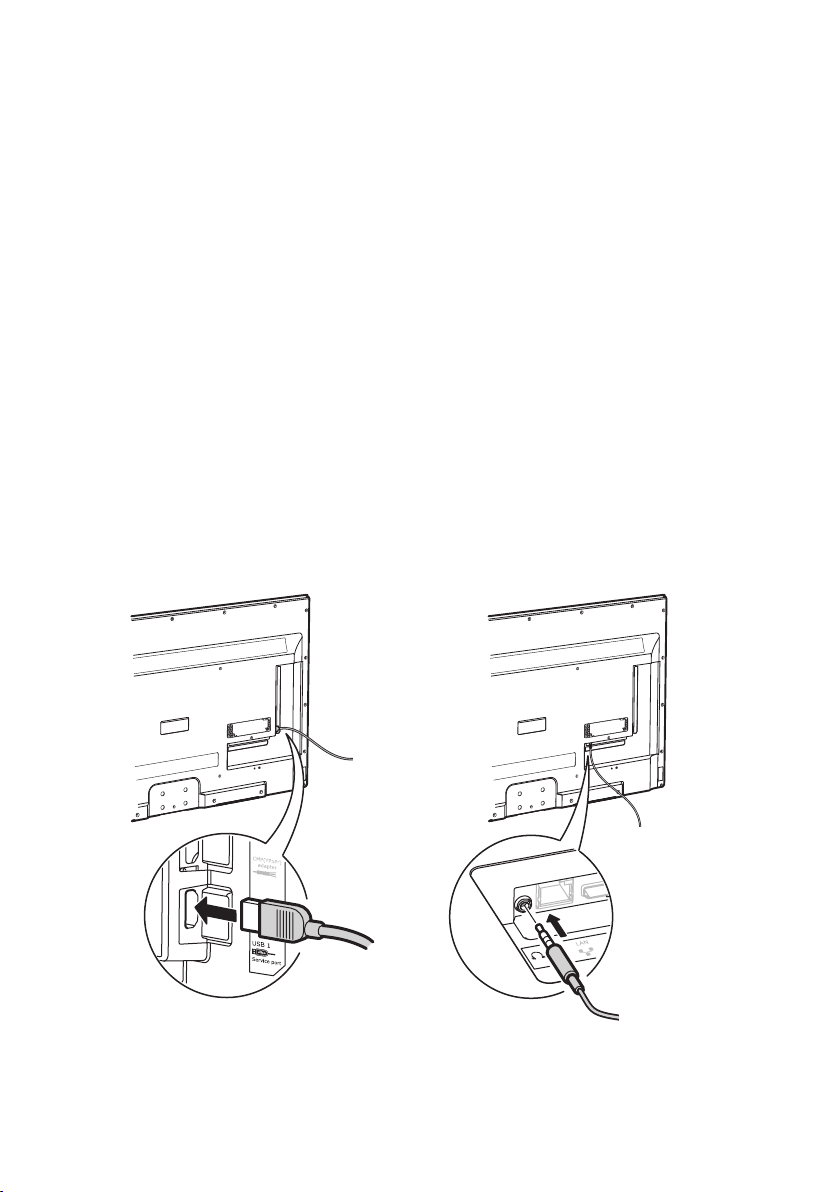
f. Connecting a USB device ................................................................................... 25
g. Connecting headphones ....................................................................................25
h. Connecting a network cable ..............................................................................26
5 Initial setup wizard .......................................................................................... 27
6 Using your TV ................................................................................................... 29
a. Switch the TV on and off ................................................................................... 29
b. TV menus ....................................................................................................... 29
c. The Home screen ............................................................................................. 29
I. Using Smart TV ........................................................................................29
II. Using Smart TV applications ...................................................................... 29
III. Watch and listen to your media ................................................................30
IV. Share&see .............................................................................................31
V. Select source ........................................................................................... 31
d. Application for your smartphone or tablet ...........................................................31
e. Time shift ....................................................................................................... 32
f. Personal video recorder (PVR) ............................................................................ 32
g. Schedule reminders and recordings .................................................................... 33
h. Manage scheduled programmes (EPG) ................................................................ 33
i. HbbTV .............................................................................................................34
j. Watching TV in 3D ............................................................................................ 34
k. Diagnostics on digital TV channels ......................................................................35

7
7 Options and settings ........................................................................................ 35
a. Search for TV channels .................................................................................... 35
b. Setting up your favourite channels .................................................................... 36
c. Connecting to your home network and the internet..............................................36
d. Rename your sources ...................................................................................... 38
e. Select country ................................................................................................ 38
f. Select menu language ...................................................................................... 38
g. Teletext language ........................................................................................... 38
h. Using subtitles ..............................................................................................38
i. Audio description ............................................................................................ 39
j. Set the time ...................................................................................................39
k. T-link ........................................................................................................... 39
l. Sound settings for SPDIF connected devices ......................................................... 40
m. DivX video .................................................................................................... 40
n. Energy saving ................................................................................................40
o. Update TV channels ........................................................................................40
p. Password ....................................................................................................... 40
q. Parental control .............................................................................................. 41
r. Change to store or home mode ......................................................................... 41
s. Software update .............................................................................................41
t. Common interface services ............................................................................... 41
u. Reset to default settings .................................................................................. 42
8 Specications ................................................................................................... 42
9 Troubleshooting ............................................................................................... 43
10 Contact IKEA .................................................................................................... 43
11 DECLARATION OF CONFORMITY ....................................................................... 44

8
1 Safety and important
information
WARNING!
This TV set must not be opened unless by a
qualied technician.
Use
This TV is intended for domestic household
use only and should not be used for any
other application, such as for non-domestic
use or in a commercial environment.
If the power cable of this product is
damaged, it shall be replaced by the
manufacturer or the manufacturer’s service
agent or a similar qualied person in order
to avoid a hazard.
Connect headphones with the volume at
a low level and increase it if required.
Prolonged listening with headphones at high
volume can result in hearing damage.
The TV screen is made of glass. Therefore,
it can break if the TV is dropped or hit by
another object.
The TV screen is a high technology
product, giving you nely detailed pictures.
Occasionally, a few nonactive pixels may
appear on the screen as a xed point of
blue, green or red. This does not affect the
performance of your product.
Power
Ensure that your domestic mains supply
voltage matches the voltage indicated on
the identication sticker located at the back
of your TV. Where the mains plug or an
appliance coupler is used to disconnect the
TV from the mains, it must be easy to get at.
To disconnect the TV completely, the mains
plug must be pulled out.
If you are not going to watch the TV for a
long time, switch it off completely by pulling
out the plug from the mains.
Disconnect the mains plug and the antenna
during thunderstorms.
Unplug the TV immediately if you notice it
giving off a smell of burning or smoke. You
must never, under any circumstances, open
the TV set yourself, as you run the risk of an
electric shock in doing so.
Environment/Surroundings
The TV’s components are sensitive to heat.
The maximum ambient temperature should
not exceed 35º Celsius. Do not cover
the vents at the back or sides of the TV.
Leave sufcient space around it to allow
adequate ventilation. Place the TV away
from any source of heat (naked ames,
replace, direct sunlight etc.) or appliances
creating strong magnetic or electric elds.
Never place the remote control or batteries
near naked ames or other heat sources,
including direct sunlight. Only use the TV
indoors.
To prevent the spread of re, keep candles
or other open ames away from this product
at all times.
Moisture in rooms where the TV is installed
should not exceed 80% humidity. Moving
it from a cold place to a warm one can
cause condensation on the screen (and on
some components inside the TV). Let the
condensation evaporate before switching the
TV on again.
Leave more than 10cm clearance around
the television to allow adequate ventilation.
The ventilation should not be impeded
by covering the ventilation openings with
items, such as newspapers, table-cloths,
curtains, etc.
The TV shall not be exposed to dripping
or splashing liquids. No objects lled with
liquids, such as vases, shall be placed near
the TV.
If an object or liquid gets into the TV,
unplug it immediately and have it checked
by an authorized engineer. Never open the
TV yourself since this may put you at risk or
damage the TV.

9
Attaching/placing the TV
To prevent injury, the TV must be securely
attached to the stand/furniture/wall in
accordance with the installation instructions.
Hanging the TV set on the wall
Warning: This requires two people.
To ensure a safe installation, observe the
following safety notes.
─ Check that the wall can support the
weight of the TV and wall bracket.
─ Follow the mounting instructions
provided with the wall bracket.
─ Make sure to use only screws suitable
for the material of the wall.
─ Make sure that the TV cables are placed
so that there is no danger of tripping
over them.
Placing the TV on a table and other
surfaces
Before setting up your TV, make sure
that the surface you want to put it on can
support its weight.
Do not place it on an unstable surface or
near the edge of a piece of furniture and
make sure that the front of the TV does not
overhang the surface it is standing on.
Place the TV near a wall so it cannot fall
backwards.
Multi product user manual
The features described in this manual are
common to most models. Some features
may not be available on your TV and/
or your TV may include features that are
not described in this user manual. The
illustrations in this manual may differ from
the actual product. Please refer to the actual
product. Product design and specications
may be changed without notice.
Care
Use a slightly damp cloth to clean the
screen and a soft cloth and mild detergent
to clean the rest of the set.
Using strong detergents, alcohol-based or
abrasive products may damage the screen.
Dust the vents at the back and sides
regularly. Using solvents, abrasive or
alcohol-based products could damage the
TV set.
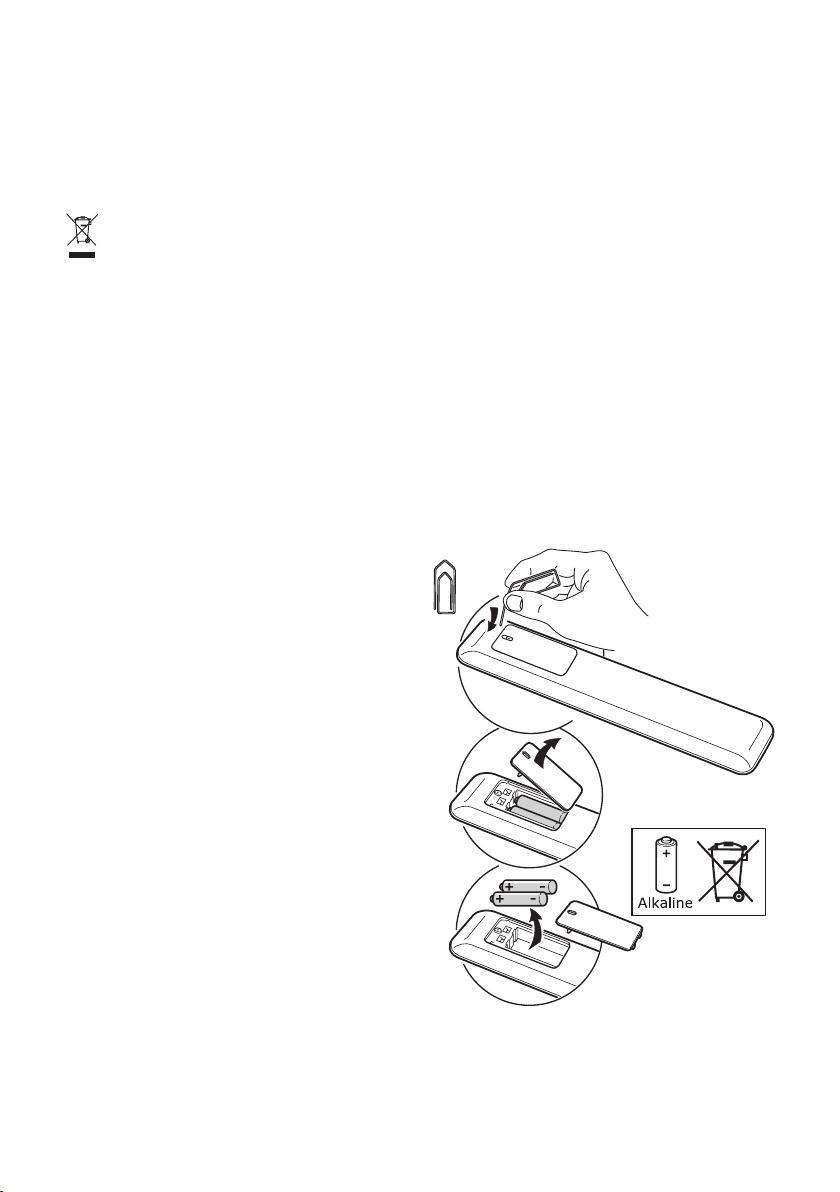
Disposal of your old product and
batteries
The crossed-out wheeled bin symbol
indicates that the item should be disposed
of separately from household waste. The
item should be handed in for recycling
in accordance with local environmental
regulations for waste disposal.
By separating a marked item from household
waste, you will help reduce the volume of
waste sent to incinerators or land-ll and
minimize any potential negative impact on
human health and the environment. For
more information, please contact your IKEA
store.
10

Copyright notice
This item incorporates copy protection
technology that is protected by U.S. patents
and other intellectual property rights of
Rovi Corporation. Reverse engineering and
disassembly are prohibited.
Notice for Trademark
11
The terms HDMI and HDMI High-Denition
Multimedia Interface, and the HDMI logo
are trademarks or registered trademarks of
HDMI Licensing LLC in the United States and
other countries.
Manufactured under license from Dolby
Laboratories. Dolby and the double-D
symbol are trademarks of Dolby
Laboratories.
The Bluetooth word mark and logos are
registered trademarks owned by Bluetooth
SIG, Inc. and any use of such marks by
IKEA is under license. Other trademarks and
trade names are those of their respective
owners.
DivX®, DivX Certied®, DivX Plus® HD
and associated logos are trademarks of Rovi
Corporation or its subsidiaries and are used
under license.
is a trademark of SRS Labs, Inc.
TruSurround HD technology is incorporated
under license from SRS Labs, Inc.
SRS TruSurround HD™ creates an
immersive, feature-rich surround sound
experience from two speakers, complete
with rich bass, high frequency detail and
clear dialog.
2 Product overview
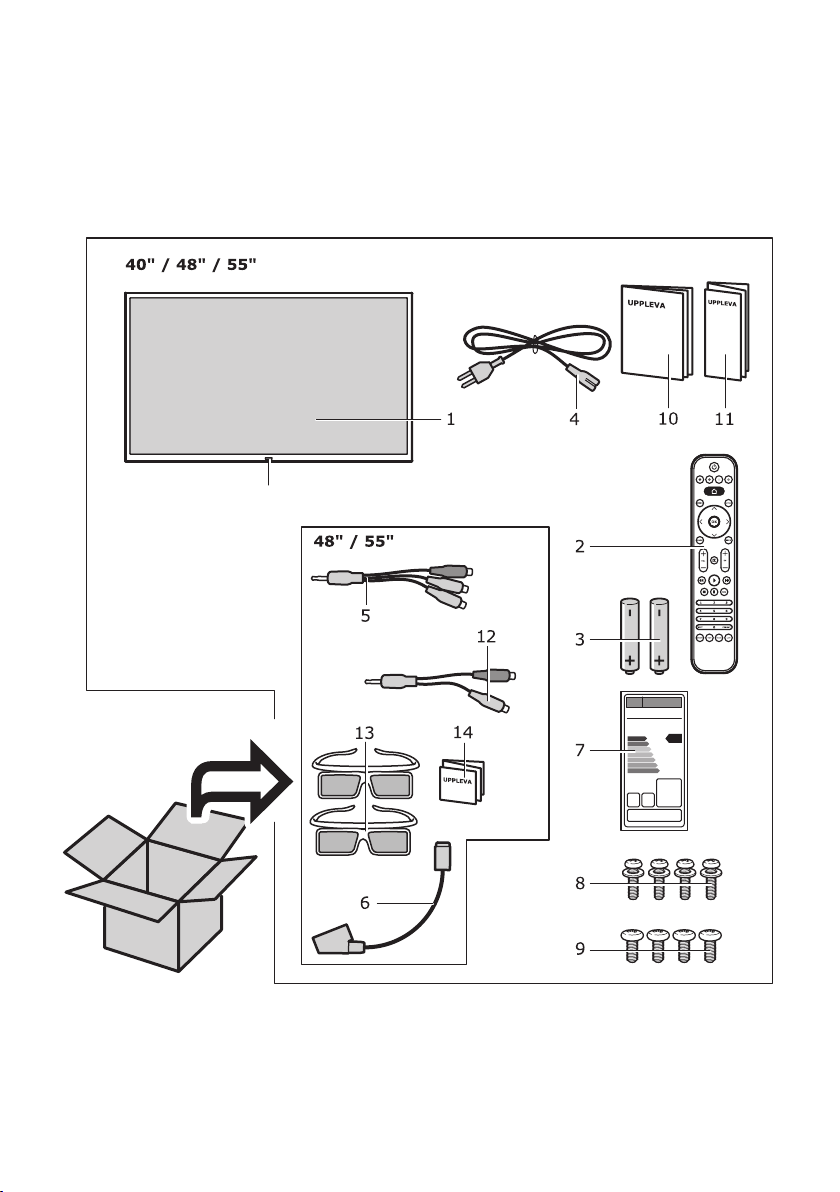
Included in the box
12
No. Item Quantity
1 TV 1x
2 Remote control 1x
3 AAA batteries 2x
4 Power cable, 1.8m 1x
5 Component
video adapter,
CMP(YPbPr)
6 SCART adapter 1x
7 Energy label 1x
1x
No. Item Quantity
8 M5x15 screws with
washers
9 M6x20 screws 4x
10 TV manual 1x
11 TV quick guide 1x
12 Audio adapter 1x
13 3D glasses 2x
14 3D glasses manual 1x
4x
Red indicator lamp
13
144583
144414
144582
144584 (48" & 55")
144411
144657 (40")
TV
sockets
14
40" TV
1
5
16
4
6
3
7
6
8
9
11
48" / 55" TV
6
6
12
13
7
3
13
15
10
10 11
14
6
5
4
2 9 8

15
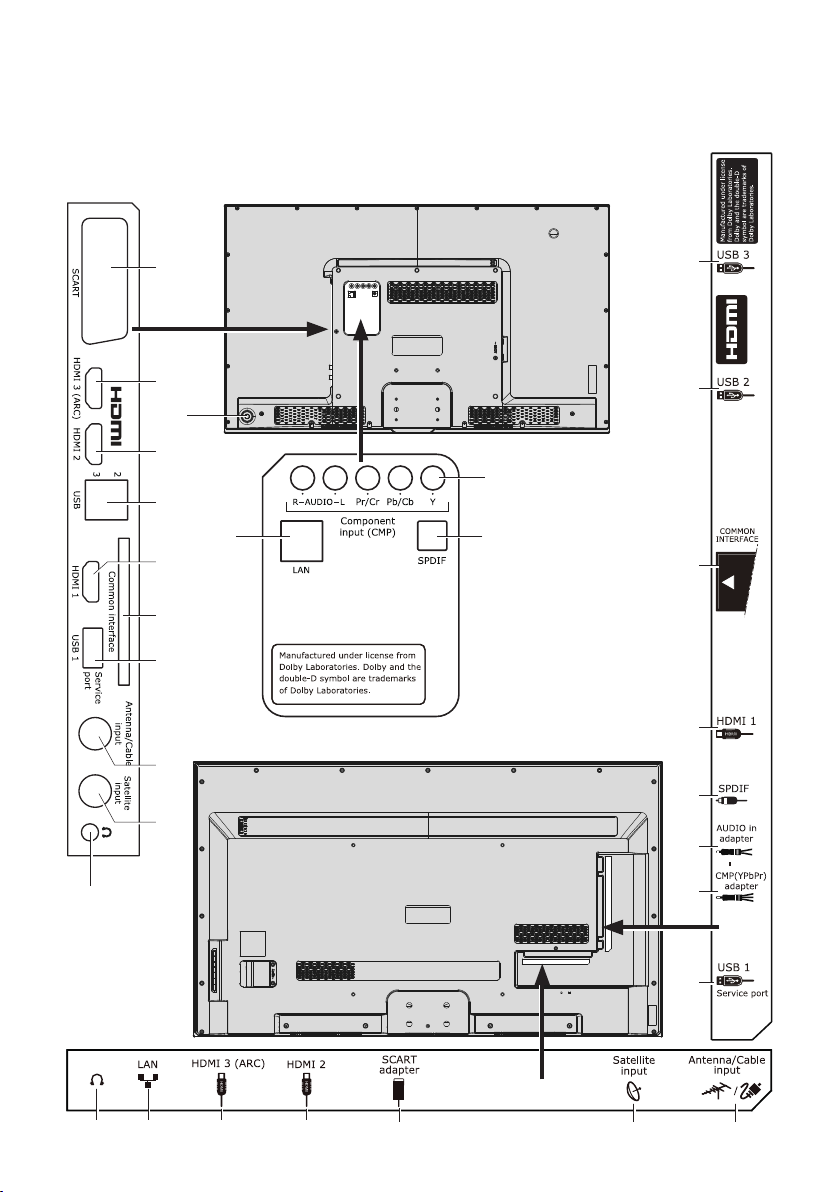
No. Control Function
1 SCART To connect a
device with SCART
connection.
2 SCART adapter To connect a
device with
SCART connection
using the SCART
adapter.
3 HDMI 1 To connect
your most used
HDMI device, for
example your
set-top box if you
have one.
4 HDMI 2 To connect your
game console,
digital camera or
other HDMI device.
HDMI 3 (ARC) To connect an
5
HDMI device.
We recommend
you connect your
UPPLEVA or other
sound system here.
6 USB 1, 2 & 3 To connect a
USB device. For
example mouse or
keyboard for Smart
TV browsing, or
USB memory.
7 Common
interface
To insert your CI+/
CAM module.
No. Control Function
8 Antenna/Cable
input
To connect your
cable TV or antenna
cable.
9 Satellite input To connect your
satellite cable*.
10 To connect your
headphones.
11 LAN To connect your
network (ethernet)
cable.
12 Component
input (CMP)
To connect a
device with these
connections.
13 SPDIF out To connect your
home theater
system or sound
system.
14 CMP(YPbPr)
adapter
To connect a
device using the
Component video
adapter.
15 AUDIO in
adapter
To connect a
device using the
audio adapter.
16 TV control
Turn TV on and off.
buttons
*Satellite input is only available for some
models.
16
144411
Remote control functions
Most of your TV’s functions are available via the menus that appear on the screen. The remote
control supplied with your TV can be used to navigate through the menus.

17
No. Control Function
1 To turn the TV on /
standby.
2
Colour buttons
To select tasks or
Teletext pages.
The red button can
also be used for
MHEG and HbbTV
function.
3 To display the
Home screen
MENU
4
To enter the main
menu and settings.
To return to the
previous menu.
OPTION To get quick access
5
OK
6
to the options
menu. To display
the Teletext page in
different modes.
To conrm an
entry or selection.
7
/
To navigate
through the menus.
To set functions
and change values.
To switch to the
next photo, song
or video in USB
function.
8
/
To navigate
through the menus.
To select menu
options.
BACK
9
To return to the
previous menu.
10 INFO To display
programme
information, if
available.
+ VOL -
11
To turn the volume
up and down.
No. Control Function
13 To mute or unmute
the TV.
14 To fast reverse.
15 To fast forward.
16 To play.
REC
17
To record
programme.
18 To pause.
19 To stop.
20 0-9 To enter channel
numbers or digits.
21 EXIT To exit Smart TV.
22 FORMAT To select the
picture format.
Note: We
recommend you
use the full screen
mode. Do not
use the display
mode with black
bars on both sides
of the picture
(such as 4:3)
for a prolonged
period of time as
this may result in
permanent damage
to the TV screen.
23 SMART To display the smart
TV homepage.
24 LIST To display the
channel list.
25 TEXT To switch Teletext
on or off.
26 GUIDE To switch the
Electronic
Programme Guide
on or off (only
available for digital
channels).
12
+ CH -
To change to the
next or previous
channel.
18
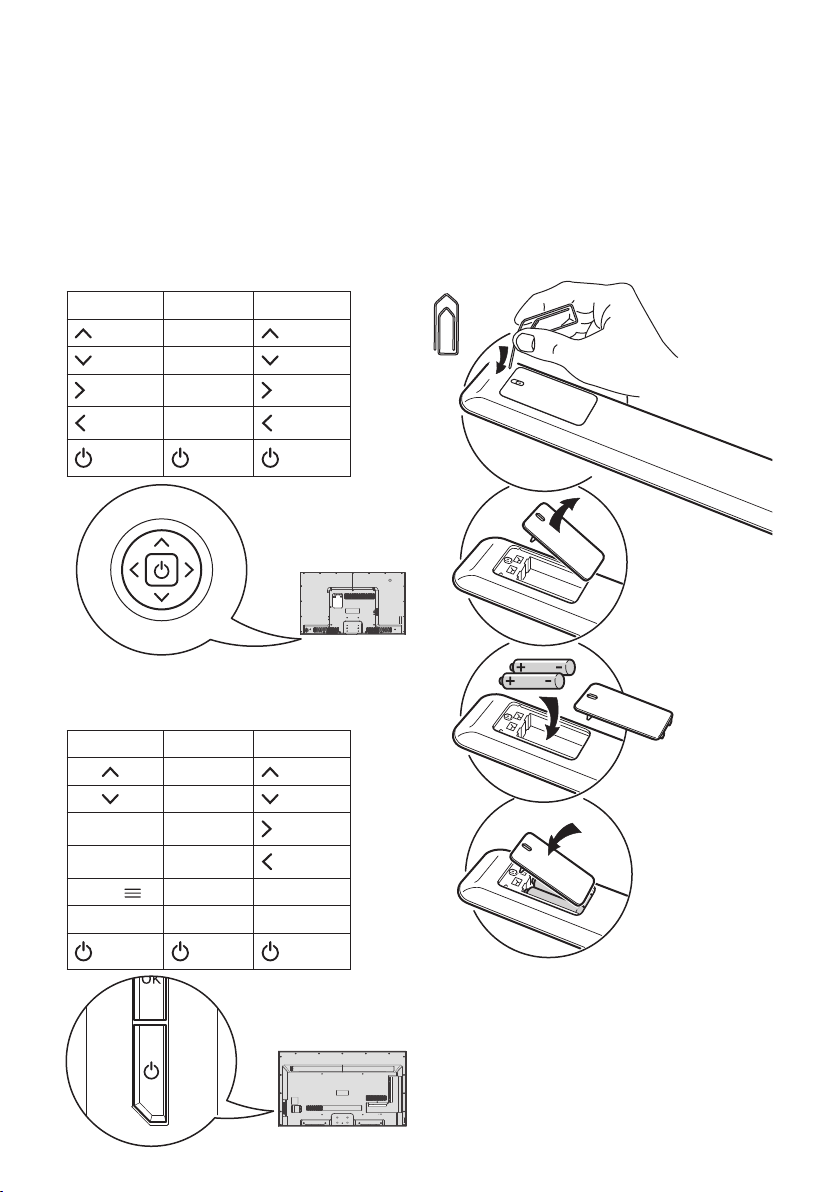
If the batteries in your remote control are
run down, you can use the buttons on the
back of your TV. They have the following
functions:
For 40" models:
TV mode In menus
CH+
CHVOL +
VOL -
For 48" and 55" models:
3 Preparation
Prepare the remote control
Insert two LR03 (AAA) batteries with correct
polarity (+/–) as indicated on the remote
control.
TV mode In menus
CH CH+
CH CHVOL + VOL +
VOL - VOL -
MENU MENU MENU
OK OK OK
Notes:
If you are not going to use the remote
control for a long time, remove the
batteries.
Do not combine old and new or different
types of batteries.
Keep batteries away from heat, sunshine
or re.
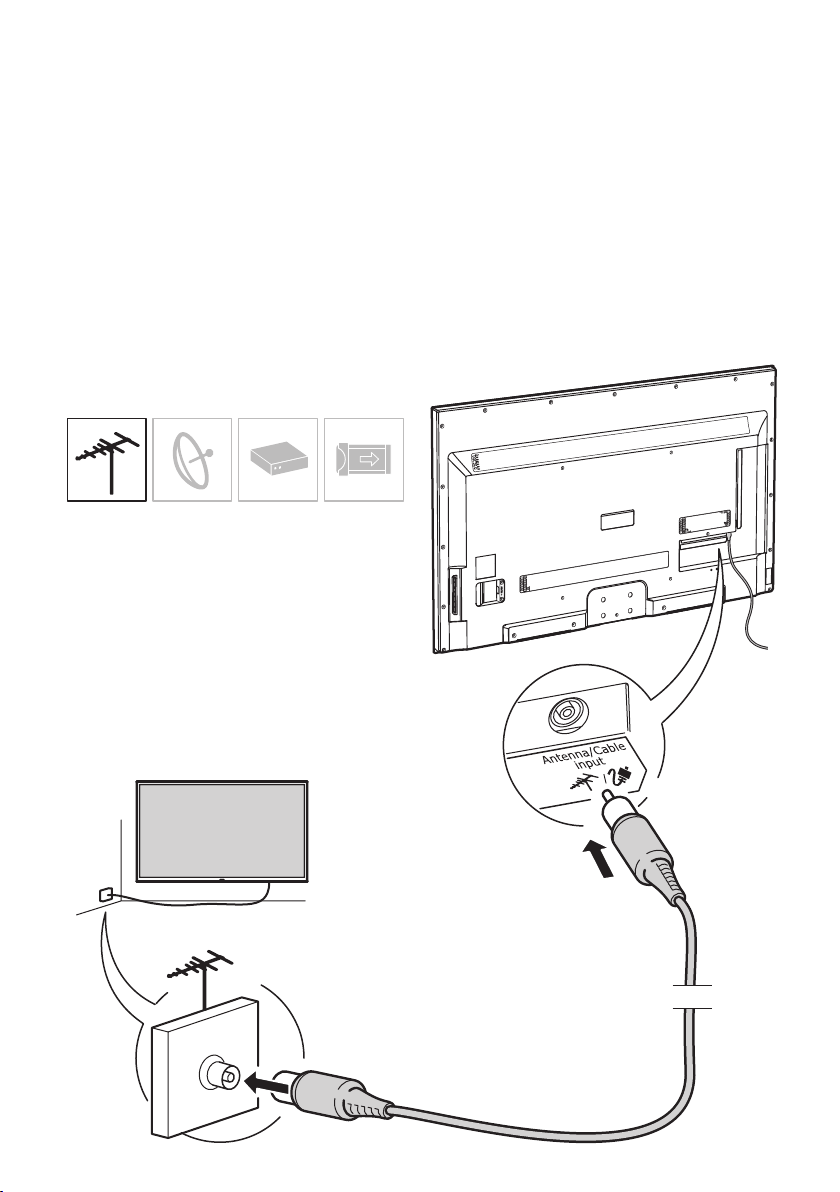
4 Connections
Connecting antenna / satellite /
set-top box / CI+/CAM card
Depending on how you get the TV signal
(antenna/satellite/set-top box/CI+/CAM
card), follow the relevant instructions below.
Note: The locations of the sockets on the TV
may vary depending on the model.
Antenna
19
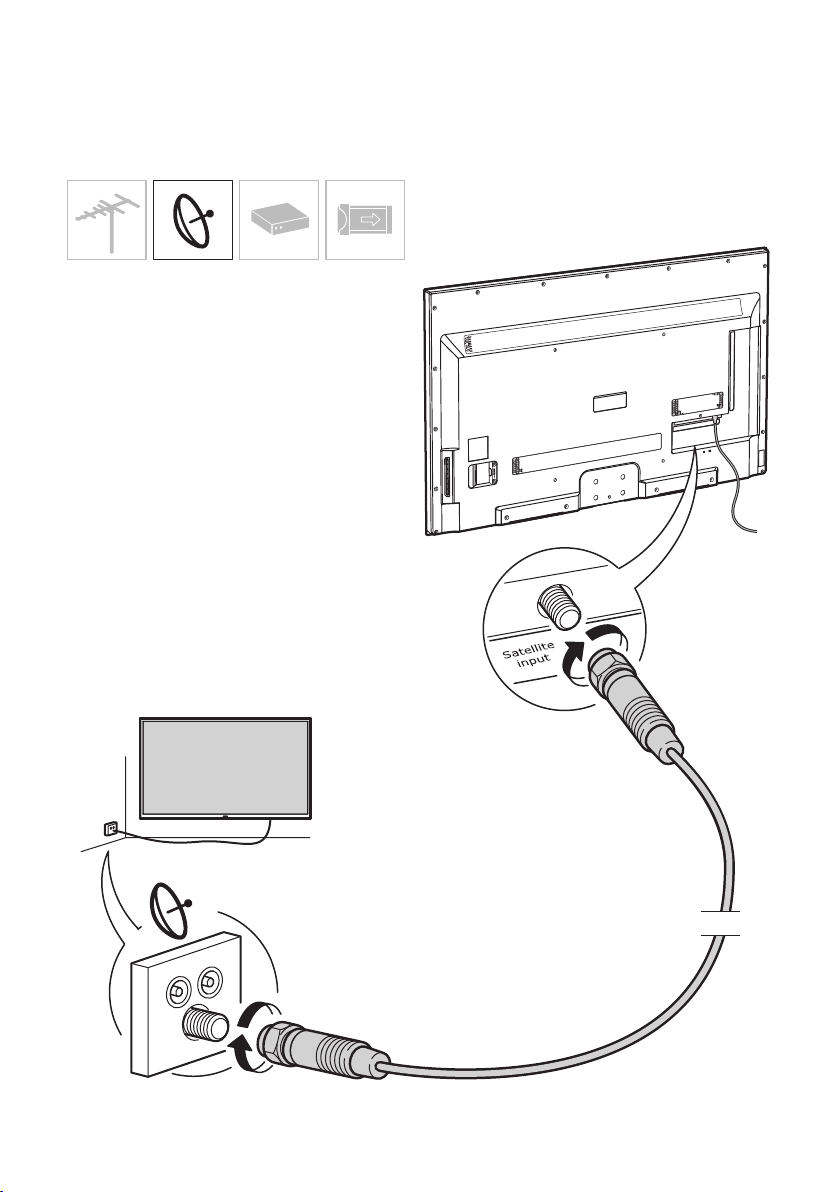
Satellite21Set-top box
20
22
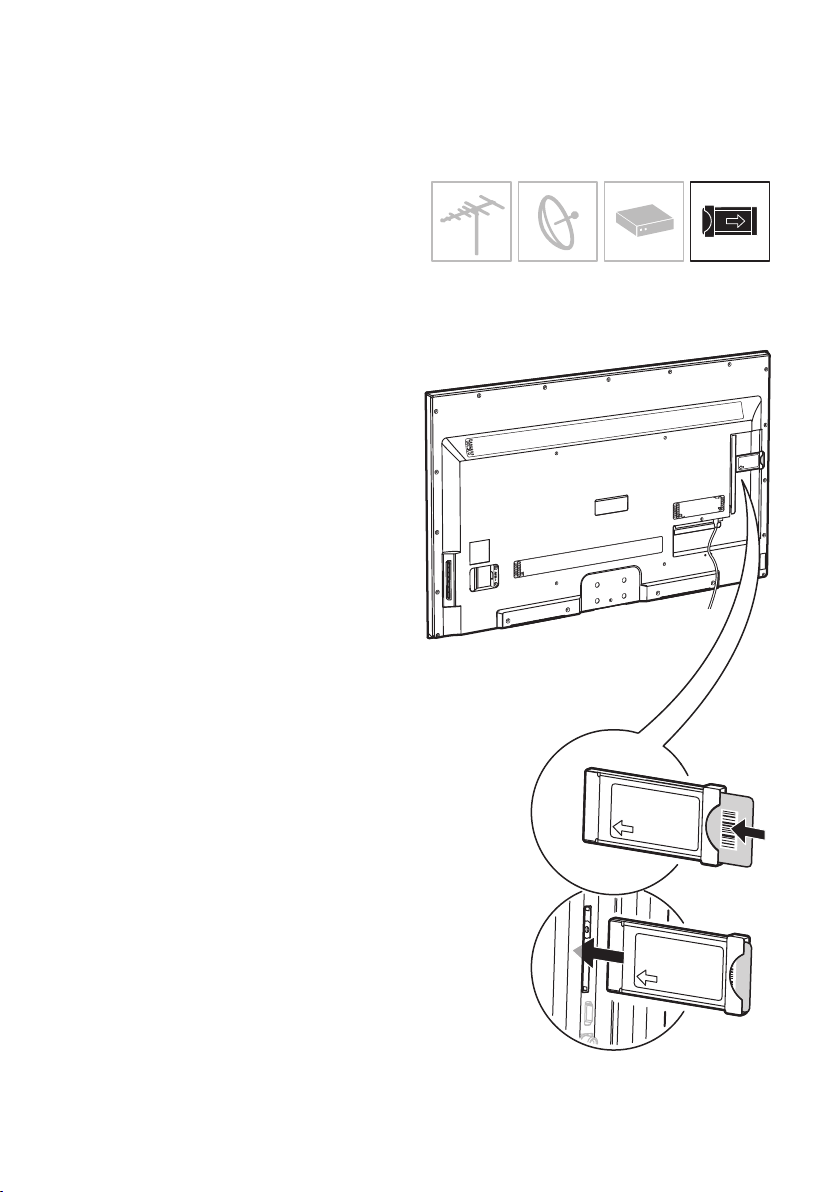
Common interface CI+/CAM card
Encrypted digital TV channels can be
decoded with a common interface module
and a card provided by a digital TV service
operator.
The common interface module may enable
several digital services, depending on the
operator and services you choose (for
example, pay TV). Contact your digital TV
service operator for more information about
services and terms.
Using the common interface module
WARNING: Switch off your TV before
inserting a common interface module.
Be sure to follow the instructions
described below. Wrong insertion of a
common interface module may damage
both the module and your TV.
1. Following the directions printed on the
common interface module, gently insert
the module into the common interface
slot on the TV.
2. Push it gently in as far as it will go.
3. When the TV is turned on, the common
interface will be activated. This may
take a few minutes.
Note: Do not remove the common interface
module from the slot. Removing the module
will deactivate the digital services.
CI+/CAM card
CI = Common Interface
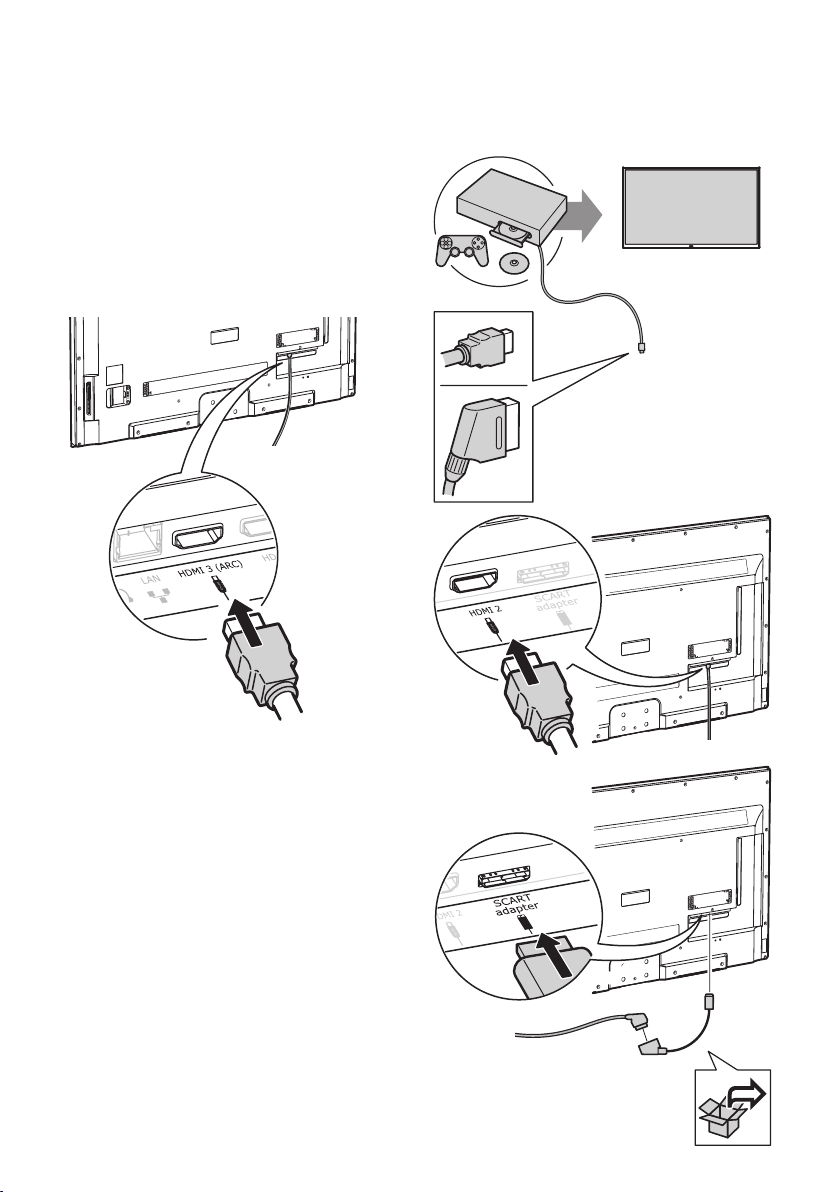
Connecting to a sound system
UPPLEVA sound system
Connect an UPPLEVA sound system to the
TV using an HDMI cable and the HDMI ARC
socket on the TV.
23
Other sound system
If you want to connect another sound
system to the TV, we recommend you use
HDMI or SPDIF sockets.
— ARC (Audio Return Channel) function
is only supported on HDMI 3 (ARC)
port. It is recommended to connect
your sound system to the HDMI ARC
connector to send sound from the TV to
the sound system via an HDMI cable.
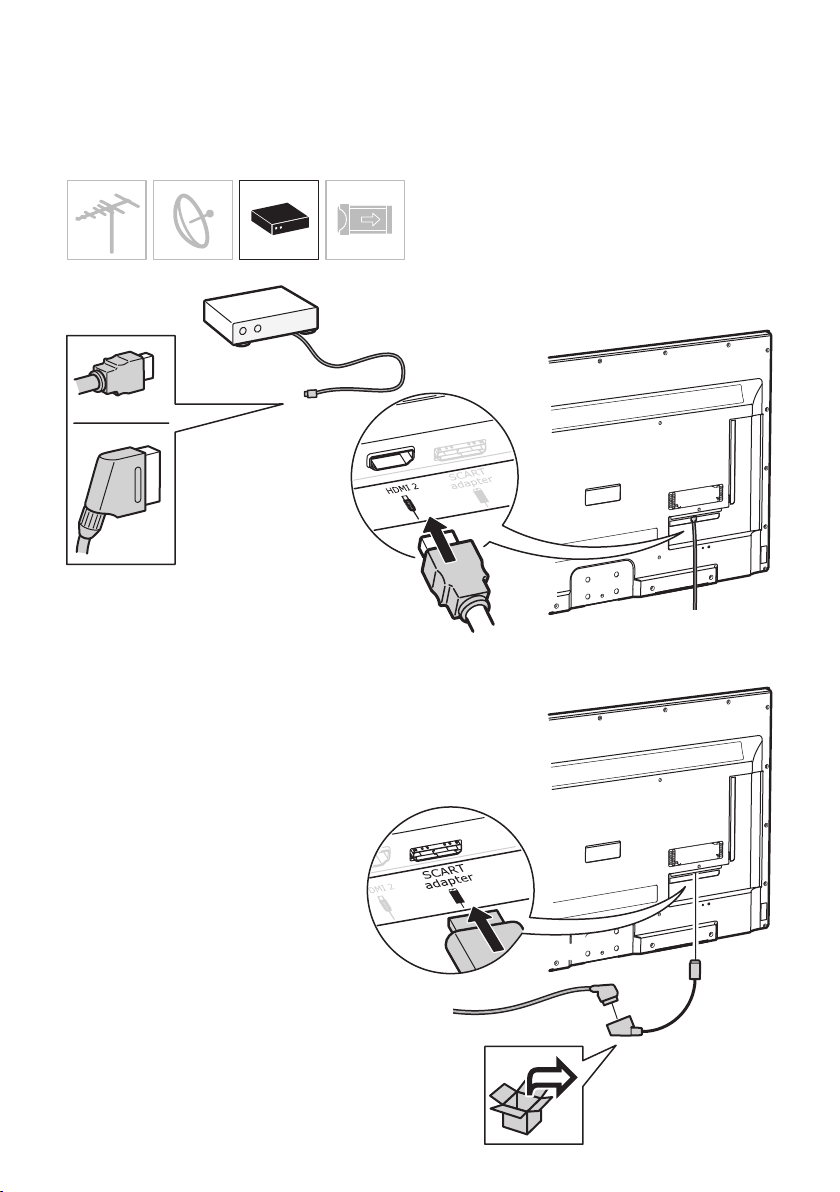
Connecting a gaming console or
DVD player
You can connect your gaming console or
DVD player using either a HDMI or a SCART
connection. For the 48/55" TV, use the
SCART adapter to connect with SCART.

24
Connecting a PC
If your PC has an HDMI port you can
connect the PC to the TV with an HDMI
cable and use your TV screen as an extra
screen for your PC.
Notes:
— Make sure you have the correct display
settings on your PC.
— To avoid possible interference, use high
quality HDMI cables that are as short as
possible.
Connecting a camera
You can connect your digital camera using
an HDMI or USB cable to see photos or
videos from your camera.
Notes:
— USB connectors are for data input from
USB storage devices. Only USB 2.0
devices are supported.
— We strongly recommend that all USB
devices are directly connected to the TV
without cable extenders. If an extender
is required, it has to be as short as
possible and equipped with ferrite
beads.
— To avoid possible interference, use high
quality HDMI cables that are as short as
possible.
25
Connecting a USB device
You can connect a USB to the TV to see
photos or videos or listen to music.
Notes:
— USB connectors are for data input from
USB storage devices. Only USB 2.0
devices are supported.
— We strongly recommend that all USB
devices are directly connected to the TV
without cable extenders. If an extender
is required, it has to be as short as
possible and equipped with ferrite
beads.
Connecting headphones
You can connect a pair of headphones to the
TV if you want to use them instead of the
TV or sound system speakers to listen to the
sound.
Note:
— Exposure to excessive sound levels from
earphones and headphones can result in
hearing loss.
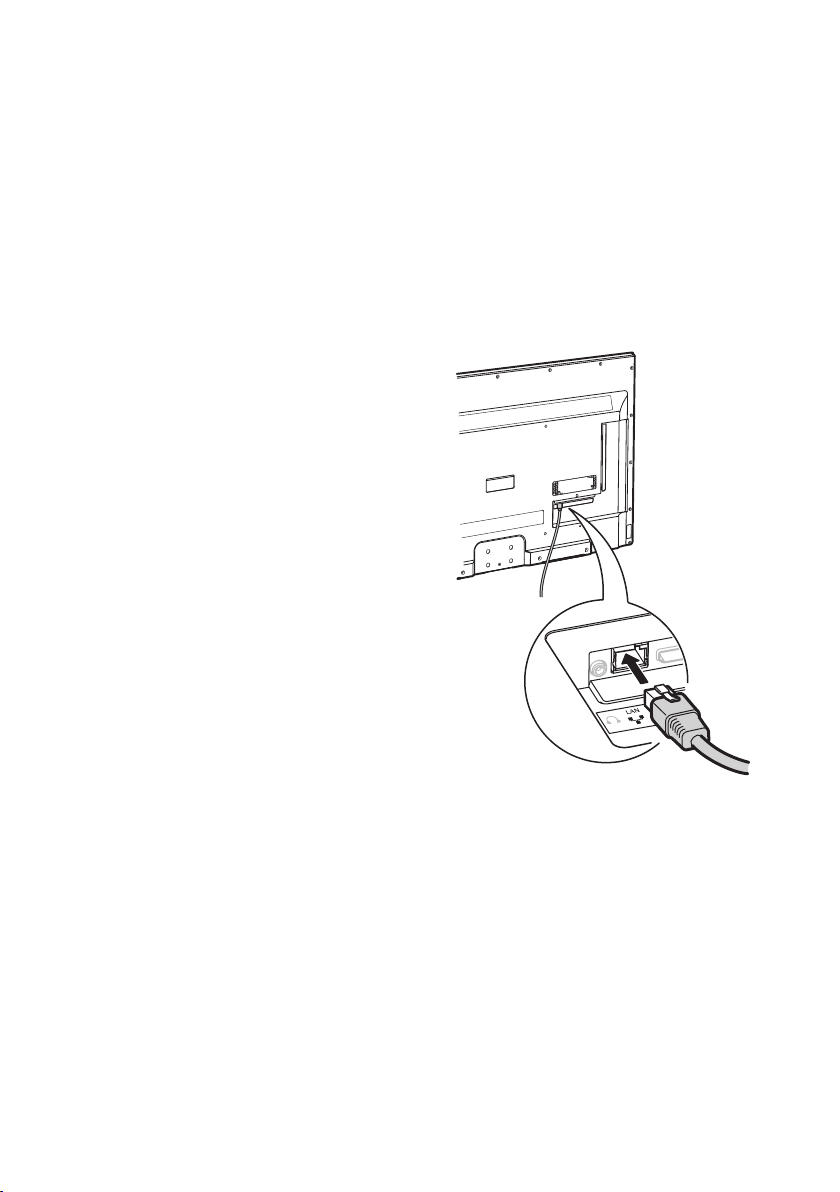
Connecting a network cable
There are two ways to connect your TV
to your home network and the internet –
wirelessly or with a network cable. If you
prefer to connect it with a network cable,
insert it in the socket as shown in the
illustration below. For more details about
both wireless and cable connections, see
Chapter 7 Options and settings – Connecting
to your home network and the internet.
26

27
5 Initial setup wizard
The initial setup wizard starts automatically
the rst time you switch on your TV (See
Figure 1). It will guide you through the
settings required for you to start using
your TV. If you want to change any of the
settings later you can easily do so in the
Options or Setup Menu. Use the / and
OK buttons to navigate and conrm your
settings. Follow the steps on the screen
with the help of the hints at the bottom of
the screen. You can always return to the
previous step by pressing . Press EXIT to
interrupt the initial setup wizard. Refer to
this manual if you need further explanation.
Note: If the channel search retrieved only
the analogue channels it could be caused
by poor broadcasting and therefore is
not covered by manufacturer warranty.
Manufacturers cannot be held responsible
for lack of or poor broadcasting in some
areas.
1. Select your language by using / .
Press OK to conrm and move on to the
next step.
2. Select your country by using / . Press
OK to conrm and move on to the next
step.
3. Select Home if you want to watch your
TV at home or select Store if the TV is
being installed in a store. Move on to the
next step.
4. Choose if you want to set up a network
connection or not by using / . Press
OK to conrm and move on to the next
step.
If you choose to set up a network
connection, follow steps 5-7. Otherwise skip
these steps and go to step 8.
Note: If you select France or Italy, you will
have to set a password for your network
connection. You will be automatically
forwarded to the Password setting menu.
Use the number buttons to enter a fourdigit number for your password. (0000 is
too simple to be set as your password.)
Re-enter it to conrm your password.
When nished, you will be automatically
transferred to the next step.
5. Use / to choose between connecting
wirelessly (step 6) or via a network
cable (step 7). Press OK to conrm and
move on to the next step.
6. To set up a wireless connection.
You can set up the wireless network
connection in 3 ways:
a) Scan. If you want to see and choose
from all the available networks within
range.
– Select Scan and press OK to start
scanning. The TV will search for and
display all the available networks.
– Navigate to the desired network and
press OK to connect the TV. If you
select a protected network, you will
have to enter the corresponding
password. Press OK on the remote
control to display the virtual keyboard
where you can enter the password.
Select OK to leave the virtual
keyboard and conrm the password
by pressing Next. If the connection
is successful, press Next again to
continue with the wizard. If it is not
successful, repeat this step.
Note:
– This TV can memorise the available
networks so it can connect to the network
even if it has been powered off.
b) Manual. If you want to search for a
specic network.
– Select Manual and press OK. You will
be asked to enter the correct name
(SSID) of the wireless router you
wish to connect to. If you select a
protected network you will have to
enter the corresponding password.
Press OK on the remote control to
display the virtual keyboard where
you can enter the password using
the / / / and OK. Select OK
to leave the virtual keyboard and
conrm the password by pressing
Next. If the connection is successful,
press Next again to continue with
the wizard. If it is not successful,
repeat this step.
c) Auto. If your network supports WPS
(Wi-Fi Protected Setup).
– You can connect to the network via
PBC (Push Button Conguration) if

28
your router has a PBC push button, or
PIN (Personal Identication Number).
The PIN should only be chosen if you
have a PIN on your router. WPS will
automatically congure the SSID and
WPA key in either mode.
- Select Auto and press OK.
- PBC: Select PBC and press OK to
enter. Press the PBC push button on
your router within 2 minutes. Press
OK on the remote control again.
Your TV will acquire all the network
setting values it needs and connect
automatically to your network.
- PIN: Select PIN and press OK to
enter. Enter the PIN code of your
router. Make sure this code is
installed on the network. (Refer to
your router manual.) Press OK on the
remote control again to set up the
connection.
7. To set up a network cable connection
(wired).
- You can set Address type to Auto if
you want the TV to acquire and enter
the needed IP address automatically,
or Manual if you want to enter your
IP address manually. Use / to
move from one entry eld to another
and enter the IP address, Subnet
mask, Default gateway, Primary
DNS and Secondary DNS. Use /
to move to each row so you can
enter the correct numbers. Press
OK to go back to the table and use
/ to choose another row. Enter
numbers using the number buttons.
Once everything is entered, press
OK to continue. If the connection
is successful, press >Next again to
continue with the wizard. If it is not
successful repeat this step.
Now it is time to install your TV
channels. If you want to do this later
you can choose Skip scan instead
of Scan. In this case you can install
your TV channels via the menu
later on (See Chapter 7 Options and
settings – Search for TV channels).
8. Press / to select the way you get
your signal (your Tuner mode)
Antenna or Cable or Satellite.
(Note: Satellite option may not be
available for certain models.)
Follow a), b) or c) below depending on
how you get your TV signal.
a) If you have selected Antenna.
Press OK to enter.
Press / to select Digital &
Analogue or Digital or Analogue,
then press OK.
Press / to select Scan, then press
OK to start the automatic search for
all digital (DVB-T) and/or analogue
channels.
b) If you have selected Cable.
Press OK to enter.
Press / to select Digital &
Analogue or Digital or Analogue.
If you select Digital & Analogue, press
OK to enter. Then:
Press / to select Scan, then press
OK.
Press / to select the scan mode if
available (Full or Advanced).
If you select Full, press OK to start
the automatic search for all digital
(DVB-C) and/or analogue channels.
If you select Advanced, use the
number buttons to adjust the values
for Frequency, Symbol rate and
Network ID, and use / to select
the Modulation mode; then press
OK to start the search for all digital
(DVB-C) and/or analogue channels.
If you select Digital, press OK to enter,
then follow the same steps as for
Digital & Analogue above, to search
for all digital (DVB-C) channels.
If you select Analogue, press OK to
enter, press / to select Scan,
then press OK to start the search for
all analogue channels.
c) If you have selected Satellite.
Press OK to enter.
Press / to select an operator and
press OK.
Press / to select a satellite, then
press OK to congure the information
related to this satellite. Press OK to
go back after nishing the settings.
Press to start scanning.
Note: To prevent the channel setup
process from being interrupted, wait for
29
the message indicating that the setup is
complete.
6 Using your TV
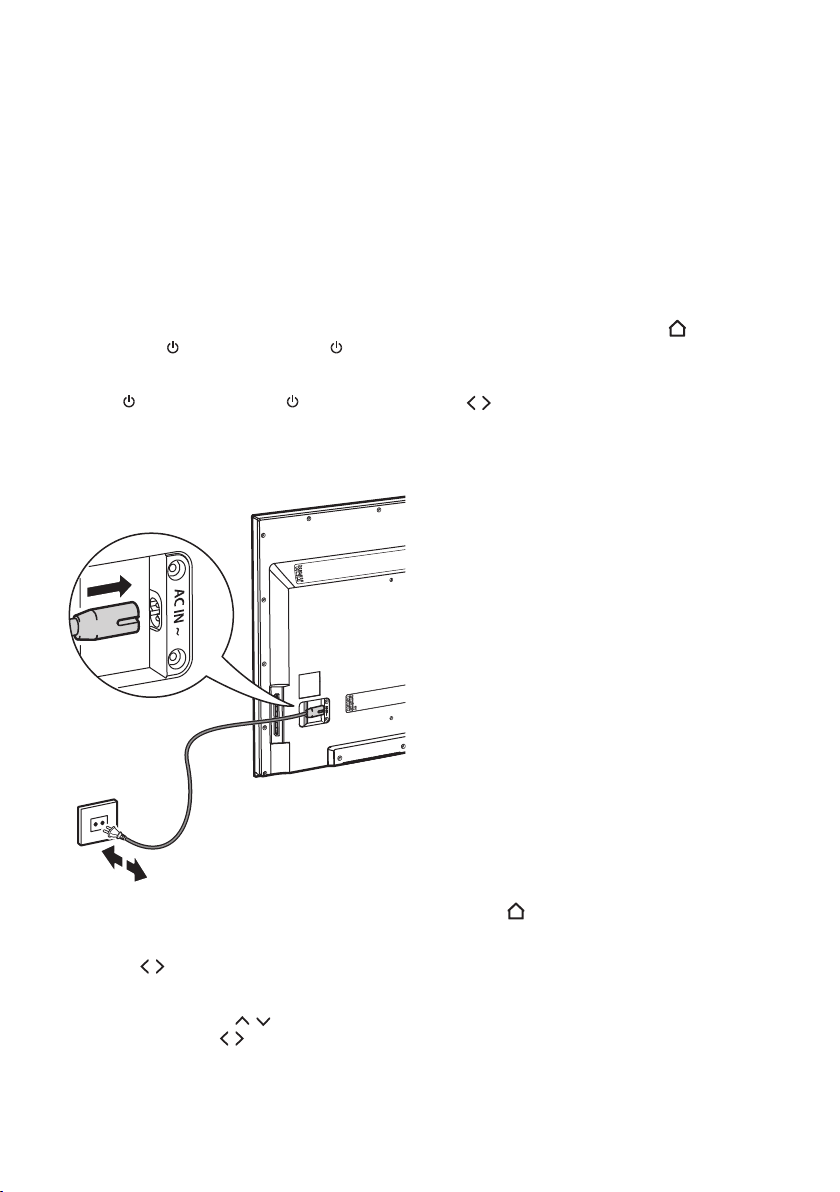
Switch the TV on and off
1. When the power cord is connected, the
TV will turn on directly or be in standby
mode. A red indicator light on the front
of the TV shines when the TV is in stanby
mode. If the TV is in standby mode,
press the button on the TV or on the
remote control to turn it on.
2. To put the TV into standby mode, press
the button on the TV or on the
remote control. The TV remains powered
up, but with low energy consumption.
3. To switch the TV off, unplug the mains
plug from the mains outlet.
5. Press MENU to close the menu.
Note: Some options may not be available
for certain signal sources.
The Home screen
The Home screen is the key to your TV.
Here you can choose between watching TV,
using Smart TV or accessing your media or
connected sources. You can always access
your Home screen by pressing on the
remote control, except if you are using
Smart TV. You then need to press EXIT to
leave Smart TV and go to the Home screen.
Use / to switch to what you want, then
press OK to select.
Using Smart TV
SMART TV makes it possible to connect to
the internet and get access to interactive
services, watch movies and listen to music
online on your TV. This requires an internet
connection, either wireless or via cable.
Notes:
— Connect to a network before using
Smart TV.
— Slow responses and/or interruptions
may occur, depending on your network
conditions.
— If you experience a problem using an
application, please contact the content
provider.
— According to the circumstances of
the content provider, an application’s
updates or the application itself may be
discontinued.
— Depending on your country's
regulations, some applications may have
limited service or not be supported.
TV Menus
1. Press MENU to display the main menu.
(Refer to Figure 3.)
2. Press / to select what you want, then
press OK to enter the corresponding
submenu.
3. In submenus, use / to select menu
options and use / to set functions
or change values. Use OK to activate
a setting or enter the corresponding
submenu.
4. Press MENU to return to the previous
menu.
Using Smart TV applications
1. Press to go to the Home screen,
select Smart TV and press OK to go to
the Smart TV portal.
2. Use the navigation buttons to select the
application you want to use and press
OK to open it.
3. To return to the Smart TV portal press
SMART on the remote control.
4. To leave Smart TV press EXIT on the
remote control.
To get quick access to Smart TV you can
press SMART on the remote control. You

30
will go directly to the Smart TV portal where
you use the navigation and OK buttons to
open an application.
Internet browsing
You can browse the internet via the Internet
application in the Smart TV portal. You can
also open the internet browser by pressing
the green button when you are on the
Smart TV portal. The best way to access
online content is via apps since they are
adapted for use with a TV remote control
instead of a mouse. (It is however possible
to connect a mouse and a keyboard to
the TV’s USB ports for more convenient
browsing).
Note!
• Most websites are designed for surng
the internet using a computer, meaning
they do not support browsing using a
TV.
• Like most Smart TV web browsers, the
UPPLEVA browser does not support
Flash, catch-up TV channels or Netix.
• Since connecting to the internet might
take some time, it is recommended that
you wait a few minutes to use Smart TV
after turning the TV on.
Watch and listen to your media
Your TV is tted with USB ports that enable
you to view photos, listen to music or watch
videos stored on a USB drive. It can also
access shared media on a home network. To
access the content on your USB device and
home network, follow these steps.
1. Share media on your DLNA network
(See Chapter 6 Using your TV –
Share&see) or connect your USB device
to the TV (See Chapter 4 Connections –
Connecting a USB device).
2. Press on the remote control to display
the home screen.
3. Use / to select Media and press OK
to enter.
4. Press / to select Photo, Music or
Video.
5. Press to enter the list of connected
USB devices and DLNA servers.
6. Press / to select a device and press
OK to enter.
7. Press / / / to select a le or a folder.
If you select a folder, press OK to enter
to select a le inside it.
8. To Sort, Edit or View all les (Parser) in
a folder press OPTION on the remote
control.
─ Sorted by: Sort your les and
folders by Date, Name, Genre,
Artist, Album and Type (depending if
you are in the Photo, Music or Video
folder).
─ Edit: Copy, paste or delete a
selected le.
─ Parser: Select Recursive to display
all les in a folder, including the
ones placed in sub-folders. Select
Normal to display the folders and
sub-folders.
9. Select a photo, a song or a video, and
press OK to play. Press OPTION on the
remote control to manage the settings
of the media player.
─ When you are looking at a slide
show of your photos you can, for
example, activate normal/repeat/
shufe mode, choose how long each
picture is displayed in the slide show,
choose the effect when moving on to
the next picture and show info.
─ When playing music you can, for
example, activate normal/repeat
one/repeat all/shufe mode, show
info, show lyrics if available, turn off
the screen and only play sound and
choose your preferred sound preset.
─ When you are watching a video you
can, for example, activate normal/
repeat one/repeat all mode, show
info, choose picture and screen
mode and choose your preferred
sound preset.
10. Use / / / / on the remote control to
manage the playing of the les. Press
the INFO button to show or remove
information about what you are playing.
Supported le formats:
Photo JPEG
Music MP3
Video AVI, MPG, MPEG, TS, DIVX, MKV...
Note: Some USB keys and USB products like
digital cameras or mobile phones are not
fully compatible with USB 2.0 standard so
they may not work with the TV multimedia
player. Not all USB keys or devices are
compatible with the USB function. The
encoding formats of your les will determine
whether or not they can be used.
 Loading...