

Page 1
BUILT-IN MICROWAVE OVEN
INSTALLATION
INSTRUCTIONS
30" (76.2 cm)
This product is suitable for use above electric or gas built-in ovens, and below non-vented electric or gas cooktops. This product is not
suitable for use below downdraft cooktops.
These installation instructions cover different models. The appearance of your particular model may differ slightly from the illustrations in
these Installation Instructions.
INSTRUCTIONSD'INSTALLATIONDU FOURA
MICRO-ONDES ENCASTRE
30" (76,2 cm)
Ce produit convient & une utilisation au-dessus de fours encastres electriques ou & gaz, et au-dessous de tables de cuisson electriques
ou & gaz sans decharge a I'exterieur. Ce produit ne convient pas a une utilisation au-dessous de tables de cuisson avec extraction par le
bas
Ces instructions d'installation sont valables pour plusieurs modeles. II se peut que I'apparence de votre propre modele soit legerement
differente de celle montree sur les illustrations dans ce document.
Table of Contents / Tabledes mati@res
BUILT-IN MICROWAVE OVEN SAFETY ................................. 2
INSTALLATION REQUIREMENTS ........................................... 2
Tools and Parts ...................................................................... 2
Location Requirements .......................................................... 2
Minimum Dimensions ............................................................. 3
Product Dimensions ............................................................... 4
Electrical Requirements ......................................................... 4
INSTALLATION INSTRUCTIONS ............................................. 5
Install the Microwave Oven .................................................... 5
Complete Installation ............................................................. 6
ASSISTANCE ............................................................................. 6
SECURITE DU FOUR A MICRO-ONDES ENCASTRE ...................... 7
EXIGENCES D'INSTALLATION ........................................................... 7
Outillage et composants ................................................................... 7
Exigences d'emplacement ................................................................ 7
Dimensions minimales ...................................................................... 8
Dimensions du produit ...................................................................... 9
Specifications electriques ................................................................. 9
INSTRUCTIONS D'INSTALLATION .................................................. 10
Installation du four & micro-ondes .................................................. 10
Achever I'installation ........................................................................ 11
ASSISTANCE ...................................................................................... 11
W10197625A
Page 2

BUILT-INMICROWAVE OVEN SAFETY
Your safety and the safety of others are very important.
We have provided many important safety messages in this manual and on your appliance. Always read and obey all safety
messages.
This is the safety alert symbol.
This symbol alerts you to potential hazards that can kill or hurt you and others.
All safety messages will follow the safety alert symbol and either the word "DANGER" or "WARNING."
These words mean:
You can be killed or seriously injured if you don't immediately
follow instructions.
You can be killed or seriously injured if you don't follow
instructions.
All safety messages will tell you what the potential hazard is, tell you how to reduce the chance of injury, and tell you what can
happen if the instructions are not followed.
INSTALLATIONREQUIREMENTS
t'O0)S 3_J
Tools Needed
Gather the required tools and parts before starting installation.
Read and follow the instructions provided with any tools
listed here.
• Measuring tape • Electric drill
• Pencil • 5/64" (2 mm) drill bit
• T10 TORX ®tscrewdriver
Parts Supplied
All of the following parts are provided.
A
B
C
The microwave oven may be located in a cabinet, and/or above a
built-in oven, or below the counter and/or below a non-vented
cooktop. Check the opening where the microwave oven will be
installed. The location must provide:
• Wood cabinetry.
• Cutout opening that is plumb and square. See "Minimum
Cutout Dimensions" in "Minimum Dimensions" section.
• Cutout floor that is solid, level and flush with bottom of
cabinet cutout.
• Support for weight of at least 150 Ibs (68 kg), which includes
microwave oven and items placed inside.
• Grounded electrical outlet. See "Electrical Requirements"
section.
• Minimum installation clearances for installation location. See
"Minimum Dimensions" section.
We recommend:
• Complete enclosure around the recessed portion of the
microwave oven.
A. Side brackets (2)
B. Removable extension plates
(shaded piece, 2)
C. Side trim panels (2)
D. 1" T-IO screws (6)
I"®TORX is a registered trademark of Acument Intellectual Properties, LLC
2
Page 3
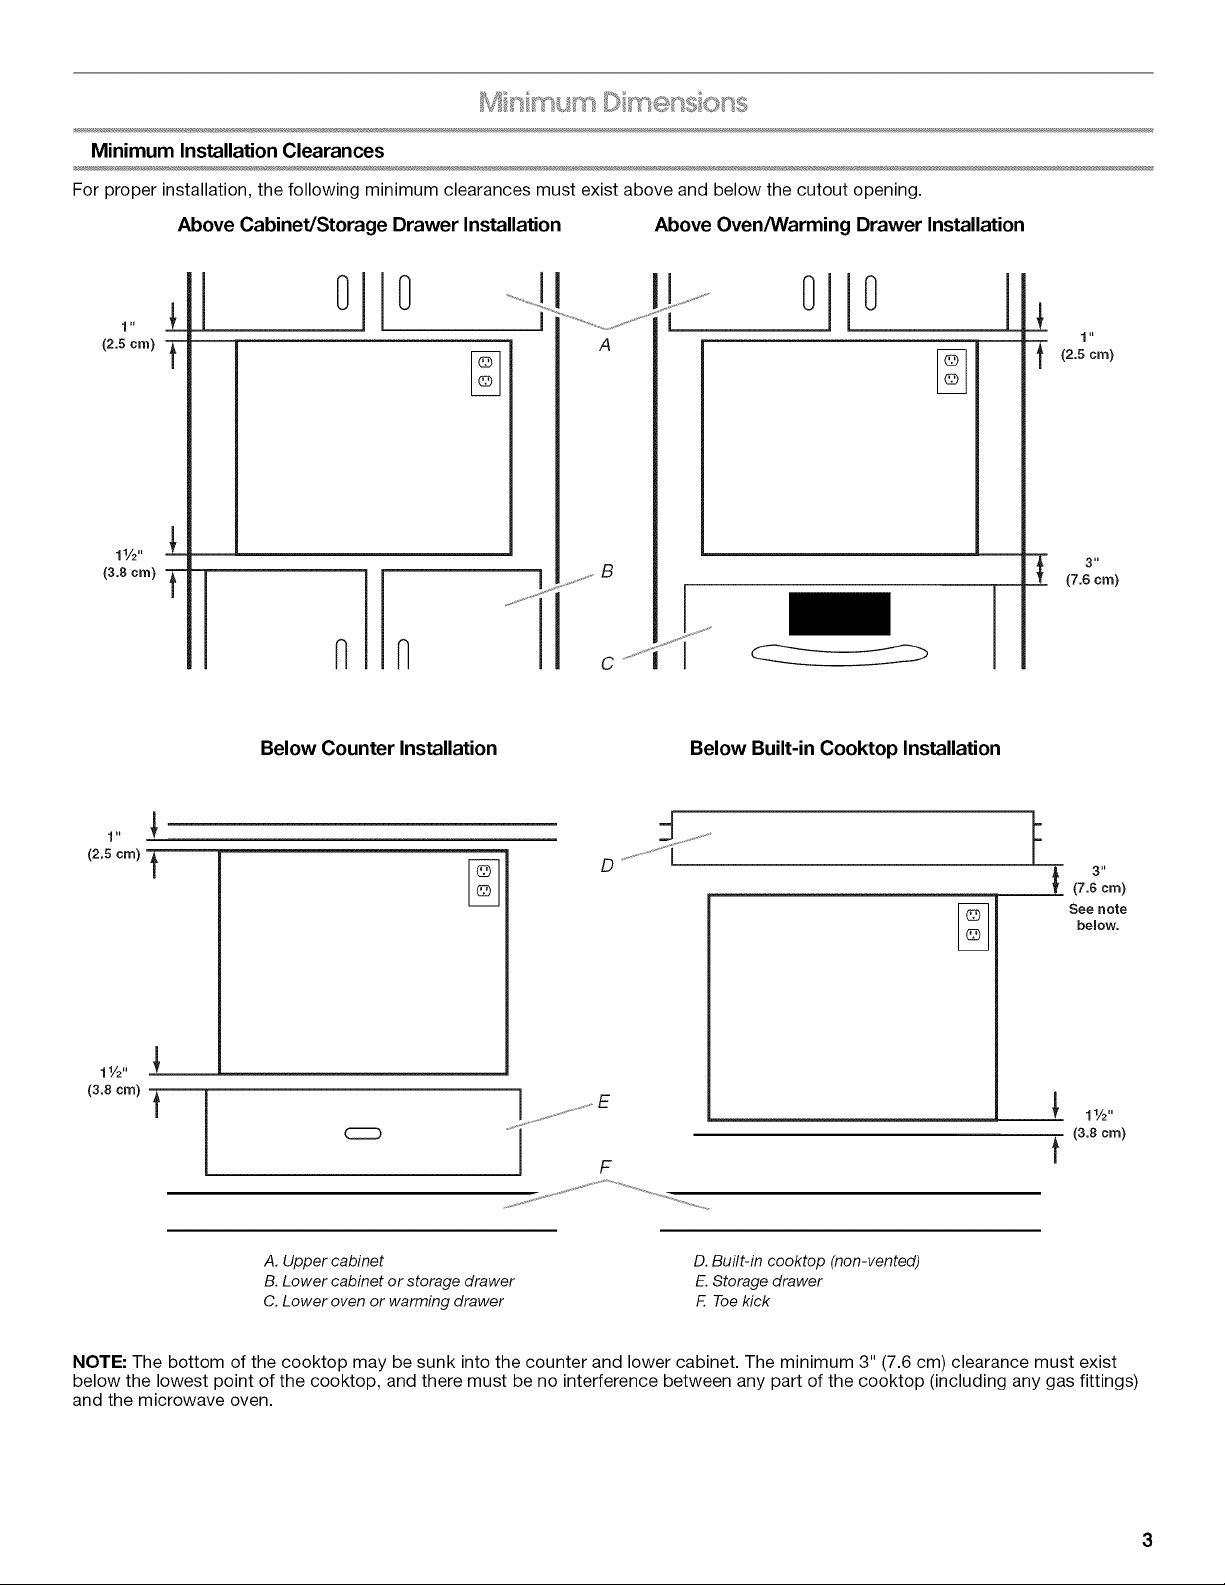
Minimum Installation Clearances
For proper installation, the following minimum clearances must exist above and below the cutout opening.
Above Cabinet/Storage Drawer Installation Above Oven/Warming Drawer Installation
J.
(2.5cm)
_L
0 0
n n
Below Counter Installation
I
!
A
_--€-
Below Built-in Cooktop Installation
1 it
(2.5cm)
3"
(7.6 crn)
3 It
(7.6 crn)
See note
bemow.
i
....i_
A. Upper cabinet
B. Lower cabinet or storage drawer
C. Lower oven or warming drawer
NOTE: The bottom of the cooktop may be sunk into the counter and lower cabinet. The minimum 3" (7.6 cm) clearance must exist
below the lowest point of the cooktop, and there must be no interference between any part of the cooktop (including any gas fittings)
and the microwave oven.
F
D. Built-in cooktop (non-vented)
E. Storage drawer
F. Toe kick
+
f
11/2"
(3.8 cm)
Page 4

Minimum Cutout Dimensions
NOTE: Depth dimension may be 213/4"(55.2 cm)with non-flush
receptacle only if the receptacle is located in upper right or upper
left corner. See "Cutout Top View."
213/4" (55.2 crn)* _
261/4'' (66.7 crn)** / I ./
/
m/_" / I_----- 28_/_"(73.0om)_×. _1 ))
18"
(45.7 crn)*
17_/2,,
(44.5 cm)
*With flush receptacle, or with non-flush receptacle located in
upper right or upper left corner of cutout.
**With non-flush receptacle.
Width Min. 253/4'' (65.4 cm); Max. 283/4'' (73.0 cm)
Height 17%" (44.8 cm) for all installations
Depth 213/4"(55.2 cm) with flush receptacle, or with non-flush
receptacle located in far corner
261/4'' (66.7 cm) with non-flush receptacle
Cutout Top View
A B C D
A. Microwave oven
B.Non-flush receptacle
C.Flushreceptacle
D.Non-flush receptacle located in upper right
or upper left corner
*Measurements include front facing of microwave oven. Depth
measurement also includes door handle.
Electrical Shock Hazard
Plug into a grounded 3 prong outlet.
Do not remove ground prong.
Do not use an adapter.
Do not use an extension cord.
Failure to follow these instructions can result in death,
fire, or electrical shock.
Observe all governing codes and ordinances.
Required:
• A 120 Volt, 60 Hz, AC only, 15- or 20-amp electrical supply
with a fuse or circuit breaker.
4
Page 5

Recommended:
• A time-delay fuse or time-delay circuit breaker.
• A separate circuit serving only this microwave oven.
3.
Place the side bracket over the 2 screws, fitting the screw
heads through the keyholes on the bracket. Then slide the
side bracket down so that the upper portions of the keyholes
rest on the screws.
GROUNDING iNSTRUCTiONS
m For all cord connected appliances:
The microwave oven must be grounded. In the event of
an electrical short circuit, grounding reduces the risk of
electric shock by providing an escape wire for the electric
current. The microwave oven is equipped with a cord
having a grounding wire with a grounding plug. The plug
must be plugged into an outlet that is properly installed
and grounded.
WARNING: Improper use of the grounding plug can
result in a risk of electric shock. Consult a qualified
electrician or serviceman if the grounding instructions are
not completely understood, or if doubt exists as to whether
the microwave oven is properly grounded.
Do not use an extension cord. If the power supply cord is
too short, have a qualified electrician or serviceman install
an outlet near the microwave oven.
SAVE THESE iNSTRUCTiONS
INSTALLATIONINSTRUCTIONS
n ffeMc 0 n,
A
C
A. Side bracket
B. Existing screws (middle and rear)
C. Proper side bracket attachment
4. Tighten screws to secure the side bracket to the microwave
oven.
5. Repeat steps 3 and 4 on the other side of the microwave
oven.
Excessive Weight Hazard
Use two or more people to move and install
microwave oven.
Failure to do so can result in back or other injury.
1.
Empty microwave oven of any loose contents.
2.
Loosen the middle and rear screws on each side of microwave
oven. The screws are located at the same height as the door
handle.
Electrical Shock Hazard
Plug into a grounded 3 prong outlet.
Do not remove ground prong.
Do not use an adapter.
Do not use an extension cord.
Failure to follow these instructions can result in death,
fire, or electrical shock.
6. With the microwave oven near the opening, plug the
microwave oven into the grounded 3 prong outlet.
Page 6

7. Using2ormorepeople,slidemicrowaveovenallthewayinto
theopening,andcenterthemicrowaveovenwithinthe
opening.
NOTE:Thescrewholesintheextensionplates(attachedtothe
wingedendsofbothsidebrackets)mustbefullyoverthewoodof
thewallorcabinet,asshown.
A B C
A. Door front facing
B. Extension plate screw hole
for cabinet attachment
C. Cabinet front
8. Using 5/64" (2 mm) drill, drill pilot holes into the cabinet
through the screw holes in the extension plates.
9. Install two 1" T-10 screws inthe pilot holes to secure the
microwave oven in place.
NOTE: To ensure proper side trim panel fitting, do not overtighten
screws.
10. Open microwave oven door.
11. Position the tabular portion of the side trim panel behind the
door facing frame, then firmly push the outside edge of the
trim behind the side bracket, as shown.
Exploded View of Panel Placement
A B C
12. Attach the side trim panel to the door facing frame using two
1" T-10 screws.
I..................................................................................................J
A_
S_
[ ................................."... .........................................../
A. Door facing frame
B. Trim panel
C. 1" T-IO screws (4)
13. Repeat steps 11 and 12 on other side.
1.
Install the turntable in the microwave oven.
2.
Check the operation of microwave oven by placing 1 cup
(250 mL) of water on the turntable and programming cook
time of 1 minute at 100% power.
3.
If the microwave oven does not operate:
• Check that a household fuse has not blown, or a circuit
breaker tripped. Replace the fuse or reset the circuit
breaker. Ifthe problem continues, call an electrician.
Check that the power supply cord is plugged into a
grounded 3 prong outlet.
See the Use and Care Guide for troubleshooting
information.
Installation is now complete.
Save these Installation Instructions for future use.
A. Door facing frame
B. Side bracket
C. Side trim panel in place
ASSISTANCE
Call your authorized dealer or service center. When you call, you
will need the microwave oven model number and serial number.
Both numbers can be found on the model and serial number
plate, which is located behind the microwave oven door on the
front frame of the microwave oven.
If you need additional assistance, call us at our toll free number or
visit our website listed in the Use and Care Guide.
6
Page 7

SECURITEDU FOURA MICRO-ONDES ENCASTRE
Votre securite et celle des autres est tres importante.
Nous donnons de nombreux messages de s6curit6 importants dans ce manuel et sur votre appareil m6nager. Assurez-vous de
toujours lire tous les messages de s6curit6 et de vous y conformer.
Ce symbole d'alerte de s6curit6 vous signale les dangers potentiels de d6ces et de blessures graves & vous
et & d'autres.
Voici le symbole d'alerte de s6curit6.
Tousles messages de securite suivront le symbole d'alerte de s6curite et le mot "DANGER" ou
"AVERTISSEMENT". Ces mots signifient •
Risque possible de d_ces ou de blessure grave si vous ne
suivez pas imm_diatement les instructions.
Risque possible de d_cbs ou de blessure grave si vous
ne suivez pas les instructions.
Tousles messages de s6curite vous diront quel est le danger potentiel et vous disent comment reduire le risque de blessure et
ce qui peut se produire en cas de non-respect des instructions.
EXIGENCESD'INSTALLATION
0 .4 c@e ®1compos<sn!S
Outillage n_cessaire
Rassembler les outils et composants necessaires avant
d'entreprendre I'installation. Lire et observer les instructions
fournies avec chacun des outils de la liste ci-dessous.
• Metre ruban • Perceuse electrique
• Crayon • Foret de 5/64" (2 mm)
• Tournevis T10 TORX ®t
Pi_ces fournies
Toutes les pieces suivantes sont fournies.
A
B
C
Le four & micro-ondes peut etre installe dans un placard et/ou au-
dessus d'un four encastre, ou bien sous le comptoir et/ou sous
une table de cuisson sans decharge & I'exterieur. Inspecter
I'ouverture dans laquelle le four µ-ondes sera install&
L'emplacement d'installation doit posseder les caracteristiques
suivantes :
• Placards de bois.
• Une ouverture decoupee qui soit d'aplomb et d'equerre. Voir
"Dimensions minimales de I'ouverture a decouper" dans la
section "Dimensions minimales".
• Le plancher au niveau de I'encastrement doit etre robuste,
d'aplomb et en affleurement avec le bas de I'ouverture
decoupee du placard.
• Une capacite de charge d'au moins 150 Ibs (68 kg), ce qui
comprend le four µ-ondes ainsi que les elements
places a I'interieur.
• Prise de courant reliee & la terre. Voir la section
"Specifications electriques".
• Distances de degagement minimales pour I'emplacement
d'installation. Voir la section "Dimensions minimales".
Nous recommandons •
• Une enceinte complete autour de la partie encastree du four
micro-ondes.
A. Brides lat#rales (2)
B. Plaques de prolongement amovibles
(pattie gris_e, 2)
C. Panneaux de garniture lat#rale (2)
D. Vis T- IO de 1" (6)
I"®TORX est une marque d6pos&e de Acument Intellectual Properties, LLC
Page 8

_I_; _ /_ _@_J_ _ _'/_"_/ ,/ _ _ ,_=_C_
Distances de d_gagement minimales d'installation
Pour une installation correcte, les distances de degagement minimales suivantes doivent _tre respectees au-dessus et en dessous de
I'ouverture a decouper.
Installation au-dessus d'un placard/tiroir de remisage Installation au-dessus du four/tiroir de remisage
0
fl fl
Installation sous comptoir
I
....j,,_ S
A
c.........¢/
0 0
1
1 "
t (2,5cm)
Installation sous table de cuisson encastr_e
f 3"
(7,6 cm)
Voir la
remarque
ci-apr_s.
1V2"
(3,8 cm)
t
A. Placard sup_rieur
B. Placard inf_rieur ou tiroir de remisage
C. Four inf_rieur ou tiroir-r_chaud
REMARQUE : Le bas de la table de cuisson peut _tre encastre dans le comptoir et le placard inferieur. La distance de degagement
minimale de 3" (7,6 cm) doit _tre respectee en dessous du point le plus bas de la table de cuisson et il ne doit y avoir aucun obstacle
entre n'importe quelle partie de la table de cuisson (y compris les raccords de gaz) et le four a micro-ondes.
D. Table de cuisson encastr#e (sans d#charge a I'ext#r/eur)
E. Tiroir de remisage
F. Plaque de protection
8
Page 9

Dimensions minimales de I'ouverture &d_couper
REMARQUE : La profondeur peut etre de 213/4"(55,2 cm) avec un
receptacle long, uniquement si le receptacle se trouve &I'angle
superieur droit ou superieur gauche. Voir "Vue du dessus de
I'ouverture a decouper".
213/4'' (55,2cm)*_t__
261/4 '' (66,7 cm)** /- q
17 .. /_/ / /
(44,ao_)
/
I --%_
*Avec receptacle court (affleurement), ou avec un receptacle
long situe & I'angle superieur droit ou superieur gauche de
I'ouverture a decouper.
**Avec receptacle long.
Largeur Min. de 253/4'' (65,4 cm); Max. 283/4'' (73 cm)
Hauteur 173/8"(44,8 cm) pour toutes les installations
Profondeur 213/4'' (55,2 cm) avec receptacle court (affleurement),
ou un receptacle long situe dans un angle eloigne;
261/4'' (66,7 cm) avec receptacle long.
Vue de dessus de I'ouverture & d_couper
A B C D
is "m)
/
/
*Les mesures comprennent la partie avant du four & micro-ondes.
Les mesures de profondeur comprennent egalement la poignee
de porte.
Risque de choc _lectrique
Brancher sur une prise a 3 alv_oles reli_e a Jaterre.
Ne pas enlever la broche de liaison a la terre.
Ne pas utiliser un adaptateur.
Ne pas utiliser un c&ble de rallonge.
Le non=respect de ces instructions peut causer
un d_c_s, un incendie ou un choc _lectrique.
(si':"m,
A. Four a micro-ondes
B. R#ceptacle long
C. R#ceptacle court (affleurement)
D. R#ceptacle long situ# au coin sup#rieur
droit ou sup#rieur gauche
Observer les dispositions de tous les codes et r_glements en
vigueur.
N_cessaire :
• Une alimentation electrique de 120 volts, 60 Hz, CA
seulement, 15 ou 20 amperes, protegee par un fusible ou un
disjoncteur.
Page 10

Recommand_:
• Unfusibletemporiseouundisjoncteurtemporis&
• Uncircuitdistinctexclusif&cefouramicro-ondes.
INSTRUCTIONS DE LIAISON .&,LA TERRE
Pour tout appareil m_nager connect_ par un cordon
de courant _lectrique :
IIfaut que le four A micro-ondes soit reli_ A la terre. En
cas de court-circuit _lectrique, la liaison & la terre r_duit le
risque de choc _lectrique car le courant _lectrique
dispose d'un itin@aire direct d'acheminement & la terre.
Le four & micro-ondes est dot_ d'un cordon de courant
_lectrique qui comporte un fil de liaison &la terre, avec
broche de liaison & la terre. On dolt brancher la fiche sur
une prise de courant convenablement install_e et reli_e &
la terre.
AVERTISSEMENT : L'utilisation incorrecte du
dispositif de liaison & la terre peut susciter un risque de choc
_lectrique. L'utilisateur qui ne comprend pas bien les
instructions de liaison & la terre, ou qui n'est pas certain que
le four & micro-ondes soit convenablement reli_ & la terre,
devrait consulter un _lectricien qualifi&
Ne pas utiliser un c&ble de rallonge. Si le cordon de
courant _lectrique est trop court, demander & un
_lectricien qualifi_ d'installer une prise de courant &
proximit_ du four & micro-ondes.
CONSERVEZ CES INSTRUCTIONS
3,
Engager la bride laterale sur les 2 vis - engager la t_te de
chaque vis dans I'ouverture allongee de la bride; faire ensuite
glisser la bride laterale vers le bas pour que la partie etroite de
chaque trou allonge repose sur la vis.
A. Garniture lat_rale
B. Vis pr#-instafl#es (milieu et arriere)
C. Fixation correcte de la bride lat#rale
4,
Resserrer les vis pour fixer la bride laterale au four a micro-
ondes.
5.
Repeter les etapes 3 et 4 pour I'autre c6te du four a micro-
ondes.
A
C
INSTRUCTIONS
D'INSTALLATION
_@_,/_ _ _ _n _'_ _,_'_ _'S_
Risque du poids excessif
Utiliser deux ou plus de personnes pour d_placer et
installer le four a micro=ondes.
Le non=respect de cette instruction peut causer
une blessure au dos ou d'autre blessure.
1,
Vider le four µ-ondes de tout article.
2.
Desserrer les vis du milieu et les vis arriere situ6es de chaque
c6te du four µ-ondes. Les vis se trouvent & la m_me
hauteur que la poignee de porte.
Risque de choc _lectrique
Brancher sur une prise a 3 alv_oles reli_e a la terre.
Ne pas enlever la broche de liaison a la terre.
Ne pas utiliser un adaptateur.
Ne pas utiliser un c&ble de rallonge.
Le non=respect de ces instructions peut causer
un d_c_s, un incendie ou un choc _lectrique.
6. Tout en gardant le four & micro-ondes & proximite de
I'ouverture d'encastrement, brancher le four µ-ondes
dans la prise de courant &3 broches reliee & la terre.
10
Page 11

7. A I'aide d'au moins 2 personnes, faire glisser completement le
four µ-ondes dans I'ouverture d'encastrement et le
centrer dans I'ouverture.
REMARQUE : II faut que les trous des plaquettes d'extension
(fixees aux embouts de chaque bride laterale) soient totalement
superposes au materiau de bois du mur ou du )lacard, tel
qu'illustr&
A B C
A. Pattie avant de la porte
B. Trou de vis de la plaquette d'extension
pour la fixation du placard
C. Avant du placard
8,
A I'aide d'un foret de 5/64" (2 mm), percer des avant-trous
dans le placard, & travers les trous de vis des plaquettes
d'extension.
9. Fixer deux vis T-10 de 1" dans les avant-trous pour maintenir
le four & micro-ondes en place.
REMARQUE : Afin que le panneau de garniture laterale soit bien
installe, ne pas trop serrer les vis.
10. Ouvrir la porte du four & micro-ondes.
11. Positionner la partie tabulaire du panneau de garniture laterale
derriere I'encadrement faisant face A la porte, puis enfoncer
fermement la rive exterieure de la garniture derriere la bride
laterale, tel qu'illustr&
Vue _clat_e de I'installation du panneau
A B C
12. Fixer le panneau de garniture laterale & I'encadrement faisant
face & la porte & I'aide de deux vis T-10 de 1".
I..................................................................................................J
A_
S_
\
A. Encadrement faisant face a la porte
B. Panneau de garniture
C. Vis T-IO de1" (4)
13. Repeter les etapes 11 et 12 pour I'autre c6t&
1. Installer le plateau rotatif dans le four µ-ondes.
2. Contr61er lefonctionnement du four µ-ondes : placer
sur le plateau rotatif 1 recipient contenant 1 tasse (250 mL)
d'eau et programmer une periode de chauffage de 1 minute &
la puissance maximale (100 %).
3. Si le four µ-ondes ne fonctionne pas :
• Determiner si un fusible est grille ou si un disjoncteur s'est
ouvert. Remplacer le fusible ou reenclencher le
disjoncteur. Si le probleme persiste, appeler un electricien.
• Verifier que le cordon d'alimentation est correctement
branche sur une prise de courant & 3 alveoles reliee a la
terre.
• Pour I'information relative au depannage, consulter le
Guide d'utilisation et d'entretien.
L'installation est maintenant terminee.
Conserver les Instructions d'installation pour une eventuelle
reutilisation future.
A. Encadrement faisant face a la porte
B. Bride lat#rale
C. Panneau de garniture lat#rale instafl#
ASSISTANCE
Appeler le marchand local autorise ou le centre de service agree.
Lors de I'appel, vous aurez besoin des numeros de modele et de
serie du four a micro-ondes. Les deux numeros peuvent _tre
trouves sur la plaque signaletique situee derriere la porte du four &
micro-ondes, sur le ch&ssis avant du four a micro-ondes.
Si une assistance supplementaire est necessaire, composer le
numero sans frais ou consulter notre site web indique dans le
Guide d'utilisation et d'entretien.
11
Page 12

W10197625A
© 2008.
All rights reserved.
Tous droits reserves.
461969469771
Printed in Sweden
Imprime en Suede
6/08
 Loading...