

Page 1

HUSHÅLLA
FRAMTID MW3
GB
FR
DE
IT
Page 2

Page 3

ENGLISH 4
DEUTSCH 18
FRANÇAIS 35
ITALIANO 52
Page 4
ENGLISH 4
Read carefully and keep for future reference
Do not heat, or use ammable materials in
or near the oven. Fumes can create a re
hazard or explosion.
Do not use your microwave oven for drying
textiles, paper, spices, herbs, wood, owers,
fruit or other combustible materials. Fire
could result.
If material inside / outside the oven should
ignite or smoke is observed, keep oven door
closed and turn the oven off. Disconnect the
power cord or shut off power at the fuse or
circuit breaker panel.
Do not over-cook food. Fire could result.
Do not leave the oven unattended,
especially when using paper, plastic or
other combustible materials in the cooking
process. Paper can char or burn and some
plastics can melt if used when heating foods.
Do not use corrosive chemicals or vapors
in this appliance. This type of oven is
specically designed to heat or cook food.
It is not designed for industrial or laboratory
use.
Only allow children to use the appliance
under adult supervision and after adequate
instructions have been given, so that the
child is able to use the appliance in a
safe way and understands the hazards of
improper use.
This appliance is not intended for use by
persons (including children) with reduced
physical, sensory or mental capabilities,
unless used under the supervision of a
person responsible for their safety.
WARNING! Accessible parts may
become hot during use, young children
should be kept away.
Do not use your microwave oven for heating
anything in airtight sealed containers. The
pressure increases and may cause damage
when opening or may explode.
The door seals and the door seal areas must
be regularly inspected for damage. If these
areas are damaged the appliance should
not be operated until it has been repaired
by a trained service technician.
i
IMPORTANT: Eggs: Do not use your
microwave oven for cooking or
reheating whole eggs with or without shell
since they may explode even after
microwave heating has ended.
Important precautions
General
This appliance is designed for domestic use
only!
The appliance should not be operated
without food inside. Operation in this
manner is likely to damage the appliance.
If you practice operating the oven, put a
glass of water inside. The water will absorb
the microwave energy and the oven will not
be damaged.
Do not use the cavity for any storage
purposes.
Remove wire twist-ties from paper or plastic
bags before placing bag in the oven.
Safety information 4
Product description 6
Control panel 8
Daily use 8
Cleaning and maintenance 13
What to do if ... 14
Technical data 15
Installation 16
Electrical connection 16
Environmental concerns 17
Safety Information
Table of contents
Page 5

ENGLISH 5
Deep-frying
Do not use your microwave oven for deepfrying, because the oil temperature cannot
be controlled.
Use hot pads or oven mitts to prevent burns,
when touching containers, oven parts, and
pan after cooking.
Liquids
E.g. beverages or water. Overheating
the liquid beyond boiling point can occur
without evidence of bubbling. This could
result in a sudden boil over of the hot liquid.
To prevent this possibility the following steps
should be taken:
1. Avoid using straight-sided containers
with narrow necks.
2. Stir the liquid before placing the
container in the oven and let the
teaspoon remain in the container.
3. After heating, allow standing for a short
time, stirring again before carefully
removing the container from the oven.
Careful
Always refer to a microwave cookbook for
details. Especially, if cooking or reheating
food that contains alcohol.
After heating baby food or liquids in a baby
bottle or in a baby food jar, always stir and
check the temperature before serving. This
will ensure that the heat is evenly distributed
and the risk of scalding or burns can be
avoided.
Ensure the Lid and the Teat is removed
before heating!
Page 6

ENGLISH 6
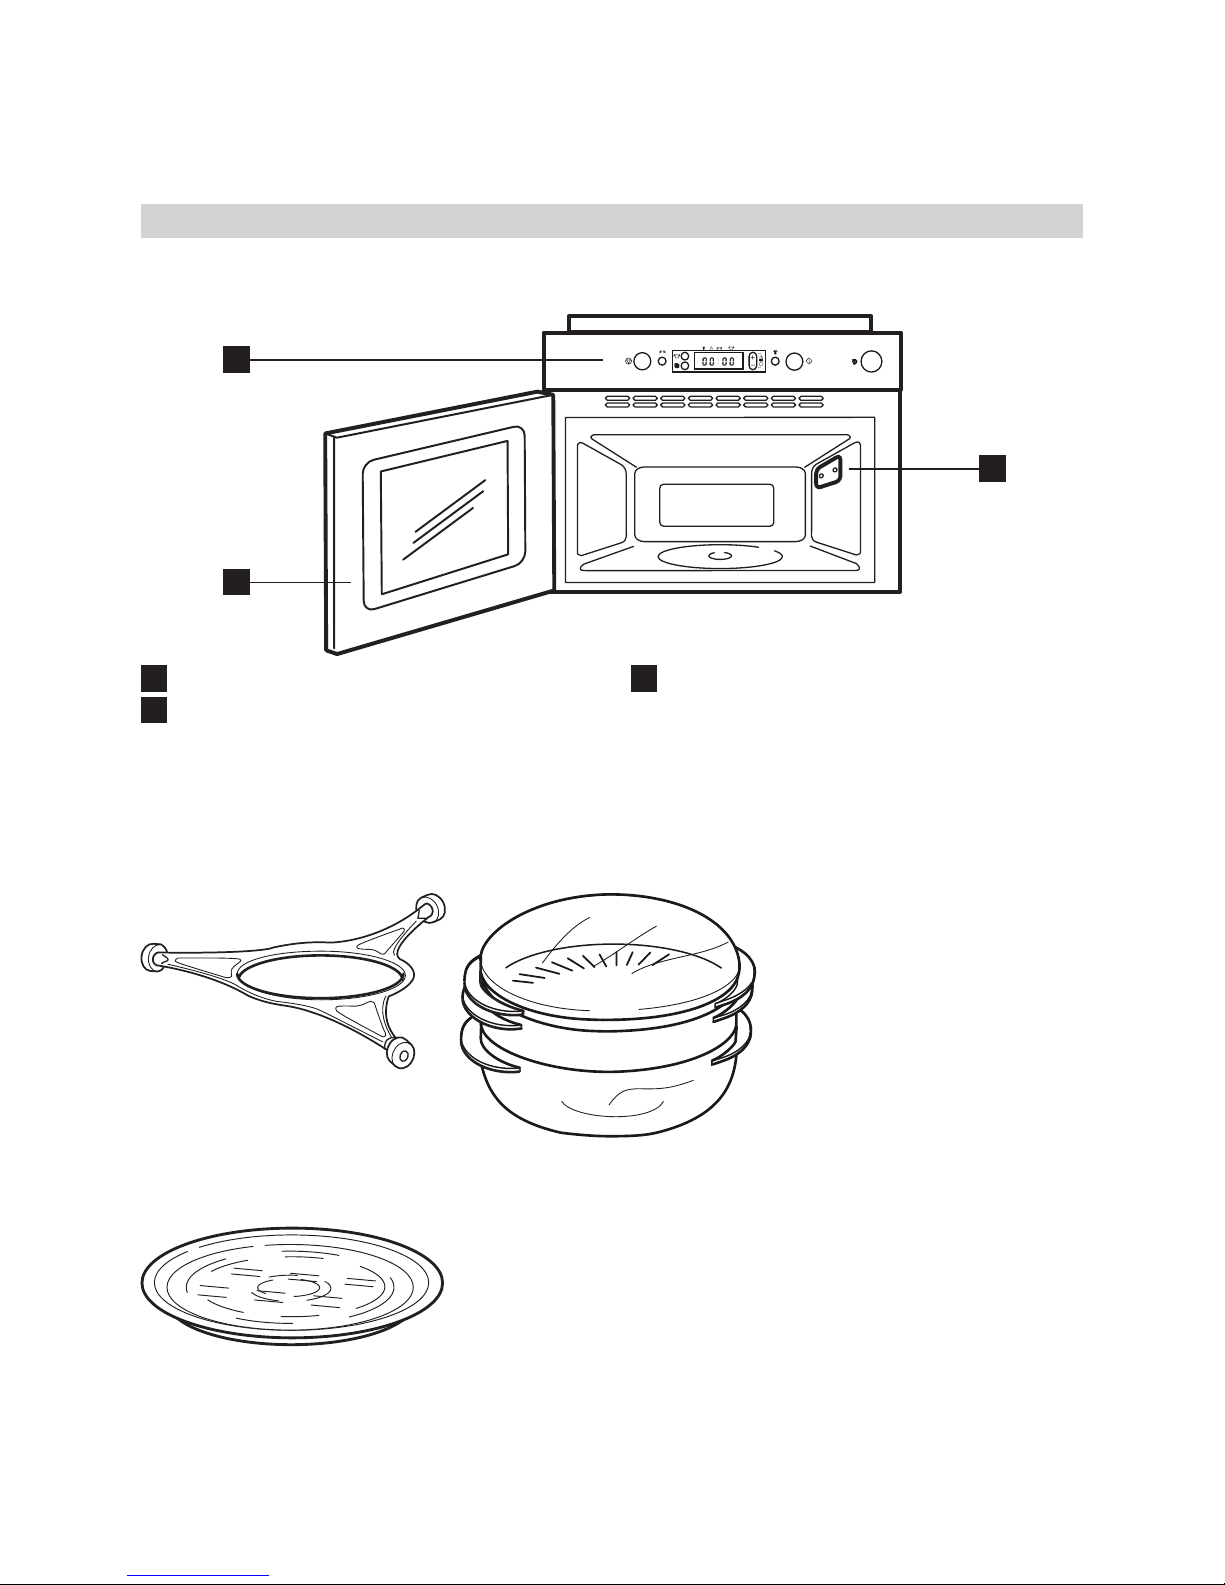
Product description
Accessories
Turntable support
x1
Glass turntable
x1
Steamer
x1
1
2
3
1
Control Panel
2
Cavity Lamp
3
Door
Page 7

ENGLISH 7
Accessories
General
There are a number of accessories available
on the market. Before you buy, ensure they
are suitable for microwave use.
Ensure that the utensils you use are oven
proof and allow microwaves to pass through
them before cooking.
When you put food and accessories in the
microwave oven, ensure that they do not
come in contact with the interior of the oven.
This is especially important with accessories
made of metal or metal parts.
If accessories containing metal comes in
contact with the oven interior, while the oven
is in operation, sparking can occur and the
oven could be damaged.
Always ensure that the turntable is able to
turn freely before starting the oven.
Turntable support
Use the turntable support under the Glass
turntable. Never put any other utensils on
the turntable support.
- Fit the turntable support in the oven.
Glass turntable
Use the Glass turntable with all cooking
methods. It collects the dripping juices and
food particles that otherwise would stain
and soil the interior of the oven.
- Place the Glass turntable on the
turntable support.
Steamer
Use the steamer with the strainer in place
for such foods as sh, vegetables and
potatoes.
Always place the steamer on the Glass
Turntable.
Page 8

ENGLISH 8
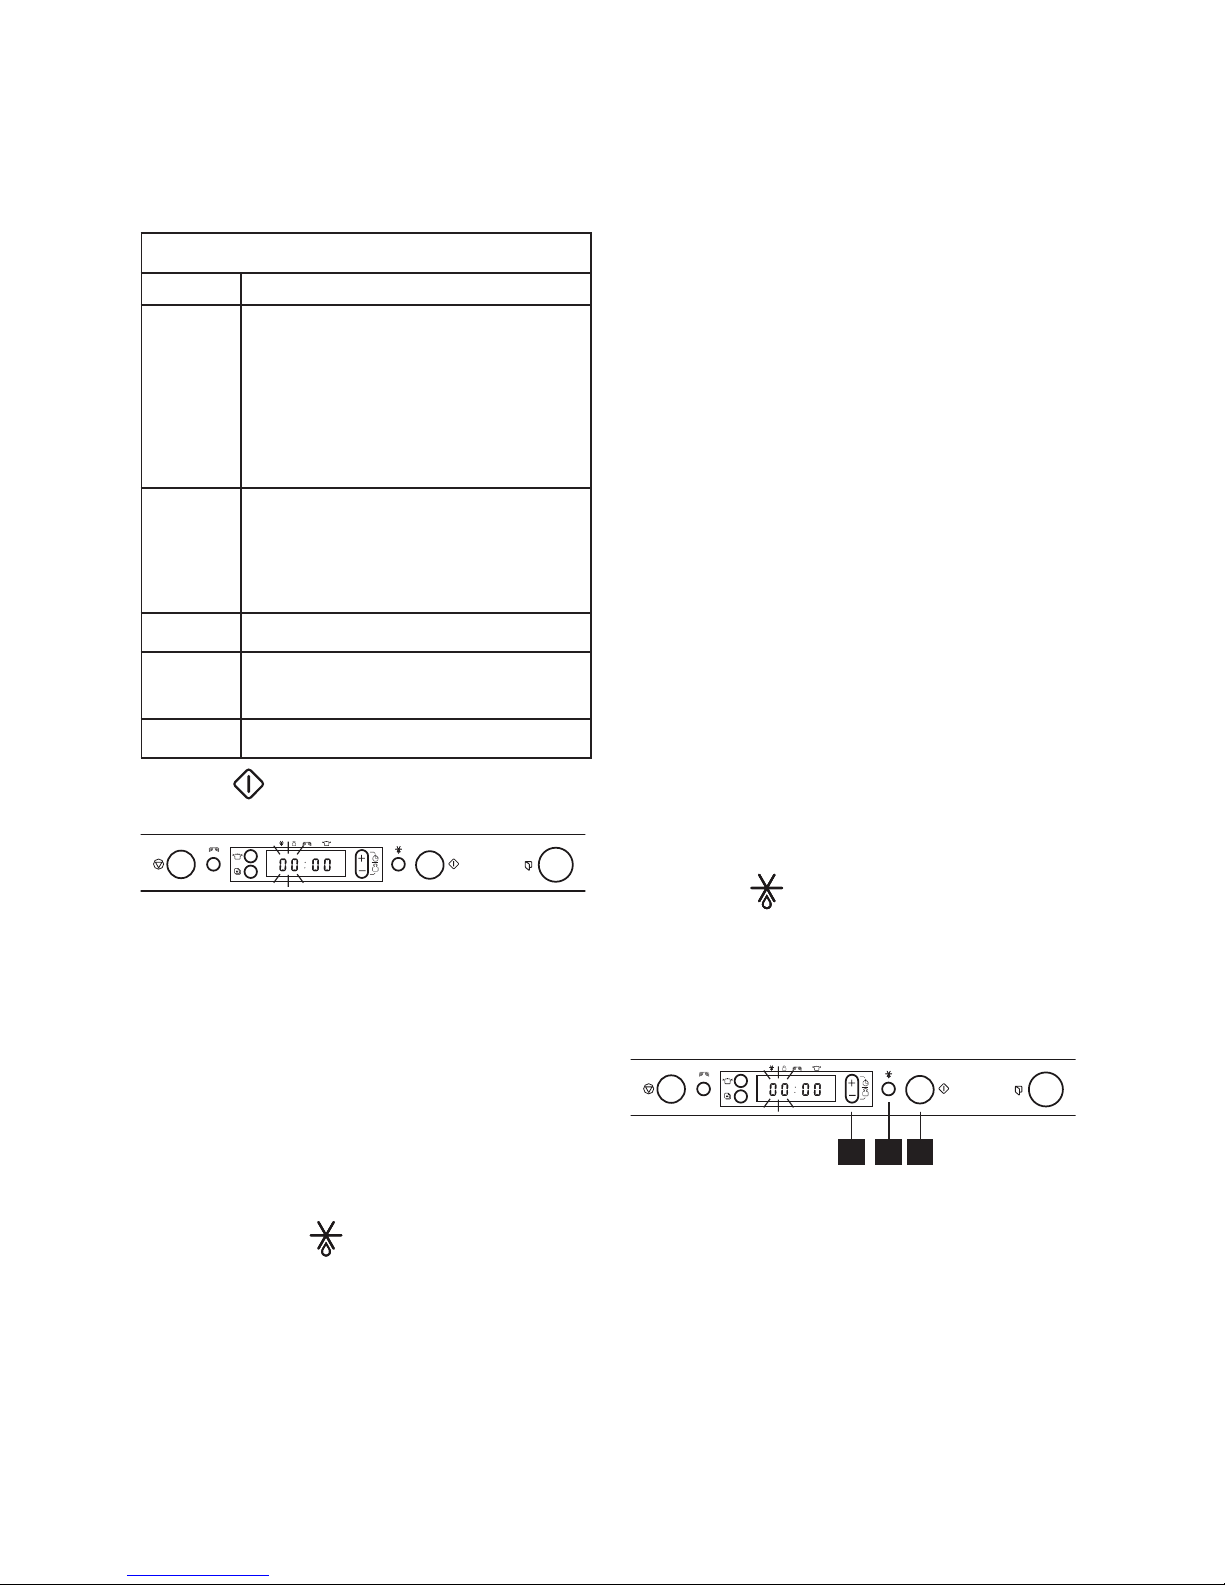
Control panel
Start protection / Key lock
This automatic safety function is activated
one minute after the oven has returned to
“stand by mode“. (The oven is in “stand by”
when the 24-hour clock is displayed or if the
clock has not been set, when the display is
blank).
The door must be opened and closed
e.g. putting food into it, before the safety
lock is released. Else the display will show
“DOOR“.
To pause or stop cooking
To pause cooking:
The cooking can be paused to check, turn
or stir the food by opening the door. The
setting will be maintained for 10 minutes.
To continue cooking:
Close the door and press the Start button
ONCE. The cooking is resumed from where
it was paused.
Pressing the Start button TWICE will increase
the time by 30 seconds.
If you don’t want to continue cooking:
Remove the food, close the door and press
the Stop button
A beep will signal once a minute for 10
minutes when the cooking is nished. Press
the Stop button or open the door to cancel
the signal.
NOTE: The oven will only hold the settings
for 60 seconds if the door is opened and
then closed after the cooking is nished.
Cooling down
When a function is nished, the oven carries
out a cooling procedure. This is normal.
After this procedure the oven switches off
automatically.
Daily use
1
Stop button
2
Power button
3
Memo button
4
Steam button
5
+ /- button
(use this button to set time or weight)
6
Jet Defrost button
7
Start button
8
Door button
(use this button to open the door)
864321 75
Page 9

ENGLISH 9
Kitchen timer
Use this function when you need a kitchen
timer to measure exact time for various
purposes such as cooking eggs or letting the
dough rise before baking etc.
312
1. Press the +/- buttons to set the desired
length of the timer.
2. Press the power button repeatedly to set
the power to 0 W.
3. Press the Start button.
An acoustic signal will be heard when the
timer has nished to count down.
Clock
Keep the door open while setting the Clock.
This gives you 5 minutes to complete the
setting of the Clock. Otherwise, each step
must be accomplished within 60 seconds.
1
2 4 3 5
1. Press the Stop button (3 seconds) until
the left-hand digit (hour’s) icker.
2. Press the +/- buttons to set the hours.
3. Press the Start button. (The two right
hand digits (minutes) blink).
4. Press the +/- buttons to set the minutes.
5. Press the Start button again.
The Clock is set and in operation.
NOTE: When the appliance is rst plugged
in or after a power failure, the display is
blank. If the clock is not set, the display will
remain blank until the cooking time is set.
If you wish to remove the Clock from the
display once it has been set, simply press
the Stop button again for 3 seconds and
then press the Stop button once more.
To reinstate the Clock, follow the above
procedure.
Cook and reheat with microwaves
Use this function for normal cooking and
reheating, such as vegetables, sh, potatoes
and meat.
312
1. Press the +/- buttons to set the time.
2. Press the power button repeatedly to set
the power.
3. Press the Start button.
Once the cooking process has been started:
The time can easily be increased in
30-second steps by pressing the Start
button. Each press increases the time with
30 seconds. You may also alter the time
by pressing the +/- buttons to increase or
decrease the time.
Pressing the power button may also change
the power level. The rst press will show you
the current power level. Press the power
button repeatedly to change power level.
All settings can be changed during cooking
if you so desire.
Page 10
ENGLISH 10
Power level
Microwaves only
Power Suggested use:
750 W
Reheating of beverages, water, clear
soups, coffee, tea or other food with
a high water content. If the food
contains egg or cream choose a
lower power.
Cooking of sh, vegetables, meat etc.
500 W
More careful cooking e.g. high
protein sauces, cheese and egg
dishes and to nish cooking
casseroles.
350 W
Simmering stews, melting butter.
160 W
Defrosting. Softening butter, cheeses.
Softening Ice cream.
0 W
When using the Timer only.
Jet start
This function is used for quick reheating of
foods with a high water content such as;
clear soups, coffee or tea.
Press to automatically start with full
microwave power level and the cooking
time set to 30 seconds. Each additional
press increases the time with 30 seconds.
You may also alter the time by pressing the
+/- buttons to increase or decrease the time
after the function has started.
Manual defrost
Follow the procedure for “How to cook &
reheat with microwaves” and choose power
level 160 W when defrosting manually.
Check and inspect the food regularly.
Experience will give you the times needed
for various amounts.
Frozen food in plastic bags, plastic lms or
cardboard packages can be placed directly
in the oven as long as the package has no
metal parts (e.g. metal twist ties).
The shape of the package alters the
defrosting time. Shallow packets defrost
more quickly than a deep block.
Separate pieces as they begin to defrost.
Individual slices defrost more easily.
Shield areas of food with small pieces of
aluminum foil if they start to become warm
(e.g. chicken legs and wing tips).
Turn large joints halfway through the
defrosting process.
Boiled food, stews and meat sauces defrost
better if stirred during defrosting time.
When defrosting it is better to under-thaw
the food slightly and allow the process to
nish during standing time.
Standing time after defrosting always
improves the result since the temperature
will then be evenly distributed throughout
the food.
Jet defrost
Use this function for defrosting Meat, Fish &
Poultry ONLY.
Jet Defrost should only be used if the net
weight is between 100 - 2Kg.
2 31
1. Press the Jet Defrost button.
2. Press the + / - buttons to set the weight
of the food.
3. Press the Start button.
Midway through the defrosting process
the oven stops and prompts you to TURN
FOOD.
- Open the door.
- Turn the food.
- Close the door and restart by pressing
the Start button.
Page 11
ENGLISH 11
NOTE: The oven continues automatically
after 2 min. if the food hasn’t been turned.
The defrosting time will be longer in this
case.
This function needs to know the net weight
of the food. The oven will then automatically
calculate the needed time to nish the
procedure.
- Frozen foods:
If the food is warmer than deep-freeze
temperature (-18°C), choose lower
weight of the food.
If the food is colder than deep-freeze
temperature (-18°C), choose higher
weight of the food.
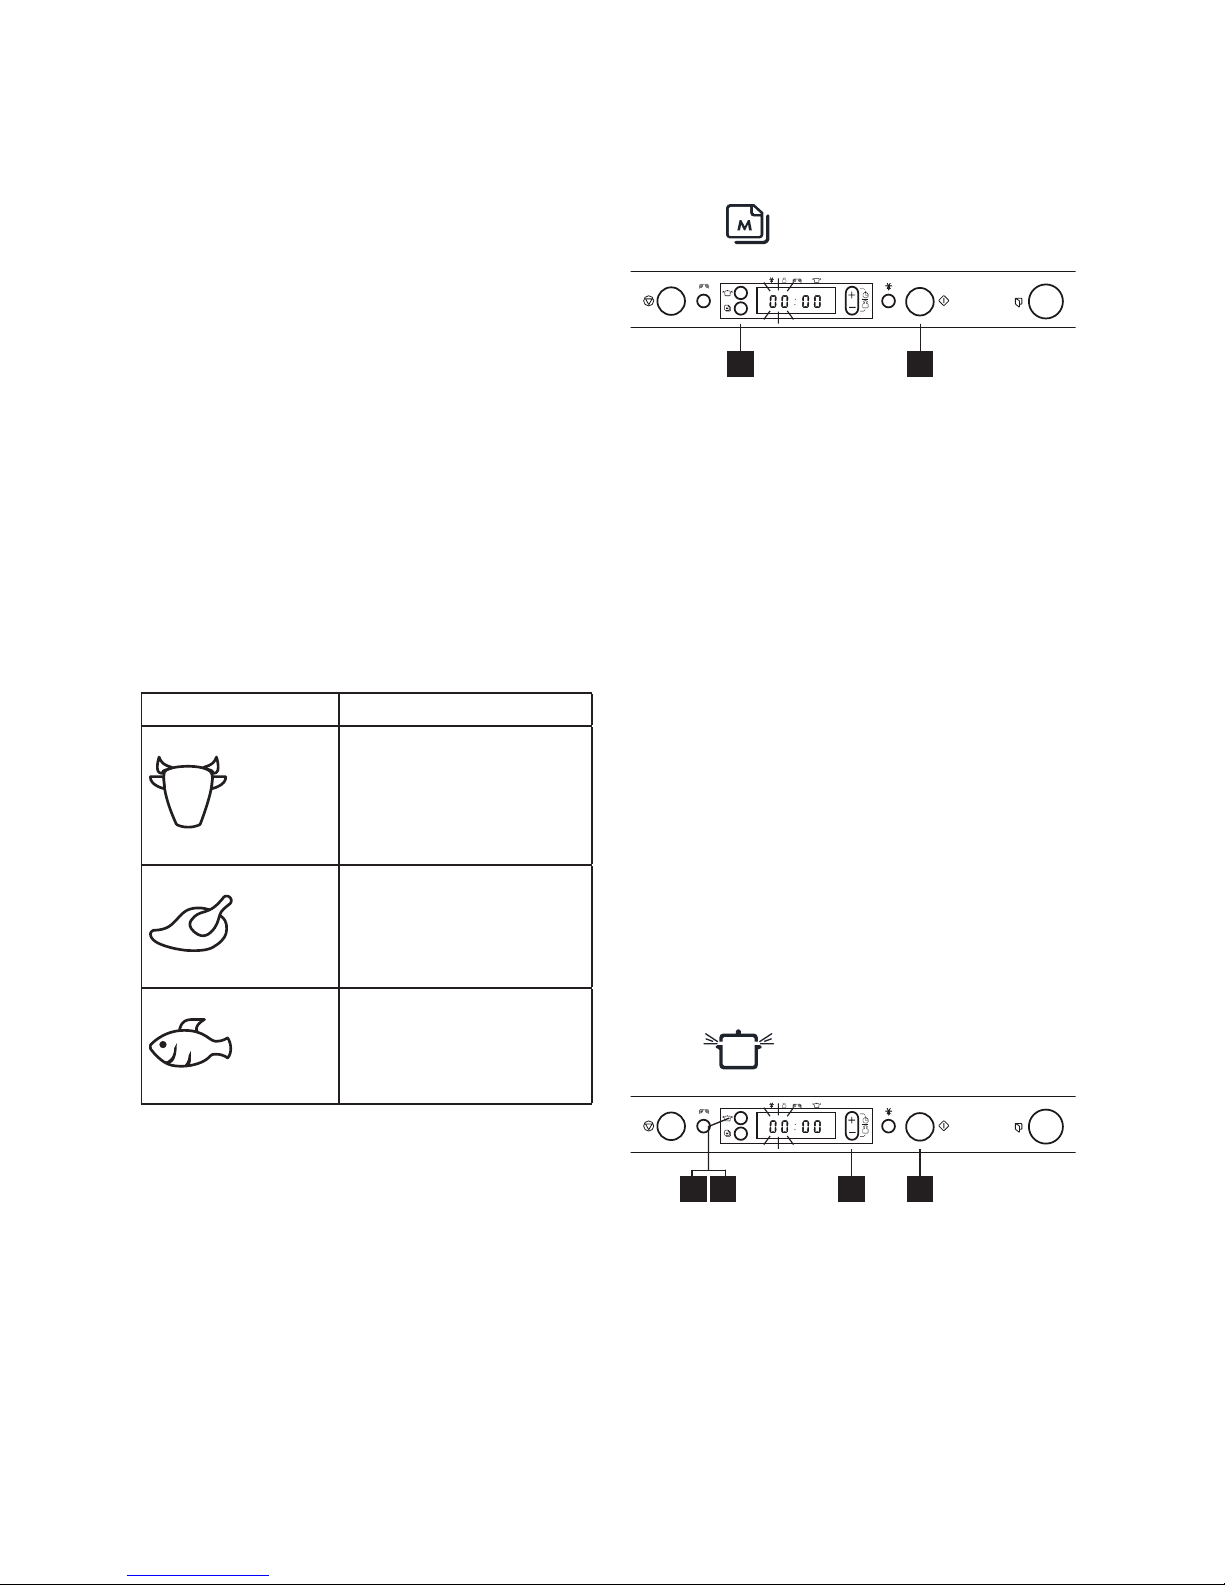
Food Hints
Meat
(100 g - 2.0 Kg)
Minced meat, cutlets,
steaks or roasts.
Poultry
(100 g - 2.0 Kg)
Chicken whole, pieces
or llets.
Fish
(100 g - 1.5 Kg)
Whole, steaks or llets.
For food not listed in this table and
if the weight is lesser or greater than
recommended weight, you should follow
the procedure for “Cook and reheat with
microwaves” and choose 160 W when
defrosting.
Memory
1 2
The Memory function provides you with
an easy way to quickly recall a preferred
setting.
The principle of the Memory function is
to store whatever setting that is currently
displayed.
1. Press the Memo button.
2. Press the Start button.
How to store a setting:
1. Select any function and make the
nesseccary settings
2. Make the necessary settings
3. Press and keep the Memo button
pressed for 3 seconds until an acoustic
signal is heard. The setting is now
stored. You may reprogram the memory
as many times as you wish.
When the appliance is plugged in or after a
power failure, your Memo function will have
stored - 1 minutes and 750 W as default
setting.
Steam
3 4
1 2
Use this function for such food as vegetables
& sh.
Always use the supplied Steamer when
using this function.
1. Press the Steam button.
2. Continue to repeatedly press the Steam
button to set the food class.
3. Press the +/- buttons to set the weight of
the food.
4. Press the Start button.
Page 12

ENGLISH 12
Place the food on the steam grid.
Add 100 ml (1dl) water in the bottom part of
the steamer.
Cover with the lid.
WARNING! The Steamer is designed to
be used with microwaves only!
Never use it with any other function at all.
Using the steamer in any other function may
cause damage.
Always ensure that the turntable is able to
turn freely before starting the oven.
Always place the steamer on the Glass
Turntable.
Cooking vegetables
Place the vegetables into the strainer.
Pour 100 ml water into the bottom part.
Cover with the lid and set the time.
Soft vegetables such as broccoli and leek
require 2-3 minutes cooking time.
Harder vegetables such as carrots and
potatoes require 4-5 minutes cooking time.
Food Hints
Potatoes / Root
vetables
(150 g - 200 g)
Use even sizes.
Cut the vetgetables
into even pieces.
Allow to stand for 1 - 2
minutes, after cooking.
Vegetables
(Cauliower and
Broccoli)
(150 g - 500 g)
Frozen
vegetables
(150 g - 500 g)
Allow to stand for 1 - 2
minutes after cooking.
Fish lets
(150 g - 500 g)
Distribute llets evenly
on the steamgrid.
Interlace thin parts.
Allow to stand for 1 - 2
minutes, after cooking.
Page 13

ENGLISH 13
Cleaning and maintenance
Cleaning is the only maintenance normally
required.
Failure to maintain the oven in a clean
condition could lead to deterioration of the
surface that could adversely affect the life
of the appliance and possibly result in a
hazardous situation.
i
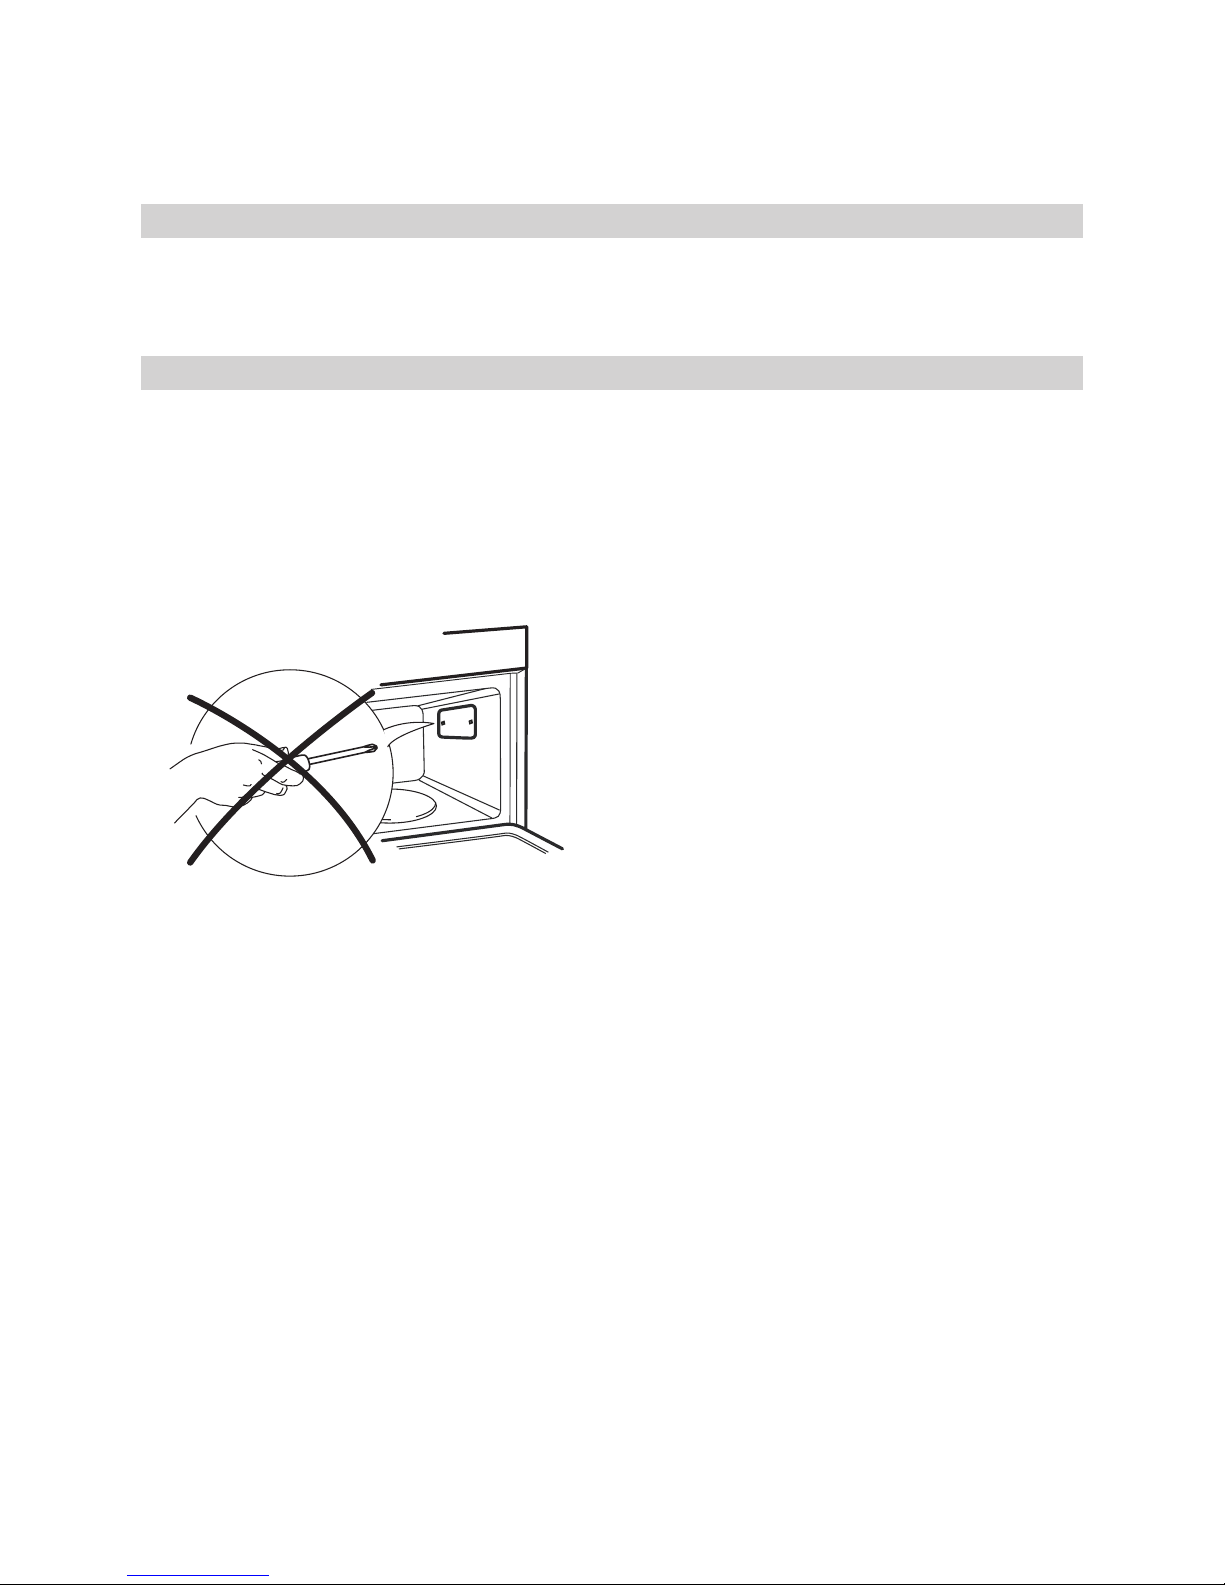
IMPORTANT: do not use metal
scouring pads, abrasive cleansers,
steel-wool pads, gritty washcloths, etc.
which can damage the control panel, and
the interior and exterior oven surfaces. Use
a sponge with a mild detergent or a paper
towel with spray glass cleaner. Apply spray
glass cleaner to a paper towel.
Do not spray directly on the oven.
At regular intervals, especially if spill overs
have occurred, remove the turntable, the
turntable support and wipe the base of the
oven clean.
This oven is designed to operate with the
turntable in place.
i
IMPORTANT: do not operate the
microwave oven when the turntable
has been removed for cleaning.
Use a mild detergent, water and a soft cloth
to clean the interior surfaces, front and rear
of the door and the door opening.
i
IMPORTANT: do not allow grease or
food particles to build up around the
door.
For stubborn stains, boil a cup of water
in the oven for 2 or 3 minutes. Steam will
soften the marks.
i
IMPORTANT: do not use steam
cleaning appliances when cleaning
your microwave oven.
Adding some lemon juice to a cup of water,
placing this on the turntable and boiling for
a few minutes can eliminate odors inside the
oven.
Dishwasher safe
• Turntable support
• Glass turntable
• Steamer
Page 14
ENGLISH 14
Problem Possible cause Solution
The appliance does not work. The mains power supply
or the appliance is not
connected.
Check your fuses and ensure
that there is power avaliable.
The door isn’t closed. Open and then close the door
before you try again.
A message is displayed such
as: F2, F3C, F7 or Err2, Err3,
Err5.
The oven has
recognized that a fault
has occured in one of it’s
sensors or similar.
Disconnect and wait 10
minutes before reconnecting,
then try to operate the oven
once more. If the problem
persists: call service.
The food is unevenly heated. Very thin parts such as
chicken wingtips and
such are not shielded.
Shield the thinner parts with
aluminum foil.
The food was heated at
a power level too high.
Choose a lower power level.
The turntable has
stopped.
Check that the turntable and
turntable support is in place
and the food is well centered,
not touching the cavity walls.
Food isn’t turning. The turntable has
stopped.
Check that the turntable and
turntable support is in place
and the cavity bottom is
clean.
After-Sales Service
Before calling the After-Sales Service:
1. See if you can solve the problem on your own (see the “What to do if ...” table).
2. Switch the appliance off and on again to see if the problem has disappeared.
If the fault persists after the above checks, contact IKEA After Sales Service.
Always specify:
- the type of fault;
- exact type and model of appliance;
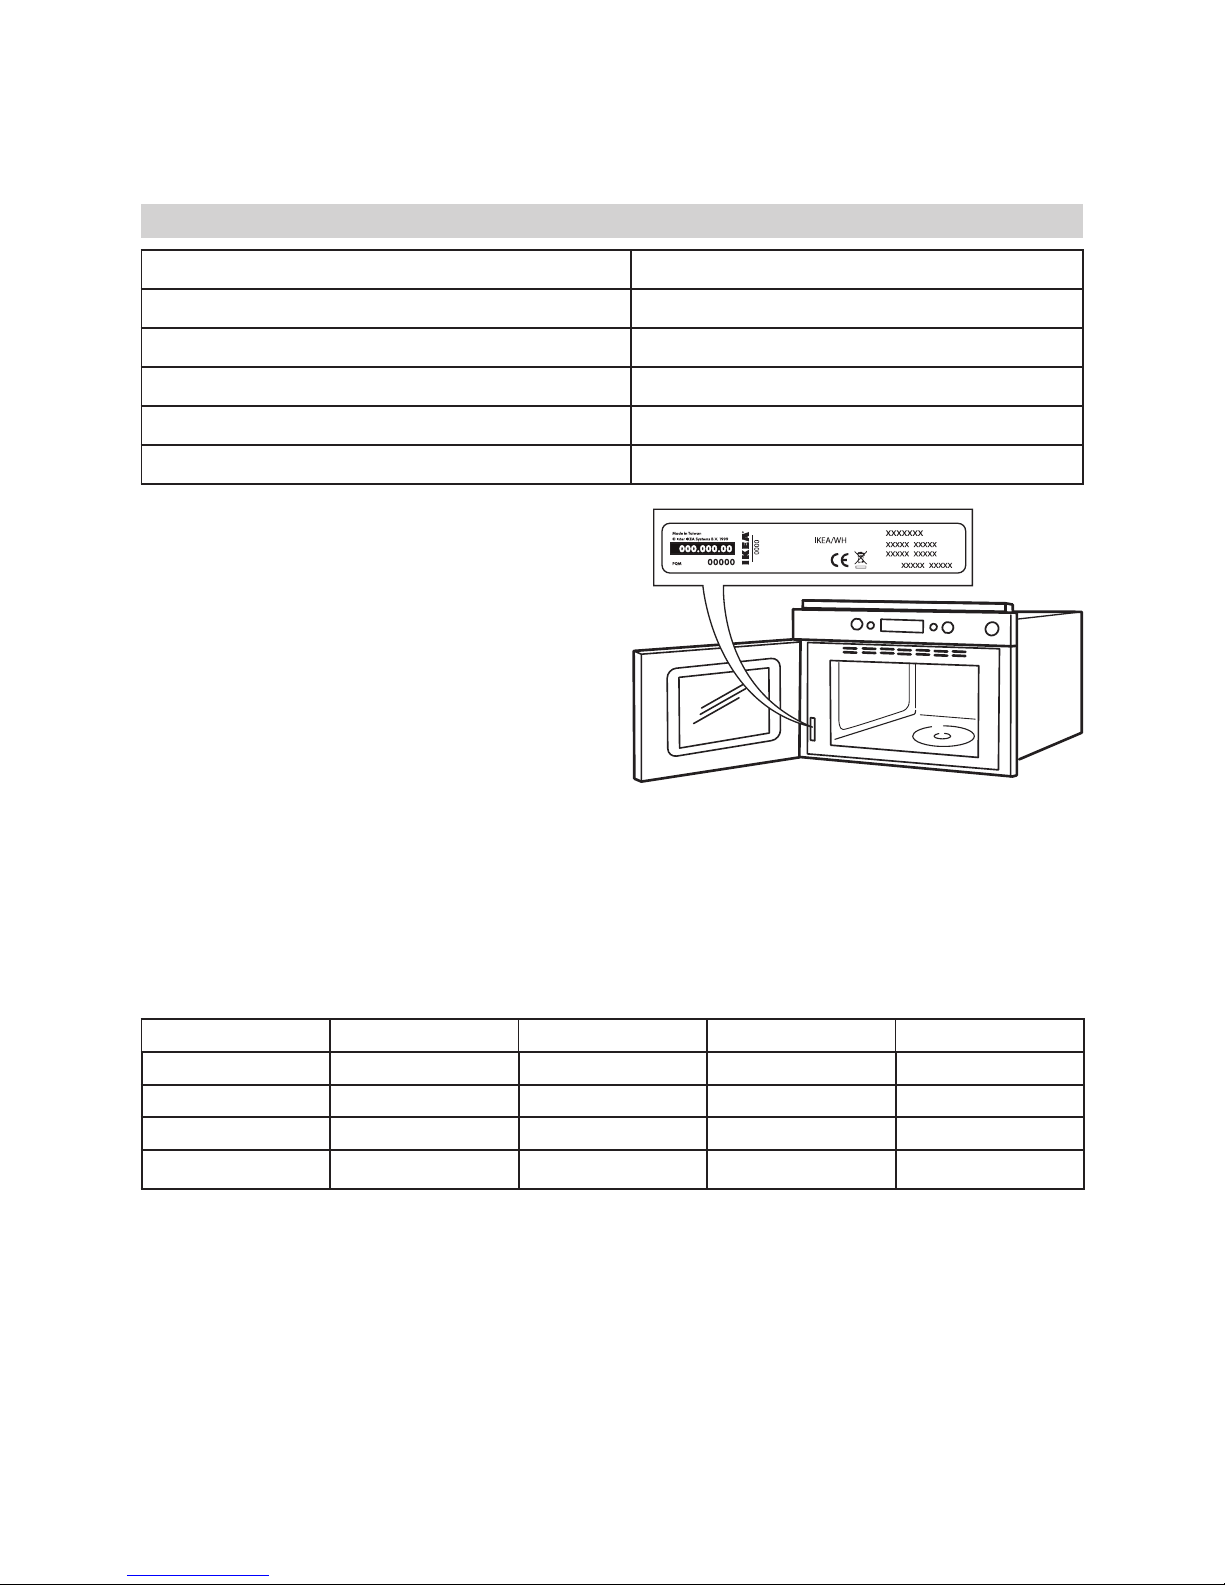
- the After-Sales Service number (the number given after the
word “Service” on the rating plate) located on the inside
edge of the oven cavity (visible when the door is open);
- your full address;
- your telephone number.
If any repairs are required, please contact IKEA After Sales Service (to guarantee that
original spare parts will be used and repairs carried out correctly).
What to do if ...
Page 15
ENGLISH 15
Technical data
Supply Voltage 230 V/50 Hz
Rated Power Input 1300 W
Fuse 10 A (UK 13 A)
MW output power 750 W
Outer dimensions (HxWxD) 348 X 595 X 320
Cavity inner dimensions (HxWxD) 187 X 370 X 290
The technical informations are situated in the rating plate inside the appliance.
Data for test heating performance in accordance with IEC 60705.
The International Electrotechnical Commission, SC. 59H, has developed a standard for
comparative testing of heating performance of different microwave ovens. We recommend
the following for this oven:
Test Amount Approx. time Power level Container
12.3.1 750 g 10 min 750 W Pyrex 3.227
12.3.2 475 g 5 ½ min 750 W Pyrex 3.827
12.3.3 900 g 14 min 750 W Pyrex 3.838
13.3 500 g 2 min 40 sec Jet Defrost
NOTE: this information is only for the qualied technician.
Page 16
ENGLISH 16
Mounting the appliance
Follow the supplied separate mounting
instructions when installing the appliance.
Check that the voltage on the rating plate
corresponds to the voltage in your home.
Do not remove the microwave inlet
protection plates located on the side of the
oven cavity wall. They prevent grease &
food particles from entering the microwave
inlet channels.
Ensure the oven cavity is empty before
mounting.
Ensure that the appliance is not damaged.
Check that the oven door closes rmly
against the door support and that the
internal door seal is not damaged. Empty
the oven and clean the interior with a soft,
damp cloth.
Do not operate this appliance if it has a
damaged mains cord or plug, if it is not
working properly, or if it has been damaged
or dropped. Do not immerse the mains cord
or plug in water. Keep the cord away from
hot surfaces. Electrical shock, re or other
hazards may result.
After connecting
The oven can be operated only if the oven
door is rmly closed.
The earthing of this appliance is
compulsory. The manufacturer will accept no
responsibility for injury to persons, animals
or damage to objects arising from the nonobservance of this requirement.
The manufacturers are not liable for any
problems caused by the user’s failure to
observe these instructions.
Installation
Electrical connection
Page 17
ENGLISH 17
Environmental concerns
The packing box may be fully recycled as
conrmed by the recycling symbol ( ).
Follow local disposal regulations. Keep
potentially hazardous packaging (plastic
bags, polystyrene etc.) out of the reach of
children.
This appliance is marked according to the
European directive 2002/96/EC on Waste
Electrical and Electronic Equipment (WEEE).
By ensuring this product is disposed of
correctly, you will help prevent potential
negative consequences for the environment
and human health, which could otherwise
be caused by inappropriate waste handling
of this product.
Declaration of conformity
This appliance, which is intended to come
- into contact with foodstuffs, complies with
European Regulation ( ) n. 1935/2004
and has been designed, manufactured
and sold in conformity with the safety
requirements of the “Low Voltage” directive
2006/95/ CE (which replaces 73/23/
CEE and subsequent amendments),
the protection requirements of “EMC”
2004/108/CE.
The symbol
on the product, or on
the documents accompanying the product,
indicates that this appliance may not be
treated as household waste. Instead it shall be
handed over to the applicable collection point
for the recycling of electrical and electronic
equipment.
Disposal must be carried out in accordance
with local environmental regulations for waste
disposal.
For more detailed information about
treatment, recovery and recycling of this
product, please contact your local city ofce,
your household waste disposal service or the
shop where you purchased the product.
Before scrapping, cut off the mains cord so
that the appliance cannot be connected to the
mains.
Page 18
DEUTSCH 18
Aufmerksam lesen und zum Nachschlagen
aufbewahren
Erhitzen oder verwenden Sie keine
brennbaren Materialien im Gerät oder in
seiner Nähe. Rauchentwicklung kann zu
Brand oder Explosion führen.
Das Mikrowellengerät nicht zum Trocknen
von Textilien, Papier, Gewürzen, Kräutern,
Holz, Blumen, Früchten oder anderen
brennbaren Materialien verwenden. Es
besteht Brandgefahr.
Wenn Material innerhalb oder außerhalb
des Garraums zu brennen anfängt, die
Gerätetür geschlossen halten und das Gerät
ausschalten. Ziehen Sie den Netzstecker
oder schalten Sie die Sicherung im
Schaltkasten aus.
Garen Sie die Speisen nicht länger als nötig.
Es besteht Brandgefahr.
Das Gerät nicht unbeaufsichtigt lassen,
insbesondere dann, wenn beim Garen
Papier, Kunststoff oder andere brennbare
Materialien verwendet werden. Papier
kann verkohlen oder Feuer fangen. Einige
Kunststoffe können schmelzen, wenn sie
zusammen mit den Speisen erhitzt werden.
Keine ätzenden Chemikalien oder Dämpfe
in diesem Gerät verwenden. Dieser
Gerätetyp wurde speziell zum Aufwärmen
oder Garen von Lebensmitteln entwickelt. Er
eignet sich nicht für industrielle Zwecke oder
Laborzwecke.
Kinder dürfen das Gerät nur unter Aufsicht
von Erwachsenen benutzen, und nur
dann, wenn sie ausreichend eingewiesen
wurden und sich der Gefahren eines
unsachgemäßen Gebrauchs bewusst sind.
Dieses Gerät darf von Personen
(einschließlich Kindern) mit eingeschränkten
physischen, sensorischen oder mentalen
Fähigkeiten nur unter Aufsicht durch eine
für ihre Sicherheit verantwortliche Person
verwendet werden.
VORSICHT! Bei der Benutzung des
Gerätes können zugängliche Teile sehr
heiß werden, halten Sie daher kleine Kinder
fern.
Verwenden Sie das Mikrowellengerät
niemals zum Erhitzen von Speisen oder
Flüssigkeiten in luftdicht verschlossenen
Behältern. Der Druck im Behälter nimmt
zu. Das kann beim Öffnen des Behälters
zu Verletzungen oder zu einer Explosion
führen.
Überprüfen Sie die Türdichtungen und die
umliegenden Bereiche der Türdichtungen
regelmäßig auf Beschädigungen. Nehmen
Sie das Gerät nach einer Beschädigung
erst wieder in Betrieb, nachdem es von
einem qualizierten Kundendiensttechniker
repariert wurde.
i
WICHTIG: Eier: Verwenden Sie das
Mikrowellengerät nicht zum Garen
oder Aufwärmen ganzer Eier mit oder ohne
Schale, da diese auch nach Beenden des
Gar- oder Aufwärmvorgangs explodieren
können.
Wichtige Vorsichtsmaßnahmen
Allgemeines
Das Gerät ist ausschließlich für die
Verwendung im Haushalt bestimmt!
Sicherheitshinweise 18
Produktbeschreibung 20
Bedienfeld 22
Täglicher Gebrauch 22
Reinigung und Pege 27
Störung - Was tun? 28
Technische Daten 29
Aufstellung 30
Elektrischer Anschluss 30
Hinweise zum Umweltschutz 31
IKEA GARANTIE 32
Sicherheitshinweise
Inhaltsverzeichnis
Page 19

DEUTSCH 19
Das Gerät darf nur mit eingestellten Speisen
in Betrieb genommen werden. Andernfalls
kann es zu Schäden am Gerät kommen.
Um sich mit den Gerätefunktionen vertraut
zu machen, stellen Sie ein Glas Wasser in
den Garraum. Das Wasser absorbiert die
Energie der Mikrowellen, so dass der Herd
nicht beschädigt wird.
Verwenden Sie den Garraum nicht als
Lagerraum.
Entfernen Sie alle Metallteile (z. B.
Verschlüsse) von Papier- oder Plastikbeuteln,
bevor diese in den Garraum gelegt werden.
Frittieren
Verwenden Sie das Mikrowellengerät nicht
zum Frittieren, da die Temperatur des
Frittieröls nicht kontrolliert werden kann.
Immer Topappen oder Ofenhandschuhe
verwenden, wenn nach dem Garen
Behälter, Geräteteile und Schalen angefasst
werden. Es besteht Verbrennungsgefahr.
Flüssigkeiten
Z. B. Getränke oder Wasser. Flüssigkeiten
können über den Siedepunkt hinaus erhitzt
werden, ohne dass es zu einer sichtbaren
Blasenbildung kommt. Das kann dazu
führen, dass die heiße Flüssigkeit plötzlich
überkocht.
Um dies zu vermeiden, ergreifen Sie
folgende Vorsichtsmaßnahmen:
1. Verwenden Sie möglichst keine hohen,
schmalen Gefäße mit engem Hals.
2. Rühren Sie die Flüssigkeit um, bevor Sie
das Gefäß in den Garraum stellen, und
lassen Sie einen Teelöffel im Gefäß.
3. Lassen Sie die Flüssigkeit nach dem
Erhitzen kurz stehen und rühren Sie
sie vor der vorsichtigen Entnahme des
Gefäßes aus dem Gerät nochmals um.
Achtung
Genauere Informationen dazu nden
Sie im Mikrowellenkochbuch. Dies gilt
besonders für das Garen oder Erhitzen von
alkoholhaltigen Speisen.
Babynahrung in Gläsern oder Getränke in
Babyaschen müssen nach dem Erwärmen
immer umgerührt und auf die richtige
Temperatur überprüft werden. Dadurch
wird eine gleichmäßige Wärmeverteilung
sichergestellt und das Risiko des Verbrühens
oder Verbrennens vermieden.
Nehmen Sie den Deckel bzw. Sauger
unbedingt vor dem Erwärmen ab!
Page 20
DEUTSCH 20
Produktbeschreibung
Zubehör
Drehtellerauage
x1
Glasdrehteller
x1
Dampfeinsatz
x1
1
2
3
1
Bedienfeld
2
Beleuchtung
3
Tür
Page 21

DEUTSCH 21
Zubehör
Allgemeines
Eine Reihe von Zubehörteilen kann käuich
erworben werden. Prüfen Sie vor dem Kauf,
ob sie für das Mikrowellengerät geeignet
sind.
Verwenden Sie bitte nur hitzebeständiges
und mikrowellengeeignetes Kochgeschirr.
Stellen Sie Speisen und Zubehör so in das
Mikrowellengerät, dass diese keinesfalls mit
dessen Innenwänden in Berührung kommen.
Das gilt besonders dann, wenn die
Zubehörteile aus Metall oder Metallteilen
bestehen.
Wenn solche Teile mit den Innenwänden des
Garraums in Berührung kommen, während
die Mikrowelle in Betrieb ist, können Funken
entstehen und das Gerät kann beschädigt
werden.
Bevor Sie den Ofen einschalten, prüfen Sie
stets, ob sich der Drehteller ungehindert
drehen kann.
Drehtellerauage
Die Drehtellerauage muss immer unter dem
Glasdrehteller eingesetzt werden. Legen
Sie keine anderen Gegenstände auf die
Drehtellerauage.
- Setzen Sie die Drehtellerauage in das
Gerät ein.
Glasdrehteller
Benutzen Sie den Glasdrehteller bei allen
Zubereitungsarten. Er fängt herunter
tropfende Flüssigkeiten und Speiseteilchen
auf, so dass eine unnötige Verschmutzung
des Innenraums vermieden wird.
- Stellen Sie den Glasdrehteller auf die
Drehtellerauage.
Dampfeinsatz
Verwenden Sie den Dampfeinsatz mit Sieb
für Nahrungsmittel wie Fisch, Gemüse und
Kartoffeln.
Platzieren Sie den Dampfeinsatz immer auf
dem Glasdrehteller.
Page 22

DEUTSCH 22
Bedienfeld
Startschutz / Kindersicherung
Diese automatische Sicherheitsfunktion wird
eine Minute, nachdem das Gerät in den
„Bereitschaftsmodus" zurückgekehrt ist, aktiviert.
(Das Gerät bendet sich im Bereitschaftsmodus,
wenn die Uhrzeit im 24-Stunden-Format
angezeigt wird oder, falls die Uhr nicht eingestellt
wurde, wenn keine Anzeige erscheint).
Die Sicherheitsverriegelung wird erst dann
freigegeben, wenn die Tür geöffnet oder
geschlossen wird, z. B. wenn Speisen in die
Mikrowelle gestellt werden. Andernfalls zeigt das
Display die Meldung "DOOR" (Tür) an.
Unterbrechung oder Abbruch des Garvorgangs
Unterbrechung des Garvorgangs:
Der Garvorgang kann durch Öffnen der
Gerätetür unterbrochen werden, um die Speisen
zu kontrollieren, zu wenden oder umzurühren.
Die Einstellungen werden 10 Minuten lang
beibehalten.
Fortsetzen des Garvorgangs:
Schließen Sie die Gerätetür und drücken Sie EIN
MAL die Taste Start. Der Garvorgang wird an der
Stelle fortgesetzt, an der er unterbrochen wurde.
Durch ZWEIMALIGES Drücken der Starttaste wird
die Garzeit um weitere 30 Sekunden verlängert.
Abbruch des Garvorgangs:
Nehmen Sie das Gericht heraus, schließen Sie die
Gerätetür und drücken Sie die Stop-Taste.
Ein Signalton signalisiert, dass der Garvorgang
beendet ist. Er ertönt nach Ablauf der Garzeit
10 Minuten lang ein Mal pro Minute. Um den
Signalton abzuschalten, drücken Sie die StopTaste oder öffnen Sie die Gerätetür.
HINWEIS: Der Ofen speichert die Einstellungen
nur für 60 Sekunden, wenn die Tür nach
Beendigung des Garvorgangs geöffnet und
anschließend wieder geschlossen wird.
Abkühlen
Nach Beenden einer Funktion kühlt das Gerät
selbsttätig ab. Das ist normal.
Danach schaltet sich das Gerät automatisch ab.
Täglicher Gebrauch
1
Stopptaste
2
Leistungstaste
3
Speichertaste
4
Dämpfen-Taste
5
+ /- Taste (stellen Sie mit dieser
Taste Zeit oder Gewicht ein)
6
Jet-Defrost-Taste
7
Start-Taste
8
Tür-Taste
(öffnen Sie mit dieser Taste die Tür)
864321 75
Page 23

DEUTSCH 23
Kurzzeitmesser
Verwenden Sie diese Funktion, wenn Sie eine
Zeitschaltuhr zur genauen Messung der Zeit für
verschiedene Vorgänge benötigen, z. B. zum
Kochen von Eiern oder zum Gehenlassen von Teig
vor dem Backen usw.
312
1.
1
Benutzen Sie die Auf-/Ab-Tasten,
um die gewünschte Garzeit mit der
Zeitschaltuhr einzustellen.
2. Drücken Sie die Leistungstaste mehrmals,
um die Leistung auf 0 W einzustellen.
3. Drücken Sie die Start-Taste.
Nach Ablauf der eingestellten Zeit ertönt ein
Signalton.
Uhr
Lassen Sie beim Einstellen der Uhr die Tür
geöffnet. Dann bleiben 5 Minuten Zeit, um die
Uhr einzustellen. Ansonsten muss jeder Schritt
innerhalb von 60 Sekunden ausgeführt werden.
1
2 4 3 5
1. Drücken Sie die Stop-Taste (3 Sekunden),
bis die linke Ziffer (für die Stunden)
blinkt.
2. Stellen Sie mit den Tasten +/- die
Stunden ein.
3. Drücken Sie die Start-Taste. (Die beiden
rechten Ziffern (Minutenangabe)
blinken).
4. Stellen Sie mit den Tasten +/- die
Minuten ein.
5. Drücken Sie erneut die Start-Taste.
Die Uhr ist nun eingestellt und in Betrieb.
HINWEIS: Wenn das Gerät zum ersten Mal an
das Stromnetz angeschlossen oder nach einem
Stromausfall eingeschaltet wird, bleibt das Display
dunkel. Wenn die Uhr nicht eingestellt wird, bleibt
das Display dunkel, bis die Garzeit eingestellt
wird.
Wenn nach der Einstellung der Uhr die
Zeitanzeige auf dem Display nicht mehr
gewünscht wird, drücken Sie die Stop-Taste
erneut drei Sekunden lang und anschließend noch
einmal.
Um die Uhr neu einzustellen, wie vorstehend
beschrieben vorgehen.
Garen und Aufwärmen mit Mikrowellen
Diese Funktion dient zum normalen Garen und
Aufwärmen von Gemüse, Fisch, Kartoffeln und
Fleisch.
312
1. Stellen Sie mit den Tasten +/- die
gewünschte Garzeit ein.
2. Drücken sie mehrmals die Leistungstaste,
um die Leistungsstufe einzustellen.
3. Drücken Sie die Start-Taste.
Während des Garvorgangs:
Die Garzeit kann problemlos durch Drücken der
Start-Taste in 30-Sekunden-Schritten verlängert
werden. Mit jedem Tastendruck wird die Garzeit
um 30 Sekunden verlängert. Die Garzeit lässt
sich auch durch durch Drücken der Tasten +/verlängern oder verkürzen.
Durch Drücken der Leistungstaste können Sie
auch die Leistungsstufe ändern. Bei der ersten
Betätigung wird die aktuelle Leistungsstufe
angezeigt. Drücken Sie die Leistungstaste
mehrmals, um eine andere Leistungsstufe zu
wählen.
Alle Einstellungen können bei Bedarf während des
Garvorgangs geändert werden.
Page 24

DEUTSCH 24
Leistungsstufe
Nur Mikrowelle
Leistungsstufe Gebrauchsempfehlung:
750 W
Zum Aufwärmen von Getränken,
Wasser, klaren Suppen, Kaffee, Tee
oder anderen Speisen mit hohem
Wassergehalt. Wählen Sie eine
niedrigere Leistungsstufe, falls die
Speise Ei oder Sahne enthält.
Garen von Fisch, Gemüse, Fleisch
etc.
500 W
Schonendere Zubereitung, z. B. bei
Saucen mit hohem Eiweißgehalt,
Käse und Eierspeisen, sowie zum
Fertigkochen von Eintopfgerichten.
350 W
Zum Köcheln von Eintopfgerichten
und zum Schmelzen von Butter.
160 W
Auftauen. Weichmachen von Butter
und Käse. Weichermachen von
Eiskrem.
0 W
Wenn nur der Kurzzeitmesser
verwendet werden soll.
Schnellstart
Diese Funktion dient zum schnellen Aufwärmen
von Speisen mit einem hohen Wassergehalt, z. B.
klare Suppen, Kaffee oder Tee.
Drücken Sie die Schnellstarttaste drücken, um
automatisch mit der vollen Mikrowellenleistung
und einer Garzeit von 30 Sekunden zu beginnen.
Mit jedem weiteren Tastendruck wird die Zeit um
30 Sekunden verlängert. Die Garzeit lässt sich
auch durch Drücken der Tasten +/- verlängern
bzw. verkürzen, wenn das Gerät bereits in Betrieb
ist.
Manuelles Auftauen
Beim manuellen Auftauen entsprechend
dem Kapitel "Garen und Aufwärmen mit der
Mikrowelle" vorgehen und die Leistung auf 160
W einstellen.
Überprüfen Sie den Auftaugrad der Speisen in
regelmäßigen Abständen. Mit der Zeit wissen
Sie aus Erfahrung, welche Einstellungen die
unterschiedlichen Mengen benötigen.
Tiefkühlkost in Plastikbeuteln, Klarsichtfolie oder
Kartons können Sie direkt mit der Verpackung
auftauen, solange diese Verpackungen keine
Metallteile (z. B. Drahtverschlüsse) enthalten.
Die Auftauzeit wird auch durch die
Verpackungsform beeinusst. Speisen in achen
Verpackungen tauen schneller auf als dicke
Blöcke.
Trennen Sie einzelne Speisestücke, sobald diese
antauen. Einzelne Scheiben tauen schneller auf.
Decken Sie bestimmte Speisebereiche (z. B.
Hähnchenschenkel oder -ügel) mit AlufolieStücken ab, sobald diese warm werden.
Wenden Sie große Speisestücke nach halber
Auftauzeit.
Gekochtes, Geschmortes und Fleischsoßen
tauen besser auf, wenn sie während des
Auftauprozesses umgerührt werden.
Die Auftauzeit sollte lieber etwas geringer
bemessen und der Auftauprozess während der
Stehzeit abgeschlossen werden.
Mit einer Stehzeit von einigen Minuten ergibt sich
immer ein besseres Auftauergebnis, da sich die
Temperatur gleichmäßiger in der Speise verteilen
kann.
Schnellauftauen
Benutzen Sie diese Funktion NUR zum Auftauen
von Fleisch, Fisch und Geügel.
Die Funktion Schnellauftauen sollte nur für Speisen
mit einem Nettogewicht von 100 g bis 2 kg
genutzt werden.
2 31
1. Drücken Sie die Taste Jet Defrost.
2. Stellen Sie mit den Tasten +/- das
Gewicht der Speise ein.
3. Drücken Sie die Start-Taste.
Nach der Hälfte der Auftauzeit hält das Gerät
Page 25

DEUTSCH 25
an und es erscheint die Meldung TURN FOOD
(Speise wenden).
- Öffnen Sie die Tür.
- Wenden Sie die Speise.
- Schließen Sie die Tür und nehmen Sie das
Gerät durch Drücken der Start-Taste wieder
in Betrieb.
HINWEIS: Das Gerät setzt sich automatisch nach
2 Minuten wieder in Gang, wenn die Speise nicht
gewendet wurde. Das Auftauen dauert in diesem
Fall länger.
Bei dieser Funktion muss das Nettogewicht
der Speise bekannt sein. Das Gerät berechnet
anschließend automatisch die Zeit bis zur
Beendigung des Vorgangs.
- Tiefgekühlte Speisen:
Wählen Sie ein niedrigeres Gewicht,
falls die Speisen wärmer sind als die
Tiefkühltemperatur (-18 °C). Wählen Sie ein
höheres Gewicht, wenn die Speisen kälter als
die Tiefkühltemperatur (-18 °C) sind.
Lebensmittel Tipps
Fleisch
(100 g bis 2,0 kg)
Hackeisch, Koteletts,
Steaks oder Braten.
Geügel
(100 g bis 2,0 kg)
Ganze Hähnchen,
Hähnchenstücke oder
Hähnchenlets.
Fisch
(100 g bis 1,5 kg)
Ganze Fische,
Fischsteaks oder
Fischlets.
Bei Lebensmitteln, die nicht in nachstehender
Tabelle enthalten sind und die ein geringeres
oder höheres Gewicht als empfohlen haben,
verfahren Sie entsprechend dem Kapitel „Garen
und Aufwärmen mit der Mikrowelle" und wählen
Sie zum Auftauen 160 W.
Speicher
1 2
Mit der Speicher-Funktion (Memory) können Sie
einfach und schnell eine bevorzugte Einstellung
aufrufen.
Mit dieser Speicher-Funktion können Sie jede
aktuell angezeigte Funktion und Einstellung
speichern.
1. Drücken Sie die Speichertaste Memo.
2. Drücken Sie die Start-Taste.
So speichern Sie eine Einstellung:
1. Wählen Sie eine beliebige Funktion und
nehmen Sie die notwendigen Einstellungen
vor
2. So führen Sie erforderliche Einstellungen durch
3. Halten Sie die Speichertaste Memo 3
Sekunden lang gedrückt, bis ein Signalton
ertönt. Die Einstellung ist nun gespeichert.
Sie können den Speicher beliebig oft neu
programmieren.
Wenn das Gerät zum ersten Mal an das
Stromnetz angeschlossen oder nach einem
Stromausfall eingeschaltet wird, enthält der
Speicher die Einstellung 1 Minute und 750 W als
Standardeinstellung.
Dampf
3 4
1 2
Nutzen Sie diese Funktion z. B. für Gemüse und
Fisch.
Verwenden Sie immer den im Lieferumfang
enthaltenen Dampfeinsatz, wenn Sie diese
Funktion benutzen.
1. Drücken Sie die Dämpfen-Taste.
2. Drücken Sie die Dampftaste mehrmals,
um die Lebensmittelkategorie
Page 26

DEUTSCH 26
auszuwählen.
3. Stellen Sie mit den Tasten +/- das
Gewicht der Speise ein.
4. Drücken Sie die Start-Taste.
Legen Sie das Gargut auf den Dampfrost.
Geben Sie 100 ml (1 dl) Wasser in den unteren
Teil des Dampfeinsatzes.
Decken Sie mit dem Deckel ab.
VORSICHT! Der Dampfeinsatz darf nur bei
Mikrowellenbetrieb verwendet werden!
Verwenden Sie ihn niemals zusammen mit
anderen Funktionen.
Wird der Dampfeinsatz für andere Funktionen
verwendet, kann es zu Schäden kommen.
Bevor Sie den Ofen einschalten, prüfen Sie stets,
ob sich der Drehteller ungehindert drehen kann.
Platzieren Sie den Dampfeinsatz immer auf dem
Glasdrehteller.
Garen von Gemüse
Geben Sie das Gemüse in das Sieb des
Dampfaufsatzes.
100 ml Wasser in den unteren Teil geben.
Abdecken und die Zeit einstellen.
Weiches Gemüse wie Brokkoli und Porree
benötigt eine Garzeit von 2-3 Minuten.
Festeres Gemüse wie Möhren und Kartoffeln
benötigt eine Garzeit von 4 bis 5 Minuten.
Lebensmittel Tipps
Kartoffeln /
Wurzelgemüse
(150 - 200 g)
Verwenden Sie gleiche
Größen.
Schneiden Sie das
Gemüse in gleich
große Stücke.
Lassen Sie es nach
dem Garen 1 - 2
Minuten stehen.
Gemüse
(Blumenkohl und
Brokkoli)
(150 - 500 g)
Tiefgekühltes
Gemüse
(150 - 500 g)
Lassen Sie es nach
dem Garen 1-2
Minuten stehen.
Fischlets
(150 - 500 g)
Verteilen Sie die
Filets gleichmäßig
auf dem Dampfrost.
Legen Sie dünne Teile
übereinander. Lassen
Sie es nach dem Garen
1 - 2 Minuten stehen.
Page 27

DEUTSCH 27
Reinigung und Pege
Im Normalfall müssen Sie das Gerät nur
reinigen.
Wird das Gerät nicht laufend sauber gehalten,
kann dies zur Abnutzung der Oberäche
führen, was die Lebensdauer des Gerätes
verringern und evtl. zu gefährlichen Situationen
führen kann.
i
WICHTIG: Verwenden Sie keine
Topfreiniger aus Metall, Scheuermittel,
Topfkratzer aus Stahlwolle und keine groben
Reinigungstücher usw., da diese das Bedienfeld
sowie die Innen- und Außenächen des
Gerätes beschädigen können. Benutzen Sie
zum Reinigen einen Schwamm und ein mildes
Reinigungsmittel oder ein Papiertuch mit
Glasreiniger-Spray. Sprühen Sie den
Glasreiniger auf das Papiertuch.
Sprühen Sie niemals direkt in das Gerät.
Entfernen Sie in regelmäßigen Abständen,
besonders wenn etwas übergelaufen ist, den
Drehteller und den Drehtellerhalter und
reinigen Sie den Boden des Geräts.
Verwenden Sie das Mikrowellengerät nur mit
korrekt eingesetztem Drehteller.
i
WICHTIG: Nehmen Sie die Mikrowelle
erst wieder in Betrieb nehmen, wenn der
Drehteller nach der Reinigung wieder
eingesetzt ist.
Verwenden Sie nur milde Reinigungsmittel,
Wasser und ein weiches Tuch zum Reinigen
der Innenraumächen sowie der Innen- und
Außenseite der Gerätetür und der Türöffnung.
i
WICHTIG:Fettspritzer oder Speisereste
dürfen sich nicht um die Tür herum
festsetzen.
Bei hartnäckiger Verschmutzung erhitzen Sie
eine Tasse Wasser 2 bis 3 Minuten lang im
Garraum. Der Dampf weicht den Schmutz auf.
i
WICHTIG:Verwenden Sie zur Reinigung
des Gerätes keine Dampfreiniger.
Unangenehmer Geruch im Garraum lässt
sich beseitigen, wenn ein Glas Wasser mit
Zitronensaft auf den Drehteller gestellt wird
und das Wasser einige Minuten lang kocht.
Spülmaschinenfestes Zubehör
• Drehtellerauage
• Glasdrehteller
• Dampfeinsatz
Page 28

DEUTSCH 28
Problem Mögliche Ursache Abhilfemaßnahme
Das Gerät funktioniert
nicht.
Der Netzstecker steckt nicht in
der Steckdose, oder das Gerät
ist nicht angeschlossen.
Prüfen Sie Ihre Sicherungen und stellen
Sie sicher, dass die Stromversorgung nicht
unterbrochen ist.
Die Tür ist nicht richtig
geschlossen.
Vor einem erneuten Versuch die Tür
öffnen und wieder schließen.
Eine der folgenden
Meldungen wird
angezeigt: F2, F3C, F7
oder Err2, Err3, Err5.
Das Gerät hat eine Störung
einer seiner Sensoren erfasst
oder eine ähnliche Störung.
Den Netzstecker des Geräts ziehen und
zehn Minuten warten. Danach das Gerät
anschließen und erneut versuchen, es in
Betrieb zu nehmen. Bleibt das Problem
bestehen, wenden Sie sich bitte an den
Kundenservice.
Die Speisen sind
ungleichmäßig erhitzt.
Sehr dünne Teile wie
Hähnchenügelspitzen o. ä.
wurden nicht abgedeckt.
Decken Sie dünnere Teile mit Alufolie ab.
Die Speise wurde mit einer zu
hohen Leistungsstufe erhitzt.
Wählen Sie eine niedrigere Leistungsstufe.
Der Drehteller dreht sich nicht
mehr.
Sind Drehtellerauage und Drehteller
richtig eingesetzt? Die Speisen müssen
genau in der Mitte liegen und dürfen die
Wände des Garraums nicht berühren.
Die Speise dreht sich
nicht.
Der Drehteller dreht sich nicht
mehr.
Sind Drehtellerauage und Drehteller
richtig eingesetzt? Ist der Boden des
Garraums sauber?
Kundendienst
Bevor Sie den Kundendienst rufen:
1. Versuchen Sie zuerst, die Störung anhand der in "Störung - was tun?" beschriebenen Anleitungen selbst
zu beheben.
2. Das Gerät aus und wieder einschalten. Ist die Störung behoben?
Falls die Störung nach den vorstehend beschriebenen Kontrollen weiter besteht, rufen Sie bitte den IKEA
Kundendienst an.
Sie benötigen dabei folgende Angaben:
- die Art der Störung;
- den genauen Gerätetyp und die Modellnummer des Geräts;
- die Servicenummer (die Zahl nach dem Wort "Service" auf dem
Typenschild) bendet sich an der Innenkante des Backofeninnenraums (bei offener Backofentür sichtbar);
- Ihre vollständige Anschrift,
- Ihre Telefonnummer.
Im Reparaturfall wenden Sie sich bitte an den IKEA Kundendienst (nur dann wird garantiert, dass
Originalersatzteile verwendet werden und eine sachgerechte Reparatur durchgeführt wird).
Störung - Was tun?
Page 29

DEUTSCH 29
Technische Daten
Netzspannung 230 V / 50 Hz
Eingangsnennleistung 1300 W
Sicherung 10 A (GB 13 A)
Ausgangsleistung MW 750 W
Außenabmessungen (H x B x T) 348 x 595 x 320
Innenabmessungen (H x B x T) 187 x 370 x 290
Die technischen Informationen stehen auf dem
Typenschild im Gerät.
Daten zum Testen der Heizleistung in Übereinstimmung mit IEC 60705.
Die Internationale Elektrotechnische Kommission (IEC), SC 59H, hat einen Standard für
Vergleichstests der Heizleistung verschiedener Mikrowellengeräte entwickelt. Für dieses
Gerät empfehlen wir Folgendes:
Test Menge
Ungefähre
Dauer Leistungsstufe Behälter/Gefäß
12.3.1 750 g 10 Min. 750 W Pyrex 3.227
12.3.2 475 g 5½ Min. 750 W Pyrex 3.827
12.3.3 900 g 14 Min. 750 W Pyrex 3.838
13.3 500 g 2 Min 40 s Schnellauftauen
HINWEIS: diese Information ist nur für einen qualizierten Techniker.
Page 30

DEUTSCH 30
Montage des Geräts
Befolgen Sie zum Installieren des Geräts die
mitgelieferte separate Montageanleitung.
Die Spannung auf dem Typenschild muss
der Spannungsversorgung in Ihrem Haus
entsprechen.
Entfernen Sie nicht die Platten zum Schutz
der Mikrowellenluftkanäle an der Seite des
Garraums. Sie verhindern, dass Fett und
Speiseteilchen in die Mikrowellenluftkanäle
gelangen.
Vor der Montage muss der Garraum des
Geräts leer sein.
Vergewissern Sie sich, dass das Gerät nicht
beschädigt ist. Die Tür muss dicht mit dem
Rahmen abschließen und die innen liegende
Türdichtung darf nicht beschädigt sein.
Entfernen Sie alle Gegenstände aus dem
Gerät und reinigen Sie die Innenächen mit
einem weichen, feuchten Tuch.
Verwenden Sie das Gerät nicht, wenn das
Netzkabel oder der Stecker beschädigt sind,
wenn es nicht einwandfrei funktioniert, wenn
es heruntergefallen ist oder in irgendeiner
Weise beschädigt wurde. Tauchen Sie das
Netzkabel oder den Stecker nicht in Wasser.
Halten Sie das Kabel von heißen Flächen
fern. Andernfalls könnten Stromschlag,
Brand oder sonstige Gefährdungen die
Folge sein.
Nach dem Anschließen
Das Gerät kann nur in Betrieb genommen
werden, wenn die Tür fest geschlossen ist.
Die Erdung dieses Geräts ist gesetzlich
vorgeschrieben. Der Hersteller haftet
nicht für Verletzungen von Personen oder
Tieren und für Sachschäden, die infolge
Missachtung der o. g. Vorschriften entstehen
sollten.
Der Hersteller haftet nicht für Probleme,
die sich aus der Nichtbeachtung dieser
Anweisungen durch den Nutzer ergeben.
Aufstellung
Anschluss an das Stromnetz
Page 31

DEUTSCH 31
Hinweise zum Umweltschutz
Die Verpackung besteht aus 100 %
recyclingfähigem Material und ist daher mit
dem Recycling-Symbol gekennzeichnet [ ].
Beachten Sie bei der Entsorgung die
örtlichen Bestimmungen. Bewahren Sie
Verpackungsmaterial, das eine potenzielle
Gefahr darstellt (Kunststoffbeutel, Styropor
usw.), nicht in der Reichweite von Kindern
auf.
In Übereinstimmung mit den Anforderungen
der Europäischen Richtlinie 2002/96/
EG über Elektro- und ElektronikAltgeräte (WEEE) ist dieses Gerät mit
einer Markierung versehen. Durch eine
vorschriftsmäßige Entsorgung tragen Sie
zum Umweltschutz bei und vermeiden
potenzielle Unfallgefahren, die bei einer
unsachgemäßen Entsorgung des Produkts
entstehen können.
Konformitätserklärung
Dieses Gerät ist für den Kontakt mit
Lebensmitteln bestimmt und entspricht
der EG-Richtlinie ( ) Nr. 1935/2004. Es
wurde den Sicherheitsanforderungen der
"Niederspannungsrichtlinie" 2006/95/
EG (die 73/23/EWG und nachfolgende
Änderungen ersetzt), den Schutzvorschriften
der EMV-Richtlinie 2004/108/EWG
entsprechend entwickelt, gebaut und in den
Handel gebracht.
Das Symbol
auf dem Produkt oder
der beiliegenden Produktdokumentation
weist darauf hin, dass dieses Gerät nicht
als normaler Hausmüll behandelt werden
darf. Stattdessen ist es an die zuständige
Sammelstelle für die Wiederverwertung
elektrischer und elektronischer Geräte
auszuhändigen.
Die Entsorgung muss gemäß den örtlichen
Bestimmungen zur Abfallbeseitigung
erfolgen.
Bitte wenden Sie sich an die zuständigen
Behörden Ihrer Gemeindeverwaltung, an
den lokalen Recyclinghof für Hausmüll oder
an den Händler, bei dem Sie dieses Gerät
erworben haben, um weitere Informationen
über die Behandlung, Verwertung und
Wiederverwendung dieses Produkts zu
erhalten.
Das Gerät vor dem Verschrotten durch
Abschneiden des Netzkabels unbrauchbar
machen.
Page 32

DEUTSCH 32
IKEA GARANTIE
Wie lange ist die IKEA Garantie gültig?
Die Garantie gilt 5 (fünf) Jahre ab dem
Kauf-/ Auslieferungsdatum für die bei IKEA
gekauften Geräte, es sei denn, es handelt
sich um Geräte der Marke “LAGAN”. Bei
diesen Geräten gilt eine Garantie von 2
(zwei) Jahren. Als Kaufnachweis ist das
Original des Einkaufsbeleges erforderlich.
Werden im Rahmen der Garantie Arbeiten
ausgeführt, verlängert sich dadurch nicht die
Garantiezeit für das Gerät.
Welche Geräte sind nicht durch die IKEA
Fünfjahresgarantie abgedeckt?
Die 5-jährige (fünf) Garantie gilt für alle
nach dem 1. August 2007 gekauften IKEA
Geräte. Hiervon ausgenommen sind die
IKEA Geräte der Marke LAGAN.
Wer übernimmt den Service?
IKEA führt die Serviceleistungen über
seinen eigenen Kundendienst oder einen
beauftragten Servicepartner aus.
Was deckt diese Garantie ab?
Die Garantie deckt Gerätefehler ab, die
aufgrund einer fehlerhaften Konstruktion
oder aufgrund von Materialfehlern nach
dem Datum bei/durch IKEA entstanden sind.
Die Garantie gilt nur für den Hausgebrauch
des betreffenden Gerätes. Ausnahmen
sind unter der Überschrift “Was deckt die
Garantie nicht ab?” erläutert. Innerhalb
der Garantiefrist werden die Kosten für
Reparatur, Ersatzteile sowie die Arbeits- und
Fahrtkosten übernommen, vorausgesetzt,
das Gerät ist ohne besonderen Aufwand für
eine Reparatur zugänglich. Die jeweiligen
örtlichen Bestimmungen oder die für die
Schweiz gültigen Rechtsvorschriften gelten
unter diesen Bedingungen. Ersetzte Teile
gehen in das Eigentum von IKEA über.
Was wird von IKEA unternommen, um das
Problem zu beheben?
Der Kundendienst begutachtet das Produkt
und entscheidet nach eigenem Ermessen,
ob ein Garantieanspruch besteht. Wenn
die Garantie geltend gemacht werden
kann, wird IKEA durch seinen eigenen
Kundendienst oder einen autorisierten
Servicepartner nach eigenem Ermessen das
schadhafte Produkt entweder reparieren
oder durch ein gleiches oder vergleichbares
Produkt ersetzen.
Was deckt diese Garantie nicht ab?
• Normale Abnutzungen und
Beschädigungen.
• Vorsätzlich oder fahrlässig herbeigeführte
Schäden, Beschädigungen infolge
Missachtung der Bedienungsanleitung,
unsachgemässer Installation, falschen
Spannungsanschlusses, Beschädigung
durch chemische oder elektrochemische
Reaktionen, Korrosions- oder
Wasserschäden, einschliesslich
Schäden durch ungewöhnlich hohen
Kalkgehalt im Wasser oder anormale
Umweltbedingungen.
• Verbrauchs- und Verschleissteile wie z.B.
Batterien und Glühlampen.
• Nichtfunktionelle und dekorative Teile,
die den normalen Gebrauch nicht
beeinussen, sowie Kratzer oder mögliche
Farbveränderungen.
• Schäden verursacht durch Fremdkörper,
Substanzen oder Reinigungsarbeiten/
Beseitigung von Verstopfungen an Filtern,
Abüssen oder Spülmittelfächern.
• Schäden an folgenden Teilen:
Glaskeramik, Zubehör, Geschirr- und
Besteckkörbe, Zu- und Ablaufschläuche,
Dichtungen, Glühlampen und deren
Abdeckungen, Siebe, Knöpfe, Gehäuse
und Gehäuseteile. Soweit nicht
nachgewiesen wird, dass solche Schäden
auf Herstellungsmängel zurückzuführen
sind.
• Bei Fällen, in welchen der Servicetechniker
keinen Fehler nden konnte.
• Reparaturen, die nicht von unserem
Page 33

DEUTSCH 33
eigenen Kundendienst oder einem
Servicevertragspartner ausgeführt oder
bei denen keine Originalteile verwendet
wurden.
• Durch fehlerhafte oder
unvorschriftsmässige Installation
erforderliche Reparaturen.
• Fehlbedienung und/oder Verwendung
des Gerätes in einer nicht privaten
sondern gewerblichen Umgebung.
• Transportschäden. Wenn der Kunde das
Produkt selbst nach Hause oder zu einer
anderen Adresse transportiert, ist IKEA
von der Haftung für Transportschäden
jeder Art freigestellt. Liefert IKEA das
Produkt direkt an die Kundenadresse,
werden eventuelle Transportschäden
durch IKEA gedeckt.
• Kosten für die Installation des IKEA
Gerätes.
Wenn jedoch der IKEA Kundendienst oder
ein Servicevertragspartner im Rahmen der
Garantie Reparaturen ausführt oder das
Gerät ersetzt, installiert der Kundendienst
oder der Servicevertragspartner
das ausgebesserte Gerät oder das
Ersatzgerät, falls dies erforderlich sein
sollte.
Als Ausnahme gilt die fehlerfreie
Installation durch qualizierte Fachleute
unter Verwendung von Originalteilen,
um das Gerät den technischen
Sicherheitsvorschriften eines anderen EULandes anzupassen.
Gültigkeit der länderspezischen
Bestimmungen
IKEA räumt Ihnen eine spezielle
Garantie ein, die die gesetzlichen
Gewährleistungsrechte, die von Land
zu Land unterschiedlich sein können,
mindestens abdeckt, evt. erweitert.
Allerdings schränken diese Bedingungen
in keiner Weise die landesweit geltenden
Verbraucherrechte ein.
Gültigkeitsbereich
Für Geräte, die in einem EU-Land gekauft
und in ein anderes Land mitgenommen
werden, wird der Kundendienst gemäss
den Garantierichtlinien im neuen Land
übernommen. Eine Verpichtung zur
Durchführung von Leistungen im Rahmen
der Garantie besteht nur dann, wenn
das Gerät gemäß der Montageanleitung
und gemäß der Sicherheitshinweise im
Benutzerhandbuch aufgestellt und installiert
wurde gemäß:
- den technischen Spezikationen des
Landes, in dem der Garantieanspruch
erfolgt;
- den Montageinstruktionen und
Informationen im Benutzerhandbuch.
Der engagierte Kundendienst für IKEA
Geräte
Der autorisierte Kundendienst für IKEA
Geräte steht Ihnen für Fragen oder
Probleme wie folgt zur Verfügung:
• Wenn Sie einen Kundendienst im Rahmen
der Garantie benötigen
• Bei Fragen zur Installation Ihres IKEAGerätes in den IKEA-Möbelkörpus
(Hinweis: Die Gasinstallation wird von
einem autorisierten Gasfachmann
durchgeführt).
• Wenn Sie Fragen zu den Funktionen Ihres
IKEA-Gerätes haben.
Um Ihnen möglichst schnell und
kompetent weiterhelfen zu können,
bitten wir Sie, vorher die Montage und
Gebrauchsanweisung Ihres Gerätes
genauestens durchzulesen.
So erreichen Sie unseren Service
Gehen Sie dazu auf die letzte
Seite dieser Broschüre. Dort
nden Sie eine Übersicht mit den
entsprechenden Telefonnummern
und Kontaktdaten unserer
autorisierten Kundendienste.
Page 34

DEUTSCH 34
Damit wir Ihnen im Falle einer
Störung jederzeit schnell und
kompetent helfen können, bitten wir
Sie, sich an die in diesem Handbuch
angegebene Service-Rufnummer zu
wenden. Halten Sie dazu bitte die
(8-stellige) IKEA Artikelnummer und
die 12-stellige Servicenummer (auf
dem Geräte-Typschild vermerkt)
Ihres IKEA Gerätes bereit.
KAUF-/AUSLIEFERUNGSBELEG AUF!
Unser Service kann einen
Garantieanspruch nur unter Vorlage
dieses Beleges akzeptieren. Auf dem
Beleg sind auch die Bezeichnung
und (8-stellige) IKEA Artikelnummer
des von Ihnen erworbenen Geräts
vermerkt.
Benötigen Sie weiteren Rat und
Unterstützung?
Bei allen anderen, nicht
kundendienstspezischen Fragen bitten
wir Sie, sich an den Kundenservice im
nächstgelegenen IKEA-Einrichtungshaus
zu wenden. Wir empfehlen Ihnen, vorher
die dem Gerät beigefügten Unterlagen
genauestens durchzulesen.
Page 35

FRANÇAIS 35
Lire attentivement et conserver pour toute
consultation ultérieure
Veillez à ne pas chauffer ou utiliser de
matériaux inammables à l'intérieur ou à
proximité du four. Les vapeurs dégagées
peuvent provoquer un incendie ou une
explosion.
N'utilisez jamais votre four micro-ondes
pour sécher des textiles, du papier, des
épices, des herbes, du bois, des eurs, des
fruits ou d'autres produits combustibles. Ils
pourraient s'enammer.
Si ce qui se trouve à l'intérieur ou à
l'extérieur du four prenait feu, ou que vous
constatez de la fumée, n'ouvrez pas la
porte, mais arrêtez le four et la ventilation.
Débranchez le cordon d'alimentation
ou coupez le courant au fusible ou au
disjoncteur.
Ne cuisez pas les aliments de façon
excessive. Ils pourraient s'enammer.
Ne laissez pas le four sans surveillance,
surtout si vous utilisez du papier,
du plastique ou d'autres matériaux
combustibles pour la cuisson. Le papier peut
carboniser ou brûler et certains plastiques
peuvent fondre lorsqu'ils sont utilisés pour
réchauffer des aliments.
N'utilisez pas de produits chimiques ou de
vapeurs corrosives dans cet appareil. Ce
type de four a été spécialement conçu pour
réchauffer ou cuire des aliments. Il n'est
pas prévu pour un usage industriel ou de
laboratoire.
Ne laissez les enfants utiliser l'appareil
que sous la surveillance d'un adulte et
uniquement après leur avoir fourni toutes les
instructions appropriées an qu'ils puissent
l'utiliser de façon sûre et comprennent les
dangers d'un usage incorrect.
Les personnes (y compris les enfants) qui,
en raison de leurs capacités physiques,
sensorielles ou mentales, de leur
inexpérience ou de leur méconnaissance, ne
sont pas en mesure d'utiliser l'appareil en
toute sécurité, doivent se servir de celui-ci
uniquement sous la surveillance ou avec les
instructions d'une personne responsable.
AVERTISSEMENT ! Les parties
accessibles peuvent chauffer au cours
de l'utilisation, les enfants ne doivent donc
pas s'en approcher.
N'utilisez pas le four micro-ondes pour
chauffer des aliments ou des liquides dans
des récipients hermétiques. L'augmentation
de la pression peut les endommager lors de
l'ouverture ou les faire exploser.
Contrôlez régulièrement l'état des joints et
de l'encadrement de la porte. Si ces zones
sont endommagées, n'utilisez plus l'appareil
et faites-le réparer par un technicien
spécialisé.
i
IMPORTANT : Œufs : N'utilisez pas
votre four micro-ondes pour cuire ou
réchauffer des œufs avec ou sans coquille,
car ils peuvent exploser même si la cuisson
est terminée.
Précautions importantes
Généralités
N'utilisez cet appareil que pour un usage
domestique !
Consignes de sécurité 35
Description de l'appareil 37
Bandeau de commande 39
Usage quotidien 39
Nettoyage et entretien 44
Ce qu'il convient de faire si ... 45
Données techniques 46
Installation 47
Branchements électriques 47
Recommandations importantes pour
la sauvegarde de l'environnement 48
Garantie IKEA 49
Consignes de sécurité
Table des matières
Page 36

FRANÇAIS 36
Ne faites pas fonctionner l'appareil à vide.
Le cas échéant, un endommagement de
l'appareil risquerait de se produire.
Si vous vous exercez à le programmer,
placez un verre d'eau à l'intérieur. L'eau
absorbera l'énergie des micro-ondes et le
four ne sera pas abîmé.
N'utilisez pas la cavité du four pour y ranger
des objets.
Enlevez les fermetures métalliques des
sachets en papier ou en plastique avant de
les placer dans le four.
Fritures
N'utilisez pas le four micro-ondes pour
frire des aliments, car il ne permet pas de
contrôler la température de l'huile.
An d'éviter de vous brûler, utilisez des
gants isolants ou des maniques pour toucher
les récipients ou les parties du four après la
cuisson.
Liquides
Par exemple, boissons ou eau. Dans un four
à micro-ondes, les liquides peuvent bouillir
sans produire de bulles. Dans ce cas, ils
peuvent déborder brusquement.
Pour éviter ce risque, prenez les précautions
suivantes :
1. Évitez d'utiliser des récipients à bord
droit et col étroit.
2. Remuez le liquide avant de placer le
récipient dans le four et laissez la petite
cuillère dans le récipient.
3. Après avoir chauffé le liquide, attendez
quelques secondes et remuez de
nouveau avant de sortir le récipient du
four avec précaution.
Attention
Reportez-vous systématiquement à un livre
de recettes au micro-ondes pour plus de
détails sur ce type de cuisson. En particulier,
si vous cuisez ou réchauffez des aliments
contenant de l'alcool.
Après avoir réchauffé des aliments pour
bébé (biberons, petits pots), remuez toujours
et vériez la température avant de servir.
Vous assurez ainsi une bonne répartition de
la chaleur et évitez les risques de brûlure ou
d'ébouillantage.
Enlevez la tétine et le couvercle avant de
réchauffer les aliments !
Page 37

FRANÇAIS 37
Description de l'appareil
Accessoires
Support du plateau tournant
x1
Plateau tournant en verre
x1
Cuit-vapeur
x1
1
2
3
1
Bandeau de commande
2
Éclairage cavité
3
Porte
Page 38

FRANÇAIS 38
Accessoires
Généralités
De nombreux accessoires sont disponibles
sur le marché. Avant de les acheter, assurezvous qu'ils conviennent bien aux microondes.
Vériez que les ustensiles sont résistants à
la chaleur et perméables aux micro-ondes
avant de les utiliser.
Lorsque vous placez des aliments et des
accessoires dans le four micro-ondes,
assurez-vous que ceux-ci ne sont pas en
contact direct avec l'intérieur du four.
Ceci est particulièrement important pour les
accessoires en métal ou avec des parties
métalliques.
Un contact entre des ustensiles métalliques
et les parois du four en cours de cuisson
peut être à l'origine d'étincelles susceptibles
d'endommager le four.
Assurez-vous toujours que le plateau
tournant peut tourner librement avant de
mettre l'appareil en marche.
Support du plateau tournant
Utilisez le support du plateau tournant sous
le plateau tournant en verre. Ne placez
jamais d'autres ustensiles que le plateau
tournant directement sur le support.
- Installez le support du plateau tournant
dans le four.
Plateau tournant en verre
Utilisez le plateau tournant en verre pour
tous les types de cuisson. Il permet de
récupérer les jus de cuisson et les particules
d'aliments qui pourraient salir l'intérieur du
four.
- Placez le plateau tournant en verre sur
son support.
Cuit-vapeur
Utilisez le cuit-vapeur avec le panier pour
cuire des aliments tels que le poisson, les
légumes et les pommes de terre.
Placez toujours le cuit-vapeur sur le plateau
tournant en verre.
Page 39

FRANÇAIS 39
Bandeau de commande
Protection contre une mise en marche du four à
vide / verrouillage de sécurité
Cette fonction de sécurité automatique est activée
une minute après le retour du four en "mode
veille". (Le four est en mode "veille" si l'heure est
afchée ou si l'horloge n'a pas été programmée
lorsque l'écran est vide.).
Cela signie que vous devez ouvrir et refermer la
porte pour y introduire un plat, an d'annuler la
sécurité enfants. Sinon l'afcheur indique "DOOR"
(porte).
Interruption ou arrêt de la cuisson
Pour interrompre la cuisson:
Si vous souhaitez vérier, mélanger ou retourner
les aliments, ouvrez la porte : la cuisson s'arrêtera
automatiquement. Les réglages sont conservés
pendant 10 minutes.
Pour poursuivre la cuisson :
Fermez la porte et appuyez UNE FOIS sur la
touche Start (Démarrage). La cuisson reprend là
où elle a été interrompue.
Si vous appuyez DEUX FOIS sur la touche Start
(Démarrage), le temps de cuisson est augmenté
de 30 secondes.
Si vous ne souhaitez pas continuer la cuisson:
Sortez les aliments, fermez la porte et appuyez sur
la touche STOP (ARRÊT).
Un signal sonore retentit toutes les minutes,
pendant 10 minutes, en n de cuisson. Pour
désactiver le signal, appuyez sur la touche STOP
ou ouvrez la porte.
REMARQUE : Les sélections ne restent afchées
que 60 secondes, si l'on ouvre et referme la porte
à la n de la cuisson.
Refroidissement
Lorsque le four a terminé de fonctionner, il exécute
une procédure de refroidissement. Ceci est normal.
Après cette procédure, le four s'arrête
automatiquement.
Usage quotidien
1
Touche Stop (Arrêt)
2
Touche POWER (Puissance)
3
Touche Mémo
4
Touche STEAM (VAPEUR)
5
Touche + /- (à utiliser pour régler le
temps ou le poids)
6
Touche JET DEFROST
(DÉCONGÉLATION RAPIDE)
7
Touche Start (Démarrage)
8
Touche Porte (à utiliser pour ouvrir la
porte)
864321 75
Page 40

FRANÇAIS 40
Minuterie indépendante
Utilisez cette fonction si vous devez mesurer un
temps avec précision, par exemple pour la cuisson
des œufs ou pour faire lever une pâte avant de la
cuire, etc.
312
1. Appuyez sur les touches +/- pour régler la
durée de cuisson.
2. Appuyez par pressions successives sur la
touche Power (Puissance) pour régler le
niveau de puissance sur 0 W.
3. Appuyez sur la touche Start (Démarrage).
Un signal sonore vous avertit lorsque le minuteur a
terminé le compte à rebours.
Horloge
Maintenez la porte ouverte pendant le réglage de
l'horloge. Vous disposez ainsi de 5 minutes pour
effectuer cette opération. À défaut, chaque étape
de la procédure doit être effectuée en moins de
60 secondes.
1
2 4 3 5
1. Appuyez sur la touche Stop (Arrêt) pendant
3 secondes, jusqu'à ce que les chiffres de
gauche (les heures) clignotent.
2. Appuyez sur les touches +/- pour régler les
heures.
3. Appuyez sur la touche Start (Démarrage).
[Les deux chiffres de droite (minutes)
clignotent.]
4. Appuyez sur les touches +/- pour régler les
minutes.
5. Appuyez de nouveau sur la touche Start
(Démarrage).
L'horloge est réglée et fonctionne.
REMARQUE : À la première utilisation ou après
une panne de courant, l'écran est vide. Si l'horloge
n'est pas réglée, l'écran reste vierge jusqu'au
réglage d'un temps de cuisson.
Si vous souhaitez supprimer l'afchage de
l'heure après le réglage de l'horloge, appuyez
de nouveau sur la touche Stop (Arrêt) pendant 3
secondes, puis encore une fois sur Stop (Arrêt).
Pour réafcher l'horloge, suivez la procédure
ci-dessus.
Cuisson et réchauffage avec la fonction microondes
Utilisez cette fonction pour la cuisson normale ou
le réchauffage rapide d'aliments tels que légumes,
poisson, pommes de terre et viande.
312
1. Appuyez sur les touches +/- pour régler le
temps de cuisson.
2. Appuyez par pressions successives sur la
touche Power (Puissance) pour régler le
niveau de puissance.
3. Appuyez sur la touche Start (Démarrage).
Lorsque la cuisson a démarré :
le temps de cuisson peut être facilement augmenté
par incréments de 30 secondes via l'activation
de la touche de démarrage. Chaque nouvelle
pression augmente le temps de cuisson de 30
secondes. Vous pouvez également modier le
temps de cuisson en appuyant sur les touches +/pour augmenter ou diminuer sa durée.
Le niveau de puissance peut également être
modié au moyen de la touche Power (Puissance).
La première pression vous indiquera le niveau
de puissance actuel. Appuyez par pressions
successives sur la touche Power (Puissance) pour
modier le niveau de puissance.
Vous pouvez modier tous les réglages en cours
de cuisson, si vous le souhaitez.
Page 41

FRANÇAIS 41
Niveau de puissance
Micro-ondes uniquement
Puissance Utilisation conseillée :
750 W
Réchauffage de boissons, eau,
bouillons, café, thé et autres aliments
à haute teneur en eau. Pour les plats
préparés avec des œufs ou de la
crème, choisir une puissance inférieure.
Cuisson de légumes, viande, etc.
500 W
Cuisson de plats plus délicats, par
ex. sauces riches en protéines, plats
préparés avec du fromage et des œufs,
ainsi que n de cuisson de ragoûts.
350 W
Cuisson lente de ragoûts,
ramollissement de beurre.
160 W
Décongélation. Ramollissement de
beurre, de fromages. Ramollissement
de crèmes glacées.
0 W
Uniquement en cas d'utilisation du
minuteur.
Jet Start (Démarrage rapide)
Utilisez cette fonction pour réchauffer rapidement
des aliments à forte teneur en eau, tels que
potages, café ou thé.
Appuyez sur ce bouton pour faire démarrer
automatiquement le four à la puissance maximale
pendant 30 secondes. Chaque nouvelle pression
augmente le temps de 30 secondes. Vous pouvez
également augmenter ou diminuer le temps de
cuisson en appuyant sur les touches +/- après
l'activation de la fonction.
Décongélation manuelle (Manual defrost)
Pour une décongélation manuelle, procédez
comme pour la "Cuisson et réchauffage aux microondes" et choisissez une puissance de 160 W.
Examinez les aliments régulièrement pour vérier
leur état. La pratique vous enseignera combien
de temps il faut pour décongeler ou ramollir
différentes quantités. Les aliments congelés,
contenus dans des sachets en plastique, de la
pellicule plastique ou des emballages en carton,
pourront être placés directement dans le four, à
condition que l'emballage n'ait aucune partie en
métal (par exemple, des fermetures métalliques).
Le temps de décongélation dépend de la forme
de l'emballage. Les paquets plats se décongèlent
plus rapidement qu'un gros bloc. Séparez les
morceaux dès qu'ils commencent à se décongeler.
Les tranches individuelles se décongèlent plus
facilement. Enveloppez certaines zones des
aliments dans de petits morceaux de papier
aluminium quand elles commencent à roussir
(par exemple, les ailes et les cuisses de poulet).
Retournez les gros morceaux vers le milieu du
processus de décongélation. Les aliments bouillis,
les ragoûts et les sauces de viande se décongèlent
mieux s'ils sont remués durant la décongélation.
Lorsque vous décongelez, il est conseillé de ne
pas décongeler complètement les aliments et
de laisser le processus se conclure pendant le
temps de repos. Quelques minutes de repos
après la décongélation améliorent toujours le
résultat, permettant une répartition uniforme de la
température dans les aliments.
Décongélation rapide (JET DEFROST)
Utilisez cette fonction UNIQUEMENT pour la
décongélation de la viande, du poisson et de la
volaille.
N'utilisez cette fonction que si le poids net des
aliments se situe entre 100 g et 2 kg.
2 31
1. Appuyez sur la touche Jet Defrost.
2. Appuyez sur les touches +/- pour spécier
le poids des aliments.
3. Appuyez sur la touche Start (Démarrage).
Page 42

FRANÇAIS 42
À mi-décongélation, le four s'arrête et vous invite à
retourner les aliments ("TURN FOOD").
- Ouvrez la porte.
- Retournez les aliments.
- Fermez la porte et redémarrez le four en
appuyant sur la touche Start.
REMARQUE : Le four continue automatiquement
après 2 minutes si vous n'avez pas retourné
les aliments. Le cas échéant, le temps de
décongélation est augmenté.
Lors de l'utilisation de cette fonction, vous devez
connaître le poids net des aliments. Le four
calcule automatiquement le temps nécessaire à la
décongélation.
- Aliments surgelés :
Pour les aliments dont la température est
supérieure à la température de surgélation
(-18 °C), sélectionnez un poids inférieur.
Pour les aliments dont la température est
inférieure à la température de surgélation
(-18 °C), sélectionnez un poids supérieur.
Aliments Conseils
Viande
(100 g - 2 kg)
Viande hachée,
côtelettes, steaks ou
rôtis.
Volaille
(100 g - 2 kg)
Poulets entiers, lets ou
morceaux.
Poisson
(100 g - 1,5 kg)
Poissons entiers,
darnes ou lets.
Pour les aliments non indiqués dans le tableau
ou de poids inférieur ou supérieur au poids
conseillé, procédez comme indiqué au
paragraphe "Cuisson et réchauffage aux microondes" et réglez la puissance sur 160 W pour la
décongélation.
Mémoire (Memory)
1 2
La fonction Mémoire permet de rappeler
rapidement et simplement les réglages préférés.
Le principe de la fonction Mémoire est
d'enregistrer le réglage en cours d'utilisation.
1. Appuyez sur la touche Memo (Mémoire).
2. Appuyez sur la touche Start (Démarrage).
Mémorisation d'un réglage
1. Sélectionnez la fonction de votre choix et
faites le réglage nécessaire.
2. Effectuer les réglages nécessaires.
3. Appuyez sur la touche Mémo et maintenezla enfoncée pendant 3 secondes, jusqu'à
l'émission d'un signal sonore. Le réglage
est désormais enregistré. Vous pouvez
reprogrammer la mémoire autant de fois que
vous le désirez.
Lorsque l'appareil est branché pour la première
fois ou après une panne de courant, les réglages
par défaut enregistrés par la fonction Mémo sont :
1 minute et 750 W.
Vapeur (Steam)
3 4
1 2
Utilisez cette fonction pour la cuisson d'aliments
tels que les légumes et le poisson.
Utilisez toujours le cuit-vapeur fourni, avec cette
fonction.
1. Appuyez sur la touche Steam (Vapeur).
2. Appuyez par pressions successives sur
la touche Steam (Vapeur) pour régler la
classe d'aliments.
3. Appuyez sur les touches +/- pour spécier
le poids des aliments.
4. Appuyez sur la touche Start (Démarrage).
Page 43

FRANÇAIS 43
Placez les aliments dans le panier vapeur.
Ajoutez 100 ml (1 dl) d'eau au fond du cuitvapeur.
Couvrez avec le couvercle.
AVERTISSEMENT ! Le cuit-vapeur est conçu
pour être utilisé avec les micro-ondes
seulement.
Ne l'utilisez jamais avec une autre fonction.
Vous risqueriez de l'endommager.
Assurez-vous toujours que le plateau tournant
peut tourner librement avant de mettre l'appareil
en marche. Placez toujours le cuit-vapeur sur le
plateau tournant en verre.
Cuisson de légumes
Placez les légumes dans le panier.
Versez 100 ml d'eau sur le fond.
Couvrez avec un couvercle et réglez le temps de
cuisson.
Les légumes tendres, tels que les brocolis et les
poireaux, cuisent en 2-3 minutes.
Les légumes durs, tels les carottes et les pommes
de terre, emploient 4-5 minutes pour cuire.
Aliments Conseils
Pommes de terre
/ Légumesracines
(150 g - 200 g)
Utilisez des morceaux
de même taille.
Coupez les légumes
en morceaux de même
taille.
Laissez reposer 1 à
2 minutes après la
cuisson.
Légumes
(Choux-eurs et
brocolis)
(150 g - 500 g)
Légumes surgelés
(150 g - 500 g)
Laissez reposer 1 à
2 minutes après la
cuisson.
Filets de poisson
(150 g - 500 g)
Répartissez les lets
uniformément dans
le panier-vapeur.
Superposez les
tranches nes. Laissez
reposer 1 à 2 minutes
après la cuisson.
Page 44

FRANÇAIS 44
Nettoyage et entretien
L’entretien de cet appareil se limite à son
nettoyage.
Si le four n’est pas maintenu propre, cela
peut entraîner la détérioration de la surface
: la durée de vie de l’appareil pourra en
être affectée et provoquer des situations de
danger.
i
IMPORTANT : n’utilisez en aucun cas
de tampons à récurer en métal,
nettoyants abrasifs, tampons en laine de
verre, chiffons rugueux etc., car ils peuvent
abîmer le bandeau de commande, ainsi
que les surfaces intérieures et extérieures du
four. Utilisez une éponge avec un détergent
doux ou une serviette en papier avec un
nettoyant pour vitres. Vaporisez le produit
sur la serviette en papier.
Ne le vaporisez pas directement sur le four.
À intervalles réguliers, notamment en cas de
débordements, enlevez le plateau tournant,
le support du plateau tournant et essuyez la
base du four.
Ce four est conçu pour fonctionner avec le
plateau tournant.
i
IMPORTANT :ne mettez pas le four en
marche si le plateau tournant a été
enlevé pour le nettoyage.
Utilisez un détergent doux, de l’eau et un
chiffon doux pour nettoyer l’intérieur du four,
les deux faces de la porte et l’encadrement
de la porte.
i
IMPORTANT :veillez à ce que de la
graisse ou des particules alimentaires
ne s’accumulent pas autour de la porte.
En cas de salissures tenaces, faites bouillir
une tasse d’eau dans le four pendant 2 ou
3 minutes. La vapeur facilitera l’élimination
des salissures.
i
IMPORTANT :n’utilisez pas d’appareil
de nettoyage à vapeur pour nettoyer
votre four micro-ondes.
Éliminez les odeurs éventuelles en faisant
bouillir une tasse d’eau avec deux rondelles
de citron , placée sur le plateau tournant.
Nettoyage au lave-vaisselle
• Support du plateau tournant
• Plateau tournant en verre
• Cuit-vapeur
Page 45

FRANÇAIS 45
Problème Cause possible Solution
L'appareil ne fonctionne
pas.
Absence d'alimentation ou
appareil non correctement
branché.
Vériez que les fusibles sont en bon état
et que la puissance de l'installation est
adaptée.
La porte n'est pas fermée
correctement.
Ouvrez et refermez la porte avant d'essayer
à nouveau.
Un message s'afche,
tel que : F2, F3C, F7 ou
Err2, Err3, Err5.
Le four a détecté une anomalie
au niveau de l'un de ses
capteurs ou composant similaire.
Débranchez l'appareil et attendez 10
minutes avant de le rebrancher. Essayez à
nouveau d'actionner le four. Si le problème
persiste, contactez le service après-vente.
Les aliments ne sont
pas réchauffés de façon
homogène.
Les parties les plus nes, telles
que les extrémités des ailes de
poulet, ne sont pas recouvertes
de papier aluminium.
Enveloppez les parties les plus nes dans du
papier d'aluminium.
Le niveau de puissance
sélectionné était trop élevé.
Sélectionnez un niveau de puissance
inférieur.
Le plateau tournant s'est arrêté. Vériez que le plateau tournant et son
support sont installés correctement, et que
les aliments sont placés bien au centre et
n'entrent pas en contact avec les parois du
four.
Les aliments ne tournent
pas.
Le plateau tournant s'est arrêté. Vériez que le plateau tournant et son
support sont installés correctement et que le
fond de la cavité est propre.
Service Après-vente
Avant de faire appel au service après-vente :
1. Vériez si vous pouvez remédier par vous-même au problème en suivant les points décrits au chapitre
"Ce qu'il convient de faire si ...".
2. Mettez l'appareil hors tension, puis de nouveau sous tension pour vérier si le problème a été éliminé.
Après avoir effectué ces contrôles, si le problème persiste, adressez-vous au Service Après-vente IKEA.
Spéciez toujours les informations suivantes :
- le type de dysfonctionnement ;
- le type et le modèle exact du four ;
- le code service (numéro suivant le mot "Service" sur la plaque signalétique) apparaissant sur le bord
intérieur de la cavité du four (visible lorsque la porte est ouverte) ;
- votre adresse complète ;
- votre numéro de téléphone.
Si le four doit être réparé, adressez-vous à un Service Après-vente IKEA.
Vous aurez ainsi la garantie que les pièces défectueuses seront remplacées par des pièces d'origine et que
la réparation de votre appareil sera effectuée correctement.
Ce qu'il convient de faire si ...
Page 46

FRANÇAIS 46
Caractéristiques techniques
Tension d'alimentation 230 V / 50 Hz
Puissance nominale 1300 W
Fusible 10 A (Royaume-Uni 13 A)
Puissance MO 750 W
Dimensions externes (HxLxP) 348 X 595 X 320
Dimensions internes de la cavité (HxLxP) 187 X 370 X 290
Les informations techniques gurent sur la plaque signalétique apposée à l'intérieur de
l'appareil.
Données pour les essais et performances de chauffage, conformément à la norme CEI
60705.
La Commission électrotechnique internationale, SC 59H, a établi une norme relative à
des essais de performance comparatifs effectués sur différents fours micro-ondes. Nous
recommandons ce qui suit pour ce four :
Test Quantité Durée approx.
Niveau de
puissance Récipient
12.3.1
750 g 10 min 750 W Pyrex 3.227
12.3.2
475 g 5 1/2 min 750 W Pyrex 3.827
12.3.3
900 g 14 min 750 W Pyrex 3.838
13.3
500 g 2 min 40 s
Jet Defrost
(décongélation
rapide)
REMARQUE : Ces informations sont fournies uniquement à l'intention du technicien qualié.
Page 47

FRANÇAIS 47
Installation de l'appareil
Lors de l'installation de l'appareil, respectez
les instructions fournies séparément.
Vériez que la tension indiquée sur la
plaque signalétique correspond bien à celle
de votre habitation.
Ne démontez pas les plaques de protection
contre les micro-ondes situées sur les ancs
de la cavité du four. Elles empêchent la
graisse et les particules alimentaires de
pénétrer dans les canaux d'entrée du microondes.
Avant de commencer l'installation, vériez
que la cavité du four est vide.
Assurez-vous que l'appareil n'est pas
endommagé. Vériez que la porte
ferme correctement et que le joint de
l'encadrement intérieur de la porte n'est pas
endommagé. Enlevez les accessoires du four
et essuyez l'intérieur avec un chiffon doux et
humide.
N'utilisez en aucun cas cet appareil si le
cordon d'alimentation ou la prise de courant
est endommagé, si l'appareil ne fonctionne
pas correctement ou s'il a été endommagé
ou est tombé. Ne plongez jamais le cordon
d'alimentation ou la prise dans l'eau.
Éloignez le cordon des surfaces chaudes.
sous peine d'électrocution, d'incendie ou de
risques du même type.
Après le branchement de l'appareil
Le four ne peut être utilisé que si la porte est
correctement fermée.
La mise à la terre de l'appareil est
obligatoire. Le fabricant décline toute
responsabilité en cas de blessures inigées
à des personnes, à des animaux ou de
dommages matériels qui découleraient du
non-respect de cette obligation.
Le fabricant décline toute responsabilité si
l'utilisateur ne respecte pas ces instructions.
Installation
Branchements électriques
Page 48

FRANÇAIS 48
Recommandations importantes pour la sauvegarde de l'environnement
Les matériaux d'emballage sont entièrement
recyclables comme l'indique le symbole de
recyclage ( ).
Suivez les réglementations locales en
vigueur en matière d'élimination des
déchets. Ne laissez pas les éléments
d'emballage potentiellement dangereux
(sachets en plastique, éléments en
polystyrène, etc.) à la portée des enfants.
Cet appareil porte le symbole du recyclage
conformément à la Directive Européenne
2002/96/CE concernant les Déchets
d'Équipements Électriques et Électroniques
(DEEE ou WEEE). En procédant correctement
à la mise au rebut de cet appareil, vous
contribuerez à empêcher toute conséquence
nuisible pour l’environnement et la santé.
Déclaration de conformité
Cet appareil est destiné à être mis en
contact avec des denrées alimentaires et est
conforme au règlement communautaire
( ) n° 1935/2004. Il a été conçu, fabriqué
et commercialisé conformément aux
exigences de sécurité de la directive "Basse
Tension" 2006/95/CE (en remplacement
de la directive 73/23/CEE et modications
ultérieures) et aux exigences de protection
de la directive "CEM" 2004/108/CE.
Le symbole
présent sur l'appareil ou
sur la documentation qui l’accompagne
indique que ce produit ne peut en aucun
cas être traité comme un déchet ménager.
Il doit par conséquent être remis à un
centre de collecte des déchets chargé du
recyclage des équipements électriques et
électroniques.
La mise au rebut doit être effectuée
conformément aux réglementations locales
en vigueur en matière de protection de
l'environnement.
Pour de plus amples informations sur le
traitement, la récupération et le recyclage
de ce produit, veuillez contacter le service
municipal ou la déchetterie de votre ville, ou
bien encore le magasin où vous avez acheté
le produit.
Avant de mettre l'appareil au rebut,
rendez-le inutilisable en coupant le cordon
d'alimentation, de manière que l'appareil
ne puisse plus être raccordé au réseau
électrique.
Page 49

FRANÇAIS 49
GARANTIE IKEA
Quelle est la durée de validité de la
garantie IKEA ?
Cette garantie est valable 5 (cinq) ans à
compter de la date d’achat/de livraison
de votre appareil, sauf pour les appareils
de la marque LAGAN pour lesquels une
garantie de 2 (deux) ans est applicable. La
preuve d’achat originale est requise. Les
réparations, effectuées sous garantie ne
prolongent pas la période de garantie de
l’appareil.
Quels sont les appareils n’étant pas
couverts par la garantie de 5 (cinq) ans
IKEA ?
Les appareils portant le nom de LAGAN et
tous les appareils achetés chez IKEA avant
le 1er août 2007.
Qui effectuera la réparation ?
IKEA gère les prestations de service par le
biais de son propre service après-vente ou
par l’un de ses partenaires agréés.
Que couvre la garantie ?
La garantie couvre les défauts de l’appareil
dus à un vice de fabrication (défaut
fonctionnel), à compter de la date d’achat/
de livraison de l’appareil. Cette garantie
ne s’applique que dans le cas d’un usage
domestique.
Les exceptions sont spéciées sous la
rubrique “Qu’est-ce-qui n’est pas couvert
par cette garantie?” Pendant la période
de garantie, les coûts engagés pour
remédier au problème, par exemple les
réparations, les pièces, la main-d’oeuvre et
les déplacements sont couverts, pour autant
que l’appareil soit accessible à des ns de
réparation sans dépenses particulières.
Les dénitions locales actuelles ou les
instructions juridiques en vigueur pour le
pays correspondant sont valables sous
ces conditions. Les pièces remplacées
deviennent la propriété d’IKEA.
Que fera IKEA pour régler le problème?
Le réparateur désigné par IKEA examinera
le produit et décidera, à sa seule discrétion,
s’il est couvert par cette garantie. Si le
réparateur estime que le produit est
couvert, celui-ci, ou un partenaire autorisé,
soit réparera le produit défectueux, soit le
remplacera par un produit identique ou
comparable, à sa seule discrétion.
Qu’est-ce qui n’est pas couvert par cette
garantie?
• L’usure normale.
• Les dommages occasionnés sciemment
ou par négligence, les dommages
occasionnés à défaut de respecter
les instructions d’utilisation, par
une installation inadéquate ou une
alimentation électrique inadéquate, les
dommages causés par des réactions
chimiques ou électrochimiques, la rouille,
la corrosion ou les dégâts des eaux,
y compris, notamment, les dommages
causés par un excès de calcaire dans
l’eau, les dommages causés par des
conditions environnementales anormales.
• Les accessoires utilisés ou usés comme
par ex. les piles et ampoules.
• Les éléments non fonctionnels et
décoratifs qui n’affectent pas l’usage
normal de l’appareil, y compris les
rayures et les éventuelles différences de
couleur.
• Les dommages provoqués par des
corps étrangers, des substances, le
nettoyage ou le débouchage des ltres,
des systèmes d’écoulement ou des
compartiments pour détergents.
• Les dommages occasionnés aux éléments
suivants : vitrocéramique, accessoires,
paniers à vaisselle supérieur et inférieur
et à couverts, tuyaux d’alimentation et de
vidange, joints, ampoules et protections
des ampoules, écrans, boutons,
revêtements et parties de revêtements,
Page 50

FRANÇAIS 50
sauf s’il est prouvé que ces dommages
sont dus à des vices de fabrication.
• Les cas où aucun défaut n’est mis à jour
par le technicien.
• Les réparations qui ne sont pas effectuées
par nos réparateurs désignés et/ou un
partenaire contractuel autorisé ou lorsque
des pièces autres que d’origine ont été
utilisées.
• Les réparations consécutives à une
installation inadéquate ou non conforme
aux spécications.
• L’utilisation impropre de l’appareil et/
ou dans un environnement autre que
domestique, par exemple à des ns
professionnelles.
• Les dommages occasionnés par ou
durant le transport. Si un client transporte
personnellement le produit jusqu’à son
domicile ou une autre adresse, IKEA
décline toute responsabilité en cas de
dommages pendant le transport. Si IKEA
livre le produit à l’adresse de livraison
indiquée par le client, tout éventuel
dommage se produisant en cours de
livraison sera couvert par IKEA.
• Les frais reliés à l’installation initiale de
l’appareil IKEA.
Si un prestataire de service IKEA ou son
partenaire contractuel agréé répare
ou remplace l’appareil conformément
à la présente garantie, le prestataire
de services ou son partenaire agréé
installera l’appareil réparé ou l’appareil
de remplacement, le cas échéant.
Ces restrictions ne s’appliquent pas aux
interventions correctes d’un spécialiste
qualié utilisant nos pièces d’origine an
d’adapter l’appareil aux spécications
techniques de sécurité d’un autre pays UE.
Loi nationale applicable
La garantie IKEA vous octroie des droits
légaux spéciques, équivalents ou
supérieurs aux droits légaux locaux.
Cependant, ces conditions ne limitent en
aucun cas les droits des consommateurs
décrits dans la législation locale.
Couverture géographique
Pour les appareils achetés dans un pays
européen et emportés dans un autre pays
européen, les interventions seront effectuées
dans le cadre des conditions de garantie
normales dans le nouveau pays.
L’obligation de réparation dans le cadre de
la garantie n’est effective que si l’appareil
est conforme et installé conformément aux :
- spécications techniques du pays dans
lequel la demande d’intervention sous
garantie est introduite ;
- instructions de montage et aux
informations relatives à la sécurité
gurant dans le manuel d’utilisation.
Service Après vente exclusif pour
appareils IKEA
Le Service après-vente agréé pour les
appareils IKEA est à votre disposition pour
les questions/demandes suivantes :
• Faire une demande d’intervention sous
garantie
• Demander des clarications au sujet de
l’installation des appareils IKEA dans les
meubles de cuisine IKEA
(Remarque : L’installation de gaz doit être
réalisée par un installateur agréé)
• Demander des clarications au sujet du
fonctionnement des appareils IKEA
An de vous garantir la meilleure
assistance possible, nous vous prions de lire
attentivement les instructions d’assemblage
et/ou le mode d’emploi avant de nous
contacter.
Comment nous joindre en cas de besoin
Veuillez utiliser uniquement le
numéro de téléphone spécique
à votre pays, donné dans la liste
en dernière page de ce livret de
garantie.
Page 51

FRANÇAIS 51
Dans le but de vous fournir un service
après-vente plus rapide, utilisez les
numéros spéciques repris sur ce
livret de garantie et citez toujours
le numéro d’article IKEA (numéro
composé de 8 chiffres) de l’appareil
pour lequel vous avez besoin
d’assistance ainsi que le code service
à 12 chiffres, indiqués sur la plaque
signalétique de votre appareil.
CONSERVEZ VOTRE PREUVE
D’ACHAT !
La preuve de votre achat est
nécessaire pour l’application de la
garantie.Le nom et le numéro d’article
(code à 8 chiffres) IKEA de chaque
appareil acheté gurent également sur
la preuve d’achat.
Besoin d’une assistance supplémentaire ?
Pour toute question additionnelle en dehors
du service après-vente de vos appareils,
contactez le call center de votre magasin
IKEA. Nous vous recommandons de lire
attentivement toute la documentation
fournie avec l’appareil avant de nous
contacter.
Page 52

ITALIANO 52
Leggere con attenzione e conservare per
riferimento futuro.
Non riscaldare o usare materiali
inammabili all'interno del forno o nelle
sue vicinanze. I vapori potrebbero causare
pericoli d'incendio o di esplosione.
Non usare il forno a microonde per
asciugare tessuti, carta, spezie, erbe, legno,
ori, frutta o altro materiale combustibile.
Potrebbe insorgere un rischio di incendio.
Se il materiale all'interno o all'esterno del
forno dovesse inammarsi o generare
fumo, tenere chiuso lo sportello e spegnere
il forno. Staccare la spina dalla presa
di corrente o disinserire l'alimentazione
generale sul quadro elettrico.
Non cuocere eccessivamente gli alimenti.
Potrebbe insorgere un rischio di incendio.
Non lasciare il forno incustodito,
specialmente quando si usano carta,
plastica o altri materiali combustibili durante
il processo di cottura. La carta potrebbe
carbonizzarsi o bruciare e alcuni tipi di
plastica potrebbero sciogliersi con il calore.
Non usare prodotti chimici o vapori corrosivi
in questo apparecchio. Questo tipo di
forno è progettato per il riscaldamento o la
cottura di alimenti. Non deve essere usato
per scopi industriali o di laboratorio.
Consentire ai bambini di utilizzare
l'apparecchio solo in presenza di adulti,
dopo avere impartito loro adeguate
istruzioni e dopo essersi accertati che
abbiano compreso i pericoli di un uso
improprio.
Questo apparecchio non è destinato ad
essere utilizzato da persone (bambini
compresi) con capacità siche, sensoriali o
mentali ridotte, a meno che siano controllati
da una persona responsabile della loro
sicurezza.
AVVERTENZA! Poiché le parti
raggiungibili possono diventare
incandescenti durante l'utilizzo, tenere
lontani i bambini.
Non usare il forno a microonde per
riscaldare alimenti o liquidi in contenitori
sigillati. L'aumento di pressione potrebbe
causare danni o esplosioni all'apertura del
contenitore.
Le guarnizioni dello sportello e le zone
circostanti devono essere controllate
periodicamente. In caso di danni, non
utilizzare l'apparecchio nché non sia stato
riparato da un tecnico qualicato.
i
IMPORTANTE: Uova: non usare il
forno a microonde per cucinare o
riscaldare uova intere, con o senza guscio,
poiché potrebbero esplodere (anche dopo il
processo di riscaldamento a microonde).
Precauzioni importanti
Istruzioni generali
Questo apparecchio è destinato
esclusivamente all'uso domestico.
Non deve mai essere messo in funzione
senza alimenti. Questo tipo di utilizzo può
danneggiare l'apparecchio.
Per provare il funzionamento del forno,
inserire un bicchiere d'acqua. L'acqua
assorbirà le microonde e il forno non verrà
danneggiato.
Informazioni di sicurezza 52
Descrizione del prodotto 54
Pannello comandi 56
Uso giornaliero 56
Pulizia e manutenzione 61
Cosa fare se... 62
Dati tecnici 63
Installazione 64
Collegamento elettrico 64
Consigli per la salvaguardia
dell'ambiente 65
Garanzia IKEA 66
Informazioni di sicurezza
Sommario
Page 53

ITALIANO 53
Non usare la cavità come dispensa.
Togliere i ferretti di chiusura dai sacchetti
di plastica o di carta prima di introdurli nel
forno.
Frittura a bagno d'olio
Non usare il forno a microonde per cucinare
piatti fritti perché è impossibile controllare la
temperatura dell'olio.
Per evitare di bruciarsi, usare sempre
presine o guanti da forno prima di toccare i
recipienti o le parti del forno.
Liquidi
Ad es. bevande o acqua. Quando si
riscaldano liquidi come bevande o acqua,
questi si possono surriscaldare oltre il punto
di ebollizione senza che appaiano bollicine.
Questo può determinare un traboccamento
improvviso di liquido bollente.
Per prevenire questa eventualità, procedere
come segue:
1. Evitare l'uso di contenitori a collo stretto.
2. Mescolare il liquido prima di introdurre il
recipiente nel forno e lasciarvi immerso
un cucchiaino.
3. Dopo il riscaldamento, lasciar riposare
brevemente il liquido e mescolarlo
nuovamente prima di estrarre il
recipiente dal forno.
Precauzioni speciali
Per maggiori informazioni consultare un
ricettario per forno a microonde. Questo
vale soprattutto se gli alimenti da cuocere o
da riscaldare contengono alcool.
Dopo aver riscaldato gli alimenti per
bambini o liquidi nel biberon, oppure in
contenitori per omogeneizzati, agitare e
controllare sempre la temperatura prima
di servire, questo permette di ottenere una
distribuzione più omogenea del calore e di
evitare scottature.
Togliere il coperchio e la tettarella dal
biberon prima di riscaldarli!
Page 54

ITALIANO 54
Descrizione dell'apparecchio
Accessori
Supporto per piatto rotante
x1
Piatto rotante di vetro
x1
Vaporiera
x1
1
2
3
1
Pannello comandi
2
Luce del forno
3
Sportello
Page 55

ITALIANO 55
Accessori
Istruzioni generali
In commercio sono disponibili diversi
accessori. Prima di acquistarli, accertarsi
che siano idonei alla cottura a microonde.
Assicurarsi che gli utensili usati siano
resistenti al calore del forno e che
permettano il passaggio delle microonde.
Quando si introducono alimenti e accessori
nel forno a microonde, accertarsi che non
tocchino le pareti interne del forno.
Questa precauzione è particolarmente
importante per gli accessori metallici o con
componenti metallici.
Se gli accessori metallici vengono a contatto
con le pareti interne mentre il forno è in
funzione, si produrranno scintille ed il forno
ne risulterà danneggiato.
Prima di avviare il forno, assicurarsi
sempre che il piatto rotante possa ruotare
liberamente.
Supporto per piatto rotante
Servirsi dell'apposito supporto per
appoggiare il piatto rotante in vetro. Non
appoggiare altri utensili sopra il supporto
per il piatto rotante.
- Montare il supporto per il piatto rotante
nel forno.
Piatto rotante di vetro
Il piatto rotante in vetro può essere
utilizzato in tutte le modalità di cottura. Il
piatto rotante raccoglie i sughi di cottura
e le particelle di cibo che altrimenti
macchierebbero e sporcherebbero l'interno
del forno.
- Appoggiare il piatto rotante in vetro
sull'apposito supporto.
Vaporiera
Usare la vaporiera con l'apposita griglia
per cuocere alimenti come pesce, verdure e
patate.
Appoggiare sempre la vaporiera sul piatto
rotante in vetro.
Page 56

ITALIANO 56
Pannello comandi
Protezione anti-avvio
Questa funzione di sicurezza si attiva
automaticamente un minuto dopo che il forno si
è commutato in modalità "standby". (Il forno si
trova in modalità "standby" quando è visualizzato
l'orologio a 24 ore oppure, se l'orologio non è
stato impostato, quando il display non mostra
nessuna indicazione).
Per disabilitare il blocco di sicurezza è necessario
aprire e richiudere lo sportello, ad esempio per
introdurre un piatto. Altrimenti sul display apparirà
la dicitura "DOOR".
Sospensione o interruzione della cottura
Per sospendere il processo di cottura:
Per controllare, mescolare o girare l'alimento,
aprire lo sportello e il processo di cottura si
interromperà automaticamente. Le impostazioni
saranno mantenute per 10 minuti.
Per riprendere il processo di cottura:
Chiudere la porta e premere il tasto Start
(avvio) UNA SOLA VOLTA. Il processo di cottura
riprenderà da dove era stato interrotto.
Premendo il tasto Start (avvio) DUE VOLTE si
determina un incremento del tempo di cottura di
30 secondi.
Se non si desidera continuare la cottura:
Togliere l'alimento, chiudere la porta e premere il
tasto Stop.
Al termine del processo di cottura, il forno emette
un segnale acustico ogni minuto per 10 minuti.
Premere il tasto Stop o aprire lo sportello per far
cessare il segnale.
NOTA: se si apre e chiude lo sportello al termine
del processo di cottura, le impostazioni rimangono
memorizzate per 60 secondi.
Raffreddamento
Al termine di una funzione, il forno inizia un ciclo
di raffreddamento. Questo ciclo fa parte del
funzionamento normale.
Alla ne del ciclo di raffreddamento, il forno si
spegne automaticamente.
Utilizzo quotidiano
1
Tasto Stop
2
Tasto Power (Potenza)
3
Tasto Memo
4
Tasto Vapore
5
Tasto + /- (usare questo tasto per
impostare il tempo o il peso desiderato)
6
Tasto Jet Defrost (Scongelamento
rapido)
7
Tasto Start
8
Tasto sportello
(usare questo tasto per aprire lo
sportello)
864321 75
Page 57

ITALIANO 57
Timer
Utilizzare questa funzione per indicare sul timer
di cucina il tempo desiderato, ad esempio per
cuocere uova o far lievitare la pasta prima di
cuocerla e così via.
312
1. Premere i tasti +/- per impostare il tempo
desiderato sul contatore del timer.
2. Premere ripetutamente il tasto Power per
impostare il livello di potenza su 0 W.
3. Premere il tasto Start.
Allo scadere del tempo impostato, il forno emette
un segnale acustico.
Clock (Orologio)
Tenere lo sportello del forno aperto quando si
imposta l'orologio. In questo modo si avranno
5 minuti di tempo per effettuare l'impostazione
dell'orologio. In caso contrario, ogni singola fase
deve essere completata entro 60 secondi.
1
2 4 3 5
1. Premere il tasto Stop (3 secondi) nché le
cifre a sinistra (ore) non lampeggiano.
2. Premere i tasti +/- impostare le ore.
3. Premere il tasto Start. (Le due cifre a destra
(minuti) lampeggiano).
4. Premere i tasti +/- per impostare i minuti.
5. Premere di nuovo il tasto Start.
L'orologio è impostato ed è in funzione.
NOTA: quando l'apparecchio viene collegato
elettricamente per la prima volta o dopo
un'interruzione di corrente, sul display non
compare nessuna indicazione. Se l'orologio non
è impostato, il display non visualizza alcuna
indicazione nché non viene impostato un tempo
di cottura.
Per togliere la funzione Orologio dal display dopo
averla programmata, premere semplicemente il
tasto Stop per 3 secondi e poi il tasto Stop ancora
una volta.
Per reinserire la funzione Orologio, seguire la
procedura sopra descritta.
Cottura e riscaldamento a microonde
Utilizzare questa funzione per le normali
operazioni di cottura e riscaldamento di verdure,
pesce, patate e carne.
312
1. Premere i tasti +/- per impostare il tempo
desiderato.
2. Premere il tasto Power per impostare il
livello di potenza desiderato.
3. Premere il tasto Start.
Una volta iniziato il processo di cottura:
Il tempo può essere incrementato di 30 secondi
alla volta premendo semplicemente il tasto
Start. Ogni successiva pressione determina un
incremento del tempo di cottura di ulteriori 30
secondi. È inoltre possibile aumentare o ridurre
il tempo premendo i tasti +/-. Premendo il tasto
Power (Potenza), è possibile modicare anche il
livello di potenza impostato. Alla prima pressione
verrà indicato l'attuale livello di potenza. Premere
il tasto ripetutamente per modicare il livello di
potenza nel modo desiderato.
Tutte le impostazioni possono essere modicate
durante la cottura.
Page 58

ITALIANO 58
Livello di potenza
Solo microonde
Potenza Uso consigliato:
750 W
Riscaldamento di bevande, acqua,
zuppe non dense, caffè, tè o
altri alimenti ad alto contenuto
d'acqua. Se l'alimento contiene
uova o panna, scegliere una
potenza inferiore.
Cottura di pesce, verdura, carne,
ecc.
500 W
Cottura accurata di salse molto
proteiche, piatti a base di uova
e formaggio e per terminare la
cottura di piatti in umido.
350 W
Far bollire lentamente stufati e per
sciogliere il burro.
160 W
Scongelamento. Per
ammorbidire burro e formaggi.
Ammorbidimento di gelati.
0 W
Per l'uso del solo timer.
Funzione Jet Start
Questa funzione permette di riscaldare
rapidamente alimenti ad alto contenuto d'acqua
come minestre, caffè o tè.
Premere Start per avviare automaticamente il
forno a microonde alla massima potenza con
il tempo di cottura impostato a 30 secondi. Ad
ogni pressione successiva, il tempo aumenta di 30
secondi. È possibile modicare il tempo premendo
i tasti +/-, rispettivamente per incrementarlo o
diminuirlo, dopo l'avvio della funzione.
Scongelamento manuale
Per effettuare lo scongelamento manuale seguire
la procedura descritta per la "Funzione di cottura
e riscaldamento con le microonde" e selezionare il
livello di potenza 160 W.
Controllare regolarmente l'alimento. Con
l'esperienza si apprenderanno i tempi corretti per
le diverse quantità.
Gli alimenti congelati in confezioni di plastica o
cartone possono essere introdotti direttamente nel
forno, purché la confezione non contenga parti
metalliche (es. ferretti di chiusura).
La forma della confezione inuisce sui tempi di
scongelamento. Le confezioni di basso spessore si
scongelano più rapidamente rispetto a quelle più
spesse.
Separare gli alimenti quando iniziano a
scongelarsi. Le porzioni separate si scongelano
più rapidamente.
Se durante lo scongelamento si nota che alcune
parti degli alimenti iniziano a cuocersi (es. cosce
o ali di pollo), è bene coprirle con una pellicola
di alluminio. Girare i pezzi più grossi a metà del
tempo di scongelamento.
Gli alimenti lessati, gli stufati e i ragù di carne si
scongelano meglio se vengono mescolati di tanto
in tanto durante del processo.
Per un risultato ottimale, è preferibile non
scongelare completamente l'alimento e prevedere
un tempo di riposo adeguato.
È preferibile considerare sempre un tempo di
riposo di alcuni minuti dopo lo scongelamento,
onde garantire una distribuzione uniforme della
temperatura interna.
Jet defrost
Usare questa funzione per scongelare SOLO
carne, pesce e pollame.
La funzione Jet Defrost può essere usata solo se il
peso netto è compreso fra 100 g e 2 kg.
2 31
1. Premere di nuovo il tasto Jet Defrost.
2. Premere i tasti + / - per impostare il peso
dell'alimento.
3. Premere il tasto Start.
A metà del processo di scongelamento, il forno
Page 59

ITALIANO 59
si arresta e viene visualizzato il messaggio TURN
FOOD (GIRARE L'ALIMENTO).
- Aprire lo sportello.
- Girare l'alimento.
- Chiudere lo sportello e riavviare il forno
premendo il tasto Start.
NOTA: il forno riprenderà a funzionare
automaticamente dopo 2 minuti se l'alimento
non è stato girato. In questo caso, tuttavia, sarà
richiesto un tempo di scongelamento maggiore.
Per questa funzione è necessario indicare il
peso netto dell'alimento. Il forno calcolerà
automaticamente il tempo necessario per
terminare la procedura.
- Alimenti surgelati:
Se l'alimento ha una temperatura più alta di
quella di surgelamento (-18 °C), selezionare
un peso inferiore.
Se l'alimento ha una temperatura più bassa di
quella di surgelamento (-18°C), selezionare un
peso superiore.
Alimento Suggerimenti
Carne
(100 g - 2 kg)
Carne macinata,
braciole, bistecche o
arrosti.
Pollame
(100 g - 2 kg)
Pollo intero, a pezzi o
a letti.
Pesce
(100 g - 1,5 kg)
Intero, a tranci o a
letti.
Per i cibi non elencati in questa tabella, o di peso
inferiore o superiore a quello consigliato, seguire
la procedura descritta in "Cottura e riscaldamento
a microonde" e scegliere la potenza di 160 W per
lo scongelamento.
Funzione Memoria
1 2
La funzione Memoria consente di richiamare
facilmente e velocemente un'impostazione
preferita.
Il principio della funzione Memoria è quello
di memorizzare l'impostazione visualizzata al
momento.
1. Premere il tasto Memo.
2. Premere il tasto Start.
Come memorizzare un’impostazione:
1. Selezionare una funzione ed effettuare le
impostazioni necessarie.
2. Effettuare le impostazioni necessarie.
3. Premere e tenere premuto il tasto Memo per
3 secondi no all’emissione di un segnale
acustico. A questo punto, l’impostazione
è memorizzata. La memoria può essere
riprogrammata quante volte si desidera.
Quando l'apparecchio viene collegato alla
presa di corrente o dopo un blackout elettrico, la
funzione Memoria avrà memorizzato 1 minuto e
750 W come impostazione predenita.
Vapore
3 4
1 2
Usare questa funzione per verdure e pesce.
Quando si utilizza questa funzione, usare sempre
la vaporiera fornita in dotazione.
1. Premere il tasto Vapore.
2. Continuare a premere ripetutamente il
tasto Vapore per impostare la categoria di
alimento.
3. Premere i tasti + / - per impostare il peso
dell'alimento.
4. Premere il tasto Start.
Page 60

ITALIANO 60
Collocare l'alimento sulla griglia per cottura a
vapore.
Aggiungere 100 ml (1dl) di acqua nella parte
inferiore della vaporiera.
Coprire con il coperchio.
AVVERTENZA! La vaporiera deve essere
utilizzata esclusivamente con la funzione
microonde!
Non utilizzarla con nessun'altra funzione.
L'uso della vaporiera con altre funzioni può
provocare danni.
Prima di avviare il forno, assicurarsi sempre che il
piatto rotante possa ruotare liberamente.
Appoggiare sempre la vaporiera sul piatto rotante
in vetro.
Cottura di verdure
Collocare le verdure nel cestello.
Versare 100 ml di acqua nella parte inferiore.
Coprire con il coperchio e impostare il tempo.
Le verdure più tenere, come broccoli e porri,
cuociono in 2-3 minuti.
Le verdure più consistenti, come carote e patate,
cuociono in 4-5 minuti.
Alimento Suggerimenti
Patate/Ortaggi a
radice
(150 g - 200 g)
Usare pezzetti
uniformi.
Tagliare le verdure in
pezzetti uniformi.
Lasciare riposare 1 - 2
minuti dopo la cottura.
Verdure
(cavolori e
broccoli)
(150 g - 500 g)
Verdure surgelate
(150 g - 500 g)
Lasciare riposare 1 - 2
minuti dopo la cottura.
Filetti di pesce
(150 g - 500 g)
Distribuire
uniformemente i
letti sulla griglia.
Sovrapporre le
parti sottili. Lasciare
riposare 1 - 2 minuti
dopo la cottura.
Page 61

ITALIANO 61
Pulizia e manutenzione
La pulizia è la sola manutenzione
normalmente richiesta.
La mancata esecuzione delle operazioni
di pulizia periodiche può provocare
deterioramenti della supercie, che possono
inuenzare negativamente la durata
dell'apparecchio e causare situazioni di
pericolo.
i
IMPORTANTE: non utilizzare pagliette
metalliche, detergenti aggressivi, panni
abrasivi, ecc,. che possono danneggiare la
mascherina, l'interno e l'esterno del forno.
Usare una spugna con un detergente neutro o
un panno carta con un detergente spray per
vetri. Applicare il prodotto spray per vetri su
un panno carta.
Non spruzzare il prodotto direttamente sul
forno.
Ad intervalli regolari, specialmente se si sono
vericati traboccamenti, rimuovere il piatto
rotante e il relativo supporto e pulire la base
del forno.
Questo forno è stato progettato per operare
con il piatto rotante alloggiato nella sua sede.
i
IMPORTANTE: non far funzionare il
forno quando il piatto rotante è stato
rimosso per essere pulito.
Usare un detergente neutro, acqua e un
panno morbido per pulire le superci interne
e la parte interna ed esterna e i giunti dello
sportello.
i
IMPORTANTE: non lasciare che si
formino depositi di grasso o di cibo
attorno allo sportello.
Per le macchie tenaci, far bollire una tazza
colma d'acqua nel forno per 2 o 3 minuti. Il
vapore ammorbidirà lo sporco.
i
IMPORTANTE: per la pulizia del forno a
microonde, non utilizzare apparecchi a
vapore.
Gli odori all'interno del forno possono essere
eliminati introducendo una tazza di acqua e
succo di limone e facendola bollire per alcuni
minuti.
Componenti lavabili in lavastoviglie
• Supporto per piatto rotante
• Piatto rotante di vetro
• Vaporiera
Page 62

ITALIANO 62
Problema Possibile causa Soluzione
L'apparecchio non
funziona.
L'apparecchio non è collegato
alla rete elettrica.
Controllare i fusibili e accertarsi che non
manchi la corrente.
Lo sportello non è chiuso. Prima del riavvio, aprire e richiudere lo
sportello.
Viene visualizzato un
messaggio, per es.:
F2, F3C, F7 o Err2,
Err3, Err5.
Il forno ha riconosciuto che si è
vericato un guasto in uno dei
sensori o qualcosa di simile.
Scollegare il forno, aspettare una decina
di minuti, poi tentare di riavviare il forno.
Se il problema persiste, contattare il
Servizio Assistenza.
Gli alimenti non sono
riscaldati in modo
uniforme.
Parti molto sottili, come le
estremità delle ali di pollo e
simili, non sono coperte.
Coprire le parti più sottili con una
pellicola di alluminio.
Gli alimenti sono stati riscaldati
a un livello di potenza troppo
elevato.
Scegliere un livello di potenza inferiore.
Il piatto rotante si è fermato. Controllare che il piatto rotante e
l'apposito supporto siano posizionati
correttamente e che gli alimenti siano
posti al centro e non tocchino le pareti
del forno.
Gli alimenti non
ruotano.
Il piatto rotante si è fermato. Controllare che il piatto rotante e
l'apposito supporto siano posizionati
correttamente e che il fondo del forno
sia pulito.
Servizio Assistenza
Prima di contattare il Servizio Assistenza:
1. Vericare se non è possibile eliminare da soli gli inconvenienti (vedere il prospetto "Cosa fare, in
caso di...").
2. Spegnere e riaccendere l'apparecchio per accertarsi che l'inconveniente sia stato risolto.
Se dopo i suddetti controlli l'inconveniente permane, contattare il Servizio Assistenza IKEA più vicino.
Indicare sempre:
- il tipo di difetto;
- il tipo e modello esatto del forno;
- il codice di assistenza (il numero indicato dopo la parola "Service" sulla targhetta ) posto sul bordo
interno della cavità del forno (visibile quando lo sportello è aperto);
- il vostro indirizzo completo;
- il vostro numero telefonico.
Qualora si renda necessaria una riparazione, rivolgersi ad un Centro di Assistenza IKEA (a garanzia
dell'utilizzo di pezzi di ricambio originali e di una corretta riparazione).
Cosa fare se...
Page 63

ITALIANO 63
Dati tecnici
Tensione di alimentazione 230 V/50 Hz
Potenza nominale 1300 W
Fusibile 10 A (Regno Unito 13 A)
Potenza di uscita microonde 750 W
Dimensioni esterne (AxLxP) 348 X 595 X 320
Dimensioni interne (AxLxP) 187 X 370 X 290
I dati tecnici si trovano nella targhetta matricola
all'interno dell'apparecchio.
Dati per verica prestazioni riscaldamento in conformità alla IEC 60705.
La Commissione Elettrotecnica Internazionale, SC. 59H, ha messo a punto una prova di
riscaldamento standard per valutare le prestazioni di riscaldamento dei forni. Per questo
forno si raccomanda quanto segue:
Prova Quantità Tempo appross.
Livello di
potenza Contenitore
12.3.1 750 g 10 min. 750 W Pyrex 3.227
12.3.2 475 g 5 min. e mezzo 750 W Pyrex 3.827
12.3.3 900 g 14 min. 750 W Pyrex 3.838
13,3 500 g 2 min. e 40 sec. Jet Defrost
NOTA: queste informazioni sono rivolte esclusivamente a tecnici qualicati.
Page 64

ITALIANO 64
Montaggio dell'apparecchio
Durante l'installazione, seguire le istruzioni
per il montaggio fornite separatamente.
Controllare che la tensione indicata sulla
targhetta matricola corrisponda a quella
dell'impianto domestico.
Non rimuovere le piastre di protezione del
forno a microonde che si trovano ai lati
della cavità del forno. Tali piastre evitano
che i grassi e i pezzetti di cibo entrino nelle
feritoie del forno.
Assicurarsi prima dell'installazione che il
forno sia vuoto.
Assicurarsi che l'apparecchio non sia
danneggiato. Vericare che lo sportello
del forno si chiuda perfettamente e che la
guarnizione interna non sia danneggiata.
Vuotare il forno e pulire l'interno con un
panno morbido inumidito.
Non accendere l'apparecchio se il cavo di
alimentazione o la spina sono danneggiati,
se non funziona correttamente o se è caduto
ed è stato danneggiato. Non immergere il
cavo di alimentazione o la spina nell'acqua.
Tenere il cavo di alimentazione lontano
dalle superci calde. Potrebbero vericarsi
scosse elettriche, incendi o altre situazioni
pericolose.
Dopo il collegamento
Il forno funziona solo se lo sportello è chiuso
correttamente.
La messa a terra dell'apparecchio
è obbligatoria a termini di legge. Il
fabbricante declina qualsiasi responsabilità
per eventuali danni a persone, animali o
cose derivanti dalla mancata osservanza di
questa norma.
I produttori non sono responsabili per
problemi causati dall'inosservanza delle
presenti istruzioni da parte dell'utente.
Installazione
Collegamenti elettrici
Page 65

ITALIANO 65
Consigli per la salvaguardia dell'ambiente
Il materiale di imballaggio è riciclabile al
100% ed è contrassegnato dal simbolo
corrispondente ( ).
Per lo smaltimento, seguire le normative
locali. Il materiale di imballaggio (sacchetti
di plastica, parti in polistirolo, ecc.) deve
essere tenuto fuori dalla portata dei
bambini, poiché può rappresentare una
fonte di pericolo.
Questo apparecchio è contrassegnato in
conformità alla direttiva europea 2002/96/
CE sui riuti di apparecchiature elettriche
ed elettroniche (RAEE). Smaltendo questo
prodotto in modo corretto si contribuirà a
prevenire potenziali danni all'ambiente e
alla salute.
Dichiarazione di conformità
Questo apparecchio, destinato ad entrare a
contatto con prodotti alimentari, è conforme
al regolamento europeo ( ) n.1935/2004
ed è stato progettato, costruito ed immesso
sul mercato in conformità ai requisiti di
sicurezza della direttiva "Bassa Tensione"
2006/95/CE (che sostituisce la 73/23/
CEE e successivi emendamenti), nonché ai
requisiti di protezione della direttiva "EMC"
2004/108/CE.
Il simbolo
riportato sul prodotto o sulla
documentazione di accompagnamento
indica che questo apparecchio non deve
essere smaltito insieme ai riuti domestici.
Deve invece essere conferito presso
un punto di raccolta predisposto per il
riciclaggio delle apparecchiature elettriche
ed elettroniche.
Lo smaltimento deve essere eseguito in
conformità alle normative locali.
Per ulteriori informazioni sul trattamento, il
recupero e il riciclaggio di questo prodotto,
contattare l'ufcio locale competente, il
servizio di raccolta dei riuti domestici o il
negozio presso il quale il prodotto è stato
acquistato.
Prima della rottamazione, renderlo
inservibile tagliando il cavo elettrico di
alimentazione.
Page 66

ITALIANO 66
GARANZIA IKEA
Quanto dura la garanzia IKEA?
Questa garanzia è valida per 5 (cinque)
anni a partire dalla data di acquisto/
consegna del vostro elettrodomestico
presso un negozio IKEA, salvo che
l’elettrodomestico appartenga alla gamma
LAGAN, nel qual caso la garanzia è di 2
(due) anni. È necessario esibire lo scontrino
originale come documento comprovante
l’acquisto. Eventuali interventi di assistenza
effettuati durante la garanzia non ne
estenderanno la validità.
Elettrodomestici non coperti dalla
garanzia IKEA di 5 (cinque) anni
La garanzia di 5 (cinque) anni è valida per
tutti gli elettrodomestici “IKEA” acquistati a
partire dal 1° Agosto 2007 eccetto che per
la gamma di prodotti LAGAN di “IKEA”.
Chi fornisce il servizio?
Il servizio assistenza selezionato ed
autorizzato da IKEA fornirà il servizio
attraverso la propria rete di Partner di
Assistenza autorizzati.
Cosa copre questa garanzia?
La garanzia copre i difetti
dell’elettrodomestico causati da vizi di
fabbricazione (difetto funzionale), a
partire dalla data di acquisto/consegna
dell’elettrodomestico. Questa garanzia
è applicabile solo all’uso domestico. Le
eccezioni sono descritte alla voce “Cosa
non è coperto dalla garanzia?”.
Nel periodo di validità della garanzia,
i costi di riparazione (pezzi di ricambio,
manodopera e viaggi del personale
tecnico) saranno sostenuti dal servizio
assistenza, fermo restando che l’accesso
all’apparecchiatura per l’intervento di
riparazione non comporti spese particolari.
Queste condizioni sono conformi alle norme
locali ed alle norme in vigore in Svizzera.
I componenti sostituiti diventano proprietà
di IKEA.
Come IKEA interverra’ per risolvere il
problema?
Il servizio assistenza incaricato per
l’esecuzione del servizio, esaminerà il
prodotto e deciderà, a propria esclusiva
discrezione, se lo stesso rientra nella
copertura della garanzia. Il Servizio
Assistenza IKEA o il suo Partner di
Assistenza autorizzato tramite i rispettivi
Centri di Assistenza, a propria esclusiva
discrezione, riparerà il prodotto difettoso
o provvederà a sostituirlo con un prodotto
uguale o di pari valore.
Cosa non è coperto dalla garanzia?
• Normale usura
• Danni provocati deliberatamente, danni
provocati dalla mancata osservanza
delle istruzioni di funzionamento, da
un’installazione non corretta o in seguito
a collegamento a un voltaggio errato.
Danni provocati da reazioni chimiche o
elettrochimiche, ruggine, corrosione o
danni causati da acqua, inclusi i danni
causati dalla presenza di eccessivo
calcare nelle condutture idriche. Danni
causati da eventi atmosferici e naturali.
• Le parti soggette a consumo, incluse
batterie e lampadine.
• Danni a parti non funzionali e decorative
che non inuiscono sul normale uso
dell’elettrodomestico, inclusi graf e
differenze di colore.
• Danni accidentali causati da sostanze o
corpi estranei e danni causati da pulizia
o eliminazione di ostruzioni da ltri,
sistemi di scarico o cassetti del detersivo.
• Danni ai seguenti componenti:
vetroceramica, accessori, cestelli per
posate e stoviglie, tubi di alimentazione
e drenaggio, guarnizioni, lampadine
e copri lampadine, griglie, manopole,
rivestimento e parti del rivestimento.
A meno che si possa provare che tali
danni siano stati causati da errori di
fabbricazione.
Page 67

ITALIANO 67
• Casi in cui non vengono rilevati difetti
funzionali durante la visita di un tecnico.
• Riparazioni non eseguite dal nostro
Servizio Assistenza autorizzato e/o da
un Partner di Assistenza contrattuale
autorizzato o in caso di uso di ricambi
non originali.
• Riparazioni causate da un’installazione
non corretta o non conforme alle
speciche.
• Casi di uso improprio e/o non
domestico dell’apparecchio, ad es. uso
professionale.
• Danni da trasporto. Qualora sia il cliente
a trasportare il prodotto alla propria
abitazione o ad altro indirizzo, IKEA
non è responsabile per eventuali danni
che potrebbero vericarsi durante il
trasporto. In compenso, qualora sia IKEA
ad effettuare il trasporto del prodotto
all’indirizzo del cliente, eventuali danni
occorsi al prodotto durante la consegna
saranno coperti da IKEA.
• Costi inerenti la prima installazione
dell’elettrodomestico IKEA.
Tuttavia, qualora un fornitore di servizi
IKEA o un suo partner autorizzato ripari
o sostituisca l’apparecchio nei termini
della presente garanzia, il fornitore o
il partner autorizzato reinstalleranno
l’apparecchio riparato o installeranno
l’apparecchio in sostituzione, se
necessario.
Tali restrizioni non valgono per regolari
interventi svolti da personale tecnico
qualicato con ricambi originali per
adattare l’apparecchio alle disposizioni
tecniche di sicurezza di un altro paese UE.
Applicazione delle leggi nazionali
La garanzia IKEA Le conferisce diritti legali
specici che coprono o superano tutti i
requisiti delle leggi locali.
Tali condizioni non limitano tuttavia in alcun
modo i diritti del consumatore deniti dalle
leggi locali.
Area di validità
Per gli elettrodomestici acquistati in una
nazione EU e portati in un’altra nazione,
i servizi saranno forniti in base alle
condizioni di garanzia applicabili nel nuovo
paese. L’obbligo di fornire il servizio in
base alle condizioni della garanzia esiste
solo se l’elettrodomestico è conforme ed è
installato secondo:
- le speciche tecniche del paese in cui
viene richiesta l’applicazione della
garanzia;
- le informazioni sulla sicurezza contenute
nelle Istruzioni per il montaggio e nel
Manuale dell’utente.
Il servizio ASSISTENZA dedicato per gli
apparecchi IKEA
Non esitate a contattare il Servizio di
Assistenza Tecnica post-vendita incaricato
da IKEA per:
• richiedere assistenza tecnica nel periodo
di garanzia
• richiedere chiarimenti sull’installazione
degli elettrodomestici IKEA installati nelle
cucine IKEA
(Nota: L’installazione del gas deve
essere effettuata da un installatore
qualicato autorizzato).
• richiedere informazioni sul
funzionamento degli elettrodomestici
IKEA
Per assicurarvi la migliore assistenza vi
preghiamo di leggere attentamente le
istruzioni di assemblaggio e/o il manuale di
istruzioni del prodotto prima di contattarci.
Come contattarci se avete bisogno di
assistenza
Siete pregati di contattare
il numero del Servizio di
Assistenza Tecnica post vendita
incaricato da IKEA riportato
sull’ultima pagina di questo
manuale.
Page 68

ITALIANO 68
Al ne di garantirvi un servizio più
veloce, vi suggeriamo di utilizzare
i numeri di telefono riportati in
questo manuale. Fate sempre
riferimento ai numeri indicati nel
manuale dell’apparecchiatura per la
quale avete bisogno di assistenza.
Vi suggeriamo di avere sempre
a disposizione il codice IKEA (8
cifre) e il codice a 12 cifre riportati
nell’etichetta del vostro prodotto.
CONSERVATE IL DOCUMENTO DI
ACQUISTO/CONSEGNA!
È la prova del vostro acquisto ed
è necessario esibirlo afnché la
garanzia sia valida. Sullo scontrino
sono riportati anche il nome e il
codice articolo IKEA (8 cifre) per ogni
apparecchiatura acquistata.
Avete bisogno di ulteriore aiuto?
Per qualunque informazione non relativa
all’assistenza vi preghiamo di far
riferimento al Servizio Cliente del punto
vendita IKEA di riferimento.
Vi preghiamo di leggere attentamente
la documentazione tecnica relativa
all’elettrodomestico prima di contattarci.
Page 69

69
BELGIË - BELGIQUE - BELGIEN
Telefoon/Numéro de téléphone/Telefon-Nummer:
026200311
Tarief/Tarif/Tarif: Lokaal tarief/Prix d’un appel local/Ortstarif
Openingstijd: Maandag - Vrijdag 8.00 - 20.00
Heures d’ouverture: Lundi - Vendredi 8.00 - 20.00
Öffnungszeiten: Montag - Freitag 8.00 - 20.00
БЪЛГАРИЯ
Телефонен номер:
02 4003536
Тарифа: Локална тарифа
Работно време: понеделник - петък 8.00 - 20.00
ČESKÁ REPUBLIKA
Telefonní číslo:
225376400
Sazba: Místní sazba
Pracovní doba: Pondělí - Pátek 8.00 - 20.00
DANMARK
Telefonnummer:
70150909
Takst: Lokal takst
Åbningstid: Mandag - fredag 9.00 - 21.00
Lørdag 9.00 - 18.00
(Åbent udvalgte søndage, se IKEA.dk)
DEUTSCHLAND
Telefon-Nummer:
06929993602
Tarif: Ortstarif
Öffnungszeiten: Montag - Freitag 8.00 - 20.00
ΕΛΛΑΔΑ
Τηλεφωνικός αριθμός:
2109696497
Χρέωση: Τοπική χρέωση
Ώρες λειτουργίας: Δευτέρα - Παρασκευή 8.00 - 20.00
ESPAÑA
Teléfono:
913754126
Tarifa: Tarifa local
Horario: Lunes - Viernes 8.00 - 20.00
(España Continental)
FRANCE
Numéro de téléphone:
0170480513
Tarif: Prix d’un appel local
Heures d’ouverture: Lundi - Vendredi 9.00 - 21.00
ÍSLAND
Símanúmer:
5852409
Kostnaður við símtal: Almennt mínútuverð
Opnunartími: Mánudaga - Föstudaga 9.00 - 17.00
ITALIA
Telefono:
0238591334
Tariffa: Tariffa locale
Orari d’apertura: Lunedì - Venerdì 8.00 - 20.00
MAGYARORSZÁG
Telefon szám:
(06-1)-3285308
Tarifa: Helyi tarifa
Nyitvatartási idő: Hétfőtől Péntekig 8.00 - 20.00
NEDERLAND
Telefoon:
09002354532
en/of 0900 BEL IKEA
Tarief: Lokaal tarief € 0,10 p/min
Openingstijd: Maandag t/m - Vrijdag 9.00 - 21.00
Zaterdag 9.00 - 20.00
Zondag 9.00 - 18.00
NORGE
Telefon nummer:
23500112
Takst: Lokal takst
Åpningstider: Mandag - fredag 8.00 - 20.00
ÖSTERREICH
Telefon-Nummer:
013602771461
Tarif: Ortstarif
Öffnungszeiten: Montag - Freitag 8.00 - 20.00
POLSKA
Numer telefonu:
225844203
Stawka: Koszt połączenia według taryfy
operatora
Godziny otwarcia: Poniedziałek - Piątek 8.00-20.00
PORTUGAL
Telefone:
213164011
Tarifa: Tarifa local
Horário: Segunda - Sexta 9.00 - 21.00
REPUBLIC OF IRELAND
Phone number:
016590276
Rate: Local rate
Opening hours: Monday - Friday 8.00 - 20.00
ROMÂNIA
Număr de telefon:
021 2044888
Tarif: Tarif local
Orar: Luni - Vineri 8.00 - 20.00
РОССИЯ
Телефонный номер:
84957059426
Стоимость звонка: Местная стоимость звонка
Время работы: Понедельник - Пятница 8.00 - 20.00
(Московское время)
SCHWEIZ - SUISSE - SVIZZERA
Telefon-Nummer/Numéro de téléphone/Telefono:
0225675345
Tarif/Tarif/Tariffa: Ortstarif/Prix d’un appel local/Tariffa locale
Öffnungszeiten: Montag - Freitag 8.00 - 20.00
Heures d’ouverture: Lundi - Vendredi 8.00 - 20.00
Orario d’apertura: Lunedì - Venerdì 8.00 - 20.00
SLOVENSKO
Telefónne číslo:
(02) 50102658
Cena za hovor: Cena za miestny hovor
Pracovná doba: Pondelok až piatok 8.00 - 20.00
SUOMI
Puhelinnumero:
0981710374
Hinta: Yksikköhinta
Aukioloaika: Maanantaista perjantaihin 8.00 - 20.00
SVERIGE
Telefon nummer:
0775-700 500
Taxa: Lokal samtal
Öppet tider: Måndag - Fredag 8.30 - 20.00
Lördag - Söndag 9.30 - 18.00
UNITED KINGDOM
Phone number:
02076601517
Rate: Local rate
Opening hours: Monday - Friday 9.00 - 21.00
Page 70

Page 71

Page 72

© Inter IKEA Systems B.V. 2012 AA-486216-2
4000-104-19867
18535
4000-104-19867
 Loading...