

Page 1
GB
FI
SE
NO
DK
LIVSLÅGA
FI SE NO DK
Page 2

Page 3

ENGLISH 4
FI
SUOMI 20
SE
SVENSKA 37
NO
NORSK 53
DK
DANSK 69
Language, Kieli, Språk Språk, Sprog
Country, valtio, Land, Land, Land
Page 4
ENGLISH 4
Table of contents
Safety information 4
Product description 7
Daily use 8
Helpful hints and tips 8
Maintenance and cleaning 9
What to do if 10
Injector table 11
Technical Data 12
Installation 12
Environmental concerns 17
IKEA GUARANTEE 18
Safety Information
Your safety and the safety of
others are very important.
This manual and the appliance
itself provide important safety
messages, to be read and
observed at all times.
This is the safety alert
symbol, pertaining to safety,
which alerts users to potential
hazards to themselves and
others.
All safety messages will follow
the safety alert symbol and
either the terms:
DANGER Indicates a
hazardous situation which, if
not avoided, will cause serious
injury.
WARNING Indicates a
hazardous situation which, if
not avoided, could cause serious
injury.
All Safety messages will tell you
what the potential hazard is, tell
you how to reduce the chance of
injury, and tell you what
can happen if the instructions are
not followed.
The appliance must be
disconnected from the power
supply before carrying out any
installation work.
Installation and maintenance
must be carried out by a
qualied technician, in
compliance with the
manufacturer’s instructions and
local safety regulations to the
relevant gas standard. Only use
original spare parts. Do not
repair or replace any part of the
appliance unless specically
stated in the user manual.
WARNING If the information
in this manual is not followed
exactly, a re or explosion may
result causing property damage
or injury.
- Do not store or use gasoline or
other ammable vapors and
liquids in the vicinity of this
appliance.
What to do if you smell gas:
- Do not try to light any
appliance.
- Do not touch any electrical
switch.
- Do not use any phone in your
building.
- Immediately call your gas
Page 5

ENGLISH 5
supplier from a neighbor’s
phone. Follow the gas
supplier’s instructions.
- If you cannot reach your
gas supplier, call the re
department.
- Installation and service must
be performed by a qualied
installer, service agency or the
gas supplier.
- Use appliance in well
ventilated rooms only.
- The electrical and gas
connections must comply with
local regulations.
- When the hob is installed,
provide a multi-pole circuit
breaker with a contact
separation of at least 3
mm, that provides full
disconnection.
- Regulations require that the
appliance is grounded.
- The power cable must be long
enough for connecting the
appliance, once tted in its
housing, to the power supply
- Use only exible or rigid metal
hose for gas connection.
- If necessary, the electrical
power cable must be
replaced exclusively with a
power cable having identical
characteristics to the original
supplied by manufacturer
(type H05V2V2-F 90°C or
H05RR-F). This operation must
be performed by a qualied
electrician.
- The manufacturer cannot
be held responsible for any
injury to persons or animals or
damage to property arising
from failure to comply with
these requirements.
- Do not use multiple plug
adapters or extension cords.
- Do not pull the power cable
to disconnect it from the
electrical supply.
- The electrical components
must not be accessible to the
user after installation.
- Do not touch the appliance
with any wet part of the body
and do not operate it when
barefoot.
- This hob (class 3) is designed
solely for private household
use for cooking food. Do not
use this appliance as a space
heater to heat or warm the
room. Doing so may result in
carbon monoxide poisoning
and overheating of the hob.
- The Manufacturer declines
all responsibility for
inappropriate use or incorrect
setting of the controls.
- The appliance and its
accessible parts become
hot during use. Care should
be taken to avoid touching
heating elements. Children less
than 8 years of age shall be
kept away unless continuously
Page 6

ENGLISH 6
supervised. This appliance
can be used by children aged
from 8 years and above and
persons with reduced physical,
sensory or mental capabilities
or lack of experience and
knowledge if they have
been given supervision or
instruction concerning use of
the appliance in a safe way
and understand the hazards
involved. They shall not play
with the appliance. Cleaning
and user maintenance shall
not be made by children
supervision.
- The use of a gas appliance
produces heat and humidity in
the room. Make sure the room
is well-ventilated, or install an
extractor hood with exhaust
duct.
- Domestic animals should
be kept away from the
appliance.
- In case of prolonged use,
additional ventilation may
be necessary (by opening
a window or increasing the
hood extraction speed).
- After use, make sure the knobs
are in off position and close
the main gas supply cock or
the gas cylinder valve.
- Overheated oils and fats catch
re easily. Always remain
vigilant when cooking foods
rich in fat, oil or alcohol (e.g.
rum, cognac, wine).
- Unattended cooking on a
hob with fat or oil can be
dangerous and may result in
re. NEVER try to extinguish a
re with water, but switch off
the appliance and then cover
ame e.g. with a lid or a re
blanket.
Danger of re: do not store
items on the cooking surfaces.
- Keep the packaging materials
out of the reach of children.
- Before cleaning or
maintenance wait for hob to
cool down.
Save these instructions
Page 7
ENGLISH 7
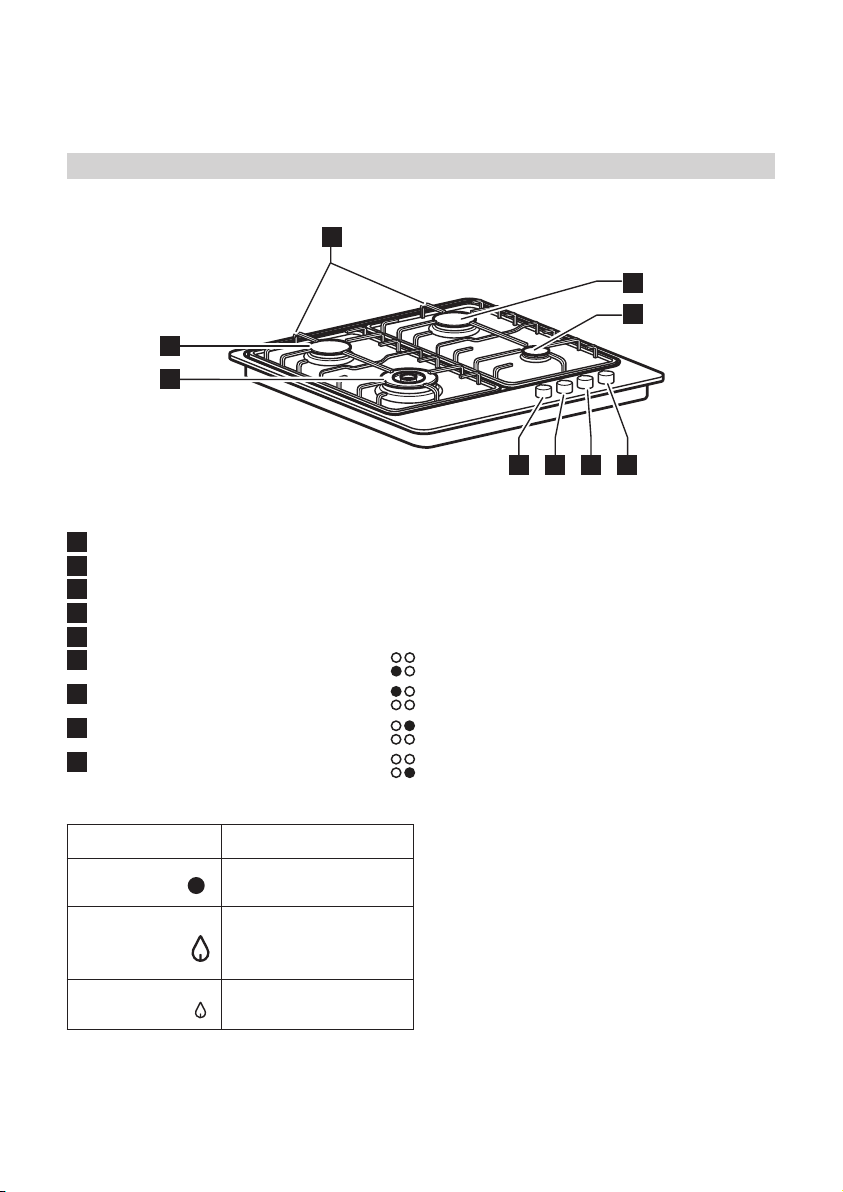
Product description
1
3
5
2
4
7 98
6
1
Removable panstand grids
2
Semirapid burner
3
Semirapid burner
4
Power burner
5
Auxiliary burner
6
Power burner control knob
7
Semirapid burner control knob
8
Semirapid burner control knob
9
Auxiliary burner control knob
Symbols
Solid disc
Large ame
and star
Small ame
Tap closed
Maximum opening/
delivery and electric
ignition
Minimum opening or
reduced delivery
Page 8

ENGLISH 8
Daily use
Do not let the burner ame extend
beyond the edge of the pan.
Important: when the hob is in use, the entire
hob area may become hot.
- To ignite one of the burners, turn the
relative knob anti-clockwise to the
maximum ame setting.
- Press the knob against the control panel
to ignite the burner.
- After the burner has ignited, keep the
knob pressed for about 5-10 seconds to
allow proper device operation.
This burner safety device shuts off the gas
supply to the burner if the ame goes out
accidentally (because of sudden draught, an
interruption in the gas delivery, boiling over
of liquids, etc.).
Helpful hints and tips
This hob has burners of different diameters.
For better burner performance, please stick
to the following rules:
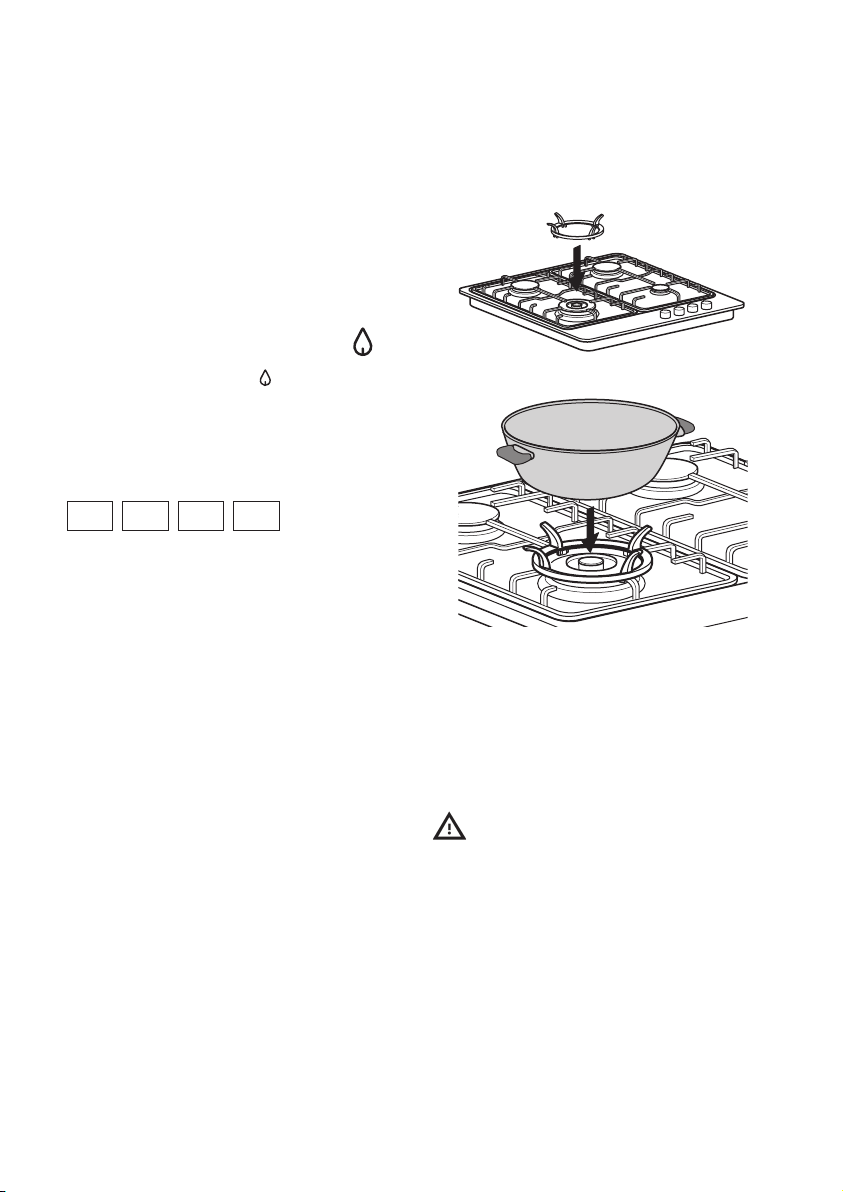
- Use pots and pans with bottoms the
same width as that of the burners or
slightly larger (see following table).
- Only use at-bottomed pots and pans.
- Use the correct amount of water
for cooking foods and keep the pot
covered.
- Make sure pots on the grates do not
protrude beyond the edge of the hob.
- The knob must not be pressed for
more than 15 sec. If, after that time has
elapsed, the burner does not remain lit,
wait at least one minute before trying to
light it again.
NOTE: should particular local conditions
of the delivered gas make the ignition of
burner difcult, it is advisable to repeat
the operation with the knob turned to small
ame setting.
The burner might go out when the knob is
released. This means that the safety device
has not warmed up enough. In this
case, repeat the operations described
above.
IMPORTANT: improper use of the grids can
result in damage to the hob: do not position
the grids upside down or slide them across
the hob. Do not use:
- Cast iron griddles, ollar stones,
terracotta pots and pans.
- Heat diffusers such as metal mesh, or
any other types.
- Two burners simultaneously for one
receptacle (e.g. sh kettle).
Burner Pot Ø
Power burner from 24 to 26 cm
Semi-rapid from 16 to 24 cm
Auxiliary from 8 to 14 cm
Page 9

ENGLISH 9
Maintenance and cleaning
- Rinse and dry
Disconnect power before servicing.
- All the enamelled and glass parts
should be cleaned with warm water and
neutral solution.
- Stainless steel surfaces may be stained
by calcareous water or aggressive
detergents if left in contact for too long.
Any food spills (water, sauce, coffee, etc.)
should be wiped away before they dry.
- Clean with warm water and neutral
detergent, and then dry with a soft
cloth or chamois. Remove baked-on dirt
with specic cleaners for stainless steel
surfaces.
NOTE: clean stainless steel only with soft
cloth or sponge.
- Do not use abrasive or corrosive
products, chlorine-based cleaners or
pan scourers.
- Do not use steam cleaning appliances.
- Do not use ammable products.
- Do not leave acid or alkaline substances,
such as vinegar, mustard, salt, sugar or
lemon juice on the hob.
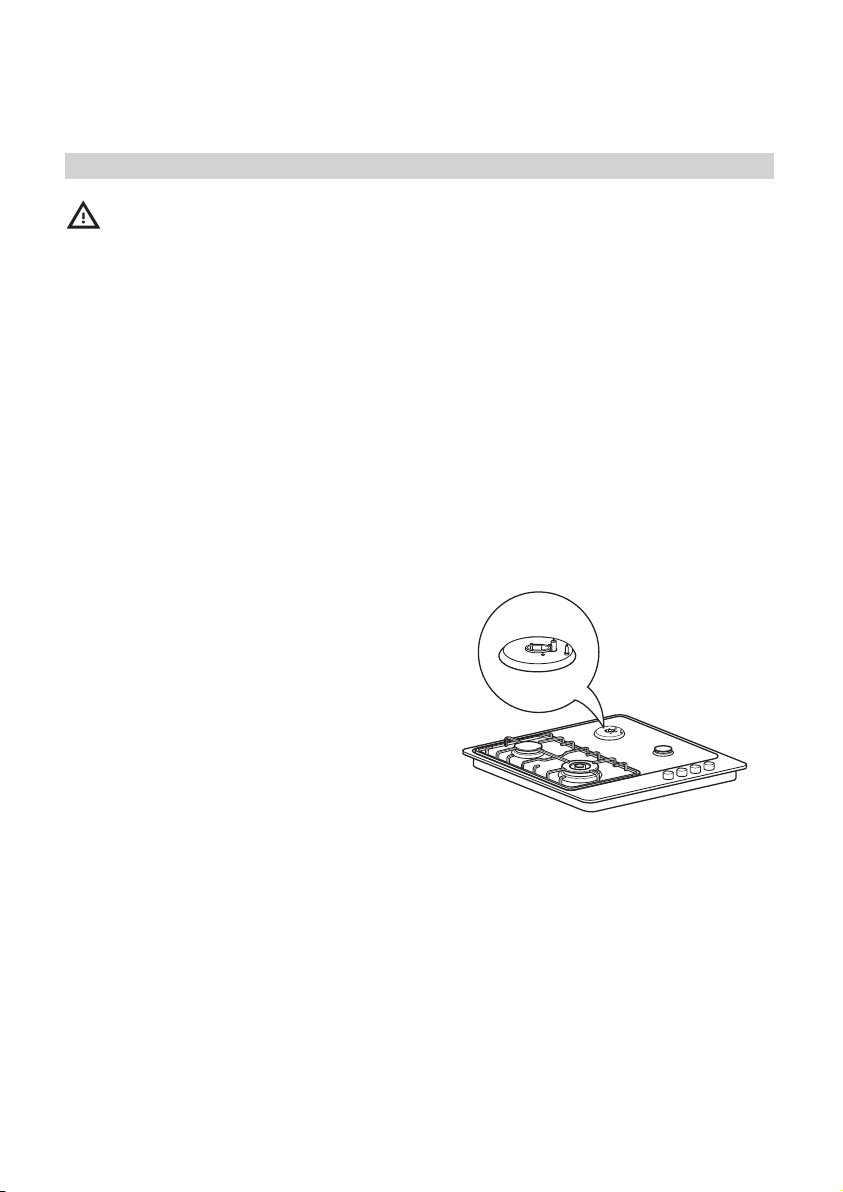
CLEANING THE HOB PARTS
- Grids, burner caps and burners can be
removed to be cleaned.
- Clean them by hand with warm water
and non-abrasive detergent, removing
any food residues and checking that
none of the burner openings is clogged.
- Ret burners and burner caps correctly
in the respective housings.
- When replacing the grids, make sure
that the panstand area is aligned with
the burner.
- Models equipped with electrical
ignition plugs and safety device require
thorough cleaning of the plug end in
order to ensure correct operation.
Check these items frequently, and if
necessary, clean them with a damp
cloth. Any baked-on food should be
removed with a toothpick or needle.
NOTE: to avoid damaging the electric
ignition device, do not use it when the
burners are not in their housing.
Page 10
ENGLISH 10
What to do if ...
Problem Possible cause Solution
The electric ignition does not
work
The burner fails to ignite The gas tap could be
The gas ring burns unevenly Burner crown may
There is no electrical
supply
closed
be occluded by food
residues
Check the unit is plugged in
and the electrical supply is
switched on.
Check that the gas tap is
open
Clean the burner crown
according to cleaning
instructions to make sure that
the burner crown is clear of
food residues.
Before calling the After-Sales Service:
1. Check “Troubleshooting guide” to see if
you can eliminate the problem yourself
2. Turn the hob on again to check if correct
operation has been restored.
3. If the problem persists, contact the Aftersales Service.
Give the following information:
• type of fault;
• hob model;
• service number (i.e. the number after the
word SERVICE on the dataplate under
the hob and on the warranty certicate);
• your full address;
• your telephone number.
If any repairs are required, contact an
authorised service centre, indicated in the
warranty.
In the unlikely event that an operation or
repair is carried out by an unauthorised
technician, always request certication
of the work carried out and insist on the use
of original spare parts.
Failure to comply with these instructions
may compromise the safety and quality of
the product.
Page 11

ENGLISH 11
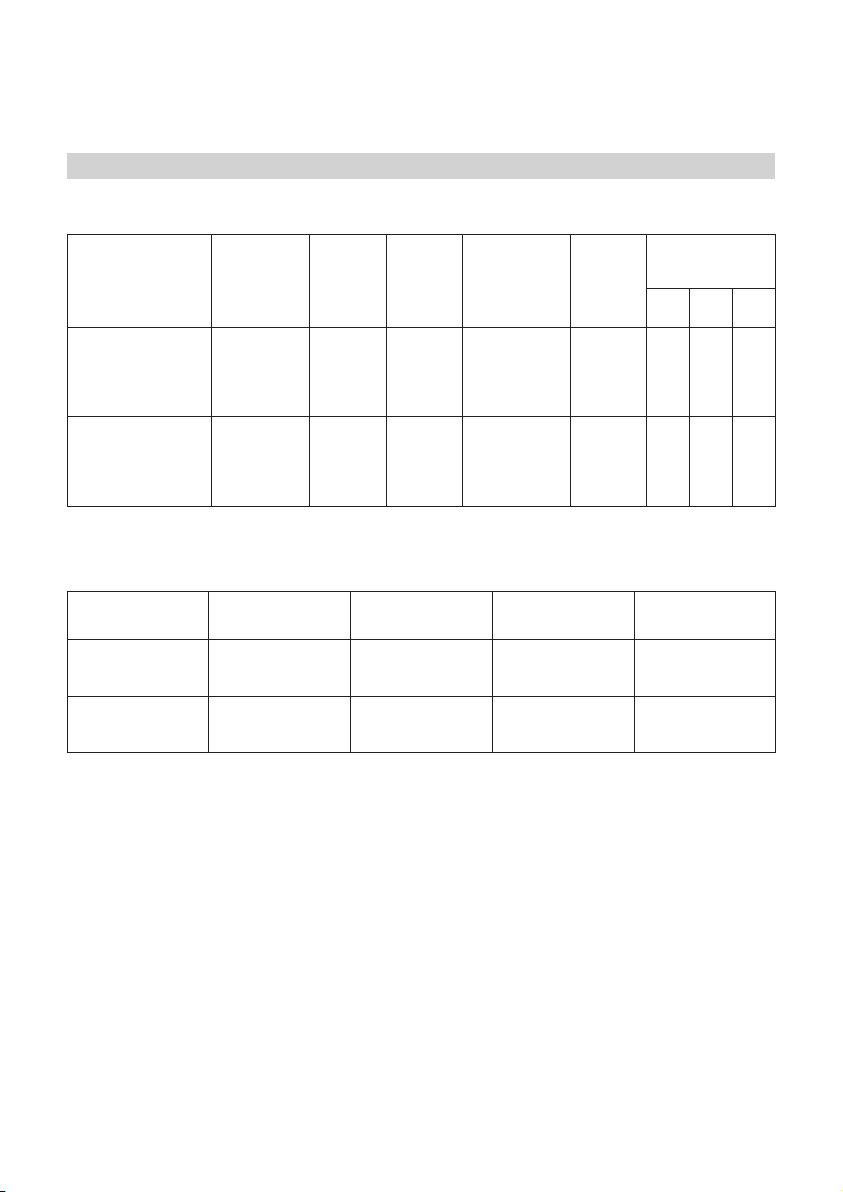
Injector table
Category II2H3B/P
Type of gas used Type of
burner
NATURAL GAS
(Methane)
G20
LIQUEFIED
PETROLEUM GAS
(Butane) G30
(Propane) G31
* 3,2kW solo per la versione 73cm Range 1
Type of gas
used
G20 20 mbar
G30/ G31
28-30 mbar
power burner
semi-rapid
auxiliary
power burner
semi-rapid
auxiliary
Model
conguration
4 BURNERS
1 PB - 2 SR
1 PB - 2 SR
1 AUX
1 AUX
Injector
marking
138 T2 A
101 Z
72 X
93 T4 P
69
50
Rated thermal
owrate (kW)
Rated
thermal
ow rate
kW
Rated
consumption
3,50
2,00
1,00
3,50
2,00
1,00
8,50 808 l/h 9,52
8,50 617 g/h 30,94
333 l/h
190 l/h
95 l/h
254 g/h
145 g/h
73 g/h
Total rated
consumption
Reduced
heat
capacity
kW
2,20
0,35
0,30
1,90
0,35
0,30
Gas pressure
(mbar)
min. rat. max.
17 20 25
25 30 35
Air required (m3)
for burning1m3 of
gas
Electric Power: 220 - 240 V ~ 50/60 Hz
SV
G110/G120-8 mbar gas set nozzle
are available through after-sales service
only.
DK
G110-8 mbar gas set nozzle are
available through after-sales service only.
Page 12
ENGLISH 12
Technical data
Dimensions
Width (mm) 580
Height (mm) 40
Length (mm) 510
Voltage (V) 220 - 240
The technical information are situated in the
rating plate on the bottom side of the appliance.
Installation
After unpacking the hob, make sure that it
has not been damaged during transport. In
the event of problems, contact the dealer or
your nearest After-sales Service.
Technical information for the installer
- This product can be embedded in a
worktop 20 to 50 mm thick.
- If there is no oven beneath the hob,
insert a separator panel that has a
surface at least equal to the opening
in the work surface. This panel must be
positioned in no case less than 20 mm
from the bottom of the hob.
- Before installation, make sure that:
- the local gas delivery conditions (nature
and pressure) are compatible with the
settings of the hob (see the rating plate
and injector table);
- the outer surfaces of the furniture or
appliances adjacent to the hob are heat
resistant according to local regulations;
- This appliance is not connected to a
fume exhaust device. It shall be installed
in accordance with current installation
regulations. Particular attention shall
be given to the relevant requirement
regarding ventilation.
- Combustion products are discharged
outdoors through specic hoods or wall
and/or window mounted electrical fans.
Gas connection
This operation must be performed by a
qualied technician.
The gas supply system must comply with
local regulations to the relavant gas
standard.
- You can nd specic local regulations
for some countries in the paragraph
“Reference to Local Regulations”. If no
information concerning your Country is
given, please ask details to a qualied
technician.
- The connection of the hob to the gas
pipe network or gas cylinder must be
Page 13
ENGLISH 13
made by means of a rigid copper or
steel pipe with ttings complying with
local regulations, or by means of a
continuous-surface stainless steel hose
complying with local regulations. The
maximum length of the hose is 2 linear
metres.
A
C
D
B
C
D
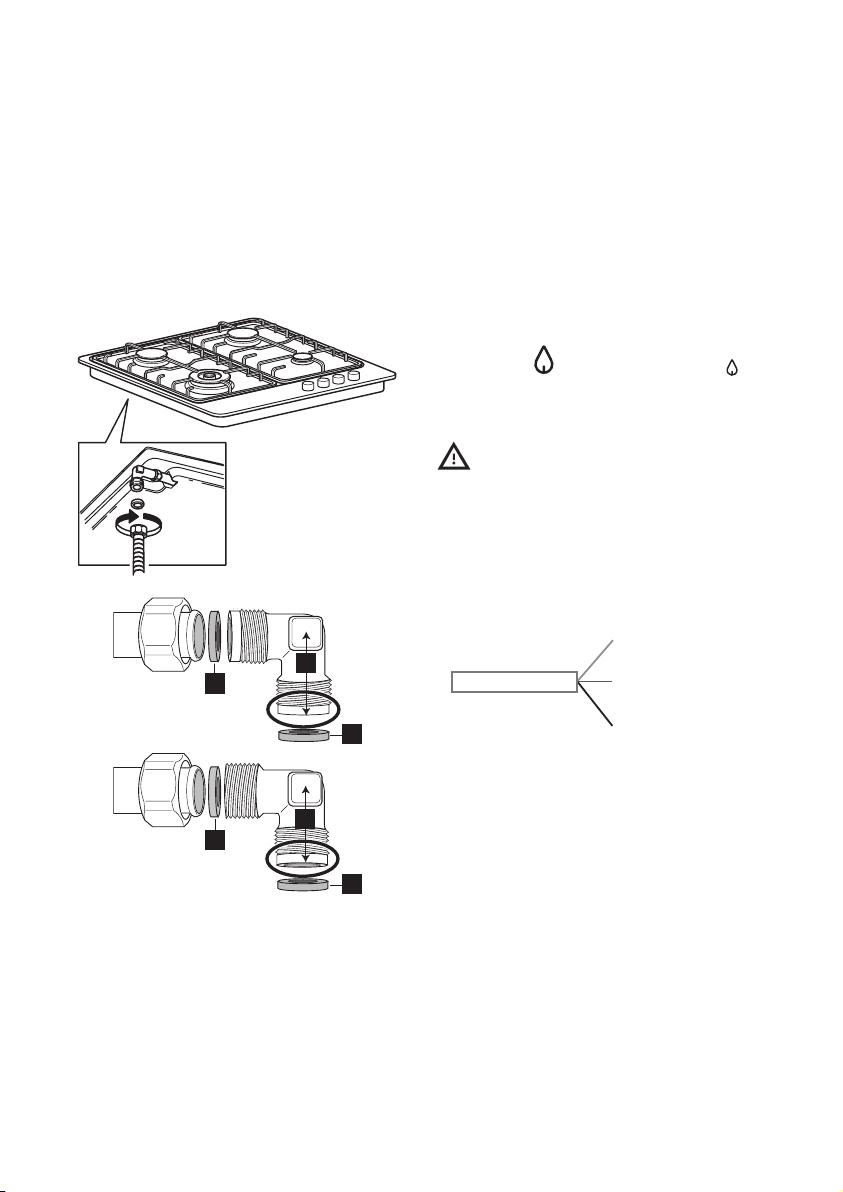
- Connect elbow (A) or (B) supplied with
to the hob inlet main pipe and interpose
the washer (C) supplied, in compliance
with EN 549.
- Washer (D) not supplied with the
product.
- IMPORTANT: if a stainless steel hose
is used, it must be installed so as not to
touch any mobile part of the furniture.
It must pass through an area where
there are no obstructions and where it is
possible to inspect it on all its length.
- After connection to the gas supply, check
for leaks with soapy water. Light up the
burners and turn the knobs from max
position
check ame stability
Electrical connection
WARNING
- This operation must be performed by a
qualied technician.
- The electrical connections must comply
with local regulations.
- The earthing of this appliance is
compulsory by law.
- Do not use an extension cord.
- IMPORTANT: the data relevant to the
voltage and power absorption are
indicated on the rating plate.
Assembly
After having cleaned the perimeter surface,
apply the supplied gasket to the hob.
Position the hob in the worktop opening
made respecting the dimensions indicated in
the Instruction.
NOTE: the power supply cable must be long
enough to permit its upward extraction.
To secure the hob, use the brackets provided
with it. Fit the brackets into the relevant
bores shown by the arrow and fasten them
by means of their screws in accordance with
the thickness of the worktop.
to minimum position to
L
Earth
(yellow/green)
N
Page 14
ENGLISH 14
Make sure that the outlet is near the product
to install. So, if the cable that came with the
product is not long enough, you will need to
replace it with another one having the same
features but with the right length.
Adjustment to different type of gas
WARNING
- This operation must be performed by a
qualied technician.
If the appliance is intended to operate with
a different gas from the gas type stated on
the rating plate and information label on
the top of the hob, change the injectors.
Remove the information label and keep it
with the instructions booklet.
Use pressure regulators suitable for the gas
pressure indicated in the Instruction.
- The gas nozzles must be changed
by After Sales Service or a qualied
technician.
- Nozzles not supplied with the appliance
must be ordered from After Sales
Service.
- Adjust the minimum setting of the taps.
NOTE: when liquid petroleum gas is used
(G30/G31), the minimum gas setting screw
must be tightened as far as it will go.
IMPORTANT: should you experience
difculty in turning the burners knobs,
please contact the After Sales Service for
the replacement of the burner tap if found to
be faulty.
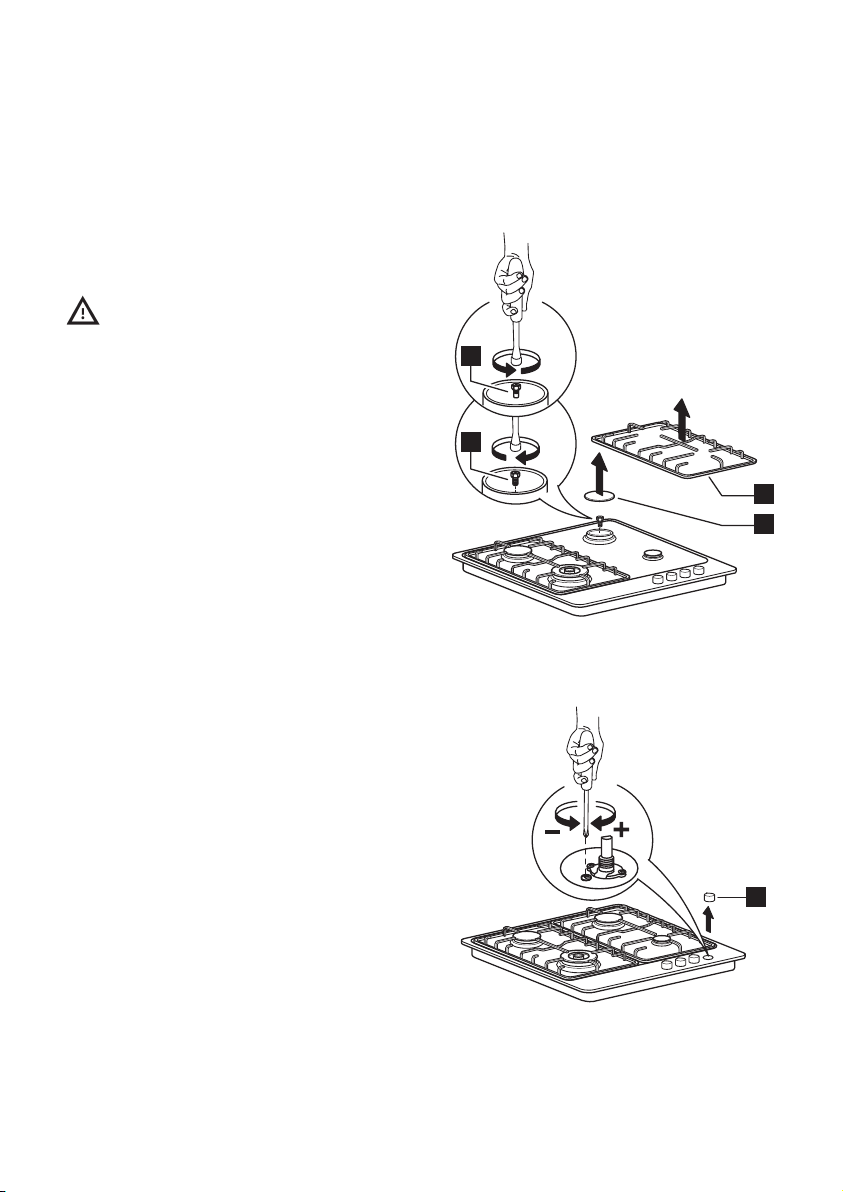
Replacing the injectors (see paragraph
“injector table”)
- Remove grids (A).
- Extract burners (B).
- Using a socket spanner of the
appropriate size unscrew the injector
(C), unscrew the injector to be replaced.
- Replace it with the injector suitable for
the new type of gas.
- Re-assemble the injector in (D).
Before installing the hob, remember to afx
the gas calibration plate supplied with
the injectors in such a way that it covers
the existing information relating to gas
calibration.
D
C
A
B
Adjusting minimum gas setting of taps
E
To ensure that the minimum setting is
correctly adjusted, remove the knob (E) and
proceed as follows:
- tighten screw to reduce the ame height
(-);
Page 15
ENGLISH 15
- loosen screw to increase the ame height
(+).
The adjustment must be performed with the
tap in minimum gas setting position (small
ame ) .
- The primary air of the burners does not
need to be adjusted.
- At this stage, light up the burners and
turn the knobs from max position
to minimum position
stability.
Upon completion of adjustment, reseal
the work surface using sealing wax or an
equivalent material.
to check ame
SE NO DK FI
REFERENCE TO LOCAL REGULATIONS
Ensure that the installation and gas
connections are performed by a qualied
technician, following the manufacturer’s
instructions and in compliance with current
local safety regulations.
WOK ADAPTER
KNOBS REPLACEMENT
Be sure that your hob is switched-off!
All knobs must be in closed position.
Page 16
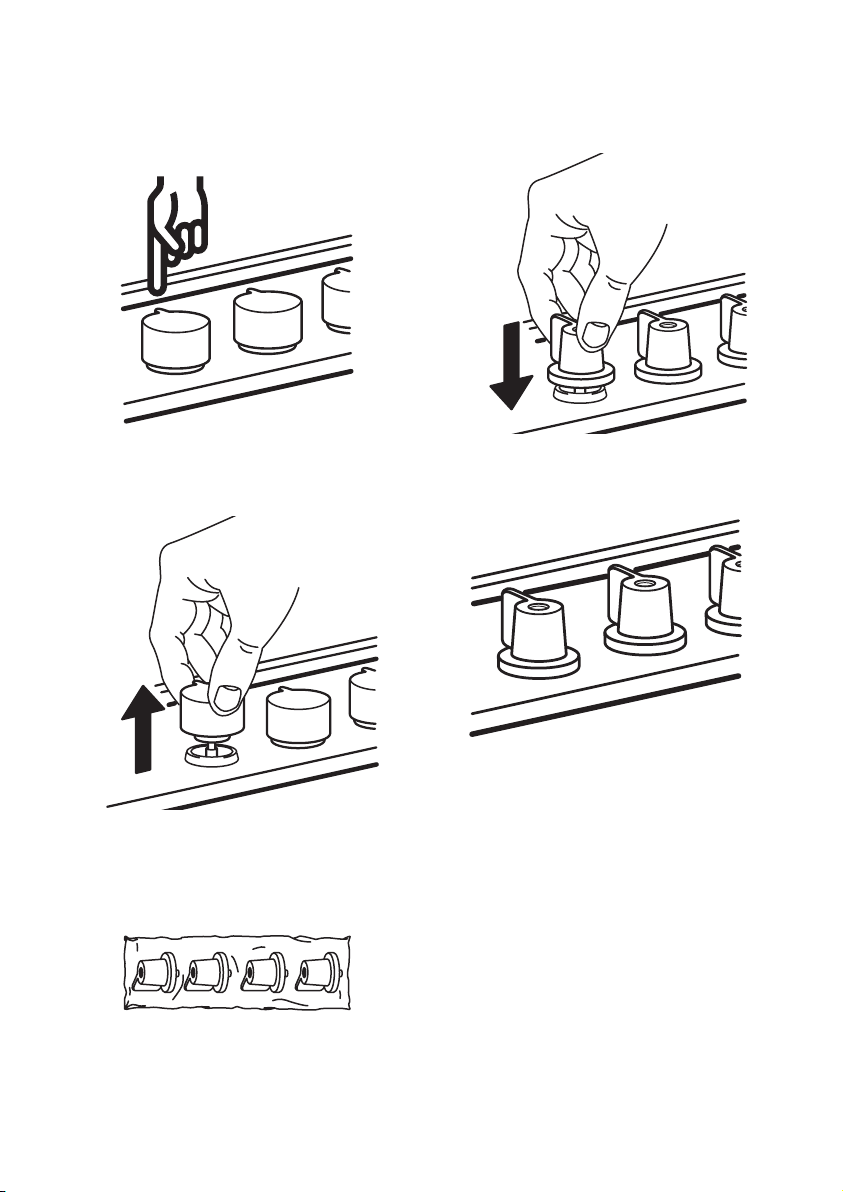
ENGLISH 16
Pull upwards each knob of the cooktop and
store together after removal.
Take the kit with new knobs, which is located
in upper part of packaging and remove the
new knobs from the plastic bag.
Make sure that all the knobs are in the right
position.
Verify correct installation by switching each
burner separately.
Push each of knob on the valve shaft until
you feel the end of sliding (sparking may
occur).
Page 17
ENGLISH 17
Environmental concerns
Packing
- The packing materials are 100%
recyclable and marked with the
recycling symbol ( ).
Products
This appliance is marked in compliance with
European Directive 2002/96/EC on Waste
Electrical and Electronic
Equipment (WEEE). By ensuring that this
appliance is correctly scrapped, the user
can help prevent potentially harmful
consequences for the environment and the
health of people.
The symbol
accompanying documentation indicates
that this product should not be treated as
domestic waste but must be taken to a
suitable centre for collection and recycling
of electrical and electronic equipment.
Disposal must be carried out in compliance
with local regulations on waste disposal.
For further information on the treatment,
recovery and recycling of this product,
contact your competent local ofce, the
household waste collection service or the
shop where you purchased the appliance.
on the product or
Declaration of Conformity
- This cooking hob has been designed,
constructed and put on the market in
conformity with:
- safety requirements of “Gas”
Directive 2009/142/EEC;
- safety objectives of “Low Voltage”
Directive 2006/95/EC (which
replaces 73/23/EEC as amended).
- protection requirements of “EMC”
Directive 2004/108/EEC;
- This hob is suitable for contact with
foodstuffs and complies with (EC)
Regulation no. 1935/2004.
- This cooking hob (Class 3) has been
designed only for cooking food. Any
other use (such as heating a room) is
improper and dangerous.
Page 18

ENGLISH 18
IKEA GUARANTEE
How long is the IKEA guarantee valid?
This guarantee is valid for ve (5) years from
the original date of purchase of your appliance
at IKEA, unless the appliance is named LAGAN
in which case two (2) years of guarantee
apply. The original sales receipt, is required
as proof of purchase. If service work is carried
out under guarantee, this will not extend the
guarantee period for the appliance.
Which appliances are not covered by the
IKEA ve (5) years guarantee?
The range of appliances named LAGAN and
all appliances purchased in IKEA before 1st of
August 2007.
Who will execute the service?
IKEA service provider will provide the
service through its own service operations or
authorized service partner network.
What does this guarantee cover?
The guarantee covers faults of the appliance,
which have been caused by faulty construction
or material faults from the date of purchase
from IKEA. This guarantee applies to domestic
use only. The exceptions are specied under
the headline “What is not covered under this
guarantee?” Within the guarantee period,
the costs to remedy the fault e.g. repairs,
parts, labour and travel will be covered,
provided that the appliance is accessible for
repair without special expenditure. On these
conditions the EU guidelines (Nr. 99/44/
EG) and the respective local regulations
are applicable. Replaced parts become the
property of IKEA.
What will IKEA do to correct the problem?
IKEA appointed Service Provider will examine
the product and decide, at its sole discretion,
if it is covered under this guarantee. If
considered covered, IKEA Service Provider
or its authorized service partner through its
own service operations, will then, at its sole
discretion, either repair the defective product
or replace it with the same or a comparable
product.
What is not covered under this guarantee?
• Normal wear and tear.
• Deliberate or negligent damage, damage
caused by failure to observe operating
instructions, incorrect installation or by
connection to the wrong voltage, damage
caused by chemical or electrochemical
reaction, rust, corrosion or water damage
including but not limited to damage
caused by excessive lime in the water
supply, damage caused by abnormal
environmental conditions.
• Consumable parts including batteries and
lamps.
• Non-functional and decorative parts which
do not affect normal use of the appliance,
including any scratches and possible color
differences.
• Accidental damage caused by foreign
objects or substances and cleaning or
unblocking of lters, drainage systems or
soap drawers.
• Damage to the following parts: ceramic
glass, accessories, crockery and cutlery
baskets, feed and drainage pipes, seals,
lamps and lamp covers, screens, knobs,
casings and parts of casings. Unless such
damages can be proved to have been
caused by production faults.
• Cases where no fault could be found
during a technician’s visit.
• Repairs not carried out by our appointed
service providers and/or an authorized
service contractual partner or where nonoriginal parts have been used.
• Repairs caused by installation which is
faulty or not according to specication.
• The use of the appliance in a non-domestic
environment i.e. professional use.
• Transportation damages. If a customer
transports the product to his home or
Page 19
ENGLISH 19
another address, IKEA is not liable for any
damage that may occur during transport.
However, if IKEA delivers the product
to the customer’s delivery address, then
damage to the product that occurs during
this delivery will be covered by IKEA.
• Cost for carrying out the initial installation
of the IKEA appliance.
However, if an IKEA appointed Service
Provider or its authorized service partner
repairs or replaces the appliance under
the terms of this guarantee, the appointed
Service Provider or its authorized
service partner will reinstall the repaired
appliance or install the replacement, if
necessary.
These restrictions do not apply to fault-free
work carried out by a qualied specialist
using our original parts in order to adapt the
appliance to the technical safety specications
of another EU country.
How country law applies
The IKEA guarantee gives you specic legal
rights, which cover or exceed all the local legal
demands. However these conditions do not
limit in any way consumer rights described in
the local legislation.
Area of validity
For appliances which are purchased in one EU
country and taken to another EU country, the
services will be provided in the framework of
the guarantee conditions normal in the new
country.
An obligation to carry out services in the
framework of the guarantee exists only if
the appliance complies and is installed in
accordance with:
- the technical specications of the country in
which the guarantee claim is made;
- the Assembly Instructions and User Manual
Safety Information.
The dedicated AFTER SALES for IKEA
appliances
Please don’t hesitate to contact IKEA
appointed After Sales Service Provider to:
• make a service request under this
guarantee;
• ask for clarications on installation of the
IKEA appliance in the dedicated IKEA
kitchen furniture;
• ask for clarication on functions of IKEA
appliances.
To ensure that we provide you with the best
assistance, please read carefully the Assembly
Instructions and/or the User Manual before
contacting us.
How to reach us if you need our service
Please refer to the last
page of this manual for the
full list of IKEA appointed
After Sales Service Provider
and relative national phone
numbers.
In order to provide you a quicker
service, we recommend to use the
specic phone numbers listed on this
manual. Always refer to the numbers
listed in the booklet of the specic
appliance you need an assistance for.
Please also always refer to the IKEA
article number (8 digit code) and 12
digit service number placed on the
rating plate of your appliance.
SAVE THE SALES RECEIPT!
It is your proof of purchase and required
for the guarantee to apply. The sales
receipt also reports the IKEA name and
article number (8 digit code) for each of
the appliances you have purchased.
Do you need extra help?
For any additional questions not related
to After Sales of your appliances please
contact your nearest IKEA store call centre.
We recommend you read the appliance
documentation carefully before contacting us.
Page 20
SUOMI 20
Sisällysluettelo
Turvallisuusohjeet 20
Tuotteen kuvaus 23
Päivittäinen käyttö 24
Hyödyllisiä ohjeita ja vinkkejä 24
Huolto ja puhdistus 25
Vianmääritys 26
Suutintaulukko 27
Tekniset tiedot 28
Asennus 28
Ympäristönsuojelu 33
IKEA-TAKUU 34
Turvallisuusohjeet
Huolehdi omasta ja muiden
henkilöiden turvallisuudesta.
Tässä käyttöohjeessa ja
itse laitteessa on tärkeitä
turvallisuusohjeita. Lue ohjeet ja
noudata niitä aina.
Tämä on turvallisuuteen
liittyvä vaaran merkki, joka
ilmoittaa käyttäjälle tai muulle
henkilölle aiheutuvasta
mahdollisesta vaarasta.
Kaikkia turvallisuusohjeita
edeltää varoitusmerkki ja toinen
seuraavista sanoista:
VAARA: vaaratilanne, joka
aiheuttaa vakavia vammoja,
ellei sitä vältetä.
VAROITUS: vaaratilanne, joka
voi aiheuttaa vakavia
vammoja, ellei sitä vältetä.
Kaikissa turvallisuusohjeissa
kuvataan mahdollinen vaara,
miten tapaturma voidaan välttää
ja mitä voi tapahtua, jos ohjeita
ei noudateta.
Laite tulee kytkeä irti
sähköverkosta ennen minkään
asennustoimenpiteen
aloittamista.
Asennuksen tai huollon saa
suorittaa vain
ammattitaitoinen asentaja
valmistajan ohjeiden ja
asiaankuuluvaa kaasustandardia
koskevien paikallisten
turvallisuusmääräysten
mukaisesti. Käytä ainoastaan
alkuperäisiä varaosia. Älä korjaa
tai vaihda mitään laitteen osaa,
ellei käyttöohjeessa nimenomaan
neuvota tekemään niin.
VAROITUS Jos käyttöohjetta ei
noudateta huolellisesti,
vaarana on tulipalo tai räjähdys,
joka voi aiheuttaa omaisuus- tai
henkilövahinkoja.
- Älä säilytä tai käytä bensiiniä
tai muita tulenarkoja kaasuja
tai nesteitä tämän laitteen
läheisyydessä.
Jos tunnet kaasun hajua:
- Älä yritä sytyttää mitään
laitetta.
- Älä koske mihinkään
sähkökytkimeen.
- Älä käytä rakennuksessa olevia
puhelimia.
- Soita heti kaasulaitokselle
naapurin puhelimesta.
Page 21

SUOMI 21
Noudata kaasulaitoksen
ohjeita.
- Ellet saa yhteyttä
kaasulaitokseen, soita
palokunnalle.
- Asennuksen ja huollon saa
tehdä vain ammattitaitoinen
asentaja, huoltoliike tai kaasun
toimittaja.
- Käytä laitetta vain hyvin
ilmastoidussa tilassa.
- Sähkö- ja kaasuliitännät
on tehtävä paikallisten
määräysten mukaisesti.
- Keittotason sähköliitäntään on
asennettava vähintään 3 mm:n
kosketinvälin suojakytkin, joka
irrottaa laitteen kokonaan
verkkovirrasta.
- Laitteen maadoitus on
lakisääteinen.
- Virtajohdon on oltava riittävän
pitkä, jotta kalusteeseen
asennetun laitteen voi kytkeä
pistorasiaan.
- Käytä kaasuliitännässä
ainoastaan metalliletkua tai
metalliputkea.
- Jos virtajohto täytyy
vaihtaa, uuden johdon
on vastattava valmistajan
toimittaman alkuperäisen
johdon ominaisuuksia
(tyyppi H05V2V2-F 90 °C tai
H05RR-F). Virtajohdon saa
vaihtaa vain ammattitaitoinen
sähköasentaja.
- Valmistaja ei vastaa mistään
ihmisille, eläimille tai
omaisuudelle aiheutuneista
vahingoista, jos vahinko on
syntynyt näiden määräysten
noudattamisen laiminlyönnin
vuoksi.
- Älä käytä jakopistorasioita tai
jatkojohtoja.
- Älä irrota pistoketta
pistorasiasta vetämällä laitteen
virtajohdosta.
- Kun asennus on tehty,
sähköosat eivät saa olla
käyttäjän ulottuvilla.
- Älä koske keittotasoa märin
käsin äläkä käytä sitä ollessasi
paljasjaloin.
- Tämä keittotaso (luokka 3)
on tarkoitettu ainoastaan
ruoanvalmistukseen
kotitalouksissa. Älä käytä
laitetta lämmityslaitteena
huoneen lämmittämiseen.
Seurauksena voi olla
häkämyrkytys ja keittotason
ylikuumeneminen.
- Valmistaja ei vastaa väärästä tai
ohjeiden vastaisesta käytöstä
aiheutuneista vahingoista.
- Laite ja sen kosketettavissa
olevat osat tulevat
kuumiksi käytön aikana. On
varottava koskettamasta
lämmityselementtejä. Alle
8-vuotiaat lapset on pidettävä
etäällä ellei heitä jatkuvasti
valvota. Yli 8-vuotiaat lapset
sekä henkilöt, joiden fyysinen,
Page 22

SUOMI 22
aistien tai mielen terveys on
heikentynyt tai joilla ei ole
riittävää kokemusta tai taitoa,
saavat käyttää tätä laitetta, jos
heitä valvotaan tai jos heille
on annettu ohjeet laitteen
turvallista käyttöä varten ja
he ymmärtävät mahdolliset
vaarat. Lapset eivät saa
leikkiä laitteella. Laitteen
puhdistaminen tai käyttäjän
huoltotoimien tekeminen ei
ole sallittu lapsille.
- Kaasulaitteen käyttö tuottaa
huoneeseen lämpöä ja
kosteutta. Varmista, että tila
on hyvin tuuletettu tai asenna
poistohormillinen liesituuletin.
- Pidä kotieläimet poissa laitteen
läheisyydestä.
- Pitkään kestävä käyttö saattaa
vaatia lisätuuletusta (avaa
ikkuna tai lisää liesituulettimen
poistotehoa).
- Varmista käytön jälkeen, että
säätimet ovat poiskytketyssä
asennossa ja sulje kaasuverkon
tai kaasupullon hana.
- Ylikuumentunut rasva tai öljy
syttyy helposti palamaan. Valvo
jatkuvasti ruoanvalmistusta, jos
käytät valmistuksessa runsaasti
rasvaa, öljyä tai alkoholia
(esimerkiksi rommia, konjakkia,
viiniä).
- Rasvassa tai öljyssä
kypsentäminen ilman
valvontaa voi olla vaarallista ja
se voi aiheuttaa tulipalovaaran.
ÄLÄ KOSKAAN yritä sammuttaa
tulipaloa vedellä. Kytke laite
irti sähköverkosta ja peitä
liekit esimerkiksi kannella tai
sammutushuovalla.
Tulipalovaara: älä säilytä
esineitä keittotason pinnalla.
- Pidä pakkausmateriaalit poissa
lasten ulottuvilta.
- Anna lieden jäähtyä ennen
minkään puhdistus- tai
huoltotoimenpiteen
aloittamista.
Säilytä tämä käyttöohje
Page 23

SUOMI 23
Tuotteen kuvaus
1
3
5
2
4
7 98
6
1
Irrotettavat kattilanalusritilät
2
Keskikokoinen poltin
3
Keskikokoinen poltin
4
Tehokas poltin
5
Pieni poltin
6
Tehokkaan polttimen säätönuppi
7
Keskikokoisen polttimen säätönuppi
8
Keskikokoisen polttimen säätönuppi
9
Pienen polttimen säätönuppi
Symbolit
Tumma piste
Suuri liekki
ja tähti
Pieni liekki
Hana kiinni
Suurin avaus/syöttö
ja sähköinen sytytys
Pienin avaus tai
pienempi syöttö
Page 24
SUOMI 24
Päivittäinen käyttö
Älä anna polttimen liekin ulottua
keittoastian pohjan yli.
Tärkeää: keittotason koko alue voi
kuumentua hyvin kuumaksi keittotason
käytön aikana.
- Poltin sytytetään kääntämällä sen
säädin vastapäivään maksimiliekin
kohdalle
- ja painamalla säädintä käyttöpaneelia
kohti.
- Kun poltin on syttynyt, säädintä pitää
painaa vielä noin 5–10 sekuntia.
Polttimen turvalaite katkaisee kaasunsyötön
polttimeen, jos liekki sammuu vahingossa
(vedon, kaasunsyötön keskeytymisen,
nesteen ylikiehumisen tms. vuoksi).
- Säädintä ei saa painaa pitempään kuin
Hyödyllisiä ohjeita ja vinkkejä
Keittotasossa on erikokoisia polttimia.
Jotta polttimet toimivat kunnolla, noudata
seuraavia ohjeita:
- Käytä kattiloita ja pannuja, joiden pohjan
läpimitta on sama tai hieman suurempi
kuin polttimen läpimitta (katso alla oleva
taulukko).
- Käytä vain tasapohjaisia kattiloita ja
pannuja.
- Käytä oikea määrä vettä ruokien
keittämisessä ja peitä kattila kannella.
- Tarkista, että ritilöillä olevat keittoastiat
15 sekuntia. Ellei polttimen liekki jää
palamaan tämän ajan jälkeen, odota
vähintään minuutti ennen kuin yrität
sytyttää liekin uudelleen.
HUOM. Jos polttimen sytyttäminen
on hankalaa paikallisen kaasuverkon
olosuhteiden vuoksi, yritä sytyttää
poltin säätimen ollessa käännetty pienen
liekin asentoon.
Poltin saattaa sammua, kun vapautat
säätimen. Tämä tarkoittaa, että turvalaite ei
ole lämmennyt tarpeeksi. Tee tässä
tapauksessa edellä kuvatut toimenpiteet
uudelleen.
eivät ulotu keittotason reunan yli.
TÄRKEÄÄ: Ritilöiden epäasianmukainen
käyttö voi vahingoittaa keittotasoa. Älä
laita ritilöitä ylösalaisin äläkä vedä niitä
keittotason päällä. Älä käytä:
- Valurautaritilöitä, paistokiviä tai
poltettuja saviastioita.
- Liekinjakajia, kuten metalliverkkoja tms.
- Kahta poltinta samanaikaisesti yhdelle
keittoastialle (esimerkiksi kalakattilalle).
Poltin Kattila Ø
Tehokas poltin 24–26 cm
Keskikoko 16 - 24 cm
Pieni 8–14 cm
Page 25
SUOMI 25
Huolto ja puhdistus
Poista varovasti kaikki ruoanjäänteet ja
Kytke laite irti sähköverkosta ennen
huoltotöiden aloittamista.
- Kaikki emali- ja lasiosat puhdistetaan
lämpimällä vedellä ja miedolla
puhdistusaineella.
- Kalkkipitoinen vesi tai voimakkaat
puhdistusaineet voivat jättää läiskiä
ruostumattomiin teräspintoihin
pitkäaikaisessa kosketuksessa. Poista
keittotasolle roiskunut ruoka (vesi,
kastike, kahvi tms.) ennen kuin se ehtii
kuivua.
- Puhdista lämpimällä vedellä ja
neutraalilla puhdistusaineella ja kuivaa
pehmeällä liinalla tai säämiskällä. Poista
kiinnipalanut lika ruostumattomille
teräspinnoille tarkoitetulla
erikoispuhdistusaineella.
HUOM. Käytä ruostumattomien teräspintojen
puhdistuksessa vain pehmeää liinaa tai
sientä.
- Älä käytä hankaavia tai syövyttäviä
aineita, klooripitoisia valkaisuaineita tai
hankaussieniä.
- Älä käytä höyrypuhdistuslaitteita.
- Älä käytä tulenarkoja aineita.
- Älä jätä keittotason päälle happamia tai
emäksisiä aineita, kuten etikkaa, sinappia,
suolaa, sokeria, sitruunamehua tms.
KEITTOTASON OSIEN PUHDISTAMINEN
- Ritilät, polttimien hatut ja polttimet
voidaan irrottaa puhdistusta varten.
- Puhdista ne haalealla vedellä ja
hankaamattomalla puhdistusaineella.
tarkista, että polttimen aukot eivät ole
tukossa.
- Huuhtele ja kuivaa huolellisesti.
- Aseta polttimet ja polttimien hatut oikein
paikoilleen.
- Kun laitat ritilät takaisin paikalleen,
tarkista, että kattilan alustan alue on
polttimen kohdalla.
- Jos keittotasossa on elektroninen
sytytin ja turvalaite, sytyttimen pää on
puhdistettava huolellisesti, jotta se toimii
kunnolla.
Tarkista nämä osat säännöllisesti ja
puhdista tarvittaessa kostealla liinalla.
Irrota kiinnipalanut ruoka hammastikulla
tai neulalla.
HUOM. Elektronista sytytintä ei saa käyttää,
kun polttimet eivät ole paikoillaan, jotta
sytytin ei vaurioidu.
Page 26
SUOMI 26
Vianmääritys
Ongelma Mahdollinen syy Ratkaisu
Elektroninen sytytys ei toimi. Laitteeseen ei tule
sähkövirtaa.
Poltin ei syty. Kaasuhana saattaa olla
kiinni.
Kaasuliekki palaa epätasaisesti. Polttimen kruunu
voi olla tukkeutunut
ruoanjäänteistä.
Tarkista, että laite on kytketty
verkkovirtaan ja virta on
kytketty laitteeseen.
Tarkista, onko kaasuhana auki.
Puhdista polttimen kruunu
puhdistusohjeita noudattaen
ja tarkista, että kruunussa ei
ole ruoanjäänteitä.
Ennen kuin otat yhteyttä huoltoon:
1. Lue kohta Vianmääritys ja tarkista, voitko
poistaa ongelman omatoimisesti
2. Kytke keittotaso uudelleen toimintaan ja
tarkista, toimiiko se oikein.
3. Jos ongelma ei poistu, ota yhteys
valtuutettuun huoltoliikkeeseen.
Ilmoita seuraavat tiedot:
• toimintahäiriön laatu
• keittotason malli
• huoltokoodi (numero, joka on merkitty
sanan SERVICE perään keittotason alla
olevaan arvokilpeen sekä takuukorttiin);
• täydellinen osoitteesi
• puhelinnumerosi.
Jos korjausta tarvitaan, ota yhteys
takuutiedoissa mainittuun valtuutettuun
huoltoliikkeeseen.
Jos huolto- tai korjaustyön jostakin syystä
tekee joku muu kuin valtuutettu huoltoliike,
pyydä aina vahvistus tehdystä työstä ja
vaadi alkuperäisten varaosien käyttöä.
Näiden ohjeiden noudattamisen laiminlyönti
voi heikentää tuotteen turvallisuus- ja
laatuominaisuuksia.
Page 27
SUOMI 27
Suutintaulukko
Kategoria II2H3B/P
Käytettävän kaasun
tyyppi
LUONNONKAASU
(metaani)
G20
NESTEKAASU
(LPG)
(butaani) G30
(propaani) G31
* 3,2 kW vain mallissa 73 cm Sarja 1
Käytettävän kaasun
tyyppi
G20 20 mbar
G30/ G31
28–30 mbar
Sähkövirta: 220–240 V ~ 50/60 Hz
Polttimen
tyyppi
tehokas poltin
keskikokoinen
poltin
pieni poltin
tehokas poltin
keskikokoinen
poltin
pieni poltin
Malli
4 POLTINTA
1 PB - 2 SR
1 AUX
1 PB - 2 SR
1 AUX
Suuttimen
merkintä
138 T2 A
101 Z
72 X
93 T4 P
69
50
Nimellinen
lämmön
virtaus kW
Nimellinen lämpöteho (kW)
Nimellinen
kulutus
3,50
2,00
1,00
3,50
2,00
1,00
8,50 808 l/h 9,52
8,50 617 g/h 30,94
333 l/h
190 l/h
95 l/h
254 g/h
145 g/h
73 g/h
Nimellinen
kokonaiskulutus
Alennettu
lämpöteho
kW
2,20
0,35
0,30
1,90
0,35
0,30
Kaasun paine
(mbar)
min. nim. maks.
17 20 25
25 30 35
Palamisen vaatima
ilma (m3) 1m3 kaasua
Page 28

SUOMI 28
Tekniset tiedot
Mitat
Leveys (mm) 580
Korkeus (mm) 40
Pituus (mm) 510
Jännite (V) 220 - 240
Tekniset tiedot on merkitty laitteen pohjaan
kiinnitettyyn arvokilpeen.
Asennus
Purettuasi keittotason pakkauksestaan
tarkista, ettei se ole vahingoittunut
kuljetuksen aikana. Jos ongelmia esiintyy,
ota yhteys jälleenmyyjään tai lähimpään
valtuutettuun huoltoliikkeeseen.
Teknisiä tietoja asentajalle
- Tämä tuote asennetaan työtasolle, jonka
paksuus on 20–50 mm.
- Jos keittotason alapuolella ei ole uunia,
aseta alle välilevy, jonka pinta-ala on
vähintään yhtä suuri kuin työtasossa
oleva aukko. Levyä ei saa asentaa alle 20
mm:n etäisyydelle keittotason pohjasta.
- Varmista seuraavat asiat ennen
asennusta:
- Paikalliset kaasun jakeluolosuhteet
(kaasun tyyppi ja paine) ovat keittotason
asetusten mukaiset (katso arvokilpi ja
suutintaulukko).
- Keittotason viereisten kalusteiden tai
laitteiden ulkopinnat ovat paikallisten
määräysten mukaisesti lämmönkestäviä.
- Tätä laitetta ei liitetä
savunpoistojärjestelmään. Se on
asennettava voimassa olevien
asennusmääräysten mukaisesti. Erityistä
huomiota tulee kiinnittää tuuletusta
koskeviin vaatimuksiin.
- Palamistuotteet johdetaan ulos erityisten
liesituulettimien tai seinään tai ikkunaan
asennetun sähkötuulettimen avulla.
Kaasuliitäntä
Toimenpiteen saa tehdä vain
ammattitaitoinen asentaja.
Kaasunsyöttöjärjestelmän tulee olla
asiaankuuluvaa kaasustandardia vastaavien
paikallisten määräysten mukainen.
- Joitakin maita koskevia
erikoismääräyksiä on esitetty
kappaleessa Viite paikallisiin
määräyksiin. Ellei tekstissä ole omaa
maatasi koskevia tietoja, pyydä
lisätietoja asentajalta.
- Keittotason liitäntä kaasuverkkoon tai
Page 29

SUOMI 29
kaasupulloon on tehtävä paikallisten
määräysten mukaisella kuparitai teräsputkella, jonka liittimet
vastaavat paikallisia määräyksiä, tai
paikallisten määräysten mukaisella
jatkuvapintaisella ruostumattomalla
teräsletkulla. Letkun enimmäispituus on
2 metriä.
A
C
D
B
C
D
- Liitä keittotason mukana toimitettu
kulmaliitin (A) tai (B) kaasun sisääntuloon
ja aseta väliin mukana toimitettu,
standardin EN 549 mukainen aluslaatta
(C).
- Aluslaattaa (D) ei toimiteta tuotteen
mukana.
- TÄRKEÄÄ: Jos käytät ruostumatonta
teräsletkua, se on asennettava siten,
ettei se kosketa mitään kalusteen
liikkuvaa osaa. Letkun tulee kulkea
kohdasta, jossa ei ole esteitä ja jossa se
voidaan tarkistaa koko pituudeltaan.
- Kun kaasuliitäntä on tehty, tarkista
sen pitävyys saippuavedellä.
Sytytä polttimet ja tarkista liekin
tasaisuus kääntämällä säätönupit
maksimiasennosta
.
Sähköliitäntä
VAROITUS
- Toimenpiteen saa tehdä vain
ammattitaitoinen asentaja.
- Sähköliitännät on tehtävä paikallisten
määräysten mukaisesti.
- Laitteen maadoitus on lakisääteinen.
- Älä käytä jatkojohtoa.
- TÄRKEÄÄ: jännite- ja virrankulutustiedot
on merkitty arvokilpeen.
Keittotason upottaminen
Kiinnitä mukana toimitettu tiiviste keittotason
reunaan puhdistettuasi pinnan ensin
huolellisesti. Aseta keittotaso työtason
aukkoon, joka on tehty käyttöohjeessa
annettujen mittojen mukaisesti.
HUOM. Virtajohdon on oltava riittävän
pitkä, jotta se ulottuu pistorasiaan yläkautta
johdettuna.
Kiinnitä keittotaso paikalleen mukana
toimitettujen kannakkeiden (A) avulla. Aseta
kannakkeet nuolella merkittyihin aukkoihin
ja kiinnitä ne työtason paksuutta vastaavilla
ruuveilla.
minimiasentoon
L
Maa
(keltavihreä)
N
Page 30

SUOMI 30
Varmista, että laitteen lähellä on pistorasia.
Jos laitteen mukana toimitettu virtajohto
on liian lyhyt, tilalle on vaihdettava
vastaavanlainen pitempi johto.
Kaasutyypin mukainen säätö
VAROITUS
- Toimenpiteen saa tehdä vain
ammattitaitoinen asentaja.
Jos keittotasoa on tarkoitus käyttää muulla
kuin arvokilpeen ja keittotason päällä
olevaan tarraan merkityllä kaasulla, suuttimet
on vaihdettava.
Poista tarra ja säilytä se käyttöohjeen kanssa
samassa paikassa.
Käytä paineensäätimiä, jotka sopivat
ohjeessa mainitulle kaasunpaineelle.
- Kaasusuuttimien vaihto on annettava
valtuutetun huoltoliikkeen tai muun
ammattitaitoisen asentajan tehtäväksi.
- Jos laitteen mukana ei ole toimitettu
suuttimia, ne on tilattava valtuutetusta
huoltoliikkeestä.
- Säädä hanojen minimiasetus.
HUOM. Jos käytät nestekaasua (G30/G31),
kaasun minimiasetuksen ruuvi on kiristettävä
mahdollisimman tiukkaan.
TÄRKEÄÄ: jos keittotason säätimet eivät
kierry helposti, ota yhteys valtuutettuun
huoltoliikkeeseen, joka vaihtaa polttimen
venttiilin, mikäli se on viallinen.
Suuttimien vaihtaminen (katso
Suutintaulukko)
- Poista ritilät (A).
- Irrota polttimet (B).
- Ruuvaa vaihdettava suutin irti sopivan
kokoisella hylsyavaimella (C).
- Vaihda tilalle uudelle kaasutyypille sopiva
suutin.
- Kokoa suutin (D).
Ennen kuin asennat keittotason, muista
kiinnittää suuttimien mukana toimitettu
kaasutietokilpi aikaisempien kaasutietojen
päälle siten, että se peittää vanhat tiedot.
D
C
A
B
Hanojen minimiasetuksen säätäminen
E
Tarkista minimiasetuksen oikea säätö
poistamalla säädin (E) ja toimimalla
seuraavasti:
- alenna liekin korkeutta kiristämällä ruuvia
(-),
- lisää liekin korkeutta löysäämällä ruuvia
(+).
Page 31

SUOMI 31
Säätö on tehtävä hanan ollessa kaasun
minimiasennossa (pieni liekki).
- Polttimien primaari-ilmaa ei tarvitse
säätää.
- Sytytä nyt polttimet ja tarkista liekin
tasaisuus kääntämällä säätönupit
maksimiasennosta
.
Kun säätö on tehty, tiivistä työtaso uudelleen
tiivistysvahalla tai vastaavalla aineella.
FI
VIITE PAIKALLISIIN MÄÄRÄYKSIIN
Varmista, että asennuksen ja kaasuliitännät
suorittaa ammattitaitoinen asentaja
noudattaen valmistajan ohjeita ja voimassa
olevia paikallisia turvallisuusmääräyksiä.
minimiasentoon
WOK-PANNUN TUKI
SÄÄTÖNUPPIEN VAIHTAMINEN
Tarkista, että keittotasosta on katkaistu
virta.
Säätönuppien on oltava pois päältä
-asennossa.
Page 32

SUOMI 32
Irrota keittotason säätönupit vetämällä niitä
ylöspäin ja pane ne yhdessä talteen.
Ota uudet säätönupit sisältävä muovipussi
pakkauksen yläosasta ja poista säätönupit
pussista.
Tarkista, että kaikki säätönupit ovat oikeassa
asennossa.
Tarkista asennus kytkemällä jokainen poltin
päälle erikseen.
Paina säätönupit venttiilin karaan, kunnes
ne eivät painu enää alemmas (kipinöintiä voi
esiintyä).
Page 33

SUOMI 33
Ympäristönsuojelu
Pakkaus
- Pakkausmateriaalit ovat täysin
kierrätyskelpoisia, mistä on merkkinä
kierrätyssymboli ( ).
Tuotteet
Tämä laite on merkitty Euroopan
yhteisön sähkö- ja elektroniikkalaitteiden
kierrätysdirektiivin (WEEE) 2002/96/EY
mukaisesti. Varmistamalla, että laite
poistetaan käytöstä asianmukaisesti,
voit auttaa välttämään ympäristö- ja
terveyshaittoja.
Tuotteeseen tai sen asiakirjoihin merkitty
symboli
hävittää kotitalousjätteiden mukana,
vaan se on toimitettava sähkö- ja
elektroniikkalaitteiden talteenotto- ja
kierrätyskeskukseen. Hävitä laite paikallisten
jätehuoltomääräysten mukaisesti.
Lisätietoja tuotteen käsittelystä,
talteenotosta ja kierrätyksestä saa paikallisilta
viranomaisilta, jätehuoltolaitokselta tai
liikkeestä, josta tuote on ostettu.
tarkoittaa, ettei laitetta saa
Vaatimustenmukaisuusvakuutus
- Tämän keittotason suunnittelussa,
valmistuksessa ja markkinoinnissa on
noudatettu seuraavia määräyksiä:
- kaasudirektiivin 2009/142/ETY
turvallisuusmääräykset
- pienjännitedirektiivin 2006/95/
ETY (korvaa direktiivin 73/23/ETY
sekä sen myöhemmät muutokset)
turvallisuusmääräykset
- EMC-direktiivin 2004/108/ETY
suojausvaatimukset.
- Tämä keittotaso soveltuu käytettäväksi
kosketuksissa elintarvikkeisiin, ja se
vastaa EU-direktiiviä 1935/2004.
- Tämä keittotaso (luokka 3) on tarkoitettu
ainoastaan ruoanvalmistukseen.
Kaikenlainen muu käyttö (esim. huoneen
lämmittäminen) on väärinkäyttöä ja
vaarallista.
Page 34

SUOMI 34
IKEA-TAKUU
Miten kauan IKEA-takuu on
voimassa?
Tämä takuu on voimassa viisi (5) vuotta
kodinkoneen ostopäivästä lukien.
LAGAN-merkkisten laitteiden takuu on
kaksi (2) vuotta. Todisteeksi vaaditaan
alkuperäinen ostokuitti. Takuuaikana
mahdollisesti tehdyt huoltotyöt eivät
pidennä kodinkoneen takuuaikaa.
Mitä laitteita IKEAn 5 vuoden takuu ei
koske?
LAGAN-merkkisiä kodinkoneita ja
kaikkia IKEA-tavaratalosta ennen 1.
elokuuta 2007 ostettuja kodinkoneita.
Kuka vastaa takuupalvelusta?
IKEAn valtuutettu palveluntarjoaja
takaa palvelun suorittamisen oman
huoltopalvelunsa tai valtuutettujen
huoltokumppaneiden verkoston kautta.
Mitä takuu kattaa?
Takuu kattaa kodinkoneiden materiaalija valmistusvirheiden aiheuttamat
virheet siitä päivästä lähtien, kun tuote
ostetaan IKEA-tavaratalosta. Takuu
koskee vain kotitalouskäyttöä. Poikkeukset
mainitaan kohdassa “Mitä tämä takuu ei
kata?”. Takuuaikana takuu kattaa vian
korjaamisesta aiheutuvat kustannukset,
kuten korjaustyöt, osat ja työ- ja
matkakustannukset edellyttäen, että laite
voidaan korjata ilman erityiskustannuksia.
Näissä olosuhteissa sovelletaan EUdirektiiviä (99/44/EY) sekä paikallisia
määräyksiä. Korvatuista osista tulee IKEAn
omaisuutta.
Mitä IKEA tekee ongelman
ratkaisemiseksi?
IKEAn nimeämä palveluntarjoaja tarkistaa
tuotteen ja päättää oman harkintansa
mukaan, kuuluuko vika takuun piiriin. Mikäli
näin on, IKEAn nimeämä palveluntarjoaja
tai sen valtuutettu huoltokumppani oman
huoltopalvelunsa kautta oman harkintansa
mukaan joko korjaa viallisen tuotteen
tai vaihtaa sen uuteen samanlaiseen tai
vastaavaan tuotteeseen. Korvatuista osista
tulee IKEAn omaisuutta.
Mitä tämä takuu ei kata?
• Normaalia kulumista.
• Tahallisia tai huolimattomuudesta
aiheutuneita vahinkoja, käyttöohjeiden
noudattamisen laiminlyömisestä,
virheellisestä asennuksesta tai
väärään jännitteeseen liittämisestä
aiheutuneet vahingot, kemiallisesta tai
sähkökemiallisesta reaktiosta, ruosteesta,
syöpymisestä tai vesivahingoista
aiheutuneet vahingot, syöttöveden
liiallisesta kalkkipitoisuudesta tai
epänormaaleista ympäristöolosuhteista
aiheutuneet vahingot mukaan lukien,
mutta niihin rajoittumatta.
• Kulutushyödykkeinä pidettäviä osia,
kuten paristoja ja lamppuja.
• Ei-toiminnallisten ja koristeellisten osien
vikoja, jotka eivät vaikuta kodinkoneen
normaaliin käyttöön, esim. naarmuja ja
värieroja.
• Vieraiden esineiden tai aineiden tai
suodattimissa, tyhjennysjärjestelmissä
tai pesuainelokeroissa olevien
tukosten poistamisen tai kodinkoneen
puhdistuksen aiheuttamia satunnaisia
vahinkoja.
• Seuraavia osia koskevia vahinkoja:
lasikeraaminen taso, varusteet, astiaja ruokailuvälinekorit, vedenotto- ja
tyhjennysletkut, tiivisteet, lamput ja
lampun suojukset, näytöt, kytkimet, kuoret
ja niiden osat. Tämä pätee, ellei näiden
vahinkojen voida todistaa syntyneen
valmistusvirheiden vuoksi.
Page 35

SUOMI 35
• Tapauksia, joissa huoltokäynnin aikana
kodinkoneessa ei havaita vikaa.
• Muiden kuin nimettyjen
palveluntarjoajien ja/tai valtuutetun
huoltokumppanin tekemiä korjauksia
tai korjauksia, joissa ei ole käytetty
alkuperäisiä varaosia.
• Virheellisestä tai ohjeiden vastaisesta
asennuksesta johtuneita korjauksia.
• Muussa kuin kotitalouskäytössä eli
ammattimaisessa käytössä syntynyttä
vikaa.
• Kuljetusvaurioita. Jos asiakas
kuljettaa tuotteen kotiinsa tai muuhun
osoitteeseen, IKEA ei vastaa kuljetuksen
aikana mahdollisesti syntyvistä
vahingoista. Jos IKEA kuitenkin toimittaa
tuotteen asiakkaan toimitusosoitteeseen,
IKEA (ei tämä takuu) vastaa toimituksen
aikana tuotteelle syntyneistä vahingoista.
• Kustannuksia, jotka syntyvät laitteen
asentamisesta paikalleen.
Jos IKEAn nimeämä palveluntarjoaja
tai valtuuttama huoltoliike kuitenkin
korjaa tai korvaa laitteen tämän takuun
ehtojen mukaisesti, palveluntarjoaja tai
sen valtuutettu huoltoliike tarvittaessa
asentaa korjatun kodinkoneen uudelleen
tai asentaa korvatun laitteen.
Nämä rajoitukset eivät koske virheetöntä
työtä, jonka on suorittanut ammattitaitoinen
korjaaja käyttäen kodinkoneen alkuperäisiä
osia mukauttaakseen laitteen vastaamaan
toisen EU-maan teknisiä turvallisuusohjeita.
Miten kansallista lakia sovelletaan?
IKEA-takuu antaa ostajalle tietyt lailliset
oikeudet, jotka kattavat tai ylittävät kaikki
paikalliset lailliset vaatimukset.
Nämä ehdot eivät kuitenkaan rajoita millään
tavalla kuluttajansuojalaissa määritettyjä
kuluttajan oikeuksia.
Se ei rajoita mitenkään Kuluttajasuojalaissa
määritettyjä oikeuksia.
Voimassaoloalue
Laitteille, jotka on ostettu EU-maassa ja
jotka viedään toiseen EU-maahan, palvelu
tarjotaan uudessa maassa normaalisti
voimassa olevien takuuehtojen mukaisesti.
Velvoite palvelujen suorittamiseksi takuun
puitteissa on olemassa ainoastaan, jos laite
vastaa ja on asennettu:
- sen maan teknisten määräysten
mukaisesti, jossa takuupyyntö tehdään.
- asennusohjeiden ja käyttöoppaan
turvallisuusohjeiden mukaisesti.
IKEA-kodinkoneiden valtuutettu
MYYNNINJÄLKEINEN PALVELU
Ota yhteys IKEAn nimeämään myynnin
jälkeisestä palvelusta vastaavaan
huoltoliikkeeseen, kun:
• haluat tehdä tämän takuun piiriin
kuuluvan huoltopyynnön
• haluat pyytää lisäohjeita koskien
IKEA-kodinkoneen asennusta
IKEA-keittiökalusteisiin
• haluat pyytää lisäohjeita koskien
IKEA-kodinkoneiden toimintoja.
Varmistaaksemme, että saat parhaan
mahdollisen avun, pyydämme tutustumaan
huolellisesti asennusohjeisiin ja/tai
käyttöohjeisiin ennen yhteydenottoa.
Huoltoliikkeiden yhteystiedot
Viimeiseltä sivulta löytyvät
kaikki IKEAn valtuuttamat
myynnin jälkeisestä
palvelusta vastaavat
huoltoliikkeet ja kyseisen
maan yhteysnumerot.
Nopean palvelun saamiseksi
suosittelemme käyttämään
tässä käyttöohjeessa mainittuja
puhelinnumeroita. Ilmoita aina tässä
ohjekirjasessa esitetyt numerotiedot
koskien sitä laitetta, joka tarvitsee
huoltoa. Ilmoita lisäksi aina IKEAn
tuotenumero (8-numeroinen koodi)
ja laitteen arvokilvessä oleva
huoltokoodi (12-numeroinen koodi).
Page 36

SUOMI 36
PIDÄ OSTOKUITTI TALLESSA!
Se on todiste ostosta ja vaaditaan
takuuta varten. Lisäksi ostokuitissa
on mainittu IKEA-tavaratalon nimi ja
kunkin ostetun laitteen tuotenumero
(8-numeroinen koodi).
Tarvitsetko lisäapua?
Jos sinulla on kysymyksiä, jotka eivät liity
kodinkoneen huoltoon, ota yhteys IKEAasiakaspalveluun.
Ennen yhteydenottoa tutustu huolellisesti
laitteen mukana tuleviin ohjekirjoihin.
Page 37

SVENSKA 37
Programöversikt
Säkerhetsinformation 37
Produktbeskrivning 40
Daglig användning 41
Tips 41
Rengöring och underhåll 42
Vad ska göras om... 43
Injektortabell 44
Tekniska data 45
Installation 45
Miljöhänsyn 50
IKEA GARANTI 51
Säkerhetsinformation
Din och andras säkerhet är
mycket viktig.
Denna handbok och
produkten själv ger viktiga
säkerhetsmeddelanden
- läs dessa och följ alltid
instruktionerna.
Detta är en säkerhetssymbol
för fara, och symbolen
varnar för eventuella risker för
användaren och andra i
närheten.
Alla säkerhetsmeddelanden
följer efter farosymbolen och
följande ord:
FARA Visar på en farlig
situation som, om den inte
undviks, kommer att förorsaka
svåra skador.
VARNING Visar på en farlig
situation som, om den inte
undviks, kan förorsaka svåra
skador.
Alla säkerhetsmeddelanden
specicerar vilken eventuell risk
du utsätts för, visar hur du kan
reducera risken för skada, och
berättar vad som kan hända om
du inte följer instruktionerna.
Apparaten skall alltid vara skild
från elnätet innan arbete med
installation utförs på apparaten.
Installation och underhåll
skall utföras av behörig
fackman i enlighet med
tillverkarens anvisningar och i
enlighet med lokala
säkerhetsbestämmelser för
gasstandard. Använd endast
originalreservdelar. Reparera
inte eller byt ut delar på
apparaten om detta inte direkt
rekommenderas i
instruktionsboken.
VARNING Om
instruktionerna i denna
handbok inte följs till punkt och
pricka, kan detta resultera i
eldsvåda eller explosion, något
som kan skada både personer
och saker.
- Använd eller förvara inte
bensin eller lättantändliga
gaser i närheten av
apparaten.
Vad gör du om du känner lukten
av gas:
- Slå inte på någon apparat.
- Rör inte vid någon elkontakt.
- Använd inte någon telefon i
Page 38

SVENSKA 38
huset.
- Ring omedelbart
gasleverantören från
din grannes telefon. Följ
gasleverantörens instruktioner.
- Om du inte kan nå din
gasleverantör, ring
brandkåren.
- Installation och service skall
endast utföras av kvalicerad
installatör, servicebyrå eller av
gasleverantören själv.
- Använd apparaten i väl
ventilerad lokal.
- Elektrisk anslutning och
gasanslutning måste uppfylla
kraven i lokala bestämmelser.
- När spishällen installeras ska
den förses med ett erpoligt
överspänningsskydd med ett
brytaravstånd på minst 3 mm.
- Enligt lag är det obligatoriskt
att ansluta apparaten till jord.
- Elsladden måste vara
tillräckligt lång för att apparat
som är inbyggd i köksskåp
skall kunna anslutas till ett
eluttag
- Använd endast en exibel
slang i rostfritt stål eller ett fast
metallrör för gasledningen.
- Om det blir nödvändigt att
byta elsladden måste den
ersättas med en elsladd med
exakt samma egenskaper
som den originalsladd som
tillverkaren levererat (typ
H05V2V2-F 90 °C eller
H05RR-F). Byte av elsladden
måste göras av utbildad
elektriker.
- Tillverkaren ansvarar inte för
skador som personer eller
djur åsamkas eller skador
på egendom som beror på
underlåtenhet att uppfylla
dessa krav.
- Använd inga adaptrar eller
förlängningssladdar.
- Dra inte i elsladden för att
skilja apparaten från elnätet.
- När installationen är klar skall
det inte gå att komma åt de
elektriska komponenterna.
- Vidrör aldrig apparaten med
våta kroppsdelar och var inte
barfota när du använder den.
- Denna spishäll (av klass 3) är
endast avsedd att användas
för matlagning i hemmet.
Använd aldrig denna apparat
som rumsuppvärmare.
Detta kan resultera i
kolmonoxidförgiftning och
överhettning av spishällen.
- Tillverkaren åtar sig inget
ansvar för olämplig eller
felaktig användning eller
för felaktiga inställningar av
reglagen.
- Denna apparat och dess
åtkomliga delar hettas upp
under användning. Var
försiktig så att du inte rör vid
värmeelementen. Barn under
8 års ålder skall hållas borta
Page 39

SVENSKA 39
från apparaten, såvida de
inte är under uppsyn. Denna
apparat kan användas av
barn från 8 år och uppåt och
av personer med reducerad
psykisk, fysisk, sensoriell
eller mental kapacitet, såväl
som av personer helt utan
erfarenhet och kunskap, så
länge de övervakas eller får
instruktioner angående säker
användning av apparaten
och förstår de faror som kan
uppstå. De får inte leka med
apparaten. Rengöring och
användarunderhåll skall inte
utföras av barn utan översyn.
- När en gasapparat används
blir det hett och fuktigt i
rummet där den benner
sig. Se till att rummet är väl
ventilerat eller installera en
äktkåpa med avgasledning.
- Husdjur skall hållas på
avstånd från apparaten.
- När en gasapparat används
under längre tid kan det
krävas extra ventilation
(öppna ett fönster eller öka
äktkåpans effekt).
- Efter användningen måste
du kontrollera att vreden
står i läge av och stänga
huvudgasventilen eller ventilen
på gascylinder.
- Fett och upphettade oljor kan
lätt fatta eld. Övervaka alltid
tillagningen när du lagar mat
med mycket fett, olja eller
alkohol (t- ex. rom, cognac,
vin).
- Tillagning utan uppsyn med
fett och olja kan vara farlig
och kan resultera i brand.
Försök ALDRIG att släcka
sådan brand med vatten, utan
stäng av apparaten och täck
över eldslågan med ett lock
eller en brandlt.
Brandfara: förvara inte saker
på tillagningsytan.
- Förvara emballagematerialet
utom räckhåll för barn.
- Innan du rengör spishällen
vänta tills den har svalnat.
Spara dessa instruktioner
Page 40

SVENSKA 40
Produktbeskrivning
1
3
5
2
4
7 98
6
1
Löstagbara kokkärlsgaller
2
Medelstor brännare
3
Medelstor brännare
4
Extrasnabb brännare
5
Liten brännare
6
Kontrollvred till extrasnabb brännare
7
Kontrollvred till medelstor brännare
8
Kontrollvred till medelstor brännare
9
Kontrollvred till den lilla brännaren
Symboler
Hel skiva
Stor låga
och stjärna
Liten låga
Kranen stängd
Maximal öppning/
tillförsel och elektrisk
tändning
Minimal öppning eller
reducerat gasöde
Page 41

SVENSKA 41
Daglig användning
Låt inte lågan brinna utanför
kastrullen.
Viktigt:Då hällen används kan hela hällens
yta bli het.
- För att tända en av brännarna, vrid dess
vred moturs till läget för maximal låga.
- Håll vredet nedtryckt mot
kontrollpanelen för att tända brännaren.
- När brännaren har tänt, håll vredet
intryckt i cirka 5-10 sekunder för att
värma upp anordningen.
Brännarens säkerhetsanordning stänger
av gastillförseln till brännaren om lågan
slocknar av misstag (t.ex. av en plötslig
vindstöt, ett avbrott i gastillförseln eller om
vätskor kokar över).
- Vredet får inte hållas nedtryckt under
Tips
Spishällen har brännare med olika diameter.
Följ nedanstående råd för att använda
brännarna på bästa sätt:
- Använd kastruller och stekpannor som
har en bottendiameter som är lika stor
som eller något större än brännaren
(se tabellen nedan).
- Använd endast atbottnade kastruller
och stekpannor.
- Använd korrekt mängd vatten för att
tillaga mat och använd alltid lock.
- Se till att kastruller och stekpannor inte
mer än 15 sekunder. Om brännaren inte
tänds inom denna tidsperiod, vänta
minst en minut innan du försöker igen.
Anmärkning: Om speciella omständigheter
i den lokala gasdistributionen gör att det är
svårt att tända brännaren, prova med
att vrida vredet till den lilla lågan och sedan
upprepa ovanstående procedur.
Lågan kan slockna när du släpper vredet.
Detta innebär att säkerhetsanordningen inte
har värmts upp tillräckligt. Upprepa i så fall
ovanstående procedur.
sticker ut utanför spishällens kant.
VIKTIGT: Felaktig användning av
stödgallren kan skada spishällen: placera
inte gallren upp och ned, och dra dem inte
över hällen. Använd inte:
- Pannkakslaggar i gjutjärn, täljsten eller
kastruller och stekpannor i terrakotta.
- Metalllter eller andra typer av
värmespridare.
- Två brännare samtidigt för samma
kokkärl, (t.ex. för skgryta).
Brännare Kokkärlets diameter
Extrasnabb brännare 24 till 26 cm
Medelstor 16 till 24 cm
Liten 8 till 14 cm
Page 42

SVENSKA 42
Rengöring och underhåll
- Skölj och torka noggrant
Skilj apparaten från elnätet innan du
utför underhåll.
- Alla emalj- och glasdetaljer skall
rengöras med varmt vatten och ett
neutralt rengöringsmedel.
- Ytor i rostfritt stål kan äckas av
kalkhaltigt vatten eller skarpa
rengöringsmedel om dessa lämnas på
ytan för länge. Torka av utspilld mat
(vatten, sås, kaffe och liknande) innan
den torkar in.
- Rengör med varmt vatten och ett
neutralt rengöringsmedel och torka torrt
med en mjuk trasa eller sämskskinn.
Avlägsna fastbrända matrester med
speciella rengöringsmedel för rostfritt
stål.
ANMÄRKNING: Rengör rostfritt stål endast
med hjälp av en mjuk trasa eller svamp.
- Använd inte slipande eller
frätande produkter, klorbaserade
rengöringsmedel eller stålull.
- Använd inte ångrengörare.
- Använd inte lättantändliga produkter.
- Låt aldrig sura eller alkaliska ämnen,
t.ex. vinäger, salt och citronjuice, vara
kvar på spishällen, utan torka genast
bort dem.
RENGÖRING AV SPISHÄLLENS DELAR
- Brännare, brännarlock och galler kan tas
av och rengöras.
- Rengör dem för hand med varmt vatten
och ett milt rengöringsmedel. Avlägsna
varsamt matrester och kontrollera att
ingen brännaröppning är tilltäppt.
- Placera åter brännare och brännarlock
på sina platser.
- Då du lägger tillbaka gallren, se till att
de hamnar rakt vid brännaren.
- Modeller med elektrisk tändning och
säkerhetsanordning kräver grundlig
rengöring av toppen på tändpluggen
för att den skall fungera korrekt.
Inspektera dessa delar ofta och rengör
dem vid behov med en fuktig trasa.
Fastbrända matrester kan avlägsnas
med en tandpetare eller nål.
ANMÄRKNING: Använd inte den elektriska
tändanordningen när brännarna inte sitter
på plats. Det nns risk att tändanordningen
skadas.
Page 43

SVENSKA 43
Vad ska göras om ...
Problem Möjliga orsaker Lösning
Den elektriska tändningen
fungerar inte
Brännaren tänds inte Gaskranen kan vara
Gasringarna brinner ojämnt Brännarkronan kan vara
Det nns ingen
elektricitet
avstängd
igentäppt av matrester
Kontrollera att apparaten är
kopplad till strömförande nät
och att strömmen är påslagen.
Kontrollera att kranen är öppen
Gör rent kronan enligt
instruktionerna och se till att
brännarkronan är fri från
matrester.
Innan du ringer Kundservice:
1. Kontrollera "Felsökning” ovan och försök
att lösa problemet på egen hand
2. Sätt på spishällen igen och kontrollera
om den fungerar på korrekt sätt.
3. Kontakta kundservice om felet kvarstår.
Ge följande information
• Typ av problem
• Modell av spishäll
• Servicenumret (dvs numret som står
efter ordet SERVICE på typskylten
under spishällen och på garantisedeln)
• din fullständiga adress och
• ditt telefonnummer.
Om det blir nödvändigt med en reparation
bör du kontakta en auktoriserad
servicerma. Se garantisedeln.
Vid den osannolika händelse av att ingrepp
eller reparation utförs av icke-auktoriserad
tekniker, kräv alltid certikation på arbetet,
och kräv att originalreservdelar används.
Underlåtenhet att följa dessa anvisningar
kan äventyra produktens säkerhet och
kvalitet.
Page 44

SVENSKA 44
Injektortabell
Kategori II2H3B/P
Använd gastyp Typ av
brännare
NATURGAS
(Metangas)
G20
FLYTANDE
FOTOGENGAS
(Butangas) G30
(Propangas) G31
* 3,2 kW endast för version 73 cm Range 1
Använd
gastyp
G20 20 mbar
G30/ G31
28-30 mbar
Elström: 220 - 240 V ~ 50/60 Hz
extrasnabb
medelstor
liten
extrasnabb
medelstor
liten
Modellens
konguration
4 BRÄNNARE
Injektormärkning
138 T2 A
101 Z
72 X
93 T4 P
1 PB - 2 SR
1 AUX
1 PB - 2 SR
1 AUX
Uppskattat
termalödesvärde
kW
69
50
Nominell värme-
ödestäthet
Nominell
förbrukning
3,50
2,00
1,00
3,50
2,00
1,00
8,50 808 l/h 9,52
8,50 617 g/h 30,94
333 l/h
190 l/h
95 l/h
254 g/h
145 g/h
73 g/h
Reducerad
värmekapacitet kW
2,20
0,35
0,30
1,90
0,35
0,30
Total nominell
förbrukning
Gastryck (mbar)
min. nom. max.
17 20 25
25 30 35
Luft som krävs (m3)
för förbränning av
1 m3 gas
SV
Gasdysor G110/G120-8 mbar kan
endast beställas via Kundservice.
Page 45

SVENSKA 45
Tekniska data
Dimensioner
Bredd (mm) 580
Höjd (mm) 40
Djup (mm) 510
Spänning (V) 220 - 240
Teknisk information nns på typskylten som sitter
i botten av apparaten.
Installation
Packa upp hällen och kontrollera att den inte
har skadats under transporten. Om du inte
är säker, kontakta kundservice eller närmaste
återförsäljare.
Teknisk information till installatören
- Denna apparat kan monteras in i en
bänkskiva som är mellan 20 och 50 mm
tjock.
- Om det inte nns en ugn under spishällen
skall en skiljepanel placeras under hällen.
Panelens yta skall minst vara lika stor som
öppningen i arbetsbänken. Denna panel
får aldrig placeras närmre än 20 mm från
bottnen på spishällen.
- Innan apparaten installeras måste du
försäkra dig om att:
- Gastryck och gastyp i
gasdistributionsnätet är kompatibla med
gastryck och gastyp för vilka spishällen är
inställd. Detta framgår av uppgifterna på
typskylten och i injektortabellen;
- Köksskåp och köksapparater som
står intill spishällen är tillverkade i
värmebeständiga material enligt
gällande standard.
- Denna apparat är inte kopplad till
något äkt- eller utsugssystem. Den skall
installeras enligt gängse normer. Var
noggrann vad gäller ventilationsreglerna.
- Förbränningsgaser transporteras utomhus
med hjälp av specika ugnsäktar eller
genom fönster- eller väggmonterade
elektriska äktar
Gasanslutning
Detta arbete måste göras av utbildad
fackman.
Gassystemet måste utföras i enlighet
med gällande normer angående specik
gasstandard.
- Speciella bestämmelser gäller i vissa
länder - du hittar dessa i avsnittet
"Referenser till lokala bestämmelser".
Om ingen information gällande ditt
land nns på detta blad kan du vända
Page 46

SVENSKA 46
dig till kvalicerad tekniker för närmare
information.
- För att ansluta spishällen till
gasledningen eller gascylindern
kan man antingen använda ett styvt
koppar- eller stålrör med kopplingar
som uppfyller kraven i gällande
bestämmelser eller en slang i rostfritt
stål utan skarvar som uppfyller kraven i
gällande bestämmelser. Maximalt tillåten
slanglängd: 2 m.
A
C
D
B
C
D
- Koppla vinkelrör (A) eller (B), som
medföljer spishällen, till hällens
inloppsrör och placera den medföljande
packningen (C) däremellan, i enlighet
med bestämmelse EN 549.
- Packning (D) som inte medföljer
produkten.
- VIKTIGT: Om en slang i rostfritt stål
används måste den placeras så att
den inte kan komma i kontakt med
köksskåpets rörliga delar. Slangen
måste placeras så att det är möjligt att
inspektera den i hela dess längd och på
en plats där inga hinder nns.
- Efter avslutad anslutning måste du
kontrollera att det inte nns några läckor.
Använd en tvållösning för detta ändamål.
Tänd brännarna och vrid vreden från
maximiläget
att kontrollera lågornas stabilitet.
Elektrisk anslutning
VARNING
- Byte av elsladden måste göras av
utbildad elektriker.
- De elektriska anslutningarna måste
uppfylla kraven i gällande bestämmelser.
- Enligt lag är det obligatoriskt att ansluta
spishällen till jord.
- Använd inte förlängningssladd.
- VIKTIGT: Uppgifter om spänning och
strömförbrukning nns på typskylten.
Montering
Placera medföljande tätning runt spishällen
efter att ha rengjort ytan. Placera hällen i
arbetsbänkens öppning och observera de
mått som anges i instruktionsboken.
ANMÄRKNING: Nätkabeln måste vara
tillräckligt lång för att du ska kunna dra upp
hällen.
Använd de medföljande beslagen för att
sätta fast spishällen. Sätt in beslagen på
avsedd plats i borrhålen som pilen visar, och
fäst dem med hjälp av skruvarna, så att allt
passar för bänkskivans tjocklek
till minimiläget för
L
Jord
(gul/grön)
N
Page 47

SVENSKA 47
Se till att uttaget är placerat i närheten av
den plats där apparaten skall installeras. Om
den elsladd som medföljer apparaten inte är
tillräckligt lång, måste den bytas ut mot en
med samma egenskaper men med korrekt
längd.
Inställning för olika typer av gas
VARNING
- Byte av elsladden måste göras av
utbildad elektriker.
Om apparaten är förberedd för en annan
typ av gas än den som beskrivs på typskylten
och på dekalen på spishällen, byt då ut
injektorerna.
Avlägsna dekalen och fäst den i
instruktionsboken.
Använd tryckregulatorer som passar
för gastrycket som speciceras i
instruktionsboken.
- Gasdysorna måste bytas av service eller
av en utbildad fackman.
- Gasdysor som inte levereras tillsammans
med spishällen måste beställas från
Service.
- Ställ in gaskranarna för minsta gasöde.
ANMÄRKNING: När ytande
fotogengas används (G30/G31) måste
inställningsskruvarna för minsta gasöde
skruvas åt så långt det går.
VIKTIGT: Om det går trögt att vrida på
brännarnas vred, kontakta Service för byte
av brännarkranen, om den är trasig.
Att byta injektorer (se kapitlet
"Injektortabell")
- Ta bort gallren (A).
- Ta ut brännarna (B).
- Skruva loss den injektor (C) som skall
bytas med hjälp av en muffskruvnyckel av
lämplig storlek.
- Ersätt den med en injektor som passar för
den nya gastypen.
- Sätt in injektorn i (D).
Innan du sätter spishällen på plats måste
du komma ihåg att täcka över existerande
information om gasinställning med plåten
med gasinformation som medföljer de nya
injektorerna.
D
C
A
B
Justering av gaskranarnas inställning till
minsta gasöde
E
För att få korrekt minimalinställning: ta loss
vredet (E) och följ anvisningarna nedan:
- Dra åt för att minska lågans höjd (-);
- Lossa för att öka lågans höjd (+).
Page 48

SVENSKA 48
När justeringen görs måste kranen vara
inställd på minsta gasöde (liten låga).
- Brännarnas insugsluft behöver inte
justeras.
- Nu skall du tända brännarna och
vrida vreden från maximiläget
till minimiläget
lågornas stabilitet.
När justeringen avslutats skall förseglingen
återställas på arbetsbänken med hjälp av
tätningsvax eller likvärdigt material.
SE
REFERENS TILL LOKALA
BESTÄMMELSER
Se till att installation och gasanslutning
utförs av en behörig fackman som följer
tillverkarens instruktioner och i enlighet med
kraven i gällande säkerhetsbestämmelser.
för att kontrollera
WOK ADAPTER
BYTE AV VRED
Kontrollera att spishällen är avstängd!
Alla vred måste vara i stängt läge.
Page 49

SVENSKA 49
Dra spishällens vred uppåt. Förvara dem
tillsammans efter borttagningen.
Ta fram den nya vredsatsen som nns överst
i förpackningen och ta ut de nya vreden ur
plastpåsen.
Kontrollera att alla vred sitter i rätt läge.
Kontrollera att installationen är korrekt
genom att tända varje enskild brännare
separat.
Skjut ned varje enskilt vred på sitt ventilskaft
tills du känner att det slutar glida nedåt (det
kan bildas gnistor).
Page 50

SVENSKA 50
Miljöhänsyn
Emballage
- Förpackningsmaterialet kan
återvinnas till 100%, vilket framgår av
återvinningssymbolen ( ).
Produkter
Denna apparat är märkt enligt EG-direktiv
2002/96/EG beträffande elektriskt och
elektroniskt avfall (Waste Electrical and
Electronic
Equipment, WEEE). Genom att säkerställa en
korrekt skrotning av denna apparat bidrar
du till att förhindra eventuella negativa
konsekvenser för vår miljö och vår hälsa.
Symbolen
medföljande dokumentation, indikerar att
denna produkt inte får behandlas som
vanligt hushållsavfall. Den skall i stället
lämnas in på en lämplig uppsamlingsplats
för återvinning av elektrisk och elektronisk
utrustning. Den skall kasseras enligt lokala
miljöbestämmelser för avfallshantering.
För mer information om hantering,
återvinning och återanvändning av denna
apparat, var god kontakta de lokala
myndigheterna, ortens sophanteringstjänst
eller butiken där produkten inhandlades.
på produkten, eller i
Försäkran om överensstämmelse
- Denna spishäll har designats, tillverkats
och marknadsförts i överensstämmelse
med:
- Säkerhetskraven i Gasdirektiv
2009/142/EEG
- Säkerhetskraven i
Lågspänningsdirektiv 2006/95/
EG (som ersätter 73/23/EEG och
påföljande tillägg)
- Skyddskraven i EMC-direktiv
2004/108/EEG
- Denna spishäll är avsedd att komma
i kontakt med livsmedel och uppfyller
kraven i EG--reglerna 1935/2004
- Denna spishäll (klass 3) är endast
framtagen för tillagning av mat.
All annan användning (t.ex. för
rumsuppvärmning) är olämplig och
farlig
Page 51

SVENSKA 51
IKEA GARANTI - VITVAROR
Hur länge gäller garantin?
Garantin gäller i fem (5) år från ursprungligt
inköpsdatum när IKEA vitvaran köptes från
IKEA. LAGAN vitvaror har två (2) års garanti
som gäller från ursprungligt inköpsdatum.
Orginalkvittot gäller som inköpsbevis.
Om arbete utförs enligt garantin förlängs inte
garantiperioden för produkten eller för de
nya delarna.
Vilka produkter omfattas inte av denna
garanti?
Alla vitvaror som köpts på IKEA före den
1 augusti 2007 och alla vitvaror i LAGAN
serien.
Vem utför service?
IKEA serviceföretaget utför service genom sin
egen serviceorganisation eller via sitt nätverk
av behöriga servicepartners.
Vad täcks av denna garanti? Vad omfattar
den här garantin?
Garantin omfattar fel på vitvaran, vilka
orsakats av material- eller produktionsfel som
fanns vid den tidpunkt produkten köptes på
IKEA. Garantin gäller endast för hemmabruk.
Undantagen speciceras under rubriken
“Vad omfattas inte av den här garantin”.
Inom garantiperioden ersätts kostnader
för att åtgärda felet – t ex reparationer,
reservdelar, arbete och resor – förutsatt att
vitvaran är tillgänglig för reparation utan
särskilda kostnader.
Dessa villkor överensstämmer med EU
direktiv (Nr. 99/44/EG) samt lokala
föreskrifter. Utbytta delar tillhörtillfaller IKEA.
Vad gör IKEA för att åtgärda problemet?
Det av IKEA utsedda serviceföretaget
undersöker produkten och avgör, efter
eget omdöme, om problemet omfattas av
den här garantin. Om så är fallet kommer
IKEA serviceföretaget eller en behörig
servicepartner, efter eget val, antingen
reparera den defekta produkten eller ersätta
den med en likadan eller jämförbar produkt.
Om IKEA serviceföretaget eller en behörig
servicepartner reparerar eller ersättare
vitvaran inom villkoren för denna garanti,
kommer denna att återinstallera den
reparerade vitvaran eller installera den nya
vitvaran, om så är nödvändigt. Åtgärden
omfattas av garantin om produkten enkelt är
tillgänglig för reparation. Om produkten är
installerad i en icke-standardmässig inbyggd
lösning måste kunden göra produkten
tillgänglig före servicebesöket.
Vad omfattas inte av den här garantin?
• Normalt slitage.
• Skador orsakade avsiktligt eller genom
oaktsamhet, genom underlåtenhet
att följa bruksanvisningen, felaktig
installation eller en anslutning till fel
spänning, skador orsakade genom
kemisk eller elektrokemisk reaktion, rost,
korrosion eller vattenskador som omfattar
men inte begränsas till skador orsakade
av tillförsel av vatten med onormalt
hög kalkhalt samt skador orsakade av
onormala miljöförhållanden.
• Förbrukningsartiklar, inklusive batterier
och lampor.
• Icke-funktionella och dekorativa delar
som inte påverkar normalt bruk av
vitvaran inklusive repor och eventuella
färgskillnader.
• Oavsiktliga skador orsakade av
främmande föremål eller ämnen
vid rengöring eller rensning av lter,
dräneringssystem eller diskmedelsfack.
• Skador på följande delar: keramiskt
glas, tillbehör, över- och underkorgar,
bestickkorgar tillförsel- och
avloppsslangar, tätningar, lampor och
lampskydd, displayer, vred, höljen
och delar av höljen. Förutom när
sådana skador kan bevisas bero på
produktionsfel.
Page 52

SVENSKA 52
• Fall när inget fel har kunnat hittas vid
besök av en servicetekniker.
• Reparationer som inte utförts av ett
utsett serviceföretag och/eller en
behörig servicepartner, eller om andra
reservdelar än orginaldelar använts.
• Reparationer orsakade av felaktig
installation eller installation som inte
utförts enligt anvisningarna.
• Användning av vitvaran i ett
professionellt sammanhang, dvs ej för
hemmabruk.
• Transportskador. Om en kund själv
transporterar produkten hem till sig
eller till någon annan adress, har IKEA
inget ansvar för eventuella skador som
kan uppstå under transporten. Men om
IKEA levererar produkten till kundens
leveransadress så täcks eventuella
skador som uppstår under den här
transporten av IKEA (dock inte inom den
här garantin). Vid sådana fall ska kunden
kontakta IKEA kundservice på Ikea.se.
• Kostnad för att utföra den initiala
installationen av IKEA vitvaran.
Dessa restriktioner gäller inte ett felfritt
arbete som utförts av en kvalicerad
specialist som använt våra originaldelar för
att anpassa produkten enligt de tekniska
säkerhetsspecikationerna i ett annat
EUland.
Så här tillämpas nationella och regionala
lagar
I Sverige tillämpar IKEA konsumentköplagen
och köplagens reklamationsrätt. Den här
garantin ger dig särskilfa juridiska rättigheter
utöver reklamationsrätten.
Garantins internationella giltighet
För vitvaror som köps i ett EU-land och sedan
tas till ett annat EU-land lämnas service
enligt garantivillkoren i det nya landet.
Skyldighet att utföra service enligt garantin
nns endast om vitvaran överensstämmer
med:
- de tekniska specikationerna för det
landdär garantianspråket görs;
- monterings- och
installationsanvisningarna samt
säkerhetsinformationen som medföljer
vitvaran.
Så här når du oss om du behöver hjälp
efter ditt köp
Kontakta IKEA kundservice på Ikea.se eller
ring 0775-700 500.
För att vi ska kunna ge dig bästa
möjliga hjälp, läs först noggrant igenom
bruksanvisingen innan du kontaktar oss.
Se också till att du har det aktuella IKEA
artikelnumret för din vitvara till hands innan
du ringer oss. Det 8-siffriga artikelnumret
hittar du på ditt kvitto.
Vänligen titta på sista sidan
i denna manual för den
fullständiga listan med IKEA
kundservice och nationella
telefonnummer.
För att kunna ge dig snabbare
service ber vi att du använder
det telefonnummer som anges i
bruksanvisningen. Se till att du
har IKEA-artikelnumret, (den
8-siffriga koden) och det 12-siffriga
servicenumret som anges på
produktens typskylt till hands.
SPARA ALLTID INKÖPSKVITTOT
Det gäller som inköpsbevis. Du måste
kunna uppvisa ditt inköpskvitto för att
garantin ska gälla. Detta kvitto anger
också IKEAs namn och artikelnummer (8
siffror) för varje produkt du har köpt.
Behöver ni extra hjälp?
För övriga frågor som är relaterade till
teknisk service av produkten, kontakta det
lokala varuhuset där produkten är inköpt.
Läs alltid produktens bruksanvising innan ni
kontaktar oss.
Page 53

NORSK 53
Innholdsfortegnelse
Sikkerhetsinformasjon 53
Produktbeskrivelse 56
Daglig bruk 57
Hjelpfulle råd og tips 57
Vedlikehold og rengjøring 58
Hva må gjøres hvis 59
Injektortabell 60
Tekniske data 61
Installasjon 61
Miljøhensyn 66
IKEA GARANTI 67
Sikkerhetsinformasjon
Din egen og andres sikkerhet er
svært viktig.
Denne bruksanvisningen og selve
apparatet er utstyrt med viktige
sikkerhetsmeldinger, som alltid
må leses og følges.
Dette er faresymbolet, som
gjelder sikkerheten og som
advarer om mulig risiko for
brukeren og andre.
Alle sikkerhetsmeldingene er
merket med faresymbolet og
følgende ord:
FARE Viser til en farlig
situasjon som vil føre til
alvorlige skader dersom den ikke
unngås.
ADVARSEL Viser til en farlig
situasjon som kan føre til
alvorlige skader dersom den ikke
unngås.
Alle sikkerhetsmeldingene
beskriver den mulige risikoen de
henviser til og viser hvordan man
reduserer fare for personskader,
samt hva som kan skje dersom
instruksene ikke følges.
Apparatet må alltid frakobles
strømnettet før installasjon.
Installasjon og vedlikehold
skal utføres av en autorisert
elektriker i samsvar med
produsentens instrukser og lokale
sikkerhetsforskrifter for den
relevante gasstandarden. Bruk
kun originale reservedeler.
Forsøk aldri å reparere eller
skifte ut deler av apparatet
dersom det ikke uttrykkelig
oppfordres til dette i
bruksanvisningen.
ADVARSEL Dersom ikke
informasjonen i denne
bruksanvisningen følges nøye,
kan det føre til brann eller
eksplosjon som kan medføre
personskader eller materielle
skader.
- Oppbevar aldri bensin eller
andre brennbare væsker eller
gasser i nærheten av dette
apparatet.
Hvis du kjenner gasslukt, må du
gjøre følgende:
- Ikke slå på apparater.
- Ikke rør noen av de elektriske
bryterne.
- Ikke bruk telefonen i huset.
- Ring umiddelbart til
Page 54

NORSK 54
gassleverandøren
med naboens telefon.
Følg instruksene fra
gassleverandøren.
- Hvis du ikke får kontakt med
gassleverandøren, må du
ringe brannvesenet.
- Installasjon og vedlikehold
skal utføres av en kvalisert
installatør, et servicebyrå eller
gassleverandøren.
- Bruk apparatet kun i rom med
god ventilasjon.
- Tilkobling til strøm og gass skal
skje i overensstemmelse med
gjeldende forskrifter.
- Når platetoppen er installert,
må den påmonteres en
erpolet kretsbryter med
kontaktavstand på minst 3 mm
som gir full frakobling.
- Det er påbudt å jorde
apparatet.
- Strømledningen må være
lang nok til at det innebygde
apparatet kan tilkobles
stikkontakten
- Bruk kun metallslanger eller
metallrør ved tilkobling til
gass.
- Ved behov må den elektriske
strømledningen skiftes ut
med en ny som har nøyaktig
de samme spesikasjonene
som den opprinnelige (type
H05V2V2-F 90°C eller type
H05RR-F). Utskiftning av
strømledningen skal kun
utføres av autorisert elektriker.
- Produsenten kan ikke holdes
ansvarlig for skader på
personer, dyr eller eiendom
som skyldes manglende
overholdelse av disse
forskriftene.
- Unngå bruk av doble
stikkontakter og
skjøteledninger.
- Trekk aldri i ledningen når
støpselet skal tas ut av
stikkontakten.
- De elektriske komponentene
må ikke være tilgjengelige
etter installasjonen.
- Ikke berør apparatet med våte
kroppsdeler og ikke betjen
apparatet med bare føtter.
- Denne platetoppen (klasse
3) er utelukkende beregnet
for tilberedning av mat i
vanlig husholdning. Ikke
bruk dette apparatet til
oppvarming av rom. Det
kan føre til kullosforgiftning
og overoppheting av
platetoppen.
- Produsenten fraskriver seg
ethvert ansvar for feil bruk
eller feil innstilling av bryterne.
- Apparatet og tilgjengelige
deler kan bli svært
varme under bruk. Vær
forsiktig så du ikke berører
varmeelementene. Barn
under 8 år må holdes på
avstand med mindre de er
Page 55

NORSK 55
under tilsyn hele tiden. Dette
apparatet kan brukes av
barn fra 8 år og personer
med reduserte fysiske,
sensoriske eller mentale evner
eller manglende erfaring
og kunnskap, hvis de har
fått tilstrekkelig opplæring
eller tilsyn vedrørende bruk
av apparatet på en trygg
måte og forstår farene som
er involvert. De må ikke leke
med apparatet. Rengjøring
og brukervedlikehold må ikke
utføres av barn uten tilsyn.
- Bruk av gassapparater fører
til at det dannes varme og
fuktighet i rommet. Pass på
at det er god ventilasjon
i rommet, eller installer
eventuelt en kjøkkenventilator
med utblåsning til friluft.
- Kjæledyr må holdes unna
apparatet.
- Ved bruk over lengre tid, kan
det være behov for ekstra
ventilasjon (slik som å åpne
vinduet eller øke hastigheten
på kjøkkenventilatoren).
- Etter bruk må du forsikre
deg om at bryterne er i avstilling. Steng også ventilen på
gasstilførselen til platetoppen.
- Overopphetet fett og olje
tar lett fyr. Vær alltid ekstra
påpasselig når du koker mat
i fett, olje eller alkohol (f.eks.
rom, cognac, vin).
- Steking med fett eller olje
uten tilsyn på platetoppen
kan være farlig og forårsake
brann. Du må ALDRI forsøke
å slukke en brann med vann,
men slå av apparatet og
dekke ammene med f.eks. et
lokk eller et brannteppe.
Brannfare: Ikke oppbevar
gjenstander på
kokeoveratene.
- Oppbevar
emballasjematerialet
utilgjengelig for barn.
- Vent til platetoppen er avkjølt
før du rengjør den eller utfører
vedlikehold på den.
Ta vare på denne
bruksanvisningen
Page 56

NORSK 56
Produktbeskrivelse
1
3
5
2
4
7 98
6
1
Avtakbare gryterister
2
Halvhurtig brenner
3
Halvhurtig brenner
4
Kraftig brenner
5
Liten brenner
6
Kontrollbryter for kraftig brenner
7
Kontrollbryter for halvhurtig brenner
8
Kontrollbryter for halvhurtig brenner
9
Kontrollbryter for liten brenner
Symboler
Fast merke
Stor amme
og stjerne
Liten amme
Kran stengt
Maksimal åpning/
gasstilførsel og
elektrisk tenning
Minimal åpning eller
redusert tilførsel
Page 57

NORSK 57
Daglig bruk
Ikke la ammen fra brenneren slikke
opp langs kanten av kokeredskapet.
Viktig: Når platetoppen er i bruk, blir hele
området på platetoppen varmt.
- Drei den tilhørende bryteren mot viserne
til maksimal ammeinnstilling for å tenne
brennerne.
- Trykk bryteren inn mot betjeningspanelet
for å tenne brenneren.
- Fortsett å holde bryteren inne i 5-10
sekunder etter at brenneren er tent for
at apparatets drift skal være sikker.
Denne sikkerhetsanordningen på brenneren
vil avbryte gasstilførselen til brenneren
dersom ammen skulle slukke (pga. et
vindpust, avbrytelse i gasstilførselen, væske
som koker over el.l.).
Hjelpfulle råd og tips
Denne platetoppen har brennere
med forskjellige diametre. For bedre
brennereffekt bør du følge reglene under:
- Bruk gryter og panner med en bunn som
er like stor som brennerne eller litt større
(se tabell under).
- Bruk kun gryter og panner med helt at
bunn.
- Bruk riktig mengde vann for tilberedning
av mat og ha lokk på gryten.
- Påse at grytene på risten ikke stikker ut
over kantene på platetoppen.
- Ikke trykk på bryteren i mer enn 15
sekunder. Hvis brenneren ikke forblir tent
når tiden er ute, må du vente i minst ett
minutt før du prøver å tenne den igjen.
MERK: Dersom spesielle egenskaper
ved gassen som benyttes skulle gjøre det
vanskelig å tenne brenneren, anbefales det
å gjenta forsøket ved å vri bryteren til en lav
ammeinnstilling.
Brenneren kan slukke når du slipper
bryteren igjen. Dette betyr at
sikkerhetsanordningen ikke er blitt varm nok
ennå. I så fall gjentar du trinnene som er
beskrevet over.
VIKTIG: Feil bruk av ristene kan skade
platetoppen: Ikke plasser og/eller dra
ristene opp-ned på platetoppen. Ikke bruk:
- Stekeplater i støpejern eller kleberstein,
eller gryter og panner i terrakotta.
- Varmespredere, som metallgitter eller
annet.
- To brennere samtidig for et kokekar
(f.eks. skegryte).
Brenner Kokekar Ø
Kraftig brenner 24 til 26 cm
Halvhurtig 16 til 24 cm
Liten 8 til 14 cm
Page 58

NORSK 58
Vedlikehold og rengjøring
at ingen av brenneråpningene er
Før feilsøking skal støpselet trekkes ut
av stikkontakten.
- Alle emaljerte deler eller deler av glass
bør rengjøres med varmt vann og et
nøytralt rengjøringsmiddel.
- Overater av rustfritt stål kan få
ekker på grunn av kalkholdig vann
eller aggressive rengjøringsmidler,
dersom dette blir liggende for lenge på
overatene. Matsøl (vann. saus, kaffe
osv.) bør tørkes bort før dette tørker inn.
- Rengjør med varmt vann og et nøytralt
rengjøringsmiddel. Tørk godt av til slutt
med en myk klut eller et skinn. Fjern
fastbrente matrester med spesielle
rengjøringsmidler for overater av
rustfritt stål.
MERK: Rustfritt stål må kun rengjøres med
en myk klut eller svamp.
- Ikke bruk slipende eller etsende midler,
klorholdige midler eller stålull.
- Ikke bruk damprenser.
- Ikke bruk brennbare produkter.
- Ikke la sure eller alkaliske produkter,
som for eksempel eddik, sennep, salt,
sukker eller sitronsaft, bli liggende på
platetoppen.
RENGJØRE PLATETOPPENS DELER
- Ristene, brennerkappene og brennerne
kan fjernes for rengjøring.
- Rengjør dem for hånd i varmt vann
og mildt rengjøringsmiddel, pass på
å fjerne alle matrester og kontroller
tilstoppede.
- Skyll og tørk godt
- Sett brennerne og brennerkappene
korrekt på plass i holderne igjen.
- Når du skifter ut ristene, må du passe
på at gryteholderen er tilpasset til
brenneren.
- Modeller som er utstyrt med elektriske
tennplugger og sikkerhetsanordning
krever at pluggendene rengjøres
grundig for å sikre at de fungerer
korrekt.
Kontroller disse delene ofte, og rengjør
dem med en fuktig klut ved behov.
Fjern alle fastbrente matrester med en
tannpirker eller en nål.
MERK: For å unngå skade på den elektriske
tenningen, må denne ikke brukes når
brennerne ikke er på plass.
Page 59

NORSK 59
Hva må gjøres hvis...
Problem Mulig årsak Løsning
Den elektriske tenneren virker
ikke
Brenneren tennes ikke Gasskranen kan være
Gassringen brenner ujevnt Brennerkronen kan være
Før du tilkaller kundeservice:
1. Kontroller i "Feilsøkingsliste” for å se om
du kan løse problemet på egenhånd
2. Slå platetoppen på igjen for å se om
problemet har løst seg.
3. Dersom feilen vedvarer, kontakt
kundeservice.
Oppgi i så fall følgende:
• typen feil,
• platetoppmodell,
• servicenummer (dvs. nummeret
som følger etter ordet SERVICE
på typeplaten under platetoppen
og på garantiseddelen),
Det er ingen
strømtilførsel
stengt
tettet av matrester
• din fulle adresse,
• telefonnummeret ditt.
Dersom apparatet trenger reparasjon,
kontakt et autorisert servicesenter som
oppgitt i garantien.
Dersom et inngrep eller reparasjon mot
formodning blir utført av en uautorisert
tekniker, må du alltid kreve sertisering av
det utførte arbeidet og insistere på bruk av
originale reservedeler.
Hvis disse reglene ikke blir fulgt, kan det
redusere produktets sikkerhet og kvalitet.
Kontroller at støpselet er satt
inn og at strømmen er slått
på.
Kontroller at gasskranen er
åpen
Rengjør brennerkronen som
angitt i rengjøringsinstruksene
for å påse at den er fri for
matrester.
Page 60

NORSK 60
Injektortabell
Kategori II2H3B/P
Gasstype Type brenner Injektor-
merking
NATURGASS
(Metan)
G20
FLYTENDE
PETROLEUMSGASS
(Butan) G30
(Propan) G31
* 3,2kW kun for versjonen på 73 cm Range 1
Anvendt
gasstype
G20 20 mbar
G30/ G31
28-30 mbar
kraftig brenner
halvhurtig
liten
kraftig brenner
halvhurtig
liten
Kongurasjonsmodell
4 BRENNERE
138 T2 A
93 T4 P
1 PB - 2 SR
1 AUX
1 PB - 2 SR
1 AUX
Nominell
varmegjennomstrømming
kW
101 Z
72 X
69
50
Nominell termisk
gjennomstrømning
(kW)
Nominelt
forbruk
3,50
2,00
1,00
3,50
2,00
1,00
8,50 808 l/t 9,52
8,50 617 g/t 30,94
333 l/t
190 l/t
254 g/t
145 g/t
73 g/t
Redusert
varmekapasitet kW
2,20
0,35
95 l/t
0,30
1,90
0,35
0,30
Totalt nominelt
forbruk
Gasstrykk (mbar)
min. nom. maks.
17 20 25
25 30 35
Luft nødvendig (m3)
for brenning av 1
m3 gass
Elektrisk effekt: 220 - 240 V ~ 50/60 Hz
Page 61

NORSK 61
Tekniske data
Mål
Bredde (mm) 580
Høyde (mm) 40
Lengde (mm) 510
Spenning (V) 220 - 240
De tekniske opplysningene nner du på
typeplaten på undersiden av apparatet.
Installasjon
Pakk ut platetoppen og forsikre deg om
at apparatet ikke er blitt skadet under
transporten. Dersom det oppstår et
problem, kontakter du forhandleren eller
Serviceavdelingen.
Teknisk informasjon til installatør
- Dette apparatet kan bygges inn i en
kjøkkenbenk med en tykkelse på mellom
20 og 50 mm.
- Hvis det ikke er noen ovn under
platetoppen, plasseres et skillepanel
med en overate som er minst like
stor som åpningen i kjøkkenbenken.
Dette panelet må ikke under noen
omstendigheter plasseres mindre enn 20
mm fra bunnen av platetoppen.
- Før installasjonen må du ta hensyn til at:
- de lokale betingelsene for gassforsyning
(gasstype og gasstrykk) svarer til
innstillingene for platetoppen (se etter
på typeplaten og i injektortabellen)
- overaten på møbler eller apparater
som er montert ved siden av
platetoppen er varmebestandige i
samsvar med lokale forskrifter
- Dette apparatet er ikke tilkoblet et
avtrekksrør. Det skal installeres i samsvar
med gjeldende retningslinjer for
installering. Det må tas spesielt hensyn
til relevante krav til ventilasjon.
- Forbrenningsprodukter slippes ut i det
fri gjennom spesielle kjøkkenventilatorer
eller elektriske vifter montert på vegg
og/eller i vinduet.
Gasstilkobling
Denne prosedyren skal kun utføres av
en autorisert tekniker.
Gassforsyningssystemet må være i samsvar
med lokale forskrifter for den relevante
gasstandarden.
- Du kan nne spesikke lokale forskrifter
for noen land i avsnittet "Henvisning
til lokale forskrifter". Hvis det ikke gis
noen informasjon om ditt land, må du
Page 62

NORSK 62
vennligst spørre en kvalisert tekniker til
råds.
- Platetoppen skal kobles til gassnettet
eller gassbeholderen ved hjelp av et
stivt kobber- eller stålrør med koblinger
i henhold til gjeldende forskrifter, eller
ved hjelp av en forskriftsmessig slange
av rustfritt stål med jevn overate.
Slangen må ikke være lenger enn 2
løpemeter.
A
C
- VIKTIG: Dersom det benyttes en slange
av rustfritt stål, må den installeres på
en slik måte at den ikke kan komme
i kontakt med bevegelige deler på
kjøkkeninventaret. Den må plasseres
på et sted uten hindre og slik at det
er mulig å inspisere den i hele dens
lengde.
- Etter tilkobling til gass, må du kontrollere
at det ikke lekker noe sted ved hjelp
av såpevann. Tenn brennerne og drei
bryterne fra posisjonen maksimum
posisjonen minimum
ammenes stabilitet.
Elektrisk tilkobling
ADVARSEL
- Denne prosedyren skal kun utføres av en
autorisert tekniker.
- Elektrisk tilkobling skal skje i
overensstemmelse med gjeldende
forskrifter.
- Jording av apparatet er påbudt ved lov.
for å kontrollere
L
Jord
(gul/grønn)
til
D
B
C
D
- Koble vedlagte albue (A) eller (B)
til platetoppens inntaksrør, og legg
på den vedlagte tetningen (C), i
overensstemmelse med EN 549.
- Tetteskive (D) følger ikke med produktet.
N
- Ikke bruk skjøteledninger.
- VIKTIG: Data angående spenning og
strømforbruk er oppgitt på typeplaten.
Montering
Når du har rengjort overaten rundt kanten,
festes vedlagte tetningslist på platetoppen.
Plasser platetoppen i åpningen i
kjøkkenbenken (utført ifølge målene som er
oppgitt i instruksjonene).
MERK: Strømledningen må være lang nok til
at man kan løfte opp platetoppen.
Platetoppen festes ved hjelp av brakettene
som følger med. Plasser brakettene i
sporene som er vist med pilen og fest dem
Page 63

NORSK 63
med skruene i henhold til tykkelsen på
kjøkkenbenken.
Påse at stikkontakten er nær apparatet
som skal installeres. Dersom ledningen som
fulgte med apparatet ikke er lang nok, må
du skifte den ut med en av samme type,
men med riktig lengde.
Tilpasning til en annen gasstype
ADVARSEL
- Denne prosedyren skal kun utføres av en
autorisert tekniker.
Hvis apparatet er beregnet for bruk med en
annen type gass enn den som er oppgitt på
typeplaten og informasjonsetiketten øverst
på platetoppen, må injektorene skiftes.
Fjern informasjonsetiketten og oppbevar
den sammen med instruksjonsboken.
Bruk trykkregulatorer som egner seg
til det gasstrykket som er oppgitt i
bruksanvisningen.
- Gassdysene må skiftes ut av
kundeservice eller en kvalisert tekniker.
- Dyser som ikke fulgte med apparatet må
bestilles fra kundeservice.
- Juster minimumsinnstillingen på kranene.
MERK: Dersom det brukes propan (G30/
G31), må skruene for minimumsinnstilling
strammes til så langt de går.
VIKTIG: Dersom bryterne går tregt,
vennligst kontakt serviceavdelingen for å få
skiftet ut kranen på brenneren.
Skifte ut injektorene (se avsnittet
“injektortabell”)
- Fjern ristene (A).
- Ta ut brennerne (B).
- Ved hjelp av en pipenøkkel av passende
størrelse, (C), løsner man injektoren som
skal skiftes ut.
- Sett inn en injektor som egner seg til den
nye gasstypen.
- Monter injektoren på (D).
Før platetoppen installeres må du huske å
sette på gasskalibreringsplaten som følger
med injektorene, slik at den dekker den
eksisterende informasjonen angående
gasskalibrering.
D
C
A
B
Justering av minimumsinnstillingen på
gasskranene
E
For å forsikre deg om at
minimumsinnstillingen er korrekt justert,
må du fjerne bryteren (E) og gå frem på
følgende måte:
- stram til skruen for å redusere
Page 64

NORSK 64
ammehøyden (-)
- løsne skruen for å øke ammehøyden
(+).
Justeringen skal foretas mens gasskranen er
på minimumsinnstillingen (liten amme).
- Primærluften på brennerne har ikke
behov for å justeres.
- Nå tenner du brennerne og dreier
bryterne fra posisjonen maksimum
posisjonen minimum
ammenes stabilitet.
Når justeringen er fullført, forsegler man
kjøkkenbenken på nytt ved hjelp av seglvoks
eller et tilsvarende materiale.
NO
ENVISNING TIL GJELDENDE
FORSKRIFTER
Forsikre deg om at installasjonen og
gasstilkoblingen utføres av en kvalisert
elektriker ifølge produsentens anvisninger
og gjeldende sikkerhetsforskrifter.
for å kontrollere
til
WOK-ADAPTER
UTSKIFTING AV BRYTERNE
Forsikre deg om at platetoppen er slått
av!
Alle bryterne må være i lukket posisjon.
Page 65

NORSK 65
Dra alle bryterne på koketoppen opp og av
og legg dem tilside.
Ta settet med nye brytere som ligger øverst
i emballasjen, og ta de nye bryterne ut av
plastposen.
Påse at alle bryterne står i riktig posisjon.
Kontroller at monteringen er riktig utført ved
å slå på hver brenner separat.
Skyv alle bryterne på gassventilene til du
kjenner at de stopper (det kan oppstå
gnister).
Page 66

NORSK 66
Miljøhensyn
Emballasje
- Emballasjen består av 100%
resirkulerbart materiale og er merket
med resirkuleringssymbolet ( ).
Produkter
Dette apparatet er merket i samsvar med
EU-direktiv 2002/96/EC om avhending av
elektrisk og elektronisk
utstyr (WEEE - Waste Electrical and
Electronic Equipment). Ved å sørge for at
dette apparatet avhendes forskriftsmessig,
kan brukeren bidra til å forhindre mulige
negative miljø- og helsekonsekvenser.
Symbolet
medfølgende dokumentene, indikerer
at dette apparatet ikke skal behandles
som husholdningsavfall, men at det må
bringes til en mottaksstasjon for elektrisk
og elektronisk avfall. Avhending må skje i
samsvar med lokale miljøbestemmelser for
håndtering av avfall.
For videre informasjon om behandling,
gjenvinning og resirkulering av dette
apparatet, kan du kontakte kommunen, det
lokale renholdsverket eller butikken der du
kjøpte apparatet.
på produktet, eller på de
Samsvarserklæring
- Denne platetoppen er utformet,
konstruert og markedsført i
overensstemmelse med:
- de sikkerhetsmessige kravene i
"Gassdirektivet" 2009/142/EØF
- sikkerhetsbestemmelsene i
“Lavspenningsdirektivet” 2006/95/
EF (som erstatter endringsdirektivet
73/23/EØF)
- kravene til beskyttelse i "EMC"direktiv 2004/108/EØF
- Denne platetoppen er beregnet på
å komme i kontakt med matvarer,
og er i overensstemmelse med EUbestemmelsen 1935/2004
- Denne platetoppen (klasse 3) er kun
beregnet på matlaging. All annen bruk
(slik som oppvarming av lokaler) må
ansees som misbruk og medfører fare.
Page 67

NORSK 67
IKEA GARANTI
Hvor lenge er IKEA garantien gyldig
Denne garantien gjelder i fem (5) år
fra opprinnelig innkjøpsdato, som er
den datoen da hvitevaren ble kjøpt på
IKEA. Garantien gjelder ikke LAGAN
hvitevarer. Original kvittering må fremvises
som kjøpsbevis. Hvis det utføres service
garantireparasjoner, fører ikke dette til at
garantiperioden på hvitevaren eller de nye
delene forlenges.
Hvilke hvitevarer dekkes ikke av IKEA 5
års garanti?
Hvitevarer med navnet LAGAN og alle
hvitevarer anskaffet hos IKEA før 1. august
2007.
Hvem utfører service?
IKEAs autoriserte servicepartner vil sørge for
service gjennom sitt eget nettverk.
Hva dekker denne garantien?
Garantien dekker feil på hvitevaren som
skyldes produksjons- eller materialfeil fra
og med datoen da hvitevaren ble kjøpt
hos IKEA. Denne garantien gjelder kun for
bruk av hvitevaren i privat husholdning.
Unntakene er spesisert under avsnittet
“Hva dekkes ikke av denne garantien?”
Under garantiperioden vil utgiftene til
utbedring av feilen, dvs. reparasjon, nye
deler, arbeidstimer og reise bli dekket, på
betingelse av at hvitevaren er tilgjengelig for
reparasjon uten spesielle utgifter. På disse
betingelser er EUs retningslinjer (Nr. 99/44/
EU) og lokale forskrifter i de enkelte land
bindende. Utskiftede reservedeler er IKEA sin
eiendom.
Hva vil IKEA gjøre for å løse problemet?
Den servicepartner som IKEA utpeker
vil undersøke hvitevaren og selv avgjøre
om det dekkes av denne garantien. Hvis
det dekkes vil IKEAs serviceavdeling eller
den servicepartner den har autorisert til
sine egne serviceoperasjoner etter egen
avgjørelse enten reparere det feilaktige
produktet eller skifte det ut med en identisk
eller tilsvarende hvitevare.
Hva dekkes ikke av denne garantien?
• Normal bruk og slitasje.
• Skade påført hvitevaren med hensikt
eller ved skjødesløshet, skader som
skyldes at bruksanvisningen ikke er
fulgt, ukorrekt installasjon eller tilkobling
til feil spenning, skade forårsaket av
kjemisk eller elektro-kjemisk reaksjon,
rust, korrosjon og vannskade, herunder
omfattet men ikke begrenset til skade
som skyldes overdrevent kalkinnhold i
vanntilførselen, og skade forårsaket av
unormale omgivelsesforhold.
• Forbruksdeler omfatter batterier og
pærer.
• Ikke-funksjonelle eller dekorative deler
som ikke påvirker normal bruk av
hvitevaren, for eksempel riper og mulige
fargeforandringer.
• Tilfeldig skade som skyldes
fremmedlegemer eller stoffer,
samt rengjøring/rensing av ltre,
avløpssystemer eller såpebeholdere.
• Skade på følgende deler: keramisk
glass, tilbehør, servise- og bestikkkurver, tilførsels- og avløpsrør,
pakninger, lamper og lampedeksler,
display, knotter, innfatninger osv. dersom
det ikke kan bevises at slike skader
skyldes produksjonsfeil.
• Tilfeller hvor reparatøren under sitt
besøk ikke kunne nne noen feil.
• Reparasjoner som ikke er utført av
autoriserte serviceytere og/eller en
autorisert servicepartner eller dersom
det ikke er blitt brukt originale deler.
• Reparasjoner som skyldes ukorrekt
installasjon eller installasjon som ikke
skjer ifølge monteringsanvisningene.
• Bruk av hvitevaren utenfor privat
Page 68

NORSK 68
husholdning, dvs. profesjonell bruk.
• Transportskader. Hvis en kunde
transporterer produktet hjem til seg selv
eller til en annen adresse, er ikke IKEA
ansvarlig for eventuell skade som kan
oppstå under transporten. Men dersom
IKEA leverer produktet til kundens
leveringsadresse, dekkes skader som
måtte oppstå på produktet under
transporten av IKEA.
• Installasjons kostnader av ditt IKEA
produkt.
Men hvis en serviceyter fra IKEA eller
en servicepartner som er autorisert
av IKEA reparerer eller erstatter
hvitevaren i samsvar med vilkårene
i denne garantien, vil serviceyteren
eller den autoriserte servicepartneren
installere den reparerte hvitevaren eller
installere den erstattede hvitevaren, om
nødvendig.
Disse restriksjonene gjelder ikke for
feilfritt arbeid utført av en kvalisert
reparatør med bruk av originale deler
for å tilpasse hvitevaren til de tekniske
sikkerhetsspesikasjonene i et annet EU-
land.
Lovfestede rettigheter
Denne garantien gir deg konkrete
rettigheter, men du har også rettigheter i
henhold til norsk lov.
Gyldighetsområde
For produkter kjøpt i et EU-land og fraktet
til et annet, vil service bli gitt innenfor
rammene av garantivilkårene i det nye
landet. Plikt til å utføre service innen
rammene for garantien foreligger kun
dersom produktet tilfredsstiller og er
installert i henhold til:
- de tekniske spesikasjonene i det landet
hvor garantikravet fremsettes.
- sikkerhetsinformasjonen i monterings- og
bruksanvisningen.
KUNDESERVICE
Ikke nøl med å kontakte IKEA for å:
• fremsette et servicekrav under denne
garantien;
• spørre etter opplysninger om installasjon
av IKEA-hvitevarer i IKEAs egen
avdeling for kjøkkenmøbler;
• spørre om hvordan hvitevarene fra IKEA
fungerer.
For å sikre oss at vi kan tilby deg den beste
assistanse vennligst studer monterings og
bruksanvisning før du kontakter oss.
Hvordan nå oss hvis du har behov for
service på ditt produkt.
Vennligst se siste side
i denne manualen for
en full oversikt over
ettersalgsservice valgt
av IKEA og relative
telefonnumre.
For å kunne tilby deg en raskere
service anbefaler vi deg å benytte
telefonnummer ihht denne listen.
Henvis alltid til numrene i heftet
til det hvitevaren som du trenger
service for. Vennligst oppgi IKEA
sitt produktnummer (8 siffer) og
servicenummer (12 siffer) som er
oppført på hvitevarens typeskilt.
TA VARE PÅ KJØPSKVITTERINGEN
Den gjelder som garantibevis og er
påkrevd ved alle garanti reparasjoner.
Kjøpskvitteringen oppgir også IKEA
navnet og produktnummeret (8 siffer)
for hver av hvitevarene du har kjøpt.
Trenger du ekstra hjelp?
For alle andre henvendelser vennligst
kontakt IKEA kundesenter. Vi anbefaler at
du leser bruksanvisning og medfølgende
dokumentasjon før du kontakter oss.
Page 69

DANSK 69
Indholdsfortegnelse
Oplysninger om sikkerhed 69
Beskrivelse af produktet 72
Daglig brug 73
Nyttige råd 73
Rengøring og vedligeholdelse 74
Fejlnding 75
Dysetabel 76
Tekniske data 77
Installation 77
Miljøhensyn 82
IKEAs GARANTI 83
Oplysninger om sikkerhed
Din og andres sikkerhed er meget
vigtig.
Denne brugervejledning og selve
apparatet er forsynet med vigtige
oplysninger om sikkerhed, der
altid skal læses og overholdes.
Dette er symbolet for fare, der
advarer om potentielle risici
for brugeren og andre.
Dette symbol står foran alle
sikkerhedsoplysninger sammen
med ordene:
FARE Angiver en farlig
situation, der, hvis den ikke
forhindres, forårsager alvorlige
læsioner.
ADVARSEL Angiver en farlig
situation, der, hvis den ikke
forhindres, kan forårsage alvorlige
læsioner.
Alle sikkerhedsoplysninger vil
specicere den potentielle fare
og angive, hvordan risikoen for
skader kan mindskes, samt hvad
der kan ske, hvis angivelserne
ikke følges.
Tag stikket ud af stikkontakten før
enhver form for installation eller
vedligeholdelse.
Installation eller
vedligeholdelse skal udføres
af en autoriseret installatør i
henhold til producentens
anvisninger og gældende
lovgivning for den relevante
gasstandard. Brug kun originale
reservedele. Reparer eller udskift
ingen af apparatets dele,
medmindre det kræves specikt i
brugervejledningen.
ADVARSEL Hvis
oplysningerne i denne
vejledning ikke følges nøje, kan
det medføre brand eller
eksplosion med deraf følgende
person- eller tingsskade.
- Opbevar og/eller brug aldrig
benzin eller andre brændbare
væsker/dampe i nærheden af
dette eller andet køkkenudstyr.
Hvis der lugter af gas:
- Tænd ikke for noget apparat.
- Rør ikke ved elektriske
kontakter.
- Anvend ikke nogen telefon i
bygningen.
- Kontakt straks gasselskabet
fra en nabos telefon. Følg
anvisningerne fra gasselskabet.
Page 70

DANSK 70
- Hvis selskabet ikke kan
kontaktes, skal brandvæsenet
tilkaldes.
- Installation og service må
udelukkende udføres af en
autoriseret vvs-installatør,
serviceafdelingen eller af
gasselskabet.
- Anvend kun apparatet i rum
med god ventilation.
- El- og gastilslutningen skal
være i overensstemmelse med
gældende regler.
- Efter installation af
kogesektionen skal der
monteres en erpolet
afbryder med en mindste
kontaktafstand på 3 mm, der
kan sørge for total frakobling.
- Dette apparat skal
ekstrabeskyttes, jvf.
stærkstrømsreglementet.
- Strømforsyningskablet skal
være tilstrækkelig langt til,
at det er muligt at slutte
det indbyggede apparat til
strømforsyningen.
- Brug kun stålslanger eller
stålrør ved tilslutning til
gasforsyningen.
- Om nødvendigt skal
strømforsyningskablet
udskiftes med et kabel med
de samme specikationer som
det originale kabel leveret
af producenten (af typen
H05V2V2-F 90°C eller H05RR-F).
Denne udskiftning må kun
foretages af en autoriseret
elektriker.
- Producenten fralægger sig
ethvert ansvar for skader
på personer, dyr eller ting,
der skyldes manglende
overholdelse af ovenstående
regler.
- Brug ikke multistikdåser eller
forlængerledninger.
- Ryk ikke i
strømforsyningskablet, når det
tages ud af stikkontakten.
- Efter endt installation må der
ikke være direkte adgang til de
elektriske dele.
- Rør ikke ved apparatet med
våde kropsdele, og brug det
ikke med bare fødder.
- Denne kogesektion (klasse
3) er udelukkende beregnet
til tilberedning af fødevarer
i private hjem. Brug aldrig
apparatet til opvarmning
af rummet. Det vil kunne
medføre kulilteforgiftning
og overophedning af
kogesektionen.
- Producenter fralægger sig
ethvert ansvar for upassende
brug eller for forkert indstilling
af betjeningsknapperne.
- Apparatet og de tilgængelige
dele kan blive varme,
når apparatet er i brug.
Sørg for ikke at berøre
varmeelementerne. Børn
under 8 år må ikke opholde
Page 71

DANSK 71
sig i nærheden af apparatet,
medmindre de er under
konstant opsyn. Apparatet
må udelukkende betjenes
af børn på 8 år og derover
samt af personer, der er
fysisk, sensorisk og mentalt
funktionshæmmede eller
uden forudgående erfaring og
viden, hvis de er under opsyn
og har fået den nødvendige
oplæring i sikker brug af
apparatet samt forstår farerne
ved forkert brug. Børn må ikke
lege med apparatet. Rengøring
og vedligeholdelse må ikke
foretages af børn, medmindre
de er under opsyn.
- Under brug af et gasapparat
dannes der varme og fugt i
rummet. Rummet skal derfor
udluftes ofte, eller der skal
installeres en emhætte med
udsugningskanal.
- Husdyr skal holdes væk fra
apparatet.
- Under længerevarende brug
kan yderligere udluftning blive
nødvendig (åbn et vindue, eller
indstil emhætten til maksimal
udsugning).
- Efter brug skal du sørge for,
at knapperne er i positionen
OFF, og du skal lukke for
hovedgashanen eller hanen på
gasasken.
- Hede fedtstoffer og olier kan
nemt antændes. Hold øje
med tilberedningen, når der
tilberedes mad med meget
fedt, olie eller alkohol (f.eks.
rom, cognac, vin).
- Hold øje med kogesektionen,
når der tilberedes med
fedtstoffer eller olie, da de kan
komme i brand. Forsøg ALDRIG
at slukke en brand med
vand, men tag stikket ud af
stikkontakten, og dæk derefter
ammen til med for eksempel
et låg eller et brandtæppe.
Risiko for brand: opbevar ikke
genstande på kogezonernes
overader.
- Opbevar emballagematerialet
uden for børns rækkevidde.
- Kogesektionen skal være kølet
helt af inden rengøring eller
vedligeholdelse.
Gem denne vejledning.
Page 72

DANSK 72
Beskrivelse af produktet
1
3
5
2
4
7 98
6
1
Løse riste
2
Halvhurtigt blus
3
Halvhurtigt blus
4
Power-blus
5
Lille blus
6
Betjeningsknap til Power-blus
7
Betjeningsknap til halvhurtigt blus
8
Betjeningsknap til halvhurtigt blus
9
Betjeningsknap til lille blus
Symboler
Gennemfarvet
cirkel
Stor amme
og stjerne
Lille amme
Gashanen lukket
Maksimal åbning/
tilførsel og elektrisk
tænding
Minimal åbning eller
reduceret tilførsel
Page 73

DANSK 73
Daglig brug
Lad aldrig ammerne nå ud forbi
kogegrejets kant.
Vigtigt: Når kogesektionen er i brug, kan
hele sektionen blive varm.
- Der tændes for et blus ved at dreje den
tilhørende knap mod uret til indstillingen
for maksimal amme.
- Tryk knappen ind mod kontrolpanelet for
at tænde blusset.
- Når blusset er tændt, holdes knappen
indtrykket i ca. 5-10 sekunder for at
give apparatet mulighed for at fungere
korrekt.
Denne sikkerhedsmekanisme slukker for
gasforsyningen, hvis ammen går ud ved
et tilfælde (pga. et pludseligt vindpust, en
afbrydelse i gasforsyningen, overkog el. lign.).
Nyttige råd
Kogesektionen er forsynet med blus af
forskellig størrelse. For at få et bedre resultat
skal du følge disse regler:
- Brug kogegrej, hvis bund har samme
bredde som blussene eller lidt større (se
følgende tabel).
- Brug kun kogegrej med plan bund.
- Brug den korrekte mængde vand til
kogning, og læg låg på.
- Sørg for, at gryderne på ristene ikke når
ud over kogesektionens kant.
- Der må ikke trykkes på knappen i mere
end 15 sekunder. Hvis blusset efter
denne tidsperiode ikke forbliver tændt,
skal du vente mindst 1 minut, før du
prøver igen.
BEMÆRK: I tilfælde af at lokale gasforhold gør
tændingen vanskelig, tilrådes det at gentage
proceduren med knappen stillet på
positionen lille amme.
Blusset kan gå ud, når knappen slippes. Det
betyder, at sikkerhedsmekanismen endnu
ikke er varmet nok op. I så
fald gentages ovenstående.
VIGTIGT: Ukorrekt brug af ristene kan
beskadige kogesektionen: Anbring aldrig
ristene med bunden opad, og lad dem ikke
glide hen over kogesektionen. Anvend ikke:
- støbejernsgrillpander eller kogegrej i
terrakotta.
- varmespredere i form af metalnet eller
andre typer.
- to blus samtidig til et stykke kogegrej
(f.eks. en skegryde).
Blus Gryde Ø
Power-blus 24 til 26 cm
Halvhurtig 16 til 24 cm
Lille blus 8 til 14 cm
Page 74

DANSK 74
Rengøring og vedligeholdelse
- Skyl, og tør efter.
Tag stikket ud af stikkontakten, inden
der foretages vedligeholdelse.
- Alle lakerede og glasoverader skal
rengøres med varmt vand og en neutral
opløsning.
- Rustfrie ståloverader kan blive plettede
af kalkholdigt vand eller aggressive
rengøringsmidler, hvis de er i kontakt i for
lang tid. Alle madrester (vand, sovs, kaffe
osv.) skal tørres af, inden de tørrer ind.
- Rengør med varmt vand og et neutralt
rengøringsmiddel, og tør efter med en
blød, tør klud eller et vaskeskind. Fjern
fastbrændt snavs med et specialmiddel
til rustfrit stål.
BEMÆRK: Rustfrit stål må kun rengøres med
en blød klud eller en svamp.
- Brug ikke slibende, ætsende eller
klorholdige produkter eller grydesvampe.
- Anvend ikke damprensere til rengøring.
- Brug ikke brændbare produkter.
- Efterlad ikke syreholdige eller basiske
stoffer som for eksempel eddike, sennep,
salt, sukker eller citronsaft på overaden.
RENGØRING AF KOGESEKTIONENS DELE
- Riste, brænderdæksler og brændere kan
tages af for at blive rengjort.
- Rengør dem i hånden med varmt vand
og et ikke-slibende rengøringsmiddel,
fjern alle madrester, og se efter, at ingen
af brænderåbningerne er tilstoppede.
- Sæt brændere og brænderdæksler
korrekt på plads.
- Når ristene sættes på plads, skal du sikre
dig, at de ugter med blussene.
- På modeller udstyret med elektriske
tændrør og sikkerhedstermoelementer
skal tændrørsenderne være helt rene for
at garantere korrekt funktion.
Kontrollér disse dele jævnligt, og rengør
dem om nødvendigt med en fugtig klud.
Alle fastbrændte madrester skal fjernes
med en tandstikker eller en nål.
BEMÆRK: For at undgå at beskadige den
elektriske tændingsmekanisme må du ikke
anvende den, når brænderne ikke er på
plads.
Page 75

DANSK 75
Fejlnding
Problem Mulig årsag Løsning
Den elektriske tænding virker
ikke
Brænderen tænder ikke Gashanen kan være
Gasringen brænder ujævnt Brænderringen kan være
Der er ingen
strømforsyning
lukket
tilstoppet af madrester
Kontrollér, at stikket sidder
i stikkontakten, og at der er
tændt for strømforsyningen.
Kontrollér, at gashanen er
åben
Rengør brænderringen i
overensstemmelse med
anvisningerne for rengøring
for at sikre, at der ikke er
madrester i brænderringen.
Før Service kontaktes:
1. Se "Fejlndingsoversigt" for at se, om det
er muligt selv at afhjælpe fejlen
2. Tænd for kogesektionen igen for at
kontrollere, om fejlen er afhjulpet.
3. Hvis problemet varer ved, kontaktes
Service.
Oplys følgende:
• Fejltype
• Kogesektionsmodel
• Servicenummer (dvs. nummeret efter
ordet SERVICE på typepladen under
kogesektionen samt på garantien)
• Fulde navn og adresse
• telefonnummer.
Hvis reparation er nødvendig, skal du
kontakte et autoriseret serviceværksted, som
angivet i garantibetingelserne.
Hvis der undtagelsesvis foretages en
reparation af en uautoriseret tekniker,
skal du altid bede om en kvittering på det
udførte arbejde samt insistere på, at der
anvendes originale reservedele.
Overholdes disse anvisninger ikke, kan det
gå ud over produktets sikkerhed og kvalitet.
Page 76

DANSK 76
Dysetabel
Kategori II2H3B/P
Anvendt
gastype
NATURGAS
(metan)
G20
FLASKEGAS
(butan) G30
(propan) G31
* 3,2kW solo per la versione 73cm Område 1
Anvendt
gastype
G20 20 mbar
G30/ G31
28-30 mbar
Brændertype Dysemar-
kering
power-blus
halvhurtig
lille
power-blus
halvhurtig
lille
Konguration af model
4 BLUS
1 POWER-BLUS - 2
HALVHURTIGE BLUS
1 LILLE BLUS
1 POWER-BLUS - 2
HALVHURTIGE BLUS
1 LILLE BLUS
138 T2 A
93 T4 P
Nominel
termisk
owhastighed
kW
101 Z
72 X
69
50
Nominel termisk
owhastighed (kW)
3.50
2.00
1.00
3.50
2.00
1.00
8.50 808 l/t 9.52
8.50 617 g/t 30.94
Nominelt
forbrug
333 l/t
190 l/t
95 l/t
254 g/t
145 g/t
73 g/t
Totalt nominelt
forbrug
Reduceret
varmekapacitet
kW
2.20
0.35
0.30
1.90
0.35
0.30
Gastryk (mbar)
min. nom. maks.
17 20 25
25 30 35
Luftbehov (m
forbrænding af 1m3
gas
3
) til
Strøm: 220 - 240 V ~ 50/60 Hz
DK
G110-8 mbar gasdyserne kan kun
købes hos Service.
Page 77

DANSK 77
Tekniske data
Mål
Bredde (mm) 580
Højde (mm) 40
Længde (mm) 510
Spænding (V) 220 - 240
De tekniske data er angivet på typepladen, der
er anbragt på apparatets underside.
Installation
Kontrollér, at kogesektionen ikke er blevet
beskadiget under transporten. Kontakt
forhandleren eller Service, hvis der er
problemer.
Tekniske oplysninger til installatøren
- Kogesektionen skal placeres i en
bordplade, der er mellem 20 og 50 mm tyk.
- Hvis der ikke er en ovn under
kogesektionen, skal der placeres en
skilleplade, der mindst har en ade
på størrelse med hullet i køkkenbordet.
Skillepladen må under ingen
omstændigheder placeres mindre end 20
mm fra kogesektionens bund.
- Før installation skal du sikre dig:
- at indstillingen af dette apparat,
som angivet på produktkortet og på
typepladen, er kompatibel med lokale
forsyningsforhold (gastype og -tryk).
- at ydersiderne af tilstødende
køkkenelementer eller apparater er
varmebestandige i henhold til lokale
bestemmelser.
- Dette apparat er ikke sluttet til et
udsugningsanlæg. Det skal installeres
i overensstemmelse med gældende
bestemmelser for installation. Der skal især
lægges vægt på gældende standarder for
ventilation.
- at forbrændingsgasser sendes udenfor
gennem specielle emhætter eller elektriske
ventilatorer monteret i væggen og/eller
vinduet.
Gastilslutning
Gastilslutningen skal foretages af en
autoriseret vvs-installatør.
Gasforsyningssystemet skal være i
overensstemmelse med gældende lovgivning
for den relevante gasstandard.
- Der er oplysninger om de specikke lokale
regler for nogle lande i afsnittet "Reference
til lokale bestemmelser". Hvis der ikke er
oplysninger om installationslandet, skal du
kontakte en autoriseret vvs-installatør.
Page 78

DANSK 78
- Kogesektionen skal sluttes til
gasforsyningsledningen eller gasasken
ved hjælp af et kobber- eller stålrør med
ttings i overensstemmelse med gældende
lovgivning eller ved hjælp af en ubrudt
rustfri stålslange i overensstemmelse med
gældende lovgivning. Slangen må højst
være 2 m lang.
A
C
D
B
C
D
- Monter det medfølgende vinkelrør (A) eller
(B) med kogesektionens indgangsrør, og
indsæt den medfølgende spændeskive (C) i
overensstemmelse med EN 549.
- Spændeskiven (D) leveres ikke sammen med
produktet.
- VIGTIGT: Hvis der anvendes en slange af
rustfrit stål, skal den monteres, så den ikke
kan komme i kontakt med bevægelige dele.
Den skal være placeret, så den ikke bliver
klemt, og hvor det er muligt at undersøge
den i hele dens længde.
- Efter gastilslutningen skal du kontrollere for
udslip med sæbevand. Tænd for blussene,
og drej knapperne fra maks. position
min. position
stabilitet.
Tilslutning til strømforsyningen
ADVARSEL
- Gastilslutningen skal foretages af en
autoriseret vvs-installatør.
- Eltilslutningen skal være i overensstemmelse
med gældende lokale regler.
- Dette apparat skal ekstrabeskyttes, jvf.
stærkstrømsreglementet.
- Brug ikke forlængerledninger.
- VIGTIGT: De relevante data for spænding
og strømforbrug er anført på typepladen.
Montering
Monter den medfølgende pakning på
kogesektionen, når kogesektionens overade
er blevet rengjort. Placer kogesektionen i
udskæringen i køkkenbordet med de mål, der er
angivet i vejledningen.
BEMÆRK: Elkablet skal være langt nok til, at
det kan trækkes opad.
Kogesektionen fastgøres med de medfølgende
beslag. Monter beslagene i de relevante
huller, der er vist med en pil, og fastgør dem
med deres skruer i overensstemmelse med
bordpladens tykkelse.
for at kontrollere ammens
L
Jord
(gul/grøn)
N
til
Page 79

DANSK 79
Sørg for, at der er en stikkontakt i nærheden af
produktet. Hvis kablet, der fulgte med produktet,
ikke er tilstrækkelig langt, skal det udskiftes
med et tilsvarende kabel, men med den rigtige
længde.
Tilpasning til forskellige gastyper
ADVARSEL
- Gastilslutningen skal foretages af en
autoriseret vvs-installatør.
Hvis apparatet skal fungere med en anden
gastype, end den der er angivet på typepladen
og på mærkaten oven på kogesektionen, skal
dyserne udskiftes.
Fjern mærkaten, og opbevar den i
brugervejledningen.
Anvend trykregulatorer, der passer til det
gastryk, der er anført i vejledningen.
- Gasdyserne skal udskiftes af
serviceafdelingen eller af en autoriseret
vvs-installatør.
- Gasdyser, der ikke leveres med apparatet,
skal bestilles hos serviceafdelingen.
- Indstil minimumsindstillingen.
BEMÆRK: Hvis der anvendes askegas (G30/
G31), skal skruen til minimumindstillingen
strammes så meget som muligt.
VIGTIGT: Hvis du oplever problemer med at
dreje knapperne til blussene, skal du kontakte
serviceafdelingen for at få en ny brændertap,
hvis den er defekt.
Udskiftning af dyserne (se afsnittet
"Dysetabel")
- Fjern ristene (A).
- Træk brænderne ud (B).
- Fjern dysen, der skal udskiftes, med en
passende størrelse topnøgle (C).
- Udskift den med en dyse, der passer til den
nye type gas.
- Saml dysen i (D).
Før montering af kogesektionen skal du huske
at fastgøre gaskalibreringspladen, der følger
med dyserne, så den dækker den eksisterende
information om gaskalibrering.
D
C
A
B
Indstilling af minimumindstillingen
E
For at sikre at minimumindstillingen er korrekt
justeret, skal du fjerne knappen (E) og gå frem
på følgende måde:
- Stram (-) for at reducere ammens højde.
- Løsn (+) for at øge ammens højde.
Justeringen skal foretages med tappen i
minimumgasindstilling (lille amme).
Page 80

DANSK 80
- Brændernes primærluft skal ikke justeres.
- Tænd derefter for blussene, og drej
knapperne fra maks. position
position
stabilitet.
Efter endt justering skal du forsegle
køkkenbordet igen ved hjælp af
forseglingsvoks eller tilsvarende materiale.
DK
REFERENCE TIL LOKALE
BESTEMMELSER
Sørg for, at installation og eltilslutning
foretages af en autoriseret installatør i
henhold til producentens anvisninger samt
gældende sikkerhedsbestemmelser.
for at kontrollere ammens
til min.
WOK-ADAPTER
UDSKIFTNING AF KNAPPER
Kontrollér, at der er slukket for
kogesektionen!
Alle knapper skal være i den lukkede position.
Page 81

DANSK 81
Træk alle kogesektionens knapper opad, og
gem dem sammen, når de er fjernet.
Tag sættet med de nye knapper, der ligger
øverst i pakken, og tag dem ud af plastposen.
Skub hver knap på ventilstangen, til de ikke
kan komme længere (måske kommer der
gnister).
Kontrollér, at alle knapperne er anbragt i den
rigtige position.
Kontrollér, at knapperne er monteret korrekt
ved at tænde for hver enkelt blus.
Page 82

DANSK 82
Miljøhensyn
Emballage
- Emballagematerialet er 100%
genbrugeligt, og mærket med
genbrugssymbolet ( ).
Produkter
Dette apparat er i overensstemmelse med
EU-direktiv 2002/96/EF, Affald af elektrisk og
elektronisk
udstyr (WEEE). Ved at sikre at dette apparat
bliver skrottet korrekt, hjælper du med til at
forhindre potentielle, negative konsekvenser
for miljøet og folkesundheden.
Symbolet
ledsagende dokumentation angiver, at
produktet ikke må bortskaffes sammen
med husholdningsaffaldet. Det skal i stedet
aeveres på en genbrugsstation for elektrisk
og elektronisk udstyr. Det skal skrottes i
overensstemmelse med gældende regler for
bortskaffelse af affald.
Vedrørende yderligere oplysninger om
håndtering, genvinding og genbrug af
dette produkt bedes du kontakte de lokale
myndigheder, renovationsselskabet eller
forretningen, hvor produktet er købt.
på produktet eller den
Overensstemmelseserklæring
- Denne kogesektion er designet,
fremstillet og markedsført i
overensstemmelse med:
- sikkerhedskravene i
“Lavspændingsdirektiv 2009/142/EØF.
- sikkerhedskravene i
“Lavspændingsdirektiv" 2006/95/
EF (der erstatter 73/23/EØF og
efterfølgende ændringer).
- beskyttelseskravene i EMC-direktiv
2004/108/EF.
- Denne kogesektion er beregnet til at
komme i kontakt med fødevarer, og
den er i overensstemmelse med EFforordning nr. 1935/2004.
- Denne kogesektion (klasse 3) er
udelukkende beregnet til tilberedning
af mad. Enhver anden brug (såsom
opvarmning af et rum) er ukorrekt og
farlig.
Page 83

DANSK 83
IKEAs GARANTI
Hvor længe gælder IKEA garantien?
Denne garanti er gyldig i fem (5) år fra
datoen for køb af produktet hos IKEA, med
mindre produktet er af mærket LAGAN,
hvortil der kun ydes to (2) års garanti. Den
originale kvittering er påkrævet som bevis
for købet. Hvis der udføres servicearbejde
under garantien, vil det ikke forlænge
garantiperioden for produktet.
Hvilke produkter er ikke dækket af IKEAs
fem (5) års garanti?
Produkter af mærket LAGAN samt alle
produkter købt før den 1. august 2007 hos
IKEA.
Hvem står for servicen?
IKEAs serviceleverandør står for servicen
inden for sit eget netværk eller inden for den
autoriserede servicepartners netværk.
Hvad er dækket under denne garanti?
Garantien dækker fejl på produktet, der
skyldes materiale- eller produktionsfejl,
fra datoen for købet hos IKEA. Denne
garanti gælder kun i forbindelse med
husholdningsbrug. Undtagelserne er
speciceret under overskriften “Hvad er ikke
dækket under denne garanti?” Inden for
garantiperioden dækkes omkostningerne
i forbindelse med udbedring af fejlen dvs.
reparationer, reservedele, arbejdsløn og
transport, såfremt produktet er til rådighed
for reparation uden særlige ekstraudgifter.
På disse betingelser er EU’s retningslinjer
(Nr. 99/44/EF) og de respektive lokale
bestemmelser gældende. Udskiftede dele
tilfalder IKEA.
Hvad gør IKEA for at afhjælpe problemet?
IKEAs serviceleverandør vil undersøge
produktet og efter eget skøn træffe afgørelse
om, hvorvidt problemet er dækket af denne
garanti eller ej. Hvis produktet er dækket,
vil IKEAs serviceleverandør eller den
autoriserede servicepartner via dennes egen
serviceafdeling, og efter eget skøn, enten
reparere det fejlbehæftede produkt eller
udskifte det med det samme eller et lignende
produkt.
Hvad er ikke dækket af garantien?
• Normalt slid.
• Forsætlig eller uagtsom skade, skade
forårsaget af manglende overholdelse af
brugervejledningen, ukorrekt installation
eller tilslutning til forkert spænding,
skade forårsaget af en kemisk eller
elektrokemisk reaktion, rust, korrosion
eller vandskade, herunder men ikke
begrænset til skade grundet for meget
kalk i vandforsyningen samt skade
forårsaget af unormale miljøforhold.
• Forbrugsstoffer herunder batterier og
pærer.
• Ikke-funktionelle og dekorative dele, der
ikke har nogen indydelse på normal
brug af produktet, herunder eventuelle
ridser og mulige farveforskelle.
• Tilfældige skader forårsaget af
fremmedlegemer eller stoffer samt
rengøring eller fjernelse af tilstopninger i
ltre, udløbssystemer eller sæbeskuffer.
• Skade på følgende dele: glaskeramik,
tilbehør, kurve til kogegrej og bestik,
tilløbs- og udløbsrør, pakninger, lamper
og lampedæksler, skærme, knapper,
beklædninger og dele af beklædninger,
medmindre det kan bevises, at disse
skader skyldes produktionsfejl.
• I tilfælde hvor der ikke ndes nogen fejl
under et teknikerbesøg.
• Reparationer, der ikke udføres af vores
egen serviceleverandør og/eller en
autoriseret servicepartner under kontrakt,
eller hvor der er anvendt uoriginale
reservedele.
• Reparationer på grund af fejlagtig
installation, eller hvor specikationerne
ikke er overholdt.
• Brugen af produktet uden for almindelig
Page 84

DANSK 84
husholdningsbrug, dvs. til professionel
brug.
• Transportskader. Hvis en kunde selv
transporterer produktet til sit hjem eller til
en anden adresse, er IKEA ikke ansvarlig
for nogen skade, der måtte opstå under
transporten. Hvis IKEA derimod leverer
produktet til kundens leveringsadresse, vil
skader, der opstår under leveringen, blive
dækket af IKEA.
• Omkostninger for at udføre installation af
produktet.
Hvis en af IKEAs serviceleverandører
eller deres autoriserede servicepartner
reparerer eller udskifter maskinen under
garantien, vil serviceleverandøren eller
deres autoriserede servicepartner
geninstallere produktet eller installere
udskiftningsproduktet om nødvendigt.
Disse begrænsninger gælder ikke for fejlfrit
arbejde udført af en autoriseret specialist og
under anvendelse af
med det formål at tilpasse apparatet til
tekniske sikkerhedsbestemmelser i et andet
EU-land.
Gældende lokal lovgivning
IKEAs garanti giver dig specikke lovmæssige
rettigheder, som dækker eller overstiger alle
lokale juridiske krav, der kan være forskellige
fra land til land.
Disse betingelser begrænser på ingen
måde forbrugerens rettigheder i medfør af
gældende national lov.
Gyldighedsområde
For maskiner købt i et EU-land og medbragt
til et andet EU-land vil serviceydelserne blive
leveret i henhold til de garantibetingelser,
der er gældende i det nye land. Der
eksisterer kun en forpligtelse til at udføre
servicearbejde under garantien, hvis
produktet overholder og er installeret i
overensstemmelse med:
- De tekniske specikationer i det land,
hvor garantikravet fremsættes.
- Monteringsvejledningen og
sikkerhedsoplysningerne i
brugervejledningen.
originale reservedele
SERVICEAFDELING for IKEA-produkter
Tøv ikke med at kontakte IKEAs kundeservice
for at:
• anmode om service under garantien;
• få præcisering omkring montering af
IKEA produktet i et tilhørende IKEA
køkkenmøbel;
• få præcisering omkring funktionaliteten af
IKEA produktet.
For at sikre, at vi yder dig den bedste
assistance, bedes du venligst have
læst monteringsvejledningen og/eller
brugervejledningen omhyggeligt igennem,
inden du kontakter os.
Hvordan kontakter du os i tilfælde af
servicebehov?
Se sidste side i denne
manual, hvor der ndes
en liste over IKEAs
kundeserviceafdelinger og
telefonnumre.
For at give dig en hurtigere service,
anbefaler vi, at du bruger et af de
specikke telefonnumre i denne
vejledning. Referer altid til numrene
i vejledningen til det produkt, der er
behov for assistance til. Ligeledes skal
du referere til IKEA produktnummeret
(8 cifret kode) og det 12 cifrede
servicenummer, der ndes på
maskinens typeplade.
GEM KØBSKVITTERINGEN!
Den er dit bevis på købet, og er
nødvendig for garantiens gyldighed.
Købskvitteringen indeholder ligeledes
IKEA navnet og produktnummeret (8
cifret kode) for hver produkt, der er
købt.
Har du brug for ekstra hjælp?
For øvrige spørgsmål, der ikke vedrører
service og/eller garanti på dit produkt,
henviser vi til IKEA butikkens kundeservice.
Vi anbefaler, at du læser dokumentationen
til produktet omhyggeligt igennem, inden du
kontakter os.
Page 85

85
BELGIË - BELGIQUE - BELGIEN
Telefoon/Numéro de téléphone/Telefon-Nummer:
Tarief/Tarif/Tarif: Lokaal tarief/Prix d’un appel local/Ortstarif
Openingstijd: Maandag - Vrijdag 8.00 - 20.00
Heures d’ouverture: Lundi - Vendredi 8.00 - 20.00
Öffnungszeiten: Montag - Freitag 8.00 - 20.00
БЪЛГАРИЯ
Телефонен номер:
Тарифа: Локална тарифа
Работно време: понеделник - петък 8.00 - 20.00
ČESKÁ REPUBLIKA
Telefonní číslo:
Sazba: Místní sazba
Pracovní doba: Pondělí - Pátek 8.00 - 20.00
DANMARK
Telefonnummer:
Takst: Lokal takst
Åbningstid: Mandag - fredag 9.00 - 21.00
Lørdag 9.00 - 18.00
(Åbent udvalgte søndage, se IKEA.dk)
DEUTSCHLAND
Telefon-Nummer:
Tarif: Ortstarif
Öffnungszeiten: Montag - Freitag 8.00 - 20.00
ΕΛΛΑΔΑ
Τηλεφωνικός αριθμός:
Χρέωση: Τοπική χρέωση
Ώρες λειτουργίας: Δευτέρα - Παρασκευή 8.00 - 20.00
ESPAÑA
Teléfono:
Tarifa: Tarifa local
Horario: Lunes - Viernes 8.00 - 20.00
(España Continental)
FRANCE
Numéro de téléphone:
Tarif: Prix d’un appel local
Heures d’ouverture: Lundi - Vendredi 9.00 - 21.00
HRVATSKA
http://www.ikea.com
ÍSLAND
Símanúmer:
Kostnaður við símtal: Almennt mínútuverð
Opnunartími: Mánudaga - Föstudaga 9.00 - 17.00
ITALIA
Telefono:
Tariffa: Tariffa locale
Orari d’apertura: Lunedì - Venerdì 8.00 - 20.00
LIETUVIŲ
Telefono numeris: (0) 520 511 35
Skambučio kaina: Vietos mokestis
Darbo laikas: Nuo pirmadienio iki
penktadienio 8.00 - 20.00
MAGYARORSZÁG
Telefon szám:
Tarifa: Helyi tarifa
Nyitvatartási idő: Hétfőtől Péntekig 8.00 - 20.00
02 4003536
225376400
70150909
06929993602
2109696497
913754126
0170480513
5852409
0238591334
(06-1)-3285308
026200311
NEDERLAND
Telefoon:
Tarief: 15 cent/min., starttarief 4.54 cent
en gebruikelijke belkosten
Openingstijd: Maandag t/m - Vrijdag 8.00 - 20.00
Zaterdag 9.00 - 20.00
Zondag gesloten
NORGE
Telefon nummer:
Takst: Lokal takst
Åpningstider: Mandag - fredag 8.00 - 20.00
ÖSTERREICH
Telefon-Nummer:
Tarif: Ortstarif
Öffnungszeiten: Montag - Freitag 8.00 - 20.00
POLSKA
Numer telefonu:
Stawka:
Godziny otwarcia: Poniedziałek - Piątek 8.00-20.00
PORTUGAL
Telefone:
Tarifa: Tarifa local
Horário: Segunda - Sexta 9.00 - 21.00
REPUBLIC OF IRELAND
Phone number:
Rate: Local rate
Opening hours: Monday - Friday 8.00 - 20.00
ROMÂNIA
Număr de telefon:
Tarif: Tarif local
Orar: Luni - Vineri 8.00 - 20.00
РОССИЯ
Телефонный номер:
Стоимость звонка: Местная стоимость звонка
Время работы: Понедельник - Пятница 9.00 - 21.00
(Московское время)
SCHWEIZ - SUISSE - SVIZZERA
Telefon-Nummer/Numéro de téléphone/Telefono:
Tarif/Tarif/Tariffa: Ortstarif/Prix d’un appel local/Tariffa locale
Öffnungszeiten: Montag - Freitag 8.00 - 20.00
Heures d’ouverture: Lundi - Vendredi 8.00 - 20.00
Orario d’apertura: Lunedì - Venerdì 8.00 - 20.00
SLOVENSKO
Telefónne číslo:
Cena za hovor: Cena za miestny hovor
Pracovná doba: Pondelok až piatok 8.00 - 20.00
SRBIJA
http://www.ikea.com
SUOMI
Puhelinnumero:
Hinta: Yksikköhinta
Aukioloaika: Maanantaista perjantaihin 8.00 - 20.00
SVERIGE
Telefon nummer:
Taxa: Lokal samtal
Öppet tider: Måndag - Fredag 8.30 - 20.00
Lördag - Söndag 9.30 - 18.00
UNITED KINGDOM
Phone number:
Rate: Local rate
Opening hours: Monday - Friday 9.00 - 21.00
09002354532
23500112
013602771461
225844203
Koszt połączenia według taryfy operatora
213164011
016590276
021 2044888
84957059426
(02) 50102658
0981710374
0775-700 500
02076601517
en/of 0900 BEL IKEA
0225675345
Page 86

Page 87

Page 88

5019-600-00741
FAC-SIMILE
In case of missing Service Sticker, please report Model and Serial numbers for future Service references, which can be found on the Rating Plate in the prod-
GB
uct. - DE Falls der Serviceaufkleber fehlt, geben Sie bitte zur Erleichterung künftiger Servicearbeiten Modell und Seriennummern an. Diese Daten benden sich
auf dem Typenschild im Gerät. - FR En l’absence d’autocollant de service, veuillez inscrire le modèle et le numéro de série de l’appareil gurant sur la plaque
signalétique, an de pouvoir les communiquer au SAV en cas de problème éventuel. - NL Als de Servicesticker ontbreekt, vermeld dan het productnummer
(85-) en serienummer bij eventueel contact met de klantenservice in de toekomst. Deze kunt u vinden op het typeplaatje in het product. - ES En el caso de que
no se encuentre la tarjeta de servicio, indique el modelo y los números de serie, que pueden encontrarse en la placa de características del producto, para futuras
referencias de servicio. - PT Se perder o autocolante “Service”, comunique o número do Modelo e de Série para referência futura em caso de assistência. Os
números encontram-se na placa sinalética do produto. - IT In caso non sia presente l’adesivo del Servizio Assistenza, comunicare il modello e il numero di
serie indicati sulla targhetta matricola del prodotto come futuro riferimento per l’assistenza. - GR Σε περίπτωση που λείπει το αυτοκόλλητο σέρβις, αναφέρετε το
μοντέλο και σειριακό αριθμό για μελλοντικές αναφορές σέρβις, τα οποία θα βρείτε στην αναγνωριστική πινακίδα στο προϊόν. - SE Om Service-etiketten fattas,
bör du anteckna modell- och serienummer för framtida behov - dessa nner du på typskylten i produkten. - NO Dersom serviceetiketten mangler, noter deg
modell- og serienummer for fremtidig referanse. Du nner dem på typeplaten i produktet. - DK Hvis servicemærkaten mangler, skal model- og serienummeret
oplyses, når Service kontaktes. Numrene er angivet på produktets typeplade. - FI Jos huoltotarraa ei ole, ilmoita huoltoa varten malli- ja sarjanumero, jotka
löytyvät tuotteen arvokilvestä. - CZ V případě, že servisní štítek chybí, uveďte prosím pro příští potřebu servisu model a sériové číslo, které najdete na výko-
novém štítku výrobku. - SK Ak chýba servisná nálepka, v prípade servisnej potreby nahláste prosím model a výrobné číslo spotrebiča zo servisného štítku, ktorý
sa nachádza na výrobku. - PL Jeśli brakuje naklejki serwisowej, w celu ułatwienia serwisowania urządzenia w przyszłości proszę podać model oraz numer
seryjny, które można znaleźć na tabliczce znamionowej. -
mis on leitavad toote andmeplaadilt. - LV Gadījumā, ja trūkst apkalpošanas uzlīme, dariet zināmus modeļa un sērijas numurus, kas atrodami izstrādājuma
tehnisko datu plāksnītē, lai nākotnē tos varētu izmantot apkalpošanai kā atsauci. - LT Nesant serviso lipduko, serviso specialistams nurodykite modelio ir serijos
numerius, kuriuos rasite prietaiso gamyklinėje plokštelėje. - HU Amennyiben hiányzik a szervizmatrica, kérjük, adja meg a jövőbeni szervizhivatkozásokhoz a
modellszámot és a sorozatszámot, amelyek a terméken az adattáblán találhatók. - RU В случае отсутствия наклейки послереализационного обслуживания
(со словом Service) следует указать модель и серийный номер, используемые в дальнейшем для справки при техобслуживании в сервисном центре.
Эти данные приведены на паспортной табличке изделия. - KZ Егер Ќызмет кґрсету жапсырмасы болмаса, келешекте ќызмет кґрсету жўмыстарын
орындату ќажет болєанда, ґнімніѕ техникалыќ аќпарат таќтайшасынан табуєа болатын Їлгі жјне Сериялыќ нґмірді хабарлаѕыз. - BG В случай на
липсващ стикер с информация за сервизно обслужване, моля посочете модела и серийния номер за бъдещи справки за сервизно обслужване, които
ще намерите на табелката с основните данни. - RO Dacă abţibildul cu informaţii pentru service lipseşte, vă rugăm să comunicaţi modelul şi numerele de
serie, ca referinţe pentru service pe viitor; acestea se găsesc pe plăcuţa cu datele tehnice de pe produs. - MA En l’absence d’autocollant de service, veuillez
inscrire le modèle et le numéro de série de l’appareil gurant sur la plaque signalétique, an de pouvoir les communiquer au SAV en cas de problème éventuel.
Hoolduskleebise puudumise korral palume teatada hooldusrmale toote mudel ja seerianumber,
EST
© Inter IKEA Systems B.V. 2013 AA-1029745-1
 Loading...