

Page 1
LIVSLÅGA
GB
NL
NL
Page 2

Page 3
ENGLISH 4
NL
NEDERLANDS 20
Language, Taal
Country, Land
Page 4
ENGLISH 4
Table of contents
Safety information 4
Product description 7
Daily use 8
Helpful hints and tips 8
Maintenance and cleaning 9
What to do if 10
Injector table 11
Technical Data 12
Installation 12
Environmental concerns 17
IKEA GUARANTEE 18
Safety Information
Your safety and the safety of
others are very important.
This manual and the appliance
itself provide important safety
messages, to be read and
observed at all times.
This is the safety alert
symbol, pertaining to safety,
which alerts users to potential
hazards to themselves and
others.
All safety messages will follow
the safety alert symbol and
either the terms:
DANGER Indicates a
hazardous situation which, if
not avoided, will cause serious
injury.
WARNING Indicates a
hazardous situation which, if
not avoided, could cause serious
injury.
All Safety messages will tell you
what the potential hazard is, tell
you how to reduce the chance of
injury, and tell you what
can happen if the instructions are
not followed.
The appliance must be
disconnected from the power
supply before carrying out any
installation work.
Installation and maintenance
must be carried out by a
qualied technician, in
compliance with the
manufacturer’s instructions and
local safety regulations to the
relevant gas standard. Only use
original spare parts. Do not
repair or replace any part of the
appliance unless specically
stated in the user manual.
WARNING If the information
in this manual is not followed
exactly, a re or explosion may
result causing property damage
or injury.
- Do not store or use gasoline or
other ammable vapors and
liquids in the vicinity of this
appliance.
What to do if you smell gas:
- Do not try to light any
appliance.
- Do not touch any electrical
switch.
- Do not use any phone in your
building.
- Immediately call your gas
Page 5

ENGLISH 5
supplier from a neighbor’s
phone. Follow the gas
supplier’s instructions.
- If you cannot reach your
gas supplier, call the re
department.
- Installation and service must
be performed by a qualied
installer, service agency or the
gas supplier.
- Use appliance in well
ventilated rooms only.
- The electrical and gas
connections must comply with
local regulations.
- When the hob is installed,
provide a multi-pole circuit
breaker with a contact
separation of at least 3
mm, that provides full
disconnection.
- Regulations require that the
appliance is grounded.
- The power cable must be long
enough for connecting the
appliance, once tted in its
housing, to the power supply
- Use only exible or rigid metal
hose for gas connection.
- If necessary, the electrical
power cable must be
replaced exclusively with a
power cable having identical
characteristics to the original
supplied by manufacturer
(type H05V2V2-F 90°C or
H05RR-F). This operation must
be performed by a qualied
electrician.
- The manufacturer cannot
be held responsible for any
injury to persons or animals or
damage to property arising
from failure to comply with
these requirements.
- Do not use multiple plug
adapters or extension cords.
- Do not pull the power cable
to disconnect it from the
electrical supply.
- The electrical components
must not be accessible to the
user after installation.
- Do not touch the appliance
with any wet part of the body
and do not operate it when
barefoot.
- This hob (class 3) is designed
solely for private household
use for cooking food. Do not
use this appliance as a space
heater to heat or warm the
room. Doing so may result in
carbon monoxide poisoning
and overheating of the hob.
- The Manufacturer declines
all responsibility for
inappropriate use or incorrect
setting of the controls.
- The appliance and its
accessible parts become
hot during use. Care should
be taken to avoid touching
heating elements. Children less
than 8 years of age shall be
kept away unless continuously
Page 6

ENGLISH 6
supervised. This appliance
can be used by children aged
from 8 years and above and
persons with reduced physical,
sensory or mental capabilities
or lack of experience and
knowledge if they have
been given supervision or
instruction concerning use of
the appliance in a safe way
and understand the hazards
involved. They shall not play
with the appliance. Cleaning
and user maintenance shall
not be made by children
supervision.
- The use of a gas appliance
produces heat and humidity in
the room. Make sure the room
is well-ventilated, or install an
extractor hood with exhaust
duct.
- Domestic animals should
be kept away from the
appliance.
- In case of prolonged use,
additional ventilation may
be necessary (by opening
a window or increasing the
hood extraction speed).
- After use, make sure the knobs
are in off position and close
the main gas supply cock or
the gas cylinder valve.
- Overheated oils and fats catch
re easily. Always remain
vigilant when cooking foods
rich in fat, oil or alcohol (e.g.
rum, cognac, wine).
- Unattended cooking on a
hob with fat or oil can be
dangerous and may result in
re. NEVER try to extinguish a
re with water, but switch off
the appliance and then cover
ame e.g. with a lid or a re
blanket.
Danger of re: do not store
items on the cooking surfaces.
- Keep the packaging materials
out of the reach of children.
- Before cleaning or
maintenance wait for hob to
cool down.
Save these instructions
Page 7
ENGLISH 7
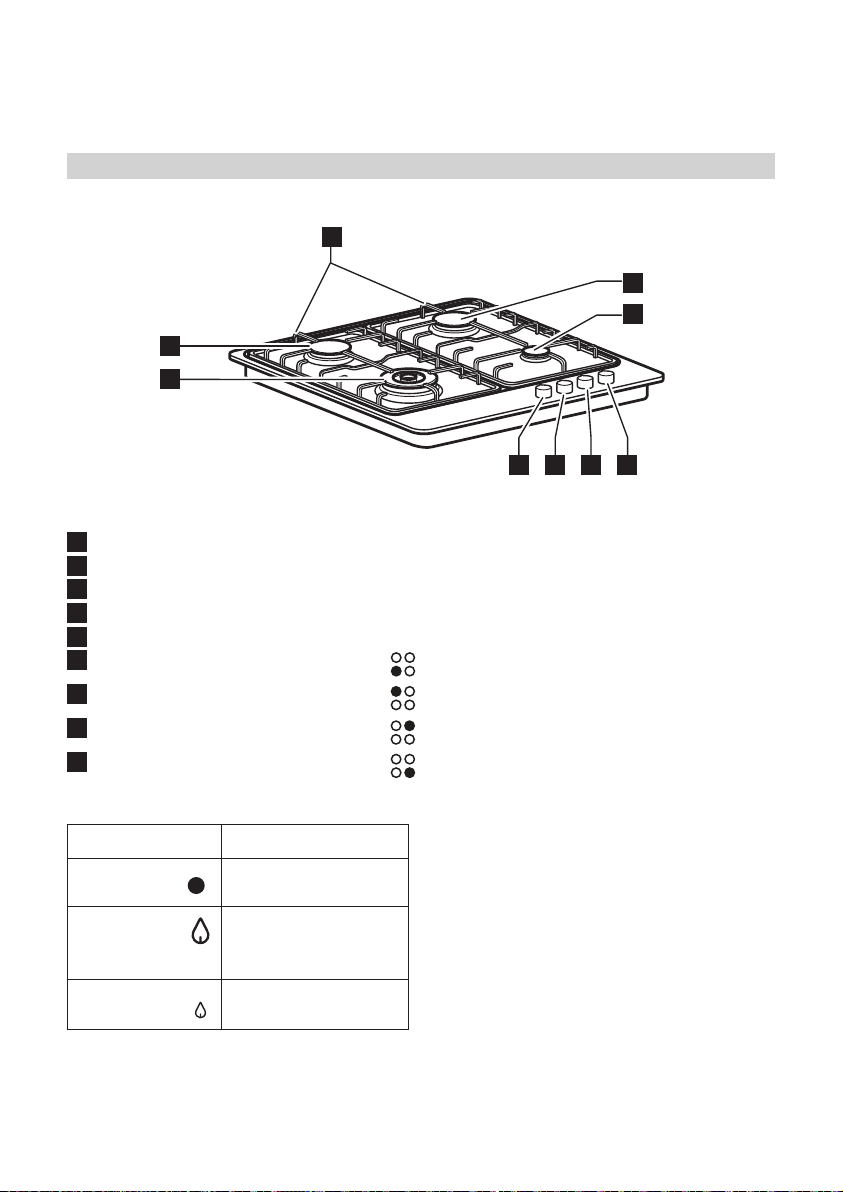
Product description
1
3
5
2
4
7 98
6
1
Removable panstand grids
2
Semirapid burner
3
Semirapid burner
4
Power burner
5
Auxiliary burner
6
Power burner control knob
7
Semirapid burner control knob
8
Semirapid burner control knob
9
Auxiliary burner control knob
Symbols
Solid disc
Large ame
and star
Small ame
Tap closed
Maximum opening/
delivery and electric
ignition
Minimum opening or
reduced delivery
Page 8

ENGLISH 8
Daily use
Do not let the burner ame extend
beyond the edge of the pan.
Important: when the hob is in use, the entire
hob area may become hot.
- To ignite one of the burners, turn the
relative knob anti-clockwise to the
maximum ame setting.
- Press the knob against the control panel
to ignite the burner.
- After the burner has ignited, keep the
knob pressed for about 5-10 seconds to
allow proper device operation.
This burner safety device shuts off the gas
supply to the burner if the ame goes out
accidentally (because of sudden draught, an
interruption in the gas delivery, boiling over
of liquids, etc.).
Helpful hints and tips
This hob has burners of different diameters.
For better burner performance, please stick
to the following rules:
- Use pots and pans with bottoms the
same width as that of the burners or
slightly larger (see following table).
- Only use at-bottomed pots and pans.
- Use the correct amount of water
for cooking foods and keep the pot
covered.
- Make sure pots on the grates do not
protrude beyond the edge of the hob.
- The knob must not be pressed for
more than 15 sec. If, after that time has
elapsed, the burner does not remain lit,
wait at least one minute before trying to
light it again.
NOTE: should particular local conditions
of the delivered gas make the ignition of
burner difcult, it is advisable to repeat
the operation with the knob turned to small
ame setting.
The burner might go out when the knob is
released. This means that the safety device
has not warmed up enough. In this
case, repeat the operations described
above.
IMPORTANT: improper use of the grids can
result in damage to the hob: do not position
the grids upside down or slide them across
the hob. Do not use:
- Cast iron griddles, ollar stones,
terracotta pots and pans.
- Heat diffusers such as metal mesh, or
any other types.
- Two burners simultaneously for one
receptacle (e.g. sh kettle).
Burner Pot Ø
Power burner from 24 to 26 cm
Semi-rapid from 16 to 24 cm
Auxiliary from 8 to 14 cm
Page 9
ENGLISH 9
Maintenance and cleaning
- Rinse and dry
Disconnect power before servicing.
- All the enamelled and glass parts
should be cleaned with warm water and
neutral solution.
- Stainless steel surfaces may be stained
by calcareous water or aggressive
detergents if left in contact for too long.
Any food spills (water, sauce, coffee, etc.)
should be wiped away before they dry.
- Clean with warm water and neutral
detergent, and then dry with a soft
cloth or chamois. Remove baked-on dirt
with specic cleaners for stainless steel
surfaces.
NOTE: clean stainless steel only with soft
cloth or sponge.
- Do not use abrasive or corrosive
products, chlorine-based cleaners or
pan scourers.
- Do not use steam cleaning appliances.
- Do not use ammable products.
- Do not leave acid or alkaline substances,
such as vinegar, mustard, salt, sugar or
lemon juice on the hob.
CLEANING THE HOB PARTS
- Grids, burner caps and burners can be
removed to be cleaned.
- Clean them by hand with warm water
and non-abrasive detergent, removing
any food residues and checking that
none of the burner openings is clogged.
- Ret burners and burner caps correctly
in the respective housings.
- When replacing the grids, make sure
that the panstand area is aligned with
the burner.
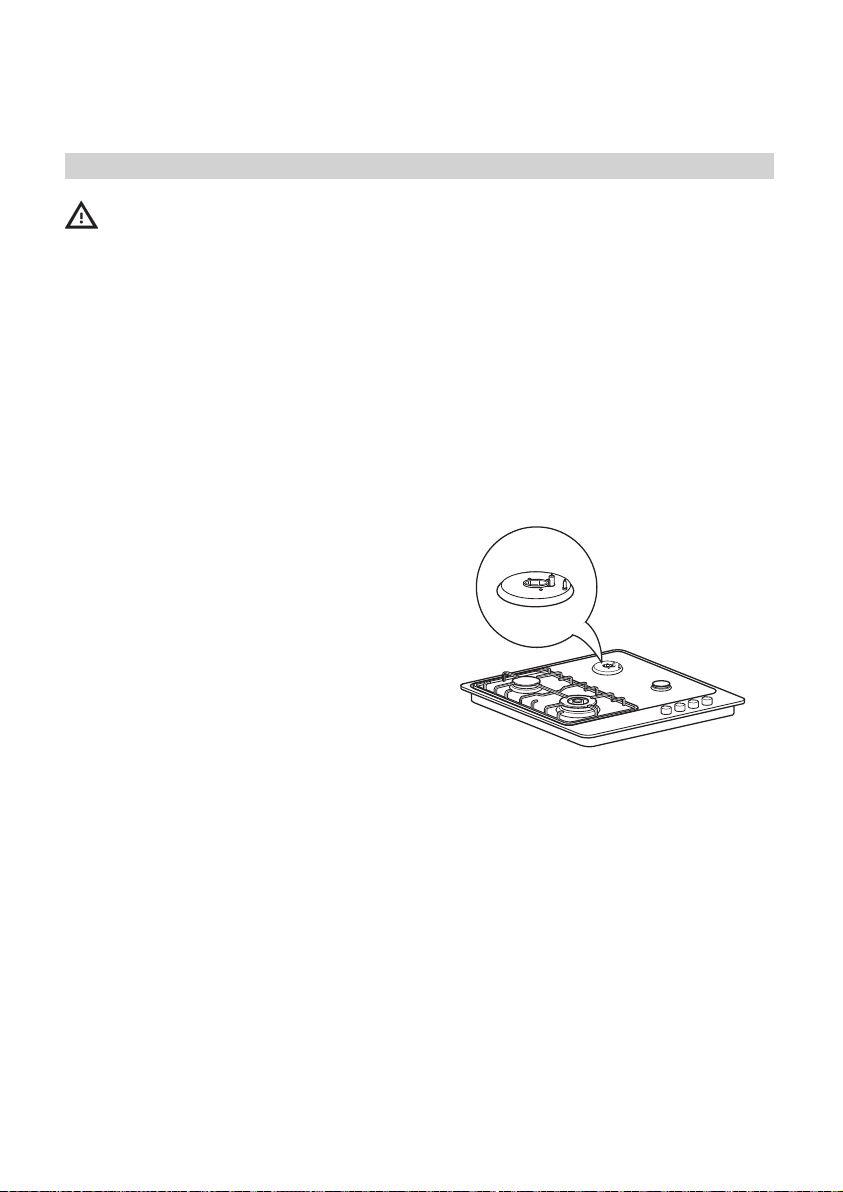
- Models equipped with electrical
ignition plugs and safety device require
thorough cleaning of the plug end in
order to ensure correct operation.
Check these items frequently, and if
necessary, clean them with a damp
cloth. Any baked-on food should be
removed with a toothpick or needle.
NOTE: to avoid damaging the electric
ignition device, do not use it when the
burners are not in their housing.
Page 10
ENGLISH 10
What to do if ...
Problem Possible cause Solution
The electric ignition does not
work
The burner fails to ignite The gas tap could be
The gas ring burns unevenly Burner crown may
There is no electrical
supply
closed
be occluded by food
residues
Check the unit is plugged in
and the electrical supply is
switched on.
Check that the gas tap is
open
Clean the burner crown
according to cleaning
instructions to make sure that
the burner crown is clear of
food residues.
Before calling the After-Sales Service:
1. Check “Troubleshooting guide” to see if
you can eliminate the problem yourself
2. Turn the hob on again to check if correct
operation has been restored.
3. If the problem persists, contact the Aftersales Service.
Give the following information:
• type of fault;
• hob model;
• service number (i.e. the number after the
word SERVICE on the dataplate under
the hob and on the warranty certicate);
• your full address;
• your telephone number.
If any repairs are required, contact an
authorised service centre, indicated in the
warranty.
In the unlikely event that an operation or
repair is carried out by an unauthorised
technician, always request certication
of the work carried out and insist on the use
of original spare parts.
Failure to comply with these instructions
may compromise the safety and quality of
the product.
Page 11
ENGLISH 11
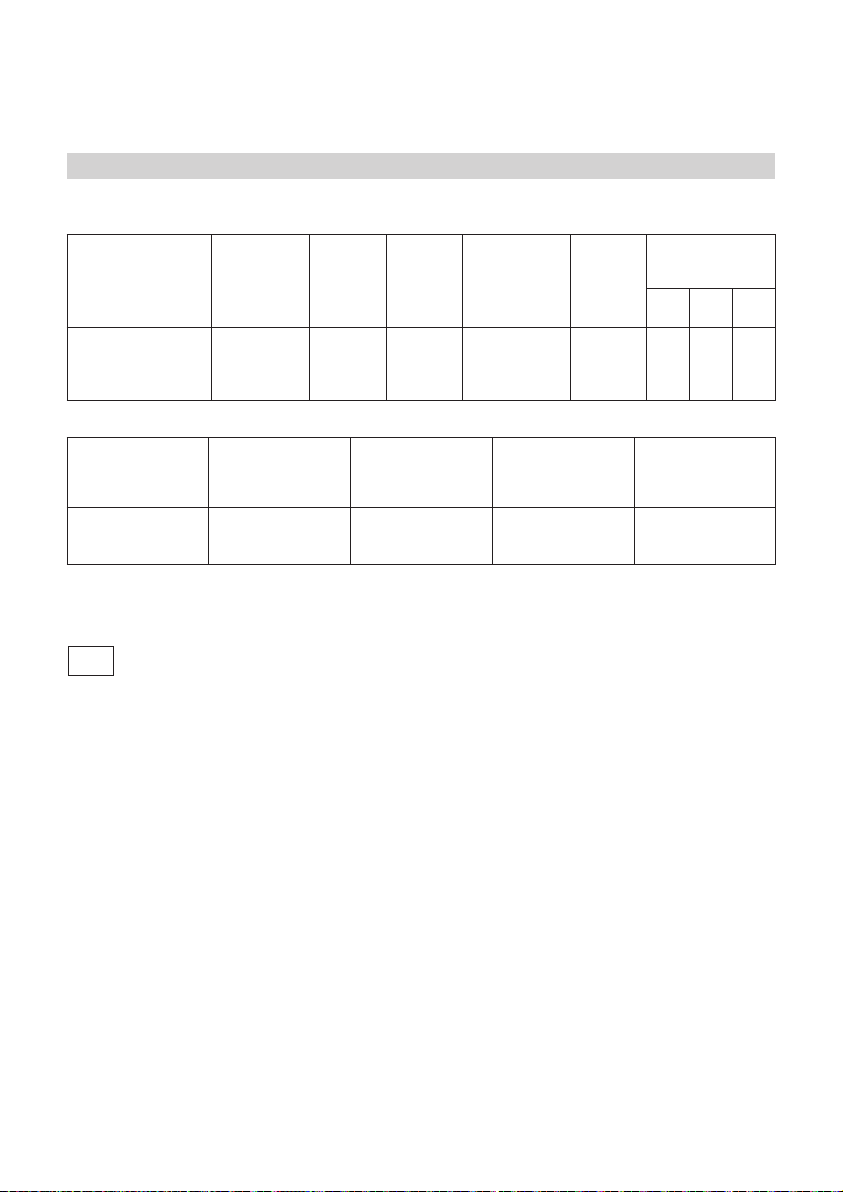
Injector table
Category I2L
Type of gas used Type of
burner
NATURAL GAS
(Methane)
G25
Type of gas
used
G25 25 mbar
Electric Power: 220 - 240 V ~ 50/60 Hz
NL
G30/G31-30 mbar gas set nozzle are
available through after-sales service only.
power burner
semi-rapid
auxiliary
Model
conguration
4 BURNERS
1 PB - 2 SR
Injector
marking
141 T2 A
Y 100
F1 72
Rated thermal
owrate (kW)
1 AUX
Rated
thermal
ow rate
kW
Rated
consumption
3,50
2,00
1,00
8,50 941 l/h 8,187
388 l/h
221 l/h
111 l/h
Total rated
consumption
Reduced
heat
capacity
kW
2,20
0,35
0,35
Gas pressure
(mbar)
min. rat. max.
20 25 30
Air required (m3)
for burning1m3 of
gas
Page 12
ENGLISH 12
Technical data
Dimensions
Width (mm) 580
Height (mm) 40
Length (mm) 510
Voltage (V) 220 - 240
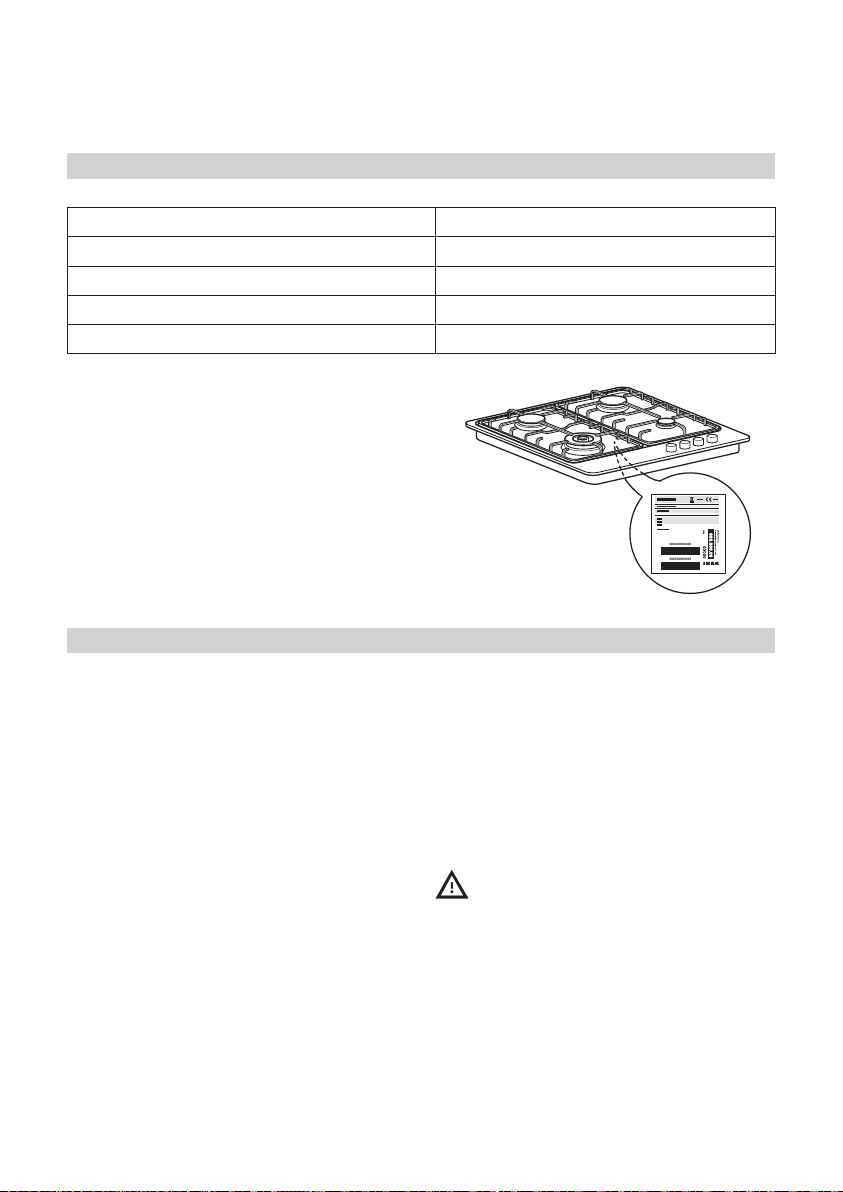
The technical information are situated in the
rating plate on the bottom side of the appliance.
Installation
After unpacking the hob, make sure that it
has not been damaged during transport. In
the event of problems, contact the dealer or
your nearest After-sales Service.
Technical information for the installer
- This product can be embedded in a
worktop 20 to 50 mm thick.
- If there is no oven beneath the hob,
insert a separator panel that has a
surface at least equal to the opening
in the work surface. This panel must be
positioned in no case less than 20 mm
from the bottom of the hob.
- Before installation, make sure that:
- the local gas delivery conditions (nature
and pressure) are compatible with the
settings of the hob (see the rating plate
and injector table);
- the outer surfaces of the furniture or
appliances adjacent to the hob are heat
resistant according to local regulations;
- This appliance is not connected to a
fume exhaust device. It shall be installed
in accordance with current installation
regulations. Particular attention shall
be given to the relevant requirement
regarding ventilation.
- Combustion products are discharged
outdoors through specic hoods or wall
and/or window mounted electrical fans.
Gas connection
This operation must be performed by a
qualied technician.
The gas supply system must comply with
local regulations to the relavant gas
standard.
- You can nd specic local regulations
for some countries in the paragraph
“Reference to Local Regulations”. If no
information concerning your Country is
given, please ask details to a qualied
technician.
- The connection of the hob to the gas
pipe network or gas cylinder must be
Page 13

ENGLISH 13
made by means of a rigid copper or
steel pipe with ttings complying with
local regulations, or by means of a
continuous-surface stainless steel hose
complying with local regulations. The
maximum length of the hose is 2 linear
metres.
A
C
D
B
C
D
- Connect elbow (A) or (B) supplied with
to the hob inlet main pipe and interpose
the washer (C) supplied, in compliance
with EN 549.
- Washer (D) not supplied with the
product.
- IMPORTANT: if a stainless steel hose
is used, it must be installed so as not to
touch any mobile part of the furniture.
It must pass through an area where
there are no obstructions and where it is
possible to inspect it on all its length.
- After connection to the gas supply, check
for leaks with soapy water. Light up the
burners and turn the knobs from max
position
check ame stability
Electrical connection
WARNING
- This operation must be performed by a
qualied technician.
- The electrical connections must comply
with local regulations.
- The earthing of this appliance is
compulsory by law.
- Do not use an extension cord.
- IMPORTANT: the data relevant to the
voltage and power absorption are
indicated on the rating plate.
Assembly
After having cleaned the perimeter surface,
apply the supplied gasket to the hob.
Position the hob in the worktop opening
made respecting the dimensions indicated in
the Instruction.
NOTE: the power supply cable must be long
enough to permit its upward extraction.
To secure the hob, use the brackets provided
with it. Fit the brackets into the relevant
bores shown by the arrow and fasten them
by means of their screws in accordance with
the thickness of the worktop.
to minimum position to
L
Earth
(yellow/green)
N
Page 14

ENGLISH 14
Make sure that the outlet is near the product
to install. So, if the cable that came with the
product is not long enough, you will need to
replace it with another one having the same
features but with the right length.
Adjustment to different type of gas
WARNING
- This operation must be performed by a
qualied technician.
If the appliance is intended to operate with
a different gas from the gas type stated on
the rating plate and information label on
the top of the hob, change the injectors.
Remove the information label and keep it
with the instructions booklet.
Use pressure regulators suitable for the gas
pressure indicated in the Instruction.
- The gas nozzles must be changed
by After Sales Service or a qualied
technician.
- Nozzles not supplied with the appliance
must be ordered from After Sales
Service.
- Adjust the minimum setting of the taps.
NOTE: when liquid petroleum gas is used
(G30/G31), the minimum gas setting screw
must be tightened as far as it will go.
IMPORTANT: should you experience
difculty in turning the burners knobs,
please contact the After Sales Service for
the replacement of the burner tap if found to
be faulty.
Replacing the injectors (see paragraph
“injector table”)
- Remove grids (A).
- Extract burners (B).
- Using a socket spanner of the
appropriate size unscrew the injector
(C), unscrew the injector to be replaced.
- Replace it with the injector suitable for
the new type of gas.
- Re-assemble the injector in (D).
Before installing the hob, remember to afx
the gas calibration plate supplied with
the injectors in such a way that it covers
the existing information relating to gas
calibration.
D
C
A
B
Adjusting minimum gas setting of taps
E
To ensure that the minimum setting is
correctly adjusted, remove the knob (E) and
proceed as follows:
- tighten screw to reduce the ame height
(-);
Page 15

ENGLISH 15
- loosen screw to increase the ame height
(+).
The adjustment must be performed with the
tap in minimum gas setting position (small
ame ) .
- The primary air of the burners does not
need to be adjusted.
- At this stage, light up the burners and
turn the knobs from max position
to minimum position
stability.
Upon completion of adjustment, reseal
the work surface using sealing wax or an
equivalent material.
NL
REFERENCE TO LOCAL
REGULATIONS
Installation must be performed in
accordance with standard NBN D 51-003.
to check ame
WOK ADAPTER
KNOBS REPLACEMENT
Be sure that your hob is switched-off!
All knobs must be in closed position.
Page 16

ENGLISH 16
Pull upwards each knob of the cooktop and
store together after removal.
Take the kit with new knobs, which is located
in upper part of packaging and remove the
new knobs from the plastic bag.
Make sure that all the knobs are in the right
position.
Verify correct installation by switching each
burner separately.
Push each of knob on the valve shaft until
you feel the end of sliding (sparking may
occur).
Page 17

ENGLISH 17
Environmental concerns
Packing
- The packing materials are 100%
recyclable and marked with the
recycling symbol ( ).
Products
This appliance is marked in compliance with
European Directive 2002/96/EC on Waste
Electrical and Electronic
Equipment (WEEE). By ensuring that this
appliance is correctly scrapped, the user
can help prevent potentially harmful
consequences for the environment and the
health of people.
The symbol
accompanying documentation indicates
that this product should not be treated as
domestic waste but must be taken to a
suitable centre for collection and recycling
of electrical and electronic equipment.
Disposal must be carried out in compliance
with local regulations on waste disposal.
For further information on the treatment,
recovery and recycling of this product,
contact your competent local ofce, the
household waste collection service or the
shop where you purchased the appliance.
on the product or
Declaration of Conformity
- This cooking hob has been designed,
constructed and put on the market in
conformity with:
- safety requirements of “Gas”
Directive 2009/142/EEC;
- safety objectives of “Low Voltage”
Directive 2006/95/EC (which
replaces 73/23/EEC as amended).
- protection requirements of “EMC”
Directive 2004/108/EEC;
- This hob is suitable for contact with
foodstuffs and complies with (EC)
Regulation no. 1935/2004.
- This cooking hob (Class 3) has been
designed only for cooking food. Any
other use (such as heating a room) is
improper and dangerous.
Page 18

ENGLISH 18
IKEA GUARANTEE
How long is the IKEA guarantee valid?
This guarantee is valid for ve (5) years from
the original date of purchase of your appliance
at IKEA, unless the appliance is named LAGAN
in which case two (2) years of guarantee
apply. The original sales receipt, is required
as proof of purchase. If service work is carried
out under guarantee, this will not extend the
guarantee period for the appliance.
Which appliances are not covered by the
IKEA ve (5) years guarantee?
The range of appliances named LAGAN and
all appliances purchased in IKEA before 1st of
August 2007.
Who will execute the service?
IKEA service provider will provide the
service through its own service operations or
authorized service partner network.
What does this guarantee cover?
The guarantee covers faults of the appliance,
which have been caused by faulty construction
or material faults from the date of purchase
from IKEA. This guarantee applies to domestic
use only. The exceptions are specied under
the headline “What is not covered under this
guarantee?” Within the guarantee period,
the costs to remedy the fault e.g. repairs,
parts, labour and travel will be covered,
provided that the appliance is accessible for
repair without special expenditure. On these
conditions the EU guidelines (Nr. 99/44/
EG) and the respective local regulations
are applicable. Replaced parts become the
property of IKEA.
What will IKEA do to correct the problem?
IKEA appointed Service Provider will examine
the product and decide, at its sole discretion,
if it is covered under this guarantee. If
considered covered, IKEA Service Provider
or its authorized service partner through its
own service operations, will then, at its sole
discretion, either repair the defective product
or replace it with the same or a comparable
product.
What is not covered under this guarantee?
• Normal wear and tear.
• Deliberate or negligent damage, damage
caused by failure to observe operating
instructions, incorrect installation or by
connection to the wrong voltage, damage
caused by chemical or electrochemical
reaction, rust, corrosion or water damage
including but not limited to damage
caused by excessive lime in the water
supply, damage caused by abnormal
environmental conditions.
• Consumable parts including batteries and
lamps.
• Non-functional and decorative parts which
do not affect normal use of the appliance,
including any scratches and possible color
differences.
• Accidental damage caused by foreign
objects or substances and cleaning or
unblocking of lters, drainage systems or
soap drawers.
• Damage to the following parts: ceramic
glass, accessories, crockery and cutlery
baskets, feed and drainage pipes, seals,
lamps and lamp covers, screens, knobs,
casings and parts of casings. Unless such
damages can be proved to have been
caused by production faults.
• Cases where no fault could be found
during a technician’s visit.
• Repairs not carried out by our appointed
service providers and/or an authorized
service contractual partner or where nonoriginal parts have been used.
• Repairs caused by installation which is
faulty or not according to specication.
• The use of the appliance in a non-domestic
environment i.e. professional use.
• Transportation damages. If a customer
transports the product to his home or
Page 19

ENGLISH 19
another address, IKEA is not liable for any
damage that may occur during transport.
However, if IKEA delivers the product
to the customer’s delivery address, then
damage to the product that occurs during
this delivery will be covered by IKEA.
• Cost for carrying out the initial installation
of the IKEA appliance.
However, if an IKEA appointed Service
Provider or its authorized service partner
repairs or replaces the appliance under
the terms of this guarantee, the appointed
Service Provider or its authorized
service partner will reinstall the repaired
appliance or install the replacement, if
necessary.
These restrictions do not apply to fault-free
work carried out by a qualied specialist
using our original parts in order to adapt the
appliance to the technical safety specications
of another EU country.
How country law applies
The IKEA guarantee gives you specic legal
rights, which cover or exceed all the local legal
demands. However these conditions do not
limit in any way consumer rights described in
the local legislation.
Area of validity
For appliances which are purchased in one EU
country and taken to another EU country, the
services will be provided in the framework of
the guarantee conditions normal in the new
country.
An obligation to carry out services in the
framework of the guarantee exists only if
the appliance complies and is installed in
accordance with:
- the technical specications of the country in
which the guarantee claim is made;
- the Assembly Instructions and User Manual
Safety Information.
The dedicated AFTER SALES for IKEA
appliances
Please don’t hesitate to contact IKEA
appointed After Sales Service Provider to:
• make a service request under this
guarantee;
• ask for clarications on installation of the
IKEA appliance in the dedicated IKEA
kitchen furniture;
• ask for clarication on functions of IKEA
appliances.
To ensure that we provide you with the best
assistance, please read carefully the Assembly
Instructions and/or the User Manual before
contacting us.
How to reach us if you need our service
Please refer to the last
page of this manual for the
full list of IKEA appointed
After Sales Service Provider
and relative national phone
numbers.
In order to provide you a quicker
service, we recommend to use the
specic phone numbers listed on this
manual. Always refer to the numbers
listed in the booklet of the specic
appliance you need an assistance for.
Please also always refer to the IKEA
article number (8 digit code) and 12
digit service number placed on the
rating plate of your appliance.
SAVE THE SALES RECEIPT!
It is your proof of purchase and required
for the guarantee to apply. The sales
receipt also reports the IKEA name and
article number (8 digit code) for each of
the appliances you have purchased.
Do you need extra help?
For any additional questions not related
to After Sales of your appliances please
contact your nearest IKEA store call centre.
We recommend you read the appliance
documentation carefully before contacting us.
Page 20

NEDERLANDS 20
Inhoudsopgave
Veiligheidsinformatie 20
Productbeschrijving 23
Dagelijks gebruik 24
Nuttige aanwijzingen en tips 24
Onderhoud en reiniging 25
Wat moet u doen als 26
Sproeiertabel 27
Technische gegevens 28
Installatie 28
Milieu 33
IKEA GARANTIE 34
Veiligheidsinformatie
Uw eigen veiligheid en die van
anderen is zeer belangrijk.
Deze handleiding en het apparaat
zelf zijn voorzien van belangrijke
veiligheidsinformatie, die te allen
tijde gelezen en opgevolgd moet
worden.
Dit is het
waarschuwingssymbool,
behorend bij de veiligheid, waarmee
gebruikers worden gewaarschuwd
voor mogelijke gevaren voor henzelf
en anderen.
Alle veiligheidsberichten
komen na het
veiligheidswaarschuwingssymbool
en de volgende woorden:
GEVAAR Geeft een gevaarlijke
situatie aan, die ernstig letsel
veroorzaakt als deze niet wordt
vermeden.
WAARSCHUWING Geeft een
gevaarlijke situatie aan, die
ernstig letsel zou kunnen
veroorzaken als deze niet wordt
vermeden.
Alle veiligheidsberichten geven aan
wat het mogelijke risico is, vertellen
u hoe u de kans op letsel kunt
verkleinen en wat
er kan gebeuren als de instructies
niet worden opgevolgd.
De stekker van het apparaat
moet altijd uit het stopcontact
getrokken zijn voordat welke
installatiehandeling dan ook verricht
wordt.
De installatie of het onderhoud
moet worden uitgevoerd door
een gespecialiseerde monteur
volgens de instructies van de
fabrikant en in overeenstemming met
de plaatselijke
veiligheidsvoorschriften met
betrekking tot het soort gas dat
gebruikt wordt. Gebruik uitsluitend
originele reserveonderdelen.
Repareer of vervang geen enkel
onderdeel van het apparaat,
behalve als dit expliciet aangegeven
wordt in de gebruikershandleiding.
WAARSCHUWING Als de
informatie in deze handleiding
niet exact opgevolgd wordt, kan dit
leiden tot brand of explosie die
schade aan eigendommen of letsel
aan personen kan veroorzaken.
- Bewaar of gebruik geen benzine
of andere ontvlambare dampen
en vloeistoffen in de buurt van dit
Page 21

NEDERLANDS 21
apparaat.
Wat moet u doen als u gas ruikt:
- Probeer geen enkel apparaat in
te schakelen.
- Raak geen enkele elektrische
schakelaar aan.
- Gebruik geen enkele telefoon in
uw woning.
- Bel onmiddellijk uw
gasleverancier met de telefoon
van uw buren. Volg de instructies
van uw gasleverancier.
- Als u uw gasleverancier niet kunt
bereiken, bel dan de brandweer.
- Installatie en service moeten
worden uitgevoerd door een
gekwaliceerde installateur,
servicecentrum of de
gasleverancier.
- Gebruik het apparaat alleen in
goed geventileerde ruimtes.
- De elektrische aansluiting en de
gasaansluiting moeten voldoen
aan de plaatselijke voorschriften.
- Wanneer de kookplaat
geïnstalleerd is, moet er een
meerpolige contactschakelaar
worden aangebracht met een
opening tussen de contacten
van minimaal 3 mm, die voor
volledige afkoppeling zorgt.
- De aarding van het apparaat is
wettelijk verplicht.
- Het netsnoer moet lang genoeg
zijn om het apparaat, nadat het in
zijn behuizing is geplaatst, aan te
sluiten op het stopcontact
- Gebruik alleen exibele of
starre metalen leidingen voor de
gasaansluiting.
- Indien vervanging van het
netsnoer noodzakelijk is, mag dit
uitsluitend worden vervangen
door een netsnoer dat dezelfde
eigenschappen heeft als het
oorspronkelijke snoer van de
fabrikant (type H05V2V2-F 90°C
of H05RR-F). Deze ingreep moet
worden uitgevoerd door een
gekwaliceerd technicus.
- De fabrikant kan niet
aansprakelijk worden gesteld
voor letsel aan mensen of dieren,
of voor materiële schade die
ontstaat doordat niet aan deze
eisen is voldaan.
- Gebruik geen meervoudige
adapters of verlengkabels.
- Trek niet aan het netsnoer van het
apparaat om het los te koppelen
van de netvoeding.
- Na de installatie mogen de
elektrische onderdelen niet
meer toegankelijk zijn voor de
gebruiker.
- Raak het apparaat niet aan
met vochtige lichaamsdelen en
gebruik het niet op als u op blote
voeten loopt.
- Deze kookplaat (klasse 3)
is uitsluitend bedoeld voor
huishoudelijk gebruik, voor
het bereiden van voedsel.
Gebruik dit apparaat nooit als
verwarming om de ruimte te
verwarmen. Dit kan leiden tot
Page 22

NEDERLANDS 22
koolmonoxidevergiftiging en
oververhitting van de kookplaat.
- De fabrikant kan niet
aansprakelijk gesteld worden
voor schade die het gevolg
is van oneigenlijk gebruik of
een onjuiste instelling van de
bedieningsknoppen.
- Het apparaat en de toegankelijke
onderdelen ervan worden heet
tijdens gebruik. Zorg ervoor dat
u de verwarmingselementen
niet aanraakt. Kinderen jonger
dan 8 jaar moeten uit de buurt
worden gehouden, tenzij ze
voortdurend onder toezicht
staan. Dit apparaat mag gebruikt
worden door kinderen ouder
dan 8 jaar en personen met
beperkte lichamelijke, zintuiglijke
of verstandelijke vermogens of
gebrek aan ervaring en kennis
als zij onder toezicht staan of
aanwijzingen hebben gekregen
met betrekking tot het op veilige
wijze gebruiken van het apparaat
en de bijbehorende gevaren
begrijpen. Zij mogen niet met het
apparaat spelen. Reinigings- en
onderhoudswerkzaamheden
mogen niet door kinderen zonder
toezicht worden uitgevoerd.
- Als een apparaat op gas
wordt gebruikt, wordt in de
ruimte warmte en vochtige lucht
geproduceerd. Verzeker u ervan
dat er in de ruimte voldoende
ventilatie aanwezig is of laat er
een afzuigkap met een afvoerpijp
installeren.
- Huisdieren moeten uit de buurt
van het apparaat gehouden
worden.
- Bij langdurig gebruik kan
extra ventilatie nodig zijn (het
openzetten van een raam of
verhoging van de afzuigkracht
van de afzuigkap).
- Controleer na het gebruik of de
knoppen in de stand "uit" staan,
en sluit de hoofdkraan van de
gastoevoer of de kraan van de
gases.
- Oververhitte vetten en olie kunnen
makkelijk vlam vatten. Blijf altijd
alert als u voedsel met veel vet,
olie of alcohol (bijv. rum, cognac,
wijn) bereidt.
- Op de kookplaat koken met vet
of olie zonder dat u erbij blijft, kan
gevaarlijk zijn en tot brand leiden.
Probeer brand NOOIT te blussen
met water, maar schakel het
apparaat uit en dek de vlammen
af met bijvoorbeeld een deksel of
brandblusdeken.
Brandgevaar: bewaar
geen voorwerpen op de
kookoppervlakken.
- Bewaar het verpakkingsmateriaal
buiten het bereik van kinderen.
- Wacht tot de kookplaat is
afgekoeld voordat u deze
schoonmaakt of onderhoudt.
Bewaar de instructies
Page 23

NEDERLANDS 23
Productbeschrijving
1
3
5
2
4
7 98
6
1
Afneembare pannenroosters
2
Middelgrote brander
3
Middelgrote brander
4
Extra sterke brander
5
Sudderbrander
6
Bedieningsknop middelgrote brander
7
Bedieningsknop middelgrote brander
8
Bedieningsknop middelgrote brander
9
Bedieningsknop sudderbrander
Symbolen
Gesloten
rondje
Grote vlam
en ster
Kleine vlam
Gaskraan gesloten
Maximale opening/
gastoevoer en
elektrische ontsteking
Minimale opening, ofwel
beperkte gastoevoer
Page 24

NEDERLANDS 24
Dagelijks gebruik
Laat de vlam van de brander nooit
buiten de randen van de pan komen.
Belangrijk: wanneer de kookplaat in gebruik
is, kan de gehele oppervlakte van de
kookplaat heet worden.
- Om één van de branders aan te steken
draait u de betreffende knop tegen de
klok in op de stand van de grootste vlam.
- Druk de knop tegen het bedieningspaneel
om de brander aan te steken.
- Nadat de brander is aangestoken
moet u de knop nog ongeveer 5-10
seconden ingedrukt houden om de
veiligheidsvoorziening goed te laten
werken.
De beveiliging waarmee de brander is
uitgerust zal het gas afsluiten als de brander
per ongeluk uitgaat (door tocht, tijdelijk
Nuttige aanwijzingen en tips
De kookplaat heeft branders van
verschillende afmetingen. Voor optimale
prestaties van de branders dient u de
volgende regels op te volgen:
- Gebruik pannen met bodems waarvan de
diameter gelijk, of iets groter is dan die
van de brander (zie volgende tabel).
- Gebruik alleen pannen met een platte
bodem.
- Gebruik de juiste hoeveelheid water
voor het koken van voedsel, en houd het
deksel op de pan.
- Zorg ervoor dat de pannen op de
roosters niet uitsteken buiten de rand
van de kookplaat.
onderbreken van de gastoevoer, gemorste
vloeistoffen etc.).
- De knop mag niet langer dan 15 sec.
ingedrukt worden. Als de brander na
deze tijd niet blijft branden, wacht dan
minstens een minuut voordat u hem
opnieuw probeert aan te steken.
OPMERKING: als specieke omstandigheden
van de gastoevoer het moeilijk maken om de
gasbrander aan te steken, wordt geadviseerd
om de handelingen te herhalen, maar nu
terwijl de knop op de kleine vlam is ingesteld.
De brander zou uit kunnen gaan wanneer de
knop losgelaten wordt. Dit betekent dat de
beveiliging nog niet warm genoeg is. In dat
geval moeten de bovenstaande handelingen
worden herhaald.
BELANGRIJK: oneigenlijk gebruik van
de roosters kan tot beschadiging van de
kookplaat leiden: zet de roosters niet
ondersteboven en schuif ze niet over de
kookplaat. Wij raden het volgende af:
- Het gebruik van gietijzeren platen,
speksteen en potten en pannen van
aardewerk.
- Het gebruik van vlamverdelers, zoals bijv.
sudderplaatjes.
- Het gebruik van twee branders voor één
pan (bijv. voor een vispan).
Brander Pan Ø
Extra sterke brander van 24 tot 26 cm
Middelgrote brander van 16 tot 24 cm
Sudderbrander van 8 tot 14 cm
Page 25

NEDERLANDS 25
Onderhoud en reiniging
- Afspoelen en goed afdrogen
Trek de stekker uit het stopcontact
voordat u onderhoud verricht.
- Alle geëmailleerde en glazen onderdelen
moeten worden gereinigd met warm
water en een neutraal reinigingsmiddel.
- Als kalkhoudend water of agressieve
reinigingsmiddelen te lang in contact
blijven met de roestvrij stalen
oppervlakken, kunnen er vlekken
ontstaan. Gemorst voedsel (water, saus,
kofe) moet verwijderd worden voordat
het kan opdrogen.
- Reinig de kookplaat met warm water en
een neutraal reinigingsmiddel en droog
hem af met een zachte doek of zeem.
Verwijder aangekoekt vuil met speciale
reinigingsmiddelen voor roestvrijstalen
oppervlakken.
OPMERKING: maak roestvrij staal alleen
schoon met een zachte doek of spons.
- Gebruik geen schurende of bijtende
producten, producten op basis van
chloor of schuursponsjes.
- Gebruik geen stoomreinigers.
- Gebruik geen brandbare producten.
- Zorg ervoor dat er geen zure of basische
substanties zoals azijn, mosterd, zout,
suiker of citroensap op de kookplaat
achterblijven.
REINIGING VAN DE ONDERDELEN VAN DE
KOOKPLAAT
- Roosters, branderdeksels en branders
kunnen worden verwijderd om ze schoon
te maken.
- Was ze met de hand af in warm water
met een niet-schurend reinigingsmiddel.
Verwijder eventuele voedselresten
zorgvuldig en controleer of de
branderopeningen niet verstopt zijn.
- Plaats de branders en de branderdeksels
weer goed terug in de daarvoor
bestemde openingen.
- Controleer bij het terugplaatsen van de
roosters of het gebied om de pannen
neer te zetten in lijn is met de brander.
- Bij modellen met elektrische
ontstekingsbougies en een beveiliging
moet het uiteinde van de bougie goed
schoongemaakt worden, om ervoor
te zorgen dat de kookplaat goed kan
functioneren.
Controleer deze onderdelen regelmatig,
en maak ze indien nodig schoon met een
vochtige doek. Als er aangekoekt voedsel
op zit, moet dit worden verwijderd met
een tandenstoker of een naald.
OPMERKING: om schade aan het
elektrische ontstekingsmechanisme te
voorkomen mag dit niet worden gebruikt
wanneer de branders niet in hun behuizing
zitten.
Page 26

NEDERLANDS 26
Wat moet u doen als ...
Probleem Mogelijke oorzaken Oplossing
De elektrische ontsteking werkt
niet
De brander ontsteekt niet Misschien staat de
De gasvlam brandt
onregelmatig
Voordat u de Klantenservice belt:
1. Controleer: "Storingen opsporen" om te
zien of u het probleem zelf kunt oplossen
2. Schakel de kookplaat uit en weer in.
om te controleren of het probleem
verdwenen is.
3. Als de storing aanhoudt, bel dan de
Klantenservice.
Geef de volgende informatie:
• type storing;
• model kookplaat;
• servicenummer (d.w.z. het nummer na
het woord SERVICE op het typeplaatje
onder de kookplaat en op het
garantiebewijs);
Er is geen elektrische
voeding
gaskraan dicht
Misschien is de
branderkroon verstopt
met etensresten
• uw volledige adres;
• uw telefoonnummer.
Wanneer er reparaties nodig zijn, neem dan
contact op met een erkende Klantenservice,
zoals aangegeven staat in de garantie.
In het onwaarschijnlijke geval dat een
reparatie wordt uitgevoerd door een nietgeautoriseerde technicus, moet u altijd
vragen om certicering
van de uitgevoerde werkzaamheden en
aandringen op het gebruik van originele
reserveonderdelen.
Het niet naleven van deze instructies
kan nadelige gevolgen hebben voor de
veiligheid en de kwaliteit van het apparaat.
Controleer of de stekker in
het stopcontact zit en of hier
stroom op staat.
Controleer of de gaskraan
open staat
Maak de branderkroon
schoon volgens de
reinigingsaanwijzingen om er
zeker van te zijn dat hij niet
verstopt is met etensresten.
Page 27

NEDERLANDS 27
Sproeiertabel
Categorie I2L
Gebruikt
type gas
AARDGAS
(Aardgas)
G25
Soort gas
dat gebruikt wordt
G25
25 mbar
Elektrisch vermogen: 220 - 240 V ~ 50/60 Hz
NL
instellingssproeiers zijn uitsluitend
verkrijgbaar via de klantenservice.
Type brander
extra sterke brander
middelgrote brander
sudderbrander
Conguratie model
4 BRANDERS
1 PB - 2 SR
1 AUX
G30/G31-30 mbar gas
Type
sproeier
141 T2 A
Y 100
F1 72
Nominale thermische doorstroomhoeveelheid (kW)
Nominaal
thermisch
vermogen
kW
3.50
2.00
1.00
8.50
Nominaal
verbruik
388 l/u
221 l/u
111 l/u
Totaal nominaal
verbruik
Verminderd
thermisch
vermogen
kW
2.20
0.35
0.35
941 l/u 8.187
Gasdruk (mbar)
min. nom. max.
20 25 30
Benodigde lucht (m3)
voor verbranding van
1 m3 gas
Page 28

NEDERLANDS 28
Technische gegevens
Afmetingen
Breedte (mm) 580
Hoogte (mm) 40
Lengte (mm) 510
Spanning (V) 220 - 240
De technische informatie is vermeld op het
typeplaatje aan de onderkant van het apparaat.
Installatie
Controleer na het uitpakken van de kookplaat of
deze tijdens het transport geen beschadigingen
heeft opgelopen. Neem in geval van twijfel contact
op met uw leverancier of de klantenservice.
Technische informatie voor de installateur
- Deze kookplaat kan in een werkblad met een
dikte van 20 tot 50 mm worden geplaatst.
- Als er geen oven onder de kookplaat is
geïnstalleerd, moet er een scheidingspaneel
worden aangebracht met een oppervlak dat
even groot is als de opening in het werkblad.
Dit paneel moet op minimaal 20 mm afstand
van de onderkant van de kookplaat worden
geplaatst.
- Controleer voor de installatie of:
- de plaatselijke gastoevoervoorzieningen
(gassoort en -druk) compatibel zijn met
de instellingen van de kookplaat (zie het
typeplaatje en de sproeiertabel);
- de buitenkant van meubels of apparaten die
aan de kookplaat grenzen hittebestendig zijn
volgens de plaatselijke voorschriften;
- Dit apparaat is niet aangesloten
op een afzuigapparaat. Het moet
geïnstalleerd worden volgens de geldende
installatievoorschriften. Besteed speciale
aandacht aan de relevante vereisten met
betrekking tot ventilatie.
- Verbrandingsproducten in de open lucht
worden afgevoerd via specieke afzuigkappen
of elektrische ventilators, die in de muur en/of
ramen zijn gemonteerd.
Gasaansluiting
Deze ingreep moet worden uitgevoerd door
een gekwaliceerd technicus.
Het gastoevoersysteem moet voldoen aan de
plaatselijke voorschriften m.b.t. het soort gas dat
gebruikt wordt.
- U kunt de specieke plaatselijke voorschriften
voor bepaalde landen terugvinden in de
paragraaf "Verwijzing naar plaatselijke
voorschriften". Als er geen informatie over uw
land wordt gegeven, doe dan navraag bij een
gekwaliceerd technicus.
Page 29

NEDERLANDS 29
- De aansluiting van de kookplaat op de
gasleiding of de gases moet uitgevoerd
worden met behulp van een starre koperen of
stalen leiding met ttingen die voldoen aan de
plaatselijke voorschriften, of door middel van
een roestvrijstalen slang met glad oppervlak,
die voldoet aan de plaatselijke voorschriften.
De lengte van de slang is maximaal 2
strekkende meter.
A
C
D
B
C
D
- Sluit de bij de kookplaat meegeleverde
elleboogtting (A) of (B) aan op de
hoofdtoevoerleiding en zet er de
meegeleverde ring (C) tussen, in
overeenstemming met EN 549.
- Ring (D) niet bij het product geleverd.
- BELANGRIJK: als er een slang van roestvrij
staal wordt gebruikt, moet deze zo worden
geplaatst dat hij geen bewegende delen van
de meubels kan raken. Hij moet door een
gebied lopen waar geen obstakels aanwezig
zijn en waar hij over zijn hele lengte kan
worden geïnspecteerd.
- Na aansluiting op de gastoevoer moeten de
leidingen met zeepsop worden gecontroleerd
op lekkages. Nu kunt u de branders aansteken
en de knoppen van de hoogste stand
de laagste stand
van de vlam te controleren
Elektrische aansluiting
WAARSCHUWING
- Deze ingreep moet worden uitgevoerd door
een gekwaliceerd technicus.
- De elektrische aansluiting dient te worden
gerealiseerd volgens de plaatselijke
voorschriften.
- De aarding van het apparaat is wettelijk
verplicht.
- Gebruik geen verlengsnoer.
- BELANGRIJK: de gegevens over de spanning
en de stroomopname staan op het typeplaatje
vermeld.
Montage
Maak het omtrekoppervlak schoon en breng
vervolgens de meegeleverde afdichting op de
kookplaat aan. Plaats de kookplaat in de opening
in het werkblad, die gemaakt is volgens de maten
die zijn aangegeven in de Gebruiksaanwijzing.
OPMERKING: het elektriciteitssnoer moet lang
genoeg zijn om naar boven te worden uitgetrokken.
Gebruik voor het vastzetten van de kookplaat
de bijgeleverde beugels. Plaats de beugels in de
zetten om de stabiliteit
L
Aarde
(geel/groen)
N
in
Page 30

NEDERLANDS 30
betreffende boorgaten (aangegeven met de pijl)
en zet ze vast met behulp van de schroeven, al
naargelang de dikte van het werkblad.
Verzeker u ervan dat er een stopcontact in de buurt
is van het apparaat dat geïnstalleerd wordt. Indien
het snoer dat bij het apparaat geleverd werd niet
lang genoeg is, dan moet dit vervangen worden
door een langer snoer met dezelfde kenmerken.
Aanpassing aan verschillende gassoorten
WAARSCHUWING
- Deze ingreep moet worden uitgevoerd door
een gekwaliceerd technicus.
Als het apparaat bedoeld is om te werken met
ander gas dan de soort die op het typeplaatje
en het informatielabel bovenop de kookplaat
wordt vermeld, dan moeten de sproeiers worden
vervangen.
Verwijder het informatielabel en bewaar het bij het
instructieboekje.
Gebruik drukregelaars die geschikt zijn voor
de gasdruk die in de Gebruiksaanwijzing staat
aangegeven.
- De sproeiers moeten worden vervangen door
de Klantenservice of door een gekwaliceerd
monteur.
- Sproeiers die niet bij het apparaat
geleverd zijn, moeten worden besteld bij de
Klantenservice.
- Stel de laagste stand van de kranen bij.
OPMERKING: als er vloeibaar gas (G30/G31)
wordt gebruikt, moet de schroef voor de laagste
stand zo ver mogelijk worden aangehaald.
BELANGRIJK: als de branderknoppen
moeilijk draaien, neem dan contact op met
de Klantenservice voor vervanging van de
branderkraan, als blijkt dat deze defect is.
De sproeiers vervangen
(zie paragraaf “sproeiertabel”)
- Verwijder de roosters (A).
- Haal de branders weg (B).
- Schroef de sproeier (C) die vervangen moet
worden los met een dopsleutel van de juiste
maat.
- Vervang hem door een sproeier die geschikt is
voor het nieuwe type gas.
- Monteer de sproeier weer op (D).
Denk er voor de installatie van de kookplaat aan
dat de sticker waarop de gasafstelling vermeld
staat, en die bij de sproeiers geleverd wordt,
zodanig moet worden aangebracht dat hij de
bestaande informatie omtrent de gasafstelling
bedekt.
D
C
A
B
Instelling van de laagste stand van de kranen
E
Page 31

NEDERLANDS 31
Om er zeker van te zijn dat de laagste stand goed
is afgesteld, moet de knop (E) worden verwijderd,
waarna u als volgt te werk gaat:
- draai de schroef vaster voor een lagere
vlamhoogte (-);
- draai de schroef losser voor een hogere
vlamhoogte (+).
De afstelling moet worden verricht terwijl de kraan
in de laagste stand staat (kleine vlam).
- De primaire lucht van de branders hoeft niet te
worden bijgesteld.
- Op dit punt kunt u de branders aansteken en
de knoppen van de hoogste stand
laagste stand
de vlam te controleren.
Na de instelling moet het werkblad worden
afgedicht met afdichtingskit of soortgelijk
materiaal.
NL
REFERENTIES LOKALE
VOORSCHRIFTEN
De installatie moet worden uitgevoerd
volgens de norm NBN D 51-003.
zetten om de stabiliteit van
in de
WOKADAPTER
VERVANGING KNOPPEN
Verzeker u ervan dat de kookplaat
uitgeschakeld is!
Alle knoppen moeten in gesloten stand staan.
Page 32

NEDERLANDS 32
Trek elke knop van de kookplaat naar boven en
berg ze na verwijdering samen op.
Neem de kit met de nieuwe knoppen, die in het
bovenste deel van de verpakking zit en haal de
nieuwe knoppen uit de plastic zak.
Zorg ervoor dat alle knoppen op de juiste plaats
zitten.
Controleer of de knoppen correct geïnstalleerd zijn
door elke brander apart in te schakelen.
Duw elke knop om de as van de klep tot hij niet
verder kan (er kan een vonk overspringen).
Page 33

NEDERLANDS 33
Milieu
Verpakking
- Het verpakkingsmateriaal is 100%
recyclebaar, zoals wordt aangegeven
door het symbool ( ).
Producten
Dit apparaat is voorzien van het merkteken
volgens de Europese richtlijn 2002/96/
EG inzake Afgedankte Elektrische en
Elektronische
Apparatuur (AEEA). Door ervoor te zorgen
dat dit product op de juiste wijze als afval
wordt verwerkt, helpt u mogelijke schadelijke
gevolgen voor het milieu en de gezondheid
van mensen te voorkomen.
Het symbool
de begeleidende documentatie bij het
product geeft aan dat dit apparaat
niet als huishoudelijk afval behandeld
mag worden, maar naar een speciaal
inzamelpunt voor recycling van elektrische
en elektronische apparaten moet worden
gebracht. Afdanken moet plaatsvinden
in overeenstemming met de plaatselijke
milieuvoorschriften voor afvalverwerking.
Voor meer informatie over behandeling,
terugwinning en recycling van
huishoudelijke apparaten kunt u contact
opnemen met uw plaatselijke instantie, de
vuilnisophaaldienst of de winkel waar u dit
product hebt gekocht.
op het product of op
Verklaring van overeenstemming
- Deze kookplaat is ontworpen,
vervaardigd en op de markt gebracht in
overeenstemming met:
- de veiligheidsvereisten van de
"Gasrichtlijn" 2009/142/EEG;
- de veiligheidsvoorschriften van de
“Laagspanningsrichtlijn" 2006/95/EG
(die de richtlijn 73/23/EEG en latere
verordeningen vervangt);
- de beschermingsvoorschriften van de
"EMC"-richtlijn 2004/108/EEG.
- Deze kookplaat is geschikt voor contact
met voedsel, en voldoet aan de Richtlijn
1935/2004/EG.
- Deze kookplaat (Klasse 3) is uitsluitend
ontworpen voor de bereiding van
voedsel. Elk ander gebruik (zoals het
verwarmen van een ruimte) is oneigenlijk
en gevaarlijk.
Page 34

NEDERLANDS 34
IKEA GARANTIE
Hoe lang is de IKEA garantie geldig?
Deze garantie is vijf (5) jaar geldig vanaf
de oorspronkelijke datum van aankoop van
uw apparaat bij IKEA, uitgezonderd indien
uw apparaat het merk LAGAN draagt, daar
is de garantieperiode van twee (2) jaar
van toepassing. Uw origineel kassaticket is
vereist. Als er tijdens de garantieperiode
service tussenkomsten worden uitgevoerd,
wordt de garantieperiode van het apparaat
niet verlengd.
Welke apparatuur valt niet onder de vijf (5)
jaar IKEA garantie?
De apparaten van het merk LAGAN en alle
apparaten die gekocht zijn bij IKEA vóór 1
augustus 2007.
Wie zal de service uitvoeren?
De erkende IKEA servicedienst zal
zorgdragen voor de dienstverlening via
haar eigen netwerk of via het netwerk van
erkende servicediensten.
Wat valt er onder de garantie?
De garantie dekt storingen van het
apparaat, die veroorzaakt zijn door
verkeerde constructie of materiaalfouten
vanaf de aankoopdatum bij IKEA. Deze
garantie is uitsluitend van toepassing bij
huishoudelijk gebruik. De uitzonderingen
worden onder het artikel “Wat is er niet
gedekt door deze garantie?” gespeciceerd.
Binnen de garantieperiode worden de kosten
om de storing te verhelpen vergoed d.w.z.
reparaties, onderdelen, arbeidsloon en
transport, op voorwaarde dat het apparaat
toegankelijk voor reparaties, (cont. zonder
speciale kosten) is zonder speciale kosten.
Op deze voorwaarden zijn de EG-richtlijnen
(Nr. 99/44/EG) en de respectievelijke
plaatselijke voorschriften van toepassing.
Vervangen onderdelen worden eigendom
van IKEA.
Wat zal IKEA doen om het probleem op te
lossen?
De door IKEA aangestelde servicedienst zal
het product onderzoeken en uitsluitend ter
eigen beoordeling bepalen of het gedekt
wordt door deze garantie.
Als het defect blijkt te zijn, zal de IKEA
servicedienst of de erkende servicedienst
via het eigen bedrijf, uitsluitend ter eigen
beoordeling,ofwel het defecte product
repareren of het vervangen door eenzelfde
of een vergelijkbaar product.
Wat valt er niet onder deze garantie?
• Normale slijtage.
• Opzettelijke schade of schade door
verwaarlozing, schade veroorzaakt
door het niet opvolgen van de
gebruiksaanwijzing, foutieve installatie
of aansluiting op een verkeerd voltage,
schade veroorzaakt door chemische of
elektrochemische reactie, roest, corrosie
of waterschade, schade veroorzaakt
door overmatig kalkgehalte van de
watertoevoer, schade veroorzaakt door
abnormale omgevingsomstandigheden.
• Verbruiksonderdelen, inclusief batterijen
en lampjes.
• Niet-functionele en decoratieve
onderdelen die niet van invloed zijn op
het normale gebruik van het apparaat,
inclusief eventuele krassen en mogelijke
kleurverschillen.
• Onvoorziene schade veroorzaakt door
vreemde voorwerpen of stoffen en het
reinigen of deblokkeren van lters,
afvoersystemen of wasmiddellades.
• Schade aan de volgende onderdelen:
glaskeramiek, accessoires, servieskorven
en bestekmandjes, aanvoer- en
afvoerpijpen, afdichtingen, lampen en
lampenkapjes, schermen, knoppen,
behuizingen en gedeeltes van
behuizingen, tenzij bewezen is dat de
schade te wijten is aan een productiefout.
• Gevallen waarbij geen storing
Page 35

NEDERLANDS 35
geconstateerd kon worden tijdens het
bezoek van een technicus.
• Reparaties die niet zijn uitgevoerd door
onze aangestelde servicediensten en/of
een erkende contractuele servicepartner
of wanneer er niet-originele onderdelen
gebruikt zijn.
• Reparaties die veroorzaakt zijn door
installatie die verkeerd of niet in
overeenstemming met de installatieinstructies zijn uitgevoerd.
• Het gebruik van het apparaat in
niet huishoudelijke omgeving d.w.z.
professioneel gebruik.
• Transportschade. Indien een klant het
product zelf naar zijn of haar woning of
naar een ander adres transporteert, is
IKEA niet aansprakelijk voor schade die
optreedt tijdens het transport. Als het
product echter door IKEA wordt afgeleverd
op het door de klant opgegeven adres,
dan wordt schade aan het product die
tijdens deze levering ontstaat wel gedekt
door IKEA.
• De installatiekosten voor het installeren
van het IKEA-apparaat.
Als een IKEA servicedienst of een
erkende servicepartner het apparaat
echter repareert of vervangt onder
de voorwaarden van deze garantie,
dan zal de servicedienst of de erkende
servicepartner het gerepareerde of
vervangende apparaat indien nodig
opnieuw installeren.
Deze beperkingen zijn niet van toepassing
op foutloze werkzaamheden uitgevoerd door
een gekwaliceerde specialist met gebruik
van onze originele onderdelen teneinde het
apparaat aan te passen aan de technische
veiligheidsspecicaties van een ander EG-
land.
Hoe de landelijke wetten van toepassing
zijn
Deze IKEA garantie verleent u specieke
wettelijke rechten, welke met de eigen
locale wetgeving overeenstemmen of deze
overstijgen, die variëren van land tot land.
Deze omstandigheden beperken geenszins
consumentenrechten die onder de
plaatselijke wetgeving vallen.
Gebied van geldigheid
Voor apparaten die in een EU-lidstaat zijn
aangeschaft en meegenomen worden naar
een ander EU-lidstaat, zal de dienstverlening
uitgevoerd worden in het kader van de
garantievoorwaarden die in het nieuwe land
gebruikelijk zijn. Een verplichting om diensten
te verlenen in het kader van de garantie
bestaat uitsluitend als het apparaat voldoet
aan en geïnstalleerd is in overeenstemming
met:
- de technische specicaties van het land
waarin aanspraak gemaakt wordt op de
garantie;
- de Montage-instructies en de
Veiligheidsinformatie uit de
Gebruiksaanwijzing.
De speciale KLANTENSERVICE voor IKEAapparaten
Aarzel niet om contact op te nemen met een
door IKEA erkende Klantenservice:
• Een claim in te dienen onder deze garantie
• Verduidelijking te vragen in verband met
de installatie van het IKEA apparaat in de
daarvoor bestemde IKEA keukenmeubels
• Verduidelijking te vragen in verband met
de functies van de IKEA apparaten.
Om u beter van dienst te kunnen zijn, leest
u best eerst de installatie-instructies en de
gebruiksaanwijziging zorgvuldig alvorens
ons te contacteren.
Hoe u ons kunt bereiken als u hulp nodig
hebt
Op de laatste pagina
van deze instructies vindt
u de volledige lijst van alle
door IKEA Klantenservices
met hun overeenkomstig
telefoonnummer.
Page 36

NEDERLANDS 36
Om u sneller van dienst te kunnen
zijn, adviseren wij u de specieke
telefoonnummers in de handleiding te
gebruiken. Vermeld altijd de nummers
die vermeld zijn in het boekje van
het specieke apparaat waarvoor
u assistentie wilt. Vermeld ook het
IKEA artikelnummer (bestaande
uit 8 cijfers) en het servicenummer
bestaande uit 12 cijfers dat op het
typeplaatje van uw apparaat staat.
BEWAAR DE KASSABON!
Het is uw bewijs van aankoop en
is ook nodig om de geldigheid van
de garantie aan te tonen. Op de
kassabon is ook de IKEA naam en het
artikelnummer (8 cijfers) van elk door u
aangeschaft apparaat vermeld
Extra hulp nodig?
Voor alle bijkomende vragen die niet bij
de dienst na-verkoop van uw toestellen
horen, neem contact op met het call center
van uw IKEA winkel. Wij adviseren u de
documentatie die bij het apparaat wordt
geleverd zorgvuldig door te lezen voordat u
contact met ons opneemt.
Page 37

37
BELGIË - BELGIQUE - BELGIEN
Telefoon/Numéro de téléphone/Telefon-Nummer:
Tarief/Tarif/Tarif: Lokaal tarief/Prix d’un appel local/Ortstarif
Openingstijd: Maandag - Vrijdag 8.00 - 20.00
Heures d’ouverture: Lundi - Vendredi 8.00 - 20.00
Öffnungszeiten: Montag - Freitag 8.00 - 20.00
БЪЛГАРИЯ
Телефонен номер:
Тарифа: Локална тарифа
Работно време: понеделник - петък 8.00 - 20.00
ČESKÁ REPUBLIKA
Telefonní číslo:
Sazba: Místní sazba
Pracovní doba: Pondělí - Pátek 8.00 - 20.00
DANMARK
Telefonnummer:
Takst: Lokal takst
Åbningstid: Mandag - fredag 9.00 - 21.00
Lørdag 9.00 - 18.00
(Åbent udvalgte søndage, se IKEA.dk)
DEUTSCHLAND
Telefon-Nummer:
Tarif: Ortstarif
Öffnungszeiten: Montag - Freitag 8.00 - 20.00
ΕΛΛΑΔΑ
Τηλεφωνικός αριθμός:
Χρέωση: Τοπική χρέωση
Ώρες λειτουργίας: Δευτέρα - Παρασκευή 8.00 - 20.00
ESPAÑA
Teléfono:
Tarifa: Tarifa local
Horario: Lunes - Viernes 8.00 - 20.00
(España Continental)
FRANCE
Numéro de téléphone:
Tarif: Prix d’un appel local
Heures d’ouverture: Lundi - Vendredi 9.00 - 21.00
HRVATSKA
http://www.ikea.com
ÍSLAND
Símanúmer:
Kostnaður við símtal: Almennt mínútuverð
Opnunartími: Mánudaga - Föstudaga 9.00 - 17.00
ITALIA
Telefono:
Tariffa: Tariffa locale
Orari d’apertura: Lunedì - Venerdì 8.00 - 20.00
LIETUVIŲ
Telefono numeris: (0) 520 511 35
Skambučio kaina: Vietos mokestis
Darbo laikas: Nuo pirmadienio iki
penktadienio 8.00 - 20.00
MAGYARORSZÁG
Telefon szám:
Tarifa: Helyi tarifa
Nyitvatartási idő: Hétfőtől Péntekig 8.00 - 20.00
02 4003536
225376400
70150909
06929993602
2109696497
913754126
0170480513
5852409
0238591334
(06-1)-3285308
026200311
NEDERLAND
Telefoon:
Tarief: 15 cent/min., starttarief 4.54 cent
en gebruikelijke belkosten
Openingstijd: Maandag t/m - Vrijdag 8.00 - 20.00
Zaterdag 9.00 - 20.00
Zondag gesloten
NORGE
Telefon nummer:
Takst: Lokal takst
Åpningstider: Mandag - fredag 8.00 - 20.00
ÖSTERREICH
Telefon-Nummer:
Tarif: Ortstarif
Öffnungszeiten: Montag - Freitag 8.00 - 20.00
POLSKA
Numer telefonu:
Stawka:
Godziny otwarcia: Poniedziałek - Piątek 8.00-20.00
PORTUGAL
Telefone:
Tarifa: Tarifa local
Horário: Segunda - Sexta 9.00 - 21.00
REPUBLIC OF IRELAND
Phone number:
Rate: Local rate
Opening hours: Monday - Friday 8.00 - 20.00
ROMÂNIA
Număr de telefon:
Tarif: Tarif local
Orar: Luni - Vineri 8.00 - 20.00
РОССИЯ
Телефонный номер:
Стоимость звонка: Местная стоимость звонка
Время работы: Понедельник - Пятница 9.00 - 21.00
(Московское время)
SCHWEIZ - SUISSE - SVIZZERA
Telefon-Nummer/Numéro de téléphone/Telefono:
Tarif/Tarif/Tariffa: Ortstarif/Prix d’un appel local/Tariffa locale
Öffnungszeiten: Montag - Freitag 8.00 - 20.00
Heures d’ouverture: Lundi - Vendredi 8.00 - 20.00
Orario d’apertura: Lunedì - Venerdì 8.00 - 20.00
SLOVENSKO
Telefónne číslo:
Cena za hovor: Cena za miestny hovor
Pracovná doba: Pondelok až piatok 8.00 - 20.00
SRBIJA
http://www.ikea.com
SUOMI
Puhelinnumero:
Hinta: Yksikköhinta
Aukioloaika: Maanantaista perjantaihin 8.00 - 20.00
SVERIGE
Telefon nummer:
Taxa: Lokal samtal
Öppet tider: Måndag - Fredag 8.30 - 20.00
Lördag - Söndag 9.30 - 18.00
UNITED KINGDOM
Phone number:
Rate: Local rate
Opening hours: Monday - Friday 9.00 - 21.00
09002354532
23500112
013602771461
225844203
Koszt połączenia według taryfy operatora
213164011
016590276
021 2044888
84957059426
(02) 50102658
0981710374
0775-700 500
02076601517
en/of 0900 BEL IKEA
0225675345
Page 38

Page 39

Page 40

5019-600-00735
FAC-SIMILE
In case of missing Service Sticker, please report Model and Serial numbers for future Service references, which can be found on the Rating Plate in the prod-
GB
uct. - DE Falls der Serviceaufkleber fehlt, geben Sie bitte zur Erleichterung künftiger Servicearbeiten Modell und Seriennummern an. Diese Daten benden sich
auf dem Typenschild im Gerät. - FR En l’absence d’autocollant de service, veuillez inscrire le modèle et le numéro de série de l’appareil gurant sur la plaque
signalétique, an de pouvoir les communiquer au SAV en cas de problème éventuel. - NL Als de Servicesticker ontbreekt, vermeld dan het productnummer
(85-) en serienummer bij eventueel contact met de klantenservice in de toekomst. Deze kunt u vinden op het typeplaatje in het product. - ES En el caso de que
no se encuentre la tarjeta de servicio, indique el modelo y los números de serie, que pueden encontrarse en la placa de características del producto, para futuras
referencias de servicio. - PT Se perder o autocolante “Service”, comunique o número do Modelo e de Série para referência futura em caso de assistência. Os
números encontram-se na placa sinalética do produto. - IT In caso non sia presente l’adesivo del Servizio Assistenza, comunicare il modello e il numero di
serie indicati sulla targhetta matricola del prodotto come futuro riferimento per l’assistenza. - GR Σε περίπτωση που λείπει το αυτοκόλλητο σέρβις, αναφέρετε το
μοντέλο και σειριακό αριθμό για μελλοντικές αναφορές σέρβις, τα οποία θα βρείτε στην αναγνωριστική πινακίδα στο προϊόν. - SE Om Service-etiketten fattas,
bör du anteckna modell- och serienummer för framtida behov - dessa nner du på typskylten i produkten. - NO Dersom serviceetiketten mangler, noter deg
modell- og serienummer for fremtidig referanse. Du nner dem på typeplaten i produktet. - DK Hvis servicemærkaten mangler, skal model- og serienummeret
oplyses, når Service kontaktes. Numrene er angivet på produktets typeplade. - FI Jos huoltotarraa ei ole, ilmoita huoltoa varten malli- ja sarjanumero, jotka
löytyvät tuotteen arvokilvestä. - CZ V případě, že servisní štítek chybí, uveďte prosím pro příští potřebu servisu model a sériové číslo, které najdete na výkonovém štítku výrobku. - SK Ak chýba servisná nálepka, v prípade servisnej potreby nahláste prosím model a výrobné číslo spotrebiča zo servisného štítku, ktorý
sa nachádza na výrobku. - PL Jeśli brakuje naklejki serwisowej, w celu ułatwienia serwisowania urządzenia w przyszłości proszę podać model oraz numer
seryjny, które można znaleźć na tabliczce znamionowej. -
mis on leitavad toote andmeplaadilt. - LV Gadījumā, ja trūkst apkalpošanas uzlīme, dariet zināmus modeļa un sērijas numurus, kas atrodami izstrādājuma
tehnisko datu plāksnītē, lai nākotnē tos varētu izmantot apkalpošanai kā atsauci. - LT Nesant serviso lipduko, serviso specialistams nurodykite modelio ir serijos
numerius, kuriuos rasite prietaiso gamyklinėje plokštelėje. - HU Amennyiben hiányzik a szervizmatrica, kérjük, adja meg a jövőbeni szervizhivatkozásokhoz a
modellszámot és a sorozatszámot, amelyek a terméken az adattáblán találhatók. - RU В случае отсутствия наклейки послереализационного обслуживания
(со словом Service) следует указать модель и серийный номер, используемые в дальнейшем для справки при техобслуживании в сервисном центре.
Эти данные приведены на паспортной табличке изделия. - KZ Егер Ќызмет кґрсету жапсырмасы болмаса, келешекте ќызмет кґрсету жўмыстарын
орындату ќажет болєанда, ґнімніѕ техникалыќ аќпарат таќтайшасынан табуєа болатын Їлгі жјне Сериялыќ нґмірді хабарлаѕыз. - BG В случай на
липсващ стикер с информация за сервизно обслужване, моля посочете модела и серийния номер за бъдещи справки за сервизно обслужване, които
ще намерите на табелката с основните данни. - RO Dacă abţibildul cu informaţii pentru service lipseşte, vă rugăm să comunicaţi modelul şi numerele de
serie, ca referinţe pentru service pe viitor; acestea se găsesc pe plăcuţa cu datele tehnice de pe produs. - MA En l’absence d’autocollant de service, veuillez
inscrire le modèle et le numéro de série de l’appareil gurant sur la plaque signalétique, an de pouvoir les communiquer au SAV en cas de problème éventuel.
Hoolduskleebise puudumise korral palume teatada hooldusrmale toote mudel ja seerianumber,
EST
© Inter IKEA Systems B.V. 2013 AA-1029706-1
 Loading...