

Page 1
GB
DE
FR
NL
ELDSLÅGA
FR BE
Page 2

Page 3

ENGLISH 4
FR
DEUTSCH 20
BE
FRANÇAIS 37
NEDERLANDS 60
Language, Sprache, Langue, Taal
Country, Land, Pays, Land
Page 4
ENGLISH 4
Table of contents
Safety information 4
Product description 7
Daily use 8
Helpful hints and tips 8
Maintenance and cleaning 9
What to do if 10
Injector table 11
Technical Data 12
Installation 12
Environmental concerns 17
IKEA GUARANTEE 18
Safety Information
Your safety and the safety of
others are very important.
This manual and the appliance
itself provide important safety
messages, to be read and
observed at all times.
This is the safety alert
symbol, pertaining to safety,
which alerts users to potential
hazards to themselves and
others.
All safety messages will follow
the safety alert symbol and
either the terms:
DANGER Indicates a
hazardous situation which, if
not avoided, will cause serious
injury.
WARNING Indicates a
hazardous situation which, if
not avoided, could cause serious
injury.
All Safety messages will tell you
what the potential hazard is, tell
you how to reduce the chance of
injury, and tell you what
can happen if the instructions are
not followed.
The appliance must be
disconnected from the power
supply before carrying out any
installation work.
Installation and maintenance
must be carried out by a
qualied technician, in
compliance with the
manufacturer’s instructions and
local safety regulations to the
relevant gas standard. Only use
original spare parts. Do not
repair or replace any part of the
appliance unless specically
stated in the user manual.
WARNING If the information
in this manual is not followed
exactly, a re or explosion may
result causing property damage
or injury.
- Do not store or use gasoline or
other ammable vapors and
liquids in the vicinity of this
appliance.
What to do if you smell gas:
- Do not try to light any
appliance.
- Do not touch any electrical
switch.
- Do not use any phone in your
building.
- Immediately call your gas
Page 5

ENGLISH 5
supplier from a neighbor’s
phone. Follow the gas
supplier’s instructions.
- If you cannot reach your
gas supplier, call the re
department.
- Installation and service must
be performed by a qualied
installer, service agency or the
gas supplier.
- Use appliance in well
ventilated rooms only.
- The electrical and gas
connections must comply with
local regulations.
- When the hob is installed,
provide a multi-pole circuit
breaker with a contact
separation of at least 3
mm, that provides full
disconnection.
- Regulations require that the
appliance is grounded.
- The power cable must be long
enough for connecting the
appliance, once tted in its
housing, to the power supply
- Use only exible or rigid metal
hose for gas connection.
- If necessary, the electrical
power cable must be
replaced exclusively with a
power cable having identical
characteristics to the original
supplied by manufacturer
(type H05V2V2-F 90°C or
H05RR-F). This operation must
be performed by a qualied
electrician.
- The manufacturer cannot
be held responsible for any
injury to persons or animals or
damage to property arising
from failure to comply with
these requirements.
- Do not use multiple plug
adapters or extension cords.
- Do not pull the power cable
to disconnect it from the
electrical supply.
- The electrical components
must not be accessible to the
user after installation.
- Do not touch the appliance
with any wet part of the body
and do not operate it when
barefoot.
- This hob (class 3) is designed
solely for private household
use for cooking food. Do not
use this appliance as a space
heater to heat or warm the
room. Doing so may result in
carbon monoxide poisoning
and overheating of the hob.
- The Manufacturer declines
all responsibility for
inappropriate use or incorrect
setting of the controls.
- The appliance and its
accessible parts become
hot during use. Care should
be taken to avoid touching
heating elements. Children less
than 8 years of age shall be
kept away unless continuously
Page 6

ENGLISH 6
supervised. This appliance
can be used by children aged
from 8 years and above and
persons with reduced physical,
sensory or mental capabilities
or lack of experience and
knowledge if they have
been given supervision or
instruction concerning use of
the appliance in a safe way
and understand the hazards
involved. They shall not play
with the appliance. Cleaning
and user maintenance shall
not be made by children
supervision.
- The use of a gas appliance
produces heat and humidity in
the room. Make sure the room
is well-ventilated, or install an
extractor hood with exhaust
duct.
- Domestic animals should be
kept away from the appliance.
- In case of prolonged use,
additional ventilation may
be necessary (by opening
a window or increasing the
hood extraction speed).
- After use, make sure the knobs
are in off position and close
the main gas supply cock or
the gas cylinder valve.
- Overheated oils and fats catch
re easily. Always remain
vigilant when cooking foods
rich in fat, oil or alcohol (e.g.
rum, cognac, wine).
- Unattended cooking on a
hob with fat or oil can be
dangerous and may result in
re. NEVER try to extinguish a
re with water, but switch off
the appliance and then cover
ame e.g. with a lid or a re
blanket.
Danger of re: do not store
items on the cooking surfaces.
- Keep the packaging materials
out of the reach of children.
- Before cleaning or
maintenance wait for hob to
cool down.
Save these instructions
Page 7
ENGLISH 7
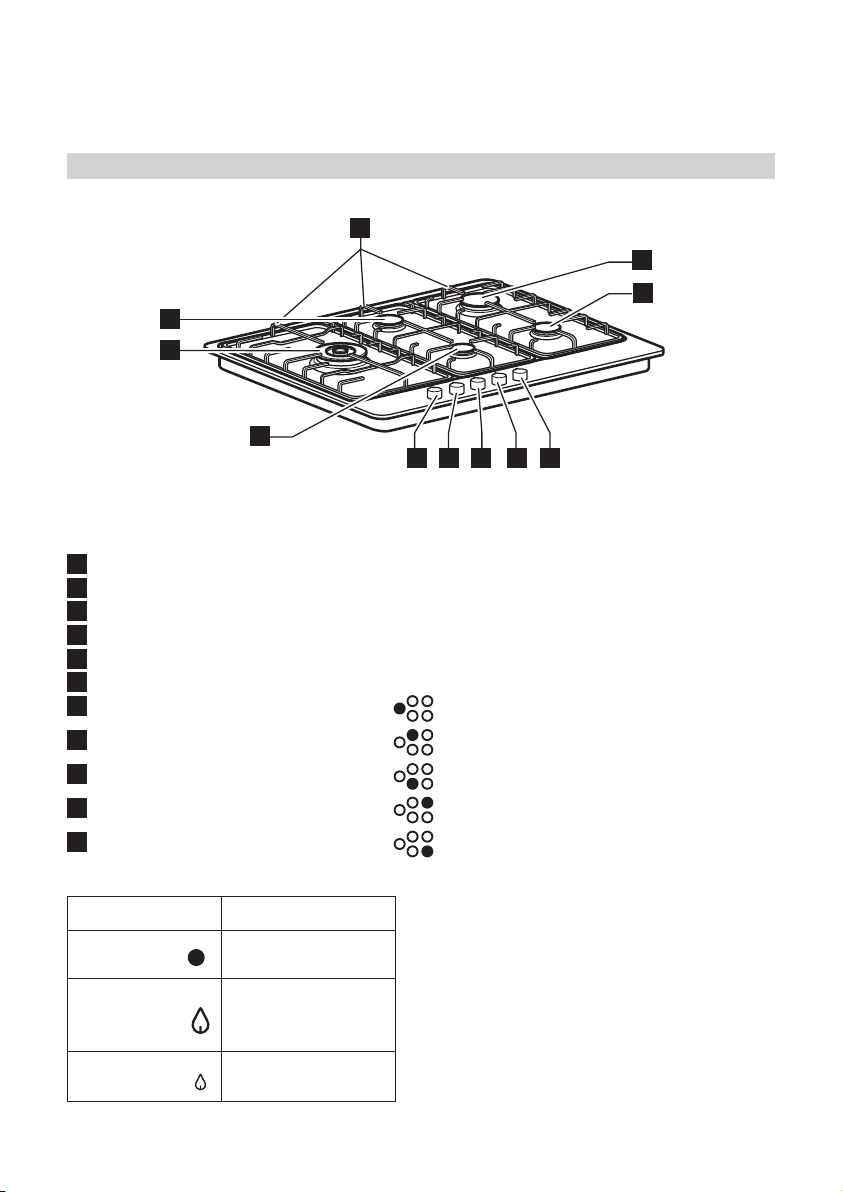
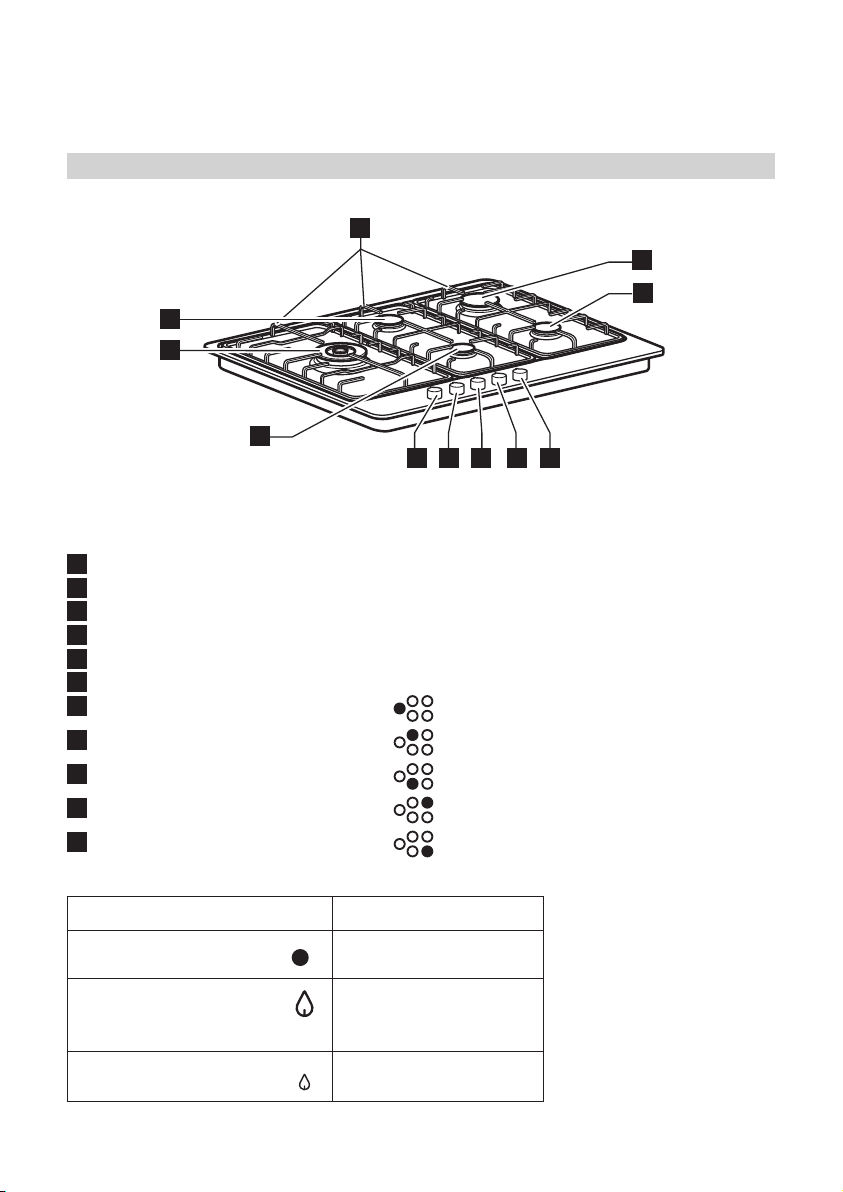
Product description
1
2
5
3
6
4
7 9 10 118
1
Removable panstand grids
2
Rapid burner
3
Semirapid burner
4
Auxiliary burner
5
Semirapid burner
6
Power burner
7
Power burner control knob
8
Semirapid burner control knob
9
Auxiliary burner control knob
10
Rapid burner control knob
11
Semirapid burner control knob
Symbols
Solid disc
Large ame
and star
Small ame
Tap closed
Maximum opening/
delivery and electric
ignition
Minimum opening
or reduced delivery
Page 8
ENGLISH 8
Daily use
Do not let the burner ame extend
beyond the edge of the pan.
Important: when the hob is in use, the entire
hob area may become hot.
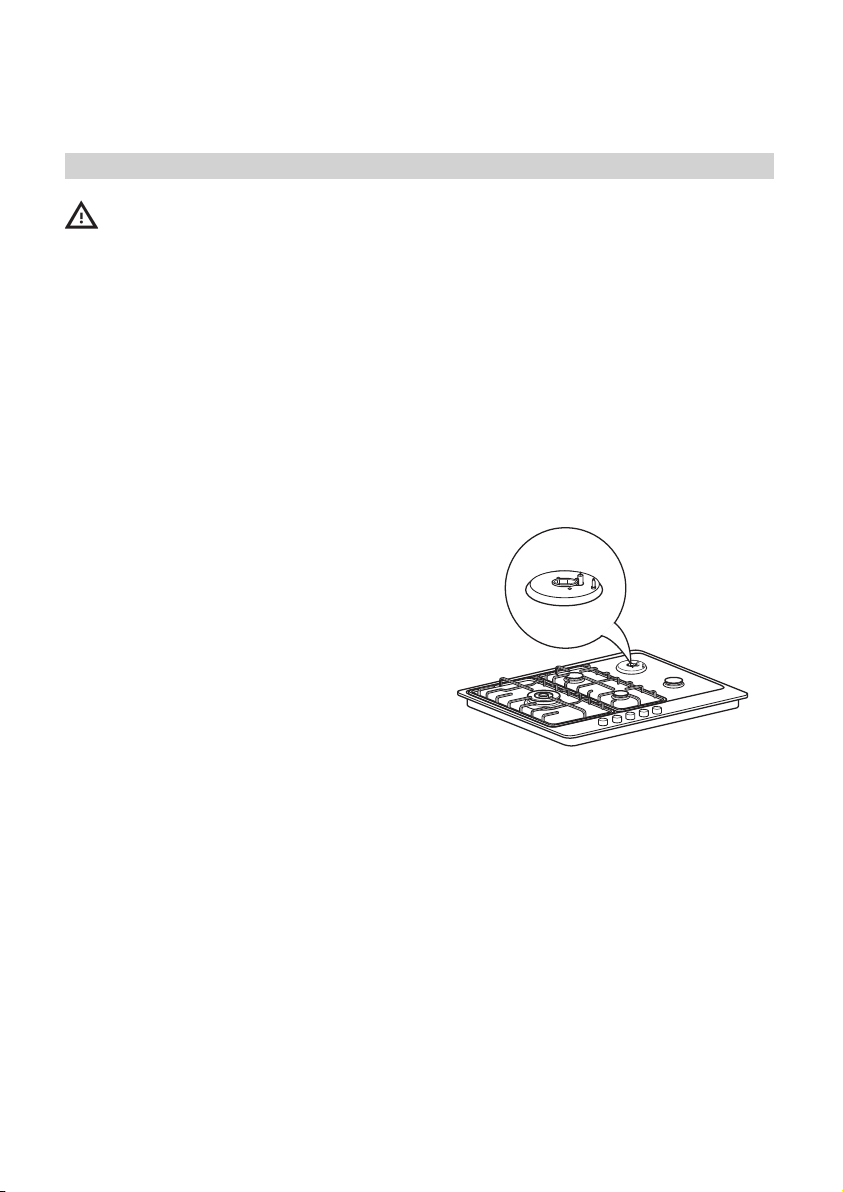
- To ignite one of the burners, turn the
relative knob anti-clockwise to the
maximum ame setting.
- Press the knob against the control panel
to ignite the burner.
- After the burner has ignited, keep the
knob pressed for about 5-10 seconds to
allow proper device operation.
This burner safety device shuts off the gas
supply to the burner if the ame goes out
accidentally (because of sudden draught, an
interruption in the gas delivery, boiling over
of liquids, etc.).
Helpful hints and tips
This hob has burners of different diameters.
For better burner performance, please stick
to the following rules:
- Use pots and pans with bottoms the
same width as that of the burners or
slightly larger (see following table).
- Only use at-bottomed pots and pans.
- Use the correct amount of water
for cooking foods and keep the pot
covered.
- Make sure pots on the grates do not
protrude beyond the edge of the hob.
- The knob must not be pressed for
more than 15 sec. If, after that time has
elapsed, the burner does not remain lit,
wait at least one minute before trying to
light it again.
NOTE: should particular local conditions
of the delivered gas make the ignition of
burner difcult, it is advisable to repeat
the operation with the knob turned to small
ame setting.
The burner might go out when the knob is
released. This means that the safety device
has not warmed up enough. In this
case, repeat the operations described
above.
IMPORTANT: improper use of the grids can
result in damage to the hob: do not position
the grids upside down or slide them across
the hob. Do not use:
- Cast iron griddles, ollar stones,
terracotta pots and pans.
- Heat diffusers such as metal mesh, or
any other types.
- Two burners simultaneously for one
receptacle (e.g. sh kettle).
Burner Pot Ø
Power burner from 24 to 26 cm
Rapid from 24 to 26 cm
Semi-rapid from 16 to 24 cm
Auxiliary from 8 to 14 cm
Page 9
ENGLISH 9
Maintenance and cleaning
- Rinse and dry
Disconnect power before servicing.
- All the enamelled and glass parts
should be cleaned with warm water and
neutral solution.
- Stainless steel surfaces may be stained
by calcareous water or aggressive
detergents if left in contact for too long.
Any food spills (water, sauce, coffee, etc.)
should be wiped away before they dry.
- Clean with warm water and neutral
detergent, and then dry with a soft
cloth or chamois. Remove baked-on dirt
with specic cleaners for stainless steel
surfaces.
NOTE: clean stainless steel only with soft
cloth or sponge.
- Do not use abrasive or corrosive
products, chlorine-based cleaners or
pan scourers.
- Do not use steam cleaning appliances.
- Do not use ammable products.
- Do not leave acid or alkaline substances,
such as vinegar, mustard, salt, sugar or
lemon juice on the hob.
CLEANING THE HOB PARTS
- Grids, burner caps and burners can be
removed to be cleaned.
- Clean them by hand with warm water
and non-abrasive detergent, removing
any food residues and checking that
none of the burner openings is clogged.
- Ret burners and burner caps correctly
in the respective housings.
- When replacing the grids, make sure
that the panstand area is aligned with
the burner.
- Models equipped with electrical
ignition plugs and safety device require
thorough cleaning of the plug end in
order to ensure correct operation.
Check these items frequently, and if
necessary, clean them with a damp
cloth. Any baked-on food should be
removed with a toothpick or needle.
NOTE: to avoid damaging the electric
ignition device, do not use it when the
burners are not in their housing.
Page 10
ENGLISH 10
What to do if ...
Problem Possible cause Solution
The electric ignition does not
work
The burner fails to ignite The gas tap could be
The gas ring burns unevenly Burner crown may
There is no electrical
supply
closed
be occluded by food
residues
Check the unit is plugged in
and the electrical supply is
switched on.
Check that the gas tap is
open
Clean the burner crown
according to cleaning
instructions to make sure that
the burner crown is clear of
food residues.
Before calling the After-Sales Service:
1. Check “Troubleshooting guide” to see if
you can eliminate the problem yourself
2. Turn the hob on again to check if correct
operation has been restored.
3. If the problem persists, contact the Aftersales Service.
Give the following information:
• type of fault;
• hob model;
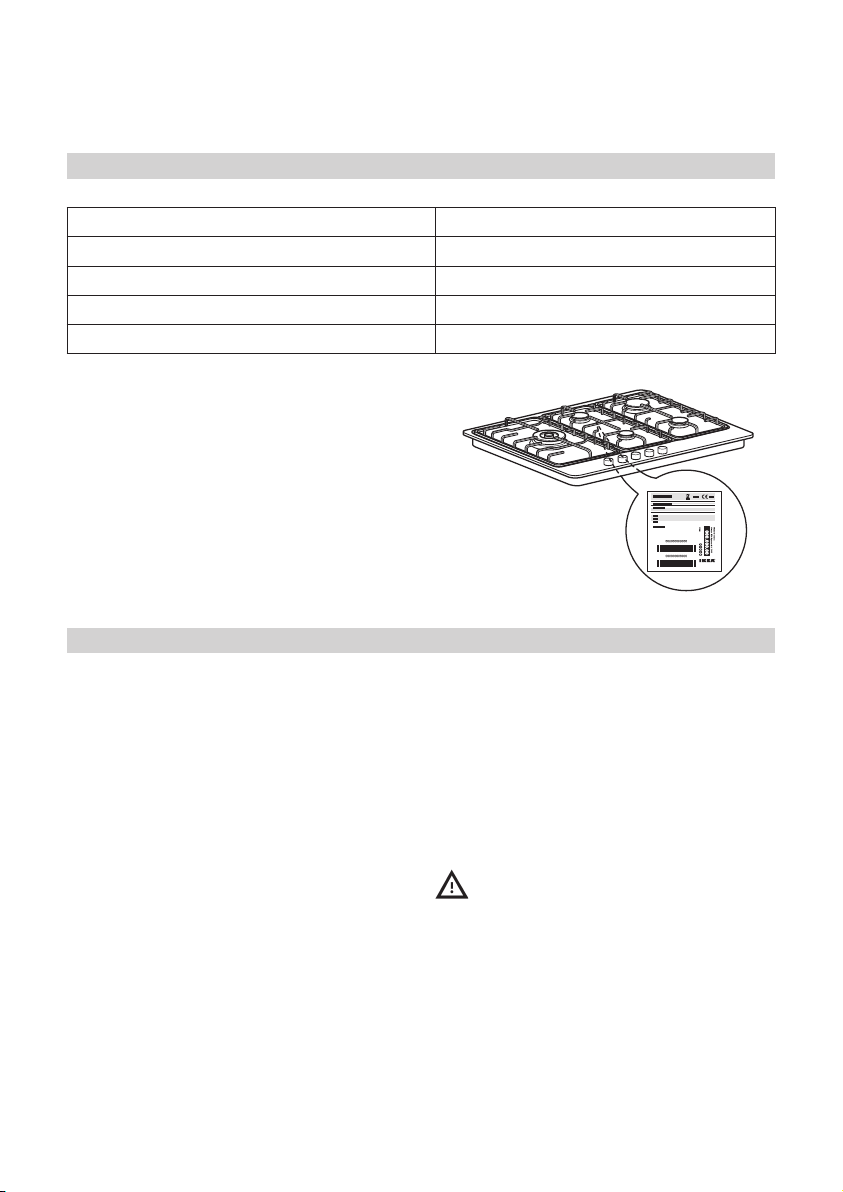
• service number (i.e. the number after the
word SERVICE on the dataplate under
the hob and on the warranty certicate);
• your full address;
• your telephone number.
If any repairs are required, contact an
authorised service centre, indicated in the
warranty.
In the unlikely event that an operation or
repair is carried out by an unauthorised
technician, always request certication
of the work carried out and insist on the use
of original spare parts.
Failure to comply with these instructions
may compromise the safety and quality of
the product.
Page 11
ENGLISH 11
Injector table
Category II2E+3+
Type of gas used Type of
burner
NATURAL GAS
(Methane)
G20
NATURAL GAS
(Methane)
G25
LIQUEFIED
PETROLEUM GAS
(Butane) G30
LIQUEFIED
PETROLEUM GAS
(Propane) G31
Type of gas
used
G20 20 mbar
power burner
rapid
semi-rapid
auxiliary
power burner
rapid
semi-rapid
auxiliary
power burner
rapid
semi-rapid
auxiliary
power burner
rapid
semi-rapid
auxiliary
Model
conguration
5 BURNERS
2 SR - 1 AUX
Injector
marking
1 PB - 1 R
145
118 F2
101 Z
72 X
145
118 F2
101 Z
72 X
96
85
69
50
96
85
69
50
Rated thermal
owrate (kW)
Rated
thermal
ow rate
kW
Rated
consumption
4,00
3,00
2,00
1,00
4,00
3,00
2,00
1,00
3,80
3,00
2,00
1,00
3,80
3,00
2,00
1,00
12,00 1142 l/h 9,52
381 l/h
286 l/h
190 l/h
95 l/h
443 l/h
332 l/h
221 l/h
111 l/h
276 g/h
218 g/h
145 g/h
73 g/h
271 g/h
214 g/h
143 g/h
71 g/h
Total rated
consumption
Reduced
heat
capacity
kW
BE FR min. rat. max.
2,30
2,20
0,80
0,60
0,45
0,35
0,35
0,30
2,20
0,60
0,35
0,30
1,90
0,60
0,35
0,30
1,90
0,60
0,35
0,30
Air required (m3)
for burning1m3 of
gas
Gas pressure
(mbar)
17 20 25
20 25 30
20 2830 35
25 37 45
G25 25 mbar
G30
28-30 mbar
G31
37 mbar
Electric Power: 220 - 240 V ~ 50/60 Hz
1 PB - 1 R
2 SR - 1 AUX
1 PB - 1 R
2 SR - 1 AUX
1 PB - 1 R
2 SR - 1 AUX
12,00 1328 l/h 8,19
11,80 857 g/h 30,94
11,80 842 g/h 23,80
Page 12
ENGLISH 12
Technical data
Dimensions
Width (mm) 730
Height (mm) 40
Length (mm) 510
Voltage (V) 220 - 240
The technical information are situated in the
rating plate on the bottom side of the
appliance.
Installation
After unpacking the hob, make sure that it
has not been damaged during transport. In
the event of problems, contact the dealer or
your nearest After-sales Service.
Technical information for the installer
- This product can be embedded in a
worktop 20 to 50 mm thick.
- If there is no oven beneath the hob,
insert a separator panel that has a
surface at least equal to the opening
in the work surface. This panel must be
positioned in no case less than 20 mm
from the bottom of the hob.
- Before installation, make sure that:
- the local gas delivery conditions (nature
and pressure) are compatible with the
settings of the hob (see the rating plate
and injector table);
- the outer surfaces of the furniture or
appliances adjacent to the hob are heat
resistant according to local regulations;
- This appliance is not connected to a
fume exhaust device. It shall be installed
in accordance with current installation
regulations. Particular attention shall
be given to the relevant requirement
regarding ventilation.
- Combustion products are discharged
outdoors through specic hoods or wall
and/or window mounted electrical fans.
Gas connection
This operation must be performed by a
qualied technician.
The gas supply system must comply with
local regulations to the relavant gas
standard.
- You can nd specic local regulations
for some countries in the paragraph
“Reference to Local Regulations”. If no
information concerning your Country is
given, please ask details to a qualied
technician.
- The connection of the hob to the gas
pipe network or gas cylinder must be
Page 13

ENGLISH 13
made by means of a rigid copper or
steel pipe with ttings complying with
local regulations, or by means of a
continuous-surface stainless steel hose
complying with local regulations. The
maximum length of the hose is 2 linear
metres.
A
C
D
B
C
D
- Connect elbow (A) or (B) supplied with
to the hob inlet main pipe and interpose
the washer (C) supplied, in compliance
with EN 549.
- Replace the premounted elbow and
related washer (C) with the ones
available as spare part in the product.
- Washer (D) not supplied with the
product.
- IMPORTANT: if a stainless steel hose
is used, it must be installed so as not to
touch any mobile part of the furniture.
It must pass through an area where
there are no obstructions and where it is
possible to inspect it on all its length.
- After connection to the gas supply, check
for leaks with soapy water. Light up the
burners and turn the knobs from max
position
check ame stability
Electrical connection
WARNING
- This operation must be performed by a
qualied technician.
- The electrical connections must comply
with local regulations.
- The earthing of this appliance is
compulsory by law.
- Do not use an extension cord.
- IMPORTANT: the data relevant to the
voltage and power absorption are
indicated on the rating plate.
Assembly
After having cleaned the perimeter surface,
apply the supplied gasket to the hob.
Position the hob in the worktop opening
made respecting the dimensions indicated in
the Instruction.
NOTE: the power supply cable must be long
enough to permit its upward extraction.
To secure the hob, use the brackets provided
with it. Fit the brackets into the relevant
bores shown by the arrow and fasten them
by means of their screws in accordance with
the thickness of the worktop.
to minimum position to
L
Earth
(yellow/green)
N
Page 14
ENGLISH 14
Make sure that the outlet is near the product
to install. So, if the cable that came with the
product is not long enough, you will need to
replace it with another one having the same
features but with the right length.
Adjustment to different type of gas
WARNING
- This operation must be performed by a
qualied technician.
If the appliance is intended to operate with
a different gas from the gas type stated on
the rating plate and information label on
the top of the hob, change the injectors.
Remove the information label and keep it
with the instructions booklet.
Use pressure regulators suitable for the gas
pressure indicated in the Instruction.
- The gas nozzles must be changed
by After Sales Service or a qualied
technician.
- Nozzles not supplied with the appliance
must be ordered from After Sales
Service.
- Adjust the minimum setting of the taps.
NOTE: when liquid petroleum gas is used
(G30/G31), the minimum gas setting screw
must be tightened as far as it will go.
IMPORTANT: should you experience
difculty in turning the burners knobs,
please contact the After Sales Service for
the replacement of the burner tap if found to
be faulty.
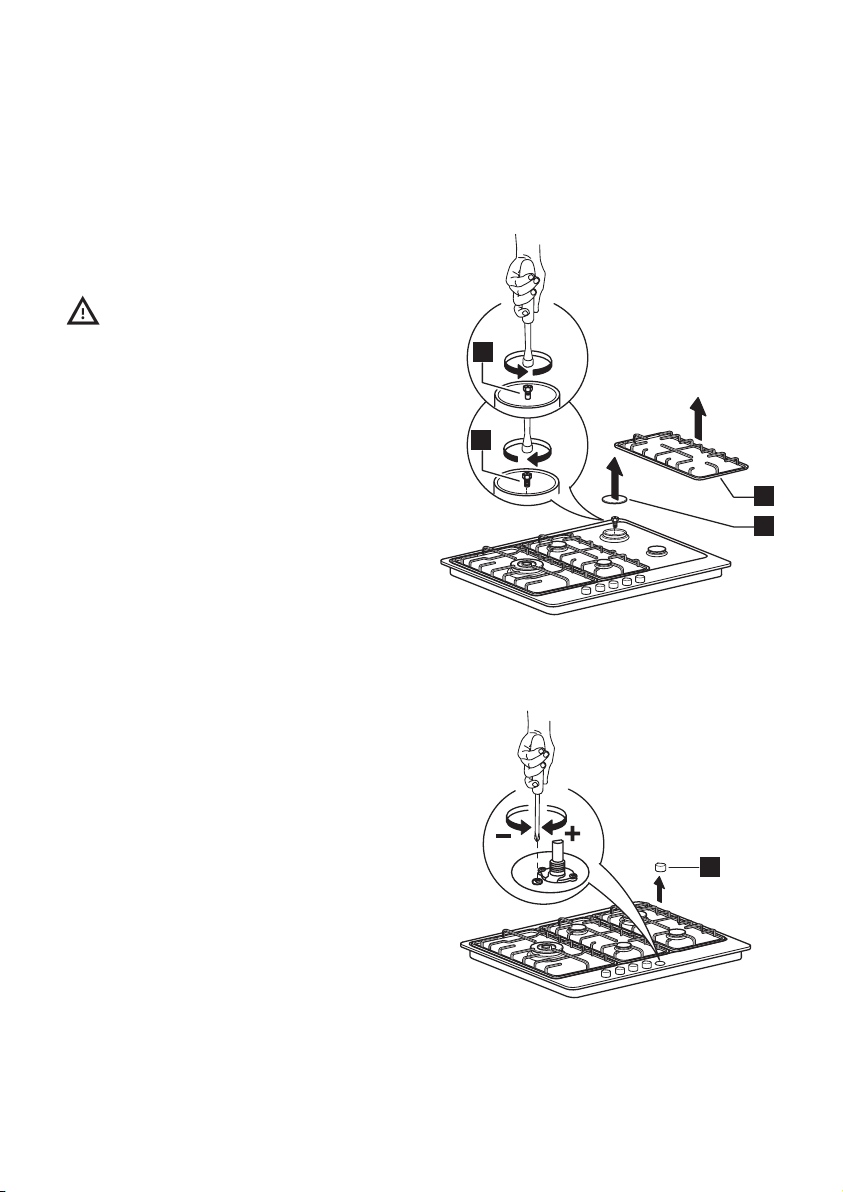
Replacing the injectors (see paragraph
“injector table”)
- Remove grids (A).
- Extract burners (B).
- Using a socket spanner of the
appropriate size unscrew the injector
(C), unscrew the injector to be replaced.
- Replace it with the injector suitable for
the new type of gas.
- Re-assemble the injector in (D).
Before installing the hob, remember to afx
the gas calibration plate supplied with
the injectors in such a way that it covers
the existing information relating to gas
calibration.
D
C
A
B
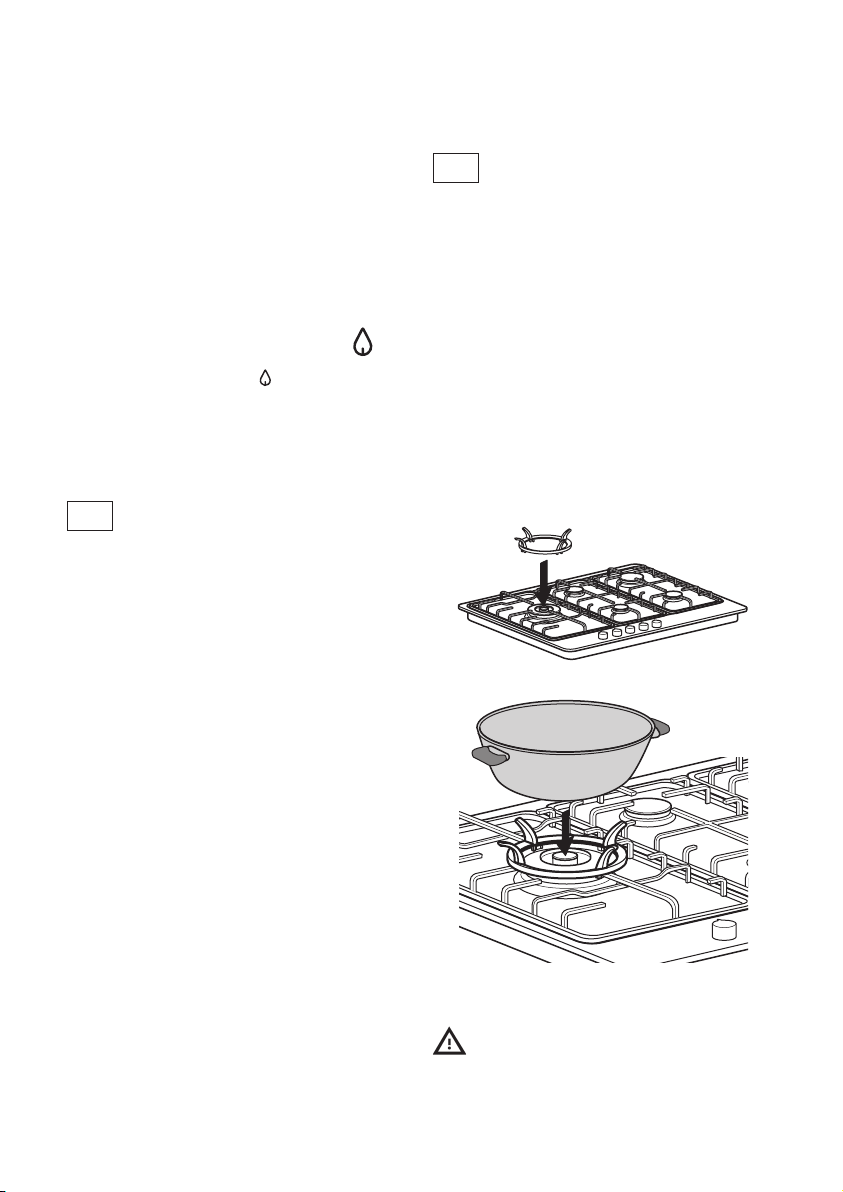
Adjusting minimum gas setting of taps
E
To ensure that the minimum setting is
correctly adjusted, remove the knob (E) and
proceed as follows:
- tighten screw to reduce the ame height
(-);
Page 15
ENGLISH 15
- loosen screw to increase the ame height
(+).
The adjustment must be performed with the
tap in minimum gas setting position (small
ame ) .
- The primary air of the burners does not
need to be adjusted.
- At this stage, light up the burners and
turn the knobs from max position
to minimum position
stability.
Upon completion of adjustment, reseal
the work surface using sealing wax or an
equivalent material.
FR
REFERENCE TO LOCAL
REGULATIONS
The installation and maintenance of the
appliance must be carried out by a qualied
skilled technician in accordance with the
regulations in force, and in particular:
- Decree of 2 August 1977
Technical and Safety Rules applicable to fuel
gas and liqueed hydrocarbon installations
located within residential buildings and
outbuildings.
- Standard DTU P 45 - 204
Gas installations (formerly DTU no. 61-1 Gas installations April 1982 + supplement
no. 1 of July 1984).
- Departmental Health Regulations
For appliances connected to the mains
electricity supply.
- Standard NF C 15-100
Low-voltage electrical installations Standards.
to check ame
BE
REFERENCE TO LOCAL
REGULATIONS
The appliance is supplied with a 1/2”
threaded conical end to be connected to
the gas supply (according to ISO regulations
ISO 7/1 RP 1/2).
The connection must be effected in
accordance with standard NBN D 51-003
using rigid piping or in accordance with
specications sheet A.R.G.B./03 using
exible tubing.
The appliance must be installed complete
with an AGB-approved stop valve.
WOK ADAPTER
KNOBS REPLACEMENT
Be sure that your hob is switched-off.
All knobs must be in closed position.
Page 16
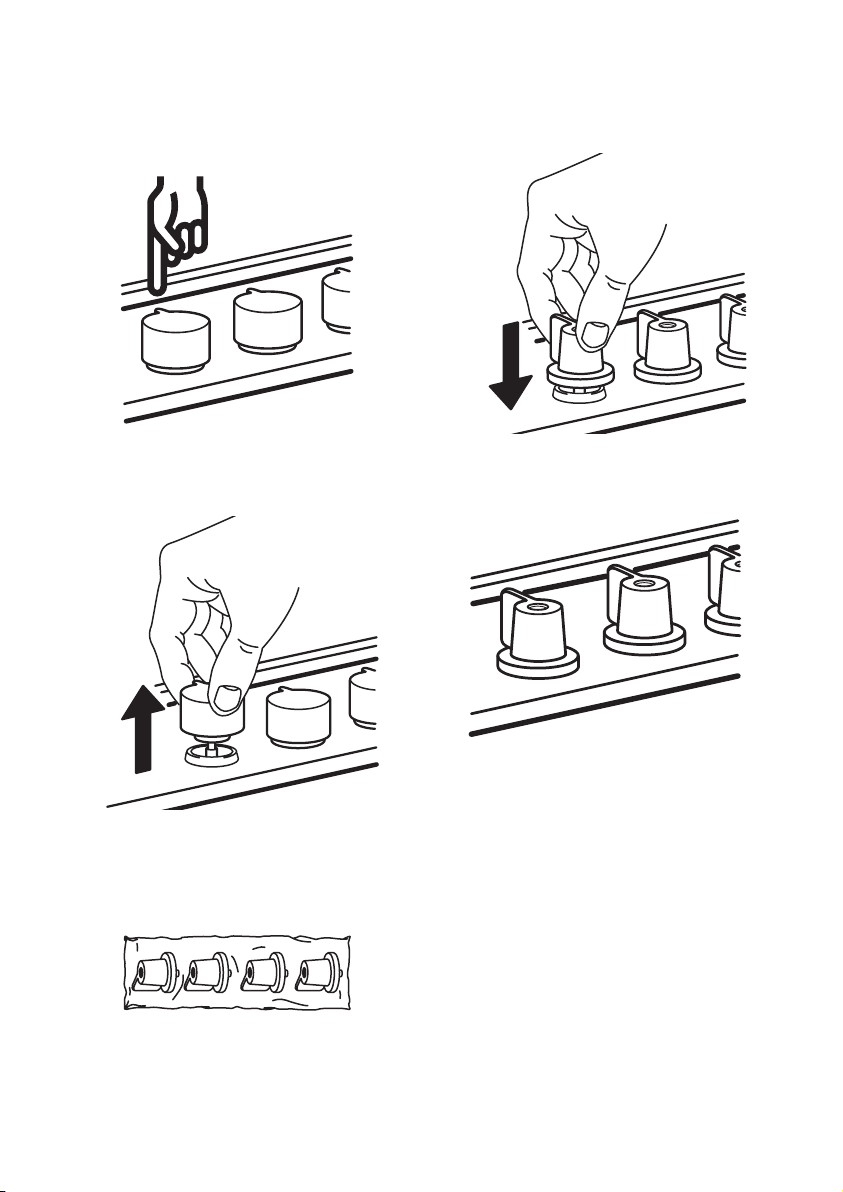
ENGLISH 16
Pull upwards each knob of the cooktop and
store together after removal.
Take the kit with new knobs, which is located
in upper part of packaging and remove the
new knobs from the plastic bag.
Make sure that all the knobs are in the right
position.
Verify correct installation by switching each
burner separately.
Push each of knob on the valve shaft until
you feel the end of sliding (sparking may
occur).
Page 17

ENGLISH 17
Environmental concerns
Packing
- The packing materials are 100%
recyclable and marked with the
recycling symbol ( ).
Products
This appliance is marked in compliance with
European Directive 2002/96/EC on Waste
Electrical and Electronic
Equipment (WEEE). By ensuring that this
appliance is correctly scrapped, the user
can help prevent potentially harmful
consequences for the environment and the
health of people.
The symbol
accompanying documentation indicates
that this product should not be treated as
domestic waste but must be taken to a
suitable centre for collection and recycling
of electrical and electronic equipment.
Disposal must be carried out in compliance
with local regulations on waste disposal.
For further information on the treatment,
recovery and recycling of this product,
contact your competent local ofce, the
household waste collection service or the
shop where you purchased the appliance.
on the product or
Declaration of Conformity
- This cooking hob has been designed,
constructed and put on the market in
conformity with:
- safety requirements of “Gas”
Directive 2009/142/EEC;
- safety objectives of “Low Voltage”
Directive 2006/95/EC (which
replaces 73/23/EEC as amended).
- protection requirements of “EMC”
Directive 2004/108/EEC;
- This hob is suitable for contact with
foodstuffs and complies with (EC)
Regulation no. 1935/2004.
- This cooking hob (Class 3) has been
designed only for cooking food. Any
other use (such as heating a room) is
improper and dangerous.
Page 18

ENGLISH 18
IKEA GUARANTEE
How long is the IKEA guarantee valid?
This guarantee is valid for ve (5) years from
the original date of purchase of your appliance
at IKEA, unless the appliance is named LAGAN
in which case two (2) years of guarantee
apply. The original sales receipt, is required
as proof of purchase. If service work is carried
out under guarantee, this will not extend the
guarantee period for the appliance.
Which appliances are not covered by the
IKEA ve (5) years guarantee?
The range of appliances named LAGAN and
all appliances purchased in IKEA before 1st of
August 2007.
Who will execute the service?
IKEA service provider will provide the
service through its own service operations or
authorized service partner network.
What does this guarantee cover?
The guarantee covers faults of the appliance,
which have been caused by faulty construction
or material faults from the date of purchase
from IKEA. This guarantee applies to domestic
use only. The exceptions are specied under
the headline “What is not covered under this
guarantee?” Within the guarantee period,
the costs to remedy the fault e.g. repairs,
parts, labour and travel will be covered,
provided that the appliance is accessible for
repair without special expenditure. On these
conditions the EU guidelines (Nr. 99/44/
EG) and the respective local regulations
are applicable. Replaced parts become the
property of IKEA.
What will IKEA do to correct the problem?
IKEA appointed Service Provider will examine
the product and decide, at its sole discretion,
if it is covered under this guarantee. If
considered covered, IKEA Service Provider
or its authorized service partner through its
own service operations, will then, at its sole
discretion, either repair the defective product
or replace it with the same or a comparable
product.
What is not covered under this guarantee?
• Normal wear and tear.
• Deliberate or negligent damage, damage
caused by failure to observe operating
instructions, incorrect installation or by
connection to the wrong voltage, damage
caused by chemical or electrochemical
reaction, rust, corrosion or water damage
including but not limited to damage
caused by excessive lime in the water
supply, damage caused by abnormal
environmental conditions.
• Consumable parts including batteries and
lamps.
• Non-functional and decorative parts which
do not affect normal use of the appliance,
including any scratches and possible color
differences.
• Accidental damage caused by foreign
objects or substances and cleaning or
unblocking of lters, drainage systems or
soap drawers.
• Damage to the following parts: ceramic
glass, accessories, crockery and cutlery
baskets, feed and drainage pipes, seals,
lamps and lamp covers, screens, knobs,
casings and parts of casings. Unless such
damages can be proved to have been
caused by production faults.
• Cases where no fault could be found
during a technician’s visit.
• Repairs not carried out by our appointed
service providers and/or an authorized
service contractual partner or where nonoriginal parts have been used.
• Repairs caused by installation which is
faulty or not according to specication.
• The use of the appliance in a non-domestic
environment i.e. professional use.
• Transportation damages. If a customer
transports the product to his home or
Page 19
ENGLISH 19
another address, IKEA is not liable for any
damage that may occur during transport.
However, if IKEA delivers the product
to the customer’s delivery address, then
damage to the product that occurs during
this delivery will be covered by IKEA.
• Cost for carrying out the initial installation
of the IKEA appliance.
However, if an IKEA appointed Service
Provider or its authorized service partner
repairs or replaces the appliance under
the terms of this guarantee, the appointed
Service Provider or its authorized
service partner will reinstall the repaired
appliance or install the replacement, if
necessary.
These restrictions do not apply to fault-free
work carried out by a qualied specialist
using our original parts in order to adapt the
appliance to the technical safety specications
of another EU country.
How country law applies
The IKEA guarantee gives you specic legal
rights, which cover or exceed all the local legal
demands. However these conditions do not
limit in any way consumer rights described in
the local legislation.
Area of validity
For appliances which are purchased in one EU
country and taken to another EU country, the
services will be provided in the framework of
the guarantee conditions normal in the new
country.
An obligation to carry out services in the
framework of the guarantee exists only if
the appliance complies and is installed in
accordance with:
- the technical specications of the country in
which the guarantee claim is made;
- the Assembly Instructions and User Manual
Safety Information.
The dedicated AFTER SALES for IKEA
appliances
Please don’t hesitate to contact IKEA
appointed After Sales Service Provider to:
• make a service request under this
guarantee;
• ask for clarications on installation of the
IKEA appliance in the dedicated IKEA
kitchen furniture;
• ask for clarication on functions of IKEA
appliances.
To ensure that we provide you with the best
assistance, please read carefully the Assembly
Instructions and/or the User Manual before
contacting us.
How to reach us if you need our service
Please refer to the last
page of this manual for the
full list of IKEA appointed
After Sales Service Provider
and relative national phone
numbers.
In order to provide you a quicker
service, we recommend to use the
specic phone numbers listed on this
manual. Always refer to the numbers
listed in the booklet of the specic
appliance you need an assistance for.
Please also always refer to the IKEA
article number (8 digit code) and 12
digit service number placed on the
rating plate of your appliance.
SAVE THE SALES RECEIPT!
It is your proof of purchase and required
for the guarantee to apply. The sales
receipt also reports the IKEA name and
article number (8 digit code) for each of
the appliances you have purchased.
Do you need extra help?
For any additional questions not related
to After Sales of your appliances please
contact your nearest IKEA store call centre.
We recommend you read the appliance
documentation carefully before contacting us.
Page 20
DEUTSCH 20
Inhalt
Sicherheitsinformationen 20
Produktbeschreibung 23
Täglicher Gebrauch 24
Nützliche Tipps und Tricks 24
Pege und Wartung 25
Was tun, wenn... 26
Düsentabelle 27
Technische Daten 28
Installation 28
Umweltschutz 33
IKEA GARANTIE 34
Sicherheitsinformationen
Ihre Sicherheit und die Sicherheit
anderer sind von größter Bedeutung.
Dieses Handbuch und das
Gerät selbst sind mit wichtigen
Sicherheitsinformationen versehen,
die Sie lesen und jederzeit beachten
sollten.
Dieses Symbol warnt vor
möglichen Gefahren für die
Sicherheit des Benutzers und anderer
Personen.
Alle Warnhinweise beginnen mit
diesem Warnsymbol und enthalten
einen der beiden folgenden Begriffe:
GEFAHR Weist auf eine
Gefahrensituation hin, die zu
schweren Verletzungen führt, wenn sie
nicht vermieden wird.
ACHTUNG Weist auf eine
Gefahrensituation hin, die bei
mangelnder Vorsicht zu schweren
Verletzungen führt.
Alle Warnhinweise enthalten einen
Hinweis auf die Art der potenziellen
Gefahr, einen Hinweis zur
Verringerung des Verletzungsrisikos
und einen Hinweis
auf die möglichen Konsequenzen,
wenn die Anweisungen nicht befolgt
werden.
Halten Sie das Gerät von der
Stromversorgung getrennt, bis der
Einbau durchgeführt wurde.
Installation und Wartung müssen
von einer Fachkraft laut
Herstellerangaben und gültigen
örtlichen Sicherheitsbestimmungen für
Gasinstallationen durchgeführt
werden. Verwenden Sie ausschließlich
Original-Ersatzteile. Reparieren Sie
das Gerät nicht selbst und tauschen
Sie keine Teile aus, wenn dies im
Bedienungshandbuch nicht
ausdrücklich angegeben ist.
ACHTUNG Wenn die
Anweisungen in dieser
Bedienungsanleitung nicht genau
befolgt werden, besteht Brand- und
Explosionsgefahr mit Sachschäden
oder Verletzungen.
- Lagern oder verwenden Sie
kein Benzin und keine sonstigen
brennbaren Gase oder
Flüssigkeiten in der Nähe dieses
Geräts.
Vorgehen bei Gasgeruch:
- Schalten Sie keinerlei Geräte ein.
- Betätigen Sie keine elektrischen
Schalter.
- Verwenden Sie kein Telefon im
Page 21

DEUTSCH 21
betroffenen Gebäude.
- Benachrichtigen Sie unverzüglich
Ihren Gasanbieter, und zwar von
einem Telefon in einem anderen
Gebäude aus. Gehen Sie nach den
Anweisungen des Gasanbieters
vor.
- Wenn der Gasanbieter nicht
erreichbar ist, rufen Sie die
Feuerwehr.
- Installation und Wartung müssen
von einer Fachkraft, einem
Wartungsunternehmen oder dem
Gasanbieter ausgeführt werden.
- Das Gerät darf nur in gut
belüfteten Räumen betrieben
werden.
- Die elektrischen Anschlüsse
und die Gasanschlüsse müssen
den örtlichen Bestimmungen
entsprechen.
- Bei der Installation des Kochfeldes
muss ein mehrpoliger Trennschalter
mit einer Kontaktöffnung von
mindestens 3 mm verwendet
werden, der für eine vollständige
Trennung sorgt.
- Die Erdung des Gerätes ist
gesetzlich vorgeschrieben.
- Das Netzkabel muss lang genug
sein, um das Gerät nach der
Montage im Küchenmöbel an die
Stromversorgung anzuschließen.
- Für den Gasanschluss dürfen
ausschließlich exible oder starre
Metallschläuche verwendet
werden.
- Falls nötig, darf das Stromkabel
nur durch ein Kabel mit identischen
Dimensionen und Eigenschaften
wie das Originalkabel ersetzt
werden (Typ H05V2V2-F 90°C
oder Typ H05RR-F). Diese Arbeit
darf nur von einem qualizierten
Elektriker durchgeführt werden.
- Der Hersteller haftet nicht für
etwaige durch Missachtung
dieser Vorschriften entstandene
Verletzungen von Personen und
Tieren oder Sachschäden.
- Verwenden Sie keine
Mehrfachstecker oder
Verlängerungskabel.
- Ziehen Sie nicht am Netzkabel des
Gerätes, um den Stecker aus der
Steckdose zu ziehen.
- Nach der Installation dürfen Strom
führende Teile für den Benutzer
nicht mehr zugänglich sein.
- Berühren Sie das Gerät nicht mit
feuchten Händen und benutzen Sie
es nicht, wenn Sie barfuß sind.
- Dieses Kochfeld (Klasse 3) ist
ausschließlich für die Verwendung
im Haushalt zum Kochen von
Lebensmitteln bestimmt. Das
Gerät darf AUF KEINEN FALL
als Heizgerät zum Heizen
oder Erwärmen des Raums
verwendet werden. Andernfalls
besteht die Gefahr einer
Kohlenmonoxidvergiftung und
einer Überhitzung des Kochfeldes.
- Der Hersteller haftet nicht
bei Schäden aufgrund
unsachgemäßen Gebrauchs oder
Page 22

DEUTSCH 22
fehlerhafter Bedienung.
- Das Gerät und die zugänglichen
Teile werden bei der Benutzung
heiß. Vermeiden Sie unbedingt das
Berühren der Heizelemente. Kinder
unter 8 Jahren dürfen das Gerät
nur unter ständiger Überwachung
bedienen. Das Gerät darf von
Kindern unter und über 8 Jahren
und von Personen, deren physische,
sensorische oder geistige
Fähigkeiten und deren Mangel
an Erfahrung und Kenntnissen
einen sicheren Gebrauch des
Gerätes ausschließen nur unter
Aufsicht oder nach ausreichender
Einweisung durch eine
verantwortungsbewußte Person
benutzt werden, die sicherstellt,
dass sie sich der Gefahren
des Gebrauchs bewusst sind.
Lassen Sie Kinder nicht mit dem
Gerät spielen. Reinigung und
Instandhaltung darf nicht von
Kindern ohne Aufsicht erfolgen.
- Der Betrieb eines Gasgeräts
erzeugt Hitze und Feuchtigkeit im
Raum. Achten Sie unbedingt auf
eine gute Raumbelüftung oder
installieren Sie eine Abzugshaube
mit Abzug ins Freie.
- Halten Sie Haustiere von dem
Gerät fern.
- Bei längerer Benutzung kann eine
zusätzliche Belüftung erforderlich
werden (Öffnen eines Fensters
oder Erhöhung der Absaugleistung
der Abzugshaube).
- Vergewissern Sie sich nach dem
Gebrauch, dass die Bedienknöpfe
auf die Position OFF gedreht sind,
und drehen Sie den Hauptgashahn
oder das Ventil der Gasasche zu.
- Heißes Fett und Öl sind leicht
entzündlich. Beaufsichtigen Sie stets
wachsam den Garvorgang, wenn
Sie Speisen mit viel Fett, Öl oder
Alkohol (wie Rum, Cognac oder
Wein zum Beispiel) zubereiten.
- Lassen Sie Speisen, die mit Öl oder
Fett zubereitet werden, niemals
unbeaufsichtigt auf dem Herd
stehen, denn dies ist gefährlich
und kann zu einem Brand führen.
Versuchen Sie NIEMALS, einen
Brand mit Wasser zu löschen,
sondern schalten Sie das Gerät aus
und decken Sie die Flamme mit
einem Deckel oder einer speziellen
Brandschutzdecke ab.
Brandgefahr: stellen Sie keine
Gegenstände auf den Kochächen
ab.
- Bewahren Sie das gesamte
Verpackungsmaterial außerhalb
der Reichweite von Kindern auf.
- Warten Sie vor dem Reinigen
des Kochfeldes oder vor
Wartungsarbeiten, bis das
Kochfeld abgekühlt ist.
Bewahren Sie diese
Bedienungsanleitung auf.
Page 23
DEUTSCH 23
Produktbeschreibung
1
2
5
3
6
4
7 9 10 118
1
Abnehmbare Roste
2
Schnellbrenner
3
Garbrenner
4
Schwachbrenner
5
Garbrenner
6
Leistungsbrenner
7
Einstellknopf Leistungsbrenner
8
Einstellknopf Garbrenner
9
Einstellknopf Schwachbrenner
10
Einstellknopf Schnellbrenner
11
Einstellknopf Garbrenner
Symbole
Geschlossene Scheibe
Große Flamme und Stern
Kleine Flamme
Hahn geschlossen
Maximale Öffnung/
Gaszufuhr und
elektrische Zündung
Minimale Öffnung oder
reduzierte Gaszufuhr
Page 24

DEUTSCH 24
Täglicher Gebrauch
Die Gasamme darf niemals über die
Kante der Pfanne steigen.
Wichtig: Beim Gebrauch des Kochfelds
erhitzt sich auch der gesamte Bereich um das
Kochfeld.
- Zum Zünden eines Brenners drehen Sie
den betreffenden Einstellknopf nach links
auf die Maximalstufe.
- Drücken Sie den Knopf nach unten, um
den Brenner zu zünden.
- Halten Sie nach der Zündung den
Knopf für etwa 5 -10 Sekunden
gedrückt, um eine korrekte Funktion der
Sicherheitsvorrichtung zu gewährleisten.
Die Sicherheitsvorrichtung des Brenners
unterbricht die Gaszufuhr, falls die
Flamme zufällig erlöschen sollte (Luftzug,
Unterbrechung der Gasversorgung,
Nützliche Tipps und Tricks
Die Brenner dieses Kochfeldes haben
verschiedene Durchmesser. Bitte halten Sie
sich für eine bessere Brennerleistung an
folgende Regeln:
- Verwenden Sie nur Töpfe und Pfannen,
deren Bodendurchmesser dem des
Brenners entspricht oder etwas größer ist
(siehe die Tabelle rechts).
- Verwenden Sie nur Töpfe und Pfannen
mit achem Boden.
- Benutzen Sie beim Kochen der Speisen
die richtige Menge Wasser und decken
Sie den Topf mit einem Deckel ab.
- Achten Sie darauf, dass das Kochgeschirr
Überlaufen von Flüssigkeiten usw.).
- Warten Sie mehr als 15 Sekunden, bevor
Sie den Einstellknopf erneut drücken. Sollte
der Brenner danach wieder erlöschen,
warten Sie mindestens eine Minute, bevor
Sie den Brenner erneut zünden.
Hinweis: Sollten bestimmte lokale
Bedingungen des gelieferten Gases die
Zündung des Brenners erschweren, wird
empfohlen, den Vorgang zu wiederholen,
jedoch den Einstellknopf dabei auf die
Einstellung Kleine Flamme zu drehen.
Der Brenner kann erlöschen, sobald Sie den
Knopf loslassen. Das bedeutet, dass sich das
Sicherheitselement nicht ausreichend erwärmt
hat. Wiederholen Sie in diesem Fall die zuvor
beschriebenen Schritte.
auf den Rosten nicht über die Kante des
Kochfeldes hinaus ragt.
WICHTIG: Unsachgemäßer Gebrauch der
Roste kann das Kochfeld beschädigen.
Legen Sie die Roste nicht umgekehrt auf das
Kochfeld und/oder schleifen Sie sie nicht
darüber. Vermeiden Sie Folgendes:
- Grillroste aus Gusseisen, Steingut, Töpfe
und Pfannen aus Ton.
- Rostaufsetzer in Form von Gittern oder
ähnlichem.
- Den gleichzeitigen Gebrauch von zwei
Gasbrennern für ein einziges Gefäß (z.B.
Fischkocher).
Brenner Topf Ø
Leistungsbrenner von 24 bis 26 cm
Schnellbrenner von 24 bis 26 cm
Garbrenner von 16 bis 24 cm
Schwachbrenner von 8 bis 14 cm
Page 25

DEUTSCH 25
Pege und Wartung
dass die Brenneröffnungen nicht verstopft
Trennen Sie das Gerät vor
Wartungsarbeiten von der Stromversorgung.
- Reinigen Sie alle Emaille- und Glasteile
mit warmem Wasser und einer neutralen
Lösung.
- Edelstahlächen können bei Verwendung
von kalkhaltigem Wasser oder
aggressiven Reinigungsmitteln eckig
werden, wenn sie damit für längere Zeit
in Berührung kommen. Entfernen Sie
Speisereste und Spritzer (Wasser, Soße,
Kaffee usw.) sofort, bevor sie antrocknen.
- Feuchten Sie dann ein weiches Tuch
gut mit warmem Wasser und etwas
Neutralseife an, reinigen Sie das Kochfeld
und trocknen Sie mit einem weichen
Tuch nach. Entfernen Sie festgebackene
Speisereste mit einem Spezialreiniger für
Edelstahlächen.
HINWEIS: Edelstahlächen nur mit einem
weichen Tuch oder einem weichen Schwamm
reinigen.
- Keine scheuernden oder ätzenden Mittel,
Bleichlauge oder Topfkratzer benutzen.
- Keine Dampfreiniger benutzen.
- Keine brennbaren Produkte benutzen.
- Keine säurehaltigen oder alkalischen
Substanzen wie Essig, Senf, Salz, Zucker
oder Zitronensaft auf dem Kochfeld
zurücklassen.
sind.
- Spülen Sie alle Teile gut ab und lassen
Sie sie sorgfältig trocknen.
- Setzen Sie die Brenner und
Brennerkappen wieder richtig in die
betreffenden Sitze ein.
- Achten Sie beim Aufsetzen der
Roste darauf, dass der Bereich der
Brennerkappen genau auf die Brenner
ausgerichtet ist.
- Bei Modellen mit Elektrozündern und
Sicherheitsmechanismus müssen die
Zünder sorgsam gereinigt werden,
um deren ordnungsgemäße Funktion
sicherzustellen.
Kontrollieren Sie diese Bauteile
regelmäßig und säubern Sie sie mit
einem feuchten Tuch. Entfernen Sie
angebackene Speisereste mit einem
Zahnstocher oder einer Nadel.
REINIGEN DER KOCHFELDTEILE
- Die Roste, Brennerkappen und Brenner
können ausgebaut und gereinigt werden.
- Reinigen Sie diese sorgfältig von Hand
mit warmem Wasser und einem nicht
scheuernden Reinigungsmittel von allen
Speiseresten und vergewissern Sie sich,
HINWEIS: Um Schäden an der
Elektrozündung zu vermeiden, betätigen Sie
diese nicht, wenn der Brenner zerlegt ist.
Page 26

DEUTSCH 26
Was tun, wenn...
Problem Mögliche Ursachen Lösung
Die Elektrozündung funktioniert
nicht
Der Brenner wird nicht gezündet Möglicherweise ist der
Das Gasring brennt nicht
gleichmäßig
Das Gerät wird nicht mit
Strom versorgt
Gashahn zugedreht
Möglicherweise ist der
Brennerkranz durch
Speisereste verstopft
Prüfen Sie, ob das Gerät an die
Stromversorgung angeschlossen
und die Stromversorgung
eingeschaltet ist
Prüfen Sie, ob der Gashahn
offen ist
Reinigen Sie den Brennerkranz
gemäß der Reinigungsanleitung,
um eventuelle Speisereste zu
entfernen
Bevor Sie den Kundendienst rufen:
1. Lesen Sie unter „Was tun, wenn...“ nach,
um zu sehen, ob Sie den Fehler selbst
beheben können.
2. Schalten Sie das Gerät aus und wieder
ein und prüfen Sie, ob die Störung
dadurch behoben ist.
3. Sollte die Störung weiterhin bestehen,
rufen Sie den Kundendienst.
Geben Sie folgende Informationen an:
• Art der Störung
• Modell des Kochfelds
• Servicenummer (d.h. die Zahl
nach dem Wort SERVICE auf dem
Typenschild unter dem Kochfeld
und auf dem Garantieschein);
• Ihre vollständige Anschrift;
• Ihre Telefonnummer.
Sollte eine Reparatur erforderlich sein,
wenden Sie sich bitte an den Kundendienst
eines Vertragshändlers, wie in den
Garantiebestimmungen festgelegt.
Sollte eine Wartung oder Reparatur
ausnahmsweise einmal von einem
Nicht-Fachmann vorgenommen werden,
verlangen Sie auf jeden Fall eine
Zertizierung
der ausgeführten Arbeiten und bestehen
Sie darauf, dass ausschließlich OriginalErsatzteile verwendet werden.
Die Nichtbeachtung dieser Vorschriften
kann die Sicherheit und die Qualität des
Produktes beeinträchtigen.
Page 27

DEUTSCH 27
Düsentabelle
KATEGORIE II2E+3+
Gasart Brennertyp Düsenmar-
kierung
ERDGAS
(Methan)
G20
ERDGAS
(Methan)
G25
LPG
(FLÜSSIGGAS)
(Butan) G30
LPG
(FLÜSSIGGAS)
(Propan) G31
Gasart
verwendet
G20 20 mbar
Leistungsbrenner
Schnellbrenner
Garbrenner
Schwachbrenner
Leistungsbrenner
Schnellbrenner
Garbrenner
Schwachbrenner
Leistungsbrenner
Schnellbrenner
Garbrenner
Schwachbrenner
Leistungsbrenner
Schnellbrenner
Garbrenner
Schwachbrenner
Modellkonguration
5 BRENNER
2 GARB. - 1 KLEINER B.
145
118 F2
101 Z
72 X
145
118 F2
101 Z
72 X
96
85
69
50
96
85
69
50
1 PB - 1 R
Nennwärmeleistung
kW
Nennverbrauch Reduzierte
Wärmeleistung kW
BE FR Min. Nom. Max.
4.00
3.00
2.00
1.00
4.00
3.00
2.00
1.00
3.80
3.00
2.00
1.00
3.80
3.00
2.00
1.00
Nennwärmeleistung (kW)
381 l/h
286 l/h
190 l/h
95 l/h
443 l/h
332 l/h
221 l/h
111 l/h
276 g/h
218 g/h
145 g/h
73 g/h
271 g/h
214 g/h
143 g/h
71 g/h
GesamtNennverbrauch
12.00 1142 l/h 9.52
2.30
0.80
0.45
0.35
2.20
0.60
0.35
0.30
1.90
0.60
0.35
0.30
1.90
0.60
0.35
0.30
Gasdruck (mbar)
2.20
0.60
17 20 25
0.35
0.30
20 25 30
20 2830 35
25 37 45
Erforderliche Luft (m3)
für die Verbrennung
von 1 m3 Gas
G25 25 mbar
G30
28-30 mbar
G31
37 mbar
Stromversorgung: 220 - 240 V ~ 50/60 Hz
1 PB - 1 R
2 GARB. - 1 KLEINER B.
1 PB - 1 R
2 SR - 1 AUX
1 PB - 1 R
2 SR - 1 AUX
12.00 1328 l/h 8.19
11.80 857 g/h 30.94
11.80 842 g/h 23.80
Page 28

DEUTSCH 28
Technische Daten
Abmessungen
Breite (mm) 730
Höhe (mm) 40
Länge (mm) 510
Spannung (V) 220 - 240
Die technischen Daten sind auf dem Typenschild
an der Geräteunterseite angegeben.
Installation
Prüfen Sie das Kochfeld nach dem Auspacken
auf Transportschäden. Bei Problemen wenden
Sie sich bitte an Ihren Händler oder die nächste
Kundendienststelle.
Technische Informationen für den Installateur
- Dieses Kochfeld kann in eine Arbeitsplatte mit
einer Stärke von 20 bis 50 mm eingelassen
werden.
- Ist unter dem Kochfeld kein Backofen
vorgesehen, muss dort ein Trennboden
angebracht werden, der mindestens ebenso
groß wie die Aussparung der Arbeitsplatte ist.
Diese Platte muss in einem Mindestabstand
von nicht weniger als 20 mm an der Unterseite
des Kochfelds angebracht werden.
- Achten Sie vor der Installation auf Folgendes:
- Die Gegebenheiten der lokalen
Gasversorgung (Gasart und Gasdruck)
müssen mit den Einstellungen des Kochfeldes
vereinbar sein (siehe Typenschild und
Düsentabelle).
- Die Außenseiten der an das Kochfeld
angrenzenden Einbaumöbel oder Geräte
müssen gemäß örtlicher Vorschriften
hitzebeständig sein.
- Dieses Gerät ist nicht an eine
Rauchabzugsvorrichtung angeschlossen.
Es muss entsprechend den gültigen
Installationsvorschriften aufgestellt werden.
Besondere Beachtung ist den entsprechenden
Anforderungen für eine Belüftung zu schenken.
- Verbrennungsprodukte müssen mithilfe
von speziellen Abzugshauben oder mit
elektrischen Wand- und/oder Fensterlüftern
nach außen abgeführt werden
Gasanschluss
Diese Arbeit darf nur von einem
qualizierten Fachmann durchgeführt
werden.
Der Gasanschluss muss den örtlichen Vorschriften
entsprechen.
- Sie nden die örtlichen Sondervorschriften
für bestimmte Länder im separat beigelegten
Blatt „Nationale Sicherheitsvorschriften“
Finden Sie darin keine Informationen zu Ihrem
Land, bitten Sie den Installateur um genauere
Page 29

DEUTSCH 29
Angaben.
- Der Anschluss des Kochfeldes an das öffentliche
Gasnetz oder eine Gasasche muss mit
einer stabilen Kupfer- oder Stahlleitung und
zugelassenen Kupplungen oder mit einem
durchgehenden Edelstahl-Schlauch gemäß den
örtlichen Vorschriften erfolgen. Die maximale
lineare Schlauchlänge beträgt 2 Meter.
A
C
D
B
C
D
- Schließen Sie das mitgelieferte Winkelstück
(A) oder (B) an die Einlasshauptleitung des
Kochfeldes an und setzen Sie die mitgelieferte
Unterlegscheibe (C) gemäß EN 549 dazwischen.
- Nur für BE - Ersetzen Sie den vorgerüsteten
Rohrkrümmer samt Unterlegscheibe (C) durch
ein mit dem Gerät mitgeliefertes Ersatzteil.
- Unterlegscheibe (D) nicht im Lieferumfang des
Gerätes inbegriffen.
- WICHTIG: Bei Verwendung eines Edelstahl-
Schlauchs muss dieser so montiert werden,
dass er keine frei beweglichen Teile der
Möbel berührt. Er muss ohne Behinderungen
verlegt werden und auf seiner ganzen Länge
kontrollierbar sein.
- Suchen Sie nach dem Anschluss an das
Gasnetz mit Seifenwasser nach eventuellen
undichten Stellen. Zünden Sie jetzt die Brenner
und drehen Sie die Einstellknöpfe von der
Maximalstufe
um die Stabilität der Flamme zu kontrollieren.
Anschluss an das Stromnetz
ACHTUNG
- Diese Arbeit darf nur von einem qualizierten
Fachmann durchgeführt werden.
- Der elektrische Anschluss muss unter
Einhaltung der örtlichen Sicherheitsvorschriften
vorgenommen werden.
- Die Erdung des Gerätes ist gesetzlich
vorgeschrieben.
- Verwenden Sie kein Verlängerungskabel.
- WICHTIG: Die Daten für Spannung und
Leistungsaufnahme benden sich auf dem
Typenschild.
Installation
Setzen Sie nach sorgfältiger Reinigung des
Kochfeldrandes das beiliegende Dichtungsprol
ein, wie in der Abbildung gezeigt. Setzen Sie
das Kochfeld in die Aussparung ein, die Sie
entsprechend den Maßangaben in der Anleitung
in die Arbeitsplatte gesägt haben.
HINWEIS: Das Stromkabel muss lang genug
sein, um das Kochfeld nach oben herausziehen
zu können. Befestigen Sie das Kochfeld mit den
mitgelieferten Klammern. Setzen Sie die Klammern
auf die Mindeststufe ,
P
Erdung
(gelb-grün)
N
Page 30

DEUTSCH 30
in die durch die Pfeile gekennzeichneten
Bohrungen ein und befestigen Sie sie mit den
für die Stärke der Arbeitsplatte geeigneten
Schrauben. Der Stromanschluss muss sich in der
Nähe der Einbaustelle benden. Wenn das mit
dem Gerät gelieferte Kabel nicht lang genug
ist, tauschen Sie es gegen ein anderes Kabel mit
genau den gleichen Spezikationen, aber von
ausreichender Länge aus.
Umstellung auf andere Gasarten
ACHTUNG
- Diese Arbeit darf nur von einem qualizierten
Fachmann durchgeführt werden.
Falls das Gerät mit einer Gasart betrieben
wird, die von der auf dem Typenschild und
dem orangefarbenen Aufkleber angegebenen
abweicht, müssen die Düsen ausgewechselt
werden.
Entfernen Sie den Informationsaufkleber und
kleben Sie diesen in die Benutzerinformation ein.
Benutzen Sie für die in der Benutzerinformation
angeführten Gasdrücke geeignete Druckregler.
- Die Gasdüsen dürfen nur vom Kundendienst
oder einem qualizierten Fachmann
ausgewechselt werden.
- Gasdüsen, die nicht mit dem Gerät geliefert
werden, müssen beim Kundendienst bestellt
werden.
- Stellen Sie die Minimalstufe der Hähne ein.
HINWEIS: Bei Verwendung von LPG (G30/
G31) muss die Schraube zur Einstellung der
Minimalstufe so fest wie möglich angezogen
werden.
WICHTIG: Sollten Sie Schwierigkeiten beim
Drehen der Brennerknöpfe haben, lassen Sie
bitte die Brennerhähne durch den Kundendienst
austauschen.
Austauschen der Düsen (siehe Abschnitt
„Düsentabelle“)
- Topfhalterungen (A) entfernen.
- Brenner (B) herausheben.
- Einen entsprechend dimensionierten
Steckschlüssel (C) verwenden, um die zu
ersetzende Düse auszuschrauben.
- Durch die für die neue Gasart passende Düse
ersetzen.
- Die Düse (D) einsetzen.
Vor der Installation des Kochfeldes das mit den
Düsen gelieferte Gaseichschild so befestigen, dass
es die bestehenden Informationen zur Gaseichung
überdeckt.
D
C
A
B
Einstellung der Minimalstufe der Hähne
E
Um sicherzustellen, dass die kleinste Stufe korrekt
Page 31

DEUTSCH 31
eingestellt ist, den Knopf (E) abziehen und
folgendermaßen vorgehen:
- Schraube anziehen, um die Größe der
Flamme zu verringern (-);
- Schraube lockern, um die Größe der Flamme
zu vergrößern (+).
Während dieser Feineinstellung muss der
Gashahn auf der Minimalstufe stehen (kleine
Flamme).
- Die Brennerluft muss nicht eingestellt werden.
- Zünden Sie jetzt die Brenner und drehen Sie
die Einstellknöpfe von der Maximalstufe
auf die Mindeststufe,
der Flamme zu kontrollieren.
Nach Beendigung der Feineinstellung versiegeln
Sie die Stelle mit Siegelwachs oder ähnlichem
Material.
FR
NATIONALE
SICHERHEITSVORSCHRIFTEN
Lassen Sie die Montage und die elektrischen
Anschlüsse von einer qualizierten Fachkraft
und unter Einhaltung der geltenden
Sicherheitsvorschriften ausführen. Zu beachten
sind insbesondere
• Die Verordnung vom 2. August 1977
Technische Richtlinien und Sicherheitsvorschriften
für Flüssiggasanlagen in Wohngebäuden und auf
Grundstücken.
• Richtlinie DTU P 45 - 204
Gasanlagen (bisher DTU Nr. 61-1 - Gasanlagen
April 1982 + Ergänzung Nr. 1 vom Juli 1984).
• Ministerielle Gesundheitsrichtlinien
Für Anlagen mit Anschluss an die
Hauptstromversorgung
• Richtlinie NF C 15-100
Richtlinien für Niederspannungsanlagen
um die Stabilität
BE
NATIONALER NORMENBEZUG
Das Gerät ist mit einem konischen Gewinde
(1/2 Zoll) für den Gasanschluss ausgerüstet
(gemäß ISO 7/1 RP 1/2).
Der Gasanschluss muss gemäß NBN D
51-003 mit einer starren Leitung oder
entsprechend dem Spezikationsblatt
A.R.G.B./03 mit einem exiblen Schlauch
erfolgen.
Das Gerät muss mit einem nach AGB
zugelassenen Notstoppventil ausgerüstet
sein.
WOK-AUFSATZ
AUSTAUSCH DER EINSTELLKNÖPFE
Vergewissern Sie sich, dass Ihre Kochmulde
ausgeschaltet ist!
Page 32

DEUTSCH 32
Alle Knöpfe müssen sich in geschlossener Stellung
benden.
Ziehen Sie jeden Knopf der Kochmulde nach
oben ab und legen Sie diese beiseite.
Anschlag auf den jeweiligen Ventilschaft
(eventuelle Funkenbildung).
Kontrollieren Sie, dass sich alle Knöpfe in der
richtigen Position benden.
Entnehmen Sie den Satz der neuen Knöpfe aus
dem oberen Teil der Packung und danach aus
den Plastikbeuteln.
Drücken Sie die einzelnen Knöpfe bis zum
Überprüfen Sie den korrekten Einbau, indem Sie
jeden einzelnen Brenner separat zünden.
Page 33

DEUTSCH 33
Umweltschutz
Verpackung
- Das Verpackungsmaterial ist zu 100%
wiederverwertbar und trägt das
Recycling-Symbol ( ).
Produkte
Dieses Gerät ist gemäß der Europäischen
Richtlinie 2002/96/EG für Elektro- und
Elektronik-Altgeräte
gekennzeichnet. Durch eine angemessene
Entsorgung des Geräts trägt der
Nutzer dazu bei, potenziell schädliche
Auswirkungen für Umwelt und Gesundheit
zu vermeiden.
Das Symbol
dem beiliegenden Informationsmaterial
weist darauf hin, dass dieses Gerät kein
normaler Haushaltsabfall ist, sondern
in einer Sammelstelle für Elektro- und
Elektronik-Altgeräte entsorgt werden muss.
Die Entsorgung muss gemäß den örtlichen
Bestimmungen zur Abfallbeseitigung
erfolgen.
Weitere Informationen zu Behandlung,
Verwertung, und Wiederverwendung von
Elektrogeräten können Sie bei der örtlichen
Abfallbeseitigungsgesellschaft, der nächsten
Sammelstelle für Haushaltsmüll oder bei
dem Händler erfragen, bei dem das Gerät
gekauft wurde.
auf dem Gerät bzw. auf
Konformitätserklärung
- Das Kochfeld wurde entsprechend
folgender Richtlinien entwickelt und
hergestellt:
- Sicherheitsvorschriften
der EG-Richtlinie für
Gasverbrauchseinrichtungen –
2009/142/EG
- Sicherheitsvorschriften der
Niederspannungsrichtlinie –
2006/95/EC (die die Richtlinie
73/23/EWG sowie deren
nachfolgende Ergänzungen ablöst)
- Schutzvorschriften der Richtlinie zur
elektromagnetischen Verträglichkeit
(EMV) – 2004/108/EWG
- Dieses Kochfeld ist für den Kontakt mit
Lebensmitteln geeignet und entspricht
der EG-Richtlinie Nr. 1935/2004.
- Dieses Kochfeld (Klasse 3) ist
ausschließlich zum Kochen von
Lebensmitteln bestimmt. Jeder andere
Gebrauch (z.B. das Heizen von Räumen)
ist bestimmungsfremd und somit
gefährlich.
Page 34

DEUTSCH 34
IKEA GARANTIE
Wie lange ist die IKEA Garantie gültig?
Die Garantie gilt fünf (5) Jahre ab dem
Kaufdatum von bei IKEA gekauften
Geräten, es sei denn, es handelt sich um
Geräte der Marke “LAGAN”. Bei diesen
Geräten gilt eine Garantie von zwei (2)
Jahren. Als Kaufnachweis ist das Original
des Einkaufsbeleges erforderlich. Werden
im Rahmen der Garantie Arbeiten
ausgeführt, verlängert sich dadurch nicht die
Garantiezeit für das Gerät.
Welche Geräte sind nicht von der 5-(Fünf)-
Jahres-Garantie abgedeckt?
Die Geräte der Marke LAGAN und alle bei
IKEA vor dem 1. August 2007 gekauften
Geräte.
Wer übernimmt den Service?
IKEA führt die Serviceleistungen über sein
eigenes Kundendienstnetz oder einen
autorisierten Servicepartner aus.
Was deckt diese Garantie ab?
Die Garantie deckt Gerätefehler ab, die
aufgrund einer fehlerhaften Konstruktion
oder aufgrund von Materialfehlern nach dem
Datum des Einkaufs bei IKEA entstanden sind.
Die Garantie gilt nur für den Hausgebrauch
des betreffenden Gerätes. Ausnahmen
sind unter der Überschrift “Was deckt die
Garantie nicht ab?” erläutert. Innerhalb
der Garantiefrist werden die Kosten für
Reparatur, Ersatzteile sowie die Arbeits- und
Fahrtkosten übernommen, vorausgesetzt,
das Gerät ist ohne besonderen Aufwand
für eine Reparatur zugänglich. Die EURichtlinien (Nr. 99/44/EG) und die jeweiligen
örtlichen Bestimmungen gelten unter diesen
Bedingungen. Ersetzte Teile gehen in das
Eigentum von IKEA über.
Was unternimmt IKEA, um das Problem zu
lösen?
Der IKEA Kundendienst begutachtet das
Produkt und entscheidet nach eigenem
Ermessen, ob ein Garantieanspruch
besteht. Wenn die Garantie geltend
gemacht werden kann, wird IKEA durch
seinen eigenen Kundendienst oder einen
autorisierten Servicepartner nach eigenem
Ermessen das schadhafte Produkt entweder
reparieren oder durch ein gleiches oder
vergleichbares Produkt ersetzen.
Was deckt diese Garantie nicht ab?
• Normale Abnutzungen und
Beschädigungen.
• Vorsätzlich oder fahrlässig
herbeigeführte Schäden,
Beschädigungen infolge Missachtung
der Bedienungsanleitung,
unsachgemäßer Installation, falschen
Spannungsanschlusses, Beschädigung
durch chemische oder elektrochemische
Reaktionen, inklusive von Korrosionsoder Wasserschäden diese sind
nicht beschränkt auf Schäden durch
ungewöhnlich hohen Kalkgehalt
im Wasser, Beschädigungen
durch aussergewöhnliche
Umweltbedingungen.
• Verbrauchs- und Verschleißteile wie
Batterien und Glühlampen.
• Nichtfunktionelle und dekorative
Teile, die den normalen Gebrauch
nicht beeinussen, sowie Kratzer oder
mögliche Farbveränderungen.
• Zufallsschäden durch Fremdkörper,
Substanzen oder Reinigungsarbeiten
an Filtern, Abüssen oder Wasch-/
Spülmittelfächern.
• Schäden an folgenden Teilen:
Glaskeramik, Zubehör, Geschirr- und
Besteckkörbe, Zu- und Ablaufschläuche,
Dichtungen, Glühlampen und deren
Abdeckungen, Siebe, Knöpfe,
Gehäuse und Gehäuseteile. Soweit
nicht nachgewiesen wird, dass solche
Schäden auf Herstellungsmängel
zurückzuführen sind.
• Fälle, in welchen der gerufene
Servicetechniker keinen Fehler nden
konnte.
• Reparaturen, die nicht von unserem
eigenen Kundendienst oder -einem
Page 35

DEUTSCH 35
Servicevertragspartner ausgeführt oder
bei denen keine Originalteile verwendet
wurden.
• Durch fehlerhafte oder
unvorschriftsmäßige Installation
erforderliche Reparaturen.
• Die reparatur von Schäden, die durch
eine gewerbliche Nutzung des Gerätes
entstanden sind. gewerbliche Nutzung
des Gerätes.
• Transportschäden. Wenn der Kunde das
Produkt selbst nach Hause oder zu einer
anderen Adresse transportiert, ist IKEA
von der Haftung für Transportschäden
jeder Art freigestellt. Liefert IKEA das
Produkt direkt an die Kundenadresse,
werden eventuelle Transportschäden
durch IKEA gedeckt.
• Kosten für die Installation des IKEA-
Gerätes.
Wenn jedoch der IKEA-Kundendienst
oder ein Servicevertragspartner im
Rahmen der Garantie Reparaturen
ausführt oder das Gerät ersetzt,
installiert der Kundendienst oder
der Servicevertragspartner das
ausgebesserte Gerät oder das
Ersatzgerät, falls dies erforderlich sein
sollte.
Als Ausnahme gilt die fehlerfreie
Installation durch qualizierte Fachleute
unter Verwendung von Originalteilen,
um das Gerät den technischen
Sicherheitsvorschriften eines anderen
EU-Landes anzupassen.
Gültigkeit der länderspezischen
Bestimmungen
IKEA räumt Ihnen eine spezielle
Garantie ein, die die gesetzlichen
Gewährleistungsrechte, die von Land zu
Land jedoch unterschiedlich sein können,
mindestens abdeckt bzw. erweitert.
Allerdings schränken diese Bedingungen
in keiner Weise die landesweit geltenden
Verbraucherrechte ein.
Gültigkeitsbereich
Für Geräte, die einem EU-Land gekauft
und in ein anderes EU-Land mitgenommen
werden, wird der Kundendienst gemäß
den Garantierichtlinien im neuen Land
übernommen. Eine Verpichtung zur
Durchführung von Leistungen im Rahmen
der Garantie besteht nur dann, wenn das
Gerät gemäß der Montageanleitung und
gemäß:
- den technischen Spezikationen des
Landes, in dem der Garantieanspruch
erfolgt;
- den Montageinstruktionen und
Informationen im Benutzerhandbuch
entspricht.
Der engagierte Kundendienst für IKEA
Geräte
Der IKEA-Service steht Ihnen bei folgenden
Fragen / Anliegen gerne zur Verfügung:
• Wenn Sie einen Kundendienst im
Rahmen der Garantie benötigen
• Bei Fragen zur Installation Ihres
IKEA-Gerätes in den IKEA-Möbelkörper
• Wenn Sie Fragen zu den Funktionen
Ihres IKEA-Gerätes haben.
Um Ihnen möglichst schnell und kompetent
weiterhelfen zu können, bitten wir
Sie, sich vorher die Montage- und
Gebrauchsanweisung Ihres Gerätes
genauestens durchzulesen.
So erreichen Sie unseren Service
Gehen Sie dazu auf die letzte
Seite dieser Broschüre. Dort
nden Sie eine Übersicht mit den
entsprechenden Telefonnummern
und Kontaktdaten unserer
autorisierten Kundendienste.
Damit wir Ihnen im Falle einer
Störung jederzeit schnell helfen
können, bitten wir Sie, die in diesem
Handbuch aufgeführten Rufnummern
zu verwenden. Wenden Sie sich
jeweils an die für den betreffenden
Gerätetyp angegebene Rufnummer.
Halten Sie dazu bitte die (8-stellige)
IKEA Artikelnummer und die
Page 36

DEUTSCH 36
12-stellige Servicenummer (auf dem
Geräte-Typschild vermerkt) Ihres
IKEA Gerätes bereit.
BEWAHREN SIE DEN KAUFBELEG
GUT AUF!
Unser Service kann einen
Garantieanspruch nur unter Vorlage
dieses Beleges akzeptieren. Auf
dem Kaufbeleg ist auch die IKEA
Bezeichnung und Artikelnummer
(8-stelliger Code) für jedes der Geräte,
die Sie gekauft haben, vermerkt.
Benötigen Sie weiteren Rat und
Unterstützung?
Bei allen anderen, nicht
kundendienstspezischen Fragen, bitten
wir Sie, sich an Ihr nächstgelegenes IKEAEinrichtungshaus zu wenden. Wir empfehlen
Ihnen, sich vorher die dem Gerät beigefügten
Unterlagen genauestens durchzulesen.
Page 37

FRANÇAIS 37
Table des matières
Instructions de sécurité 37
Description de l'appareil 40
Utilisation quotidienne 41
Conseils et recommandations utiles 41
Nettoyage et entretien 42
Que faire si 43
Tableau des injecteurs 44
Données techniques 45
Installation 45
Conseils pour la protection
de l'environnement 50
GARANTIE IKEA 51
Instructions de sécurité
Votre sécurité et celle des autres est
très importante.
Des messages importants concernant
la sécurité sont insérés dans le présent
manuel et apposés sur l'appareil ; il
convient de les lire et de les observer
en toute circonstance.
Ceci est le symbole
d'avertissement relatif à la
sécurité, qui rappelle l'attention des
utilisateurs sur les dangers potentiels
que eux-mêmes ou d'autres
personnes peuvent encourir.
Tous les messages de sécurité sont
précédés de ce symbole et des
termes :
DANGER Indique une situation
dangereuse qui, si elle n'est pas
évitée, occasionnera de graves
lésions.
AVERTISSEMENT Indique une
situation dangereuse qui, si elle
n'est pas évitée, est susceptible
d'occasionner de graves lésions.
Tous les messages de sécurité vous
informent sur le danger potentiel,
sur la façon de limiter le risque de
blessures et sur
les conséquences d'une nonobservation des instructions.
Débranchez l'appareil du secteur
avant de procéder aux opérations
d'installation.
L'installation et l'entretien doivent
être réalisés par un technicien
spécialisé, conformément aux
instructions du fabricant et à la
réglementation régissant l'utilisation
d'appareils au gaz applicable
localement. Utilisez uniquement des
pièces de rechange d'origine. Pour
toute réparation ou tout
remplacement de pièces, procédez
uniquement aux opérations spéciées
dans le manuel en utilisant les pièces
expressément indiquées.
AVERTISSEMENT Le non-respect
des informations contenues dans
le présent manuel peut être source
d'incendie ou d'explosion et causer
des dommages corporels ou
matériels.
- Ne rangez pas ou ne manipulez
pas de l'essence ou des vapeurs
et des liquides inammables à
proximité de l'appareil.
Que faire en cas de détection d'une
odeur de gaz :
- Ne tentez pas d'allumer un autre
appareil.
Page 38

FRANÇAIS 38
- Ne touchez pas les interrupteurs
électriques.
- N'utilisez pas de téléphone à
l'intérieur de l'habitation.
- Appelez immédiatement votre
fournisseur de gaz avec le
téléphone d'un voisin. Suivez
les instructions que celui-ci vous
fournira.
- Si votre fournisseur de gaz n'est
pas joignable, appelez les
pompiers.
- L'installation et l'entretien doivent
être effectués par un technicien
qualié, un atelier d'entretien et de
réparation ou par le fournisseur de
gaz.
- Utilisez l'appareil dans une pièce
bien aérée.
- Les branchements électriques et
le raccordement au gaz doivent
être réalisés conformément aux
réglementations locales en vigueur.
- Lors de l'installation, il faut prévoir
un disjoncteur omnipolaire
avec ouverture des contacts de
3 mm minimum assurant une
déconnexion complète.
- La mise à la terre de l'appareil est
obligatoire.
- Le cordon d'alimentation doit être
sufsamment long pour permettre
le branchement de l'appareil une
fois installé dans son logement
- Effectuez le raccordement au gaz
à l'aide d'un exible ou d'un tuyau
en métal rigide.
- Si cela s'avère nécessaire, il
convient de remplacer le cordon
d'alimentation exclusivement par
un cordon possédant les mêmes
caractéristiques que celui d'origine
fourni par le fabricant (type
H05V2V2-F 90°C ou H05RR-F).
Cette opération doit être réalisée
par un électricien qualié.
- Le fabricant décline toute
responsabilité en cas de blessure
causée à des personnes ou des
animaux ou en cas de dommage
matériel résultant du non-respect
de ces consignes.
- N'utilisez ni rallonge, ni adaptateur
multiple.
- Ne tirez pas sur le cordon
d'alimentation de l'appareil pour le
débrancher.
- Une fois l'installation terminée,
l'utilisateur ne devra plus pouvoir
accéder aux composants
électriques.
- Évitez de toucher l'appareil avec
les mains mouillées et lorsque vous
êtes pieds nus.
- Cette table de cuisson (Classe 3)
est exclusivement conçue comme
appareil de cuisson. N'utilisez
jamais cet appareil pour chauffer
une pièce. Il en résulterait un risque
d'intoxication au monoxyde de
carbone et une surchauffe de la
table de cuisson.
- Le fabricant décline toute
responsabilité en cas d'utilisation
incorrecte ou de mauvais réglages
des commandes.
Page 39

FRANÇAIS 39
- L'appareil et ses parties
accessibles deviennent chauds
pendant l'utilisation. Veillez à
ne pas toucher les résistances.
Les enfants de moins de 8 ans
doivent être tenus à distance ou
être surveillés en permanence.
L'appareil n'est pas destiné à être
utilisé par des personnes (enfants
de moins de 8 ans compris)
atteintes de déciences physiques,
sensorielles ou mentales, ayant une
expérience et des connaissances
insufsantes, sauf si placées sous
la surveillance ou instruites sur
l'utilisation de l'appareil par une
personne responsable de leur
sécurité. Empêchez-les de jouer
avec l'appareil. Le nettoyage et
l'entretien quotidien de l'appareil
ne doivent pas être effectués
par un enfant, à moins qu'une
personne adulte ne supervise ces
opérations.
- L'utilisation d'un appareil à
gaz produit de la chaleur et de
l'humidité à l'intérieur de la pièce.
Veillez à ce que la pièce soit aérée
correctement ou installez une
hotte aspirante dotée d'un conduit
d'évacuation.
- Veillez à tenir les animaux
domestiques hors de portée de
l’appareil.
- En cas d'utilisation prolongée, il
peut s'avérer nécessaire d'aérer
davantage la pièce, soit en ouvrant
une fenêtre, soit en augmentant la
puissance d'aspiration de la hotte.
- Après utilisation, assurez-vous que
les boutons sont bien en position
d'arrêt (OFF) et fermez le robinet
principal d'arrivée du gaz ou le
robinet de la bouteille de gaz.
- L'huile et la graisse peuvent
devenir très chaudes et
s'enammer facilement. Surveillez
régulièrement la cuisson si vous
utilisez une quantité importante de
graisse, d'huile ou d'alcool (rhum,
cognac, vin, par exemple).
- Si vous cuisinez avec de la
graisse ou de l'huile, surveillez
constamment la cuisson, car ces
matières peuvent s'enammer et
provoquer un incendie. Ne tentez
JAMAIS d'éteindre un incendie
avec de l'eau. En cas d'incendie,
mettez l'appareil hors tension puis
couvrez la amme à l'aide d'un
couvercle ou d'une couverture
anti-feu.
Risque d'incendie : ne stockez rien
sur les surfaces de cuisson.
- Les matériaux d'emballage
doivent être tenus hors de portée
des enfants.
- Avant de procéder au nettoyage
ou à l'entretien de l'appareil,
laissez-le refroidir auparavant.
Conservez soigneusement ces
instructions.
Page 40

FRANÇAIS 40
Description de l'appareil
1
2
5
3
6
4
7 9 10 118
1
Grilles amovibles
2
Brûleur rapide
3
Brûleur semi-rapide
4
Brûleur auxiliaire
5
Brûleur semi-rapide
6
Brûleur haute puissance
7
Bouton de commande du brûleur haute puissance
8
Bouton de commande du brûleur semi-rapide
9
Bouton de commande du brûleur auxiliaire
10
Bouton de commande du brûleur rapide
11
Bouton de commande du brûleur semi-rapide
Symboles
Disque plein
Grandes amme et étoile
Petite amme
Robinet fermé
Ouverture/admission
maximum et allumage
électrique
Ouverture minimum ou
puissance réduite
Page 41

FRANÇAIS 41
Utilisation quotidienne
Ne laissez pas la amme du brûleur
dépasser le bord de la casserole.
Remarque importante : lorsque la table de
cuisson est utilisée, elle peut être chaude dans
son intégralité.
- Pour allumer un des brûleurs, tournez le
bouton correspondant dans le sens inverse
des aiguilles d'une montre jusqu'à la
position grande amme.
- Appuyez sur le bouton et maintenez-le
dans cette position jusqu'à ce que le brûleur
s'allume.
- Dès que le brûleur est allumé, maintenez le
bouton enfoncé pendant 5 à 10 secondes
environ pour permettre l'enclenchement
correct du dispositif de sécurité.
Ce dispositif de sécurité du brûleur permet de
couper l'arrivée du gaz en cas d'extinction
Conseils et recommandations utiles
Cette table de cuisson est équipée de
brûleurs de différents diamètres. Pour obtenir
une meilleure performance des brûleurs,
veuillez respecter les consignes suivantes :
- Utilisez des ustensiles de cuisson d'un
diamètre égal ou légèrement supérieur à
celui du foyer (voir le tableau suivant) ;
- Utilisez exclusivement des ustensiles de
cuisson à fond plat ;
- Cuisez les aliments dans une quantité
d'eau adaptée aux besoins et laissez le
couvercle sur la casserole.
- Vériez que les ustensiles de cuisson ne
inopinée de la amme (suite à un courant
d'air, une absence momentanée de gaz, un
débordement de liquides, etc.).
- Ne maintenez pas le bouton enfoncé plus
de 15 secondes. Si, une fois ce temps écoulé,
le brûleur ne reste pas allumé, attendez
au moins une minute avant de répéter
l'opération.
REMARQUE : Si des conditions locales spéciales
du gaz distribué rendent l'allumage du brûleur
difcile, il est conseillé de répéter l'opération en
plaçant le bouton sur la position petite amme.
Il se peut que le brûleur s'éteigne lorsque vous
relâchez le bouton. Cela signie que le dispositif
de sécurité n'a pas chauffé sufsamment. Dans
un tel cas, veuillez répéter les opérations décrites
ci-dessus.
dépassent pas de la table de cuisson.
REMARQUE IMPORTANTE : l'utilisation
impropre des grilles peut endommager la
table de cuisson : ne les retournez pas ou
ne les faites pas glisser sur la surface de la
table de cuisson. N'utilisez pas :
- de plaques en fonte, de pierres ollaires,
d'ustensiles de cuisson en terre cuite ;
- de diffuseurs de chaleur comme des
mailles métalliques ou tout autre type ;
- deux brûleurs simultanément pour
un seul récipient (par exemple, une
poissonnière).
Brûleur Ø ustensile de cuisson
Brûleur haute puissance 24 à 26 cm
Rapide 24 à 26 cm
Semi-rapide 16 à 24 cm
Auxiliaire 8 à 14 cm
Page 42

FRANÇAIS 42
Nettoyage et entretien
- Rincez et séchez soigneusement
Débranchez l'appareil avant de
procéder à son entretien.
- Nettoyez les parties émaillées et en verre
à l'eau chaude en utilisant un peu de
détergent neutre.
- Si les surfaces en acier inoxydable restent
trop longtemps en contact avec de l'eau
calcaire ou des détergents corrosifs, des
taches risquent de se former. Éliminez
tout débordement de liquide (eau, sauce,
café, etc.) avant qu'il ne sèche.
- Nettoyez à l'eau chaude en utilisant un
détergent neutre, puis essuyez à l'aide
d'un chiffon doux ou d'une peau de
chamois. Éliminez les résidus carbonisés
à l'aide d'un produit de nettoyage spécial
pour surfaces en acier inoxydable.
REMARQUE : nettoyez l'inox uniquement
avec un chiffon doux ou une éponge.
- N'utilisez en aucun cas de produits
abrasifs ou corrosifs, de produits chlorés
ou de tampons à récurer.
- N'utilisez pas d'appareils de nettoyage à
la vapeur.
- N'utilisez pas de produits inammables.
- Essuyez immédiatement les substances
acides ou alcalines, telles que vinaigre,
moutarde, sel ou jus de citron, qui se sont
déposées sur la table de cuisson.
NETTOYAGE DES ÉLÉMENTS DE LA TABLE DE
CUISSON
- Les grilles, les chapeaux des brûleurs et
les brûleurs peuvent être retirés pour être
nettoyés.
- Lavez-les à la main, à l'eau chaude en
utilisant un détergent non abrasif. Veillez
à éliminer soigneusement tous les
résidus d'aliments et assurez-vous que
les ouvertures du brûleur ne sont pas
obstruées.
- Réinstallez les brûleurs et les chapeaux
des brûleurs dans leurs logements
respectifs.
- Au moment de réinstaller les grilles,
assurez-vous que celles-ci sont alignées
par rapport aux brûleurs.
- Sur les modèles équipés de bougies
d'allumage électriques et de
thermocouples de sécurité, veillez à
nettoyer soigneusement l'extrémité
de la bougie pour garantir son bon
fonctionnement.
Vériez régulièrement l'état de ces
éléments et nettoyez-les à l'aide d'un
chiffon humide, si nécessaire. Éliminez
tout résidu d'aliment à l'aide d'un curedent ou d'une aiguille.
REMARQUE : pour ne pas endommager le
dispositif d'allumage électrique, actionnezle uniquement lorsque les brûleurs ont été
remis en place.
Page 43

FRANÇAIS 43
Que faire si ...
Problème Cause probable Solution
L'allumage électronique ne
fonctionne pas
Le brûleur ne s'allume pas Il se peut que le robinet
La amme n'est pas répartie de
façon homogène autour de la
couronne.
Avant de contacter le Service après-vente :
1. Vériez si vous pouvez remédier par
vous-même au problème en consultant
le chapitre "Diagnostic des pannes".
2. Éteignez et rallumez l'appareil pour voir
si le problème persiste.
3. Si le problème persiste, contactez le
Service après-vente.
Veuillez spécier les informations suivantes :
• le type de panne ;
• le modèle de la table de cuisson ;
• le code service (numéro suivant le mot
SERVICE sur la plaque signalétique
située sous la table de cuisson
et sur le certicat de garantie) ;
L'appareil n'est pas
alimenté électriquement.
du gaz soit fermé.
Il se peut que la
couronne soit obstruée
par des résidus
d'aliments.
• votre adresse complète ;
• votre numéro de téléphone.
Si une réparation est nécessaire, veuillez
contacter un Service Après-vente agréé,
comme indiqué dans la garantie.
Si la réparation devait être réalisée par
un technicien non agréé, exigez qu'il vous
remette une certication du travail effectué
et insistez pour qu'il soit fait usage de
pièces détachées d'origine.
Le non-respect des instructions
susmentionnées peut compromettre la
sécurité et la qualité de l’appareil.
Vériez si l'appareil est
branché dans la prise secteur
et si le courant n'est pas coupé.
Vériez que le robinet du gaz
est ouvert.
Nettoyez la couronne en
suivant les instructions de
nettoyage, en veillant à
éliminer tous les résidus
d'aliments.
Page 44

FRANÇAIS 44
Tableau des injecteurs
Catégorie II2E+3+
Type de gaz
utilisé
GAZ NATUREL
(Méthane)
G20
GAZ NATUREL
(Méthane)
G25
GAZ DE
PÉTROLE
LIQUÉFIÉ
(Butane) G30
GAZ DE
PÉTROLE
LIQUÉFIÉ
(Propane) G31
Type de gaz
utilisé
G20 20 mbars
G25 25 mbars
G30
28-30 mbars
G31
37 mbars
Type de brûleur
Brûleur haute
puissance
rapide
semi-rapide
auxiliaire
Brûleur haute
puissance
rapide
semi-rapide
auxiliaire
Brûleur haute
puissance
rapide
semi-rapide
auxiliaire
Brûleur haute
puissance
rapide
semi-rapide
auxiliaire
Type de modèle
5 BRÛLEURS
1 PB - 1 R
2 SR - 1 AUX
1 PB - 1 R
2 SR - 1 AUX
1 PB - 1 R
2 SR - 1 AUX
1 PB - 1 R
2 SR - 1 AUX
Marque de
l'injecteur
145
118 F2
101 Z
72 X
145
118 F2
101 Z
72 X
96
85
69
50
96
85
69
50
Puissance thermique
nominale (kW)
Puissance
thermique
nominale
(kW)
Consommation
nominale
4.00
3.00
2.00
1.00
4.00
3.00
2.00
1.00
3.80
3.00
2.00
1.00
3.80
3.00
2.00
1.00
12.00 1142 l/h 9.52
12.00 1328 l/h 8.19
11.80 857 g/h 30.94
11.80 842 g/h 23.80
381 l/h
286 l/h
190 l/h
95 l/h
443 l/h
332 l/h
221 l/h
111 l/h
276 g/h
218 g/h
145 g/h
73 g/h
271 g/h
214 g/h
143 g/h
71 g/h
Consommation
totale nominale
Puissance
thermique
réduite kW
BE FR
2.30
0.80
0.45
0.35
2.20
0.60
0.35
0.30
1.90
0.60
0.35
0.30
1.90
0.60
0.35
0.30
Pression du gaz
(bar)
min. nom. max.
2.20
0.60
0.35
0.30
Air nécessaire (m3) à
la combustion de 1
m3de gaz
17 20 25
20 25 30
28-
20
25 37 45
30
35
Puissance électrique : 220 - 240 V ~ 50/60 Hz
Page 45

FRANÇAIS 45
Données techniques
Dimensions
Largeur (mm) 730
Hauteur (mm) 40
Longueur (mm) 510
Tension (V) 220 - 240
Les données techniques gurent sur la plaque
signalétique située dans le fond de l'appareil.
Installation
Après avoir déballé la table de cuisson, contrôlez
que l'appareil n'a pas été endommagé pendant
le transport. En cas de problème, contactez votre
revendeur ou le Service Après-vente le plus
proche.
Informations techniques pour l'installateur
- La table de cuisson peut être encastrée dans
un plan de travail de 20 à 50 mm d'épaisseur.
- Si vous n'installez pas de four en dessous de
la table de cuisson, placez un panneau de
séparation d'une surface au moins égale à
celle de l'ouverture pratiquée dans le plan
de travail. Ce panneau ne peut en aucun cas
être installé à moins de 20 mm de la partie
inférieure de la table de cuisson.
- Avant de procéder à l'installation, assurezvous que :
- les conditions de distribution locale (nature et
pression du gaz) sont compatibles avec les
réglages de la table de cuisson (voir la che
produit et le tableau des injecteurs) ;
- les surfaces extérieures des meubles ou des
appareils adjacents à la table de cuisson
résistent à la chaleur, conformément aux
réglementations locales en vigueur ;
- cet appareil n'est pas raccordé à un dispositif
d'évacuation des fumées. Il doit être installé
conformément aux normes d'installation en
vigueur. Faire particulièrement attention aux
normes d'aération.
- les produits de la combustion sont évacués
vers l'extérieur, à travers une hotte ou des
ventilateurs électriques installés sur un mur et/
ou sur une fenêtre.
Raccordement au gaz
Cette opération doit être réalisée par un
technicien qualié.
Le système d'alimentation au gaz doit être
conforme à la réglementation régissant l'utilisation
d'appareils au gaz applicable localement.
- Vous trouverez les réglementations locales
en vigueur dans le pays de destination au
paragraphe "Réglementations en vigueur".
Si aucune information concernant votre pays
n'est fournie, adressez-vous à un technicien
qualié.
Page 46

FRANÇAIS 46
- La table de cuisson doit être raccordée au
réseau de distribution du gaz ou à la bouteille
de gaz à l'aide d'un tuyau rigide en cuivre
ou en acier dont les raccords sont conformes
aux réglementations locales en vigueur, ou à
l'aide d'un tuyau en acier inoxydable à surface
continue, conforme aux réglementations locales
en vigueur dans le pays d'installation. La
longueur maximale du tuyau est de 2 mètres.
A
C
D
B
C
D
- Raccordez le coude (A) ou (B) fourni au
tuyau principal d'alimentation de la table
de cuisson et installez la rondelle (C) fournie,
conformément à la norme EN 549.
- Remplacez le coude prémonté et la rondelle
(C) correspondante par les pièces de
rechange disponibles avec le produit.
- Rondelle (D) non fournie avec le produit.
- REMARQUE IMPORTANTE : Si vous utilisez
un tuyau en acier inoxydable, veillez à ce qu'il
ne touche aucune partie mobile des meubles.
Le tuyau doit être libre d'accès sur toute sa
longueur pour permettre son inspection.
- Une fois le tuyau de gaz raccordé, vériez
l'absence de fuites à l'aide d'eau savonneuse.
Allumez les brûleurs et tournez les boutons
de la position Maximum
Minimum
amme.
Branchement électrique
AVERTISSEMENT
- Cette opération doit être réalisée par un
technicien qualié.
- Les branchements électriques doivent être
réalisés conformément aux réglementations
locales en vigueur.
- La mise à la terre de l'appareil est obligatoire
aux termes de la loi.
- N'utilisez pas de rallonge.
- REMARQUE IMPORTANTE : les données
relatives à la tension et à la puissance
absorbée sont indiquées sur la plaque
signalétique.
Montage
Après avoir nettoyé le pourtour de la table de
cuisson, appliquez le joint fourni. Installez la table
de cuisson dans l'ouverture du plan de cuisson
dont les dimensions correspondent à celles gurant
dans le mode d'emploi.
REMARQUE : le cordon d'alimentation doit être
sufsamment long pour permettre son extraction
par le haut.
Pour xer la table de cuisson, utilisez les attaches
pour vérier la stabilité de la
à la position
L
Terre
(jaune/vert)
N
Page 47

FRANÇAIS 47
fournies. Introduisez les attaches dans les orices
prévus à cet effet (indiqués par la èche) et serrez-
les au moyen des vis en fonction de l'épaisseur du
plan de travail.
Veillez à ce que la prise secteur soit située à
proximité de l'appareil. Si le câble n'est pas
sufsamment long, remplacez-le par un câble
de longueur adéquate, présentant les mêmes
caractéristiques.
Adaptation à différents types de gaz
AVERTISSEMENT
- Cette opération doit être réalisée par un
technicien qualié.
Si votre appareil est conçu pour fonctionner avec
un type de gaz différent de celui indiqué sur la
plaque signalétique et sur l'étiquette d'information
appliquée sur le dessus de la table de cuisson,
remplacez les injecteurs.
Retirez l'étiquette d'information et conservez-la
avec le mode d'emploi.
Utilisez des détendeurs compatibles avec la
pression du gaz indiquée dans le mode d'emploi.
- Les injecteurs doivent être remplacés par le
Service Après-vente ou par un technicien
qualié.
- Les injecteurs non livrés avec l'appareil
doivent être commandés auprès du Service
Après-vente.
- Réglez les robinets sur le minimum.
REMARQUE : si vous utilisez du gaz de pétrole
liquéé (G30/G31), la vis de réglage du débit
minimum de gaz doit être serrée à fond.
REMARQUE IMPORTANTE : si les boutons de
commande des brûleurs tournent difcilement,
faites remplacer le robinet du brûleur par le
Service après-vente si celui-ci est défectueux.
Remplacement des injecteurs (voir le
paragraphe “Tableau des injecteurs”)
- Retirez les grilles (A).
- Retirez les brûleurs (B).
- Utilisez une clef à douille de taille appropriée
et dévissez l'injecteur (C) à remplacer.
- Remplacez-le par l'injecteur compatible avec
le nouveau type de gaz.
- Remontez l'injecteur en (D).
Avant d'installer la table de cuisson, n'oubliez
pas de coller l'étiquette fournie avec les injecteurs
contenant les informations correspondant au gaz
utilisé.
D
C
A
B
Réglage des ralentis des robinets
E
Pour vous assurer que le réglage minimum
est correctement réglé, retirez le bouton (E) et
procédez comme suit :
Page 48

FRANÇAIS 48
- serrez la vis pour réduire la hauteur de la
amme (-) ;
- desserrez la vis pour augmenter la hauteur
de la amme (+).
Le réglage doit être réalisé avec le robinet en
position de ralenti (petite amme).
- L'air primaire des brûleurs ne doit pas être
réglé.
- Allumez maintenant les brûleurs et tournez les
boutons de la position Maximum
position Minimum
de la amme
Une fois le réglage terminé, refaites le joint en
utilisant une cire à cacheter ou un matériau
équivalent.
FR
RAPPELS SUR LES NORMES DE
SÉCURITE EN VIGUEUR DANS LE PAYS
D’INSTALLATION
L’installation et la maintenance de l’appareil
doivent être effectuées par un technicien
qualié qui travaille en conformité avec
les réglementations en vigueur, et tout
particulièrement :
- Décret du 2 août 1977
Règles techniques et de sécurité applicables
aux installations fonctionnant au gaz et
au gaz d’hydrocarbures liquéés situées à
l’intérieur d’immeubles résidentiels et des
dépendances.
- Standard DTU P 45 - 204
Installations au gaz (anciennement DTU
no. 61-1 - Installations au gaz avril 1982 +
supplément no. 1 de juillet 1984).
- Réglementations du ministère de la
santé.
Pour les appareils raccordés à l’alimentation
électrique principale.
- Standard NF C 15-100
Installations électriques basse tension Standards.
pour vérier la stabilité
.
vers la
BE
RAPPELS SUR LES NORMES DE
SÉCURITE EN VIGUEUR DANS LE PAYS
D’INSTALLATION
L’appareil est équipé d’un embout
conique leté 1/2” pour être raccordé à
l’alimentation en gaz (conformément aux
réglementations ISO 7/1 RP 1/ 2).
Le raccordement doit être réalisé
conformément à la norme NBN D 51-003 au
moyen d’un tuyau rigide, ou conformément
au document des spécications A.R.G.B./03
à l’aide d’un tuyau exible.
Au moment de l’installation, l’appareil doit
être doté d’une valve d’arrêt agréée AGB.
ADAPTATEUR WOK
REMPLACEMENT DES BOUTONS
Assurez-vous que votre table de cuisson est
éteinte !
Tous les boutons doivent être en position fermée.
Page 49

FRANÇAIS 49
Tirez vers le haut chaque bouton de la table de
cuisson et rangez-les ensemble après les avoir
retirés.
Retirez le kit contenant les nouveaux boutons,
qui est situé dans la partie supérieure du carton
d'emballage, et sortez les nouveaux boutons du
sachet en plastique.
Vériez que tous les boutons sont à la bonne
place
Vériez que l'installation est correcte en allumant
chaque brûleur séparément.
Poussez chaque bouton sur la tige de la soupape
jusqu'à ce que vous sentiez glisser l'extrémité
(possibilité d'étincelles).
Page 50

FRANÇAIS 50
Conseils pour la protection de l'environnement
Emballage
- L'emballage se compose de matériaux
100 % recyclables et porte le symbole du
recyclage ( ).
Produits
Cet appareil porte le symbole du recyclage
conformément à la Directive Européenne
2002/96/CE relative aux déchets
d'équipements électriques et électroniques
(DEEE). En procédant à la mise au rebut
correcte de cet appareil, vous contribuerez
à empêcher toute conséquence nocive pour
l'environnement et la santé de l'homme.
Le symbole
sur la documentation qui l'accompagne
indique que cet appareil ne peut en aucun
cas être traité comme un déchet ménager et
qu'il doit être remis à un centre de collecte
agréé pour le recyclage des équipements
électriques et électroniques. La mise au
rebut doit être effectuée conformément aux
réglementations locales en vigueur.
Pour de plus amples informations sur le
traitement, la récupération et le recyclage
de ce produit, contactez le service de
collecte des déchets de votre ville, le service
compétent de votre municipalité ou le
magasin où vous avez acheté votre appareil.
apposé sur l'appareil ou
Déclaration de conformité
- Cette table de cuisson a été conçue,
fabriquée et commercialisée en
conformité aux :
- objectifs de sécurité de la Directive
“Gaz” 2009/142/CEE ;
- objectifs de sécurité de la Directive
“Basse tension” 2006/95/CE (en
remplacement de la Directive 73/23/
CEE et modications ultérieures) ;
- exigences de protection de la
Directive CEM 2004/108/CEE.
- Cette table de cuisson est conçue
pour entrer en contact avec des
denrées alimentaires et a été fabriquée
conformément au règlement CEE
1935/2004.
- Cette table de cuisson (Classe 3) a
été conçue uniquement pour cuire
des aliments. Toute autre utilisation
(pour chauffer une pièce, par exemple)
est considérée comme impropre et
dangereuse.
Page 51

FRANÇAIS 51
GARANTIE IKEA (FRANCE)
CONTRAT DE GARANTIE ET DE SERVICE
APRES-VENTE IKEA
Décret n° 87-1045 relatif à la présentation
des écrits constatant les contrats de garantie
et de service après-vente (J.O.R.F. du 29
décembre 1987).
Préalablement à la signature du bon
de commande, le vendeur indiquera à
l’acheteur les installations nécessaires pour
assurer le branchement de l’appareil selon
les règles de l’art.
Numéros de modèle et de série (Reporter
ici le numéro d’identication porté sur
l’étiquette code barre du produit)
Modèle :
N° de série :
Date d’achat (Reporter ici la date d’achat
portée sur votre ticket de caisse) :
Le vendeur est tenu de fournir une
marchandise conforme à la commande.
Livraison et mise en service
Livraison à domicile : oui, si demandée
par le client (selon modalités dénies et
mentionnées sur la facture d’achat ou le bon
de commande).
Gratuite : non (tarif et modalités disponibles
en magasin et fournis au client au moment
de la commande ou de l’achat).
Mise en service : non.
En cas de défauts apparents ou d’absence
de notice d’emploi et d’entretien, l’acheteur
a intérêt à les faire constater par écrit par le
vendeur ou le livreur lors de l’enlèvement de
la livraison ou de la mise en service.
Garantie Légale (sans supplément de
prix)
A la condition que l’acheteur fasse la preuve
du défaut caché, le vendeur doit légalement
en réparer toutes les conséquences (art.1641
et suivants du Code Civil). Si l’acheteur
s’adresse aux tribunaux, il doit le faire
dans un délai de deux ans à compter de la
découverte du défaut caché (art.1648 du
Code Civil).
Nota - En cas de recherche de solutions
amiables préalablement à toute action en
justice, il est rappelé qu’elles n’interrompent
pas le délai de prescription. La réparation
des conséquences du défaut caché,
lorsqu’il a été prouvé, comporte, selon la
jurisprudence:
• soit la réparation totalement gratuite de
l’appareil, y compris les frais de maind’oeuvre et de déplacement au lieu de la
mise en service ;
• soit son remplacement ou le
remboursement total ou partiel de son
prix au cas où l’appareil serait totalement
ou partiellement inutilisable ;
• et I’indemnisation du dommage
éventuellement causé aux personnes ou
aux biens par le défaut de l’appareil.
La garantie légale due par le vendeur
n’exclut en rien la garantie légale due par le
constructeur.
Litiges éventuels
En cas de difculté vous avez la possibilité,
avant toute action en justice, de rechercher
une solution amiable, notamment avec l’aide
:
d’une association de consommateurs ;
ou d’une organisation professionnelle de
la branche;
ou de tout autre conseil de votre choix.
Il est rappelé que la recherche d’une
solution amiable n’interrompt pas le délai
de deux ans de l’art.1648 du Code Civil.
Il est aussi rappelé qu’en règle générale
et sous réserve de l’appréciation des
tribunaux, le respect des dispositions de la
présente garantie contractuelle suppose :
• Que l’acheteur honore ses engagements
nanciers envers le vendeur;
• Que l’acheteur utilise l’appareil de façon
normale; (*)
• Que pour les opérations nécessitant une
haute technicité aucun tiers non agréé par
le vendeur ou le constructeur n’intervienne
Page 52

FRANÇAIS 52
pour réparation sur l’appareil (sauf cas de
force majeure ou carence prolongée du
vendeur).
(*) Voir la notice d’emploi et d’entretien et
les conditions d’application de la garantie
contractuelle
Garantie contractuelle IKEA
PRIX : rien à payer en sus.
DUREE : 5 (cinq) ans.
POINT DE DEPART : à compter de la date
d’achat chez IKEA.
RÉPARATION DE L’APPAREIL :
• remplacement des pièces, main-d’oeuvre,
déplacement, transport des pièces ou de
l’appareil : oui
• garantie des pièces remplacées : non
• délai d’intervention : fonction du type de
réparation et porté à la connaissance de
l’acheteur avant intervention.
REMPLACEMENT OU REMBOURSEMENT
DE L’APPAREIL (en cas d’impossibilité de
réparation reconnue par le vendeur et le
constructeur) : oui
Pour mettre en oeuvre le service aprèsvente en cas de panne couverte par la
garantie contractuelle, ou pour obtenir
des informations techniques pour la mise
en service ou le bon fonctionnement de
l’appareil, contacter IKEA au numéro de
téléphone respectif, suivant le pays, indiqué
à la n de cette notice et correspondant à
votre appareil.
Conservez votre preuve d’achat avec
le document de garantie, ils vous seront
nécessaires pour la mise en oeuvre de la
garantie.
CONDITIONS DE GARANTIE
CONTRACTUELLE IKEA
Quelle est la durée de validité de la
garantie ?
La présente garantie est valable cinq (5)
ans à compter de la date d’achat chez
IKEA d’un appareil électroménager de
l’assortiment cuisines, à l’exception des
appareils LAGAN qui sont garantis pour une
durée de deux (2) ans.
L’original du ticket de caisse, de la facture
ou du bon de livraison en cas de vente
à distance sera exigé comme preuve de
l’achat. Conservez-le dans un endroit sûr.
La réparation ou le remplacement
du produit défectueux n’a pas pour
conséquence de prolonger la durée initiale
de garantie. Toutefois, conformément à l’art.
L.211-16 du Code de la Consommation, toute
période d’immobilisation du produit, pour
une remise en état couverte par la garantie,
d’au moins sept jours vient s’ajouter à la
durée de la garantie qui restait à courir à
la date de la demande d’intervention du
consommateur ou de la mise à disposition
pour réparation du bien en cause, si cette
mise à disposition est postérieure à la
demande d’intervention.
Quels sont les appareils électroménagers
couverts par la garantie ?
La garantie IKEA de cinq (5) ans couvre
tous les appareils électroménagers de
l’assortiment cuisines, hors appareils de la
série LAGAN qui sont garantis pour une
durée de deux (2) ans, achetés chez IKEA à
compter du 1er août 2007.
Quels sont les appareils électroménagers
exclus de la présente garantie ?
Les appareils électroménagers portant
le nom de LAGAN, et tous les appareils
électroménagers de l’assortiment cuisines
IKEA achetés avant le 1er août 2007.
Qui est couvert par la garantie ?
La présente garantie concerne l’acheteur
agissant en qualité de consommateur à
compter de la date d’achat du produit.
Qui exécutera les prestations dans le
cadre de la garantie ?
Le prestataire de services désigné par
IKEA fournira l’assistance de son réseau de
réparateurs agréés pour vous servir dans
le cadre de cette garantie. Pour la mise en
oeuvre, veuillez vous reporter à la rubrique
«Comment nous joindre ».
Page 53

FRANÇAIS 53
Que couvre cette garantie ?
La présente garantie IKEA couvre les
défauts de construction et de fabrication
susceptibles de nuire à une utilisation
normale, à compter de la date d’achat chez
IKEA par le client. Elle ne s’applique que
dans le cadre d’un usage domestique.
Les exclusions sont reprises dans la section
“Qu’est-ce qui n’est pas couvert dans le
cadre de cette garantie ?”
Les présentes conditions de garantie
couvrent les frais de réparation, de pièces
de rechange, de main d’oeuvre et de
déplacement du personnel à domicile
pendant une période de cinq (5) ans,
ramenée à deux (2) ans sur la série LAGAN,
à compter de la date d’achat chez IKEA,
sous réserve que les défauts soient couverts
et à condition que l’appareil soit disponible
pour réparation sans occasionner de
dépenses spéciales. Voir aussi “Rappel des
dispositions légales”. Les pièces remplacées
deviennent la propriété de IKEA. Ces
dispositions ne s’appliquent pas aux
réparations effectuées sans autorisation du
prestataire de services IKEA.
Que ferons-nous pour remédier au
problème ?
Dans le cadre de cette garantie, le
prestataire de service désigné par
IKEA, examinera le produit. Si après
vérication, et hormis mise en oeuvre de
la garantie légale, il est reconnu que votre
réclamation est couverte par la présente
garantie contractuelle, il sera procédé à
la réparation du produit défectueux, ou
en cas d’impossibilité de réparation, à
son remplacement par le même article ou
par un article de qualité et de technicité
comparable. Compte tenu des évolutions
technologiques, l’article de remplacement
de qualité équivalente peut être d’un prix
inférieur au modèle acheté.
Si aucun article équivalent n’est disponible,
et en cas d’impossibilité totale ou partielle
de réparation reconnue par le prestataire
de IKEA ou son représentant agréé, sous
réserve que les conditions d’application de
la garantie soient remplies, IKEA procèdera
au remboursement total ou partiel de
l’appareil reconnu défectueux.
Le prestataire de service désigné par
IKEA s’engage à tout mettre en oeuvre
pour apporter une solution rapide et
satisfaisante dans le cadre de cette garantie
mais ni IKEA, ni le prestataire ne sauraient
être tenus pour responsables des cas de
forces majeurs, tels que dénis par la
jurisprudence, susceptibles d’empêcher
l’application correcte de la garantie.
Qu’est-ce qui n’est pas couvert dans le
cadre de la présente garantie ?
• L’usure normale et graduelle inhérente
aux appareils électroménagers,
compte tenu de la durée de vie et du
comportement communément admis pour
des produits semblables.
• Les dommages engageant la
responsabilité d’un tiers ou résultant d’une
faute intentionnelle ou dolosive.
• Les dommages résultant du non respect
des consignes d’utilisation, d’une
mauvaise installation non conforme
aux instructions du fabricant et/ou aux
règles de l’art, notamment en matière
de raccordement au réseau électrique,
ou aux arrivées d’eau ou de gaz qui
requièrent l’intervention d’un professionnel
qualié.
• Les dommages tels que, entre autres,
le vol, la chute ou le choc d’un objet,
l’incendie, la décoloration à la lumière,
les brûlures, l’humidité ou la chaleur
sèche excessive ou toute autre condition
environnementale anormale, les coupures,
les éraures, toute imprégnation par
un liquide, les réactions chimiques ou
électrochimiques, la rouille, la corrosion,
ou un dégât des eaux résultant entre
autres, d’un taux de calcaire trop élevé
dans l’eau d’approvisionnement.
Page 54

FRANÇAIS 54
• Les pièces d’usure normale dites pièces
consommables, comme par exemple les
piles, les ampoules, les ltres, les joints,
tuyaux de vidange, etc. qui nécessitent
un remplacement régulier pour le
fonctionnement normal de l’appareil.
• Les dommages aux éléments non
fonctionnels et décoratifs qui n’affectent
pas l’usage normal de l’appareil,
notamment les rayures, coupures,
éraures, décoloration.
• Les dommages accidentels causés par
des corps ou substances étrangers et par
le nettoyage et déblocage des ltres,
systèmes d’évacuation ou compartiments
pour détergent.
• Les dommages causés aux pièces
suivantes : verre céramique, accessoires,
paniers à vaisselle et à couverts, tuyaux
d’alimentation et d’évacuation, joints,
lampes et protections de lampes, écrans,
boutons et poignées, chassis et parties de
chassis.
• Les frais de transport de l’appareil,
de déplacement du réparateur et de
main-d’oeuvre relatif à un dommage non
garanti ou non constaté par le réparateur
agréé.
• Les réparations effectuées par un
prestataire de service et /ou un
partenaire non agréés, ou en cas
d’utilisation de pièces autres que des
pièces d’origine, toute réparation de
fortune ou provisoire restant à la charge
du client qui supporterait en outre, les
conséquences de l’aggravation éventuelle
du dommage en résultant.
• L’utilisation en environnement non
domestique, par exemple usage
professionnel ou collectif, ou dans un lieu
public.
• Les dommages liés au transport lorsque
l’appareil est emporté par le client lui-
même ou un prestataire de transport qu’il
a lui-même désigné. Lorsque l’appareil
est livré par IKEA, les dommages résultant
du transport seront pris en charge par
IKEA. Le client doit vérier ses colis et
porter IMPERATIVEMENT sur le bon
de livraison des RESERVES PRECISES :
indication du nombre de colis manquants
et/ou endommagés, et description
détaillée du dommage éventuel
(emballage ouvert ou déchiré, produit
détérioré ou manquant, etc.)
• Les coûts d’installation initiaux.
Toutefois, si le prestataire de service
ou son partenaire agréé procède à
une réparation ou un remplacement
d’appareil selon les termes de la présente
garantie, le prestataire de service ou son
partenaire agréé ré-installeront le cas
échéant l’appareil réparé ou remplacé.
La garantie reste toutefois applicable aux
appareils ayant fait l’objet d’une adaptation
dans le respect des rêgles de l’art par un
spécialiste qualié avec des pièces d’origine
du fabricant pour une mise en conformité de
l’appareil aux spécications techniques d’un
autre pays membre de l’Union Européenne.
Rappel des dispositions légales :
Le fabricant s’engage à garantir la
conformité des biens au contrat ainsi que
les éventuels vices cachés, conformément
aux dispositions légales gurant ci-après,
sans que cela ne fasse obstacle à la mise
en oeuvre de la garantie commerciale
ci-dessus consentie lorsque celle-ci est plus
étendue que la garantie légale.
« Garantie légale de conformité » (extrait
du code de la consommation)
• Art. L. 211-4. « Le vendeur est tenu de
livrer un bien conforme au contrat et
répond des défauts de conformité existant
lors de la délivrance. Il répond également
des défauts de conformité résultant de
l’emballage, des instructions de montage
ou de l’installation lorsque celle-ci a été
mise à sa charge par le contrat ou a été
réalisée sous sa responsabilité. »
• Art. L. 211-12. « L’action résultant du
défaut de conformité se prescrit par deux
ans à compter de la délivrance du bien. »
Page 55

FRANÇAIS 55
• Art. L. 211-5. « Pour être conforme au
contrat, le bien doit :
1° Etre propre à l’usage habituellement
attendu d’un bien semblable et, le cas
échéant :
- correspondre à la description donnée
par le vendeur et posséder les qualités
que celui-ci a présentées à l’acheteur
sous forme d’échantillon ou de modèle ;
- présenter les qualités qu’un acheteur
peut légitimement attendre eu égard
aux déclarations publiques faites par
le vendeur, par le producteur ou par
son représentant, notamment dans la
publicité ou l’étiquetage ;
- 2° Ou présenter les caractéristiques
dénies d’un commun accord par les
parties ou être propre à tout usage
spécial recherché par l’acheteur, porté
à la connaissance du vendeur et que ce
dernier a accepté. »
«De la garantie des défauts de la chose
vendue» (extrait du code civil)
• Art. 1641. « Le vendeur est tenu de la
garantie à raison des défauts cachés de
la chose vendue qui la rendent impropre
à l’usage auquel on la destine, ou qui
diminuent tellement cet usage, que
l’acheteur ne l’aurait pas acquise, ou n’en
aurait donné qu’un moindre prix, s’il les
avait connus. »
• Art. 1648 (1er alinéa). « L’action résultant
des vices rédhibitoires doit être intentée
par l’acquéreur dans un délai de deux
ans à compter de la découverte du vice. »
Où s’applique la présente garantie ?
Sous réserve de conformité aux
spécications techniques et réglementations
applicables et propres à chaque pays le
cas échéant, les garanties pourront être
exercées auprès de l’organisation IKEA
locale du pays où le produit est utilisé sur
tout le territoire de l’Union Européenne (hors
DOM et TOM). Les conditions de garantie,
étendues et limites, sont celles applicables
sur le marché local. Il est recommandé de se
les procurer auprès de l’organisation IKEA
locale.
Le Service Après-Vente applicable à vos
appareils électroménagers IKEA :
N’hésitez pas à contacter le prestataire de
Service Après-Vente désigné par IKEA pour :
1. requérir la mise en oeuvre du service
dans le cadre de cette garantie
contractuelle.
2. obtenir des conseils pour l’installation
de l’appareil IKEA dans un meuble de
cuisine IKEA prévu à cet effet.
3. obtenir des informations pour le bon
fonctionnement de l’appareil.
Pour pouvoir vous apporter la meilleure
assistance, assurez-vous d’avoir lu
attentivement les instructions de montage
et/ou le manuel de l’utilisateur avant de
nous contacter.
Comment nous joindre pour la mise en
oeuvre de la présente garantie ?
Dans le but de vous fournir un
service rapide, veuillez utiliser le
numéro de téléphone spécique à
votre pays indiqué dans le manuel.
Veuillez toujours vous reporter aux
numéros énoncés dans le livret fourni
spéciquement avec l’appareil
IKEA pour lequel vous avez besoin
d’assistance.
Avant de nous appeler, assurez
vous de disposer de la référence
IKEA (code à 8 chiffres) et du
numéro de service (code à 12
chiffres) que vous trouverez sur la
plaque d’identication apposée sur
l’appareil.
CONSERVEZ IMPERATIVEMENT
L’ORIGINAL DE VOTRE TICKET
Page 56

FRANÇAIS 56
DE CAISSE, FACTURE OU BON DE
LIVRAISON AVEC LE LIVRET DE
GARANTIE !
Ils vous seront nécessaires comme
preuve de l’achat pour vous permettre
de bénécier de la présente garantie.
Vous y retrouverez notamment la
désignation et la référence IKEA
(code à 8 chiffres) de chaque appareil
acheté.
Besoin d’aide supplémentaire?
Si vous avez des questions supplémentaires
sur les conditions d’application des garanties
IKEA (étendues et limites, produits couverts),
adressez-vous à votre magasin IKEA le
plus proche. Adresse et horaires sur le site
www.IKEA.fr, dans le catalogue IKEA ou par
téléphone au 0825 10 3000 (0,15 €/mn).
Page 57

FRANÇAIS 57
GARANTIE IKEA (BELGIQUE)
Quelle est la durée de validité de la
garantie IKEA?
Cette garantie est valable cinq (5) ans
à compter de la date d’achat de votre
appareil chez IKEA, à l’exception des
appareils LAGAN qui sont garantis pour une
durée de deux (2) ans. La preuve d’achat
originale est requise. Les réparations,
effectuées sous garantie ne prolongent pas
la période de garantie de l’appareil.
Quels appareils ne sont pas couverts par
cette garantie de cinq (5) ans ?
Les appareils portant le nom de LAGAN et
tous les appareils achetés chez IKEA avant
le 1er août 2007.
Qui effectuera la réparation ?
Le réparateur agréé IKEA se chargera de la
réparation par le biais de son propre réseau
ou du réseau de partenaires autorisés.
Que couvre la garantie ?
La garantie couvre les défauts de
l’appareil, dus à des vices de matière ou de
fabrication, à partir de la date d’achat chez
IKEA.
Cette garantie ne s’applique que dans le
cas d’un usage domestique. Les exceptions
sont spéciées à la rubrique “Qu’est-ce qui
n’est pas couvert par cette garantie ?”
Pendant la période de garantie, les coûts
engagés pour remédier au problème, par
exemple les réparations, les pièces, la
main-d’œuvre et les déplacements sont pris
en charge à condition que l’appareil soit
accessible à des ns de réparation sans
dépenses particulières. La directive UE (N°
99/44/CE) et les règlementations locales
respectives s’appliquent à ces conditions.
Les pièces remplacées deviendront
propriété d’IKEA.
Que fera IKEA pour régler le problème ?
Le réparateur désigné par IKEA examinera
le produit et décidera, à sa seule discrétion,
s’il est couvert par cette garantie. Si le
réparateur estime que le produit est
couvert, celui-ci, ou un partenaire autorisé,
soit réparera le produit défectueux, soit le
remplacera par un produit identique ou
comparable, à sa seule discrétion.
Qu’est-ce qui n’est pas couvert par cette
garantie?
• L’usure normale.
• Les dommages occasionnés sciemment
ou par négligence, les dommages
résultant du non-respect des instructions
d’utilisation, d’une installation
inadéquate ou d’une alimentation
électrique inadéquate, les dommages
causés par des réactions chimiques ou
électrochimiques, la rouille, la corrosion ou
un dégât des eaux, y compris, notamment,
les dommages causés par un excès de
calcaire dans l’eau, les dommages causés
par des conditions environnementales
anormales.
• Les consommables, y compris les
ampoules et les piles.
• Les éléments non fonctionnels et
décoratifs qui n’affectent pas l’usage
normal de l’appareil, y compris les griffes
et les éventuelles différences de couleur.
• Les dommages accidentels causés par
des corps étrangers ou des substances,
et le nettoyage et le débouchage des
ltres, les systèmes de vidange ou les
compartiments à savon.
• Les dommages occasionnés aux éléments
suivants : vitrocéramique, accessoires,
paniers à vaisselle et à couverts, tuyaux
d’alimentation et de vidange, joints,
ampoules et diffuseurs, écrans, boutons,
revêtements et parties de revêtements,
sauf s’il est prouvé que ces dommages
sont dus à des vices de fabrication.
• Les cas où aucun défaut n’est constaté
par le technicien.
Page 58

FRANÇAIS 58
• Les réparations qui ne sont pas effectuées
par nos réparateurs désignés et/ou un
partenaire contractuel autorisé ou lorsque
des pièces qui ne sont pas d’origine ont
été utilisées.
• Les réparations consécutives à une
installation inadéquate ou pas conforme
aux spécications.
• L’utilisation de l’appareil dans un
environnement non domestique, (p.ex.
professionnel).
• Les dommages occasionnés par ou
durant le transport. Si un client transporte
personnellement le produit jusqu’à son
domicile ou une autre adresse, IKEA
décline toute responsabilité en cas de
dommages pendant le transport. Si IKEA
livre le produit à l’adresse de livraison
indiquée par le client, tout éventuel
dommage se produisant en cours de
livraison sera couvert par IKEA.
• Les frais liés à l’installation initiale de
l’appareil IKEA.
Si un prestataire de service IKEA ou un
partenaire contractuel autorisé répare
ou remplace l’appareil conformément à
la présente garantie, le prestataire de
services ou le partenaire agréé autorisé
réinstallera l’appareil réparé ou installera
l’appareil de remplacement, le cas
échéant.
Ces restrictions ne s’appliquent pas aux
interventions correctes d’un spécialiste
qualié utilisant nos pièces d’origine an
d’adapter l’appareil aux spécications
techniques de sécurité d’un autre pays
européen.
Loi nationale applicable
La garantie IKEA vous donne des droits
légaux spéciques, qui couvrent ou
dépassent toutes les exigences légales
locales.
Cependant, ces conditions ne limitent en
aucun cas les droits des consommateurs
décrits dans la législation locale.
Zone de validité
Pour les appareils achetés dans un pays
européen et transportés dans un autre pays
européen, les interventions seront effectuées
dans le cadre des conditions de garantie
normales dans le nouveau pays.
L’obligation de réparation dans le cadre de
la garantie n’est effective que si l’appareil
est conforme et installé conformément aux :
- spécications techniques du pays dans
lequel la demande d’intervention sous
garantie est introduite ;
- instructions de montage et aux
informations relatives aux consignes
de sécurité gurant dans le manuel
d’utilisation.
Service Après-vente exclusif pour
appareils IKEA
N’hésitez pas à contacter un service Aprèsvente agréé IKEA pour :
• Faire une demande d’intervention sous
garantie.
• Demander des précisions au sujet de
l’installation des appareils IKEA dans les
meubles de cuisine IKEA.
• Demander des précisions au sujet des
fonctions des appareils IKEA.
An de vous garantir la meilleure
assistance possible, nous vous prions de lire
attentivement les instructions d’assemblage
et le mode d’emploi avant de nous
contacter.
Page 59

FRANÇAIS 59
Comment nous joindre en cas de besoin
CONSERVEZ VOTRE PREUVE
Consultez la dernière page
de ce manuel pour la liste
complète des services
Après-vente agréés IKEA
avec leur numéro de
téléphone respectifs.
An de mieux vous servir, nous vous
conseillons d’utiliser les numéros
de téléphone spéciques repris
dans le mode d’emploi. Sur base
des numéros repris dans le livret,
mentionnez toujours les références
de l’appareil pour lequel vous
demandez assistance. Ayez toujours
à disposition le numéro d’article IKEA
(il s’agit d’un numéro composé de
8 chiffres) ainsi que le code service
composé de 12 chiffres que vous
trouverez sur la plaque signalétique
de votre appareil.
D’ACHAT !
La preuve de votre achat est
nécessaire pour l’application de la
garantie.
Le nom et le numéro d’article (code à
8 chiffres) IKEA de chaque appareil
acheté gurent également sur la
preuve d’achat.
Besoin d’une assistance supplémentaire ?
Pour toute autre questions en dehors du
service après-vente de vos appareils,
contactez le call center de votre magasin
IKEA. Nous vous recommandons de lire
attentivement toute la documentation fournie
avec l’appareil avant de nous contacter.
Page 60

NEDERLANDS 60
Inhoudsopgave
Veiligheidsinformatie 60
Productbeschrijving 63
Dagelijks gebruik 64
Nuttige aanwijzingen en tips 64
Onderhoud en reiniging 65
Wat moet u doen als 66
Sproeiertabel 67
Technische gegevens 68
Installatie 68
Milieu 73
IKEA GARANTIE 74
Veiligheidsinformatie
Uw eigen veiligheid en die van
anderen is zeer belangrijk.
Deze handleiding en het apparaat
zelf zijn voorzien van belangrijke
veiligheidsinformatie, die te allen
tijde gelezen en opgevolgd moet
worden.
Dit is het
waarschuwingssymbool,
behorend bij de veiligheid, waarmee
gebruikers worden gewaarschuwd
voor mogelijke gevaren voor henzelf
en anderen.
Alle veiligheidsberichten
komen na het
veiligheidswaarschuwingssymbool en
de volgende woorden:
GEVAAR Geeft een gevaarlijke
situatie aan, die ernstig letsel
veroorzaakt als deze niet wordt
vermeden.
WAARSCHUWING Geeft een
gevaarlijke situatie aan, die
ernstig letsel zou kunnen veroorzaken
als deze niet wordt vermeden.
Alle veiligheidsberichten geven aan
wat het mogelijke risico is, vertellen
u hoe u de kans op letsel kunt
verkleinen en wat
er kan gebeuren als de instructies
niet worden opgevolgd.
De stekker van het apparaat
moet altijd uit het stopcontact
getrokken zijn voordat welke
installatiehandeling dan ook verricht
wordt.
De installatie of het onderhoud
moet worden uitgevoerd door
een gespecialiseerde monteur
volgens de instructies van de
fabrikant en in overeenstemming met
de plaatselijke
veiligheidsvoorschriften met
betrekking tot het soort gas dat
gebruikt wordt. Gebruik uitsluitend
originele reserveonderdelen.
Repareer of vervang geen enkel
onderdeel van het apparaat,
behalve als dit expliciet aangegeven
wordt in de gebruikershandleiding.
WAARSCHUWING Als de
informatie in deze handleiding
niet exact opgevolgd wordt, kan dit
leiden tot brand of explosie die
schade aan eigendommen of letsel
aan personen kan veroorzaken.
- Bewaar of gebruik geen benzine
of andere ontvlambare dampen
en vloeistoffen in de buurt van dit
apparaat.
Page 61

NEDERLANDS 61
Wat moet u doen als u gas ruikt:
- Probeer geen enkel apparaat in
te schakelen.
- Raak geen enkele elektrische
schakelaar aan.
- Gebruik geen enkele telefoon in
uw woning.
- Bel onmiddellijk uw gasleverancier
met de telefoon van uw buren.
Volg de instructies van uw
gasleverancier.
- Als u uw gasleverancier niet kunt
bereiken, bel dan de brandweer.
- Installatie en service moeten
worden uitgevoerd door een
gekwaliceerde installateur,
servicecentrum of de
gasleverancier.
- Gebruik het apparaat alleen in
goed geventileerde ruimtes.
- De elektrische aansluiting en de
gasaansluiting moeten voldoen
aan de plaatselijke voorschriften.
- Wanneer de kookplaat
geïnstalleerd is, moet er een
meerpolige contactschakelaar
worden aangebracht met een
opening tussen de contacten van
minimaal 3 mm, die voor volledige
afkoppeling zorgt.
- De aarding van het apparaat is
wettelijk verplicht.
- Het netsnoer moet lang genoeg
zijn om het apparaat, nadat het in
zijn behuizing is geplaatst, aan te
sluiten op het stopcontact
- Gebruik alleen exibele of
starre metalen leidingen voor de
gasaansluiting.
- Indien vervanging van het
netsnoer noodzakelijk is, mag dit
uitsluitend worden vervangen
door een netsnoer dat dezelfde
eigenschappen heeft als het
oorspronkelijke snoer van de
fabrikant (type H05V2V2-F 90°C
of H05RR-F). Deze ingreep moet
worden uitgevoerd door een
gekwaliceerd technicus.
- De fabrikant kan niet aansprakelijk
worden gesteld voor letsel
aan mensen of dieren, of voor
materiële schade die ontstaat
doordat niet aan deze eisen is
voldaan.
- Gebruik geen meervoudige
adapters of verlengkabels.
- Trek niet aan het netsnoer van het
apparaat om het los te koppelen
van de netvoeding.
- Na de installatie mogen de
elektrische onderdelen niet
meer toegankelijk zijn voor de
gebruiker.
- Raak het apparaat niet aan
met vochtige lichaamsdelen en
gebruik het niet op als u op blote
voeten loopt.
- Deze kookplaat (klasse 3)
is uitsluitend bedoeld voor
huishoudelijk gebruik, voor
het bereiden van voedsel.
Gebruik dit apparaat nooit als
verwarming om de ruimte te
verwarmen. Dit kan leiden tot
koolmonoxidevergiftiging en
Page 62

NEDERLANDS 62
oververhitting van de kookplaat.
- De fabrikant kan niet aansprakelijk
gesteld worden voor schade
die het gevolg is van oneigenlijk
gebruik of een onjuiste instelling
van de bedieningsknoppen.
- Het apparaat en de toegankelijke
onderdelen ervan worden heet
tijdens gebruik. Zorg ervoor dat
u de verwarmingselementen
niet aanraakt. Kinderen jonger
dan 8 jaar moeten uit de buurt
worden gehouden, tenzij ze
voortdurend onder toezicht
staan. Dit apparaat mag gebruikt
worden door kinderen ouder
dan 8 jaar en personen met
beperkte lichamelijke, zintuiglijke
of verstandelijke vermogens of
gebrek aan ervaring en kennis
als zij onder toezicht staan of
aanwijzingen hebben gekregen
met betrekking tot het op veilige
wijze gebruiken van het apparaat
en de bijbehorende gevaren
begrijpen. Zij mogen niet met het
apparaat spelen. Reinigings- en
onderhoudswerkzaamheden
mogen niet door kinderen zonder
toezicht worden uitgevoerd.
- Als een apparaat op gas
wordt gebruikt, wordt in de
ruimte warmte en vochtige lucht
geproduceerd. Verzeker u ervan
dat er in de ruimte voldoende
ventilatie aanwezig is of laat er
een afzuigkap met een afvoerpijp
installeren.
- Huisdieren moeten uit de buurt
van het apparaat gehouden
worden.
- Bij langdurig gebruik kan
extra ventilatie nodig zijn (het
openzetten van een raam of
verhoging van de afzuigkracht
van de afzuigkap).
- Controleer na het gebruik of de
knoppen in de stand "uit" staan,
en sluit de hoofdkraan van de
gastoevoer of de kraan van de
gases.
- Oververhitte vetten en olie kunnen
makkelijk vlam vatten. Blijf altijd
alert als u voedsel met veel vet,
olie of alcohol (bijv. rum, cognac,
wijn) bereidt.
- Op de kookplaat koken met vet
of olie zonder dat u erbij blijft, kan
gevaarlijk zijn en tot brand leiden.
Probeer brand NOOIT te blussen
met water, maar schakel het
apparaat uit en dek de vlammen
af met bijvoorbeeld een deksel of
brandblusdeken.
Brandgevaar: bewaar
geen voorwerpen op de
kookoppervlakken.
- Bewaar het verpakkingsmateriaal
buiten het bereik van kinderen.
- Wacht tot de kookplaat is
afgekoeld voordat u deze
schoonmaakt of onderhoudt.
Bewaar de instructies
Page 63

NEDERLANDS 63
Productbeschrijving
1
2
5
3
6
4
7 9 10 118
1
Afneembare pannenroosters
2
Grote brander
3
Middelgrote brander
4
Sudderbrander
5
Middelgrote brander
6
Extra sterke brander
7
Bedieningsknop middelgrote brander
8
Bedieningsknop middelgrote brander
9
Bedieningsknop sudderbrander
10
Bedieningsknop voor de grote brander
11
Bedieningsknop middelgrote brander
Symbolen
Gesloten rondje
Grote vlam en ster
Kleine vlam
Gaskraan gesloten
Maximale opening/gastoevoer
en elektrische ontsteking
Minimale opening, ofwel
beperkte gastoevoer
Page 64

NEDERLANDS 64
Dagelijks gebruik
Laat de vlam van de brander nooit buiten
de randen van de pan komen.
Belangrijk: wanneer de kookplaat in gebruik is,
kan de gehele oppervlakte van de kookplaat
heet worden.
- Om één van de branders aan te steken
draait u de betreffende knop tegen de klok
in op de stand van de grootste vlam.
- Druk de knop tegen het bedieningspaneel
om de brander aan te steken.
- Nadat de brander is aangestoken
moet u de knop nog ongeveer 5-10
seconden ingedrukt houden om de
veiligheidsvoorziening goed te laten werken.
De beveiliging waarmee de brander is uitgerust
zal het gas afsluiten als de brander per ongeluk
uitgaat (door tocht, tijdelijk onderbreken van de
Nuttige aanwijzingen en tips
De kookplaat heeft branders van verschillende
afmetingen. Voor optimale prestaties van de
branders dient u de volgende regels op te volgen:
- Gebruik pannen met bodems waarvan de
diameter gelijk, of iets groter is dan die van
de brander (zie volgende tabel).
- Gebruik alleen pannen met een platte
bodem.
- Gebruik de juiste hoeveelheid water voor het
koken van voedsel, en houd het deksel op
de pan.
- Zorg ervoor dat de pannen op de roosters
niet uitsteken buiten de rand van de
gastoevoer, gemorste vloeistoffen etc.).
- De knop mag niet langer dan 15 sec.
ingedrukt worden. Als de brander na deze
tijd niet blijft branden, wacht dan minstens
een minuut voordat u hem opnieuw
probeert aan te steken.
OPMERKING: als specieke omstandigheden
van de gastoevoer het moeilijk maken om de
gasbrander aan te steken, wordt geadviseerd
om de handelingen te herhalen, maar nu terwijl
de knop op de kleine vlam is ingesteld.
De brander zou uit kunnen gaan wanneer de
knop losgelaten wordt. Dit betekent dat de
beveiliging nog niet warm genoeg is. In dat
geval moeten de bovenstaande handelingen
worden herhaald.
kookplaat.
BELANGRIJK: oneigenlijk gebruik van de roosters
kan tot beschadiging van de kookplaat leiden: zet
de roosters niet ondersteboven en schuif ze niet
over de kookplaat. Wij raden het volgende af:
- Het gebruik van gietijzeren platen, speksteen
en potten en pannen van aardewerk.
- Het gebruik van vlamverdelers, zoals bijv.
sudderplaatjes.
- Het gebruik van twee branders voor één pan
(bijv. voor een vispan).
Brander Pan Ø
Extra sterke brander van 24 tot 26 cm
Grote brander van 24 tot 26 cm
Middelgrote brander van 16 tot 24 cm
Sudderbrander van 8 tot 14 cm
Page 65

NEDERLANDS 65
Onderhoud en reiniging
- Controleer bij het terugplaatsen van de
Trek de stekker uit het stopcontact
voordat u onderhoud verricht.
- Alle geëmailleerde en glazen onderdelen
moeten worden gereinigd met warm
water en een neutraal reinigingsmiddel.
- Als kalkhoudend water of agressieve
reinigingsmiddelen te lang in contact
blijven met de roestvrij stalen
oppervlakken, kunnen er vlekken
ontstaan. Gemorst voedsel (water, saus,
kofe) moet verwijderd worden voordat
het kan opdrogen.
- Reinig de kookplaat met warm water en
een neutraal reinigingsmiddel en droog
hem af met een zachte doek of zeem.
Verwijder aangekoekt vuil met speciale
reinigingsmiddelen voor roestvrijstalen
oppervlakken.
OPMERKING: maak roestvrij staal alleen
schoon met een zachte doek of spons.
- Gebruik geen schurende of bijtende
producten, producten op basis van
chloor of schuursponsjes.
- Gebruik geen stoomreinigers.
- Gebruik geen brandbare producten.
- Zorg ervoor dat er geen zure of basische
substanties zoals azijn, mosterd, zout,
suiker of citroensap op de kookplaat
achterblijven.
REINIGING VAN DE ONDERDELEN VAN DE
KOOKPLAAT
- Roosters, branderdeksels en branders
kunnen worden verwijderd om ze schoon
te maken.
- Was ze met de hand af in warm water
met een niet-schurend reinigingsmiddel.
Verwijder eventuele voedselresten
zorgvuldig en controleer of de
branderopeningen niet verstopt zijn.
- Afspoelen en goed afdrogen
- Plaats de branders en de branderdeksels
weer goed terug in de daarvoor
bestemde openingen.
roosters of het gebied om de pannen
neer te zetten in lijn is met de brander.
- Bij modellen met elektrische
ontstekingsbougies en een beveiliging
moet het uiteinde van de bougie goed
schoongemaakt worden, om ervoor
te zorgen dat de kookplaat goed kan
functioneren.
Controleer deze onderdelen regelmatig,
en maak ze indien nodig schoon met een
vochtige doek. Als er aangekoekt voedsel
op zit, moet dit worden verwijderd met
een tandenstoker of een naald.
OPMERKING: om schade aan het
elektrische ontstekingsmechanisme te
voorkomen mag dit niet worden gebruikt
wanneer de branders niet in hun behuizing
zitten.
Page 66

NEDERLANDS 66
Wat moet u doen als ...
Probleem Mogelijke oorzaken Oplossing
De elektrische ontsteking werkt
niet
De brander ontsteekt niet Misschien staat de
De gasvlam brandt
onregelmatig
Er is geen elektrische
voeding
gaskraan dicht
Misschien is de
branderkroon verstopt
met etensresten
Controleer of de stekker in
het stopcontact zit en of hier
stroom op staat.
Controleer of de gaskraan
open staat
Maak de branderkroon
schoon volgens de
reinigingsaanwijzingen om er
zeker van te zijn dat hij niet
verstopt is met etensresten.
Voordat u de Klantenservice belt:
1. Controleer: "Storingen opsporen" om te
zien of u het probleem zelf kunt oplossen
2. Schakel de kookplaat uit en weer in,
om te controleren of het probleem
verdwenen is.
3. Als de storing aanhoudt, bel dan de
Klantenservice.
Geef de volgende informatie:
• type storing;
• model kookplaat;
• servicenummer (d.w.z. het nummer
na het woord SERVICE op het
typeplaatje onder de kookplaat
en op het garantiebewijs);
• uw volledige adres;
• uw telefoonnummer.
Wanneer er reparaties nodig zijn, neem dan
contact op met een erkende Klantenservice,
zoals aangegeven staat in de garantie.
In het onwaarschijnlijke geval dat een
reparatie wordt uitgevoerd door een nietgeautoriseerde technicus, moet u altijd
vragen om certicering
van de uitgevoerde werkzaamheden en
aandringen op het gebruik van originele
reserveonderdelen.
Het niet naleven van deze instructies
kan nadelige gevolgen hebben voor de
veiligheid en de kwaliteit van het apparaat.
Page 67

NEDERLANDS 67
Sproeiertabel
Categorie II2E+3
Gebruikt
type gas
AARDGAS
(Aardgas)
G20
AARDGAS
(Aardgas)
G25
VLOEIBAAR
GAS
(Butaan) G30
VLOEIBAAR
GAS
(Propaan) G31
Type brander Type
extra sterke brander
grote brander
middelgrote
brander
sudderbrander
extra sterke brander
grote brander
middelgrote
brander
sudderbrander
extra sterke brander
grote brander
middelgrote
brander
sudderbrander
extra sterke brander
grote brander
middelgrote
brander
sudderbrander
sproeier
145
118 F2
101 Z
72 X
145
118 F2
101 Z
72 X
96
85
69
50
96
85
69
50
Nominaal
thermisch
vermogen
kW
4.00
3.00
2.00
1.00
4.00
3.00
2.00
1.00
3.80
3.00
2.00
1.00
3.80
3.00
2.00
1.00
Nominaal
verbruik
381 l/h
286 l/h
190 l/h
95 l/h
443 l/h
332 l/h
221 l/h
111 l/h
276 g/u
218 g/u
145 g/u
73 g/u
271 g/u
214 g/u
143 g/u
71 g/u
Verminderd
thermisch
vermogen kW
BE FR min. nom. max.
2.30
0.80
0.45
0.35
2.20
0.60
0.35
0.30
1.90
0.60
0.35
0.30
1.90
0.60
0.35
0.30
Gasdruk (mbar)
2.20
0.60
17 20 25
0.35
0.30
20 25 30
20
25 37 45
28-
30
35
Soort gas
dat gebruikt wordt
G20 20 mbar
G25 25 mbar
G30
28-30 mbar
G31
37 mbar
Elektrisch vermogen: 220 - 240 V ~ 50/60 Hz
Conguratie model
5 BRANDERS
1 PB - 1 R
2 SR - 1 AUX
1 PB - 1 R
2 SR - 1 AUX
1 PB - 1 R
2 SR - 1 AUX
1 PB - 1 R
2 SR - 1 AUX
Nominale thermische doorstroomhoeveelheid (kW)
Totaal nominaal
verbruik
12.00 1142 l/u 9.52
12.00 1328 l/u 8.19
11.80 857 g/u 30.94
11.80 842 g/u 23.80
Benodigde lucht (m3)
voor verbranding van
1 m3 gas
Page 68

NEDERLANDS 68
Technische gegevens
Afmetingen
Breedte (mm) 730
Hoogte (mm) 40
Lengte (mm) 510
Spanning (V) 220 - 240
De technische informatie staat vermeld op het
typeplaatje aan de onderkant van het apparaat.
Installatie
Controleer na het uitpakken van de kookplaat of
deze tijdens het transport geen beschadigingen
heeft opgelopen. Neem in geval van twijfel contact
op met uw leverancier of de klantenservice.
Technische informatie voor de installateur
- Deze kookplaat kan in een werkblad met een
dikte van 20 tot 50 mm worden geplaatst.
- Als er geen oven onder de kookplaat is
geïnstalleerd, moet er een scheidingspaneel
worden aangebracht met een oppervlak dat
even groot is als de opening in het werkblad.
Dit paneel moet op minimaal 20 mm afstand
van de onderkant van de kookplaat worden
geplaatst.
- Controleer voor de installatie of:
- de plaatselijke gastoevoervoorzieningen
(gassoort en -druk) compatibel zijn met
de instellingen van de kookplaat (zie het
typeplaatje en de sproeiertabel);
- de buitenkant van meubels of apparaten die
aan de kookplaat grenzen hittebestendig zijn
volgens de plaatselijke voorschriften;
- Dit apparaat is niet aangesloten op een
afzuigapparaat. Het moet geïnstalleerd worden
volgens de geldende installatievoorschriften.
Besteed speciale aandacht aan de relevante
vereisten met betrekking tot ventilatie.
- Verbrandingsproducten in de open lucht
worden afgevoerd via specieke afzuigkappen
of elektrische ventilators, die in de muur en/of
ramen zijn gemonteerd.
Gasaansluiting
Deze ingreep moet worden uitgevoerd door
een gekwaliceerd technicus.
Het gastoevoersysteem moet voldoen aan de
plaatselijke voorschriften m.b.t. het soort gas dat
gebruikt wordt.
- U kunt de specieke plaatselijke voorschriften
voor bepaalde landen terugvinden in de
paragraaf "Verwijzing naar plaatselijke
voorschriften". Als er geen informatie over uw
land wordt gegeven, doe dan navraag bij een
gekwaliceerd technicus.
- De aansluiting van de kookplaat op de
gasleiding of de gases moet uitgevoerd
worden met behulp van een starre koperen of
Page 69

NEDERLANDS 69
stalen leiding met ttingen die voldoen aan de
plaatselijke voorschriften, of door middel van
een roestvrijstalen slang met glad oppervlak,
die voldoet aan de plaatselijke voorschriften. De
lengte van de slang is maximaal 2 strekkende
meter.
A
C
D
geplaatst dat hij geen bewegende delen van
de meubels kan raken. Hij moet door een
gebied lopen waar geen obstakels aanwezig
zijn en waar hij over zijn hele lengte kan worden
geïnspecteerd.
- Na aansluiting op de gastoevoer moeten de
leidingen met zeepsop worden gecontroleerd
op lekkages. Nu kunt u de branders aansteken
en de knoppen van de hoogste stand
laagste stand
de vlam te controleren
Elektrische aansluiting
WAARSCHUWING
- Deze ingreep moet worden uitgevoerd door
een gekwaliceerd technicus.
- De elektrische aansluiting dient te worden
gerealiseerd volgens de plaatselijke
voorschriften.
- De aarding van het apparaat is wettelijk
verplicht.
zetten om de stabiliteit van
L
Aarde
(geel/groen)
in de
B
C
D
- Sluit de bij de kookplaat meegeleverde
elleboogtting (A) of (B) aan op de
hoofdtoevoerleiding en zet er de meegeleverde
ring (C) tussen, in overeenstemming met EN 549.
- Vervang de van te voren gemonteerde elleboog
en bijbehorende ring (C) met de exemplaren
die beschikbaar zijn als reserveonderdeel in het
product.
- Ring (D) niet bij het product geleverd.
- BELANGRIJK: als er een slang van roestvrij
staal wordt gebruikt, moet deze zo worden
N
- Gebruik geen verlengsnoer.
- BELANGRIJK: de gegevens over de spanning
en de stroomopname staan op het typeplaatje
vermeld.
Montage
Maak het omtrekoppervlak schoon en breng
vervolgens de meegeleverde afdichting op de
kookplaat aan. Plaats de kookplaat in de opening in
het werkblad, die gemaakt is volgens de maten die
zijn aangegeven in de Gebruiksaanwijzing.
OPMERKING: het elektriciteitssnoer moet lang
genoeg zijn om naar boven te worden uitgetrokken.
Gebruik voor het vastzetten van de kookplaat
de bijgeleverde beugels. Plaats de beugels in de
betreffende boorgaten (aangegeven met de pijl)
Page 70

NEDERLANDS 70
en zet ze vast met behulp van de schroeven, al
naargelang de dikte van het werkblad.
Verzeker u ervan dat er een stopcontact in de buurt
is van het apparaat dat geïnstalleerd wordt. Indien
het snoer dat bij het apparaat geleverd werd niet
lang genoeg is, dan moet dit vervangen worden
door een langer snoer met dezelfde kenmerken.
Aanpassing aan verschillende gassoorten
WAARSCHUWING
- Deze ingreep moet worden uitgevoerd door
een gekwaliceerd technicus.
Als het apparaat bedoeld is om te werken met
ander gas dan de soort die op het typeplaatje
en het informatielabel bovenop de kookplaat
wordt vermeld, dan moeten de sproeiers worden
vervangen.
Verwijder het informatielabel en bewaar het bij het
instructieboekje.
Gebruik drukregelaars die geschikt zijn voor
de gasdruk die in de Gebruiksaanwijzing staat
aangegeven.
- De sproeiers moeten worden vervangen door
de Klantenservice of door een gekwaliceerd
monteur.
- Sproeiers die niet bij het apparaat
geleverd zijn, moeten worden besteld bij de
Klantenservice.
- Stel de laagste stand van de kranen bij.
OPMERKING: als er vloeibaar gas (G30/G31)
wordt gebruikt, moet de schroef voor de laagste
stand zo ver mogelijk worden aangehaald.
BELANGRIJK: als de branderknoppen
moeilijk draaien, neem dan contact op met
de Klantenservice voor vervanging van de
branderkraan, als blijkt dat deze defect is.
De sproeiers vervangen (zie paragraaf
“sproeiertabel”)
- Verwijder de roosters (A).
- Haal de branders weg (B).
- Schroef de sproeier (C) die vervangen moet
worden los met een dopsleutel van de juiste maat.
- Vervang hem door een sproeier die geschikt is
voor het nieuwe type gas.
- Monteer de sproeier weer op (D).
Denk er voor de installatie van de kookplaat aan
dat de sticker waarop de gasafstelling vermeld staat,
en die bij de sproeiers geleverd wordt, zodanig
moet worden aangebracht dat hij de bestaande
informatie omtrent de gasafstelling bedekt.
D
C
A
B
Instelling van de laagste stand van de kranen
E
Om er zeker van te zijn dat de laagste stand goed
is afgesteld, moet de knop (E) worden verwijderd,
waarna u als volgt te werk gaat:
Page 71

NEDERLANDS 71
- draai de schroef vaster voor een lagere
vlamhoogte (-);
- draai de schroef losser voor een hogere
vlamhoogte (+).
De afstelling moet worden verricht terwijl de kraan
in de laagste stand staat (kleine vlam).
- De primaire lucht van de branders hoeft niet te
worden bijgesteld.
- Op dit punt kunt u de branders aansteken en
de knoppen van de hoogste stand
laagste stand
de vlam te controleren.
Na de instelling moet het werkblad worden
afgedicht met afdichtingskit of soortgelijk materiaal.
FR
VERWIJZING NAAR PLAATSELIJKE
VOORSCHRIFTEN
De installatie en het onderhoud van het
apparaat moeten uitgevoerd worden
door een gekwaliceerd technicus, in
overeenstemming met de geldende
voorschriften en met name:
• Decreet van 2 augustus 1977
Technische en Veiligheidsvoorschriften
die van toepassing zijn op installaties op
vloeibaar gas en vloeibare koolwaterstoffen
in woonhuizen en bijgebouwen.
• Standaard DTU P 45 - 204
Gasinstallaties (voorheen DTU nr. 61-1 Gasinstallaties april 1982 + supplement nr. 1
van juli 1984).
• Ministeriële Gezondheidsvoorschriften
Voor apparaten die aangesloten zijn op de
elektrische hoofdvoeding.
• Standaard NF C 15-100
Laagspanning elektrische installaties Standaards.
BE
REFERENTIES LOKALE
VOORSCHRIFTEN
Het apparaat is uitgerust met een
kegelvormig 1/2” uiteinde met schroefdraad
voor de aansluiting op de gastoevoer
zetten om de stabiliteit van
in de
(overeenkomstig de ISOvoorschriften ISO
7/1 RP 1/2).
De aansluiting moet uitgevoerd
worden ofwel met een stijve leiding in
overeenstemming met de norm NBN D
51-003 ofwel met een exibele leiding in
overeenstemming met het specicatieblad
A.R.G.B./03.
Het apparaat moet geïnstalleerd worden
met een door AGB goedgekeurde afsluiter.
WOKADAPTER
VERVANGING KNOPPEN
Verzeker u ervan dat de kookplaat
uitgeschakeld is.
Alle knoppen moeten in gesloten stand staan.
Page 72

NEDERLANDS 72
Trek elke knop van de kookplaat naar boven en
berg ze na verwijdering samen op.
Neem de kit met de nieuwe knoppen, die in het
bovenste deel van de verpakking zit en haal de
nieuwe knoppen uit de plastic zak.
Zorg ervoor dat alle knoppen op de juiste plaats
zitten.
Controleer of de knoppen correct geïnstalleerd zijn
door elke brander apart in te schakelen.
Duw elke knop om de as van de klep tot hij niet
verder kan (er kan een vonk overspringen).
Page 73

NEDERLANDS 73
Milieu
Verpakking
- Het verpakkingsmateriaal is 100%
recyclebaar, zoals wordt aangegeven
door het symbool ( ).
Producten
Dit apparaat is voorzien van het merkteken
volgens de Europese richtlijn 2002/96/
EG inzake Afgedankte Elektrische en
Elektronische
Apparatuur (AEEA). Door ervoor te zorgen
dat dit product op de juiste wijze als afval
wordt verwerkt, helpt u mogelijke schadelijke
gevolgen voor het milieu en de gezondheid
van mensen te voorkomen.
Het symbool
de begeleidende documentatie bij het
product geeft aan dat dit apparaat
niet als huishoudelijk afval behandeld
mag worden, maar naar een speciaal
inzamelpunt voor recycling van elektrische
en elektronische apparaten moet worden
gebracht. Afdanken moet plaatsvinden
in overeenstemming met de plaatselijke
milieuvoorschriften voor afvalverwerking.
Voor meer informatie over behandeling,
terugwinning en recycling van
huishoudelijke apparaten kunt u contact
opnemen met uw plaatselijke instantie, de
vuilnisophaaldienst of de winkel waar u dit
product hebt gekocht.
op het product of op
Verklaring van overeenstemming
- Deze kookplaat is ontworpen,
vervaardigd en op de markt gebracht in
overeenstemming met:
- de veiligheidsvereisten van de
"Gasrichtlijn" 2009/142/EEG;
- de veiligheidsvoorschriften van de
“Laagspanningsrichtlijn" 2006/95/EG
(die de richtlijn 73/23/EEG en latere
verordeningen vervangt);
- de beschermingsvoorschriften van de
"EMC"-richtlijn 2004/108/EEG.
- Deze kookplaat is geschikt voor contact
met voedsel, en voldoet aan de Richtlijn
1935/2004/EG.
- Deze kookplaat (Klasse 3) is uitsluitend
ontworpen voor de bereiding van
voedsel. Elk ander gebruik (zoals het
verwarmen van een ruimte) is oneigenlijk
en gevaarlijk.
Page 74

NEDERLANDS 74
IKEA GARANTIE
Hoe lang is de IKEA garantie geldig?
Deze garantie is vijf (5) jaar geldig vanaf
de oorspronkelijke datum van aankoop van
uw apparaat bij IKEA, uitgezonderd indien
uw apparaat het merk LAGAN draagt, daar
is de garantieperiode van twee (2) jaar
van toepassing. Uw origineel kassaticket is
vereist. Als er tijdens de garantieperiode
service tussenkomsten worden uitgevoerd,
wordt de garantieperiode van het apparaat
niet verlengd.
Welke apparatuur valt niet onder de vijf (5)
jaar IKEA garantie?
De apparaten van het merk LAGAN en alle
apparaten die gekocht zijn bij IKEA vóór 1
augustus 2007.
Wie zal de service uitvoeren?
De erkende IKEA servicedienst zal
zorgdragen voor de dienstverlening via
haar eigen netwerk of via het netwerk van
erkende servicediensten.
Wat valt er onder de garantie?
De garantie dekt storingen van het
apparaat, die veroorzaakt zijn door
verkeerde constructie of materiaalfouten
vanaf de aankoopdatum bij IKEA. Deze
garantie is uitsluitend van toepassing bij
huishoudelijk gebruik. De uitzonderingen
worden onder het artikel “Wat is er niet
gedekt door deze garantie?” gespeciceerd.
Binnen de garantieperiode worden de kosten
om de storing te verhelpen vergoed d.w.z.
reparaties, onderdelen, arbeidsloon en
transport, op voorwaarde dat het apparaat
toegankelijk voor reparaties, (cont. zonder
speciale kosten) is zonder speciale kosten.
Op deze voorwaarden zijn de EG-richtlijnen
(Nr. 99/44/EG) en de respectievelijke
plaatselijke voorschriften van toepassing.
Vervangen onderdelen worden eigendom
van IKEA.
Wat zal IKEA doen om het probleem op te
lossen?
De door IKEA aangestelde servicedienst zal
het product onderzoeken en uitsluitend ter
eigen beoordeling bepalen of het gedekt
wordt door deze garantie.
Als het defect blijkt te zijn, zal de IKEA
servicedienst of de erkende servicedienst
via het eigen bedrijf, uitsluitend ter eigen
beoordeling,ofwel het defecte product
repareren of het vervangen door eenzelfde
of een vergelijkbaar product.
Wat valt er niet onder deze garantie?
• Normale slijtage.
• Opzettelijke schade of schade door
verwaarlozing, schade veroorzaakt
door het niet opvolgen van de
gebruiksaanwijzing, foutieve installatie
of aansluiting op een verkeerd voltage,
schade veroorzaakt door chemische of
elektrochemische reactie, roest, corrosie
of waterschade, schade veroorzaakt
door overmatig kalkgehalte van de
watertoevoer, schade veroorzaakt door
abnormale omgevingsomstandigheden.
• Verbruiksonderdelen, inclusief batterijen
en lampjes.
• Niet-functionele en decoratieve
onderdelen die niet van invloed zijn op
het normale gebruik van het apparaat,
inclusief eventuele krassen en mogelijke
kleurverschillen.
• Onvoorziene schade veroorzaakt door
vreemde voorwerpen of stoffen en het
reinigen of deblokkeren van lters,
afvoersystemen of wasmiddellades.
• Schade aan de volgende onderdelen:
glaskeramiek, accessoires, servieskorven
en bestekmandjes, aanvoer- en
afvoerpijpen, afdichtingen, lampen en
lampenkapjes, schermen, knoppen,
behuizingen en gedeeltes van
behuizingen, tenzij bewezen is dat de
schade te wijten is aan een productiefout.
• Gevallen waarbij geen storing
Page 75

NEDERLANDS 75
geconstateerd kon worden tijdens het
bezoek van een technicus.
• Reparaties die niet zijn uitgevoerd door
onze aangestelde servicediensten en/of
een erkende contractuele servicepartner
of wanneer er niet-originele onderdelen
gebruikt zijn.
• Reparaties die veroorzaakt zijn door
installatie die verkeerd of niet in
overeenstemming met de installatieinstructies zijn uitgevoerd.
• Het gebruik van het apparaat in
niet huishoudelijke omgeving d.w.z.
professioneel gebruik.
• Transportschade. Indien een klant het
product zelf naar zijn of haar woning of
naar een ander adres transporteert, is
IKEA niet aansprakelijk voor schade die
optreedt tijdens het transport. Als het
product echter door IKEA wordt afgeleverd
op het door de klant opgegeven adres,
dan wordt schade aan het product die
tijdens deze levering ontstaat wel gedekt
door IKEA.
• De installatiekosten voor het installeren
van het IKEA-apparaat.
Als een IKEA servicedienst of een
erkende servicepartner het apparaat
echter repareert of vervangt onder
de voorwaarden van deze garantie,
dan zal de servicedienst of de erkende
servicepartner het gerepareerde of
vervangende apparaat indien nodig
opnieuw installeren.
Deze beperkingen zijn niet van toepassing
op foutloze werkzaamheden uitgevoerd door
een gekwaliceerde specialist met gebruik
van onze originele onderdelen teneinde het
apparaat aan te passen aan de technische
veiligheidsspecicaties van een ander EG-
land.
Hoe de landelijke wetten van toepassing
zijn
Deze IKEA garantie verleent u specieke
wettelijke rechten, welke met de eigen
locale wetgeving overeenstemmen of deze
overstijgen, die variëren van land tot land.
Deze omstandigheden beperken geenszins
consumentenrechten die onder de
plaatselijke wetgeving vallen.
Gebied van geldigheid
Voor apparaten die in een EU-lidstaat zijn
aangeschaft en meegenomen worden naar
een ander EU-lidstaat, zal de dienstverlening
uitgevoerd worden in het kader van de
garantievoorwaarden die in het nieuwe land
gebruikelijk zijn. Een verplichting om diensten
te verlenen in het kader van de garantie
bestaat uitsluitend als het apparaat voldoet
aan en geïnstalleerd is in overeenstemming
met:
- de technische specicaties van het land
waarin aanspraak gemaakt wordt op de
garantie;
- de Montage-instructies en de
Veiligheidsinformatie uit de
Gebruiksaanwijzing.
De speciale KLANTENSERVICE voor IKEA-
apparaten
Aarzel niet om contact op te nemen met een
door IKEA erkende Klantenservice:
• Een claim in te dienen onder deze garantie
• Verduidelijking te vragen in verband met
de installatie van het IKEA apparaat in de
daarvoor bestemde IKEA keukenmeubels
• Verduidelijking te vragen in verband met
de functies van de IKEA apparaten.
Om u beter van dienst te kunnen zijn, leest
u best eerst de installatie-instructies en de
gebruiksaanwijziging zorgvuldig alvorens
ons te contacteren.
Hoe u ons kunt bereiken als u hulp nodig
hebt
Op de laatste pagina
van deze instructies vindt
u de volledige lijst van alle
door IKEA Klantenservices
met hun overeenkomstig
telefoonnummer.
Page 76

NEDERLANDS 76
Om u sneller van dienst te kunnen
zijn, adviseren wij u de specieke
telefoonnummers in de handleiding te
gebruiken. Vermeld altijd de nummers
die vermeld zijn in het boekje van
het specieke apparaat waarvoor
u assistentie wilt. Vermeld ook het
IKEA artikelnummer (bestaande
uit 8 cijfers) en het servicenummer
bestaande uit 12 cijfers dat op het
typeplaatje van uw apparaat staat.
BEWAAR DE KASSABON!
Het is uw bewijs van aankoop en
is ook nodig om de geldigheid van
de garantie aan te tonen. Op de
kassabon is ook de IKEA naam en het
artikelnummer (8 cijfers) van elk door u
aangeschaft apparaat vermeld
Extra hulp nodig?
Voor alle bijkomende vragen die niet bij
de dienst na-verkoop van uw toestellen
horen, neem contact op met het call center
van uw IKEA winkel. Wij adviseren u de
documentatie die bij het apparaat wordt
geleverd zorgvuldig door te lezen voordat u
contact met ons opneemt.
Page 77

77
BELGIË - BELGIQUE - BELGIEN
Telefoon/Numéro de téléphone/Telefon-Nummer:
Tarief/Tarif/Tarif: Lokaal tarief/Prix d’un appel local/Ortstarif
Openingstijd: Maandag - Vrijdag 8.00 - 20.00
Heures d’ouverture: Lundi - Vendredi 8.00 - 20.00
Öffnungszeiten: Montag - Freitag 8.00 - 20.00
БЪЛГАРИЯ
Телефонен номер:
Тарифа: Локална тарифа
Работно време: понеделник - петък 8.00 - 20.00
ČESKÁ REPUBLIKA
Telefonní číslo:
Sazba: Místní sazba
Pracovní doba: Pondělí - Pátek 8.00 - 20.00
DANMARK
Telefonnummer:
Takst: Lokal takst
Åbningstid: Mandag - fredag 9.00 - 21.00
Lørdag 9.00 - 18.00
(Åbent udvalgte søndage, se IKEA.dk)
DEUTSCHLAND
Telefon-Nummer:
Tarif: Ortstarif
Öffnungszeiten: Montag - Freitag 8.00 - 20.00
ΕΛΛΑΔΑ
Τηλεφωνικός αριθμός:
Χρέωση: Τοπική χρέωση
Ώρες λειτουργίας: Δευτέρα - Παρασκευή 8.00 - 20.00
ESPAÑA
Teléfono:
Tarifa: Tarifa local
Horario: Lunes - Viernes 8.00 - 20.00
(España Continental)
FRANCE
Numéro de téléphone:
Tarif: Prix d’un appel local
Heures d’ouverture: Lundi - Vendredi 9.00 - 21.00
HRVATSKA
http://www.ikea.com
ÍSLAND
Símanúmer:
Kostnaður við símtal: Almennt mínútuverð
Opnunartími: Mánudaga - Föstudaga 9.00 - 17.00
ITALIA
Telefono:
Tariffa: Tariffa locale
Orari d’apertura: Lunedì - Venerdì 8.00 - 20.00
LIETUVIŲ
Telefono numeris: (0) 520 511 35
Skambučio kaina: Vietos mokestis
Darbo laikas: Nuo pirmadienio iki
penktadienio 8.00 - 20.00
MAGYARORSZÁG
Telefon szám:
Tarifa: Helyi tarifa
Nyitvatartási idő: Hétfőtől Péntekig 8.00 - 20.00
02 4003536
225376400
70150909
06929993602
2109696497
913754126
0170480513
5852409
0238591334
(06-1)-3285308
026200311
NEDERLAND
Telefoon:
Tarief: 15 cent/min., starttarief 4.54 cent
en gebruikelijke belkosten
Openingstijd: Maandag t/m - Vrijdag 8.00 - 20.00
Zaterdag 9.00 - 20.00
Zondag gesloten
NORGE
Telefon nummer:
Takst: Lokal takst
Åpningstider: Mandag - fredag 8.00 - 20.00
ÖSTERREICH
Telefon-Nummer:
Tarif: Ortstarif
Öffnungszeiten: Montag - Freitag 8.00 - 20.00
POLSKA
Numer telefonu:
Stawka:
Godziny otwarcia: Poniedziałek - Piątek 8.00-20.00
PORTUGAL
Telefone:
Tarifa: Tarifa local
Horário: Segunda - Sexta 9.00 - 21.00
REPUBLIC OF IRELAND
Phone number:
Rate: Local rate
Opening hours: Monday - Friday 8.00 - 20.00
ROMÂNIA
Număr de telefon:
Tarif: Tarif local
Orar: Luni - Vineri 8.00 - 20.00
РОССИЯ
Телефонный номер:
Стоимость звонка: Местная стоимость звонка
Время работы: Понедельник - Пятница 9.00 - 21.00
(Московское время)
SCHWEIZ - SUISSE - SVIZZERA
Telefon-Nummer/Numéro de téléphone/Telefono:
Tarif/Tarif/Tariffa: Ortstarif/Prix d’un appel local/Tariffa locale
Öffnungszeiten: Montag - Freitag 8.00 - 20.00
Heures d’ouverture: Lundi - Vendredi 8.00 - 20.00
Orario d’apertura: Lunedì - Venerdì 8.00 - 20.00
SLOVENSKO
Telefónne číslo:
Cena za hovor: Cena za miestny hovor
Pracovná doba: Pondelok až piatok 8.00 - 20.00
SRBIJA
http://www.ikea.com
SUOMI
Puhelinnumero:
Hinta: Yksikköhinta
Aukioloaika: Maanantaista perjantaihin 8.00 - 20.00
SVERIGE
Telefon nummer:
Taxa: Lokal samtal
Öppet tider: Måndag - Fredag 8.30 - 20.00
Lördag - Söndag 9.30 - 18.00
UNITED KINGDOM
Phone number:
Rate: Local rate
Opening hours: Monday - Friday 9.00 - 21.00
09002354532
23500112
013602771461
225844203
Koszt połączenia według taryfy operatora
213164011
016590276
021 2044888
84957059426
(02) 50102658
0981710374
0775-700 500
02076601517
en/of 0900 BEL IKEA
0225675345
Page 78

Page 79

Page 80

5019-600-00743
FAC-SIMILE
In case of missing Service Sticker, please report Model and Serial numbers for future Service references, which can be found on the Rating Plate in the prod-
GB
uct. - DE Falls der Serviceaufkleber fehlt, geben Sie bitte zur Erleichterung künftiger Servicearbeiten Modell und Seriennummern an. Diese Daten benden sich
auf dem Typenschild im Gerät. - FR En l’absence d’autocollant de service, veuillez inscrire le modèle et le numéro de série de l’appareil gurant sur la plaque
signalétique, an de pouvoir les communiquer au SAV en cas de problème éventuel. - NL Als de Servicesticker ontbreekt, vermeld dan het productnummer
(85-) en serienummer bij eventueel contact met de klantenservice in de toekomst. Deze kunt u vinden op het typeplaatje in het product. - ES En el caso de que
no se encuentre la tarjeta de servicio, indique el modelo y los números de serie, que pueden encontrarse en la placa de características del producto, para futuras
referencias de servicio. - PT Se perder o autocolante “Service”, comunique o número do Modelo e de Série para referência futura em caso de assistência. Os
números encontram-se na placa sinalética do produto. - IT In caso non sia presente l’adesivo del Servizio Assistenza, comunicare il modello e il numero di
serie indicati sulla targhetta matricola del prodotto come futuro riferimento per l’assistenza. - GR Σε περίπτωση που λείπει το αυτοκόλλητο σέρβις, αναφέρετε το
μοντέλο και σειριακό αριθμό για μελλοντικές αναφορές σέρβις, τα οποία θα βρείτε στην αναγνωριστική πινακίδα στο προϊόν. - SE Om Service-etiketten fattas,
bör du anteckna modell- och serienummer för framtida behov - dessa nner du på typskylten i produkten. - NO Dersom serviceetiketten mangler, noter deg
modell- og serienummer for fremtidig referanse. Du nner dem på typeplaten i produktet. - DK Hvis servicemærkaten mangler, skal model- og serienummeret
oplyses, når Service kontaktes. Numrene er angivet på produktets typeplade. - FI Jos huoltotarraa ei ole, ilmoita huoltoa varten malli- ja sarjanumero, jotka
löytyvät tuotteen arvokilvestä. - CZ V případě, že servisní štítek chybí, uveďte prosím pro příští potřebu servisu model a sériové číslo, které najdete na výko-
novém štítku výrobku. - SK Ak chýba servisná nálepka, v prípade servisnej potreby nahláste prosím model a výrobné číslo spotrebiča zo servisného štítku, ktorý
sa nachádza na výrobku. - PL Jeśli brakuje naklejki serwisowej, w celu ułatwienia serwisowania urządzenia w przyszłości proszę podać model oraz numer
seryjny, które można znaleźć na tabliczce znamionowej. -
mis on leitavad toote andmeplaadilt. - LV Gadījumā, ja trūkst apkalpošanas uzlīme, dariet zināmus modeļa un sērijas numurus, kas atrodami izstrādājuma
tehnisko datu plāksnītē, lai nākotnē tos varētu izmantot apkalpošanai kā atsauci. - LT Nesant serviso lipduko, serviso specialistams nurodykite modelio ir serijos
numerius, kuriuos rasite prietaiso gamyklinėje plokštelėje. - HU Amennyiben hiányzik a szervizmatrica, kérjük, adja meg a jövőbeni szervizhivatkozásokhoz a
modellszámot és a sorozatszámot, amelyek a terméken az adattáblán találhatók. - RU В случае отсутствия наклейки послереализационного обслуживания
(со словом Service) следует указать модель и серийный номер, используемые в дальнейшем для справки при техобслуживании в сервисном центре.
Эти данные приведены на паспортной табличке изделия. - KZ Егер Ќызмет кґрсету жапсырмасы болмаса, келешекте ќызмет кґрсету жўмыстарын
орындату ќажет болєанда, ґнімніѕ техникалыќ аќпарат таќтайшасынан табуєа болатын Їлгі жјне Сериялыќ нґмірді хабарлаѕыз. - BG В случай на
липсващ стикер с информация за сервизно обслужване, моля посочете модела и серийния номер за бъдещи справки за сервизно обслужване, които
ще намерите на табелката с основните данни. - RO Dacă abţibildul cu informaţii pentru service lipseşte, vă rugăm să comunicaţi modelul şi numerele de
serie, ca referinţe pentru service pe viitor; acestea se găsesc pe plăcuţa cu datele tehnice de pe produs. - MA En l’absence d’autocollant de service, veuillez
inscrire le modèle et le numéro de série de l’appareil gurant sur la plaque signalétique, an de pouvoir les communiquer au SAV en cas de problème éventuel.
Hoolduskleebise puudumise korral palume teatada hooldusrmale toote mudel ja seerianumber,
EST
© Inter IKEA Systems B.V. 2013 AA-1029633-1
 Loading...