IKEA HB 550 AN User Manual

DÅTID

SK


GB


TR


RU


CZ


HGA4K

BG


RO


CZ SK RU


ENGLISH

4

CZ


TÜRKÇE

17


SK


РУССКИЙ

28


RU

SLOVENSKY

42


ČEŠTINA

56


БЪЛГАРСКИ

70


ROMÂNĂ

84

Language, Dil, Язык, Jazyk, Jazyk, Език, Limba Country, Ülke, Страна, Krajina, Stát, Страна, Ţară

ENGLISH

4

Table of contents

Safety information

4

Injector table

10

Product description

6

Technical Data

11

Daily use

7

Installation

11

Helpful hints and tips

7

Environmental concerns

14

Maintenance and cleaning

8

IKEA GUARANTEE

15

What to do if

9


Safety Information

Your safety and the safety of others are very important.

This manual and the appliance itself provide important safety messages, to be read and observed at all times.

This is the safety alert symbol, pertaining to safety, which alerts users

to potential hazards to themselves and others.

All safety messages will follow the safety alert symbol and either the terms:

DANGER Indicates a hazardous situation which, if not avoided, will

cause serious injury.

WARNING Indicates a hazardous situation which, if not avoided, could

cause serious injury.

All Safety messages will tell you what the potential hazard is, tell you how to reduce the chance of injury, and tell you what can happen if the instructions are not followed.

The appliance must be disconnected from the power supply before carrying out any installation work.

Installation and maintenance must be carried out by a qualified technician, in

compliance with the manufacturer’s instructions and local safety regulations to the relevant gas standard. Only use original spare parts. Do not repair or replace any part of the appliance unless specifically stated in the user manual.

WARNING If the information in this manual is not followed exactly, a fire or

explosion may result causing property

damage or injury.

-- Do not store or use gasoline or other flammable vapors and liquids in the vicinity of this appliance.

What to do if you smell gas:

-- Do not try to light any appliance. -- Do not touch any electrical switch.

-- Do not use any phone in your building. -- Immediately call your gas supplier from a neighbor’s phone. Follow the gas

supplier’s instructions.

-- If you cannot reach your gas supplier, call the fire department.

-- Installation and service must be performed by a qualified installer, service agency or the gas supplier.

-- Use appliance in well ventilated rooms only.

-- The electrical and gas connections must comply with local regulations.

-- When the hob is installed, provide a multi-pole circuit breaker with a contact separation of at least 3 mm, that provides full disconnection.

-- Regulations require that the appliance is grounded.

-- The power cable must be long enough for connecting the appliance, once fitted in its housing, to the power supply

-- Use only flexible or rigid metal hose for gas connection.

-- If necessary, the electrical power cable must be replaced exclusively with a power cable having identical characteristics to the original supplied

by manufacturer (type H05V2V2-F 90°C

ENGLISH

5

or H05RR-F). This operation must be performed by a qualified electrician.

-- The manufacturer cannot be held responsible for any injury to persons or animals or damage to property arising from failure to comply with these requirements.

-- Do not use multiple plug adapters or extension cords.

-- Do not pull the power supply cord in order to unplug the appliance.

-- The electrical components must not be accessible to the user after installation.

-- Do not touch the appliance with any wet part of the body and do not operate it when barefoot.

-- This hob (class 3) is designed solely for private household use for cooking food. Do not use this appliance as a space heater to heat or warm the room.

Doing so may result in carbon monoxide poisoning and overheating of the hob.

-- The Manufacturer declines all responsibility for inappropriate use or incorrect setting of the controls.

-- The appliance is not intended for use by persons (including children) with reduced physical, sensory or mental

capabilities, or with lack of experience and knowledge of the appliance, unless supervised or previously instructed in its use by those responsible for their safety.

-- Young children should be kept away from the appliance and supervised to ensure that they do not play with it.

-- The use of a gas appliance produces heat and humidity in the room. Make sure the room is well-ventilated, or install an extractor hood with exhaust duct.

-- In case of prolonged use, additional ventilation may be necessary (by opening a window or increasing the hood extraction speed).

-- After use, make sure the knobs are in off position and close the main gas supply cock or the gas cylinder valve.

-- Overheated oils and fats catch fire easily. Always remain vigilant when cooking foods rich in fat, oil or alcohol (e.g. rum, cognac, wine).

-- Keep the packaging materials out of the reach of children.

-- Before cleaning or maintenance wait for hob to cool down.

Save these instructions

ENGLISH

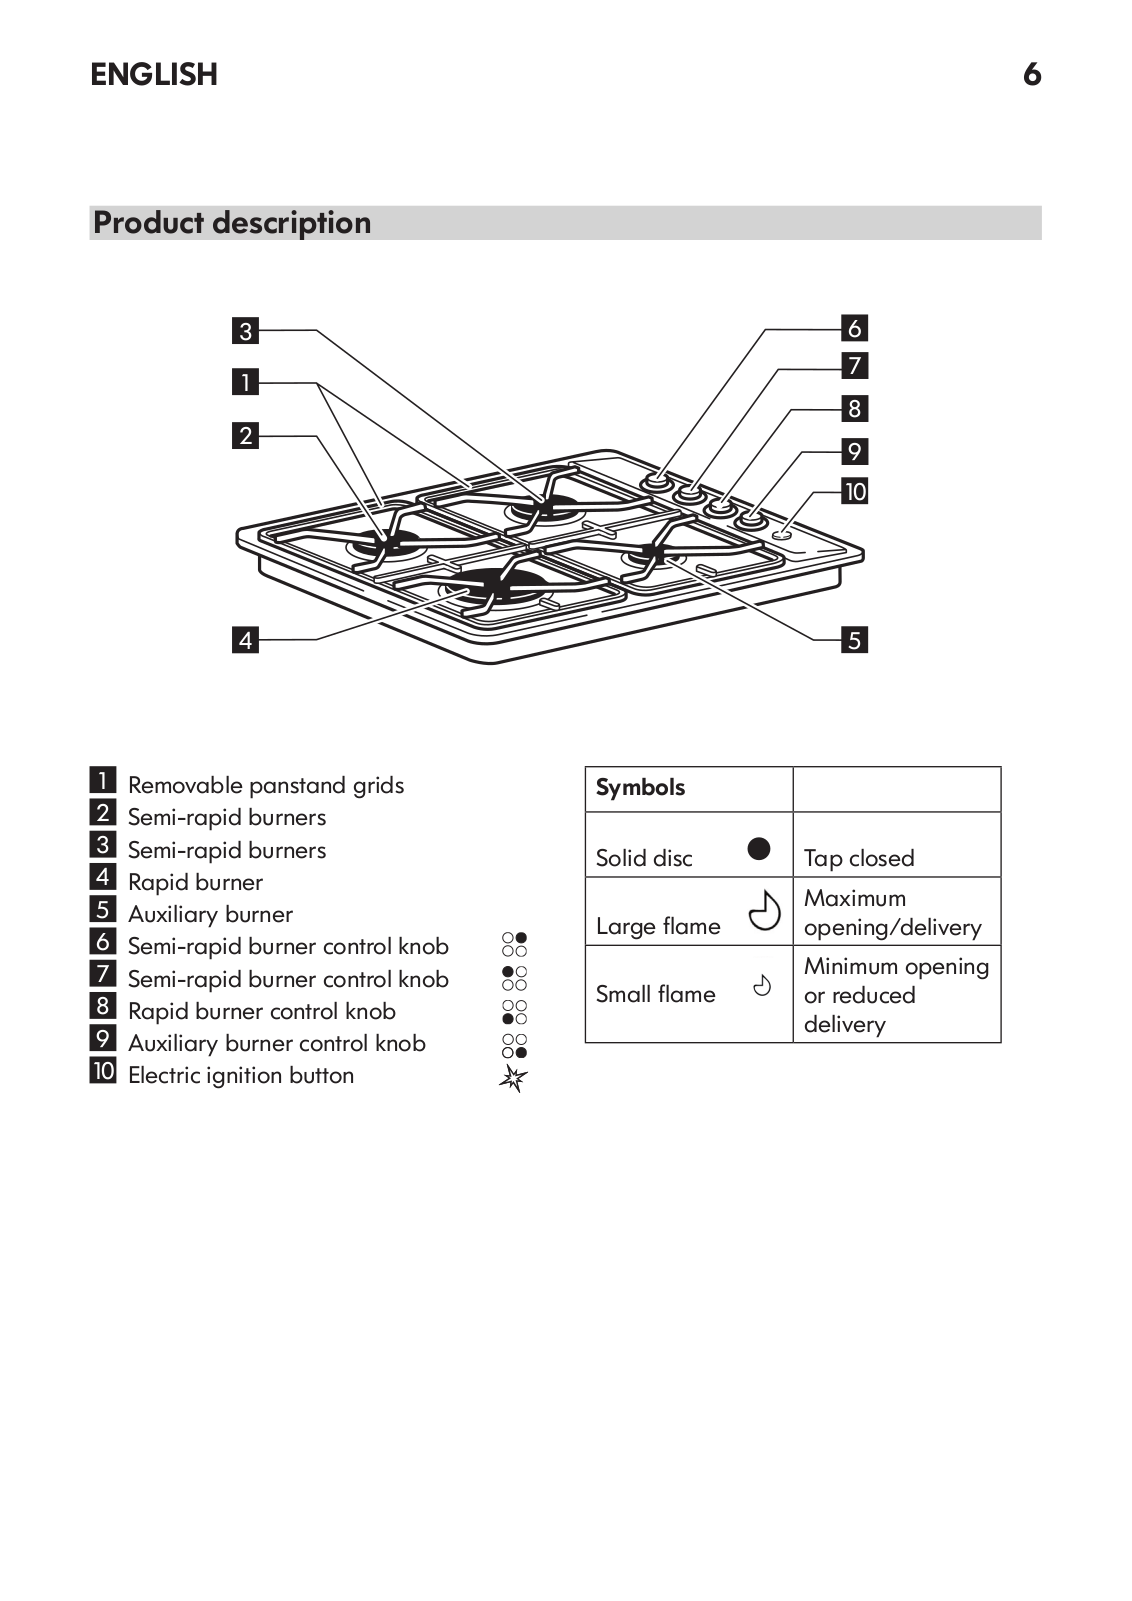
Product description

3

1

2

4


Removable panstand grids

1

2

Semi-rapid burners

3

Semi-rapid burners

4

Rapid burner

5

Auxiliary burner

6

Semi-rapid burner control knob

7

Semi-rapid burner control knob

8

Rapid burner control knob

9

Auxiliary burner control knob

10

Electric ignition button

6

6

7

8

9

10

5

Symbols


Solid disc

Tap closed

Large flame

Maximum

opening/delivery

Small flame

Minimum opening

or reduced


delivery

ENGLISH

Daily use

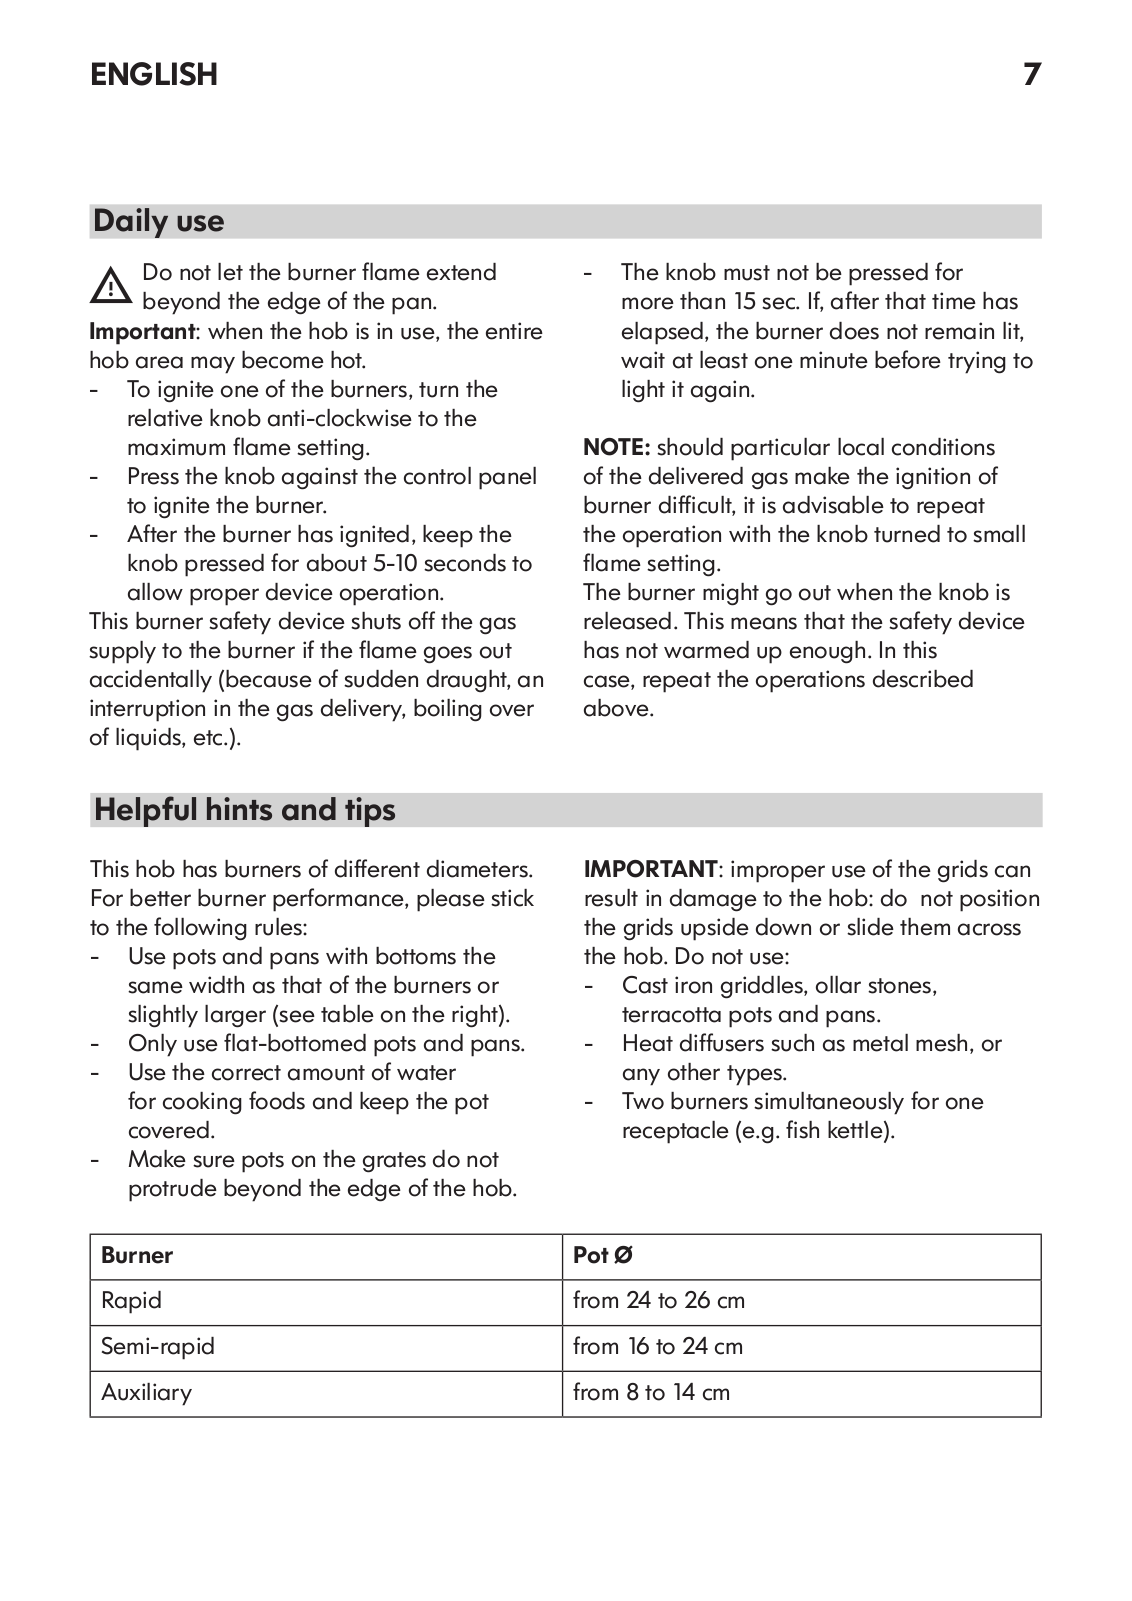
Do not let the burner flame extend beyond the edge of the pan.

Important: when the hob is in use, the entire hob area may become hot.

-- To ignite one of the burners, turn the relative knob anti-clockwise to the maximum flame setting.

-- Press the knob against the control panel to ignite the burner.

-- After the burner has ignited, keep the knob pressed for about 5-10 seconds to allow proper device operation.

This burner safety device shuts off the gas supply to the burner if the flame goes out accidentally (because of sudden draught, an interruption in the gas delivery, boiling over of liquids, etc.).

7

-- The knob must not be pressed for more than 15 sec. If, after that time has elapsed, the burner does not remain lit, wait at least one minute before trying to light it again.

NOTE: should particular local conditions of the delivered gas make the ignition of burner difficult, it is advisable to repeat the operation with the knob turned to small flame setting.

The burner might go out when the knob is released. This means that the safety device has not warmed up enough. In this

case, repeat the operations described above.

Helpful hints and tips

This hob has burners of different diameters. For better burner performance, please stick to the following rules:

-- Use pots and pans with bottoms the same width as that of the burners or slightly larger (see table on the right).

-- Only use flat-bottomed pots and pans. -- Use the correct amount of water

for cooking foods and keep the pot covered.

-- Make sure pots on the grates do not protrude beyond the edge of the hob.

IMPORTANT: improper use of the grids can result in damage to the hob: do not position the grids upside down or slide them across the hob. Do not use:

-- Cast iron griddles, ollar stones, terracotta pots and pans.

-- Heat diffusers such as metal mesh, or any other types.

-- Two burners simultaneously for one receptacle (e.g. fish kettle).

Burner

Pot Ø


Rapid

from 24 to 26 cm


Semi-rapid

from 16 to 24 cm


Auxiliary

from 8 to 14 cm


ENGLISH

Maintenance and cleaning

Disconnect power before servicing. -- All the enamelled and glass parts

should be cleaned with warm water and neutral solution.

-- Stainless steel surfaces may be stained by calcareous water or aggressive detergents if left in contact for too long. Any food spills (water, sauce, coffee, etc.) should be wiped away before they dry.

-- Clean with warm water and neutral detergent, and then dry with a soft cloth or chamois. Remove baked-on dirt with specific cleaners for stainless steel surfaces.

NOTE: clean stainless steel only with soft cloth or sponge.

-- Do not use abrasive or corrosive products, chlorine-based cleaners or pan scourers.

-- Do not use steam cleaning appliances. -- Do not use flammable products.

-- Do not leave acid or alkaline substances, such as vinegar, mustard, salt, sugar or lemon juice on the hob.

CLEANING THE HOB PARTS

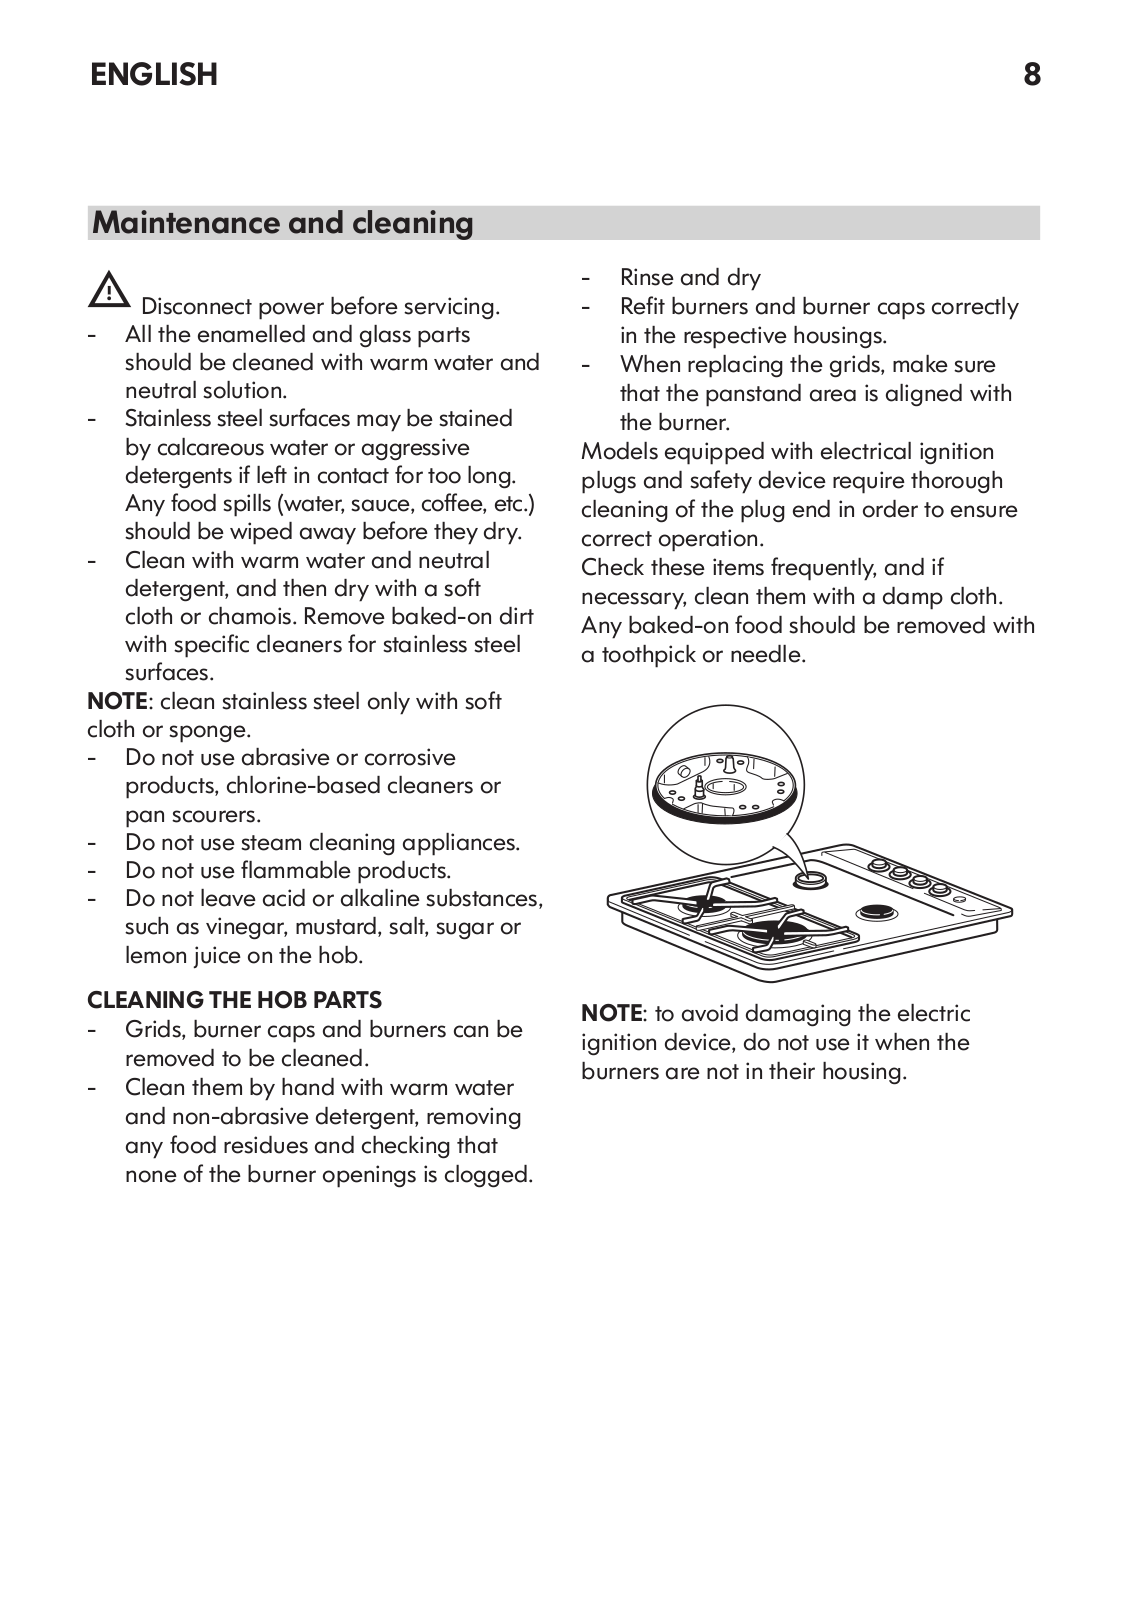
-- Grids, burner caps and burners can be removed to be cleaned.

-- Clean them by hand with warm water and non-abrasive detergent, removing any food residues and checking that none of the burner openings is clogged.

8

-- Rinse and dry

-- Refit burners and burner caps correctly in the respective housings.

-- When replacing the grids, make sure that the panstand area is aligned with the burner.

Models equipped with electrical ignition plugs and safety device require thorough cleaning of the plug end in order to ensure correct operation.

Check these items frequently, and if necessary, clean them with a damp cloth. Any baked-on food should be removed with a toothpick or needle.

NOTE: to avoid damaging the electric ignition device, do not use it when the burners are not in their housing.

ENGLISH

9

What to do if ...

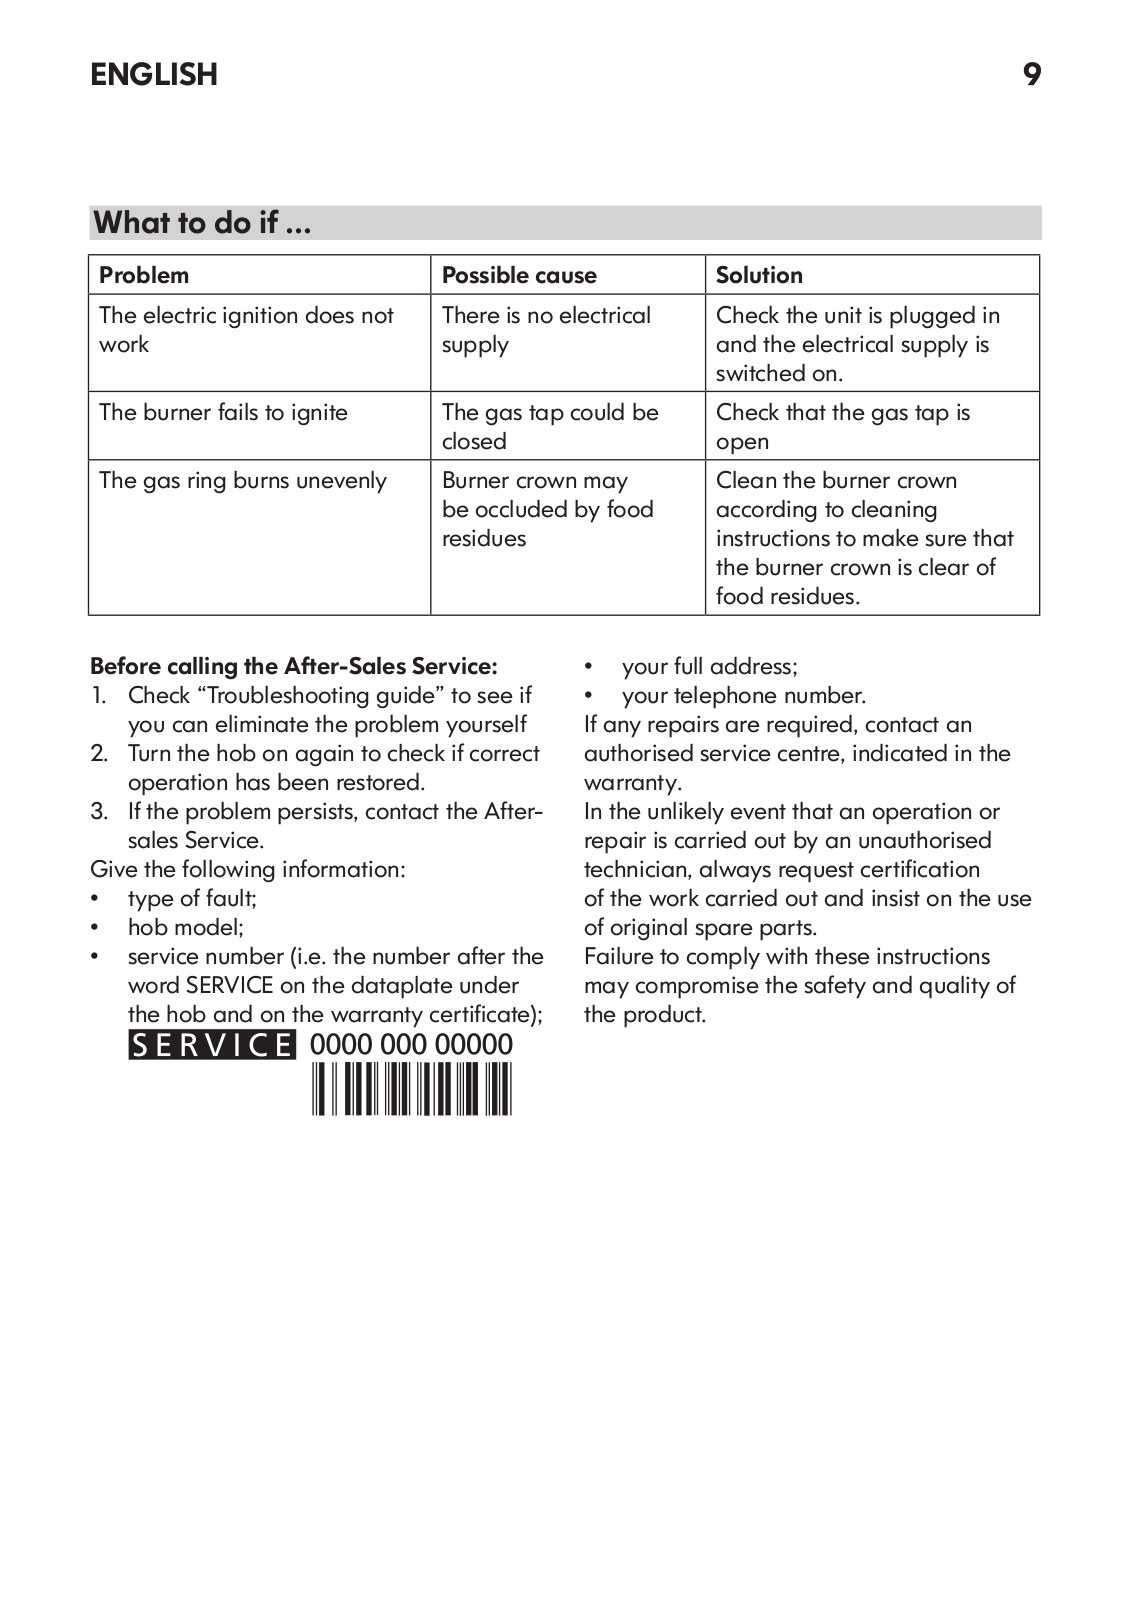
Problem

Possible cause

Solution

The electric ignition does not

There is no electrical

Check the unit is plugged in

work

supply

and the electrical supply is


switched on.

The burner fails to ignite

The gas tap could be

Check that the gas tap is


closed

open

The gas ring burns unevenly

Burner crown may

Clean the burner crown


be occluded by food

according to cleaning


residues

instructions to make sure that


the burner crown is clear of


food residues.

Before calling the After-Sales Service:

1.Check “Troubleshooting guide” to see if you can eliminate the problem yourself

2.Turn the hob on again to check if correct operation has been restored.

3.If the problem persists, contact the Aftersales Service.

Give the following information:

type of fault;

hob model;

service number (i.e. the number after the word SERVICE on the dataplate under the hob and on the warranty certificate);

your full address;

your telephone number.

If any repairs are required, contact an authorised service centre, indicated in the warranty.

In the unlikely event that an operation or repair is carried out by an unauthorised technician, always request certification

of the work carried out and insist on the use of original spare parts.

Failure to comply with these instructions may compromise the safety and quality of the product.

ENGLISH

10

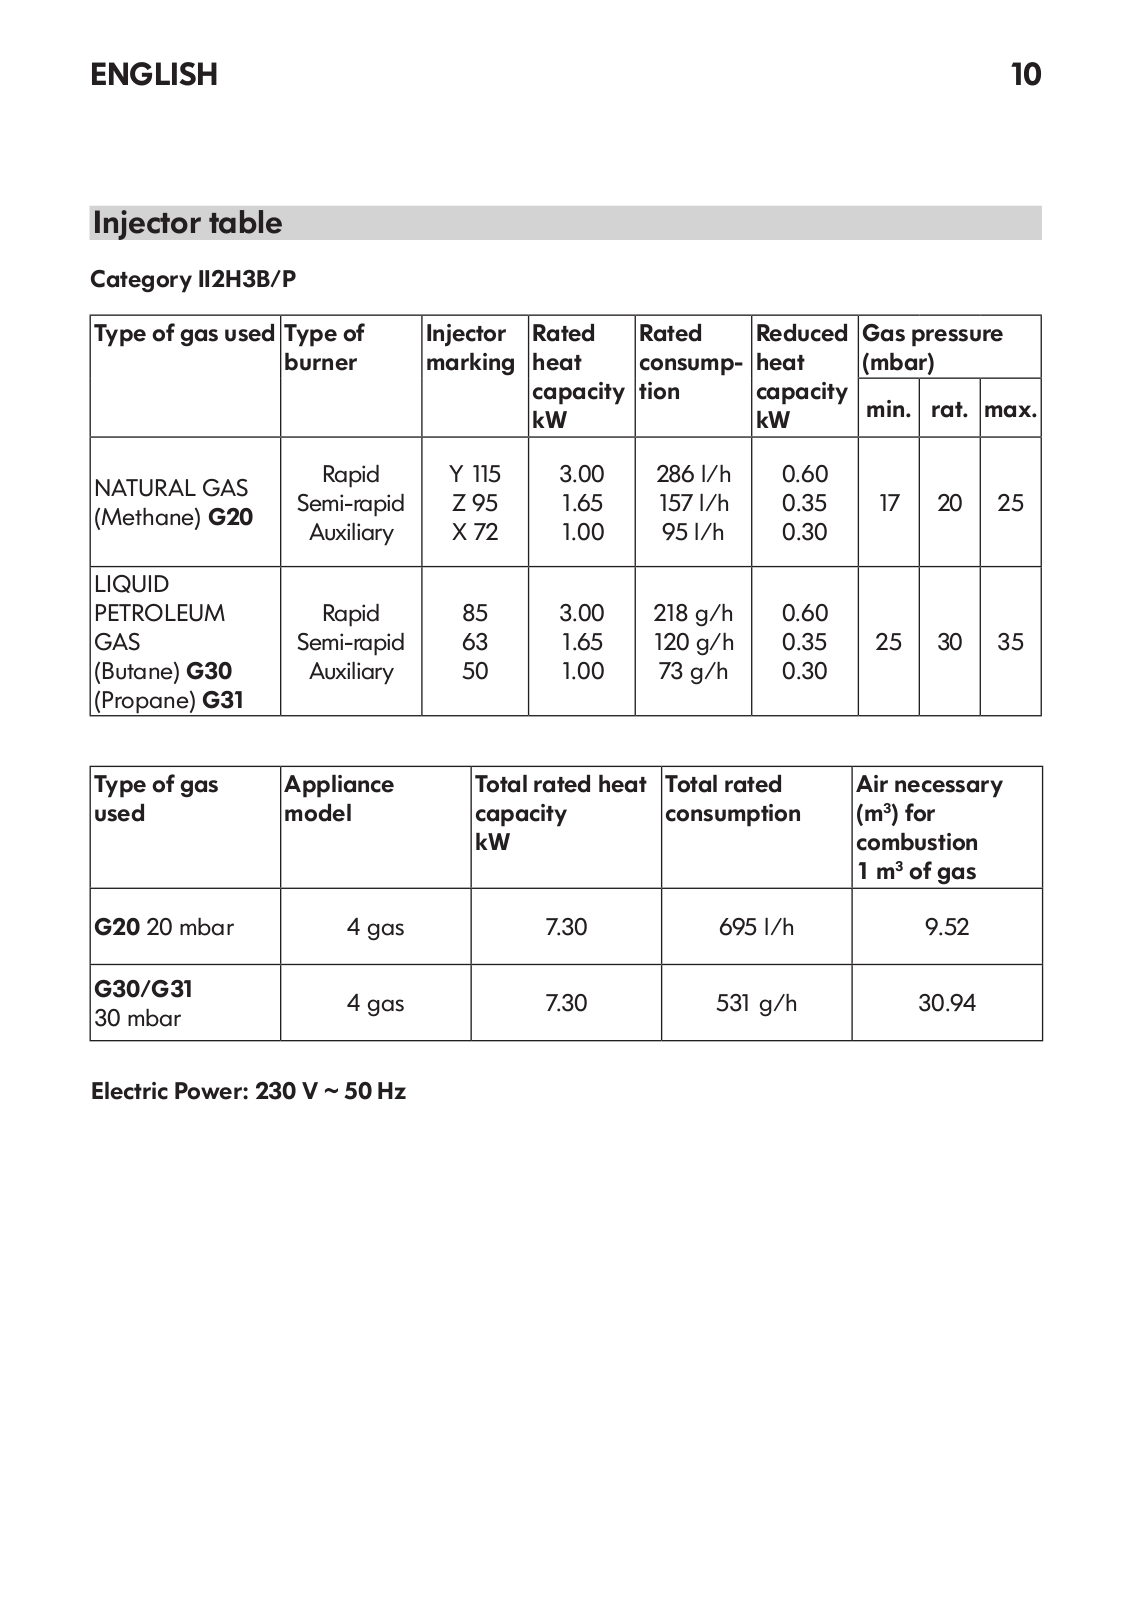
Injector table

Category II2H3B/P

Type of gas used

Type of

Injector

Rated

Rated

Reduced


Gas pressure


burner

marking

heat

consump-

heat


(mbar)


capacity

tion

capacity


min.


rat.

max.


kW


kW


NATURAL GAS

Rapid

Y 115

3.00

286 l/h

0.60


Semi-rapid

Z 95

1.65

157 l/h

0.35


17


20

25

(Methane) G20


Auxiliary

X 72

1.00


95 l/h

0.30


LIQUID


PETROLEUM

Rapid

85

3.00

218 g/h

0.60


GAS

Semi-rapid

63

1.65

120 g/h

0.35


25


30

35

(Butane) G30

Auxiliary

50

1.00

73 g/h

0.30


(Propane) G31


Type of gas

Appliance


Total rated heat

Total rated

Air necessary

used

model


capacity


consumption

(m3) for


kW


combustion


1 m3 of gas


G20 20 mbar

4 gas


7.30


695 l/h


9.52


G30/G31

4 gas


7.30


531 g/h


30.94


30 mbar


Electric Power: 230 V ~ 50 Hz


ENGLISH

11

Technical data

Dimensions


Width (mm)

580

Height (mm)

40

Length (mm)

500

Voltage (V)

230

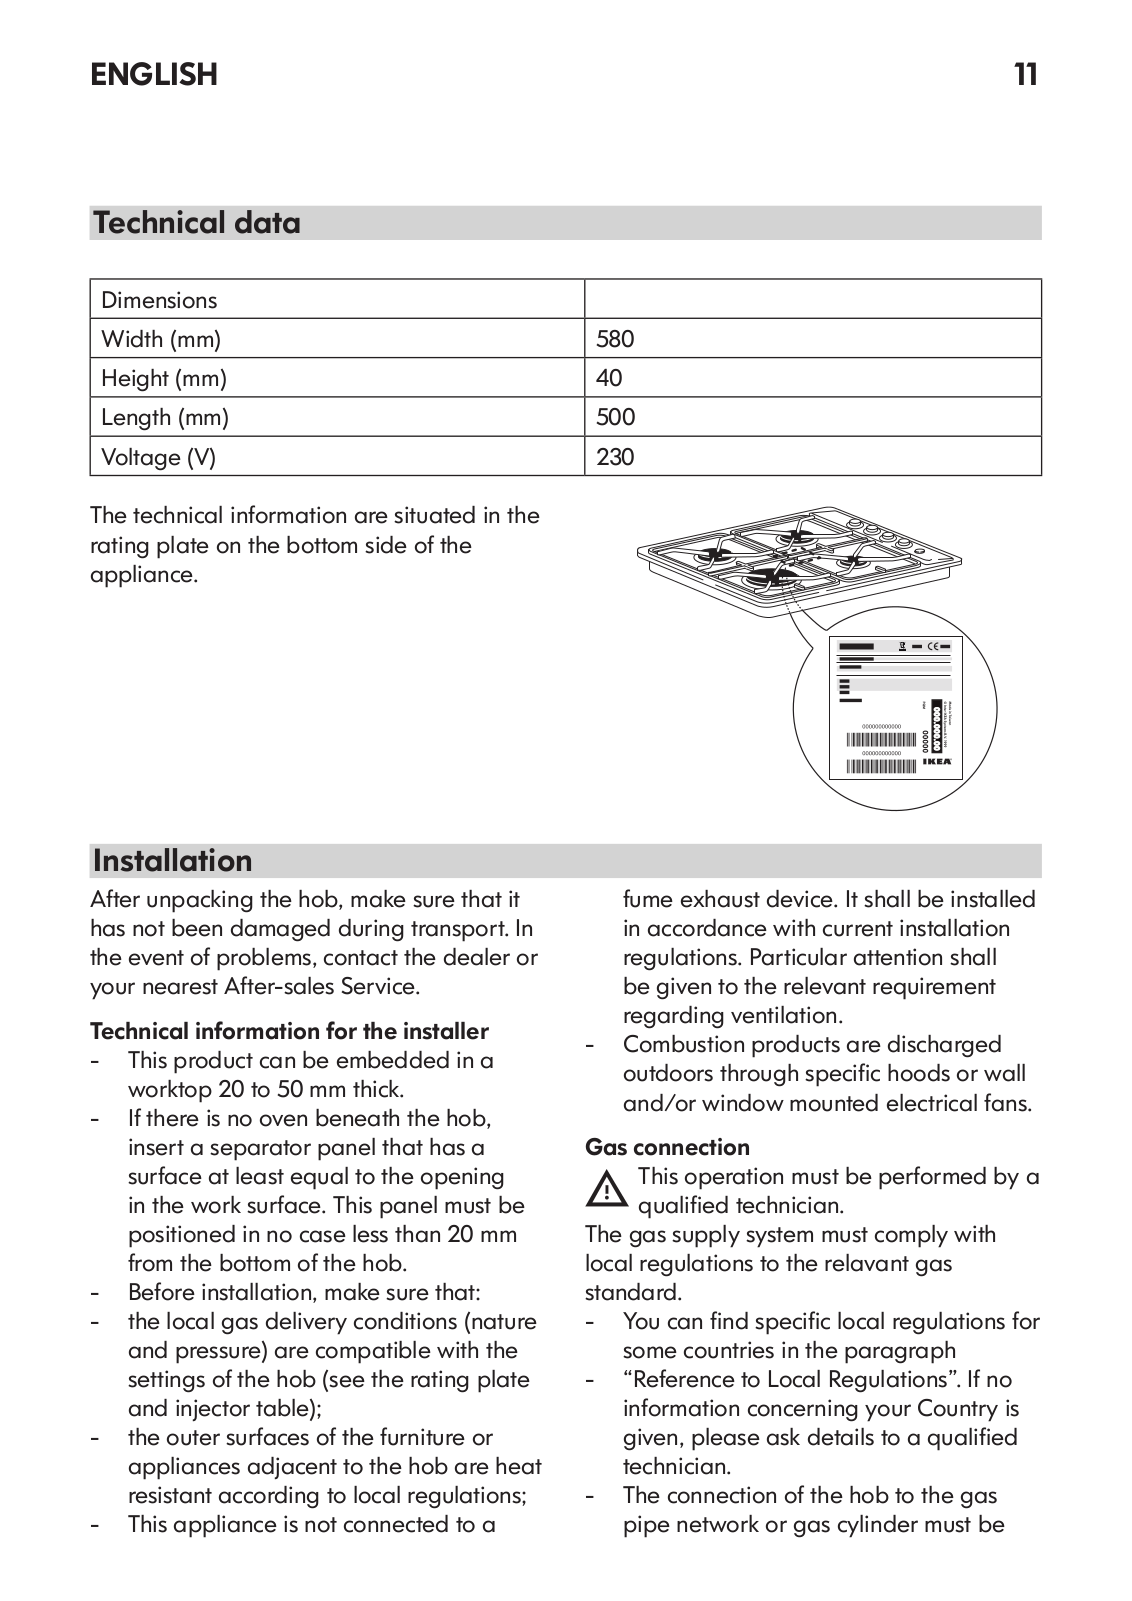
The technical information are situated in the rating plate on the bottom side of the appliance.

Installation

After unpacking the hob, make sure that it has not been damaged during transport. In the event of problems, contact the dealer or your nearest After-sales Service.

Technical information for the installer

-- This product can be embedded in a worktop 20 to 50 mm thick.

-- If there is no oven beneath the hob, insert a separator panel that has a surface at least equal to the opening in the work surface. This panel must be positioned in no case less than 20 mm from the bottom of the hob.

-- Before installation, make sure that:

-- the local gas delivery conditions (nature and pressure) are compatible with the settings of the hob (see the rating plate and injector table);

-- the outer surfaces of the furniture or appliances adjacent to the hob are heat resistant according to local regulations;

-- This appliance is not connected to a

fume exhaust device. It shall be installed in accordance with current installation regulations. Particular attention shall be given to the relevant requirement regarding ventilation.

-- Combustion products are discharged outdoors through specific hoods or wall and/or window mounted electrical fans.

Gas connection

This operation must be performed by a qualified technician.

The gas supply system must comply with local regulations to the relavant gas standard.

-- You can find specific local regulations for some countries in the paragraph

-- “Reference to Local Regulations”. If no information concerning your Country is given, please ask details to a qualified technician.

-- The connection of the hob to the gas pipe network or gas cylinder must be

ENGLISH

12

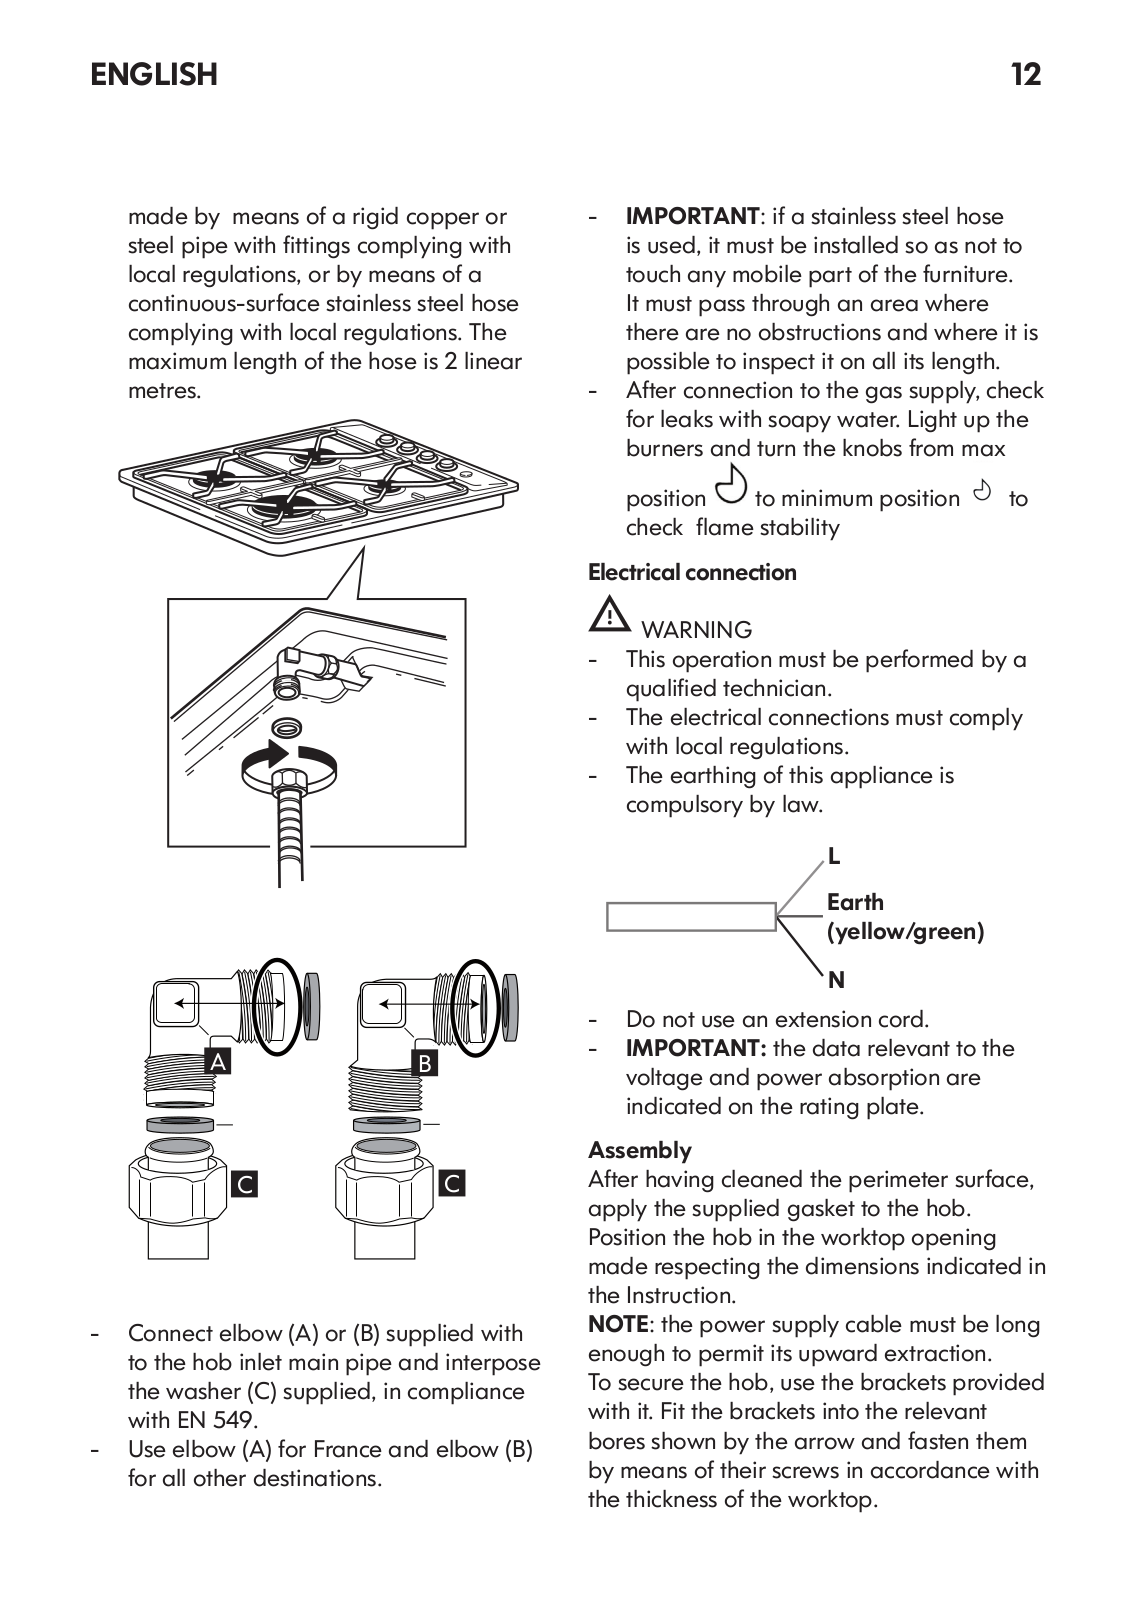
made by means of a rigid copper or steel pipe with fittings complying with local regulations, or by means of a continuous-surface stainless steel hose complying with local regulations. The maximum length of the hose is 2 linear metres.

A B

C C

-- Connect elbow (A) or (B) supplied with to the hob inlet main pipe and interpose the washer (C) supplied, in compliance with EN 549.

-- Use elbow (A) for France and elbow (B) for all other destinations.

-- IMPORTANT: if a stainless steel hose is used, it must be installed so as not to touch any mobile part of the furniture. It must pass through an area where there are no obstructions and where it is possible to inspect it on all its length.

-- After connection to the gas supply, check for leaks with soapy water. Light up the burners and turn the knobs from max

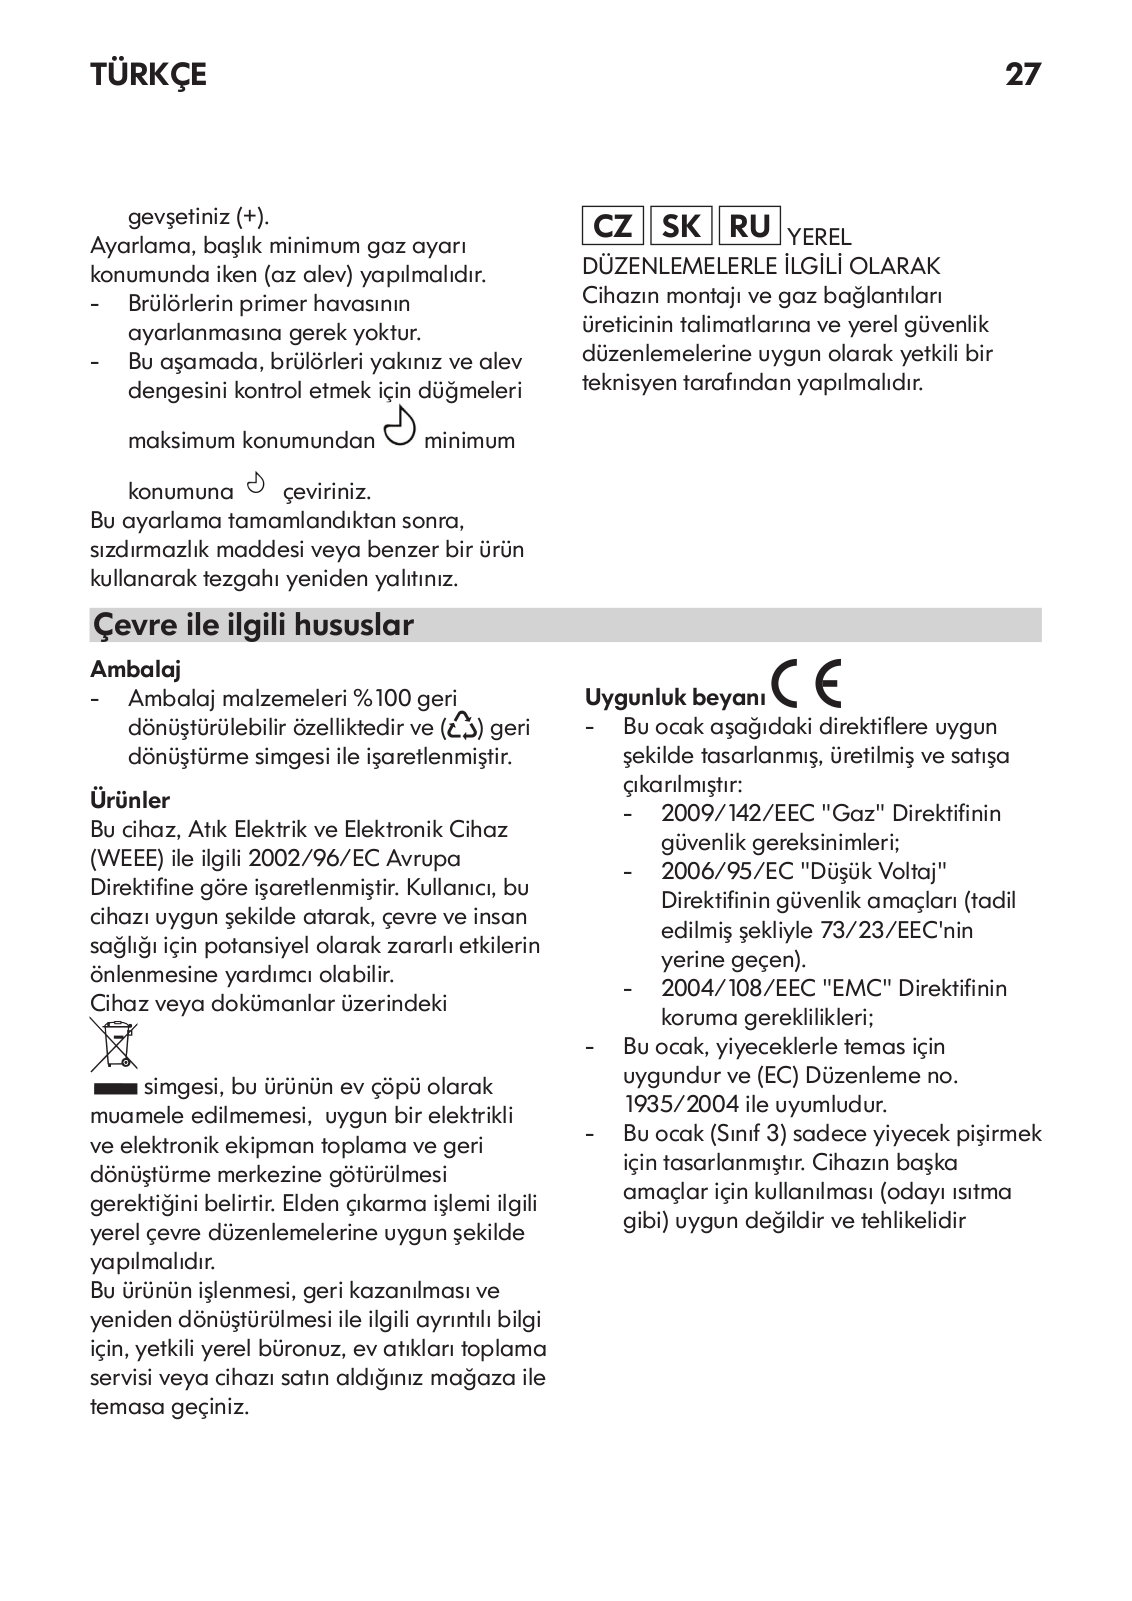
positionto minimum position to check flame stability

Electrical connection

WARNING

-- This operation must be performed by a qualified technician.

-- The electrical connections must comply with local regulations.

-- The earthing of this appliance is compulsory by law.

L

Earth (yellow/green)

N

-- Do not use an extension cord.

-- IMPORTANT: the data relevant to the voltage and power absorption are indicated on the rating plate.

Assembly

After having cleaned the perimeter surface, apply the supplied gasket to the hob. Position the hob in the worktop opening made respecting the dimensions indicated in the Instruction.

NOTE: the power supply cable must be long enough to permit its upward extraction.

To secure the hob, use the brackets provided with it. Fit the brackets into the relevant bores shown by the arrow and fasten them by means of their screws in accordance with the thickness of the worktop.

ENGLISH

13

Make sure that the outlet is near the product to install. So, if the cable that came with the product is not long enough, you will need to replace it with another one having the same features but with the right length.

Adjustment to different type of gas

WARNING

-- This operation must be performed by a qualified technician.

If the appliance is intended to operate with a different gas from the gas type stated on the rating plate and information label on the top of the hob, change the injectors. Remove the information label and keep it with the instructions booklet.

Use pressure regulators suitable for the gas pressure indicated in the Instruction.

-- The gas nozzles must be changed by After Sales Service or a qualified technician.

-- Nozzles not supplied with the appliance must be ordered from After Sales Service.

-- Adjust the minimum setting of the taps. NOTE: when liquid petroleum gas is used (G30/G31), the minimum gas setting screw must be tightened as far as it will go.

IMPORTANT: should you experience difficulty in turning the burners knobs, please contact the After Sales Service for the replacement of the burner tap if found to be faulty.

Replacing the injectors (see paragraph “injector table”)

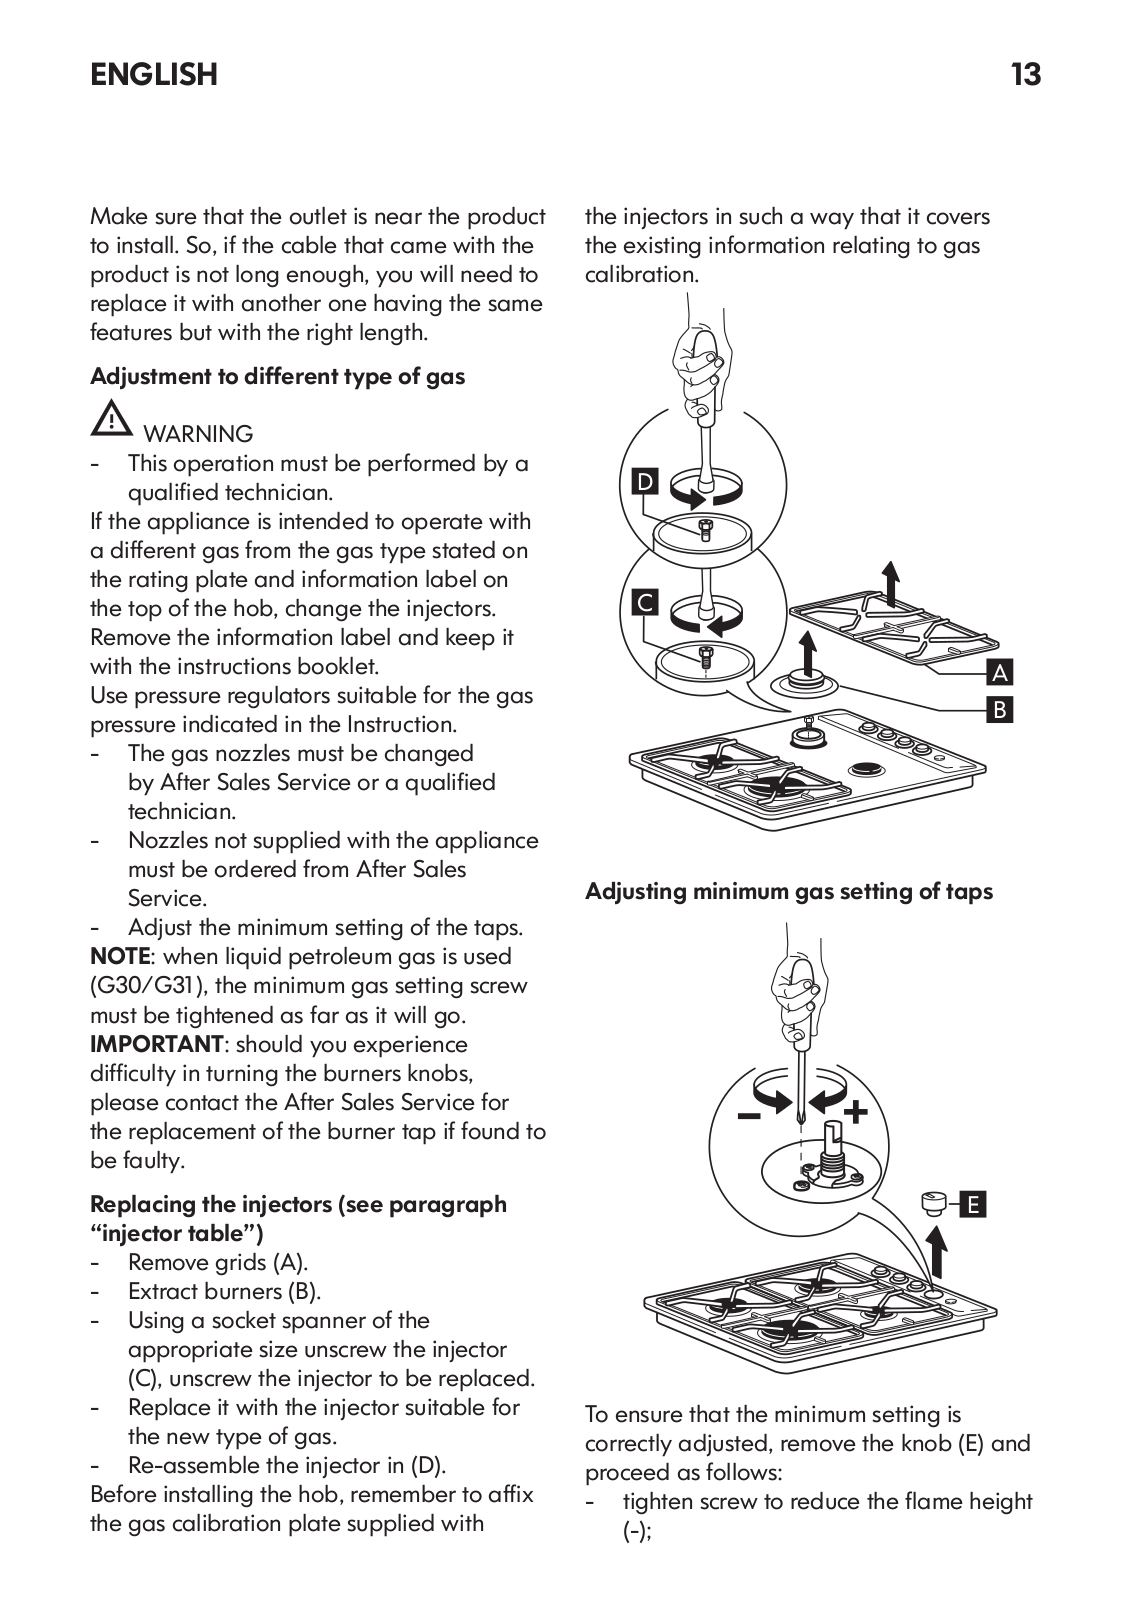
-- Remove grids (A). -- Extract burners (B).

-- Using a socket spanner of the appropriate size unscrew the injector (C), unscrew the injector to be replaced.

-- Replace it with the injector suitable for the new type of gas.

-- Re-assemble the injector in (D). Before installing the hob, remember to affix the gas calibration plate supplied with

the injectors in such a way that it covers the existing information relating to gas calibration.

D

C

A

B

Adjusting minimum gas setting of taps

E

To ensure that the minimum setting is correctly adjusted, remove the knob (E) and proceed as follows:

-- tighten screw to reduce the flame height (-);

ENGLISH

14

-- loosen screw to increase the flame height

(+).

The adjustment must be performed with the tap in minimum gas setting position (small flame ) .

-- The primary air of the burners does not need to be adjusted.

-- At this stage, light up the burners and turn the knobs from max position

to minimum position to check flame stability.

Upon completion of adjustment, reseal the work surface using sealing wax or an equivalent material.

CZ SK RU REFERENCE TO LOCAL REGULATIONS

Ensure that the installation and gas connections are performed by a qualified technician, following the manufacturer’s instructions and in compliance with current local safety regulations.

Environmental concerns

Packing

-- The packing materials are 100% recyclable and marked with the recycling symbol ().

Products

This appliance is marked in compliance with European Directive 2002/96/EC on Waste Electrical and Electronic

Equipment (WEEE). By ensuring that this appliance is correctly scrapped, the user can help prevent potentially harmful consequences for the environment and the health of people.

The symbol on the product or accompanying documentation indicates that this product should not be treated as domestic waste but must be taken to a suitable centre for collection and recycling of electrical and electronic equipment. Disposal must be carried out in compliance with local regulations on waste disposal. For further information on the treatment, recovery and recycling of this product, contact your competent local office, the household waste collection service or the shop where you purchased the appliance.

Declaration of Conformity

-- This cooking hob has been designed, constructed and put on the market in conformity with:

-- safety requirements of “Gas” Directive 2009/142/EEC;

-- safety objectives of “Low Voltage” Directive 2006/95/EC (which replaces 73/23/EEC as amended).

-- protection requirements of “EMC” Directive 2004/108/EEC;

-- This hob is suitable for contact with foodstuffs and complies with (EC) Regulation no. 1935/2004.

-- This cooking hob (Class 3) has been designed only for cooking food. Any other use (such as heating a room) is improper and dangerous.

ENGLISH

IKEA GUARANTEE

How long is the IKEA guarantee valid?

This guarantee is valid for five (5) years from the original date of purchase of your appliance at IKEA, unless the appliance is named LAGAN in which case two (2) years of guarantee apply. The original sales receipt, is required as proof of purchase. If service work is carried out under guarantee, this will not extend the guarantee period for the appliance.

Which appliances are not covered by the IKEA five (5) years guarantee?

The range of appliances named LAGAN and all appliances purchased in IKEA before 1st of August 2007.

Who will execute the service?

IKEA service provider will provide the service through its own service operations or authorized service partner network.

What does this guarantee cover?

The guarantee covers faults of the appliance, which have been caused by faulty construction or material faults from the date of purchase from IKEA. This guarantee applies to domestic use only. The exceptions are specified under the headline “What is not covered under this guarantee?” Within the guarantee period, the costs to remedy the fault e.g. repairs, parts, labour and travel will be covered, provided that the appliance is accessible for repair without special expenditure. On these conditions the EU guidelines (Nr. 99/44/

EG) and the respective local regulations are applicable. Replaced parts become the property of IKEA.

What will IKEA do to correct the problem?

IKEA appointed Service Provider will examine the product and decide, at its sole discretion, if it is covered under this guarantee. If considered covered, IKEA Service Provider or its authorized service partner through its own service operations, will then, at its sole discretion, either repair the defective product

15

or replace it with the same or a comparable product.

What is not covered under this guarantee?

Normal wear and tear.

Deliberate or negligent damage, damage caused by failure to observe operating instructions, incorrect installation or by connection to the wrong voltage, damage caused by chemical or electrochemical reaction, rust, corrosion or water damage including but not limited to damage caused by excessive lime in the water supply, damage caused by abnormal environmental conditions.

Consumable parts including batteries and lamps.

Non-functional and decorative parts which do not affect normal use of the appliance, including any scratches and possible color differences.

Accidental damage caused by foreign objects or substances and cleaning or unblocking of filters, drainage systems or soap drawers.

Damage to the following parts: ceramic glass, accessories, crockery and cutlery baskets, feed and drainage pipes, seals, lamps and lamp covers, screens, knobs, casings and parts of casings. Unless such damages can be proved to have been caused by production faults.

Cases where no fault could be found during a technician’s visit.

Repairs not carried out by our appointed service providers and/or an authorized service contractual partner or where nonoriginal parts have been used.

Repairs caused by installation which is faulty or not according to specification.

The use of the appliance in a non-domestic environment i.e. professional use.

Transportation damages. If a customer transports the product to his home or

ENGLISH

16

another address, IKEA is not liable for any damage that may occur during transport. However, if IKEA delivers the product

to the customer’s delivery address, then damage to the product that occurs during this delivery will be covered by IKEA.

Cost for carrying out the initial installation of the IKEA appliance.

However, if an IKEA appointed Service Provider or its authorized service partner repairs or replaces the appliance under the terms of this guarantee, the appointed Service Provider or its authorized

service partner will reinstall the repaired appliance or install the replacement, if necessary.

These restrictions do not apply to fault-free work carried out by a qualified specialist using our original parts in order to adapt the appliance to the technical safety specifications of another EU country.

How country law applies

The IKEA guarantee gives you specific legal rights, which cover or exceed all the local legal demands. However these conditions do not limit in any way consumer rights described in the local legislation.

Area of validity

For appliances which are purchased in one EU country and taken to another EU country, the services will be provided in the framework of the guarantee conditions normal in the new country.

An obligation to carry out services in the framework of the guarantee exists only if the appliance complies and is installed in accordance with:

-the technical specifications of the country in which the guarantee claim is made;

-the Assembly Instructions and User Manual Safety Information.

The dedicated AFTER SALES for IKEA appliances

Please don’t hesitate to contact IKEA

appointed After Sales Service Provider to:

make a service request under this guarantee;

ask for clarifications on installation of the IKEA appliance in the dedicated IKEA kitchen furniture;

ask for clarification on functions of IKEA appliances.

To ensure that we provide you with the best assistance, please read carefully the Assembly Instructions and/or the User Manual before contacting us.

How to reach us if you need our service

Please refer to the last page of this manual for the full list of IKEA appointed After Sales Service Provider and relative national phone numbers.

In order to provide you a quicker service, we recommend to use the specific phone numbers listed on this manual. Always refer to the numbers listed in the booklet of the specific appliance you need an assistance for. Please also always refer to the IKEA article number (8 digit code) and 12 digit service number placed on the rating plate of your appliance.

SAVE THE SALES RECEIPT!

It is your proof of purchase and required for the guarantee to apply. The sales receipt also reports the IKEA name and article number (8 digit code) for each of the appliances you have purchased.

Do you need extra help?

For any additional questions not related to After Sales of your appliances please contact your nearest IKEA store call centre. We recommend you read the appliance

documentation carefully before contacting us.

TÜRKÇE

17

İÇİNDEKİLER

Güvenlik ile ilgili bilgiler

17

Enjektör tablosu

23

Ürün tanımı

19

Teknik Veriler

24

Günlük kullanım

20

Kurulum

24

Faydalı tavsiyeler ve ipuçları

20

Çevre ile ilgili hususlar

27

Temizlik ve bakım

21


Servis çağırmadan önce

22


Güvenlik ile ilgili bilgiler

Sizin ve başkalarının güvenliği büyük önem taşır.

Bu kılavuz ve cihazın kendisi, her zaman okunması ve uyulması gereken önemli güvenlik mesajları içermektedir.

Bu, güvenlikle ilgili olan, kullanıcıları kendileri için ve diğer kişiler için

potansiyel tehlikeler hakkında uyaran güvenlik alarmı sembolüdür.

Güvenlik mesajlarının tümü, güvenlik alarmı sembolünü veya şu sözcüklerden birini takip edecektir:

TEHLİKE Önlenmediği takdirde ciddi yaralanmalara neden olacak bir

tehlike durumunu belirtir.

UYARI Önlenmediği takdirde ciddi yaralanmalara neden olabilecek bir

tehlike durumunu belirtir.

Güvenlik mesajlarının tümü size potansiyel tehlikenin ne olduğunu, yaralanma tehlikesini nasıl azaltabileceğinizi ve talimatlara uyulmaması halinde nelerin meydana gelebileceğini açıklayacaktır. Herhangi bir montaj işlemi uygulanmadan önce, cihazın fişi elektrik prizinden çekilmelidir.

Montaj işlemi üreticinin talimatlarına ve ilgili gaz standardına yönelik yerel

düzenlemelere uygun olarak yetkili bir teknisyen tarafından yapılmalıdır. Yalnızca orijinal yedek parçalar kullanınız. Kullanıcı kılavuzunda özellikle belirtilmedikçe, cihazın hiçbir parçasını tamir etmeyiniz veya değiştirmeyiniz.

UYARI Bu kılavuzda verilen talimatlara tamamen uyulmaması halinde,

eşyaların zarar görmesine veya yaralanmalara yol açan bir yangın veya patlama meydana gelebilir.

-- Bu cihazın yakınında mazot veya diğer yanıcı buharlar veya sıvılar saklamayınız veya kullanmayınız.

Bir gaz kokusu aldığınızda yapmanız gerekenler:

-- Hiçbir cihazı yakmayın.

-- Hiçbir elektrik düğmesine dokunmayın. -- Binada telefon kullanmayın.

-- Derhal bir komşunuzun ev telefonundan gaz tedarikçinizi arayın. Gaz tedarikçisinin talimatlarını uygulayın.

-- Gaz tedarikçinize ulaşamamanız halinde, itfaiye teşkilatını arayın.

-- Montaj ve servis işlemleri kalifiye bir montaj elemanı, servis acentesi veya gaz tedarikçisi tarafından yapılmalıdır.

-- Cihazı sadece iyi havalandırılan yerlerde kullanınız.

-- Elektrik ve gaz bağlantıları yerel düzenlemelere uygun olmalıdır.

-- Ocak monte edildiğinde, bağlantının tamamen kesilmesini sağlayan en az 3 mm kontak ayırımlı çok kutuplu bir devre kesici takınız.

-- Düzenlemeler cihazın topraklanmasını gerektirir.

-- Elektrik kablosu, yerine takıldıktan sonra cihazın fişini elektrik prizine takmak için yeterli uzunlukta olmalıdır.

-- Gaz bağlantısı için sadece esnek veya sert metal hortum kullanınız.

-- Gerekirse elektrik kablosu, üretici tarafından verilenle aynı özelliklere

TÜRKÇE

18

sahip bir kablo ile değiştirilmelidir

veya davlumbazın havalandırma hızını

(H05V2V2-F 90°C veya H05RR-F tipi).

artırma).

Bu işlem yetkili bir elektrikçi tarafından

-- Kullanımdan sonra, düğmelerin kapalı

yapılmalıdır.

konumunda olduğundan emin olunuz ve

-- Üretici, bu uyarıların dikkate

ana gaz besleme musluğunu veya gaz

alınmaması sonucu meydana gelen

tüpü vanasını kapatınız.

yaralanmalardan ve maddi hasardan

-- Aşırı ısınmış yağlar ve sıvı yağlar

sorumlu tutulamaz.

kolaylıkla alev alırlar. Bol yağ, sıvı yağ

-- Uzatma kablolarını veya üçlü prizleri

veya alkol (rom, konyak, şarap) içeren

kullanmayınız.

yiyecekleri pişirirken daima dikkatli

-- Cihazın fişini prizden çıkarmak için,

olunuz.

elektrik kablosunu çekmeyiniz.

-- Ambalaj malzemelerini çocukların

-- Montaj işleminden sonra elektrikli

ulaşamayacakları yerlerde saklayınız.

aksamlar kullanıcı tarafından erişilebilir

-- Temizlik veya bakım işleminden önce

olmamalıdır.

ocağın soğumasını bekleyiniz.

-- Kesinlikle ocağa ıslak elle dokunmayınız

Bu talimatları saklayın

ve ayaklarınız çıplak iken cihazı


çalıştırmayınız.


-- Bu ocak (3. sınıf) sadece evde pişirme


amaçlı kullanım için tasarlanmıştır. Bu


cihazı odayı ısıtmak için bir mekan ısıtıcısı


olarak kullanmayınız. Bunun yapılması


karbondioksit zehirlenmesine ve ocağın


aşırı ısınmasına yol açabilir.


-- Üretici, kumandaların uygunsuz


kullanımından veya hatalı


ayarlanmasından doğan her türlü


sorumluluktan feragat eder.


-- Kendi güvenlikleri için gözetim altında


olmadıkça veya ilgili talimatlar


verilmedikçe, cihazın fiziksel, duyusal


veya mental kapasiteleri kısıtlı kişiler


(çocuklar dahil) veya deneyimi ve


bilgisi bulunmayan kişiler tarafından


kullanılması uygun değildir.


-- Küçük çocuklar cihazdan uzak tutulmalı


ve cihazla oynamadıklarından emin


olacak şekilde gözetim altında


tutulmalıdır.


-- Gazlı cihazların kullanımı, odada


ısı ve nem yaratır. Odanın iyice


havalandırıldığından emin olunuz;


aksi takdirde havalandırma kanallı bir


davlumbaz monte ediniz.


-- Uzun süreli kullanım durumunda, ilave


havalandırma gerekebilir (camı açma


TÜRKÇE

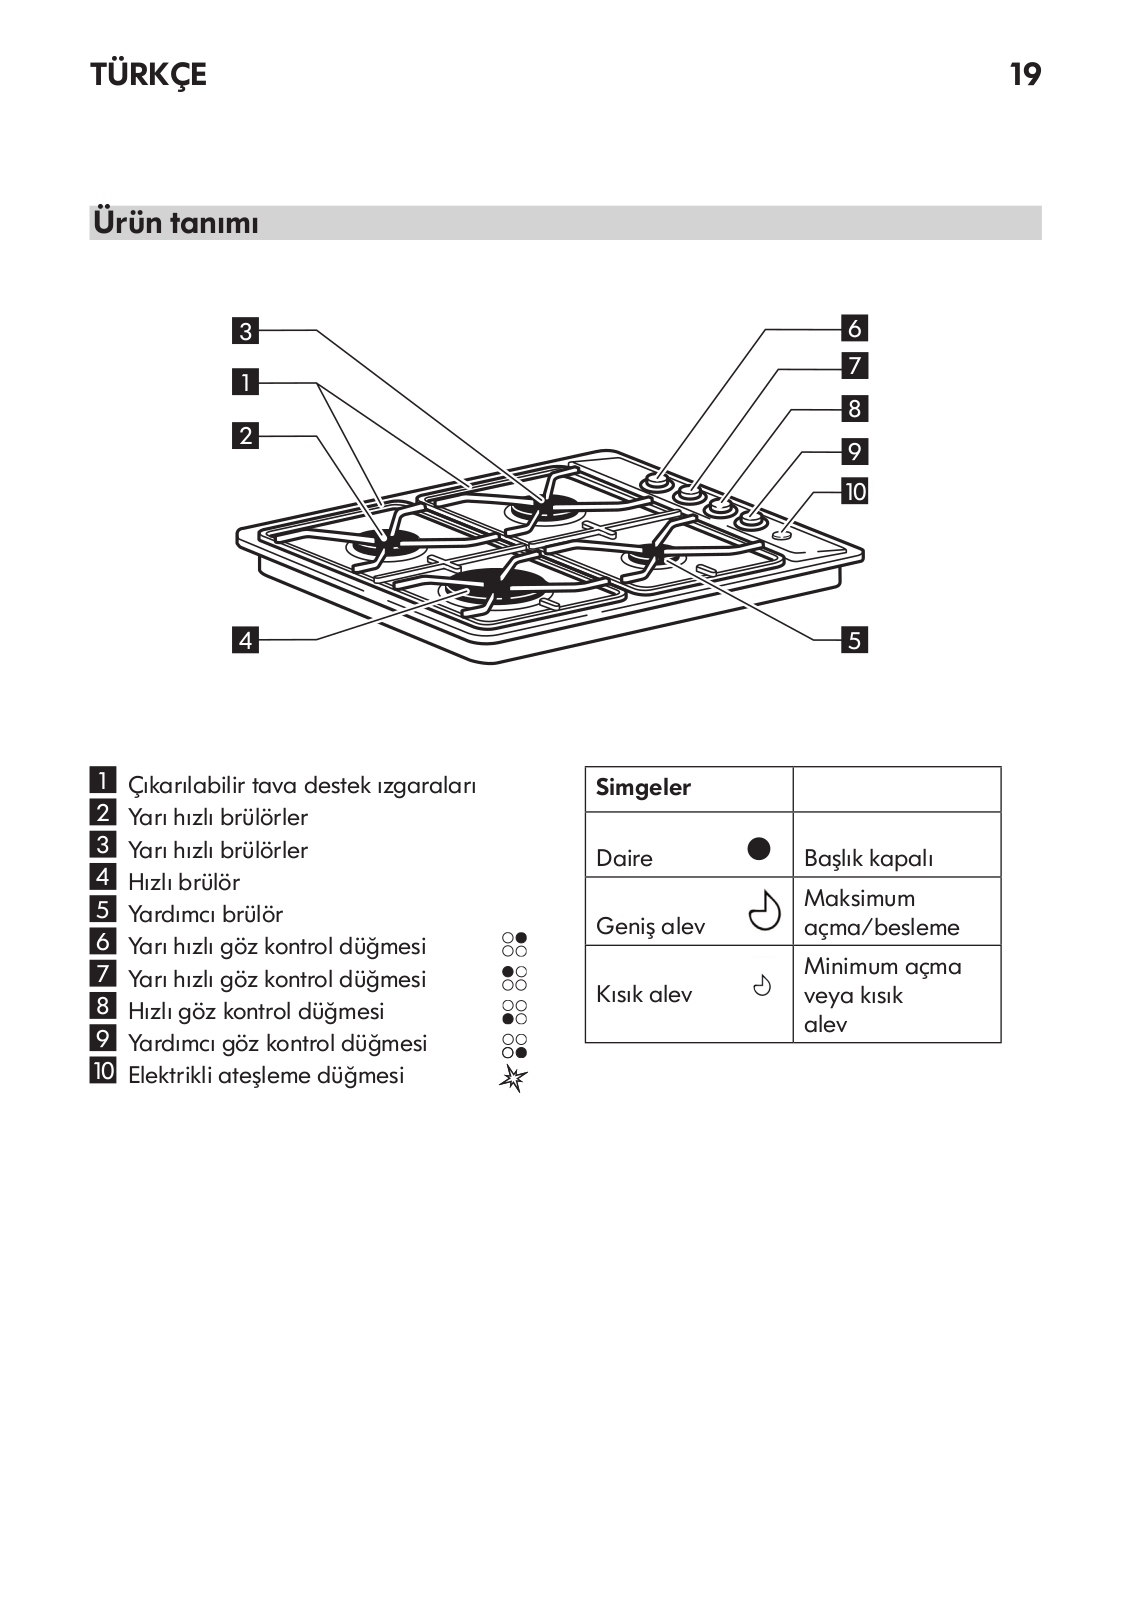
Ürün tanımı

3

1

2

4


Çıkarılabilir tava destek ızgaraları

1

2

Yarı hızlı brülörler

3

Yarı hızlı brülörler

4

Hızlı brülör

5

Yardımcı brülör

6

Yarı hızlı göz kontrol düğmesi

7

Yarı hızlı göz kontrol düğmesi

8

Hızlı göz kontrol düğmesi

9

Yardımcı göz kontrol düğmesi

10

Elektrikli ateşleme düğmesi

19

6

7

8

9

10

5

Simgeler


Daire

Başlık kapalı

Geniş alev

Maksimum

açma/besleme

Kısık alev

Minimum açma

veya kısık


alev

TÜRKÇE

20

Günlük kullanım

Ocağın alevinin tencerenin kenarlarından taşmasına izin

vermeyiniz.

ÖNEMLI: ocak kullanımda iken, ocağın tüm alanı ısınabilir.

-- Brülörlerden birisini yakmak için, ilgili düğmeyi saatin tersi yönünde maksimum alev ayarına çeviriniz.

-- Ocağı yakmak için, düğmeyi kontrol paneline doğru bastırınız.

-- Ocak yandıktan sonra, uygun aygıtın çalışması için düğmeyi 5-10 saniye kadar basılı tutunuz.

Alev kazayla söndüğünde (ani elektrik kesintisi, gaz beslemesindeki kesilme, sıvıların taşması vs. nedenlerden dolayı) bu ocak güvenlik devresi, ocağa giden gazı keser.

-- Bu düğme 15 saniyeden uzun süre basılı tutulmamalıdır. Bu süre sonunda ocak yanmazsa, tekrar yakmayı denemeden önce en az bir dakika bekleyin.

NOT: İletilen gaz ile ilgili yerel koşullar ocağın yanmasını zorlaştırıyorsa, düğmeyi kısık alev ayarına çevirerek işlemi tekrarlamanızı tavsiye ederiz.

Düğme bırakıldığında ocak sönebilir. Bu, güvenlik aygıtının yeterince ısınmadığı anlamına gelir. Bu

durumda, yukarıda açıklanan işlemleri tekrarlayın.

Faydalı tavsiyeler ve ipuçları

Bu ocak farklı çaplardaki brülörlere sahiptir. Daha iyi ocak performansı için, lütfen aşağıdaki kurallara uyunuz:

-- Tabanları ocakla aynı genişlikte veya biraz daha geniş olan tencereler ve tavalar kullanın (sağdaki tabloya bakınız).

-- Sadece düz tabanlı tencereler ve tavalar kullanın.

-- Yiyecekleri pişirmek için uygun miktarda su kullanın ve tencerenin kapağını kapalı tutun.

-- Demirlerin üzerindeki tencerelerin

ocağın kenarından taşmadığından emin olun.

ÖNEMLİ: ızgaraların yanlış kullanımı ocağın hasar görmesine neden olabilir: ızgaraları ters şekilde yerleştirmeyiniz veya ocağın üzerinde kaydırmayınız. Şu maddeleri kullanmayınız:

-- Dökme demir ızgaralar, pişirme taşları, topraktan yapılan kaplar ve tencereler.

-- Metal ızgaralar vs. gibi ısı yayan maddeler.

-- Bir kap için iki ocak brülörü aynı anda (örn; balık tavası).

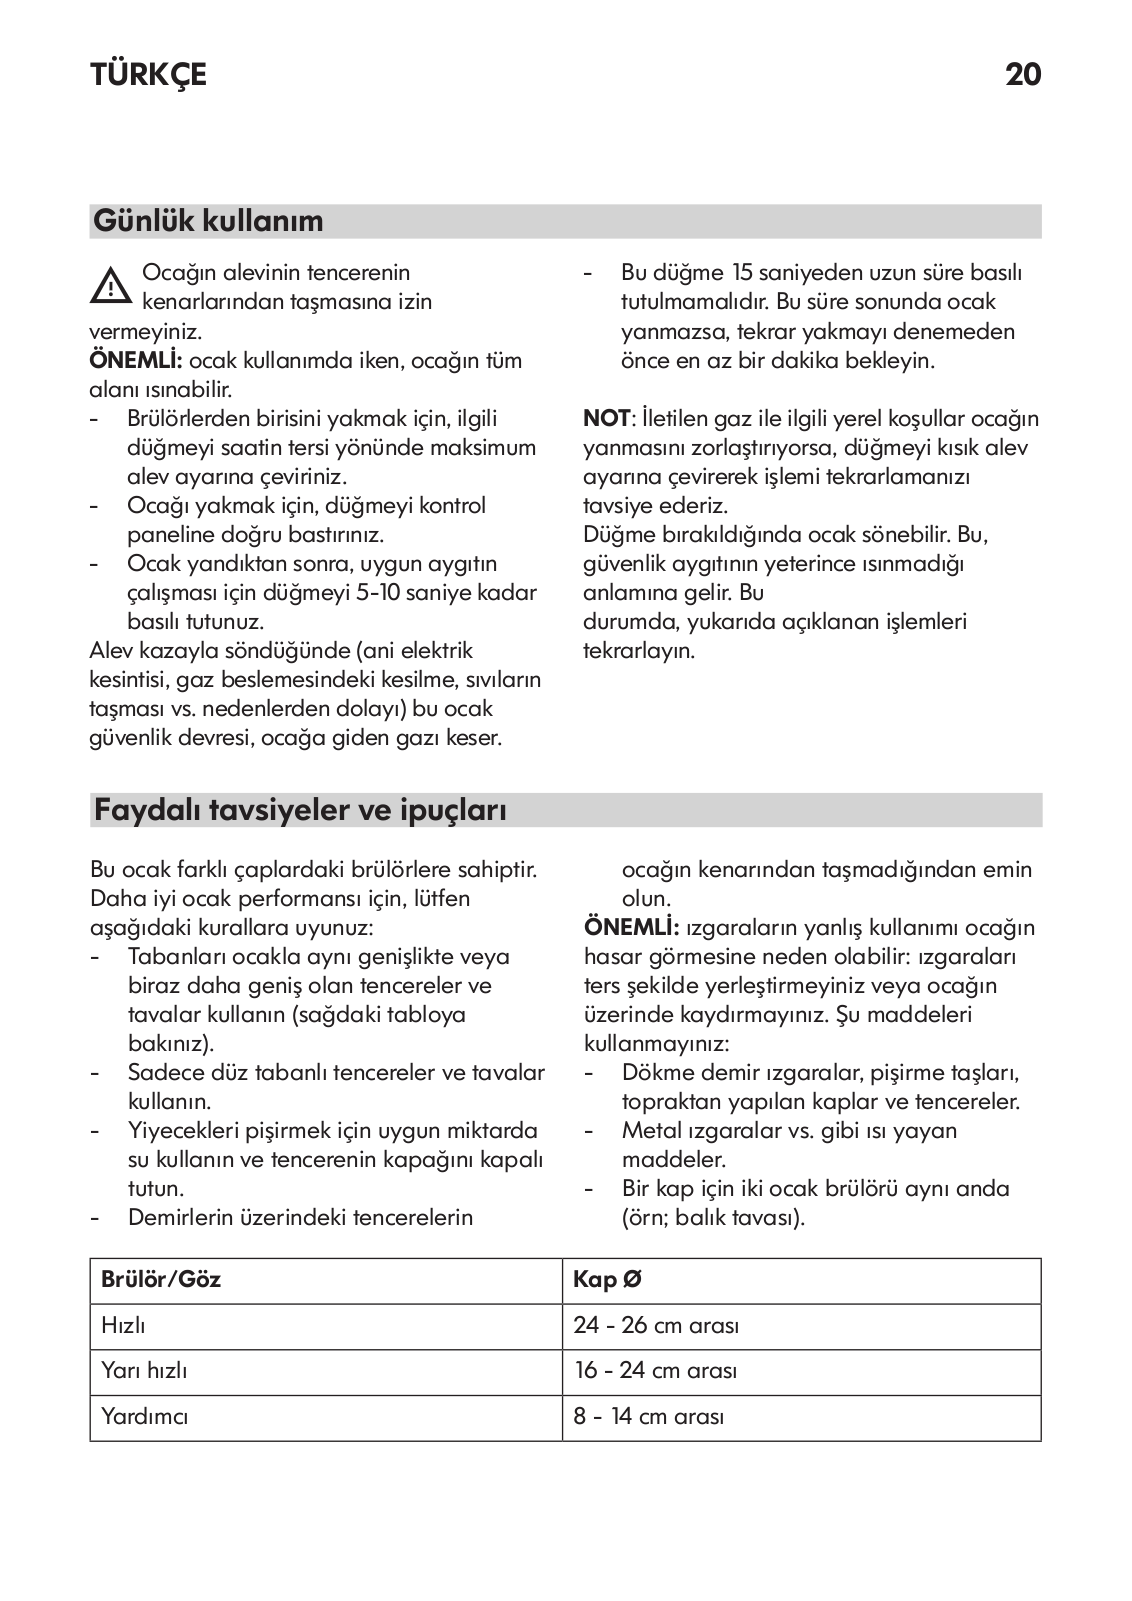
Brülör/Göz

Kap Ø


Hızlı

24 - 26 cm arası


Yarı hızlı

16 - 24 cm arası


Yardımcı

8 - 14 cm arası


TÜRKÇE

Bakım ve temizlik

Servis işleminden önce fişi prizden çekiniz.

-- Bütün emaye ve cam parçalar, ılık su ve doğal solüsyon ile temizlenmelidir.

-- Paslanmaz çelik yüzeyler, uzun süre temas halinde bırakıldığında, kireçli su veya aşındırıcı deterjanlar tarafından kirlenebilir. Dökülen yemekler (su, sos, kahve), kurumadan temizlenmelidir.

-- Ilık su ve yumuşak deterjan kullanarak temizledikten sonra yumuşak bir bez veya süngerle kurutunuz. Yapışmış kirleri, paslanmaz çelik yüzeylere uygun özel temizlik ürünleriyle çıkarınız.

NOT: Paslanmaz çelik yüzeyi sadece yumuşak bez veya sünger kullanarak siliniz. -- Aşındırıcı veya sert ürünler, klorlu

temizlik maddeleri veya bulaşık teli kullanmayınız.

-- Buharlı temizleme cihazlarını kullanmayınız.

-- Yanıcı maddeler kullanmayınız.

-- Sirke, hardal, tuz, şeker veya limon suyu gibi asitli veya alkali maddeleri ocağın üstünde bırakmayınız.

OCAK PARÇALARININ TEMİZLENMESİ

-- Izgaralar, brülör kapakları ve brülörler temizlenmek üzere çıkarılabilir.

-- Bu parçaları ılık su ve aşındırıcı olmayan bir deterjan kullanarak elle dikkatlice temizleyiniz; yemek kalıntılarını

21

bırakmadığınızdan ve brülör deliklerinin tıkanmadığını kontrol ettiğinizden emin olunuz.

-- Durulayınız ve dikkatlice kurutunuz

-- Brülörleri ve brülör kapaklarını dikkatlice yerlerine takınız.

-- Izgaraları takarken, tava destek alanının brülör ile hizalandığından emin olunuz.

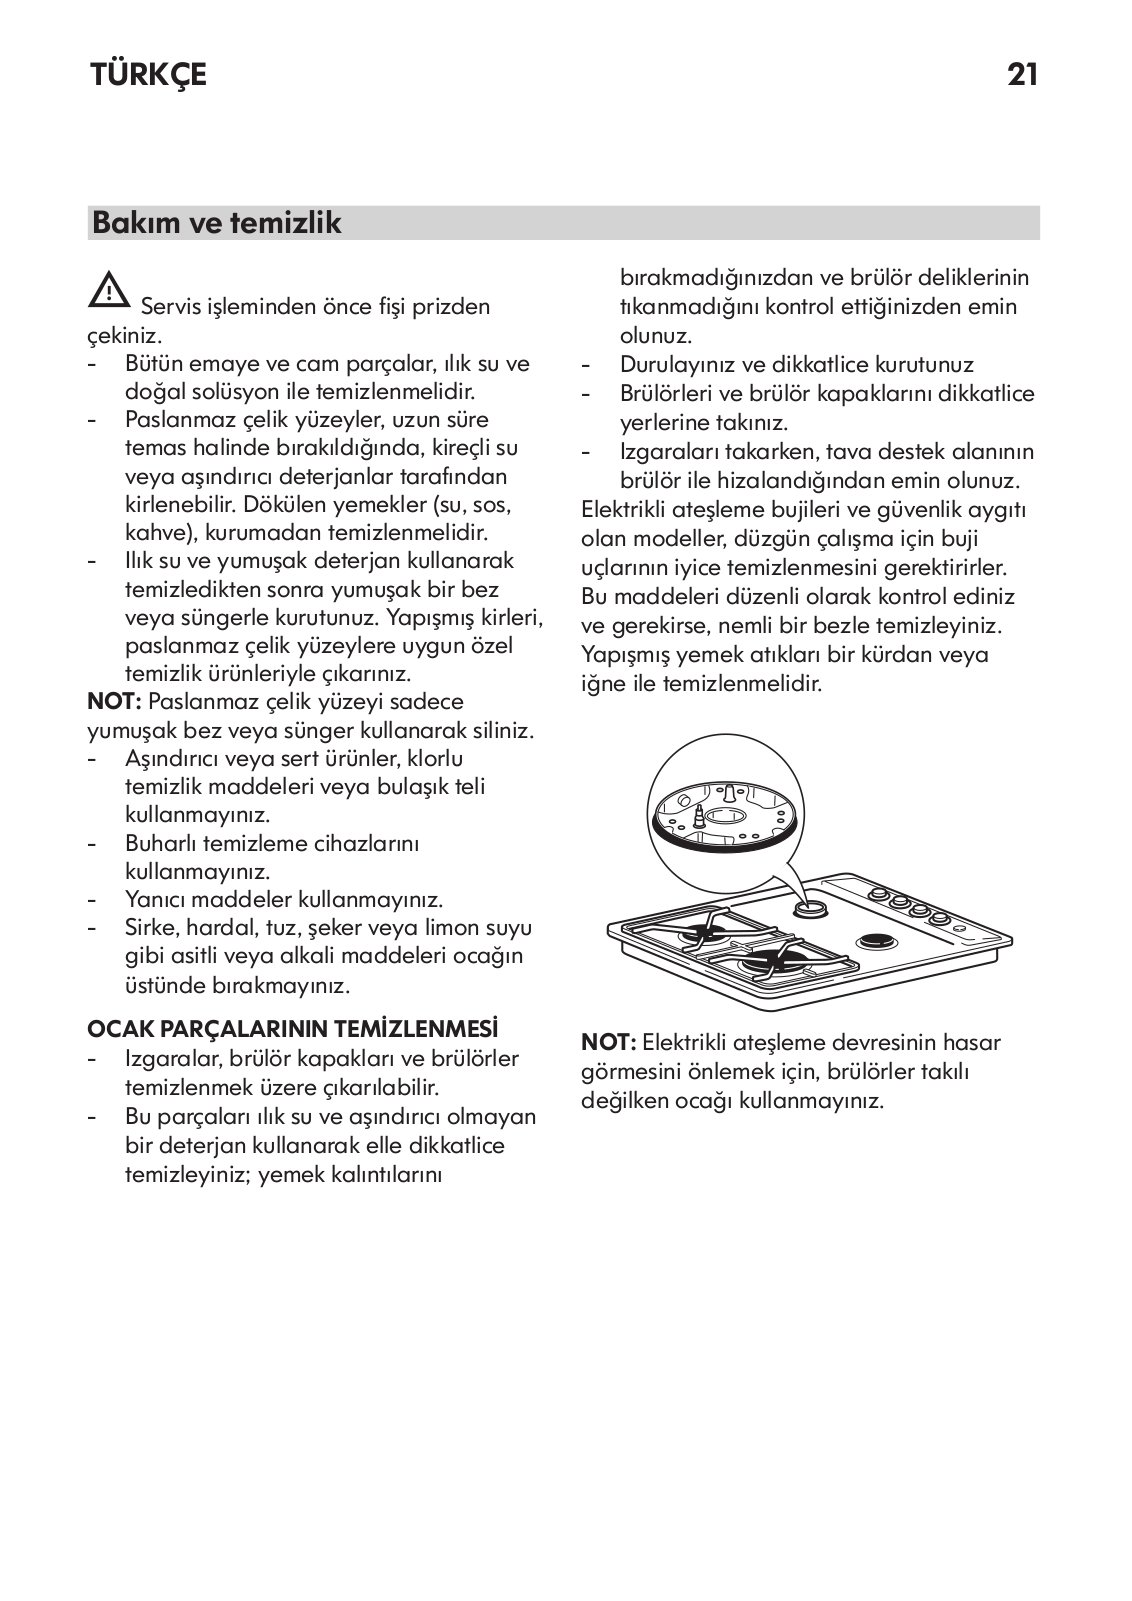
Elektrikli ateşleme bujileri ve güvenlik aygıtı olan modeller, düzgün çalışma için buji uçlarının iyice temizlenmesini gerektirirler. Bu maddeleri düzenli olarak kontrol ediniz ve gerekirse, nemli bir bezle temizleyiniz. Yapışmış yemek atıkları bir kürdan veya iğne ile temizlenmelidir.

NOT: Elektrikli ateşleme devresinin hasar görmesini önlemek için, brülörler takılı değilken ocağı kullanmayınız.

TÜRKÇE

22

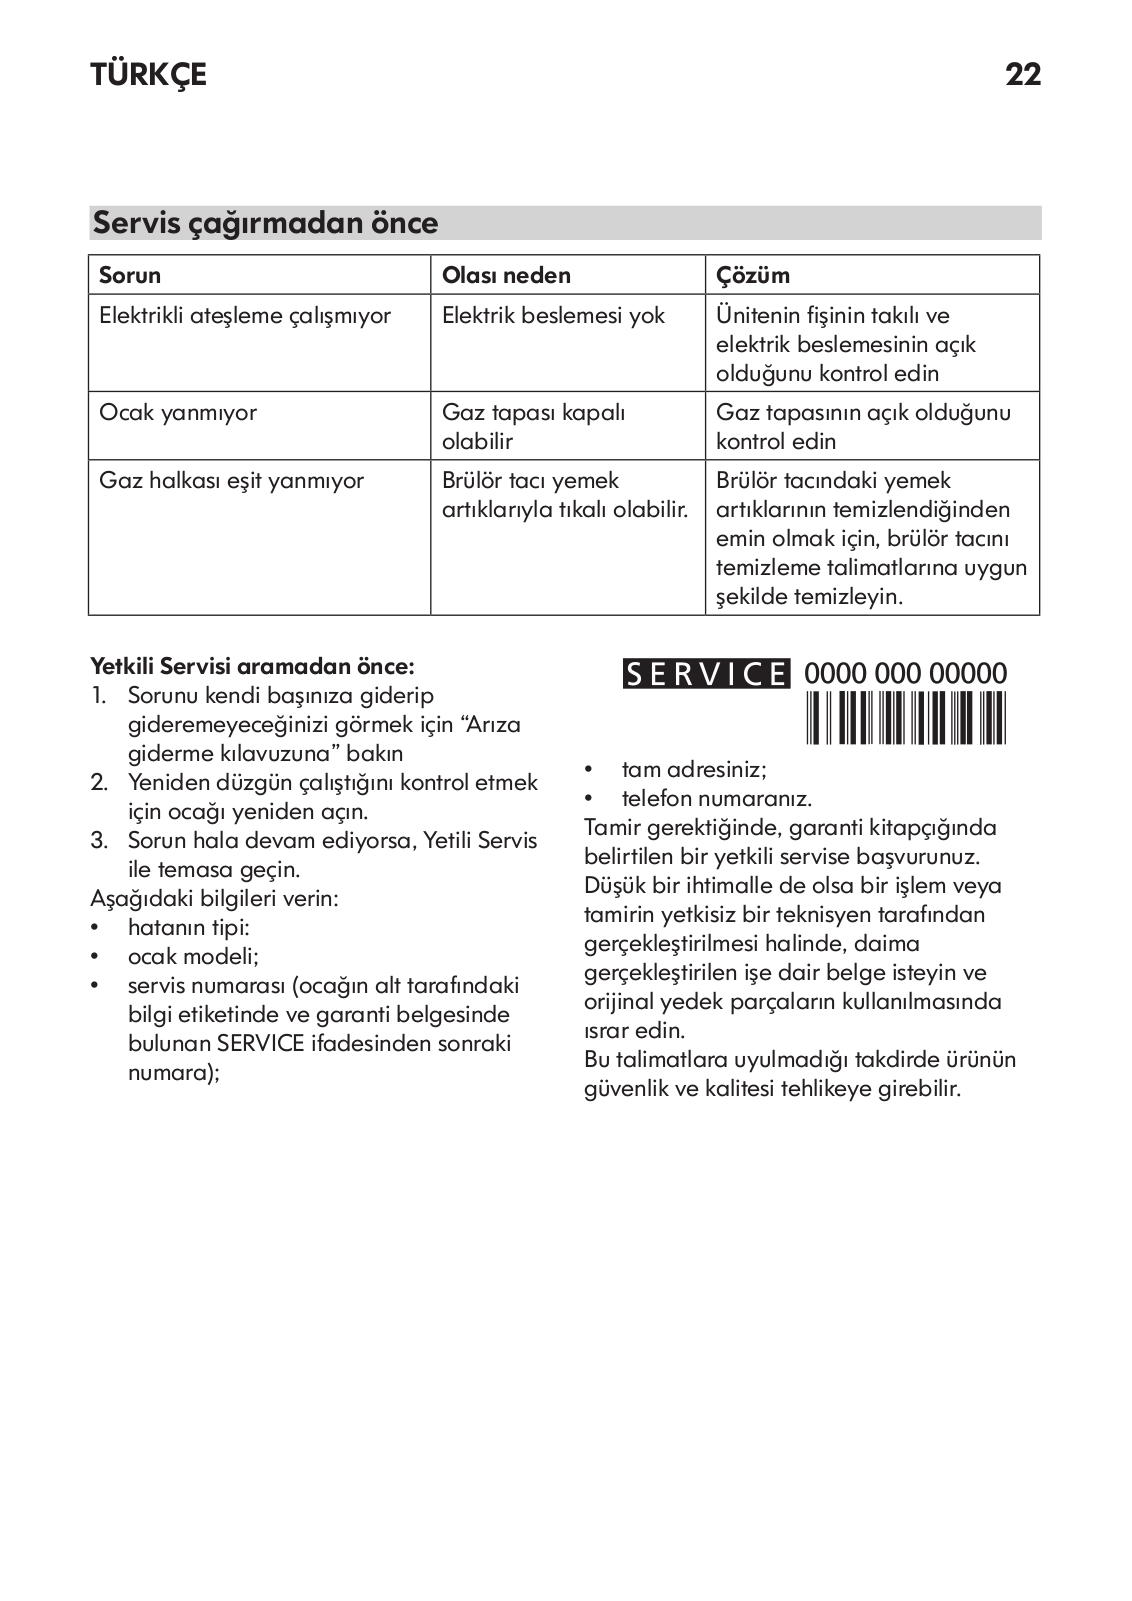
Servis çağırmadan önce

Sorun

Olası neden

Çözüm

Elektrikli ateşleme çalışmıyor

Elektrik beslemesi yok

Ünitenin fişinin takılı ve


elektrik beslemesinin açık


olduğunu kontrol edin

Ocak yanmıyor

Gaz tapası kapalı

Gaz tapasının açık olduğunu


olabilir

kontrol edin

Gaz halkası eşit yanmıyor

Brülör tacı yemek

Brülör tacındaki yemek


artıklarıyla tıkalı olabilir.

artıklarının temizlendiğinden


emin olmak için, brülör tacını


temizleme talimatlarına uygun


şekilde temizleyin.

Yetkili Servisi aramadan önce:

1.Sorunu kendi başınıza giderip gideremeyeceğinizi görmek için “Arıza giderme kılavuzuna” bakın

2.Yeniden düzgün çalıştığını kontrol etmek için ocağı yeniden açın.

3.Sorun hala devam ediyorsa, Yetili Servis

ile temasa geçin. Aşağıdaki bilgileri verin:

hatanın tipi:

ocak modeli;

servis numarası (ocağın alt tarafındaki bilgi etiketinde ve garanti belgesinde bulunan SERVICE ifadesinden sonraki numara);

tam adresiniz;

telefon numaranız.

Tamir gerektiğinde, garanti kitapçığında belirtilen bir yetkili servise başvurunuz. Düşük bir ihtimalle de olsa bir işlem veya tamirin yetkisiz bir teknisyen tarafından gerçekleştirilmesi halinde, daima gerçekleştirilen işe dair belge isteyin ve orijinal yedek parçaların kullanılmasında ısrar edin.

Bu talimatlara uyulmadığı takdirde ürünün güvenlik ve kalitesi tehlikeye girebilir.

TÜRKÇE

23

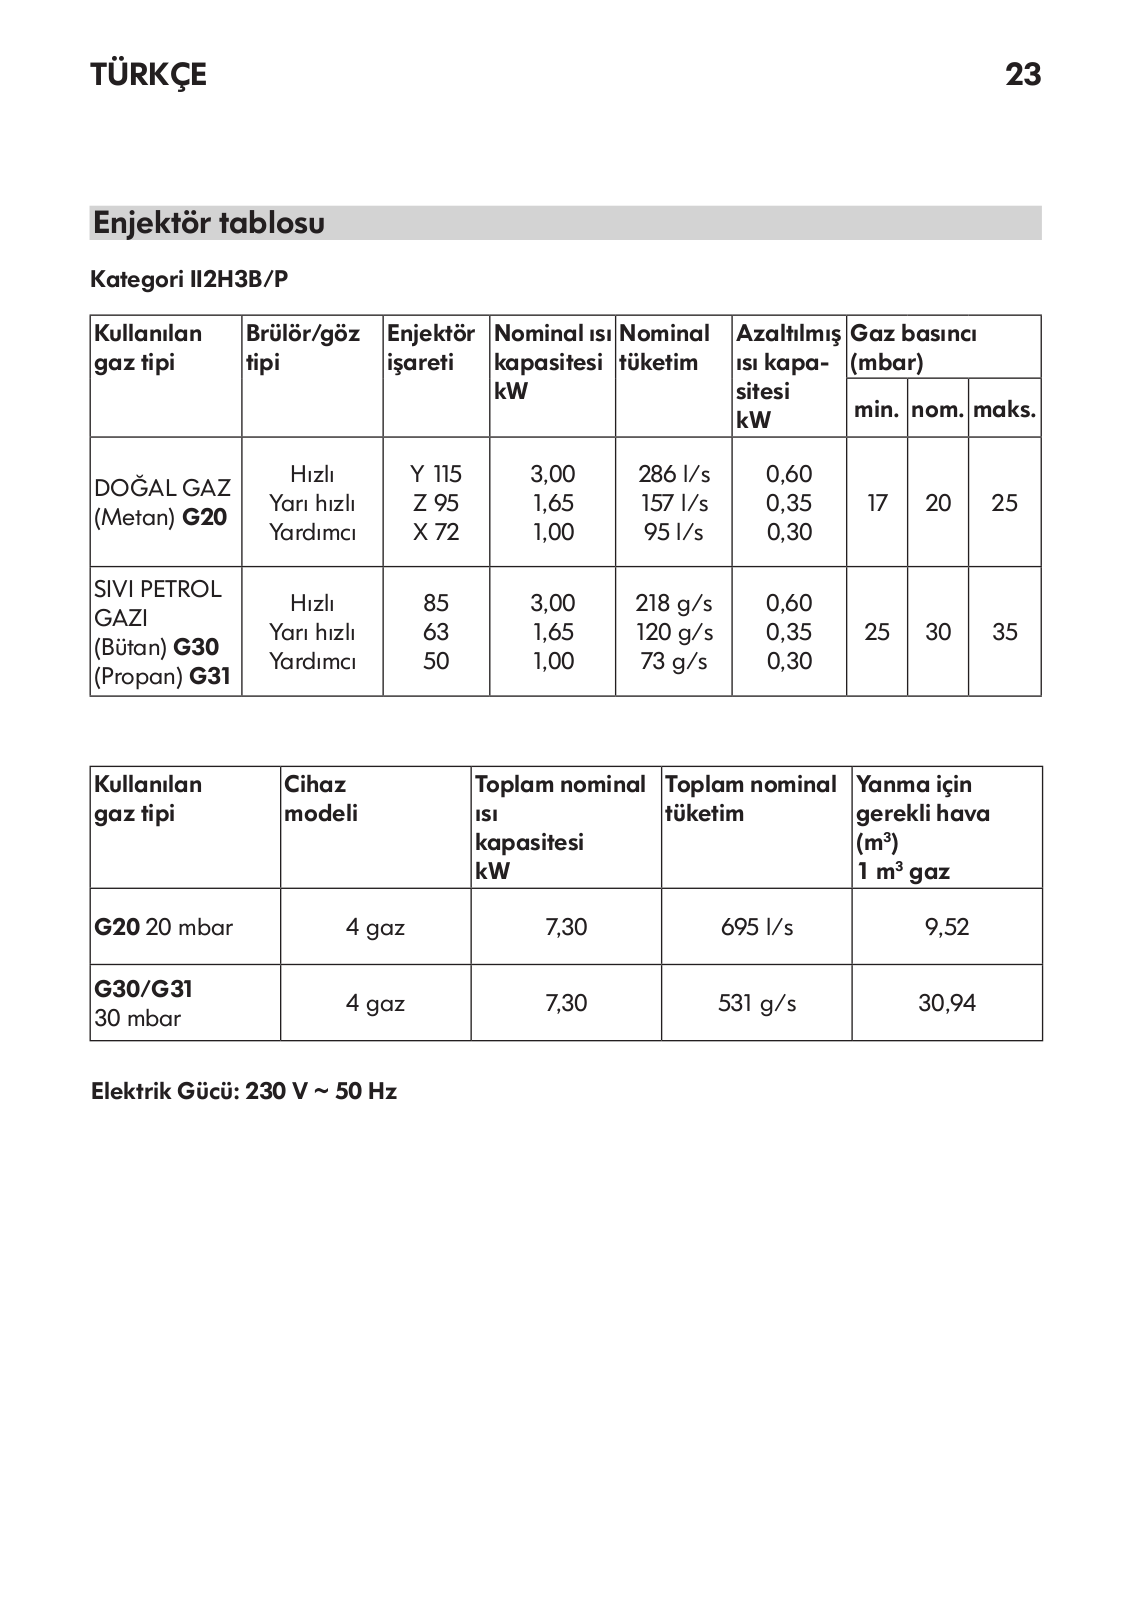
Enjektör tablosu

Kategori II2H3B/P

Kullanılan

Brülör/göz

Enjektör

Nominal ısı

Nominal


Azaltılmış

Gaz basıncı


gaz tipi

tipi

işareti


kapasitesi

tüketim


ısı kapa-

(mbar)


kW


sitesi


min.

nom.

maks.


kW


DOĞAL GAZ


Hızlı

Y 115


3,00

286 l/s


0,60


Yarı hızlı

Z 95


1,65

157 l/s


0,35

17

20


25

(Metan) G20

Yardımcı

X 72


1,00

95 l/s


0,30


SIVI PETROL


Hızlı

85


3,00

218 g/s


0,60


GAZI


Yarı hızlı

63


1,65

120 g/s


0,35

25

30


35

(Bütan) G30


Yardımcı

50


1,00

73 g/s


0,30


(Propan) G31


Kullanılan


Cihaz


Toplam nominal

Toplam nominal


Yanma için


gaz tipi


modeli


ısı


tüketim


gerekli hava


kapasitesi


(m3)


kW


1 m3 gaz


G20 20 mbar


4 gaz

7,30


695 l/s


9,52


G30/G31


4 gaz

7,30


531 g/s


30,94


30 mbar


Elektrik Gücü: 230 V ~ 50 Hz


TÜRKÇE

24

Teknik veriler

Boyutlar


Genişlik (mm)

580

Yükseklik (mm)

40

Uzunluk (mm)

500

Voltaj (V)

230

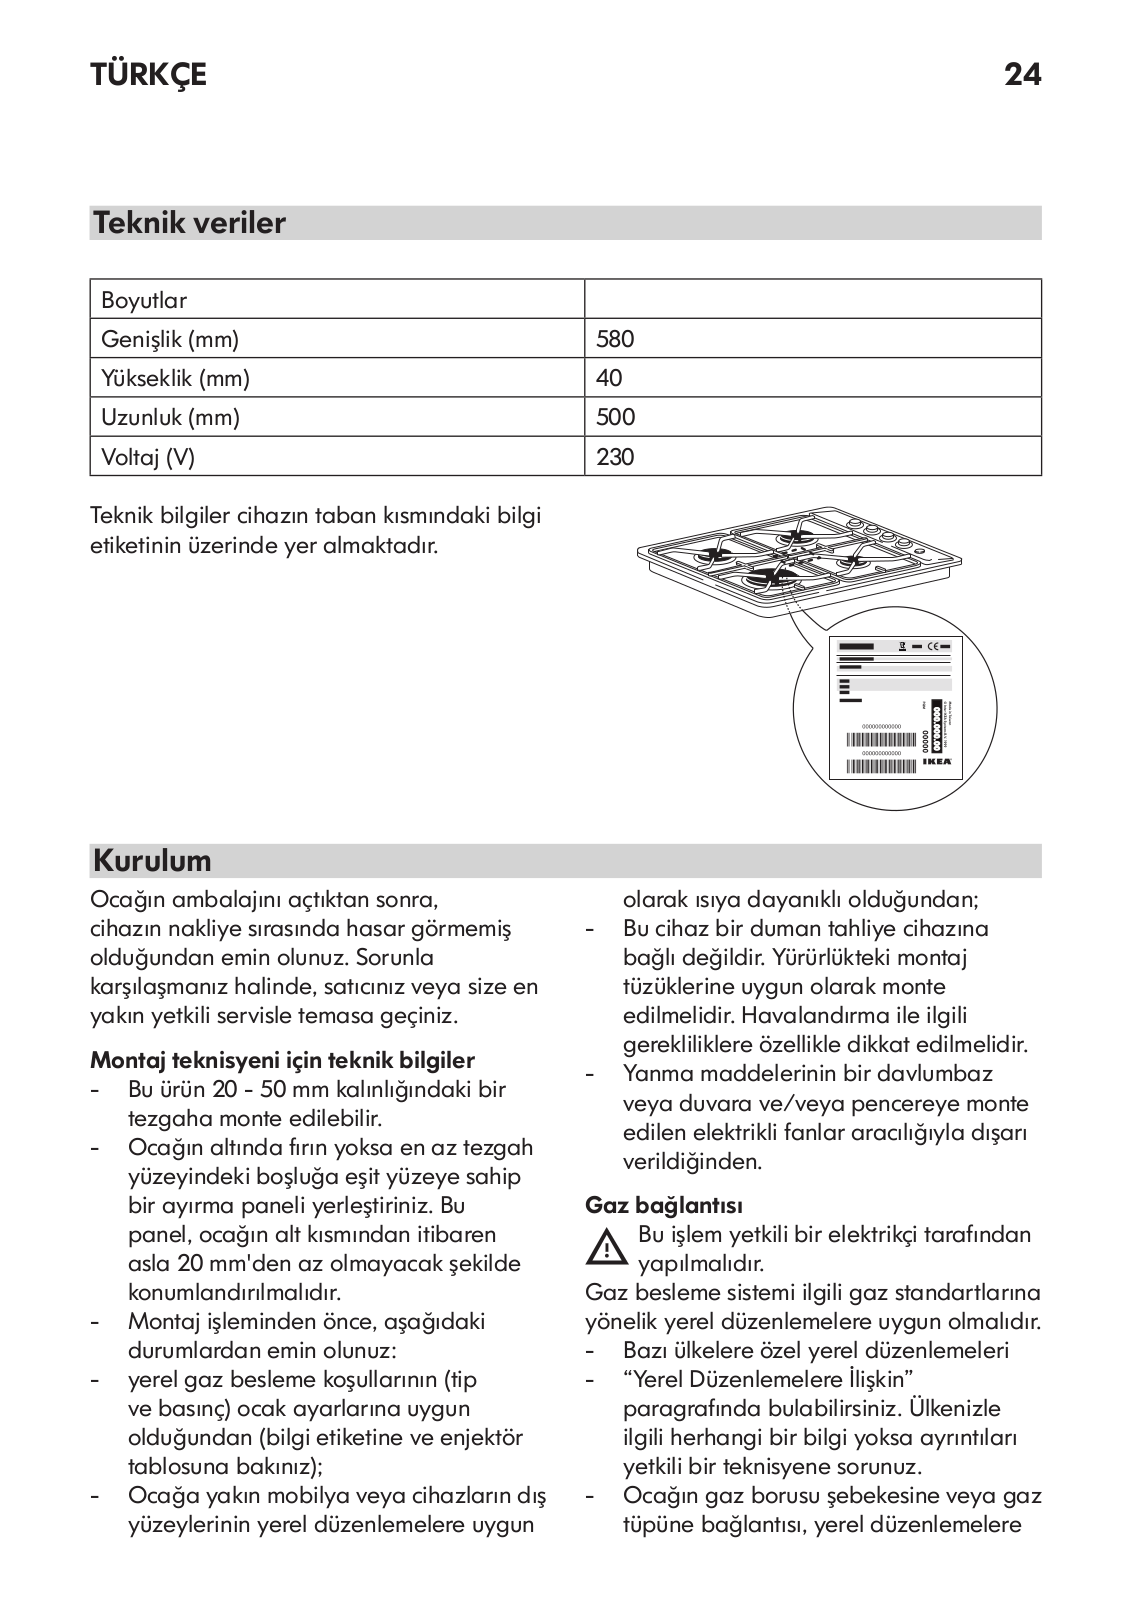
Teknik bilgiler cihazın taban kısmındaki bilgi etiketinin üzerinde yer almaktadır.

Kurulum

Ocağın ambalajını açtıktan sonra, cihazın nakliye sırasında hasar görmemiş olduğundan emin olunuz. Sorunla

karşılaşmanız halinde, satıcınız veya size en yakın yetkili servisle temasa geçiniz.

Montaj teknisyeni için teknik bilgiler

-- Bu ürün 20 - 50 mm kalınlığındaki bir tezgaha monte edilebilir.

-- Ocağın altında fırın yoksa en az tezgah yüzeyindeki boşluğa eşit yüzeye sahip bir ayırma paneli yerleştiriniz. Bu panel, ocağın alt kısmından itibaren asla 20 mm'den az olmayacak şekilde konumlandırılmalıdır.

-- Montaj işleminden önce, aşağıdaki durumlardan emin olunuz:

-- yerel gaz besleme koşullarının (tip ve basınç) ocak ayarlarına uygun

olduğundan (bilgi etiketine ve enjektör tablosuna bakınız);

-- Ocağa yakın mobilya veya cihazların dış yüzeylerinin yerel düzenlemelere uygun

olarak ısıya dayanıklı olduğundan; -- Bu cihaz bir duman tahliye cihazına bağlı değildir. Yürürlükteki montaj tüzüklerine uygun olarak monte edilmelidir. Havalandırma ile ilgili

gerekliliklere özellikle dikkat edilmelidir. -- Yanma maddelerinin bir davlumbaz

veya duvara ve/veya pencereye monte edilen elektrikli fanlar aracılığıyla dışarı verildiğinden.

Gaz bağlantısı

Bu işlem yetkili bir elektrikçi tarafından yapılmalıdır.

Gaz besleme sistemi ilgili gaz standartlarına yönelik yerel düzenlemelere uygun olmalıdır. -- Bazı ülkelere özel yerel düzenlemeleri -- “Yerel Düzenlemelere İlişkin”

paragrafında bulabilirsiniz. Ülkenizle ilgili herhangi bir bilgi yoksa ayrıntıları yetkili bir teknisyene sorunuz.

-- Ocağın gaz borusu şebekesine veya gaz tüpüne bağlantısı, yerel düzenlemelere

TÜRKÇE

25

uygun rakorlu sert bakır veya çelik boru ile ya da düzenlemelere uygun sürekliyüzeyli paslanmaz çelik bir hortum

ile yapılmalıdır. Hortumun maksimum uzunluğu 2 lineer metre olmalıdır.

AB

C

C

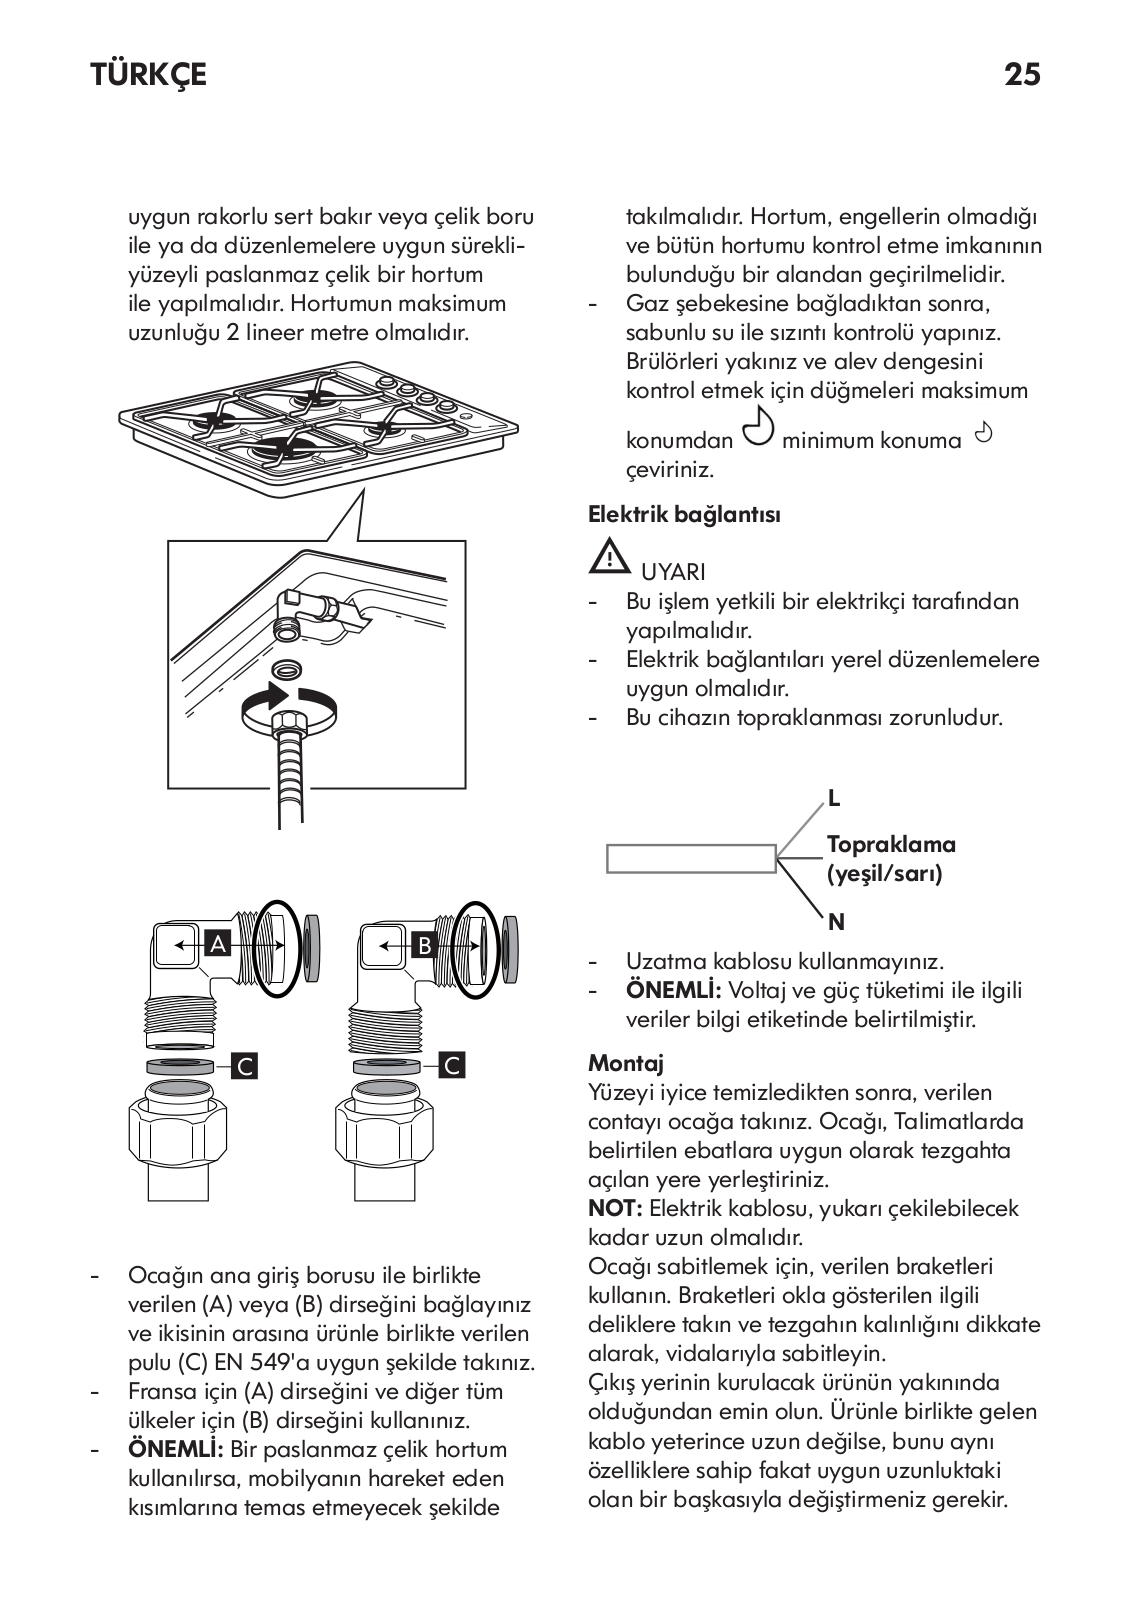
-- Ocağın ana giriş borusu ile birlikte verilen (A) veya (B) dirseğini bağlayınız ve ikisinin arasına ürünle birlikte verilen pulu (C) EN 549'a uygun şekilde takınız.

-- Fransa için (A) dirseğini ve diğer tüm ülkeler için (B) dirseğini kullanınız.

-- ÖNEMLİ: Bir paslanmaz çelik hortum kullanılırsa, mobilyanın hareket eden kısımlarına temas etmeyecek şekilde

takılmalıdır. Hortum, engellerin olmadığı ve bütün hortumu kontrol etme imkanının bulunduğu bir alandan geçirilmelidir.

-- Gaz şebekesine bağladıktan sonra, sabunlu su ile sızıntı kontrolü yapınız. Brülörleri yakınız ve alev dengesini kontrol etmek için düğmeleri maksimum

konumdan

minimum konuma

çeviriniz.


Elektrik bağlantısı


UYARI

-- Bu işlem yetkili bir elektrikçi tarafından yapılmalıdır.

-- Elektrik bağlantıları yerel düzenlemelere uygun olmalıdır.

-- Bu cihazın topraklanması zorunludur.

L

Topraklama (yeşil/sarı)

N

-- Uzatma kablosu kullanmayınız.

-- ÖNEMLİ: Voltaj ve güç tüketimi ile ilgili veriler bilgi etiketinde belirtilmiştir.

Montaj

Yüzeyi iyice temizledikten sonra, verilen contayı ocağa takınız. Ocağı, Talimatlarda belirtilen ebatlara uygun olarak tezgahta açılan yere yerleştiriniz.

NOT: Elektrik kablosu, yukarı çekilebilecek kadar uzun olmalıdır.

Ocağı sabitlemek için, verilen braketleri kullanın. Braketleri okla gösterilen ilgili deliklere takın ve tezgahın kalınlığını dikkate alarak, vidalarıyla sabitleyin.

Çıkış yerinin kurulacak ürünün yakınında olduğundan emin olun. Ürünle birlikte gelen kablo yeterince uzun değilse, bunu aynı özelliklere sahip fakat uygun uzunluktaki olan bir başkasıyla değiştirmeniz gerekir.

TÜRKÇE

26

Farklı gaz tipine ayarlama

UYARI

-- Bu işlem yetkili bir elektrikçi tarafından yapılmalıdır.

Cihaz, bilgi etiketinde ve ocağın üst tarafındaki bilgi etiketinde belirtilenden farklı bir gaz tipiyle çalıştırılacaksa, enjektörleri değiştiriniz.

Bilgi etiketini çıkarınız ve kullanım kılavuzu ile birlikte saklayınız.

Talimatlarda belirtilen gaz basıncına uygun basınç regülatörleri kullanınız.

-- Gaz memeleri Yetkili Servis veya yetkili bir teknisyen tarafından değiştirilmelidir.

-- Cihazla birlikte verilmeyen memeler Yetkili Servisten temin edilmelidir.

-- Başlıkların minimum ayarlamasını yapınız.

NOT: Sıvı petrol gazı kullanıldığında (G30/ G31), minimum gaz ayar vidası sonuna kadar sıkılmalıdır.

ÖNEMLİ: Brülör düğmelerini çevirirken zorlukla karşılaştığınızda, brülör başlığının değiştirilmesi için (arızalı ise) Yetkili Servise başvurunuz.

Enjektörlerin değiştirilmesi (bkz. "enjektör tablosu" paragrafı)

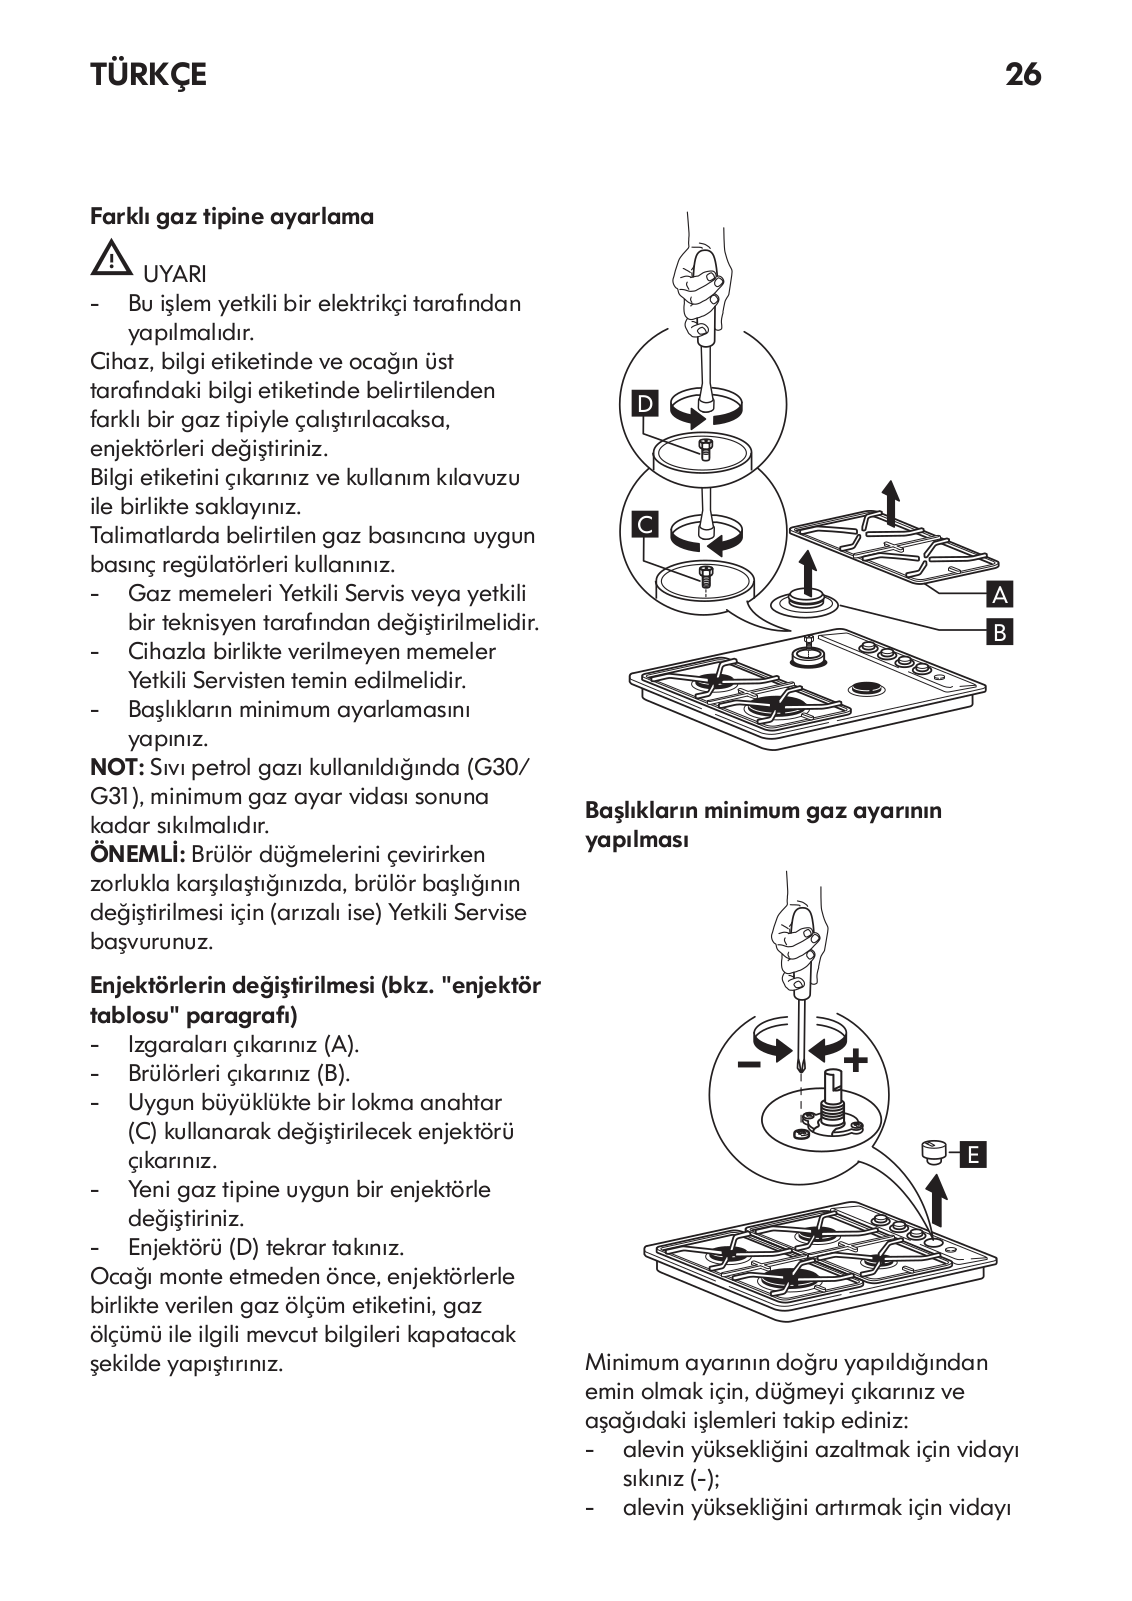
-- Izgaraları çıkarınız (A). -- Brülörleri çıkarınız (B).

-- Uygun büyüklükte bir lokma anahtar

(C) kullanarak değiştirilecek enjektörü çıkarınız.

-- Yeni gaz tipine uygun bir enjektörle değiştiriniz.

-- Enjektörü (D) tekrar takınız.

Ocağı monte etmeden önce, enjektörlerle birlikte verilen gaz ölçüm etiketini, gaz ölçümü ile ilgili mevcut bilgileri kapatacak şekilde yapıştırınız.

D

C

A

BB

Başlıkların minimum gaz ayarının yapılması

E

Minimum ayarının doğru yapıldığından emin olmak için, düğmeyi çıkarınız ve aşağıdaki işlemleri takip ediniz:

-- alevin yüksekliğini azaltmak için vidayı sıkınız (-);

-- alevin yüksekliğini artırmak için vidayı

TÜRKÇE

gevşetiniz (+).

Ayarlama, başlık minimum gaz ayarı konumunda iken (az alev) yapılmalıdır. -- Brülörlerin primer havasının

ayarlanmasına gerek yoktur.

-- Bu aşamada, brülörleri yakınız ve alev dengesini kontrol etmek için düğmeleri

maksimum konumundan

minimum

konumuna

çeviriniz.


Bu ayarlama tamamlandıktan sonra,

sızdırmazlık maddesi veya benzer bir ürün kullanarak tezgahı yeniden yalıtınız.

Çevre ile ilgili hususlar

Ambalaj

-- Ambalaj malzemeleri %100 geri dönüştürülebilir özelliktedir ve ( ) geri dönüştürme simgesi ile işaretlenmiştir.

Ürünler

Bu cihaz, Atık Elektrik ve Elektronik Cihaz (WEEE) ile ilgili 2002/96/EC Avrupa Direktifine göre işaretlenmiştir. Kullanıcı, bu cihazı uygun şekilde atarak, çevre ve insan sağlığı için potansiyel olarak zararlı etkilerin önlenmesine yardımcı olabilir.

Cihaz veya dokümanlar üzerindeki

simgesi, bu ürünün ev çöpü olarak muamele edilmemesi, uygun bir elektrikli ve elektronik ekipman toplama ve geri dönüştürme merkezine götürülmesi gerektiğini belirtir. Elden çıkarma işlemi ilgili yerel çevre düzenlemelerine uygun şekilde yapılmalıdır.

Bu ürünün işlenmesi, geri kazanılması ve yeniden dönüştürülmesi ile ilgili ayrıntılı bilgi için, yetkili yerel büronuz, ev atıkları toplama servisi veya cihazı satın aldığınız mağaza ile temasa geçiniz.

27

CZ SK RU YEREL

DÜZENLEMELERLE İLGİLİ OLARAK Cihazın montajı ve gaz bağlantıları üreticinin talimatlarına ve yerel güvenlik düzenlemelerine uygun olarak yetkili bir teknisyen tarafından yapılmalıdır.

Uygunluk beyanı

-- Bu ocak aşağıdaki direktiflere uygun şekilde tasarlanmış, üretilmiş ve satışa çıkarılmıştır:

-- 2009/142/EEC "Gaz" Direktifinin güvenlik gereksinimleri;

-- 2006/95/EC "Düşük Voltaj" Direktifinin güvenlik amaçları (tadil edilmiş şekliyle 73/23/EEC'nin yerine geçen).

-- 2004/108/EEC "EMC" Direktifinin koruma gereklilikleri;

-- Bu ocak, yiyeceklerle temas için uygundur ve (EC) Düzenleme no. 1935/2004 ile uyumludur.

-- Bu ocak (Sınıf 3) sadece yiyecek pişirmek için tasarlanmıştır. Cihazın başka amaçlar için kullanılması (odayı ısıtma gibi) uygun değildir ve tehlikelidir

РУССКИЙ

28

Содержание

Информация о безопасности

28

Таблица инжекторов

34

Описание прибора

30

Технические данные

35

Ежедневная эксплуатация

31

Установка

35

Полезные советы и рекомендации

31

Экологические аспекты

38

Чистка и уход

32

ГАРАНТИЯ IKEA

39

Если прибор не работает

33


Информация о безопасности

Обеспечение вашей личной безопасности

ибезопасности других людей имеет очень большое значение.

В данном Руководстве и на самом приборе содержатся важные указания в отношении правил техники безопасности. Необходимо ознакомиться с ними и постоянно соблюдать их в дальнейшем.

Символ опасности, указывающий на наличие возможного риска для

пользователя прибора и других людей. Все сообщения, относящиеся к вопросам соблюдения безопасности, сопровождаются этим символом, а также следующими словами:

ОПАСНО Указание на ситуацию, представляющую опасность; если эта

опасность не будет устранена, то она приведет к тяжелым травмам.

ПРЕДУПРЕЖДЕНИЕ Указание на ситуацию, представляющую опасность;

если эта опасность не будет устранена, то она может стать причиной тяжелых травм. Все сообщения, относящиеся к вопросам соблюдения техники безопасности, включают в себя следующую информацию: в чем заключается потенциальная опасность, как снизить риск травмы, что может случиться в случае несоблюдения указаний производителя.

Перед выполнением любой операции по установке прибора необходимо отключать его от сети.

Установка и техническое обслуживание должны выполняться

только квалифицированным специалистом в соответствии с инструкциями производителя

идействующими стандартами безопасности, относящимися к установке и эксплуатации

газовых приборов. Используйте только оригинальные запчасти. Пользователям запрещается самостоятельно ремонтировать или заменять любую из деталей прибора, за исключением случаев, конкретно оговоренных в Руководстве.

ВНИМАНИЕ! При несоблюдении указаний, приведенных в настоящем

Руководстве, может произойти взрыв или пожар, который может привести к материальному ущербу или травмам.

-- Запрещается хранить или использовать бензин и другие горючие жидкости, а также горючие пары вблизи от прибора.

Что делать при появлении запаха газа: -- Не пытайтесь включать какие-либо

приборы.

-- Не дотрагивайтесь ни до каких электрических выключателей.

-- Не пользуйтесь телефоном в данном здании.

-- Немедленно позвоните в службу газоснабжения с телефона, находящегося в соседнем доме. Выполните указания, полученные от специалистов службы газоснабжения.

-- При невозможности дозвониться в службу газоснабжения, позвоните в пожарную службу.

-- Установка прибора и его техобслуживание должны выполняться квалифицированным специалистом по монтажу, персоналом технической службы или персоналом службы газоснабжения.

-- Прибор может использоваться только в хорошо вентилируемых помещениях.

-- Подключения к электрической сети и к сети газоснабжения должны выполняться

РУССКИЙ

29


с соблюдением местных норм.


отравление угарным газом и перегрев

-- При установке варочной панели


варочной панели.


необходимо предусмотреть

-- Изготовитель не несет какой бы то ни


многополюсный автоматический


было ответственности за ненадлежащее


размыкатель с расстоянием между


использование или неправильную


разомкнутыми контактами не менее


настройку органов управления.


3 мм, необходимым для обеспечения

-- Данный прибор не предназначен для


полного отключения от сети.


использования лицами (в т.ч. детьми),

-- Заземление данного прибора является


чьи физические, сенсорные или


обязательным.


умственные способности либо отсутствие

-- Сетевой шнур должен иметь достаточную


необходимого опыта и знаний не


длину для того, чтобы подключить


позволяют им осуществлять эксплуатацию


прибор к электрической сети после его


прибора без присмотра или указаний


встраивания в кухонную мебель


со стороны лица, отвечающего за их

-- Для подсоединения к системе подачи


безопасность.


газа необходимо использовать гибкий

-- Необходимо следить за тем, чтобы


или жесткий металлический шланг.


маленькие дети не подходили близко к

-- При необходимости замены сетевого


прибору, и не разрешать им играть с


шнура его следует заменять только


ним.


сетевым шнуром с характеристиками,

-- При использовании газовых приборов


идентичными характеристикам


в помещении происходит повышение


оригинального шнура, поставленного


температуры и влажности. Поэтому


изготовителем (типа H05V2V2-F 90°C


необходимо следить за тем, чтобы


или H05RR-F). Эта операция должна


помещение хорошо проветривалось,


выполняться квалифицированным


или же установить вытяжку с вытяжным


техническим специалистом.


воздуховодом.

-- Изготовитель не несет никакой

--

В случае продолжительного


ответственности за травмы людей или


использования может понадобиться


животных или материальный ущерб,


дополнительная вентиляция (откройте


явившиеся результатом несоблюдения


окно или включите вытяжку на


этих требований.


повышенную мощность).

--

Использование разветвителей-

--

Закончив пользование варочной


переходников и удлинителей не


панелью, убедитесь, что ручки находятся


допускается.


в положении "Выкл", и закройте вентиль

-- Запрещается тянуть за сетевой шнур для


подачи газа от сети или вентиль на


того, чтобы вынуть вилку из розетки.


баллоне.

--

После завершения установки

-- Разогретые до высокой температуры


электрические компоненты должны быть


жиры и масло могут легко


недоступны для пользователя.


воспламениться. Рекомендуется

-- Не прикасайтесь к варочной панели


внимательно следить за приготовлением


влажными руками или другими частями


блюд с большим количеством жира,


тела и не пользуйтесь ею, будучи


масла или спирта (например, рома,


разутыми.


коньяка, вина).

-- Данная варочная панель (класс 3)

-- Храните упаковочные материалы в


предназначена исключительно для


недоступных для детей местах.


приготовления пищи в домашних

-- Прежде чем чистить варочную панель,


условиях. Не используйте данный прибор


следует дождаться, чтобы она полностью


в качестве обогревателя помещения.


остыла.


В противном случае может произойти

Сохраняйте данное руководство

IKEA HB 550 AN User Manual

РУССКИЙ

30

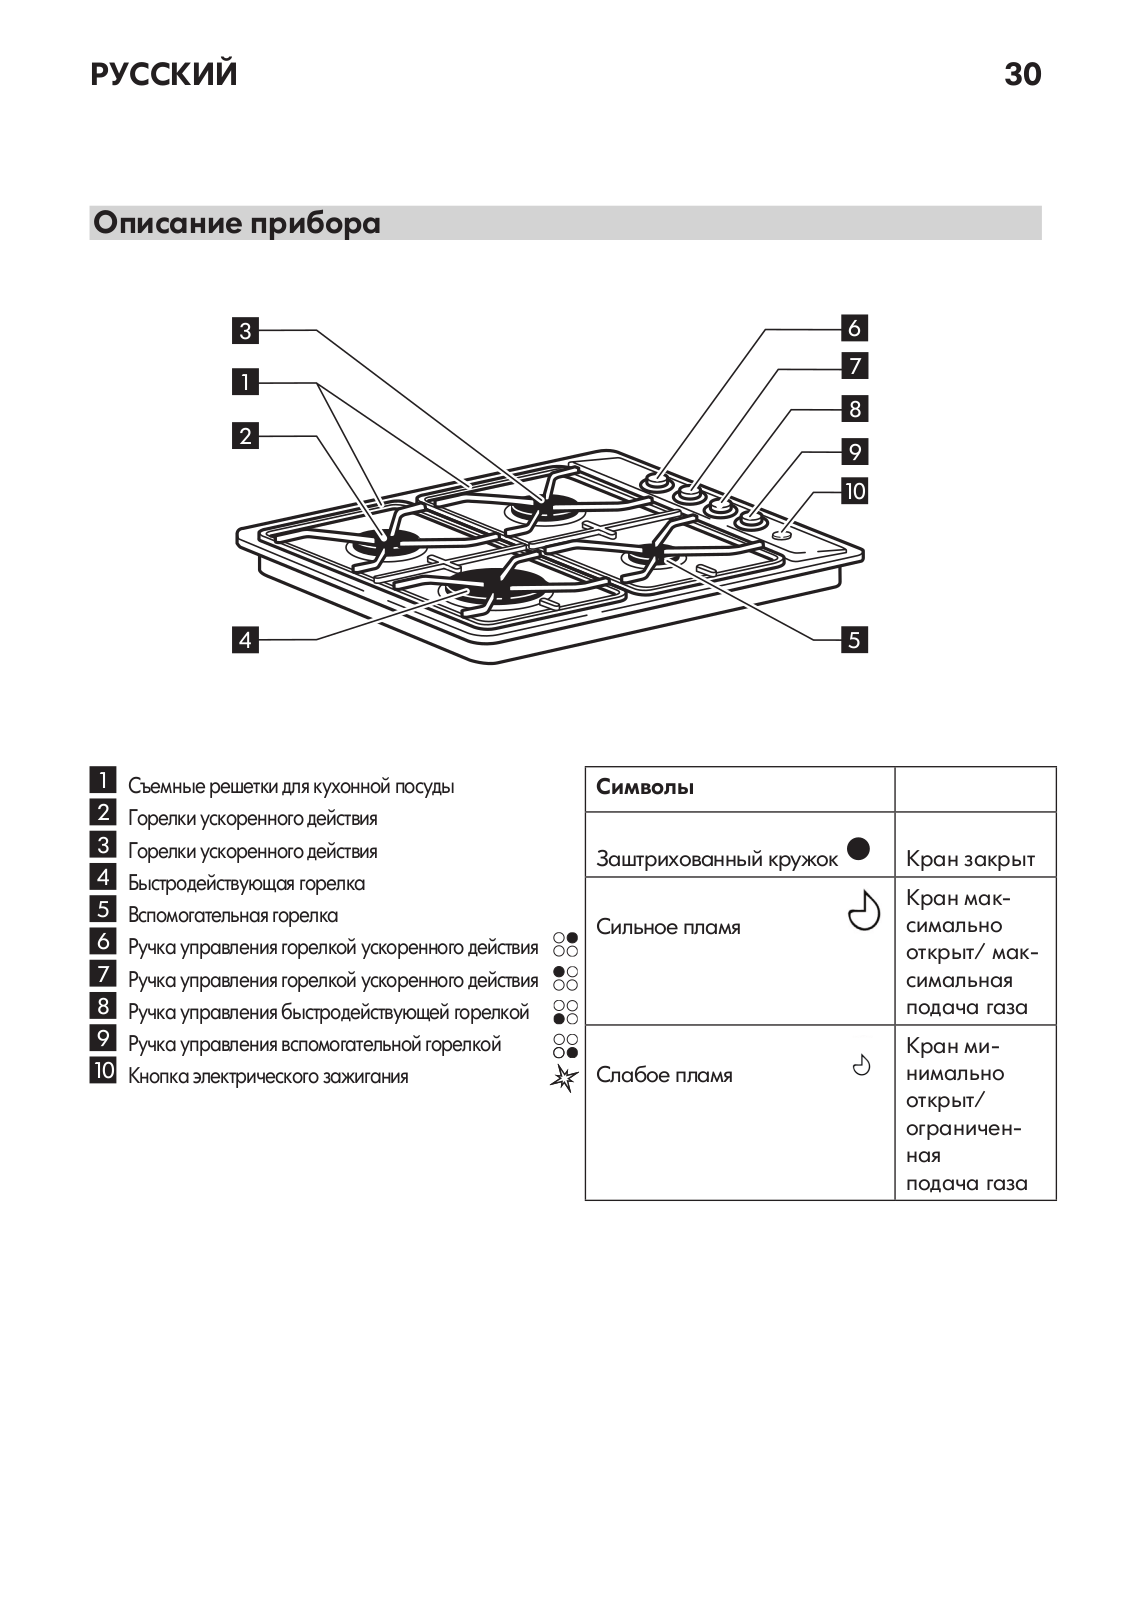
Описание прибора


3


6


1


7


8


2


9


10


4


5

1

Съемныерешеткидлякухоннойпосуды

Символы


2

Горелкиускоренногодействия


3

Горелкиускоренногодействия

Заштрихованный кружок

Кран закрыт

4

Быстродействующаягорелка


Кран мак-

5

Вспомогательнаягорелка


Сильное пламя

симально

6

Ручкауправлениягорелкойускоренногодействия


открыт/ мак-

7

Ручкауправлениягорелкойускоренногодействия


симальная

8

Ручкауправлениябыстродействующейгорелкой


подача газа

9

Ручкауправлениявспомогательнойгорелкой


Кран ми-

10

Кнопкаэлектрическогозажигания

Слабое пламя

нимально


открыт/


ограничен-


ная


подача газа

Loading...
+ 70 hidden pages