

IKEA BEJUBLAD 603.009.01, EJUBLAD 403.009.02, RAFFINERAD 803.009.19, BEJUBLAD 603.008.97, BEJUBLAD 403.008.98 Instruction Manual
...Page 1

GB
FR
DE
IT
BEJUBLAD
RAFFINERAD
Page 2

Page 3
ENGLISH 4
DEUTSCH 30
FRANÇAIS 59
ITALIANO 88
Please refer to the last page
of this manual for the full list
of IKEA appointed Authorized
Service Centre and relative
national phone numbers.
Die vollständige Liste
aller autorisierten IKEA
Kundendienste sowie die
zugehörigen Telefonnummern
nden Sie auf der letzten Seite
in diesem Handbuch.
Consultez la liste complète
des centres d’entretien et de
réparation agréés IKEA ainsi
que des numéros de téléphone
nationaux correspondants à la
dernière page de ce manuel.
Consultare l’ultima pagina
di questo manuale dove è
riportato l’elenco completo
dei Centri Assistenza IKEA
con i relativi numeri telefonici
nazionali.
Page 4
ENGLISH 4
Your safety and that of others are
very important.
This manual and the appliance
itself provide important safety
warnings, to be read and
observed at all times.
This is the danger symbol,
pertaining to safety, which
alerts users to potential risks to
themselves and others.
All safety warnings are preceded
by the danger symbol and the
following terms:
DANGER! Indicates a
hazardous situation which, if
not avoided, will cause serious
injury.
WARNING! Indicates a
hazardous situation which, if
not avoided, could cause serious
injury. All safety warnings give
specic details of the potential risk
present and indicate how to
reduce risk of injury, damage and
electric shock resulting from
improper use of the appliance.
Carefully observe the following
instructions:
- Use protective gloves to
perform all unpacking and
installation operations.
- The appliance must be
disconnected from the power
supply before carrying out any
installation work.
- Electrical installation and
maintenance must be carried
out by a qualied technician,
in compliance with the
manufacturer’s instructions and
local safety regulations. Do not
repair or replace any part of
the appliance unless specically
stated in the user manual.
- Power cable replacement
must be carried out by
qualied electician. Contact an
authorizes service centre.
- Regulations require that the
appliance is earthed.
- The power cable must be long
enough for connecting the
appliance, once tted in its
housing, to the power supply
socket.
- When the appliance is
installed, provide a multipole circuit breaker with a
Safety Information 4
Product description 7
Control panel 9
List of functions 9
Description of display 10
Daily use 13
Cooking tables 16
Cleaning and maintenance 21
What to do if ... 23
Technical data 24
Installation 25
Recommended use and tips 27
Electrical connection 29
Environmental concerns 29
Safety Information
Table of contents
Page 5

ENGLISH 5
contact separation (at least 3
mm) in all poles that provide
full disconnection under
overvoltage category III and
must be incorporated in the
xed wiring in accordance with
the national wiring rules.
- Do not use multiple plug
adapters or extension leads.
- Do not pull the power supply
cable in order to unplug the
appliance.
- The electrical components must
not be accessible to the user
after installation.
- If the surface of the induction
plate is cracked, do not use it
and switch off the appliance to
avoid the possibility of electric
shock (only for models with
induction function).
- Do not touch the appliance
with any wet part of the body
and do not operate it when
barefoot.
- This appliance is designed
solely for use as a domestic
appliance for cooking food. No
other type of use is permitted
(e.g.: heating rooms). The
Manufacturer declines all
responsibility for inappropriate
use or incorrect setting of the
controls.
- This appliance can be used
by children aged from 8 years
and above and persons with
reduced physical, sensory or
mental capabilities or lack of
experience and knowledge
if they have been given
supervision or instruction
concerning use of the appliance
in a safe way and understand
hazards involved. Children shall
not play with the appliance.
Cleaning and user maintenance
shall not be made by children
without supervision.
- The accessible parts of the
appliance may become very
hot during use. Young children
should be kept away from the
appliance and supervised to
ensure that they do not play
with it.
- The appliance and its
accessible parts become hot
during use. Care should be
taken to avoid touching heating
elements. Children less than 8
years old shall be kept away,
unless continuosly supervised.
- During and after use, do not
touch the heating elements
or interior surfaces of the
appliance - risk of burns. Do not
allow the appliance to come
into contact with cloths or other
ammable materials until all
the components have cooled
sufciently.
- At the end of cooking, exercise
caution when opening the
appliance door, letting the hot
air or steam exit gradually
before accessing the oven.
When the appliance door is
shut, hot air is vented from the
aperture above the control
panel. Do not obstruct the vent
apertures.
Page 6

ENGLISH 6
- Use oven gloves to remove
pans and accessories, taking
care not to touch the heating
elements.
- Do not place ammable
materials in or near the
appliance: a re may break out
if the appliance is inadvertently
switched on.
- Do not heat or cook sealed jars
or containers in the appliance.
The pressure that builds up
inside might cause the jar
to explode, damaging the
appliance.
- Do not use containers made of
synthetic materials.
- Overheated oils and fats catch
re easily. Always remain
vigilant when cooking foods
rich in fat and oil.
- Never leave the appliance
unattended during food drying.
- If alcoholic beverages are used
when cooking foods (e.g. rum,
cognac, wine), remember that
alcohol evaporates at high
temperatures. As a result, there
is a risk that vapours released
by the alcohol may catch re
upon coming into contact with
the electrical heating element.
- Never use steam cleaning
equipment.
- Do not touch the oven during
the pyrolysys cycle. Keep
children away from the oven
during the pyrolysis cycle.(only
for ovens with Pyrolisis function).
- During and after the Pyrolytic
cleaning, every pets (especially
birds) have to be kept away
from the area of the appliance
location.
- Only use the temperature
probe recommended for this
oven.
- Do not use harsh abrasive
cleaners or sharp metal
scrapers to clean the oven door
glass since they can scratch the
surface, which may result in
shattering of the glass.
- Ensure that the appliance is
switched off before replacing
the lamp to avoid the possibility
of electric shock.
Scrapping of household
appliances
- This appliance is manufactured
with recyclable or reusable
materials. Dispose of it in
accordance with local waste
disposal regulations. Before
scrapping, cut off the power
supply cable.
- For further information on
the treatment, recovery and
recycling of household electrical
appliances, contact your
competent local authority, the
collection service for household
waste or the store where you
purchased the appliance.
Page 7
ENGLISH 7
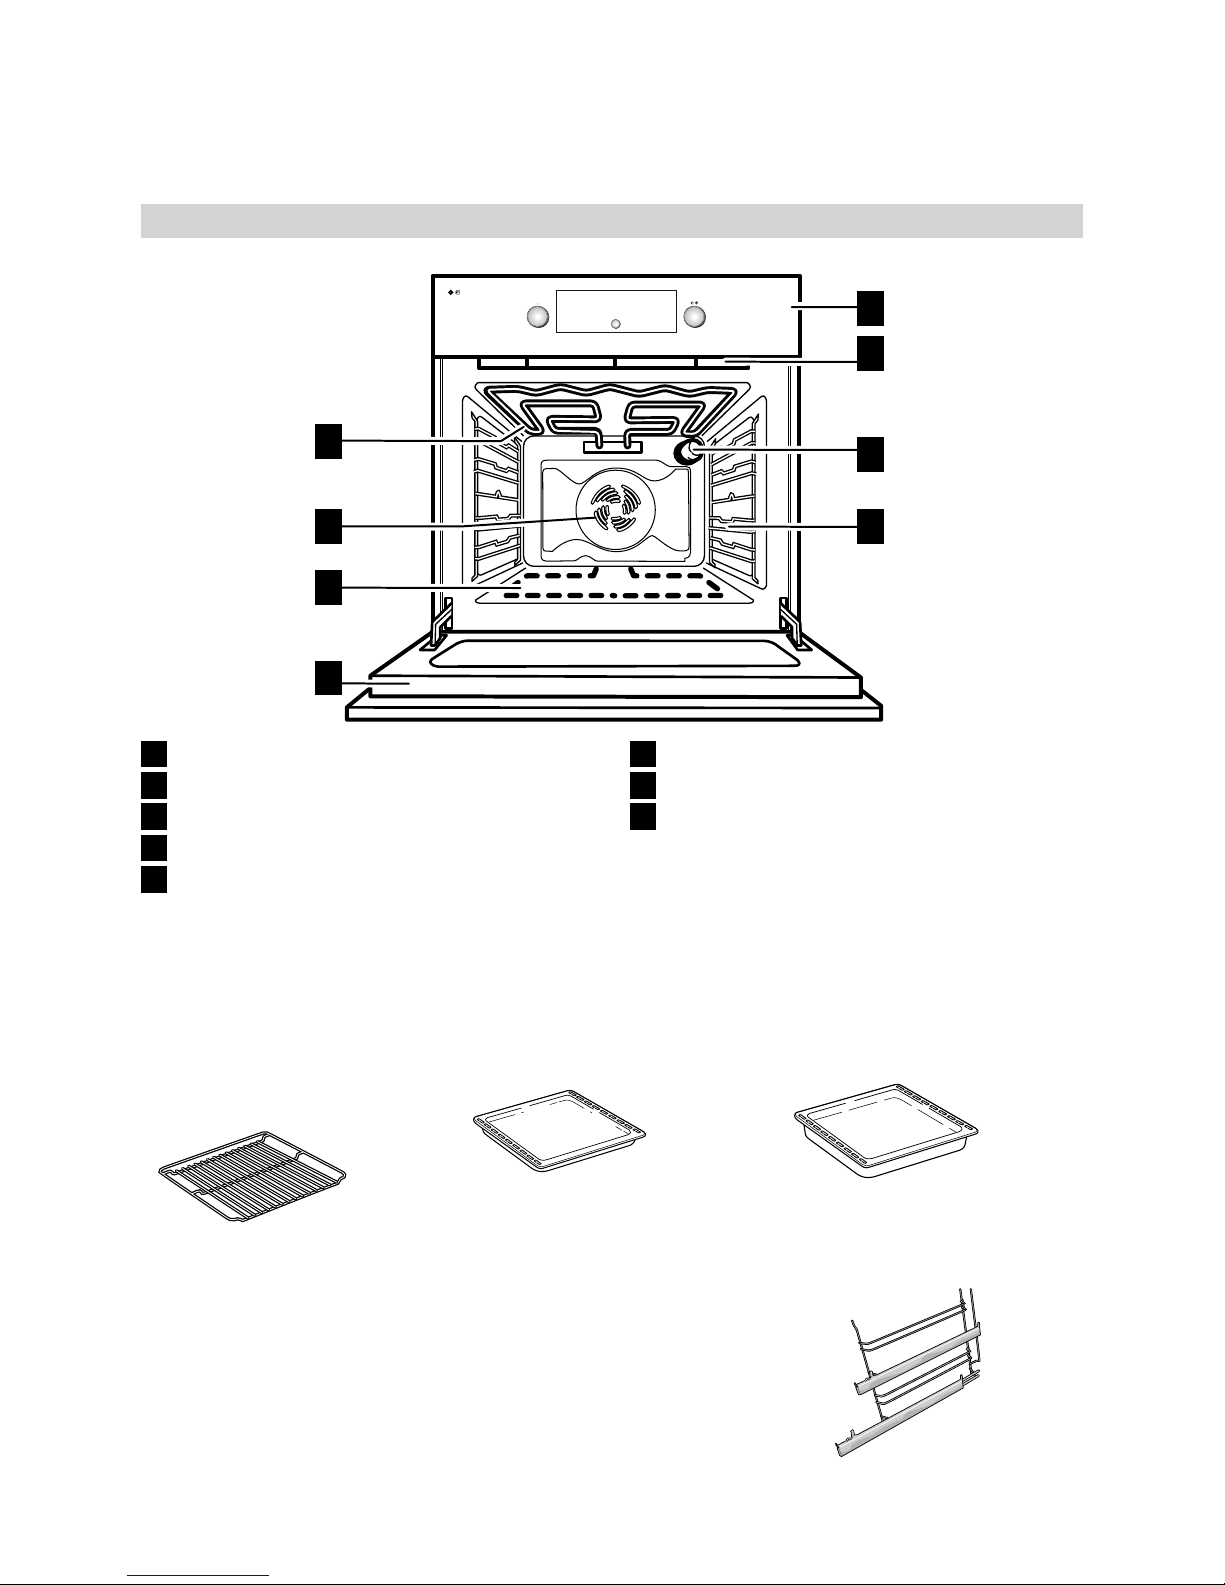
Product description
1
Control panel
2
Cooling fan
1)
(hidden)
3
Upper heating element/Grill
4
Rear oven lamp
5
Oven fan
6
Bottom heating element (not visible)
7
Oven door
8
Lateral Grids
1) The cooling fan may continue running even after the
oven is switched off. During the pyro-clean cycle the
fan runs faster than during normal cooking functions.
1
2
4
8
3
5
6
7
Accessories
Wire Shelf
1x
Baking tray
1x
Drip tray
1x
Telescopic Runners
2x
Page 8
ENGLISH 8
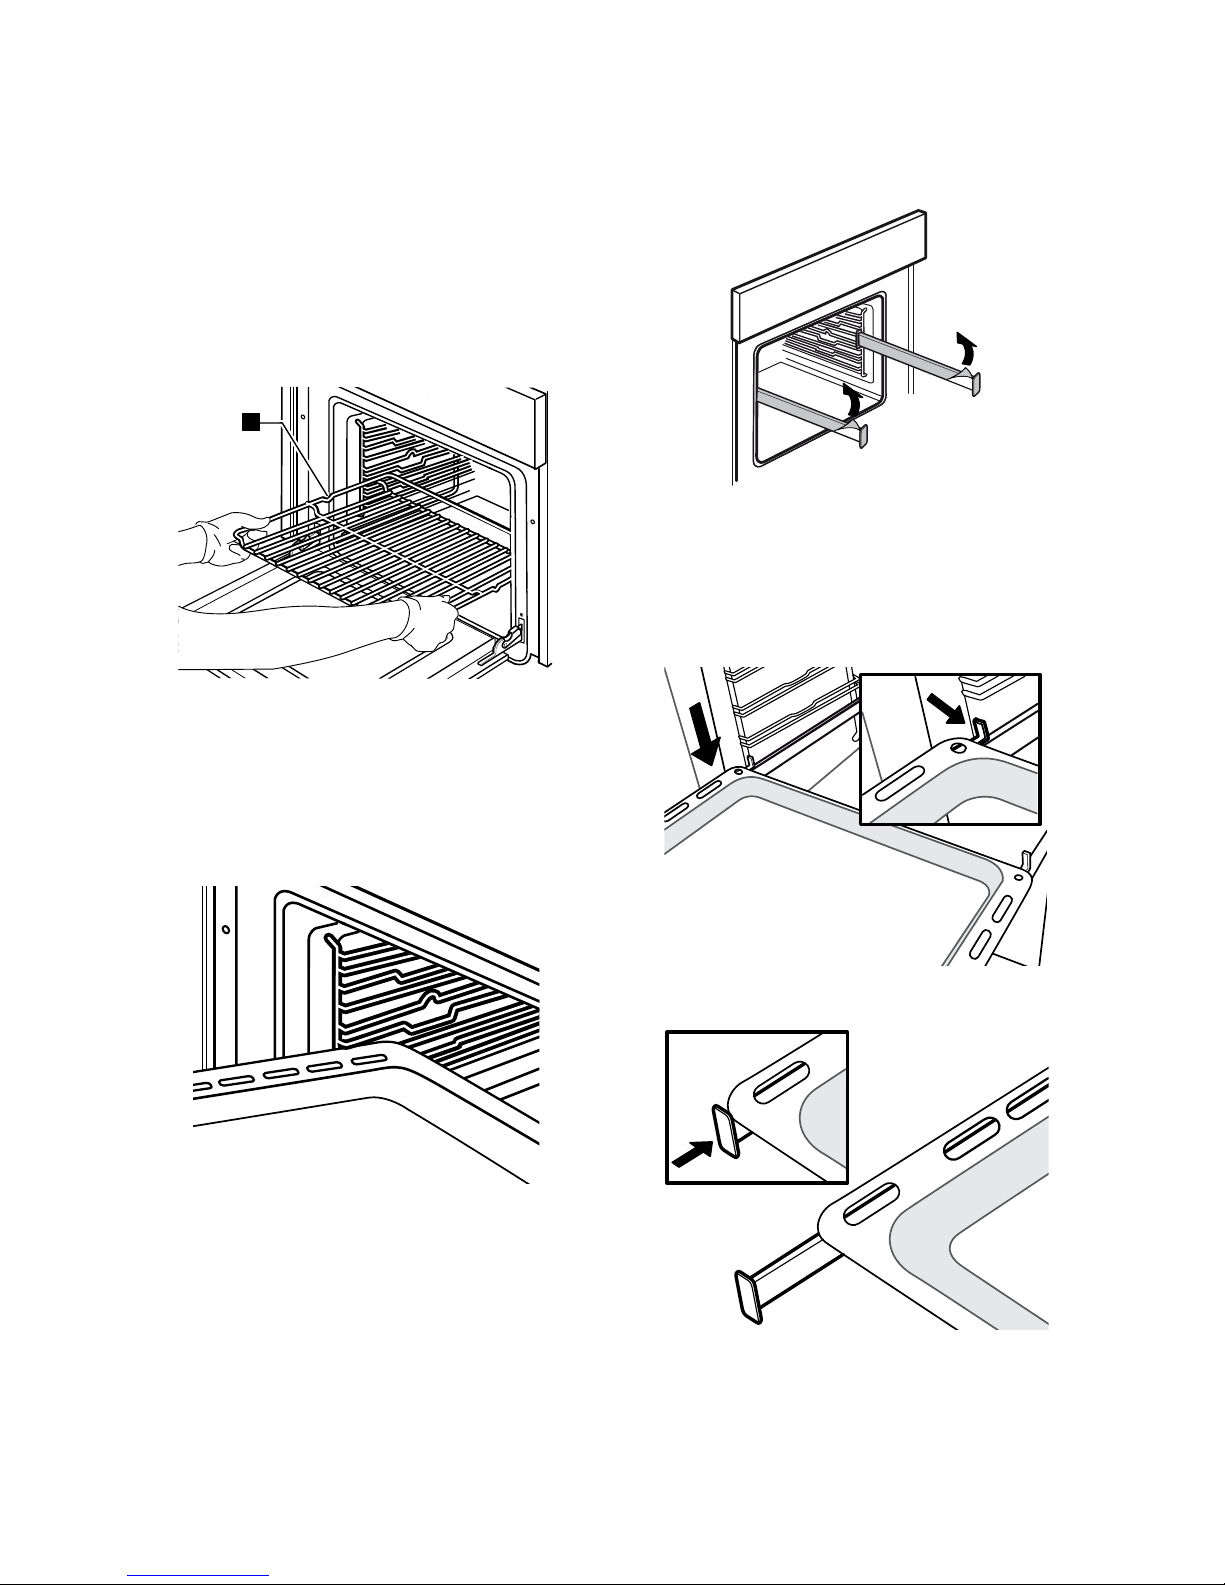
Inserting wire shelves and other accessories
in the oven
1. Insert the wire shelf horizontally, with the
raised part “A” upwards (Fig. 1).
A
Fig. 1
2. Other accessories, such as the drip tray
and baking tray, are inserted in the same
way as the wire shelf (Fig. 2).
Fig. 2
Remove the blue lm as shown in the image
How you align the tray with the telescopic
runners.
Place the drip tray on the telescopic runners
xing it between the rear and front fastener.
Fig. 2
Fig. 3
Page 9
ENGLISH 9
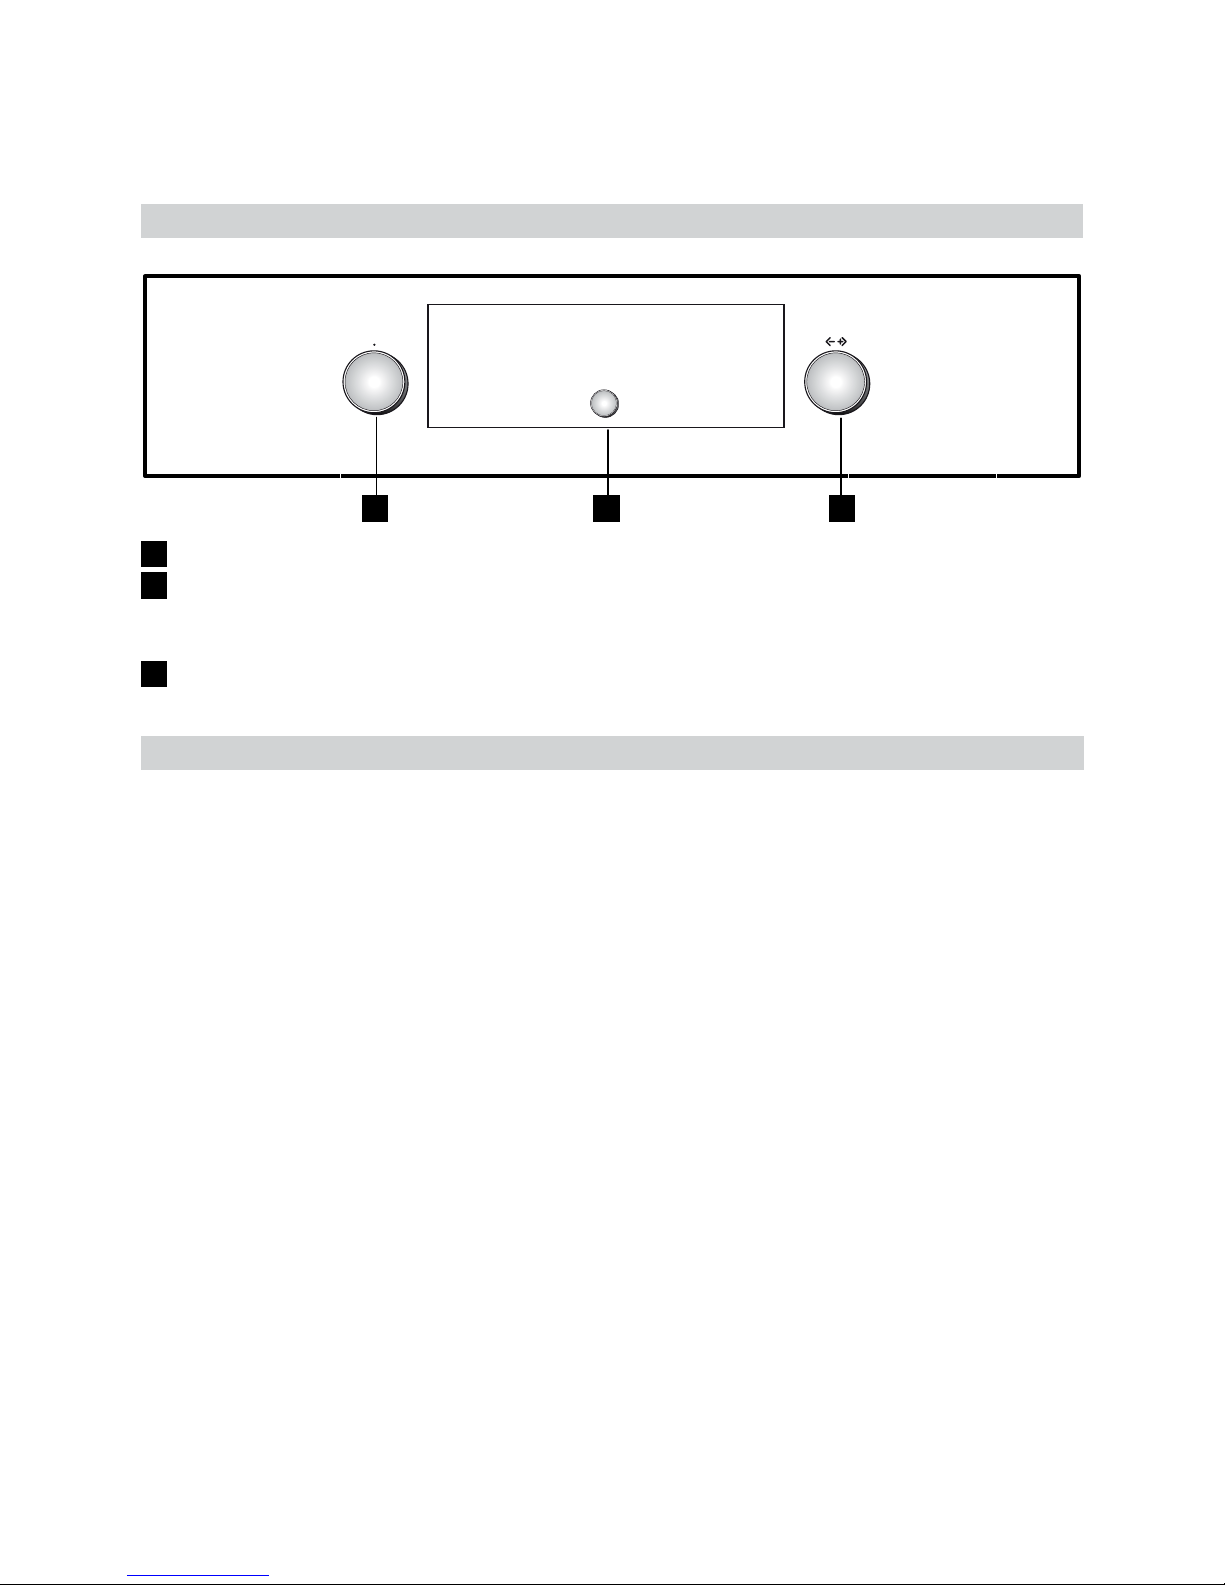
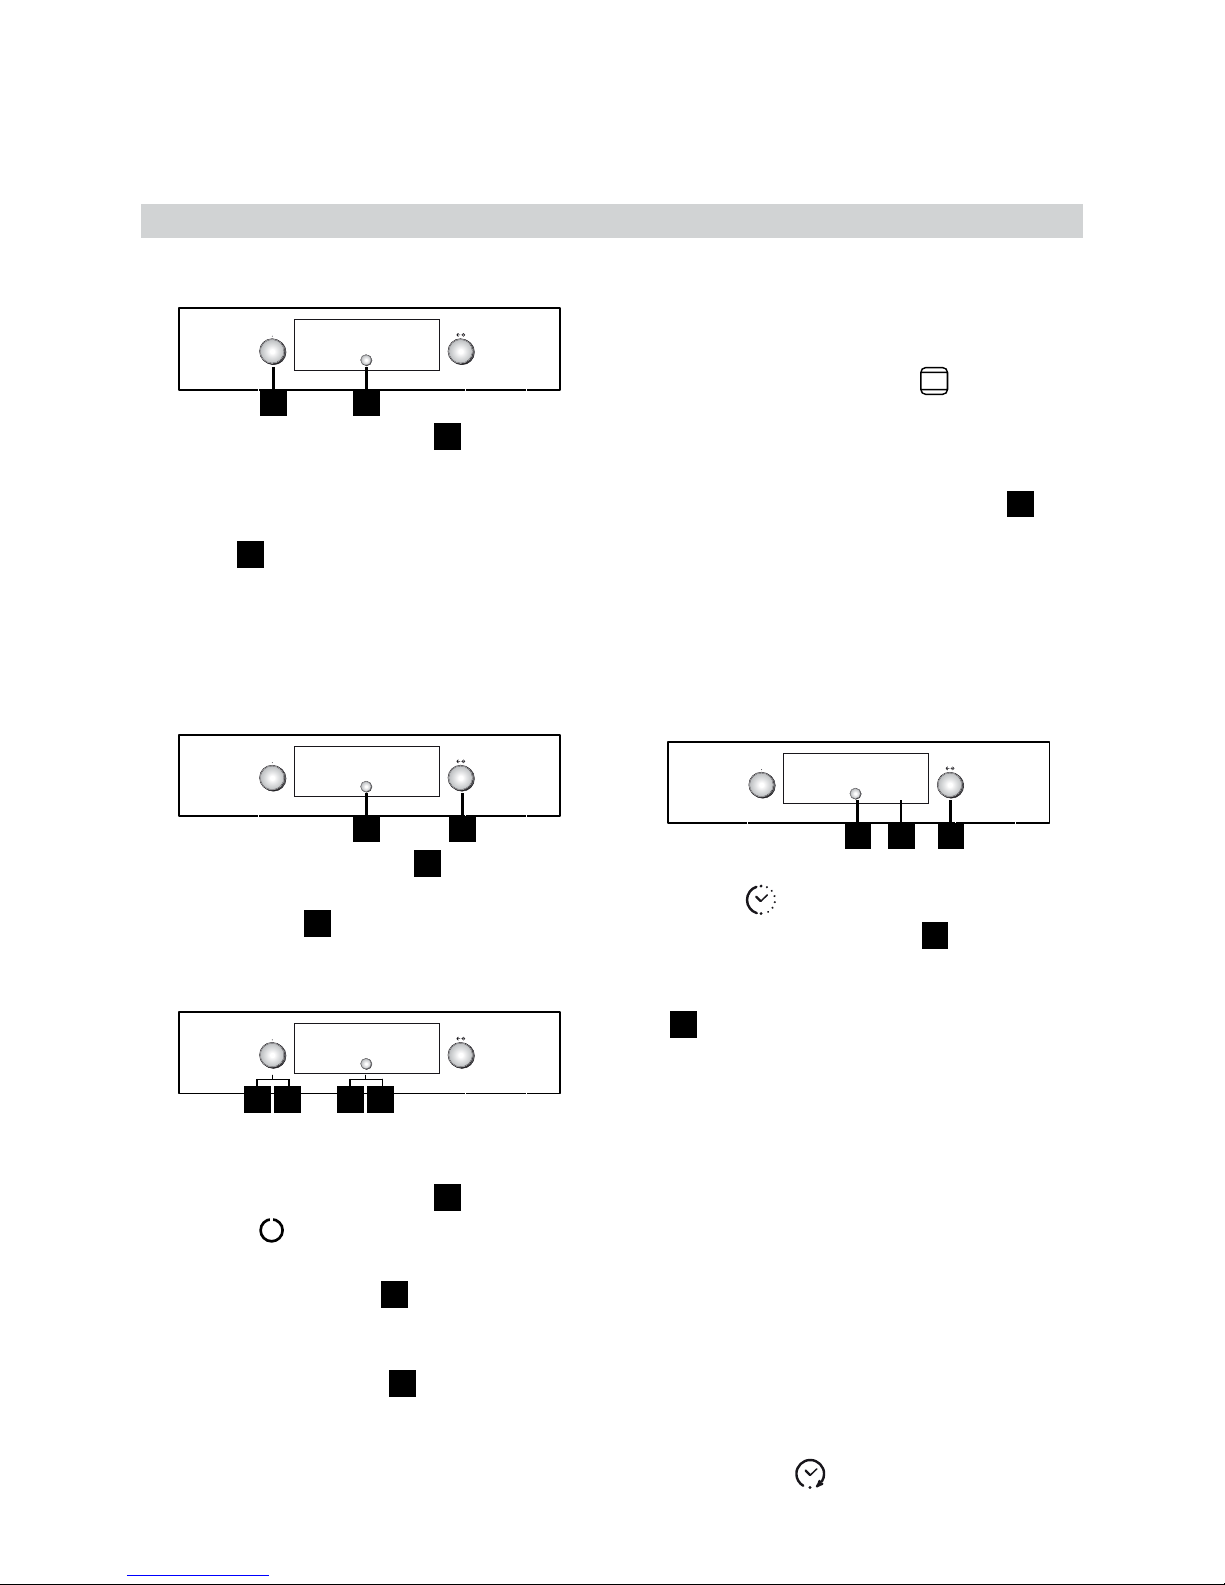
Control panel
A
Function selector knob
B
Browse knob
Note: the control knobs are retractable. Press
the knobs in the middle and they pop up.
C
Selection/Conrmation button
A BC
Turn the “Functions” knob to any position and
the oven switches on: the display shows the
functions or the associated submenus.
The submenus are available and selectable
by turning the knob to the functions GRILL,
SPECIALS, SETTINGS, BREAD/PIZZA.
N.B.: for the list and description of functions,
see the specic table.
List of functions
Page 10
ENGLISH 10
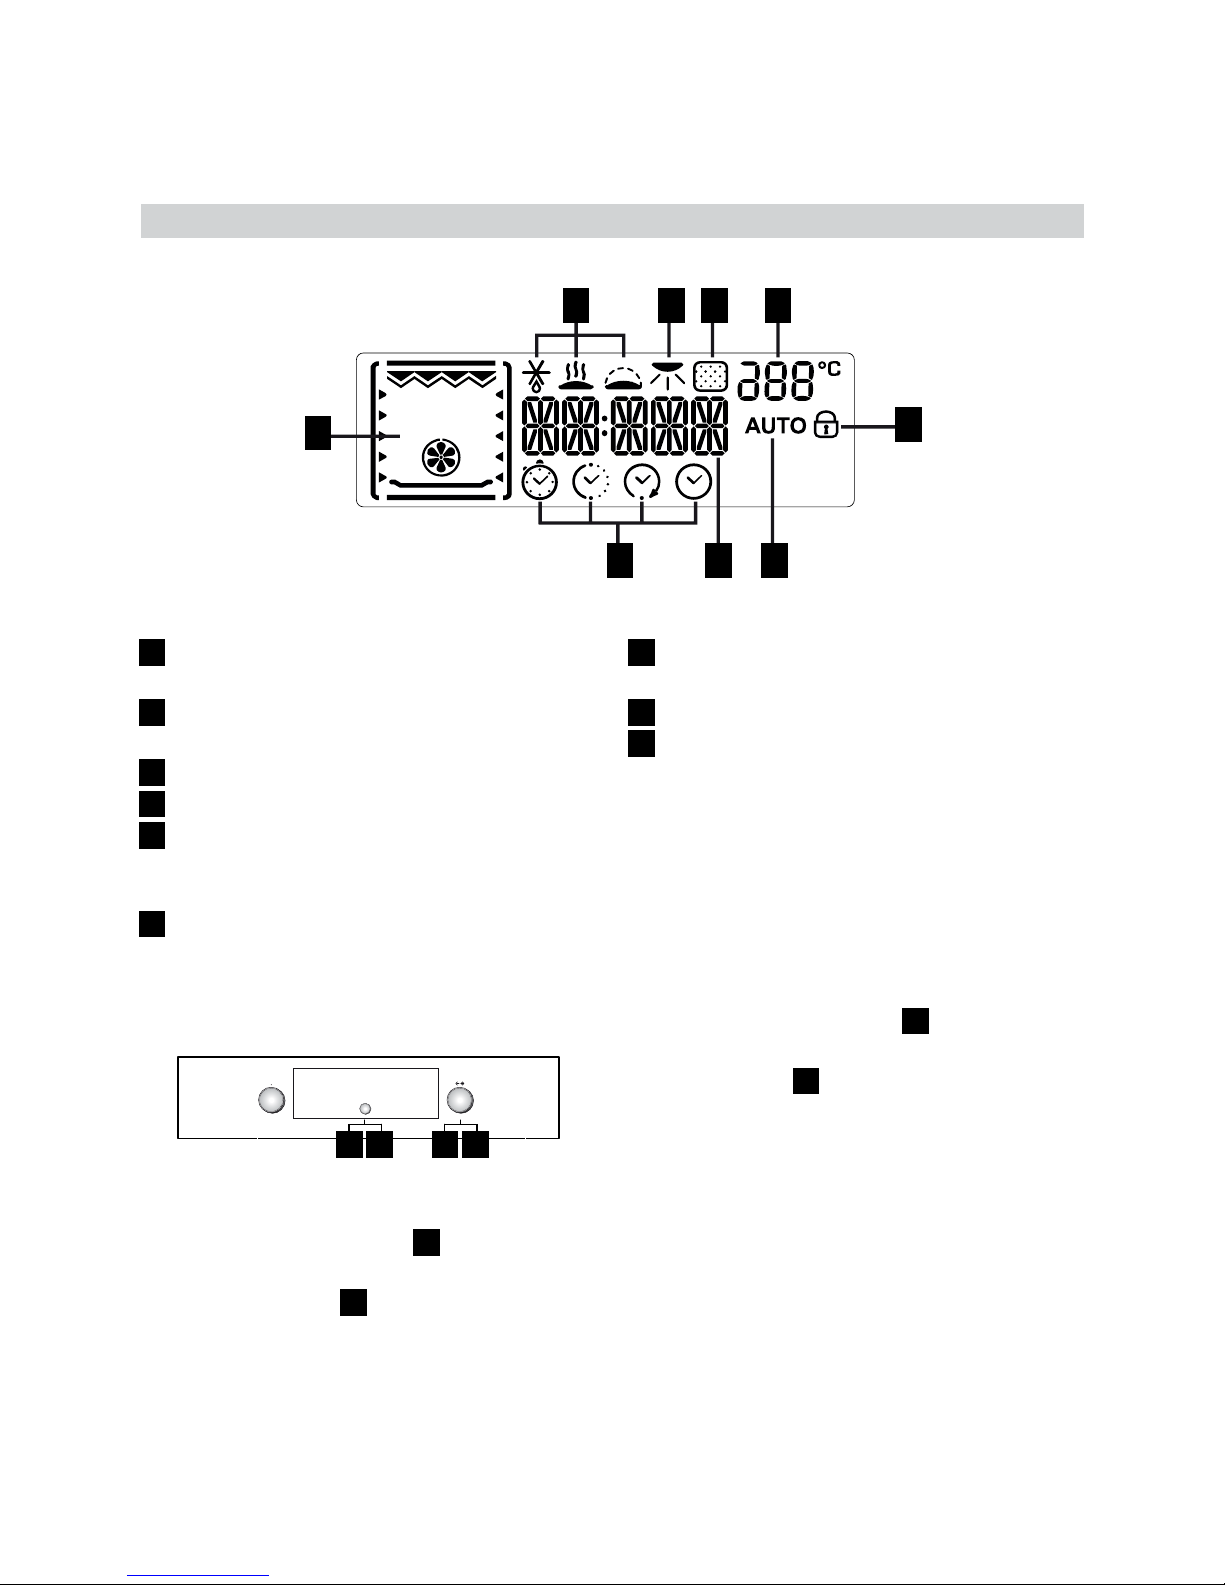
Description of display
1
Display of heating elements activated
during the various cooking functions
2
Time management symbols: timer, cooking
time, end of cooking time, time
3
Information regarding selected functions
4
Automatic BREAD/PIZZA function selected
5
Indication of door locked during automatic
cleaning cycle (not available on this
model)
6
Internal oven temperature
7
Pyrolisis function (not available on this
model)
8
Browning
9
Special functions: defrosting, keep warm,
rising
1
2 3 4
5
6789
Setting the time
2
4
1
3
At the rst switch on of the oven, the two hour
digits ash on the display
1. Turn the “Browse” knob
B
to display the
correct hour.
2. Press the button
C
to conrm; the two
minute digits ash on the display.
3. Turn the “Browse” knob
B
to display the
correct minutes.
4. Press button
C
to conrm.
To change the time, for example following
a power cut, see the next paragraph
(SETTINGS).
Page 11
ENGLISH 11
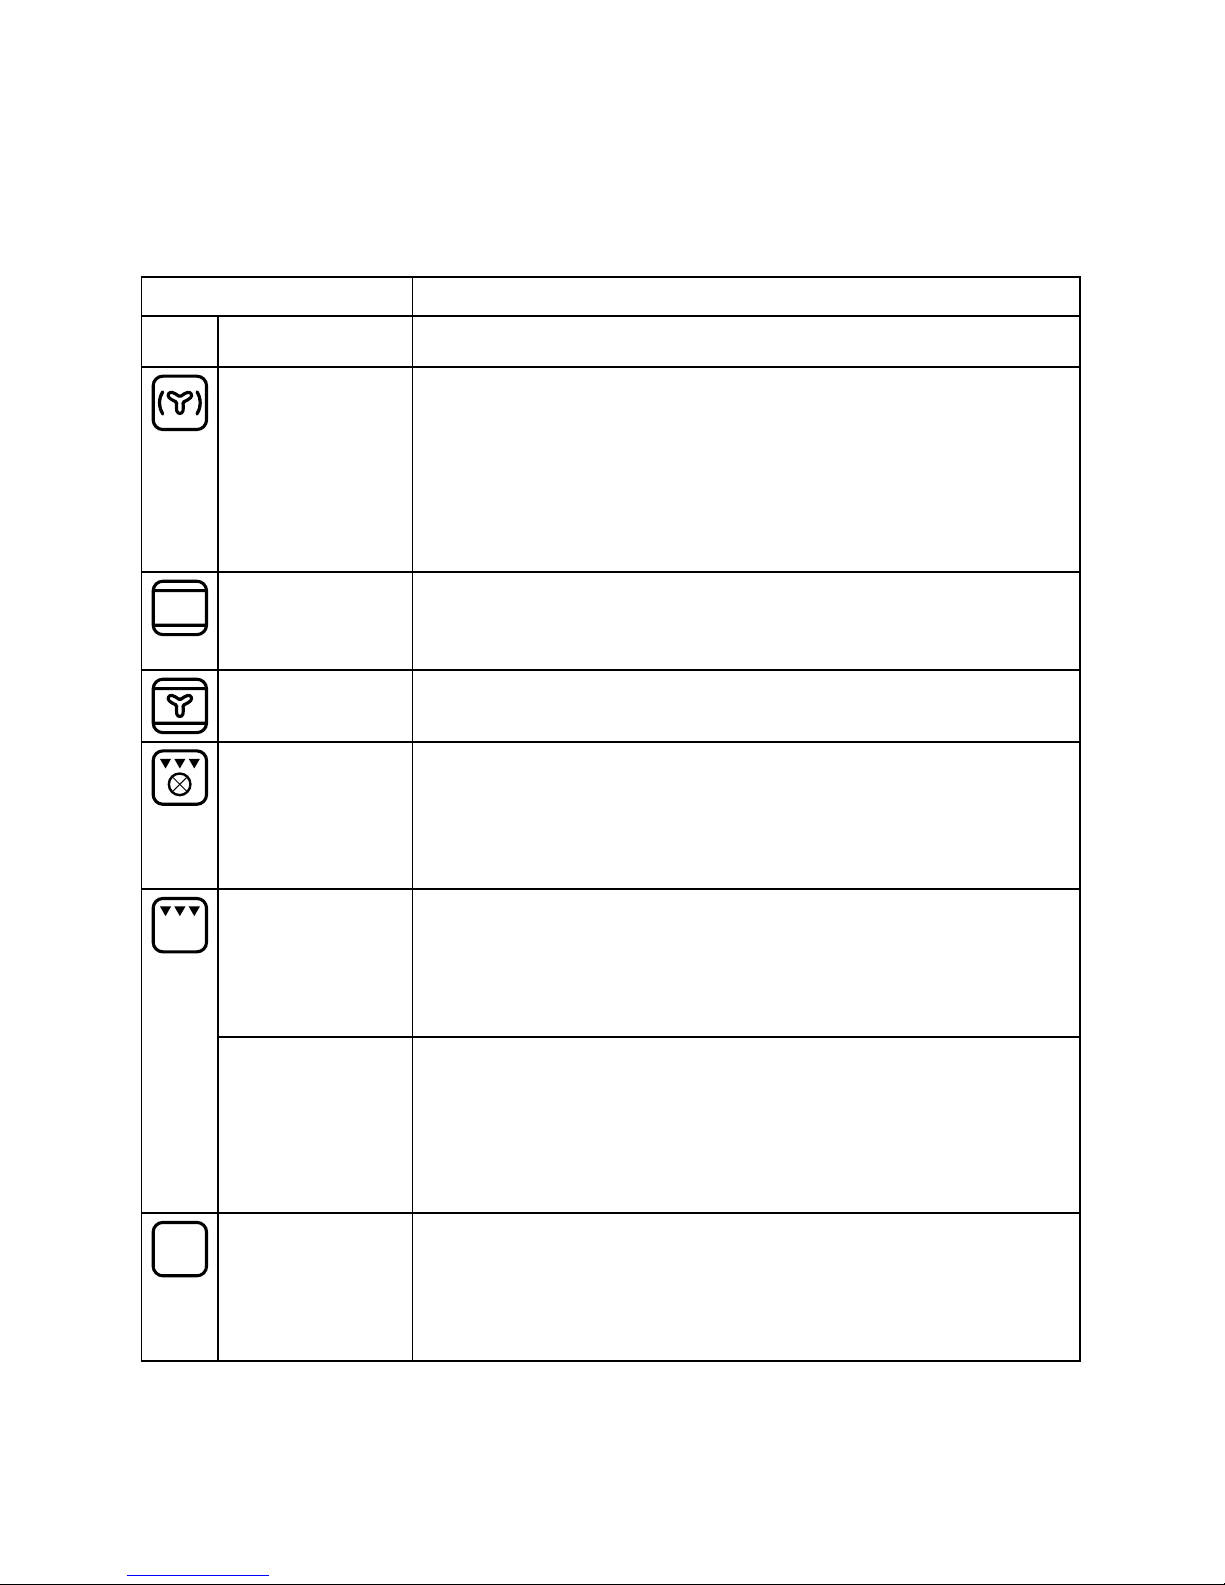
Oven functions table
The oven has 4 cooking levels. Count up from the lower level.
Function Description of function
0
OFF To stop cooking and switch off the oven.
FORCED AIR To cook a variety of food requiring the same cooking temperature
on two shelves at the same time (e.g: sh, vegetables, cakes). This
function can be used to cook different foods without odours being
transferred from one food to another. Use the 2nd shelf to cook on
one shelf only.
To cook on two shelves, use the 1st and 3rd shelves after
preheating the oven.
CONVENTIONAL To cook any kind of dish on one shelf only. Use the 2nd shelf.
Preheat the oven before placing food inside.
CONVECTION
BAKE
To cook meat and pies with liquid lling (savoury or sweet) on a
single shelf. Use the 2nd shelf. Preheat the oven before cooking.
MAXI COOKING To cook large joints of meat (above 2.5 kg). Use the 1st or 2nd shelf,
depending on the size of the joint. The oven does not have to be
preheated. It is advisable to turn the meat over during cooking for
more even browning. It is best to baste the meat every now and
again to avoid it drying out.
GRILL To grill steak, kebabs and sausages; to cook vegetables au gratin
and toast bread. Place food on the 4th shelf. When grilling meat,
use the drip tray to collect the cooking juices. Position it on the 3rd
shelf, adding approx. half a litre of water. The oven does not have
to be preheated. During cooking the oven door must remain closed.
TURBOGRILL To roast large joints of meat (legs, roast beef, chickens). Position the
food on the middle shelves.
Use the drip tray to collect the cooking juices. Position it on the
1st/2nd shelf, adding approx. half a litre of water. The oven does
not have to be preheated. During cooking the oven door must
remain closed.
BREAD/PIZZA To bake different types and sizes of pizza and bread. This function
contains two programmes with predened settings. Simply indicate
the values required (temperature and time) and the oven will
manage the cooking cycle automatically. Place the dough on the
2nd shelf after preheating the oven.
Page 12
ENGLISH 12
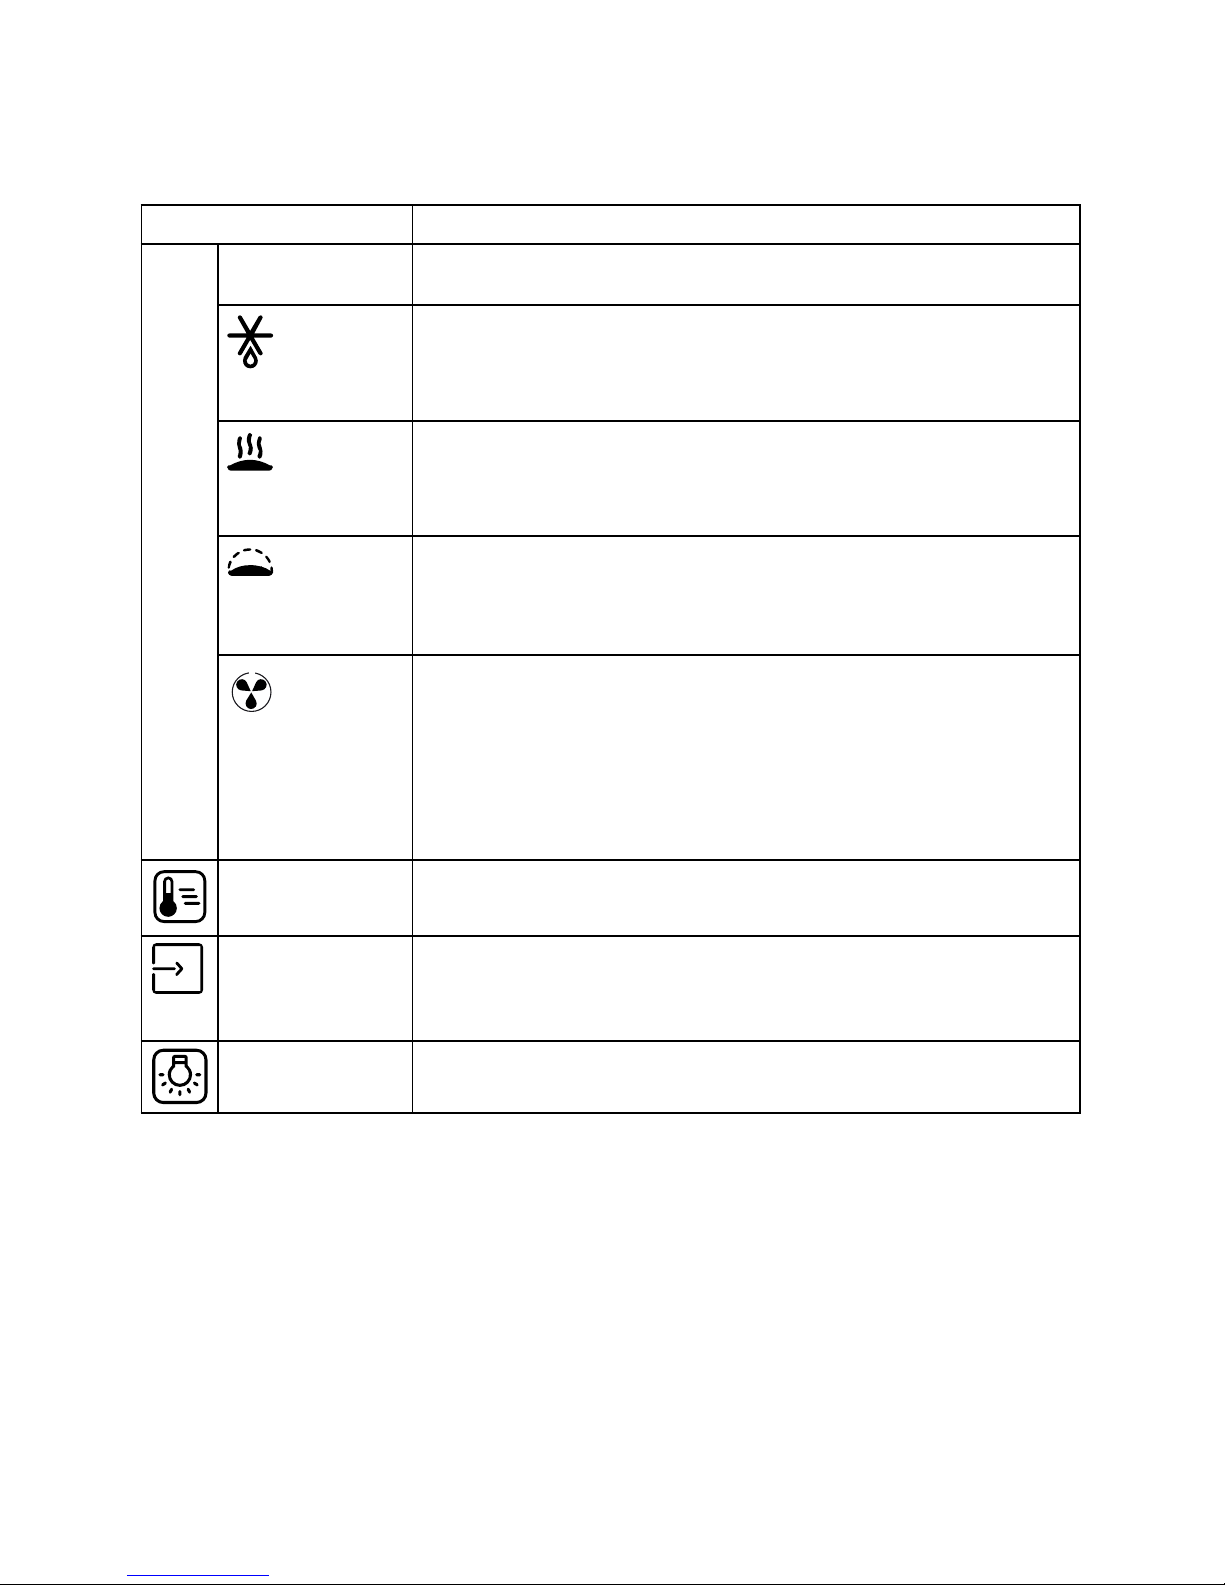
Function Description of function
SPECIAL
FUNCTIONS
DEFROST
To speed up defrosting of food. Place food on the middle shelf.
Leave food in its packaging in order to prevent it from drying out on
the outside.
WARM KEEPING
For keeping just-cooked food hot and crisp (e.g: meat, fried food or
ans). Place food on the middle shelf. The function will not activate
if the temperature in the oven is above 65°.
RISING
For optimal rising of sweet or savoury dough. To safeguard the
quality of proving, the function will not activate if the temperature in
the oven is above 40°C. Place the dough on the 2nd shelf. The oven
does not have to be preheated.
ECO FORCED AIR
To cook stuffed roasts and meat in pieces on one shelf. This
function uses discontinuous, delicate fan assistance, which prevents
excessive drying of foods. In this ECO function the light remains
off during cooking and can be temporarily switched on again by
pressing the conrm button. In order to maximize energy efciency,
it is advisable not to open the door during cooking. It is advisable
to use 3rd level. The oven does not have to be preheated.
FAST
PREHEATING
To preheat the oven rapidly.
SETTINGS To set the display (language, time, brightness, buzzer volume,
energy saving).
LAMP To switch the oven interior light on/off.
Page 13
ENGLISH 13
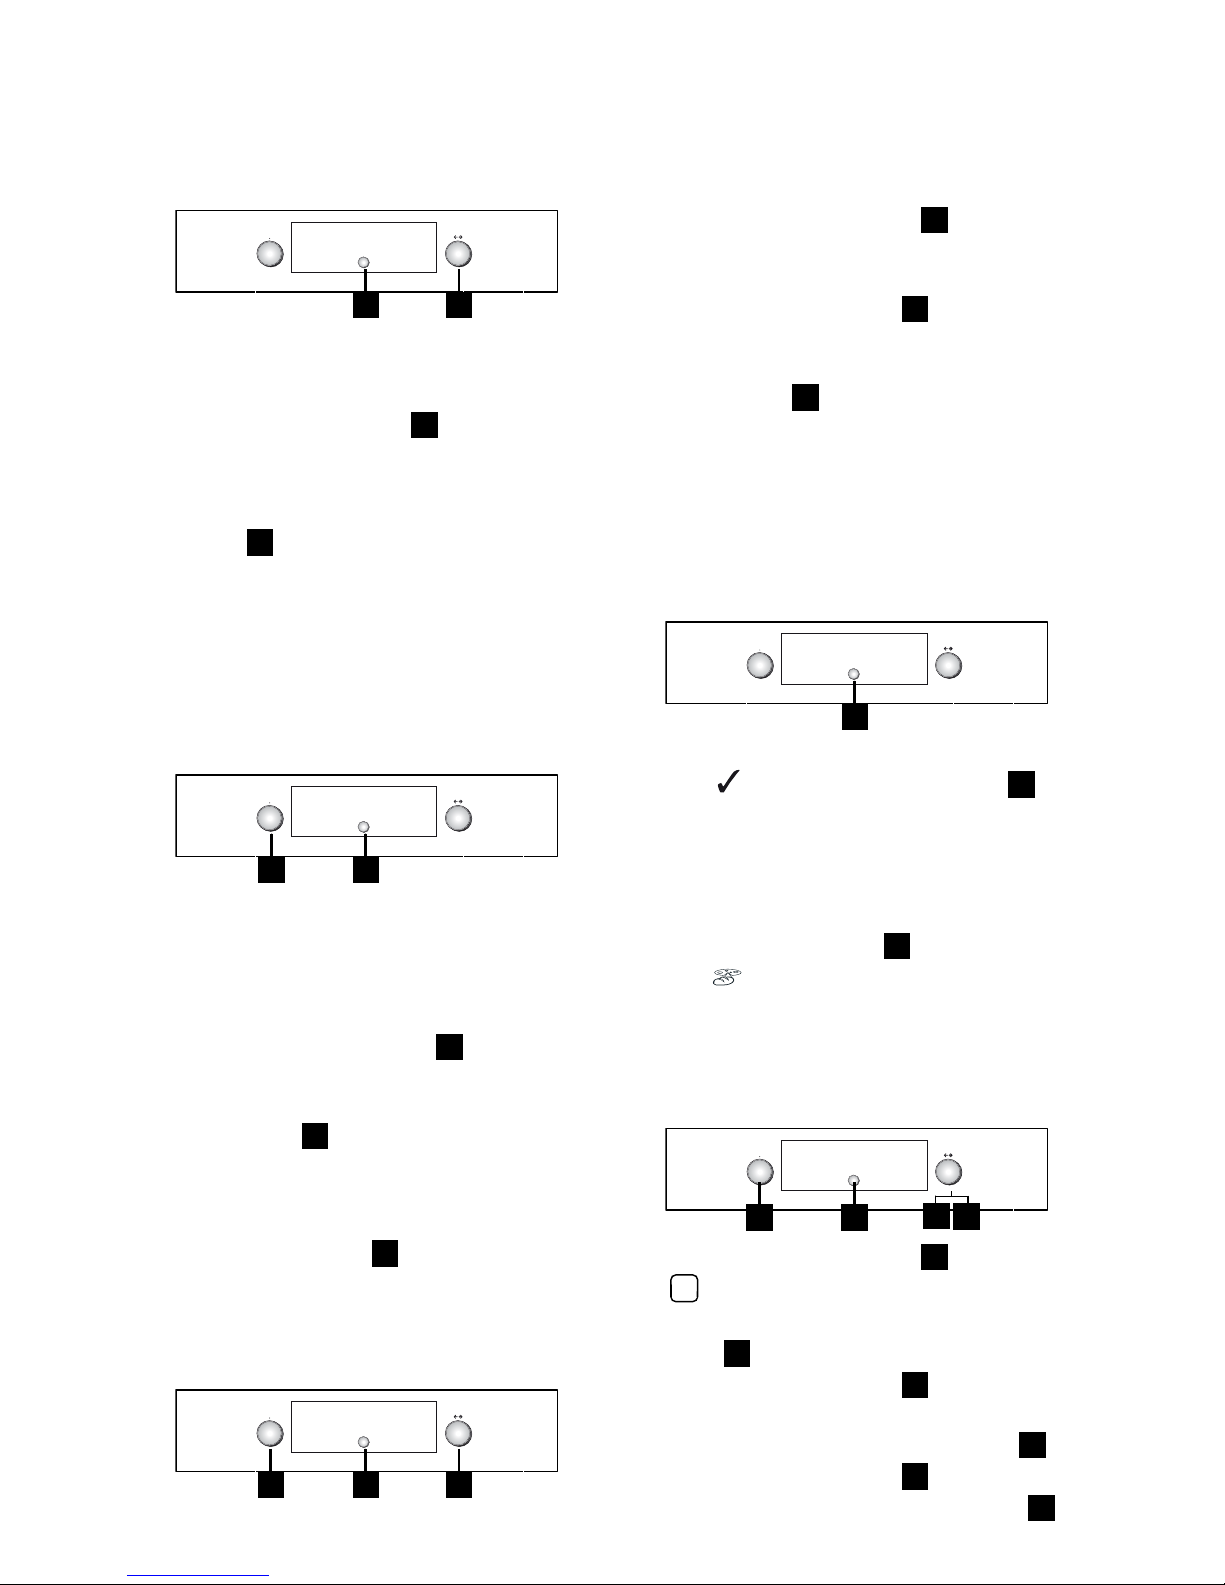
Daily use
Selecting cooking functions
1 2
1. Turn the “Functions” knob
A
to the
desired function: the cooking settings are
shown on the display.
2. If the values shown are those desired,
press
C
. To change them, proceed as
indicated below.
Setting the temperature/output of the grill
To change the temperature or output of the
grill, proceed as follows:
12
1. Turn the “Browse” knob
B
to display the
desired value.
2. Press button
C
to conrm.
Fast preheating
2
3
1
4
Don’t insert food in the oven until the fast
preheating cycle are completed.
1. Turn the “Functions” knob
A
to the
symbol
to select the fast preheating
function.
2. Conrm by pressing
C
: the settings are
shown on the display.
3. If the proposed temperature is that
desired, press button
C
. To change the
temperature, proceeed ad described
in the previous paragraph “Setting the
temperature/output of the grill”. The
message PRE appears on the display.
When the set temperature is reached, the
corresponding value (e.g. 200°) and an
acoustic signal will sound. At the end of
preheating, the oven automatically selects
the conventional function
. At this
point food can be placed in the oven for
cooking.
4. If you wish to set a different cooking
function, turn the “Functions” knob
A
and
select the desired function.
Setting cooking time
This function can be used to cook food for a
set length of time, from a minimum of 1 minute
to the maximum time allowed by the selected
function, after which the oven switches off
automatically.
1 2 3
1. Once the temperature is conrmed, the
symbol
ashes.
2. Turn the adjustment knob
B
to display
the desired cooking time.
3. To conrm the cooking time, press button
C
.
Setting end of cooking time /start delayed
IMPORTANT: the start delayed setting is not
available for the following functions: FAST
PREHEATING, BREAD/PIZZA.
N.B.: with this setting, the selected
temperature is reached in a more gradual
way, so cooking times will be slightly longer
than stated in the cooking table.
The end of cooking time can be set, delaying
the start of cooking by up to a maximum of 23
hours and 59 minutes. This can only be done
once cooking time has been set.
After setting cooking time, the display shows
the end of cooking time (for example 15:45)
and the symbol
ashes.
Page 14
ENGLISH 14
1 2
To delay the end of cooking time, and thus
also the cooking start time, proceed as
follows:
1. Turn the “Browse” knob
B
to display the
time you wish cooking to end (for example
16:00).
2. Conrm the selected value by pressing
button
C
: the two dots of end of cooking
time ash, indicating that the setting has
been made correctly.
3. The oven will automatically delay the start
of cooking so as to nish cooking at the set
time.
Timer
1 2
This function can be used only with the oven
switched off and is useful, for example, for
monitoring the cooking time of pasta.
The maximum time which can be set is 23
hours and 59 minutes.
1. With the “Functions” knob
A
at zero, turn
the “Browse” knob to display the desired
time.
2. Press button
C
to start the countdown.
When the set time has elapsed, the
display will show “END” and an acoustic
signal will sound. To mute the acoustic
signal, press button
C
(the time of day
appears on the display).
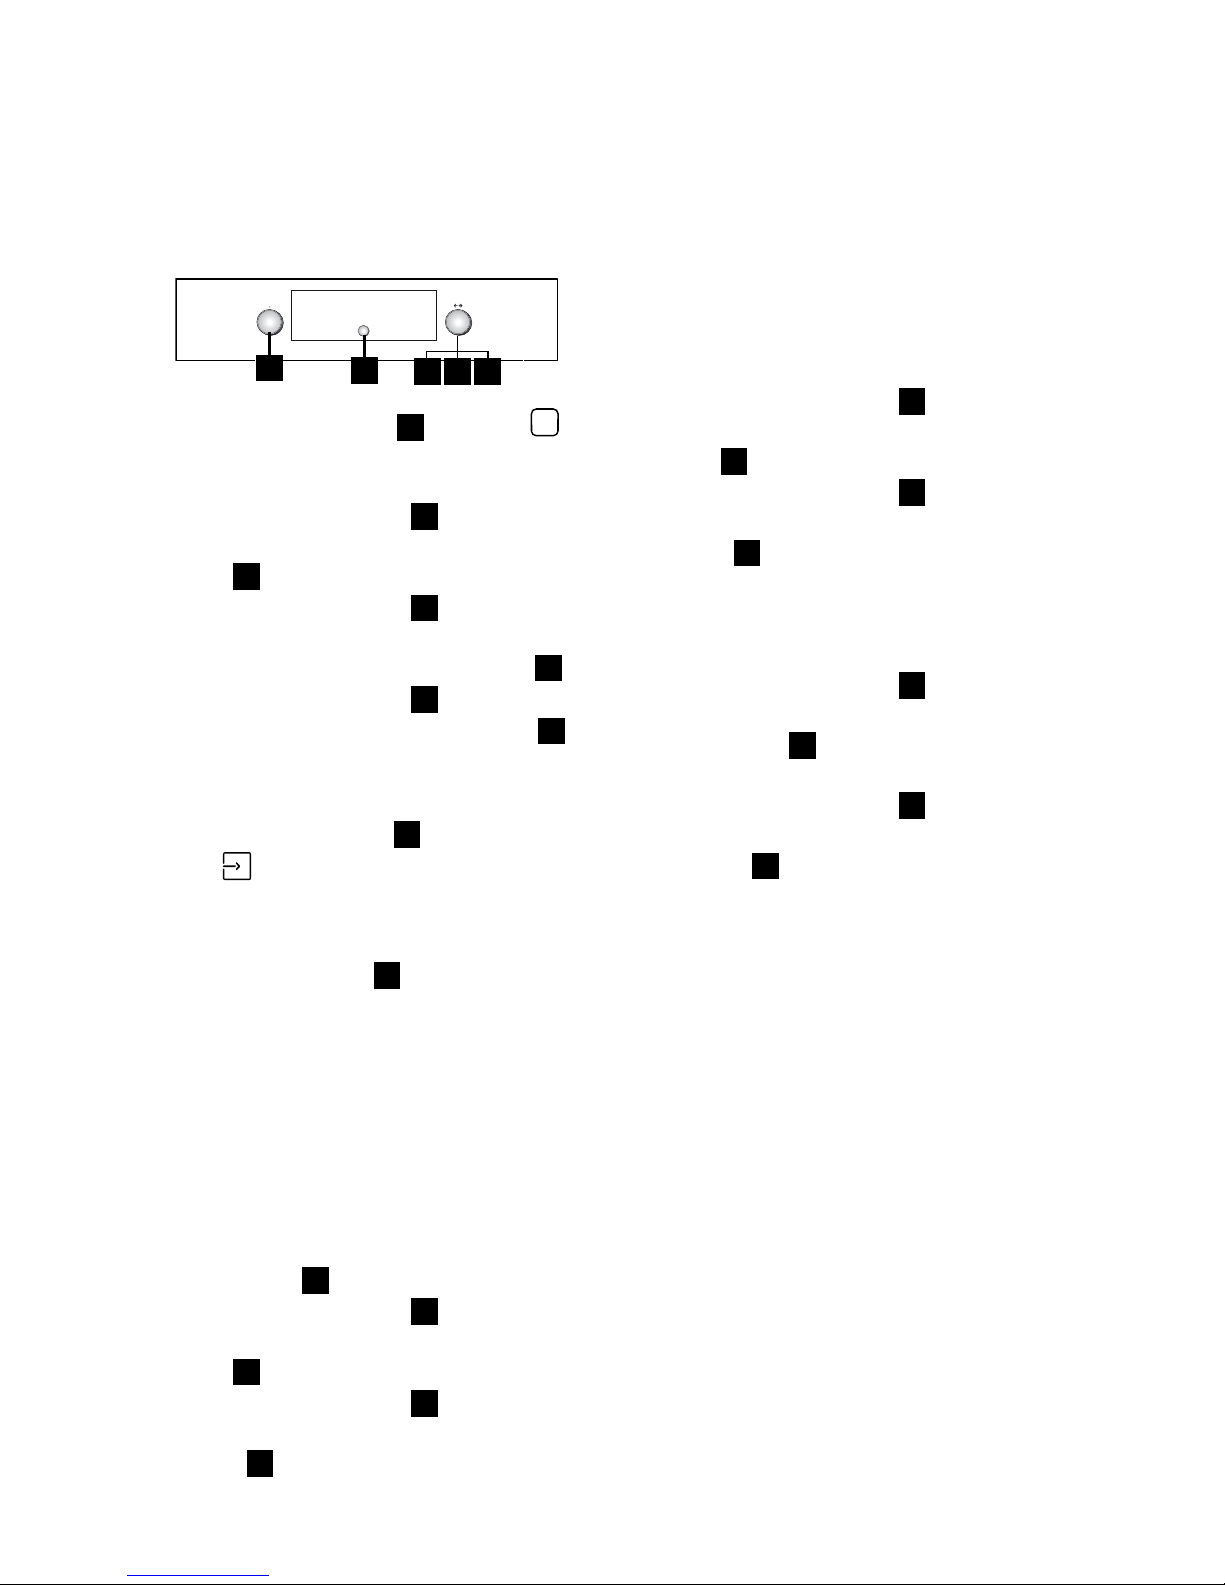
Selecting special functions
1 2 3
1. Turn the “Functions” knob
A
till the
display shows “ DEFROST” along with this
function’s corresponding symbol.
2. Turn the “Browse” knob
B
to scroll the
list of functions: DEFROST, KEEP WARM,
RISING, ECO FORCED AIR.
3. Press button
C
to conrm.
Browning
At the end of cooking, with certain functions,
the display indicates the possibility of extra
browning. This function can only be used
when cooking time has been set.
1
At the end of cooking time, the display shows:
“PRESS
TO BROWN”. Press button
C
,
and the oven starts a 5 minute browning cycle.
This function can be selected consecutively a
maximum of twice.
Bread/pizza function selection
Turn the “Functions” knob
A
indicator to the
symbol
to access a submenu containing
two automatic cooking functions for “bread”
and “pizza”.
Bread
3
4
1 2
1. Turn the “Functions” knob
A
to symbol
: the display shows “BREAD” and
AUTO at the side.
2. Press
C
to select the function.
3. Turn the “Browse” knob
B
to set the
required temperature (between 180°C
and 220°C) and conrm with button
C
.
4. Turn the “Browse” knob
B
to set the
required cooking duration and press
C
to
Page 15
ENGLISH 15
start cooking.
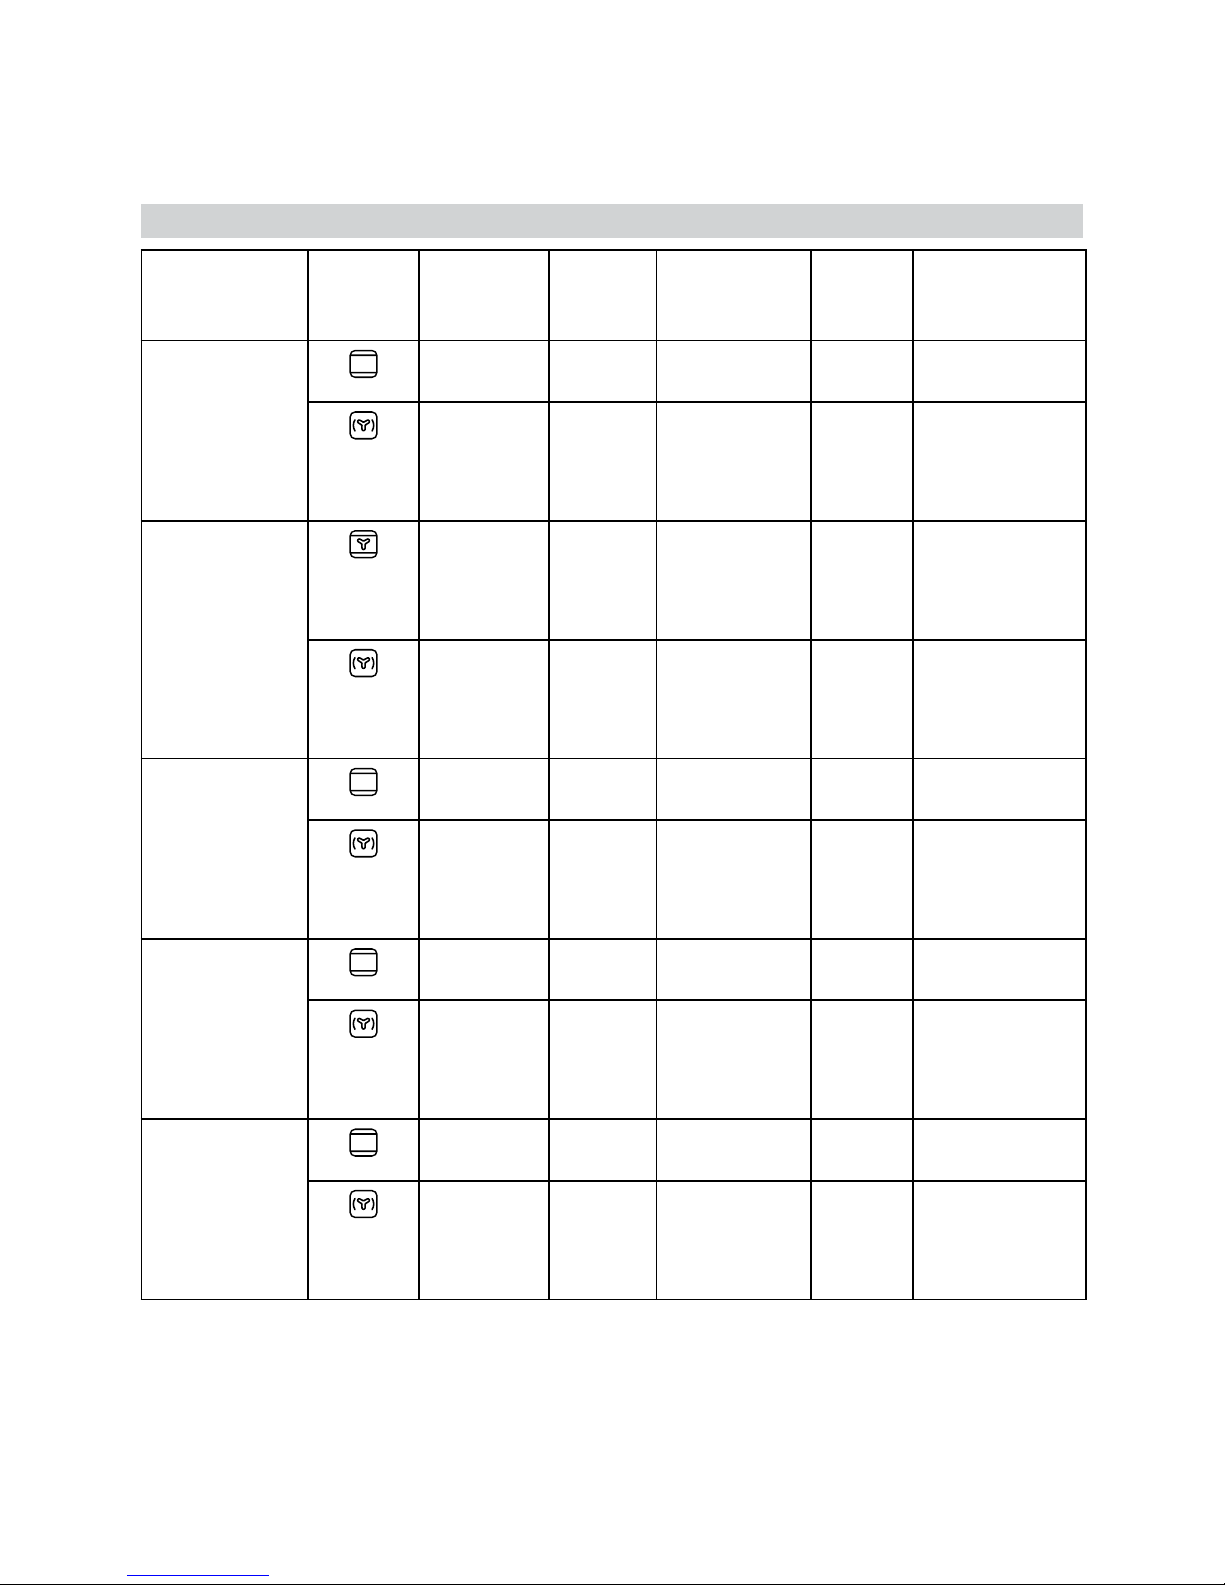
Pizza
1
3
2
4 5
1. Turn the Functions knob
A
to symbol
the display shows “BREAD”. To select the
“PIZZA” function, proceed as follows:
2. Turn the “Browse” knob
B
: “PIZZA”
appears on the display.
3. Press
C
to select the function.
4. Turn the “Browse” knob
B
to set the
required temperature (between 220°C
and 250°C) and conrm with button
C
.
5. Turn the “Browse” knob
B
to set the
required cooking duration and press
C
to
start cooking.
Settings
Turn the “Functions” knob
A
indicator to the
symbol
to access a submenu containing
ve display settings which can be changed.
Clock
Turn the “Browse” knob
B
to display CLOCK.
To change the time, see the previous section
(SETTING THE CURRENT TIME).
Eco
With the ECO mode selected (ON), the display
reduces the brightness, showing the clock
when the oven is on standby position from 3
minutes. Also, the oven light is switched off
during cooking. To view information on the
display and switch the light on again, just
press the button
C
or turn one of the knobs.
1. Turn the “Browse” knob
B
to display
“ECO.
2. Press
C
to access the setting (ON/OFF).
3. Turn the “Browse” knob
B
to select the
desired setting and conrm by pressing
button
C
.
4. During a cooking function, if the Eco
Mode is activated, the cavity lamp will be
switched off after 1 minute of cooking and
reactivated for each user interaction.
Acoustic signal
To activate or deactivate the acoustic signal,
proceed as follows:
1. Turn the “Browse” knob
B
to display
“SOUND.
2. Press
C
to access the setting (ON/OFF).
3. Turn the “Browse” knob
B
to select the
desired setting and conrm by pressing
button
C
.
Brightness
To change the display brightness, proceed as
follows:
1. Turn the “Browse” knob
B
to display
“BRIGHTNESS.
2. Press button
C
number 1 appears on the
display.
3. Turn the “Browse” knob
B
to increase
or decrease brightness and conrm by
pressing
C
.
Page 16
ENGLISH 16
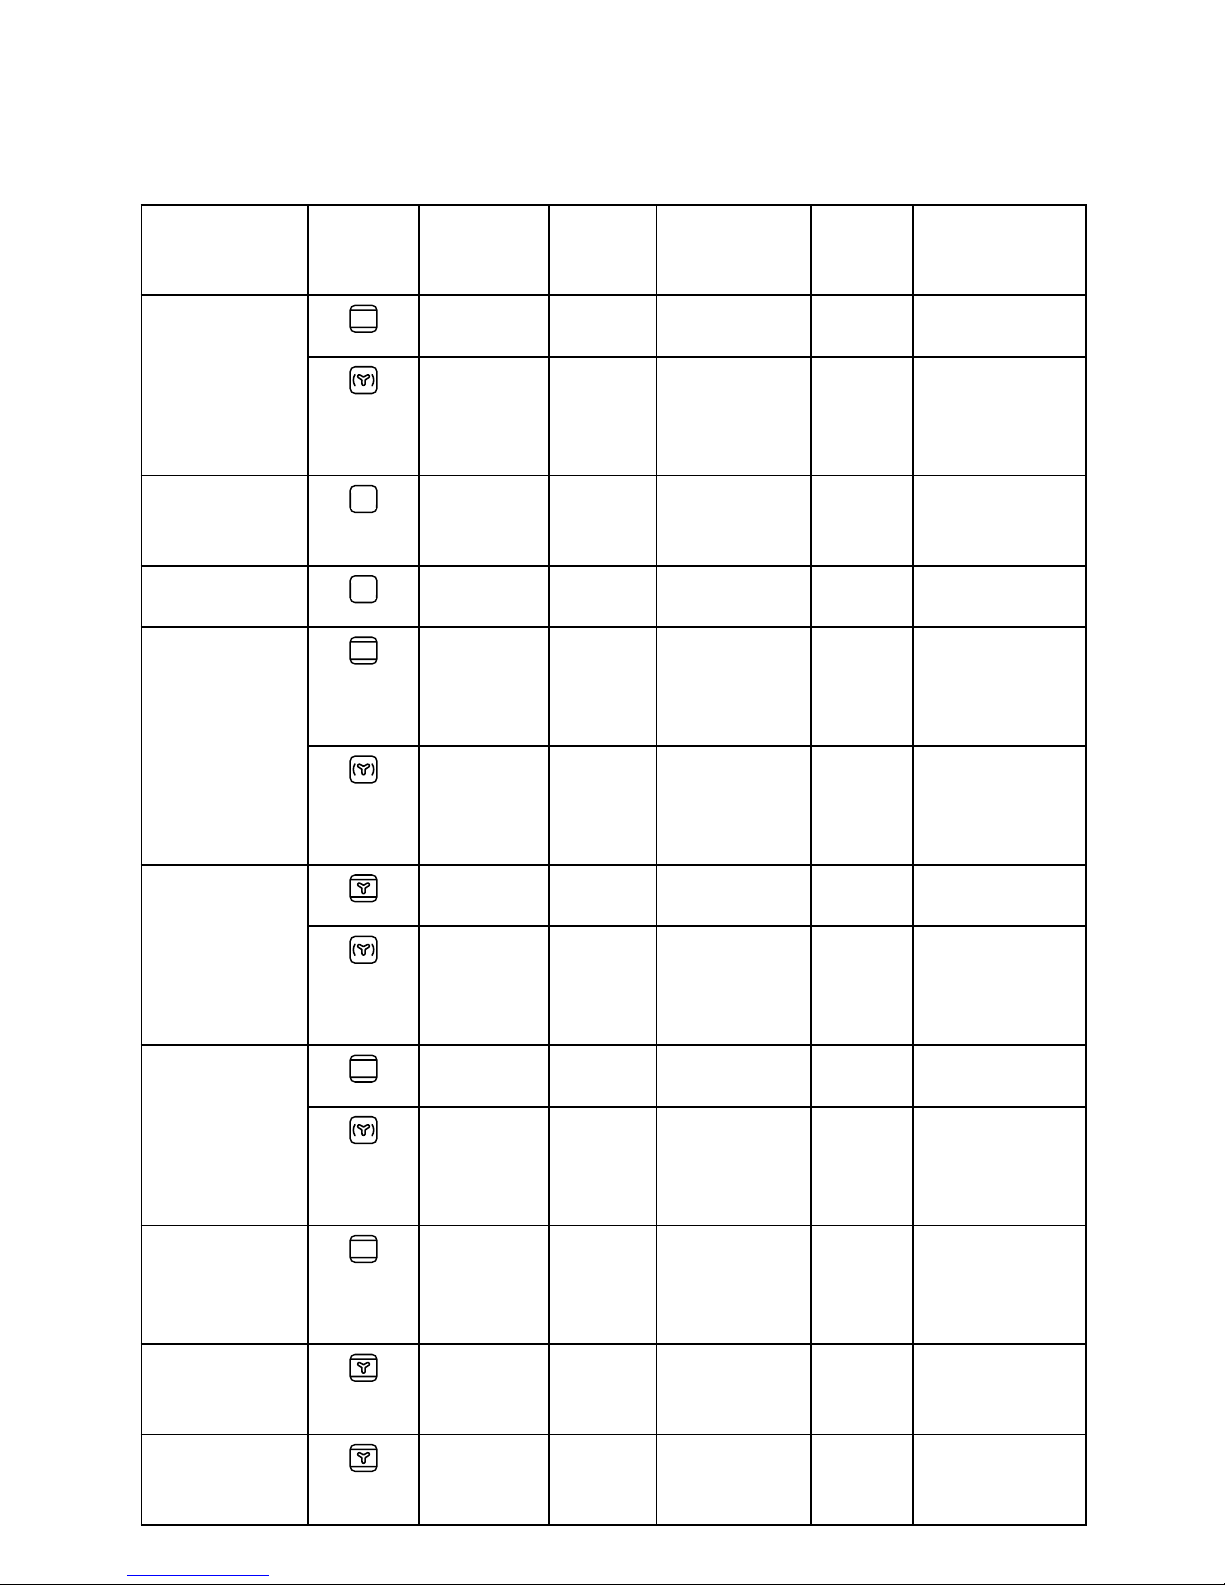
Cooking tables
Type of food Function Preheating Level
(from the
bottom)
Temperature
(°C)
Cooking
time
(min)
Accessories
Leavened
cakes
X 2 160-180 30-90 Cake tin on wire
shelf
X 1-3 160-180 30-90 Shelf 3: cake tin
on wire shelf
Shelf 1: cake tin
on wire shelf
Filled pies
(cheesecake,
strudel, apple
pie)
– 2 160-200 30-85 Drip tray/
baking tray or
cake tin
on wire shelf
X 1-3 160-200 35-90 Shelf 3: cake tin
on wire shelf
Shelf 1: cake tin
on wire shelf
Biscuits/tartlets
X 2 170 -180 15-45 Drip tray/
baking tray
X 1-3 150 -170 20-45 Shelf 3: baking
tray
Shelf 1: drip
tray
Choux buns
X 2 180-200 30-40 Drip tray/
baking tray
X 1-3 180 -190 35-45 Shelf 3: baking
tray
Shelf 1: drip
tray
Meringues
X 2 90 110 -15 0 Drip tray/
baking tray
X 1-3 90 130 -150 Shelf 3: baking
tray
Shelf 1: drip
tray
Page 17
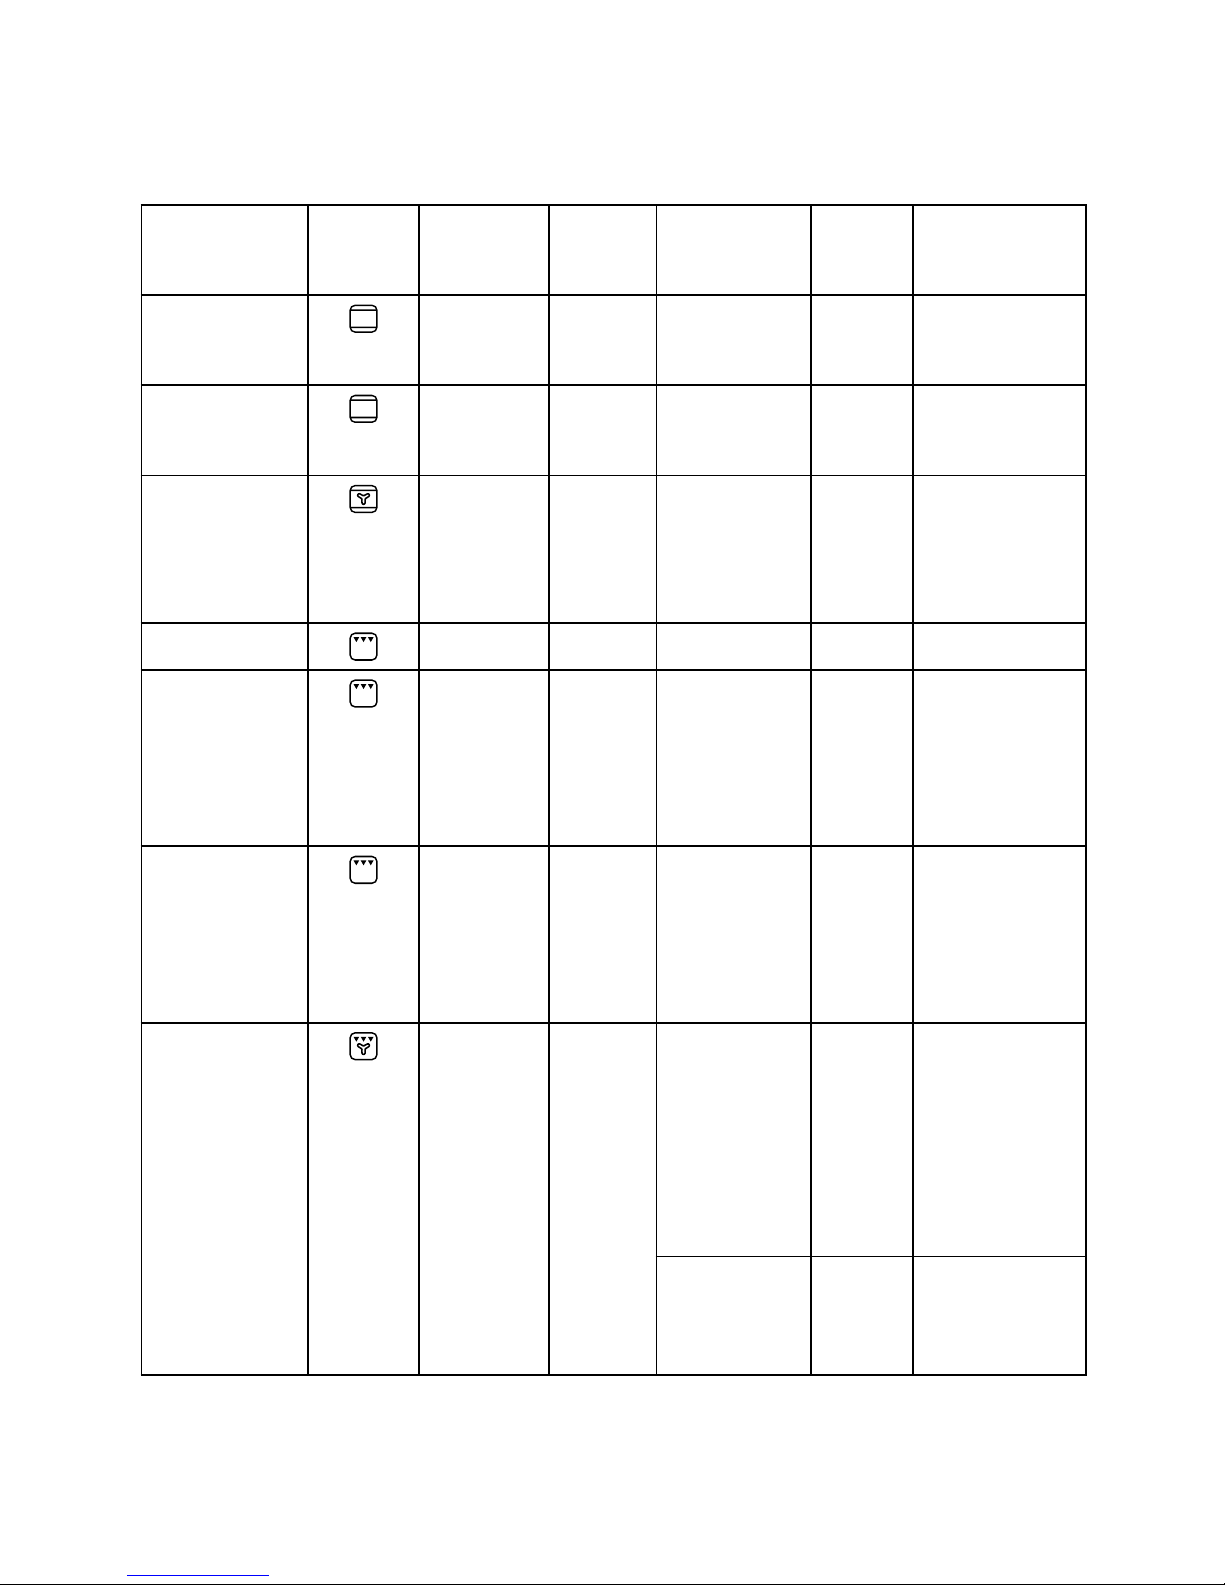
ENGLISH 17
Type of food Function Preheating Level
(from the
bottom)
Temperature
(°C)
Cooking
time
(min)
Accessories
Bread/pizza/
focaccia
X 2 190-250 15-50 Drip tray/
baking tray
X 1-3 190-250 25-50 Shelf 3: baking
tray
Shelf 1: drip
tray
Bread
X 2 180-220 30-50 Drip-tray /
baking tray or
rack
Pizza
X 2 220-250 15-30 Drip-tray /
baking tray
Frozen pizza
X 2 250 10 -15 Shelf 2: drip
tray / baking
tray or wire
shelf
X 1-3 250 10-20 Shelf 3: baking
tray
Shelf 1: drip
tray
Savoury pies
(vegetable pie,
quiche)
X 2 180-19 0 35-45 Cake tin on wire
shelf
X 1-3 180 -190 45-60 Shelf 3: cake tin
on wire shelf
Shelf 2: cake tin
on wire shelf
Vols-au-vent
/Puff pastry
crackers
X 2 190-200 20-30 Drip tray/
baking tray
X 1-3 180 -190 20-40 Shelf 3: baking
tray
Shelf 1: drip
tray
Lasagne,
baked pasta,
cannelloni,
ans
X 2 190-200 30-60 Drip tray or
oven tray on
wire shelf
Lamb / Veal /
Beef / Pork
1 Kg
X 2 190-200 70-100 Drip tray or
oven tray on
wire shelf
Chicken /
Rabbit / Duck
1 Kg
X 2 200-230 50-100 Drip tray or
oven tray on
wire shelf
Page 18
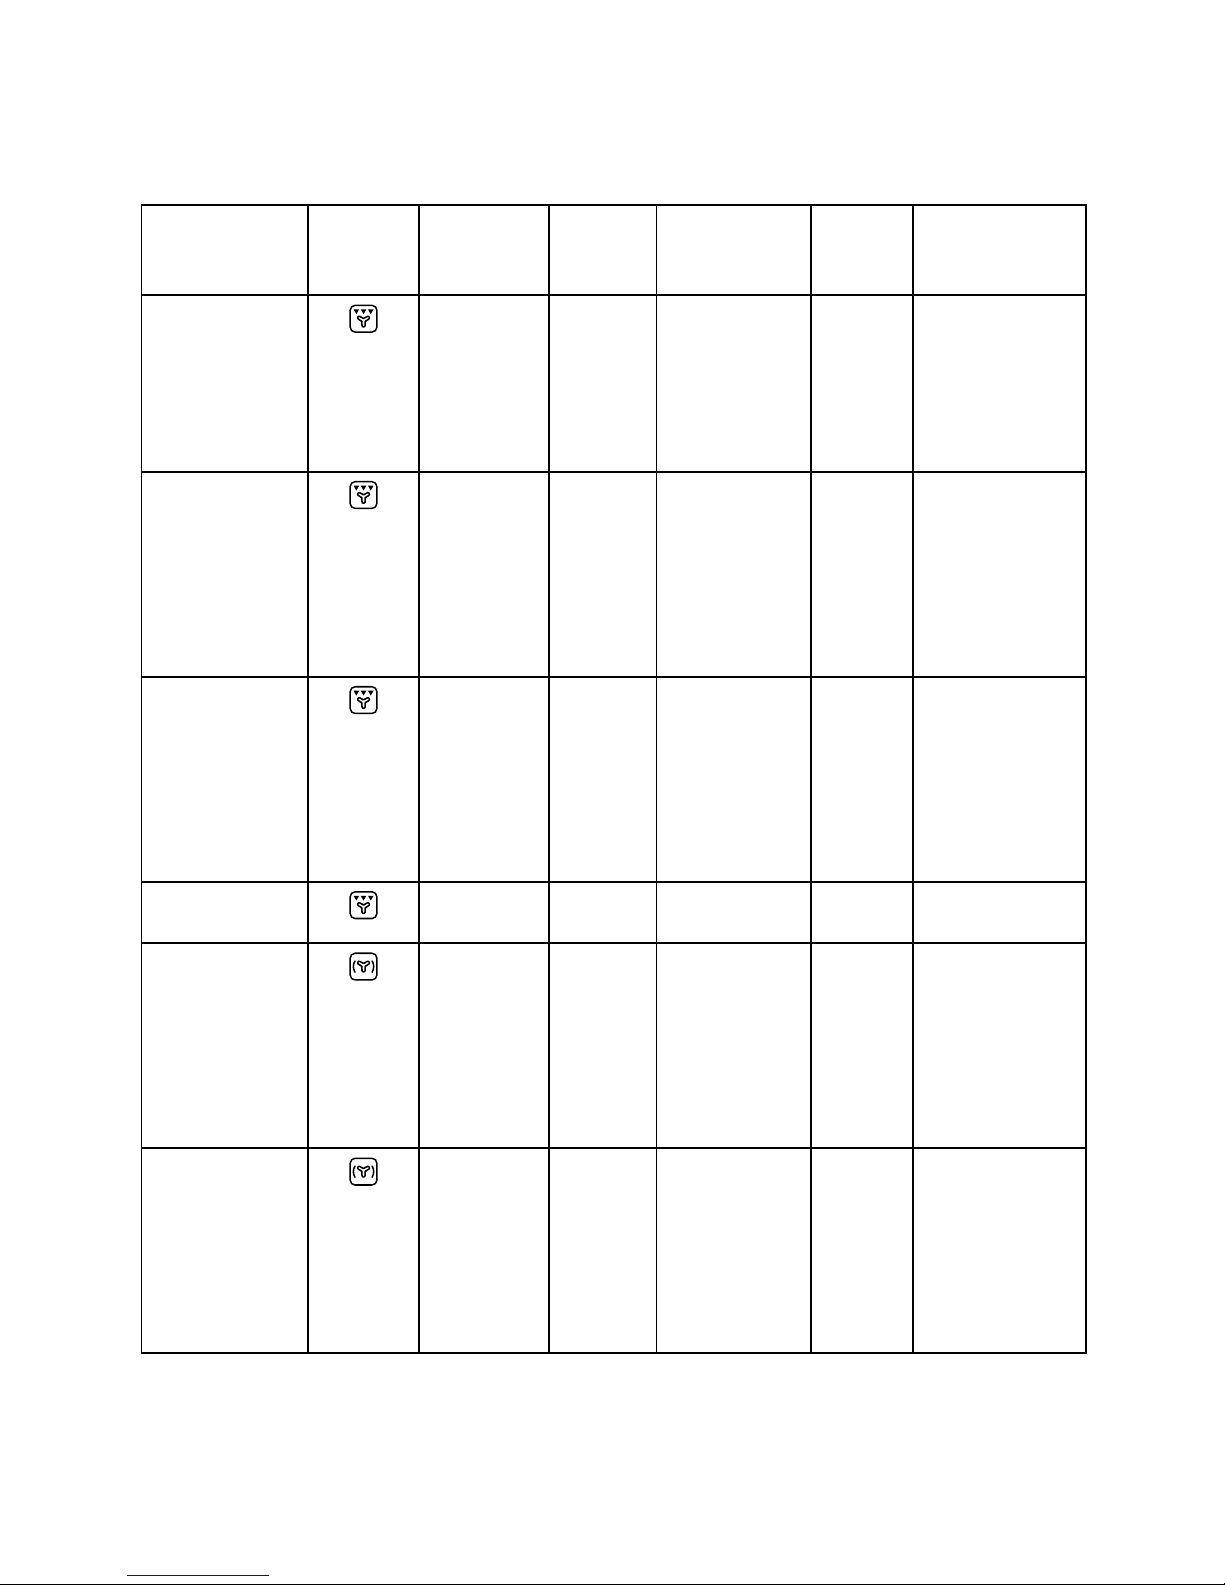
ENGLISH 18
Type of food Function Preheating Level
(from the
bottom)
Temperature
(°C)
Cooking
time
(min)
Accessories
Turkey / Goose
3 Kg
X 1-2 190-200 80 -13 0 Drip tray or
oven tray on
wire shelf
Baked sh / en
papillote (llet,
whole)
X 2 180-200 40-60 Drip tray or
oven tray on
wire shelf
Stuffed
vegetables
(tomatoes,
courgettes,
aubergines)
X 2 170 -19 0 30-60 Oven tray on
wire shelf
Toast
– 4 3 (high) 2-5 Wire shelf
Fish llets /
steaks
– 4 2 (medium) 20-35 Shelf 4: wire
shelf (turn food
halfway through
cooking)
Shelf 3: drip
tray with water
Sausages /
Kebabs /
Spare ribs /
Hamburgers
– 4 2-3 (medium-
high)
15-40 Shelf 4: wire
shelf (turn food
halfway through
cooking)
Shelf 3: drip
tray with water
Roast chicken
1-1.3 Kg
X 2 2 (medium) 50-65 Shelf 2: wire
tray (turn food
two
thirds of the
way through
cooking)
Shelf 1: drip
tray with water
3 (high) 60-80 Shelf 2:
rotisserie
Shelf 1: drip
tray with water
Page 19
ENGLISH 19
Type of food Function Preheating Level
(from the
bottom)
Temperature
(°C)
Cooking
time
(min)
Accessories
Roast Beef rare
1 Kg
– 2 2 (medium) 35-50 Oven tray on
wire shelf (turn
food two thirds
of the way
through cooking
if necessary)
Leg of lamb /
Shanks
– 2 2 (medium) 60-90 Drip tray or
oven tray on
wire shelf (turn
food two thirds
of the way
through cooking
if necessary)
Roast potatoes
– 2 2 (medium) 35-50 Drip-tray /
baking tray
(if necessary,
turn food two
thirds of the
way through
cooking)
Vegetable
gratin
– 2 3 (high) 10-15 Oven tray on
wire shelf
Lasagna &
Meat
X 1-3 200 50-100* Shelf 3: oven
tray on wire
shelf
Shelf 1: drip
tray or oven
tray on wire
shelf
Meat &
Potatoes
X 1-3 200 45-100* Shelf 3: oven
tray on wire
shelf
Shelf 1: drip
tray or oven
tray on wire
shelf
Page 20

ENGLISH 20
Type of food Function Preheating Level
(from the
bottom)
Temperature
(°C)
Cooking
time
(min)
Accessories
Fish &
Vegetables
X 1-3 180 30-50* Shelf 3: oven
tray on wire
shelf
Shelf 1: drip
tray or oven
tray on wire
shelf
Stuffed roasts
– 3 200 80-120* Drip tray or
oven tray on
wire shelf
Meat pieces
(rabbit, chicken,
lamb)
– 3 200 50-100* Drip tray or
oven tray on
wire shelf
* Cooking time is approximate. Food can be removed from the oven at different times depending
on personal preference.
Page 21

ENGLISH 21
Cleaning and maintenance
CLEANING
WARNING!
- Never use steam cleaning equipment.
- Only clean the oven when it is cool to the
touch.
- Disconnect the appliance from the power
supply.
Oven exterior
i
IMPORTANT: do not use corrosive or
abrasive detergents. If any of these
products accidentally comes into contact with
the appliance, clean immediately with a
damp cloth.
• Clean the surfaces with a damp cloth. If it
is very dirty, add a few drops of washing
up detergent to the water. Finish off with a
dry cloth.
Oven interior
i
IMPORTANT: do not use abrasive
sponges or metallic scrapers or scourers.
Over time, these can ruin enamelled surfaces
and the oven door glass.
• After every use, allow the oven to cool
then clean it preferably while it is still
moderately warm in order to remove builtup dirt and stains caused by food residues
(e.g. food with a high sugar content).
• Use proper oven detergents and follow
the manufacturer’s instructions.
• Clean the door glass with a suitable
liquid detergent. The oven door can
be removed to facilitate cleaning (see
MAINTENANCE). Inner glass is smooth to
facilitate cleaning.
NOTE: during prolonged cooking of foods
with a high water content (e.g. pizza,
vegetables, etc.) condensation may form on
the inside of the door and around the seal.
When the oven is cold, dry the inside of the
door with a cloth or sponge.
Accessories
• Soak the accessories in water with
washing up detergent immediately after
use, handling them with oven gloves if still
hot.
• Food residues can be easily removed
using a brush or sponge.
MAINTENANCE
WARNING!
- Use safety gloves.
- Ensure the oven is cold before carrying out
the following operations.
- Disconnect the oven from the power
supply.
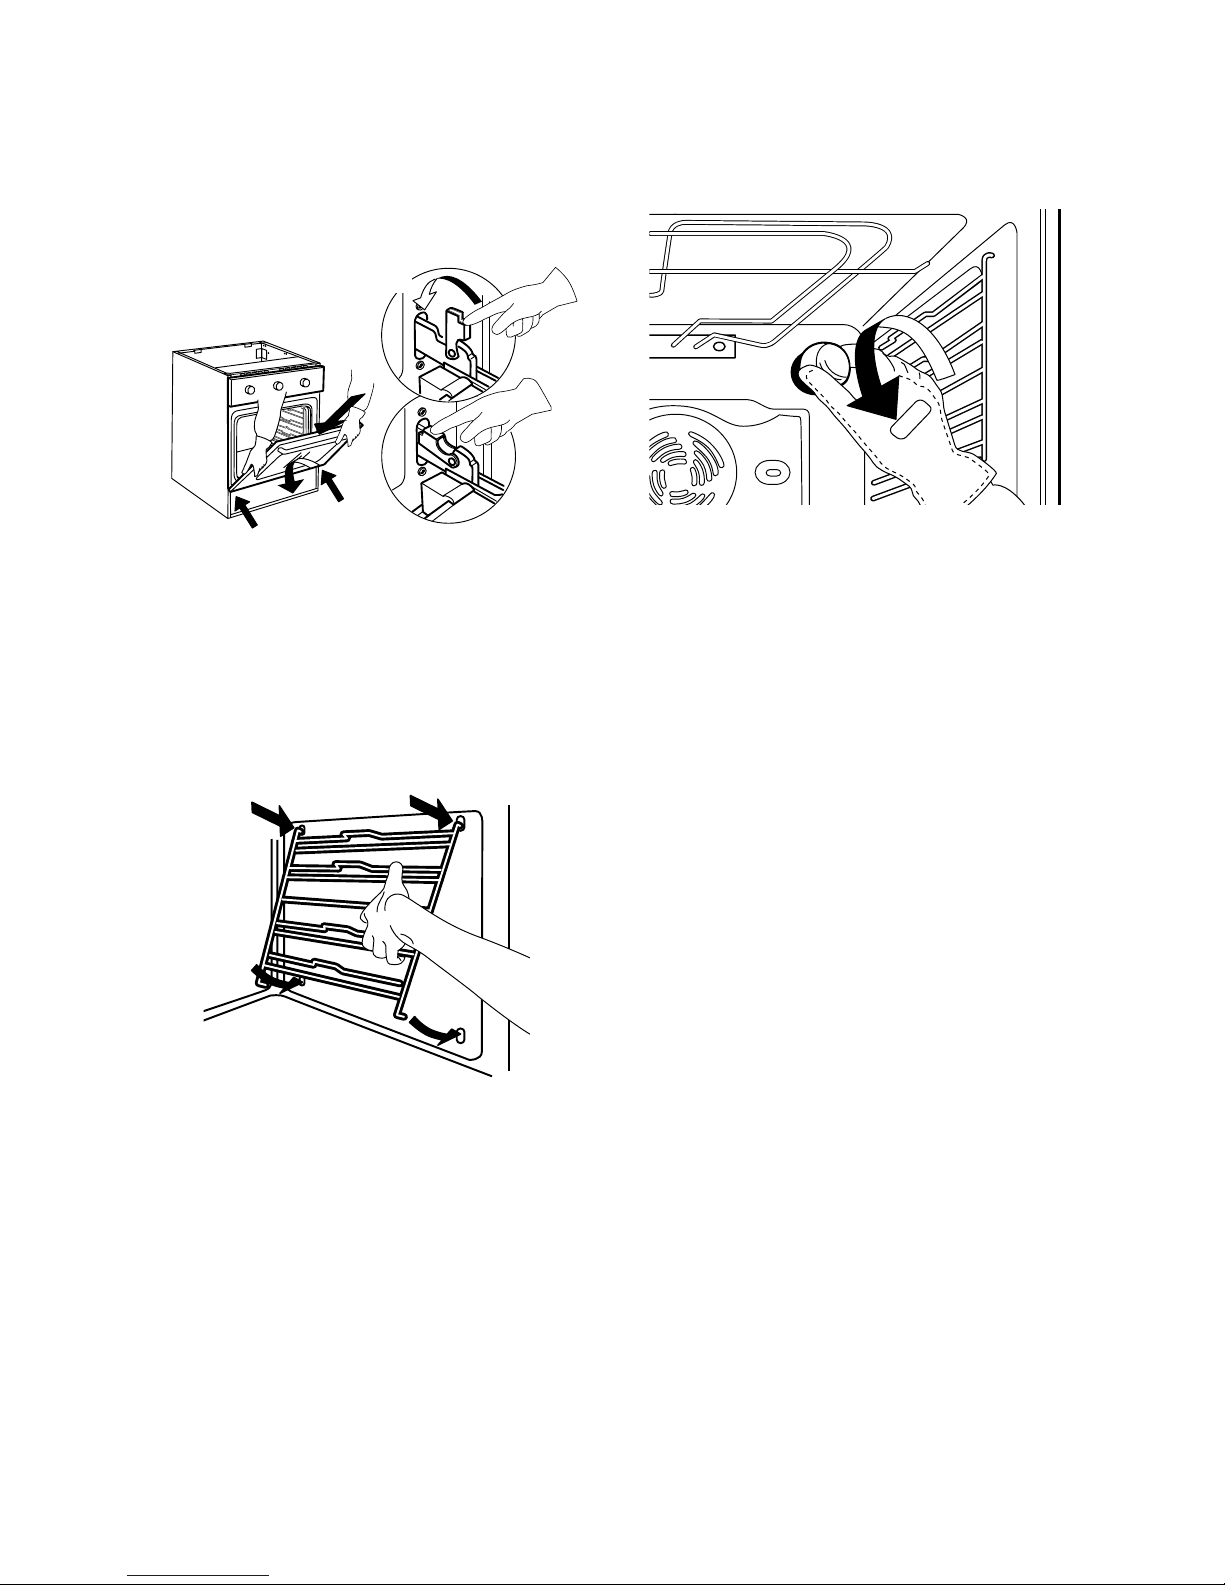
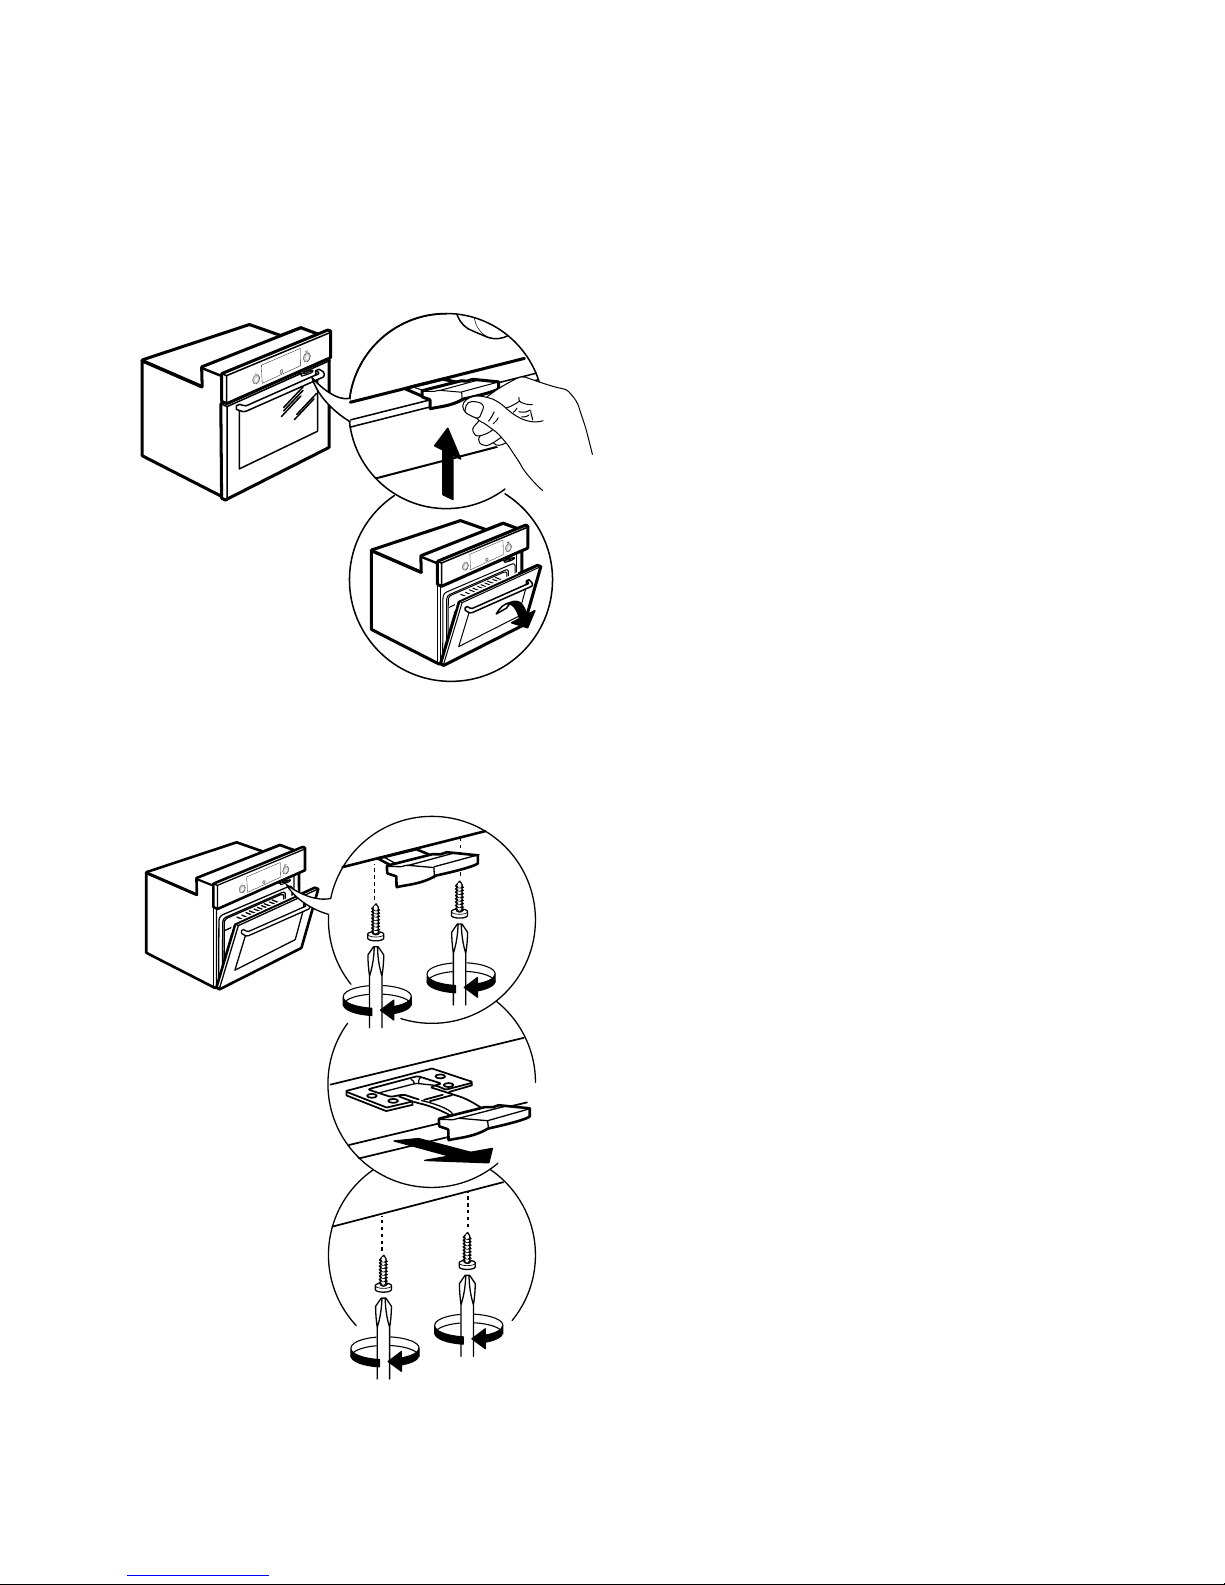
To remove the door
2x
Page 22
ENGLISH 22
To ret the door
2x
To remove lateral grids
Move the lateral grid upwards until the two
lower terminals are released, then rotate the
grid towards the center of the compartment.
To re-position the grid, perform the above
operations in reverse.
1
2
To replace the rear lamp
1. Disconnect the oven from the power
supply.
Fig. 5
2. Unscrew the lamp cover (Fig. 5), replace
the lamp (see note for lamp type) and
screw the lamp cover back on.
3. Reconnect the oven to the power supply.
NOTE:
- Only use 40W/230 V type G9, T300°C
halogen lamps (depending on model).
- The lamp used in the appliance is
specically designed for electrical
appliances and it is not suitable for
household room illumination (Commission
Regulation (EC) No 244/2009).
- Lamps are available from IKEA
Authorized Service Centre.
Page 23
ENGLISH 23
Problem Possible cause Solution
The oven does not work. No presence of mains
electrical power.
Verify the presence of mains
electrical power.
The oven is not
connected to the
electrical supply.
Connect the oven to the power
supply.
Turn off the oven and restart it
to see if the fault persists.
The door will not open Turn off the oven and restart it
to see if the fault persists.
The electronic display does not
work:
If the display shows the
letter “F” followed by a
number, contact your nearest
Authorized Service Centre.
Specify in this case the
number that follows the letter
“F”.
What to do if ...
Before calling the Authorized Service
Centre:
1. See if you can solve the problem yourself
with the help of the suggestions given in
the “What to do if ...” table.
2. Switch the appliance off and back on
again it to see if the fault persists.
If after the above checks the fault still occurs,
contact IKEA Authorized Service Centre.
Always specify:
• a brief description of the fault;
• the type and exact model of the oven;
• the service number (number after the
word Service on the rating plate), located
on the right hand edge of the oven cavity
(visible when the oven door is open);
• your full address;
• your telephone number.
If any repairs are required, please contact
IKEA Authorized Service Centre (to guarantee
that original spare parts will be used and
repairs carried out correctly).
Page 24
ENGLISH 24
Technical data
Type of product: Built-in Electrical Oven
Model identication:
BEJUBLAD 603.009.01, BEJUBLAD 403.009.02, BEJUBLAD 603.008.97
BEJUBLAD 403.008.98, RAFFINERAD 003.009.18, RAFFINERAD 803.009.19
Number of cavities 1
Heat source Electrical
Number of functions 11
Usable volume. Measured with any side grids and catalytic panels removed l 65
Area of the largest baking sheet cm
2
1200
Energy Efciency Class (Lowest Consumption) A+
Energy Efciency Index 81, 9
Energy consumption
Conventional function (with a standard load and top + bottom heating)
kWh/cycle
0,87
Energy consumption
Fan Forced function (with a standard load and forced air heating)
kWh/cycle
0,70
Top heating element W 2450
Bottom heating element W 115 0
Grill heating element W 2450
Fan heating element W 2000
Cooling fan W 12-21
Oven lamp W 40
Oven Fan Wattage W 12-21
Total rating W 2600
Dimensions
Width mm 595
Height mm 595
Depth mm 564
Page 25
ENGLISH 25
After unpacking the oven, make sure that
it has not been damaged during transport
and that the oven door closes properly. In
the event of problems, contact the dealer or
your nearest Authorized Service Centre. To
prevent any damage, only remove the oven
from its polystyrene foam base at the time of
installation.
Preparing the housing unit
• Kitchen units in contact with the oven must
be heat resistant (min 90°C).
• Carry out all cabinet cutting work before
tting the oven in the housing and remove
all wood chips and sawdust.
• After installation, the bottom of the oven
must no longer be accessible.
• For correct appliance operation, do not
obstruct the minimum gap between the
worktop and the upper edge of the oven.
General recommendations
Before use
- Remove cardboard protection pieces,
protective lm and adhesive labels from
accessories.
- Do not remove the rating plate situated on
the right side of the door frame.
- Remove the accessories from the oven
and heat it at 200° for about an hour to
eliminate the smell and fumes from the
insulating materials and protective grease.
During use
- Do not place heavy objects on the door as
they could damage it.
- Do not cling to the door or hang anything
from the handle.
- Do not cover the inside of the oven with
aluminium foil.
- Never pour water into the inside of a
hot oven; this could damage the enamel
coating.
- Never drag pots or pans across the
bottom of the oven as this could damage
the enamel coating.
- Make sure that the electrical cables of
other appliances do not touch hot parts of
the oven or become trapped in the door.
- Do not expose the oven to atmospheric
agents.
Installation
Technical data
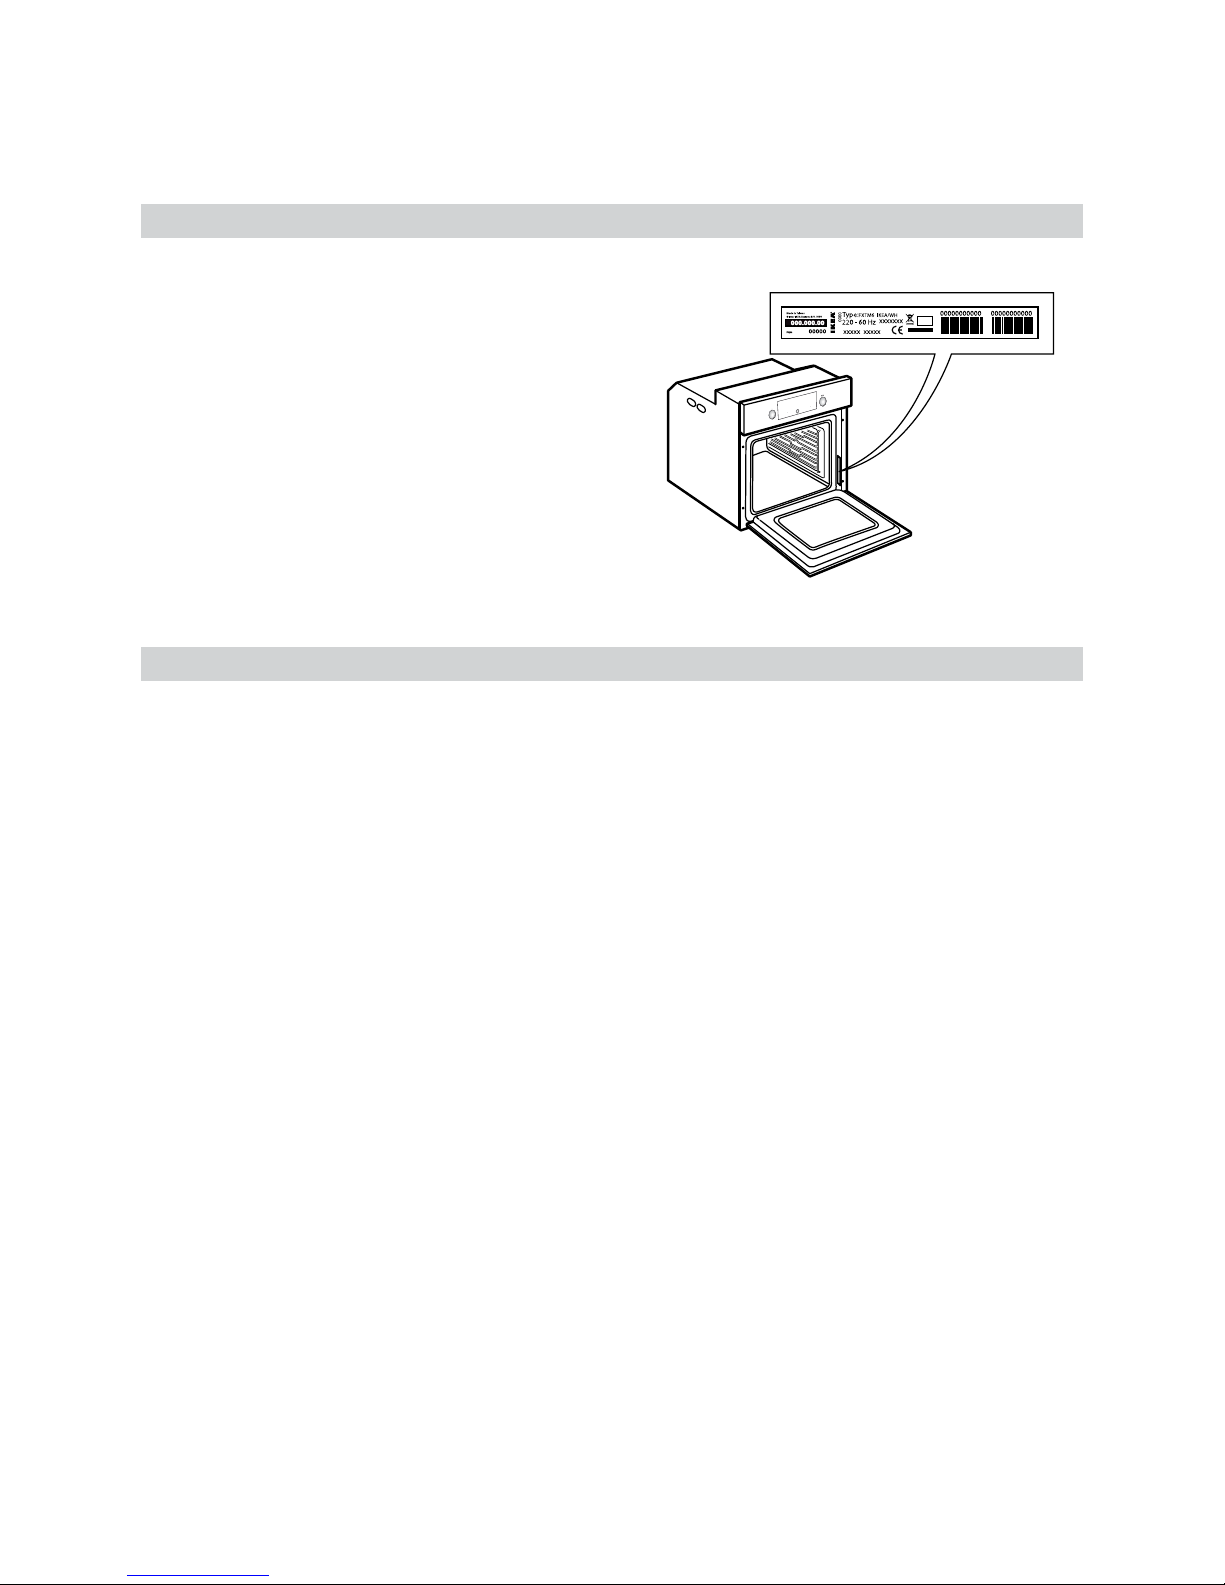
The technical informations are situated in the
rating plate inside the appliance.
Page 26
ENGLISH 26
Door lock device
To open the door with the door lock device
see Fig 1.
Fig. 1
The door safety device can be removed by
following the sequence of images (see Fig. 2).
Fig. 2
Page 27

ENGLISH 27
How to read the cooking table
The table indicates the best function to use
for any given food, to be cooked on one or
more shelves at the same time. Cooking times
start from the moment food is placed in the
oven, excluding pre-heating (where required).
Cooking temperatures and times are purely
for guidance and will depend on the amount
of food and type of accessory used. Use the
lowest recommended values to begin with
and, if the food is not cooked enough, then
move on to higher values. Use the accessories
supplied and preferably dark coloured metal
cake tins and oven trays. You can also use
pans and accessories in pyrex or stoneware,
but bear in mind that cooking times will be
slightly longer. To obtain best results, carefully
follow the advice given in the cooking table
for the choice of accessories (supplied) to be
placed on the various shelves.
Cooking different foods at the same time
Using the “FORCED AIR” function, you can
cook different foods which require the same
cooking temperature at the same time (for
example: sh and vegetables), using different
shelves. Remove the food which requires less
cooking time and leave food which requires
longer cooking time in the oven.
Desserts
- Cook delicate desserts with the conventional
function on one shelf only. Use dark coloured
metal cake tins and always position them on
the wire shelf supplied. To cook on more than
one shelf, select the forced air function and
stagger the position of the cake tins on the
shelves, aiding optimum circulation of the hot
air.
- To check whether a raising cake is cooked,
insert a wooden toothpick into the centre of
the cake. If the toothpick comes out clean, the
cake is ready.
- If using non-stick cake tins, do not butter the
edges as the cake may not rise evenly around
the edges.
- If the cake “sinks” during cooking, set a
lower temperature the next time, perhaps
reducing the amount of liquid in the mixture
and mixing more gently.
- For sweets with moist llings (cheesecake
or fruit pies) use the “CONVECTION BAKE”
function. If the base of the cake is soggy, lower
the shelf and sprinkle the bottom of the cake
with breadcrumbs or biscuit crumbs before
adding the lling.
Meat
- Use any kind of oven tray or pyrex dish
suited to the size of the piece of meat being
cooked. For roast joints, it is best to add some
stock to the bottom of the dish, basting the
meat during cooking for added avour. When
the roast is ready, let it rest in the oven for
another 10-15 minutes, or wrap it in aluminium
foil.
- When you want to grill meat, choose cuts
with an even thickness all over in order to
achieve uniform cooking results. Very thick
pieces of meat require longer cooking times.
To prevent the meat from burning on the
outside, lower the position of the wire shelf,
keeping the food farther away from the grill.
Turn the meat two thirds of the way through
cooking.
To collect the cooking juices it is advisable
to place a drip-tray with half a litre of water
directly under the grill on which the meat is
placed. Top-up when necessary.
Pizza
Lightly grease the trays to ensure the pizza
has a crispy base. Scatter the mozzarella
over the pizza two thirds of the way through
cooking.
Recommended use and tips
Page 28

ENGLISH 28
Rising function
It is always best to cover the dough with a
damp cloth before placing it in the oven.
Dough proving time with this function
is reduced by approximately one third
compared to proving at room temperature
(20-25°C). Proving time for a 1 Kg batch of
pizza dough is around one hour.
Page 29
ENGLISH 29
Disposal of packing material
- The packing material is 100% recyclable
and is marked with the recycle symbol (
). The various parts of the packing
must therefore be disposed of responsibly
and in full compliance with local authority
regulations governing waste disposal.
Scrapping the product
- This appliance is marked in compliance
with European Directive 2012/19/EU,
Waste Electrical and Electronic Equipment
(WEEE).
- By ensuring this product is disposed
of correctly, you will help prevent
potential negative consequences for
the environment and human health,
which could otherwise be caused by
inappropriate waste handling of this
product.
- The symbol
on the product or
on the accompanying documentation
indicates that it should not be treated
as domestic waste but must be taken
to an appropriate collection centre for
the recycling of electrical and electronic
equipment.
Energy saving tips
- Only pre-heat the oven if specied in the
cooking table or your recipe.
- Use dark lacquered or enamelled baking
moulds as they absorb heat far better.
- Switch the oven off 10/15 minutes before
the set cooking time. Food requiring
prolonged cooking will continue to cook
even once the oven is switched off.
Declaration of conformity
- This oven, which is intended to come
into contact with foodstuffs, complies
with European Regulation ( )
n. 1935/2004 and has been designed,
manufactured and sold in conformity
with the safety requirements of the “Low
Voltage” directive 2006/95/CE (which
replaces 73/23/CEE and subsequent
amendments), the protection requirements
of “EMC” 2004/108/CE.
- This appliance meets the eco design
requirements of european regulations n.
65/2014 and 66/2014 in conformity to the
european standard EN 60350-1.
Environmental concerns
Make sure the power voltage specied on
the appliance rating plate is the same as the
mains voltage. The rating plate is on the front
edge of the oven (visible when the door is
open).
Power cable replacement (type H05 RR-F 3
x 1,5 mm2) must be carried out by a qualied
electrician. Contact IKEA Authorized Service
Centre.
Electrical connection
IKEA GUARANTEE
Page 30
DEUTSCH 30
Ihre eigene Sicherheit und die anderer
Personen ist von höchster Wichtigkeit!
Diese Anweisungen sowie das
Gerät selbst enthalten wichtige
Sicherheitshinweise, die Sie durchlesen
und stets beachten sollten.
Dieses Symbol warnt vor möglichen
Gefahren für die Sicherheit des
Benutzers und anderer Personen.
Alle Sicherheitshinweise werden von
dem Gefahrensymbol und folgenden
Begriffen begleitet:
GEFAHR! Weist auf eine
Gefahrensituation hin, die zu
schweren Verletzungen führt, wenn sie
nicht vermieden wird.
WARNUNG! Weist auf eine
Gefahrensituation hin, die bei
mangelnder Vorsicht zu schweren
Verletzungen führt. Alle
Gefahrenhinweise bezeichnen das
potenzielle Risiko, auf das sie sich
beziehen und geben an, wie
Verletzungsgefahren, Schäden und
Stromschläge durch unsachgemäßen
Gebrauch des Gerätes vermieden
werden können. Halten Sie sich genau
an folgende Anweisungen:
- Verwenden Sie beim Auspacken
und Aufstellen des Geräts immer
Schutzhandschuhe.
- Halten Sie das Gerät von der
Stromversorgung getrennt, bis der
Einbau durchgeführt wurde.
- Die elektrische Installation und
Wartungsarbeiten müssen von einer
qualizierten Fachkraft gemäß den
Herstellerangaben und den gültigen
örtlichen Sicherheitsbestimmungen
durchgeführt werden. Reparieren
Sie das Gerät nicht selbst und
tauschen Sie keine Teile aus, wenn
dies vom Bedienungshandbuch
nicht ausdrücklich vorgesehen ist.
- Das Netzkabel darf nur durch einen
qualizierten Elektriker ersetzt
werden. Wenden Sie sich an eine
autorisierte Kundendienststelle.
- Die Erdung des Geräts ist gesetzlich
vorgeschrieben.
- Das Netzkabel muss lang genug
sein, um das in die Küchenzeile
eingebaute Gerät über die
Steckdose an das Stromnetz
anzuschließen.
- Bei der Installation des Geräts
muss ein mehrpoliger Trennschalter
mit einer Kontaktöffnung (von
Sicherheitshinweise 30
Produktbeschreibung 33
Bedienfeld 35
Liste der Funktionen 35
Beschreibung des Displays 36
Täglicher Gebrauch 39
Gartabellen 42
Reinigung und Pege 47
Störung - was tun? 49
Technische Daten 50
Aufstellung 51
Hinweise zum Gebrauch
und Empfehlungen 53
Anschluss an das Stromnetz 55
Umweltschutz 55
IKEA GARANTIE 56
Sicherheitshinweise
Inhaltsverzeichnis
Page 31

DEUTSCH 31
mindestens 3 mm) verwendet
werden, der für eine vollständige
Trennung bei Überspannungen der
Kategorie III sorgt; der Trennschalter
muss in die Festverdrahtung
in Übereinstimmung mit den
nationalen Vorschriften für
Verdrahtungen eingebaut werden.
- Verwenden Sie keine
Mehrfachstecker oder
Verlängerungskabel.
- Ziehen Sie nie am Netzkabel des
Gerätes, um den Stecker aus der
Steckdose zu ziehen.
- Nach der Installation dürfen die
Strom führenden Teile für den
Benutzer nicht mehr zugänglich sein.
- Weist die Oberäche der
Induktionsplatte Risse auf, benutzen
Sie das Gerät nicht, sondern
schalten Sie das Gerät aus, um
die Gefahr eines Stromschlags
zu vermeiden (nur zutreffend für
Modelle mit Induktionsfunktion).
- Berühren Sie das Gerät nicht mit
feuchten Händen und benutzen Sie
es nicht, wenn Sie barfuß sind.
- Dieses Gerät ist ausschließlich zur
Zubereitung von Nahrungsmitteln
für private Haushalte konzipiert.
Jeder hiervon abweichende
Gebrauch ist nicht gestattet (z.B. das
Heizen von Räumen). Der Hersteller
übernimmt keine Verantwortung
für Schäden aufgrund von
unsachgemäßer oder falscher
Verwendung.
- Dieses Gerät kann von Kindern
ab 8 Jahren und von Personen
mit eingeschränkten physischen,
sensorischen oder geistigen
Fähigkeiten oder eingeschränkter
Erfahrung oder Unkenntnis
benutzt werden, wenn sie in das
Gerät eingewiesen wurden und
eine Anweisung für den sicheren
Gebrauch dieses Gerätes bekamen
und die damit verbundenen
Gefahren verstanden haben. Kinder
dürfen nicht an dem Gerät herum
spielen. Die Reinigung und Pege
des Gerätes darf von Kindern nicht
ohne Aufsicht durchgeführt werden.
- Die erreichbaren Teile des
Backofens können während des
Betriebs sehr heiß werden. Halten
Sie Kinder vom Gerät fern und
achten Sie darauf, dass sie das
Gerät nicht als Spielzeug benutzen.
- Das Gerät und die zugänglichen
Teile werden bei der Benutzung
heiß. Vermeiden Sie unbedingt das
Berühren der Heizelemente. Kinder
unter 8 Jahren dürfen das Gerät
nur unter ständiger Überwachung
bedienen.
- Berühren Sie die Heizelemente
sowie die Geräteinnenächen
während und unmittelbar nach
dem Betrieb nicht, es besteht
Verbrennungsgefahr. Vermeiden
Sie den Kontakt mit Tüchern
oder anderen entammbaren
Materialien, bis das Gerät wieder
vollständig abgekühlt ist.
- Öffnen Sie die Gerätetür am Ende
der Garzeit vorsichtig. Lassen Sie
heiße Luft und Dampf austreten,
bevor Sie ins Geräteinnere fassen.
Bei geschlossener Gerätetür wird
die heiße Luft durch eine Öffnung
oberhalb der Bedienblende
Page 32

DEUTSCH 32
nach außen geblasen. Die
Belüftungsöffnungen dürfen nicht
blockiert werden.
- Verwenden Sie
Backofenhandschuhe, um
Gargeschirr und Roste zu
entnehmen. Achten Sie dabei
darauf, die Heizelemente nicht zu
berühren.
- Auf, in oder neben dem Gerät darf
sich kein entammbares Material
benden; bei einem versehentlichen
Einschalten könnte es zu einem
Brand im Gerät kommen.
- Erhitzen Sie keine geschlossenen
Gefäße oder Behälter im Backofen.
Der Druck, der in solchen Gefäßen
entsteht, kann zu ihrer Explosion und
dadurch zu Beschädigungen am
Gerät führen.
- Verwenden Sie keine Behälter aus
synthetischen Materialien.
- Heißes Fett und Öl sind leicht
entzündlich. Beaufsichtigen Sie stets
den Garvorgang, wenn Sie Speisen
mit viel Fett oder Öl zubereiten.
- Lassen Sie das Gerät während
des Dörrens von Speisen niemals
unbeaufsichtigt.
- Bei der Verwendung von
alkoholischen Getränken (z. B. Rum,
Cognac, Wein, usw.) zum Braten
oder Backen ist zu beachten, dass
Alkohol bei hohen Temperaturen
verdampft. Die entstandenen
Dämpfe können sich entzünden,
wenn sie in Kontakt mit dem
elektrischen Heizelement kommen.
- Verwenden Sie niemals
Wasserdampfreinigungsgeräte.
- Berühren Sie den Ofen nicht
während des Pyrolysezyklus.
Halten Sie Kinder während des
Pyrolysezyklus fern von diesem
Gerät (gilt nur für Geräte mit
Pyrolysefunktion).
- Während und nach der
Pyrolysereinigung dürfen sich keine
Haustiere (insbesondere keine
Vögel) in dem Bereich aufhalten, in
dem das Gerät aufgestellt ist.
- Verwenden Sie für dieses Gerät
nur die empfohlene Speisesonde
(Kerntemperaturfühler).
- Die Verwendung scharfer oder
scheuernder Reinigungsmittel für die
Reinigung dieses Geräts wird nicht
empfohlen, da diese Reiniger die
Oberäche verkratzen und damit zu
einer Beeinträchtigung des Glases
führen können.
- Stellen Sie vor dem Auswechseln
der Lampe sicher, dass das Gerät
ausgeschaltet ist, um das Risiko
eines Elektroschocks zu vermeiden.
Entsorgung von Altgeräten
- Dieses Gerät wurde
aus recycelbaren oder
wiederverwendbaren Werkstoffen
hergestellt. Entsorgen Sie das
Gerät im Einklang mit den lokalen
Vorschriften zur Abfallbeseitigung.
Schneiden Sie das Netzkabel durch,
bevor Sie das Gerät verschrotten.
- Genauere Informationen zu
Behandlung, Entsorgung und
Recycling von elektrischen
Haushaltsgeräten erhalten Sie bei
Ihrer örtlichen Verwaltungsstelle, der
Müllabfuhr oder dem Händler, bei
dem Sie das Gerät gekauft haben.
Page 33

DEUTSCH 33
Produktbeschreibung
1
Bedienfeld
2
Kühlgebläse
1)
(nicht sichtbar)
3
Oberes Heizelement/Grill
4
Hintere Backofenbeleuchtung
5
Backofengebläse
6
Unteres Heizelement (nicht sichtbar)
7
Backofentür
8
Seitliche Gitter
1) Das Kühlgebläse kann auch nach dem Ausschalten
des Backofens noch lange nachlaufen. Im Verlauf
der Pyrolyse dreht sich das Kühlgebläse schneller als
während der Garfunktionen.
1
2
4
8
3
5
6
7
Zubehör
Rost
1x
Kuchenblech
1x
Fettpfanne
1x
Teleskopführungen
2x
Page 34

DEUTSCH 34
Einschieben der Roste und anderer
Zubehörteile in den Backofen
1. Schieben Sie den Rost mit dem erhöhten
Teil “A” nach oben zeigend waagerecht
ein (Abb. 1).
A
Abb. 1
2. Für die anderen Zubehörteile wie
Fettpfanne und Backblech erfolgt das
Einschieben auf die selbe Weise wie für
den Rost (Abb. 2).
Abb. 2
Entfernen Sie die blaue Folie wie im Bild
gezeigt.
So richten Sie die Fettpfanne auf die
Teleskopführungen aus.
Setzen Sie die Fettpfanne so auf die
Teleskopführungen, dass die Fixierung
zwischen dem hinteren und vorderen
Befestigungselement liegt.
Abb. 2
Abb. 3
Page 35

DEUTSCH 35
Bedienfeld
A
Bedienknopf zur Funktionswahl
B
Navigationsknopf
Hinweis: Die Bedienknöpfe sind versenkbar.
Drücken Sie den Bedienknopf mittig ein, um
ihn aus der Versenkung zu holen.
C
Wähl-/Bestätigungstaste
A BC
Durch Drehen des "Funktionswahlknopfs" in
eine beliebige Position schaltet sich der Ofen
ein: das Display zeigt die Funktionen oder
zugehörigen Untermenüs an.
Die Untermenüs sind verfügbar und
durch Drehen des Bedienknopfs auf die
Funktionen GRILL, SPEZIAL-FUNKTIONEN,
EINSTELLUNGEN, BROT/PIZZA anwählbar.
Hinweis: Näheres zur Liste und der
Beschreibung der Funktionen siehe die
entsprechende Tabelle.
Liste der Funktionen
Page 36

DEUTSCH 36
Beschreibung des Displays
1
Anzeige der aktiven Heizelemente für die
verschiedenen Funktionen zum Garen
2
Zeitmanagementsymbole: Timer, Garzeit,
Garzeitende, Uhrzeit
3
Informationen zu den ausgewählten
Funktionen
4
Automatische BROT/PIZZA Funktion
ausgewählt
5
Anzeige Backofentür geschlossen
während des automatischen
Reinigungszyklus (für dieses Modell nicht
verfügbar)
6
Backofen-Innentemperatur
7
Pyrolyse-Funktion (für dieses Modell nicht
verfügbar)
8
Anbräunen
9
Sonderfunktionen: Auftauen,
Warmhalten, Aufgehen lassen
1
2 3 4
5
6789
Einstellung der Uhrzeit
2
4
1
3
Beim ersten Einschalten des Backofens
blinken die beiden Stundenziffern an Display
1. Drehen Sie den “Navigationsknopf”,
B
bis die korrekte Stunde angezeigt wird.
2. Drücken Sie die Taste
C
zur Bestätigung;
die beiden Minutenzeiger blinken am
Display.
3. Drehen Sie den “Navigationsknopf”,
B
bis die korrekten Minuten angezeigt
werden.
4. Drücken Sie die Taste
C
zur Bestätigung.
Um die aktuelle Uhrzeit zu ändern, z. B. nach
einer Unterbrechung der Stromversorgung,
siehe nächsten Abschnitt (EINSTELLUNGEN).
Page 37

DEUTSCH 37
Übersicht Betriebsarten des Geräts
Der Backofen verfügt über 4 Garebenen. Es wird von der untersten Ebene nach oben gezählt.
Funktion Funktionsbeschreibung
0
AUSSCHALTEN Zum Unterbrechen des Garvorgangs und Abschalten des Geräts.
HEISSLUFT Zum gleichzeitigen Garen verschiedener Speisen (z. B. Fisch,
Gemüse, Kuchen) bei gleicher Temperatur auf zwei Einschubebenen.
Die Funktion erlaubt das Garen ohne Geschmacksübertragung von
einer Speise auf die anderen. Es wird empfohlen, zum Garen auf nur
einer Ebene die 2. Ebene zu verwenden.
Zum Garen auf zwei Ebenen wird empfohlen, den Backofen
vorzuheizen und die 1. und 3. Ebene zu verwenden.
OBER-/
UNTERHITZE
Zur Zubereitung aller Arten von Gerichten auf nur einer
Einschubebene. Verwenden Sie die 2. Ebene. Heizen Sie den
Backofen vor, bevor Sie die Speisen in den Garraum stellen.
UMLUFT Zum Garen von Fleisch und Backen (von salzigen oder süßen)
Kuchen mit üssiger Füllung auf einer Ebene. Verwenden Sie die 2.
Ebene. Heizen Sie den Backofen vor dem Garen vor.
MAXI GAREN Zum Garen von großen Fleischstücken (über 2,5 kg). Verwenden Sie
die 1. oder 2. Ebene, je nach Größe des Fleischstücks. Ein Vorheizen
des Backofens ist nicht notwendig. Es wird empfohlen, das Fleisch
während des Garvorgangs zu wenden, um eine gleichmäßigere
Bräunung auf beiden Seiten zu erreichen. Es wird empfohlen, das
Fleisch ab und an zu begießen, damit es nicht austrocknet.
GRILL Zum Grillen von Steaks, Fleischspießen und Würsten, zum Überbacken
von Gemüse und Rösten von Brot. Es wird empfohlen, das Gargut auf
die 4. Ebene zu geben. Zum Grillen von Fleisch. Es wird empfohlen,
eine Fettpfanne zu verwenden, um den Bratensaft aufzufangen.
Geben Sie die Fettpfanne mit etwa einem halben Liter Wasser auf die
3. Ebene. Ein Vorheizen des Backofens ist nicht notwendig. Während
des Garvorgangs muss die Tür geschlossen bleiben.
GRILL +
HEISSLUFT
Zum Garen großer Fleischstücke (Keulen, Roastbeef, Hähnchen).
Geben Sie das Gargut auf die mittleren Ebenen.
Es wird empfohlen, eine Fettpfanne zu verwenden, um den
Bratensaft aufzufangen. Geben Sie die Fettpfanne mit etwa einem
halben Liter Wasser auf die 1. oder 2. Ebene. Ein Vorheizen des
Backofens ist nicht notwendig. Während des Garvorgangs muss die
Tür geschlossen bleiben.
BROT/PIZZA Zum Backen verschiedener Sorten und Formen von Brot und Pizza.
Innerhalb dieser Funktion gibt es zwei Programme mit vordenierten
Einstellungen. Es genügt, einfach die notwendigen Werte
(Temperatur und Zeit) anzugeben, und der Backofen verwaltet den
optimalen Garzyklus automatisch. Heizen Sie den Backofen vor und
geben Sie den Teig auf die 2. Ebene.
Page 38

DEUTSCH 38
Funktion Funktionsbeschreibung
SONDERFUNKTIONEN
AUFTAUEN
Zur Beschleunigung des Auftauens von Speisen. Es wird
empfohlen, das Gargut auf die mittlere Ebene zu geben. Es wird
empfohlen, die Lebensmittel in ihrer Verpackung aufzutauen, um
dem Austrocknen der Oberäche vorzubeugen.
WARMHALTEN
Hält frisch zubereitete Speisen warm und knusprig (z. B. Fleisch,
Frittiertes, Auäufe). Es wird empfohlen, das Gargut auf die
mittlere Ebene zu geben. Die Funktion schaltet sich nur ein, wenn
die Temperatur im Geräteinneren unter 65 °C beträgt.
GEHEN LASSEN
Für optimales Gehen von süßen oder salzigen Hefeteigen. Damit
der Teig optimal geht, schaltet sich die Funktion nur ein, wenn
die Temperatur im Geräteinneren unter 40 °C beträgt. Stellen Sie
den Teig auf die 2. Ebene. Ein Vorheizen des Backofens ist nicht
notwendig.
ÖKO HEISSLUFT
Zum Garen von gefüllten Braten und Fleisch im Stück auf
einer Einschubebene. Diese Funktion arbeitet mit einer nur
zeitweise aktiven und sehr schonenden Belüftung, so dass ein
Austrocknen der Speisen verhindert wird. Im Ökomodus ECO
ist die Beleuchtung während des Garens ausgeschaltet und
kann vorübergehend durch Drücken der Bestätigungstaste
eingeschaltet werden. Zur maximalen Energieefzienz sollte die
Ofentür während des Garens nicht geöffnet werden. Verwenden
Sie zum Garen möglichst die 3. Einschubebene. Ein Vorheizen des
Backofens ist nicht notwendig.
SCHNELLES
VORHEIZEN
Zum Schnellvorheizen des Backofens.
EINSTELLUNGEN Für die Einstellungen des Displays (Uhrzeit, Helligkeit, Lautstärke
Signalton, Energiesparen).
LAMPE Zum Ein-/Ausschalten der Innenbeleuchtung.
Page 39

DEUTSCH 39
Täglicher Gebrauch
Wahl der Garfunktionen
1 2
1. Drehen Sie den “Funktionswahlknopf”
A
auf die gewünschte Funktion: die
Gareinstellungen werden auf dem Display
angezeigt.
2. Wenn die vorgeschlagenen den gewünschten
Parametern entsprechen, drücken Sie die
Taste
C
. Um die Parameter zu ändern,
verfahren Sie wie folgt.
Einstellung der Temperatur/Leistung des Grills
Zur Änderung der Temperatur oder der Leistung
des Grills gehen Sie folgendermaßen vor:
12
1. Drehen Sie den “Navigationsknopf”, B bis
der gewünschte Wert angezeigt wird.
2. Drücken Sie die Taste
C
zur Bestätigung.
Schnelles Vorheizen
2
3
1
4
Geben Sie die Speise erst dann in den Backofen,
wenn das Programm Schnelles Vorheizen beendet
ist.
1. Wählen Sie die Funktion Schnelles Vorheizen
durch Drehen des “Funktionswahlknopfs”
A
auf das Symbol
.
2. Bestätigen Sie mit der Taste
C
: Die
Einstellungen erscheinen auf dem Display.
3. Wenn die vorgeschlagene Temperatur
der gewünschten Temperatur entspricht,
drücken Sie die Taste
C
. Gehen Sie zur
Änderung der Temperatur wie im vorigen
Abschnitt beschrieben vor unter "Einstellung
der Temperatur/Leistung des Grills". Die
Meldung PRE erscheint auf dem Display.
Wenn die gewünschte Temperatur erreicht ist,
wird der entsprechende Wert (z.B. 200 °C)
angezeigt, und ein Signalton ertönt. Am Ende
der Aufheizphase wählt der Ofen automatisch
die Funktion Ober-/Unterhitze
. Stellen Sie
jetzt das Gargut in den Ofen und starten Sie
den Garvorgang.
4. Falls Sie eine andere Garfunktion
wählen möchten, drehen Sie den
“Funktionswahlknopf”
A
und wählen Sie die
gewünschte Funktion.
Programmierung der Garzeit
Diese Funktion erlaubt das Garen für eine
unbestimmte Zeitdauer, von mindestens 1 Minute
bis zur für die gewählte Garfunktion maximal
zulässigen Garzeit. Nach Ablauf der Garzeit
schaltet sich der Ofen automatisch ab.
1 2 3
1. Nach dem Bestätigen der Temperatur blinkt
das Symbol
.
2. Drehen Sie den Einstellknopf,
B
bis die
gewünschte Garzeit angezeigt wird.
3. Bestätigen Sie die Garzeit durch Drücken der
Taste
C
.
Einstellung Garzeitende / Startverzögerung
WICHTIG: die Einstellung Startzeitverzögerung
ist für die folgenden Funktionen nicht verfügbar:
SCHNELLES VORHEIZEN, BROT/PIZZA.
Hinweis: Bei dieser Einstellung wird die gewählte
Temperatur etwas langsamer erreicht. Die
Garzeiten sind daher etwas länger als in der
Gartabelle angegeben.
Die gewünschte Abschaltzeit lässt sich einstellen,
indem das Einschalten des Ofens ab der aktuellen
Uhrzeit um bis maximal 23 Stunden und 59
Page 40

DEUTSCH 40
Minuten verzögert wird. Dies ist erst nach dem
Einstellen der Garzeit möglich.
Nach Einstellen der Garzeit wird auf dem Display
die Abschaltzeit angezeigt (beispielsweise 15:45),
und das Symbol
blinkt.
1 2
Um die Abschaltzeit durch eine Startverzögerung
des Ofens hinauszuschieben, gehen Sie
folgendermaßen vor:
1. Drehen Sie den “Navigationsknopf”
B
, bis
die gewünschte Abschaltzeit angezeigt wird
(beispielsweise 16:00).
2. Bestätigen Sie den ausgewählten Wert durch
Drücken der Taste
C
: die beiden Punkte des
Garzeitendes blinken und zeigen damit an,
dass die Einstellung korrekt erfolgt ist.
3. Der Ofen verzögert den Start automatisch,
um die Garzeit zum voreingestellten Zeitpunkt
enden zu lassen.
Kurzzeitwecker (Timer)
1 2
Diese Funktion lässt sich nur bei ausgeschaltetem
Ofen, beispielsweise für die Kontrolle der Kochzeit
von Nudeln, verwenden.
Die maximal programmierbare Zeit beträgt 23
Stunden und 59 Minuten.
1. Lassen Sie den “Funktionswahlknopf”
A
auf
Null und drehen Sie den “Navigationsknopf”,
bis die gewünschte Zeit angezeigt wird.
2. Drücken Sie die Taste
C
, um den Countdown
zu starten. Nach Ablauf der eingestellten Zeit
erscheint auf dem Display “ENDE” und es
ertönt ein akustisches Signal. Um dieses zu
unterbrechen, drücken Sie die Taste
C
(auf
dem Display erscheint die aktuelle Uhrzeit).
Wahl der Sonderfunktionen
1 2 3
1. Drehen Sie den "Funktionswahlknopf" auf
das Symbol
A
bis das Display "DEFROST"
(Auftauen) mit dem entsprechenden Symbol
anzeigt.
2. Drehen Sie den “Navigationsknopf”
B
, um
die Liste der Funktionen durchzublättern:
AUFTAUEN, WARMHALTEN, AUFGEHEN
LASSEN, ECO HEISSLUFT-
3. Drücken Sie die Taste
C
zur Bestätigung.
Anbräunen
Nach Ablauf des Garvorgangs wird für die
Funktionen, die dies vorsehen, auf dem Display
die Möglichkeit vorgeschlagen, das Gericht
anzubräunen. Diese Funktion lässt sich nur
aktivieren, wenn eine Garzeit eingestellt wurde.
1
Nach dem Ablauf der Garzeit zeigt das Display:
"DRÜCKEN SIE
ZUM BRÄUNEN". Nach
dem Drücken der Taste
C
startet der Ofen die
Bräunungsphase, die 5 Minuten dauert. Diese
Funktion kann nur zwei Mal ausgeführt werden.
Auswahl der Funktion Brot/Pizza
Durch Drehen des Zeigers am
"Funktionswahlknopf"
A
auf das Symbol
gelangen Sie in ein Untermenü mit zwei
automatischen Backfunktionen für "Brot" und
"Pizza".
Brot
3
4
1 2
1. Drehen Sie den "Funktionswahlknopf" A auf
Page 41

DEUTSCH 41
das Symbol : das Display zeigt "BROT"
und "AUTO" seitlich an.
2. Drücken Sie
C
, um die Funktion auszuwählen.
3. Drehen Sie den “Navigationsknopf”
B
, um
die gewünschte Temperatur (zwischen 180 °C
und 220 °C) einzustellen und bestätigen Sie
mit der Taste
C
.
4. Drehen Sie den “Navigationsknopf”
B
,
um die gewünschte Garzeit einzustellen und
drücken Sie
C
zum Starten des Garvorgangs.
Pizza
1
3
2
4 5
1. Drehen Sie den "Funktionswahlknopf" A auf
das Symbol
: das Display zeigt "BROT" an.
Um die Funktion "PIZZA" zu wählen, gehen Sie
folgendermaßen vor:
2. Drehen Sie den "Navigationsknopf"
B
: Auf
dem Display erscheint “PIZZA”.
3. Drücken Sie
C
, um die Funktion auszuwählen.
4. Drehen Sie den “Navigationsknopf”
B
, um
die gewünschte Temperatur (zwischen 220 °C
und 250 °C) einzustellen und bestätigen Sie
mit der Taste
C
.
5. Drehen Sie den “Navigationsknopf”
B
,
um die gewünschte Garzeit einzustellen und
drücken Sie
C
zum Starten des Garvorgangs.
Einstellungen
Durch Drehen des Zeigers des
“Funktionswahlknopfs”
A
auf das Symbol
erhalten Sie Zugriff auf ein Untermenü mit fünf
Displayeinstellungen, die sich ändern lassen.
Uhr
Drehen Sie den "Navigationsknopf"
B
, bis "UHR"
angezeigt wird. Zum Ändern der Uhrzeit siehe
den vorangehenden Abschnitt (EINSTELLEN DER
AKTUELLEN UHRZEIT).
Öko
Bei ausgewähltem Ökomodus ECO (ON) wird die
Helligkeit des Displays reduziert und für 3 Minuten
die Uhrzeit angezeigt, wenn der Backofen auf
Standby geschaltet ist. Darüber hinaus wird die
Innenbeleuchtung während des Garvorgangs
abgeschaltet. Um Informationen auf dem
Display anzuzeigen und die Beleuchtung wieder
einzuschalten, drücken Sie einfach die Taste
C
oder drehen Sie einen beliebigen Knopf.
1. Drehen Sie den "Navigationsknopf"
B
, bis
"ECO" angezeigt wird.
2. Drücken Sie die Taste
C
, um in die Einstellung
(ON/OFF) zu gelangen.
3. Drehen Sie den “Navigationsknopf”
B
, um
die gewünschte Einstellung zu wählen und
bestätigen Sie mit der Taste
C
.
4. Ist die Funktion Ökomodus bei
einer Garfunktion aktiviert, wird die
Innenbeleuchtung nach 1 Minute Garzeit
ausgeschaltet und nach jeder Interaktion des
Benutzers erneut eingeschaltet.
Signalton
Um den Signalton ein- oder auszuschalten gehen
Sie folgendermaßen vor:
1. Drehen Sie den "Navigationsknopf"
B
, bis
"TON" angezeigt wird.
2. Drücken Sie die Taste
C
, um in die Einstellung
(ON/OFF) zu gelangen.
3. Drehen Sie den “Navigationsknopf”
B
, um
die gewünschte Einstellung zu wählen und
bestätigen Sie mit der Taste
C
.
Helligkeit
Um die Helligkeit des Bildschirms zu ändern, gehen
Sie folgendermaßen vor:
1. Drehen Sie den "Navigationsknopf"
B
, bis
"HELLIGKEIT" angezeigt wird.
2. Drücken Sie die Taste
C
, auf dem Display
erscheint die Ziffer 1.
3. Drehen Sie den “Navigationsknopf”
B
, um
die Helligkeit zu erhöhen oder zu reduzieren
und bestätigen Sie mit der Taste
C .
Page 42

DEUTSCH 42
Gartabellen
Art der Speise Funktion Vorheizen Einschube-
bene (von
unten)
Temperatur
(°C)
Garzeit
(Min.)
Zubehör
Hefekuchen
X 2 160-180 30-90 Kuchenform auf
Rost
X 1-3 160-180 30-90 Ebene 3:
Kuchenform auf
Rost
Ebene 1:
Kuchenform auf
Rost
Gefüllter
Kuchen
(Käsekuchen,
Strudel,
Apfelkuchen)
– 2 160-200 30-85 Fettpfanne /
Backblech oder
Kuchenform
auf Rost
X 1-3 160-200 35-90 Ebene 3:
Kuchenform auf
Rost
Ebene 1:
Kuchenform auf
Rost
Plätzchen
(Kekse),
Törtchen
X 2 170 -18 0 15-45 Fettpfanne /
Backblech
X 1-3 150-170 20-45 Ebene 3:
Backblech
Ebene 1:
Fettpfanne
Beignets
X 2 180-200 30-40 Fettpfanne /
Backblech
X 1-3 180-190 35-45 Ebene 3:
Backblech
Ebene 1:
Fettpfanne
Baiser
(Meringuen)
X 2 90 110 - 15 0 Fettpfanne /
Backblech
X 1-3 90 13 0 -15 0 Ebene 3:
Backblech
Ebene 1:
Fettpfanne
Page 43

DEUTSCH 43
Art der Speise Funktion Vorheizen Einschube-
bene (von
unten)
Temperatur
(°C)
Garzeit
(Min.)
Zubehör
Brot, Pizza,
Fladenbrot
X 2 190-250 15- 50 Fettpfanne /
Backblech
X 1-3 190-250 25-50 Ebene 3:
Backblech
Ebene 1:
Fettpfanne
Brot
X 2 180-220 30-50 Fettpfanne /
Backblech oder
Rost
Pizza
X 2 220-250 15-30 Fettpfanne /
Backblech
Tiefkühlpizza
X 2 250 10 -15 Ebene 2:
Fettpfanne /
Backblech oder
Rost
X 1-3 250 10-20 Ebene 3:
Backblech
Ebene 1:
Fettpfanne
Quiche
(Gemüsetorte,
Quiche)
X 2 180 -190 35-45 Kuchenform auf
Rost
X 1-3 180-190 45-60 Ebene 3:
Kuchenform auf
Rost
Ebene 2:
Kuchenform auf
Rost
Blätterteigtört
chen, salziges
Blätterteigge
-
bäck
X 2 190-200 20-30 Fettpfanne /
Backblech
X 1-3 180-190 20-40 Ebene 3:
Backblech
Ebene 1:
Fettpfanne
Lasagne,
überbackene
Pasta,
Cannelloni,
Auäufe
X 2 190-200 30-60 Fettpfanne oder
Form auf Rost
Lamm, Kalb,
Rind, Schwein
1 kg
X 2 190-200 70-100 Fettpfanne oder
Form auf Rost
Page 44

DEUTSCH 44
Art der Speise Funktion Vorheizen Einschube-
bene (von
unten)
Temperatur
(°C)
Garzeit
(Min.)
Zubehör
Hähnchen,
Kaninchen, Ente
1 kg
X 2 200-230 50-100 Fettpfanne oder
Form auf Rost
Puter, Gans
3 kg
X 1-2 190-200 80-130 Fettpfanne oder
Form auf Rost
Fisch gebacken
/ in Folie (Filet,
ganz)
X 2 180-200 40-60 Fettpfanne oder
Form auf Rost
Gefülltes
Gemüse
(Tomaten,
Zucchini,
Auberginen)
X 2 170 -19 0 30-60 Form auf Rost
Toast
– 4 3 (hoch) 2-5 Rost
Fischlets,
-stücke
– 4 2 (Mittel) 20-35 Ebene 4: Rost
(Gargut nach
halber Garzeit
wenden)
Ebene 3:
Fettpfanne mit
Wasser
Bratwurst /
Grillspieße /
Rippchen /
Hamburger
– 4 2-3 (Mittel-
Hoch)
15-40 Ebene 4: Rost
(Gargut nach
halber Garzeit
wenden)
Ebene 3:
Fettpfanne mit
Wasser
Page 45

DEUTSCH 45
Art der Speise Funktion Vorheizen Einschube-
bene (von
unten)
Temperatur
(°C)
Garzeit
(Min.)
Zubehör
Brathähnchen
1-1,3 kg
X 2 2 (Mittel) 50-65 Ebene 2: Rost
(Gargut nach
zwei
Drittel der
Garzeit
wenden)
Ebene 1:
Fettpfanne mit
Wasser
3 (hoch) 60-80 Ebene 2:
Drehspieß/
Rotisserie
Ebene 1:
Fettpfanne mit
Wasser
Roastbeef
englisch 1 kg
– 2 2 (Mittel) 35-50 Form auf Rost
(Gargut bei
Bedarf nach
zwei Dritteln
der Garzeit
wenden)
Lammkeule,
Schweinshaxe
– 2 2 (Mittel) 60-90 Fettpfanne oder
Form auf Rost
(Gargut bei
Bedarf nach
zwei Dritteln
der Garzeit
wenden)
Ofenkartoffeln
– 2 2 (Mittel) 35-50 Fettpfanne
/ Backblech
(Gargut bei
Bedarf nach
zwei Dritteln
der Garzeit
wenden)
Gratiniertes
Gemüse
– 2 3 (hoch) 10-15 Form auf Rost
Page 46

DEUTSCH 46
Art der Speise Funktion Vorheizen Einschube-
bene (von
unten)
Temperatur
(°C)
Garzeit
(Min.)
Zubehör
Lasagne und
Fleisch
X 1-3 200 50-100* Ebene 3: Form
auf Rost
Ebene 1:
Fettpfanne oder
Form auf Rost
Fleisch und
Kartoffeln
X 1-3 200 45-100* Ebene 3: Form
auf Rost
Ebene 1:
Fettpfanne oder
Form auf Rost
Fisch, Gemüse
X 1-3 180 30-50* Ebene 3: Form
auf Rost
Ebene 1:
Fettpfanne oder
Form auf Rost
Gefüllte Braten
– 3 200 80-120* Fettpfanne oder
Form auf Rost
Fleisch
geschnitten
(Hase/
Kaninchen,
Hühnchen,
Lamm)
– 3 200 50-100* Fettpfanne oder
Form auf Rost
* Die Gardauer ist eine Schätzung. Je nach persönlicher Vorliebe kann die Speise zu
verschiedenen Zeiten aus dem Ofen genommen werden.
Page 47

DEUTSCH 47
Reinigung und Pege
REINIGUNG
WARNUNG!
- Verwenden Sie niemals
Wasserdampfreinigungsgeräte.
- Lassen Sie das Gerät vor dem Reinigen
auskühlen.
- Trennen Sie das Gerät von der
Stromversorgung.
Außenächen des Ofens
i
WICHTIG: Verwenden Sie keine
aggressiven Reinigungs- oder
Scheuermittel. Falls ein solches Mittel doch
mit dem Gerät in Kontakt kommt, reinigen Sie
es sofort mit einem feuchten Tuch.
• Reinigen Sie die Flächen mit einem
feuchten Tuch. Entfernen Sie starke
Verschmutzungen mit Wasser und ein
paar Tropfen Geschirrspülmittel. Reiben
Sie mit einem trockenen Tuch nach.
Geräteinnenraum
i
IMPORTANT: Vermeiden Sie den
Gebrauch von Scheuerschwämmen,
Topfkratzern und Metallschabern. Diese
können die Emailächen und das Glas der
Gerätetür mit der Zeit beschädigen.
• Lassen Sie den Backofen nach jedem
Gebrauch etwas abkühlen und reinigen
Sie ihn, solange er noch ein wenig
warm ist, um Verkrustungen und Flecken
durch Speisereste (z. B. durch stark
zuckerhaltige Speisen) besser entfernen
zu können.
• Verwenden Sie ausschließlich für
Backöfen vorgesehene Reinigungsmittel
und beachten Sie die Herstellerangaben.
• Reinigen Sie das Glas der Backofentür
mit einem geeigneten Flüssigreiniger.
Die Backofentür lässt sich zum Reinigen
vollständig aushängen (siehe PFLEGE).
Die Glasinnenseite ist glatt und lässt sich
mühelos reinigen.
HINWEIS: Während längeren Garens von
Speisen mit hohem Wassergehalt (z. B. Pizza,
Gemüse usw.) kann sich Kondenswasser an
der Innenseite der Tür und der Türdichtung
bilden. Wenn der Backofen kalt ist, trocknen
Sie die Innenseite der Tür mit einem Tuch
oder Schwamm ab.
Zubehör
• Weichen Sie die Zubehörteile
sofort nach jedem Gebrauch in
Geschirrspülmittellauge ein. Verwenden
Sie Backofenhandschuhe, so lange das
Zubehör noch heiß ist.
• Speiserückstände können Sie dann leicht
mit einer geeigneten Bürste oder einem
Schwamm entfernen.
PFLEGE
WARNUNG!
- Verwenden Sie Schutzhandschuhe.
- Führen Sie die beschriebenen Vorgänge
aus, wenn das Gerät kalt ist.
- Trennen Sie den Ofen von der
Stromversorgung.
Ausbau der Tür
2x
Page 48

DEUTSCH 48
Einsetzen der Tür
2x
Ausbau der seitlichen Gitter
Schieben Sie das seitliche Gitter nach oben,
bis die beiden unteren Anschlüsse frei
kommen, und drehen Sie das Gitter zur Mitte
des Innenraums. Das Einsetzen des Gitters
erfolgt in umgekehrter Reihenfolge des
Ausbaus.
1
2
Glühlampe der hinteren
Backofenbeleuchtung auswechseln
1. Trennen Sie den Ofen von der
Stromversorgung.
Abb. 5
2. Schrauben Sie die Lampenabdeckung
ab (Abb. 5). Wechseln Sie die
Glühlampe aus (bezüglich des Typs siehe
nachstehenden Hinweis) und schrauben
Sie die Lampenabdeckung wieder auf.
3. Schließen Sie den Ofen wieder an das
Stromnetz an.
HINWEIS:
- Verwenden Sie nur Halogenlampen des
Typs 40W/230 V Typ G9, T300°C (je
nach Modell).
- Die in diesem Gerät verwendete
Lampe ist speziell für elektrische Geräte
ausgelegt und nicht geeignet für die
Beleuchtung von Räumen eines Haushalts
(EU-Regelung (EC) Nr. 244/2009).
- Lampen sind beim autorisierten IKEA
Kundendienst erhältlich.
Page 49

DEUTSCH 49
Störung Mögliche Ursachen Abhilfe
Der Backofen funktioniert nicht. Die Stromnetz ist
ausgefallen.
Prüfen Sie, ob das Stromnetz
Strom führt.
Der Backofen ist
nicht ans Stromnetz
angeschlossen.
Schließen Sie den Backofen an
die Stromversorgung an.
Schalten Sie den Backofen
aus und wieder ein, um
festzustellen, ob die Störung
erneut auftritt.
Die Gerätetür lässt sich nicht
öffnen
Schalten Sie den Backofen
aus und wieder ein, um
festzustellen, ob die Störung
erneut auftritt.
Die Elektronikanzeige
funktioniert nicht:
Zeigt das Display den
Buchstaben “F” und danach
eine Nummer an, kontaktieren
Sie bitte den nächsten
autorisierten Kundendienst.
Geben Sie dabei an, welche
Zahl nach dem "F" folgt.
Störung - was tun?
Bevor Sie den autorisierten Kundendienst
kontaktieren:
1. Versuchen Sie zuerst, die Störung
anhand der in "Störung - was tun?"
beschriebenen Anleitungen/Tabelle
selbst zu beheben.
2. Schalten Sie das Gerät aus und wieder
ein, um festzustellen, ob die Störung
behoben ist.
Falls nach den oben beschriebenen
Kontrollen die Störung weiterhin besteht,
kontaktieren Sie bitte den autorisierten IKEA
Kundendienst.
Sie benötigen dabei folgenden Angaben:
• eine kurze Beschreibung der Störung;
• Gerätetyp und Modellnummer;
• die Servicenummer (die Zahl
nach dem Wort Service auf dem
Typenschild), bendet sich rechts
im Backofeninnenraum (bei offener
Backofentür sichtbar);
• Ihre vollständige Anschrift;
• Ihre Telefonnummer.
Im Reparaturfall wenden Sie sich bitte an
einen autorisierten IKEA Kundendienst
(nur dann wird garantiert, dass
Originalersatzteile verwendet werden und
eine sachgerechte Reparatur durchgeführt
wird).
Page 50

DEUTSCH 50
Technische Daten
Art des Produkts: Einbau-Elektroofen
Modellnummer:
BEJUBLAD 603.009.01, BEJUBLAD 403.009.02, BEJUBLAD 603.008.97
BEJUBLAD 403.008.98, RAFFINERAD 003.009.18, RAFFINERAD 803.009.19
Anzahl der Innenräume 1
Heizquelle Elektrisch
Anzahl der Funktionen 11
Nutzinhalt. Gemessen ohne seitliche Gitter und mit abgenommenen
Pyrolysepaneelen l
65
Fläche des größten Backblechs cm
2
1200
Energieefzienzklasse (niedrigster Verbrauch) A+
Energieefzienzindex 81, 9
Energieverbrauch
Energieverbrauch (bei Standardbeladung und Ober-/Unterhitze)
kWh/Zyklus
0,87
Energieverbrauch
Gebläse Heißluft-Funktion (bei Standardbeladung und Heißluftbetrieb)
kWh/Zyklus
0,70
Oberes Heizelement W 2450
Unter-/Oberhitze Heizelement W 115 0
Grillelement W 2450
Gebläse Heizelement W 2000
Kühlgebläse W 12-21
Backofenlampe W 40
Backofenventilator, Wattzahl W 12-21
Gesamtleistung W 2600
Abmessungen
Breite mm 595
Höhe mm 595
Tiefe mm 564
Page 51

DEUTSCH 51
Prüfen Sie nach dem Auspacken, dass das
Gerät keine Transportschäden aufweist
und die Backofentür richtig schließt. Bei
auftretenden Problemen wenden Sie sich
bitte an Ihren Händler oder kontaktieren Sie
Ihren nächsten autorisierten Kundendienst.
Um eventuellen Schäden vorzubeugen,
sollten Sie das Gerät erst unmittelbar vor
der Installation von der Polystyrolunterlage
nehmen.
Vorbereitung des Einbauschranks
• Alle Küchenmöbel in unmittelbarer Nähe
des Backofens müssen hitzebeständig
sein (min. 90 °C).
• Schneiden Sie den Unterbauschrank
vor dem Einschub des Backofens in die
Aussparung auf das Einbaumaß zurecht
und entfernen Sie Sägespäne oder
Schnittreste sorgfältig.
• Der Geräteboden darf nach der
Installation nicht mehr zugänglich sein.
• Für einen einwandfreien Gerätebetrieb
darf die Mindestöffnung zwischen
Arbeitsäche und Geräteoberseite nicht
verschlossen werden.
Allgemeine Hinweise
Vor der Inbetriebnahme
- Entfernen Sie Kartonteile, Schutzfolien
und Klebeetiketten von den
Zubehörteilen.
- Das Typenschild auf der rechten Seite des
Türrahmens darf nicht entfernt werden.
Aufstellung
Technische Daten
Die technischen Informationen benden sich
auf dem Typenschild im Geräteinneren.
Page 52

DEUTSCH 52
- Nehmen Sie die Zubehörteile aus dem
Backofen und heizen Sie den Backofen
auf 200 °C auf und lassen Sie ihn ca.
eine Stunde bei dieser Temperatur
eingeschaltet, um den Geruch von
Isoliermaterial und Schutzfetten zu
beseitigen.
Während des Gebrauchs
- Stellen Sie keine schweren Gewichte
auf der Tür ab, um Beschädigungen zu
vermeiden.
- Halten Sie sich nicht an der Tür fest und
hängen Sie keine Gegenstände an den
Türgriff.
- Kleiden Sie den Geräteinnenraum nicht
mit Alufolie aus.
- Gießen Sie niemals Wasser in
einen heißen Backofen, da dies die
Emailbeschichtung beschädigen kann.
- Ziehen Sie Töpfe und Pfannen nicht über
den Boden des Geräteinnenraumes, um
Kratzer zu vermeiden.
- Stellen Sie sicher, dass die Kabel anderer
in der Nähe des Backofens verwendeter
Geräte keine heißen Teile berühren und
nicht in der Backofentür eingeklemmt
werden.
- Vermeiden Sie es, den Backofen
Witterungseinüssen auszusetzen.
Sicherheitselement der Tür (Verriegelung)
Näheres zum Öffnen der Tür mit dem
Sicherheitselement siehe Abb. 1.
Abb. 1
Das Türsicherheitselement kann durch
Befolgen der Bildsequenzen abgebaut
werden (siehe Abb. 2).
Abb. 2
Page 53

DEUTSCH 53
So lesen Sie die Garzeittabelle
Die Tabelle gibt die beste Garfunktion für
ein bestimmtes Lebensmittel an, das auf
einer oder mehreren Ebenen gleichzeitig
gegart werden kann. Die Garzeiten gelten
ab dem Moment, in dem Sie das Gargut in
den Ofen geben, die (eventuell erforderliche)
Aufheizzeit zählt nicht dazu. Die
Gartemperaturen und -zeiten sind Richtwerte
und hängen sowohl von der gegarten
Menge als auch der Art des Zubehörs ab.
Verwenden Sie zunächst die niedrigeren
der empfohlenen Werte und gehen Sie,
falls das erzielte Garergebnis nicht ihren
Wünschen entspricht, zu den höheren Werten
über. Es wird empfohlen, die mitgelieferten
Zubehörteile und möglichst Kuchenformen
und -bleche aus dunklem Metall zu
verwenden. Sie können auch Töpfe und
Zubehör aus feuerfestem Glas oder Keramik
verwenden, die Garzeiten verlängern sich
dadurch allerdings etwas. Für ein optimales
Ergebnis befolgen Sie bitte die Hinweise
zur Positionierung der mitgelieferten
Zubehörteile im Backofen genau wie in der
Gartabelle angegeben.
Garen von Speisen auf mehreren
Einschubebenen gleichzeitig
Mit der Funktion HEISSLUFT lassen sich
mehrere verschiedene Speisen (z. B. Fisch
und Gemüse) bei gleicher Temperatur auf
verschiedenen Ebenen gleichzeitig garen.
Nehmen Sie die Speise mit kürzerer Garzeit
heraus und lassen Sie die Speisen mit
längerer Garzeit weiter im Ofen.
Dessert
- Backen Sie sehr feine Süßspeisen bei
Ober-/Unterhitze auf nur einer Ebene.
Verwenden Sie Kuchenformen aus dunklem
Metall und stellen Sie diese immer auf den
mitgelieferten Rost. Wählen Sie für das Garen
auf mehreren Ebenen die Heißluftfunktion
und stellen Sie die Kuchenformen versetzt auf
die Roste, damit die Luft frei zirkulieren kann.
- Machen Sie bei einem Hefekuchen mit
einem Holzstäbchen eine Garprobe in der
Mitte des Kuchens. Wenn das Holzstäbchen
trocken bleibt, ist der Kuchen fertig.
- Falls Sie beschichtete Kuchenformen
verwenden, fetten Sie die Ränder nicht
ein, damit der Kuchen an den Rändern
gleichmäßig aufgeht.
- Falls der Kuchen beim Backen
zusammenfällt, wählen Sie beim nächsten
Mal eine niedrigere Temperatur, etwas
weniger Flüssigkeit und rühren Sie den Teig
vorsichtiger durch.
- Kuchen mit saftiger Füllung (Käse- oder
Obstkuchen) backen Sie am besten mit der
Funktion UMLUFT. Ist der Kuchenboden
zu feucht, verwenden Sie eine niedrigere
Ebene und bestreuen Sie den Boden mit
Semmelbröseln oder Kekskrümeln, bevor Sie
die Füllung hineingeben.
Fleisch
- Verwenden Sie einen für die Größe des zu
garenden Fleischstücks geeigneten Bräter
oder eine Auaufform. Garen Sie Braten
möglichst in etwas Brühe und beschöpfen
Sie das Fleisch während des Garens, damit
es schmackhaft wird. Lassen Sie den Braten
nach dem Ende der Garzeit weitere 10-15
Minuten im Ofen ruhen oder wickeln Sie ihn
in Alufolie.
Hinweise zum Gebrauch und Empfehlungen
Page 54

DEUTSCH 54
- Wählen Sie für ein gleichmäßiges
Garergebnis zum Grillen von Fleischstücken
immer gleich dicke Scheiben. Sehr dicke
Fleischscheiben benötigen eine längere
Garzeit. Um zu vermeiden, dass das Fleisch
anbrennt, vergrößern Sie den Abstand der
gegarten Stücke zum Grill und versetzen
Sie den Rost auf eine der unteren Ebenen.
Wenden Sie das Fleisch nach zwei Dritteln
der Garzeit.
Es wird empfohlen, eine Fettpfanne mit
einem halben Liter Wasser direkt unter dem
Rost mit dem Grilleisch zu positionieren, um
den Bratensaft aufzufangen. Füllen Sie bei
Bedarf nach.
Pizza
Fetten Sie die Bleche, damit auch der
Pizzaboden knusprig wird. Verteilen Sie die
Mozzarella nach zwei Dritteln der Garzeit
auf der Pizza.
Funktion Gehen lassen
Sie sollten den Teig immer mit einem feuchten
Tuch abdecken, bevor Sie ihn in den Ofen
stellen. Bei dieser Funktion verkürzt sich
die Gehzeit gegenüber dem Gehen bei
Raumtemperatur (20-25 °C) um etwa ein
Drittel. Die Zeit zum Gehen für 1 kg Pizzateig
beträgt etwa eine Stunde.
Page 55

DEUTSCH 55
Entsorgung von Verpackungsmaterial
- Das Verpackungsmaterial ist zu 100
% wiederverwertbar und trägt das
Recycling-Symbol ( ). Werfen Sie das
Verpackungsmaterial deshalb nicht
einfach fort, sondern entsorgen Sie es
auf die von den verantwortlichen Stellen
festgelegte Weise.
Entsorgung von Altgeräten
- Dieses Gerät ist gemäß der Europäischen
Richtlinie 2012/19/EC für Elektround Elektronik-Altgeräte (WEEE)
gekennzeichnet.
- Durch eine angemessene Entsorgung
des Gerätes trägt der Nutzer dazu bei,
potentiell schädliche Auswirkungen für
Umwelt und Gesundheit zu vermeiden.
- Das Symbol
auf dem Gerät bzw. auf
dem beiliegenden Informationsmaterial
weist darauf hin, dass dieses Gerät kein
normaler Haushaltsabfall ist, sondern
in einer Sammelstelle für Elektro- und
Elektronik-Altgeräte entsorgt werden
muss.
Energiespartipps
- Heizen Sie den Backofen nur dann vor,
wenn es in der Gartabelle oder Ihrem
Rezept so angegeben ist.
- Verwenden Sie dunkle, schwarz lackierte
oder emaillierte Backformen, da sie die
Hitze besonders gut aufnehmen.
- Schalten Sie den Backofen 10 bis 15
Minuten vor Ende der eingestellten
Garzeit aus. Falls die Speisen eine lange
Garzeit benötigen, so garen diese in
jedem Fall weiter.
Konformitätserklärung
- Dieses Gerät ist für den Kontakt mit
Lebensmitteln bestimmt und entspricht
der EG-Richtlinie ( ) Nr. 1935/2004.
Es wurde den Sicherheitsanforderungen
der “Niederspannungsrichtlinie”
2006/95/EG (die 73/23/EWG und
nachfolgende Änderungen ersetzt) und
den Schutzvorschriften der EMV-Richtlinie
2004/108/EWG entsprechend entwickelt,
gebaut und in den Handel gebracht.
- Dieses Gerät entspricht den ÖkoKonstruktionsanforderungen der
europäischen Richtlinien N. 65/2014 und
N. 66/2014 in Übereinstimmung mit der
europäischen Norm EN 60350-1.
Umweltschutz
Die Spannung auf dem Typenschild des
Gerätes muss der Spannung des Stromnetzes
entsprechen. Das Typenschild bendet sich
an der Vorderkante des Backofens (bei
offener Tür sichtbar).
Das Netzkabel (Typ H05 RR-F 3 x 1,5 mm2)
darf nur durch Fachpersonal ersetzt werden.
Wenden Sie sich an einen autorisierten IKEA
Kundendienst.
Anschluss an das Stromnetz
IKEA GARANTIE
Page 56

DEUTSCH 56
IKEA GARANTIE CH
Wie lange ist die IKEA Garantie gültig?
Die Garantie gilt 5 (fünf) Jahre ab dem
Kauf-/ Auslieferungsdatum für die bei IKEA
gekauften Geräte, es sei denn, es handelt
sich um Geräte der Marke “LAGAN”. Bei
diesen Geräten gilt eine Garantie von 2
(zwei) Jahren. Als Kaufnachweis ist das
Original des Einkaufsbeleges erforderlich.
Werden im Rahmen der Garantie Arbeiten
ausgeführt, verlängert sich dadurch nicht die
Garantiezeit für das Gerät.
Welche Geräte sind nicht durch die IKEA
Fünfjahresgarantie abgedeckt?
Die 5-jährige (fünf) Garantie gilt für alle
nach dem 1. August 2007 gekauften IKEA
Geräte. Hiervon ausgenommen sind die
IKEA Geräte der Marke LAGAN.
Wer übernimmt den Service?
IKEA führt die Serviceleistungen über
seinen eigenen Kundendienst oder einen
beauftragten Servicepartner aus.
Was deckt diese Garantie ab?
Die Garantie deckt Gerätefehler ab, die
aufgrund einer fehlerhaften Konstruktion
oder aufgrund von Materialfehlern nach
dem Datum bei/durch IKEA entstanden sind.
Die Garantie gilt nur für den Hausgebrauch
des betreffenden Gerätes. Ausnahmen
sind unter der Überschrift “Was deckt die
Garantie nicht ab?” erläutert. Innerhalb
der Garantiefrist werden die Kosten für
Reparatur, Ersatzteile sowie die Arbeits- und
Fahrtkosten übernommen, vorausgesetzt,
das Gerät ist ohne besonderen Aufwand für
eine Reparatur zugänglich. Die jeweiligen
örtlichen Bestimmungen oder die für die
Schweiz gültigen Rechtsvorschriften gelten
unter diesen Bedingungen. Ersetzte Teile
gehen in das Eigentum von IKEA über.
Was wird von IKEA unternommen, um das
Problem zu beheben?
Der Kundendienst begutachtet das Produkt
und entscheidet nach eigenem Ermessen,
ob ein Garantieanspruch besteht. Wenn
die Garantie geltend gemacht werden
kann, wird IKEA durch seinen eigenen
Kundendienst oder einen autorisierten
Servicepartner nach eigenem Ermessen das
schadhafte Produkt entweder reparieren
oder durch ein gleiches oder vergleichbares
Produkt ersetzen.
Was deckt diese Garantie nicht ab?
• Normale Abnutzungen und
Beschädigungen.
• Vorsätzlich oder fahrlässig herbeigeführte
Schäden, Beschädigungen infolge
Missachtung der Bedienungsanleitung,
unsachgemässer Installation, falschen
Spannungsanschlusses, Beschädigung
durch chemische oder elektrochemische
Reaktionen, Korrosions- oder
Wasserschäden, einschliesslich
Schäden durch ungewöhnlich hohen
Kalkgehalt im Wasser oder anormale
Umweltbedingungen.
• Verbrauchs- und Verschleissteile wie z.B.
Batterien und Glühlampen.
• Nichtfunktionelle und dekorative Teile,
die den normalen Gebrauch nicht
beeinussen, sowie Kratzer oder mögliche
Farbveränderungen.
• Schäden verursacht durch Fremdkörper,
Substanzen oder Reinigungsarbeiten/
Beseitigung von Verstopfungen an Filtern,
Abüssen oder Spülmittelfächern.
• Schäden an folgenden Teilen:
Glaskeramik, Zubehör, Geschirr- und
Besteckkörbe, Zu- und Ablaufschläuche,
Dichtungen, Glühlampen und deren
Abdeckungen, Siebe, Knöpfe, Gehäuse
und Gehäuseteile. Soweit nicht
nachgewiesen wird, dass solche Schäden
auf Herstellungsmängel zurückzuführen
sind.
• Bei Fällen, in welchen der Servicetechniker
keinen Fehler nden konnte.
• Reparaturen, die nicht von unserem
Page 57

DEUTSCH 57
eigenen Kundendienst oder einem
Servicevertragspartner ausgeführt oder
bei denen keine Originalteile verwendet
wurden.
• Durch fehlerhafte oder
unvorschriftsmässige Installation
erforderliche Reparaturen.
• Fehlbedienung und/oder Verwendung
des Gerätes in einer nicht privaten
sondern gewerblichen Umgebung.
• Transportschäden. Wenn der Kunde das
Produkt selbst nach Hause oder zu einer
anderen Adresse transportiert, ist IKEA
von der Haftung für Transportschäden
jeder Art freigestellt. Liefert IKEA das
Produkt direkt an die Kundenadresse,
werden eventuelle Transportschäden
durch IKEA gedeckt.
• Kosten für die Installation des IKEA
Gerätes.
Wenn jedoch der IKEA Kundendienst oder
ein Servicevertragspartner im Rahmen der
Garantie Reparaturen ausführt oder das
Gerät ersetzt, installiert der Kundendienst
oder der Servicevertragspartner
das ausgebesserte Gerät oder das
Ersatzgerät, falls dies erforderlich sein
sollte.
Als Ausnahme gilt die fehlerfreie
Installation durch qualizierte Fachleute
unter Verwendung von Originalteilen,
um das Gerät den technischen
Sicherheitsvorschriften eines anderen EULandes anzupassen.
Gültigkeit der länderspezischen
Bestimmungen
IKEA räumt Ihnen eine spezielle
Garantie ein, die die gesetzlichen
Gewährleistungsrechte, die von Land
zu Land unterschiedlich sein können,
mindestens abdeckt, evt. erweitert.
Allerdings schränken diese Bedingungen
in keiner Weise die landesweit geltenden
Verbraucherrechte ein.
Gültigkeitsbereich
Für Geräte, die in einem EU-Land gekauft
und in ein anderes Land mitgenommen
werden, wird der Kundendienst gemäss
den Garantierichtlinien im neuen Land
übernommen. Eine Verpichtung zur
Durchführung von Leistungen im Rahmen
der Garantie besteht nur dann, wenn
das Gerät gemäß der Montageanleitung
und gemäß der Sicherheitshinweise im
Benutzerhandbuch aufgestellt und installiert
wurde gemäß:
- den technischen Spezikationen des
Landes, in dem der Garantieanspruch
erfolgt;
- den Montageinstruktionen und
Informationen im Benutzerhandbuch.
Der autorisierte Kundendienst für IKEA
Geräte
Der autorisierte Kundendienst für IKEA
Geräte steht Ihnen für Fragen oder
Probleme wie folgt zur Verfügung:
• Wenn Sie einen Kundendienst im Rahmen
der Garantie benötigen
• Bei Fragen zur Installation Ihres IKEAGerätes in den IKEA-Möbelkörpus
(Hinweis: Die Gasinstallation wird von
einem autorisierten Gasfachmann
durchgeführt).
• Wenn Sie Fragen zu den Funktionen Ihres
IKEA-Gerätes haben.
Um Ihnen möglichst schnell und
kompetent weiterhelfen zu können,
bitten wir Sie, vorher die Montage und
Gebrauchsanweisung Ihres Gerätes
genauestens durchzulesen.
So erreichen Sie unseren Service
Gehen Sie dazu auf die letzte
Seite dieser Broschüre. Dort
nden Sie eine Übersicht mit den
entsprechenden Telefonnummern
und Kontaktdaten unserer
autorisierten Kundendienste.
Page 58

DEUTSCH 58
Damit wir Ihnen im Falle einer
Störung jederzeit schnell und
kompetent helfen können, bitten wir
Sie, sich an die in diesem Handbuch
angegebene Service-Rufnummer zu
wenden. Halten Sie dazu bitte die
(8-stellige) IKEA Artikelnummer und
die 12-stellige Servicenummer (auf
dem Geräte-Typschild vermerkt)
Ihres IKEA Gerätes bereit.
KAUF-/AUSLIEFERUNGSBELEG AUF!
Unser Service kann einen
Garantieanspruch nur unter Vorlage
dieses Beleges akzeptieren. Auf dem
Beleg sind auch die Bezeichnung
und (8-stellige) IKEA Artikelnummer
des von Ihnen erworbenen Geräts
vermerkt.
Benötigen Sie weiteren Rat und
Unterstützung?
Bei allen anderen, nicht
kundendienstspezischen Fragen bitten
wir Sie, sich an den Kundenservice im
nächstgelegenen IKEA-Einrichtungshaus
zu wenden. Wir empfehlen Ihnen, vorher
die dem Gerät beigefügten Unterlagen
genauestens durchzulesen.
Page 59

FRANÇAIS 59
Votre sécurité et celle d'autrui est très
importante.
Le présent manuel contient d’importants
messages relatifs à la sécurité, qui gurent
également sur l’appareil. Nous vous
invitons à les lire soigneusement et à les
respecter en toute circonstance.
Ceci est le symbole de danger relatif
à la sécurité. Il met en garde
l'utilisateur et toute autre personne contre
les risques potentiels dérivant de
l'utilisation de cet appareil.
Tous les messages relatifs à la sécurité
sont précédés du symbole de danger et
des termes suivants :
DANGER ! Indique une situation
dangereuse qui, si elle n'est pas
évitée, provoque des blessures graves.
AVERTISSEMENT ! Indique une
situation dangereuse qui, si elle n'est
pas évitée, est susceptible de provoquer
des blessures graves. Tous les messages
relatifs à la sécurité spécient le danger
potentiel auquel ils se réfèrent et
indiquent comment réduire le risque de
blessures, de dommages et de chocs
électriques résultant d’une utilisation non
réglementaire de l’appareil. Veuillez
observer scrupuleusement les instructions
suivantes :
- Utilisez des gants de protection pour
déballer et installer l'appareil.
- Débranchez l’appareil de
l’alimentation secteur avant de
procéder aux opérations d’installation.
- Les opérations d'installation et
d'entretien électriques doivent
exclusivement être réalisées par des
techniciens spécialisés, en conformité
avec les instructions du fabricant et les
normes locales en vigueur en matière
de sécurité. Évitez de réparer ou de
remplacer les pièces, sauf indication
contraire expressément mentionnée
dans le manuel.
- Si le cordon d'alimentation doit être
remplacé, faites appel à un technicien
qualié. Adressez-vous à un Service
Après-vente agréé.
- La mise à la terre de l'appareil est
obligatoire aux termes de la loi.
- Le cordon d’alimentation de l’appareil
doit être sufsamment long pour
permettre de le brancher sur le secteur
une fois encastré.
- Au moment d'installer l'appareil,
il est nécessaire de prévoir un
dispositif de coupure omnipolaire
Informations relatives à la sécurité 59
Description du produit 62
Bandeau de commandes 64
Liste des fonctions 64
Description de l'afchage 65
Utilisation quotidienne 68
Tableaux de cuisson 71
Nettoyage et entretien 76
Ce qu'il convient de faire si ... 78
Caractéristiques techniques 79
Installation 80
Conseils d'utilisation et suggestions 82
Branchements électriques 84
Conseils pour la protection
de l'environnement 84
GARANTIE IKEA 85
Informations relatives à la sécurité
Sommaire
Page 60

FRANÇAIS 60
ayant une distance d'au moins 3
mm entre les contacts, an d'assurer
une déconnexion complète en cas
de surtension de catégorie III, à
incorporer dans l'installation électrique
de l'habitation, conformément aux
normes locales en vigueur en matière
d'installation électrique.
- N’utilisez en aucun cas de prises
multiples ou de rallonges.
- Ne tirez jamais sur le cordon
d'alimentation pour débrancher
l'appareil de la prise de courant.
- Une fois l’installation terminée,
l’utilisateur ne devra plus pouvoir
accéder aux composants électriques.
- Si la surface de la plaque à induction
est ssurée, cette dernière ne doit pas
être utilisée. Mettez l'appareil hors
tension an de ne pas vous exposer
à un risque d'électrocution (concerne
uniquement les modèles à induction).
- Évitez de toucher l’appareil avec les
mains mouillées et ne l’utilisez pas
lorsque vous êtes pieds nus.
- Ce four a été conçu uniquement
comme appareil ménager destiné à
la cuisson des aliments. Toute autre
utilisation est considérée comme
impropre (chauffer une pièce, par
exemple). Le fabricant décline toute
responsabilité en cas d’utilisation
impropre ou de réglage incorrect des
commandes.
- Les personnes (y compris les
enfants âgés d'au moins 8 ans)
qui, en raison de leurs capacités
physiques, sensorielles ou mentales,
de leur inexpérience ou de leur
méconnaissance, ne sont pas en
mesure d'utiliser l'appareil en toute
sécurité, doivent se servir de celui-ci
uniquement sous la surveillance et
avec les instructions d'une personne
responsable. Empêchez les enfants de
jouer avec l'appareil. Le nettoyage
et l'entretien quotidien de l'appareil
ne doivent pas être effectués par
un enfant, à moins qu'une personne
adulte ne supervise ces opérations.
- Les parties accessibles du four
peuvent atteindre une température
élevée quand l’appareil est en service.
Veillez à tenir les enfants hors de
portée de l’appareil. Contrôlez qu'ils
ne jouent pas avec le four.
- L'appareil et ses parties accessibles
deviennent chauds pendant
l'utilisation. Veillez à ne pas toucher les
résistances. Tenez les enfants de moins
de 8 ans à l'écart de l'appareil ou
surveillez-les constamment pour éviter
qu'ils ne jouent avec l'appareil.
- Pendant et après utilisation, veillez
à ne pas toucher les résistances ou
les surfaces intérieures du four, vous
risquez de vous brûler. Évitez de
mettre le four en contact avec des
chiffons ou tout matériau inammable
avant que les composants de
l’appareil n’aient sufsamment
refroidis.
- En n de cuisson, soyez
particulièrement prudent au moment
d’ouvrir la porte. Laissez l’air chaud ou
la vapeur s’évacuer progressivement
de l’enceinte de cuisson avant
d’accéder à celle-ci. Lorsque la
porte est fermée, l’air chaud sort
à travers l’ouverture située audessus du bandeau de commande.
Évitez d'obstruer les ouvertures de
Page 61

FRANÇAIS 61
ventilation.
- Munissez-vous de gants pour
retirer les plats et les accessoires
du four. Veillez à ne pas toucher les
résistances.
- Ne placez aucun matériau
inammable à proximité ou à
l'intérieur de l'appareil. Le cas
échéant, un incendie risquerait de se
produire en cas de mise en marche
accidentelle de l'appareil.
- Évitez de chauffer ou de cuire
au four des aliments dans des
récipients hermétiques. La pression
qui se développe à l’intérieur du
récipient pourrait le faire exploser et
endommager l’appareil.
- N'utilisez en aucun cas de récipients
en matière synthétique pour cuire des
aliments au four.
- L'huile et la graisse peuvent devenir
très chaudes et s'enammer
facilement. Surveillez régulièrement
la cuisson si vous utilisez une quantité
importante de graisse ou d'huile.
- Ne laissez jamais l'appareil sans
surveillance pendant la dessiccation
des aliments.
- Si des liquides contenant de l’alcool
(par exemple, rhum, cognac, vin)
sont utilisés pour cuisiner des plats,
rappelez-vous que l’alcool s’évapore
à des températures élevées. Il peut
donc s'ensuivre que les vapeurs
dégagées par l’alcool s’enamment
en entrant en contact avec la
résistance électrique.
- Pour nettoyer votre appareil, n'utilisez
en aucun cas un jet d'eau sous haute
pression ni d'appareil de nettoyage à
la vapeur.
- Ne touchez pas le four pendant le
cycle de pyrolyse. Éloignez les enfants
de l'appareil pendant le déroulement
du cycle de pyrolyse (uniquement
pour les fours dotés de la fonction
Pyrolyse).
- Pendant et après le nettoyage par
pyrolyse, veillez à tenir les animaux
domestiques (en particulier, les
oiseaux) éloignés de l'endroit où est
installé l'appareil.
- Utilisez uniquement la sonde
de température spéciquement
recommandée pour ce four.
- N'utilisez en aucun cas de produits
de nettoyage abrasifs ou de tampons
métalliques à récurer pour nettoyer
la vitre du four, car vous risqueriez de
rayer la surface et d'entraîner à la
longue sa rupture.
- Avant de remplacer la lampe du
four, veillez à mettre l'appareil hors
tension pour éviter tout risque éventuel
d'électrocution.
Mise au rebut des appareils ménagers
usagés
- Cet appareil est fabriqué à partir de
matériaux recyclables ou pouvant
être réutilisés. Mettez-le au rebut en
vous conformant aux réglementations
locales en matière d’élimination
des déchets. Avant de mettre votre
appareil au rebut, coupez le cordon
d'alimentation.
- Pour toute information sur le
traitement et le recyclage d'appareils
électroménagers, contactez le service
municipal compétent, le service de
collecte des déchets ménagers ou le
magasin où vous l’avez acheté.
Page 62

FRANÇAIS 62
Description du produit
1
Bandeau de commandes
2
Ventilateur de refroidissement
1)
(dissimulé)
3
Résistance de voûte/Gril
4
Éclairage arrière du four
5
Ventilateur de four
6
Résistance de sole (non visible)
7
Porte du four
8
Grilles latérales
1) Il se peut que le ventilateur continue de fonctionner
même après l'extinction du four. Pendant la pyrolyse,
la vitesse du ventilateur est plus élevée que pendant
la cuisson.
1
2
4
8
3
5
6
7
Accessoires
Grille
1x
Plaque à pâtisserie
1x
Lèchefrite
1x
Glissières coulissantes
2x
Page 63

FRANÇAIS 63
Introduction de grilles et autres accessoires
à l'intérieur du four
1. Insérez la grille horizontalement, avec la
partie rehaussée « A » orientée vers le
haut (Fig. 1).
A
Fig. 1
2. Pour les autres accessoires, tels que
la lèchefrite et la plaque à pâtisserie,
l'introduction s'effectue de la même
manière que pour la grille (Fig. 2).
Fig. 2
Retirez le lm bleu comme indiqué sur
l'illustration
Insertion de la plaque dans les glissières
coulissantes.
Placez la lèchefrite sur les glissières
coulissantes jusqu'à ce qu'elle se xe en
position.
Fig. 2
Fig. 3
Page 64

FRANÇAIS 64
Bandeau de commandes
A
Bouton de sélection des fonctions
B
Bouton de navigation
Remarque : les boutons de commande sont
escamotables. Appuyez sur le centre de ces
boutons pour les extraire de leur siège.
C
Touche de sélection/conrmation
A BC
En tournant le bouton « Fonctions » dans
une position quelconque, le four s’active:
l’afcheur visualise les fonctions ou les sous-
menus associés à chacune d’elles.
Les sous-menus sont disponibles et
sélectionnables en positionnant le bouton sur
les fonctions GRIL, FONCTIONS SPÉCIALES,
RÉGLAGES, PAIN/PIZZA.
REMARQUE: pour la liste et la description
des fonctions, se référer au tableau
correspondant.
Liste des fonctions
Page 65

FRANÇAIS 65
Description de l'afchage
1
Visualisation des éléments chauffants
actifs pour les différentes fonctions
2
Symboles pour la gestion du temps:
minuterie, durée de cuisson, heure de n
de cuisson, heure courante
3
Informations relatives aux fonctions
choisies
4
Fonction automatique PAIN/PIZZA
sélectionnée
5
Indication porte four fermée durant le
cycle de nettoyage automatique (non
disponible sur ce modèle)
6
Température intérieure du four
7
Fonction Pyrolyse (non disponible sur ce
modèle)
8
Brunissage
9
Fonctions spéciales: décongélation,
maintien au chaud, levage de pâtes
1
2 3 4
5
6789
Réglage du temps
2
4
1
3
Lors de la première mise en service du four,
les deux chiffres relatifs à l'heure clignotent
sur l'afchage.
1. Tournez le bouton "Navigation"
B
pour
afcher l'heure correcte.
2. Appuyez sur la touche
C
pour
conrmer ; les deux chiffres relatifs aux
minutes clignotent sur l'afchage.
3. Tournez le bouton "Navigation"
B
pour
afcher les minutes.
4. Appuyez sur la touche
C
pour conrmer.
Pour modier l'heure courante, par exemple,
après une coupure de courant, voir le
paragraphe suivant (RÉGLAGES).
Page 66

FRANÇAIS 66
Tableau des fonctions du four
Le four possède 4 niveaux de cuisson. Le comptage s'effectue en partant du bas.
Fonction Description de la fonction
0
OFF Pour interrompre la cuisson et éteindre le four.
CHALEUR PULSÉE Pour cuire simultanément sur deux gradins des aliments, mêmes
différents, nécessitant la même température de cuisson (par ex. :
poisson, légumes, gâteaux). La fonction permet de cuire sans
transmettre les odeurs d'un aliment à l'autre. Utilisez le 2e gradin
pour les cuissons sur un seul gradin.
Pour les cuissons sur deux niveaux, utilisez les 1er et 3e gradins
après avoir préchauffé le four.
CONVECTION
NATURELLE
Pour cuire n'importe quel type de plat sur un seul gradin. Utilisez
le 2e gradin. Préchauffer le four avant d'y introduire les aliments.
CONVECTION
FORCÉE
Pour cuire des viandes et des gâteaux avec farce liquide (salés ou
sucrés) sur un unique gradin. Utilisez le 2e gradin. Préchauffez le
four avant d'y introduire les aliments.
CUISSON
GROSSE PIÈCE
Pour cuire les gros morceaux de viande (supérieurs à 2,5 kg).
Utilisez le 1er ou le 2e gradin selon les dimensions de la viande.
Il n'est pas nécessaire de préchauffer le four. Il est conseillé de
retourner la viande pendant la cuisson pour obtenir un brunissage
homogène des deux côtés. Mouillez la viande avec son jus de
temps à autre, vous éviterez ainsi qu'elle ne soit trop sèche en n
de cuisson.
GRIL Pour griller des steaks, des brochettes et des saucisses, faire
gratiner des légumes et dorer du pain. Nous suggérons de
positionner le plat sur le 4e gradin. Pour faire griller de la viande,
il est conseillé d'utiliser une lèchefrite pour recueillir le jus de
cuisson. La placer sur le 3e gradin en ajoutant environ un demilitre d'eau. Il n'est pas nécessaire de préchauffer le four. Pendant
la cuisson, la porte du four doit rester fermée.
TURBOGRIL Pour griller de gros morceaux de viande (cuisseaux, rosbifs,
poulets). Placez-les sur les gradins centraux.
Il est conseillé d'utiliser une lèchefrite pour recueillir le jus de
cuisson. Placez-la sur le 1er/2e gradin en ajoutant environ un
demi-litre d'eau. Il n'est pas nécessaire de préchauffer le four.
Pendant la cuisson, la porte du four doit rester fermée.
PAIN/PIZZA Pour cuire différents types et formats de pain et de pizza. Cette
fonction a deux programmes dont les réglages sont prédénis. Il
sufra d'indiquer les valeurs demandées (température et durée)
et le four gèrera automatiquement le cycle de cuisson optimal.
Placez la pâte sur le 2e gradin après le préchauffage du four.
Page 67

FRANÇAIS 67
Fonction Description de la fonction
FONCTIONS
SPÉCIALES
DÉCONGÉLATION
Pour accélérer la décongélation des aliments. Il est conseillé de
placer l'aliment sur le gradin central. Laissez les aliments dans leur
emballage pour empêcher que leur surface ne se déshydrate.
MAINTIEN AU
CHAUD
Pour conserver les aliments cuits chauds et croustillants (ex:
viandes, fritures, ans). Il est conseillé de placer l'aliment sur le
gradin central. La fonction ne s'active pas si la température de
l'enceinte est supérieure à 65°C.
LEVAGE DE LA
PÂTE
Pour obtenir un levage optimal des pâtons salés ou sucrés. An de
préserver la qualité du levage, la fonction ne s’activera pas si la
température du four est supérieure à 40 °C. Placez la pâte sur le
2e gradin. Il n'est pas nécessaire de préchauffer le four.
ECO CHALEUR
PULSÉE
Pour la cuisson de rôtis de viande farcis et de morceaux de viande
sur un gradin. Cette fonction utilise l'assistance d'une douce
ventilation intermittente pour éviter le dessèchement excessif des
aliments. Avec cette fonction ECO, l'éclairage reste désactivé
pendant la cuisson et peut être temporairement réactivé via une
pression sur la touche de conrmation. Pour optimiser l'efcacité
énergétique, il est conseillé de ne pas ouvrir la porte en cours
de cuisson. Il est conseillé d'utiliser le 3ème gradin. Il n'est pas
nécessaire de préchauffer le four.
PRÉCHAUFFAGE
RAPIDE
Pour préchauffer le four rapidement.
RÉGLAGES Pour régler l'afchage (langue, heure, luminosité, volume du signal
sonore, économie d'énergie).
ÉCLAIRAGE Pour allumer/éteindre l'éclairage à l'intérieur du four.
Page 68

FRANÇAIS 68
Utilisation quotidienne
Sélectionnez une fonction de cuisson
1 2
1. Tournez le bouton "Fonctions"
A
sur la
fonction choisie : les paramètres de cuisson
s'afchent.
2. Si les valeurs proposées correspondent à
celles que vous souhaitez, appuyez sur la
touche
C
. Pour les modier, procédez
comme indiqué ci-dessous.
Réglage de la température/puissance du gril
Pour modier la température ou la puissance du
gril, procédez comme suit :
12
1. Tournez le bouton "Navigation"
B
pour
afcher la valeur désirée.
2. Appuyez sur la touche
C
pour conrmer.
Préchauffage rapide
2
3
1
4
N'introduisez pas d'aliments dans le four avant
que le cycle de préchauffage ne soit terminé.
1. Tournez le bouton "Fonctions"
A
jusqu'au
symbole
pour sélectionner la fonction de
préchauffage rapide.
2. Conrmez en appuyant sur la touche
C
: les
paramétrages s'afchent.
3. Si la température proposée correspond à
celle que vous souhaitez, appuyez sur la
touche
C
. Pour modier la température
du four, procédez comme indiqué dans
le paragraphe précédent "Réglage
de la température/puissance du gril".
L'indication PRE s'afche. Une fois la
température programmée atteinte, la valeur
correspondante (200 °C par exemple)
s'afche et un signal sonore retentit. À la n
du cycle de préchauffage, le four sélectionne
automatiquement la convection naturelle
.
À ce stade, introduisez le plat à cuire.
4. Si vous désirez programmer une fonction
de cuisson différente, tournez le bouton
"Fonctions"
A
et sélectionnez la fonction
désirée.
Programmation du temps de cuisson
Cette fonction permet de cuire pendant un temps
déni, d'un minimum de 1 minute jusqu'au temps
maximum permis par la fonction sélectionnée.
Quand la durée de cuisson s'est écoulée, le four
s'éteint automatiquement.
1 2 3
1. Après avoir conrmé la température, le
symbole
clignote.
2. Tournez le bouton de réglage
B
pour
afcher le temps de cuisson désiré.
3. Appuyez sur la touche
C
pour conrmer la
durée de cuisson.
Réglage de l'heure de n de cuisson/départ
différé
REMARQUE IMPORTANTE : le réglage Départ
différé n'est pas disponible avec les fonctions
suivantes : PRÉCHAUFFAGE RAPIDE, PAIN/
PIZZA.
Remarque : Lorsque vous effectuez ce réglage,
la température sélectionnée est atteinte
progressivement, c'est pourquoi la durée de
cuisson est légèrement plus longue que celle
indiquée dans le tableau de cuisson.
Vous pouvez programmer l'heure de n de
cuisson désirée en retardant l'allumage du four
de 23 heures et 59 minutes maximum à partir
Page 69

FRANÇAIS 69
de l'heure courante. Ceci n'est possible qu'après
avoir programmé une durée de cuisson.
Après avoir introduit la durée de la cuisson,
l'heure de n de cuisson s'afche (par exemple
15:45) et le symbole
clignote.
1 2
Pour différer la n de la cuisson, en différant
l'allumage du four, procédez comme suit :
1. Tournez le bouton "Navigation"
B
jusqu'à
la visualisation de l'heure à laquelle vous
désirez terminer la cuisson (par exemple
16:00).
2. Conrmez la valeur choisie en appuyant sur
la touche
C
: les deux points de l'heure de
n de cuisson clignotent pour indiquer que le
réglage a été effectué correctement.
3. Le four diffèrera automatiquement le départ
de manière à terminer la cuisson à l'heure
préréglée.
Minuteur
1 2
Cette fonction ne peut être utilisée que lorsque
le four est éteint et est utile, par exemple, pour
contrôler le temps de cuisson des pâtes.
La durée maximum pouvant être réglée est de 23
heures et 59 minutes.
1. Avec le bouton "Fonctions"
A
sur zéro,
tournez le bouton "Navigation" jusqu'à
l'afchage de la durée désirée.
2. Appuyez sur la touche
C
pour lancer
le compte à rebours. Une fois la durée
programmée écoulée, l'indication "END"
s'afche et un signal sonore retentit. Pour
l'interrompre, appuyez sur la touche
C
(l'heure courante apparaît sur l'afchage).
Sélection des fonctions spéciales
1 2 3
1. Tournez le bouton "Fonctions"
A
jusqu'à ce
que "DEFROST" et le symbole correspondant
s'afchent.
2. Tournez le bouton "Navigation"
B
pour parcourir la liste des fonctions :
DÉCONGÉLATION, MAINTIEN AU CHAUD,
LEVAGE DE LA PÂTE, ÉCO CHALEUR
PULSÉE.
3. Appuyez sur la touche
C
pour conrmer.
Brunissage
À la n de la cuisson, pour les fonctions qui
le permettent, l'afcheur propose de dorer
davantage votre plat. Cette fonction ne peut
être activée que si vous avez réglé une durée de
cuisson.
1
Une fois la durée de cuisson écoulée, l'afchage
montre : "PRESS
TO BROWN" (Appuyer pour
dorer). En appuyant sur la touche
C
, le four lance
le cycle de brunissage pendant 5 minutes. Cette
fonction ne peut être exécutée que deux fois.
Sélection de la fonction pain/pizza
En plaçant l'indicateur du bouton "Fonctions"
A
en face du symbole
, on accède à un sousmenu contenant deux fonctions automatiques de
cuisson pour "pain" et "pizza".
Pain
3
4
1 2
1. Tournez le bouton "Fonctions"
A
sur le
Page 70

FRANÇAIS 70
symbole : "BREAD" AUTO s'afche.
2. Appuyez sur
C
pour sélectionner la fonction.
3. Tournez le bouton "Navigation"
B
pour
régler la température désirée (entre 180°C et
220°C) et conrmez avec la touche
C
.
4. Tournez le bouton "Navigation"
B
pour
régler la durée de cuisson désirée et appuyez
sur
C
pour lancer la cuisson.
Pizza
1
3
2
4 5
1. Tournez le bouton "Fonctions"
A
sur le
symbole
: "BREAD" s'afche. Pour sélectionner
la fonction "PIZZA", procédez comme suit :
2. Tournez le bouton "Navigation"
B
: "PIZZA"
s'afche à l'écran.
3. Appuyez sur
C
pour sélectionner la fonction.
4. Tournez le bouton "Navigation"
B
pour
régler la température désirée (entre 220°C et
250°C) et conrmez avec la touche
C
.
5. Tournez le bouton "Navigation"
B
pour
régler la durée de cuisson désirée et appuyez
sur
C
pour lancer la cuisson.
Réglages
Positionnez l'indicateur du bouton "Fonctions"
A
face au symbole
pour accéder à un
sous-menu regroupant cinq réglages d'afchage
modiables.
Horloge
Tournez le bouton "Navigation"
B
jusqu'à ce
que "HEURE" s'afche. Pour modier l'heure,
reportez-vous au paragraphe précédent
(RÉGLAGE HEURE COURANTE).
Eco
Lorsque le mode ECO est sélectionné (ON), la
luminosité de l'afchage est réduite et l'horloge
s'afche 3 minutes après l'activation du mode de
veille du four. L'éclairage du four est également
désactivé pendant la cuisson. Pour visualiser les
informations sur l'afchage et rallumer le four, il
suft d'appuyer sur la touche
C
ou de tourner
l'un des boutons.
1. Tournez le bouton "Navigation"
B
jusqu'à ce
que "ECO" s'afche.
2. Appuyez sur la touche
C
pour accéder aux
réglages (ON/OFF).
3. Tournez le bouton "Navigation"
B
pour
sélectionner le réglage désiré et conrmez
avec la touche
C
.
4. Si la fonction Mode Eco est activée alors
qu'une fonction de cuisson est en cours,
l'éclairage de la cavité s'éteint au bout de
1 minute de cuisson et se rallume lors de toute
interaction de l'utilisateur avec le four.
Signal sonore
Pour activer ou désactiver le signal sonore,
procédez comme suit :
1. Tournez le bouton "Navigation"
B
jusqu'à ce
que "SOUND" s'afche.
2. Appuyez sur la touche
C
pour accéder aux
réglages (ON/OFF).
3. Tournez le bouton "Navigation"
B
pour
sélectionner le réglage désiré et conrmez
avec la touche
C
.
Luminosité
Pour modier la luminosité de l'écran, procédez
comme suit :
1. Tournez le bouton "Navigation"
B
jusqu'à ce
que "BRIGHTNESS" s'afche.
2. Appuyez sur la touche
C
: le numéro 1
s'afche.
3. Tournez le bouton "Navigation"
B
pour
augmenter ou diminuer la luminosité et
conrmez avec la touche
C
.
Page 71

FRANÇAIS 71
Tableaux de cuisson
Type d’aliment Fonction Préchauf-
fage
Niveau
(en
partant
du bas)
Température
(°C)
Temps
de
cuisson
(min)
Accessoires
Gâteaux levés
X 2 160-180 30-90 Moule à gâteau
sur grille
X 1-3 160-180 30-90 Grad. 3 : moule
à gâteau sur
grille
Grad. 1 : moule
à gâteau sur
grille
Tourtes fourrées
(tarte au
fromage blanc,
strudel aux
pommes, tarte
aux fruits)
– 2 160-200 30-85 Lèchefrite/
plaque à
pâtisserie
ou moule à
gâteaux
sur grille
X 1-3 160-200 35-90 Grad. 3 : moule
à gâteau sur
grille
Grad. 1 : moule
à gâteau sur
grille
Biscuits/
Tartelettes
X 2 170 -180 15-45 Lèchefrite/
plaque à
pâtisserie
X 1-3 15 0 -170 20-45 Grad. 3 : plaque
à pâtisserie
Grad. 1 :
lèchefrite
Choux ronds
X 2 180-200 30-40 Lèchefrite/
plaque à
pâtisserie
X 1-3 180 -190 35-45 Grad. 3 : plaque
à pâtisserie
Grad. 1 :
lèchefrite
Page 72

FRANÇAIS 72
Type d’aliment Fonction Préchauf-
fage
Niveau
(en
partant
du bas)
Température
(°C)
Temps
de
cuisson
(min)
Accessoires
Meringues
X 2 90 110 -15 0 Lèchefrite/
plaque à
pâtisserie
X 1-3 90 130 -150 Grad. 3 : plaque
à pâtisserie
Grad. 1 :
lèchefrite
Pain/Pizza/
Fougasse
X 2 190-250 15- 50 Lèchefrite/
plaque à
pâtisserie
X 1-3 190-250 25-50 Grad. 3 : plaque
à pâtisserie
Grad. 1 :
lèchefrite
Pain
X 2 180-220 30-50 Lèchefrite/
plaque à
pâtisserie ou
grille
Pizza
X 2 220-250 15-30 Lèchefrite/
plaque à
pâtisserie
Pizzas
surgelées
X 2 250 10-15 Grad. 2 :
lèchefrite
/ plaque à
pâtisserie ou
grille
X 1-3 250 10-20 Grad. 3 : plaque
à pâtisserie
Grad. 1 :
lèchefrite
Tourtes (Tourtes
aux légumes,
quiches)
X 2 180-19 0 35-45 Moule à gâteau
sur grille
X 1-3 180 -190 45-60 Grad. 3 : moule
à gâteau sur
grille
Grad. 2 : moule
à gâteau sur
grille
Page 73

FRANÇAIS 73
Type d’aliment Fonction Préchauf-
fage
Niveau
(en
partant
du bas)
Température
(°C)
Temps
de
cuisson
(min)
Accessoires
Vol-au-vent/
biscuits salés en
pâte feuilletée
X 2 190-200 20-30 Lèchefrite/
plaque à
pâtisserie
X 1-3 180 -190 20-40 Grad. 3 : plaque
à pâtisserie
Grad. 1 :
lèchefrite
Lasagnes/
Pâtes au four/
Cannellonis/
Flans
X 2 190-200 30-60 Lèchefrite ou
plaque sur grille
Agneau/Veau/
Bœuf/Porc
1 kg
X 2 190-200 70-100 Lèchefrite ou
plaque sur grille
Poulet/Lapin/
Canard
1 kg
X 2 200-230 50-100 Lèchefrite ou
plaque sur grille
Dinde / Oie
3 Kg
X 1-2 190-200 8 0-130 Lèchefrite ou
plaque sur grille
Poisson au four
/ en papillote
(let, entier)
X 2 180-200 40-60 Lèchefrite ou
plaque sur grille
Légumes farcis
(tomates,
courgettes,
aubergines)
X 2 170 -19 0 30-60 Plaque sur grille
Toast
– 4 3 (élevée) 2-5 Grille
Filets/darnes
de poisson
– 4 2 (moyenne) 20-35 Grad. 4 : grille
(retourner les
aliments à micuisson)
Grad. 3 :
lèchefrite avec
eau
Page 74

FRANÇAIS 74
Type d’aliment Fonction Préchauf-
fage
Niveau
(en
partant
du bas)
Température
(°C)
Temps
de
cuisson
(min)
Accessoires
Saucisses/
brochettes/
côtelettes/
hamburgers
– 4 2-3
(moyenneélevée)
15-40 Grad. 4 : grille
(retourner les
aliments à micuisson)
Grad. 3 :
lèchefrite avec
eau
Poulet rôti 1-1,3
Kg
X 2 2 (moyenne) 50-65 Grad. 2 : grille
métallique
(tourner les
aliments aux
deux tiers de la
cuisson)
Grad. 1 :
lèchefrite avec
eau
3 (élevée) 60-80 Grad. 2 :
tournebroche
Grad. 1 :
lèchefrite avec
eau
Rosbif saignant
1 Kg
– 2 2 (moyenne) 35-50 Plaque sur grille
(retourner les
aliments aux
deux tiers de
la cuisson si
nécessaire)
Gigot
d'agneau/
Jarrets
– 2 2 (moyenne) 60-90 Lèchefrite ou
plaque sur grille
(retourner les
aliments aux
deux tiers de
la cuisson si
nécessaire)
Page 75

FRANÇAIS 75
Type d’aliment Fonction Préchauf-
fage
Niveau
(en
partant
du bas)
Température
(°C)
Temps
de
cuisson
(min)
Accessoires
Pommes de
terre au four
– 2 2 (moyenne) 35-50 Lèchefrite/
plaque à
pâtisserie
(retourner les
aliments aux
deux tiers de
la cuisson si
nécessaire)
Légumes
gratinés
– 2 3 (élevée) 10 -15 Plaque sur grille
Lasagnes et
viande
X 1-3 200 50-100* Grad. 3 : plaque
sur grille
Grad. 1 :
lèchefrite ou
plaque sur grille
Viande et
pommes de
terre
X 1-3 200 45-100* Grad. 3 : plaque
sur grille
Grad. 1 :
lèchefrite ou
plaque sur grille
Poisson et
légumes
X 1-3 180 30-50* Grad. 3 : plaque
sur grille
Grad. 1 :
lèchefrite ou
plaque sur grille
Rôtis de viande
farcis
– 3 200 80-120* Lèchefrite ou
plaque sur grille
Morceaux de
viande
(lapin, poulet,
agneau)
– 3 200 50-100* Lèchefrite ou
plaque sur grille
* La durée de cuisson est approximative. Les aliments peuvent être retirés du four à des
moments différents, en fonction du goût personnel.
Page 76

FRANÇAIS 76
Nettoyage et entretien
NETTOYAGE
AVERTISSEMENT !
- Pour nettoyer votre appareil, n'utilisez en
aucun cas un appareil de nettoyage à la
vapeur.
- Attendez que le four soit froid avant de
procéder à son nettoyage.
- Débranchez l'appareil.
Extérieur du four
i
IMPORTANT : n’utilisez en aucun cas
des produits corrosifs ou des détergents
abrasifs. En cas de contact accidentel d'un tel
produit avec le four, essuyez immédiatement
ce dernier avec un chiffon humide.
• Nettoyez les surfaces à l'aide d'un chiffon
humide. S'il est très sale, utilisez une
solution d'eau additionnée de quelques
gouttes de détergent à vaisselle. Essuyez
avec un chiffon sec.
Enceinte du four
i
IMPORTANT: n’utilisez pas d’éponges
abrasives ou de paille de fer. À la
longue, celles-ci risquent d'abîmer les
surfaces émaillées et la vitre de la porte.
• Après chaque utilisation, laissez refroidir
le four et nettoyez-le, de préférence
lorsqu'il est tiède, pour éviter que les
résidus d'aliments ne s'incrustent (par
exemple, aliments à haute teneur en
sucre).
• Utilisez des produits spéciaux pour fours
et respectez les instructions du fabricant.
• Nettoyez la vitre de la porte du four
avec un détergent liquide approprié.
Pour faciliter le nettoyage du four, la
porte peut être retirée (référez-vous à la
section "Entretien"). La vitre intérieure est
lisse pour faciliter le nettoyage.
REMARQUE : pendant les cuissons
prolongées d'aliments à forte teneur en eau
(par exemple, pizzas, légumes, etc.), de la
condensation risque de se former à l'intérieur
de la porte et sur le pourtour du joint. Dès
que le four est froid, essuyez l'intérieur de la
porte avec un chiffon ou une éponge.
Accessoires
• Faites tremper les accessoires dans de
l'eau contenant du détergent à vaisselle
immédiatement après leur utilisation, en
les manipulant avec des gants isolants ou
des maniques s'ils sont encore chauds.
• Utilisez une brosse ou une éponge
pour détacher facilement les résidus
d'aliments.
ENTRETIEN
AVERTISSEMENT !
- Munissez-vous de gants de protection.
- Assurez-vous que le four est froid avant
d'effectuer les opérations suivantes.
- Débranchez le four.
Pour démonter la porte
2x
Page 77

FRANÇAIS 77
Pour remonter la porte
2x
Pour déposer les grilles porte-accessoires
latérales
Déplacez la grille latérale vers le haut
jusqu'à ce que les deux bornes inférieures
soient débloquées puis faites pivoter la grille
vers le centre du four. Pour remettre la grille
en place, procédez dans l'ordre inverse de
la dépose.
1
2
Pour remplacer l'ampoule arrière
1. Débranchez le four.
Fig. 5
2. Dévissez le cache de l'ampoule (Fig. 5),
remplacez l'ampoule grillée par une
neuve (voir la remarque concernant le
type d'ampoule utilisé) et revissez le
cache.
3. Rebranchez le four.
REMARQUE :
- Utilisez uniquement des ampoules
halogènes de 40W/230 V type G9, T300
°C (selon modèle).
- L'ampoule utilisée dans l'appareil est
spécialement conçue pour les appareils
électriques et n’est pas destinée à être
utilisée pour un éclairage de pièce
(Règlement (CE) n° 244/2009 de la
Commission).
- Ces ampoules sont disponibles auprès du
centre d'entretien et de réparation agrée
IKEA.
Page 78

FRANÇAIS 78
Problème Cause possible Solution
Le four ne fonctionne pas. Pas de courant. Vériez qu'il n'y a pas de
coupure de courant.
Le four n'est pas
branché.
Branchez le four à
l'alimentation électrique.
Éteignez puis rallumez le four
pour voir si le problème a été
éliminé.
La porte ne s'ouvre pas Éteignez puis rallumez le four
pour voir si le problème a été
éliminé.
Le bandeau d'afchage
électronique ne fonctionne
pas :
Si la lettre "F" suivie d'un
numéro s'afche, contactez
le centre d'entretien et de
réparation agréé le plus
proche. Dans ce cas, spéciez
le numéro qui suit la lettre "F".
Ce qu'il convient de faire si ...
Avant de contacter le centre d'entretien et
de réparation agréé :
1. Vériez en premier lieu si vous pouvez
remédier au problème par vous-même à
l'aide des suggestions de la section "Ce
qu'il convient de faire si ...".
2. Éteignez puis rallumez l'appareil pour
voir si le problème a été éliminé.
Si, après ces contrôles, le problème persiste,
adressez-vous au centre d'entretien et de
réparation agréé IKEA.
Veuillez toujours spécier :
• une brève description du défaut ;
• le type et le modèle exact du four ;
• la référence (numéro suivant le mot
"Service" sur la plaque signalétique)
apparaissant sur le bord intérieur droit
de
l’enceinte du four (visible lorsque la porte
est ouverte) ;
• votre adresse complète ;
• votre numéro de téléphone.
Si le four doit être réparé, adressez-vous au
Centre d'entretien et de réparation agréé
IKEA (vous aurez ainsi la garantie que les
pièces défectueuses seront remplacées par
des pièces d'origine et que la réparation de
votre appareil sera effectuée correctement).
Page 79

FRANÇAIS 79
Caractéristiques techniques
Type de produit : Four électrique encastrable
Code d'identication du modèle :
BEJUBLAD 603.009.01, BEJUBLAD 403.009.02, BEJUBLAD 603.008.97
BEJUBLAD 403.008.98, RAFFINERAD 003.009.18, RAFFINERAD 803.009.19
Nombre de cavités 1
Type de chauffage Électrique
Nombre de fonctions 11
Volume utile. Calculé grilles porte-accessoires latérales et panneaux
catalytiques déposés (l)
65
Surface de la plus grande plaque de cuisson en cm
2
1200
Classe d'efcacité énergétique (consommation des plus réduites) A+
Indice d’efcacité énergétique 81, 9
Consommation électrique
Fonction convection naturelle (avec charge standard et résistances de voûte et
de sole)
kWh/cycle
0,87
Consommation électrique
Fonction chaleur pulsée (avec charge standard et système de chauffage à air
pulsé)
kWh/cycle
0,70
Résistance de voûte (W) 2450
Résistance de sole (W) 115 0
Résistance gril (W) 2450
Résistance de ventilateur (W) 2000
Ventilateur de refroidissement (W) 12-21
Ampoule du four (W) 40
Puissance nominale du ventilateur de four (W) 12-21
Puissance totale (W) 2600
Dimensions
Largeur (mm) 595
Hauteur (mm) 595
Profondeur (mm) 564
Page 80

FRANÇAIS 80
Après avoir déballé le four, contrôlez
que l'appareil n'a pas été endommagé
pendant le transport et que la porte ferme
parfaitement. En cas de problème, contactez
votre revendeur ou le Centre d'entretien et
de réparation agréé le plus proche. Pour
éviter un endommagement du four, il est
recommandé de le retirer de la base en
polystyrène uniquement au moment de
l'installation.
Préparation du meuble d'encastrement
• Les meubles de cuisine adjacents au four
doivent résister à la chaleur (min. 90 °C).
• Procédez au découpage du meuble
avant d'y installer l'appareil. Prenez soin
d'éliminer tous les copeaux et la sciure
de bois qui pourraient entraver le bon
fonctionnement de l'appareil.
• Une fois l'installation terminée, la base
du four ne doit plus être accessible.
• Pour un bon fonctionnement de
l'appareil, veillez à ne jamais obstruer
l'espace minimum requis entre le plan de
travail et le bord supérieur du four.
Recommandations générales
Avant la première utilisation
- Retirez les protections en carton,
les lms plastiques et les étiquettes
adhésives éventuellement présents sur les
accessoires.
- Ne retirez pas la plaque signalétique
située sur le côté droit du cadre de porte.
Installation
Caractéristiques techniques
Les informations techniques sont situées
sur la plaque signalétique à l'intérieur de
l'appareil.
Page 81

FRANÇAIS 81
- Retirez tous les accessoires du four et
faites-le chauffer à 200 °C pendant une
heure environ an de faire disparaître
les odeurs et les fumées qui se dégagent
du matériau isolant et des graisses de
protection.
Pendant l'utilisation
- Évitez de déposer des objets lourds sur la
porte du four pour ne pas l'endommager.
- Évitez de prendre appui sur la porte et
ne suspendez aucun objet à la poignée.
- Évitez de recouvrir l'intérieur du four avec
des feuilles d'aluminium.
- Ne versez jamais d'eau à l'intérieur
d'un four chaud. Cela risquerait
d'endommager le revêtement en émail.
- Ne déplacez jamais les ustensiles de
cuisson en les faisant glisser sur le
fond du four, sous peine de rayer le
revêtement en émail.
- Veillez à ce que le cordon électrique
d'autres appareils électroménagers se
trouvant à proximité ne puisse entrer en
contact avec les parties chaudes du four
ni ne se coince dans la porte.
- Évitez d'exposer le four aux agents
atmosphériques.
Dispositif de verrouillage du four
Pour ouvrir la porte avec le dispositif de
verrouillage du four, reportez-vous à la
gure 1.
Fig. 1
Pour déposer le dispositif de sécurité de la
porte, suivez la procédure décrite dans les
images (voir Fig. 2).
Fig. 2
Page 82

FRANÇAIS 82
Comment lire le tableau de cuisson
Le tableau indique la meilleure fonction
à utiliser pour un aliment donné, à cuire
sur un ou plusieurs gradins simultanément.
Les temps de cuisson sont effectifs à partir
de l'introduction du plat dans le four et ne
tiennent pas compte du préchauffage (le cas
échéant). Les températures et les temps de
cuisson sont indicatifs et dépendent de la
quantité des aliments et du type d'accessoire
utilisé. Commencez par utiliser les valeurs
les plus basses conseillées et, si le résultat de
la cuisson n'est pas satisfaisant, augmentez
les valeurs. Il est conseillé d'utiliser les
accessoires fournis et des moules ou plats
en métal foncé, dans la mesure du possible.
Il est également possible d'utiliser des
casseroles et accessoires en pyrex ou en
céramique ; les temps de cuisson augmentent
alors légèrement. Pour obtenir de meilleurs
résultats, suivez attentivement les conseils
donnés dans le tableau de cuisson pour le
choix des accessoires fournis à positionner
sur les différents gradins.
Cuisson simultanée d'aliments différents
La fonction "CHALEUR PULSÉE" permet de
cuire simultanément sur différents gradins
plusieurs aliments nécessitant une même
température de cuisson (par exemple :
poisson et légumes). Sortez les aliments
nécessitant un temps de cuisson inférieur et
laissez la cuisson continuer pour ceux dont le
temps de cuisson est plus important.
Desserts
- Faites cuire la pâtisserie sur un seul gradin
avec la fonction convection naturelle. Utilisez
des moules à gâteau en métal foncé et
placez-les toujours sur la grille fournie. Pour
la cuisson sur plusieurs gradins, sélectionnez
la fonction Chaleur pulsée et disposez les
moules décalés sur les grilles, de manière à
favoriser la circulation de l'air.
- Pour vérier si le gâteau est cuit, introduisez
un cure-dent au centre du gâteau. Si le curedent en ressort sec, le gâteau est cuit.
- Si vous utilisez des moules anti-adhésifs,
ne beurrez pas les bords car le gâteau
risquerait de ne pas lever de manière
homogène sur le pourtour.
- Si le gâteau "retombe" en cours de cuisson,
utilisez une température inférieure la fois
suivante. Vous pouvez également réduire
la quantité de liquide et mélanger plus
délicatement la pâte.
- La pâtisserie avec une garniture moelleuse
(gâteaux au fromage ou tartes aux fruits)
requiert la fonction "CONVECTION
FORCÉE". Si le fond de la tarte est trop
humide, placez-le sur un gradin inférieur
et saupoudrez la base de chapelure ou de
biscuits émiettés avant de la garnir.
Viande
- Utilisez n'importe quel type de plat adapté
à la taille de la viande à cuire. Pour les rôtis,
ajoutez de préférence du bouillon sur le
fond du plat et mouillez la viande durant
la cuisson pour la rendre plus savoureuse.
Lorsque le rôti est cuit, laissez-le reposer
dans le four 10 à 15 minutes ou enveloppezle dans du papier aluminium.
- Si vous souhaitez faire griller de la viande,
choisissez des morceaux de même épaisseur
pour obtenir une cuisson uniforme. Les
morceaux de viande très épais nécessitent
un temps de cuisson supérieur. Pour éviter de
faire brûler leur surface, éloignez-les du gril
en plaçant la grille sur un gradin inférieur.
Retournez la viande aux deux tiers de la
cuisson.
Il est conseillé d'installer une lèchefrite avec
un demi-litre d'eau directement en dessous
de la grille sur laquelle la viande à griller
a été placée, de façon à recueillir le jus de
cuisson. Ajoutez de l'eau si nécessaire.
Conseils d'utilisation et suggestions
Page 83

FRANÇAIS 83
Pizza
Graissez légèrement la plaque pour obtenir
une pizza au fond croustillant. Répartissez la
mozzarella sur la pizza aux deux tiers de la
cuisson.
Fonction levage
Il est conseillé de toujours couvrir la pâte
avec un torchon humide avant de la mettre
au four. Avec cette fonction, le temps de
levage est réduit d'un tiers environ par
rapport au temps de levage à température
ambiante (20-25 °C). Le temps de levage
pour 1 kg de pâte à pizza est d'environ une
heure.
Page 84

FRANÇAIS 84
Élimination des emballages
- Les matériaux d'emballage sont
entièrement recyclables, comme l'indique
le symbole de recyclage ( ). Par
conséquent, ne les jetez jamais dans la
nature et respectez les réglementations
locales en vigueur en matière
d'élimination des déchets.
Mise au rebut de l'appareil
- Cet appareil porte le symbole du
recyclage conformément à la Directive
européenne 2012/19/CE concernant les
déchets d'équipements électriques et
électroniques (DEEE ou WEEE).
- En procédant correctement à la mise au
rebut de cet appareil, vous contribuerez
à empêcher toute conséquence nuisible
pour l'environnement et la santé de
l'homme.
- Le symbole
apposé sur le produit et
sur la documentation qui l'accompagne
indique que cet appareil ne doit pas être
jeté avec les ordures ménagères, mais
remis à un centre de collecte spécialisé
dans le recyclage des appareils
électriques et électroniques.
Conseils d'économie d'énergie
- Préchauffez le four uniquement si le
tableau de cuisson, gurant sur la Fiche
produit séparée, ou votre recette le
précise.
- Utilisez des moules à pâtisserie foncés,
laqués noir ou émaillés, car ceux-ci
absorbent mieux la chaleur.
- Éteignez le four 10 à 15 minutes avant
la n du temps de cuisson prévu. Les
aliments nécessitant un temps de cuisson
relativement long continueront à cuire en
utilisant la chaleur résiduelle du four.
Déclaration de conformité
- Ce four est destiné à entrer en contact
avec des denrées alimentaires et
est conforme à la réglementation
européenne ( ) n° 1935/2004. Il a
été conçu, fabriqué et commercialisé
conformément aux exigences de
sécurité de la directive « Basse Tension »
2006/95/CE (en remplacement de la
directive 73/23/CEE et modications
ultérieures) et aux exigences de
protection de la directive « CEM »
2004/108/CE.
- Cet appareil est conforme aux exigences
de conception éco-énergétique des
réglementations européennes n° 65/2014
et 66/2014, conformément à la norme
européenne EN 60350-1.
Conseils pour la protection de l'environnement
Vériez que la tension gurant sur la plaque
signalétique de l'appareil correspond à celle
de votre habitation. La plaque signalétique
se trouve sur le rebord avant du four (visible
lorsque la porte est ouverte).
Si un remplacement du cordon d'alimentation
(type H05 RR-F 3 x 1,5 mm2) s'avère nécessaire,
cette opération doit être effectuée par un
électricien qualié uniquement. Adressez-vous
au Centre d'entretien et de réparation agréé
IKEA.
Branchements électriques
GARANTIE IKEA
Page 85

FRANÇAIS 85
GARANTIE IKEA CH
Quelle est la durée de validité de la
garantie IKEA ?
Cette garantie est valable 5 (cinq) ans à
compter de la date d’achat/de livraison de
votre appareil, sauf pour les appareils de la
marque LAGAN pour lesquels une garantie
de 2 (deux) ans est applicable. La preuve
d’achat originale est requise. Les réparations,
effectuées sous garantie ne prolongent pas
la période de garantie de l’appareil.
Quels sont les appareils n’étant pas
couverts par la garantie de 5 (cinq) ans
IKEA ?
Les appareils portant le nom de LAGAN et
tous les appareils achetés chez IKEA avant le
1er août 2007.
Qui effectuera la réparation ?
IKEA gère les prestations de service par le
biais de son propre service après-vente ou
par l’un de ses partenaires agréés.
Que couvre la garantie ?
La garantie couvre les défauts de l’appareil
dus à un vice de fabrication (défaut
fonctionnel), à compter de la date d’achat/
de livraison de l’appareil. Cette garantie
ne s’applique que dans le cas d’un usage
domestique.
Les exceptions sont spéciées sous la
rubrique “Qu’est-ce-qui n’est pas couvert
par cette garantie?” Pendant la période de
garantie, les coûts engagés pour remédier au
problème, par exemple les réparations, les
pièces, la main-d’oeuvre et les déplacements
sont couverts, pour autant que l’appareil
soit accessible à des ns de réparation sans
dépenses particulières. Les dénitions locales
actuelles ou les instructions juridiques en
vigueur pour le pays correspondant sont
valables sous ces conditions. Les pièces
remplacées deviennent la propriété d’IKEA.
Que fera IKEA pour régler le problème?
Le réparateur désigné par IKEA examinera
le produit et décidera, à sa seule discrétion,
s’il est couvert par cette garantie. Si le
réparateur estime que le produit est
couvert, celui-ci, ou un partenaire autorisé,
soit réparera le produit défectueux, soit le
remplacera par un produit identique ou
comparable, à sa seule discrétion.
Qu’est-ce qui n’est pas couvert par cette
garantie?
• L’usure normale.
• Les dommages occasionnés sciemment
ou par négligence, les dommages
occasionnés à défaut de respecter les
instructions d’utilisation, par une installation
inadéquate ou une alimentation électrique
inadéquate, les dommages causés par des
réactions chimiques ou électrochimiques, la
rouille, la corrosion ou les dégâts des eaux,
y compris, notamment, les dommages
causés par un excès de calcaire dans l’eau,
les dommages causés par des conditions
environnementales anormales.
• Les accessoires utilisés ou usés comme par
ex. les piles et ampoules.
• Les éléments non fonctionnels et décoratifs
qui n’affectent pas l’usage normal de
l’appareil, y compris les rayures et les
éventuelles différences de couleur.
• Les dommages provoqués par des corps
étrangers, des substances, le nettoyage
ou le débouchage des ltres, des systèmes
d’écoulement ou des compartiments pour
détergents.
• Les dommages occasionnés aux éléments
suivants : vitrocéramique, accessoires,
paniers à vaisselle supérieur et inférieur
et à couverts, tuyaux d’alimentation
et de vidange, joints, ampoules et
protections des ampoules, écrans, boutons,
revêtements et parties de revêtements,
sauf s’il est prouvé que ces dommages sont
dus à des vices de fabrication.
• Les cas où aucun défaut n’est mis à jour
par le technicien.
• Les réparations qui ne sont pas effectuées
Page 86

FRANÇAIS 86
par nos réparateurs désignés et/ou un
partenaire contractuel autorisé ou lorsque
des pièces autres que d’origine ont été
utilisées.
• Les réparations consécutives à une
installation inadéquate ou non conforme
aux spécications.
• L’utilisation impropre de l’appareil et/
ou dans un environnement autre que
domestique, par exemple à des ns
professionnelles.
• Les dommages occasionnés par ou
durant le transport. Si un client transporte
personnellement le produit jusqu’à son
domicile ou une autre adresse, IKEA
décline toute responsabilité en cas de
dommages pendant le transport. Si IKEA
livre le produit à l’adresse de livraison
indiquée par le client, tout éventuel
dommage se produisant en cours de
livraison sera couvert par IKEA.
• Les frais reliés à l’installation initiale de
l’appareil IKEA.
Si un prestataire de service IKEA ou son
partenaire contractuel agréé répare
ou remplace l’appareil conformément
à la présente garantie, le prestataire
de services ou son partenaire agréé
installera l’appareil réparé ou l’appareil de
remplacement, le cas échéant.
Ces restrictions ne s’appliquent pas aux
interventions correctes d’un spécialiste
qualié utilisant nos pièces d’origine an
d’adapter l’appareil aux spécications
techniques de sécurité d’un autre pays UE.
Loi nationale applicable
La garantie IKEA vous octroie des droits
légaux spéciques, équivalents ou supérieurs
aux droits légaux locaux.
Cependant, ces conditions ne limitent en
aucun cas les droits des consommateurs
décrits dans la législation locale.
Couverture géographique
Pour les appareils achetés dans un pays
européen et emportés dans un autre pays
européen, les interventions seront effectuées
dans le cadre des conditions de garantie
normales dans le nouveau pays.
L’obligation de réparation dans le cadre de
la garantie n’est effective que si l’appareil est
conforme et installé conformément aux :
- spécications techniques du pays dans
lequel la demande d’intervention sous
garantie est introduite ;
- instructions de montage et aux
informations relatives à la sécurité gurant
dans le manuel d’utilisation.
centre de réparation et d’entretien agréé
exclusif pour appareils IKEA
Le centre de réparation et d’entretien
agréé pour les appareils IKEA est à votre
disposition pour les questions/demandes
suivantes :
• Faire une demande d’intervention sous
garantie
• Demander des clarications au sujet de
l’installation des appareils IKEA dans les
meubles de cuisine IKEA
(Remarque : L’installation de gaz doit être
réalisée par un installateur agréé)
• Demander des clarications au sujet du
fonctionnement des appareils IKEA
An de vous garantir la meilleure
assistance possible, nous vous prions de lire
attentivement les instructions d’assemblage
et/ou le mode d’emploi avant de nous
contacter.
Comment nous joindre en cas de besoin
Veuillez utiliser uniquement le
numéro de téléphone spécique
à votre pays, donné dans la liste
en dernière page de ce livret de
garantie.
Dans le but de vous fournir un service
après-vente plus rapide, utilisez les
numéros spéciques repris sur ce
Page 87

FRANÇAIS 87
livret de garantie et citez toujours
le numéro d’article IKEA (numéro
composé de 8 chiffres) de l’appareil
pour lequel vous avez besoin
d’assistance ainsi que le code service
à 12 chiffres, indiqués sur la plaque
signalétique de votre appareil.
CONSERVEZ VOTRE PREUVE D’ACHAT
!
La preuve de votre achat est nécessaire
pour l’application de la garantie.Le
nom et le numéro d’article (code à
8 chiffres) IKEA de chaque appareil
acheté gurent également sur la preuve
d’achat.
Besoin d’une assistance supplémentaire ?
Pour toute question additionnelle en dehors
du service après-vente de vos appareils,
contactez le call center de votre magasin
IKEA. Nous vous recommandons de lire
attentivement toute la documentation fournie
avec l’appareil avant de nous contacter.
Page 88

ITALIANO 88
Importanza della sicurezza per sé e
per gli altri.
Questo manuale e l'apparecchio
stesso forniscono importanti avvisi per
la sicurezza, che devono essere letti e
a cui è necessario attenersi sempre.
Questo è il simbolo di pericolo per
la sicurezza, che avverte gli utenti
dei potenziali rischi per sé stessi e per
gli altri.
Tutti i messaggi relativi alla sicurezza
saranno preceduti dal simbolo di
pericolo e dai seguenti termini:
PERICOLO! Indica una situazione
pericolosa che, se non evitata,
provoca lesioni gravi.
ATTENZIONE! Indica una
situazione pericolosa che, se non
evitata, potrebbe provocare lesioni
gravi. Tutti i messaggi relativi alla
sicurezza specicano il potenziale
pericolo esistente ed indicano come
ridurre il rischio di lesioni, danni e
scosse elettriche conseguenti ad un
non corretto uso dell'apparecchio.
Attenersi scrupolosamente alle
seguenti istruzioni:
- Utilizzare guanti protettivi per
eseguire tutte le operazioni
di rimozione imballaggio e
installazione.
- Prima di qualsiasi intervento
di installazione l'apparecchio
deve essere scollegato dalla rete
elettrica.
- L'installazione elettrica e
la manutenzione devono
essere eseguite da un tecnico
specializzato, in conformità alle
istruzioni del fabbricante e nel
rispetto delle norme locali vigenti
in materia di sicurezza. Non
riparare né sostituire alcuna parte
dell'apparecchio a meno che non
sia specicamente affermato nel
manuale dell'utente.
- La sostituzione del cavo di
alimentazione deve essere
effettuata da un elettricista.
Rivolgersi a un Centro Assistenza
autorizzato.
- La messa a terra dell'apparecchio
è obbligatoria a termini di legge.
- Il cavo di alimentazione deve
essere sufcientemente lungo per
collegare l'apparecchio alla presa
di alimentazione dopo che è stato
inserito nell'alloggiamento.
Informazioni sulla sicurezza 88
Descrizione del prodotto 91
Pannello comandi 93
Elenco funzioni 93
Descrizione del display 94
Uso quotidiano 97
Tabelle di cottura 100
Pulizia e manutenzione 105
Cosa fare se ... 107
Dati tecnici 108
Installazione 109
Consigli d'utilizzo e suggerimenti 111
Collegamenti elettrici 113
Consigli per la salvaguardia
dell'ambiente 113
GARANZIA IKEA 114
Informazioni sulla sicurezza
Indice
Page 89

ITALIANO 89
- Quando si installa l'apparecchio,
dotarlo un interruttore multipolare
con una separazione dei
contatti di almeno 3 mm in tutti
i poli che consenta di scollegare
completamente l'apparecchio in
caso di sovratensione di categoria
III; deve essere incorporato nel
cablaggio sso in conformità alle
normative nazionali relative ai
cablaggi.
- Non utilizzare prese multiple o
prolunghe.
- Non tirare il cavo di alimentazione
per estrarre la spina dalla presa di
corrente.
- Una volta terminata l'installazione,
i componenti elettrici non
dovranno più essere accessibili
dall'utilizzatore.
- Se la supercie del piano a
induzione presenta incrinature, non
usarlo, spegnere l'apparecchio per
evitare scosse elettriche (solo per i
modelli con funzione Induzione).
- Non toccare l'apparecchio con
parti del corpo bagnate e non
utilizzarlo a piedi scalzi.
- Questo apparecchio è destinato
esclusivamente all'uso come
elettrodomestico per la cottura
di cibi. Non sono consentiti
altri usi (es. riscaldamento di
ambienti). Il fabbricante declina
ogni responsabilità per usi
non appropriati o per errate
impostazioni dei comandi.
- Questo apparecchio può
essere usato da bambini di età
superiore a 8 anni e da persone
con capacità siche, sensoriali o
mentali ridotte o con esperienza
e conoscenza inadeguate, solo
se sono sorvegliati o se è stato
loro insegnato come usare
l'apparecchio in condizioni di
sicurezza e se sono a conoscenza
dei pericoli che può comportare.
I bambini non devono giocare
con l'apparecchio. La pulizia e la
manutenzione non devono essere
effettuate da bambini, a meno che
non siano sorvegliati da adulti.
- Le parti accessibili possono
diventare molto calde durante
l’uso. Tenere i bambini lontano
dall'apparecchio e controllarli
afnché non giochino con esso.
- L'apparecchio e i suoi componenti
accessibili diventano caldi
durante l'uso. Fare attenzione
a non toccare le resistenze. I
bambini di età inferiore a 8 anni
devono essere tenuti lontani
dall'apparecchio a meno che non
siano sempre controllati.
- Durante e dopo l'uso non toccare
le resistenze o le superci interne
dell'apparecchio per evitare di
ustionarsi.
- Impedire che l'apparecchio
entri a contatto con indumenti
o altro materiale inammabile
no a quando i componenti
non si saranno raffreddati
sufcientemente.
- A ne cottura, aprire la porta
dell'apparecchio con cautela,
facendo uscire gradualmente
l'aria calda o il vapore prima di
accedere al suo interno. Quando
la porta dell'apparecchio è chiusa
Page 90

ITALIANO 90
l'aria calda fuoriesce dall'apertura
sopra il pannello comandi. Non
ostruire in nessun caso le aperture
di ventilazione.
- Usare guanti da forno per
rimuovere pentole e accessori
facendo attenzione a non toccare
le resistenze.
- Non riporre materiale
inammabile nell’apparecchio
o nelle sue vicinanze. Se
l’apparecchio dovesse
essere messo in funzione
inavvertitamente, potrebbe
incendiarsi.
- Non scaldare o cucinare
utilizzando barattoli o
contenitori chiusi ermeticamente
nell'apparecchio. L'accumulo di
pressione che si viene a creare
all'interno potrebbe far esplodere
il barattolo e danneggiare
l'apparecchio.
- Non usare recipienti in materiale
sintetico.
- I grassi e gli oli surriscaldati
prendono facilmente fuoco.
Sorvegliare la cottura di alimenti
ricchi di grasso e di olio.
- Non lasciare mai l'apparecchio
incustodito durante l'essiccazione
degli alimenti.
- Se per la cottura degli alimenti si
aggiungono bevande alcoliche
(ad es. rum, cognac, vino) tenere
presente che l'alcool evapora a
temperature elevate. Non è quindi
escluso che i vapori generati
possano inammarsi giungendo a
contatto con la resistenza elettrica.
- Evitare l'uso di pulitrici a getto di
vapore.
- Non toccare il forno durante il ciclo
di pirolisi. I bambini devono essere
mantenuti a distanza dal forno
durante il ciclo di pirolisi (soltanto
per forni con funzione Pirolisi).
- Durante e dopo la pulizia
pirolitica, tenere lontano gli animali
domestici (specialmente i volatili)
dall'area in cui è posizionato
l'apparecchio.
- Usare solamente la sonda di
temperatura fornita in dotazione o
raccomandata per questo forno.
- Non impiegare detergenti abrasivi
aggressivi o utensili metallici
taglienti per pulire il vetro della
porta del forno perché possono
grafare la supercie e mandare
in frantumi il vetro.
- Assicurarsi che l'apparecchio
sia spento prima di sostituire la
lampadina per evitare scosse
elettriche.
Smaltimento elettrodomestici
- Questo prodotto è stato
fabbricato con materiale riciclabile
o riutilizzabile. Disfarsene
seguendo le normative locali per
lo smaltimento dei riuti. Prima
della rottamazione, renderlo
inutilizzabile tagliando il cavo di
alimentazione.
- Per ulteriori informazioni sul
trattamento, recupero e riciclaggio
di elettrodomestici, contattare
l'idoneo ufcio locale, il servizio
di raccolta dei riuti domestici o il
negozio presso il quale il prodotto
è stato acquistato.
Page 91

ITALIANO 91
Descrizione del prodotto
1
Pannello comandi
2
Ventola di raffreddamento
1)
(non visibile)
3
Resistenza superiore
4
Lampada posteriore
5
Ventola forno
6
Resistenza inferiore (non visibile)
7
Porta del forno
8
Griglie laterali
1) La ventola di raffreddamento può continuare
a funzionare anche dopo lo spegnimento del forno.
Durante la Pirolisi la velocità della ventola aumenta
rispetto alla velocità delle funzioni di cottura.
1
2
4
8
3
5
6
7
Accessori
Griglia
1x
Piastra dolci
1x
Leccarda
1x
Guide telescopiche
2x
Page 92

ITALIANO 92
Inserimento di griglie e altri accessori
all’interno del forno
1. Inserire la griglia orizzontalmente, con la
parte rialzata “A” orientata verso l’alto
(Fig. 1).
A
Fig. 1
2. Altri accessori, come la leccarda e la
piastra dolci, si inseriscono come la
griglia (Fig. 2).
Fig. 2
Rimuovere la pellicola azzurra come
mostrato in gura.
Come allineare la leccarda alle guide
telescopiche.
Collocare la leccarda sulle guide
telescopiche ssandola fra gli elementi di
bloccaggio posteriore e anteriore.
Fig. 2
Fig. 3
Page 93

ITALIANO 93
Pannello comandi
A
Manopola selezione funzioni
B
Manopola navigazione
Nota: le due manopole sono a scomparsa.
Fare pressione al centro delle stesse per
estrarle dalla loro sede.
C
Tasto di selezione/conferma
A BC
Ruotando la manopola "Funzioni" in una
posizione qualsiasi, il forno si attiva: il
display visualizza le funzioni o i sottomenu
associati a ciascuna di esse.
I sottomenu risultano disponibili e
selezionabili posizionando la manopola
sulle funzioni GRILL, FUNZIONI SPECIALI,
IMPOSTAZIONI, PANE/PIZZA.
N.B.: per l'elenco e la descrizione delle
funzioni, vedere la specica tabella.
Elenco funzioni
Page 94

ITALIANO 94
Descrizione del display
1
Visualizzazione delle resistenza attive
durante le diverse funzioni di cottura
2
Simboli riguardanti la gestione del
tempo: timer, durata di cottura, ora di
ne cottura, ora corrente
3
Informazioni relative alle funzioni
prescelte
4
Funzione PANE/PIZZA automatica
selezionata
5
Indicazione porta forno chiusa durante
il ciclo di pulizia automatica (non
disponibile su questo modello)
6
Temperatura interna forno
7
Funzione pirolisi (non disponibile su
questo modello)
8
Doratura
9
Funzioni speciali: scongelamento,
mantenere in caldo, lievitazione
1
2 3 4
5
6789
Impostazione dell'ora
2
4
1
3
Alla prima accensione del forno, nel display
lampeggiano le due cifre relative alle ore.
1. Ruotare la manopola "Navigazione"
B
no a visualizzare l'ora corretta.
2. Premere il tasto
C
per confermare; sul
display lampeggiano le due cifre relative
ai minuti.
3. Ruotare la manopola "Navigazione"
B
no a visualizzare i minuti corretti.
4. Premere il tasto
C
per confermare.
Per modicare l’ora corrente, per esempio a
seguito di un’interruzione dell’alimentazione
elettrica, vedere il paragrafo successivo
(IMPOSTAZIONI).
Page 95

ITALIANO 95
Tabella Funzioni Forno
Il forno è dotato di 4 livelli di cottura. Contarli partendo dal più basso.
Funzione Descrizione della funzione
0
SPEGNIMENTO Per interrompere la cottura e spegnere il forno.
TERMOVENTILATO
Per cuocere contemporaneamente su due ripiani alimenti, anche
diversi, che richiedono medesima temperatura di cottura (es.:
pesce, verdure, torte). La funzione permette di cuocere senza
trasmissione di odori da un alimento all’altro. Si consiglia di
utilizzare il 2° livello per cotture su singolo ripiano.
Per cotture su due ripiani, si consiglia di utilizzare il 1° e il 3°
livello dopo aver preriscaldato il forno.
STATICO Per cuocere qualsiasi tipo di pietanza su un solo ripiano. Utilizzare
il 2° livello. Preriscaldare il forno prima di inserire il cibo da
cuocere.
VENTILATO Per cuocere carni e torte con ripieno liquido (salate o dolci) su un
solo ripiano. Utilizzare il 2° livello. Preriscaldare il forno prima di
cuocere.
COTTURA MAXI Per cuocere carni di grosse dimensioni (superiori ai 2,5 kg).
Utilizzare il 1° o il 2° livello in base alle dimensioni della carne.
Non occorre preriscaldare il forno. Si suggerisce di girare la
carne durante la cottura per ottenere una brunitura omogenea
su entrambi i lati. È preferibile inumidirla di tanto in tanto per non
farla seccare eccessivamente.
GRILL Per cuocere al grill bistecche, spiedini e salsicce, gratinare
verdure e tostare pane. Si suggerisce di posizionare il cibo sul
4° livello. Per la grigliatura di carni, si consiglia di utilizzare una
leccarda per raccogliere il liquido di cottura. Posizionarla sul
3° livello aggiungendo circa mezzo litro d’acqua. Non occorre
preriscaldare il forno. Durante la cottura la porta del forno deve
essere mantenuta chiusa.
TURBOGRILL Per arrostire grossi pezzi di carne (cosciotti, roast beef, polli).
Posizionare il cibo sui livelli centrali.
Si consiglia di utilizzare una leccarda per raccogliere il liquido di
cottura. Posizionarla sul 1°/2° livello, aggiungendo circa mezzo
litro d’acqua. Non occorre preriscaldare il forno. Durante la
cottura la porta del forno deve essere mantenuta chiusa.
PANE/PIZZA Per cuocere diversi tipi e formati di pane e pizza. All’interno di
questa funzione, sono presenti due programmi le cui impostazioni
sono predenite. Basterà soltanto indicare i valori richiesti
(temperatura e tempo) e il forno gestirà automaticamente il ciclo
di cottura ottimale. Posizionare l’impasto al 2° livello dopo aver
preriscaldato il forno.
Page 96

ITALIANO 96
Funzione Descrizione della funzione
FUNZIONI
SPECIALI
SCONGELAMENTO
Per velocizzare lo scongelamento degli alimenti. Posizionare gli
alimenti sul livello intermedio. Si suggerisce di lasciare l’alimento
nella sua confezione per impedire la disidratazione della
supercie.
MANT. IN CALDO
Per mantenere caldi e croccanti cibi appena cotti (es: carni,
fritture, sformati). Posizionare gli alimenti sul livello intermedio. La
funzione non si attiva se la temperatura in cavità è superiore ai
65°.
LIEVITAZIONE
Per ottenere una lievitazione ottimale di impasti dolci o salati. Allo
scopo di preservare la qualità della lievitazione, la funzione non si
attiva se la temperatura in cavità è superiore ai 40°C. Posizionare
l’impasto sul 2° livello. Non occorre preriscaldare il forno.
VENTILATO ECO
Per cuocere arrosti ripieni e pezzi di carne su un ripiano. Questa
funzione utilizza una ventilazione intermittente e delicata, per
evitare che gli alimenti si asciughino eccessivamente. Con questa
funzione Eco la lampadina rimane spenta durante la cottura
e può essere temporaneamente riaccesa premendo il tasto di
conferma. Per massimizzare l'efcienza energetica, si consiglia di
non aprire la porta durante la cottura. Si consiglia di utilizzare il
3° livello. Non occorre preriscaldare il forno.
PRERISCALDAMENTO RAPIDO
Per preriscaldare il forno rapidamente.
IMPOSTAZIONI Per impostare il display (lingua, ora, luminosità, volume del
segnale acustico, risparmio energetico).
LAMPADA Per accendere/spegnere la lampada all’interno del forno.
Page 97

ITALIANO 97
Uso quotidiano
Selezione funzione cottura
1 2
1. Ruotare la manopola "Funzioni"
A
sulla
funzione desiderata: sul display vengono
visualizzate le impostazioni di cottura.
2. Se i parametri proposti corrispondono a
quelli desiderati, premere il tasto
C
. Per
modicarli procedere come indicato di
seguito.
Impostazione della temperatura/potenza del
grill
Per modicare la temperatura o la potenza del
grill procedere come segue:
12
1. Ruotare la manopola "Navigazione"
B
no
a visualizzare il valore desiderato.
2. Premere il tasto
C
per confermare.
Preriscaldamento rapido
2
3
1
4
Non introdurre alimenti nel forno nché il ciclo di
preriscaldamento rapido non è terminato.
1. Selezionare la funzione preriscaldamento
rapido ruotando la manopola "Funzioni"
A
in corrispondenza del simbolo
.
2. Confermare con il tasto
C
: le impostazioni
appaiono sul display.
3. Se la temperatura proposta corrisponde a
quella desiderata premere il tasto
C
.
Per modicare la temperatura procedere
come descritto nel paragrafo precedente
"Impostazione della temperatura/potenza
del grill". Sul display appare la scritta PRE.
Al raggiungimento della temperatura
impostata, questa verrà sostituita dal
relativo valore (es. 200°) accompagnato
da un segnale acustico. Al termine della
fase di preriscaldamento, il forno seleziona
automaticamente la funzione statico
.
A questo punto inserire la pietanza e
procedere alla cottura.
4. Se si desidera impostare una funzione di
cottura differente, ruotare la manopola
"Funzioni"
A
e selezionare quella
desiderata.
Programmazione del tempo di cottura
Questa funzione consente di cuocere per un
tempo denito, da un minimo di 1 minuto no
al tempo massimo consentito dalla funzione
selezionata, allo scadere del quale, il forno si
spegne automaticamente.
1 2 3
1. Dopo aver confermato la temperatura, il
simbolo
lampeggia.
2. Ruotare la manopola di regolazione
B
no
a visualizzare il tempo di cottura desiderato.
3. Confermare il tempo di cottura premendo il
tasto
C
.
Impostazione dell'ora di ne cottura/avvio
ritardato
IMPORTANTE: il settaggio avvio ritardato
non è disponibile per le seguenti funzioni:
PRERISCALDAMENTO RAPIDO, PANE/PIZZA.
N.B.: con questo settaggio, la temperatura
selezionata viene raggiunta in modo
più graduale, per cui i tempi di cottura si
allungheranno leggermente rispetto a quelli
riportati nella tabella di cottura.
È possibile impostare l’ora di ne cottura
desiderata, ritardando l’avvio del forno no
Page 98

ITALIANO 98
ad un massimo di 23 ore e 59 minuti a partire
dall’ora corrente. Questo è possibile solo dopo
aver impostato una durata di cottura.
Dopo aver impostato la durata della cottura, sul
display viene visualizzata l’ora di ne cottura
(ad esempio 15:45) ed il simbolo
lampeggia.
1 2
Per ritardare la ne cottura, posticipando l’avvio
del forno, procedere come segue:
1. Ruotare la manopola "Navigazione"
B
no a visualizzare l’ora in cui si desidera
terminare la cottura (ad esempio 16:00).
2. Confermare il valore prescelto premendo
il tasto
C
: i due punti dell’ora di ne
cottura lampeggiano, ad indicare
che l’impostazione è stata effettuata
correttamente.
3. Il forno ritarderà l’avvio automaticamente
in modo da terminare la cottura all’ora preimpostata.
Contaminuti
1 2
Questa funzione può essere utilizzata solo
a forno spento ed è utile, ad esempio, per
controllare il tempo di cottura della pasta.
Il tempo massimo che è possibile impostare è di
23 ore e 59 minuti.
1. Con la manopola "Funzioni"
A
sullo zero,
ruotare la manopola "Navigazione" no a
visualizzare il tempo desiderato.
2. Premere il tasto
C
per avviare il conto alla
rovescia. Allo scadere del tempo impostato
sul display appare "FINE" e viene emesso
un segnale acustico. Per interromperlo,
premere il tasto
C
(sul display appare l’ora
corrente).
Selezione delle funzioni speciali
1 2 3
1. Ruotare la manopola "Funzioni"
A
nché il display non visualizza
"SCONGELAMENTO" e il relativo simbolo
associato a questa funzione.
2. Ruotare la manopola "Navigazione"
B
per scorrere l’elenco delle funzioni:
SCONGELAMENTO, MANTENERE IN
CALDO, LIEVITAZIONE, VENTILATO ECO.
3. Premere il tasto
C
per confermare.
Doratura
Al termine della cottura, per le funzioni che
lo consentono, sul display viene proposta la
possibilità di effettuare una doratura della
vostra pietanza. Questa funzione è attivabile
solo nel caso abbiate impostato una durata di
cottura.
1
Scaduto il tempo di cottura, il display visualizza:
"PREMERE
PER DORARE". Premendo il tasto
C
, il forno avvia la fase di doratura per una
durata di 5 minuti. Questa funzione può essere
eseguita solo due volte.
Selezione funzione Pane/pizza
Posizionando l'indice della manopola "Funzioni"
A
in corrispondenza del simbolo
si accede
ad un sottomenu contenente due funzioni
automatiche di cottura per "pane" e "pizza".
Pane
3
4
1 2
Page 99

ITALIANO 99
1. Ruotare la manopola "Funzioni"
A
sul
simbolo
: il display visualizza "PANE" con
a anco la scritta "AUTO".
2. Premere
C
per selezionare la funzione.
3. Ruotare la manopola "Navigazione"
B
per
impostare la temperatura desiderata (tra
180 °C e 220 °C) e confermare con il tasto
C
.
4. Ruotare la manopola "Navigazione"
B
per
impostare la durata di cottura desiderata e
premere
C
per avviare la cottura.
Pizza
1
3
2
4 5
1. Ruotare la manopola "Funzioni"
A
sul
simbolo
: il display visualizza "PANE". Per
selezionare la funzione "PIZZA", procedere
come segue:
2. Ruotare la manopola "Navigazione"
B
: Sul
display appare "PIZZA".
3. Premere
C
per selezionare la funzione.
4. Ruotare la manopola "Navigazione"
B
per
impostare la temperatura desiderata (tra
220 °C e 250 °C) e confermare con il tasto
C
.
5. Ruotare la manopola "Navigazione"
B
per
impostare la durata di cottura desiderata e
premere
C
per avviare la cottura.
Impostazioni
Posizionando l'indice della manopola "Funzioni"
A
in corrispondenza del simbolo
si accede
ad un sottomenu contenente cinque impostazioni
del display che è possibile modicare.
Orologio
Ruotare la manopola "Navigazione"
B
per
visualizzare "ORA". Per modicare l'ora, vedere
la sezione precedente (IMPOSTAZIONE ORA
CORRENTE).
Eco
Quando è selezionata (ON) la modalità ECO, il
display riduce la luminosità e, dopo 3 minuti da
quando il forno è in stand-by, viene visualizzato
l'orologio. Inoltre, la lampada interna viene
disattivata durante la cottura. Per visualizzare
le informazioni sul display e riaccendere la
lampada, occorre premere un tasto qualsiasi
C
o ruotare una delle manopole.
1. Ruotare la manopola "Navigazione"
B
per
visualizzare "ECO".
2. Premere il tasto
C
per accedere alla
impostazioni (ON/OFF).
3. Ruotare la manopola "Navigazione"
B
per selezionare l'impostazione desiderata e
confermare con il tasto
C
.
4. Durante la cottura, se è attivata la modalità
Eco, la lampadina all'interno del forno
si spegne dopo 1 minuto di cottura, per
riattivarsi ad ogni interazione dell'utente.
Segnale acustico
Per attivare o disattivare il segnale acustico
procedere come segue:
1. Ruotare la manopola "Navigazione"
B
per
visualizzare "SEGNALE ACUSTICO".
2. Premere il tasto
C
per accedere alla
impostazioni (ON/OFF).
3. Ruotare la manopola "Navigazione"
B
per selezionare l'impostazione desiderata e
confermare con il tasto
C
.
Luminosità
Per modicare la luminosità dello schermo
procedere come segue:
1. Ruotare la manopola "Navigazione"
B
per
visualizzare "LUMINOSITÀ".
2. Premere il tasto
C
: sul display viene
visualizzato il numero 1.
3. Ruotare la manopola "Navigazione"
B
per aumentare o diminuire la luminosità e
confermare premendo il tasto
C
.
Page 100

ITALIANO 100
Tabelle di cottura
Alimenti Funzione Preriscal-
damento
Livello
(dal
fondo)
Temperatura
(°C)
Tempo
di
cottura
(min)
Accessori
Torte a
lievitazione
X 2 160-180 30-90 Tortiera su
griglia
X 1-3 160-180 30-90 Liv. 3: tortiera
su griglia
Liv. 1: tortiera su
griglia
Torte ripiene
(cheese cake,
strudel, torta di
mele)
– 2 160-200 30-85 Leccarda/
piastra dolci o
tortiera
su griglia
X 1-3 160-200 35-90 Liv. 3: tortiera
su griglia
Liv. 1: tortiera su
griglia
Biscotti/tortine
X 2 170 -180 15-45 Leccarda/
piastra dolci
X 1-3 150 -170 20-45 Liv. 3: piastra
dolci
Liv. 1: leccarda
Bignè
X 2 180-200 30-40 Leccarda/
piastra dolci
X 1-3 180 -190 35-45 Liv. 3: piastra
dolci
Liv. 1: leccarda
Meringhe
X 2 90 110 -15 0 Leccarda/
piastra dolci
X 1-3 90 130 -150 Liv. 3: piastra
dolci
Liv. 1: leccarda
 Loading...