


IMPORTANT SAFEGUARDS
• Read all instructions carefully before using any appliance.
• Always ensure that the voltage on the rating label corresponds to the mains voltage.
• Incorrect operation and improper use can damage the appliance and cause injury to the user.
• Regularly check the power cord and plug for any damage. If the cord or plug is damaged it must be replaced by the
IKAWA or qualified person to avoid an electrical hazard.
• Do not use the appliance if it has been dropped or damaged in any way. In case of damage return the appliance to
IAKWA for repair.
• Never immerse the unit in water or any other liquid for cleaning purposes.
• Remove the plug from the socket by gripping the plug. Do not pull on the cord to disconnect the appliance from the
mains. Always unplug the unit when it is not in use, before cleaning or when adding or removing parts.
• The use of accessory attachments or Apps that are not recommended or supplied by IKAWA may result in injuries,
fire or electric shock.
• Always ensure that the machine is used on a hard flat surface. Never use the machine on a soft surface or
tablecloth.
• Never leave the appliance unattended while in use or powered.
• This appliance is not intended for use by persons (including children) with reduced physical, sensory, or mental
capabilities. Additionally, persons with a lack of experience or knowledge should not use the appliance unless they are
supervised or instructed concerning the use of the appliance by persons responsible for their safety. Children should
be supervised to ensure they do not play with the appliance.

ONE YEAR GARANTEE
This product in guaranteed for one year from the date of
purchase. If any defect arises due to faulty materials or
workmanship faulty products must be returned to IKAWA
for repair or replacement.
The following conditions apply:
1) The product must be installed and used in accordance
with the instructions contained in this instruction guide.
2) It does not cover wear and tear, damage, misuse or
consumable parts.
3) IKAWA has no responsibility for incidental or
consequential loss or damage.
CONTENTS
WELCOME & CONTENTS OF THE PACK 4
1. POSITIONING YOUR MACHINE 5
2. SETTING-UP YOUR MACHINE 6
3. CONNECTING THE IKAWApp T0 THE ROASTER 7
4. ROASTING 8 - 13
5. REMOVING THE BEANS FROM THE ROASTER 14
6. TROUBLE SHOOTING 15 - 16
7. MAINTENANCE 17
8. REPAIR & DISPOSAL 18
3
contact:
IKAWA Ltd.
www.ikawacoffee.com
info@ikawacoffee.com
Made in England
IKAWA MEANS COFFEE IN BURUNDI
URAKAZE MEANS WELCOME IN BURUNDI
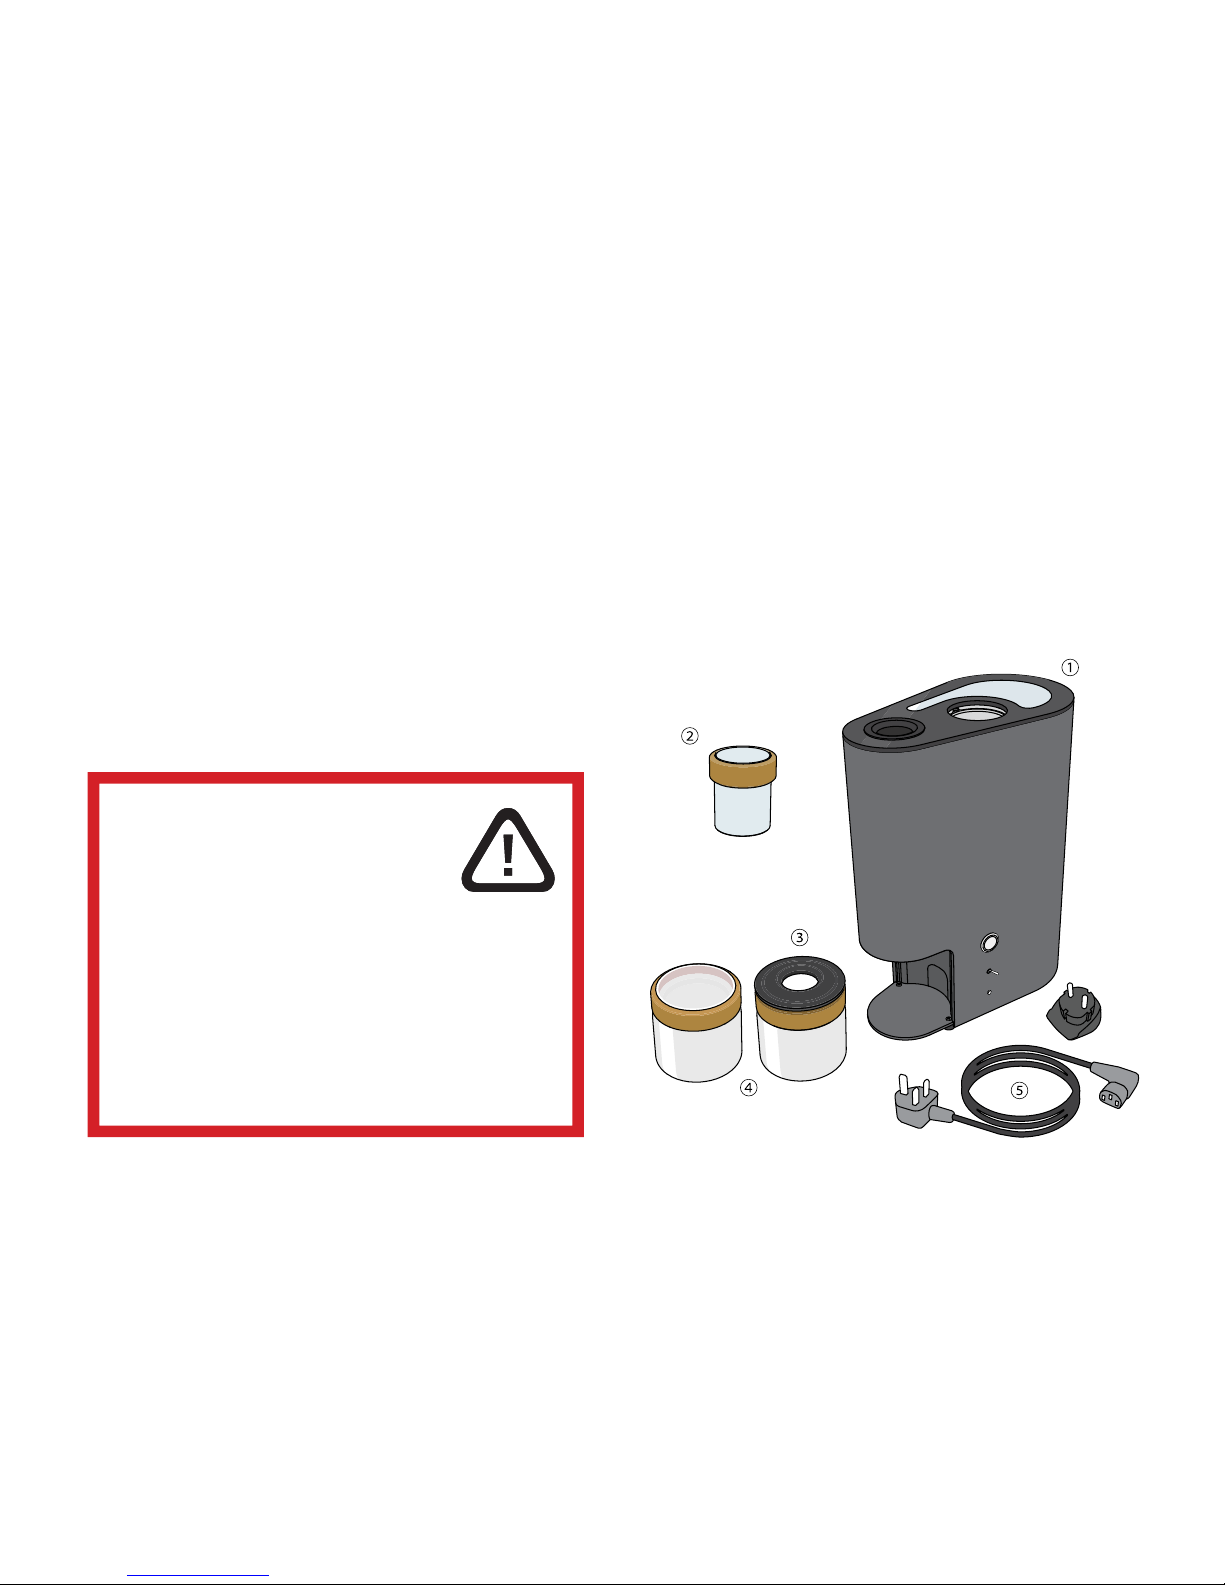
CONTENTS OF THE PACK
① IKAWA DIGITAL MICRO-ROASTER
② ONE DOSER
③ ONE JAR LID
④ TWO GLASS JARS
⑤ ONE POWER CORD (GB)
⑥ ONE UK TO EURO POWER ADAPTOR
4
⑥
Welcome and thank you for purchasing an IKAWA digital
micro-roasting system. IKAWA is continuously improving its
product range. Please visit www.ikawacoffee.com for all
updates. Products manufactured by IKAWA are safe and
without risk provided they are installed, used and maintained
in good working order in accordance with our instructions
and recommendations. To enjoy the full potential of your new
product, please take the time to read this guide thoroughly,
and keep it handy for future reference.
NOTICE:
1. Read all of these instructions
including important safeguards.
2. Retain this guide for later use.
3. Pass on this guide in the event of change of
ownership.
4. Follow all warnings, cautions and instructions
contained in this guide.
5. When the product has reached the end of its
serviceable life, it should be disposed of in
accordance with WEEE directive.

1 POSITIONING YOUR MACHINE
① Place your machine on a flat hard surface with plenty of
space around it to access all of the sides and the top of the
machine.
② During the roasting process hot air is released through the
vent of the machine. Do not obstruct the vent or place
anything on top of it.
CAUTION:
MAKE SURE THE AIR INLET
ON THE BOTTOM OF THE MACHINE
STAYS CLEAR AND DOES NOT BLOCK UP
WITH CHAFF OR DIRT.
5
CAUTION:
THE MACHINE HEATS UP DURING THE
ROASTING PROCESS AND SOME
SURFACES CAN GET VERY HOT. TAKE CARE AS
THESE SURFACES MAY CAUSE INJURY.
DO NOT TOUCH ANY PARTS OF THE LID AND DO NOT
TOUCH THE VENT.
DO NOT TOUCH THE OUTER SURFACES OF THE
ROASTING CHAMBER 25mm FROM THE TOP OF THE
MACHINE.
DO NOT OBSTRUCT THE VENT AND ENSURE THAT
THERE IS NOTHING ABOVE OR NEAR THE MACHINE.

2 SETTING-UP YOUR MACHINE
① Ensure the lid is on the machine.
② Place the doser into the hole at the top of the machine.
③ Slide the jar and the lid into the opening at the bottom of
the machine.
④ Ensure that the doser completely seals off the roasting
chamber. if not, turn the doser until it is sealed.
6
④
④
CAUTION:
ENSURE THAT THE JAR WITH LID IS IN PLACE.
ENSURE THE ROASTER LID IS IN PLACE

3 CONNECTING THE IKAWApp T0 THE ROASTER
7
0 I
top button
status light
Before starting this step ensure that you have gone through
the steps on the previous page and that your machine is
plugged into a wall socket.
① Turn the machine ON by pressing the 1-side of the
machine’s power switch, located on the left side.
The status light should now be green and the top button
should light-up white.
(If the status light flashes red/green alternating - shut the
doser as indicated on the previous page)
② The IKAWApp will automatically connect to the machine.
Once this has happened program the machine with a roast
profile. Instructions on how to use the IKAWApp are provided
separately as the app design can change over the life of the
machine. Instructions for the latest app are available at
www.ikawacoffee.com
Distance
max 2 metres
7

top button
status light
8
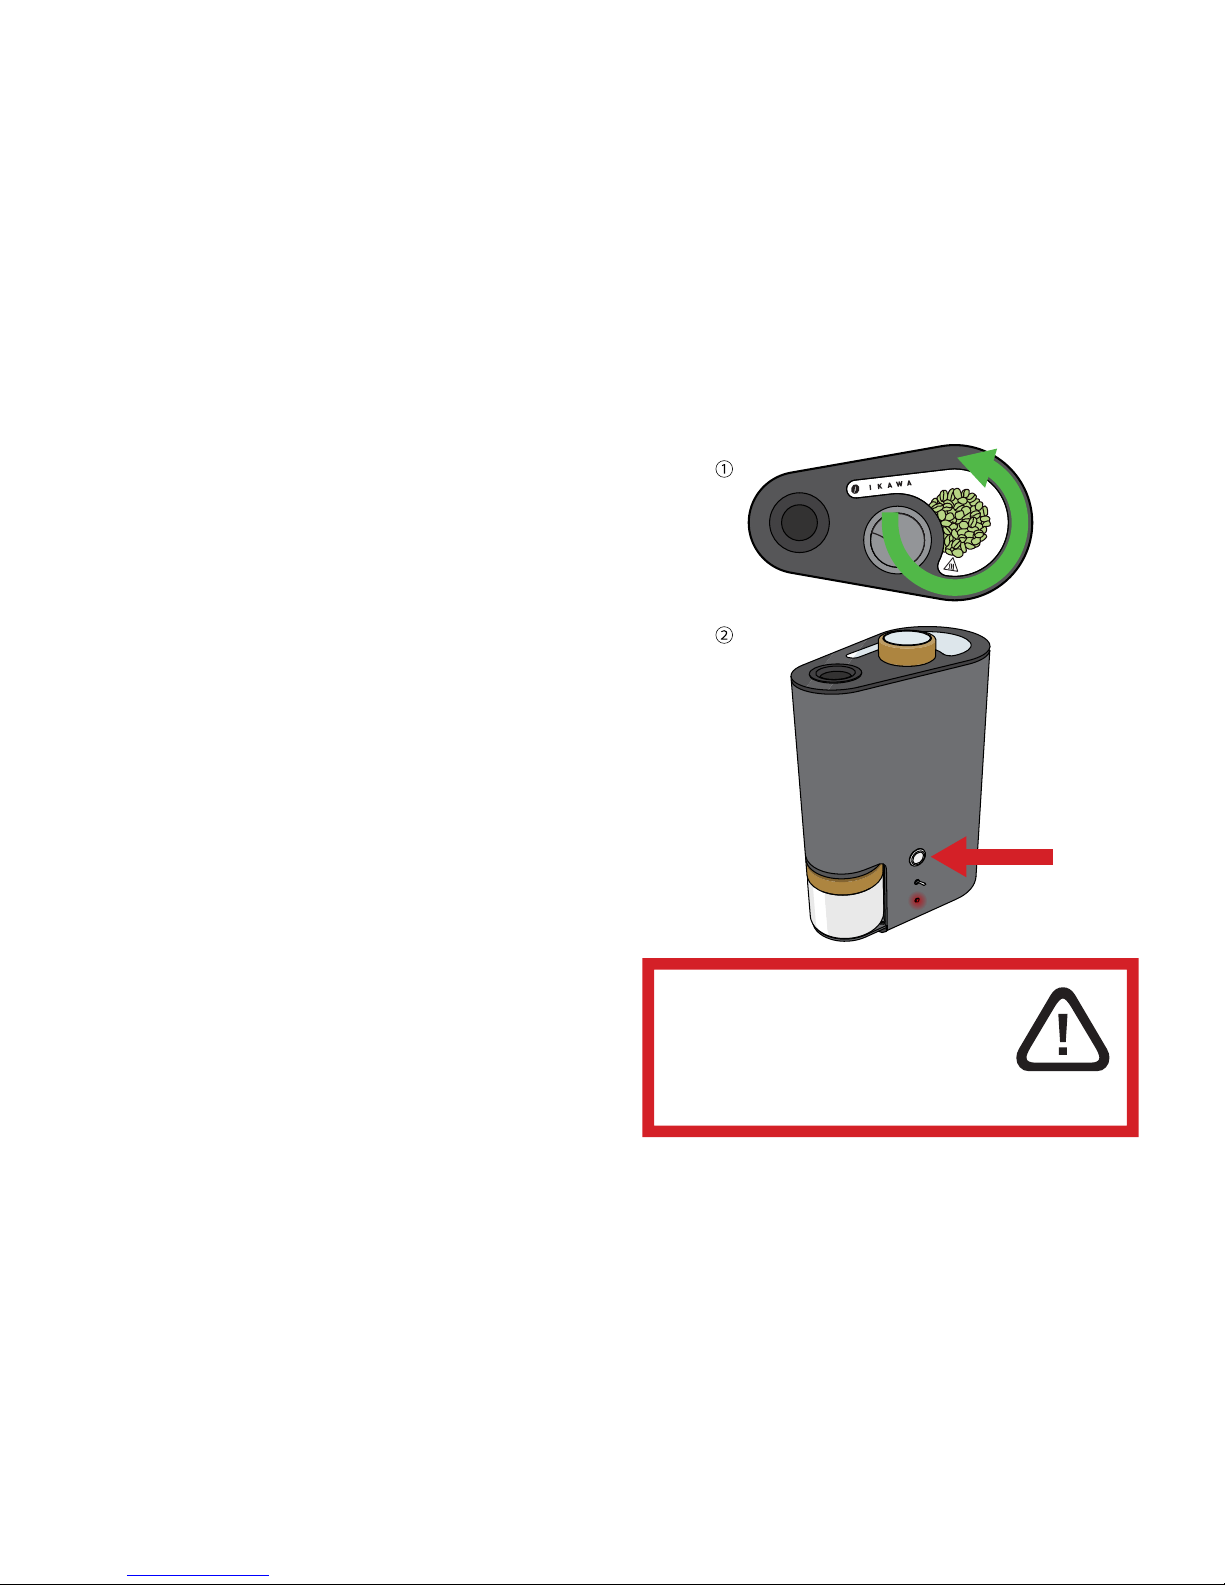
① Fill the doser at the top of the machine with
green coffee beans.
Fill the doser completely up to the top with
approximately 50-60 grams of coffee.
You can use a small jar or flexible coffee sample
tray to pour the coffee into the doser.
② Make sure that the status light is still green and the top
button is illuminated by white light.
If this is not the case the doser may not be shut properly.
Please see previous pages.
③ Start the roasting process by pushing the top button of the
machine.
The machine will begin pre-heating to the starting
temperature.
4 ROASTING: PRIMING WITH COFFEE
8
WARNING
BEFORE CONTINUING, ENSURE THAT
THE MACHINE IS NOT IN OPERATION
AND THAT THE DOSER IS CLOSED (SEE PREVIOUS
PAGE) MAKE SURE THE ROASTING CHAMBER IS
CLOSED AND THE JAR WITH IT’S LID IS IN POSITION

9
4 ROASTING: PRE-HEATING
The IKAWAapp will show that the machine is pre-heating by
displaying the temperature in the machine.
If you want to cancel the pre-heat mode, press the top button
on the machine. The machine will start to cool-down. (see
following pages)
Once the machine has heated to the starting temperature
wait until the status light on the machine blinks red.
If the roaster temperature does not reach and stabilise at the
profile starting temperature, or the user does not press the
top button after two minutes the roaster will automatically
swtich into cool down mode.
If the roaster is cold and/or profile starting temperature is
high and/or the profile starting fan speed is high the roaster
may not reach and stabilise at the starting temperature in
two minutes. If this happens try pre-heating the roaster again
after the cool down mode has finished.
top button
status light

4 ROASTING: DOSING
①
②
10
① Turn the doser halfway so that all the beans fall through
the hole of the doser into the Roasting Chamber.
The fan will slow down while the doser is open
and the status light will blink red and green.
② Turn the doser back so that it closes off the Roasting
Chamber completely.
The fan will speed up again and the status light on the
machine should stop blinking and be steadily red (If this is not
the case the doser is most probably not shut properly)
The roaster will now start the roasting process.
WARNING:
THE MACHINE LID COULD BE VERY HOT
DO NOT TOUCH ANY PARTS OR
SURFACES OTHER THAN
THE CORK GRIP ON THE DOSER
During the roasting process an app connected to the
machine will plot the measured temperature. Even if the
app is not connected, the roaster will execute the profile
stored in it’s memory.
If the roaster has been programmed with a profile that is
not suitable for the coffee, the beans can either burn or in
extreme cases catch fire.
We advise the following procedures during the roast
process.
4 ROASTING: ROASTING
11
① When the roast starts ensure that the
beans are rotating freely.
② If the beans are not rotating freely
stop the roast by pressing the upper
button.

③ If the roaster starts to produce
excessive smoke press the upper button.
④ If the coffee beans in the roast
chamber catch fire. Switch the roaster
off at the power inlet or wall socket and
then wait until the fire has gone out. The
fire will be contained wihin the roaster.
0 I
④
③
1212

4 ROASTING: COOL DOWN
Once the roasting process is finished, the machine goes in
cool-down mode. This is indicated by the blue status light on
the machine.
Wait until the fan stops running and the status light becomes
green again.
The cool-down process has now finished.
4 ROASTING: COOL DOWN
1313
① ②
0 I
④
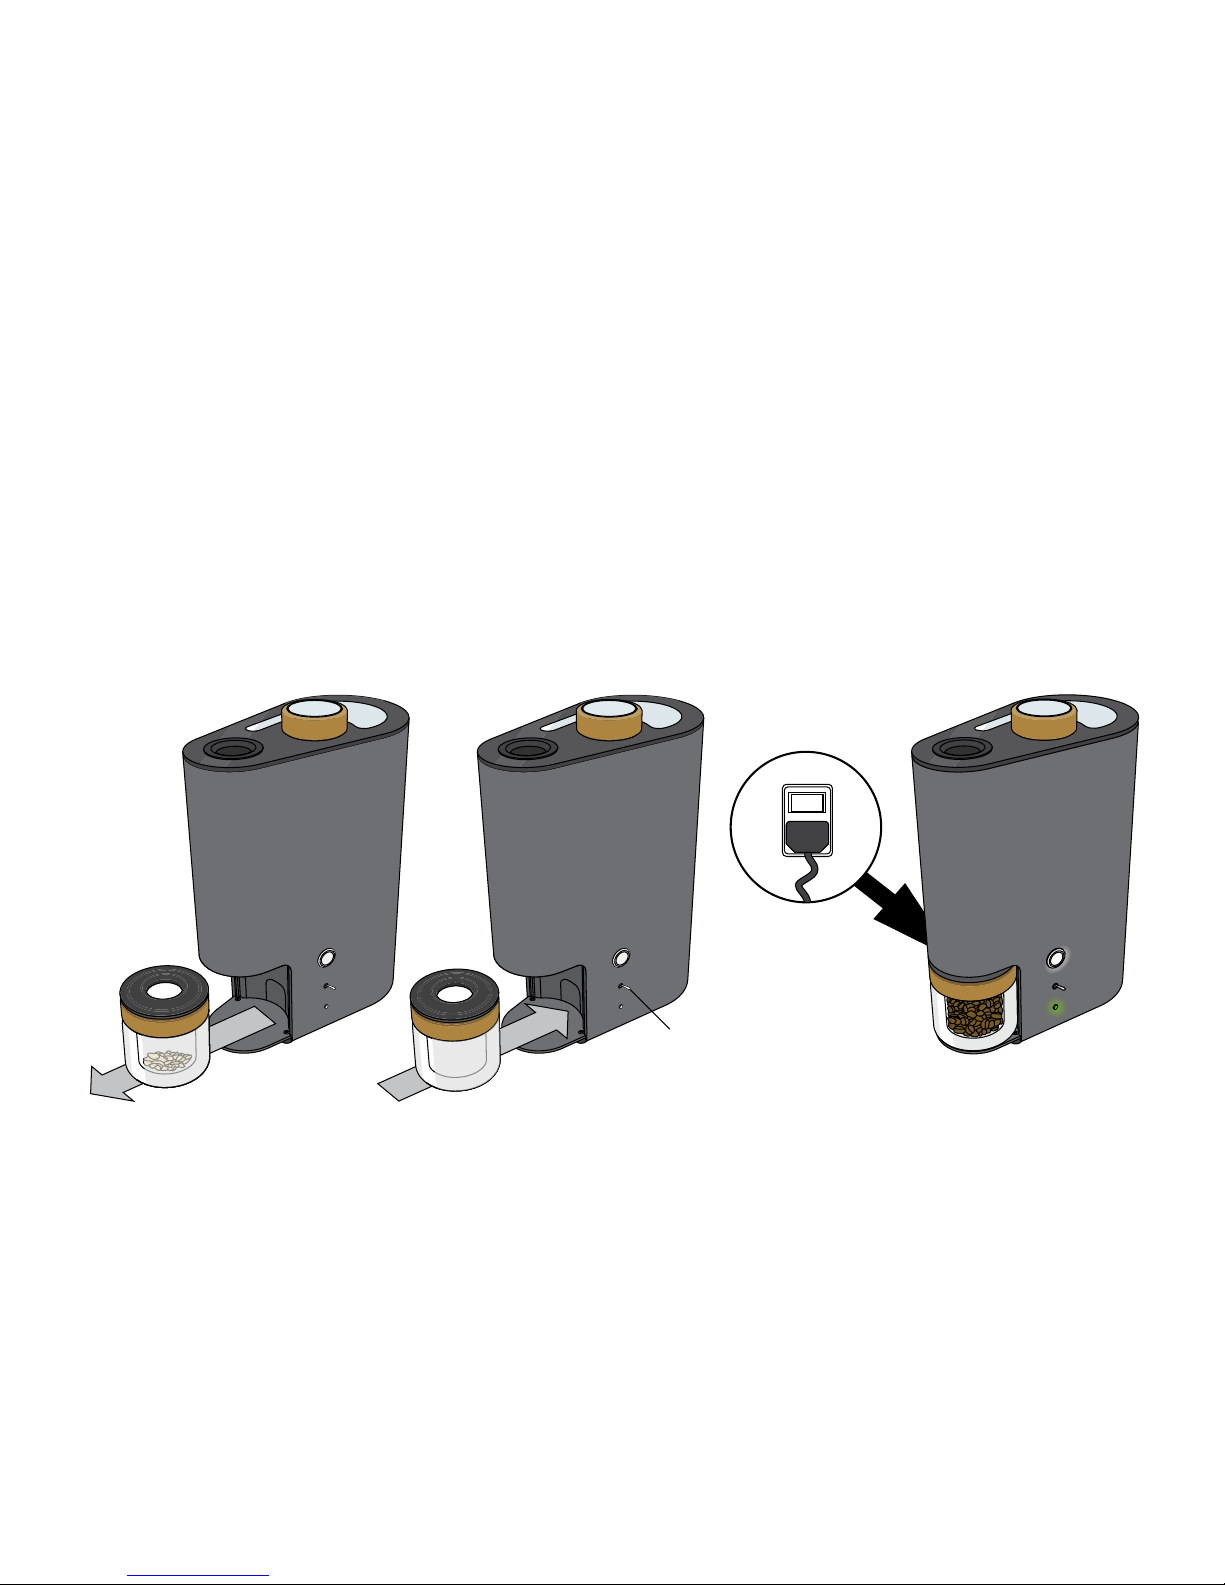
5 REMOVING THE BEANS FROM THE ROASTER
① Take the glass jar, containing chaff (skin) out of the
machine and throw the chaff away (rememer to take off the
jar lid)
② Put the jar with lid back in the machine.
③ Now, flip and hold the toggle switch on the machine to
make the beans blow over to the glass jar.
④ SWITCH THE MACHINE OFF AFTER ROASTING
Congratulations! You have successfully roasted coffee!
③ BLOW OVER SWITCH
1414

6 TROUBLE SHOOTING
Problem:
The light on the roaster shines a purple colour and the
roaster does not work.
Cause:
The roaster in an error state that could be triggered by a
number of problems.
The most likely causes are:
1. The tip of temperature sensor has been boken off.
2. The ambient air temperature is less than ten degrees C.
Solution:
1. Contact support@ikawacoffee.com, quoting your roaster
serial number.
2 Try using the roaster in a warmer place.
Problem:
The roaster starts to cool during a roast and will no longer
heat regardless of the profile it is programmed with.
Cause:
A thermally activated switch prevents the case heating to an
unsafe temperature. This switch should not activate under
normal roasting conditions but may activate if the roaster
was programmed with an extreme roast or in high ambient
temperatures.
If the thermal safety switch is activated the heating element
will switch off and the roaster will cool down, although it will
otherwise appear to operate as normal.
Solution:
Allow the roaster to cool for at least 30 min. Switch it on and
see if it works again. If the the roaster does not work contact
IKAWA.
15

Problem:
I cannot get my beans out of the roasting chamber.
Cause:
This may happen because your beans have not roasted
sufficiently. They may be too heavy to be transferred from the
Roasting Chamber into the jar.
Solution:
1. Turn off your machine and disconnect the power supply.
2. Ensure your machine is cooled down by letting it stand for
at least 30 minutes.
3. Then take out the doser and jar.
4. Remove the glass lid by pulling upwards on each side (the
lid is attached magnetically).
5. You can remove the beans by tilting the machine on it’s
side to pour them out.
Problem:
The beans inside the roaster do not rotate.
Cause 1:
1. The air inlet at the bottom of the roaster may be blocked
with chaff or other debris.
Solution:
Allow the roaster to cool for at least 30 min. Turn the roaster
over and inspect the air inlet on the bottom of the machine. If
the air inlet is blocked with chaff or other debris unblock by
removing the debris.
Cause 2:
The roaster may be programmed with a roast profile with
inadequate air flow.
Solution:
Program the roaster with a higher air flow using the
IAKWApp.
6 TROUBLE SHOOTING
16

17
7 MAINTENANCE 8 REPAIR & DISPOSAL
Periodically check the air inlet at the bottom and remove
any debris that may have accumulated.
The jar can be washed with warm, soapy water but only
when the cork grip is removed. The cork should not get wet.
The jar cannot go in the dishwasher or microwave.
To clean the glass lid, first remove the doser. Second,
remove the glass lid by pulling upwards on each side (the lid
is attached magnetically). You can wash the glass lid
including the metal vent with warm, soapy water. The lid
cannot go in the dishwasher or microwave.
We do not recommend cleaning the inside the Roasting
Chamber or cyclone as this risks breaking the temperature
sensor tip and or water entering the roaster.
If your system is not working correctly, refer to Chapter 6
(Troubleshooting).
If your IKAWA system is no longer working and not under
warranty, we recommend replacing your machine with a
new IKAWA Roaster.
DISPOSAL:
Waste and electrical products should not be disposed of
with household waste. Please contact our technical team for
recycling/disposal advice as regional variations apply
WARNING:
ENSURE THAT NO LIQUID PENETRATES
THE HOLES IN THE BOTTOM OF THE
ROASTING CHAMBER.
BEFORE ATTEMPTING ANY
MAINTENANCE ENSURE THAT THE
MACHINE UNPLUGGED FROM ANY
POWER SOURCE, AND THAT THE
MACHINE IS AT ROOM TEMPERATURE.
WARNING:
DO NOT REPAIR THE IKAWA SYSTEM
YOURSELF. BY DOING SO YOU
INVALIDATE ANY WARRANTY, AND
RISK GETTING INJURED.


© IKAWA limited 2011-2015
www.ikawacoffee.com
info@ikawacoffee.com

 Loading...