

Page 1
MS1
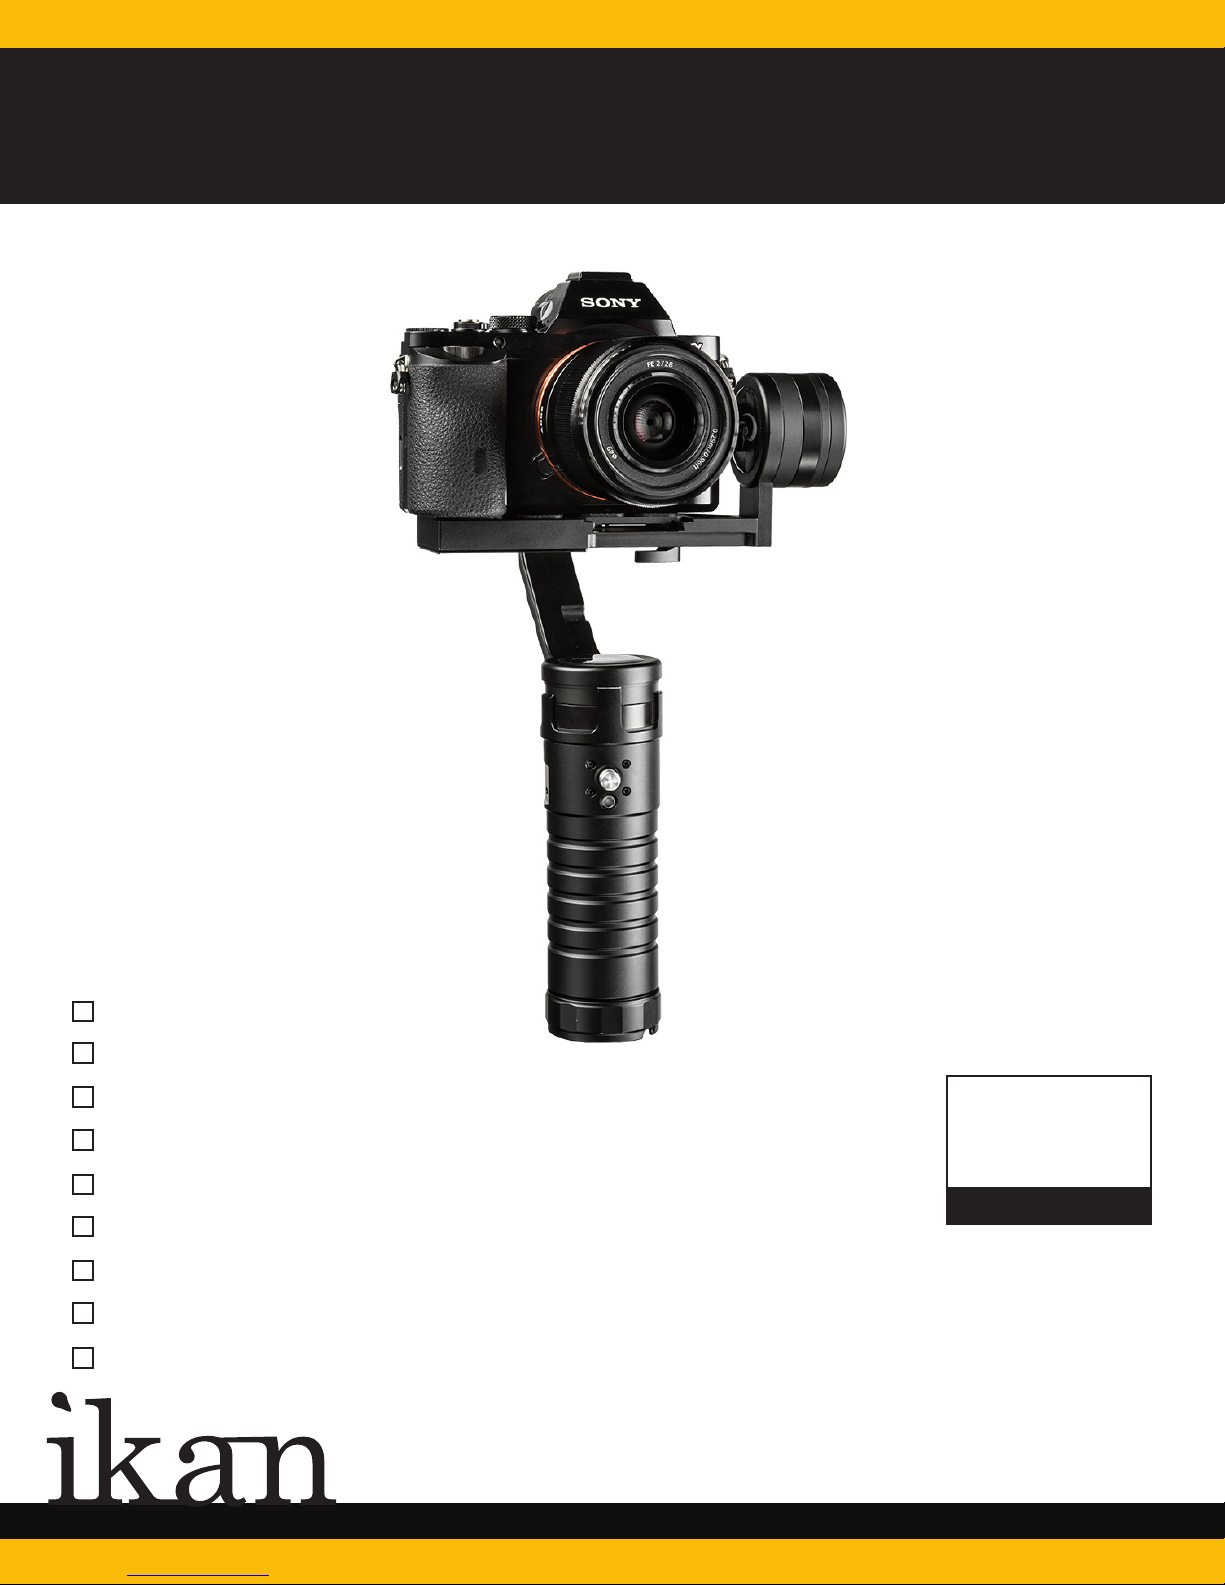
Beholder Gimbal for Mirrorless Cameras
QUICKSTART GUIDE
What’s Included
1 x Stabilizer
1 x Battery Holder
1 x Battery Cap
1 x Quick Release Plate
1 x USB LED Light
1 x Adapter Plate
1 x Micro USB Cable
2 x ¼”-20 Screw
3 x 18650 Batteries
www.ikancorp.com
CHECKED BY
713.272.8822
Page 2

Beholder MS1 Camera Stabilizer
Specifications
Height: 268mm, 10.5 Inches
Length: 168mm, 6.6 Inches
Width: 123 mm, 4.8 Inches
Weight w/o Battery: 641g, 1.4 lbs
Weight w/ Battery: 778g, 1.7 lbs
Unit with Packaging: 1520g, 3.4 lbs
Packaging Dimensions: 390 x 200 x 100mm,
15.4 x 7.9 x 3.9 Inches
Range of Motion: 90°–180°
Yaw: 355°
Pitch: 355°+ –180°
Roll: 355°+ – 60°
Battery Life: 2-3 Hours
Electronics: 8-Bit Board, 3-Axis Stabilizer Gyro System
Kit Includes:
Stabilizer
Battery Cap
Adapter Plate
1/4”-20 Screw
Battery Holder
Quick Release Plate
3 x Batteries (18650)
Max Supported Camera Weight: 850g, 1.9 lbs
Supported Camera Models: Sony A7S, NEW
Series, Panasonic DMC, GH4, BMPCC, RX100,
A6000, Canon G7, A7ii, and more.
Battery: 3 x 3.7v Li-Ion 18650
Page 3
Version:2.0
1. Production Introduction
The Beholder MS1 Camera Stabilizer is designed to support professional videographers
of all levels. The stabilizer is easy to use and small enough to travel with. The Beholder
MS1 Stabilizer is intuitive and offers a greater range of camera movement.
2. Battery Setup and Charging
A Battery Setup
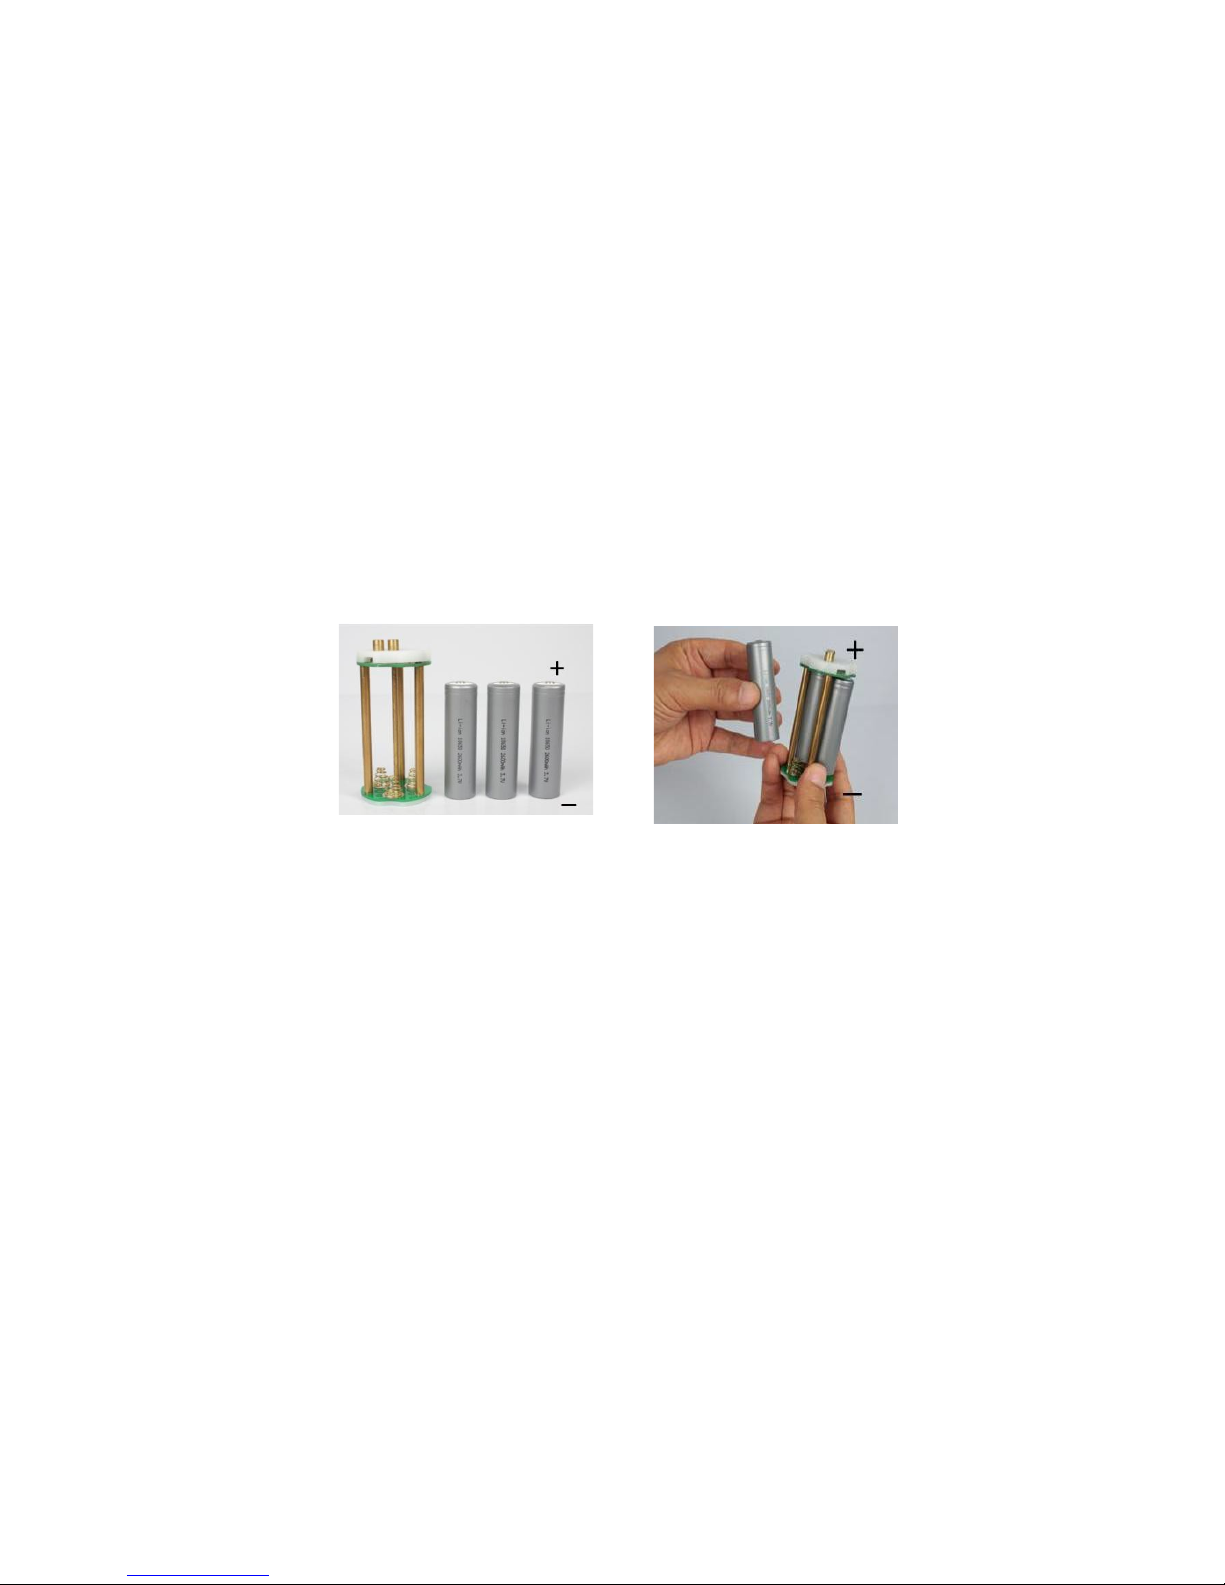
a. Install batteries positive side up into battery holder.Connect the Micro USB
cable to the Battery Holder Micro USB port. Connect USB cable to 1.5-2
amp power supply.
b. Battery Charging time 4-5 hours.
c. Green light means fully charged. Red light means charging.
Flashing Red
and Green lightsmeans almost fully charged.
d. Warning using a charger that does not support 1.5-2 amps will result in
batteries failing to charge.
Version:2.0
1. Production Introduction
The Beholder MS1 Camera Stabilizer is designed to support professional videographers
of all levels. The stabilizer is easy to use and small enough to travel with. The Beholder
MS1 Stabilizer is intuitive and offers a greater range of camera movement.
2. Battery Setup and Charging
A Battery Setup
a. Install batteries positive side up into battery holder.Connect the Micro USB
cable to the Battery Holder Micro USB port. Connect USB cable to 1.5-2
amp power supply.
b. Battery Charging time 4-5 hours.
c. Green light means fully charged. Red light means charging.
Flashing Red
and Green lightsmeans almost fully charged.
d. Warning using a charger that does not support 1.5-2 amps will result in
batteries failing to charge.
Production Introduction
The Beholder MS1 Camera Stabilizer is designed to support professional videographers of all levels.
The stabilizer is easy to use and small enough to travel with. The Beholder MS1 Stabilizer is intuitive and
offers a greater range of camera movement.
Battery Setup
A. Battery Setup
a.) Install the batteries positive side up into the battery holder. Connect the Micro USB AC Adapter.
Battery Charging time is about 4-5 Hours.
Green light means fully charged. Red light means charging.
Flashing Red and Green lights means almost fully charged.
b.) WARNING! Using a charger that does not support 1.5 Amp or more will result in batteries
failing to charge.
B. Battery Holder
a.) Identify the positive side of the battery holder.
b.) Insert the Battery Holder into handle, positive side first.
c.) Screw on the battery cap and make sure the cap is secured snuggly.
Page 4
c. Screw on battery cap and make sure the cap is secured snuggly.
3. Camera Setup and Balancing
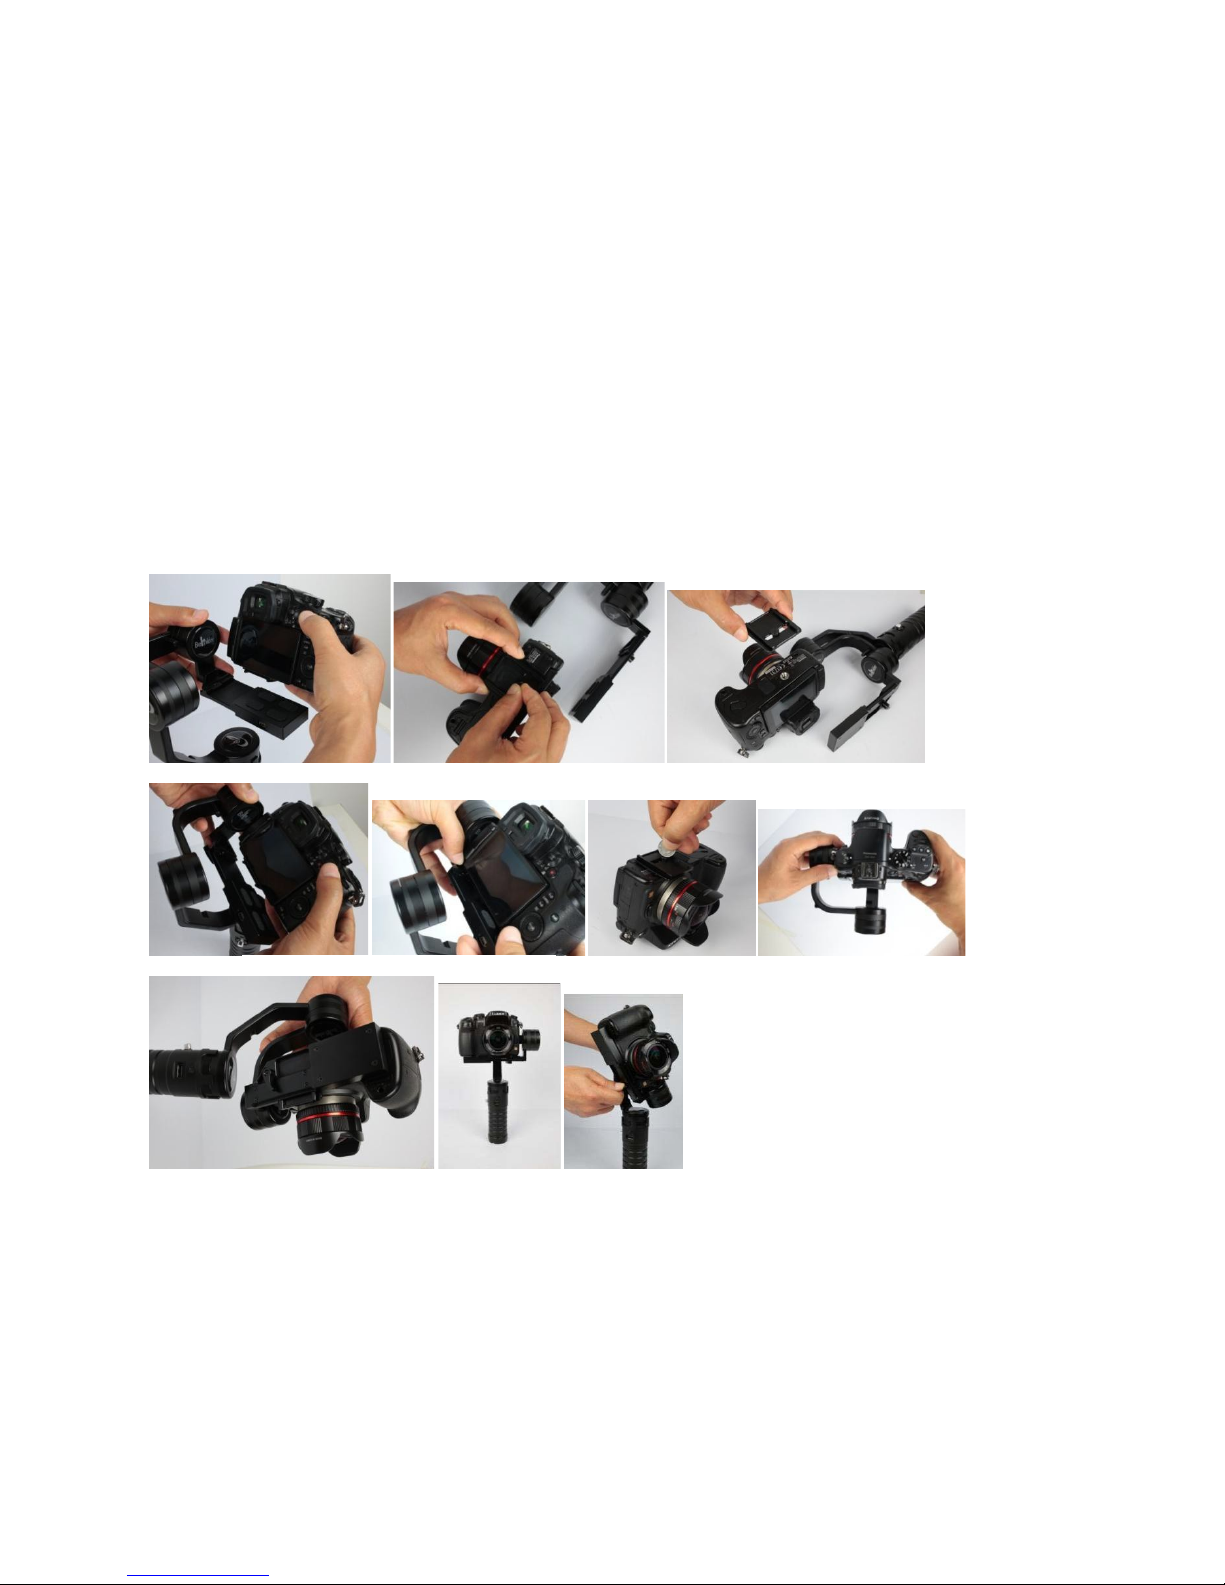
A. Attach the quick release plate as shown with the longest slide pointing out
towards the direction of the lens. Snuggly tighten the camera screw.
B. Attach the camera with plate to stabilizer. Adjust the camera’s position so that
the gimbal remains level.
C. Adjust the left-right balance of the camera. Small adjustments maybe needed.
D.Adjust the front and rear balance. Once gimbal is balanced, tighten the quick
release lock. If the camera does not balance perfectly, don’t worry the MS1 will
usually be able to maintain stab
ility.
Camera Setup & Balancing
A. Attach the quick release plate as shown with the longest slide pointing out towards the direction of the
lens. Hand-tighten the camera screw.
B. Attach the camera with the plate to the stabilizer. Adjust the camera’s position so that the gimbal
remains level.
C. Adjust the left-right balance of the camera. Small adjustments may be needed to ensure correct
balancing.
D. Adjust the front and rear balance. Once the gimbal is balanced, tighten the quick release lock. If the
camera does not balance perfectly, don’t worry, the MS1 will usually be able to maintain stability.
1 2 3
123
4 5 6 7
456 7
8 9 10
Page 5
Installation for Small Cameras
89 10
E.Installation for small cameras.
Camera less than 400g such as Sony NEX5R and BMPCC will need an adapter
plate.The adapter plate will allow cameras that cannot mount properly to be mounted
on the gimbal.
Installation steps:
1. Put the adapter plate on the camera,then tighten the screw.
2.According to your camera select an appropriate mounting position.
3.Check the position of the adapter plate, ensure the camera does not come in contact with
the gimbal.
4. How to Use
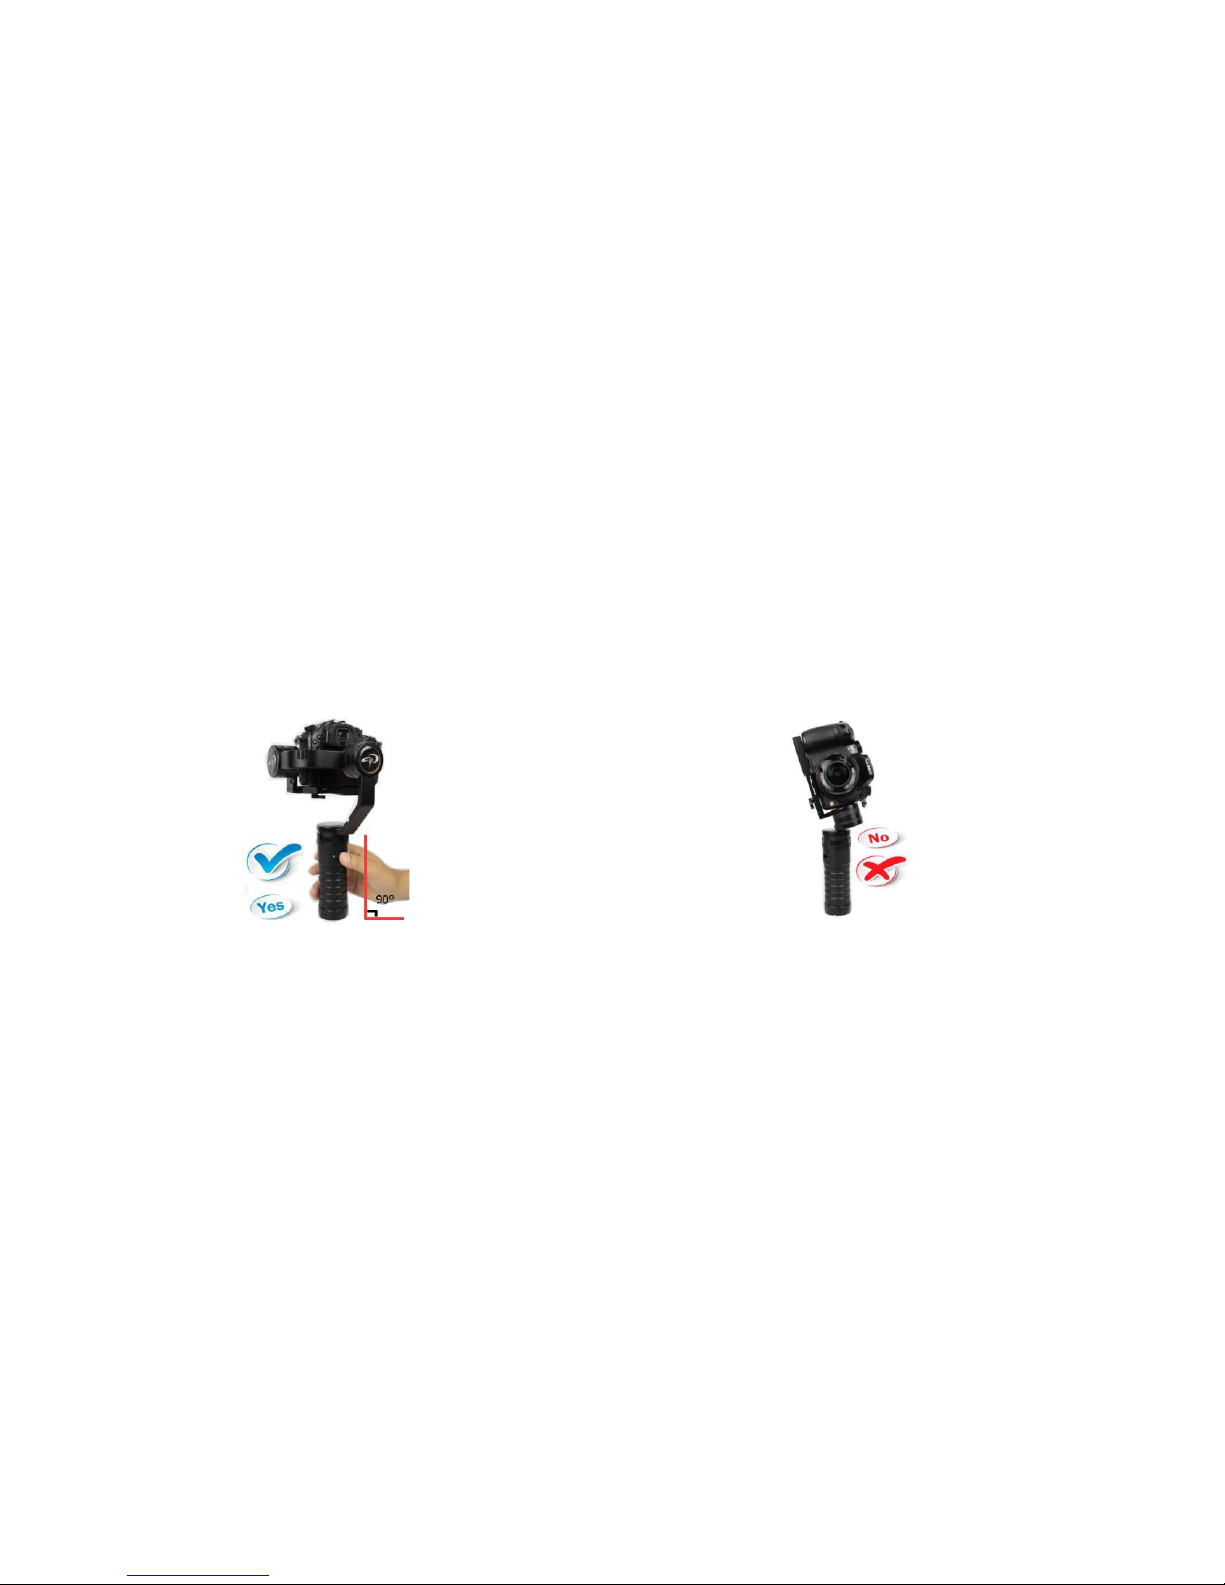
A: To start the stabilizer with the camera and gimbal level on a flat surface at 90
degrees and then press the power button.
Note: Starting the stabilizer in a position other than 90 degrees will result in
performance issues.
Cameras less than 400g such as the Sony NEX5R and BMPCC will need an adapter plate. The
adapter plate will allow cameras that cannot mount properly to be raised and adjusted on the gimbal.
Installation Steps:
a.) Put the adapter plate on the camera, then tighten the screw.
b.) According to your camera, select an appropriate mounting position.
c.) Check the position of the adapter plate, ensure the camera does not come in contact
with the gimbal.
How to Use
To start the stabilizer with the camera and gimbal level on a flat surface at 90° and then press the
power button.
Note: Starting the stabilizer in a position other than 90° will result in performance issues.
The correct way to start Incorrect
Page 6
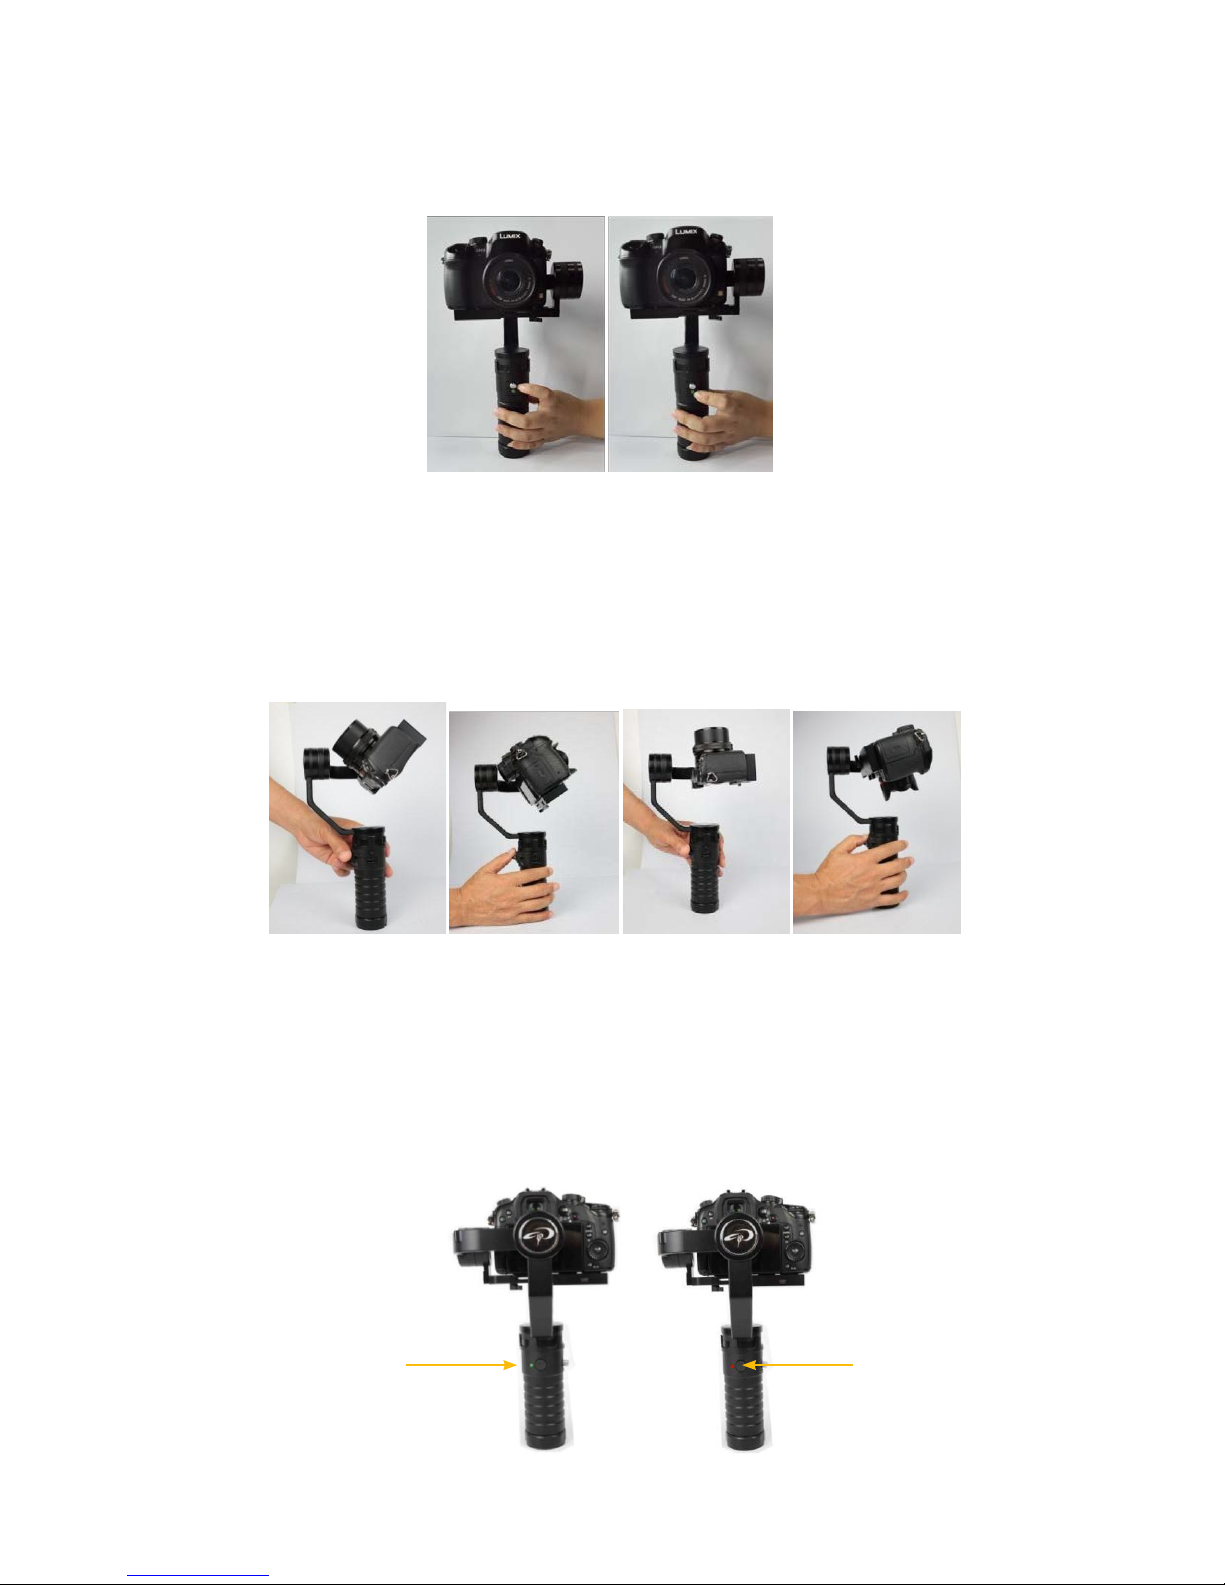
a. Press once for Lock Mode this mode will make the stabilizer hold a position.
b. Press again to change to Follow Mode which will make the stabilizer follow
the pan and tilt of your hand.
c. Press and hold the joystick for 3 seconds to calibrate the gyro.The
gyrocontrols the horizontal level. During calibration the MS1 must not be
touched and the gimbal must be level.
Use the joystick to pan and tilt the camera.
C .Battery Status
Green light means, normal. Red
light means, low battery.
Flashingred light means, batteries
need to be charged. Also the MS1
will shut down to protect the
batteries.
a. Press once for Lock Mode this mode will make the stabilizer hold a position.
b. Press again to change to Follow Mode which will make the stabilizer follow
the pan and tilt of your hand.
c. Press and hold the joystick for 3 seconds to calibrate the gyro.The
gyrocontrols the horizontal level. During calibration the MS1 must not be
touched and the gimbal must be level.
Joystick Mode Selection
A. Press once for Lock Mode, this mode will make stabilizer hold a position.
B. Press again to change to Follow Mode which will make the stabilizer follow the pan and tilt
of your hand.
C. Press and hold the joystick for 3 seconds to calibrate the gyro. The gyro controls the
horizontal level. During calibration, the MS1 must not be touched and the gimbal must be level on
a solid surface.
D. Use the joystick to pan and tilt the camera.
Battery Status
A. Green Light means normal.
Red Lights means low battery.
Flashing Red Light means batteries need to be charged.
Also the MS1 will shut down to protect the batteries.
Green Light means normal. Red Light means low battery.
Page 7
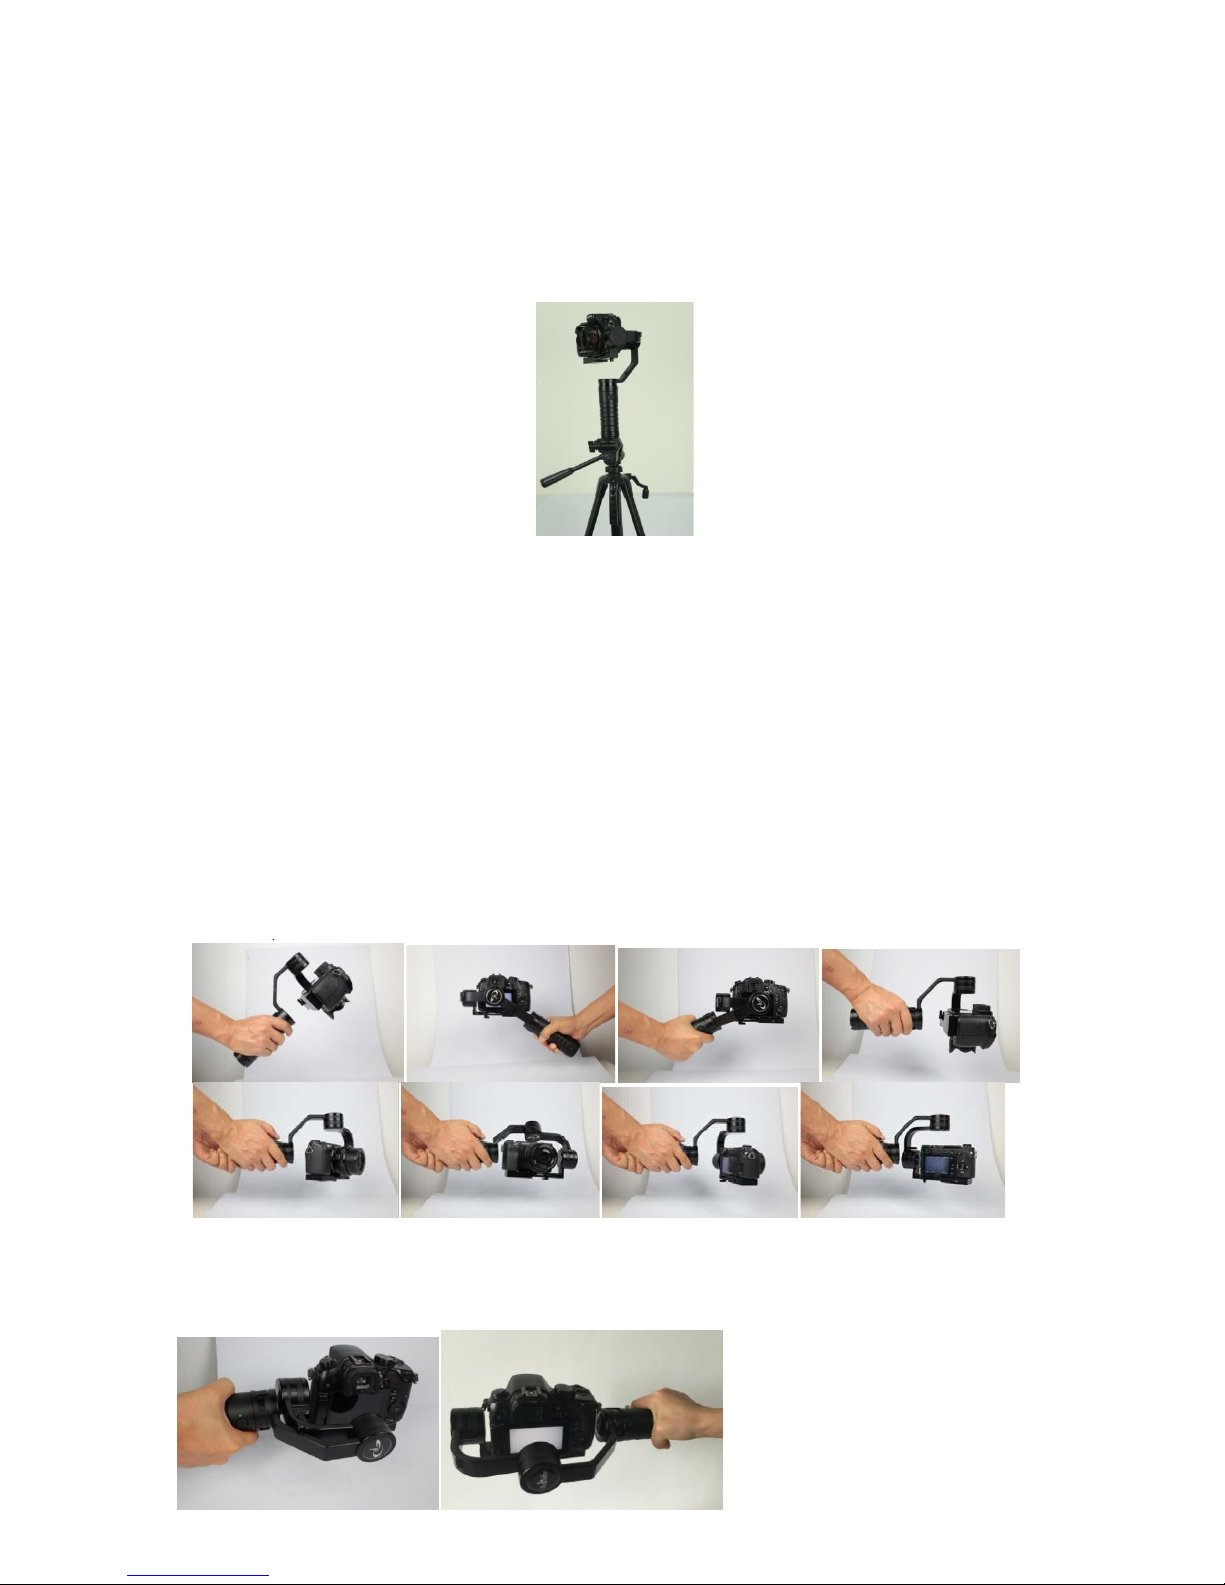
A. The stabilizer can be mounted to a tripod, selfie stick, and more.
B. LED USB light is great for shooting at night.
C. Charge a cellphone from stabilizer. Note stabilizer must be off.
6. Supported Cameras.
Sony A7S, NEX series, Panasonic DMC, GH4, BMPCC, RX100, A6000, Canon
G7x, A7ii, and more.
7. Shooting Angle Range
Roll 45°+-45°.
Tilt 45
°
, 90°.
A. The stabilizer can be mounted to a tripod, selfie stick, and more.
B. LED USB light is great for shooting at night.
C. Charge a cellphone from stabilizer. Note stabilizer must be off.
6. Supported Cameras.
Sony A7S, NEX series, Panasonic DMC, GH4, BMPCC, RX100, A6000, Canon
G7x, A7ii, and more.
7. Shooting Angle Range
Roll 45°+-45°.
Tilt 45
°
, 90°.
A. The stabilizer can be mounted to a tripod, selfie stick, and more.
B. LED USB light is great for shooting at night.
C. Charge a cellphone from stabilizer. Note stabilizer must be off.
Other Features
A. The stabilizer can be mounted to a tripod, selfie stick, and more.
B. Charge a cellpone from stabilizer. NOTE: Stabilizer must be OFF. USB Cable not included.
Supported Cameras
Sony a7S, NEX Series, Pannasonic DMC, GH4, BMPCC, RX100, A6000, Canon G7x, A7ii and more.
Shooting Angle Range
Roll: 45°+ –45°
Tilt: 45°+ –90°
The following angles are not possible.
Page 8

Learn More
More dynamic information at official website: www.ikancorp.com
Support
Contact email: [email protected]
WARNING!
This product comes from the factory tuned and ready to use. It is NOT meant
to be user-serviceable, accessing and changing software settings and/or tuning
settings will void warranty.
CONDITIONS OF WARRANTY SERVICE
• Free service for one year from the day of purchase if the problem is caused by manufacturing errors.
• The components and maintenance service fee will be charged if the warranty period is expired.
Free Service will not be Provided in the Following Situations:(*Even if the product is still within the warranty period.)
• Damage caused by abuse or misuse, dismantling, or changes to the product not made by the company.
• Damage caused by natural disaster, abnormal voltage, and environmental factors, etc.
©2016 ikan Corporation. All rights reserved
 Loading...