

Iiyama PROLITE X4071UHSU, PL4071UH User Manual
USER MANUAL
Thank you very much for choosing the iiyama
LCD monitor.
We recommend that you take a few minutes
to read this comprehensive manual carefully
before installing and switching on the monitor.
Please keep this manual in a safe place for
your future reference.
ENGLISH
CE MARKING DECLARATION OF CONFORMITY
This LCD monitor complies with the requirements of the EC/EU Directive 2014/30/EU “EMC
Directive”, 2014/35/EU “Low Voltage Directive” and 2011/65/EU “RoHS Directive”.
Warning
This is a class A product. In a domestic environment this product may cause radio interference in
which case the user may be required to take adequate measures.
IIYAMA CORPORATION: Wijkermeerstraat 8, 2131 HA Hoofddorp, The Netherlands
Model No. : PL4071UH
ENGLISH
We recommend recycling of used product. Please contact your dealer or iiyama
service center. Recycle information is obtained via the Internet, using the
address: http://www.iiyama.com
You can access the Web page of diff erent countries from there.
We reserve the right to change specifi cations without notice.
All trademarks used in this user manual are the property of their respective owners.
As an ENERGY STAR
for energy effi ciency.
®
Partner, iiyama has determined that this product meets the ENERGY STAR® guidelines

TABLE OF CONTENTS
FOR YOUR SAFETY ............................................................................1
SAFETY PRECAUTIONS................................................................1
SPECIAL NOTES ON LCD MONITORS .........................................3
CUSTOMER SERVICE ...................................................................4
CLEANING ......................................................................................4
BEFORE YOU OPERATE THE MONITOR ..........................................5
FEATURES......................................................................................5
CHECKING THE CONTENTS OF THE PACKAGE ........................5
UNPACKING ..................................................................................5
FITTING AND REMOVAL OF BASE ...............................................6
CONTROLS AND CONNECTORS : MONITOR ..............................7
INSTALLATION ...............................................................................9
CONTROLS AND CONNECTORS : REMOTE CONTROL ..........10
PREPARING THE REMOTE CONTROL.......................................11
BASIC OPERATION ......................................................................12
CONNECTING YOUR MONITOR .................................................15
COMPUTER SETTING .................................................................16
ADJUSTING THE VIEWING ANGLE ............................................16
OPERATING THE MONITOR .............................................................17
ADJUSTMENT MENU CONTENTS ..............................................19
SCREEN ADJUSTMENTS ............................................................27
POWER MANAGEMENT FEATURE .............................................30
TROUBLE SHOOTING ......................................................................31
RECYCLING INFORMATION .............................................................32
APPENDIX ........................................................................................33
SPECIFICATIONS .........................................................................33
DIMENSIONS ................................................................................34
COMPLIANT TIMING ....................................................................35
ENGLISH

FOR YOUR SAFETY
SAFETY PRECAUTIONS
WARNING
STOP OPERATING THE MONITOR WHEN YOU SENSE TROUBLE
If you notice any abnormal phenomena such as smoke, strange sounds or fumes, unplug the
monitor and contact your dealer or iiyama service center immediately. Further use may be
dangerous and can cause fi re or electric shock.
NEVER REMOVE THE CABINET
High voltage circuits are inside the monitor. Removing the cabinet may expose you to the danger of
fi re or electric shock.
DO NOT PUT ANY OBJECT INTO THE MONITOR
Do not put any solid objects or liquids such as water into the monitor. In case of an accident, unplug
your monitor immediately and contact your dealer or iiyama service center. Using the monitor with
any object inside may cause fi re, electric shock or damage.
INSTALL THE MONITOR ON A FLAT, STABLE SURFACE
The monitor may cause an injury if it falls or is dropped.
DO NOT USE THE MONITOR NEAR WATER
Do not use where water may be splashed or spilt onto the monitor as it may cause fi re or electric
shock.
OPERATE UNDER THE SPECIFIED POWER SUPPLY
Be sure to operate the monitor only with the specifi ed power supply. Use of an incorrect voltage will
cause malfunction and may cause fi re or electric shock.
ENGLISH
PROTECT THE CABLES
Do not pull or bend the power cable and signal cable. Do not place the monitor or any other heavy
objects on the cables. If damaged, the cables may cause fi re or electric shock.
ADVERSE WEATHER CONDITIONS
It is advisable not to operate the monitor during a heavy thunder storm as the continual breaks in
power may cause malfunction. It is also advised not to touch the plug in these circumstances as it
may cause electric shock.
FOR YOUR SAFETY 1

CAUTION
INSTALLATION LOCATION
Do not install the monitor where sudden temperature changes may occur, or in humid, dusty or
smoky areas as it may cause fi re, electric shock or damage. You should also avoid areas where the
sun shines directly on the monitor.
DO NOT PLACE THE MONITOR IN A HAZARDOUS POSITION
The monitor may topple and cause injury if not suitably located. Please also ensure that you do not
place any heavy objects on the monitor, and that all cables are routed such that children may not
pull the cables and possibly cause injury.
MAINTAIN GOOD VENTILATION
Ventilation slots are provided to keep the monitor from overheating. Covering the slots may cause
ENGLISH
fi re. To allow adequate air circulation, place the monitor at least 10 cm (or 4 inches) from any walls.
Do not remove the tilt stand when operating the monitor. Ventilation slots on the back of the
cabinet will be blocked and the monitor may overheat if the stand is removed. This may cause fi re
or damage. Operating the monitor on its back, side, upside down or on a carpet or any other soft
material may also cause damage.
DISCONNECT THE CABLES WHEN YOU MOVE THE MONITOR
When you move the monitor, turn off the power switch, unplug the monitor and be sure the signal
cable is disconnected. If you do not disconnect them, it may cause fi re or electric shock.
UNPLUG THE MONITOR
If the monitor is not in use for a long period of time it is recommended that it is left unplugged to
avoid accidents.
HOLD THE PLUG WHEN DISCONNECTING
To disconnect the power cable or signal cable, always pull it by the plug. Never pull on the cable
itself as this may cause fi re or electric shock.
DO NOT TOUCH THE PLUG WITH WET HANDS
Pulling or inserting the plug with wet hands may cause electric shock.
WHEN YOU INSTALL THE MONITOR ON YOUR COMPUTER
Be sure the computer is strong enough to hold the weight of the monitor, otherwise, you may
damage your computer.
REMARK FOR 24/7 USAGE
This product is not specifi cally designed for 24/7 usage in all environments.
OTHERS
ERGONOMIC RECOMMENDATIONS
To eliminate eye fatigue, do not operate the monitor against a bright background or in a dark room.
For optimal viewing comfort, the monitor should be just below eye level and 40-60 cm (16-24 inches)
away from your eyes. When using the monitor over a prolonged time, a ten minute break every hour
is recommended as looking at the screen continuously can cause eye strain.
2 FOR YOUR SAFETY

SPECIAL NOTES ON LCD MONITORS
The following symptoms are normal with LCD monitors and do not indicate a problem.
NOTE
When you fi rst turn on the LCD monitor, the picture may not fi t in the display area
because of the type of computer that is used. In this case, adjust the picture position
to the correct position.
You may fi nd slightly uneven brightness on the screen depending on the desktop
pattern you use.
Due to the nature of the LCD screen, an afterimage of the previous screen may
remain after switching the image, when the same image is displayed for hours. In
this case, the screen is recovered slowly by changing the image or turning off the
Power Switch for hours.
Max. non-stop operating time and conditions
(1) If a static image is displayed continuously, it is recommended to disrupt it with a
motion picture.
(2) It is recommended to periodically change the background colour and background
image.
(3) Do not exceed a 12 hour non-stop operating time limit.
(4) If the screen is active for a longer period of time, it is recommended to
I. Run the screensaver (motion picture or black pattern)
II. Power off the system for a while
(5) Make sure that the screen is suitably ventilated, or is used in conjunction with
climate control system if installed into any bespoke cabinets.
(6) We strongly recommend an active cooling system with fans for long operating times,
especially for high luminance LCD models.
This LCD cannot be used outdoors.
This LCD cannot be used with the screen facing upwards.
ENGLISH
FOR YOUR SAFETY 3

CUSTOMER SERVICE
NOTE
CLEANING
WARNING
CAUTION
ENGLISH
NOTE
CABINET
LCD
SCREEN
If you have to return your unit for service and the original packaging has been
discarded, please contact your dealer or iiyama service center for advice or
replacement packaging.
If you drop any materials or liquids such as water into the monitor when cleaning,
unplug the power cable immediately and contact your dealer or iiyama service center.
For safety reasons, turn off the power switch and unplug the monitor before you
clean it.
To protect the LCD panel, do not scratch or rub the screen with a hard object.
Never use any of the following strong solvents. These will damage the cabinet and
the LCD screen.
Thinner Benzine Abrasive cleaner
Spray-type cleaner Wax Acid or Alkaline solvent
Touching the cabinet with any product made from rubber or plastic for a long time
may cause degeneration or loss of paint on the cabinet.
Stains can be removed with a cloth lightly moistened with a mild detergent solvent.
Then wipe the cabinet with a soft dry cloth.
Periodic cleaning with a soft dry cloth is recommended.
Don't use tissue paper etc. because these will damage the LCD screen.
4 FOR YOUR SAFETY
BEFORE YOU OPERATE THE MONITOR
FEATURES
Supports Resolutions up to 3840 × 2160
High Contrast 5000:1 (Typical) / Brightness 350cd/m2 (Typical) / Response Time
: 3ms (Gray to Gray)
Blue Light Reducer
Digital Character Smoothing
Automatic Set-up
Stereo Speakers
2 × 6W Stereo Speakers
Plug & Play VESA DDC2B Compliant
Windows
Power Management (ENERGY STAR
VESA Mounting Standard (200mm×200mm) Compliant
Fanless design
Headphone hook
CHECKING THE CONTENTS OF THE PACKAGE
The following accessories are included in your package. Check to see if they are enclosed with
the monitor. If anything is missing or damaged, please contact your local iiyama dealer or regional
iiyama offi ce.
Power Cable (2pcs)*
DisplayPort Cable
Audio Cable
Remote Control
Quick Start Guide
CAUTION
®
Vista/7/8/8.1/10 Compliant
®
VESA DPMS Compliant)
*
The rating of the Power Cable enclosed in 120V area is 10A/125V. If you are using
a power supply higher than this rating, then a power cable with a rating of 10A/
250V must be used. However, all guarantees and warranties are void for any
problems or damage caused by a power cable not supplied by iiyama.
HDMI Cable
RS232C Cable
Stand Base (2pcs)
Battery (2pcs)
mDP-DP Cable
USB Cable
Screw for stand fi xing (2pcs)
Safety Guide
ENGLISH
UNPACKING
CAUTION
Moving the monitor requires at least two people. If not, it may drop and could result in a serious
injury.
BEFORE YOU OPERATE THE MONITOR 5
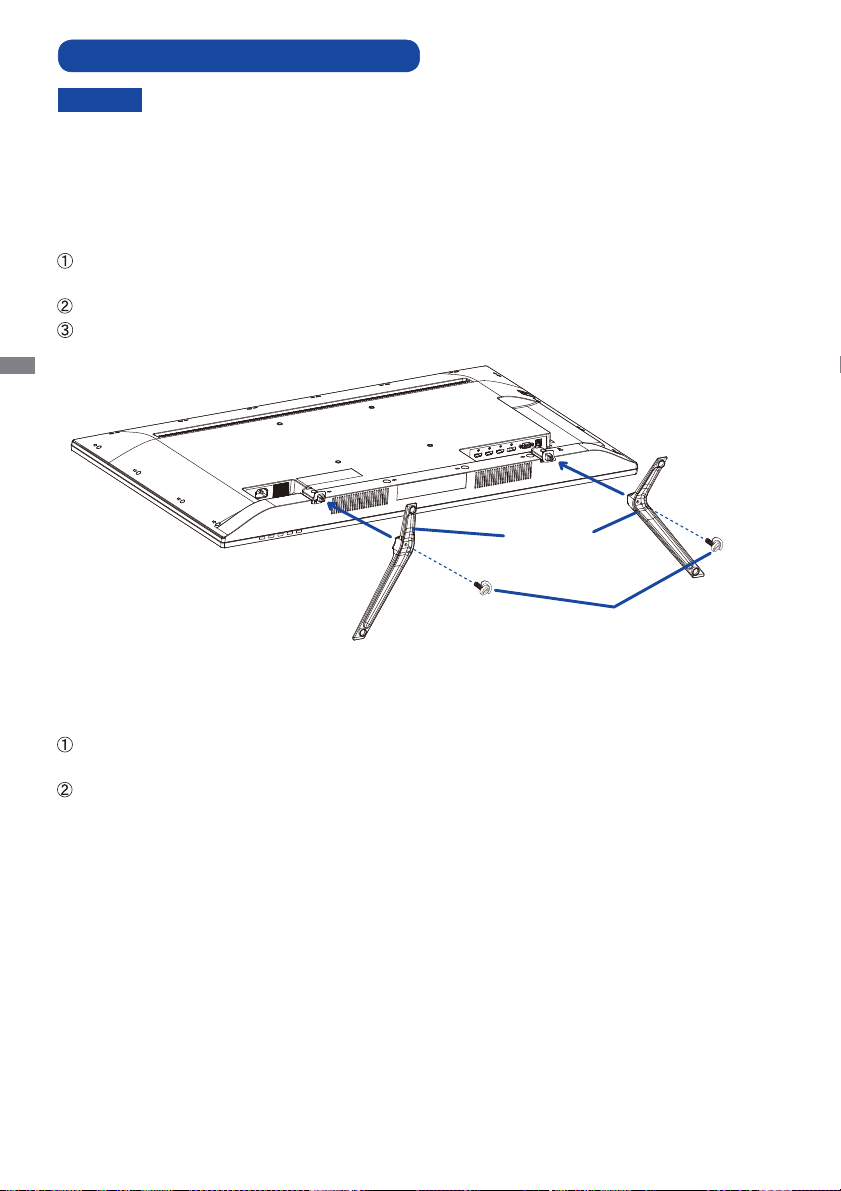
FITTING AND REMOVAL OF BASE
CAUTION
<Installation>
Put a piece of soft cloth on the table beforehand to prevent the monitor from being scratched.
Lay the monitor fl at on a table with front face down.
Hold the monitor and push the Stand-Base.
Use ‘thumb screw’ provided to secure base to monitor column.
ENGLISH
Put the monitor on a stable surface. The monitor may cause injury or damage if it
falls or is dropped.
Do not give a strong impact to the monitor. It may cause damage.
Unplug the monitor before removal or installation to avoid electric shock or damage.
Stand-Base
Thumb screw for Stand-Base fixing
<Removal>
Put a piece of soft cloth on the table beforehand to prevent the monitor from being scratched.
Lay the monitor fl at on a table with front face down.
Remove ‘thumb screw’ to remove base from monitor column.
6 BEFORE YOU OPERATE THE MONITOR
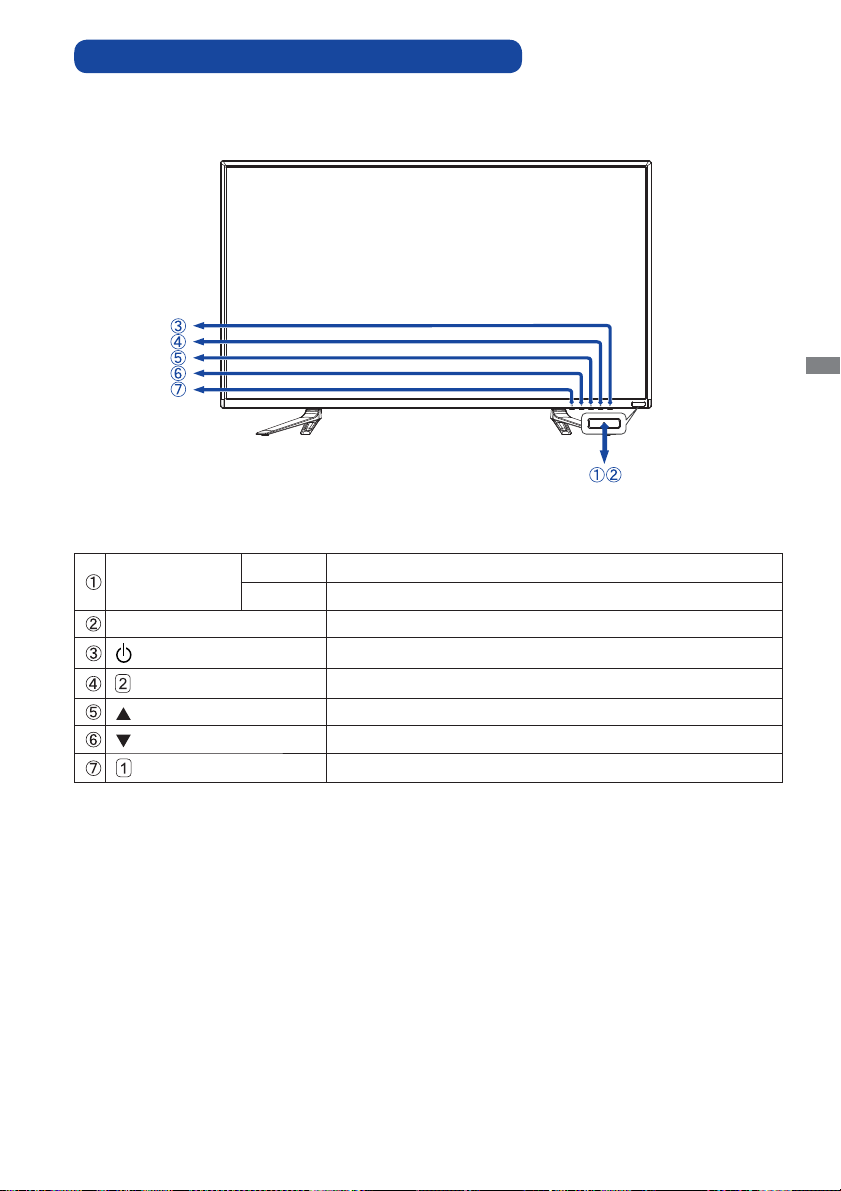
CONTROLS AND CONNECTORS : MONITOR
<Front>
ENGLISH
Power Indicator
Remote Sensor Remote Sensor
Down Button
Blue Normal Operation
Orange Power Management
Power Button
Input / Select Button
Up Button
Menu Button
BEFORE YOU OPERATE THE MONITOR 7
ENGLISH
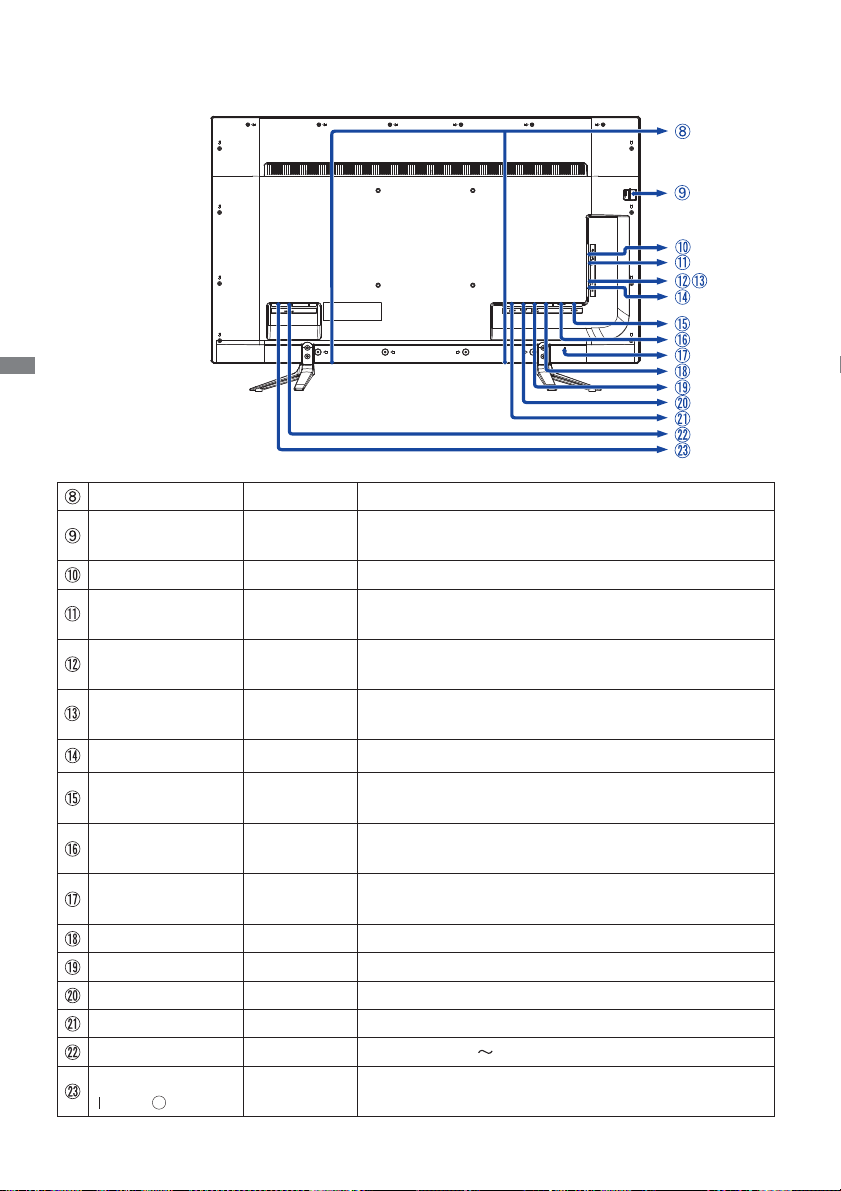
<Back>
SPEAKERS Speakers
HEADPHONE
HOOK
Headphone hook
EARPHONE Mini Jack Headphone connector
AUDIO IN
(PC Audio In)
USB
USB
Mini Jack
USB
Downstream
USB
Downstream
RS232C Mini Jack
PC USB
VGA
USB
Upstream
D-SUB mini
15pin
KEYHOLE FOR
SECURITY LOCK
Audio Connector
USB Downstream Connector
USB Downstream Connector
RS232C Connector
USB Upstream Connector
VGA(D-sub) mini 15pin Connector
Keyhole for Security Lock
DP DisplayPort DisplayPort Connector
HDMI-1 (4K 60p) HDMI
HDMI-2/MHL HDMI/MHL
HDMI-3 HDMI
HDMI Connector
HDMI
/MHL
Connector
HDMI Connector
AC POWER IN AC-INLET AC Connector( : Alternating current) (AC POWER IN)
AC SWITCH
(ON) / (OFF)
MAIN
POWER
Main Power Switch
8 BEFORE YOU OPERATE THE MONITOR
INSTALLATION
CAUTION
Follow the manual instructions for the type of mount you have selected. Refer all servicing to
qualifi ed service personnel.
Moving the monitor requires at least two people.
Before installing, please make sure the wall is strong enough to hold the necessary weight of the
display and the mount.
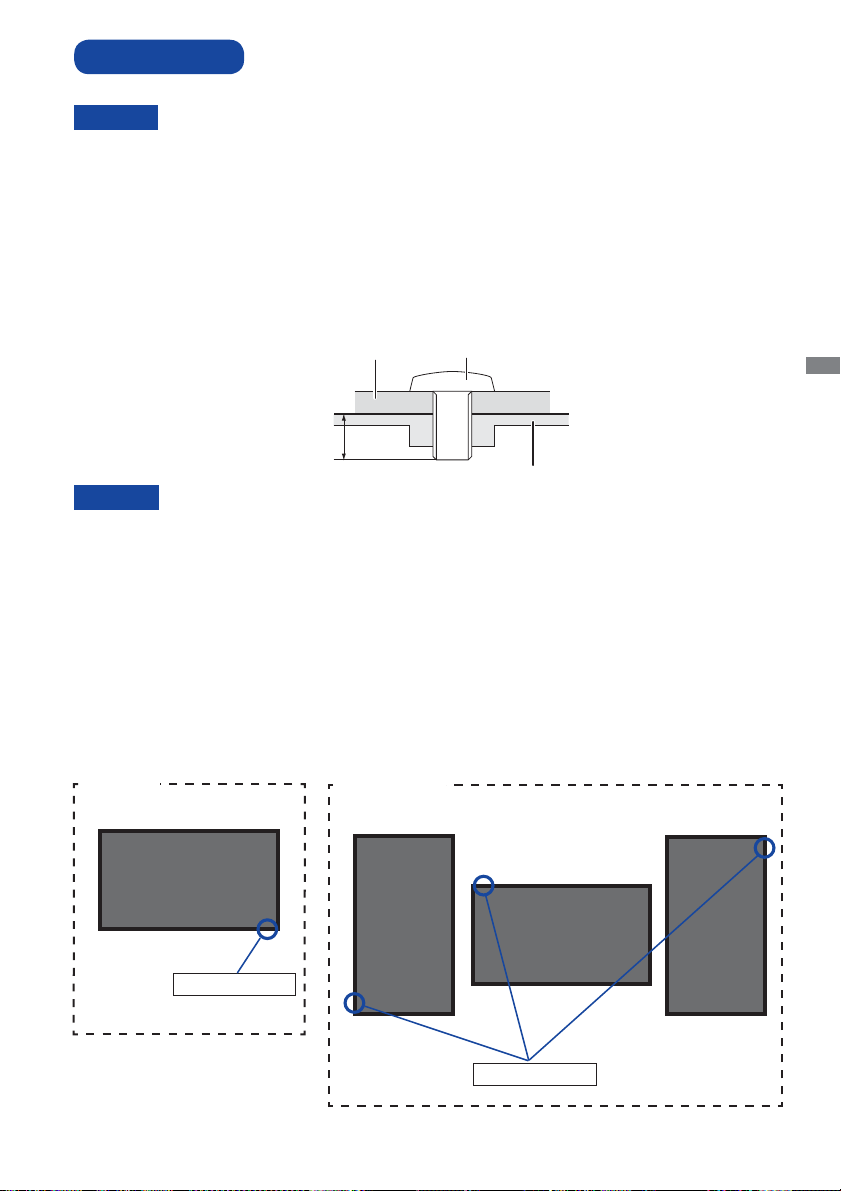
[WALL MOUNTING]
Mounting Stage
L
CAUTION
When using the wall mounting, consideration of thickness of the mounting stage needs to be taken.
Tighten the M6 Screw with washer which “L” length is 10mm to fasten the monitor. Using a screw
longer than this may cause electric shock or damage because it may contact with the electrical parts
inside the monitor.
Screw
Chassis
ENGLISH
[ROTATING THE DISPLAY]
It is designed to be compatible in landscape mode.
Available
A
Landscape
Power indicator
Not Available
A
A
A
Power indicator
BEFORE YOU OPERATE THE MONITOR 9
 Loading...