

Iiyama ProLite T1731SR, ProLite T9731SR User Manual

ENGLISH
Thank you very much for choosing the iiyama
LCD monitor.
We recommend that you take a few minutes
to read this comprehensive manual carefully
before installing and switching on the monitor.
Please keep this manual in a safe place for
your future reference.
Downloaded from ManualMonitor.com Manuals
ENGLISH
Downloaded from ManualMonitor.com Manuals
ENGLISH
We reserve the right to change specifi cations without notice.
All trademarks used in this user manual are the property of their respective owners.
We recommend recycling of used product. Please contact your dealer or iiyama
service center. Recycle information is obtained via the Internet, using the address:
http://www.iiyama.com
You can access the Web page of different countries from there.
CE MARKING DECLARATION OF CONFORMITY
This LCD monitor complies with the requirements of the EC/EU Directive 2004/108/EC “EMC
Directive”, 2006/95/EC “Low Voltage Directive”, 2009/125/EC “ErP Directive” and 2011/65/EU
“RoHS Directive”.
The electro-magnetic susceptibility has been chosen at a level that gives correct operation in
residential areas, business and light industrial premises and small-scale enterprises, inside as
well as outside of the buildings. All places of operation are characterised by their connection to
the public low voltage power supply system.
IIYAMA CORPORATION: Wijkermeerstraat 8, 2131 HA Hoofddorp, The Netherlands
Downloaded from ManualMonitor.com Manuals

ENGLISH
TABLE OF CONTENTS
FOR YOUR SAFETY ..........................................................................1
SAFETY PRECAUTIONS ..............................................................1
SPECIAL NOTES ON LCD MONITORS .......................................3
CUSTOMER SERVICE .................................................................3
CLEANING ....................................................................................3
BEFORE YOU OPERATE THE MONITOR ........................................4
FEATURES ....................................................................................4
CHECKING THE CONTENTS OF THE PACKAGE ......................5
SPECIAL NOTES ON TOUCH PANEL ..........................................5
WALL MOUNTING ........................................................................5
CONTROLS AND CONNECTORS ................................................6
CONNECTING YOUR MONITOR .................................................7
COMPUTER SETTING .................................................................8
ADJUSTING THE VIEWING ANGLE ...........................................8
OPERA TING THE MONITOR .............................................................9
ADJUSTMENT MENU CONTENTS ............................................10
SCREEN ADJUSTMENTS ..........................................................14
POWER MANAGEMENT FEATURE ...........................................17
TROUBLE SHOOTING ....................................................................18
RECYCLING INFORMATION ...........................................................19
APPENDIX ......................................................................................20
SPECIFICATIONS : ProLite T1531SR ........................................20
SPECIFICATIONS : ProLite T1531SAW .....................................21
SPECIFICATIONS : ProLite T1532SR ........................................22
SPECIFICATIONS : ProLite T1731SR ........................................23
SPECIFICATIONS : ProLite T1731SAW .....................................24
SPECIFICATIONS : ProLite T1931SR ........................................25
SPECIFICATIONS : ProLite T1931SAW .....................................26
DIMENSIONS :
ProLite T1531SR
/ ProLite T1531SAW / ProLite T1532SR ...........27
DIMENSIONS : ProLite T1731SR / ProLite T1731SAW ..............27
DIMENSIONS : ProLite T1931SR / ProLite T1931SAW ..............27
COMPLIANT TIMING ..................................................................28
Downloaded from ManualMonitor.com Manuals

Downloaded from ManualMonitor.com Manuals

Downloaded from ManualMonitor.com Manuals

ENGLISH
FOR YOUR SAFETY 3
The following symptoms are normal with LCD monitors and do not indicate a problem.
NOTE
When you first turn on the LCD monitor, the picture may not fit in the display area
because of the type of computer that is used. In this case, adjust the picture position to
the correct position.
Due to the nature of the backlight, the screen may fl icker during initial use. Turn off the
Power Switch and then turn it on again to make sure the fl icker disappears.
You may fi nd slightly uneven brightness on the screen depending on the desktop pattern
you use.
Due to the nature of the LCD screen, an afterimage of the previous screen may remain
after switching the image, when the same image is displayed for hours. In this case, the
screen is recovered slowly by changing the image or turning off the Power Switch for
hours.
Contact your dealer or iiyama service center for the backlight replacement when the
screen is dark, fl ickering or not lighting up. Never attempt to replace it by yourself.
SPECIAL NOTES ON LCD MONITORS
NOTE
The fl uorescent light used in the LCD monitor may have to be periodically replaced. For
the warranty coverage on this component, please check with local iiyama service center.
If you have to return your unit for service and the original packaging has been discarded,
please contact your dealer or iiyama service center for advice or replacement packaging.
WARNING
If you drop any materials or liquids such as water into the monitor when cleaning,
unplug the power cable immediately and contact your dealer or iiyama service center.
CAUTION
For safety reasons, turn off the power switch and unplug the monitor before you clean
it.
NOTE
To protect the LCD panel, do not scratch or rub the screen with a hard object.
Never use any of the following strong solvents. These will damage the cabinet and the
LCD screen.
Touching the cabinet with any product made from rubber or plastic for a long time may
cause degeneration or loss of paint on the cabinet.
Thinner
Benzine
Abrasive cleaner
Spray-type cleaner
Wax
Acid or Alkaline solvent
CABINET
Stains can be removed with a cloth lightly moistened with a mild detergent solvent.
Then wipe the cabinet with a soft dry cloth.
LCD
SCREEN
Periodic cleaning with a soft dry cloth is recommended.
Don't use tissue paper etc. because these will damage the LCD screen.
CUSTOMER SERVICE
CLEANING
Downloaded from ManualMonitor.com Manuals

ENGLISH
4 BEFORE YOU OPERATE THE MONITOR
BEFORE YOU OPERATE THE MONITOR
FEATURES
Supports Resolutions up to 1024 × 768 :
ProLite T1531SR / ProLit T1531SAW / ProLite T1532SR
Supports Resolutions up to 1280 × 1024 :
ProLite T1731SR / ProLite T1731SAW / ProLite T1931SR / ProLite T1931SAW
High Contrast 500:1 (Typical: with Touch panel) / Brightness 200cd/m
2
(Typical:
with Touch panel) : ProLite T1531SR / ProLite T1532SR
High Contrast 500:1 (Typical: with Touch panel) / Brightness 230cd/m
2
(Typical:
with Touch panel) : ProLit T1531SAW
High Contrast 900:1 (Typical: with Touch panel) / Brightness 200cd/m
2
(Typical:
with Touch panel) : ProLite T1731SR / ProLite T1931SR
High Contrast 1000:1 (Typical: with Touch panel) / Brightness 230cd/m
2
(Typical:
with Touch panel) : ProLite T1731SAW
High Contrast 900:1 (Typical: with Touch panel) / Brightness 230cd/m
2
(Typical:
with Touch panel) : ProLite T1931SAW
Digital Character Smoothing
Automatic Set-up
Stereo Speakers
2 × 1W Stereo Speakers
Plug & Play VESA DDC2B Compliant
Windows
®
95/98/2000/Me/XP/Vista/7 Compliant
Power Management (VESA DPMS Compliant)
VESA Mounting Standard (100mm×100mm) Compliant
Keyhole for Security Lock
IP54 Standard Compliant (Only front face)
Windows8 touch environment
Basic touch operations can be performed under Windows 8.
However, please be informed that full touch functionality and normal operational performance are
not guaranteed.
Downloaded from ManualMonitor.com Manuals
ENGLISH
BEFORE YOU OPERATE THE MONITOR 5
The following accessories are included in your package. Check to see if they are enclosed with
the monitor. If anything is missing or damaged, please contact your local iiyama dealer or regional
iiyama offi ce.
*1 The rating of the Power Cable enclosed in 120V area is 10A/125V. If you are using
a power supply higher than this rating, then a power cable with a rating of 10A/
250V must be used. However, all guarantees and warranties are void for any
problems or damage caused by a power cable not supplied by iiyama.
*2 This CD-ROM contains the touch screen driver software.
Install the Touch Panel Driver Disk after connecting the computer to the monitor with
RS-232C Cable or USB Cable. For the details, see Readme fi le in the Touch Panel
Driver Disk.
Power Cable*
1
D-Sub Signal Cable
DVI-D Cable
RS-232C Cable
USB Cable
Audio Cable
Screw (M3x6mm)
Touch Panel Driver Disk (CD-ROM)*
2
Safety Guide
Quick Start Guide
CHECKING THE CONTENTS OF THE PACKAGE
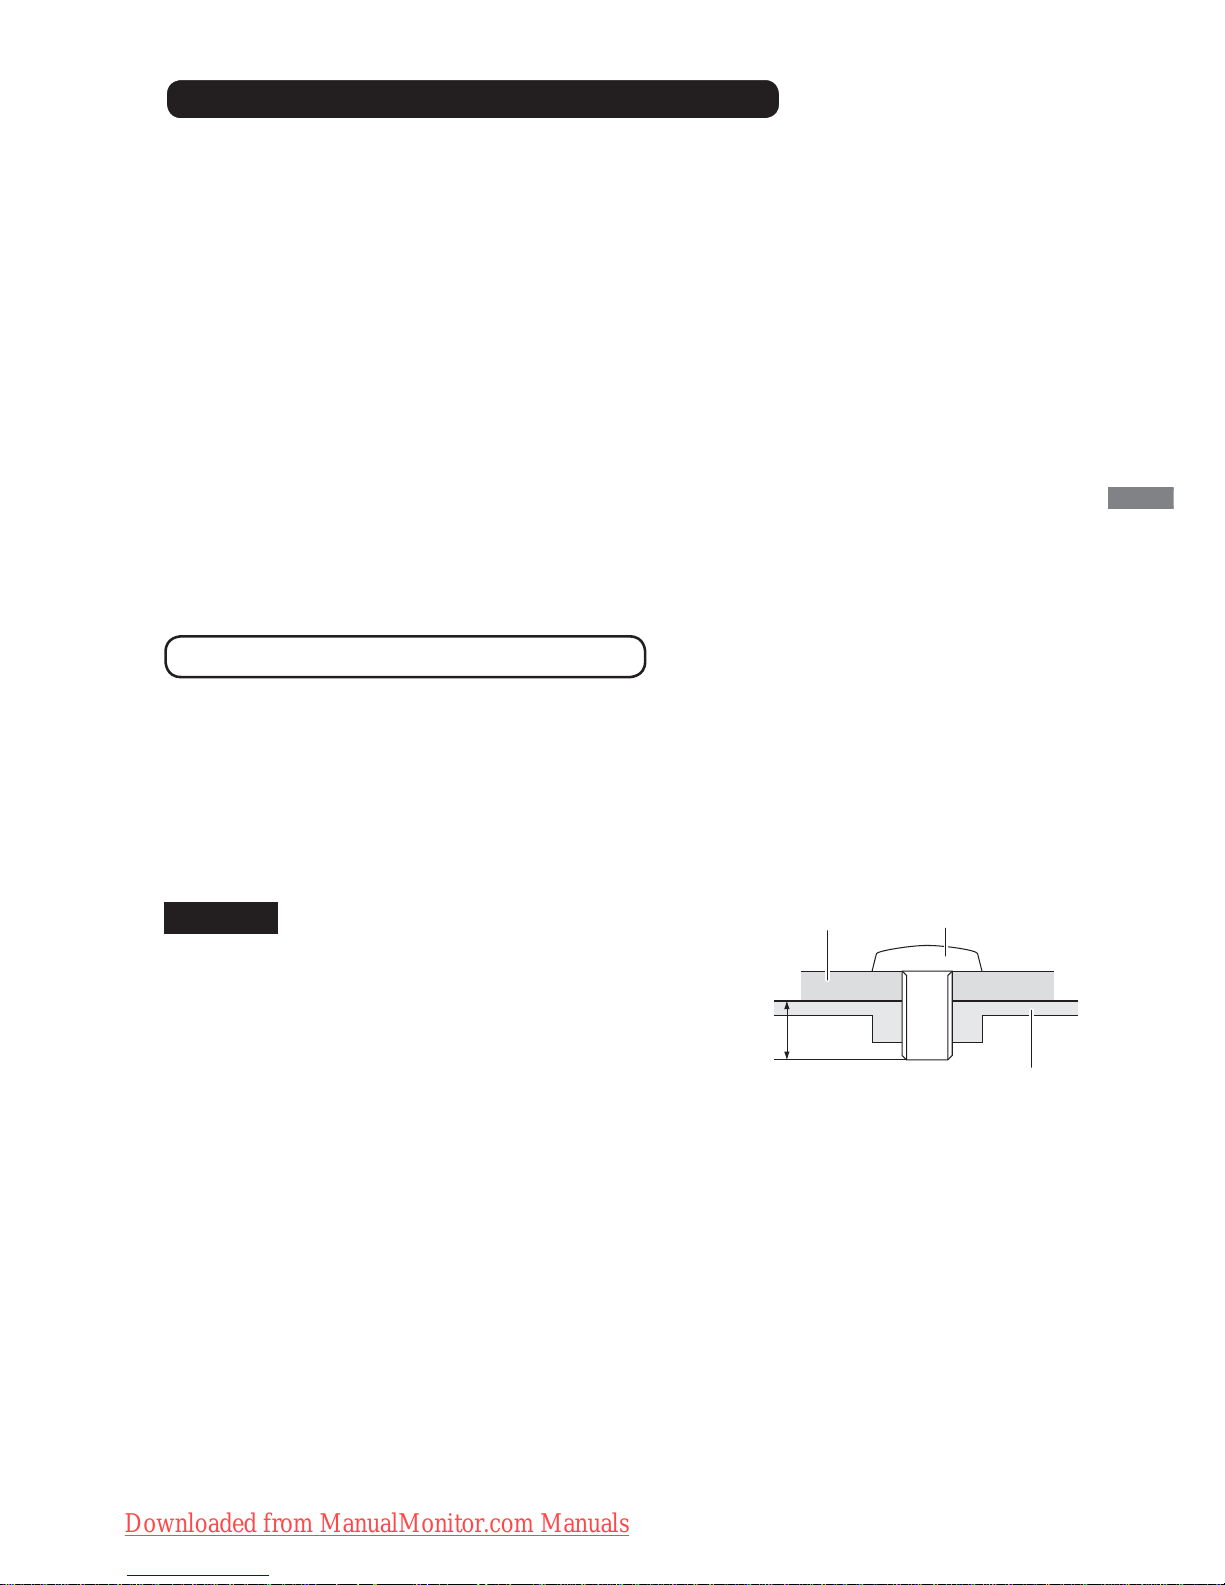
CAUTION
When you use with the wall mounting, in
consideration of thickness of the mounting stage,
tighten the M4 Screw with washer which “L” length
is 8mm to fasten the monitor. Using the screw
longer than this may cause electric shock or
damage because it may contact with the electrical
parts inside the monitor.
WALL MOUNTING
Screw
Chassis
Mounting Stage
L
WARNING
Permanent damage can occur if Sharp Edged, Pointed or Metal items are used to activate Touch.
This could invalidate any remaining warranty.
We recommend to use a plastic stylus (tip R0.8 or over) or fi nger.
SPECIAL NOTES ON TOUCH PANEL
Downloaded from ManualMonitor.com Manuals

Downloaded from ManualMonitor.com Manuals
 Loading...