

Page 1
AX3819UT
AX3819UT BK
USER MANUAL
TABLE OF CONTENTS
FOR YOUR SAFETY .............................................................................. 1
SAFETY PRECAUTIONS ................................................................. 1
SPECIAL NOTES ON LCD MONITORS ............................................. 3
CUSTOMER SERVICE ...................................................................... 3
CLEANING ....................................................................................... 3
BEFORE YOU OPERATE THE MONITOR ................................................ 4
FEATURES ....................................................................................... 4
CHECKING THE CONTENTS OF THE PACKAGE ............................. 4
CONTROLS AND CONNECTORS .................................................... 5
CONNECTING YOUR MONITOR ...................................................... 6
COMPUTER SETTING....................................................................... 7
ADJUSTING THE HEIGHT AND THE VIEWING ANGLE .................... 8
OPERATING THE MONITOR ................................................................... 9
ADJUSTMENT MENU CONTENTS .................................................... 10
SCREEN ADJUSTMENTS ................................................................. 13
POWER MANAGEMENT FEATURE .................................................. 16
TROUBLE SHOOTING ............................................................................ 17
APPENDIX .............................................................................................. 18
SPECIFICATIONS ............................................................................. 18
COMPLIANT TIMING ......................................................................... 19
CONNECTOR PIN ASSIGNMENT ...................................................... 20
ENGLISH
DEUTSCH
FRANCAIS
NEDERLANDS
SVENSKA
ITALIANO
Thank you very much for choosing the iiyama LCD monitor.
We recommend that you take a few minutes to read carefully through this brief but
comprehensive manual before installing and switching on the monitor. Please keep this
manual in a safe place for your future reference.
Page 2
Congratulations!
You have just purchased a TCO’99 approved and labelled
product! Your choice has provided you with a product developed
for professional use. Your purchase has also contributed to
reducing the burden on the environment and also to the further
development of environmentally adapted electronics products.
Why do we have environmentally labelled computers?
In many countries, environmental labelling has become an established method for encouraging the adaptation
of goods and services to the environment. The main problem, as far as computers and other electronics
ENGLISH
equipment are concerned, is that environmentally harmful substances are used both in the products and during
their manufacture. Since it is not so far possible to satisfactorily recycle the majority of electronics equipment,
most of these potentially damaging substances sooner or later enter nature.
There are also other characteristics of a computer, such as energy consumption levels, that are important
from the viewpoints of both the work (internal) and natural (external) environments. Since all methods of
electricity generation have a negative effect on the environment (e.g. acidic and climate-influencing emissions,
radioactive waste), it is vital to save energy. Electronics equipment in offices is often left running continuously
and thereby consumes a lot of energy.
What does labelling involve?
This product meets the requirements for the TCO’99 scheme which provides for international and environmental
labelling of personal computers. The labelling scheme was developed as a joint effort by the TCO (The Swedish
Confederation of Professional Employees), Svenska Naturskyddsforeningen (The Swedish Society for Nature
Conservation) and Statens Energimyndighet (The Swedish National Energy Administration).
Approval requirements cover a wide range of issues: environment, ergonomics, usability, emission of electric
and magnetic fields, energy consumption and electrical and fire safety.
The environmental demands impose restrictions on the presence and use of heavy metals, brominated and
chlorinated flame retardants, CFCs (freons) and chlorinated solvents, among other things. The product must
be prepared for recycling and the manufacturer is obliged to have an environmental policy which must be
adhered to in each country where the company implements its operational policy.
The energy requirements include a demand that the computer and/or display, after a certain period of
inactivity, shall reduce its power consumption to a lower level in one or more stages. The length of time to
reactivate the computer shall be reasonable for the user.
Labelled products must meet strict environmental demands, for example, in respect of the reduction of
electric and magnetic fields, physical and visual ergonomics and good usability.
Below you will find a brief summary of the environmental requirements met by this product. The complete
environmental criteria document may be ordered from:
TCO Development
SE-114 94 Stockholm, Sweden
Fax: +46 8 782 92 07
Email (Internet): development@tco.se
Current information regarding TCO’99 approved and labelled products may also be
obtained via the Internet, using the address: http://www.tco-info.com/
Page 3
Environmental requirements
Flame retardants
Flame retardants are present in printed circuit boards, cables, wires, casings and housings. Their purpose is to
prevent, or at least to delay the spread of fire. Up to 30% of the plastic in a computer casing can consist of
flame retardant substances. Most flame retardants contain bromine or chloride, and those flame retardants are
chemically related to another group of environmental toxins, PCBs. Both the flame retardants containing
bromine or chloride and the PCBs are suspected of giving rise to severe health effects, including reproductive
damage in fish-eating birds and mammals, due to the bio-accumulative
been found in human blood and researchers fear that disturbances in foetus development may occur.
The relevant TCO’99 demand requires that plastic components weighing more than 25 grams must not contain
flame retardants with organically bound bromine or chlorine. Flame retardants are allowed in the printed circuit
boards since no substitutes are available.
*
processes. Flame retardants have
ENGLISH
Cadmium
**
Cadmium is present in rechargeable batteries and in the colour-generating layers of certain computer displays.
Cadmium damages the nervous system and is toxic in high doses. The relevant TCO’99 requirement states
that batteries, the colour-generating layers of display screens and the electrical or electronics components
must not contain any cadmium.
**
Mercury
Mercury is sometimes found in batteries, relays and switches. It damages the nervous system and is toxic
in high doses. The relevant TCO’99 requirement states that batteries may not contain any mercury. It also
demands that mercury is not present in any of the electrical or electronics components associated with the
labelled unit.
CFCs (freons)
The relevant TCO’99 requirement states that neither CFCs nor HCFCs may be used during the manufacture
and assembly of the product. CFCs (freons) are sometimes used for washing printed circuit boards. CFCs
break down ozone and thereby damage the ozone layer in the stratosphere, causing increased reception on
earth of ultraviolet light with e.g. increased risks of skin cancer (malignant melanoma) as a consequence.
**
Lead
Lead can be found in picture tubes, display screens, solders and capacitors. Lead damages the nervous
system and in higher doses, causes lead poisoning. The relevant TCO’99 requirement permits the inclusion of
lead since no replacement has yet been developed.
* Bio-accumulative is defined as substances which accumulate within living organisms
** Lead, Cadmium and Mercury are heavy metals which are Bio-accumulative.
Page 4

Congratulations!
You have just purchased a TCO’95 approved and labelled
product! Your choice has provided you with a product developed
for professional use. Your purchase has also contributed to
reducing the burden on the environment and also to the further
development of environmentally adapted electronics products.
Why do we have environmentally labelled computers?
In many countries, environmental labelling has become an established method for encouraging the adaptation
of goods and services to the environment. The main problem, as far as computers and other electronics
ENGLISH
equipment are concerned, is that environmentally harmful substances are used both in the products and during
their manufacture. Since it is not so far possible to satisfactorily recycle the majority of electronics equipment,
most of these potentially damaging substances sooner or later enter nature.
There are also other characteristics of a computer, such as energy consumption levels, that are important
from the viewpoints of both the work (internal) and natural (external) environments. Since all methods of
electricity generation have a negative effect on the environment (e.g. acidic and climate-influencing emissions,
radioactive waste), it is vital to save energy. Electronics equipment in offices is often left running continuously
and thereby consumes a lot of energy.
What does labelling involve?
This product meets the requirements for the TCO’95 scheme which provides for international and environmental
labelling of personal computers. The labelling scheme was developed as a joint effort by the TCO (The Swedish
Confederation of Professional Employees), Svenska Naturskyddsforeningen (The Swedish Society for Nature
Conservation) and Statens Energimyndighet (The Swedish National Energy Administration).
Approval requirements cover a wide range of issues: environment, ergonomics, usability, emission of electric
and magnetic fields, energy consumption and electrical and fire safety.
The environmental demands impose restrictions on the presence and use of heavy metals, brominated and
chlorinated flame retardants, CFCs (freons) and chlorinated solvents, among other things. The product must
be prepared for recycling and the manufacturer is obliged to have an environmental policy which must be
adhered to in each country where the company implements its operational policy.
The energy requirements include a demand that the computer and/or display, after a certain period of
inactivity, shall reduce its power consumption to a lower level in one or more stages. The length of time to
reactivate the computer shall be reasonable for the user.
Labelled products must meet strict environmental demands, for example, in respect of the reduction of
electric and magnetic fields, physical and visual ergonomics and good usability.
Below you will find a brief summary of the environmental requirements met by this product. The complete
environmental criteria document may be ordered from:
TCO Development
SE-114 94 Stockholm, Sweden
Fax: +46 8 782 92 07
Email (Internet): development@tco.se
Current information regarding TCO’95 approved and labelled products may also be obtained via the Internet,
using the address: http://www.tco-info.com/
Page 5

Environmental Requirements
Brominated flame retardants
Brominated flame retardants are present in printed circuit boards, cables, wires, casings and housings. In
turn, they delay the spread of fire. Up to thirty percent of the plastic in a computer casing can consist of
flame retardant substances. These are related to another group of environmental toxins, PCBs, which are
suspected to give rise to similar harm, including reproductive damage in fish eating birds and mammals,
due to the bio-accumulative* processes. Flame retardants have been found in human blood and researchers
fear that disturbances in foetus development may occur.
TCO’95 demand requires that plastic components weighing more than 25 grams must not contain
organically bound chlorine and bromine.
Lead
Lead can be found in picture tubes, display screens, solders and capacitors. Lead damages the nervous
system and in higher doses, causes lead poisoning.
TCO’95 requirement permits the inclusion of lead since no replacement has yet been developed.*
Cadmium
Cadmium is present in rechargeable batteries and in the colour generating layers of certain computer
displays. Cadmium damages the nervous system and is toxic in high doses.
TCO’95 requirement states that batteries may not contain more than 25 ppm (parts per million) of
cadmium. The colour-generating layers of display screens must not contain any cadmium.*
Mercury
Mercury is sometimes found in batteries, relays and switches. Mercury damages the nervous system and
is toxic in high doses.
TCO’95 requirement states that batteries may not contain more than 25 ppm (parts per million) of
mercury. It also demands that no mercury is present in any of the electrical or electronics components
concerned with the display unit.*
CFCs (freons)
CFCs (freons) are sometimes used for washing printed circuit boards and in the manufacturing of expanded
foam for packaging. CFCs break down ozone and thereby damage the ozone layer in the stratosphere,
causing increased reception on Earth of ultraviolet light with consequent increased risks of skin cancer
(malignant melanoma).
The relevant TCO’95 requirement: Neither CFCs nor HCFCs may be used during the manufacturing of
the product or its packaging.
ENGLISH
* Bio-accumulative is defined as substances which accumulate within living organisms.
Page 6
FCC DECLARATION OF CONFORMITY
Model Number: AX3819UT / AX3819UT BK
Trade Name: iiyama
Responsible party: IIYAMA NORTH AMERICA, INC.
Address: 1560 Brookhollow Drive, Suite 208, Santa Ana, CA 92705 U.S.A.
Telephone number: 714-437-5111
This device complies with Part 15 of the FCC Rules. Operation is subject to the following two conditions: (1)
This device may not cause harmful interference, and (2) this device must accept any interference received,
including interference that may cause undesired operation.
This device has been tested and found to comply with the limits for Class B Personal Computers and
ENGLISH
peripherals, pursuant to Part 15 of the FCC Rules. These limits are designed to provide reasonable protection
against harmful interference when the device is operated in a residential environment. This device generates,
uses and can radiate radio frequency energy, and if not installed and used in accordance with the instructions,
may cause harmful interference to radio communications. However, there is no guarantee that interference
will not occur in a particular installation. If you determine the device does cause harmful interference to radio
or television reception (this may be determined by monitoring the interference while turning the device off and
on), you are encouraged to try to correct the interference by one of the following measures:
n Reorient or relocate the receiving antenna.
n Increase the separation between the device and receiver.
n Connect the device into an outlet on a circuit different from that to which the receiver
is connected.
n Consult the dealer or an experienced radio or TV technician for help.
To meet the FCC requirements, you should use a signal cable with ferrite core at both ends.
CAUTION Changes or modifications not expressly approved by iiyama could void the users authority
to operate the device under FCC compliance regulations.
CANADIAN DEPARTMENT OF COMMUNICATIONS COMPLIANCE
STATEMENT
This digital apparatus does not exceed the Class B limits for radio noise emissions from digital apparatus as
set out in the radio interference regulation of the Canadian department of communications.
CE MARKING DECLARATION OF CONFORMITY
This LCD monitor complies with the requirements of the EC Directive 89/336/EEC “EMC Directive” and 73/23/
EEC “Low Voltage Directive” as amended by Directive 93/68/EEC.
The electro-magnetic susceptibility has been chosen at a level that gives correct operation in residential areas,
business and light industrial premises and small-scale enterprises, inside as well as outside of the buildings.
All places of operation are characterised by their connection to the public low voltage power supply system.
n We reserve the right to change specifications without notice.
n All trademarks used in this user manual are the property of their respective owners.
n As an ENERGY STAR
energy efficiency.
®
Partner, iiyama has determined that this product meets the ENERGY STAR® guidelines for
Page 7

FOR YOUR SAFETY
SAFETY PRECAUTIONS
WARNING
STOP OPERATING THE MONITOR WHEN YOU SENSE TROUBLE
If you notice any abnormal phenomena such as smoke, strange sounds or fumes, unplug the monitor
and contact your dealer or iiyama service center immediately. Further use may be dangerous and
can cause fire or electric shock.
NEVER REMOVE THE CABINET
High voltage circuits are inside the monitor. Removing the cabinet may expose you to the danger of
fire or electric shock.
DO NOT PUT ANY OBJECT INTO THE MONITOR
Do not put any solid objects or liquids such as water into the monitor. In case of an accident, unplug
your monitor immediately and contact your dealer or iiyama service center. Using the monitor with
any object inside may cause fire, electric shock or damage.
INSTALL THE MONITOR ON A FLAT, STABLE SURFACE
The monitor may cause an injury if it falls or is dropped.
DO NOT USE THE MONITOR NEAR WATER
Do not use where water may be splashed or spilt onto the monitor as it may cause fire or electric
shock.
ENGLISH
OPERATE UNDER THE SPECIFIED POWER SUPPLY
Be sure to operate the monitor only with the specified power supply. Use of an incorrect voltage will
cause malfunction and may cause fire or electric shock.
PROTECT THE CABLES
Do not pull or bend the power cable and signal cable. Do not place the monitor or any other heavy
objects on the cables. If damaged, the cables may cause fire or electric shock.
ADVERSE WEATHER CONDITIONS
It is advisable not to operate the monitor during a heavy thunder storm as the continual breaks in
power may cause malfunction. It is also advised not to touch the plug in these circumstances as it
may cause electric shock.
FOR YOUR SAFETY 1
Page 8

CAUTION
INSTALLATION LOCATION
Do not install the monitor where sudden temperature changes may occur, or in humid, dusty or smoky
areas as it may cause fire, electric shock or damage. You should also avoid areas where the sun
shines directly on the monitor.
DO NOT PLACE THE MONITOR IN A HAZARDOUS POSITION
The monitor may topple and cause injury if not suitably located. Please also ensure that you do not
place any heavy objects on the monitor, and that all cables are routed such that children may not pull
the cables and possibly cause injury.
MAINTAIN GOOD VENTILATION
Ventilation slots are provided to keep the monitor from overheating. Covering the slots may cause
ENGLISH
fire. To allow adequate air circulation, place the monitor at least 10 cm (or 4 inches) from any walls.
Do not remove the tilt stand when operating the monitor. Ventilation slots on the back of the cabinet
will be blocked and the monitor may overheat if the stand is removed. This may cause fire or damage.
Operating the monitor on its back, side, upside down or on a carpet or any other soft material may
also cause damage.
DISCONNECT THE CABLES WHEN YOU MOVE THE MONITOR
When you move the monitor, turn off the power switch, unplug the monitor and be sure the signal
cable is disconnected. If you do not disconnect them, it may cause fire or electric shock.
UNPLUG THE MONITOR
If the monitor is not in use for a long period of time it is recommended that it is left unplugged to avoid
accidents.
HOLD THE PLUG WHEN DISCONNECTING
To disconnect the power cable or signal cable, always pull it by the plug. Never pull on the cable itself
as this may cause fire or electric shock.
DO NOT TOUCH THE PLUG WITH WET HANDS
Pulling or inserting the plug with wet hands may cause electric shock.
WHEN YOU INSTALL THE MONITOR ON YOUR COMPUTER
Be sure the computer is strong enough to hold the weight of the monitor, otherwise, you may damage
your computer.
OTHERS
ERGONOMIC RECOMMENDATIONS
To eliminate eye fatigue, do not operate the monitor against a bright background or in a dark room. For
optimal viewing comfort, the monitor should be just below eye level and 40-60 cm (16-24 inches)
away from your eyes. When using the monitor over a prolonged time, a ten minute break every hour
is recommended as looking at the screen continuously can cause eye strain.
2 FOR YOUR SAFETY
Page 9

SPECIAL NOTES ON LCD MONITORS
The following symptoms are normal with LCD monitors and do not indicate a problem.
NOTE
When you first turn on the LCD monitor, the picture may not fit in the display area
n
because of the type of computer that is used. In this case, adjust the picture
position to its correct position.
Due to the nature of the backlight, the screen may flicker during initial use. Turn off
n
the Power Switch and then turn it on again to make sure the flicker disappears.
You may find slightly uneven brightness on the screen depending on the desktop
n
pattern you use.
n
Due to the nature of the LCD screen, an afterimage of the previous screen may
remain after switching the image, when the same image is displayed for hours. In
this case, the screen is recovered slowly by changing the image or turning off the
Power Switch for hours.
n
Contact your dealer or iiyama service center for the backlight replacement when the
screen is dark, flickering or not lighting up. Never attempt to replace it by yourself.
CUSTOMER SERVICE
n
NOTE
The fluorescent light used in the LCD monitor may have to be periodically replaced.
For the warranty coverage on this component, please check with local iiyama
service center.
If you have to return your unit for service and the original packaging has been
n
discarded, please contact your dealer or iiyama service center for advice or
replacement packaging.
ENGLISH
CLEANING
WARNING
CAUTION
NOTE To protect the LCD panel, do not scratch or rub the screen with a hard object.
CABINET
LCD
SCREEN
If you drop any materials or liquids such as water into the monitor when cleaning,
n
unplug the power cable immediately and contact your dealer or iiyama service center.
For safety reasons, turn off the power switch and unplug the monitor before you
n
clean it.
n
n
Never use any of the following strong solvents. These will damage the cabinet and
the LCD screen.
Thinner
Benzine
Abrasive cleaner
Touching the cabinet with any product made from rubber or plastic for a long time
n
may cause degeneration or loss of paint on the cabinet.
Stains can be removed with a cloth lightly moistened with a mild detergent solvent. Then
wipe the cabinet with a soft dry cloth.
Periodic cleaning with a soft dry cloth is recommended.
Don't use tissue paper etc. because these will damage the LCD screen.
Spray-type cleaner
Wax
Acid or Alkaline solvent
FOR YOUR SAFETY 3
Page 10

BEFORE YOU OPERATE THE MONITOR
FEATURES
K 38cm (15.0") TFT Color LCD Monitor
K Supports Resolutions up to 1024 × 768
K Wide Viewing Angle and High Contrast
K Digital Character Smoothing
K Automatic Set-up
®
K Plug & Play VESA DDC1/2B Compliant, Windows
K Power Management (ENERGY STA R® and VESA DPMS Compliant)
K Ergonomic Design
ENGLISH
AX3819UT: TCO ’99 and MPR 3 Approved
AX3819UT BK*: TCO ’95 and MPR 3 Approved
*Cabinet color is black.
K Digital Input (DVI-I) for Clear Display
K VESA Standard Compliant for Arm or Wall Mounting
CHECKING THE CONTENTS OF THE PACKAGE
The following accessories are included in your package. Check to see if they are enclosed with the monitor.
If anything is missing or damaged, please contact your local iiyama dealer or regional iiyama office.
n Power Cable*
n D-Sub Signal Cable
n DVI-D Signal Cable
n User Manual
95/98/2000/Me/XP Compliant
CAUTION
Optional parts as below are available for your LCD monitor. Please contact your local iiyama dealer
or regional iiyama office for them. The Speaker is attached to the monitor to output a sound from the
computer or the audio equipment. The Protection Sheet is attached to LCD panel surface to protect
it from stains or scratches.
n Speaker
AX3819UT: OSP1-1 (Bottom, Monoral) AX3819UT BK: OSP1-1B (Bottom, Monoral)
n Protection Sheet (Parts No. 832Z001-03)
4 BEFORE YOU OPERATE THE MONITOR
* TO USERS IN 120V AREA
The rating of the Power Cable enclosed in 120V area is 10A/125V. If you are using a
power supply higher than this
must be used.
rating, then a power cable with a rating of 10A/250V
Page 11

CONTROLS AND CONNECTORS
<Front> <Back>
Power Indicator
A
NOTE
Power Switch
B
Auto Button (Auto Set-up)
C
Adjust Clock, Phase, H-Position and V-Position automatically.
NOTE
+ / Brightness Button
D
– / Contrast Button
E
Menu Button
F
Input Button
G
Select either INPUT 1 or 2 for the signal input when both of the signal inputs are connected to a
signal source. Switch INPUT 1 and 2 whenever pressing the Input Button.
NOTE
H Main Power Switch
AC Connector (AC IN)
I
D-Sub mini 15pin Connector (INPUT 2)
J
DVI-I 29pin Connector (INPUT 1)
K
Optional Speaker Connector (DC OUT)
L
Green: Normal operation
Orange: Power Management
The monitor enters into power management mode which reduces the power
consumption to less than 5W when receiving no horizontal and/or vertical
sync signal.
n The Auto Set-up needs to display the Test.bmp in order for it to work correctly.
(See page 13 for SCREEN ADJUSTMENTS.)
n The screen becomes dark for approximately five seconds during the adjustment.
The signal input is not selected automatically. Press the Input Button once when the
Power Indicator turns orange irrespective of connecting only one signal input to the
signal source.
ENGLISH
BEFORE YOU OPERATE THE MONITOR 5
Page 12
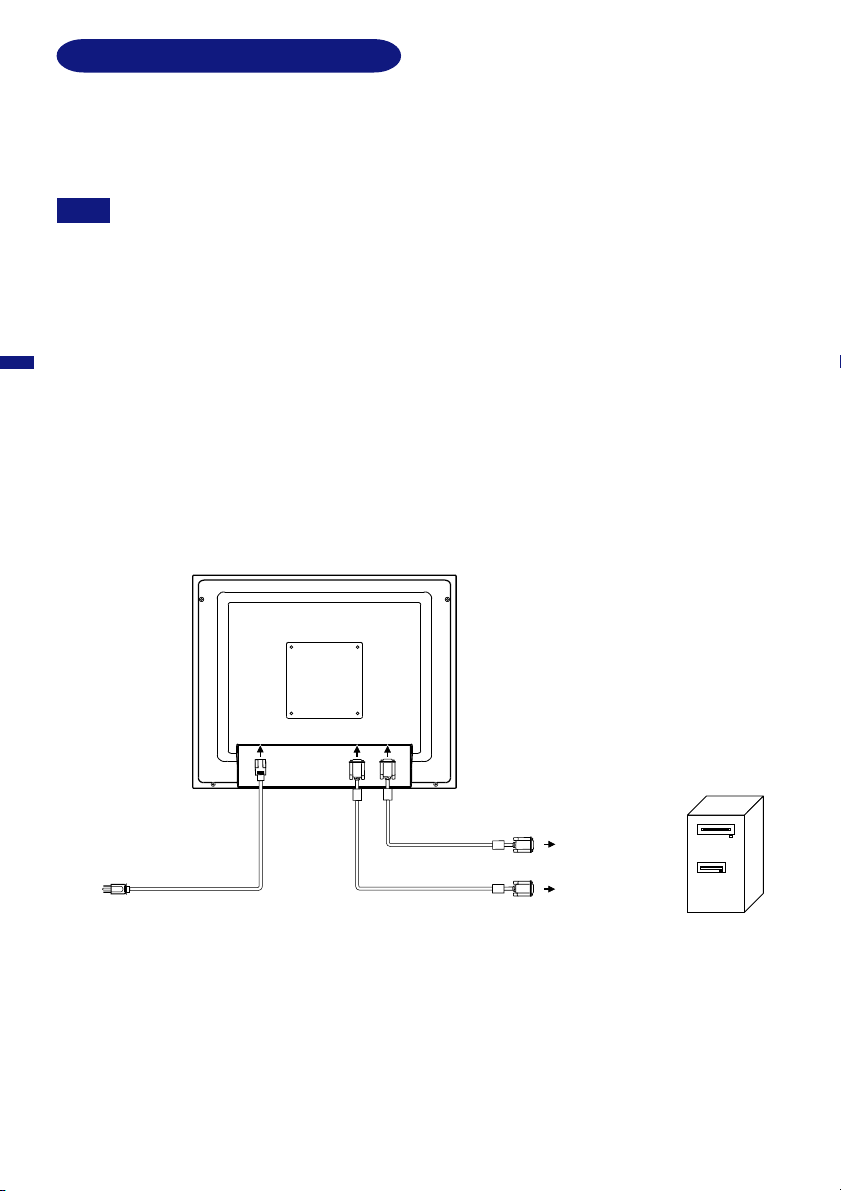
CONNECTING YOUR MONITOR
Ensure that both the computer and the monitor are switched off.
A
Connect the computer to the monitor with the signal cable. (See page 20 for CONNECTOR PIN
B
ASSIGNMENT.)
Connect the Power Cable to the monitor first and then to the power supply.
C
NOTE n The signal cables used for connecting the computer and monitor vary by the type of computer
used. An incorrect connection may cause serious damage to both the monitor and the
computer. The cable supplied with the monitor is for a standard 15 pin D-Sub connector. If a
special cable is required please contact your local iiyama dealer or regional iiyama office.
n For connection to Macintosh computers, contact your local iiyama dealer or regional
ENGLISH
iiyama office for a suitable adaptor.
n Make sure you tighten the finger screws at each end of the signal cable.
n Cables can be bundled together inside the cover at the back of the stand. See next page
for cable wiring.
[Example of Connection]
< Back >
Power Cable (Accessory)
6 BEFORE YOU OPERATE THE MONITOR
DVI-D Signal Cable
(Accessory)
D-Sub Signal Cable
(Accessory)
to DVI connector
of computer
to D-Sub connector
of computer
Computer
Page 13
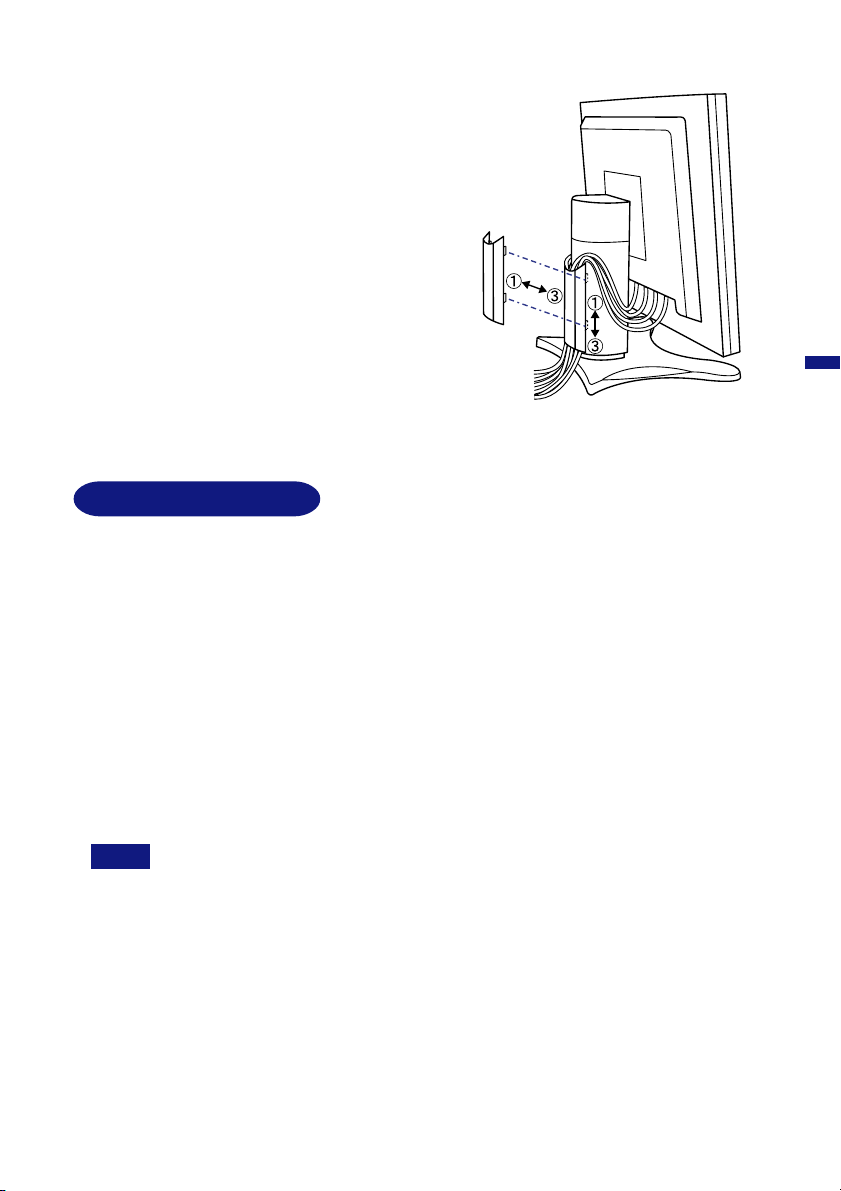
[Cable Wiring]
Remove the cover at the back of the stand by
A
sliding it upward.
Collect cables at the back of the stand.
B
Replace the cover by inserting the tabs into guide
C
holes and then sliding the cover downward.
COMPUTER SETTING
n Signal Timing
When you connect the monitor to the computer for the first time, set the signal timing of the
computer to VGA before connection. Change to the desired signal timings listed on page 19 in
COMPLIANT TIMING, after you confirm that the picture appears normally at VGA.
n Windows 95/98/2000/Me/XP Plug & Play
The iiyama LCD monitor complies with DDC1/2B of VESA standard. The Plug & Play function runs
on Windows 95/98/2000/Me/XP by connecting the monitor to DDC1/2B compliant computer with
the Signal Cable supplied. Windows 95/98/2000/Me/XP Monitor Information File for iiyama monitors
may be necessary for your computer and obtained via the Internet, using the address:
http://www.iiyama.com (U.S.A.)
http://www.iiyama.co.uk (U.K.)
ENGLISH
NOTE
n For additional information on how to download the driver for your monitor, please
access one of the internet sites noted above.
n Monitor Drivers are not required in most cases for Macintosh or Unix operating systems.
For further information, please contact your computer dealer first for advice.
BEFORE YOU OPERATE THE MONITOR 7
Page 14
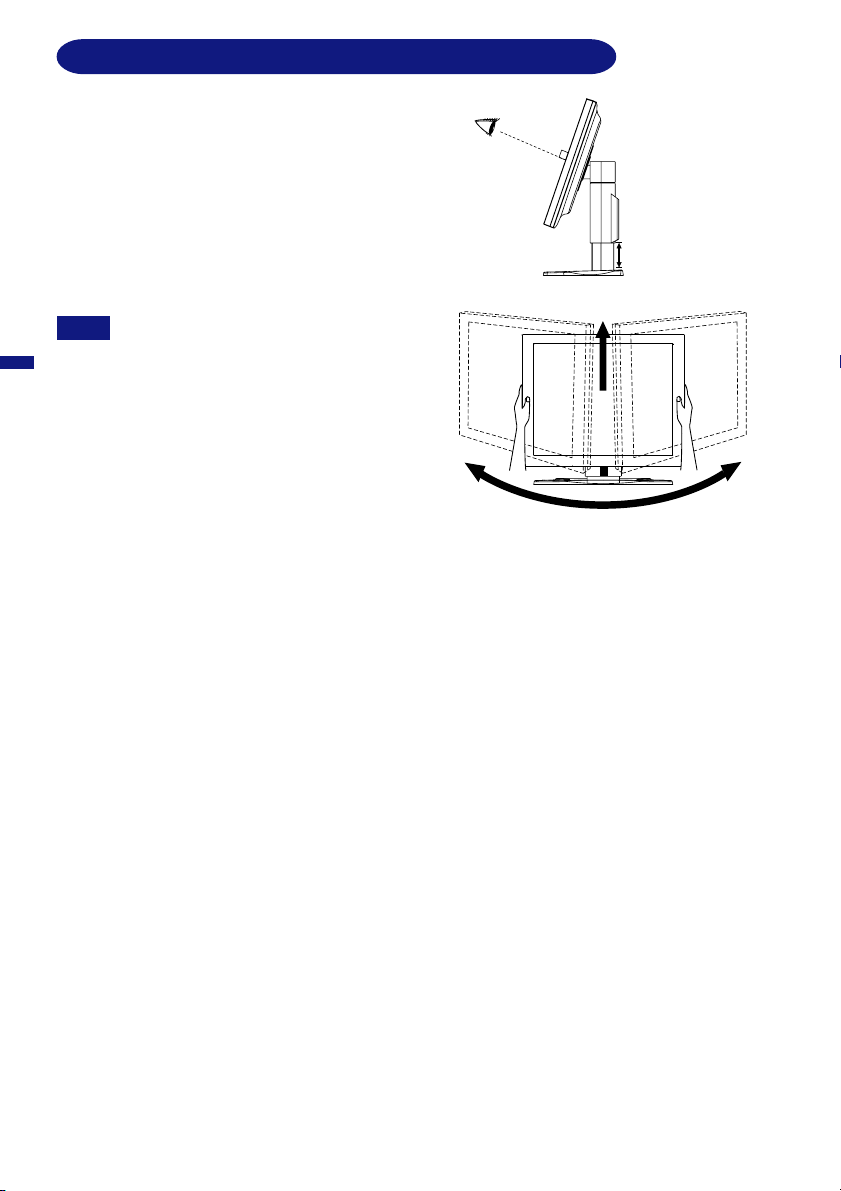
ADJUSTING THE HEIGHT AND THE VIEWING ANGLE
85mm
n For optimal viewing it is recommended to look at
the full face of the monitor, then adjust the monitor’s
height and angle to your own preference.
n Hold the panel so that the monitor does not topple
when you change the monitor’s height or angle.
n You are able to adjust the monitor’s height up to 85
mm, angle up to 30 degrees right and left, 35
degrees upward.
NOTE n Do not touch the LCD screen when you
ENGLISH
change the height or the angle. It may
cause damage or break the LCD screen.
n Careful attention is required not to catch
your fingers or hands when you change
the height or the angle.
35˚
30˚30˚
8 BEFORE YOU OPERATE THE MONITOR
Page 15
OPERATING THE MONITOR
To create the best picture, your iiyama LCD monitor has been preset at the factory
TIMING shown on page 19. You are also able to adjust the picture by following the button operation
shown below. For more detailed adjustments, see page 13 for SCREEN ADJUSTMENTS.
Press the Menu Button to start the On Screen Display feature. There are
(
with the COMPLIANT
two Menu pages which can be switched by using the +/– Buttons.
Menu:1
Adjustment icon
Current horizontal frequency,
B
vertical refresh rate
and resolution
Select the Menu page which contains the adjustment icon relating to the
H:46.8K V:75.0
800 × 600
Page no.
adjustment you want to make. Press the Menu Button again. Then, use the
+/– Buttons to highlight the desired adjustment icon. Press the Menu Button
again.
Use the +/– Buttons to make the appropriate adjustment or setting.
C
For example, to correct for vertical position, select Menu page number 1 and then press the Menu
Button. Then, select (V-Position) by using the +/– Buttons.
Menu:1
ENGLISH
V-Position
An adjustment bar appears after you press the Menu Button. Use the +/– Buttons to change the
vertical position settings. The vertical position of the overall display should be changing accordingly
while you are doing this.
V-Position
The bar shows
the progress of the
adjustment being made.
NOTE
The On Screen Display disappears several seconds after you stop pressing the buttons while
n
performing an adjustment. Any changes are automatically saved in the memory when the On
Screen Display
n
Adjustments for Clock, Phase and Position are saved for each signal timing. Except for these
adjustments, all other adjustments have only one setting which applies to all signal timings.
disappears. Turning off the power should be avoided while using the Menu.
–
+
OPERATING THE MONITOR 9
Page 16
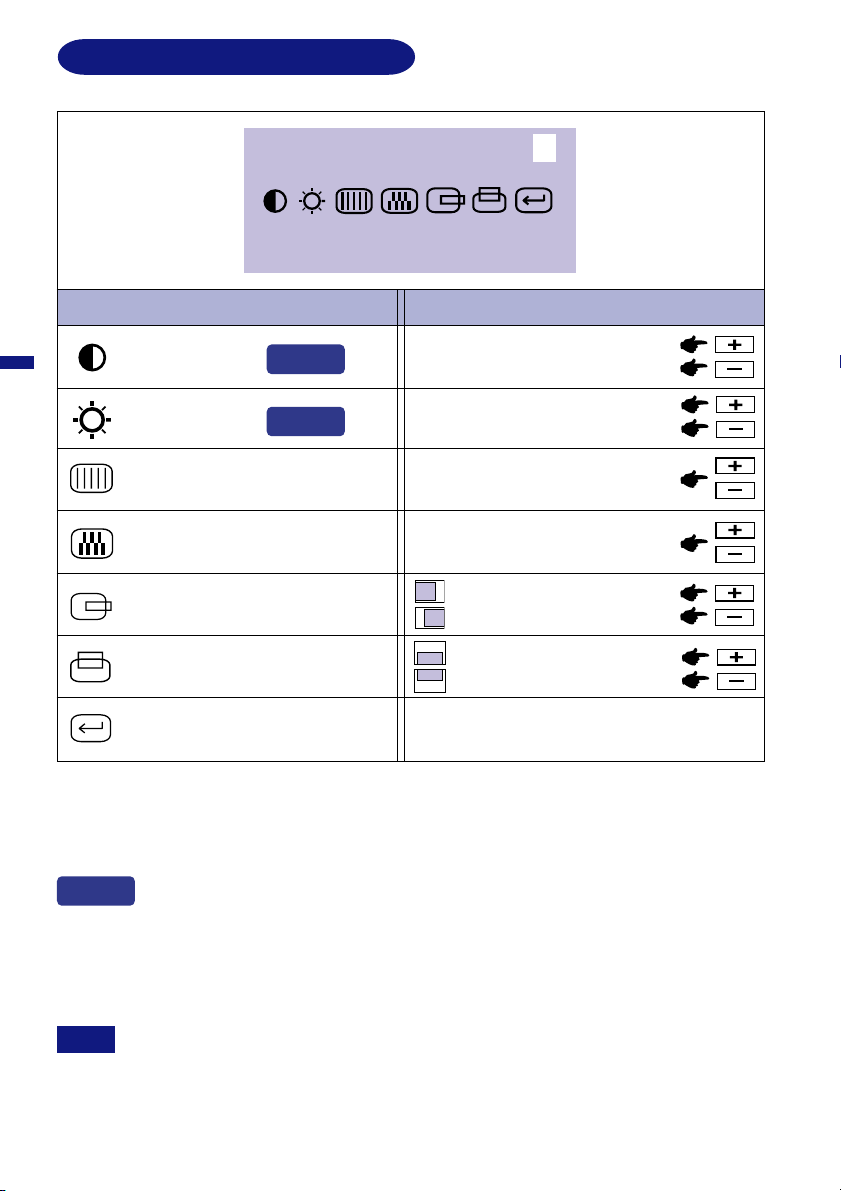
ADJUSTMENT MENU CONTENTS
D-Sub Input
Menu : 1
(D-Sub)
H:46.8K V:75.0
800 × 600
Adjustment Item Problem / Option Button to Press
Menu:1
ENGLISH
Contrast
Brightness*
2
Clock*
2
Phase*
H-Position
V-Position
Return to Menu Highlight “Menu : 1” again.
*1Adjust the Brightness when you are using the monitor in a dark room and feel the screen is too
bright.
*2See page 13 for SCREEN ADJUSTMENTS.
Direct
1
Direct
Too dull
Too intense
Too dark
Too bright
To correct flickering text or lines
To correct flickering text or lines
Too far to the left
Too far to the right
Too low
Too high
Direct
You can skip the Menu pages and display an adjustment scale directly by using the
following button operations.
l Contrast: Press the Contrast Button when the Menu is not displayed.
l Brightness: Press the Brightness Button when the Menu is not displayed.
NOTE
SWITCHING CONTRAST / BRIGHTNESS ADJUSTMENT
To switch between Contrast and Brightness adjustments, press the Menu Button within 10
seconds after pressing the Contrast Button or the Brightness Button during the direct
adjustments above.
10 OPERATING THE MONITOR
Page 17

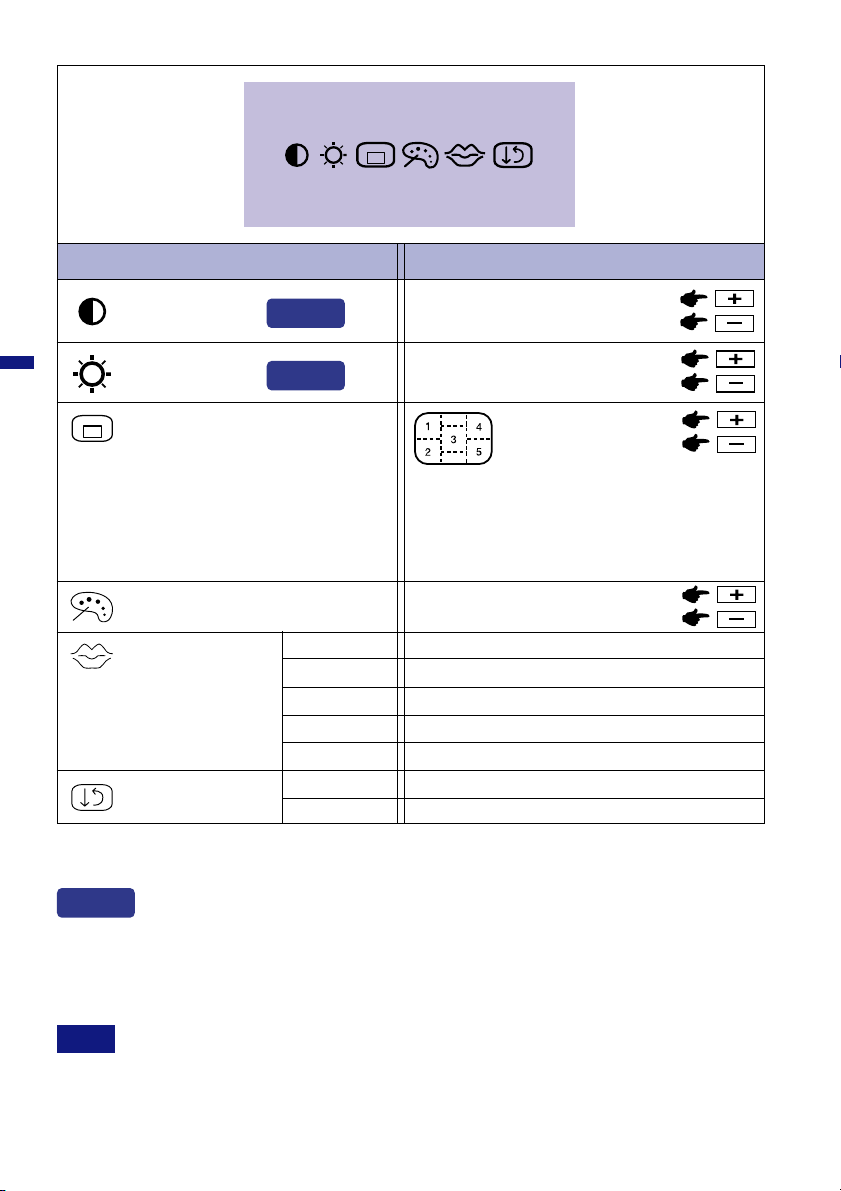
Menu : 2
(D-Sub)
Menu:2
H:46.8K V:75.0
800 × 600
NOTE
Adjustment Item
No
Auto Set-up*
Direct
OSD Position
Color Temp.
Auto Balance
n
The Auto Balance needs more than 5 cm around white area in order to work correctly.
The screen becomes dark for approximately ten seconds during the adjustment.
n
The Auto Balance may not work correctly due to your computer system, resolution or
n
displayed pattern. In this case, select “Reset” and restore factory-preset data.
Language
Reset
1
Yes
No
Yes
ENGLISH
DEUTSCH
FRANÇAIS
NEDERLANDS
SVENSKA Swedish
No
Yes
Problem / Option Button to Press
Return to Menu.
Adjust Clock, Phase, H-Position and V-Position
automatically.
You can move the OSD display to any one of the
above 5 positions within the overall display.
Press the + Button to move the OSD in numerical order.
Press the – Button to move the OSD in reverse
numerical order.
Reddish white
Bluish white
Return to Menu.
Adjust the Red, Green and Blue to suitable colors
automatically.
English
German
French
Dutch
Return to Menu.
Factory-preset data is restored.
ENGLISH
Return to Menu
*1See page 13 for SCREEN ADJUSTMENTS.
Highlight “Menu : 2” again.
Direct
You can skip the Menu pages and display an adjustment scale directly by using the
following button operations.
l Auto Set-up: Press the Auto Button.
OPERATING THE MONITOR 11
Page 18
DVI Input
Menu
H:46.8K V:75.0
800 × 600
Adjustment Item Problem / Option Button to Press
Contrast
Direct
Too dull
Too intense
ENGLISH
Brightness*
OSD Position
Color Temp.
Language
Reset
*1Adjust the Brightness when you are using the monitor in a dark room and feel the screen is too
bright.
1
Direct
ENGLISH
DEUTSCH
FRANÇAIS
NEDERLANDS
SVENSKA Swedish
No
Yes
Too dark
Too bright
You can move the OSD display to any one of the
above 5 positions within the overall display.
Press the + Button to move the OSD in numerical
order.
Press the – Button to move the OSD in reverse
numerical order.
Reddish white
Bluish white
English
German
French
Dutch
Return to Menu.
Factory-preset data is restored.
Direct
You can skip the Menu pages and display an adjustment scale directly by using the
following button operations.
l Contrast: Press the Contrast Button when the Menu is not displayed.
l Brightness: Press the Brightness Button when the Menu is not displayed.
NOTE
SWITCHING CONTRAST / BRIGHTNESS ADJUSTMENT
To switch between Contrast and Brightness adjustments, press the Menu Button within 10
seconds after pressing the Contrast Button or the Brightness Button during the direct
adjustments above.
12 OPERATING THE MONITOR
Page 19
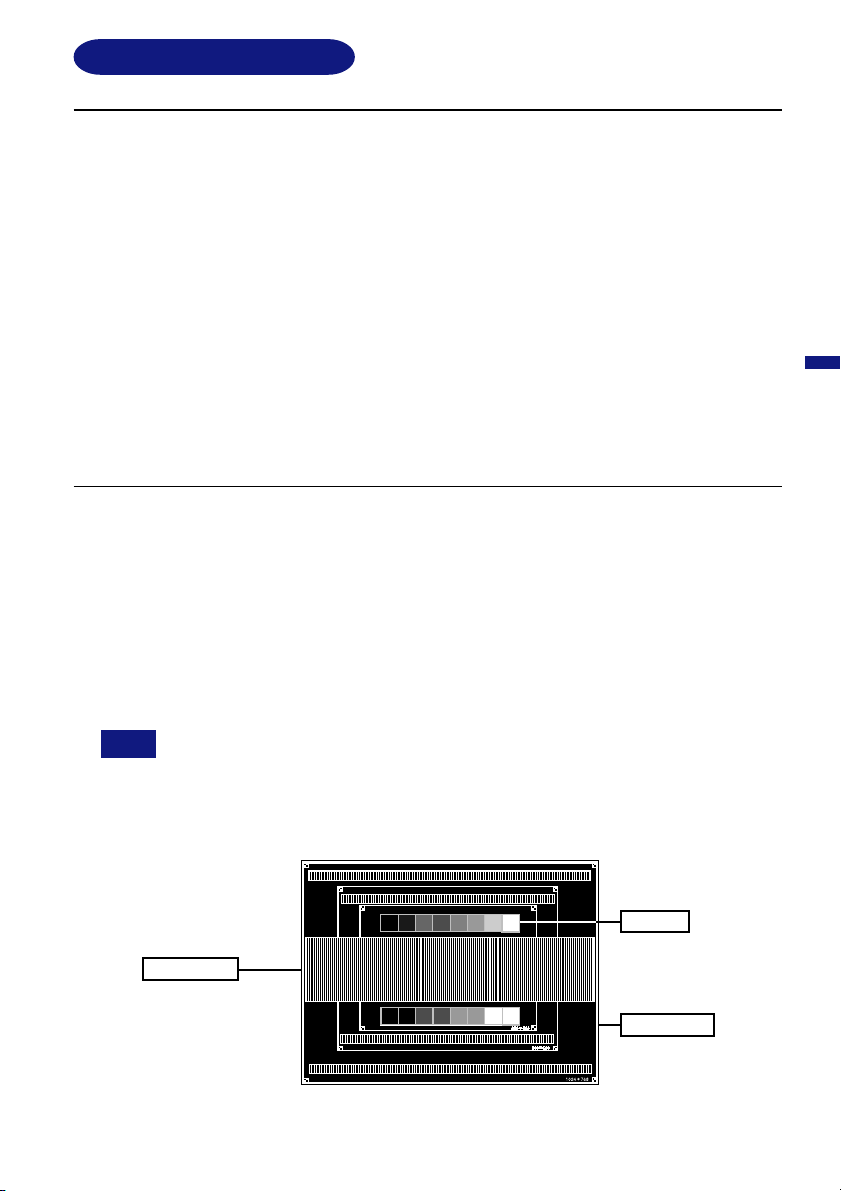
SCREEN ADJUSTMENTS
Adjust the image by following the procedure below to get the desired picture when selecting D-Sub input.
n The screen adjustments described in this manual are designed to set image position and minimize
flicker or blur for the particular computer in use. They are unlike the adjustments you would make
on a CRT monitor.
n The monitor is designed to provide the best performance at resolution of 1024 × 768, but can not
provide the best at resolutions of less than 1024 × 768 because the picture is automatically stretched
to fit the full screen. It is recommended to operate at resolution of 1024 × 768 in normal use.
n Displayed text or lines will be blurred or irregular in thickness when the picture is stretched due to
the screen enlargement process.
n It is preferable to adjust the image position and frequency with the monitor controls, rather than the
computer software or utilities.
n Perform adjustments after a warm-up period of at least thirty minutes.
n Additional adjustments may be required after the Auto Set-up depending on the resolution or signal
timing.
n The Auto Set-up may not work correctly when displaying the picture other than the Test.bmp
(screen adjustment pattern). In this case, manual adjustments are required.
There are two ways to adjust the screen. One way is automatic adjustment for Clock, Phase and
Position. Another way is performing each adjustment manually.
Perform the Auto Set-up first when the monitor is connected to a new computer, or resolution is
changed. If the screen has a flicker or blur, or the picture does not fit in the display area after
performing the Auto Set-up, manual adjustments are required. Both adjustments should be made by
using the screen adjustment pattern (Test.bmp) obtained via the iiyama web site (http://
www.iiyama.com or http://www.iiyama.co.uk).
This manual explains adjustment under Windows 95/98/2000/Me/XP.
Enter the Test.bmp (screen adjustment pattern) to wallpaper.
A
NOTE n Consult the appropriate documentation for doing this.
n Test.bmp is made at resolution of 1280 × 1024. Set the display position to center in the
wallpaper setting dialogue box surely. If you use Microsoft® PLUS! 95/98 cancel the
setting of “Stretch desktop wallpaper to fit the screen”.
ENGLISH
[Adjustment pattern]
Zebra pattern
Color bar
Picture frame
This is the image displayed at 1024 × 768.
OPERATING THE MONITOR 13
Page 20
Press the Auto Button. (Direct adjustment)
B
Or perform the Auto Set-up.
Adjust the image manually by following procedure below when the screen has a
C
flicker or blur, or the picture does not fit in the display area after performing the Auto
Set-up.
Adjust the V-Position so that the top and bottom of the picture frame will fit to the
D
display area.
+
ENGLISH
NOTE n In case that you have to make adjustments at resolutions of less than 1024 × 768,
1) Adjust the H-Position so that the left side of the picture frame will move to the left
E
adjust the vertical position of the screen adjustment pattern to center.
edge of the display area.
–
+
–
2) Stretch the right side of the picture frame to the right edge of the display area by
adjusting the Clock.
+
–
NOTE n When the left side of the picture frame moves apart from the left edge of the display
area during the Clock adjustment, adjust steps 1) and 2).
n Another way to make the Clock adjustment is to correct the vertical wavy lines in the
zebra pattern.
n The picture may flicker during the Clock, H-Position and V-Position adjustment.
14 OPERATING THE MONITOR
Page 21

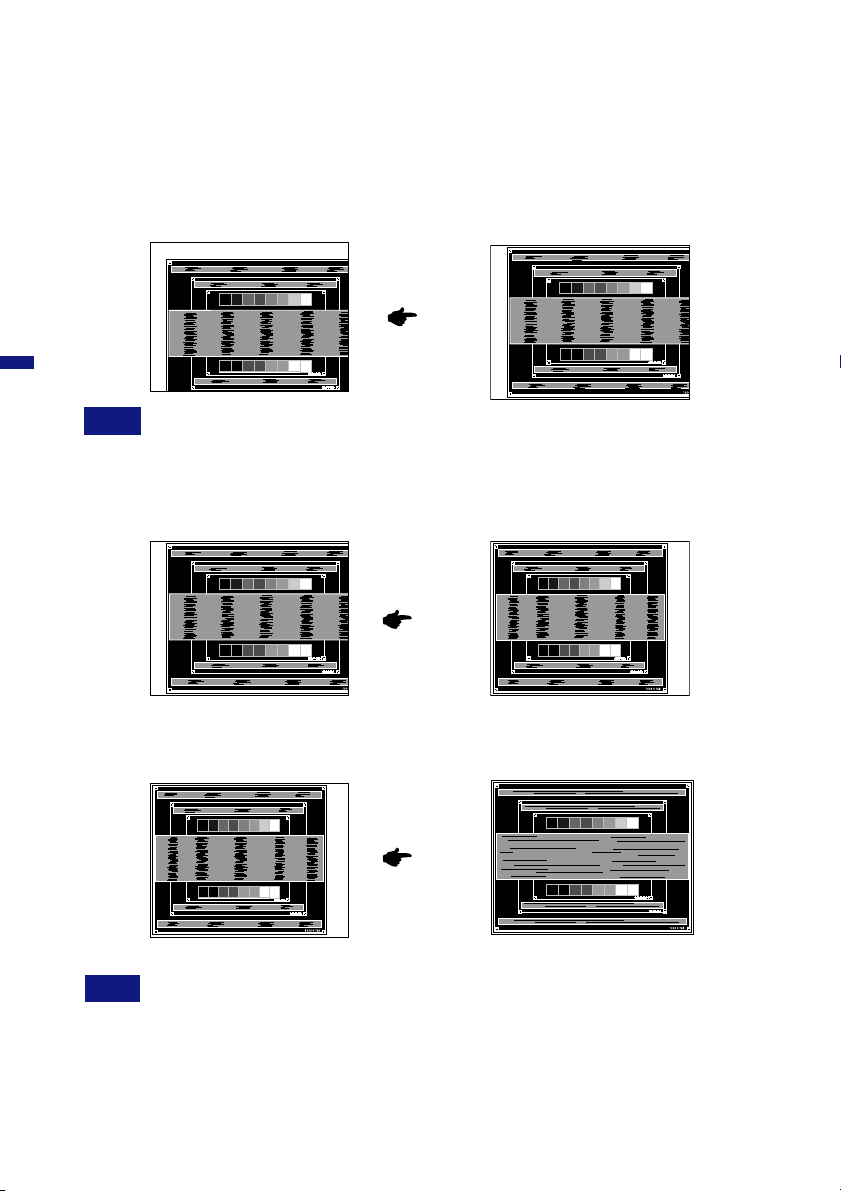
Adjust the Phase to correct horizontal wavy noise, flicker or blur in the zebra
F
pattern.
+
–
NOTE n In case the strong flicker or blurs remain on a part of the screen, repeat steps E and
because the Clock may not be adjusted correctly. If the flicker or blurs still remain,
F
set the refresh rate of computer to low (60Hz) and repeat steps from B again.
n Adjust the H-Position after the Phase adjustment if the horizontal position moves
during the adjustment.
Adjust the Brightness and Color Temp. to get the desired picture after you complete
G
the Clock and Phase adjustments.
Put back your favorite wallpaper.
ENGLISH
OPERATING THE MONITOR 15
Page 22
POWER MANAGEMENT FEATURE
The power management feature of this product complies with every power saving requirement of
ENERGY STA R® and VESA DPMS. When activated, it automatically reduces unnecessary power
consumption of the monitor when your computer is not in use.
To use the feature, the monitor needs to be connected to a VESA DPMS compliant computer. There
is a power management step the monitor takes as described below. The power management function,
including any timer settings is configured by the operating system. Check your operating system
manual for information on how this can be configured.
Power Management Mode
n
When the H-sync signal / V-sync signal / H and V sync signals from the computer are off, the
monitor enters into Power Management Mode which reduces the power consumption to less than
ENGLISH
5W. The screen becomes dark, and the power indicator turns to orange. From Power Management
Mode, the image reappears in several seconds when either the keyboard or the mouse are
touched again.
Power Indicator
NORMAL MODE
Green
POWER MANAGEMENT MODE
NOTE
Even when using the power management mode, the monitor consumes electricity. Turn
n
off the Power Switch whenever the monitor is not in use, during the night and weekends,
to avoid unnecessary power consumption.
It is possible that the video signal from the computer may be on while the H or V sync
n
signal is missing. In this instance, the POWER MANAGEMENT feature may not work
properly.
Orange
POWER
CONSUMPTION
0 5 W 100%
16 OPERATING THE MONITOR
Page 23

TROUBLE SHOOTING
If the monitor fails to operate correctly, please follow the steps below for a possible solution.
Perform the adjustments described in OPERATING THE MONITOR, depending on the problem you
1.
have.
2. Consult the following items if you cannot find an appropriate adjustment item in OPERATING THE
MONITOR or if the problem persists.
3.
If you are experiencing a problem which is not described below or you cannot correct the
problem, discontinue using the monitor and contact your dealer or iiyama service center for
further assistance.
Problem Check
The picture does
A
not appear.
(Power indicator
does not light up.)
The Power Cable is firmly seated in the socket.o
o
The Power Switch is turned ON.
o The AC socket is live. Please check with another piece of equipment.
ENGLISH
(Power indicator
is green.)
(Power indicator
is orange.)
The screen is not
B
synchronized.
The screen
C
position is not in
the center.
The screen is
D
too bright or too
dark.
The screen is
E
shaking.
o If the blank screen saver is in active mode, touch the keyboard or the
mouse.
o
Increase the Contrast and/or Brightness.
The computer is ON.
o
o
The Signal Cable is properly connected.
o The signal timing of the computer is within the specification of the monitor.
o
If the monitor is in power management mode, touch the keyboard or the
mouse.
o
If the input video signal selection is different, switch the Signal Select.
The computer is ON.
o
o
The Signal Cable is properly connected.
o
The signal timing of the computer is within the specification of the monitor.
The Signal Cable is properly connected.
o
o The signal timing of the computer is within the specification of the monitor.
o The video output level of the computer is within the specification of the
monitor.
The signal timing of the computer is within the specification of the monitor.
o
The video output level of the computer is within the specification of the
o
monitor.
o The power voltage is within the specification of the monitor.
o The signal timing of the computer is within the specification of the monitor.
TROUBLE SHOOTING 17
Page 24
APPENDIX
SPECIFICATIONS
LCD Panel
Display Colors
Sync Frequency
Dot Clock
ENGLISH
Maximum Resolution
Input Connector D-Sub mini 15pin
Plug & Play VESA DDC1/2B
Input Sync Signal
Input Video Signal
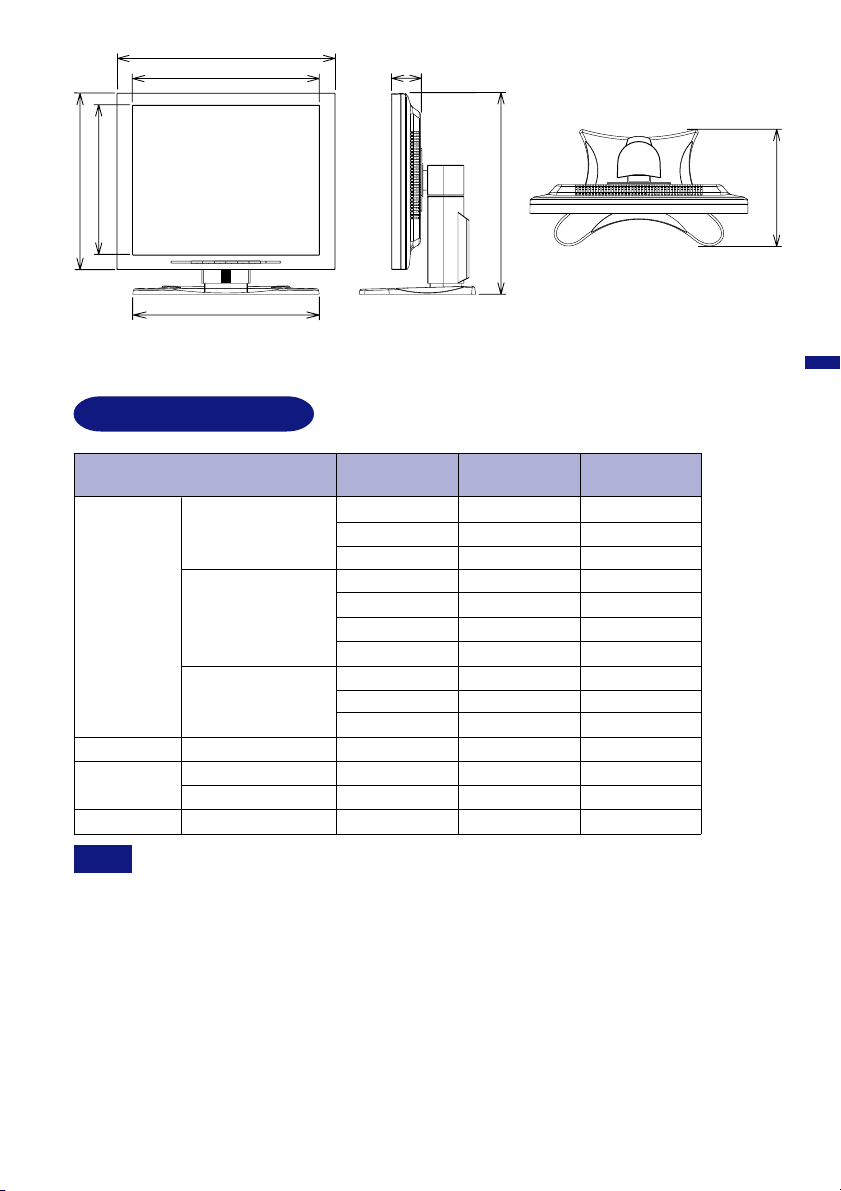
Maximum Screen Size 304.1mm W × 228.1mm H / 12.0" W × 9.0" H
Power Source 100-230VAC, 50/60Hz 1.3-0.6A
Dimensions / Net Weight 344×342×212.4mm / 13.5×13.5×8.4" (W×H×D), 6.0kg / 13.2lbs
Tilt Angle
Environmental
Considerations
Approvals AX3819UT
Driving system
Size
Pixel pitch
Viewable angle
Response time
AX3819UT BK
a-Si TFT Active Matrix
Diagonal: 38cm / 15.0"
0.297mm H × 0.297mm V
Right/Left: 60 dgrees each, Up: 40 degrees, Down: 60 degrees (Typical)
30ms (Black, white, black)
Approx. 16.2 million
Horizontal: 31.0-60.0kHz, Vertical: 56-75Hz
80MHz maximum
1024 × 768
DVI-I 29pin
TM
Separate sync: TTL, Positive or Negative
Composite sync: TTL, Positive or Negative
Sync on green: 0.3Vp-p, Negative
Analog: 0.7Vp-p (Standard), 75Ω, Positive
Digital: DVI (Digital Visual Interface standard Rev.1.0) compliance
60W maximum, Power management mode: 5W maximumPower Consumption
Right / Left: 30 degrees each, Up: 35 degrees
Operative temperature:
Storage temperature:
Humidity (-20 to under 50°C / -4 to under 122°F) :
Humidity (50 to 60°C / 122 to 140°F) :
TCO ’99, CE, TÜV-GS / MPR3(prEN50279) / ISO 13406-2, FCC-B,
UL / C-UL, VCCI-B
TCO ’95, CE, TÜV-GS / MPR3(prEN50279) / ISO 13406-2, FCC-B,
UL / C-UL, VCCI-B
5 to 35°C / 41 to 95°F
-20 to 60°C / -4 to 140°F
20 to 85% (No condensation)
20 to 55% (No condensation)
18 APPENDIX
Page 25
344mm/13.5"
305.2mm/12.0"
229.2mm/9.0"
268mm/10.6"
309.2mm/12.2"
COMPLIANT TIMING
60.3mm/2.4"
(427mm/16.8")
212.4mm/8.4"
342mm/13.5"
( ): Maximum adjustment range
ENGLISH
Video Mode
VGA
VESA
VGA TEXT
Macintosh
MS-DOS
NOTE
SVGA
XGA 1024 × 768
* DVI input is not compliant.
640 × 480
800 × 600
720 × 400
640 × 480
832 × 624
640 × 350
Horizontal
Frequency
31.469kHz
37.861kHz
37.500kHz
35.156kHz
37.879kHz
48.077kHz
46.875kHz
48.363kHz
56.476kHz
60.023kHz
31.469kHz
35.000kHz
49.725kHz
31.469kHz
Vertical
Frequency
59.940Hz
72.809Hz
75.000Hz
56.250Hz
60.317Hz
72.188Hz
75.000Hz
60.004Hz
70.069Hz
75.029Hz
70.087Hz
66.667Hz
74.500Hz
70.087Hz
Dot Clock
25.175MHz
31.500MHz
31.500MHz
36.000MHz
40.000MHz
50.000MHz
49.500MHz
65.000MHz
75.000MHz
78.750MHz
28.322MHz
30.240MHz
57.283MHz
25.175MHz
*
*
*
*
APPENDIX 19
Page 26
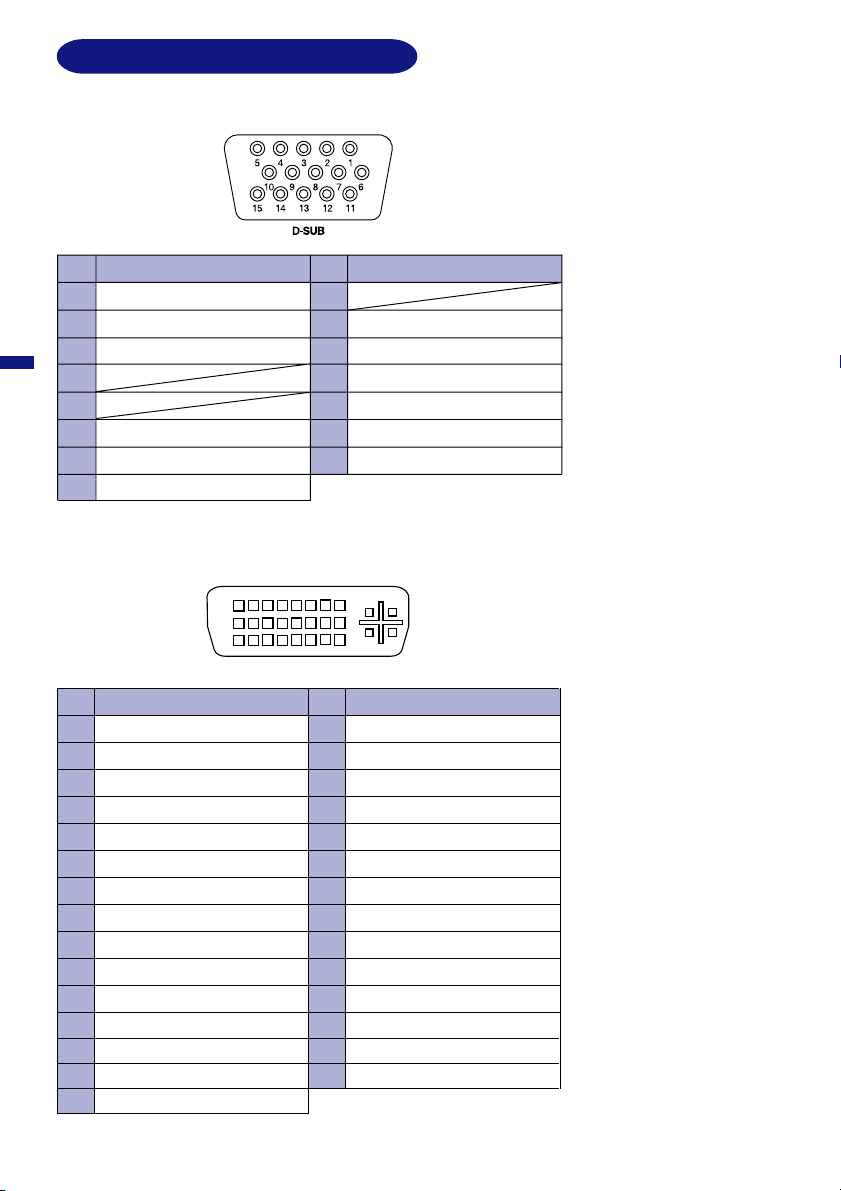
CONNECTOR PIN ASSIGNMENT
n D-Sub mini 15pin Connector
Pin
1
2
ENGLISH
3
Input Signal
Red video
Green video / Sync on green
Blue video
4
5
6
Red video ground
7
Green video ground
8
Blue video ground
n
DVI-I 29pin Connector
Pin Input Signal
1
T.M.D.S Data 2–
T.M.D.S Data 2+
2
3
T.M.D.S Data 2/4 Ground
4
T.M.D.S Data 4–
T.M.D.S Data 4+
5
6
Clock line (SCL) *
7
Data line (SDA) *
Analog V-Sync
8
T.M.D.S Data 1–
9
T.M.D.S Data 1+
10
T.M.D.S Data 1/3 Ground
11
T.M.D.S Data 3–
12
13
T.M.D.S Data 3+
14
+5V Power
15
Ground
Pin
Input Signal
9
10
Ground
11
Ground
12
Data line (SDA)*
H-Sync/HV-Sync
13
V-Sync
14
15
Clock line (SCL)*
* Compliant to VESA DDC.
C2
1
9
17
DVI-I
C1
8
16
24
C4
C3
C5
Pin
16
17
18
19
20
21
22
23
24
C1
C2
C3
C4
C5
Input Signal
Hot Plug Detect
T.M.D.S Data 0–
T.M.D.S Data 0+
T.M.D.S Data 0/5 Ground
T.M.D.S Data 5–
T.M.D.S Data 5+
T.M.D.S Clock Ground
T.M.D.S Clock +
T.M.D.S Clock –
Analog Red
Analog Green
Analog Blue
Analog H-Sync
Analog Ground
* Compliant to VESA DDC.
20 APPENDIX
Page 27

AX3819UT
AX3819UT BK
BEDIENUNGSANLEITUNG
INHALTSÜBERSICHT
FÜR IHRE SICHERHEIT ........................................................................... 1
SICHERHEITSHINWEISE ................................................................... 1
BESONDERE HINWEISE ZU LCD-MONITOREN ................................ 3
KUNDENDIENST ............................................................................... 3
REINIGUNGSHINWEISE .................................................................... 3
VOR DER INBETRIEBNAHME ................................................................. 4
LEISTUNGSMERKMALE .................................................................. 4
LIEFERUMFANG ............................................................................... 4
FUNKTIONSELEMENTE UND ANSCHLÜSSE ................................... 5
ANSCHLUSSHINWEISE ................................................................... 6
COMPUTER-EINSTELLUNG ............................................................. 7
AUSRICHTUNG DER HÖHE UND DES BETRACHTUNGSWINKELS.. 8
INBETRIEBNAHME .................................................................................. 9
VERFÜGBARE EINSTELLPARAMETER ........................................... 10
BILDSCHIRMEINSTELLUNGEN ......................................................... 13
POWER MANAGEMENT .................................................................. 16
FEHLERSUCHE ...................................................................................... 17
ANHANG ................................................................................................ 18
SPEZIFIKATIONEN ........................................................................... 18
SYNCHRONISIERUNG ..................................................................... 19
STECKERBELEGUNG ...................................................................... 20
DEUTSCH
Wir gratulieren Ihnen zu Ihrer Entscheidung für den iiyama TFT-Monitor und bedanken
uns für das Vertrauen, das Sie uns entgegenbringen. Damit Ihre Arbeit nicht durch
Fehleinstellungen getrübt wird, bitten wir Sie, sich einige Minuten Zeit zu nehmen und
dieses Handbuch durchzulesen, bevor Sie Ihren neuen iiyama TFT-Monitor das erste
Mal in Betrieb nehmen. Bitte bewahren Sie diese Anleitung zum späteren Nachschlagen
sorgfältig auf.
Page 28

ERKLÄRUNG DER CE-KONFORMITÄT
Dieser LCD Flachbildschirm entspricht den Anforderungen der EG Richtlinien 89/336/EWG, “EMV
Richtlinie” und 73/23/EWG, “Niederspannungsrichtlinie”, ergänzt durch die Richtlinie 93/68/EWG.
Die Anforderungen zur Störfestigkeit werden eingehalten bei einer Benutzung im Wohnbereich,
in Geschäfts- und Gewerbebereichen sowie in Kleinbetrieben, sowohl innerhalb als auch
ausserhalb der Gebäude.
Alle Einsatzorte sind dadurch gekennzeichnet, dass sie direkt an die öffentliche NiederspannungsStromversorgung angeschlossen sind.
INDEX
A
ANSCHLUSSHINWEISE ........................................... 6
Anschluss-Möglichkeiten ............................................ 6
AUSRICHTUNG DER HÖHE UND DES BETRACHTUNGSWINKELS
DEUTSCH
Auto Set-up .......................................................... 11,14
B
BESONDERE HINWEISE ZU LCD-MONITOREN .... 3
BILDSCHIRMEINSTELLUNGEN ............................. 13
C
COMPUTER-EINSTELLUNG ..................................... 7
D
Direkte ............................................................ 10,11,12
E
ENERGY STAR........................................................ 16
F
Farbtemperatur .................................................... 11,12
FEHLERSUCHE ...................................................... 17
FUNKTIONSELEMENTE UND ANSCHLÜSSE .......... 5
H
Helligkeit ............................................................. 10,12
H-Position ................................................................ 10
I
INBETRIEBNAHME ................................................... 9
K
Kontrast ............................................................... 10,12
KUNDENDIENST ....................................................... 3
Kabelverbindung ........................................................ 7
.........8
L
LEISTUNGSMERKMALE ............................................ 4
O
On-Screen-Display ..................................................... 9
OSD Position ....................................................... 11,12
P
Phase .................................................................. 10,15
Plug & Play ................................................................ 7
POWER MANAGEMENT .......................................... 16
R
REINIGUNGSHINWEISE .......................................... 3
S
SICHERHEITSHINWEISE ......................................... 1
Signal Timing .............................................................. 7
SPEZIFIKATIONEN ................................................. 18
Sprache ................................................................ 11,12
STECKERBELEGUNG ............................................. 20
SYNCHRONISIERUNG .......................................... 19
T
Takt ..................................................................... 10,14
V
VERFÜGBARE EINSTELLPARAMETER .................. 10
VESA DPMS............................................................. 16
V-Position ................................................................. 10
Z
Zubehör ...................................................................... 4
Zurücksetzen ....................................................... 11,12
n Änderungsrechte vorbehalten.
n Alle verwendeten Handelsnamen und -marken sind Eigentum der jeweiligen Besitzer.
n Als E
NERGY STAR
für effiziente Energienutzung entspricht.
®
- Partner hat iiyama sichergestellt, dass dieses Produkt den ENERGY STA R® - Bestimmungen
Page 29

FÜR IHRE SICHERHEIT
SICHERHEITSHINWEISE
ACHTUNG
BEI GEFAHR ABSCHALTEN
Sollten Sie irgendwelche unnormalen Erscheinungen wie Rauch, Geräusche oder Gerüche bemerken,
schalten Sie sofort den Monitor aus und trennen Sie den Netzstecker vom Gerät. Benachrichtigen
Sie dann bitte Ihren Fachhändler oder das iiyama Customer-Care-Center. Fortgesetzter Bertrieb kann
gefährlich sein und zu einem Brand oder zu Stromschlägen führen.
GEHÄUSE NIEMALS ÖFFNEN
Im Innern des Gerätes sind spannungsführende Teile frei zugänglich. Bei Entfernung des Gehäuses
setzen Sie sich der Gefahr aus, einen Brand auszulösen oder einen Stromschlag zu erleiden.
KEINE FREMDGEGENSTÄNDE IN DAS GERÄT STECKEN
Bitte führen Sie keine festen Gegenstände oder flüssigen Materialien in den Monitor ein. Im Falle eines
Unfalls schalten Sie bitte Ihren Monitor sofort ab und trennen Sie den Netzstecker vom Gerät.
Benachrichtigen Sie dann bitte Ihren Fachhändler oder das iiyama Customer-Care-Center. Sollte sich
ein Gegenstand im Innern des Monitors befinden, kann das zu einem Brand, Kurzschlüssen oder
anderen Beschädigungen führen.
STELLEN SIE DEN MONITOR AUF EINE SICHERE UND STABILE UNTERLAGE
Sollten Sie den Monitor fallen lassen, besteht Verletzungsgefahr.
DEUTSCH
BENUTZEN SIE DEN MONITOR NICHT IN DER NÄHE VON WASSER
Benutzen Sie den Monitor nicht an einer spritzwassergefährdeten Stelle. Sollte Wasser in den
Monitor gelangen, kann dies zu Brandgefahr oder Stromschlägen führen.
BEACHTEN SIE DIE RICHTIGE BETRIEBSSPANNUNG
Achten Sie auf die Einhaltung der spezifizierten Spannungswerte. Die Benutzung einer falschen
Stromspannung kann zu Fehlfunktionen, Brandgefahr oder Stromschlägen führen.
KABEL SCHÜTZEN
Schützen Sie Ihre Kabel vor mechanischer Belastung (Quetschung, Zug). Beschädigte Kabel führen
zu Brandgefahr oder Kurzschlüssen.
WIDRIGE WETTERBEDINGUNGEN
Es empfielt sich, den Monitor nicht während heftiger Gewitter zu benützen, da es durch
Spannungsschwankungen zu Fehlfunktionen kommen kann. Um Stromschläge zu vermeiden, ist es
ratsam, während solch widriger Witterungsbedingungen das Stromkabel nicht zu berühren.
FÜR IHRE SICHERHEIT 1
Page 30

VORSICHT
UMGEBUNGSBEDINGUNGEN
Installieren Sie den Monitor nicht in Umgebungsbedingungen, wo es rapide Temperaturschwankungen,
hohe Luftfeuchtigkeit oder stark staubige Luft gibt, da es sonst zu Brandgefahr, Kurzschlüssen oder
anderen Beschädigungen kommen kann. Vermeiden Sie es ebenfalls, den Monitor so aufzustellen,
dass er direkter Sonneneinstrahlung oder einer anderen Lichtquelle ausgesetzt wird.
STELLEN SIE DEN MONITOR NICHT AUF EINE WACKLIGE UNTERLAGE
Der Monitor könnte herunterfallen und jemanden verletzen. Bitte legen Sie ebenfalls keine schweren
Gegenstände auf den Monitor und achten Sie darauf, dass die Kabel so verlegt sind, dass niemand
darüber stolpern kann und sich dabei verletzt.
BELÜFTUNG SICHERSTELLEN
Die Lüftungsschlitze sollen für ausreichende Belüftung sorgen. Achten Sie darauf, dass Sie die
Belüftungsschlitze des Monitors nicht verdecken, da ansonsten Brandgefahr besteht. Um
ausreichende Belüftung zu gewährleisten, lassen Sie bitte mindestens 10 cm Platz zwischen Monitor
DEUTSCH
und Wand.
Entfernen Sie auf keinen Fall den Kipp-/Schwenkfuss. Die Lüfungsschlitze auf der Rückseite des
Gehäuses werden blockiert und es kann zu einer Überhitzung des Monitors kommen, wenn der Fuss
entfernt wird. Die Aufstellung des Monitors auf dem Rücken, seitlich oder auf dem Kopf liegend kann zu
Beschädigungen führen. Achten Sie darauf, dass Sie den Monitor auf eine feste Unterlage stellen.
ENTFERNEN SIE DIE KABEL, BEVOR SIE DEN MONITOR TRANSPORTIEREN
Wenn Sie den Monitor bewegen, müssen Sie vorher den Monitor ausschalten, den Netzstecker
ziehen und darauf achten, dass das Signalkabel abgezogen ist. Wenn Sie die Kabel nicht entfernen,
könnte dies zu Brandgefahr oder Kurzschlüssen führen.
NETZSTECKER ZIEHEN
Sollten Sie den Monitor über langere Zeit nicht benützen, raten wir das Gerät vom Stromnetz zu
trennen, um Unfallgefahren zu vermeiden.
AUS- UND EINSTECKEN
Nehmen Sie beim Aus- und Einstecken immer den Stecker in die Hand. Ziehen Sie niemals an der
Stromleitung, sondern immer am Stecker, ansonsten könnte dies zu Brandgefahr oder Stromschlägen
führen.
BERÜHREN SIE DEN STECKER NICHT MIT FEUCHTEN HÄNDEN
Ausstecken des Monitors mit nassen Händen kann zu einem Stromschlag führen.
WENN SIE DEN MONITOR AUF IHREN COMPUTER STELLEN MÖCHTEN
vergewissern Sie sich, dass Ihr Computer stabil genug ist um das Gewicht des Monitors zu tragen,
ansonsten könnte dies zu Beschädigungen an Ihrem Computer führen.
SONSTIGES
ERGONOMISCHE HINWEISE
Um eine Ermüdung der Augen auszuschliessen, sollten Sie den Monitor nicht vor einem grellen
Hintergrund oder in einem dunklen Raum benutzen. Um optimalen Sehkomfort zu gewährleisten, sollte
die Oberkante des Monitors knapp unterhalb Ihrer Augenhöhe liegen und der Abstand zwischen Augen
und Monitor 40-60 cm betragen. Wenn Sie den Monitor länger benutzen, sollten Sie mindestens 10
Minuten pro Stunde nicht in den Monitor schauen, um eine Überanstrengung der Augen zu vermeiden.
2 FÜR IHRE SICHERHEIT
Page 31

BESONDERE HINWEISE ZU LCD-MONITOREN
Die folgenden Symptome stellen keine Störung dar, sondern sind normal:
HINWEIS
Wenn Sie das erste Mal Ihren LCD-Monitor anschalten, kann es bedingt durch
n
Ihren Computer eintreten, daß das wiedergegebene Bild nicht in richtiger Größe
auf dem Monitor dargestellt wird. In diesem Fall stellen Sie bitte die Bildgröße
richtig ein.
Aufgrund der Eigenschaften von Fluoreszenzlicht kann es bei Ersteinschaltung
n
zu Bildschirmflackern kommen. Schalten Sie das LCD kurz aus und wieder ein,
um diesen Zustand zu beheben.
Leicht ungleiche Helligkeit je nach verwendetem Desktop-Layout.
n
Sollten Sie nachdem Sie ein Bild über Stunden unverändert angezeit haben, auf
n
ein neues Bild wechseln, kommt es bauartbedingt zu einem sogenannten
Geisterbild. Dieses Geisterbild verschwindet nach einiger Zeit von selbst oder
Sie schalten das Gerät für einen längeren Zeitraum aus.
Bitte wenden Sie sich an Ihren Fachhändler oder das iiyama Customer-Care-
n
Center in Deutschland für einen Ersatz der Hintergrundbeleuchtung, wenn der
Bildschirm schwarz ist, flackert oder nicht leuchtet. Versuchen Sie niemals, die
Hintergrundbeleuchtung selber auszuwechseln.
KUNDENDIENST
Die im LCD-Monitor verwendete Hintergrundbeleuchtung ist ein Verbrauchsartikel.
ANMERKUNG
n
Für die Garantie diese Gerätes wenden Sie sich bitte an das lokale iiyama
Service Center. Die Adresse finden Sie im beigelegten Monitorpass oder auf
www.iiyama.de.
Sollten Sie den Monitor für eine Service-Reparatur versenden müssen und Sie
n
verfügen nicht mehr über die Originalverpackung, so wenden Sie sich bitte an
lhren Fachhändler, der Ihnen bei der Beschaffung einer Ersatz-Verpackung
behilflich sein wird.
DEUTSCH
REINIGUNGSHINWEISE
ACHTUNG
VORSICHT
ANMERKUNG
GEHÄUSE
LC-SCHIRM
Ziehen Sie aus Sicherheitsgründen immer den Netzstecker, bevor Sie den Monitor
n
reinigen.
Sollten während der Reinigung flüssige oder feste Materialien in den Monitor
n
gelangt sein, schalten Sie bitte Ihren Monitor sofort ab und ziehen Sie den
Netzstecker ab. Benachrichtigen Sie dann bitte Ihren Fachhändler.
Die Bildschirmoberfläche nicht mit einem rauhen Gegenstand reinigen.
n
Verwenden Sie unter keinen Umständen scharfe Reinigungsmittel wie
n
nachfolgend aufgeführt. Diese Mittel beschädigen die Bildschirmoberfläche und
greifen das Finish an.
Längerer Kontakt des Gehäuses mit Gummi- oder Kunststoffprodukten kann
n
das Finish angreifen.
Flecken können mit einem feuchten, weichen Tuch entfernt werden. Zum Anfeuchten
nehmen Sie eine schwache Spülmittellösung.
Wir empfehlen das Display regelmäßig mit einem trockenen weichen Tuch zu
reinigen.
Bitte benutzten Sie keine Papiertücher, dies könnte das LCD beschädigen.
Verdünner
Reinigungsbenzin
Scheuermilch
Sprühreiniger
Wachs
Säuren oder Laugen
FÜR IHRE SICHERHEIT 3
Page 32

VOR DER INBETRIEBNAHME
LEISTUNGSMERKMALE
K 38 cm (15.0") TFT-Farb-LCD-Monitor
K Unterstützt Auflösungen bis 1024×768
K Hoher Sichtwinkel und hoher Kontrast
K Digitale Glättung von Schriftzeichen
K Automatisches Set-Up
®
K Plug & Play VESA DDC1/2B kompatibel, Windows
K Power Management Funktion (ENERGY STAR® und VESA DPMS Compliant)
K Ergonomisches Design
AX3819UT: strahlungsarm nach MPR 3 und TCO ’99
DEUTSCH
AX3819UT BK*: strahlungsarm nach MPR 3 und TCO ’95
*Die Gehäusefarbe ist Schwarz.
K Digitaler Eingang (DVI-I) für beste Bildqualität
K VESA-kompatible Aufhängungsmöglichkeit für Wand- oder Schwenkarmbefestigung
LIEFERUMFANG
Ihr iiyama TFT-Monitor-Paket enthält das folgende Zubehör. Überprüfen Sie bitte den Lieferumfang
des Pakets auf Vollständigkeit. Wenn eine Komponente fehlt oder beschädigt ist, setzen Sie sich bitte
mit Ihrem zuständigen iiyama-Händler oder iiyama-Büro vor Ort in Verbindung.
n Netzkabel
n D-Sub Signalkabel
n DVI-D Signalkabel
n Bedienungsanleitung
95/98/2000/Me/XP kompatibel
Sie können die unten aufgeführten Teile optional beziehen. Wenden sie sich hierfür bitte an Ihren
Fachhändler oder direkt an eine iiyama Niederlassung. Die Lautsprecher werden am LCD-Monitor
angeschlossen, die Schutzfolie wird am Panel befestigt um dieses z.B. gegen Kratzer zu schützen.
n Lautsprecher
AX3819UT: OSP1-1 (Unten, Mono) AX3819UT BK: OSP1-1B (Unten, Mono)
n Schutzfolie (Bestellnr.: 832Z001-03)
4 VOR DER INBETRIEBNAHME
Page 33

FUNKTIONSELEMENTE UND ANSCHLÜSSE
<Frontseite> <Rückseite>
Betriebszustandsanzeige
A
HINWEIS
Schalter
B
Auto Taste (Auto Set-up)
C
Stellt automatisch Takt, Phase, H-Position und V-Position ein.
HINWEIS
+ / Helligkeit Taste
D
– / Kontrast Taste
E
Menü Taste
F
Signalwahl Schalter
G
Sind beide Signaleingänge mit einer aktiven Datenquelle verbunden, können Sie den Eingang
durch Drücken dieser Taste umschalten.
HINWEIS
Hauptschalter
H
Stromversorgung (AC IN)
I
D-Sub mini 15pin Anschluss (INPUT 2)
J
DVI-I 29pin Anschluss (INPUT 1)
K
Optionaler Lautsprecher Anschluss (DC OUT)
L
Grün: Normaler Betrieb
Orange: Power Management
Der Bildschirm wechselt automatisch in den Power Management Mode
über, der den Energieverbrauch auf weniger als 5 W senkt, sobald er keine
horizontalen und / oder vertikalen synchronisierten Signale mehr erhält.
n Damit der Automatische Set-Up korrekt durchgeführt werden kann, muss das Test.bmp
auf dem LCD dargestellt werden. (Siehe Seite 13 BILDSCHIRMEINSTELLUNGEN.)
n Während der Einstellungsphase wird der Bildschirm für ca. 5 Sekunden schwarz.
Wenn nur einer der beiden Eingänge mit einer Signalquelle belegt ist , so wird dieser
nicht automatisch gewählt. Drücken sie die Signalwahl Taste wenn die Power- LED
orange leuchtet um auf den richtigen Eingang umzuschalten.
DEUTSCH
VOR DER INBETRIEBNAHME 5
Page 34

ANSCHLUSSHINWEISE
Stellen Sie vor dem Einstecken sicher, dass Monitor und Computer ausgeschaltet sind.
A
Verbinden Sie Monitor und Computer mittels des mitgelieferten Signalkabels siehe Seite 20
B
STECKERBELEGUNG.
Schliessen Sie zuerst das Netzkabel an den Monitor und schalten Sie dann den Monitor an.
C
ACHTUNG n Die Art des Signalkabels hängt von der Art des angeschlossenen Computers ab. Ein
falsches Kabel kann sowohl den Monitor als auch den Computer zerstören. Mit dem
Monitor wird ein Standard-15-Pin D-Sub-Kabel mitgeliefert. Wenn Sie ein spezielles
Kabel benötigen, wenden Sie sich bitte an Ihren Fachhändler.
n Zum Anschluss an einen Macintosh-Computer könnte ein Adapter nötig sein. Bitte
wenden Sie sich, in diesem Fall an Ihren lokalen Fachhändler.
n Stellen Sie sicher, dass das Signalkabel an beiden Enden festgeschraubt ist.
DEUTSCH
[Anschluss-Möglichkeiten]
n Die Kabel können auf der Rückseite des Fusses gebündelt werden. (Siehe nächste
Seite Kabelverbindungen)
< Rückseite >
Netzkabel (Zubehör)
6 VOR DER INBETRIEBNAHME
DVI-D Signalkabel
(Zubehör)
D-Sub Signalkabel
(Zubehör)
Anschluss an den DVI
Ausgang des Computers
Anschluss an den D-Sub
Ausgang des Computers
Computer
Page 35

[Kabelverbindung]
Entfernen sie das Rückgehäuse vom Fuss.
A
Ziehen Sie die rückwärtige Abdeckung nach
B
oben. Sammeln sie die Kabel auf der Rückseite
des Fusses.
Setzen sie die rückwärtige Abdeckung wieder
C
auf , indem der obere Teil der Andeckung in die
Führungsschienen gesetzt werden. Drücken sie
die Abdeckung nach unten bis diese vollständig
„eingeklickt“ ist.
COMPUTER-EINSTELLUNG
n Signal Timing
Wenn Sie den Monitor das erste Mal einschalten, setzen Sie bitte die Auflösung der Grafikkarte
(“Signal Timing”) auf die VGA-Auflösung, bevor Sie den Monitor anschliessen. Wechseln erst zu
den auf Seite 19 genannen Auflösungen (“Timings”) im Kapitel “SYNCHRONISIERUNG”, nachdem
Sie bestätigt haben, dass das Monitorbild korrekt in der VGA-Auflösung erschienen ist.
n Windows 95/98/2000/Me/XP Plug & Play
Der iiyama TFT-Monitor entspricht den DDC1/2B-Richtlinien gemässt dem VESA-Standard. Plug & PlayFunktionen laufen unter Windows 95/98/2000/Me/XP, indem der Monitor an einen DDC1/2B-kompatiblen
Computer mit dem beiligenden Signalkabel angeschlossen wird. Sollten Sie Windows 95/98/2000/Me/
XP Treiber für Ihren iiyama Monitor benötigen, finden Sie diesen via Internet unter:
http://www.iiyama.de
ANMERKUNG
n Nähere Informationen über den Monitortreiber, Beschaffung und Installation
finden Sie auf der oben angegebenen Internetseite.
n Verwenden Sie ein Macintosh oder Unix Betriebssystem, ist das Einbinden
von Monitortreibern nicht nötig. Detaillierte Informationen erhalten Sie bei Ihrem
Fachhändler vor Ort.
DEUTSCH
VOR DER INBETRIEBNAHME 7
Page 36

AUSTRICHTUNG DER HÖHE UND DES BETRACHTUNGSWINKELS
n Für eine optimales Arbeiten sollten sie direkt von
vorne auf den Bildschirm blicken. Richten sie den
Winkel und Höhe des Monitors wunschgemäss aus.
n Halten Sie beim Ändern des Neigungswinkels und
Höhe das Panel mit einer Hand fest, um ein Umkippen
des LCD-Monitors zu verhindern.
n Sie können nun die Höhe auf bis zu 85 mm und den
Winkel um bis zu 30° nach rechts und links, drehen
sowie um 35° nach hinten.
HINWEIS
n
DEUTSCH
n
Berühren sie beim Ändern der Höhe
bzw. Neigungswinkel nicht den LCDSchirm. Andernfalls besteht
Beschädigungsgefahr.
Achten Sie beim Ändern der Höhe und
des Winkels darauf , sich nicht die
Finger einzuklemmen.
35˚
85mm
30˚30˚
8 VOR DER INBETRIEBNAHME
Page 37

INBETRIEBNAHME
Zur Sicherstellung bester Bildqualität wird der iiyama TFT-Monitor bereits im Werk mit einer
SYNCHRONISIERUNG (s. S.19) ausgerüstet. Sie können ebenfalls das Bild nach Ihren Wünschen
einstellen, wenn sie die nachfolgenden Einstellhinweise beachten. Für detaillierte Einstellungen
beachten Sie bitte Seite 13 BILDSCHIRMEINSTELLUNGEN.
Drücken Sie die Menütaste zum Start des On-Screen-Displays. Es gibt
(
zwei Menü-Seiten, die sie mit Hilfe der +/– Tasten aufrufen können.
Menü :1
Aktuell verwendete Horizontal-,
Bildwiederholfrequenz
und Auflösung
Wählen Sie die Menü-Seite zur Justierung Ihres Monitors anhand
B
H:46.8K V:75.0
800 × 600
des Menü-Icons, das die von Ihnen gewünschte Justierung
repräsentiert. Drücken Sie wiederum die Menütaste. Danach wählen
Sie wieder mit den +/– Tasten das gewünsche Symbol aus. Drücken
Sie wiederum die Menütaste.
Benutzen Sie die +/– Tasten bis zur gewünschen Einstellung.
C
Ein Beispiel: Um die Vertikal-Position zu korrigieren, wählen Sie die Menü-Seite 1 und drücken
dann die Menütaste. Danach wählen Sie das Symbol (V-Position) mit Hilfe der +/– Tasten.
Menü :1
V-Position
Nach dem Betätigen der Menütaste erscheint eine Einstellungsskala. Mit Hilfer der +/– Tasten
können Sie die Vertical-Position verändern. Während der Benutzung der +/– Tasten ändert sich
die Vertical-Position des Gesamtbildes im Verhältnis zu den von Ihnen bewirkten Einstellungen
der +/– Tasten.
V-Position
–
+
DEUTSCH
ACHTUNG
n
Das On Screen Menü wird ebenfalls ausgeblendet, wenn mehrere Sekunden lang keine EinstellTaste betätigt wird. Die veränderten Einstellungen werden automatisch bei jedem Ausblenden des
On Screen Menüs abgespeichert. Das Ausschalten des Monitors während des Einstellvorganges
sollte vermieden werden, da dadurch die Veränderungen nicht abgespeichert werden können.
Einstellungen für “Takt, Phase und Position” werden für jede einzelne Auflösung (=Signaltiming)
n
separat gespeichert. Alle anderen Einstellungen wirken jeweils auf alle Auflösungen und können
nicht für jedes Timing und jede Auflösung separat eingestellt werden.
INBETRIEBNAHME 9
Page 38

VERFÜGBARE EINSTELLPARAMETER
Bei Verwendung des D-Sub Eingang:
Menü : 1
(D-Sub)
H:46.8K V:75.0
800 × 600
Menü :1
Einstellungsmöglichkeiten
Kontrast
DEUTSCH
*1Stellen Sie die Helligkeit neu ein, wenn Sie den Monitor in einem dunklen Raum benutzen und Sie
*2Siehe Seite 13 BILDSCHIRMEINSTELLUNGEN.
Contrast
Helligkeit *
Brightness
Takt *
Clock
Phase *
Phase
H-Positon
H-Position
V-Position
V-Position
Hauptmenü
Return to Menu
das Gefühl haben das dieser zu hell wirkt.
1
2
2
Problem / Lösung Entsprechende Taste
Zu blass
Zu intensiv
Zu dunkel
Zu hell
Um flickernden Text oder Linien zu
stabilisieren
Um flickernden Text oder Linien zu
stabilisieren
Zu weit links
Zu weit rechts
Zu niedrig
Zu hoch
Rückkehr zur “Menü : 1”.
Sie können die Menü-seiten überspringen und die Einstellungsskala für Kontrast und Helligkeit direkt
aufrufen, indem Sie die folgende Einstellungen vornehmen:
l Kontrast: Drücken Sie die Kontrast Taste, wenn das On-Screen-Menü nicht dargestellt
wird.
l Helligkeit: Drücken Sie die Helligkeit Taste, wenn das On-Screen-Menü nicht dargestellt wird.
BEMERKUNG
10 INBETRIEBNAHME
WECHSELN ZWISCHEN DEN KONTRAST- UND HELLIGKEITSEINSTELLUNGEN
Um zwischen den Kontrast- und Helligkeitseinstellungen zu wechseln, Drücken Sie
die Menü Taste innerhalb 10 Sekunden, nachdem Sie die Kontrast Taste oder die
Helligkeit Taste der vorherigen Einstellungen benutzt haben.
Page 39

Menü : 2
(D-Sub)
Menü :2
H:46.8K V:75.0
800 × 600
Einstellungsmöglichkeiten
Auto Set-up*
Auto Set-up
OSD Position
OSD Position
Farbtemperatur
Color Temp.
Signalabgleich
Auto Balance
BEMERKUNG
“Signalabgleich” braucht an weisser Fläche mehr als 5 cm um korrekt arbeiten zu können.
n
Während der Einstellungsphase wird der Bildschirm für ca. 10 Sekunden schwarz.
n
Es kann vorkommen, dass “Signalabgleich” aufgrund Ihrer Systemeinstellungen, eingestellter
n
Auflösung oder Darstellung nicht richtig arbeitet. In diesem Fall wählen Sie “Zurücksetzen” und
greifen damit auf die Grundeinstellung zurück.
Sprache
Language
Zurücksetzen
Reset
Hauptmenü
Return to Menu
*1Siehe Seite 13 BILDSCHIRMEINSTELLUNGEN.
1
Nein No
Ja Ye s
Nein No
Ja Ye s
ENGLISH
DEUTSCH
FRANÇAIS
NEDERLANDS
SVENSKA
Nein No
Ja Ye s
Problem / Lösung Entsprechende Taste
Rückkehr zum Hauptmenü.
Stellt automatisch Takt, Phase, H-Position und VPosition ein.
Sie können das On Screen Displays in einer der Fünf
oben dargestellten Positionen darstellen.
Drücken Sie die + Taste, um das OSD in numerischer
Reihenfolge zu bewegen.
Drücken Sie die – Taste, um das OSD gegen die
numerische Reihenfolge zu bewegen.
Rötlich weiss
Bläuliches weiss
Rückkehr zum Hauptmenü.
Stelllt automatisch Rot, Grün und Blau passend ein.
Englisch
Deutsch
Französisch
Niederländisch
Schwedisch
Rückkehr zum Hauptmenü.
Die werksseitigen Voreinstellungen sind wieder aktiv.
Rückkehr zur “Menü : 2”.
DEUTSCH
Sie können die Menü-seiten überspringen und die Einstellungsskala für Auto Set-up direkt aufrufen,
indem Sie die folgende Einstellungen vornehmen:
l Auto Set-up: Drücken Sie die Auto Taste.
INBETRIEBNAHME 11
Page 40

Bei Verwendung des DVI Eingang:
H:46.8K V:75.0
800 × 600
Einstellungsmöglichkeiten Problem / Lösung Entsprechende Taste
Menü
Kontrast
Contrast
Helligkeit *
DEUTSCH
*1Stellen Sie die Helligkeit neu ein, wenn Sie den Monitor in einem dunklen Raum benutzen und Sie
Brightness
OSD Position
OSD Position
Farbtemperatur
Color Temp.
Sprache
Language
Zurücksetzen
Reset
das Gefühl haben das dieser zu hell wirkt.
1
ENGLISH
DEUTSCH
FRANÇAIS
NEDERLANDS
SVENSKA Schwedisch
Nein No
Ja Ye s
Zu blass
Zu intensiv
Zu dunkel
Zu hell
Sie können das On Screen Displays in einer der Fünf
oben dargestellten Positionen darstellen.
Drücken Sie die + Taste, um das OSD in numerischer
Reihenfolge zu bewegen.
Drücken Sie die – Taste, um das OSD gegen die
numerische Reihenfolge zu bewegen.
Rötlich weiss
Bläuliches weiss
Englisch
Deutsch
Französisch
Niederländisch
Rückkehr zum Hauptmenü.
Die werksseitigen Voreinstellungen sind wieder aktiv.
Sie können die Menü-seiten überspringen und die Einstellungsskala für Kontrast und Helligkeit direkt
aufrufen, indem Sie die folgende Einstellungen vornehmen:
l Kontrast: Drücken Sie die Kontrast Taste, wenn das On-Screen-Menü nicht dargestellt
wird.
l Helligkeit: Drücken Sie die Helligkeit Taste, wenn das On-Screen-Menü nicht dargestellt wird.
BEMERKUNG
12 INBETRIEBNAHME
WECHSELN ZWISCHEN DEN KONTRAST- UND HELLIGKEITSEINSTELLUNGEN
Um zwischen den Kontrast- und Helligkeitseinstellungen zu wechseln, Drücken Sie
die Menü Taste innerhalb 10 Sekunden, nachdem Sie die Kontrast Taste oder die
Helligkeit Taste der vorherigen Einstellungen benutzt haben.
Page 41

BILDSCHIRMEINSTELLUNGEN
Um die best mögliche Bildqualität unter Verwendung des D-Sub Einganges zu erhalten, folgen Sie
bitte dieser Beschreibung:
n Im Handbuch bedeutet “BILDSCHIRMEINSTELLUNGEN” die Einstellung der Bildposition, die Minimierung
von Flackern oder Verschmieren von Buchstaben oder Linien für den von Ihnen benutzten Monitor.
Daher sind diese Einstellungen nicht vergleichbar mit den Einstellungen, die Sie bei einem normalen
Kathodenstrahlmonitor vornehmen würden, um ein optimales Bild zu erhalten.
n Der Monitor ist für die optimale Darstellungen einer Auflösung von 1024 × 768 Bildpunkten entwickelt
worden. Auflösungen unterhalb von 1024 × 768 Bildpunkten werden weniger gut dargestellt, da
diese Auflösungen automatisch auf die volle Bildschirmgrösse vergrössert werden. Wir empfehlen,
den Monitor im normalen Gebrauch nur mit einer Auflösung von 1024 × 768 Bildpunkten zu betreien.
n Texte oder Linien können verwischt oder in anderen Dicken dargestellt werden, wenn das Monitorbild
vergrössert dargestellt wird.
n Sie sollten Bildlage über das OSD Monitors anpassen. Veränderung dieser Parameter über den
Computer können zu Darstellungsfehlern führen.
n Bitte nehmen Sie erst Eingaben vor, wenn das Gerät bereits mindestens 30 Minuten eingeschaltet
ist (“Aufwärmphase”).
n Nach dem automatischen Set-Up werden eventuell weitere Einstellungen erforderlich, bedingt
durch die gewünschte Auflösung oder die Signaleinstellung.
n Die Auto Set-up Funktion kann nur korrekt arbeiten, wenn das Test.bmp auf dem Display dargestellt
wird. Anderenfalls muss die Einstellung des Displays via Clock und Phase von Hand vorgenommen
werden.
Es gibt zwei Möglichkeiten der ildschirmeinstellung. Entweder nehmen Sie die automatische Einstellung
von Takt, Phase und Position oder Sie stellen alles manuell ein. Wenn der Monitor an einen neuen
Computer angeschlossen wird, nutzen Sie das automatische Set-Up, ansonsten wird eine andere
Auflösung eingestellt. Wenn es bei der Bildwiedergabe flackert, unscharf ist oder die Bildgrösse
nicht passt, nachdem Sie das automatische Set-Up haben laufen lassen, dann müssen Sie manuell
nachjustieren. Beide Einstellungen sollten unter Verwendung des Testbildes (Test.bmp) vorgenommen
werden. Das Testbild erhalten Sie via Internat auf der iiyama Homepage (http://www.iiyama.de).
Die Erklärungen beziehen sich auf Eingaben, die auf der Basis von Windows 95/98/2000/Me/XP
gemacht werden.
Stellen Sie das Testbild auf dem kompletten Desktop dar (Vollbildmodus).
A
BEMERKUNG n Folgen Sie dabei den Anweisungen Ihres Computer-Handbuchs.
n Test.bmp läuft bei einer Auflösung von 1280 × 1024. Gehen Sie sicher, daß Sie
die Bildschirmposition in der Dialogbox für den Bildschirmhintergrund auf
“zentriert “ eingestellt haben. Wenn Sie Microsoft® PLUS! 95/98 verwenden,
löschen Sie bitte die Einstellung “Ausdehnen des Hintergrundbildes über den
gesamten Bildschirm”.
DEUTSCH
[Einstellungsmuster]
Zebrastreifen
Dieses Muster bezieht sich
auf die Grösse 1024 × 768.
Farbbalken
Rahmen
INBETRIEBNAHME 13
Page 42

Halten Sie den Auto Taste (direkte Einstellung).
B
Oer führen Sie das automatische Set-up durch.
Wenn das Bild nach dem automatischen Set-up flackert, unscharf ist oder die
C
Bildgrösse nicht richtig paßt, dann stellen Sie das Bild durch nachfolgende Prozedur
manuell ein.
Stellen Sie die V-Position so ein, dass das obere und untere Ende des Bildschirm-
D
Frames die Bildschirmfläche ausfüllt.
+
–
DEUTSCH
BEMERKUNG n Sollten Sie Einstellungen bei Auflösungen kleiner als 1024 × 768 Bildpunkten
durchführen wollen, stellen Sie die vertikale Position der Einstellungsvorlage
auf “CENTER” ein.
1) Stellen Sie die H-Position so ein, dass die linke Seite des Bildrandes auf die linke
E
Seite der Bildschirmfläche wandert.
+
–
2) Vergrössern Sie die rechte Seite des Bildrandes auf der Bildschirmfläche, indem
Sie die “Takt”-Einstellungen verändern.
+
–
BEMERKUNG n Wenn die linke Seite des Bildschirmrandes während der “Takt”-Einstellungen
nach links wandert, wiederholen Sie bitte entsprechend Schritt 1) und 2).
n Mit der “Takt”-Einstellung können auch vertikale wellenförmige Linien bei Zebra-
Mustern korrigiert werden.
n Während der “Takt”-, “H-Position”- und “V-Position”-Einstellungen kann das
Bild flickern.
14 INBETRIEBNAHME
Page 43

Stellen Sie mit der “Phase”-Einstellung horizontale wellenförmige Linien, Flackern
F
oder Schmieren in Zebra-Mustern ein.
+
–
BEMERKUNG n Sollten Teile des Bildes stark verschmiert dargestellt werden oder durch ein
starkes Flackern gestört werden, ist die „Takt“ - Einstellung möglicherweise
nicht optimal. Wiederholen Sie hierfür bitte die Schritte E und F. Lässt sich
das Problem durch optimieren der „Takt“ – Einstellung nicht beheben, vermindern
Sie bitte die Bildwiederholfrequenz (60Hz) und wiederholen Sie dann die
Einstellung ab Schritt B.
n Stellen Sie die “H-Position” nach der “Phase”-Einstellung ein, wenn sich die
horizontale Position während der Einstellung verändert.
Stellen Sie Helligkeit und Farbtemperatur nach Ihren Wünschen ein, nachdem Sie
G
die Takt- und Phase-Einstellungen beendet haben. Stellen Sie auch wieder ihren
bevorzugten Bildschirmhintergrund ein.
DEUTSCH
INBETRIEBNAHME 15
Page 44

POWER MANAGEMENT
Die Powermanagement funktion entspricht den Vorgaben von ENERGY STA R® und VESA/DPMS. Sie
reduziert unnötigen Stromverbrauch und schaltet den Monitor automatisch ab, wenn er nicht
gebraucht wird.
Um diese Funktion zu nutzen, muss der Monitor an einen VESA/DPMS tauglichen Computer
angeschlossen sein. Dieser Monitor verfügt über einen Power-Management-Modus, welcher den
Energiebedarf deutlich verringern kann. Die hierfür erforderlichen Einstellungen, inklusive der
Zeitvorgaben, müssen am Computer vorgenommen werden.
Power-Management-Modus
n
Der Power-Management-Modus des Monitors wird aktiviert, wenn kein H- oder V-sync bzw.
keines der beiden Sync-Signale am Monitoreingang anliegt. Der Bildschirm wird schwarz, die
Betriebsanzeige leuchtet orange und die Stromaufnahme sinkt auf unter 5W. Befindet sich der
Monitor im Powermanagement, erscheint das Bild in einigen Sekunden bei Betätigung der Maus
oder Tastatur.
DEUTSCH
HINWEIS
NORMAL MODUS
POWER-MANAGEMENT-MODUS
Auch im Power Management Modus wird Energie verbraucht. Schalten Sie deshalb
n
Grün
Orange
STROMAUFNAHME
0 5 W 100%
den Monitor ab, wenn Sie ihn länger nicht benutzen (während der Nacht oder an
Wochenenden), Sie vermeiden damit unnötigen Stromverbrauch.
Es ist möglich, dass das Videosignal des Computers aktiv ist, obwohl das H- oder V-
n
Signal fehlt. In diesem Fall arbeitet das Power Management möglicherweise nicht
korrekt.
16 INBETRIEBNAHME
Page 45

FEHLERSUCHE
Falls der Monitor nicht richtig arbeitet, suchen Sie bitte zuerst an Hand dieser Liste nach der Ursache:
1.
Überprüfen Sie die Einstellungen wie im Abschnitt INBETRIEBNAHME beschrieben.
2. Wenn das Problem nicht behoben ist, suchen Sie die Ursache wie unten beschrieben.
3.
Sollten Sie ein Problem bemerken, das nicht in der Liste aufgeführt ist und Sie nicht anhand der
Vorschläge beheben können, schalten Sie den Monitor aus, trennen Sie den Netzstecker vom
Gerät und wenden Sie sich für weitere Hilfe an Ihren Fachhändler.
Problem Abhilfe
Kein Bild.
Á
Steckt das Stromkabel richtig?
(Betriebszustandsanzeige ist aus)
o
Steht der Hauptschalter auf ON?
o
o Überprüfen Sie mit Hilfe eines anderen Gerätes, ob überhaupt Strom
vorhanden ist.
DEUTSCH
(Betriebszustandsanzeige ist grün)
(Betriebszustandsanzeige ist
orange)
Das Bild
B
synchronisiert
nicht.
Das Bild ist nicht
C
in der Mitte.
Das Bild ist zu
D
dunkel oder zu
hell.
Das Bild wackelt.
E
o
Ist der Bildschirmschoner aktiviert? Zur Überprüfung bewegen Sie die Maus
oder drücken Sie eine Taste des Keyboards.
o
Drehen Sie Kontrast und/oder Helligkeit auf.
o
Ist der Computer eingeschaltet?
o
Ist das Signalkabel richtig eingesteckt?
o
Entspricht das Signal Timing den Werten des Monitors?
o
Falls der Monitor im Power Management Mode ist, bewegen Sie die Maus
oder drücken Sie eine Taste des Keyboards.
o
Möglicherweise ist der falsche Signaleingang aktiv. Wechsel Sie bitte den
Signaleingang.
o
Ist der Computer eingeschaltet?
o
Ist das Signalkabel richtig eingesteckt?
o
Entspricht das Signal Timing den Werten des Monitors?
Ist das Signalkabel richtig eingesteckt (verpolt)?
o
o
Entspricht das Signal Timing den Werten des Monitors?
o Entspricht der Videoausgangspegel den Spezifikationen des Monitors?
Entspricht das Signal Timing den Werten des Monitors?
o
Entspricht der Videoausgangspegel den Spezifikationen des Monitors?o
o Entspricht die Spannungsversorgung den Spezifikationen des Monitors?
o
Entspricht das Video Timing den Spezifikationen des Monitors?
FEHLERSUCHE 17
Page 46

ANHANG
SPEZIFIKATIONEN
LCD
LCD-Art
Grösse
Pixelabstand
einsehbarer Bilckwinkel
Antwortzeit
Darstellbare Farben
Synchronisationsfrequenzen
Dot Clock
Auflösung
Eingangsstecker
DEUTSCH
Plug & Play VESA DDC1/2B
Sync Signal
Videosignal
Maximumbildgrösse 304.1mm × 228.1mm / 12.0" × 9.0" (B × H)
Stromversorgung 100-230VAC, 50/60Hz 1.3-0.6A
Abmessungen / Gewicht 344×342×212.4mm / 13.5×13.5×8.4" (B×H×T), 6.0kg / 13.2lbs
Neigungswinkel
Umgebungsbedingungen
Prüfzeichen AX3819UT
AX3819UT BK
a-Si TFT Active Matrix
Diagonal: 38cm / 15.0"
0.297(H) × 0.297 (V) mm
rechts / links: jeweils 60 Grad, auf: 40 Grad, ab: 60 Grad (typisch)
30ms (schwarz, weiss, schwarz)
Ungefähr 16.2 Millionen
Horizontal: 31.0-60.0kHz, Vertikal: 56-75Hz
max. 80MHz
max. 1024 × 768
D-Sub mini 15pin
DVI-I 29pin
Separate sync: TTL, Positiv oder Negativ
Composite sync: TTL, Positiv oder Negativ
Sync auf grün: 0.3Vp-p, Negativ
Analog: 0.7Vp-p (Standard), 75Ω, Positiv
Digital: DVI (Digital Visual Interface standard Rev.1.0)
max. 60W, Power-management-modus : max. 5WStromaufnahme
rechts / links: jeweils 30 Grad, auf: 35 Grad
Betriebstemperatur:
Lagerungstemperatur:
Feuchtigkeit (-20 bis max. 50°C / -4 bis max. 122°F)
Feuchtigkeit (50 bis 60°C / 122 bis 140°F) :
TCO ’99, CE, TÜV-GS / MPR3(prEN50279) / ISO 13406-2, FCC-B,
UL / C-UL, VCCI-B
TCO ’95, CE, TÜV-GS / MPR3(prEN50279) / ISO 13406-2, FCC-B,
UL / C-UL, VCCI-B
TM
5 bis 35°C / 41 bis 95°F
-20 bis 60°C / -4 bis 140°F
20 bis 85% (nicht kondensierend)
20 bis 55% (nicht kondensierend)
18 ANHANG
Page 47

344mm/13.5"
305.2mm/12.0"
229.2mm/9.0"
268mm/10.6"
309.2mm/12.2"
SYNCHRONISIERUNG
60.3mm/2.4"
212.4mm/8.4"
342mm/13.5"(427mm/16.8")
( ): Maximale Werte
DEUTSCH
VESA
VGA TEXT
Macintosh
MS-DOS
ACHTUNG
Video Mode
VGA
SVGA
XGA 1024 × 768
* DVI nicht kompatible.
640 × 480
800 × 600
720 × 400
640 × 480
832 × 624
640 × 350
Horizontal-
Frequenz
31.469kHz
37.861kHz
37.500kHz
35.156kHz
37.879kHz
48.077kHz
46.875kHz
48.363kHz
56.476kHz
60.023kHz
31.469kHz
35.000kHz
49.725kHz
31.469kHz
Vertikal-
Frequenz
59.940Hz
72.809Hz
75.000Hz
56.250Hz
60.317Hz
72.188Hz
75.000Hz
60.004Hz
70.069Hz
75.029Hz
70.087Hz
66.667Hz
74.500Hz
70.087Hz
Dot Clock
25.175MHz
31.500MHz
31.500MHz
36.000MHz
40.000MHz
50.000MHz
49.500MHz
65.000MHz
75.000MHz
78.750MHz
28.322MHz
30.240MHz
57.283MHz
25.175MHz
*
*
*
*
ANHANG 19
Page 48

STECKERBELEGUNG
n D-Sub mini 15pin Stecker
Pin
1
2
3
Eingangssignal
Rot Video
Grün Video / Sync On Green
Blau Video
4
DEUTSCH
5
6
Rot Video Masse
7
Grün Video Masse
8
Blau Video Masse
DVI-I 29pin Steckern
Pin Eingangssignal
1
T.M.D.S Daten 2–
T.M.D.S Daten 2+
2
3
T.M.D.S Daten 2/4 Masse
4
T.M.D.S Daten 4–
T.M.D.S Daten 4+
5
6
DDC Eingang (SCL) *
7
DDC Daten (SDA) *
8
Analog V-Sync
T.M.D.S Daten 1–
9
T.M.D.S Daten 1+
10
11
T.M.D.S Daten 1/3 Masse
T.M.D.S Daten 3–
12
T.M.D.S Daten 3+
13
+5V Power
14
15
Masse
Pin
Eingangssignal
9
10
Masse
11
Masse
12
DDC Daten (SDA) *
H-Sync / HV-Sync
13
V-Sync
14
15
DDC Eingang (SCL) *
* Compliant to VESA DDC.
C2
1
9
17
DVI-I
C1
8
16
24
C4
C3
C5
Pin
16
17
18
19
20
21
22
23
24
C1
C2
C3
C4
C5
Eingangssignal
Hot Plug Erkennung
T.M.D.S Daten 0–
T.M.D.S Daten 0+
T.M.D.S Daten 0/5 Masse
T.M.D.S Daten 5–
T.M.D.S Daten 5+
T.M.D.S Takt Masse
T.M.D.S Takt +
T.M.D.S Takt –
Analog Rot
Analog Grün
Analog Blau
Analog H-Sync
Analog Masse
* Compliant to VESA DDC.
20 ANHANG
Page 49

AX3819UT
AX3819UT BK
MODE D’EMPLOI
TABLE DES MATIERES
POUR VOTRE SECURITE ....................................................................... 1
CONSIGNES DE SECURITE .............................................................. 1
REMARQUES SUR LES ECRANS A CRISTAUX LIQUIDES (LCD).... 3
SERVICE CLIENT ............................................................................. 3
ENTRETIEN....................................................................................... 3
AVANT D’UTILISER LE MONITEUR ......................................................... 4
FONCTIONS ..................................................................................... 4
LISTE DES ACCESSOIRES LIVRE AVEC LE LCD IIYAMA ............... 4
COMMANDES ET CONNECTEURS .................................................. 5
CONNEXION DU MONITEUR ............................................................ 6
MISE EN ROUTE DE L’ORDINATEUR ................................................ 7
AJUSTEMENT DE LA HAUTEUR ET L’ANGLE DE VISION ............... 8
UTILISATION DU MONITEUR .................................................................. 9
MENU DES PARAMETRES DE REGLAGE ........................................ 10
AJUSTEMENTS DE L’ECRAN ........................................................... 13
SYSTEME D’ECONOMIE D’ENERGIE “POWER MANAGEMENT” ...... 16
DEPANNAGE .......................................................................................... 17
ANNEXE ................................................................................................. 18
CARACTERISTIQUES TECHNIQUES ................................................ 18
FRÉQUENCES DE SYNCHRONISATION .......................................... 19
AFFECTATION DES BROCHES ........................................................ 20
FRANCAIS
Merci d’avoir choisi le moniteur LCD iiyama.
Ce petit manuel contient toutes les informations nécessaires à l’utilisation du moniteur.
Prière de le lire attentivement avant d’allumer le moniteur. Conserver ce manuel pour
toute référence ultérieure.
Page 50

AVIS DE CONFORMITÉ AUX NORMES DU MINISTÈRE DES
COMMUNICATIONS DU CANADA
Le présent appareil numérique n’émet pas de bruits radioélectriques dépassant les limites
applicables aux appareils numériques de Class B prescrites dans le règlement sur le brouillage
radioélectrique édicté par le ministère des Communications du Canada.
DECLARATION DE CONFORMITE AU MARQUAGE CE
Ce moniteur LCD est conforme aux spécifications des directives EC 89/336/EEC, aux directives
EMC sur les basses tensions 73/23/EEC et l’amendement 93/68/EEC.
La sensibilité électromagnétique a été choisie à un niveau permettant une utilisation correcte en
milieu résidentiel, bureaux et locaux d’industrie légère et d’entreprises de petite taille, à l’intérieur
FRANCAIS
aussi bien qu’à l’extérieur des immeubles. Tout lieu d’utilisation devra se caractériser par sa
connexion à un système public d’alimentation électrique basse tension.
n Nous nous réservons le droit de modifier les caractéristiques de nos produits sans préavis.
n Toutes les marques de fabrique utilisées dans ce mode d’emploi appartiennent à leurs propriétaires respectifs.
n En tant que partenaire du programme E
pour l’économie d’énergie édictées par E
NERGY STAR
NERGY STAR
®
, iiyama a déterminé que ce produit répondait aux directives
®
.
Page 51

POUR VOTRE SECURITE
CONSIGNES DE SECURITE
AVERTISSEMENT
MISE HORS TENSION DU MONITEUR EN CAS DE FONCTIONNEMENT ANORMAL
En cas de phénomène anormal tel que de la fumée, des bruits étranges ou de la vapeur, débranchez
le moniteur et contactez immédiatement votre revendeur ou le service technique iiyama. Tout autre
utilisation peut être dangereuse et peut engendrer un incendie ou un choc électrique.
NE JAMAIS OUVRIR LE BOITIER
Ce moniteur contient des circuits haute-tension. La dépose du boîtier peut vous exposer à des
risques d’incendie ou de chocs électriques.
NE PAS INTRODUIRE D’OBJETS DANS LE MONITEUR
N’insérez pas d’objets solides ou liquides tel que de l’eau à l’intérieur du moniteur. En cas d’accident,
débranchez votre moniteur immédiatement et contactez votre revendeur ou le service technique
iiyama. L’utilisation du moniteur avec un objet logé à l’intérieur peut engendrer un incendie, un choc
électrique ou des dommages.
INSTALLER LE MONITEUR SUR UNE SURFACE PLANE ET STABLE
Le moniteur peut blesser quelqu’un s’il tombe ou s’il est lancé.
NE PAS UTILISER SON MONITEUR PRES DE L’EAU
N’utilisez pas le moniteur à proximité d’un point d’eau pour éviter les éclaboussures, ou si de l’eau a
été répandue dessus cela peut engendrer un incendie ou un choc électrique.
FRANCAIS
UTILISER LA TENSION SECTEUR SPECIFIEE
Assurez-vous que le moniteur fonctionne à la tension d’alimentation secteur spécifiée. L’utilisation
d’une tension incorrecte occasionnera un malfonctionnement et peut engendrer un incendie ou un
choc électique.
PROTECTION DES CABLES
Ne pas tirer ou plier les câbles d’alimentation et de signal. Ne pas poser le moniteur ou tout autre objet
volumineux sur ces câbles. Des câbles endommagés peuvent engendrer un incendie ou un choc
électrique.
CONDITIONS CLIMATIQUES DEFAVORABLES
Il est conseillé de ne pas utiliser le moniteur pendant un orage violent en raison des coupures
répétées de courant pouvant entraîner des malfonctions. Il est également conseillé de ne pas
toucher à la prise électrique dans ces conditions car elles peuvent engendrer des chocs électriques.
POUR VOTRE SECURITE 1
Page 52

ATTENTION
INSTALLATION
Pour prévenir les risques d’incendie, de chocs électriques ou de dommages, installez votre moniteur
à l’abri de variations brutales de températures et évitez les endroits humides, poussiéreux ou
enfumés. Vous devrez également éviter d’exposer votre moniteur directement au soleil ou tout autre
source lumineuse.
NE PAS PLACER LE MONITEUR DANS UNE POSITION DANGEREUSE
Le moniteur peut basculer et causer des blessures s’il n’est pas convenablement installé. Vous
devez également vous assurez de ne pas placer d’objets lourds sur le moniteur, et qu’aucun câble
ne soient accessibles à des enfants qui pourraient les tirer et se blesser avec
MAINTENIR UNE BONNE VENTILATION
Le moniteur est équipé de fentes de ventilation. Veuillez à ne pas couvrir les fentes ou placer un objet
trop proche afin d’éviter tout risque d’incendie. Pour assurer une circulation d’air suffisante, installer
le moniteur à 10 cm environ du mur.
Les fentes d’aération sur l’arrière du châssis seront obstruées et il y aura risque de surchauffe du
moniteur si vous retirez le socle du moniteur. La dépose du socle entraînera une surchauffe du
FRANCAIS
moniteur ainsi que des risques d’incendie et de dommages. L’utilisation du moniteur lorsque celui-ci
est posé sur sa partie avant, arrière ou retourné ou bien sur un tapis ou un matériau mou peut
également entraîner des dommages.
DECONNECTEZ LES CABLES LORSQUE VOUS DEPLACEZ LE MONITEUR
Avant de déplacer le moniteur, désactivez le commutateur de mise sous tension, débranchez le
moniteur et assurez-vous que le câble vidéo est déconnecté. Si vous ne le déconnectez pas, cela
peut engendrer un incendie et un choc électrique.
DEBRANCHEZ LE MONITEUR
Afin d’éviter les accidents, nous vous recommandons de débrancher votre moniteur s’il n’est pas
utilisé pendant une longue période.
TOUJOURS DEBRANCHER LE MONITEUR EN TIRANT SUR LA PRISE
Débrancher le câble d’alimentation ou le câble de signal en tirant sur la prise. Ne jamais tirer le câble
par le cordon car cela peut engendrer un incendie ou un choc électrique.
NE TOUCHEZ PAS LA PRISE AVEC DES MAINS HUMIDES
Si vous tirez ou insérez la prise avec des mains humides, vous risquez un choc électrique.
LORS DE L’INSTALLATION DU MONITEUR SUR VOTRE ORDINATEUR
Assurez-vous que l’ordinateur soit suffisamment robuste pour supporter le poids car cela pourrait
engendrer des dommages à votre ordinateur.
AUTRES
RECOMMANDATIONS D’USAGE
Pour prévenir toute fatigue visuelle, n’utilisez pas le moniteur à contre-jour ou dans une pièce
sombre. Pour un confort et une vision optimum, positionnez l’écran juste au dessous du niveau des
yeux et à une distance de 40 à 60 cm (16 à 24 pouces). En cas d’utilisation prolongée du moniteur,
il est recommandé de respecter une pause de 10 minutes par heure car la lecture continue de l’écran
peut entraîner une fatigue de l’œil.
2 POUR VOTRE SECURITE
Page 53

REMARQUES SUR LES ECRANS A CRISTAUX LIQUIDES (LCD)
Les symptômes suivants n’indique pas qu’il y a un problème, c’est normal:
Quand vous allumez le LCD pour la première fois, l’image peut être mal cadrée à
NOTE
n
l’écran suivant le type d’ordinateur que vous utilisez. Dans ce cas ajuster l’image
correctement.
De part de la nature fluorescente de la lumière émise, l’écran peut clignoter à
n
l’allumage. Mettre l’interrupteur d’alimentation sur OFF, puis à nouveau sur ON pour
faire disparaître le clignotement.
La luminosité peut être légèrement inégale selon la configuration de bureau utilisée.
n
En raison de la nature de l’écran LCD, une image rémanente de la précédente vue
n
peut subsister après un nouvel affichage, si la même image a été affichée pendant
des heures. Dans ce cas, l’affichage est rétabli lentement en changeant d’image ou
en éteignant l’écran pendant des heures.
n
Veuillez prendre contact avec IIYAMA France pour le remplacement de la lampe
fluorescente de rétro éclairage quand l’écran est sombre, scintille ou ne s’éclaire
pas. Ne jamais essayez de le remplacer vous même.
SERVICE CLIENT
n
NOTE
L’éclairage fluorescent utilisé dans votre moniteur à cristaux liquides est un
consommable. Pour la garantie de ce composant, veuillez contacter IIYAMA France.
Si vous devez retourner votre matériel et que vous ne possédez plus votre emballage
n
d’origine, merci de contacter votre revendeur ou le service après vente d’iiyama
pour conseil ou pour remplacer l’emballage.
FRANCAIS
ENTRETIEN
Si vous renversez n’importe quel objet solide ou liquide tel que de l’eau à l’intérieur
AVERTISSEMENT
NOTE
BOITIER
ECRAN LCD Un nettoyage périodique est recommandé avec un chiffon sec et doux. N’utilisez pas
n
du moniteur, débranchez immédiatement le câble d’alimentation et contactez votre
revendeur ou le service technique iiyama.
Pour des raisons de sécurité, éteindre et débrancher le moniteur avant de le nettoyer.
nATTENTION
Ne pas gratter ou frotter l’écran à l’aide d’un objet dur afin de ne pas endommager
n
le panneau LCD.
L’utilisation des solvants suivants est à proscrire pour ne pas endommager le boîtier
n
et l’écran LCD:
Diluant
Essence
Nettoyants abrasifs
Le contact du boîtier avec un produit en caoutchouc ou en plastique pendant
n
longtemps peut dégrader ou écailler sa peinture.
Eliminer les tâches à l’aide d’un chiffon légèrement humide et d’un détergent doux, puis
essuyer le boîtier à l’aide d’un chiffon sec et propre.
de papier tissé car cela endommagera l’écran LCD.
Nettoyants en atomiseur
Cire
Solvants acides ou alcalins
POUR VOTRE SECURITE 3
Page 54

AVANT D’UTILISER LE MONITEUR
FONCTIONS
K Moniteur LCD TFT Couleur 38 cm (15,0")
K Supporte une résolution maximum de 1024 × 768
K Un angle de vision large et un fort contraste
K Caractères digitalisés lissés
K Auto ajustement
®
K Conforme au Plug & Play VESA DDC1/2B, Conforme au Windows
K Normes d’économie d’énergie (Compatible E
NERGY STA R
K Ergonomie approuvé
AX3819UT: TCO ’99 et MPR 3
AX3819UT BK*: TCO ’95 et MPR 3
*La couleur du plastique est noir.
FRANCAIS
K Entrée digital (DVI-I) pour une image nette
K Conforme au standard VESA pour bras ou montage sur un mur
LISTE DES ACCESSOIRES LIVRE AVEC LE LCD IIYAMA
Les accessoires suivants sont livrés avec le LCD. Vérifiez que tous sont inclus avec le moniteur. Si
l’un ou l’autre manque ou est détérioré, veuillez contacter votre revendeur iiyama local ou adressezvous au bureau iiyama régional.
95/98/2000/Me/XP
®
et VESA DPMS)
n Câble d’alimentation*
n Câble D-Sub
n Câble DVI-D
n Mode d’emploi
ATTENTION
Les accessoires optionnels ci-dessous sont disponible pour votre moniteur LCD. Contactez votre
revendeur local ou IIYAMA France. Les haut-parleurs sont reliés au moniteur sur la sortie son
provenant de l’ordinateur ou d’un équipement audio. Une feuille de protection posée sur la surface de
la matrice afin de la protéger des taches ou rayures.
n Haut-parleur
AX3819UT: OSP1-1 (Bas, Mono) AX3819UT BK: OSP1-1B (Bas, Mono)
n Feuille de protection (Référence N°: 832Z001-03)
4 AVANT D’UTILISER LE MONITEUR
* UTILISATION EN 120V.
La puissance nominale du câble fourni est de 10A/125V. En cas d’utilisation à une
tension supérieure, utiliser un câble d’alimentation ayant une puissance nominale
de 10A/250V.
Page 55

COMMANDES ET CONNECTEURS
<Façade> <Arrière>
Voyant d’alimentation
A
NOTE
Touche marche-arrêt
B
Touche Auto (Auto Calibrage)
C
Ajustement de Horloge, Phase, Position-H et Position-V automatiquement.
NOTE
Touche + / Luminosite
D
Touche – / Contraste
E
Touche Menu
F
Touche Entrée
G
Sélectionnez soit l’ENTREE 1 ou 2 pour le signal d’entrée quand les deux entrées sont connectées
à un signal. Sélectionnez alternativement l’entrée 1 et 2 en appuyant sur le Touche Entrée.
NOTE
Interrupteur secteur
H
Prise d’alimentation secteurr (AC IN)
I
Mini connecteur secondaire D 15 broches (INPUT 2)
J
Connecteur secondaire
K
Connecteur pour haut-parleur optionnel (DC OUT)
L
Vert: Fonctionnement normal
Orange: Economie d’énergie
Le moniteur se met en mode contrôle d’énergie ce qui réduit la consommation électrique
à moins de 5W lorsqu’il ne reçoit aucun signal sync horizontal et/ou vertical.
n Auto ajustement nécessite l’affichage de Test.bmp (Mire d’ajustement de l’écran),
afin de faire le réglage correctement. (Se reporter à la section AJUSTEMENTS DE
L’ECRAN page 13.)
n L’écran devient noir pendant approximativement 5 secondes durant l’ajustement.
L’entrée du signal n’est pas sélectionné automatiquement. Appuyez sur Touche Entrée
une fois quand le témoin lumineux est orange indépendamment d’une seul entrée
connecté à un signal source.
DVI-I 29 broches (INPUT 1)
FRANCAIS
AVANT D’UTILISER LE MONITEUR 5
Page 56

CONNEXION DU MONITEUR
S’assurer que l’ordinateur et le moniteur sont éteints.
A
Brancher l’ordinateur au moniteur à l’aide du câble de signal (Se reporter à la section AFFECTATION
B
DES BROCHES page 20)
Connectez d’abord le câble d’alimentation au moniteur puis sur la prise électrique.
C
NOTE n Le câble de signal peut varier en fonction du type d’ordinateur utilisé. Une connexion
incorrecte risquerait d’endommager sérieusement le moniteur et l’ordinateur. Le câble
fourni avec le moniteur est un connecteur 15 broches au standard D-Sub. Si un câble
spécial est recquis, veuillez contacter votre revendeur local iiyama ou le bureau régional
iiyama.
n Pour la connexion aux ordinateurs Macintosh, veuillez contacter votre revendeur local
iiyama ou le bureau régional iiyama pour l’adaptateur recquis.
n S’assurer que les connecteurs du câble de signal sont correctement serrés.
n Les câbles peuvent être rassemblés à l’intérieur du couvercle arrière du pied. Voir la page
FRANCAIS
[Exemple de connexion]
suivante pour le câblage.
< Arrière >
Câble d’alimentation
(Accessoire)
6 AVANT D’UTILISER LE MONITEUR
Câble DVI-D
(Accessoire)
Câble D-Sub
(Accessoire)
Vers le connecteur
DVI de l’ordinateur
Vers le connecteur
D-Sub de l’ordinateur
Ordinateur
Page 57

[Câblage]
Enlevez le couvercle à l’arrière du pied en le
A
glissant vers le haut.
Rassemblez les câbles à l’arrière du pied.
B
Replacez le couvercle en insérant les ergots
C
dans les guides et ensuite glissez le couvercle
vers le bas.
MISE EN ROUTE DE L’ORDINATEUR
n Fréquences du signal
Avant de connecter l’écran à votre ordinateur pour la première fois, paramétrez la fréquence de
votre ordinateur en mode VGA. Passez aux fréquences souhaités détailles à la page 19
“FRÉQUENCES DE SYNCHRONISATION”, après avoir vérifier que l’image apparaît normalement
en VGA.
n Plug & Play Windows 95/98/2000/Me/XP
Le LCD iiyama répond au standard VESA DDC1/2B. En connectant l’écran au DDC1/2B de votre
ordinateur avec le câble qui vous a été fournie, le moniteur sera reconnu conforme au Plug and
Play sous Windows 95/98/2000/Me/XP. Le fichier d’information pour les moniteurs iiyama sous
Windows 95/98/2000/Me/XP peuvent être nécessaire pour votre ordinateur et obtenu via le site
internet: http://www.iiyama.fr
FRANCAIS
NOTE n Pour plus d’information comment télécharger les drivers de votre moniteur, veuillez
vous connectez sur un des sites internet liste ci-dessous.
n Les drivers pour moniteurs ne sont pas requis dans la plus part des cas sous les
systèmes d’exploitation Macintosh ou Unix. Pour plus d’informations et conseils,
contactez votre revendeur.
AVANT D’UTILISER LE MONITEUR 7
Page 58

AJUSTEMENT DE LA HAUTEUR ET L’ANGLE DE VISION
85mm
n Pour optimiser la vision, il est recommandé de
regarder de face le moniteur, ensuite ajuster la
hauteur et l’angle de vision du moniteur à votre
convenance.
n Maintenir la matrice afin que le moniteur ne bascule
pas quand vous ajustez la hauteur et l’angle.
n Vous pouvez ajuster la hauteur du moniteur jusqu’à
85 mm et l’angle de vision, jusqu’à 30 degrés à
gauche et à droite, 35 degrés vers le haut.
NOTE n Ne pas toucher l’écran LCD quand vous
ajustez la hauteur ou l’angle de vision. Cela
pourrait engendrer des dommages ou
fêlures de l’écran LCD.
FRANCAIS
n Attention la prudence est recommandée
quand vous ajustez la hauteur ou l’angle
de vision à ne pas vous coincer les doigts
ou les mains.
35˚
30˚30˚
8 AVANT D’UTILISER LE MONITEUR
Page 59

UTILISATION DU MONITEUR
Le LCD iiyama est réglé d’usine avec un temps de réponse figurant à la page 19 afin de donner la
meilleur image. Vous pouvez également ajuster la position de l’image comme vous le souhaitez en
suivant le mode opératoire ci-dessous. Pour plus de détails voir page 13 “AJUSTEMENTS DE L’ECRAN”.
Appuyez sur la Touche Menu pour afficher à l’écran les réglages.
(
Il existe deux pages de menus qui peuvent être activées en utilisant
les Touches +/–.
Menu:1
Fréquence horizontal en cours,
taux de rafraîchissement verticale
Sélectionnez la page de menu où se trouve l’icône de l’ajustement
B
et résolution
désiré. Appuyez à nouveau sur la Touche Menu. Utilisez ensuite les
Touches +/– pour mettre en surbrillance l’icône du réglages souhaité.
Appuyez à nouveau sur la Touche Menu.
Utilisez les Touches +/– pour effectuer les ajustements ou réglages
C
appropriés.
Par exemple, pour corriger la position vertical, sélectionnez la page Menu numéro 1 et appuyez
sur le Touche Menu. Sélectionnez ensuite (Position-V) en utilisant le Touches +/–.
H:46.8K V:75.0
800 × 600
Menu:1
Position-V
Une échelle d’ajustement apparait lorsque vous appuyez sur le Touche Menu. Utilisez les Touches
+/– pour corriger la position vertical. La position vertical de l’image entière doit changer pendant
que vous effectuez l’opération.
Position-V
–
+
Page no.
FRANCAIS
NOTE
n
L’affichage sur écran disparaît quelques secondes après avoir relâché la touche. Les
données de réglage sont automatiquement sauvegardées dans la mémoire lorsque
l’affichage sur écran disparaît. Evitez d’éteindre le moniteur pendant cette procédure.
Les ajustements pour la Horloge, Phase et Position sont sauvegard
n
fréquence de signal. A l’exception de ces ajustements, tous les autres ajustements
n’ont q’un seul réglage qui s’applique sur toutes les fréquences de signal.
UTILISATION DU MONITEUR 9
és pour chaque
Page 60

MENU DES PARAMETRES DE REGLAGE
Entrée D-Sub
Menu : 1
(D-Sub)
FRANCAIS
Ajustement
Contraste
Contrast
Luminosite *
Brightness
Horloge *
Clock
Phase *
Phase
Position-H
H-Position
Position-V
V-Position
2
2
H:46.8K V:75.0
800 × 600
Direct
1
Direct
Menu:1
Problème / Option Touche correspondante
Trop terne
Trop intense
Trop sombre
Trop clair
Pour corriger le scintillement des
caractères ou des lignes
Pour corriger le scintillement des
caractères ou des lignes
Trop à gauche
Trop à droite
Trop bas
Trop haut
Retour au Menu
Return to Menu
*1Ajustez la luminosité quand vous utilisez le moniteur dans une pièce sombre et que vous sentez
que l’écran est trop lumineux.
*2Se reporter à la section AJUSTEMENTS DE L’ECRAN page 13.
Mettre en Surbrillance “Menu : 1” à nouveau.
Direct
Vous pouvez éviter la page de Menu et afficher directement l’échelle d’ajustement en suivant
la manipulation suivante.
l Contraste: Appuyez sur le Touche Contraste lorsque le Menu n’est pas affiché.
l Luminosite: Appuyez sur le Touche Luminosite lorsque le Menu n’est pas affiché.
SELECTIONNER LES AJUSTEMENTS CONTRASTE / LUMINOSITE
NOTE
Pour basculer de l’ajustement entre le contraste et la luminosité, appuyez dans les 10
secondes sur le Touche Menu, après avoir appuyé sur le Touche Contraste ou Touche
Luminosite pendant l’ajustement direct.
10 UTILISATION DU MONITEUR
Page 61

Menu : 2
(D-Sub)
Menu:2
H:46.8K V:75.0
800 × 600
Ajustement
Auto Calibrage*
Auto Set-up
Direct
OSD Position
OSD Position
Couleur Temp.
Color Temp.
Auto Balance
Auto Balance
NOTE
Le Balance Automatique a besoin de plus de 5 cm autour de la zone blanche afin de fonctionner
n
correctement.
L’écran devient noir pendant approximativement 10 secondes durant l’ajustement.
n
Le Balance Automatique peut ne pas fonctionner correctement due à votre configuration, résolution
n
ou affichage. Dans ce cas, sélectionnez “Réinitialiser” qui restaure les paramétrages d’usine.
Langages
Language
Réinitialiser
Reset
Retour au Menu
Return to Menu
1
Non No
Oui Ye s
Non No
Oui Yes
ENGLISH
DEUTSCH
FRANÇAIS
NEDERLANDS
SVENSKA
Non No
Oui Ye s
Problème / Option Touche correspondante
Retour au Menu.
Ajustement de l’Horloge, Phase, Position-H et PositionV automatiquement.
Vous pouvez déplacer l’affichage de l’OSD sur les 5
positions ci-dessus à l’écran.
Appuyez sur le Touche + pour déplacer les menus
dans l’ordre numérique.
Appuyez sur le Touche – pour déplacer les menus
dans l’ordre numérique inverse.
Blanc rougeâtre
Blanc bleuâtre
Retour au Menu.
Ajustement du rouge, vert et bleu automatiquement à
votre convenance.
Anglais
Allemand
Français
Néerlandais
Suédois
Retour au Menu.
Restauration des données pré-réglées en usine.
Mettre en Surbrillance “Menu : 2” à nouveau.
FRANCAIS
*1Se reporter à la section AJUSTEMENTS DE L’ECRAN page 13.
Direct
Vous pouvez éviter la page de Menu et afficher directement l’échelle d’ajustement
en suivant la manipulation suivante.
l Auto Calibrage: Appuyez sur le Touche Auto.
UTILISATION DU MONITEUR 11
Page 62

Entrée DVI
Menu
H:46.8K V:75.0
800 × 600
Ajustement Problème / Option Touche correspondante
Contraste
Contrast
Luminosite *
Brightness
FRANCAIS
*1Ajustez la luminosité quand vous utilisez le moniteur dans une pièce sombre et que vous sentez
OSD Position
OSD Position
Couleur Temp.
Color Temp.
Langages
Language
Réinitialiser
Reset
que l’écran est trop lumineux.
Direct
1
Direct
ENGLISH
DEUTSCH
FRANÇAIS
NEDERLANDS
SVENSKA Suédois
Non No
Oui Ye s
Trop terne
Trop intense
Trop sombre
Trop clair
Vous pouvez déplacer l’affichage de l’OSD sur
les 5 positions ci-dessus à l’écran.
Appuyez sur le Touche + pour déplacer les menus
dans l’ordre numérique.
Appuyez sur le Touche – pour déplacer les menus
dans l’ordre numérique inverse.
Blanc rougeâtre
Blanc bleuâtre
Anglais
Allemand
Français
Néerlandais
Retour au Menu.
Restauration des données pré-réglées en usine.
Direct
Vous pouvez éviter la page de Menu et afficher directement l’échelle d’ajustement en suivant
la manipulation suivante.
l Contraste: Appuyez sur le Touche Contraste lorsque le Menu n’est pas affiché.
l Luminosite: Appuyez sur le Touche Luminosite lorsque le Menu n’est pas affiché.
SELECTIONNER LES AJUSTEMENTS CONTRASTE / LUMINOSITE
NOTE
Pour basculer de l’ajustement entre le contraste et la luminosité, appuyez dans les 10
secondes sur le Touche Menu, après avoir appuyé sur le Touche Contraste ou Touche
Luminosite pendant l’ajustement direct.
12 UTILISATION DU MONITEUR
Page 63

AJUSTEMENTS DE L’ECRAN
Ajustez l’image suivant la procédure ci-dessous pour obtenir l’image désirée quand l’entrée D-Sub
est sélectionné.
n Dans le manuel sont décrits le réglage de la position de l’image, la réduction du scintillement, et
l’ajustement de netteté sur le texte ou des lignes pour le type d’ordinateur que vous utilisez.
Cependant ces ajustements ne sont pas comparables à celui d’un tube cathodique pour la position
et dimensions.
n L’écran a été conçu pour donner la meilleur performance à une résolution à 1024×768, mais ne
peut pas fournir les meilleures résolutions à moins de 1024×768, car l’image est automatiquement
cadrée plein écran. Cette résolution est recommandée pour bénéficier des performances de
l’écran.
n L’affichage du texte ou des lignes seront floues ou irrégulière dans l’épaisseur, quand l’image est
étirée due au processus d’élargissement de l’affichage.
n Vous ne devez pas ajuster la position de l’image ou la fréquence par le PC qui peut faire ses
ajustements parce que l’image ne pourra être affichée normalement.
Les ajustements seront fait à partir du moniteur.
n Procédez aux ajustements après une période d’échauffement de trente minutes au moins.
n Des ajustements supplémentaires peuvent être nécessaires après l’Auto ajustement selon la
résolution ou la fréquence du signal.
n L’auto ajustement peut ne pas fonctionner correctement quand l’image affichée est autre que le
Test.bmp (Mire d’ajustement de l’écran).
Il y a deux façons d’ajuster l’écran. L’ajustement automatique pour l’horloge, la phase, et la position.
L’autre façon est de faire chacun des ajustements manuellement. Effectuez l’auto ajustement pour la
première fois, quand l’écran est connecté à un nouveau micro ordinateur ou lors d’un changement de
résolution. Si le moniteur est floue ou scintille ou bien que l’image n’est pas cadrée correctement à
l’écran après avoir effectué l’Auto ajustement, les ajustements manuels sont nécessaires. Ces deux
ajustements devront être fait en utilisant la mire de réglage (Test.bmp) obtenu sur le site web de
iiyama (http://www.iiyama.fr).
Ce manuel explique les ajustements sous Window 95/98/2000/Me/XP.
Ouvrez le Test.bmp (Mire d’ajustement) sur votre papier peint.
(
NOTE n Consultez la documentation appropriée pour le faire.
n Test.bmp est conçu pour une résolution de 1280×1024 . Bien positionnez la mire au
centre du papier peint. Si vous utilisez Microsoft® PLUS! 95/98, annulez la fonction
“Etirez la tenture en fonction de l’écran”.
[Mire d’ajustement ]
FRANCAIS
Motif zébré
Cette mire est affichée à
une résolution de 1024×768.
Barre des couleurs
Cadre d’image
UTILISATION DU MONITEUR 13
Page 64

Appuyer sur la Touche Auto. (Ajustement direct)
B
Ou effectuez l’auto ajustement.
Ajustez l’image manuellement en suivant la procédure ci-dessous lorsque l’écran
C
est floue ou scintille ou bien que l’image n’est pas correctement cadrée après avoir
fait l’auto ajustement.
Ajuster Position-V de sorte que le haut et le bas de l’image soit bien cadré à l’écran.
D
+
–
NOTE n Dans le cas ou vous avez à faire des ajustements pour des résolutions inférieures à
FRANCAIS
1) Ajuster la Position-H afin que le coté gauche de l’image soit sur le bord gauche de
E
1024×768, ajuster la position verticale afin de centrer la mire à l’écran.
l’écran.
+
–
2) Ajuster l’image sur le coté droite de l’écran en utilisant le Horloge.
+
–
NOTE n Quand la partie gauche de l’image déborde sur le coté gauche de l’écran pendant
l’ajustement du Horloge. Réglez les étapes 1) et 2) à tour de rôle.
n Une autre façon de faire le réglage du Horloge est de faire l’ajustement sur les motifs
zébrés verticaux de la mire.
n L’image peut scintiller pendant l’ajustement du Horloge, Position-H et Position-V.
14 UTILISATION DU MONITEUR
Page 65

Ajuster la Phase pour corriger les perturbations horizontales, le scintillement ou la
F
netteté en présence de la mire d’ajustement.
+
–
NOTE n Dans le cas d’un fort scintillement ou, d’un manque de netteté sur une partie de
l’écran, répéter les étapes E et F, car l’ajustement de l’Horloge n’a peut être pas été
effectué correctement. Si le scintillement ou la manque de netteté persiste, paramétrez
le taux de rafraîchissement sur une fréquence basse de votre ordinateur (60Hz) et
reprenez les réglages à partir de l’étape B.
n Réajuster la Position-H, si la position horizontale s’est déplacée pendant l’ajustement
de la Phase.
Ajuster le Luminosite et Couleur Temp., pour obtenir l’image que vous souhaitez
G
après l’ajustement du Horloge et de la Phase. Et remettez votre papier peint favoris.
FRANCAIS
UTILISATION DU MONITEUR 15
Page 66

SYSTEME D’ECONOMIE D’ENERGIE “POWER MANAGEMENT”
Le système d’économie d’énergie de ce produit est conforme aux normes ENERGY STA R® et VESA
DPMS. Il permet de réduire automatiquement la consommation d’énergie du moniteur lorsque l’ordinateur
ne fonctionne pas de manière active.
Pour utiliser cette fonction, le moniteur doit être connecté à un ordinateur conforme aux normes
VESA DPMS. Il existe un mode d’économie d’énergie disponible comme décrit ci-dessous. Les réglages
requis, incluant le paramétrage de mise en veille, doivent être établis à partir de I’ordinateur.
Mode Economie d’Energie
n
Quand les signaux de synchronisation H / Synchronisation V / Synchronisation H et V provenant
de l’ordinateur sont inactifs, le moniteur entre en Mode Economie d’Energie, ce qui réduit la
consommation électrique à moins de 5W. L’écran devient noir, et le voyant d’alimentation passe
orange. A partir du mode économie d’énergie, I’image réapparaît aprés quelques secondes soit en
touchant de nouveau le clavier ou la sourie.
FRANCAIS
NOTE
MODE NORMAL
MODE ECONOMIE D
Le moniteur continue à consommer de l’électricité même en mode d’économie d’énergie.
n
’ENERGIE
Vert
Orange
CONSOMMATION
D’ELECTRICITE
0 5 W 100%
Il est recommandé d’éteindre le moniteur lorsque celui-ci n’est pas utilisé, pendant la nuit
et les week-ends afin d’éviter toute consommation inutile d’électricité.
ll est possible que le signal vidéo provenant de l’ordinateur puisse fonctionner alors que
n
la synchronisation du signal H ou V soit absente. Dans ce cas, l’ECONOMISEUR D’ENERGIE
peut ne pas fonctionner normalement.
16 UTILISATION DU MONITEUR
Page 67

DEPANNAGE
En cas de dysfonctionnement du moniteur, procéder dans l’ordre aux contrôles suivants.
1. Effectuer les réglages décrits à la section UTILISATION DU MONITEUR en fonction du problème
rencontré.
2.
Se reporter aux tableaux suivants si l’on ne trouve pas la fonction de réglage correspondante à
la section UTILISATION DU MONITEUR ou si le problème persiste.
3.
Si vous recontrez un problème qui n’est pas décrit dans les tableaux ou qui ne peut pas être
corrigé en utilisant les tableaux, cessez d’utiliser le moniteur et contactez votre revendeur ou le
service technique iiyama pour plus d’assistance.
Problème Contrôle
L’image
A
n’apparaît pas
(Le voyant
d’alimentation ne
s’allume pas)
(Le voyant
d’alimentation est
vert)
Le câble d’alimentation est-il correctement branché ?o
o
L’interrupteur marche-arrêt est-il sur ON ?
Vérifier à l’aide d’un autre appareil que la prise secteur fonctionne.
o
o Si l’économiseur d’écran est activé, toucher la souris ou l’écran.
o
Augmenter le Contraste et/ou la Luminosite.
L’ordinateur est-il allumé ?
o
o
Le câble de signal est-il correctement branché ?
Les paramètres des signaux de l’ordinateur sont-ils dans la plage de
o
valeurs du moniteur ?
FRANCAIS
(Le voyant
d’alimentation est
orange)
L’écran n’est pas
B
synchronisé
L’écran n’est pas
C
centré
L’écran est trop
D
lumineux ou trop
sombre.
L’écran tremble
E
Si le moniteur est en mode Economie d’énergie, toucher la souris ou l’écran.o
Si le signal sélectionné d’entrée vidéo est différent, changez la sélection
o
du signal.
o
L’ordinateur est-il allumé ?
Le câble de signal est-il correctement branché ?
o
o
Les paramètres des signaux de l’ordinateur sont-ils dans la plage de
valeurs du moniteur ?
Le câble de signal est-il correctement branché ?
o
Les paramètres des signaux de l’ordinateur sont-ils dans la plage de
o
valeurs du moniteur ?
o
Le niveau de sortie vidéo de l’ordinateur est-il dans la plage de valeurs du
moniteur ?
Les paramètres des signaux de l’ordinateur sont-ils dans la plage de
o
valeurs du moniteur ?
Le niveau de sortie vidéo de l’ordinateur est-il dans la plage de valeurs du
o
moniteur ?
La tension d’alimentation est-elle dans la plage de valeurs du moniteur ?
o
Les paramètres des signaux de l’ordinateur sont-ils dans la plage de
o
valeurs du moniteur ?
DEPANNAGE 17
Page 68

ANNEXE
CARACTERISTIQUES TECHNIQUES
Panneau
LCD
Couleurs affichées
Sync Frequency
Fréquence de synchronisation
Résolution maximum
Connecteur d’entrée
Plug & Play VESA DDC1/2B
Signal de synchronisation
FRANCAIS
Signal vidéo
Taille écran maximum 304,1mm L × 228,1mm H / 12,0" L × 9,0" H
Alimentation 100-230VAC, 50/60Hz, 1,3-0,6A
Dimensions / Poids net 344×342×212,4mm / 13,5×13,5×8,4" (L× H × P), 6,0kg / 13,2lbs
Angle d’inclinaison
Conditions de
fonctionnement
Homologation AX3819UT
Système d’affichage
Taille
Taille du point
Angle de vue
Temps de réponse
AX3819UT BK
a-Si TFT Active Matrix
Diagonale: 38cm / 15,0"
0,297mm H × 0,297mm V
Droit / Gauche: 60 degrés, Haut: 40 degrés, Bas: 60 degrés (typique)
30ms (noir, blanc, noir)
Approx. 16,2 million
Horizontal: 31,0-60,0kHz, Vertical: 56-75Hz
80MHz maximum
1024 × 768
Mini connecteur secondaire D 15 broches
DVI-I 29 broches
Sync. séparée: TTL, Positif ou négatif
Sync. composite: TTL, Positif ou négatif
Sync sur vert: 0,3Vp-p, Négatif
Analogique: 0,7Vp-p (standard), 75Ω, Positif
Digital: Conforme au DVI (Digital Visual Interface standard Rev.1,0)
60W maximum, Mode economie d’énergie: 5W (max)Puissance absorbée
Droit / Gauche: 30 degrés, Haut: 35 degrés
Température d’utilisation de:
Température de stockage de:
Taux d’hygrométrie entre (-20 et inférieur à 50°C / -4 et inférieur à
122°F) :
Taux d’hygrométrie entre (50 à 60°C / 122 à 140°F) :
TCO ’99, CE, TÜV-GS / MPR3(prEN50279) / ISO 13406-2, FCC-B,
UL / C-UL, VCCI-B
TCO ’95, CE, TÜV-GS / MPR3(prEN50279) / ISO 13406-2, FCC-B,
UL / C-UL, VCCI-B
TM
5 à 35°C / 41 à 95°F
-20 à 60°C / -4 à 140°F
de 20 à 85% (sans condensation)
de 20 à 55% (sans condensation)
18 ANNEXE
Page 69

229,2mm/9,0"
268mm/10,6"
344mm/13,5"
305,2mm/12,0"
309,2mm/12,2"
60,3mm/2,4"
( ): Plage d’ajustement maximum
FRÉQUENCES DE SYNCHRONISATION
Fréquence
horizontale
31,469kHz
37,861kHz
37,500kHz
35,156kHz
37,879kHz
48,077kHz
46,875kHz
48,363kHz
56,476kHz
60,023kHz
31,469kHz
35,000kHz
49,725kHz
31,469kHz
VESA
VGA TEXT
Macintosh
MS-DOS
Mode video
VGA
SVGA
XGA 1024 × 768
640 × 480
800 × 600
720 × 400
640 × 480
832 × 624
640 × 350
342mm/13,5"(427mm/16,8")
Fréquence
verticale
59,940Hz
72,809Hz
75,000Hz
56,250Hz
60,317Hz
72,188Hz
75,000Hz
60,004Hz
70,069Hz
75,029Hz
70,087Hz
66,667Hz
74,500Hz
70,087Hz
Horloge à points
25,175MHz
31,500MHz
31,500MHz
36,000MHz
40,000MHz
50,000MHz
49,500MHz
65,000MHz
75,000MHz
78,750MHz
28,322MHz
30,240MHz
57,283MHz
25,175MHz
212,4mm/8,4"
FRANCAIS
*
*
*
*
NOTE
* Entée DVI n'est pas compatible.
ANNEXE 19
Page 70

AFFECTATION DES BROCHES
Mini connecteur secondaire D 15 broches
n
Broche
1
2
3
4
5
6
FRANCAIS
7
8
DVI-I connecteur 29 brochesn
Broche
1
2
3
4
5
6
7
8
9
10
11
12
13
14
15
Signal d’entrée
Vidéo rouge
Vidéo vert / Sync on Green
Vidéo bleu
Terre vidéo rouge
Terre vidéo vert
Terre vidéo bleu
1
9
17
Signal d’entrée
T.M.D.S Donnée 2–
T.M.D.S Donnée 2+
T.M.D.S Donnée 2/4 Masse
T.M.D.S Donnée 4–
T.M.D.S Donnée 4+
Horloge (SCL) *
Données (SDA) *
Analogique Sync V
T.M.D.S Donnée 1–
T.M.D.S Donnée 1+
T.M.D.S Donnée 1/3 Masse
T.M.D.S Donnée 3–
T.M.D.S Donnée 3+
+5V Power
Masse
DVI-I
Broche
Signal d’entrée
9
10
Terre
11
Terre
12
Données (SDA) *
Sync H / Sync HV
13
Sync V
14
15
Horloge (SCL) *
* Compatible VESA DDC.
C2
C1
8
16
24
C4
C3
C5
Broche
16
17
18
19
20
21
22
23
24
C1
C2
C3
C4
C5
Signal d’entrée
Détection Hot plug
T.M.D.S Donnée 0–
T.M.D.S Donnée 0+
T.M.D.S Donnée 0/5 Masse
T.M.D.S Donnée 5–
T.M.D.S Donnée 5+
T.M.D.S Horloge Masse
T.M.D.S Horloge +
T.M.D.S Horloge –
Analogique rouge
Analogique vert
Analogique bleu
Analogique Sync H
Analogique masse
* Compatible VESA DDC.
20 ANNEXE
Page 71

AX3819UT
AX3819UT BK
GEBRUIKERSHANDLEIDING
INHOUDSOPGAVE
VEILIGHEIDSVOORSCHRIFTEN ............................................................. 1
VOORZORGSMAATREGELEN ........................................................ 1
SPECIALE OPMERKINGEN OVER LCD-MONITORS ........................ 3
KLANTENSERVICE .......................................................................... 3
REINIGING ........................................................................................ 3
VOORDAT U DE MONITOR GEBRUIKT .................................................. 4
KENMERKEN .................................................................................... 4
DE INHOUD CONTROLEREN ............................................................ 4
BEDIENINGSELEMENTEN EN AANSLUITINGEN ............................... 5
DE MONITOR AANSLUITEN ............................................................. 6
INSTELLEN VAN DE COMPUTER ..................................................... 7
INSTELLING VAN DE HOOGTE EN DE KIJKHOEK ........................... 8
GEBRUIK VAN DE MONITOR ................................................................. 9
INHOUD AFSTELLINGSMENU .......................................................... 10
SCREEN ADJUSTMENTS ................................................................. 13
ENERGIEBEHEER-FUNCTIE .............................................................. 16
PROBLEMEN OPLOSSEN ...................................................................... 17
BIJLAGE ................................................................................................. 18
SPECIFICATIES ................................................................................ 18
VOORAF INGESTELDE MODI .......................................................... 19
TOEWIJZING VAN PINNEN .............................................................. 20
NEDERLANDS
Wij zijn zeer blij dat u deze iiyama LCD monitor heeft uitgekozen.
Wij raden u aan een paar minuten de tijd te nemen om deze korte maar complete
handleiding zorgvuldig door te lezen, voordat u de monitor installeert en inschakelt. Bewaar
deze handleiding om later als referentie te gebruiken.
Page 72

CONFORMITEITSVERKLARING CE-MARKERING
Deze LCD monitor voldoet aan de eisen van EG-richtlijn 89/336/EEC “EMC-richtlijn” en 73/23/EEC
“Richtlijn ten aanzien van laagspanning” zoals gewijzigd door Richtlijn 93/68/EEC.
Het niveau van de elektromagnetische gevoeligheid is zo gekozen dat bij aansluiting op het
openbare laagspanningsnet zowel binnen als buiten een goede werking wordt verkregen in
woongebieden, op bedrijfsterreinen, gebieden met lichte industrie en bij kleinschalige
ondernemingen.
NEDERLANDS
n Wij behouden ons het recht voor om specificaties zonder voorafgaand bericht te wijzigen.
Alle handelsmerken die in deze gebruikershandleiding worden gebruikt zijn het eigendom van de respectieve
n
eigenaars daarvan.
n iiyama als E
energie verbruik.
NERGY STA R
®
Partner heeft vastgesteld dat dit product voldoet aan de richtlijnen die gelden voor
Page 73

VEILIGHEIDSVOORSCHRIFTEN
VOORZORGSMAATREGELEN
WAARSCHUWING
GEBRUIK DE MONITOR NIET ALS U PROBLEMEN VERMOEDT
Als u abnormale verschijnselen opmerkt, zoals rook, vreemde geluiden of dampen, moet u onmiddellijk
de stekker van de monitor uit het stopcontact halen en contact opnemen met uw dealer of met iiyama.
Het is erg gevaarlijk de monitor nog langer te gebruiken, dit kan brand of elektrische schokken
veroorzaken.
VERWIJDER NOOIT DE BEHUIZING
Binnen in de monitor bevinden zich hoogspanningscircuits. Als u de behuizing verwijdert, loopt u het
risico op brand of elektrische schokken.
PLAATS GEEN VOORWERPEN IN DE MONITOR
Plaats geen voorwerpen in de monitor en mors geen vloeibare stoffen zoals water in de monitor. Als
dit per ongeluk toch gebeurt, moet u onmiddellijk de stekker van uw monitor uit het stopcontact halen
en contact opnemen met uw dealer of met iiyama. Als u de monitor gebruikt terwijl er zich een
voorwerp in bevindt, kan dit brand, elektrische schokken of schade veroorzaken.
PLAATS DE MONITOR OP EEN VLAK, STABIEL OPPERVLAK
De monitor kan, als hij valt of gevallen is, letsel veroorzaken.
GEBRUIK DE MONITOR NIET IN DE BUURT VAN WATER
Gebruik de monitor niet op een plaats waar er water op de monitor terecht kan komen. Dit kan brand
of elektrische schokken veroorzaken.
NEDERLANDS
GEBRUIK DE OPGEGEVEN VOEDING
Zorg ervoor dat u de monitor alleen gebruikt met de opgegeven voeding. Gebruik van de onjuiste
voeding zal defecten veroorzaken en kan brand of elektrische schokken tot gevolg hebben.
BESCHERM DE KABELS
Trek niet aan het netsnoer of de signaalkabel. Zorg ervoor dat deze kabels niet worden geknikt en dat
de monitor of andere zware voorwerpen niet op de kabels worden geplaatst. Als een kabel beschadigd
is, kan dat brand of elektrische schokken tot gevolg hebben.
ONGUNSTIGE WEERSOMSTANDIGHEDEN
Het is raadzaam om de monitor niet te gebruiken tijdens zware storm. De herhaalde
stroomonderbrekingen kunnen defecten veroorzaken. Het is ook raadzaam om tijdens deze
omstandigheden de stekker niet aan te raken omdat dit elektrische schokken kan veroorzaken.
VEILIGHEIDSVOORSCHRIFTEN 1
Page 74

PAS OP
PLAATSING
Zet de monitor niet op een plaats waar plotselinge temperatuurschommelingen kunnen optreden, of
in vochtige, stoffige of rokerige ruimten. Dit kan brand, elektrische shokken of schade veroorzaken.
Vermijd ook ruimten waar de zon of ander licht rechtstreeks op de monitor kan schijnen.
PLAATS DE MONITOR NIET IN EEN GEVAARLIJKE POSITIE
Als de monitor niet op een geschikte positie geplaatst is kan de monitor omvallen en letsel tot gevolg
hebben. Zorg er ook voor dat er geen zware voorwerpen op de monitor geplaatst worden en zorg
ervoor dat kinderen niet aan de kabels kunnen trekken en daardoor letsel oplopen.
ZORG VOOR EEN GOEDE VENTILATIE
Er zijn ventilatie-openingen aangebracht om te voorkomen dat de monitor oververhit raakt. Als de
openingen worden afgedekt of als er een voorwerp in de buurt van de openingen wordt geplaatst
kan brand ontstaan. Plaats de monitor in verband met de luchtcirculatie ten minste 10 cm (4 inches)
van de muur af.
Verwijder de kantelvoet niet als u de monitor gebruikt. Als de voet wordt verwijderd, zullen alle
ventilatie-openingen aan de achterzijde van de behuizing worden geblokkeerd en zal de monitor
oververhit raken. Hierdoor kan brand of schade ontstaan. Als u de monitor gebruikt terwijl deze
achterover is gekanteld, op zijn zij ligt of ondersteboven staat, of als de monitor op vloerbedekking of
een zachte ondergrond geplaatst wordt, kan ook schade ontstaan.
NEDERLANDS
HAAL DE STEKKERS LOS ALS U DE MONITOR VERPLAATST
Zet de monitor uit en haal de stekker uit het stopcontact en zorg ervoor dat de signaal kabel niet
aangesloten zijn als u de monitor verplaatst. Anders kan dit brand of elektrische schokken tot gevolg
hebben.
HAAL DE STEKKER UIT HET STOPCONTACT
Om ongelukken te voorkomen is het raadzaam om de stekker van de monitor uit het stopcontact te
halen als u de monitor lange tijd niet gebruikt.
TREK AAN DE STEKKER, NIET AAN HET SNOER
Als u het netsnoer of de signaalkabel wilt verwijderen, moet u het snoer altijd bij de stekker vastpakken.
Trek nooit aan de kabel zelf, dit kan brand of elektrische schokken veroorzaken.
RAAK DE STEKKER NIET MET NATTE HANDEN AAN
Het in of uit het stopcontact halen van de stekker met natte handen kan elektrische schokken
veroorzaken.
ALS U DE MONITOR OP UW COMPUTER PLAATST
Zorg ervoor dat de computer sterk genoeg is om het gewicht van de monitor te dragen, anders kan
dit schade aan uw computer veroorzaken.
OVERIGE
ERGONOMISCHE AANBEVELINGEN
Om vermoeide ogen te voorkomen, moet u de monitor niet gebruiken tegen een lichte achtergrond of
in een donkere ruimte. Voor optimaal comfort moet u de monitor net onder het oogniveau plaatsen en
moet de afstand tussen uw ogen en de monitor 40-60 cm zijn. Als u langere tijd achter de monitor zit
is het raadzaam om 10 minuten per uur rust te nemen. Continue kijken naar het beeldscherm kan
vermoeidheid van de ogen veroorzaken.
2 VEILIGHEIDSVOORSCHRIFTEN
Page 75

SPECIALE OPMERKINGEN OVER LCD-MONITORS
De volgende verschijnselen zijn normaal en geven geen probleem aan:
OPMERKING Als u de LCD-monitor voor de eerste keer aanzet, kan het voorkomen dat het beeld
n
niet in het weergavegebied past van het type computer dat u gebruikt. In dat geval
moet u de beeldpositie instellen.
Wegens de aard van het fluorescentielicht kan het scherm in het begin flikkeren.
n
Schakel de monitor met de Power-schakelaar uit en vervolgens weer aan in om dit
te verhelpen.
Het kan zijn dat de helderheid niet over het hele scherm gelijk is. Dit is afhankelijk
n
van het patroon dat u voor het bureaublad gebruikt.
Als gevolg van de aard van het LCD scherm is het mogelijk dat er een nabeeld van
n
het vorige scherm blijft staan na verandering van het beeld, wanneer hetzelfde
beeld enkele uren zichtbaar is. In dit geval wordt het scherm langzaam hersteld
door het beeld te veranderen of de LCD voor enkele uren uit te zetten.
Neem contact op met uw dealer of met het iiyama-onderhoudscentrum voor
n
vervanging van het fluorescentielicht als het scherm donker is, flikkert of niet
oplicht. Probeer het nooit zelf te vervangen.
KLANTENSERVICE
Het fluorescentielicht dat in de LCD-monitor wordt gebruikt, wordt als gebruiksgoed
OPMERKING
n
beschouwd. Voor de garantiebepalingen met betrekking tot dit product kunt u
contact opnemen met het dichtstbijzijnde iiyama service center.
Als u het apparaat voor onderhoud moet retourneren en u de originele verpakking
n
niet meer hebt, moet u het apparaat niet in een andere verpakking versturen. Neem
contact op met de dichtstbijzijnde iiyama vestiging of dealer voor advies of
vervangende verpakking.
NEDERLANDS
REINIGING
WAARSCHUWING
PAS OP
OPMERKING
BEHUIZING
LCD SCHERM
n Als er tijdens het schoonmaken voorwerpen of vloeistoffen in de monitor terecht
komen, moet u onmiddellijk de stekker uit het stopcontact halen en contact opnemen
met uw dealer of met iiyama.
Zet om veiligheidsredenen de monitor uit en haal de stekker uit het stopcontact,
n
voordat u de monitor gaat reinigen.
n
Zorg ervoor dat u de beschermlaag van het LCD scherm niet beschadigt door met
een hard voorwerp te krabben of te wrijven.
Gebruik nooit een van de volgende oplosmiddelen. Hiermee beschadigt u de behuizing
n
en het LCD scherm.
Verdunner
Benzine
Schurende reinigingsmiddelen
Als de behuizing gedurende een lange periode contact maakt met een product van
n
rubber of plastic, kan dit de verf van de behuizing aantasten.
Vlekken kunt u verwijderen met een doek die licht bevochtigd is met een mild, reinigend
oplosmiddel. Veeg de behuizing vervolgens met een zachte droge doek af.
Periodiek reinigen met een zachte droge doek wordt aanbevolen.
Gebruik geen tissue papier etc. omdat deze het LCD scherm beschadigen.
Spray-reiniger
Was
Zuur of alkalisch oplosmiddel
VEILIGHEIDSVOORSCHRIFTEN 3
Page 76

VOORDAT U DE MONITOR GEBRUIKT
KENMERKEN
K TFT Kleuren LCD monitor
K Ondersteunt resoluties tot 1024 × 768
K Breed beeld en hoog contrast
K Digitale karakter glad-afstemming
K Automatische set-up
®
K Plug & Play VESA DDC1/2B, Windows
K Energiebeheer-voorziening (voldoet aan ENERGY S TA R® en VESA DPMS)
K Ergonomisch ontwerp
AX3819UT: goedgekeurd volgens TCO ’99 en MPR3
AX3819UT BK*: goedgekeurd volgens TCO ’95 en MPR3
*De behuizing van de kast is zwart.
K Digitale ingang (DVI-I) voor Optimale Beeldkwaliteit
K VESA Standaard - Geschikt voor bevestiging op monitorarm of aan de muur
NEDERLANDS
DE INHOUD CONTROLEREN
De volgende accessoires bevinden zich in de verpakking. Controleer of deze allemaal aanwezig zijn.
Als er iets ontbreekt of beschadigd is, gelieve u contact op te nemen met uw plaatselijke iiyamadealer of de regionale iiyama-vestiging.
n Netsnoer*
n D-Sub Signaalkabel
n DVI-D Signaalkabel
n Gebruikershandleiding
* VOOR GEBRUIKERS IN 120 VOLT-GEBIEDWAAR-
SCHUWING
Het toelaatbare vermogen van het bijgesloten netsnoer in een 120 Volt-gebied is 10
A/125 V. Als u een voedingsbron gebruikt met een hoger toelaatbaar vermogen,
moet u een netsnoer met een toelaatbaar vermogen van 10 A/250 V gebruiken.
95/98/2000/Me/XP Plug & Play
De hieronder aangegeven optionele onderdelen zijn voor uw LCD-monitor leverbaar. Neem contact
op met uw iiyama dealer of het regiokantoor. De luidspreker is aan de monitor bevestigd voor de
output van geluid uit de computer of de audioapparatuur. Het beschermingssheet is aan het oppervlak
van het LCD paneel bevestigd om dit te beschermen tegen vlekken of krassen.
n Luidspreker
AX3819UT: OSP1-1 (onder, monoral) AX3819UT BK: OSP1-1B (onder, monoral)
n Beschermingssheet (onderdeelnr. 832Z001-03)
4 VOORDAT U DE MONITOR GEBRUIKT
Page 77

BEDIENINGSELEMENTEN EN AANSLUITINGEN
<Voorkant> <Achterkant>
Power-indicator
A
OPMERKING
Koptelefoon aansluiting
B
Knop Auto (Auto Instal)
C
Klok, Fase, H-Positie en V-Positie automatisch instellen.
OPMERKING
Knop + / Helderheid
D
Knop – / Contrast
E
Knop Menu
F
Knop Input
G
Kies INPUT 1 of 2 voor de signaalinvoer als beide signaalinvoeren zijn aangesloten op een
signaalbron. Activeer INPUT 1 en 2 telkens wanneer de Knop Input wordt ingedrukt.
OPMERKING
Aan/uit schakelaar
H
Wisselstroomaansluiting (AC IN)
I
15-pins D-Sub mini-aansluiting (INPUT 2)
J
29-pins DVI-I aansluiting (INPUT 1)
K
Optionele aansluiting voor luidspreker (DC OUT)
L
Groen: Normale werking
Oranje: Energiebeheer
De monitor schakelt in de energiebesparingsfunctie en vermindert het
stroomverbuik tot minder dan 5 Watt wanneer er geen horizontaal en/
of verticaal sync-signaal wordt ontvangen.
n De Auto Instal moet de Test.bmp (schermaanpassingspatroon) weergeven,
anders werkt deze niet naar behoren. (Zie pagina 13 voor SCREEN ADJUSTMENTS.)
n Tijdens het aanpassen van de instellingen wordt het scherm gedurende
ongeveer 5 seconden donker.
De signaaluitvoer wordt niet automatisch gekozen. Druk één maal op de Knop
Input als de stroomindicator oranje wordt, ongeacht of slechts één signaaluitvoer op
de signaalbron is aangesloten.
NEDERLANDS
VOORDAT U DE MONITOR GEBRUIKT 5
Page 78

DE MONITOR AANSLUITEN
Controleer of zowel de computer als de monitor uitgeschakeld zijn.
A
Sluit de computer op de monitor aan met de signaalkabel. (Zie pagina 20 voor TOEWIJZING VAN
B
PINNEN.)
Sluit eerst het netsnoer op de monitor aan en vervolgens op de stroom aansluiting.
C
OPMERKING
n De signaalkabel die voor de aansluiting wordt gebruikt kan variëren. Dit is afhankelijk van het type
computer dat u gebruikt. Door onjuiste aansluiting kan ernstige schade aan zowel de monitor als
de computer ontstaan. De kabel die bij de monitor geleverd wordt, heeft een standaard 15 pins
D-Sub aansluiting. Wanneer een speciale kabel vereist is, neem dan contact op met uw dealer of
met één van de iiyama vestigingen.
n Als u de monitor op een Macintosh-computer wilt aansluiten, moet u contact opnemen met uw
dealer of met één van de iiyama vestigingen voor een geschikte adapter.
n Zorg ervoor dat u de vingerschroeven van de signaalaansluitingen vastdraait.
n Kabels kunnen worden gebundeld binnenin het deksel aan de achterzijde van de standaard. Zie
de volgende pagina voor kabelbedrading.
NEDERLANDS
[Aansluitvoorbeeld]
< Achterkant >
Netsnoer (Bijgeleverd)
6 VOORDAT U DE MONITOR GEBRUIKT
DVI-D Signaalkabel
(Bijgeleverd)
D-Sub Signaalkabel
(Bijgeleverd)
Naar DVI connector
van de computer
Naar D-Sub connector
van de computer
Computer
Page 79

[De kabels aansluiten]
Verwijder het cover aan de achterzijde van de
A
standaard door het omhoog te schuiven.
Verzamel de kabels aan de achterzijde van de
B
standaard.
Plaats het cover terug door de tabs in de
C
geleidingsgaten te plaatsen en het cover dan
omlaag te schuiven.
INSTELLEN VAN DE COMPUTER
n Signaaltiming
Wanneer u de monitor voor de eerste keer op de computer aansluit, moet u de signaalinstelling van
de computer instellen op VGA alvorens de monitor aan te sluiten. Nadat u hebt bevestigd dat het
beeld op VGA wordt weergegeven, stelt u de gewenste signaalinstellingen in. Deze staan vermeld
onder VOORAF INGESTELDE MODI op pagina 19.
NEDERLANDS
n Windows 95/98/2000/Me/XP Plug & Play
De iiyama voldoet aan VESA-norm DDC1/2B. De Plug & Play functie wordt onder Windows 95/98/
2000/Me/XP geactiveerd wanneer u de monitor met de bijgeleverde kabel aansluit op een computer
die voldoet aan DDC1/2B. Het Windows 95/98/2000/Me/XP monitorinformatiebestand voor iiyama
monitors kan nodig zijn voor uw computer en is te vinden op het volgende Internet-adres:
http://www.iiyama.nl
OPMERKING
n Raadpleeg één van bovenvermelde Internet pagina’s voor meer informatie
over het downloaden van het stuurprogramma voor uw monitor.
n Het is niet nodig om een monitor driver te installeren voor Macintosh en Unix
besturingssystemen. Voor meer informatie, neem eerst contact op met uw
dealer voor advies.
VOORDAT U DE MONITOR GEBRUIKT 7
Page 80

INSTELLING VAN DE HOOGTE EN DE KIJKHOEK
Voor optimaal comfort wordt u aangeraden recht voor
n
de monitor te gaan zitten. Pas vervolgens de hoogte
of de hoek van de monitor aan uw wensen aan.
Houd het paneel zo dat de monitor niet kantelt als u
n
de hoogte of de hoek van de monitor aanpast.
De monitor kan maximaal 85mm de hoogte, 30 graden
n
naar links en rechts, 35 graden naar boven.
OPMERKING Raak het LCD-scherm niet aan terwijl
NEDERLANDS
n
u de hoogte of de hoek aanpast.
Hierdoor kan schade ontstaan of kan
het LCD-scherm breken.
Let erop dat uw vinger of hand niet
n
bekneld raakt als u de hoogte of de
hoek aanpast.
85mm
35˚
30˚30˚
8 VOORDAT U DE MONITOR GEBRUIKT
Page 81

GEBRUIK VAN DE MONITOR
De iiyama TFT monitor is bij het verlaten van de fabriek ingesteld met de VOORAF INGESTELDE MODI
zoals afgebeeld op blz. 19 voor het verkrijgen van optimale beelden. U kunt het beeld tevens aan uw
wensen aanpassen door de onderstaande instructies uit te voeren. Zie pagina 13, SCREEN
ADJUSTMENTS, voor specifieke aanpassingen.
Het On Screen Display verschijnt op het scherm wanneer u op de
(
Knop Menu drukt. Er zijn twee Menu pagina’s waartussen gewisseld
kan worden met de +/– Knoppen.
Menu:1
Huidige horizontale frequentie,
B
verversingssnelheid
en resolutie
Selecteer de Menu pagina die het afstellingspictogram bevat welke
H:46.8K V:75.0
800 × 600
overeenkomt met de afstelling die u wilt maken. Druk nogmaals de
Knop Menu in. Gebruik daarna de +/– Knoppen om het gewenste
afstellingspictogram te selecteren. Druk nogmaals de Knop Menu in.
Gebruik de +/– Knoppen om de passende afstelling of instelling te
C
maken.
Als u bijvoorbeeld de verticaal positie wilt corrigeren, kiest u Menu pagina 1 en drukt u op de Knop
Menu. Daarna selecteert u (V-Positie) met de +/– Knoppen.
Menu:1
V-Positie
Er wordt een afstellingsschaal weergegeven als u op de Knop Menu drukt. Gebruik de +/–
Knoppen om de verticaal positie instelling te wijzigen.
V-Positie
–
+
NEDERLANDS
OPMERKING
Als u bij het afstellen enkele seconden niet meer op de knoppen drukt, verdwijnt het On Screen
n
Display. De afstellingsgegevens worden automatisch in het geheugen opgeslagen wanneer het
On Screen Display verdwijnt. U moet gedurende deze tijd de monitor niet uitschakelen.
De afstellingen voor Klok, Fase en Positie worden voor elke signaal timing vastgelegd. Buiten deze
n
afstellingen om worden alle andere afstellingen vastgelegd in een instelling die betrekking heeft op
alle signaaltimings.
GEBRUIK VAN DE MONITOR 9
Page 82

INHOUD AFSTELLINGSMENU
D-Sub ingang
Menu : 1
(D-Sub)
H:46.8K V:75.0
Afstellingsonderdeel Probleem / Keuze Te gebruiken knop
Menu:1
800 × 600
Contrast
Contrast
Helderheid *
Brightness
Klok *
NEDERLANDS
*1Pas de helderheid aan wanneer u de monitor in een donkere kamer gebruikt en u het scherm te
*2Zie pagina 13 voor SCREEN ADJUSTMENTS.
U kunt de Menu pagina’s overslaan en een afstellingsschaal direct zichtbaar maken door gebruik te
maken van de volgende Knop bedieningen.
l Contrast: Druk op één van de Knop Contrast als het Menu niet zichtbaar is.
l Helderheid: Druk op één van de Knop Helderheid als het Menu niet zichtbaar is.
Clock
Fase *
Phase
H-Positie
H-Position
V-Positie
V-Position
Naar Menu
Return to Menu
helder vindt.
1
2
2
Te licht
Te sterk
Te donker
Te helder
Trillende tekst of lijnen corrigeren
Trillende tekst of lijnen corrigeren
Te ver naar links
Te ver naar rechts
Te laag
Te hoog
Selecteer “Menu : 1” opnieuw.
OPMERKING
10 GEBRUIK VAN DE MONITOR
WISSELEN TUSSEN DE CONTRAST EN HELDERHEID AFSTELLINGEN
Om te schakelen tussen de instelling van de helderheid en van het contrast op de
dient u de Knop Menu in te drukken binnen 10 seconden nadat u tijdens de
bovengenoemde directe instellingen op de Knop Contrast of de Knop Helderheid
hebt gedrukt.
Page 83

Menu : 2
(D-Sub)
Menu:2
H:46.8K V:75.0
800 × 600
Afstellingsonderdeel
Auto Instal*
Auto Set-up
OSD Positie
OSD Potition
Kleur Temp.
Color Temp.
Auto Balance
Auto Balance
OPMERKING
De functie Auto Balance functioneert alleen correct wanneer het witgebied rond het beeld
n
breder is dan 5 cm.
Tijdens het aanpassen van de instellingen wordt het scherm gedurende ongeveer 10 seconden donker.
n
Indien de functie Auto Balance niet correct werkt, kan dit worden veroorzaakt door uw
n
computersysteem, de resolutie of het weergegeven patroon. Indien dit het geval is, selecteer
dan de optie “Reset” en herstel de fabrieksinstellingen.
Taal
Language
Réinitialiser
Reset
Retour au Menu
Return to Menu
*1Zie pagina 13 voor SCREEN ADJUSTMENTS.
1
Nee No
Ja Yes
Nee No
Ja Yes
ENGLISH
DEUTSCH
FRANÇAIS
NEDERLANDS
SVENSKA
Non No
Oui Ye s
Probleem / Keuze Te gebruiken knop
Terug naar Menu.
Klok, Fase, H-Positie en V-Positie automatisch
instellen.
U kunt het OSD weergavegebied instellen in een van de
bovengenoemde vijf posities in de algemene weergave.
Druk de + Knop om het OSD in numerieke volgorde te
verplaatsen.
Druk de – Knop om het OSD in omgekeerde volgorde
te verplaatsen.
Roodachtig wit
Blauwachtig wit
Terug naar Menu.
Rood, groen en blauw automatisch instellen op de
juiste kleuren.
Engels
Duits
Frans
Nederlands
Zweeds
Retour au Menu.
Restauration des données pré-réglées en usine.
Mettre en Surbrillance “Menu : 2” à nouveau.
NEDERLANDS
U kunt de Menu pagina’s overslaan en een afstellingsschaal direct zichtbaar maken door gebruik te
maken van de volgende Knop bedieningen.
l Auto Instal: Druk op één van de Knop Auto.
GEBRUIK VAN DE MONITOR 11
Page 84

DVI ingang
Menu
H:46.8K V:75.0
800 × 600
Afstellingsonderdeel
Contrast
Contrast
Helderheid *
Brightness
OSD Positie
OSD Potition
1
NEDERLANDS
Kleur Temp.
Color Temp.
Taal
Language
Reset
Reset
*1Pas de helderheid aan wanneer u de monitor in een donkere kamer gebruikt en u het scherm te
helder vindt.
ENGLISH
DEUTSCH
FRANÇAIS
NEDERLANDS
SVENSKA
Nee No
Ja Yes
Probleem / Keuze Te gebruiken knop
Te licht
Te sterk
Te donker
Te helder
U kunt het OSD weergavegebied instellen in een
van de bovengenoemde vijf posities in de algemene
weergave.
Druk de + Knop om het OSD in numerieke volgorde
te verplaatsen.
Druk de – Knop om het OSD in omgekeerde
volgorde te verplaatsen.
Roodachtig wit
Blauwachtig wit
Engels
Duits
Frans
Nederlands
Zweeds
Terug naar Menu.
Fabrieksinstellingen worden teruggezet.
U kunt de Menu pagina’s overslaan en een afstellingsschaal direct zichtbaar maken door gebruik te
maken van de volgende Knop bedieningen.
l Contrast: Druk op één van de Knop Contrast als het Menu niet zichtbaar is.
l Helderheid: Druk op één van de Knop Helderheid als het Menu niet zichtbaar is.
OPMERKING
12 GEBRUIK VAN DE MONITOR
WISSELEN TUSSEN DE CONTRAST EN HELDERHEID AFSTELLINGEN
Om te schakelen tussen de instelling van de helderheid en van het contrast op de
dient u de Knop Menu in te drukken binnen 10 seconden nadat u tijdens de
bovengenoemde directe instellingen op de Knop Contrast of de Knop Helderheid
hebt gedrukt.
Page 85

SCREEN ADJUSTMENTS
Regel het beeld af volgens de onderstaande procedure wanneer u de D-Sub ingang gebruikt.
n In het handboek wordt met schermaanpassingen het volgende bedoeld: schermpositie aanpassen
en trilling of wazigheid van weergegeven tekst of lijnen voor het gebruikte type computer
minimaliseren. Deze aanpassingen verwijzen dus niet naar aanpassingen om het gewenste formaat
of de gewenste positie die u gewoonlijk uitvoert op CRT-monitoren.
n De monitor levert de beste prestaties wanneer de resolutie wordt ingesteld op 1024×768. Deze
optimale prestaties kunnen echter niet worden geleverd wanneer de resolutie lager dan 1024×768
wordt ingesteld, omdat het beeld automatisch wordt uitgerekt zodat het volledige scherm wordt
gevuld. Het wordt daarom aanbevolen voor normaal gebruik de monitor te gebruiken met een
resolutie 1024×768.
n De weergegeven tekst of lijnen kunnen wazig zijn of een wisselende dikte hebben wanneer het
beeld wordt uitgerekt als gevolg van schermvergroting.
n Pas de positie of de frequentie van het scherm niet vanuit de computer aan omdat het beeld dan
vertekend kan worden. Aanpassingen moeten via deze monitor worden doorgevoerd.
n Maak de instellingen ongeveer 30 minuten na het inschakelen (warm lopen).
n Afhankelijk van de resolutie of signaalinstelling, kunnen extra aanpassingen nodig zijn nadat Auto
Instal is uitgevoerd.
n De Auto Set-up functioneert soms niet op de juiste wijze bij het weergeven van andere beelden
dan Test.bmp (schermaanpassingspatroon). In dat geval zijn handmatige aanpassingen noodzakelijk.
Het scherm kan op twee manieren worden ingesteld. De ene manier is automatische instelling voor
Klok,Fase en Positie. De andere manier is om elke instelling handmatig uit te voeren. Voer Auto Instal
uit wanneer u de monitor voor de eerste keer op een nieuwe computer hebt aangesloten of wanneer
u de resolutie hebt gewijzigd. Als het scherm flikkert of vaag is of het beeld niet in het weergavegebied
past nadat u Auto Instal hebt uitgevoerd, moet u de instellingen handmatig uitvoeren. Beide instellingen
moeten worden gedaan door gebruik te maken van het scherminstellingspatroon (Test.bmp) dat via
de iiyama website (http://www.iiyama.nl) kan worden gedownload.
Gebruik Test.bmp (scherminstellingspatroon) voor het veranderen van de achtergrond.
(
OPMERKING n Zie de betreffende handleiding voor details.
n De resolutie van het bestand Test.bmp is 1280 × 1024. Stel in het dialoogvenster
Wallpaper setting de weergavepositie zodanig in dat deze centraal op het
scherm staat. Bij gebruik van Microsoft® PLUS! 95/98, moet u de instelling van
“Stretch desktop wallpaper to fit the screen” annuleren.
[Instelpatroon]
NEDERLANDS
Zebra-patroon
Dit patroon wordt
met 1024×768
getoond.
Kleurenbalk
Beeldlijst
GEBRUIK VAN DE MONITOR 13
Page 86

Houd de Knop Auto ingedrukt. (directe aanpassing)
B
Of Voer Auto Instal uit.
Wanneer het scherm flikkert of onscherp is of wanneer het beeld niet in het
C
weergavegebied past, stel het beeld dan handmatig in door onderstaande procedure
uit te voeren nadat u Auto Instal hebt uitgevoerd.
Pas de V-Positie aan zodat de bovenzijde en de onderzijde van het beeldkader in het
D
weergavegebied passen.
+
–
OPMERKING
n Wanneer u aanpassingen moet invoeren op een lagere resolutie dan 1024 × 768, moet u de
verticale positie van het schermaanpassingspatroon zodanig aanpassen dat het wordt
NEDERLANDS
gecentreerd.
1) Pas de H-Positie aan zodat de linkerzijde van het beeldkader naar de linkerkant
E
van het weergavegebied verschuift.
+
–
2) Trek de rechterzijde van het beeldkader uit naar de rechterkant van het
weergavegebied door de Klok aan te passen.
+
–
OPMERKING
n Als de linkerzijde van het beeldkader loskomt van de linkerkant van het weergavegebied
wanneer u de Klok-aanpassing uitvoert, moet u stap 1) en 2) beurtelings aanpassen.
n U kunt de Klok ook aanpassen door de verticale golvende lijnen in streeppatroon te corrigeren.
n Tijdens aanpassing van de Klok, H-Positie en V-Positie kan het beeld trillen.
14 GEBRUIK VAN DE MONITOR
Page 87

Pas de Fase aan om horizontale golvende ruis, trilling of wazigheid in het
F
streeppatroon te corrigeren.
+
–
OPMERKING
n Wanneer op een deel van het scherm nog steeds sterke trilling of wazigheid optreedt, moet u
stappen E en F herhalen omdat de Klok waarschijnlijk niet correct is aangepast. Als de
trillingen of wazigheid nog steeds aanwezig is, zet dan de verversingsfrequentie van de
computer op laag (60Hz) en moet u de stappen vanaf B herhalen.
n Pas nadat u de Fase-aanpassing hebt uitgevoerd de H-Positie aan wanneer de horizontale
positie tijdens de aanpassing is verschoven.
Pas Helderheid en Kleur Temp. aan om het gewenste beeld te krijgen nadat u de
G
Klok- en Fase-aanpassingen hebt uitgevoerd.
Stel uw favoriete achtergrond opnieuw in.
NEDERLANDS
GEBRUIK VAN DE MONITOR 15
Page 88

ENERGIEBEHEER-FUNCTIE
De energiebeheer-functie van dit product voldoet aan de energiebesparingseisen van ENERGY
STAR® en VESA DPMS. Met deze functie wordt onnodig stroomverbruik van de monitor verminderd
wanneer uw computer niet actief wordt gebruikt.
Als u van deze functie gebruik wilt maken, moet de monitor zijn aangesloten op een computer die
voldoet aan de VESA DPMS-richtlijnen. Er is één Energiebeheer-modus beschikbaar. Deze modus
worden hierna beschreven. De vereiste instelling, waaronder die van de timer, moeten door de
computer worden uitgevoerd.
Power Management modus
n
Wanneer het H-sync-signaal / V-sync-signaal / H en V-sync-signaal van de computer uit is, wordt
de monitor in de Power Management modus gezet. Dit reduceert het stroomverbruik tot minder dan
5W. Het scherm wordt donker en de Power-indicator wordt oranje. Vanuit Energiebesparingsstand
verschijnt het beeld binnen enkele seconden nadat het toetsenbord of muis weer aangeraakt
wordt.
NEDERLANDS
OPMERKING
NORMAL MODUS
POWER MANAGEMENT MODUS
STROOMVERBRUIK
Ook als u de energiebeheer-modus gebruikt, verbruikt de monitor elektriciteit.
n
Schakel de Power-schakelaar, wanneer u de monitor niet gebruikt, ’s nachts en in
het weekend uit om te voorkomen dat onnodig stroom wordt verbruikt.
Het is modelijk dat het video signaal van de computer aan staar terwijl het H- of V-
n
synchronisatie signaal ontbreekt. In dit geval zal de ENERGIEBEHEER functie niet
goed functioneren.
Groen
Oranje
0 5 W 100%
16 GEBRUIK VAN DE MONITOR
Page 89

PROBLEMEN OPLOSSEN
Als de monitor niet juist functioneert, moet u de onderstaande punten in de genoemde volgorde
doornemen om te zien of een mogelijke oplossing wordt genoemd.
Verricht de afstellingen die staan beschreven in GEBRUIK VAN DE MONITOR, afhankelijk van het
1.
probleem dat u ondervindt.
2. Raadpleeg de volgende overzichten als u geen passend afstellingsonderdeel vindt in GEBRUIK
VAN DE MONITOR of als het probleem aanhoudt.
3.
Als u een probleem ondervindt dat niet in de overzichten wordt beschreven of als u het probleem
niet aan de hand van de overzichten kunt oplossen, moet u de monitor niet langer gebruiken en
moet u contact opnemen met uw dealer of met iiyama voor verdere assistentie.
Probleem Controlepunt
Geen beeld.
A
(Power-indicator
licht niet op.)
Is het netsnoer goed aangesloten?o
o
Staat de Power-schakelaar op ON?
o Staat er spanning op het stopcontact ? Controleer dit met een ander
apparaat.
(Power-indicator
is groen.)
(Power-indicator
is oranje.)
Het scherm is niet
B
gesynchroniseerd.
De schermpositie
C
bevindt zich niet in
het midden.
Het scherm is te
D
helder of te donker.
Het scherm trilt.
E
o Als de blanco schermbeveiliging actief is, moet u het toetsenbord of de
muis aanraken.
o
Verhoog het Contrast en/of de Helderheid.
Is de computer ingeschakeld?
o
o
Is de signaalkabel goed aangesloten?
o Valt de signaaltiming van de computer binnen de specificatie van de monitor?
o
Als de monitor in de energiebeheer-modus staat, moet u het toetsenbord
of de muis aanraken.
o
Wanneer de video signaal selectie verschillend is moet de Signaal Selectie
toets indrukken.
o
Is de computer ingeschakeld?
o
Is de signaalkabel goed aangesloten?
o
Valt de signaaltiming van de computer binnen de specificatie van de monitor?
Is de signaalkabel goed aangesloten?
o
o Valt de signaaltiming van de computer binnen de specificatie van de monitor?
o Valt het video-uitgangsniveau van de computer binnen de specificatie van
de monitor?
o
Valt de signaaltiming van de computer binnen de specificatie van de monitor?
Valt het video-uitgangsniveau van de computer binnen de specificatie van
o
de monitor?
Valt het voltage binnen de specificatie van de monitor?
o
Valt de signaaltiming van de computer binnen de specificatie van de monitor?
o
NEDERLANDS
PROBLEMEN OPLOSSEN 17
Page 90

BIJLAGE
SPECIFICATIES
LCD
Scherm
Beeldschermkleuren
Sync-frequentie
Puntklok
Maximale resolutie
Invoeraansluitingen
Plug & Play VESA DDC1/2B
Invoersignaal sync
NEDERLANDS
Invoersignaal video
Maximale-schermomvang 304,1mm × 228,1mm / 12,0" × 9,0" (b × h)
Voedingsbron 100-230Vwisselstroom, 50/60Hz, 1,3-0,6A
Afmetingen - nettogewicht 344×342×212,4mm / 13,5×13,5×8,4" (b × h × d), 6,0kg / 13,2lbs
Kantelhoek
Omgeving
Voldoet aan
Type panel
Grootte
Pitch
Zichtbare inkijk hoek
Reactie tijd
AX3819UT
AX3819UT BK
a-Si TFT Active Matrix
Diagonaal: 38cm / 15,0"
0,297mm H × 0,297mm V
Rechts / links: naar beide kanten 60 graden
Omhoog: 40 graden, Omlaag: 60 graden (typisch)
30ms (zwart, wit, zwart)
Ca. 16,2 miljoen
Horizontaal: 31,0-60,0kHz, Verticaal: 56-75Hz
maximaal 80MHz
1024 × 768
D-Sub mini 15-pins
DVI-I 29-pins
TM
Gescheiden sync: TTL, positief of negatief
Samengestelde sync: TTL, positief of negatief
Sync op groen: 0,3 Vp-p, negatief
Analoog: 0,7Vp-p (standaard), 75Ω, positief
Digitaal: DVI (Digital Visual Interface standaard Rev. 1,0) compatible
maximaal 60W, Power management modus: maximaal 5WStroomverbruik
Rechts/links: naar beide kanten 30 graden, Omhoog: 35 graden
Gebruikstemperatuur:
Opslagtemperatuur:
Vochtigheid (-20 tot 50°C / -4 tot 122°F) :
Vochtigheid (50 tot 60°C / 122 tot 140°F) :
TCO ’99, CE, TÜV-GS / MPR3(prEN50279) / ISO 13406-2, FCC-B,
UL / C-UL, VCCI-B
TCO ’95, CE, TÜV-GS / MPR3(prEN50279) / ISO 13406-2, FCC-B,
UL / C-UL, VCCI-B
5 tot 35°C / 41 tot 95°F
-20 tot 60°C / -4 tot 140°F
20 tot 85% (geen condensatie)
20 tot 55% (geen condensatie)
18 BIJ LAGE
Page 91

344mm/13,5"
305,2mm/12,0"
229,2mm/9,0"
268mm/10,6"
309,2mm/12,2"
VOORAF INGESTELDE MODI
60,3mm/2,4"
212,4mm/8,4"
342mm/13,5"(427mm/16,8")
( ): Maximum instellingsbereik
VESA
VGA TEXT
Macintosh
MS-DOS
OPMERKING
Videofunctie
VGA
SVGA
XGA 1024 × 768
640 × 480
800 × 600
720 × 400
640 × 480
832 × 624
640 × 350
* DVI ingang is niet compatible.
Horizontale
frequentie
31,469kHz
37,861kHz
37,500kHz
35,156kHz
37,879kHz
48,077kHz
46,875kHz
48,363kHz
56,476kHz
60,023kHz
31,469kHz
35,000kHz
49,725kHz
31,469kHz
Verticale
frequentie
59,940Hz
72,809Hz
75,000Hz
56,250Hz
60,317Hz
72,188Hz
75,000Hz
60,004Hz
70,069Hz
75,029Hz
70,087Hz
66,667Hz
74,500Hz
70,087Hz
Puntklok
25,175MHz
31,500MHz
31,500MHz
36,000MHz
40,000MHz
50,000MHz
49,500MHz
65,000MHz
75,000MHz
78,750MHz
28,322MHz
30,240MHz
57,283MHz
25,175MHz
NEDERLANDS
*
*
*
*
BIJLAGE 19
Page 92

TOEWIJZING VAN PINNEN
n 15-pins D-Sub mini-aansluiting
Pen
1
2
3
Invoersignaal
Rood video
Groen video / Sync op groen
Blauw video
4
5
6
Rood video aarde
7
Groen video aarde
8
NEDERLANDS
Blauw video aarde
29-pins DVI-I aansluitingn
1
9
17
Pen Pen
1
2
3
4
5
6
7
8
9
10
11
12
13
14
15
20 BIJ LAGE
Invoersignaal
T.M.D.S Data 2–
T.M.D.S Data 2+
T.M.D.S Data 2/4 Aarde
T.M.D.S Data 4–
T.M.D.S Data 4+
Kloklijn (SCL) *
Gegevenslijn (SDA) *
Analoog V-sync
T.M.D.S Data 1–
T.M.D.S Data 1+
T.M.D.S Data 1/3 Aarde
T.M.D.S Data 3–
T.M.D.S Data 3+
+5V Power
Aarde
DVI-I
Pen
Invoersignaal
9
10
Aarde
11
Aarde
Gegevenslijn (SDA) *
12
H-sync / HV-sync
13
V-sync
14
15
Kloklijn (SCL) *
* Voldoet aan VESA DDC
C2
C1
8
16
24
C4
C3
C5
Invoersignaal
16
Hot Plug Detectie
T.M.D.S Data 0–
17
18
T.M.D.S Data 0+
T.M.D.S Data 0/5 Aarde
19
20
T.M.D.S Data 5–
21
T.M.D.S Data 5+
22
T.M.D.S Klok Aarde
T.M.D.S Klok +
23
T.M.D.S Klok –
24
C1
Analoog rood
C2
Analoog groen
Analoog blauw
C3
Analoog H-sync
C4
Analoog Aarde
C5
* Voldoet aan VESA DDC.
Page 93

AX3819UT
AX3819UT BK
ANVÄNDARHANDBOK
INNEHÅLL
FÖR DIN SÄKERHET .............................................................................. 1
FÖRSIKTIGHETSÅTGÄRDER .......................................................... 1
SPECIELLT BETRÄFFANDE LCD-SKÄRMAR .................................. 3
KUNDSERVICE ................................................................................ 3
RENGÖRING .................................................................................... 3
INNAN DU ANVÄNDER BILDSKÄRMEN ................................................. 4
FUNKTIONER ................................................................................... 4
KONTROLLERA KARTONGENS INNEHÅLL .................................... 4
REGLAGE OCH ANSLUTNINGAR ................................................... 5
ANSLUTA BILDSKÄRMEN ............................................................... 6
INSTÄLLNINGAR AV DATORN ........................................................ 7
INSTÄLLNING AV HÖJDEN OCH SYNVINKELN .............................. 8
ANVÄNDA BILDSKÄRMEN .................................................................... 9
JUSTERA INNEHÅLLET I MENYERNA ............................................. 10
SKÄRMINSTÄLLNINGAR ................................................................ 13
FUNKTION FÖR STRÖMBESPARING ............................................... 16
FELSÖKNING ......................................................................................... 17
BILAGA .................................................................................................. 18
SPECIFIKATIONER ........................................................................... 18
SIGNALTIMING ................................................................................. 19
KONTAKTERNAS STIFTADRESSER ................................................ 20
SVENSKA
Gratulerar till ditt val av en iiyama LCD-bildskärmen.
Vi rekommenderar att du noggrant läser igenom denna handbok innan du installerar och
börjar använda bildskärmen. Förvara handboken på ett säkert ställe för framtida referens.
Page 94

CE-MÄRKNING AVSEENDE ÖVERENSSTÄMMELSE
Denna LCD-skärm uppfyller gällande krav enligt EC-direktivet 89/336/EEC “EMC Directive” och
73/23/EEC “Low Voltage Directive” med tillägg enligt direktivet 93/68/EEC.
Den elektromagnetiska känsligheten ligger på en nivå som medger korrekt operation inom
fastigheter avsedda för bostäder, kontor, lätt industri och småföretag, både inom- och utomhus.
Alla dessa lokaliteter kännetecknas av att de är anslutna till det allmänna lågspänningsnätet.
SVENSKA
n Vi förbehåller oss rätten att ändra specifikationer utan föregående meddelande.
n Samtliga varumärken i denna handbok tillhör respektive ägare.
n Såsom varande en E
NERGY STAR
E
NERGY STAR
®
anger för effektiv energianvändning.
®
-partner har liyama bestämt att denna produkt ska uppfylla de riktlinjer som
Page 95

FÖR DIN SÄKERHET
FÖRSIKTIGHETSÅTGÄRDER
VARNING
ANVÄND INTE BILDSKÄRMEN OM DU MISSTÄNKER ATT NÅGOT ÄR FEL
Om du tycker att något är konstigt, till exempel rök, missljud eller lukt, bör du först dra ut nätkabeln och
sedan omgående kontakta din återförsäljare. Det kan vara farligt att fortsätta använda bildskärmen –
det kan uppstå brand eller du kan få en elektrisk stöt.
TA ALDRIG BORT HÖLJET
Det finns elektriska kretsar under hög spänning inne i bildskärmen. Tar du bort höljet riskerar du få en
elektrisk stöt och det kan också börja brinna.
PLACERA ELLER HÄLL INTE NÅGOT I SKÄRMEN
Lägg inte in något fast föremål eller häll inte in någon vätska, t ex vatten, i skärmen. Om du råkar ut
för olyckshändelse bör du dra ut nätkabeln och omgående kontakta din återförsäljare. Om du använder
bildskärmen och har placerat något föremål i den, kan det orsaka brand, elektriska stötar eller andra
skador.
INSTALLERA BILDSKÄRMEN PÅ ETT PLANT OCH STADIGT UNDERLAG
Det finns risk för personskador om bildskärmen skulle välta eller ramla ner.
ANVÄND INTE SKÄRMEN NÄRA VATTEN
Arbeta inte med skärmen där det finns risk för vattenstänk eller -spill, eftersom det kan förorsaka
brand eller elektriska stötar.
SVENSKA
ANVÄND SPECIFICERAD STRÖMFÖRSÖRJNING
Kontrollera att du har bildskärmen ansluten till specificerad strömkälla. Felaktigt volttal kan leda till
funktionsstörningar och kan förorsaka brand eller elektriska stötar.
SKYDDA KABLARNA
Dra inte i nätkabeln eller signalkabeln. Du bör heller inte böja dem. Placera inte skärmen eller något
annat tungt föremål över kablarna. Om de skadas kan det medföra brand eller elektriska stötar.
OGYNNSAM VÄDERLEK
Vi rekommenderar att du inte använder bildskärmen under åskväder eftersom flera på varandra
följande strömavbrott kan medföra funktionsfel. Du bör heller inte röra kontakten under dessa
förhållanden eftersom det kan orsaka en elektrisk stöt.
FÖR DIN SÄKERHET 1
Page 96

FÖRSIKTIGHET
INSTALLATIONSPLATS
Installera inte bildskärmen på en plats där temperaturen kan förändras plötsligt, har hög luftfuktighet
eller som är mycket dammig eller rökig. På sådana platser ökar risken för brand, elektriska stötar eller
andra skador. Du bör också undvika platser där bildskärmen utsätts för direkt solljus.
PLACERA SKÄRMEN I EN SÄKER POSITION
Skärmen kan välta och orsaka personskador om den placeras olämpligt. Se till att du inte lägger tunga
föremål på skärmen och att alla kablar dras så att barn inte kan komma åt dem och utsättas för
olyckor.
ORDNA EN BRA VENTILATION
Skärmen har ventilationshål för att den inte ska bli överhettad. För att undvika fara för bränder måste
du se till att hålen inte täcks för. Placera bildskärmen på ett avstånd till omgivande väggar av minst 10
cm för att få bra luftcirkulation. Ta inte av det inställbara stativet när du arbetar med skärmen,
eftersom det kan blockera ventilationshålen på höljets baksida. Tar du bort stativet kan skärmen bli
överhettad och du riskerar få brand eller annan skada. Att använda bildskärmen när den ligger på
bakre delen, sidan, upp och nedvänd eller finns på en matta eller något annat mjukt underlag kan
också innebära risk för brand.
DRA UT KABLARNA OM DU SKA FLYTTA BILDSKÄRMEN
Om du vill flytta bildskärmen ska du slå av strömmen, dra ut nätkabeln och se till signalkabeln är
SVENSKA
urkopplad. Du riskerar annars få brand eller elektrisk stöt.
DRA UT NÄTKABELN
Om bildskärmen inte ska användas på ett tag rekommenderar vi att du drar ut nätkabeln för att
undvika olyckor.
HÅLL I KONTAKTEN NÄR DU SKA DRA UT KABELN
Ta alltid tag i kontakterna när du ska dra ut nät- eller signalkabeln. Om du håller du i kabeln när du ska
dra ut den är det risk för brand eller elektrisk stöt.
RÖR ALDRIG KONTAKTEN MED FUKTIGA HÄNDER
Du kan få en elektrisk stöt om du drar ut eller sticker in kontakten när dina händer är fuktiga.
OM DU SKA INSTALLERA BILDSKÄRMEN OVANPÅ DIN DATOR
Kontrollera att datorn ger ett tillräckligt stabilt underlag för att klara bildskärmens tyngd. Det finns
annars risk för att skada datorn.
ANNAT
ERGONOMISKA REKOMMENDATIONER
Du slipper ögontrötthet om du inte vänder skärmen mot en ljus bakgrund eller arbetar i ett rum med
dålig belysning. Du får bästa läskomfort om bildskärmens överkant finns något under ögonhöjd och
avståndet till skärmen är 40 – 60 cm. Om du ska använda bildskärmen under långa arbetspass,
rekommenderar vi att du varje timme tar en tiominuters paus. Långvarigt arbete framför en bildskärm
tröttar ögonen.
2 FÖR DIN SÄKERHET
Page 97

SPECIELLT BETRÄFFANDE LCD-SKÄRMAR
LCD-bildskärmar har följande egenskaper, som är helt normala och alltså inga problem.
Obs!
När Du slår på LCD-skärmen för första gången, så kan bilden hamna lite utanför
n
synfältet beroende på vilken typ av dator den är ansluten till. I detta fall så centrera
bilden korrekt.
Skärmens bakgrundsbelysning har en utformning som gör att bilden kan flimra initialt.
n
Flimret försvinner om du slår av strömbrytaren och därefter slår på den igen.
Du kanske märker att skärmen har en något ojämn ljusstyrka. Detta kan bero på det
n
mönster du valt för skrivbordet i Windows.
n
LCD-skärmen har en egenskap som gör att en bild, som visats under flera timmar, kan
efter bildväxling lämna en kvardröjande effekt på nästa bild. Skärmen återhämtar sig
sakta om bilden ändras eller om strömmen slås av under några timmar.
n
Kontakta din återförsäljare eller Iiyama Service center för att byta
bakgrundsbelysningen till Din skärm när skärmen är mörk, flimmrar eller inte tänds
upp. Försök aldrig att byta belysningen själv.
KUNDSERVICE
Obs!
RENGÖRING
VARNING
FÖRSIKTIGHET
Obs!
HÖLJE
LCDSKÄRM
n
Den fluorescerande ljuskällan som finns i LCD-skärmen behöver ersättas efter
ett tag. Denna komponents garantibestämmelser bör stämmas av med ditt lokala
Iiyama Service Center.
Om du måste lämna in bildskärmen för service och inte har kvar originalkartongen,
n
kan du kontakta din återförsäljare för hjälp.
Dra genast ut nätkabeln och kontakta din återförsäljare, om du får in något
n
föremål eller något flytande, till exempel vatten, i bildskärmen när du ska göra
den ren.
Slå av strömmen och dra ut nätkabeln för säkerhets skull, när du ska rengöra den.
n
Var rädd om LCD-skärmen, skrapa eller gnid inte på skärmytan med något hårt
n
föremål.
Använd aldrig något av följande preparat eftersom de kan skada höljet och
n
skärmytan:
förtunning
bensin
rengöringsmedel med slipmedel
Att ha något föremål av gummi eller plast på höljet under en längre tid kan
n
försämra dess utseende och färgen kan försvinna.
Använd en duk, lätt fuktad med ett milt tvättmedel, för att ta bort fläckar. Torka
därefter av höljet med en mjuk, torr duk.
Regelbunden rengöring med en mjuk och torr duk rekommenderas. Använd inte
silkespapper, eller liknande, som kan skada LCD-skärmen.
rengöringsmedel i spraytub
vax
syra eller alkaliskt lösningsmedel
SVENSKA
FÖR DIN SÄKERHET 3
Page 98

INNAN DU ANVÄNDER BILDSKÄRMEN
FUNKTIONER
K 38 cm (15,0-tums) TFT färg-LCD-skärm
K Stöder upplösningar av upp till 1024 × 768
K Extremt bred betraktnings vinkel och hög kontrast
K Digital bildutjämning
K Automatisk Set-up
®
K Uppfyller Plug & Play VESA DDC1/2B, Uppfyller Windows
K Strömbesparing (uppfyller E
NERGY STAR
®
och VESA DPMS)
K Ergonomisk design
AX3819UT: TCO ’99- och MPR3-godkänd
AX3819UT BK*: TCO ’95- och MPR3-godkänd
*Skåpets färg är svart.
K Digital ingång (DVI-I) för klar skärm
K VESA kompatibelt for armfästen eller väggmontage
KONTROLLERA KARTONGENS INNEHÅLL
SVENSKA
Nedanstående tillbehör ska finnas med i kartongen. Kontrollera att följande finns med tillsammans
med bildskärmen. Om något skulle saknas eller är skadat kontaktar du din återförsäljare.
95/98/2000/Me/XP
n Nätkabel*
n D-Sub Signalkabel
n DVI-D Signalkabel
n Användarhandbok
FÖRSIKTIGHET
Tillvalen som anges nedan kan levereras till din LCD-monitor. Kontakta din iiyama-handlare eller
kontoret i din region. Högtalaren är fäst vid monitorn för output av ljud från datorn eller
audioapparaturen. Skyddsbladet sitter på LCD-panelens yta för att skydda mot fläckar och repor.
n Högtalare
AX3819UT: OSP1-1 (under, monoral) AX3819UT BK: OSP1-1B (under, monoral)
n Skyddsblad (delnr. 832Z001-03)
4 INNAN DU ANVÄNDER BILDSKÄRMEN
* VID ANVÄNDNING MED 120 V
Nätkabeln som följer med leveranser avsedda för 120 V har klassificeringen
10 A/125 V. Om du har strömförsörjning med högre spänning, måste du använda
en nätkabel som är klassad för 10A / 250V.
Page 99

REGLAGE OCH ANSLUTNINGAR
<Framifrån> <Bakifrån>
Power Indicator
A
Obs!
Strömbrytare
B
Autoknapp (Auto-Bildinst)
C
Justerar Klocka, Fas, H-Position och V-Position automatiskt.
Obs!
+ / Ljusstyrka Knapp
D
– / Kontrast Knapp
E
Menyknapp
F
Inputknapp
G
Välj INPUT 1 eller 2 för signalinförsel när båda signalinförslar har anslutits till en signalkälla.
Aktivera INPUT 1 och 2 varje gång Inputknapp trycks in.
Obs!
Huvudströmbrytare elektricitet
H
AC-anslutning (AC IN)
I
D-Sub 15-stifts minikontakt (INPUT 2)
J
DVI-I 29-stifts kontakt (INPUT 1)
K
Valfri anslutning för högtalare (DC OUT)
L
Grön: Normalläge
Orange: Strömbesparing
Bildskärmen går in i strömbesparingsläget, vilket reducerar strömförbrukningen
till under 5 W, när den inte tar emot några horisontella och/eller vertikala
synkroniseringssignaler.
n Auto-Bildinst kräver att Test.bmp (testmönster för skärmjustering) visas som
bakgrundsbild för att fungera korrekt. (Se under SKÄRMINSTÄLLNINGAR på sidan 13)
n Bilden försvinner ca 5 sekunder under den automatiska justeringen.
Signalingång väljs inte automatiskt. Tryck på Inputknapp direkt när strömindikator blir
orange, oavsett om bara en signalingång ansluts till signal källa.
SVENSKA
INNAN DU ANVÄNDER BILDSKÄRMEN 5
Page 100

ANSLUTA BILDSKÄRMEN
Kontrollera att strömmen är avslagen på både datorn och bildskärmen.
A
Anslut datorn till bildskärmen med signalkabeln. (Se under KONTAKTERNAS STIFTADRESSER på
B
sidan 20)
Anslut nätkabeln först till bildskärmen och sedan till vägguttaget.
C
Obs! n Signalkablar för anslutning av bildskärmar till datorer är av varierande typer, beroende på
aktuell datormodell. En felaktig anslutning kan allvarligt skada både dator och bildskärm.
Den medföljande kabeln är avsedd för en standard, 15-stifts D-Sub-kontakt. Kontakta din
återförsäljare om du skulle behöva annan kabel.
n Ska du ansluta bildskärmen till en Macintosh-dator kan du kontakta din återförsäljare för
att skaffa en lämplig adapter.
n Kontrollera att signalkabelns fästskruvar i de båda kabeländarna är ordentligt fastdragna.
n Kablarna kan samlas ihop inuti locket på standardmodellens baksida. Se nästa sida för
kabelkopplingar.
[Exempel på anslutningar]
SVENSKA
Nätkabel (Tillbehör)
< Bakifrån >
DVI-D Signalkabel
(Tillbehör)
D-Sub Signalkabel
(Tillbehör)
Till DVI kontakten
på datorn
Till D-Sub kontakten
på datorn
Dator
6 INNAN DU ANVÄNDER BILDSKÄRMEN
 Loading...