

Page 1
DXXI- KVM-EXTENDER DXXI- KVM-EXTENDER DXXI- KVM-EXTENDER
Manual: http://www.ihse.de/pdf/b472-xx_e.pdf Manual: http://www.ihse.de/pdf/ b472-xx_e.pdf Manual: http://www.ihse.de/pdf/ b472-xx_e.pdf
1 Quick Setup
This section briefly describes how to install your KVM extender system. Unless you are an
experienced user, we recommend that you follow the full procedures described in the rest of this
manual. You can download the manual on:
http://www.ihse.de/pdf/b472-xx_e.pdf.
2 Installation
For first-time users, we recommend that you carry out a test placement, confined to a single room,
before commencing full installation. This will allow you to identify and solve any cabling problems,
and experiment with the KVM extender system more conveniently.
2.1 Package Contents
You should receive the following items in your extender package:
• DXXi KVM-Extend er- pair (Local Unit + Remote Unit)
• 2x 5V DC universal power supp ly for the DXXi - Extender
• 2x German type power cord
• User manual (Quick Setup)
• DVI (1,8m) video cable(s) (DV I-I male-to-male)
K472-SSH and K472-SST (1 pc.); K472-DSH, K472-DST and K472-SWH (2 pcs.)
• USB (1,8m) cable(s) (USB type A to type B) (1 pc.)
K472-SWH and K472-DWH (2 pcs.)
If anything is missing, please contact our Technical Support
(see Appendix F – Calling Technical Support).
2.2 Interconnection Cable Requirements
To connect the Local and Remote units you will need:
• DVI: Connect the suppli ed DVI cable(s) to your CPU(s) (KVM - Switch, etc.). Please ensure
that the connection is tension-free!
• USB-Keyboard, USB-Mouse, USB 2.0: Conn ect the supplied USB cable(s) to your CPU
(USB-A to USB-B). Please ensure that the connection is tension-free!
• Fibre Cables:
•
Multimode: Two fibres 50µm or 62.5µm. E.g. I-V(ZN)H 2G50 (In house patch
cable)or I-V(ZN)HH 2G62,5 (In house Breakout cable) or I/AD(ZN)H 4G50 (In
house OR Outdoor Breakout cable, stress resistant) or A/DQ(ZN)B2Y 4G62,5
(Outdoor cable, stress resistant with protection against animal biting). All notations
acc. to VDE specification.
1 fibre: K472-SSH and K472-SWH
2 fibre: K472-DSH, K472-SST, K472-SDH and K472-DWH
3 fibre: K472-DST and K472-SDT
A point to point connection is required. Having one or more patch panels in the
line is possible and allowed. Not allowed is a connection from the fibre lin k
interface to any other products, especially telecommunications or n etwork
equipment.
• Power Supply: Connect the supplied 5V/DC power supplies to the Plug terminal on the rear of
both the local and the remote unit.
2.3 System Setup
To install your DXXi – Extender system:
1. Switch off all devices.
2. Connect your keyboard, monitor(s) and mouse to the Remote unit (depending on device type).
3. Using the supplied CPU KVM cable(s), connect the local unit to your computer (or KVM
switch).
4. Connect the interconnect cable (fibre cable) to the local and the remote unit.
To ensure a stable data connectionyou must hear the SC connectors of th e fibre
cable snap into the sockets and the Link LEDs must be on.
5. Connect the 5V power supply to power the unit.
Only use the power supply originally supplied with this
equipment or a manufacturer-approved replacement.
6. Power up the system.
3 Device Views
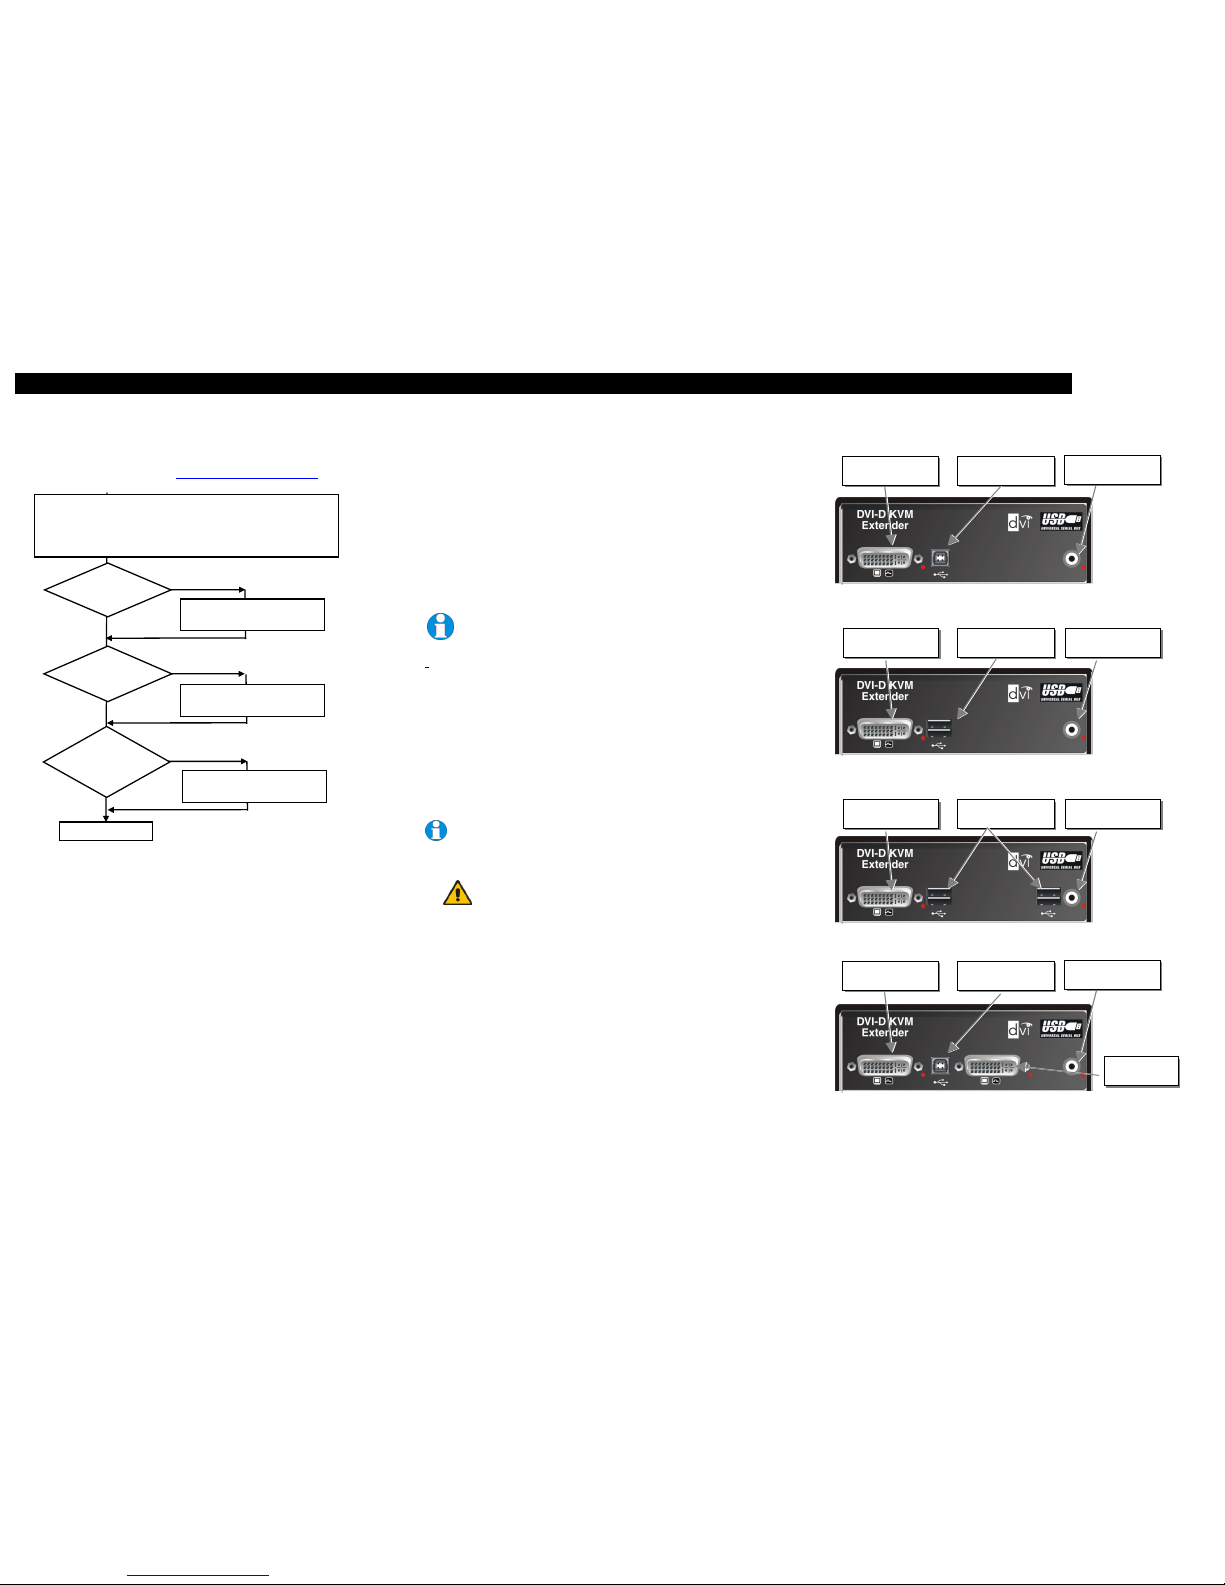
Local Unit – Type K472-SSH, K472-SST, K472-SDH and K472 -SDT
Remote Unit HID – Type K472-SSH and K472-SDH
Remote Unit USB 2.0 – Type K472-SST and K472-SDT
Local Unit – Type K472-DSH and K472-DST
Install system
1. Connect Local unit to CPU or switch.
2. Connect Remote unit to KVM.
3. Connect Local unit and Remote unit with Multimode fibre cables.
4. Power up the system.
Done
YES
NO
Link LED*
illuminated?
NO
NO
YES
Check p.s.u.’s and connection
to power outlet
Power LED
illuminated?
Check the fibre cable, and
fibre connectors
Check settings of graphic card
or boot CPU
Video OK
LED**
illuminated
?
YES
* Link LEDs are the LEDs at the fibre sockets
(Fibre DVI 1, Fibre DVI 2 and/or USB)
** Video LEDs are the LEDs at the DVI sockets
(DVI1 and/or DVI 2)
Connect to CPU
DVI Port
Connect to CPU
USB Port
Connect to Remote
DVI Monitor
Connect to Remote
USB-Keyboard/ Mouse
Connect to
5V Power Supply
Connect to
5V Power Supply
Connect to Remote
DVI Monitor
Connect to Remote
USB 2.0 Devices
Connect to
5V Power Supply
Connect to CPU
DVI Port #1
Connect to CPU
USB Port
Connect to
5V Power Supply
Connect to CPU
DVI Port #2
Page 2
DXXI- KVM-EXTENDER DXXI- KVM-EXTENDER DXXI- KVM-EXTENDER
Manual: http://www.ihse.de/pdf/b472-xx_e.pdf Manual: http://www.ihse.de/pdf/ b472-xx_e.pdf Manual: http://www.ihse.de/pdf/ b472-xx_e.pdf
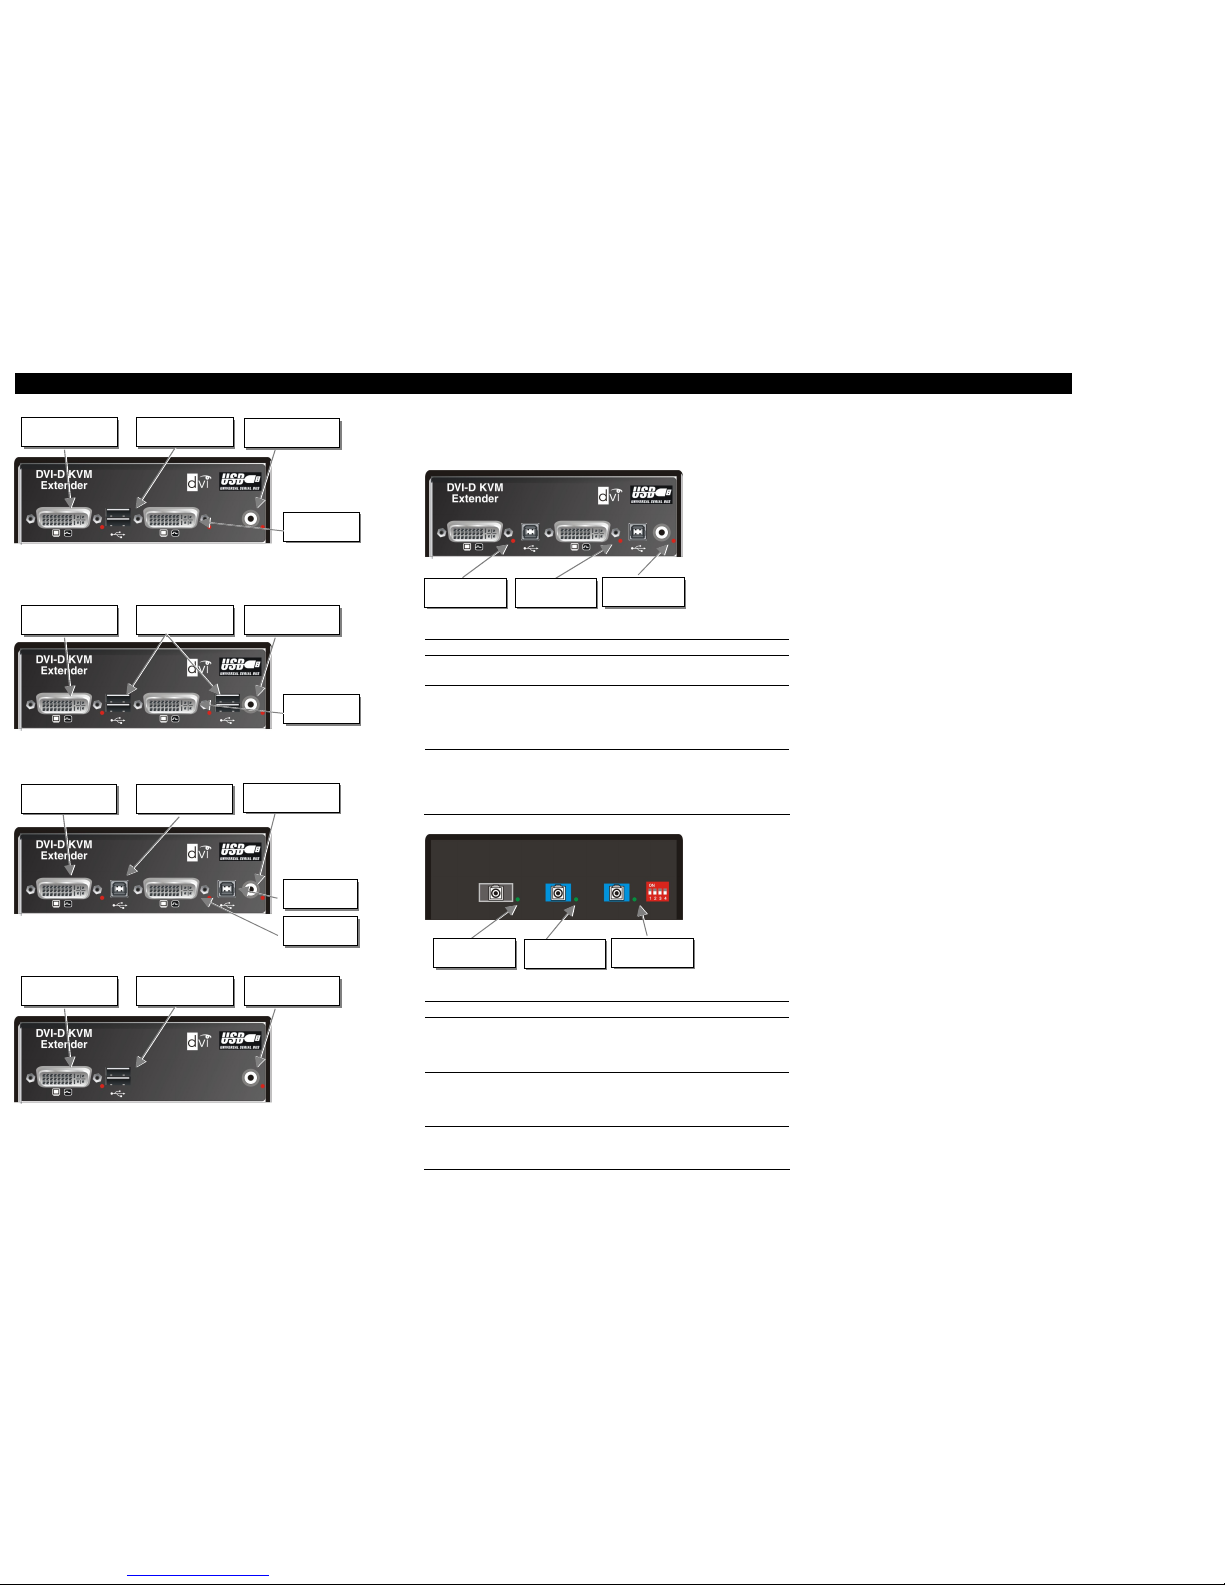
Remote Unit HID – Type K472-DSH
Remote Unit USB 2.0 – Type K472-DST
Local Unit – Type K472-SWH and K472-DWH
Remote Unit HID – Type K472-SWH and K472-DWH
3.1 Diagnostic LEDs
Each DXXi DVXi/ET KVM-Extender is fitted with up to six indicator LEDs: Power, Video OK, and
Link Status. The location of the LEDs is shown below:
Diagnostic LEDs at the DXXi – Extender (DVI Sockets)
LED Appearance Diagnostics
Power LED
(Red LED)
Off
On
Device not ready
Device ready
DVI 1
(Red LED)
Off
On
Blinking
DVI signal from video source NOT available
DVI signal from video source available
Monitor DDC is being transmitted from Remote Unit to Local
Unit and stored there (only if video source switched off or not
connected)
DVI 2
(Red LED)
Off
On
Blinking
DVI signal from video source NOT available
DVI signal from video source available
Monitor DDC is being transmitted from Remote Unit to Local
Unit and stored there (only if video source switched off or not
connected)
Diagnostic LEDs at the DXXi – Extender (Fibre Sockets)
LED Appearance Diagnostics
Fibre DVI 1
(Green LED)
Off
On
Blinking
No Connection to DVI 1 Port at Local/Remote Unit
Connection to DVI 1 Port at Local/Remote Unit Ok
Connection to DVI 1 Port at Local/Remote Unit disturbed
Fibre DVI 2
(Green LED)
Off
On
Blinking
No Connection to DVI 2 Port at Local/Remote Unit
Connection to DVI 2 Port at Local/Remote Unit Ok
Connection to DVI 1 Port at Local/Remote Unit disturbed
USB
(Green LED)
Off
On
Blinking
No Connection to USB Port at Local/Remote Unit
Connection to USB Port at Local/Remote Unit Ok
Connection to DVI 1 Port at Local/Remote Unit disturbed
DXXi
DVI-KVM-Extender
Type:
K472-SSH
K472-DSH
K472-SST
K472-DST
K472-SDH
K472-SDT
K472-SWH
K472-DWH
(Quick Setup)
Connect to Remote
DVI Monitor #1
Connect to Remote
USB-Keyboard/ Mouse
Connect to
5V Power Supply
Connect to Remote
DVI Monitor #1
Connect to Remote
USB 2.0 Devices
Connect to
5V Power Supply
Connect to Remote
DVI Monitor #2
Connec
t to Remote
DVI Monitor #2
Connect to CPU #1
DVI Port
Connect to CPU #1
USB Port
Connect to
5V Power Supply
Connect to CPU #
2
DVI Port
Connect to CPU #1
DVI Port
Connect to Remote
DVI Monitor
Connect to Remote
USB-Keyboard/ Mouse
Connect to
5V Power Supply
Diagnostic LED
DVI 1
Diagnostic LED
DVI 2
Diagnostic LED
Power
Diagnostic LED
USB
Diagnostic LED
Fibre DVI 1
Diagnostic LED
Fibre DVI 2
 Loading...