

Page 1
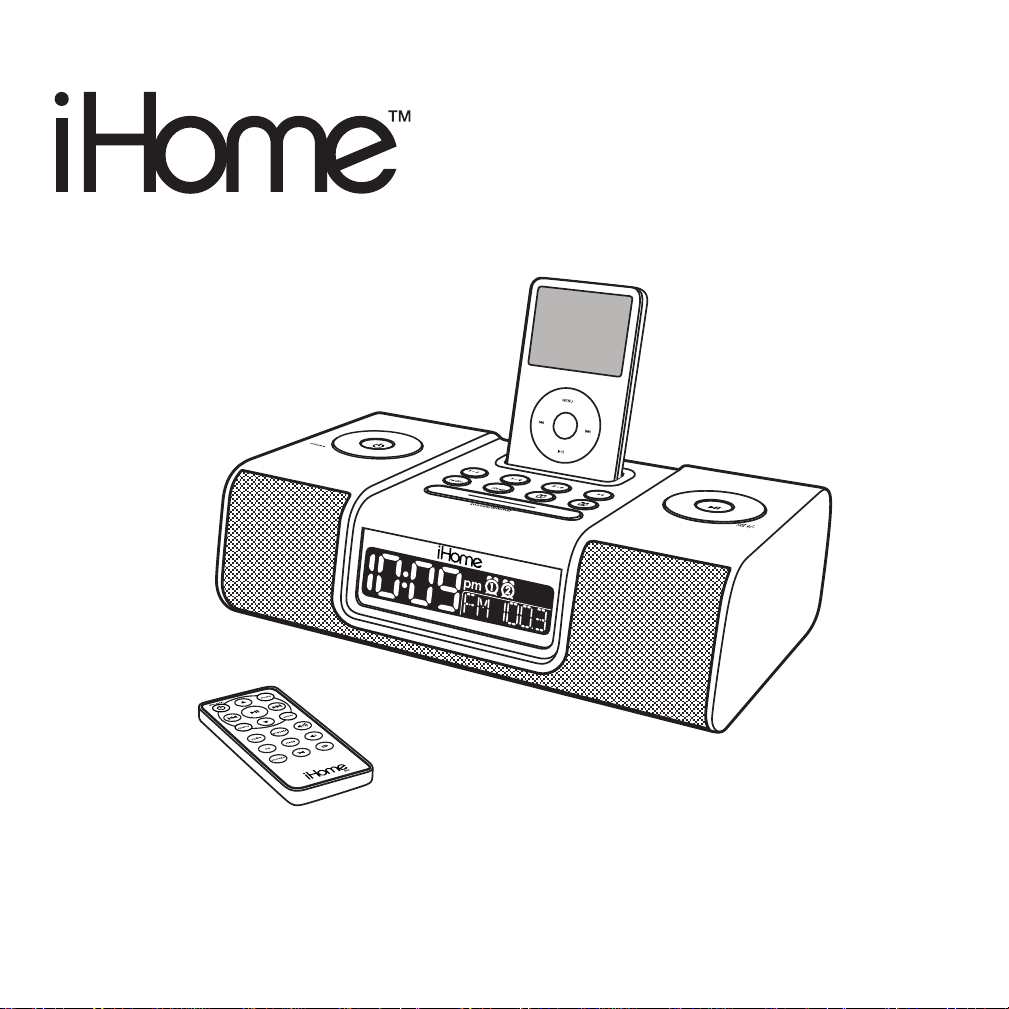
Model iH9
The Home System
For Your iPod
®
NOTE: THIS UNIT WILL NOT CONTROL OR CHARGE 3G iPod
Questions? Visit www.ihomeaudio.com
Page 2

Table of Contents
Quick Start ........................................................................................................................................................................1
Controls and Indicators / iH9 Display ............................................................................................................................2
Using the iH9 .................................................................................................................................................................3-4
Replacing iH9 Backup Batteries......................................................................................................................................4
Using the Remote Control Unit.......................................................................................................................................5
A Consumer Guide to Product Safety............................................................................................................................6
Troubleshooting............................................................................................................................................................7-8
Solucionando problemas ...........................................................................................................................................9-10
Warranty Information .....................................................................................................................................................11
A Consumer Guide to Product Safety
This device complies with part 15 of the FCC Rules. Operation is subject to the condition that this
device does not cause harmful interference.
This equipment complies with the limits for a Class B digital device as specified in Part 15 of FCC Rules. These limits
provide reasonable protection against radio and TV interference in a residential area.
However, your equipment might cause TV or radio interference even when it is operating properly. To eliminate interference
you can try one or more of the following corrective measures:
• Reorient or relocate the receiving antenna.
• Increase the distance between the equipment and the radio or TV.
• Use outlets on different electrical circuits for the equipment and the radio or TV.
Consult your dealer or an experienced radio/television technician if the problem still exists.
Modifying or tampering with your system’s internal components can cause a malfunction and might invalidate the system’s
warranty and void your FCC authorization to operate it.
This Class B digital apparatus complies with Canadian ICES-003.
Maintenance
• Place the unit on a level surface away from sources of direct sunlight or excessive heat.
• Protect your furniture when placing your unit on a natural wood and lacquered finish. A cloth or other protective material should
be placed between it and the furniture.
• Clean your unit with a soft cloth moistened only with mild soap and water. Stronger cleaning agents, such as Benzine, thinner
or similar materials can damage the surface of the unit.
Page 3
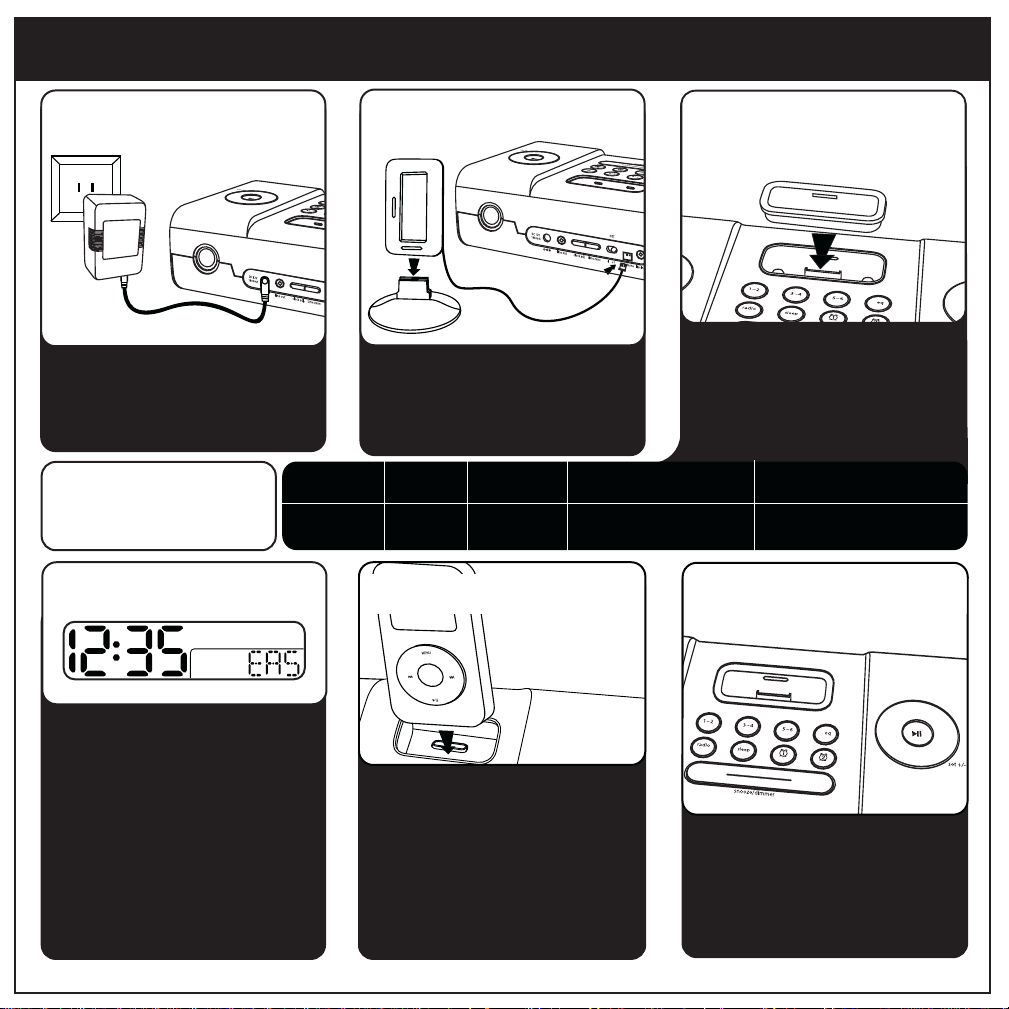
quick start
1:power
Attach AC adaptor cable to
jack on back of the iH9 and
plug the other end into a
wall socket.
NOTE: If you do not have an insert
for your iPod, please visit an Apple
store, www.ihomeaudio.com, or
call iHome toll free at 800-288-2792
to purchase one.
4:time
Snap AM antenna into provided
stand, then plug antenna cable
into socket on back of iH9.
Move antenna 12” away.
Use this insert
For this iPod
5:iPod
2:antenna
iPod Touch
Insert 14
iPod Touch
3rd Gen nano
Insert 13
3rd Gen nano
3:inserts
Select the dock insert for your
iPod® model from the table
below and place insert in dock.
Never dock an iPod without
an insert in place.
thin iPod with video (30 GB)
Insert 9
thin (30 GB) iPod with video
thin (80 GB) iPod classic
6:radio
iPod with video (60,80 GB)
Insert 10
thick (60,80 GB) iPod with video
thick (160 GB) iPod classic
• Press & hold the Time Zone
button on back until the
display flashes
• Turn the Set Wheel to select
your time zone
• Press the Time Zone
button again.
• Move the DST switch on back
of unit to +1 or -1 (adds or
subtracts an hour)
Insert an iPod® into the dock
with proper insert (iPod must
not be in a skin or case). The
iPod will charge while docked.
Press the Play/Pause Button on
the iH9 to play your iPod.
1
Press the Radio button and
press again to select AM/FM
band. Turn the Set Wheel to
tune in a station. See page 4
for programming presets.
Page 4
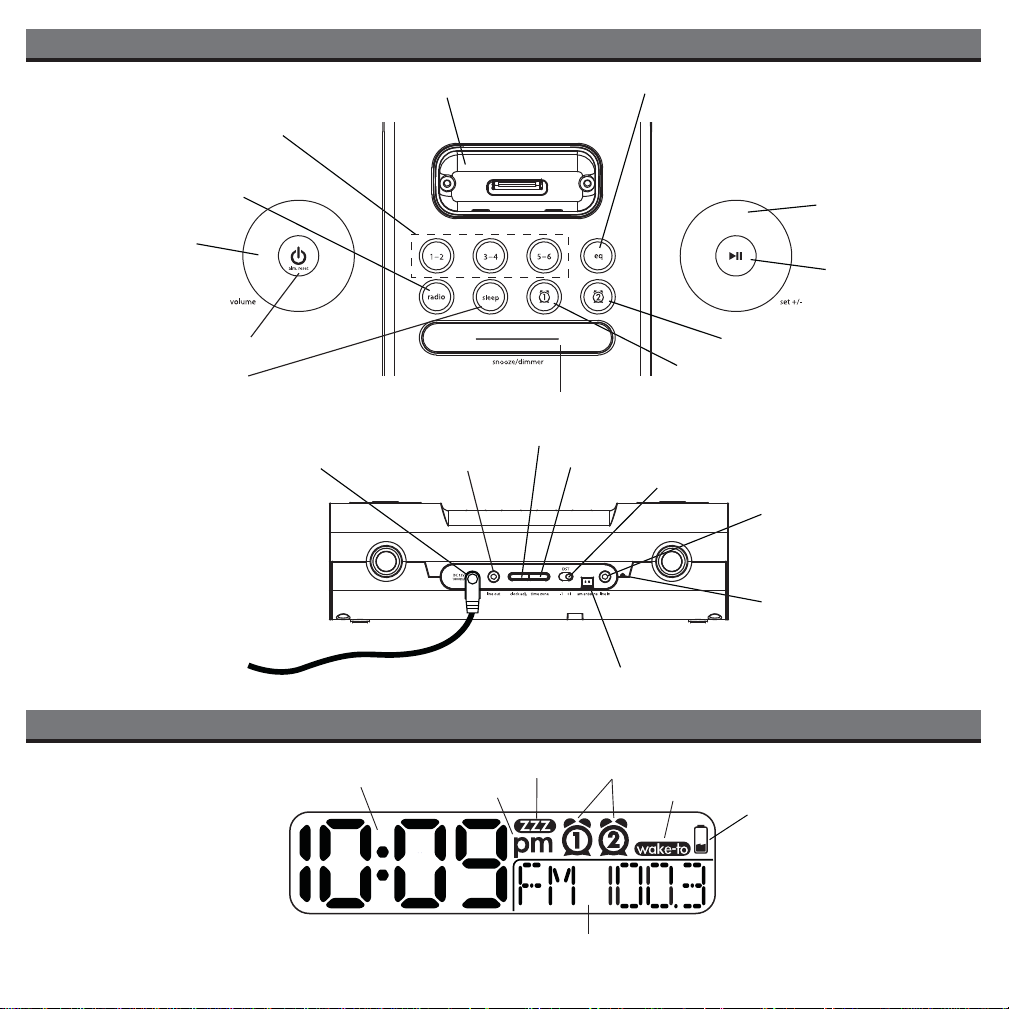
Controls and Indicators
Preset Buttons
Radio Button
Volume Wheel
Alarm Reset / Power Button
Sleep Button
AC Adaptor Jack
Dock
Snooze/Dimmer Button
Clock Adjust Button
Line Out Jack
Time Zone Button
EQ Button
Alarm 1 Button
DST switch
Set Wheel
Play/Pause Button
Alarm 2 Button
Line-in Jack
FM Antenna
Time Display
AM Loop Antenna socket
iH9 Display
Sleep
Indicator
PM Indicator
Radio / Alarm Time / iPod Display
2
Alarm 1, Alarm 2 Indicators
Wake-to Indicator
Battery Low Indicator
Page 5

Using the iH9
Connect iH9 to Power Source
Plug the AC adaptor cable into the AC Adaptor Jack and the other end into a standard 120 VAC wall socket. Adaptor must be
plugged in to operate. The iH9 does not operate on batteries.
Setting the Clock
a) Press and hold the Time Zone Button until the display flashes.
b) Turn the Set Wheel to select your time zone.
c) Press the Time Zone Button again. The clock will display the current time in your time zone.
d) To adjust the time for Daylight Saving Time, slide the
Slide to -1 to turn the clock back 1 hour.
To Set Clock Manually
a) Press and hold the
b) Turn the
c) Press the Clock Adjust Button to accept the time. The year display will flash.
d) Turn the Set Wheel to adjust the year and press the Clock Adjust Button. The date display will flash.
e) Turn the Set Wheel to adjust the date and press the Clock Adjust Button. Two beeps will indicate clock setting is complete. Use
DST switch to adjust for Daylight Saving Time.
Set Wheel until the current time is displayed (a PM indicator appears when time is set to PM; there is no AM indictor).
Clock Adjust Button. The clock display will flash.
Using the Alarms
The iH9 has two independent alarms. Each can be set to wake you to iPod, iPod playlist, radio or buzzer at separate times.
Setting the Alarms
a) Press and hold the
b) Turn the Set Wheel to set the alarm time.
c) Press the Alarm Button again and turn the Set Wheel to select having the alarm come on all week (7days), only weekdays (5
days) or just weekends (2 days).
d) Press the Alarm Button again and then turn the Set Wheel to select a wake source: Buzzer, iPod, iPod playlist* (PLYLST) or Radio
(last selected station).
* PLAYLIST: To wake to an iPod playlist, you must a create a playlist in iTunes called ‘iHome’ and import it to your iPod. When
PLYLST is set as your wake to source, the iH9 will wake to random songs in your iHome playlist.
Note: If wake to source is set to iPod or playlist and iPod or playlist is not present, the iH9 defaults to buzzer alarm.
Arming and Disarming Alarm (Turn Alarm Function ON and OFF)
a) Press an Alarm Button to preview current alarm time(s). Press again to arm or disarm alarm function. When armed, the related
alarm icon appears in the display.
Resetting the Alarm to Come on the Next Day
a) When the alarm is sounding, press the
Snooze
Press the Snooze/Dimmer Button after the alarm sounds. The alarm will be silenced and come on again after the selected
a)
snooze time. Snooze can be pressed several times during the 2 hours alarm cycle.
b) To adjust the snooze time, during normal mode press and hold the
Set Wheel to adjust snooze time from 1 to 29 minutes.
Sure Alarm
The iH9 has a sure alarm feature so the buzzer alarm will still sound in the event of power failure, if backup batteries are installed.
Alarm 1 or Alarm 2 Button until the alarm time flashes.
Alarm Reset/Power Button to stop the alarm and reset it to come on the following day.
iPod
Playing and charging your iPod
a) Place proper insert for your iPod (see insert table under Quick Start) in Dock, then gently dock iPod. When docked, your iPod
will charge until fully charged. Unit will not overcharge iPod. Note: The iH9 will not control or charge 3G iPod models.
b) Press the Play/Pause Button to play iPod, and again to pause.
c) Turn Volume Wheel to adjust iH9 volume up or down
d) Press the EQ Button to select Treble, Bass, 3D sound effect or Balance. Turn the Set Wheel to adjust settings. EQ settings for
iPod and radio mode are independent.
e) Press
Note: If you dock an iPod with a drained battery, it may take up to 6 minutes of charging before the iPod will respond.
Alarm Reset/Power Button to turn iH9 and iPod off.
DST switch to +1 to advance the time 1 hour.
Snooze/Dimmer Button until the display flashes. Use the
3
Page 6
Using the iH9
Radio
Setting up Antennas
a) Snap AM loop antenna into provided stand, then plug AM antenna cable into
Move antenna 12” away from unit for best reception.
b) Extend
Tuning and Playing the Radio
a) Press the Radio Button to select radio play mode. Press as needed to select FM or AM radio band.
b) Turn the Set Wheel to tune radio to a desired station.
c) To program the current station as a preset, press and hold
d) Turn the
e) Press the
f) Press
FM Antenna (on back of unit) fully for best reception. Do not strip, alter or attach to other antennas.
Preset Button 1-2 until P1 flashes on display; press again for
P2 and allow to time-out (beep confirmation). Repeat steps a,b,and c for other preset buttons to preset up to 12 stations (6 AM,
6 FM). To listen to a preset station at any time, simply press the desired preset button once or twice.
Volume Wheel to adjust iH9 volume up or down.
EQ Button to select Treble, Bass, 3D sound effect or Balance. Turn the Set Wheel to adjust settings. EQ settings
for iPod and radio mode are independent.
Alarm Reset/Power Button to turn iH9 off.
Using the Line-in and Line-out Jacks
a) An audio patch cord comes with the iH9. Use it to play nondocking iPods or other audio devices through the iH9 Line-in Jack
(connect one end in the device’s line out or headphones jack, the other in the iH9 line-in jack). Make sure there is no iPod
docked in the iH9 when using the line-in jack.
b) To listen to your audio device, press the
volume on your line-in device.
c) Use the
The Volume Wheel of the iH9 does not control line-out volume (adjust on attached device instead). The Line Out Jack is not
for headphones.
Line Out Jack to connect the iH9 to the line-in jack of other audio devices such as a tape recorder or amplifier.
Radio Button until line-in is displayed, indicating line-in mode. Adjust the output
Using Sleep Mode
Sleep mode lets you sleep to your iPod or the radio, gradually lowering the volume until the unit shuts off at the selected time.
a) Press the
b) Turn the Volume Wheel to set the sleep volume (this volume setting is separate from your standard volume setting).
Sleep Button to select an amount of time before the iH9 shuts off: 120, 90, 60, 30 or 15 minutes.
Using the Dimmer
a) Press the Snooze/Dimmer Button during normal operation to adjust brightness of LCD display. There are 8 levels of brightness
including OFF.
AM Loop Antenna socket on back of unit.
Replacing iH9 Backup Batteries
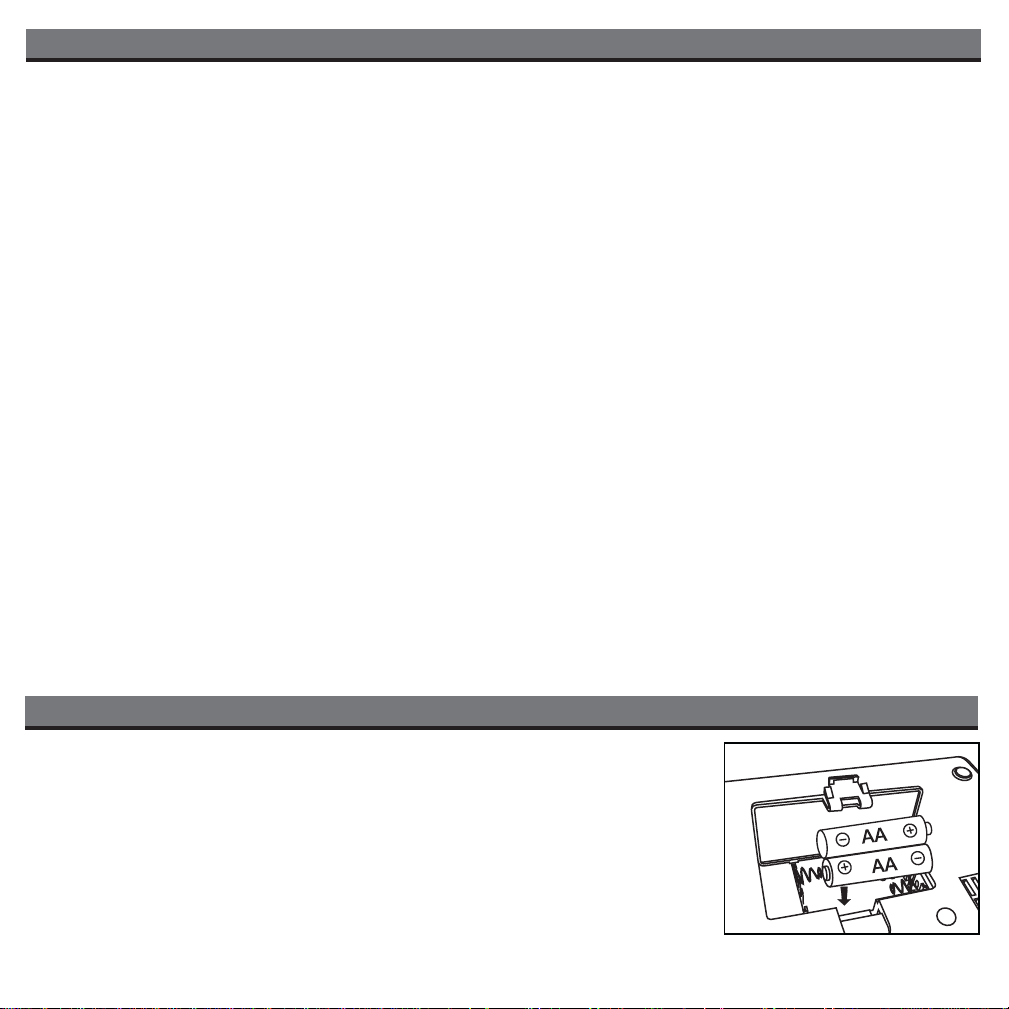
Install/Replace Backup Battery
The iH9 uses a backup battery system to provide continuous alarm operation and clock settings
in the event of a power failure. If the Battery Low Icon located on the right of the display is flashing,
it is time to replace the backup batteries. Please make sure the AC adaptor is connected, otherwise
all settings may be lost during battery replacement.
Open the battery compartment cover located on the bottom of the unit. Insert 2 “AA” batteries
as indicated. We recommend the use of alkaline batteries for longer life.
Batteries information:
• Do not mix old and new batteries.
• Do not mix alkaline, standard (carbon -zinc) or rechargeable (nickel-cadmium) batteries.
4
Page 7
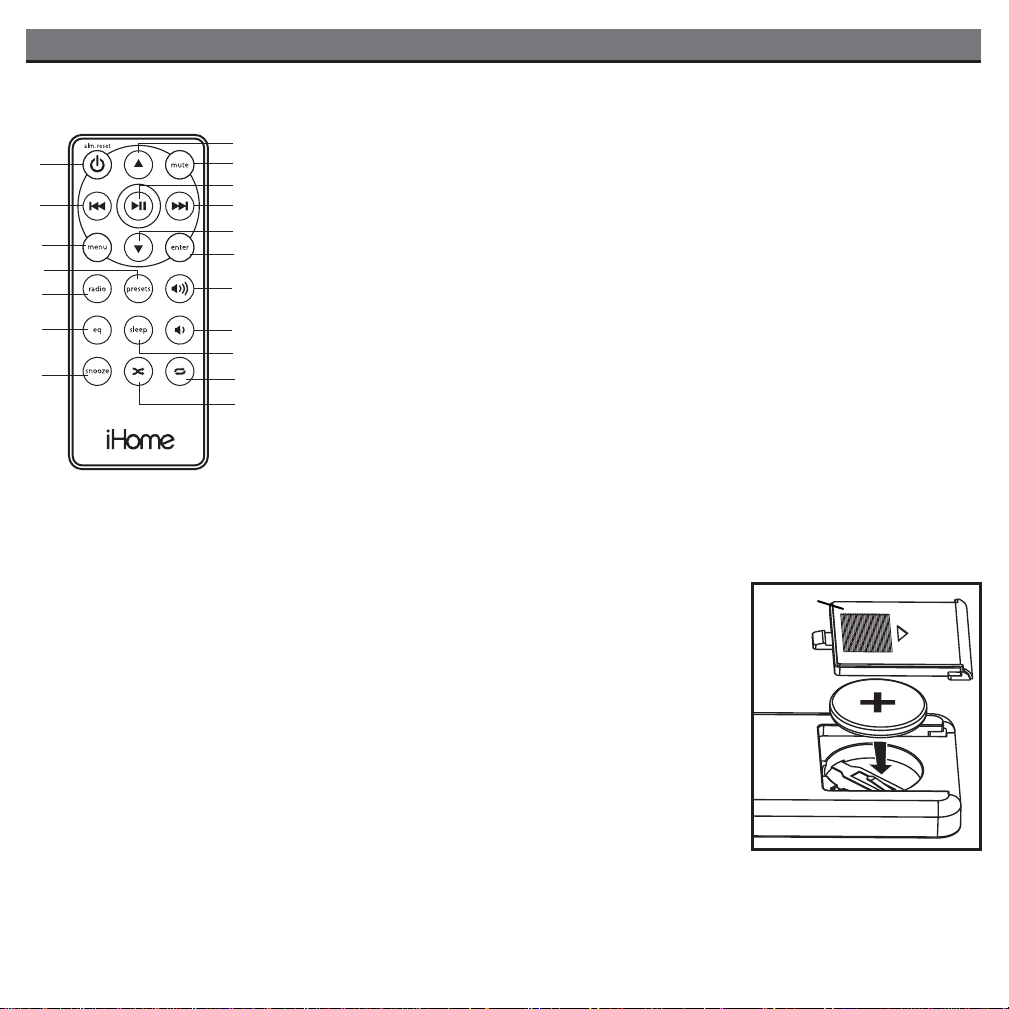
Using The Remote Control Unit
The Remote Control controls basic functions on the iH9 and certain iPod® functions when the iPod® is docked in the iH9.
For best results, use the remote control within 12 feet of the unit.
Power On/Off Alarm Reset Button: Turns iH9 ON or OFF or resets alarm when alarm
is sounding
Fwd/Rev Button: Skip to previous or next track, or HOLD to scan current playing track;
Also controls set wheel functions (changing settings, tuning radio, etc.)
Menu Button: Press to access iPod Menu functions
Preset Button: Cycles through AM or FM radio presets
Radio Button: Selects Radio (AM and FM radio bands) and line-in functions
EQ Button: Set Treble, Bass, 3D sound effect and Balance settings for best sound
Snooze/Dimmer Button: Snooze mode when alarm sounds, otherwise dims display
Random Button: Press for random play
Repeat Button: Press for repeat play (press again to repeat all)
Sleep Button:
30 or 15 minutes
Volume – Button: Lowers volume level
Volume + Button: Raises volume level
Enter Button: Press to select iPod menu function
Up/Down Button: Press Up or Down to scroll iPod menu
Play/Pause Button: Plays track. In play mode, press to pause
Mute Button: Toggles sound ON or OFF
Press to select an amount of time before the iH9 shuts off: 120, 90, 60,
Install/Replace the Remote Control Batteries
The remote control batteries are already installed at the factory. When the remote control
stops operating or its range seems reduced, replace the batteries with new ones.
1. The battery door is located on the back end of the unit.
2. Press to release the battery door latch.
3. Insert one “CR2032” 3-volt lithium batteries. Make sure the polarity (the + and – side
of the battery) is correct.
4. Replace the battery holder back in the remote control.
NOTE: PLEASE DISCARD BATTERIES PROPERLY
5
Battery
door
Page 8
A Consumer Guide to Product Safety
When used in the directed manner, this unit has been designed and manufactured to ensure your personal safety.
However, improper use can result in potential electrical shock or fire hazards. Please read all safety and operating
instructions carefully before installation and use, and keep these instructions handy for future reference. Take special
note of all warnings listed in these instructions and on the unit.
1. Water and Moisture – The unit should not be used near water. For example: near a bathtub, washbowl, kitchen sink,
laundry tub, swimming pool or in a wet basement.
2. Ventilation – The unit should be situated so that its location or position does not interfere with its proper ventilation.
For example, it should not be situated on a bed, sofa, rug or similar surface that may block ventilation openings.
Also, it should not be placed in a built-in installation, such as a bookcase or cabinet, which may impede the flow of
air through the ventilation openings.
3. Heat – The unit should be situated away from heat sources such as radiators, heat registers, stoves or other appliances
(including amplifiers) that produce heat.
4. Power Sources – The unit should be connected to a power supply only of the type described in the operating
instructions or as marked on the appliance.
5. Power-Cable Protection – Power supply cables should be routed so that they are not likely to be walked on or
pinched by items placed upon or against them. It is always best to have a clear area from where the cable exits the
unit to where it is plugged into an AC socket.
6. Cleaning – The unit should be cleaned only as recommended. See the Maintenance section of this manual for
cleaning instructions.
7. Objects and Liquid Entry – Care should be taken so that objects do not fall and liquids are not spilled into any
openings or vents located on the product.
8. Attachments – Do not use attachments not recommended by the product manufacturer.
9. Lightning and Power Surge Protection – Unplug the unit from the wall socket and disconnect the antenna or
cable system during a lightning storm or when it is left unattended and unused for long periods of time. This will
prevent damage to the product due to lightning and power-line surges.
10. Overloading – Do not overload wall sockets, extension cords, or integral convenience receptacles as this can result
in a risk of fire or electric shock.
11. Damage Requiring Service – The unit should be serviced by qualified service personnel when:
A. the power supply cable or plug has been damaged.
B. objects have fallen into or liquid has been spilled into the enclosure.
C. the unit has been exposed to rain.
D. the unit has been dropped or the enclosure damaged.
E. the unit exhibits a marked change in performance or does not operate normally.
12. Antenna – Do not connect an external antenna to the unit (other than that provided).
13. Periods of Nonuse – If the unit is to be left unused for an extended period of time, such as a month or longer, the
power cable should be unplugged from the unit to prevent damage or corrosion.
14. Servicing – The user should not attempt to service the unit beyond those methods described in the user’s operating
instructions. Service methods not covered in the operating instructions should be referred to qualified service
personnel.
Questions? Visit www.ihomeaudio.com
6
Page 9
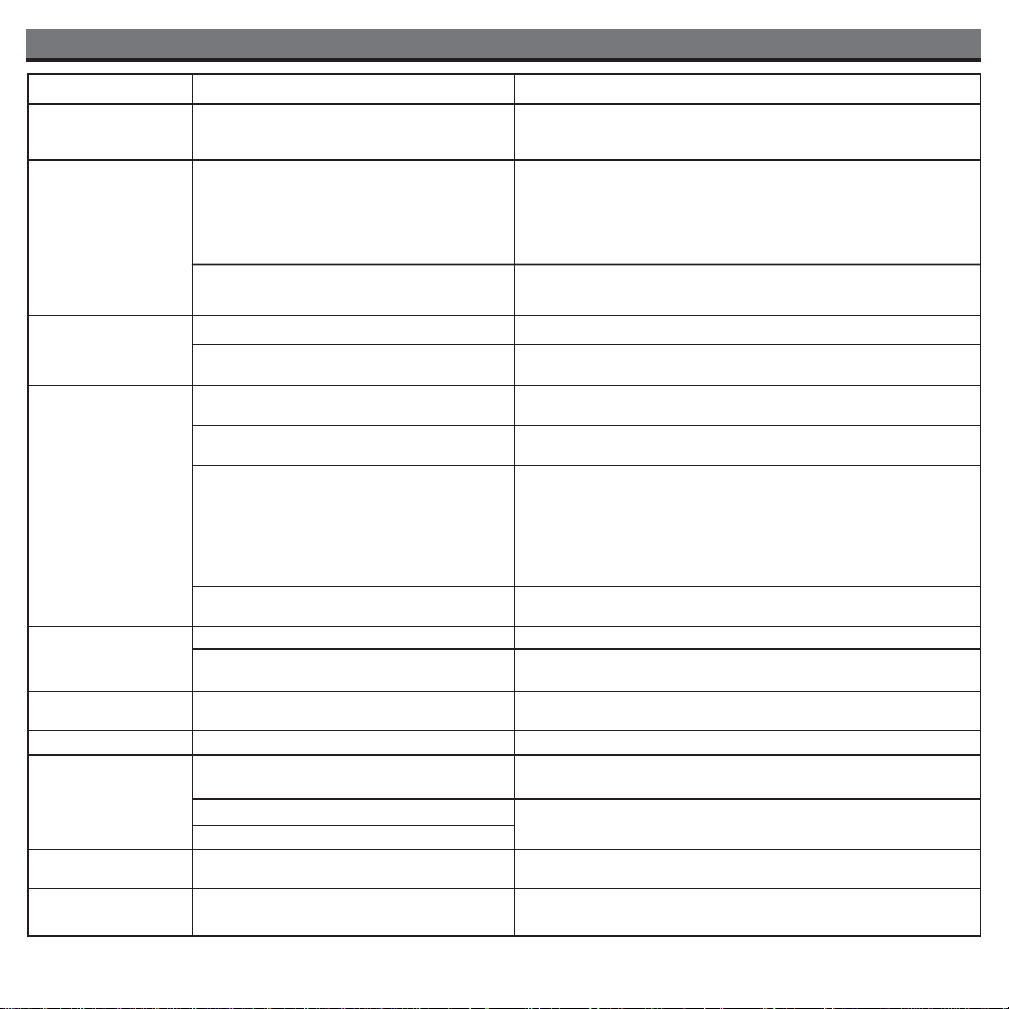
Troubleshooting
Symptom
iH9 does not turn on AC adaptor isn't plugged into a working wall socket
iH9 doesn’t respond
Battery Low icon always
flashing
iPod does not respond
to the unit/iPod is
playing but no sound
comes out
Remote Control didn’t
work
iH9/iPod performance is
erratic
No sound from iH9 Volume is set too low on iH9 Make sure volume is turned up
iPod didn’t charge up iPod is not installed properly Remove your iPod from the dock and check for obstruction on the
No AM band radio
sound but others OK
AM band radio is very
noisy
or not plugged into the power supply jack on back
of the unit
iH9 requires a reset If unit is plugged in and doesn't respond, try resetting the unit by following
iPod is not docked properly
Batteries are weak Replace with new batteries
Batteries were not installed properly Check to make sure the polarity ( + and – ends) matches the diagram
iPod is not docked properly Remove your iPod from the dock and check for obstruction on the
Your iPod software is too old Upgrade software on your iPod. For details visit
iPod is locked up/plays but no sound
comes out
Using 1st or 2nd generation iPod, iPod Shuffle or
other devices.
Battery weak Replace current battery with new battery
Remote Control is out of range of the iH9
remote sensor
The iH9 is reacting to external interference
iPod is locked up/ frozen
iPod battery has problem
AM loop antenna is not connected to the unit Plug the AM loop antenna connector to the jack on the back of the unit
AM loop antenna isn’t located properly
Possible Problem
Plug the AC adaptor into a working wall socket and plug the connector
into the supply jack on the unit
these steps:
a) remove iPod from dock
b) unplug unit from power source
c) remove back up batteries
d) wait 1 hour, then resume use
Remove your iPod from the dock and check for obstruction on the
connectors in the dock and on your iPod. Then reseat it in the dock.
in the battery compartment
connectors in the dock and on your iPod. Then reseat it in the dock.
http://www.apple.com/ipod/download
Check the volume setting. Make sure your iPod is working properly before
docking into the unit. Please refer to your iPod manual for details. See
above for software upgrade information.
You may need to reset your iPod. To do so:
1. Toggle the Hold switch to hold position, then off.
2. Press and hold the Menu and center Select buttons at the same time until
Apple logo appears. You may need to repeat this step.
iH9 cannot control those iPods or other devices.
Move within 30 feet of the unit.
Move unit away from potential sources of external interference such as
computers, modems, wireless devices (routers) or fluorescent light.
connectors in the dock and on your iPod. Then reseat it in the dock.
Please make sure your iPod is working properly before docking into the
unit. Please refer to your iPod manual for details.
Move the AM loop antenna away from the main unit/iPod and rotate it
for best reception
Solution
7
Page 10
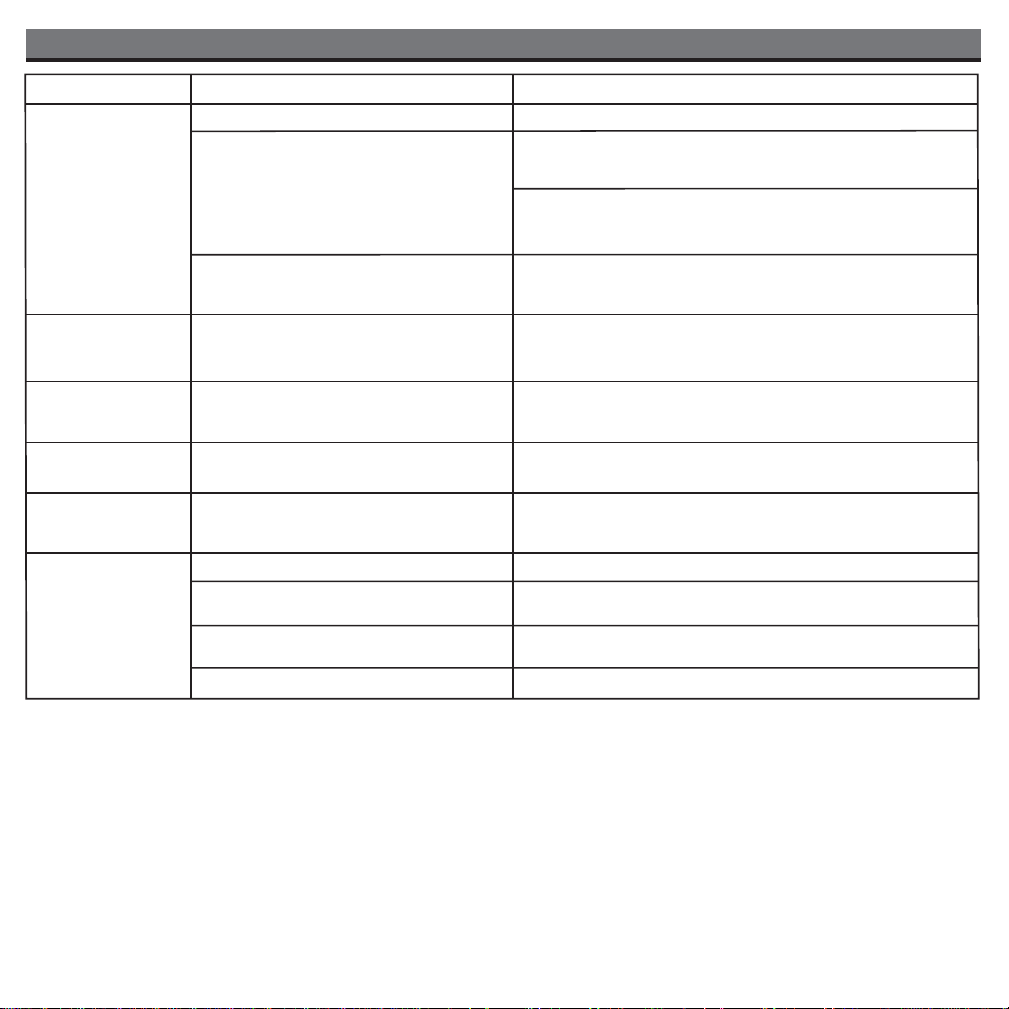
Troubleshooting
Symptom
Sound is distorted Volume level is set too high Decrease the volume
Sound source is distorted If the iPod original sound source (MP3) is old or of poor quality, distortion
treble is too high, the 3D effect may not sound
as good
Unit/adaptor gets warm
after extended play at
high volume
Can't hear
headphones/speakers
attached to line out jack
Snooze time
is too long/short
Can’t wake to playlist Playlist is misnamed or empty
Alarm not working AM/PM indicator not set up correctly Adjust alarm time for desired AM or PM.
This is normal Turn unit off for awhile or lower volume
Line out jack is not meant for headphones.
Speakers need a power source
Custom snooze time not set
Wrong alarm icon set on clock display Make sure the alarm time you adjusted matches the alarm icon 1 or 2
7-5-2 days setting is not correct 7 days is everday alarm, 5 days is Mon-Fri, and 2 days is Sat-Sun. See
Calendar is not set correctly for 5/2 days alarm See page 3 for setting Clock/Calendar Section.
Possible Problem
and noise are easily noticed with high-power speakers. Try a different
audio source such as a music CD.
If you are using an external sound source like older generation of iPod
or iPod Shuffle, try reducing the output volume on the device itself. Also
try turning bass boost OFF.
Lower EQ settings.EQ settings are too high. For example, if the
The signal from the line out jack needs amplification. Use powered
speakers/monitors or other amplified audio device.
Press and hold Snooze button then turn set wheel to adjust
Sync iPod to iTunes and manually label playlist iHome. Make sure to
add songs to your playlist. For help in creating a playlist, please see the
Help tab in iTunes or visit www.apple.com
that is shown on the clock display.
page 3 for setting alarms.
Solution
8
Page 11
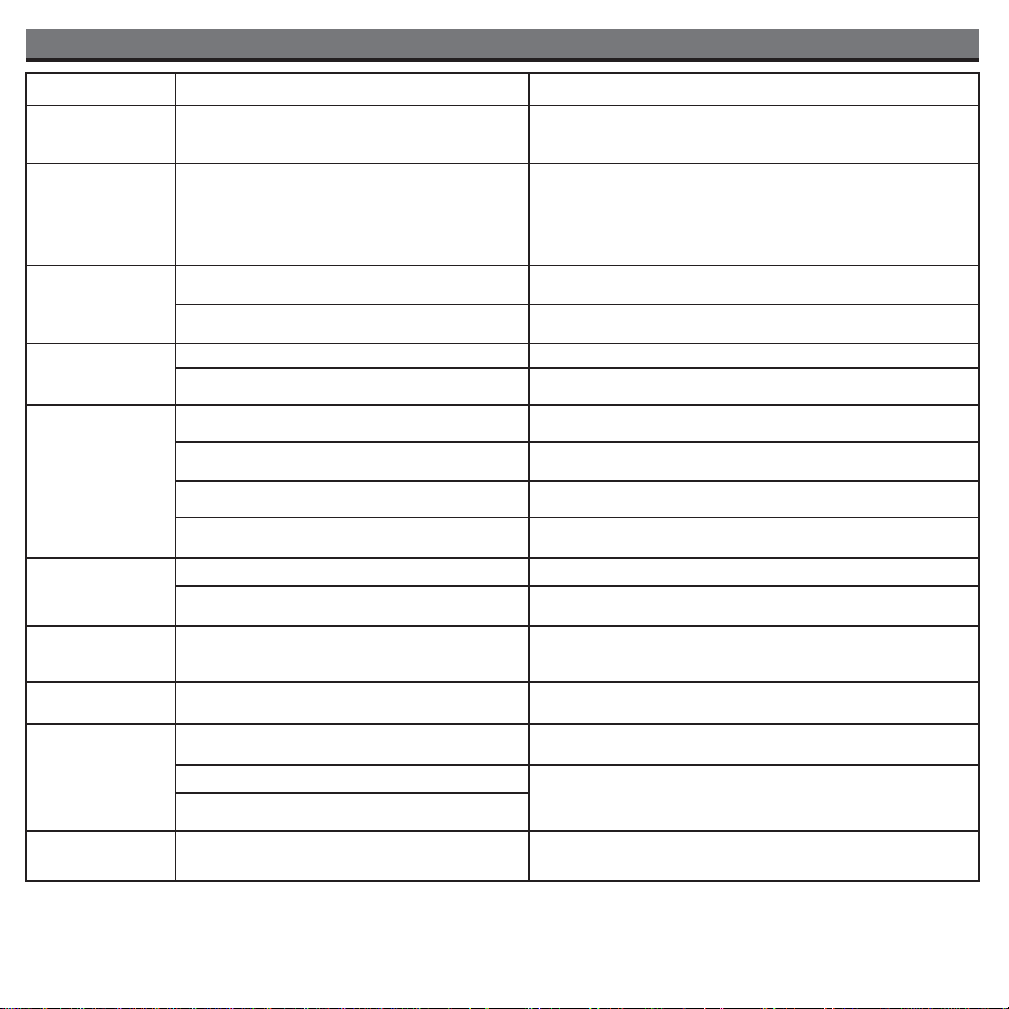
Solucionando problemas
Síntoma
La unidad no
enciende
La unidad no
responde
El iPod no encastra
correctamente
El ícono de batería
baja está
destellando
El iPod no se
comunica con la
unidad
El control remoto
no funciona
El funcionamiento
del iH9/iPod es
errático.
No sale sonido
de su iH9
El iPod no carga El iPod no está instalado correctamente Quite el iPod del encastre y retire la posible obstrucción del
La banda de AM no
suena pero las demás sí
El adaptador de corriente AC no está conectado a
un tomacorriente que funcione o no está conectado
en la parte posterior de la unidad
La unidad debe ser reprogramada Si la unidad está conectada y no responde, pruebe reprogramarla
No ha colocado el encastre del iPod, o está
utilizando el encastre incorrecto.
El iPod no encastra correctamente Quite el iPod del encastre y retire la posible obstrucción del
Las baterías están gastadas Reemplace las baterías
Las baterías no están instaladas
correctamente
El iPod no está instalado correctamente Quite el iPod del encastre y verifique posibles obstrucciones del
Su software es obsoleto Renueve su software. Para mayor información, diríjase a
El iPod no responde Verifique que su iPod funcione correctamente antes de conectarlo
Usted tiene un iPod de primera o segunda
generación, un Shuffle u otro tipo de aparato
Las baterías están gastadas Reemplace las baterías por nuevas
No está apuntando el control remoto hacia el
iH9
El iH9 está reaccionando a interferencias
externas.
El volumen del iH9 se encuentra muy bajo Asegúrese de subir el volumen
El iPod está trabado/no responde
La batería del iPod podría tener algún
inconveniente
La antena no está ubicada correctamente Aleje la antena de la unidad y gírela para mejorar la recepción
Causa Solución
Conecte el adaptador de corriente a un tomacorriente que funcione
y a la parte posterior de la unidad
siguiendo estos pasos:
a) Quite el iPod de la base
b) Desconecte la unidad del tomacorriente
c) Quite las baterías auxiliares
d) Espere 1 hora y vuelva a probar
Verifique que el encastre sea el apropiado para su iPod
encastre o de su iPod. Vuelva a colocar el iPod dentro del encastre.
Verifique que la polaridad de las baterías (- y +) se encuentren
de acuerdo al diagrama del compartimiento de baterías.
encastre o de su iPod. Vuelva a colocar el iPod dentro del encastre.
http://www.apple.com/ipod/download
a la unidad. Refiérase al manual de su iPod para más detalles.
El iH9 no puede controlar estos otros aparatos
Apunte el control remoto hacia el iH9 y manténgase a una distancia
máxima de 10 pies de la unidad.
Aleje la unidad de Fuentes potenciales de interferencia externa
como computadoras, modems, ruteadores inalámbricos, luz
fluorescente, etc.
encastre o de su iPod. Vuelva a colocar el iPod dentro del encastre.
Por favor asegúrese de que su iPod funcione correctamente antes
de colocarlo en el encastre. Refiérase al manual de su iPod para
mayor información.
9
Page 12
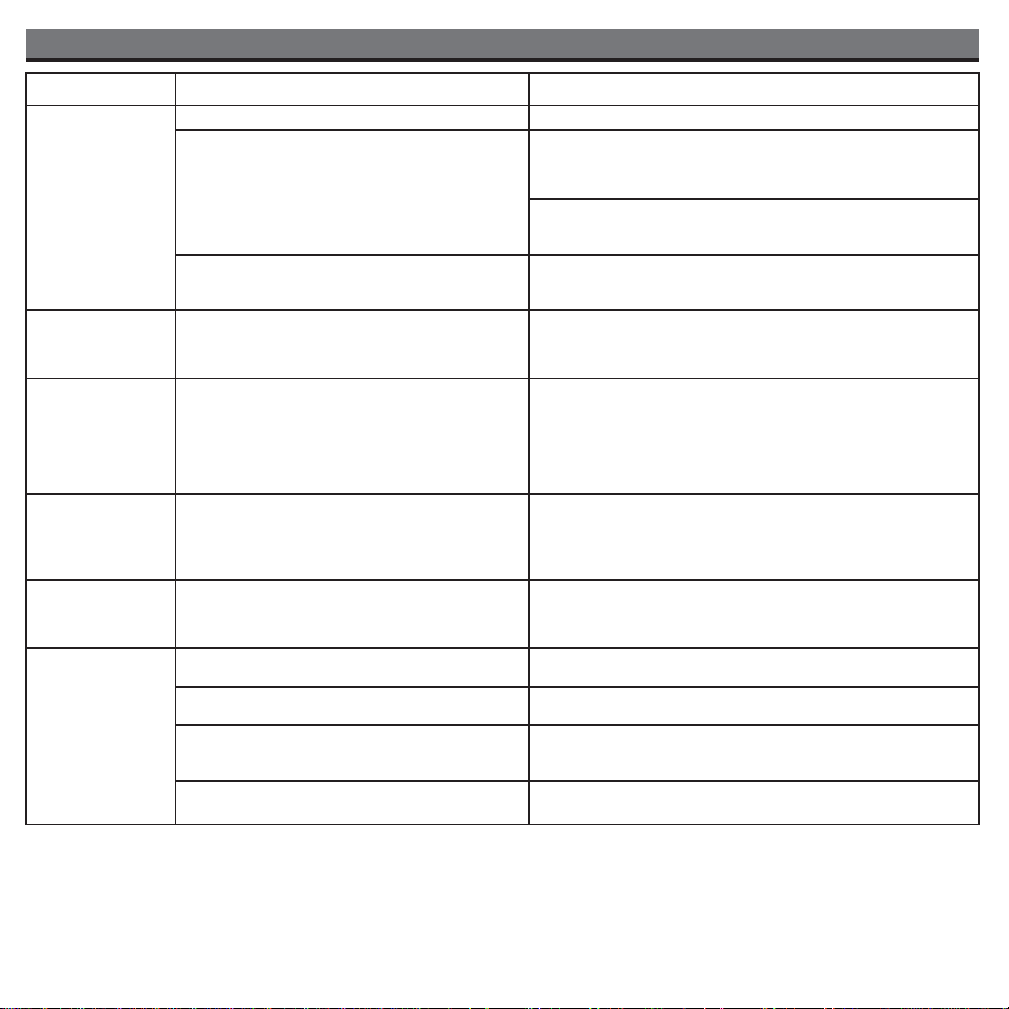
Solucionando problemas
Síntoma Causa Solución
El sonido sale
distorsionado
La unidad recalienta
luego de largos
períodos de uso a
alto volumen
No puede
escuuchar los
auriculares/parlant
es que están
conectados a la
ficha de salida “line
out”
El tiempo de
apagado con
“Snooze”
(Dormilón), es muy
largo/corto.
La unidad no
reproduce la lista de
canciones al
despertar.
La alarma no
funciona
El volumen se encuentra muy alto
El sonido sale distorsionado de la unidad
La programación de EQ está demasiado alta.
Por ejemplo, si los agudos están en volumen muy
alto, el efecto 3D podría no sonar bien.
Esto es normal Apague la unidad o baje el volumen
La línea de salida no está diseñada para
auriculares. Los parlantes necesitan una fuente
de alimentación
La duración del programa “Snooze” no ha sido
programada.
La lista está vacía o se encuentra mal denominada. Sincronice su iPod a iTunes y manualmente ingrese el nombre
El indicador de AM/PM no ha sido programado
correctamente.
El ícono indicador en el visor es incorrecto. Verifique que el horario de la la alarma y el del ícono correspondiente
La programación 7-5-2 no es correcta. Utilice 7 para uso de alarma diario por 7 días, 5 para Lunes a
El calendario no se encuentra programado
correctamente para 5/2 días.
Baje el volumen
Si el sonido original de su iPod era de pobre calidad, las
distorsiones y ruidos se harán más notables con los
parlantes de alta potencia. Pruebe utilizar otra fuente de
audio como un CD.
Si está utilizando un iPod de primeras generaciones o un Shuffle,
intente bajar el volumen de su aparato. También intente apagar
el amplificador de bajos
Baje los niveles del EQ.
La señal de salida require amplificación. Utilice parlantes u otra
clase de aparto amplificado.
Mantenga oprimido el botón “Snooze” luego gire la rueda para
programar la duración de tiempo deseada.
de la lista bajo “iHome”. Asegúrese de agregar las canciones a
su lista.
Ajuste la alarma según deseé que suene en hora AM o después
del mediodía PM.
1 o 2 en el visor del reloj se encuentren sincronizados.
Viernes y 2 para Sábado y Domingo. Diríjase a la página 3 para
su programación.
Refiérase a la página 3 para ver la sección de programación del
Reloj/ calendario.
10
Page 13

Limited 90-Day Warranty Information
iHome Products, a division of SDI Technologies Inc. (hereafter referred to as SDI Technologies), warrants this product to be free from
defects in workmanship and materials, under normal use and conditions, for a period of 90 days from the date of original purchase.
Should this product fail to function in a satisfactory manner , it is best to first return it to the store wher e it was originally purchased. Should
this fail to resolve the matter and service still be required by reason of any defect or malfunction during the warranty period, SDI Technologies
will repair or , at its discr etion, replace this product without char ge (except for a $10.00 charge for handling, packing, r eturn UPS/postage,
and insurance). This decision is subject to verification of the defect or malfunction upon delivery of this product to the Factory Service
Center listed below. The product must include pr oof of purchase, including date of purchase. The fee for service without pr oof of purchase
is $30.00.
Before returning this product for service, please first replace the batteries (if applicable) with fresh ones, as exhausted or defective batteries
are the most common cause of problems encountered.
If service is still required:
1. Remove the batteries (if applicable) and pack the unit in a well padded, heavy corrugated box.
2. Enclose a photocopy of your sales receipt, credit card statement, or other proof of the date of purchase, if within the warranty period.
3. Enclose a check or money order payable to the order of SDI T echnologies, for the sum of $10.00 ($30.00 without pr oof of purchase).
4. Send the unit prepaid and insured, to the Factory Service Center listed below.
Consumer Repair Department
SDI T echnologies Inc.
1330 Goodyear Dr .
Disclaimer of Warranty
NOTE: This warranty is valid only if the product is used for the purpose for which it was designed. It does not cover (i) products which
have been damaged by negligence or willful actions, misuse or accident, or which have been modified or repaired by unauthorized
persons; (ii) cracked or broken cabinets, or units damaged by excessive heat; (iii) damage to digital media players, CD’ s or tape cassettes
(if applicable); (iv) the cost of shipping this product to the Factory Service Center and its return to the owner.
This warranty is valid only in the United States of America and does not extend to owners of the product other than to the original
purchaser . In no event will SDI Technologies or any of its affiliates, contractors, resellers, their officers, dir ectors, shareholders, members
or agents be liable to you or any third party for any consequential or incidental damages, any lost profits, actual, exemplary or punitive
damages. (Some states do not allow limitations on implied warranties or exclusion of consequential damages, so these restrictions may
not apply to you.) This warranty gives you specific legal rights, and you may also have other rights which vary from state to state.
Your acknowledgment and agreement to fully and completely abide by the above mentioned disclaimer of warranty is contractually
binding to you upon your transfer of currency (money order , cashier's check, or cr edit card) for purchase of your SDI Technologies product.
El Paso, TX 79936-6420
Questions? Visit www .ihomeaudio.com
Toll Free Customer Service: 1-800-288-2792
iH9IB-072707-B ©SDI Technologies 2007 All rights Reserved Printed in China
 Loading...