

iHome iH64 User Manual

Model iH64
Portable Computer Speakers
for your iPod
Questions? Visit www.ihomeaudio.com

Table of Contents
Quick Start ......................................................................................................................................................................... 1
Controls and Indicators....................................................................................................................................................... 2
Using iH64.......................................................................................................................................................................... 3
Charging your iPod ............................................................................................................................................................ 3
Listening to your iPod......................................................................................................................................................... 3
Listening to non-docking iPod or other audio devices......................................................................................................... 4
Syncing your iPod to a Computer through iH64.................................................................................................................. 4
Changing the Speaker Panel .............................................................................................................................................. 4
Operating the Remote On/Off Switch ................................................................................................................................. 4
Using the Optional Remote Control .................................................................................................................................... 5
Install/Replace the Remote Control Battery......................................................................................................................... 5
A Consumer Guide to Product Safety................................................................................................................................. 6
Trouble Shooting ................................................................................................................................................................ 7
Solucionando Problemas.................................................................................................................................................... 8
Warranty Information .......................................................................................................................................................... 9
and are registered trademarks of SRS Labs, Inc.
TruBass and WOW technologies are incorporated under license from SRS Labs, Inc.
Maintenance
• Place the unit on a level surface away from sources of direct sunlight or excessive heat.
• Protect your furniture when placing your unit on a natural wood and lacquered finish. A cloth or other protective material
should be placed between it and the furniture.
• Clean your unit with a soft cloth moistened only with mild soap and water. Stronger cleaning agents, such as Benzene,
thinner or similar materials can damage the surface of the unit.

FCC Information
This device complies with Part 15 of the FCC Rules. Operation is subject to the following two conditions: (1) This
device may not cause harmful interference, and (2) this device must accept any interference received, including
interference that may cause undesired operation.
Warning: Changes or modifications to this unit not expressly approved by the party responsible for compliance
could void the user’s authority to operate the equipment.
NOTE: This equipment has been tested and found to comply with the limits for a Class B digital device, pursuant
to Part 15 of the FCC Rules. These limits are designed to provide reasonable protection against harmful interference
in a residential installation. This equipment generates, uses and can radiate radio frequency energy and , if not
installed and used in accordance with the instructions, may cause harmful interference to radio communications.
However, there is no guarantee that interference will not occur in a particular installation. If this equipment does
cause harmful interference to radio or television reception, which can be determined by turning the equipment
off and on, the user is encouraged to try to correct the interference by one or more of the following measures:
• Reorient or relocate the receiving antenna.
• Increase the separation between the equipment and receiver.
• Connect the equipment into an outlet on a circuit different from that to which the receiver is connected.
• Consult the dealer or an experienced radio/TV technician for help.
Shielded cables must be used with this unit to ensure compliance with the Class B FCC limits
SDI Technologies Inc.
1299 Main Street,
Rahway
NJ 07065
Tel. No.: (732) 574-9000
Getting Started
Thank you for purchasing the iHome iH64 Computer Speaker System for your iPod. Designed
specifically to work with your Computer and iPod, this system provides high quality audio
performance that brings out the best in your music.
Please read this instruction book carefully before operating the iH69 and keep it for future reference.
Check for iPod compatibility
iH64 is an advanced system and supports most updated iPod features. To make sure your iPod works properly with iH64,
please update your iPod firmware with the latest version via iTunes.
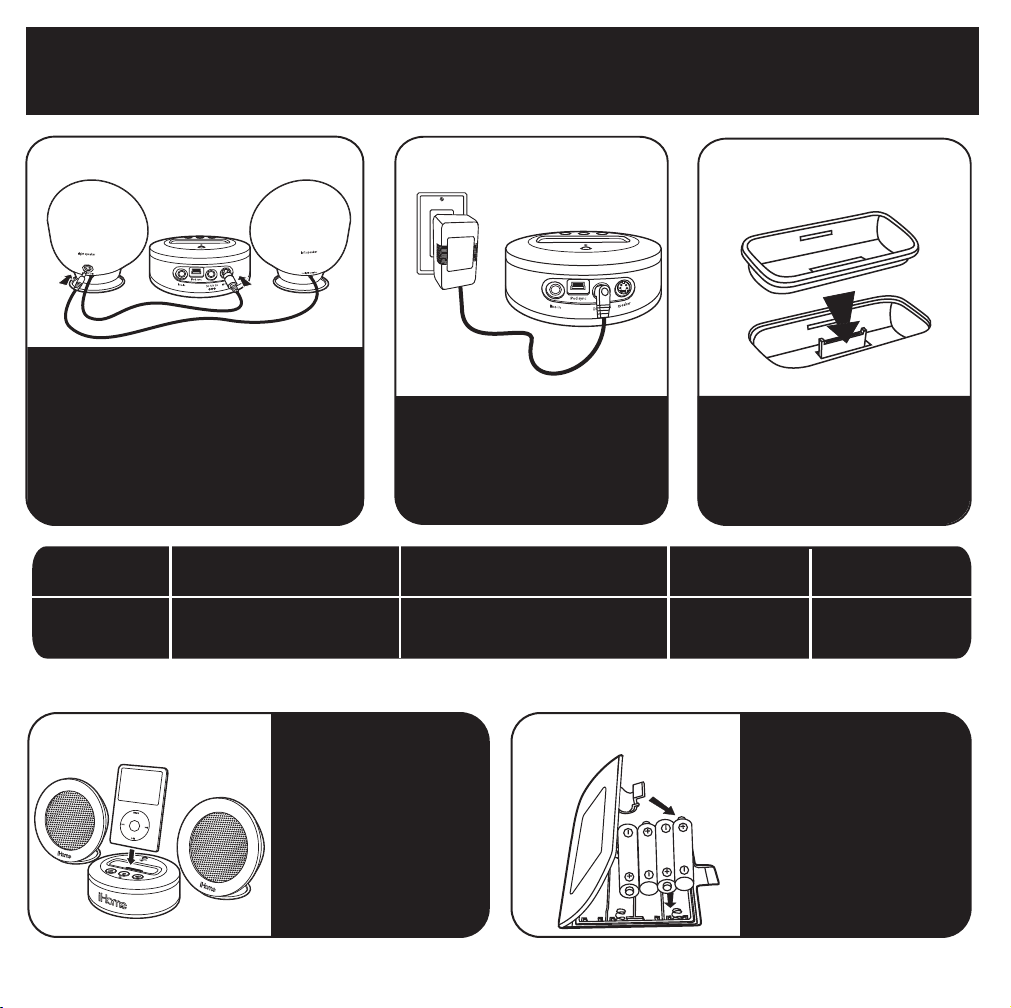
Quick Start: Connections
1:connections
Important: Turn off iH64 before
connecting or disconncting speakers!
1. Power off iH64.
2. Connect the right speaker to the
speaker jack on the back of main unit.
3. Connect the left speaker to the speaker
jack on the back of right speaker.
Use this insert
For this iPod
NOTE: If the insert for your iPod isn’t listed, please visit an Apple store or www.ihomeaudio.com
4:iPod
thin iPod with video (30 GB)
Insert 9
thin (30 GB) iPod with video
thin (80GB) iPod classic
Insert iPod into dock with
proper insert (iPod must
not be in a skin or case).
iPod will charge while
docked.
Press the Power button
on the iH64 then press
play/pause button on your
iPod to play the iPod.
2:power
Attach the AC adaptor cable to
the jack on the back of the main
unit and plug the other end into a
working wall socket.
iPod with video (60,80 GB)
Insert 10
thick (60, 80 GB) iPod with video
thick (160 GB) iPod classic
to purchase the proper insert.
5:batteries
3:inserts
Select the dock insert for your
iPod model from the table below
and place insert in dock.
Never dock an iPod without an
insert in place.
3rd Gen nano
insert 13
3rd Gen nano
For portable operation,
remove the battery
compartment door on the
bottom of the main unit
and insert 4 AAA batteries
(match + and - polarity to
diagram in compartment).
Replace door. Will not
charge iPod when
operating on batteries.
iPod Touch
insert 14
iPod Touch
1
 Loading...