

Page 1
iGREEN GENESIS Tab-2
GREEN Planet Co. www.igreen-co.com
1
User Manual
iGREEN GENESIS Tab-2
iGT-10N1-3G
Page 2

iGREEN GENESIS Tab-2
GREEN Planet Co. www.igreen-co.com
2
Table of Contents ......................................................................................................................................... 2
Outlook Description..................................................................................................................................... 3
Power Button Usage.................................................................................................................................... 4
Touch-Screen Navigation .......................................................................................................................... 4
Using microSD Card .................................................................................................................................... 4
Getting Started ............................................................................................................................................. 5
Launcher ........................................................................................................................................................ 6
Screen Lock ....................................................................................................................................................7
Pre-loaded Applications ............................................................................................................................. 8
Application Management ........................................................................................................................... 11
Phone ............................................................................................................................................................. 12
Message ........................................................................................................................................................ 13
People ............................................................................................................................................................ 14
Voice Search ................................................................................................................................................ 15
Clock ..............................................................................................................................................................16
Play Store ......................................................................................................................................................18
Browser and Chrome .................................................................................................................................. 21
Calendar ....................................................................................................................................................... 22
Camera ......................................................................................................................................................... 24
Calculator ....................................................................................................................................................25
Email ............................................................................................................................................................ 26
Explorer ........................................................................................................................................................28
Music ........................................................................................................................................................... 30
Video .............................................................................................................................................................. 31
Gallery ........................................................................................................................................................... 33
Gmail ............................................................................................................................................................. 34
Maps, Local, and Latitude ......................................................................................................................... 37
Google Talk ..................................................................................................................................................40
Google ........................................................................................................................................................... 41
Wi-Fi .............................................................................................................................................................. 43
Accounts ...................................................................................................................................................... 45
Settings ........................................................................................................................................................46
49 .........................................................................................................................................................................ﯽﺳرﺎﻓ يﺎﻤﻨﻫار
Page 3
iGREEN GENESIS Tab-2
GREEN Planet Co. www.igreen-co.com
3
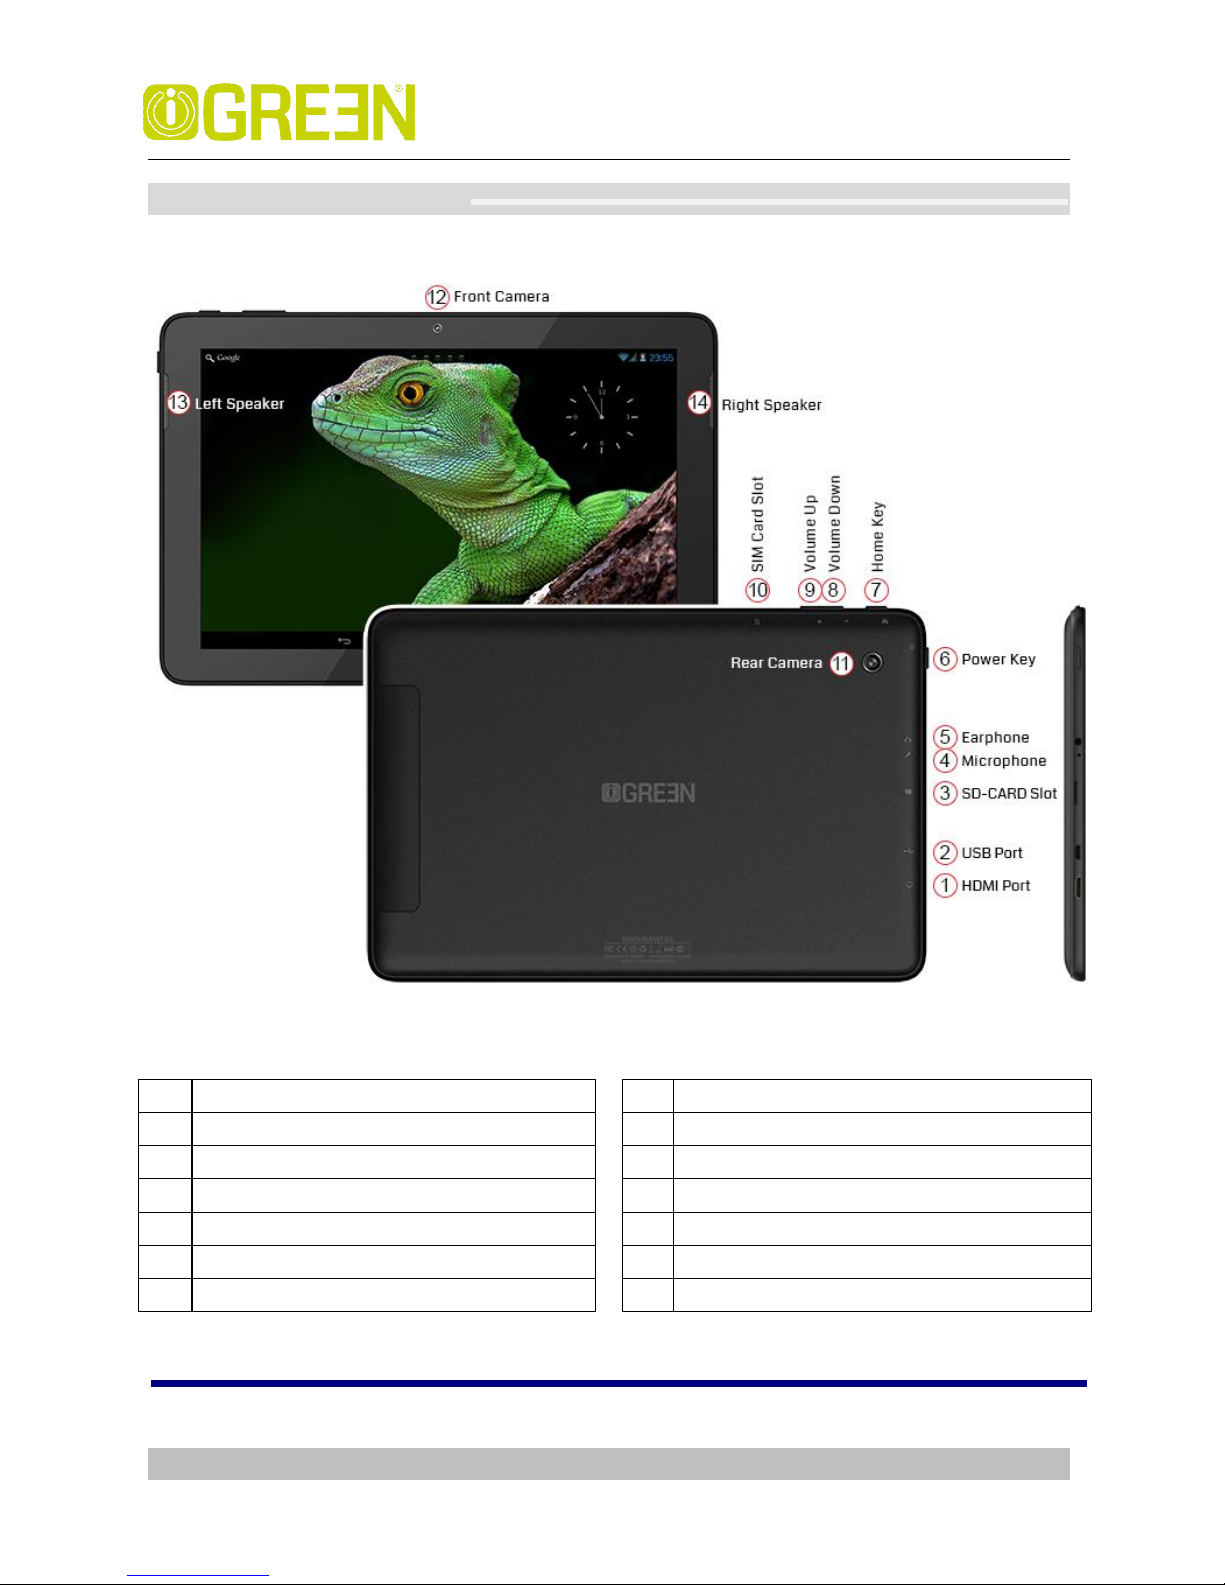
1 Outlook Description
1 HDMI Port
8 Volume Down (
-) 2
USB Port
9
Volume Up (+)
3
SD Card Slot
10
SIM Card Slot
4
Microphone
11
Rear Camera
5
Headphone
12
Front Camera
6
Power Key (ON/OFF)
13
Speaker
(Left) 7 Home Key
14
Speaker
(Right)
Page 4
iGREEN GENESIS Tab-2
GREEN Planet Co. www.igreen-co.com
4
2 Power Button Usage
Turn On: Press the power button and hold for 2 seconds.
Turn Off: Press the power button and hold for 2 seconds →tap Power off → tap OK
Turn on/off airplane mode: Press the power button and hold for 2 seconds →tap airplane
mode
Sleep Mode On/Off: Press & release the power button quickly to turn sleep mode on and off.
3 Touch-Screen Navigation
The touch-screen allows for quick, easy and convenient navigation for all applications.
Throughout the User Guide, you are instructed to use the following tap or touch navigation
methods:
Tap: quick tap & release on an item on the screen.
Finger slide: touch & slide your finger across the screen and then release.
Touch & hold: touch and hold in place approx 2 seconds, and then release to display an
options window.
Note:
To avoid scratching or crushing, do not place objects on the touch screen surface.
4 Using micro SD Card
· Insert your card into the micro SD slot until it clicks into place. When ready for use, it’s
OK.
· Remove micro SD Card
· Close all applications or documents which have been opened on the card. Press
Settings → Storage → SD Card →Un-mount Storage → OK.
Note:
Don’t insert and remove the SD card repeatedly in a short time, as this may cause damage
to the card.
Page 5
iGREEN GENESIS Tab-2
GREEN Planet Co. www.igreen-co.com
5
5 Getting Started
Charge the device
Note:
You can also charge the battery using the USB cable.
. Plug the power adapter into an electrical wall outlet named DC, and then connect to the
device to fully charge the battery before use (approx. 4hour).
· While charging, the battery indicator light is red. When fully charged, the battery
indicator light is off
Turn the device on
Press the power button and hold for 2 seconds.
Start Wi-Fi Network
· Turn on Wi-Fi
Since many features require a Wi-Fi connection, we recommend you set up your Wi-Fi
network now.
Press Settings,→ Wi-Fi
Check Wi-Fi to turn on.
· Connect to Wi-Fi
The device automatically scans and lists all local Wi-Fi Network found. A indicates
that the secure networks require login name/password to connect.
1、Tap the desired network to which you want to connect, → enter the Network Password if
applicable, → tap Connect.
2、Tap back key to return to the Home screen.
Note:
If your Wi-Fi network is set as hidden, it won’t be found by the auto scan. Tap “+”on the top
of the screen and follow the prompts to add your network
Page 6
iGREEN GENESIS Tab-2
GREEN Planet Co. www.igreen-co.com
6
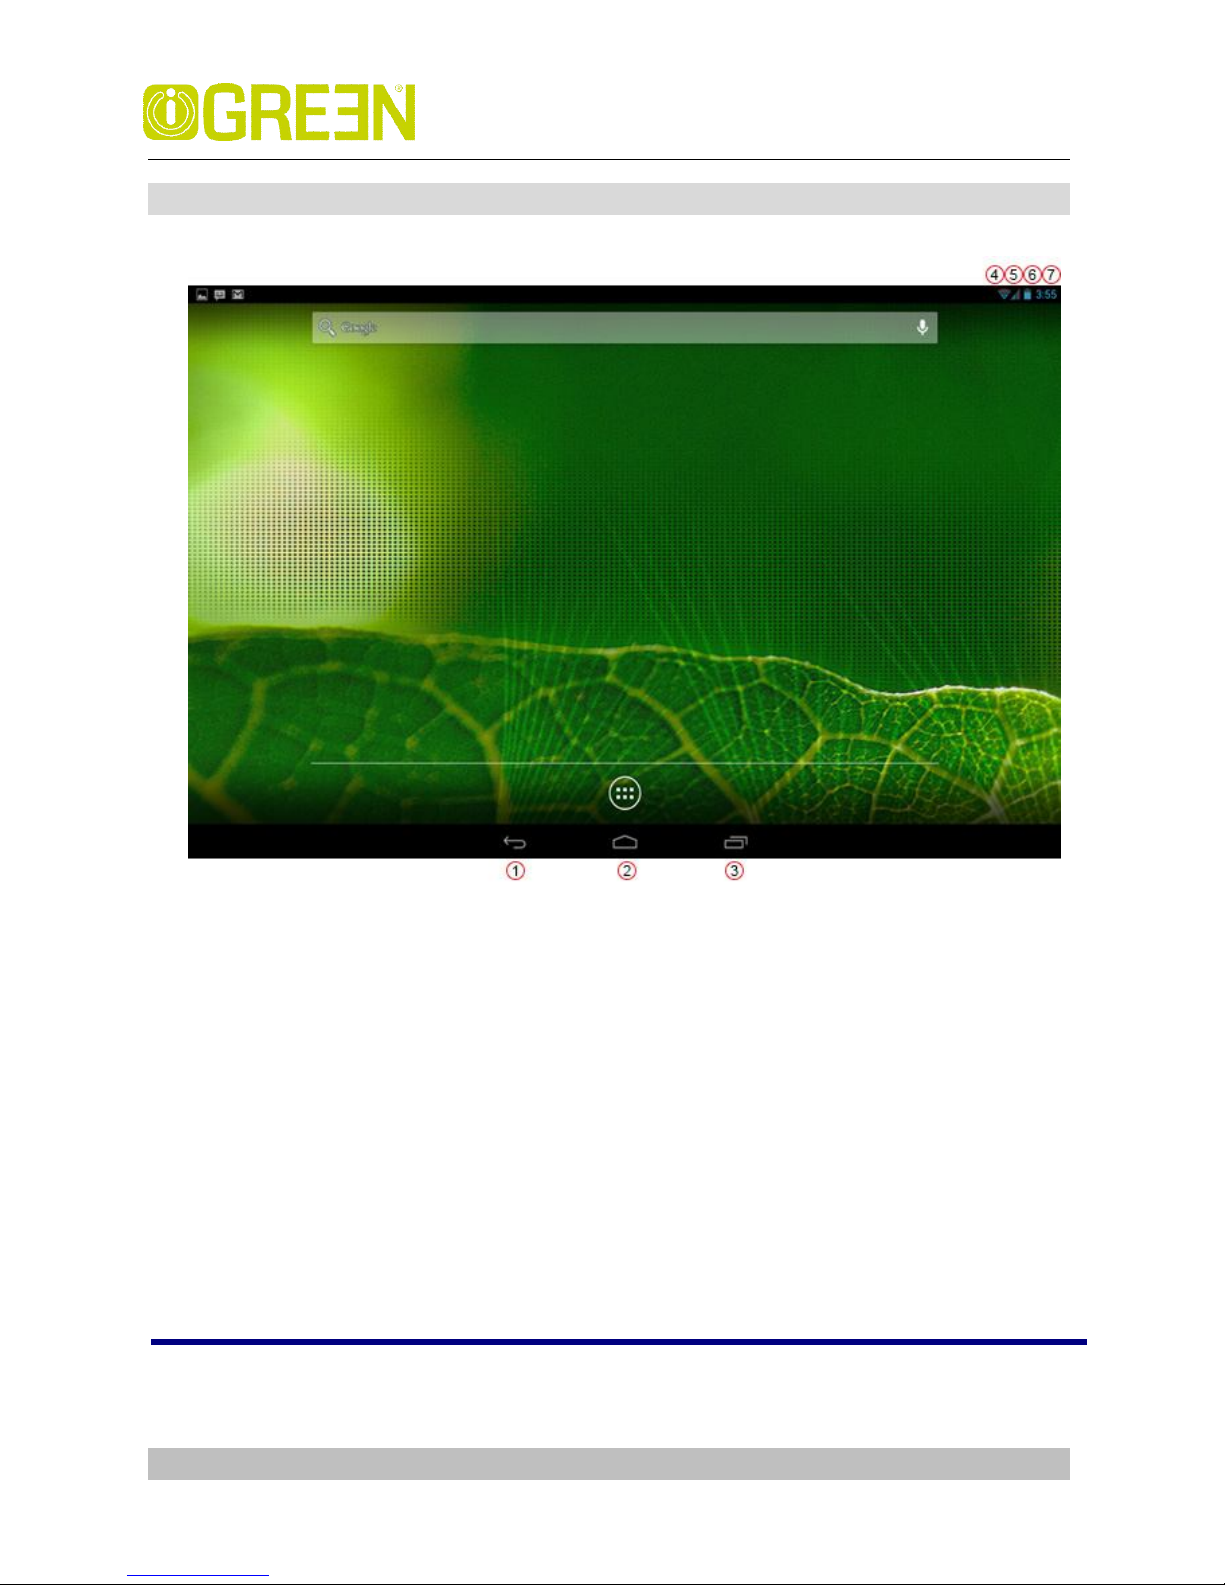
6 Launcher
1. Backspace
2. Home
3. Display the program is running
4. Wi-Fi signal icon
5. Phone signal
6. Battery
7. Time
Page 7
iGREEN GENESIS Tab-2
GREEN Planet Co. www.igreen-co.com
7
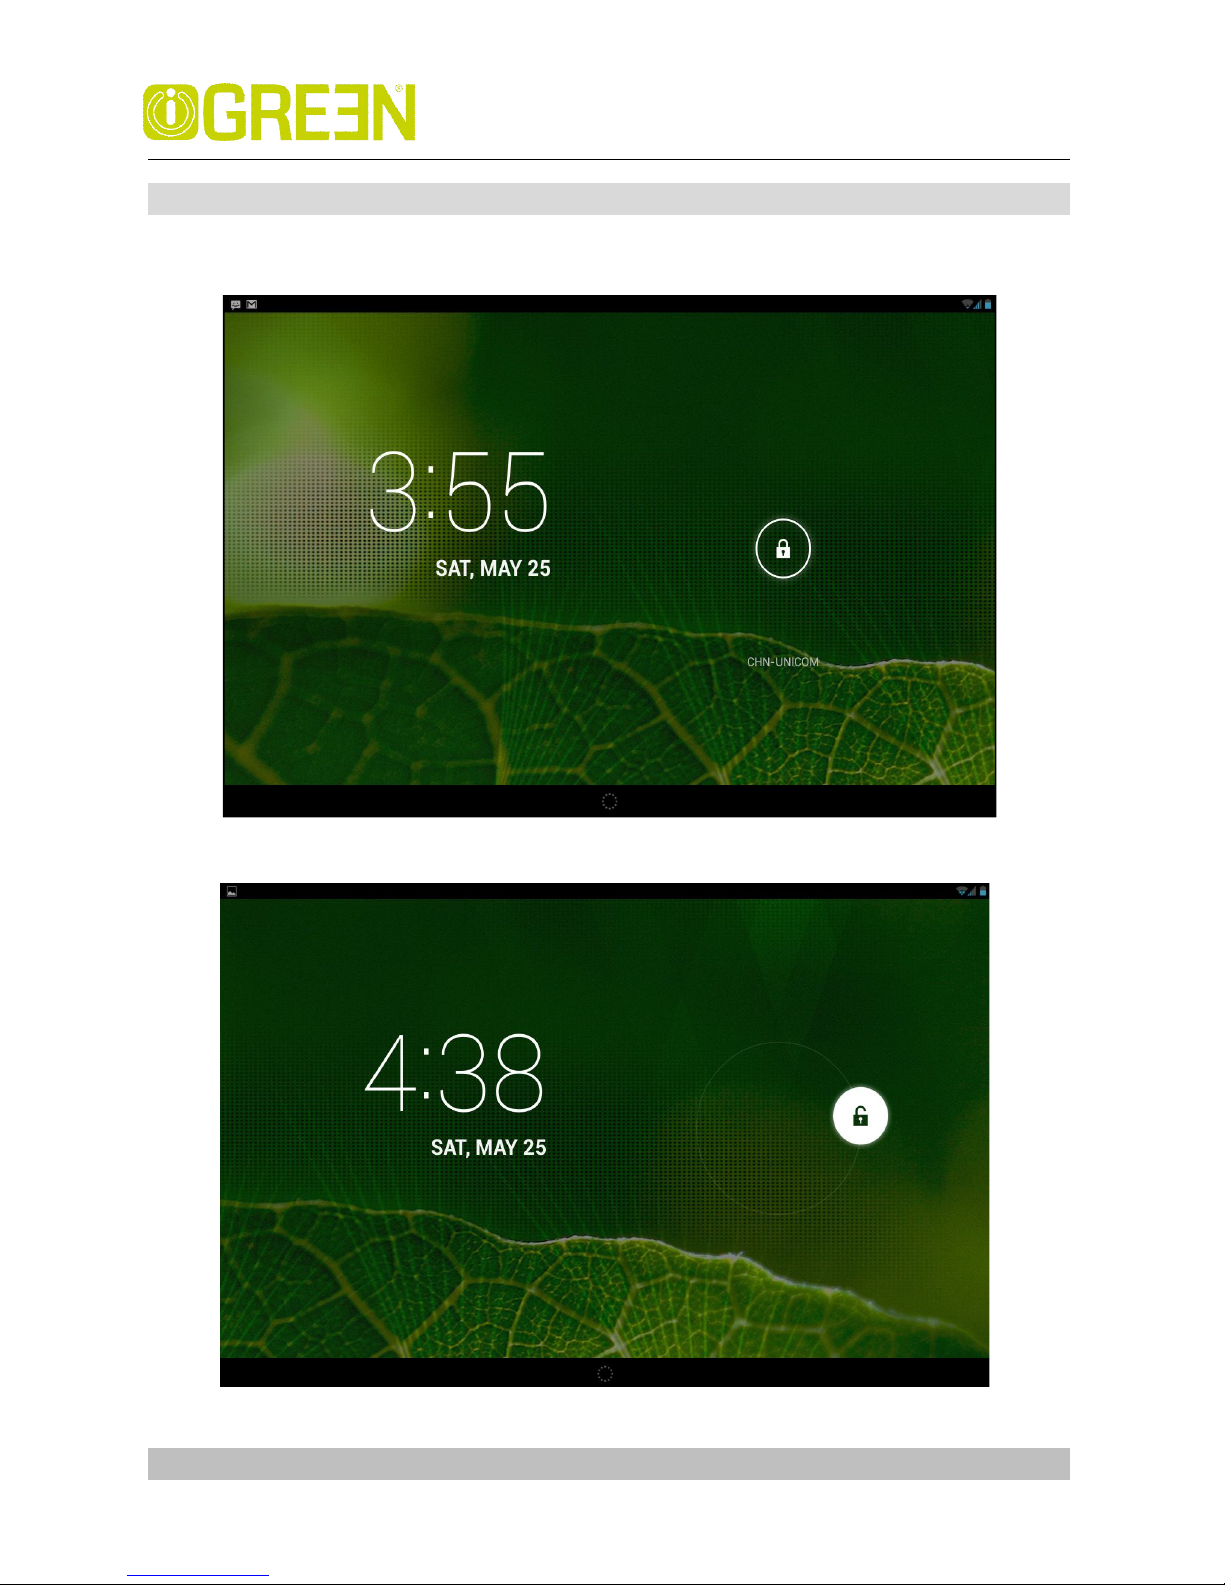
7 Screen Lock
Can be set to automatically lock screen or quickly press the power button to manually lock
screen. Lock screen displays the following:
You can drag the lock to any direction to unlock your device.
Page 8
iGREEN GENESIS Tab-2
GREEN Planet Co. www.igreen-co.com
8
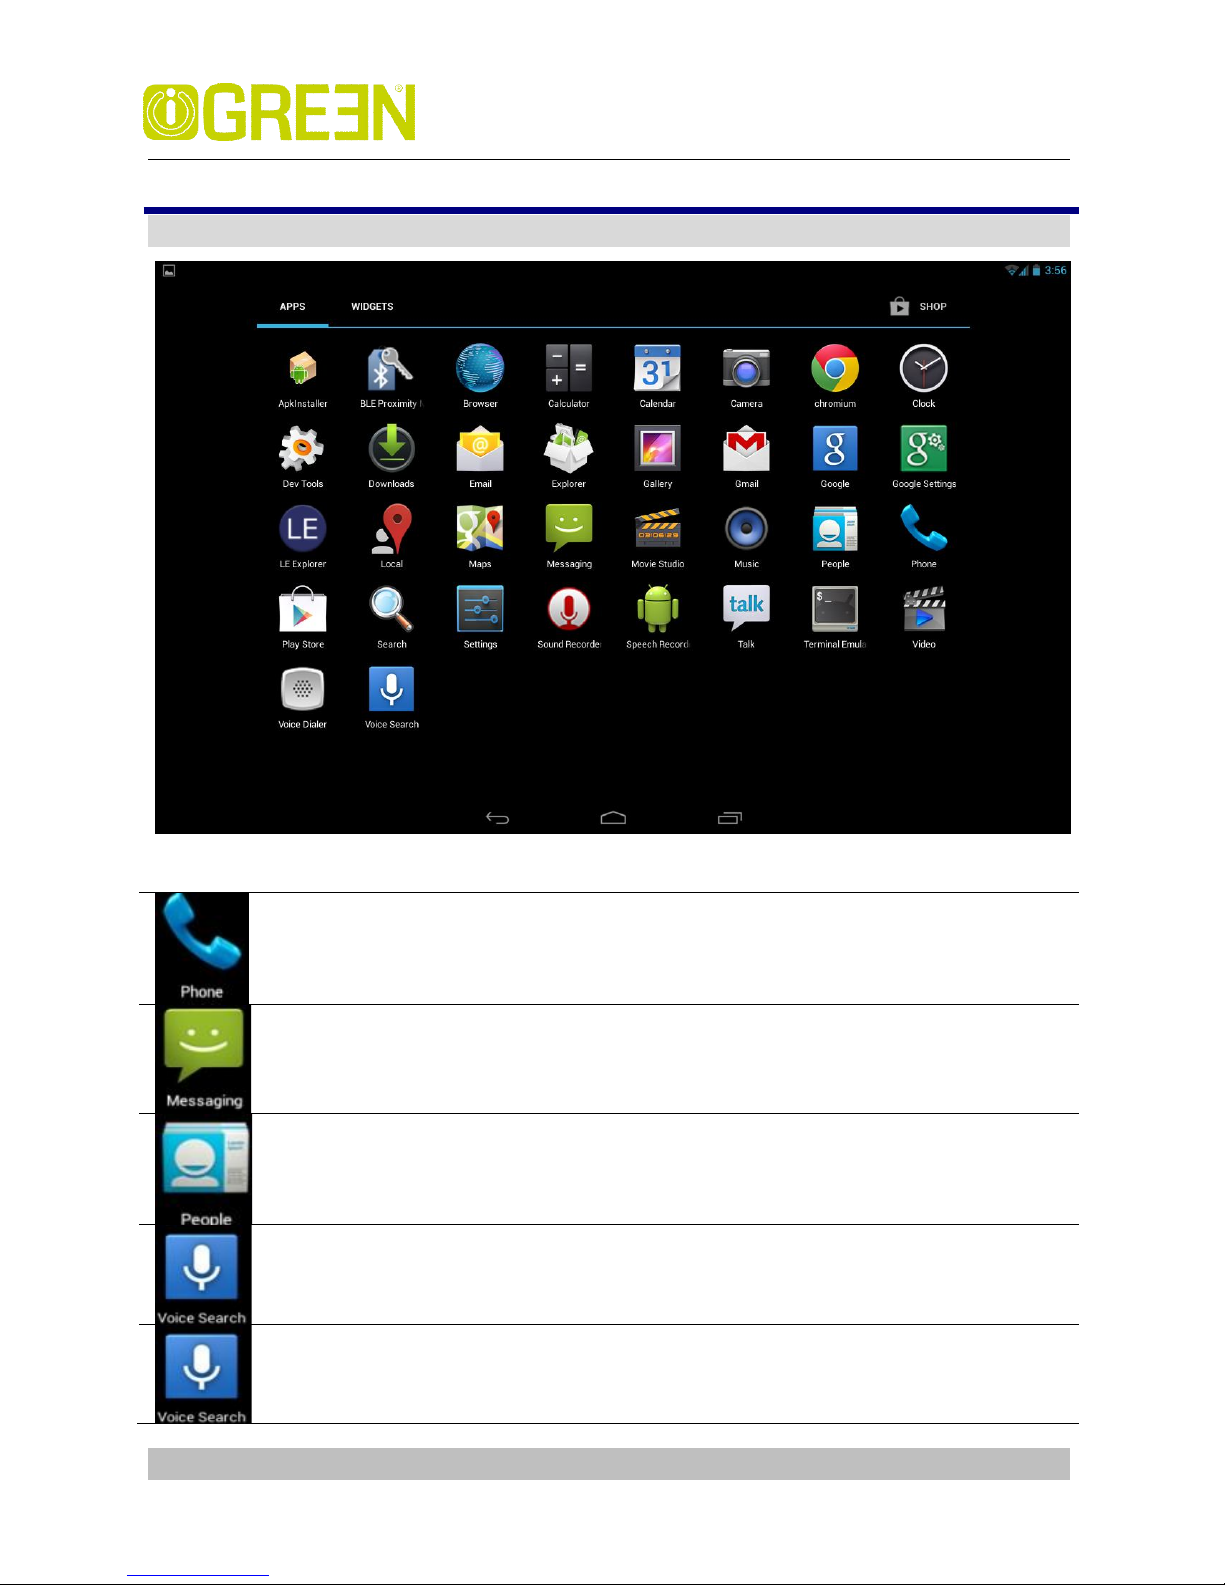
8 Pre-loaded Applications
Phone Contact with others in speech communication
Message Send SMS or MMS to people you desired
People Save a person’s information
Voice Search Search for something that you speak out
Voice Search Search for something that you speak out
Page 9
iGREEN GENESIS Tab-2
GREEN Planet Co. www.igreen-co.com
9
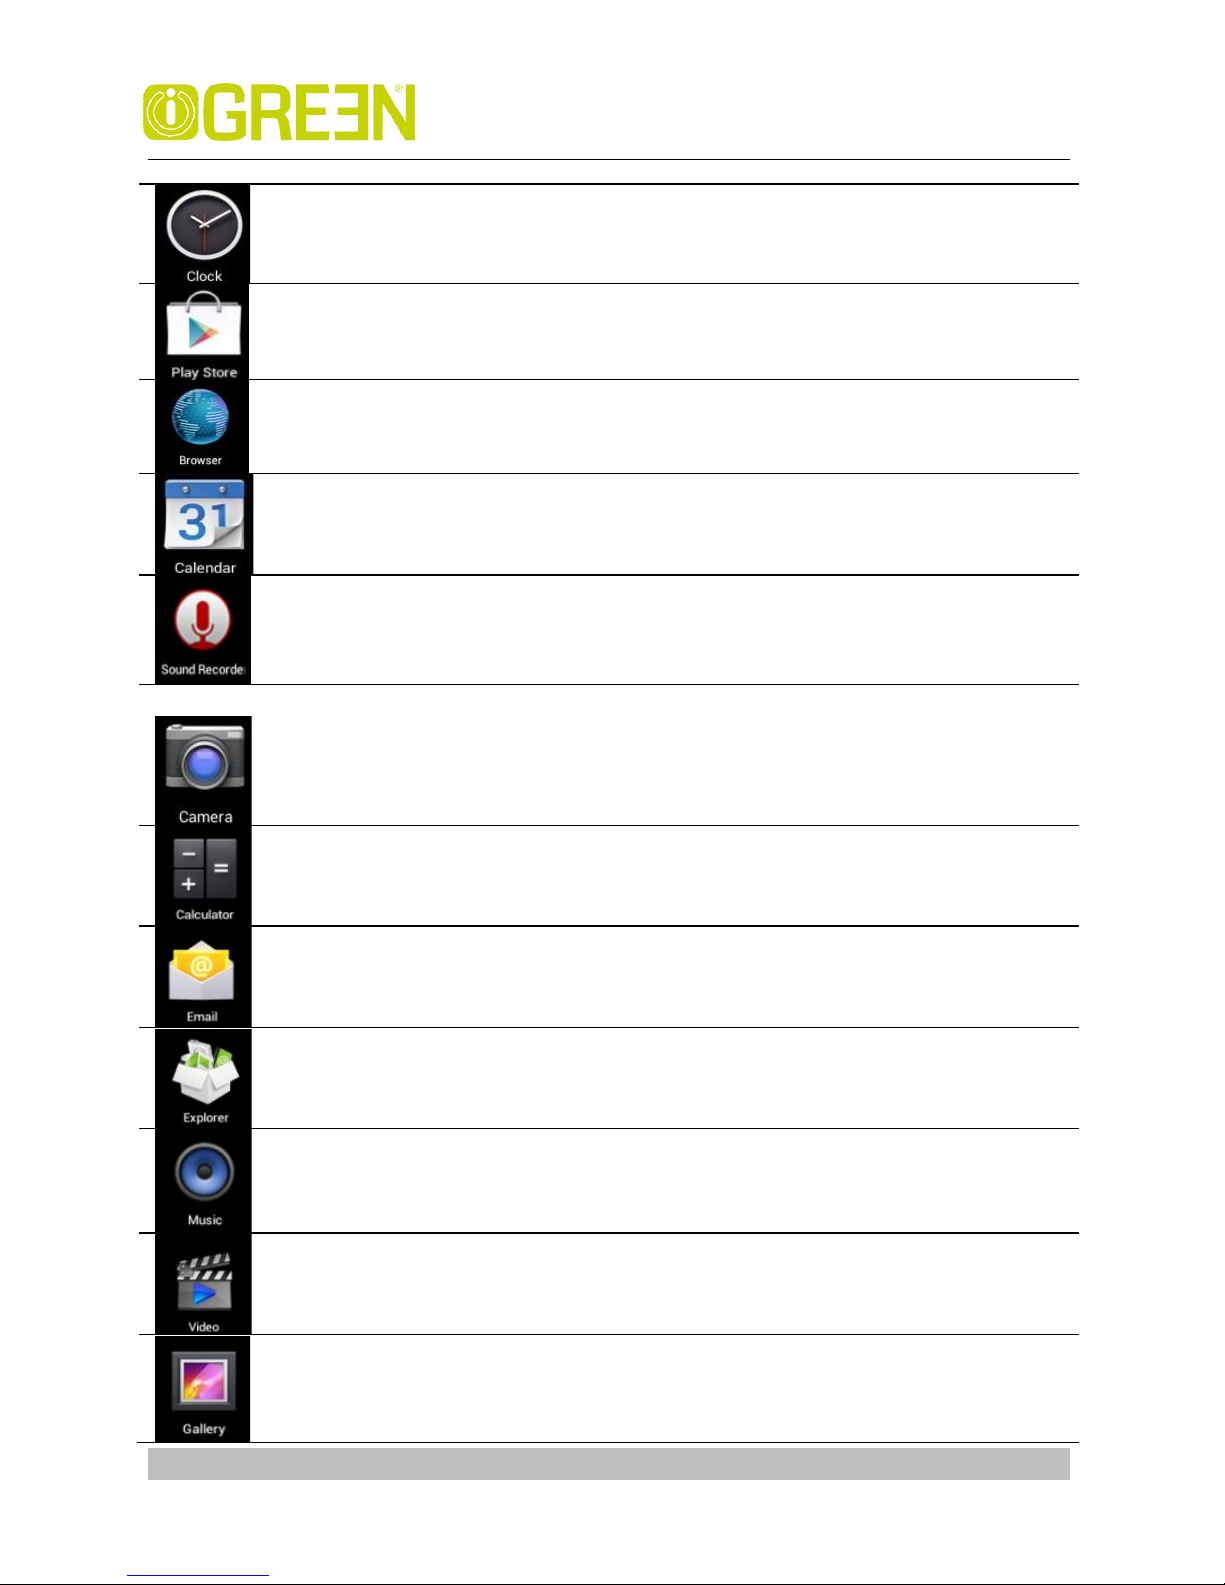
Clock Use as alarm clock with scheduled alarms.
Play Store Downloaded applications quickly & easily.
Browser Access the Internet and “surf the web” whenever desired.
Calendar Calendar with ability to set events.
Sound recorder For recording your voices
Camera Capture image of the screen.
Calculator Do calculation.
Email Send/Receive email using your existing email addresses.
Explorer
Explorer application for viewing and managing files and
apps. Use to install Android apps, and to backup files to
your SD card.
Music Play and manage audio files.
Video Player Play and manage video files.
Gallery View and manage photo files.
Page 10
iGREEN GENESIS Tab-2
GREEN Planet Co. www.igreen-co.com
10
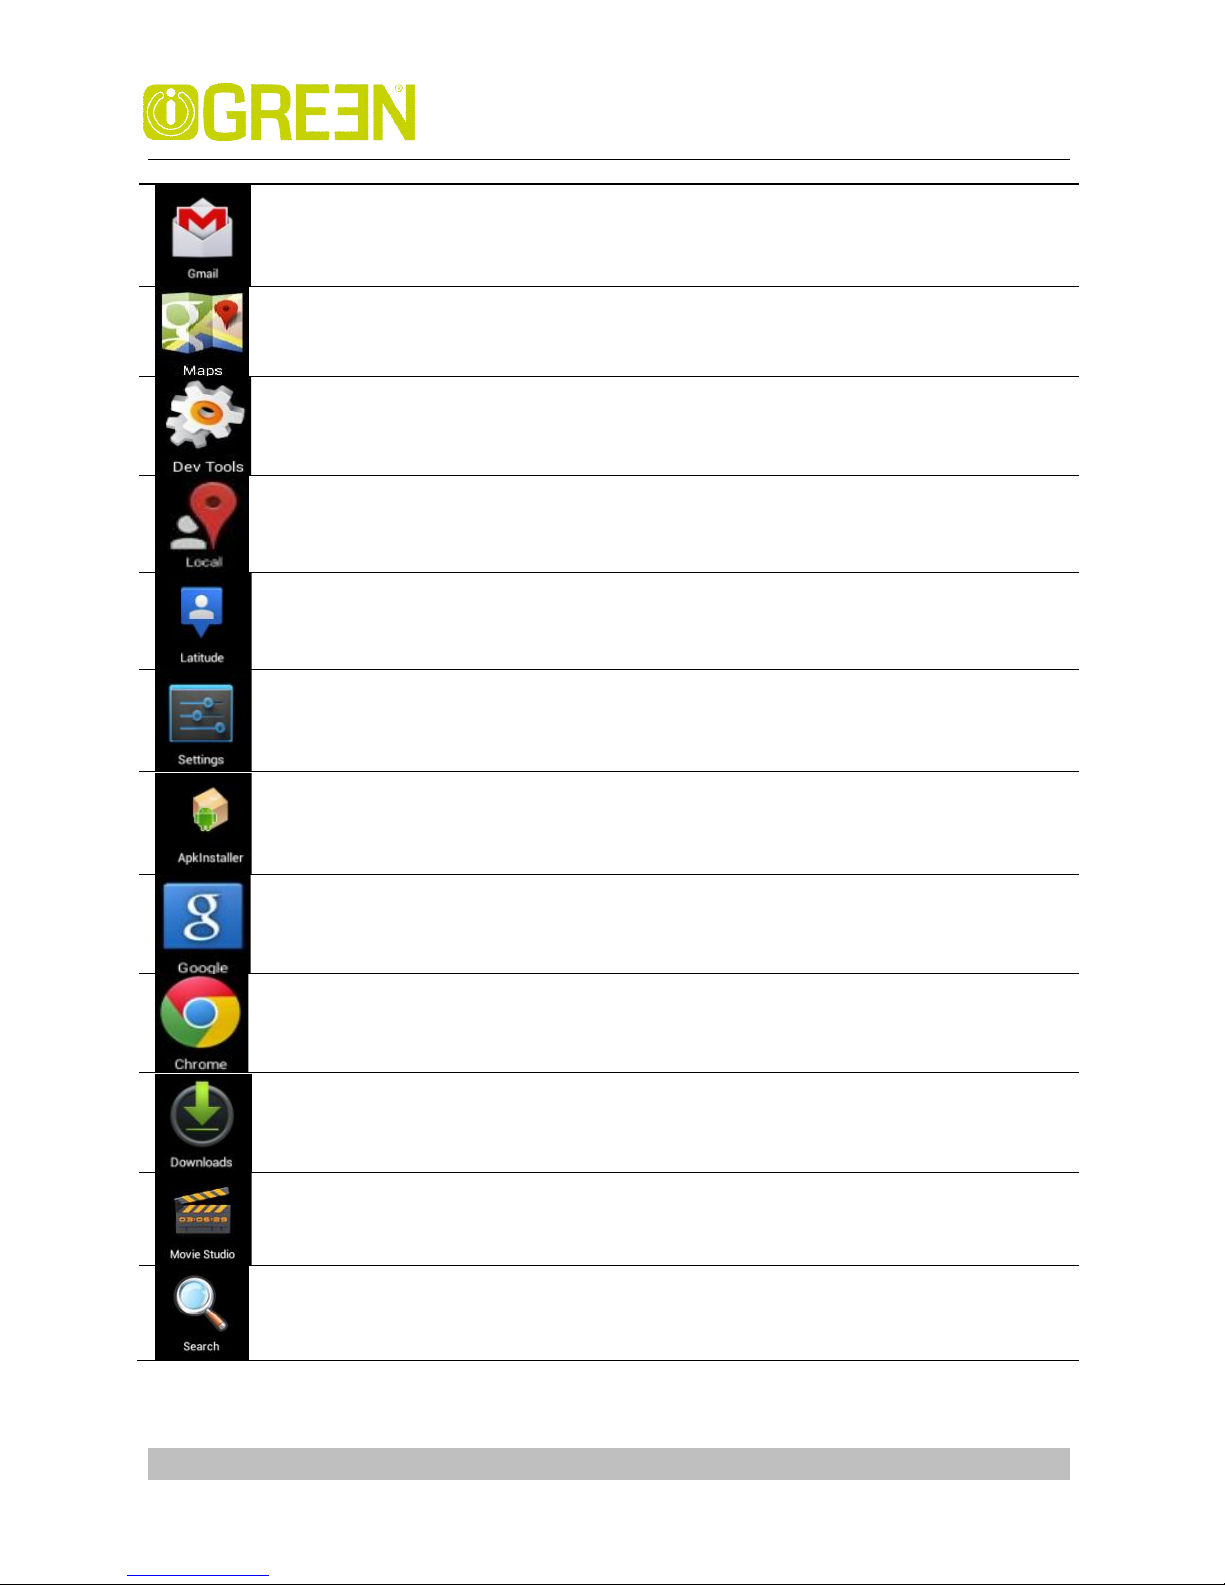
Gmail For sending and receiving mails by Gmail server
Maps
For discovering the world with street and satellite data
from the Google Earth
Dev Tools Android debug tools
Places A shortcut for finding places using Navigation service
Latitude
lets you and your friends view each others’ locations on
maps and share status messages with each other
Settings
Multiple settings for personalizing and enhancing your
Device.
Apk Installer
Used for installation the android application in SD card or
NANDFLASH the android application
Google You can do searching by voice or text
Chrome Access the Internet and “surf the web” whenever desired.
Downloads To download the application from the website
Movie-Studio Play and manage video files.
Search To find out the application you want to run
Page 11
iGREEN GENESIS Tab-2
GREEN Planet Co. www.igreen-co.com
11
Talk To stay in contact with your Gmail friends
☆ To move an icon to the Desktop screen, touch & hold on the icon, and then release it
when it appears on the Desktop screen.
☆ Touch, hold and slide icons onto “×” to remove them from the Desktop screen.
9 Application Management
Install Android Applications
Purchased or free Android applications that you have downloaded to your
computer can be installed quickly & easily on your Tablet using the ApkInstaller application.
1. Copy the .apk files that you want to install onto a SD card or USB device, →
insert or connect to your Device.
2. Tap the Apk-Installer application icon.
3. Tap Install and locate the folder (Internal Memory or TF Card) in which the .apk
application files were saved.
4. Tap on a .apk file → Install.
The application is installed and the application icon is added to the
Applications screen.
5. Tap Open to launch the application now, or tap Done to return to the
Apk-Installer screen.
Download Android Applications direct from a Website
You can download Android applications directly from websites, and then quickly
and easily install them on your device.
1. Tap the Browser application icon to launch the internet browser.
2. Enter the desired website URL, and tap the download link for the application
you want to install on your device.
3. After the download is complete, touch & hold on the download file (in the
Download history screen), → tap Open → Install.
Download Android Applications direct from Play Store
Please refer to the Chapter of “Play store”
Page 12
iGREEN GENESIS Tab-2
GREEN Planet Co. www.igreen-co.com
12
Uninstalling Android Applications
You can also quickly and easily uninstall the Android applications that you have
installed.
1. Press Settings → Applications
2. Tap the application you want to uninstall, → Uninstall.
3. Tap OK to confirm the Uninstall.
You can also use Apk-Installer to uninstall the Android applications
1. Tap the Apk-Installer application icon.
2. Tap Manage
3. Tap one .apk from the application list and tap Uninstall
4. Tap OK to confirm to uninstall the .apk
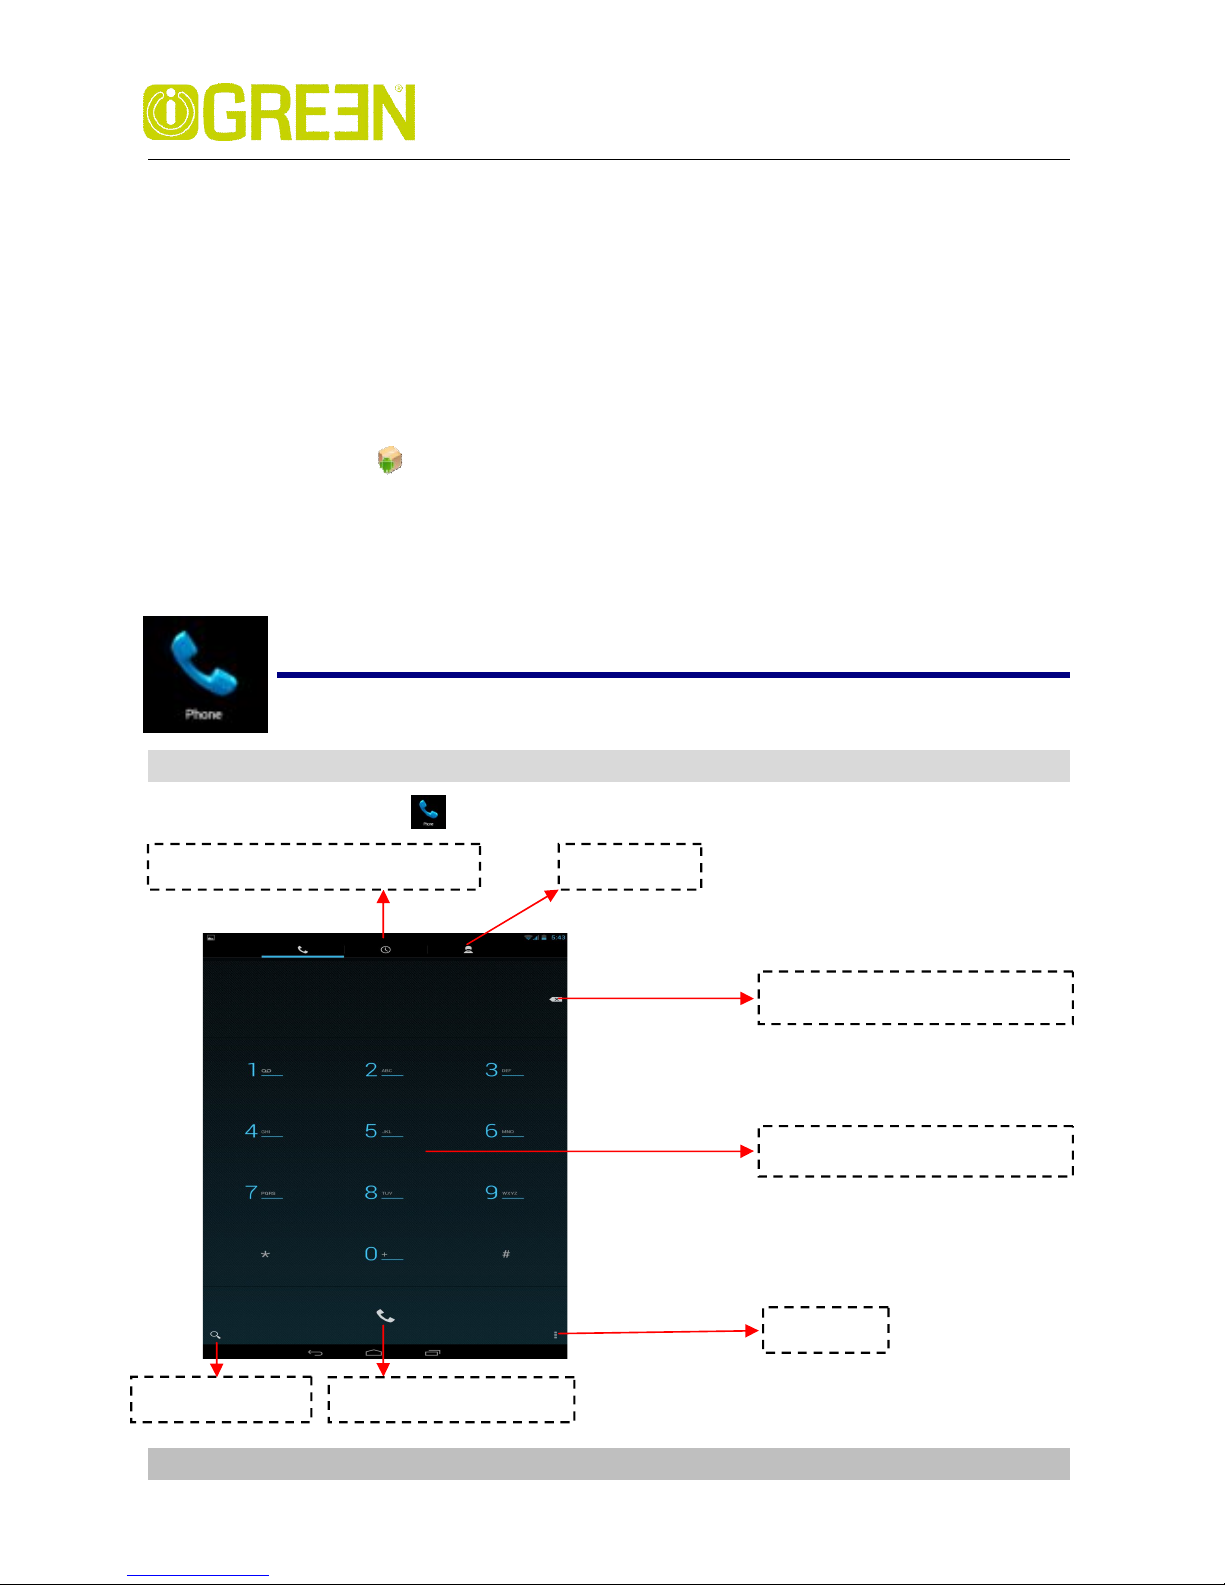
10 Phone
Press the phone icon
Dialing phone numbers
Delete the wrong
number
View the history call records
Contacts
Make the phone call
Settings
Find contacts
Page 13
iGREEN GENESIS Tab-2
GREEN Planet Co. www.igreen-co.com
13
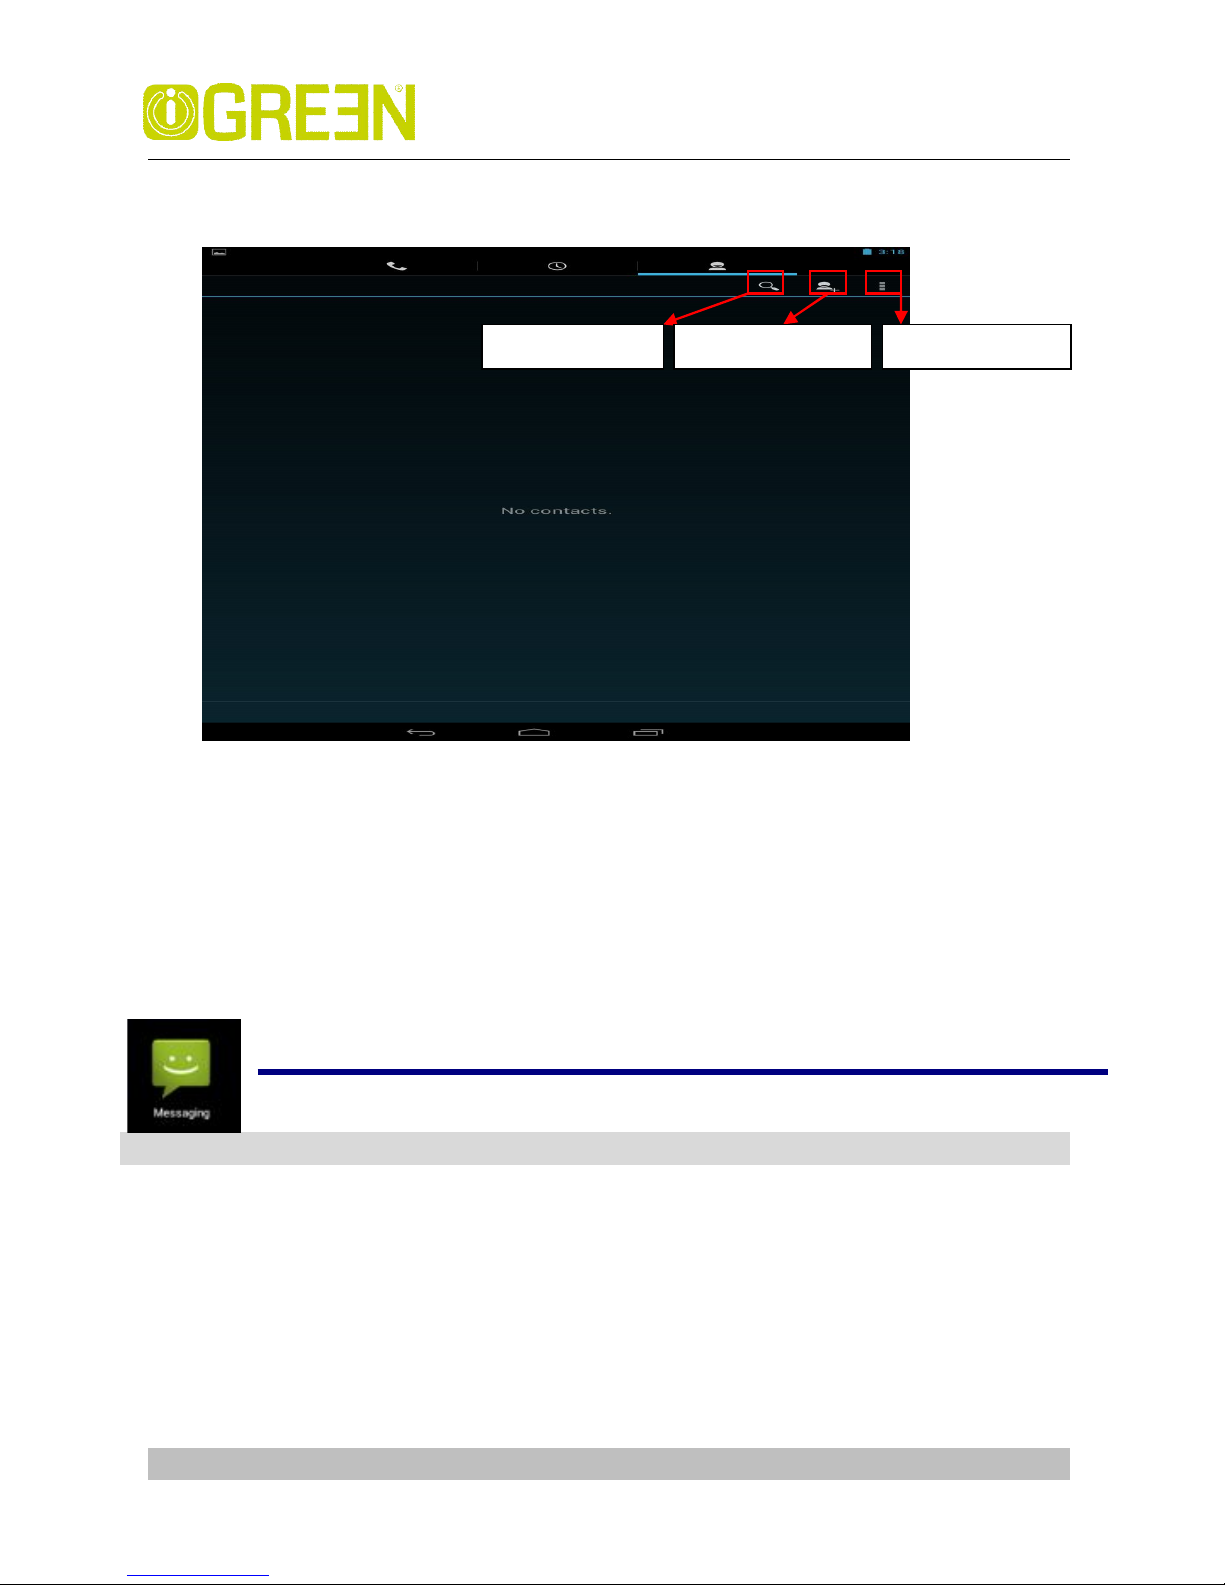
View the contacts, see as follows:
More choice
Contacts to display Show all contacts or customize
Import/export Import from storage / Export to storage /Share visible contacts
Accounts Choose Auto-sync app data or not
Settings Set the ringtone and other settings
11 Message
Open message
1.Press the message icon on the screen.
2. Create new message or open the chat which is ongoing.
Send message
1. Pressing “New massage” at the top of the screen to compose new massage.
Find contacts
Add contacts
More choices
Page 14
iGREEN GENESIS Tab-2
GREEN Planet Co. www.igreen-co.com
14
2. Touch To to input the phone numbers that you want to send the message to.
Input the phone number directly using the virtual keyboard
You can also enter already entities of the mobile phone number the contact's name.
3. Touch Type message to start editing your message.
You can input some text information to make a SMS.
You can add subject or insert pictures or video to make a MMS.
4.Touch the arrow icon to send the message.
12 People
Open people
1. Touch the people icon on the desk to open people
2. At the top of the screen ,you will see GROUPS, ALL, FAVOURITES
3. Four buttons on the right top screen can help you manage the people.
check of People
1. Open the "people".
2. You want to see the details , touch of the contact on the left side.
3. All kinds of contact will show the appropriate details right side.
add contacts
1. To add a group ,touch GROUPS and . Type Group’s name and person’s name
according to the tips
2. To add a person’s message, touch ALL and .Type the contact’s
name ,phone ,email ,according to what you need.
You can add contacts on mobile phones, and with Google account, Microsoft Exchange
ActiveSync account or support the accounts in other contact synchronization
correspondent synchronization.
If which you give is not in the "contact" listed in some email addresses to send reply
E-mail or forwarding mail.
the system will add this email address to the contact. The "contact" will attempt to put
a new address and existing contact merged into one entry. You can also manually
manage the process.
Page 15
iGREEN GENESIS Tab-2
GREEN Planet Co. www.igreen-co.com
15
13 Voice Dialer
Press the icon to open the following window,
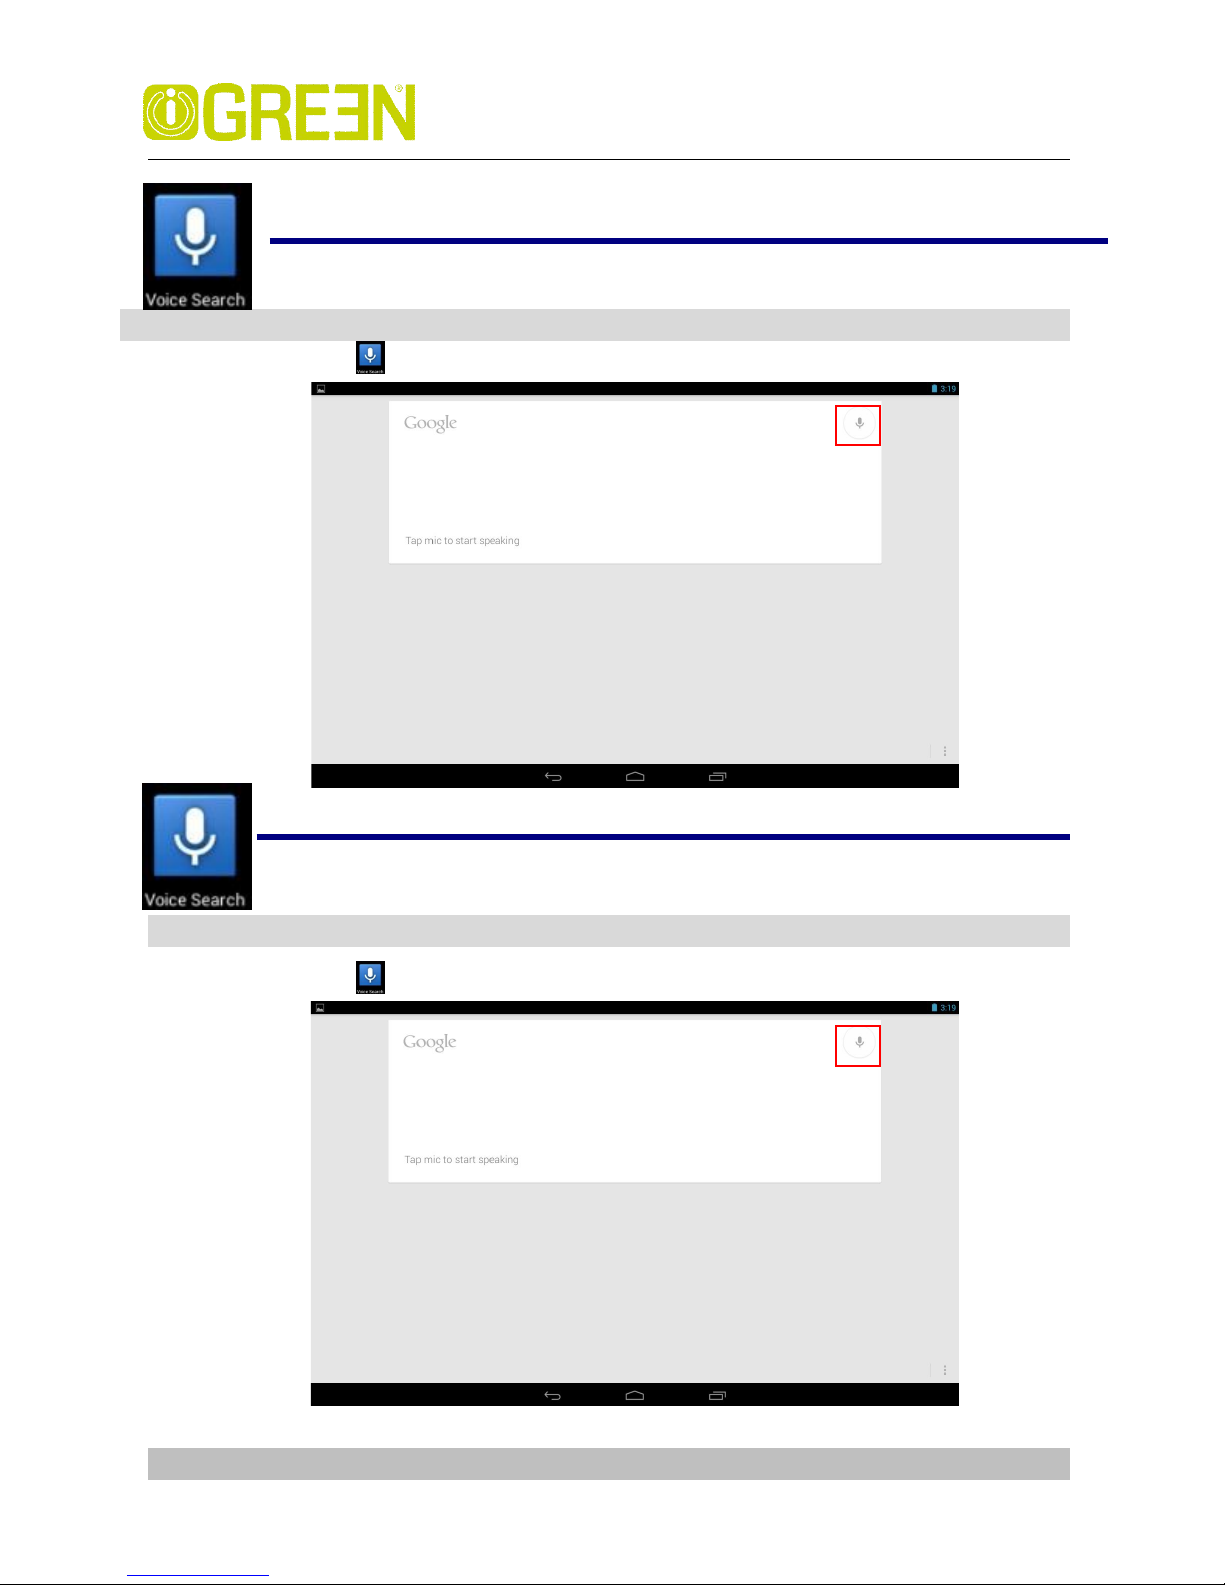
14 Voice Search
Press the icon to open the following window,
Page 16
iGREEN GENESIS Tab-2
GREEN Planet Co. www.igreen-co.com
16
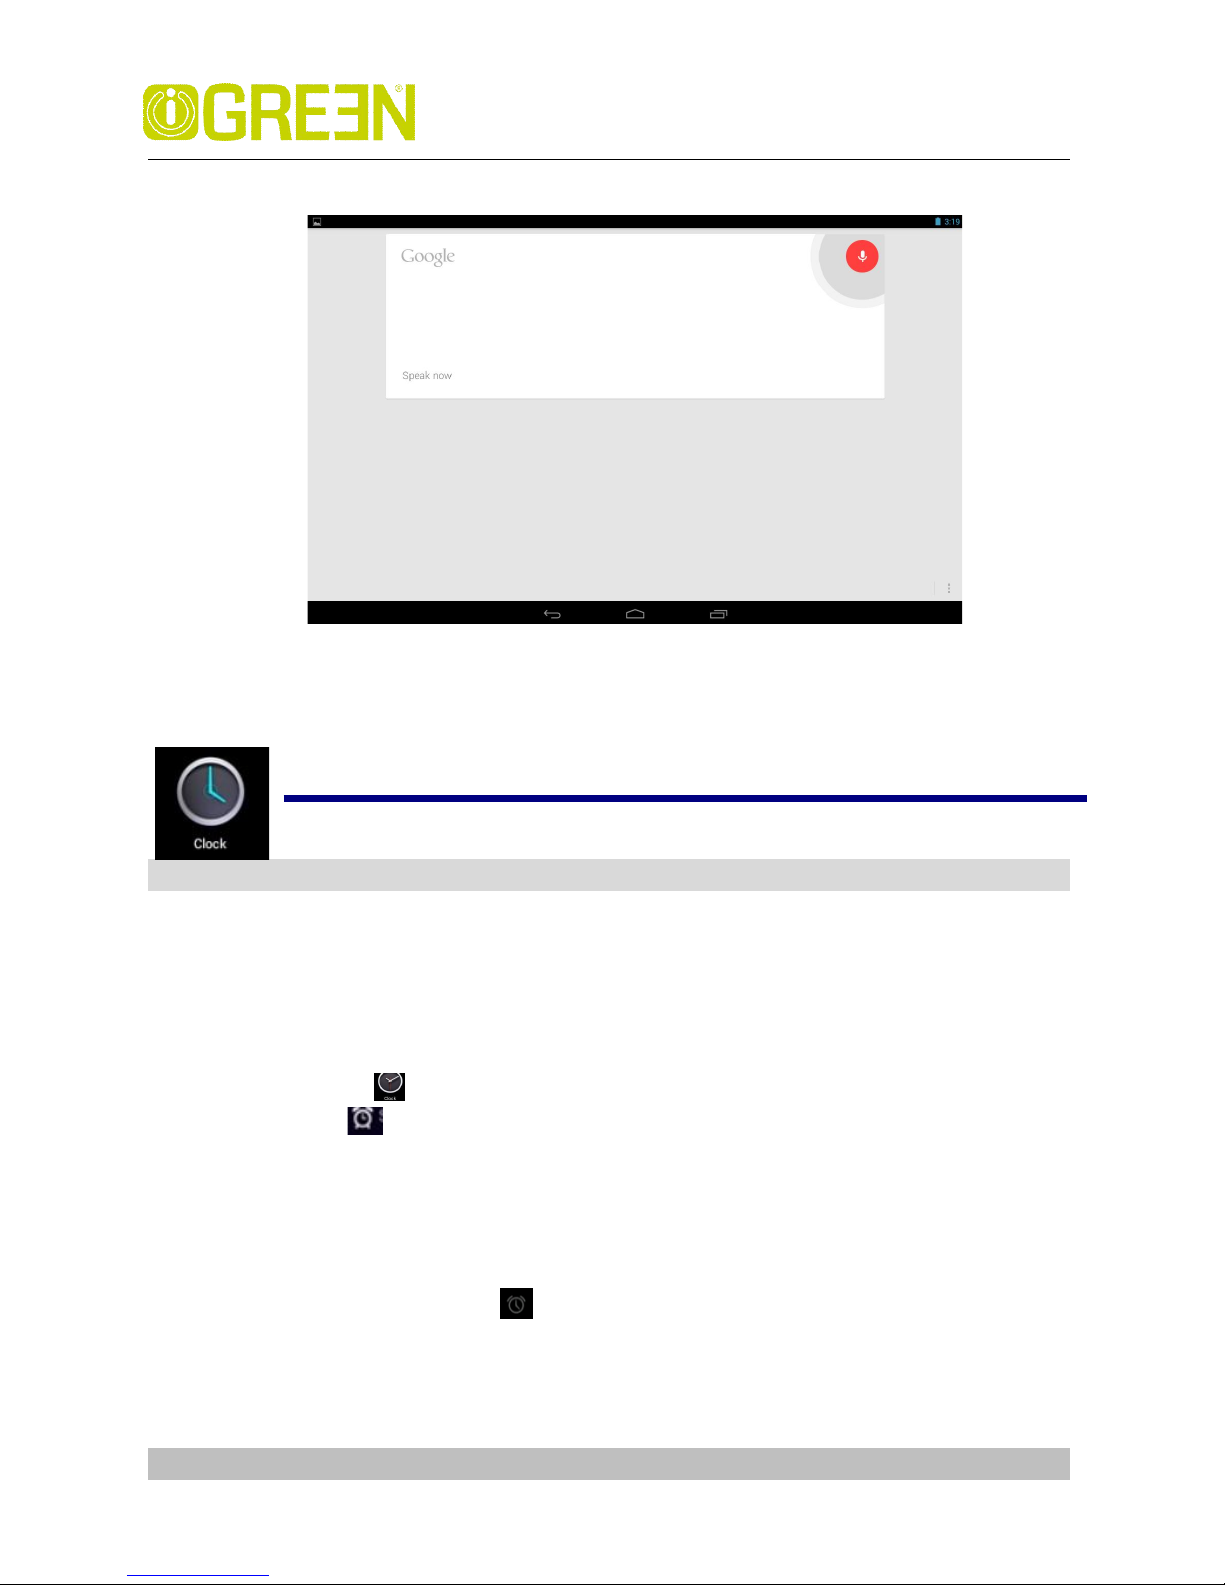
Tap mic to enter the speaking mode
Speak out what you want to search, then it will analysis the content. If your device can
recognize the word, it will start searching the internet automatically.
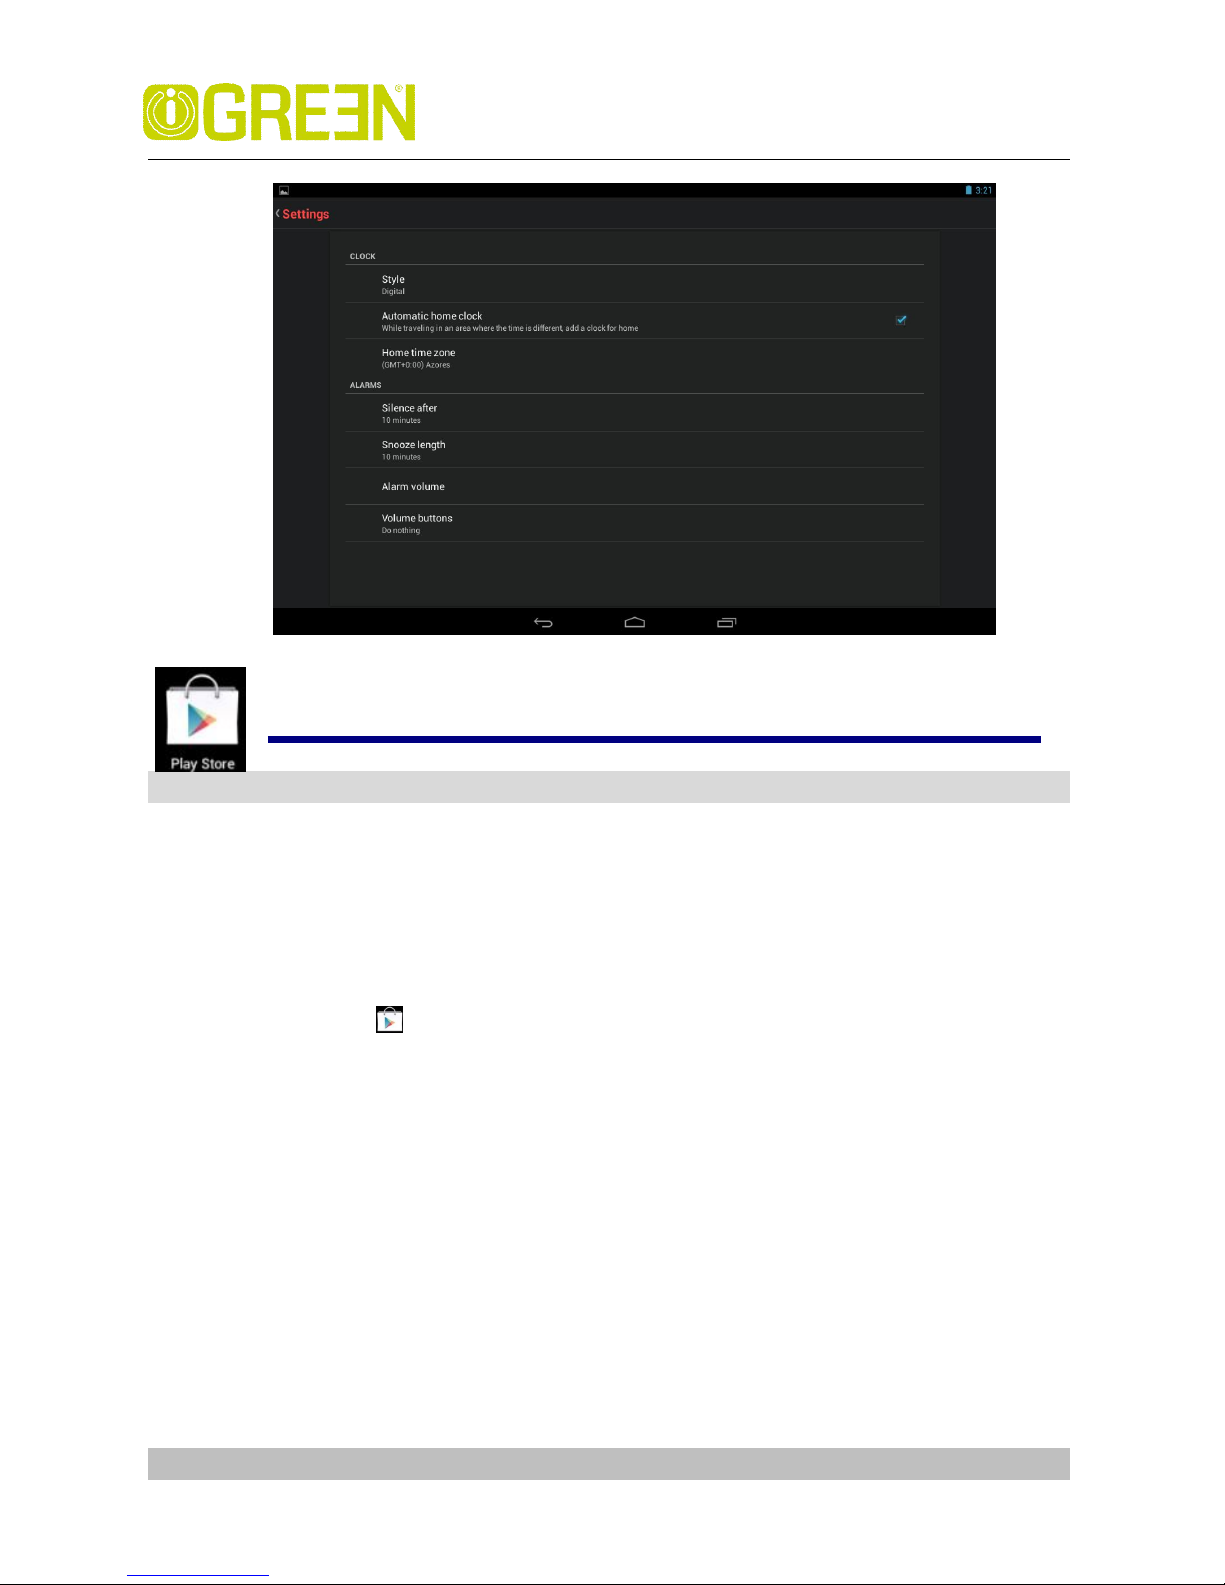
15 Clock
Alarm
You can use your device as an alarm clock by setting multiple alarms.
Add Alarm
1. Tap the Clock application icon.
2. Press to add alarm
3. Set up your alarm as desired.
4. Tap Turn on alarm to activate the alarm.
5. Tap Done or tap Revert to reset your alarm again.
Note:
- This clock icon displayed at the bottom of screens indicates that
one or more alarms have been set and are active.
-
Page 17
iGREEN GENESIS Tab-2
GREEN Planet Co. www.igreen-co.com
17
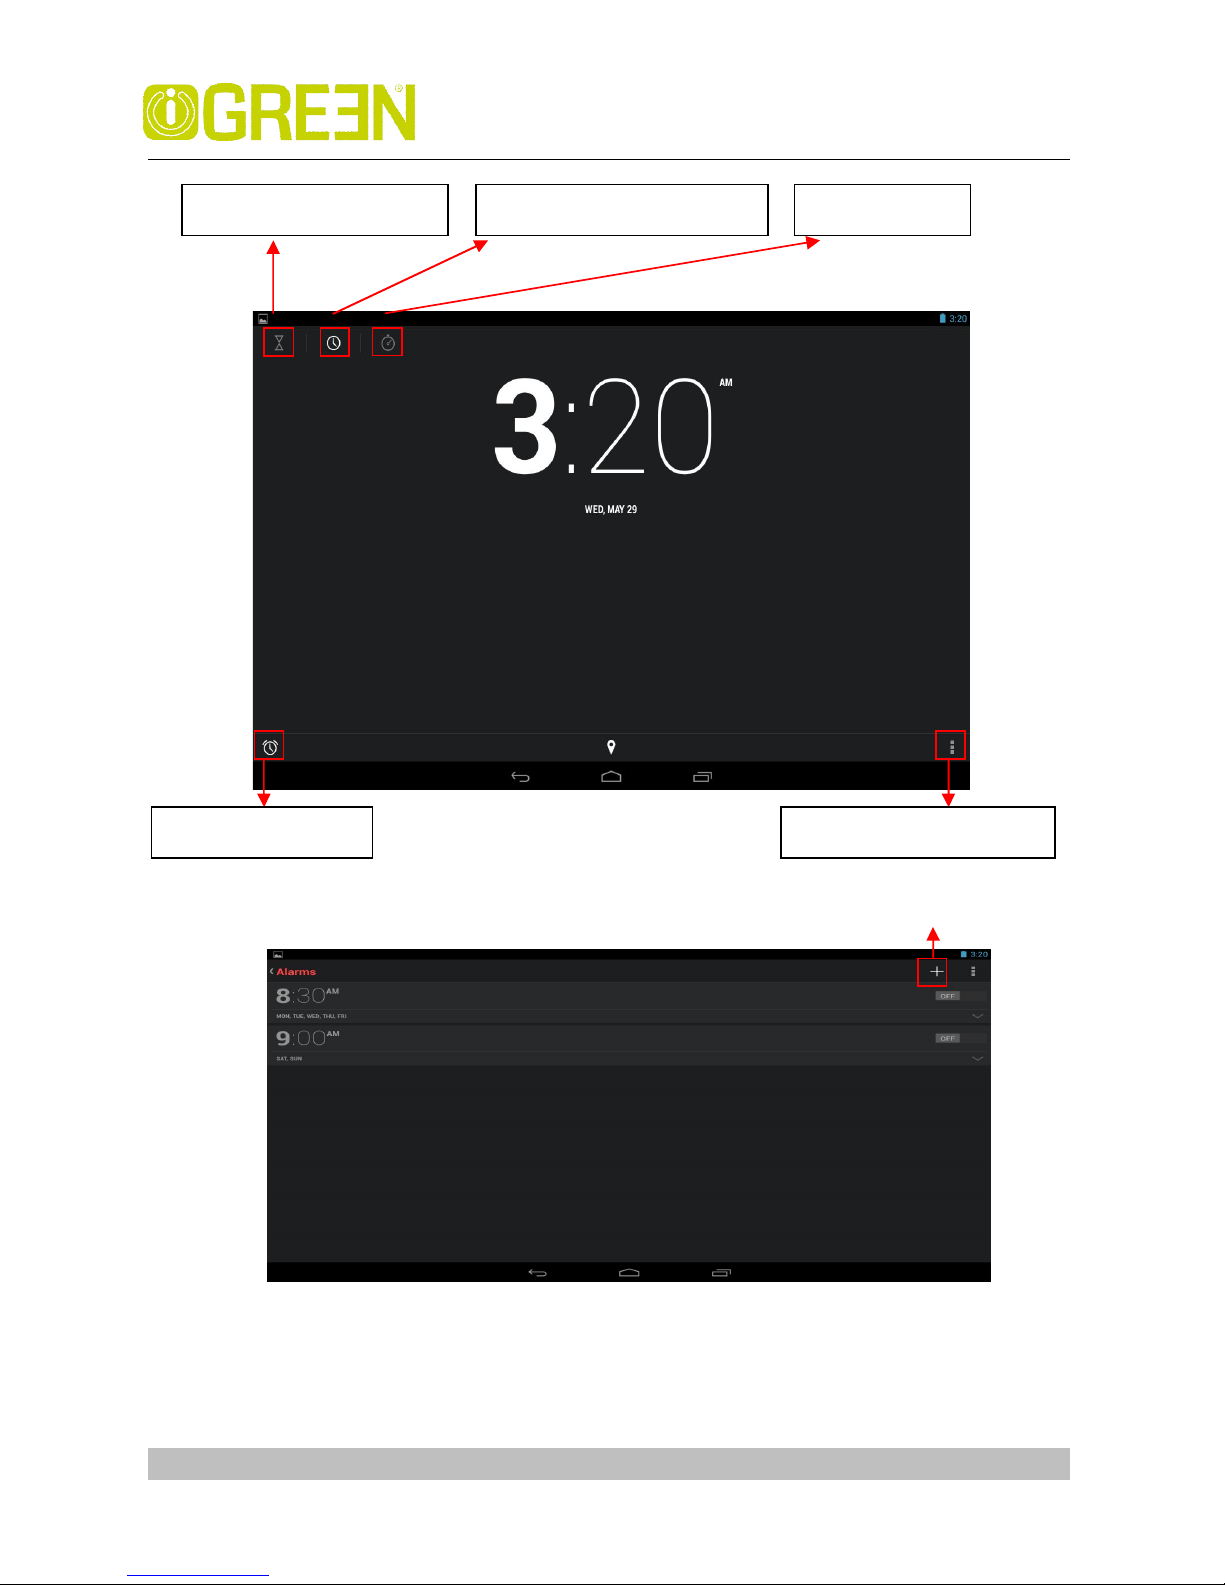
To do more settings, touch settings to open the following window, and make your
choice.
Tab to add a alarm
To set the countdown
Display the current time
Stopwatch
To view an alarm
Night mode &
settings
Page 18
iGREEN GENESIS Tab-2
GREEN Planet Co. www.igreen-co.com
18
16 Play Store
The App Play Store has many applications that you can quickly and easily
download to your MID. Before using APP Play Store, you have to make sure you
device have a internet connection (Please refer to the Chapter of Wi-Fi )
Download Applications
1. Tap the App Play Store application icon and tap Accept on the bottom of
the screen.
Note:
The first time, you are prompted for your App Market login information. If you have
not yet registered an account, tap New.
Otherwise, tap Exiting and enter your login information and then tap Done
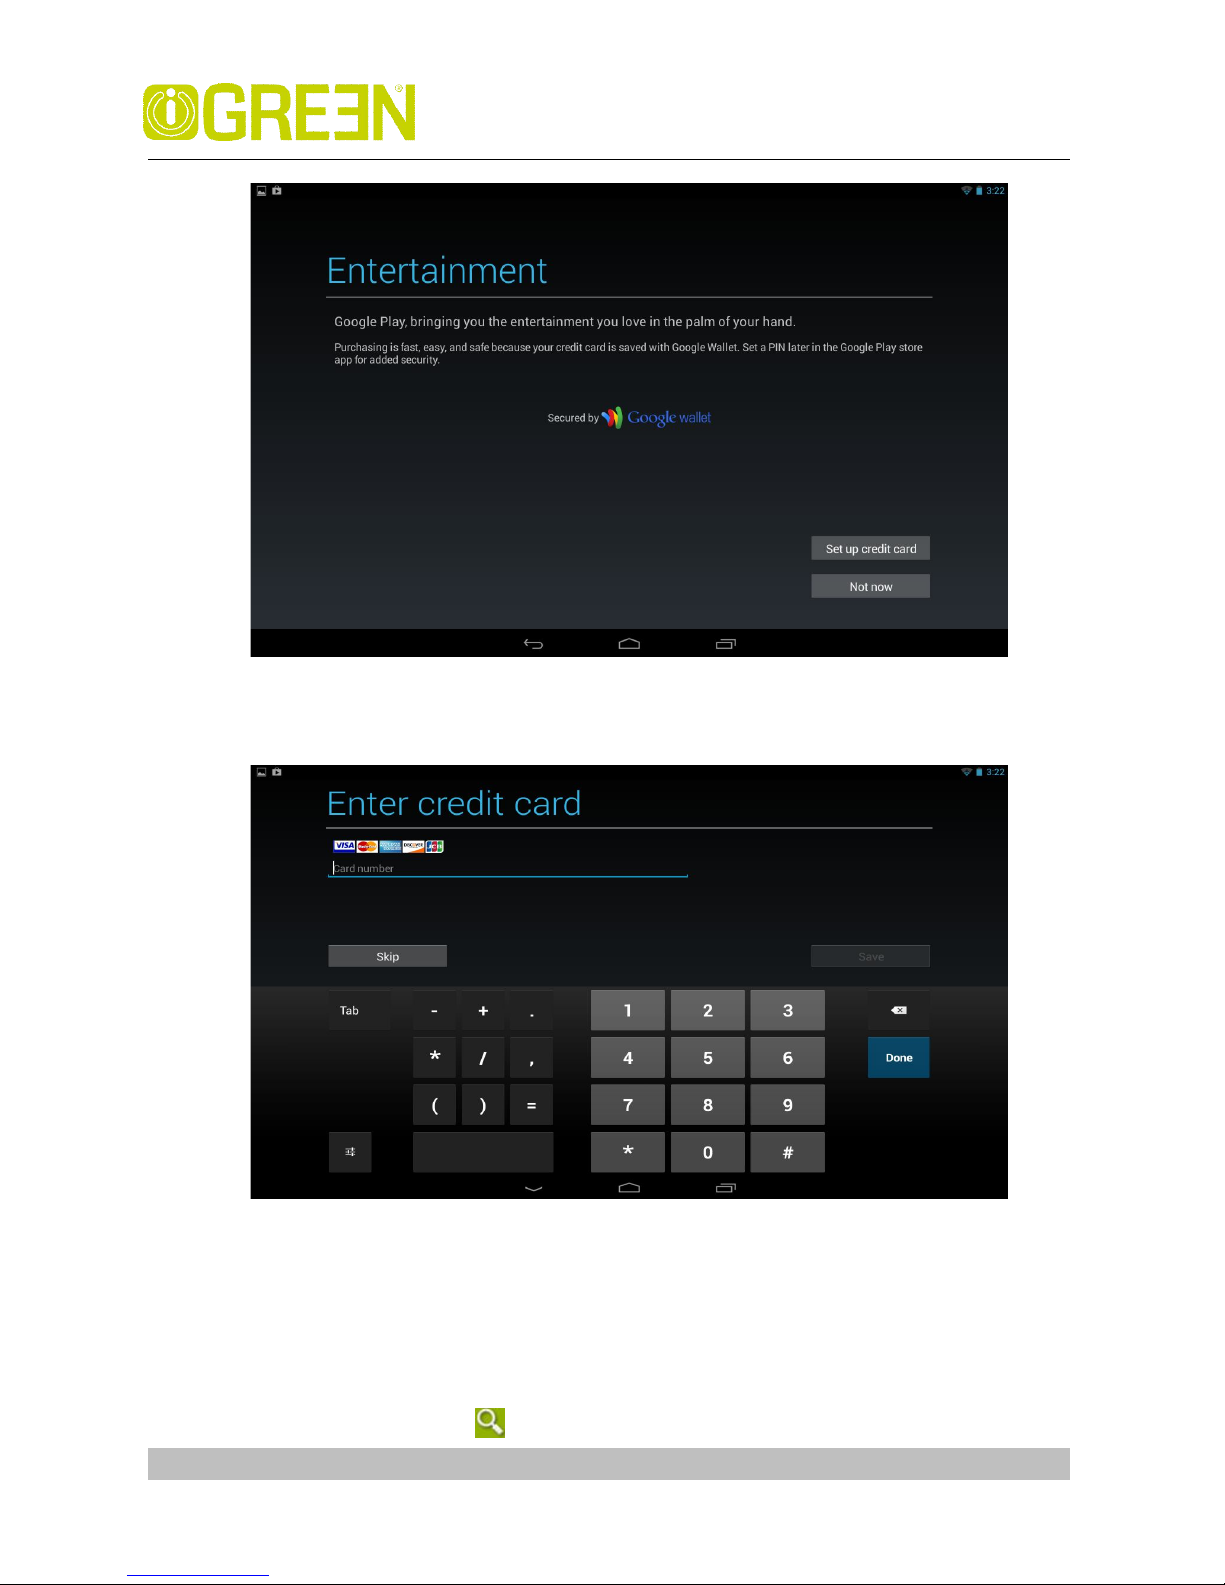
The first you enter your account, you are required to set your credit card, like
follows:
Page 19
iGREEN GENESIS Tab-2
GREEN Planet Co. www.igreen-co.com
19
Tap set up credit card button to open the following window, you can edit your
information according to the introductions
If you wouldn’t set the credit card, tap Not now button to enter the play store
directly.
.
2. You can select applications from the default Featured group, or tab
Apps/Games on bottom of the screen on the left to choose from the
application list by categories, or you can also search applications by name by
tapping the icon .
Page 20

iGREEN GENESIS Tab-2
GREEN Planet Co. www.igreen-co.com
20
3. Tap any application you want to download, → Download → Accept
&download.
When download process started, the icon will be displayed on the status
bar.
When the icon is displayed on the status bar, the app is downloaded
successfully.
4. Slide down the status bar and tap the “Successfully installed” → tap Open to
launch it now or tap Uninstall.
5. Press Back key to return to the Play Store screen to download other
applications
App Market Function Menu
Press Menu key to display the App Market Function Menu.
Search
Tap to enter the keys of the application you want to search.
My Apps
This page displays the apps installed on your device that can be also found in the
APP Market
Uninstall apps (With Installed displayed on right of the item)
1. Tap the app you want to uninstall.
2. Tap Uninstall.
3. Tap “OK” when display a dialog.
Update apps (For FREE displayed on right of the item)
1. Tap the app you want to update
2. Tap Download → Accept &Download
Settings
You can see some settings, such as: Filtering level and Notifications settings.
Filtering level Set the filtering rules as desired
Notifications Set whether a notification prompt when application is
downloaded.
Help
If you have some doubts, please refer to this part.
Page 21
iGREEN GENESIS Tab-2
GREEN Planet Co. www.igreen-co.com
21
17 Browser and Chromium
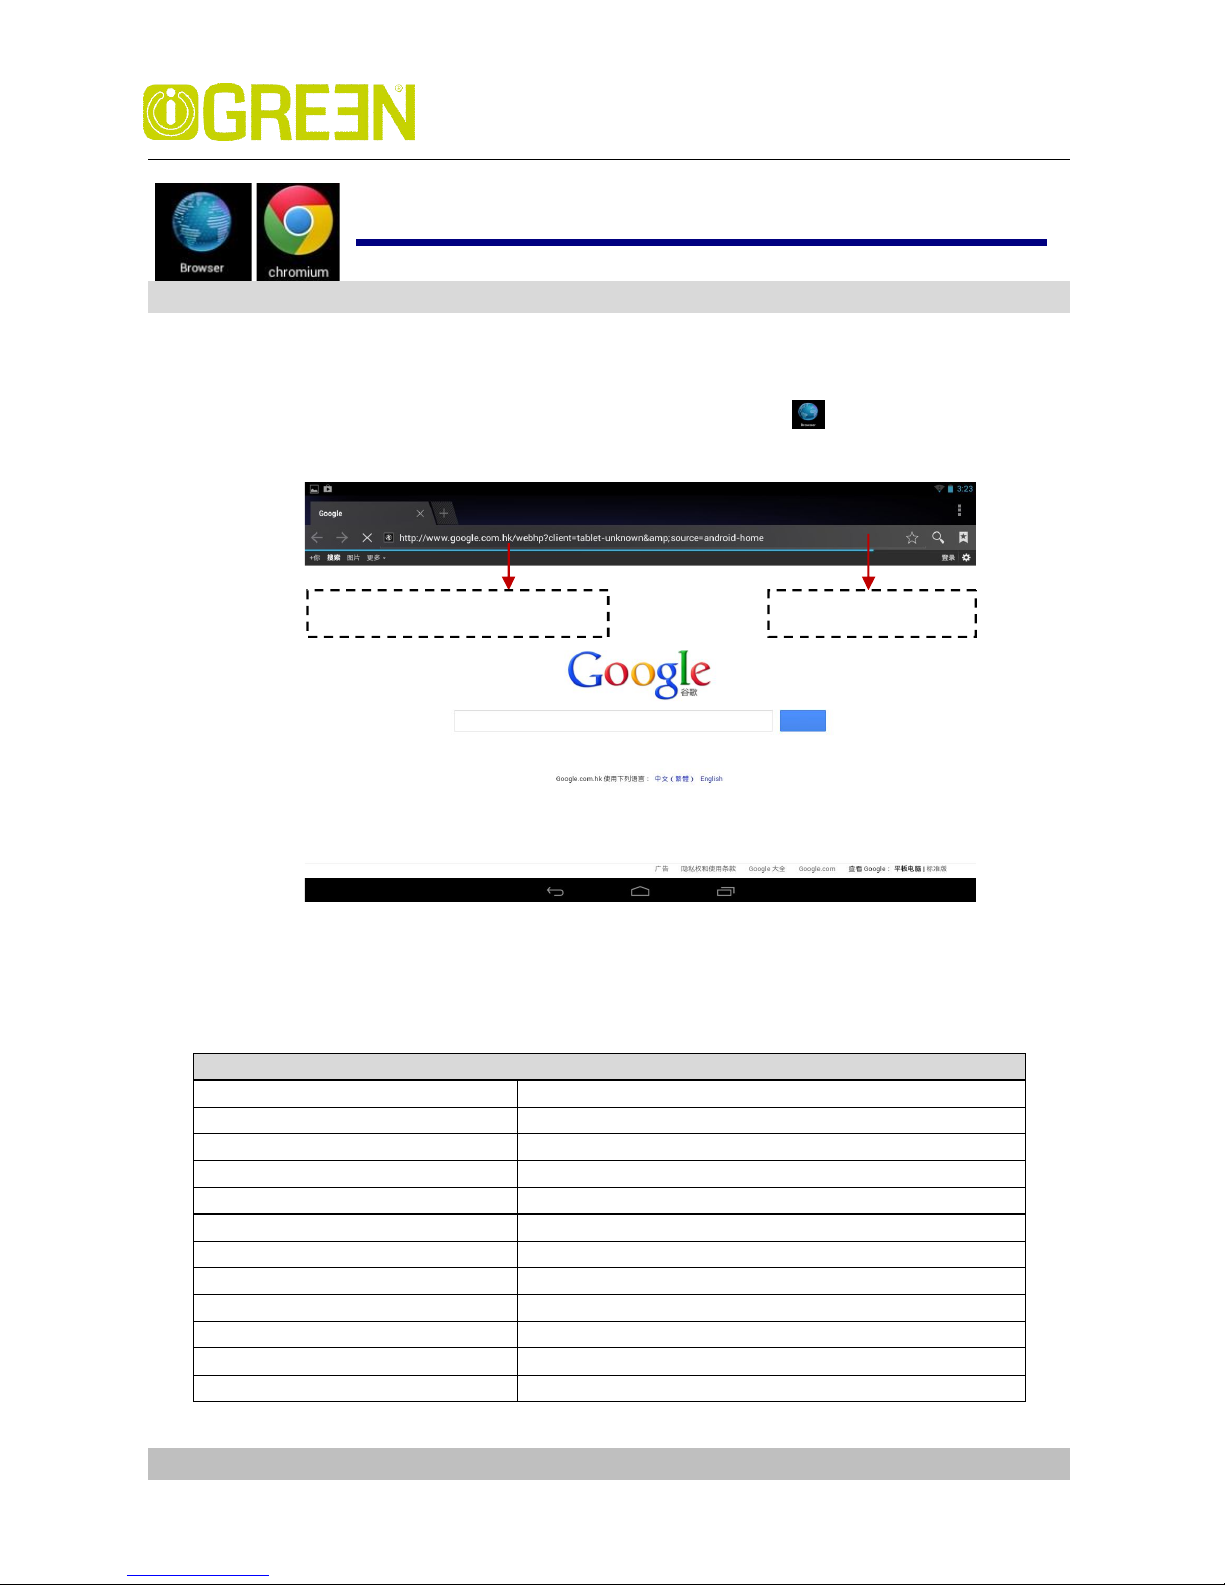
Using Browser to surf the web .
Opening Browser: Tap the browser icon on the Home screen , and then you can open
the Web browser.
You can browse the web by Wi-Fi or Ethernet.
Browser options: You can tap the button(make up of three dots)to make more choice:
Options
Refresh/stop(Browser) Refresh the current page/stop opening the current page
New Tab(Browser Chrome) Enter the latest added tab.
New incognito tab(Browser, Chrome Enter the incognito tab
Share page(Browser) Share your favorite pages with your friends
Find on page(Browser, Chrome) Looking for something in the current page.
Request desktop site(Browse,) You can select or unselect the options
Save for offline reading(Browser) save the current content for offline reading
Page info(Browser) Display the current web page information
Settings(Browser, Chrome) For some other Settings
Book marks(Chrome) Books let you revisit your favorite web pages with one touch
Other devices(Chrome) Sign in to Chrome to contact with other devices
Help (Chrome) Useful tips that you can refer to
Website of current page
Network Status
Page 22
iGREEN GENESIS Tab-2
GREEN Planet Co. www.igreen-co.com
22
18 Calendar
Tap the Calendar application icon.
For the first time using the Calendar, you need to add an Exchange account or a
Gmail account. Enter the account address and password information, click Next
and follow the prompts to complete the account configuration. Then you can use
the Calendar.
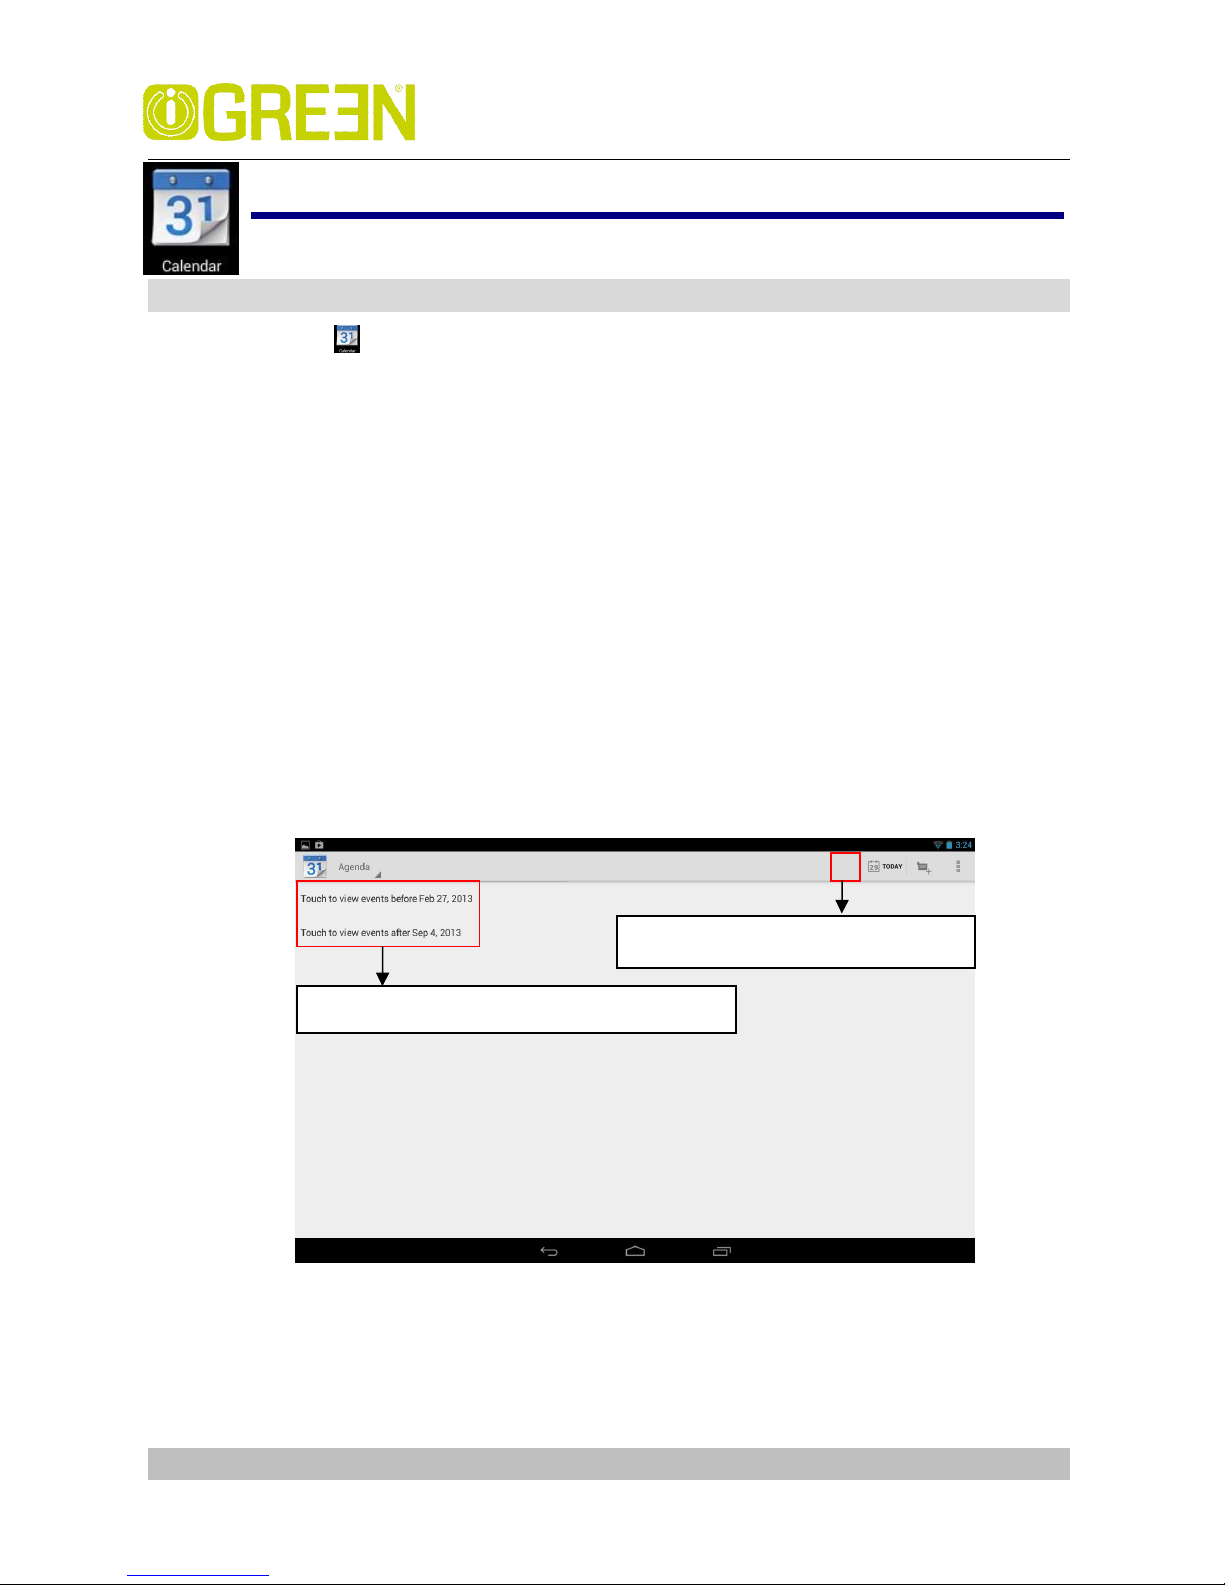
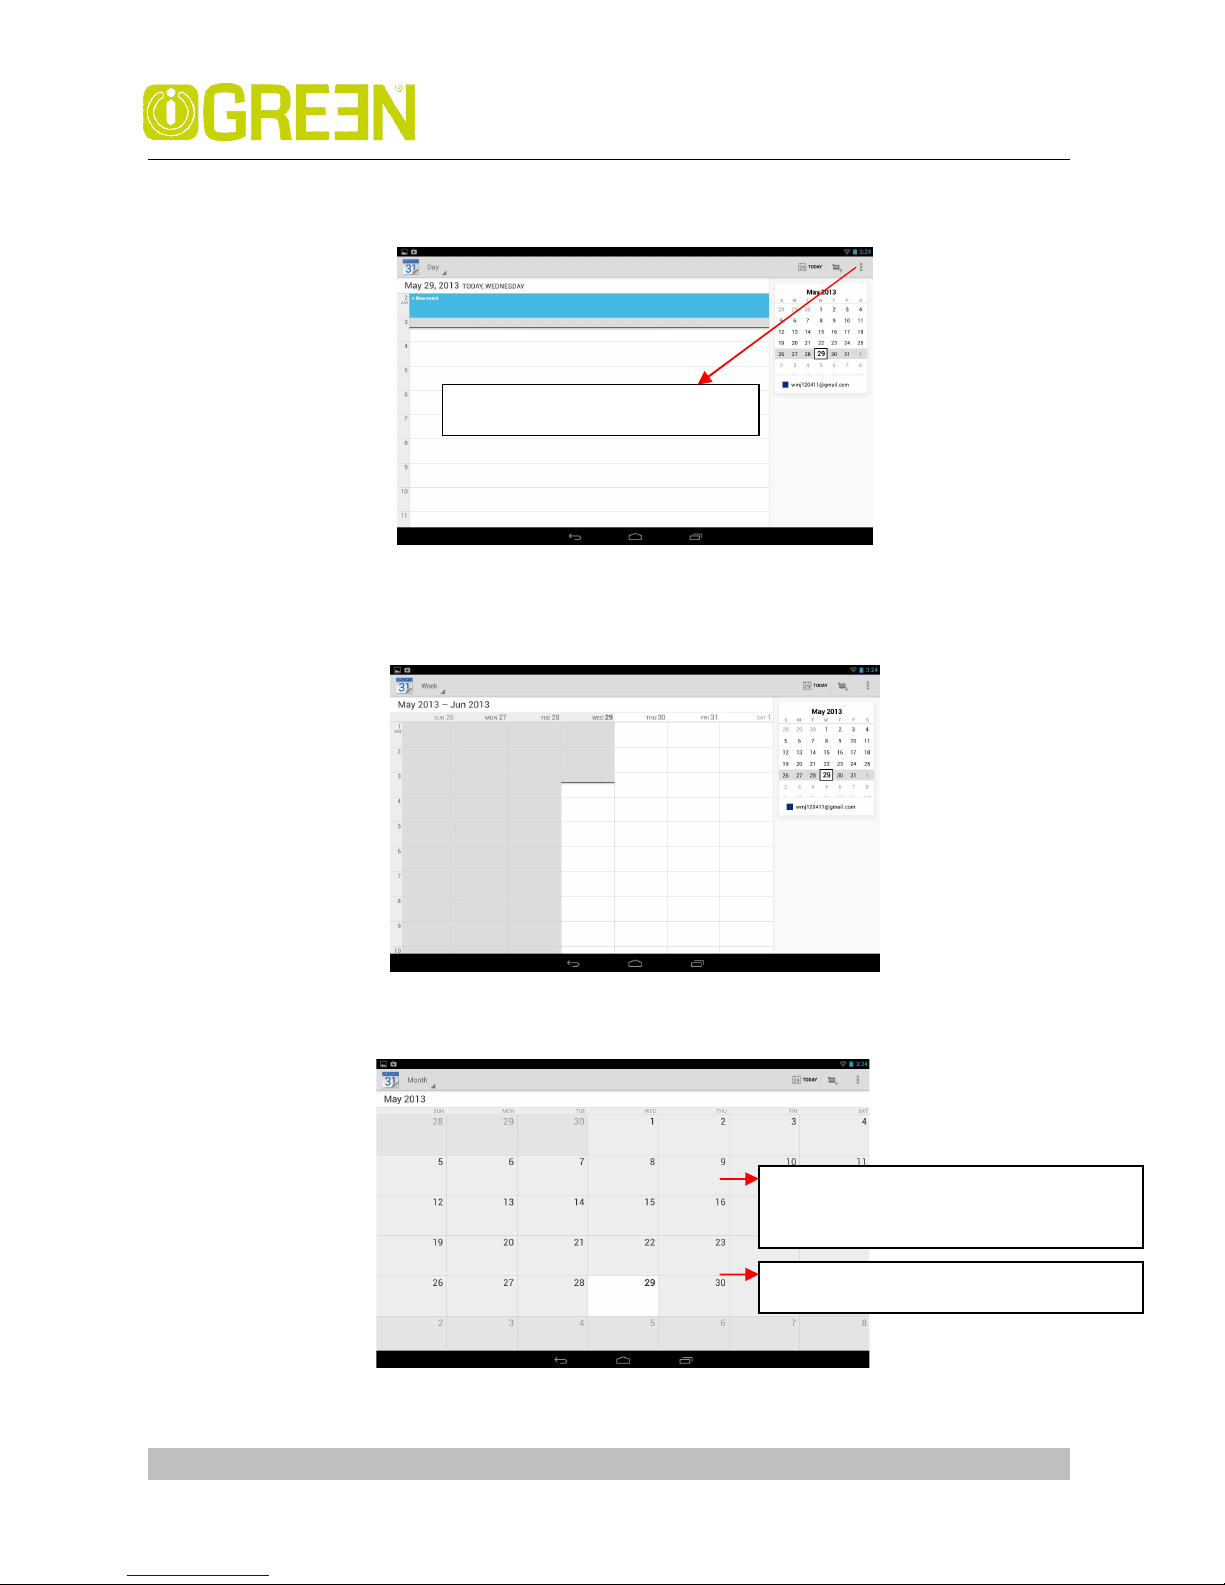
Open Calendar
Events from each account you’ve added to your device and configured to
synchronize calendars is displayed in Calendar. There are different views you can
choose in Calendar by pressing Menu key and touch Agenda View, Day View, Month
View, Week View.
Agenda View
Touch here to add new
agenda
Touch to view the details of an agenda
Page 23
iGREEN GENESIS Tab-2
GREEN Planet Co. www.igreen-co.com
23
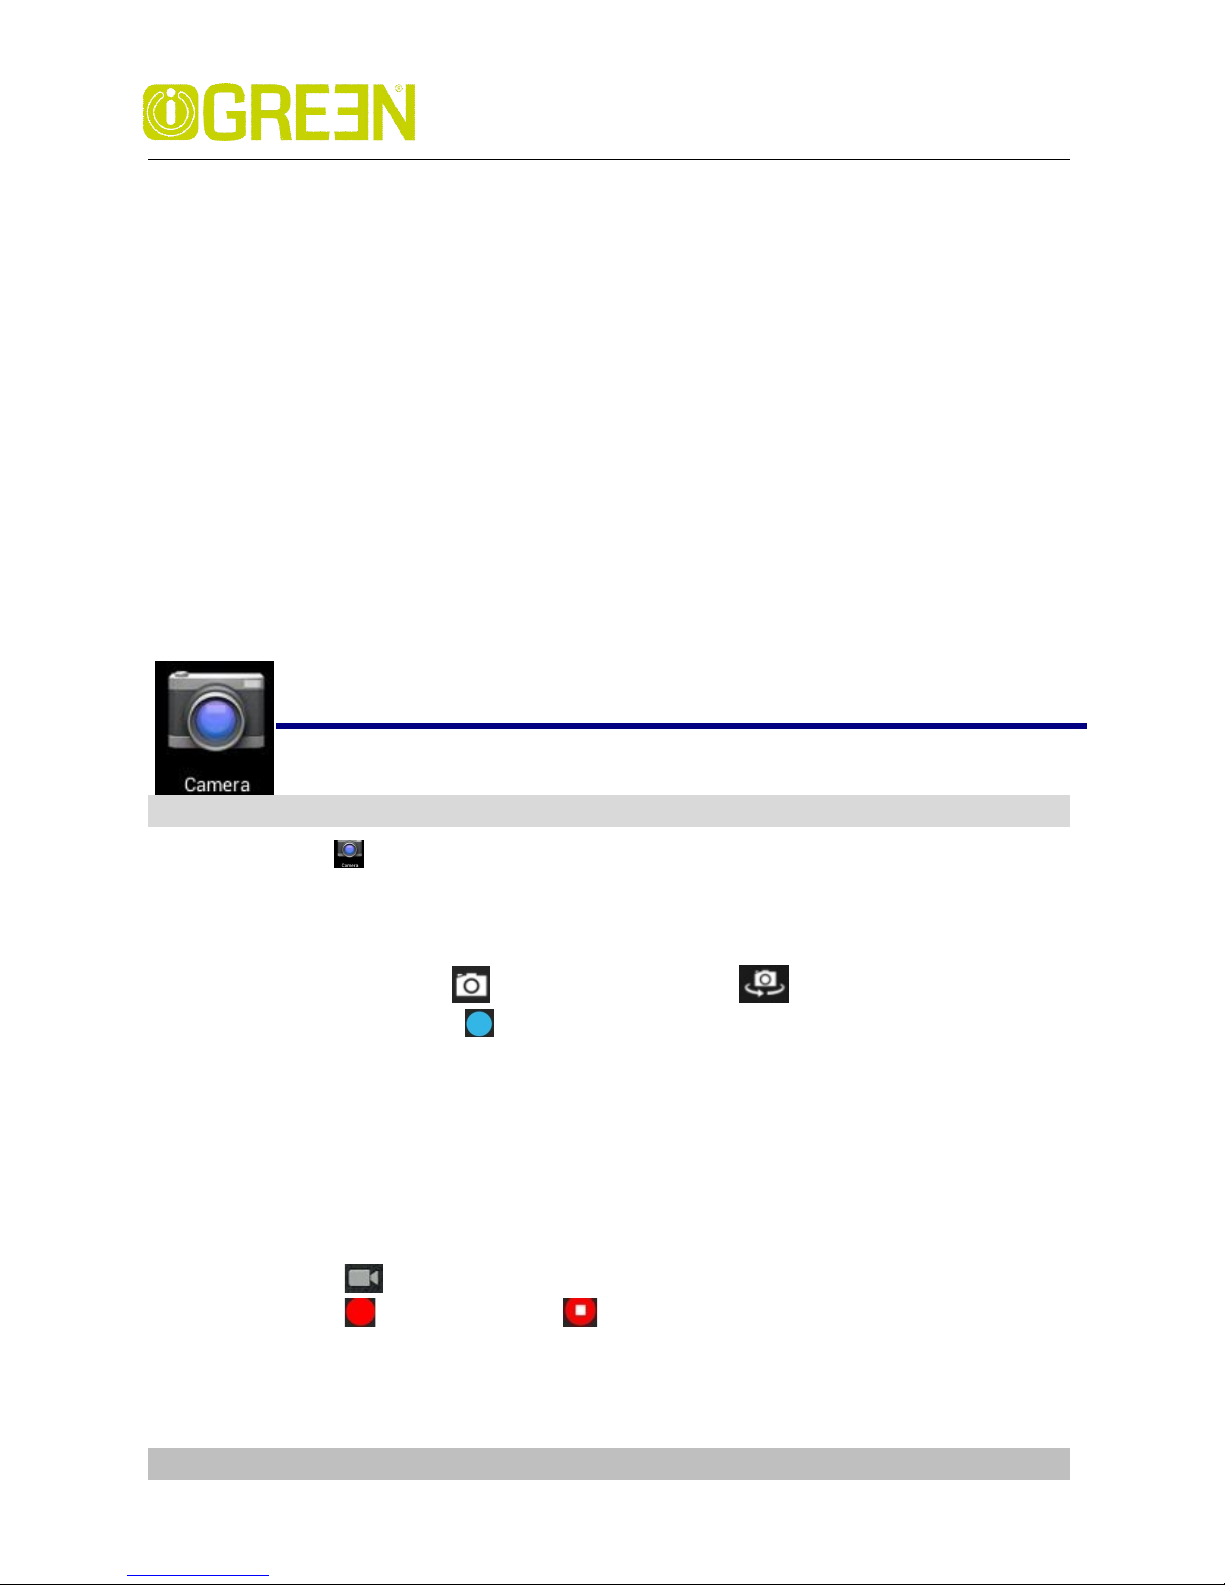
Day View
Week View
Month View
Show much more settings
Touch an event to
view its details
Drag up or down to view earlier
or later months
.
Page 24
iGREEN GENESIS Tab-2
GREEN Planet Co. www.igreen-co.com
24
Creating an Event
1. In any view of Calendar, press Menu key -> More -> New event .
2. Add details about the event
3. Press Menu and touch Show extra options to add details about the event
4. Scroll to the bottom of the event details screen and tap Done.
Edit /Delete/View an Event
To edit an event, touch and hold the event, then touch Edit event. Edit event
details, then when you’re done, touch Done.
To delete an event, touch and hold the event, then touch Delete event.
To view an event, touch and hold the event, then touch View event.
19 Camera
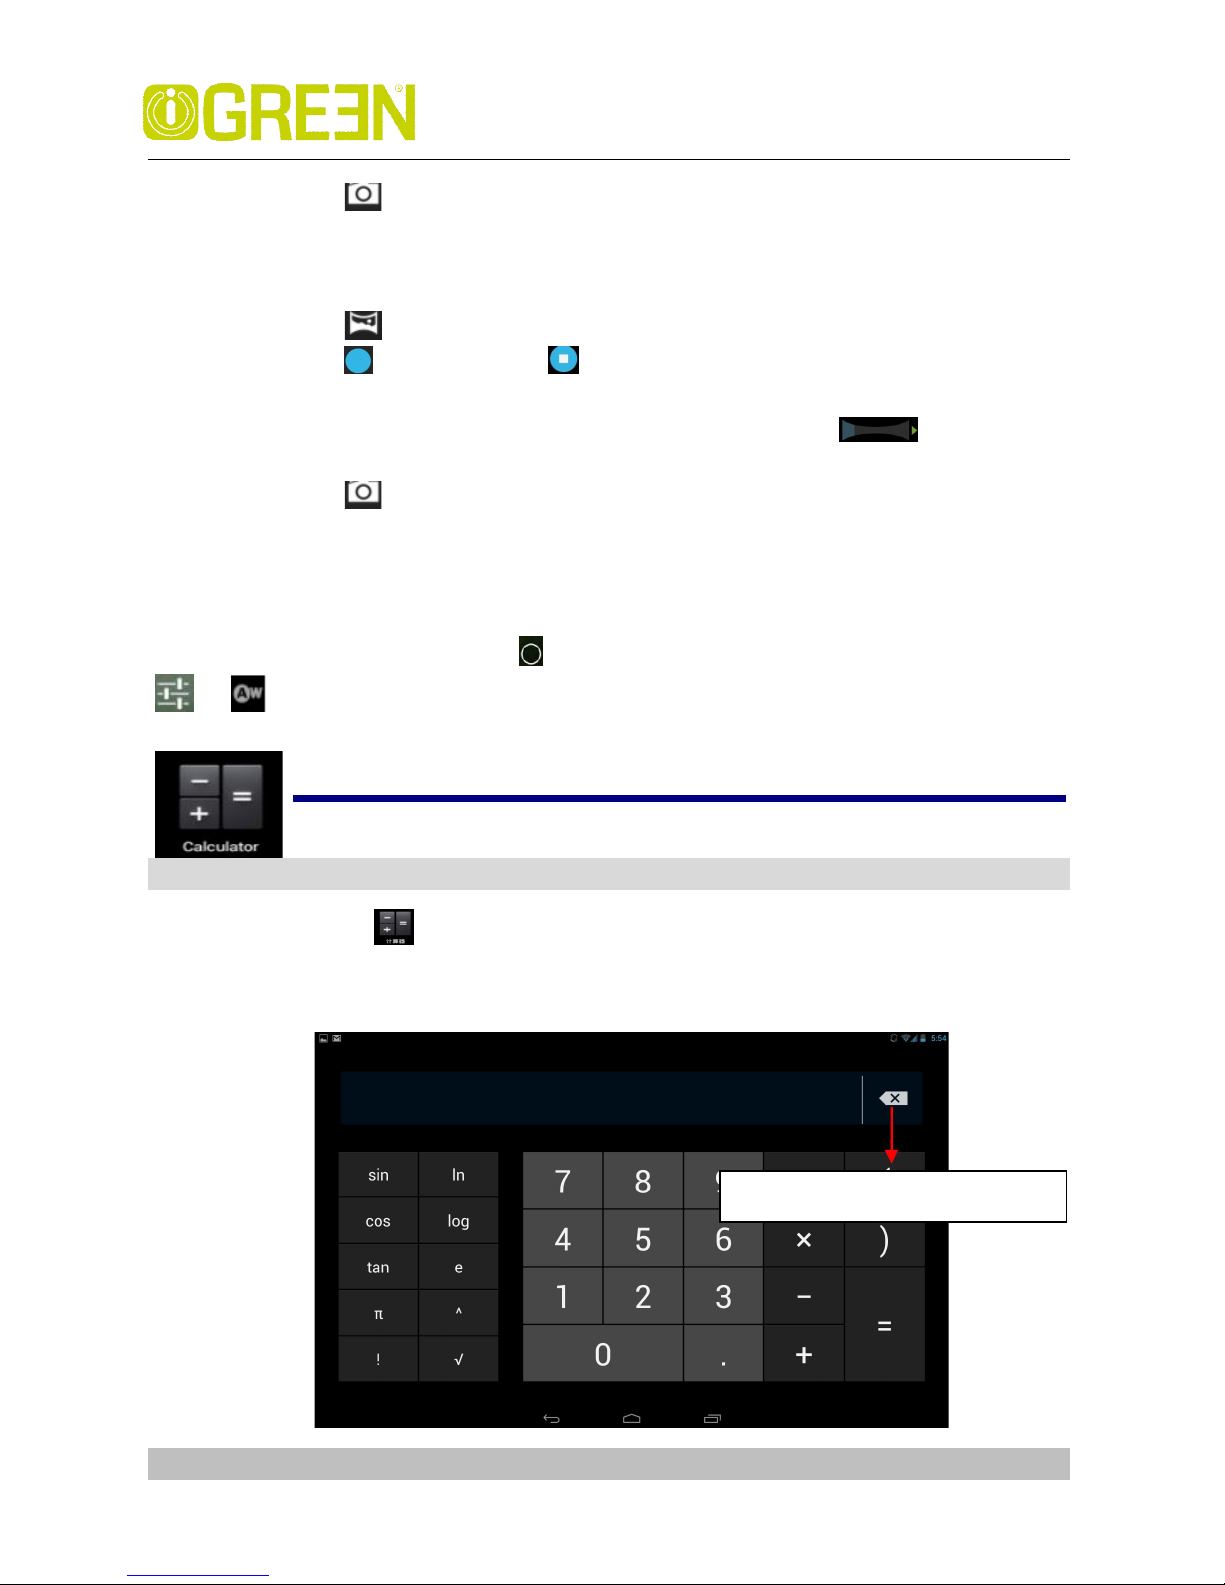
Tap the Camera application icon.
Take Pictures
1. In Camera tap into photos mode, tap to change from front and
rear camera; tap to take the picture.
2. The picture will be saved automatically.
3. Sliding to the left to enter the Gallery to scan the picture.
4. Press Back to the Camera.
5. Press Back to exit the Camera and back to the Home screen.
Take Videos
1. Tap switch to video, and you can take videos.
2. Tap to begin and tap to stop.
3. The video will be saved.
4. Sliding to the left to enter the Gallery to play the video.
5. Press Back to the Camera.
Page 25
iGREEN GENESIS Tab-2
GREEN Planet Co. www.igreen-co.com
25
6. Tap switch back to camera.
7. Press Back to exit the Camera and back to the Home screen.
Panorama Photography
1. Tap switch to panorama photography.
2. Tap to begin and tap to stop.
3. The picture will be saved.
4. Move your machine slowly to receive panorama. shows filming
schedule ,if you move too fast ,there will be a red block.
5. Tap switch back to camera.
6. Press Back to exit the Camera and back to the Home screen.
Photo options
On the preview of the camera, tap you can see some icons on the preview, such as
, , touch it you can open the settings.
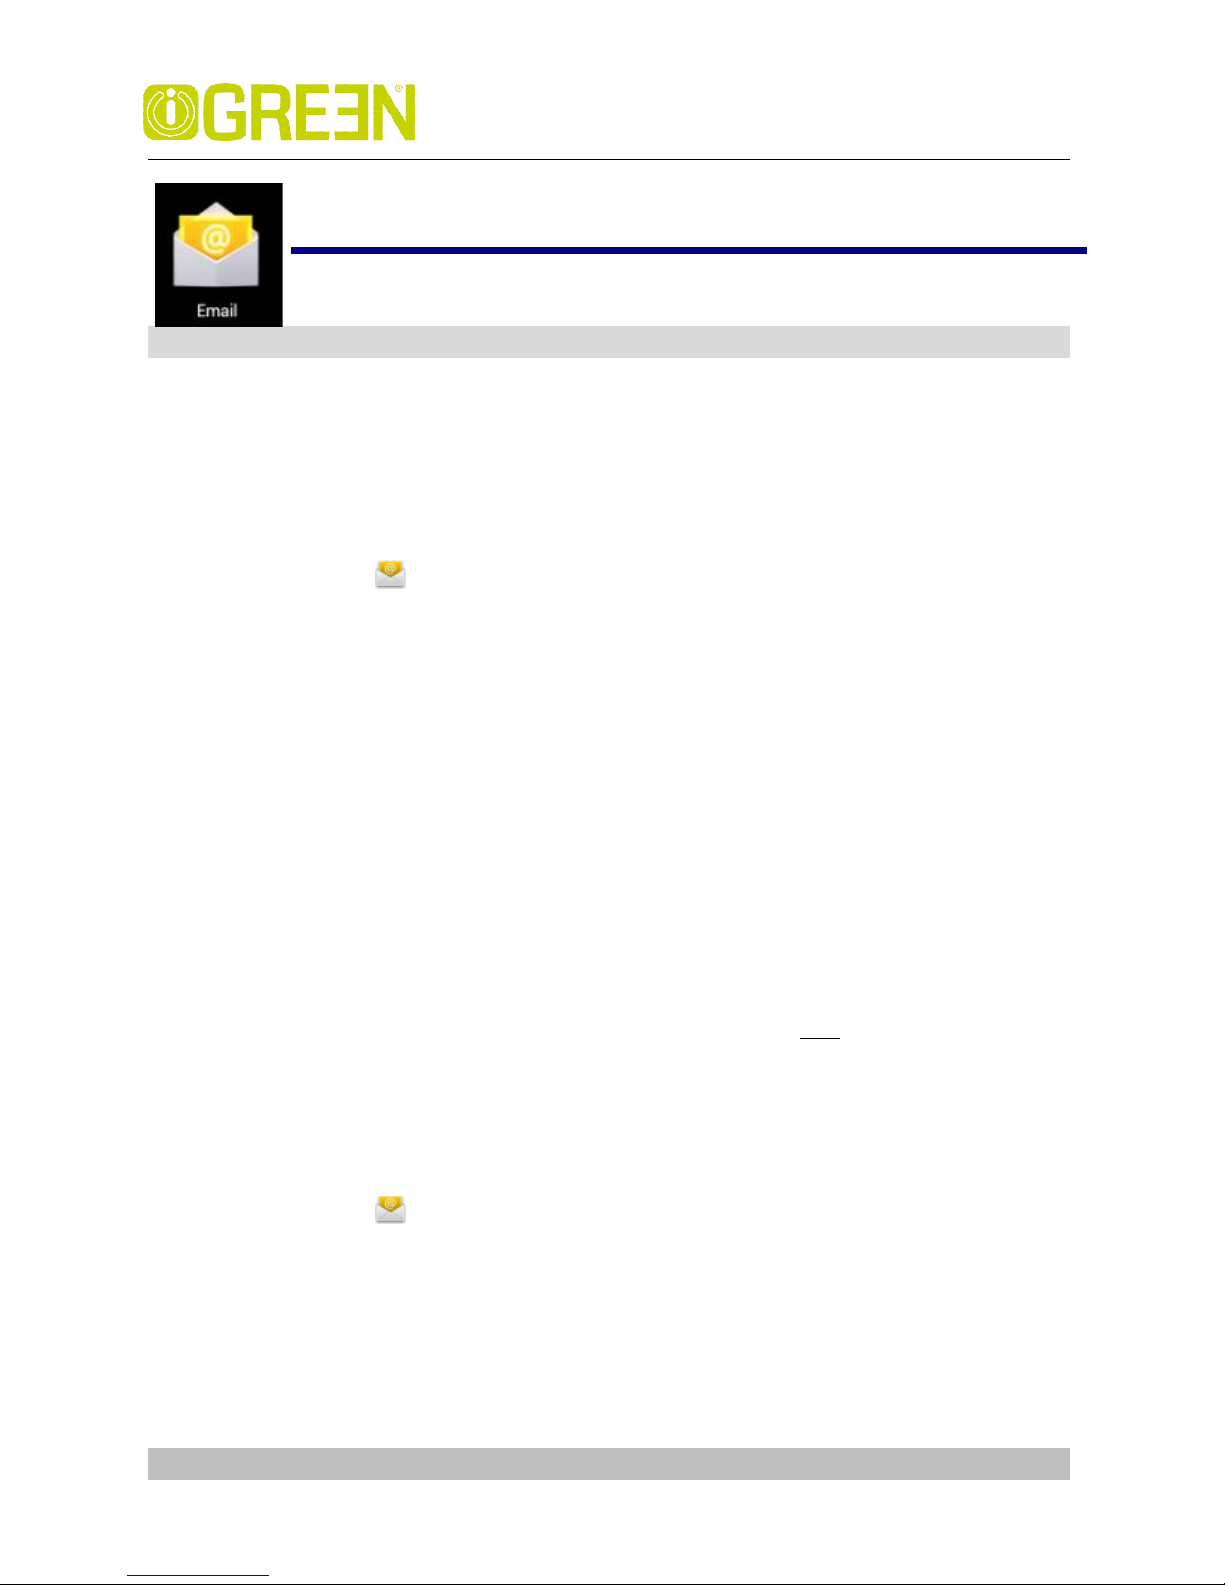
20 Calculator
1. Tap the Calculator application icon on home screen to launch it.
2. Tap the numbers and sign of operation to do the calculation.
3. Tap CLEAR to clear the result one by one, tap and hold CLEAR to clear all.
tap and hold to clear all data.
Page 26
iGREEN GENESIS Tab-2
GREEN Planet Co. www.igreen-co.com
26
21 Email
POP3 and SMTP accounts are supported.
Add Email accounts
You can enter one or more personal email addresses that you would like to access
through your Tablet.
1. Tap the Email application icon.
2. On the Your Accounts screen, tap Next.
3. Tap in the Email address entry field, → enter your email address.
4. Tap in the Password entry field, → enter your email password.
5. Tap Done.
6. Manual Setup (optional): The server settings are automatically populated
based on your email account provider (i.e., gmail.com, etc). However, if you
need to change the server settings tap Manual Setup and make necessary
changes.
7. Tap Next.
8. Optional: Enter a name for the account.
9. Enter name for outgoing message, → tap Done.
Note:
- After setup, if you are unable to connect to a free email account, check
with your email provider to make sure their servers support free accounts
on Post Office Protocol (POP) or Simple Mail Transfer Protocol (SMTP).
Email Inbox
1. Tap the Email application icon.
2. If you set up only one email account, it opens immediately. If you set up
multiple accounts, they are listed in the Accounts screen.
3. Tap on the desired email account, → tap Inbox.
Open Email Message
1. On the Inbox screen, tap on an email to open it.
Page 27
iGREEN GENESIS Tab-2
GREEN Planet Co. www.igreen-co.com
27
2. For attachments, tap Open to launch appropriate application, or tap Save to
save attachment to a SD card.
3. To replay, tap Reply or Reply all.
a. Tap in the Compose Mail entry field to enter your reply message.
b. Tap SEND to send immediately, SAVE DRAFT to save without send or Delete
to discard without saving or sending.
4. To delete the email immediately, tap Delete.
Compose New Email Message
1. On the Inbox screen, touch
2. Tap in the To entry field and then enter the recipient’s email address.
3. Optionally, if you want to add Cc or Bcc recipients, touch settings → Add
Cc/Bcc, and then enter the recipient’s email address.
4. Tap in the Subject entry field to enter your desired subject title.
5. Tap in the Compose Mail area to enter your personal message.
6. If desired, touch to attach a file.
7. When ready to send the email, touch SEND
Edit Email Account
1. Tap the Email application icon.
2. On the Inbox screen, touch settings
3. Set your desired preferences to customize your email account.
4. Touch back to return to the Inbox screen.
Delete Email Accounts
If you have multiple accounts, and you delete the account designated as the
default account, the next email listed is automatically set as the default.
1. Tap the Email application icon.
2. On the Inbox screen, touch settings
3. Touch the account you want to delete.
4. In the right Account options window, tap Remove account.
5. Tap OK to confirm the deletion.
Set Default Email Account
You must always have one account designated as the default account, so if you
Page 28
iGREEN GENESIS Tab-2
GREEN Planet Co. www.igreen-co.com
28
have multiple email accounts, you can select any one as the default.
1. Tap the Email application icon.
2. On the Inbox screen, touch settings.
3. Tap Default Account to select it.
If you delete the account that was designated as the default account, the next
email listed is automatically designated as the default.
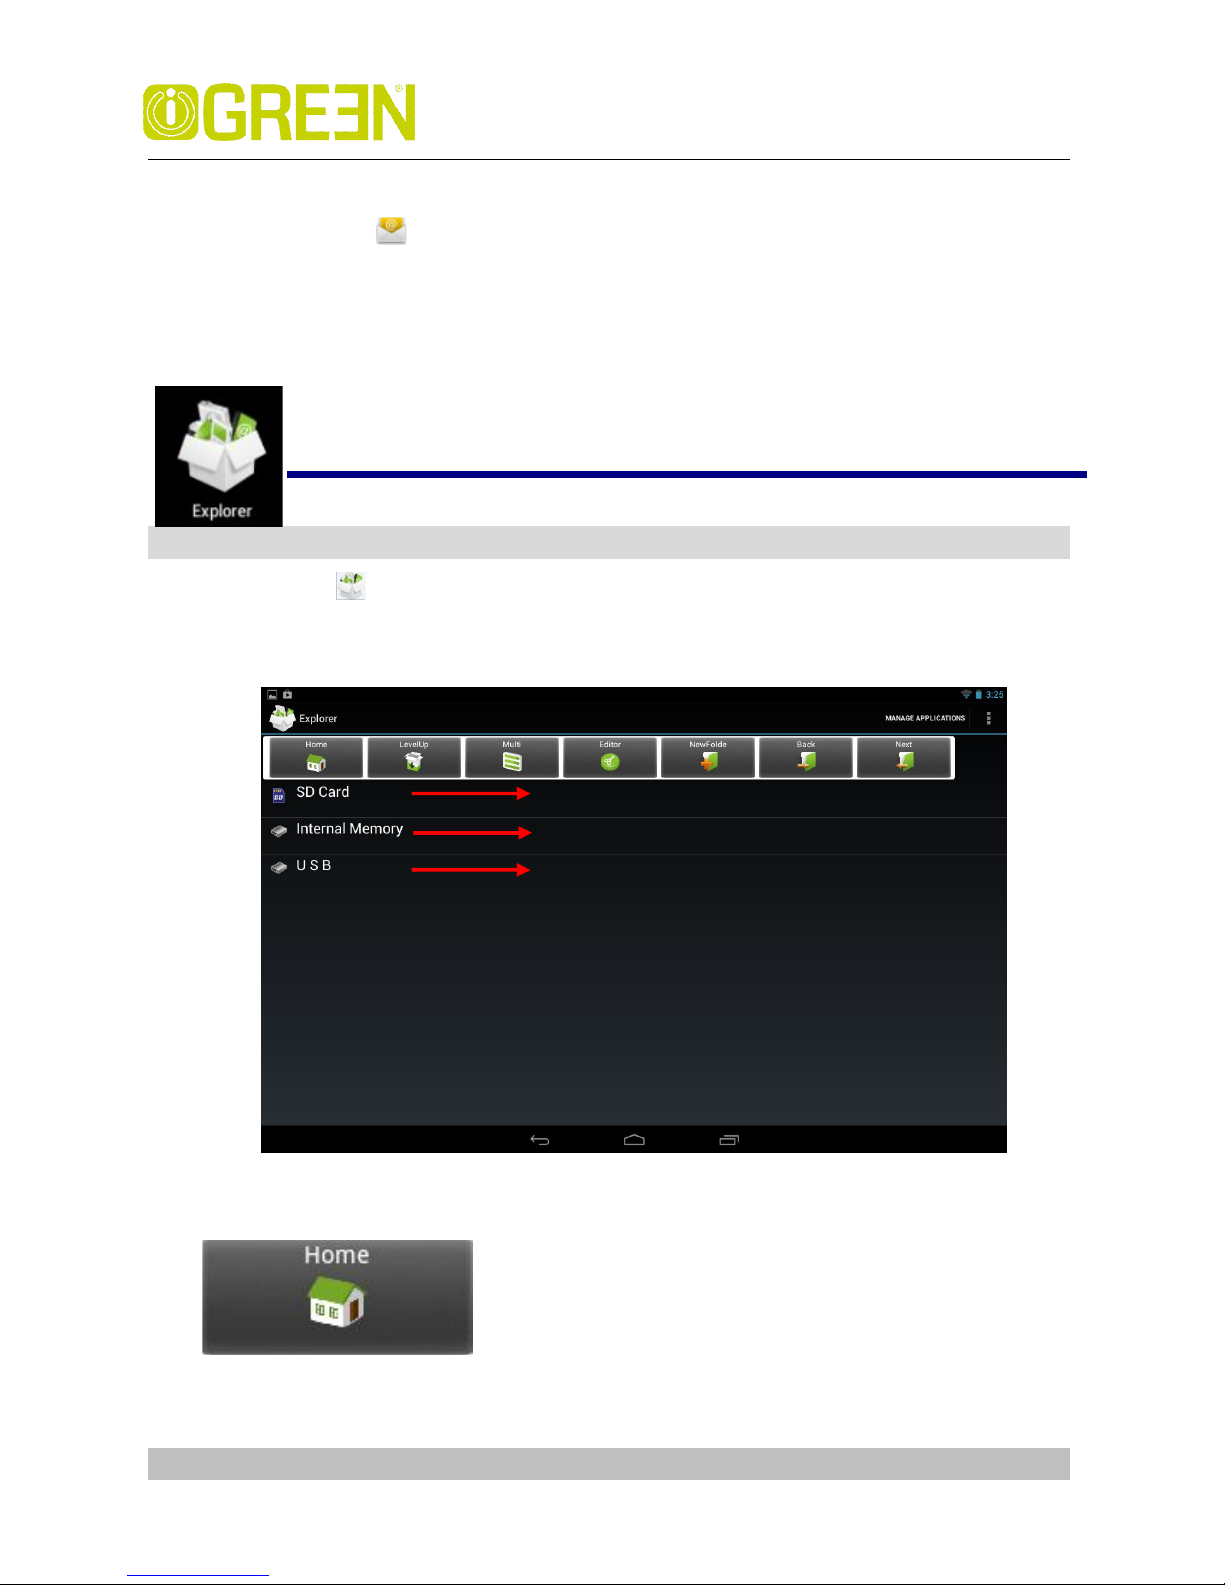
22 Explorer
Tap the File Browser application icon to view the files on all storage devices
(Internal memory, SD card, USB), and to quickly & easily install Android
application on your Tablet.
Functions of icons introduction
Check the file in SD Card
Check the file in
internal memory
Check the file in USB device
Display the root directory of Explorer
.
Page 29
iGREEN GENESIS Tab-2
GREEN Planet Co. www.igreen-co.com
29
Delete files
Tap and hold on the folder/file you want to delete, → tap Delete
Install android application
Using Explorer to install android application. Before doing this please copy
the .apk files into SD card or your internal memory.
1. Tap the File Browser application icon to view the files
2. Tap one .apk that you want to install on your devices
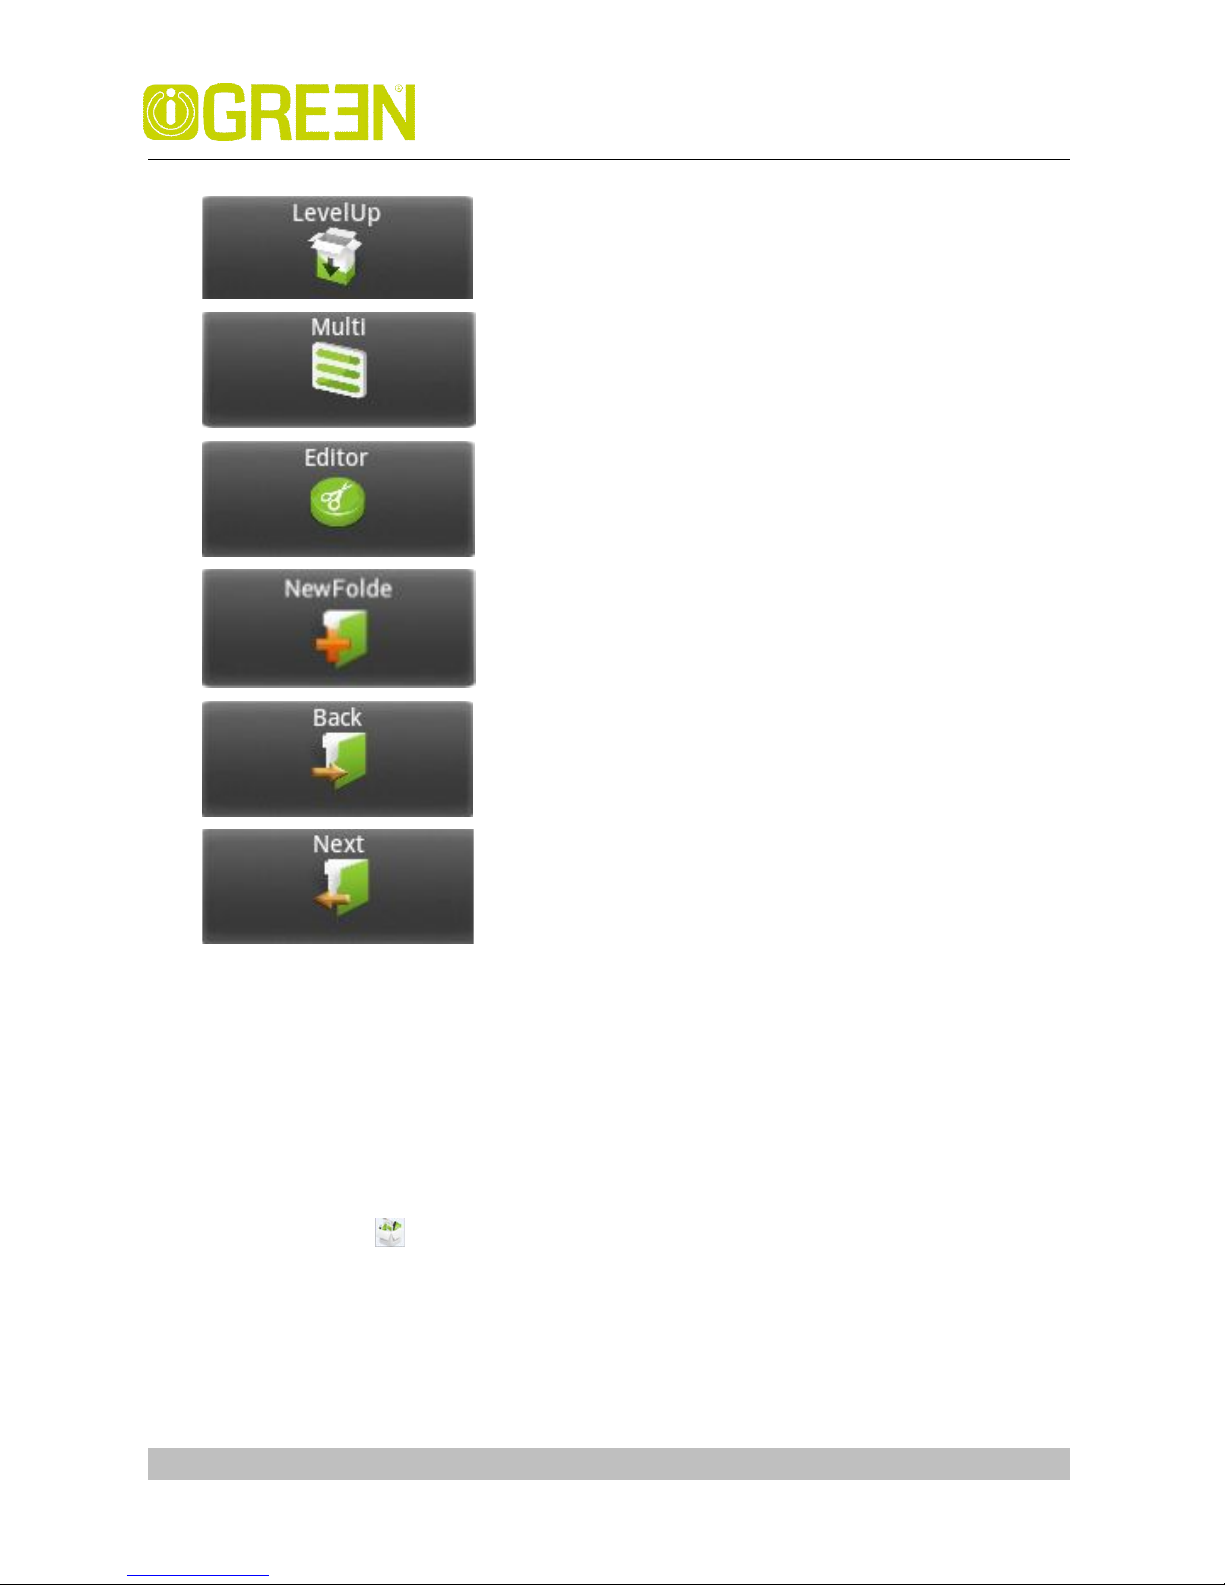
Go the parent directory of the current
folder.
Tap it once, you can multi select the items
displayed.
Tap it to
do some operation for the selected
item, such as copy, delete, move, paste,
rename.
Tap it to go to the previous page
. Tap it to go to the next page
.
Tap it to build a new folder
.
Page 30
iGREEN GENESIS Tab-2
GREEN Planet Co. www.igreen-co.com
30
23 Music
Transfer music using USB
Transfer music files from a computer to your memory card.
1. With a memory card inserted, and your tablet showing the home screen, connect a
USB data cable from you tablet micro USB port to a USB port on you computer. Your
tablet should show in the status bar.
2. Tap then your tablet shows a USB connected message above the status bar,
touch the message to open the storage dialog. You can’t use the files on you memory
card while it is connected.
3. Touch Turn on USB storage.
4. Tap “OK” to confirm the dialog.
5. Drag and drop you music to a folder on the memory card.
6. When you’re done, select the “Turn off USB storage”.
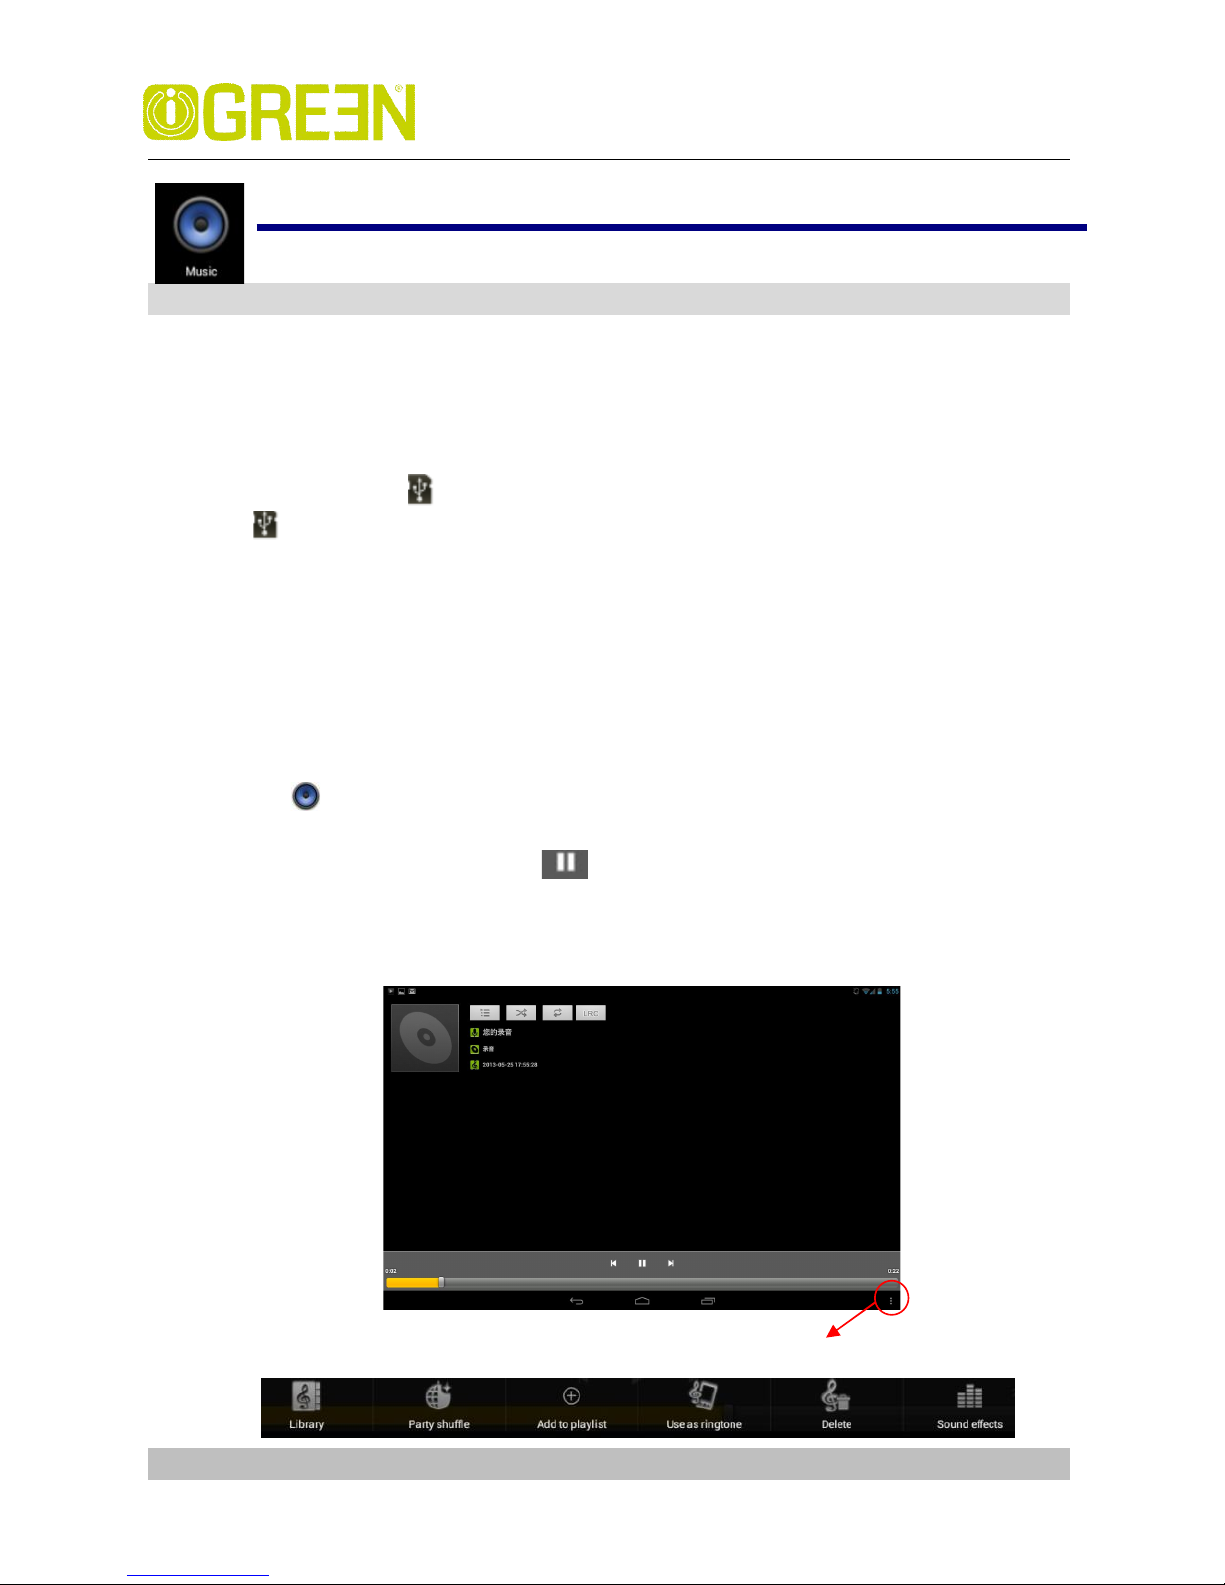
Play Music
1. Tap the Music application icon.
2. Tap any audio file from Albums/Artists/Songs/Playlists/ to play it.
3. To stop the music, tap the Pause icon.
4. To leave the music playing and return to previous screens, press Back key to return to
the Home screen.
Touch here you can make more settings, as follows:
Page 31
iGREEN GENESIS Tab-2
GREEN Planet Co. www.igreen-co.com
31
24 Video
Play Video
1. Tap the My Video application icon.
2. Touch any video from the video list.
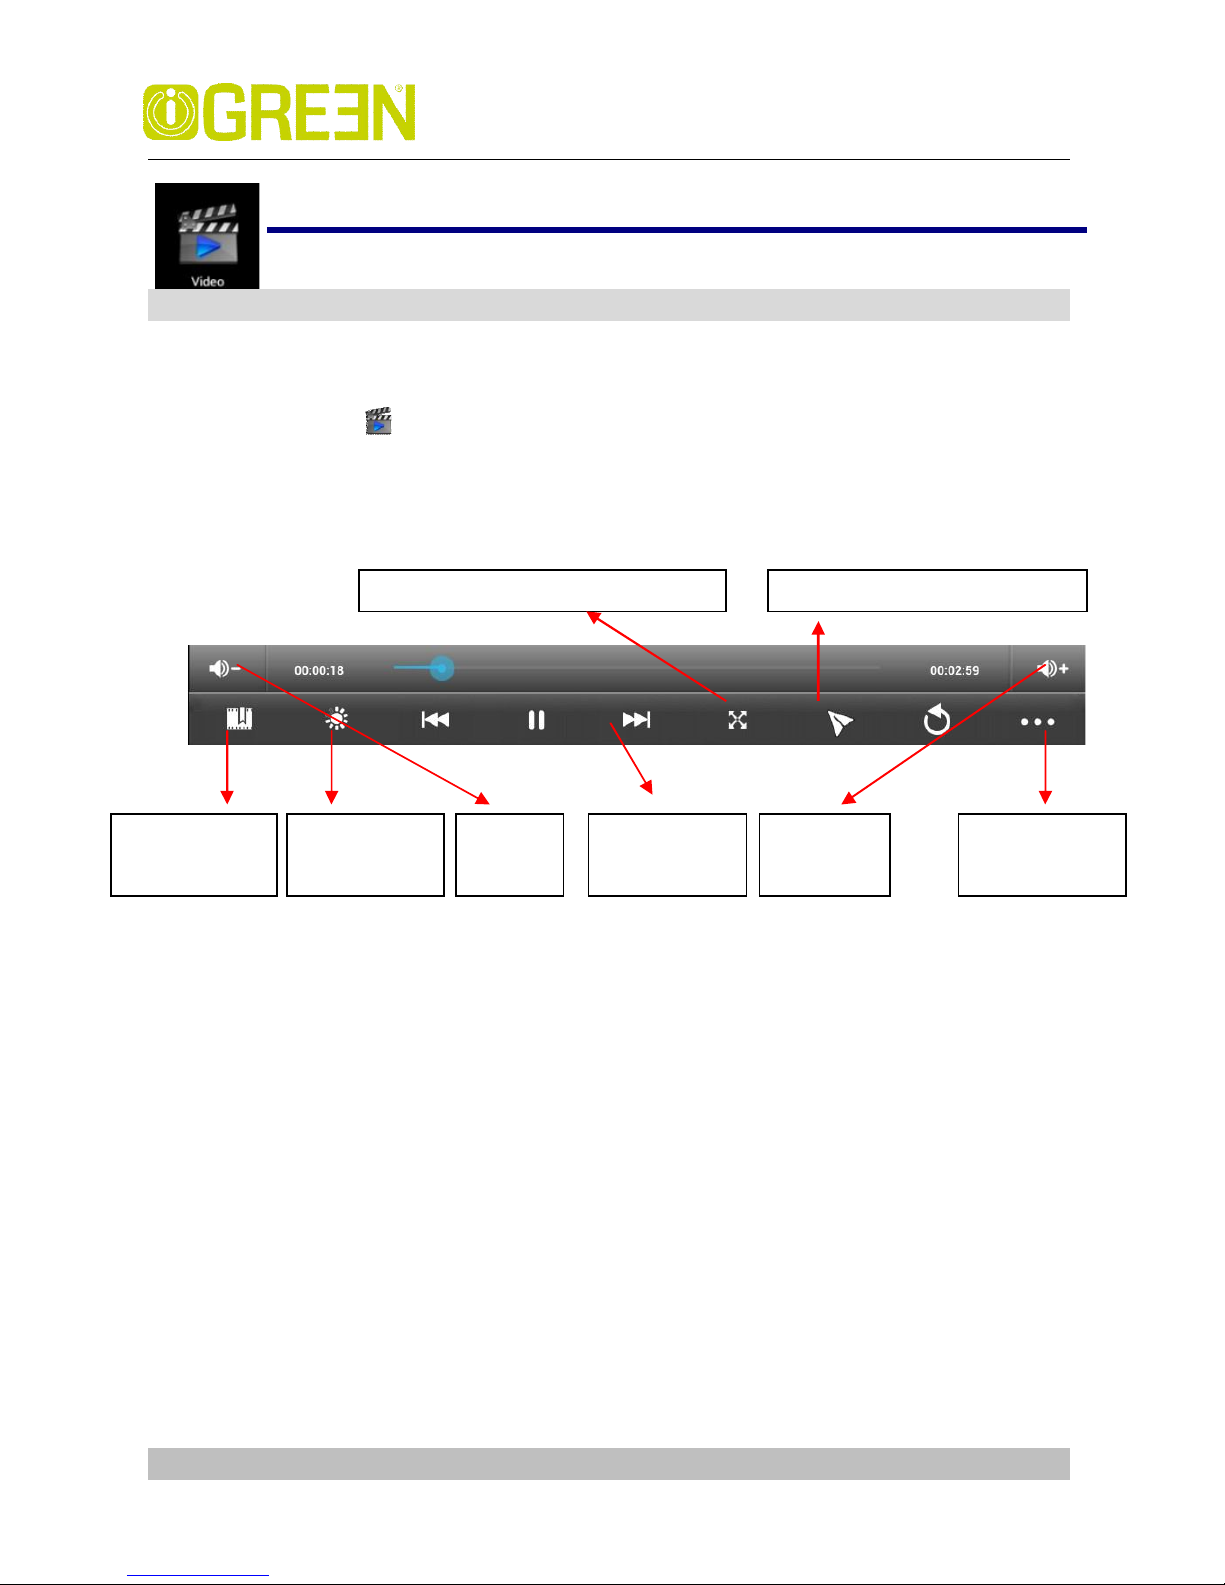
3. Tap on the playing video screen, the options displayed on the screen below.
Add to bookmark
Touch to record the current play course during a video is playing. Next time you
open this video, you can choose to play from the bookmark or from the very
beginning.
Play the video in small window
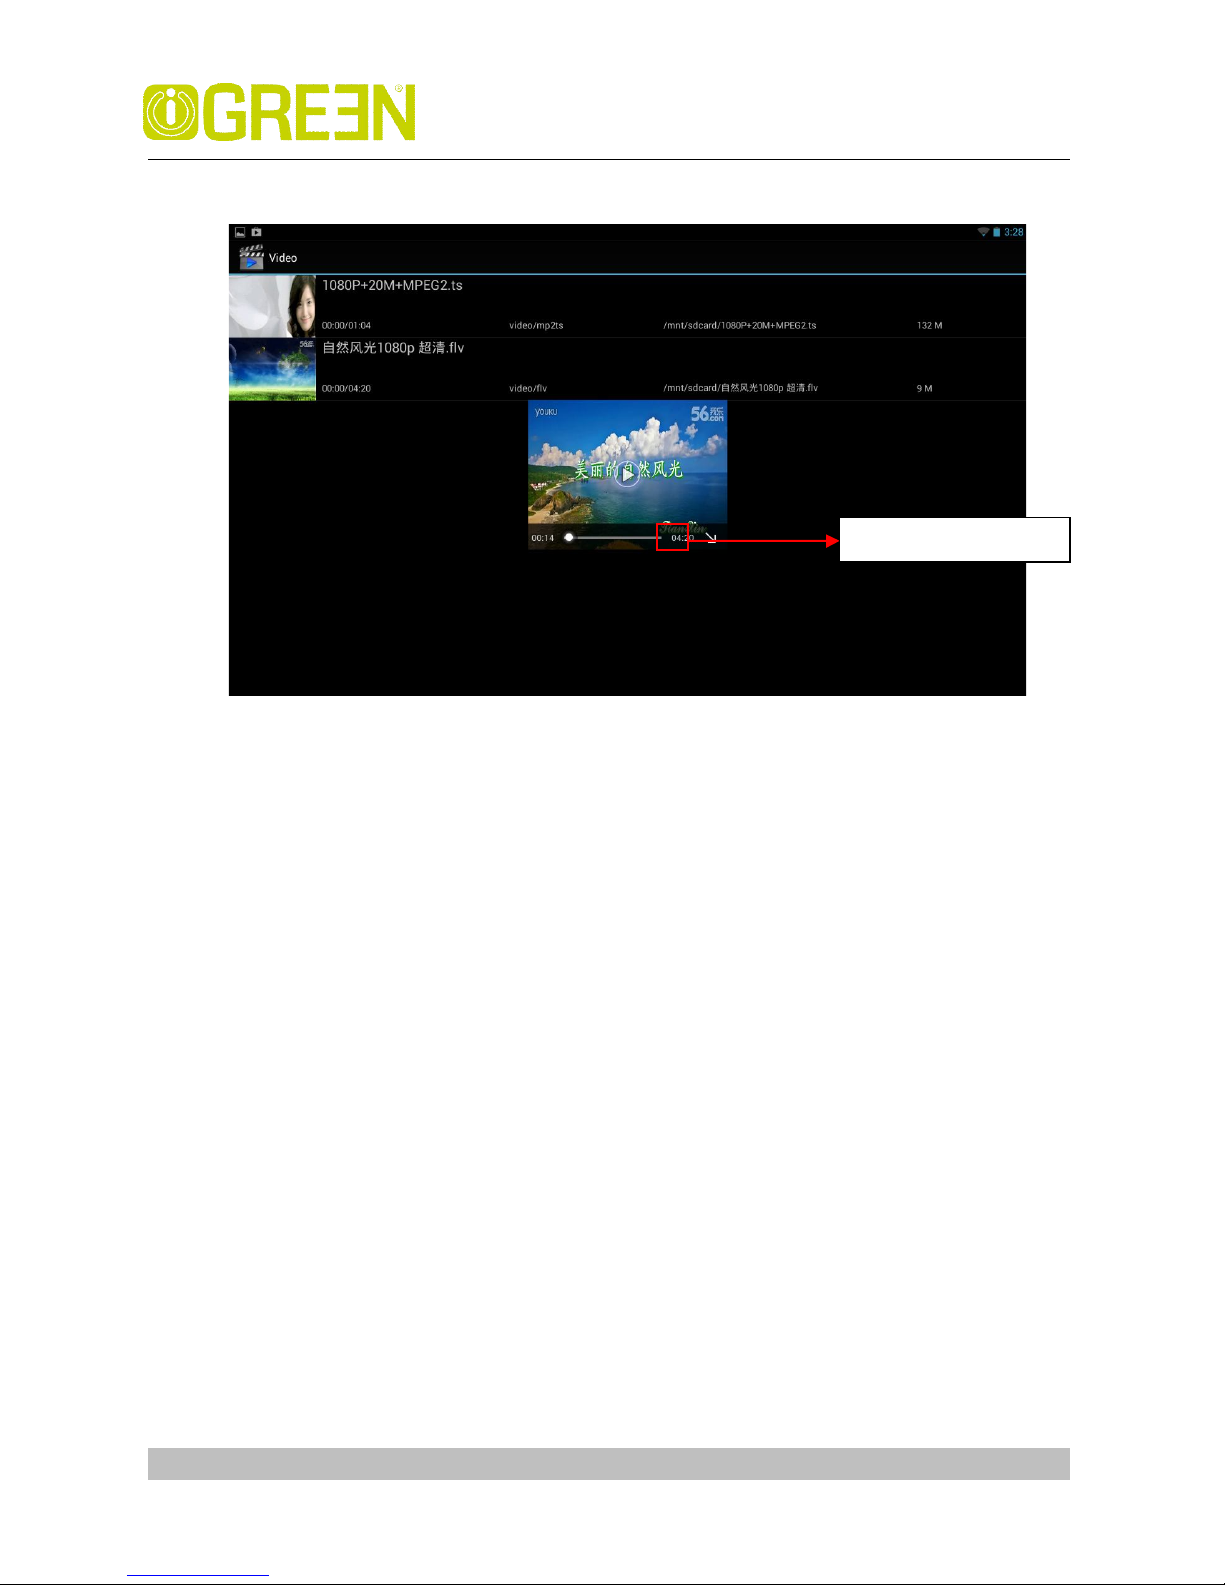
Tap the button to enter small window mode, see as the following picture,
Add to
bookmark
Modify the
backlight
Other options
Volume
-
Volume
+ Quick media
play course
Change the size of the video screen
Play the video in small window
Page 32
iGREEN GENESIS Tab-2
GREEN Planet Co. www.igreen-co.com
32
To close the window, you can tap and hold the window until there is a”X” in the middle
of the window,the tap the “X” to close the window.
Other options
Delete Book Mark And Play from beginning
During playing a video which has been added a bookmark touch it and the video
will play from the beginning.
Delete bookmark
During playing a video which has been added a bookmark touch it and the
bookmark added to it will be deleted.
Play mode
During playing a video, touch play mode you can choose:
Single After the current video is over, the playing is stopped.
Repeat one The current video will be played in repetition.
Repeat all All the videos will be played in repetition.
Help Show some help information about the video player
Return Back to the playing video view
Minimize window
Page 33
iGREEN GENESIS Tab-2
GREEN Planet Co. www.igreen-co.com
33
25 Gallery
Opening Gallery and viewing your albums
1. Touch the Gallery icon in the Launcher or on the Home screen
OR
2. Open Gallery from Camera by touching the thumbnail image at the top right
Note:
- If you have a great many pictures or videos on your SD card or USB
storage, it may take Gallery a few minutes when you open it to
discover and organize them.
Working with albums
Open Gallery and touch the album whose contents you want to view
Albums open displaying the pictures and videos they contain in a chronologically
ordered grid. The name of the album is shown at the top of the screen. You can
touch a picture or video to view it
Get the details of an album
1. Open the main Gallery window
2. Touch the albums you want details about
Delete an album
1. Open the main Gallery window
2. Touch and hold the albums you want delete for a second
3. Touch the at the top of the screen
Working with pictures
View and browse pictures
Open Gallery album and touch a picture
Watch a slideshow of your pictures
Page 34
iGREEN GENESIS Tab-2
GREEN Planet Co. www.igreen-co.com
34
1. Open Gallery album and touch a picture
2. Touch the settings at the top of the screen to see the controls of the picture.
You can see “Slideshow” on the list. Touch it to see pictures in a slideshow
Edit/crop a picture
1. Open Gallery album and touch a picture
2. Touch the settings at the top of the screen to see the controls of the picture.
You can see “edit/crop” on the list..
Touch edit->edit the picture
Touch crop-> crop the picture
Get details about a picture
1. Open Gallery album and touch a picture
2. Touch the settings at the top of the screen to see the controls of the picture.
You can see “Details” on the list. Touch Details to get more information about
the picture
Set the picture as wallpaper
1. Open Gallery album and touch a picture
2. Touch the settings at the top of the screen to see the controls of the picture.
You can see “Set picture as” on the list.
3. Touch Set picture as and touch Wallpaper then crop on the top of the screen
26 Gmail
Opening Gmail and your Inbox
Open Gmail
Touch Gmail icon on the Home screen or in the Launcher.
When you open Gmail, the current Google Account is displayed at the top of the
Inbox. If you have more than one account, you touch the current account to
switch accounts
Open your Inbox when Gmail is running
Page 35
iGREEN GENESIS Tab-2
GREEN Planet Co. www.igreen-co.com
35
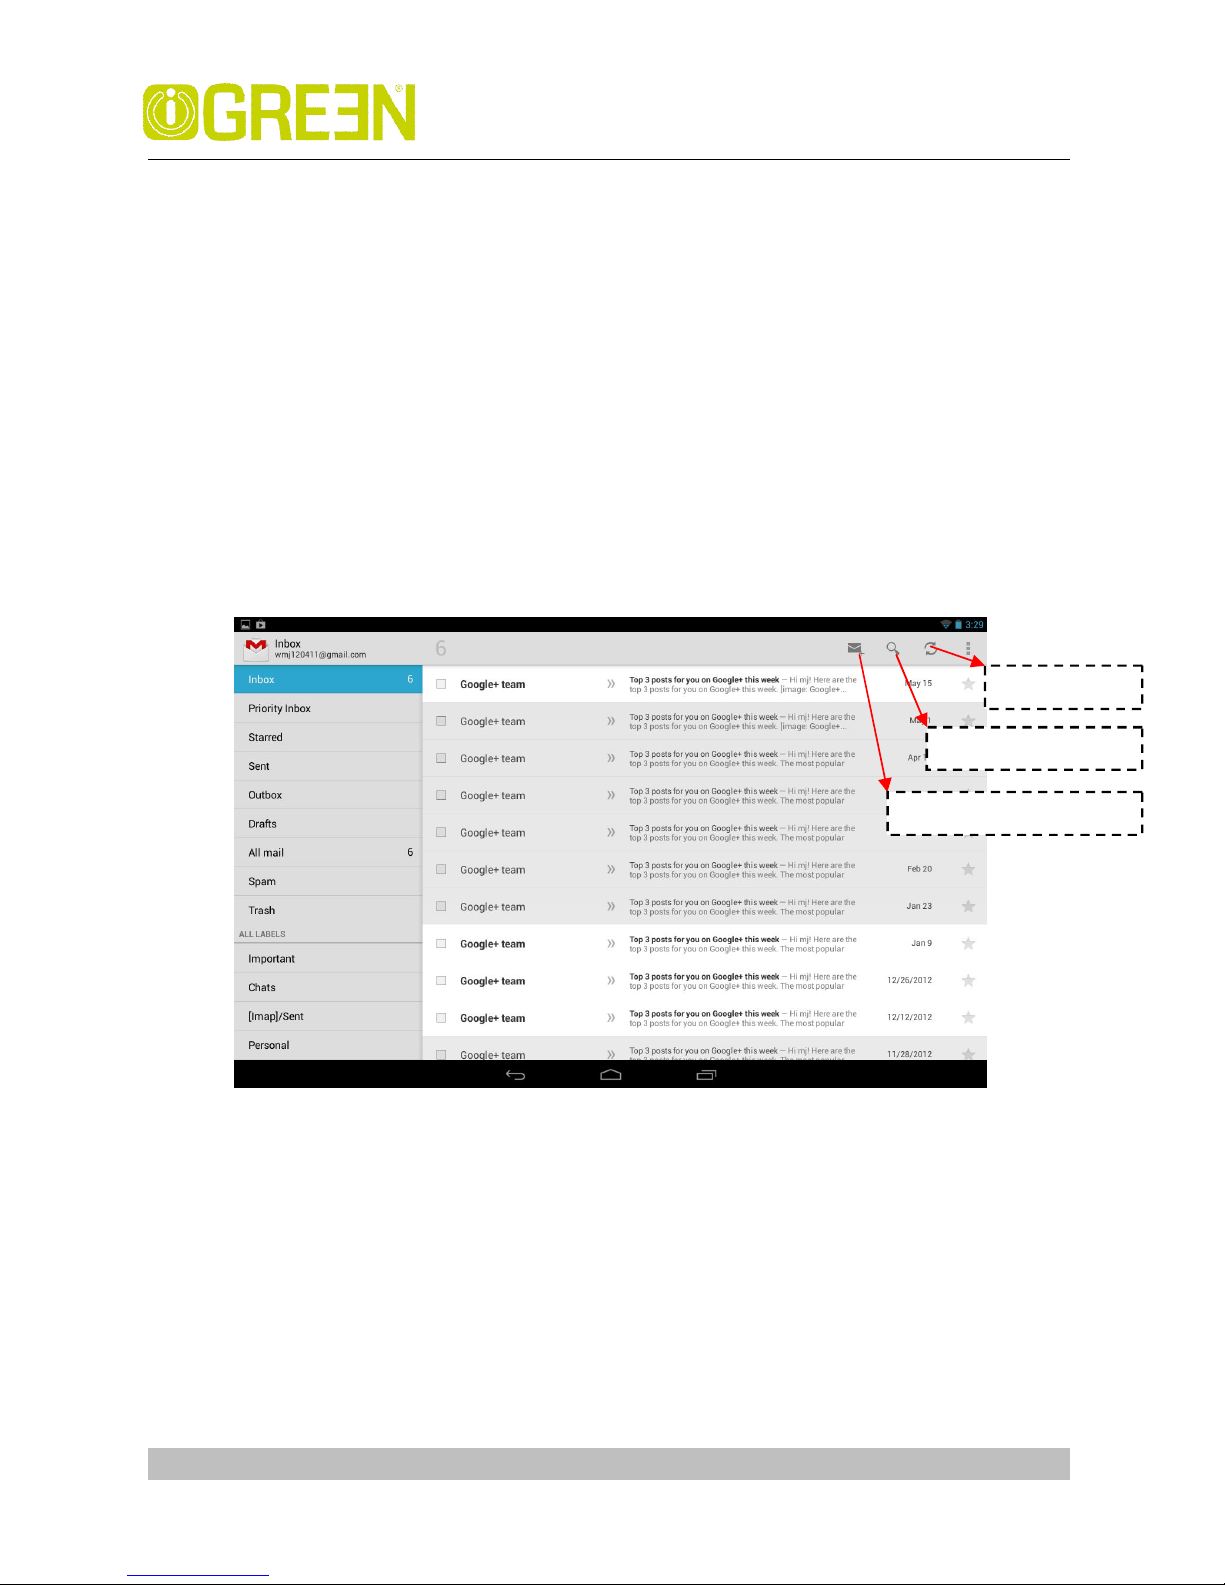
The Gmail interface is divided into two parts, the left one lists all the mail types,
such as Inbox, Priority Inbox ,Starred ,Chats ,Outbox etc. The right side presents
the details. So when reading a message, you can easily back to inbox by touching
the Inbox on the left side . You can also touch back until you return to your Inbox.
Switching accounts
Gail displays conversations, messages, and settings from one Google Account at
a time. If you have more than one account, you can open the Accounts screen to
view how many unread messages you have in each account and to switch
accounts.
1. From your Inbox, touch the current account at the top right of the
screen. Each account is listed, along with the number of unread messages in
your Inbox
2. Touch the account that contains the email you want to read.
Note: Here we only have one account.
Read a message
Touch a conversation that contains the messages you want to read.
The message header shows who sent the message, when, who it was sent to, and
other information. Icons indicate whether the message has an attachment
and the sender’s Google
When reading messages in a conversation, you can use the buttons at the top of
the screen to archive the entire conversation
Tab to create a new mail
Tab to search an email
Tab to refresh
Page 36
iGREEN GENESIS Tab-2
GREEN Planet Co. www.igreen-co.com
36
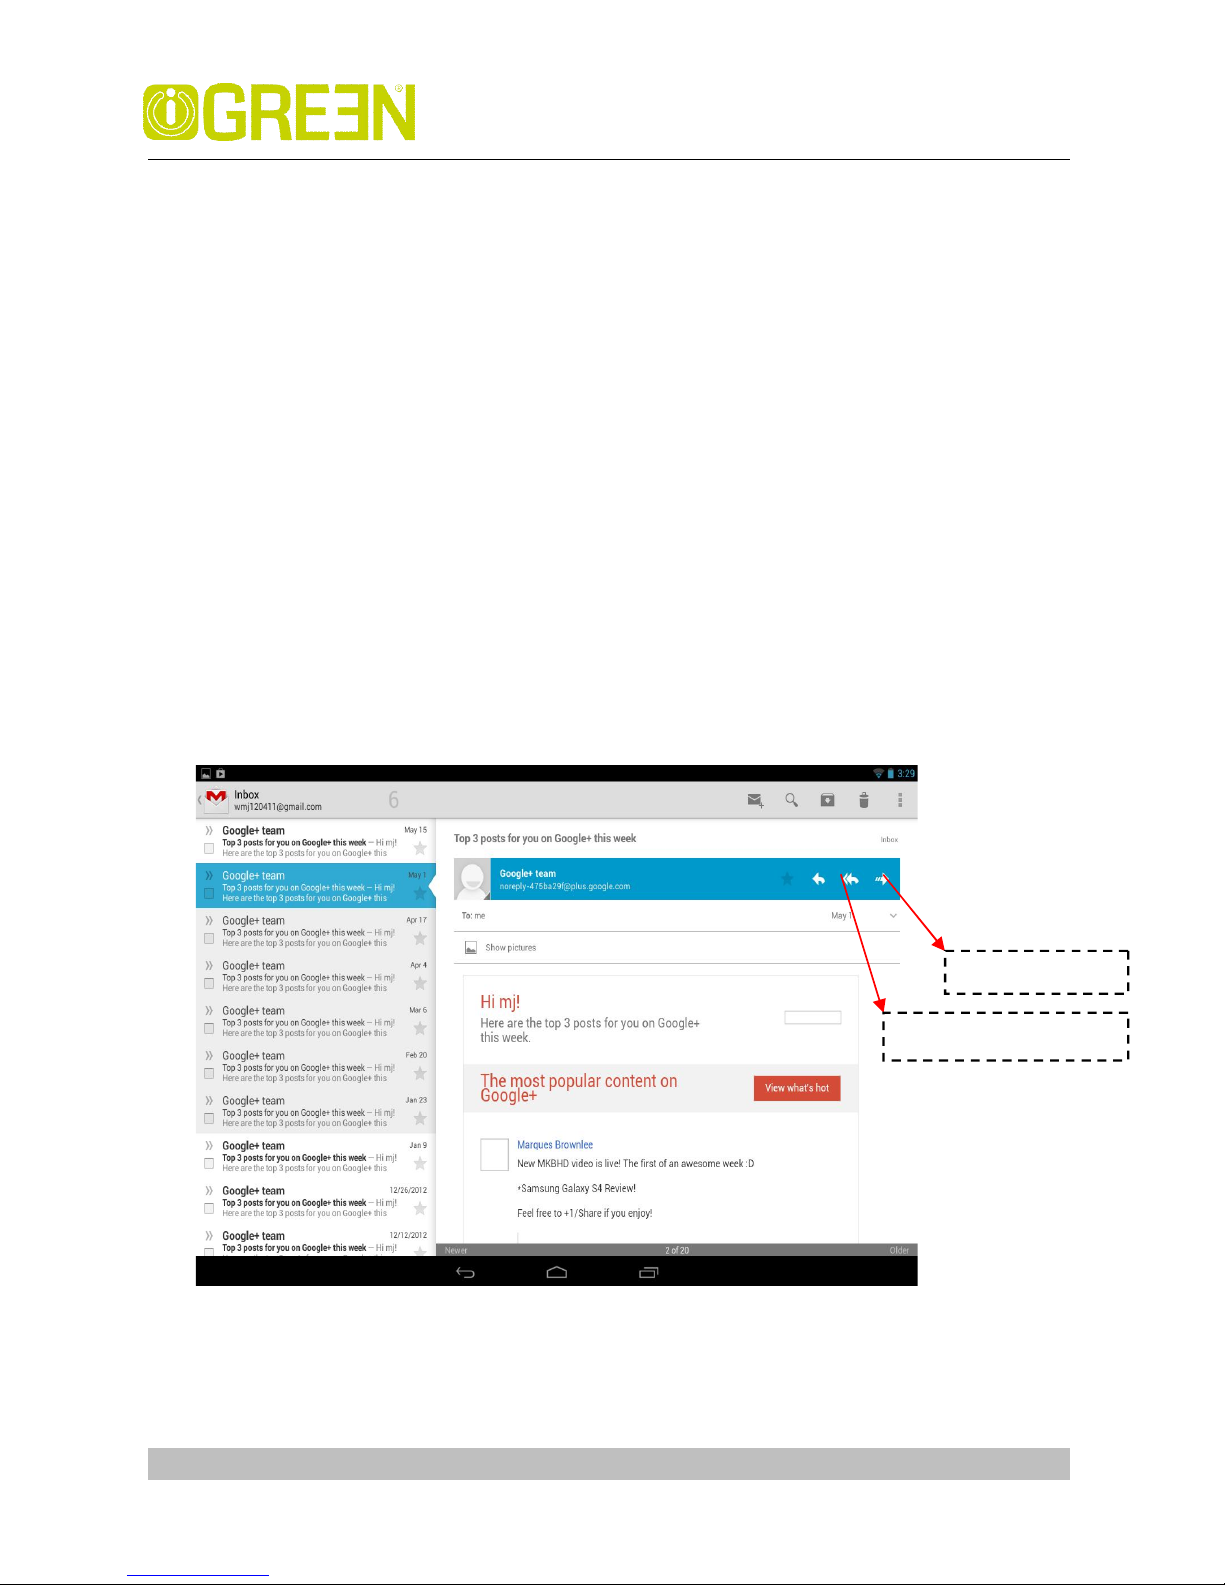
Touch the topic on the left side to open the next or previous conversation in the
Inbox.
Work with an attachment
Gmail can display some kinds of attached images ( .png, jpeg, depending on your
device) in a message. Others have a Preview or Download button you can use.
Depending on the applications installed on your device, you may also be able to
download and read a variety of kinds of files, including spreadsheets (.xls),
word-processing documents (.doc), or PDF files (.pdf). Other applications may
add support for opening other kinds of file.
Attachments you download are stored on your device’s USB storage or SD card.
Image files are added to albums in Gallery.
Composing and sending a message
Compose and send a message
1.
When viewing the Inbox, touch settings and touch Compose
2. Enter all the information that is needed for a message and touch SEND
to send the message.
Attach a photo to a message
Tab to reply the email
Tab to transmit
Page 37
iGREEN GENESIS Tab-2
GREEN Planet Co. www.igreen-co.com
37
1. Touch settings on the view of composing message and touch
2. Touch to choose a picture to attach as an attachment for the message
Replying to or forwarding a message
1. Touch the reply icon on the view of the conversation that you want to
reply.
Or touch the arrow to display the Forward icon for forwarding a message.
27 Maps, Local, and Latitude
Maps
Google Maps for Android includes the Maps application as well as the Latitude,
Navigation, and Places components, each available within Maps and as a
separate shortcut in the Launcher.
Open maps
Touch Maps icon in the Launcher or on the Home screen.
Note:
- And for the first time you open Maps you should use Wi-Fi to download
the maps data.
Move the map
Drag the map with your finger
Zoom on the map
1. Touch the plus or minus side of the Zoom control
OR
2. Double-tap a location on the map with one finger zoom in that location top
once with two fingers to zoom out
OR
3. Touch an area with two fingers at once and spread them apart to zoom in;
pinch them together to zoom out.
Page 38
iGREEN GENESIS Tab-2
GREEN Planet Co. www.igreen-co.com
38
Finding your friends with Google Latitude
Google Latitude lets you and your friends view each others’ locations on maps
and share status messages with each other.
Join Latitude
- While viewing a map touch settings and touch Join Latitude.
The first time you join Latitude you’re prompted to accept or reject the Google
privacy policy.
Open Latitude
After you join Latitude, you can open it to find your friends and view their updates.
While viewing a map, touch settings and touch Latitude
Invite friends to share their locations
After you join Latitude, you can start to share your location with your friends. Only
friends whom you have explicitly invited or accepted can see your location.
1. Open Latitude touch settings and touch Add friends
2. Touch Select from Contacts or Add via email address in the menu that opens.
If you touched Select from Contacts, a scrolling list of all your contacts opens.
Check all of the contacts you want to invite.
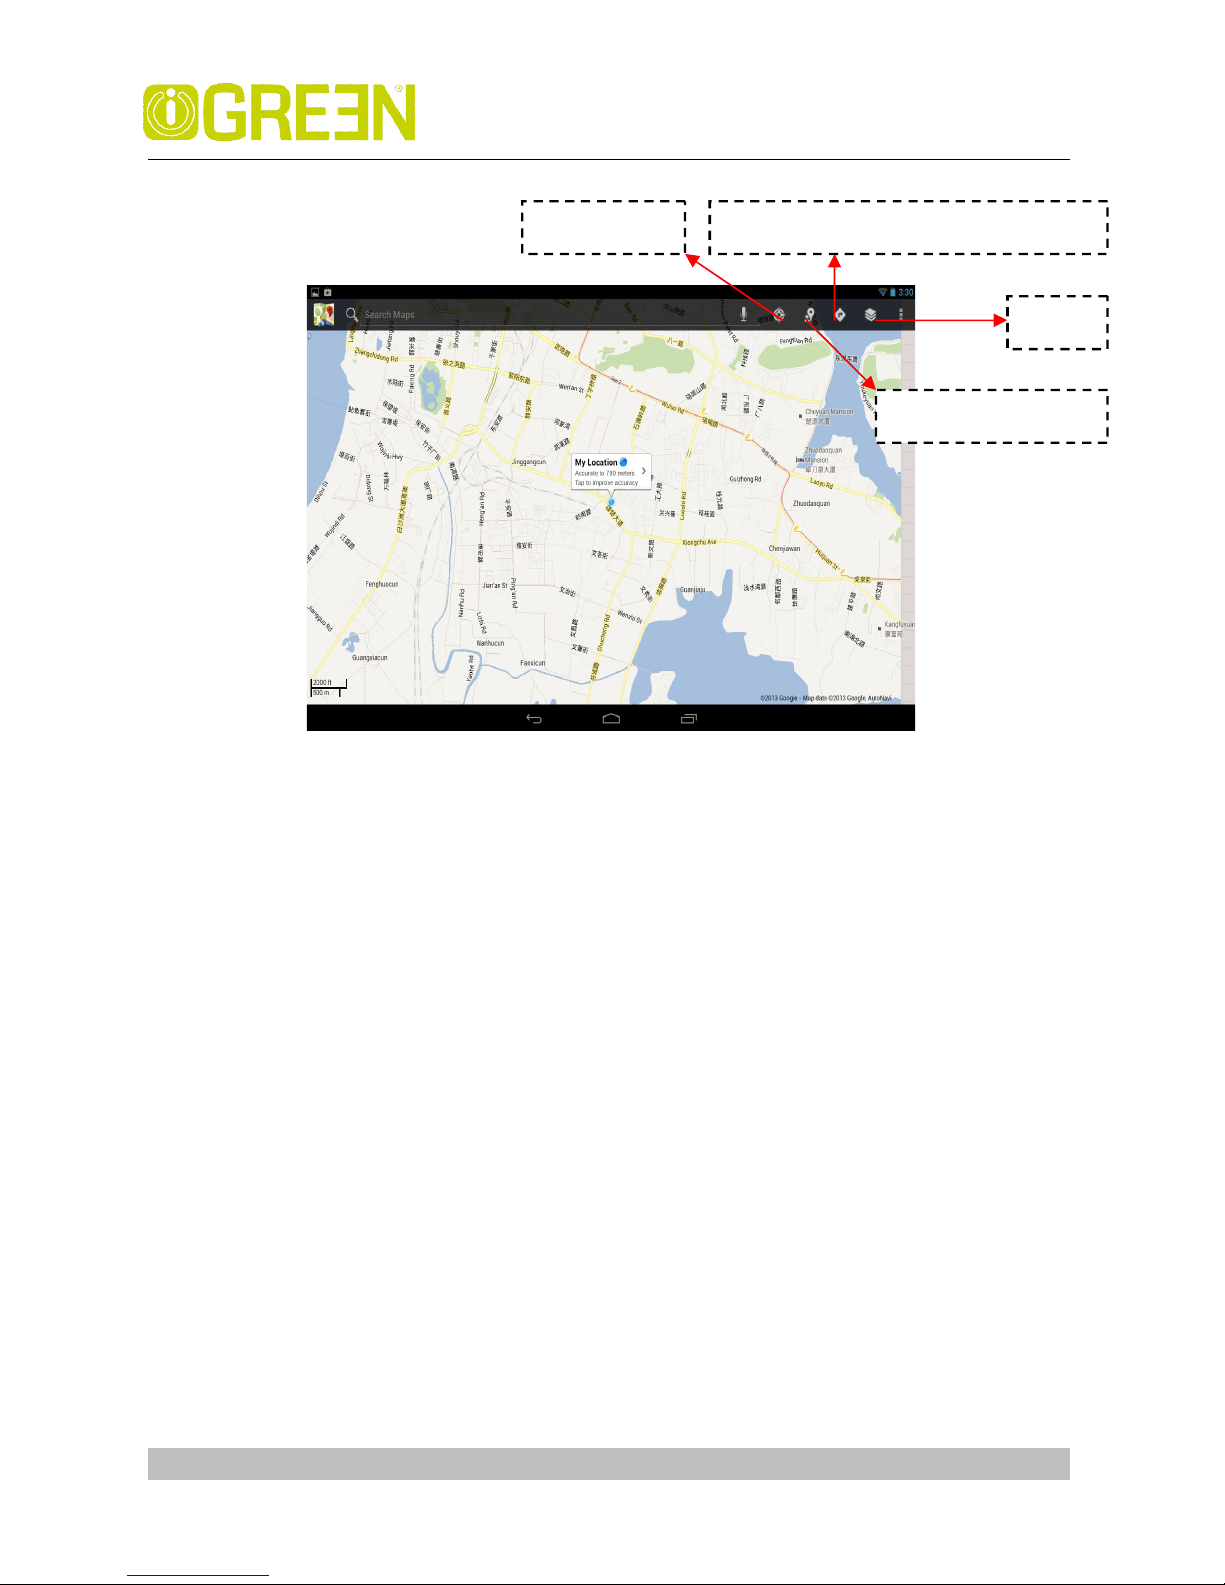
location
Search nearby places
layers
Getting walking/transit/driving direction
Page 39

iGREEN GENESIS Tab-2
GREEN Planet Co. www.igreen-co.com
39
If you touched Add via email address, you can enter one or more email
addresses, separated by commas, of the friends you want to invite.
3. Touch Add friends at the bottom of the screen.
If your friends already use Latitude, they receive an email request and a
notification on Latitude. If they have not yet joined Latitude, they receive an
email inviting them to sign into Latitude with their Google Account.
Respond to an invitation
When a friend invites you to share your location in Latitude, you can respond in
the following ways.
Accept and share back You and your friend can see each other’s locations.
Accept, but hide my location You can see your friend's location, but they can’t
see yours.
Don’t accept No location information is shared between you and your friend.
View your friends locations
You can view your friends’ locations on a map or in a list.
Your friends’ locations are shown when you open Maps. Each friend is
represented by their picture from Contacts with an arrow that points to their
approximate location. If a friend has chosen to share city-level locations, their
picture doesn’t have an arrow and appears in the middle of the city.
Manage connections with your friends
Touch a friend’s contact details balloon in Map view or touch a friend in List view
to open the friend’s profile. In the Profile screen, you can communicate with your
friend and set privacy options.
Show on map Shows the friend’s location on the map.
Chat using Google Talk Open a Google Talk chat window with that friend. Send
email Opens Gmail with a message addressed to the friend. Directions get
directions to the friend’s location.
Hide from this friend Stop sharing your location with this friend in Latitude, in a
list or on a map. To share your location with this friend again, touch Unhide from
this friend.
Share only city level location Share only the city you are in, not your street- level
location. Your friend sees your picture in the middle of the city you are in. To share
more precise locations again, touch Best available location.
Page 40
iGREEN GENESIS Tab-2
GREEN Planet Co. www.igreen-co.com
40
Remove
Remove the friend from your list and stop sharing locations altogether.
Control what you share
You have control over how and when your friends can find you in Latitude. Only
the last location sent to Latitude is stored with your Google Account. If you turn off
Latitude or are hiding, no location is stored.
Open Latitude, touch your own name, and touch Edit privacy settings. You can set
the following privacy options.
Detect your
location
Let Latitude detect and update
your
location as you move.
The update frequency is
determined
by several factors, such as
your
device’s
battery
charge
level
and
how
recently
your
location has
changed.
Set your location Set the location shared with others as an address you
enter;
or, from Contacts,
pick
a spot on a map, or resume having Latitude
share
your
actual
location.
Hide your location
Hide your
location from
all your fr
iends.
Sign out of Latitude
Disable
Latitude and stop sharing
your location
or status
.
You
can
always join
Latitude again
28 Google Talk
Touch the widgets “Google talk” on the home screen, or tap the Google talk
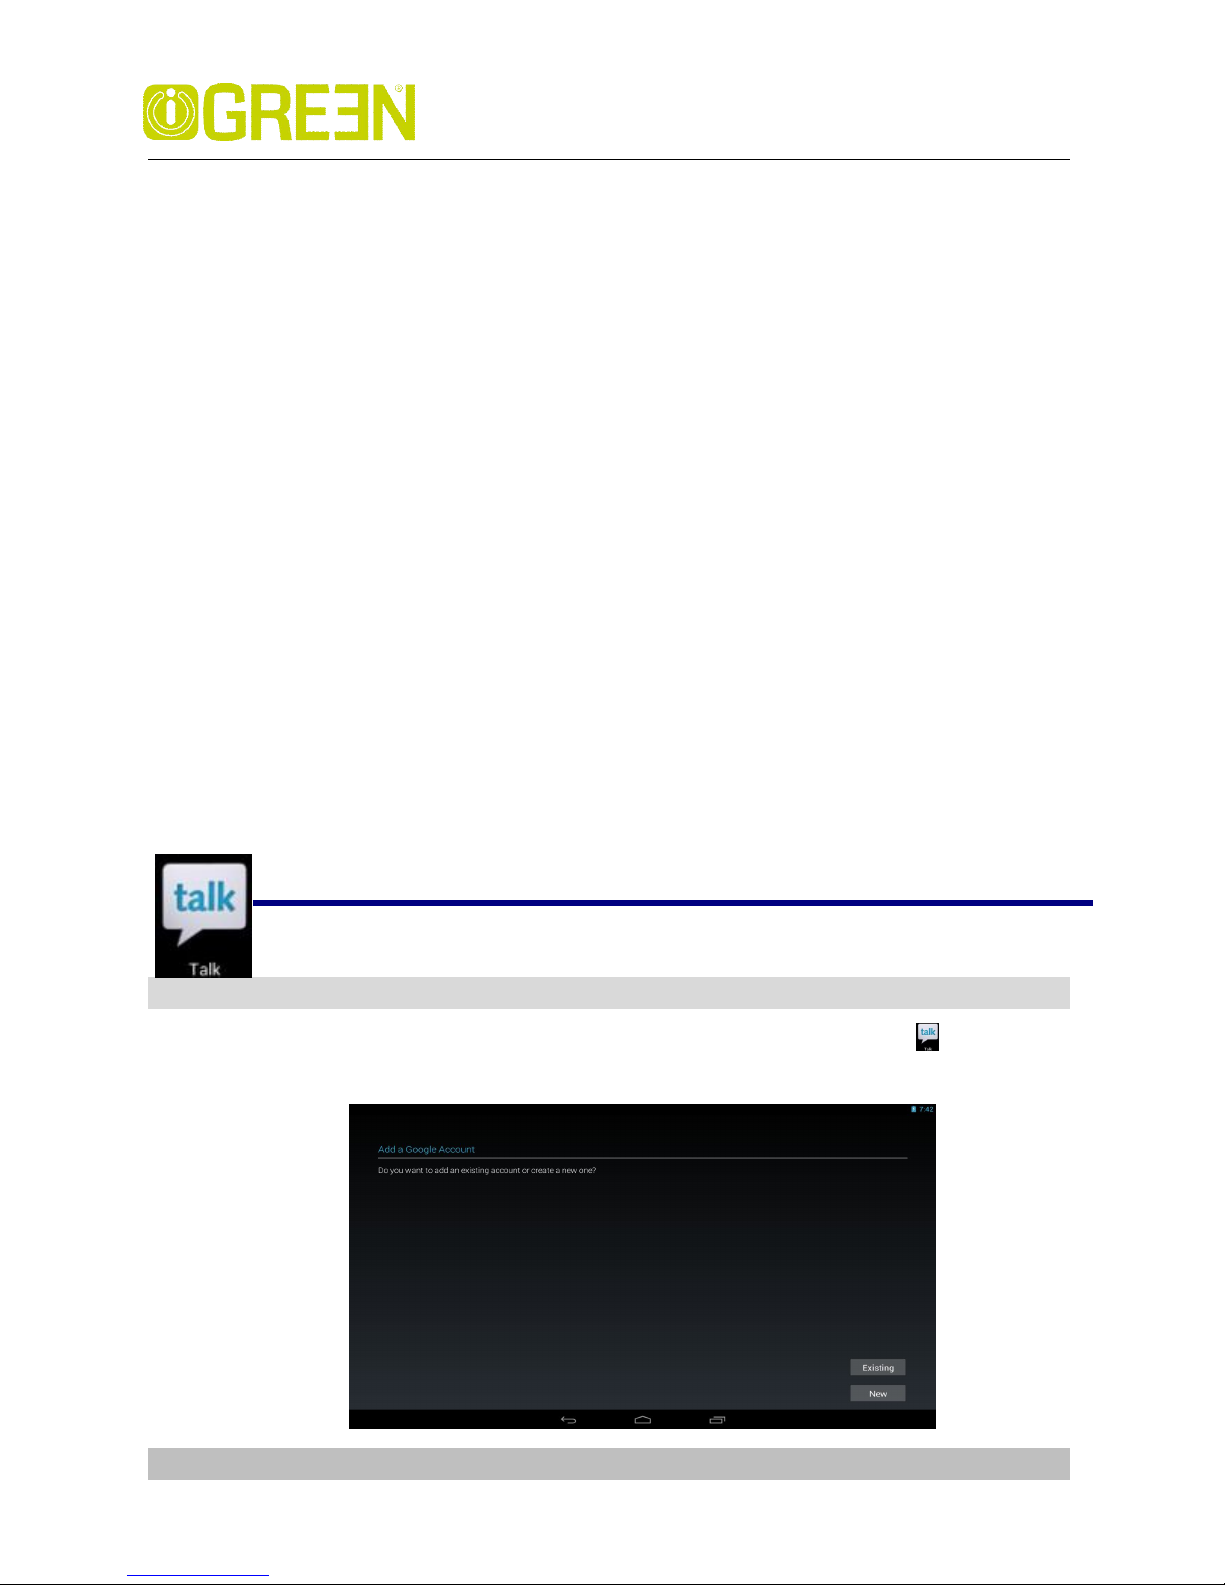
application icon. The first time you open Google, the below page is displayed
Page 41
iGREEN GENESIS Tab-2
GREEN Planet Co. www.igreen-co.com
41
If you don’t have a Google account, tap new to create one. Edit your information
according to the prompt. when you finish creating the account, it will login automatically.
If you already have a Google account, tap exiting and input your account and password
to login.
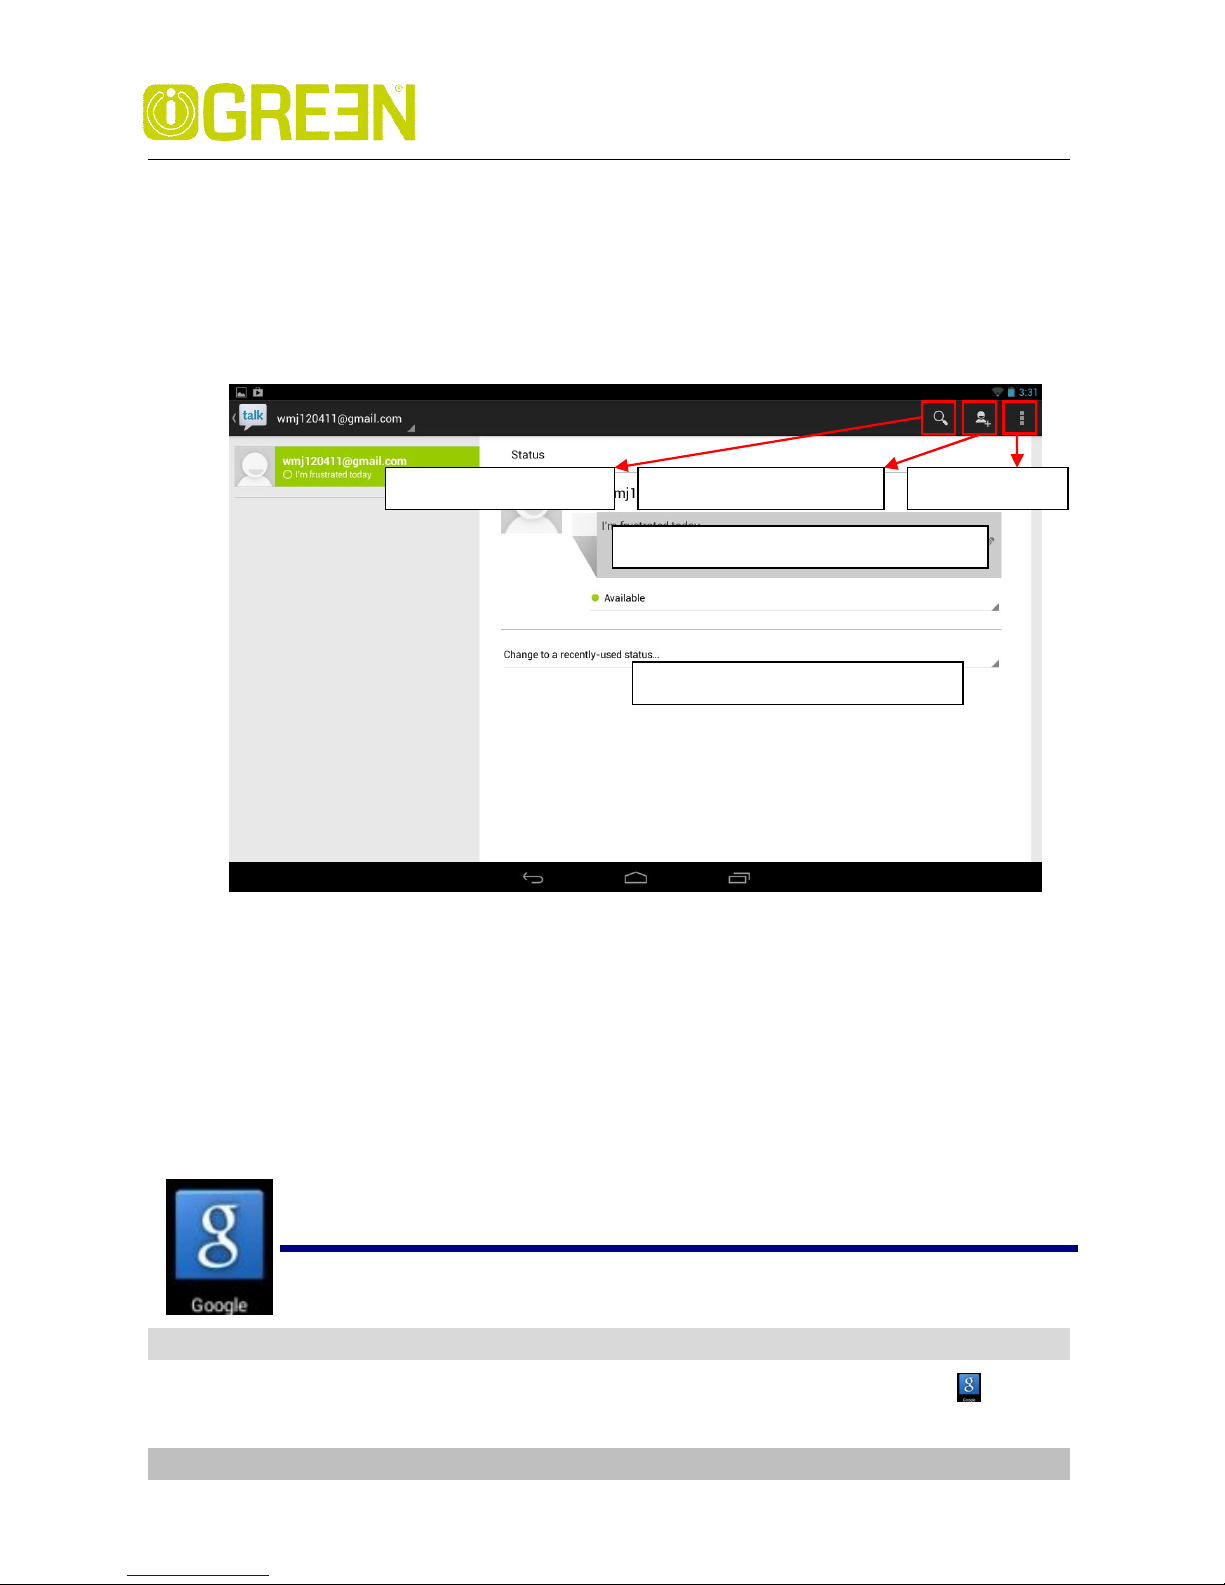
When you login successfully, you will see the following window,
More options
Display options Choose the methods to sort friends by
Sign out Tap to sign out, but you can tap your account to sign in again
Settings Make some private settings according to your appetite
Help connect to the internet for help
Send feedback Display some Google legal
29 Google
Touch the widgets “Google ” on the home screen. or tap the Google
application icon to open the following window.
Tap here to edit your status message
Tap here to choose your status
Search Google Talk
Invite a friend to chat
More options
Page 42
iGREEN GENESIS Tab-2
GREEN Planet Co. www.igreen-co.com
42
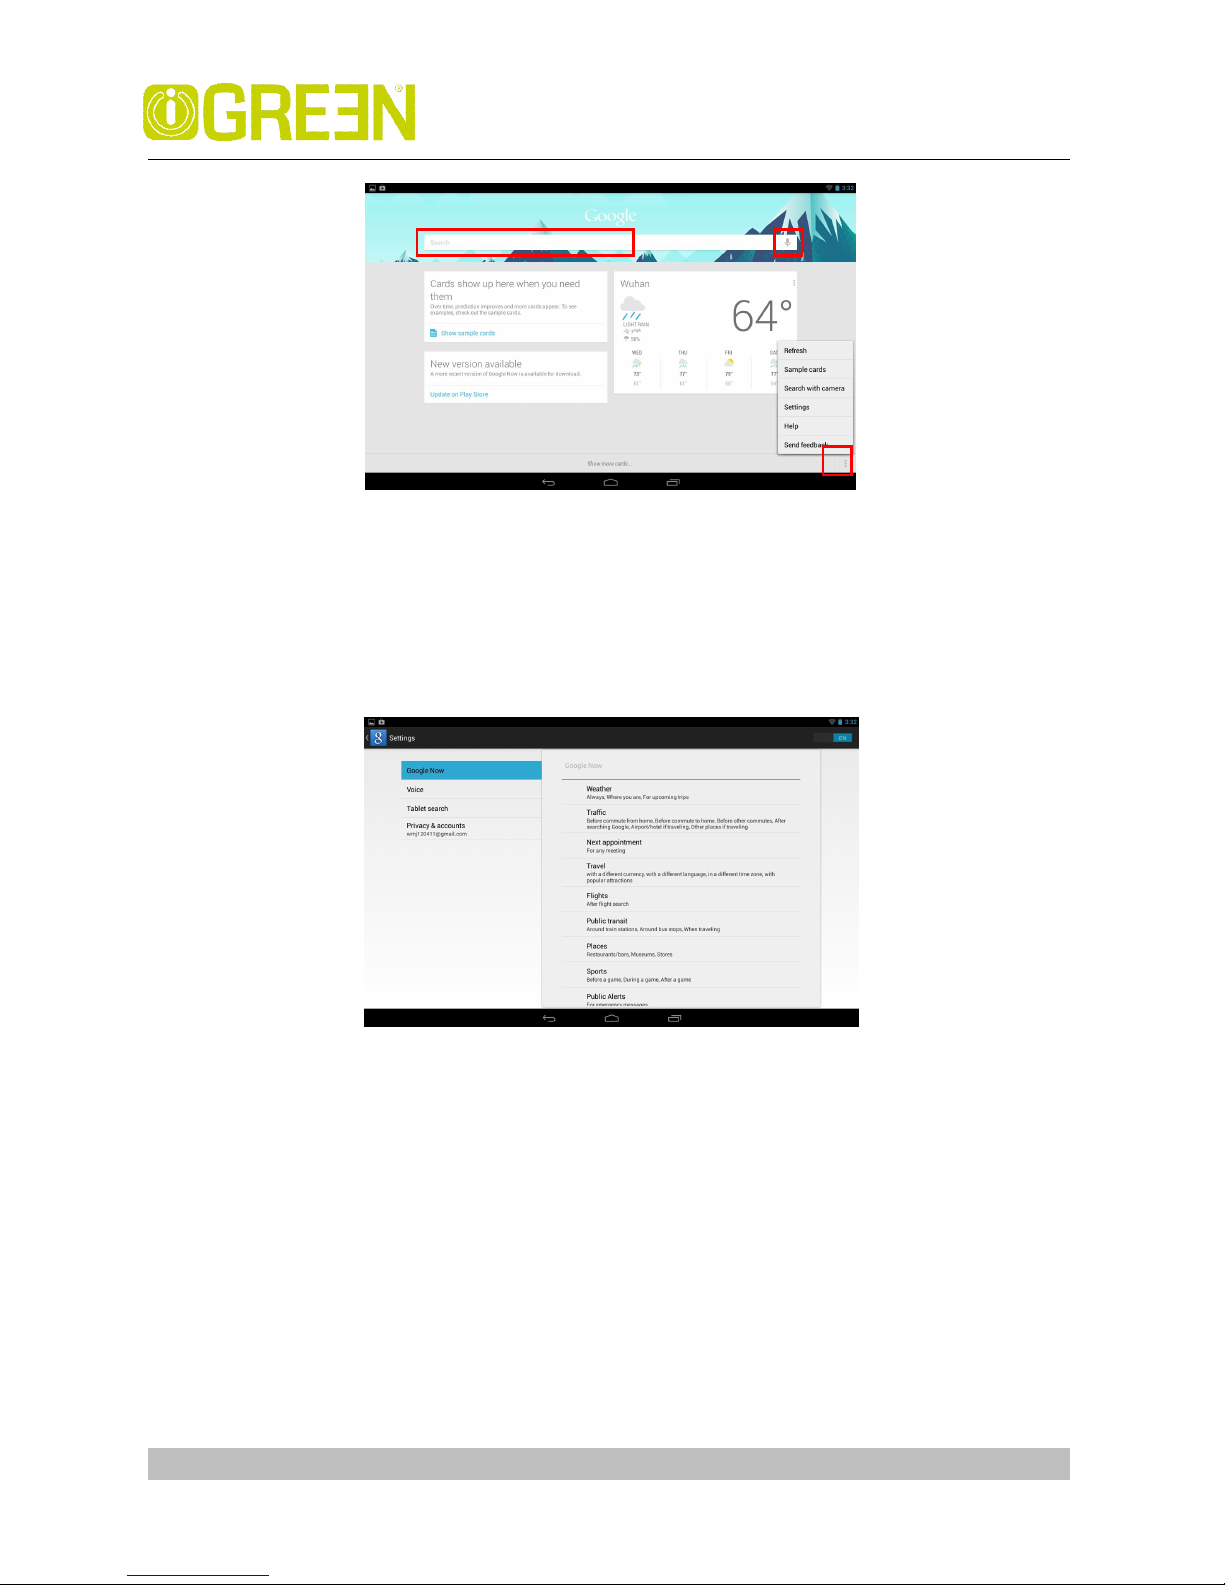
Tap the left red block to input the content by keyboard to start searching
Tap the microphone icon to speak out the content to start searching
Tap the “three dot” icon to open the menu
Settings: Tap settings to open the following window,
This window is divided by two parts:
The right part is to show the details.
The left part is to show the main terms
Google now; Set Sticky Notes, such as the weather location, when to appear the card and
so on
Voice; Set the language, choose the time when speech output, choose whether hide the
recognized offensive results or not, choose whether do Hotword detection or not.
Tablet search; Set the range for searching according to what you need
Privacy and accounts; Some settings associated with your account.
Page 43

iGREEN GENESIS Tab-2
GREEN Planet Co. www.igreen-co.com
43
30 Wi-Fi
Connecting to Wi-Fi networks
1. Press Settings -> Wi-Fi
2. Check Wi-Fi item on the top of the screen to turn it on
3. Touch a network to connect to it
- If the network is open, you are prompted to confirm that you want to
connect to that network by touching Connect.
- If the network is secured, you’re prompted to enter a
password or other credentials. (Ask your network
administrator for details.)
Receive notifications when open networks are in range
By default, when Wi-Fi is on, you receive notifications in the Status bar when your
device detects an open Wi-Fi network.
1. Turn on Wi-Fi, if it’s not already on
2. In the Wi-Fi settings screen, check Network notification.
You can uncheck this option to stop receiving notification.
Add a Wi-Fi network
1. Turn on Wi-Fi, if it’s not already on.
If you’re adding a Wi-Fi network when first setting up your device, Wi-Fi is
turned on automatically.
2. In the Wi-Fi settings screen, touch Add network (at the top of your screen).
3. Enter the SSID (name) of the network. If the network is secured, touch the
Security menu and then touch the type of security deployed on the network.
4. Enter any required security credentials.
5. Touch Save.
The device connects to the wireless network. Any credentials that you
entered are saved, so you are connected automatically the next time you
come within range of this network.
Forget a Wi-Fi network
You can make the device forget about the details of a Wi-Fi network that you
added— for example, if you don’t want the device to connect to it automatically or
Page 44

iGREEN GENESIS Tab-2
GREEN Planet Co. www.igreen-co.com
44
if it is a network that you no longer use.
1. Turn on Wi-Fi, if it’s not already on.
2. In the Wi-Fi settings screen, touch & hold the name of the network.
3. Touch Forget in the dialog that opens.
Wi-Fi Settings screen
In addition to the settings described in this section, you can press Menu and
Advanced Wi-Fi settings as described in “Advanced Wi-Fi”
Wi-Fi
Check to turn on Wi-Fi so you can connect to Wi-Fi networks. When connected to
a network, displays the network’s name.
Wi-Fi networks
Displays a list of Wi-Fi networks you’ve previously configured and those detected
when the device last scanned for Wi-Fi networks.
Add Wi-Fi network
Opens a dialog where you can add a Wi-Fi network by entering its SSID (the name
it broadcasts) and security type.
Advanced Wi-Fi settings screen
Network notification
Check to receive a notification when an open Wi-Fi network becomes available.
Keep Wi-Fi on during sleep
Opens a dialog where you can set whether and when the Wi-Fi radio disconnects.
Disabling sleep uses more battery power.
MAC address
The Media Access Control (MAC) address of your device when connecting to
Wi-Fi networks.
IP address
The Internet Protocol (IP) address assigned to the device by the Wi-Fi network you
are connected to (unless you used the IP settings to assign it a static IP address).
Page 45

iGREEN GENESIS Tab-2
GREEN Planet Co. www.igreen-co.com
45
31 Accounts
Adding and removing accounts
Add an account
1. Open the Accounts & Sync Settings screen:
Press Settings -> Accounts
2. Touch + Add account .
3. Touch the kind of account you want to add
4. Follow the steps displayed on the screen to enter the required and optional
information about the account.
Remove an account
1. Open the Accounts & Sync Settings screen:
Press Settings -> Accounts
2. Touch the account to delete
3. Touch Settings on the top of the screen and then touch Remove account on
the dropdown menu.
4. Confirm that you want to remove the account
Configuring account sync and display options
Sync information manually
1. Open the Accounts Settings screen:
Press Settings -> Accounts
2. Touch the account whose data you want to sync.
3. Touch Menu on the top of the screen and touch Sync now on the dropdown
menu.
Change an account’s sync settings
1. Open the Accounts Settings screen:
Press Settings -> Accounts
2. Touch the account whose sync settings you want to change
3. Check or uncheck the kinds of information you want to sync to the device.
Page 46
iGREEN GENESIS Tab-2
GREEN Planet Co. www.igreen-co.com
46
32 Settings
Page 47
iGREEN GENESIS Tab-2
GREEN Planet Co. www.igreen-co.com
47
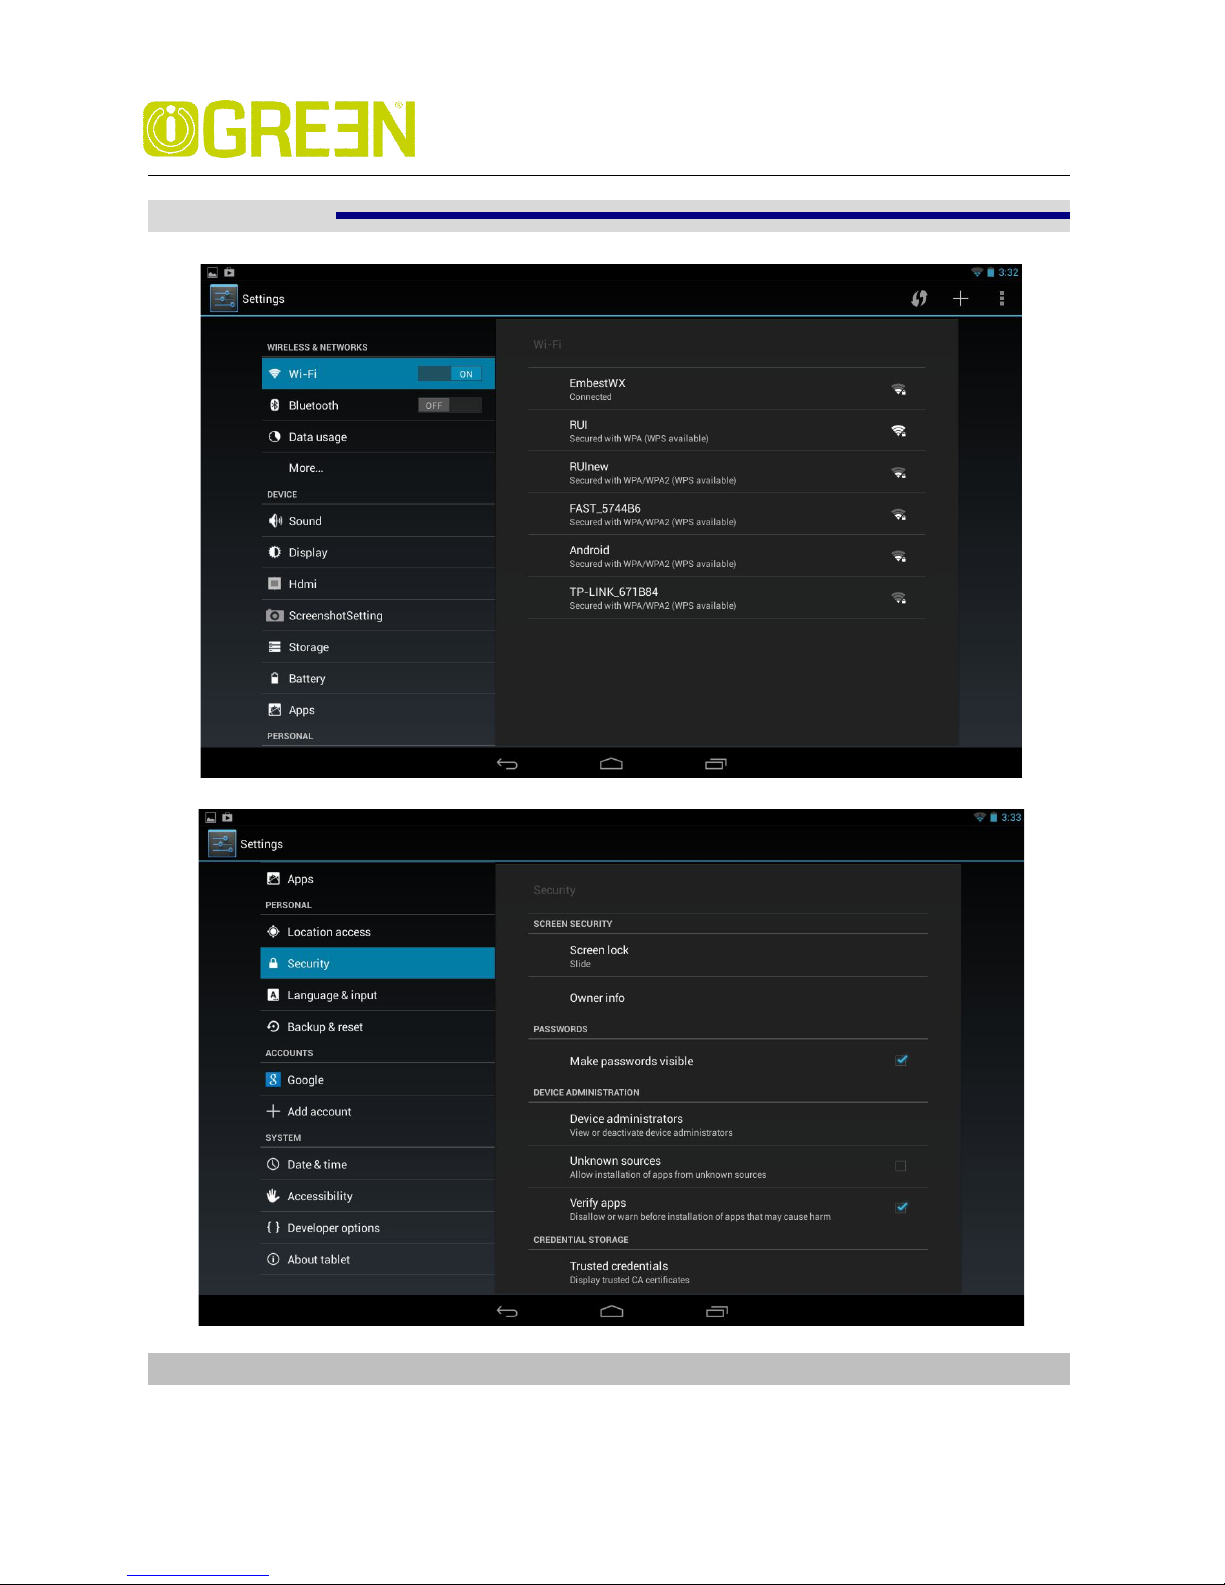
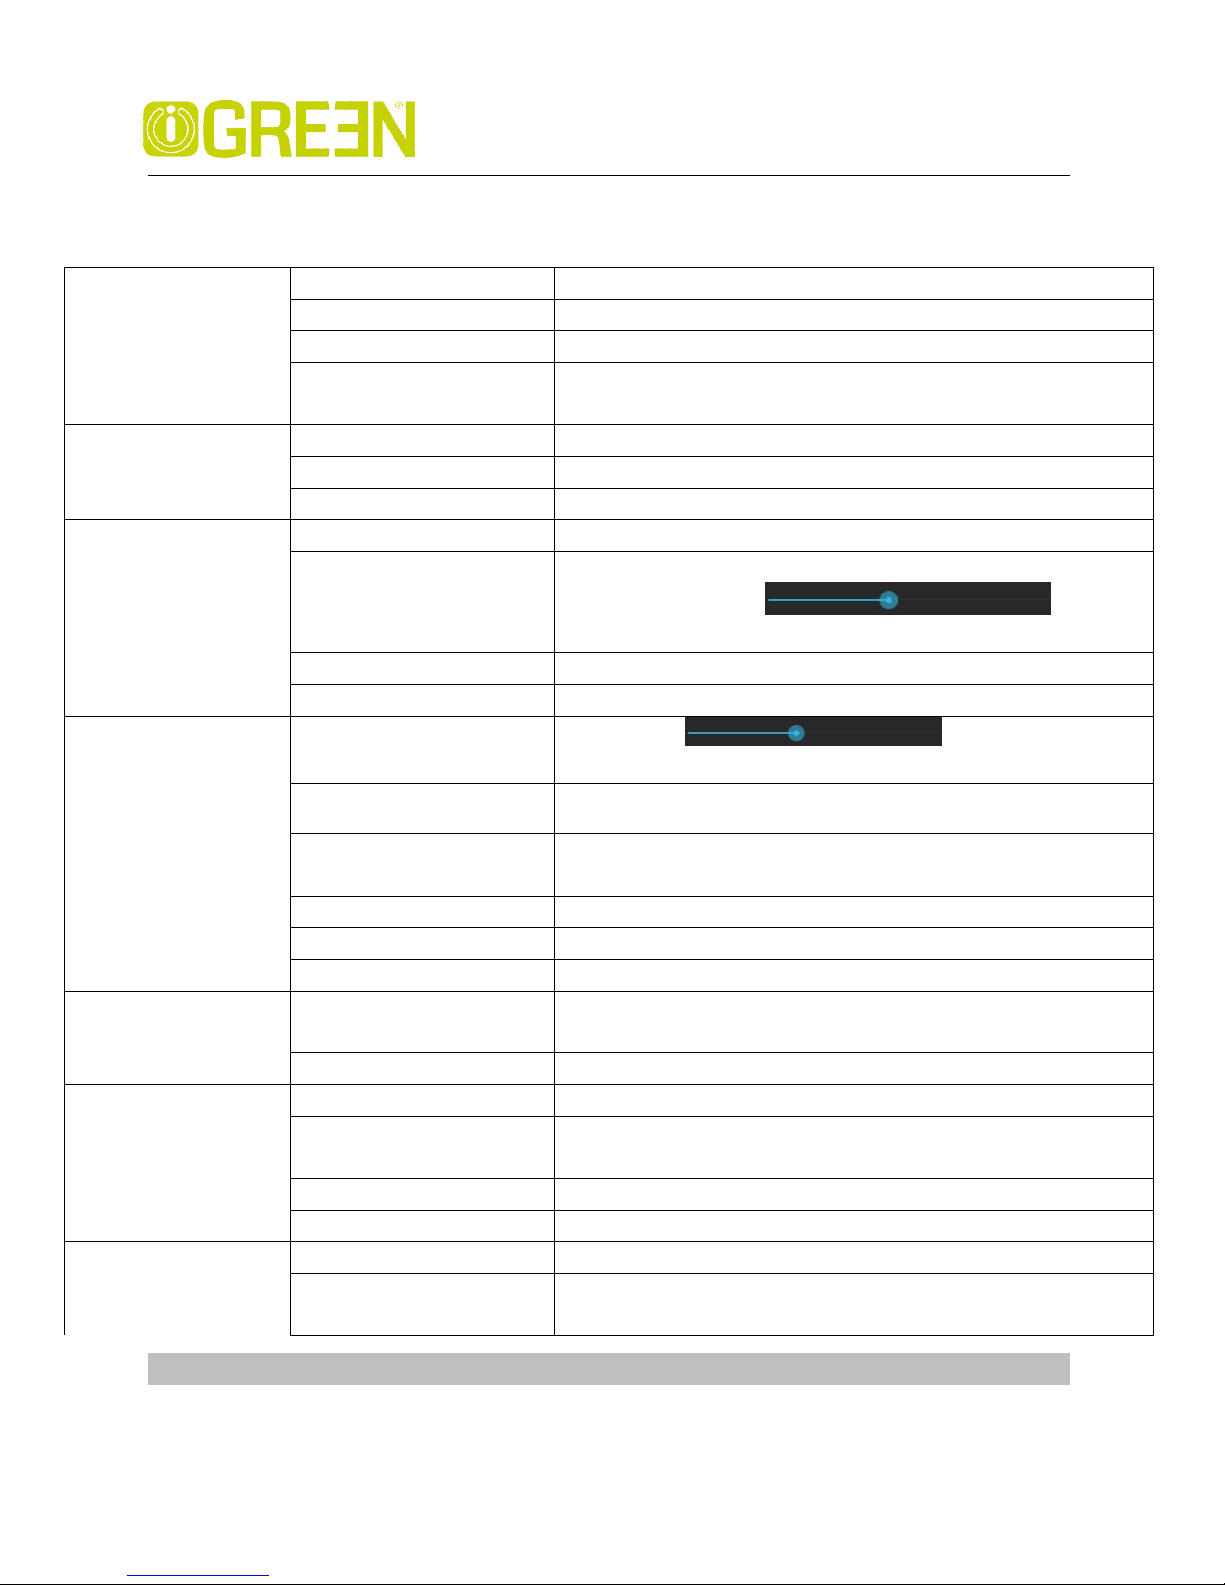
Wireless & networks
Wi-Fi Turn on Wi-Fi.
Bluetooth Turn on/off Bluetooth and manage it.
Data usage Turn on Mobile data to check the data usage
More
Touch to set VPN ,portable hotspot ,Wi-Fi direct and Mobile
network
HDMI
Turn on HDMI Turn on HDMI before using HDMI
HDMI Resolution Set the resolution before using HDMI
Screen Zoom Zoom in/out the display of tablet on TV
Sound
Silent mode Silence all sounds except media & alarms.
Volume
To adjust the Media volume, Alarm volume and Notification
volume. Tap & slide and
then tap OK.
Call ringtone &vibrate Choose phone ringtone and whether vibrate when ring
System Select to enable a sound when making a selection.
Display
Brightness
Tap & slide to adjust the screen
brightness as desired, and then tap OK.
Wallpaper Touch to set the wall paper
Sleep
Choose how long before going asleep when no operation
happened
Daydream Choose pictures as Daydream
Font size Choose the appropriate font size
Wireless display Turn on Wi-Fi to look for nearby wireless displays
Location access
Access to my locstion
Turn on the button to let apps that have asked your
permission use your location information.
Location sources Wi-Fi &mobile network location
Apps
Downloaded Program downloaded from your tablet.
On SD card
Manage and remove installed applications from your SD
card
Running View and control currently running services.
All Manage all the programs in your tablet
Backup &reset
Backup &restore You can choose to backup your data or not
Factory data reset
Tap to reset the device to its initial factory state, erasing all
data and downloaded applications. Tap Reset Tablet to
Page 48
iGREEN GENESIS Tab-2
GREEN Planet Co. www.igreen-co.com
48
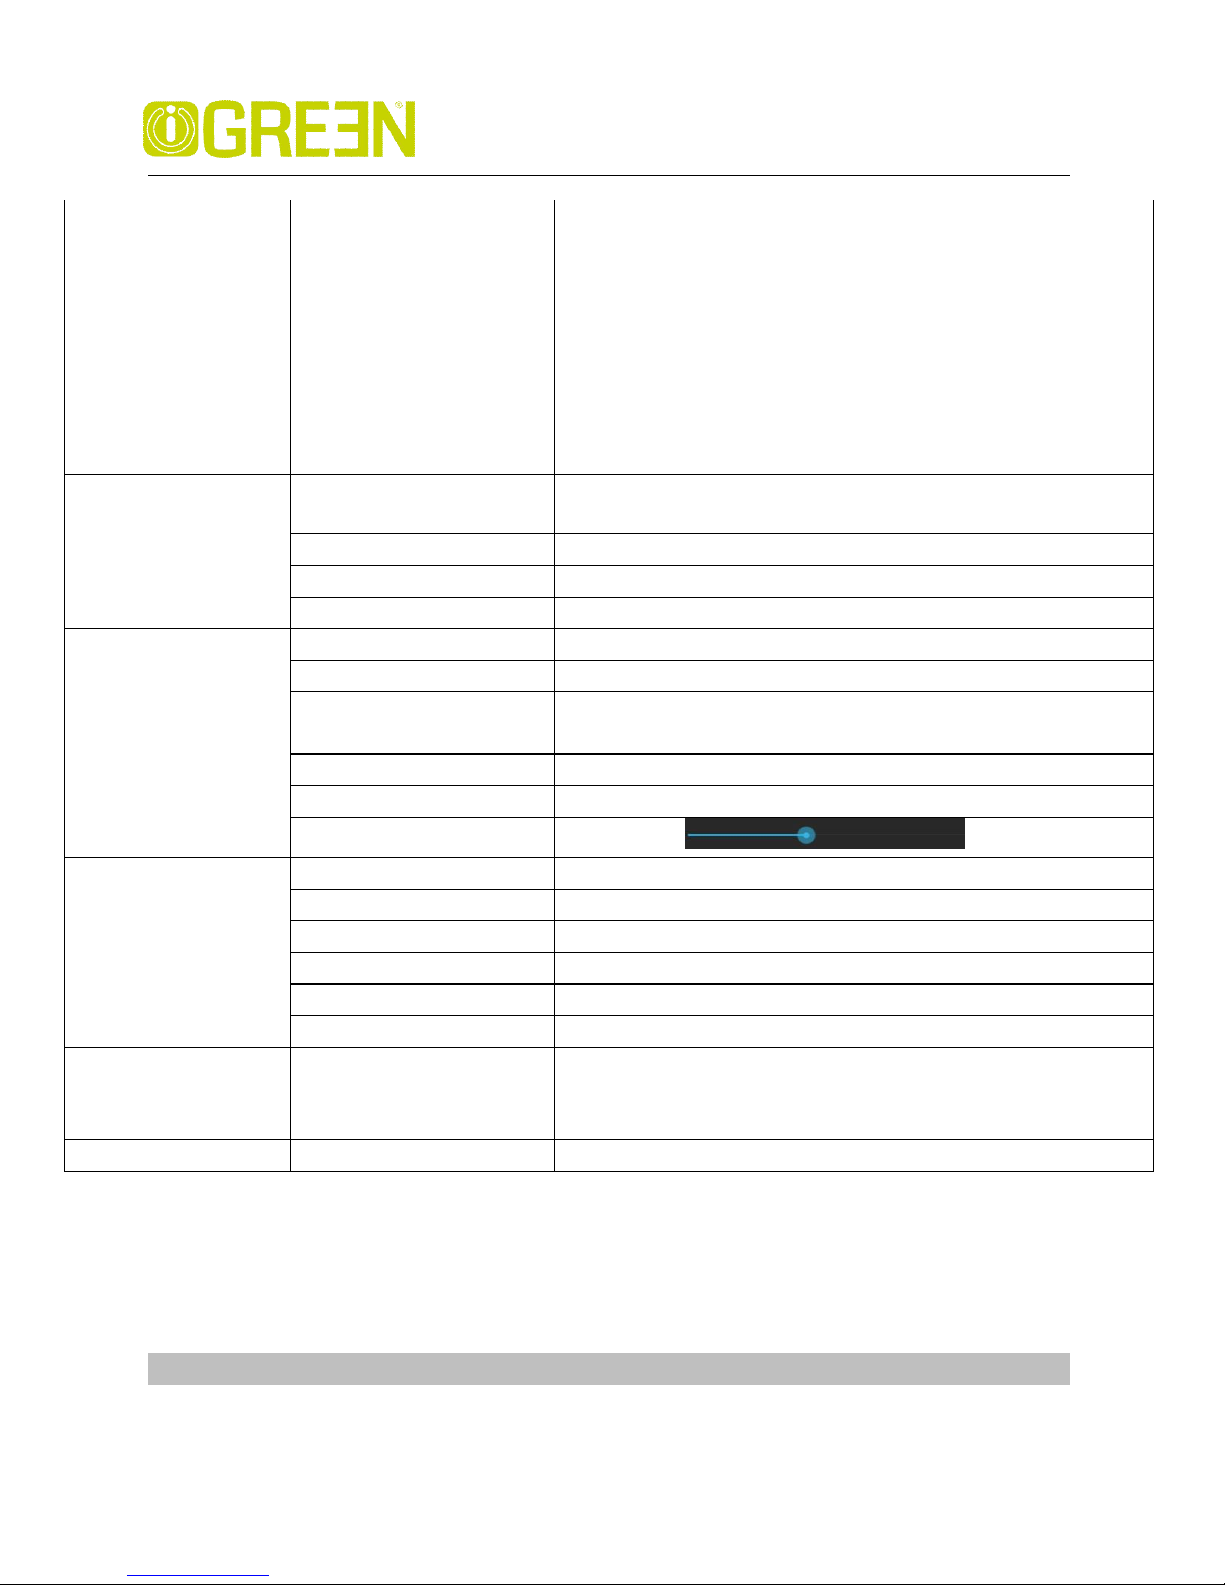
Backup &reset
proceed with reset, or press Back key to cancel and return
to previous screen.
WARNING! The following will be erased during the factory
Reset: ~ Google account
~ System and application data and settings
~ Downloaded applications
The factory reset will NOT erased:
~ Current system software and bundled applications
~ SD card files, such as music or photos
Security
Screen security
You can choose a
ap
propriate mode to unlock your screen and
you can choose to show your owner info on lock screen or not
Passwords You can choose to make passwords visible
Device administration Choose to allow installation of non-Market apps
Credential storage Include trusted credentials and Install from SD card
Language & input
Language Select the language and region according to your location.
Spell checker Pitch on to enable spell checker
Personal dictionary
You can add words to a personal dictionary, words that may
not be included in the default dictionary.
Keyboard & input methods
Choose a appropriate input from the list
Speech Include voice speech and text-to speech output
Mouse / Track-pad
Tap & slide and then tap OK
Date & time
Automatic date &time Use network-provided values
Set date Set the date manually when Automatic is not checked
Select time zone Select the time zone when Automatic is not checked
Set time Set the time when Automatic is not checked
Use 24-hour format You can choose to use 24-hour format or 12-hour format.
Choose date format You can select the date format.
About tablet
View updates Status (Battery, Wi-Fi, etc), Legal
information, Model number, Android version, Kernel version
and Build number.
Page 49
iGREEN GENESIS Tab-2
GREEN Planet Co. www.igreen-co.com
49
يﺎﻤﻨﻫار ﺖﻠﺒﺗ:
دﻮﺑ ﺪﻨﻫاﻮﺧ طﺎﺒﺗرا رد ﻢﯿﻘﺘﺴﻣ ترﻮﺻ ﻪﺑ ﺎﻬﻧآ ﺎﺑ ناﺮﺑرﺎﮐ ﻪﮐ ﺪﻨﺘﺴﻫ يﺎﻫرﻮﺘﮐﺎﻓ ﻦﯾﺮﺘﻤﻬﻣ و ﻦﯿﻟوا وﺰﺟ ،ﯽﺴﻤﻟ ﻪﺤﻔﺻ ﺖﯿﺳﺎﺴﺣ و ﺮﯾﻮﺼﺗ ،اﺪﺻ . ﺶﯾﺎﻤﻧ ﻪﺤﻔﺻ يﻻﺎﺑ ﺖﯿﻔﯿﮐ
ﺪﯿﻫد راﺮﻗ ﺖﯾﻮﻟوا رد ار رﻮﺘﮐﺎﻓ ﻦﯾا ﺖﻠﺒﺗ ﺪﯾﺮﺧ مﺎﮕﻨﻫ رد ﻦﯾاﺮﺑﺎﻨﺑ ،ﯽﻣاﺰﻟا ﺖﺴﯾﺮﻣا .ﺘﺳد ﻪﺑ تارﻮﺘﺳد ﯽﻠﺻا يدورو ﻦﯿﻨﭽﻤﻫ و ﺪﺷﺎﺑ ﯽﻣ نآ ﯽﺴﻤﻟ ﻪﺤﻔﺻ ﻖﯾﺮﻃ زا ﺎﻤﺷ هﺎﮕ
ﯽﺴﻤﻟ ﻪﺤﻔﺻ ﻦﯾا ﺖﯿﺳﺎﺴﺣ ﻪﺑ ﻪﺟﻮﺗ(Touch)دور ﯽﻣ رﺎﻤﺷ ﻪﺑ يروﺮﺿ رﺎﯿﺴﺑ ﺮﻣا ﮏﯾ ، . ﺚﻋﺎﺑ هﺎﺗﻮﮐ ﯽﺗﺪﻣ لﻮﻃ رد ﺪﻧاﻮﺗ ﯽﻣ ﯽﺴﻤﻟ ﻪﺤﻔﺻ ﺐﺳﺎﻨﻣﺎﻧ دﺮﮑﻠﻤﻋ و ﺖﯿﻔﯿﮐ
دﻮﺷ هﺎﮕﺘﺳد ﻪﺑ ﺖﺒﺴﻧ ﺎﻤﺷ ﺪﺑ ﺲﺣ و ﯽﮔدﺰﻟد.
ﺮﮕﺸﯾﺎﻤﻧ ﺖﯿﻔﯿﮐ :اﺮﺑ ﻪﮐ ﻪﯿﻟوا رﻮﺘﮐﺎﻓ ﺎﺒﻟﺎﻏ ﻞﮑﺷ ﻪﺑ ار ﺎﻫ ﻞﺴﮑﯿﭘ ﻢﮐاﺮﺗ ﻪﮐ ﺪﺷﺎﺑ ﯽﻣ نآ ﻦﺷﻮﻟوزر ناﺰﯿﻣ دﻮﺷ ﯽﻣ حﺮﻄﻣ ﺮﮕﺸﯾﺎﻤﻧ ﮏﯾ تﺎﺼﺨﺸﻣ ي) لﻮﻃx
ضﺮﻋ (دروآ ﯽﻣ رد ﺶﯾﺎﻤﻧ ﻪﺑ . ﺺﺨﺸﻣ يﺎﻀﻓ ﮏﯾ رد ﺎﻫ ﻞﺴﮑﯿﭘ ﻢﮐاﺮﺗ ناﺰﯿﻣ ،رﻮﺘﮐﺎﻓ ﻦﯿﻣود)PPI ( ﻊﺑﺮﻣ ﭻﻨﯾا ﺪﺣاو رد ﺎﻫ ﻞﺴﮑﯿﭘ ﻊﻤﺠﺗ و ﻢﮐاﺮﺗ ﻪﭼ ﺮﻫ ﻪﮐ ﺪﺷﺎﺑ ﯽﻣ
ﺮﮕﺸﯾﺎﻤﻧ ﻪﺤﻔﺻ ،ﺪﺷﺎﺑ ﺮﺘﺸﯿﺑ دﻮﺑ ﺪﻫاﻮﺧ رادرﻮﺧﺮﺑ يﺮﺗﻻﺎﺑ ﺮﯾﻮﺼﺗ حﻮﺿو و ﺖﻗد زا . رﺎﺘﺧﺎﺳ رد ﻪﺘﻓر رﺎﮐ ﻪﺑ يژﻮﻟﻮﻨﮑﺗ عﻮﻧ ،ﺮﮕﺸﯾﺎﻤﻧ ﺖﯿﻔﯿﮐ هﺪﻨﻨﮐ ﻦﯿﯿﻌﺗ مﻮﺳ رﻮﺘﮐﺎﻓ
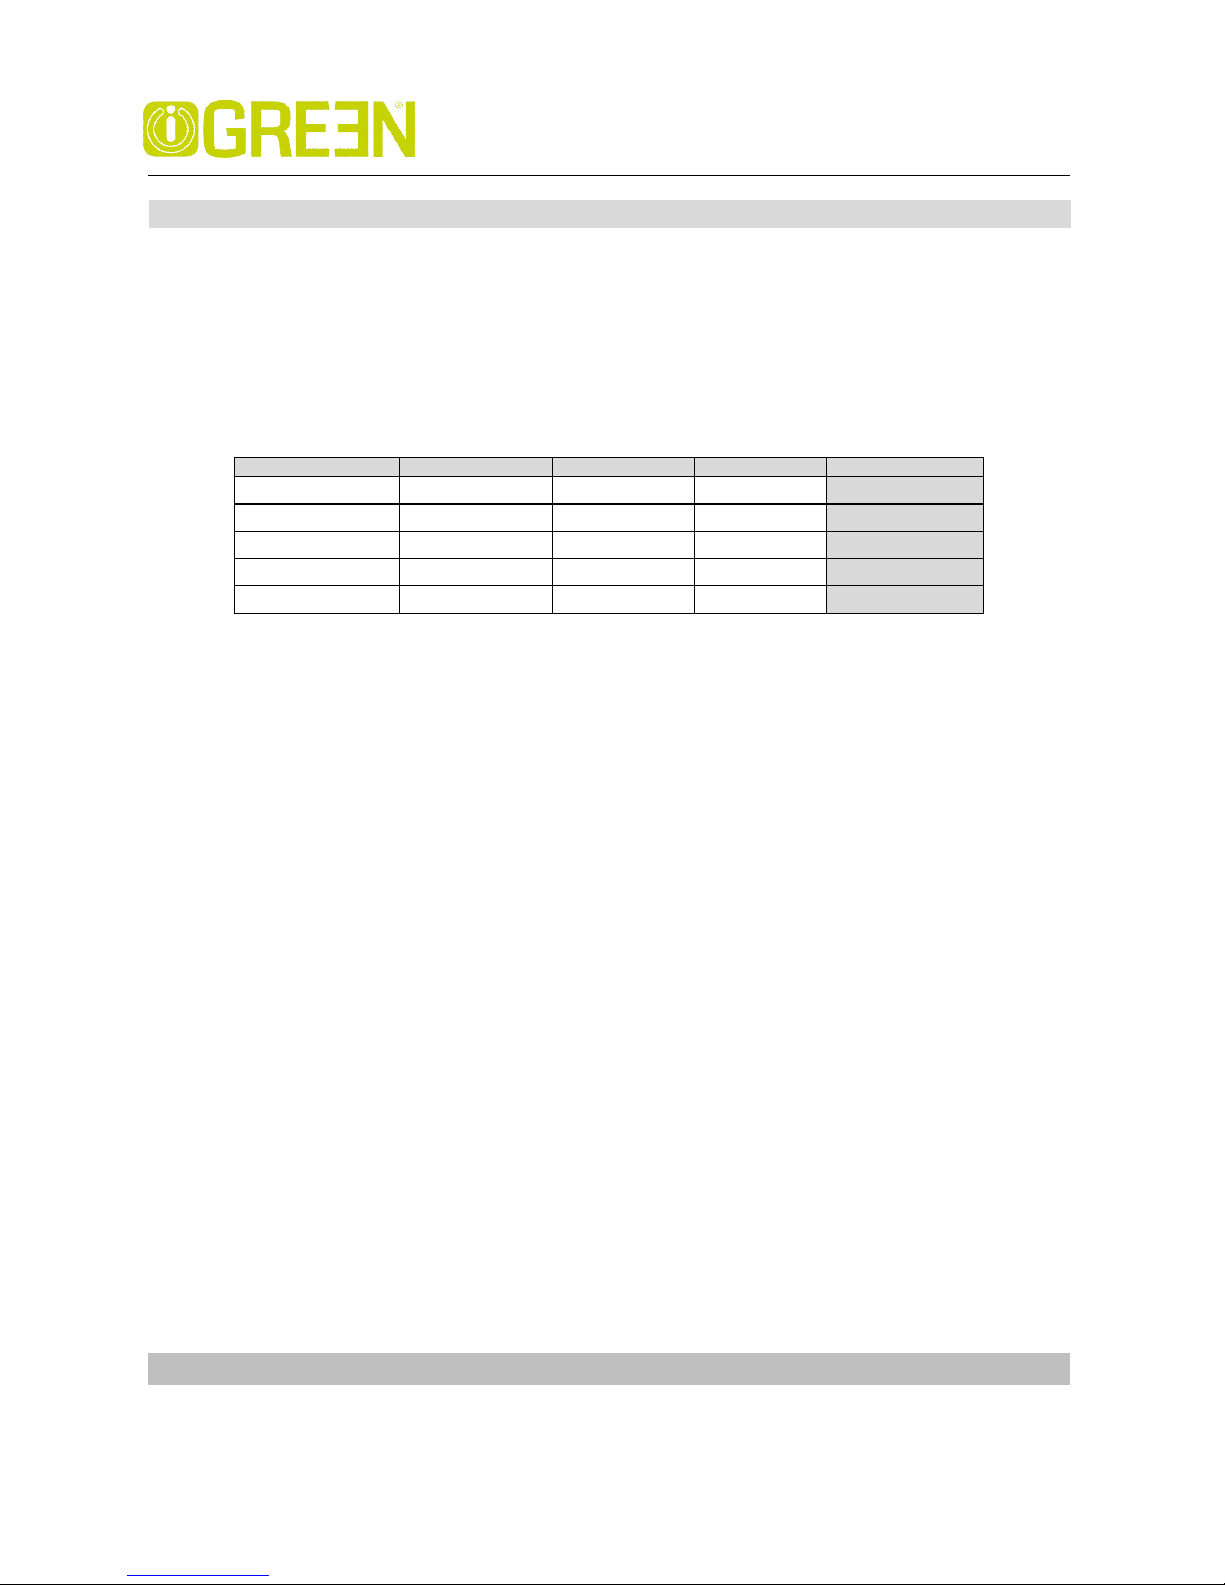
ﺪﺷﺎﺑ ﯽﻣ ﺮﮕﺸﯾﺎﻤﻧ . ﻪﺴﯾﺎﻘﻣ ﺮﮕﯾﺪﮑﯾ ﺎﺑ ﻞﯾذ لوﺪﺟ ﺐﻟﺎﻗ رد اﺮﺼﺘﺨﻣ ﺎﻬﻧآ ﯽﮔﮋﯾو ﻪﮐ ﺪﻧا هﺪﺷ ﻪﺻﻼﺧ لواﺪﺘﻣ عﻮﻧ رﺎﻬﭼ رد ،ﺎﻫ ﺖﻠﺒﺗ ﺮﮕﺸﯾﺎﻤﻧ ﻪﺤﻔﺻ هزوﺮﻣاﺪﻧا هﺪﺷ:
LCD
TFT
IPS
OLED
ﺮﯾﻮﺼﺗ ﺖﯿﻔﯿﮐ ﻦﯿﯾﺎﭘ ﺖﯿﻔﯿﮐ ﻂﺳﻮﺘﻣ ﺖﯿﻔﯿﮐ ﻻﺎﺑ ﺖﯿﻔﯿﮐ ﻻﺎﺑ ﺖﯿﻔﯿﮐ
ﺖﺳاﺮﺘﻨﮐ ﻦﯿﯾﺎﭘ ﻂﺳﻮﺘﻣ ﻻﺎﺑ ﻻﺎﺑ
ﺪﯾد ﻪﯾواز ﻢﮐ دﺎﯾز دﺎﯾز دﺎﯾز
ﺶﯾﺎﻤﻧ ﻪﺤﻔﺻ فﺮﺼﻣ ﻻﺎﺑ يژﺮﻧا فﺮﺼﻣ ﻦﯿﯾﺎﭘ يژﺮﻧا فﺮﺼﻣ ﻂﺳﻮﺘﻣ يژﺮﻧا فﺮﺼﻣ ﻦﯿﯾﺎﭘ رﺎﯿﺴﺑ يژﺮﻧا فﺮﺼﻣ
ﻪﻨﯿﻣز رﻮﻧ ﻦﯿﻣﺎﺗ ﻪﺤﻔﺻ فاﺮﻃا ﺖﯾﻻ ﮏﺑ ﺎﻫ ﻞﺴﮑﯿﭘ ﺎﻫ ﻞﺴﮑﯿﭘ
ﯽﺴﻤﻟ ﻪﺤﻔﺻ ﺖﯿﺳﺎﺴﺣ :ﺪﺷﺎﺑ ﯽﻣ نآ ﯽﺴﻤﻟ ﻪﺤﻔﺻ ﺖﯿﺳﺎﺴﺣ ،ﺖﻠﺒﺗ ﮏﯾ ياﺮﺑ ﯽﻔﯿﮐ يﺎﻫرﻮﺘﮐﺎﻓ ﻦﯾﺮﺘﻤﻬﻣ زا ﯽﮑﯾ . ﯽﺴﻤﻟ ﻪﺤﻔﺻ ياﺮﺑ ﯽﻔﻠﺘﺨﻣ يﺎﻫ يژﻮﻟﻮﻨﮑﺗ
ﺪﻨﺘﺴﻫ دﻮﺧ صﺎﺧ ﺐﯾﺎﻌﻣ و ﺎﯾاﺰﻣ ياراد ﮏﯾ ﺮﻫ ﻪﮐ ﺪﻧراد دﻮﺟو .ﺪﻧﻮﺷ ﯽﻣ ﻢﯿﺴﻘﺗ ﯽﻧزﺎﺧ و ﯽﺘﻣوﺎﻘﻣ ي ﻪﺘﺳد ود ﻪﺑ ﯽﺴﻤﻟ تﺎﺤﻔﺻ يﺎﻫ لﺪﻣ هﺪﻤﻋ. رد
،ﯽﺘﻣوﺎﻘﻣ لﺪﻣ ﯽﺴﻤﻟ تﺎﺤﻔﺻ ﺎﯾ و ﺖﺳد ،ﻢﻠﻗ زا هدﺎﻔﺘﺳا ﻪﺑ ناﻮﺗ ﯽﻣ نآ يﺎﯾاﺰﻣ زا ﻪﮐ ﺪﻫد راﺮﻗ سﺎﻤﺗ درﻮﻣ ار ﺮﮕﺸﯾﺎﻤﻧ ﻪﺤﻔﺻ ﯽﻤﺴﺟ ﺮﻫ ﺎﺑ ﺪﻧاﻮﺗ ﯽﻣ ﺮﺑرﺎﮐ
هرﺎﺷا ﯽﺴﻤﻟ ﻪﺤﻔﺻ يور ﺮﺑ ﺮﺘﺸﯿﺑ رﺎﺸﻓ لﺎﻤﻋا و دﺮﮑﻠﻤﻋ ﻦﯿﯾﺎﭘ ﺖﻗد ﻪﺑ ناﻮﺗ ﯽﻣ ﺰﯿﻧ نآ ﺐﯾﺎﻌﻣ زا و دﻮﻤﻧ هرﺎﺷا طﺎﺒﺗرا ياﺮﺑ يﺮﮕﯾد ﻪﻠﯿﺳو ﺮﻫ دﺮﮐ . ﻪﺤﻔﺻ
ﻣ ﯽﺴﻤﻟرد ﺮﮕﯾﺪﮑﯾ ﺎﺑ ﺮﮕﺸﯾﺎﻤﻧ ﻪﺤﻔﺻ يورﺮﺑ ﯽﯾﺮﻣﺎﻧ ﯽﻃﺎﺒﺗرا يﺎﻫ لﺎﻧﺎﮐ ﻪﻠﯿﺳو ﻪﺑ ﻪﮐ ﺪﺷﺎﺑ ﯽﻣ ﺮﮕﺸﯾﺎﻤﻧ بﺎﻗ فاﺮﻃا رد نزﺎﺧ يداﺪﻌﺗ ياراد ،ﯽﻧزﺎﺧ لﺪ
ﺪﻨﺷﺎﺑ ﯽﻣ طﺎﺒﺗرا .ﺮﺑ ار ﺎﻤﺷ ﺖﺳد نﺎﮑﻣ و هداد ﺺﯿﺨﺸﺗ ار رﺎﺑ فﻼﺘﺧا ناﺰﯿﻣ ،ﯽﺴﻤﻟ ﻪﺤﻔﺻ يور ﺮﺑ ﺖﺸﮕﻧا سﺎﻤﺗ ﻦﯾﺮﺘﻤﮐ ﺎﺑ ،ﯽﻃﺎﺒﺗرا يﺎﻫ لﺎﻧﺎﮐ ﻦﯾا يور
ﺪﻨﯾﺎﻤﻧ ﯽﻣ ﺺﺨﺸﻣ ﺮﮕﺸﯾﺎﻤﻧ ﻪﺤﻔﺻ . ﻪﻧﻮﻤﻧ ﺎﺑ ﻪﺴﯾﺎﻘﻣ رد نﺎﻣﺰﻤﻫ ي ﻪﻄﻘﻧ ﺪﻨﭼ ﺺﯿﺨﺸﺗ و ﺮﺘﺸﯿﺑ ﺖﻋﺮﺳ ، ﻻﺎﺑ ﺖﻗد ﻪﺑ ناﻮﺗ ﯽﻣ ﯽﻧزﺎﺧ تﺎﺤﻔﺻ يﺎﯾاﺰﻣ زا
دﺮﮐ هرﺎﺷا مﺎﺴﺟا ﺮﯾﺎﺳ سﺎﻤﺗ ﺺﯿﺨﺸﺗ مﺪﻋ ﻪﺑ ناﻮﺗ ﯽﻣ نآ ﺐﯾﺎﻌﻣ زا و دﻮﻤﻧ هرﺎﺷا ﯽﺘﻣوﺎﻘﻣ تﺎﺤﻔﺻ .
ﻗد و ﺖﯿﺳﺎﺴﺣ ﺖﯿﻤﻫا ﻪﺑ ﻪﺟﻮﺗ ﺎﺑ هزوﺮﻣا يﺎﻫ يزﺎﺑ و ﺎﻫ ﻪﻣﺎﻧﺮﺑ زا يرﺎﯿﺴﺑ ياﺮﺑ ،نﺎﻣﺰﻤﻫ ترﻮﺻ ﻪﺑ سﺎﻤﺗ ﻪﻄﻘﻧ ﻦﯾﺪﻨﭼ ﺺﯿﺨﺸﺗ ياﺮﺑ ﯽﺴﻤﻟ تﺎﺤﻔﺻ دﺮﮑﻠﻤﻋ رد ﺖ
ﻢﯿﺘﺴﻫ ﯽﻧزﺎﺧ ﯽﺴﻤﻟ تﺎﺤﻔﺻ زا هدﺎﻔﺘﺳا ﯽﻣﻮﻤﻋ ﺖﯿﻟﻮﺒﻘﻣ ﺪﻫﺎﺷ ،ﺎﻫ ﺖﻠﺒﺗ صﻮﺼﺨﻣ . دراﺪﻧﺎﺘﺳا ﯽﺴﻤﻟ تﺎﺤﻔﺻ ﺮﺿﺎﺣ لﺎﺣ رد7 نﺎﻣﺰﻤﻫ ﺺﯿﺨﺸﺗ ﺖﯿﻠﺑﺎﻗ ياراد ﭻﻨﯾا5 ﻪﻄﻘﻧ
تﺎﺤﻔﺻ و سﺎﻤﺗ دراﺪﻧﺎﺘﺳا ﯽﺴﻤﻟ10 نﺎﻣﺰﻤﻫ ﺺﯿﺨﺸﺗ ﺖﯿﻠﺑﺎﻗ ياراد ﭻﻨﯾا10 ﺪﻨﺷﺎﺑ ﯽﻣ سﺎﻤﺗ ﻪﻄﻘﻧ.
ﺪﯾد ﻪﯾواز: ﺸﯾﺎﻤﻧ ﻪﺤﻔﺻ ﺢﻄﺳ ﻪﺑ ﺖﺒﺴﻧ راد ﻪﯾواز ﺪﯾد ﺖﻟﺎﺣ رد ﺮﯾﻮﺼﺗ حﻮﺿو ،ﺎﻫﺮﮕﺸﯾﺎﻤﻧ ﺮﯾﻮﺼﺗ ﺖﯿﻔﯿﮐ ﻦﯿﯿﻌﺗ ياﺮﺑ ﯽﺒﻧﺎﺟ يﺎﻫﺮﺘﻣارﺎﭘ زا ﯽﮑﯾ ﺮﺿﺎﺣ لﺎﺣ رد ﯽﻣ ﺮﮕ
ﺪﺷ ﺪﻫاﻮﺧ ﻆﻔﺣ دﻮﻤﻋ ﺪﯾد ﺖﻟﺎﺣ ﺪﻨﻧﺎﻤﻫ ﺎﺒﯾﺮﻘﺗ ﺮﯾﻮﺼﺗ حﻮﺿو ﻦﯾا ،ﺖﯿﻔﯿﮐ ﺎﺑ يﺎﻫﺮﮕﺸﯾﺎﻤﻧ رد ﻪﮐ ﺪﺷﺎﺑ . ﺮﮕﺸﯾﺎﻤﻧ تﺎﺤﻔﺻLED وIPS ﯾد ﻪﯾواز ﺎﺑ ﺪ178 ﻪﺟرد
ﺪﻨﺷﺎﺑ ﯽﻣ ﺪﯾد ﻪﯾواز ﺮﻈﻧ زا تﺎﺤﻔﺻ ﻦﯾﺮﺘﻬﺑ .
اﺪﺻ ﺖﯿﻔﯿﮐ :ﺪﺷﺎﺑ ﯽﻣ هﺎﮕﺘﺳد ﯽﺟوﺮﺧ ياﺪﺻ ﺖﯿﻔﯿﮐ ،ﺎﻫ ﺖﻠﺒﺗ يور ﺮﺑ ﺎﯾﺪﻣ ﯽﺘﻟﺎﻣ يﺎﻫ ﻪﻣﺎﻧﺮﺑ زا هدﺎﻔﺘﺳا ياﺮﺑ ﺎﻫرﻮﺘﮐﺎﻓ ﻦﯾﺮﺘﻤﻬﻣ زا ﯽﮑﯾ . عﻮﻧ و داﺪﻌﺗ ﺮﺑ هوﻼﻋ
ياﺪﺻ ﺖﯿﻔﯿﮐ يورﺮﺑ ﺮﺛﻮﻣ تﺎﮑﻧ زا ﻮﮔﺪﻨﻠﺑ راﺮﻘﺘﺳا نﺎﮑﻣ ،ﺎﻫ ﻮﮔﺪﻨﻠﺑدور ﯽﻣ رﺎﻤﺷ ﻪﺑ ﯽﺟوﺮﺧ . ﻪﺟﻮﺗ هﺎﮕﺘﺳد ياﺪﺻ يﺪﻨﻠﺑ ﻪﺑ ﻪﮑﻧآ زا ﺶﯿﺑ ،ﺪﯾﺮﺧ مﺎﮕﻨﻫ رد ﺲﭘ
ﺪﯿﯾﺎﻤﻧ ﺖﻗد نآ ﯽﺟوﺮﺧ ياﺪﺻ ﺖﯿﻔﯿﮐ ﻪﺑ ،ﺪﯿﺷﺎﺑ ﻪﺘﺷاد.
ﯽﻠﺻا ﻪﻈﻓﺎﺣ و ﯽﮑﯿﻓاﺮﮔ هﺪﻧزادﺮﭘ ،يﺰﮐﺮﻣ هﺪﻧزادﺮﭘ)SoC : ( ترﺎﺒﻋSoC ﻒﻔﺨﻣ هژاو System on a Chip ﯽﻣ ﺪﺷﺎﺑ .رد هﺎﮕﺘﺳد يﺎﻫ هاﺮﻤﻫ يزوﺮﻣا زا ﮏﯾ SoC ﻪﺑ ﻞﮑﺷ
ﯽﻠﮐ هدﺎﻔﺘﺳا ﯽﻣ دﻮﺷ. ﻦﯾا ﭗﯿﭼ ﻞﻣﺎﺷ هﺪﻧزادﺮﭘ ،يﺰﮐﺮﻣ هﺪﻧزادﺮﭘ ﯽﮑﯿﻓاﺮﮔ و ﻪﻈﻓﺎﺣ ﯽﻠﺻا ﯽﻣ ﻪﮐ ﺪﺷﺎﺑ نﺎﮑﻣا ﻪﺑ يﺮﯿﮔرﺎﮐ ﻪﻈﻓﺎﺣ ﯽﻠﺻا ﻪﺑ ترﻮﺻ ﻪﻧﺎﮔاﺪﺟ ﺰﯿﻧ دﻮﺟو دراد.
ﺎﯾ يﺰﮐﺮﻣ هﺪﻧزادﺮﭘCPU دراد هﺪﻬﻋ ﺮﺑ ار هﺎﮕﺘﺳد ﮏﯾ يﺎﻫ هداد و ﺎﻫ نﺎﻣﺮﻓ ﻪﯿﻠﮐ شزادﺮﭘ ﻪﻔﯿﻇو . ﯽﻤﯿﻘﺘﺴﻣ ﻪﻄﺑار ،نآ ﺮﺘﺸﯿﺑ يﺎﻫ ﻪﺘﺴﻫ داﺪﻌﺗ و هﺪﻧزادﺮﭘ ﺮﺗﻻﺎﺑ ﺲﻧﺎﮐﺮﻓ
دراد هﺎﮕﺘﺳد ﯽﺗﺎﺒﺳﺎﺤﻣ ترﺪﻗ ﺎﺑ . و يا ﻪﺘﺴﻫ رﺎﻬﭼ و يا ﻪﺘﺴﻫ ود ،يا ﻪﺘﺴﻫ ﮏﺗ يﺎﻫ هﺪﻧزادﺮﭘ زا يزوﺮﻣا يﺎﻫ ﺖﻠﺒﺗ ...ﻣ رد ﻪﮐ ﺪﻧﺮﺑ ﯽﻣ هﺮﻬﺑ ود يﺎﻫ هﺪﻧزادﺮﭘ ﺎﻬﻧآ نﺎﯿ
ﺪﻨﺷﺎﺑ ﯽﻣ رادرﻮﺧﺮﺑ يﺮﺘﻬﺑ ﺖﻤﯿﻗ ﻪﺑ دﺮﮑﻠﻤﻋ ﺖﺒﺴﻧ زا يا ﻪﺘﺴﻫ . زا لﻮﻤﻌﻣ رﻮﻃ ﻪﺑ ﺰﯿﻧ يﺰﮐﺮﻣ يﺎﻫ هﺪﻧزادﺮﭘ يرﺎﮐ ﺲﻧﺎﮐﺮﻓ1 هﺪﻨﻨﮐ ﻦﯿﯿﻌﺗ ﻪﮐ ﺪﻨﺷﺎﺑ ﯽﻣ ﻻﺎﺑ ﻪﺑ ﺰﺗﺮﻫﺎﮕﯿﮔ
دﻮﺑ ﺪﻫاﻮﺧ نآ شزادﺮﭘ ﺖﻋﺮﺳ . ﺎﯾ ﯽﮑﯿﻓاﺮﮔ هﺪﻧزادﺮﭘ ﺎﻣاGPU ا ﻞﻣﺎﻋ و ﺮﯾﻮﺼﺗ شزادﺮﭘ ﻪﻔﯿﻇوﺪﺷﺎﺑ ﯽﻣ هﺎﮕﺘﺳد يور ﺮﺑ ﺎﻫ يزﺎﺑ اﺮﺟا رد ﯽﻠﺻ . ﺎﯾ ﯽﻠﺻا ﻪﻈﻓﺎﺣ ﻪﮑﻨﯾا ﻦﻤﺿ
RAM هﺪﻬﻋ ﺮﺑ هﺪﻧزادﺮﭘ زا ار ﺎﻫ هداد يﺮﯿﮔرﺎﺑ ﻪﻔﯿﻇو و هدﻮﻤﻧ ﻞﻤﻋ ﻢﺘﺴﯿﺳ يﺎﻫ ﻪﻈﻓﺎﺣ و ﯽﮑﯿﻓاﺮﮔ هﺪﻧزادﺮﭘ ،ﯽﻠﺻا هﺪﻧزادﺮﭘ نﺎﯿﻣ ﻂﺳاو ناﻮﻨﻋ ﻪﺑ دراد . و ﺖﻋﺮﺳ ،ﻢﺠﺣ
ﻪﻈﻓﺎﺣ ﻦﯾا ﺪﻧﺎﺑ يﺎﻨﻬﭘ)DDR2 ﺎﯾDDR3 (ﻪﻄﺑار دراد ﯽﻠﺻا ﻪﻈﻓﺎﺣ دﺮﮑﻠﻤﻋ ﺎﺑ ﯽﻤﯿﻘﺘﺴﻣ .
Page 50

iGREEN GENESIS Tab-2
GREEN Planet Co. www.igreen-co.com
50
يﺎﻫ ﻞﯾﺎﻓ ﺶﺨﭘ نﺎﮑﻣاHD وFull HD : ﺖﯿﻔﯿﮐ ﺎﺑ يﺮﯾﻮﺼﺗ يﺎﻫ ﻞﯾﺎﻓHD ﻦﺷﻮﻟوزر ياراد1680x1050 ﺖﯿﻔﯿﮐ ﺎﺑ يﺮﯾﻮﺼﺗ يﺎﻫ ﻞﯾﺎﻓ و ﻞﺴﮑﯿﭘFull HD ﻦﺷﻮﻟوزر ياراد
1920x1080 ﺪﻨﺷﺎﺑ ﯽﻣ ﻞﺴﮑﯿﭘ .ﺎﺤﻔﺻ رد لواﺪﺘﻣ ﻦﺷﻮﻟوزر ﺎﺑ ﻪﻄﺑار رد ﺮﺗ ﺶﯿﭘ ﻪﮐ رﻮﻃ نﺎﻤﻫ ﺮﮕﺸﯾﺎﻤﻧ ت7 و10 تﺎﺤﻔﺻ ﻦﯾا ﻪﮐ ﺪﯾد ناﻮﺗ ﯽﻣ ﺪﺷ هداد ﺢﯿﺿﻮﺗ ﯽﭽﻨﯾا
يﺎﻫ ﻞﯾﺎﻓ ﻪﺑ ﺖﺒﺴﻧ يﺮﺗ ﻦﯿﯾﺎﭘ يرﺎﮐ ﻦﺷﻮﻟوزر ياراد ﺮﮕﺸﯾﺎﻤﻧFull HD ﺪﻨﺷﺎﺑ ﯽﻣ . ﺪﻨﻤﺗرﺪﻗ يﺎﻫ ﺖﻠﺒﺗ ﺎﻣا7 ﺎﯾ و10 زا يﺮﯿﮔ هﺮﻬﺑ و ﻞﯾﺎﻓ ﯽﺸﯾﺎﻤﻧ ﺰﯾﺎﺳ ﺮﯿﯿﻐﺗ ﺎﺑ ﯽﭽﻨﯾا
ر ﺎﻫ ﻞﯾﺎﻓ ﻦﯾا ﺶﺨﭘ نﺎﮑﻣا ﺮﺗﻻﺎﺑ ﯽﺷزادﺮﭘ ترﺪﻗﺪﻧراد ا . يﺎﻫ ﻞﯾﺎﻓ ﺶﺨﭘ نﺎﮑﻣاFull HD ﺪﺷﺎﺑ ﯽﻣ ﺪﻨﻤﺗرﺪﻗ يﺎﻫ ﺖﻠﺒﺗ ياﺮﺑ ﺶﺠﻨﺳ رﺎﯿﻌﻣ و يﺮﺗﺮﺑ ﮏﯾ.
ﺖﻠﺒﺗ نزو و دﺎﻌﺑا: ﺪﺷﺎﺑ ﯽﻣ نآ نزو و هﺎﮕﺘﺳد ﯽﻧوﺮﯿﺑ دﺎﻌﺑا ﺐﺳﺎﻨﺗ ،دراﺪﻧﺎﺘﺳا ﺖﻠﺒﺗ ﺪﯾﺮﺧ رد راﺬﮔﺮﯿﺛﺎﺗ و ﻢﻬﻣ يﺎﻫرﻮﺘﮐﺎﻓ زا ﺮﮕﯾد ﯽﮑﯾ . ﻞﻤﺣ ﺖﯿﻠﺑﺎﻗ ،هﺎﮕﺘﺳد يﺮﻫﺎﻇ ﺖﯿﻔﯿﮐ
ﺖﻟﻮﻬﺳ و نﺎﺳآ دراد هﺎﮕﺘﺳد ﺺﻟﺎﺧ نزو ﺎﺑ نآ ﺐﺳﺎﻨﺗ ﺎﺻﻮﺼﺧ و ﺖﻠﺒﺗ ﯽﻧوﺮﯿﺑ دﺎﻌﺑا ﺎﺑ ﯽﻤﯿﻘﺘﺴﻣ ﻪﻄﺑار ،نآ زا هدﺎﻔﺘﺳا رد . دﺮﺑرﺎﮐ و ﻪﻘﯿﻠﺳ ﻪﺑ ﻪﺟﻮﺗ ﺎﺑ اﺪﺘﺑا ﺖﺳا ﺮﺘﻬﺑ ﺲﭘ
و ﺮﻈﻧ زا ﺖﻠﺒﺗ ﻦﯾﺮﺗ ﻪﻨﯿﻬﺑ بﺎﺨﺘﻧا ﻪﺑ ﺖﺒﺴﻧ ﺲﭙﺳ و هدﻮﻤﻧ دﻮﺧ زﺎﯿﻧ درﻮﻣ ﺮﮕﺸﯾﺎﻤﻧ ﻪﺤﻔﺻ ﺰﯾﺎﺳ ياﺮﺑ ضﺮﻓ ﺶﯿﭘ ﻦﯿﯿﻌﺗ ﻪﺑ ماﺪﻗا ،دﻮﺧو تﺎﻧﺎﮑﻣا ، ﺮﻫﺎﻇ ،نز ...ﻢﯿﯾﺎﻤﻧ ماﺪﻗا .
يﺮﻃﺎﺑ دﺮﮑﻠﻤﻋ و ﺮﻤﻋ لﻮﻃ : رﺎﮐ ﻪﺑ هدﺎﻣآ ﺖﻟﺎﺣ رد ﺖﻠﺒﺗ ﮏﯾ يﺮﻃﺎﺑ ﻪﮐ ﺖﺳا ﯽﻧﺎﻣز تﺪﻣ ،دراﺪﻧﺎﺘﺳا ﺖﻠﺒﺗ ﻪﯿﻬﺗ درﻮﻣ رد سﺎﺴﺣ دراﻮﻣ زا ﺮﮕﯾد ﯽﮑﯾ(Stand By) رد ﺎﯾ
ﯽﺒﻧﺎﺟ ﻪﺘﮑﻧ ﺪﻨﭼ ﻪﺑ عﻮﺿﻮﻣ ﻦﯾا ،دﻮﺑ ﺪﻫاﻮﺧ ﯽﯾﻮﮕﺨﺳﺎﭘ ﻪﺑ ردﺎﻗ ،هدﺎﻔﺘﺳا نﺎﻣز)ﻧو ﯽﻠﺧاد راﺰﻓا ﺖﺨﺳ عﻮﻧ ،نآ ﺖﯿﻓﺎﻔﺷ ناﺰﯿﻣ ،ﺶﯾﺎﻤﻧ ﻪﺤﻔﺻ عﻮ (...ﺖﺳا ﻂﺒﺗﺮﻣ . ﮏﺷ ﯽﺑ ﺎﻣا
ازور هدﺎﻔﺘﺳا تﺪﻣ لﻮﻃ رد ﯽﭘ رد ﯽﭘ يﺎﻫژرﺎﺷ زا ار ﺎﻤﺷ ،يژﺮﻧا ﯽﻧﻻﻮﻃ يزﺎﺳ هﺮﯿﺧذ ﺖﯿﻠﺑﺎﻗ ﺎﺑ دراﺪﻧﺎﺘﺳا و ﺐﺳﺎﻨﺘﻣ يﺎﻫ يﺮﻃﺎﺑ زا هدﺎﻔﺘﺳاﺖﺧﺎﺳ ﺪﻫاﻮﺧ زﺎﯿﻧ ﯽﺑ ﻪﻧ . ياﺮﺑ
يﺮﻃﺎﺑ دﺮﮑﻠﻤﻋ و ﺖﯿﻔﯿﮐ ﻆﻔﺣ زﺮﻣ ﻪﺑ يﺮﻃﺎﺑ ژرﺎﺷ ناﺰﯿﻣ نﺪﯿﺳر زا ﻞﺒﻗ دﻮﺷ ﯽﻣ ﻪﯿﺻﻮﺗ ،ﺖﻠﺒﺗ20 ،دﺪﺠﻣ هدﺎﻔﺘﺳا زا ﻞﺒﻗ و ﺪﯿﯾﺎﻤﻧ ماﺪﻗا نآ دﺪﺠﻣ ژرﺎﺷ ﻪﺑ ﺖﺒﺴﻧ ،ﺪﺻرد
ﻪﺑ هﺎﮕﺘﺳد ژرﺎﺷ ناﺰﯿﻣ ﺎﺗ ﺪﯿﻧﺎﻤﺑ ﺮﻈﺘﻨﻣ100 ﺪﺳﺮﺑ دﻮﺧ ﺪﺻرد .اد ﻪﺟﻮﺗ ﻪﺸﯿﻤﻫ و ﺪﯿﻨﮑﻧ هدﺎﻔﺘﺳا هﺎﮕﺘﺳد زا يﺮﻃﺎﺑ ژرﺎﺷ ﺎﺑ نﺎﻣز ﻢﻫ ﺖﺳا ﺮﺘﻬﺑ ﻦﯿﻨﭽﻤﻫ زا ﻪﮐ ﺪﯿﺷﺎﺑ ﻪﺘﺷ
ﺪﯿﯾﺎﻤﻧ هدﺎﻔﺘﺳا دﻮﺧ ﺖﻠﺒﺗ ژرﺎﺷ ياﺮﺑ ﯽﻠﺻا رژرﺎﺷ .
ﺐﺳﺎﻨﺘﻣ ﯽﺒﻧﺎﺟ تﺎﻧﺎﮑﻣا: ا ﺖﯿﻠﺑﺎﻗ ﺮﺑ هوﻼﻋ ﺰﯿﻧ يزوﺮﻣا ﻪﺘﻓﺮﺸﯿﭘ يﺎﻫ ﺖﻠﺒﺗ ،دﻮﺷ ﯽﻣ هدﺎﻔﺘﺳا ﺰﯿﻧ ﺮﮕﯾد ﯽﺒﻧﺎﺟ يﺎﻫدﺮﺑرﺎﮐ ياﺮﺑ هاﺮﻤﻫ ﻦﻔﻠﺗ ﯽﺷﻮﮔ ﮏﯾ زا ﻪﮐ ﻪﻧﻮﮕﻧﺎﻤﻫ ياﺮﺟ
دﺎﻗ ،ﺎﻬﻧآ ياﺮﺑ هﺪﺷ ﯽﺣاﺮﻃ ﯽﻣﻮﻤﻋ يﺎﻫ ﻪﻣﺎﻧﺮﺑﺪﻨﺷﺎﺑ ﯽﻣ ﺰﯿﻧ يﺮﮕﯾد صﺎﺧ يﺎﻫ ﺖﯿﻠﺑﺎﻗ و ﺎﻫ ﻪﻣﺎﻧﺮﺑ مﺎﺠﻧا ﻪﺑ ر . ﻪﮐ دور ﯽﻣ رﺎﻤﺷ ﻪﺑ هاﺮﻤﻫ يﺮﺗﻮﯿﭙﻣﺎﮐ ﻢﺘﺴﯿﺳ ﮏﯾ ،ﺖﻠﺒﺗ
ﺪﺷ ﺪﻫاﻮﺧ نآ ﯽﯾآرﺎﮐ و ﺎﻫ ﺖﯿﻠﺑﺎﻗ ﺶﯾاﺰﻓا ﺐﺟﻮﻣ ،ﻂﺒﺗﺮﻣ ﯽﺒﻧﺎﺟ تﺎﻧﺎﮑﻣا ندﻮﺑ اراد.
ﺖﯿﻠﺑﺎﻗ3G : ﺎﯾ تﺎﻃﺎﺒﺗرا مﻮﺳ ﻞﺴﻧThird Generation نآ ﻪﺑ رﺎﺼﺘﺧا ﻪﺑ ﻪﮐ3G ﺘﻔﮔ ﺎﻫ ﺖﻠﺒﺗ و هاﺮﻤﻫ يﺎﻫ ﻦﻔﻠﺗ ﺮﯿﻈﻧ ﯽﻃﺎﺒﺗرا يﺎﻫ هﺎﮕﺘﺳد ياﺮﺑ ار ﯽﺘﯿﻠﺑﺎﻗ ،دﻮﺷ ﯽﻣ ﻪ
ﺑ ﺪﻫاﻮﺧ ﺰﯿﻧ ﺖﻋﺮﺳ ﺮﭘ ﯽﺘﻧﺮﺘﻨﯾا طﺎﺒﺗرا و ﺮﯾﻮﺼﺗ ﺖﻓﺎﯾرد و لﺎﺳرا ﻪﺑ ردﺎﻗ ،ﯽﻨﺘﻣ و ﯽﺗﻮﺻ طﺎﺒﺗرا ﺮﺑ هوﻼﻋ ﺮﺑرﺎﮐ نآ رد ﻪﮐ ﺪﯾﺎﻤﻧ ﯽﻣ دﺎﺠﯾادﻮ . يﺎﻫ ﺖﻠﺒﺗ ﯽﺒﻧﺎﺟ يﺎﯾاﺰﻣ زا ﯽﮑﯾ
ﯿﻠﺑﺎﻗ ،يزوﺮﻣا دراﺪﻧﺎﺘﺳا ﻢﺘﺴﯿﺳ زا ﯽﻧﺎﺒﯿﺘﺸﭘ ﺖ3G ﻢﯿﻘﺘﺴﻣ ﻞﮑﺷ ود ﻪﺑ ﺪﻧاﻮﺗ ﯽﻣ طﺎﺒﺗرا ﻦﯾا و ﺪﺷﺎﺑ ﯽﻣ(Sim Card Slot) ﻢﯿﻘﺘﺴﻣ ﺮﯿﻏ و(Dongle USB) دﺮﯾﺬﭘ ترﻮﺻ .
ﺮﯿﻈﻧ ﯽﻔﻠﺘﺨﻣ يﺎﻫدراﺪﻧﺎﺘﺳاWCDMA وHSPA+ وCDMA ياﺮﺑ3G ﺎﺑ يرﺎﮔزﺎﺳ ﻦﯾﺮﺘﺸﯿﺑ ياراد نﺎﻣرﻮﺸﮐ مﻮﺳ ﻞﺴﻧ رﻮﺗاﺮﭘا تاﺰﯿﻬﺠﺗ ﯽﻟو ﺖﺳا هﺪﺷ ﻒﯾﺮﻌﺗ
دراﺪﻧﺎﺘﺳاWCDMA يرﺎﮐ ﺲﻧﺎﮐﺮﻓ ﺖﺤﺗ900MHz و2100MHz ﺪﺷﺎﺑ ﯽﻣ . رﻮﺗاﺮﭘا تﺎﻧﺎﮑﻣا زا يﺪﻨﻣ هﺮﻬﺑ نﺎﻫاﻮﺧ ﺮﮔا دﻮﺷ ﯽﻣ ﻪﯿﺻﻮﺗ اﺬﻟ3G بﺎﺨﺘﻧا ﯽﻫﺎﮕﺘﺳد ،ﺪﯿﺘﺴﻫ
دراﺪﻧﺎﺘﺳا ﺖﺤﺗ ﺲﻧﺎﮐﺮﻓ ﺎﺑ ﻪﮐ ﺪﯿﯾﺎﻤﻧWCDMA ﺪﺷﺎﺑ ﻪﺘﺷاد يرﺎﮔزﺎﺳ . يژﻮﻟﻮﻨﮑﺗ ﻪﮐ ﺖﺳا ﺮﮐذ نﺎﯾﺎﺷHSPA+ ﯽﻨﻌﯾ نآ يﺎﻫ ﻪﺧﺎﺷ ﺮﯾز وHSDPA وHSUPA عﻮﻧ
يژﻮﻟﻮﻨﮑﺗﺮﺗ ﻪﺘﻓﺮﺸﯿﭘWCDMA ﺪﻧراد ار ﻪﮑﺒﺷ ﻦﯾا رد ﺖﯿﻟﺎﻌﻓ ﺖﯿﻠﺑﺎﻗ ﻪﮐ ﺪﻨﺷﺎﺑ ﯽﻣ.
ﯽﻨﻔﻠﺗ سﺎﻤﺗ يراﺮﻗﺮﺑ ﺖﯿﻠﺑﺎﻗ: نﺎﮑﻣاCall تﻼﺳا ياراد يﺎﻫ ﺖﻠﺒﺗ ﺐﻠﻏا رد ،ﯽﻨﻔﻠﺗ سﺎﻤﺗ يراﺮﻗﺮﺑ ﺎﯾ ترﺎﮐ ﻢﯿﺳ ﻖﯾﺮﻃ زا ﺪﻧاﻮﺗ ﯽﻣ ﺮﺑرﺎﮐ نآ رد ﻪﮐ دراد دﻮﺟو ترﺎﮐ ﻢﯿﺳ
دﻮﺧ) ًﺎﻣاﺰﻟا ﻪﮐ3G ﺖﺴﯿﻧ (دﻮﻤﻧ ﺪﻫاﻮﺧ ﻞﻤﻋ هاﺮﻤﻫ ﻦﻔﻠﺗ ﺪﻨﻧﺎﻤﻫ ﺖﻠﺒﺗ ﺖﻟﺎﺣ ﻦﯾا رد و ﺪﻨﮐ راﺮﻗﺮﺑ ﯽﻨﻔﻠﺗ طﺎﺒﺗرا . ﺖﻬﺟ ﻢﯿﻘﺘﺴﻣ تﻼﺳا ياراد ﻪﮐ ﯽﯾﺎﻫ ﺖﻠﺒﺗ ،ﻞﯿﻟد ﻦﯿﻤﻫ ﻪﺑ
ﻮﺧﺮﺑ يﺮﺗﻻﺎﺑ ﺖﻤﯿﻗ زا ،ﺪﻨﺷﺎﺑ ﯽﻣ ترﺎﮐ ﻢﯿﺳ ﺐﺼﻧﺪﻨﺘﺴﻫ رادر .
ﻦﯿﺑرود: ﺮﻤﻫ ﻦﻔﻠﺗ و ﺖﻠﺒﺗ ﺮﯿﻈﻧ ﻞﻤﺣ ﻞﺑﺎﻗ تاﺰﯿﻬﺠﺗ ياﺮﺑ هﮋﯾو تﺎﻧﺎﮑﻣا زا ﯽﮑﯾ ،يرادﺮﺑ ﻢﻠﯿﻓ و يرادﺮﺑ ﺲﮑﻋ ﺖﯿﻠﺑﺎﻗ ﺎﺑ ترﺪﻗﺮﭘ ﻦﯿﺑرود زا يﺪﻨﻣ هﺮﻬﺑ دور ﯽﻣ رﺎﻤﺷ ﻪﺑ ها
ﺖﺧﺎﺳ ﺪﻫاﻮﺧ فﺎﻌﻣ اﺰﺠﻣ ترﻮﺻ ﻪﺑ يرادﺮﺑ ﺮﯾﻮﺼﺗ تاﺰﯿﻬﺠﺗ ﻞﻤﺣ زا ار ﺎﻤﺷ ﻪﮐ .دﺮﺑ ﺲﮑﻋ نﺎﮑﻣا ،شﻼﻓ دﻮﺟو نﺎﮑﻣا ﺎﻤﺷ ياﺮﺑ ار ﮏﯾرﺎﺗ يﺎﻫ ﻂﯿﺤﻣ رد يرادﺮﺑ ﻢﻠﯿﻓ و يرا
ﺖﺧﺎﺳ ﺪﻫاﻮﺧ ﺮﯾﺬﭘ .ﺪﯾﺎﻤﻧ يرادﺮﺑ ﺮﯾﻮﺼﺗ ﻪﺑ ماﺪﻗا يا ﻪﻓﺮﺣ ﻦﯿﺑرود ﮏﯾ ﺪﻨﻧﺎﻤﻫ ﺪﻧاﻮﺗ ﯽﻤﻧ ﺖﻠﺒﺗ ﻪﮐ ﺪﯿﺷﺎﺑ ﻪﺘﺷاد ﺮﻈﻧ رد ﺎﻣا . ﻦﯿﺑرود ﻪﯿﺒﻌﺗ ﯽﻠﺻا و ﻪﯿﻟوا ﻪﻔﺴﻠﻓ ﻪﮐ اﺮﭼ
ﺟ ،كراﺪﻣ و ﺮﯾوﺎﺼﺗ زا ﻦﮑﺳا ﻪﯿﻬﺗ نﺎﮑﻣا ،ﺎﻫ ﺖﻠﺒﺗ يورﺮﺑﺖﺳا هدﻮﺑ يزﺎﺳ هﺮﯿﺧذ ﺖﻬ.
ﯽﻧﺎﻬﺟ بﺎﯾ نﺎﮑﻣGPS : ﺮﻔﺳ لﺎﺣ رد ﺮﺘﺸﯿﺑ ﻪﮐ يداﺮﻓا ياﺮﺑ ﯽﺑﺎﯾ نﺎﮑﻣ ﺖﯿﻠﺑﺎﻗ)يﺮﻬﺷ نوﺮﺑ ،يﺮﻬﺷ نورد ( ﮏﯾ ﺪﻨﻧﺎﻤﻫ ار ﺎﻤﺷ ﺖﻠﺒﺗ ﺎﺗ ﺪﺷﺎﺑ ﯽﺒﺳﺎﻨﻣ ﻪﻨﯾﺰﮔ ﺪﻧاﻮﺗ ﯽﻣ ﺪﻨﺘﺴﻫ
ﺪﯾﺎﻤﻧ نﺎﮑﻣ و ﺮﯿﺴﻣ ﻦﯿﯿﻌﺗ ﻪﺑ ردﺎﻗ ،يﺮﺑوﺎﻧ هﺎﮕﺘﺳد .
هﺎﮔردHDMI : ﻂﺑار دﻮﺟوHDMI ﺎﯾMini-HDMI ﺪﯿﻨﮐ ﻞﺼﺘﻣ رﻮﺘﯿﻧﺎﻣ ﺎﯾ و نﻮﯾﺰﯾﻮﻠﺗ ﻪﺑ ار دﻮﺧ هﺎﮕﺘﺳد ﯽﺟوﺮﺧ ﺮﯾﻮﺼﺗ زﺎﯿﻧ ترﻮﺻ رد ﺎﺗ داد ﺪﻫاﻮﺧ ﺎﻤﺷ ﻪﺑ ار نﺎﮑﻣا ﻦﯾا
ﺪﯿﯾﺎﻤﻧ هدﺎﻔﺘﺳا ﺮﺗ گرﺰﺑ دﺎﻌﺑا رد تﺎﻋﻼﻃا ﺶﯾﺎﻤﻧ ياﺮﺑ دﻮﺧ ﺖﻠﺒﺗ زا ﺪﯿﻧاﻮﺘﺑ ﺎﺗ.
هﺎﮔردUSB: هﺎﮔردUSB ﺎﯾmini USB يﺎﻫ هﺎﮕﺘﺳد نﺎﺳآ و ﻊﯾﺮﺳ لﺎﺼﺗا نﺎﮑﻣا داد ﺪﻫاﻮﺧ ﺎﻤﺷ ﻪﺑ ار ﯽﺒﻧﺎﺟ . ﯽﺟوﺮﺧ و يدورو هﺎﮔرد زا ﻢﯿﻘﺘﺴﻣ ترﻮﺻ ﻪﺑ ﺎﻫ ﺖﻠﺒﺗ ﺐﻠﻏا
USB يﺎﻫ هﺎﮔرد زا ﺎﻫ ﺖﻠﺒﺗ يدﺎﻌﺑا ﺖﯾدوﺪﺤﻣ ﻪﺑ ﻪﺟﻮﺗ ﺎﺑ و ﺪﻧﺮﺑ ﯽﻤﻧ هﺮﻬﺑMicro-USB وMini-USB ﯽﻣ لﺪﺒﻣ يﺎﻫرﻮﺘﮑﻧﺎﮐ زا هدﺎﻔﺘﺳا ﺎﺑ ﻪﮐ دﻮﺷ ﯽﻣ هدﺎﻔﺘﺳا ﺎﻬﻧآ رد
ﻪﺑ ار ﺎﻫ هﺎﮔرد ﻦﯾا ناﻮﺗUSB رد دﻮﻤﻧ هدﺎﻔﺘﺳا نآ زا و ﻞﯾﺪﺒﺗ فرﺎﻌﺘﻣ ﺰﯾﺎﺳ .
Page 51

iGREEN GENESIS Tab-2
GREEN Planet Co. www.igreen-co.com
51
لﺎﺼﺗاWi-Fi :ﺪﻫد ﯽﻣ ﺮﺑرﺎﮐ ﻪﺑ ار ﺪﻨﺘﺴﻫ يژﻮﻟﻮﻨﮑﺗ ﻦﯾا ياراد ﻪﮐ ﯽﯾﺎﻫ هﺎﮕﺘﺳد ﻦﯿﺑ تﺎﻋﻼﻃا لدﺎﺒﺗ نﺎﮑﻣا ﻪﮐ دﻮﺷ ﯽﻣ قﻼﻃا ﯽﻤﯿﺳ ﯽﺑ لﺎﺼﺗا ﻪﺑ يﺎﻓ ياو . دﺮﺑرﺎﮐ ﻦﯾﺮﺗ ﺞﯾار
Wi-Fi رﺎﮐ ﻪﮐ ﺖﺳا ﻢﯿﺳ ﯽﺑ يﺎﻫ مدﻮﻣ ﻂﺳﻮﺗ ﺖﻧﺮﺘﻨﯾا ﻪﺑ لﺎﺼﺗا ياﺮﺑدﻮﺷ ﻞﺼﺘﻣ ﺖﻧﺮﺘﻨﯾا ﯽﻧﺎﻬﺟ ﻪﮑﺒﺷ ﻪﺑ دﻮﺧ هﺎﮕﺘﺳد ﺎﺑ ﺎﺗ دزﺎﺳ ﯽﻣ ردﺎﻗ ار ﺮﺑ . ﺮﺗﺪﯾﺪﺟ يﺎﻫ ﻪﺨﺴﻧWi-Fi
يﺎﻫ يﺮﺳ ﻞﻣﺎﺷ ﻪﮐN وG ﺪﻨﺷﺎﺑ ﯽﻣ ﯽﻤﯾﺪﻗ يﺎﻫ ﻪﺨﺴﻧ ﻪﺑ ﺖﺒﺴﻧ يﺮﺗﻻﺎﺑ هداد لﺎﻘﺘﻧا خﺮﻧ ياراد ﺖﺳا .
لﺎﺼﺗاBluetooth: ﺖﺳا ﺮﯿﮔاﺮﻓ و ﺞﯾار يﺮﻣا ثﻮﺗﻮﻠﺑ ﻢﯿﺳ ﯽﺑ طﺎﺒﺗرا يژﻮﻟﻮﻨﮑﺗ ﻂﺳﻮﺗ هاﺮﻤﻫ يﺎﻫ هﺎﮕﺘﺳد لﺎﺼﺗا هزوﺮﻣا . ﺖﺴﯾﺮﻣا ،ﺎﻤﺷ هﺎﮕﺘﺳد رد ثﻮﺗﻮﻠﺑ دﻮﺟو موﺰﻟ
ﺎﻤﺷ ياﺮﺑ ار يﺮﺘﺸﯿﺑ هداد لﺎﻘﺘﻧا خﺮﻧ ﺪﻧاﻮﺗ ﯽﻣ هﺪﻧﺮﯿﮔ و هﺪﻨﺘﺳﺮﻓ هﺎﮕﺘﺳد ود ﺮﻫ رد يژﻮﻟﻮﻨﮑﺗ ﻦﯾا زا ﺮﺗﺪﯾﺪﺟ يﺎﻫ ﻪﺨﺴﻧ و ﺮﯾﺬﭘﺎﻧ بﺎﻨﺘﺟاﻬﻣﺪﻨﮐ ﺎﯿ . ﻪﮐ ﺖﺳا ﺮﮐذ نﺎﯾﺎﺷ
ﺮﯿﻈﻧ يﺪﯾﺪﺟ يﺎﻫ يژﻮﻟﻮﻨﮑﺗNFC ﺪﻨﺷﺎﺑ ﯽﻣ ﺖﯿﻠﺑﺎﻗ ﻦﯾا نﺪﺷ ﻦﯾﺰﮕﯾﺎﺟ لﺎﺣ رد.
ﻞﻣﺎﻋ ﻢﺘﺴﯿﺳ ﻪﺨﺴﻧ: ﺪﯿﻨﮐ ﻪﺟﻮﺗ نآ ﻪﺑ ﺪﯾﺮﺧ مﺎﮕﻨﻫ رد ﯽﺘﺴﯾﺎﺑ ﯽﻣ ﻪﮐ ﺖﺳا يدراﻮﻣ زا ﯽﮑﯾ ﻞﻣﺎﻋ ﻢﺘﺴﯿﺳ ﻪﺨﺴﻧ . هﺎﮕﺘﺳد يﺎﻫ ﻞﻣﺎﻋ ﻢﺘﺴﯿﺳ ﺮﺗﺪﯾﺪﺟ يﺎﻫ ﺶﯾاﺮﯾو رد اﺮﯾز
ﻒﻌﺿ طﺎﻘﻧ ،هاﺮﻤﻫ يﺎﻫ ﺪﻧﻮﺷ ﯽﻣ ﺮﺘﮕﻧر ﺮﭘ ﺰﯿﻧ تﻮﻗ طﺎﻘﻧ و ﺪﻧور ﯽﻣ ﻦﯿﺑ زا ﯽﻠﺒﻗ . اراد ار ﻞﻣﺎﻋ ﻢﺘﺴﯿﺳ ﻪﺨﺴﻧ يﺎﻘﺗرا ﺖﯿﻠﺑﺎﻗ ﺎﻫ هﺎﮕﺘﺳد ﺮﺘﺸﯿﺑ ﻪﮐ دﺮﮐ هرﺎﺷا ﯽﺘﺴﯾﺎﺑ ﻪﺘﺒﻟا
ﺪﻨﺘﺴﻫ . ﻞﮔﻮﮔ يﺎﻫ ﯽﻧﺎﭙﻤﮐ يﻮﺳ زا فرﺎﻌﺘﻣ ﻞﻣﺎﻋ ﻢﺘﺴﯿﺳ عﻮﻧ ود ﯽﻠﮐ رﻮﻃ ﻪﺑ(Android) ﺖﻓﺎﺳوﺮﮐﺎﻣو(Windows) ﻪﺘﻓﺮﮔ ﺮﻈﻧ رد ﺎﻫ ﺖﻠﺒﺗ ياﺮﺑ ظﺎﺤﻟ زا ﻪﮐ ﺖﺳا هﺪﺷ
زوﺪﻨﯾو ﻞﻣﺎﻋ ﻢﺘﺴﯿﺳ ،ﯽﯾآرﺎﮐ) ًﺎﺻﻮﺼﺧWin8 PRO ( ﺎﻫراﺰﻓا مﺮﻧ ياﺮﺟا ،يزوﺪﻨﯾو يﺎﻫ ﺖﻠﺒﺗ عﻮﻧ ﻦﯾا يﺮﺗﺮﺑ ﻦﯾﺮﺗ ﻢﻬﻣ و دراد مﻮﺳﺮﻣ يﺎﻫ ﻪﻧﺎﯾار ﻪﺑ ﺮﺗ ﮏﯾدﺰﻧ يدﺮﮑﻠﻤﻋ
ﺖﺳا نﺎﺸﻟواﺪﺘﻣ يﺎﻫ ﺖﯿﻠﺑﺎﻗ مﺎﻤﺗ ﺎﺑ .ﺴﯾﺎﺑ ﯽﻣ ،زوﺪﻨﯾو ﻞﻣﺎﻋ ﻢﺘﺴﯿﺳ ﻪﺑ ﺰﻬﺠﻣ يﺎﻫ ﺖﻠﺒﺗ ﺖﻬﺟ ﻦﯿﻤﻫ ﻪﺑ ﺐﺟﻮﻣ ﻪﮐ ﺪﻨﺷﺎﺑ يﺮﺗ يﻮﻗ يراﺰﻓا ﺖﺨﺳ تﺎﺼﺨﺸﻣ ياراد ﺖ
ﺪﺷ ﺪﻫاﻮﺧ يﺪﯾورﺪﻧا يﺎﻫ ﺖﻠﺒﺗ ﺎﺑ ﻪﺴﯾﺎﻘﻣ رد ﺎﻬﻧآ هﺪﺷ مﺎﻤﺗ ﺖﻤﯿﻗ ﺶﯾاﺰﻓا . مﺮﻧ و ﺎﻫ ﻪﻣﺎﻧﺮﺑ ياراد ،زﺎﺑ ﯽﺴﯾﻮﻧﺪﮐ ﺖﯿﻫﺎﻣ ﻪﻄﺳاو ﻪﺑ ﺪﯾورﺪﻧا ﻞﻣﺎﻋ ﻢﺘﺴﯿﺳ ﺮﮕﯾد يﻮﺳ زا
ﯿﻣ رد نآ نﺪﺷ ﺮﯿﮔاﺮﻓ ﺐﺟﻮﻣ ﻪﮐ ﺖﺳا يﺮﺗ هدﺎﺳ و ﺮﺗ عﻮﻨﺘﻣ يﺎﻫراﺰﻓاﺖﺳا هﺪﺷ يزوﺮﻣا ﻞﺑﺎﺗﺮﭘ تﻻﻮﺼﺤﻣ نﺎ.
ﯽﺟرﺎﺧ و ﯽﻠﺧاد ﻪﻈﻓﺎﺣ: ﯽﻣ ناﺮﺑرﺎﮐ ﻪﮐ ﺖﺳا يا ﻪﺘﮑﻧ ﺖﻠﺒﺗ هﺎﮕﺘﺳد ﮏﯾ ﺪﯾﺮﺧ ياﺪﺘﺑا رد ﯽﻧﺎﺒﯿﺘﺸﭘ ﻞﺑﺎﻗ ﯽﺟرﺎﺧ ﻪﻈﻓﺎﺣ ﻢﻤﯿﺴﮐﺎﻣ و هﺎﮕﺘﺳد ﯽﻠﺧاد ﻪﻈﻓﺎﺣ ناﺰﯿﻣ ﻪﺑ ﻪﺟﻮﺗ ﺪﻨﻧاﻮﺗ
ﺪﻨﯾﺎﻤﻧ بﺎﺨﺘﻧا ار ﺮﻈﻧ درﻮﻣ هﺎﮕﺘﺳد ،دﻮﺧ فﺮﺼﻣ ناﺰﯿﻣ ﻪﺑ ﺖﺒﺴﻧ . ﻪﮐ يا ﻪﺘﮑﻧ ﻞﺑﺎﻗ ﯽﻠﺧاد ﻪﻈﻓﺎﺣ ندﻮﺑ ﺮﺘﻤﮐ ،دراد دﻮﺟو دراﻮﻣ ﯽﻣﺎﻤﺗ رد ﯽﻠﺧاد ﻪﻈﻓﺎﺣ ﺎﺑ ﻪﻄﺑار رد
ﺪﺷﺎﺑ ﯽﻣ ﺖﺳا هدﺮﮐ رﺎﻬﻇا هﺪﻨﻨﮐﺪﯿﻟﻮﺗ ﻪﮐ يدﺪﻋ ﻪﺑ ﺖﺒﺴﻧ ﺮﺑرﺎﮐ ﻂﺳﻮﺗ ﯽﺳﺮﺘﺳد . ﻪﺑ ناﺮﺑرﺎﮐ يﺎﻫ نﺎﻣﺮﻓ و ﻞﻣﺎﻋ ﻢﺘﺴﯿﺳ اﺮﺟا ياﺮﺑ هﺎﮕﺘﺳد ﯽﻠﺧاد ﻪﻈﻓﺎﺣ زا ﯽﺸﺨﺑ اﺮﯾز
ﻔﺘﺳا ﻞﺑﺎﻗ ﺮﯿﻏ ترﻮﺻ ﻪﺑ ضﺮﻓ ﺶﯿﭘ ترﻮﺻﺪﯾآ ﯽﻣ رد ناﺮﺑرﺎﮐ ياﺮﺑ هدﺎ .
ﺎﻫ ﺖﻠﺒﺗ ﯽﺒﻧﺎﺟ مزاﻮﻟ :ﺪﻧا هﺪﺷ هداد راﺮﻗ لﻮﺼﺤﻣ ﻪﺘﺴﺑ ﻞﺧاد رد ضﺮﻓ ﺶﯿﭘ ترﻮﺻ ﻪﺑ هﺎﮕﺘﺳد نآ ﯽﺒﻧﺎﺟ مزاﻮﻟ زا يداﺪﻌﺗ ،ﺖﻠﺒﺗ هﺎﮕﺘﺳد ﺮﻫ ﺪﯾﺮﺧ مﺎﮕﻨﻫ رد . رد ﻦﯾا
ﺪﯿﻨﮐ ﻪﯿﻬﺗ ﻪﻧﺎﮔاﺪﺟ ترﻮﺻ ﻪﺑ ار ﺮﮕﯾد ﯽﺒﻧﺎﺟ مزاﻮﻟ ﺎﺗ دﻮﺑ ﺪﯿﻫاﻮﺧ ردﺎﻗ ﺎﻤﺷ ﻪﮐ ﺖﺴﯿﻟﺎﺣ .ﺸﯾﺎﻤﻧ ﻪﺤﻔﺻ ﻆﻓﺎﺤﻣ زا هﺎﮕﺘﺳد ﺪﯾﺮﺧ زا ﺲﭘ ﻪﮐ دﻮﺷ ﯽﻣ ﻪﯿﺻﻮﺗ ﺐﺳﺎﻨﻣ ﻒﯿﮐ و ﺮﮕ
ﺪﯿﯾﺎﻤﻧ هدﺎﻔﺘﺳا هﺎﮕﺘﺳد ﺮﻤﻋ لﻮﻃ و ﺖﻣﻼﺳ ﻦﯿﻤﻀﺗ ياﺮﺑ ،ﺰﯿﻧ ﺖﻠﺒﺗ . هﺮﯿﻏ و ﺎﻫدرﻮﺒﯿﮐ ﯽﻨﯿﻣ ،ﯽﺟرﺎﺧ ﻪﻈﻓﺎﺣ ،ﻢﯿﺳ نوﺪﺑ ﺎﯾ راد ﻢﯿﺳ نﻮﻓﺪﻫ ﻪﺑ ناﻮﺗ ﯽﻣ ﯽﺒﻧﺎﺟ مزاﻮﻟ ﺮﮕﯾد زا
دﺮﮐ هرﺎﺷا .
ﯽﺘﻧارﺎﮔ: ا قﺎﯿﺘﺷا و قوذ ﻞﯿﻟد ﻪﺑ ،ﯽﮑﯿﻧوﺮﺘﮑﻟا يﺎﻫ هﺎﮕﺘﺳد ﻪﯿﻬﺗ مﺎﮕﻨﻫ رد ﺎﻣ ﺐﻠﻏاﻢﯾراد ﺮﻈﻧ درﻮﻣ لﻮﺼﺤﻣ ﯽﻧﺎﺒﯿﺘﺸﭘ تﺎﻣﺪﺧ و ﯽﺘﻧارﺎﮔ ﻪﻟﻮﻘﻣ ﻪﺑ يﺮﺘﻤﮐ ﻪﺟﻮﺗ ،ﺪﯾﺮﺧ ﻪﯿﻟو . ﺎﻣا
ددﺮﮔ ﯽﻨﻓ ﺐﯿﺳآ ﺎﯾ و لﺎﮑﺷا رﺎﭼد هﺪﺷ يراﺪﯾﺮﺧ هﺎﮕﺘﺳد ﺖﺳا ﻦﮑﻤﻣ ،فﺮﺼﻣ ﻂﯾاﺮﺷ ﺮﺑ ﺎﻨﺑ و ﯽﺗﺪﻣ زا ﺲﭘ . ﻪﺟﻮﺗ نآ رﺎﺒﺘﻋا و لﻮﺼﺤﻣ ﯽﺘﻧارﺎﮔ ﻪﺑ ﺪﯾﺮﺧ مﺎﮕﻨﻫ رد ﺮﮔا اﺬﻟ
و نﺎﺒﯿﺘﺸﭘ ﮏﯾ ﻪﺸﯿﻤﻫ ،ﻢﯿﯾﺎﻤﻧﻢﯾا ﻪﺘﻓﺮﮔ ﺮﻈﻧ رد دﻮﺧ ﺪﯾﺮﺧ ياﺮﺑ ﯽﻣﺎﺣ.
يراﺰﻓا مﺮﻧ ﯽﻧﺎﺳرزور ﻪﺑ و ﯽﻧﺎﺒﯿﺘﺸﭘ :ﺪﺷﺎﺑ ﯽﻣ ﺖﻠﺒﺗ ﻞﻣﺎﻋ ﻢﺘﺴﯿﺳ و ﺎﻫراﺰﻓا مﺮﻧ ﯽﻧﺎﺳرزور ﻪﺑ و دﻮﻠﻧاد ،ﺎﻫ ﺖﻠﺒﺗ يا ﻪﻓﺮﺣ ناﺮﺑرﺎﮐ ياﺮﺑ ﻢﻬﻣ تﺎﮑﻧ زا ﺮﮕﯾد ﯽﮑﯾ . ﺖﻠﺒﺗ ﺐﻠﻏا
ًﺎﻫﺎﮔ ﯽﺘﺣ و ﺪﻨﺘﺴﻫ ﯽﺼﺨﺸﻣ هداد هﺎﮕﯾﺎﭘ و ﺖﯾﺎﺳ بو ﺪﻗﺎﻓ ،ﻪﻗﺮﻔﺘﻣ يﺎﻫ دراﺪﻧ دﻮﺟو هﺎﮕﺘﺳد ﯽﻧﺎﺳرزور ﻪﺑ و ﯽﻧﺎﺒﯿﺘﺸﭘ ياﺮﺑ ﯽﺗﺎﻋﻼﻃا ،ﺖﯾﺎﺳ بو دﻮﺟو ترﻮﺻ رد . ﺮﮔا ﺲﭘ
ﺪﯿﯾﺎﻤﻧ ﻪﻌﺟاﺮﻣ دﻮﺧ ﺮﻈﻧ درﻮﻣ ﺖﻠﺒﺗ هﺪﻧزﺎﺳ ﺖﯾﺎﺳ بو ﻪﺑ ،ﺪﯾﺮﺧ زا ﻞﺒﻗ ﺎﻤﺘﺣ ،ﺪﯾراد هﺪﻨﯾآ رد ار دﻮﺧ هﺎﮕﺘﺳد يراﺰﻓا مﺮﻧ ﺖﯾﺪﭘآ ﺪﺼﻗ.
ﺰﺒﺳ هرﺎﯿﺳ ﺖﻌﻨﺻ ﺲﯾدﺮﭘ ﺖﮐﺮﺷ
ﺪﺒﻬﭙﺳ ﻦﯿﺑ ،ﻪﯿﻤﺳ نﺎﺑﺎﯿﺧ هرﺎﻤﺷ ،ﯽﻬﻟا تﺎﺠﻧ دﺎﺘﺳا و ﯽﻧﺮﻗ215
ﻦﻔﻠﺗ :88911378 ﺲﮐﺎﻓ :88808171
Page 52

52
 Loading...