

I-gotU GT-120, GT-200e, GT-600, GT-200, GT-100 User Manual
GPS Logger
GPS Logger package comes in two specifications, GPS Logger (USB) & GPS Logger (Bluetooth). Please check the package contents as
shown below before getting started.
Package contents & specifications
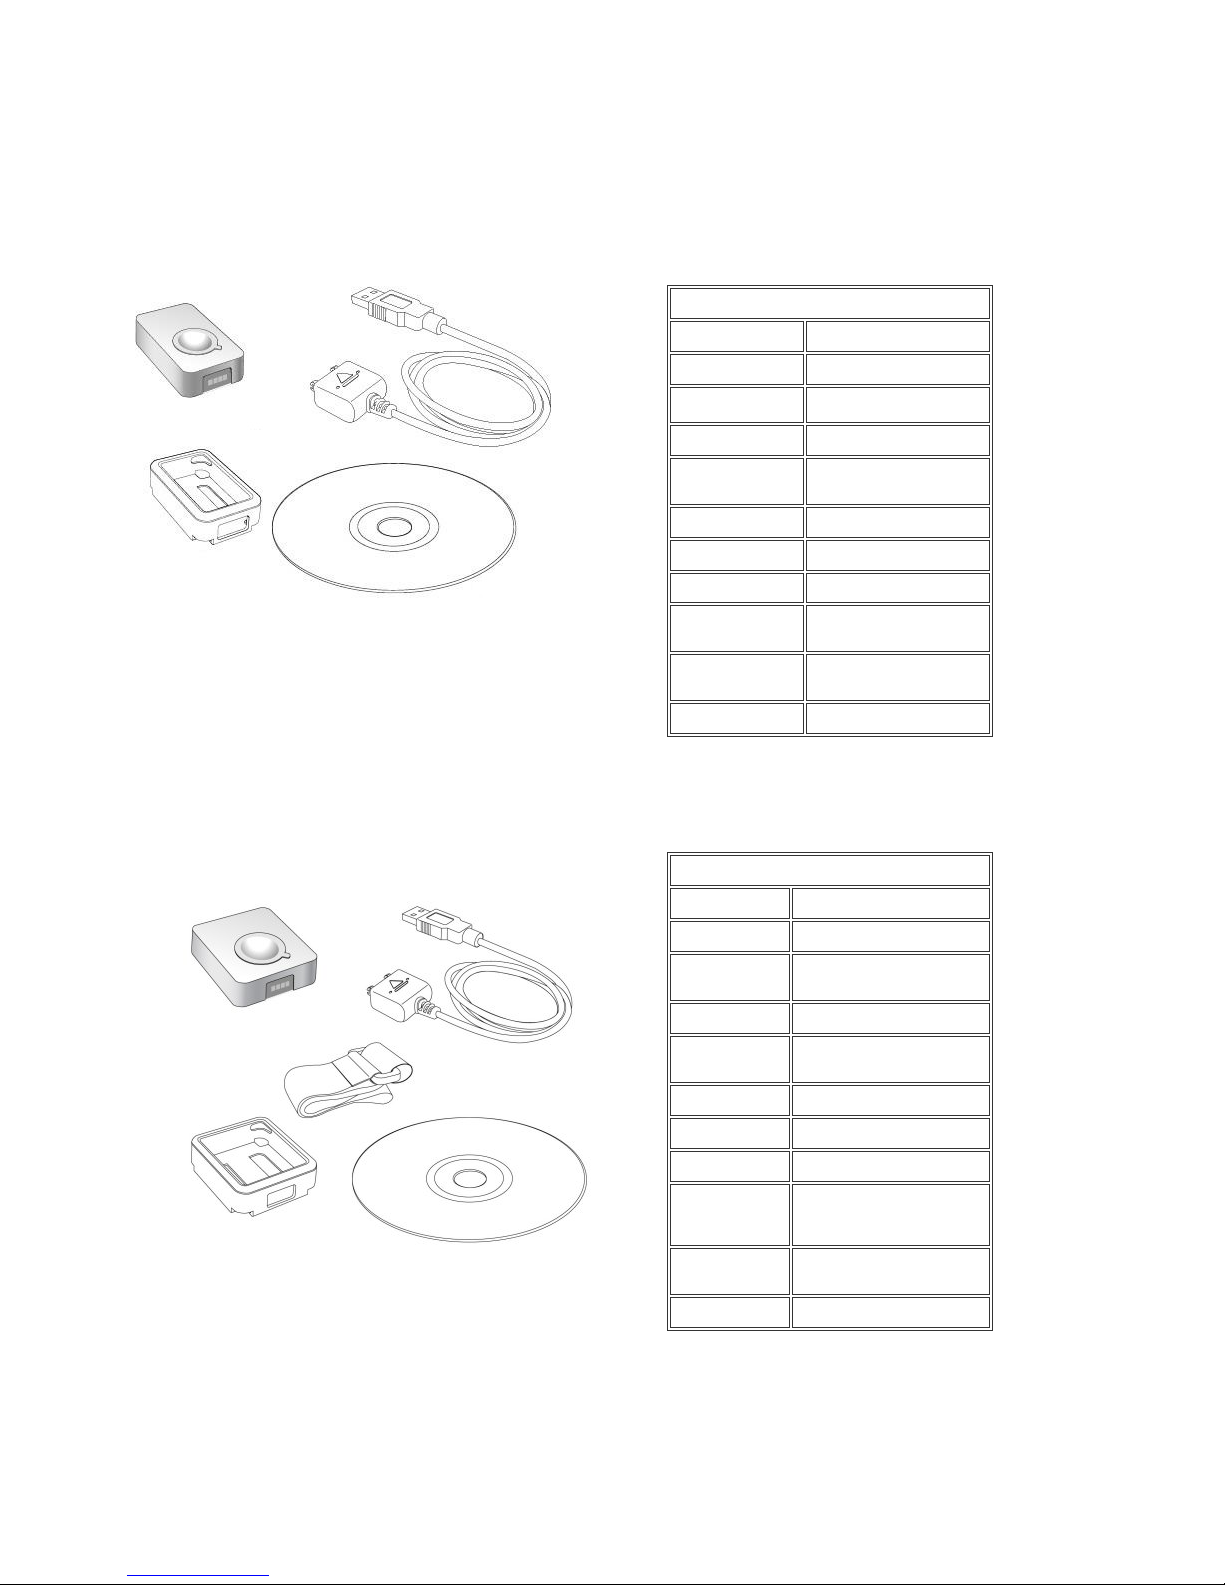
The GPS Logger package comes with 1 @trip PC CD-ROM, 1 GPS data logger, 1 GPS Logger Dock/ USB Cable, and 1 color jelly case.
GT-120
Dimension
44.5 x 28.5 x 13mm
Weight
20g
Chipset
Built-in SiRF StarIII
low-power chipset
Antenna
Built-in GPS patch antenna
Battery
Built-in 230mAh Lithium-ion
battery
LED indicators
Blue & Red
Cold start
< 35 seconds
Warm start
< 35 seconds
Connection
interface
USB 1.1
Operation
temperature
-10 °C to + 50 °C
Water-resistant
Yes
GT-120 package contents
GT-200e
Dimension
46 x 41.5 x 14 mm
Weight
37g
Chipset
Built-in SiRF StarIII
low-power chipset
Antenna
Built-in GPS patch antenna
Battery
Built-in 750 mAh Lithium-ion
battery
LED indicators
Blue & Red
Cold start
< 35 seconds
Warm start
< 35 seconds
Connection
interface
USB 1.1 for PC connection;
Bluetooth V2.0 EDR Class 2
for PDA & mobile phones
Operation
temperature
-10 °C to + 50 °C
Water-resistant
Yes
GT-200e package contents
GT-600
Dimension
46 x 41.5 x 14 mm
Weight
37g
Chipset
Built-in SiRF StarIII low-power chipset
Antenna
Built-in GPS patch antenna
Battery
Built-in 750 mAh Lithium-ion battery
LED indicators
Blue & Red
Cold start
< 35 seconds
Warm start
< 35 seconds
Connection
interface
USB 1.1 for PC connection;
Operation
temperature
-10 °C to + 50 °C
Water-resistan
t
Yes
Motion
detection
Yes
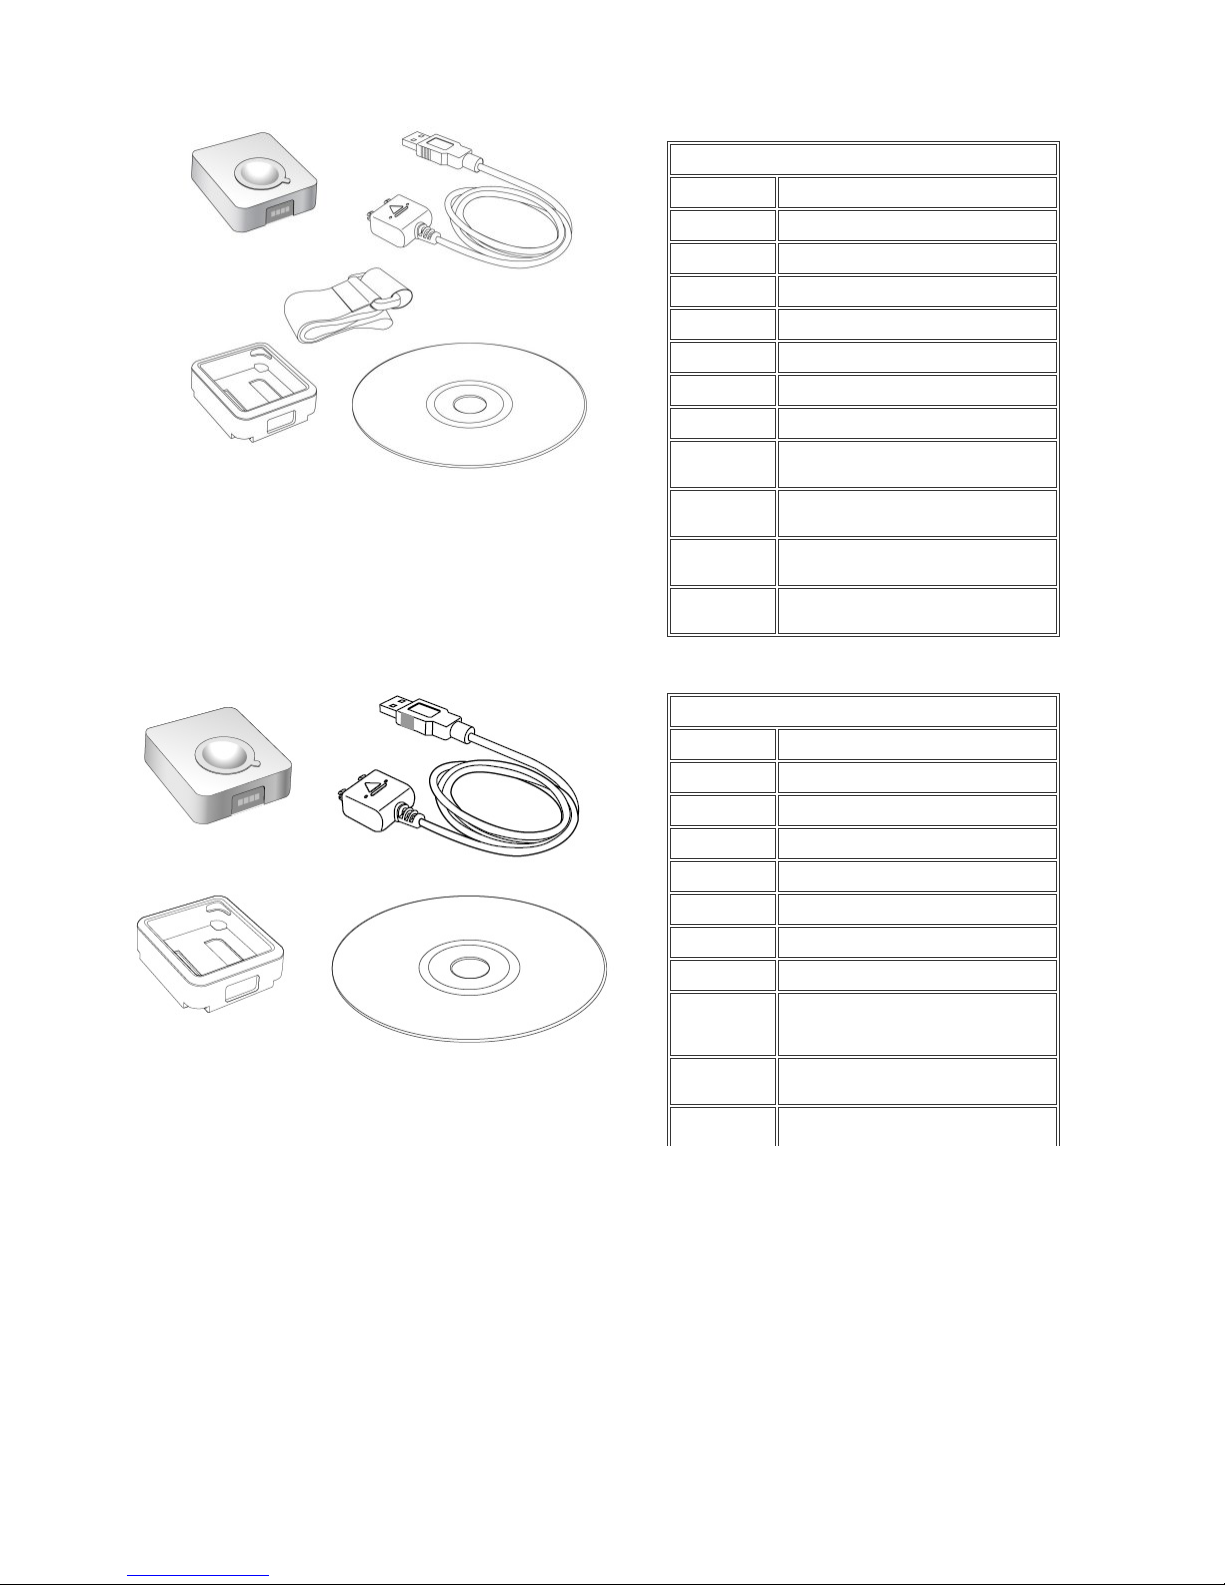
GT-600 package contents
GT-200
Dimension
46 x 41.5 x 14 mm
Weight
37g
Chipset
Built-in SiRF StarIII low-power chipset
Antenna
Built-in GPS patch antenna
Battery
Built-in 750 mAh Lithium-ion battery
LED indicators
Blue & Red
Cold start
< 60 seconds
Warm start
< 38 seconds
Connection
interface
USB 1.1 for PC connection;
Bluetooth V2.0 EDR Class 2 for PDA &
mobile phones
Operation
temperature
-10 °C to + 50 °C
Water-resistan
t
Yes
GT-200 package contents
GT-100
Dimension
47 x 29 x 12 mm
Weight
21g
Chipset
Built-in SiRF StarIII
low-power chipset
Antenna
Built-in GPS patch antenna
Battery
Built-in 230mAh Lithium-ion
battery
LED indicators
Blue & Red
Cold start
< 60 seconds
Warm start
< 38 seconds
Connection
interface
USB 1.1
Operation
temperature
-10 °C to + 50 °C
Water-resistant
Yes
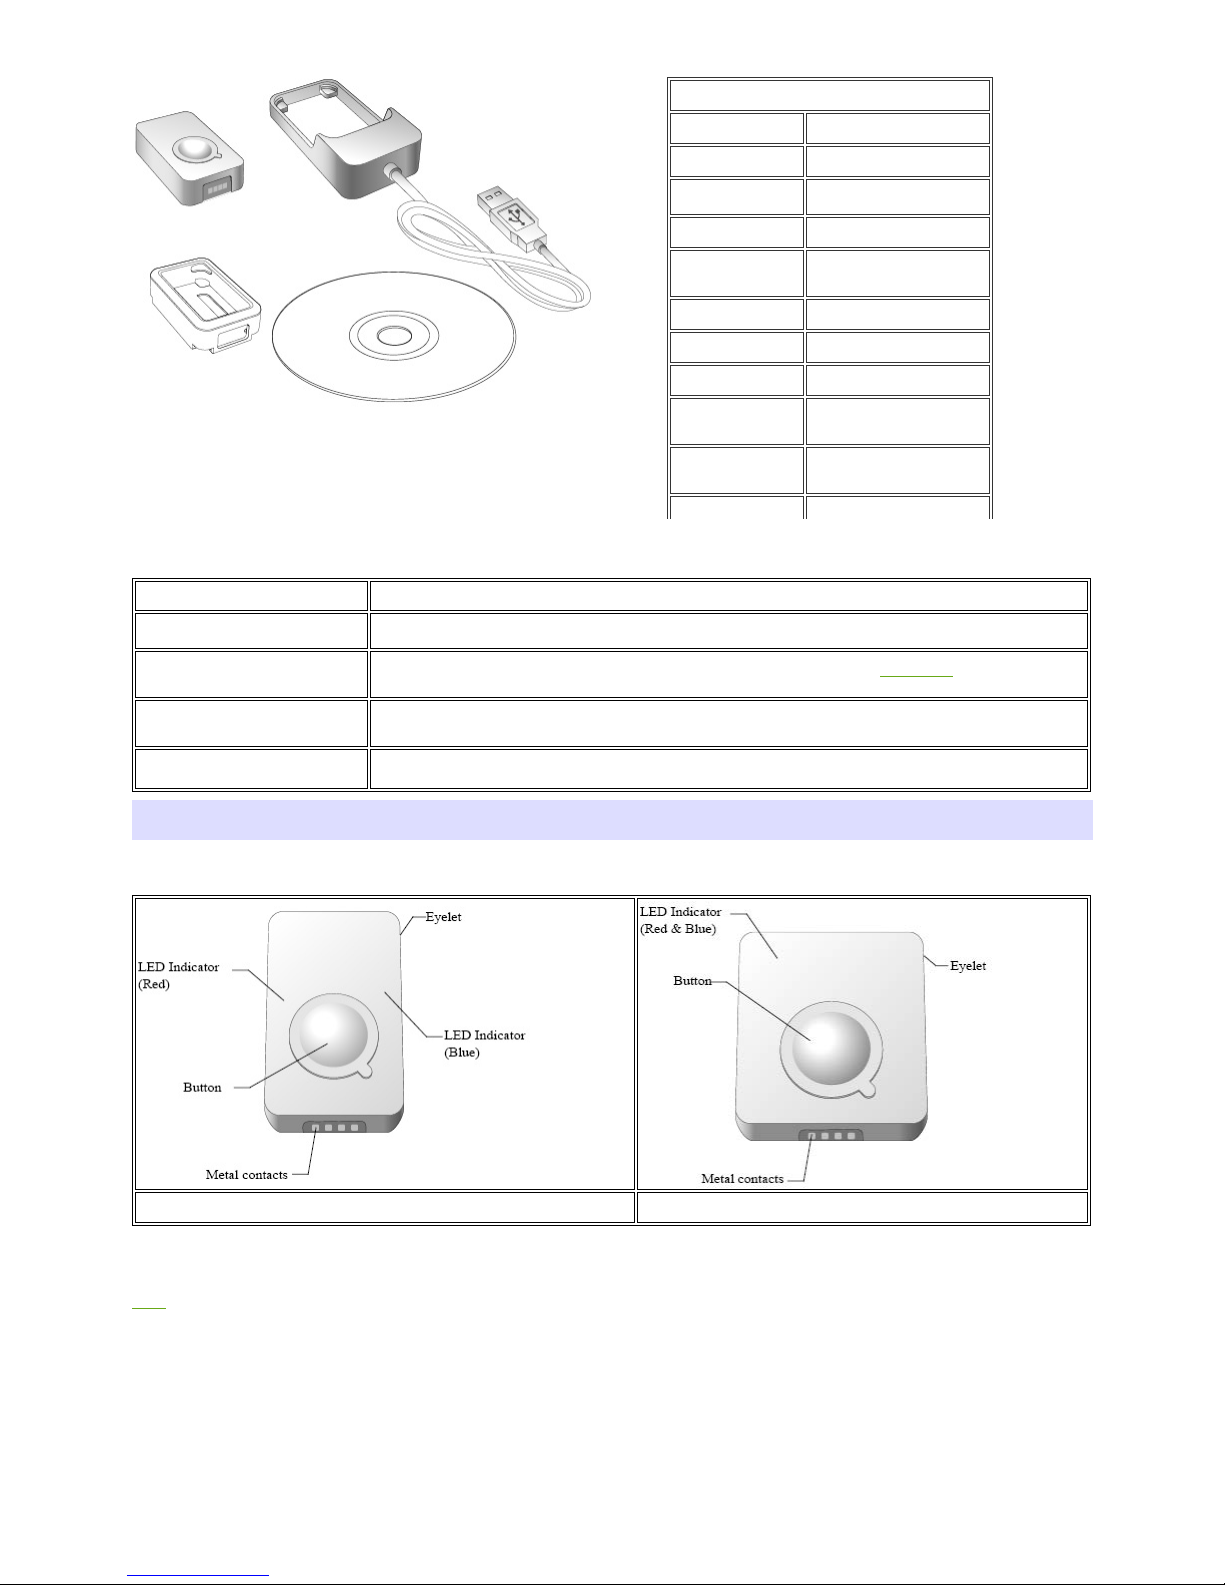
GT-100 package contents
GPS Logger Dock
GPS Logger Dock works both as GT-100 built-in battery charger and data transfer medium for GT-100.
GPS Logger USB Cable
GPS Logger Cable works both as GT-600 / GT-200 / GT-200e / GT-120 built-in battery charger and
data transfer medium for GT-600 / GT-200 / GT-200e / GT-120.
@trip PC CD-ROM
@trip PC is an easy to use software tool to fast create and personalize the Travel Blog for your journey.
Follow the on-screen instructions to complete the installation.
GPS Logger jelly case
Besides especially designed for broader appliances, both GPS Logger (USB) & GPS Logger (Bluetooth)
also comes with a jelly case for easier wear or any other kind of attachment.
GPS Logger Fastening
Strap
GPS Logger Fastening Strap allows you to tie and fasten the GPS Logger anywhere for easier travel.
Note: Considering the need for GPS Logger to be used outdoors, it is designed as a water-resistent device. Just like the watch, it'll still function normally when it gets
splashed by rain or water. Although it is made water-resistent, it should NOT be carried under water for activities like swimming, diving, and etc. Inappropriate use of
GPS Logger might cause unexpected damages to it.
Outlook of GPS Logger
GT-100 / GT-120
GT-200 / GT-200e / GT-600
Next
Getting Started with GPS Logger
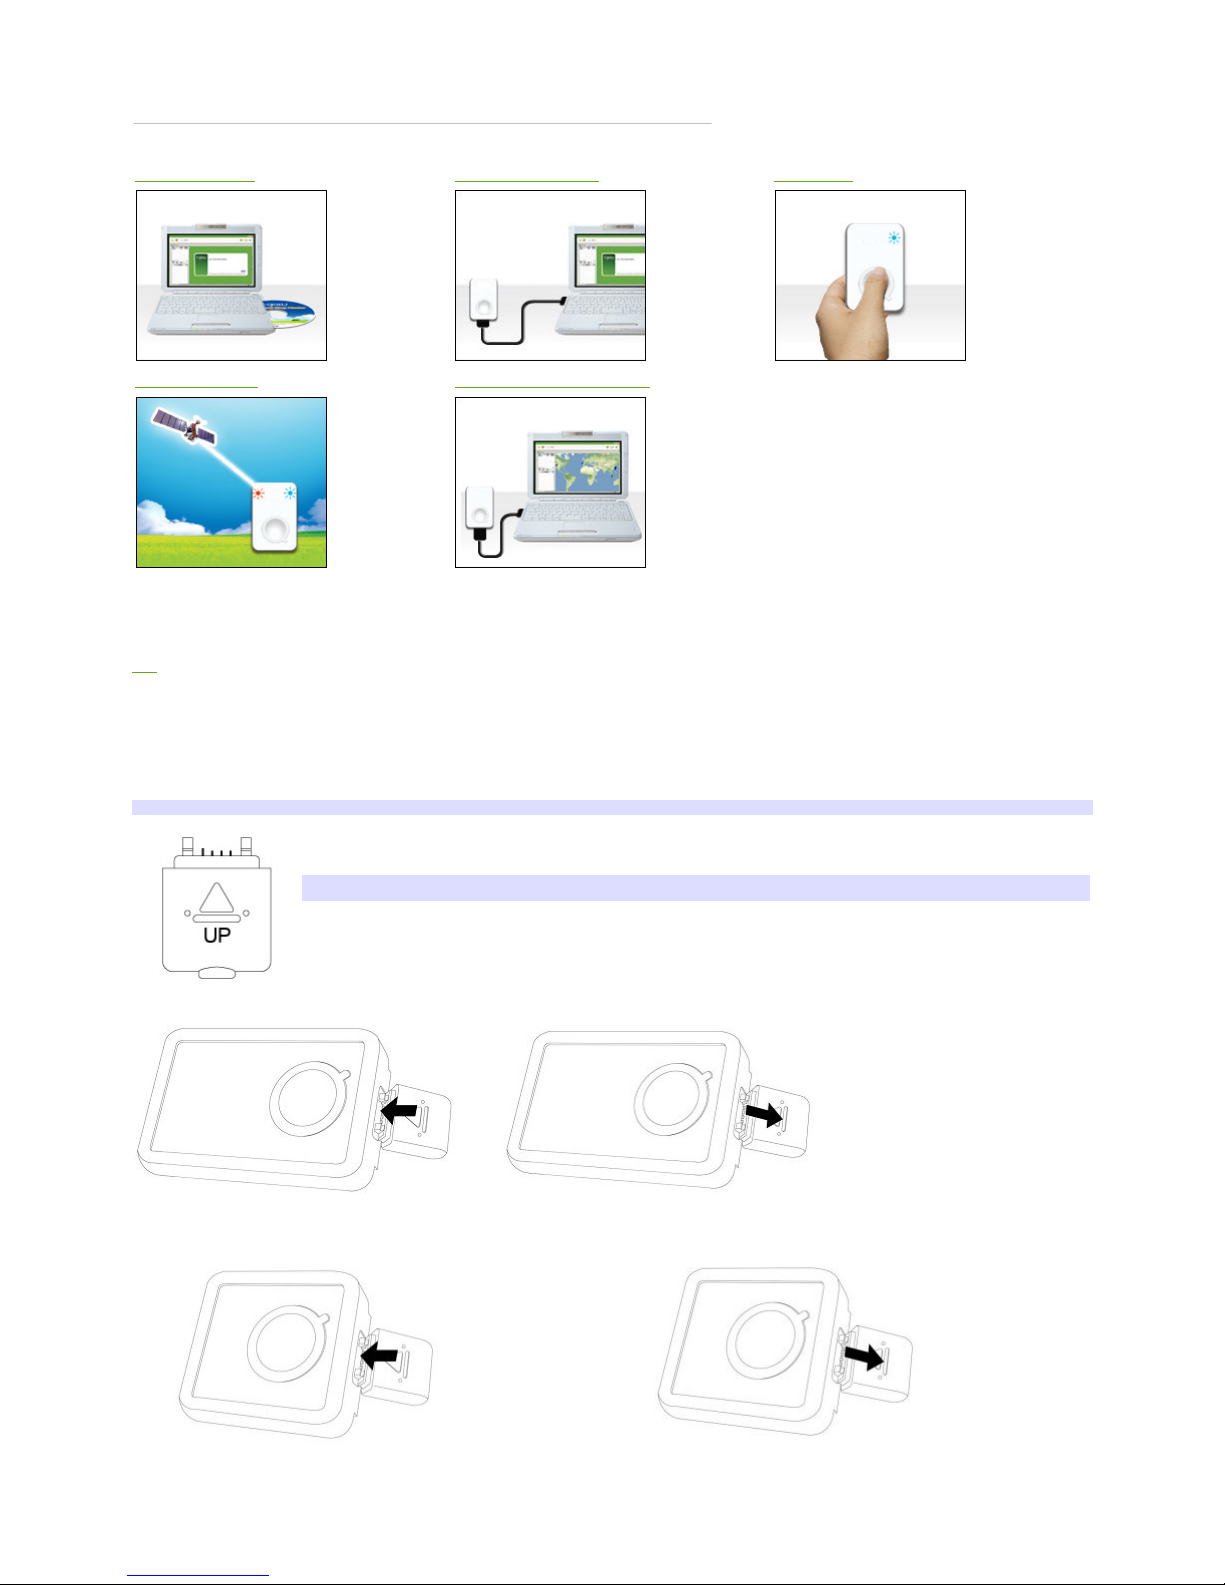
The following demonstrates how to get started with your GPS Logger and @trip PC:
1. Install @trip PC
2. Charge GPS Logger
3. Power on
4. Get first GPS fix
5. Connect PC to import data
1. Install @trip PC
Insert the CD-ROM to the CD-ROM drive and follow the on-screen instructions to install @trip PC.
Top
2. Charge GPS Logger
GPS Logger Dock/ USB Cable serves as a charger as well as data transfer medium. Please follow the instructions shown in the illustrations
below to connect your GPS Logger to PC and have it fully charged.
It takes about 4 hours to fully charge your GPS Logger for the first time. 2-hour charge is enough for later use. The red LED indicator stays on
during charging, and goes off when charging is complete. Remove your GPS Logger when charging is complete.
Tip: You can also use any market available standard USB car charger or USB travel charger to charge up the battery power for your GPS Logger
.
Note: One side of the USB connector marked with an arrow should face up when you intend to connect it to the device, in order to avoid
unexpected damage caused by incorrect plugging.
Connect & Remove GPS Logger USB Cable
Connect & Remove GPS Logger USB Cable

Install & Charge GPS Logger
Top
3. Power on/off your GPS Logger
Long press the button to power on/off your GPS Logger. The blue LED indicator blinks once upon power-on, and the red LED indicator blinks
upon power-off.
Tip: Go to GPS Logger indicators to familiarize yourself with the LED indicators.
Note: @trip PC automatically adds GPS information to the photos taken on your journey with fussy time mapping; therefore, setting up a correct time for your
camera/ camera phone will enhance the mapping procedure.
Top
4. Initiate your GPS Logger for the first GPS fix
It requires a clear sky for your GPS Logger to receive GPS signals and acquires a GPS fix. Please leave your GPS Logger on the balcony, the
top of your car, or anyplace where there is no obstruction or shading to fasten up the GPS fix acquisition for your GPS Logger.
Once the first GPS fix is successfully acquired, both the blue and red LED indicators of GPS Logger will blink simultaneously twice, indicating
that track logging has begun. GPS Logger will then start logging based on the tracking interval configured in hardware settings.
Note:
1. Find the LED indicator demos in GPS Logger LED indicators
.
2. For more detailed information on the GPS fix, correct wear and use of your GPS Logger, please refer to Essentials for Beginners
.
Top
5. Data import & @trip PC
Connect your GPS Logger to your computer, and launch @trip PC to start importing track data logged in your GPS device. Click Import GPS
Track and follow the on-screen instruction to import the track logs saved on GPS Logger to your computer. Click on the imported track, and
you can see it on Google Map in few seconds.
Note:
1. It requires Internet connection to retrieve the map data for the selected track.
2. For correct mapping of track data and photos, please make sure your camera time is adjusted prior to starting a track. If any photo taken along the track is not
correctly located, please Adjust Camera Time
with @trip PC , or use Photo Locator for further fixing.
Top
Next

GPS Logger LED Indicators
The following lists various LED indications of GPS Logger:
Main indication:
Power On
The blue LED indicator blinks once.
Operation: Long press (1.5 seconds) the button to power on GPS Logger.
Note: When the device is powered on and starts tracking, the blue LED indicator blinks every 4 seconds. For GPS Loggers
with firmware versions older than 3.0, the blue LED indicator blinks every 16 seconds.
Data Logged
Both the red and blue indicators blink simultaneously twice.
Status: Device is powered on and GPS data has been logged successfully.
Power Off
Long press the button, and the red LED stays red until GPS Logger is powered off.
Memory full / Battery low
The red LED blinks: twice / once.
BT Pairing
The blue and red LED indicators blink in turn for 5 minutes during pairing mode.

Operation: While Bluetooth GPS Logger is turned off, long press (5 seconds) to enter pairing mode.
(Please refer to the user manual of your handset or bluetooth device for details on bluetooth pairing.)
Note:1.If necessary, enter the passcode " 0000 " to complete pairing.
2.
Once Bluetooth GPS Logger is successfully paired, it will not exit the pairing
mode automatically. It is normal to see both the red and blue LED indicators
flash continuously.
3.
Once Bluetooth GPS Logger is connected via bluetooth, only the blue LED
indicator will flash continuously.
4.
Once bluetooth connection is enabled on GT-200e, it will start logging by default.
5.
If bluetooth connection fails, GT-200 Bluetooth GPS Logger will turn off
automatically after 5 minutes.
Others:
Charging
The red LED indicator stays on during charging and goes off when charging is complete.
Status: The device is connected to power sources, such as car charger or computer USB port.
Push-to-log
The blue LED indicator blinks once, followed by both indicators blinking simultaneously twice.
Status: Device is powered on and functions normally.
Operation: Press the button once to log the current GPS information.
Data Transfer
The red LED indicator stays on, and the blue LED indicator blinks randomly.
Status: The device is connected to PC and transferring data.
GPS Receiver
The blue LED indicator blinks steadily.
Status: Receiving GPS information for the connected navigation device/ software.
Next
Essentials For Beginners
Before hitting on the road with your GPS Logger , please read the following information thoroughly to ensure the GPS Logger to work properly,
lest any incorrect operation ruin your precious travel memories.
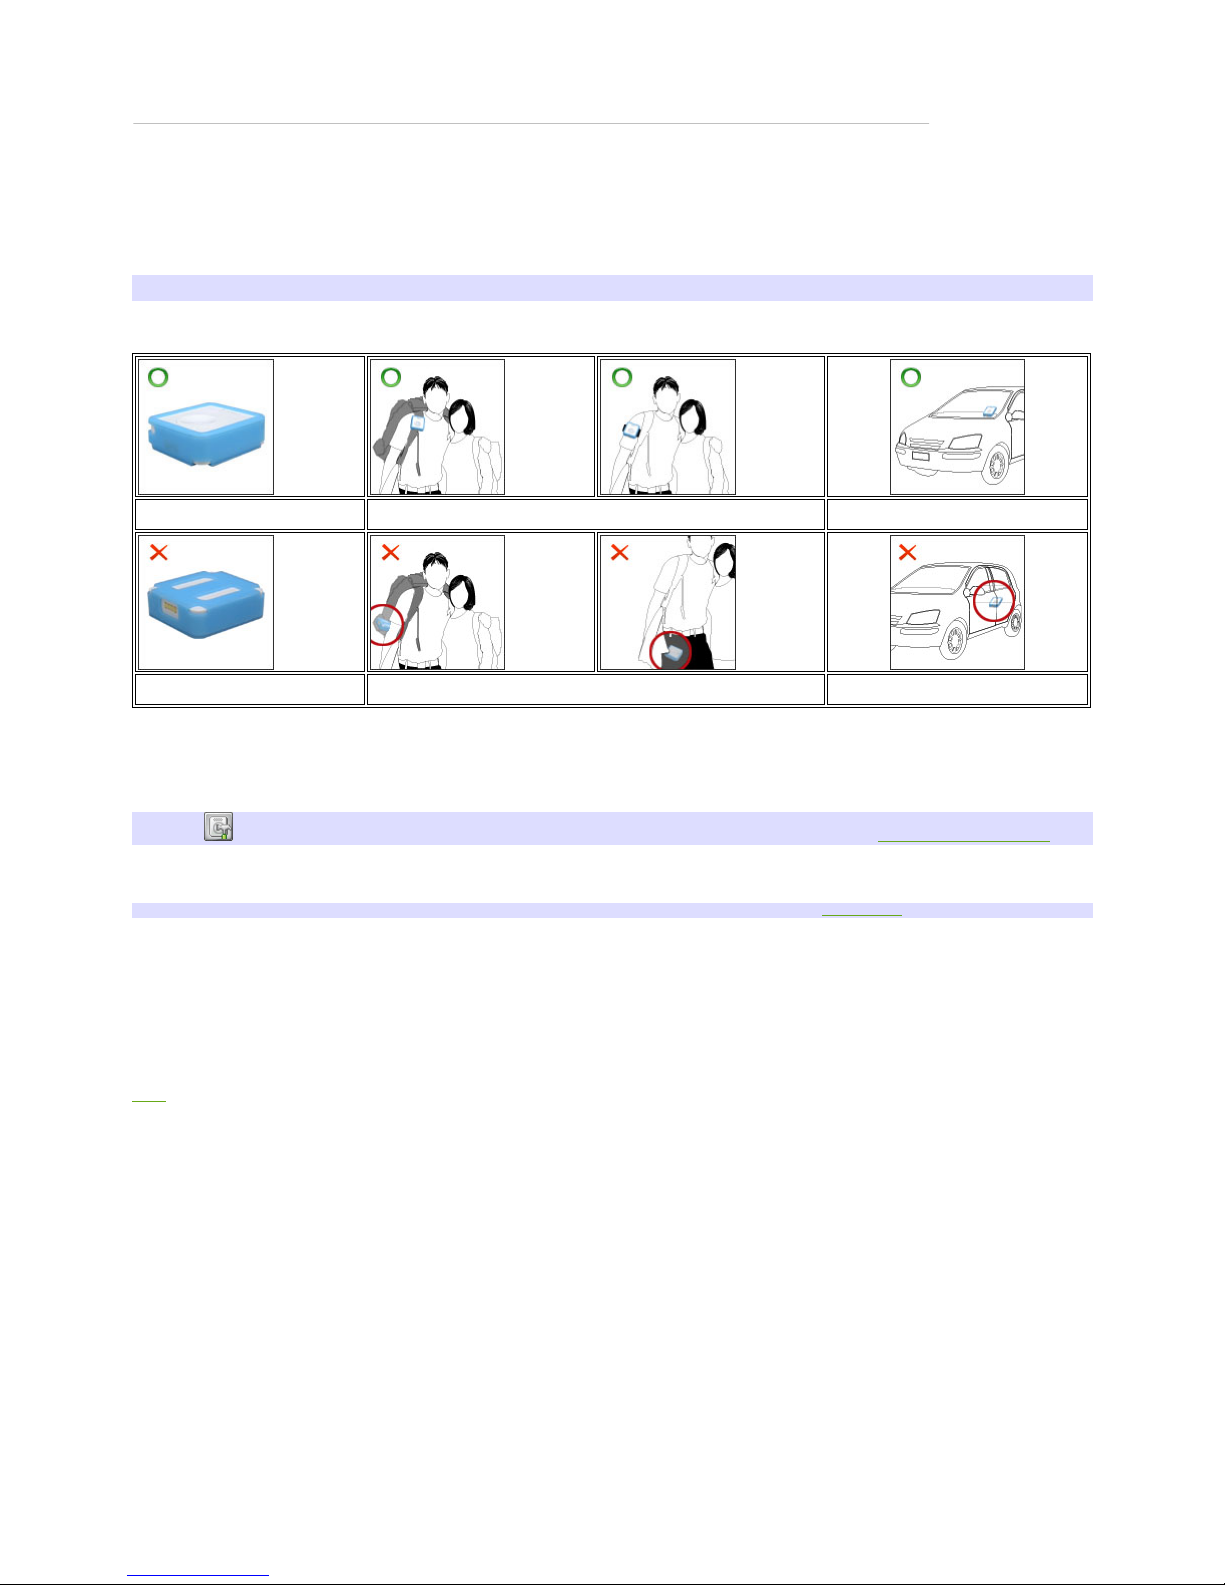
GPS Logger wear & attachment
When taking GPS Logger from indoors to outdoors, it usually takes longer to get a GPS fix. Please place your GPS Logger face-up toward the
sky and press the button to acquire a GPS fix.
Tip: If GPS Logger functions normally and gets a GPS fix, both the red and blue LED indicators blink simultaneously twice, indicating the current GPS information is
logged successfully to the device memory.
Please always place your GPS Logger exposed to the open sky to ensure the successful GPS fix acquisition. Refer to the illustration below to
expose your GPS Logger as much as possible in the open sky to ensure stable and successful GPS fix acquisition.
face-up
exposed to the sky
near the car windshield
face-down
inside backpack/ bag or pocket
on the car backseats
GPS Logger setup
GPS Logger: GPS Logger is water-resistant, designed for a broader use. Multiple tracking modes with different data logging intervals work for
both short & long journey.
Note: C lick on the main menu bar of @trip PC to configure your GPS Logger. For detailed setup information, please refer to Hardware & Software Settings
.
Camera/ Camera phones: @trip PC automatically adds GPS information to the photos taken on your journey with fussy time mapping;
therefore, setting up a correct time for your camera/ camera phone will enhance the mapping procedure.
Note: Besides auto-mapping, you can also manually map the photos to your Trip. For more information, please refer to Compose Trip
.
Safety information
Please do not leave your GPS Logger exposed to high temperature for a long time, such as on the inside of the windshield of a car at noon in
the summer, to avoid the overheat to cause any device malfunction or danger.
Next

GPS Classroom
What is GPS: Global Position System (GPS) is developed and operated by the Department of Defense (DOD) of the United States, on which the
accuracy and maintenance of this system fully depends. Any change made by the authorities might influence the accuracy and performance of
the GPS equipments.
How GPS works: GPS provides satellite signals which are specially coded for the computation in a GPS receiver to produce the position,
velocity and time. Usually it requires four GPS satellite signals to computer correctly the position in three dimensions and the offset time of the
GPS receiver’s clock.
Limitations on GPS reception: Initial or any use after a longer interval over four hours takes a few minutes for a successful location. Any
obstruction above or around the receiver, such as high buildings in the neighborhood, or bad reception location, such as in a tunnel or in the
building, will influence the time needed for a successful GPS location.
Cold Start: Cold start of the GPS device refers to the state of the tracker when time and position are known to within some limits, the almanac
known, and the ephemeris unknown.
Example: If the GPS device has been off for a few hours, and the ephemeris data is known for at least three satellites, the start up will be a warm start and fix the
positional in 10 - 20 seconds. Therefore, if ephemeris data for only 2 or less satellites is known it's a cold start and acquisition will take as much as a few minutes.
Warm Start: Warm start of the GPS device refers to the state of the device when time and position are known to within some limits, the
almanac known, and at least 3 satellite ephemeris are known from previous operation.
Example: If the GPS device has been off for only a few minutes, the ephemeris data for all the satellites will be known and therefore the GPS device will fix the
positional in a matter of seconds.
Note: The almanac data is an estimated (computed) data and can be valid for months while the ephemeris is only valid for 3 - 6 hours.
Note: Actual acquisition time depends on the terrain and satellite coverage.
Next

Use GPS Logger as GPS Receiver
A GPS Logger serves not only as a GPS data logger that records all the GPS data on your journey but also works as a GPS receiver for many
navigation software by third parties. Connect it to any PC installed with navigation software to work both together as a GPS navigation
system.
GPS Logger with PC
1.
Slide GPS Logger onto GPS Logger Dock/ USB Cable and connect it to your PC USB port.
2.
Please go to Start-> Settings -> Control Panel -> System -> Hardware -> Device Manager -> Ports (COM & LPT), and note down
the com port number of "GPS Logger USB Com Port" device.
3.
Please refer to the user manual of your navigation software to set up the transfer port and set the Baud rate between 9600 and
115200.
4.
The blue LED indicator starts to flash when the setup is completed. GPS Logger now works as GPS receiver for your navigation
software.
Note: When you connect GPS Logger to the PC installed with navigation software, please select the specific C OM port that GPS Logger is assigned.
Bluetooth GPS Logger
1.
During Bluetooth GPS Logger is turned off, long press (5 seconds) to enter pairing mode. Long press (1.5 seconds) the button to
power off Bluetooth GPS Logger.
2.
The blue and red LED indicators blink in turn for 5 minutes during pairing mode.
3.
Once Bluetooth GPS Logger is successfully paired, it will not exit the pairing mode automatically. It is normal to see both the red and
blue LED indicators flash continuously.
*If necessary, enter the passcode "0000" to complete pairing.
4.
Please refer to the user manual of your navigation software for the detailed information on using Bluetooth GPS Logger as GPS receiver
for your navigation software.
Next

@trip PC
@trip PC is a specialized software that can auto-add GPS information on the photos taken on your journey and present your journey lively on
3D map. Besides, @trip PC offers great functionality that allows you to create, customize and export your trips in various file formats, in order
to share many traveling fun times with your family and friends.
Using @trip PC can be as simple as three short steps:
»
Launch @trip PC
»
Start A Trip
»
Share A Trip
Next
Start Using @trip PC
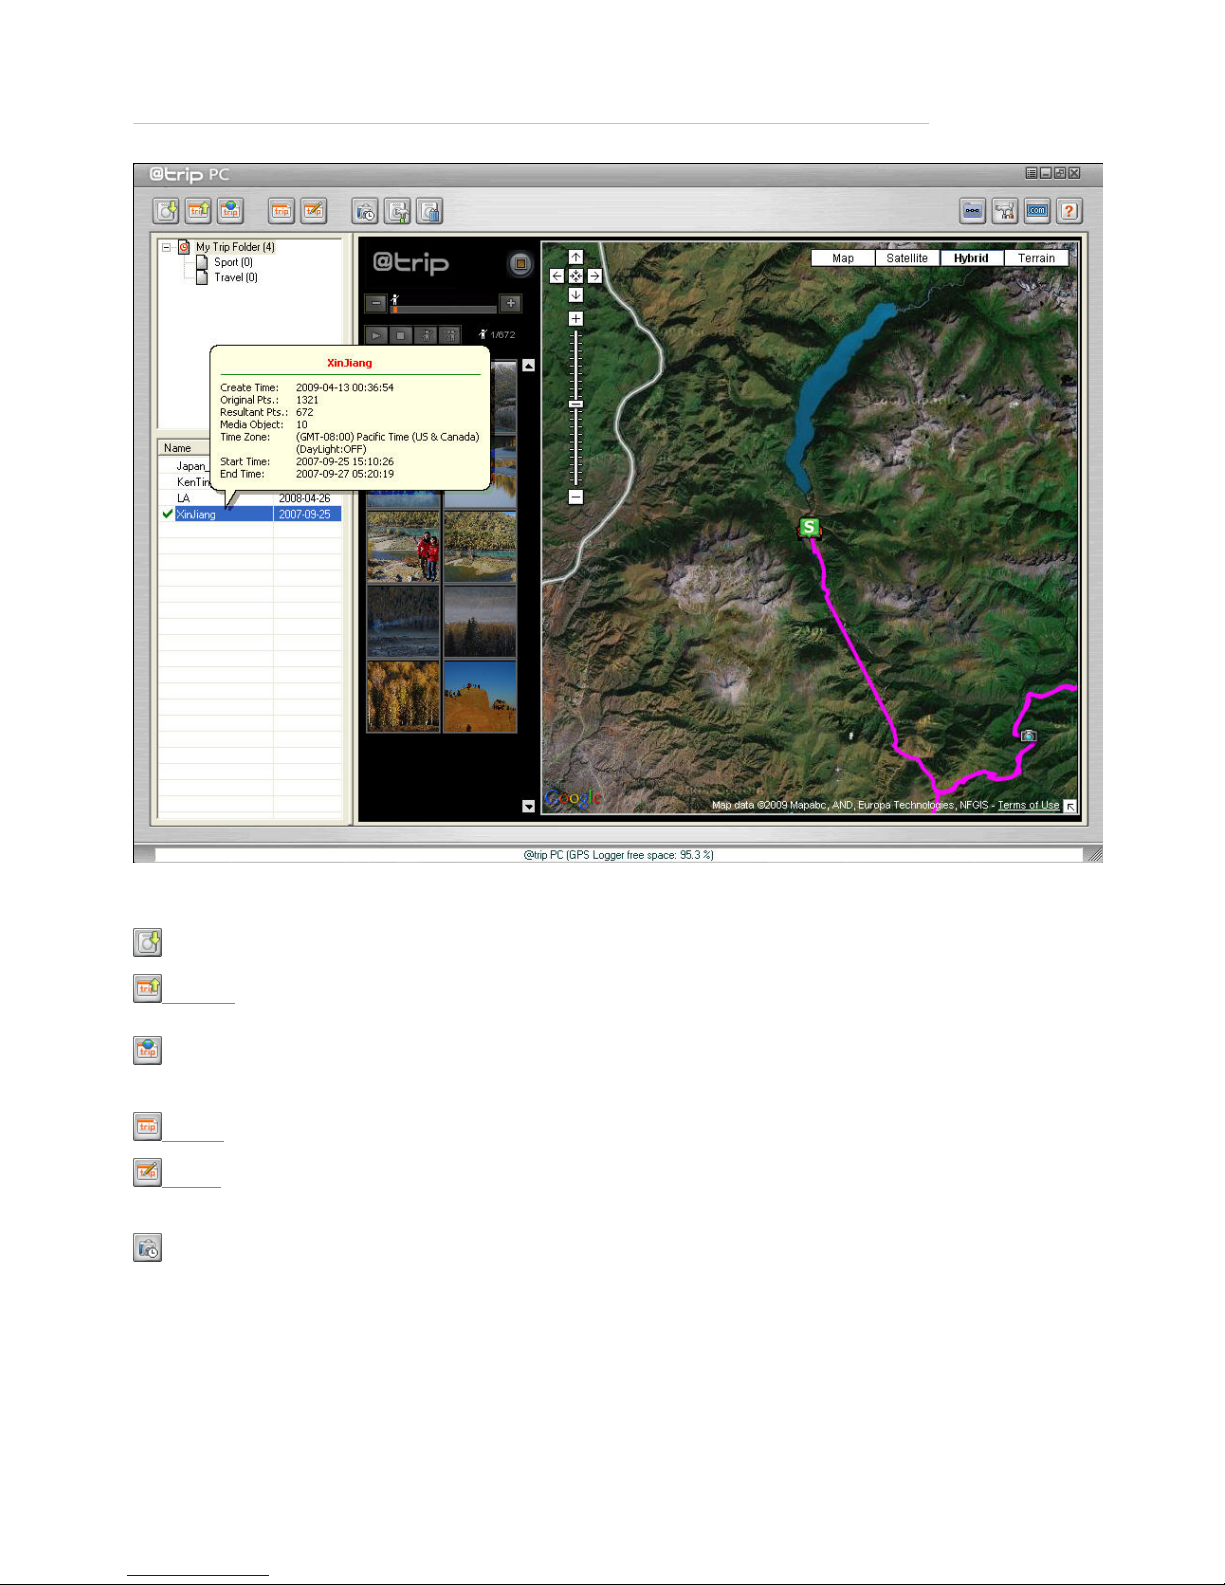
Easy-to-use interface. Let @trip PC do all the hard work for you!
Main menu bar
Main menu bar provides you with quick accesses to the main functions and information concerned.
Import GPS Track : Click to to launch Import Wizard to import GPS log data.
Share Trip: Click to share your trip by uploading to @trip server (including an option to make it public), exporting to file, or any advanced
options.
Download from @trip server: Click to download trip(s) previously uploaded to @trip Server.
New Trip:Click to add a new trip.
Edit Trip:Click to edit existing track(s).
Adjust Camera Time : Click to adjust the time of your camera.
Page 13
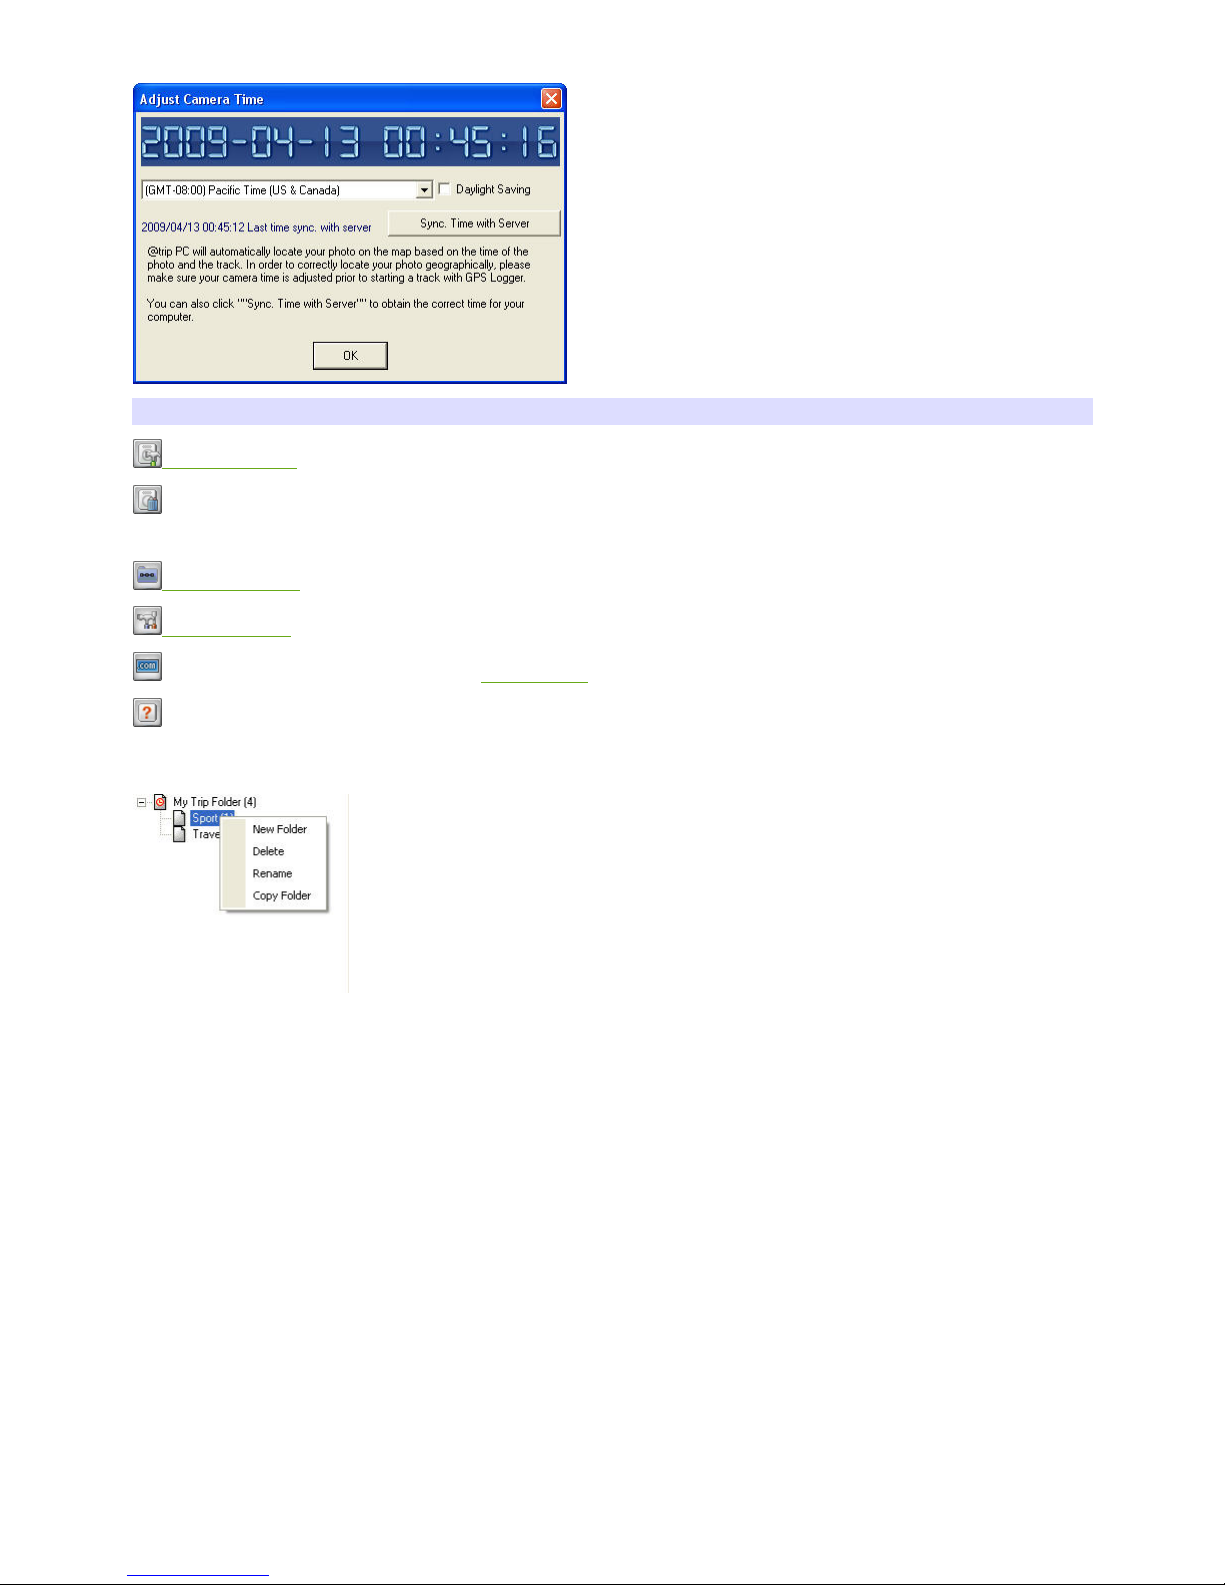
Note: For correct mapping of track data and photos, please make sure your camera time is adjusted prior to starting a track. Or click Sync. Time with Server to
obtain the correct time from server.
Hardware Settings: Click to customize the tracking modes of your GPS Logger .
Clear Device Data: Click to clear the GPS logs saved on your GPS Logger.
Track Management: Click to manage all existing tracks.
Software Settings: Click to customize the @trip PC settings.
Visit @trip: Click to connect to @trip website: www.a-trip.com.
Help: Click to bring up @trip PC Help file.
Trip folder window
This trip folder window gives a clear view of how trips are categorized and stored. Right-click on a folder to see more options:
New Folder : A sub-folder will be created under the selected folder.
Delete : The selected folder will be deleted.
R ename : The selected folder can be renamed.
Copy Folder : The selected folder will be duplicated.
Trip information window
Page 14
 Loading...