

Page 1

Gebrauchsanweisung
Instructions for use
Mode d’emploi
Gebruiksaanwijzing
Istruzioni per l’uso
Brugsanvisning
Bruksanvisning
Käyttöohje
Manual de utilização
Instrucciones para el uso
Instrukcje użytkowania
Használati utasítás
ИнструкциЯ за употреба
Návod k použití
Návod na použitie
Instruc∑iuni de utilizare
Инструкции по эксплуатации
Page 2

Page 3

DEUTSCH Gebrauchsanweisung Seite 4
ENGLISH Instructions for use Page 14
FRANÇAIS Mode d’emploi Page 24
NEDERLANDS Gebruiksaanwijzing Pagina 34
SVENSKA Bruksanvisning Sidan 44
NORSK Bruksanvisning Side 54
DANSK Brugsanvisning Side 64
ČESKY Návod k použití Strana
74
SLOVENSKY Návod na použitie Strana
84
MAGYAR Használati utasítás Oldal
94
3
Page 4
4
• Das von Ihnen erworbene Gerät ist ein
Haushaltsgerät, das auch folgenden Bereichen
bestimmt ist
- Küchen von Arbeitsbereichen, Geschäften
und/oder Büros
- landwirtschaftliche Betriebe
- Hotels, Motels, Wohngemeinschaften, Bed &
Brekfast.
Damit Sie den größtmöglichen Nutzen aus Ihrem
Gerät ziehen, lesen Sie bitte aufmerksam die
Bedienungsanleitung, in der Sie die
Gerätebeschreibung sowie nützliche Ratschläge
zur Aufbewahrung der Lebensmittel finden.
Heben Sie diese Anleitung bitte als
Nachschlagwerk gut auf.
1. Überprüfen Sie nach dem Auspacken des Geräts das
einwandfreie Schließen der Türen. Mögliche
Transportschäden müssen dem Händler innerhalb
von 24 Stunden nach Anlieferung gemeldet werden.
2. Warten Sie vor der Inbetriebnahme des Gerätes
mindestens zwei Stunden, damit der Kühlkreislauf
seine volle Funktionstüchtigkeit erreichen kann.
3. Die Installation und der elektrische Anschluss
müssen von einer Fachkraft gemäß den
Herstelleranweisungen und den gültigen örtlichen
Bestimmungen ausgeführt werden.
4. Vor der Inbetriebnahme den Innenraum des Geräts
reinigen.
VOR DEM GEBRAUCH DES GERÄTS
1. Verpackung
Das Verpackungsmaterial ist zu 100% wieder
verwertbar und durch ein Recyclingsymbol
gekennzeichnet. Für die Entsorgung die örtlichen
Vorschriften beachten. Das Verpackungsmaterial
(Plastikbeutel, Styroporteile, usw.) außerhalb der
Reichweite von Kindern aufbewahren, da es eine
mögliche Gefahrenquelle darstellt.
2. Entsorgung
Das Gerät ist aus wieder verwertbaren Materialien
hergestellt. Dieses Gerät verfügt über die
Konformitätskennzeichnung entsprechend der
Europäischen Richtlinie 2002/96/EG über Elektro- und
Elektronik-Altgeräte (WEEE).Bei einer korrekten
Entsorgung des Gerätes durch den Benutzer werden
Gefahren für die Umwelt und die Gesundheit
ausgeschlossen.
Das Symbol auf dem Gerät oder dem
Begleitdokument weist darauf hin, dass dieses Gerät
nicht wie Hausmüll behandelt werden darf, sondern
bei speziellen Sammel- und Recyclingstellen für
Elektro- und Elektronik-Altgeräte abzugeben ist. Vor
der Entsorgung des Gerätes das Speisekabel
durchtrennen, Türen und Ablageflächen entfernen,
damit das Gerät funktionsuntüchtig ist und keine
Gefahrenquelle für spielende Kinder darstellen kann.
Bei der Entsorgung die örtlichen Bestimmungen zur
Abfallbeseitigung beachten und das Gerät bei den
zugelassenen Entsorgungsbetrieben abliefern; das
Gerät auf keinen Fall, auch nicht für wenige Tage,
unbewacht stehen lassen, da es eine Gefahrenquelle
für spielende Kinder darstellen kann. Für weitere
Informationen zu Behandlung, Entsorgung und
Recycling dieses Gerätes das zuständige örtliche Amt,
das Abfallentsorgungsunternehmen oder den Händler
kontaktieren, bei dem das Gerät gekauft wurde.
Information:
Dieses Gerät ist FCKW-frei. Der Kältekreislauf enthält
R134a (HFC) oder R600a (HC), siehe Typenschild im
Innenraum. Für Geräte mit Isobutan (R600a): Isobutan
ist ein Naturgas ohne umweltschädigende
Auswirkungen, es ist jedoch entflammbar. Die
Leitungen des Kältekreises müssen daher unbedingt
auf ihre Unversehrtheit überprüft werden. Dieses
Gerät könnte fluorierte Treibhausgase im Sinne des
Kyoto-Protokolls enthalten. Das Kühlmittel befindet
sich in einem hermetisch versiegelten System.
Kühlmittel: R134a hat ein Treibhauspotential (GWP)
von 1300.
Konformitätserklärung
• Dieses Gerät ist für die Aufbewahrung von
Lebensmitteln bestimmt und entspricht der
Verordnung (EG) Nr. 1935/2004
• Dieses Gerät wurde gemäß folgender Richtlinien
entworfen, hergestellt und auf den Markt gebracht:
- Sicherheitsanforderungen der
"Niederspannungsrichtlinie" 2006/95/CE (die
73/23/CEE und nachfolgende Änderungen
ersetzt);
- Schutzvorschriften der EG-Richtlinie 2004/108
"EMV".
Die elektrische Sicherheit des Gerätes ist nur dann
gewährleistet, wenn es korrekt an eine
funktionstüchtige und den gesetzlichen
Bestimmungen entsprechende Erdung
angeschlossen ist.
INFORMATIONEN ZUM UMWELTSCHUTZ
Page 5
5
INSTALLATION
• Zum Transport und zur Installation des Geräts sind
zwei oder mehrere Personen erforderlich.
• Beim Auf- bzw. Umstellen des Gerätes darauf
achten, dass der Fußboden nicht beschädigt wird (z.
B. Parkett).
• Während der Installation sicherstellen, dass das
Gerät nicht auf dem Stromkabel steht.
• Das Gerät nicht neben einer Wärmequelle
aufstellen.
• Zur Gewährleistung einer angemessenen Belüftung
ausreichend Freiraum über und neben dem Gerät
lassen.
• Die Belüftungsöffnungen des Gerätes nicht abdecken
oder zustellen.
• Die Leitungen des Kühlkreislaufs dürfen nicht
beschädigt werden.
• Installieren Sie und nivellieren Sie das Gerät auf einer
tragfähigen Fußbodenfläche und wählen Sie dazu
einen seinen Abmessungen und seinem
Verwendungszweck angemessenen Raum.
• Stellen Sie das Gerät in einem trockenen und gut
belüfteten Raum auf. Das Gerät ist für den Einsatz in
Räumen mit nachstehenden Temperaturbereichen
ausgelegt, die ihrerseits von der Klimaklasse auf dem
Typenschild abhängig sind: Der Gerätebetrieb
könnte beeinträchtigt werden, wenn das Gerät über
längere Zeit bei höheren oder tieferen
Temperaturwerten als denen des vorgeschriebenen
Bereichs läuft.
• Prüfen Sie, ob die auf dem Typenschild angegebene
Spannung mit der in der Wohnung übereinstimmt.
• Weder Einzel- noch Mehrfachadapter oder
Verlängerungskabel verwenden.
• Verwenden Sie zum Anschluss an die Wasserleitung
den im Lieferumfang des neuen Geräts
einbegriffenen Schlauch und nicht den Ihres
Vorgängergeräts.
• Das Netzanschlusskabel darf nur von qualifizierten
Technikern oder von der Kundendienststelle
geändert oder ersetzt werden.
• Die elektrische Abschaltung des Gerätes muss durch
Ziehen des Netzsteckers oder durch einen der
Steckdose vorgeschalteten Zweipolschalter möglich
sein.
SICHERHEIT
• Im Gerät keine Spraydosen oder Behälter mit
Treibgasen oder Brennstoffen lagern.
• Kein Benzin, Gas oder andere entflammbare Stoffe
in der Nähe des Geräts oder anderer
Haushaltsgeräte aufbewahren oder verwenden.
Durch die ausströmenden Dämpfe bestände
Brandoder Explosionsgefahr.
• Zum Beschleunigen des Abtauvorganges niemals zu
anderen mechanischen, elektrischen oder
chemischen Hilfsmitteln greifen als zu den vom
Hersteller empfohlenen.
• Verwenden Sie keine elektrischen Geräte in den
Geräteräumen, wenn diese nicht denen vom
Hersteller genehmigten entsprechen.
• Dieses Gerät sollte von Kindern, Behinderten und im
Umgang mit dem Gerät unerfahrenen Personen nur
nach einer Einweisung zum Gebrauch und unter
Aufsicht benutzt werden.
• Kindern das Spielen und Verstecken im Gerät
untersagen, um Erstickungs- und Einschließgefahr zu
vermeiden.
• Die in den Kälteakkus enthaltene (ungiftige)
Flüssigkeit nicht verschlucken (nicht bei allen
Modellen).
• Eiswürfel oder Wassereis nicht sofort nach der
Entnahme aus dem Gefrierraum verzehren, da sie
Kälteverbrennungen hervorrufen können.
GEBRAUCH
• Vor jeder Reinigungs- und Wartungsarbeit den
Netzstecker ziehen oder die Stromversorgung
unterbrechen.
• Sämtliche Geräte mit Eisbereiter und
Wasserspender müssen ausschließlich an eine
Trinkwasserleitung angeschlossen werden (mit
Wasserleitungsdruck zwischen 0,17 und 0,81 MPa
(1,7 und 8,1 bar)). Nicht direkt an die Wasserleitung
angeschlossene Eisbereiter bzw. Wasserspender
dürfen nur mit Trinkwasser gefüllt werden.
• Das Kühlabteil nur zur Lagerung frischer
Lebensmittel und das Gefrierabteil nur zur Lagerung
von Tiefkühlware, zum Einfrieren frischer
Lebensmittel und zum Herstellen von Eiswürfeln
verwenden.
• Bewahren Sie keine Flüssigkeiten in Glasbehältern im
Gefrierraum auf, da die Behälter platzen können.
• Vermeiden Sie, dass unverpackte Lebensmittel mit
den Innenwänden des Kühl- oder Gefrierraums in
direkten Kontakt kommen.
Der Hersteller übernimmt keine Haftung bei
Nichtbefolgen oben angeführter Ratschläge und
Vorsichtsmaßnahmen.
Klimaklasse
Raumtemp.
(°C)
Raumtemp.
(°F)
SN von 10 bis 32 von 50 bis 90
N von 16 bis 32 von 61 bis 90
ST von 16 bis 38 von 61 bis 100
T von 16 bis 43 von 61 bis 110
ALLGEMEINE HINWEISE UND RATSCHLÄGE
Page 6

6
Hinweise:
• Verstellen Sie den Luftauslassbereich (an der
Rückwand) nicht mit Lebensmitteln
• Ist der Gefrierraum mit einer Klappe ausgestattet,
kann das Fassungsvermögen durch Entfernen
(Biegen) der Klappe erhöht werden.
• Alle Ablagen, Klappen und Ausziehkörbe können
entfernt werden.
• Die Innentemperaturen des Geräts hängen von der
Raumtemperatur, der Häufigkeit der Türöffnungen
und dem Gerätestandort ab. Bei der
Temperatureinstellung sind diese Faktoren zu
berücksichtigen.
• Soweit nicht anders angegeben, ist das
Gerätezubehör nicht zum Spülen im Geschirrspüler
geeignet.
• Je größer der Abstand zwischen der Geräterückseite
und der Wand ist, um so größer ist die
Energieersparnis.
Gerät einschalten
Inbetriebnahme des Geräts
Die Bedienelemente befinden sich im Innenraum des
Geräts. Stecken Sie den Netzstecker in die Steckdose.
Wenn das Gerät an die Stromversorgung
angeschlossen ist, schaltet sich die Innenbeleuchtung
ein, wenn die Tür geöffnet wird. An dem Thermostat
im Kühlraum können Sie die Temperatur des
Kühlraums und des Tiefkühlfachs (falls vorhanden)
einstellen.
Temperatureinstellung des Geräts:
Temperatureinstellung:
Der Thermostat regelt automatisch die
Innentemperatur des Kühlraums und des
Tiefkühlfachs (falls vorhanden). Durch Drehen des
Thermostatknopfs von 1 bis 7 (kälteste Einstellung)
werden stufenweise niedrigere Kühltemperaturen im
Innenraum erzielt. In der Stellung 0 ist das Gerät
ausgeschaltet. Für die vorübergehende Aufbewahrung
von Lebensmitteln sollte der Thermostatknopf auf die
Positionen zwischen 1 (niedrigste Kühlleistung) und
3 (mittlere Kühlleistung) gestellt werden.
- Stellen Sie für eine längerfristige Aufbewahrung
von Lebensmitteln im Tiefkühlfach den
Thermostatknopf auf 3 oder 4.
Hinweis:
Die Raumtemperatur, die Häufigkeit der Türöffnungen
und der Aufstellungsort des Geräts können die
Innentemperatur beeinflussen. Bei der
Thermostateinstellung müssen diese Faktoren
berücksichtigt werden.
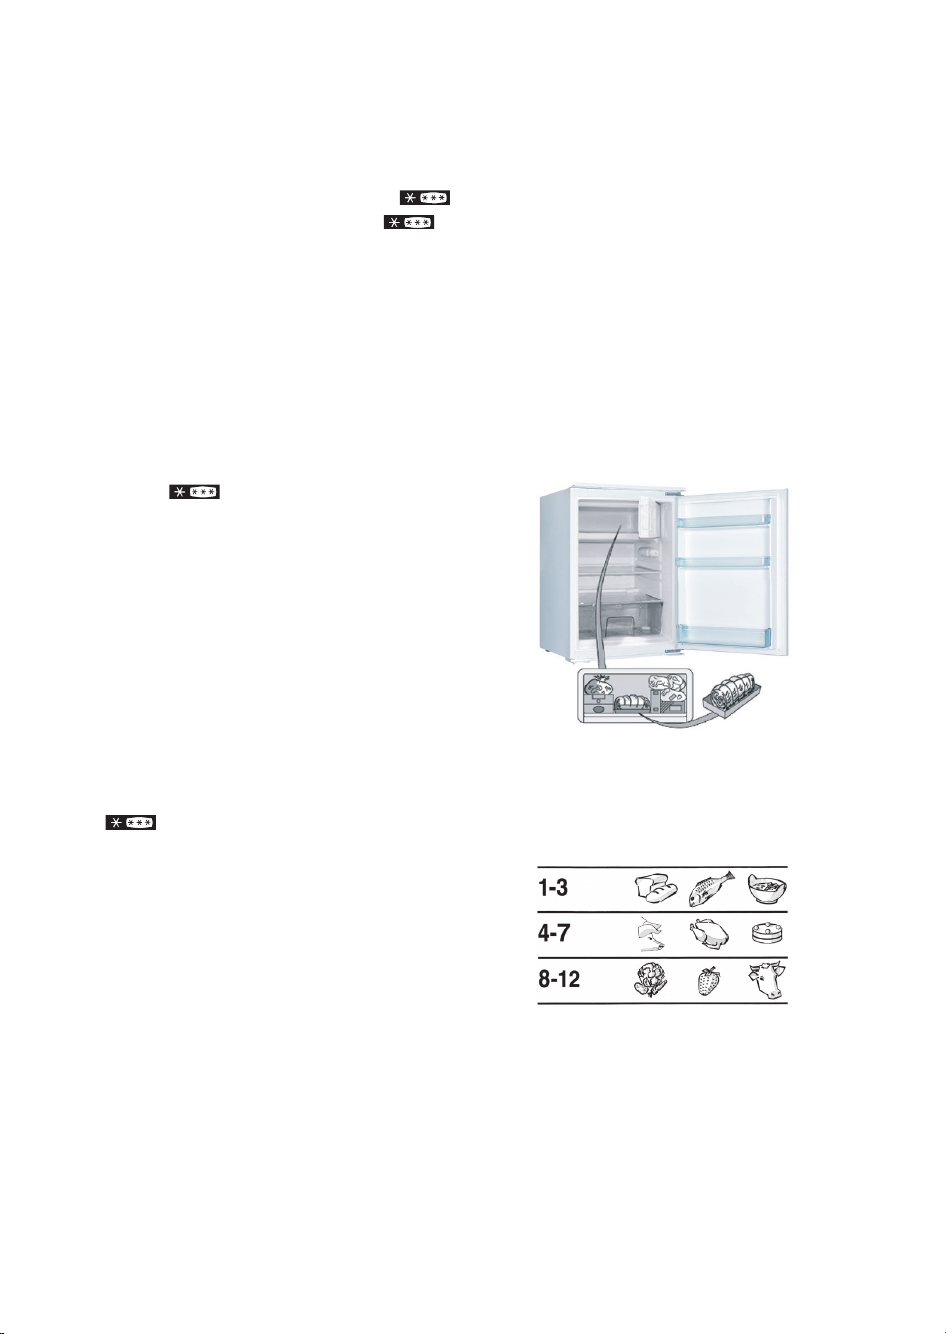
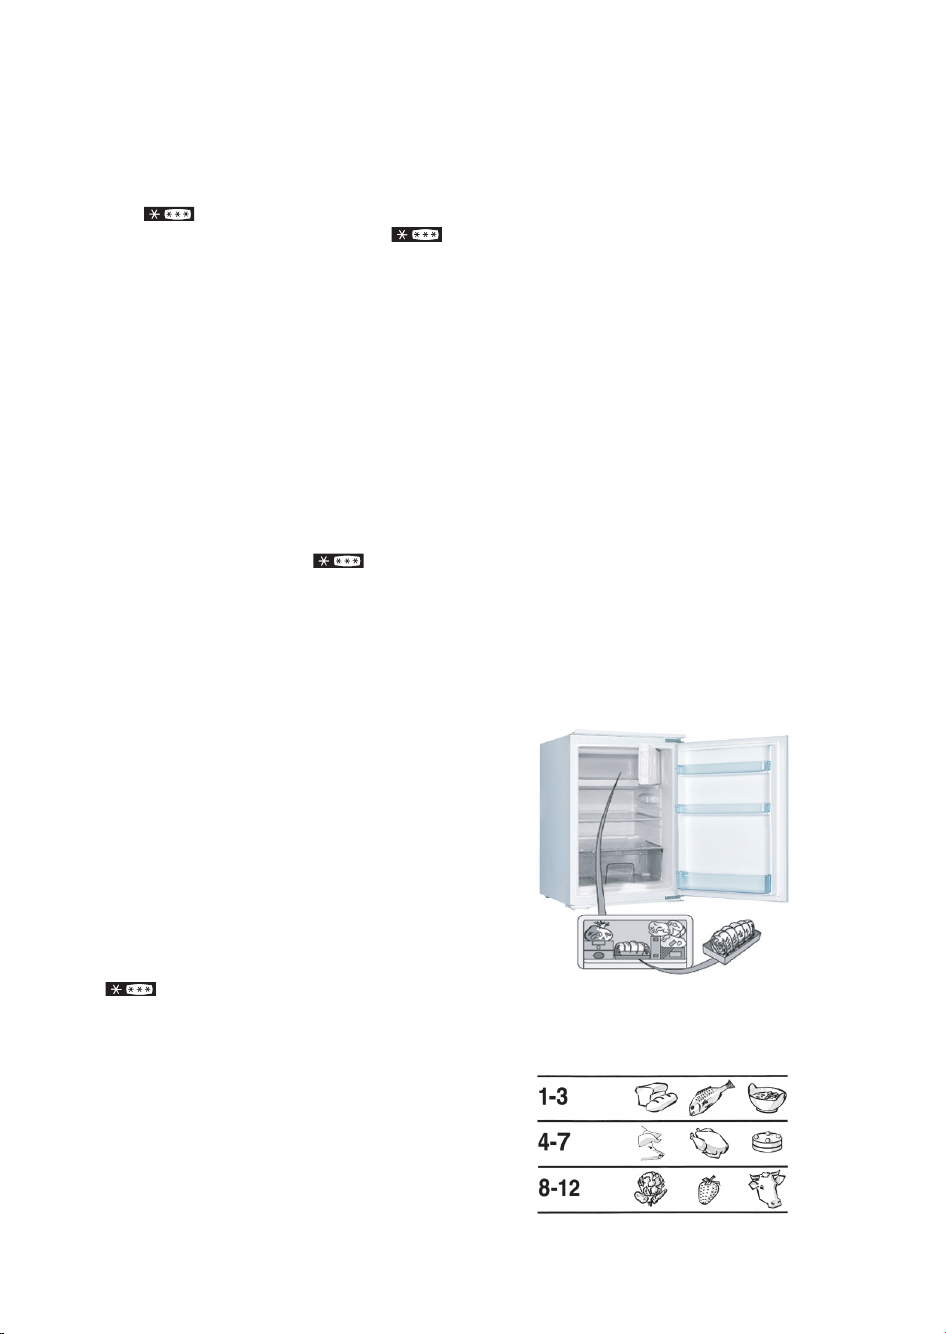
Aufbewahrung von Lebensmitteln im Kühlschrank
Lagern Sie die Lebensmittel laut Abbildung ein:
A Fisch, Fleisch
B Gegarte, gekochte Speisen
C Obst und Gemüse
D Flaschen
EKäse
Hinweise:
• Der Abstand zwischen den Abstellflächen und der
Innenrückwand gewährleistet eine freie
Luftzirkulation.
• Lagern Sie die Lebensmittel so, dass sie nicht mit
der Rückwand des Kühlraums in Berührung
kommen.
• Lagern Sie keine warmen Speisen im Kühlraum ein.
• Bewahren Sie Flüssigkeiten in geschlossenen
Behältern auf.
Wichtig:
Die Aufbewahrung von Gemüse mit hohem
Wassergehalt kann zur Bildung von
Kondenswasser auf der Glasplatte des Obstund
Gemüsefachs führen: dies beeinträchtigt den
korrekten Betrieb des Geräts nicht.
SO BEDIENEN SIE IHR GERÄT RICHTIG
DER KÜHLRAUM
Die Form des Thermostatgehäuses hängt von der
Marke ab
Page 7

7
Das Tiefkühlfach ist
.
Das Tiefkühlfacht kann auch zum
Einfrieren frischer Lebensmittel verwendet
werden. Die Menge frischer Lebensmittel, die
innerhalb von 24 Stunden eingefroren werden
kann, ist auf dem Typenschild angegeben.
Hinweis:
Auch bei Stromausfall behält das Gefrierfach die zur
Aufbewahrung der Lebensmittel erforderliche
Temperatur aufrecht. Während dieser Zeit sollte
die Tür des Fachs allerdings nicht geöffnet werden.
Einfrieren frischer Lebensmittel (nur in mit
markierten Fächern )
Wichtig:
• Packen und versiegeln Sie frische Lebensmittel
vor dem Einfrieren in Aluminium- oder
Klarsichtfolie, wasserdichte Kunststoffbeutel,
Polyäthylenbehälter mit Deckel oder zum
Einfrieren frischer Lebensmittel geeignete
Tiefkühlbehälter.
• Legen Sie die einzufrierenden Lebensmittel in
das obere Fach und lassen Sie um die Päckchen
ausreichend Platz für die freie Luftzirkulation.
• Stellen Sie zur Beschleunigung des
Gefriervorgangs den Thermostatknopf vor dem
Einführen der Lebensmittel um eine halbe
Raststellung nach unten.
• Nach 24 Stunden ist der Gefriervorgang
beendet.
Für Geräte mit -Sterne Gefrierfach
Die maximale Aufbewahrungsdauer für
eingefrorene frische Lebensmittel kann der
nebenstehenden Tabelle entnommen werden.
Achten Sie bitte beim Einkaufen von
Tiefkühlware auf Folgendes:
• Die Verpackung darf nicht beschädigt sein (da
sonst der Inhalt leicht ungenießbar werden
könnte). Wenn die Verpackung aufgebläht ist
oder feuchte Flecken aufweist, wurde das
Produkt nicht optimal gelagert und der Inhalt
könnte angetaut sein.
• Legen sie beim Einkaufen die Tiefkühlware erst
am Ende des Einkaufs in den Einkaufswagen und
transportieren Sie sie stets in einer Kühltasche.
• Legen Sie die Tiefkühlware zu Hause sofort in
das Gefrierfach.
• Frieren Sie teilweise angetaute Tiefkühlware
nicht erneut ein. Verbrauchen Sie diese
innerhalb von 24 Stunden.
• Vermeiden Sie Temperaturschwankungen oder
reduzieren Sie diese auf ein Minimum. Beachten
Sie das auf der Verpackung angegebene
Haltbarkeitsdatum.
• Befolgen Sie für die Konservierung von
Tiefkühlware stets die Anweisungen auf der
Verpackung.
Stellen Sie Eiswürfel her, falls eine
Eiswürfelschale vorhanden ist
• Füllen Sie dazu die Eiswürfelschale zu 2/3 mit
Wasser und stellen Sie diese in das Gefrierfach.
• Falls die Schale auf dem Boden fest friert, dürfen
zum Lösen keine spitzen oder scharfen
Gegenstände verwendet werden.
• Biegen Sie zur leichteren Entnahme der
Eiswürfel aus der Schale diese leicht.
SO BENUTZEN SIE DAS
TIEFKÜHLFACH
(falls vorhanden)
MONATE LEBENSMITTEL
Page 8

8
Ziehen Sie vor jeder Reinigungs- und
Wartungsarbeit den Netzstecker des Geräts
oder schalten Sie die Stromversorgung ab.
Das Abtauen des Kühlraums erfolgt
vollautomatisch.
Die von Zeit zu Zeit an der Innenrückwand des
Kühlraums auftretenden Wassertropfen zeigen an,
dass die automatische Abtauphase aktiv ist.
Das Tauwasser wird automatisch in eine
Abflussöffnung geleitet und anschließend in einem
Behälter gesammelt, wo es verdampft.
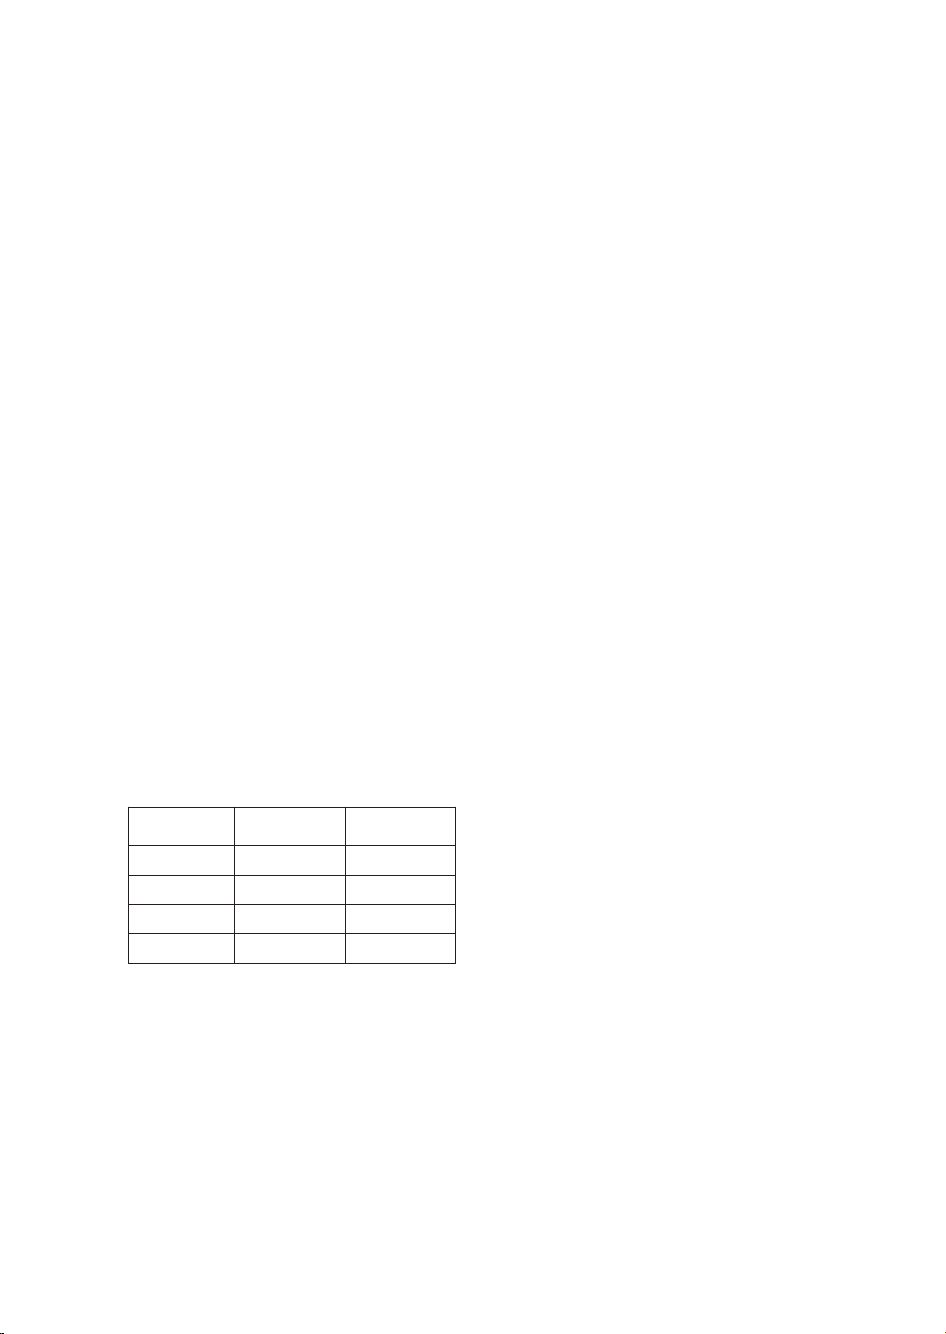
Reinigen Sie die Innenseite der Wasserablauföffnung
regelmäßig, um den konstanten und korrekten Fluss
des Tauwassers zu gewährleisten.
Abtauen des Gefrierfachs Das Gefrierfach
sollte ein- oder zweimal jährlich oder bei
Erreichen einer übermäßig dicken Reifschicht
auf den Wänden abgetaut werden.
Diese Reifbildung ist vollkommen normal. Die
Menge und Schnelligkeit der Reifbildung
hängen von den Umgebungsbedingungen und
der Häufigkeit der Türöffnungen ab.
Reifbildung besonders im oberen Teil des
Fachs ist möglich und bedeutet nicht, dass das
Gerät nicht richtig funktioniert.
Das Abtauen sollte dann vorgenommen
werden, wenn sehr wenig Tiefkühlgut
eingelagert ist.
• Öffnen Sie die Tür, entnehmen Sie alle
Lebensmittel und wickeln Sie sie eng aneinander
in Zeitungspapier. Bewahren Sie sie an einem
kühlen Ort oder in einer Kühltasche auf.
• Lassen Sie die Tür offen, damit der Reif abtauen
kann.
• Reinigen Sie den Innenraum mit einem
Schwamm und einer Lösung aus
lauwarmem Wasser und/oder
Neutralreiniger. Verwenden Sie keine
Scheuermittel.
• Spülen Sie nach und trocknen Sie sorgfältig ab.
• Lagern Sie die Lebensmittel wieder in das
Gefrierfach ein.
• Schließen Sie die Gerätetür.
• Stecken Sie den Netzstecker wieder ein.
• Schalten Sie das Gerät ein.
SO TAUEN SIE IHR GERÄT RICHTIG AB SO
REINIGEN SIE IHREN KÜHLSCHRANK RICHTIG
Page 9
9
• Reinigen Sie die Luftaustrittsöffnungen und den
Kondensator an der Geräterückseite regelmäßig
mit einem Staubsauger oder einer Bürste.
• Reinigen Sie die Außenwände mit einem
weichen Tuch.
Bei längerer Abwesenheit
1. Entleeren Sie den Kühlschrank vollständig.
2. Trennen Sie das Gerät von der
Stromversorgung.
3. Tauen Sie die Innenräume ab und reinigen Sie
diese.
4. Lassen Sie bei abgeschaltetem Kühlschrank die
Tür offen, um Schimmelbildung, unangenehme
Gerüche oder Oxydation zu vermeiden.
5. Reinigen Sie das Gerät.
• Reinigen Sie während des Abtauvorgangs das
Innere des Tiefkühlfachs (sofern vorhanden).
• Reinigen Sie den Kühlraum regelmäßig mit
einem Schwamm und einer Lösung aus
lauwarmem Wasser und/oder Neutralreiniger.
Spülen Sie nach und reiben Sie mit einem
weichen Tuch trocken. Verwenden Sie keine
Scheuermittel.
• Reinigen Sie die Außenseiten des Geräts mit
einem weichen, mit Wasser angefeuchteten
Tuch. Benutzen Sie weder Scheuerpaste noch schwämmchen oder Fleckenentferner (z.B.
Azeton, Trichloräthylen) oder Essig.
Lampenwechsel:
Gehen Sie zum Lampenwechsel folgendermaßen
vor:
• Ziehen Sie den Netzstecker aus der Steckdose.
• Drücken Sie auf die Zungen seitlich an der
Lampenhalterung und nehmen Sie diese ab.
• Ersetzen Sie die Lampe durch eine neue mit
einer Wattstärke von max. 10W.
• Setzen Sie die Lampenhalterung wieder auf und
warten Sie 5 Minuten, bevor Sie das Gerät
wieder an das Stromnetz anschließen.
REINIGUNG UND PFLEGE
Page 10

10
1. Das Gerät funktioniert nicht.
• Gibt es einen Stromausfall?
• Ist der Netzstecker richtig angeschlossen?
• Ist der Zweipolschalter eingeschaltet?
• Ist die Sicherung durchgebrannt?
• Ist das Netzkabel beschädigt?
• Steht der Thermostat auf Position
•
(Stop)?
2. Die Temperatur in den Geräteräumen ist
nicht kalt genug.
• Wurde die Tür korrekt geschlossen?
• Blockieren eingelagerte Lebensmittel das
Schließen der Tür?
• Ist das Gerät in der Nähe einer Wärmequelle
aufgestellt?
• Ist der Thermostat richtig eingestellt?
• Wird die Luftzirkulation behindert?
3. Die Temperatur im Kühlraum ist zu tief.
• Ist der Thermostat richtig eingestellt?
4. Das Gerät läuft zu laut.
• Wurde das Gerät fachgerecht installiert?
• Berühren sich die Leitungen an der
Geräterückseite oder vibrieren sie?
5. Wasser steht auf dem Boden des
Kühlraums.
• Ist der Tauwasserabfluss verstopft?
6. Übermäßige Reifbildung im Tiefkühlfach
• Wurde die Tür korrekt geschlossen?
• Blockieren eingelagerte Lebensmittel das
Schließen der Tür?
Hinweise:
• Gluckergeräusche und leichtes Zischen des
Kältekreises sind durchaus normal.
STÖRUNG – WAS TUN?
Vor dem Verständigen des Kundendienstes:
1. Prüfen Sie zuerst, ob Sie die Störung selbst
beheben können (Siehe “Erst einmal selbst
prüfen”).
2. Schalten Sie das Gerät nochmals ein, um zu
prüfen, ob die Störung immer noch vorliegt.
Wenn Sie keinen Erfolg hatten, schalten Sie das
Gerät aus, ziehen Sie den Stecker aus der
Steckdose und wiederholen Sie den Versuch
nach einer Stunde.
3. Bleibt das Ergebnis negativ, benachrichtigen Sie
den Kundendienst.
Machen Sie dabei bitte folgende Angaben:
• die Art der Störung,
• das Gerätemodell,
• die Servicenummer (die Ziffer hinter dem Wort
“Service” auf dem Typenschild im Geräteinnern),
• Ihre vollständige Anschrift,
• Ihre Telefonnummer mit Vorwahl.
Hinweis:
Der Anschlag der Tür kann geändert werden.
Sollte der Kundendienst den
Türanschlagwechsel durchführen, fällt dies
nicht unter die Garantieleistung.
KUNDENDIENST
Page 11
11
• Stellen Sie das Gerät nicht neben einer
Wärmequelle auf. Installationen in warmen
Räumen, in der Nähe von Wärmequellen
(Heizungen, Öfen, Herden) oder die direkte
Sonnenlichteinstrahlung erhöhen den
Stromverbrauch und sollten deshalb vermieden
werden.
• Falls dies nicht möglich ist, müssen folgende
Mindestabstände eingehalten werden:
• 30 cm von Kohle- oder Ölöfen;
• 3 cm von Elektro- und/oder Gasherden.
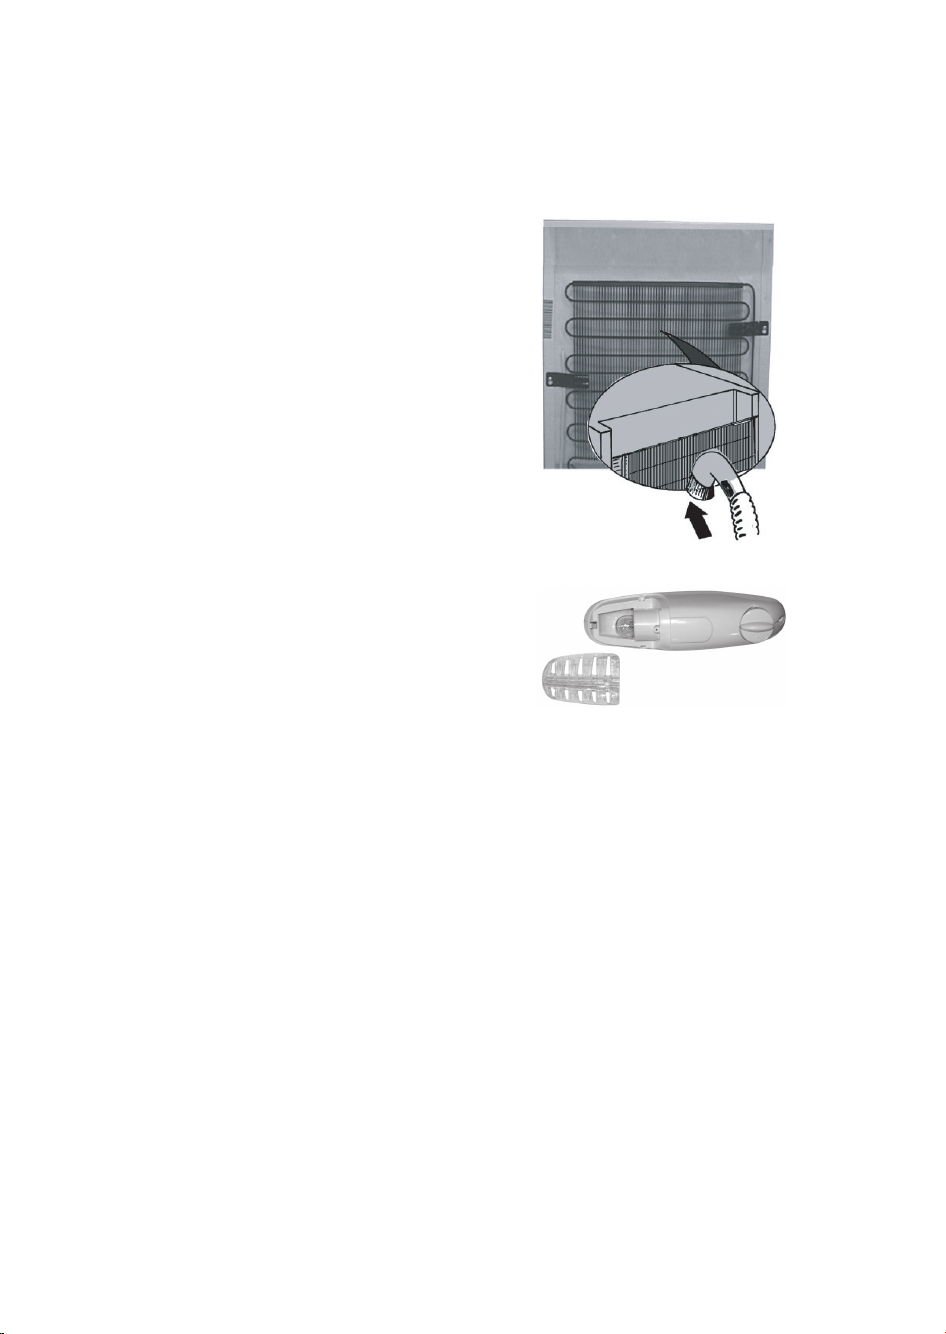
• Dieses Gerät ist für ein Einbaugerät. Montieren
Sie das Gerät auf der Basis der erforderlichen
Abmessungen (siehe Abbildung) in die
Küchenmöbel.
• Reinigen Sie den Innenraum.
• Setzen Sie das Zubehör ein.
Anschluss an das Stromnetz
• Die elektrischen Anschlüsse müssen in
Übereinstimmung mit den jeweils geltenden
örtlichen Verordnungen erfolgen.
• Die Daten zu Spannung und Leistungsaufnahme
können dem Typenschild im Geräteinnern
entnommen werden.
• Die Erdung des Geräts ist gesetzlich
vorgeschrieben. Der Hersteller haftet nicht für
eventuelle Schäden an Personen oder Sachen,
die infolge Nichtbeachtung dieser Vorschriften
entstehen.
• Falls Stecker und Steckdose nicht vom selben
Typ sind, lassen Sie die Steckdose von einem
qualifizierten Elektriker auswechseln.
• Verwenden Sie keine Verlängerungskabel oder
Mehrfachadapter.
Elektrische Abschaltung des Geräts
Die elektrische Abschaltung des Geräts muss durch
Ziehen des Netzsteckers oder durch einen der
Steckdose vorgeschalteten Zweipolschalter möglich
sein.
INSTALLATION
Page 12

12
Türanschlagwechsel
Türanschlagwechsel
Bei diesem Kühlschrank kann die Tür von rechts
oder von links geöffnet werden.
Werkseitig ist die Tür so angeschlagen, dass sie von
links geöffnet wird.
Gehen Sie für einen Türanschlagwechsel gemäß den
folgenden Anweisungen vor.
Hinweis: Ziehen Sie vor dem Beginn des
Türanschlagwechsels den Netzstecker oder
unterbrechen Sie die Stromversorgung zum Gerät.
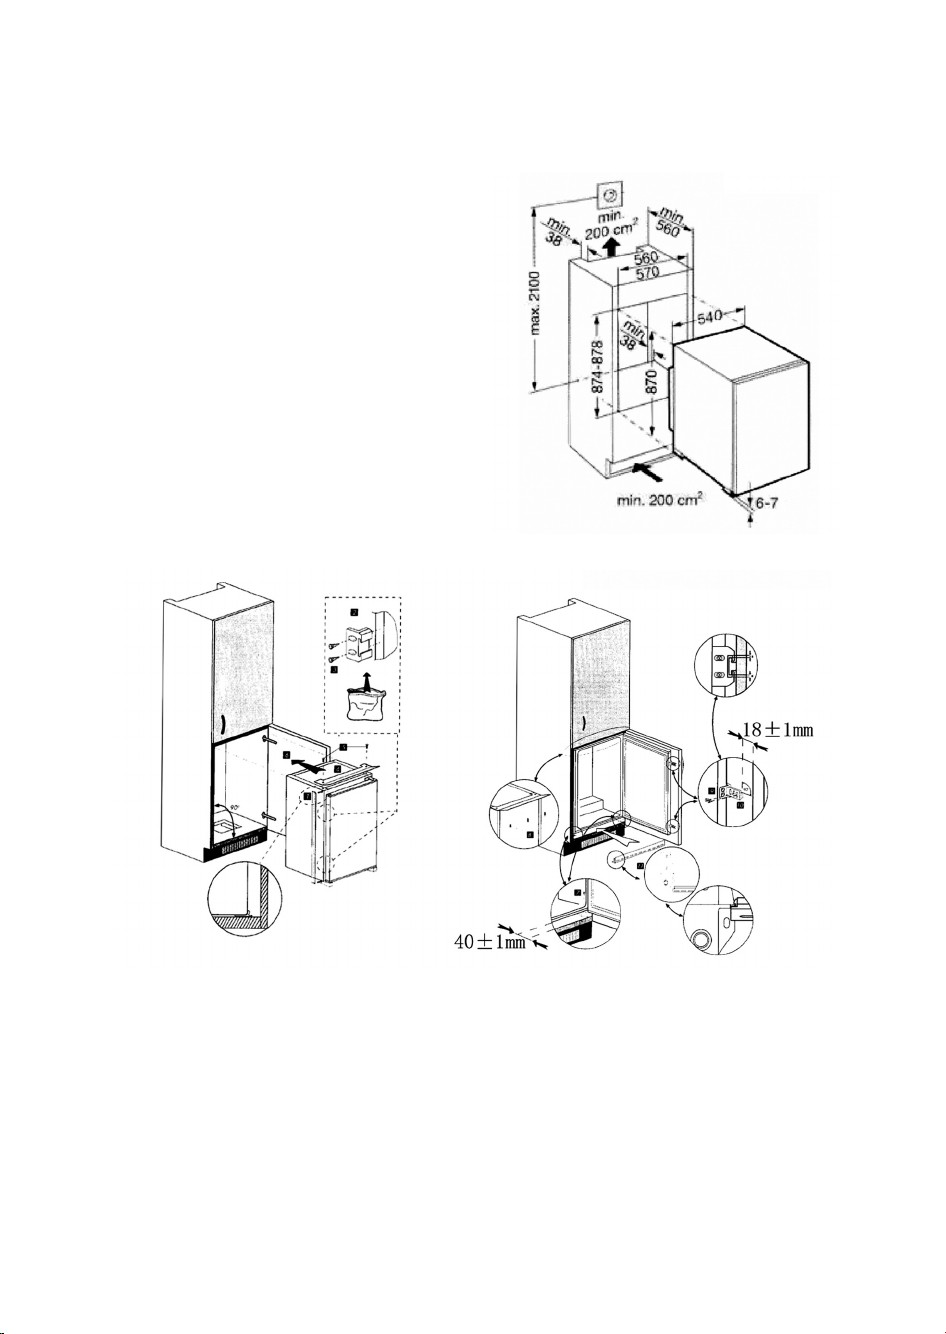
1. Lösen Sie die zwei Schrauben (1) und drücken
Sie dabei das obere (rechtsseitige) Scharnier (2)
an den Rahmen. Nehmen Sie das Scharnier (2)
ab.
2. Heben Sie die Tür vom Zapfen des unteren
Scharnier ab und legen Sie es auf einer weichen
Unterlage ab.
3. Lösen Sie die zwei Schrauben (3) und halten Sie
dabei das untere Scharnier (4) fest. Nehmen Sie
das Scharnier (4) ab.
4. Kehren Sie den Anschlag des Scharniers (2) um.
Montieren Sie das Scharnier (2) auf der unteren
linken Seite mit den zwei Schrauben (1).
5. Schieben Sie die Tür auf den Zapfen des unteren
Scharniers (2).
6. Halten Sie die Tür in geschlossener Position fest
und montieren Sie das obere Scharnier (4) mit
den zwei Schrauben (3) auf der linken Seite.
Ziehen Sie die Schrauben (1) erst dann fest,
wenn die Tür korrekt mit der oberen
Arbeitsplatte fluchtet.
Linksseitige Türöffnung Abb. 1
Rechtsseitige Türöffnung Abb. 2
2
1
3
3
4
2
4
1
Page 13

13
Anschlagwechsel der
Gefrierfachklappe
1. Entfernen Sie die zwei Kunststoffschrauben (1)
auf der linken Seite.
2. Entfernen Sie die beiden Schraubenabdeckungen
(2) und den Türhaken (3).
3. Schrauben Sie die Tiefkühlfachklappe (4) ab und
entfernen Sie diese.
Drehen Sie die Klappe um und montieren Sie sie
auf der linken Seite.
4. Drehen Sie den Türhaken (3) um, montieren Sie
ihn auf der rechten Seite, und setzen Sie die
zwei Schraubenabdeckungen (2) wieder ein.
5. Setzen Sie danach die zwei Kunststoffschrauben
(1) auf der rechten Seite ein.
VOR DEM TÜRANSCHLAGWECHSEL
NACH DEM TÜRANSCHLAGWECHSEL
Page 14
14
• This appliance is intended to be used in
household and similar applications such as
- staff kitchen areas in shops, offices and other
working environments;
- farm houses and by clients in hotels, motels
and other residential type environments;
- bed and breakfast type environments;
To ensure best use of your appliance, carefully
read the operating instructions which contain
a description of the product and useful advice.
Keep these instructions for future reference.
1. After unpacking the appliance, make sure it is
not damaged and that the door closes properly.
Any damage must be reported to the dealer
within 24 hours of delivery of the appliance.
2. Wait at least two hours before switching the
appliance on, to ensure that the refrigerant
circuit is fully efficient.
3. Installation and the electrical connection must
be carried out by a qualified technician
according to the manufacturer's instructions and
in compliance with the local safety regulations.
4. Clean the inside of the appliance before using it.
BEFORE USING THE APPLIANCE
1. Packing
The packing material is 100% recyclable and bears
the recycling symbol. For disposal, comply with the
local regulations. Keep the packing materials (plastic
bags, polystyrene parts, etc.) out of the reach of
children, as they are a potential source of danger.
2. Scrapping/Disposal
The appliance is manufactured using recyclable
material.
This appliance is marked in compliance with
European Directive 2002/96/EC on Waste Electrical
and Electronic Equipment (WEEE). By ensuring the
correct disposal of this appliance, you can help
prevent potentially negative consequences for the
environment and the health of persons.
The symbol on the appliance, or on the
accompanying documents, indicates that this
appliance should not be treated as domestic waste
but must be taken to a special collection centre for
the recycling of electrical and electronic equipment.
When scrapping the appliance, make it unusable by
cutting off the power cable and removing the doors
and shelves so that children cannot easily climb
inside and become trapped.
Scrap the appliance in compliance with local
regulations on waste disposal, taking it to a special
collection centre; do not leave the appliance
unattended even for a few days, since it is a
potential source of danger for children.
For further information on the treatment, recovery
and recycling of this product, contact your
competent local office, the household waste
collection service or the shop where you purchased
the appliance.
Information:
This appliance does not contain CFCs. The
refrigerant circuit contains R134a (HFC) or R600a
(HC) (see the rating plate inside the appliance).
Appliances with Isobutane (R600a): isobutane is a
natural gas without environmental impact, but is
flammable. Therefore, make sure the refrigerant
circuit pipes are not damaged.
This product may contain Fluorinated Greenhouse
Gases covered by the Kyoto Protocol; the
refrigerant gas is inside a hermetically sealed
system.
Refrigerant gas: R134a has a Global Warming
Potential of (GWP) 1300.
Declaration of conformity
• This appliance has been designed for preserving
food and is manufactured in compliance with
Regulation (CE) No. 1935/2004.
• This appliance has been designed, manufactured
and marketed in compliance with:
- safety objectives of the "Low Voltage"
Directive 2006/95/CE (which replaces
73/23/CEE and subsequent amendments);
- the protection requirements of Directive
"EMC" 2004/108/EC.
Electrical safety of the appliance can only be
guaranteed if it is correctly connected to an
approved earthing system.
SAFEGUARDING THE ENVIRONMENT
Page 15

15
INSTALLATION
• The appliance must be handled and installed by
two or more persons.
• Be careful not to damage the floors (e.g.
parquet) when moving the appliance.
• During installation, make sure the appliance
does not damage the power cable.
• Make sure the appliance is not near a heat
source.
• To guarantee adequate ventilation, leave a space
on both sides and above the appliance. The
distance between the rear of the appliance and
the wall behind the appliance should be 50mm.
A reduction of this space will increase the
Energy consumption of product.
• Keep the appliance ventilation openings free.
• Do not damage the appliance refrigerant circuit
pipes.
• Install and level the appliance on a floor strong
enough to take its weight and in a place suitable
for its size and use.
• Install the appliance in a dry and well-ventilated
place. The appliance is arranged for operation in
places where the temperature comes within the
following ranges, according to the climatic class
given on the rating plate. The appliance may not
work properly if it is left for a long time at a
temperature outside the specified range.
• Make sure the voltage specified on the rating
plate corresponds to that of your home.
• Do not use single/multi adapters or extension
cords.
• For the water connection, use the pipe supplied
with the new appliance; do not reuse that of the
previous appliance.
• Power cable modification or replacement must
only be carried out by qualified personnel or by
After-sales Service.
• It must be possible to disconnect the appliance
from the power supply by unplugging it or by
means of a mains two-pole switch installed
upstream of the socket.
SAFETY
• Do not store explosive substances such as
aerosol cans with a flammable propellant in this
appliance.
• Do not store or use petrol, flammable liquids or
gas in the vicinity of this or other electrical
appliances. The fumes can cause fires or
explosions.
• Do not use mechanical, electric or chemical
means other than those recommended by the
Manufacturer to speed up the defrost process.
• Do not use or place electrical devices inside the
appliance compartments if they are not of the
type expressly authorised by the Manufacturer.
• This appliance is not intended for use by persons
(including children) with reduced physical,
sensory or mental capabilities, or lack of
experience and knowledge, unless they have
been given supervision or instruction concerning
use of the appliance by a person responsible for
their safety.
• To avoid the risk of children becoming trapped
and suffocating, do not allow them to play or
hide inside the appliance.
• Do not swallow the contents (non-toxic) of the
ice packs (in some models).
• Do not eat ice cubes or ice lollies immediately
after taking them out of the freezer since they
may cause cold burns.
USE
• Before carrying out any maintenance or cleaning
operation, unplug the appliance or disconnect it
from the power supply.
• All appliances equipped with an automatic icemaker and water dispenser must be connected
to a water supply that only delivers drinking
water (with mains water pressure of between
0.17 and 0.81 Mpa (1.7 and 8.1 bar)). Automatic
ice-makers and/or water dispensers not directly
connected to the water supply must be filled
with drinking water only.
• Use the refrigerator compartment only for
storing fresh food and the freezer compartment
only for storing frozen food, freezing fresh food
and making ice cubes.
• Do not store glass containers with liquids in the
freezer compartment since they may break.
• Avoid storing unwrapped food in direct contact
with internal surfaces of the refrigerator or
freezer compartments.
The Manufacturer declines any liability if the
above advice and precautions are not
respected.
Climatic
Class
Amb. T. (°C) Amb. T. (°F)
SN From 10 to 32 From 50 to 90
N From 16 to 32 From 61 to 90
ST From 16 to 38 From 61 to 100
T From 16 to 43 From 61 to 110
PRECAUTIONS AND GENERAL
RECOMMENDATIONS
Page 16

16
Notes:
• Do not block the air outlet area (on the back
wall) with food products
• If the freezer is provided with a flap, it is
possible to maximize the storage volume by
removing the flap (by bending it).
• All shelves, flaps and pull-out baskets are
removable.
• The internal temperatures of the appliance may
be affected by the ambient temperature,
frequency of door opening, as well as location of
the appliance. Temperature setting should take
into consideration these factors.
• Unless otherwise specified the appliance
accessories are not dishwasher safe.
• The bigger distance at the backside of appliance
to the wall, the higher is energy-saving.
Switching on the appliance
Starting up the appliance
The appliance features internal controls.
Plug in the appliance.
When the appliance is connected to the mains, the
inside light switches on each time the door is
opened. The thermostat, located inside the
refrigerator compartment, is used to adjust the
temperature of both the refrigerator compartment
and low temperature compartment (if fitted).
Appliance temperature adjustment:
Temperature setting:
The thermostat is used to automatically adjust the
internal temperature of the refrigerator
compartment and the compartment (if
provided).
The thermostat knob can be turned from position1
to 7 (coldest setting) to make the internal
temperature colder.
When set to 0 the appliance is switched off.
To store food for a short period of time, set the
thermostat between 1 (Min) and 3 (Med).
- To store food for long periods of time in the
compartment, set the thermostat to 3
or 4.
Note:
The ambient air temperature, frequency of door
opening and the position of the appliance can affect
internal temperatures. These factors must be taken
into account when setting the thermostat.
How to use the refrigerator compartment
Position the food as shown in the figure.
A Fish, meat
B Cooked food
C Fruit and vegetables
D Bottles
E Cheese
Notes:
• The space between the shelves and the rear
wall of the refrigerator compartment must be
unobstructed to allow circulation of air.
• Do not place food in direct contact with the
rear wall of the refrigerator compartment.
• Do not place hot food in the refrigerator.
• Store liquids in closed containers.
Important
Storing vegetables with high water content
can cause condensation to form on the glass
shelf of the crisper drawer: this will not affect
the correct operation of the appliance.
HOW TO OPERATE
THE REFRIGERATOR COMPARTMENT
Thermostat box shape depending from brand
Page 17
17
The low temperature compartment is
.
The low temperature compartment
can also be used to freeze fresh food.
The quantity of fresh food that can be frozen
in 24 hours is shown on the rating plate.
Note:
In the event of a power cut, the low temperature
compartment will maintain a sufficiently low
temperature for food storage. However, it is
advisable to avoid opening the compartment door
during such periods.
Freezing fresh food (only in compartments
marked )
Important
• Before freezing, wrap and seal fresh food in:
aluminium foil, cling film, air and water-tight
plastic bags, polythene containers with lids or
freezer containers suitable for freezing fresh
food.
• Arrange the fresh food in the top compartment,
leaving sufficient space around each pack for the
air to circulate.
• For optimum freezing, turn the thermostat
down by half a point when placing fresh foods in
the freezer compartment.
• The food will be completely frozen in 24 hours.
For appliances with compartments marked
The table alongside shows the recommended
maximum storage time for frozen fresh foods.
When purchasing frozen food products:
• ensure that the packaging is not damaged
(frozen food in damaged packaging may have
deteriorated). If the package is swollen or has
damp patches, it may not have been stored
under optimal conditions and defrosting may
have already begun.
• When shopping, leave frozen food purchases
until last and transport the products in a
thermally insulated cool bag.
• Place the items in the low temperature
compartment as soon as you get home.
• If food has defrosted even partially, do not refreeze it. Consume within 24 hours.
• Avoid, or reduce temperature variations to the
minimum. Respect the best-before date on the
package.
• Always observe the storage information on the
package.
Making ice cubes if ice tray available
• Fill the ice cube tray 2/3 full and place it in the
low temperature compartment
• Do not use sharp or pointed instruments to
detach the tray if it is stuck to the low
temperature compartment bottom.
• Bend the ice tray slightly to remove the cubes.
HOW TO OPERATE THE LOW
TEMPERATURE COMPARTMENT
(if available)
MONTHS FOOD
Page 18

18
Before any cleaning or maintenance
operation, unplug the appliance from the
mains or disconnect the electrical power
supply.
Defrosting of the refrigerator compartment is
completely automatic.
Droplets of water on the rear wall of the
refrigerator compartment indicate that the periodic
automatic defrost cycle is in progress.
The defrost water is automatically routed to a drain
outlet and into a container from which it
evaporates.
Regularly clean the inside of the defrost water drain
hole in order to guarantee the constant and correct
flow of defrost water.
Defrosting the low temperature compartment
Defrost the low temperature compartment
once or twice a year or when the ice
formation is excessive.
It is perfectly normal for ice to form. The
amount of ice which forms and the rate at
which it accumulates will depends on room
temperature and humidity, and on the
frequency with which the door is opened. Ice
formation is concentrated at the top of the
compartment and does not affect the
efficiency of the appliance.
If possible, defrost the freezer when it is
nearly empty.
• Remove the food from the freezer, wrap in
newspaper and group together in a cool place or
in a portable cooler.
• Leave the door open to allow the frost to melt.
• Clean the interior with a sponge soaked in
warm water and/ or neutral detergent. Do
not use abrasive substances.
• Rinse the interior and dry thoroughly.
• Put the food back into the freezer.
• Close the door.
• Plug in the appliance once again.
• Switch the appliance on.
HOW TO DEFROST
AND CLEAN THE REFRIGERATOR
Page 19

19
• Periodically clean air vents and the condenser at
the rear of the appliance with a vacuum cleaner
or a brush.
• Clean the outside using a soft cloth.
Prolonged disuse
1. Empty the refrigerator.
2. Disconnect the appliance from the power
supply.
3. Defrost and clean the interior.
4. In the event of prolonged disuse, leave the door
open to prevent the formation of mould, odours
and oxidation.
5. Clean the appliance.
• Clean the inside of the low temperature
compartment (where fitted) when defrosting.
• Periodically clean the inside of the refrigerator
compartment with a sponge dampened in warm
water and/or neutral detergent. Rinse and dry
with a soft cloth. Do not use abrasive products.
• Clean the outside with a soft damp cloth.
Do not use abrasive products, scourers, stainremovers (e.g. acetone, trichloroethylene) or
vinegar.
Replacing bulbs:
When replacing the bulb, proceed as follows:
• Unplug the appliance from the mains
• Squeeze the tabs on the sides of the lamp cover
and remove it.
• Replace the bulb with a new one, maximum
10W.
• Put the lamp cover back on and wait 5 minutes
before plugging the appliance back into the
mains.
CARE AND MAINTENANCE
Page 20
20
1. The appliance is not working.
•Is there a power failure?
•Is the plug properly inserted in the socket?
•Is the double-pole switch on?
•Has the fuse blown?
•Is the power cord damaged?
•Is the thermostat set to
•
(Stop)?
2. Temperature inside the compartments is
not low enough.
•Is the door shut properly?
•Is food obstructing proper door closure?
•Is the appliance installed near a heat source?
•Is the thermostat setting correct?
•Are the air circulation vents blocked?
3. Temperature inside the refrigerator
compartment is too low.
•Is the thermostat setting correct?
4. The appliance is excessively noisy.
•Has the appliance been installed correctly?
•Are the pipes at the back touching or vibrating?
5. Water collects at the bottom of the
refrigerator compartment.
•Is the defrost water drain blocked?
6. Excessive frost build-up in the low
temperature compartment.
•Is the door shut properly?
•Is food obstructing proper door closure?
Notes:
• Gurgling and hissing noises due to
expansion in the refrigerant circuit are
normal.
TROUBLESHOOTING GUIDE
Before contacting After-Sales Service:
1. See if you can solve the problem yourself with
the help of the “Troubleshooting guide”).
2. Switch the appliance on again to see if the
problem has been solved. If it has not,
disconnect the appliance from the power supply
and wait for about an hour before switching on
again.
3. If the problem persists after this course of
action, contact After-sales Service.
Specify:
• the nature of the problem
• the model
• the Service number (the number after the word
SERVICE on the rating plate on the inside of the
appliance)
• your full address
• your telephone number and area code.
Note:
The direction of door opening can be changed.
If this operation is performed by After-sales
Service it is not covered by the warranty.
AFTER-SALES SERVICE
Page 21

21
• Install the appliance away from heat sources.
Installation in a hot environment, direct
exposure to the sun or installation near heat
sources (heaters, radiators, cookers) will
increase power consumption and should
therefore be avoided.
• If this is not possible, the following minimum
distances must be respected:
• 30 cm from coal or paraffin stoves;
• 3 cm from electric and/or gas stoves.
• The appliance is designed for built-in. Install the
appliance into the kitchen units basing on the
required dimensions (see figure).
• Clean the interior.
• Fit the accessories.
Electrical connection
• Electrical connections must be made in
accordance with local regulations.
• Voltage and power consumption are indicated
on the rating plate inside the appliance.
• Regulations require that the appliance is earthed.
The Manufacturer declines all liabilities for injury
to persons or animals or damage to property
resulting from failure to observe these
regulations.
• If the plug and socket are not of the same type,
have the socket replaced by a qualified
electrician.
• Do not use extension leads or adapters.
Disconnecting the appliance
It must be possible to disconnect the appliance by
unplugging it or by means of a two-pole switch
fitted upline of the socket.
INSTALLATION
Page 22

22
Door Swing Reversal
Reversing the door swing
The refrigerator has the capability of opening the
door from either the left or the right side.
The unit is delivered to you with the door opening
from the left side.
To change the opening direction, please follow
these instructions.
Note: Before reversing the door swing, unplug the
appliance from the mains or disconnect the
electrical power supply.
1. Remove the two screws (1) holding the top
hinge (2) (right side) to the frame. Remove the
hinge (2).
2. Lift the door off the bottom hinge pin and place
it on a nonscratching surface.
3. Remove the two screws (3) holding the bottom
hinge (4).
Remove the hinge (4).
4. Reverse the direction of the hinge (2).
Reassemble the hinge (2) on the bottom left
hand side using the two screws (1).
5. Lower the door onto the bottom hinge (2) pin.
6. While holding the door in the closed position,
reassemble the top hinge (4) on the left hand
side using the two screws (3). Do not tighten
the screws (1) until the top of the door is level
with the counter top.
Door opening from left side fig. 1
Door opening from right side fig. 2
2
1
3
3
4
4
1
2
Page 23

23
Reversing the Inside Compartment
Door Swing
1. Remove the two plastic screws (1) on the left
hand side.
2. Remove the two screw covers (2) and the door
catch (3).
3. Unscrew the freezer compartment door (4) and
remove it.
Reverse the door and reassemble it on the left
hand side.
4. Reverse the door catch (3), reassemble it on the
right hand side and refit the two screw covers
(2).
5. Lastly, replace the two plastic screws (1) on the
right hand side.
PRIOR TO REVERSAL
AFTER REVERSAL
Page 24
24
• L'appareil que vous avez acheté a été conçu pour
être utilisé dans un environnement domestique,
mais aussi :
- dans les zones de cuisine des lieux de travail,
magasins et/ou bureaux
- dans les fermes
- dans les hôtels, les motels, les résidences, les bed
& breakfasts à usage exclusif du client.
Pour utiliser au mieux votre appareil, nous vous
invitons à lire attentivement les instructions
relatives à son utilisation ; vous y trouverez la
description de votre appareil et des conseils
utiles pour la conservation des aliments.
Conservez cette notice d'emploi pour toute
consultation ultérieure.
1. Après avoir déballé l'appareil, assurez-vous qu'il
n'est pas endommagé et que les portes ferment
parfaitement. Tout dommage éventuel devra être
signalé au revendeur dans un délai de 24 heures.
2. Nous vous conseillons d'attendre au moins deux
heures avant de mettre l'appareil en service afin
que le circuit réfrigérant soit pleinement
performant.
3. Assurez-vous que l'installation et le branchement
électrique ont été réalisés par un technicien
qualifié, conformément aux instructions du
fabricant et aux normes locales en vigueur en
matière de sécurité.
4. Nettoyez l'intérieur de l'appareil avant de l'utiliser.
AVANT D'UTILISER L'APPAREIL
1. Emballage
L'emballage est recyclable à 100 % et porte le symbole
du recyclage. Pour son élimination, respectez la
réglementation locale en vigueur. Les matériaux
d'emballage (sachets en plastique, éléments en
polystyrène, etc.) doivent être conservés hors de
portée des enfants, car ils constituent une source
potentielle de danger.
2. Mise au rebut
L'appareil a été fabriqué avec des matériaux recyclables.
Il est certifié conforme à la Directive Européenne
2002/96/CE relative aux déchets d'équipements
électriques et électroniques (DEEE ou WEEE). En
procédant correctement à la mise au rebut de cet
appareil, vous contribuerez à éviter des conséquences
nuisibles pour l'environnement et la santé de l'homme.
Le symbole apposé sur le produit ou sur la
documentation qui l'accompagne indique que cet
appareil ne doit pas être traité comme un déchet
ménager, mais doit être remis à un centre de collecte
spécialisé dans le recyclage des appareils électriques et
électroniques. Lors de la mise au rebut de l'appareil,
rendez-le inutilisable en sectionnant le cordon
d'alimentation et en retirant les portes et les grilles, de
façon que les enfants ne puissent pas facilement
accéder à l'intérieur et s'y retrouver prisonniers.
Pour la mise au rebut, respectez les normes locales en
vigueur et remettez l'appareil à un centre de collecte
spécialisé. Ne laissez jamais l'appareil sans surveillance,
ne serait-ce que quelques jours, car il représente une
source de danger pour les enfants. Pour en savoir plus
sur le traitement, la mise au rebut et le recyclage de cet
appareil, contactez le service municipal compétent, la
déchetterie de votre ville ou le revendeur du produit.
Informations :
Cet appareil est sans CFC. Le circuit réfrigérant
contient du R134a (HFC) ou du R600a (HC). Pour en
savoir plus, consultez la plaquette signalétique située à
l'intérieur de l'appareil. Pour les appareils à isobutane
(R600a) : l'isobutane est un gaz naturel sans danger
pour l'environnement, mais inflammable. Assurez-vous
par conséquent que les tuyaux du circuit réfrigérant
sont en parfait état. Ce produit peut contenir des gaz à
effet de serre fluorés visés par le protocole de Kyoto ;
le gaz réfrigérant est contenu à l'intérieur d'un circuit
hermétique. Gaz réfrigérant : le R134a a un potentiel
de réchauffement global (GWP) de 1300.
Déclaration de conformité
• Cet appareil est destiné à la conservation de
produits alimentaires et est fabriqué conformément
à la réglementation CE N° 1935/2004.
• Cet appareil a été conçu, fabriqué et commercialisé
en conformité avec :
- les objectifs de sécurité de la directive basse
tension 2006/95/CE (remplaçant la directive
73/23/CEE et ses modifications successives) ;
- les exigences de protection de la directive CEM
2004/108/CE.
La sécurité électrique de l'appareil est
garantie uniquement lorsque ce
dernier est correctement raccordé à
une installation homologuée de mise à
la terre.
CONSEILS POUR LA PROTECTION DE
L'ENVIRONNEMENT
Page 25

25
INSTALLATION
• La manutention et l'installation de l'appareil
nécessitent la présence d'au moins deux personnes.
• Faites attention à ne pas rayer le revêtement de sol
(parquet, par exemple) lorsque vous déplacez
l'appareil.
• Au moment de l'installation, veillez à ce que l'appareil
n'écrase pas le cordon d'alimentation, sous peine de
l'endommager.
• N'installez pas l'appareil à proximité d'une source de
chaleur.
• Pour garantir une ventilation adéquate, laissez un
espace de chaque côté ainsi qu'au-dessus de l'appareil.
Il doit y avoir au moins 50 mm entre l'arrière de
l'appareil et le mur derrière lui. Une réduction de
cette distance provoquerait une augmentation de la
consommation énergétique de l'appareil.
• Veillez à ne jamais obstruer les orifices de ventilation
de l'appareil.
• N'endommagez pas les tubes du circuit de
refroidissement de l'appareil.
• Installez et mettez l'appareil de niveau sur un sol assez
solide pour supporter son poids, dans un endroit
adapté à ses dimensions et à son utilisation.
• Placez-le dans une pièce sèche bien ventilée.
L'appareil est réglé pour fonctionner dans la plage de
température suivante, en fonction de la classe
climatique indiquée sur la plaque signalétique.
L'appareil risque de ne de pas fonctionner
correctement s'il est laissé pendant une période
prolongée à une température supérieure ou
inférieure à la plage indiquée.
• Veillez à ce que la tension indiquée sur la plaque
signalétique corresponde à celle de votre habitation.
• N'utilisez ni rallonge électrique, ni adaptateur simple
ou multiple.
• Pour le raccordement hydraulique de l'appareil,
utilisez le tube fourni en série ; ne réutilisez pas celui
de votre ancien appareil.
• La modification et le remplacement du cordon
d'alimentation doivent être exclusivement confiés à un
professionnel ou au service après-vente.
• Pour mettre l'appareil hors tension, débranchez son
cordon d'alimentation ou actionnez l'interrupteur
bipolaire installé en amont de la prise.
SÉCURITÉ
• N'introduisez jamais dans l'appareil des bombes
aérosol ou des récipients contenant des gaz
propulseurs inflammables.
• N'entreposez pas et n'utilisez pas d'essence, de
liquides ou de gaz inflammables à proximité de
l'appareil ou de tout autre appareil ménager. Les
vapeurs dégagées sont susceptibles de provoquer un
incendie ou une explosion.
• N'utilisez pas de dispositifs mécaniques, électriques
ou chimiques autres de ceux préconisés par le
fabricant pour accélérer le processus de dégivrage.
• N'utilisez pas et n'introduisez pas d'appareils
électriques dans les compartiments de l'appareil s'ils
ne sont pas expressément autorisés par le fabricant.
• Les personnes (y compris les enfants) qui, en raison
de leurs capacités physiques, sensorielles ou
mentales, de leur inexpérience ou de leur
méconnaissance, ne sont pas en mesure d'utiliser
l'appareil en toute sécurité, doivent s'en servir
uniquement sous la surveillance ou avec les
instructions d'une personne responsable.
• Pour éviter tout risque d'emprisonnement et
d'étouffement, interdisez aux enfants de jouer ou de
se cacher à l'intérieur de l'appareil.
• N'avalez jamais le liquide (atoxique) circulant dans les
accumulateurs de froid (selon modèle).
• Ne mangez les glaçons ou les glaces immédiatement
après les avoir sortis du congélateur, car ils pourraient
provoquer des brûlures dues au froid.
USE
• Avant d'effectuer les opérations d'entretien ou de
nettoyage, retirez la fiche de la prise de courant ou
coupez l'alimentation générale.
• Tous les appareils équipés de distributeurs
automatiques de glaçons et d'eau doivent être
raccordés à une arrivée d'eau potable uniquement
[avec une pression réseau comprise entre 0,17 et
0,81 Mpa (1,7 et 8,1 bar)]. Les distributeurs
automatiques de glaçons et/ou d'eau non directement
raccordés à une arrivée d'eau doivent être alimentés
avec de d'eau potable uniquement.
• N'utilisez le compartiment réfrigérateur que pour la
conservation d'aliments frais et le compartiment
congélateur que pour les produits surgelés, la
congélation d'aliments frais et la production de
glaçons.
• N'introduisez pas de récipients en verre contenant
des liquides dans le congélateur, car ils risqueraient de
se rompre.
• Évitez de mettre des aliments non emballés
directement en contact avec les surfaces intérieures
du compartiment réfrigérateur ou du compartiment
congélateur.
Le fabricant décline toute responsabilité pour tout
dommage résultant du non-respect des consignes
et conseils ci-avant.
Classe
climatique
T. amb. (°C) T. amb. (°F)
SN De 10 à 32 De 50 à 90
N De 16 à 32 De 61 à 90
ST De 16 à 38 De 61 à 100
T De 16 à 43 De 61 à 110
PRÉCAUTIONS ET RECOMMANDATIONS
GÉNÉRALES
Page 26

26
Remarques :
• N'obstruez pas la zone de sortie d'air (sur la paroi
arrière) avec des produits alimentaires.
• Si le congélateur est doté d'un compartiment à
abattant, le volume de stockage peut être optimisé via
le retrait de l'abattant (pour ce faire, fléchissez-le).
• Les étagères, les abattants et les bacs coulissants sont
tous amovibles.
• Les températures à l'intérieur de l'appareil peuvent
être affectées par la température ambiante, la
fréquence d'ouverture des portes et le lieu
d'installation de l'appareil. Le réglage de température
doit toujours prendre ces facteurs en compte.
• Sauf indication contraire, les accessoires de l'appareil
ne sont pas lavables au lave-vaisselle.
• Plus la distance entre l'arrière de l'appareil et le mur
est grande, plus les économies d'énergie sont
importantes.
Mise en service de l’appareil
Mise en marche de l’appareil
L’appareil est doté de commandes internes.
Branchez l’appareil sur la prise secteur.
Une fois l’appareil branché, l’éclairage intérieur
s’allume à l’ouverture de la porte. Le thermostat, situé
dans le compartiment réfrigérateur de l’appareil,
permet de régler la température du compartiment
réfrigérateur et celle du compartiment basse
température (selon modèle).
Réglage de la température de l’appareil :
Réglage de la température :
Le thermostat permet de régler automatiquement la
température à l’intérieur du compartiment
réfrigérateur et du compartiment (selon
modèle). Tournez le bouton de thermostat depuis la
position 1 jusqu’à la position 7 (température minimale)
pour réduire la température à l’intérieur de l’appareil.
Lorsqu’il est positionné sur 0, l’appareil est hors
tension. Pour la conservation d’aliments pendant de
brèves périodes, réglez le thermostat entre 1 (temp.
mini.) et 3 (temp. interm.).
- Pour conserver de façon prolongée des aliments
dans le compartiment , positionnez le
bouton de thermostat sur 3 ou 4.
Remarque :
La température ambiante, la fréquence d’ouverture de
la porte et la position de l’appareil peuvent influer sur
la température intérieure du réfrigérateur. Le
thermostat doit être réglé en fonction de ces facteurs.
Conservation des aliments dans le compartiment
réfrigérateur
Placez les aliments comme illustré.
A Viande, poisson
B Aliments cuits
C Fruits et légumes
D Bouteilles
E Fromages
Remarques :
• L’espace entre les clayettes et la paroi arrière
intérieure du réfrigérateur permet à l’air de
circuler librement.
• Disposez les aliments de façon à éviter tout
contact direct avec la paroi arrière du
compartiment réfrigérateur.
• Ne placez pas d’aliments chauds dans le
compartiment réfrigérateur.
• Conservez les liquides dans des récipients fermés.
Remarque importante :
La conservation de légumes à forte teneur en
eau peut provoquer la formation de
condensation sur la clayette en verre du bac à
fruits et légumes, mais ceci n’affecte pas le
fonctionnement correct de l’appareil.
MODE D’EMPLOI DU COMPARTIMENT
RÉFRIGÉRATEUR
La forme du boîtier du thermostat varie en fonction
de la marque.
Page 27
27
Le compartiment basse température est de
type
.
Le compartiment basse température
peut également être utilisé pour congeler des
aliments frais.
La quantité d’aliments frais qu’il est possible
de congeler en 24 heures est indiquée sur la
plaque signalétique.
Remarque :
Le compartiment basse température maintient la
température appropriée pour la conservation des
aliments, même en cas de coupure de courant Il est
toutefois recommandé d’éviter d’ouvrir la porte du
compartiment tant que le courant n’a pas été
rétabli.
Congélation d’aliments frais (uniquement dans
les compartiments de type )
Remarque importante :
• Avant de congeler des aliments frais, enveloppez
et scellez-les dans du papier aluminium, du film
cellophane, des sacs en plastique étanches à l’air
et à l’eau, des récipients en polyéthylène avec
couvercles ou des récipients pour congélateurs
adaptés à la congélation d’aliments frais.
• Placez les aliments à congeler dans le
compartiment supérieur, en les espaçant
suffisamment pour permettre une bonne
circulation de l’air.
• Pour une congélation optimale, abaissez la
température en tournant le bouton du
thermostat d’un demi-cran lorsque des aliments
frais sont introduits dans le compartiment
congélateur.
• Les aliments sont complètement congelés au
bout de 24 heures.
Pour les appareils à compartiment de type
Le tableau ci-contre répertorie les durées
maximales de conservation des aliments frais
congelés.
Lors de l’achat d’aliments surgelés, observez
ce qui suit :
• L’emballage/le paquet ne doit pas être
endommagé (un emballage endommagé peut
être le signe d’une détérioration des aliments
surgelés). Si un paquet est gonflé ou présente
des taches d’humidité, cela signifie qu’il n’a pas
été conservé dans des conditions optimales et
qu’il risque d’avoir subi un début de
décongélation.
• Achetez vos produits surgelés une fois toutes
vos autres courses terminées, et utilisez des sacs
isothermes pour leur transport.
• Une fois à la maison, placez immédiatement les
aliments surgelés dans le compartiment basse
température.
• Ne recongelez pas des aliments partiellement ou
complètement décongelés. Consommez-les
dans un délai de 24 heures.
• Évitez ou réduisez au minimum les variations de
température. Respectez la date de péremption
indiquée sur l’emballage.
• Suivez toujours les instructions de conservation
figurant sur l’emballage.
Préparation de glaçons avec le bac à glaçons
(selon modèle)
• Remplissez le bac à glaçons aux 2/3 et placez-le
dans le compartiment basse température.
• Si le fond du bac à glaçons est collé au
compartiment basse température, n’utilisez
aucun objet pointu ou tranchant pour le
décoller.
• Pour extraire plus facilement les glaçons du bac,
fléchir légèrement ce dernier.
MODE D’EMPLOI DU COMPARTIMENT
BASSE TEMPÉRATURE
(selon modèle)
MOIS ALIMENTS
Page 28
28
Avant d’effectuer toute opération d’entretien
ou de nettoyage, retirez la fiche de la prise de
courant ou coupez l’alimentation générale.
Le dégivrage du compartiment réfrigérateur
est entièrement automatique.
La présence périodique de petites gouttes d’eau sur
la paroi arrière, à l’intérieur du compartiment
réfrigérateur, indique qu’un dégivrage automatique
est en cours.
L’eau de dégivrage est automatiquement acheminée
jusqu’à un orifice d’évacuation avant d’être
recueillie dans un récipient depuis lequel elle
s’évapore.
Nettoyez régulièrement l’intérieur de l’orifice
d’évacuation afin de garantir un flux d’eau de
dégivrage constant et correct.
Dégivrage du compartiment basse
température.
Nous vous suggérons de dégivrer le
compartiment basse température 1 à 2 fois
par an ou lorsque la formation de glace est
excessive.
La formation de glace est un phénomène
normal. La quantité et la rapidité de
formation du givre varient en fonction des
conditions ambiantes (température et
humidité) et de la fréquence d’ouverture de la
porte. L’accumulation de glace dans le haut du
compartiment est normale et n’a aucune
influence sur le bon fonctionnement de
l’appareil.
Il est conseillé de dégivrer quand les réserves
sont peu abondantes.
• Retirez tous les aliments du congélateur,
enveloppez-les dans du papier journal et
placezles en les serrant bien les uns contre les
autres dans un endroit très frais ou dans un sac
isotherme/une glacière.
• Laissez la porte du congélateur ouverte pour
faire fondre la glace.
• Nettoyez l’intérieur du compartiment avec
une éponge imbibée d’eau tiède et/ou de
détergent neutre. N’utilisez pas de
substances abrasives.
• Rincez et séchez soigneusement l’intérieur du
compartiment.
• Réintroduisez les aliments dans le congélateur.
• Fermez la porte de l’appareil.
• Rebranchez l’appareil.
• Mettez l’appareil en marche.
MODE D’EMPLOI POUR LE DÉGIVRAGE ET
LE NETTOYAGE DU RÉFRIGÉRATEUR
Page 29

29
• Nettoyez régulièrement les orifices de
ventilation et le condenseur se trouvant à
l’arrière de l’appareil à l’aide d’un aspirateur ou
d’une brosse.
• Nettoyez l’extérieur de l’appareil avec un
chiffon doux.
En cas de non-utilisation prolongée
1. Videz complètement le réfrigérateur.
2. Débranchez l’appareil.
3. Dégivrez et nettoyez l’intérieur de l’appareil.
4. Laissez la porte ouverte pour éviter la formation
de moisissures, de mauvaises odeurs et
d’oxydation lorsque l’appareil n’est pas en
service.
5. Nettoyez l’appareil.
• Nettoyez l’intérieur du compartiment basse
température (selon modèle) pendant le
dégivrage.
• Nettoyez régulièrement l’intérieur du
réfrigérateur à l’aide d’une éponge imbibée
d’eau tiède et/ou de détergent neutre. Rincez et
essuyez avec un chiffon doux. N’utilisez pas de
substances abrasives.
• Nettoyez l’extérieur de l’appareil avec un
chiffon doux humidifié.
N’utilisez ni détergents abrasifs ni éponges
métalliques, ni détachants (tels que dissolvant,
trichloréthylène) ou vinaigre.
Comment remplacer l’ampoule :
Pour remplacer l’ampoule, procédez de la façon
suivante :
• Débranchez l’appareil.
• Pincez les languettes situées sur les côtés du
cache de l’ampoule, puis retirez ce dernier.
• Remplacez l’ampoule par une ampoule neuve de
puissance inférieure ou égale à 10 W.
• Remettez le cache de l’ampoule en place, puis
attendez 5 minutes avant de rebrancher
l’appareil.
NETTOYAGE ET ENTRETIEN
Page 30
30
1. L’appareil ne fonctionne pas.
• Y a-t-il une coupure de courant ?
• La fiche est-elle correctement insérée dans la
prise de courant ?
• Le commutateur bipolaire est-il activé ?
• Le fusible est-il grillé ?
• Le cordon d’alimentation est-il endommagé ?
• Le thermostat est-il réglé sur
•
(arrêt) ?
2. La température à l’intérieur des
compartiments n’est pas assez froide.
• La porte est-elle correctement fermée ?
• Des aliments gênent-ils la fermeture de la
porte ?
• L’appareil est-il installé à proximité d’une
source de chaleur ?
• Le réglage du thermostat est-il correct ?
• Les ouvertures de ventilation sont-elles
obstruées ?
3. La température à l’intérieur du
réfrigérateur est trop froide.
• Le réglage du thermostat est-il correct ?
4. L’appareil est très bruyant.
• L’appareil a-t-il été correctement installé ?
• Les tuyaux à l’arrière se touchent-ils ou
vibrent-ils ?
5. Présence d’eau au fond du compartiment
réfrigérateur.
• L’orifice d’évacuation de l’eau de dégivrage
estil obstrué ?
6. Formation de glace excessive dans le
compartiment basse température
• La porte est-elle correctement fermée ?
• Des aliments gênent-ils la fermeture de la
porte ?
Remarques :
• Les gargouillements et les sifflements émis
par le circuit de réfrigérant sont des bruits
normaux.
DIAGNOSTIC RAPIDE
Avant de contacter le service après-vente :
1. Vérifiez en premier lieu si vous pouvez remédier
au problème par vous-même à l’aide des
suggestions de la section “Diagnostic rapide”.
2. Remettez l’appareil en marche pour vous
assurer que le problème a été éliminé. Si le
problème persiste, débranchez à nouveau
l’appareil et répétez cette opération une heure
plus tard.
3. Si le résultat est encore négatif, contactez le
service après-vente.
Spécifiez les informations suivantes :
• la nature du problème ;
• le modèle ;
• le numéro de Service (numéro situé après le
terme SERVICE sur la plaque signalétique
installée à l’intérieur de l’appareil) ;
• votre adresse complète ;
• votre numéro de téléphone avec indicatif.
Remarque :
Il est possible d’inverser le sens de l’ouverture
de la porte.
Si la modification est effectuée par le service
après-vente, elle n’est pas considérée comme
une intervention sous garantie.
SERVICE APRÈS-VENTE
Page 31

31
• N’installez pas l’appareil à proximité d’une
source de chaleur. Les appareils installés dans un
endroit chaud, exposés aux rayons directs du
soleil ou près d’une source de chaleur (radiateur,
cuisinière) consomment plus d’énergie, ce qui
doit être évité.
• Si cela s’avère impossible, il convient de
respecter les distances minimales suivantes :
• 30 cm par rapport aux cuisinières à charbon
ou au mazout ;
• 3 m par rapport aux cuisinières électriques
et/ou au gaz.
• L’appareil est conçu pour être encastré. Installez
l’appareil dans le meuble de cuisine en
respectant les dimensions requises (voir
l’illustration).
• Nettoyez l’intérieur.
• Installez les accessoires fournis.
Branchement électrique
• Les branchements électriques doivent être
réalisés en conformité avec les réglementations
locales.
• La tension et la puissance absorbée sont
indiquées sur la plaque signalétique située à
l’intérieur de l’appareil.
• La mise à la terre de l’appareil est obligatoire.
Le fabricant décline toute responsabilité pour
tout dommage éventuel subi par des personnes
ou des biens, résultant de la non-observation
des consignes mentionnées ci-dessus
• Si la prise et la fiche ne sont pas du même type,
faites-les remplacer par un électricien qualifié.
• N’utilisez ni adaptateurs, ni rallonges.
Mise hors tension de l’appareil
Pour mettre l’appareil hors tension, débranchez son
cordon d’alimentation ou activez le commutateur
bipolaire installé en amont de la prise.
INSTALLATION
Page 32

32
Inversion du sens d’ouverture de la
porte
Inversion du sens d’ouverture de la porte
La porte du réfrigérateur peut être ouverte par le
côté droit ou par le côté gauche.
À la livraison de l’appareil, la porte s’ouvre par la
gauche.
Pour modifier le sens de l’ouverture, suivez les
instructions ci-après.
Remarque : Avant de procéder à l’inversion du
sens d’ouverture de la porte, débranchez la fiche de
la prise de courant ou coupez le courant.
1. Retirez les deux vis (1) maintenant la charnière
supérieure (2) (côté droit) sur le châssis. Retirez
la charnière (2).
2. Soulevez la porte pour la dégager de l’axe de la
charnière inférieure, puis posez-la sur une
surface non abrasive.
3. Retirez les deux vis (3) maintenant la charnière
inférieure (4) en place.
Retirez la charnière (4).
4. Retournez la charnière (2). Réinstallez la
charnière (2) sur le côté inférieur gauche à l’aide
des deux vis (1).
5. Engagez la porte sur l’axe de la charnière
inférieure (2).
6. Tout en maintenant la porte en position fermée,
réinstallez la charnière supérieure (4) sur le côté
gauche à l’aide des deux vis (3). Ne serrez pas
les vis (1) tant que la porte n’est pas de niveau
par rapport au plan de travail.
Ouverture de la porte par le côté gauche fig. 1
Ouverture de la porte par le côté droit fig. 2
2
1
3
3
4
2
4
1
Page 33

33
Inversion du sens de l’ouverture de
la porte du compartiment intérieur
1. Retirez les deux vis en plastique (1) situées sur le
côté gauche de l’appareil.
2. Retirez les deux caches de vis (2) ainsi que le
crochet de la porte (3).
3. Dévissez la porte du compartiment congélateur
(4) et retirez-la.
Retournez la porte et réinstallez-la sur le côté
gauche de l’appareil.
4. Retournez le crochet de la porte (3),
réinstallezle sur le côté droit de l’appareil, puis
remettez les deux caches ce vis (2) en place.
5. Pour finir, réinstallez les deux vis en plastique (1)
sur le côté droit de l’appareil.
AVANT L’INVERSION
APRÈS L’INVERSION
Page 34

34
• Het apparaat dat u zojuist gekocht heeft, is
ontworpen voor huishoudelijk gebruik en voor het
gebruik in:
- keukens van werkplekken, winkels en/of
kantoren
- op boerderijen
- in hotels, motels, residences, bed & breakfast
voor het gebruik door de verschillende klanten.
Voor een optimaal gebruik van uw apparaat is
het raadzaam de gebruiksaanwijzing aandachtig
door te lezen, hierin vindt u een beschrijving van
het apparaat en adviezen voor het conserveren
van voedingsmiddelen.
Bewaar dit boekje zodat u het naderhand nog
eens kunt raadplegen.
1. Controleer na het uitpakken van het apparaat of
het niet beschadigd is en of de deur goed sluit. Uw
leverancier dient binnen 24 uur vanaf de levering
van het product van eventuele schade op de
hoogte te worden gesteld.
2. Het is raadzaam minstens twee uur te wachten
alvorens het apparaat in werking te stellen, om het
koelcircuit perfect te kunnen laten functioneren.
3. Zorg ervoor dat de installatie en de elektrische
aansluiting door een gekwalificeerd technicus
worden verricht overeenkomstig de aanwijzingen
van de fabrikant en de plaatselijke
veiligheidsvoorschriften.
4. Reinig de binnenkant van het product alvorens het
in gebruik te nemen.
ALVORENS HET APPARAAT TE GEBRUIKEN
1. Verpakking
Het verpakkingsmateriaal is voor 100% recyclebaar en
draagt het recyclingsymbool. Voor de verwerking
moeten de plaatselijke voorschriften worden nageleefd.
Het verpakkingsmateriaal (plastic zakken, stukken
polystyreen enz.) moet buiten het bereik van kinderen
worden gehouden, omdat het een bron van gevaar kan
vormen.
2. Afdanken van het apparaat
Het product is vervaardigd van materiaal dat kan
worden gerecycled. Dit apparaat is voorzien van het
merkteken volgens de Europese richtlijn 2002/96/EG
inzake Afgedankte elektrische en elektronische
apparaten (AEEA). Door ervoor te zorgen dat dit
product op de juiste manier als afval wordt verwerkt,
helpt u mogelijk negatieve consequenties voor het
milieu en de menselijke gezondheid te voorkomen.
Het symbool op het product of op de
bijbehorende documentatie geeft aan dat dit product
niet als huishoudelijk afval mag worden behandeld. In
plaats daarvan moet het worden afgegeven bij een
verzamelpunt voor recycling van elektrische en
elektronische apparaten. Maak het apparaat op het
moment dat het wordt afgedankt onbruikbaar door de
voedingskabel door te snijden en de deuren en
schappen te verwijderen, zodat kinderen niet
gemakkelijk in het apparaat kunnen kruipen. Volg bij het
afdanken van het apparaat de plaatselijke voorschriften
voor afvalverwerking en breng het naar een speciaal
afvalverwerkingscentrum, en laat het niet onbewaakt
achter, ook niet voor slechts een paar dagen, aangezien
het voor kinderen een bron van gevaar kan opleveren.
Voor nadere informatie over de behandeling,
terugwinning en recycling van dit product wordt u
verzocht contact op te nemen met het stadskantoor in
uw woonplaats, uw afvalophaaldienst of de winkel waar
u het product heeft aangeschaft.
Informatie:
Dit apparaat bevat geen CFK. Het koelcircuit bevat
R134a (HFC) of R600a (HC), zie serienummerplaatje in
het apparaat. Voor apparaten met isobutaan (R600a):
isobutaan is een natuurlijk gas dat geen schadelijke
invloed heeft op het milieu, maar wel ontvlambaar is. Het
is daarom noodzakelijk om te controleren of de leidingen
van het koelcircuit niet beschadigd zijn. Dit product kan
een gefluorideerd broeikasgas bevatten dat onder het
Protocol van Kyoto valt; het koelgas zit in een hermetisch
verzegeld systeem. Koelgas: R134a heeft een globaal
verwarmingsvermogen (GWP) van 1300.
Conformiteitsverklaring
• Dit apparaat is bestemd voor het conserveren van
voedingsmiddelen en is vervaardigd in
overeenstemming met de Verordening (EG) nr.
1935/2004
• Dit apparaat is ontwikkeld, gefabriceerd en op de
markt gebracht in overeenstemming met:
-
veiligheidsvoorschriften van de
"Laagspanningsrichtlijn" 2006/95/EG (die de richtlijn
73/23/EEG en latere verordeningen vervangt);
- de veiligheidsvereisten van de "EMC"-richtlijn
2004/108/EG.
De elektrische veiligheid is alleen gewaarborgd
wanneer het op de juiste wijze op een
efficiënt werkende installatie is
aangesloten, die volgens de wettelijke
voorschriften is geaard.
MILIEUTIPS
Page 35

35
INSTALLATIE
• Het apparaat moet door twee of meerdere
personen worden verplaatst en geïnstalleerd.
• Wees voorzichtig bij het verplaatsen van het
apparaat om te voorkomen dat de vloer
beschadigd raakt (b.v. parket).
• Zorg ervoor dat het product tijdens de installatie
de voedingskabel niet beschadigt.
• Installeer het product niet in de buurt van een
warmtebron.
• Laat een vrije ruimte aan de zijkanten en boven het
apparaat om een goede ventilatie te garanderen of
volg de installatie-instructies.
• Houd de ventilatie-openingen van het apparaat vrij
van obstakels.
• Beschadig de leidingen van het koelcircuit van de
koelkast niet.
• Installeer het product waterpas op een vloer die
het gewicht kan dragen en in een ruimte die
geschikt is voor de afmetingen en het gebruik van
het product.
• Plaats het apparaat in een droge en goed
geventileerde ruimte. Het apparaat is afgesteld om
te werken in ruimten waarin de temperatuur
binnen de volgende waarden ligt, die op hun beurt
weer afhankelijk zijn van de klimaatklasse die op
het serienummerplaatje staat aangegeven: het is
mogelijk dat het apparaat niet goed functioneert als
het voor een lange tijd in een ruimte wordt gelaten
met een hogere of lagere temperatuur dan het
genoemde bereik.
• Controleer of de spanning op het typeplaatje
overeenkomt met de spanning in uw woning.
• Gebruik geen enkele of meervoudige adapters of
verlengsnoeren.
• Gebruik voor de aansluiting op de waterleiding de
bij het nieuwe apparaat geleverde slang en niet die
van het vorige apparaat.
• De voedingskabel mag alleen door gekwalificeerd
personeel of door de Klantenservice worden
gewijzigd of vervangen.
• Het moet mogelijk zijn het apparaat van het
elektriciteitsnet af te koppelen door de stekker uit
het stopcontact te halen of via een tweepolige
netschakelaar die bovenstrooms van het
stopcontact is geplaatst.
VEILIGHEID
• Voorkom de opslag in het apparaat van sprays of
houders met drijfgassen of brandbare stoffen.
• Bewaar of gebruik geen benzine of andere gassen
en licht ontvlambare stoffen in de buurt van het
apparaat of van andere elektrische huishoudelijke
apparatuur. De dampen die hieruit voortkomen
kunnen brand of explosies veroorzaken.
• Gebruik geen andere mechanische, elektrische of
chemische systemen die het ontdooiproces
versnellen dan door de fabrikant zijn aanbevolen.
• Gebruik of plaats geen elektrische apparaten in de
vakken van het apparaat, als hiervoor geen
uitdrukkelijke toestemming door de fabrikant is
gegeven.
• Dit apparaat is niet bestemd om gebruikt te
worden door personen (met inbegrip van
kinderen) met beperkte fysieke, sensorische of
mentale vermogens, of zonder ervaring of kennis
van het apparaat, behalve als zij tijdens het gebruik
instructies ontvangen van of begeleid worden door
een persoon die verantwoordelijk is voor hun
veiligheid.
• Om het risico te vermijden dat kinderen in de
koelkast opgesloten raken en stikken, mag hen niet
worden toegestaan in het product te spelen of zich
erin te verstoppen.
• Slik de (niet-giftige) vloeistof uit de vrieselementen
niet in (niet op alle modellen).
• Eet geen ijsblokjes of waterijsjes die net uit de
vriezer komen, aangezien deze zo koud zijn dat ze
ijsbrand kunnen veroorzaken.
GEBRUIK
• Trek de stekker uit het stopcontact of sluit de
stroomtoevoer af voordat u met reinigings- of
onderhoudswerkzaamheden begint.
• Alle apparaten met ijsmakers en waterdispensers
moeten op een waterleidingnet aangesloten
worden dat uitsluitend drinkwater levert (met een
waterleidingdruk van tussen de 0,17 en 0,81 MPa
(1,7 en 8,1 bar)). De ijsmakers en/of
waterdispensers die niet rechtstreeks op het
waterleidingnet zijn aangesloten, mogen uitsluitend
met drinkwater worden gevuld.
• Gebruik het koelgedeelte uitsluitend voor het
bewaren van verse levensmiddelen en het
vriesgedeelte uitsluitend voor het bewaren van
diepvriesproducten, het invriezen van verse
levensmiddelen en het maken van ijsblokjes.
• Bewaar geen dranken in glas in het vriesvak, omdat
glazen potten of flessen kunnen barsten.
• Leg onverpakt voedsel niet tegen de interne
onderdelen van de koelkast of het vriesvak aan.
De fabrikant kan niet aansprakelijk worden
gesteld, indien bovenstaande adviezen en
voorzorgsmaatregelen niet in acht zijn genomen.
Klimaatklasse
Omg. Temp.
(°C)
Omg. Temp.
(°F)
SN van 10 tot 32 van 50 tot 90
N van 16 tot 32 van 61 tot 90
ST van 16 tot 38 van 61 tot 100
T van 16 tot 43 van 61 tot 110
ALGEMENE VOORZORGSMAATREGELEN
EN ADVIEZEN
Page 36

36
Opmerkingen:
• Blokkeer het luchtuitlaatgebied (op de
achterwand) niet met levensmiddelen
• Als de vriezer voorzien is van een klep, dan kan de
opbergruimte vergroot worden door de klep te
verwijderen (door hem te buigen).
• Alle schappen, kleppen en korven zijn uitneembaar.
• De binnentemperatuur van het apparaat kan
beïnvloed worden door de omgevingstemperatuur,
hoe vaak de deur wordt geopend en de plaats van
het apparaat. Bij het instellen van de temperatuur
moet rekening gehouden worden met deze
factoren.
• Tenzij anders gespecificeerd zijn de accessoires van
het apparaat niet geschikt om afgewassen te
worden in de afwasmachine.
• Hoe groter de afstand tussen de achterkant van
het apparaat en de muur, hoe hoger de
energiebesparing.
Inschakelen van het apparaat
Het apparaat in werking stellen
Het apparaat heeft interne bedieningen.
Steek de stekker in het stopcontact.
Wanneer het apparaat is aangesloten op het
elektriciteitsnet, gaat de binnenverlichting branden als
de deur van de koelkast wordt geopend. Met de
thermostaat in het koelvak van het apparaat kan de
temperatuur van het koelvak en die van het
lagetemperatuurvak (indien aanwezig) worden
geregeld.
Instellen van de temperatuur:
Temperatuurinstelling:
De thermostaat regelt automatisch de
binnentemperatuur van het koelvak en van het
vak (indien aanwezig).
Door de knop van stand 1 op 7 (koudste instelling) te
draaien wordt de binnentemperatuur verlaagd.
Op de stand 0 wordt het apparaat uitgeschakeld.
Voor het bewaren van voedsel voor een korte tijd kan
de thermostaatknop tussen 1 (Min) en 3 (Med).
- Zet voor het bewaren van voedsel voor een lange
periode in het vak , de thermostaatknop
op 3 of 4.
Opmerking:
De omgevingstemperatuur, de frequentie waarmee de
deur wordt geopend en de plaats van het apparaat
kunnen van invloed zijn op de binnentemperatuur van
de koelkast. De stand van de thermostaatknop dient
op grond van deze factoren te worden aangepast.
Bewaren van levensmiddelen in de koelkast
Plaats de levensmiddelen zoals in de afbeelding te zien
is.
A Vis, vlees
B Gekookt voedsel
C Groente en fruit
D Flessen
E Kaas
Opmerkingen:
• De afstand tussen de schappen en de achterste
binnenwand van de koelkast zorgt voor een vrije
luchtcirculatie.
• Zet de levensmiddelen niet tegen de achterwand
van de koelkast.
• Zet geen levensmiddelen in de koelkast die nog
warm zijn.
• Bewaar vloeistoffen in gesloten houders.
Belangrijk
Het bewaren van groente met een hoog
watergehalte kan condensvorming veroorzaken
op het glazen schap van de groente- en fruitlade:
dit is niet van invloed op de goede werking van
het apparaat.
GEBRUIK VAN HET KOELVAK
De vorm van het thermostaatkastje is afhankelijk
van het merk
Page 37

37
Het lagetemperatuurvak is
.
In het lagetemperatuurvak kunnen
ook verse levensmiddelen worden ingevroren.
De hoeveelheid verse levensmiddelen die in 24
uur kan worden ingevroren staat aangegeven
op het typeplaatje.
Opmerking:
In het lagetemperatuurvak kan ook bij een
stroomuitval de juiste temperatuur worden
gehandhaafd voor het bewaren van voedsel.
Geadviseerd wordt om gedurende een dergelijke
periode de deur van het vak niet te openen.
Invriezen van vers voedsel (alleen in de vakken
met de markering )
Belangrijk
• Voordat verse levensmiddelen ingevroren
worden, moeten ze in aluminiumfolie, plastic
folie, waterdichte plastic verpakking,
polyethyleen bakjes met deksel, diepvriesbakken
die geschikt zijn voor het invriezen van vers
voedsel verpakt worden.
• Zet het in te vriezen voedsel in het bovenste
vak, laat voldoende ruimte om de pakjes heen
zodat de lucht goed kan circuleren.
• Draai de thermostaatknop een half teken lager
wanneer u de levensmiddelen in het vriesvak
zet, om een optimale invriesprocedure te
bewerkstelligen.
• Na 24 uur is het invriezen voltooid.
Apparaten met een vak
In de tabel hiernaast kunt u zien hoeveel
maanden verse, ingevroren levensmiddelen
bewaard kunnen worden.
Bij de aankoop van diepvriesproducten moet u
op de volgende punten letten:
• controleer of de verpakking niet beschadigd is
(ingevroren levensmiddelen in beschadigde
verpakking kunnen bedorven zijn). Als de
verpakking bol staat of als er vochtplekken op
zitten, is het product niet onder optimale
omstandigheden bewaard en kan het al
gedeeltelijk ontdooid zijn.
• Diepvriesproducten moeten als laatste worden
gekocht en in isolerende tassen worden
vervoerd.
• Zet de diepvriesproducten bij thuiskomst
meteen in het lagetemperatuurvak.
• Als voedsel gedeeltelijk ontdooid is, mag het niet
opnieuw worden ingevroren. Eet het binnen 24
uur op.
• Variaties in temperatuur moeten vermeden
worden of tot een minimum worden beperkt.
De uiterste houdbaarheidsdatum op de
verpakking moet worden gerespecteerd.
• De instructies op de verpakking voor het
conserveren van diepvriesproducten moeten
altijd worden opgevolgd.
Het maken van ijsblokjes als er een ijsbakje
aanwezig is
• Vul het ijsbakje voor 2/3 met water en zet het in
het lagetemperatuurvak
• Gebruik, indien het ijsbakje aan de bodem van
het lagetemperatuurvak is vastgevroren, geen
puntige of scherpe voorwerpen om het los te
maken.
• Om de ijsblokjes eenvoudig te verwijderen buigt
u het bakje om.
GEBRUIK VAN HET
LAGETEMPERATUURVAK
(indien aanwezig)
MAANDEN VOEDINGSMIDDELEN
Page 38

38
Trek de stekker uit het stopcontact of sluit de
stroomtoevoer af voordat u onderhouds- of
reinigingswerkzaamheden uitvoert.
De koelkast wordt geheel automatisch
ontdooid.
De aanwezigheid van waterdruppels op de
achterwand aan de binnenkant van de koelkast
duidt erop dat het apparaat bezig is automatisch te
ontdooien.
Het dooiwater wordt automatisch via een
afvoeropening in een opvangbak geleid, waar het
verdampt.
Maak de binnenkant van de afvoeropening van het
dooiwater regelmatig schoon om een constante en
correcte afvoer van dooiwater te garanderen.
Ontdooien van het vriesvak
Wij raden u aan het vriesvak 1 of 2 maal per
jaar te ontdooien, of wanneer de ijsvorming te
dik is geworden.
IJsvorming is een normaal verschijnsel. De
hoeveelheid en de snelheid waarmee zich het
ijs vormt, hangt af van de omgeving waarin
het apparaat zich bevindt en van de
frequentie waarmee de deur wordt geopend
en is over het algemeen groter op de bovenste
roosters. De ijsvorming is het grootst op het
bovenste gedeelte van het vak. Dit is normaal
en heeft geen invloed op het correct
functioneren van het apparaat.
Het is raadzaam het vak te ontdooien
wanneer u weinig voorraad heeft.sont peu
abondantes.
• Open de deur en haal alle levensmiddelen uit de
vriezer, wikkel ze dicht tegen elkaar in
krantenpapier en bewaar ze op een koele plaats
of in een koeltas.
• Laat de deur open zodat het ijs kan smelten.
• Reinig de binnenkant van de vriezer met
een vochtige spons met lauw water en/of
een neutraal schoonmaakmiddel. Gebruik
geen schuurmiddelen.
• Spoel de binnenkant goed af en droog hem
zorgvuldig.
• Plaats de levensmiddelen weer in het vak.
• Sluit de deur.
• Steek de stekker weer in het stopcontact.
• Schakel het apparaat weer in.
HET ONTDOOIEN EN REINIGEN
VAN DE KOELKAST
Page 39

39
• Reinig geregeld de condensor aan de achterkant
van het apparaat met een stofzuiger of een
borstel.
• Reinig de buitenkant met een zachte doek.
Als u het apparaat langere tijd niet gebruikt
1. Maak de koelkast helemaal leeg.
2. Trek de stekker uit het stopcontact.
3. Ontdooi het apparaat en maak de binnenkant
schoon.
4. Laat, als het apparaat langdurig niet gebruikt
wordt, de deur open staan, om te voorkomen
dat er schimmel, onaangename geuren en
oxidatie ontstaan.
5. Reinig het apparaat.
• Reinig de binnenkant van het
lagetemperatuurvak (waar aanwezig) tijdens het
ontdooien.
• Reinig de binnenkant van de koelkast regelmatig
met een vochtige spons met lauw water en/of
een neutraal schoonmaakmiddel. Spoel en droog
het apparaat met een zachte doek. Gebruik
geen schuurmiddelen.
• Reinig de buitenkant met een met water
bevochtigde zachte doek.
Gebruik geen schuurmiddelen of
schuursponsjes, vlekkenmiddelen (bv. aceton,
trichloorethyleen), of azijn.
Vervangen van het lampje:
Ga als volgt te werk om het lampje te vervangen:
• Haal de stekker uit het stopcontact.
• Druk de lipjes aan de zijkanten van het
lampenkapje in en neem het weg.
• Vervang het lampje door een nieuw exemplaar
met een vermogen van niet meer dan 10W.
• Plaats het lampenkapje terug en wacht 5
minuten voordat u het apparaat opnieuw
aansluit.
REINGING EN ONDERHOUD
Page 40

40
1. De koelkast werkt niet.
• Is de stroom uitgevallen?
• Zit de stekker goed in het stopcontact?
• Is de tweepolige netschakelaar ingeschakeld?
• Is de zekering doorgebrand?
• Is de voedingskabel beschadigd?
• Staat de thermostaat op de juiste stand
•
(Stop)?
2. De temperatuur in de vakken is te hoog.
• Zit de deur goed dicht?
• Verhindert het voedsel dat de deur gesloten
wordt?
• Staat het apparaat dicht bij een warmtebron?
• Staat de thermostaat in de goede stand?
• Wordt de luchtcirculatie door de
ventilatieopeningen gehinderd?
3. De temperatuur in het koelvak is te laag
• Staat de thermostaat in de goede stand?
4. Het apparaat maakt erg veel lawaai.
• Is het apparaat correct geïnstalleerd?
• Raken de buizen aan de achterkant elkaar of
trillen ze?
5. Er ligt water op de bodem van het koelvak.
• Is de afvoer van het dooiwater misschien
verstopt?
6. Te veel ijsvorming in het
lagetemperatuurvak.
• Zit de deur goed dicht?
• Verhindert het voedsel dat de deur gesloten
wordt?
Opmerkingen:
• Borrelende of sissende geluiden
veroorzaakt door de expansie van het
koelcircuit zijn normaal.
STORINGEN OPSPOREN
Voordat u de klantenservice belt:
1. Ga na of u de storingen niet zelf kunt verhelpen
(zie “Storingen opsporen”).
2. Zet het apparaat weer aan om te zien of het
probleem is verholpen. Is dit niet het geval,
schakel het apparaat dan uit en wacht ongeveer
een uur voordat u het weer aanzet.
3. Als ook dat niet helpt, wend u dan tot onze
klantenservice.
Vermeld de volgende gegevens:
• de aard van de storing
• het model
• het servicenummer (nummer achter het woord
SERVICE op het typeplaatje binnenin het
apparaat)
• uw volledige adres
• uw telefoonnummer.
Opmerking:
De richting waarin de deur opengaat, kan
worden veranderd.
Als deze verandering verricht wordt door de
Klantenservice, wordt dit niet gedekt door de
garantie.
KLANTENSERVICE
Page 41

41
• Installeer het apparaat niet in de buurt van
warmtebronnen. Installatie in een warme
omgeving, rechtstreekse blootstelling aan de zon
of opstelling van het apparaat in de buurt van
een warmtebron (kachel, fornuis) verhogen het
stroomverbruik en dienen te worden vermeden.
• Indien dit niet mogelijk is, moeten de volgende
minimumafstanden worden aangehouden:
• 30 cm vanaf fornuizen die werken op kolen of
petroleum;
• 3 cm vanaf elektrische fornuizen en/of
gasfornuizen.
• Het apparaat is ontworpen om ingebouwd te
worden. Installeer het apparaat in het
keukenmeubel op basis van de vereiste
afmetingen (zie afbeelding).
• Maak de binnenkant schoon.
• Breng de bijgeleverde accessoires aan.
Elektrische aansluiting
• Houd u aan de plaatselijke voorschriften voor de
elektrische aansluiting.
• De gegevens met betrekking tot de spanning en
het vermogensverbruik staan op het typeplaatje
in het apparaat.
• De aarding van het apparaat is wettelijk
verplicht.
De fabrikant aanvaardt geen enkele
aansprakelijkheid voor eventueel persoonlijk
letsel of schade aan dieren of voorwerpen, die
te wijten is aan het niet in acht nemen van deze
voorschriften.
• Als de stekker en het stopcontact niet van
hetzelfde type zijn, laat het stopcontact dan
vervangen door een erkend elektricien.
• Gebruik geen verlengsnoeren of meervoudige
adapters.
Afkoppeling van het
elektriciteitsnet
Het moet mogelijk zijn het apparaat van het
elektriciteitsnet af te koppelen door de stekker uit
het stopcontact te halen of via een tweepolige
netschakelaar die bovenstrooms van het
stopcontact is geplaatst.
INSTALLATIE
Page 42

42
Omkeren van de draairichting van
de deur
Omkeren van de draairichting van de deur
De deur van de koelkast kan aan de rechter- of
linkerkant worden geopend.
Bij levering wordt de deur van het apparaat aan de
linkerkant geopend.
Om de openingsrichting te wijzigen moeten de
onderstaande instructies worden opgevolgd.
Opmerking: Opmerking: alvorens de
openingsrichting van de deur om te keren moet de
stekker van het apparaat uit het stopcontact
worden getrokken of moet de elektrische voeding
worden uitgeschakeld.
1. Verwijder de twee schroeven (1) terwijl u het
bovenste scharnier (2) (rechterkant) tegen het
frame houdt. Verwijder het scharnier (2).
2. Til de deur op van de pen van het onderste
scharnier en leg hem op een niet-krassend
oppervlak.
3. Verwijder de twee schroeven (3) terwijl u het
onderste scharnier ondersteunt (4).
Verwijder het scharnier (4).
4. Draai het scharnier (2) om. Monteer het
onderste scharnier (2) weer op de linker
onderkant, met behulp van de twee schroeven
(1).
5. Laat de deur op de pen van het onderste
scharnier (2) zakken.
6. Monteer, terwijl de deur in gesloten stand is, het
bovenste scharnier (4) aan de linkerkant met
behulp van de twee schroeven (3). Draai de
schroeven (1) pas vast als de deur waterpas is
ten opzichte van de bovenkant van het meubel.
Opening van de deur aan de linkerkant fig. 1
Opening van de deur aan de rechterkant fig. 2
2
1
3
3
4
2
4
1
Page 43

43
Omkeren van de draairichting van
de deur van het binnenvak
1. Verwijder de twee plastic schroeven (1) aan de
linkerkant.
2. Verwijder de twee schroefafdekkingen (2) en de
haak van de deur (3).
3. Schroef de deur van het vriesvak (4) los en haal
hem weg.
Keer de deur om en monteer hem weer aan de
linkerkant.
4. Keer de haak van de deur (3) om, monteer hem
weer aan de rechterkant en monteer de twee
schroefafdekkingen (2) weer.
5. Plaats tenslotte de twee plastic schroeven (1)
weer aan de rechterkant.
VOOR DE OMKERING
NA DE OMKERING
Page 44

44
• Apparaten som du har köpt är avsedd för
hushållsbruk samt:
- i kök på arbetsplatser, affärer och/eller kontor
- på bondgårdar
- på hotell, motell, lägenhetshotell, Rum &
Frukost för att användas av den enskilde
gästen.
För att du skall få mesta möjliga utbyte av din
apparat rekommenderar vi att du läser
bruksanvisningen noggrant. Här finner du en
beskrivning av apparaten och goda råd om
livsmedelsförvaring.
Spar detta häfte som referensmaterial.
1. Ta av emballaget och försäkra dig om att
apparaten inte har skadats under transporten
och att dörrarna stänger ordentligt.
Återförsäljaren skall upplysas om eventuella
skador senast 24 timmar efter leverans.
2. Vi rekommenderar att du väntar minst två
timmar innan du tar apparaten i funktion. Denna
tid krävs för att kylsystemet skall fungera på
bästa sätt.
3. Se till att installationen och den elektriska
anslutningen av apparaten görs av en behörig
fackman i enlighet med tillverkarens anvisningar
och gällande bestämmelser.
4. Rengör apparaten invändigt före användning.
INNAN APPARATEN ANVÄNDS
1. Förpackning
Förpackningsmaterialet kan återvinnas till 100%,
vilket framgår av återvinningssymbolen. Följ lokala
bestämmelser när förpackningen skall kasseras.
Förpackningsmaterialet (plastpåsar, delar i
styrenplast, osv.) skall förvaras utom räckhåll för
barn. Det kan vara farligt.
2. Skrotning
Denna produkt är tillverkad av material som kan
återvinnas. Denna produkt är märkt enligt
Europadirektiv 2002/96/EEG beträffande kassering
av elektriskt och elektroniskt avfall.Genom att
säkerställa en korrekt skrotning av denna produkt
bidrar du till att förhindra eventuella negativa
konsekvenser för vår miljö och vår hälsa.
Symbolen på produkten eller i medföljande
dokumentation visar att denna produkt inte får
behandlas som vanligt hushållsavfall. Den skall i
stället lämnas in på en lämplig uppsamlingsplats för
återvinning av elektrisk och elektronisk utrustning.
Klipp av elsladden innan apparaten skrotas så att
apparaten blir obrukbar. Avlägsna även dörrar och
hyllplan så att barn inte kan stängas in i apparaten.
Följ lokala bestämmelser om avfallshantering när
apparaten skall skrotas. Lämna in den till en
återvinningscentral. Lämna inte apparaten utan
övervakning ens ett par dagar, eftersom den kan
vara farligt för barn.
För mer information om hantering, återvinning och
återanvändning av denna produkt, var god kontakta
de lokala myndigheterna, ortens sophanteringstjänst
eller butiken där produkten inhandlades.
Information:
Denna apparat innehåller varken CFC. Kylsystemet
innehåller R134a (HFC) eller R600a (HC), se
typskylten på apparatens insida.
Apparater med isobutan (R600a):Isobutan är en
naturgas som är mycket miljövänlig, men också
mycket lättantändlig. Det är därför av största vikt
att se till att kylsystemets ledningar inte skadas.
Denna produkt kan innehålla fluorerade
växthusgaser som omfattas av Kyotoavtalet.
Köldmediet befinner sig i ett hermetiskt slutet
system.
Köldmedium: R134a har en global
uppvärmningspotential (GWP) på 1 300.
EU-försäkran om överensstämmelse
• Denna apparat är avsedd för förvaring av
livsmedel och tillverkad i överensstämmelse
med förordning (EG) nr. 1935/2004
• Denna apparat formges, tillverkas och
marknadsförs i överensstämmelse med:
- Säkerhetsföreskrifterna i lågspänningsdirektiv
2006/95/EG (som ersätter direktiv 73/23/EEG
och dess påföljande tillägg);
- skyddskraven i EMC-direktiv 2004/108/EG.
Apparatens elektriska säkerhet kan
endast garanteras när apparaten är
korrekt ansluten till ett verksamt
jordningssystem som överensstämmer
med gällande lagstiftning.
MILJÖRÅD
Page 45

45
INSTALLATION
• För att flytta och installera apparaten krävs minst
två personer.
• Var försiktig när du flyttar apparaten så att
golven (t.ex. parkettgolv) inte skadas.
• Se till att elsladden inte blir skadad under
installationen.
• Se till att denna apparat inte placeras i närheten
av en värmekälla.
• För att god ventilation skall kunna garanteras
måste det finnas tillräckligt med utrymme
runtom skåpet - både ovanför och på sidorna.
Följ installationsanvisningarna.
• Se till att apparatens ventilationsöppningar inte
är blockerade eller övertäckta.
• Se till kylsystemets ledningar inte skadas.
• Ställ apparaten på ett golv som klarar att bära
upp dess tyngd och på en plats som är lämplig
för dess dimensioner och användning och se till
att den står i våg.
• Placera apparaten i ett torrt rum med god
ventilation. Apparaten är utformad för att
fungera i omgivningstemperaturer inom
bestämda intervall, som i sin tur är beroende av
vilken klimatklass apparaten tillhör. Apparatens
klimatklass anges på typskylten: Det finns risk att
apparaten inte fungerar på korrekt sätt om den
står i ett rum där temperaturen är lägre eller
högre än den avsedda.
• Kontrollera att spänningen på typskylten
överensstämmer med spänningen i din bostad.
• Använd inte förlängningssladdar eller adaptrar.
• Använd vattenslangen som medföljer den nya
apparaten för anslutningen till vattenledningen.
Använd inte den gamla apparatens slang.
• Ändring eller byte av elsladden får endast
ombesörjas av behörig fackman eller Service.
• Det måste vara möjligt att skilja apparaten från
elnätet, antingen genom att dra ut
stickkontakten ur eluttaget eller med hjälp av en
tvåpolig strömbrytare som skall sitta mellan
apparaten och eluttaget.
SÄKERHET
• Förvara aldrig sprayflaskor eller behållare med
bränslen eller lättantändliga ämnen i apparaten.
• Förvara inte bensin och andra lättantändliga
ämnen i gas- eller vätskeform i närheten av
denna apparat eller andra elektriska apparater.
Gaserna som utvecklas kan förorsaka brand eller
explosion.
• Använd inga andra typer av mekaniska,
elektriska och kemiska anordningar än dem som
rekommenderas av tillverkaren för att påskynda
avfrostningen.
• Använd inte och lägg inte in elektriska apparater
inuti apparaten om dessa inte är specifikt
auktoriserade av tillverkaren.
• Apparaten får ej användas av personer (inklusive
barn) med reducerad fysisk, känslomässig eller
mental kapacitet, eller av personer utan lämplig
kompetens eller erfarenhet, såvida de inte fått
instruktioner om apparatens användande från
den eller de personer som ansvarar för deras
säkerhet.
• Låt inte barn leka med apparaten eller gömma
sig inuti den. Barn som ägnar sig åt sådana lekar
riskerar att bli instängda i apparaten med
påföljande risk för kvävning.
• Förtär inte den vätska (ej giftig) som finns i
frysackumulatorerna (på vissa modeller).
• Förtär inte isbitar eller isglassar direkt efter att
de tagits ut ur frysen. Den låga temperaturen
kan förorsaka köldskador.
ANVÄNDNING
• Dra alltid ut stickkontakten ur eluttaget eller skilj
skåpet från elnätet på annat sätt innan någon typ
av rengöring och underhåll görs.
• Apparater som är utrustade med ismaskin och
vattendistributör måste anslutas till en
vattenledning med dricksvatten (med ett tryck
mellan 0,17 och 0,81 MPa (1,7 och 8,1 bar)).
Ismaskiner och/eller vattendistributörer som
inte är direkt kopplade till en vattenledning får
endast fyllas med dricksvatten.
• Använd kyldelen uteslutande för förvaring av
färska livsmedel och frysdelen uteslutande för
förvaring av frysta livsmedel, infrysning av färska
livsmedel och tillverkning av isbitar.
• Förvara inte glasbehållare som innehåller vätska i
frysdelen eftersom de kan spricka.
• Undvik att förvara ej inslagna livsmedel i direkt
kontakt med de invändiga ytorna i kyl- eller
frysdelen.
Tillverkaren accepterar inget ansvar om ovan
nämnda säkerhetsföreskrifter och förslag inte
iakttas.
Klimatklass
Omgivning-
stemperatur
(°C)
Omgivning-
stemperatur
(°F)
SN Från 10 till 32 Från 50 till 90
N Från 16 till 32 Från 61 till 90
ST Från 16 till 38 Från 61 till 100
T Från 16 till 43 Från 61 till 110
FÖRSIKTIGHETSÅTGÄRDER OCH
ALLMÄNNA FÖRSLAG
Page 46

46
Anmärkningar:
• Blockera inte ventilationsöppningarna (på den
bakre väggen) med matvaror
• Om frysen har en lucka kan du göra
förvaringsutrymmet större genom att ta bort
den (genom att böja undan den).
• Alla hyllor, luckor och utdragbara korgar kan
avlägsnas.
• Apparatens innertemperatur kan bero på
rumstemperaturen, hur ofta dörren öppnas och
på apparatens placering. Temperaturinställningen
bör räkna in dessa faktorer.
• Såvida inte annat anges är produktens tillbehör
inte lämpliga för diskmaskin.
• Ju större avståndet är till bakomvarande vägg,
desto större blir energibesparingen.
Slå på apparaten
Att starta apparaten
Apparaten är försedd med inre reglage.
Sätt in stickkontakten i eluttaget.
När apparaten är ansluten till elnätet tänds den
invändiga belysningen när kyldörren öppnas.
Termostaten som sitter i kyldelen används för att
reglera temperaturen i kyldelen och i
lågtemperaturavdelningen (om sådan finns).
Hu du reglerar apparatens temperatur:
Temperaturreglering:
Termostaten reglerar automatiskt temperaturen i
kyldelen och i -delen (om sådan finns).
Genom att vrida ratten från position 1 till position 7
(kallaste inställningen) blir temperaturen lägre.
I position 0 är apparaten avstängd.
För kortare förvaring av matvaror kan
termostatvredet ställas in på en position mellan 1
(Min) and 3 (Med).
- För längre förvaring av matvaror i -delen,
placera vredet på 3 eller 4.
Anmärkning:
Rumstemperaturen, apparatens placering och hur ofta
skåpdörren öppnas påverkar den invändiga
temperaturen. Termostatratten måste därför regleras
med hänsyn tagen till dessa faktorer.
Placering av livsmedel i kyldelen
Placera livsmedlen som i bilden.
A Fisk, kött
B Tillagade livsmedel
C Frukt- och grönsaker
DFlaskor
EOst
Anmärkningar:
• I det tomma utrymmet mellan hyllorna och
kylskåpets bakre innervägg skall luften kunna
cirkulera obehindrat.
• Placera inte matvaror direkt mot den bakre väggen
i kyldelen.
• Placera inte varma livsmedel i kylskåpet.
• Förvara vätskor i behållare med lock.
Viktigt
När grönsaker med hög vätskehalt förvaras i
kylen kan det bildas kondens på grönsakslådans
glashylla. Detta inverkar inte negativt på kylens
funktion.
GÖR SÅ HÄR FÖR ATT ANVÄNDA
KYLDELEN
Termostatlådans storlek varierear beroende på
märke
Page 47

47
Lågtemperaturavdelningen är
.
Lågtemperaturdelen kan du dessutom
använda för att frysa in färska livsmedel.
På typskylten anges vilken mängd färska
livsmedel det går att frysa in under ett dygn
(24 timmar).
Anmärkning:
I frysdelen bibehålls lämplig temperatur för
livsmedelsförvaring, även om det blir strömavbrott.
Vi rekommenderar dock att frysdelens dörr inte
öppnas under strömavbrottet.
Infrysning av färska livsmedel (bara i
avdelningen )
Viktigt
• Innan maten läggs in för infrysning, slå in den i
aluminiumfolie eller plastfolie eller lägg den i
luftoch vattentäta plastpåsar, plastburkar med
lock eller frysbehållare som är lämpade för
infrysning av färska livsmedel.
• Placera livsmedlen som ska frysas in i utrymmet
högst upp och lämna tillräckligt utrymme runt
förpackningarna så att luften kan cirkulera fritt.
• För att få bästa resultat vid infrysning skall
termostatratten sänkas ett halvt steg då du
lägger in färska matvaror i frysen.
• Efter 24 timmar är infrysningen avslutad.
För enheter med avdelning
I vidstående tabell anges hur många månader
olika frysta livsmedel kan förvaras i frysen. Följ
dessa anvisningar.
Att tänka på när du köper frysta livsmedel:
• Försäkra dig om att förpackningen eller
omslaget är intakt (eftersom kvaliteten på fryst
livsmedel annars kan ha försämrats). Om
förpackningen är skrovlig eller har fuktfläckar
har livsmedlet inte förvarats på optimalt sätt och
det finns risk att det har börjat tina.
• Planera din runda i livsmedelsaffären så att du
går till frysdisken det sista du gör och använd
fryspåsar för hemtransporten.
• Lägg in de frysta livsmedlen i
lågtemperaturavdelningen så fort du kommit
hem.
• Tinade livsmedel får inte frysas in på nytt. De
måste förtäras inom 24 timmar.
• Se till att temperaturvariationerna i matvarorna
blir så små som möjligt. Respektera det “bäst
före datum” som anges på förpackningen.
• Följ alltid anvisningarna om frysförvaring som
finns på matförpackningen.
Att göra isbitar om det finns en isbitsbricka
• Fyll isbitsbrickan till 2/3 med vatten, och sätt in
den ilågtemperaturavdelningen
• Om isbitsbrickan har fastnat på botten av
frysfacket, använd inte spetsiga eller vassa
föremål för att få loss den.
• Bänd en aning på isbitsbrickan så går det lättare
att få loss isbitarna.
ATT ANVÄNDA
LÅGTEMPERATURAVDELNINGEN
(om sådan finns)
MÅNADER LIVSMEDEL
Page 48

48
Dra alltid ut stickkontakten ur eluttaget eller
skilj apparaten från elnätet på annat sätt
innan någon typ av rengöring och underhåll
utförs.
Avfrostningen av kyldelen sker helt
automatiskt.
Det är helt normalt att det bildas vattendroppar på
kyldelens bakre innervägg och det visar att det
automatiska avfrostningsprogrammet pågår.
Vattnet från avfrostningen leds till ett dräneringshål
och samlas sedan upp i en behållare, där det
förångas.
Rengör regelbundet insidan av avfrostningsvattnets
dräneringshål, för att garantera konstant och
korrekt avrinning av avfrostningsvatten.
Avfrostning av lågtemperaturavdelningen
Vi rekommenderar att du frostar av
lågtemperaturavdelningen 1 eller 2 gånger per
år eller när frostlagret blir alltför tjockt.
Det är normalt att det bildas frost. Hur
mycket frost det bildas och hur snabbt detta
går beror på omgivningens temperatur och
luftfuktighet, och på hur ofta dörren öppnas.
Framför allt bildas det frost i den övre delen
av frysdelen, men detta är helt normalt och
försämrar inte apparatens funktion.
Det är en god regel att passa på att göra
avfrostningen när livsmedelsförråden inte är
så stora.
• Öppna frysdörren och ta ut alla livsmedel. Slå in
matvarorna i tidningspapper och lägg dem tätt
intill varandra på en mycket sval plats eller i en
frysväska.
• Låt dörren stå öppen så att frosten smälter.
• Rengör frysens insida med en svamp som
fuktats i en blandning av ljummet vatten
och milt rengöringsmedel. Använd inte
slipande substanser.
• Skölj och torka insidan noggrant.
• Lägg tillbaka livsmedlen i frysen.
• Stäng dörren.
• Sätt i stickproppen igen.
• Sätt igång apparaten igen.
GÖR SÅ HÄR FÖR ATT AVFROSTA
OCH RENGÖRA KYLEN
Page 49

49
• Rengör regelbundet både luftningshål och
kondensatorn, som är placerad på baksidan av
frysen, med en dammsugare eller med en
borste.
• Rengör skåpet utvändigt med en mjuk trasa.
När du åker bort (längre bortavaro)
1. Ta ut alla livsmedel ur kylskåpet.
2. Skilj apparaten från elnätet.
3. Frosta av skåpet och rengör det invändigt.
4. För att undvika att det bildas mögel, dålig lukt
eller rost ska dörren alltid lämnas öppen när
skåpet inte är i funktion.
5. Rengör apparaten.
• Rengör lågtemperaturavdelningens insida (på
modeller där den finns) under avfrostningen.
• Rengör regelbundet kyldelens insida med en
svamp som fuktats i ljummet vatten och ett milt
rengöringsmedel. Skölj och torka torrt med en
mjuk trasa. Använd inte slipmedel.
• Rengör skåpets utsida med en mjuk trasa som
fuktats i vatten.
Använd inte slipmedel, slipande svampar,
fläckborttagningsmedel (t ex aceton,
trikloretylen) eller vinäger.
Byta glödlampa:
Gör så här för att byta ut glödlampan:
• Dra ut stickkontakten ur eluttaget
• Tryck på de två vingarna på lampskyddet och
avlägsna det.
• Byt ut lampan till en ny med max 10W.
• Sätt tillbaka lampskyddet och vänta 5 minuter
innan du sätter på apparaten igen.
RENGÖRING OCH UNDERHÅLL
Page 50

50
1. Om apparaten inte fungerar.
• Är det strömavbrott?
• Är stickkontakten ordentligt insatt i eluttaget?
• Har strömmen brutits med hjälp av den
tvåpoliga strömbrytaren?
• Har det gått en säkring?
• Är elsladden trasig?
• Står termostaten i läge
•
(Stopp)?
2. Temperaturen inuti kyl- och frysdelen är
inte tillräckligt låg.
• Är dörren ordentligt stängd?
• Hindrar livsmedlen att dörren stängs
ordentligt?
• Står apparaten i närheten av en värmekälla?
• Är termostaten inställd på rätt sätt?
• Finns det något som hindrar att luften
cirkulerar genom ventilationsgallren?
3. Temperaturen inuti kyldelen är alltför låg.
• Är termostaten inställd på rätt sätt?
4. Apparaten bullrar.
• Har installationen utförts på korrekt sätt?
• Vidrör rören på baksidan varandra eller
vibrerar de?
5. Det finns vatten på kyldelens botten.
• Finns det något som hindrar att
avfrostningsvattnet rinner undan?
6. Det bildas onormalt mycket frost i
lågtemperaturavdelningen.
• Är dörren ordentligt stängd?
• Hindrar livsmedlen att dörren stängs
ordentligt?
Anmärkningar:
• Blås- och gurgelljud som kommer från
kylsystemet är helt normala.
FELSÖKNING
Innan du kontaktar Service:
1. Försök att lösa problemet på egen hand med
hjälp av avsnittet “Felsökning”.
2. Sätt på apparaten igen för att kontrollera om
felet har åtgärdats. Om så inte är fallet skiljer du
apparaten från elnätet, väntar en timme och
försöker sedan igen.
3. Om du inte lyckas åtgärda felet på egen hand
kontaktar du Service.
Uppge:
• Vilken typ av problem det rör sig om
• Modell
• Servicenumret (denna kod finns efter ordet
SERVICE på typskylten som finns inuti
apparaten)
• Din fullständiga adress
• Telefon- och riktnummer.
Anmärkning:
Dörren kan hängas om till öppning på andra
sidan.
Omhängning av dörrar som utförs av
Aftersales Service täcks inte av garantin.
KUNDSERVICE
Page 51

51
• Installera apparaten långt ifrån värmekällor. Om
apparaten placeras i ett varmt rum eller i
närheten av värmekällor (värmeelement, spis)
eller om den utsätts för direkt solljus ökar
energiförbrukningen, vilket bör undvikas.
• Om apparaten inte kan placeras långt ifrån
värmekällor måste följande minsta avstånd
respekteras:
• 30 cm från kol- eller gasoleldade spisar;
• 3 cm från elektriska spisar och/eller gasspisar.
• Apparaten är gjord för att byggas in i ett skåp.
Installera den i en köksenhet baserat på dess
dimensioner (se bilden).
• Rengör apparatens insida.
• Sätt i de medföljande tillbehören.
Elektrisk anslutning
• Den elektriska anslutningen skall utföras i
enlighet med gällande lokala bestämmelser.
• Data angående spänning och effektförbrukning
finns på typskylten som är placerad inuti skåpet.
• Enligt lag är det obligatoriskt att ansluta denna
apparat till jord.
Tillverkaren accepterar inget ansvar för
personskador och skador på föremål som
uppstår till följd av att dessa anvisningar inte har
följts.
• Låt en behörig fackman byta ut eluttaget om
stickkontakten och eluttaget inte är av samma
typ.
• Använd inte förlängningssladdar eller adaptrar.
Att skilja apparaten från elnätet
Det måste vara möjligt att skilja apparaten från
elnätet, antingen genom att dra ut stickkontakten ur
eluttaget eller med hjälp av en tvåpolig
strömbrytare som skall sitta mellan apparaten och
eluttaget.
INSTALLATION
Page 52

52
Omhängning av dörr
Att hänga om dörren
Kylskåpsdörren kan öppnas från höger eller från
vänster sida.
Vid leverans öppnas dörren från vänster sida.
Följ anvisningarna nedan för att hänga om dörren.
Anmärkning: Dra alltid ut stickkontakten ur
eluttaget eller skilj apparaten från elnätet på annat
sätt innan du hänger om dörren.
1. Ta bort de två skruvarna (1) samtidigt som du
håller det översta gångjärnet (2) (på höger sida)
mot stommen. Ta bort gångjärnet (2).
2. Lyft upp dörren från bulten i det nedersta
gångjärnet och lägg ner dörren på en yta som
inte repar.
3. Ta bort de två skruvarna (3) samtidigt som du
håller fast det nedersta gångjärnet (4).
Ta bort gångjärnet (4).
4. Vänd runt gångjärnet (2). Sätt tillbaka gångjärnet
(2) på vänster sida nedtill med hjälp av de två
skruvarna (1).
5. Sänk ned dörren på bulten i det nedersta
gångjärnet (2).
6. Ha dörren stängd och sätt tillbaka det översta
gångjärnet (4) upptill på vänster sida med hjälp
av de två skruvarna (3). Dra inte åt skruvarna (1)
förrän dörren är helt i nivå med arbetsbänken.
Öppning av dörren från vänster sida fig. 1
Öppning av dörren från höger sida fig. 2
2
1
3
3
4
4
1
2
Page 53

53
Omhängning av innerluckan
1. Ta bort de två plastskruvarna (1) på vänster sida.
2. Ta bort de två skruvlocken (2) och beslaget (3).
3. Skruva ur frysluckan (4) och ta bort den.
Vänd på luckan och sätt den på vänster sida.
4. Vänd på beslaget (3), sätt det på höger sida och
sätt tillbaka de två skruvlocken (2).
5. Sätt slutligen tillbaka de två plastskruvarna (1) på
höger sida.
FÖRE OMHÄNGNINGEN
EFTER OMHÄNGNINGEN
Page 54

54
• Apparatet som du har kjøpt har blitt laget for å
brukes til husholdningsbruk, og også til følgende
bruk:
- på kjøkkenet på arbeidssteder, butikker
og/eller kontorer,
- på gårder,
- på hoteller, moteller, leilighetshoteller, bed &
breakfast ol. til bruk for hver kunde.
For at du skal kunne bruke apparatet på best
mulig måte må du lese nøye bruksanvisningen
hvor du finner beskrivelsen av apparatet, og
råd for oppbevaring av matvarer.
Ta vare på heftet for fremtidige behov.
1. Når du har pakket ut apparatet må du
kontrollere at det ikke er skadet, og at døren
lukker seg skikkelig. Gi beskjed til forhandleren
om eventuelle skader innen 24 timer fra
apparatet ble levert.
2. Det anbefales å vente minst to timer før
apparatet settes igang, slik at kjølekretsen virker
maksimalt.
3. Installasjon og elektrisk tilkobling må utføres av
en kvalifisert elektriker ifølge produsentens
anvisninger og gjeldende forskrifter.
4. Rengjør apparatet på innsiden før bruk.
FØR DU BRUKER APPARATET
1. Emballasjen
Emballasjen består av 100% resirkulerbart
materiale og er merket med resirkuleringssymbolet.
Kildesorter i henhold til de lokale forskrifter.
Emballasjen (plastposter, polystyrendeler osv.) må
holdes utenfor barns rekkevidde.
2. Kassering
Kjøleskapet er fremstilt av resirkulerbart materiale.
Dette apparatet er merket i samsvar med
EUdirektiv 2002/96/EC om avhending av elektrisk
og elektronisk utstyr (Waste Electrical and
Electronic Equipment - WEEE).Forsikre deg om at
dette produktet blir avhendet på korrekt vis, slik at
det ikke kan utgjøre noen helse- eller miljørisiko.
Symbolet på produktet eller på dokumentene
som følger med det, viser at dette produktet ikke
må behandles som husholdningsavfall. Lever det til
et autorisert mottak for resirkulering av elektrisk og
elektronisk utstyr.
Før apparatet kastes, må man sørge for at det ikke
kan tas i bruk igjen ved å klippe av nettledningen.
Fjern også dørene og hyllene, slik at ikke barn kan
stenge seg inne i kjøleskapet. Avhend apparatet
ifølge de lokale renovasjonsforskrifter. Apparatet
må bringes til et autorisert mottak og ikke
etterlates uten tilsyn, da det kan utgjøre en fare for
barn. For nærmere informasjon om håndtering,
kassering og resirkulering av dette produktet,
kontakt kommunen, renovasjonsetaten eller
forretningen der du anskaffet det.
Informasjon:
Dette apparatet er KFK-fritt. Kjølekretsen
inneholder R134a (HFC) eller R600a (HC), se
typeskiltet inni apparatet.
For apparater med Isobutan (R 600 a):Isobutan er
en naturlig gass uten innvirkning på miljøet. Gassen
er imidlertid brannfarlig. Det er derfor viktig å
forsikre seg om at rørene i kjølekretsen ikke er
skadet.
Det er mulig at dette apparatet inneholder
fluorinerte drivhusgasser som omtales i
Kyotoprotokollen.
Kjølegassen befinner seg i et hermetisk lukket
system.
Kjølegass: R134a har et globalt
oppvarmingspotensial (GWP) på 1 300.
Overensstemmelseserklæring
• Dette apparatet er fremstilt for oppbevaring av
matvarer og er i overensstemmelse med
CEstandard nr. 1935/2004
• Dette produktet er utformet, fremstilt og
markedsført i samsvar med:
- kravene til sikkerhet i direktivet “Lav spenning"
2006/95/EU (som erstatter 73/23/EØF og
påfølgende endringer);
- beskyttelseskravene i EMC-direktivet
2004/108/EF.
Apparatets elektriske sikkerhet er kun
garantert når det er koblet til et
forskriftsmessig, jordet elektrisk
anlegg.
MILJØVENNLIG BRUK
Page 55

55
INSTALLASJON
• Flytting og installasjon av produktet må utføres
av to eller flere personer.
• Vær forsiktig ved flytting av kjøleskapet, slik at
det ikke oppstår skader på gulvet (f. eks.
parkett).
• Etter installasjon må man forsikre seg om at
apparatet ikke kan skade nettledningen.
• Forsikre deg om at kjøleskapet ikke er plassert
ved siden av en varmekilde.
• For å sikre tilfredsstillende ventilasjon, må det
være luft på hver side av apparatet og over
dette. Følg installasjonsveiledningen
• Pass på at ikke ventilasjonsåpningene på
apparatet tildekkes.
• Pass på at det ikke oppstår skader på rørene i
kjølekretsen på apparatet.
• Installer og oppvatre kjøleskapet på et gulv som
er tilstrekkelig solid og på et sted der det er
tilstrekkelig med plass rundt apparatet.
• Plasser apparatet på et tørt sted med god
ventilasjon. Apparatet er beregnet på bruk ved
bestemte omgivelsestemperaturer, i henhold til
klimaklassen som er oppgitt på typeskiltet: Det
kan hende apparatet ikke fungerer korrekt
dersom omgivelsestemperaturen over lengre tid
er lavere eller høyere enn de temperaturer
apparatet er beregnet for.
• Kontroller at nettspenningen er den samme som
oppgitt på typeplaten.
• Benytt ikke skjøteledninger eller doble
stikkontakter.
• For tilkobling til vanntilførsel benyttes slangen
som følger med det nye apparatet. Bruk ikke
slangen til det gamle apparatet.
• Endringer eller utskifting av nettledningen må
kun utføres av kvalifisert personale eller Service.
• Det må være mulig å frakoble apparatet, enten
ved at støpslet trekkes ut, eller ved hjelp av en
topolsbryter plassert før stikkontakten.
SIKKERHET
• Ikke legg spraybokser eller beholdere som
inneholder drivstoff eller lettantennelige stoffer
inn i apparatet.
• Ikke bruk eller oppbevar bensin eller andre
brennbare gasser/væsker i nærheten av
kjøleskapet eller andre husholdningsapparater.
Dunst fra slike væsker kan nemlig føre til brann
eller eksplosjon.
• Bruk ikke andre hjelpemidler for å fremskynde
avrimingen enn de som eventuelt anbefales av
produsenten.
• Bruk ikke elektriske apparater inni seksjonene
på apparatet, med mindre disse er godkjent av
produsenten
• Dette apparatet er ikke beregnet på bruk av
barn eller personer med nedsatte fysiske,
sanselig eller mentale evner eller som ikke har
erfaring med eller kjenner til apparatet, med
mindre de under bruk av apparatet blir instruert
og kontrollert av en person som er ansvarlig for
sikkerheten deres.
• For å unngå at barn setter seg fast eller kveles
inni apparatet må du ikke tillate dem å leke eller
gjemme seg inni apparatet.
• Svelg ikke væsken (ikke giftig) i kjøleelementene
(kun på noen modeller).
• Spis ikke ispinner eller isterninger umiddelbart
etter at de er tatt ut av fryseren. Det kan
forårsake kuldesår.
BRUK
• Før enhver form for rengjøring eller vedlikehold
av apparatet, må apparatet frakobles
strømnettet.
• Alle apparater som er utstyrt med ismaskin og
vanndispenser må utelukkende tilkobles
vanntilførsel med drikkevann (med et
tilførselstrykk på mellom 0,17 og 0,81 MPa (1,7
og 8,1 bar)). Ismaskin og/eller vanndispenser
som ikke er koblet direkte til vannettet, må kun
fylles med drikkevann.
• Bruk kjøleseksjonen kun til oppbevaring av
ferske matvarer og fryseseksjonen kun til
oppbevaring av frysevarer, samt til innfrysing av
ferske matvarer og produksjon av isterninger.
• Sett aldri glassbeholdere med væsker inn i
fryseseksjonen, fordi de kan knuse.
• Unngå å oppbevare utpakket mat i direkte
kontakt med de indre flatene i kjøle- eller
fryseseksjonen.
Produsenten fraskriver seg ethvert ansvar
dersom anbefalingene og retningslinjene over
ikke følges
Klimaklasse
Omg. temp.
(°C)
Omg. temp.
(°F)
SN Fra 10 til 32 Fra 50 til 90
N Fra 16 til 32 Fra 61 til 90
ST Fra 16 til 38 Fra 61 til 100
T Fra 16 til 43 Fra 61 til 110
GENERELLE RÅD
Page 56

56
Merknader:
• Ikke blokker området rundt luftutløpet (på
bakveggen) med matvarer.
• Hvis fryseren er utstyrt med en klaff, er det
mulig å øke oppbevaringsvolumet ved å fjerne
klaffen (ved å bøye den).
• Alle hyller, klaffer og uttrekkskurver kan tas ut.
• Temperaturen i apparatet kan påvirkes av
romtemperaturen, hvor ofte dørene åpnes og
apparatets plassering. Når du stiller inn
temperaturen, bør du ta disse faktorene med i
betraktning.
• Tilbehøret til apparatet kan ikke vaskes i
oppvaskmaskin hvis ikke noe annet er oppgitt.
• Jo større avstanden mellom baksiden av
apparatet og veggen er, desto mer strøm sparer
du.
Slå apparatet på
Starte apparatet
Apparatet er utstyrt med innvendige kontroller.
Koble apparatet til strømnettet.
Når støpselet er satt i stikkontakten, vil interiørlyset
tennes hver gang døren åpnes. Termostaten i
kjøleseksjonen kan brukes til å regulere temperaturen
i kjøleseksjonen og fryseseksjonen (finnes på noen
modeller).
Regulere temperaturen i apparatet:
Temperaturinnstilling:
Termostaten regulerer temperaturen automatisk i
kjøleseksjonen og i seksjonen (hvis modellen
din har den).
Termostatbryteren kan vris fra stilling 1 til 7 (kaldeste
innstilling) for å oppnå kaldere temperaturer.
Når bryteren er innstilt på 0, er apparatet slått av.
For kortvarig oppbevaring av matvarer, still
termostaten mellom 1 (min) og 3 (med).
- For langvarig oppbevaring av matvarer i seksjonen
, still termostaten på 3 eller 4.
Merk:
Romtemperaturen, hvor ofte døren åpnes og
plasseringen av apparatet kan påvirke temperaturen i
kjøleskapet. Disse forhold må tas i betraktning ved
innstilling av termostaten.
Bruke kjøleseksjonen
Plasser matvarene som vist på figuren.
A Fisk, kjøtt
B Kokte matvarer
C Frukt og grønnsaker
DFlasker
EOst
Merknader:
• Avstanden mellom hyllene og bakveggen i
kjøleseksjonen må ikke blokkeres, ellers kan ikke
luften sirkulere fritt.
• Ikke plasser matvarer helt inntil bakveggen i
kjøleseksjonen.
• Ikke sett varm mat i kjøleskapet.
• Oppbevar væske i lukkede beholdere.
Viktig
Oppbevaring av grønnsaker med høyt
vanninnhold kan føre til at det dannes kondens
på glasshyllen til crisper-skuffen:
Dette har ingen innvirkning på apparatets
funksjon.
BRUKE KJØLESEKSJONEN
Termostatboksens form avhenger av merket
Page 57

57
Fryseseksjonen er merket med
.
Fryseseksjonen kan også brukes til å
fryse inn ferske matvarer.
Den mengde ferske matvarer som kan fryses
inn på 24 timer er oppgitt på typeplaten.
Merk:
Fryseseksjonen er i stand til å holde riktig
oppbevaringstemperatur for matvarer også ved
strømbrudd. Det anbefales imidlertid å unngå å
åpne døren til seksjonen så lenge strømbruddet
varer.
Innfrysing av ferske matvarer (kun seksjoner
merket med )
Viktig
• Før innfrysing må du pakke ferske matvarer i:
aluminiumsfolie, plastfolie, vanntette plastposer,
polyetylenbeholdere m/lokk eller spesielle
fryseposer/-bokser som egner seg for innfrysing
av matvarer.
• Plasser matvarene i øverste del av
fryseseksjonen, og sørg for at det er plass nok
rundt pakkene til at luften kan sirkulere.
• For optimal frysing, vri termostatbryteren et
halvt trinn ned når du legger ferske matvarer i
fryseseksjonen.
• Maten vil være helt dypfryst etter 24 timer.
For apparater med seksjon merket med
I tabellen ved siden av ser du anbefalt
maksimal oppbevaringstid for dypfryste
matvarer.
Når du kjøper frysevarer:
• Kontroller at emballasjen er i god stand (dypfryst
mat i skadet emballasje kan ha blitt forringet).
Dersom pakken buler ut eller det er våte flekker
på den, er den ikke blitt oppbevart riktig og kan
ha vært utsatt for en delvis opptining.
• Når du handler, kjøp alltid frysevarene til slutt og
frakt dem hjem i kjølebag.
• Legg matvarene i fryseseksjonen med en gang
du kommer hjem.
• Dersom matvarene er begynt å tine, må de aldri
fryses inn på nytt. Bruk i så fall varene innen 24
timer.
• Unngå variasjoner i temperaturen eller reduser
dem til et minimum. Ta hensyn til
holdbarhetsdatoen på emballasjen.
• Følg alltid instruksjonene på emballasjen for
oppbevaring av frysevarene.
Lage isterninger hvis isterningsbrett er
tilgjengelig
• Fyll isterningbrettet 2/3 fullt med vann, og
plasser det i fryseseksjonen
• Hvis brettet skulle fryse fast, må du ikke bruke
skarpe gjenstander for å få det løs.
• Bøy isterningsbrettet forsiktig for å løsne
isterningene.
BRUKE FRYSESEKSJONEN (hvis den finnes)
MÅNEDER MATVARER
Page 58

58
Før enhver form for rengjøring eller
vedlikehold av apparatet, må apparatet kobles
fra strømnettet.
Avriming av kjøleseksjonen skjer automatisk.
Tidvis dannelse av vanndråper på bakveggen i
kjøleseksjonen viser at apparatet er i ferd med å
avrime seg.
Smeltevannet renner ned gjennom et
dreneringshull, og samles deretter opp i en
beholder der det fordamper.
Rengjør jevnlig innsiden av dreneringshullet for
avrimingsvannet for å sikre at overflødig vann
renner ut.
Avriming av fryseseksjonen
Det anbefales å avrime fryseseksjonen én til to
ganger i året, eller når det har dannet seg et
tykt islag.
Rimdannelse er normalt. Hvor raskt det
danner seg rim og hvor mye som dannes,
avhenger av romtemperaturen og hvor ofte
døren åpnes. Rimdannelse i den øverste delen
av seksjonen er normalt og har ingen
innvirkning på apparatets funksjon.
Avrimingen bør helst gjøres når det er
minimalt med matvarer i fryseren.
• Ta ut alle matvarene fra fryseren. Pakk dem inn i
avispapir, og legg dem tett sammen på et kjølig
sted eller i en kjølebag.
• La døren stå åpen for å fremskynde
nedsmeltingen.
• Rengjør innsiden av seksjonen med en
svamp fuktet i lunkent vann, eventuelt
tilsatt et nøytralt vaskemiddel. Ikke bruk
slipende rengjøringsmidler.
• Skyll innsiden og tørk grundig.
• Legg matvarene inn igjen i fryseren.
• Lukk døren.
• Sett støpslet tilbake i stikkontakten.
• Slå apparatet på igjen.
AVRIME OG RENGJØRE KJØLESKAPET
Page 59

59
• Rengjør jevnlig luftåpningene og kondensatoren
bak på apparatet med støvsuger eller med en
børste.
• Rengjør utsiden med en myk klut.
Ved lengre fravær
1. Tøm kjøleskapet.
2. Koble apparatet fra strømnettet.
3. Avrim og rengjør seksjonene innvendig.
4. Hvis apparatet ikke skal brukes i en lengre
periode, la døren stå åpen slik at det ikke dannes
mugg, ubehagelig lukt eller korrosjon.
5. Rengjør apparatet.
• Rengjør fryseseksjonen (noen modeller) i
forbindelse med avriming.
• Rengjør innsiden av kjøleseksjonen jevnlig med
en svamp fuktet i varmt vann og/eller et nøytralt
rengjøringsmiddel. Skyll og tørk med en myk
klut. Ikke bruk skurende midler.
• Rengjør utsiden av apparatet med en myk, fuktig
klut.
Ikke bruk etsende midler eller stålull, og heller
ikke løsemidler (f.eks. aceton, terpentin) eller
eddik.
Skifte lyspære:
Dersom lyspæren skal skiftes ut, går du frem på
følgende måte:
• Ta støpselet ut av stikkontakten.
• Trykk inn tappene på hver side av
lampedekselet, og ta det av.
• Skift ut pæren med en ny pære, maksimalt 10W.
• Sett lampedekselet tilbake på plass, og vent 5
minutter før du kobler apparatet til strømnettet
igjen.
RENGJØRING OG VEDLIKEHOLD
Page 60

60
1. Apparatet virker ikke.
• Er det strømbrudd?
• Står støpselet skikkelig i stikkontakten?
• Er topolsbryteren slått på?
• Har sikringen gått?
• Er strømkabelen skadet?
• Er termostaten innstilt på
•
(stopp)?
2. Temperaturen i seksjonene er ikke kald
nok.
• Er døren ordentlig lukket?
• Er noen av matvarene plassert slik at døren
ikke lukker seg skikkelig?
• Er apparatet plassert i nærheten av en
varmekilde?
• Er termostaten riktig innstilt?
• Er luftsirkulasjonen gjennom
ventilasjonsåpningene blokkert?
3. Temperaturen i kjøleseksjonen er for lav.
• Er termostaten riktig innstilt?
4. Apparatet lager mye støy.
• Er apparatet riktig installert?
• Berører rørene bak på apparatet
noe/hverandre eller vibrerer de?
5. Det er vann i bunnen av kjøleseksjonen.
• Er dreneringshullet for avriming tilstoppet?
6. Mye rimdannelse i fryseseksjonen.
• Er døren ordentlig lukket?
• Er noen av matvarene plassert slik at døren
ikke lukker seg skikkelig?
Merknader:
• Gurglende og hvislende lyder fra
kjølekretsen er helt normalt.
FEILSØKINGSLISTE
Før du kontakter serviceavdelingen:
1. Forsøk å løse problemet på egen hånd (se
“Feilsøkingsliste“).
2. Slå apparatet på igjen for å se om problemet er
løst. Hvis problemet vedvarer, frakobles
apparatet strømnettet igjen og forsøket gjentas
etter en time.
3. Hvis problemet fremdeles er der, kontakt
serviceavdelingen.
Oppgi:
• hva problemet er
• modellen
• servicenummeret (står etter ordet SERVICE på
typeplaten inni apparatet)
• din adresse
• ditt telefonnummer
Merk:
Døren kan hengsles om.
Dette arbeidet dekkes ikke av garantien
dersom det utføres av kundeservice.
SERVICE
Page 61

61
• Ikke plasser apparatet i nærheten av en
varmekilde. Plassering i et rom med høy
temperatur, i direkte sollys eller nær en
varmekilde (ovn eller komfyr) fører til økt
strømforbruk og bør derfor unngås.
• Hvis dette ikke er mulig, bør følgende
minimumsavstander overholdes:
• 30 cm fra olje- eller vedkomfyrer
• 3 cm fra elektriske komfyrer og/eller
gasskomfyrer
• Apparatet er laget for integrering. Installer
apparatet i kjøkkenseksjoner basert på angitte
mål (se figuren).
• Rengjør innsiden.
• Monter tilbehøret.
Elektrisk tilkobling
• Elektrisk tilkobling må utføres i henhold til
gjeldende lokale bestemmelser.
• Spenning og strømforbruk er oppgitt på
typeplaten inne i apparatet.
• Det er påbudt å jorde apparatet.
Produsenten fraskriver seg ethvert ansvar for
eventuelle skader på personer, dyr eller
gjenstander som skyldes manglende respekt for
ovennevnte bestemmelser.
• Hvis støpslet og stikkontakten ikke er av samme
type, må stikkontakten skiftes ut av en kvalifisert
elektriker.
• Ikke bruk skjøteledninger eller doble
stikkontakter.
Elektrisk frakobling
Det må være mulig å frakoble apparatet, enten ved
at støpslet trekkes ut, eller ved hjelp av en
topolsbryter plassert over stikkontakten.
INSTALLASJON
Page 62

62
Hengsle om døren
Bytte om dørens svingretning
Døren til kjøleskapet kan åpnes fra høyre eller
venstre side.
Når apparatet leveres, åpnes døren fra venstre side.
Følg fremgangsmåten under hvis du skal hengsle om
døren.
Merk: Før du hengsler om døren, må apparatet
kobles fra strøm.
1. Fjern de to skruene (1) mens du holder det øvre
hengselet (2) (høyre side) mot rammen. Ta av
hengselet (2).
2. Løft døren opp av bolten på det nedre
hengselet, og legg den på en overflate som ikke
riper.
3. Skru ut de to skruene (3) som holder det nedre
hengselet (4).
Ta av hengselet (4).
4. Bytt om hengselets retning (2). Monter hengslet
(2) igjen nede på venstre side ved hjelp av de to
skruene (1).
5. Senk døren ned på bolten i det nedre hengselet
(2).
6. Mens døren holdes i lukket stilling, monterer du
det øvre hengselet (4) igjen på venstre side ved
hjelp av de to skruene (3). Ikke stram skruene
(1) før toppen av døren står på linje med
benkeplaten.
Døren åpnes fra venstre side fig. 1
Døren åpnes fra høyre side fig. 2
2
1
3
3
4
4
1
2
Page 63

63
Omhengsle døren til den
innvendige seksjonen
1. Fjern de to plastskruene (1) på venstre side.
2. Fjern de to skruedekslene (2) og kroken på
døren (3).
3. Skru løs døren til fryseseksjonen (4), og ta den
av.
Snu døren og monter den igjen på venstre side.
4. Snu dørlåsen (3), monter den på høyre side, og
monter de to skruedekslene igjen (2).
5. Sett de to plastskruene (1) tilbake på plass på
høyre side.
FØR OMHENGSLING
ETTER OMHENGSLING
Page 64

64
• Dette apparat er beregnet til husholdningsbrug
samt til brug:
- i køkkener på arbejdspladser, i forretninger
og/eller i kontorer
- på landbrugsejendomme
- i hotelværelser, i motelværelser, i
ferielejligheder, i bed & breakfast værelser.
For at få det bedste udbytte af apparatet
anbefales det at læse brugsanvisningen nøje,
da den indeholder en beskrivelse af apparatet
samt nyttige råd om opbevaring af
madvarerne.
Gem denne brugsanvisning til senere brug.
1. Efter at have fjernet emballagen fra apparatet
skal det kontrolleres, at det ikke er beskadiget
og at døren lukker korrekt. Eventuelle skader
skal anmeldes til forhandleren inden for 24 timer
fra leveringen af apparatet.
2. Det anbefales at vente mindst 2 timer med at
starte skabet, således at kølesystemet fungerer
perfekt.
3. Installation og eltilslutning skal foretages af en
autoriseret servicetekniker i henhold til
producentens anvisninger samt gældende lokal
lovgivning.
4. Rengør apparatet indvendigt inden brug.
FØR APPARATET TAGES I BRUG
1. Emballage
Emballagen kan genbruges 100 % og er mærket
med genbrugssymbolet. Bortskaffelse skal ske i
henhold til gældende lokale regler. Emballagen
(plastposer, polystyrenstykker osv.) skal opbevares
uden for børns rækkevidde, da den udgør en
potentiel fare.
2. Bortskaffelse
Skabet er fremstillet af genbrugeligt materiale.
Dette produkt er mærket i henhold til EU-direktiv
2002/96/EF om Kasseret elektrisk og elektronisk
udstyr (WEEE). Ved at sikre at dette produkt bliver
skrottet korrekt, hjælper du med til at forhindre
potentielle, negative konsekvenser for miljøet og
folkesundheden, der kunne opstå gennem
uhensigtsmæssig bortskaffelse af dette produkt.
Symbolet på produktet eller på
dokumenterne, der ledsager produktet, angiver, at
produktet ikke må bortskaffes sammen med
husholdningsaffaldet. Det skal i stedet afleveres på
en genbrugsstation for elektrisk og elektronisk
udstyr. Gør apparatet ubrugeligt ved at fjerne
dørene og hylderne og klippe netledningen af, så
børn ikke kan gemme sig i skabet.
Apparatet skal skrottes i henhold til gældende
lokale regler for bortskaffelse af affald og sendes til
specielle affaldsstationer. Det må ikke efterlades i
miljøet selv i få dage, hvor det kan udgøre en fare
for børn. For yderligere oplysninger om håndtering,
genvinding og genbrug af dette produkt bedes du
kontakte de lokale myndigheder,
renovationsselskabet eller forretningen, hvor
produktet er købt.
Bemærk:
Dette apparat indeholder ikke CFC. Kølekredsløbet
indeholder R134a (HFC) eller R600a (HC), se
typeskiltet i apparatet.
Apparater med isobutan (R600a): Isobutan er en
uskadelig naturlig gas, som dog er brandfarlig. Det
er derfor vigtigt at kontrollere, at kølekredsløbets
rør ikke er beskadigede.
Dette apparat kan indeholde fluorholdige
drivhusgasser, der er omfattet af Kyotoprotokollen. Kølemidlet er indeholdt i et hermetisk
forseglet system.
Kølemiddel: R134a har en potentiel global
opvarmning (GWP) på 1.300.
Overensstemmelseserklæring
• Dette apparat er beregnet til opbevaring af
madvarer og er produceret med overholdelse af
kravene i forordning (EF) nr. 1935/2004.
• Apparatet er designet, produceret og
markedsført i overensstemmelse med:
- Sikkerhedskravene i Lavspændingsdirektivet
2006/95/EF (der erstatter direktiv 73/23/EØF
og efterfølgende ændringer);
- Beskyttelseskravene i EMC-direktivet
2004/108/EF.
Skabets elsikkerhed garanteres kun,
når det er korrekt tilsluttet til en
kontakt med lovpligtig
ekstrabeskyttelse.
OPLYSNINGER OM MILJØHENSYN
Page 65

65
INSTALLATION
• Flytning og installation af apparatet skal udføres
af to eller flere personer.
• Vær forsigtig i forbindelse med flytninger, så
gulvet ikke bliver beskadiget (f.eks. parketgulv).
• Under opstillingen kontrolleres det, at skabet
ikke beskadiger elkablet.
• Sørg for, at apparatet ikke er placeret i
nærheden af en varmekilde.
• Sørg for, at der er plads på begge sider og over
apparatet eller følg installationsanvisningerne for
at sikre en passende udluftning.
• Sørg for, at ventilationsåbningerne i skabet ikke
blokeres eller tildækkes.
• Sørg for ikke at beskadige kølekredsløbet.
• Opstil skabet på et plant gulv, som kan modstå
vægten, og på et passende anvendelsessted.
• Stil skabet et tørt sted med god udluftning.
Skabet er beregnet til optimal drift ved
rumtemperaturer inden for følgende intervaller,
der svarer til den klimakategori, som er angivet
på typeskiltet. Skabet kan ikke fungere korrekt,
hvis det i en længere periode får lov til at stå i en
temperatur over eller under det angivne
interval.
• Kontrollér, at spændingen på typeskiltet svarer
til spændingen i husstanden.
• Der må ikke benyttes multi- eller
enkeltstikdåser eller forlængerledninger.
• Brug vandslangen, der følger med skabet til
slutning til vand, men brug ikke slangen til det
tidligere apparat.
• Elkablet må kun ændres eller udskiftes af en
autoriseret tekniker eller af Service.
• Det skal være muligt at afbryde strømmen enten
ved fjernelse af stikket eller ved hjælp af en
bipolær netværksafbryder, som installeres inden
stikkontakten.
SIKKERHED
• Benyt ikke apparatet til opbevaring af
sprayflasker eller beholdere med drivgas eller
brandfarlige væsker.
• Opbevar og benyt ikke benzin, brandfarlige
gasser eller væsker i nærheden af apparatet eller
andre elartikler. Dampene, som udvikles, kan
medføre brand eller eksplosioner.
• Benyt ikke mekaniske, elektriske eller kemiske
anordninger for at fremskynde afrimningen,
medmindre de er af en type anbefalet af
producenten.
• Brug aldrig elektriske apparater indvendigt i
skabet, medmindre de er af en type anbefalet af
producenten.
• Dette apparat er ikke beregnet til at blive brugt
af børn eller personer med fysiske, sensoriske
eller mentale handicap eller med med
manglende erfaring og kendskab til apparatet,
medmindre disse personer er under opsyn eller
er oplært i brugen af apparatet af en person, der
er ansvarlig for deres sikkerhed.
• For at undgå risikoen for, at børn bliver lukket
inde eller kvalt i apparatet, er det forbudt at lege
ved eller gemme sig i apparatet.
• Indtag ikke væsken (ugiftig) i fryseelementerne
(hvis de findes).
• Spis ikke isterninger eller ispinde umiddelbart
efter fjernelse fra fryseren, idet der er risiko for
fryseskader.
BRUG
• Før enhver form for vedligeholdelse eller
rengøring skal stikket tages ud af stikkontakten,
eller strømmen afbrydes på hovedafbryderen.
• Alle apparater med ismaskine og vandautomat
skal sluttes til drikkevandsforsyningen
(vandforsyningstrykket skal være mellem 1,7 og
8,1 bar). Ismaskinen, is- og/eller vandautomaten,
som ikke er tilsluttet vandforsyningen, må kun
fyldes med drikkevand.
• Brug kun køleskabet til opbevaring af friske
madvarer og fryseren kun til opbevaring af
frostvarer, til indfrysning af friske madvarer samt
til fremstilling af isterninger.
• Glasflasker med væsker må ikke anbringes i
fryseren, da de kan gå i stykker.
• Anbring ikke madvarer, der ikke er emballerede,
i kontakt med køle- eller fryseafdelingens
indvendige vægge.
Producenten kan på ingen måde gøres
ansvarlig i tilfælde af manglende overholdelse
af ovennævnte råd og advarsler.
KlimakategoriOmg. temp.
(°C)
Omg. temp.
(°F)
SN Fra 10 til 32 Fra 50 til 90
N Fra 16 til 32 Fra 61 til 90
ST Fra 16 til 38 Fra 61 til 100
T Fra 16 til 43 Fra 61 til 110
ADVARSLER OG GENERELLE RÅD
Page 66

66
Bemærk:
• Luftudtagsområdet (på bagvæggen) må ikke
blokeres med fødevarer
• Hvis fryseafdelingen er forsynet med en klap,
kan opbevaringsområdet gøres større ved at
bøje den.
• Alle hylder, klapper og skuffer kan fjernes.
• Apparatets indvendige temperatur afhænger af
rumtemperaturen, apparatets placering, og hvor
tit døren åbnes. Disse faktorer skal tages i
betragtning ved indstillingen af temperaturen.
• Tilbehørsdelene kan ikke vaskes i
opvaskemaskine, medmindre andet er angivet.
• Jo større afstand der er bag ved apparatet, jo
større er strømbesparelsen.
Sådan tændes skabet
Igangsætning af skabet
Skabet er forsynet med indvendige betjeningsknapper.
Sæt stikket i stikkontakten.
Det indvendige lys tænder, når døren åbnes, hvis
apparatet er tilsluttet. Termostaten, der sidder i
køleskabsdelen, gør det muligt at regulere
køleskabstemperaturen og temperaturen i frostboksen
(når den findes).
Regulering af temperaturen i skabet:
Regulering af temperaturen:
Termostaten regulerer automatisk temperaturen i
køleskabet og i frostboksen (hvis den
forefindes).
Når knappen drejes fra position 1 til 7 (koldeste
indstilling), falder temperaturen.
I position 0 er der slukket for skabets drift.
Ved opbevaring af madvarer i kort tid kan
termostatknappen stilles mellem 1 (min.) og
3 (med.).
- Ved opbevaring af madvarer i lang tid i
frostboksen skal knappen stilles på 3 eller 4.
Bemærk:
Rumtemperaturen, antallet af gange døren åbnes samt
placeringen af skabet har betydning for temperaturen.
Indstillingerne af termostaten skal derfor stå i forhold
til disse faktorer.
Opbevaring af madvarer i køleskabet
Anbring madvarerne som vist på tegningen.
A Kød og fisk
B Tilberedte madvarer
C Frugt og grøntsager
DFlasker
EOst
Bemærk:
• Afstanden mellem hylderne og bagvæggen i
køleskabet sikrer fri luftcirkulation.
• Madvarerne må ikke anbringes i direkte kontakt
med skabets bagvæg.
• Læg ikke varme madvarer i køleskabet.
• Opbevar væsker i lukkede beholdere.
Vigtigt
Opbevaring af grøntsager med højt vandindhold
kan medføre, at der dannes kondens på
glashylden i grøntsagsskuffen:
Dette påvirker ikke apparatets korrekte
funktion.
SÅDAN ANVENDES KØLESKABET
Termostatens kasseform afhængigt af mærket
Page 67

67
Frostboksen er
.
I frostboksen kan man også indfryse
friske madvarer.
Mængden af friske madvarer, der kan indfryses
på 24 timer, er angivet på typepladen.
Bemærk:
Frostboksen er i stand til at vedligeholde den
nødvendige temperatur til opbevaring af madvarer,
selv om der sker en strømafbrydelse. Det anbefales
dog at undlade at åbne frostboksens låge under
strømafbrydelsen.
Indfrysning af friske madvarer (kun i bokse
med )
Vigtigt
• Inden frysning pakkes maden ind i: stanniol,
plastfilm, luft- og vandtætte plastposer,
lågbeholdere i polyætylen eller fryseemballage,
som er egnet til nedfrysning af frisk mad.
• Varer, der skal indfryses, anbringes i øverste
rum. Sørg for fri luftcirkulation mellem
madvarerne.
• For at optimere indfrysningen skal
termostatknappen drejes et halvt trin, hver gang
der lægges madvarer i fryseren.
• Varerne vil være helt frosne efter 24 timer.
Til apparater med frostboks med
I den viste tabel ses det antal måneder, hvori
friske, indfrosne varer kan opbevares.
Ved køb af frostvarer skal man:
• kontrollere, at emballagen ikke er beskadiget
(frossen mad i beskadiget emballage kan være
forringet). Hvis en pakke er bulet eller har
fugtige pletter, har den ikke været opbevaret
under optimale betingelser og kan have været
udsat for delvis optøning.
• Køb frostvarer som det sidste, og transporter
produkterne i en termopose.
• Anbring straks varerne i frostboksen ved
hjemkomsten.
• Hvis en madvare har været optøet (også
delvist), må den ikke nedfryses igen. Brug den
inden for 24 timer.
• Undgå eller begræns temperaturudsving mest
muligt. Overhold udløbsdatoen på emballagen.
• Følg altid anvisningerne på emballagen
vedrørende opbevaring af frostvarer.
Fremstilling af isterninger, hvis isbakken er
tilgængelig
• Fyld bakken 2/3 op med vand, og sæt den i
frostboksen
• Hvis isterningbakken sidder fast på bunden, må
der ikke anvendes spidse eller skarpe genstande
til at løsne den med.
• Isterningerne kommer lettere ud, hvis bakken
vrides let.
BRUG AF FROSTBOKSEN (hvis den forefindes)
MÅNEDER MADVARER
Page 68

68
Før enhver form for vedligeholdelse eller
rengøring skal stikket tages ud af
stikkontakten, eller strømmen afbrydes på
hovedafbryderen.
Afrimningen af køleafdelingen er
fuldautomatisk.
Periodisk dannelse af vanddråber på køleskabets
bagvæg betyder, at den automatiske afrimning er i
gang.
Afrimningsvandet ledes automatisk via en
afløbskanal ud i en beholder, hvor det fordamper.
Rens regelmæssigt indersiden af drænhullet til
afrimningsvandet for at sikre konstant og korrekt
gennemstrømning af afrimningsvand.
Afrimning af frostboksen
Det anbefales at afrime frostboksen 1-2 gange
årligt, eller så snart rimlaget bliver for tykt.
Dannelse af rim er helt normalt. Mængden af
is samt hastigheden, hvormed den dannes, er
afhængig af den omgivende rumtemperatur og
fugtighed samt antallet af gange, døren åbnes.
Dannelsen af rim især øverst i rummet er helt
naturlig og har ingen betydning for apparatets
korrekte funktion.
Det anbefales at afrime frostboksen, når der
kun er få varer i den.
• Åbn døren, og tag madvarerne ud af
frostboksen. Pak dem ind i avispapir, og læg dem
et køligt sted eller i en termopose.
• Lad døren stå åben, således at isen på væggene
kan smelte.
• Rengør med en svamp, der er fugtet med
lunkent vand og/eller sæbevand. Der må
ikke anvendes slibemidler.
• Skyl indvendigt, og tør godt efter.
• Læg madvarerne på plads.
• Luk døren.
• Sæt stikket i stikkontakten igen.
• Tænd for apparatet.
AFRIMNING OG RENGØRING AF
KØLESKABET
Page 69

69
• Rengør regelmæssigt ventilationsristene og
kondensatoren på bagsiden af fryseren med en
støvsuger eller en børste.
• Den udvendige del af skabet rengøres med en
blød klud.
Ved længerevarende fravær
1. Tøm køleskabet.
2. Tag apparatets strømstik ud.
3. Afrim og rengør begge rum.
4. Lad dørene stå åbne for at forhindre afiltning og
dannelse af mug og dårlig lugt.
5. Gør skabet rent.
• Rengør frostboksen under afrimningen (i de
modeller hvor den findes).
• Rengør køleskabet regelmæssigt indvendigt med
en svamp fugtet med varmt vand og/eller
neutralt rengøringsmiddel. Skyl og tør grundigt
med en blød klud. Der må ikke anvendes
slibemidler.
• Rengør skabet udvendigt med en blød klud
fugtet med vand.
Der må ikke anvendes skurecreme eller
skuresvampe og heller ikke pletfjerningsmidler
(som f.eks. acetone, trikloræthylen) eller eddike.
Udskiftning af pæren:
Sådan udskiftes pæren:
• Tag stikket ud af stikkontakten
• Tryk på tapperne på lampeglassets sider, og fjern
det.
• Fjern pæren, og udskift den med en ny på maks.
10 watt.
• Sæt lampeglasset på plads igen. Vent 5 minutter,
og sæt derefter stikket i stikkontakten igen.
RENGØRING OG VEDLIGEHOLDELSE
Page 70

70
1. Køle-/fryseskabet fungerer ikke.
• Er der strømafbrydelse?
• Sidder stikket ordentligt i stikkontakten?
• Er den bipolære afbryder aktiveret?
• Er der gået en sikring?
• Er elkablet beskadiget?
• Står termostaten i position
•
(Stop)?
2. Køle-/fryseskabet køler ikke tilstrækkeligt.
• Er døren ordentligt lukket?
• Forhindrer madvarerne en korrekt lukning af
døren?
• Er apparatet opstillet tæt på en varmekilde?
• Er termostaten indstillet korrekt?
• Er luftcirkulationen gennem ventilationsristene
blokeret?
3. Køleskabet køler for meget.
• Er termostaten indstillet korrekt?
4. Køleskabet støjer for meget.
• Er opstillingen af skabet foretaget korrekt?
• Berører rørene på bagsiden hinanden, eller
vibrerer de?
5. Der er vand i bunden af køleafdelingen.
• Er afløbskanalen for afrimningsvand blokeret?
6. Kraftig rimdannelse i frostboksen.
• Er døren ordentligt lukket?
• Forhindrer madvarerne en korrekt lukning af
døren?
Bemærk:
• Gurglende og hvislende lyde stammer fra
kølesystemet og er helt normale.
FEJLFINDINGSOVERSIGT
Før Service kontaktes:
1. Undersøg, om det er muligt selv at rette fejlene
(se “Fejlfindingsoversigt”).
2. Start apparatet igen for at se, om fejlen er
afhjulpet. Hvis det ikke er tilfældet, afbrydes
strømmen igen, og operationen gentages efter 1
time.
3. Hvis resultatet stadig er negativt, kontaktes
Service.
Oplys venligst:
• Fejltypen
• Modellen
• Servicenummeret (tallet står efter ordet
SERVICE på typepladen, der er anbragt inden i
apparatet)
• Fuldt navn og adresse
• Telefonnummer.
Bemærk:
Døren kan vendes, så den åbner i modsatte
side.
Hvis Service udfører vending af døren, dækkes
det ikke af garantien.
SERVICE
Page 71

71
• Apparatet må ikke opstilles tæt på en
varmekilde. Det bør ikke opstilles i et varmt
rum, udsættes for direkte sollys eller anbringes i
nærheden af varmekilder (radiator, komfur), da
dette forøger energiforbruget.
• Hvis ovenstående ikke er muligt, skal følgende
regler om minimumafstande overholdes:
• 30 cm fra kulfyrede eller petroleumsfyrede
komfurer,
• 3 cm fra el- og/eller gaskomfurer.
• Apparatet er fremstillet til at være indbygget.
Monter apparatet i køkkenenhederne i henhold
til de nødvendige mål (se figur).
• Rengør skabet indvendigt.
• Monter tilbehøret.
Eltilslutning
• Tilslutning skal foretages i henhold til gældende
lokal lovgivning.
• Netspændingen og strømforbruget fremgår af
typepladen, der er anbragt inden i apparatet.
• Dette apparat skal ekstrabeskyttes jævnfør
stærkstrømsreglementet.
Producenten fralægger sig ethvert ansvar for
eventuelle skader på personer eller ting som
følge af manglende overholdelse af disse regler.
• Hvis stikket og stikkontakten ikke er af samme
type, skal stikket udskiftes af en autoriseret
elektriker.
• Der må ikke benyttes forlængerledninger eller
multistikdåser.
Afbrydelse af elektricitet
Elektriciteten skal kunne afbrydes enten ved at tage
stikket ud eller ved hjælp af en topolet afbryder, der
er anbragt før stikkontakten.
OPSTILLING
Page 72

72
Ændring af dørens åbningsretning
Sådan ændres dørens åbningsretning
Køleskabsdøren kan åbnes fra højre eller venstre
side.
Ved leveringen åbnes skabsdøren fra venstre side.
Følg disse instruktioner for at ændre dørens
åbningsretning.
Bemærk: Før dørens åbningsretning ændres, skal
stikket trækkes ud af stikkontakten, eller apparatet
skal kobles fra strømforsyningen.
1. Fjern de to skruer (1), idet det øverste hængsel
(2) (højre side) holdes tæt ind til rammen. Fjern
hængslet (2).
2. Løft døren af den nederste hængselstap, og læg
den forsigtigt på en plan overflade.
3. Fjern de to skruer (3), idet det nederste hængsel
(4) understøttes.
Fjern hængslet (4).
4. Vend hængslets retning (2). Genmonter det
nederste hængsel (2) i venstre side med de to
skruer (1).
5. Sænk døren ned på tappen af nederste hængsel
(2).
6. Idet døren holdes i lukket position, genmonteres
det øverste hængsel (4) i venstre side med de to
skruer (3). Stram ikke skruerne (1), før døren er
i niveau i forhold til køkkenbordet.
Døråbning fra venstre side fig. 1
Døråbning fra højre side fig. 2
2
1
3
3
4
4
1
2
Page 73

73
Vending af fryseboksens lågeåbning
1. Fjern de to plastskruer (1) i venstre side.
2. Fjern de to skruedæksler (2) og dørkrogen (3).
3. Skru fryseboksens låge (4) af, og fjern den. Vend
lågen, og monter den igen i venstre side.
4. Vend dørkrogen (3), genmonter den i højre side,
og genmonter de to skruedæksler (2).
5. Til slut sættes de to plastskruer (1) på plads igen
i højre side.
FØR VENDINGEN
EFTER VENDINGEN
Page 74

74
• Spotřebič, který jste zakoupili, byl navržen pro
použití v domácnosti a také:
- v kuchyňských koutcích na pracovištích, v
prodejnách a/nebo kancelářích
- na farmách
- v hotelích, motelích, rezidencích, penzionech
Bed & Breakfast pro jednu osobu.
Chcete-li váš spotřebič využívat co nejlépe,
přečtěte si pozorně návod k použití, ve kterém
najdete popis spotřebiče a užitečné rady.
Návod si uschovejte pro další použití.
1. Po vybalení spotřebiče se přesvědčte, zda není
poškozený a zda dveře dokonale přiléhají.
Případná poškození je třeba nahlásit prodejci do
24 hodin od dodání spotřebiče.
2. Doporučujeme Vám, abyste se zapojením
spotřebiče počkali nejméně dvě hodiny, aby
chladící okruh mohl dokonale fungovat.
3. Instalaci a elektrické připojení spotřebiče smí
provádět pouze kvalifikovaný odborník podle
pokynů výrobce a v souladu s platnými místními
bezpečnostními předpisy.
4. Před použitím vnitřek spotřebiče vymyjte.
PŘED PRVNÍM POUŽITÍM SPOTŘEBIČE
1. Obal
Obal je ze 100 % recyklovatelného materiálu a je
označen recyklačním znakem. Při likvidaci se řiďte
místními předpisy pro odstraňování odpadu. Obalové
materiály (plastové sáčky, polystyrén apod.) mohou
být pro děti nebezpečné, proto je třeba odstranit
obalový materiál z jejich dosahu.
2. Likvidace
Spotřebič byl vyroben z recyklovatelného materiálu.
Tento spotřebič je označený v souladu s evropskou
směrnicí 2002/96/ES o likvidaci elektrického a
elektronického zařízení (WEEE). Zajištěním správné
likvidace tohoto spotřebiče pomůžete zabránit
případným negativním důsledkům na životní
prostředí a lidské zdraví, ke kterým by nevhodnou
likvidací tohoto spotřebiče mohlo dojít.
Symbol na výrobku nebo k němu přiložených
dokladech udává, že tento spotřebič nesmí být
likvidován spolu s domácím odpadem, ale je ho
nutné odevzdat do sběrného místa pro recyklaci
elektrického a elektronického zařízení.
Jestliže už nechcete spotřebič používat, znehodnoťte
ho odříznutím elektrického přívodního kabelu po
odpojení od elektrické sítě a odstraňte police a dveře,
aby se děti nemohly zavřít uvnitř.
Při likvidaci spotřebiče se řiďte místními předpisy pro
odstraňování odpadu a odevzdejte ho do příslušného
sběrného dvora; nenechávejte ho bez dozoru ani jen
na několik dní, protože pro děti představuje možný
zdroj nebezpečí.
Další informace o likvidaci, rekuperaci a recyklaci
tohoto spotřebiče získáte na příslušném místním
úřadě, v podniku pro sběr domácího odpadu nebo v
obchodě, kde jste spotřebič zakoupili.
Informace:
Tento spotřebič neobsahuje CFC. Chladicí okruh
obsahuje R134a (HFC) ani R600a (HC) (viz typový
štítek uvnitř spotřebiče).
Pro majitele spotřebičů obsahujících isobutan
(R600a): isobutan je přírodní plyn bez škodlivých
účinků na životní prostředí, ale je hořlavý. Je tedy
nutné se přesvědčit, že nedošlo k poškození trubek
chladicího okruhu.
Tento spotřebič může obsahovat fluorované
skleníkové plyny, na které se vztahuje Kjótský
protokol; chladicí plyn je obsažen v hermeticky
uzavřeném systému.
Chladicí plyn: R134a má potenciál globálního
oteplování (GWP) 1300.
Prohlášení o souladu s předpisy
• Tento spotřebič je určen k uchovávání potravin a
byl vyroben v souladu s předpisem (ES) č.
1935/2004.
• Tento spotřebič byl navržen, zkonstruován a
prodán v souladu s:
- bezpečnostními cíli směrnice "Nízké napětí"
2006/95/ES (která nahrazuje 73/23/EHS a
následná znění);
- požadavky na ochranu směrnice "EMC"
2004/108/ES.
Elektrické zabezpečení spotřebiče je
zajištěno pouze v případě správného
připojení k účinnému uzemňovacímu
zařízení odpovídajícímu předpisům.
RADY K OCHRANĚ ŽIVOTNÍHO PROSTŘEDÍ
Page 75

75
INSTALACE
• Ke stěhování a instalaci spotřebiče jsou nutné
minimálně dvě osoby.
• Při přemísťování dejte pozor, abyste nepoškodili
podlahy (např. parkety).
• Během instalace se přesvědčte, zda se
přemisťováním chladničky nepoškodil přívodní
kabel.
• Přesvědčte se, zda chladnička nestojí v blízkosti
tepelného zdroje.
• Nad spotřebičem a po jeho stranách ponechte
vždy volný prostor k zajištění správného větrání a
dodržujte pokyny k instalaci.
• Větrací otvory spotřebiče musí vždy zůstat volné.
• Nepoškozujte okruh chladicí kapaliny.
• Spotřebič instalujte a vyrovnejte na podlaze, která
unese jeho váhu, a v prostředí, které vyhovuje
jeho rozměrům a použití.
• Spotřebič umístěte na suchém a dobře větraném
místě. Spotřebič je určen k provozu v prostředích,
ve kterých je teplota v následujícím rozmezí podle
klimatické třídy uvedené na štítku s údaji: při
dlouhodobém ponechání spotřebiče v nižší nebo
vyšší teplotě nemůže spotřebič správně fungovat.
• Zkontrolujte, zda napětí na typovém štítku
odpovídá napětí ve vašem bytě.
• Nepoužívejte jednoduché adaptéry ani rozdvojky,
či prodlužovací šňůry.
• Pro připojení k vodovodní síti použijte hadici,
která je součástí vybavení nového spotřebiče, a
nepoužívejte hadici od starého spotřebiče.
• Výměnu nebo opravu napájecího kabelu smějí
provádět pouze odborně vyškolení nebo servisní
pracovníci.
• Odpojení od elektrické sítě musí být možné buď
vytažením zástrčky ze zásuvky, nebo pomocí
dvoupólového síťového vypínače umístěného
před zásuvkou.
BEZPEČNOSTNÍ OPATŘENÍ
• Do spotřebiče nevkládejte nádobky se sprejem
nebo nádobky obsahující pohonné hmoty anebo
hořlavé kapaliny.
• V blízkosti chladničky ani jiných elektrických
spotřebičů nepoužívejte benzín, plyn nebo
hořlavé kapaliny. Uvolněné páry mohou způsobit
požár nebo výbuch.
• Neurychlujte odmrazování mechanickými nástroji
nebo jinými postupy, než doporučuje výrobce.
• V oddílech spotřebiče nepoužívejte elektrické
přístroje, které nejsou doporučené výrobcem, ani
je do nich neukládejte.
• Tento spotřebič nesmějí používat osoby (včetně
dětí) se sníženými fyzickými, smyslovými nebo
duševními schopnostmi, ani osoby bez patřičných
znalostí o spotřebiči a zkušeností s jeho
používáním, s výjimkou situace, kdy na tyto osoby
dohlíží, nebo jim radí jiná osoba odpovědná za
jejich bezpečnost.
• Nedovolte dětem, aby si hrály nebo se schovávaly
v chladničce, mohly by se udusit nebo zůstat
uvnitř jako v pasti.
• Je-li váš model vybaven mrazicími akumulátory,
nepolykejte kapalinu (netoxickou), která je v nich
obsažena.
• Nejezte ledové kostky nebo ledová lízátka ihned
po vyjmutí z mrazničky, mohly by vám způsobit
omrzliny v ústech.
POUŽITÍ
• Před každou údržbou nebo čištěním spotřebiče
vytáhněte přívodní kabel ze zásuvky nebo odpojte
přístroj od elektrické sítě.
• Všechny spotřebiče vybavené výrobníky ledu a
dávkovači vody musí být připojené k vodovodní
síti, která dodává výlučně pitnou vodu (s tlakem
vodovodní sítě mezi 1,7 a 8,1 bar (25 a 117 PSI).
Výrobníky ledu a/nebo dávkovače vody, které
nejsou přímo připojené k vodovodní síti, je nutné
plnit výhradně pitnou vodou.
• Chladicí oddíl používejte pouze k uchovávání
čerstvých potravin a mrazicí oddíl pouze k
uchovávání zmrazených potravin, zmrazování
čerstvých potravin a k výrobě ledových kostek.
• Do mrazicího oddílu nedávejte skleněné nádoby s
tekutinami, protože by mohly prasknout.
• Nezabalené uložené potraviny se nesmějí přímo
dotýkat vnitřních stran chladicího nebo mrazicího
oddílu.
Výrobce odmítá jakoukoli odpovědnost v případě
nedodržení výše uvedených doporučení a
bezpečnostních opatření.
Poznámky:
• Nezakrývejte prostor s otvory pro výstup vzduchu
(na zadní stěně) potravinami.
• V případě, že je mrazicí prostor uzavřen víkem,
můžete jeho odstraněním zvětšit skladovací
prostor (ohnutím).
Klimatická
třída
Teplota prostř.
(°C)
Teplota prostř.
(°F)
SN od 10 do 32 od 50 do 90
N od 16 do 32 od 61 do 90
ST od 16 do 38 od 61 do 100
T od 16 do 43 od 61 do 110
VŠEOBECNÉ POKYNY A UPOZORNĚNÍ
Page 76

76
• Všechny police, víka a vysunovací koše jsou
vyjímatelné.
• Vnitřní teploty spotřebiče mohou být ovlivněny
teplotou v místnosti, frekvencí otevírání dveří i
umístěním spotřebiče. Při nastavování teploty
musíte brát tyto faktory v úvahu.
• Pokud není uvedeno jinak, není příslušenství
spotřebiče vhodné pro mytí v myčce nádobí.
• Čím větší je vzdálenost zadní strany spotřebiče
od stěny, tím vyšší je úspora energie.
Zapnutí spotřebiče
Spuštění spotřebiče
Spotřebič je vybaven vnitřním ovládáním.
Zasuňte zástrčku do zásuvky.
Jestliže je spotřebič připojený ke zdroji elektrického
proudu, rozsvítí se po otevření dveří vnitřní osvětlení.
Termostat, který je umístěný v chladicím oddílu
spotřebiče, umožňuje nastavení teploty v chladicím
oddílu a teploty v oddílu s nízkou teplotou (je-li jím
model vybaven).
Seřízení teploty spotřebiče:
Nastavení teploty:
Termostat automaticky seřizuje vnitřní teplotu chladicího
oddílu a oddílu (je-li jím model vybaven).
Otočením ovladače termostatu z polohy1 na 7
(nejchladnější nastavení) dosáhnete nižší vnitřní teploty.
V poloze 0 je spotřebič vypnutý.
Ke krátkodobému uchovávání potravin doporučujeme
nastavit ovladač termostatu mezi 1 (Min) a 3 (Med).
- K dlouhodobému uchování potravin v oddílu
otočte ovladačem termostatu na 3 nebo 4.
Poznámka:
Vnitřní teploty uvnitř obou oddílů mohou být ovlivněny
okolní teplotou, četností otevírání dveří a umístěním
spotřebiče. Při nastavování ovladače termostatu musíte
brát tyto skutečnosti v úvahu.
Jak uchovávat potraviny v chladicím oddílu
Potraviny ukládejte tak, jak je znázorněno na obrázku.
A Ryby, maso
B Vařená jídla
C Ovoce a zelenina
D Láhve
E Sýr
Poznámky:
• Odstup polic od vnitřní zadní stěny chladicího oddílu
umožňuje volný oběh vzduchu.
• Uložené potraviny se nesmí dotýkat vnitřní zadní
stěny chladicího oddílu.
• Do chladničky neukládejte ještě teplé potraviny.
• Tekutiny uchovávejte v uzavřených nádobách.
Důležité upozornění
Uchovávání zeleniny s vysokým obsahem vody
může způsobit kondenzaci vlhkosti na skleněné
polici zásuvky na ovoce a zeleninu; správnému
chodu spotřebiče to ale nevadí.
JAK POUŽÍVAT CHLADICÍ ODDÍL
Tvar krytu termostatu v závislosti na značce
Page 77

77
Oddíl s nízkou teplotou je označen
.
Je-li oddíl s nízkou teplotou označen
můžete ho použít také ke zmrazování čerstvých
potravin.
Množství potravin, které je možné zmrazit za 24
hodin je uvedeno na typovém štítku.
Poznámka:
Oddíl s nízkou teplotu si udrží teplotu vhodnou k
uchování potravin i v případě přerušení elektrického
proudu Doporučujeme nicméně v této době neotvírat
dveře mrazicího oddílu.
Zmrazování čerstvých potravin (pouze v oddílech
označených )
Důležité upozornění
• Zabalte a zapečeťte čerstvé potraviny ke
zmrazení do: alobalu, průhledných fólií,
plastových obalů nepropouštějících vodu ani
vzduch, polyetylénových nádob s víčky, nádob do
mrazničky vhodných ke zmrazování.
• Potraviny ke zmrazení položte do horního
prostoru a okolo balíčků ponechte dostatečný
prostor k volnému oběhu vzduchu.
• Chcete-li dosáhnout co nejlepšího výsledku
zmrazování, otočte po vložení čerstvých potravin
do mrazicího oddílu termostatem o půl bodu k
nižším hodnotám.
• Po 24 hodinách je zmrazování dokončeno.
Pro spotřebiče s oddíly označenými
Délku uchování čerstvých zmrazených potravin v
měsících najdete v uvedené tabulce.
Při nákupu zmrazených potravin dbejte na to,
aby:
• obal nebo krabička nebyly porušené (zmrazené
potraviny v poškozeném obalu se mohly začít
kazit). Je-li obal vyboulený nebo jsou na něm
vlhké skvrny, výrobek zřejmě nebyl správně
skladován a obsah se již mohl začít rozmrazovat.
• Hlubokozmrazené potraviny nakupujte jako
poslední a k přepravě používejte speciální
chladicí tašky.
• Ihned po návratu domů uložte potraviny do oddílu
s nízkou teplotou.
• Jestliže jsou potraviny i jen částečně rozmrazené,
znovu je nezmrazujte.
Spotřebujte je do 24 hodin.
• Snažte se zabránit změnám teploty, nebo je co
nejvíce omezte. Dodržujte dobu trvanlivosti
uvedenou na obalu.
• Při skladování zmrazených potravin se vždy řiďte
pokyny na jejich obalu.
Výroba ledových kostek (je-li u modelu nádobka
na ledové kostky)
• Nádobku na ledové kostky do naplňte do 2/3
vodou a postavte ji do mrazicího oddílu
• K uvolnění nádobky nepoužívejte ostré nebo
špičaté předměty.
• Aby se vám ledové kostky z misky snadněji
vyndávaly, lehce ji ohněte.
JAK POUŽÍVAT ODDÍL S NÍZKOU
TEPLOTOU
(je-li k dispozici)
MĚSÍCE POTRAVINY
Page 78

78
Před každou údržbou nebo čištěním spotřebiče
vytáhněte napájecí kabel ze zásuvky nebo jinak
odpojte spotřebič od elektrické sítě.
Odmrazování chladicího oddílu je zcela
automatické.
Pravidelné tvoření vodních kapek na vnitřní zadní
stěně chladicího oddílu znamená, že právě probíhá
automatické odmrazování.
Rozmrazená voda stéká do odpadního kanálku a
odtud do sběrné nádoby, kde se vypařuje.
Pravidelně čistěte vnitřek odtokového otvoru; zajistíte
tak stálý a pravidelný odtok rozmrazené vody.
Odmrazování oddílu s nízkou teplotou
Doporučujeme odmrazovat oddíl s nízkou
teplotou jednou nebo dvakrát ročně, nebo když
se vytvoří nadměrná vrstva námrazy.
Tvoření námrazy je normální jev. Její množství a
rychlost usazování závisí na okolním prostředí a
četnosti otvírání dveří mrazničky. Hromadění
námrazy hlavně v horní části oddílu je normální
jev a nijak neohrožuje správný chod spotřebiče.
Doporučujeme odmrazovat tehdy, když je v oddílu
nejmenší množství potravin.
• Vyjměte všechny zmrazené potraviny z
mrazničky, zabalte je do několika vrstev novin a
dejte je na chladné místo nebo do speciální
chladicí tašky.
• Dveře nechte otevřené, aby námraza mohla
roztát.
• Vnitřek mrazničky vymyjte houbou
namočenou v roztoku teplé vody a/nebo
neutrálního čisticího prostředku.
Nepoužívejte prostředky s drsnými částicemi.
• Pečlivě ho opláchněte a osušte.
• Potraviny vložte zpět.
• Zavřete dveře.
• Zástrčku opět zasuňte do sítě.
• Zapněte spotřebič.
JAK ODMRAZOVAT A ČISTIT CHLADNIČKU
Page 79

79
• Pravidelně vysavačem nebo kartáčem čistěte
větrací mřížky a kondenzátor umístěný na zadní
stěně spotřebiče.
• Vnější části čistěte měkkým hadříkem.
Při dlouhé nepřítomnosti
1. Z chladničky vyndejte všechny potraviny.
2. Odpojte ho od zdroje elektrického napájení.
3. Odmrazte a vyčistěte vnitřek.
4. Není-li spotřebič v provozu, nechávejte vždy
otevřené dveře, abyste zabránili vzniku plísní,
nepříjemných pachů a oxidaci.
5. Čištění spotřebiče.
• Vnitřek oddílu s nízkou teplotou (je-li u modelu)
čistěte vždy při odmrazování.
• Vnitřek chladicího oddílu pravidelně čistěte
houbou namočenou v roztoku vlažné vody a/nebo
neutrálního čisticího prostředku.
Opláchněte a vysušte měkkým hadříkem.
Nepoužívejte čisticí prostředky s drsnými
částicemi.
• Vnější plochy čistěte měkkým hadříkem
namočeným ve vodě.
Nepoužívejte pasty ani drátěnky s drsnými
částicemi, ani prostředky na čistění skvrn (např.
aceton, terpentýn) nebo ocet.
Výměna žárovky:
V případě výměny žárovky postupujte následujícím
způsobem:
• Vytáhněte zástrčku ze zásuvky.
• Stiskněte šroubovákem boční úchytky krytu
žárovky a odstraňte ho.
• Žárovku vyměňte za novou, max. 10 W.
• Vraťte kryt žárovky, počkejte 5 minut, a teprve pak
spotřebič opět připojte k síti.
ČIŠTĚNÍ A ÚDRŽBA
Page 80

80
1. Spotřebič nefunguje.
• Nedošlo k výpadku proudu?
• Je zástrčka správně zasunutá do zásuvky?
• Je dvoupólový vypínač zapnutý?
• Není spálená síťová pojistka?
• Není přívodní kabel poškozený?
• Není ovladač termostatu v poloze
•
(Stop)?
2. Teplota uvnitř oddílů není dostatečně nízká.
• Jsou dveře správně zavřené?
• Nebrání uložené potraviny správnému zavření
dveří?
• Nestojí spotřebič blízko zdroje tepla?
• Je termostat správně nastavený?
• Nejsou zablokované větrací otvory pro cirkulaci
vzduchu?
3. Teplota uvnitř chladicího prostoru je příliš
nízká
• Je termostat správně nastavený?
4. Spotřebič je příliš hlučný.
• Je spotřebič správně instalovaný?
• Nedotýká se potrubí na zadní straně něčeho,
nebo nevibruje?
5. Na dně chladicího oddílu je voda.
• Není ucpaný odvod rozmrazené vody?
6. Nadměrné množství námrazy v mrazicím
oddíle.
• Jsou dveře správně zavřené?
• Nebrání uložené potraviny správnému zavření
dveří?
Poznámky:
• Bublání a šumění v chladicím okruhu
neznamená závadu, je normální.
JAK ODSTRANIT PORUCHU
Než zavoláte do poprodejního servisu:
1. Zkuste poruchu odstranit sami podle pokynů v
části “Jak odstranit poruchu”).
2. Zkuste, zda problém trvá i po opětovném zapnutí
spotřebiče. Jestliže porucha stále trvá, spotřebič
opět vypněte a zkoušku po hodině opakujte.
3. V případě stále trvající poruchy zavolejte do
servisu.
Sdělte:
• druh poruchy
• model
• servisní číslo (číslo uvedené za slovem SERVICE
na typovém štítku uvnitř spotřebiče)
• svoji úplnou adresu
• své telefonní číslo s předvolbou.
Poznámka:
Směr otvírání dveří můžete změnit.
Změna otevírání dveří provedená servisní
službou se nepovažuje za opravu splňující
podmínky záruky.
POPRODEJNÍ SERVIS
Page 81

81
• Spotřebič by se měl instalovat v dostatečné
vzdálenosti od zdrojů tepla. Neměli byste ho
instalovat do teplé místnosti, nebo na místo, kde
by byl přímo vystaven slunečním paprskům nebo
do blízkosti tepelného zdroje (radiátory, vařiče),
protože to vše zvyšuje spotřebu energie.
• Není-li to možné, je nutné dodržet následující
minimální vzdálenosti:
• 30 cm od sporáků na uhlí nebo na topný olej;
• 3 cm od elektrických a/nebo plynových sporáků.
• Spotřebič není určen k vestavbě. Instalujte ho do
kuchyňské linky podle požadovaných rozměrů (viz
obrázek).
• Vymyjte vnitřek.
• Instalujte příslušné vybavení.
Připojení k elektrické síti
• Připojení k síti musí být provedeno v souladu s
platnými předpisy.
• Údaje o napětí a příkonu jsou uvedeny na
typovém štítku umístěném uvnitř spotřebiče.
• Uzemnění spotřebiče je podle zákona povinné.
Výrobce odmítá jakoukoli odpovědnost za zranění
osob či zvířat nebo poškození majetku vzniklé
nedodržením výše uvedených předpisů.
• Jestliže zástrčka napájecího kabelu neodpovídá
zásuvce, požádejte o výměnu zásuvky
kvalifikovaného elektrikáře.
• Nepoužívejte prodlužovací kabely ani sdružené
zásuvky.
Odpojení od elektrické sítě
Spotřebič musí být odpojitelný od elektrické sítě buď
vytažením napájecího kabelu ze zásuvky nebo
pomocí dvoupólového síťového vypínače umístěného
před zásuvkou.
INSTALACE
Page 82

82
Změna směru otvírání dveří
Přemístění dveřních závěsů
Dveře chladničky se mohou otvírat zprava nebo
zleva.
Chladnička se dodává s otvíráním zleva.
Chcete-li směr otvírání změnit, postupujte
následujícím způsobem.
Poznámka: Před změnou směru otvírání dveří
vytáhněte zástrčku ze zásuvky, nebo jinak odpojte
spotřebič od elektrické sítě.
1. Vyšroubujte dva šrouby (1) a podržte přitom horní
závěs (2) (pravá strana) k rámu.
Odstraňte závěs (2).
2. Nadzdvihněte dveře z čepu dolního závěsu a
položte je na hladkou plochu, aby se neodřely.
3. Vyšroubujte dva šrouby (3) držící dolní závěs(4).
Odstraňte závěs (4).
4. Změňte směr závěsu (2). Opět namontujte závěs
(2) na dolní levou stranu pomocí dvou šroubů (1).
5. Spusťte dveře dolů na čep dolního závěsu (2).
6. Podržte dveře v zavřené poloze, opět namontujte
horní závěs (4) na levé straně pomocí dvou
šroubů (3). Neutahujte šrouby (1), dokud nebude
horní okraj dveří vyrovnaný s pracovní deskou.
Otvírání dveří zleva obr. 1
Otvírání dveří zprava obr. 2
2
1
3
4
3
4
1
2
Page 83

83
Změna směru otvírání dveří vnitřního
oddílu
1. Vyšroubujte dva plastové šrouby (1) na levé
straně.
2. Odstraňte dvě krytky šroubů (2) a háček dveří (3).
3. Odšroubujte dveře mrazicího oddílu (4) a
odstraňte je.
Otočte dveře a instalujte je na levé straně.
4. Obraťte umístění háčku dveří (3), instalujte ho na
pravé straně a opět namontujte dvě krytky šroubů
(2).
5. Nakonec umístěte dva plastové šrouby (1) na
pravou stranu.
PŘED ZMĚNOU SMĚRU OTVÍRÁNÍ DVEŘÍ
PO ZMĚNĚ SMĚRU OTVÍRÁNÍ DVEŘÍ
Page 84

84
• Váš spotrebič bol naprojektovaný a vyrobený
nielen pre domáce používanie ale aj pre
používanie:
- v pracovných priestoroch napr: podnikových
kuchyniach, obchodoch, úradoch - vo farmách
- v hoteloch, moteloch, turistických rezidenciách,
bed & breakfast a pre vlastné použitie
zákazníka e.
Pre najefektívnejšie využitie spotrebiča, radíme
Vám, aby ste si pozorne prečítali návod na
používanie, kde nájdete popis spotrebiča a
užitočné rady.
Odložte si túto príručku na budúce použitie.
1. Po odstránení obalov, skontrolujte či nie je
poškodený a či dvere sa dobre zatvárajú.
Oznámte prípadné zistené poškodenia predajcovi
do 24 hodín od doručenia spotrebiča.
2. Pred pripojením do elektrickej siete, vyčkajte
najmenej dve hodiny, aby bol chladiaci okruh
spotrebiča funkčný.
3. Inštaláciu spotrebiča a jeho elektrické zapojenie
môže uskutočniť kvalifikovaný pracovník servisu v
súlade s pokynmi výrobcu a požiadavkami noriem
STN.
4. Pred uvedením spotrebiča do prevádzky vyčistite
jeho vnútro.
PRED UVEDENÍM SPOTREBIČA DO
ČINNOSTI
1. Obal
Materiál obalu je 100% necyklovateľný a označený
symbolom recyklácie. Pri jeho likvidácii dodržiavajte
platné predpisy. Obalový materiál (plastové vrecia,
polystyrénové kúsky a pod...) musí byť uložený mimo
dosahu detí, pretože môže byť pre ne nebezpečný.
2. Likvidácia
Výrobok je vyrobený z recyklovateľných materiálov.
Tento spotrebič je označený v súlade s Európskou
smernicou 2002/96/EC, o likvidácii elektrických a
elektronických zariadení Zabezpečením, že tento
výrobok bude likvidovaný správnym spôsobom,
pomôžete predchádzať potenciálnym negatívnym
dopadom na životné prostredie a ľudské zdravie.
Symbol na výrobku alebo na sprievodných
dokumentoch znamená, že s týmto výrobkom sa
nesmie zaobchádzať ako s domovým odpadom.
Naopak, treba ho odovzdať do zberného strediska na
recykláciu elektrických alebo elektronických
zariadení.
V prípade jeho likvidácie odrežte prívodný elektrický
kábel, aby nebolo možné spotrebič znovu použiť.
Odstráňte dvere a vyberte police, aby sa deti nemohli
dostať ľahko do vnútra spotrebiča.
Pri likvidácii dodržiavajte miestne predpisy pre
likvidáciu odpadu a spotrebič odovzdajte do
zberného strediska. Nenechávajte ho bez dozoru ani
na málo dní, pretože predstavuje nebezpečenstvo
pre deti. Podrobnejšie informácie o zaobchádzaní,
regenerácii a recyklácii tohto výrobku si vyžiadajte na
Vašom miestnom úrade, v zberných surovinách alebo
v obchode kde ste si výrobok kúpili.
Informácia:
Tento výrobok neobsahuje CFC. Chladiaci okruh
obsahuje R134a (HFC) ani R600a (HC) (pozri typový
štítok umiestnený vo vnútri spotrebiča).
Spotrebiče s izobutánom (R600a): izobután je
prírodný plyn, bez škodlivých vplyvov na životné
prostredie e je však horľavý. Dbajte aby sa
nepoškodili trubky chladiaceho okruhu.
Tento spotrebič môže obsahovať plyny s obsahom
fluóru spôsobujúce skleníkový efekt, na ktoré sa
vzťahuje Dohoda podpísaná v Kyoto; chladiaci plyn je
v hermeticky uzavretom systéme.
Chladiaci plyn: R134a má schopnost’ ovplyvnit’
globálne ohrievanie atmosféry (GWP) 1300.
Prehlásenie o zhode
• Tento spotrebič je určený na skladovanie
potravinárskych výrobkov a je vyrobený v súlade
s požiadavkami nariadení noriem (CE) číslo.
1935/2004.
• Tento spotrebič bol navrhnutý, vyrobený a
uvedený na trh v súlade s:
- bezpečnostnými predpismi “Smernice o nízkom
napätí" 2006/95/ES (ktorá nahrádza smernicu
73/23/EHS v znení nasledujúcich úprav);
- ochrannými požiadavkami smernice “EMC"
2004/108/CE.
Elektrická bezpečnosť spotrebiča je
zaručená výhradne iba v prípade
správneho zapojenia do elektrickej siete
s uzemnením podľa normy.
OCHRANA ŽIVOTNÉHO PROSTREDIA
Page 85

85
INŠTALÁCIA
• Na presúvanie a na inštaláciu spotrebiča sú
potrebné aspoň dve osoby alebo viac osôb.
• Pri premiestňovaní dávajte pozor, aby ste
nepoškodili podlahu (napr. parkety).
• Počas inštalácii dbajte aby spotrebič nepoškodil
pri jeho manipulácii elektrickú prívodovú šnúru.
• Skontrolujte či spotrebič nie umiestnený v
blízkosti tepelných zdrojov.
• Aby sa zaručila dostatočná cirkulácia vzduchu,
nechajte po bokoch voľný priestor alebo
postupujte podľa inštalačných pokynov.
• Nechajte voľné ventilačné otvory spotrebiča.
• Dbajte aby sa nepoškodili trubky chladiaceho
okruhu chladničky.
• Spotrebič nainštalujte a vyrovnajte do vodorovnej
poly voči podlahe, ktorá unesie jeho hmotnosť a
do prostredia, ktoré je vhodné pre jeho rozmery a
účel použitia.
• Spotrebič umiestnite v suchom a dobre vetranom
prostredí. Spotrebič je vyrobený pre prevádzku v
prostrediach s teplotou, ktorá sa musí pohybovať
v následne uvedených intervaloch a v závislosti
od klimatickej triedy uvedenej na štítku s
technickými údajmi: ak spotrebič necháte
fungovať dlhší čas pri teplote vyššej alebo nižšej
ako je teplota uvedená v určenom intervale, jeho
činnosť by sa tým mohla byť narušiť.
• Skontrolujte či údaje o napätie uvedené na
typovom štítku zodpovedajú napätiu elektrickej
siete Vašej domácnosti.
• Nepoužívajte predlžovacie káble ani rozdvojky.
• Pri zapojení na vodovodnú sieť používajte hadicu,
ktorá sa dodáva s novým spotrebičom,
nepoužívajte nikdy starú hadicu, ktorú ste už
predtým používali zo starého spotrebiča.
• Opravu alebo výmenu elektrického prívodného
kábla zverte výhradne zaškoleným pracovníkom
alebo sa obráťte na Servisné stredisko.
• Zabezpečte možnosť odpojenia spotrebiča zo
siete vytiahnutím zástrčky zo zásuvky alebo
pomocou dvojpólového vypínača zapojeného
pred zásuvkou.
RADY A BEZPEČNOSTNÉ POKYNY
• Nikdy nevkladajte do spotrebiča spreje alebo
nádobky, ktoré obsahujú propelenty alebo
vznetlivé látky.
• V blízkosti chladničky alebo iných domácich
spotrebičov neuskladňujte a nepoužívajte benzín,
plyn alebo iné horľavé kvapaliny. Uvoľňované
výpary môžu spôsobiť požiar alebo výbuch.
• Na urýchlenie rozmrazovania nepoužívajte
mechanické nástroje, elektrické prístroje alebo
chemické prostriedky, ak ich výrobca neodporučil.
• Vo vnútri skladovacích priestorov nepoužívajte a
nevkladajte elektrické prístroje ak ich používanie
nie je doporučené výrobcom.
• Tento spotrebič nesmú používat' osoby (vrátane
detí) s obmedzenými fyzickými, zmyslovými alebo
psychickými schopnost'ami bez dozoru, ani
osoby, ktoré nemajú skúsenosti a nevedia
spotrebič používat', ak neboli o jeho používaní
poučené osobou zodpovednou za ich
bezpečnost'.
• Aby ste predišli nebezpečenstvu zatvorenia a
udusenia detí vo vnútri spotrebiča, nedovoľte im
hrať sa alebo schovávať vo vnútri spotrebiča.
• Nepite kvapalinu (je jedovatá) ktorú obsahujú
chladiace kompresory, ak je nimi spotrebič
vybavený.
• Nejedzte ľadové kocky ani ľadové nanuky ihneď
potom, ako ich vyberiete z mrazničky, hrozí
nebezpečenstvo "studených" popálenín
POUŽÍVANIE
• Pred údržbou alebo čistením, odpojte spotrebič
od elektrickej siete vypnutím alebo vytiahnutím
prívodného kábla.
• Všetky spotrebiče vybavené výrobníkom ľadu
alebo dávkovačom vody musia byť pripojené k
vodovodnému potrubiu, ktoré privádza výhradne
iba pitnú vodu (s tlakom v potrubí od 0,17 do 0,81
MPa (1,7 do 8,1 bar)). Výrobníky ľadu alebo
dávkovače, ktoré nie sú priamo napojené na
vodovodnú sieť, musia sa naplňovať iba pitnou
vodou.
• Používajte chladiaci priestor iba na skladovanie
čerstvých potravín, nápojov a mraziaci priestor iba
na skladovanie hlboko zmrazených potravín, na
zmrazenie čerstvých potravín a prípravu ľadových
kociek.
• V mraziacom priestore neskladujte kvapaliny v
sklenených nádobách, pretože nádoba by mohla
prasknúť.
• Vyhýbajte sa skladovaniu nebalených potravín,
ktoré by boli v kontakte s vnútornými stenami
chladničky alebo mraziaceho priestoru.
Výrobca odmieta akúkoľvek zodpovednosť za
poruchy a škody v prípade ak neboli dodržané
hore uvedené rady a bezpečnostné pokyny.
Klimatická
trieda
T. prostr.
(°C)
T. prostr.
(°F)
SN od 10 do 32 od 50 do 90
N od 16 do 32 od 61 do 90
ST od 16 do 38 od 61 do 100
T od 16 do 43 od 61 do 110
RADY A BEZPEČNOSTNÉ POKYNY
Page 86

86
Poznámky:
• Neblokujte priestor vetracích otvorov (na zadnej
stene) potravinami.
• Ak je mraznička vybavená klapkou, je možné
maximalizovať úložný priestor vybratím klapky (jej
sklopením).
• Všetky police, klapky a vyťahovacie koše sa dajú
vybrať.
• Vnútorné teploty spotrebiča môže ovplyvňovať
teplota prostredia, frekvencia otvárania dverí, ako
aj umiestnenie spotrebiča. Teplotu treba nastaviť
vzhľadom na tieto faktory.
• Pokiaľ nie je uvedené inak, príslušenstvo
spotrebiča sa nesmie umývať v umývačke riadu.
• Čím väčšia bude vzdialenosť zadnej steny
spotrebiča od steny, tým väčšia bude úspora
energie.
Zapnutie spotrebiča
Uvedenie spotrebiča do prevádzky
Spotrebič je vybavený vnútornými ovládacími prvkami.
Zasuňte zástrčku do zásuvky elektrickej siete.
Keď je spotrebič zapojený v sieti, vnútorné osvetlenie sa
rozsvieti pri otvorení dverí chladničky. Termostat,
umiestnený v chladiacom priestore spotrebiča môžete
použiť na reguláciu teploty v chladiacom priestore a v
priestore s nízkou teplotou (ak je prítomný).
Funkcia regulácie teploty spotrebiča:
Regulácia teplôt:
Termostat automaticky reguluje vnútornú teplotu
chladiaceho priestoru a priestoru (ak je
prítomný).
Otočením ovládacieho gombíka z polohy 1 na 7 môžete
dosiahnuť chladnejšie teploty.
V polohe 0 je spotrebič mimo prevádzky.
Pri krátkodobom skladovaní potravín môžete otočiť
ovládací gombík do polohy medzi 1 (Min) a 3 (Str).
- Pri dlhodobom skladovaní potravín v priestore
, otočte ovládací gombík do polohy 3 alebo
4.
Poznámka:
Vnútorná teplota spotrebiča závisí od teploty vzduchu v
miestnosti, frekvencie otvárania dverí a umiestnenia
spotrebiča. Gombík termostatu nastavte s ohľadom na
tieto vplyvy.
Ako uchovávať potraviny v chladiacom priestore
Potraviny ukladajte, ako je to znázornené na obrázku.
A Ryby, mäso
B Varené jedlá
C Ovocie a zelenina
D Fľaše
E Syry
Poznámky:
• Priestor medzi policami a zadnou stenou
chladiaceho priestoru musí zostať voľný, aby bolo
zaručené voľné prúdenie vzduchu.
• Jedlá ukladajte tak, aby sa nedotýkali priamo zadnej
steny chladiaceho priestoru.
• Do chladničky nevkladajte ešte teplé jedlá.
• Tekutiny skladujte v uzavretých nádobách.
Dôležité upozornenie
Pri skladovaní zeleniny s vysokým obsahom vody
sa môže na stenách skladovacích nádob na ovocie a
zeleninu tvoriť vodný kondenzát: je bežným javom a
nevplýva na riadne fungovanie spotrebiča.
AKO POUŽÍVAŤ CHLADIACI PRIESTOR
Vzhľad termostatu v závislosti od značky
Page 87

87
Priestor s nízkou teplotou je označený
.
V priestore s nízkou teplotou s označením
môžete aj zmrazovať čerstvé potraviny.
Množstvo čerstvých potravín, ktoré sa môžu
zmraziť za 24 hodín sa uvádza na typovom štítku.
Poznámka:
Priestor s nízkou teplotou dokáže udržať teplotu
vhodnú pre skladovanie potravín aj v prípade
výpadku dodávky elektrickej energie Napriek tomu
Vám odporúčame počas výpadku prúdu dvere
neotvárať.
Zmrazovanie čerstvých potravín (iba v priestore
)
Dôležité upozornenie
• Pred zmrazovaním čerstvé potraviny zabaľte a
pevne uzavrite do: hliníkovej fólie, plastovej fólie,
vzduchotesných a vodotesných plastových
vreciek, uzavretých polyetylénových nádob alebo
osobitných zmrazovacích nádob.
• Potraviny, ktoré chcete zmraziť, uložte do
vrchného oddelenia, pričom okolo balíčkov
nechajte dostatočný priestor pre prúdenie
vzduchu.
• Na lepšie zmrazenie vložených potravín nastavte
ovládací gombík termostatu zo strednej polohy
smerom k nižším číslam.
• Potraviny sa úplne zmrazia za 24 hodín.
Spotrebič s oddelením
Tabuľka vedľa znázorňuje odporúčaný
maximálny čas skladovania mrazených čerstvých
potravín.
Pri nákupe mrazených potravinárskych výrobkov
skontrolujte, či:
• Uistite sa, že obal a samotný balíček sú
nepoškodené (mrazené potraviny by sa v
poškodenom obale mohli znehodnotiť). Ak je
balíček vydutý alebo sú na ňom vlhké škvrny, je to
príznakom nevhodného uchovávania a možného
čiastočného rozmrazenia potravín počas
skladovania.
• Pri nákupe si nechávajte nákup mrazených
potravín na koniec a dopravujte ich v tepelne
izolačných vreckách.
• Mrazené výrobky uložte do priestoru s nízkou
teplotou ihneď po príchode domov.
• Ak sa potraviny rozmrazili, hoci iba čiastočne,
nezmrazujte ich znova.
Spotrebujte ich do 24 hodín.
• Potraviny nevystavujte zmenám teploty.
Dodržiavajte dátum spotreby uvedený na obale.
• Vždy sa riaďte pokynmi pre skladovanie
mrazených potravín, ktoré sú uvedené na obale.
Príprava ľadových kociek, ak je prítomná miska
na ľad
• Naplňte misku na ľad do 2/3 jej výšky a vložte ju
do priestoru s nízkou teplotou
• Ak sa nádobka na ľad primrazila ku dnu priestoru
s nízkou teplotou, nepoužívajte na jej uvoľnenie
ostré alebo špicaté predmety.
• Opatrným prehnutím misky na ľad kocky uvoľnite.
AKO POUŽÍVAŤ PRIESTOR S NÍZKOU
TEPLOTOU
(ak je prítomný)
MESIACE POTRAVINY
Page 88

88
Pred akýmkoľvek úkonom údržby alebo pred
čistením spotrebiča vytiahnite zástrčku
prívodného kábla alebo odpojte spotrebič od
elektrickej siete.
Rozmrazovanie chladiaceho priestoru je úplne
automatické.
Kvapky vody na zadnej stene chladiaceho priestoru
sú znakom prebiehajúceho periodického
automatického cyklu odmrazovania.
Rozmrazená voda sa odvádza do odtokového otvoru
a do nádobky, odkiaľ sa odparuje.
Pravidelne čistite vnútro odtokového otvoru na
rozmrazenú vodu tak, aby bol zaručený optimálny a
stabilný prietok rozmrazenej vody.
Rozmrazovanie priestoru s nízkou teplotou
Priestor s nízkou teplotou rozmrazujte raz až
dvakrát ročne alebo pri nadmernom množstve
ľadu.
Tvorba námrazy je úplne bežný jav.
Množstvo a rýchlosť závisí od izbovej teploty,
vlhkosti a od frekvencie otvárania dverí. Ľad sa
tvorí najmä v hornej časti priestoru, je bežným
javom a nevplýva na riadne fungovanie
spotrebiča.
Podľa možnosti mraziaci priestor odmrazujte,
keď je takmer prázdny.
• Vyberte potraviny z mraziaceho priestoru, zabaľte
ich do novín a uložte ich spoločne na studené
miesto alebo do prenosnej chladničky.
• Dvere nechajte otvorené, aby sa námraza mohla
roztopiť.
• Vyčistite vnútro špongiou namočenou vo
vlažnej vode, prípadne s neutrálnym čistiacim
prostriedkom. Nepoužívajte abrazívne čistiace
prostriedky.
• Vnútro starostlivo opláchnite a osušte.
• Uložte potraviny späť do mraziaceho priestoru.
• Zatvorte dvere.
• Vsuňte zástrčku do zásuvky.
• Spotrebič zapnite.
AKO ODMRAZIŤ A VYČISTIŤ CHLADIACI
PRIESTOR
Page 89

89
• Pravidelne vyčistite vysávačom alebo kefou
vetracie mriežky a kondenzátor na zadnej časti
spotrebiča.
• Vonkajšie časti čistite mäkkou handričkou.
Dlhodobá neprítomnosť
1. Chladničku úplne vyprázdnite.
2. Spotrebič odpojte od elektrickej siete.
3. Rozmrazte a vyčistite vnútro oboch priestorov.
4. Aby ste zabránili tvorbe plesní, nepríjemnému
zápachu a oxidácii, dvere spotrebiča nechajte
otvorené, ak je spotrebič mimo prevádzky.
5. Spotrebič vyčistite.
• Počas rozmrazovania vyčistite vnútro
nízkoteplotného priestoru (ak ho model obsahuje).
• Pravidelne čistite vnútro chladiaceho priestoru
špongiou namočenou v teplej vode, prípadne s
prídavkom neutrálneho saponátu. Vnútro
opláchnite a vysušte mäkkou handričkou.
Nepoužívajte abrazívne čistiace prostriedky.
• Vyčistite spotrebič zvonka mäkkou handričkou,
navlhčenou vo vode.
Nepoužívajte abrazívne produkty, škrabky,
odstraňovače škvŕn (napr. acetón, trichlóretylén)
ani ocot.
Výmena žiarovky:
Pri výmene žiarovky dodržiavajte nasledujúci postup:
• Odpojte spotrebič z elektrickej siete.
• Zatlačte na jazýčky na bokoch krytu žiarovky a
vyberte kryt.
• Vymeňte žiarovku za novú s výkonom max. 10W.
• Namontujte späť kryt žiarovky a pred opätovným
zapojením spotrebiča k sieti počkajte 5 minút.
ČISTENIE A ÚDRŽBA
Page 90

90
1. Spotrebič nefunguje.
• Bola prerušená dodávka elektriny?
• Je zástrčka riadne zasunutá v sieťovej zásuvke?
• Je sieťový vypínač v polohe ON (Zapnuté)?
• Nie je vypálená poistka?
• Je napájací kábel v bezchybnom stave?
• Je termostat v polohe
•
(Stop)?
2. Vnútorná teplota nie je dostatočne nízka.
• Sú dvere dobre zatvorené?
• Neprekážajú skladované potraviny správnemu
zatvoreniu dverí?
• Nie je spotrebič umiestnený blízko tepelného
zdroja?
• Je termostat v správnej polohe?
• Je umožnené prúdenie vzduchu?
3. Teplota je príliš nízka
• Je termostat v správnej polohe?
4. Spotrebič je mimoriadne hlučný.
• Bol spotrebič nainštalovaný správne?
• Nedotýkajú sa rúrky vzadu zadnej steny alebo
nevibrujú?
5. Na dne chladničky je voda.
• Nie je upchatý odtokový otvor na rozmrazenú
vodu?
6. Nadmerná tvorba ľadu v priestore s nízkou
teplotou
• Sú dvere dobre zatvorené?
• Neprekážajú skladované potraviny správnemu
zatvoreniu dverí?
Poznámky:
• Bublanie a pískanie spôsobené expanziou v
chladiacom okruhu je normálne.
PRÍRUČKA NA ODSTRAŇOVANIE
PROBLÉMOV
Skôr ako zavoláte servis:
1. Presvedčte sa, či problém nedokážete vyriešiť
sami podľa pokynov v časti „Príručka na
odstraňovanie problémov”.
2. Spotrebič znovu zapnite a presvedčte sa, či
problém naďalej pretrváva. Ak problém pretrváva
aj naďalej, spotrebič opäť vypnite a pred
opakovaným zapnutím počkajte jednu hodinu.
3. Ak problém pretrváva aj naďalej, zavolajte servis.
Uveďte tieto informácie:
• druh problému
• model
• servisné číslo (číslo uvedené po slove SERVICE
na výrobnom štítku nachádzajúcom sa vnútri
spotrebiča)
• vašu celú adresu
• vaše telefónne číslo a smerový kód.
Poznámka:
Smer otvárania dverí možno zmeniť.
Ak túto operáciu uskutoční servis, nevzťahuje sa
na ňu záruka.
SERVIS
Page 91

91
• Spotrebič nainštalujte ďaleko od tepelných
zdrojov. Umiestnenie v horúcom prostredí, priame
pôsobenie slnečného žiarenia alebo umiestnenie
v blízkosti tepelných zdrojov (ohrievače, radiátory,
sporáky) vedie k zvýšeniu spotreby, preto sa jej
treba vyhýbať.
• Ak toto nie je možné, je nevyhnutné dodržiavať
tieto minimálne vzdialenosti:
• 30 cm od sporákov na uhlie alebo naftu;
• 3 cm od elektrických alebo plynových sporákov.
• Tento spotrebič je navrhnutý pre vstavanie.
Spotrebič inštalujte do kuchynskej linky v
závislosti od potrebných rozmerov (pozri
obrázok).
• Vyčistite vnútro.
• Namontujte príslušenstvo.
Zapojenie do elektrickej siete
• Elektrické zapojenie musí zodpovedať
požiadavkám platných noriem STN.
• Údaje o napätí, príkone a elektrickom krytí sa
uvádzajú na typovom štítku umiestnenom vnútri
spotrebiča.
• Podľa noriem STN musí byť spotrebič uzemnený.
Výrobca odmieta akúkoľvek zodpovednosť za
prípadné poškodenia osôb alebo majetku
spôsobené nedodržaním noriem
• Ak zástrčka a zásuvka nie sú toho istého typu,
dajte zásuvku vymeniť kvalifikovanému
elektrikárovi.
• Nepoužívajte predlžovacie káble ani adaptéry.
Odpojenie spotrebiča
Zabezpečte možnosť odpojenia spotrebiča zo siete
vytiahnutím zástrčky zo zásuvky, alebo pomocou
dvojpólového vypínača zapojeného pred zásuvkou.
INŠTALÁCIA
Page 92

92
Zmena smeru otvárania dverí
Možnosť zmeny smeru otvárania dverí
Dvere chladničky sa môžu otvárať sprava alebo
zľava.
Pri dodávke sa dvere spotrebiča otvárajú zľava.
Aby ste zmenili smer otvárania dverí, postupujte
podľa nasledujúcich pokynov.
Poznámka: Pred zmenou smeru otvárania dverí
spotrebiča vytiahnite zástrčku napájacieho
elektrického kábla alebo odpojte spotrebič od
elektrickej siete.
1. Vyberte dve skrutky (1), pričom pridržte horný
záves (2) (na pravej strane) na ráme.
Vyberte záves (2).
2. Dvere nadvihnite z čapu spodného závesu a
oprite ich na vhodnom mieste, aby sa
nepoškriabali.
3. Vyberte dve skrutky (3), pričom pridržte spodný
záves (4).
Vyberte záves (4).
4. Obrát’te smer závesu (2). Namontujte späť
spodný záves (2) na ľavú stranu, použite dve
skrutky (1).
5. Spusťte dvere na čap spodného závesu (2).
6. Držiac dvere v zatvorenej polohe namontujte späť
horný záves (4) na ľavú stranu, použite dve
skrutky (3). Skrutky neuťahujte (1), kým dvere
nebudú vo vodorovnej polohe vzhľadom na
spodný okraj.
Otváranie dverí z ľavej strany obr. 1
Otváranie dverí z pravej strany obr. 2
2
1
3
4
3
4
1
2
Page 93

93
Obrátenie dvierok vnútorného
oddelenia
1. Vyberte dve plastové skrutky (1) na ľavej strane.
2. Vyberte dva kryty skrutiek (2) a západku dverí (3).
3. Odskrutkujte dvierka mraziaceho oddelenia (4) a
vyberte ich.
Dvierka obráťte a namontujte ich na ľavú stranu.
4. Obráťte západku dvierok (3), namontujte ju na
pravú stranu a namontujte dva kryty skrutiek (2).
5. Nakoniec namontujte dve plastové skrutky (1) na
pravú stranu.
PRED ZMENOU SMERU OTVÁRANIA
PO ZMENE SMERU OTVÁRANIA
Page 94

94
• Az Ön által vásárolt készülék háztartási
alkalmazásra és az alábbi helyeken történő
használatra szolgál:
- munkahelyeken, üzletekben és/vagy irodákban
levő konyhákban
- üzemekben
- hotelekben, motelekben, bérlakásokban és
fizetővendéglátó szálláshelyeken a vendégek
általi használatra.
A készülék megfelelő üzemeltetése érdekében
tanácsos figyelmesen elolvasni a használati
utasítást, ahol a termékleírást és hasznos
tanácsokat talál.
Ajánlatos a használati utasítást megőrizni, mert
később még szükség lehet rá.
1. A készülék kicsomagolása után ellenőrizze annak
épségét, és hogy az ajtó tökéletesen záródik-e.
Az esetleges hibákat 24 órán belül kell közölni a
márkakereskedővel.
2. A készülék üzembe helyezése előtt legalább két
órát kell várni annak érdekében, hogy a
hűtőrendszer tökéletes hatásfokkal működjön.
3. Gondoskodni kell arról, hogy a beüzemeltetést és
az elektromos csatlakoztatást szakember
végezze a gyártó utasításainak és az érvényben
levő helyi előírásoknak megfelelően.
4. Használat előtt tisztítsa meg a termék belsejét.
A KÉSZÜLÉK HASZNÁLATA ELŐTT
1. Csomagolóanyag
A csomagolóanyag 100%-ban újrahasznosítható, és
az újrahasznosíthatóság jelével van ellátva. A
csomagolóanyag elhelyezésénél a helyi előírásokkal
összhangban kell eljárni. A csomagolóanyagot
(műanyag fólia, polisztirol elemek, stb.) gyermekektől
távol kell tartani, mert veszélyforrást jelenthetnek.
2. Kiselejtezés/hulladéklerakás
A termék újrahasznosítható anyagok
felhasználásával készült.
Ez a készülék az elektromos és elektronikus
berendezések hulladékairól szóló 2002/96/EK
európai irányelv (WEEE) szerinti jelzéssel van
ellátva. Ha Ön ügyel arra, hogy a kiselejtezett
készülék megfelelő módon kerüljön elhelyezésre,
akkor azzal hozzájárul a környezeti és egészségügyi
ártalmak elkerüléséhez.
A terméken vagy annak iratain feltüntetett arra
utal, hogy ez a termék nem kezelhető háztartási
hulladékként, hanem a terméket a villamos és
elektronikus berendezések újrahasznosítását végző
telephelyek valamelyikén kell leadni.
Kiselejtezéskor a hálózati zsinór elvágásával tegye a
készüléket használhatatlanná, valamint szerelje le az
ajtókat és a polcokat is, hogy a gyermekek ne
mehessenek be könnyen a készülék belsejébe.
A készülék kiselejtezésekor a hulladékok
elhelyezésére vonatkozó helyi előírások szerint kell
eljárni, és a készüléket a kijelölt begyűjtőhelyek
valamelyikén kell leadni ügyelve arra, hogy a
készülék még pár napig se maradjon őrizetlenül, mert
a gyerekekre nézve veszélyforrást jelent. A termék
kezelésével, visszanyerésével vagy
újrahasznosításával kapcsolatban a helyileg illetések
hivatal, a háztartási hulladékgyűjtő szolgálat, vagy a
terméket értékesítő bolt tud bővebb tájékoztatást
adni.
Tájékoztató:
Ez a készülék nem tartalmaz CFC-t. A hűtőhálózat
R134a-t (HFC-t), vagy R600a-t (HC-t) tartalmaz, lásd
a készülék belsejében található adattáblán.
Az izobutánt (R600a) alkalmazó készülékekről azt
kell tudni, hogy az izobután olyan természetes gáz,
amely nem károsítja a környezetet, viszont
gyúlékony. Éppen ezért feltétlenül szükséges
ellenőrizni, hogy a hűtőhálózat csőrendszere nincs-e
károsodva.
A termék a Kyotói Egyezményben szereplő flór
tartalmú üvegházhatású gázt tartalmazhat; a hűtőgáz
hermetikusan zárt rendszerben található.
Hűtőgáz: az R134a teljes fűtési teljesítménye1300
(GWP).
Megfelelőségi nyilatkozat
• A készüléket élelmiszerek tárolására tervezték és
megfelel az EK 1935/2004 sz. előírásának.
• A készülék terve, konstrukciója és forgalmazása
megfelel:
- a 2006/95/EK számú (73/23/EGK számú
irányelv és annak módosításai helyébe lépő)
“Kisfeszültség" irányelv biztonsági
követelményei;
- a 2004/108/EK számú “EMC" irányelv védelmi
követelményeinek.
A készülék elektromos szempontból
csak akkor biztonságos, ha
csatlakoztatása előírásszerűen földelt
hálózathoz történik.
KÖRNYEZETVÉDELMI TANÁCSOK
Page 95

95
ÜZEMBE HELYEZÉS
• A termék szállítását és beállítását két vagy több
ember végezze.
• A készülék mozgatása során ügyelni kell a padló
(pl. parketta) sérülésének elkerülésére.
• Üzembe helyezés közben ügyeljen arra, hogy a
készülék ne károsítsa a tápvezetéket.
• Vigyázzon arra, hogy a készülék ne kerüljön
hőforrás közelébe.
• A megfelelő szellőzés biztosítása érdekében a
készülék minden oldala és fedőlapja felett
hagyjon szabad teret, vagy kövesse a beszerelési
útmutatót.
• Ügyeljen arra, hogy a készülék szellőzőnyílásait
semmi ne fedje vagy takarja el.
• Vigyázzon a készülék hűtőcsöveinek épségére.
• A terméket helyezze és állítsa vízszintbe
méreteinek és a rendeltetésének megfelelő olyan
helyiségbe, amely padlózata kibírja a súlyát.
• A készüléket száraz és jól szellőzött környezetben
kell elhelyezni. A készüléket az alábbi
hőmérsékleti tartományok közül abba a
klímaosztályban kell üzemeltetni, amelynek
jelzése a készülék gyári adattábláján van
feltüntetve: előfordulhat, hogy a készülék nem
működik megfelelően akkor, ha hosszabb időn át
az előírt tartomány feletti vagy alatti
hőmérsékleten üzemeltetik.
• Ellenőrizze, hogy lakhelyének feszültsége
megegyezik-e az adattáblán feltüntetett értékkel.
• Ne használjon hosszabbítókat, illetve elosztókat.
• Az új készülékhez mellékelt tömlővel végezze a
bekötést a vízhálózatra, ne használja a régi
készülék tömlőjét.
• A hálózati zsinór módosítását vagy cseréjét
kizárólag szakember vagy a műszaki
vevőszolgálat végezheti.
• Az elektromos hálózatról történő leválasztást a
villásdugó kihúzásával, illetve az aljzat és a
készülék közé csatlakoztatott bipoláris
megszakítóval végezze.
BIZTONSÁGI ÓVINTÉZKEDÉSEK
• Tilos a készülékbe spray palackokat, illetve
hajtógázt vagy gyúlékony anyagot tartalmazó
edényeket behelyezni.
• A termék vagy más háztartási gép közelében tilos
benzint, gázt vagy gyúlékony folyadékot tárolni,
illetve használni. A kiáramló gőzök tüzet vagy
robbanást okozhatnak.
• A leolvasztás felgyorsítása érdekében kizárólag a
gyártó által tanácsolt eszközt használja és ne
alkalmazzon ettől eltérő mechanikus, elektromos
eszközöket, illetve vegyszereket.
• Tilos a gyártó által ajánlottaktól eltérő típusú
elektromos berendezéseket használni a
fagyasztott élelmiszerek tárolására szolgáló
térben.
• A jelen készülék nem arra készült, hogy csökkent
fizikai, érzékszervi vagy mentális képességű
személyek (beleértve a gyermekeket is), illetve
tapasztalattal nem rendelkező és a készüléket
nem ismerő emberek használják, kivéve ha a
biztonságukért felelős személy őket megtanítja a
készülék használatára, vagy használat közben
felügyeli őket.
• A beszorulás vagy megfulladás elkerülése
érdekében ne engedje, hogy a készülékben
gyermekek játsszanak vagy elbújjanak.
• Ne nyelje le a jégakkuban levő (nem mérgező)
folyadékot, ha a jégakku mellékelve van.
• Kivétel után azonnal ne fogyasszon jégkockát
vagy jégrudat, mert égési sebeket szenvedhet a
hidegtől.
FELHASZNÁLÁS
• Mielőtt bármilyen karbantartási vagy tisztítási
műveletbe fogna, húzza ki a villásdugót a hálózati
aljzatból, vagy kapcsolja le az áramot.
• Jeget, illetve vizet adagoló készülékeket csak
ivóvizet szolgáltató (1,7 és 8,1 bar nyomású /25
és 117 PSI/) hálózatra szabad kötni. Azokat a jég
és/vagy vízadagoló készülékeket, amelyek
nincsenek közvetlenül hálózatra kötve, kizárólag
ivóvízzel szabad feltölteni.
• A hűtőteret kizárólag friss élelmiszerek tárolására,
míg a fagyasztóteret mélyhűtött ételek tárolására,
friss ételek lefagyasztására, valamint jégkocka
gyártására használja.
• A fagyasztótérben semmilyen folyadékot ne
tároljon üvegedényekben, mert azok
szétrobbanhatnak.
• A nem előrecsomagolt élelmiszereket úgy
helyezze el, hogy azok ne érjenek hozzá a hűtőtér
vagy a fagyasztótér belső falaihoz.
A gyártó elhárít minden felelősséget a fenti
javaslatok és óvintézkedések be nem tartásából
származó károkért.
Megjegyzések:
• Ne blokkolja a levegőkimeneti területet (a hátsó
falon) élelmiszertermékekkel
• Ha a fagyasztó el van látva terelőlappal,
lehetőség van arra, hogy a terelőlap
eltávolításával (lehajtásával) maximálisra növelje
a tárolási tárfogatot.
• Az összes polc, terelőlap és kihúzható kosár
eltávolítható.
• A készülék belső hőmérsékletét befolyásolhatja a
környezeti hőmérséklet, az ajtónyitások
Klímaosztály
Körny. hőm.
(°C)
Körny. hőm.
(°F)
SN 10 és 32 között 50 és 90 között
N 16 és 32 között 61 és 90 között
ST 16 és 38 között 61 és 100 között
T 16 és 43 között 61 és 110 között
ÁLTALÁNOS ÓVINTÉZKEDÉSEK ÉS
JAVASLATOK
Page 96

96
gyakorisága, valamint a készülék elhelyezése. A
hőmérséklet-beállításnak számításba kell vennie
ezeket a tényezőket.
• Hacsak másként nincs meghatározva, a készülék
tartozékai nem alkalmasak mosogatógépben való
tisztításra.
• Minél nagyobb a faltó való távolság a készülék
hátoldalán, annál nagyobb az
energiamegtakarítás.
A készülék bekapcsolása
A készülék beindítása
A készülék belső kezelőszervekkel rendelkezik.
Csatlakoztassa a készüléket a hálózathoz.
Ha a készülék a hálózathoz van csatlakoztatva, akkor
az ajtó kinyitásakor működésbe lép a belső világítás. A
készülék hűtőterében elhelyezett
hőmérsékletszabályozó segítségével szabályozható a
hűtőtér és az alacsony hőmérsékletű tér (ha van)
hőmérséklete.
A készülék hőmérsékletének szabályozása:
Hőmérséklet-beállítás:
A hőmérséklet-szabályozó automatikusan állítja be a
hűtőtér és a tér (ha van) belső hőmérsékletét.
A hőmérséklet-szabályozó gombnak az 1-es állásból a
7-es (leghidegebb beállítás) felé való elforgatása egyre
alacsonyabb hőmérsékletet eredményez.
0 állásban a készülék ki van kapcsolva.
Az élelmiszerek rövid időtartamig való tárolásához
állítsa a hőmérséklet-szabályozót az 1 (Min) és a
3 (Med) érték közé.
- Ha a térben hosszabb ideig kíván
élelmiszereket tárolni, akkor forgassa a gombot a 3
vagy 4 állásba.
Megjegyzés:
A készülék belsejében uralkodó hőmérsékletet
befolyásolhatja a környezeti hőmérséklet, az
ajtónyitások gyakorisága valamint a készülék helye. A
termosztátot ezen tényezők függvényében kell
beállítani.
Élelmiszertárolás a hűtőtérben
Az élelmiszereket a mellékelt ábrán látható módon
helyezze el.
A Hal, hús
B Főtt ételek
C Gyümölcs és zöldség
D Palackok
E Sajt
Megjegyzések:
• A polcok és a hűtőszekrény belső hátsó fala közötti
távolság biztosítja a levegő szabad áramlását.
• Az élelmiszereket úgy helyezze el, hogy azok ne
érjenek hozzá a hűtőtér hátsó falához.
• Tilos meleg ételeket tenni a hűtőszekrénybe.
• A folyadékokat lezárt tárolóedényben tartsa.
Fontos
A magas víztartalmú zöldségek tárolása
páralecsapódást okozhat a crisper rekesz
üvegpolcán: ez semmilyen módon nem befolyásolja
a készülék helyes működését.
A HŰTŐTÉR ÜZEMELTETÉSE
A hőmérséklet-szabályozó dobozának alakja a
márkától függ
Page 97

97
Az alacsony hőmérsékletű tér jelzése
.
Az alacsony hőmérsékletű térben friss
élelmiszerek is lefagyaszthatók.
A 24 óra alatt lefagyasztható friss élelmiszerek
mennyiségét az adattábla tartalmazza.
Megjegyzés:
Az alacsony hőmérsékletű tér áramkimaradás esetén
is képes tartani az élelmiszerek megfelelő
tárolásához szükséges hőmérsékletet. Ilyen
esetekben azonban ajánlatos kerülni a fagyasztótér
ajtajának a kinyitását.
A friss élelmiszerek lefagyasztásának
menete (csak a ) jelzésű rekeszben)
Fontos
• Fagyasztás előtt csomagolja be, és zárja le az
élelmiszereket a következőkbe: alufóliába,
átlátszó műanyag fóliába, vízzáró műanyag
csomagolóanyagba, fedővel ellátott polietilén
tárolóedényekbe illetve a lefagyasztandó
élelmiszereknek megfelelő úgynevezett
fagyasztóedényekbe.
• A lefagyasztandó élelmiszereket a felső zónában
helyezze el ügyelve arra, hogy a csomagok között
maradjon egy kis hely a levegő zavartalan
áramlásához.
• A tökéletes lefagyasztás érdekében az
élelmiszereknek az alacsony hőmérsékletű térbe
való behelyezésekor a termosztátot forgassa a
kisebb számok irányába.
• 24 óra elteltével a fagyasztás befejeződik.
Jelzésű rekesszel ellátott készülékek
A frissen lefagyasztott élelmiszerek hónapokban
kifejezett eltarthatósági idejét a mellékelt táblázat
tartalmazza.
A gyorsfagyasztott élelmiszerek vásárlásánál a
következőképpen járjon el:
• Győződjön meg arról, hogy a csomagolás
sértetlen (sérült csomagolásban lévő fagyasztott
élelmiszer megromolhatott). Ha egy doboz meg
van duzzadva, vagy rajta nedvességfoltok
láthatók, akkor tárolása nem megfelelő
körülmények között történt, és esetleg már
megkezdődhetett a felengedése.
• A fagyasztott élelmiszereket mindig utoljára
vásárolja meg, szállításukhoz pedig használjon
hűtőtáskát.
• Amikor hazaért, rögtön tegye be a fagyasztott
termékeket az alacsony hőmérsékletű térbe.
• Ha az élelmiszer, akár részben is, felolvadt, ne
fagyassza le ismét. 24 órán belül fogyassza el.
• Kerülje, illetve csökkentse minimálisra a
hőmérséklet-változásokat. Mindig vegye
figyelembe a csomagoláson jelzett szavatossági
időt.
• A fagyasztott élelmiszerek tárolásánál mindig
kövesse a csomagoláson feltüntetett utasításokat.
Jégkocka készítése, ha jégkockatartó áll
rendelkezésre
• Töltse fel 2/3 részig a jégkockatartót, majd tegye
be az alacsony hőmérsékletű térbe
• Ha a jégkockatartó az alacsony hőmérsékletű tér
aljához ragadna, akkor annak kivételéhez soha ne
használjon hegyes vagy éles tárgyakat.
• A jégkockák kivételéhez kissé hajlítsa meg a
jégkockatartót.
AZ ALACSONY HŐMÉRSÉKLETŰ TÉR
ÜZEMELTETÉSE
(ha van)
HÓNAP ÉLELMISZER
Page 98

98
Mielőtt bármilyen karbantartási vagy tisztítási
műveletbe fogna, húzza ki a készülék
villásdugóját a hálózati aljzatból, vagy válassza le
a tápellátást.
A hűtőtér leolvasztása teljes mértékben
automatikus.
Az automatikus leolvasztási ciklust az jelzi, hogy a
hűtőtér belsejének hátsó falán alkalmanként
vízcseppek jelennek meg.
A leolvasztott víz egy leeresztő nyíláson keresztül
egy tárolótartályba kerül, ahonnan elpárolog.
A leolvasztott víz folyamatos és megfelelő
elvezetésének biztosítása érdekében rendszeresen
tisztítsa ki a leolvasztott víz leeresztőnyílásának
belsejét.
Az alacsony hőmérsékletű tér leolvasztása
Az alacsony hőmérsékletű tér leolvasztása évente
egy vagy két alkalommal, illetve túlzott mértékű
zúzmaraképződés esetén javasolt.
A zúzmaraképződés normális jelenség. A
zúzmaraképződés mértéke és gyorsasága a külső
körülményektől és az ajtónyitások gyakoriságától
függ, és elsősorban a magasabban levő rácsokon
jelentkezik. A zúzmaraképződés - különösen az
alacsony hőmérsékletű tér felső részén természetes jelenségnek számít és nem
befolyásolja a készülék megfelelő működését.
A leolvasztást akkor ajánlatos elvégezni, amikor a
hűtőszekrényben található élelmiszermennyiség
a lehető legkisebb.
• Nyissa ki az ajtót, és a kivett élelmiszereket
szorosan csavarja be újságpapírba, majd
helyezze azokat hűvös helyre vagy hűtőtáskába.
• A zúzmara leolvadásának elősegítése érdekében
hagyja nyitva az ajtót.
• A belső teret langyos vízbe és/vagy közömbös
kémhatású mosószeres oldatba mártott
szivaccsal tisztítsa meg.
Soha ne használjon dörzshatású anyagokat.
• A készüléket gondosan öblítse át, és törölje
szárazra.
• Helyezze vissza az élelmiszereket a fagyasztóba.
• Csukja be az ajtót.
• Csatlakoztassa ismét a készüléket a hálózathoz.
• Kapcsolja be a készüléket.
A HŰTŐSZEKRÉNY LEOLVASZTÁSA ÉS
TISZTÍTÁSA
Page 99

99
• A készülék hátulján található szellőzőrácsokat és
kondenzátort porszívó vagy kefe segítségével kell
időszakonként megtisztítani.
• A külső burkolatot puha ruhával tisztítsa.
Hosszabb távollét esetén
1. Ürítse ki teljesen a készüléket.
2. Csatlakoztassa le a készüléket az elektromos
hálózatról.
3. Olvassza le a készüléket, és tisztítsa ki a belső
tereket.
4. A penészedés, az oxidálódás valamint a
kellemetlen szagok képződésének elkerülése
érdekében a készülék ajtaját mindig nyitva kell
hagyni, ha a készülék nincs használatban.
5. Tisztítsa meg a készüléket.
• Az alacsony hőmérsékletű teret (azoknál a
típusoknál, ahol van) a leolvasztás ideje alatt
tisztítsa ki.
• Meleg vízbe és/vagy semleges kémhatású
tisztítószerbe áztatott szivaccsal tisztítsa ki
időszakonként a hűtőtér belsejét. A készülék
belsejét öblítse ki, és puha ronggyal törölje
szárazra. Ne használjon dörzshatású anyagokat.
• A készüléket kívülről vízbe mártott puha ronggyal
tisztítsa.
Ne használjon súrolószereket, kaparókat,
folteltávolítókat (pl. aceton, triklóroetilén) vagy
esetet.
Izzócsere:
Izzócsere esetén a következő módon járjon el:
• Válassza le a készüléket a hálózatról
• A levételhez nyomja meg a lámpabura két oldalán
levő nyelvecskéket.
• Cserélje ki az izzót egy legfeljebb 10 W-os újjal.
• Tegye vissza a lámpaburát, majd a készüléknek a
hálózathoz való csatlakoztatása előtt várjon 5
percet.
ÁPOLÁS ÉS KARBANTARTÁS
Page 100

100
1. Ha a készülék nem működik.
• Nincs-e áramkimaradás?
• A hálózati csatlakozó jól be van-e dugva a
konnektorba?
• Be van-e kapcsolva a kétpólusú hálózati
megszakító?
• Nem égett ki a biztosíték?
• Nem sérült a hálózati csatlakozóvezeték?
• Nincs a hőmérséklet-szabályozó
•
(Stop)
állásban?
2. A rekeszek belsejében uralkodó hőmérséklet
nem elég alacsony.
• Jól be van-e zárva a készülék ajtaja?
• Nem akadályozzák-e élelmiszerek az ajtó
megfelelő záródását?
• Nincs-e a készülék hőforrás közelében?
• Jól van-e beállítva a hőmérsékletszabályozó?
• Nincsenek eltömve a szellőzőnyílások?
3. A hűtőtér belsejének hőmérséklete túlságosan
alacsony.
• Jól van-e beállítva a hőmérsékletszabályozó?
4. A készülék rendkívül zajos.
• Helyesen van üzembe helyezve a készülék?
• Nem érnek-e össze, illetve nem rázkódnake a
készülék hátulján lévő csövek?
5. A hűtőtér alján víz található.
• Nincs-e akadályozva a leolvasztott víz
elvezetése?
6. Túlzott mértékű zúzmaraképződés az alacsony
hőmérsékletű térben.
• Jól be van-e zárva a készülék ajtaja?
• Nem akadályozzák-e élelmiszerek az ajtó
megfelelő záródását?
Megjegyzések:
• A hűtőkörben végbemenő folyamatok miatti
bugyborékoló vagy sziszegő hangok normális
jelenségnek
számítanak.
HIBAELHÁRÍTÁSI ÚTMUTATÓ
Mielőtt a vevőszolgálatot hívná:
1. Ellenőrizze, hogy egyedül nem tudja-e elhárítani a
hibát (lásd a “Hibakeresési útmutató” című részt).
2. Indítsa el újra a készüléket, és ellenőrizze, hogy
fennáll-e még a hiba. Ha igen, akkor ismét húzza
ki a konnektorból a hálózati csatlakozót, és a
műveletet ismételje meg egy óra múlva.
3. Ha a hiba még mindig fennáll, értesítse a
vevőszolgálatot.
Közölje az alábbiakat:
• a hiba jellege
• a készülékmodell
• a szervizszám (a készülék belsejébe felszerelt
adatlapon a SERVICE szó után látható szám)
• az Ön pontos címe
• az Ön telefonszáma és körzetszáma.
Megjegyzés:
Az ajtónyitás iránya megváltoztatható.
Ha ezt a műveletet a vevőszolgálat végzi, a
munkára a garancia nem terjed ki.
VEVŐSZOLGÁLAT
 Loading...