

Page 1
BTC511
INSTRUCTION MANUAL
Page 2
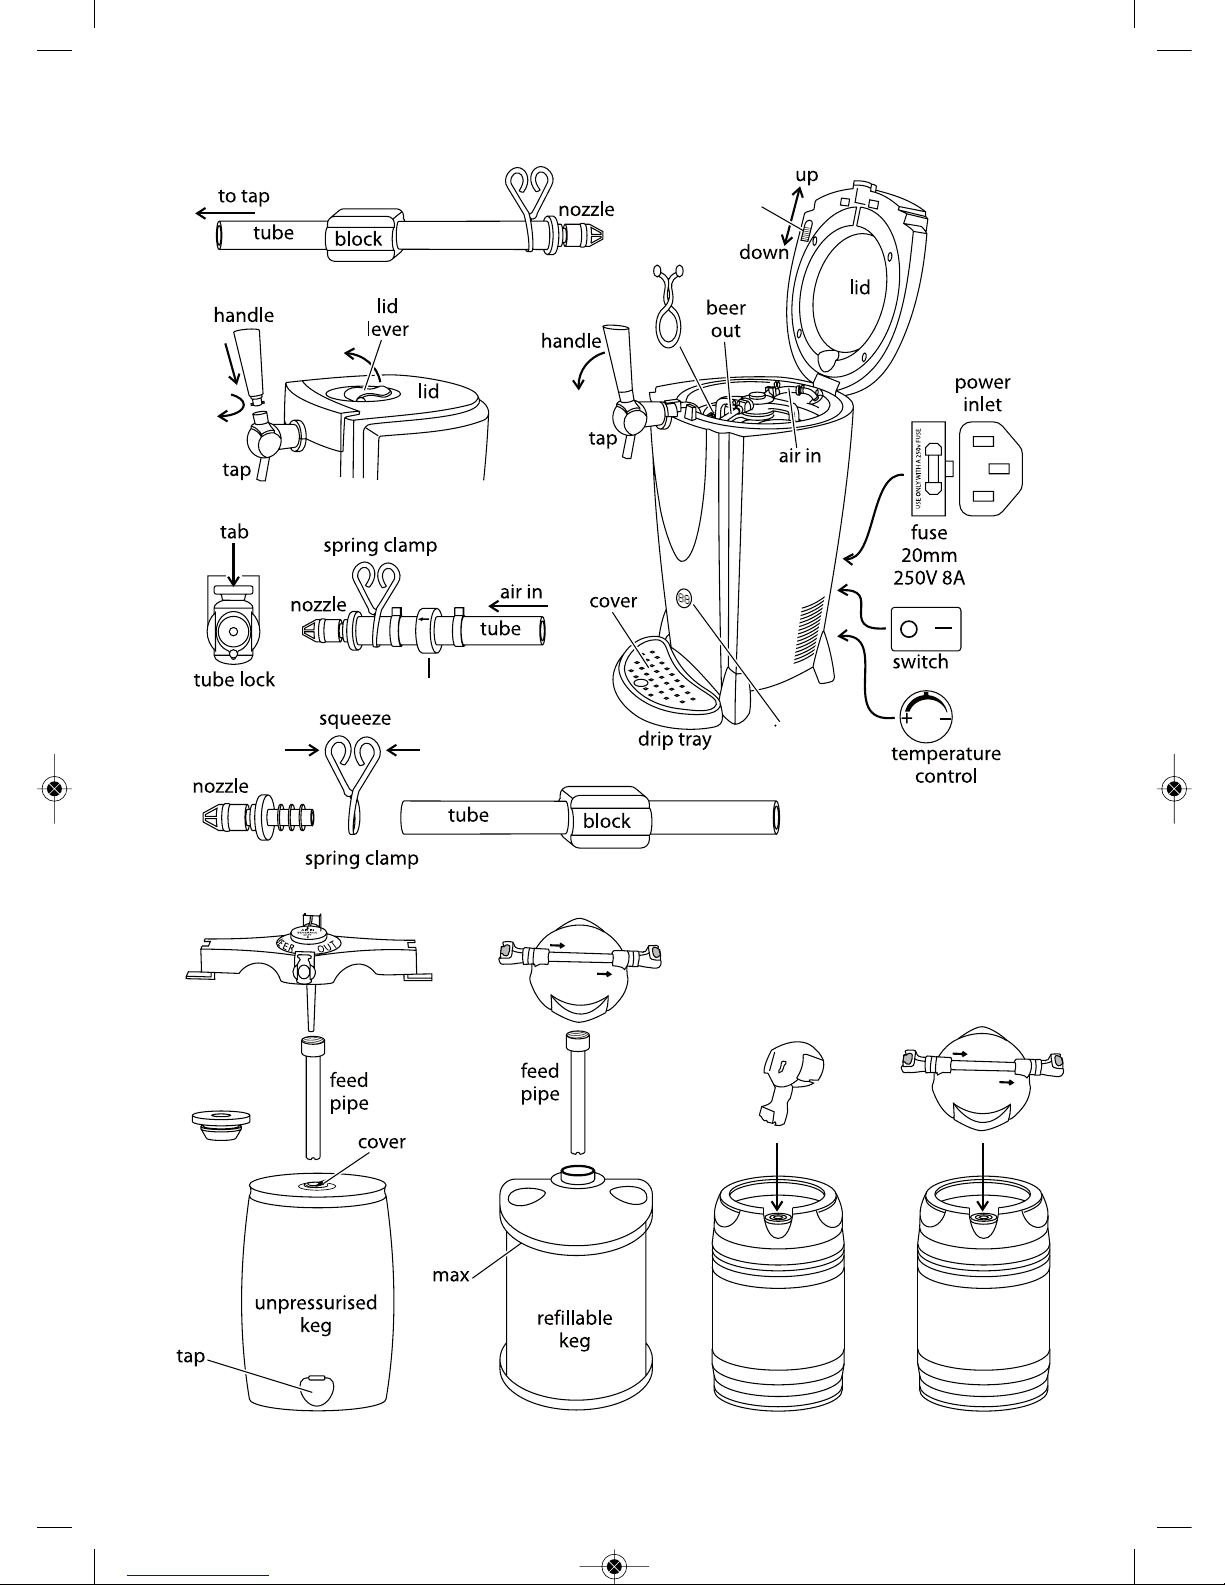
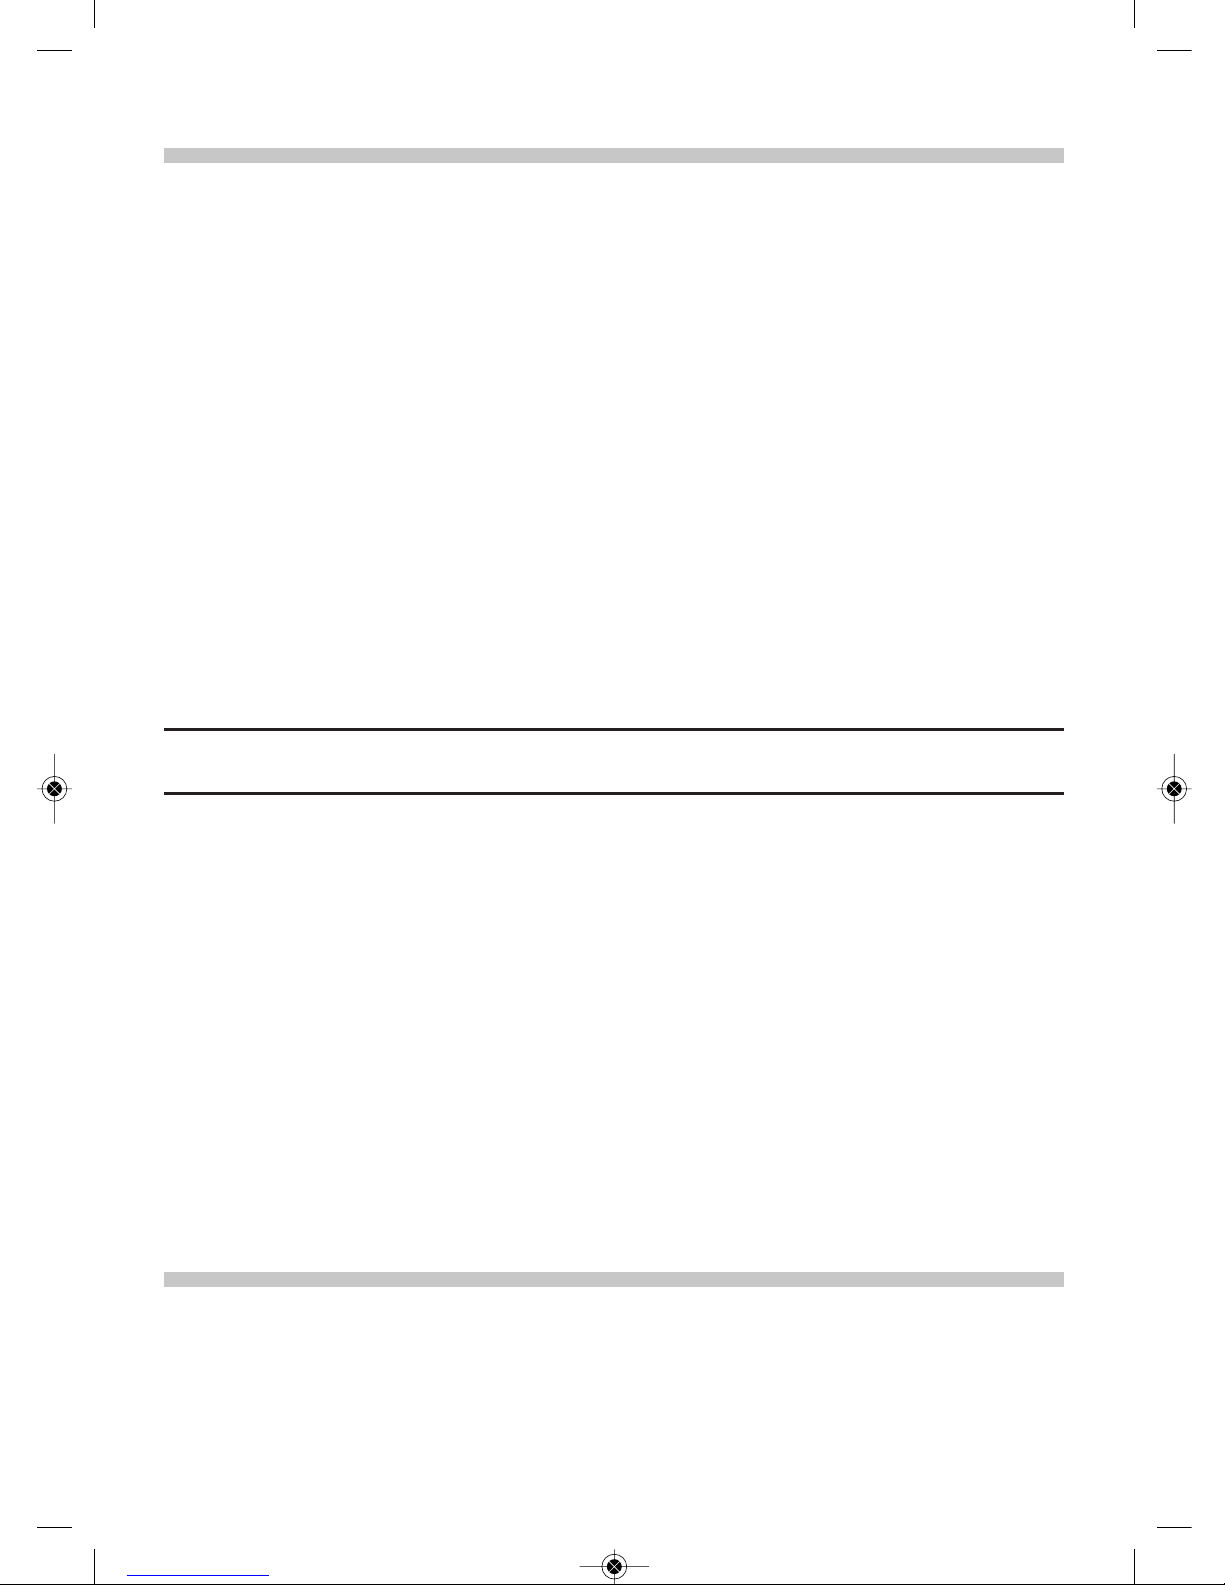
5 L 6 L
Yellow adaptor for 5L keg
White adaptor for 6L keg and plastic keg
White adaptor
for 5L keg
White adaptor
for 6L keg
and plastic keg
A
I
R
I
N
B
E
E
R
O
U
T
A
I
R
I
N
B
EE
R
O
U
T
Black plastic
gasket (seal)
pressurised keg
Backstop valve
Temperature
display screen
A
ir pump
switch
White collar
Optional
Optional
2
Page 3
3
Read the instructions and keep them safe. If you pass the appliance on, remember to pass
on the instructions and warning notice too as these are important to ensuring correct
use of the product. Remove all packaging, but keep it until you know the appliance works.
Warning
• Do not let the vents to the rear of the appliance become blocked.
• Do not put anything into the appliance other than the kegs specified in these
instructions.
• The refrigerant is inflammable and may cause eye irritation. If the appliance is damaged:
a) do not operate switches (on or off) in the room
b) open the windows and air the room
c) evacuate the room
d) seek medical attention in the event of eye irritation and inform the medical
attendant that the refrigerant is R134a (isobutane)
Important precautions
Follow basic safety precautions, including the following:
1 This appliance must only be used by or under the supervision of a responsible adult.
Use and store the appliance out of the reach of children.
2 This appliance is not a toy. Do not let children play with it.
3 Keep the appliance upright at all times.
4 is a beverage refrigeration unit. If it is put on its side, for any reason,
you must stand it upright for at least 3 hours before switching it on, otherwise the
compressor will be damaged.
5 Do not immerse the appliance in any liquid and do not use it in a bathroom,
near water or outdoors.
6 Do not place the appliance in a wet or damp environment and keep it out
of direct sunlight. The room temperature should not exceed 30°C.
7 All parts coming into contact with the beverage must be cleaned before use, before
replacing the container with another, and after use.
a) before use, to ensure that there are no contaminants left after storage,
b) before replacing the beverage contained, to prevent contaminants building up
within the system, and
c) after use, to ensure that there are no contaminants left on the appliance before it
is stored away.
8 The appliance and the beverage container are both heavy. Take great care when lifting
them.
9 Do not lift or move the appliance with a keg fitted.
10 Do not lift the beverage machine by the handle or the power cable. Always lift the
machine by its base.
11 Do not cool kegs in a freezer. As with glass bottles, kegs may explode when frozen.
12 Route the power cable so that it doesn't overhang and cannot be tripped over or
become caught on anything.
Instructions
Model BTC511:
Model BTC511
Page 4

4
13 Keep the appliance and the cable away from hotplates, hobs and burners.
14 Unplug the appliance when not in use and allow to cool down fully before cleaning or
moving.
15 Do not use the appliance for any purpose other than those outlined in these
instructions.
16 This appliance must not be used with an external timer or remote control system.
17 Do not use the appliance with any connector other than the one supplied.
18 The appliance must only be connected to an earthed power socket.
19 Do not use the appliance if it is dropped or damaged or if it malfunctions or leaks.
20 If the connector or cable is damaged it must be replaced with parts supplied by the
manufacturer or their approved service agent.
Domestic use only
Preparation
1 Chill the keg thoroughly before use. If the keg is not cold enough, too much froth will
form when you serve the beer.
2 Store the keg in a cool place.
3 The keg must be at or below room temperature before putting it into the appliance.
4 Check the use-by date before putting a keg into the appliance. Do not use the keg if the
use-by date has passed.
5 The keg can be pre-cooled in two ways:
- inside the beverage machine. Kegs will take around 15 hours with model 14463-56 and
2 hours with to cool to the correct temperature. Place your keg at the
centre of the appliance without attaching the tubes and move the pump slide (located
under the lid) to AIR OFF (slide to the bottom). Close the lid of the machine. Plug the
connector into the machine’s power socket and press the switch to the rear of the
appliance. Adjust the temperature.
- in the refrigerator. Kegs will take around 10 hours to cool depending on the cooling
capacity of your refrigerator.
Warning:Do not chill kegs in a freezer. As with glass bottles, kegs may explode when frozen.
Tip: Keep a keg in the refrigerator in advance so you always have a chilled keg available.
We would also recommend that you switch the appliance on an hour before using it to
give it time to cool down properly.
6 The keg must not be shaken. If it is shaken, leave it to rest for 4 hours before using it or
the pressure will result in excessive frothing.
N.B.: Do not shake or drop kegs. Do not expose them to sunlight or to temperatures greater
than 30°C and do not pierce or burn, even after use.
model BTC511
Page 5
5
7 Clean the appliance and attachments thoroughly. Refer to the "care & maintenance"
section“.
8 Position the appliance on a level, dry, clean and heat-resistant surface at least 75cm above
floor level.
9 Leave a clear space of at least 5cm all around the appliance.
10 Do not use the beverage machine outdoors, particularly when temperatures exceed
30°C.
11 Centre the drip tray under the front of the appliance.
12 Put a plastic mat underneath the appliance to protect the work surface from scratches
and drips.
13 Have a bucket and towel handy in case of frothing or spillage and wear old clothes that
you don’t mind getting beer on.
CO² cartridge
Your beverage machine can be operated without a CO² cartridge,
howeve
r
use CO² when preparing your favourite drinks to improve their
quality. Adding CO²
results
in the formation of bubbles in the beer and better frothing.
CO² cartridges can be obtained from our after-sales service only in France on 0820 200 275.
Customers in Belgium can obtain then from their local electrical goods store – 320g CO2
cartridge.
One cartridge can be used for several kegs of beer.
A set of accessories used to connect the cartridge to the appliance are provided with your
beverage machine.
Positioning and connecting the CO² cartridge
Ensure that the tap is closed before screwing the pressure gauge on to the CO² cartridge.
Insert the whole piece – cartridge and pressure gauge – into the black plastic shell.
Position the shell, using the hook located at its base, to the rear of the machine, in the
opening in the casing of the appliance.
Using the socket connection on the tap connect the cartridge to the metal outlet to the
rear of the machine near the lid.
Using the CO² cartridge:
The air pump must not be used whilst the CO² cartridge is in use. In this case, the cartridge
will provide the pressure required for the beverage to flow.
We would recommend that you set the pressure between 1.5 bars and 2 bars using the
pressure gauge located on the cartridge. The outlet must only be opened once the keg
has been completely connected to the machine.
N.B. The tube coming from the adaptor fastened to the keg must be connected to the metal
‘ CO2’ tube.
can
some models
Page 6
6
FITTING A 5L PRESSURISED BEER KEG
The WHITE adaptor is compatible with 5L pressurised kegs.
1. Before putting the keg in the machine, connect the WHITE adaptor to the outlet tube
by locking the outlet tube valve onto the WHITE adaptor.
2. Open the lid of the machine using the lever located in the middle of the lid.
Next, install the outlet tube connected to the WHITE adaptor by lowering the handle
of the tap and inserting the tube into the opening located at the back. The tube must
reach the outlet of the tap and the clamp (black rectangle) must automatically lock to
hold the tube in place.
Check that the clamp is correctly positioned in the designated space.
If the tube protrudes past the tap, simply cut the overhanging tube to the required length.
3. Put the keg in the appliance and firmly fasten the WHITE adaptor to the keg.
4. The beverage outlet tube must form a continuation of the handle so as not to interfere
with the closing of the lid. To ensure that this is the case, place the tube in the white plastic
collar located at the top of the vat. The collar will now hold the outlet tube onto the shaft
of the tap, thus preventing it from being crushed when the lid is closed.
5. Move the pump slide (located under the lid) to AIR OFF (slide to the bottom). The
pump does not need to be sending out air as the keg is already pressurised.
The air pump is not required for pressurised kegs as they provide their own pressure
for pouring.
6. Rinse and wipe up any traces of spillage thoroughly.
7. Close the lid of the machine.
8. Plug the connector into the machine’s power socket and press the switch to the rear of
the appliance.
9. Adjust the temperature.
The temperature display on the front of the machine will indicate the temperature
inside the machine on the outer wall of the keg.
The cooling temperature can be adjusted by turning the temperature regulation
button clockwise to reduce (-) or anti-clockwise to increase (+) the temperature.
You will then need to allow some time for the content of the keg to reach the temperature
indicated on the display, which is why it is recommended that you perform this operation
before serving the first beverage from the keg.
5L UNPRESSURISED KEGS
The YELLOW adaptor is compatible with 5L unpressurised kegs.
1. Check that there is a translucent gasket (seal) on the rigid yellow tube.
2. Screw the rigid yellow tube onto the YELLOW adaptor.
3. Pass the flexible black ring provided around the rigid tube and bring the ring up from
Page 7
7
the bottom of the rigid tube to meet the YELLOW adaptor.
4. You will need to decompress the keg, removing any pressure from inside it, before putting
it into the appliance.
N.B.: always check the instructions on how to eliminate excess gas on the keg itself.
It is essential that the keg be kept upright and not shaken for several hours before use.
Otherwise, an excessive amount of froth will form when the keg is tapped.
a. Depressurise the keg.
- Place the 5L keg on a table.
- Pull out the built-in tap on the keg (located in the lower front part of the keg) and halffill a glass.
b. Ventilate the keg
- Remove the plastic plug from the keg (located on top of the keg) to allow air into the
keg.
- Using pliers, remove the ring from around the cap. Make sure that you have sufficient
space to slide the rigid tube into the keg.
5. Insert the end of the rigid yellow tube into the hole on top of the keg and push the tube
in until the flexible black ring clips tightly into the hole on top of the keg. The ends of
the YELLOW adaptor will clip onto the ends of the keg.
6. Put the keg into the machine.
7. Wipe up any spillage.
8. Install the outlet tube by lowering the handle of the tap and inserting the tube into
the opening located at the back. The tube must reach the outlet of the tap and the
clamp (black rectangle) must automatically lock to hold the tube in place.
Check that the clamp is correctly positioned in the designated space.
9. Connect the outlet tube with the YELLOW adaptor to the ‘BEVERAGE OUT’ nozzle of the
YELLOW adaptor.
10. Attach the air inlet tube to one of the metal ‘air’ or ‘CO2’ connectors located in front of
the lid hinge.
The air pump is required for unpressurised kegs. Unpressurised kegs have a small amount
of internal pressure which must be released. They are then pressurised by the air pump
or the CO² cartridge.
Should you wish to use the air pump on the machine:
- Locate the flexible air or CO2 inlet tube.
N.B.: The flexible air or CO2 inlet tube is equipped with a ‘backstop valve’. The red arrow
on the valve, indicating the direction of connection, must be directed towards the YELLOW
adaptor. In the event of poor connection, the beverage will leak into the pump, resulting
in the machine having to be returned to our technical department for examination and
repair at your expense.
- Place the flexible tube over the metal ‘AIR’ nozzle and fasten the retaining spring over the
top of it to ensure the connection is perfectly airtight.
Page 8

8
- Connect the yellow valve of the flexible tube to the ‘AIR IN’ nozzle of the YELLOW adaptor.
The red arrow on the flexible tube must be positioned to face the YELLOW adaptor.
- Move the pump slide to AIR ON (slide to the top). The pump will send air through the keg
to ensure the correct level of pressure.
Should you wish to use the system with a CO2 cartridge:
- Locate the flexible air or CO2 inlet tube.
N.B.: The flexible air or CO2 inlet tube is equipped with a ‘backstop valve’. The red arrow
on the valve, indicating the direction of connection, must be directed towards the YELLOW
adaptor. In the event of poor connection, the beverage will leak into the pump, resulting
in the machine having to be returned to our technical department for examination and
repair at your expense.
- Place the flexible tube over the metal ‘CO2’ nozzle and fasten the retaining spring over
the top of it to ensure the connection is perfectly airtight.
- Connect the yellow valve of the flexible tube to the ‘AIR IN’ nozzle of the YELLOW adaptor.
The red arrow on the flexible tube must be positioned to face the YELLOW adaptor.
- Move the pump slide to AIR OFF (slide to the bottom). The pump does not need to be
sending out air as the pressure will be provided by the cartridge.
For information on attaching the CO2 cartridge see the paragraph on ‘Positioning and
connecting the CO2 cartridge’.
11. Check that the tubes are not bent before closing the lid of the machine. If this is the
case, gently rotate the keg to undo any kinks in the tubes. The beverage outlet tube must
form a continuation of the handle so as not to interfere with the closing of the lid. To
ensure that this is the case, place the tube in the white plastic collar located at the top
of the vat. The collar will now hold the outlet tube onto the shaft of the tap, thus
preventing it from being crushed when the lid is closed.
12. Rinse and wipe up any traces of spillage thoroughly.
13. Close the lid of the machine.
14. Plug the connector into the machine's power socket and press the switch to the rear
of the appliance.
15. Adjust the temperature.
The temperature display on the front of the machine will indicate the temperature
inside the machine on the outer wall of the keg.
The cooling temperature can be adjusted by turning the temperature regulation
button clockwise to reduce (-) or anti-clockwise to increase (+) the temperature.
You will then need to allow some time for the content of the keg to reach the temperature
indicated on the display, which is why it is recommended that you perform this operation
before serving the first beverage from the keg.
Page 9
9
THE REFILLABLE PLASTIC KEG
The WHITE adaptor for 6L kegs and plastic kegs is compatible with
the plastic keg.
1. Remove the cap from the plastic keg and fill with the beverage of your choice.
2. To avoid blockages and possible damage to the tap mechanism:
a) Do not fill with milk or any liquid containing milk.
b) Do not fill with any thick or sticky liquids.
c) Do not fill with any liquids containing fruit flesh or other particles.
d) Do not fill above the ‘maximum’ level marked around the body of the keg.
3. When filling the keg with a carbonated beverage such as beer it is preferable to use the
entire keg in one go. Otherwise, the beverage is likely to go flat.
4. Locate the WHITE adaptor and the white rigid tube. Check that the connection valves
on the tubes are disconnected from each end of the adaptor. If this is not the case, remove
them by pressing the metal tab.
5. Insert the large neck of the white rigid tube into the pocket under the WHITE adaptor.
6. Insert the WHITE adaptor and the white rigid tube into the plastic keg and press the centre
of the WHITE adaptor to firmly clip the adaptor onto the keg.
7. Next, install the outlet tube by lowering the handle of the tap and inserting the tube
into the opening located at the back. The tube must reach the outlet of the tap and
the clamp (black rectangle) must automatically lock to hold the tube in place.
Check that the clamp is correctly positioned in the designated space.
8. Connect the outlet tube with the WHITE adaptor to the ‘BEER OUT' nozzle.
9. Attach the air or CO2 inlet tube to one of the metal ‘air’ or ‘CO2’ connectors located in
front of the lid hinge.
Should you wish to use the air pump on the machine:
- Locate the flexible air or CO2 inlet tube.
N.B.: The flexible air or CO2 inlet tube is equipped with a ‘backstop valve’. The red arrow
on the valve, indicating the direction of connection, must be directed towards the WHITE
adaptor. In the event of poor connection, the beverage will leak into the pump, resulting
in the machine having to be returned to our technical department for examination and
repair at your expense.
- Place the flexible tube over the metal ‘AIR’ nozzle and fasten the retaining spring over the
top of it to ensure the connection is perfectly airtight.
- Connect the flexible tube to the ‘AIR IN’ nozzle of the WHITE adaptor. The red arrow on
the flexible tube must be positioned to face the WHITE adaptor.
- Move the pump slide to AIR ON (slide to the top). The pump will send air through the keg
to ensure the correct level of pressure.
Page 10

10
Should you wish to use the system with a CO2 cartridge:
- Locate the flexible air or CO2 inlet tube.
N.B.: The flexible air or CO2 inlet tube is equipped with a ‘backstop valve’. The red arrow
on the valve, indicating the direction of connection, must be directed towards the WHITE
adaptor. In the event of poor connection, the beverage will leak into the pump, resulting
in the machine having to be returned to our technical department for examination and
repair at your expense.
- Place the flexible tube over the metal ‘CO2’ nozzle and fasten the retaining spring over
the top of it to ensure the connection is perfectly airtight.
- Connect the flexible tube to the ‘AIR IN’ nozzle of the WHITE adaptor. The red arrow on
the flexible tube must be positioned to face the WHITE adaptor.
- Move the pump slide to AIR OFF (slide to the bottom). The pump does not need to be
sending out air as the pressure will be provided by the cartridge.
For information on attaching the CO2 cartridge see the paragraph on ‘Positioning and
connecting the CO2 cartridge’.
10. Check that the tubes are not bent before closing the lid of the machine. If this is the
case, gently rotate the keg to undo any kinks in the tubes. The beverage outlet tube must
form a continuation of the handle so as not to interfere with the closing of the lid. To
ensure that this is the case, place the tube in the white plastic collar located at the top
of the vat. The collar will now hold the outlet tube onto the shaft of the tap, thus
preventing it from being crushed when the lid is closed.
11. Rinse and wipe up any traces of spillage thoroughly.
12. Close the lid of the machine.
13. Plug the connector into the machine's power socket and press the switch to the rear
of the appliance.
14. Adjust the temperature.
The temperature display on the front of the machine will indicate the temperature
inside the machine on the outer wall of the keg.
The cooling temperature can be adjusted by turning the temperature regulation
button clockwise to reduce (-) or anti-clockwise to increase (+) the temperature.
You will then need to allow some time for the content of the keg to reach the temperature
indicated on the display, which is why it is recommended that you perform this operation
before serving the first beverage from the keg.
FITTING A 6L PRESSURISED BEER KEG
The WHITE adaptor for 6L kegs and plastic kegs is compatible with
6L pressurised kegs.
1 Locate the WHITE adaptor. Check that the connection valves on the tubes are
disconnected from each end of the adaptor. If this is not the case, remove them by
pressing the metal tab.
Page 11

11
2 Attach the WHITE adaptor to the keg before putting the keg in the machine by
pressing the centre of the adaptor and pushing the adaptor on to the top of the keg
as firmly as possible.
Check that the adaptor is firmly connected to the keg before continuing.
3 Install the outlet tube by lowering the handle of the tap and inserting the tube into
the opening located at the back. The tube must reach the outlet of the tap and the
clamp (black rectangle) must automatically lock to hold the tube in place.
Check that the clamp is correctly positioned in the designated space.
4 Fasten the outlet tube onto the end of one of the connection valves.
5 Position the connection valve connected to the outlet tube onto the ‘BEER OUT’ nozzle
of the WHITE adaptor.
6 Attach the air or CO2 inlet tube to one of the metal ‘air’ or ‘CO2’ connectors located in front
of the lid hinge.
Should you wish to use the air pump on the machine:
- Locate the flexible air or CO2 inlet tube.
N.B.: The flexible air or CO2 inlet tube is equipped with a ‘backstop valve’. The red arrow
on the valve, indicating the direction of connection, must be directed towards the WHITE
adaptor. In the event of poor connection, the beverage will leak into the pump, resulting
in the machine having to be returned to our technical department for examination and
repair at your expense.
- Place the flexible tube over the metal ‘AIR’ nozzle and fasten the retaining spring over the
top of it to ensure the connection is perfectly airtight.
- Connect the flexible tube to the ‘AIR IN’ nozzle of the WHITE adaptor. The red arrow on
the flexible tube must be positioned to face the WHITE adaptor.
- Move the pump slide to AIR ON (slide to the top). The pump will send air through the keg
to ensure the correct level of pressure.
Should you wish to use the system with a CO2 cartridge:
- Locate the flexible air or CO2 inlet tube.
N.B.: The flexible air or CO2 inlet tube is equipped with a ‘backstop valve’. The red arrow
on the valve, indicating the direction of connection, must be directed towards the WHITE
adaptor. In the event of poor connection, the beverage will leak into the pump, resulting
in the machine having to be returned to our technical department for examination and
repair at your expense.
- Place the flexible tube over the metal ‘CO2’ nozzle and fasten the retaining spring over
the top of it to ensure the connection is perfectly airtight.
- Connect the flexible tube to the ‘AIR IN’ nozzle of the WHITE adaptor. The red arrow on
the flexible tube must be positioned to face the WHITE adaptor.
- Move the pump slide to AIR OFF (slide to the bottom). The pump does not need to be
sending out air as the pressure will be provided by the cartridge.
For information on attaching the CO2 cartridge see the paragraph on ‘Positioning and
connecting the CO2 cartridge’.
Page 12

12
7. Check that the tubes are not bent before closing the lid of the machine. If this is the case,
gently rotate the keg to undo any kinks in the tubes. The beverage outlet tube must form
a continuation of the handle so as not to interfere with the closing of the lid. To ensure
that this is the case, place the tube in the white plastic collar located at the top of the
vat. The collar will now hold the outlet tube onto the shaft of the tap, thus preventing
it from being crushed when the lid is closed.
8. Rinse and wipe up any traces of spillage thoroughly.
9. Close the lid of the machine.
10. Plug the connector into the machine’s power socket and press the switch to the rear
of the appliance.
11. Adjust the temperature.
The temperature display on the front of the machine will indicate the temperature
inside the machine on the outer wall of the keg.
The cooling temperature can be adjusted by turning the temperature regulation
button clockwise to reduce (-) or anti-clockwise to increase (+) the temperature.
You will then need to allow some time for the content of the keg to reach the temperature
indicated on the display, which is why it is recommended that you perform this operation
before serving the first beverage from the keg.
If the keg is empty
If you are only getting froth or air out of the tap this will generally mean that the keg is
empty.
You may disconnect a partially-used keg but this is not advisable as it can be a very messy
task.
Replacing a keg
1. Flick the switch at the rear of the machine to 0.
2. Place a glass under the tap and ensure that there is no more liquid coming from it.
3. Open the lid by raising the lever.
To remove the WHITE 5L adaptor from a pressurised keg:
- Squeeze the sides of the nozzle, taking care not to damage the attachments.
- Lift the adaptor from the keg and hold the adaptor above the level of the tap.
- Pull the handle of the tap fully forwards (45°) to empty the tap and the tube.
- Keep the handle of the tap in the forwards position and remove the outlet tube positioned
in the tap to the rear.
- Remove the keg from the appliance by lifting it out of the machine.
To remove the YELLOW adaptor from a pressurised keg:
- If you are using the air pump, move the pump slide to AIR OFF (slide to the bottom).
- If you are using the CO2 cartridge system, close the CO2 inlet by turning the tap on the
pressure gauge.
Page 13

13
- Disconnect the flexible air or CO2 inlet tube from the adaptor by pressing the metal tab
and removing the valve.
- Disconnect the outlet tube from the adaptor by pressing the metal tab and removing the
valve.
- Pull the handle of the tap fully forwards (45°) to empty the tap and the tube.
- Keep the handle of the tap in the forwards position and remove the outlet tube positioned
in the tap to the rear.
- Squeeze the sides of the YELLOW adaptor to disconnect it from the keg.
- Remove the adaptor from the keg.
- Remove the keg from the appliance by lifting it out of the machine.
To remove the WHITE adaptor for 6L kegs and plastic kegs from a 6L keg or plastic
keg :
- If you are using the air pump, move the pump slide to AIR OFF (slide to the bottom).
- If you are using the CO2 cartridge system, close the CO2 inlet by turning the tap on the
pressure gauge.
- Disconnect the flexible air or CO2 inlet tube from the adaptor by pressing the metal tab
and removing the valve.
- Disconnect the outlet tube from the adaptor by pressing the metal tab and removing the
valve.
- Pull the handle of the tap fully forwards (45°) to empty the tap and the tube.
- Keep the handle of the tap in the forwards position and remove the outlet tube positioned
in the tap to the rear.
- Squeeze the two side buttons on the adaptor to disconnect it from the keg.
- Remove the adaptor from the keg.
- Remove the keg from the appliance by lifting it out of the machine.
Pouring a glass of beer
Pouring the ideal beer starts with a cold, clean glass. Rinse the glass under cold water before
filling it with beer. Hold the glass at a slight angle under the tap and pull the tap handle
fully forward (45°). If it is not fully open an excessive amount of froth will form. Once the
glass is 3/4 full, gradually bring it into the upright position as you pour. Move the glass away
from the tap to increase the froth produced or nearer to the tap to finish filling the glass
without increasing the amount of froth. Return the tap to the upright position.
Do not immerse the end of the tap in the liquid inside the glass as this is unhygienic.
At first, the liquid may splutter as air is driven through the system, but the flow will soon
become even.
Keep an eye on the drip tray and empty and rinse it at regular intervals during use.
Care and maintenance
Clean your beverage machine after use, when fitting a new keg and at regular intervals.
The machine, tubes, adaptors and accessories must be kept clean in order to optimise the
quality of the beer or other beverage and prevent odours.
Page 14

14
1. Flick the switch at the rear of the machine to 0.
2. Unplug the appliance.
3. Wipe the outer surface using a damp cloth and a few drops of washing-up liquid if
necessary.
4. Clean the front of the tap using a damp cloth.
5. Clean the cooling chamber of the machine using a damp cloth or sponge. Never fill the
cooling chamber as this will damage the appliance and never use aggressive detergents.
6. Clean the outlet tube, removing it from the tap by lowering the handle and pulling gently.
Rinse the outlet tube in warm soapy water, rinse and dry.
7. Clean the connection valves and tubes. IMPORTANT: all accessories must be
disassembled and cleaned with the utmost care. Any beer, wine or fruit juice residue may
ferment in the connections and result in beverage contamination.
a) Squeeze a spring clamp to loosen it.
b) Slide it along the tube, away from the connection valve.
c) Separate the connection valve from the tube.
d) Wash removable parts in warm soapy water, and squeeze and roll the ends of the
tubes between two fingers to clean inside them, rinse and dry.
e) Reconnect the tube and the connection valve using spring clamps.
f) Squeeze a spring clamp to loosen it.
g) Slide it along the tube, over the end of the valve.
8 Do not put any parts of the appliance in the dishwasher.
9 Do not immerse the appliance in water or any other liquid.
10 Do not use aggressive detergents such as vinegar, acid products, solvents or spirits to
clean your machine.
N.B.: To clean the WHITE adaptor for 6L kegs and plastic kegs properly connect the inlet
and outlet tubes to the adaptor. Under the tap, flush water through the end of each tube
in turn to thoroughly rinse the inside of the adaptor. The water should flow freely out of
the holes in the middle of the adaptor.
To avoid environmental and health problems due to hazardous substances
in electrical and electronic goods, appliances marked with this symbol
mustn’t be disposed of with unsorted municipal waste, but recovered,
reused, or recycled.
Page 15

BTC511
MANUEL D'INSTRUCTION
Page 16

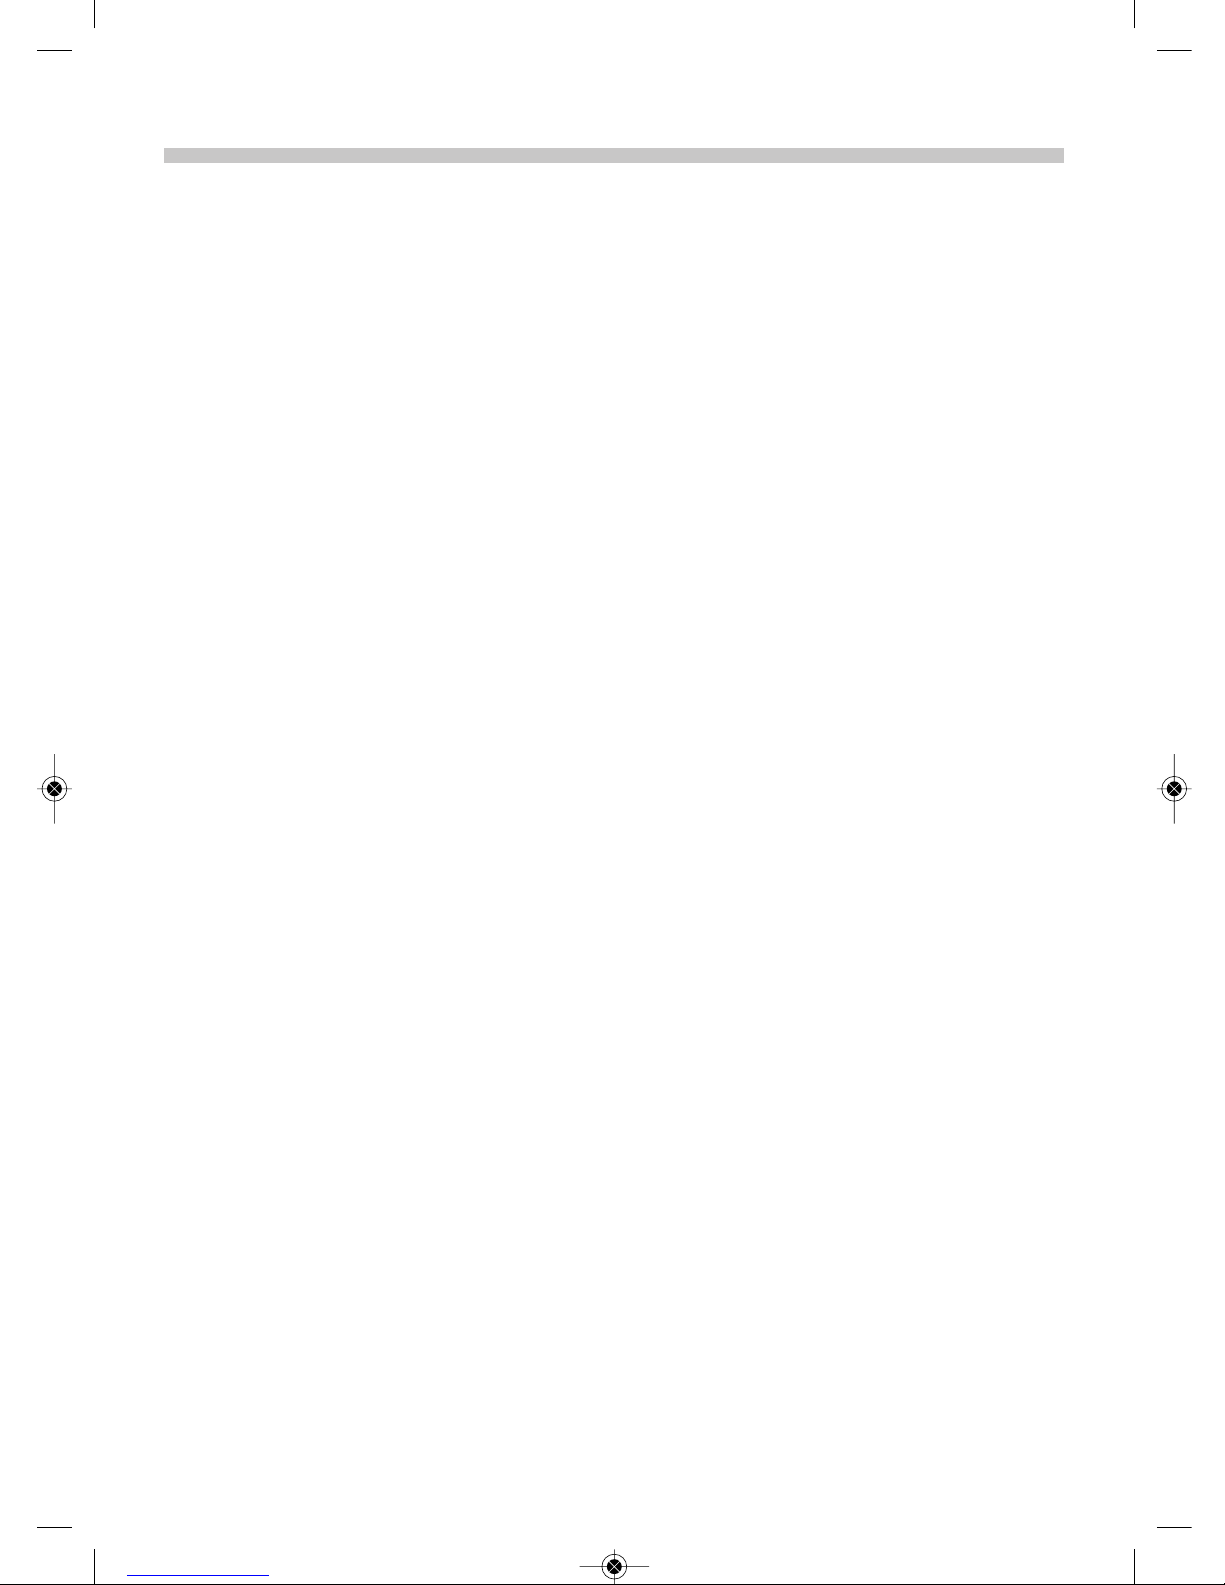
16
valve
collier
blanc
on
o
pompe à air
valve
clapet anti-retour
valve
achage
température
5 L
5 L
6 L
adaptateur jaune fût 5 L adaptateur blanc fût 6 L et fût plastique
adaptateur blanc
fût 5 L
adaptateur blanc
fût 6 L
et fût plastique
AIR
IN
B
EER O
UT
AIR IN
B
EER
OUT
Anneau
(joint)
en option en option
Page 17

17
Mode d'emploi
Lisez le mode d’emploi et gardez-le. Si vous confiez l’appareil à une tierce personne,
n’oubliez pas de lui transmettre la notice. Les instructions et conseils sont essentiels pour
un usage conforme du produit. Retirez l’appareil de l’emballage, mais gardez-le le temps
de vérifier l’état de l’appareil.
Avertissement
• Faites en sorte que les aérations à l’arrière de l’appareil restent libre pour la bonne
ventilation du système de refroidissement et qu’elles ne soient pas bloquées.
• Ne mettez rien d’autre dans l’appareil que les fûts spécifiés dans les présentes
consignes.
• Le liquide frigorigène est inflammable et il peut entraîner une irritation des yeux. Si
l’appareil est endommagé :
a) ne faites pas fonctionner l’interrupteur ON ou OFF dans la pièce
b) ouvrez les fenêtres et aérez la pièce
c) évacuez la pièce
d) consultez un médecin en cas d’irritation des yeux. Signalez-lui que le liquide
frigorigène est le R134a (isobutane)
Précautions importantes
Prenez des précautions essentielles comme:
1 Cet appareil doit uniquement être utilisé par ou sous la supervision d’un adulte
responsable. Utilisez et rangez l’appareil hors de portée des enfants.
2 Cet appareil n’est pas un jouet. Ne laissez pas vos enfants jouer avec ce dernier.
3 Maintenez l’appareil debout en permanence.
4 Le est une machine à boisson réfrigérante. Si, pour une quelconque
raison, vous inclinez cet appareil sur le côté, vous devrez le maintenir debout au moins
pendant 3 heures avant de le mettre en route. Sinon, vous endommagerez le
compresseur.
5 N’immergez pas l’appareil dans un liquide, ne l’utilisez pas dans une salle de
bains, à proximité d’une source d’eau ou à l’extérieur.
6 Ne placez pas l’appareil dans un environnement humide ou mouillé et tenez-
le à l’écart des rayons du soleil. La température ambiante ne doit pas dépasser 30°C.
7 Toutes les parties entrant en contact avec la boisson doivent être nettoyées avec soin
avant utilisation, avant de remplacer le conteneur par un autre et après utilisation.
a) avant utilisation, pour s’assurer qu’aucune impureté n’a été laissée après l’avoir
rangé.
b) avant de remplacer le conteneur de boisson, pour empêcher l’accumulation
d’impuretés à l’intérieur du système.
c) après utilisation, pour s’assurer qu’aucune impureté n’a été laissée dans l’appareil
avant qu’il ne soit rangé.
8 L’appareil et le conteneur de boisson sont tous les deux lourds. Faites très attention
lorsque vous les soulevez.
9 Ne soulevez pas ou ne déplacez pas l’appareil lorsqu’un fût est placé dans l’appareil.
Modèle BTC511:
modèle BTC511
Page 18

18
10 Ne soulevez pas la machine à boissons par le robinet ou le câble d’alimentation. Soulevez
toujours la machine par sa base.
11 Ne faites pas refroidir des fûts dans un congélateur. Tout comme les bouteilles en verre,
les fûts risquent d’exploser s’ils sont congelés.
12 Veillez à ce que le cordon d’alimentation ne soit pas en surplomb et qu’on ne puisse
pas trébucher dessus ou l’accrocher.
13 Gardez l’appareil et le cordon à l’écart des plaques chauffantes, plans de cuisson et becs
de gaz.
14 Débranchez l’appareil quand vous ne l’utilisez pas et laissez-le refroidir avant de le
déplacer ou de le nettoyer.
15 N’utilisez pas l’appareil à d’autres fins que celles décrites dans ce mode d’emploi.
16 Cet appareil ne doit pas être utilisé avec un minuteur externe ou un système de contrôle
à distance.
17 N’utilisez pas d’autres connecteurs que ceux fournis avec cet appareil.
18 L’appareil doit uniquement être branché à une prise reliée à la terre.
19 N’utilisez pas l’appareil s’il est tombé ou endommagé ou s’il fonctionne mal ou s’il fuit.
20 Si le connecteur ou le câble est abîmé, ils doivent être remplacés à l’aide de pièces
fournies par le fabricant ou son technicien agréé.
Usage ménager uniquement
Préparation
1 Réfrigérer bien votre fût avant utilisation. Si le fût n’est pas suffisamment froid, une
quantité de mousse trop importante se formera lorsque vous servirez votre bière.
2 Entreposez le fût dans un endroit froid, frais.
3 Le fût doit être en dessous de ou à la température de la pièce avant de le mettre dans
l’appareil.
4 Avant d’insérer un fût dans l’appareil, vérifier la date limite de consommation. N’utilisez
pas le fût si cette date est dépassée.
5 Vous pouvez pré refroidir le fût de 2 manières :
- à l’intérieur de la machine à boisson. Le refroidissement du fût à juste température dure
environ 15 heures avec le modèle 14463-56 et 2 heures avec le . Placez
votre fût au centre de l’appareil, ne fixez pas les tuyaux, placez le curseur de la pompe (situé
sous le couvercle) sur AIR OFF (curseur en bas). Fermez le couvercle de la machine.
Branchez le connecteur sur la prise d’alimentation de l’appareil et appuyez sur
l’interrupteur à l’arrière de la machine. Réglez la température.
- au réfrigérateur. Le refroidissement du fût dure environ 10 heures selon la capacité de
refroidissement de votre réfrigérateur.
Avertissement : Ne faites pas refroidir des fûts dans un congélateur. Tout comme les
bouteilles en verre, les fûts risquent d’exploser s’ils sont congelés.
modèle BTC511
Page 19

19
Conseil : Conservez un fût d’avance au réfrigérateur. Ainsi, vous aurez toujours un fût
réfrigéré disponible. Nous vous recommandons également de mettre l’appareil sous tension
une heure avant de l’utiliser pour que votre machine se refroidisse.
6 Le fût ne doit pas être secoué. Si c’est le cas, ne le manipulez pas pendant 4 heures avant
de l’utiliser car sinon la pression produira une mousse excessive.
Attention :Ne pas secouer ou laisser tomber les fûts. Ne pas les exposer au soleil ou à une
température supérieur à 30°C. Ne pas les percer ou brûler même après usage.
7 Nettoyez soigneusement l’appareil et ses accessoires. Reportez-vous au paragraphe «soins
et entretien».
8 Placez l’appareil sur une surface plane, sèche, propre et résistante à la chaleur, à au moins
75 cm du sol.
9 Laissez un espace dégagé d’au moins 5 cm tout autour de l’appareil.
10 N’utilisez pas la machine à boissons en pleine air, surtout quand la température
extérieure dépasse les 30°C.
11 Centrez le bac récepteur de mousse sous le devant de l’appareil.
12 Mettez un tapis en plastique sous l’appareil pour protéger la surface de travail des
éraflures et des égouttements.
13 Ayez un seau et une serviette à portée de main si de la mousse se forme ou en cas
d’écoulement. De plus, portez des vêtements qui ne craignent pas de recevoir de la bière.
La cartouche de CO² alimentaire
Vous pouvez acquérir une cartouche de CO² auprès de notre service SAV au 0820 200 275
uniquement pour la France. En Belgique, via votre détaillant en électroménager Modèle
CO2 alimentaire 320g.
Une cartouche est valable pour le débit de plusieurs fûts de bière.
Un ensemble d’accessoire est livré avec votre machine à boissons, destiné au raccordement
de la cartouche sur la machine.
Placement et raccordement de la cartouche CO²
Visser le manomètre sur la cartouche de CO² en veillant préalablement à la fermeture du
robinet avant le vissage sur la cartouche.
Insérer l’ensemble - cartouche et manomètre - dans la coque en plastique noir.
A l’arrière de la machine, assemblez la coque au moyen du crochet situé à sa base, dans
la découpe de l’habillage de la machine à boisson.
la formation de bulles dans la bière et de mieux faire mousser.
Votre machine à boisson peut être utilisé sans une cartouche de , mais
CO²
certains modèles peuvent utiliser le lors de la préparation de vos boissons
CO²
préférées pour améliorer leurs résultats quality.Adding de dans
CO²
Page 20

20
Au moyen du raccord à douille du robinet raccordez la cartouche sur la sortie métallique
à l’arrière de la machine à hauteur du couvercle.
Usage de la cartouche de CO² alimentaire :
Lors de l’emploi de cartouche de CO², la pompe à air doit être hors d’usage. C’est la
cartouche qui assurera la pression pour obtenir le débit de la boisson.
Nous vous recommandons de régler la pression entre 1,5 bars et 2 bars, au moyen du
manomètre situé sur la cartouche. L’ouverture du débit doit être fait après le raccordement
complet du fût dans la machine.
N.B. Le tuyau venant de l’adaptateur fixé sur le fût doit être raccordé sur le tuyau
métallique « CO2 ».
INSTALLATION D’UN FÛT DE BIÈRE PRESSURISÉ 5L
L’adaptateur BLANC est compatible avec les fûts de 5L pressurisé.
1. Avant de placez le fût dans la machine, connectez l’adaptateur BLANC au tube de sortie.
Pour cela, enclenchez la valve du tube de sortie sur l’adaptateur BLANC. Ouvrez le
couvercle de la machine, au moyen du levier situé au centre du couvercle.
2. Installez ensuite le tube de sortie relié à l’adaptateur BLANC. Pour cela, abaissez la
poignée du robinet et insérez le tube dans l’ouverture située à l’arrière. Le tube doit
aller jusqu’à la sortie du robinet. La bride de serrage (rectangle noir) doit se caler
automatiquement pour maintenir le tube en place.
Vérifiez bien que la bride de serrage soit logée correctement dans l’espace réservé à
cet effet.
Si le tube dépasse du robinet, n’hésitez pas à couper ce qui dépasse.
3. Placez le fût dans l’appareil et fixez fermement l’adaptateur BLANC sur le fût.
4. Le tube de sortie pour la boisson doit être dans le prolongement de la poignée pour ne
pas gêner la fermeture du couvercle. Pour cela, placez le tube dans le collier en
plastique blanc situé dans le haut de la cuve de la machine. Le collier maintient alors le
tube de sortie dans l’axe du robinet et évite qu’il ne soit écrasé lors de la fermeture du
couvercle.
5. Placez le curseur de la pompe (situé sous le couvercle) sur AIR OFF (curseur en bas). Il
n’est pas nécessaire que la pompe envoie de l’air car le fût est déjà sous pression.
La pompe à air n’est pas nécessaire pour les fûts pressurisés : ils n’ont pas besoin de la
pompe à air car ils fournissent leur propre pression de déversement.
6. Rincez et essuyez soigneusement toutes traces d’écoulement.
7. Fermez le couvercle de la machine.
8. Branchez le connecteur sur la prise d’alimentation de l’appareil et appuyez sur
l’interrupteur à l’arrière de la machine.
9. Réglez la température.
Page 21

21
L’afficheur de température sur le devant de la machine indiquera la température dans
l’enceinte de la machine sur la paroi extérieure du fût.
Vous pouvez régler la température de refroidissement en tournant le bouton de
réglage de température dans le sens des aiguilles d’une montre afin de réduire (-), ou
dans le sens contraire des aiguilles d’une montre afin d’augmenter (+) la
température.
Il faudra un certain temps avant que la température du contenu du fût soit celle indiquée
sur l’afficheur. Par conséquent, il est préférable de réaliser cette opération avant de servir
le premier verre de boisson.
FÛTS NON PRESSURISÉS 5L
L’adaptateur JAUNE est compatible avec les fûts de 5L non
pressurisé.
1. Vérifiez la présence d’un anneau translucide (joint) dans le tube rigide jaune.
2. Vissez le tube rigide jaune sur l’adaptateur JAUNE.
3. Passez l’anneau souple noir fourni autour du tube rigide. Remontez l’anneau du bas du
tube rigide jusqu’à l’adaptateur JAUNE.
4. Avant de placer votre fût dans l’appareil, il est nécessaire de le décompresser, c'est-à-dire
d’éliminer la pression présente dans le fût.
Attention : vérifiez toujours sur le fût les consignes d’élimination du surplus de gaz.
Il est impératif que le fût soit depuis plusieurs heures en position droite et qu’il n’ait pas
été secoué. Sans cela, une quantité excessive de mousse va se former à la mise en perce.
a. Dépressurisez le fût.
- Installez le fût 5L sur une table.
- Sortez le robinet intégré au fût (positionné en partie basse sur l’avant du fût) et
remplissez la moitié d’un verre.
b. Ventilez le fût
- Retirez le bouchon plastique du fût (positionné sur le sommet du fût) pour faire entrer
l’air dans le fût.
- À l’aide d’une pince, retirez l’anneau autour de l’opercule. Vous avez besoin d’un espace
suffisant pour faire glisser le tube rigide dans le fût.
5. Introduisez l’extrémité du tube rigide jaune dans l’orifice situé sur la partie supérieur du
fût et enfoncez le tube jusqu’à ce que l’anneau souple noir se clipse hermétiquement
dans l’orifice supérieur du fût. Les extrémités de l’adaptateur JAUNE vont se clipser sur
les extrémités du fût.
6. Placez le fût dans la machine.
7. Essuyez tout écoulement.
Page 22

22
8. Installez le tube de sortie. Pour cela, abaissez la poignée du robinet et insérez le tube
dans l’ouverture située à l’arrière. Le tube doit aller jusqu’à la sortie du robinet. La
bride de serrage (rectangle noir) doit se caler automatiquement pour maintenir le
tube en place.
Vérifiez bien que la bride de serrage soit logée correctement dans l’espace réservé à
cet effet.
9. Connectez le tube de sortie à l’adaptateur JAUNE sur l’embout « BEVERAGE OUT » de
l’adaptateur JAUNE.
10. Installez le tube d’arrivée d’air sur l’un des raccords métalliques « air » ou « CO2 », situé
devant la charnière du couvercle.
La pompe à air est nécessaire pour les fûts non pressurisés. Les fûts non pressurisés
possèdent une petite pression interne qui doit être relâchée. Ils sont ensuite pressurisés
par la pompe à air ou la cartouche CO².
Si vous souhaitez utiliser la pompe à air de la machine :
- Munissez vous du tube flexible d’arrivée d’air ou CO2
ATTENTION : Le tube flexible d’arrivée d’air ou CO2 est muni d’un « clapet anti-retour ».
Sur le clapet, une flèche rouge indique le sens de raccordement. La flèche doit être dirigée
vers l’adaptateur JAUNE. En cas de mauvais raccordement, de la boisson serait envoyée dans
la pompe de la machine, cette erreur nécessite un retour dans notre service technique avec
intervention à vos frais.
- Placez le tube flexible sur l’embout métallique « AIR » puis fixez le ressort de maintien par-
dessus pour assurer une parfaite étanchéité.
- Connectez la valve jaune du tube flexible sur l’adaptateur JAUNE sur l’embout « AIR IN ».
La flèche rouge sur le tube flexible doit être tournée vers l’adaptateur JAUNE.
- Placez le curseur de la pompe sur AIR ON (curseur en haut). La pompe enverra de l’air au
sein du fût pour assurer une bonne pression.
Si vous souhaitez utiliser le système à cartouche CO2 :
- Munissez vous du tube flexible d’arrivée d’air ou CO2
ATTENTION : Le tube flexible d’arrivée d’air ou CO2 est muni d’un « clapet anti-retour ».
Sur le clapet, une flèche rouge indique le sens de raccordement. La flèche doit être dirigée
vers l’adaptateur JAUNE. En cas de mauvais raccordement, de la boisson serait envoyée dans
la pompe de la machine, cette erreur nécessite un retour dans notre service technique avec
intervention à vos frais.
- Placez le tube flexible sur l’embout métallique « CO2 » puis fixez le ressort de maintien
par-dessus pour assurer une parfaite étanchéité.
- Connectez la valve jaune du tube flexible sur l’adaptateur JAUNE sur l’embout « AIR IN ».
La flèche rouge sur le tube flexible doit être tournée vers l’adaptateur JAUNE.
- Placez le curseur de la pompe sur AIR OFF (curseur en bas). Il n’est pas nécessaire que la
pompe envoie de l’air car la pression viendra de la cartouche.
Pour fixer la cartouche CO2 lire le paragraphe « Placement et raccordement de la
cartouche CO2».
Page 23

23
11. Avant de fermer le couvercle de la machine, vérifiez bien que les tubes ne soient pas
pliés. Si c’est le cas, faites pivoter légèrement le fût pour qu’ils soient sans plis. Le tube
de sortie pour la boisson doit être dans le prolongement de la poignée pour ne pas
gêner la fermeture du couvercle. Pour cela, placez le tube dans le collier en plastique
blanc situé dans le haut de la cuve de la machine. Le collier maintient alors le tube de
sortie dans l’axe du robinet et évite qu’il ne soit écrasé lors de la fermeture du couvercle.
12. Rincez et essuyez soigneusement toutes traces d’écoulement.
13. Fermez le couvercle de la machine.
14. Branchez le connecteur sur la prise d’alimentation de l’appareil et appuyez sur
l’interrupteur à l’arrière de la machine.
15. Réglez la température.
L’afficheur de température sur le devant de la machine indiquera la température
dans l’enceinte de la machine sur la paroi extérieure du fût.
Vous pouvez régler la température de refroidissement en tournant le bouton de
réglage de température dans le sens des aiguilles d’une montre afin de réduire (-),
ou dans le sens contraire des aiguilles d’une montre afin d’augmenter (+) la
température.
Il faudra un certain temps avant que la température du contenu du fût soit celle indiquée
sur l’afficheur. Par conséquent, il est préférable de réaliser cette opération largement avant
de servir le premier verre de boisson.
LE FÛT PLASTIQUE MULTI BOISSONS
L’adaptateur BLANC fût 6L et fût plastique est compatible avec le fût
plastique.
1. Retirez le bouchon du fût plastique et remplissez le fût avec la boisson de votre choix.
2. Pour éviter les blocages et une éventuelle dégradation du mécanisme du robinet :
a) Ne le remplissez pas avec du lait ou tout liquide contenant du lait.
b) Ne le remplissez pas avec un liquide collant ou épais.
c) Ne le remplissez pas avec un liquide contenant la chair d’un fruit ou d’autres
particules.
d) Ne le remplissez pas au-delà de la marque supérieure « maximum » entourant le corps
du fût.
3. Si vous remplissez le fût avec une boisson gazeuse, comme la bière.
Il est préférable d’utiliser la totalité du fût en une seule fois. Sinon, la boisson risque
fortement de perdre son goût.
4. Munissez vous de l’adaptateur BLANC et du tuyau rigide blanc. Vérifier bien que les valves
de raccordement des tuyaux soient retirées à chaque extrémité de l’adaptateur. Si ce n’est
pas le cas, veillez à les retirer en appuyant sur la languette métal.
5. Insérer le grand col du tube rigide blanc dans le logement sous l’adaptateur BLANC.
6. Insérer l’adaptateur BLANC et le tuyau rigide blanc dans le fût plastique et appuyez sur
le centre de l’adaptateur BLANC pour clipser fermement l’adaptateur sur le fût.
Page 24

24
7. Installez ensuite le tube de sortie. Pour cela, abaissez la poignée du robinet et insérez
le tube dans l’ouverture située à l’arrière. Le tube doit aller jusqu’à la sortie du
robinet. La bride de serrage (rectangle noir) doit se caler automatiquement pour
maintenir le tube en place.
Vérifiez bien que la bride de serrage soit logée correctement dans l’espace réservé à
cet effet.
8. Connectez le tube de sortie à l’adaptateur BLANC sur l’embout «BEER OUT».
9. Installez le tube d’arrivée d’air ou CO2 sur l’un des raccords métalliques « air » ou « CO2 »,
situé devant la charnière du couvercle.
Si vous souhaitez utiliser la pompe à air de la machine :
- Munissez vous du tube flexible d’arrivée d’air ou CO2
ATTENTION : Le tube flexible d’arrivée d’air ou CO2 est muni d’un « clapet anti-retour ».
Sur le clapet, une flèche rouge indique le sens de raccordement. La flèche doit être dirigée
vers l’adaptateur BLANC. En cas de mauvais raccordement, de la boisson serait envoyée
dans la pompe de la machine, cette erreur nécessite un retour dans notre service
technique avec intervention à vos frais.
- Placez le tube flexible sur l’embout métallique « AIR » puis fixez le ressort de maintien par-
dessus pour assurer une parfaite étanchéité.
- Connectez le tube flexible sur l’adaptateur BLANC sur l’embout « AIR IN ». La flèche rouge
sur le tube flexible doit être tournée vers l’adaptateur BLANC.
- Placez le curseur de la pompe sur AIR ON (curseur en haut). La pompe enverra de l’air au
sein du fût pour assurer une bonne pression.
Si vous souhaitez utiliser le système à cartouche CO2 :
- Munissez vous du tube flexible d’arrivée d’air ou CO2
ATTENTION : Le tube flexible d’arrivée d’air ou CO2 est muni d’un « clapet anti-retour ».
Sur le clapet, une flèche rouge indique le sens de raccordement. La flèche doit être dirigée
vers l’adaptateur BLANC. En cas de mauvais raccordement, de la boisson serait envoyée
dans la pompe de la machine, cette erreur nécessite un retour dans notre service
technique avec intervention à vos frais.
- Placez le tube flexible sur l’embout métallique « CO2 » puis fixez le ressort de maintien
par-dessus pour assurer une parfaite étanchéité.
- Connectez le tube flexible sur l’adaptateur BLANC sur l’embout « AIR IN ». La flèche rouge
sur le tube flexible doit être tournée vers l’adaptateur BLANC.
- Placez le curseur de la pompe sur AIR OFF (curseur en bas). Il n’est pas nécessaire que la
pompe envoie de l’air car la pression viendra de la cartouche.
Pour fixer la cartouche CO2 lire le paragraphe « Placement et raccordement de la
cartouche CO2».
10. Avant de fermer le couvercle de la machine, vérifiez bien que les tubes ne soient pas
pliés. Si c’est le cas, faites pivoter légèrement le fût pour qu’ils soient sans plis. Le tube
de sortie pour la boisson doit être dans le prolongement de la poignée pour ne pas
gêner la fermeture du couvercle. Pour cela, placez le tube dans le collier en plastique
blanc situé dans le haut de la cuve de la machine. Le collier maintient alors le tube de
sortie dans l’axe du robinet et évite qu’il ne soit écrasé lors de la fermeture du couvercle.
Page 25

25
11. Rincez et essuyez soigneusement toutes traces d’écoulement.
12. Fermez le couvercle de la machine.
13. Branchez le connecteur sur la prise d’alimentation de l’appareil et appuyez sur
l’interrupteur à l’arrière de la machine.
14. Réglez la température.
L’afficheur de température sur le devant de la machine indiquera la température
dans l’enceinte de la machine sur la paroi extérieure du fût.
Vous pouvez régler la température de refroidissement en tournant le bouton de
réglage de température dans le sens des aiguilles d’une montre afin de réduire (-),
ou dans le sens contraire des aiguilles d’une montre afin d’augmenter (+) la
température.
Il faudra un certain temps avant que la température du contenu du fût soit celle indiquée
sur l’afficheur. Par conséquent, il est préférable de réaliser cette opération largement avant
de servir le premier verre de boisson.
INSTALLATION D’UN FÛT DE BIÈRE PRESSURISÉ 6L
L’adaptateur BLANC fût 6L et fût plastique est compatible avec les
fûts pressurisés de 6L.
1 Munissez vous de l’adaptateur BLANC. Vérifier bien que les valves de raccordement des
tuyaux soient retirées à chaque extrémité de l’adaptateur. Si ce n’est pas le cas, veillez à
les retirer en appuyant sur la languette métal.
2 Installez l’adaptateur BLANC sur le fût avant de placer le fût dans la machine. Pour
cela, appuyez sur le centre de l’adaptateur et enfoncez au maximum l’adaptateur
sur le sommet du fût.
Vérifiez que l’adaptateur soit bien solidaire du fût avant de continuer.
3 Installez le tube de sortie. Pour cela, abaissez la poignée du robinet et insérez le tube dans
l’ouverture située à l’arrière. Le tube doit aller jusqu’à la sortie du robinet. La bride de
serrage (rectangle noir) doit se caler automatiquement pour maintenir le tube en place.
Vérifiez bien que la bride de serrage soit logée correctement dans l’espace réservé à cet
effet.
4. Fixez le tube de sortie sur l’extrémité d’une des valves de raccordement.
5. Insérez la valve de raccordement reliée au tube de sortie dans l’adaptateur BLANC sur
l’embout «BEER OUT».
6. Installez le tube d’arrivée d’air ou CO2 sur l’un des raccords métalliques « air » ou « CO2 »,
situé devant la charnière du couvercle.
Page 26

26
Si vous souhaitez utiliser la pompe à air de la machine :
- Munissez vous du tube flexible d’arrivée d’air ou CO2
ATTENTION : Le tube flexible d’arrivée d’air ou CO2 est muni d’un « clapet anti-retour ».
Sur le clapet, une flèche rouge indique le sens de raccordement. La flèche doit être dirigée
vers l’adaptateur BLANC. En cas de mauvais raccordement, de la boisson serait envoyée
dans la pompe de la machine, cette erreur nécessite un retour dans notre service
technique avec intervention à vos frais.
- Placez le tube flexible sur l’embout métallique « AIR » puis fixez le ressort de maintien par-
dessus pour assurer une parfaite étanchéité.
- Connectez le tube flexible sur l’adaptateur BLANC sur l’embout « AIR IN ». La flèche rouge
sur le tube flexible doit être tournée vers l’adaptateur BLANC.
- Placez le curseur de la pompe sur AIR ON (curseur en haut). La pompe enverra de l’air au
sein du fût pour assurer une bonne pression.
Si vous souhaitez utiliser le système à cartouche CO2 :
- Munissez vous du tube flexible d’arrivée d’air ou CO2
ATTENTION : Le tube flexible d’arrivée d’air ou CO2 est muni d’un « clapet anti-retour ».
Sur le clapet, une flèche rouge indique le sens de raccordement. La flèche doit être dirigée
vers l’adaptateur BLANC. En cas de mauvais raccordement, de la boisson serait envoyée
dans la pompe de la machine, cette erreur nécessite un retour dans notre service
technique avec intervention à vos frais.
- Placez le tube flexible sur l’embout métallique « CO2 » puis fixez le ressort de maintien
par-dessus pour assurer une parfaite étanchéité.
- Connectez le tube flexible sur l’adaptateur BLANC sur l’embout « AIR IN ». La flèche rouge
sur le tube flexible doit être tournée vers l’adaptateur BLANC.
- Placez le curseur de la pompe sur AIR OFF (curseur en bas). Il n’est pas nécessaire que la
pompe envoie de l’air car la pression viendra de la cartouche.
Pour fixer la cartouche CO2 lire le paragraphe « Placement et raccordement de la
cartouche CO2».
7. Avant de fermer le couvercle de la machine, vérifiez bien que les tubes ne soient pas pliés.
Si c’est le cas, faites pivoter légèrement le fût pour qu’ils soient sans plis. Le tube de sortie
pour la boisson doit être dans le prolongement de la poignée pour ne pas gêner la
fermeture du couvercle. Pour cela, placez le tube dans le collier en plastique blanc situé
dans le haut de la cuve de la machine. Le collier maintient alors le tube de sortie dans
l’axe du robinet et évite qu’il ne soit écrasé lors de la fermeture du couvercle.
8. Rincez et essuyez soigneusement toutes traces d’écoulement.
9. Fermez le couvercle de la machine.
10. Branchez le connecteur sur la prise d’alimentation de l’appareil et appuyez sur
l’interrupteur à l’arrière de la machine.
11. Réglez la température.
L’afficheur de température sur le devant de la machine indiquera la température
dans l’enceinte de la machine sur la paroi extérieure du fût.
Page 27

27
Vous pouvez régler la température de refroidissement en tournant le bouton de réglage
de température dans le sens des aiguilles d’une montre afin de réduire (-), ou dans le sens
contraire des aiguilles d’une montre afin d’augmenter (+) la température.
Il faudra un certain temps avant que la température du contenu du fût soit celle indiquée
sur l’afficheur. Par conséquent, il est préférable de réaliser cette opération largement avant
de servir le premier verre de boisson.
Si le fût est vide
Si vous obtenez uniquement de la mousse ou de l’air venant du robinet, cela signifie en
général que le fût est vide.
Vous pouvez déconnecter un fût partiellement entamé. Cependant, nous ne le
recommandons pas car cela peut être un travail très salissant.
Remplacer un fût
1. Placez l’interrupteur à l’arrière de la machine sur 0.
2. Mettez un verre sous le robinet et assurez vous que plus aucun liquide n’en sort.
3. Ouvrez le couvercle en soulevant le levier.
Pour retirer l’adaptateur BLANC 5L d’un fût pressurisé :
- Appuyez sur les cotés de l’embout de manière à ne pas endommager les attaches.
- Soulevez l’adaptateur du fût et tenez l’adaptateur au-dessus du niveau du robinet.
- Tirez le manche du robinet totalement vers l’avant (45°) pour vider le robinet et le tube.
- Maintenez le manche du robinet vers l’avant et retirez par l’arrière le tube de sortie situé
dans le robinet.
- Retirez le fût de l’appareil en le soulevant hors de la machine.
Pour retirer l’adaptateur JAUNE d’un fût pressurisé :
- Si vous utilisez la pompe à air, placez le curseur de la pompe sur AIR OFF (curseur en bas).
- Si vous utilisez le système à cartouche CO2, fermez l’arrivée de CO2 en tournant le robinet
du manomètre.
- Déconnectez le tube flexible d’arrivée d’air ou CO2 de l’adaptateur. Pour cela, appuyez
sur la languette métal et retirez la valve.
- Déconnectez le tube de sortie de l’adaptateur. Pour cela, appuyez sur la languette métal
et retirez la valve.
- Tirez le manche du robinet totalement vers l’avant (45°) pour vider le robinet et le tube.
- Maintenez le manche du robinet vers l’avant et retirez par l’arrière le tube de sortie situé
dans le robinet.
- Appuyez sur les cotés de l’adaptateur JAUNE pour le décrocher du fût.
- Retirez l’adaptateur du fût.
- Retirez le fût de l’appareil en le soulevant hors de la machine.
Page 28

28
Pour retirer l’adaptateur BLANC fût 6L et fût plastique d’un fût 6L ou du fût
plastique :
- Si vous utilisez la pompe à air, placez le curseur de la pompe sur AIR OFF (curseur en bas).
- Si vous utilisez le système à cartouche CO2, fermez l’arrivée de CO2 en tournant le robinet
du manomètre.
- Déconnectez le tube flexible d’arrivée d’air ou CO2 de l’adaptateur. Pour cela, appuyez
sur la languette métal et retirez la valve.
- Déconnectez le tube de sortie de l’adaptateur. Pour cela, appuyez sur la languette métal
et retirez la valve.
- Tirez le manche du robinet totalement vers l’avant (45°) pour vider le robinet et le tube.
- Maintenez le manche du robinet vers l’avant et retirez par l’arrière le tube de sortie situé
dans le robinet.
- Appuyez sur les 2 boutons latéraux de l’adaptateur pour le décrocher du fût.
- Retirez l’adaptateur du fût.
- Retirez le fût de l’appareil en le soulevant hors de la machine.
Servir un verre de bière
Pour servir une bière idéale, il est important de commencer dans un verre propre et frais.
Rincez le verre à l’eau froide avant de remplir votre verre de bière. Inclinez légèrement votre
verre sous le robinet et tirez franchement vers l’avant sur le manche du robinet (45°). S’il
n’est pas totalement ouvert, vous obtiendrez une mousse excessive. Tout en versant, au
¾ de la capacité du verre, ramenez-le graduellement en position debout. A ce moment,
éloigniez le verre du robinet pour obtenir plus de mousse, ou rapprochez le du robinet pour
finir de remplir le verre sans augmenter le volume de mousse. Relâchez le robinet en
position debout.
N’immergez pas l’extrémité du robinet dans le liquide à l’intérieur du verre car cela n’est
pas hygiénique.
Au début, le liquide peut couler de façon intermittente, étant donné que les tuyaux doivent
être purgées des poches d’air éventuelles, ensuite le débit deviendra continu.
Surveillez régulièrement le bac récepteur. Videz-le et rincez-le à intervalle régulier
pendant l’utilisation.
Soins et entretien
Nettoyez votre machine à boissons après utilisation, lors de l’installation d’un nouveau fût
et à intervalle régulier.
La machine, les tubes, les adaptateurs et les accessoires doivent toujours rester propres pour
maintenir un excellent niveau de qualité de la bière ou de la boisson choisie et pour éviter
les odeurs.
1. Placez l’interrupteur à l’arrière de la machine sur 0.
2. Débranchez l’appareil.
3. Essuyez la surface extérieure à l’aide d’un chiffon humide. Si nécessaire, utilisez
quelques gouttes de produit vaisselle.
Page 29

29
4. Nettoyez la partie avant du robinet avec un chiffon humide.
5. Nettoyez la chambre de refroidissement de la machine à l’aide d’un chiffon ou d’une
éponge humide. Ne remplissez jamais la chambre de refroidissement, vous
endommagerez l’appareil. N’utilisez jamais de détergents agressifs.
6. Nettoyez le tube de sortie. Pour le retirer du robinet, abaissez la poignée et retirer le. Rincez
le tube de sortie à l’eau chaude savonneuse, rincez et séchez
7. Nettoyez les valves de raccordement, les tuyaux et les tubes. IMPORTANT : tous les
accessoires doivent être désassemblés pour être nettoyés avec le plus grand soin. Les
résidus de bière, de vin ou de jus de fruit peuvent fermenter dans les raccords et entraîner
une contamination des boissons.
a) Appuyez sur un collier à ressort pour le desserrer.
b) Faites-le glisser le long du tuyau, à l’écart de la valve de raccordement.
c) Séparez la valve de raccordement du tuyau.
d) Lavez les parties amovibles à l’eau chaude savonneuse, faites rouler les extrémités des
tuyaux entre deux doigts en les écrasants pour en nettoyer l’intérieur, rincez et séchez.
e) Fixez à nouveau le tuyau et la valve de raccordement ensemble avec des colliers à ressort.
f) Appuyez sur un collier à ressort pour le desserrer.
g) Faites-le glisser le long du tuyau, par-dessus l’extrémité de la valve.
8 Ne mettez aucune des pièces dans un lave-vaisselle.
9 N’immergez pas l’appareil dans de l’eau ou autre liquide.
10 N’utilisez pas de détergents agressifs comme du vinaigre, des acides, des solvants ou
de l’essence pour nettoyer votre machine.
NB : Pour nettoyer correctement l’adaptateur BLANC fût 6 L et fût plastique : vous devez
raccorder les tuyaux d’entrée et de sortie sur l’adaptateur. Ensuite, sous le robinet,
envoyez de l’eau successivement par l’extrémité de chaque tuyau pour rincer
soigneusement l’intérieur de l’adaptateur. L’eau doit s’écouler librement par les orifices au
centre de l’adaptateur.
Ce symbole signifie que l’appareil ne doit pas être jeté avec les autres
déchets et qu’il fera l’objet d’une collecte sélective en vue de sa réutilisation,
de son recyclage ou de sa valorisation. S’il contient des substances
susceptibles de nuire à l’environnement, celles-ci seront éliminées ou
neutralisées.
 Loading...