

Page 1

Safety precautions
Individual parameters, description by figures and design in the manual may differ depending on the version
and updates. Printing errors reserved. The buyer is obliged to provide a serial number on the warranty card as
well as in the delivery note and the proof of purchase. In this context, the buyer acknowledges that unless the
serial number of goods is not marked on the proof of purchase, delivery note and in the warranty card and
therefore it cannot be possible to compare this serial number marked on goods and its protective packaging
with the serial number stated in the warranty card, delivery note and the proof of purchase and thus to verify
that the goods runs from the seller, the service center is competent to claim such a goods automatically and
reject it immediately. The buyer must instruct all persons to whom the goods would be subsequently sold.
Product complaints do with your dealer if you are not on the web www.iget.eu indicated otherwise.
For household use: The given symbol (crossed-out wheeled bin) on the product or at accompanying
documents means that used electrical and electronic products should not disposed of with household waste.
To ensure proper disposal of the product, hand it over to a designated collection point, where it will be
accepted free of charge. The correct disposal of this product will help to save valuable natural resources and
prevent any potential negative impacts on the environment and human health, which could otherwise be
caused by inappropriate disposal of wastes. For more details, please, contact your local authorities or the
nearest collection point. The improper disposal of this waste can be penalized in accordance with national
regulations. Information for users to disposal of electrical and electronic devices (corporate and business use):
For proper disposal of electrical and electronic devices, ask for details from your dealer or distributor.
Information for users to disposal of electrical and electronic devices in other countries outside EU: The above
mentioned symbol (crossed-out wheeled bin) is valid only in the countries of EU. For proper disposal of
electrical and electronic devices, ask for details from your authorities or dealer. All is expressed by the symbol of
crossed-out wheeled bin on product, packaging or in printed materials.
Set up the claim for warranty repair of device at your dealer. If you have technical questions or problems,
contact your dealer. Follow the rules for working with electrical equipment. The user may not dismantle the
device or replace any part of this. Opening or removing the covers poses the risk of electric shock.
Declaration of Conformity:
Company INTELEK spol. s r.o. hereby declares that all M3P15v2/M3P18v2/M3P20v2 devices are in compliance
with essential requirements and other relevant provisions of Directive 2014/53/EU. The full text of the EU
Declaration of Conformity is available on this website www.iget.eu.
The warranty period of the product is 24 months, unless stated otherwise.
This device can be used in the following countries:
RoHS: The components used in the device meet the requirements on the restriction of hazardous substances in
electrical and electronic devices in accordance with Directive 2011/65/EU. The RoHS declaration can be
downloaded from www.iget.eu.
Producer / Exclusive importer of iGET products to EU:
INTELEK spol. s r.o., Ericha Roučky 1291/4, 627 00 Brno - Černovice, CZ, web: http://www.iget.eu
SUPPORT: http://www.iget.eu/helpdesk
Copyright © 2018 Intelek spol. s r.o. All rights reserved.
EN M3P15v2/M3P18v2/M3P20v2
iGET
Setting Up Camera M3P15v2/M3P18v2
Insert Lan Cable and Power Up
Please always connect Smart Camera with LAN before
powering up when you first using it.
• Make sure the the settings like DHCP Server and UPNP are
enabled on your router.
• Connect the power cable, the Smart Camera will run some
diagnostic processes like rolling the camera. When it stops
rolling, the startup is completed.
Pairing with system
Tap “+” Add accessory to scan QR codes printed on the back cover
of the camera. Then name the camera for daily use. After that,
you’ve successfully paired the camera with system.
Setting Up Camera M3P20v2
Power up
• Insert power cable into the Micro-USB slot on the round edge.
•The camera will power up you will hear the prompt voice to
show you it is waiting to WiFi settings.
Pairing with system
Tap “+” Add accessory to scan QR codes printed on the back
cover of the camera, you will be guided to connect to Camera by
connected the AP started with IPCAM-XXXXXX.
WiFi Settings
•After switch back to App, you will have the page to set up WiFi
of camera.
•Select your WiFi router in the list, then input Password and Save.
•You will hear the camera play a special tone that means it was
connected to the router successfully.
•Name it, then getting started to use camera.
FAQ
I’ve Already Connected My Camera to Internet, But I Can’t Connect It in App.
Please make sure your router has successfully connected to Internet.
DHCP Server/Service should be Enable on the router. UPNP should be Enable too.
Your phone’s data plan should be available. Some carriers restricts the p2p connection protocol, try using App in the same Wi-Fi with Smart Camera to
figure out the problem. If you still can’t connect it, try another router if possible. Some routers’ build-in firewall also interfere the connection.
I Can’t Save the Snapshots.
App will need to access to your phone’s album for saving snapshots. The authorization might need you to approve while using the function for the
first time in some phones. If you mis-click the ‘No’ option during the authorization, you might need to enable it in the system setting menu.
How to Reset My Camera?
PLEASE MAKE SURE YOU CLEARLY KNOW THE RESULT OF RESETING: ALL DATA WILL BE ERASED INCLUDING THE INTERNET SETTINGS.
Power up your Smart Camera, wait until the camera stops rolling. Hold the reset button for a while until the camera starts rolling again. Release the
button then the Smart Camera would be reset.
Page 2
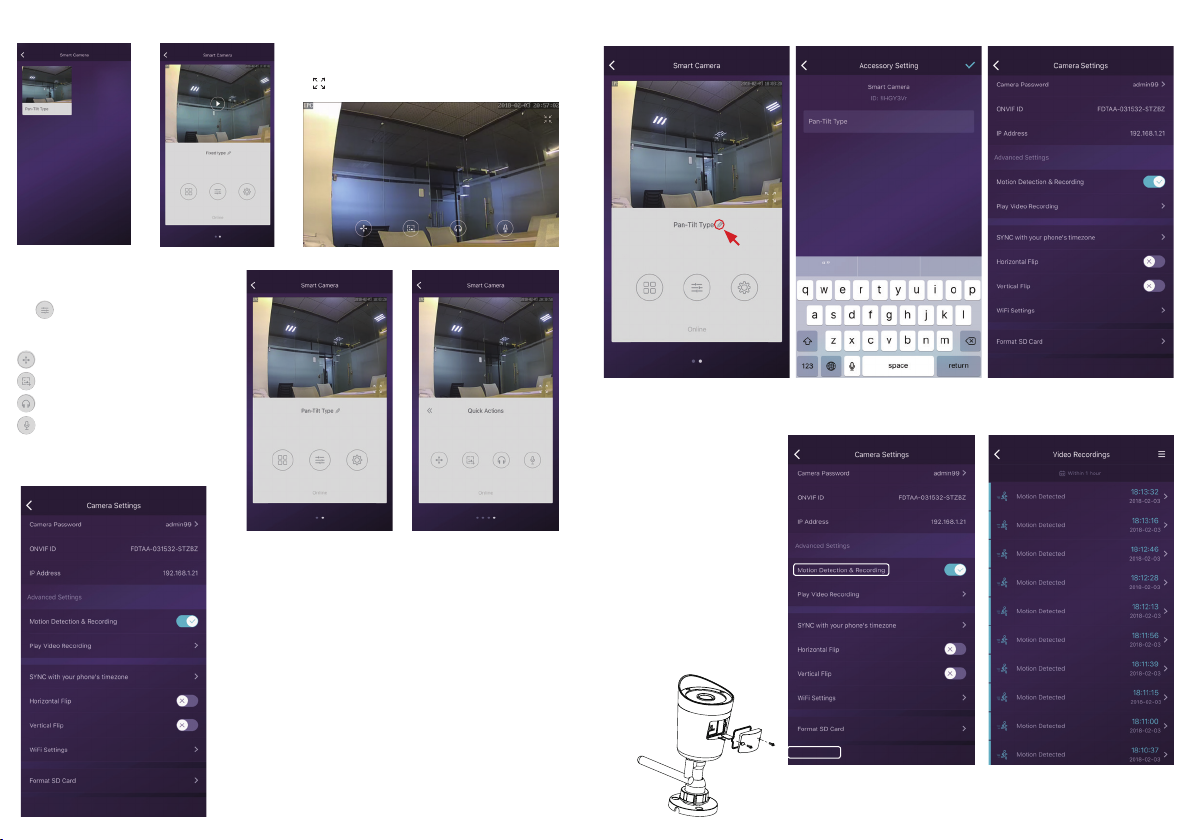
Access live video and daily opeartion
Quick Actions for camera
Tap to entry quick actions page
Easily use below buttons to move, snapshot, hear and talk.
: Move the camera by these buttons.
: Snapshot and save pictures to album.
: Hearing the audio from the camera.
: Talking to the camera.
.
1. Go to Camera list from the App, select the camera you woud like to access.
2. Press play button on the snapshot of camera to access live video.
3. : Enter in or exit for the full screen mode.
Camera settings
SYNC with phone’s timezone:
SYNC with phone’s timezone. Synchronize the timezone with your phone’s.
Horizontal & Vertical Flip:
Flip the screen to view correctly when the Smart Camera was installed upside-down.
WiFi Setting:
Set the WiFi for the camera.
Motion Detection & Recording:
Automatically record video when any motion is detected (5s before + 15s after).
Format Your SD card:
Erase and make your SD card recordable.
Play Video Recording:
List all the recorded video on your SD card, can be sorted by date. Click to play.
Rename or delete the camera
Tap the name of the camera. Then re-name or delete the camera.
Use TF Card for Video Recording
If the SD card is new or needs to be erased,
please tap [Format SD Card] to make it
available for recording. Switch on [Motion
Detection Recording] to record videos
when motion is detected by Smart Camera’s
lens. The video will be recorded as 640*480
and lasted 15s(3s pre-recorded not
included). When the SD Card is full, the old
files will be automatically deleted for
recording the latest one.
MicroSD card inserting to outdoor
camera M3P18v2:
Change to another router by directly
plugin the networking cable
Page 3

Bezpečnostní opatření
Nepokládejte žádné těžké nebo ostré předměty na zařízení.
Nevystavujte zařízení přímému slunečnímu a tepelnému záření a obojí nesmí být zakrýváno.
Nevystavujte zařízení prostředí s vyšší nebo nižší teplotou než je teplota doporučená.
Nevystavujte zařízení prašnému a vlhkému prostředí přes 85% včetně deště a kapalin (mimo M3P18xx).
Nepoužívejte žádné korozivní čisticí prostředky k čištění zařízení.
Nevystavujte zařízení silnému magnetickému nebo elektronickému rušení.
Nepoužívejte jiné napájecí adaptéry než ty, které jsou součástí výbavy daného zařízení. Dodaný napájecí zdroj může být zapojen
pouze do elektrického rozvodu, jehož napětí odpovídá údajům na typovém štítku zdroje.
Nenechávejte napájecí adaptér na místech s nižší teplotou hoření a na částech lidského těla neboť adaptér se zahřívá a může
způsobit zranění.
Nepoužívejte zařízení při konzumaci jídla nebo pití.
Ponechávejte zařízení mimo dosah dětí.
Uživatel není oprávněn rozebírat zařízení ani vyměňovat žádnou jeho součást. Při otevření nebo odstranění krytů, které nejsou
originálně přístupné, hrozí riziko úrazu elektrickým proudem. Při nesprávném sestavení zařízení a jeho opětovném zapojení se
rovněž vystavujete riziku úrazu elektrickým proudem. V případě nutného servisního zásahu se obracejte výhradně na kvalifikované
servisní techniky.
V případě, že zařízení bylo po určitou dobu v prostředí s nižší teplotou než -10°C, nechejte více než jednu hodinu toto nezapnuté
zařízení v místnosti o teplotě 10°C až +40°C. Teprve poté jej můžete zapnout.
Záruční opravy zařízení uplatňujte u svého prodejce. V případě technických problémů a dotazů kontaktujte svého prodejce.
Pro domácnosti: Uvedený symbol (přeškrtnutý koš) na výrobku nebo v průvodní dokumentaci znamená, že použité elektrické nebo
elektronické výrobky nesmí být likvidovány společně s komunálním odpadem. Za účelem správné likvidace výrobku jej odevzdejte
na určených sběrných místech, kde budou přijata zdarma. Správnou likvidací tohoto produktu pomůžete zachovat cenné přírodní
zdroje a napomáháte prevenci potenciálních negativních dopadů na životní prostředí a lidské zdraví, což by mohly být důsledky
nesprávné likvidace odpadů. Další podrobnosti si vyžádejte od místního úřadu nebo nejbližšího sběrného místa. Při nesprávné
likvidaci tohoto druhu odpadu mohou být v souladu s národními předpisy uděleny pokuty. Informace pro uživatele k likvidaci
elektrických a elektronických zařízení (firemní a podnikové použití): Pro správnou likvidaci elektrických a elektronických zařízení si
vyžádejte podrobné informace u Vašeho prodejce nebo dodavatele. Informace pro uživatele k likvidaci elektrických a
elektronických zařízení v ostatních zemích mimo Evropskou unii: Výše uvedený symbol (přeškrtnutý koš) je platný pouze v zemích
Evropské unie. Pro správnou likvidaci elektrických a elektronických zařízení si vyžádejte podrobné informace u Vašich úřadů nebo
prodejce zařízení. Vše vyjadřuje symbol přeškrtnutého kontejneru na výrobku, obalu nebo tištěných materiálech.
Není určeno k používání v blízkosti vody, např. u vany, umyvadla, dřezu, výlevky, ve vlhkém sklepě nebo u bazénu (mimo
M3P18xx).
Další opatření:
Dodržujte pravidla pro práci s elektrickými přístroji a přívodní elektrickou šňůru zapojujte pouze do odpovídajících elektrických
zásuvek. Uživatel není oprávněn rozebírat zařízení ani vyměňovat žádnou jeho součást. Při otevření nebo odstranění krytů, které
k tomu nejsou originálně určeny, hrozí riziko úrazu elektrickým proudem. Při nesprávném sestavení zařízení a jeho opětovném
zapojení se rovněž vystavujete riziku úrazu elektrickým proudem.
Prohlášení o shodě:
Tímto INTELEK spol. s r.o. prohlašuje, že typ rádiového zařízení M3P15v2, M3P18v2, M3P20v2, M3P15xx, M3P18xx, M3P20xx je
v souladu se směrnicí 2014/53/EU. Úplné změní EU prohlášení o shodě je k dispozici na těchto internetových stránkách:
www.iget.eu. Záruční lhůta je na produkt 24 měsíců, pokud není stanovena jinak. Toto zařízení lze používat v následujících
zemích, viz. tabulka níže.
RoHS:
Tento přístroj splňuje požadavky o omezení používání některých nebezpečných látek v elektrických a elektronických zařízeních
(nařízení vlády č. 481/2012 Sb., které bylo novelizováno nařízením vlády č. 391/2016 Sb.) a tím i požadavky Směrnice
Evropského parlamentu a Rady (ES) 2011/65/EU o omezení používání některých nebezpečných látek v elektrických a
elektronických zařízeních. Prohlášení k RoHS lze stáhnout na webu www.iget.eu.
Výhradní výrobce/dovozce produktů iGET pro EU:
INTELEK spol. s r.o., Ericha Roučky 1291/4, 627 00 Brno
WEB: http://www.iget.eu
SUPPORT: http://www.iget.eu/helpdesk
Copyright © 2018 Intelek spol. s r.o. Všechna práva vyhrazena.
CZ M3P15v2/M3P18v2/M3P20v2
iGET
Párování M3P15v2/ M3P18v2
1) Připojte Ethernet kabel od domácího routeru
do LAN konektoru a kameru připojte k
napájení. Vždy nejdříve připojte kameru
drátově pomocí Ethernet kabelu do LAN
konektoru routeru a kamery a poté ji zapojte
do napájení.
2) Na routeru musí být povolen DHCP server a
UPNP služba aby kamera obdržela
automaticky veškerá nastavení.
3) Po připojení napájecí kabelu začne kamera
nabíhat. Také bude provádět kalibrace
pohybu a obrazu.
4) Nabíhání kamery je kompletní do 2 minut od
zapnutí.
5) V aplikaci zvolte "+" pro přidání příslušenství,
poté naskenujte QR kód který je na kameře.
6) Kameru pojmenujte a nastavení uložte.
Párování M3P20v2
napájecí kabel ke kameře a do zásuvky.
1) Připojte
Během nabíhání kamery uslyšíte zvuk s významem,
že čeká na WiFi nastavení.
2) V aplikaci zvolte "+" pro přidání příslušenství, poté
naskenujte QR kód, který je na kameře.
3) Kameru pojmenujte a nastavení uložte.
4) Stiskněte nastavení pomocí Sonického zvuku, poté
název a heslo WiFi sítě ke které se má kamera
připojit.
5) Zkontrolujte že telefon nemá ztlumený zvuk,
telefon začne přehrávat zvuk pro nastavení kamery
.
6) Telefon držte cca 20 cm od kamery aby uslyšela
tento sonický zvuk a nastavila tak připojení.
FAQ - rychlé dotazy a odpovědi
Připojil jsem kameru k Internetu ale není možné se připojit v aplikaci.
Zkontrolujte připojení routeru k Internetu. Router musí mít povolen DHCP Server a UPNP službu. Zkontrolujte
připojení telefonu k Internetu. Některé připojení k Internetu mají zakázán P2P protokol, vyzkoušejte připojení ke
kameře ve stejné domácí síti pomocí WiFi. Vyzkoušejte také přenastavení routeru, WiFi kanály 1 až 11 a zabezpečení
WPA nebo WPA2, PSK, AES. Kamera využívá porty 10000 až 65535, tyto musí být ve firewallu routeru povolené.
Kamera podporuje pouze WiFi síť 2,4 GHz. 5 GHz není podporováno.
Není možné ukládat fotografie.
Aplikace potřebuje přístup do alba telefonu aby do něj mohla ukládat fotografie. Zkontrolujte nastavení práv
aplikace v nastavení telefonu.
Jak mohu resetovat kameru do základního továrního nastavení?
Pozor! Veškerá data a nastavení v kameře budou smazána! Jakmile kamera po zapnutí naběhne, podržte tlačítko
Reset po dobu 30 vteřin. Poté ponechejte kameru v klidu po dobu 1 minuty, Reset je dokončen.
Page 4

Online prohlížení videa
Rychlé ovládání
Stiskněte pro vstup do rychlého
ovládání, u některé aplikace se zobrazí
tlačítka přímo
.
Pohyb kamery
Fotografie
Poslech zvuku z kamery
Mluvení
1. V seznamu IP kamer klikněte na požadovanou kameru.
2. Zvolte tlačítko Play pro zobrazení online pohledu. Některé
verze aplikace toto tlačítko neobsahují a přehrávání začne
ihned.
Nastavení kamery
SYNC with phone’s timezone (Synchronizace s časem telefonu)
- Synchronizace s časem v telefonu.
Horizontal & Vertical Flip (Horizontální/vertikální otočení)
- Otočení obrazu vertikálně/horizontálně.
WiFi Setting (Nastavení WiFi)
- Nastavení připojení k WiFi síti.
Motion Detection & Recording (Detekce pohybu a nahrávání)
- Automaticky bude natáčet video jakmile detekuje pohyb (5 vteřin
před a 15 vteřin po události).
Format Your SD card (Formátování SD karty)
- Kompletní přemazání SD karty v kameře.
Play Video Recording (Přehrávání videozáznamů)
- seznam videonahrávek, filtrování dle datumu, pro přehrání klikněte
na soubor.
Přejmenování/Odstranění kamery
Klikněte na název kamery Zadejte nové jméno
Nahrávání na SD kartu
Vložte SD kartu a kameru zapněte.
Až naběhne, proveďte
formátování pomocí [Format SD
Card].
Aktivujte tlačítko Nahrávat při
detekci pohybu. [Motion
Detection Recording]. Jakmile je
SD karta plná, začne kamera
přemazávat nejstarší záznamy.
Vložení microSD karty
do venkovní kamery M3P18v2:
Je možné připojit k jinému routeru.
Připojte kameru kabelem
k novému routeru a zapněte ji.
Page 5

Bezpečnostné opatrenia
Neklaďte žiadne ťažké alebo ostré predmety na zariadenie.
Nevystavujte zariadenie priamemu slnečnému a tepelnému žiareniu, nesmie byť zakryté.
Nevystavujte zariadenie prostrediu s vyššou alebo nižšou teplotou ako je teplota odporúčaná.
Nevystavujte zariadenie prašnému a vlhkému prostrediu cez 85% vrátane dažďa a kvapalín. (okrem M3P18xx)
Nepoužívajte žiadne korozívne čistiace prostriedky na čistenie zariadenia.
Nevystavujte zariadenie silnému magnetickému alebo elektronickému rušeniu.
Nepoužívajte iné napájacie adaptéry než tie, ktoré sú súčasťou výbavy daného zariadenia. Dodaný napájací zdroj môže byť
zapojený iba do elektrického rozvodu, ktorého napätie zodpovedá údajom na typovom štítku zdroja.
Nenechávajte napájací adaptér na miestach s nižšou teplotou horenia a na častiach ľudského tela pretože adaptér sa zahrieva a
môže spôsobiť zranenie.
Nepoužívajte zariadenie pri konzumácií jedla alebo pitia.
Ponechávajte zariadenie mimo dosahu detí.
Užívateľ nie je oprávnený rozoberať zariadenie ani vymieňať žiadnu jeho súčasť. Pri otvorení alebo odstránení krytov, ktoré nie sú
originálne prístupné, hrozí riziko úrazu elektrickým prúdom. Pri nesprávnom zostavení zariadenia a jeho opätovnom zapojení sa
taktiež vystavujete riziku úrazu elektrickým prúdom. V prípade nutného servisného zásahu sa obracajte výhradne na
kvalifikovaných servisných technikov.
V prípade, že zariadenie bolo po určitú dobu v prostredí s nižšou teplotou ako -10 ° C, nechajte zariadenie viac ako jednu hodinu
vypnuté v miestnosti s teplotou +10 ° C do + 40 ° C. Až potom ho môžete zapnúť.
Záručné opravy zariadení uplatňujte u svojho predajcu. V prípade technických problémov a otázok kontaktujte svojho predajcu.
Pre domácnosti: Uvedený symbol (preškrtnutý kôš) na výrobku alebo v sprievodnej dokumentácií znamená, že použité elektrické
alebo elektronické zariadenia nesmú byť likvidované spoločne s komunálnym odpadom. Za účelom správnej likvidácie zariadenia
ho odovzdajte na určených zberných miestach, kde bude prijaté zdarma. Správnou likvidáciou tohto zariadenia pomôžete
zachovať cenné prírodné zdroje a napomáhate prevencii potenciálnych negatívnych dopadov na životné prostredie a ľudské
zdravie, čo by mohli byť dôsledky nesprávnej likvidácie odpadov. Ďalšie podrobnosti si vyžiadajte od miestneho úradu alebo
najbližšieho zberného miesta. Pri nesprávnej likvidácii tohto druhu odpadu môžu byť v súlade s národnými predpismi udelené
pokuty. Informácie pre užívateľov k likvidácii elektrických a elektronických zariadení (firemné a podnikové použitie): Pre správnu
likvidáciu elektrických a elektronických zariadení si vyžiadajte podrobné informácie u Vášho predajcu alebo dodávateľa. Informácie
pre užívateľov k likvidácii elektrických a elektronických zariadení v ostatných krajinách mimo Európskej únie: Vyššie uvedený
symbol (preškrtnutý kôš) je platný iba v krajinách Európskej únie. Pre správnu likvidáciu elektrických a elektronických zariadení si
vyžiadajte podrobné informácie u Vašich úradov alebo predajcu zariadenia. Všetko vyjadruje symbol prečiarknutého kontajnera na
výrobku, obale alebo tlačených materiáloch.
Nie je určené na používanie v blízkosti vody, napr. pri vani, umývadle, dreze, výlevky, vo vlhkej pivnici alebo pri bazéne.(okrem
M3P18xx).
Ďalšie opatrenia:
Dodržujte pravidlá pre prácu s elektrickými prístrojmi a prívodnú elektrickú šnúru zapájajte len do príslušných elektrických
zásuviek. Užívateľ nie je oprávnený rozoberať zariadenie ani vymieňať žiadnu jeho súčasť. Pri otvorení alebo odstránení krytov,
ktoré na to nie sú originálne určené, hrozí riziko úrazu elektrickým prúdom. Pri nesprávnom zostavení zariadenia a jeho
opätovnom zapojení sa taktiež vystavujete riziku úrazu elektrickým prúdom.
Vyhlásenie o zhode:
Týmto INTELEK spol. s r.o. vyhlasuje, že rádiového zariadenia M3P15v2, M3P18v2, M3P20v2, M3P15xx, M3P18xx, M3P20xx je v
souladu s smernici 2014/53/EU. Záručná doba na produkt je 24 mesiacov, pokiaľ nie je stanovená inak. Toto zařízení lze používat
v následujících zemích, viz. tabulka níže.
RoHS:
Súčiastky použité v prístroji splňujú požiadavky o obmedzení používania nebezpečných látok v elektrických a elektronických
zariadeniach a sú v súlade so smernicou 2011/65/EU. Vyhlásenie k RoHS možno stiahnuť na webe www.iget.eu.
Výhradný výrobca/dovozca produktov iGET pre EU:
INTELEK spol. s r.o., Ericha Roučky 1291/4, 627 00 Brno
WEB: http://www.iget.eu
SUPPORT: http://www.iget.eu/helpdesk
Copyright © 2018 INTELEK spol. s r.o. Všetky práva vyhradené.
SK M3P15v2/M3P18v2/M3P20v2 i
Pripárovanie M3P15v2/ M3P18v2
1) Pripojte Ethernet kábel od domáceho routru
do LAN konektoru a kameru pripojte k napájaniu.
Vždy najskôr pripojte kameru pomocou Ethernet
káblu do LAN konektoru routra a kamery a potom
ju zapojte do napájania.
2) Na routri musí byť povolený DHCP sever a
UPNP služba aby kamera mohla prijať
automaticky všetky nastavenia.
3) Po pripojení napájacieho káblu začne kamera
nabiehať. Taktiež bude robiť kalibráciu pohybu a
obrazu.
4) Nabiehanie kamery je kompletné do 2 minút
od zapnutia.
5) V aplikácií zvoľte “+“ pre pridanie
príslušenstva, potom naskenujte QR kód, ktorý je
uvedený na kamere.
6) Kameru pomenujte a nastavenie uložte.
Pripárovanie M3P20v2
1) Pripojte napájací kábel ku kamere a do zásuvky.
Počas nabiehania kamery počujete zvuk s
významom, že čaká na WiFi nastavenia.
2) V aplikácii zvoľte "+" pre pridanie príslušenstva,
potom naskenujte QR kód, ktorý je na kamere.
3) Kameru pomenujte a nastavenia uložte.
4) Stlačte nastavenie pomocou sonického zvuku,
potom zadajte názov a heslo WiFi siete ku ktorej sa
má kamera pripojiť.
5) Skontrolujte, že telefón nemá stlmený zvuk,
telefón začne prehrávať zvuk pre nastavenie
kamery.
6) Telefón držte cca. 20 cm od kamery aby počula
tento sonicky zvuk a nastavila tak pripojenie.
FAQ - rýchle otázky a odpovede
Pripojil som kameru k Internetu, ale nie je možné sa pripojiť v aplikácií.
GET
Skontrolujte pripojeniu routru k Internetu. Router musí mať povolený DHCP server a UPNP službu. Skontrolujte
pripojenie telefónu k Internetu. Niektoré pripojenia k Internetu mávajú zakázaný P2P protokol, vyskúšajte
pripojenie ku kamere v rovnakej domácej sieti pomocou WiFi. Vyskúšajte taktiež prenastavenie routru, WiFi kanály
1 až 11 a zabezpečenie WPA alebo WPA2, PSK, AES. Kamera využíva porty 10000 až 65535, tie musia byť povolené
vo firewalle routru. Kamera podporuje len WiFi sieť 2,4 GHz. 5 GHz sieť nie je podporovaná.
Nie je možné ukladať fotografie.
Aplikácia potrebuje prístup do albumu telefónu aby mohla ukladať fotografie. Skontrolujte nastavenie práv
aplikácie v nastavení telefónu.
Ako môžem resetovať kameru do základného továrneho nastavenia?
Pozor! Všetky dáta a nastavenia v kamere budú zmazané! Ako náhle kamera po zapnutí nabehne, podržte tlačidlo
Reset po dobu 30 sekúnd. Potom nechajte kameru v pokoji po dobu 1 minúty. Reset je dokončený.
Page 6

Online prehliadanie videa
Rýchle ovládanie
Stlačte pre vstup do rýchleho
ovládania, u niektorej aplikácie sa
zobrazia tlačidla priamo.
Pohyb kamery
Fotografie
Posluch zvuku kamery
Rozprávanie
1. V zozname IP kamier kliknite na požadovanú kameru.
2. Zvoľte tlačidlo Play pre zobrazenie online pohľadu.
Niektoré verzie aplikácie toto tlačidlo neobsahujú a
prehrávanie začne ihneď.
Nastavenie kamery
SYNC with phone’s timezone (Synchronizace s časem telefonu)
- Synchronizácia s časom v telefóne.
Horizontal & Vertical Flip (Horizontální/vertikální otočení)
- Otočenie obrazu vertikálne/horizontálne.
WiFi Setting (Nastavení WiFi)
- Nastavenie pripojenia k WiFi sieti.
Motion Detection & Recording (Detekce pohybu a nahrávání)
- Automaticky bude natáčať video ako náhle detekuje pohyb (5
sekúnd pred a 15 sekúnd po udalosti).
Format Your SD card (Formátování SD karty)
- Kompletné premazanie SD karty v kamere.
Play Video Recording (Přehrávání videozáznamů)
- Zoznam videonahrávok, filtrovanie podľa dátumu, pre prehrávanie
kliknite na súbor.
Premenovanie/Odstránenie kamery
Kliknite na názov kamery Zadajte nové meno
Nahrávanie na SD kartu
Vložte SD kartu a kameru
zapnite. Až nabehne, spravte
formátovanie pomocou
[Format SD Card].
Aktivujte tlačidlo Nahrávať pri
detekcii pohybu. [Motion
Detection Recording]. Ako náhle
je SD karta plná, začne kamera
premazávať najstaršie záznamy.
Vloženie microSD karty
do kamery M3P18v2:
Je možné pripojiť k inému routru.
Pripojte kameru káblom k novému
routru a zapnite ju.
 Loading...