


iGET SECURITY M3
Designed for home and business security
.
Easy to setup and use with
App M3.
Home Intelligent Alarm System
Perfectly match all Android and iOS smart phones.
World famous expert of smart-home alarm system
User Manual

1
P3
P4
P7
P8
P10
P11
P12
P13
P14
P17
P
18
Get ready and power on
Work with the main panel
Initializing
Add a new Alarm M3
Switch between one /two hands mode
How to use the Easy Control Panel
How to add emer
gency contacts
(with brief instructions about incoming alarm call)
MENU
The mobile app in this manual is the Android version of iGET SECURITY M3 app.
The snapshots and texts might be different from the version you’re using. Please refer to the latest version.
How to add accessories
Advanced settings and other features
FAQ
Appendix1: Accessory installing

2

3
Get ready and power on
Insert sim card and connect the power cable
Power ON
• On the back of the panel, open the battery cover, you will see a slot for your
SIM Card. Insert the Sim Card and connect the power cable.
For those micro or nano SIM cards, please use sim adapter to fit the card slot.
• Flip the switch on the back of the panel to the ON position. Replace the battery cover.
Wait 20 seconds as the system runs a start-up diagnostic with a welcome screen.
• You will hear a confirmation when the test is complete.
When you see the main screen ( left ) the system is ready.
• M3 uses GSM based SIM cards to send text messages and make phone calls.
•
Make sure PIN-codes and voicemail are de-activated on the SIM before use with the
panel.
• Make a note of the SIM telephone number, you will need it for setup.

4
Work with the main panel 1/3
• The
M3 uses MicroUSB as the power cable interface..
• You can easily recharge it via any MicroUSB cable.
LED Monitor
Control Button
Press to enter the settings menu.
Press to navigate.
Press to select.
Press to go back.
Child Lock
Lock: Long-press for 6 seconds until the lock icon shows on screen.
Unlock: Long-press for 6 seconds until the lock icon disappears.
Power Light & Delay Arming Button
Power Light with logo.
Long-press to activate delayed arming.
Delayed Arming means the system will wait a few seconds before going into ARM status.
This allows you to leave your home without triggering the alarm. The delay time can be adjusted in the APP
.

5
Work with the main panel 2/3
08:18
18
°c
Wednesday, September 15
Signal Bars
Indicate the GSM signal strength.
Battery Life
Indicate the remain battery life when AC power is OFF.
Arm
All active sensors can trigger alarm.
Home Arm
Only those on Home mode stop trigger alarm.
Alarm Clock Status
Indicate one or more Alarm Clock has been set.
Real-time Temperature
The temperature surrounding main panel.
Users can change ºC or ºF in settings.
Clock
After initializing process, the time
will synchronize with your phone’s.
SIM Card Status
Flashing when starting up or SIM card error.
AC Power
External power is available.
Disarm
Stop trigger alarm, except those on 24-hours mode.
Arming Schedule
Indicate the Arm Schedule has been set.
Child Lock
Indicate the Child Lock is active.

6
Work with the main panel 3/3
Alarm Clock
Check all working alarm clocks set by APP.
ºC/ ºF Switch
Switch the temperature scale between Fahrenheit and Celsius.
Screen Timeout
Set the screen saving time.

7
Initializing by APP iGET SECURITY M3
About languages
• There is a build-in default language
pack on App. The app will automatically
check and fetch the latest available
language files, or use the latest saved
language pack or default one.
• You don’t have to reset App while
switching language. The setting will
immediately effect right after the lan-
guage being selected.
• Make sure your smart phone is
online.
• Tap iGET SECURITY icon.
• You can download iGET SECURITY M3 from both App Store or Google Play, or visit
our download page listed above from your phone.
• APP supports global languages
• Choose Auto Detect to use the phone’s current
language.
http://din.bz/iGetAndroi
dd http:/ din.bz/iGetiOS

8
Add a new Alarm M3 1/2
• APP is a great tool to control alarm M3. M3 should be added to APP before using, which we call binding.
One
APP can handle more than one alarms M3. The phone number of M3 and the password would be asked during binding. Different
role has its default password.
Administrator: General operations and advanced settings are available. User: General operations only.
• The beginners will get kindly reminder, which could help them through the settings step by step.
• APP supports renaming for the main panel, which is especially useful when managing multiple devices.
• Users without having a
M3 may experience the products in the demo mode of APP.

9
Add a new iGET SECURITY M3 2/2
About the reply SMS
• Bec
ause the iOS’s limitation, we can’t
capture the SMS. So you have to type in the
codes by your own.
• Few Android phones may also need to
enter codes manually due to the limitation from
some so-called security software, or the self-made
ROM by hobbyists.
• Most of the time, users only need to wait
few seconds.
• If you can’t receive the reply SMS, please
check the M3 phone numbers entered before,
or if the phone is charged.
• APP sends an authorization request SMS to M3, Please wait for the reply.
•
APP can recognize the verification code in SMS and fill it automatically. (Android only)
• Users may need to fill the codes manually due to some limitation of iOS system or some Android
phones.

10
Switch between one/two hands mode
One/two hands mode
• There are different sizes of smart phones with
Android
or iOS systems, which bring operational
inconvenience for users.
• We bring convenience by offering one/two
hands modes for both small sizes phones (3.5
inches including under) and big sizes phones
and tablet PC (4 inches including above)
• It’s one good case to show iGET ’s principle:
make every effort to minimum users’ operative
difficulty.
One Hand Mode Two Hands Mode

11
How to use the Easy Control Panel
• Arm: All accessories under none “Disable” status are on arm.
• Home arm: Only the accessories on "Instant" or "24 Hours" mode are on arm.
• Disarm: Only “24 Hours”mode accessories are on arm.
System will alarm when one or more accessories on arm is triggered.
Navigator
Swap to switch between menus.
The other two menus are [Accessories and
Device Info] and [Settings]
Easy Control Panel
Arm, Disarm, Home Arm, SOS, Etc.
Accessories QuickView
The fastest way to use your accessories.
12
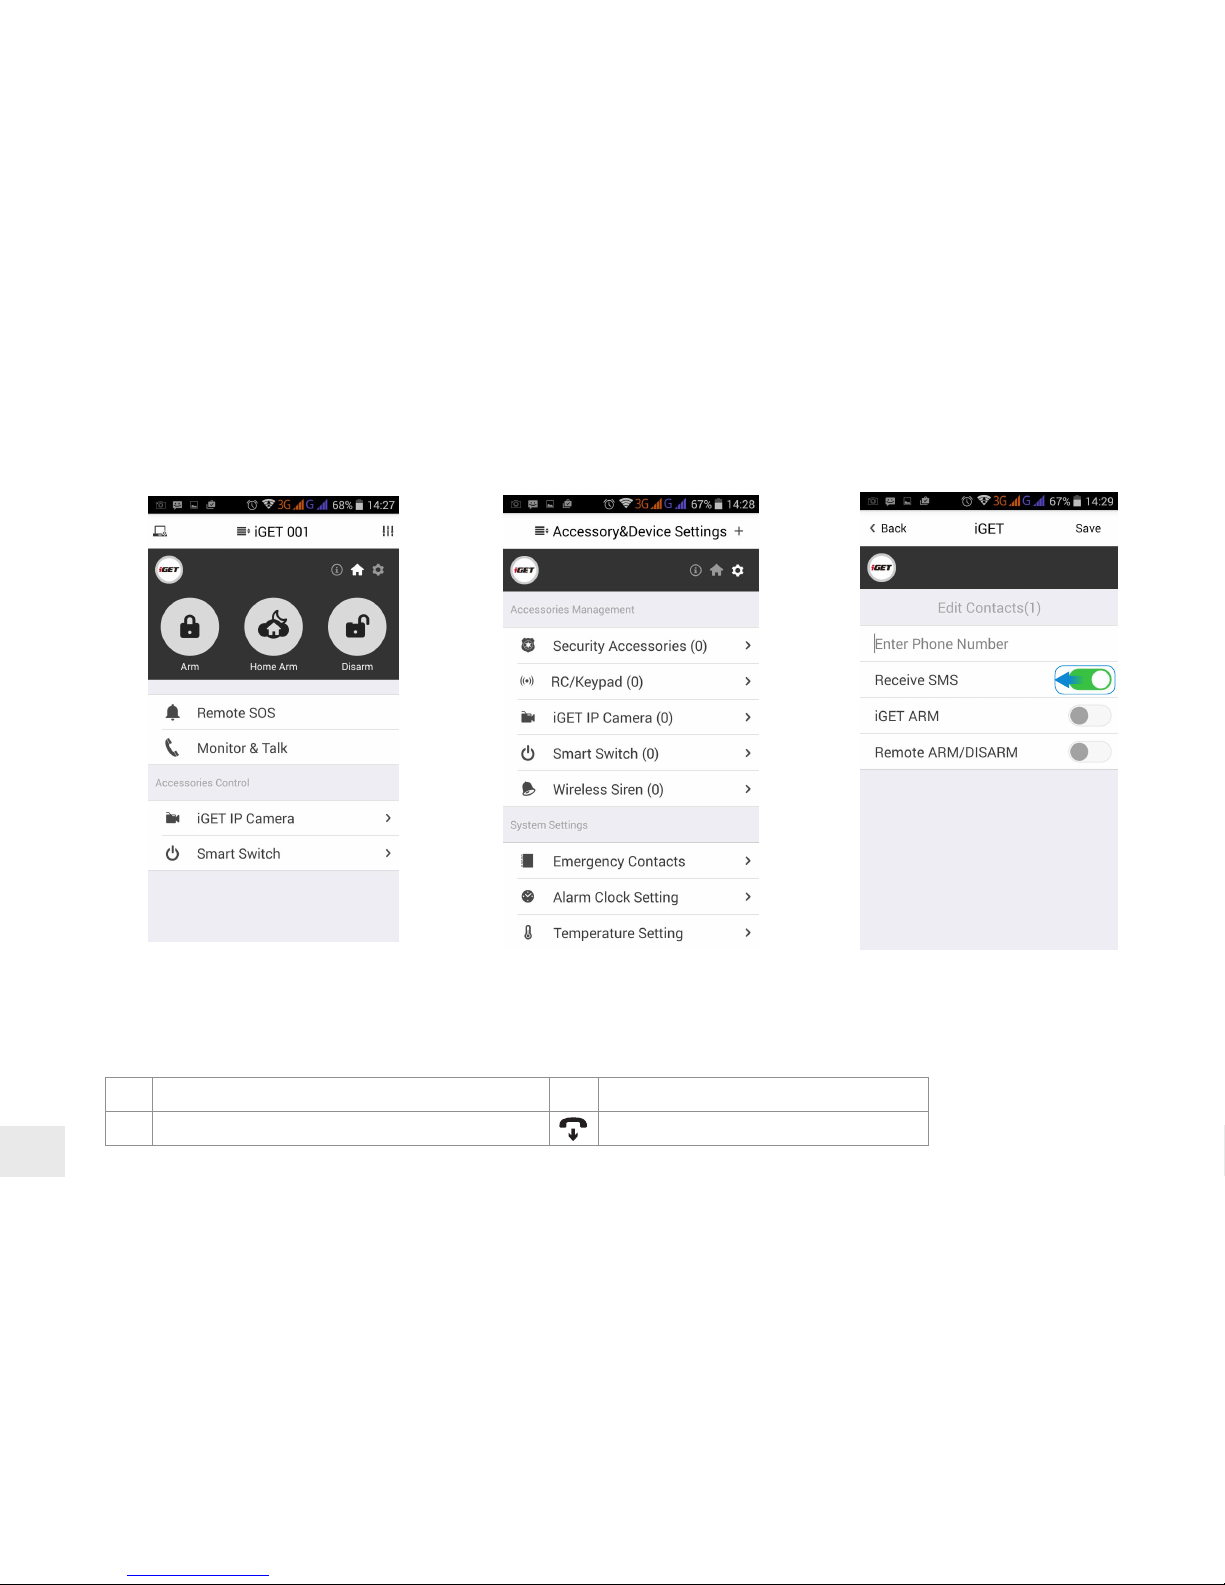
How to add emergency contacts
• Slide softly on Main Panel, switch to [Accessories and Device Info] menu.
• Click [Emergency contacts]. Up to 6 emergency contacts are for settings. Tap any of them for editing.
• The M3 calls and texts to emergency contacts when alarming. You can decide which informing message to receive.
•
Please set your cellphone number as the 1st emergency contact. Because only the first one could receive arming notification
.
**
Press ** to monitor and talk via phone to main panel.
88
Press 88 to listen again.
##
Press ## to cancel SOS. Hang up to call the next emergency contact.
When you get an incoming emergency call, you could follow the instructions above to operate via phone.

13
How to add accessories
• Click + on top-right of the screen.
• Scan the bar code or QR code printed on accessories with phone’s camera.
• Name the accessory.
• Set the trigger modes or other properties as you need, then save.

14
Advanced settings and other features 1/3
Emergency Contact:
Up to 6 contacts for setting.
Alarm Clock:
Up to 4 clocks for setting, with 4 modes each.
Temperature Setting:
An informing SMS would be received when
surrounding temperature is out of the safe
range you set.
Knock Over to SOS:
Punch or knock over the main panel to trigger
SOS when the switch is ON.
(Strongly recommended to those live alone)
Ready to ARM:
Needs to work with door/window sensors. The
system will inform you to check and refuse to
arm when door/window is still open.
Language Setting:
Select and apply the app language.
(Language for M3 menu and SMS needs to be
set via main panel)

15
SMS Forward:
Forward the SMS from the setting number to the first emergency contact.
(Mainly used for checking Sim card balance by forwarding SMS of phone bill from local carrier)
Advanced settings and other features 2/3
Arming Schedule:
Up to 6 groups of settings for daily arming.
(Disarm is not supported for security consideration)
Delay Time (ARM):
Waiting time before arming when receiving an order. It can be 90 seconds longest.
Delay Time (ALARM):
If some sensors in delay mode trigger alarm, system will wait few seconds before
activating alarm. It can be 90 seconds longest.
Speaker Volume:
The build-in speaker volume, with 4 grades and 1 is weakest.
Change Password:
Admin and user password settings, for authorization while initializing.
Re-initialization:
All settings of this phone would be erased if re-initialized.
Siren Time:
The build-in siren time, up to 30 minutes long last.

16
Logs & Events:
List recent arm, disarm and alarm records.
• Security Accessory’s Trigger Mode:
Sho
w names of paired accessories and
their trigger modes.
• Remote Controller List:
Show names of paired remote controllers.
• List & Linking Status: Show all paired
M3P15s’ names and their linking
accessories status.
• Smart Switch List:
Show all paired Smart Switch.
Sim Card Balance:
Check the balance by sending query SMS to
local carrier from M3
.
System Status:
Check current time, arm status, etc.
Informing Strategies:
Check types of informing SMS received
from M3 when event occurs.
(Like power down, temperature alarm, etc.)
Arming Schedule:
Check timing arming schedule.
Alarm Clock List:
Show all available alarm clocks.
Realtime Temperature: Check
temperature around M3.
Emergency Contacts:
Show added emergency contacts in M3.
Arm & Alarm Delay Time:
Check delay settings for Arm/Alarm.
Advanced settings and other features 3/3
M3 sends SMS to reply your inquiry here.

17
FAQ
Can I use non-iGET branded accessories with the iGET SECURITY M3?
Sorry, M3 only supports the iGET accessories.
1. The iGET accessories use encrypted communication protocols with patented technology. This makes them safer and more stable.
2. The iGET accessories are easily paired with the system just by scanning QR codes or barcodes. All of our accessories support low-battery warning.
How can I get help with my M3
system?
1. Contact the local agency first to get the fastest support services.
2. Visit
www.iget.eu and summit your question, or send us an email to sales@iget.eu
Why can’t I receive verication code after initialization?
1. Make sure the SIM card is available and installed properly. If there’s a SIM icon flashing on the main screen, please power off and reinstall the
SIM card again, then power on.
2. Make a phone call to your M3 to check if the Sim card is working.
3. If you just selected the ‘default’ country code during initialization, please choose the right one and try again.
Default Administrator Password: 123456 ; Default User Password: 1234
How can I reset my M3?
1. Power up your M3.
2. Hold down the reset button on the back of the panel until you hear 1 beep.
3. Continue holding it for 6 seconds until hearing 2 beeps.
4. System would be reset and restart.

18
Appendix1: Accessory installing
10-30
o
6.5-7.5 feet
• Remember to pull out the
battery insulating pieces
before use.
• Use APP for pairing
accessories before installing.
• It’s recommended to take
pictures for the QR codes
or barcodes printed on the
accessories and save them
to your phone’s album.
Less than 0.4 inches.

iGET ©2015. All rights reserved. Website :
www.iget.eu E-mail : sales@iget.eu
http://din.bz/iGetAndroidd http:/ din.bz/iGetiOS

1. Use the device only and exclusively in accordance with this manual. Failure to follow instructions can lead to fire or damages to the device.
2. For safety reasons protect the device from falling, shortage of electric circuits and high temperatures. If the device or battery suffers from distortion
and cause damage to the device, stop using the device immediately.
3. Keep out of the reach of children. Only adult persons may use the device. Its owner is responsible for using of this device by other persons.
4. There is a battery inside the product. For safety reasons do not approach the product with metal objects, which could cause a short circuit.
5. The product must not be installed and used in hot (more than 40°C) or cold (less than -10°C) environment. At the same time the product must not be installed
and used in humid (more than 90%) or dusty environment, or in the vicinity of fire.
6. Do not expose the product to direct sunlight and heat radiation and do not cover it, i.e. it must have a permanent supply of colder ambient air.
7. Do not expose the product to direct contact with liquids (water); do not use any corrosive cleaning agents for cleaning including alcohol. Use only a dry
cloth.
8. The device must meet the requirements needed to use direct current; using a different power source may cause fire or malfunction.
9. A strong impact can lead to fire or explosion.
10. When using the product make sure that you have dry hands. Otherwise, it can cause damages to the product or electrical accident.
11. Set up the claim for warranty repair of device at your dealer. If you have technical questions or problems, contact your dealer.
12. For household use: The given symbol (crossed-out wheeled bin) on the product or at accompanying documents means that used electrical and electronic
products should not be disposed of with
household waste. To ensure proper disposal of the product, hand it over to a designated
collection point, where it will be accepted free of charge. The correct disposal of this
product will help to save valuable natural resources and prevent any potential negative
impacts on the environment and human health, which could otherwise be caused by
inappropriate disposal of wastes. For more details, please, contact your local authorities
or the nearest collection point. The improper disposal of this waste can be penalized in
accordance with national regulations. Information for users to disposal of electrical and
electronic devices (corporate and business use): For proper disposal of electrical and
electronic devices, ask for details from your dealer or distributor. Information for users to
disposal of electrical and electronic devices in other countries outside EU: The above
mentioned symbol (crossed-out wheeled bin) is valid only in the countries of EU. For
proper disposal of electrical and electronic devices, ask for details from your authorities
or dealer. All is expressed by the symbol of crossed-out wheeled bin on product,
packaging or in printed materials.
13. To make a claim it is necessary to know the serial number of product, indicated on the back side of product and the packaging box.
Please, keep the box with serial number carefully for any complaints, you will avoid the unnecessary inconveniences or to be unable to establish a
claim. Make a complaint of the product at your dealer, if not on website www.iget.eu stated otherwise.
Individual parameters, description by figures and design may differ depending on the version and updates. For exact parameters and other product
information visit the website www.iget.eu. Printing errors reserved. The manufacturer and importer
have no liability for data loss or other damages arising
howsoever when using Power bank.
Declaration of Conformity:
Company INTELEK spol. s r.o. hereby declares that all SECURITY M3 (MatiGuard Air) devices are in compliance with
essential requirements and other relevant provisions of Directive 2004/108/EC.
The products are intended for sale without limitation in the Czech Republic, Slovakia, Poland, Bulgaria, Germany,
Austria, Belgium, Denmark, Finland, Greece, Netherlands Ireland, Great Britain, Norway, France, Spain, Italy,
Hungary, Lithuania, Latvia, Estonia, Romania and other member countries of EU and in Russia. The warranty
period of the product is 24 months, unless stated otherwise. The Declaration of Conformity can be
downloaded from the website www.iget.eu.
 Loading...