

Page 1

Operating instructions
Monitor for analogue cameras
E2M231
E2M232
UK
706451 / 00 02/2018
Page 2

E2M231 / E2M232 monitor for analogue cameras
Contents
1 Preliminary note ....................................................................4
1.1 Symbols used..................................................................4
1.2 Warnings used .................................................................4
2 Safety instructions ..................................................................4
2.1 General ......................................................................4
2.2 Target group ...................................................................4
2.3 Electrical connection.............................................................4
2.4 Tampering with the device ........................................................4
3 Functions and features...............................................................5
4 Function keys . . . . . . . . . . . . . . . . . . . . . . . . . . . . . . . . . . . . . . . . . . . . . . . . . . . . . . . . . . . . . . . . . . . . . .5
4.1 Camera switch .................................................................6
4.2 Day / Night setting ..............................................................6
4.3 Contrast ......................................................................7
4.4 Brightness.....................................................................7
4.5 Colour saturation ...............................................................7
4.6 Scan / Back in menu.............................................................7
5 User menu ........................................................................8
5.1 Language .....................................................................8
5.2 Camera settings ................................................................9
6 Service menu .....................................................................10
6.1 Camera settings ...............................................................10
6.2 Camera name.................................................................10
6.3 System settings ...............................................................11
6.3.1 Language . . . . . . . . . . . . . . . . . . . . . . . . . . . . . . . . . . . . . . . . . . . . . . . . . . . . . . . . . . . . . . . . 11
6.3.2 On screen display..........................................................11
6.3.3 Keyboard ................................................................12
6.3.4 Power supply settings . . . . . . . . . . . . . . . . . . . . . . . . . . . . . . . . . . . . . . . . . . . . . . . . . . . . . .12
6.3.5 LCD backlight.............................................................13
6.3.6 Scanning.................................................................13
6.3.7 Camera switch ............................................................14
6.3.8 Tacho settings.............................................................14
6.3.9 Default settings............................................................15
6.4 Info .....................................................................15
7 Glossary ........................................................................16
8 Error messages ...................................................................16
8.1 Automatic camera selection ......................................................16
8.2 Malfunction of camera 3 .........................................................16
8.3 Device shuts off after 2 seconds. ..................................................16
8.4 LEDs C1 and [Enter / Standby] key flash ............................................16
2
Page 3

E2M231 / E2M232 monitor for analogue cameras
UK
Licences and trademarks
All trademarks and company names used are subject to the copyright of the respective companies.
This device contains (maybe modified) open source software which is subject to special licensing terms.
For copyright information and licensing terms please refer to: www.ifm.com/int/GNU
For software subject to the GNU General Public License or the GNU Lesser General Public License the source code can be
requested against payment of the copying and shipping costs.
3
Page 4

E2M231 / E2M232 monitor for analogue cameras
1 Preliminary note
This document describes the operation of the E2M23x monitor for analogue cameras.
1.1 Symbols used
► Instructions
> Reaction, result
[…] Designation of keys and keys
"…" Name of display text
→ Cross-reference
Important note
Non-compliance may result in malfunction or interference.
Information
Supplementary note
1.2 Warnings used
NOTE
Warning of damage to property.
2 Safety instructions
2.1 General
These instructions are an integral part of the device. They contain texts and figures concerning the correct
handling of the device and must be read before installation or use.
Observe the operating instructions. Non-observance of the instructions, operation which is not in
accordance with use as prescribed below, wrong installation or incorrect handling can seriously affect the
safety of operators and machinery.
2.2 Target group
These instructions are intended for authorised persons according to the EMC and low-voltage directives.
The device must be installed, connected and put into operation by a qualified electrician.
2.3 Electrical connection
Disconnect the unit externally before handling it.
The connection pins may only be supplied with the signals indicated in the technical data and on the
device label and only the approved accessories of ifm may be connected.
2.4 Tampering with the device
In case of malfunctions or uncertainties please contact the manufacturer. Any tampering with the
device can seriously affect the safety of operators and machinery. This is not permitted and leads to the
exclusion of any liability and warranty claims.
NOTE
The display is sensitive to pressure. Touching the display may result in permanent pixel errors.
► Do not touch the screen.
4
Page 5
E2M231 / E2M232 monitor for analogue cameras
3 Functions and features
The E2M231 / E2M232 monitor processes input signals from analogue cameras and shows them on the
internal display. The parameters of the device are set via integrated keys. The device is available in 2
versions:
● with 1 analogue video input (E2M231)
● with 2 analogue video inputs (E2M232)
The O2M2xx and O3M2xx cameras from ifm electronic are compatible with the device.
The device must not be operated during safety-critical operations.
Because of the requirements for electromagnetic interference emissions, the device is intended for use in
industrial environments. The device is not designed for use in domestic areas.
The device may only be used under the operating conditions specified in the data sheet.
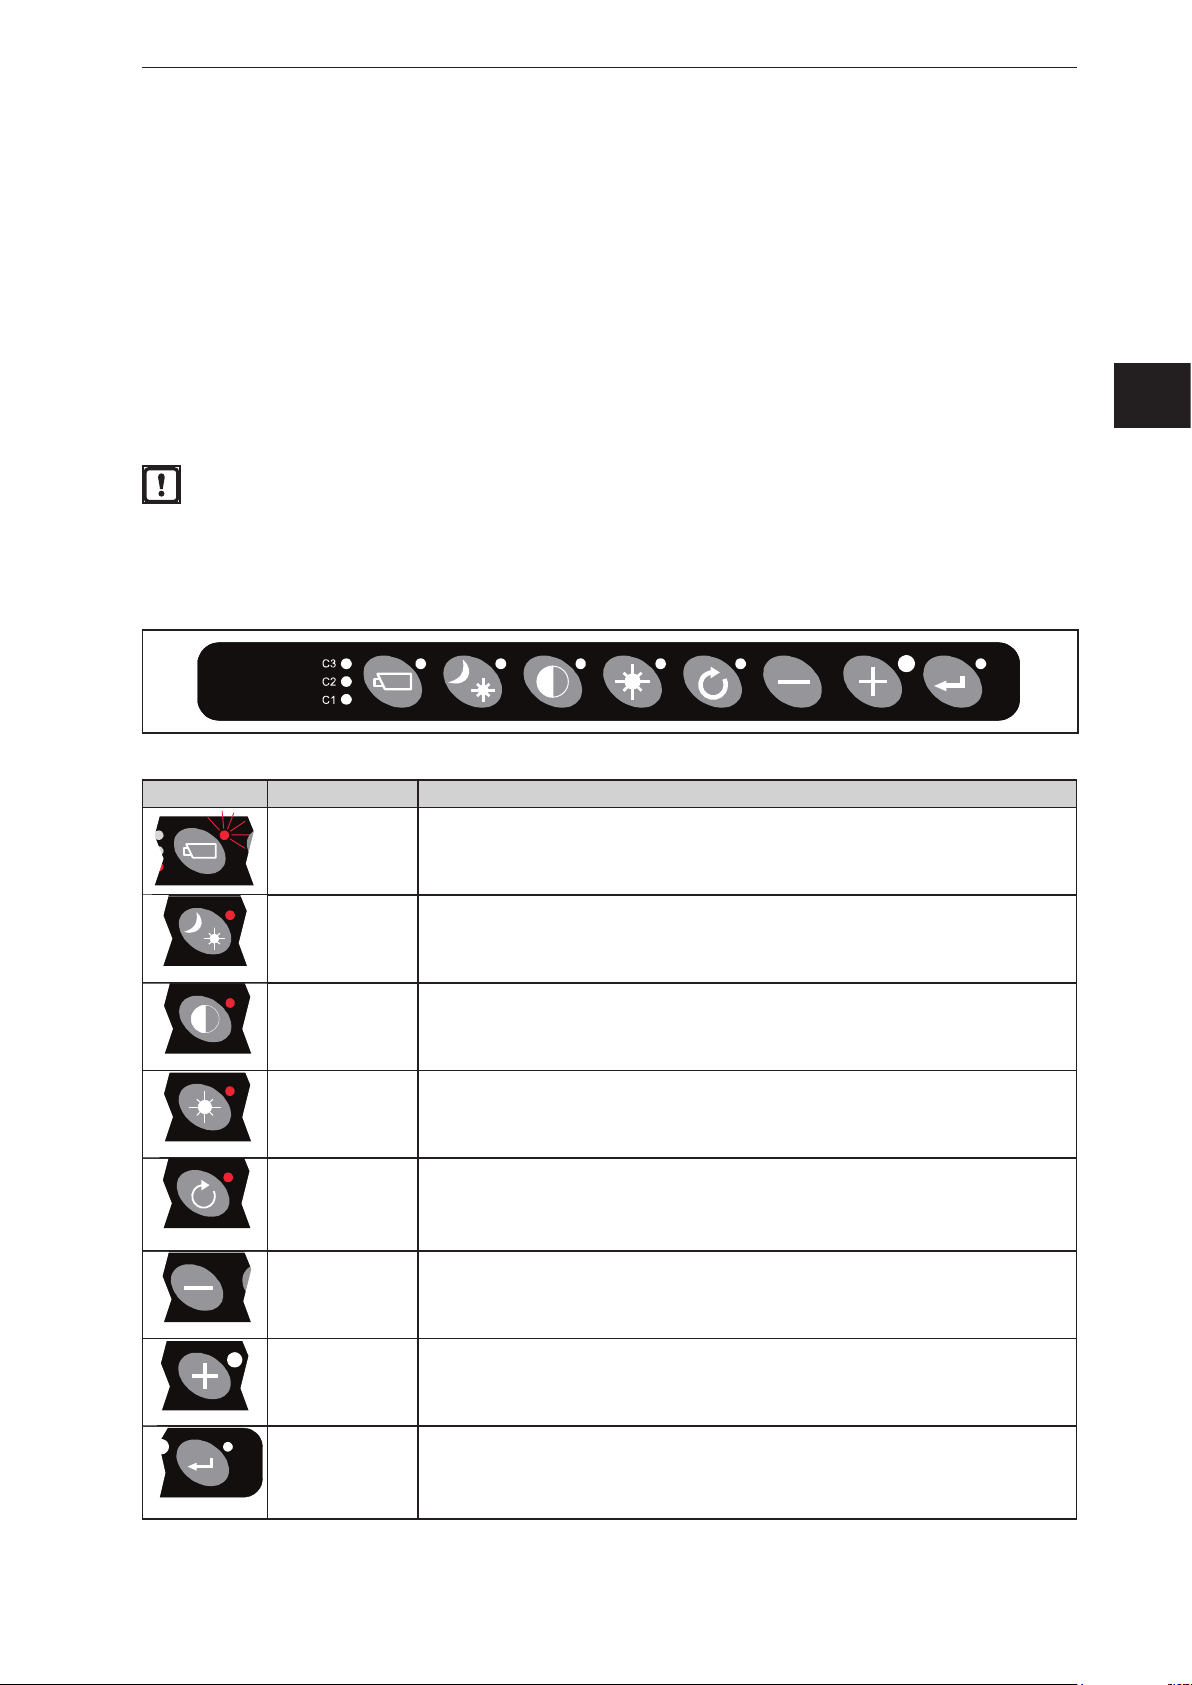
4 Function keys
The following keys are on the front of the device:
UK
ni ni stcejbo stcejbo
era era rotinom rotinom
naht naht
resolc resolc
raeppa raeppa yeht yeht
Symbol Name Function
Camera switch Select between the connected cameras.
Press the [Camera switch] key to activate the manual selection of the camera. Use the
[Plus / +] and [Minus / -] keys to select the connected cameras. Press the [Camera switch]
key again to deactivate the manual camera selection (→ „4.1 Camera switch“).
Day / Night setting Select between day and night setting.
Press the [Day / Night setting] key to change the brightness and colour palette of the
display (→ „4.2 Day / Night setting“).
Contrast Set the contrast.
Press the [Contrast] key to activate contrast setting. Use the [Plus / +] and [Minus / -] keys
to change the contrast. Press the [Contrast] key again to deactivate contrast setting
(→ „4.3 Contrast“).
Brightness Set the brightness.
Press the [Brightness] key to activate brightness setting. Use the [Plus / +] and
[Minus / -] keys to change the brightness. Press the [Brightness] key again to deactivate
the brightness setting (→ „4.4 Brightness“).
Scan /
Back in menu
Minus / - Select next menu item.
Display the image of the connected cameras one after the other.
Go Back in menu.
Press the [Scan / Back in menu] key to display the view of the connected cameras one
after the other or navigate back in menu (→ „4.6 Scan / Back in menu“).
Navigate to the left in the menu.
Press the [Minus / -] key to navigate to the next menu item or to the left.
Plus / + Select the previous menu item.
Navigate to the right in the menu.
Press the [Plus / +] key to navigate to the previous menu item or to the right.
Enter / Standby Display standby mode and details about the firmware.
Acknowledge the menu item.
Press the [Enter / Standby] key to activate the standby mode and to display the details
about the firmware or to confirm the selected menu item.
5
Page 6

E2M231 / E2M232 monitor for analogue cameras
4.1 Camera switch
The [Camera switch] key activates the manual camera selection. Use the [Plus / +] and
[Minus/ -] keys to select the connected cameras. Press the [Camera switch] key again to
deactivate the manual camera selection.
The active camera is displayed with the "C1", "C2" and "C3" LEDs.
The [Camera switch] key has priority over the scan function and the automatic camera selection.
The [Camera switch] key can be set (→ „6.3.7 Camera switch“).
The [Camera switch] key can be deactivated (→ „6.3.3 Keyboard“).
4.2 Day / Night setting
The [Day / Night setting] key changes between the day and night setting of the device.
The day / Night setting changes the brightness and the colour palette of the device.
Available day and night setting:
Day / Night setting Description
ABC Automatic setting of the brightness depending on the ambient light. The brightness sensor is above the
ABC RED Automatic setting of the brightness depending on the ambient light. A red colour palette is used. The
ABC BLUE Automatic setting of the brightness depending on the ambient light. A blue colour palette is used. The
DAY 100% Day mode. The brightness is set to 100 %. The LED above the [Day / Night setting] key is permanently
NIT 20% Night mode. The brightness is set to 20 %. Use the [Plus / +] and [Minus / -] keys to vary the brightness
RED 20% Night mode. The brightness is set to 20 %. A red colour palette is used. Use the [Plus / +] and
BLUE 20% Night mode. The brightness is set to 20 %. A blue colour palette is used. Use the [Plus / +] and
[Plus / +] key.
brightness sensor is above the [Plus / +] key.
brightness sensor is above the [Plus / +] key.
on. Use the [Plus / +] and [Minus / -] keys to vary the brightness between 50 % and 100 %.
between 0 % and 50 %.
[Minus / -] keys to vary the brightness between 0 % and 50 %.
[Minus / -] keys to vary the brightness between 0 % and 50 %.
A minimum value for automatic background illumination can be set in the Service menu
(→ „6.3.5 LCD backlight“).
6
Page 7

E2M231 / E2M232 monitor for analogue cameras
4.3 Contrast
The [Contrast] key activates contrast setting. Use the [Plus / +] and [Minus / -] keys to
set the contrast. The set contrast is permanently stored.
The contrast must be set separately for each connected camera.
4.4 Brightness
The [Brightness] key activates brightness setting. Use the [Plus / +] and [Minus / -] keys
to set the brightness. The set brightness is permanently stored.
The brightness must be set separately for each connected camera.
4.5 Colour saturation
+
The colour saturation must be set separately for each connected camera.
Press the [Contrast] and [Brightness] keys simultaneously to
activate colour saturation setting. Use the [Plus / +] and [Minus
/ -] keys to set the colour saturation. The set colour saturation is
permanently stored.
4.6 Scan / Back in menu
The [Scan / Back in menu] key displays the view of the connected cameras one after the
other.
If you are in a menu, use this key to navigate Back in menu. The display time of a
camera image can be set in the Service menu (→ „6.3.6 Scanning“).
UK
7
Page 8

E2M231 / E2M232 monitor for analogue cameras
5 User menu
The user menu contains the settings frequently used by the user.
+
The user menu is deactivated as default and has to be activated in the Service menu
(→ „6.3.3 Keyboard“).
Press the [Minus / -] and [Plus / + ] keys simultaneously to activate
the user menu.
The settings are divided:
The following settings are available in the user menu:
● Language (→ „5.1 Language“)
● Camera settings (→ „5.2 Camera settings“)
5.1 Language
The language of the on screen display (OSD) is set in the
[Language] menu. The following languages are available:
● English
● Dutch
● German
● French
● Czech
● Hungarian
● Italian
● Polish
● Portuguese
● Spanish
● Turkish
● Swedish
● Finnish
● Danish
● Norwegian
8
Page 9

5.2 Camera settings
E2M231 / E2M232 monitor for analogue cameras
In the [Camera settings] menu the green marking line is
superimposed on the camera image. The following settings are
available:
[C1] / [C2] / [C3]: The camera settings are made separately
for each connected camera.
● [Hor. marker]: Activate or deactivate horizontal marking line.
● [Marker pos.]: Set position of the horizontal marking line. With
default setting the marking line is in the middle of the screen
(50).
● [Vert. marker.]: Activate or deactivate vertical marking line.
● [Marker pos.]: Set position of the vertical marking line. With
default setting the marking line is in the middle of the screen
(50).
● [Graticule]: Activate or deactivate the point grid.
UK
9
Page 10

E2M231 / E2M232 monitor for analogue cameras
6 Service menu
The [Service menu] contains extended device settings.
+ +
6.1 Camera settings
Press the [Camera selection] [Minus / -] and
[Plus / + ] keys simultaneously to activate the
service menu.
The settings are divided:
● [Camera settings] (→ „6.1 Camera settings“)
● [Camera tags] (→ „6.2 Camera name“)
● [System settings] (→ „6.3 System settings“)
● [Info] (→ „6.4 Info“)
The connected cameras are set in the [Camera settings] menu.
The following settings are available:
[C1] / [C2] / [C3]: The camera settings are made separately
for each connected camera.
● [Mirror]: Mirror the screen on the horizontal axis.
● [Upside down]: Mirror the screen on the vertical axis.
● [Brightness]: Set the brightness of the display.
● [Contrast]: Set the contrast of the display.
6.2 Camera name
● [Saturation]: Set the colour saturation of the display.
● [Switch delay]: Activate the switching delay. This setting is
required if the wire is to be controlled with an uninterrupted
signal (e.g. from an indicator).
● [Hor. marker]: Activate or deactivate horizontal marking line.
● [Marker pos.]: Set position of the horizontal marking line. With
default setting the marking line is in the middle of the screen
(50).
● [Vert. marker]: Activate or deactivate vertical marking line.
● [Marker pos.]: Set position of the vertical marking line. With
default setting the marking line is in the middle of the screen
(50).
● [Graticule]: Activate or deactivate the point grid.
● [Cinema mode]: Scale the camera signal to the screen area.
With scaling, the camera signal distances may be more
difficult to estimate.
10
In the [Camera tags] menu the name of the connected cameras is
changed. Max. 6 alphanumerical characters are available for the
name.
Page 11

E2M231 / E2M232 monitor for analogue cameras
6.3 System settings
The device is set in the [System settings] menu. The following settings are available.
6.3.1 Language
The language of the on screen display (OSD) is set in the
[Language] menu. The following languages are available:
English, Dutch, German, French, Czech, Hungarian, Italian,
Polish, Portuguese, Spanish, Turkish, Swedish, Finnish, Danish,
Norwegian.
6.3.2 On screen display
The on screen displays are set in the [On screen display].
● [OSD timeout]: Suppress the on screen displays after the time
set in seconds. The [OFF] setting permanently activates the on
screen displays. The [ON] setting deactivates the on screen
displays.
● [OSD Position]: Set the horizontal position of the on screen
displays.
UK
● [Info transparency]: Set the transparency of the on screen
displays.
● [Menu transparency]: Set the transparency of the menu.
● [Disclaimer transp.]: Set the transparency of the disclaimer.
The disclaimer is displayed when the device is started.
● [OSD Menu help]: The help texts in the on screen displays are
activated or deactivated. The activated help texts are displayed
if no key is pressed within 10 seconds.
11
Page 12

E2M231 / E2M232 monitor for analogue cameras
6.3.3 Keyboard
The keyboard is set in the [Keyboard] menu.
The [Keyboard sound] and [Beeper volume] settings are
without any function.
● [Keyboard lock]: Lock access to certain device functions.
– [Standby menu]: Lock access to the standby menu.
– [Operator menu]: Lock access to the user menu.
– [Camera switch]: Lock access to the camera switch.
– [Camera settings]: Lock access to the camera settings.
– [Standby]: Lock access to the standby mode.
6.3.4 Power supply settings
The standby mode of the device is set in the [Power settings]
menu.
● [Standby mode]: Set one of the following modes for standby:
– [MNU]: Use the [Enter / Standby] key to activate the standby
menu (→ „4 Function keys“).
– [IMM]: Use the [Enter / Standby] key to activate the standby
mode directly.
– [2 S]: Keep the [Enter / Standby] key pressed for 2 seconds
to activate the standby mode.
● [Standby, camera off]: Deactivate the voltage supply of the
connected cameras in the standby mode.
The standby mode is deactivated by pressing any key.
12
Page 13

6.3.5 LCD backlight
E2M231 / E2M232 monitor for analogue cameras
The background illumination of the screen is set in the
[LCD backlight] menu.
● [LCD backlight mode]: Set one of the following modes for the
background illumination:
– [ABC]: Automatic setting of the brightness depending on the
ambient light. The brightness sensor is above the [Plus / +]
key.
– [A_R]: Automatic setting of the brightness depending on the
ambient light. A red colour palette is used. The brightness
sensor is above the [Plus / +] key.
– [A_B]: Automatic setting of the brightness depending on the
ambient light. A blue colour palette is used. The brightness
sensor is above the [Plus / +] key.
– [DAY]: Day mode. Set the brightness to 100 %. The LED
above the [Day / Night setting] key is permanently on. Use
the [Plus / +] and [Minus / -] keys to vary the brightness
between 50 % and 100 %.
– [NIT]: Night mode. The brightness is set to 20 %. Use the
[Plus / +] and [Minus / -] keys the vary the brightness between
0 % and 50 %.
– [N_R]: Night mode. The brightness is set to 20 %. A red
colour palette is used. Use the [Plus / +] and [Minus / -] keys
to vary the brightness between 0 % and 50 %.
– [N_B]: Night mode. The brightness is set to 20 %. A blue
colour palette is used. Use the [Plus / +] and [Minus / -] keys
to vary the brightness between 0 % and 50 %.
● [ABC minimum level]: Set a minimum value for the automatic
background illumination (modes [ABC], [A_R,] and [A_B]).
● [LCD backlight day]: Set the brightness during the day between
50 % and 100 % ([DAY] mode).
UK
6.3.6 Scanning
● [LCD backlight night]: Set the brightness during the night
between 0 % and 50 % ([NIT, [N_R,] and [N_B] modes).
The behaviour of the [Scan / Back in menu] key is set in the
[Scanning] menu (→ „4 Function keys“).
● [Scan sequence]: Select the cameras to be scanned.
● [Scan interval]: Set the display time of the cameras to be
scanned in seconds.
13
Page 14

E2M231 / E2M232 monitor for analogue cameras
6.3.7 Camera switch
The behaviour of the [Camera switch] key is set in the [Camera
switch] menu (→ „4.1 Camera switch“):
● [OFF]: Setting for 1 connected camera without video switcher.
The [Camera switch] key is deactivated.
● [3C]: Setting for 3 connected cameras with video switcher.
● [2C]: Setting for 2 connected cameras with E2M232 or video
switcher.
● [4C]: Setting for 4 connected cameras with E2M232 and video
switcher.
The ifm video switcher is available as accessory with the article number E2M235:
6.3.8 Tacho settings
In the [Tacho settings] menu the external control of the cameras is
set:
● [AUX wire function]: Set the mode of the wires. The following
modes are available:
– [OFF]: Deactivate the wires.
– [TCH]: Control the cameras via a tachometer. Connect the
grey wire to the tachometer and the yellow wire to the parking
brake.
– [KEY]: Deactivate the keyboard with the grey wire.
– [C-+]: Select the connected cameras with the wires.
● [Pulses per meter]: Set the speed pulses per metre (resolution)
in the [TCH] mode.
● [Cam to activate]: Set the camera to be activated in the [TCH]
mode.
● [Cam on if speed >=]: Set the speed in km/h as from which the
camera is to be active in the [TCH] mode.
www.ifm.com
● [.. and speed <]: Set the speed in km/h up to which the
camera is to be active in the [TCH] mode.
Wiring and more details about the wires are indicated in the supplied installation instructions
(→ Installation instructions, chapter 6.2 "Wiring").
14
Page 15

6.3.9 Default settings
6.4 Info
E2M231 / E2M232 monitor for analogue cameras
In the [Default settings] menu all settings are reset and the default
settings are restored:
● [Select defaults]: Select the default settings to be restored. The
preset value is "45".
As standard the value of [Select defaults] must not be
changed. Contact the manufacturer for more details.
● [Restore defaults]: Reset all settings and restore the default
values.
All settings are lost at once and without further enquiry!
The former settings cannot be restored.
In the [Info] menu information about the hardware and software
used is displayed. The displayed information is very important in
the event of service.
UK
15
Page 16

E2M231 / E2M232 monitor for analogue cameras
7 Glossary
ABC Automatic background illumination (Automatic Brightness Control)
A_R Automatic background illumination with red colour palette
A_B Automatic background illumination with blue colour palette
DAY Day mode
NIT Night mode
N_R Night mode with red colour palette
N_B Night mode with blue colour palette
OSD On screen display
TCH Tachometer
8 Error messages
8.1 Automatic camera selection
The [Scan / Back in menu] key does not function as expected: The images of the connected camera are
not displayed one after the other. In addition the LED next to the [Camera switch] key flashes.
Solution: Press [Camera switch] key.
8.2 Malfunction of camera 3
Camera 3 is active and does not display an image.
Solution: Keep the [Scan / Back in menu] key pressed for 15 seconds.
8.3 Device shuts off after 2 seconds.
The device shuts off again 2 seconds after switch-on.
Solution: Press the [Enter / Standby] key.
8.4 LEDs C1 and [Enter / Standby] key flash
LEDs "C1" and the one next to the [Enter / Standby] key flash simultaneously 4x times.
Solution: The device is defective. Contact service:
www.ifm.com
16
Page 17

E2M231 / E2M232 monitor for analogue cameras
UK
17
 Loading...