

Page 1
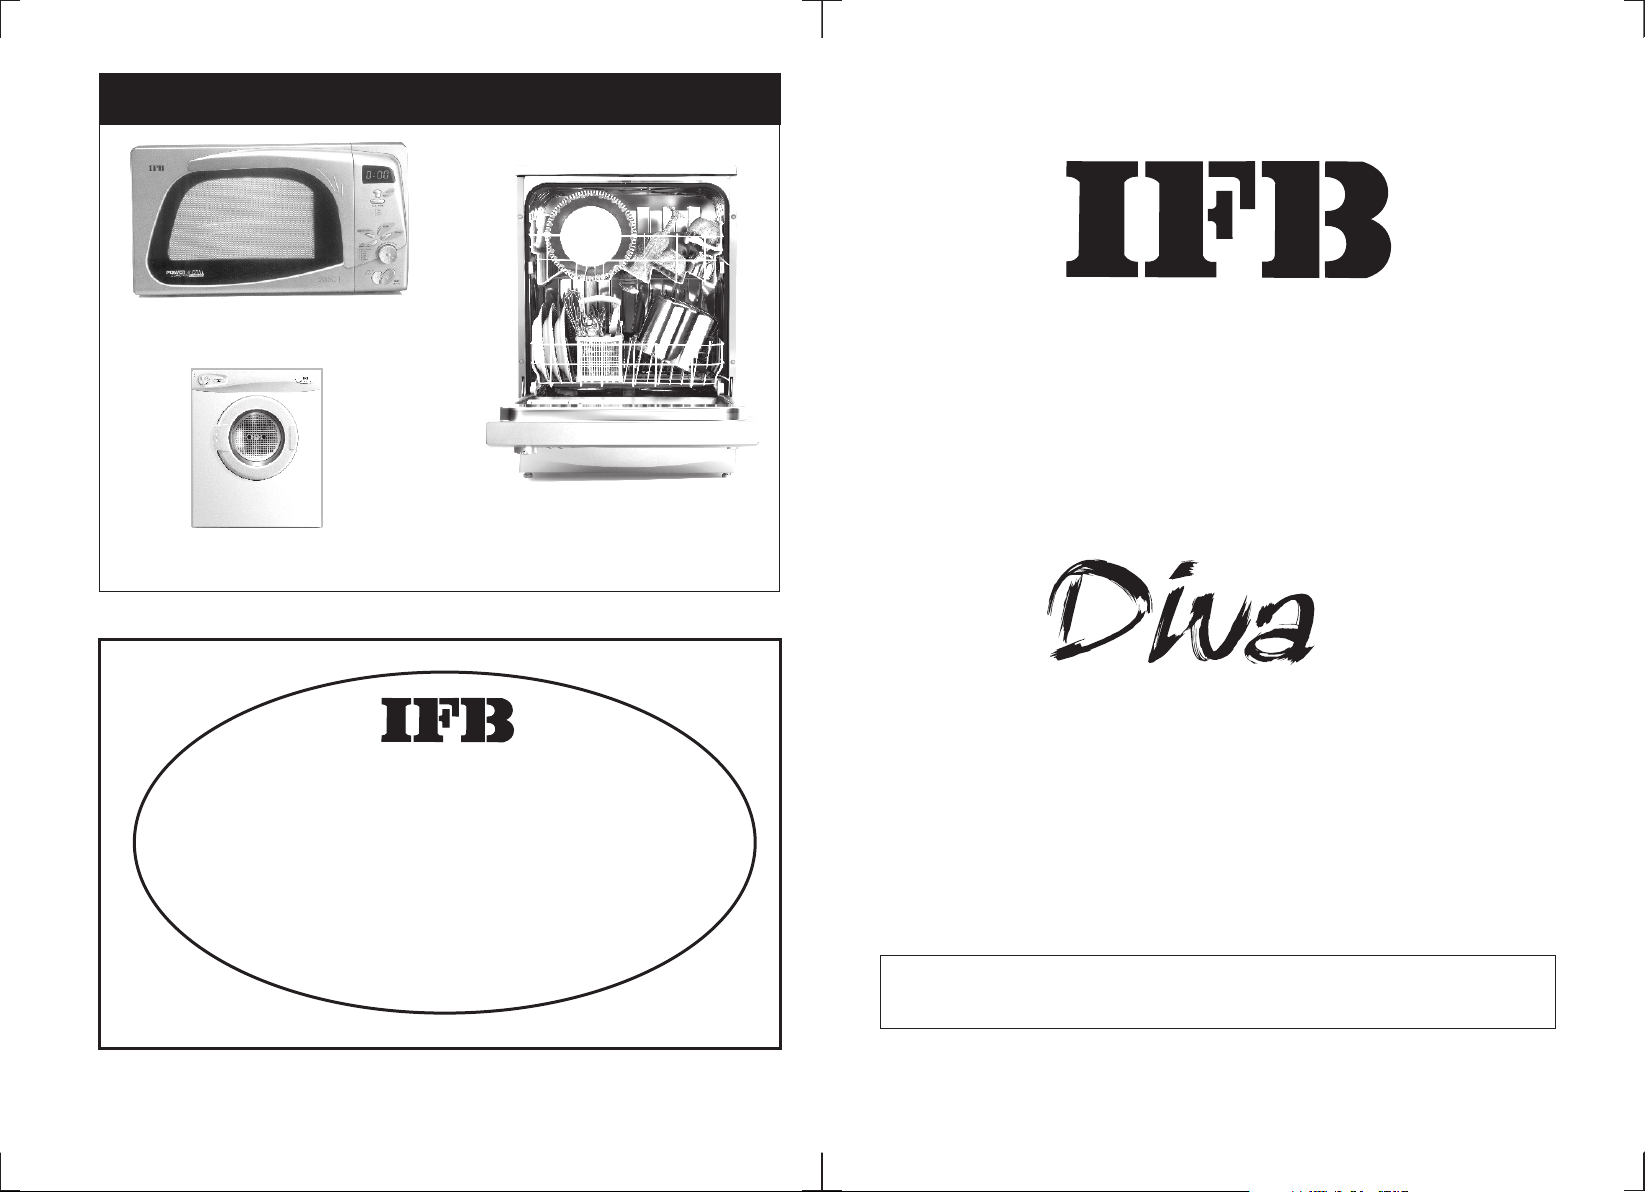
ALSO FROM IFB
MICROWAVE OVEN
CAPACITY - 17 to 30 LITERS
CLOTHES DRYER
CAPACITY - 5.5KG
Advancing the science of washing
DISHWASHER
CAPACITY - 12 PLACE SETTING
Customer Care
Dial
1860 425 5678 - BSNL & MTNL Callers
3900 4321 - Other Callers
or email
customerservice@ifbglobal.com
IFB Industries Limited, Plot No. IND - 5, Sector - 1, East Calcutta Township, Calcutta - 700 078
Visit us at www.ifbappliances.com
OPERATING MANUAL
USE ONLY GENUINE IFB SPARES & ACCESSORIES
* Company shall not be responsible for defects arising due to usage of spurious parts and accessories
Page 2
D
A wa m
F
I
ac in
m
freed
n
i
T i
a
un
wa
omer
ustea
C
r
e c
w
r
um e
‘t bl wa h
B
rs.
e
o n
e
h w
h ng m
s i h
a
w
our
Y
hine I
ac
m
. t
m
o
fab
e
h r
t
g
i
ad n
o
l
,
after
re
e r
h
T
washin
s
h
ore T
ym
q e a h
i ue
perfo
sh
s
A y u
washin
or an
ar
l
de
g m
i
h
bl
‘tum
an
m c
r
ad
re
o
m c
g a h ne
ut
y f
I
F
r
o
m
o e to h
l
s
ac
re
n
c
i sa
a e o a
you
i e
c
a h n o
hi
s
wa
s
’ con e t
s
w
es.
is m
h
t
ando for
i c
f r
in o m tio
r
he
B
r
e na i
t
n
e i
t
olo
t c
e hn
’
tru
s
i
n ,
i e
30
s
res just
i
qu
h
gt e
n
i
s
d ett
free o
l
l y
t
t
not
s e
d e
achine s
m
g
n
s
for
p u
c
u w ll
y
a
nu
a l o i
u.
yo
, p
n
a
C
e n r .
i
e
sS rv c
ami y
l f l f
na
t o
e wa g
s d
ba
gy
o e
ing t
go
y
l
o y ur t
f o
ds
on
ec
e.
m
ram
g
pro
l a e
hatyo
w
do
t
ur supe
o i
y
ed
n
l
e led n t e n
od
m
i
r
f b
a
r
rio
pe
tand
s a
de
un r
e o t
e s c n a o
l a
t ee
e
ct y
i
b
u
c
o
in
sh
o
y ur
im
e s .
p
rv sio
o
r d
ca e
wh
n
ur
e
n
h
an
this
t
ea e
r s
tF
3
Page 3
MODEL :DIVA SERIAL NO. WT DIV B
DEALER’S NAME :
CUSTOMER’S NAME :
ADDRESS :
PIN CODE :
TEL. NO. (Resi.) (Off.)
E-MAIL :
MOTOR SR. NO. :
CONTENTS
KNOW YOUR MACHINE 6
INSTALLATION 7
qPre Installation
qUnpacking
qSetting Up
qWater Inlet
qWater Outlet
qElectrical Connection
USING YOUR MACHINE 11
qControl Panel
qEnviromental protection/conservation issues
qBefore using your machine for the first time
qAutomatic Detergent Dispenser Tray
qON - OFF Switch / Programme Selector Knob
qProgramme Selection
qProgramme Selection Chart
DATE OF PURCHASE :
INSTALL THE MACHINE, ONLY IF EARTHING IS PROPER
OPERATION 17
qSorting of Garments
qLoading the Machine
qDetergent to be used and Quantity
qTreatment of stains
qWash Load Guide
qInternational Washing Symbols
qProgramme Run
qSwitching Off the Machine
qCheck Points
MAINTENANCE 22
qFluff Filters
qDrum
qSieves
qFrost Protection
qDraining During Emergencies
FAULT DIAGNOSIS 25
qWhy does it happen?
SAFETY PRECAUTIONS 26
TECHNICAL DATA 28
5
Page 4
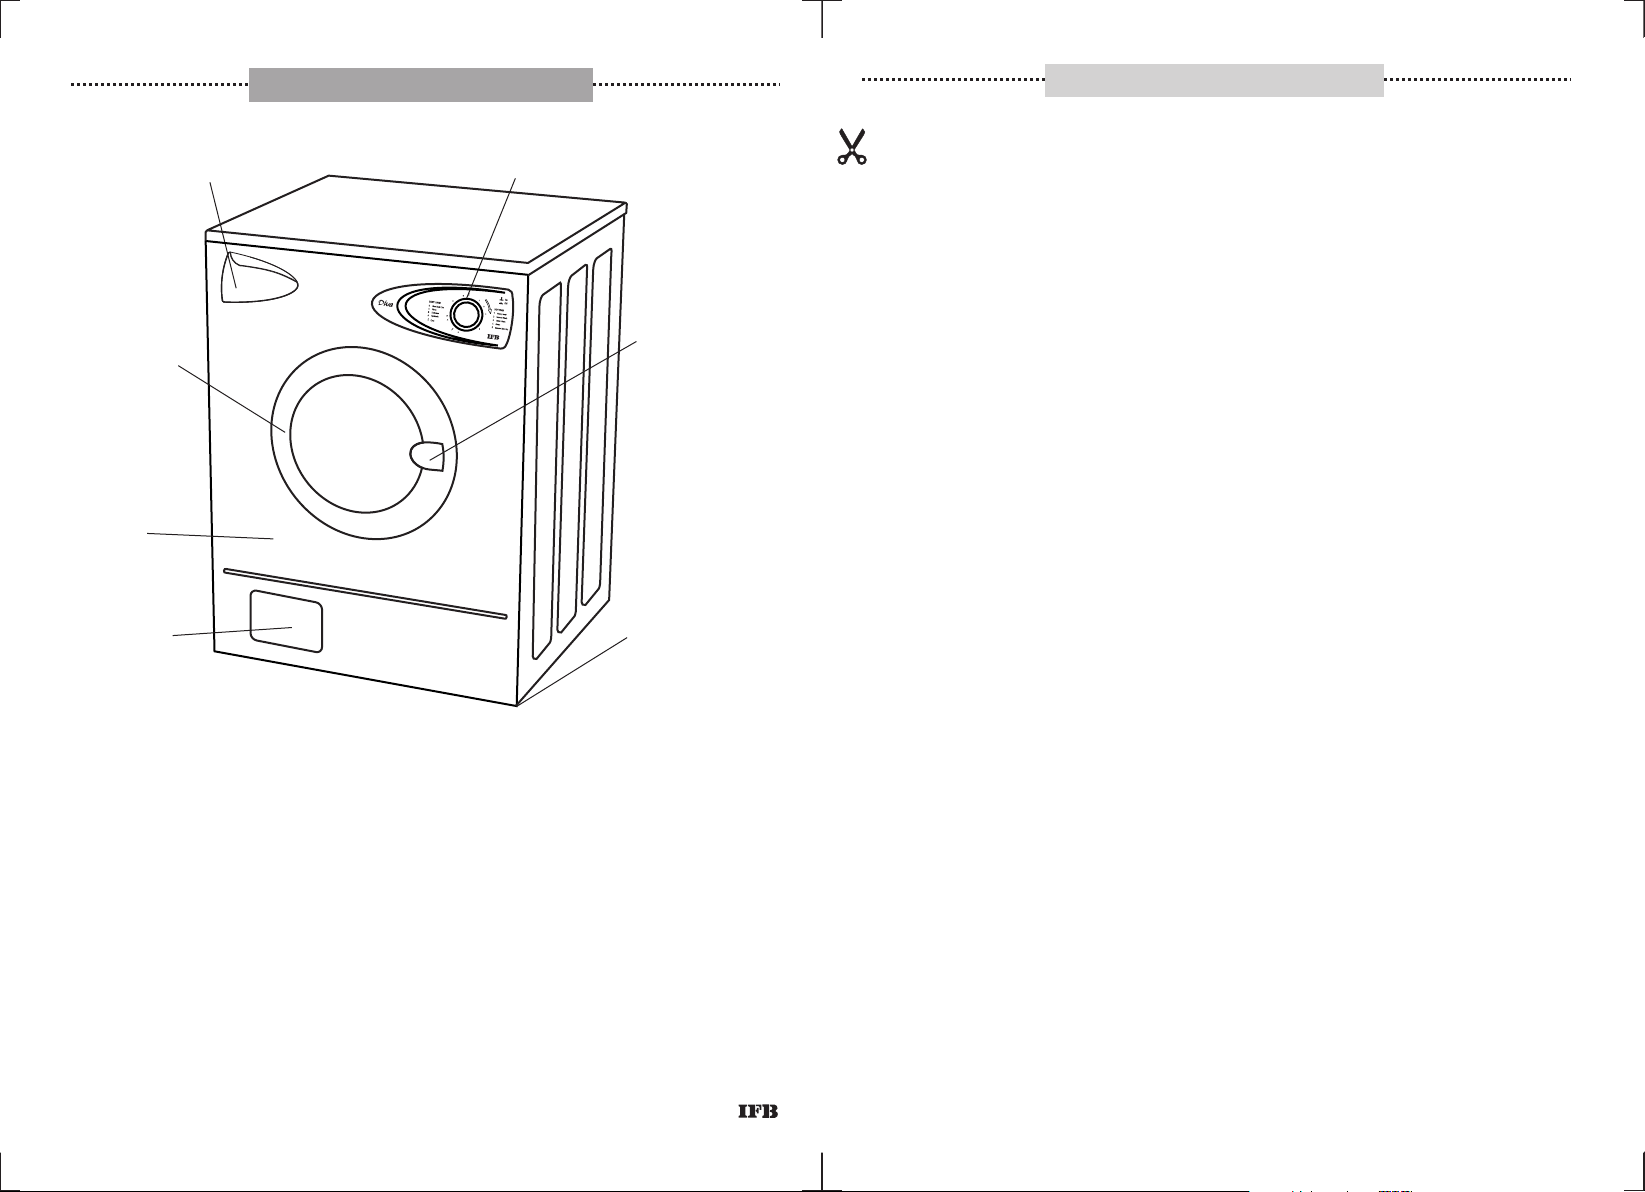
KNOW YOUR MACHINE
DETERGENT DISPENSER TRAY
ON-OFF SWITCH/PROGRAMME
SELECTOR KNOB
INSTALLATION REPORT
IFB WASHING MACHINE
Model : __________________ Serial No. : ______________Customer’s Name : __________________
_________________________________________________Tel. No. ___________________________
Address :___________________________________________________________________________
__________________________________________________________________________________
Installation Check Points
Machine Delivered on : __________________ Machine Installed on :_______________
INTERLOCKING
PORTHOLE
DOOR
SPECIAL
POWDER
COATED
GALVANISED
STEEL
CABINET
FLUFF
FILTER
DOOR
DOOR LOCK
HANDLE
ADJUSTABLE
FEET FOR
LEVELLING
Advantages Of Tumble Wash
qMOST EFFECTIVE CLEANING AS THE CLOTHES PASS
THROUGH SOAPY WATER AND ALSO FALL ON SOAP
SOLUTION IMPROVING WETTING OF CLOTHES.
qRESEMBLES THE THUMPING AND RUBBING ACTION OF
GENTLE HAND WASH.
qUSES LESS WATER COMPARED TO TUB TYPE TOP LOADERS.
qLESS WATER MEANS LESS DETERGENT AND ELECTRICITY
CONSUMPTION.
qWASHING IS EFFECTIVE BY DETERGENCY, SOAKING,
TUMBLING AND SQUEEZING.
qGIVES BETTER DRYING EFFECT BY SPINNING.
1. Any Major transit damage to the machine observed Yes No
2. Condition of Earthing/Plug Point (16 Amp.
230V AC with MCB or other automatic short circuit
protection devices. )good
If poor, customer has been advised, to correct the same Yes No
3. User Manual Delivered Yes No
4. Inform user of need to keep drain hose
straight & maximum height of draining. Yes No
5. Warranty term explained Yes No
6. Machine levelling procedure &
importance explained Yes No
7. Detergents and bleach recommendation
revelent DD tray chambers explained Yes No
8. Basic wash demo given Yes No
9. Trouble shooting explained Yes No
10.Check following for proper order :
a. Inlet Hose Yes No
b. DD Tray Yes No
c. Ratmesh fitted ( If applicable ) Yes No
d. Drain hose Yes No
11.Do’s and Don't’s explained Yes No
12.Display function explained ( If applicable ) Yes No
13.Procedure for cleaning rubber sleave / coin trap Yes No
14.Program selection, Programs & buttons options
( other knob ) explaind Yes No
15.Indicator lamp/Status LED function ( if Applicable ) Yes No
16.Buzzer function ( if Applicable ) Yes No
Installed by :_______________________ Signature : ________________________________
Customer’s response
1. The installation person was courteous & Helpful. Yes No
2. I would describe my experience
with installation as Unacceptable Satisfactory
Non Satisfactory Very Satisfactory
I certify that the above information & checks have been done to my satisfaction & I am fully satisfied with
the installation of the washing machine.
Customer’s Signature________________Date :__________________ Time : ____________
6
Page 5
INSTALLATION
Pre Installation
1. It is mandatory to have a 16 amp. 3-pin 230V AC, 50Hz
electrical point with a 16 amp. MCB or Automatic short
circuit protection device within 1 meter of the machine.
Make sure it has proper earthing.
2. Fixed plumbing is recommended
for the machine. The water inlet
of the m achine has a collar
with3/4”parallel internal threads.
The water supply point with an
ex tern al 3/ 4” par all el th rea d
WATER
SUPPLY
STOP
LOCK
REDUCER
1/2
should be available within1 meter
of the machine’s location.
DRAIN
3. Two options on the water inlet and
PIPE
drain pipe connection are shown.
In case these possibilities do not
exist for the drain pipe, please
WATER INLET
arrange an additional length of
pipe.
4. Please inform our service centre for installation and demonstration
of the machine once the points mentioned above have been
completed.
3/4
WATER INLET
DRAIN
PIPE
MACHINE
WATER
INLET
Unpacking
1. Remove Carton.
2. Remove top packing cover.
3. Remove side packing and plastic jacket.
4. Remove packing from the bottom of the
motor
5. Place the machine at the site at which it is to be
Installed, and put the rat mesh.
7
Page 6

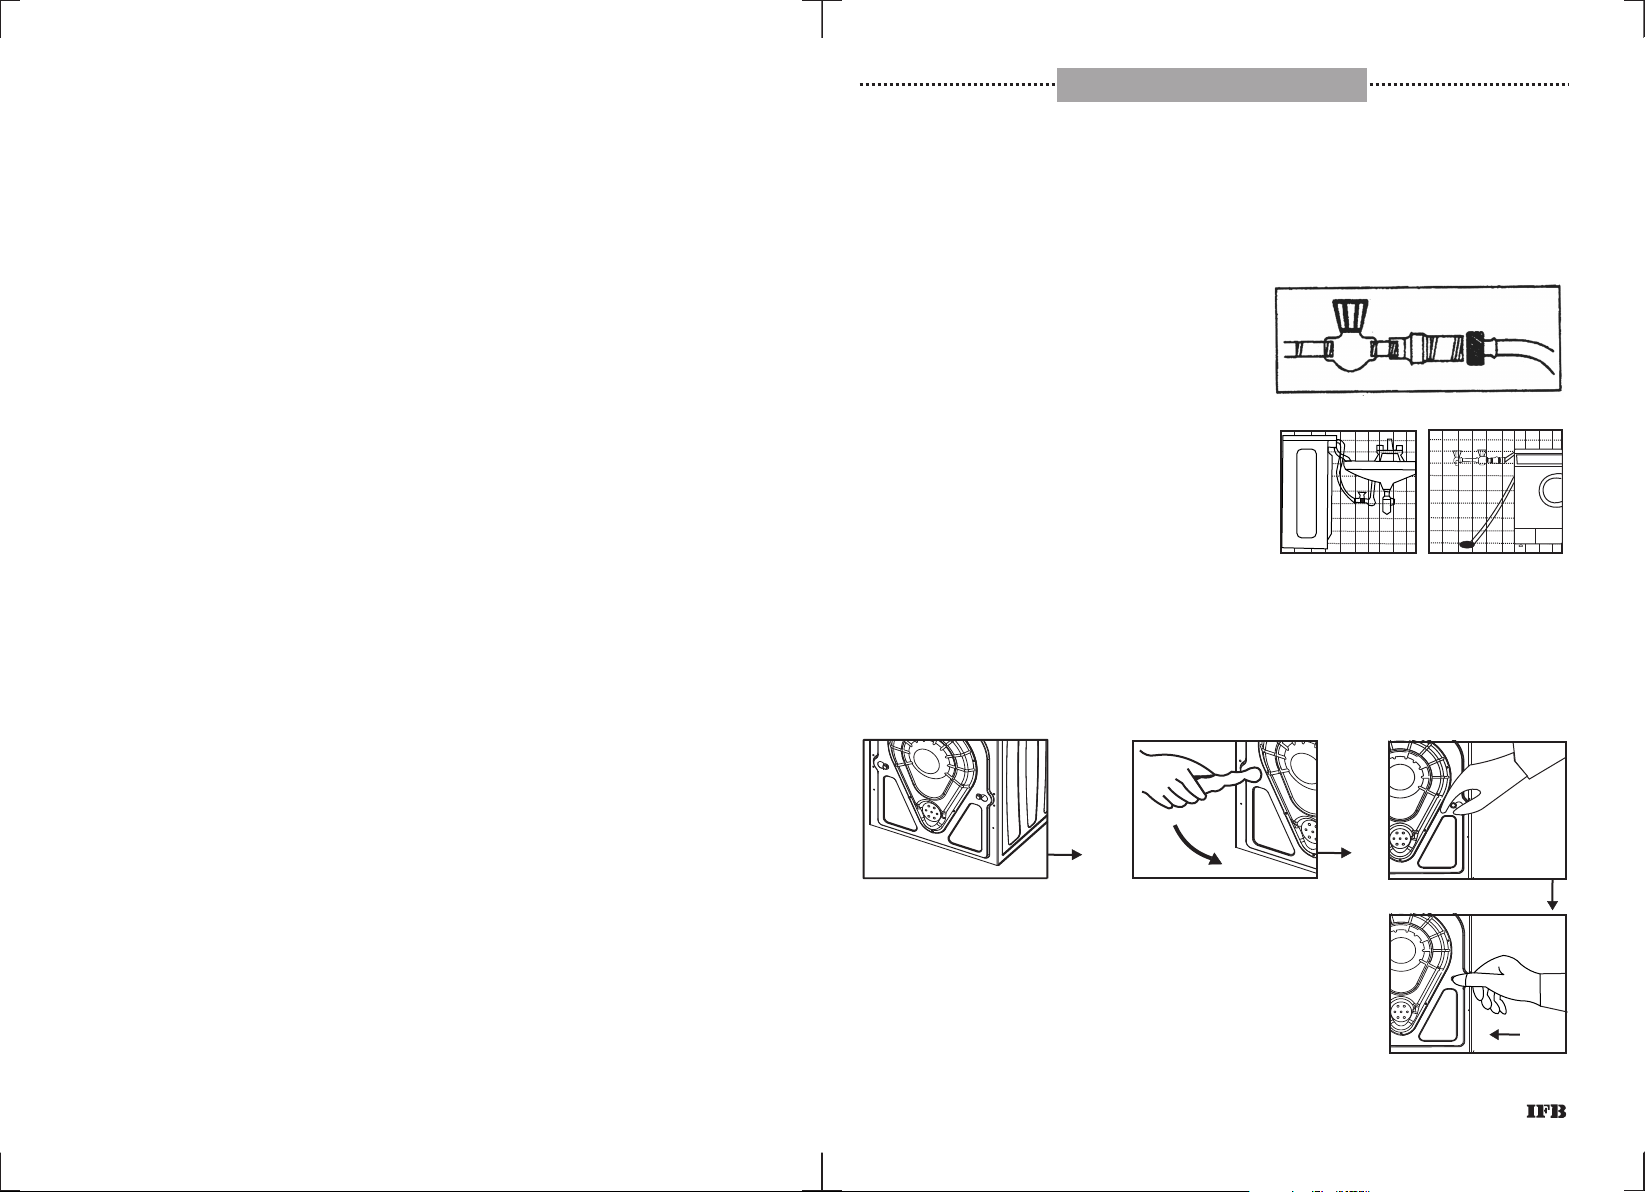
6. Remove transit bolts.
7. Insert plastic caps provided into holes vacated and press till they
click into place.
8. Keep transit bolts carefully. They will be required in case you need to
shift the machine again.
9. For shifting and re-installation at a new site, please get in touch with
our ser vice personnel.
10. Keep packaging material carefully. It comes handy while shifting
residence.
11. PLEASE DO NOT OPERATE THE MACHINE TILL TRANSIT BOLTS
HAVE BEEN REMOVED.
MODEL :DIVA SERIAL NO. WT DIV B
DEALER’S NAME :
CUSTOMER’S NAME :
ADDRESS :
PIN CODE :
Setting Up
The machine should be levelled properly on the
floor. However, it can be installed on any suitable
platform or trolley, as desired.
Install machine in a room with adequate
ventilation. Avoid a room with no windows. The
back of the machine should be at least 4 inches
(100 mm) away from the wall.
1. Do not place the machine on slanting, uneven,
unstable surface.
2. Level the machine by using the adjustable screws provided at the
bottom for levelling.
3. Loosen securing nut. Adjust the screw to change level. Tighten
securing nut to ensure that screw is locked into place.
4. Make sure that the machine rests on all four feet on a level
surface, at all times, to avoid vibrations during operation
5. Machine should be leveled again in case it is moved to a new site.
6. Machine is provided with ventilating openings on the base. Hence it
is always recommended to put the machine on the floor after
removing the carpet.
7. In countries where there are areas which may be subjected to
infestation by cockroaches or other insects etc, pay attention to
keep the appliance & surrounding in clean condition at at all times
any damage which be caused by cockroaches etc will not be
covered by the appliance guratantee.
TEL. NO. (Resi.) (Off.)
E-MAIL :
MOTOR SR. NO. :
DATE OF PURCHASE :
8
29
Page 7

TECHNICAL DATA
Dimensions : 55cm x 60 cm x 85 cm
(D x W x H )
Weight : 55 kgs
Capacity : 5 kgs of dry clothes (cotton)*
Water Inlet
1. Connect inlet hose to water tap/line.
2. Do not connect machine to a hot water
supply.
WATER INLET
DRAIN
PIPE
Programmes : 10 wash care programmes
Spin speed : 600 rpm
Drum : Stainless Steel
Drain Pump rating : 30W
Water Consumption : 55 litres for Standard wash
Power Consumption : 0.2 - 0.3 units
Connected Load : 690 W
Programme Duration: 50 to 115 mins
Power Supply : 220 - 240V, single phase, 50 Hz
Water Pressure : 1 bar ( 1.03 kg/cm ) - 10 bar
(10.3 kg/cm )
2
2
Specifications are subject to change without prior notice:
* Capacity depends on size, texture and combination of clothes.
Depending on water pressure, Water hardness, Water inlet
Temperature, Quantity and type of Textile, Detergents used, Degree
of soiling, Ambient conditions, selected additional functions & power
supply fluctuations the actual values given on or with the machine
can deviate from the declared standard values, as they are tested
according to the laboratory conditions
Water Outlet
1. A drain pump is provided in the machine to
pump out used water.
2. The end of the outlet should be placed near a
drain. If necessary, it can be placed over the
edge of a sink at a maximum height of 1 mt.
from the floor level.
3. Allow free flow of water from the outlet pipe.
Electrical Connection
qCheck that the electrical line take the required
load.
qConnect to a 230V, 50Hz single phase AC
supply. The appliance must be positioned so
that the plug is accessible.
qMachine must be earthed properly before
operation. This can be done by using a 3 - pin
plug and a properly earthed operated socket
of 16 Ampere rating.
qIf the supply cord is damaged, it must be
replaced by the manufacturer or its service
agent or a similarly qualified person in order to
avoid a hazard. It should not be stretched
when connected to the main socket.
16 AMPS
DRAIN
PIPE
WATER INLET
X
X
28
9
Page 8

qUse of extension cord not recommended since it may not be
properly earthed.
qUse ISI marked sockets of reputed make for preventing loose
contact of power supply cable.
qEnsure that there is a firm connection between the 3 PIN PLUG and
SOCKET, else it may result in sparking and subsequent failure of 3
pin plug.
qEnsure that L,N,E is as per the Fig. Shown
qWashing machine should always be connected to socket with 16
Amps MCB or other automatic short circuit protection devices.
CAUTION :- The producer/Manufacturer declines any responsibility
for damage caused by failure to observe this rule. You are therefore
advised to check that your household supply has an efficient earth.
qAvoid the machine coming in contact with floor cleaning
chemicals.*
qDo not wash or spray water over the switch or control panel.
qDo not allow children/pets to play with the machine.
qDo not wash shoes or utensils in the machine.
qKeep machine away from fire or heat.
qIFB will not be responsible if the user uses accessories not
manufactured or recommended by IFB.
qTake care when draining hot washing solution.
qDoor always become very hot during washing at higher
temperatures. Keep children away from the appliance while it is in
use.
*Exposure can lead to rusting/corrosion.
SPECIAL NOTE
ONLY USE A DETERGENT RECOMMENDED FOR FRONT
LOADING WASHING MACHINES. A DETERGENT WHICH FOAMS
EXCESSIVELY CAN DAMAGE THE MOTOR AND DETERIORATE
THE RINSE QUALITY.
INSTALL MACHINE IN A ROOM WITH ADEQUATE VENTILATION.
AVOID A ROOM WITH NO WINDOWS. THE BACK OF THE
MACHINE SHOULD BE AT LEAST 4 INCHES (100 mm )AWAY
FROM THE WALL.
IF YOU USE A COVER OR TABLE CLOTH ON THE TOP LID, MAKE
SURE THAT THE VENTILATION SLOTS AT THE BACK ARE NOT
COVERED OR BLOCKED. THIS PRECAUTION WILL PROLONG
THE LIFE OF ELECTRICAL AND RUBBER COMPONENTS.
10
27
Page 9

SAFETY PRECAUTIONS
qEnsure that the machine is properly balanced on four adjustable
feet.
qEnsure that the machine is connected to 3 pin socked with good
earth and 16 Amp MCB or other automatic short circuit
protection devices.
qThe machine is tested with water during assembly for performance
check ing . Con dense d dro plets o f water m ay re main
inside the drum. It is advisable to run the machine without wash
load in cotton program with detergent for the first time
after installation.
qServicing should be handled by the Company ’s authorized
personnel only.
qCheck label on garments for determining conditions under which
fabrics are to be washed.
qUse detergent recommended for washing machine.
qEnsure that the electrical line on which the machine is used can
take the required load.
qCheck the inside of drum before loading the clothes.
qProtect the machine from direct sunlight and do not splash water on
it. Clean with a damp cloth.
qKeep your machine dry to avoid corrosion/rusting. Take special care
to wipe the machine af ter cleaning the Coin trap.
qThe machine should ideally be installed on the floor. It can be
installed on any suitable platform or trolley, if desired by the
customer.
qClean the shell lower and detergent tray periodically by taking out
the detergent tray.
qDo not pull the cord to disconnect the plug. Hold the plug itself/do
not insert or remove the plug with damp hand.
qDo not drag the washing machine to its position. Always lift the or
move the machine keeping the wheel’s direction in mind.
qDo not move the washing machine if it contains the wash load or
when in operation.
qDo not install the machine in a damp area or bathroom, with
exposure to direct shower*.
qDo not spill water over the machine*. In case of spillage, wipe dry.
CONTROL PANEL
Let’s take a look at the control panel and understand the working of each of its features.
Each feature serves a specific purpose in the complete operation of the machine.
ON-OFF SWITCH /
PROGRAMME SELECTOR KNOB
DETERGENT
DISPENSER
TRAY
26
11
Page 10

Environmental Protection/ Conservation Issues
Your washing machine uses water, energy and detergent efficiently,
thereby protecting the environment and reducing your household costs.
Using your washing machine in an efficient and environmentally
friendly manner:
Do not exceed recommended load.
Cottons 5.0kg
Easy-care 2.5kg
FAULT DIAGNOSIS
Why Does It Happen ?
WATER DOES NOT ENTER MACHINE/DETERGENT NOT
BEING FLUSHED INTO DRUM.
qCheck water supply
qPorthole door not firmly closed
qWater tap not turned on
qBent inlet hose
qSieve on inlet valve clogged
Add detergent according to the degree of soiling, amount of laundry and
water hardness, and observe the dertergent manufacturer’s
instructions.
Before Using Your Washing Machine For The First
Time
Caution
The washing machine must have been installed and connected properly
(refer page 7)
Your appliance was tested before leaving the factory. To remove any
water left over from testing procedures, the first washing cycle should
be carried out without laundry in the machine.
Do not load any laundry.
1. Turn on water tap.
2. Pull out the detergent dispenser up to the end stop.
3. Pour approx. 1 litre of water into chamber II of the detergent
dispenser.
4. Pour ½ measuring beaker of detergent into dispenser II.
5. Close the detergent dispenser.
6. Set the programme to cottons and start the machine.
7. After the program is over turn OFF the machine.
SUDS ESCAPING FROM DETERGENT DISPENSER TRAY./
EXCESSIVE FOAM IN THE DRUM.
qDetergent used is not a washing machine
detergent
qExcessive detergent used
WATER LEAKAGE FROM THE MACHINE.
qInlet / Outlet hose connection loose
qFluff Filter not screwed on properly
qInlet hose leaking
qDrain plug not fixed properly onto Drain hose.
MACHINE DOES NOT DRAIN.
qFluff Filter clogged
qOutlet hose end above 1 meter from floor level
MACHINE VIBRATES STRONGLY DURING SPINNING.
qMachine not levelled properly
qClothes not loaded as instructed
qwater not drained completely
MACHINE DOES NOT START.
qCheck position of programme selector knob
qCheck water supply
qPorthole door not closed properly
MOTOR NOISE.
qIt is normal for noises to be heard while motor is running.
However wash load, belt tension and motor mounting
bolt should be checked for specified limits.
12
PUMP NOISE.
qIt is normal for noises to be heard from the pump during
the start- up and final stage of draining. However
check for fluff filter clogging.
25
Page 11

Frost Protection
If the machine is being operated in very cold temperature, all
the water should be drained out after use.
qRemove Fluff Filter.
qLocate the drain hose and drain the water.
qDisconnect inlet hose from the tap and drain.
Draining During Emergencies
Incase of a long power faliure during a programme run, the
water can be drained from the drum through the drain hose
qLocate the drain hose and pull out the drain hose to drain
water in a large shallow container.
qBefore restarting machine, ensure that drain plug is fixed on
drainhose properly and fluff filter water line is filled with water
by running the machine without any clothes or detergents.
qSpillage of water can rust the base plate. Draining through
drain hose prevents rusting.
Automatic Detergent Dispenser Tray
Designed for automatic dispensing of detergent. The
Dete r gen t D i spe n ser Tr ay sho u ld be fil l ed wit h
recommended detergent quantity before the start of a
programme.
The detergent tray must be pulled out, filled as required and
shut before athe machine is switched on.
On - Off Switch / Programme Selector Knob
To switch ON the machine and to select the right
programme as per the fabric being washed and extent of
soilage.
qA choice of 10 programmes is
available to wash different kinds /
loads of clothes.
qProgramme selection should be
done before the machine is
switched ON.
qTHE STARTING POINT OF PROGRAMME NEEDS TO BE
SELECTED BY SHIFTING THE PROGRAMME SELECTOR
KNOB ADJACENT TO PRINTED LETTERS. OPERATING
THE MACHINE BEYOND PRINTING ZONE MAY RESULT IN
HIGHER CONSUMPTION OFWATER & ELECTRICITY AND
WILL NOT IMPROVE WASH QUALITY.
24
qMachine should be switched on by gently pulling out the
programme selector knob.
qAfter initiating the programme, machine runs through
automatically. If for any reason you wish to change the
programme switch OFF the machine by pushing in the
programme selector knob, then set the desired
programme and re-start.
qKNOB SHOULD BE TURNED ONLY IN CLOCKWISE
DIRECTION.
13
Page 12

Programme Selection
1. COTTONS
To be used for whites and coloureds of cotton or
predominantly of cotton in case of mixed load.
STAGE I : Main Wash - Heavy wash/Normal wash/Quick wash
qClothes are soaked, tumbled in water with detergent to
remove dirt. Clothes are tumbled to expose more
surface, before draining out dirty water.
qIF CLOTHES ARE NOT VERY DIRTY, THE WASH CYCLE
CAN BE STARTED BY DIRECTLY SETTING THE
PROGRAMME SELECTOR KNOB AT NORMAL OR QUICK
WASH, TO REDUCE WASHING TIME.
STAGE II : Rinse
qAfter washing, the rinsing is done automatically four
times to remove traces of detergent and dirt from
clothes.
qFor most efficient rinsing, two intermittent short spins are
provided.
STAGE III : Intensive Spin Drying
Drum
Rust Stains
Never leave metal items e.g. paper clips, safety
pins etc. in he drum as it creates superficial rust
marks in drum. If there are any rust stains
remove with a non-chlorine agent. Special nonmetal sponges (never use steel wool ) may also
be used.
Sieves
Cleaning of Water connection Sieves, filter
1. Turn off Taps. Disconnect Power supply to the
machine. Unscrew inlet hose from machine
as well from the tap and drain out water from
the hose.
2. Pull the sieve out of the magnetic valve with a
pair of flat nosed plier and clean under running
water with a brush. Fit Sieve back to the Valve.
3. Remove the filter mesh from the tap end of the
inlet hose and clean under running water with
a brush.
4. Fit the filter mesh back to inlet hose.
5. Screw inlet hose back to the machine and the
tap. Ensure that both the sieves and the filter are
in place.
6. Turn on the tap.
qSpin drying takes place at 600 rpm for longer duration.
14
Cleaning of Porthole Door Area:
qAfter every wash clean vapour off porthole
door.
qLift the fold in the rubber gasket under
porthole periodically to remove lint and dirt
preferably af ter every wash.
23
Page 13

MAINTENANCE
2. Easy Care Programme
To be used for easycare fabrics like polyester blends or
predominantly having such fabric in mixed load.
STAGE I : Main Wash : Synthetic/delicates
qClothes are soaked, tumbled in water with detergent for
lesser duration than main wa sh of Normal wash
programme Clothes are tumbled to expose more surface,
before draining out dirty water.
qDuring soaking period clothes will remain stationary
in the drum to a maximum of 10 minutes.
Open door flap by pressing on the right hand
edge and pull out the plastic tray.
STAGE II : Rinse
qAfter washing the rinsing is done automatically three
times to remove traces of detergent and dirt from
clothes.
STAGE III : Short Spin dry
qSpin drying takes place at 600 r.p.m. for shorter
duration.
Exclusive spin drying programmes : Intense Spin dry / Short spin dry
qCan be used for spin drying hand washed/wet clothes.
qTurn programme selector knob directly to the spin drying
points af ter loading the clothes.
qSwitch ON the machine.
Note:
IN CASE ELECTRICITY/WATER SUPPLY GOES OFF,THE
MACHINE STOPS AND STARTS AGAIN FROM THE SAME
P O INT, A U T O M ATICALLY, O N R E S U M P TION OF
ELECTRICITY/WATER SUPPLY.
22
15
Page 14

Programme Run
Note :
qDuring the programme run the knob turns automatically in the
clockwise direction only.
qWashing, rinsing and spining can be seen through the
porthole window.
qAt any moment the position of the knob with respect to its start
position shows how far the programme has advanced.
qThe starting point is just beyond the thick line on the knob.
(MINUTES)
COMPLETE
CYCLE TIME
( 2.0 Kg Max. )
Switching Off The Machine
qThe wash ends automatically at the end of each programme
at the thick line on the knob
qTo switch the machine OFF push in the programme selector
knob
qPorthole door can be opened only after 90 seconds
qRemove clothes from Inside the machine
qLeave door slightly ajar to dry out the inside of the machine.
Very soiled cotton, or boil - proof linen
Normally soiled, non boil - proof baby washing
Cotton fabrics or linen which are colour fast.
non boil - proof ( 2.5 Kg Max. )
Check Points
Before switching your machine ’ON’ check...
qThe machine is connected to a 220V, 50Hz supply with proper
earthing.
qThe water inlet stopcock is fully open.
qThe hoses are not bent or twisted
qDry clothes are loaded into the machine drum, and door is
closed firmly with a click
qThe required amount of detergent is filled in the detergent
dispenser tray.
qAfter completing the above check points the machine should
be switched ON by gently pulling out the programme selector
knob.
qThe programme Selector knob is turned to the appropriate
SELECTION
PROGRAMME
Heavy wash
Normal Wash
Quick wash
Rinse
Intense Spin Dry
Synthetic
Delicates
Refer detailed Programme Chart given below showing 10 fully automatic wash programes.
Short Spin dry
Synthetic
Rinse
EASY CARE 2.5 KG MAX. COTTON 5 KG MAX CAPACITY
Note:
Cycle time does not include water filling time.
Water consumption does not include the extra water taken before completing main wash cycle
and additional water filling time.
The above values are under standard test conditions.
16
position in a clockwise direction only.
qThe Fluff Filter/Drain Hose is not open.
21
Page 15

Ironing
The number of dots indicate the maximum recommended
temperature
Max 200 C,150 C, 110 C,
Non - iron
Dry Cleaning
A circle symbolizes dry cleaning.
articles normal for dry cleaning in all solvents.
articles normal for dry cleaning in
perchloroethylene, white spirit, Solvent 113
and Solvent 11
article normal for dry cleaning in fluorocarbon
113 or white spirit.
do not dry clean.
Bleaching
A triangle symbolizes bleaching
bleaching
do not bleach
Drying
A rectangle symbolizes drying
suitable for tumble-drying
do not tumble-dry
0 0 0
OPERATION
Sorting Of Garments
qMachine to be used for machine washable fabrics only (Look
for wash symbols given on your garments.)
qNon-fast coloured should be washed with like colours only.
Wash whites separately from colours.
qCheck the pockets for any loose articles like coins, keys,
keychain etc. Remove these articles as these can damage
the drum/tub.
qDo not mix clothes that give lint with clothes that attract lint
(e.g. lint givers-woollens, socks, coarse cotton fabrics etc.
Lint takers - synthetic fibres and corduroys).
Loading The Machine
qOpen the front porthole door, place
garments loosely inside drum. For best
results load garments one by one,
preferably mix of large and small clothes.
qTurn knitted garments inside out, remove
loose hooks, rings and pins found on
curtains etc.
Or
Tie a knot around them with the garments
itself.
qClose door and press till you hear a
click. Ensure that no cloth is jammed
between door and rubber gasket of
frame.
qFor large garments like bed covers and
curtains etc. open out the garments and
hold from the centre to load.
qEnsure that volume of load allows the
clothes to tumble freely in the drum for best
wash results.
20
qOver-loading the drum will affect wash
quality. It can also damage the machine
and clothes in the long run.
qRunning the machine underloaded may
cause excessive vibration, noise and
damage.
17
Page 16

Detergent To Be Used And Quantity
The best washing results will be achieved by using the correct
q
dosage of detergent .
Use the detergent as per the instructions on the detergent
q
packaging, However the dosage need to be adjusted during usage
to avoid effects of inadequate/excess detergent as mentioned
below.
Use liquid detergent dispenser tray ( Optional ) while using liquid
q
detergent. It is not to be used for powder detergent.
Pour the liquid detergent into the detergent dispenser tray and
q
place the tray in the main wash chamber (Marked - II) of the
detergent dispenser tray before the start of the program.
The quantity of detergent will depend on
q
a. Quantity of clothes being washed
b. Degree of soilage of clothes
c. Water hardness
Hard water and heavily soiled clothes require more, while less
q
soiled clothes requires less then recommended quantity of
detergents.
Do not use dry cleaning agents.
q
Frequent use of insufficient detergent will be noticeable as
q
follows:
a. Washing appears grey or not properly clean
b. Grey/brown stains appear on the clothes
Excess use of detergent will result in
q
a. Higher environmental pollution
b. Generation of too much foam
c. Building up of scales
d. Poor rinse quality
e. Less drying efficiency
f. Reduction in life of the Components.
Wash Load Guide
Sheets Pajama/Kurta 400gms Bedspread 3kg
Cotton (D) 1kg Shirt Blankets
Other than
Coton (D) 650gms Blouse: Sweaters(Wool) 400gms
Pillow slips: Sarees:
Cotton 110gms Cotton 650gms Cotton vests 100gms
others 85gms Synthetics 350gms Underslip 100gms
Bath towels 600gms Socks: Skits 200gms
Hand Towels 260gms long(2pair) 150gms Trousers 250gms
Tablecloths:
small 230gms
large 600gms Hankies (6) 85gms
Table Napkins (4) 150gms Lungi/Dhoti 200gms
(S) 500gms Cotton 280gms Wool 2.0kg
Others 200gms acrylic 1.5kg
(S) 400gms cotton 140gms other heavy weight 300gms
others 100gms light weight 150gms
Panties 60gms
short(2pair) 85gms jeans 400gms
Napkins(1doz) 1.1kgs
D = Double S = Single
qThe chart indicates the average weight of clothes.
qThe recommended weight of your wash should not be
exceeded to ensure that your machine gives your clothes an
effective wash.
International Washing Symbols
Washing Wash Temp Action
Symbol Max C
0
Treatment Of Stains
qStains need to be treated immediately when they are fresh.
Usually stains are catagorised as absorbed stains, built-up
stains, and compound stains.
qAbsorbed stains can be removed by rubbing gently a pad
containing a suitable solvent over the stain from outer edge
towards centre by keeping stained cloth on absorbent fabric.
qBuilt up and compound stains may be removed by first carefully
brushing off stained area. Then rub gently with a pad containing
solvent from the back of fabric.
qIt is advisable to try out the solvent on hidden part of the garment
to verif y its effect on cloth.
18
95, 60, 40 normal
30 gentle
Do not machine - wash handwash
Do not wash in water
19
 Loading...