

Page 1

Advancing the science of washing
OPERATING MANUAL
* Company shall not be responsible for defects arising due to usage of spurious parts and accessories
USE ONLY GENUINE IFB SPARES & ACCESSORIES
Page 2
r
ea
D
A war
IF
owne
Y
freedom
loading the
T
an
‘tu
pe
A
w
F
sto
u
C
m
B ‘tumb
rs.
wa
r
ou
ac
m
fa
reaf
The
ash
his w
ymor T
mble w
an
rm
rfo
ou
s y
g m
in
sh
a
ny fu
or a
r I
r o
delea
er
m
welc me to
le wash’
shi
hin
br
ter
g
in
his w
h’
as
ces.
ad this
re
ac
techno
machine,
ng
eq
t r
. I
e u
ett
and s
ics
re totally
ou a
, y
machin
ashing mac
t for s
ep
conc
ma
an do
e c
hin
nf
r i
the
FB
Serv
the
uires j
g t
in
do
e
al
nu
for y
m
or
ional fam
i
log
is
he
es
hin
per or
u
you
ion
at
ice C
nterna
y based
st 30 s
prog
fr
n
ou
t
a
w shing
goin
truly
econds of y
mm
ra
o what you pl
d
ee to
t need y
o
odell
e s m
br
fa
i
ll un
wi
.
s c u
a e c
e
l
, p
.
tre
en
o
g t be
our ti e in
e.
r super
ou
on the u ique e i n
ed
care and
ic
an
rst
de
ta
on
f o
o
ily
machine
ur
yo
m
ea
isio
v
wash
d what
r neare
o
t y
se.
n
thi
s
st
1
Page 3

CONTENTS
KNOW YOUR MACHINE 6
INSTALLATION 7
q Pre Installation
q Unpacking
q Setting Up
q Water Inlet
q Water Outlet
q Electrical Connection
USING YOUR MACHINE 9
q Control Panel
q Automatic Detergent Dispenser Tray
q Selector Buttons
q Programme Selector Knob
q Programme Selection
q Programme Selection Chart
OPERATION 13
q Sorting of Garments
q Loading the Machine
q Detergent to be used and Quantity
q Treatment of Stains
q Wash Load Guide
q International Washing Symbols
q Programme Run
q Switching Off the Machine
q Check Points
MAINTENANCE 19
q Fluff Filters
q Drum
q Sieves
q Frost Protection
q Draining During Emergencies
FAULT DIAGNOSIS 21
q Why does it happen?
SAFETY PRECAUTIONS 22
TECHNICAL DATA 23
2
Page 4
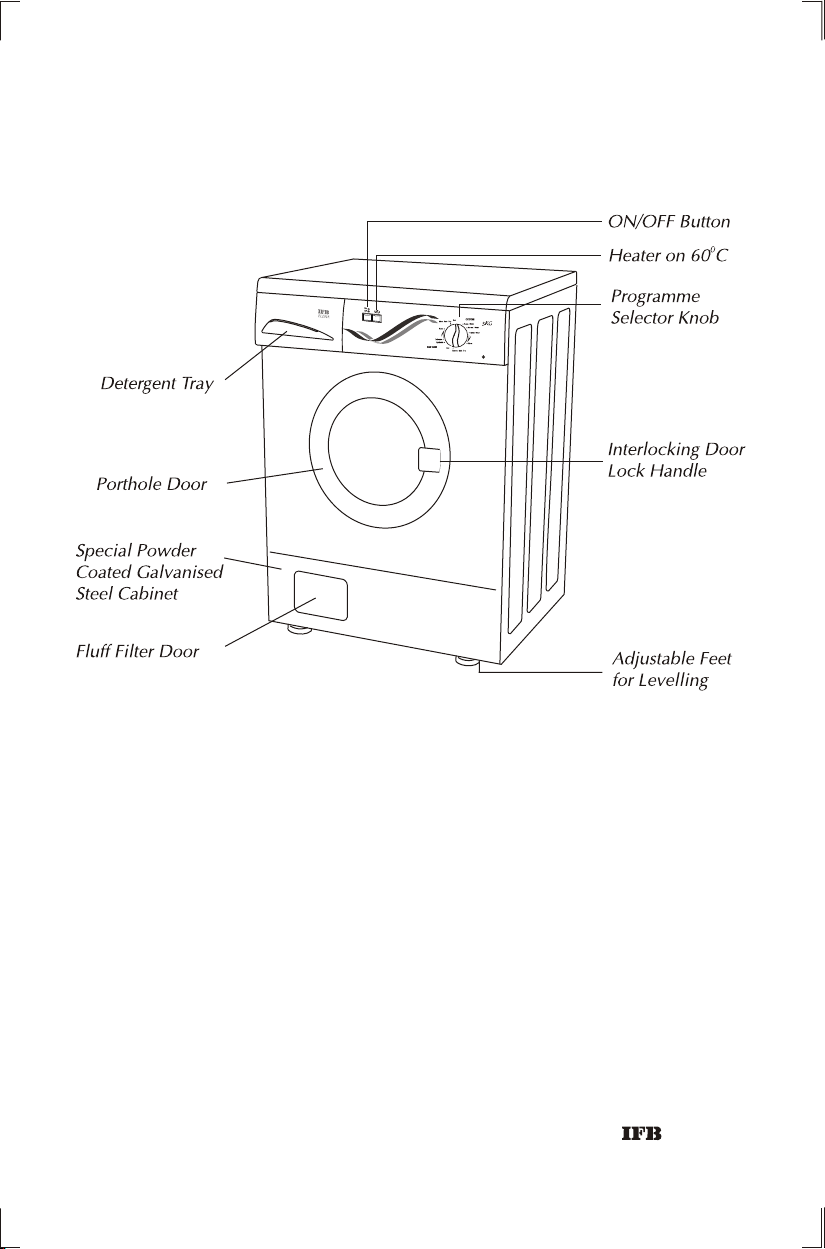
KNOW YOUR MACHINE
ADVANTAGES OF TUMBLE WASH
ADVANTAGES OF TUMBLE WASH
q MOST EFFECTIVE CLEANING AS THE CLOTHES PASS THROUGH
SOAPY WATER AND ALSO FALL ON SOAP SOLUTION IMPROVING
WETTING OF CLOTHES.
q RESEMBLES THE THUMPING AND RUBBING ACTION OF GENTLE
HAND WASH.
q USES LESS WATER COMPARED TO TUB TYPE TOP LOADERS.
q LESS WATER MEANS LESS DETERGENT AND ELECTRICITY
CONSUMPTION.
q WASHING IS EFFECTIVE BY DETERGENCY, SOAKING, HEATING,
TUMBLING AND SQUEEZING.
q GIVES BETTER DRYING EFFECT BY SPINNING.
3
Page 5

INSTALLATION
PRE-INSTALLATION
1. Make sure there is a 16 amp. 3-pin electrical point preferably with a 16 amp.
fuse, within 1 meter of the machine. Make sure it has proper earthing.
2. Fixed plumbing is recommended for
the machine. The water inlet of the
machine has a collar with3/4”parallel
internal threads. The water supply
point with an external 3/4” parallel
WATER
SUPPLY
STOP
LOCK
REDUCER
1/2
thread should be available within1
meter of the machine’s location.
DRAIN
PIPE
3. Two options on the water inlet and drain
pipe connection are shown. In case these
possibilities do not exist for the drain pipe,
WATER INLET
please arrange an additional length of pipe.
4. Please inform our service centre for installation and demonstration of the
machine once the points mentioned above have been completed.
3/4
WATER INLET
DRAIN
MACHINE
WATER
INLET
PIPE
UNPACKING
1. Remove Carton.
2. Remove wooden base. Keep machine on floor
or trolley.
3. Place the machine at the site at which it is to be
installed.
4. Remove transit bolts.
5. Insert plastic caps provided into holes vacated and press till they click into
place.
6. Remove packing from the bottom of the motor
7. Keep transit bolts carefully. They will be required in case you need to shift the
machine again.
8. For shifting and re-installation at a new site,please get in touch with our service
personnel.
9. Keep packaging material carefully. It comes handy while shifting residence.
10. PLEASE DO NOT OPERATE THE MACHINE TILL TRANSIT BOLTS HAVE BEEN
REMOVED.
4
Page 6

SETTING UPSETTING UP
1. MAKE SURE THAT THE MACHINE RESTS ON ALL
FOUR FEET ON A LEVEL SURFACE.Adjustable
screws are provided at the bottom to allow
levelling.
2. Loosen securing nut. Adjust the screw to change
level. Tighten securing nut to ensure that screw is
locked into place.
3. MACHINE SHOULD BE LEVELLED AGAIN IN C A S E
IT IS MOVED TO A NEW SITE.
WATER INLETWATER INLET
1. Connect inlet hose to water tap/line.
2. Do not connect machine to a hot water supply.
WATER OUTLETWATER OUTLET
1. A drain pump is provided in the machine to pump out
used water.
2. The end of the outlet should be placed near a drain. If
necessary, it can be placed over the edge of a sink
at a maximum height of 1 mt. from the floor level.
3. Allow free flow of water from the outlet pipe.
ELECTRICAL CONNECTIONELECTRICAL CONNECTION
1. Check that the electrical line can take the required
load.
2. Connect to a 220V, 50 Hz single phase AC supply.
3. Machine must be earthed properly before
operation. This can be done by using a 3 pin plug
and properly earthed socket of 16 ampere rating.
4. Ensure that there is a firm connection between the 3
pin plug and socket, else it may result in sparking and
subsequent failure of 3 pin plug.
5. Use of extension cord not recommended.
WATER INLET
DRAIN
PIPE
16 AMPS
DRAIN
PIPE
WATER INLET
X
X
5
Page 7
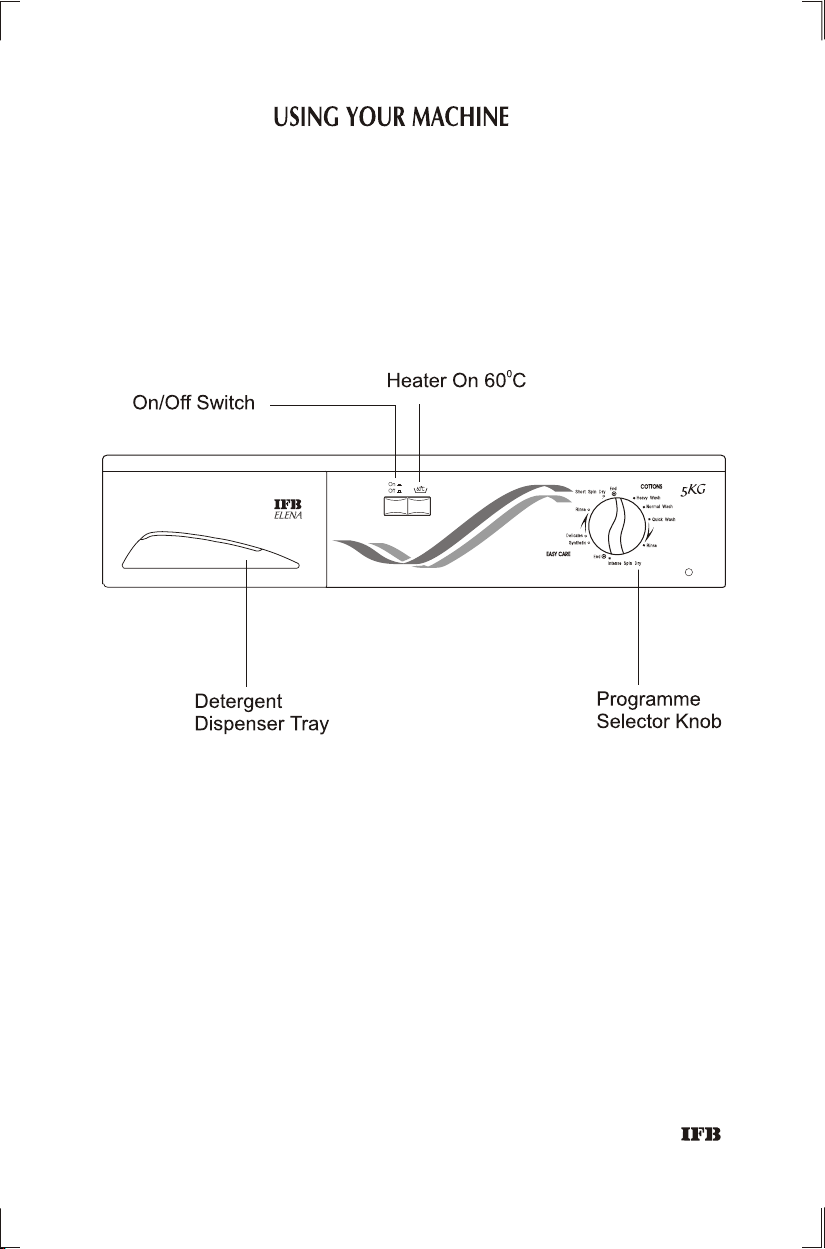
CONTROL PANEL
Let’s take a look at the control panel and understand the working of each of its features. Each feature
serves a specific purpose in the complete operation of the machine.
6
Page 8

AUTOMATIC DETERGENT DISPENSER TRAY
Designed for automatic dispensing of
detergent. The Detergent Dispenser Tray
should be filled with detergent before the start
of a programme.
Normal-wash chamber: (Marked-I),to be filled
with - detergent during every wash
programme. Do not fill detergent in other
chambers.
The detergent tray must be pulled out, filled as
required and shut before the machine is
switched on.
SELECTOR BUTTONS
ON/OFF Button
q To switch ON the machine press
button.
q To switch OFF the machine release
button.
Heater On Button
q Switches on the heater Temp.
selection 60 C
0
q To be pressed when hot wash is
required.
7
Page 9

PROGRAMME SELECTOR KNOB
q To select the right programme as per the
fabric being washed and extent of soilage.
q A choice of 10 programmes is available to
wash different kinds/loads of clothes.
q Programme selection should be done before
the machine is switched ON.
q THE STARTING POINT OF PROGRAMME NEEDS TO BE SELECTED BY
SHIFTING THE PROGRAMME SELECTOR KNOB ADJACENT TO
PRINTED LETTERS. OPERATING THE MACHINE BEYOND PRINTING
ZONE MAY RESULT IN HIGHER CONSUMPTION OF WATER &
ELECTRICITY AND WILL NOT IMPROVE WASH QUALITY.
q After initiating the programme, machine runs through automatically. If
for any reason you wish to change the programme switch OFF the
machine , then set the desired programme and re-start.
q KNOB SHOULD BE TURNED ONLY IN CLOCKWISE DIRECTION.
PROGRAMME SELECTION
1. COTTONS
To be used for whites and coloureds of cotton or predominantly of cotton
in case of mixed load.
STAGE I: Main wash - Heavy wash / Normal wash / Quick wash
q Clothes are soaked, tumbled in hot water with detergent for longer
duration to remove dirt. During draining dirty water, it is cooled down
by adding cold water. Clothes are tumbled to expose more surface,
squeezed by spinning to remove dirt inside the fabric.
q IF CLOTHES ARE NOT VERY DIRTY, THE MAIN WASH CAN BE
STARTED BY DIRECTLY SETTING THE PROGRAMME SELECTOR
KNOB AT NORMAL OR QUICK WASH TO REDUCE WASHING TIME.
8
Page 10

STAGE II : Rinse
q After washing, the rinsing is done automatically four times to remove
traces of detergent and dirt from clothes.
q For most efficient rinsing two intermittent short spins are provided.
STAGE III : Intense spin Dry
q Spin drying takes place at 600 rpm for longer duration.
2.Easy Care Programme
To be used for easy care fabrics like polyester blends or
predominantly having such fabric in mixed load.
STAGE 1 : Main Wash : synthetic / delicates
q Clothes are soaked, tumbled in hot water with detergent for lesser
duration than main wash of Normal wash programme. During
draining of dirty water, it is cooled down by adding cold water.
Clothes are tumbled to expose more surface, squeezed by spinning
to remove dirt.
STAGE II : Rinse
q After washing the rinsing is done automatically three times to remove
traces of detergent and dirt from clothes.
STAGE III : Short spin Dry
Spin drying takes place at 600 r.p.m for shorter duration.
Exclusive spin drying programmes : Intense spin Dry / Short spin Dry
q Can be used for spin drying hand washed/wet clothes.
q Turn programme selector knob directly to the spin drying points
after loading the clothes.
q Switch ON the machine.
Note:
IN CASE ELECTRICITY / WATER SUPPLY GOES OFF, THE
MACHINE STOPS AND STARTS AGAIN FROM THE SAME POINT,
AUTOMATICALLY, ON RESUMPTION OF ELECTRICITY/ WATER
SUPPLY.
9
Page 11

OPERATION
SORTING OF GARMENTS
q Machine to be used for machine washable fabrics only (Look for
wash symbols given on your garments.)
q Non-fast coloured should be washed with like colours only .Wash
whites separately from colours.
q Check the pockets for any loose articles like coins, keys, keychains
etc. Remove these articles as these can damage the drum/tub.
q Do not mix clothes that give lint with clothes that attract lint (e.g lint
givers-woollens, socks, coarse cotton fabrics etc. Lint takerssynthetic fibres and corduroys).
LOADING THE MACHINE
q Open the front porthole door, place
garments loosely inside drum. For best
results load garments one by one
,preferably mix of large and small
clothes
q Turn knitted garments inside out,
remove loose hooks, rings and pins
found on curtains etc.
Or
Tie a knot around them with the
garment itself.
q Close door and press till you hear a
click. Ensure that no cloth is jammed
between door and rubber gasket of
frame.
q For large garments like bed covers and
curtains etc. open out the garments and
hold from the centre to load.
q Ensure that volume of load allows the clothes to tumble freely in the
drum for best wash results.
q Over loading the drum will affect wash quality. It can also damage
the machine and clothes in the long run.
q Running the machine under loaded may cause excessive vibration,
noise and damage.
10
Page 12

I
11
Page 13

DETERGENT TO BE USED AND QUANTITY
q The best results will be achieved using correct amount of washing
machine detergent.
q Approximate quantities to be used:
Full load i.e. 5 kgs Detergents to be used as per directions
indicated by the manufacturer on their
package.
Half Load
i.e. 2.5 kg and below Use 20 to 25% less detergent.
q Liquid detergents can be used.
q Hard water and heavily soiled clothes require more than the
recommended quantity of detergents.
q Frequent use of insufficient detergent will be noticeable as follows:
- Washing appears grey or not properly clean
- Grey - brown stains form on the washing
q Excess use of detergent will result in
- Higher environment pollution
- Generation of too much foam
- Scale builds up
TREATMENT OF STAINS
q Stains need to be treated immediately when they are fresh. Usually stains
are categorised as absorbed stains, built-up stains, and compound stains.
q Absorbed stains can be removed by rubbing gently a pad containing a
suitable solvent over the stain from outer edge towards centre by
keeping stained cloth on absorbent fabric.
q Built up and compound stains may be removed by first carefully
brushing off stained area. Then rub gently with a pad containing solvent
from the back of fabric.
q It is advisable to try out the solvent on hidden part of the garment to verify
its effect on cloth.
12
Page 14

13
Page 15

14
Page 16

PROGRAMME RUN
Note:
q During the programme run the knob turns automatically in the clockwise
direction only.
q Washing, rinsing and spinning can be seen through the porthole window.
q At any moment the position of the knob with respect to its start position
shows how far the programme has advanced.
SWITCHING OFF THE MACHINE
q The wash programme automatically completes at the End.
q To switch the machine OFF push in the programme selector knob
q Porthole door can be opened only after 90 seconds
q Remove clothes from inside the machine
q Leave door slightly ajar to dry out the inside of the machine
CHECK POINTS
Before switching your machine ‘ON’ check...
q The machine is connected to a 220V, 50 Hz supply with proper earthing.
q The water inlet stopcock is fully open.
q The hoses are not bent or twisted.
q Dry clothes are loaded into the machine drum, and door is closed firmly
with a click.
q The required amount of detergent is filled in the compartment.
q After completing the above check points the machine should be switched
ON by gently pulling out the programme selector knob.
q The programme Selector knob is turned to the appropriate programme
position in a clockwise direction only.
q The Fluff Filter is not open.
15
Page 17

MAINTENANCE
FLUFF FILTER
1 4
Open door flap by pressing on the right hand. Clean filter under running water
2 5
Place shallow container under the tray to
collect water that comes out.
3
Turn Fluff Filter cover anti-clockwise
drain water into container and
take out filter
Replace filter and screw on tightly
to avoid leakage of water
ENSURE THAT THE FLUFF FILTER IS
NOT BLOCKED, CLEAN WEEKLY OR
AS OFTEN AS REQUIRED.
BEFORE USING MACHINE AGAIN
RUN THE MACHINE WITHOUT
CLOTHES AND DETERGENTS BY
SELECTING ANY SHORT WASH
PROGRAMME. THIS WILL ENSURE
THAT THE FLUFF FILTER LINE GETS
FILLED WITH WATER.
ALTERNATIVELY POUR TWO MUGS
OF WATER (APPROX, 1.5 LTRS.)
DIRECTLY INTO THE DRUM.
DO NOT OPEN THE FLUFF FILTER
DURING A PROGRAMME RUN.
16
Page 18

DRUM
Rust Stains
Never leave metal items e.g. paper clips, safety pins etc. in
the drum as there is a danger of rusting. If there are any rust
stains remove with a non-chlorine agent. Special non-metal
sponges (never use steel wool) may also be used.
SIEVES
Cleaning of Water Connection Sieves, filter
1. Turn off Taps. Disconnect Power supply to the machine.
Unscrew inlet hose from machine as well as from the tap
and drain out water from the hose.
2. Pull the sieve out of the magnetic valve with a pair of flat
nosed pliers and clean under running water with a brush.
Fit Sieve back to the valve.
3. Remove the filter mesh from the tap end of the inlet hose
and clean under running water with a brush.
4. Fit the filter mesh back to inlet hose.
5. Screw inlet hose back to the machine and the tap. Ensure
that both the sieves and filter are in place.
6. Turn on the tap.
Cleaning of Porthole Door Area:
q After every wash clean vapour off porthole door.
q Lift the fold in the rubber gasket under porthole
periodically to remove lint and dirt preferably after every
wash.
FROST PROTECTION
If the machine is being operated in very cold temperature, all the water
should be drained out after use.
q Remove Fluff Filter.
q Locate the drain hose and drain the water.
q Disconnect inlet hose from the tap and drain.
DRAINING DURING EMERGENCIES
In case of a long power failure during a programme run, the water
can be drained from the drum through the drain hose
q Allow the water in the machine to cool down sufficiently.
q Locate the drain hose and pull out the drain hose to drain water in a large
shallow container.
q Before restarting machine, ensure that drain plug is fixed on drain hose
properly and fluff filter water line is filled with water by running the
machine without any clothes or detergents.
q Spillage of water can rust the base plate. Draining through drain
hose prevents rusting.
17
Page 19

FAULT DIAGNOSIS
WHY DOES IT HAPPEN?
WATER DOES NOT ENTER MACHINE/DETERGENT NOT
BEING FLUSHED INTO DRUM.
q Check water supply
q Porthole door not firmly closed
q Water tap not turned on
q Bent inlet hose
q Sieve on inlet valve clogged
SUDS ESCAPING FROM DETERGENT DISPENSER TRAY.
q Detergent used is not a washing machine detergent
q Excessive detergent used
WATER LEAKAGE FROM THE MACHINE.
q Inlet/Outlet hose connection loose
q Fluff Filter not screwed on properly
q Inlet hose leaking
q Drain plug not fixed properly onto Drain hose.
MACHINE DOES NOT DRAIN.
q Fluff Filter clogged
q Outlet hose end above 1 mtr. from floor level
MACHINE VIBRATES STRONGLY DURING SPINNING.
q Machine not levelled properly
q Clothes not loaded as instructed
q Water not drained completely
MACHINE DOES NOT START.
q Check position of programme selector knob
q Check water supply
q Porthole door not closed properly
MOTOR NOISE
q It is normal for noises to be heard while motor is running. However
wash load, belt tension and motor mounting bolt should be
checked for specified limits.
PUMP NOISE
q It is normal for noises to be heard from the pump during the start-up
and final stage of draining. However check for fluff filter clogging.
18
Page 20

SAFETY PRECAUTIONS
1. Ensure that the machine is properly balanced on four adjustable feet.
2. Ensure that the machine is connected to 3 pin socket with earth and 16
amps fuse.
3. The machine is tested with water during assembly for performance
checking. Condensed droplets of water may remain inside the drum. It is
advisable to run the machine without wash load at 60 C with detergent
for the first time after installation.
4. The programme knob should be turned clockwise only.
5. Programme selection must be done prior to switching on the machine. For
resetting of programme, switch off the machine, select the programme and
re-start. Do not operate the machine beyond the printed zone.
6. Servicing should be handled by the Company’s authorized personnel
only.
7. Check for the end of the programme before opening porthole door. The
door can be opened about 90 seconds after the wash cycle is over or
machine is switched off. This is a safety feature. The door should not be
forced open.
8. Check label on garments for determining conditions under which fabrics
are to be washed.
9. Use detergent recommended for washing machine.
10. Ensure that the electrical line on which the machine is used can take the
required load.
11. Check the inside of drum before loading the clothes.
12. Protect the machine from direct sunlight and do not splash water on
it. Clean with a damp cloth.
13. Keep your machine dry to avoid corrosion / rusting. Take special care to
wipe the machine after cleaning the fluff filter.
14. The machine should ideally be installed on the floor, It can be installed on
any suitable platform or trolley, if desired by the customer.
15. Clean the shell lower and detergent tray periodically by taking out the
detergent tray.
16. Incase of plastic table top, don’t use the table top as an ironing board.
0
19
Page 21

TECHNICAL DATA
Dimensions(DxWxH) : 56 cm x 60 cm x 85 cm
Weight : 58.5 kgs
Capacity : 5 Kgs of dry clothes (cotton)*
Programmes : 10 wash care programmes
Selector Buttons : On/Off, Hot wash.
Motor Rating : 690 Watts (max.)
Spin Speed : 600 rpm
Heater Rating : 1.55 kW
Drum : Stainless Steel
Temperature Selection : 60 C
Drain Pump Rating : 30 W
Water Consumption : 75 litres for normal wash.
Power Consumption : 0.25 unit for cold wash
Cotton Wash Programme : 0.6 - 0.9unit hot wash at 60 C
0
0
Connected Load : 2.0 KW Max.
Programme Duration : 10 to 115 minutes
Power supply : 220 - 240 V, Single Phase, 50 Hz
Water Pressure : 1 bar ( 1.03 kg/cm ) - 10 bar ( 10.3 kg/cm )
22
Specifications are subject to change without prior notice.
*Capacity depends on size, texture and combination of clothes
Depending on water pressure, Water hardness, Water inlet Temperature, Quantity
and type of textile, Detergents used, Degree of soiling, Ambient condition, selected
additional functions & power supply fluctuations the actual values given on or with
the machine can deviate from the declared standard values, as they are tested
according to the laboratory conditions
20
Page 22

21
Page 23

MODEL : ELENA SERIAL NO. WT ELN B
DEALER’S NAME :
CUSTOMER’S NAME :
ADDRESS :
PIN CODE :
TEL. NO. (Resi.) (Off.)
E-MAIL :
MOTOR SR. NO. :
DATE OF PURCHASE :
MODEL : ELENA SERIAL NO. WT ELN B
DEALER’S NAME :
CUSTOMER’S NAME :
ADDRESS :
PIN CODE :
TEL. NO. (Resi.) (Off.)
E-MAIL :
MOTOR SR. NO. :
DATE OF PURCHASE :
22
Page 24

ALSO FROM IFB
MICROWAVE OVEN
CAPACITY - 17 to 30 LITERS
CLOTHES DRYER
CAPACITY - 5.5KG
DISHWASHER
CAPACITY - 12 PLACE SETTING
IFB Industries Limited, Plot No. IND - 5, Sector - 1, East Calcutta Township, Calcutta - 700 078
Visit us at www.ifbappliances.com
 Loading...