

Page 1
O
W
W
NEE
N
O
R’’SS
R
MAA
M
N
UAALL
N
U
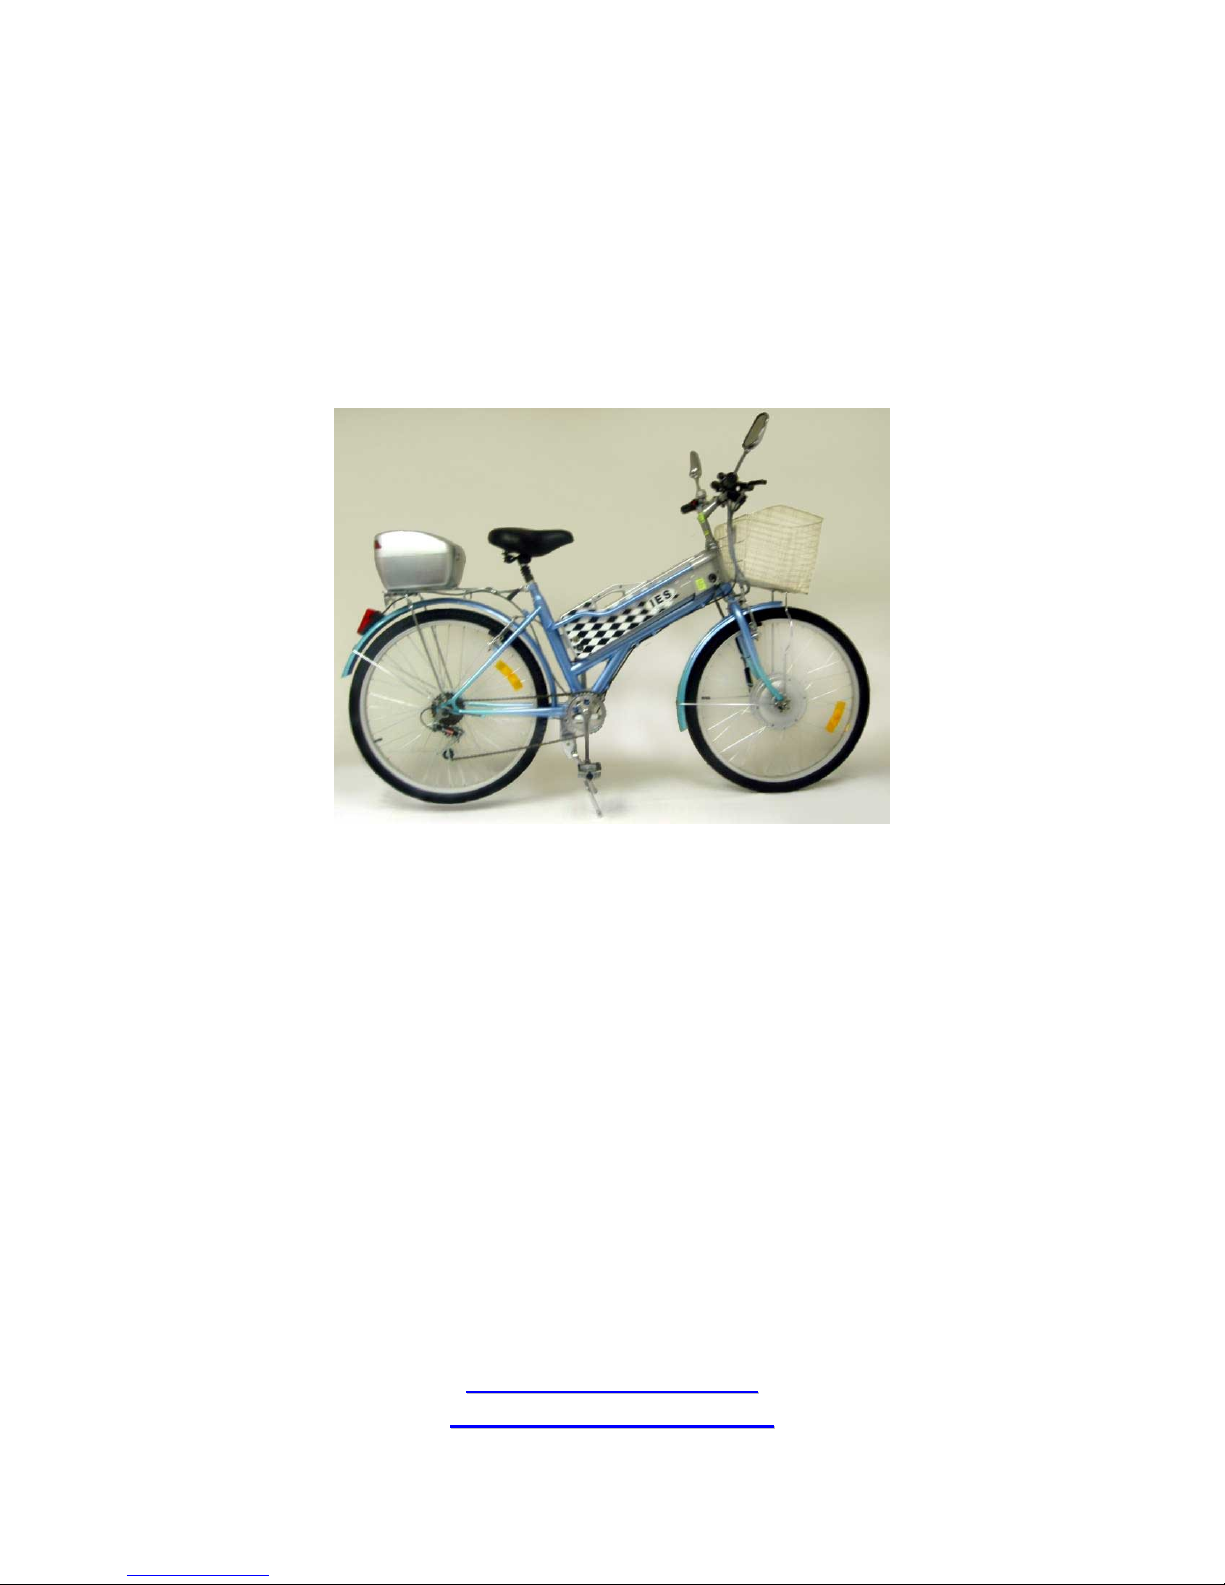
IIEESS SShhaaddooww EElleeccttrriicc BBiiccyyccllee
With 6 Speed Shimano Gear System
Copyright 2004 by IES
E
II
IInntteerrnnaattiioonnaall EEccoollooggiiccaall SSyysstteemmss,, LLttdd..
5511 HHaarrttzz WWaay
SSeeccaauuccuuss,, NNJJ 0077009944
11--886666--774422--66227744
iinnffoo@@ccyycclleeiieess..ccoomm
wwwwww..ccyycclleeiieess..ccoom
S
S
y
m
3/04
Page 2

OWNER’S MANUAL – IES SHADOW
IMPORTANT!!
Congratulations on selecting the IES Shadow. In order to use and enjoy your
bicycle safely and to get the best performance and durability from this product,
please read this manual before riding.
Warning! Even on the best days, riding or operating any sort of
vehicle is hazardous. Always wear a helmet and use extra caution to
avoid accidents. This manual contains many cautions and warnings.
It is important that you read and understand the material outlined in
this manual.
We want you to be completely satisfied with your Shadow. If you have any
questions or concerns, please call the IES team at 1-866-742-6274.
Each bicycle comes with a Vehicle Identification Number (VIN) embossed into
the frame. Please record the VIN along with other pertinent information below in
the event that the bicycle is lost or stolen. It may also be a good idea to register
your VIN number with the local police department.
VIN:
Model:
Color:
Date of Purchase:
Place of Purchase:
IINNTTEERRNNAATTIIOONNAALL EECCOOLLOOGGIICCAALL SSYYSSTTEEMMSS,, LLTTDD..
11--886666--774422--662
27744
PPaaggee 22 ooff 2288
Page 3
OWNER’S MANUAL – IES SHADOW
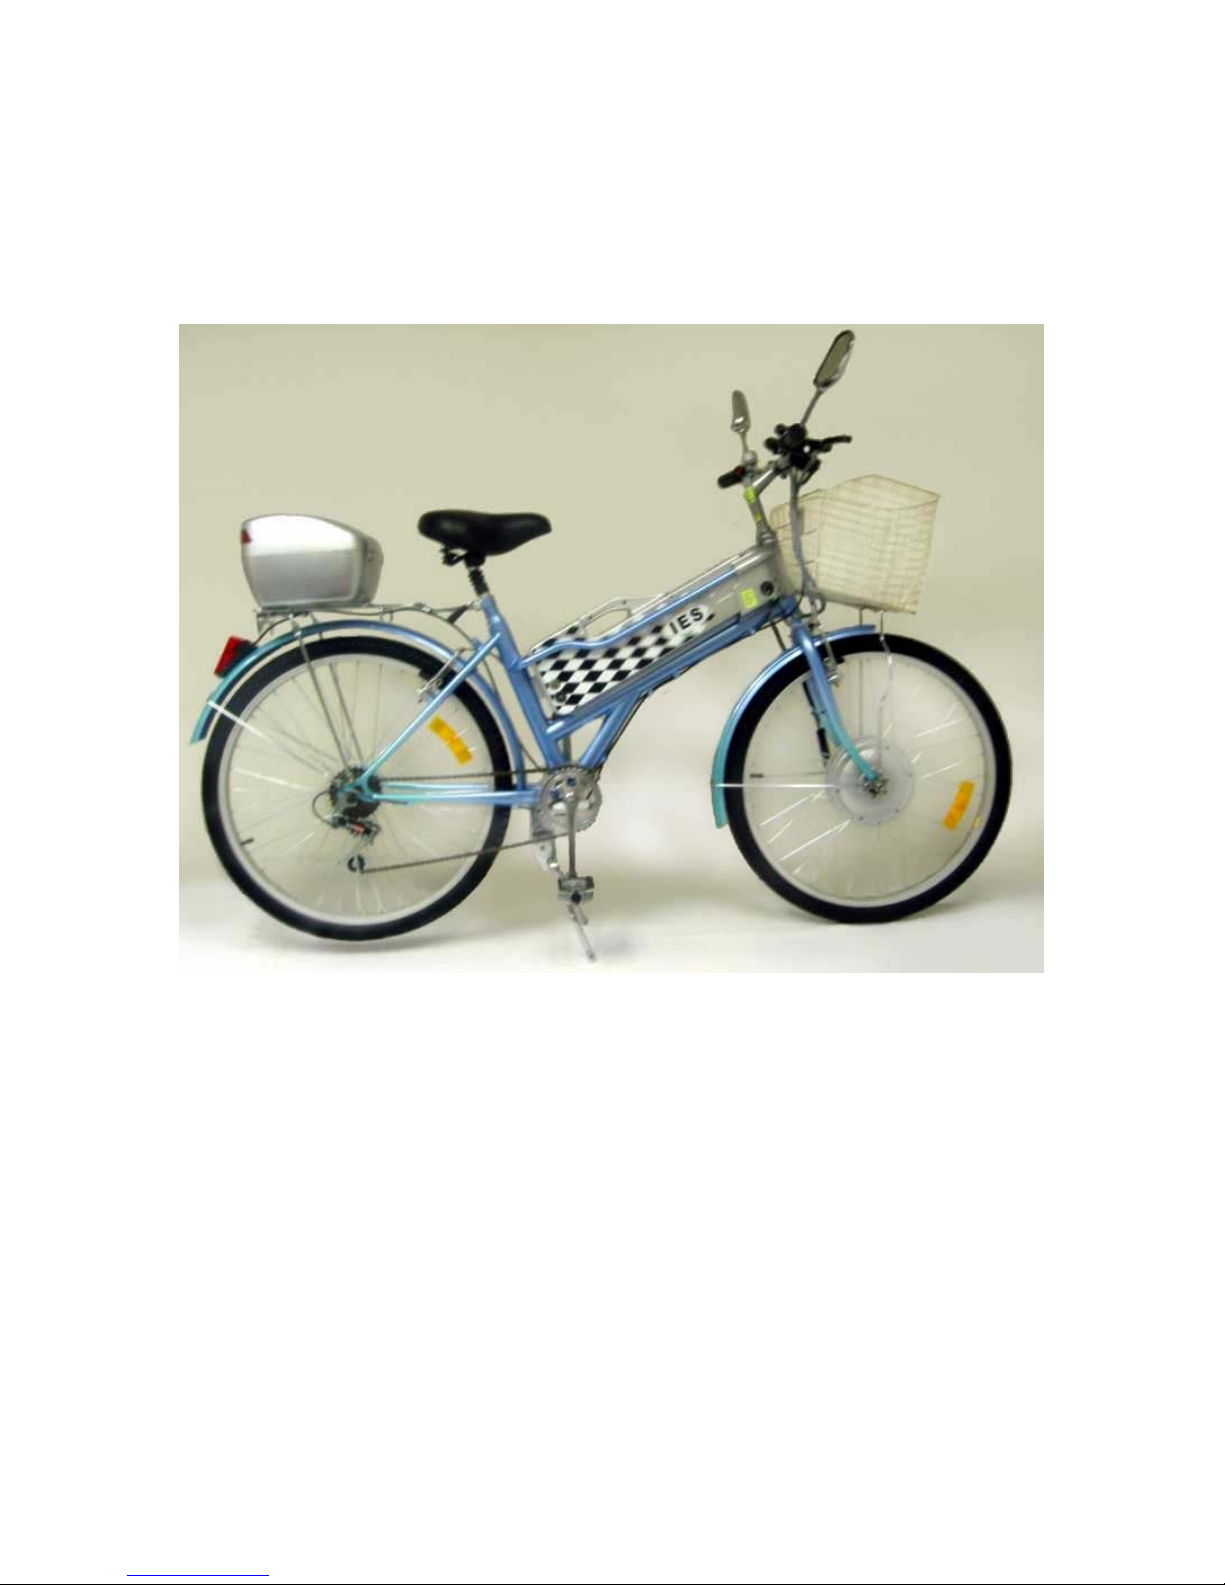
SHADOW
If you have any difficulty with the final assembly of your electric bike,
please call the IES Service Department at 1-866-726-6856.
IINNTTEERRNNAATTIIOONNAALL EECCOOLLOOGGIICCAALL SSYYSSTTEEMMSS,, LLTTDD..
11--886666--774422--662
27744
PPaaggee 33 ooff 2288
Page 4

OWNER’S MANUAL – IES SHADOW
Table of Contents Page
• Record of serial number
• Photo of Shadow
• Table of Contents
• Cautions and Warnings
• Inspection of your Shipment
• Illustration of bike
• Assembly Instructions
• Operating Instructions
• Recharging your Battery
• Bicycle Care
• Safety Responsibility
• How to Adjust the Gear Shift
• How to Change the Fuse
• How to Adjust the V type Brakes
• Installing and Removing the Battery
2
3
4
5
6
7
8
13
16
18
19
20
21
22
23
• How to Install the Dynamo Light
• How to Install the Rear Accessory Light
• Specifications
IINNTTEERRNNAATTIIOONNAALL EECCOOLLOOGGIICCAALL SSYYSSTTEEMMSS,, LLTTDD..
24
26
28
11--886666--774422--662
27744
PPaaggee 44 ooff 2288
Page 5

OWNER’S MANUAL – IES SHADOW
CAUTIONS AND WARNINGS
Please read this section! It is very important for your safety and
satisfaction that you read these cautions and warnings. Thanks!
Warning! Always wear your helmet, obey local laws, and
exercise caution when riding.
Warning! If you are not certain that your bike is safe to ride,
call the IES Service Department at 1-866-726-6856 for detailed
advice and information.
Warning! Keep the power switched off until you are seated on
the bike and ready to ride. Turning the power on when not seated,
and then accidentally twisting the hand throttle can result in the bike
accelerating or “jumping” and cause damage or injury.
Warning! Never attempt to disassemble the battery, motor,
controller, or throttle. This can result in injury, fire, or damage to the
bike.
Warning! Only use the charger that was supplied with your bike
to charge the battery. Use of an improper charger can result in fire or
explosion. Read and follow the charging instructions in the manual for
complete information about the operation of your charger.
Warning! Substituting batteries, changing motors or
controllers will void the warranty and may result in various
types of safety problems including fire, explosion, excessive
speed, or lack of control. All service should be performed by the IES
Service Department or authorized dealer referred by the IES Service
Department.
Warning! Avoid contact with live wires, or the battery
terminals. Although the voltage is low, the amperage is high. Burns and
other injuries can result from contact with any body part.
Warning! Keep the battery and charger out of the reach of
children.
Caution! Fully charge the battery before the first use. Failure to
do this can result in decreased battery performance for the life of the bike.
Fully charge the battery each time you use the bike.
Caution! Do not store your new bike where it will be exposed to
high heat, high humidity, or rain for extended periods. All of
these will decrease the life and appearance of your bike.
Caution! Do not immerse your bike in water especially sea
water. This can damage or destroy the electrical components.
IINNTTEERRNNAATTIIOONNAALL EECCOOLLOOGGIICCAALL SSYYSSTTEEMMSS,, LLTTDD..
11--886666--774422--662
27744
PPaaggee 55 ooff 2288
Page 6

OWNER’S MANUAL – IES SHADOW
INSPECTION OF YOUR SHIPMENT
The following is a list of all the necessary parts and components of your new
Shadow. Please make sure everything is enclosed in the boxes and in good
working condition.
Bicycle
1 Comfort Saddle and Seat Post
2 Pedals
Battery Charger and Power Cord
Battery
Front Wheel with Motor Assembly
Front Fender
Front Basket with clamps, nuts, bolts and screws
Rear Locking Carrier
Reflectors
Front and Rear Dynamo lights with wire cable, clamps, nuts, bolts and screws
Tools
2 Mirrors
Assorted nuts, bolts, washers and screws and extra fuses
Keys
Lock
Owner’s Manual
Please check the bike along with the parts and components thoroughly for any
damage that may have been sustained during shipping. Be careful to avoid
scratching the frame when untying or unpacking the bicycle and components.
If you find that something is missing, please call the IES team at 1-866-742-
6274.
IINNTTEERRNNAATTIIOONNAALL EECCOOLLOOGGIICCAALL SSYYSSTTEEMMSS,, LLTTDD..
11--886666--774422--662
27744
PPaaggee 66 ooff 2288
Page 7
OWNER’S MANUAL – IES SHADOW
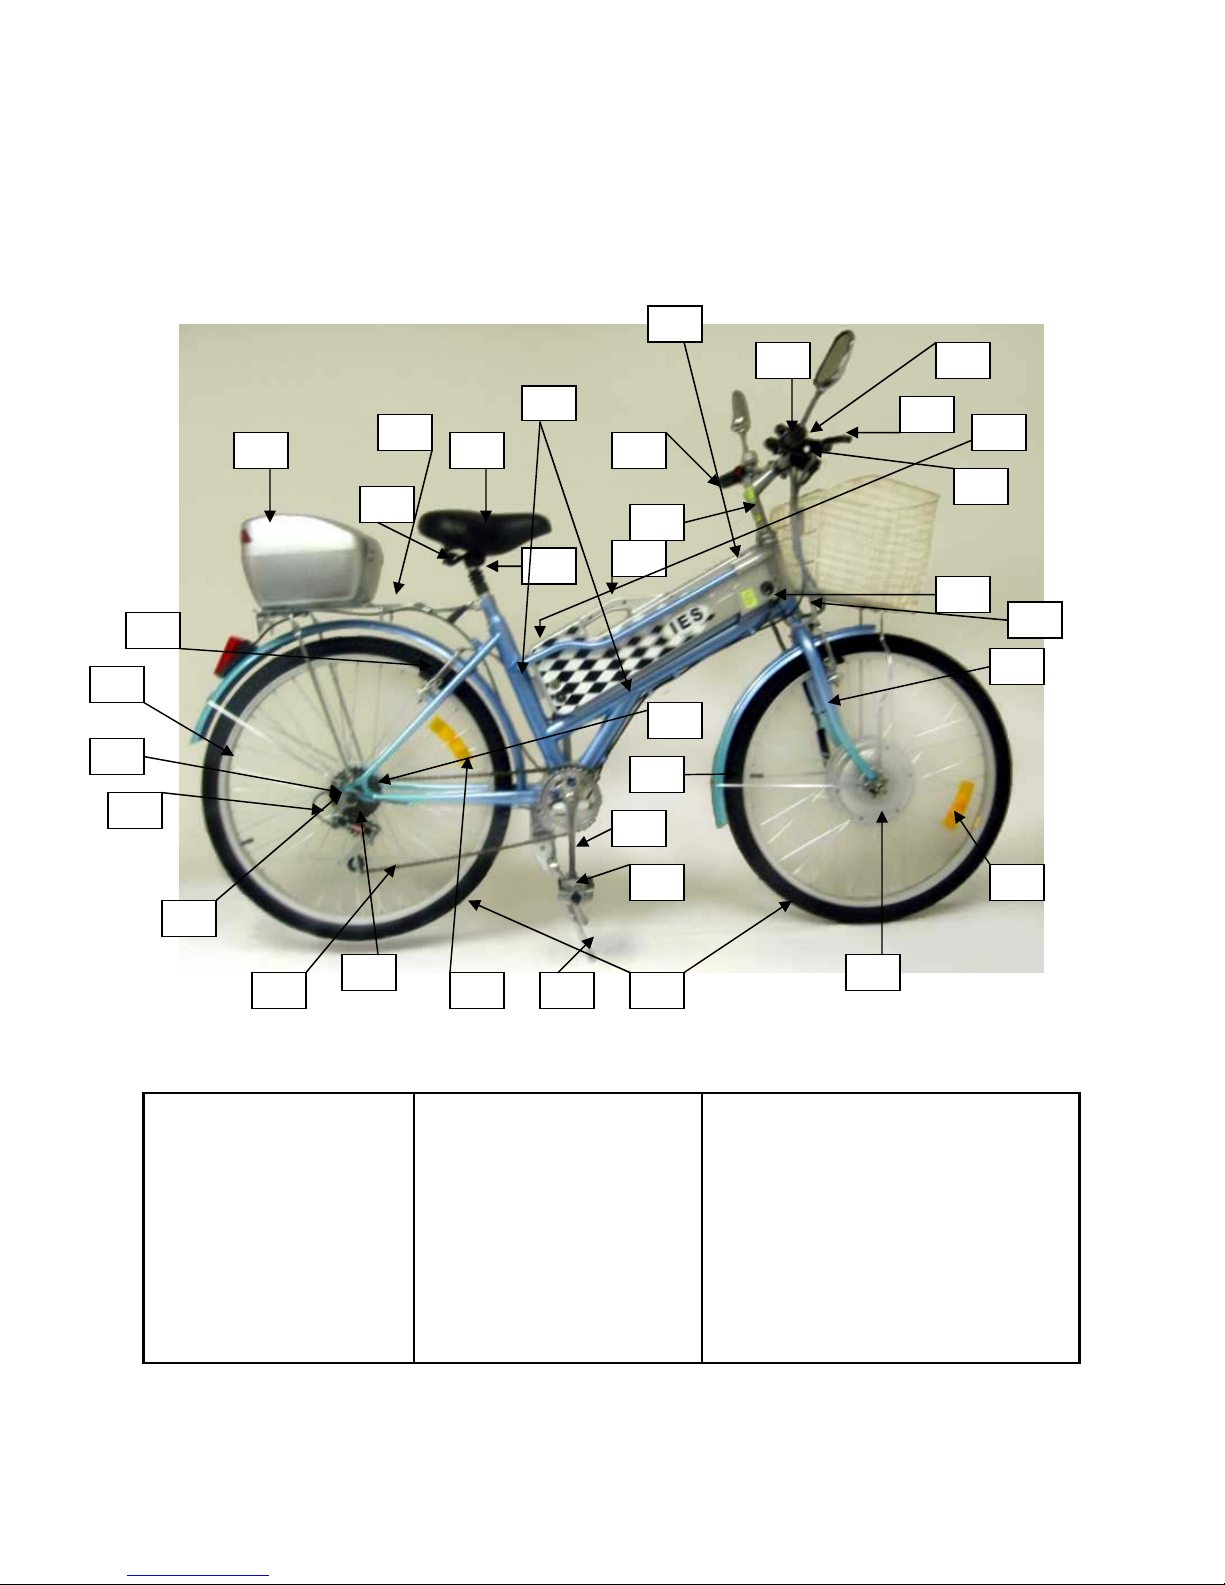
Figure 1 – Parts of your Shadow
29
10
26
17
22
24
30
21
23
20
31
19
12
15
11
3
7
6
10
14
4
1,5
27
1,6
28
17
8
2
16
25
2
13
9
18
SHADOW
1 – Brake Lever 11 – Battery Indicator 21 – Seat Post Quick Release
2 – Reflectors 12 – Battery 22 – Rear Brake
3 – Handlebar 13 - Kickstand
install rear locking carrier)
4 – Shift Lever 14 - Pedal 24 – Rear Wheel Lug Nut
5 – Front Brake 15 – Crank Arm 25– Gears
6 – Rear Brake 16 – Chain Wheel 26 – Rear Derailleur
7 – Stem 17 – Wire Harness 27 – Charging Port
8 – Front Fork Assembly 18 - Motor 28 – Power On/Off
9 – Tire (Front & Rear) 19 – Seat Post 29– Display
10 – Rim (Front & Rear) 20 – Saddle 30 – Rear Locking Carrier
31 – Frame Tubes
23 – Luggage Rack (
can be used if you do not
IINNTTEERRNNAATTIIOONNAALL EECCOOLLOOGGIICCAALL SSYYSSTTEEMMSS,, LLTTDD..
11--886666--774422--662
27744
PPaaggee 77 ooff 2288
Page 8
OWNER’S MANUAL – IES SHADOW
ASSEMBLY INSTRUCTIONS
Tools Required For Assembly
A set of tools is provided for your convenience inside the shipping carton.
Assembly Instructions
Please read through and follow all instructions to ensure that your Shadow is
properly assembled and ready for use.
We recommend you assembly your Shadow on a mat or non-abrasive surface
in order to avoid scratching your bike.
1. Remove the bicycle from the box by cutting the plastic strapping, then
cutting two sides of the box away. Avoid lifting the bike straight up out of
the box. Remove all of the wrappings and ties that protect the bicycle
during shipment.
2. Attach the front wheel and fender. Position the handlebars so that the stem
fits into the bicycle frame and loosely tighten the hex nut. Turn the bike
upside down. Position the front wheel bolt between the front fork
assembly, making sure the locking nut, washer, and fender and basket
clamp are all on the outside of the front fork assembly. The final washer
should be positioned inside the front fork assembly against the hub motor.
Tighten the locking nuts and washers on the outside of the front fork
assembly by turning until they are securely fastened to the front fork
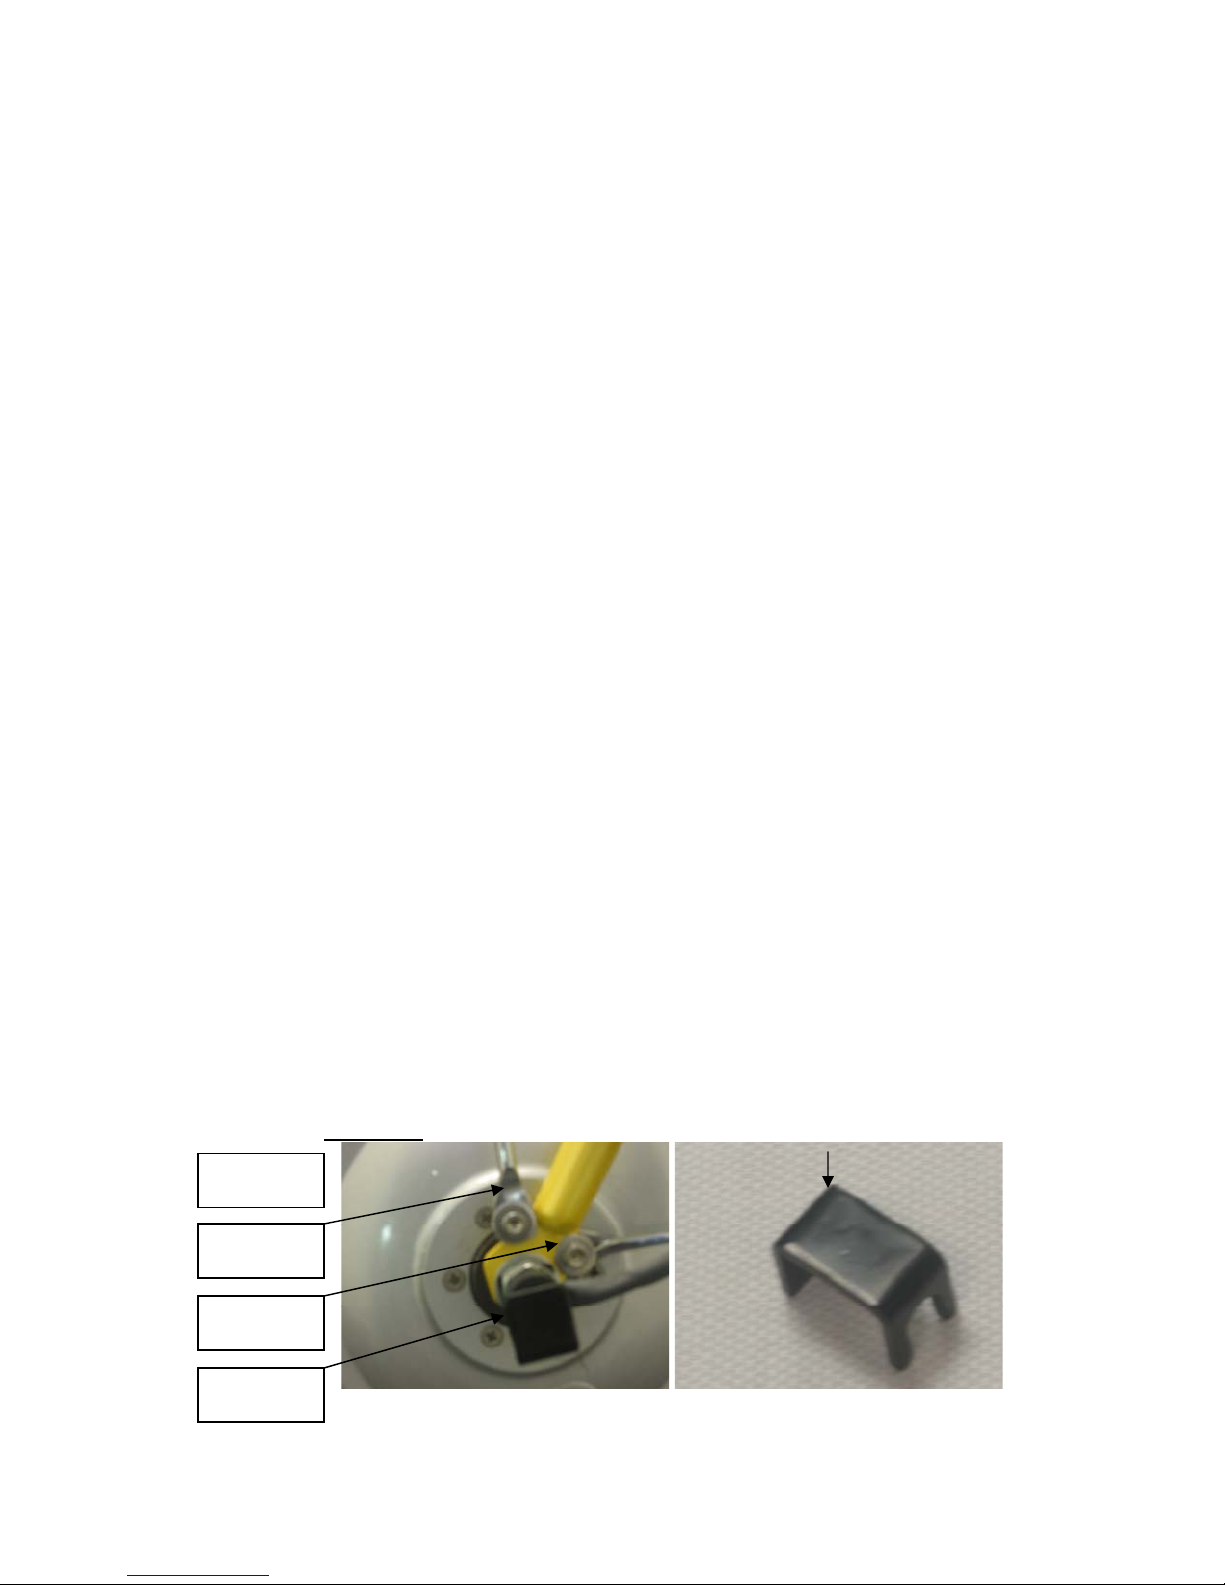
assembly. On the left front side, insert the black power cable protection
clip which protects the power cable (See Figure below) outside the locking
nut and power cable as shown, before securely tightening the locking nut.
Turn the bike upright and lower the kickstand. Remove the rear locking nut
and washer from the front brake assembly. Fit fender clamp over brake
assembly screw and replace and tighten washer and nut. Attach the fender
support with a screw and washer to the lower screw hole on each side of the
front fork assembly. (See Figure 1) Connect the power cable clip
attachment from the front wheel to the wire harness connector. Slide the
protective plastic cover over the cable connection.
Figure 1 (power cable protection clip)
Left front
wheel shown
Front basket
frame
Fender
support
Power cable
protection clip
IINNTTEERRNNAATTIIOONNAALL EECCOOLLOOGGIICCAALL SSYYSSTTEEMMSS,, LLTTDD..
11--886666--774422--662
27744
PPaaggee 88 ooff 2288
Page 9
OWNER’S MANUAL – IES SHADOW
3. Line the handlebars up with the front wheel and securely tighten them with
an Allen wrench. Observe the stem – there is a marking on the stem that
indicates the minimum safe insertion. The line or marking must be inside
the frame. If the stem is not inserted this far into the frame it may break
and the rider may lose control.
4. Install the pedals by carefully threading through crank arm, then
tightening securely with a wrench.
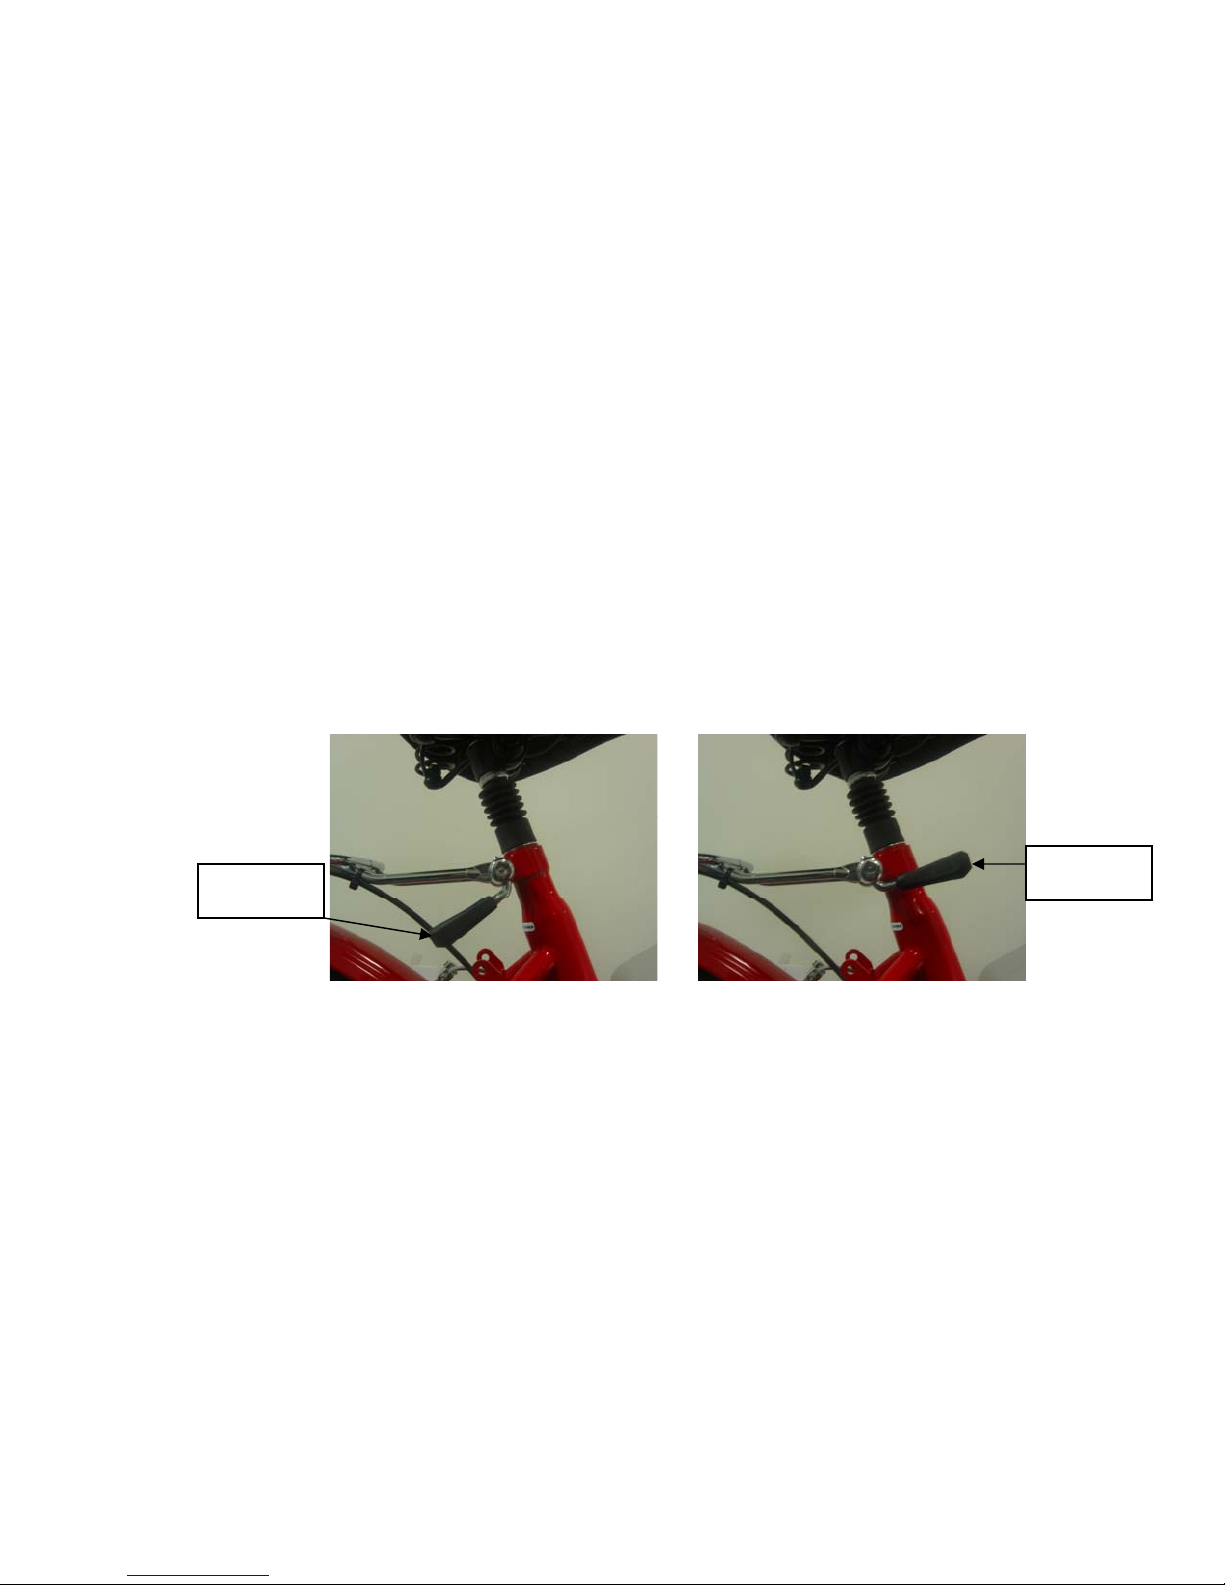
5. (See Figure 2) Install the seat and adjust the height. Since your Shadow
has a bicycle type quick release mechanism to secure the seat, it is essential
that you understand how to use this correctly.
How to adjust seat height
Loosen the quick release lever, adjust seat to desired height and tighten
the lever. Read section below for complete information on Quick Release
Operating Instructions.
CAUTION: Do not adjust the saddle height above the safety line found on
the seat pole.
Figure 2
Seat release
open
Seat release
closed
Quick Release Operating Instructions:
1) To release the lever, pull it away from the bike and towards you until it turns 180°
away from the bicycle. The quick release lever is open when the lever curves
away from the bicycle.
2) The tightness of the lever is adjusted with the nut opposite the release lever and
by rotating the quick release lever. Turn the nut by hand to adjust the tension
while holding the lever stable.
3) To lock the release lever, push lever up and over towards the bike frame until it
turns over 180° and or the lever curves toward the bicycle. The lever is securely
tightened when it leaves an imprint on the palm of your hand from pushing it
closed.
4) Once the lever is securely closed, you should not be able to move it unless you
open it again (Step 1). If you can easily move it, then open the quick release lever
again and tighten the nut another half turn clockwise. Continue with Step 3.
IINNTTEERRNNAATTIIOONNAALL EECCOOLLOOGGIICCAALL SSYYSSTTEEMMSS,, LLTTDD..
11--886666--774422--662
27744
PPaaggee 99 ooff 2288
Page 10

OWNER’S MANUAL – IES SHADOW
5) If you have adjusted the nut too tightly and cannot push the lever to the “closed”
position, open the quick release lever again and turn the nut a half turn
counterclockwise. Continue with Step 3.
Failure to properly tighten, adjust and fasten these mechanisms
may result in loss of control of the bicycle. If in doubt, take your
shadow to a local bicycle dealer for instruction or call IES Service Department
at 1-866-726-6856.
DO NOT RIDE YOUR BICYCLE WITHOUT THE SEAT QUICK
RELEASE SECURELY LOCKED.
6. Adjusting the brakes (See Figure 3 – how to adjust the V-type
brakes) -
the junction of the brake cable and brake lever. When you have determined
the proper setting, (see section which follows on brake testing) turn the
knurled knob at the shaft of the adjusting bolt all the way down to the
brake lever to lock the brake setting in place.
The right brake lever controls the rear brake. To tighten brakes, turn the
adjusting nut clockwise. To loosen brakes, turn the adjusting nut
counterclockwise.
The left brake lever controls the front brake. To tighten brakes, turn the
adjusting nut counterclockwise. To loosen brakes, turn the adjusting nut
clockwise.
Do Not remove the protective plastic spiral cover from the brake cable.
Brake Testing
Squeeze the brake levers. The brake levers should be easy for you to reach,
and engage the brakes completely when pulled in. You should not be able to
pull the brake lever in until it touches the handlebar or grip. Test the brakes
and the brake lever adjustment; you should be able to comfortably control
your brakes. If the brake is adjusted too loose, the extra play will cause
insufficient braking power. The play is properly adjusted if the brake pads
meet the rim fully when the brake lever is pulled one-third of the way.
If you have any questions please call our Service Department at 1-866-726-
6856.
7. Install the battery (See Figure 4 – for detailed instructions)
Adjust the front brake by turning the adjusting nuts located at
IINNTTEERRNNAATTIIOONNAALL EECCOOLLOOGGIICCAALL SSYYSSTTEEMMSS,, LLTTDD..
11--886666--774422--662
27744
PPaaggee 1100 ooff 2288
Page 11
OWNER’S MANUAL – IES SHADOW
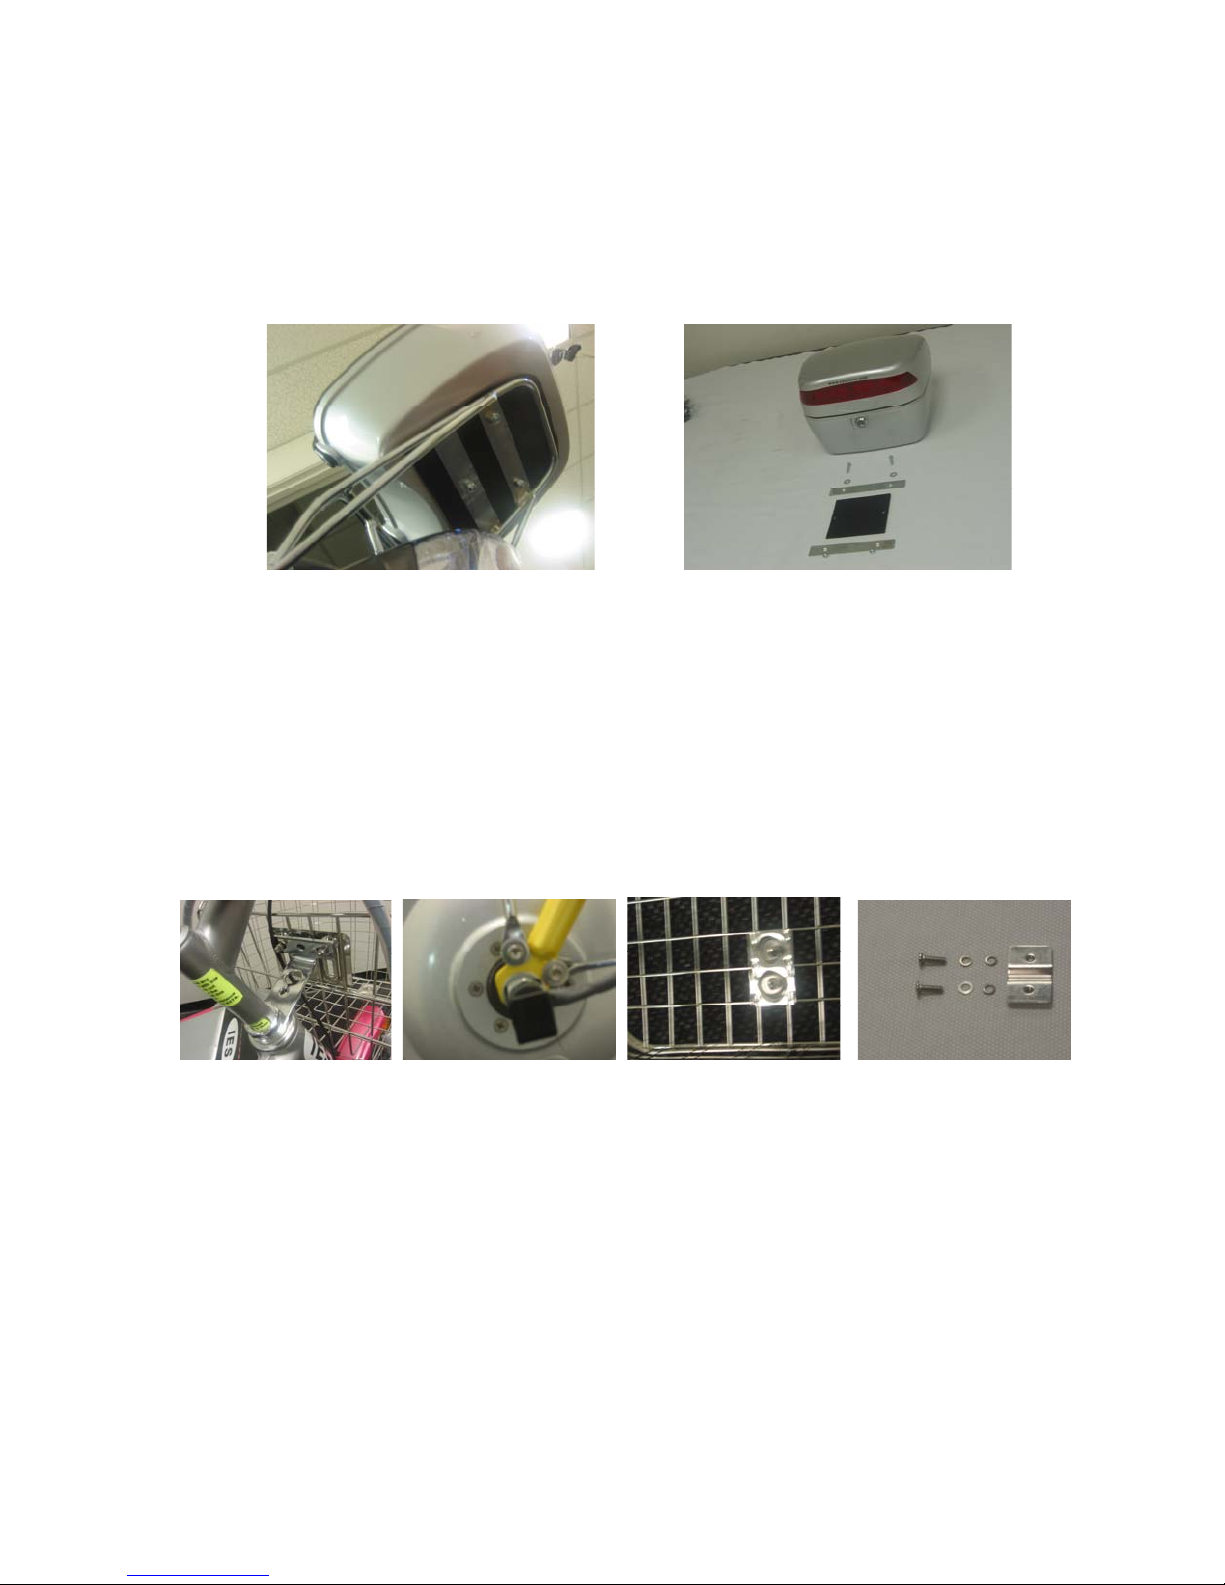
8. Install the rear locking carrier – Position the carrier on the rear bike rack
as shown. Insert screw and washer through two holes in supplied metal
bracket, then through two holes in locking carrier. Next mount screws
through rubber pad. Place assembly on rear bike rack and after positioning
second metal bracket under rear bike rack, firmly tighten entire assembly
using two washers and nuts.
9. a) Install the front basket – Attach the basket clamp to the clamp
protruding from the handlebar stem by threading two screws through the
assembly, adding a washer and securely tightening with a nut.
b) Secure the basket frame to each side of the bottom of the front fork
assembly with a screw in the top screw seat of the assembly as shown
below.
c) Secure the welded bracket in the bottom of the basket to the basket
frame by attaching the supplied clamp with a screw and 2 washers.
a) b) c)
10. Attach the front dynamo light (Optional) (See Figure 5 – for detailed
instructions)
11. Attach the rear accessory light (Optional) (See Figure 6 – for detailed
instructions)
IINNTTEERRNNAATTIIOONNAALL EECCOOLLOOGGIICCAALL SSYYSSTTEEMMSS,, LLTTDD..
11--886666--774422--662
27744
PPaaggee 1111 ooff 2288
Page 12
OWNER’S MANUAL – IES SHADOW
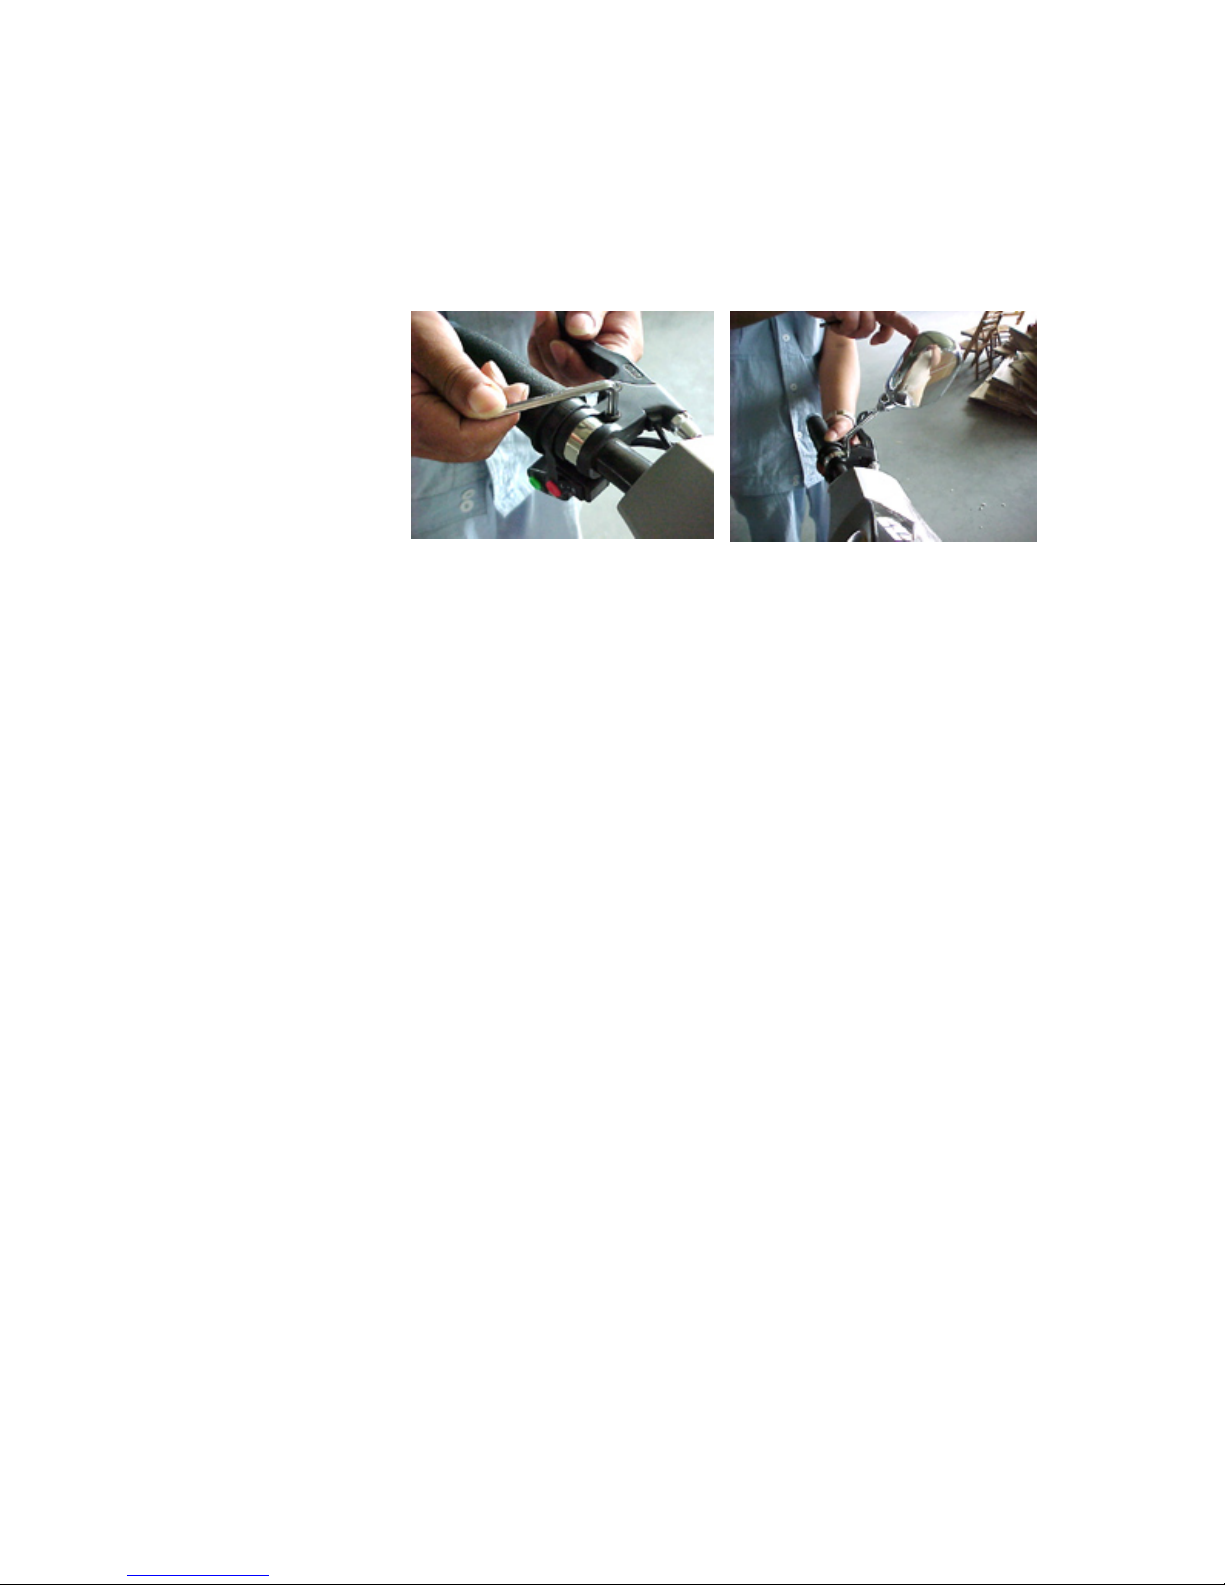
12. Attach the rear view mirrors to the handlebar assembly (See Figure 7)
Figure 7
Installing the Rear-View Mirrors
a)
b)
a) Remove the screw and nut from the right and left brake lever as shown.
b) Slide the mirror through the screw hole and tighten the nut securely. (You
do not need the screw which you have removed once mirrors have been
attached)
IINNTTEERRNNAATTIIOONNAALL EECCOOLLOOGGIICCAALL SSYYSSTTEEMMSS,, LLTTDD..
11--886666--774422--662
27744
PPaaggee 1122 ooff 2288
Page 13

OWNER’S MANUAL – IES SHADOW
OPERATING INSTRUCTIONS
Before You Ride
Make sure all of your quick release is locked and secure. Make sure all parts,
components and accessories are in good working order. Check all fittings and
be sure that they are tight and secure. Inspect your bike completely.
BICYCLE COMPONENTS
Wheels
Wheels should be centered in fork or dropouts. Whenever you hear any
irregular noise from the wheels or the brakes, the wheels should be checked
and repaired. Wheels should be checked regularly for spoke tightness and rim
alignment. Wheels should rotate smoothly without wobbling from side to side.
Check the bearing play of the hubs by lifting the bicycle and spinning the
wheel. The wheel should continue to spin for several turns and finally cease
spinning. To check the play of the hubs, try to move the rim from side to side
between the forks. During this test, no substantial play should exist. If you
detect play or if the wheel is difficult to turn, the hub bearings must be
adjusted.
Please contact a local bicycle dealer to have the hub bearings adjusted or call
the IES Service Department at 1-866-726-6856.
Throttle
Your throttle is located on the right hand side of your handlebars. Because it is
a variable speed throttle it is easily adaptable to any situation. You are always
in control of your speed. To increase speed, turn throttle towards you while
seated on the bike. One of the most important features of the Shadow
is the power shutdown mechanism incorporated into the right
brake lever. Every time the right brake lever is compressed, the
power from the motor is discontinued.
Rims
The rims must be smooth and without cracks, breaks or bulges.
Spokes
Check spoke tension regularly. Approximately the same tension should be
applied to all spokes. If there is minor loosening of the spokes, you may
tighten the nipples, but it is recommended that you take the bicycle to a bicycle
mechanic. If you detect a loose spoke or if the rim has a side play of more than
4mm (1/8 inch), immediately have the wheel trued by a bicycle mechanic or
call our IES Service Department at 1-866-726-6856.
RIDING WITH LOOSE SPOKES MAY CAUSE THE WHEEL TO FAIL
IINNTTEERRNNAATTIIOONNAALL EECCOOLLOOGGIICCAALL SSYYSSTTEEMMSS,, LLTTDD..
11--886666--774422--662
27744
PPaaggee 1133 ooff 2288
Page 14

OWNER’S MANUAL – IES SHADOW
BICYCLE COMPONENTS (continued)
Tires
Inflate your tires to the pressure embossed on the sidewall before the first use
of your new bike. The recommended tire pressure for the Shadow is 40-PSI.
Every time you ride, make sure that the tires are inflated according
to pressure indicated on tire sidewall. Improper tire pressure will cause
excessive wear, causing premature replacement. Low tire pressure will also
make riding more difficult. The tire should be properly seated in the rim and
the fitting of the tire bead and rim bead should be checked. If the tube is
pinched between the tire and the rim, it will fail when inflated. Ensure that the
tire is not cracked or unevenly worn. Check for bulges. Check that the valve is
straight in the rim. Irregular tires should be replaced immediately.
Handlebar and display
We have created and designed this handlebar assembly so that everything you
need is within easy reach and sight while riding. To adjust the height of your
handlebar, loosen the stem binder bolt by turning it counterclockwise 4 or 5
turns with your Allen wrench. Adjust the height position as desired, and
remember to align the stem with the wheel before retightening the stem bolt.
Make sure you cannot twist the handlebars after tightening.
CAUTION: LOOSE OR DAMAGED GRIPS ON YOUR HANDLEBARS
ARE DANGEROUS. IF YOUR GRIP COMES OFF, YOU COULD
LOSE CONTROL OF YOUR BICYCLE. A GRIP WITH THE END
MISSING CAN ALLOW HANDLEBARS TO SERIOUSLY INJURE A
RIDER DURING AN ACCIDENT. PLEASE CHECK THAT BOTH
HANDLEBAR ENDS ARE PLUGGED. BE SURE THAT YOUR GRIPS
ARE IN GOOD REPAIR AND SECURELY GLUED OR FASTENED TO
THE HANDLEBARS.
Brakes
Riding with brakes that are damaged, have worn brake shoes or cables, or are
on wheels that are in poor condition or damaged may result in losing control of
your bicycle. Wet weather detracts from brake performance. You will require
more distance to stop safely in the rain or on a wet or icy street. Check to be
sure the brake cables are not wrapped tightly, and are free of obstructions. It
is important to check that your brakes work properly before operating your
vehicle. Test before every use.
IINNTTEERRNNAATTIIOONNAALL EECCOOLLOOGGIICCAALL SSYYSSTTEEMMSS,, LLTTDD..
11--886666--774422--662
27744
PPaaggee 1144 ooff 2288
Page 15

OWNER’S MANUAL – IES SHADOW
BICYCLE COMPONENTS (continued)
Gears & Shifting
Congratulations! Your bike is equipped with a Shimano 6 Speed Gear
System.
Operating the Gear Shift
See the illustrated instructions on operating the gears on Page 19.
Computer / Display
Your bike is equipped with a display unit that will inform you of the battery
charge state, and other functions.
Power On/Off
Your Power On/Off switch is a key switch located on the right front side of the
bike frame. The Shadow uses the same key to lock the battery box. Turn the
key clockwise, when the display is lit, power is on. (The rear locking carrier box
has a separate key.)
Batteries
CAUTION: DO NOT ATTEMPT TO OPEN OR TAMPER WITH THE
BATTERY IN ANY WAY. DOING SO MAY CAUSE CHEMICAL,
ELECTRICAL AND/OR FIRE HAZARDS.
Batteries that lay dormant for an extended period of time will lose their ability
to accept charge. Please make sure you ride and recharge your bike
periodically to prevent this from happening. Charge the batteries every two
months, even if the bike is not being used.
You should recharge the batteries after every use when two or more display
lights are out for optimum performance and battery life. The average battery
life for a Lead Acid battery is about 300 cycles. One cycle is one complete
charge and discharge of the battery. You will need to replace your batteries
when they no longer hold a sufficient charge.
IINNTTEERRNNAATTIIOONNAALL EECCOOLLOOGGIICCAALL SSYYSSTTEEMMSS,, LLTTDD..
11--886666--774422--662
27744
PPaaggee 1155 ooff 2288
Page 16

OWNER’S MANUAL – IES SHADOW
RECHARGING THE BATTERY
It is important that you charge your batteries after every use when
two or more of the display lights are not lit.
This will extend the total life of your battery. Once the charger has indicated
that the battery is fully charged, unplug the power source from the bicycle and
from the electrical outlet and store in a cool (59° - 86°F or 15° - 30°C), dry
(10% - 70% humidity) place. Do not leave the battery charger plugged in for
long periods of time (more than 10 hours). This can damage the battery.
Do not remove the battery box from the bicycle frame while
recharging to avoid damaging charging cables. You can however
remove the battery from the bike after you have turned the power off. See
instructions in the manual for removing the battery. Once the battery has
been completely removed from the bike, it can be charged independently.
To charge your batteries:
1. Turn the on/off power switch on your bike to the “off” position.
2. Plug the battery charger into the wall outlet.
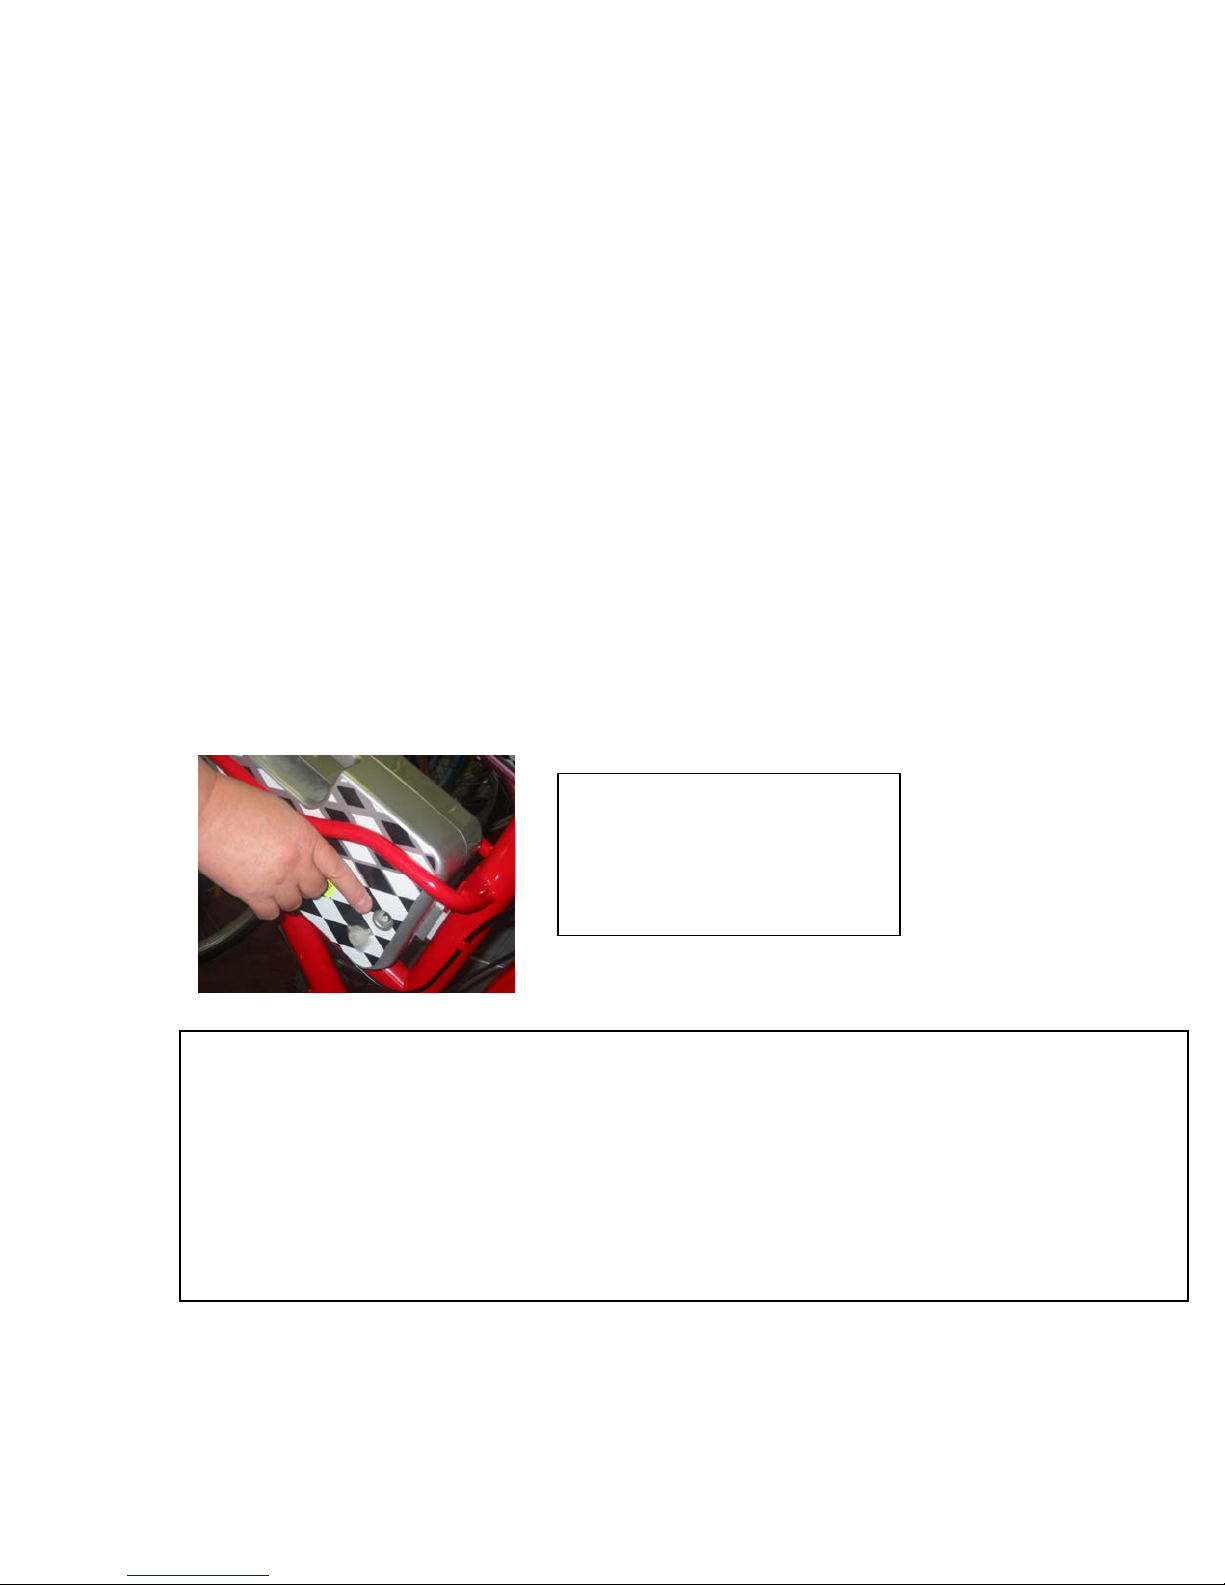
3. Insert the charger’s plug into the battery box charging port. (see
illustration on page 17)
4. Turn the charger on.
5. The charger will take 6-8 hours to recharge the battery completely. When
the green light appears the battery is sufficiently charged. If possible,
continue to charge the battery for an additional 2-4 hours.
6. Do not charge for more than 10 hours to avoid overcharging and damaging
the battery, especially in hot weather.
7. Charge the bike in a dry and clean place. Keep the charger dry and clean.
8. The charger will become warm during charging.
9. You can also charge the battery when it has been removed from the bike.
IINNTTEERRNNAATTIIOONNAALL EECCOOLLOOGGIICCAALL SSYYSSTTEEMMSS,, LLTTDD..
11--886666--774422--662
27744
PPaaggee 1166 ooff 2288
Page 17
OWNER’S MANUAL – IES SHADOW
PRECAUTIONS WHILE RECHARGING THE BATTERY
1. Using your power source incorrectly or leaving the power source
connected to the bicycle and plugged into an AC power source for
extended periods of time can result in a fire.
2. Always use your charger as instructed.
3. Do not use any other charger than the one that came with your Shadow.
4. Avoid any contact with water when recharging your battery. If a plug or
socket should get wet, dry it thoroughly before proceeding.
5. Do not recharge your battery in direct sunlight or in any very hot
environment.
6. Be sure to keep pets and small children away from the area where you are
recharging.
7. To avoid damage to the integrated charger, never subject it to intense
physical shock or constant vibration.
8. You can charge your battery independently of the bike.
Please contact the IES Service Department at 1-866-726-6856 if you have the
wrong charger or if it is not functioning properly.
Location of battery charging
port on Shadow
When the power source is ‘on’ but the charger is not connected to the battery port,
the indicator light on the charger will be orange.
When the charger is on and connected to the battery port, the indicator light on the
charger will turn red if the battery energy supply is low.
When the green indicator lights up after 6-8 hours of charging time, (less if battery
has not been fully depleted) it means the battery is sufficiently charged.
IINNTTEERRNNAATTIIOONNAALL EECCOOLLOOGGIICCAALL SSYYSSTTEEMMSS,, LLTTDD..
11--886666--774422--662
27744
PPaaggee 1177 ooff 2288
Page 18

OWNER’S MANUAL – IES SHADOW
BICYCLE CARE
We recommend having your Shadow serviced once a year by a bicycle
mechanic for regular bicycle maintenance in order to ensure safety and keep
components in proper working order.
Throughout the year, there are simple steps you can take to inspect and
maintain your Shadow:
1. Every week or two, tighten all nuts and bolts. Check all hardware to see
that no parts are worn, damaged, or missing. Make certain that the frame
and fork alignment are true and that all components are seated in the right
position.
2. Clean the frame and all parts regularly with a moist cloth or sponge.
Remove the battery and turn off the power before cleaning. Do not
completely immerse the bicycle in water and avoid using a hose and
soaking the battery and motor area. Be sure to completely dry the bike
with a soft towel to prevent rusting and corrosion. Your Shadow is water
resistant, but not water-proof.
3. Reflectors should be kept clean, securely fastened and positioned for easy
visibility at night from the front, rear and side. Immediately replace any
damaged reflectors. ALWAYS USE A FRONT AND REAR LIGHT
WHEN RIDING AT NIGHT. Check your local regulations for specific
requirements.
4. Replace worn or damaged cables. Do not kink cables. Cables stretch with
use - adjust accordingly.
5. Replace worn grips. Make sure they fit snugly.
6. Check the chain tension frequently and keep it adjusted.
IINNTTEERRNNAATTIIOONNAALL EECCOOLLOOGGIICCAALL SSYYSSTTEEMMSS,, LLTTDD..
11--886666--774422--662
27744
PPaaggee 1188 ooff 2288
Page 19

OWNER’S MANUAL – IES SHADOW
SAFETY RESPONSIBILITY
Know the laws of your state. It is your responsibility to know and obey the
laws of your local area concerning the operation of an electric bicycle. Laws
which apply to regular bicycles also govern the use of electric bikes. In some
cities and towns, local laws may also apply. You can check with your local
police department for information on local laws.
There are also some common sense rules to keep in mind as you are preparing
to ride and as you are riding.
1. Wear your helmet at all times. This is required by law in some states
and is an important precaution in all states. Always use a helmet that fits
and is approved for such use. Keep the chinstrap fastened. HELMETS
CAN HELP PREVENT HEAD INJURIES IN THE EVENT OF AN
ACCIDENT.
2. Only one rider at a time. Riding double or carrying large objects that
obstruct your vision or interfere with your control of the vehicle can result
in loss of control.
3. Ride with traffic and obey all traffic laws.
4. Do not perform tricks or stunts. Maintain complete control, caution and a
reasonable speed at all times. This bicycle is not suited for stunt jumping,
competition or racing. Never allow other vehicles to tow the bicycle.
5. When riding at night or in inclement weather, always use lights that are
bright and in good working order. Use the clear light on the front and the
red light on the back of your Shadow at night. Wear light colored and/or
reflective clothing. Assume motorists are unable to see you and ride in a
very defensive, cautious manner.
6. Take special precautions when riding in the rain, ice or snow. Give
yourself more time and room to brake. Ride slower than normal in order
to keep full control of your bicycle. It is also difficult for motorists to see
you when it is raining or snowing; take care when riding in inclement
weather.
7. Watch for cars pulling out in front of you and the sudden opening of car
doors.
8. Give pedestrians the right of way and be sure to (bell, horn, voice, etc.)
alert them to your presence to avoid any type of collision.
IINNTTEERRNNAATTIIOONNAALL EECCOOLLOOGGIICCAALL SSYYSSTTEEMMSS,, LLTTDD..
11--886666--774422--662
27744
PPaaggee 1199 ooff 2288
Page 20
OWNER’S MANUAL – IES SHADOW
Additional Instructions:
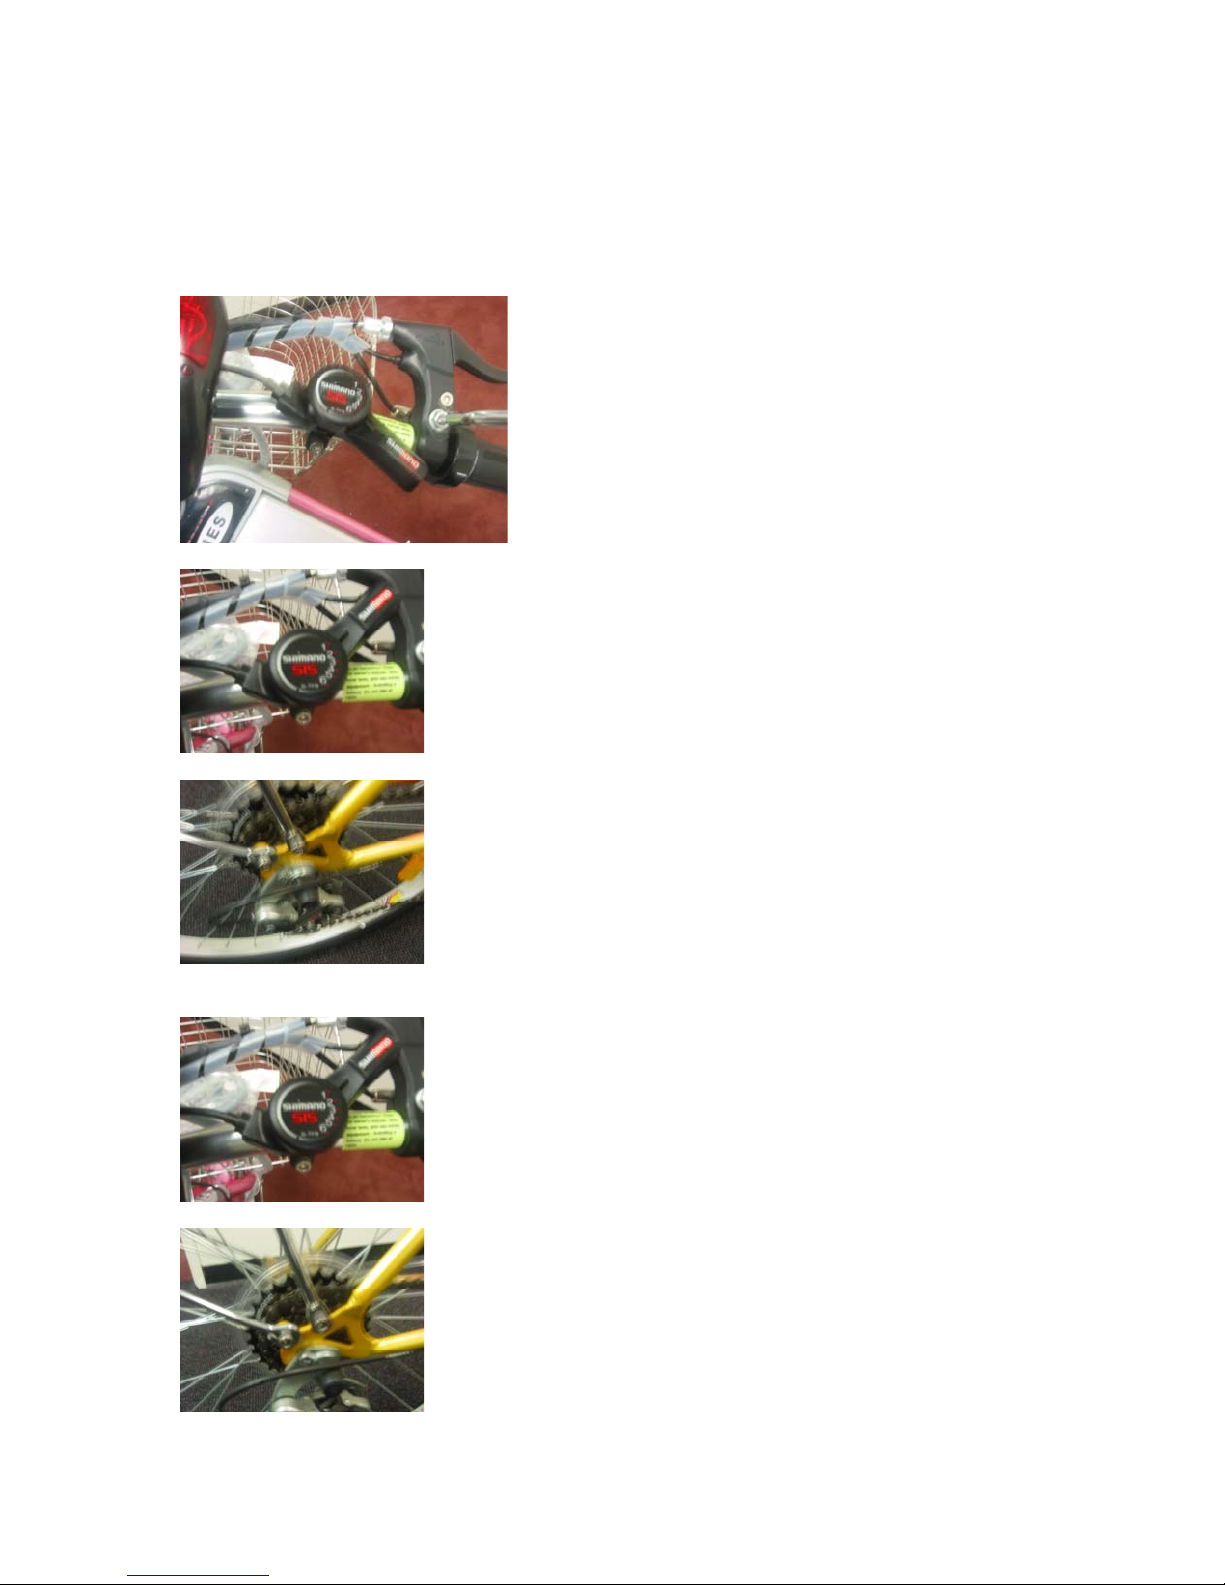
How to adjust the gearshift
The gearshift is on the right hand side of the
handlebar. It has 6 gear levels.
The first gear level is the slowest speed. This is the
easiest to pedal.
The 6th gear level is the fastest speed. This is
the hardest to pedal, but the bike will move
quickly.
IINNTTEERRNNAATTIIOONNAALL EECCOOLLOOGGIICCAALL SSYYSSTTEEMMSS,, LLTTDD..
CAUTION:
Never attempt to change gears when you are not riding
the bicycle. This can damage the gear shift or wire.
11--886666--774422--662
27744
PPaaggee 2200 ooff 2288
Page 21
OWNER’S MANUAL – IES SHADOW
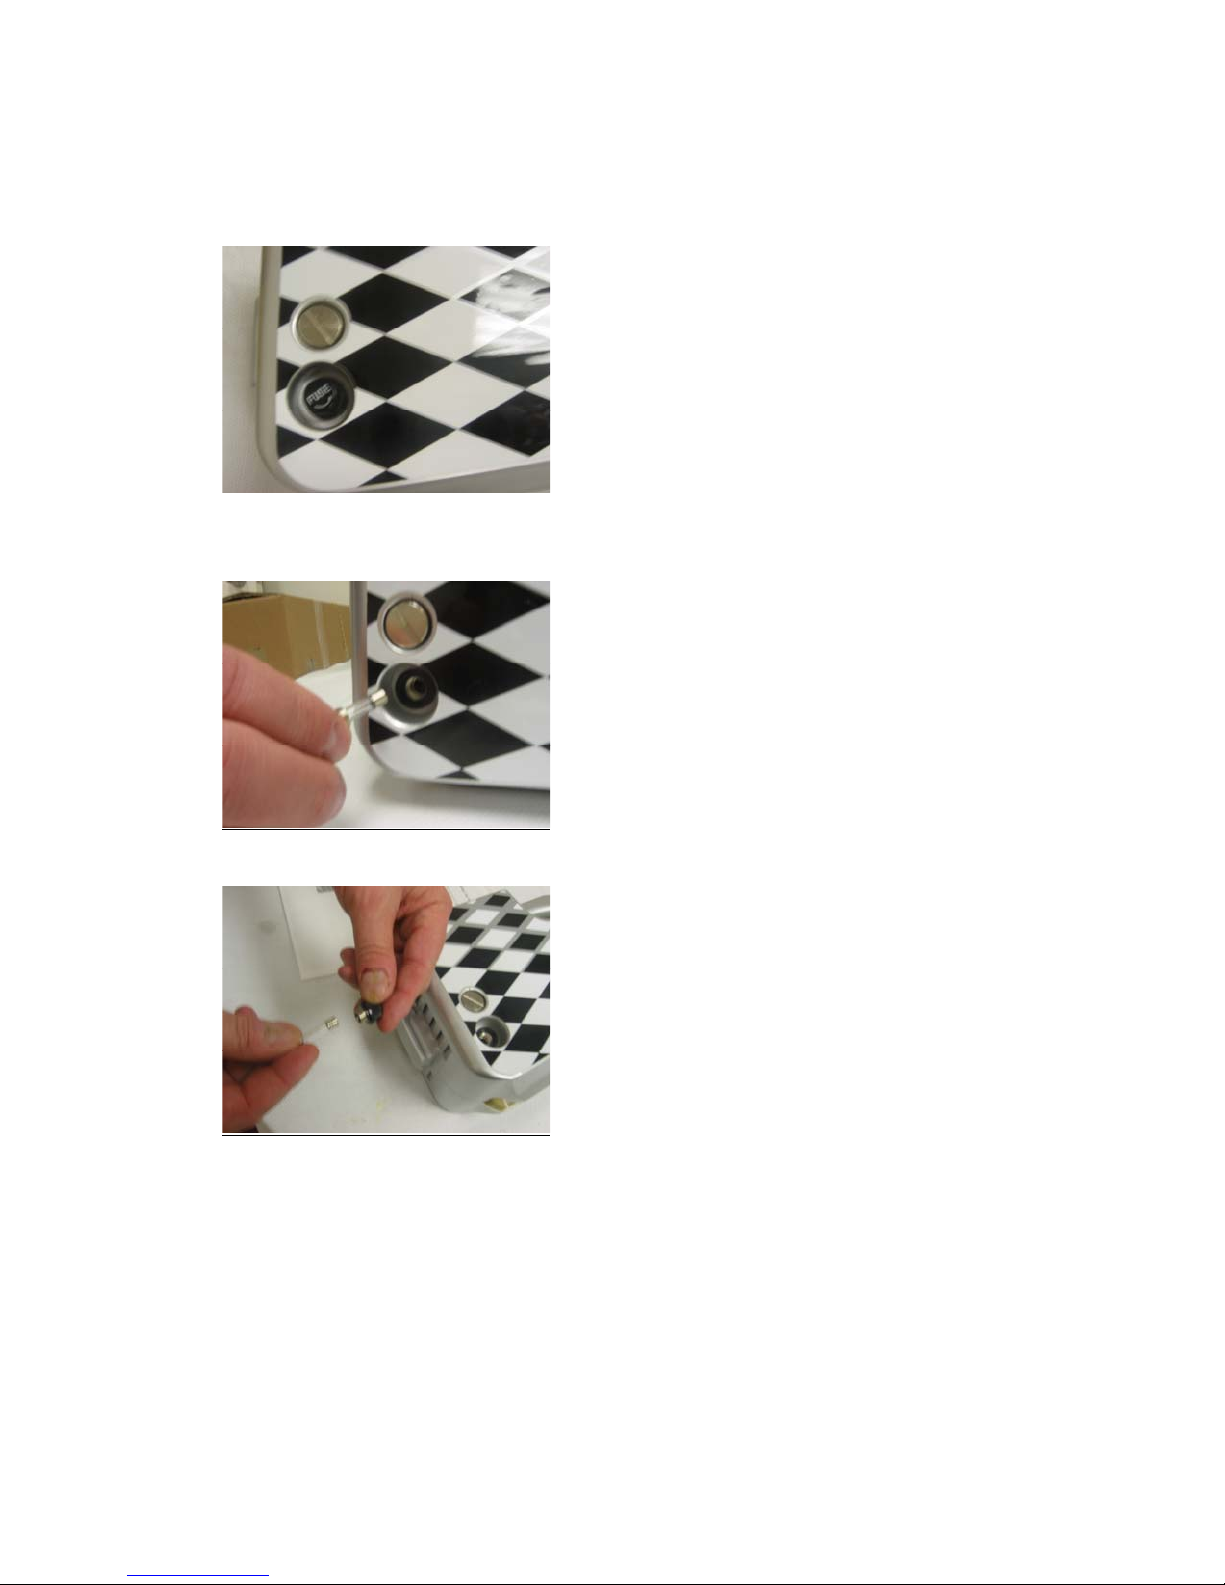
How to change the fuse
There will not be any electric power if the fuse
has failed.
Replace the fuse, located at the right hand
bottom of the battery box, as show in the two
figures on the left. Unscrew the fuse cap,
remove used fuse and replace. Screw fuse cap
tightly after inserting new fuse.
Your Shadow comes with two replacement
fuses for your convenience.
IINNTTEERRNNAATTIIOONNAALL EECCOOLLOOGGIICCAALL SSYYSSTTEEMMSS,, LLTTDD..
11--886666--774422--662
27744
PPaaggee 2211 ooff 2288
Page 22
OWNER’S MANUAL – IES SHADOW
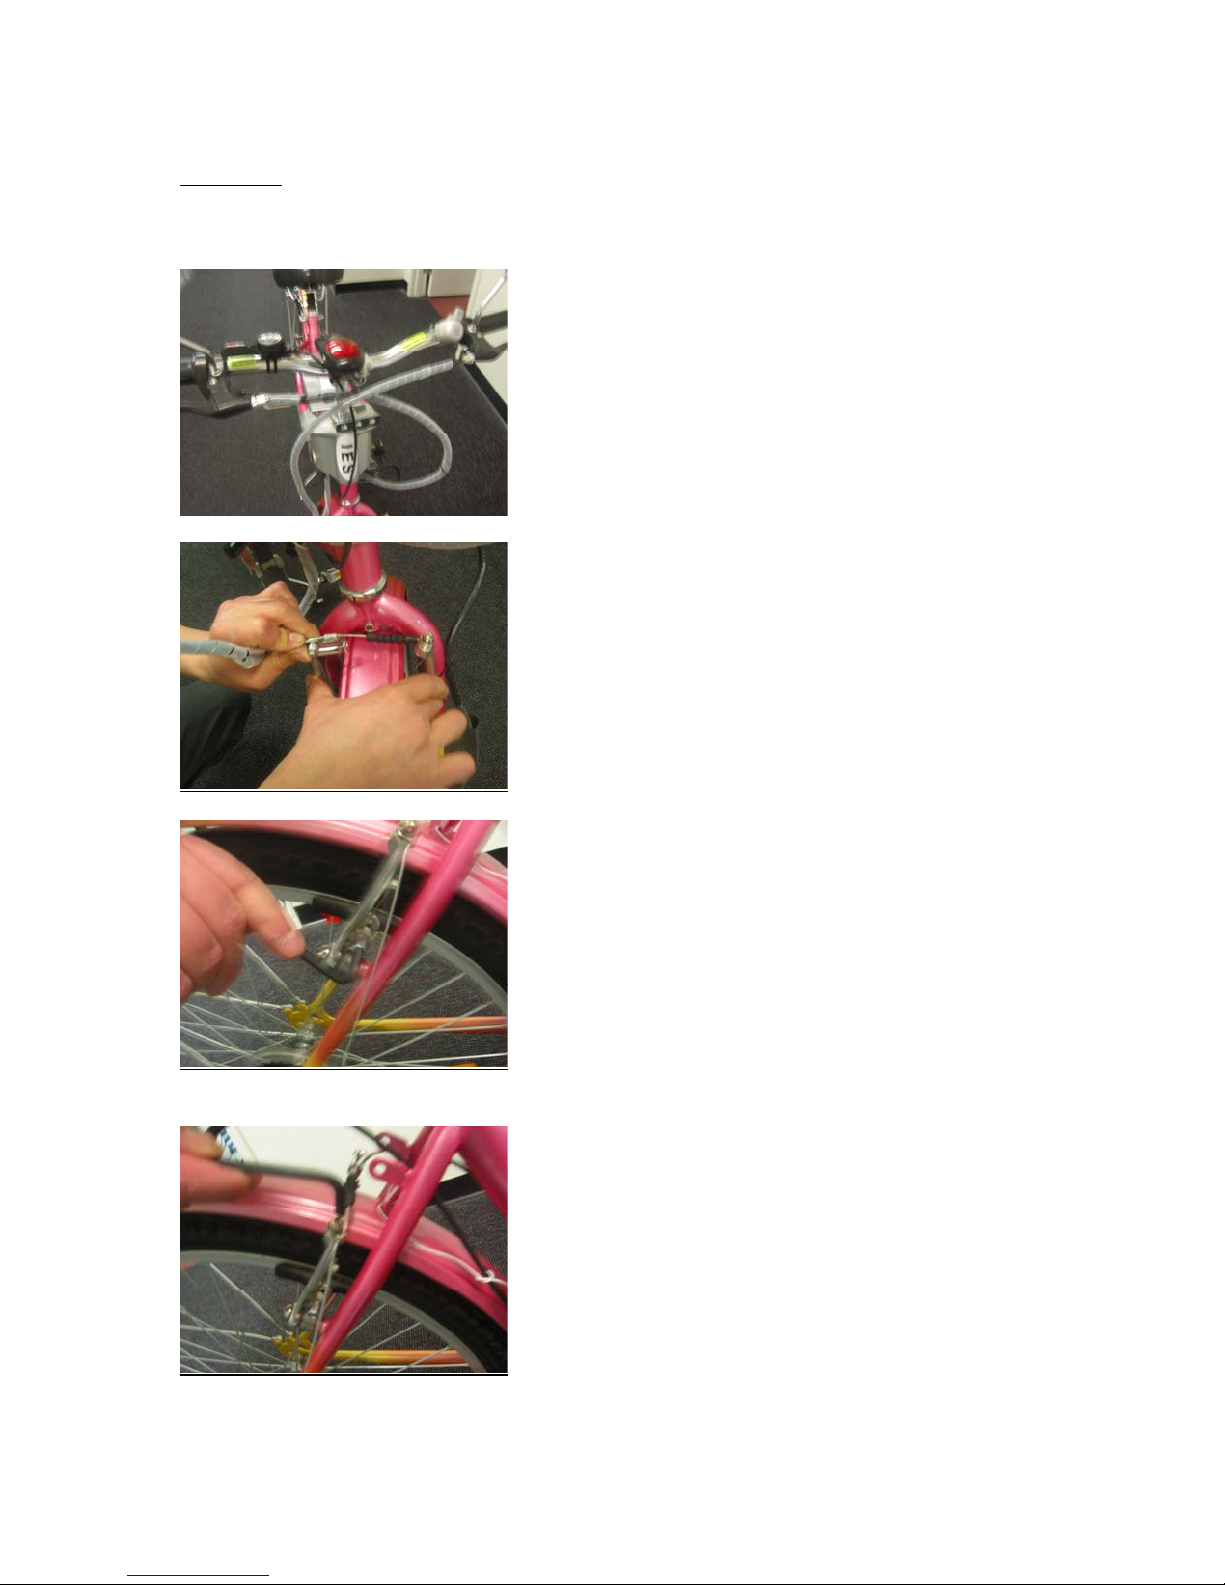
Figure 3
How to adjust the V-type Brakes
If you find that the brake requires adjustment,
please follow the following steps:
1. Hold the two brake clamps together as
shown. Insert the wire portion of the
brake cable into the clamp attachment as
shown.
2. Spin the front wheel. If either brake pad
touches the front rim, loosen the Allen key
nut shown to widen the clearance between
the brake rubber pads and the tire rim.
3. Loosen the Allen key nut shown to adjust the
grip tension on the brake cable. Adjust to
the desired length, and tighten nut.
IINNTTEERRNNAATTIIOONNAALL EECCOOLLOOGGIICCAALL SSYYSSTTEEMMSS,, LLTTDD..
11--886666--774422--662
27744
PPaaggee 2222 ooff 2288
Page 23
OWNER’S MANUAL – IES SHADOW
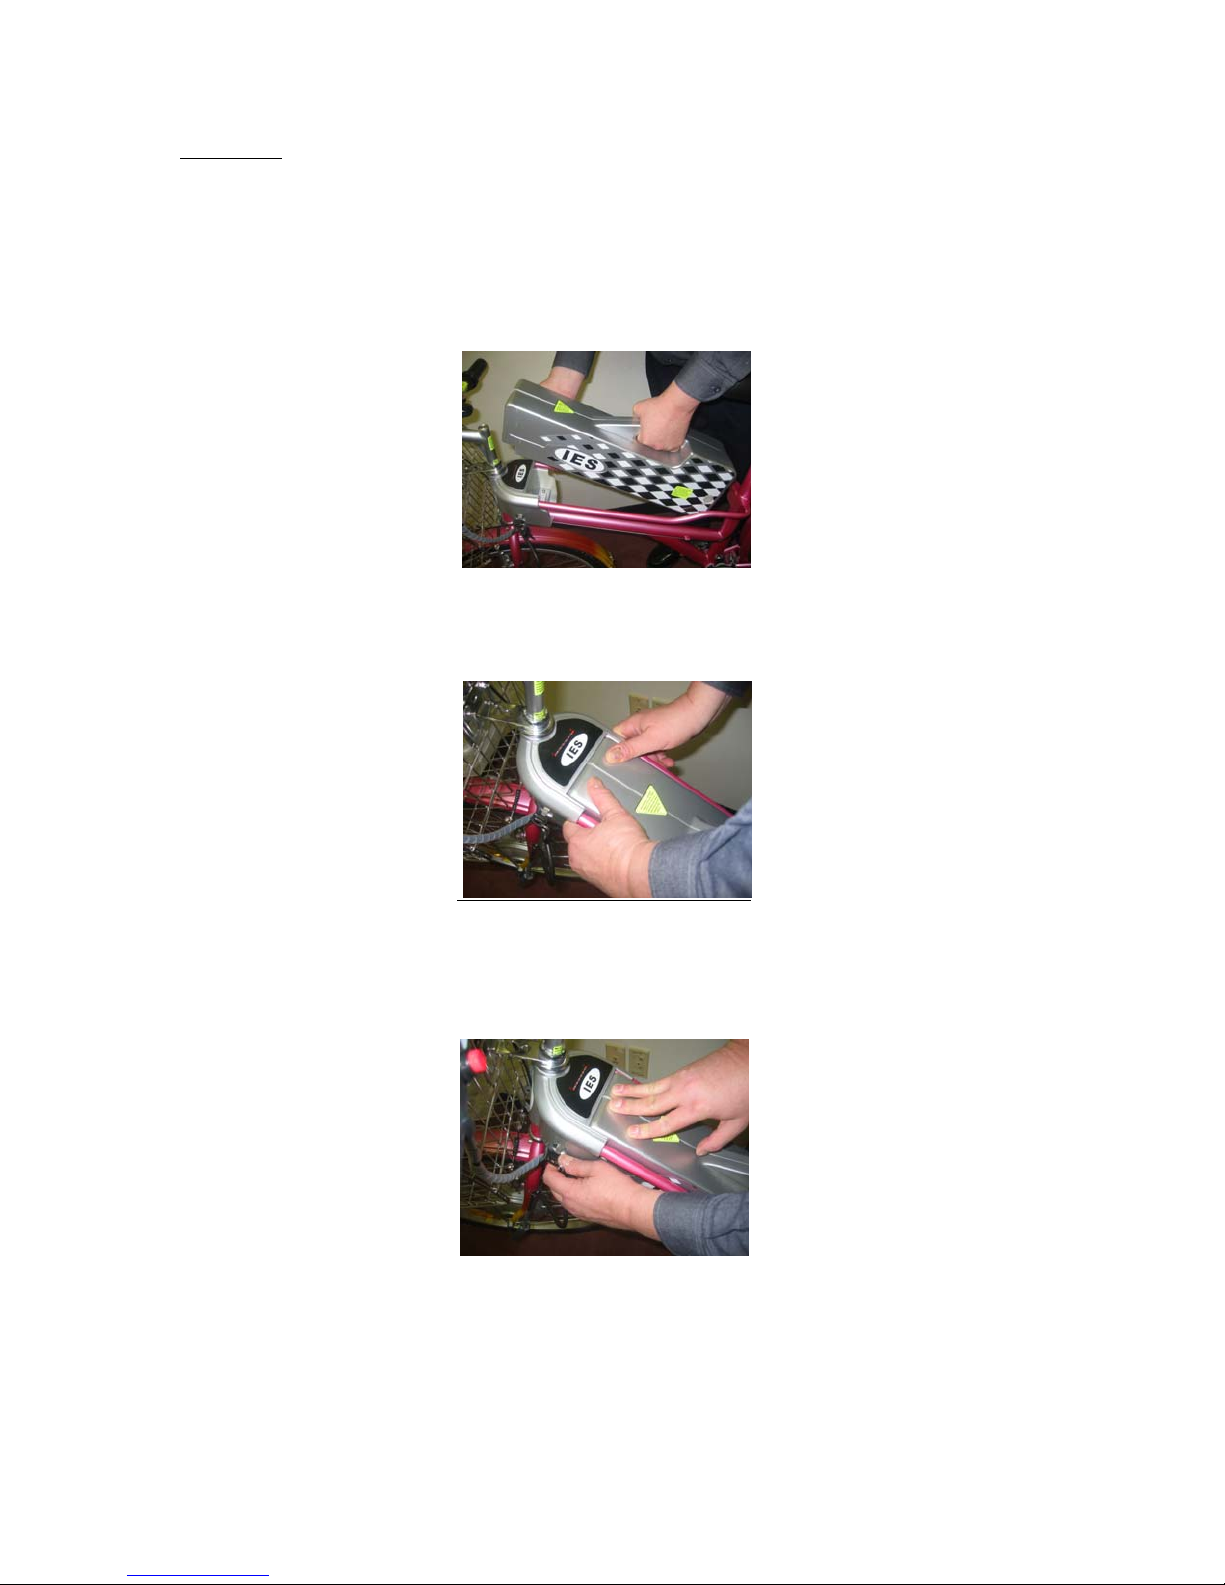
Figure 4
INSTALLING AND REMOVING THE BATTERY
Installing The Battery
1. Lower battery as shown in (a) into rear portion of battery compartment
first.
(a)
2. Push down firmly the front end of battery until it is seated securely in
the battery compartment – see (b).
(b)
3. While pushing the front edge of battery firmly into the battery
compartment, turn the key 180◦ clockwise until lock is engaged as
shown in (c).
(c)
Removing The Battery - To remove the battery, reverse the process shown
above. You must place both hands underneath the front edge of the
battery, beneath the frame and push up from the front only. After you
do this, remove the battery by lifting with the handle.
IINNTTEERRNNAATTIIOONNAALL EECCOOLLOOGGIICCAALL SSYYSSTTEEMMSS,, LLTTDD..
11--886666--774422--662
27744
PPaaggee 2233 ooff 2288
Page 24
OWNER’S MANUAL – IES SHADOW
Figure 5
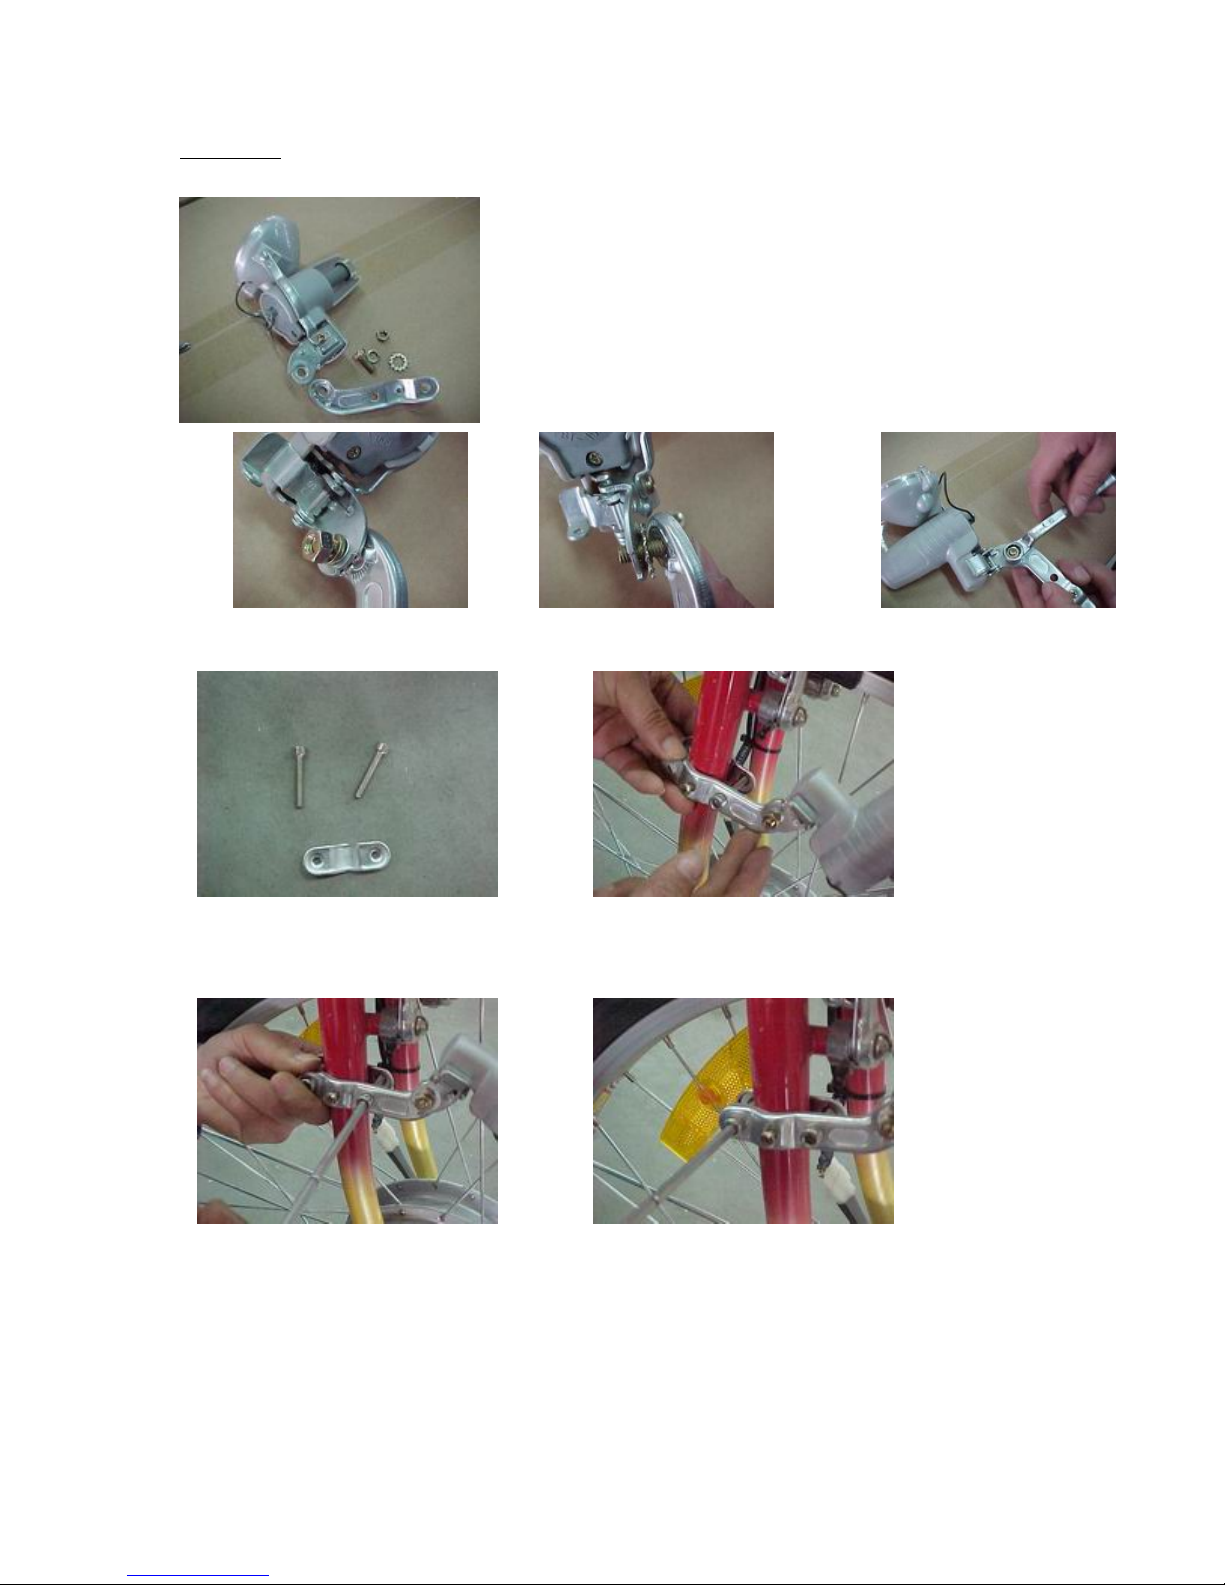
How to attach the Dynamo light (Optional)
a. In a separate package, you will find these
parts.
b. Assemble the parts first as shown above.
c. Fix the front dynamo light on the right hand side of the front fork
assembly as shown.
IINNTTEERRNNAATTIIOONNAALL EECCOOLLOOGGIICCAALL SSYYSSTTEEMMSS,, LLTTDD..
11--886666--774422--662
27744
PPaaggee 2244 ooff 2288
Page 25
OWNER’S MANUAL – IES SHADOW
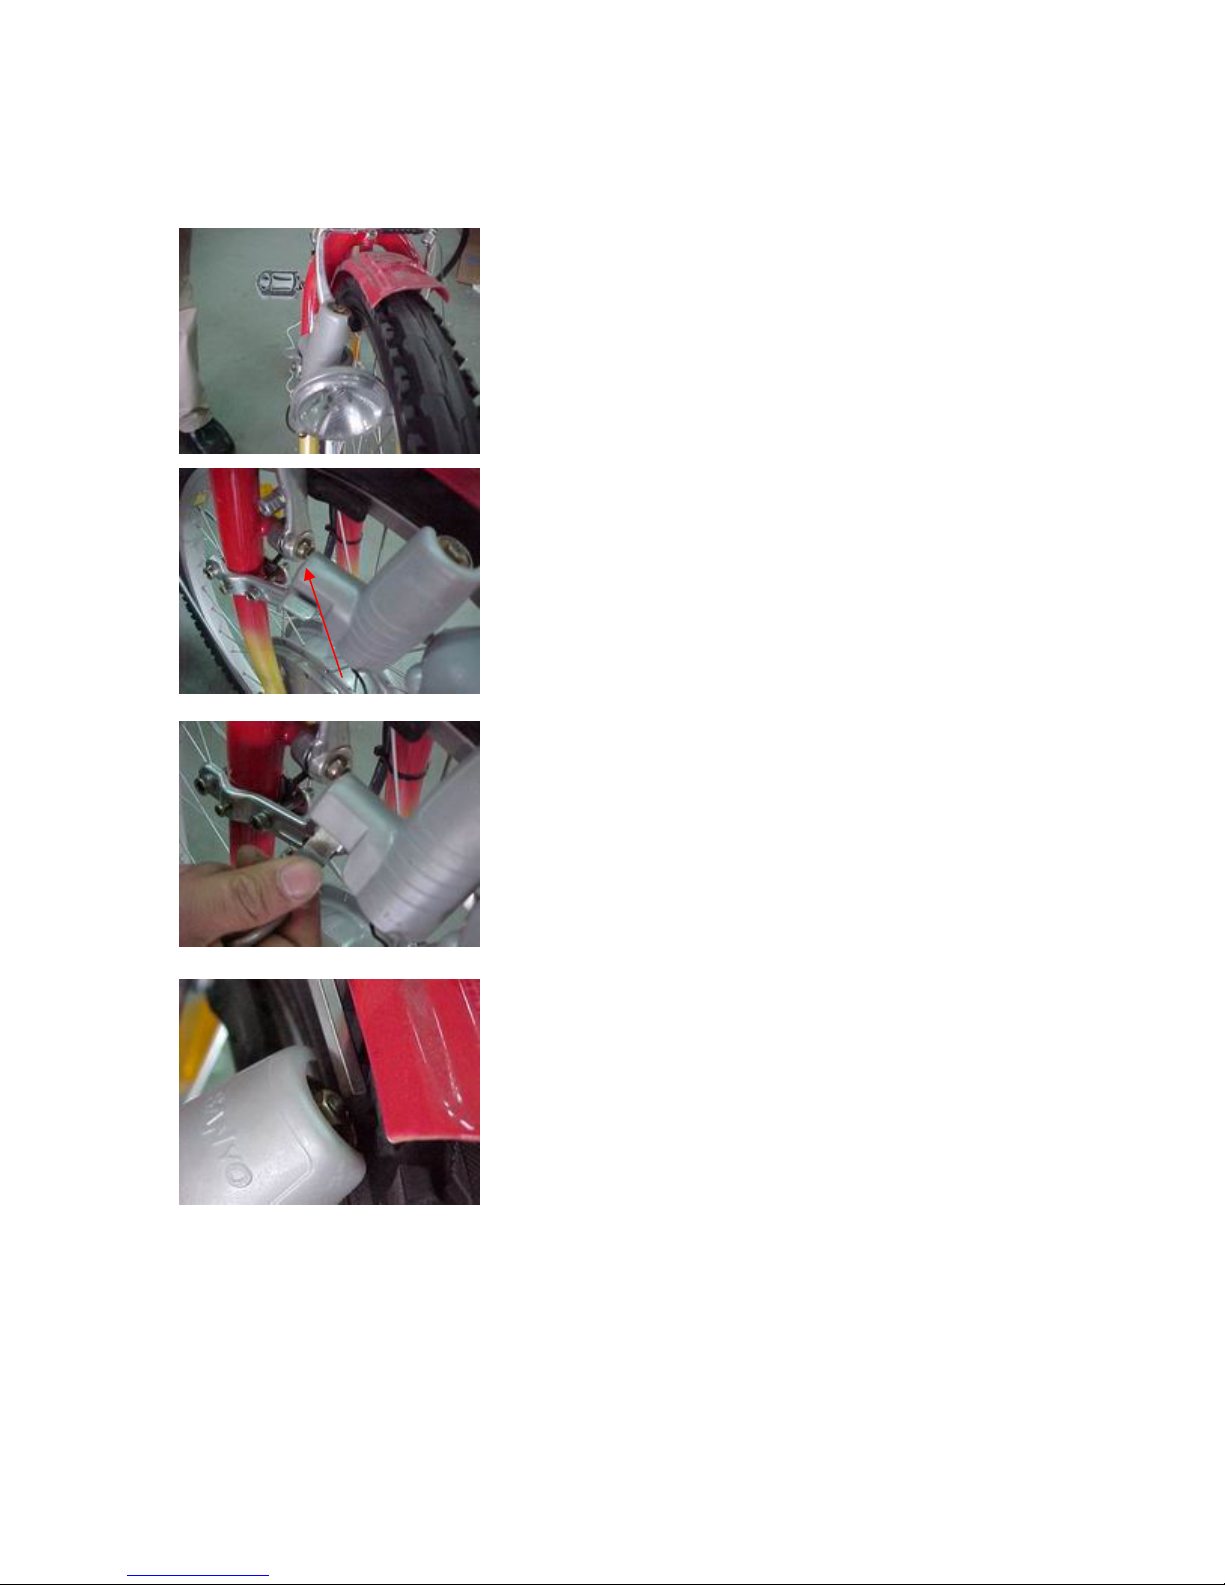
d. Fasten the screws.
Now the front dynamo light does not touch
the tire.
e. There is a trigger on the light.
f. Press it.
The light gear brushes the tire. As the wheel turns
the light is activated.
To deactivate the front and rear dynamo lights, pull the gear assembly away from
the tire until the trigger locks in place.
IINNTTEERRNNAATTIIOONNAALL EECCOOLLOOGGIICCAALL SSYYSSTTEEMMSS,, LLTTDD..
11--886666--774422--662
27744
PPaaggee 2255 ooff 2288
Page 26
OWNER’S MANUAL – IES SHADOW
Figure 6
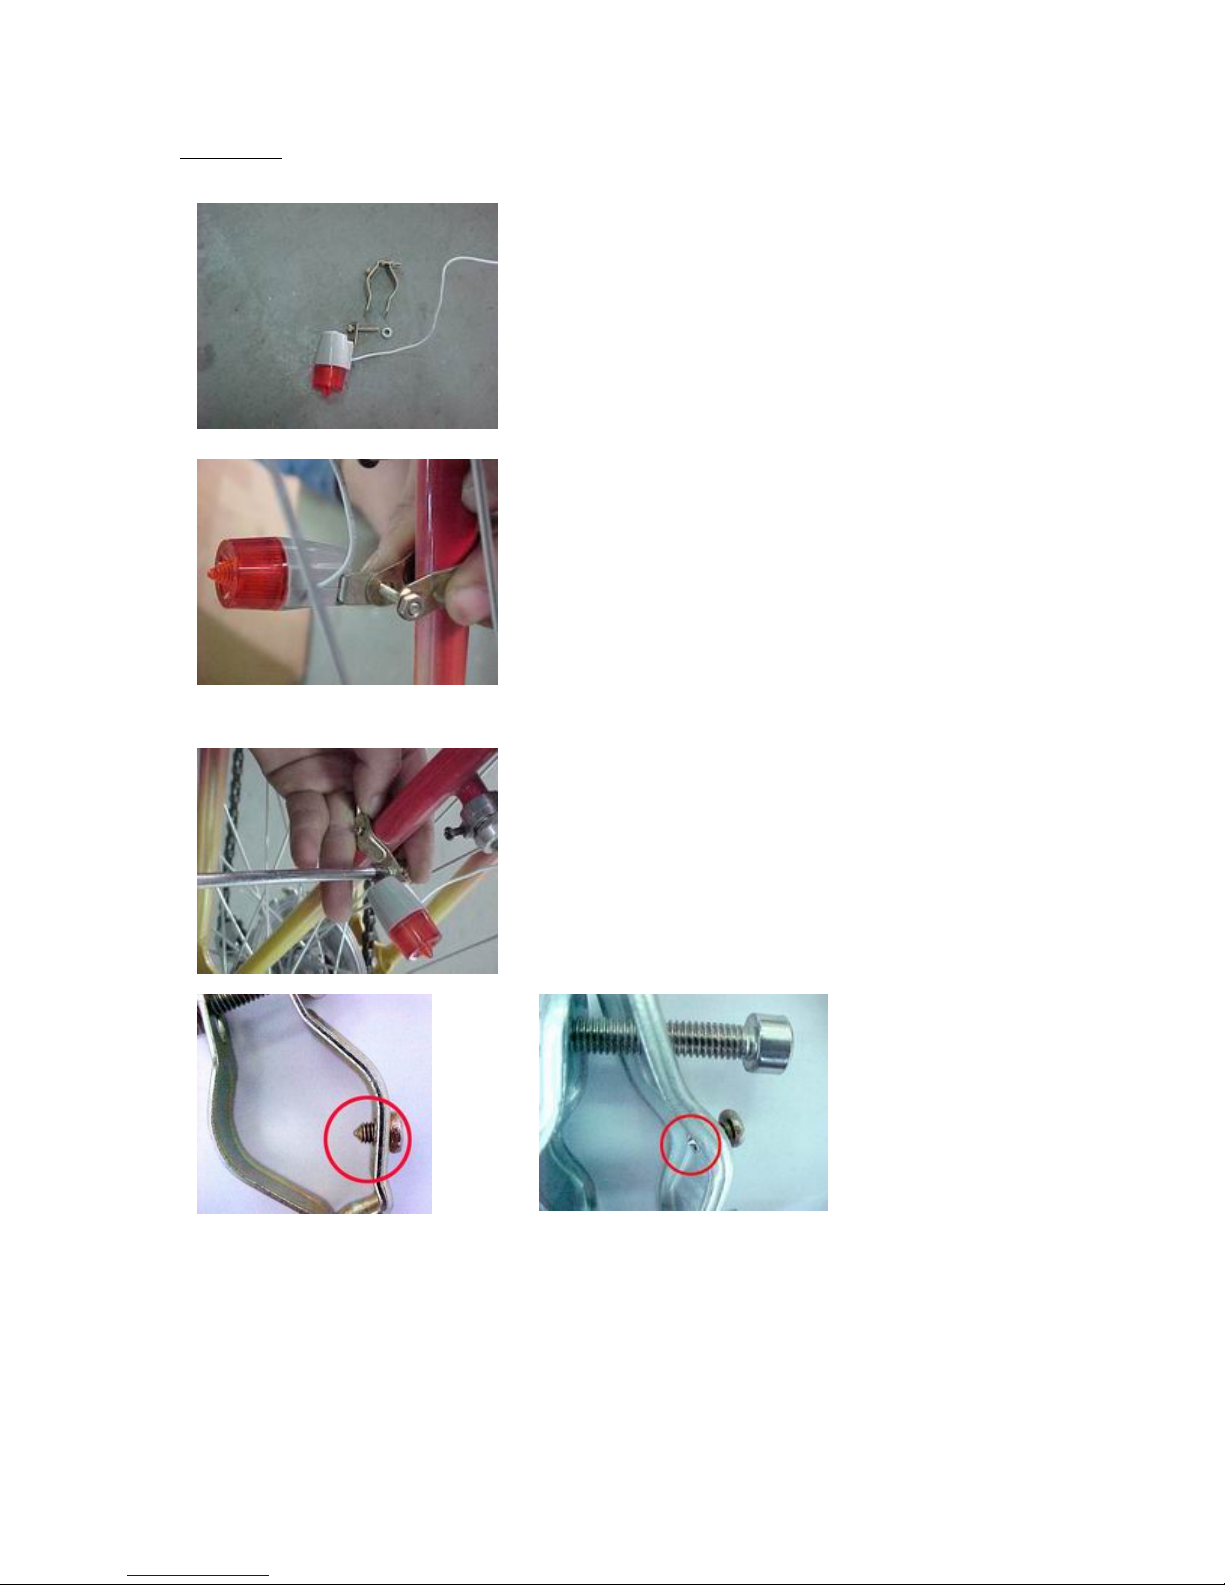
Rear Accessory Light (Optional)
d) On the light bracket, you can find 2 screws.
e) The end of screw is very sharp as it is intended to break the paint on
the bike frame.
a) Rear light & parts
b) Attach the rear light to the rear frame
as shown.
c) Tighten the nut as shown.
IINNTTEERRNNAATTIIOONNAALL EECCOOLLOOGGIICCAALL SSYYSSTTEEMMSS,, LLTTDD..
11--886666--774422--662
27744
PPaaggee 2266 ooff 2288
Page 27
OWNER’S MANUAL – IES SHADOW
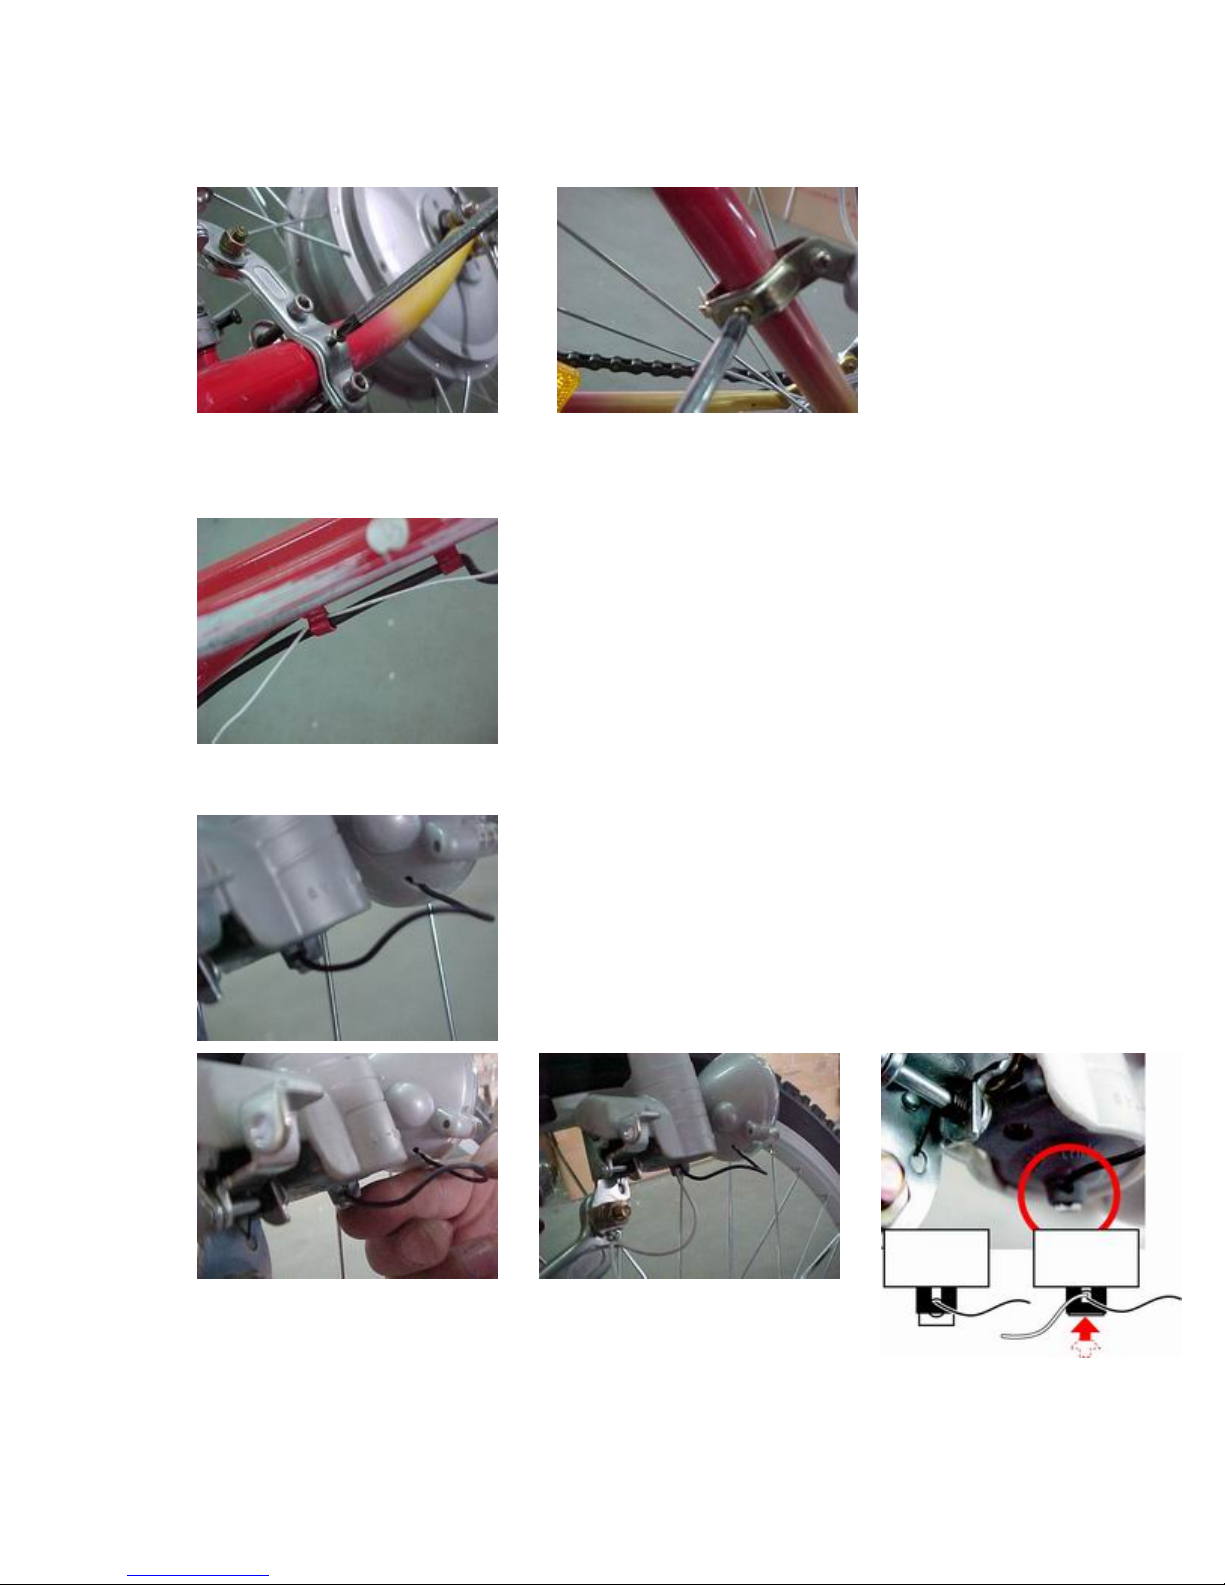
f) Tighten these 2 screws lightly.
g) Thread the white cable through the
frame clips from rear light to front
light.
h) Under the front dynamo light, there
is cable clip. Push it above then insert
the white cable from rear light.
IINNTTEERRNNAATTIIOONNAALL EECCOOLLOOGGIICCAALL SSYYSSTTEEMMSS,, LLTTDD..
11--886666--774422--662
27744
PPaaggee 2277 ooff 2288
Page 28

OWNER’S MANUAL – IES SHADOW
SPECIFICATIONS
1. Size: 72x26x42 inches
2. Wheel size: 26 inch wheel
3. Maximum speed: 16 MPH
4. Bicycle weight: 88 lbs including battery – 62 lbs without battery
5. Power consumption per charge: less than 0.8 kWh:
6. Battery life: Total battery life is approximately 6000-7500 miles
under normal conditions or 300 charges
7. Noise: less than 62 dB (A)
8. Range per charge under power: up to 30 miles
Note:
Speed and distances quoted will vary according to rider’s
weight, road and weather conditions, type of terrain traveled,
and age of battery.
IINNTTEERRNNAATTIIOONNAALL EECCOOLLOOGGIICCAALL SSYYSSTTEEMMSS,, LLTTDD..
11--886666--774422--662
27744
PPaaggee 2288 ooff 2288
 Loading...