

Page 1

NOVA-LX 5.25” Motherboard
T
Page i
Page 2
NOVA-LX 5.25” Motherboard
Revision
Date Version Changes
2008-03-31 1.00 Initial release
Page ii
Page 3
NOVA-LX 5.25” Motherboard
COPYRIGHT NOTICE
The information in this document is subject to change without prior notice in order to
improve reliability, design and function and does not represent a commitment on the part
of the manufacturer.
In no event will the manufacturer be liable for direct, indirect, special, incidental, or
consequential damages arising out of the use or inability to use the product or
documentation, even if advised of the possibility of such damages.
Copyright
This document contains proprietary information protected by copyright. All rights are
reserved. No part of this manual may be reproduced by any mechanical, electronic, or
other means in any form without prior written permission of the manufacturer.
TRADEMARKS
All registered trademarks and product names mentioned herein are used for identification
purposes only and may be trademarks and/or registered trademarks of their respective
owners.
Page iii
Page 4
NOVA-LX 5.25” Motherboard
Manual Conventions
WARNING!
Warnings appear where overlooked details may cause damage to the equipment or result
in personal injury. Warnings should be taken seriously. Warnings are easy to recognize.
The word “warning” is written as “WARNING,” both capitalized and bold and is followed by
text. The text is the warning message. A warning message is sho w n below:
WARNING:
CAUTION!
This is an example of a warning message. Failure to adhere to warning
messages may result in permanent damage to the NOVA-LX or
personal injury to the user. Please take warning messages seriously.
Cautionary messages should also be heeded to help reduce the chance of losing data or
damaging the NOVA-LX. Cautions are easy to recognize. The word “caution” is written as
“CAUTION,” both capitalized and bold and is followed. The italicized text is the cautionary
message. A caution message is shown below:
Page iv
Page 5
NOVA-LX 5.25” Motherboard
CAUTION:
This is an example of a caution message. Failure to adhere to cautions
messages may result in permanent damage to the NOVA-LX. Please
take caution messages seriously.
NOTE:
These messages inform the reader of essential but non-critical information. These
messages should be read carefully as any directions or instructions contained therein can
help avoid making mistakes. Notes are easy to recognize. The word “note” is written as
“NOTE,” both capitalized and bold and is followed by text. The text is the cautionary
message. A note message is shown below:
NOTE:
This is an example of a note message. Notes should always be read.
Notes contain critical information about the NOVA-LX. Please take note
messages seriously.
Page v
Page 6
NOVA-LX 5.25” Motherboard
Packing List
NOTE:
If any of the components listed in the checklist below are missing,
please do not proceed with the installation. Contact the IEI reseller or
vendor you purchased the NOVA-LX from or contact an IEI sales
representative directly. To contact an IEI sales representative, please
send an email to
The items listed below should all be included in the NOVA-LX package.
1 x NOVA-LX single board computer
1 x mini jumper pack
1 x IDE flat cable
1 x VGA cable
1 x KB/MS Y cable
1 x Audio cable
1 x 4 RS-232 Adapter cable
2 x USB cable
2 x single RS-232 cable
1 x Utility CD
1 x QIG (Quick Installation Guide)
Images of the above items are shown in Chapter 3.
Page vi
Page 7
NOVA-LX 5.25” Motherboard
Table of Contents
1 INTRODUCTION..................................................................................................... 1
1.1 OVERVIEW ................................................................................................................. 2
1.1.1 NOVA-LX Features............................................................................................ 2
1.2 NOVA-LX OVERVIEW............................................................................................... 3
1.2.1 NOVA-LX Overview Photo................................................................................. 3
1.2.2 NOVA-LX Peripheral Connectors and Jumpers................................................ 3
1.2.3 Technical Specifications..................................................................................... 5
2 DETAILED SPECIFICATIONS ............................................................................. 7
2.1 DIMENSIONS .............................................................................................................. 8
2.1.1 Board Dimensions.............................................................................................. 8
2.1.2 External Interface Panel Dimensions................................................................ 9
2.2 DATA FLOW................................................................................................................ 9
2.3 AMD
2.3.1 AMD® Geode™ LX 800 500MHz Overview.....................................................11
2.3.2 AMD Geode™ LX 800 Memory Support..........................................................11
2.3.3 AMD® Geode™ LX 800 500MHz Display Support......................................... 12
2.3.4 AMD Geode™ LX 800 500MHz Graphics processor...................................... 12
2.3.5 AMD Geode™ LX 800 500MHz Power Management ..................................... 14
2.4 AMD GEODE™ CS5536 SYSTEM CHIPSET ............................................................. 14
2.4.1 GeodeLink™ Interface Unit............................................................................. 15
2.4.2 AMD Geode™ CS5536 AT A-6 Contr oller....................................................... 15
2.4.3 AMD Geode™ CS5536 Audio Codec 97 (AC’97) Controller......................... 16
2.4.4 AMD Geode™ CS5536 Flash Interface .......................................................... 19
2.4.5 AMD Geode™ CS5536 USB Controller.......................................................... 19
2.4.6 AMD Geode™ CS5536 Serial Communications............................................. 20
2.4.7 AMD Geode™ CS5536 Real Time Clock......................................................... 20
®
GEODE™ LX 800 CPU SUPPORT.................................................................11
2.4.8 BIOS................................................................................................................. 21
2.5 LPC BUS COMPONENTS........................................................................................... 21
2.5.1 LPC Bus Overview........................................................................................... 21
2.5.2 BIOS................................................................................................................. 21
Page vii
Page 8
2.5.3 Winbond W83627EHG Super I/O chipset........................................................ 22
2.5.3.1 Super I/O LPC Interface ........................................................................... 23
2.5.3.2 Super I/O Hardware Monitor Functions ................................................... 24
2.5.3.3 Super I/O Parallel Port .............................................................................. 24
2.5.3.4 Super I/O Floppy Disk Drive (FDD) Controller....................................... 24
2.5.3.5 Super I/O Keyboard and Mouse Controller .............................................. 25
2.5.3.6 Super I/O GPIO Ports ............................................................................... 25
2.5.3.7 Super I/O Fan Speed and Fan Control ...................................................... 26
2.5.4 Serial Port Chipset........................................................................................... 26
2.6 PCI BUS................................................................................................................... 26
2.6.1 PCI Bus Overview............................................................................................ 26
2.6.2 PCI Bus Components....................................................................................... 27
2.6.3 RealTek RTL8100C PCI Express Fast Ethernet Controller............................. 27
2.6.4 ITE IT8888F PCI-to-ISA Bridge...................................................................... 29
NOVA-LX 5.25” Motherboard
2.6.5 PC/104-Plus Interface ..................................................................................... 30
2.6.6 Mini PCI........................................................................................................... 31
2.7 ENVIRONMENTAL AND POWER SPECIFICATIONS ....................................................... 32
2.7.1 System Monitoring........................................................................................... 32
2.7.2 Operating Temperature and Temperature Control........................................... 33
2.7.3 Power Consumption......................................................................................... 33
3 UNPACKING.......................................................................................................... 34
3.1 ANTI-STATIC PRECAUTIONS...................................................................................... 35
3.2 UNPACKING.............................................................................................................. 35
3.2.1 Unpacking Precautions.................................................................................... 35
3.3 UNPACKING CHECKLIST........................................................................................... 36
3.3.1 Package Contents............................................................................................. 36
3.4 OPTIONAL ITEMS...................................................................................................... 37
4 CONNECTOR PINOUTS...................................................................................... 39
4.1 PERIPHERAL INTERFACE CONNECTORS .................................................................... 40
4.1.1 NOVA-LX Layout ............................................................................................. 40
4.1.2 Peripheral Interface Connectors ..................................................................... 40
4.1.3 External Interface Panel Connectors............................................................... 42
4.2 INTERNAL PERIPHERAL CONNECTORS...................................................................... 42
Page viii
Page 9
NOVA-LX 5.25” Motherboard
4.2.1 ATX +12V Power Connector ........................................................................... 42
4.2.2 ATX Power Supply Enable Connector............................................................. 43
4.2.3 Audio CD In Connector (4-pin)....................................................................... 44
4.2.4 Audio Connector (10-pin)................................................................................ 45
4.2.5 Backlight Inverter Connector .......................................................................... 46
4.2.6 Fan Connector (+12V) (System Cooling Fans)............................................... 47
4.2.7 Floppy Disk Connector (34-pin)...................................................................... 48
4.2.8 Front Panel Connector (8-pin)........................................................................ 50
4.2.9 GPIO Connector.............................................................................................. 51
4.2.10 IDE Connector(40-pin).................................................................................. 52
4.2.11 Keyboard/Mouse Connector........................................................................... 54
4.2.12 LVDS LCD Connector ................................................................................... 55
4.2.13 Parallel Port Connector ................................................................................ 56
4.2.14 PC/104 Power Input Connector..................................................................... 57
4.2.15 Serial Port Connectors (COM1, COM2)....................................................... 58
4.2.16 Serial Port Connector (COM3 and COM4)(RS-232, RS-422 or RS-485)..... 59
4.2.17 Serial Port Connector (COM 5, COM 6, COM 7 and COM 8)..................... 60
4.2.18 TFT LCD TTL Connector............................................................................... 62
4.2.19 USB Connectors (Internal)............................................................................ 64
4.2.20 VGA Connectors (Internal)............................................................................ 65
4.3 EXTERNAL PERIPHERAL INTERFACE CONNECTORS .................................................. 66
4.3.1 Keyboard/Mouse Connector............................................................................ 66
4.3.2 LAN Connectors............................................................................................... 67
5 INSTALLATION ....................................................................................................69
5.1 ANTI-STATIC PRECAUTIONS...................................................................................... 70
5.2 INSTALLATION CONSIDERATIONS ............................................................................. 71
5.2.1 Installation Notices.......................................................................................... 71
5.2.2 Installation Checklist....................................................................................... 72
5.3 UNPACKING.............................................................................................................. 73
5.3.1 Unpacking Precautions.................................................................................... 73
5.4 CF CARD INSTALLATION.......................................................................................... 74
5.5 JUMPER SETTINGS .................................................................................................... 75
5.5.1 AT Power Select Jumper Settings..................................................................... 76
5.5.2 AT or ATX Power Select Jumper Settings........................................................ 77
Page ix
Page 10
5.5.3 CF Card Setup ................................................................................................. 78
5.5.4 Clear CMOS Jumper........................................................................................ 79
5.5.5 COM 1/2 Pin 9 Setting Jumper........................................................................ 80
5.5.6 COM 3/4 Function Select Jumper.................................................................... 81
5.5.7 LCD Clock Select Jumper................................................................................ 82
5.5.8 LCD Voltage Selection..................................................................................... 83
5.5.9 PCI-104 Serial IRQ Selector ........................................................................... 84
5.5.10 PCI-104 Voltage Setup................................................................................... 85
5.6 CHASSIS INSTALLATION ........................................................................................... 86
5.6.1 Airflow.............................................................................................................. 86
5.7 INTERNAL PERIPHERAL DEVICE CONNECTIONS........................................................ 87
5.7.1 Peripheral Device Cables................................................................................ 87
5.7.2 ATA Flat Cable Connection ............................................................................. 88
5.7.3 Audio Kit Installation....................................................................................... 89
NOVA-LX 5.25” Motherboard
5.7.4 USB Cable (Dual Port without Bracket) ......................................................... 90
5.7.5 FDD Cable Connection ................................................................................... 91
5.7.6 Parallel Port Cable with Slot Bracket............................................................. 92
5.7.7 Dual RS-232 Cable with Slot Bracket.............................................................. 93
5.7.8 Single RS-232/422/485 Cable with Slot Bracket ............................................. 94
5.8 EXTERNAL PERIPHERAL INTERFACE CONNECTION ................................................... 95
5.8.1 LAN Connection............................................................................................... 96
5.8.2 PS/2 Y-Cable Connection................................................................................. 96
6 BIOS SCREENS...................................................................................................... 98
6.1 INTRODUCTION ........................................................................................................ 99
6.1.1 Starting Setup................................................................................................... 99
6.1.2 Using Setup...................................................................................................... 99
6.1.3 Getting Help................................................................................................... 100
6.1.4 Unable to Reboot After Configuration Changes............................................ 100
6.1.5 BIOS Menu Bar.............................................................................................. 100
6.2 MAIN ..................................................................................................................... 101
6.3 ADVANCED............................................................................................................. 102
6.3.1 CPU Configuration........................................................................................ 103
6.3.2 IDE Configuration......................................................................................... 104
6.3.2.1 IDE Master, IDE Slave ........................................................................... 106
Page x
Page 11
NOVA-LX 5.25” Motherboard
6.3.3 Floppy Configuration......................................................................................112
6.3.4 Super IO Configuration...................................................................................113
6.3.5 Hardware Health Configuration.....................................................................118
6.3.6 Smbios............................................................................................................ 120
6.3.7 Remote Access Configuration........................................................................ 121
6.3.8 USB Configuration......................................................................................... 125
6.3.9 IT8888 Configuration .................................................................................... 126
6.3.9.1 ISA Decode IO Spaces............................................................................ 127
6.3.9.2 ISA Decode Memory Spaces .................................................................. 130
6.3.10 Power........................................................................................................... 133
6.3.10.1 APM Configuration............................................................................... 134
6.4 PCI/PNP ................................................................................................................ 135
6.5 BOOT ..................................................................................................................... 137
6.5.1 Boot Settings Configuration........................................................................... 138
6.5.2 Boot Device Priority...................................................................................... 141
6.5.3 Removable Drives.......................................................................................... 142
6.6 SECURITY............................................................................................................... 143
6.7 CHIPSET ................................................................................................................. 145
6.7.1 Video Configuration....................................................................................... 146
6.8 EXIT....................................................................................................................... 150
7 DRIVER INSTALLATION.................................................................................. 152
7.1 AVAILABLE SOFTWARE DRIVERS ............................................................................ 153
7.2 OPEN THE DEVICE MANAGER IN WINDOWS........................................................... 153
7.3 VGA DRIVER INSTALLATION ................................................................................. 158
7.4 AUDIO DRIVER INSTALLATION ............................................................................... 165
7.5 LAN DRIVER ......................................................................................................... 172
A BIOS OPTIONS.................................................................................................... 175
B TERMINOLOGY................................................................................................. 179
C DIO INTERFACE................................................................................................. 184
C.1 DIO INTERFACE INTRODUCTION ........................................................................... 185
C.2 DIO CONNECTOR PINOUTS ................................................................................... 185
C.3 ASSEMBLY LANGUAGE SAMPLES........................................................................... 186
C.3.1 Enable the DIO Input Function..................................................................... 186
Page xi
Page 12
C.3.2 Enable the DIO Output Function.................................................................. 186
D WATCHDOG TIMER.......................................................................................... 187
E ADDRESS MAPPING.......................................................................................... 190
E.1 ADDRESS MAP ....................................................................................................... 191
E.2 1ST MB MEMORY ADDRESS MAP.......................................................................... 191
E.3 IRQ MAPPING TABLE ............................................................................................ 192
E.4 DMA CHANNEL ASSIGNMENTS............................................................................. 192
F COMPATIBILITY................................................................................................ 193
F.1 COMPATIBLE OPERATING SYSTEMS ........................................................................ 194
G HAZARDOUS MATERIALS DISCLOSURE................................................... 195
G.1 HAZARDOUS MATERIAL DISCLOSURE TABLE FOR IPB PRODUCTS CERTIFIED AS
ROHS COMPLIANT UNDER 2002/95/EC WITHOUT MERCURY..................................... 196
NOVA-LX 5.25” Motherboard
H INDEX.................................................................................................................... 199
Page xii
Page 13
NOVA-LX 5.25” Motherboard
Figure 1-1: NOVA-LX Motherboard..............................................................................2
Figure 1-2: NOVA-LX Overview [Front View]..............................................................3
Figure 2-1: NOVA-LX Dimensions (mm)......................................................................8
Figure 2-2: External Interface Panel Dimensions (mm).............................................9
Figure 2-3: Data Flow Block Diagram........................................................................10
Figure 2-4: Memory Modules .....................................................................................12
Figure 2-5: IDE Connector..........................................................................................15
Figure 2-6: AC’97 Codec and Audio Connector.......................................................17
Figure 2-7: CompactFlash Connector.......................................................................19
List of Figures
Figure 2-8: USB Connectors ......................................................................................20
Figure 2-9: BIOS Chipset............................................................................................22
Figure 2-10: Super I/O Chipset...................................................................................23
Figure 2-11: Ethern et Interface..................................................................................28
Figure 2-12: PCI-to-ISA Bridge...................................................................................29
Figure 2-13: PC/104-Plus Components.....................................................................31
Figure 2-14: Mini PCI Slot...........................................................................................32
Figure 4-1: Connector and Jumper Locations .........................................................40
Figure 4-2: ATX Power Connector Location.............................................................43
Figure 4-3: ATX Power Supply Enable Connector Location...................................44
Figure 4-4: Audio CD In Connector Pinouts (4-pin).................................................45
Figure 4-5: Audio Connector Pinouts (10-pin)..........................................................46
Figure 4-6: Panel Backlight Connector Pinout Locations.......................................47
Figure 4-9: +12V Fan Connector Location................................................................48
Figure 4-10: 34-pin FDD Connector Location...........................................................49
Figure 4-11: Front Panel Connector Pinout Locati ons (8-pin)................................50
Figure 4-12: GPIO Connector Pinout Locations ......................................................51
Figure 4-13: Secondary IDE Device Connector Locations......................................53
Page xiii
Page 14
Figure 4-14: Keyboard/Mouse Connector Location.................................................54
Figure 4-15: LVDS LCD Connector Pinout Locations..............................................55
Figure 4-16: Parallel Port Connector Location.........................................................56
Figure 4-17: PC/104 Power Input Connector Pinouts..............................................57
Figure 4-18: RS-232 COM Connector Pinout Locations..........................................58
Figure 4-19: RS-232/422/485 Serial Port Connector Location ................................60
Figure 4-20: COM 2 to COM 4 Connector Pinout Locations...................................61
Figure 4-21: TFT LCD TTL Connector Pinout Locations.........................................63
Figure 4-22: USB Connector Pinout Locations........................................................64
Figure 4-23: VGA Connector Pinout Locations........................................................65
Figure 4-24: NOVA-LX External Interface Connectors ............................................66
Figure 4-25: PS/2 Pinout and Configuration.............................................................67
Figure 4-26: RJ-45 Ethernet Connector ....................................................................68
NOVA-LX 5.25” Motherboard
Figure 5-1: CF Card Installation.................................................................................75
Figure 5-2: AT Power Select Jumper Location.........................................................77
Figure 5-3: AT Power Select Jumper Location.........................................................78
Figure 5-4: CF Card Setup Jumper Location............................................................79
Figure 5-5: Clear CMOS Jumper................................................................................80
Figure 5-6: COM 1/2 Pin 9 Setting Jumper Location ...............................................81
Figure 5-7: COM 2 Function Select Jumper Location .............................................82
Figure 5-8: LCD Clock Select Jumper Location.......................................................83
Figure 5-9: LCD Voltage Selection Jumper Location...............................................84
Figure 5-10: PCI-104 Serial IRQ Selector Jumper Pinout Locations......................85
Figure 5-11: PCI-104 Voltage Setup Jumper Pinout Locations...............................86
Figure 5-12: IDE Cable Connection...........................................................................88
Figure 5-13: Audio Kit Cable Connection.................................................................89
Figure 5-14: Dual USB Cable Connection.................................................................90
Figure 5-15: FDD Cable Connection..........................................................................91
Page xiv
Figure 5-16: LPT Cable Connection ..........................................................................92
Figure 5-17: Connect the LPT Device........................................................................93
Figure 5-18: Dual RS-232 Cable Installation.............................................................94
Figure 5-19: Single RS-232 Cable Installation..........................................................95
Page 15
NOVA-LX 5.25” Motherboard
Figure 5-20: LAN Connection.....................................................................................96
Figure 5-21: PS/2 Keyboard/Mouse Connector........................................................97
Figure 6-1: IT8888 Configuration............................................................................ 127
Figure 6-2: Decode IO Spaces................................................................................. 128
Figure 6-3: ISA Decode Memory Spacesk,l............................................................ 131
Figure 7-1: Access Windows Control Panel.......................................................... 154
Figure 7-2: Performance and Maintenance............................................................ 155
Figure 7-3: Access the System............................................................................... 155
Figure 7-4: System Properties................................................................................ 156
Figure 7-5: Open Device Manager.......................................................................... 157
Figure 7-6: Device Manager .................................................................................... 158
Figure 7-7: Video Controller (Device Manager)..................................................... 159
Figure 7-8: Update Driver Selection....................................................................... 159
Figure 7-9: Hardware Update Wizard...................................................................... 160
Figure 7-10: VGA Driver Installation Start.............................................................. 161
Figure 7-11: Wi zard Search..................................................................................... 162
Figure 7-12: Wizard Warning Screen...................................................................... 162
Figure 7-13: VGA Driver Installation....................................................................... 163
Figure 7-14: VGA Driver Installation Complete ..................................................... 164
Figure 7-15: Device Manager Update..................................................................... 165
Figure 7-16: Audio Controller (Device Manager)................................................... 166
Figure 7-17: Update Audio Driver Selection.......................................................... 166
Figure 7-18: Hardware Update Wizard.................................................................... 167
Figure 7-19: Audio Driver Installation Start........................................................... 168
Figure 7-20: Wizard Search..................................................................................... 169
Figure 7-21: Wizard Warning Screen...................................................................... 169
Figure 7-22: Audio Driver Installation .................................................................... 170
Figure 7-23: Audio Driver Installation Complete................................................... 171
Page xv
Page 16
Figure 7-24: Device Manager Update..................................................................... 172
Figure 7-25: Locate the Setup Program Icon......................................................... 172
Figure 7-26: Preparing Setup Screen..................................................................... 173
Figure 7-27: Install Wizard Welcome Screen......................................................... 174
Figure 7-28: Installing Screen................................................................................. 174
NOVA-LX 5.25” Motherboard
Page xvi
Page 17
NOVA-LX 5.25” Motherboard
Table 1-1: Technical Specifications.............................................................................6
Table 2-1: Geode LX Graphics Features ...................................................................14
Table 2-2: Supported HDD Specifications ................................................................16
Table 2-3: Power Consumption..................................................................................33
Table 3-1: Package List Contents..............................................................................37
Table 3-2: Package List Contents..............................................................................38
Table 4-1: Peripheral Interface Connectors..............................................................42
Table 4-2: Rear Panel Connectors.............................................................................42
Table 4-3: ATX Power Connector Pinouts.................................................................43
List of Tables
Table 4-4: ATX Power Supply Enable Connector Pinouts.......................................44
Table 4-5: Audio CD In Connector Pinouts...............................................................45
Table 4-6: Audio Connector Pinouts (10-pin)...........................................................46
Table 4-7: Panel Backlight Connector Pinouts.........................................................47
Table 4-10: +12V Fan Connector Pinouts..................................................................48
Table 4-11: 34-pin FDD Connector Pinouts...............................................................50
Table 4-12: Front Panel Connector Pinouts (8-pin)..................................................51
Table 4-13: GPIO Connector Pinouts.........................................................................52
Table 4-14: Secondary IDE Connector Pinouts........................................................54
Table 4-15: Keyboard/Mouse Connector Pinouts ....................................................55
Table 4-16: LVDS LCD Port Connector Pinouts........................................................56
Table 4-17: Parallel Port Connector Pinouts ............................................................57
Table 4-18: PC/104 Power Input Connector Pinouts................................................58
Table 4-19: RS-232 COM Connector Pinouts............................................................59
Table 4-20: RS-232/RS-485 Serial Port Connector Pinouts.....................................60
Table 4-21: COM 2 to COM 4 Connector Pinouts.....................................................62
Table 4-22: TFT LCD TTL Port Connector Pinouts...................................................64
Table 4-23: USB Port Connector Pinouts..................................................................65
Table 4-24: VGA Connector Pinouts..........................................................................66
Page xvii
Page 18
Table 4-25: Keyboard Connector Pinouts.................................................................67
Table 4-26: LAN Pinouts .............................................................................................68
Table 4-27: RJ-45 Ethernet Connector LEDs............................................................68
Table 5-1: Jumpers......................................................................................................76
Table 5-2: AT Power Select Jumper Settings............................................................76
Table 5-3: AT Power Select Jumper Settings............................................................77
Table 5-4: CF Card Setup Jumper Settings ..............................................................78
Table 5-5: Clear CMOS Jumper Settings...................................................................80
Table 5-6: COM 1/2 Pin 9 Setting Jumper Settings..................................................81
Table 5-7: COM 3/4 Function Select Jumper Settings.............................................82
Table 5-8: LCD Clock Select Jumper Settings..........................................................82
Table 5-9: LCD Voltage Selection Jumper Settings .................................................84
Table 5-10: PCI-104 Serial IRQ Selector Jumper Settings.......................................85
NOVA-LX 5.25” Motherboard
Table 5-11: PCI-104 Voltage Setup Jumper Settings................................................85
Table 5-12: IEI Provided Cables.................................................................................87
Table 6-1: BIOS Navigation Keys............................................................................ 100
Page xviii
Page 19
NOVA-LX 5.25” Motherboard
Menu 1: Main............................................................................................................. 101
Menu 2: Advanced.................................................................................................... 103
Menu 3: CPU Configuration..................................................................................... 104
Menu 4: IDE Configuration...................................................................................... 105
Menu 5: IDE Master and IDE Slave Configuration ................................................ 107
BIOS Menu 6: Floppy Configuration .......................................................................112
Menu 7: Super IO Configuration..............................................................................113
Menu 8: Hardware Health Configuration.................................................................119
Menu 9: Smbios Configuration............................................................................... 120
BIOS Menus
Menu 10: Remote Access Configuration............................................................... 121
Menu 11: USB Configuration................................................................................... 125
Menu 12: Power Configuration ............................................................................... 133
Menu 13: APM Configuration.................................................................................. 134
Menu 14: PCI/PnP Configuration............................................................................ 135
Menu 15: Boot........................................................................................................... 138
Menu 16: Boot Settings Configuration................................................................... 139
Menu 17: Boot Device Priority Settings................................................................. 141
Menu 18: Removable Drives ................................................................................... 143
Menu 19: Security..................................................................................................... 144
Menu 20: Chipset...................................................................................................... 146
Menu 21: Video Configuration................................................................................ 147
Menu 22:Exit............................................................................................................. 150
Page xix
Page 20
NOVA-LX 5.25” Motherboard
THIS PAGE IS INTENTIONALLY LEFT BLANK
Page xx
Page 21
NOVA-LX 5.25” Motherboard
Chapter
Chapter
1
1 Introduction
Page 1
Page 22
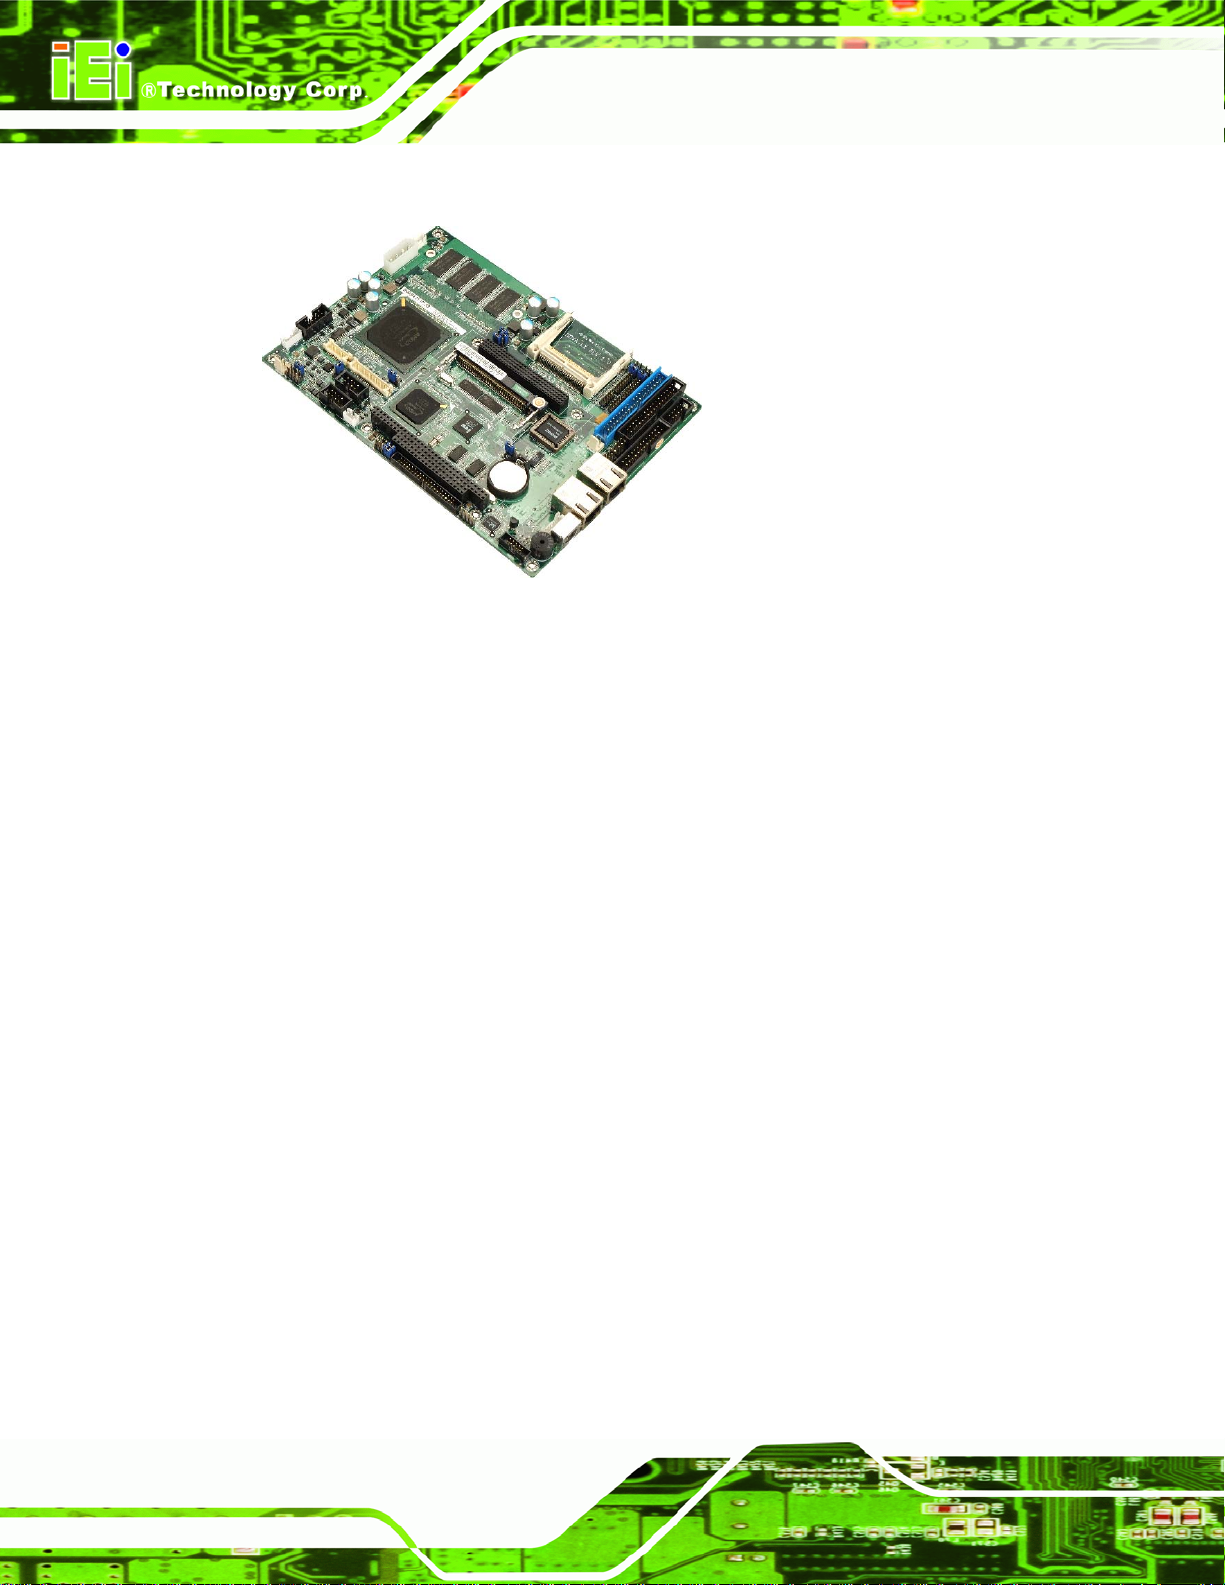
1.1 Overview
Figure 1-1: NOVA-LX Motherboard
NOVA-LX 5.25” Motherboard
The NOVA-LX 5.25” form factor motherboard is an AMD Geode™ LX 800 platform with
256 MB of on-board DDR SDRAM, support for dual 10/100 Mbps Ethernet, eight serial
ports, digital I/O interface and audio. The NOVA-LX also supports multiple display unit
types including VGA, LVDS and TTL. A PC/104 slot and four USB 2.0 ports are available
for system expansion and peripheral device connection. A Mini PCI slot is also available
for expansion. There are two NOVA-LX models. The NOVA-LX-800 operates in a normal
temperature range and the NOVA-LX-800W operates in a much wider temperature range.
1.1.1 NOVA-LX Features
Some of the NOVA-LX features are listed below.
5.25” form factor
AMD Geode™ LX 800 processor
256 MB on-board memory can be increased to 512 MB
Supports VGA, 24-bit TTL and single-channel 18-bit LVDS displays
Six RS-232 serial connectors and two RS-232/422/485 serial connectors
Page 2
Wide operating temperature supported
RoHS compliant
Supports AT or ATX power supplies
Page 23
NOVA-LX 5.25” Motherboard
1.2 NOVA-LX Overview
1.2.1 NOVA-LX Overview Photo
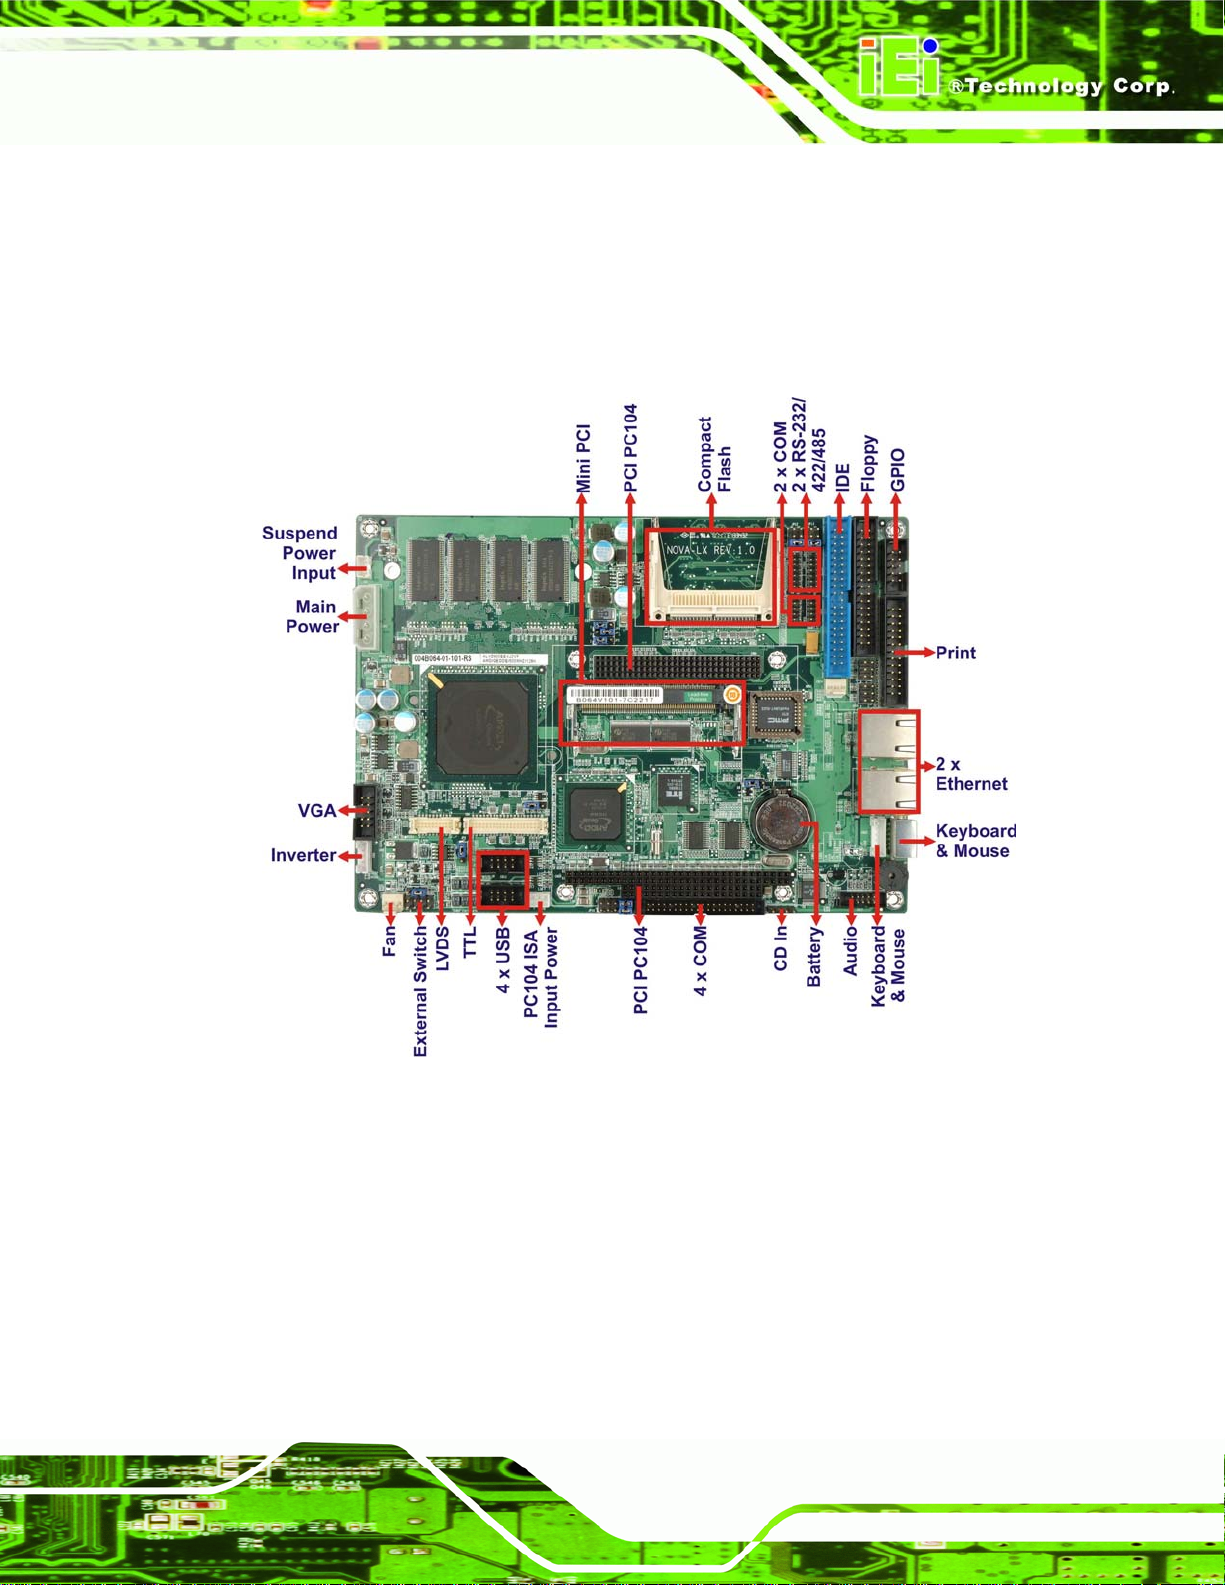
The NOVA-LX has a wide variety of peripheral interface connectors. Figure 1-2 is a
labeled photo of the peripheral interface connectors on the NOVA-LX.
Figure 1-2: NOVA-LX Overview [Front View]
1.2.2 NOVA-LX Peripheral Connectors and Jumpers
The NOVA-LX has the following connectors on-board:
1 x ATX +12V/5V power connector
1 x A TX power enable connector
1 x Audio connector
1 x Backlight inverter connector
Page 3
Page 24
1 x Battery connector
1 x CD-in connector
1 x CompactFlash® Type II (CF Type II) socket
1 x Fan connectors
1 x Floppy disk (FDD) connector
1 x Front panel connector
1 x General purpose input/output (GPIO) connector
1 x HDD connector
1 x Keyboard and mouse connector
1 x LVDS connector
1 x Parallel port connector
1 x PC/104-Plus connector
1 x PC/104-Plus ISA power connector
1 x Quad RS-232 serial port connector
NOVA-LX 5.25” Motherboard
2 x RS-232 serial port connectors
2 x RS-232/422/485 serial port connector
1 x TTL connector
2 x USB 2.0 connectors (support four USB devices)
1 x VGA connector
The NOV A-L X has the following external peripheral interface co nnectors on the board rear
panel
2 x Ethernet connectors
1 x PS/2 connectors
The NOVA-LX has the following on-board jumpers:
AT or ATX power select
CF card setup
Clear CMOS
COM 1/2 Pin 9 setting
Page 4
COM 3 function select
COM 4 function select
LCD clock setting
LCD voltage selection
Page 25
NOVA-LX 5.25” Motherboard
PCI-104 Voltage Setup
PC/104-Plus SERIRQ Select
1.2.3 Technical Specifications
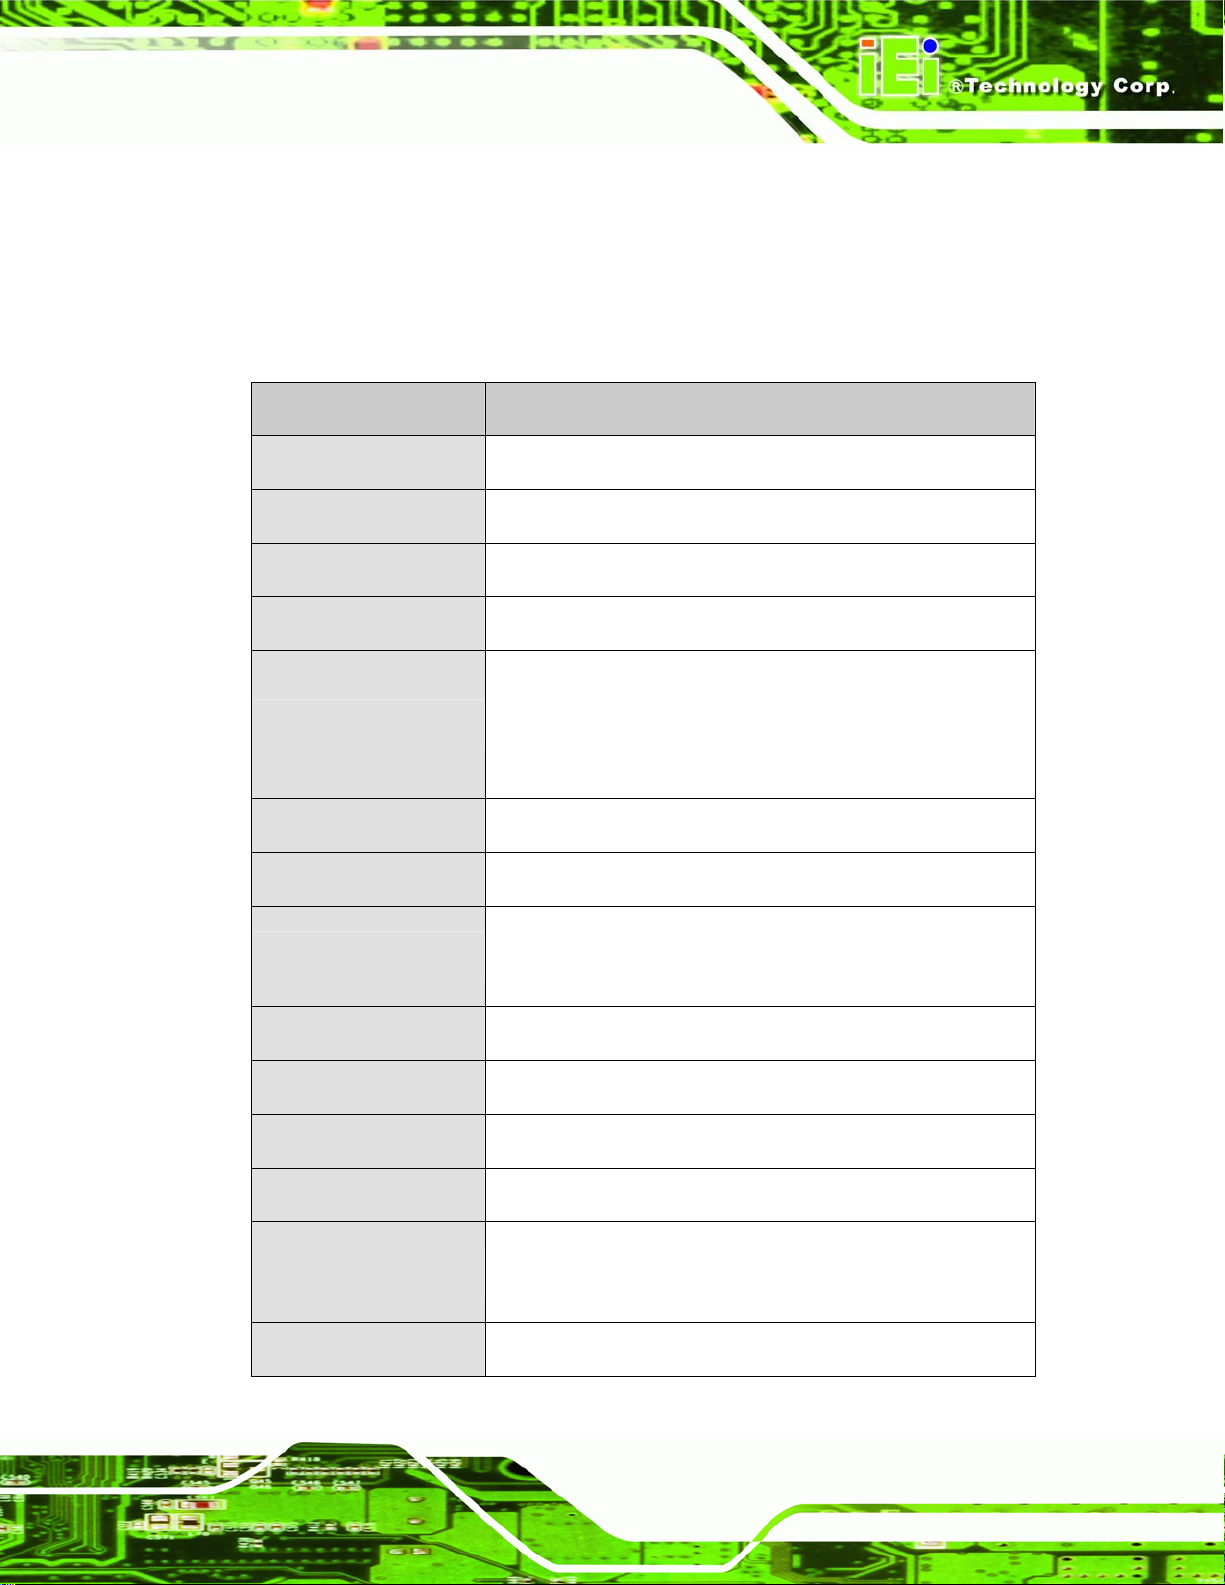
NOVA-LX technical specifications are listed in Table 1-1. See Chapter 2 for details.
Specification NOVA-LX
Form Factor
System CPU
System Chipset
Memory
Display
BIOS
Audio
Expansion Options
LAN
5.25”
AMD Geode™ LX 800
AMD Geode™ CS5536
256 MB DDR SDRAM on-board
VGA integrated into the AMD Geode™ LX 800
One 24-bit TTL
One 18-bit single-channel LVDS
AMI Flash BIOS
RealT ek AL C203 AC’97 codec
One PC/104-Plus
One Minic PCI
Dual 10/100 Mbps RealTek RTL8100C Ethernet chipsets
SuperIO
SSD
Digital I/O
COM
USB 2.0
Winbond W83627EHG
CF Type II
8-bit digital I/O, 4-bit input/4-bit output
Six RS-232 serial ports (internal)
Two RS-232, RS-422 or RS-485 serial port (internal)
Four USB 2.0 devices supported
Page 5
Page 26
One 40-pin IDE connector connects to two Ultra
IDE
ATA33/66/100 devices
NOVA-LX 5.25” Motherboard
Floppy Disk Drivers
Keyboard/mouse
Parallel Port
Watchdog Timer
Power Supply
Power Type
Power Consumption
Temperature
One FDD
One PS/2 connectors for keyboard and mouse
One 26-pin parallel port connects to parallel
communications device (e.g. printer)
Software programmable 1-255 sec. by super I/O
5 V only
12 V for LCD and COM1 and COM2
AT or ATX
5 V @ 1.66 A
(500 MHz AMD Geode™ LX 800 processor with 256 MB
on-board memory.)
NOVA-LX-800: 0ºC – 60ºC (32ºF - 140ºF)’
NOVA-LX-800W: -20ºC – +70ºC (-4ºF - 158ºF)
apter
2
Page 6
Humidity (operating)
Dimensions (LxW)
Weight (GW/NW)
Table 1-1: Technical Specifications
5%~95% non-condensing
203 mm x 146 mm
700 g/260 g
Page 27
NOVA-LX 5.25” Motherboard
Chapter
2
2 Detailed Specifications
Page 7
Page 28
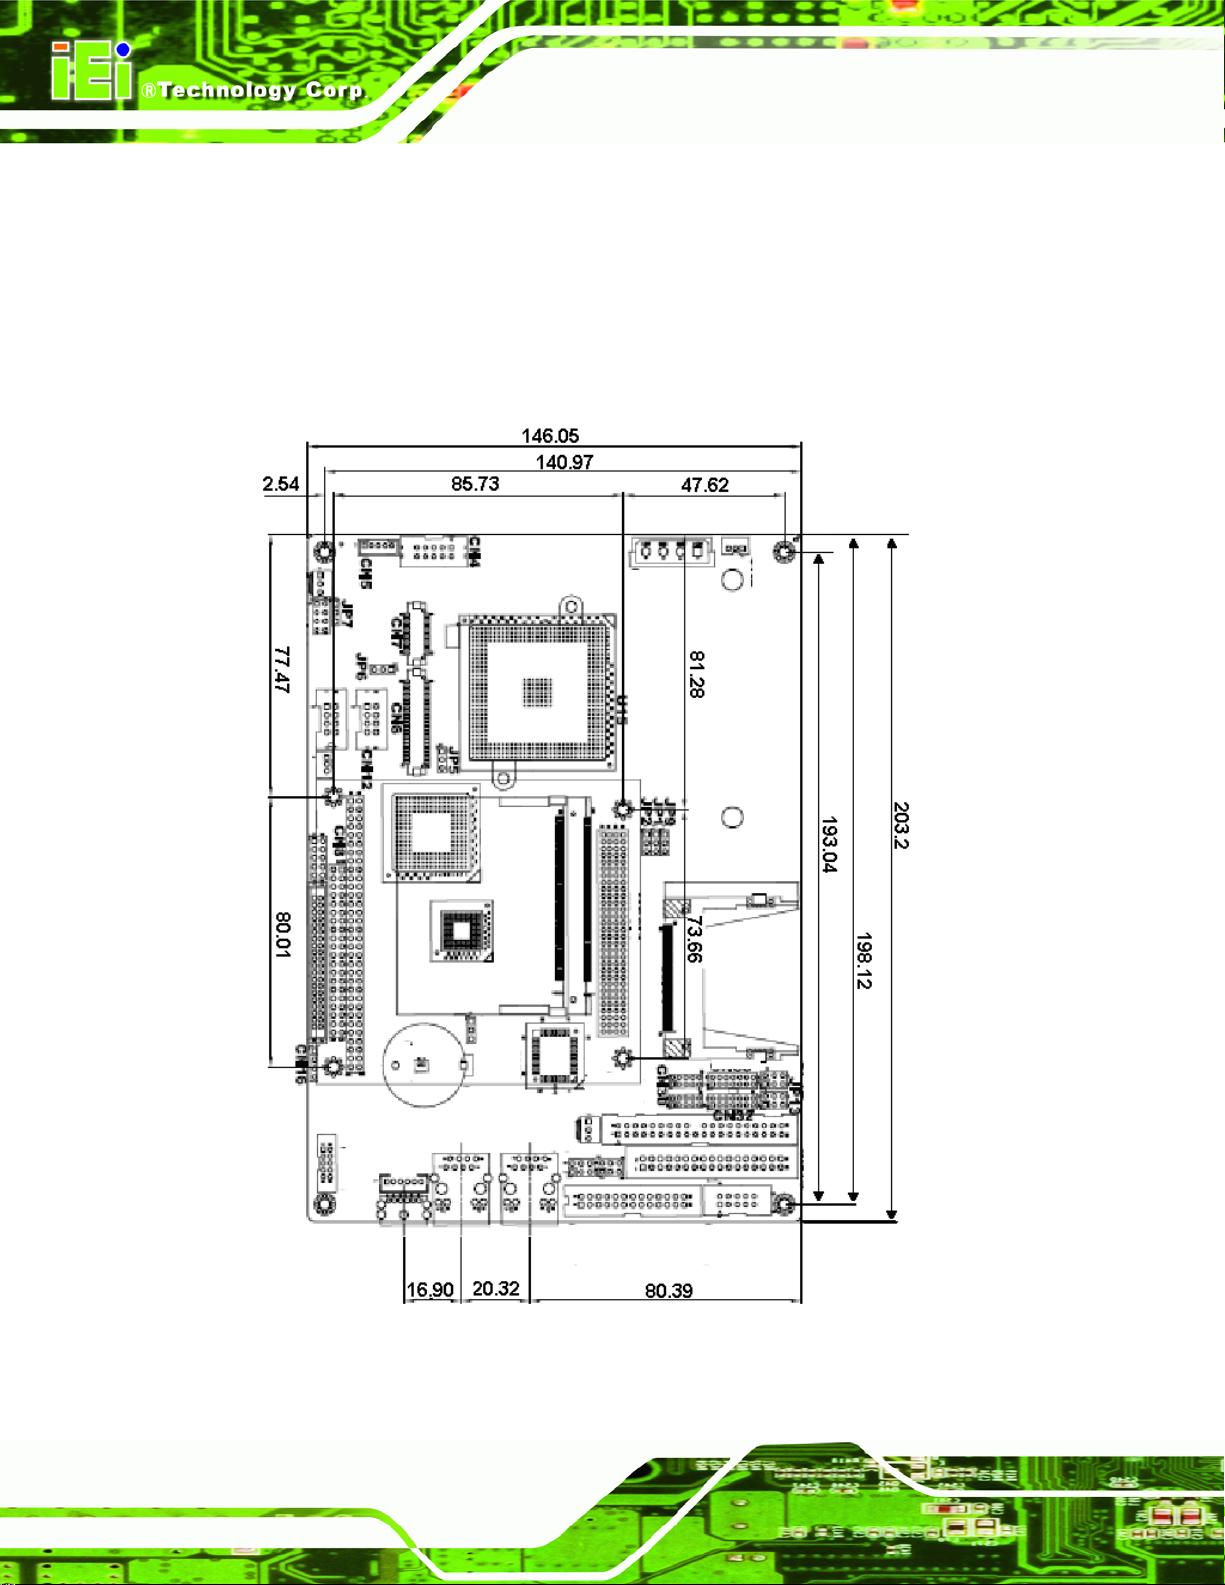
2.1 Dimensions
2.1.1 Board Dimensions
The dimensions of the board are listed below:
Length: 203 mm
Width: 146 mm
NOVA-LX 5.25” Motherboard
Page 8
Figure 2-1: NOVA-LX Dimensions (mm)
Page 29
NOVA-LX 5.25” Motherboard
2.1.2 External Interface Panel Dimensions
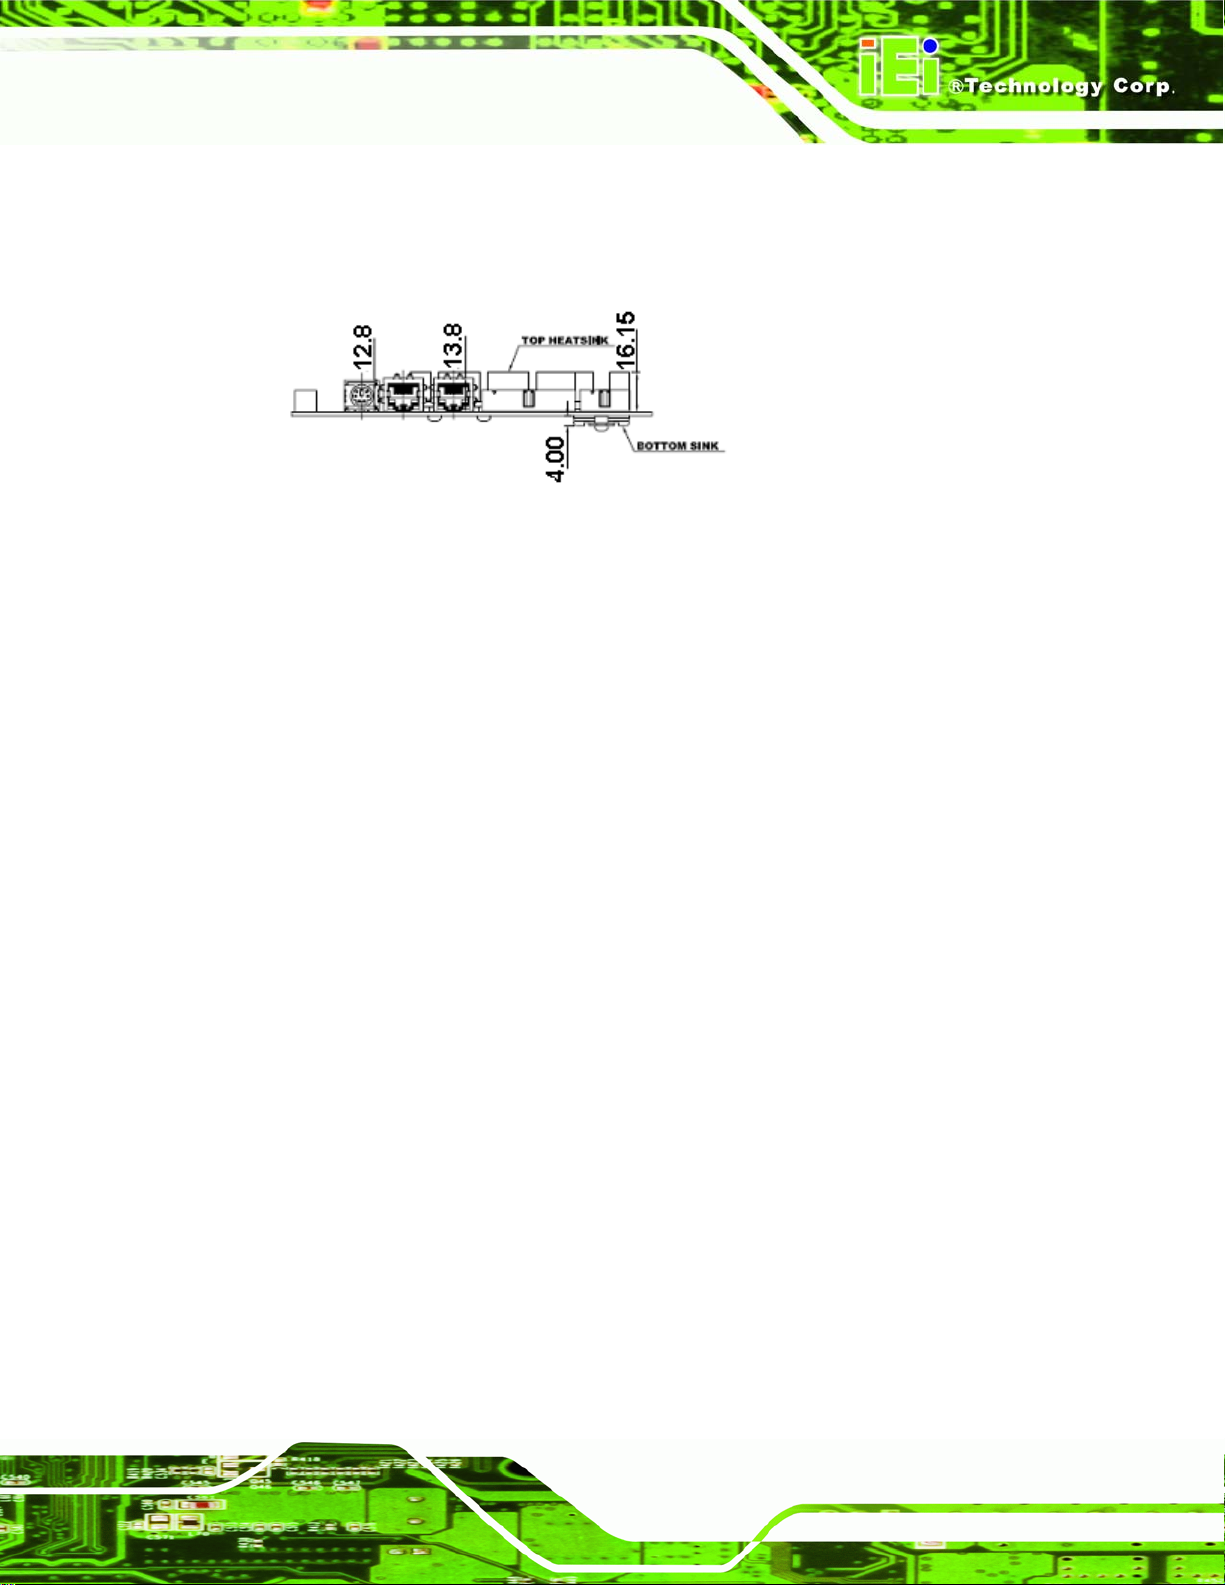
External peripheral interface connector panel dimensions are shown in Figure 2-2.
Figure 2-2: External Interface Panel Dimensions (mm)
2.2 Data Flow
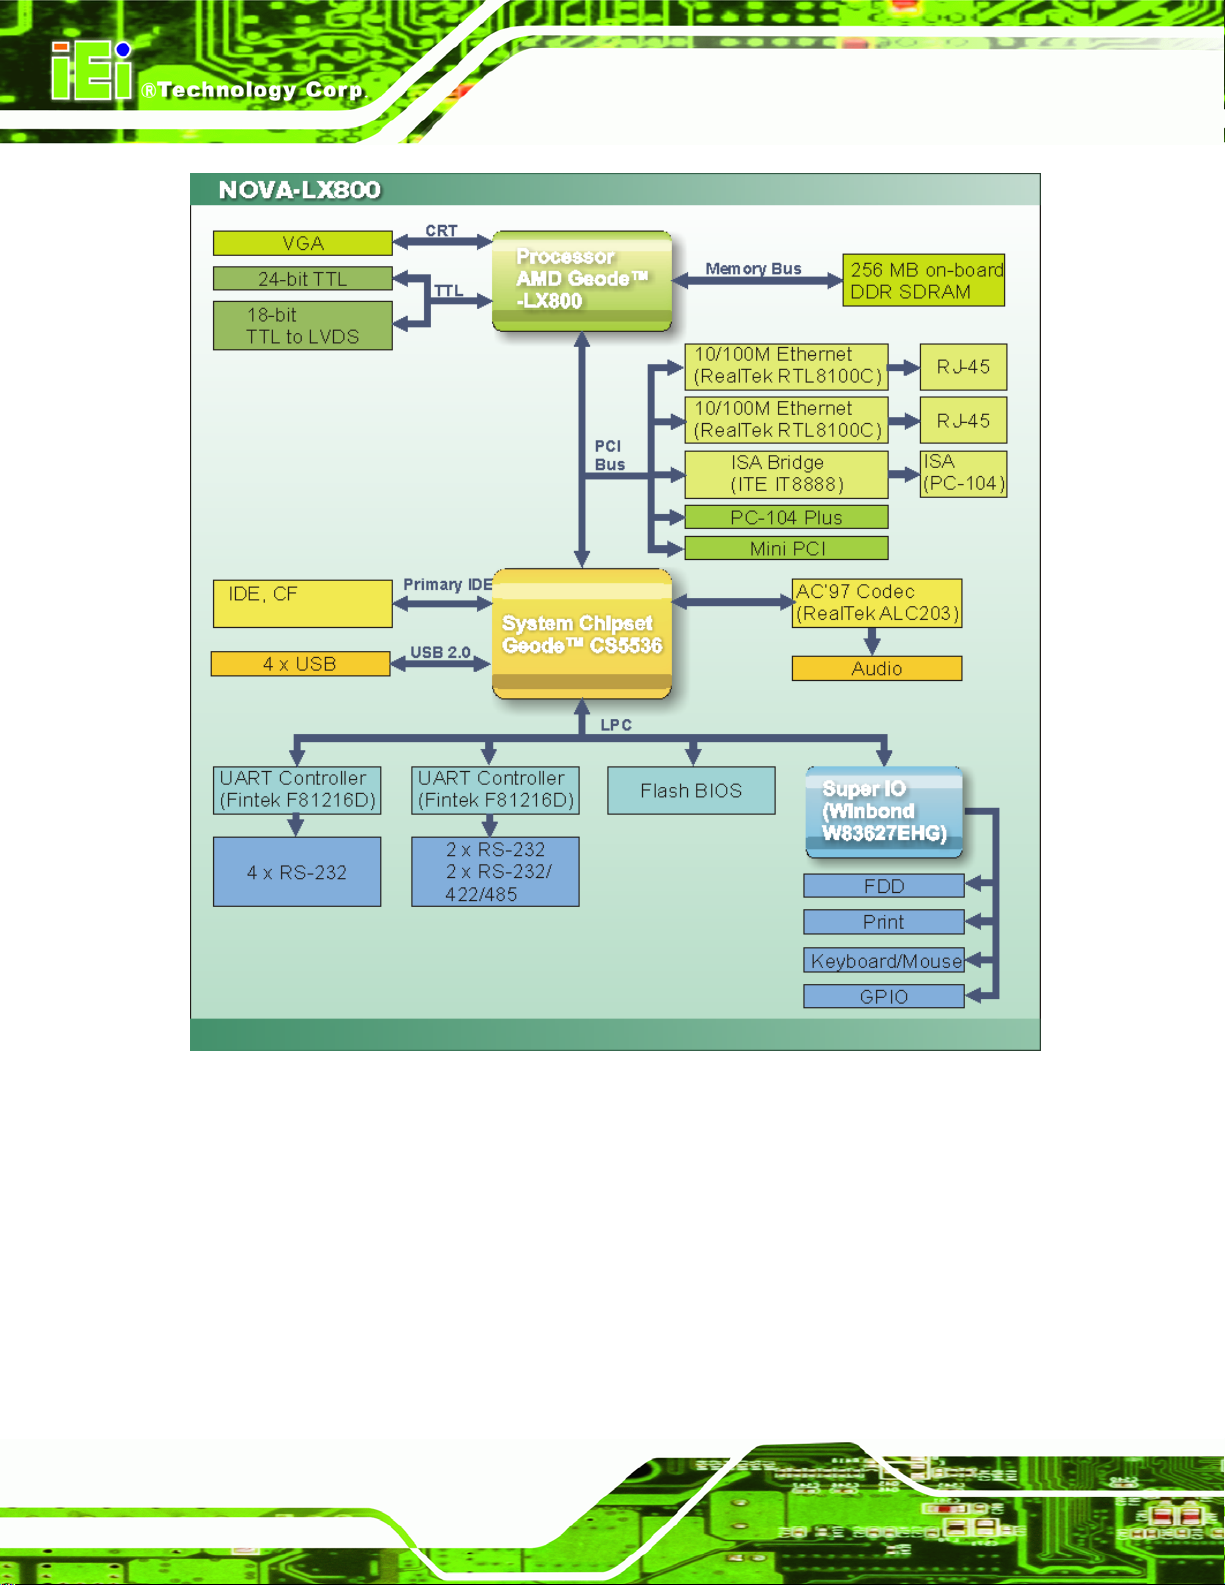
Figure 2-3 shows the data flow between the two on-board chip set s and other component s
installed on the motherboard and described in the followin g sections of this chapter.
Page 9
Page 30
NOVA-LX 5.25” Motherboard
Figure 2-3: Data Flow Block Diagram
Page 10
Page 31
NOVA-LX 5.25” Motherboard
2.3 AMD® Geode™ LX 800 CPU Support
The NOVA-LX series motherboards all come with a preinstalled AMD® Geode™ LX 800
500MHz CPU.
2.3.1 AMD® Geode™ LX 800 500MHz Overview
The specifications for the 500MHz AMD® Geode™ LX 800 are listed below
x86/x87-compatible core
Processor frequency up to 500 MHZ
64K I/64K D L1 cache and 128K L2 cache
Split I/D cache/TLB (Translation Look-Aside Buffer)
Integrated FPU that supports the Intel MMX® and AMD 3DNow!™
Technology instruction sets
9 GB/s internal GeodeLink™ Interface Unit (GLIU)
Security Block
o 128-bit AES (CBC/ECB)
True Random Number Generator
2.3.2 AMD Geode™ LX 800 Memory Support
The AMD Geode™ LX 800 supports 64-bit DDR memory modules with frequencies up to
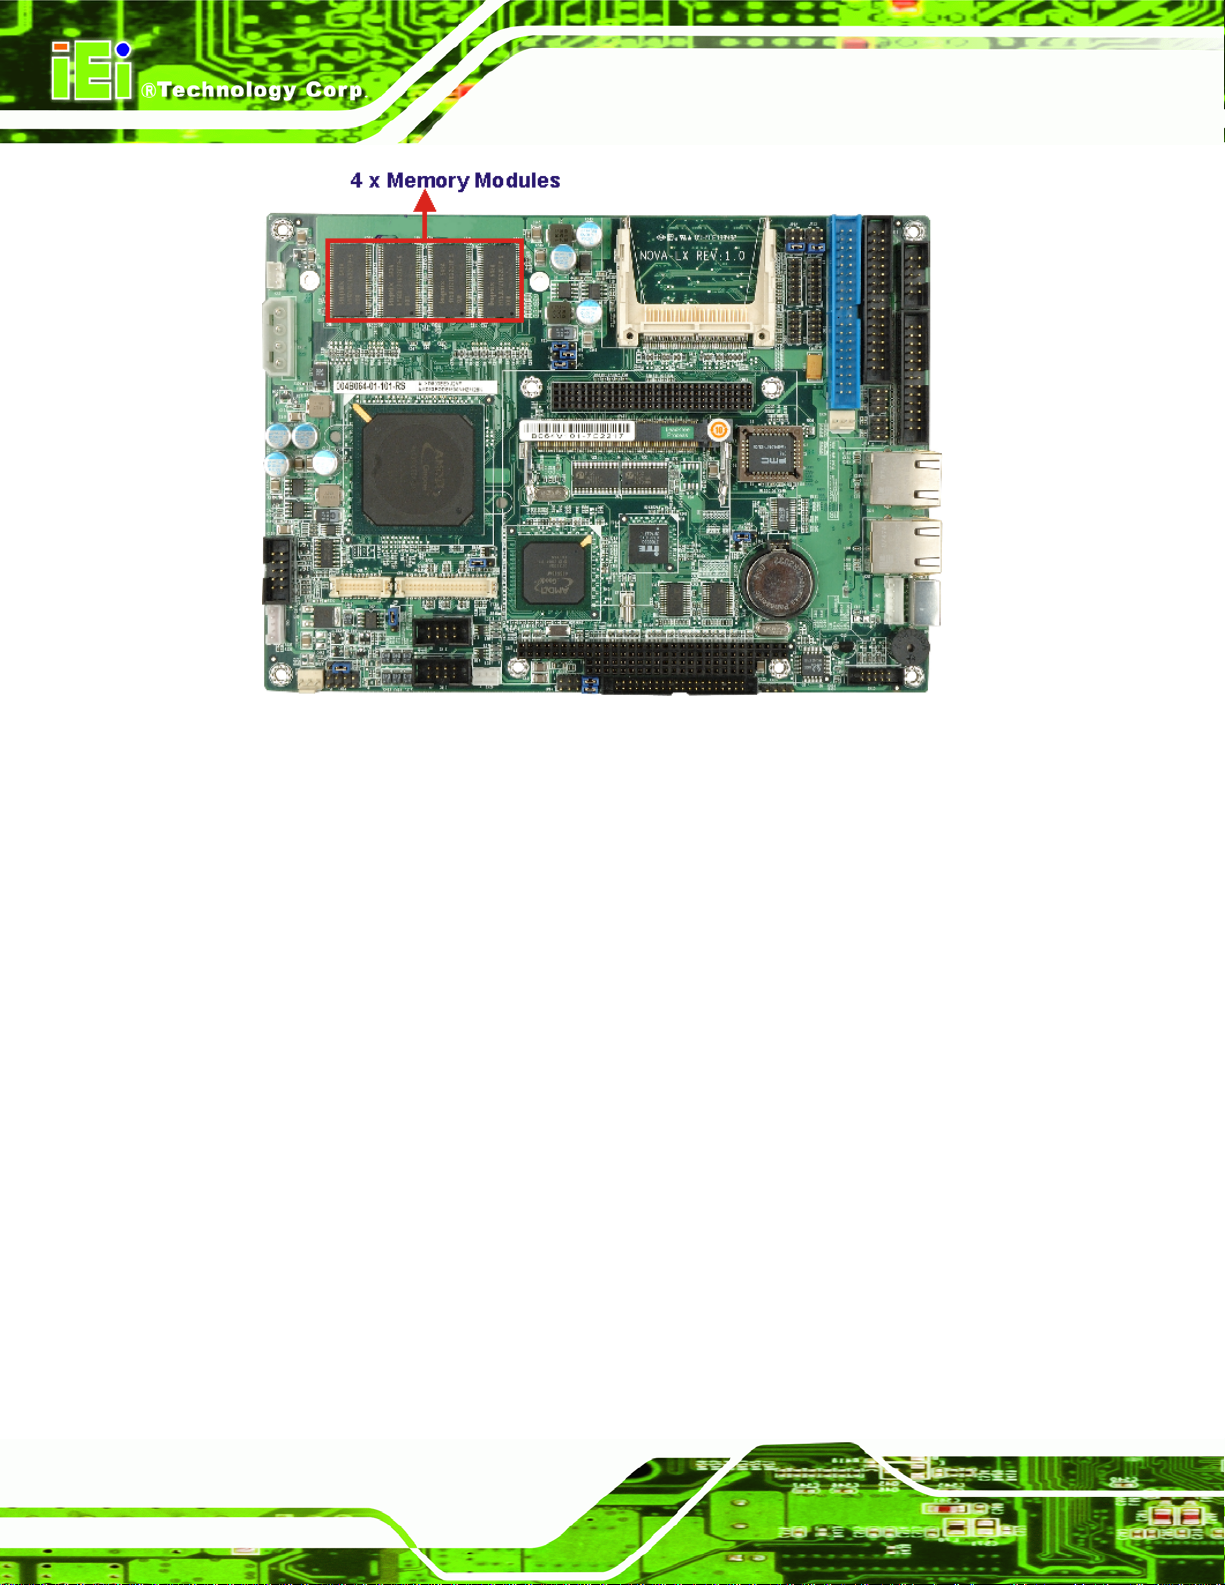
400 MHz. The NOVA-LX has four optional preinstalled DDR SDRAM memory modules.
Each memory module has a capacity 64 MB. The 512 Mb (64 MB) DDR SDRAM modules
have a clock frequency of 200 MHz and a maximum data transmission rate of 200 Mbps
per pin.
Page 11
Page 32
NOVA-LX 5.25” Motherboard
Figure 2-4: Memory Modules
2.3.3 AMD® Geode™ LX 800 500MHz Display Support
The AMD® Geode™ LX 800 supports both CRT and TFT in a dual display mode. The
following display specifications.
Supported Standards
o High Definition (HD)
o Standard Definition (SD)
Supported Resolution
o 1920x1440 in CRT mode
o 1600x1200 in TFT mode
VESA 1.1 and 2.0 VIP/VDA support
2.3.4 AMD Geode™ LX 800 500MHz Graphics processor
Page 12
The AMD Geode™ LX 800 BitBLT/vector engine graphics processor supports pattern
generation, source expansion, pattern/source transpa rency, 256 ternary raster operations,
alpha blenders to support alpha- BLTs, incorporated BLT FIFOs, a GeodeLink interface
Page 33
NOVA-LX 5.25” Motherboard
and the ability to throttle BLTs according to video timing. New features added to the
Graphics Processor include:
Command buffer interface
Hardware accelerated rotation BLTs
Color depth conversion
Paletized color
Full 8x8 color pattern buffer
Separate base addresses for all channels
Monochrome inversion
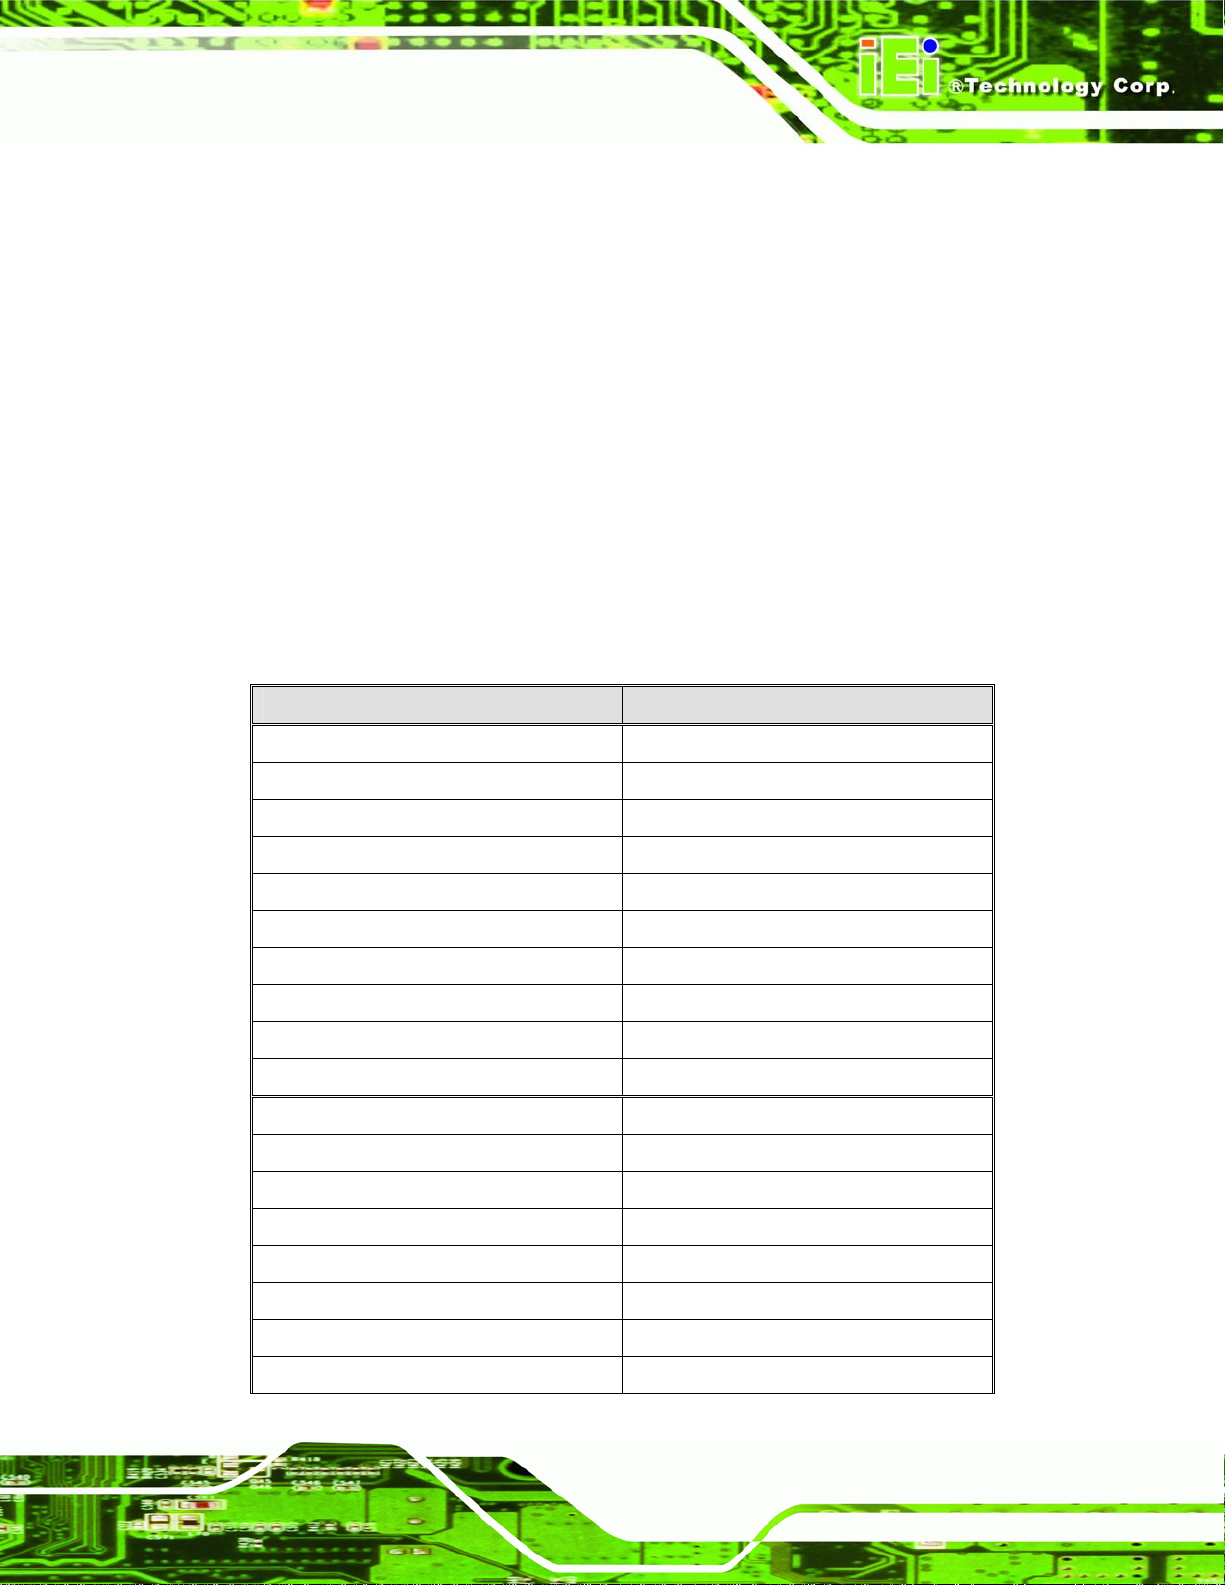
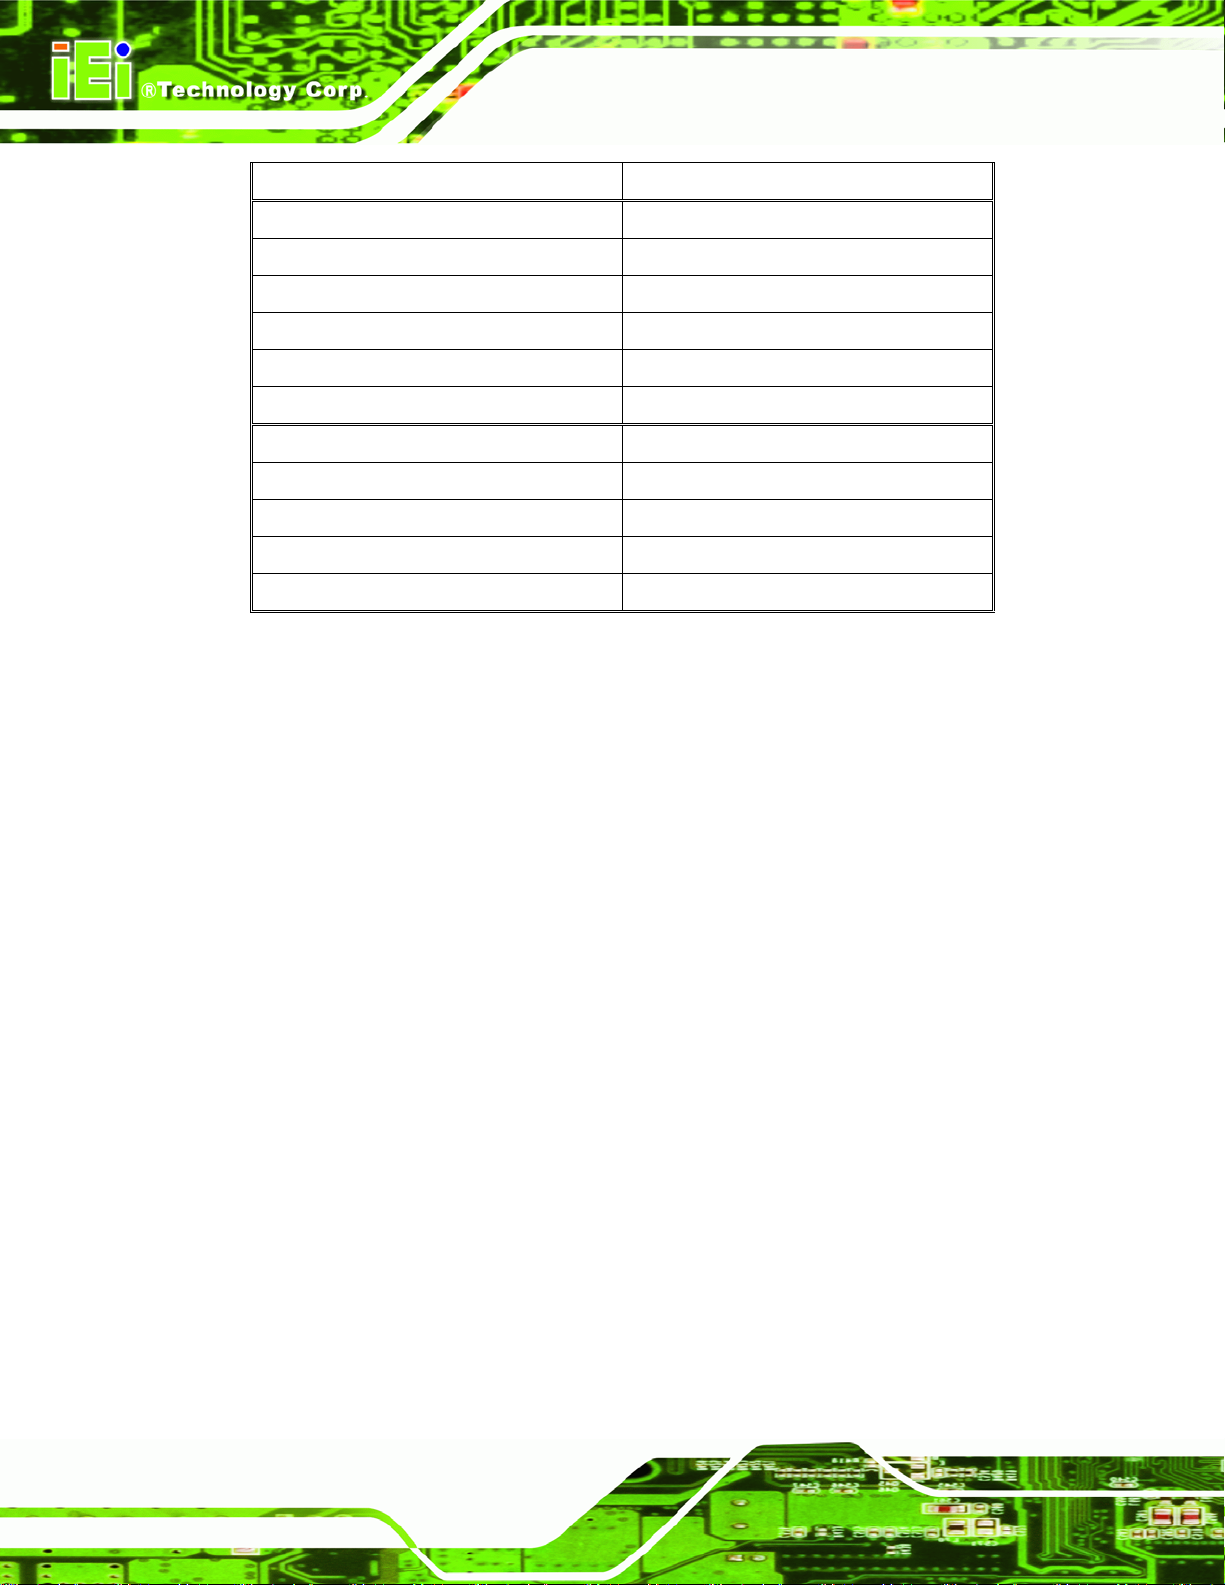
Table 2-1: Geode LX Graphics Features lists a complete list of Geode™ LX 800 graphics
features. For more details, please refer to the AMD website or the Geode™ LX 800 series
data book available from AMD.
Feature AMD Geode™ LX Processor
Color Depth 8, 16, 32 bpp (A) RGB 4 and 8-bit indexed
ROPs 256 (2-src, dest and pattern)
BLT Buffers FIFOs in Graphics Processor
BLT Splitting Managed by hardware
Video Synchronized BLT/Vector Throttle by VBLANK
Bresenham Lines Yes
Patterned (stippled) Lines Yes
Screen to Screen BLT Yes
Screen to Screen BLT with mono expansion Yes
Memory to Screen BLT Yes (throttled rep movs writes)
Accelerated Text No
Pattern Size (Mono) 8x8 pixels
Pattern Size (Color) 8x8 pixels
Monochrome Pattern Yes (with inversion)
Dithered Pattern (4 color) No
Color Pattern 8, 16, 32 bpp
Transparent Pattern Monochrome
Solid Fill Yes
Page 13
Page 34
Pattern Fill Yes
Transparent Source Monochrome
Color Key Source Transparency Y with mask
Variable Source Stride Yes
Variable Destination Stride Yes
Destination Write Bursting Yes
Selectable BLT Direction Vertical and Horizontal
NOVA-LX 5.25” Motherboard
Alpha BLT
VGA Support Decodes VGA Register
Pipeline Depth Unlimited
Accelerated Rotation BLT 8, 16, 32 bpp
Color Depth Conversion 5:6:5, 1:5:5:5, 4:4:4:4, 8:8:8:8
Yes (constant α, α/pix, or sep. α channel)
Table 2-1: Geode LX Graphics Features
2.3.5 AMD Geode™ LX 800 500MHz Power Management
The power management for the 500 MHz AMD Geode™ LX 800 is listed below:
1.8W Typical (3.9W TDP) @ 500MHz
GeodeLink active hardware power management
Hardware support for standard ACPI software power manageme nt
I/O companion SUSP#/SUSPA# power controls
Lower power I/O
Wakeup on SMI/INTR
2.4 AMD Geode™ CS5536 System Chipset
The NOV A -LX serie s motherbo ards all have a prei nstalled AMD Geode™ CS5536 syste m
chipset. The system chipset features are listed below.
82xx Legacy Devices
System Management Bus (SMB) Controller
8 Multi-Function General Purpose Timers (MFGPTs)
Power Management Controller
ACPI v2.0 compliant
Page 14
Page 35
NOVA-LX 5.25” Motherboard
2.4.1 GeodeLink™ Interface Unit
The GeodeLink™ interface unit connects the AMD Geode™ LX 800 pro cessor to the AMD
Geode™ CS5536 system chipsets. Some of the GeodeLink™ features are listed below.
o 64-bit, 66MHz operation
o PCI VSM (Virtual System Module) that makes the interface transparent to
applications software and BIOS
o Programmable routing descriptors, use and activity monitors, and SSMI
(Synchronous System Management Interrupt)
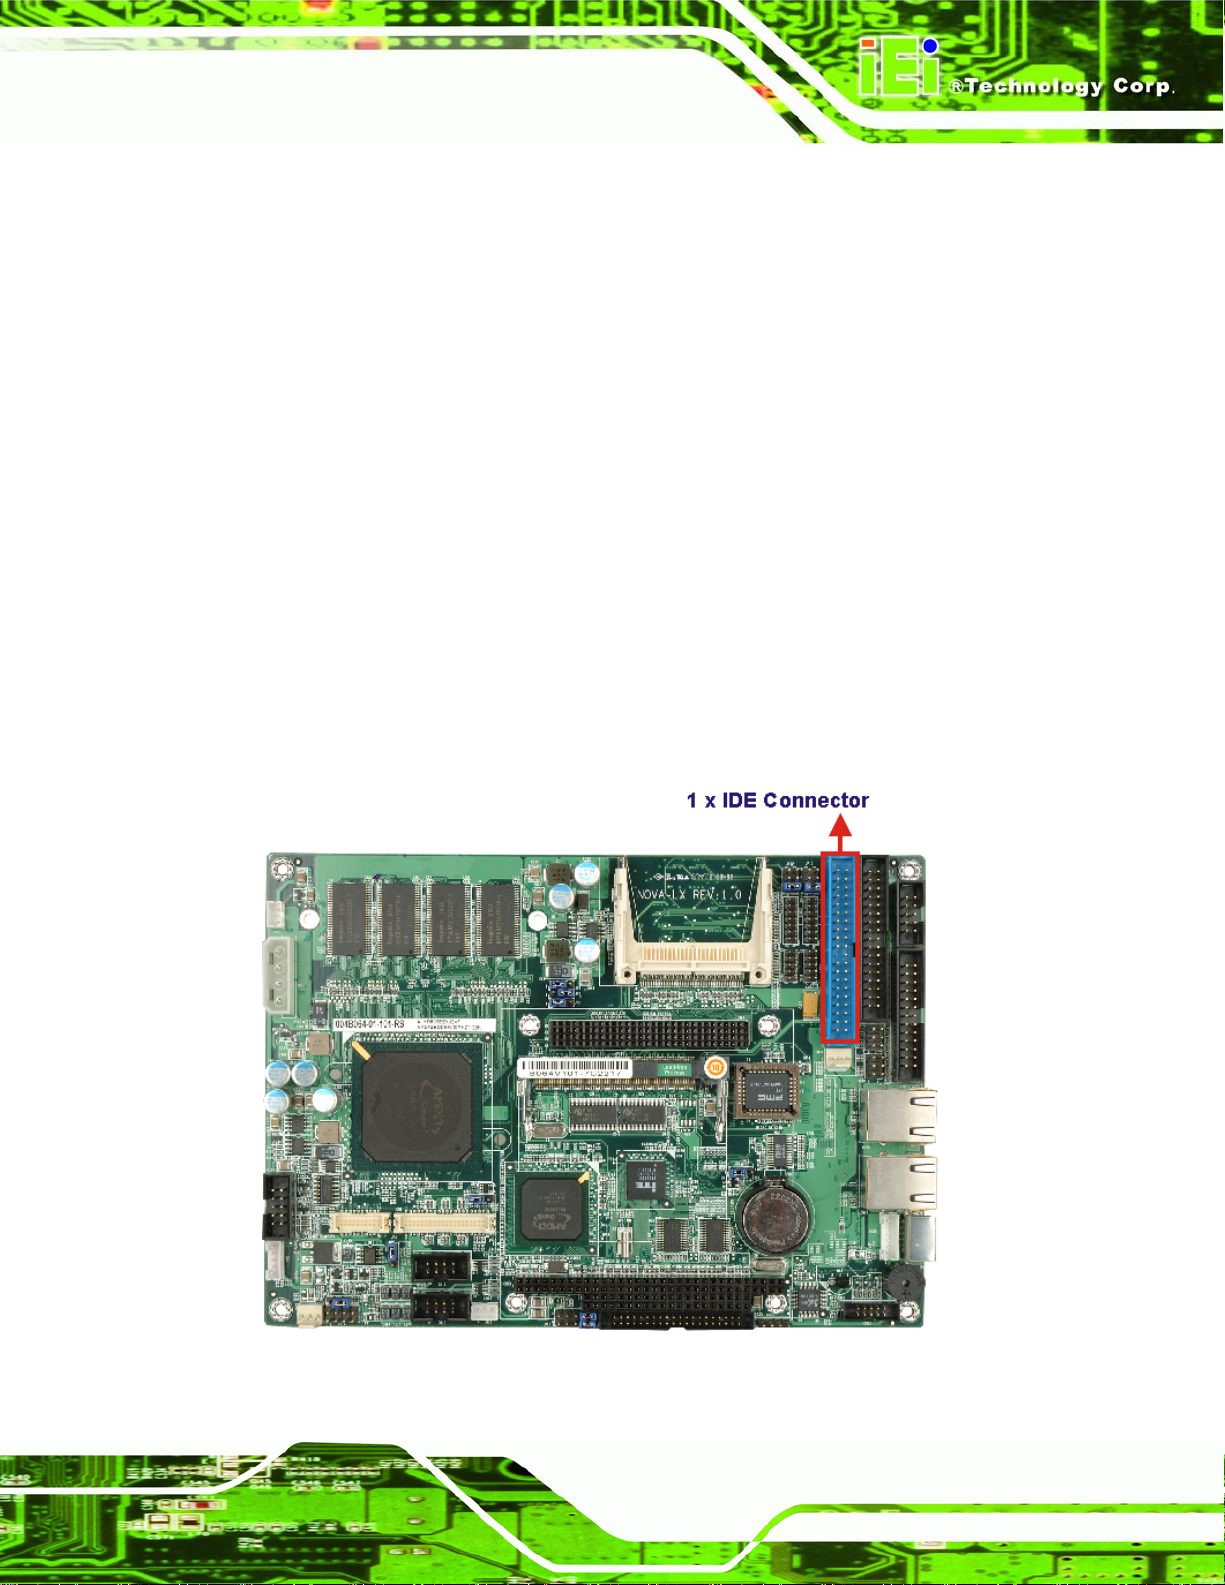
2.4.2 AMD Geode™ CS5536 ATA-6 Controller
The single NOVA-LX IDE connector supports two ATA-6 HDDs. An ATA-6 (Ultra ATA/100)
compliant IDE controller on the AMD Geode™ CS5536 has a maximum transfer rate of
100MB/s. ATA-6 includes advancements in error checking and ATA-6 drives are
compatible with future interface additions.
Figure 2-5: IDE Connector
Page 15
Page 36
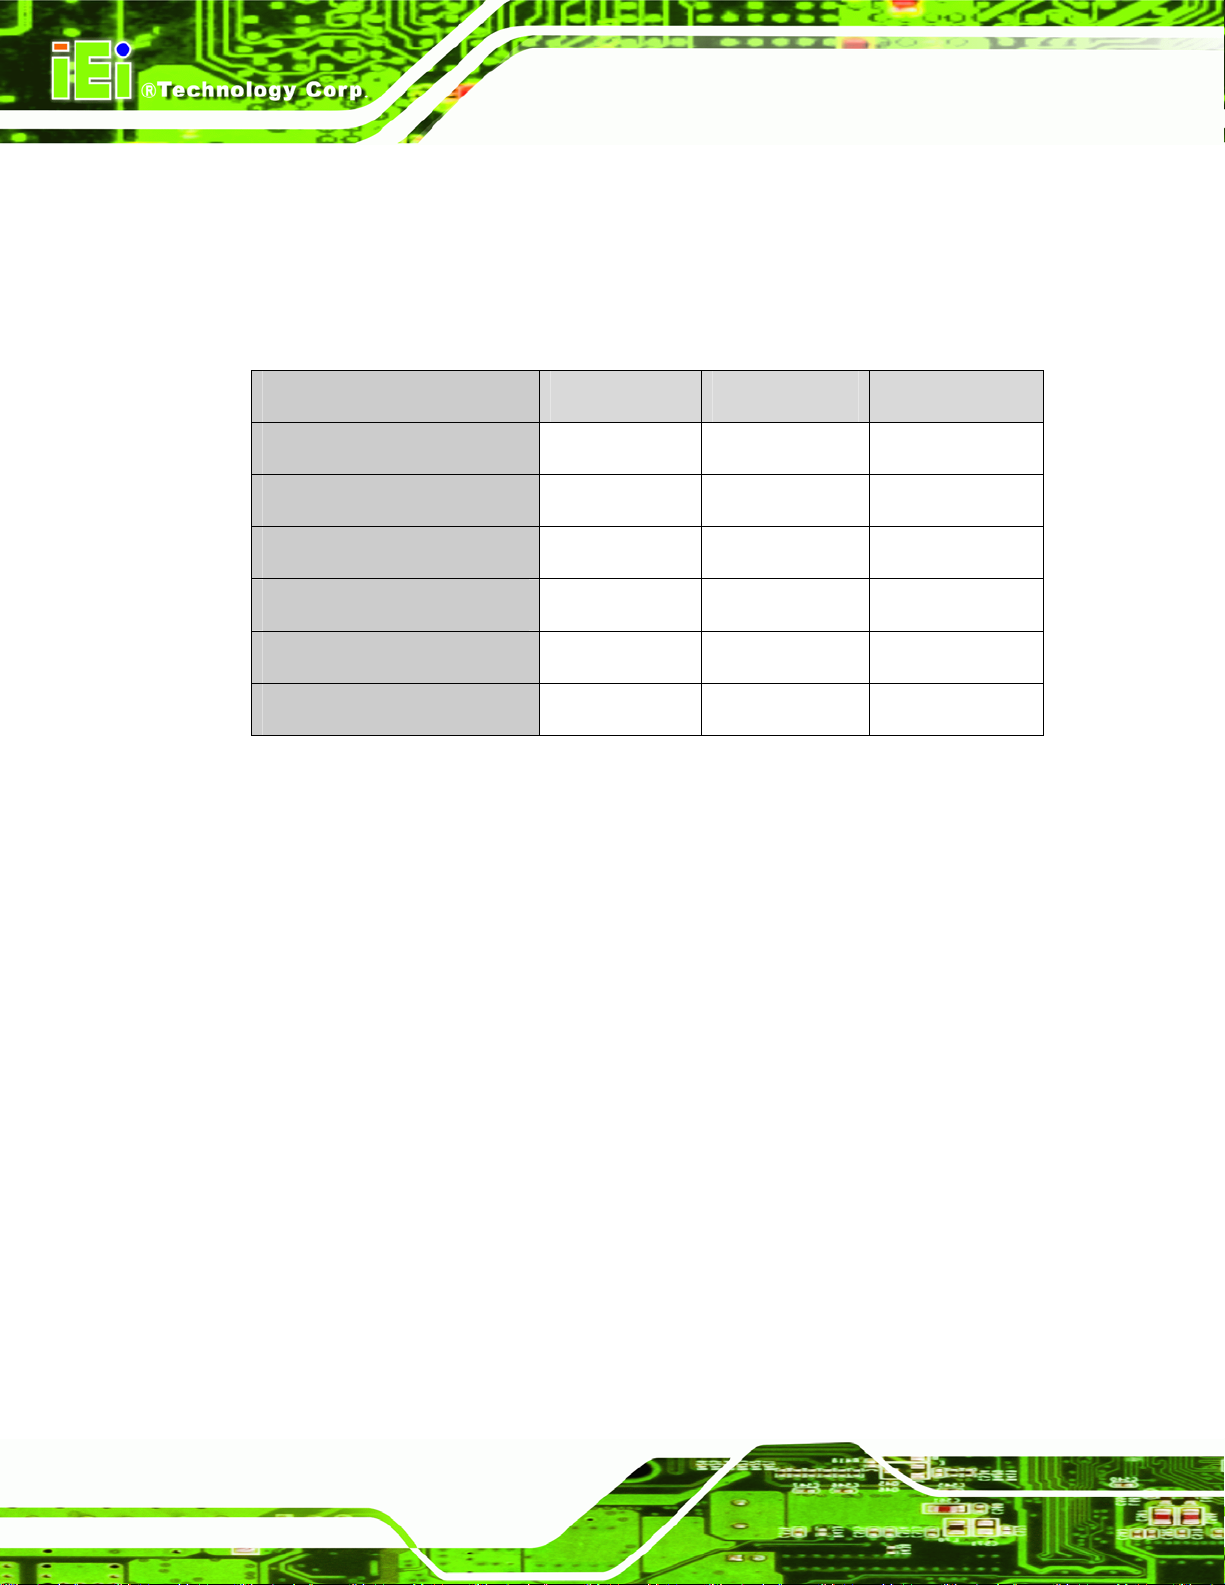
The onboard ATA-6 controller is able to support the following IDE HDDs:
Ultra AT A/100, with dat a transfer rates up to 100MB/s
Ultra AT A/66, with data transfer rates up to 66MB/s
Ultra AT A/33, with data transfer rates up to 33MB/s
NOVA-LX 5.25” Motherboard
Specification
IDE devices
PIO Mode
PIO Max Transfer Rate
DMA/UDMA designation
DMA/UDMA Max Transfer
Controller Interface
Table 2-2: Supported HDD Specifications
Ultra A T A/100 Ultra A T A/66 Ultra A T A/100
2 2 2
0 – 4 0 – 4 0 – 4
16.6 MB/s 16.6 MB/s 16.6 MB/s
UDMA 3 - 4 UDMA 3 – 4 UDMA 2
100MB/s 66MB/s 33MB/s
5V 5V 5V
2.4.3 AMD Geode™ CS5536 Audio Codec 97 (AC’97) Controller
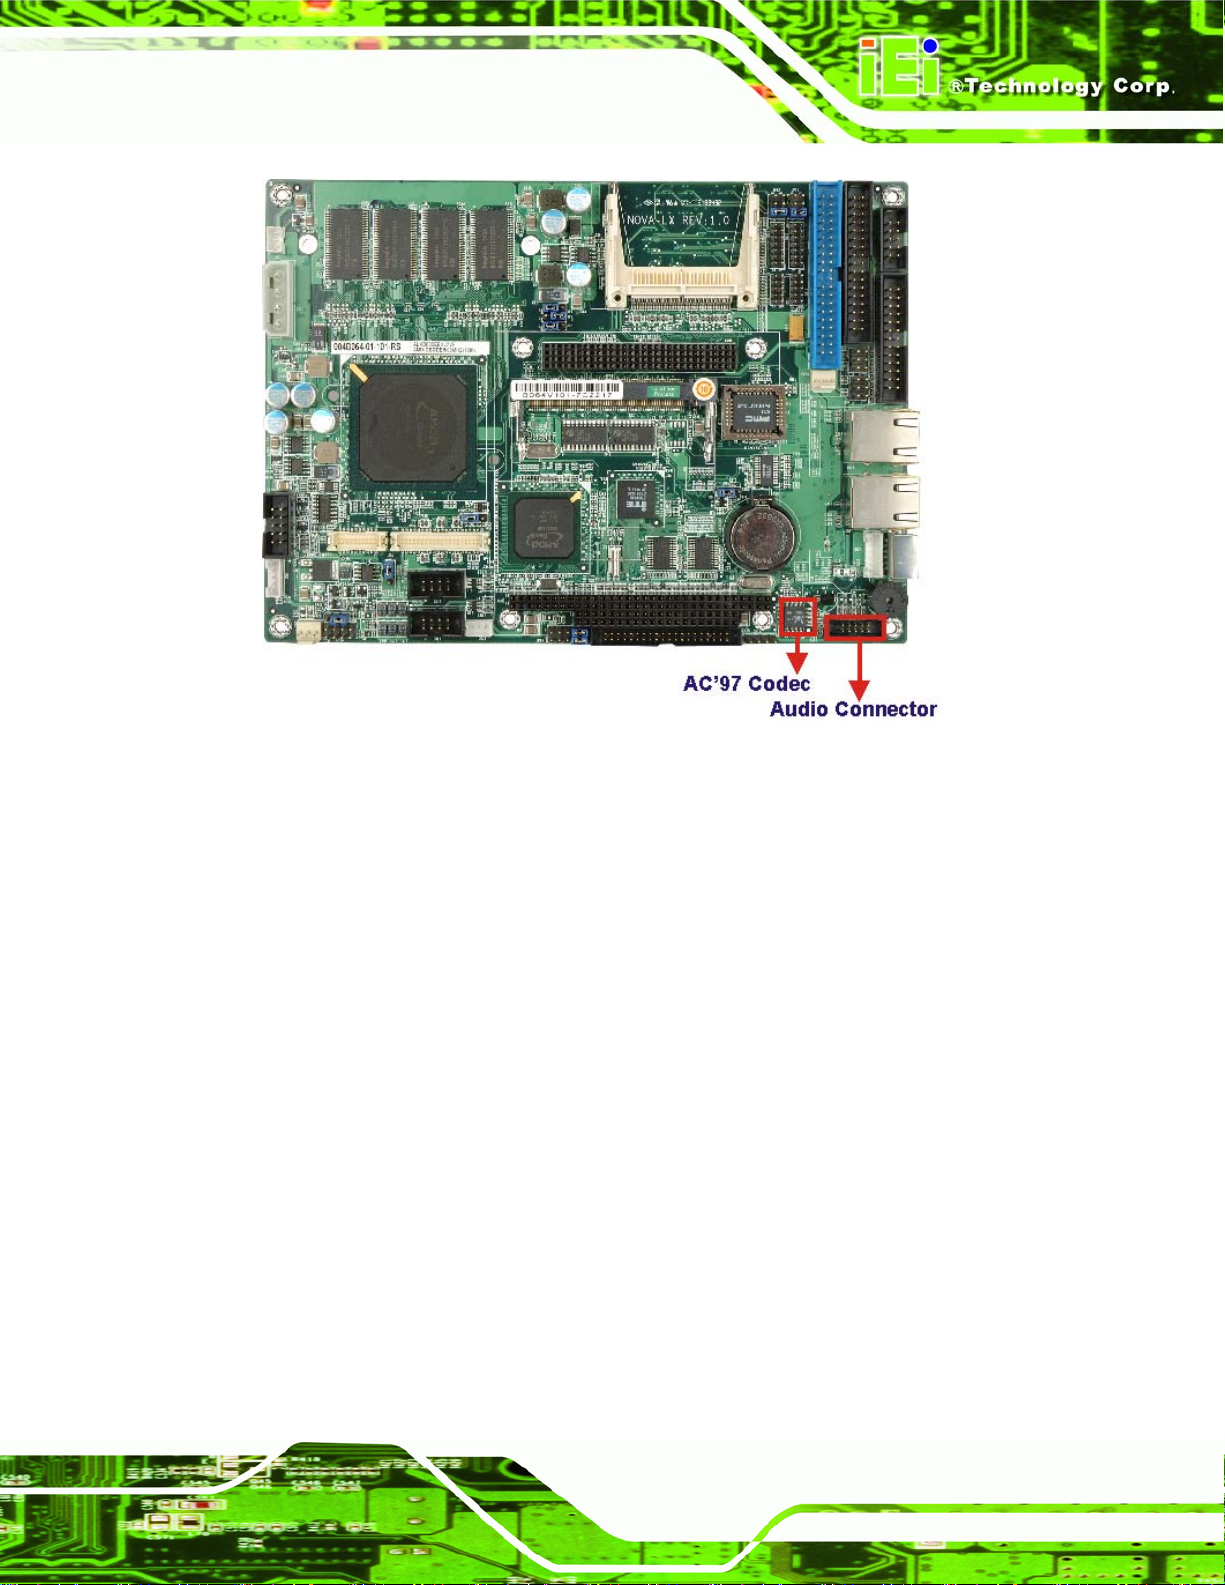
The AC’97 specification v2.3 compliant controller on the chipset is interfaced to a 20-bit
DAC and 18-bit ADC full-duplex AC'97 2.3 stereo RealTek ALC203 codec. The ALC203 is
Page 16
then connected to a 10-pin audio connector to which an audio kit can easily be conne cted.
Page 37
NOVA-LX 5.25” Motherboard
Figure 2-6: AC’97 Codec and Audio Connector
The codec meets performance requirements for audio on PC99/2001 systems. Some of
the codec features are listed below.
Meets Microsoft WHQL/WLP 2.0 audio requirements
20-bit DAC and 18-bit ADC resolution
18-bit Stereo full-duplex CODEC with independent and variable sampling rate
Complies with AC'97 2.3 specifications
o LINE/HP-OUT, MIC-IN and LINE-IN sensing
o 14.318MHz -> 24.576MHz PLL saves crystal
o 12.288MHz BITCLK input can be consumed
o Integrated PCBEEP generator to save buzzer
o Interrupt capability
o Page registers and Analog Plug & Play
Support of S/PDIF out is fully compliant with AC'97 rev2.3 specifications
Three analog line-level stereo inputs with 5-bit volume control: LINE_IN, CD,
AUX
Page 17
Page 38
High quality differential CD input
Two analog line-level mono input: PCBEEP, PHONE-IN
Supports double sampling rate (96KHz) of DVD audio playback
Two software selectable MIC inputs
+6/12/20/30dB boost preamplifier for MIC input
Stereo output with 6-bit volume control
Mono output with 5-bit volume control
Headphone output with 50mW/20Ohm amplifier
3D Stereo Enhancement
Multiple CODEC extension capability
External Amplifier Power Down (EAPD) capability
Power management and enhanced power saving features
Stereo MIC record for AEC/BF appli cation
DC Voltage volume control
NOVA-LX 5.25” Motherboard
Auxiliary power to support Power Off CD
Adjustable VREFOUT control
2 GPIO pins with smart GPIO volume control
2 Universal Audio Jacks (UAJ)® for front panel
Supports 32K/44.1K/48K/96KHz S/PDIF output
Supports 32K/44.1K/48KHz S/PDIF input
Power support: Digital: 3.3V; Analog: 3.3V/5V
Standard 48-Pin LQFP Package
EAX™ 1.0 & 2.0 compatible
Direct Sound 3D™ compatible
A3D™ compatible
I3DL2 compatible
HRTF 3D Positional Audio
Sensaura™ 3D Enhancement (optional)
10 Bands of Software Equalizer
Voice Cancellation and Key Shifting in Kareoke mode
AVRack® Media Player
Page 18
Page 39
NOVA-LX 5.25” Motherboard
2.4.4 AMD Geode™ CS5536 Flash Interface
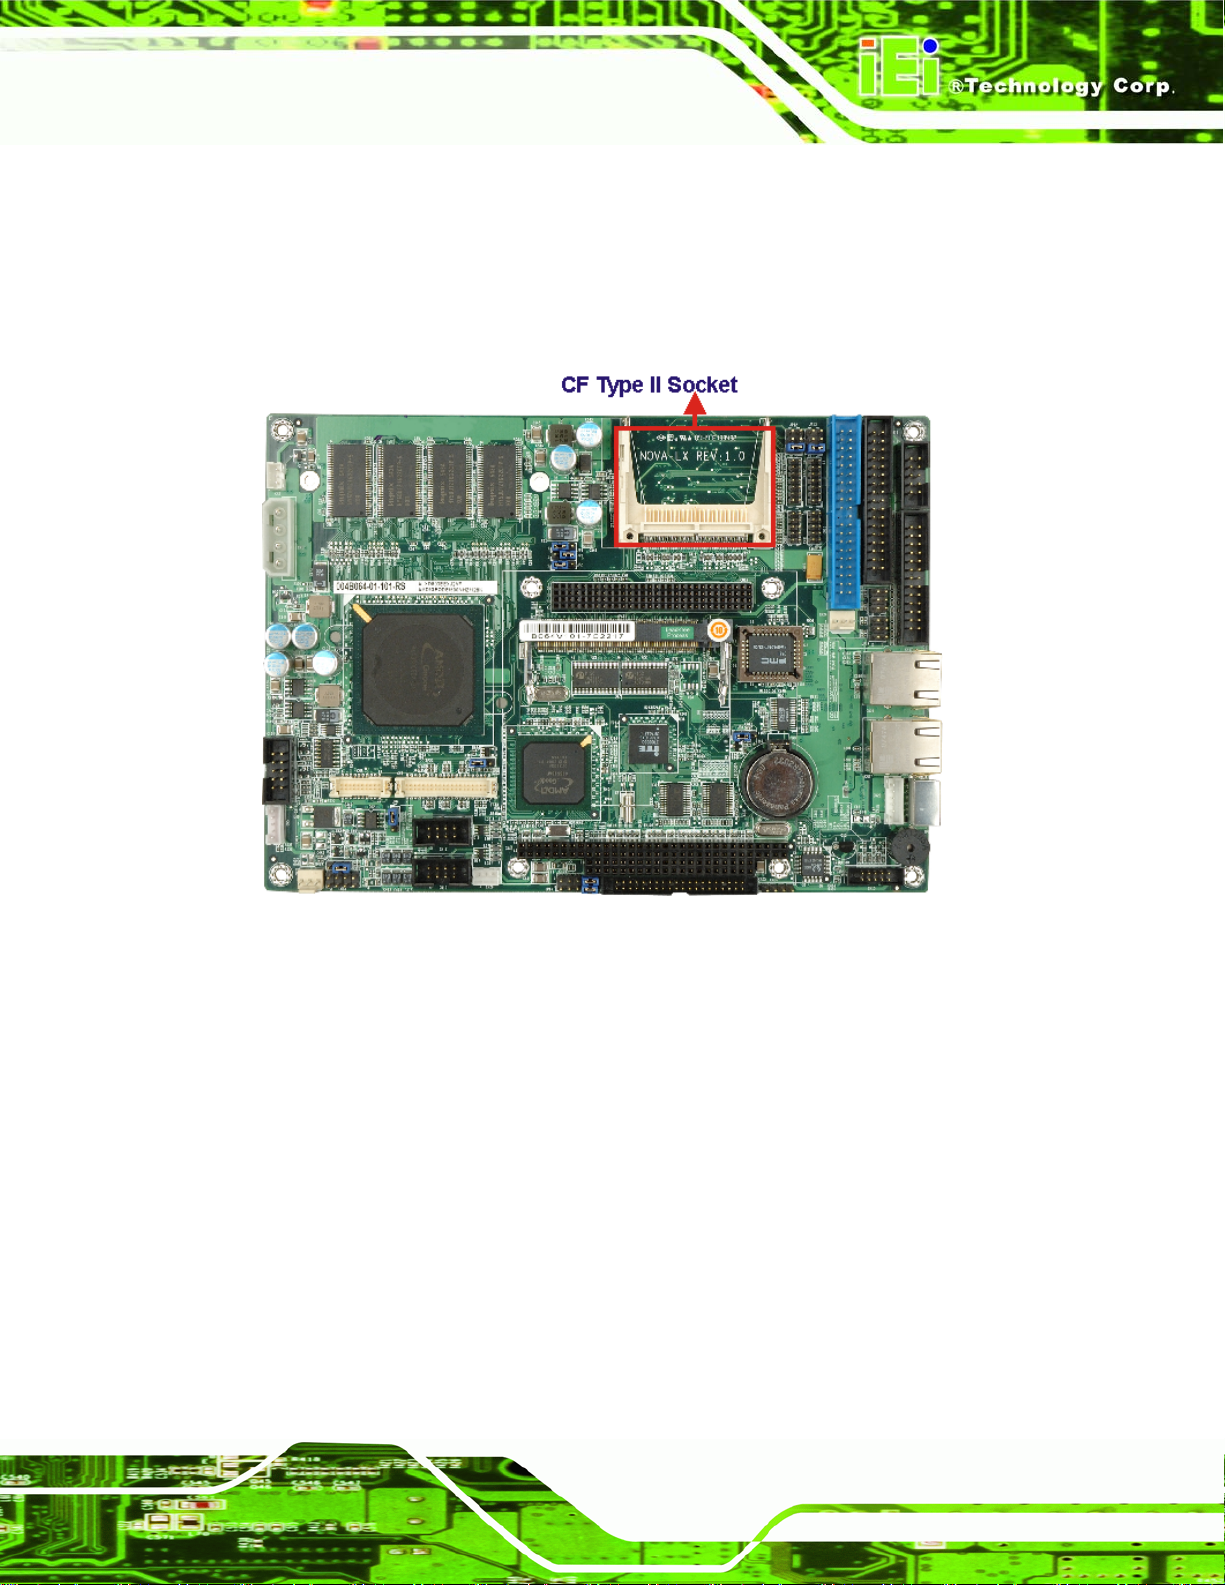
The NOVA-LX CompactFlash socket supports standard CF Type I and CF Type II cards.
The chipset flash interface is multiplexed with an IDE interface and can be connected to
an array of industry standard NAND Flash or NOR Flash devices.
Figure 2-7: CompactFlash Connector
2.4.5 AMD Geode™ CS5536 USB Controller
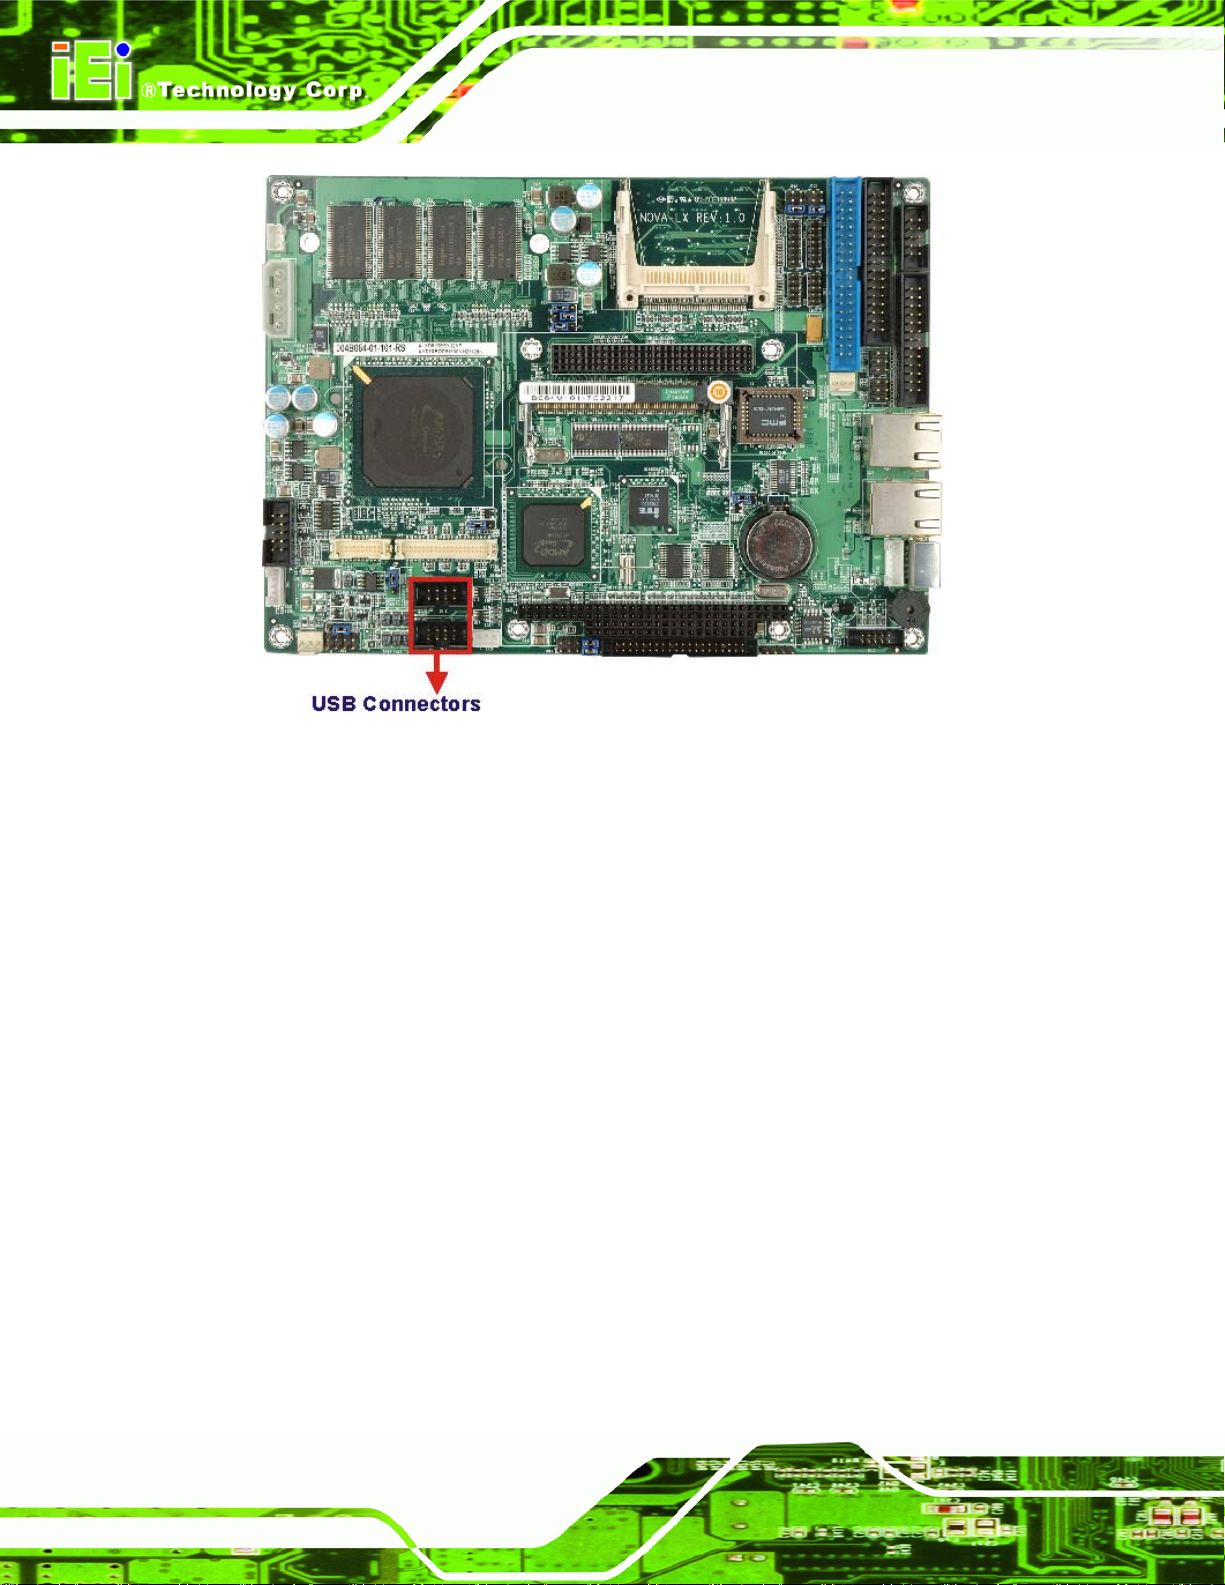
Four USB ports on the NOVA-LX board are interfaced to the chipset USB controller. Four
USB 1.1 or USB 2.0 devices can be connected simultaneously to the NOVA-LX. The
chipset USB controller has the following specifications:
o 4 USB ports
o USB 1.1 and USB 2.0 compliant
Page 19
Page 40
NOVA-LX 5.25” Motherboard
Figure 2-8: USB Connectors
2.4.6 AMD Geode™ CS5536 Serial Communications
Eight high-speed UART serial port connectors, seven RS-232 and one that can be
configured as RS-232, RS-422 or RS-485, are connected to the system chipset low pin
count (LPC) port via the LPC bus. The specifications for the serial port s are listed below.
16C550 UART with 16-byte FIFO buffer
115.2Kbps transmission rate
2.4.7 AMD Geode™ CS5536 Real Time Clock
The system chipset has a battery backed up 256-byte real-time clock (RTC) with CMOS
RAM.
Page 20
Page 41
NOVA-LX 5.25” Motherboard
2.4.8 BIOS
The BIOS flash memory chip on the NOVA-LX has a licensed copy of AMI BIOS loaded
onto it. The BIOS flash memory chip is connected to the chipset via the LPC bus. The
flash BIOS features are listed below:
SMIBIOS (DMI) compliant
Console redirection function support
USB booting support
2.5 LPC Bus Components
2.5.1 LPC Bus Overview
The LPC bus is connected to components listed below:
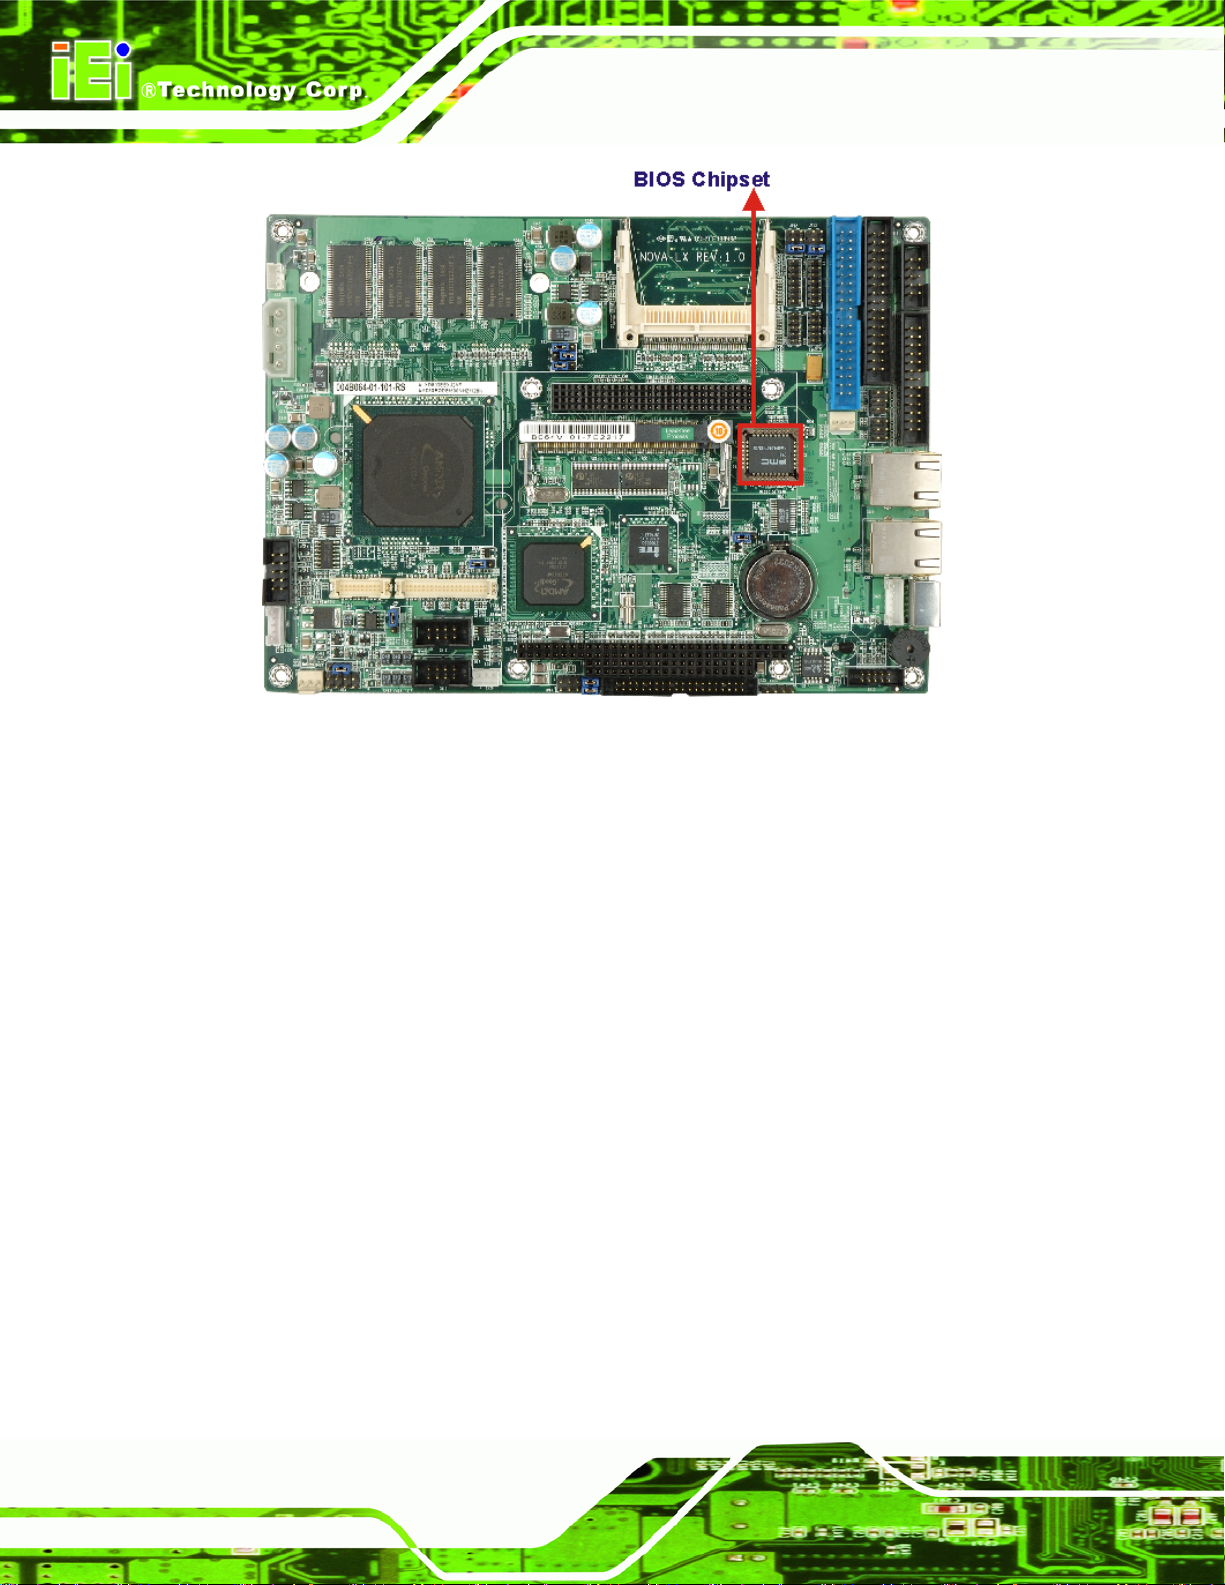
1 x BIOS chipset
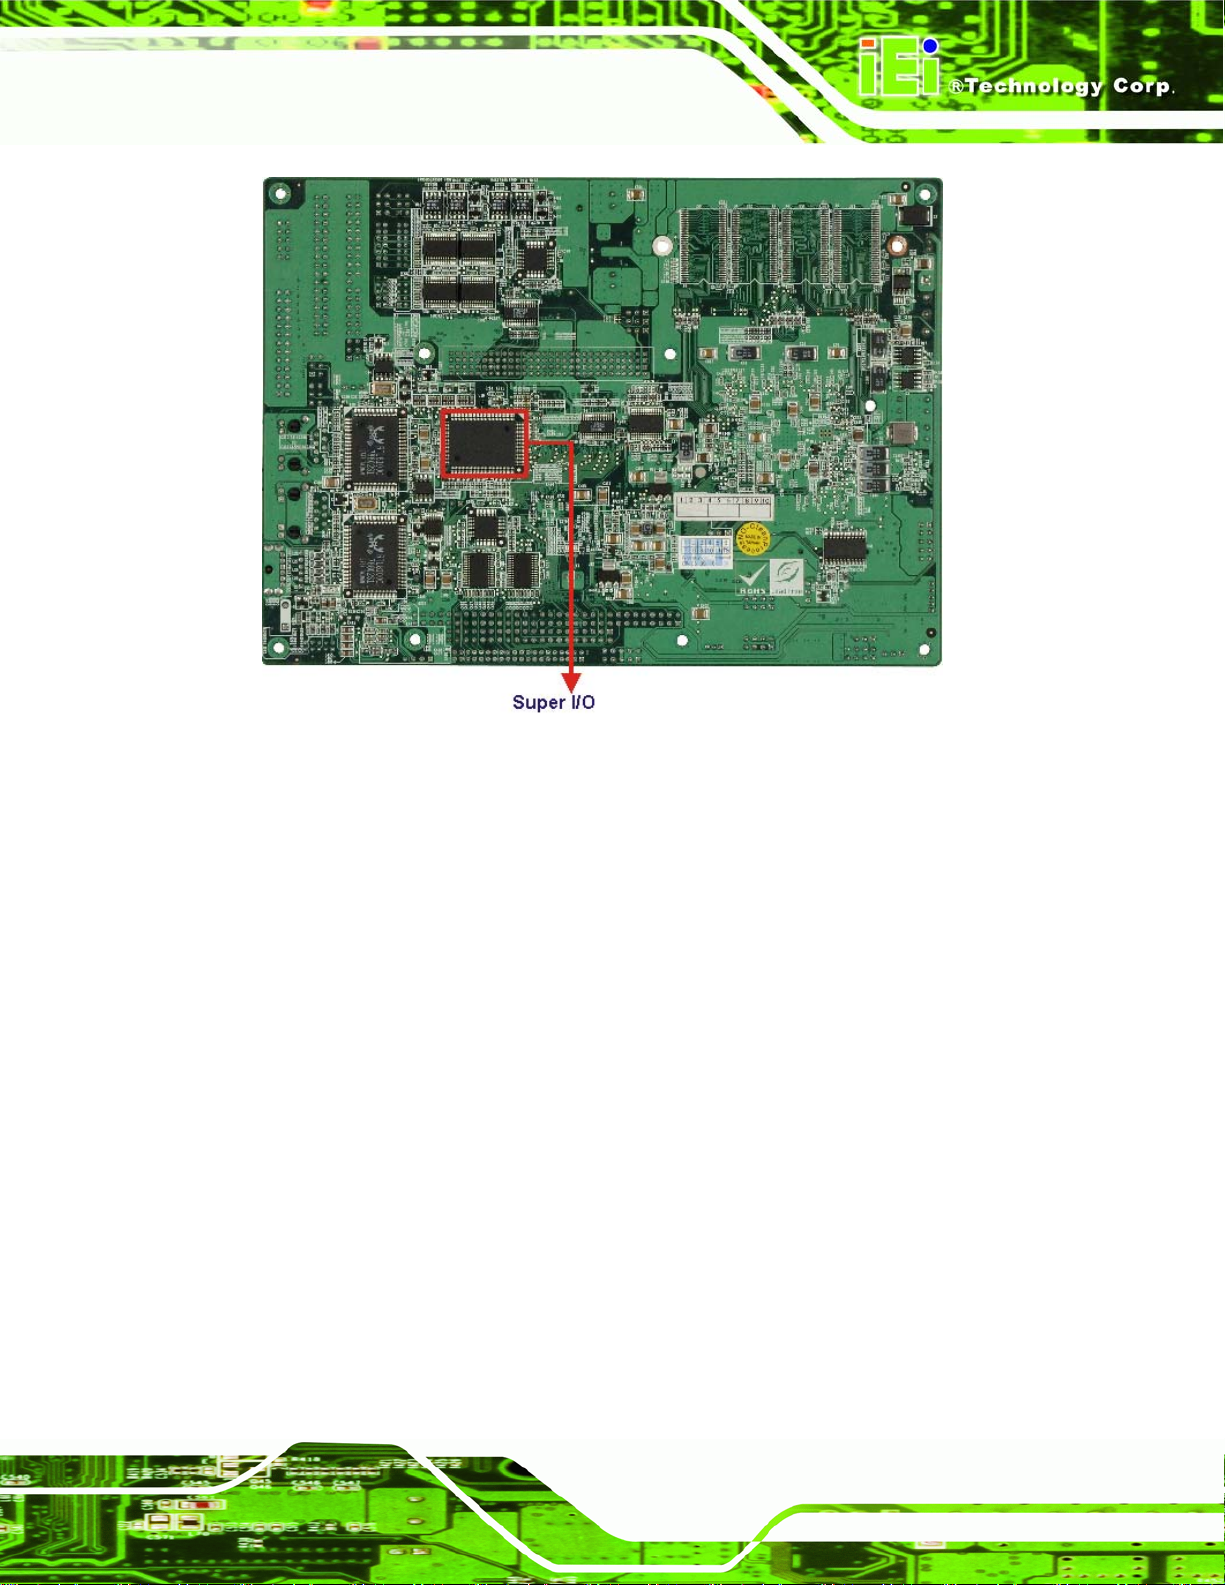
1 x Super I/O chipset
2 x Serial port chipsets
2.5.2 BIOS
The BIOS flash memory chip on the NOVA-LX has a licensed copy of AMI BIOS loaded
onto it. The BIOS flash memory chip is connected to the chipset via the LPC bus. The
flash BIOS features are listed below:
SMIBIOS (DMI) compliant
Console redirection function support
PXE (Pre-Boot Execution Environment) support
USB booting support
Page 21
Page 42
NOVA-LX 5.25” Motherboard
Figure 2-9: BIOS Chipset
2.5.3 Winbond W83627EHG Super I/O chipset
The Winbond W83627HG Super I/O chipset is connected to the system chipset through
the LPC bus.
Page 22
Page 43
NOVA-LX 5.25” Motherboard
Figure 2-10: Super I/O Chipset
The Winbond W83627EHG is an LPC interface-based Super I/O device that comes with
Environment Controller integration, floppy disk controller, and UART controller. Some of
the features of the Winbond W83697EHG chipset are listed below:
LPC Spec. 1.01 compliant
LDRQ# (LPC DMA) and SERIRQ (serial IRQ) supported
Hardware monitor functions integrated
Microsoft PC98/PC99 Hardware Design Guide compliant
ACPI DPM (Device Power Management) supported
Some of the Super I/O features are described in more detail below:
2.5.3.1 Super I/O LPC Interface
The LPC interface on the Super I/O complies with the Intel® Low Pin Count Specification
Rev. 1.01. The LPC interface supports both LDRQ# and SERIRQ protocols as well as PCI
PME# interfaces.
Page 23
Page 44
NOVA-LX 5.25” Motherboard
2.5.3.2 Super I/O Hardware Monitor Functions
The Super I/O Hardware Monitor monitors internal voltages, system temperature and the
cooling fan speed. All the monitore d environment al p arameters can be read from the BIOS
Hardware Health Configuration menu.
2.5.3.3 Super I/O Parallel Port
The Super I/O parallel port (LPT) is compatible with the following LPT specifications.
IBM parallel port compatible
PS/2 compatible bi-directional parallel port
Enhanced Parallel Port (EPP) mode supported. Compatible with IEEE 1284
specifications
Extended Parallel Port (EPP) mode supported. Compatible with IEEE 1284
specifications
Enhanced printer port back-drive current protection
The parallel port controller is connected to an external DB-26 LPT connector.
2.5.3.4 Super I/O Floppy Disk Drive (FDD) Controller
The Super I/O FDD controller is compatible with the following specifications.
IBM PC AT disk drive compatible
Variable write pre-compensation with track selectable capability
Vertical recording format supported
DMA logic enabled
16-byte data FIFOs
Overrun and under run conditions detected
Built-in address mark detection circuitry to simplify the read electronics
FDD anti-virus functions with software write protect and FDD write enable
signal
Page 24
Supports 3.5-inch or 5.25-inch FDD
Compatible with industry standard 82077
Supported capacities:
o 360K
Page 45
NOVA-LX 5.25” Motherboard
o 720K
o 1.2M
o 1.44M
o 2.88M
Supported transfer rates
o 250Kbps
o 300Kbps
o 500Kbps
o 1Mbps
o 2Mbps
3-mode FDD and Win95/98 driver supported
The FDD controller is interfaced to a FDD connected to the backplane through the
board-to-board connectors.
2.5.3.5 Super I/O Keyboard and Mouse Controller
The Super I/O keyboard and mouse controller is compatible with the following
specifications.
8042 compatible
Asynchronous access to two data registers and one status register
Compatible with 8042 software
PS/2 mouse supported
Port 92 supported
Interrupt and polling modes supported
Fast Gate A20 and Hardware Keyboard Reset
8-bit timer/counter
The keyboard and mouse controller controller is interfaced to a keyboard and mouse
connected to the backplane through the board-to-board connectors.
2.5.3.6 Super I/O GPIO Ports
The Super I/O has 22 programmable GPIO ports.
Page 25
Page 46
2.5.3.7 Super I/O Fan Speed and Fan Control
The super I/O can both monitor and control the fan speed. The super I/O is interfaced to
the fan on the backplane through the board-to-board connectors.
2.5.4 Serial Port Chipset
Two Fintek F81216DG chipsets on the NOVA-LX support six RS-232 serial ports and two
RS-232/422/484 serial ports. The Fintek serial port chipset is interf aced to the southbri dge
chipset through the LPC bus. Some of the features of the Fintek chipset are listed below:
Supports LPC interface
Totally provides 4 UART (16550 asynchronous) ports
o 3 x Pure UART
o 1 x UART+IR
NOVA-LX 5.25” Motherboard
One Watch dog timer with WDTOUT# signal
One Frequency input 24/48MHz
Powered by 3Vcc
2.6 PCI Bus
2.6.1 PCI Bus Overview
The PCI bus on the Geode™ CS5536 chipset is interfaced through the GeodeLink
connection between the Geode™ CS5536 and the Geode™ LX 800. Some features of the
PCI bus are listed below:
PCI specification v2.2 compliant
32-Bit, 33 MHz or 66 MHz operation
Transaction FIFOs (First In/First Out)
Bus master or slave
Converts selected PCI configuration bus internal MSR (Model Specific
Register)
Page 26
Capable of handling in-bound transactions immediately after reset - no setup
Mapping of PCI virtual configuration space space is done completely in Virtual
System Architecture (VSA) code
Serialized processor control interface
Page 47
NOVA-LX 5.25” Motherboard
2.6.2 PCI Bus Components
The following components are interfaced through the PCI bus
2 x PCI Ethernet controllers
1 x PCI-to-ISA bridge
1 x PC/104-Plus interface
1 x Mini PCI slot
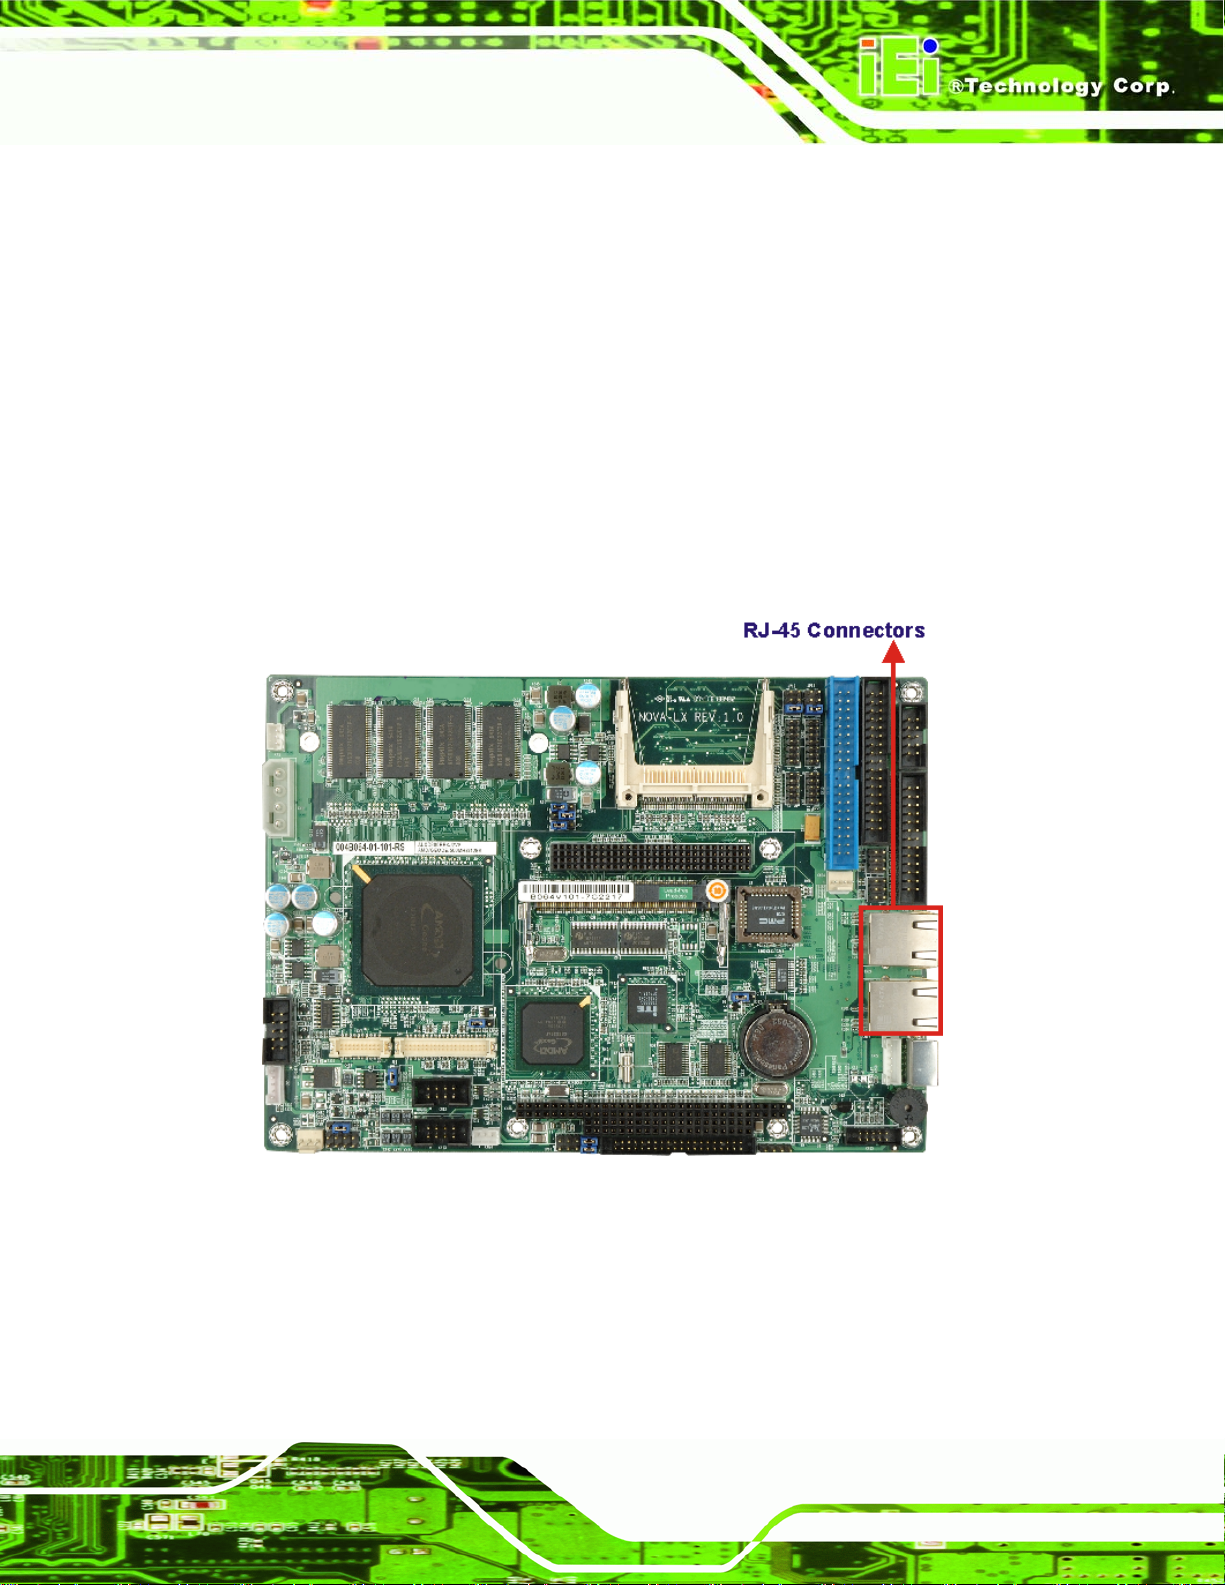
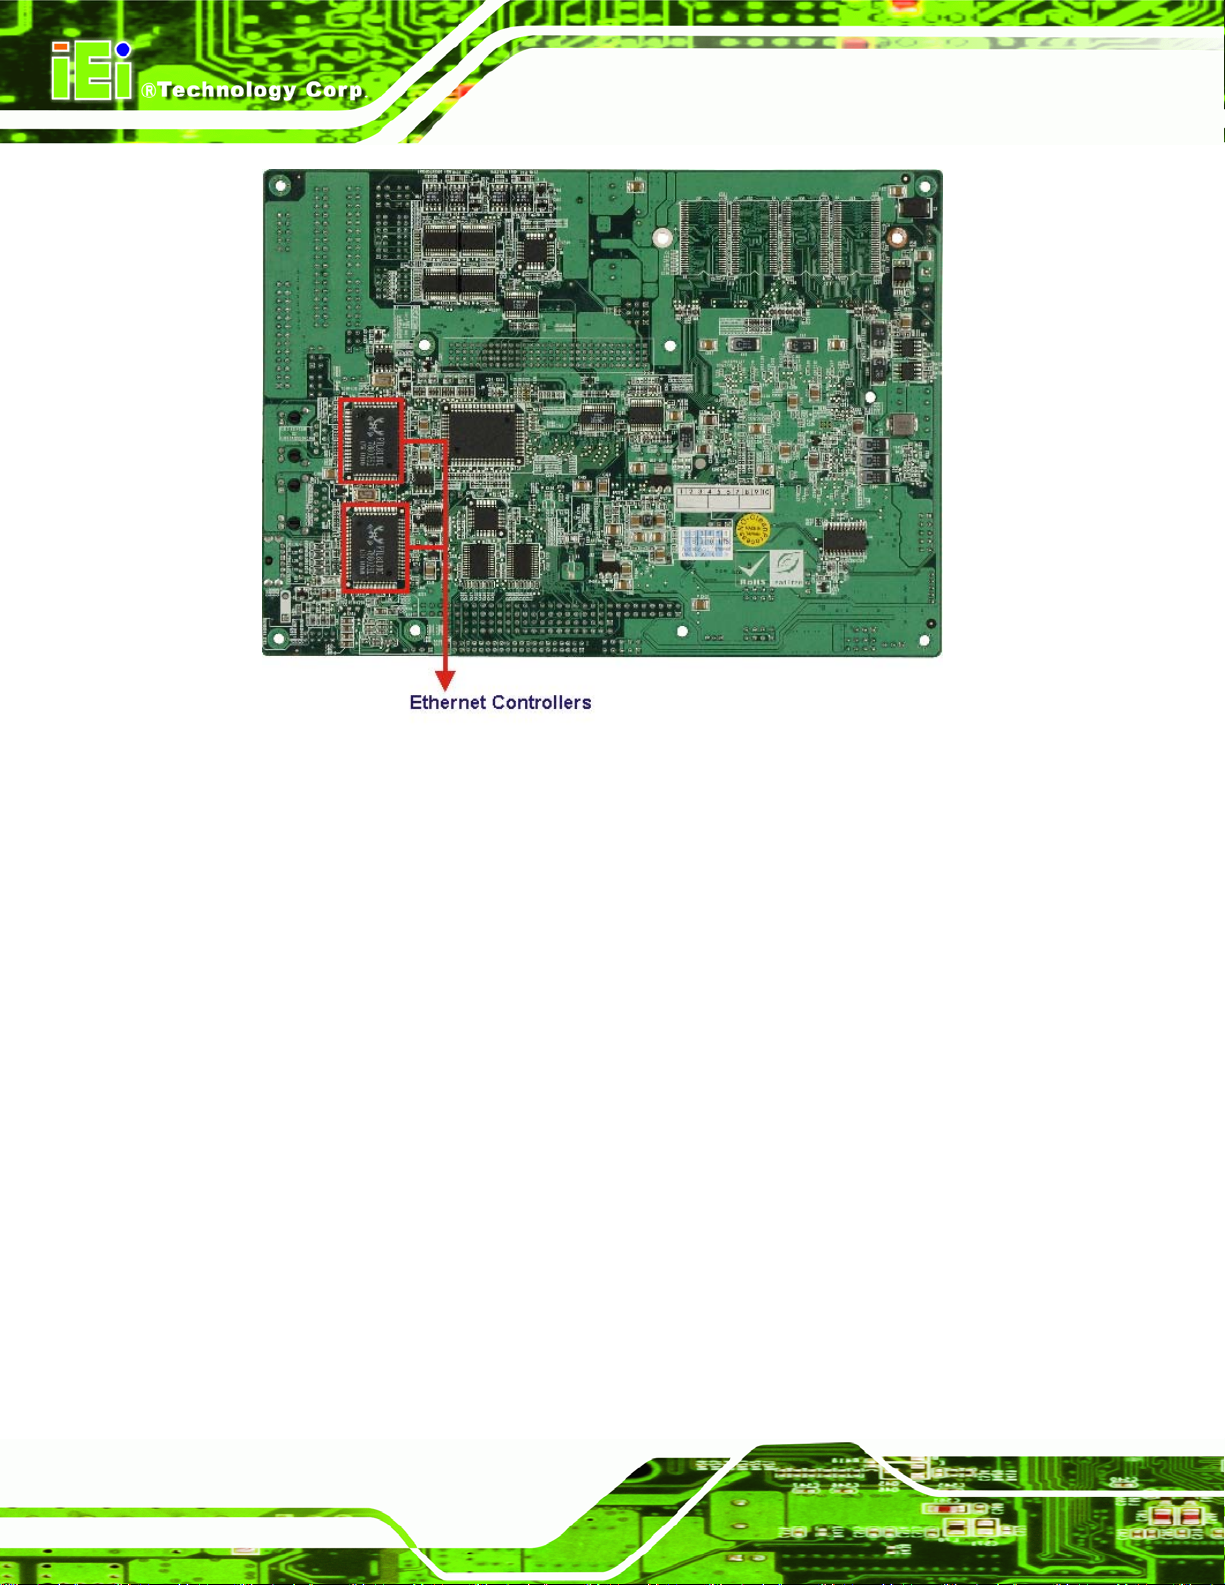
2.6.3 RealTek RTL8100C PCI Express Fast Ethernet Controller
The PCI bus is interfaced to two RealTek RTL8100C Fast Ethernet controllers, which are
then connected to two RJ-45 connectors. See
Figure 2-11.
Page 27
Page 48
NOVA-LX 5.25” Motherboard
Figure 2-11: Ethernet Interface
Some of the features of the Realtek RTL8100C are listed below:
Supports PCI/mini-PCI interfaces
Integrates Fast Ethernet MAC, physical chip, and transceiver onto a single
chip
10Mbps and 100Mbps operation
Supports 10Mbps and 100Mbps N-way auto-negotiation
Supports 25MHz Crystal or 25MHz OSC as the internal clock source
Complies with PC99/PC2001 standards
Supports ACPI power management
Provides PCI bus master data transfer
Provides PCI memory space or I/O space mapped data transfer
Supports PCI clock speed of 16.75MHz-40MHz
Advanced power saving mode
Page 28
Supports Wake-on-LAN and remote wake-up (AMD Magic Packet™, Link
Change, and Microsoft® Wake -up frame)
Half/Full duplex capability
Page 49
NOVA-LX 5.25” Motherboard
Supports Full Duplex Flow Control (IEEE 802.3x)
Provides interface to 93C46 EEPROM to store resource configuration and ID
parameters
Provides PCI clock run pin
Provides LED pins for network operation status indication
2.5/3.3V power supply with 5V tolerant I/Os
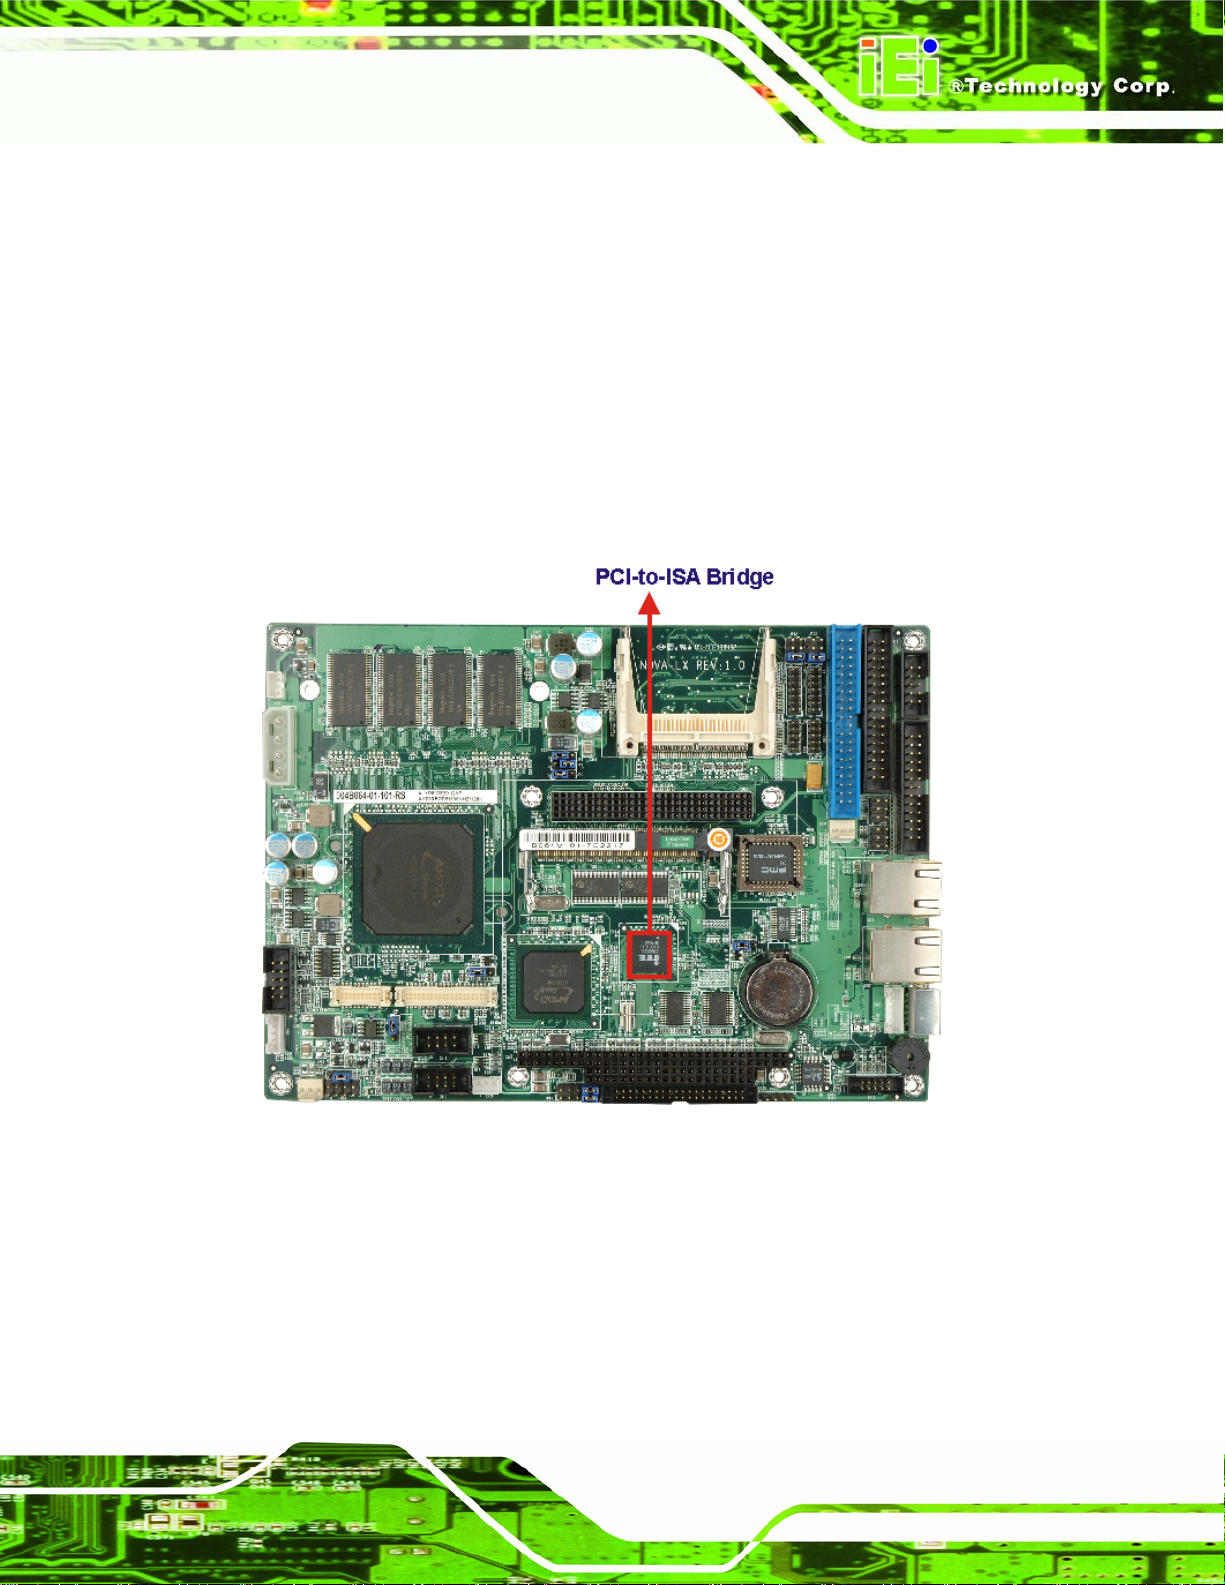
2.6.4 ITE IT8888F PCI-to-ISA Bridge
An ITE IT8888F PCI to ISA bridge single function device enables legacy ISA card
expansion on the backplane. The PCI to ISA bridge is shown in below.
Figure 2-12: PCI-to-ISA Bridge
The IT8888F has a PCI specification v2.1 compliant 32-bit PCI bus interface and support s
both PCI Bus master and slave. The PCI interface supports both programmable positive
and full subtractive decoding schemes. Some of the features of the IT8888F PCI to ISA
bridge are listed below .
PCI Interface
Page 29
Page 50
Programmable PCI Address Decoders
PC/PCI DMA Controller
Distributed DMA Controller
ISA Interface
SM Bus
Serial IRQ
Supports NOGO function
Single 33 MHz Clock Input
+3.3V PCI I/F with +5V tolerant I/O buffers
+5V ISA I/F and core Power Supply
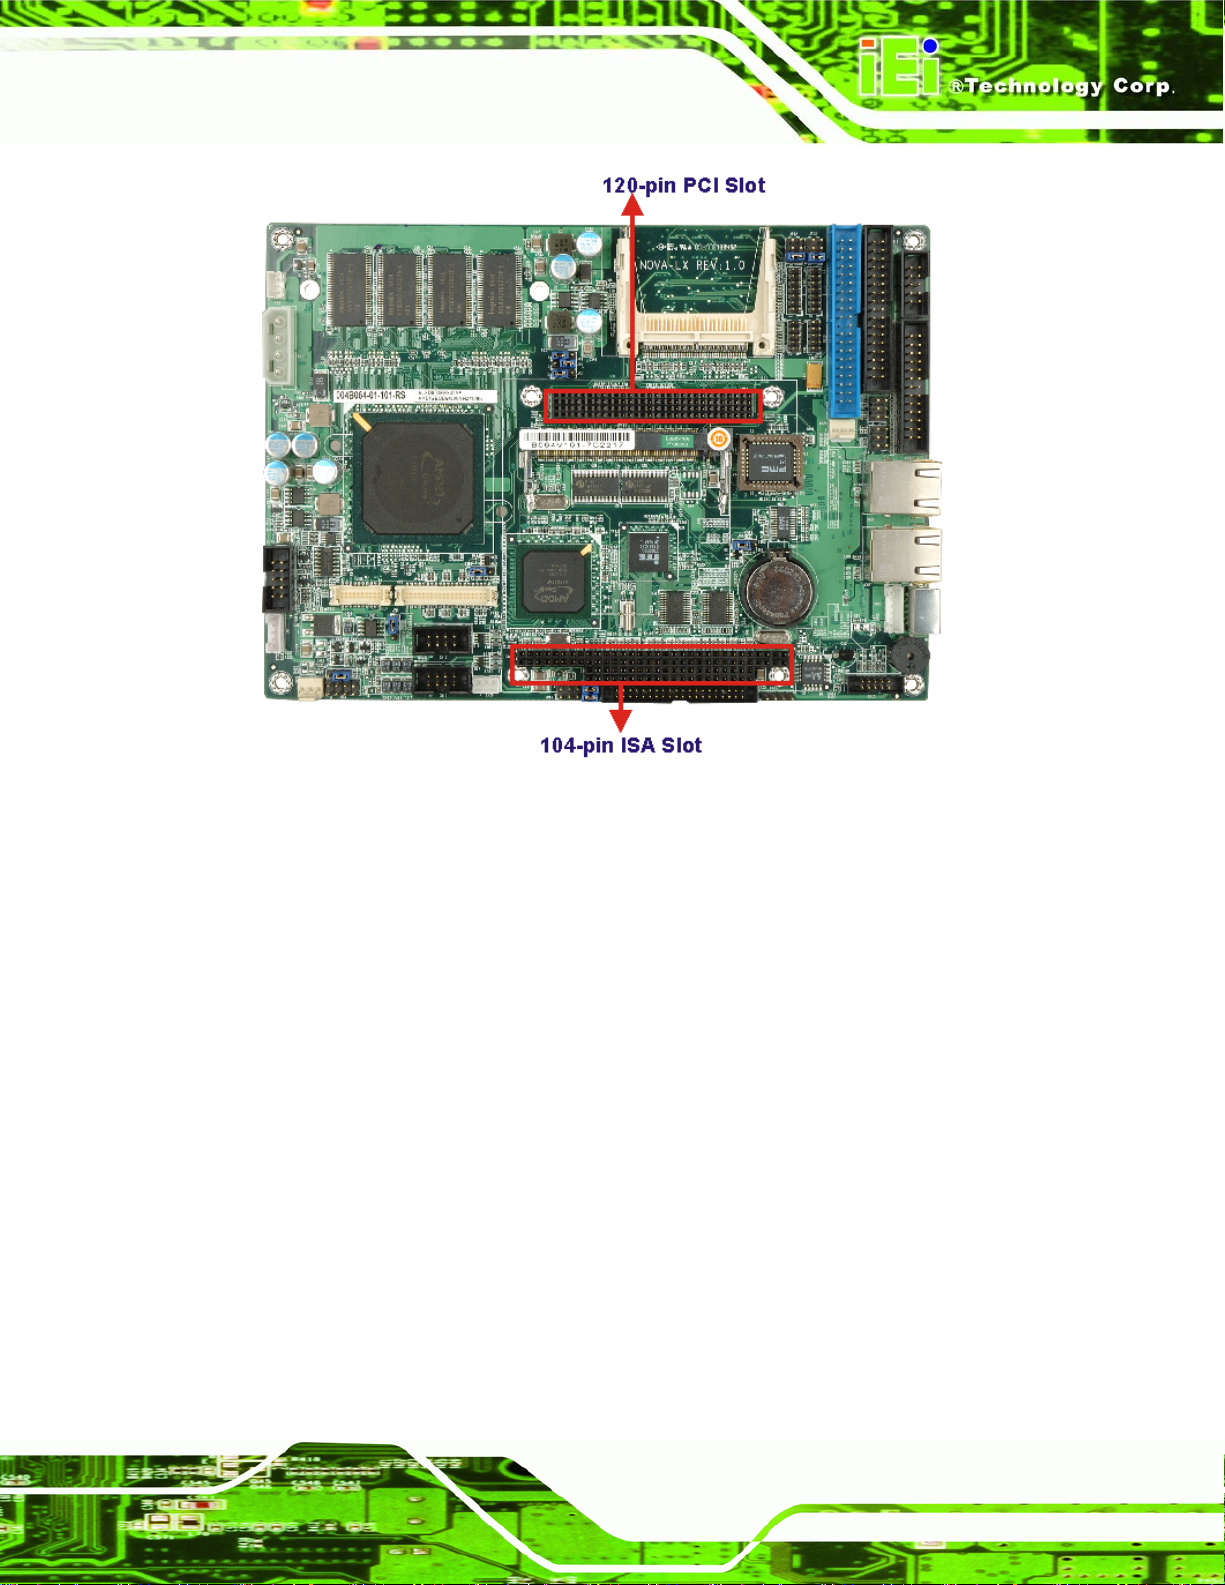
2.6.5 PC/104-Plus Interface
The PC/104-Plus interface comprises of the following components:
NOVA-LX 5.25” Motherboard
120-pin PCI connector
104-pin ISA bus connector
ISA connectivity is facilitated with a PCI lane being connected to the ISA bus connector
through the IT8888 PCI-to-ISA bridge described above.
Page 30
Page 51
NOVA-LX 5.25” Motherboard
Figure 2-13: PC/104-Plus Components
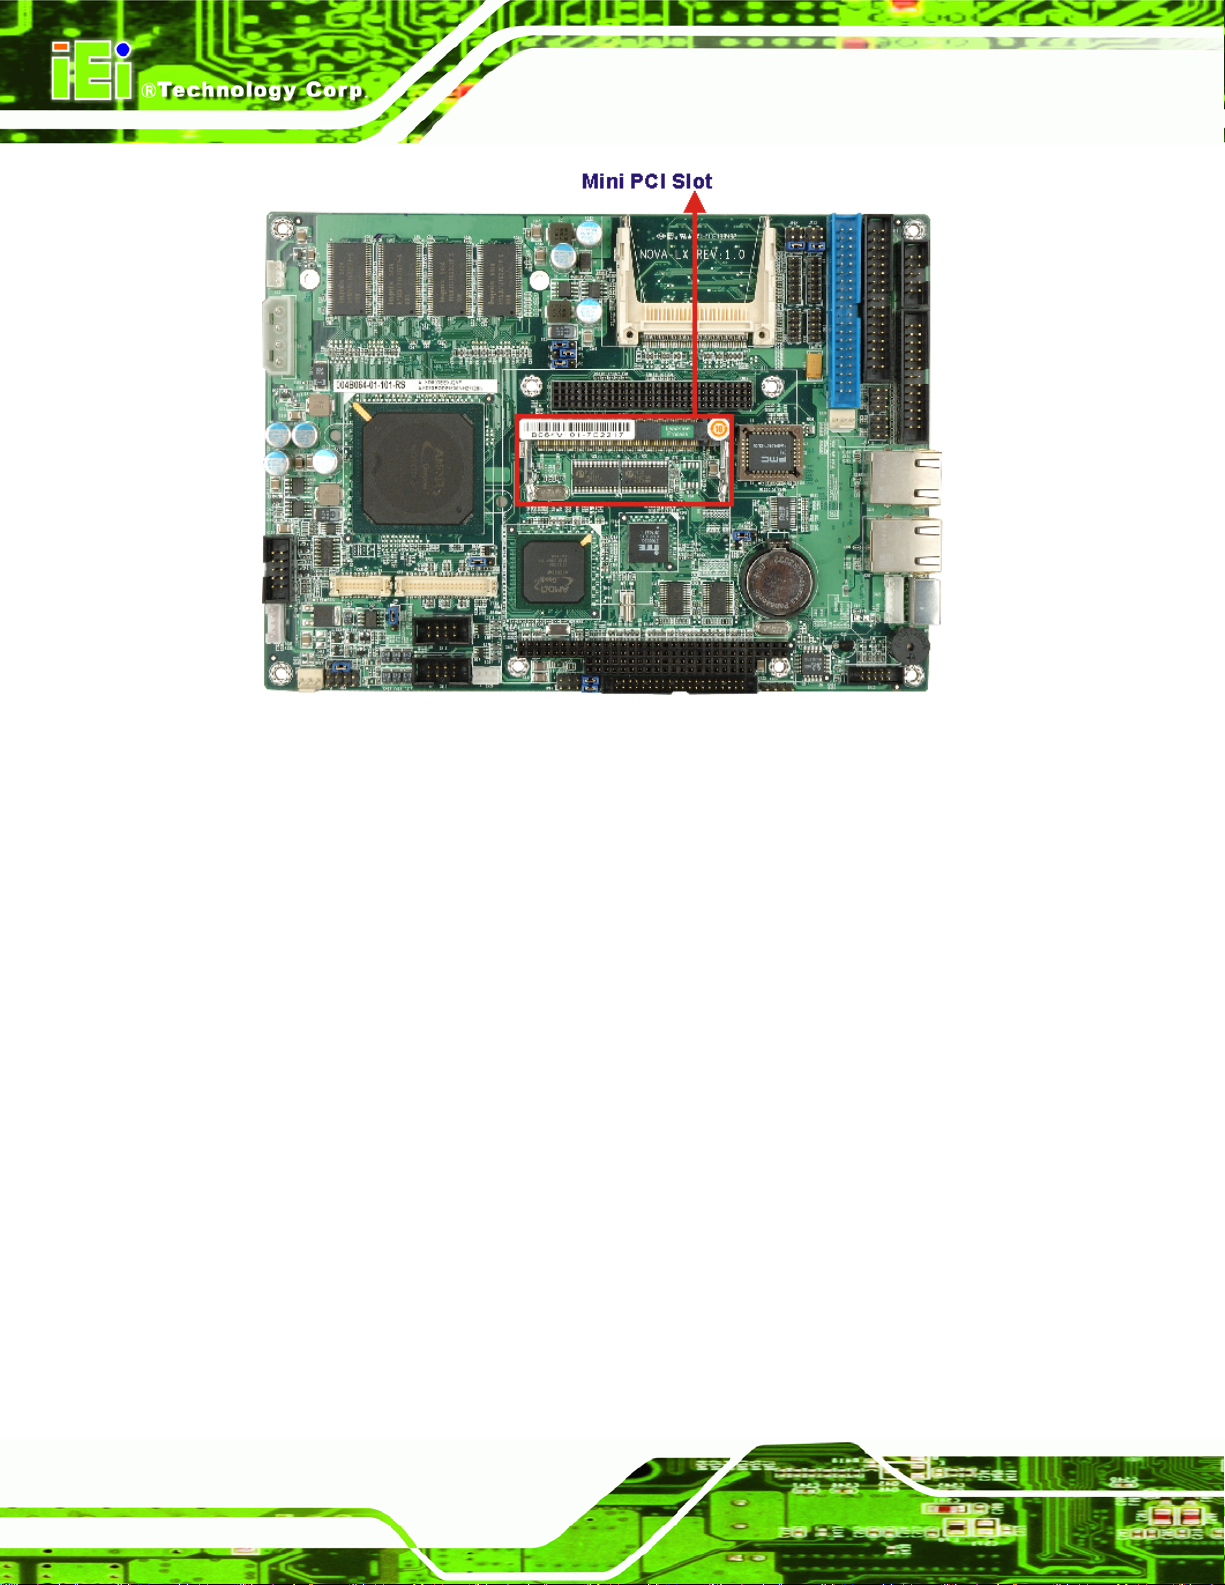
2.6.6 Mini PCI
A Mini PCI slot on the board facilitates additional system expansion.
Page 31
Page 52
NOVA-LX 5.25” Motherboard
Figure 2-14: Mini PCI Slot
2.7 Environmental and Power Specifications
2.7.1 System Monitoring
Three thermal inputs on the NOVA-LX Super I/O Enhanced Hardware Monitor monitor the
following temperatures:
CPU Temperature
Eight voltage inputs on the NOVA-LX Super I/O Enhanced Hardware Monitor monitor the
following volatages:
Vcore
VMEM
+3.30V
Page 32
+5.00V
+12.0V
5VSB
Page 53
NOVA-LX 5.25” Motherboard
The NOV A-LX Super I/O E nhanced Hardware Monito r also monitors the following volt ages
internally:
VBAT
The values for the above environmental parameters are all recorded in the BIOS
Hardware Health Configuration menu.
2.7.2 Operating Temperature and Temperature Control
The maximum and minimum operating temperatures for the NOVA-LX are listed below.
NOV A -LX800W
o Minimum Operating Temperature: -20ºC
o Maximum Operating Temperature: 70°C
NOV A -LX800
o Minimum Operating Temperature: 0ºC
o Maximum Operating Temperature: 60°C
A cooling fan and heat sink must be installed on the CPU. Thermal paste must be
smeared on the lower side of the heat sink before it is mounted on the CPU. Heat sinks
are also mounted on the northbridge and southbridge chipsets to ensure the operating
temperature of these chips remain low.
2.7.3 Power Consumption
Table 2-3 shows the power consumption parameters for the NOVA-LX running with a
500 MHz AMD Geode™ LX 800 processor with 256 MB of memory onboard.
Voltage Current
+5 V 1.66 A
Table 2-3: Power Consumption
Page 33
Page 54
Chapter
3
NOVA-LX 5.25” Motherboard
Chapter
3
3 Unpacking
Page 34
Page 55
NOVA-LX 5.25” Motherboard
3.1 Anti-static Precautions
WARNING:
Failure to take ESD precautions during the installation of the NOVA-LX
may result in permanent damage to the NOVA-LX and severe injury to
the user.
Electrostatic discharge (ESD) can cause serious damage to electronic components,
including the NOVA-LX. Dry climates are especially susceptible to ESD. It is therefore
critical that whenever the NOVA-LX, or any other electrical component is handled, the
following anti-static precautions are strictly adhered to.
Wear an anti-static wristband: - Wearing a simple anti-static wristband can
help to prevent ESD from damaging the board.
Self-grounding:- Before handling the board touch any grounded conducting
material. During the time the board is handled, frequently touch any
conducting materials that are connected to the ground.
Use an anti-static pad: When configuring the NOVA-LX, place it on an
antic-static pad. This reduces the possibility of ESD damaging the NOVA-LX.
Only handle the edges of the PCB:-: When handling the PCB, hold the PCB
by the edges.
3.2 Unpacking
3.2.1 Unpacking Precautions
When the NOVA-LX is unpacked, please do the following:
Follow the anti-static precautions outlined in Section 3.1.
Make sure the packing box is facing upwards so the NOVA-LX does not fall
out of the box.
Make sure all the components shown in Section 3.3 are present.
Page 35
Page 56
3.3 Unpacking Checklist
NOTE:
If some of the components listed in the checklist below are missing,
please do not proceed with the installation. Contact the IEI reseller or
vendor you purchased the NOVA-LX from or contact an IEI sales
representative directly. To contact an IEI sales representative, please
NOVA-LX 5.25” Motherboard
send an email to
3.3.1 Package Contents
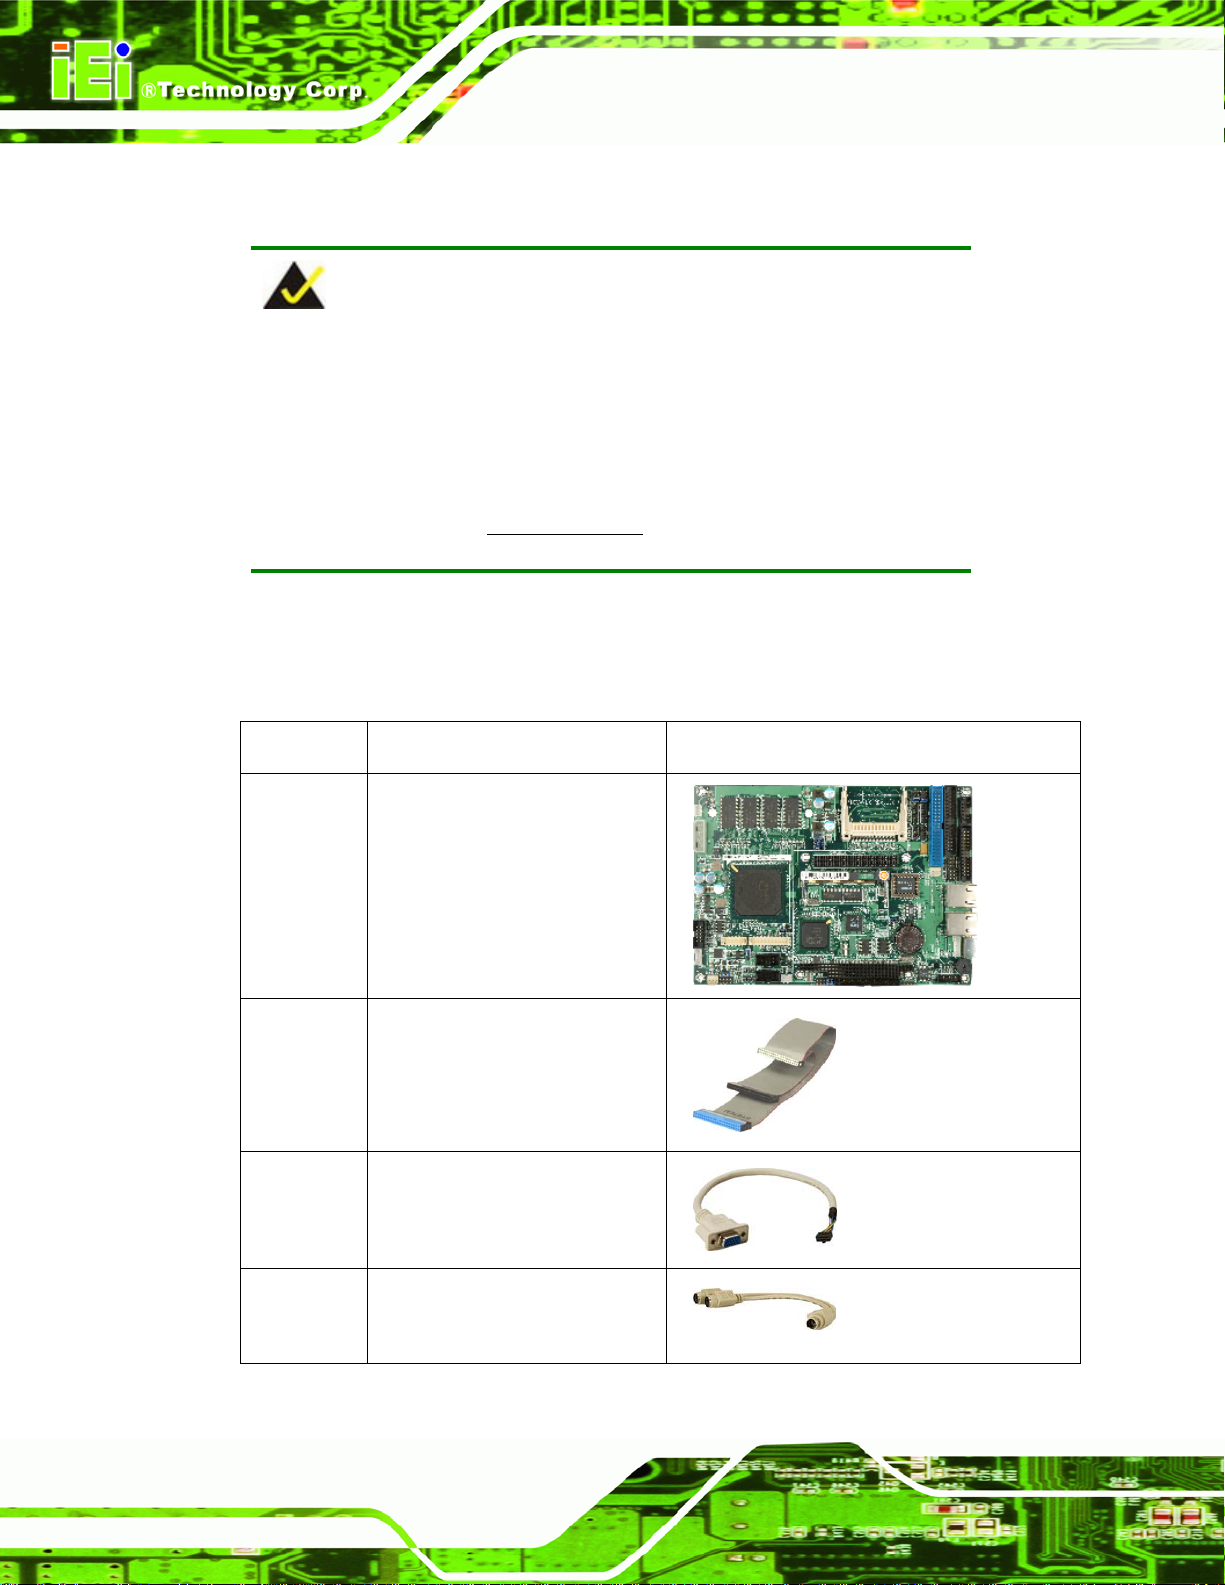
The NOVA-LX is shipped with the following components:
Quantity Item and Part Number Image
1 NOVA-LX
1 ATA 66/100 flat cable
(P/N: 32200-000052-RS)
Page 36
1 VGA cable
(P/N: 32000-033800-RS)
1 KB/MS PS/2 Y-cable
(P/N: 32000-000138-RS)
Page 57
NOVA-LX 5.25” Motherboard
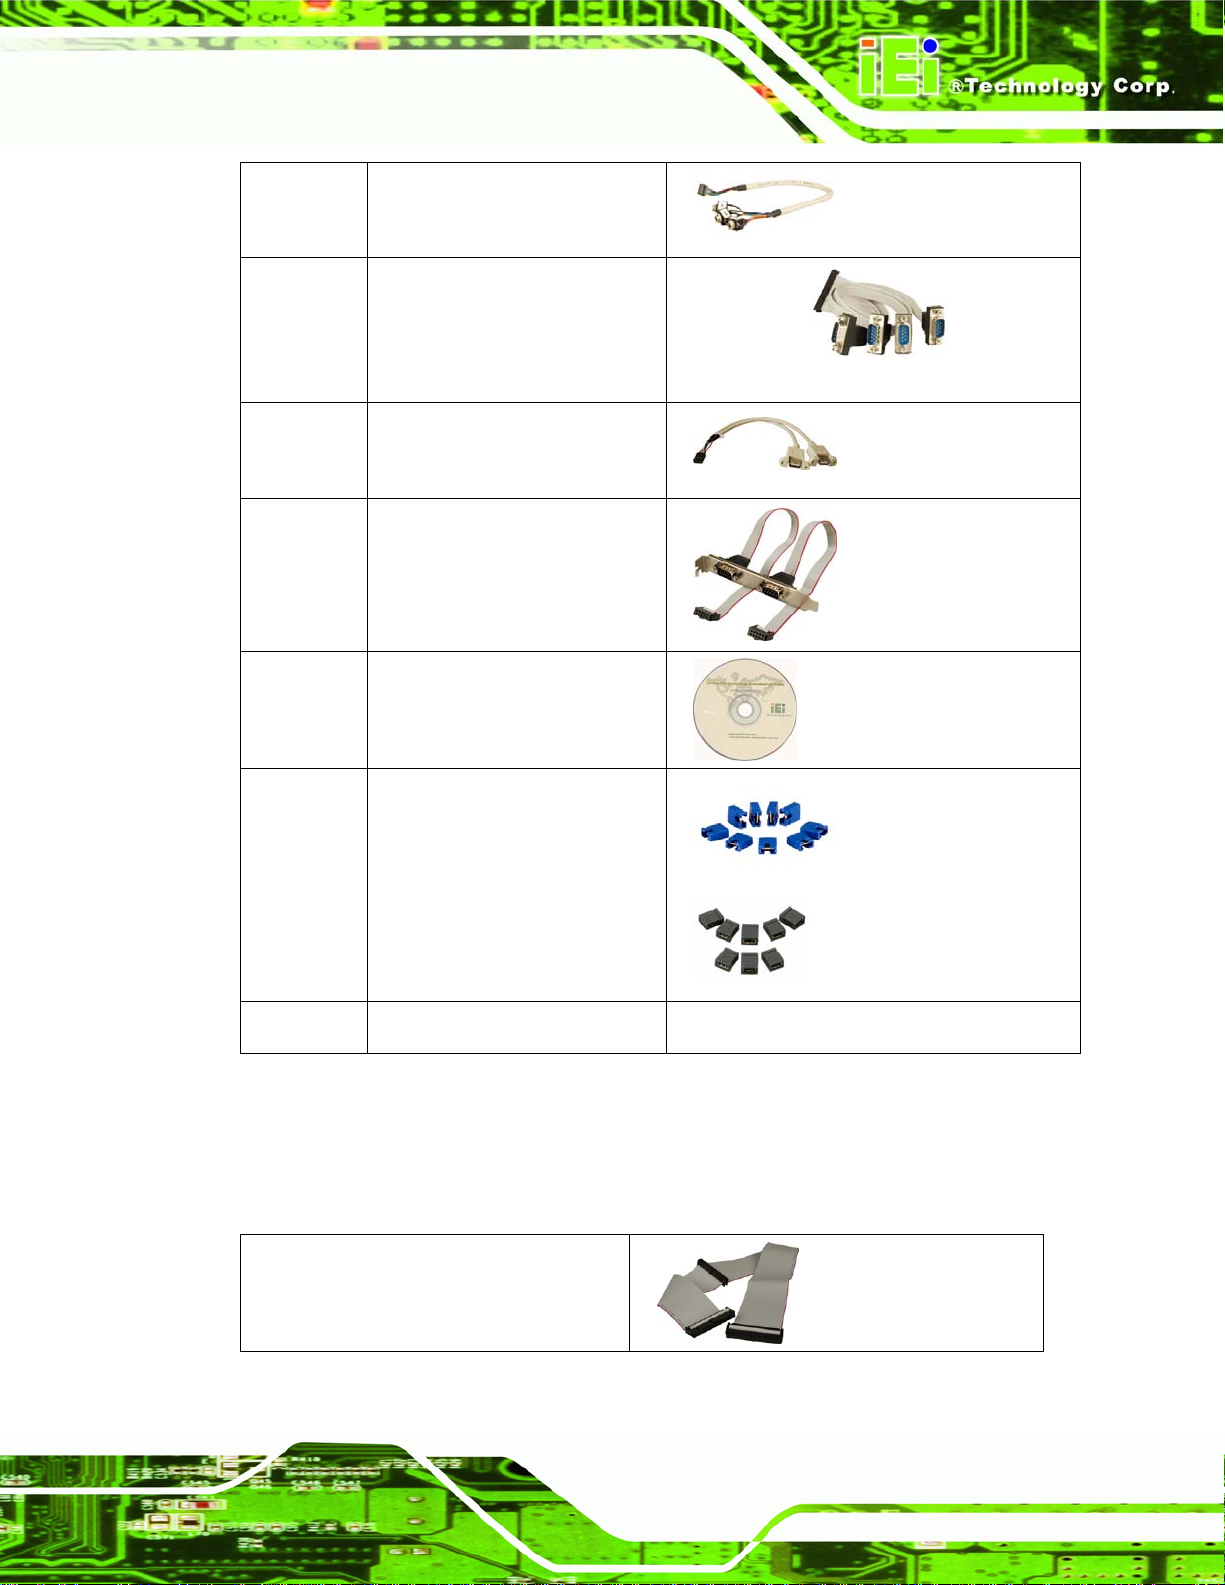
1 Audio cable
(P/N: 32000-072100-RS)
1
2 Dual USB cable (wo bracket)
1 Dual RS-232 cable
1 Utility CD
1 Mini jumper pack (2.4mm)
4 COM (wo bracket)
(P/N: 32200-025401-RS)
(P/N: 32000-044300-RS)
(P/N: 19800-000051-RS)
(P/N:33100-000079-RS)
Or
Mini jumper pack (2.0mm)
(P/N:33100-000033-RS)
1
Table 3-1: Package List Contents
3.4 Optional Items
FDD cable
(P/N: 32200-000017-RS)
Page 37
Page 58
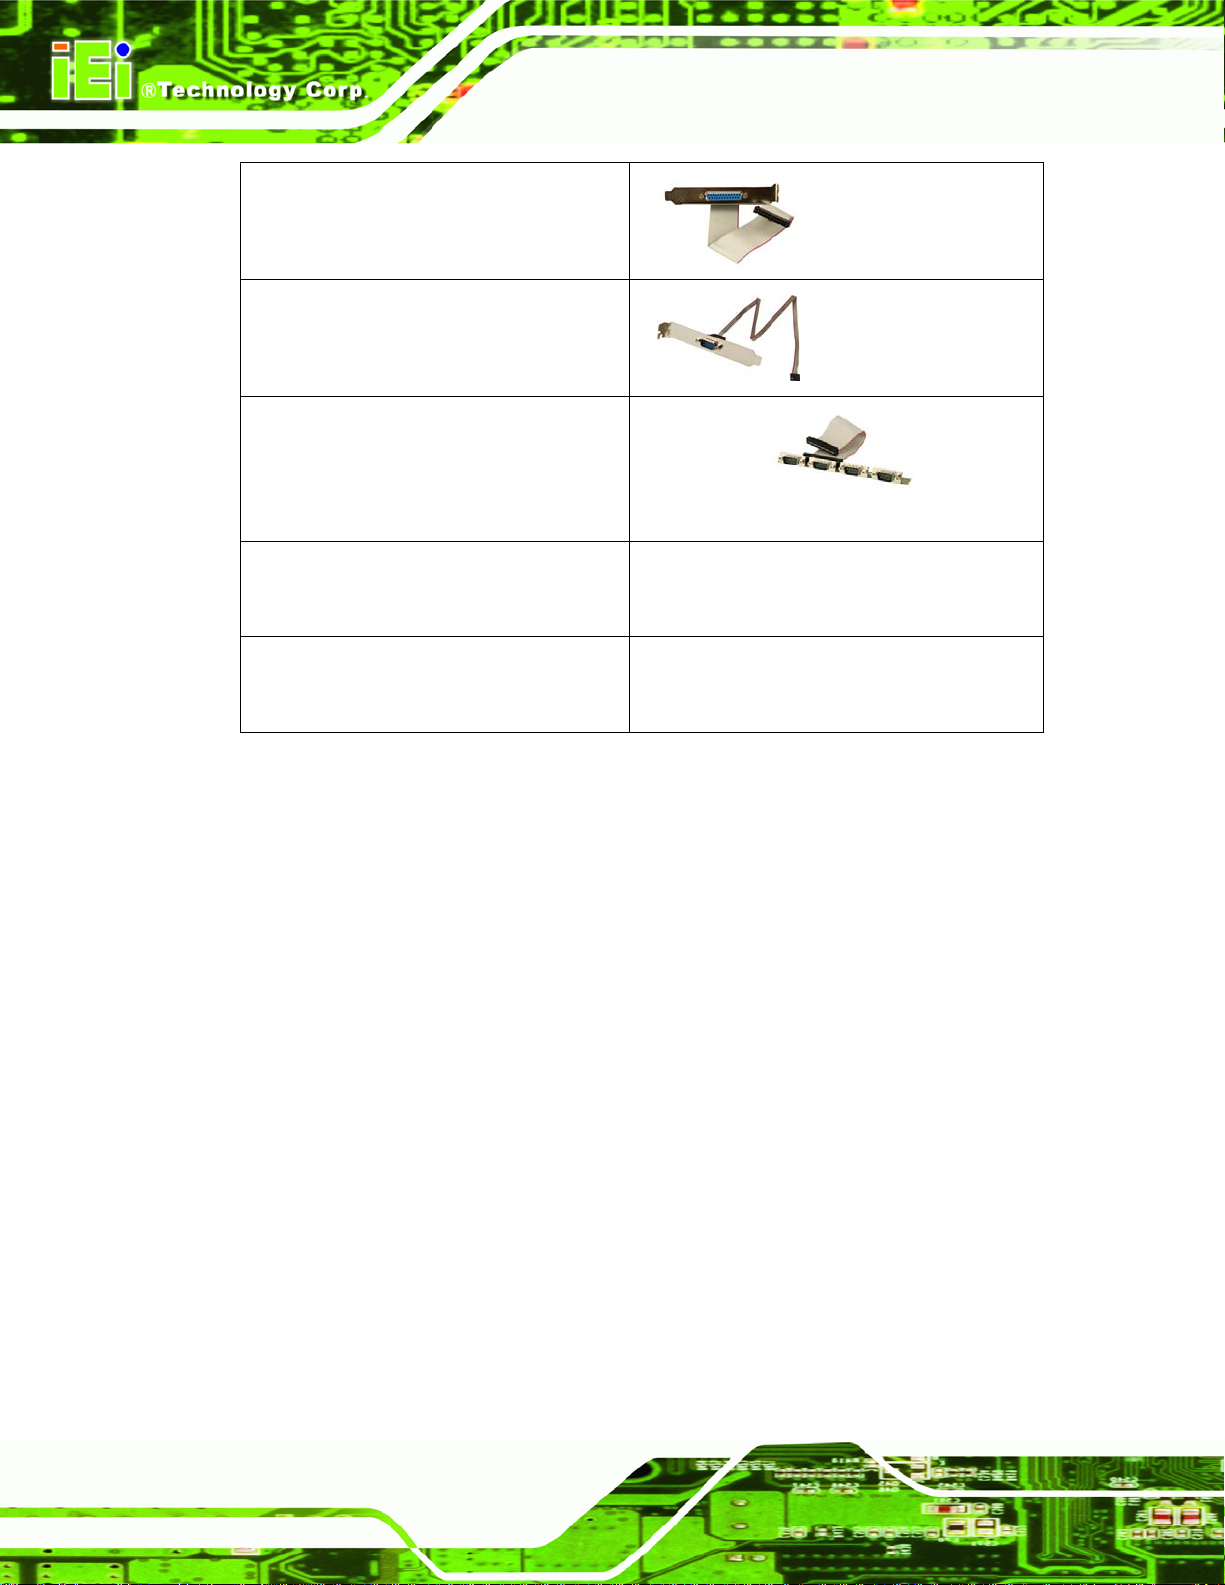
Parallel port cable
(P/N:19800-000049-RS)
RS-422/485 cable with bracket
(P/N: 19800-000063-RS)
4 COM (w bracket)
(P/N: IO-KIT-4COM-R10)
NOVA-LX-CE060 Windows CE 6.0 image and BSP S/W CD,
NOVA-LX-XPE Windows XPE image and BSP S/W CD,
NOVA-LX 5.25” Motherboard
licenses sticker (w/o CPU board)
licenses sticker (w/o CPU board)
Table 3-2: Package List Contents
Page 38
Page 59
NOVA-LX 5.25” Motherboard
Chapter
4
4 Connector Pinouts
Chapter
4
Page 39
Page 60
4.1 Peripheral Interface Connectors
Section 4.1.2 shows peripheral interface connector locations. Section 4.1.2 lists all the
NOVA-LX 5.25” Motherboard
peripheral interface connectors seen in Section
4.1.2.
4.1.1 NOVA-LX Layout
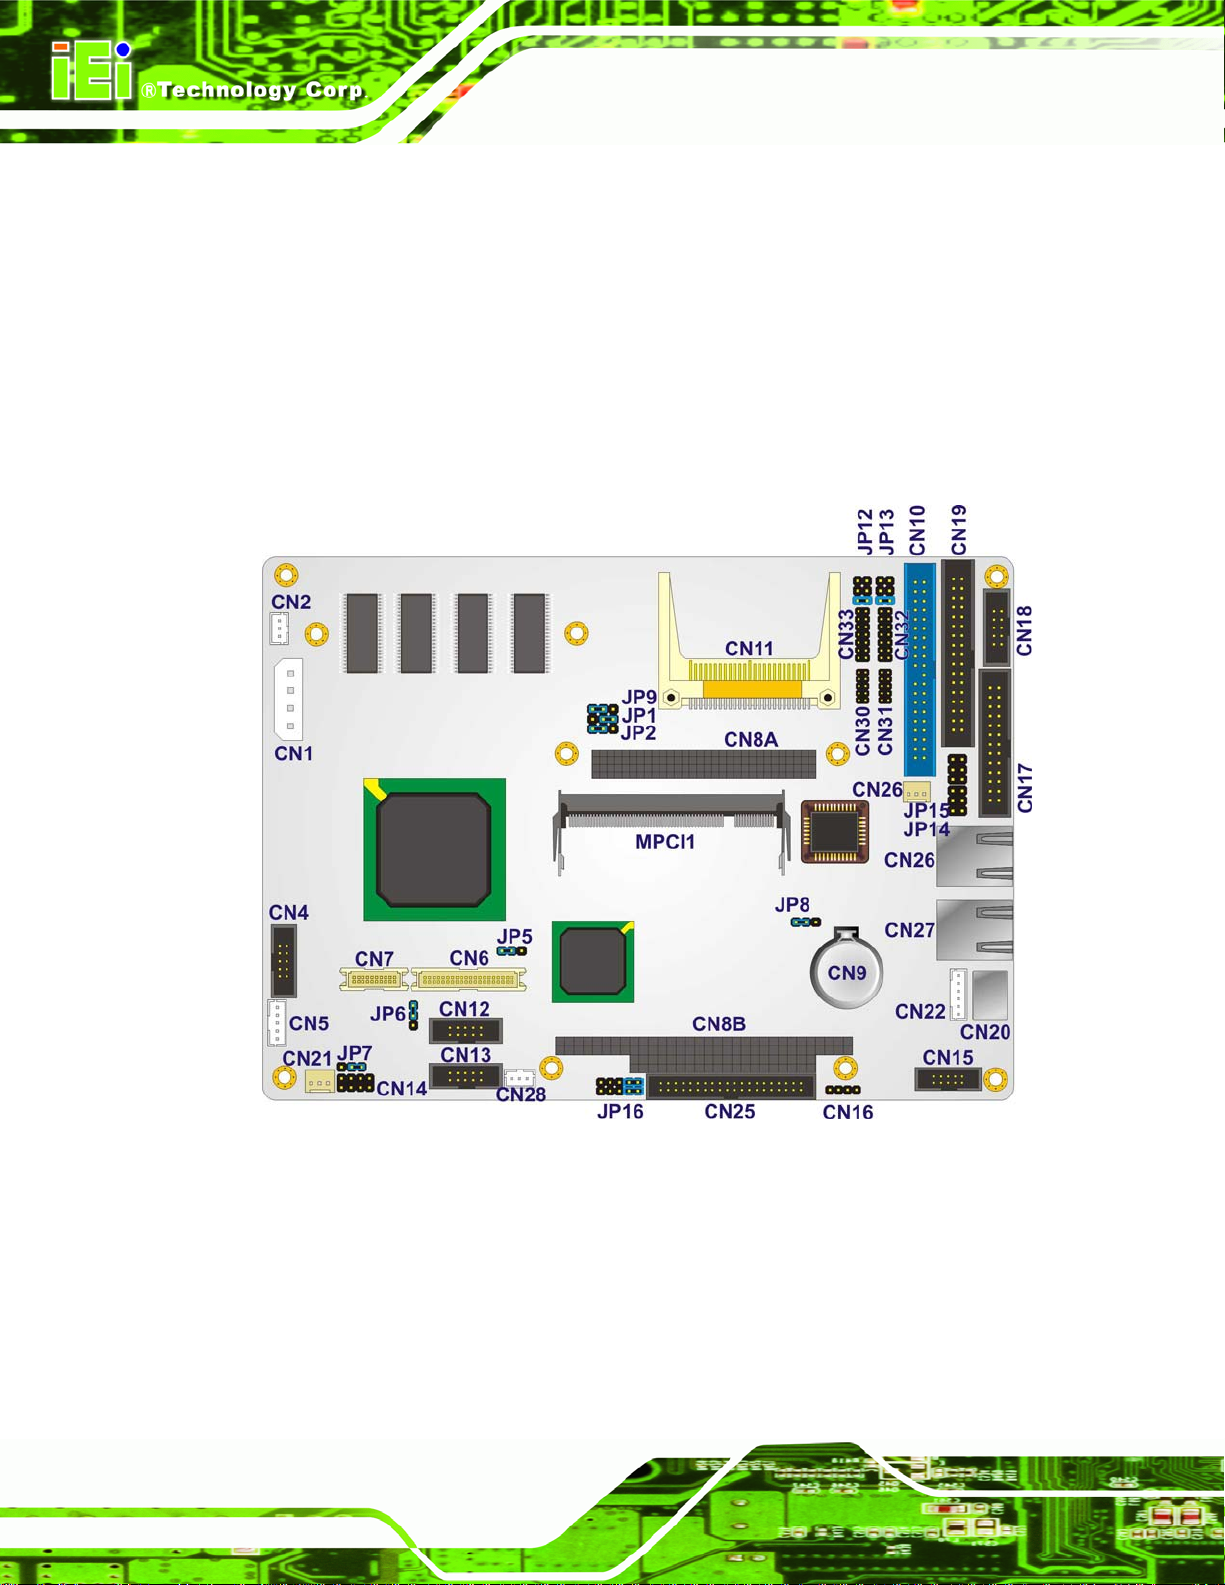
Figure 4-1 shows the on-board peripheral connectors, rear panel peripheral connectors
and on-board jumpers.
Figure 4-1: Connector and Jumper Locations
4.1.2 Peripheral Interface Connectors
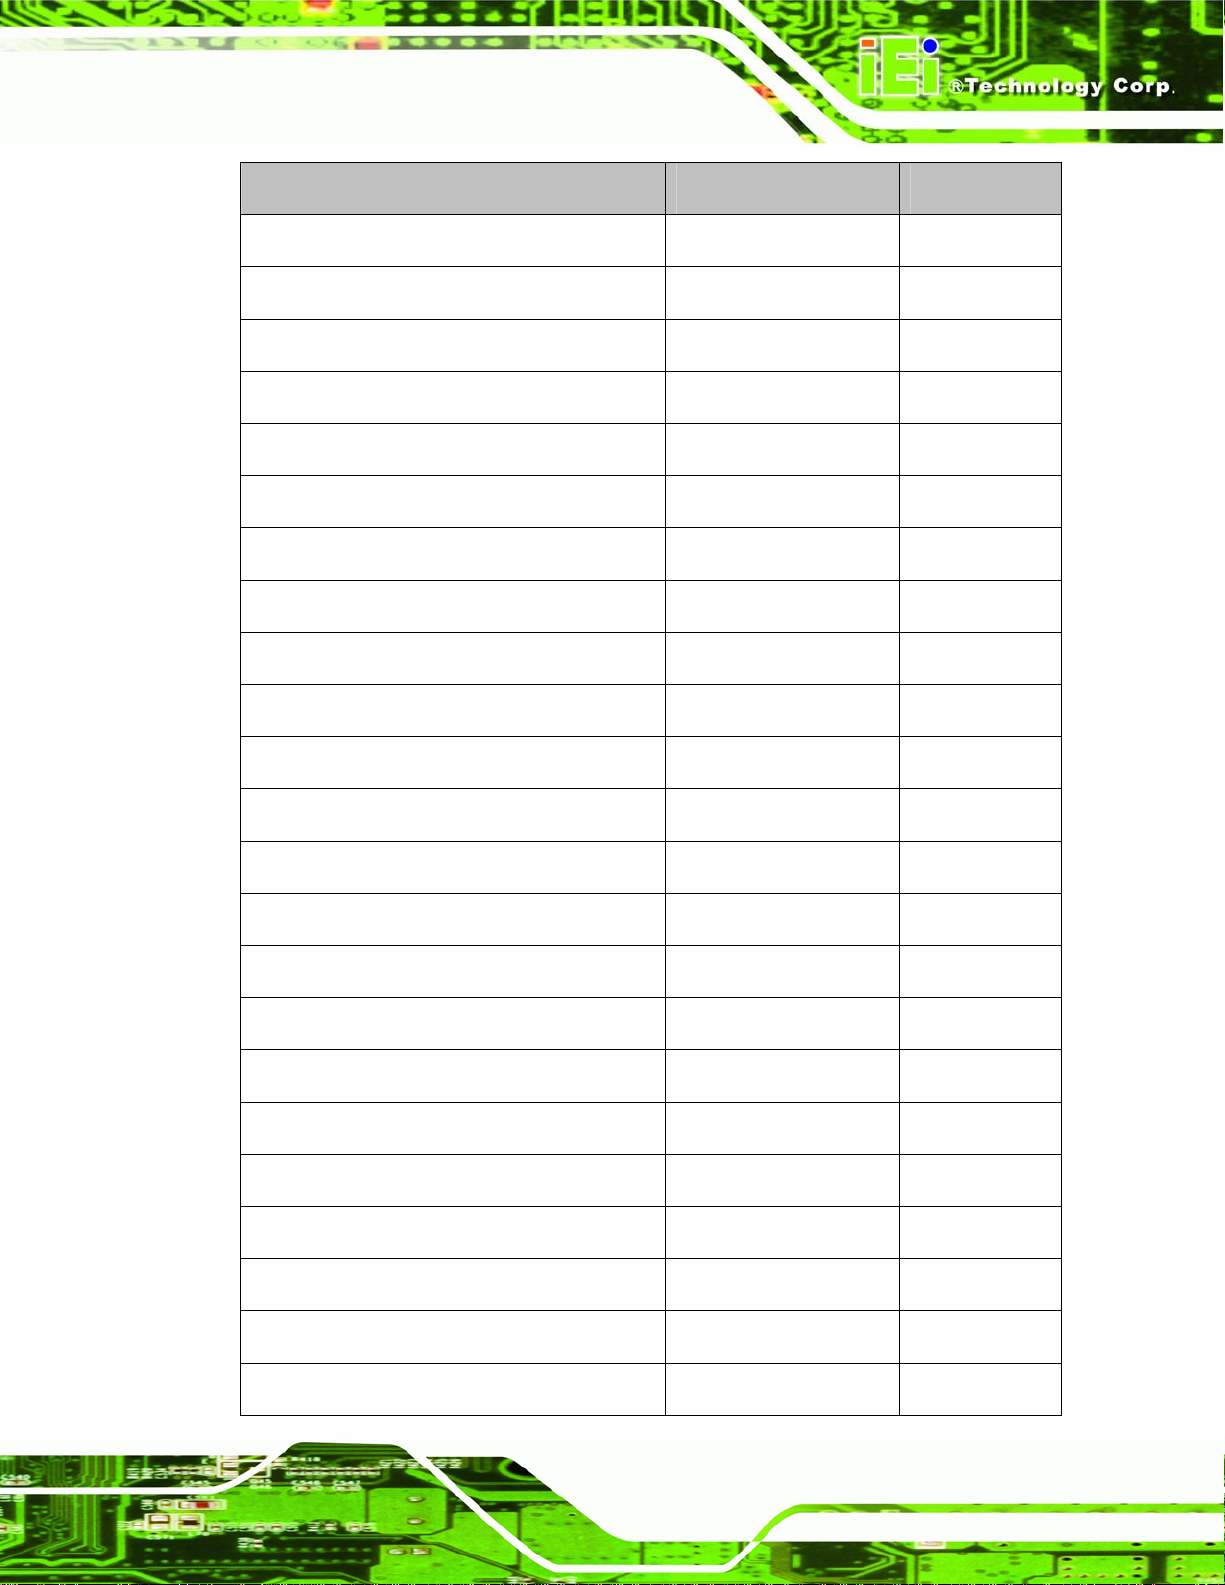
Table 4-1 shows a list of the peripheral interface connectors on the NOVA-LX. Detailed
descriptions of these connectors can be found below.
Page 40
Page 61
NOVA-LX 5.25” Motherboard
Connector Type Label
ATX +12V power connector 4-pin ATX CN1
ATX power supply enable connector 3-pin wafer CN2
Audio CD In 4-pin header CN16
Audio connector 10-pin header CN15
Backlight inverter connector 5-pin wafer CN5
Battery connector 2-pin wafer CN9
Batter connector (LX800W models) 3-pin wafer CN24
Cooling fan connector 3-pin wafer CN211
Floppy disk connector 34-pin box header CN19
Front panel connector 8-pin header CN14
GPIO connector 10-pin header CN18
IDE connector 44-pin box header CN10
Keyboard and mouse connector 6-pin wafer CN22
LVDS connector 20-pin crimp CN7
Parallel port connector 26-pin box header CN17
PC/104-Plus power connector 3-pin header CN28
Serial port connector (COM1, COM2) 10-pin header CN30
Serial port connector (COM3) 14-pin header CN32
Serial port connector (COM4) 14-pin header CN33
Serial port connector (COM5 – COM8) 40-pin header CN25
TTL connector 40-pin crimp CN6
USB connectors 8-pin header CN12
USB connectors 8-pin header CN13
Page 41
Page 62
VGA connector 10-pin box header CN4
Table 4-1: Peripheral Interface Connectors
4.1.3 External Interface Panel Connectors
Table 4-2 lists the rear panel connectors on the NOVA-LX. Detailed descriptions of these
NOVA-LX 5.25” Motherboard
connectors can be found in Section
Connector Type Label
Keyboard and mouse connector PS/2 CN20
Ethernet connector RJ-45 CN26
Ethernet connector RJ-45 CN27
Table 4-2: Rear Panel Connectors
4.2.20 on page 65
4.2 Internal Peripheral Connectors
Internal peripheral connectors are found on the motherboard and are only accessible
when the motherboard is outside of the chassis. This section has complete descriptions of
all the internal, peripheral connectors on the NOVA-LX.
4.2.1 ATX +12V Power Connector
Page 42
CN Label:
CN Type:
CN Location:
CN Pinouts:
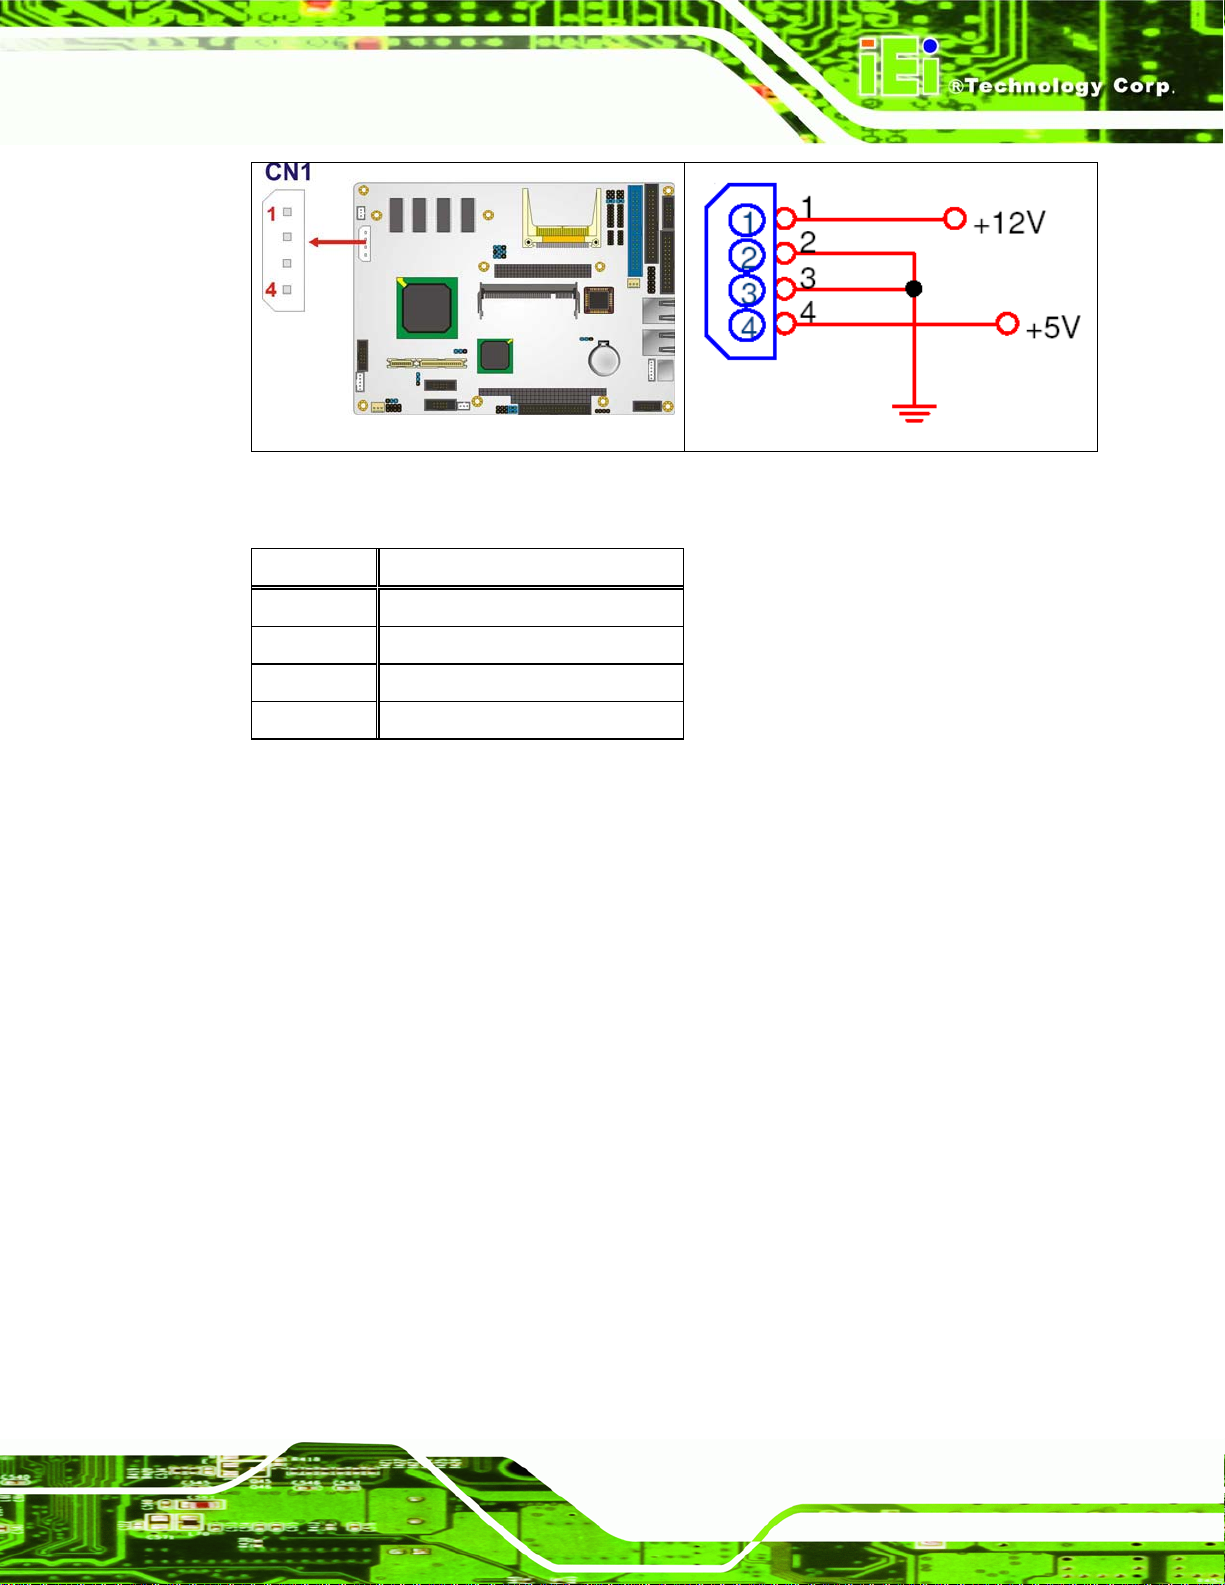
The 4-pin ATX power connector is connected to an ATX power supply.
CN1
4-pin ATX power connector (1x4)
Figure 4-2
See
Table 4-3
See
Page 63
NOVA-LX 5.25” Motherboard
Figure 4-2: ATX Power Connector Location
PIN NO. DESCRIPTION
1 +12 V
2 GND
3 GND
4 +5 V
Table 4-3: ATX Power Connector Pinouts
4.2.2 ATX Power Supply Enable Connector
CN Label: CN2
CN Type:
CN Location: See
CN Pinouts: See
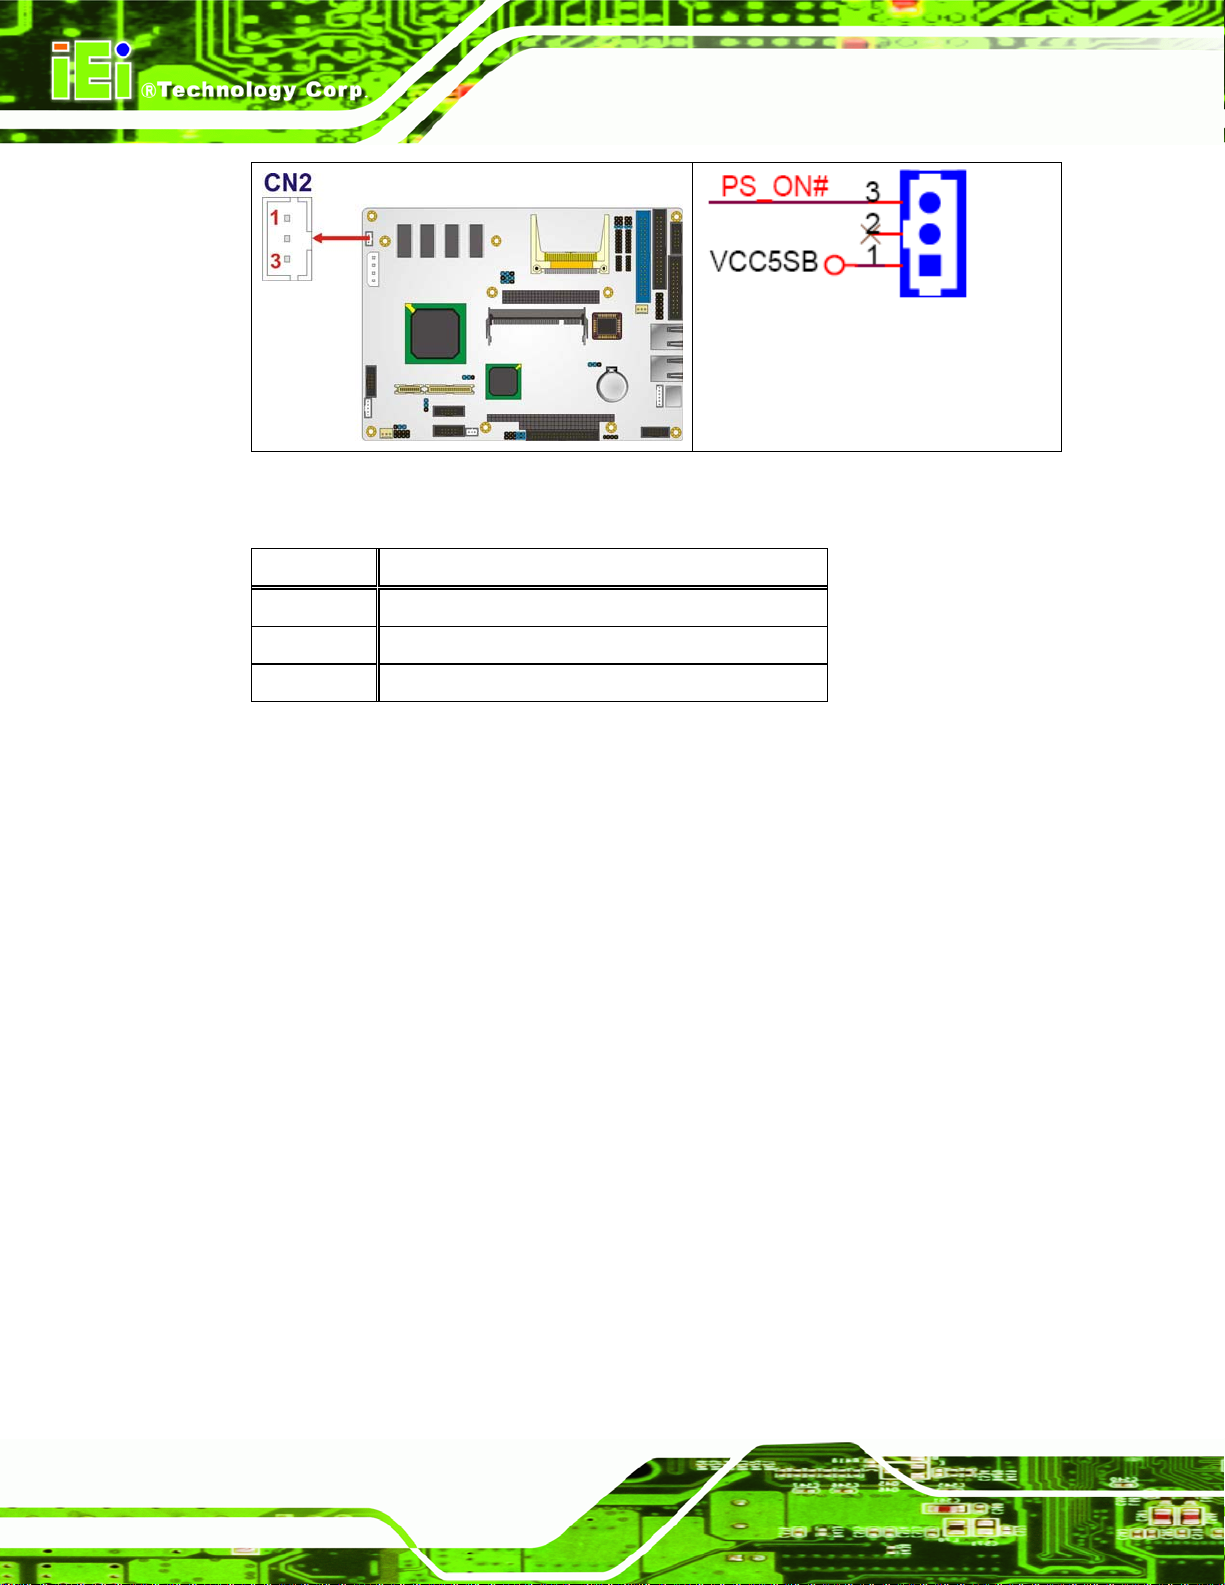
The ATX power supply enable connector enables the NOVA-LX to be connected to an ATX
power supply. In default mode, the NOVA-LX can only us an AT power supply. To enable
an ATX power supply the AT Power Select jumper must also be configured. Please refer to
Chapter 3 for more details.
3-pin wafer (1x3)
Figure 4-3
Table 4-4
Page 43
Page 64
NOVA-LX 5.25” Motherboard
Figure 4-3: ATX Power Supply Enable Connector Location
PIN NO. DESCRIPTION
1 +5 V Standby
2 No connection
3 PS-ON
Table 4-4: ATX Power Supply Enable Connector Pinouts
4.2.3 Audio CD In Connector (4-pin)
CN Label:
CN Type:
CN Location:
CN Pinouts:
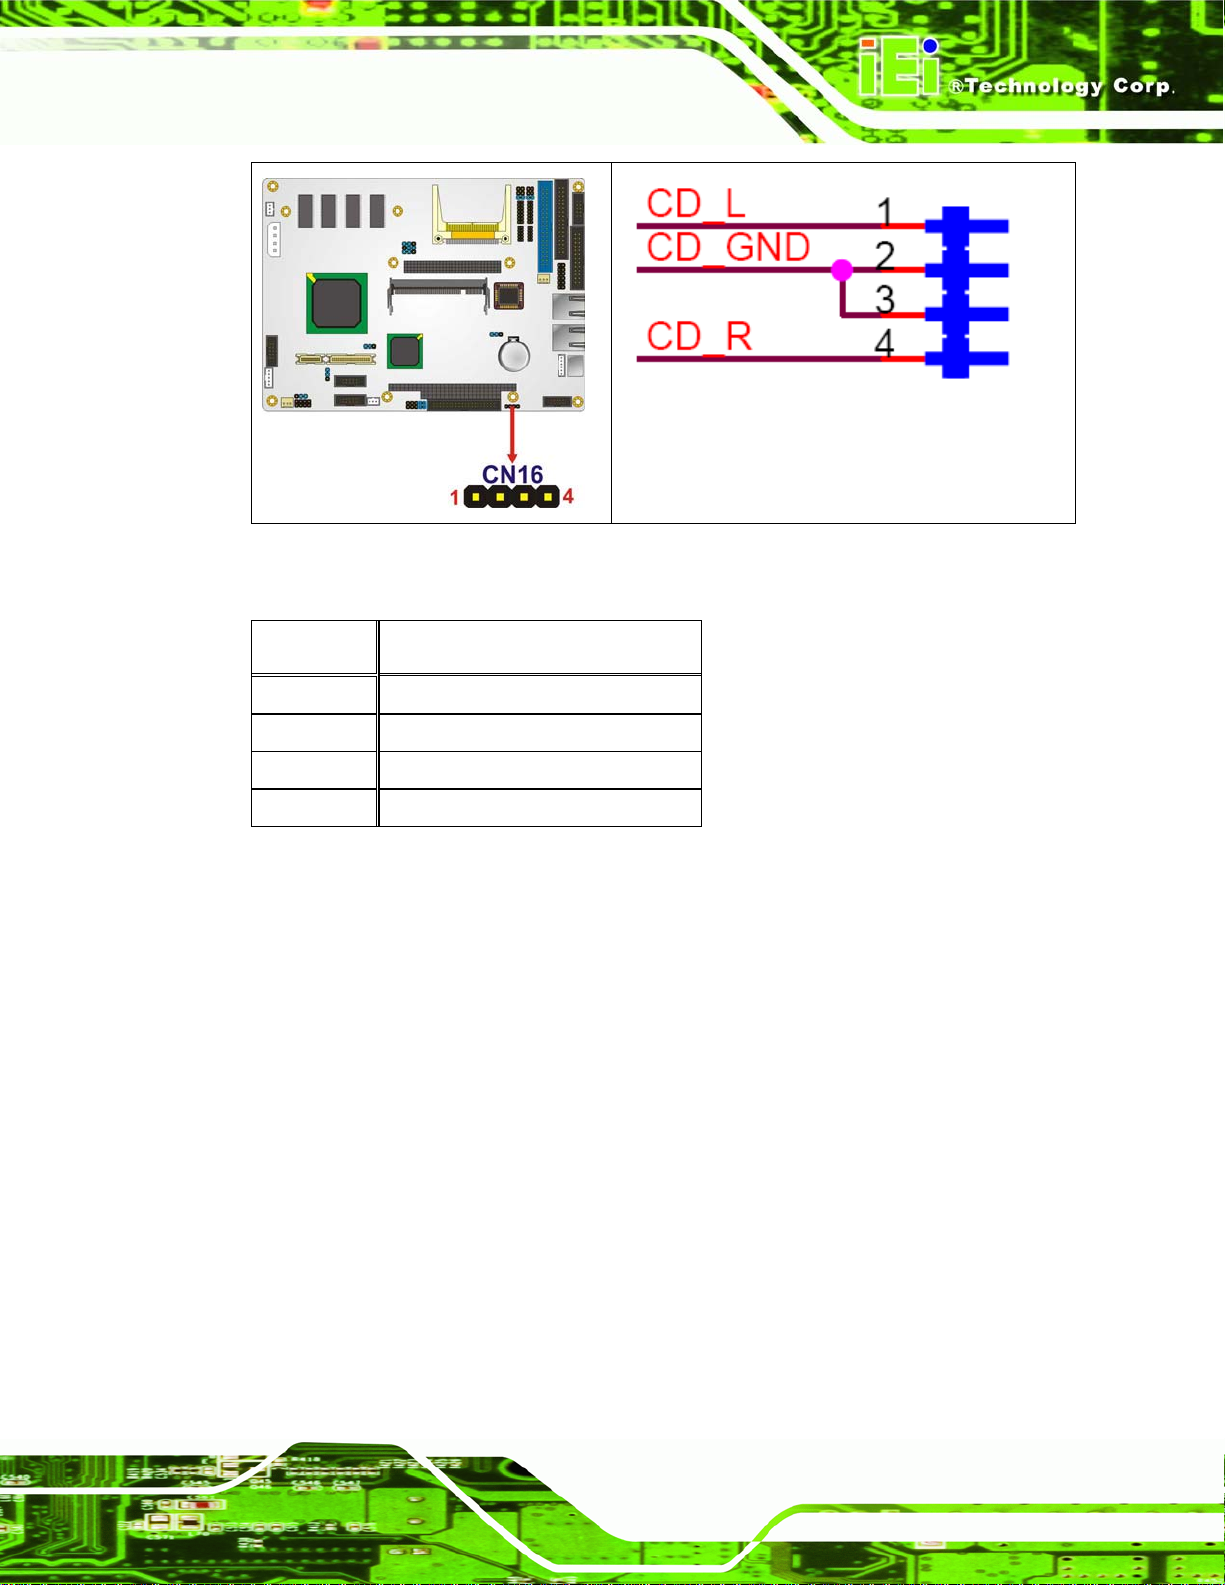
The 4-pin audio CD in connector is connected to an external audio CD device for the input
and output of audio signals from a CD player to the system.
CN16
4-pin header
Figure 4-4
See
Table 4-5
See
Page 44
Page 65
NOVA-LX 5.25” Motherboard
Figure 4-4: Audio CD In Connector Pinouts (4-pin)
PIN NO. DESCRIPTION
1 CD Signal (Left)
2 Ground
3 Ground
4 CD Signal (Right)
Table 4-5: Audio CD In Connector Pinouts
4.2.4 Audio Connector (10-pin)
CN Label: CN15
CN Type:
CN Location: See
CN Pinouts: See
The 10-pin audio connector is connected to external audio devices including speakers a nd
microphones for the input and output of audio signals to and from the system.
10-pin header
Figure 4-5
Table 4-6
Page 45
Page 66
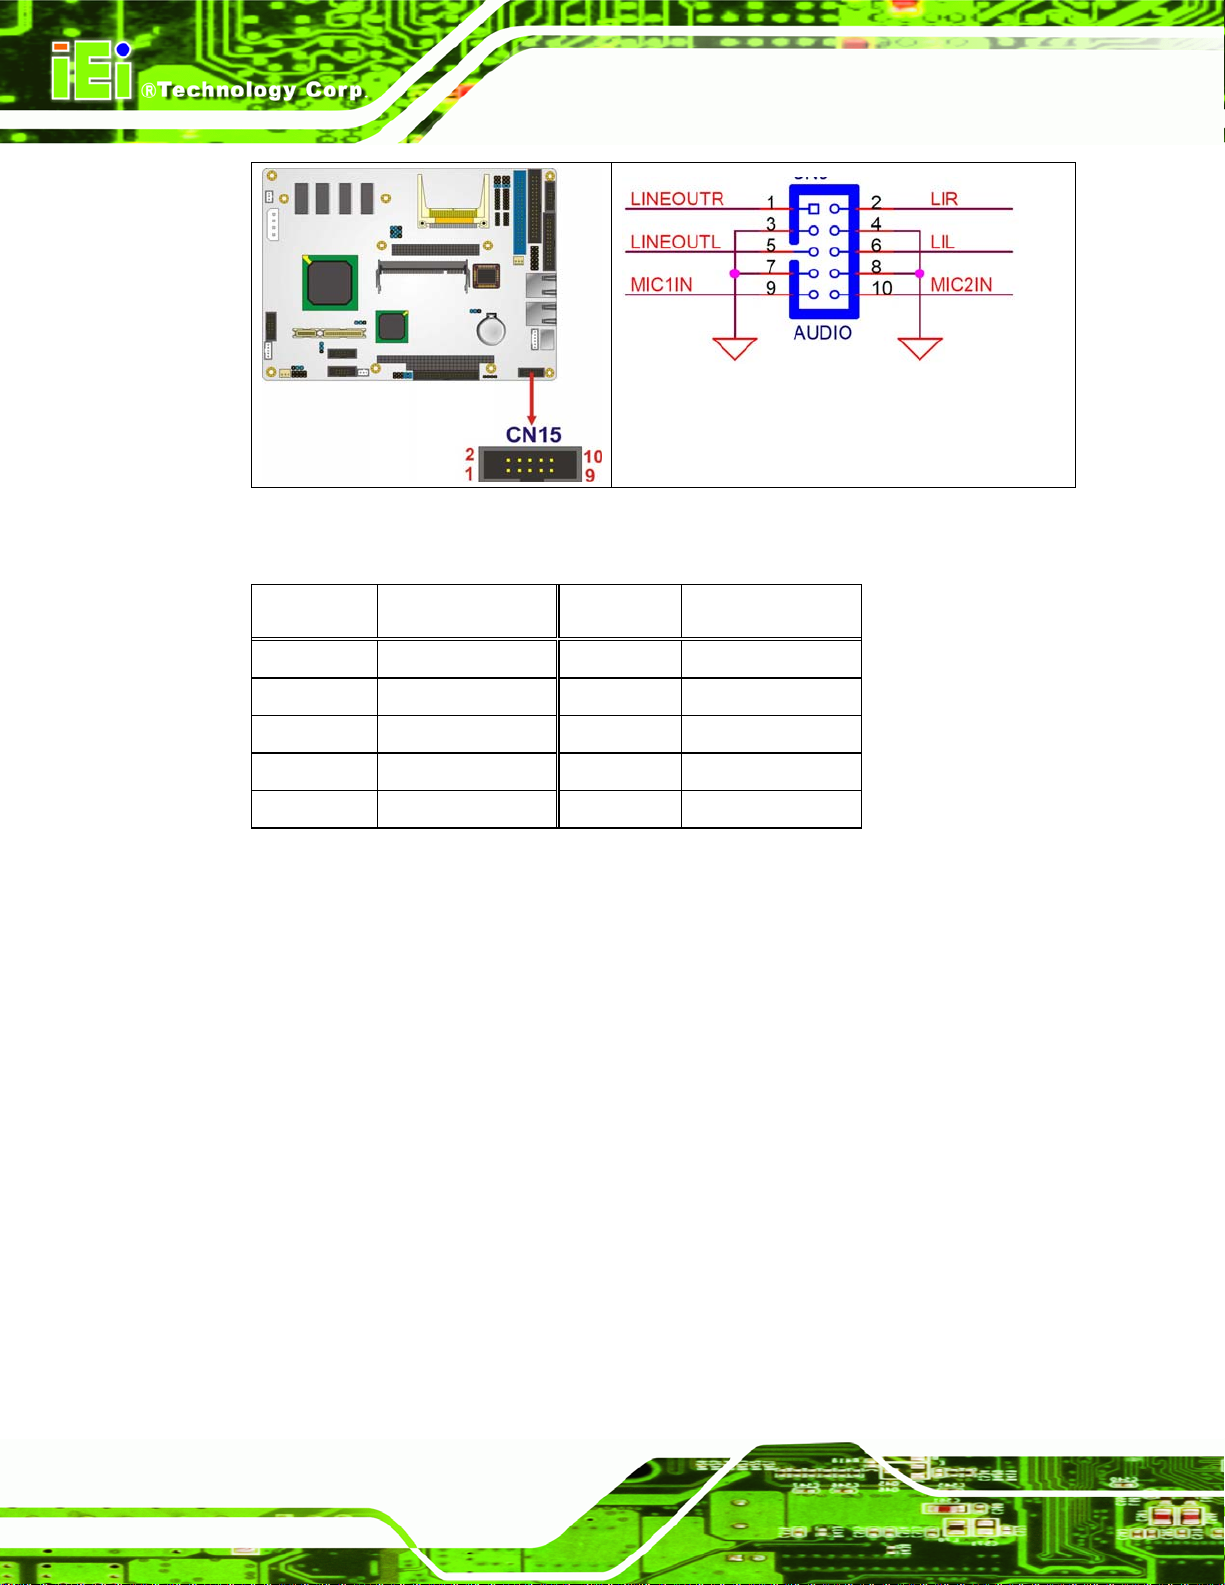
NOVA-LX 5.25” Motherboard
Figure 4-5: Audio Connector Pinouts (10-pin)
PIN NO. DESCRIPTION PIN NO. DESCRIPTION
1 Line out R 2 Line in R
3 GND 4 GND
5 Line out L 6 Line in L
7 GND 8 GND
9 MIC1 in 10 MIC2 in
Table 4-6: Audio Connector Pinouts (10-pin)
4.2.5 Backlight Inverter Connector
CN Label: CN5
CN Type:
CN Location: See
CN Pinouts: See
The backlight inverter connector provides the backlight on the LCD display connected to
the NOVA-LX with +12V of power.
5-pin wafer (1x5)
Figure 4-6
Table 4-7
Page 46
Page 67
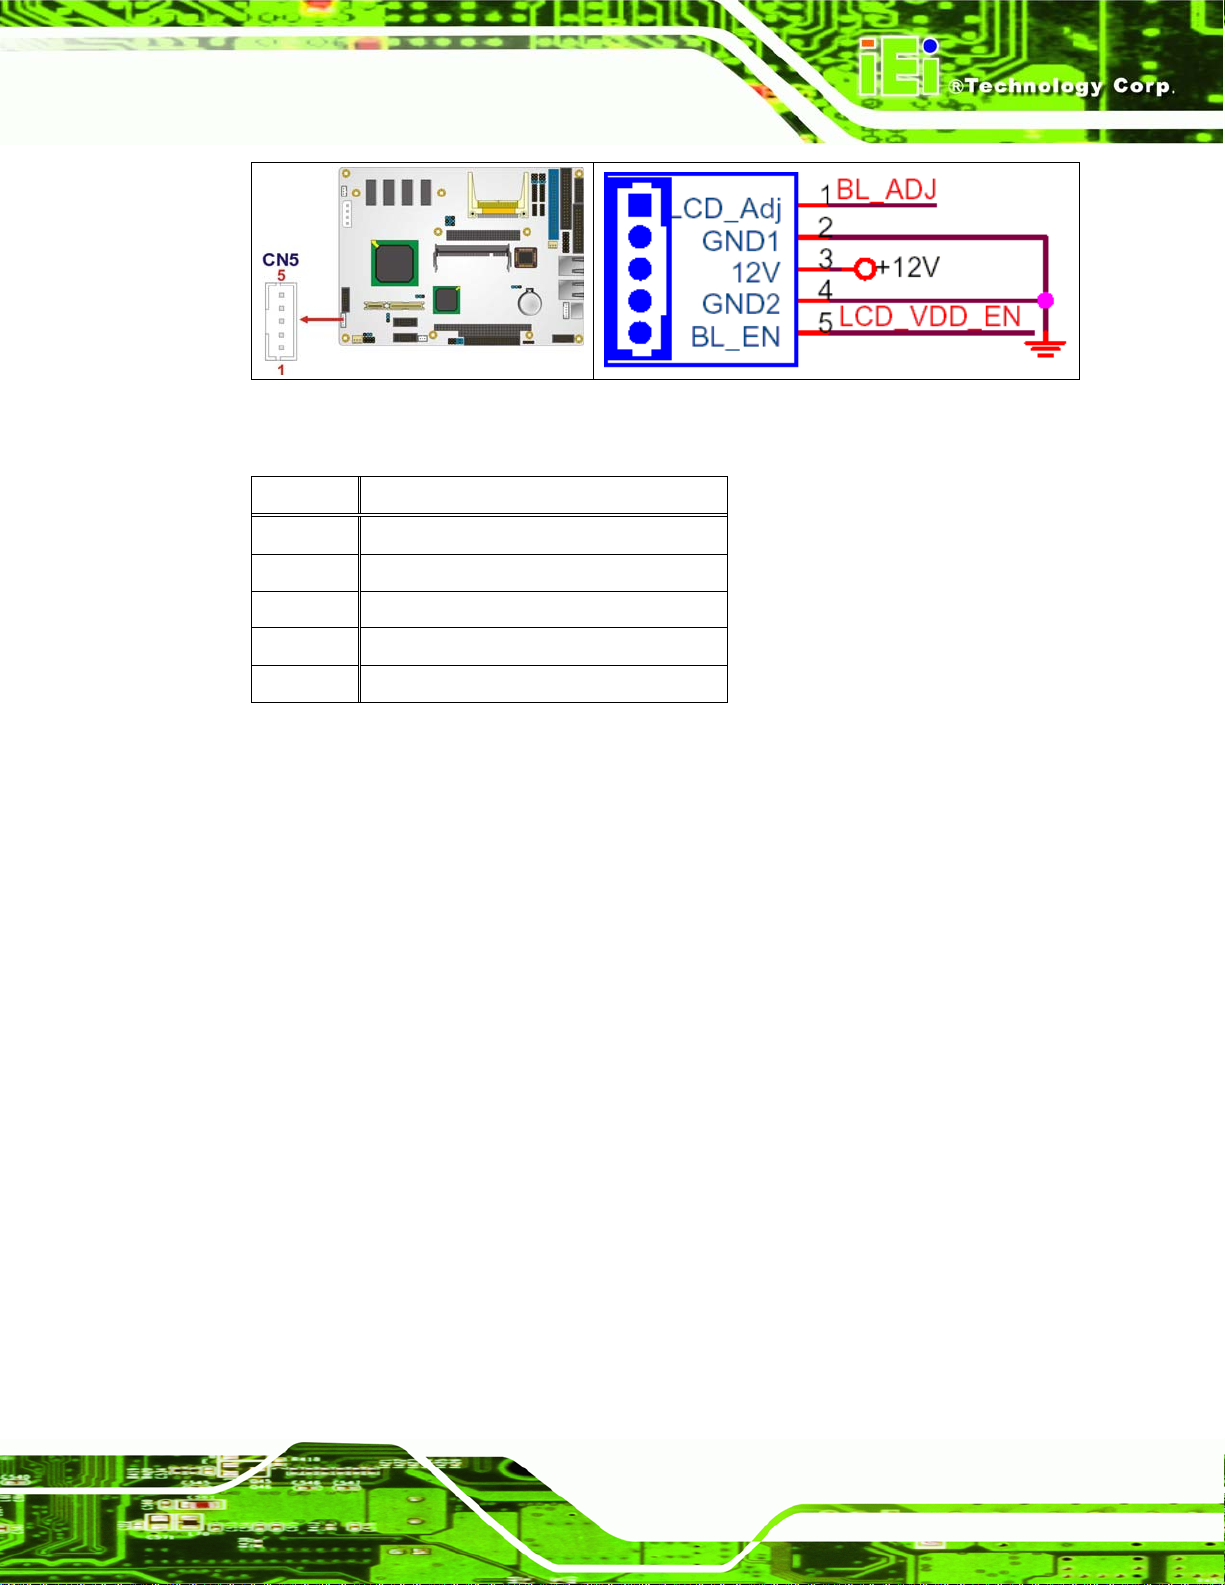
NOVA-LX 5.25” Motherboard
Figure 4-6: Panel Backlight Connector Pinout Locations
PIN NO. DESCRIPTION
1 BL_ADJ
2 GND
3 12V
4 GND
5 VDD_EN
Table 4-7: Panel Backlight Connector Pinouts
4.2.6 Fan Connector (+12V) (System Cooling Fans)
CN Label:
CN Type:
CN Location:
CN Pinouts:
Two system cooling fan connectors provide a 12V, 500mA current to two system cooling
fans. The connectors have a "rotation" pin to get rotation signals from fans and notify the
system so the system BIOS can recognize the fan speed. Please note that only specified
fans can issue the rotation signals.
CN21
3-pin wafer
Figure 4-7
See
Table 4-8
See
Page 47
Page 68
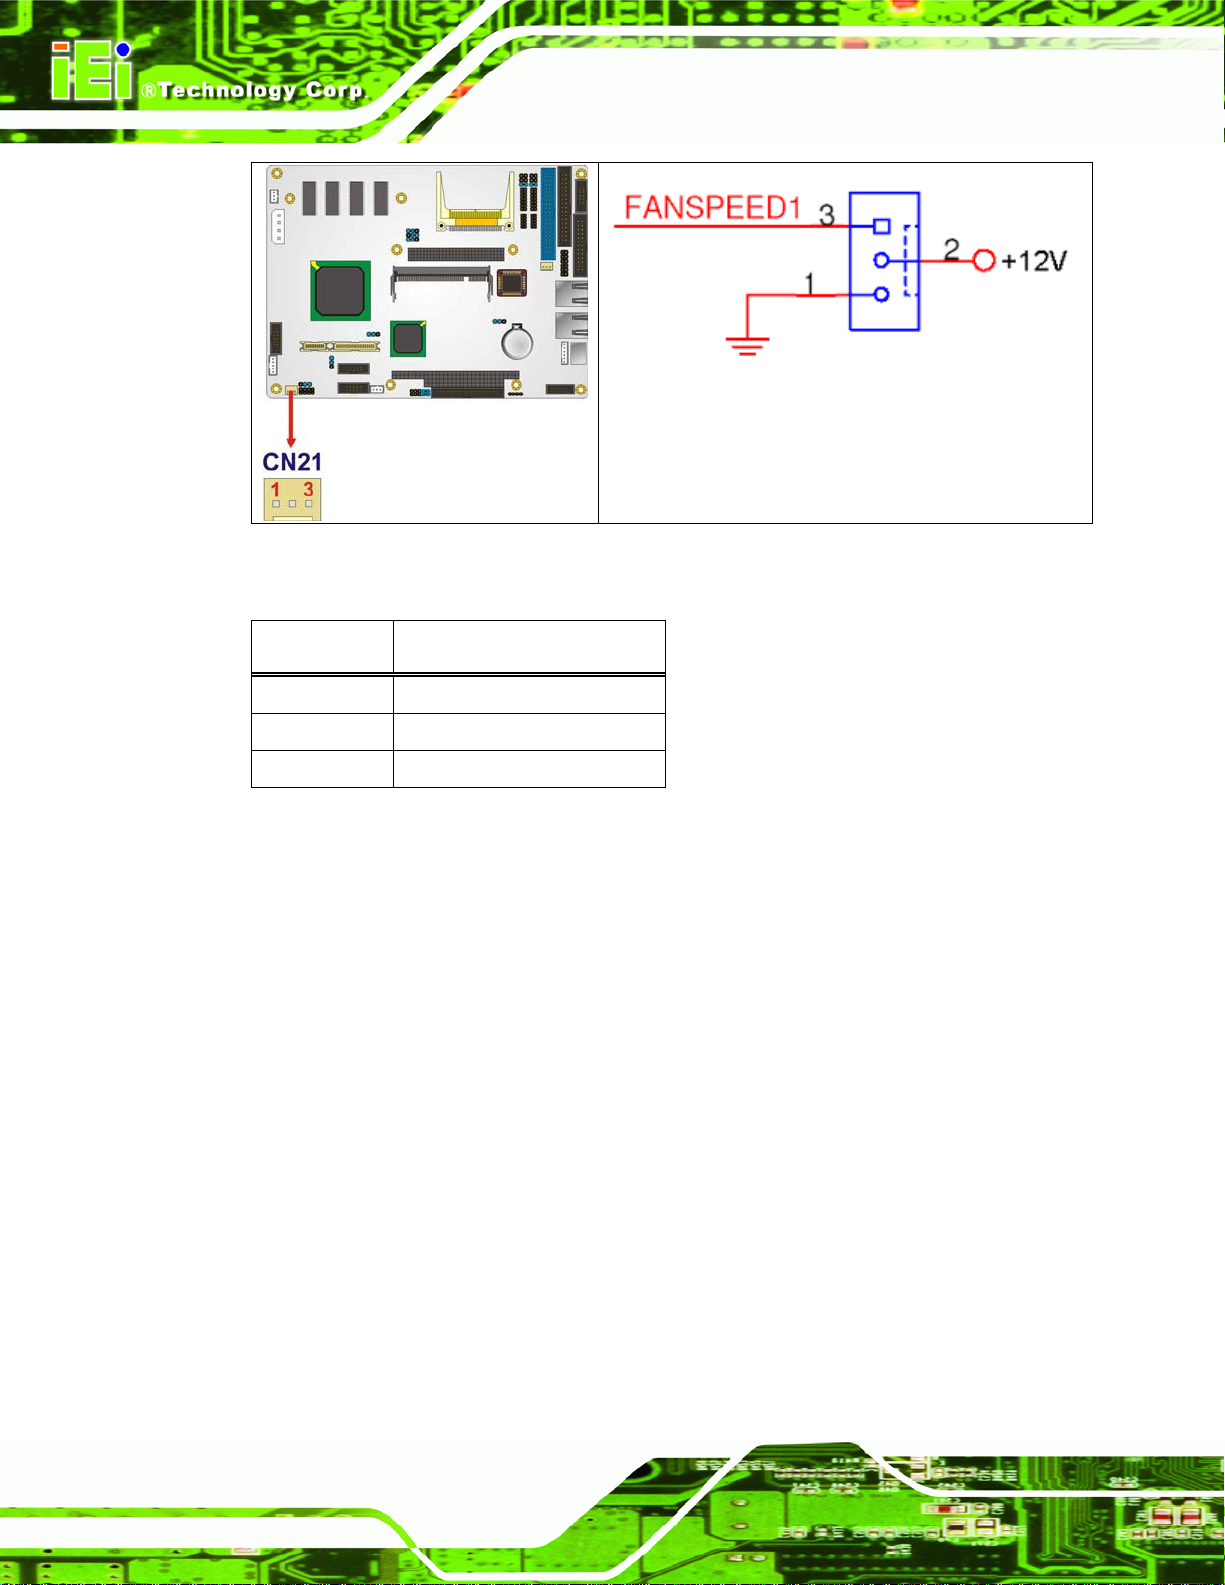
NOVA-LX 5.25” Motherboard
Figure 4-7: +12V Fan Connector Location
PIN NO. DESCRIPTION
1 GND
2 +12V
3 Fan Speed Detect
Table 4-8: +12V Fan Connector Pinouts
4.2.7 Floppy Disk Connector (34-pin)
CN Label: CN19
CN Type:
CN Location: See
CN Pinouts: See
The floppy disk connector is connected to a floppy disk drive.
34-pin header (2x17)
Figure 4-8
Table 4-9
Page 48
Page 69
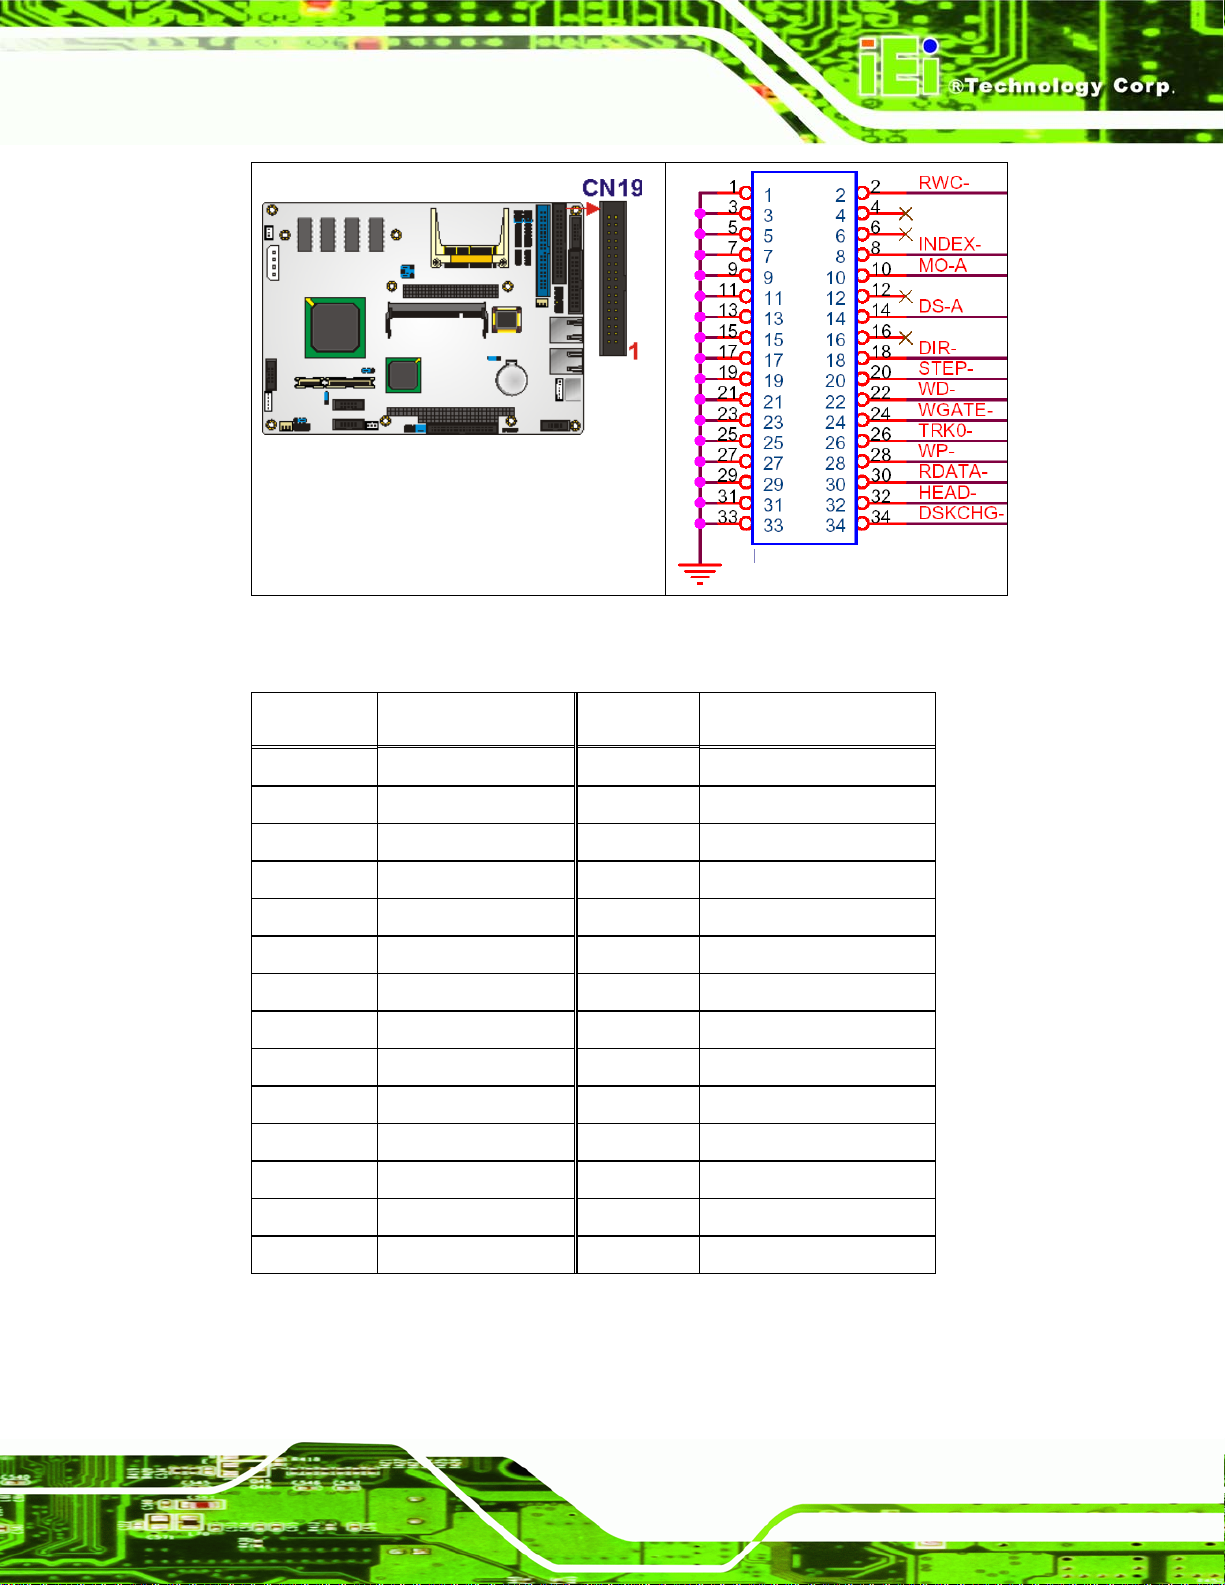
NOVA-LX 5.25” Motherboard
Figure 4-8: 34-pin FDD Connector Location
PIN NO. DESCRIPTION PIN NO. DESCRIPTION
1 GND 2 REDUCE WRITE
3 GND 4 N/C
5 GND 6 N/C
7 GND 8 INDEX#
9 GND 10 MOTOR ENABLE A#
11 GND 12 N/C
13 GND 14 DRIVE SELECT A#
15 GND 16 N/C
17 GND 18 DIRECTION#
19 GND 20 STEP#
21 GND 22 WRITE DATA#
23 GND 24 WRITE GATE#
25 GND 26 TRACK 0#
27 GND 28 WRITE PROTECT#
Page 49
Page 70
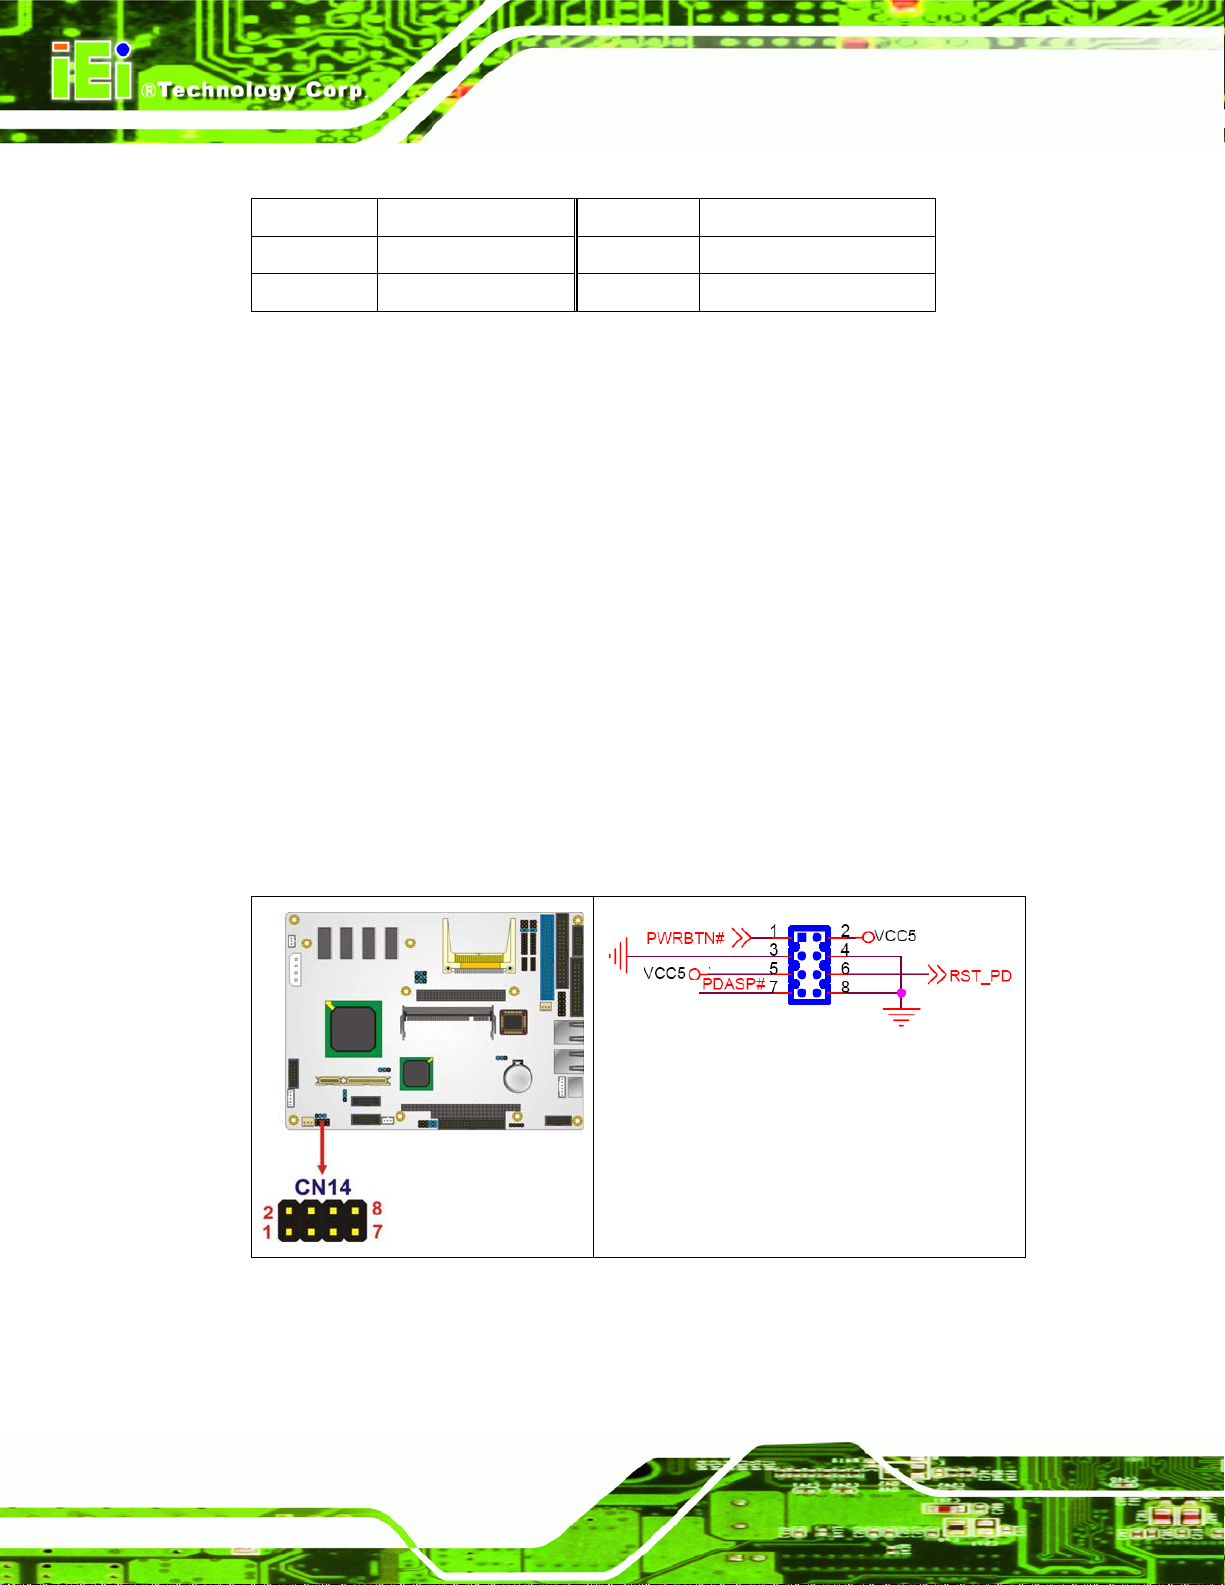
29 GND 30 READ DATA#
31 GND 32 SIDE 1 SELECT#
33 GND 34 DISK CHANGE#
Table 4-9: 34-pin FDD Connector Pinouts
4.2.8 Front Panel Connector (8-pin)
NOVA-LX 5.25” Motherboard
CN Label:
CN Type:
CN Location:
CN Pinouts:
The front panel connector connects to external switches and indicators to monitor and
controls the motherboard. These indicators and switches include:
Power button
Reset
HDD LED
CN14
14-pin header (2x7)
Figure 4-9
See
Table 4-10
See
Page 50
Figure 4-9: Front Panel Connector Pinout Locations (8-pin)
Page 71
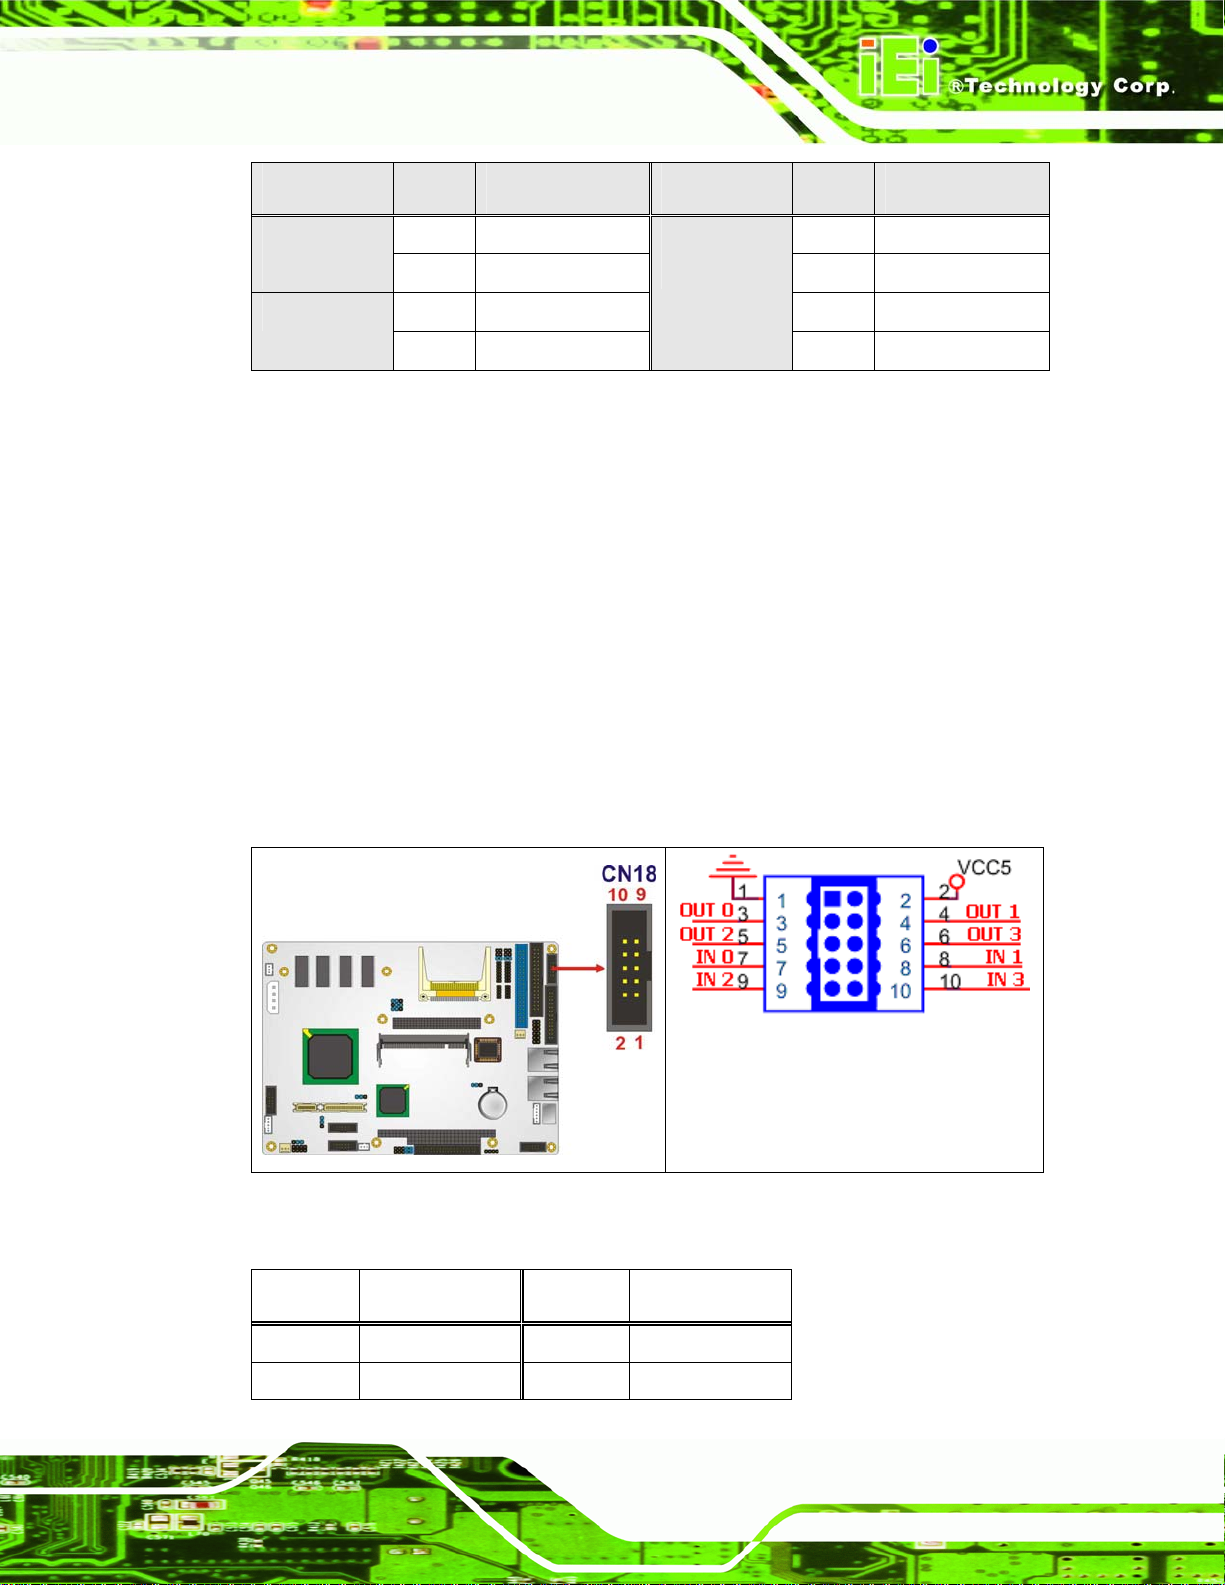
NOVA-LX 5.25” Motherboard
FUNCTION PIN DESCRIPTION FUNCTION PIN DESCRIPTION
Button
1 PWR_BTN 2 VCC5 Power
3 GND 4 GND
5 HDD_LED+ 6 RESET HDD LED
7 HDD_LED-
Reset
Button
8 GND
Table 4-10: Front Panel Connector Pinouts (8-pin)
4.2.9 GPIO Connector
CN Label: CN18
CN Type:
CN Location: See
CN Pinouts: See
The GPIO connector can be connected to external I/O control devices including sensors,
lights, alarms and switches.
10-pin header (2x5)
Figure 4-10
Table 4-11
Figure 4-10: GPIO Connector Pinout Locations
PIN NO. DESCRIPTION PIN NO. DESCRIPTION
1 GND 2 VCC5
3 OUT 0 4 OUT 1
Page 51
Page 72
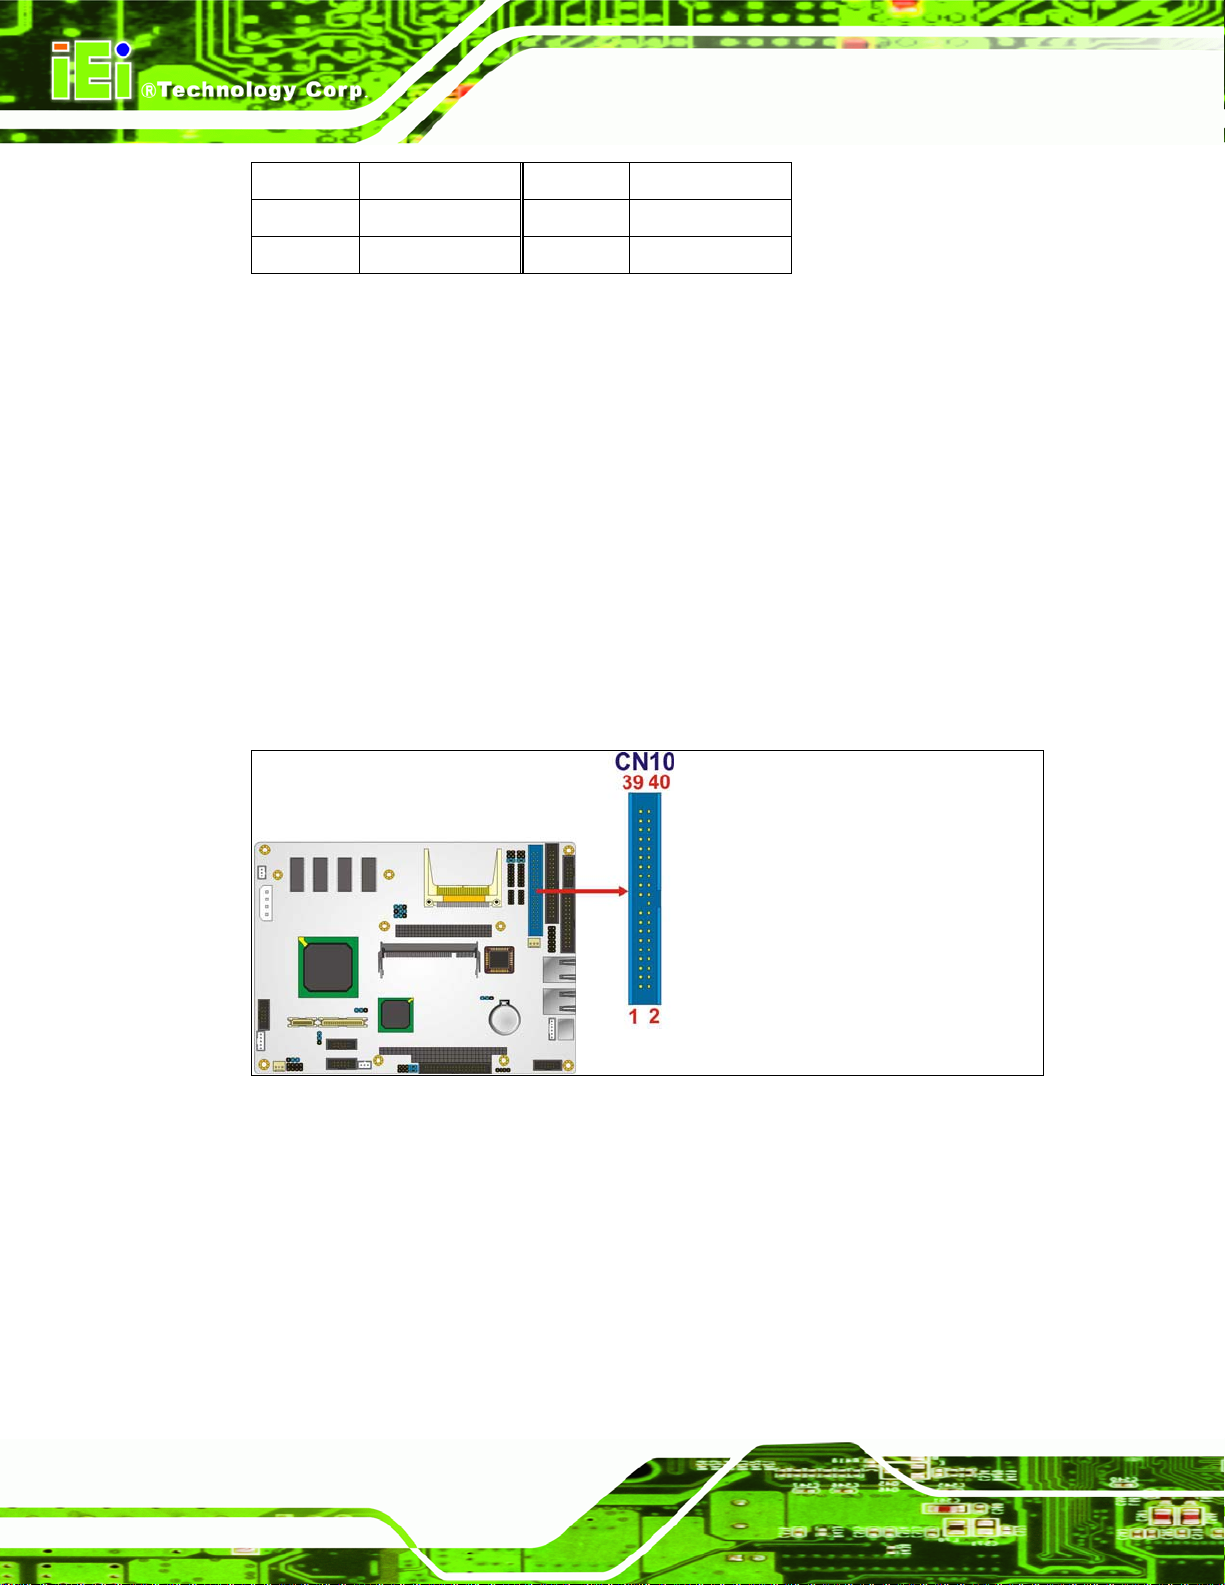
5 OUT 2 6 OUT 3
7 IN 0 8 IN 0
9 IN 2 10 IN 3
Table 4-11: GPIO Connector Pinouts
4.2.10 IDE Connector(40-pin)
NOVA-LX 5.25” Motherboard
CN Label:
CN Type:
CN Location:
CN Pinouts:
One 40-pin IDE device connector on the NOVA-LX supports connectivity to two hard disk
drives.
CN10
40-pin header (2x20)
Figure 4-11
See
Table 4-12
See
Page 52
Page 73
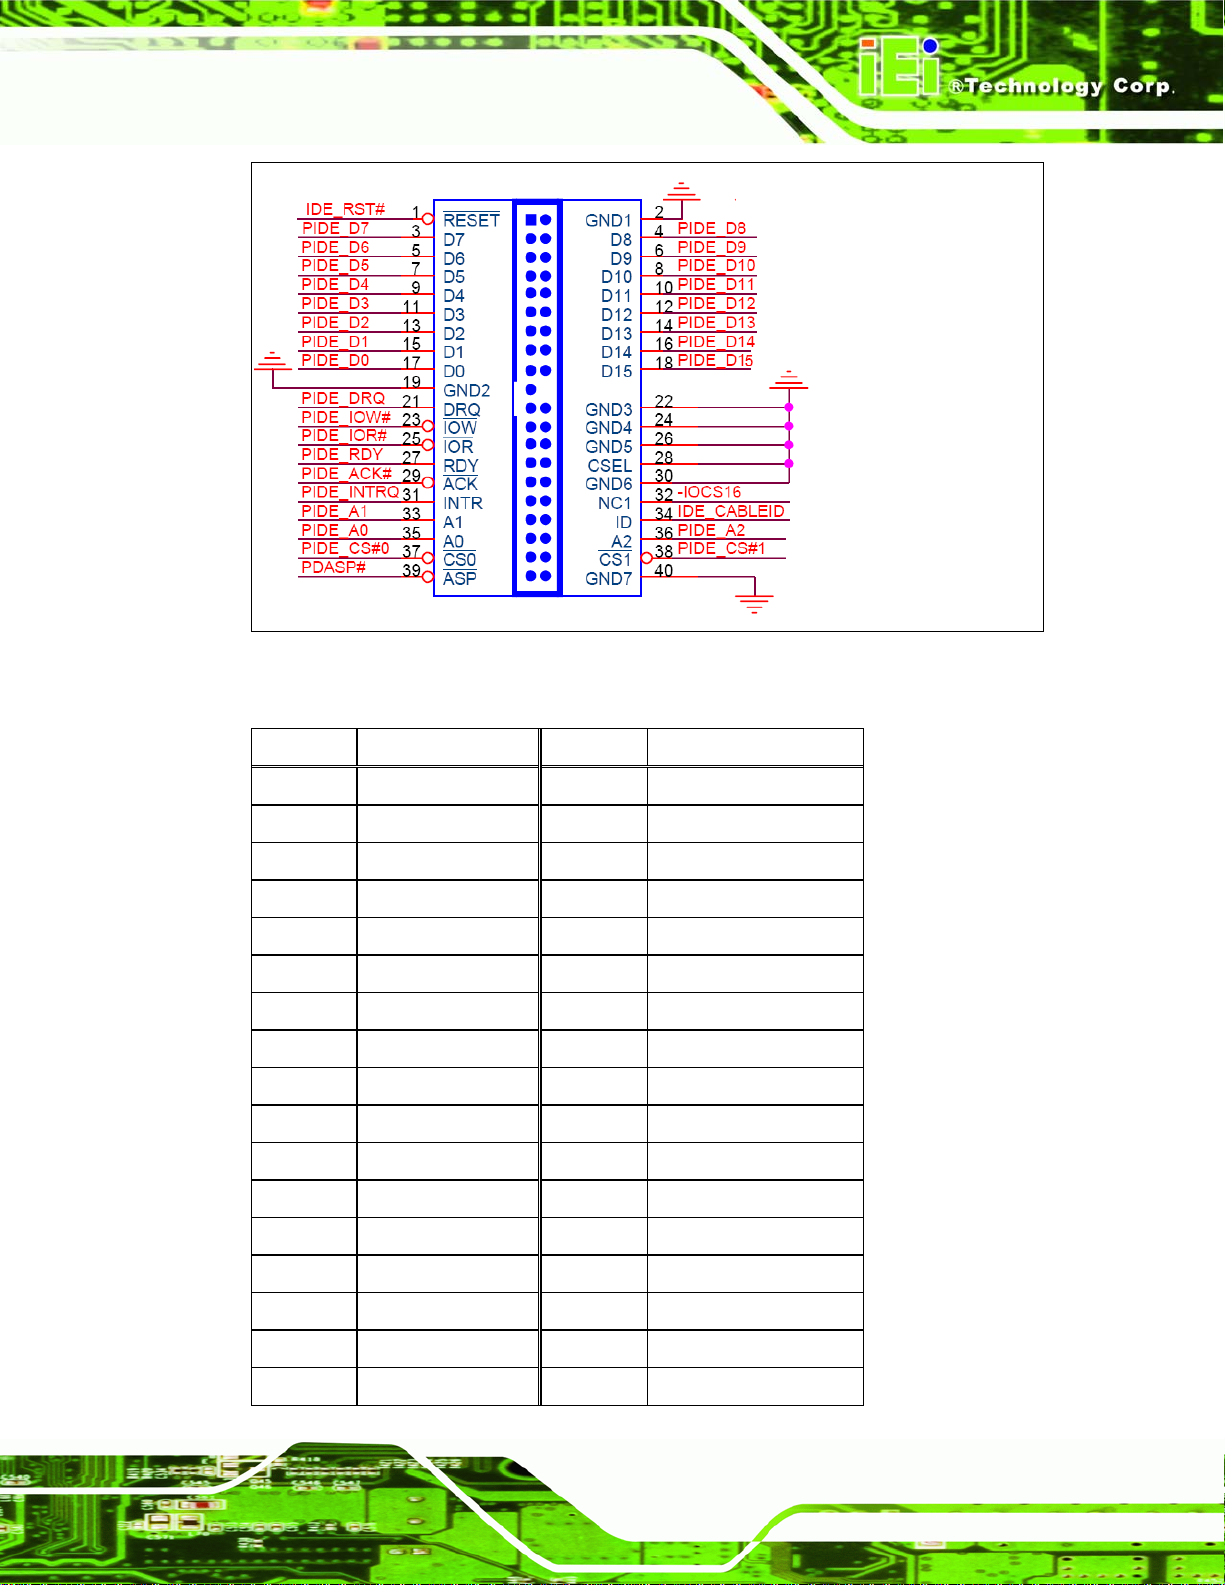
NOVA-LX 5.25” Motherboard
Figure 4-11: Secondary IDE Device Connector Locations
PIN NO. DESCRIPTION PIN NO. DESCRIPTION
1 RESET# 2 GROUND
3 DATA 7 4 DATA 8
5 DATA 6 6 DATA 9
7 DATA 5 8 DATA 10
9 DATA 4 10 DATA 11
11 DATA 3 12 DATA 12
13 DATA 2 14 DATA 13
15 DATA 1 16 DATA 14
17 DATA 0 18 DATA 15
19 GROUND 20 N/C
21 IDE DRQ 22 GROUND
23 IOW# 24 GROUND
25 IOR# 26 GROUND
27 IDE CHRDY 28 GROUND
29 IDE DACK 30 GROUND–DEFAULT
31 INTERRUPT 32 IOCS16
33 SA1 34 IDE_CABLEID
Page 53
Page 74
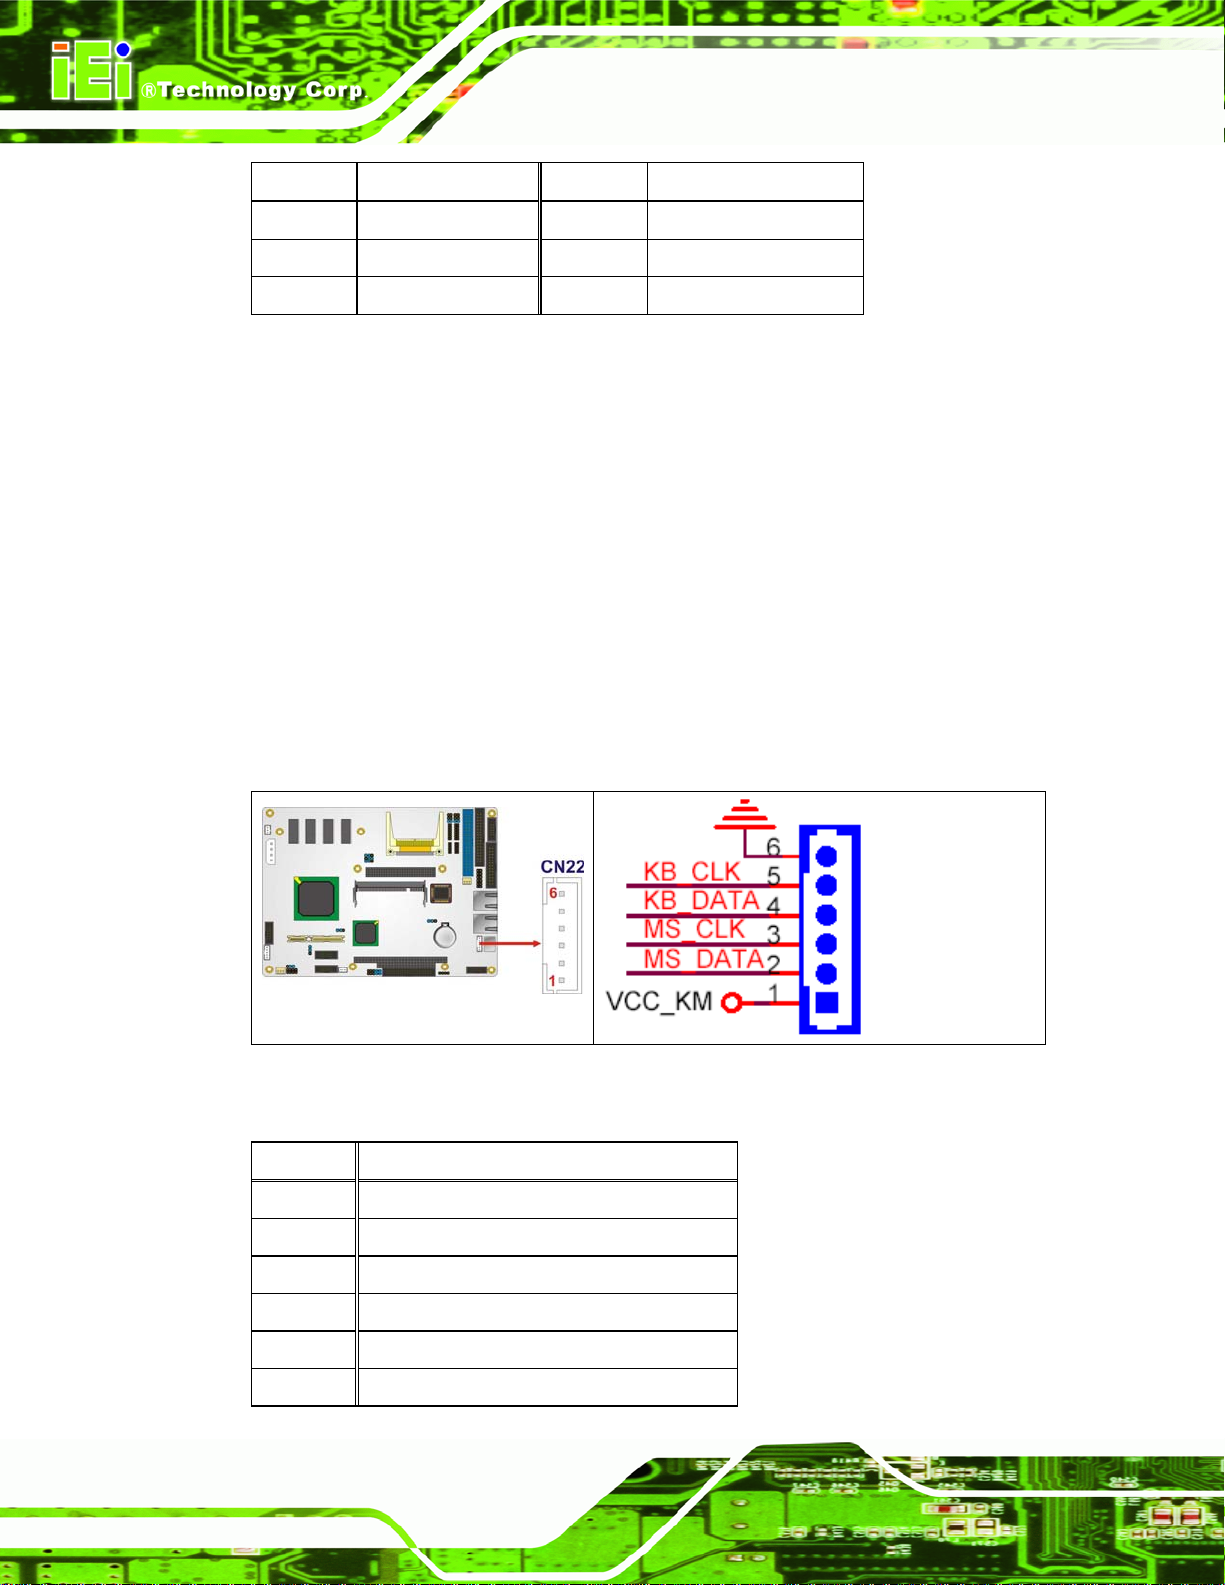
PIN NO. DESCRIPTION PIN NO. DESCRIPTION
35 SA0 36 SA2
37 HDC CS0# 38 HDC CS1#
39 HDD ACTIVE# 40 GROUND
Table 4-12: Secondary IDE Connector Pinouts
4.2.11 Keyboard/Mouse Connector
CN Label: CN22
NOVA-LX 5.25” Motherboard
CN Type:
CN Location: See
CN Pinouts: See
6-pin header (1x6)
Figure 4-12
Table 4-13
The keyboard and mouse connector can be connected to a standard PS/2 cable or PS/2
Y-cable to add keyboard and mouse functionality to the system.
Figure 4-12: Keyboard/Mouse Connector Location
Page 54
PIN NO. DESCRIPTION
1 +5V KB DATA
2 MS DATA
3 MS CLK
4 KB DATA
5 KB CLK
6 GROUND
Page 75
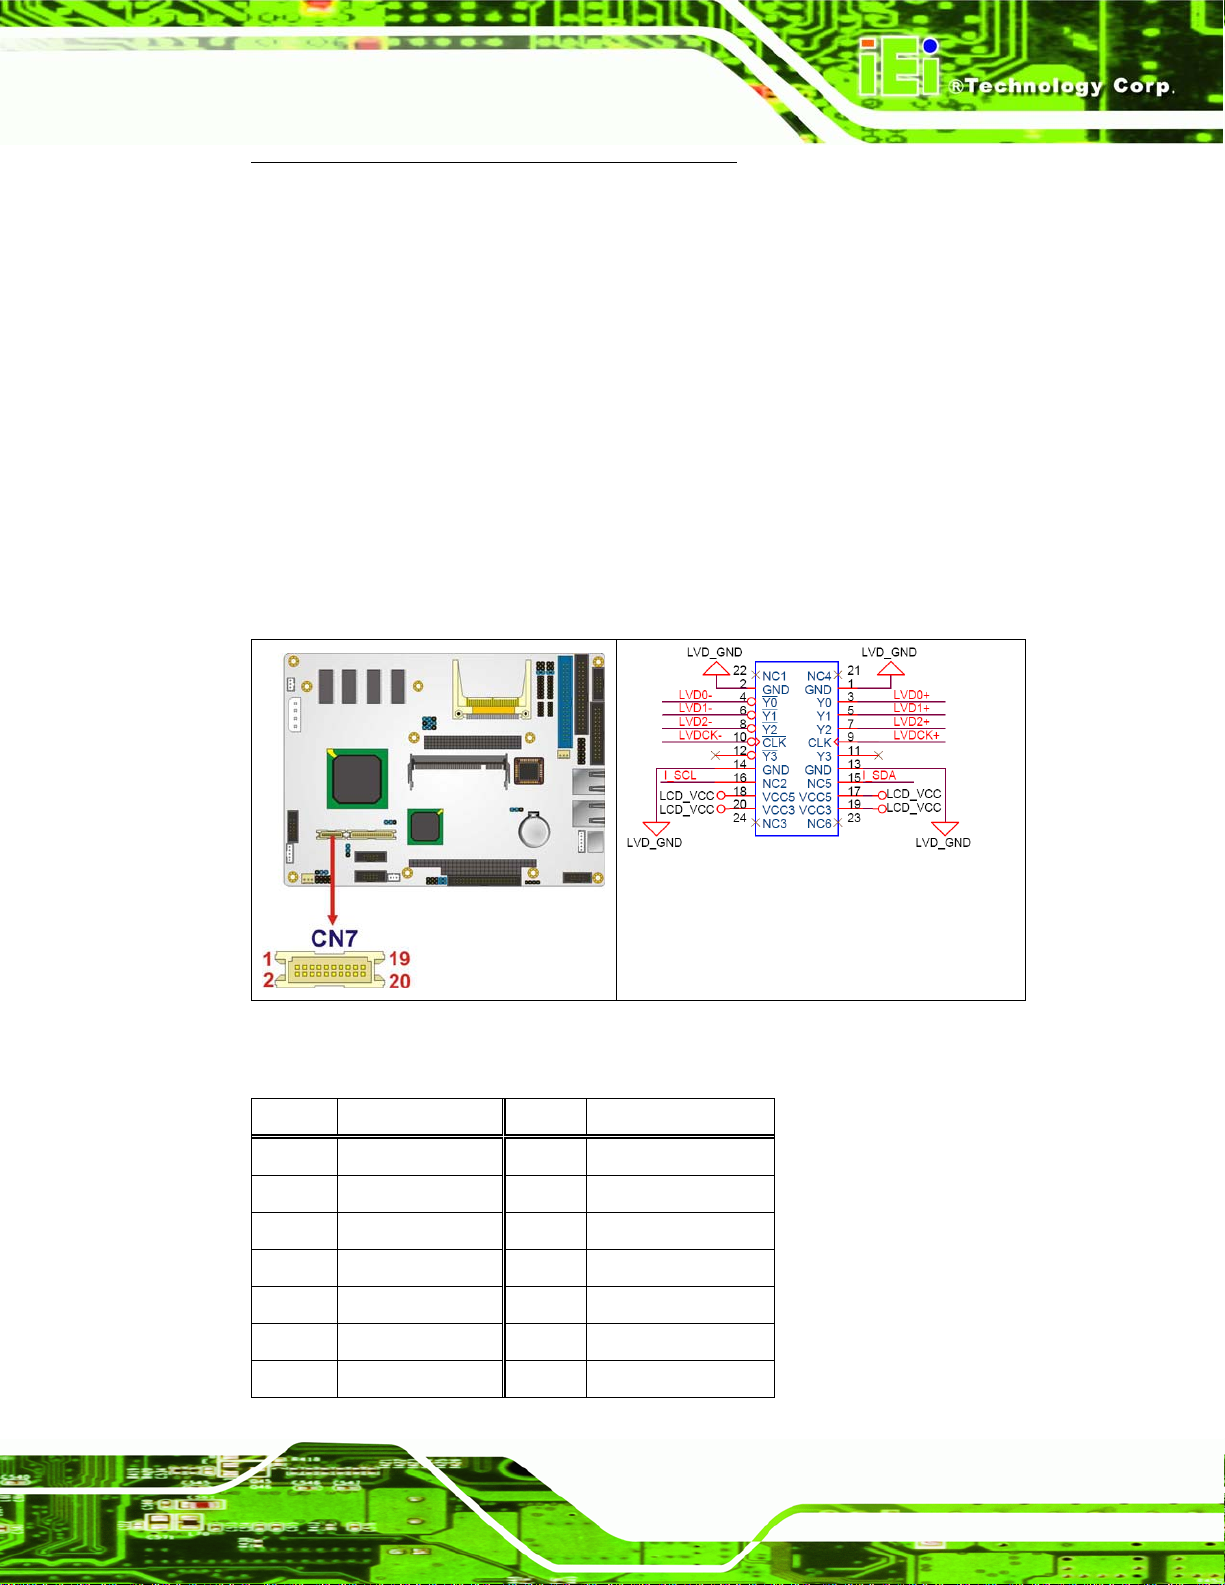
NOVA-LX 5.25” Motherboard
Table 4-13: Keyboard/Mouse Connector Pinouts
4.2.12 LVDS LCD Connector
CN Label: CN7
CN Type:
CN Location: See
CN Pinouts: See
20-pin crimp (2x10)
Figure 4-13
Table 4-14
The 30-pin LVDS LCD connector can be connected to single channel or dual channel,
18-bit or 36-bit LVDS panel.
Figure 4-13: LVDS LCD Connector Pinout Locations
PIN NO. DESCRIPTION PIN NO. DESCRIPTION
1 GROUND 2 GROUND
3 LVDSA_Y0+ 4 LVDSA_Y05 LVDSA_Y1+ 6 LVDSA_Y17 LVDSA_Y2+ 8 LVDSA_Y29 LVDSA_CLK+ 10 LVDSA_CLK11 N/C 12 N/C
13 GROUND 14 GROUND
Page 55
Page 76
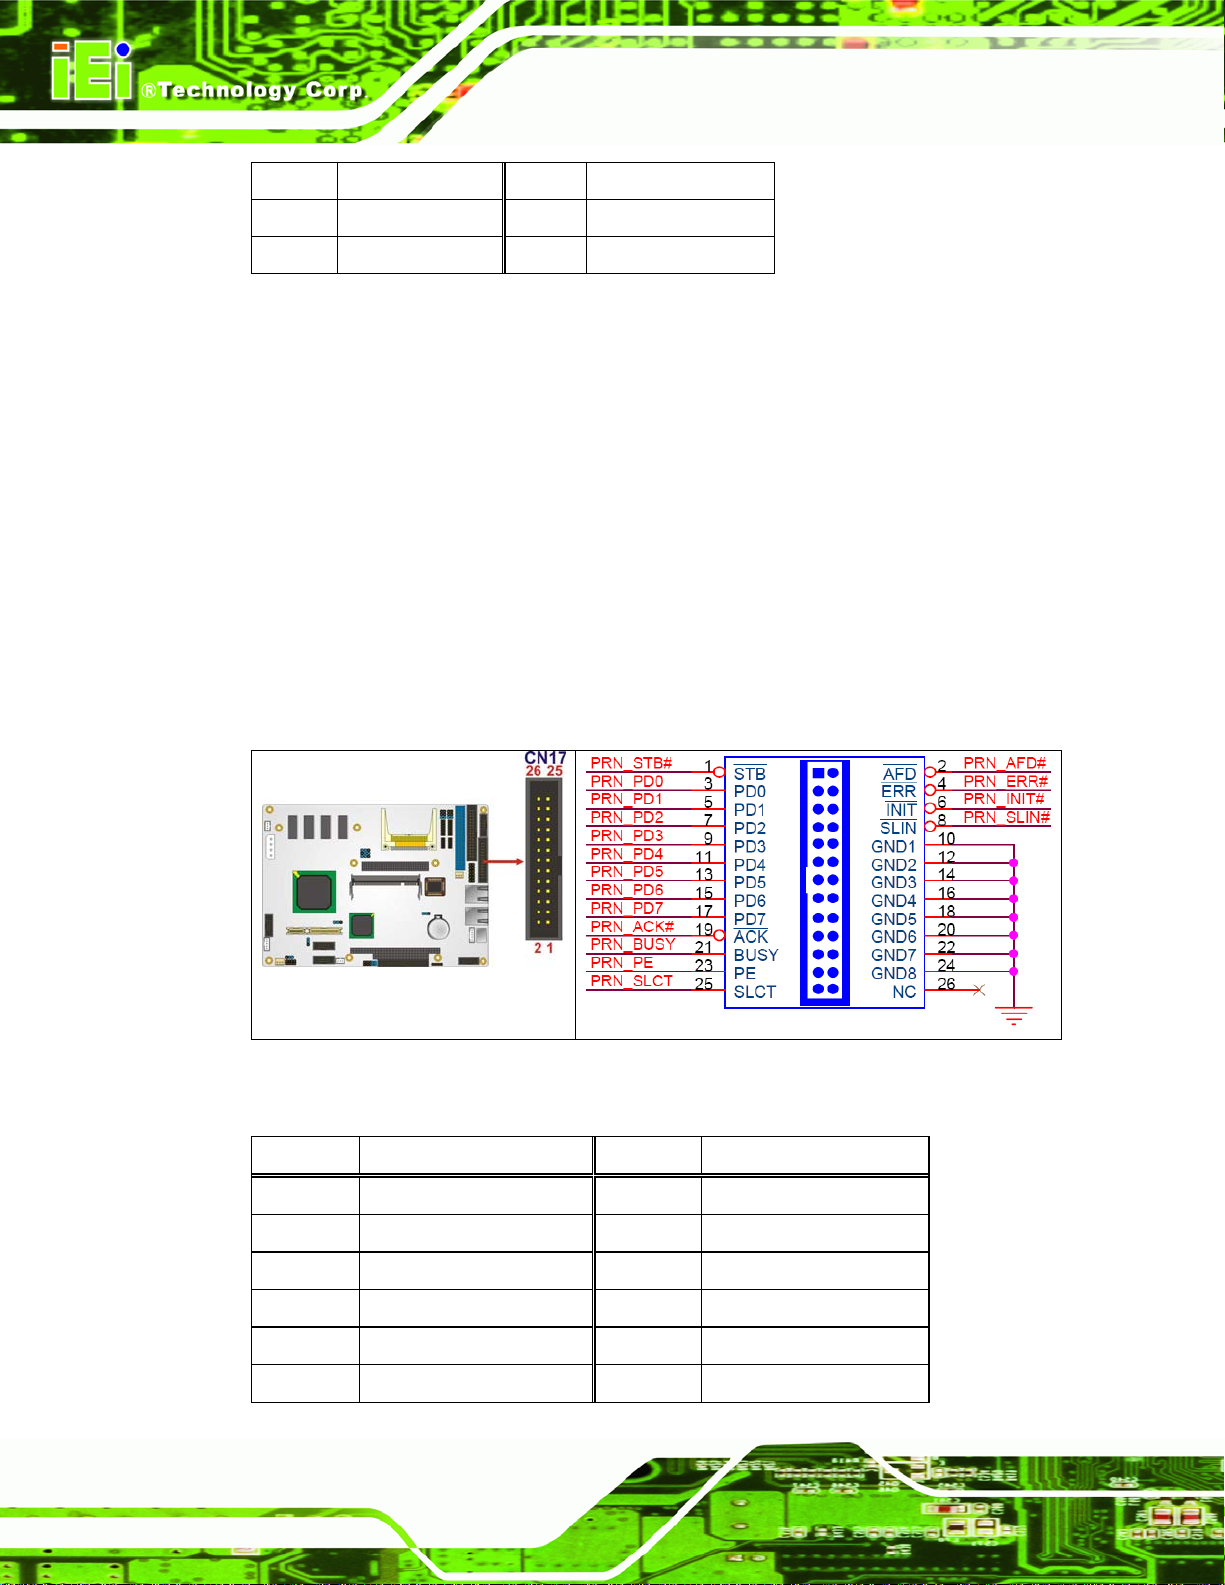
15 I_SDA 16 I_SCL
17 LCD_VCC 18 LCD_VCC
19 LCD_VCC 20 LCD_VCC
Table 4-14: LVDS LCD Port Connector Pinouts
4.2.13 Parallel Port Connector
CN Label: CN17
NOVA-LX 5.25” Motherboard
CN Type:
CN Location: See
CN Pinouts: See
26-pin box header
Figure 4-14
Table 4-15
The 26-pin parallel port connector connects to a parallel port connector interface or some
other parallel port device such as a printer.
Figure 4-14: Parallel Port Connector Location
Page 56
PIN NO. DESCRIPTION PIN NO. DESCRIPTION
1 STROBE# 2 AFD
3 DATA 0 4 ERR
5 DATA 1 6 INIT
7 DATA 2 8 SLIN
9 DATA 3 10 GROUND
11 DATA 4 12 GROUND
Page 77
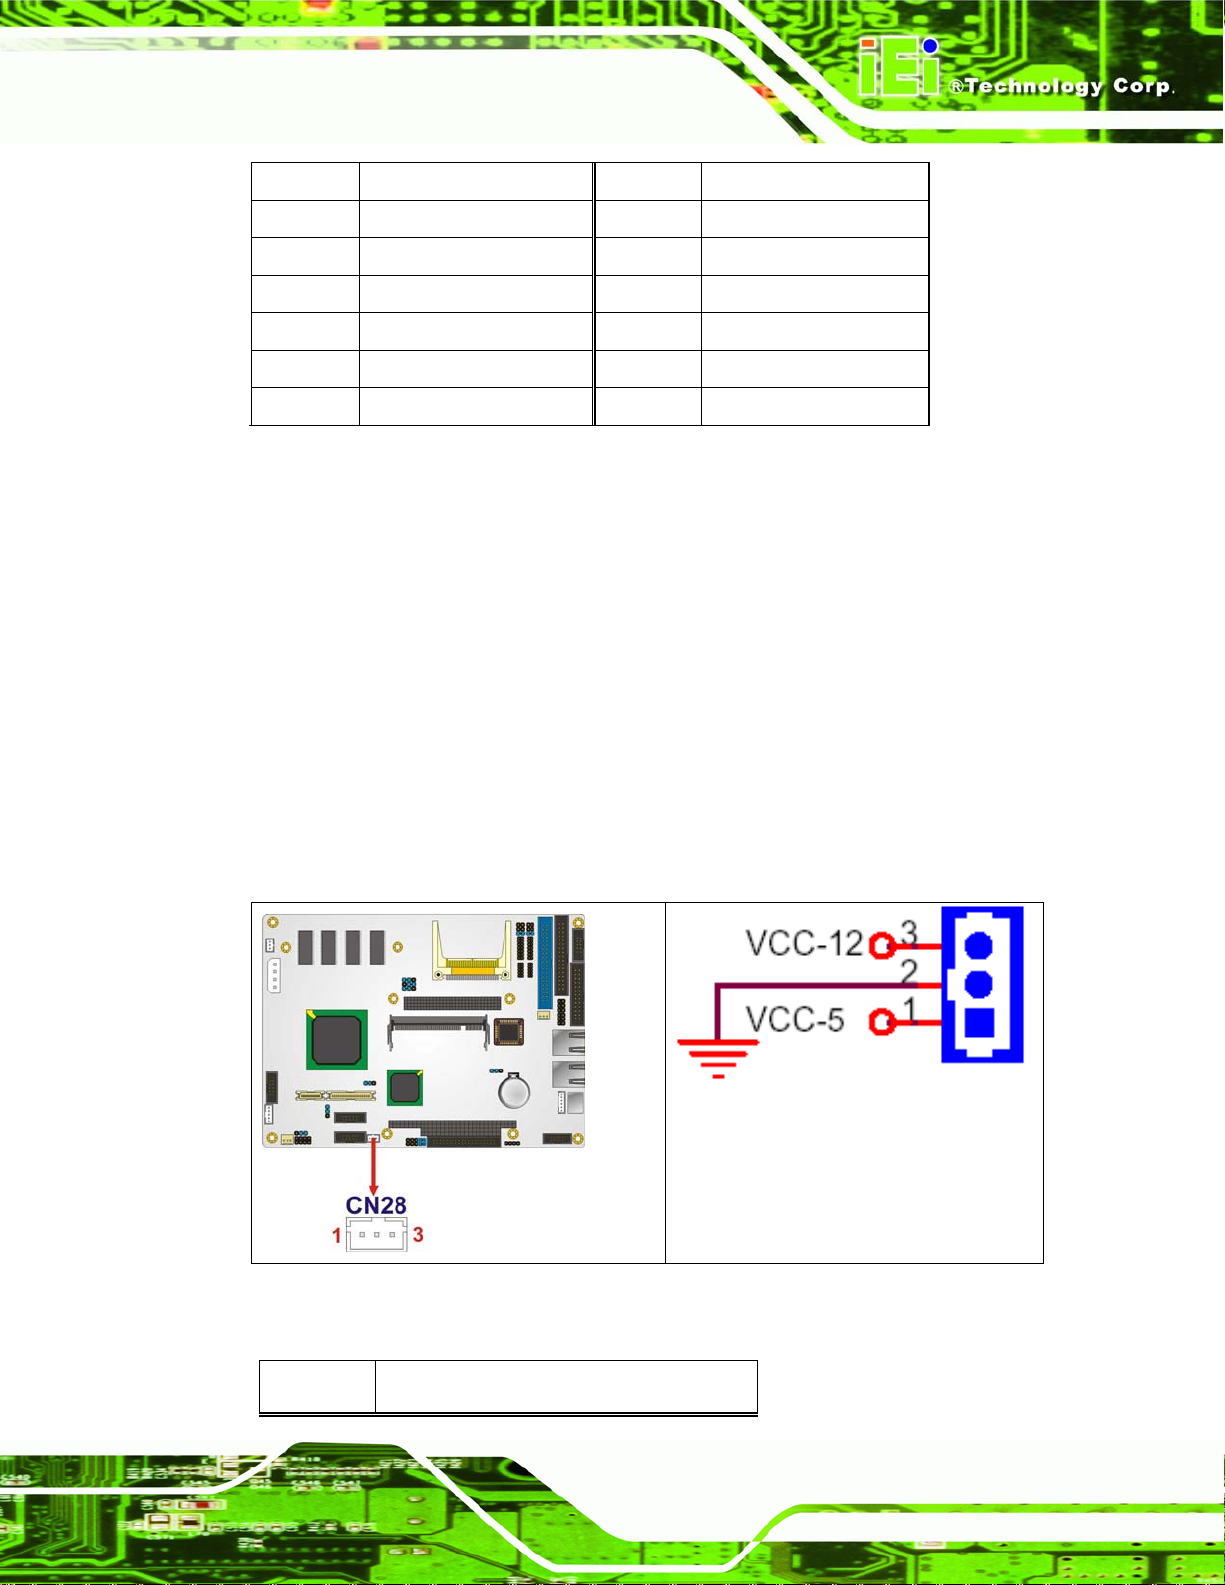
NOVA-LX 5.25” Motherboard
13 DATA 5 14 GROUND
15 DATA 6 16 GROUND
17 DATA 7 18 GROUND
19 ACK 20 GROUND
21 BUSY 22 GROUND
23 PE 24 GROUND
25 SELECT 26 NC
Table 4-15: Parallel Port Connector Pinouts
4.2.14 PC/104 Power Input Connector
CN Label: CN28
CN Type:
CN Location: See
CN Pinouts: See
The PC/104 power input connector provides power to the PC/104 expansion module
installed on the PC/104 slot.
3-pin wafer (1x3)
Figure 4-15
Table 4-16
Figure 4-15: PC/104 Power Input Connector Pinouts
PIN NO. DESCRIPTION
Page 57
Page 78
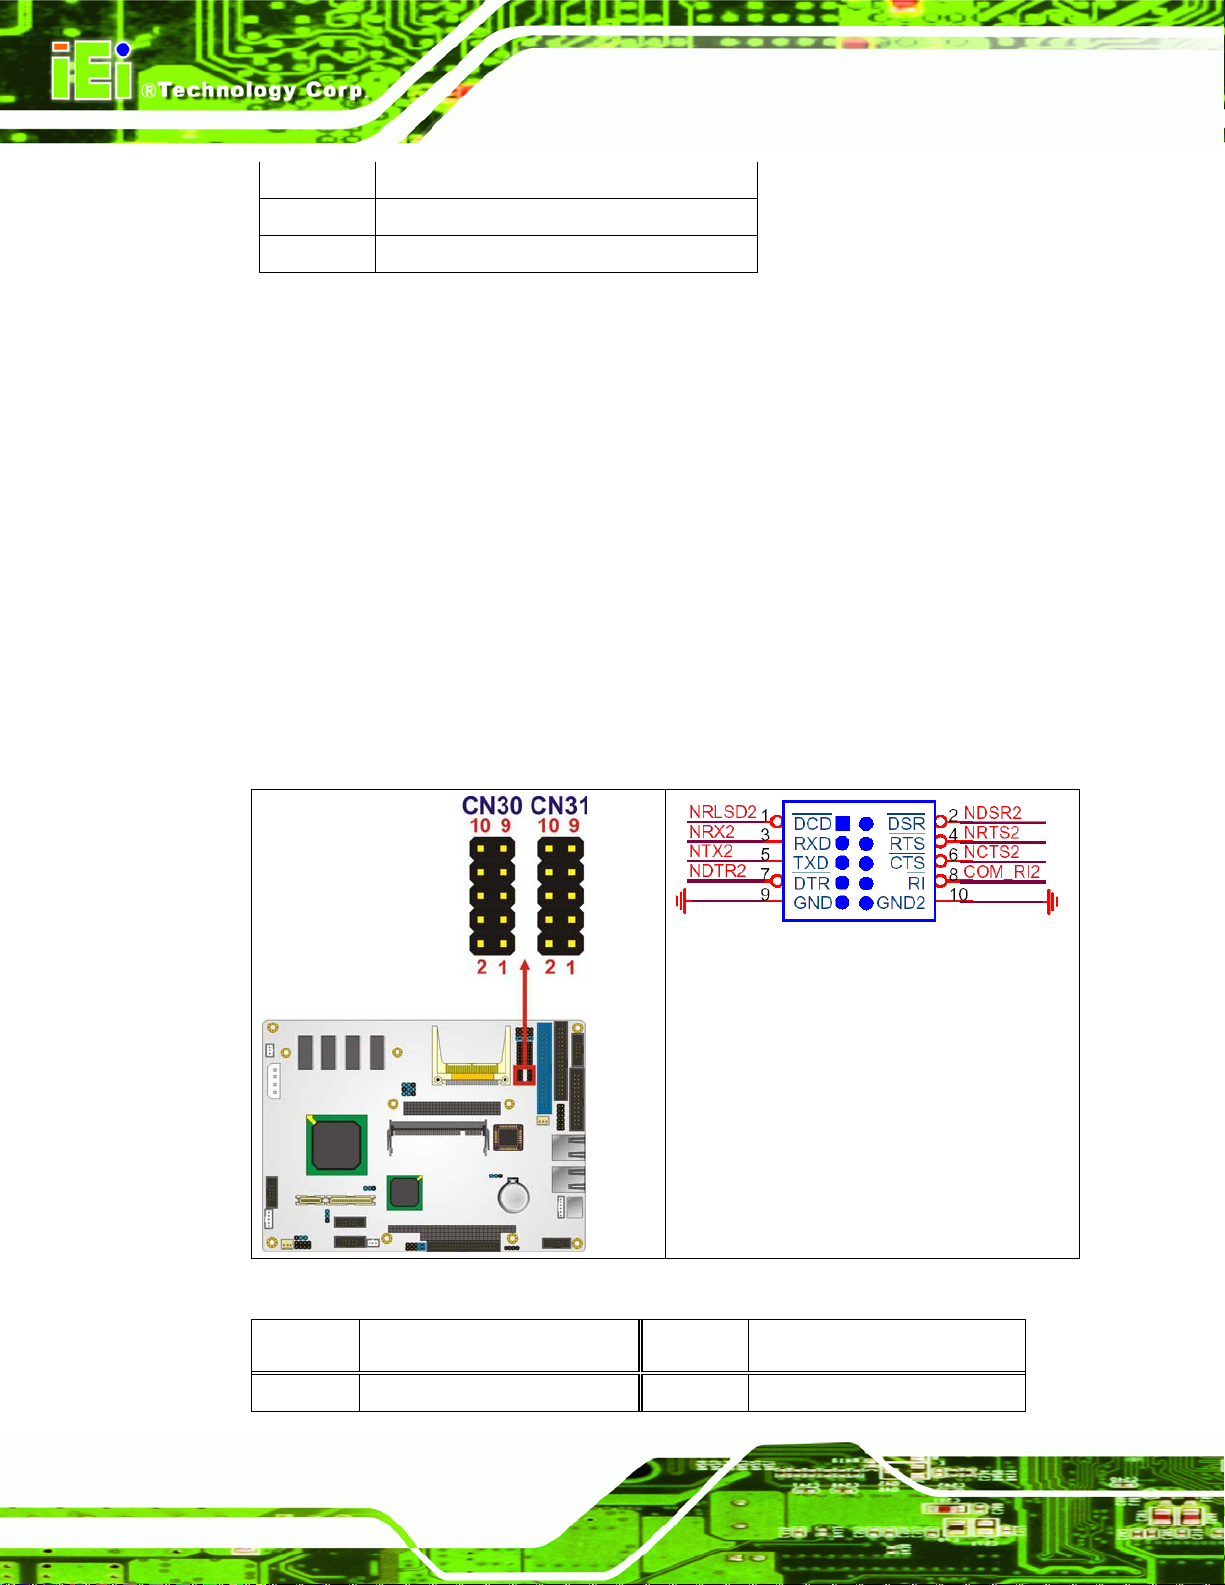
1 -5V
3 GND
5 -12V
Table 4-16: PC/104 Power Input Connector Pinouts
4.2.15 Serial Port Connectors (COM1, COM2)
NOVA-LX 5.25” Motherboard
CN Label:
CN Type:
CN Location:
CN Pinouts:
The four 10-pin serial port connectors provide four additional RS-232 serial
communications channels. The four internal RS-232 serial port connectors can be
connected to external RS-232 serial port devices.
CN30 and CN31
10-pin header (2x5)
Figure 4-16
See
Table 4-17
See
Page 58
Figure 4-16: RS-232 COM Connector Pinout Locations
PIN NO. DESCRIPTION PIN NO. DESCRIPTION
1 Data Carrier Direct (DCD) 2 Data Set Ready (DSR)
Page 79
NOVA-LX 5.25” Motherboard
3 Receive Data (RXD) 4 Request To Send (RTS)
5 Transmit Data (TXD) 6 Clear To Send (CTS)
7 Data Terminal Ready (DTR) 8 Ring Indicator (RI)
9 Ground (GND) 10 Ground (GND)
Table 4-17: RS-232 COM Connector Pinouts
4.2.16 Serial Port Connector (COM3 and COM4)(RS-232, RS-422 or
RS-485)
CN Label:
CN Type:
CN Location:
CN Pinouts:
The 14-pin serial port connector connects to the COM3 and COM4 serial comm unications
channels. COM3 and COM4 are multi function channels. In default mode COM3 and
COM4 are RS-232 serial communication channels but, with the COM3 and COM4 function
select jumpers, can be configured as either an RS-422 or RS-485 serial communications
channel.
CN32, CN33
14-pin header (2x7)
Figure 4-17
See
Table 4-18
See
Page 59
Page 80
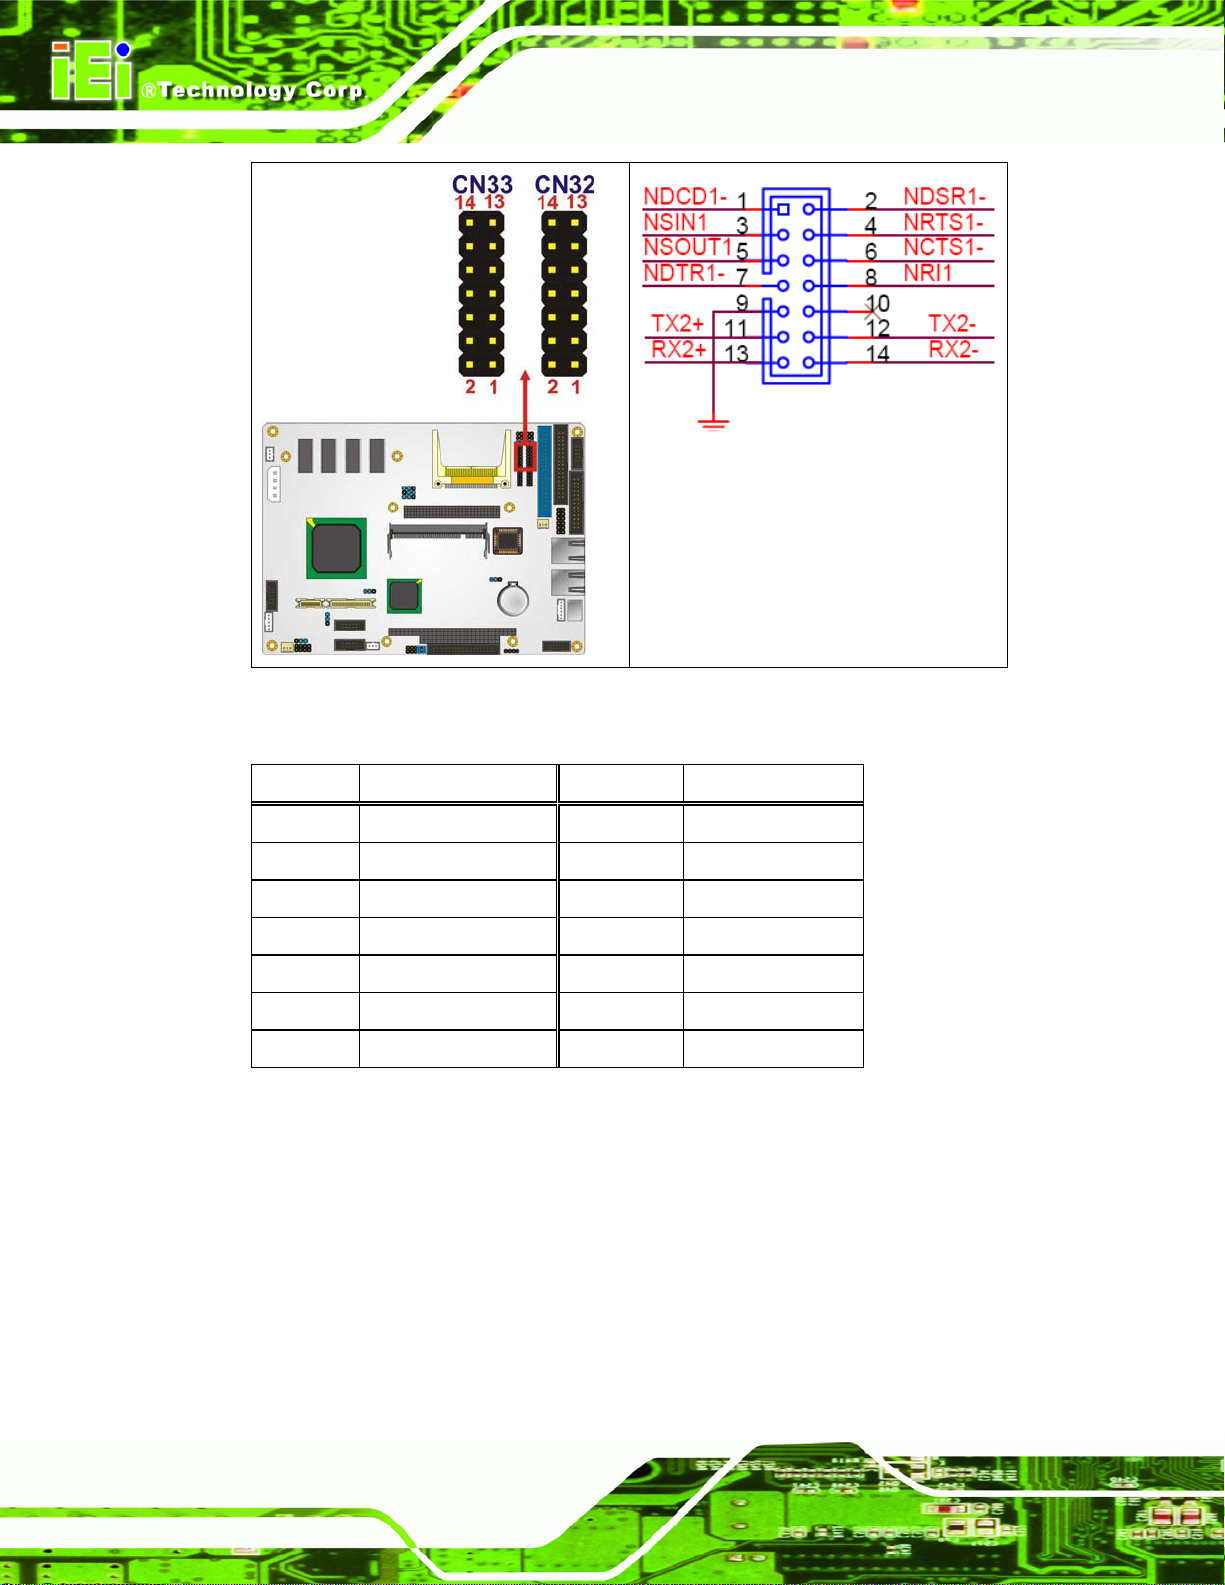
NOVA-LX 5.25” Motherboard
Figure 4-17: RS-232/422/485 Serial Port Connector Location
PIN NO. DESCRIPTION PIN NO. DESCRIPTION
1 DCD 2 DSR
3 RXD 4 RTS
5 TXD 6 CTS
7 DTR 8 RI
9 GND 10 GND
11 TXD485+ 12 TXD48513 RXD485+ 14 RXD485-
Table 4-18: RS-232/RS-485 Serial Port Connector Pinouts
4.2.17 Serial Port Connector (COM 5, COM 6, COM 7 and COM 8)
CN Label: CN25
Page 60
CN Type:
CN Location:
CN Pinouts:
40-pin header (2x20)
Figure 4-18
See
Table 4-19
See
Page 81
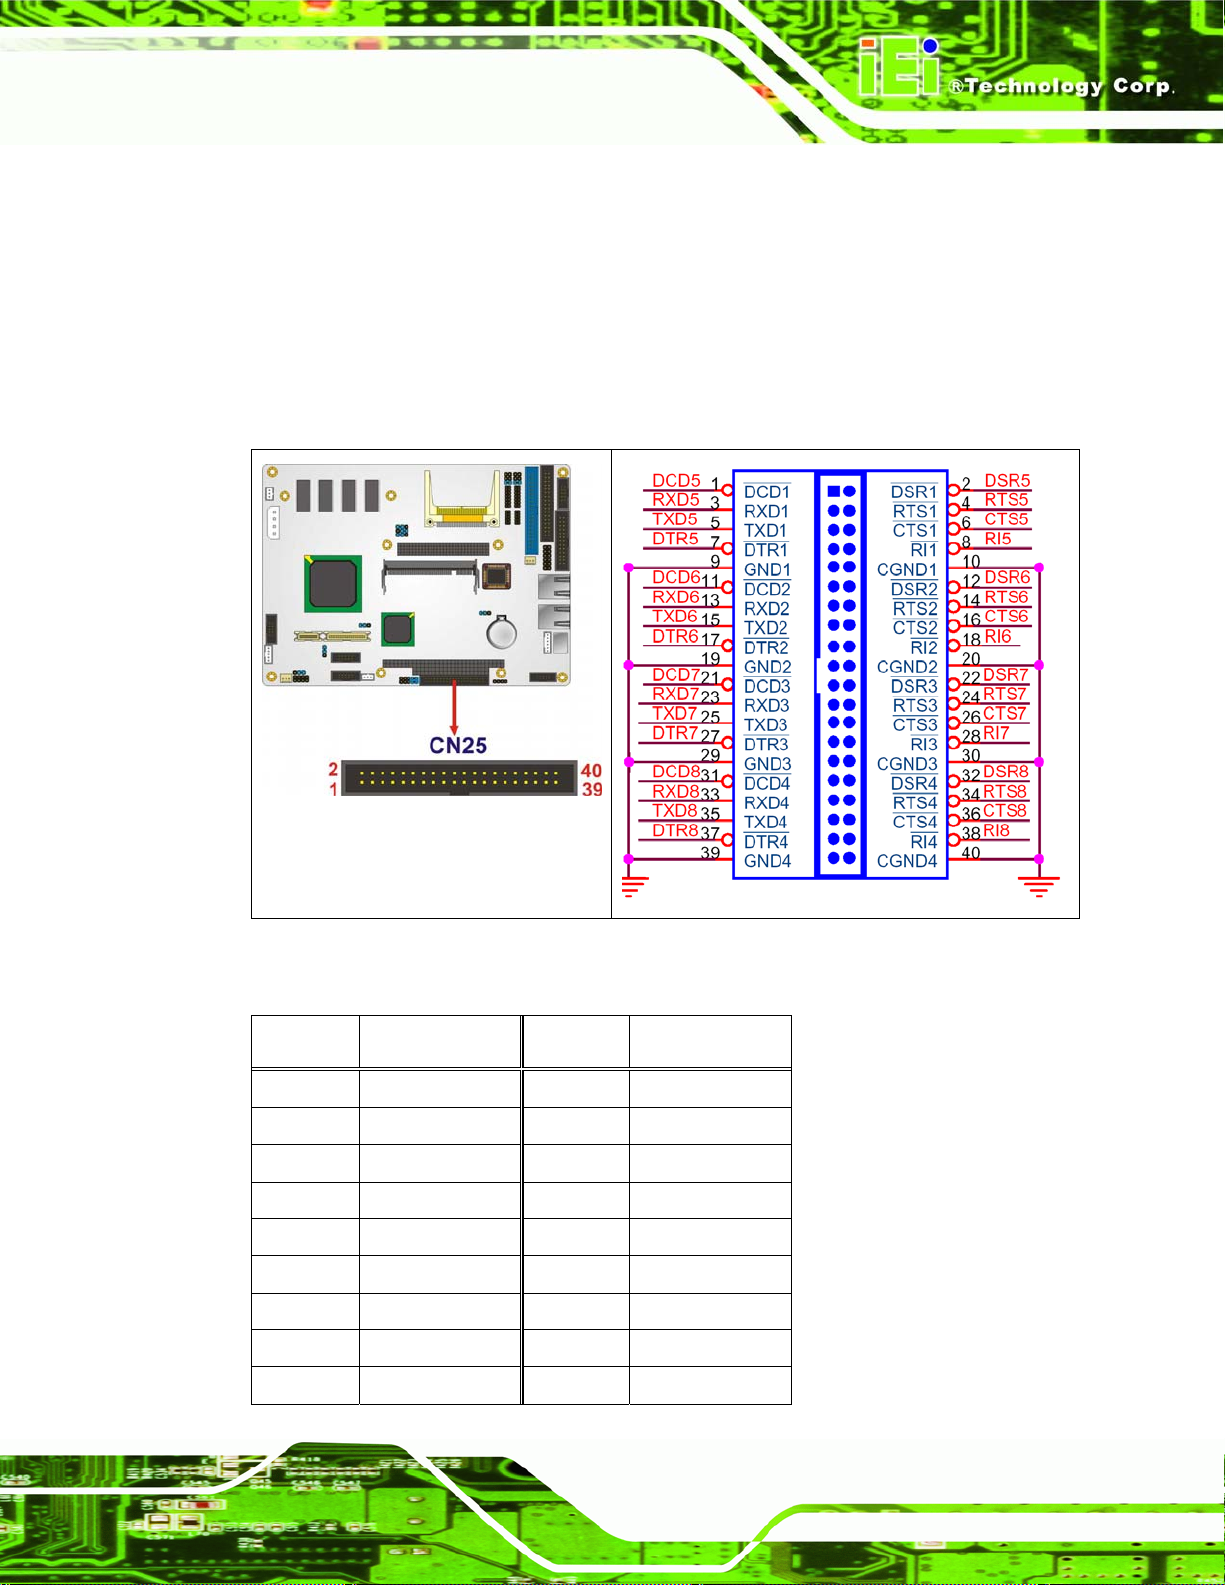
NOVA-LX 5.25” Motherboard
The 40-pin serial port connector contains the following four serial ports, COM 5, COM 6,
COM 7 and COM 8. All four serial ports are RS-232 serial communications channels. The
serial port locations are specified below.
COM 5 is located on pin 1 to pin 10
COM 6 is located on pin 11 to pin 20
COM 7 is located on pin 21 to pin 30
COM 8 is located on pin 31 to pin 40
Figure 4-18: COM 2 to COM 4 Connector Pinout Locations
PIN NO. DESCRIPTION PIN NO. DESCRIPTION
1 DCD5 2 DSR5
3 RXD5 4 RTS5
5 TXD5 6 CTS5
7 DTR5 8 RI5
9 GND 10 GND
11 DCD6 12 DSR6
13 RXD6 14 RTS6
15 TXD6 16 CTS6
17 DTR6 18 RI6
Page 61
Page 82
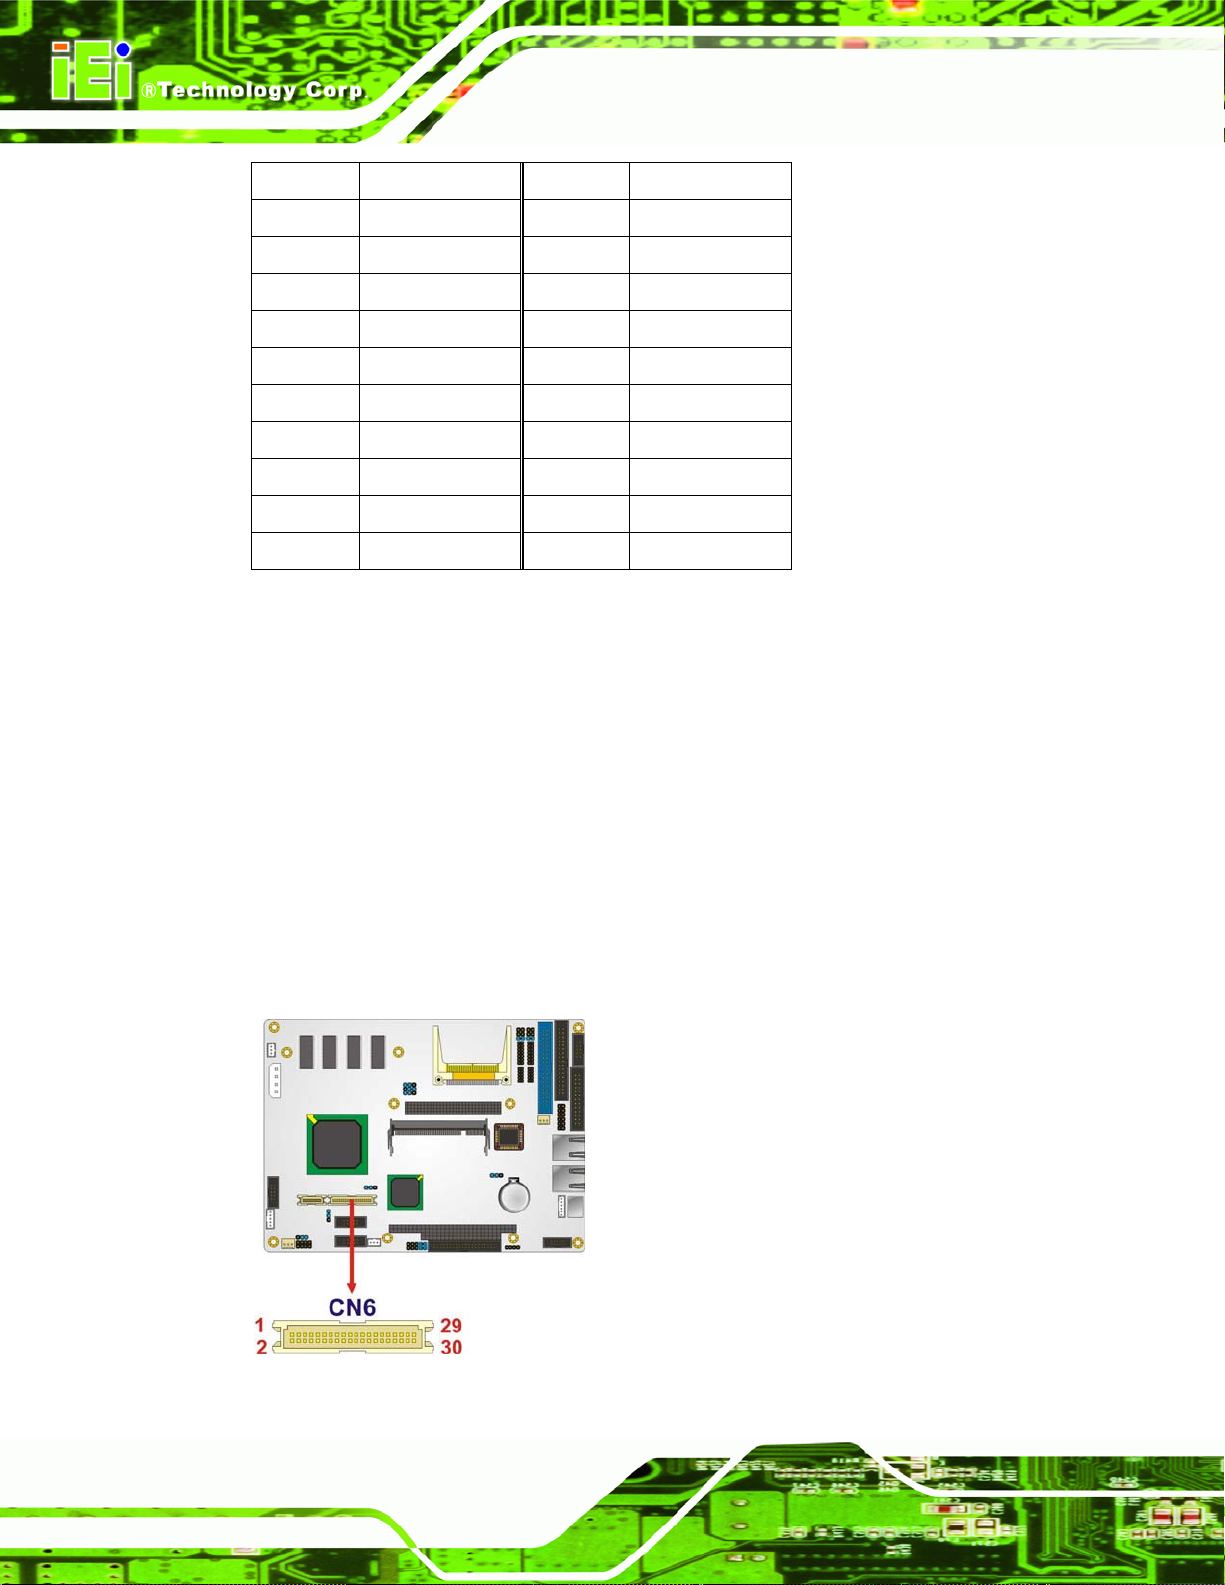
19 GND 20 GND
21 DCD7 22 DSR7
23 RXD7 24 RTS7
25 TXD7 26 CTS7
27 DTR7 28 RI7
29 GND 30 GND
31 DCD8 32 DSR8
33 RXD8 34 RTS8
35 TXD8 36 CTS8
37 DTR8 38 RI8
39 GND 40 GND
Table 4-19: COM 2 to COM 4 Connector Pinouts
4.2.18 TFT LCD TTL Connector
NOVA-LX 5.25” Motherboard
CN Label: CN6
CN Type:
CN Location: See
CN Pinouts: See
40-pin crimp (2x20)
Figure 4-19
Table 4-20
The TFT LCD LVDS can be connected to a TFT LCD screen directly.
Page 62
Page 83
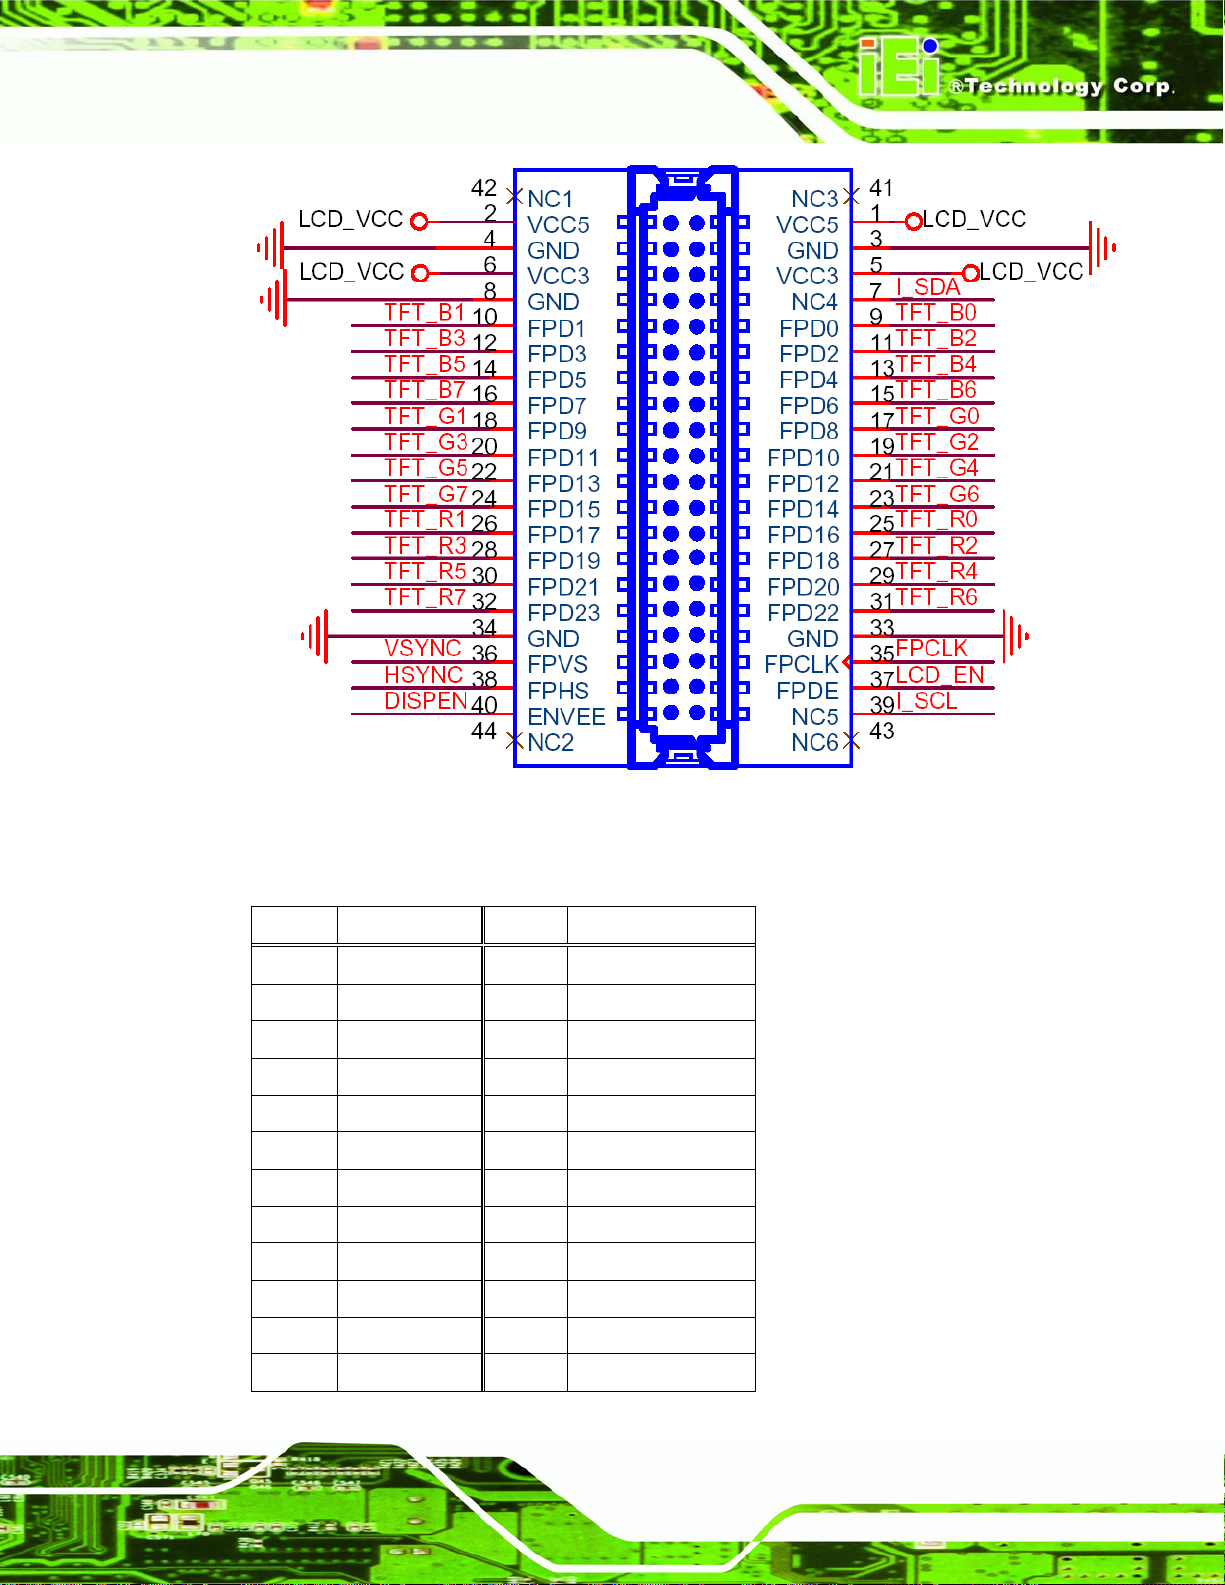
NOVA-LX 5.25” Motherboard
Figure 4-19: TFT LCD TTL Connector Pinout Locations
PIN NO. DESCRIPTION PIN NO. DESCRIPTION
1 LCD_Vcc 2 LCD_Vcc
3 GND 4 GND
5 LCD_Vcc 6 LCD_Vcc
7 SDA 8 GND
9 B0 10 B1
11 B2 12 B3
13 B4 14 B5
15 B6 16 B7
17 G0 18 G1
19 G2 20 G3
21 G4 22 G5
23 G6 24 G7
Page 63
Page 84
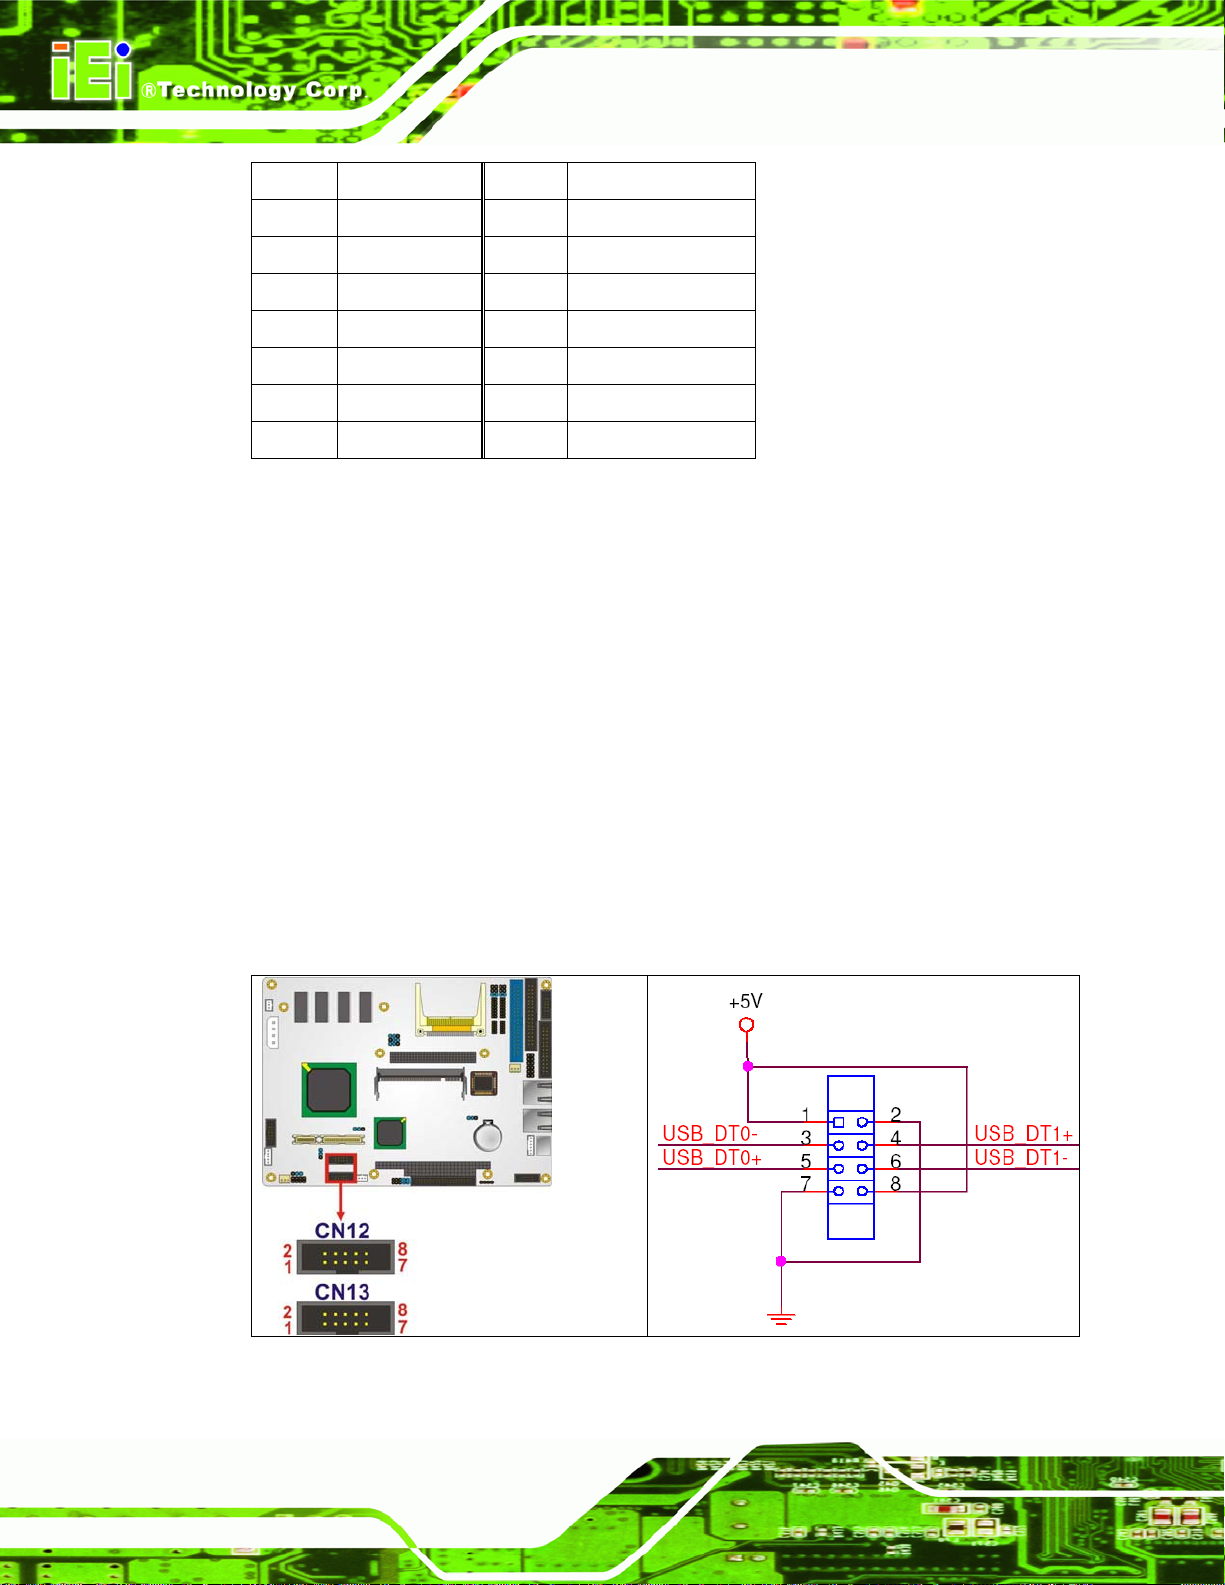
25 R0 26 R1
26 R2 28 R3
29 R4 30 R5
31 R6 32 R7
33 GND 34 GND
35 CLK 36 VSYNC
37 LCD_EN 38 HSYNC
39 SCL 40 DISP_EN
Table 4-20: TFT LCD TTL Port Connector Pinouts
4.2.19 USB Connectors (Internal)
NOVA-LX 5.25” Motherboard
CN Label:
CN Type:
CN Location:
CN Pinouts:
CN12 and CN13
8-pin header (2x4)
Figure 4-20
See
Table 4-21
See
The 2x4 USB pin connectors each provide connectivity to two USB 1.1 or two USB 2.0
ports. Each USB connector can support two USB devices. Additional external USB ports
are found on the rear panel. The USB ports are used for I/O bus expansion.
Page 64
Figure 4-20: USB Connector Pinout Locations
Page 85
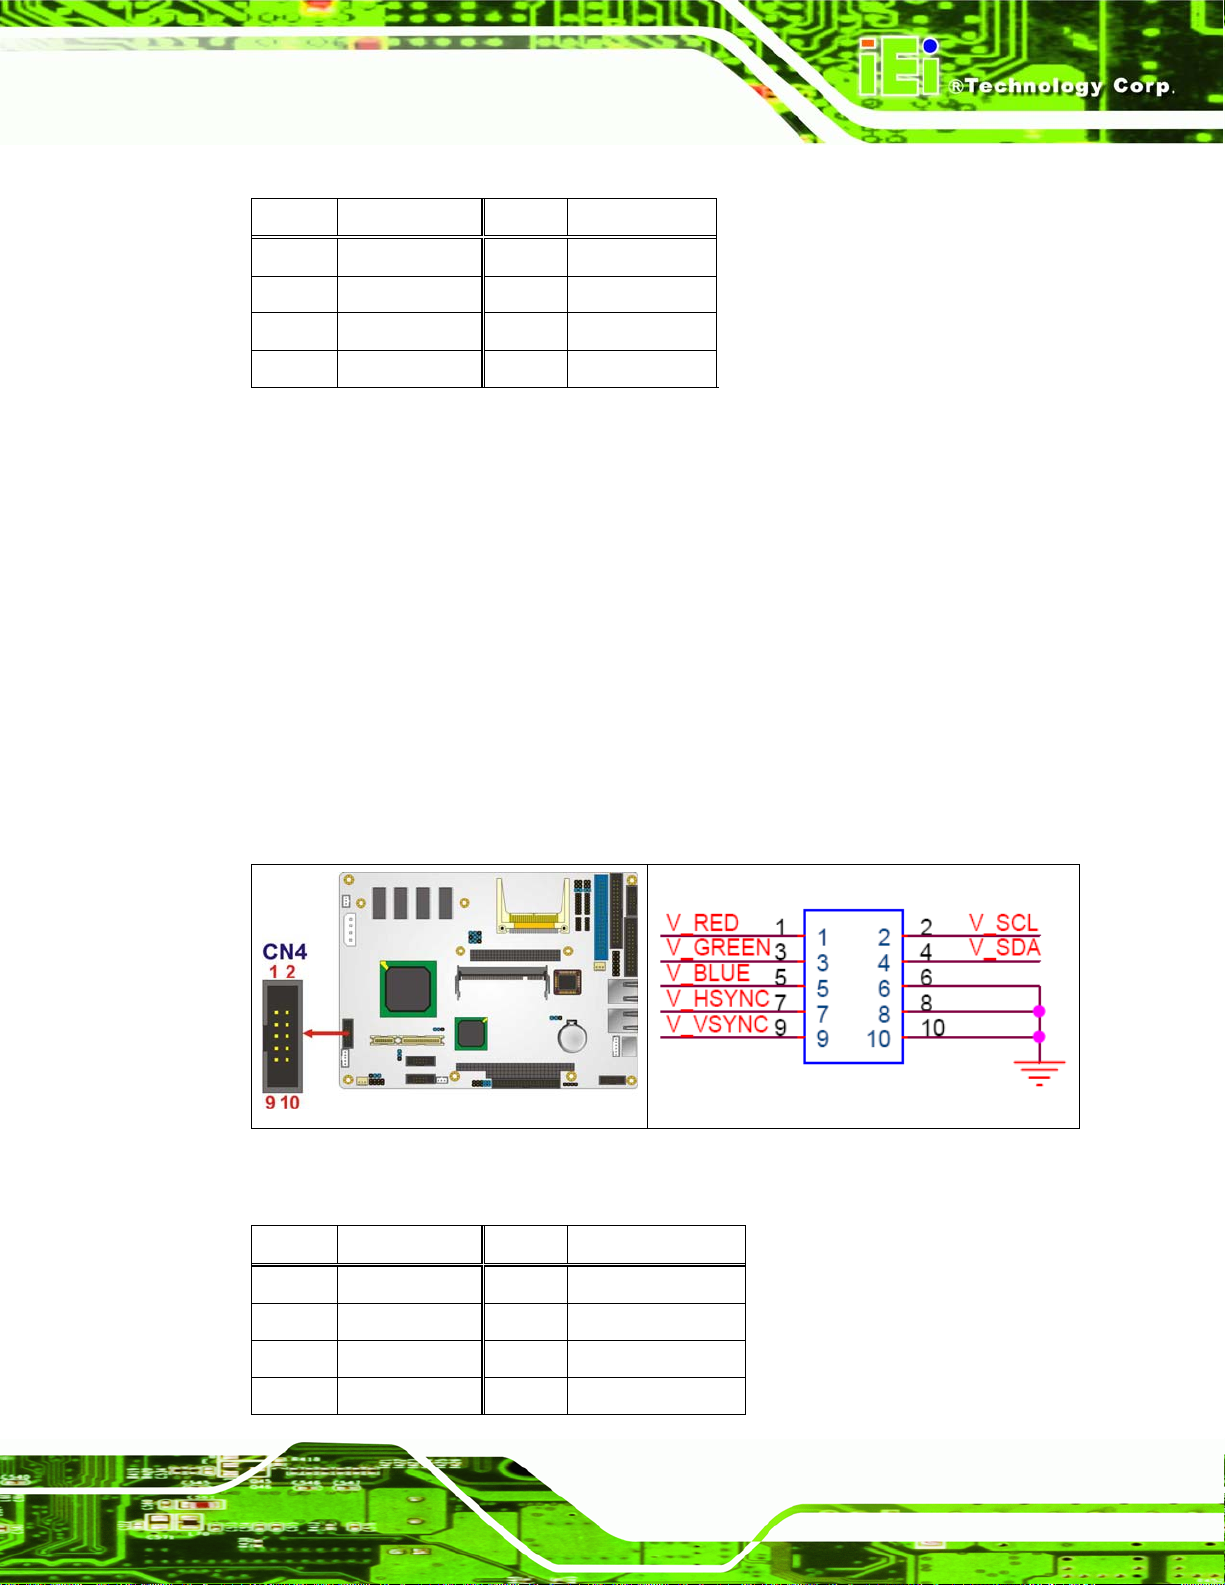
NOVA-LX 5.25” Motherboard
PIN NO. DESCRIPTION PIN NO. DESCRIPTION
1 VCC 2 GND
3 DATAN- 4 DATAM+
5 DATAN+ 6 DATAN7 GND 8 VCC
Table 4-21: USB Port Connector Pinouts
4.2.20 VGA Connectors (Internal)
CN Label:
CN Type:
CN Location: See
CN Pinouts: See
CN4
10-pin box header (2x4)
Figure 4-21
Table 4-22
The 2x5 VGA pin connector provides connectivity to an external VGA port enabling the
system to be connected to a standard CRT screen.
Figure 4-21: VGA Connector Pinout Locations
PIN NO. DESCRIPTION PIN NO. DESCRIPTION
1 L_RED 2 SCL
3 L_GREEN 4 SDA
5 L_BLUE 6 GND
7 5VHSYNC 8 GND
Page 65
Page 86
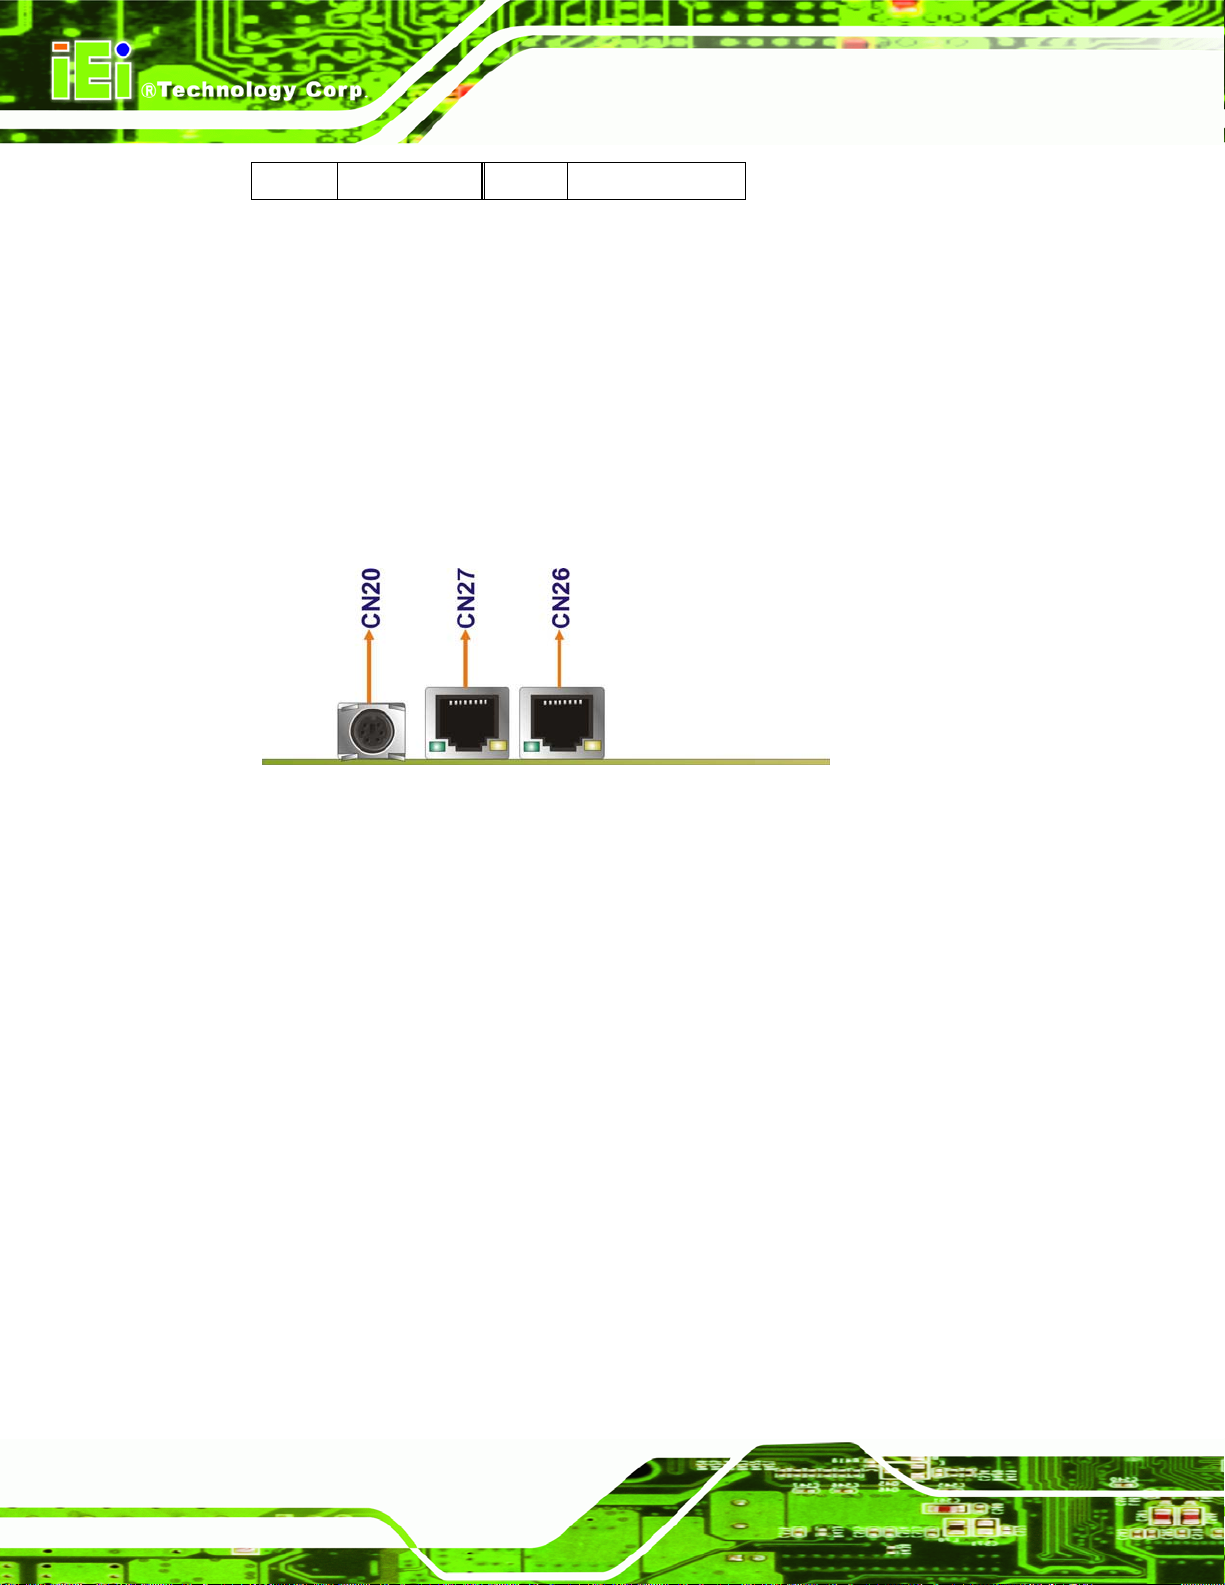
9 5VVSYNC 8 GND
Table 4-22: VGA Connector Pinouts
NOVA-LX 5.25” Motherboard
4.3 External Peripheral Interface Connectors
The external peripheral interface connectors on the back panel are connected to devices
externally when the NOVA-LX is installed in a chassis. The peripheral connectors on the
rear panel are:
1 x Keyboard/mouse connector
2 x RJ-45 Ethernet connector
Figure 4-22: NOVA-LX External Interface Connectors
4.3.1 Keyboard/Mouse Connector
CN Label:
CN T ype:
CN Location:
CN Pinouts:
The PCIE-9450 keyboard and mouse connector is a standard PS/2 connector.
CN20
PS/2
Figure 4-22
See
Table 4-23
See
Page 66
Page 87
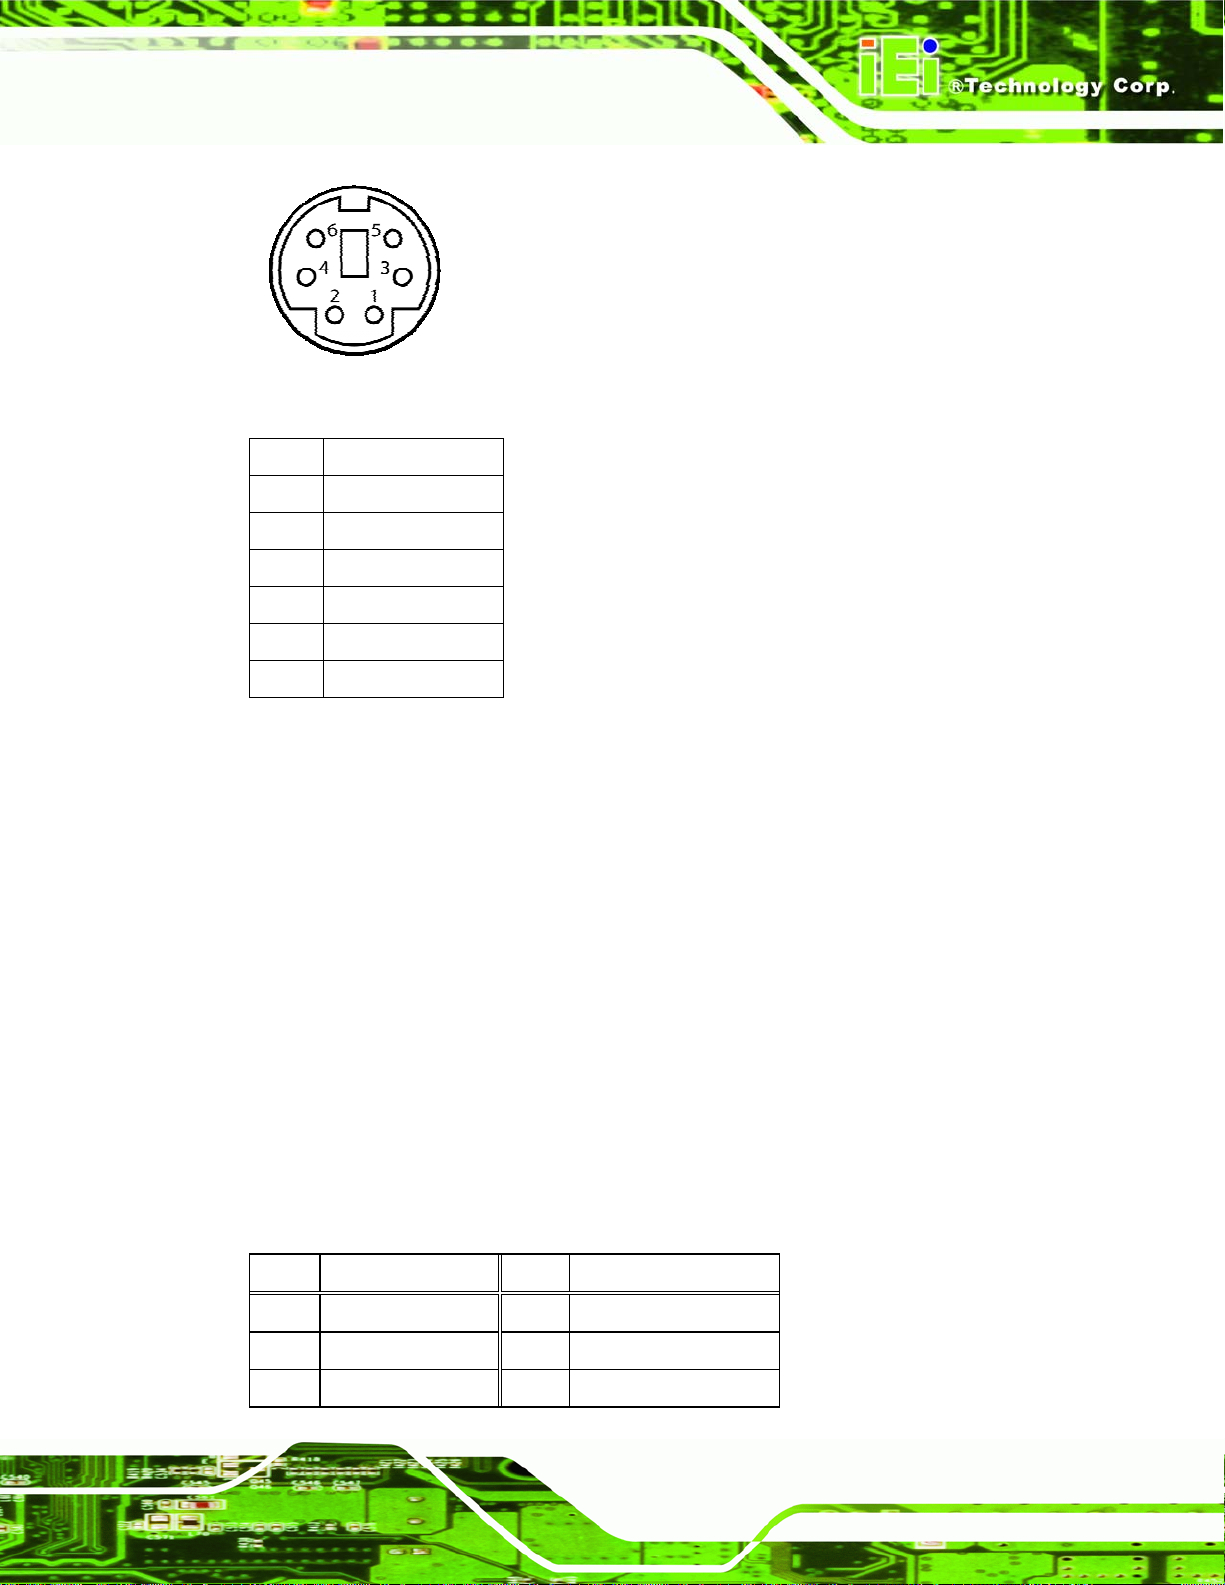
NOVA-LX 5.25” Motherboard
Figure 4-23: PS/2 Pinout and Configuration
PIN DESCRIPTION
1 KB DATA
2 MS DATA
3 GND
4 VCC
5 KB CLOCK
6 MS CLOCK
Table 4-23: Keyboard Connector Pinouts
4.3.2 LAN Connectors
CN Label:
CN Type:
CN Location:
CN Pinouts:
The NOV A -LX is equipped with two built-in RJ-45 Ethernet controllers. The controllers ca n
connect to the LAN through two RJ-45 LAN connectors. There are two LEDs on the
connector indicating the status of LAN. The pin assignments are listed in the following
table:
PIN DESCRIPTION PIN DESCRIPTION
CN26 and CN27
RJ-45
Figure 4-22
Table 4-24
1 TXA+ 5 TXC2 TXA- 6 TXB-
3 TXB+ 7 TXD+
Page 67
Page 88
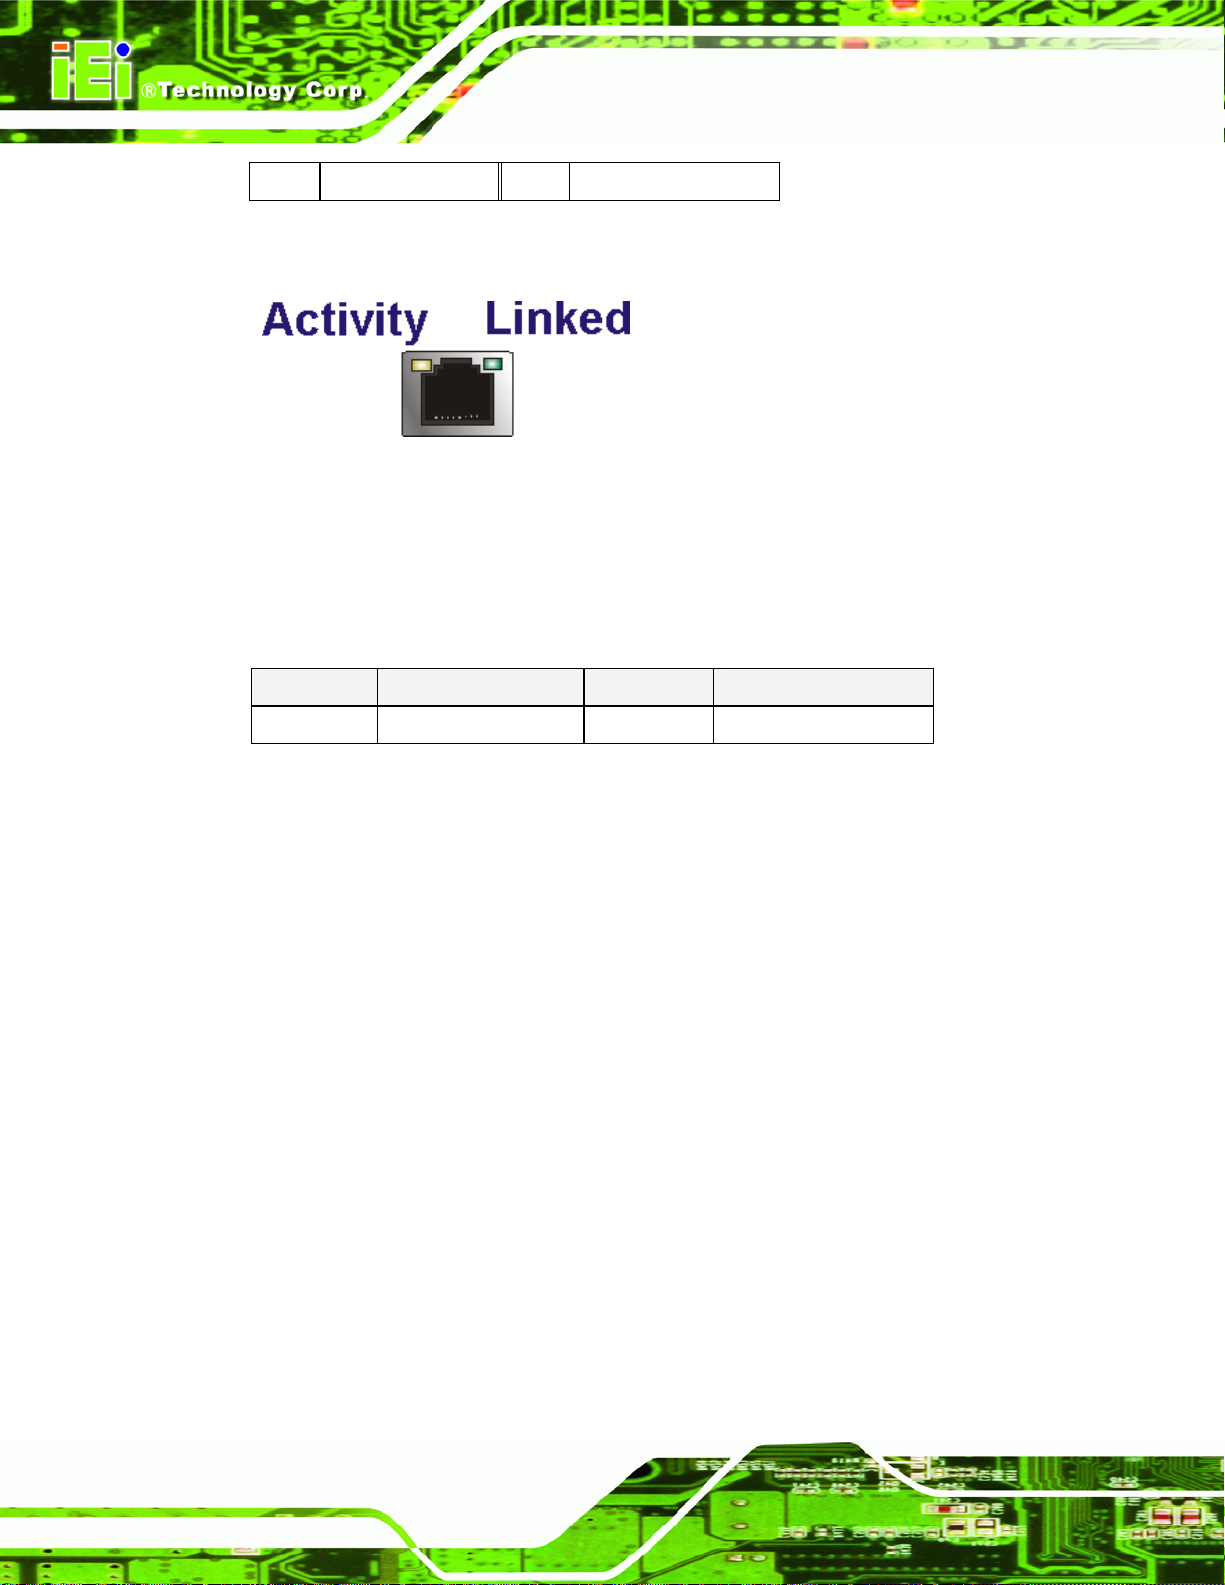
4 TXC+ 8 TXD-
NOVA-LX 5.25” Motherboard
Table 4-24: LAN Pinouts
Figure 4-24: RJ-45 Ethernet Connector
The RJ-45 Ethernet connector has two status LE Ds, one g reen and one yellow. The green
LED indicates activity on the port and the yellow LED indicates the port is linked. See
Table 4-25.
STATUS DESCRIPTION STATUS DESCRIPTION
YELLOW Activity GREEN Linked
Table 4-25: RJ-45 Ethernet Connector LEDs
Page 68
Page 89
NOVA-LX 5.25” Motherboard
Chapter
5
Chapter
5
5 Installation
Page 69
Page 90
5.1 Anti-static Precautions
WARNING:
Failure to take ESD precautions during the installation of the NOVA-LX
may result in permanent damage to the NOVA-LX and severe injury to
the user.
Electrostatic discharge (ESD) can cause serious damage to electronic components,
including the NOVA-LX. Dry climates are especially susceptible to ESD. It is therefore
critical that whenever the NOVA-LX, or any other electrical component is handled, the
following anti-static precautions are strictly adhered to.
NOVA-LX 5.25” Motherboard
Wear an anti-static wristband: - Wearing a simple anti-static wristband can
help to prevent ESD from damaging the board.
Self-grounding:- Before handling the board touch any grounded conducting
material. During the time the board is handled, frequently touch any
conducting materials that are connected to the ground.
Use an anti-static pad: When configuring the NOVA-LX, place it on an
antic-static pad. This reduces the possibility of ESD damaging the NOVA-LX.
Only handle the edges of the PCB:-: When handling the PCB, hold the PCB
by the edges.
Page 70
Page 91
NOVA-LX 5.25” Motherboard
5.2 Installation Considerations
NOTE:
The following installation notices and installation considerations should
be read and understood before the NOVA-LX is installed. All installation
notices pertaining to the installation of the NOVA-LX should be strictly
adhered to. Failing to adhere to these precautions may lead to severe
damage of the NOVA-LX and injury to the person installing the
motherboard.
5.2.1 Installation Notices
WARNING:
The installation instructions described in this manual should be carefully
followed in order to prevent damage to the NOVA-LX, NOVA-LX
components and injury to the user.
Before and during the installation please DO the following:
Read the user manual:
o The user manual provides a complete description of the NOVA-LX
installation instructions and configuration options.
Wear an electrostatic discharge cuff (ESD):
o Electronic components are easily damaged by ESD. Wearing an ESD cuff
removes ESD from the body and helps prevent ESD damage.
Place the NOVA-LX on an antistatic pad:
o When installing or configuring the motherboard, place it on an antistatic
pad. This helps to prevent potential ESD damage.
Turn all power to the NOVA-LX off:
Page 71
Page 92
o When working with the NOVA-LX, make sure that it is disconnected from
all power supplies and that no electricity is being fed into the system.
Before and during the installation of the NOVA-LX DO NOT:
Remove any of the stickers on the PCB board. These stickers are required for
warranty validation.
Use the product before verifying all the cables and power connectors are
properly connected.
Allow screws to come in contact with the PCB circuit, connector pins, or its
components.
5.2.2 Installation Checklist
The following checklist is provided to ensure the NOVA-LX is properly installed.
NOVA-LX 5.25” Motherboard
All the items in the packing list are present
The CPU is installed
The CPU cooling kit is properly installed
A compatible memory module is properly inserted into the slot
The CF Type I or CF Type II card is properly installed into the CF socket
The jumpers have been properly configured
The NOVA-LX is inserted into a chassis with adequate ventilation
The correct power supply is being used
The following devices are properly connected
o Primary and secondary IDE device
o Power supply
o USB cables
o Serial port cables
o VGA cable
The following external peripheral devices are properly connected to the
chassis:
o Keyboard
Page 72
o Parallel port device (printer)
o LAN connection
Page 93
NOVA-LX 5.25” Motherboard
5.3 Unpacking
5.3.1 Unpacking Precautions
When the NOVA-LX is unpacked, please do the following:
Follow the anti-static precautions outlined in Section 5.1.
Make sure the packing box is facing upwards so the NOVA-LX does not fall
out of the box.
Make sure all the components in the checklist shown in Chapter 3 are
present.
NOTE:
If some of the components listed in the checklist in Chapter 3 are
missing, please do not proceed with the installation. Contact the IEI
reseller or vendor you purchased the NOVA-LX from or contact an IEI
sales representative directly. To contact an IEI sales representative,
please send an email to
Page 73
Page 94
5.4 CF Card Installation
NOTE:
The NOVA-LX can support both CF Type I cards and CF Type II cards.
For the complete specifications of the supported CF cards please refer
to Chapter 2.
To install the a CF card (Type 1 or Type 2) onto the NOVA-LX, please follow the steps
below:
Step 1: Locate the CF card socket. Place the NOVA-LX on an anti-static pad with the
NOVA-LX 5.25” Motherboard
solder side facing up. Locate the CF card.
Step 2: Align the CF card. Make sure the CF card is properly aligned with the CF
socket.
Step 3: Insert the CF card. Gently insert the CF card into the socket making sure the
socket pins are properly inserted into the socket. See
Figure 5-1. Step 0:
Page 74
Page 95
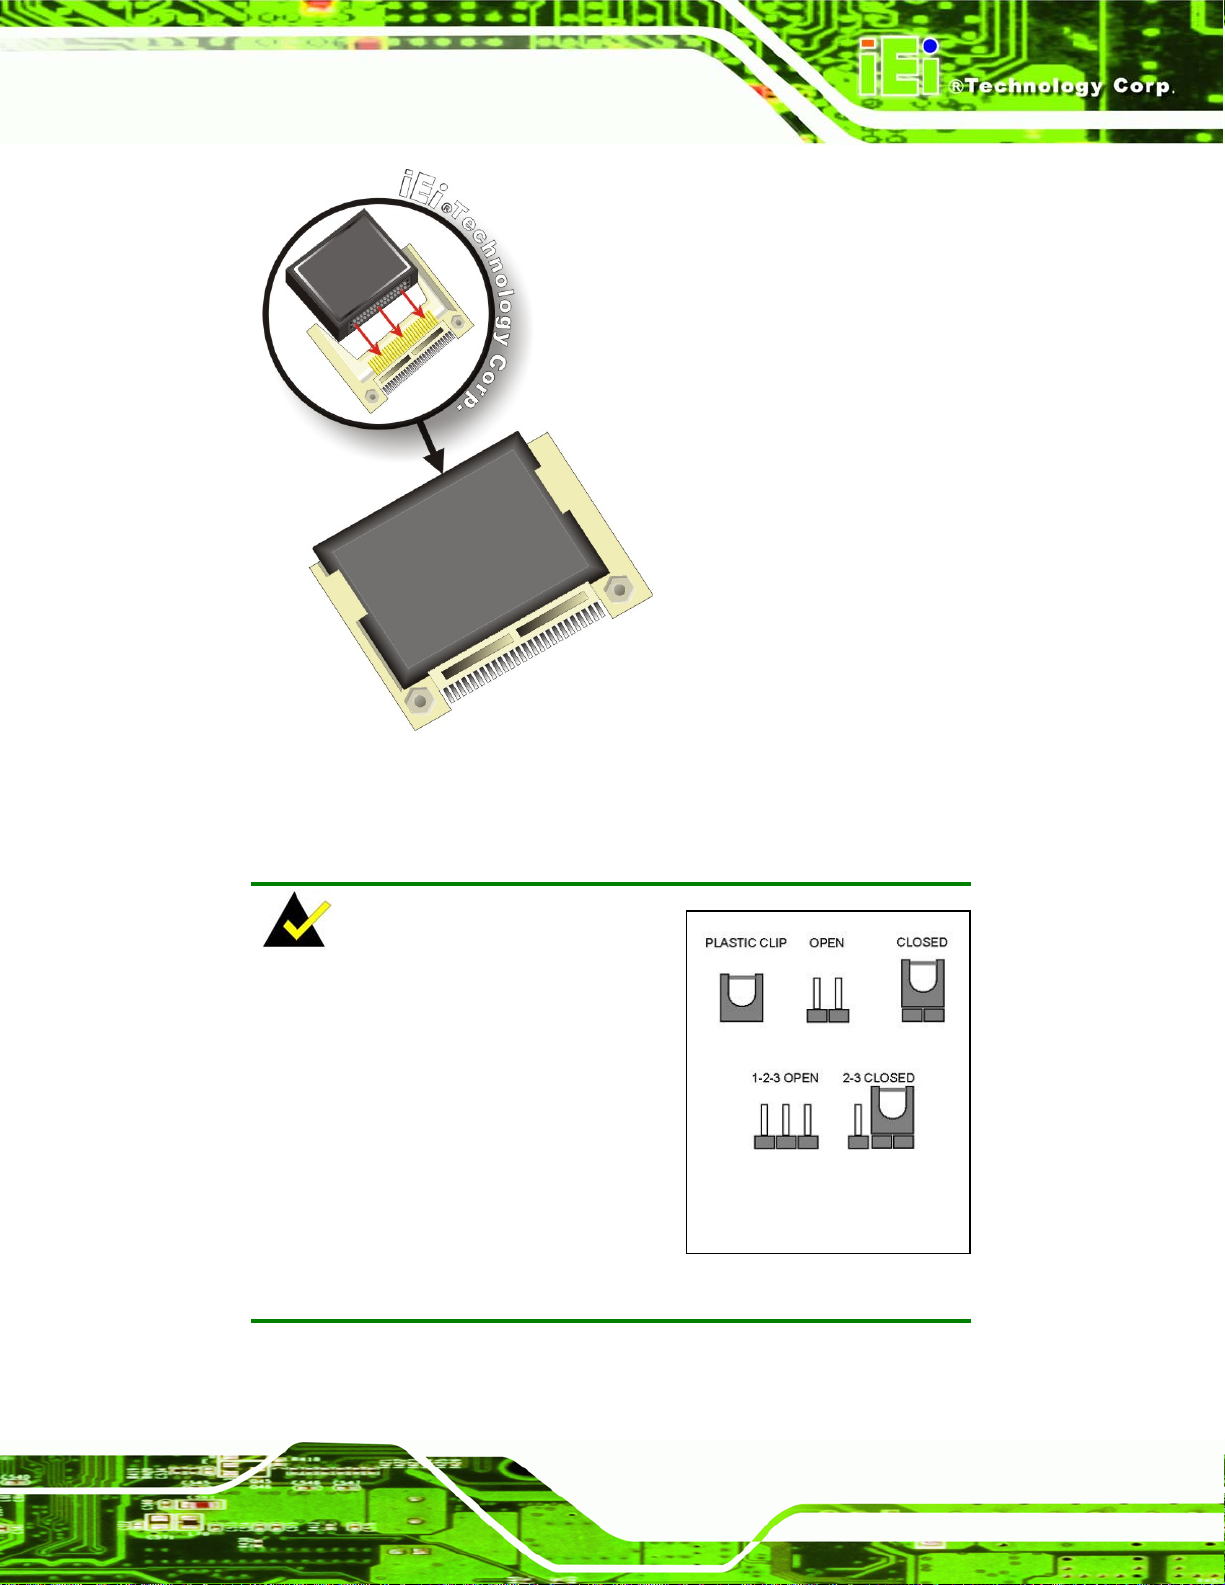
NOVA-LX 5.25” Motherboard
Figure 5-1: CF Card Installation
5.5 Jumper Settings
NOTE:
A jumper is a metal bridge that is used to
close an electrical circuit. It consists of two
metal pins and a small metal clip (often
protected by a plastic cover) that slides over
the pins to connect them. To
CLOSE/SHORT a jumper means connecting
the pins of the jumper with the plastic clip and
to OPEN a jumper means removing the
plastic clip from a jumper.
Jumper
Before the NOVA-LX is installed in the system, the jumpers must be set in accordance
with the desired configuration. The jumpers on the NOVA-LX are listed in
Table 5-1.
Page 75
Page 96
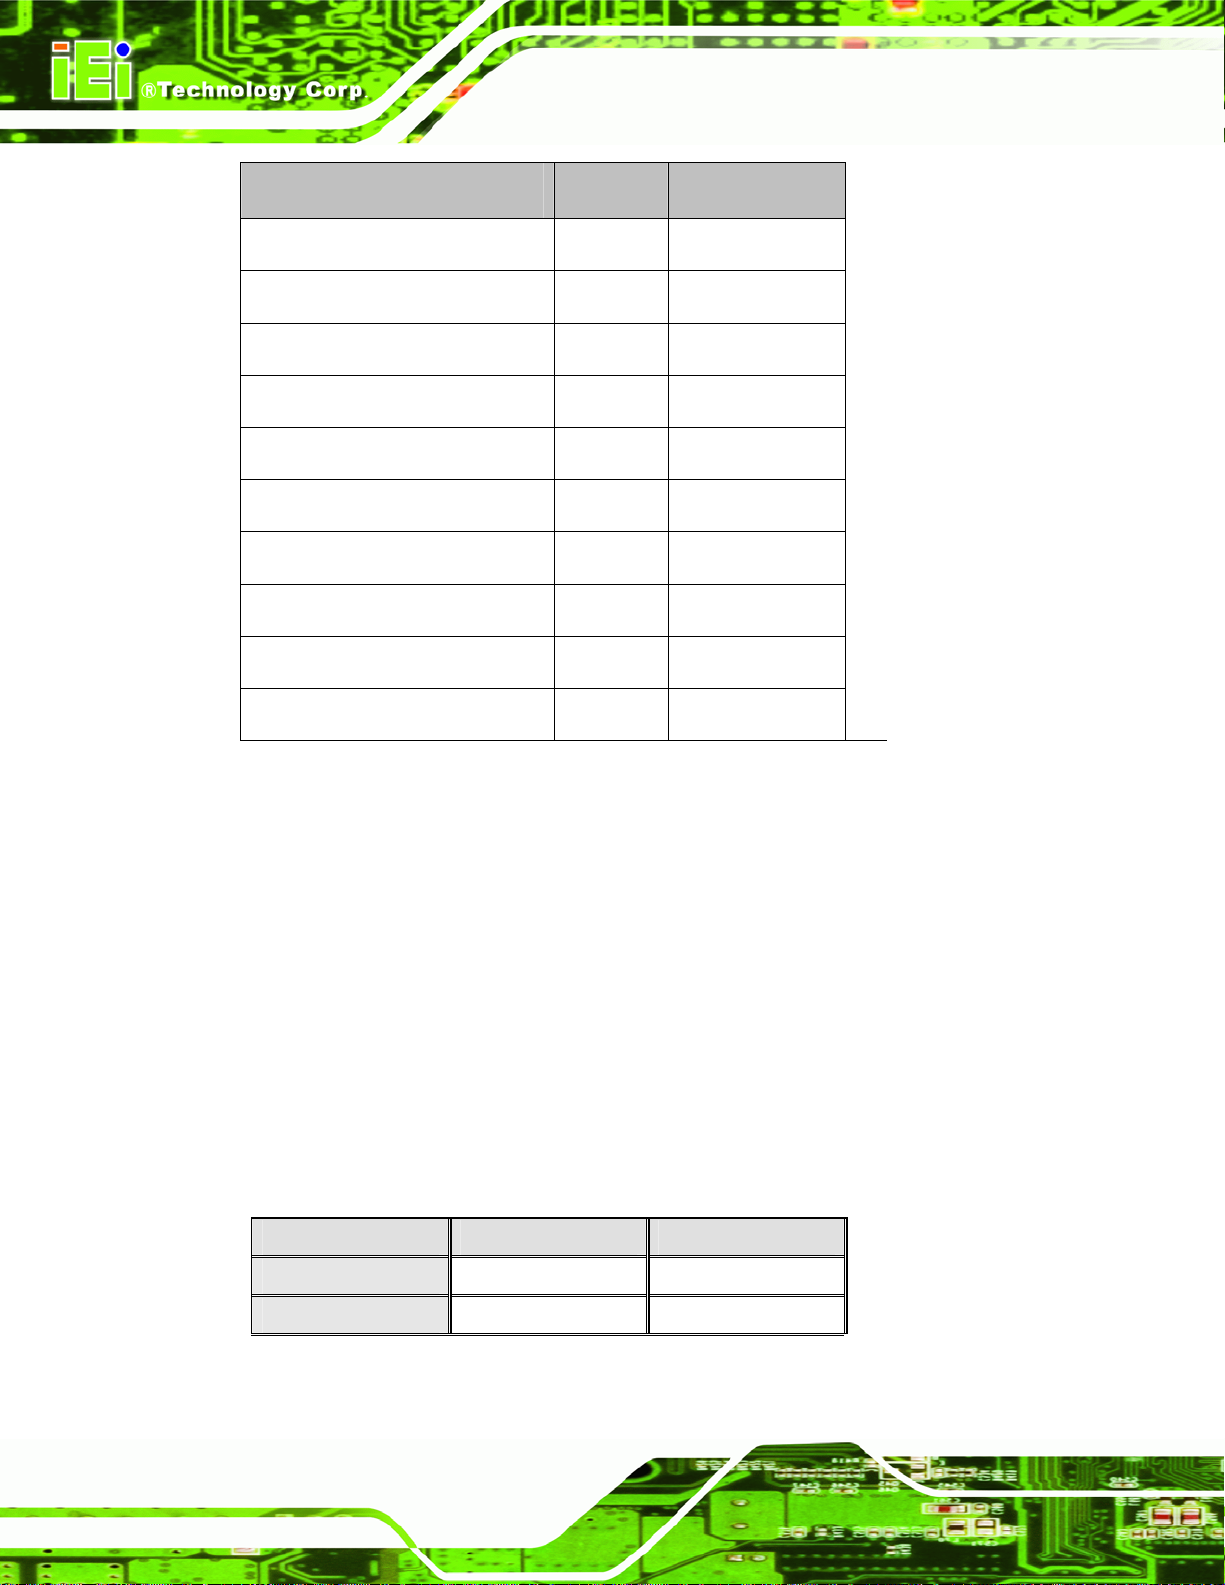
Description Label Type
AT or ATX power select JP7 3-pin header
CF card setup JP1 3-pin header
Clear CMOS JP8 3-pin header
COM 1/2 Pin 9 setting JP16 10-pin header
COM 3 function select JP12 6-pin header
COM 4 function select JP13 6-pin header
LCD clock setting JP5 3-pin header
LCD voltage selection JP6 3-pin header
PCI-104 Voltage Setup JP2 3-pin header
NOVA-LX 5.25” Motherboard
PC/104-Plus SERIRQ Select JP9 3-pin head er
Table 5-1: Jumpers
5.5.1 AT Power Select Jumper Settings
Jumper Label: JP1
Jumper Type:
Jumper Settings: See
Jumper Location:
The AT Power Select jumper specifies the systems power mode as AT or ATX. AT Power
Select jumper settings are shown in
AT Power Select Description
Short Use AT power Default
2-pin header
Table 5-2
Figure 5-2
See
Table 5-2.
Page 76
Open Use ATX power
Table 5-2: AT Power Select Jumper Settings
Page 97
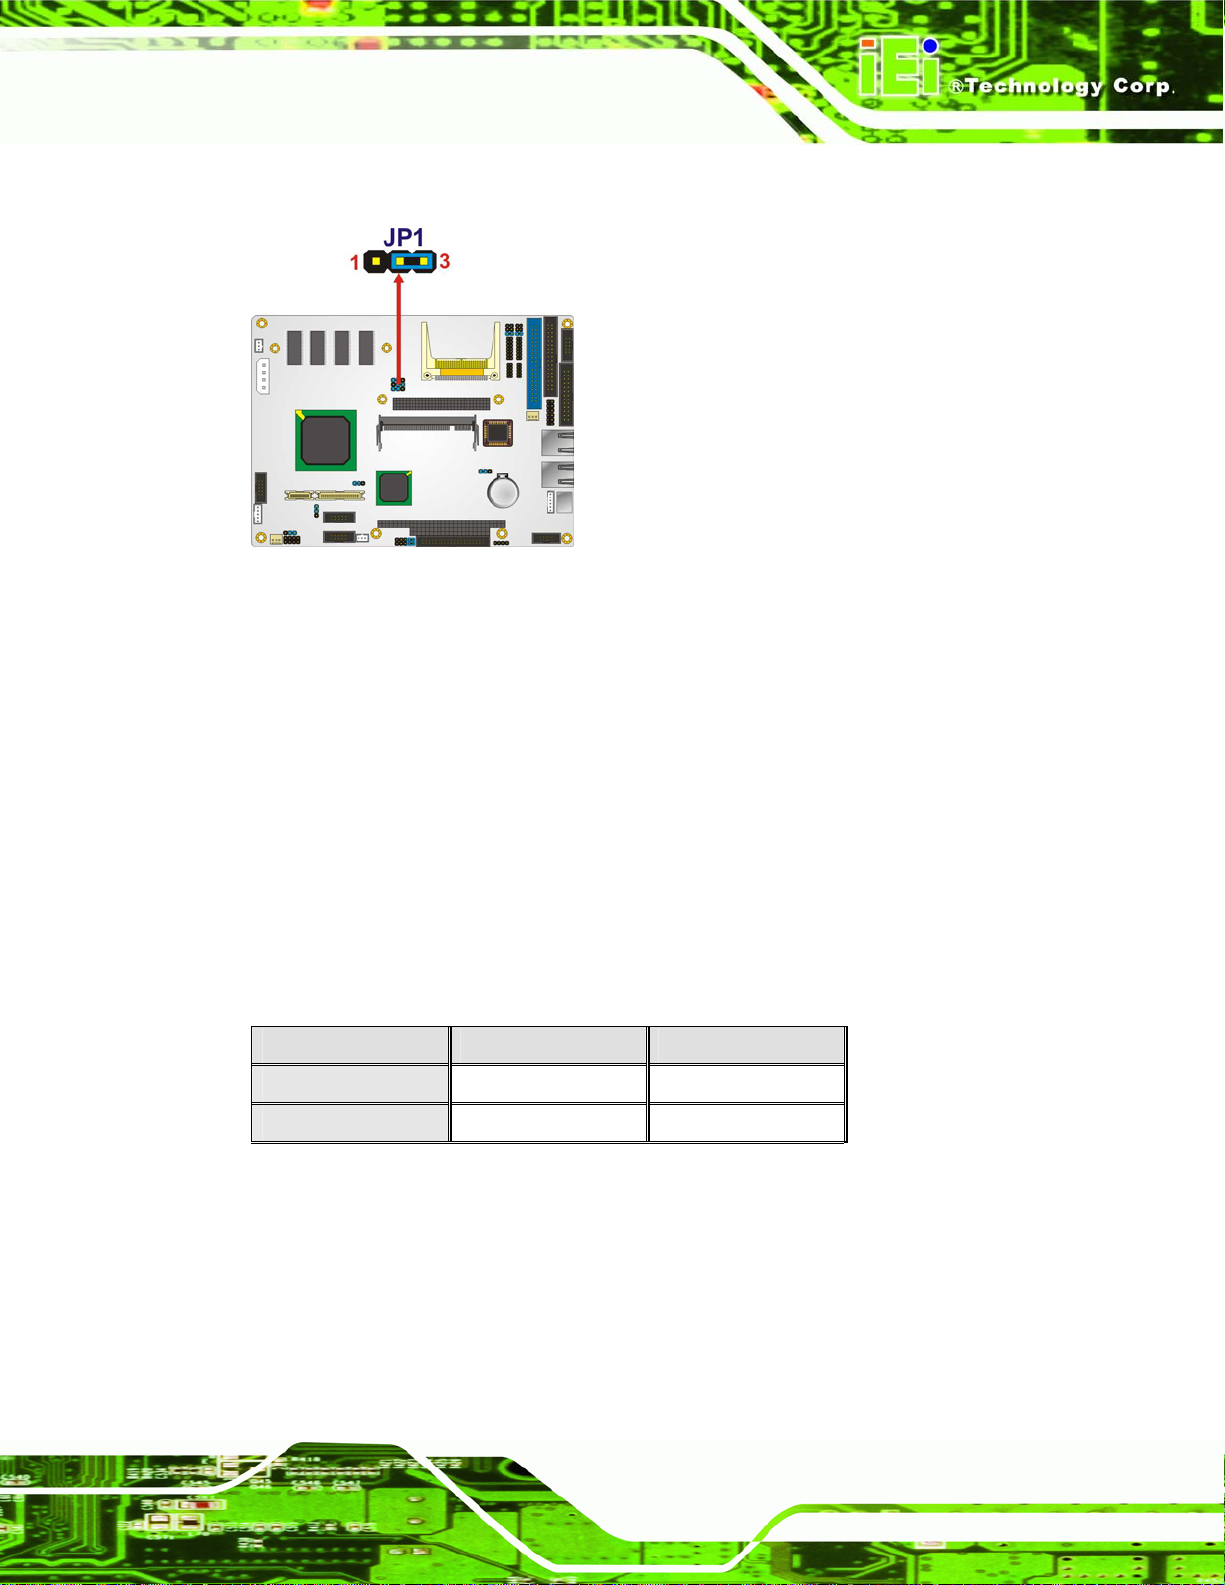
NOVA-LX 5.25” Motherboard
The location of the AT or ATX Power Select jumper is shown in Figure 5-2 below.
Figure 5-2: AT Power Select Jumper Location
5.5.2 AT or ATX Power Select Jumper Settings
Jumper Label: JP7
Jumper Type:
Jumper Settings: See
Jumper Location:
The AT or ATX Power Select jumper specifies the systems power mode as AT or ATX. AT
Power Select jumper settings are shown in
AT Power Select Description
Short 1 – 2 Use AT power Default
Short 2 - 3 Use ATX power
Table 5-3: AT Power Select Jumper Settings
The location of the AT or ATX Power Select jumper is shown in Figure 5-2 below.
23-pin header
Table 5-2
Figure 5-2
See
Table 5-2.
Page 77
Page 98
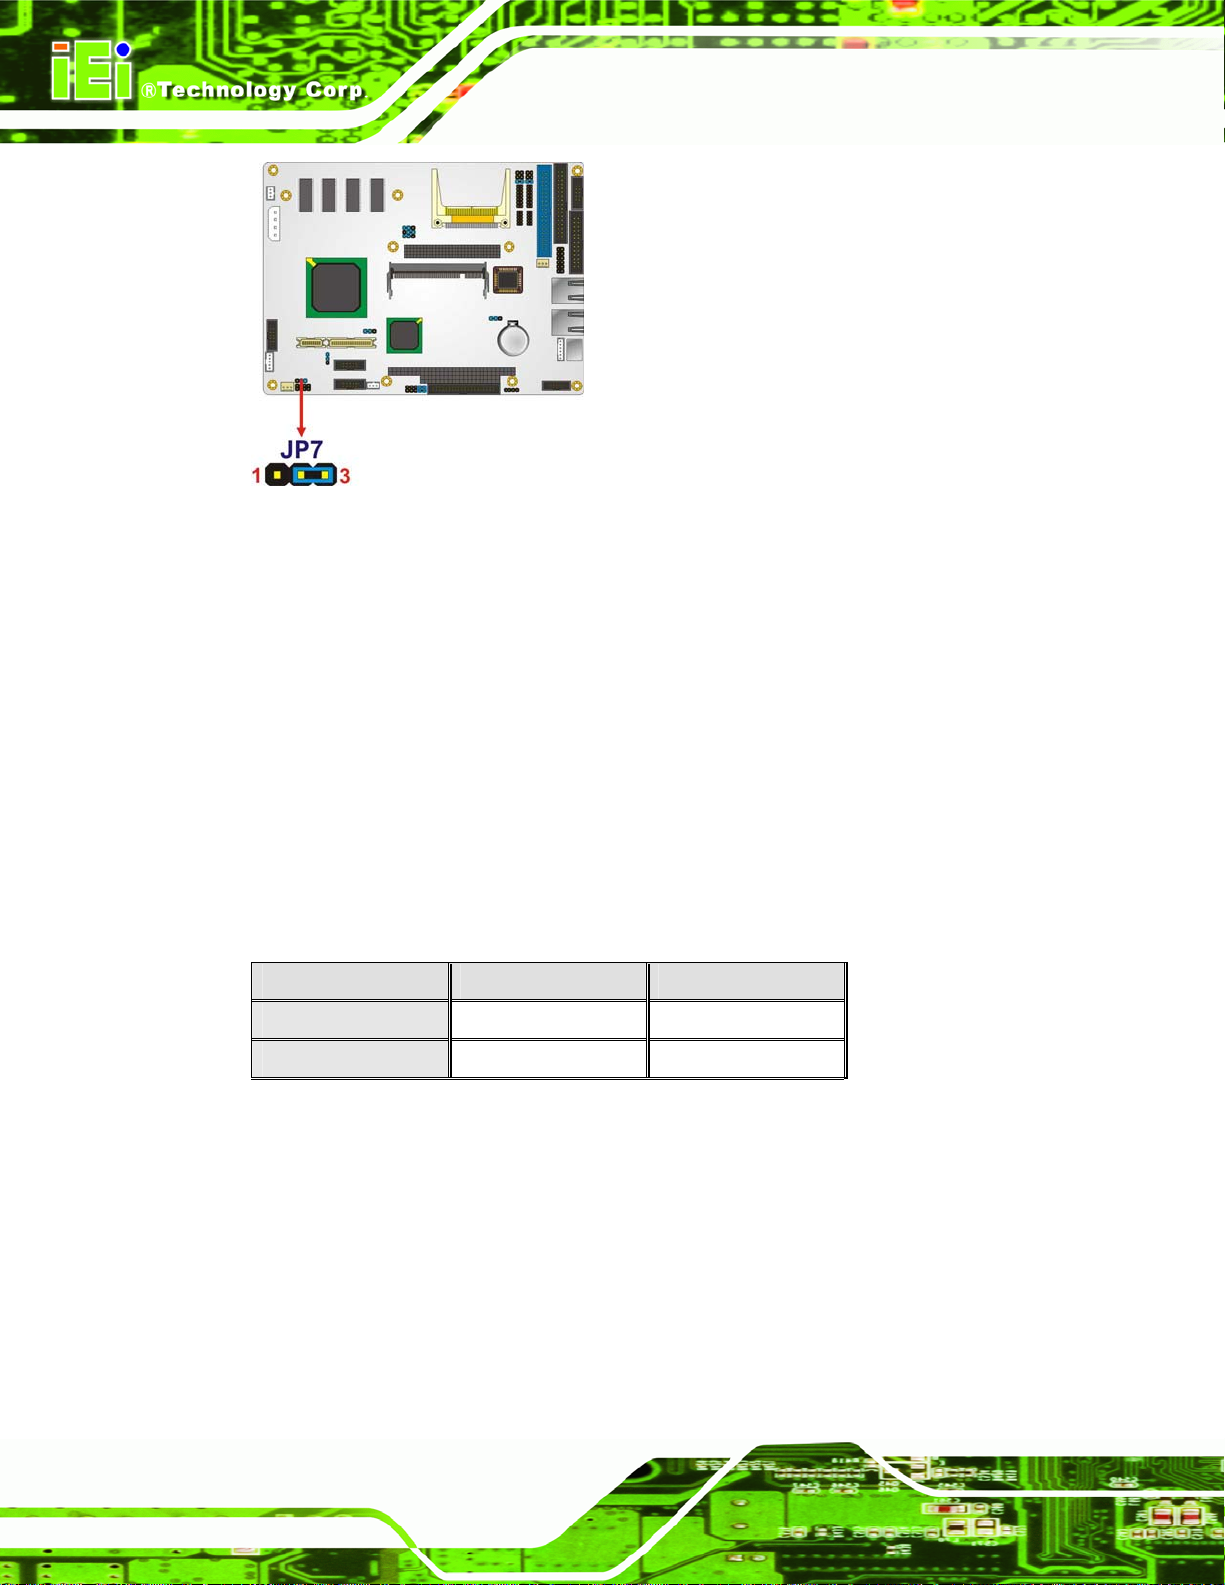
Figure 5-3: AT Power Select Jumper Location
5.5.3 CF Card Setup
Jumper Label: JP1
NOVA-LX 5.25” Motherboard
Jumper Type:
Jumper Settings: See
Jumper Location: See
The CF Card Setup jumper sets the CF Type I card or CF Type II cards as either the slave
device or the master device. CF Card Setup jumper settings are shown in
CF Card Setup Description
Short 1-2 Master
Short 2-3 Slave Default
Table 5-4: CF Card Setup Jumper Settings
The CF Card Setup jumper location is shown in Figure 5-4.
3-pin header
Table 5-4
Figure 5-4
T able 5-4.
Page 78
Page 99
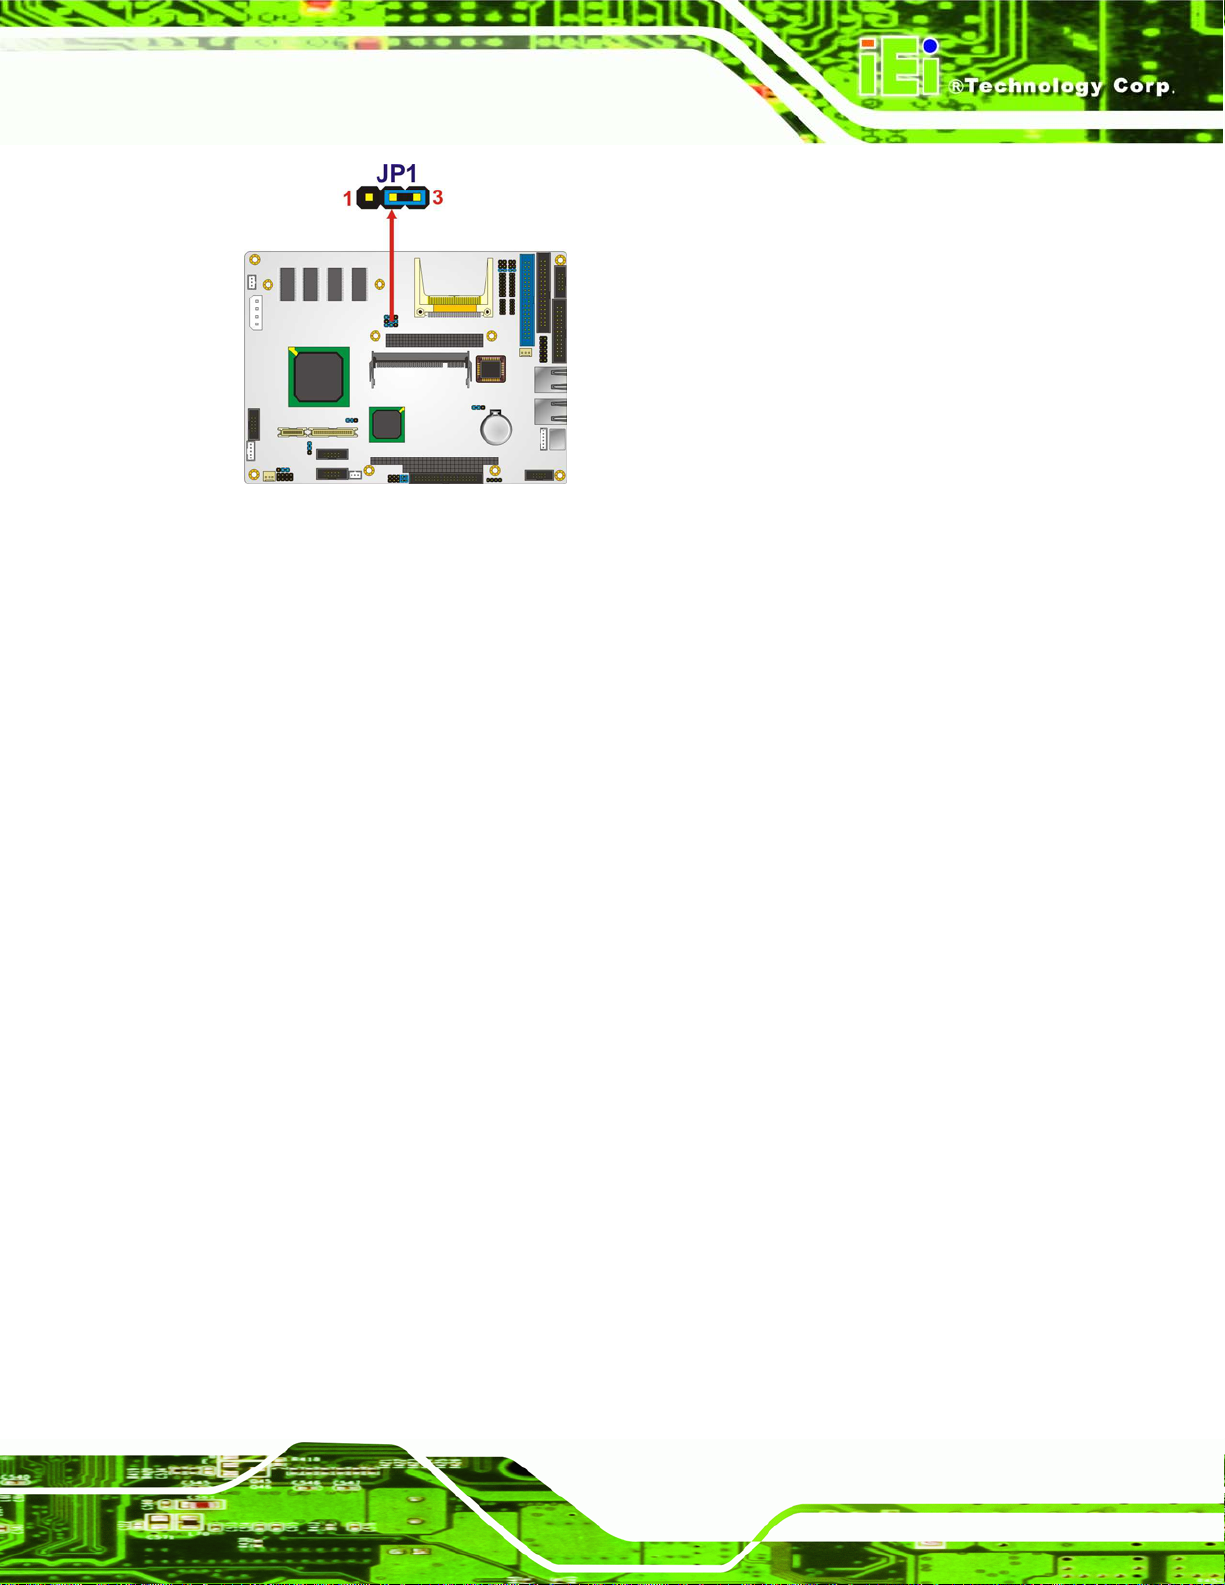
NOVA-LX 5.25” Motherboard
Figure 5-4: CF Card Setup Jumper Location
5.5.4 Clear CMOS Jumper
Jumper Label:
Jumper Type:
Jumper Settings:
Jumper Location:
If the NOV A-L X fails to boot due to improper BIOS sett ings, the clea r CMOS jump er clears
the CMOS data and resets the system BIOS information. To do this, use the jumper cap to
close pins 1 and 2 for a few seconds then remove the jumper cap and enable pins 1 and 2
to remain open.
If the “CMOS Settings Wrong” message is displayed during the boot up process, the fault
may be corrected by pressing the F1 to enter the CMOS Setup menu. Do one of the
following:
Enter the correct CMOS setting
JP8
3-pin header
Table 5-5
See
Figure 5-5
See
Load Optimal Defaults
Load Failsafe Defaults.
After having done one of the above, save the changes and exit the CMOS Setup menu.
The clear CMOS jumper settings are shown in
Table 5-5.
Page 79
Page 100
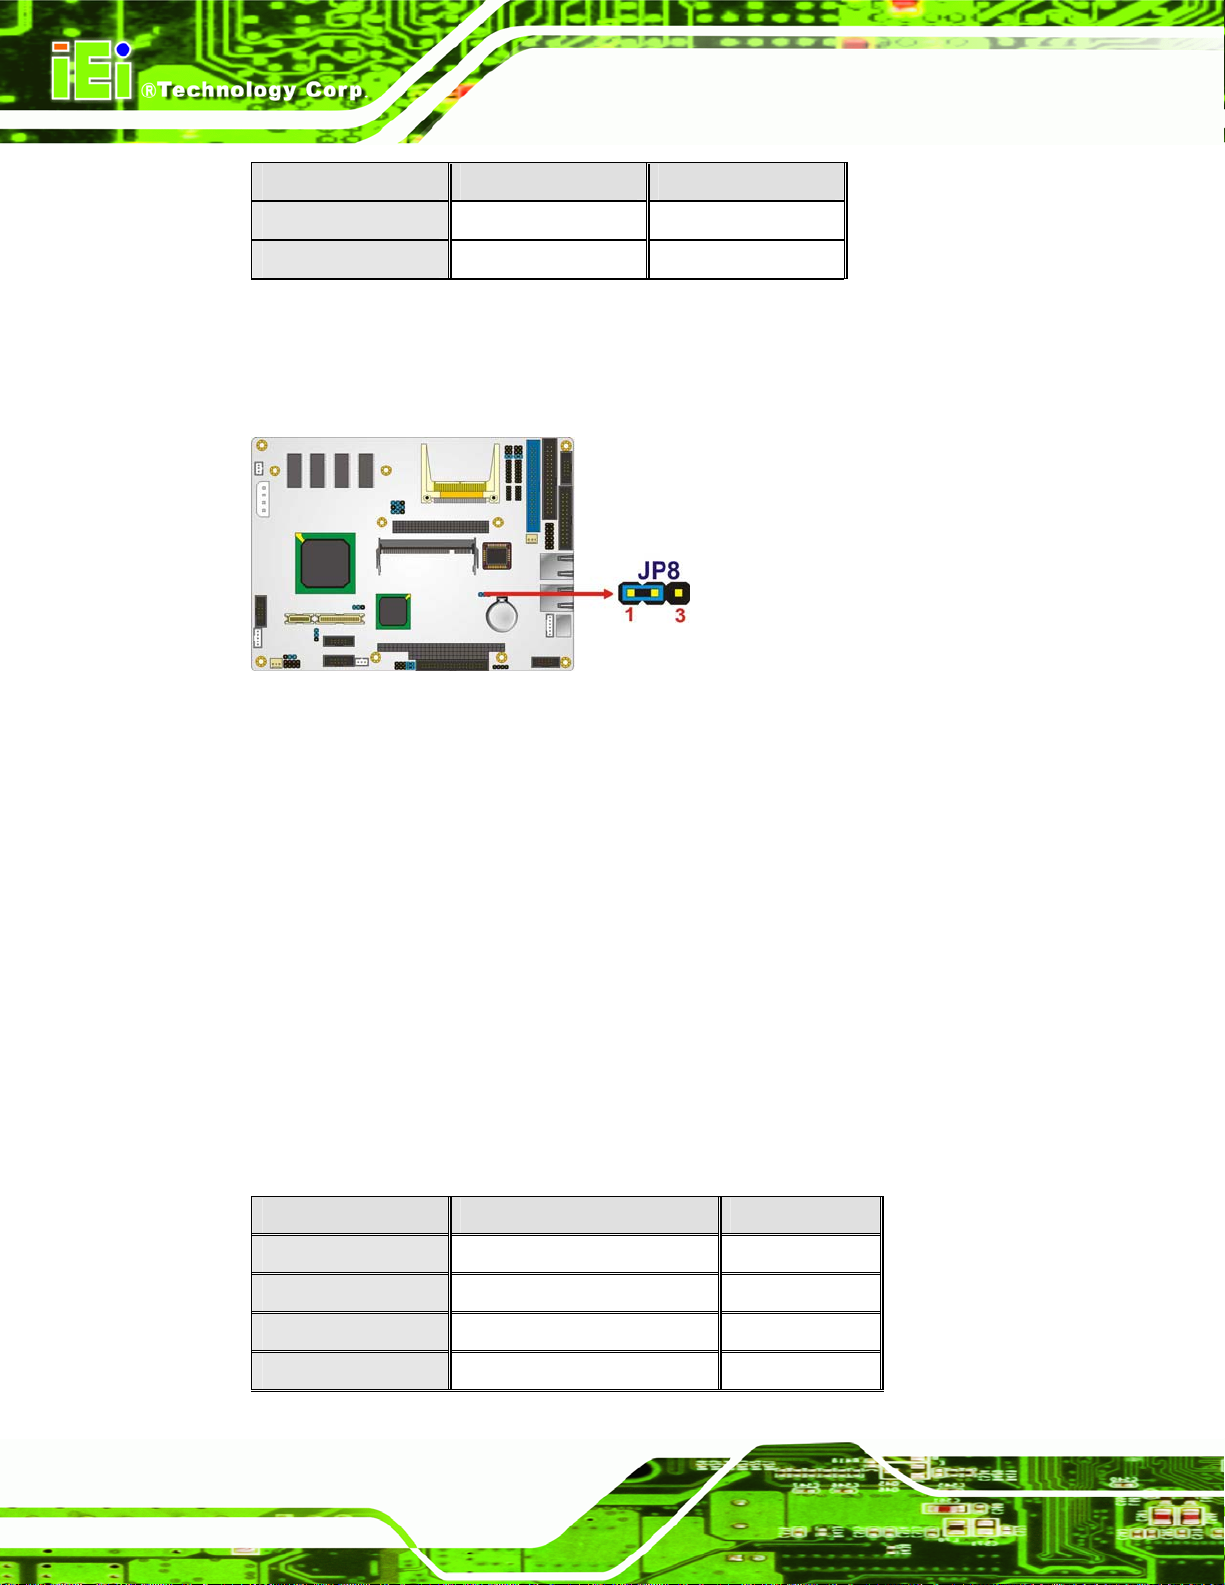
Jumper Select Description
Short 1 - 2 Keep CMOS Setup Default
Short 2 - 3 Clear CMOS Setup
NOVA-LX 5.25” Motherboard
Table 5-5: Clear CMOS Jumper Settings
The location of the clear CMOS jumper is shown in Figure 5-5 below.
Figure 5-5: Clear CMOS Jumper
5.5.5 COM 1/2 Pin 9 Setting Jumper
Jumper Label: JP16
Jumper Type:
Jumper Settings:
Jumper Location:
The COM 1/2 Pin 9 Setting jumper configures pin 9 on COM 1 and COM 2 as either a +5V,
+12V power source or as a ring-in (RI) line. The COM 1/2 Pin 9 Setting jumper selection
options are shown in
COM 1/2 RI Pin Description
Short 1 – 3 COM 1 RI Pin use +12V Default
10-pin header
See
See
Table 5-8.
Table 5-8
Figure 5-8
Page 80
Short 3 – 5 COM 1 RI Pin use +5V
Short 7 – 9 COM 1 RI Pin use RI
Short 2 – 4 COM 2 RI Pin use +12V
 Loading...