

Page 1

Mustang-M2BM-MX2
Page I
MODEL:
Intel
®
Vision Accelerator Design with Intel® Movidius™ VPU
Rev. 1.00 - July 23, 2019
Mustang-M2BM-MX2
Mustang-M2BM-MX2 CPU Ca
Powered by Open Visual Inference & Neural Network Optimization (OpenVINO™) toolkit
User Manual
Page 2

Mustang-M2BM-MX2
Page II
Date Version Changes
July 23, 2019 1.00 Initial release
Revision
Page 3

Mustang-M2BM-MX2
Page III
Copyright
COPYRIGHT NOTICE
The information in this document is subject to change without prior notice in order to
improve reliability, design and function and does not represent a commitment on the part
of the manufacturer.
In no event will the manufacturer be liable for direct, indirect, special, incidental, or
consequential damages arising out of the use or inability to use the product or
documentation, even if advised of the possibility of such damages.
This document contains proprietary information protected by copyright. All rights are
reserved. No part of this manual may be reproduced by any mechanical, electronic, or
other means in any form without prior written permission of the manufacturer.
TRADEMARKS
All registered trademarks and product names mentioned herein are used for identification
purposes only and may be trademarks and/or registered trademarks of their respective
owners.
Page 4

Mustang-M2BM-MX2
Page IV
Manual Conventions
WARNING
Warnings appear where overlooked details may cause damage to the
equipment or result in personal injury. Warnings should be taken
seriously.
CAUTION
Cautionary messages should be heeded to help reduce the chance of
losing data or damaging the product.
NOTE
These messages inform the reader of essential but non-critical
information. These messages should be read carefully as any directions
or instructions contained therein can help avoid making mistakes.
Page 5

Mustang-M2BM-MX2
Page V
Table of Contents
1 INTRODUCTION .......................................................................................................... 1
1.1 INTRODUCTION ........................................................................................................... 2
1.2 FEATURES ................................................................................................................... 3
1.3 DIMENSIONS ............................................................................................................... 3
1.4 TECHNICAL SPECIFICATIONS ...................................................................................... 4
2 UNPACKING ................................................................................................................. 5
2.1 ANTI-STAT I C PRECAUTIONS ........................................................................................ 6
2.2 UNPACKING PRECAUTIONS ......................................................................................... 6
2.3 PACKING LIST ............................................................................................................. 7
3 HARDWARE INSTALLATION ................................................................................... 8
3.1 ANTI-STAT I C PRECAUTIONS ........................................................................................ 9
3.2 INSTALLATION CONSIDERATIONS ................................................................................ 9
3.3 HARDWARE INSTALLATION ........................................................................................ 11
4 OPENVINO™ TOOLKIT INSTALLATION (LINUX) ........................................... 12
4.1 SYSTEM REQUIREMENTS .......................................................................................... 13
4.2 ONLINE INSTALLATION GUIDE .................................................................................. 13
4.3 INSTALLATION - STEP BY STEP (2019 R1) ................................................................. 14
4.3.1 Install the Intel® Distribution of OpenVINO™ Toolkit Core Components ..... 15
4.3.2 Set the Environment Variables ......................................................................... 18
4.3.3 Configure the Model Optimizer ....................................................................... 19
4.4 STEPS FOR INTEL® VISION ACCELERATOR DESIGN WITH INTEL® MOVIDIUS™ VPUS
MUSTANG-M2BM-MX2 DRIVER INSTALLATION ........................................................... 21
4.5 USE THE DEMO SCRIPTS TO VERIFY YOUR INSTALLATION........................................ 23
4.5.1 Run the Image Classification Demo ................................................................ 24
4.5.2 Run the Inference Pipeline Demo .................................................................... 25
4.6 INSTALLATION - STEP BY STEP (OPENVINO 2018 R5) ............................................. 28
4.6.1 Install External Software Dependencies .......................................................... 28
4.6.2 Install the Intel® Distribution of OpenVINO™ Toolkit Core Components ..... 29
Page 6

Mustang-M2BM-MX2
Page VI
4.6.3 Set the Environment Variables ......................................................................... 31
4.6.4 Configure the Model Optimizer ....................................................................... 32
4.7 STEPS FOR INTEL® VISION ACCELERATOR DESIGN WITH INTEL® MOVIDIUS™ VPUS
MUSTANG-M2BM-MX2 DRIVER INSTALLATION ........................................................... 34
4.8 USE THE DEMO SCRIPTS TO VERIFY YOUR INSTALLATION........................................ 36
4.8.1 Run the Image Classification Demo ................................................................ 37
4.8.2 Run the Inference Pipeline Demo .................................................................... 38
5 OPENVINO™ TOOLKIT INSTALLATION (WINDOWS 10) .............................. 41
5.1 SYSTEM REQUIREMENTS .......................................................................................... 42
5.2 ONLINE INSTALLATION GUIDE .................................................................................. 42
5.3 INSTALLATION - STEP BY STEP (2019 R1) ................................................................. 43
5.3.1 Install the Intel® Distribution of OpenVINO™ Toolkit Core Components ..... 43
5.3.2 Install the External Software Dependencies .................................................... 45
5.3.2.1 Microsoft Visual Studio* with C++ and MSBuild ................................... 46
5.3.2.2 Install CMake* 3.4 or higher ................................................................ 49
5.3.2.3 Install Python* 3.6.5 .............................................................................. 50
5.3.3 Set the Environment Variables ................................................................... 52
5.3.4 Configure the Model Optimizer ....................................................................... 53
5.3.4.1 Model Optimizer Configuration Steps ...................................................... 54
5.4 INSTALLATION STEPS FOR INTEL® VISION ACCELERATOR DESIGN WITH INTEL®
MOVIDIUS™ VPUS MUSTANG-M2BM-MX2 ................................................................ 57
5.5 USE THE DEMO SCRIPTS TO VERIFY YOUR INSTALLATION........................................ 57
5.5.1 Run the Image Classification Demo ................................................................ 59
5.5.2 Set Up a Neural Network Model ...................................................................... 59
5.6 INSTALLATION - STEP BY STEP (2018 R5) ................................................................. 62
5.6.1 Install the Intel® Distribution of OpenVINO™ Toolkit Core Components ..... 62
5.6.2 Install the External Software Dependencies .................................................... 65
5.6.2.1 Microsoft Visual Studio* with C++ and MSBuild ................................... 65
5.6.2.2 Install the Build Tools for Visual Studio 2017 .......................................... 68
5.6.2.3 Install CMake* 3.4 or higher .................................................................... 69
5.6.2.4 Install Python* 3.6.5 ................................................................................. 70
5.6.3 Set the Environment Variables ......................................................................... 72
5.6.4 Configure the Model Optimizer ....................................................................... 72
5.6.4.1 Model Optimizer Configuration Steps ...................................................... 73
Page 7

Mustang-M2BM-MX2
Page VII
5.7 INSTALLATION STEPS FOR INTEL® VISION ACCELERATOR DESIGN WITH INTEL®
MOVIDIUS™ VPUS MUSTANG-M2BM-MX2 ................................................................ 76
5.8 USE THE DEMO SCRIPTS TO VERIFY YOUR INSTALLATION........................................ 76
5.8.1 Run the Image Classification Demo ................................................................ 78
5.8.2 Run the Inference Pipeline Demo .................................................................... 79
A PERFORMANCE TEST ............................................................................................ 82
B REGULATORY COMPLIANCE .............................................................................. 84
C PRODUCT DISPOSAL .............................................................................................. 86
D HAZARDOUS MATERIALS DISCLOSURE ......................................................... 88
Page 8

Mustang-M2BM-MX2
Page VIII
List of Figures
Figure 1-1: Mustang-M2BM-MX2 ................................................................................................... 2
Figure 1-2: Dimensions (mm) ........................................................................................................ 3
Page 9

Mustang-M2BM-MX2
Page 1
Chapter
1
1 Introduction
Page 10

Mustang-M2BM-MX2
Page 2
1.1 Introduction
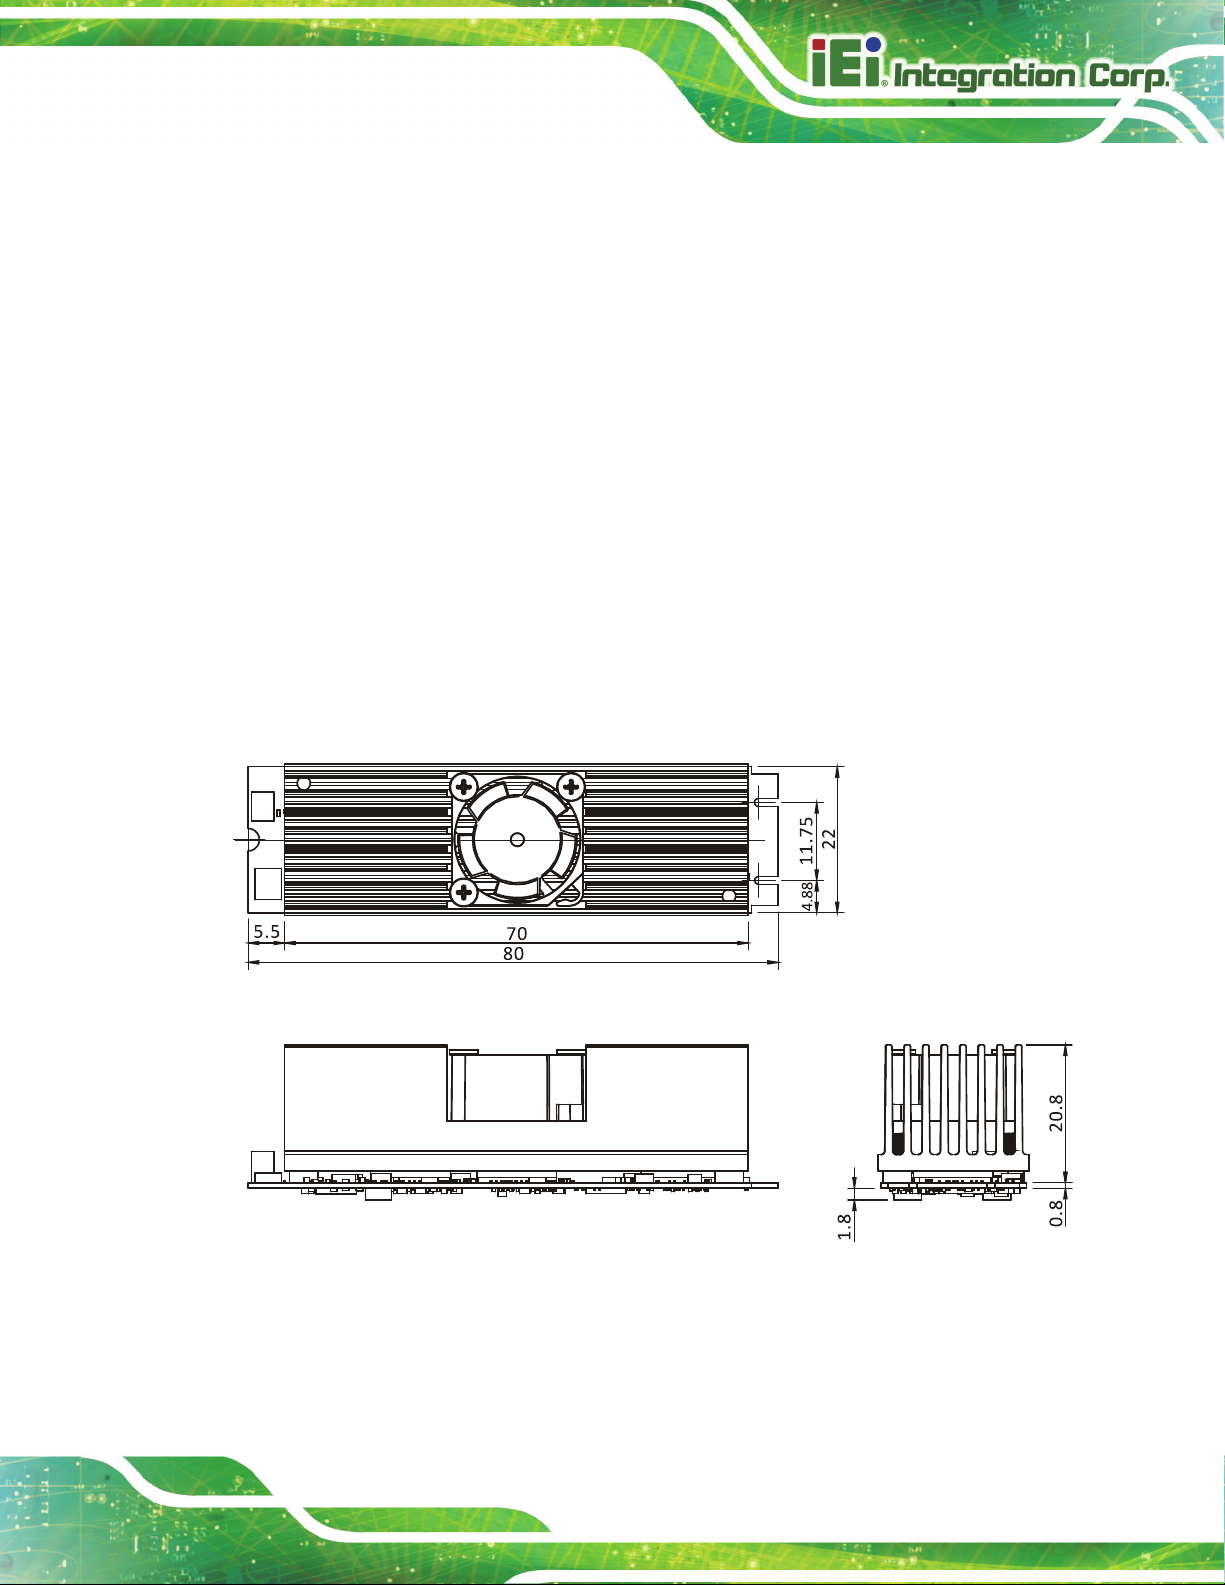
Figure 1-1: Mustang-M2BM-MX2
The Mustang-M2BM-MX2 is a deep learning convolutional neural network acceleration
card for speeding up AI inference, in a flexible and scalable way. Equipped with Intel®
Movidius™ Myriad™ X Vision Processing Unit (VPU), the Mustang-M2BM-MX2 M.2 card
can be used with the existing system, enabling high-performance computing without
costing a fortune. VPUs can run AI faster, and is well suited for low power consumption
applications such as surveillance, retail and transportation. With the advantage of power
efficiency and high performance to dedicate DNN topologies, it is perfect to be
implemented in AI edge computing device to reduce total power usage, providing longer
duty time for the rechargeable edge computing equipment.
"Open Visual Inference & Neural Network Optimization (OpenVINO™) toolkit" is based on
convolutional neural networks (CNN), the toolkit extends workloads across Intel®
hardware and maximizes performance. It can optimize pre-trained deep learning model
such as Caffe, MXNET, Tensorflow into IR binary file then execute the inference engine
across Intel®-hardware heterogeneously such as CPU, GPU, Intel® Movidius™ Myriad X
VPU, and FPGA.
Page 11
Mustang-M2BM-MX2
Page 3
1.2 Features
Mustang-M2BM-MX2 features are listed below:
Intel® Movidius™ Myriad™ X Vision Processing Unit
Interface: M.2 B+M key
Dimensions: 22 mm x 80 mm
Cooling: Active fan
OpenVINO™ Toolkit, AI edge computing ready device
Two Intel® Movidius™ Myriad™ X chips can execute two topologies
simultaneously
Low power consumption, approximate 7.5W
1.3 Dimensions
The dimensions of the board are listed below:
Figure 1-2: Dimensions (mm)
Page 12

Mustang-M2BM-MX2
Page 4
1.4 Technical Specifications
Mustang-M2BM-MX2 technical specifications are listed below.
Specification Mustang-M2BM-MX2
Main Chip
Operating Systems
Interface
Fan
Power Consumption
Operating Temperature
Operating Humidity
Dimensions
Table 1-1: Technical Specifications
Two Intel® Movidius™ Myriad™ X
Ubuntu 16.04.3 (LTS) 64-bit,
CentOS 64-bit
Windows10 64-bit
M.2 B+M Key
Active fan
Approximate 7.5W
0°C~55°C (in FLEX-BX200)
5% ~ 90%
22 mm x 80 mm
Page 13

Mustang-M2BM-MX2
Page 5
Chapter
2
2 Unpacking
Page 14

Mustang-M2BM-MX2
Page 6
2.1 Anti-static Precautions
WARNING!
Static electricity can destroy certain electronics. Make sure to follow the
ESD precautions to prevent damage to the product, and injury to the
user.
Make sure to adhere to the following guidelines:
Wear an anti-static wristband: Wearing an anti-static wristband can prevent
electrostatic discharge.
Self-grounding: Touch a grounded conductor every few minutes to discharge
any excess static buildup.
Use an anti-static pad: When configuring any circuit board, place it on an
anti-static mat.
Only handle the edges of the PCB: Don't touch the surface of the
motherboard. Hold the motherboard by the edges when handling.
2.2 Unpacking Precautions
When the Mustang-M2BM-MX2 is unpacked, please do the following:
Follow the antistatic guidelines above.
Make sure the packing box is facing upwards when opening.
Make sure all the packing list items are present.
Page 15
Mustang-M2BM-MX2
Page 7
2.3 Packing List
NOTE:
If any of the components listed in the checklist below are missing, do not
proceed with the installation. Contact the IEI reseller or vendor the
Mustang-M2BM-MX2 was purchased from or contact an IEI sales
representative directly by sending an email to sales@ieiworld.com.
The Mustang-M2BM-MX2 is shipped with the following component:
Quantity Item and Part Number Image
1 Mustang-M2BM-MX2 AI acceleration card
Page 16

Mustang-M2BM-MX2
Page 8
Chapter
3
3 Hardware Installation
Page 17

Mustang-M2BM-MX2
Page 9
Failure to take ESD precautions during the installation of the
may result in permanent damage to the
3.1 Anti-static Precautions
WARNING:
Mustang-M2BM-MX2
Mustang-M2BM-MX2 and severe injury to the user.
Electrostatic discharge (ESD) can cause serious damage to electronic components,
including the Mustang-M2BM-MX2. Dry climates are especially susceptible to ESD. It is
therefore critical that whenever the Mustang-M2BM-MX2 or any other electrical
component is handled, the following anti-static precautions are strictly adhered to.
Wear an anti-static wristband: Wearing a simple anti-static wristband can
help to prevent ESD from damaging the board.
Self-grounding Before handling the board, touch any grounded conducting
material. During the time the board is handled, frequently touch any
conducting materials that are connected to the ground.
Use an anti-static pad: When configuring the Mustang-M2BM-MX2, place it
on an anti-static pad. This reduces the possibility of ESD damaging the
Mustang-M2BM-MX2.
Only handle the edges of the PCB: When handling the PCB, hold the PCB
by the edges.
3.2 Installation Considerations
NOTE:
The following installation notices and installation considerations should
be read and understood before installation. All installation notices must
be strictly adhered to. Failing to adhere to these precautions may lead
to severe damage and injury to the person performing the installation.
Page 18

Mustang-M2BM-MX2
Page 10
The installation instructions described in this manual should be carefully
WARNING:
followed in order to prevent damage to the Mustang-M2BM-MX2, its
components and injury to the user.
Before and during the installation please DO the following:
Read the user manual:
The user manual provides a complete description of the Mustang-M2BM-MX2
installation instructions and configuration options.
Wear an electrostatic discharge cuff (ESD):
Electronic components are easily damaged by ESD. Wearing an ESD cuff
removes ESD from the body and helps prevent ESD damage.
Turn off system:
When installing the Mustang-M2BM-MX2, make sure that the system to be
connected is disconnected from all power supplies and that no electricity is
being fed into the system.
Before and during the installation of the Mustang-M2BM-MX2 DO NOT:
Remove any of the stickers on the PCB board. These stickers are required for
warranty validation.
Use the product before verifying all the cables and power connectors are
properly connected.
Allow screws to come in contact with the PCB circuit, connector pins, or its
components.
Page 19

Mustang-M2BM-MX2
Page 11
3.3 Hardware Installation
To install the Mustang-M2BM-MX2, please follow the steps below.
Step 1: Prepare the computer. Turn off the computer, and remove the power cord from
the rear of the power supply.
WARNING:
Disconnect the computer from the power supply and from any networks
to which you will install the Mustang-M2BM-MX2, or you risk damaging
the system or experiencing electrical shock.
Step 2: Remove the cover from the chassis.
Step 3: Locate available M.2 2280 slot. The Mustang-M2BM-MX2 is compatible with
M.2 2280 B+M key slot.
Step 4: Insert into the socket. Line up the notch on the module with the notch on the
slot. Slide the Mustang-M2BM-MX2 into the socket at an angle of about 20º.
Step 5: Secure the Mustang-M2BM-MX2 with a retention screw.
Step 6: Re-install the cover of the chassis.
Step 7: Reconnect any power cords and any network cables to the system. Power
up the system. Step 0:
Page 20

Mustang-M2BM-MX2
Page 12
Chapter
4
4 OpenVINO™ Toolkit
Installation (Linux)
Page 21

Mustang-M2BM-MX2
Page 13
4.1 System Requirements
Linux Ubuntu 16.04.3 LTS 64bit
4.2 Online Installation Guide
Go to https://software.intel.com/en-us/openvino-toolkit. Click “Get Started” then choose
your configuration from “Development Environment Installation Guides & Videos”. Follow
the instruction to complete the installation procedure.
Page 22

Mustang-M2BM-MX2
Page 14
4.3 Installation - Step by Step (2019 R1)
This guide assumes you downloaded the Intel Distribution of OpenVINO toolkit for Linux*
OS. If you do not have a copy of the toolkit package file, download the latest version and
then return to this guide to proceed with the installation.
1. Open the Terminal* or your preferred console application and go to the directory in
which you downloaded the Intel® Distribution of OpenVINO™ toolkit. This document
assumes this is your ~/Downloads directory. If not, replace ~/Downloads with the
directory where the file is located:
cd ~/Downloads/
2. By default, the package file is saved as l_openvino_toolkit_p_<version>.tgz
3. Unpack the .tgz file you downloaded:
tar -zxf l_openvino_toolkit_p_<version>.tgz
4. The files are unpacked to a directory named l_openvino_toolkit_p_<version>.
5. Go to the l_openvino_toolkit_p_<version> directory:
cd l_openvino_toolkit_p_<version>
6. Run a script to automatically download and install external software dependencies.
These dependencies are required for the Intel-optimized version of OpenCV, the
Deep Learning Inference Engine, and the Deep Learning Model Optimizer tools.
Install these before the Intel Distribution of OpenVINO toolkit:
sudo -E ./install_openvino_dependencies.sh
The dependencies are installed. Continue to the next section to install the OpenVINO
toolkit core components.
Note: The Model Optimizer has additional prerequisites that are addressed later in this
document.
Page 23

Mustang-M2BM-MX2
Page 15
4.3.1 Install the Intel® Distribution of OpenVINO™ Toolkit Core
Components
If you have a previous version of the toolkit installed, rename or delete two directories:
• /home/<user>/inference_engine_samples
• /home/<user>/openvino_models
To install the OpenVINO™ core components:
1. Choose one of the installation options below and run the related script with root or
regular user privileges. The default installation directory path depends on the
privileges you choose for the installation.
You can use either a GUI installation wizard or command-line instructions. The only
difference between the two options is that the command-line instructions are
text-based. This means that instead of clicking options in a GUI, command-line
prompts ask for input on a text screen.
GUI installation Wizard:
sudo ./install_GUI.sh
2. Follow the instructions on your screen. Watch for informational messages such as the
following in case you must complete additional steps:
Page 24

Mustang-M2BM-MX2
Page 16
3. Click Next.
4. The Installation summary screen shows you the default component set to install:
o If you used root privileges to run the installer, it installs the Intel Distribution of
OpenVINO toolkit in this directory: /opt/intel/computer_vision_sdk_<version>/
For simplicity, a symbolic link to the latest installation is also created:
/opt/intel/computer_vision_sdk/
o If you used regular user privileges to run the installer, it installs the Intel Distribution
of OpenVINO toolkit in this directory:
/home/<user>/intel/computer_vision_sdk_<version>/
For simplicity, a symbolic link to the latest installation is also created:
/home/<user>/intel/computer_vision_sdk/
5. If needed, click Customize to change the installation directory or the components you
want to install:
Page 25

Mustang-M2BM-MX2
Page 17
Click Next to save the installation options and show the Installation summary screen.
6. On the Installation summary screen, press Install to begin the installation.
7. When the first part of installation is complete, the final screen informs you that the
core components have been installed and additional steps still required:
Page 26

Mustang-M2BM-MX2
Page 18
8. Click Finish to close the installation wizard. A new browser window opens to the next
section of the installation guide to set the environment variables. You are in the same
document. The new window opens in case you ran the installation without first
opening this installation guide.
The core components are installed. Continue to the next section to set environment
variables.
4.3.2 Set the Environment Variables
You must update several environment variables before you can compile and run
OpenVINO™ applications. Run the following script to temporarily set your environment
variables:
source /opt/intel/openvino_<version>/bin/setupvars.sh
Page 27

Mustang-M2BM-MX2
Page 19
(Optional) The Intel Distribution of OpenVINO toolkit environment variables are removed
when you close the shell. As an option, you can permanently set the environment
variables as follows:
1. Open the .bashrc file in <user_directory>:
vi <user_directory>/.bashrc
2. Add this line to the end of the file:
source /opt/intel/openvino_<version> /bin/setupvars.sh
3. Save and close the file: press the Esc key and type :wq.
4. To test your change, open a new terminal. You will see [setupvars.sh] OpenVINO
environment initialized.
The environment variables are set. Continue to the next section to configure the Model
Optimizer.
4.3.3 Configure the Model Optimizer
Important: This section is required. You must configure the Model Optimizer for at least
one framework. The Model Optimizer will fail if you do not complete the steps in this
section.
The Model Optimizer is a key component of the Intel Distribution of OpenVINO toolkit. You
cannot do inference on your trained model without running the model through the Model
Optimizer. When you run a pre-trained model through the Model Optimizer, your output is
an Intermediate Representation (IR) of the network. The IR is a pair of files that describe
the whole model:
.xml: Describes the network topology
.bin: Contains the weights and biases binary data
The Inference Engine reads, loads, and infers the IR files, using a common API across the
CPU, GPU, or VPU hardware.
The Model Optimizer is a Python*-based command line tool (mo.py), which is located in
/opt/intel/openvino_<version>/deployment_tools/model_optimizer.
Page 28

Mustang-M2BM-MX2
Page 20
Use this tool on models trained with popular deep learning frameworks such as Caffe*,
TensorFlow*, MXNet*, and ONNX* to convert them to an optimized IR format that the
Inference Engine can use.
This section explains how to use scripts to configure the Model Optimizer either for all of
the supported frameworks at the same time or for individual frameworks. If you want to
manually configure the Model Optimizer instead of using scripts, see the using manual
configuration process section in the Model Optimizer Developer Guide.
For more information about the Model Optimizer, see the Model Optimizer Developer
Guide.
Model Optimizer configuration steps
You can either configure the Model Optimizer for all supported frameworks at once, or for
one framework at a time. Choose the option that best suits your needs. If you see error
messages, make sure you installed all dependencies.
Note: If you did not install the Intel Distribution of OpenVINO toolkit to the default
installation directory, replace /intel/ with the directory where you installed the software to.
Option 1: Configure the Model Optimizer for all supported frameworks at the same time:
1. Go to the Model Optimizer prerequisites directory:
cd
/opt/intel/openvino_<version>/deployment_tools/model_optimizer
/install_prerequisites
2. Run the script to configure the Model Optimizer for Caffe, TensorFlow, MXNet, Kaldi*,
and ONNX:
sudo ./install_prerequisites.sh
Option 2: Configure the Model Optimizer for each framework separately:
1. Go to the Model Optimizer prerequisites directory:
cd
/opt/intel/openvino_<version>//deployment_tools/model_optimize
r/install_prerequisites
2. Run the script for your model framework. You can run more than one script:
Page 29

Mustang-M2BM-MX2
Page 21
o For Caffe:
sudo ./install_prerequisites_caffe.sh
o For TensorFlow:
sudo ./install_prerequisites_tf.sh
o For MXNet:
sudo ./install_prerequisites_mxnet.sh
o For ONNX:
sudo ./install_prerequisites_onnx.sh
o For Kaldi:
sudo ./install_prerequisites_kaldi.sh
The Model Optimizer is configured for one or more frameworks. You are ready to use two
short demos to see the results of running the Intel Distribution of OpenVINO toolkit and to
verify your installation was successful. The demo scripts are required since they perform
additional configuration steps. Continue to the next section.
4.4 Steps for Intel® Vision Accelerator Design with Intel® Movidius™ VPUs Mustang-M2BM-MX2 Driver Installation
1. Install dependencies:
sudo apt install libusb-1.0-0 libboost-program-options1.58.0
libboost-thread1.58.0 libboost-filesystem1.58.0 libssl1.0.0
libudev1 libjson-c2 libelf-dev
2. Add the current Linux user to the users group:
sudo usermod -a -G users "$(whoami)"
3. Log out and log in for it to take effect.
4. If your Intel® Vision Accelerator Design with Intel® Movidius™ VPUs card requires
SMBUS connection to PCIe slot (Raw video data card with HW version Fab-B and
before), generate rules for SMBUS controller and enable the i2c_i801 driver (Intel®
SMBUS controller driver):
cd
/opt/intel/openvino_<version>/deployment_tools/inference_engine/e
Page 30

Mustang-M2BM-MX2
Page 22
xternal/hddl
sudo chmod +x ./generate_udev_rules.sh
sudo ./generate_udev_rules.sh /etc/udev/rules.d/98-hddlbsl.rules
5. Check if the file /etc/modprobe.d/blacklist.conf contains the line "blacklist i2c_i801"
and comment it out if so:
sudo sed -i "s/\(.*i2c_i801$\)/#\1/g"
/etc/modprobe.d/blacklist.conf
sudo modprobe i2c_i801
6. Before you start installing the drivers, make sure there is no inference application is
running. Use the following command to make sure there is no HDDL service is
running:
kill -9 $(pidof hddldaemon autoboot)
7. Install the drivers:
cd
/opt/intel/openvino_<version>/deployment_tools/inference_engine/e
xternal/hddl
sudo chmod +x ./setup.sh
sudo ./setup.sh install
sudo cp -av
/opt/intel/openvino_<version>/deployment_tools/inference_engine/e
xternal/hddl
sudo cp -av
/opt/intel/openvino_<version>/deployment_tools/inference_engine/e
xternal/hddl
sudo udevadm control --reload-rules
sudo udevadm trigger
sudo ldconfig
/drivers
/}/../97-myriad-usbboot.rules /etc/udev/rules.d/
/etc /
Now, the Mustang-M2BM-MX2 drivers are installed.
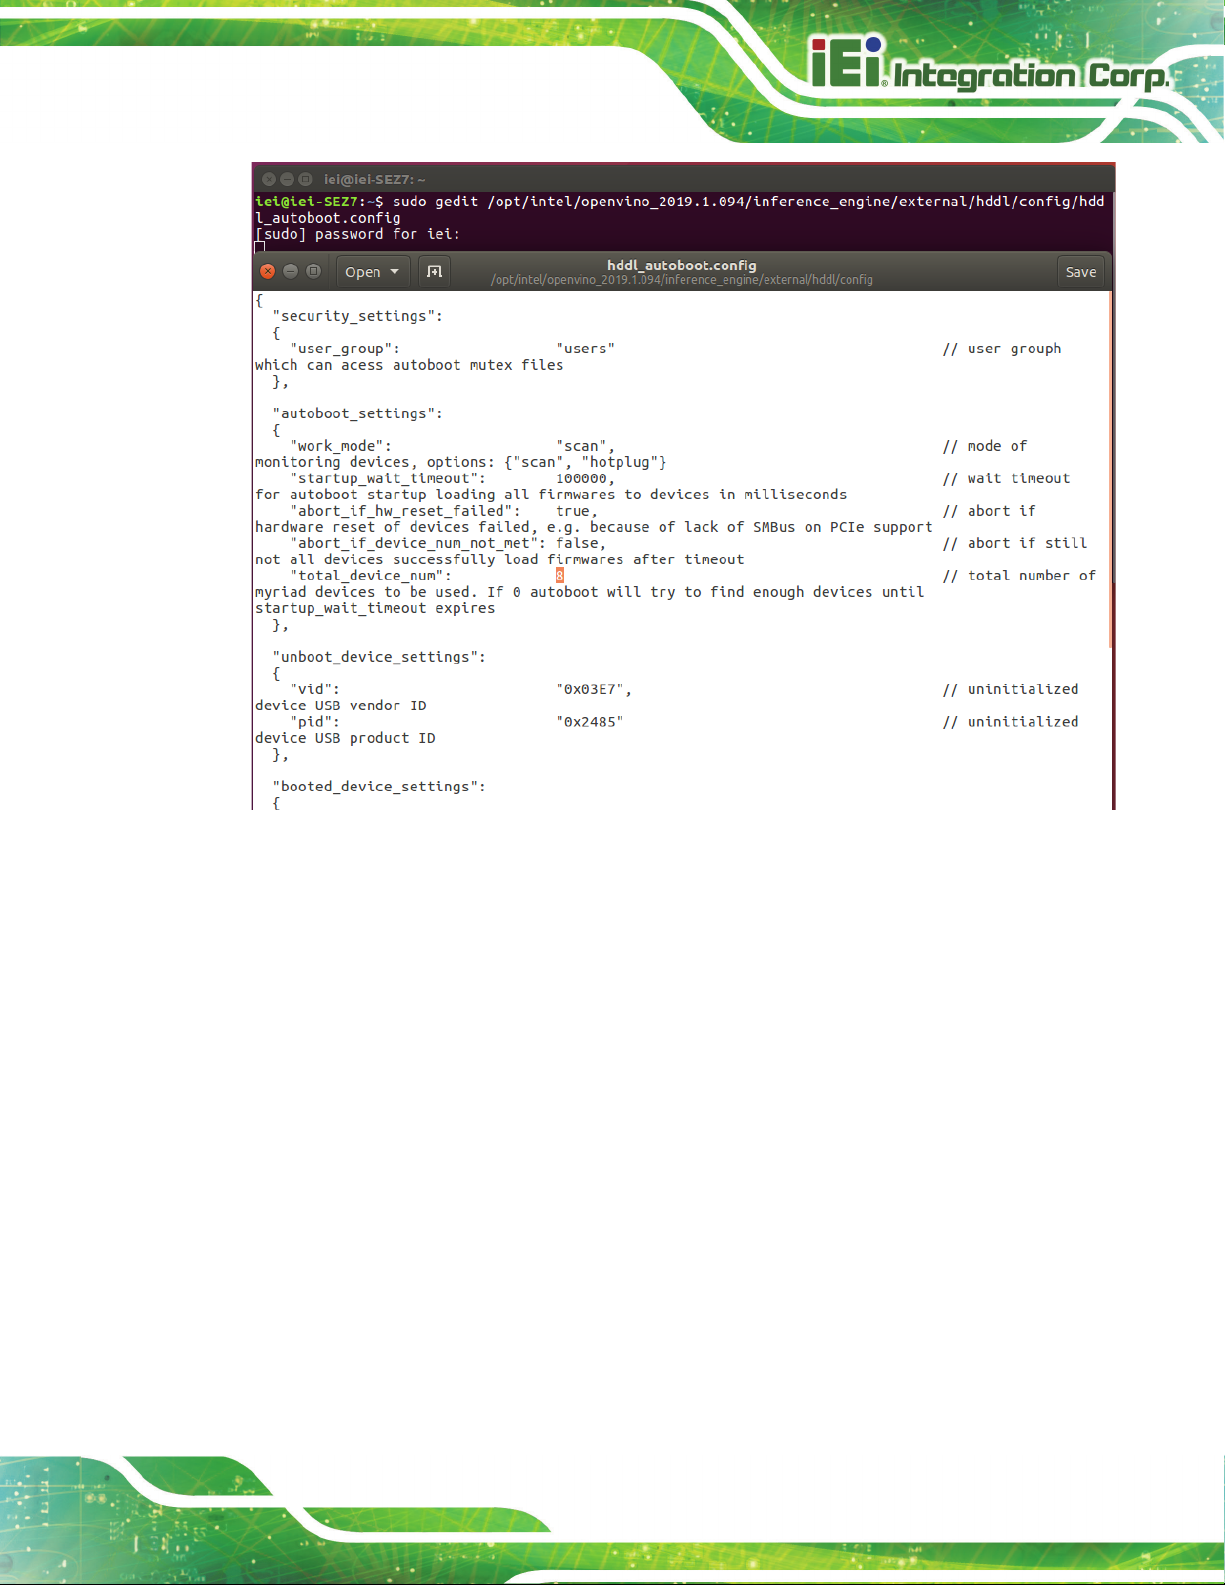
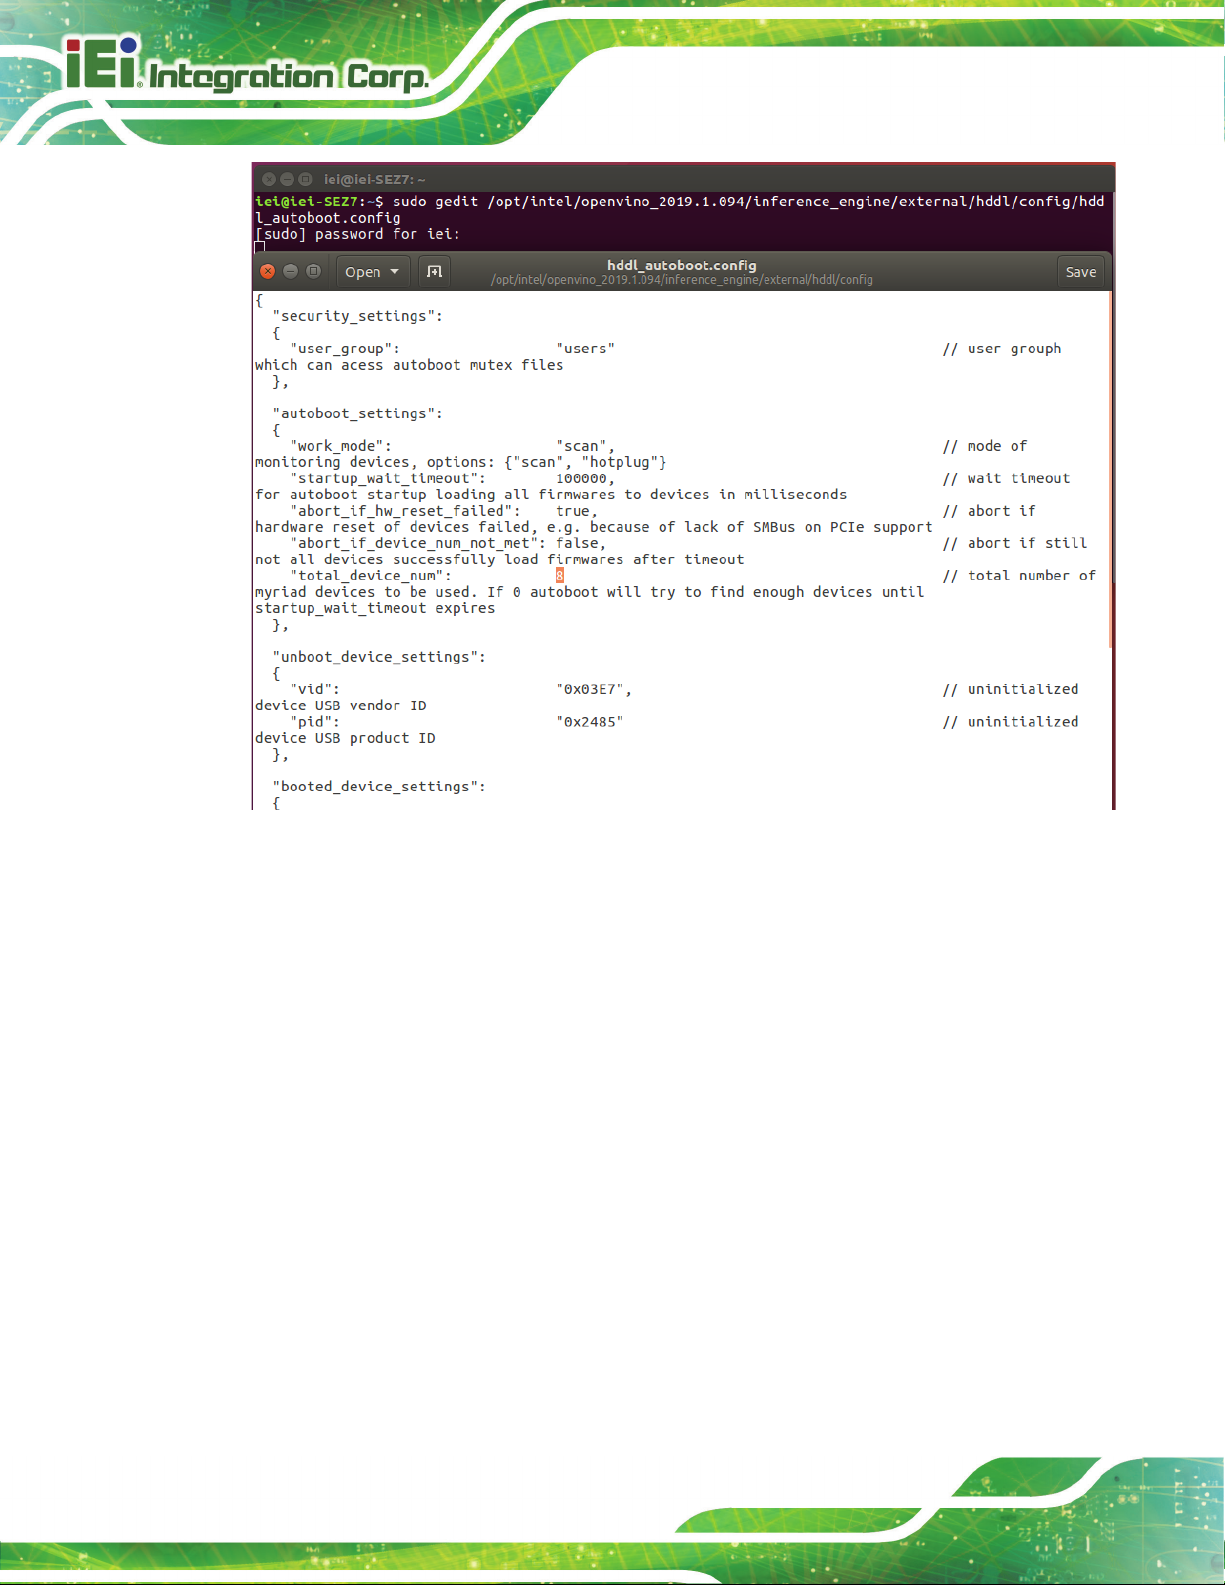
8. Modify the device number on your host
Change the total device numbers of “hddl_autoboot.config” .
Each Mustnag-M2BM-MX2 contains 2 devices, therefore, user has to change device
number from default 8 to 2.
Page 31
Mustang-M2BM-MX2
Page 23
4.5 Use the Demo Scripts to Verify Your Installation
Important: This section is required. In addition to confirming that your installation was
successful, the demo scripts perform additional steps, such as setting up your computer to
use the Model Optimizer samples.
To learn more about the demo applications, see README.txt in
/opt/intel/oprnvino_<version>/deployment_tools/demo/.
For detailed description of the pre-trained object detection and object recognition models,
go to /opt/intel/openvino_<version>/deployment_tools/intel_models/ and open index.html.
Page 32

Mustang-M2BM-MX2
Page 24
Note:
The paths in this section assume you used the default installation directory to install the
Intel Distribution of OpenVINO toolkit. If you installed the software to a directory other than
/opt/intel/, update the directory path with the location where you installed the toolkit to.
If you installed the product as a root user, you must switch to the root mode before you
continue: sudo –i
4.5.1 Run the Image Classification Demo
1. Go to the Inference Engine demo directory:
cd /opt/intel/computer_vision_sdk/deployment_tools/demo
2. Set environment variables and run the Image Classification demo:
1) Set your environment variables:
source /opt/intel/computer_vision_sdk/bin/setupvars.sh
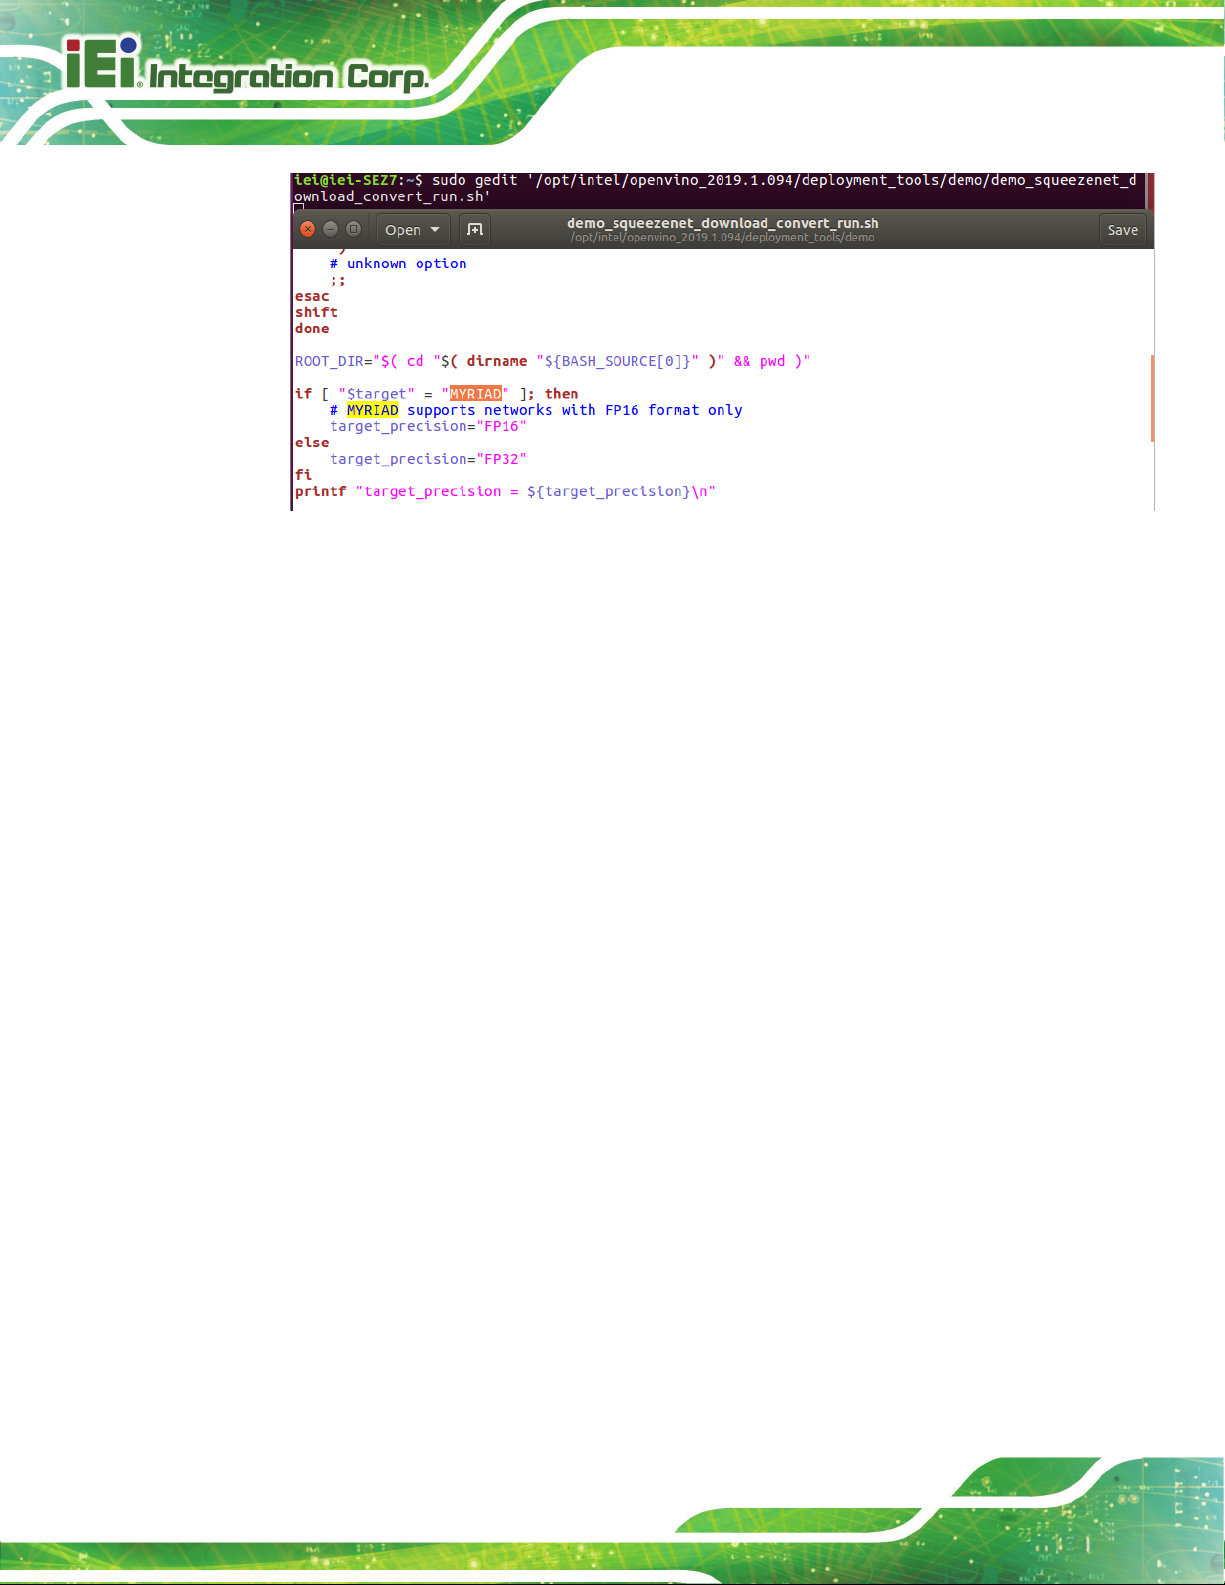
2) Modify .sh content:
sudo gedit demo_squeezenet_download_convert_run.sh
Search MYRIAD and modify to HDDL then save
Page 33

Mustang-M2BM-MX2
Page 25
3) Assign Mustang-M2BM-MX2 (-d HDDL) and run demo
/demo_squeezenet_download_convert_run.sh -d HDDL
3. The Image Classification demo uses the Model Optimizer to convert a SqueezeNet
model to .bin and .xml Intermediate Representation (IR) files. The Inference Engine
component uses these files.
For a brief description of the Intermediate Representation .bin and .xml files, see
Configuring the Model Optimizer.
This demo creates the directory /home/<user>/inference_engine_samples/.
This demo uses car.png in the demo directory. When the demo completes, you will
see the label and confidence for the top-10 categories:
4.5.2 Run the Inference Pipeline Demo
This demo is complete. Continue to the next section to run the Inference Pipeline demo.
1. While still in /opt/intel/computer_vision_sdk/deployment_tools/demo/, run the
Inference Pipeline demo.
2. Modify .sh content:
sudo gedit demo_squeezenet_download_convert_run.sh
Search MYRIAD and modify to HDDL then save
Page 34
Mustang-M2BM-MX2
Page 26
3. Assign Mustang-M2BM-MX2 (-d HDDL) and run demo
/demo_security_barrier_camera.sh –d HDDL
4. This demo uses car.png in /opt/intel/computer_vision_sdk/deployment_tools/demo/ to
show an inference pipeline. This demo uses three pre-trained models. The demo
uses vehicle recognition in which vehicle attributes build on each other to narrow in on
a specific attribute. The demo works as follows:
1) An object is identified as a vehicle.
2) This identification is used as input to the next model, which identifies specific
vehicle attributes, including the license plate.
3) The attributes identified as the license plate are used as input to the third model,
which recognizes specific characters in the license plate.
For more information about the demo, see the Security Camera Sample.
5. When the demo completes, two windows are open:
o A console window that displays information about the tasks performed by the demo
o An image viewer window that displays a picture similar to the following:
Page 35

Mustang-M2BM-MX2
Page 27
6. Close the image viewer screen to end the demo.
In this section, you saw a preview of the Intel Distribution of OpenVINO toolkit capabilities.
You have completed all the required installation, configuration, and build steps to work with your
trained models using the Mustang-M2BM-MX2.
Page 36

Mustang-M2BM-MX2
Page 28
4.6 Installation - Step by Step (OpenVINO 2018 R5)
This guide assumes you downloaded the Intel Distribution of OpenVINO toolkit for Linux*
OS. If you do not have a copy of the toolkit package file, download the latest version and
then return to this guide to proceed with the installation.
NOTE: Before beginning the installation, make sure you have the correct Linux kernel
version:
cat /proc/version
Make sure you are using a Linux kernel version 4.14 and later.
For example:
• 4.15.0-38-Generic
Install kernel of 4.15.0-38
• apt-get install linux-image-4.15.0-38-generic
• apt-get install linux-headers-4.15.0-38-generic
• apt-get install linux-modules-extra-4.15.0-38-generic
• apt-get remove linux-modules-extra-4.15.0-38-generic
4.6.1 Install External Software Dependencies
1. Open the Terminal* or your preferred console application and go to the directory in
which you downloaded the Intel® Distribution of OpenVINO™ toolkit. This document
assumes this is your ~/Downloads directory. If not, replace ~/Downloads with the
directory where the file is located:
cd ~/Downloads/
2. By default, the package file is saved as l_openvino_toolkit_p_<version>.tgz
3. Unpack the .tgz file you downloaded:
tar -zxf l_openvino_toolkit_p_<version>.tgz
4. The files are unpacked to a directory named l_openvino_toolkit_p_<version>.
Page 37

Mustang-M2BM-MX2
Page 29
5. Go to the l_openvino_toolkit_p_<version> directory:
cd l_openvino_toolkit_p_<version>
6. Run a script to automatically download and install external software dependencies.
These dependencies are required for the Intel-optimized version of OpenCV, the
Deep Learning Inference Engine, and the Deep Learning Model Optimizer tools.
Install these before the Intel Distribution of OpenVINO toolkit:
sudo -E ./install_cv_sdk_dependencies.sh
7. As an option, you can install all the dependencies manually instead of running
install_cv_sdk_dependencies.sh. In this case, use the list of dependencies at System
Requirements.
The dependencies are installed. Continue to the next section to install the OpenVINO
toolkit core components.
Note: The Model Optimizer has additional prerequisites that are addressed later in this
document.
4.6.2 Install the Intel® Distribution of OpenVINO™ Toolkit Core
Components
If you have a previous version of the toolkit installed, rename or delete two directories:
• /home/<user>/inference_engine_samples
• /home/<user>/openvino_models
To install the OpenVINO™ core components:
1. Choose one of the installation options below and run the related script with root or
regular user privileges. The default installation directory path depends on the
privileges you choose for the installation.
You can use either a GUI installation wizard or command-line instructions. The only
difference between the two options is that the command-line instructions are
text-based. This means that instead of clicking options in a GUI, command-line
prompts ask for input on a text screen.
GUI installation Wizard:
sudo ./install_GUI.sh
Page 38

Mustang-M2BM-MX2
Page 30
2. Follow the instructions on your screen. Watch for informational messages such as the
following in case you must complete additional steps:
3. Click Next.
4. The Installation summary screen shows you the default component set to install:
o If you used root privileges to run the installer, it installs the Intel Distribution of
OpenVINO toolkit in this directory: /opt/intel/computer_vision_sdk_<version>/
For simplicity, a symbolic link to the latest installation is also created:
/opt/intel/computer_vision_sdk/
o If you used regular user privileges to run the installer, it installs the Intel Distribution
of OpenVINO toolkit in this directory:
/home/<user>/intel/computer_vision_sdk_<version>/
For simplicity, a symbolic link to the latest installation is also created:
/home/<user>/intel/computer_vision_sdk/
5. If needed, click Customize to change the installation directory or the components you
want to install:
Click Next to save the installation options and show the Installation summary screen.
Page 39

Mustang-M2BM-MX2
Page 31
6. On the Installation summary screen, press Install to begin the installation.
7. When the first part of installation is complete, the final screen informs you that the
core components have been installed and additional steps still required:
8. Click Finish to close the installation wizard. A new browser window opens to the next
section of the installation guide to set the environment variables. You are in the same
document. The new window opens in case you ran the installation without first
opening this installation guide.
The core components are installed. Continue to the next section to set environment
variables.
4.6.3 Set the Environment Variables
You must update several environment variables before you can compile and run
OpenVINO™ applications. Run the following script to temporarily set your environment
variables:
source /opt/intel/computer_vision_sdk/bin/setupvars.sh
Page 40

Mustang-M2BM-MX2
Page 32
(Optional) The Intel Distribution of OpenVINO toolkit environment variables are removed
when you close the shell. As an option, you can permanently set the environment
variables as follows:
1. Open the .bashrc file in <user_directory>:
vi <user_directory>/.bashrc
2. Add this line to the end of the file:
source /opt/intel/computer_vision_sdk/bin/setupvars.sh
3. Save and close the file: press the Esc key and type :wq.
4. To test your change, open a new terminal. You will see [setupvars.sh] OpenVINO
environment initialized.
The environment variables are set. Continue to the next section to configure the Model
Optimizer.
4.6.4 Configure the Model Optimizer
Important: This section is required. You must configure the Model Optimizer for at least
one framework. The Model Optimizer will fail if you do not complete the steps in this
section.
The Model Optimizer is a key component of the Intel Distribution of OpenVINO toolkit. You
cannot do inference on your trained model without running the model through the Model
Optimizer. When you run a pre-trained model through the Model Optimizer, your output is
an Intermediate Representation (IR) of the network. The IR is a pair of files that describe
the whole model:
.xml: Describes the network topology
.bin: Contains the weights and biases binary data
The Inference Engine reads, loads, and infers the IR files, using a common API across the
CPU, GPU, or VPU hardware.
The Model Optimizer is a Python*-based command line tool (mo.py), which is located in
/opt/intel/computer_vision_sdk/deployment_tools/model_optimizer.
Page 41

Mustang-M2BM-MX2
Page 33
Use this tool on models trained with popular deep learning frameworks such as Caffe*,
TensorFlow*, MXNet*, and ONNX* to convert them to an optimized IR format that the
Inference Engine can use.
This section explains how to use scripts to configure the Model Optimizer either for all of
the supported frameworks at the same time or for individual frameworks. If you want to
manually configure the Model Optimizer instead of using scripts, see the using manual
configuration process section in the Model Optimizer Developer Guide.
For more information about the Model Optimizer, see the Model Optimizer Developer
Guide.
Model Optimizer configuration steps
You can either configure the Model Optimizer for all supported frameworks at once, or for
one framework at a time. Choose the option that best suits your needs. If you see error
messages, make sure you installed all dependencies.
Note: If you did not install the Intel Distribution of OpenVINO toolkit to the default
installation directory, replace /intel/ with the directory where you installed the software to.
Option 1: Configure the Model Optimizer for all supported frameworks at the same time:
1. Go to the Model Optimizer prerequisites directory:
cd
/opt/intel/computer_vision_sdk/deployment_tools/model_optimize
r/install_prerequisites
2. Run the script to configure the Model Optimizer for Caffe, TensorFlow, MXNet, Kaldi*,
and ONNX:
sudo ./install_prerequisites.sh
Option 2: Configure the Model Optimizer for each framework separately:
1. Go to the Model Optimizer prerequisites directory:
cd
/opt/intel/computer_vision_sdk/deployment_tools/model_optimize
r/install_prerequisites
2. Run the script for your model framework. You can run more than one script:
Page 42

Mustang-M2BM-MX2
Page 34
o For Caffe:
sudo ./install_prerequisites_caffe.sh
o For TensorFlow:
sudo ./install_prerequisites_tf.sh
o For MXNet:
sudo ./install_prerequisites_mxnet.sh
o For ONNX:
sudo ./install_prerequisites_onnx.sh
o For Kaldi:
sudo ./install_prerequisites_kaldi.sh
The Model Optimizer is configured for one or more frameworks. You are ready to use two
short demos to see the results of running the Intel Distribution of OpenVINO toolkit and to
verify your installation was successful. The demo scripts are required since they perform
additional configuration steps. Continue to the next section.
4.7 Steps for Intel® Vision Accelerator Design with Intel® Movidius™ VPUs Mustang-M2BM-MX2 Driver Installation
1. Install dependencies:
sudo apt install libusb-1.0-0 libboost-program-options1.58.0
libboost-thread1.58.0 libboost-filesystem1.58.0 libssl1.0.0
libudev1 libjson-c2
2. Add the current Linux user to the users group:
sudo usermod -a -G users "$(whoami)"
3. Log out and log in for it to take effect.
4. If your Intel® Vision Accelerator Design with Intel® Movidius™ VPUs card requires
SMBUS connection to PCIe slot (Raw video data card with HW version Fab-B and
before), generate rules for SMBUS controller and enable the i2c_i801 driver (Intel®
SMBUS controller driver):
cd ${HDDL_INSTALL_DIR}
sudo chmod +x ./generate_udev_rules.sh
Page 43

Mustang-M2BM-MX2
Page 35
sudo ./generate_udev_rules.sh /etc/udev/rules.d/98-hddlbsl.rules
5. Check if the file /etc/modprobe.d/blacklist.conf contains the line "blacklist i2c_i801"
and comment it out if so:
sudo sed -i "s/\(.*i2c_i801$\)/#\1/g"
/etc/modprobe.d/blacklist.conf
sudo modprobe i2c_i801
6. Before you start installing the drivers, make sure there is no inference application is
running. Use the following command to make sure there is no HDDL service is
running:
kill -9 $(pidof hddldaemon autoboot)
7. Install the drivers:
cd ${HDDL_INSTALL_DIR}/drivers
sudo chmod +x ./setup.sh
sudo ./setup.sh install
sudo cp -av ${HDDL_INSTALL_DIR}/../97-myriad-usbboot.rules
/etc/udev/rules.d/
sudo cp -av ${HDDL_INSTALL_DIR}/etc /
sudo udevadm control --reload-rules
sudo udevadm trigger
sudo ldconfig
Now, the Mustang-M2BM-MX2 drivers are installed.
8. Modify the device number on your host
Change the total device numbers of “hddl_autoboot.config” .
Each Mustnag-M2BM-MX2 contains 2 devices, therefore, user has to change device
number from default 8 to 2.
Page 44
Mustang-M2BM-MX2
Page 36
4.8 Use the Demo Scripts to Verify Your Installation
Important: This section is required. In addition to confirming that your installation was
successful, the demo scripts perform additional steps, such as setting up your computer to
use the Model Optimizer samples.
To learn more about the demo applications, see README.txt in
/opt/intel/oprnvino_<version>/deployment_tools/demo/.
For detailed description of the pre-trained object detection and object recognition models,
go to /opt/intel/openvino_<version>/deployment_tools/intel_models/ and open index.html.
Page 45

Mustang-M2BM-MX2
Page 37
Note:
The paths in this section assume you used the default installation directory to install the
Intel Distribution of OpenVINO toolkit. If you installed the software to a directory other than
/opt/intel/, update the directory path with the location where you installed the toolkit to.
If you installed the product as a root user, you must switch to the root mode before you
continue: sudo –i
4.8.1 Run the Image Classification Demo
1. Go to the Inference Engine demo directory:
cd /opt/intel/computer_vision_sdk/deployment_tools/demo
2. Set environment variables and run the Image Classification demo:
1) Set your environment variables:
source /opt/intel/computer_vision_sdk/bin/setupvars.sh
2) Modify .sh content:
sudo gedit demo_squeezenet_download_convert_run.sh
Search MYRIAD and modify to HDDL then save
Page 46

Mustang-M2BM-MX2
Page 38
3) Assign Mustang-M2BM-MX2 (-d HDDL) and run demo
/demo_squeezenet_download_convert_run.sh -d HDDL
3. The Image Classification demo uses the Model Optimizer to convert a SqueezeNet
model to .bin and .xml Intermediate Representation (IR) files. The Inference Engine
component uses these files.
For a brief description of the Intermediate Representation .bin and .xml files, see
Configuring the Model Optimizer.
This demo creates the directory /home/<user>/inference_engine_samples/.
This demo uses car.png in the demo directory. When the demo completes, you will
see the label and confidence for the top-10 categories:
This demo is complete. Continue to the next section to run the Inference Pipeline demo.
4.8.2 Run the Inference Pipeline Demo
1. While still in /opt/intel/computer_vision_sdk/deployment_tools/demo/, run the
Inference Pipeline demo.
2. Modify .sh content:
sudo gedit demo_squeezenet_download_convert_run.sh
Search MYRIAD and modify to HDDL then save
Page 47

Mustang-M2BM-MX2
Page 39
3. Assign Mustang-M2BM-MX2 (-d HDDL) and run demo
/demo_security_barrier_camera.sh –d HDDL
4. This demo uses car.png in /opt/intel/computer_vision_sdk/deployment_tools/demo/ to
show an inference pipeline. This demo uses three pre-trained models. The demo
uses vehicle recognition in which vehicle attributes build on each other to narrow in on
a specific attribute. The demo works as follows:
1) An object is identified as a vehicle.
2) This identification is used as input to the next model, which identifies specific
vehicle attributes, including the license plate.
3) The attributes identified as the license plate are used as input to the third model,
which recognizes specific characters in the license plate.
For more information about the demo, see the Security Camera Sample.
5. When the demo completes, two windows are open:
o A console window that displays information about the tasks performed by the demo
o An image viewer window that displays a picture similar to the following:
Page 48

Mustang-M2BM-MX2
Page 40
6. Close the image viewer screen to end the demo.
In this section, you saw a preview of the Intel Distribution of OpenVINO toolkit capabilities.
You have completed all the required installation, configuration, and build steps to work with your
trained models using the Mustang-M2BM-MX2.
Page 49

Mustang-M2BM-MX2
Page 41
Chapter
5
5 OpenVINO™ Toolkit
Installation (Windows 10)
Page 50

Mustang-M2BM-MX2
Page 42
5.1 System Requirements
Windows 10 64-bit
5.2 Online Installation Guide
Go to https://software.intel.com/en-us/openvino-toolkit. Click “Get Started” then choose
your configuration from “Development Environment Installation Guides & Videos”. Follow
the instruction to complete the installation procedure.
Page 51

Mustang-M2BM-MX2
Page 43
5.3 Installation - Step by Step (2019 R1)
5.3.1 Install the Intel® Distribution of OpenVINO™ Toolkit Core
Components
1. If you have not downloaded the Intel® Distribution of OpenVINO™ toolkit, download
the latest version.. By default, the file is saved to the Downloads directory as
w_openvino_toolkit_p_<version>.exe.
2. Go to the Downloads folder.
3. Double-click w_openvino_toolkit_p_<version>.exe. A window opens to let you
choose your installation directory and components. The default installation directory is
C:\Intel. If you choose a different installation directory, the installer will create the
directory for you.
4. Click Next.
5. You are asked if you want to provide consent to gather information. Choose the option
Page 52

Mustang-M2BM-MX2
Page 44
of your choice. Click Next.
6. If you are missing external dependencies, you will see a warning screen. Write down
the dependencies you are missing. You need to take no other action at this time.
After installing the Intel® Distribution of OpenVINO™ toolkit core components, you
will be provided instructions to install the missing dependencies.
The screen example below indicates you are missing two dependencies:
7. Click Next.
8. When the first part of installation is complete, the final screen informs you that the
core components have been installed and additional steps still required:
Page 53

Mustang-M2BM-MX2
Page 45
9. Click Finish to close the installation wizard. A new browser window opens to the next
section of the installation guide to install the dependencies. You are in the same
document. The new window opens in case you ran the installation without first
opening this installation guide. If the installation did not indicate you must install
dependencies, you can skip ahead to set the environment variables..
5.3.2 Install the External Software Dependencies
If the installation process indicated if you are missing dependencies, you must install each
missing dependency. Click the link for the first dependency you must install:
• Microsoft Visual Studio* with C++ 2019, 2017, or 2015 with MSBuild
• CMake 3.4 or higher
• Python 3.6.5
Page 54

Mustang-M2BM-MX2
Page 46
If you have no missing dependencies, skip ahead to Configure the Model Optimizer.
5.3.2.1 Microsoft Visual Studio* with C++ and MSBuild
Microsoft Visual Studio with Visual Studio C++ is required for building the Intel® Deep
Learning Deployment Toolkit samples and demonstration applications. You can install
the free Community version of Microsoft Visual Studio.
IMPORTANT: The Microsoft Visual Studio dependency is a two-part installation that
consists of Microsoft Visual Studio 2017 or 2015 and the Microsoft Visual Studio
Build Tools. This guide includes steps for installing both parts of this dependency. These
are separate installations. MAKE SURE YOU INSTALL BOTH COMPONENTS.
The steps below apply to Microsoft Visual Studio 2019. If you prefer to use Microsoft
Visual Studio 2017 or 2015, see Installing Microsoft Visual Studio 2017 or 2015 for
Intel® Distribution of OpenVINO™ toolkit.
1. Go to the Visual Studio downloads page.
2. Click Free Download in the Visual Studio 2019 box, Community section:
An executable file named vs_community__313888930.1524151023.exe, or similar,
is saved in your Downloads folder.
3. Double-click the executable file to launch the Visual Studio installer.
4. On the opened window, click Continue. Visual Studio Installer configuration takes
several minutes.
5. From the Workloads tab, use the check boxes to select Universal Windows
Platform development and Desktop development with C++.
Page 55

Mustang-M2BM-MX2
Page 47
6. Under the Individual components tab, select MSBuild:
The Installation details at the right side of the screen displays your installation selections:
Page 56

Mustang-M2BM-MX2
Page 48
7. Make no other changes. Click Install. The installation begins and takes around 30
minutes to complete.
8. If you see a prompt to restart your computer after the installation completes,
dismiss it.
You have completed the Microsoft Visual Studio 2019 installation.
Install your next dependency:
• CMake
• Python
If you have installed all the dependencies, you are ready to set the environment variables.
Page 57

Mustang-M2BM-MX2
Page 49
5.3.2.2 Install CMake* 3.4 or higher
These steps guide you through installing CMake 3.4 or higher, which is required to build
the Intel® Distribution of OpenVINO™ toolkit samples.
NOTE: If you want to use Microsoft Visual Studio 2019, you are required to install
CMake 3.14.
1. Go to the CMake download site.
2. Under the heading Get the Software, click the link for latest stable in the first
paragraph. Your screen displays Latest Release information.
3. Scroll down to the line Windows win64-x64 Installer.
4. Click the associated file name to download the installer. The file name will have
the extension .msi. The file is saved to your Downloads folder.
5. Go to the Downloads folder.
6. Double-click the file to launch the installer.
NOTE: If you have a previous version of CMake installed, you are prompted to uninstall it.
You must uninstall the previous version before installing the new version. Follow the
instructions on the screen and then launch the installer again to install the new version.
7. In the installer, select the option to Add CMake to the system PATH for all users:
Page 58

Mustang-M2BM-MX2
Page 50
8. Click Next.
9. Click Finish when the installation completes.
You have completed the CMake installation. Next, install Python 3.6.5 if the Intel®
Distribution of OpenVINO™ toolkit installation indicated you are missing the software.
5.3.2.3 Install Python* 3.6.5
Python 3.6.5 with pip is required to run the Model Optimizer. Use these steps to install the
correct version of the Python software.
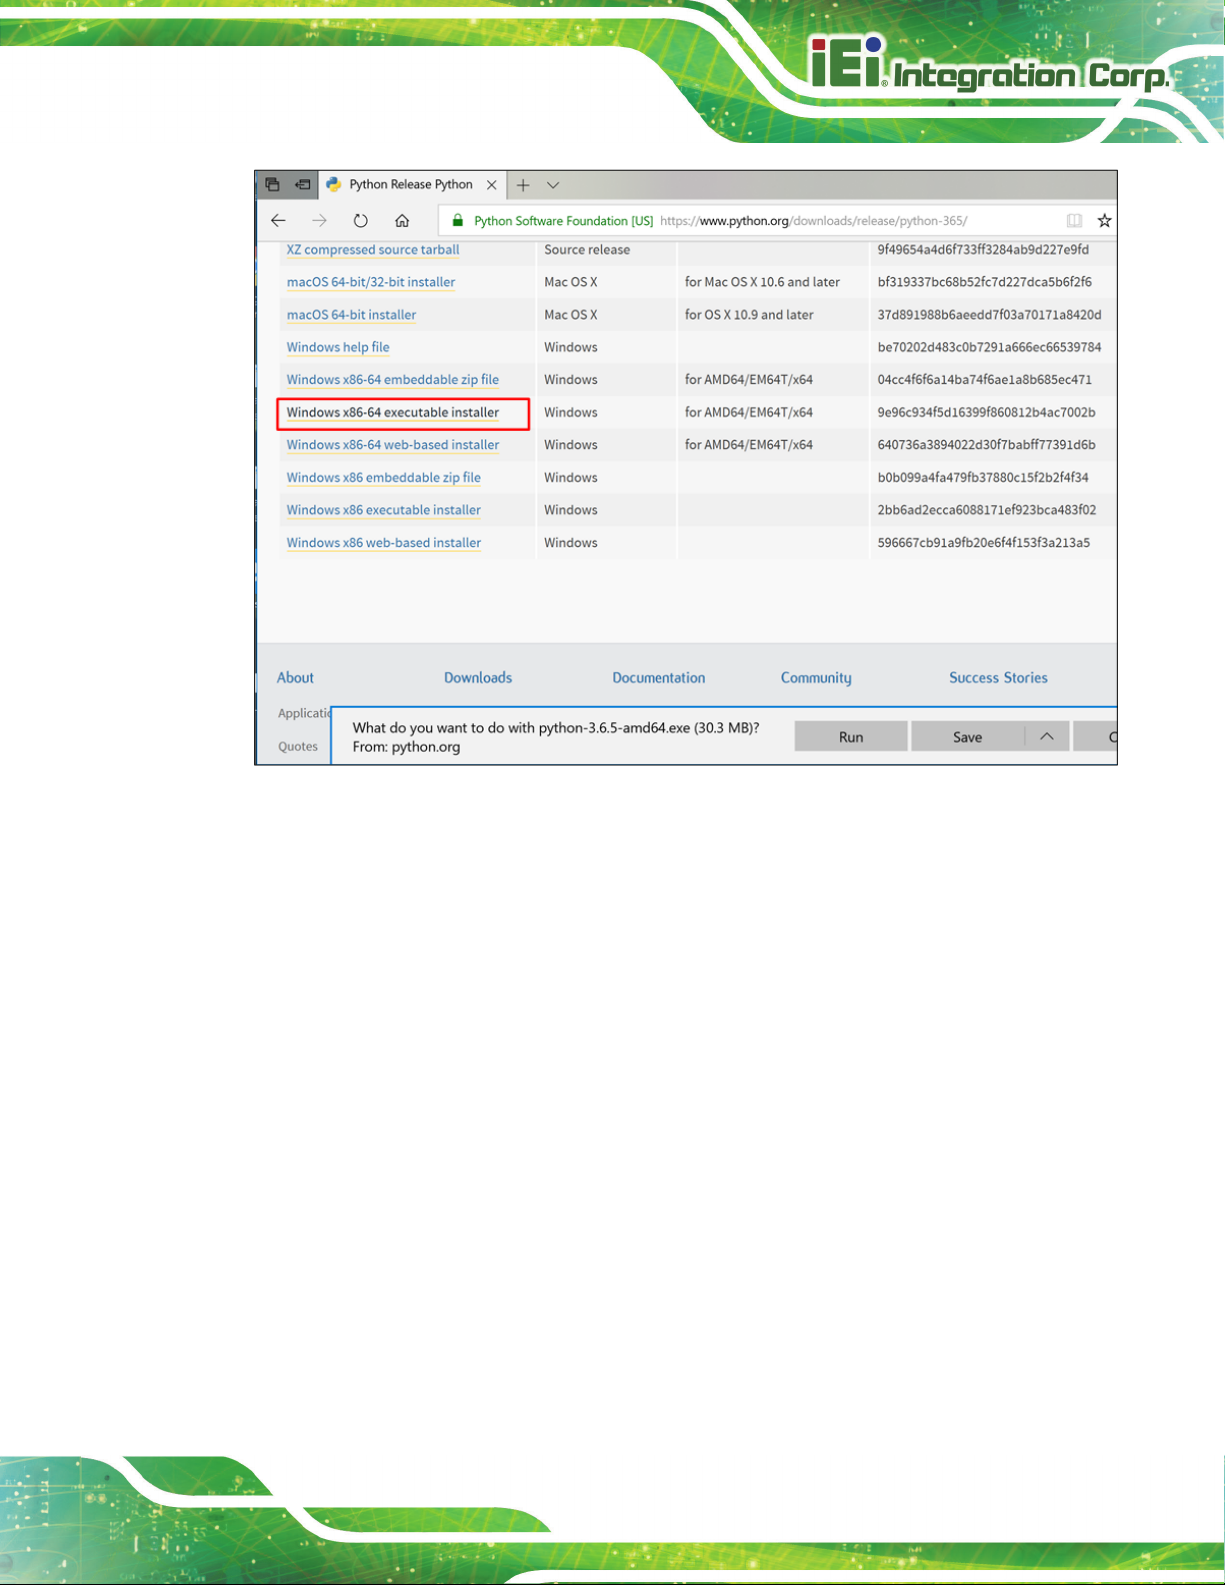
1. Go to the Python 3.6.5 download page and click Windows x86-64 executable
installer to download the executable file. The file is saved as
python-3.6.5-amd64.exe in your Downloads folder.
Page 59
Mustang-M2BM-MX2
Page 51
2. Double-click the file to launch the installation.
3. Make sure the top of the screen shows Python 3.6.5 (64-bit).
4. IMPORTANT: At the bottom of the install screen, select Add Python 3.6 to PATH.
Page 60

Mustang-M2BM-MX2
Page 52
5. Click Install Now near the top of the install screen and let the installation
complete.
6. When the installation finishes, click Close.
You have completed the Python installation and are ready to set environment variables.
Continue to the next section.
5.3.3 Set the Environment Variables
You must update several environment variables before you can compile and run
OpenVINO™ applications. Open the Command Prompt, and run the `setupvars.bat batch
file to temporarily set your environment variables:
cd C:\Program Files (x86)\IntelSWTools\openvino\bin\
setupvars.bat
(Optional): OpenVINO toolkit environment variables are removed when you close the
Command Prompt window. As an option, you can permanently set the environment
variables manually.
Page 61

Mustang-M2BM-MX2
Page 53
The environment variables are set. Continue to the next section to configure the Model
Optimizer.
5.3.4 Configure the Model Optimizer
Important: These steps are required. You must configure the Model Optimizer for at least
one framework. The Model Optimizer will fail if you do not complete the steps in this
section.
If you see an error indicating Python is not installed when you know you installed it, your
computer might not be able to find the program. For instructions to add Python to your
system environment variables, see Update Your Windows Environment Variables.
The Model Optimizer is a key component of the Intel® Distribution of OpenVINO™ toolkit.
You cannot do inference on your trained model without running the model through the
Model Optimizer. When you run a pre-trained model through the Model Optimizer, your
output is an Intermediate Representation (IR) of the network. The IR is a pair of files that
describe the whole model:
• .xml: Describes the network topology
• .bin: Contains the weights and biases binary data
The Inference Engine reads, loads, and infers the IR files, using a common API across the
CPU, GPU, or VPU hardware.
The Model Optimizer is a Python*-based command line tool (mo.py), which is located in
C:\Intel\computer_vision_sdk_<version>\deployment_tools\model_optimizer, where
<version> is the version of the Intel® Distribution of OpenVINO™ toolkit that you installed.
Use this tool on models trained with popular deep learning frameworks such as Caffe,
TensorFlow, MXNet, and ONNX to convert them to an optimized IR format that the
Inference Engine can use.
This section explains how to use scripts to configure the Model Optimizer either for all of
the supported frameworks at the same time or for individual frameworks. If you want to
Page 62

Mustang-M2BM-MX2
Page 54
manually configure the Model Optimizer instead of using scripts, see the Using Manual
Configuration Process section in the Model Optimizer Developer Guide.
For more information about the Model Optimizer, see the Model Optimizer Developer
Guide.
5.3.4.1 Model Optimizer Configuration Steps
You can configure the Model Optimizer either for all supported frameworks at once or for
one framework at a time. Choose the option that best suits your needs. If you see error
messages, make sure you installed all dependencies.
IMPORTANT: The Internet access is required to execute the following steps successfully.
If you have access to the Internet through the proxy server only, please make sure that it is
configured in your environment.
NOTE: In the steps below:
• If you you want to use the Model Optimizer from another installed versions of
Intel® Distribution of OpenVINO™ toolkit installed, replace openvino with
openvino_<version>.
• If you installed the Intel® Distribution of OpenVINO™ toolkit to the non-default
installation directory, replace C:\Program Files (x86)\IntelSWTools with the
directory where you installed the software.
These steps use a command prompt to make sure you see error messages.
Option 1: Configure the Model Optimizer for all supported frameworks at the same
time:
1. Open a command prompt. To do so, type cmd in your Search Windows box and then
press Enter. Type commands in the opened window:
Page 63

Mustang-M2BM-MX2
Page 55
2. Go to the Model Optimizer prerequisites directory.
cd C:\Program Files
(x86)\IntelSWTools\openvino\deployment_tools\model_optimizer\
install_prerequisites
3. Run the following batch file to configure the Model Optimizer for Caffe*, TensorFlow*,
MXNet*, Kaldi*, and ONNX*::
install_prerequisites.bat
Option 2: Configure the Model Optimizer for each framework separately:
1. Go to the Model Optimizer prerequisites directory:
cd C:\Program Files
(x86)\IntelSWTools\openvino\deployment_tools\model_optimizer\i
nstall_prerequisites
2. Run the batch file for the framework you will use with the Model Optimizer. You can
use more than one:
o For Caffe:
install_prerequisites_caffe.bat
o For TensorFlow:
install_prerequisites_tf.bat
o For MXNet:
install_prerequisites_mxnet.bat
Page 64

Mustang-M2BM-MX2
Page 56
o For ONNX:
install_prerequisites_onnx.bat
o For Kaldi:
install_prerequisites_kaldi.bat
The Model Optimizer is configured for one or more frameworks. Success is indicated by a
screen similar to this:
You are ready to use two short demos to see the results of running the Intel Distribution of
OpenVINO toolkit and to verify your installation was successful. The demo scripts are
required since they perform additional configuration steps. Continue to the next section.
Page 65

Mustang-M2BM-MX2
Page 57
5.4 Installation Steps for Intel® Vision Accelerator Design with Intel® Movidius™ VPUs Mustang-M2BM-MX2
To perform inference on Intel® Vision Accelerator Design with Intel® Movidius™ VPUs,
the following additional installation steps are required:
1. Install the Movidius™ VSC driver:
a. Go to the
<INSTALL_DIR>\deployment_tools\inference-engine\external\MovidiusDriver
directory, where <INSTALL_DIR> is the directory in which the Intel Distribution of
OpenVINO toolkit is installed.
b. Right click on the Movidius_VSC_Device.inf file and choose Install from the pop
up menu.
2. If your Intel® Vision Accelerator Design with Intel® Movidius™ VPUs card
requires SMBUS connection to PCIe slot (Raw video data card with HW version
Fab-B and before), install the SMBUS driver:
a. Go to the
<INSTALL_DIR>\deployment_tools\inference-engine\external\hddl\SMBusDriver
directory, where <INSTALL_DIR> is the directory in which the Intel Distribution of
OpenVINO toolkit is installed.
b. Right click on the hddlsmbus.inf file and choose Install from the pop up menu.
3. Download and install Visual C++ Redistributable for Visual Studio 2015
You are done installing your device driver and are ready to use your Intel® Vision
Accelerator Design with Intel® Movidius™ VPUs.
5.5 Use the Demo Scripts to Verify Your Installation
Important: This section is required. In addition to confirming your installation was
successful, demo scripts perform other steps, such as setting up your computer to use the
Model Optimizer samples.
Note: To run the demo applications on Intel® Processor Graphics, Intel® Movidius™
Neural Compute Stick or Intel® Neural Compute Stick 2, make sure you completed the
Additional Installation Steps first.
Page 66

Mustang-M2BM-MX2
Page 58
To learn more about the demo applications, see README.txt in
C:\Intel\computer_vision_sdk_<version>\deployment_tools\demo\.
For detailed description of the pre-trained object detection and object recognition models,
go to
C:\Intel\computer_vision_sdk_<version>\deployment_tools\intel_mode
ls\ and open index.html.
Notes:
- The paths in this section assume you used the default installation directory. If you used a
directory other than C:\Intel, update the directory with the location where you installed the
software.
- If you are migrating from the Intel® Computer Vision SDK 2017 R3 Beta version to the
Intel® Distribution of OpenVINO™ toolkit, read this information about porting your
applications.
1. Go to modify device number of VPU from 8 to 2, in C:\Program Files
(x86)\IntelSWtools\openvino_<version>\deployment_tools\inference_engine
\external\hddl\config\hddl_autoboot.config
Page 67

Mustang-M2BM-MX2
Page 59
1. Open a command prompt window.
2. Go to the Inference Engine demo directory:
cd
C:\Intel\computer_vision_sdk_<version>\deployment_tools\demo\
3. Run the demos by following the instructions in the next two sections.
5.5.1 Run the Image Classification Demo
5.5.2 Set Up a Neural Network Model
If you are running inference on hardware other than VPU-based devices, you already
have the required FP32 neural network model converted to an optimized Intermediate
Representation (IR). Follow the steps in the Run the Sample Application section to run the
sample.
If you want to run inference on a VPU device (Intel® Movidius™ Neural Compute Stick,
Intel® Neural Compute Stick 2 or Intel® Vision Accelerator Design with Intel® Movidius™
VPU), you'll need an FP16 version of the model, which you will set up in this paragraph.
To convert the FP32 model to a FP16 IR suitable for VPU-based hardware accelerators,
follow the steps below:
1. Create a directory for the FP16 SqueezeNet Model, for example,
C:\Users\<username>\Documents\squeezenet1.1_FP16
2. Open the Command Prompt and run the Model Optimizer to convert the FP32
Squeezenet Caffe* model delevered with the installation into an optimized FP16
Intermediate Representation (IR):
python3 "C:\Program Files
(x86)\IntelSWTools\openvino\deployment_tools\model_optimize
r\mo.py" --input_model
"C:\Users<username>\Documents\Intel\OpenVINO\openvino_model
Page 68

Mustang-M2BM-MX2
Page 60
s\models\FP32\classification\squeezenet\1.1\caffe\squeezene
t1.1.caffemodel" --data_type FP16 --output_dir
"C:\Users<username>\Documents\squeezenet1.1_FP16"
3. The squeezenet1.1.labels file contains the classes that ImageNet uses.
This file is included so that the inference results show text instead of classification
numbers. Copy
copy
"C:\Users<username>\Documents\Intel\OpenVINO\openvino_model
s\ir\FP32\classification\squeezenet\1.1\caffe\squeezenet1.1
.labels" "C:\Users<username>\Documents\squeezenet1.1_FP16"
Now your neural network setup is complete and you're ready to run the sample application.
1. Go to modify device number of VPU from 8 to 2, in C:\Program Files
(x86)\IntelSWtools\openvino_<version>\deployment_tools\inference_engine
\external\hddl\config\hddl_autoboot.config
squeezenet1.1.labels to your optimized model location:
2. Run the sample executable with specifying the car.png file from the demo directory as
an input image, the IR of your FP16 model and a plugin for a hardware device to
perform inference on.
Page 69

Mustang-M2BM-MX2
Page 61
classification_sample.exe -i "C:\Program Files
(x86)\IntelSWTools\openvino\deployment_tools\demo\car.png"
-m
"C:\Users<username>\Documents\squeezenet1.1_FP16\squeezenet
1.1.xml" -d HDDL
Note: performance here is only for reference, it should base on the benchmark app result.
This demo is complete. Leave the console open and continue to the next section to run the
Inference Pipeline demo.
4. Close the image viewer window to end the demo.
In this section, you saw a preview of the Intel® Distribution of OpenVINO™ toolkit
capabilities.
You have completed all the required installation, configuration, and build steps to work
with your trained models using the Mustang-M2BM-MX2.
Page 70

Mustang-M2BM-MX2
Page 62
5.6 Installation - Step by Step (2018 R5)
5.6.1 Install the Intel® Distribution of OpenVINO™ Toolkit Core
Components
1. If you have not downloaded the Intel® Distribution of OpenVINO™ toolkit, download
the latest version. By default, the file is saved to the Downloads directory as
w_openvino_toolkit_p_<version>.exe.
2. Go to the Downloads folder.
3. Double-click w_openvino_toolkit_p_<version>.exe. A window opens to let you
choose your installation directory and components. The default installation directory is
C:\Intel. If you choose a different installation directory, the installer will create the
directory for you.
Page 71

Mustang-M2BM-MX2
Page 63
4. Click Next.
5. You are asked if you want to provide consent to gather information. Choose the option
of your choice. Click Next.
6. If you are missing external dependencies, you will see a warning screen. Write down
the dependencies you are missing. You need to take no other action at this time.
After installing the Intel® Distribution of OpenVINO™ toolkit core components, you
will be provided instructions to install the missing dependencies.
The screen example below indicates you are missing two dependencies:
Page 72

Mustang-M2BM-MX2
Page 64
7. Click Next.
8. When the first part of installation is complete, the final screen informs you that the
core components have been installed and additional steps still required:
9. Click Finish to close the installation wizard. A new browser window opens to the next
section of the installation guide to install the dependencies. You are in the same
document. The new window opens in case you ran the installation without first
opening this installation guide. If the installation did not indicate you must install
dependencies, you can skip ahead to Configure the Model Optimizer.
Page 73

Mustang-M2BM-MX2
Page 65
5.6.2 Install the External Software Dependencies
If the installation process indicated if you are missing dependencies, you must install each
missing dependency. Click the link for the first dependency you must install:
• Microsoft Visual Studio* with C++ 2017 or 2015 with MSBuild and the Visual
Studio Build Tools. This is a two-part installation. You must install both
components.
• CMake 3.4 or higher
• Python 3.6.5
If you have no missing dependencies, skip ahead to Configure the Model Optimizer.
5.6.2.1 Microsoft Visual Studio* with C++ and MSBuild
Microsoft Visual Studio with Visual Studio C++ is required for building the Intel® Deep
Learning Deployment Toolkit samples and demonstration applications. You can install
the free Community version of Microsoft Visual Studio.
IMPORTANT: The Microsoft Visual Studio dependency is a two-part installation that
consists of Microsoft Visual Studio 2017 or 2015 and the Microsoft Visual Studio
Build Tools. This guide includes steps for installing both parts of this dependency. These
are separate installations. MAKE SURE YOU INSTALL BOTH COMPONENTS.
The steps below apply to Microsoft Visual Studio 2017. If you prefer to use Microsoft
Visual Studio 2015, see Installing Microsoft Visual Studio* 2015 for Intel® Distribution of
OpenVINO™ toolkit.
1. Go to the Visual Studio downloads page.
2. Click Free Download in the Visual Studio 2017 box, Community section:
Page 74

Mustang-M2BM-MX2
Page 66
An executable file named vs_community__313888930.1524151023.exe, or similar,
is saved in your Downloads folder.
3. Double-click the executable file to launch the Visual Studio Community 2017
installer.
4. From the Workloads tab, use the check boxes to select Universal Windows
Platform development and Desktop development with C++.
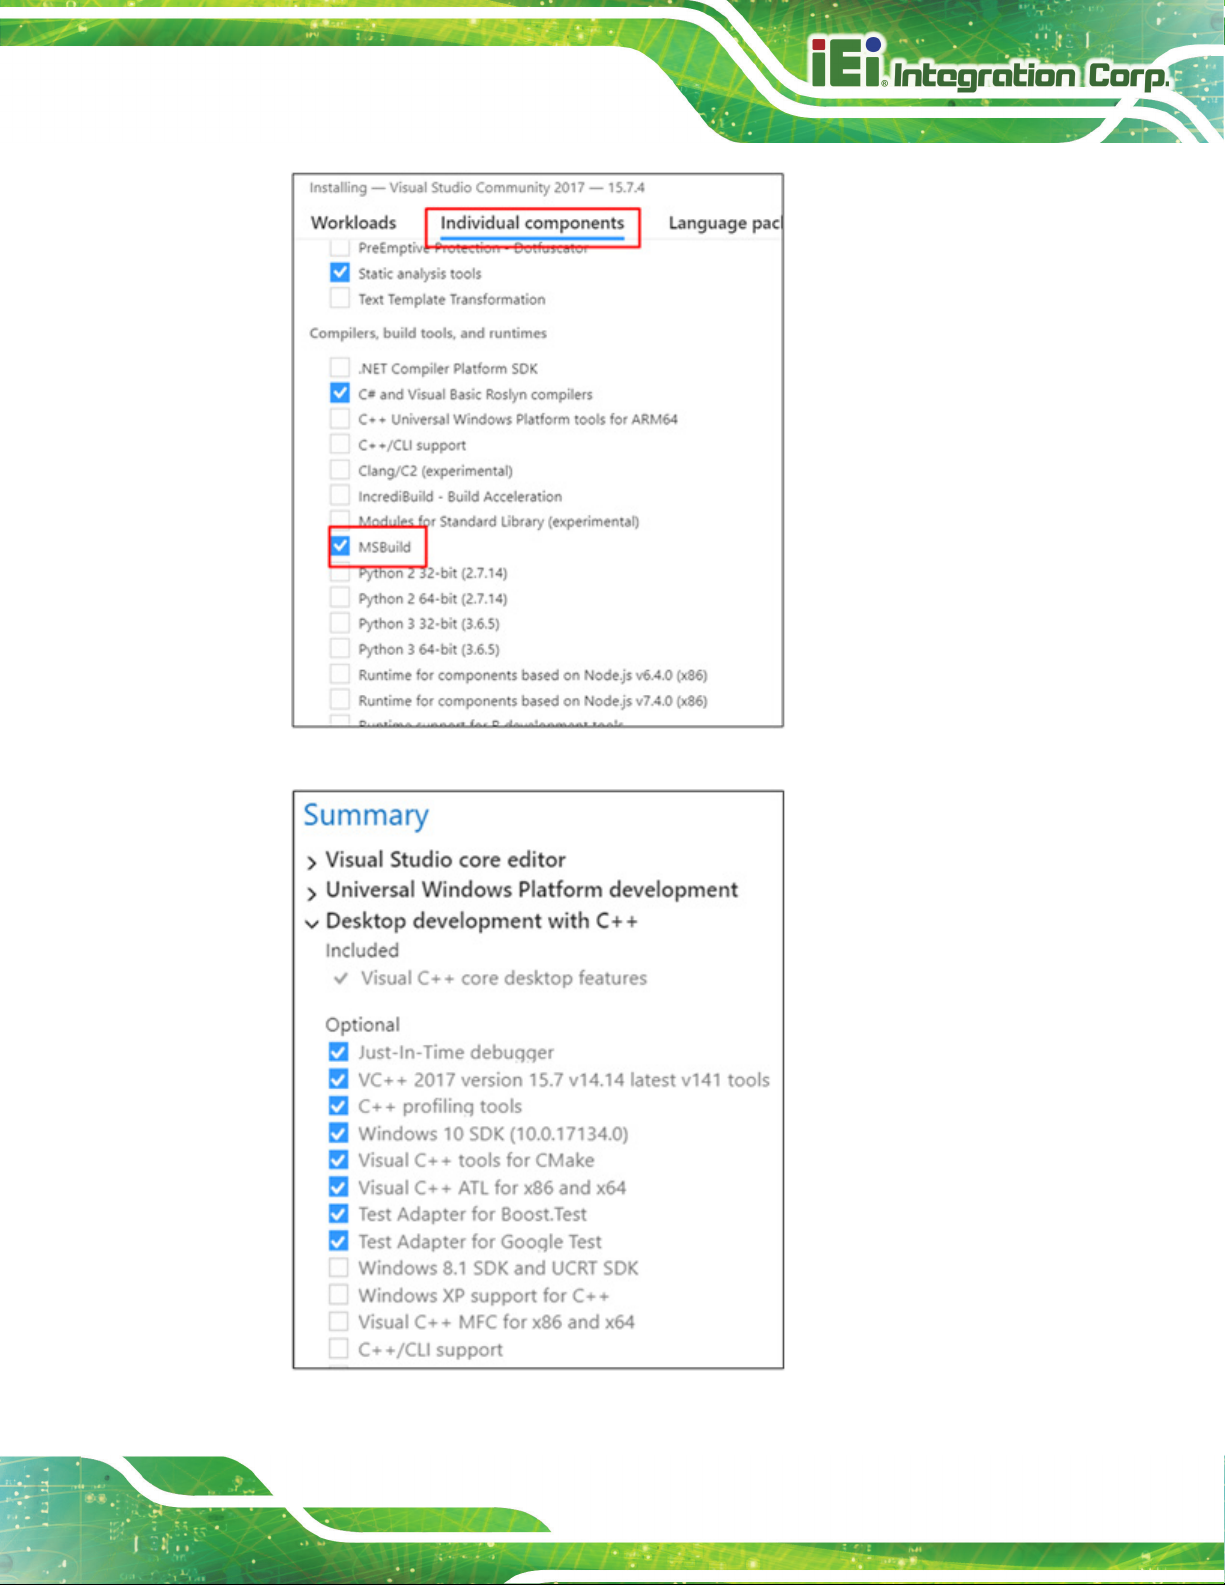
5. Under the Individual components tab, select MSBuild:
Page 75
Mustang-M2BM-MX2
Page 67
The Summary at the right side of the screen displays your installation selections:
6. Make no other changes. Click Next. The installation begins, and takes around 30
Page 76

Mustang-M2BM-MX2
Page 68
minutes to complete.
7. If you see a prompt to restart your computer after the installation completes, dismiss
it.
Continue to the next section to install the Build Tools for Visual Studio 2017.
5.6.2.2 Install the Build Tools for Visual Studio 2017
The Build Tools for Visual Studio 2017 is the second part of the Microsoft Visual Studio
dependency. You must complete this installation.
1. Go to the Tools for Visual Studio 2017 section of the Microsoft Visual Studio
Downloads page.
2. Click the Download button next to Build tools for Visual Studio 2017:
3. An executable file named vs_buildtools.exe, or similar, is saved in your Downloads
folder.
4. Double-click the file to install Build Tools for Visual Studio 2017.
5. The installation opens to the Workloads tab. Select Visual C++ build tools:
The Summary on the right side shows the features you chose to install:
Page 77

Mustang-M2BM-MX2
Page 69
6. Click Install.
7. When the installation completes, restart your computer if prompted to do so.
You have completed the Visual Studio 2017 installation.
Install your next dependency:
• CMake 3.4 or higher
• Python 3.6.5
Or if you have installed all the dependencies, you are ready to configure the Model
Optimizer.
5.6.2.3 Install CMake* 3.4 or higher
These steps guide you through installing CMake 3.4 or higher, which is required to build
the Intel® Distribution of OpenVINO™ toolkit samples.
1. Go to the CMake download site.
2. Under the heading Get the Software, click the link for latest stable in the first
paragraph. Your screen displays Latest Release information.
3. Scroll down to the line Windows win64-x64 Installer.
4. Click the associated file name to download the installer. The file name will have the
extension .msi. The file is saved to your Downloads folder.
Page 78

Mustang-M2BM-MX2
Page 70
5. Go to the Downloads folder.
6. Double-click the file to launch the installer.
Note: If you have a previous version of CMake installed, you are prompted to uninstall
it. You must uninstall the previous version before installing the new version. Follow the
instructions on the screen and then launch the installer again to install the new
version.
7. In the installer, select the option to Add CMake to the system PATH for all users:
8. Click Next.
9. Click Finish when the installation completes.
You have completed the CMake installation. Next, install Python 3.6.5 if the Intel®
Distribution of OpenVINO™ toolkit installation indicated you are missing the software.
5.6.2.4 Install Python* 3.6.5
Python 3.6.5 with pip is required to run the Model Optimizer. Use these steps to install the
correct version of the Python software.
1. Go to the Python 3.6.5 download page and click Windows x86-64 executable
installer to download the executable file. The file is saved as
python-3.6.5-amd64.exe in your Downloads folder.
Page 79

Mustang-M2BM-MX2
Page 71
2. Double-click the file to launch the installation.
3. Make sure the top of the screen shows Python 3.6.5 (64-bit).
4. IMPORTANT: At the bottom of the install screen, select Add Python 3.6 to PATH.
Page 80

Mustang-M2BM-MX2
Page 72
5. Click Install Now near the top of the install screen and let the installation complete.
6. When the installation finishes, click Close.
You have completed the Python installation and are ready to set environment variables.
Continue to the next section.
5.6.3 Set the Environment Variables
You must update several environment variables before you can compile and run
OpenVINO™ applications. Open the Command Prompt and run the following batch file to
temporarily set your environment variables:
C:\Intel\computer_vision_sdk\bin\setupvars.bat
(Optional): OpenVINO toolkit environment variables are removed when you close the
Command Prompt window. As an option, you can permanently set the environment
variables manually.
The environment variables are set. Continue to the next section to configure the Model
Optimizer.
5.6.4 Configure the Model Optimizer
Important: These steps are required. You must configure the Model Optimizer for at least
one framework. The Model Optimizer will fail if you do not complete the steps in this
section.
If you see an error indicating Python is not installed when you know you installed it, your
computer might not be able to find the program. For instructions to add Python to your
system environment variables, see Update Your Windows Environment Variables.
The Model Optimizer is a key component of the Intel® Distribution of OpenVINO™ toolkit.
You cannot do inference on your trained model without running the model through the
Model Optimizer. When you run a pre-trained model through the Model Optimizer, your
output is an Intermediate Representation (IR) of the network. The IR is a pair of files that
describe the whole model:
Page 81

Mustang-M2BM-MX2
Page 73
• .xml: Describes the network topology
• .bin: Contains the weights and biases binary data
The Inference Engine reads, loads, and infers the IR files, using a common API across the
CPU, GPU, or VPU hardware.
The Model Optimizer is a Python*-based command line tool (mo.py), which is located in
C:\Intel\computer_vision_sdk_<version>\deployment_tools\model_optimizer, where
<version> is the version of the Intel® Distribution of OpenVINO™ toolkit that you installed.
Use this tool on models trained with popular deep learning frameworks such as Caffe,
TensorFlow, MXNet, and ONNX to convert them to an optimized IR format that the
Inference Engine can use.
This section explains how to use scripts to configure the Model Optimizer either for all of
the supported frameworks at the same time or for individual frameworks. If you want to
manually configure the Model Optimizer instead of using scripts, see the Using Manual
Configuration Process section in the Model Optimizer Developer Guide.
For more information about the Model Optimizer, see the Model Optimizer Developer
Guide.
5.6.4.1 Model Optimizer Configuration Steps
You can configure the Model Optimizer either for all supported frameworks at once or for
one framework at a time. Choose the option that best suits your needs. If you see error
messages, make sure you installed all dependencies.
Note: These steps use a command prompt to make sure you see error messages.
In the steps below:
- Replace <version> with the version number of your Intel® Distribution of OpenVINO™
toolkit
- If you did not install Intel® Distribution of OpenVINO™ toolkit to the default installation
directory, replace \Intel\ with the directory where you installed the software.
Page 82

Mustang-M2BM-MX2
Page 74
Option 1: Configure the Model Optimizer for all supported frameworks at the same
time:
1. Open a command prompt. To do so, type the following in your Search Windows box
and then press Enter:
Cmd
2. Type commands in the opened window:
3. Go to the Model Optimizer prerequisites directory. Remember to replace <version>
with the version of the Intel® Distribution of OpenVINO™ toolkit that you installed:
cd
C:\Intel\computer_vision_sdk_<version>\deployment_tools\model_
optimizer\install_prerequisites
4. Run the following batch file to configure Model Optimizer for Caffe*, TensorFlow*,
MXNet*, Kaldi*, and ONNX*:
install_prerequisites.bat
Option 2: Configure the Model Optimizer for each framework separately:
1. Go to the Model Optimizer prerequisites directory:
cd
C:\Intel\computer_vision_sdk_<version>\deployment_tools\model_
optimizer\install_prerequisites
2. Run the batch file for the framework you will use with the Model Optimizer. You can
use more than one:
Page 83

Mustang-M2BM-MX2
Page 75
o For Caffe:
install_prerequisites_caffe.bat
o For TensorFlow:
install_prerequisites_tf.bat
o For MXNet:
install_prerequisites_mxnet.bat
o For ONNX:
install_prerequisites_onnx.bat
o For Kaldi:
install_prerequisites_kaldi.bat
The Model Optimizer is configured for one or more frameworks. Success is indicated by a
screen similar to this:
Page 84

Mustang-M2BM-MX2
Page 76
You are ready to use two short demos to see the results of running the Intel Distribution of
OpenVINO toolkit and to verify your installation was successful. The demo scripts are
required since they perform additional configuration steps. Continue to the next section.
5.7 Installation Steps for Intel® Vision Accelerator Design with Intel® Movidius™ VPUs Mustang-M2BM-MX2
To perform inference on Mustang-M2BM-MX2, the following additional installation steps
are required:
1. Install the Movidius™ VSC driver:
1) Go to the
<INSTALL_DIR>\deployment_tools\inference-engine\external\
directory, where <INSTALL_DIR> is the directory in which the OpenVINO™ toolkit is
installed.
2) Right click on the Movidius_VSC_Device.inf file and choose Install from the
pop up menu.
2. Install the SMBUS driver:
1) Go to the
<INSTALL_DIR>\deployment_tools\inference-engine\external\hddl\
SMBusDriver directory, where <INSTALL_DIR> is the directory in which the
OpenVINO™ toolkit is installed.
2) Right click on the hddlsmbus.inf file and choose Install from the pop up menu.
3. Download and install Visual C++ Redistributable for Visual Studio 2015
You are done installing your device driver and are ready to use Mustang-M2BM-MX2.
5.8 Use the Demo Scripts to Verify Your Installation
Important: This section is required. In addition to confirming your installation was
successful, demo scripts perform other steps, such as setting up your computer to use the
Model Optimizer samples.
Page 85

Mustang-M2BM-MX2
Page 77
Note: To run the demo applications on Intel® Processor Graphics, Intel® Movidius™
Neural Compute Stick or Intel® Neural Compute Stick 2, make sure you completed the
Additional Installation Steps first.
To learn more about the demo applications, see README.txt in
C:\Intel\computer_vision_sdk_<version>\deployment_tools\demo\.
For detailed description of the pre-trained object detection and object recognition models,
go to
C:\Intel\computer_vision_sdk_<version>\deployment_tools\intel_mode
ls\ and open index.html.
Notes:
- The paths in this section assume you used the default installation directory. If you used a
directory other than C:\Intel, update the directory with the location where you installed the
software.
- If you are migrating from the Intel® Computer Vision SDK 2017 R3 Beta version to the
Intel® Distribution of OpenVINO™ toolkit, read this information about porting your
applications.
1. Go to modify device number of VPU from 8 to 2, in
<install_DIR>\openvino_<version>\deployment_tools\inference_engine
\external\hddl\config\hddl_autoboot.config
Page 86

Mustang-M2BM-MX2
Page 78
2. Open a command prompt window.
3. Go to the Inference Engine demo directory:
cd
C:\Intel\computer_vision_sdk_<version>\deployment_tools\demo\
4. Run the demos by following the instructions in the next two sections.
5.8.1 Run the Image Classification Demo
This demo serves two purposes:
• It creates a directory named build_<version> in
C:\Intel\computer_vision_sdk_<version>\deployment_tools\infer
ence_engine\samples.
• It uses the Model Optimizer to convert a SqueezeNet model to .bin and .xml
Intermediate Representation (IR) files that are used by the Inference Engine.
For a brief description of the Intermediate Representation .bin and .xml files, see
Configuring the Model Optimizer.
For more information about the Inference Engine, see the Inference Engine Developer
Guide.
1. Run the Image Classification demo:
demo_squeezenet_download_convert_run.bat
2. This demo uses the car.png image located in the
C:\Intel\computer_vision_sdk_<version>\deployment_tools\demo
directory. When the demo completes, the label and confidence for the top-10
categories are displayed on your screen:
Page 87
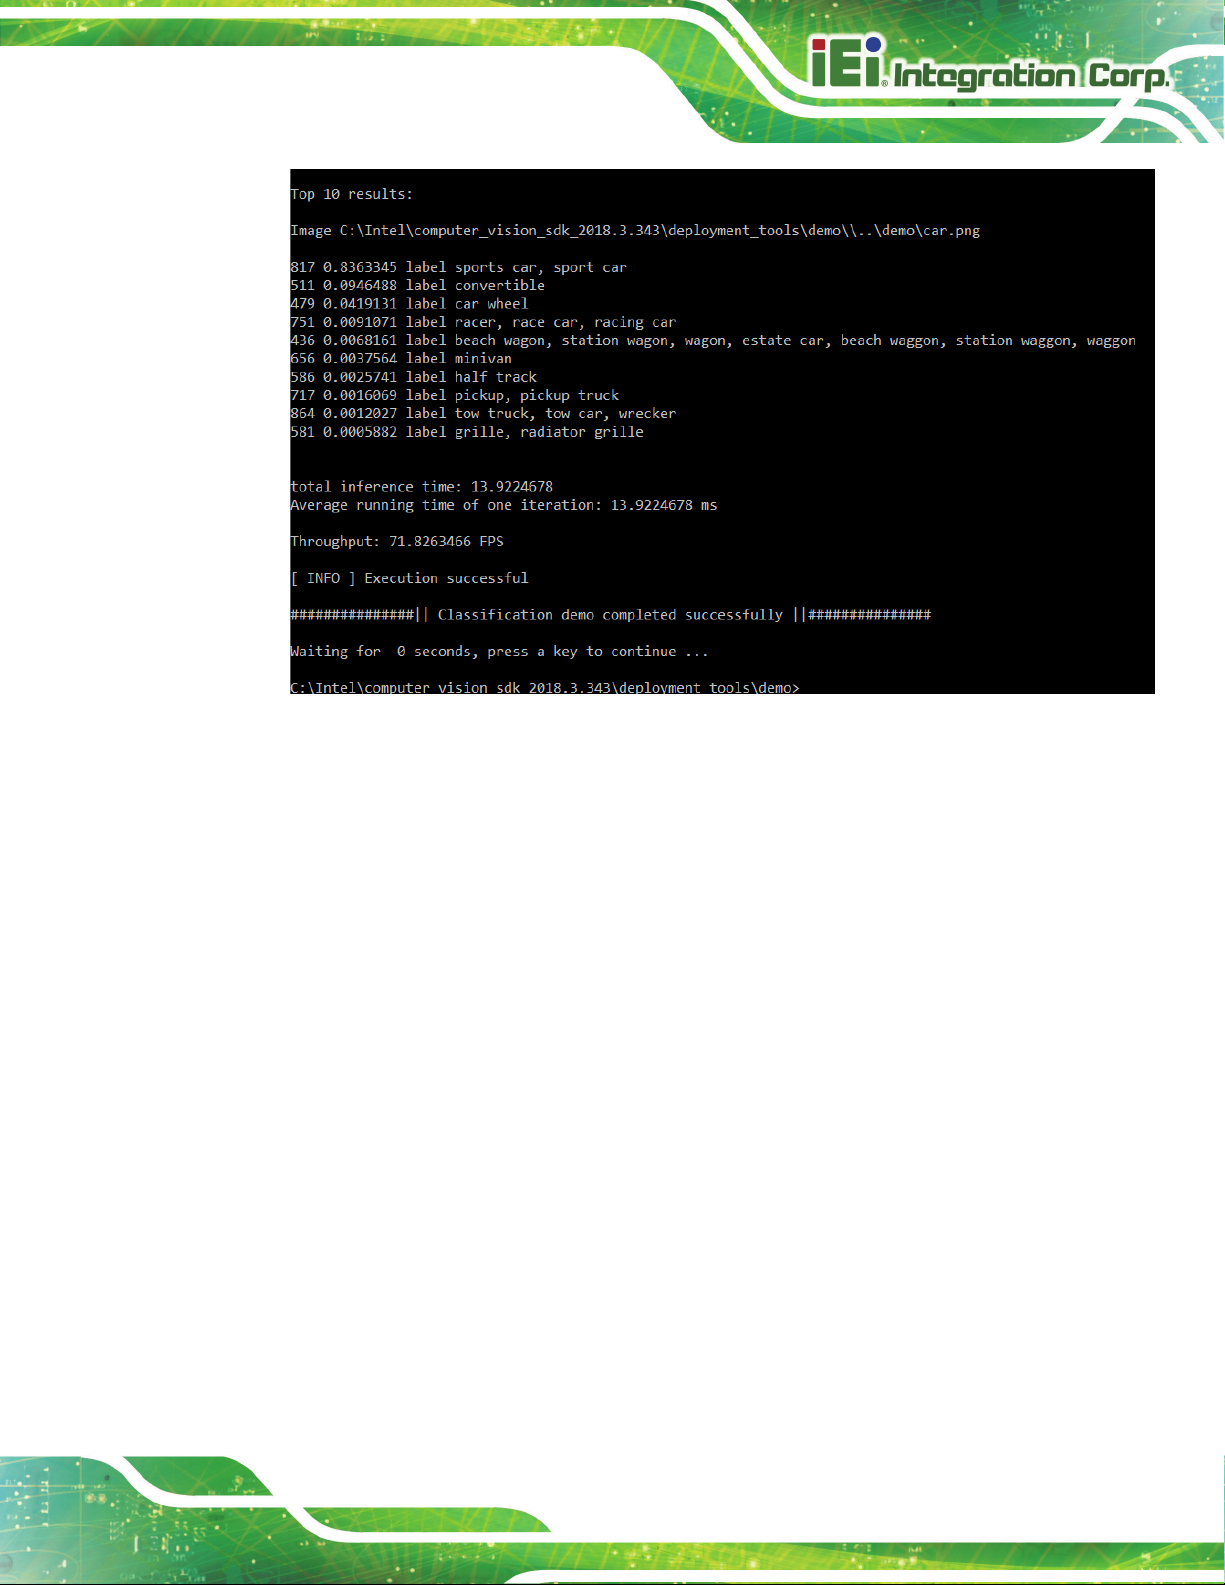
Mustang-M2BM-MX2
Page 79
Note: performance here is only for reference, it should base on the benchmark app result.
This demo is complete. Leave the console open and continue to the next section to run the
Inference Pipeline demo.
5.8.2 Run the Inference Pipeline Demo
1. While still in the
C:\Intel\computer_vision_sdk_<version>\deployment_tools\demo\
directory, run the Inference Pipeline demo:
demo_security_barrier_camera.bat
2. This demo uses the car.png image located in
C:\Intel\computer_vision_sdk_<version>\deployment_tools\demo\ to
show an inference pipeline. This demo uses three pre-trained models. The demo
uses vehicle recognition in which vehicle attributes build on each other to narrow in on
a specific attribute. The demo works as follows:
1) An object is identified as a vehicle.
2) This identification is used as input to the next model, which identifies specific
Page 88

Mustang-M2BM-MX2
Page 80
vehicle attributes, including the license plate.
3) The attributes identified as the license plate are used as input to the third model,
which recognizes specific characters in the license plate.
For more information, see the Security Camera Sample.
3. When the demo completes, you have two windows open:
o A console window that displays information about the tasks performed by the
demo.
o An image viewer window that displays a picture similar to the following:
Note: performance here is only for reference, it should base on the benchmark app result.
4. Close the image viewer window to end the demo.
Page 89

Mustang-M2BM-MX2
Page 81
In this section, you saw a preview of the Intel® Distribution of OpenVINO™ toolkit
capabilities.
You have completed all the required installation, configuration, and build steps to work
with your trained models using the Mustang-M2BM-MX2.
Page 90

Mustang-M2BM-MX2
Page 82
Appendix
A
A Performance Test
Page 91

Mustang-M2BM-MX2
Page 83
./perfcheck -m <model_Dir> -inputs_dir<image_Dir> -num_requests 8 -d HDDL
Note: suggest -num_requests # = 4xVPU qty. (Mustang-M2BM-MX2=> 8)
Ex. squeezenet1.1.xml
Page 92

Mustang-M2BM-MX2
Page 84
Appendix
B
B Regulatory Compliance
Page 93

Mustang-M2BM-MX2
Page 85
other devices in the equipment, the CE conformity
is equipment complies with Part 15 of the FCC Rules. Operation is subject to the
Rules. These limits are designed to provide
commercial environment. This equipment generates, uses, and can radiate radio
d in accordance with the instruction
manual, may cause harmful interference to radio communications. Operation of this
DECLARATION OF CONFORMITY
This equipment has been tested and found to comply with specifications for CE marking.
If the user modifies and/or installs
declaration may no longer apply.
FCC WARNING
Th
following two conditions:
This device may not cause harmful interference, and
This device must accept any interference received, including interference
that may cause undesired operation.
This equipment has been tested and found to comply with the limits for a Class A digital
device, pursuant to part 15 of the FCC
reasonable protection against harmful interference when the equipment is operated in a
frequency energy and, if not installed and use
equipment in a residential area is likely to cause harmful interference in which case the
user will be required to correct the interference at his own expense.
Page 94

Mustang-M2BM-MX2
Page 86
C Product Disposal
Appendix
C
Page 95

Mustang-M2BM-MX2
Page 87
of used batteries according to instructions and local
CAUTION:
Risk of explosion if battery is replaced by an incorrect type. Only
certified engineers should replace the on-board battery.
Dispose
regulations.
Outside the European Union–If you wish to dispose of used electrical and
electronic products outside the European Union, please contact your local
authority so as to comply with the correct disposal method.
Within the European Union–The device that produces less waste and is
easier to recycle is classified as electronic device in terms of the European
Directive 2012/19/EU (WEEE), and must not be disposed of as domestic
garbage.
EU-wide legislation, as implemented in each Member State, requires that
waste electrical and electronic products carrying the mark (left) must be
disposed of separately from normal household waste. This includes
monitors and electrical accessories, such as signal cables or power
cords. When you need to dispose of your device, please follow the
guidance of your local authority, or ask the shop where you purchased the product. The
mark on electrical and electronic products only applies to the current European Union
Member States.
Please follow the national guidelines for electrical and electronic product disposal.
Page 96

Mustang-M2BM-MX2
Page 88
Appendix
D
D Hazardous Materials
Disclosure
Page 97

Mustang-M2BM-MX2
Page 89
The details provided in this appendix are to ensure that the product is compliant with the
Peoples Republic of China (China) RoHS standards. The table below acknowledges the
presences of small quantities of certain materials in the product, and is applicable to China
RoHS only.
A label will be placed on each product to indicate the estimated “Environmentally Friendly
Use Period” (EFUP). This is an estimate of the number of years that these substances
would “not leak out or undergo abrupt change.” This product may contain replaceable
sub-assemblies/components which have a shorter EFUP such as batteries and lamps.
These components will be separately marked.
Please refer to the following table.
Part Name Toxic or Hazardous Substances and Elements
Lead
(Pb)
Housing
Display
Printed Circuit
Board
Metal Fasteners
Cable Assembly
Fan Assembly
Power Supply
Assemblies
Battery
O: This toxic or hazardous substance is contained in all of the homogeneous materials for the part is below the limit
requirement in SJ/T11363-2006 (now replaced by GB/T 26572-2011).
X: This toxic or hazardous substance is contained in at least one of the homogeneous materials for this part is above
O O O O O O
O O O O O O
O O O O O O
O O O O O O
O O O O O O
O O O O O O
O O O O O O
O O O O O O
Mercury
(Hg)
Cadmium
(Cd)
Hexavalent
Chromium
(CR(VI))
Polybrominated
Biphenyls
(PBB)
Polybrominated
Diphenyl Ethers
(PBDE)
the limit requirement in SJ/T11363-2006 (now replaced by GB/T 26572-2011).
Page 98

Mustang-M2BM-MX2
Page 90
部件名称
有毒有害物质或元素
铅
汞
镉
六价铬
多溴联苯
多溴二苯
醚
壳体
显示
印刷电路板
金属螺帽
电缆组装
风扇组装
电力供应组装
电池
此附件旨在确保本产品符合中国 RoHS 标准。以下表格标示此产品中某有毒物质的含量符
合中国 RoHS 标准规定的限量要求。
本产品上会附有”环境友好使用期限”的标签,此期限是估算这些物质”不会有泄漏或突变”的
年限。本产品可能包含有较短的环境友好使用期限的可替换元件,像是电池或灯管,这些元
件将会单独标示出来。
(Pb)
O: 表示该有毒有害物质在该部件所有物质材料中的含量均在 SJ/T 11363-2006 (现由 GB/T 26572-2011 取代)
标准规定的限量要求以下。
O O O O O O
O O O O O O
O O O O O O
O O O O O O
O O O O O O
O O O O O O
O O O O O O
O O O O O O
(Hg)
(Cd)
(CR(VI))
(PBB)
(PBDE)
X: 表示该有毒有害物质至少在该部件的某一均质材料中的含量超出 SJ/T 11363-2006 (现由 GB/T
26572-2011 取代) 标准规定的限量要求。
 Loading...