

Page 1
TANK-720 Emb edded System
Page i
MODEL:
board 2.0 GB DDR3 Memory, VGA/HDMI, USB 3.0, Dual Co mbo (SFP
Rev. 1 .03 – 18 Decem ber 2012
IEI Technology Corp.
TANK-720
High Performance Fanles s Embedded System with
2 nd G en Int el® C ore™ i7 /i5/i3, Celeron® and Pentium® de sktop proces sors,
On-
Fiber/RJ-45 ) Gigabit LAN, Iso la ted C AN-bus, Audio and R oHS C ompliant
User Manual
Page 2

TANK-720 Emb edded System
Page ii
Date Version Changes
Revision
18 December 2012 1.03 Update
21 June 2012 1.02 Update the system memory capacity
12 March 2012 1.01 Update the pictures for TANK-720
25 October 2011 1.00 Initial release
Section 3.9.11: Remote Control Terminal Block
Page 3

TANK-720 Embed d ed Syste m
Page iii
Copyright
COP YRIGHT NOTICE
The information in this document is subject to change without prior notice in order to
improve reliability, design and function and does not represent a commitment on the part
of the manufacturer.
In no event will the manufacturer be liable for direct, indirect, special, incidental, or
consequential damages arising out of the use or inability to use the product or
documentation, even if advised of the possibil ity of such damages.
This document contains proprietary information protected by copyright. All rights are
reserved. No part of this manual may be reproduced by any mechanical, electronic, or
other means in any form without prior written perm ission of the manufacturer.
TRADEMARKS
All registered trademarks and product names mentioned herein are used for identification
purposes only and may be trademarks and/or registered trademarks of their respective
owners.
Page 4

TANK-720 Embed d ed Syste m
Page iv
WARNING
This device complies with Part 15 of the FCC Rules. Operation is subject to the following
two conditions:
(1) this device may not cause harmful interference, and(2) this device must accept any
interference received, including interferenc e that may cause undesired operation.
NOTE: This e quipm ent ha s be en te sted a nd found to com ply wi th the l im its fo r a Cla ss
A digital device, pursuant to part 15 of the FCC Rules. These limits are designed to
provide reasonable protection against harmful interference in a residential installation.
This equipment generates, uses and can radiate radio frequency energy and, if not
installed and used in ac cordance with the instructions, ma y cause harm ful interference
to radio communications.
However, there is no guarantee that interference will not occur in a particular
installation. If this equipment does cause harmful interference to radio or television
reception, which can be determined by turning the equipment off and on, the user is
encouraged to try to correct the interference by one or more of the following measures:
—
Reorient or relocate the receiving antenna.
—
Increase the separation between the equipment and receiver.
—
Connect the equipment into an outlet on a circuit different from that to which the
receiver is connected.
—
Consult the dealer or an experienced radio/ TV technician for help.
You are cautioned that any change or modifications to the equipment not expressly
approve by the party responsible for compliance could void your authority to operate
such equipment.
IMPORTANT NOTE :
FCC Radiation Exposure Statement:
This equipment complies with FCC radiation exposure limits set forth for an
uncontrolled environment. This equipment should be installed and operated with
minimum distance 20cm between the radiator & your body
.
Page 5

TANK-720 Embed d ed Syste m
Page v
Tab le of Contents
1 INTRODUCTION .......................................................................................................... 1
1.1 OVERVIEW .................................................................................................................. 2
1.2 MODEL VARIATIONS ................................................................................................... 2
1.3 FEATURES ................................................................................................................... 3
1.4 TECHNICAL SPECIFICATIONS ...................................................................................... 3
1.5 CONNECTOR PANEL .................................................................................................... 5
1.5.1 Front Panel ........................................................................................................ 5
1.5.2 Rear Panel ......................................................................................................... 6
1.6 LED INDICATORS ....................................................................................................... 8
1.7 DIMENSIONS ............................................................................................................... 9
2 UNPACKING ............................................................................................................... 10
2.1 ANTI-STATIC PRECAUTIONS ....................................................................................... 11
2.2 UNPACKING PRECAUTIONS ........................................................................................ 11
2.3 UNPACKING CHECKLIST ........................................................................................... 12
3 INSTALLATION ......................................................................................................... 15
3.1 INSTALLATION PRECAUTIONS ................................................................................... 16
3.2 HARD DISK DRIVE (HDD) INSTALLATION ................................................................ 16
3.3 PLUGGABLE CAN-BUS TERMINAL BLOCK INSTALLATION ........................................ 18
3.4 PLUGGABLE DC-IN TERMINAL BLOCK INSTALLATION ............................................. 19
3.5 PLUGGABLE REMOTE CONTROL TERMINAL BLOCK INSTALLATION .......................... 20
3.6 SFP MODULE INSTALLATION .................................................................................... 21
3.7 SO-DIMM INSTALLATION ....................................................................................... 22
3.8 MOUNTING THE SYSTEM WITH MOUNTING BRACKETS ............................................ 24
3.9 EXTERNAL PERIPHERAL INTERFACE CONNECTORS ................................................... 25
3.9.1 ACC Mode Switch ............................................................................................ 26
3.9.2 AT/ATX Power Mode Switch ............................................................................ 26
3.9.3 Audio Connector .............................................................................................. 27
3.9.4 Audio/V ideo Input Connectors ......................................................................... 27
3.9.5 CAN-bus Terminal Block .................................................................................. 27
Page 6

TANK-720 Embed d ed Syste m
Page vi
3.9.6 Digital I/O Connector ...................................................................................... 28
3.9.7 HDMI Connector ............................................................................................. 28
3.9.8 LAN Connectors ............................................................................................... 29
3.9.9 Power Input, 4-pin Terminal Block .................................................................. 31
3.9.10 Power Input, 4-pin DIN Connector ............................................................... 31
3.9.11 Remote Control Terminal Block ..................................................................... 32
3.9.12 RJ-45 RS-232 Serial Port Connectors ........................................................... 33
3.9.13 RJ-45 RS-422/485 Serial Port Connectors .................................................... 35
3.9.14 RS-232 Serial Port Connectors ...................................................................... 37
3.9.15 SFP Fiber Connectors ................................................................................... 38
3.9.16 USB Connectors ............................................................................................. 38
3.9.17 VGA Connector .............................................................................................. 39
3.10 POWERING ON/OFF THE SYSTEM ........................................................................... 41
3.11 REDUNDANT POWER .............................................................................................. 42
3.1 1.1 A CC ON .......................................................................................................... 43
3.11.1.1 Boot-up .................................................................................................... 43
3.11.1.2 Switch to Backup Power ......................................................................... 44
3.11.1.3 Shutdown ................................................................................................ 44
3.1 1.2 A CC OFF ....................................................................................................... 45
3.11.2.1 Boot-up .................................................................................................... 45
3.11.2.2 Switch to Backup Power ......................................................................... 46
3.11.2.3 Shutdown ................................................................................................ 46
4 BIOS .............................................................................................................................. 48
4.1 INTRODUCTION ......................................................................................................... 49
4.1.1 Starting Setup ................................................................................................... 49
4.1.2 Using Setup ...................................................................................................... 49
4.1.3 Getting Help ..................................................................................................... 50
4.1.4 Unable to Reboot after Configuration Changes .............................................. 50
4.1.5 BIOS Menu Bar ................................................................................................ 50
4.2 MAIN ........................................................................................................................ 51
4.3 ADVANCED ............................................................................................................... 52
4.3.1 ACPI Settings ................................................................................................... 53
4.3.2 Trusted Computing ........................................................................................... 54
4.3.3 CPU Configuration .......................................................................................... 55
Page 7

TANK-720 Embed d ed Syste m
Page vii
4.3.3.1 CPU Information ....................................................................................... 56
4.3.4 SATA Configuration ......................................................................................... 57
4.3.5 USB Configuration ........................................................................................... 59
4.3.6 Secondary Super IO Configuration .................................................................. 61
4.3.6.1 Serial Port n Configuration ....................................................................... 61
4.3.7 Super IO Configuration ................................................................................... 64
4.3.7.1 Serial Port n Configuration ....................................................................... 64
4.3.8 H/W Monitor .................................................................................................... 70
4.3.9 Serial Port Console Redirection ...................................................................... 71
4.3.10 iEi Feature ...................................................................................................... 73
4.4 CHIPSET ................................................................................................................... 74
4.4.1 North Bridge .................................................................................................... 75
4.4.1.1 Intel IGD SWSCI OpRegion .................................................................... 75
4.4.2 South Bridge ..................................................................................................... 76
4.4.3 ME Configuration ............................................................................................ 79
4.5 BOOT ........................................................................................................................ 80
4.6 SECURITY ................................................................................................................. 82
4.7 EXIT ......................................................................................................................... 84
A ONE KEY RECOVERY ............................................................................................. 86
A.1 ONE KEY RECOVERY INTRODUCTION ...................................................................... 87
A.1.1 System Requirement ......................................................................................... 88
A.1.2 Supported Operating System ........................................................................... 89
A.2 SETUP PROCEDURE FOR WINDOWS .......................................................................... 90
A.2.1 Hardware and BIOS Setup .............................................................................. 91
A.2.2 Create Partitions ............................................................................................. 91
A.2.3 Install Operating System, Drivers and Applications ....................................... 95
A.2.4 Build-up Recovery Partition ............................................................................ 96
A.2.5 Create Factory Default Image ......................................................................... 98
A.3 AUTO RECOVERY SETUP PROCEDURE .................................................................... 103
A.4 SETUP PROCEDURE FOR LINUX .............................................................................. 107
A.5 RECOVERY TOOL FUNCTIONS ................................................................................. 111
A.5.1 Factory Restore .............................................................................................. 112
A.5.2 Backup System ................................................................................................ 113
A.5.3 Restore Your Last Backup ............................................................................... 114
Page 8

TANK-720 Embed d ed Syste m
Page viii
A.5.4 Manual ............................................................................................................ 115
A.6 RESTORE SYSTEMS FROM A LINUX SERVER THROUGH LAN ................................... 116
A.6.1 Configure DHCP Server Settings ................................................................... 117
A.6.2 Configure TFTP Settings ................................................................................ 118
A.6.3 Configure One Key Recovery Server Settings ................................................ 119
A.6.4 Start the DHCP, TFTP and HTTP ................................................................. 120
A.6.5 Create Shared Directory ................................................................................ 120
A.6.6 Setup a Client System for Auto Recovery ...................................................... 121
A.7 OTHER INFORMATION ............................................................................................ 124
A.7.1 Using AHCI Mode or ALi M5283 / VIA VT6421A Controller ....................... 124
A.7.2 System Memory Requirement ........................................................................ 126
B SAFETY PRECAUTIONS ....................................................................................... 127
B.1 SAFETY PRECAUTIONS ........................................................................................... 128
B.1.1 General Safety Precautions ........................................................................... 128
B.1.2 Anti-static Precautions .................................................................................. 129
B.1.3 Product Disposal ........................................................................................... 130
B.2 MAINTENANCE AND CLEANING PRECAUTIONS ...................................................... 130
B.2.1 Maintenance and Cleaning ............................................................................ 130
B.2.2 Cleaning T ools ............................................................................................... 131
C HAZARDOUS MATERIALS DISCLOSURE ....................................................... 132
C.1 HAZARDOUS MATERIALS DISCLOSURE TABLE FOR IPB PRODUCTS CERTIFIED AS
ROHS COMPLIANT UNDER 2002/95/EC WITHOUT MERCURY ..................................... 133
Page 9

TANK-720 Embed d ed Syste m
Page ix
List of Figures
Figure 1-1: TANK-720 ..................................................................................................................... 2
Figure 1-2: TANK-720 Front Panel
Figure 1-3: TANK-720 Rear Panel
Figure 1-4: TANK-720 LED Indicators
Figure 1-5: Physical Dimensions (mm)
Figure 3-1: Bottom Panel Retention Screws
Figure 3-2: HDD Bracket Retention S crews
Figure 3-3: HDD Installation
Figure 3-4: HDD Bracket Installa tion
Figure 3-5: Pluggable CAN-bus Terminal Block In stallation
Figure 3-6: Pluggable DC-in Terminal Block Installation
Figure 3-7: Pluggable Remote Control Terminal Block Installation
Figure 3-8: SFP Module Installation
Figure 3-9: Retention Screws
Figure 3-10: SO-DIMM Socket
Figure 3-11: SO-DIMM Installation
Figure 3-12: Mounting Bracket Retention Screws
Figure 3-13: ACC Mode Switch
................................................................................................ 6
................................................................................................. 7
........................................................................................... 8
........................................................................................ 9
.............................................................................. 17
............................................................................... 17
........................................................................................................ 18
.......................................................................................... 18
.................................................... 19
......................................................... 20
........................................ 20
............................................................................................ 21
...................................................................................................... 22
..................................................................................................... 23
.............................................................................................. 23
.................................................................... 24
................................................................................................... 26
Figure 3-14: AT/ATX Power Mode Switch
Figure 3-15: Audio Connector
Figure 3-16: CAN-bus Terminal Block Pinouts
Figure 3-17: Digital I/O Connector Pinout Location
Figure 3-18: LAN Connection
Figure 3-19: RJ-45 Ethernet Connector
Figure 3-20: 4-pin Terminal Block Pinout Location
Figure 3-21: Power Input Connector
Figure 3-22: Remote Control Terminal Block Pinout Location
Figure 3-23: RJ-45 RS-232 Serial Device Connection
Figure 3-24: RJ-45 RS-232 Serial Port Pinout Location
Figure 3-25: DB-9 Connector Pinout Location
.................................................................................. 26
..................................................................................................... 27
.......................................................................... 27
.................................................................. 28
...................................................................................................... 30
...................................................................................... 30
.................................................................. 31
........................................................................................... 32
................................................ 32
............................................................... 33
............................................................ 34
.......................................................................... 34
Page 10

TANK-720 Embed d ed Syste m
Page x
Figure 3-26: RJ-45 RS-422/485 Serial Device Connectio n ........................................................ 35
Figure 3-27: RJ-45 RS-422/485 Serial Port Pinout Location
Figure 3-28: DB-9 Connector Pinout Location
Figure 3-29: Serial Device Connector
Figure 3-30: Serial Port Pinout Location
Figure 3-31: USB Device Connection
Figure 3-32: VGA Connector
Figure 3-33: VGA Connector
Figure 3-34: Power Button
Figure 3-35: Power Connectors
Figure 3-36: ACC On: AT Mode
Figure 3-37: ACC On: ATX Mode
Figure 3-38: ACC On: Switch Bet ween PWR1 and PWR2
Figure 3-39: ACC On: Shutdown
Figure 3-40: ACC Off: AT Mode
Figure 3-41: ACC Off: ATX Mode
Figure 3-42: ACC Off: Switch Between PWR1 a n d PWR2
Figure 3-43: ACC Off: Shutdown
..................................................... 36
.......................................................................... 36
......................................................................................... 37
.................................................................................... 38
......................................................................................... 39
....................................................................................................... 40
....................................................................................................... 40
........................................................................................................... 41
.................................................................................................. 42
................................................................................................... 43
................................................................................................. 43
........................................................ 44
................................................................................................. 44
................................................................................................... 45
................................................................................................ 45
........................................................ 46
................................................................................................. 46
Figure A-1: IEI One Key Recovery Tool Menu
Figure A-2: Launching the Recovery Tool
Figure A-3: Recovery Tool Setup Menu
Figure A-4: Command Mode
Figure A-5: Partition Creation Commands
Figure A-6: Launching the Recovery Tool
Figure A-7: System Configuration for Windows
Figure A-8: Building the Recovery Partition
Figure A-9: Press Any Key to Continue
Figure A-10: Press F3 to Boot into Recovery Mode
Figure A-11: Recovery Tool Menu
Figure A-12: About Symantec Ghost Window
Figure A-13: Symantec Ghost Path
Figure A-14: Select a Local Source Drive
Figure A-15: Select a Source Partition from Basi c Drive
Figure A-16: File Name to Copy Image to
Figure A-17: Compress Image
........................................................................... 87
................................................................................. 92
..................................................................................... 92
........................................................................................................ 93
................................................................................. 94
................................................................................. 96
....................................................................... 96
.............................................................................. 97
..................................................................................... 97
.................................................................. 98
.............................................................................................. 98
........................................................................... 99
............................................................................................ 99
................................................................................100
.......................................................100
................................................................................101
...................................................................................................101
Page 11

TANK-720 Embed d ed Syste m
Page xi
Figure A-18: Image Creation Confirmation ..............................................................................102
Figure A-19: Image Creation Process
Figure A-20: Image Creation Complete
Figure A-21: Press Any Key to Continue
Figure A-22: Auto Recovery Utili ty
Figure A-23: Launching the Recovery Tool
Figure A-24: Auto Recovery Environment for Windows
Figure A-25: Building the Auto Recovery Partition
Figure A-26: Factory Default Image Confirmation
Figure A-27: Image Creation Complete
Figure A-28: Press any key to continue
Figure A-29: Partitions for Linux
Figure A-30: Manual Recovery Environment for Linux
Figure A-31: Access menu.lst in Linux (Text Mode )
Figure A-32: Recovery Tool Menu
Figure A-33: Recovery Tool Main Menu
Figure A-34: Restore Factory Default
Figure A-35: Recovery Complete Window
.......................................................................................102
....................................................................................102
.................................................................................103
...........................................................................................104
.............................................................................104
........................................................104
.................................................................105
..................................................................105
....................................................................................106
...................................................................................106
...............................................................................................108
..........................................................109
...............................................................110
............................................................................................110
...................................................................................111
.......................................................................................112
...............................................................................113
Figure A-36: Backup System
Figure A-37: System Backup Complete Window
Figure A-38: Restore Backup
Figure A-39: Restore System Backup Complete Window
Figure A-40: Symantec Ghost Window
.....................................................................................................113
....................................................................114
....................................................................................................114
......................................................115
....................................................................................115
Page 12

TANK-720 Embed d ed Syste m
Page xii
List of Tables
Table 1-1: TANK-720 Model Variations ......................................................................................... 2
Table 1-2: Technical Specifications
Table 3-1: Digital I/O Connector Pinouts
Table 3-2: HDMI Connector Pinouts
Table 3-3: LAN Pinouts
Table 3-4: RJ-45 Ethernet Connector LEDs
Table 3-5: 4-pin Terminal Block Pinouts
Table 3-6: Power Input Pinouts
Table 3-7: RJ-45 RS-232 Serial Port Pinouts
Table 3-8: DB-9 Connector Pinouts
Table 3-9: RJ-45 RS-422/485 Serial Port Pinouts
Table 3-10: DB-9 Connector Pinouts
Table 3-11: Serial Port Pinouts
Table 3-12: USB Port Pinouts
Table 3-13: VGA Connector Pinouts
Table 4-1: BIOS Navigation Keys
.............................................................................................. 5
.................................................................................... 28
........................................................................................... 29
................................................................................................................ 30
............................................................................... 31
.................................................................................... 31
................................................................................................... 32
............................................................................. 34
............................................................................................ 34
...................................................................... 36
.......................................................................................... 36
.................................................................................................... 38
...................................................................................................... 39
........................................................................................... 41
................................................................................................ 50
TANK-720
Page 13

TANK-720 Embed d ed Syste m
Page 1
Chapter
1
1 Introduction
Page 14

TANK-720 Embed d ed Syste m
Page 2
1.1 Overview
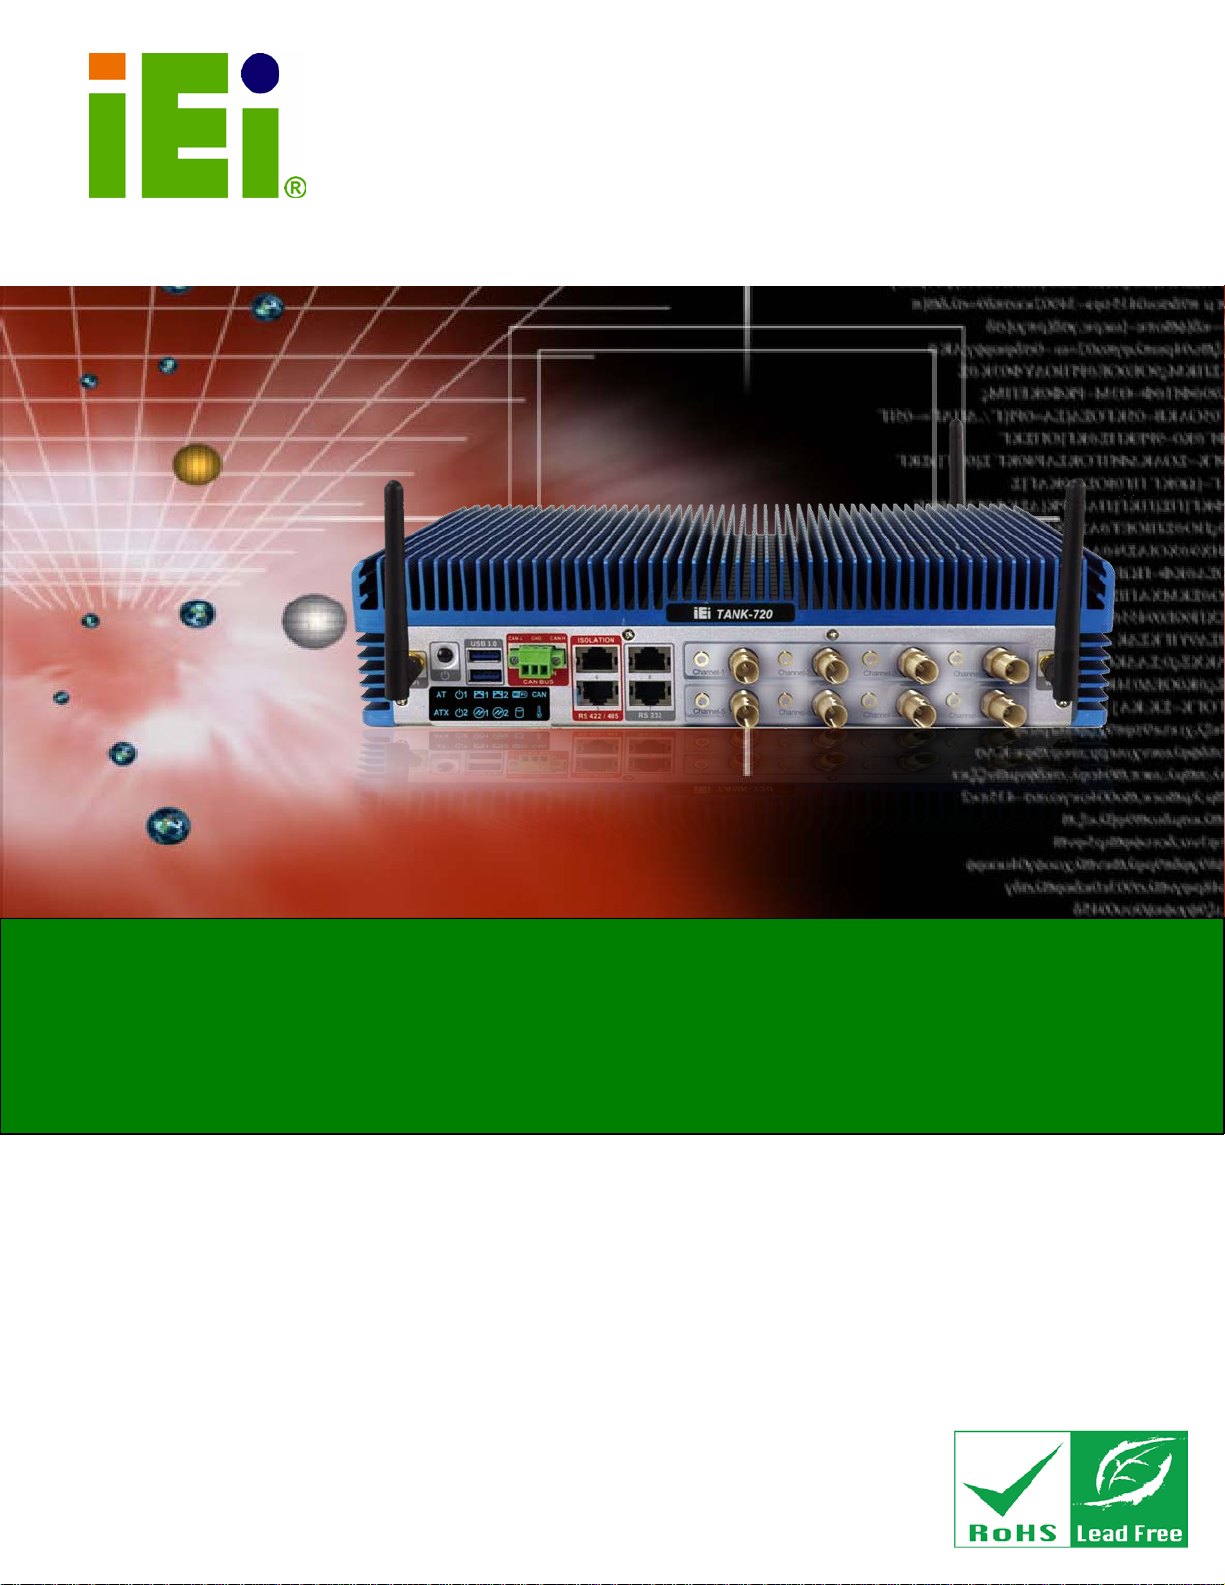
Figure 1-1: TANK-720
The TANK-720 Series fanless embedde d system i s powered by t he 2nd Generation Intel®
Core™ i7/i5/i3 and Pentium®/Celeron® desktop processor, uses the Intel® Q67 chipset
and has 2.0 GB of DDR3 memory. It supports dual display via VGA and HDMI. One SATA
6Gb/s, two USB 3.0 and four USB 2.0 ports provide flexible expansion options. Serial
device connectivity is provided by six RS-232 and two RS-422/485 ports.
1.2 Model Variations
The model variations of the TANK-720 Series are listed below.
Model No.
TANK-720-Q67/C/2G-R10
TANK-720-Q67/2G-R10
TANK-720-Q67W/C/2G-R10
TANK-720-Q67W/2G-R10
Table 1-1: TANK-720 Model Variations
8-Channel Audio/Video
Capture Card
Yes No
No No
Yes Yes
No Yes
802.11a/b/g/n 3T3R
Wi-Fi
Page 15

TANK-720 Emb edded System
Page 3
1.3 Features
The TANK-720 features are listed below:
2nd Gen Intel® Core™ i7/i5/i3 and Pentium®/Celeron® desktop processor
Intel® HD graphics supports H.264/AVC-MPEG2/VC1, DirectX 10.1 and
2.0 GB of DDR3 SDRAM S O -DIMM preinstalled
Dual combo (10/100/1000 baseT(X) or 1000 baseSPF slot) Gigabit LAN ports
8-channel audio/video capture support
Dual display via VGA and HDMI
Two USB 3.0 ports
Four USB 2.0 ports
One SATA 6Gb/s port
OpenGL 3.0
with Intel® AMT 7.0 support
Eight COM ports (four with isolation)
Dual-band 2.4/5 GHz 802.11a/b/g/n 3T3R MIMO Wi-Fi for high speed
wireless transmission
Redundant dual DC power input (9V~36V)
CAN-bus interface with isolatio n
1.4 Technical Specifications
The TANK-720 technical specifications are listed in Table 1-2.
Specifications
System
CPU
Chipset
Memo ry
2nd Generation Intel® Core™ i7/i5/i3 and Pentium®/Celeron®
desktop processor
Intel® Q67
1 x 204-pin 1066/1333 MHz dual-channel DDR3 SDRAM SO-DIMM
Ethernet Controller
slot (system max. 10GB)
2.0 GB of DDR3 mem ory preinstalled
Intel® 82579 PHY with Intel® AMT 7.0 support
Intel® 82583V Ethernet controller
Page 16

TANK-720 Embed d ed Syste m
Page 4
Specifications
I/O and Indicators
Ethernet
RS-232
RS-422/RS-485
USB Interfaces
Display
Audio Connector
CAN-bus
Audio/Video Capture
2 x Combo (SFP Fiber/RJ-45) Gigabit LAN
4 x DB-9 serial ports on rear panel
2 x RJ-45 serial ports with isolation on front panel
2 x RJ-45 serial ports with isolation on f ront panel
2 x USB 3.0 ports on front panel
4 x USB 2.0 ports on rear panel
1 x VGA port
1 x HDMI port
Supports resolution up to 2048x1536 @ 75Hz (VGA), 1920x1200
@ 60Hz (HDMI)
1 x Line-out port
1 x Mic-in port
1 x Phoenix terminal block on front pan el
Optional 4-channel audio/video input PCI e M i ni car d (up to two
cards)
Digital I/O
LED Indicators
Storage
1 x DIO port (8 bits)
AT power mode LED
ATX power mode LED
CAN-bus LED
CPU temperature alert LED
HDD LED
LAN 1 LED
LAN 2 LED
Power 1 LED
Power 2 LED
SFP 1 LED
SFP 2 LED
Wi-Fi LED
Page 17

TANK-720 Embed d ed Syste m
Page 5
Specifications
SATA
Power
Power Adapter
Power Supply
Power Consumption
Environmental and Mechanical
Operating Temperature
Storage Temperature
Mounting
Color
SATA 6Gb/s with 2.5” HDD/SSD support
90W power adapter
Input: 100V AC~240V AC, 50/60 Hz
Output: 19V DC
Redundant dual DC input
Power 1: 9V (+/-3%) ~ 36V
Power 2: 10.5V (+/-3%) ~36 V
19V@3.1A (Intel® Core™ i3-2100T processor 4G DDR3 memory)
-20°C~50°C, 5%~95%, non-condensing
-30°C~80°C
Desktop, Wall mount
Black C + Silver C
Weigh t (Net/G ross )
Phys ical Dimensions
Table 1-2: Technical Specifications
4.2 Kg / 6.9 Kg
310 mm x 200 mm x 70 mm (W x D x H)
1.5 Connector Panel
1.5.1 Front Panel
The TANK-720 front panel contains:
2 x 4-channel audio/video input (Optional)
1 x CAN-bus terminal block with isolation
12 x LED indicators
1 x Power button
2 x RS-232 serial ports with isolation
2 x RS-422/485 serial ports with isolation
2 x USB 3.0 ports
Page 18

TANK-720 Embed d ed Syste m
Page 6
2 x Wi-Fi antenna connectors
An overview of the front panel is shown in Figure 1-2.
Figure 1-2: TANK-720 Front Panel
1.5.2 Rear Panel
The TANK-720 rear panel contains:
1 x DIO port
1 x HDMI port
1 x Line-out port (green)
1 x Mic-in port (pink)
1 x 4-pin power jack for 10.5V (+/-3%) ~ 36V power input
1 x 4-pin terminal block for 9V (+/-3%) ~ 36V power input
1 x 2-pin terminal block for remote control
1 x Reset button
Page 19

TANK-720 Embed d ed Syste m
Page 7
2 x RJ-45 combo Gigabit LAN ports
4 x RS-232 serial ports
2 x SFP Fiber combo Gigabit LAN ports
4 x USB 2.0 ports
1 x VGA port
1 x Wi-Fi antenna connector
An overview of the rear panel is shown in Figure 1-3 below.
Figure 1-3: TANK-720 Rear Panel
Page 20

TANK-720 Embed d ed Syste m
Page 8
NOTE:
The TANK-720 provides two pairs of combo LANs. For each pair of
combo LAN, only one LAN port can work at one time, and the SFP
Fiber port works prior to the RJ-45 one. When a LAN port is working,
the corresponding LED indicator lights up. Refer to Section 1.6 for the
locations of the LED indicators.
1.6 LED Indicators
There are several indicators on the front panel of the TANK-720 as shown in Figure 1-4.
Figure 1-4: TANK-720 LED Indicators
WARNING:
The CPU Temperature Alert LED turns red when the CPU temperat ure
is too high. If this situation occurs, lower the environment temperature
or close some running applications to cool down the CPU.
Page 21

TANK-720 Embed d ed Syste m
Page 9
1.7 Dimensions
The physical dimensions are shown below:
Figure 1-5: Physical Dimensions (mm)
Page 22

TANK-720 Embed d ed Syste m
Page 10
Chapter
2
2 Unpacking
Page 23

TANK-720 Embed d ed Syste m
Page 11
may result in
2.1 Anti-static Precautions
WARNING:
Failure to take ESD precautions during installation
permanent damage to the TANK-720 and severe injury to the user.
Electrostatic discharge (ESD) can cause serious damage to electronic components,
including the TANK-720. Dry climates are especially susceptible to ESD. It is therefore
critical that whenever the TANK-720 or any other electrical component is handled, the
following anti-static precautions are strictly adhere d to.
Wear an anti-static wristband: Wearing a simple anti-static wristband can
help to prevent ESD from damaging the board.
Self-grounding: Touch any grounded conducting material before handling
the board. During the time the board is handled, frequently touch any
conducting materials that are connected to the ground.
Use an anti-static pad: When configuring the TANK-720, place it on an
antic-static pad. This reduces the possibility of ESD damaging the TANK-720.
2.2 Unpacking Precautions
When the TANK-720 is unpacked, please do the following:
Follow the anti-static precauti ons outlined in Section 2.1.
Make sure the packing box is facing upwards so the TANK-720 does not fall
out of the box.
Make sure all the components sho wn i n Section 2.3 are present.
Page 24

TANK-720 Embed d ed Syste m
Page 12
2.3 Unpacking Checklis t
NOTE:
If some of the components listed in the checklist below are missing,
please do not proceed with the installation. Contact the IEI reseller or
vendor you purchased the TANK-720 from or contact an IEI sales
representative directly. To contact an IEI sales representative, please
send an email to
The TANK-720 is shipped with the following components:
Quantity Item and Part Number Ima ge
Standard
1 TANK-720 Series
1 Power adapter
(P/N: 63040-010090-020-RS)
1 Power cord
(P/N: 32702-000401-100-RS)
1 Power cord convert cable
sales@iei.com.tw.
(P/N: 32702-000300-100-RS)
2 Mounting brackets
(P/N: 41020-0163J4-00-RS)
8 Mounting brackets screw
(P/N: 44033-030062-RS)
 Loading...