

Page 1

IDUINO for maker’s life
User Manual
For IDUINO Mega2560 Board(ST1026)
www.openplatform.cc
Page 2

IDUINO for maker’s life
1.Overview
1.1 what is Arduino?
Arduino is an open-source prototyping platform based on easy-to-use hardware
and software. Arduino boards are able to read inputs - light on a sensor, a finger on a
button, or a Twitter message - and turn it into an output - activating a motor, turning
on a LED, publishing something online. You can tell your board what to do by sending
a set of instructions to the microcontroller on the board. To do so you use the Arduino
programming language (based on Wiring), and the Arduino Software (IDE), based on
Processing.
The official website is www.arduino.cc and www.arduino.org.
1.2 what is IDUINO ?
Because of the arduino technology is totally opensource, so anyone can use this
facility to create more valuable products.
IDUINO is a series of Ardunio opensource products’ collection, which not only
includes motherboard or shield board , but hundreds of sensors and modules used for
Arduino board, and many kinds of Arduino Starter Kit, many Arduino projects, many
car chassis , expansion boards, accessories , and Arduino based DIY 3D Printer.
IDUINO are more focused on manufacturing and constructing Arduino project
system.
1.3 What’s the difference between Arduino and IDUINO?
For the development board, IDUINO is just a different brand compared with the
Arduino development.
For other categories, IDUINO’s quantity exceeds Arduino a lot.
www.openplatform.cc
Page 3
IDUINO for maker’s life
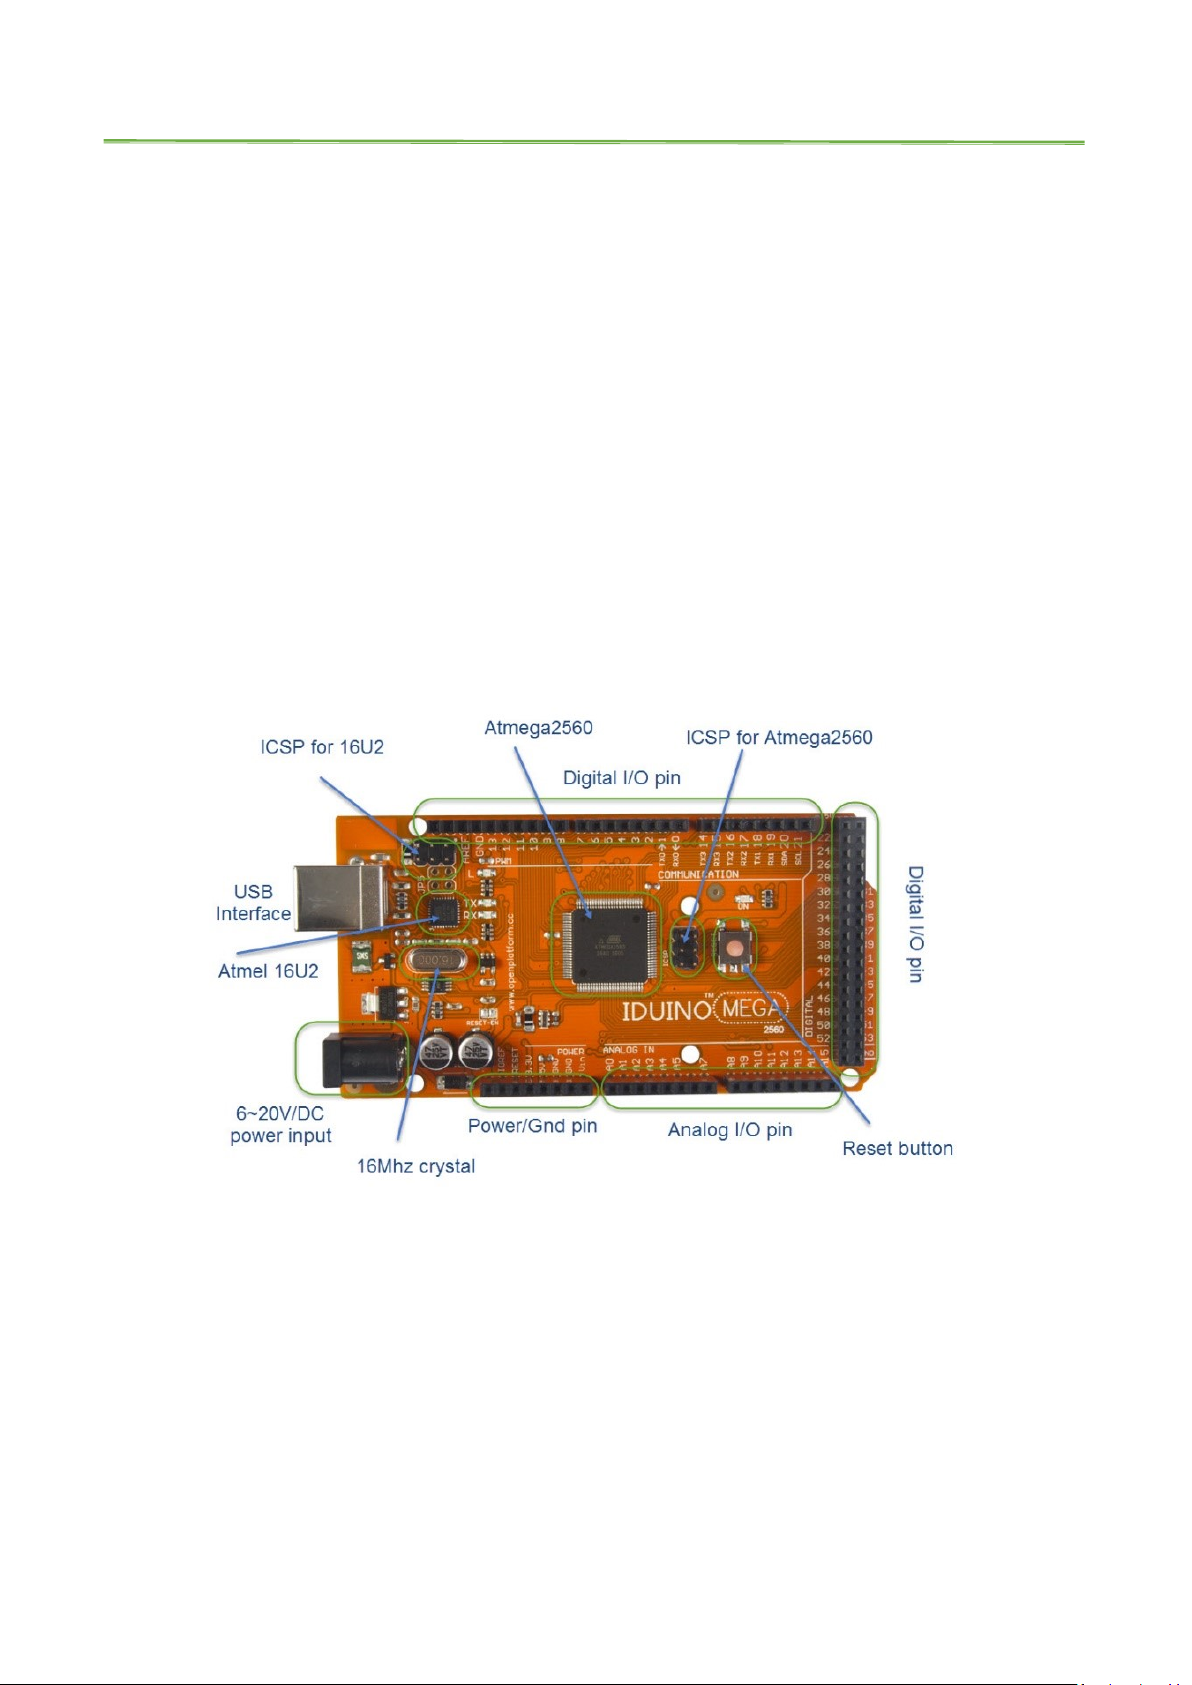
2.IDUINO Mega 2560
The Mega 2560 is a microcontroller board based on the ATmega2560. It has 54
digital input/output pins (of which 15 can be used as PWM outputs), 16 analog inputs,
4 UARTs (hardware serial ports), a 16 MHz crystal oscillator, a USB connection, a power
jack, an ICSP header, and a reset button. It contains everything needed to support the
microcontroller; simply connect it to a computer with a USB cable or power it with an
AC-to-DC adapter or battery to get started.
Pinout:
www.openplatform.cc
Page 4

Specifications:
Microcontroller
ATmega2560
Operating Voltage
5V
Input Voltage (recommended)
7-12V
Input Voltage (limit)
6-20V
Digital I/O Pins
54 (of which 15 provide PWM output)
Analog Input Pins
16
DC Current per I/O Pin
20 mA
DC Current for 3.3V Pin
50 mA
Flash Memory
256 KB of which 8 KB used by bootloader
SRAM
8 KB
EEPROM
4 KB
Clock Speed
16 MHz
Length
101.52 mm
Width
53.3 mm
Weight
37 g
IDUINO for maker’s life
3. How to use these boards?
Here we use an example to indicate how to use these board. In this trail, we blink
a led via the IDUINO uno board’s 13 digital pin.
The connection as below:
www.openplatform.cc
Page 5

IDUINO for maker’s life
First, download the Arduino latest edition Integrated development
environment(IDE) from this page:
https://www.arduino.cc/en/Main/Software,
Then install the software, and connect the IDUINO development board with the
computer via USB cable, like below:
www.openplatform.cc
Page 6

IDUINO for maker’s life
launch the Arduino application, and open File > Examples > 01.Basics > Blink.
www.openplatform.cc
Page 7

IDUINO for maker’s life
You'll need to select the entry in the Tools > Board menu that corresponds to your
Arduino.
www.openplatform.cc
Page 8

IDUINO for maker’s life
Select the serial device of the Arduino board from the Tools > Serial Port menu. On the
Mac, this should be something with /dev/tty.usbmodem (for the Uno or Mega 2560)
or /dev/tty.usbserial (for older boards) in it.
www.openplatform.cc
Page 9

IDUINO for maker’s life
Now, simply click the "Upload" button in the environment. Wait a few seconds - you
should see the RX and TX LEDs on the board flashing. If the upload is successful, the
message "Done uploading." will appear in the status bar. (Note: If you have an Arduino
Mini, NG, or other board, you'll need to physically press the reset button on the board
immediately before clicking the upload button on the Arduino Software.)
A few seconds after the upload finishes, you should see the pin 13 (L) LED on the
board start to blink (in orange). If it does, congratulations! You've gotten Arduino upand-running.
www.openplatform.cc
 Loading...