

Page 1

Oregon Scientific™ OUTBREAKER
Sports Watch (TS1X0 series)
User Manual
TABLE OF CONTENTS
Introduction ......................................................................2
Key features .....................................................................3
OUTBREAKER watch ...................................................3
Chest belt (TS120/ TS130 only) .................................... 3
Bicycle equipment .........................................................3
PC Kit ............................................................................4
LCD display symbols .....................................................4
How the OUTBREAKER works ....................................... 6
How the altimeter, thermometer and barometer work
(TS 110 & 130 only).......................................................6
A multi-system facility ....................................................6
TOUR Mode ..................................................................6
PC Kit ............................................................................6
Getting started .................................................................7
Turn on the watch (first-time use only) .......................... 7
Batteries ........................................................................7
Switch between Modes..................................................8
Switch between Mode options ....................................... 8
Change setting values ...................................................8
Use the HI-GLO backlight..............................................8
Key lock .........................................................................8
Handling the product .....................................................8
CLOCK Mode .................................................................... 9
Set clock ........................................................................9
Set the alarm .................................................................9
Stopwatch ......................................................................... 9
Timer .................................................................................10
Temperature display (TS110 / TS130 Only) .................. 10
ALTI Mode (TS110 / TS130 Only) ....................................10
Access altimeter options................................................11
Set current altitude and resolution ................................. 11
Set altitude alert.............................................................12
Recall altitude data ........................................................12
Switch between view options.........................................13
Additional view options ..................................................13
BARO Mode (TS110 / TS130 Only) .................................13
Set sea-level pressure ................................................... 13
View sea-level pressure ................................................14
Weather forecast ...........................................................14
TOUR Mode ......................................................................14
TOUR memory ..............................................................14
Activate TOUR Mode.....................................................15
Record markers in TOUR Mode ....................................15
Pause TOUR Mode .......................................................15
Deactivate TOUR Mode ................................................16
Clear all TOUR memories .............................................16
PULSE (Heart Rate) Mode (TS120 / TS130 only) ........... 16
Wearing the chest belt ................................................... 17
Training Zones...............................................................17
Set Training Zones alarm ..............................................18
Track heart rate during training .....................................19
1
GB
Page 2

GB
BIKE Mode ........................................................................20
Set up for BIKE Mode .................................................... 20
Step 1: Attach the equipment to the bicycle ..................20
Step 2: Enter wheel circumference...............................21
Access the BIKE Mode options .....................................22
View speed and cadence information............................22
PC Kit ................................................................................22
PC Mode............................................................................23
Set up for PC Mode .......................................................23
Use the software............................................................23
PC Mode options ...........................................................23
Download data...............................................................24
Effective use and range...................................................24
Aquatic and outdoor activities........................................24
Safety and care ................................................................25
Safety precautions ......................................................... 25
Care instructions............................................................25
Troubleshooting guide ....................................................26
Specifications...................................................................27
Warnings...........................................................................29
Additional resources ....................................................... 29
INTRODUCTION
Thank you for selecting the Oregon Scientific OUTBREAKER
Sports Watch as your fitness product of choice. Your new
sports watch is designed to give you many years of reliable
service and includes the following features:
•Clock, calendar, stopwatch and timer functions
•Barometer with local and sea pressure readings (TS110 /
TS130 only)
•Weather forecast and temperature readings for up to 24
hours (TS110 / TS130 only)
•Altimeter readings up to 9,000 meters (29,700 feet) (TS110
/ TS130 only)
•Heart rate monitor that gives heart rate readings during
exercise (TS120 / TS130 only)
•Bicycle accessory kit to take readings during cycling
• PC docking station and software to download readings onto
your computer
The OUTBREAKER TS110 and TS130 sports watches comprise the most advanced and patented Baro-compensation
technology, distinguishing between barometric and altitude
pressure changes, and giving you more reliable readings
(weather forecasts, etc.). It is a precision device designed to
augment your daily or weekly exercise program as well as
provide you with accurate and easy to use watch functions.
This manual contains important safety and care information,
and provides step-by-step instructions for using this product.
Read the manual thoroughly, and keep it in a safe place in case
you need to later refer to it..
2
Page 3

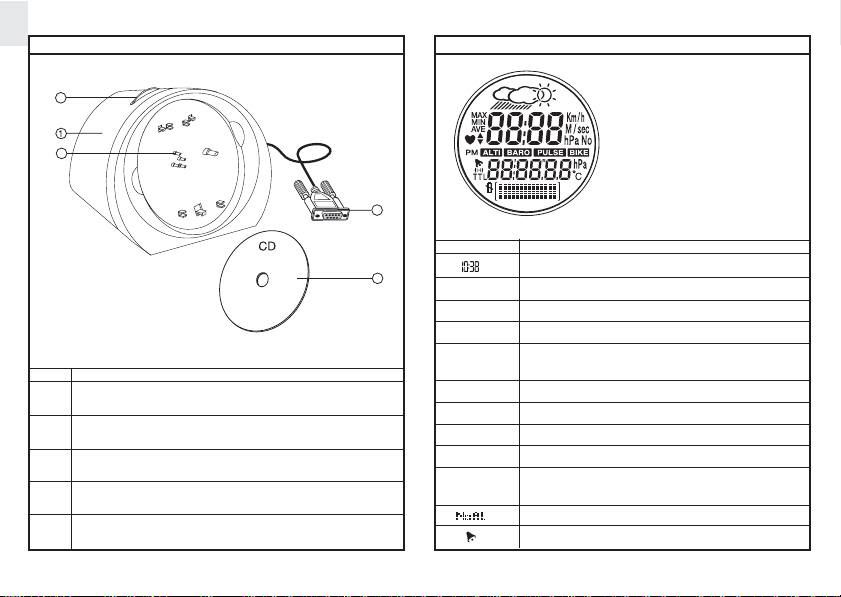
KEY FEATURES
OUTBREAKER WATCH
BICYCLE EQUIPMENT
3
GB
4 1 2
ITEM NAME DESCRIPTION
1 SELECT/+ Press to increase value, change Mode display. Press and hold
2 MODE Press to switch between Modes.
3MARKER/LIGHT Press to activate HIGLO backlight. Press to record a marker
4 ST/SP/- Press to start or stop the Stopwatch/Timer or decrease value.
5 FUN/SET Press to enter a sub-mode or press and hold to change a value.
6 LYCRA WATCH Unfasten the strap and pull to remove.
to activate the key lock function.
during TOUR Mode.
STRAP
CHEST BELT
I
ITEM NAME
1 WIRELESS SPEED SENSOR
2 CADENCE SENSOR (TS130-WIRELESS; TS110/TS120-WIRE-CON-
NECTED to Bike Mount)
3 BIKE MOUNT
2
I ITEM NAME
1 CHEST BELT
2 STRAP
4 MAGNETS/ SCREWS/ NUTS/PADS
5 FIXING STRAPS
The OUTBREAKER TS130 comes with two wireless
NOTE
sensors.
3
5
Page 4
GB
PC KIT
LCD DISPLAY SYMBOLS
3
2
4
ITEM NAME
1 DOCKING STATION
2 WATCH CONNECTION POINTS
3 MOUNTING CLIPS (rotate to release)
4 RS-232C COMPUTER CONNECTION CABLE
5 SOFTWARE CD-ROM
SYMBOL DESCRIPTION
5
YR Year setting.
The current time.
MTH Month setting.
DAY Day setting.
MON Current day of the week.
(MON..SUN)
TRIP TOUR Mode is running time/date cannot be set
HR Hour setting.
MIN Minute setting.
SET Displayed when in a setting mode.
AL Shows alarm time, or event alarms
(max/min altitude/heart rate etc)
Shows alarm is deactivated.
Shows if alarm is on.
4
Page 5
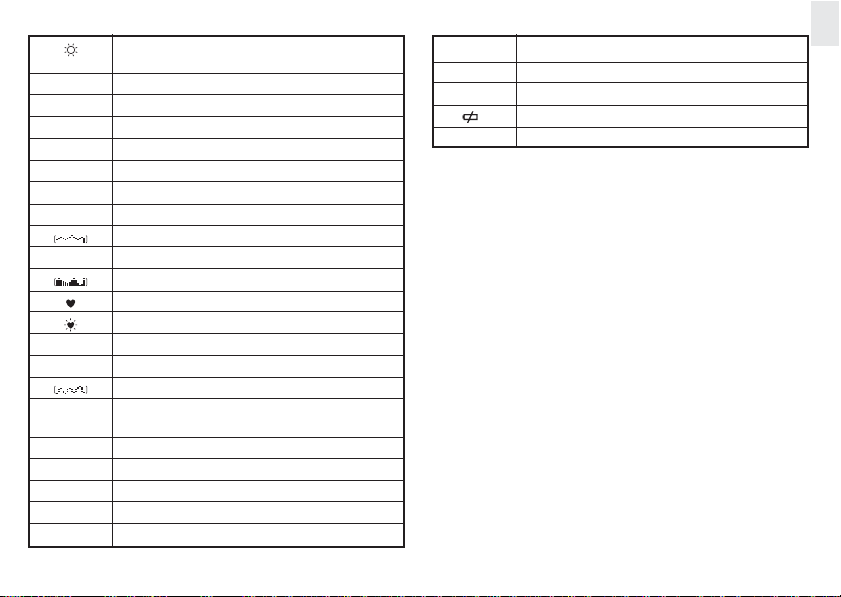
Weather forecast for the next 12-24 hours.
(Sunny/Slightly Cloudy/Cloudy/Rainy)
STW Stopwatch can be started/stopped/reset.
TMR Timer (countdown) can be started/stopped/reset
ALTI Altitude is displayed (top row).
MEM Memory record (current trip only).
LOC Local barometric pressure.
SEA Sea pressure (barometric).
SPD Shows vertical speed (historical or current).
Graphical display of your bicycle speed.
ttl Shows total time of activity.
Shows altitude graphically.
Heart rate (per minute) monitor activated.
Heart rate signal reception.
Status Bar Blinks Key lock activated.
Z1 (1-5) Shows which training shown is currently selected.
Shows heart beat graphically.
M1 (1..99) Shows which record you are making, or storing
WØ (wheel icon) Wheel circumference setting mode.
CAD Cadence (pedal) speed (revolutions/min).
END TOUR is finished.
(see TOUR Mode).
88% % of memory used in TOUR Mode.
CLR Ready to clear all tour memories.
GB
donE All tour memories have been cleared.
hPa Pressure shown in Hecto-Pascal’s.
inHg Pressure shown in inches of mercury.
Low battery level (replace batteries)
REST TOUR Mode paused (off) or resumed (on)
5
Page 6

GB
HOW THE OUTBREAKER WORKS
The top feature of the OUTBREAKER TS series is a Bike
Computer that allows you to download information to a PC.
Select models also include a Heart Rate Monitor (TS120) or/
and Altimeter and Barometer (TS110). TS110 and TS130
feature temperature and weather forecast (with barocompensation technology for accuracy). The TS130 has all
these features.
HOW THE ALTIMETER, THERMOMETER, AND
BAROMETER WORK
The patented baro-compensation technology used in this watch
allows it to distinguish between barometric pressure change
and altitude pressure change. This means it can detect barometric pressure (localized weather conditions) as distinct from
changes in altitude pressure, and gives more accurate readings than most average devices (which frequently rely on
manual deactivation before initiating a new forecast).
A MULTI-SYSTEM FACILITY
The product is designed for use during many kinds of activity.
It can display and store a range of information of interest to the
casual and more serious sports or exercise enthusiast. The
watch includes the following Modes:
TS110 — Clock, Altimeter, Barometer, Bike & PC
TS120 — Clock, Pulse, Bike & PC
TS130 — Clock, Altimeter, barometer, Pulse, Bike and PC
It is equipped with a multi-system facility that allows you to
combine information according to your preference, such as sea
level pressure and temperature (Except TS120), Heart Rate
and Stopwatch (TS120/TS130), or bike speed and cadence for
all three models. You may also use the stopwatch or timer
(countdown) facility in combination with other functions, and
both will continue to run in the background while you use other
features of the watch.
The heart-rate monitor and altimeter features of the
OUTBREAKER watch include customized settings. For the
TS120/TS130 models, maximum and minimum heart rate
limits can be set for use during exercise, and for the TS110/
TS130, the altimeter can be set to register ascending and
descending limits. In both cases a short beep signifies either
limit has been exceeded. The watch also has a clock, calendar,
and chronometer, all of which need to be set according to the
current date and location.
TOUR MODE
The watch features a TOUR Mode in which you can record all
data from a single trip, or workout, and then download this
information onto your PC for storage and viewing. The watch
can recall 99 different single tours, trips or workouts.
NOTE
The docking station and CD-ROM are supplied to
download information from TOUR Mode.
PC KIT
A docking station is provided with the watch for connecting to
a computer, along with a CD-ROM for installing the necessary
software onto your computer. You can also use the software to
change some of the watch settings.
6
Page 7
GETTING STARTED
TURN ON THE WATCH (FIRST-TIME USE ONLY)
Press MODE key for 2 seconds or more to activate the
LCD Display
BATTERIES
All batteries are included and already installed. Refer to the
Specifications page for battery types (➔ 28).
NOTE
To avoid the possibility of permanently damaging the
watch, we strongly recommend that you take your watch to a
local retailer or jeweler to have the watch battery replaced.
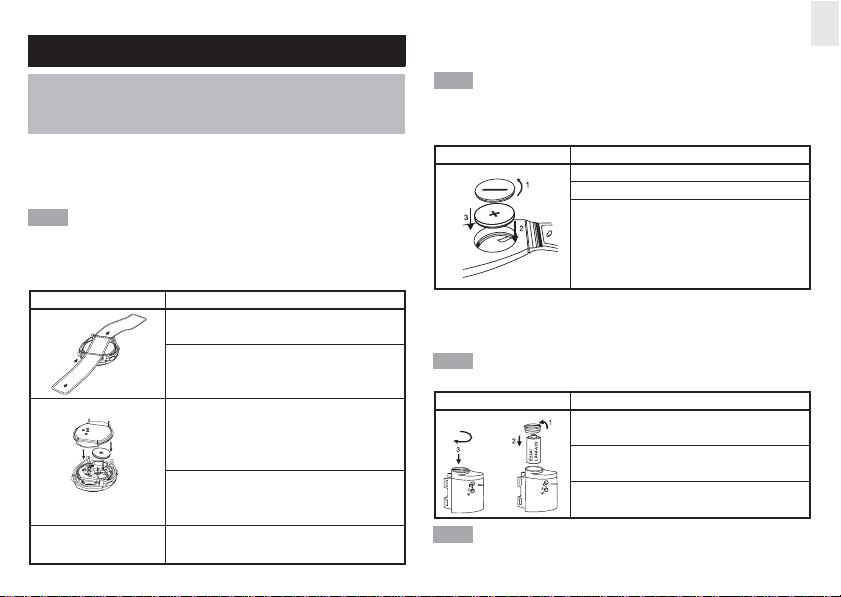
To load new batteries in the watch:
Diagram Instructions
1. Remove the Lycra strap.
2. Remove the back cover with a small Phillips
screwdriver.
3. Install the battery by matching the correct polarity.
Always use the correct battery type.
Warning: Reversing the polarity may damage the
product.
4. Replace the cover, screws, screw pin, and
watchband. (Be sure to replace the O ring
properly).
5. Check that replacement batteries are fitted properly
by pressing a button. You should hear a beep.
To load new batteries in the chest belt (TS120 and TS130
only) and bike mount:
NOTE
The chest belt will stop sending signals if its battery is
low. Bad transmission from the chest belt may also be the result
of poor contact with the skin, surrounding interference, or
placing the receiver watch too far away.
Diagram Instructions
To load new batteries in the bicycle sensors and bike
mount:
The sensors will stop sending signals to the watch if
NOTE
their batteries are low.
Diagram Instructions
NOTE
Replace the batteries whenever the HIGLO backlight
dims or stops working, or when you see the low battery icon.
7
1. Insert a coin into the grove. Turn counter-clockwise.
2. Insert the battery. Match the correct polarity.
3. Replace the battery compartment. Tighten into
place.
1. Insert a coin into the grove and turn counterclockwise.
2. Remove the battery. Remove the battery and
insert a new one.
3. Replace thebattery holder and compartment lid.
Tighten into place.
GB
Page 8

GB
Change the battery whenever the sensor does not perform as
expected.
NOTE
Used batteries can be harmful to the environment, and
should not be thrown out with household rubbish. Contact your
local waste disposal authority for instructions on how to dispose
of used batteries. Protect the environment by taking exhausted
batteries to authorized disposal stations.
USE THE HI-GLO BACKLIGHT
Press MARKER/LIGHT to turn on the HI-GLO backlight on for
five seconds. Once the light is on, press any key to keep it on
for a further five seconds.
In order to save power the light will not work when the battery
is low. If this happens, change the battery as soon as possible.
SWITCH BETWEEN MODES
Press the MODE button to switch between the Modes:
TS110 — CLOCK, ALTIMETER, BAROMETER, BIKE, and
PC
TS120 — CLOCK, PULSE (Heart Rate), BIKE, and PC
TS130 — CLOCK, ALTIMETER, BAROMETER, PULSE,
BIKE, and PC
A status bar the appropriate mode on the LCD display when it
is selected.
SWITCH BETWEEN MODE OPTIONS
Press SELECT/+ to switch between the options within a Mode.
CHANGE SETTING VALUES
Press and hold FUN/SET for 2 seconds to enter setting mode.
Then, press ST/SP/- or SELECT/+ to change the value. Press
FUN/SET to switch between options, and to confirm the changes
when you are done.
KEY LOCK
The watch also has a key lock function to stop the buttons from
being accidentally pressed during an activity. To activate it
simply press and hold SELECT/+ until the status bar blinks. The
function keys are now useless. To reactivate them, press and
hold SELECT/+ again until the status bar stops blinking.
The alarm will still go off while the Key Lock is activated.
NOTE
Pressing any key while in Key lock will stop the alarm.
HANDLING THE PRODUCT
The watch is designed to withstand a wide range of sports
activities, and comes complete with a strong wristband. When
riding, make sure the watch is firmly connected to the bike
mount, and connect all bicycle equipment carefully and securely. See the BIKE Mode section (➔ 20) for instructions.
8
Page 9

CLOCK MODE
The time, date (including the day of the week) and time alarm
can be set while the watch is in CLOCK Mode. Follow the
instructions below to set or activate the time, date, alarm time,
stopwatch and timer.
SET CLOCK:
1. Press MODE to display the CLOCK Mode.
2. Press and hold FUN/SET for 2 seconds. “24h” will flash on
the display.
3. Press ST/SP/- to change from 24 hour to 12 hour time
display.
4. Press FUN/SET again. The hour will flash. Press
SELECT/+ to move the value up, or ST/SP/- to move the
value down.
Tip: Continuously press and hold a button to fast-change
the value.
5. Repeat Steps 3 – 4 to change the rest of the settings, in this
order: hours, minutes, year, month, and day.
SET THE ALARM
1. Press MODE to display the CLOCK mode.
2. Press FUN/SET to display the Alarm screen.
3. To turn the alarm on or off, press SELECT/+.
4. To change the alarm settings, press and hold FUN/SET for
2 seconds, Then, use the SELECT/+ or ST/SP/- buttons to
change the hour. Press FUN/SET to switch to minutes, and
use SELECT/+ or ST/SP/- to change the values. Press
FUN/SET again when you are finished.
STOPWATCH
The Stopwatch works in CLOCK, ALTI, PULSE, and BIKE
Modes. From any of these Modes, press SELECT/+ to display
the stopwatch. Then,
•
Press ST/SP/- to start, pause, and
stop the stopwatch.
•
With the stopwatch stopped, press
ST/SP/- again to reset.
GB
NOTE
You cannot change these settings while in TOUR
Mode. If you attempt to do so, TRIP will show on the display.
Refer to the TOUR Mode section (➔ 14).
NOTE
You can switch to other Modes
while running the stopwatch in the background.
9
Page 10

GB
TIMER
The Timer works in CLOCK, ALTI,
PULSE, and BIKE Modes. From any of
these Modes, press SELECT/+ to display the stopwatch. Press ST/SP/- to
reset the Stopwatch, then:
•Press and hold FUN/SET for 2 seconds. The display will change to
TMR.
•Press ST/SP/- or SELECT/+ to change a value.
•Press FUN/SET to switch between values and accept
changes.
•Press ST/SP/- to start or stop the timer.
•With the timer stopped, press ST/SP/- again to reset.
NOTE
You can switch to other Modes while running the timer
in the background.
NOTE
To return to STW Mode, you must reset all the timer
values to 0. The timer automatically switches to STW Mode
when it reaches 0.
TEMPERATURE DISPLAY
(TS110 & TS130 ONLY)
The Temperature can be displayed in
CLOCK, ALTI, and BARO Modes. From
any of these Modes, press SELECT/+
to display the Temperature. The Temperature shows in either Celsius or
Fahrenheit only, depending on the
watch version you purchased.
NOTE
Your wrist temperature may affect the reading, particularly during exercise. Take off the watch and leave it for 15
minutes to get the most accurate reading.
ALTI MODE (TS110 / TS130 ONLY)
The OUTBREAKER sports watch includes a barometer that distinguishes
between pressure caused by altitude
changes and pressure caused by
weather conditions. This technology
reduces discrepancies in readings and
makes the altimeter more accurate than
most average devices.
The watch can store and recall the following values:
•Current altitude
•Maximum / minimum altitudes attained during your a trip
10
Page 11

• Total accumulated maximum / minimum altitudes attained
during your trip
•Maximum / minimum altitude alert (sounds an alarm when
exceeded)
•Maximum ascending, maximum descending speeds
•Current vertical speed
•Rate of altitude change
The altitude is shown it two ways, as a numeric value indicating
your current altitude, and as a bar chart indicating changes in
altitude. Both values will change as you move about.
ACCESSING THE ALTIMETER OPTIONS
Press MODE to access the ALTI Mode, then press SELECT/+
to loop through the options.
SET CURRENT ALTITUDE
When you first use the watch, it is important to set the current
altitude and local sea-level pressure so your ascending and
descending altitude can be accurately measured. You can
find the current altitude by comparing your position to a
topographical map, and then entering the value in the watch.
NOTE
It is necessary to reset the altitude after being in a
pressurized chamber (i.e., airplane).
For instructions on setting the sea-level pressure, refer to the
next section.
Diagram Instructions
Tip: You can also set the current altitude and alarm limits with
the help of the PC software (see PC section).
11
1. Press and hold FUN/SET for 2 seconds while in
ALTI mode.
2. Use SELECT/+ or ST/SP/- to change the value.
3. Press FUN/SET to exit the setting mode.
GB
Page 12

GB
SET ALTITUDE ALERT
The watch can be set to remember an altitude limit (either up or
down, but not both simultaneously). If the alarm is activated, a
series of beeps (at 5 second intervals) will sound, and the whole
LCD display will flash, when you breach the limit. To end the
alert, press any button.
To activate or deactivate the alert and set its direction:
Diagram Instructions
To set the altitude alert value:
Diagram Instructions
1. Press FUN/SET 2 times until you reach the Alarm
screen. Display reads 'AL' (off) or 'AL' (on) at the
bottom)
2. You may set the arrow at the bottom of the screen
to a
ascending
, or
descending
To change direction, press ST/SP/-.
3. Press SELECT/+ to turn the alarm on or off.
1. Press and hold FUNC/SET for 2 seconds, then
press SELECT/+ or ST/SP/- to change the altitude
limit.
limit (but not both).
RECALLING ALTITUDE DATA
The OUTBREAKER allows you to track the following information as you exercise.
•Max / min altitude attained -- shows the highest or lowest
point you have reached so far in relation to your watch’s
permanent altitude setting.
•Max / min altitude accumulated – represents the total distance you have ascended or descended; that is, every
incline is added together or ‘accumulated’, and likewise
every decline is added and ‘accumulated’, to give a total.
•Vertical speed -- how fast you are currently climbing
•Max ascending speed – fastest speed you have climbed
•Max descending speed – fastest speed you have descended
NOTE
Clearing the memory allows you to start over again on
a new trip, though all the information from your current trip will
be lost.
SWITCH BETWEEN VIEW OPTIONS
While in ALTI Mode, press SELECT/+ to
switch between the view options:
Altimeter/Clock, Altimeter/Local
pressure, Altimeter/STW and Altimeter/
Temperature.
12
Page 13

ADDITIONAL VIEW OPTIONS
While viewing the ALTI/Clock display,
press FUN/SET to switch between additional view options: max and TOTAL TTL (accumulated) ascending altitude
(press SELECT/+ to show max and
accumulated descending altitude), altitude alarm, current vertical speed and
clock (use SELECT/+ to show current vertical speed and
stopwatch), and max vertical speed (press SELECT/+ for max
descending speed).
To clear a value from the memory, press and hold FUN/SET for
2 seconds.
GB
BARO MODE (TS110/TS130 ONLY)
A unique feature of the TS110/ TS130 BARO Mode is that
it enables you to view sea level pressure history for the
past 24 hrs.
SET THE SEA-LEVEL PRESSURE
Sea level pressure can change relative to location. To achieve
accurate altitude readings, set the sea-level pressure value
before every trip. Check the newspaper, local news station,
trail marker, or weather forecast for local readings, and always
select the reading nearest to your present location.
Diagram Instructions
1. While in BARO Mode, press FUN/SET until the
SEA (sea pressure) screen is shown.
2. Use SELECT/+ or ST/SP/- to change the value.
The value will change in increments of 1 hPa or
.03 inHg, depending on the watch you purchased.
3. Press FUN/SET again when finished.
13
Page 14

GB
VIEW THE SEA-LEVEL PRESSURE
To view a graphical image of the sea level
pressure (for the current 14 hours), press
FUN/SET with the SEA screen shown in
BARO Mode. Press SELECT/+ to view
sea pressure history for –1h (last hour) up
to –24h, then press FUN/SET again to
view the reading.
WEATHER FORECAST
The built-in barometer helps to forecast the weather for the next
12-24 hours. This reading is based on barometric pressure
changes and has an effective range of 30 to 50 kilometers
(18 – 31 miles). The patented baro-compensation technology
in the OUTBREAKER watch allows it to differentiate between
pressure changes due to altitude, and those due to weather
changes. To avoid inaccurate forecasts, the watch will favor
altitude readings when you are
ing. This means the weather icon will disappear after significant
vertical movements. To display an accurate forecast, simply
remain at any fixed altitude for roughly 5 minutes.
The forecast will be displayed at the top of the watch as one of
these four icons:
NOTE
When functioning normally the watch automatically
updates the forecast every 15 minutes.
actually
ascending or descend-
TOUR MODE
There are two ways of using the memory on the OUTBREAKER.
First, the watch computer will record information as you train,
for display only. This means you can check the information
during or after your exercise, but there will be no record once
you clear the memory in preparation for your next training
event.
To record and store this information (for up to 99 different trips,
depending on the size of each record – see below) you must
activate the TOUR Mode and view the records through the PC
software.
NOTE
The information from a TOUR can only be viewed
through the PC software.
NOTE
You cannot change the date or time during TOUR
Mode.
TOUR MEMORY
TOUR Mode allows you to record and store data displayed on
the watch, which can then be downloaded onto your PC. Up to
99 TOURs can be recorded and stored to the PC software.
Depending on the model you purchase, the information you
choose to record (see below), and the time used by TOURs you
have already stored on the watch, the available memory length
may vary. The average memory storage capacities in realtime, (taking a data sample every 5 seconds), assuming default
settings (see Specifications: TOUR Mode) and no TOURs have
been saved for each model are as follows:
14
Page 15

Recording Total Memory Recording time (hours)
Interval TS130 TS120 TS110
5 sec 11 8 6
20 sec 44 34 23
40 sec 88 68 47
60 sec 132 102 70
120 sec 264 203 140
240 sec 527 406 280
The watch can record and store up to 99 different trips,
providing there is enough remaining memory.
Default sampling time for readings in TOUR Mode is every 5
seconds. To increase the gap between samplings, and thus
increase the memory capacity, you can adjust this setting
through the PC software.
ACTIVATE TOUR MODE:
For best results, perform these steps immediately before you begin your trip.
1. Simultaneously press FUN/SET and
MODE. The TOUR END screen will
display.
2. Press and hold FUN/SET for 2 seconds. The TOUR number (M1, M2, etc.) will show at the
bottom of the display. You are now recording information.
The percentage (%) at the top indicates the total used
memory.
3. To stop the TOUR, press and hold FUN/SET for 2 seconds.
END will show at the bottom of the display. The Tour data will
be stopped.
4. To begin another TOUR, press and hold FUN/SET for 2
seconds. The new TOUR number (M3, etc.) will show at the
bottom of the display. You are recording information again.
5. Press MODE to return to the CLOCK display.
NOTE
Used watch memory is given as a percentage. It is
recommended that you download information to your PC and
clear all TOUR memories when this figure approaches 100%.
When the used memory hits 100% it will no longer record, and
any future readings will not be recorded.
RECORD MARKERS IN TOUR MODE
The marker function is used to mark a particular position during
a TOUR. To place a marker in TOUR Mode, press and hold
MARKER/LIGHT until the watch beeps.
NOTE
The marker will only be shown in the PC data, once it
has been downloaded from the watch.
PAUSE TOUR MODE:
1. If you are not already in TOUR Mode,
simultaneously press FUN/SET and
MODE. The TOUR number will display. The percentage (%) at the top
indicates the total used memory.
2. Press FUN/SET. REST shows at the
bottom of the display.
3. Press SELECT/+ or press and hold FUN/SET for 2 seconds
to turn the rest on (paused) or off (recording).
15
GB
Page 16

GB
DEACTIVATE TOUR MODE:
For best results, perform these steps immediately after you end your trip.
1. Simultaneously press FUN/SET and
MODE. The TOUR number will display. The percentage (%) at the top
indicates the total used memory.
2. Press and hold FUN/SET for 2 seconds. This ENDS the
TOUR recording session.
3. Press MODE to return to the CLOCK display.
CLEAR ALL TOUR MEMORIES
For best results, perform these steps when
you no longer want to keep the data in the
watch or want to free up some memory.
Either:
1. Download the information to you PC (the
TOUR will be automatically cleared).
Or:
1. Deactivate the TOUR Mode. With the
END screen shown, press the FUN/SET.
CLR shows at the bottom of the display.
2. Press and hold FUN/SET until donE
shows at the bottom of the display.
3. Press FUN/SET again to display 0% and
confirm all data has been cleared.
4. Press MODE to return to the CLOCK display.
NOTE
The maximum and minimum values for the various submodes (i.e., max heart rate, or max altitude, etc) will remain
after all data has been cleared.
PULSE (HEART RATE) MODEL
(TS 120/TS 130 ONLY)
The OUTBREAKER watch is equipped
with a PULSE Mode and heart rate chest
belt, which together allow you to measure
your heart rate (from 25-240 beats per
minute) while exercising. You can view
your heart rate with the Stopwatch, Timer
and Clock.
Press SELECT/+ to switch between the HEART RATE/CLOCK
(starting) and HEART RATE/STW (stopwatch) screens.
➔
16
➔
Page 17

WEARING THE CHEST BELT
You must wear the chest belt to measure your heart rate.
NOTE
This OUTBREAKER watch is specially designed to
work with the coded chest belt with which it was sold. It is not
recommended you use any other chest belt with this watch, as
the transmission may not work.
Diagram Instructions
Tips: The transmission from the belt is dependent on good
contact with the skin and proximity to the receiver watch. Make
sure the transmitting section of the belt is against the skin, not
blocked by chest hair, and close enough to the receiver watch
(approximately 76 cm/30 inches) to send a clear signal. Sweat
or gel can help to improve the signal, and remember it is not
instantaneous. If no signal is received immediately, wait for a
few seconds for the signal to get through.
NOTE
An old battery may weaken the transmission and reception power. Replace the battery if the performance is progressively worse.
1. Wet the conductive pads on the underside
of the chest belt with few drops of water or a
conductive gel to ensure a better, solid contact.
2. Put on the belt, wrapping it around the upper
chest so the heart rate monitor is in the
middle of the chest, tucked snugly under the
pectoral muscles.
3. Adjust the belt for comfort and best contact
with the skin.
Once you have good contact with the chest belt,
flash. This means the signal is being sent and your heart rate
will soon appear in place of the large 0. Your heart rate will be
displayed as the larger font in every screen of this Mode. If you
remove the chest belt, or the watch is moved too far away from
it, the signal will be broken.
NOTE
The PULSE Mode will stop functioning after no signal is
received for 5 or more minutes.
When you are measuring your heart rate, keep the
NOTE
watch away from signal generating sources, such as TVs, PCs,
and car engines, as these may impair the reading.
will begin to
TRAINING ZONES (TS 120 / TS130 ONLY)
The OUTBREAKER watch is
equipped with a special Training Zone
feature that allows you to pre-select
the optimal heart rate range (25-240
beats per minute) for your activity.
For example, the amount of exertion
required for a stroll in the park is
different from the amount of exertion
required for weight lifting to build muscle mass. With the
Training Zone feature, you can set and then monitor the upper
and lower heart rate limits (Training Zone) that best support
your training activity and goals.
17
GB
Page 18

GB
The calculation for determining your upper and lower heart rate
limits is as follows.
Sex Maximum Heart Lower limit Upper limit
Range (MHR)
Men 220 – age = MHR
Women 230 – age = MHR
Once you know your maximum heart range, you can set the 5
Training Zones (described below) with the PC software (refer
to the online help). With the OUTBREAKER watch, you can
directly set your upper and lower limits for Training Zone 5, and
can set an alarm to sound whenever you exceed the limits for
the selected Training Zone.
Warning: The heart rate limits for Training Zones 1 – 4 are
based on the profile for a 20-year-old young man. If you do not
meet this profile, we HIGHLY RECOMMEND that you either set
the limits for Training Zones 1 – 4 using the PC software, or
follow the steps below to set the limits for Training Zone 5.
The recommended Training Zones are as follows:
Zone MHR range Description
(min – max %)
1 50 – 60% Moderate Activity – This low-intensity zone is good for warm-
2 60 – 70% Weight Management – Up to 85% of calories burned in this
3 70 – 80% Aerobic Zone – Increases strength and endurance. It works
MHR x (lower training zone %) MHR x (upper training zone %)
ups, cool downs, and activities such as brisk walking. It is also
good for beginners and those who want to strengthen their
cardiovascular systems.
zone are from fat cells. Moderate exercises such as light
jogging or swimming are good for this zone.
within the body’s oxygen intake capability, burns more calories, and can be maintained for a long period of time.
18
4 80 – 90% Anaerobic Zone – Generates speed and power. It works at
5 90 – 100% Red Line Zone – This high-intensity zone can only be
High-altitude activities may elevate your maximum heart
NOTE
rate.
You can override the zone preference by adjusting the
NOTE
value through the PC (all zones), or by manually adjusting
Zone 5.
or above the body’s oxygen intake capability, builds muscle,
and cannot be maintained for a long period of time.
maintained in short bursts or intervals, as it pushes your
muscles and cardiovascular system beyond their capacity.
SET TRAINING ZONE ALARM
1. Press MODE to access the PULSE
(heart rate) Mode.
2. Press SELECT/+ to show the clock
sub-mode.
3. Press and hold FUN/SET for two
seconds. The zone number will flash
at the bottom of the screen. The
upper limit is shown above the line
in larger font, and the lower limit is below. (You may adjust
the value for upper and lower rate limits in Zones 1-4 by using
the PC software. Otherwise pressing ST/SP/- will simply
activate or deactivate the preset alarm).
4. Press SELECT/+ or ST/SP/- to switch to Zone 5.
5. Press FUN/SET again to display the SET screen. The upper
HR will flash.
Page 19

6. Press SELECT/+ or ST/SP/- to change the upper heart rate
limit.
7. Repeat Steps 5 – 6 to set the lower heart rate limit.
8. Press FUN/SET.
9. Press SELECT/+ or ST/SP/- to turn the alarm off or on.
10.Press FUN/SET again to exit the setting mode.
NOTE
You can set the Heart Range between (upper 26-240
bpm) and (lower 25-239 bpm).
TRACK HEART RATE DURING TRAINING
To set up the OUTBREAKER watch
so that it can track your heart rate
activity during training, first do the following:
1. Put on the chest belt (refer to the
“Wearing the Chest belt” section).
2. Press MODE to access the PULSE
Mode and check to make sure the
watch is receiving your heart rate signals.
3. Select the Training Zone that is most appropriate for your
activity (refer to previous section).
4. Activate the Stopwatch or Timer in PULSE Mode (refer to the
Stopwatch / Timer section).
5. Set up the TOUR Mode if you want to store a long-term
record of your heart rate history that spans several training
sessions or activities (refer to the TOUR Mode section).
Once you complete these steps, you are ready to begin
exercising. After you finish, reset the Stopwatch or Timer to
zero, then press FUN/SET to have the following metrics displayed in 5-second intervals:
• Time and date in M1 or M2….M99 (all current data will be
stored under M1, while previous data is stored under M2 and
so on until M99).
•Average heart rate during exercise and Total exercise time
•Upper Training Zone limit and time spent above limit
• Lower Training Zone limit and time spent below limit
• Total time spent exercising within the heart rate limits
If you have more than one set (M1-M99) of training
NOTE
records, press SELECT/+ or ST/SP/- to loop through the
records.
19
GB
Page 20

GB
BIKE MODE
The OUTBREAKER sports watch comes complete with a
bicycle computer (and accessories), which records and displays the following information:
•Speed: 0 – 255 km/hour or 0 – 158 mile/hour
•Average speed (Max:255km/hr or 158 mile/hr)
•Maximum speed (Max:255km/hr or 158 mile/hr)
•Cadence: 0 – 255 rpm (pedal revolutions per minute)
•Distance traveled (Max:999.9 km/999.9 mile)
• Total distance travelled (Max:99,999.9 km/99,999.9 miles)
• Total time spent cycling
The BIKE Mode for the TS130 model comprises pioneering
technology that uses two wireless sensors instead of one (other
models use one wireless and one wired sensor). The formatted
signals of the sensors eliminate possible interference between
the cadence and speed sensors, ensuring you accurate performance measurements.
SET UP FOR BIKE MODE
To set up the BIKE Mode you must first do two things:
1. Attach the measuring equipment to your bicycle: speed
sensor (front wheel), cadence sensor (pedal), two magnets
(front wheel and pedal), and bike mount (handle bar). Refer
to the next section for instructions.
2. Specify your wheel circumference. See below for instructions.
STEP 1: ATTACH THE EQUIPMENT TO THE BICYCLE
align
Max 100 cm
20
Page 21

To attach the equipment:
1. Attach the bike mount to the right or left handlebar using the
nut and bolt provided. Tighten until the bike mount is fixed
into place.
2. Attach the cadence sensor to a stationary point just behind
the pedal, using the rubber grip for a firmer contact. There
should be maximum 100cm (39 inches) between the sensor and the bike mount, and less than 30 degrees vertical
angle.
3. Attach the cadence magnet to a pedal so that it is directly
aligned with the sensor with less than 5mm (0.2 inches)
between.
4. Attach the speed sensor to either leg of the front forks, using
the rubber grip for a firmer contact. There should be
maximum 100cm (39 inches) between the sensor and the
bike mount, and less than 30 degrees vertical angle.
5. Attach the speed magnet on a spoke of the front wheel so
that it less than 5mm (0.2 inches) from the sensor.
6. Check and adjust as necessary, then snip the ends off the
clips so that no excess remains.
7. Remove the Lycra strap. Fit the watch into the bike mount.
8. Press MODE on the watch to switch to BIKE Mode.
9. Press FUN/SET twice, then press SELECT/+ to view the
cadence sub-mode.
10. Ride the bike a short distance to make sure signals are
being sent to the watch successfully.
11. You are now ready to begin your trip.
NOTE
The watch can work with one or both sensors.
When the display shows a low battery icon
NOTE
not perform to expectation (see ‘Battery’ section) replace the
battery.
STEP 2: ENTER WHEEL CIRCUMFERENCE
You must set the bike’s wheel circumference on the watch so it can accurately
calculate your speed and distance. If you
do not know the bike’s wheel circumference, you can check the manufacturer’s
specifications or measure it by marking
the wheel where it touches the ground,
and then rotating the wheel once fully along the ground.
Measure the difference between the two marks.
NOTE
Most wheels have their specifications written on them.
To specify this information on the watch:
1. Press MODE to switch to the BIKE Mode.
2. Press SELECT/+.
3. Press and hold FUN/SET for 2 seconds. The wheel circum-
ference data will appear.
4. Press SELECT/+ or ST/SP/- to increase or decrease the
value.
5. Press FUN/SET to save your changes.
You can also use the PC software for this operation (see
NOTE
PC section).
21
GB
or does
Page 22

GB
ACCESSING BIKE MODE OPTIONS
Press MODE to access the BIKE Mode,
then press SELECT/+ to loop through
the options: Bike speed/STW, Bike
speed/TTL (see TOUR Mode section),
and Bike speed/Clock.
For instructions on how to use the Stopwatch or Timer in BIKE Mode, refer to
pp. 9 – 10.
VIEWING SPEED AND CADENCE INFORMATION
1. Press FUN/SET while in BIKE Mode to view Average speed/
Tour time. To view Maximum speed, TOUR distance, and
Total distance, press SELECT/+ repeatedly.
2. Press FUN/SET again to view Cadence/STW. To view
Cadence/Clock, press SELECT/+.
3. Press FUN/SET a third time to view Average Cadence/
TOUR time. Press SELECT/+ to view Max Cadence/Tour
time.
To clear a value from a specific memory, press and hold FUN/
SET for 2 seconds.
When finished press FUN/SET or wait 30 seconds to return to
the Speed/STW view.
PC KIT
The Oregon Scientific OUTBREAKER sports watch is equipped
with a PC Kit that includes a PC Docking Station and CD-ROM
for downloading information to a personal computer. Full instructions for using the software are provided in the online help
and can be viewed once you have installed the CD-ROM.
The PC Kit enables you to store and recall most of the
information that is collected by the OUTBREAKER watch. This
allows you to free up the watch memory for recording more
information, while preserving the training records that are most
important to you. For example, with the PC Kit you can specify
which information you want to record in TOUR Mode: By
limiting what is recorded, you can keep longer records. This can
be useful if you wish to monitor your performance during an
extended period such as a two-day hike, where only heart rate
and altitude are of concern, or a day of cycling, where only
speed and distance are important to you. Full details of the
watch’s memory capacity are given in the USING THE TOUR
MODE section.
You can also use the PC Hook-up Kit to set values on the watch
through the PC. A full list of options is given at the end of this
section.
The hardware/software requirements for the PC Kit are
NOTE
listed at the back of this manual.
22
Page 23

PC MODE
SET UP FOR PC MODE
To use the features of the PC Mode, you will need the PC Kit
(includes PC docking station, connector cable, and the installation software CD-ROM), and a PC or laptop computer.
To set up for PC Mode:
Diagram Instructions
1. Connect the PC Docking Station to your computer. For
best results, turn the computer off before you connect.
2. Install the software using the CD-ROM (first-time use
only). The process is automatic, and requires you to
respond to self-explanatory prompts.
Once the software is installed, an Oregon Scientific icon
will be placed on your desktop.
3. Remove the Lycra watch strap. Mount the watch on the
docking station, making sure the contact points on the
station and the watch are aligned. Press the MODE
button to switch to PC Mode.
The cadence, speed and heart rate functions
NOTE
will be temporarily disabled when you use the watch in
PC Mode.
USING THE SOFTWARE
Double-click on the Oregon Scientific icon. Once the software
opens, click on Help for information about the function you
require.
PC MODE OPTIONS
You can perform the following tasks by using the CD-ROM
software supplied.
Access/recall information/ on the PC
• All information recorded in TOUR
Mode, including temperature, altitude,
local pressure, heart rate, wheel
speed, cadence, trip distance, etc,
[Provided this data has been selected
in “Data should be stored” in the
“Configuration menu” (see software
help menu)].
• Back up/import and export data
• Define user data
• Display graphical chart and print table
• Give data overview with a specified
duration
23
Change watch settings on the PC
• Date and time (set to PC time, or a
manual setting)
• Time, and event alarm (3 event
alarms, 1 daily alarm, and select alarm
duration)
• Current sea-level pressure
• Altitude limits
• Weather icon
• Upper and lower heart rate limits for
Training Zones 1 – 5.
• Wheel circumference/diameter
• TOUR Mode data recording and
download options
• Choose a serial port (Com 1 to Com 4)
• Sampling rate (1 second and up)
GB
Page 24

GB
To send all selected settings and preferences to the
NOTE
watch select “Transfer configuration” in the “communication”
sub-menu (PC software).
DOWNLOAD DATA
Follow these procedures to download data
1. After installing the CD-ROM click the OUTBREAKER icon
on your PC.
2. In the main menu, select “Communication”.
3. Connect the docking station to your PC.
4. Press “Mode” until you reach PC Mode.
5. Fit the OUTBREAKER watch in the docking station, making
sure the pins are matched and secured.
6. Select “Connect” in the “Communication” sub-menu.
7. You will see an arrow mark on the watch, and “download in
progress” on your PC.
8. Select “Read Trip Data” in the “Communication” sub-menu,
then follow the on screen instructions.
9. Select “Format” to process the data arrangement.
10.Download is now complete. Select desired graphical report.
EFFECTIVE USE AND RANGE
The heart rate and chest belt have a maximum transmission
range of about 76 centimeters (30 inches). If the signal is weak
take the following steps:
•Shorten the distance between the heart rate chest belt and
watch
•Re-adjust the position of the heart rate chest belt
•Check the batteries. If they are low or exhausted, change the
battery immediately
You can wear the receiver watch on your wrist or strap it to a
bike or exercise machine as shown below:
AQUATIC AND OUTDOOR ACTIVITIES
The watch is water-resistant up to 30 meters. The chest belt and
other accessories (bike mount/speed and cadence sensors)
are splash-proof, but should not be worn for underwater activities, as the heart rate transmission cannot work properly under
water. Refer to the table below for guidelines.
24
Page 25

SAFETY AND CARE INSTRUCTIONS
GB
30m / 100ft
50m / 165ft
100m / 325ft
RAIN
SPLASHES, ETC
OK
OK
OK
SHOWERING
(WARM / COOL
WATER ONLY)
OK
OK
OK
LIGHT SWIMMING
/ SHALLOW WATER
NO
OK
OK
SHALLOW DIVING /
SURFING /
WATER SPORT
NO
NO
OK
SNORKELING /
DEEP WATER
DIVING
NO
NO
NO
When using the watch for outdoor sports activities, observe the
following guidelines:
•Do not press the buttons underwater or with wet fingers.
•Rinse with water and mild soap after use.
•Do not use the watch in hot water.
Tips for keeping your watch fit: Keep your watch water
resistant! Avoid chemicals (gasoline, chlorine, perfumes, alcohol, hair sprays, etc.). Rinse after use. Reduce exposure to
heat. Have your watch serviced by an approved service center
once yearly.
SAFETY PRECAUTIONS
Please observe these safety precautions when using this
product.
•Do not consult the watch while moving or engaging in active
sports. Doing so may result in a collision that causes
personal injury.
•Do not subject the product to excessive force, shock, dust or
temperatures.
•Do not tamper with the product’s internal components.
•Do not mix fresh and old batteries, or batteries of different
specifications.
•Do not use this watch as a substitute for professional
measuring devices used in skydiving, hang gliding,
paragliding, gyrocopter piloting and flying small aircraft.
•Do not use this watch as a substitute for industrial precision
instruments.
• Follow the water-resistance guidelines carefully before use
in water (see Effective Use and Range section).
•Keep the product away from heat sources such as radiators,
stoves, heaters, and other heat-generating products.
CARE INSTRUCTIONS
To ensure you receive the maximum benefit from using this
product, please observe the following guidelines.
25
Page 26

GB
•Cleaning – Clean with a damp cloth. Do not use liquid
cleaning agents, benzene, thinner, or aerosols.
•Repair – Do not attempt to repair the product or modify the
circuitry by yourself. Contact the retailer or a qualified
repairman if the product requires servicing. Only use replacement parts that are recommended by the manufacturer.
•Do not scratch hard objects against the LCD display as this
may cause damage.
TROUBLESHOOTING GUIDE
This section includes a list of frequently asked questions for
problems you may encounter with the OUTBREAKER sports
watch. If your watch is not operating as you think it should,
check here before arranging for servicing.
Problem
No power
Date / time
is wrong
Symptom
Power will not turn
on.
Keys do not respond
Date display is
wrong
Check this
Batteries are
exhausted.
Batteries are inserted
incorrectly.
Key lock in
operation.
(Key icon shown)
Date not set
Remedy
Replace with new
batteries.
Insert the batteries
correctly (➔ 7).
Press SELECT/+ for 2
seconds (blinking icon will
disappear).
Set date correctly (➔ 9)
Cannot be changed when
TOUR Mode is operating.
Altitude
reading is
strange
No altitude
alarm
Temperature
reading is
strange
No alarm
Pressure
reading is
strange
Heart icon
not working
26
Symptom Check thisProblem Remedy
Time display is
wrong
Reading is less than
0 (-20, etc.)
Different height
reading at same
point after trip
Alarm does not
sound
Too high
Expected alarm
does not sound
Too high or low
Blank display
Time zone set
incorrectly
Current altitude is
below ground (watch
sea level setting)
Barometric changes
Levels not set
Watch is too close to
body
Levels not set
Alarm not activated
Is change due to
wind, pressurized
chamber, or
pressurized
environment
(airplane)?
Time out after 5
minutes of inactivity
Chest belt is too far
from watch or poor
skin contact
Reset time zone
Cannot be changed when
TOUR Mode is operating.
(TRIP shows on display)
Adjust altitude, or accept
reading
Minor pressure changes
may produce minimal
deviations in altitude
readings
Set levels (➔ 12)
Take off watch, wait 15
minutes, then try again
Set levels (➔ see relevant
MODE section)
Activate alarm (➔ see
relevant MODE section)
Reset after you have
changed locations
Press MODE to return to
PULSE Mode
Move chest belt closer or
adjust contact with skin
Page 27

No heart rate
alert
No heart rate
memory
No sensor
power
No memory
Symptom Check thisProblem Remedy
Expected alarm
does not sound
No heart rate data
No data
No display
No TOUR data
stored
Strange distance,
cadence or speed
reading
Weak reception or
poor transmission
Memory % does not
changed
100% of memory
used
Training Zone/Alert
limits not set
Chest belt is too far
from watch or poor
skin contact
Sensor not ready
Watch not fitted well
on Bike Mount
Disabled feature
through PC
Memory is full
Wrong wheel size set
Sensors fitted
incorrectly
Magnet not aligned
Interference
Battery low or empty
TOUR Mode not set
Memory full
Set limits (➔ 19)
Move chest belt closer or
adjust contact with skin
Check distance between
sensor and magnet
Ajust the watch
Re-select check box in PC
software
Download TOUR memory
to PC or clear memory
Measure and set wheel
circumference again
(➔ 21)
Check sensor fittings
Realign magnet
Find source and move or
switch off
Replace battery
Set TOUR Mode
Clear all memories
manually, or download to
the PC. Data manually
erased cannot be recalled
or recovered
SPECIFICATIONS
Unit of measurement (Imperial/metric, Celsius/Farenheit,
NOTE
etc.) depends on the store model purchased.
Calendar Clock
Hour format 12/24 hr
Date format DD:MM:YY (MM:DD:YY)
Auto calendar 2001-2099
Alarms 1 daily (hr:min)
(Must be set with PC)
Chronometer/Timer 99:59:59 (hr:min:sec)
Heart Rate Monitor (TS 120 / TS 130 only)
Heart rate range 25…240 beats per minute (bpm)
Resolution 1 bpm
Accuracy +/- 1 bpm
Training zones 5
HR alert range 26…240 bpm (upper)
Alert memory 2 heart rate alarms
TOUR memory 99 max
Thermometer (TS 110 / TS 130 only)
Range -10.0º C….60.0º C
Resolution 0.1º C (0.1 º F)
Accuracy +/- 1º C (+/- 2º F)
Altimeter (TS 110 / TS 130 only)
Range -400…9,000 meters
Resolution 1 m (3 ft)
27
3 event (hr:min DD.MM.YY)
25…239 bpm (lower)
(14.0º F….140.0º F)
(-1,312….29,700 feet)
GB
Page 28

GB
Accuracy +/- 10 m (+/- 30 ft)
Vertical speed 0…125 m/sec (0…415 ft/sec)
(ascending or descending)
Vertical speed resolution 1 m/sec (3 ft/sec)
Max altitude change +/- 32,787 m (+/- 99,999 ft)
Total altitude change +/- 32,787 m (+/- 99,999 ft)
Alerts 1 alarm
Barometer (TS 110 / TS 130 only)
Local pressure range 300…1100 hPa
Sea level pressure range 900…1100 hPa
Resolution 1 hPa (0.03 inHg)
Accuracy +/- 3 hPa (+/- 0.1 inHg)
Bar graph x-resolution 1 hour
Bar graph y-resolution 1 hPa (0.03 inHg)
TOUR Mode
OUTBREAKER TS 110
Record time: 350 min
5 second samplings: Altitude / Pressure / Temperature
OUTBREAKER TS 120
Record time: 508 min
5 second samplings: Heart Rate / Distance / Speed
OUTBREAKER TS 130
Record time: 659 min
5 second samplings: Distance / Cadence / Speed /
(8.86…32.48 inHg)
(26.58…32.48 inHg)
/ Speed / Cadence / Distance
/ Cadence
Heart Rate/ Altitude / Pressure /
Temperature
BIKE Computer
Wheel speed range 0…255 km/hr (158 mile/hr)
Wheel speed resolution 1 km/hr (1 mile/hr)
Cadence range 0…255 revolutions per minute
Cadence resolution 1 rpm
Max trip distance 999.9 km (999 miles)
Max total trip distance 99,999.9 km (99,999.9 miles)
Wheel circumference 1,000….3,000 mm
Circumference resolution 1 mm (0.04 in)
Environment
Operation -10º C…60º C (14º F…140º F)
Storage -20º C…70º C (-4º F…158º F)
Relative Humidity 10%…95%
Water Resistance
Watch not actuating keys to 30 m (100 ft)
Other accessories splash proof
Power
Watch 1 x CR2032 3V lithium battery
Chest belt 1 x CR2032 3V lithium battery
Bike mount 1 x CR2032 3V lithium battery
Speed sensor 1 x 23A 12V alkaline battery
Cadence sensor 1 x 23A 12V alkaline battery
(TS 130 only)
PC Requirements
• Pentium I or above with 128 KB RAM or above
• Windows 98 or above
• 50 MB free memory (hard disk)
• Printer and mouse recommended
28
(rpm)
(39 in…118 in)
Page 29

WARNINGS
To ensure you use your product correctly and safely, read these
Warnings and the entire user manual before using the product.
The warnings given here provide important safety information
and should be observed at all times.
•Do not attempt to repair the product yourself. Contact the
retailer or our customer service department if it requires
servicing.
• Take precautions when handling all battery types. They can
cause injuries, burns, or property damage as a result of
contact with conducting materials, heat, corrosive materials
or explosives. Remove the batteries before storing the
product for long periods of time.
• The product is a precision instrument. Never attempt to take
this device apart. There is a serious danger of powerful
electric shocks.
•Do not, under any circumstances, touch the exposed electronic circuitry of the device as there is a danger of electric
shock should it become exposed.
• Take special care when handling a damaged LCD display,
as the liquid crystals can be harmful to your health.
•Do not use or store the device, including the remote sensor,
in locations that may adversely affect the product such as,
snow, desert, and magnetic fields.
•Do not use this device in aircrafts or hospitals. The use of
radio frequency products can cause malfunctions in the
control devices of other equipment.
•Do not subject the product to impact or shock.
•Check all major functions when the device is unused for a
long period of time. This is to ensure its full operation.
Maintain a regular internal testing and cleaning of your
device.
•When disposing of this product, do so in accordance with
your local waste disposal regulations.
ADDITIONAL RESOURCES
Visit our website (www.oregonscientific.com) to learn more
about your OUTBREAKER sports watch and other Oregon
Scientific™ products such as digital cameras, hand-held organizers, alarm clocks, and weather stations. The website also
includes contact information for our customer service department, in case you need to reach us.
© 2003 Oregon Scientific. All rights reserved.
29
GB
Page 30

GB
Outbreaker
TS110/TS120/TS130
Tested To Comply
With FCC Standards
FOR HOME OR OFFICE USE
encouraged to try to correct the interference by one or more of
the following measures:
•Reorient or relocate the receiving antenna.
• Increase the separation between the equipment and receiver.
•Connect the equipment into an outlet on a circuit different
from that to which the receiver is connected.
•Consult the dealer of an experienced radio/TV technician for
help.
FCC ID: NMT – TS1X0A
This device complies with Part 15 of FCC Rules. Operation is
subject to the following two conditions: (1) this device may not
cause harmful interference and (2) this device must accept any
interference received, including interference that may cause
undesired operations.
NOTE This equipment has been tested and found to comply
with the limits for a Class B digital device, pursuant to Part 15
of the FCC Rules. These limits are designed to provide
reasonable protection against harmful interference in a
residential installation. This equipment generates, uses, and
can radiate radio frequency energy and, if not installed and
used in accordance with the instructions, may cause harmful
interference to radio communications.
However, there is no guarantee that interference will not occur
in a particular installation. If this equipment does cause harmful
interference to radio or television reception, which can be
determined by turning the equipment off and on, the user is
Warning: Changes or modifications to this unit not expressly
approved by the party responsible for compliance could void
the user’s authority to operate the equipment.
30
 Loading...