

Page 1
EN
RESONANCE
NOTE
12345
6
Clock Speaker
Model: CIR600
User Manual
Thank you for selecting the Oregon ScienticTM RESONANCE Clock
Speaker (CIR600).
Please keep this manual handy as you use your new product.
It contains practical step-by-step instructions, as well as technical
specications and warning you should know about.
PACKAGE CONTENTS
• Main unit x 1
• CR2025 battery x 1
• AC/DC Power adapter x1
• User manual x 1
OVERVIEW
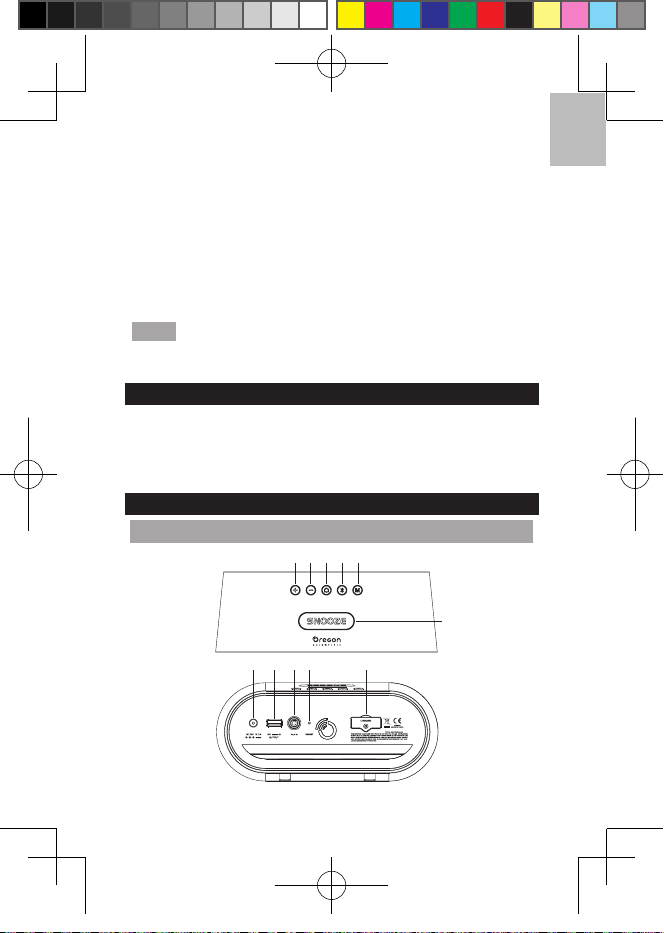
MAIN UNIT
7891011
CIR600_EN_UM_300103929-00001-10 XD 作认证 R1.indd 1 2017/10/25 下午2:23
Page 2
EN
B
A
POWER YOUR CLOCK
INSTALL BATTERY
The device comes with a back-up battery installed. Remove the plastic tab
before using the clock. Replace the battery when displays.
1. Screw off the battery compartment cover.
2. Insert a new CR2025 3 V battery, positive (+) side up, and replace the
battery compartment cover.
3. Press RESET.
NOTE
• Keep button-cell battery away from children. Swallowing a button-cell
battery can be fatal.
CONNECT POWER ADAPTER
Connect the supplied AC/DC power adapter to the DC 12 V, 2.0 A jack on
the rear of the unit and plug into a standard outlet.
NOTE
• The battery is only for back-up use. Always connect the unit to the
power grid source via power adapter.
• When the clock is connected to AC power source, it can charge your
smart device via the USB port.
• Make sure the adapter is not obstructed and is easily accessible to
the unit.
• To completely disconnect from power, unplug adapter from the mains.
SET THE CLOCK TIME
1. Press and hold for 3 seconds to enter the clock time setting mode.
2. Press or repeatedly to adjust settings; press and hold or
to quickly setting.
3. Press to conrm and go to the next setting.
• The setting order is 12/24 hour format > Hour > Minute > Year >
Calendar format (MD/DM) > Month > Day > Weekday language.
1. Volume up; Increase a value in setting mode.
2. Volume down; Decrease a value in setting mode;
3. Set the alarm; Activate/Cancel the alarm;
4. Activate Bluetooth pairing mode; Toggle between Bluetooth and
Aux in audio mode.
5. Toggle display mode between time and calendar;
Set the time/calendar.
6. SNOOZE Snooze the alarm; Dimmer
7. DC 12 V, 2.0 A jack Connect AC/DC adapter.
8.
5 V, 1A USB port Charge smart device;
9. Aux in Connect to external audio source.
10. RESET Returns all settings to factory defaults.
11. Battery compartment: for back-up power source.
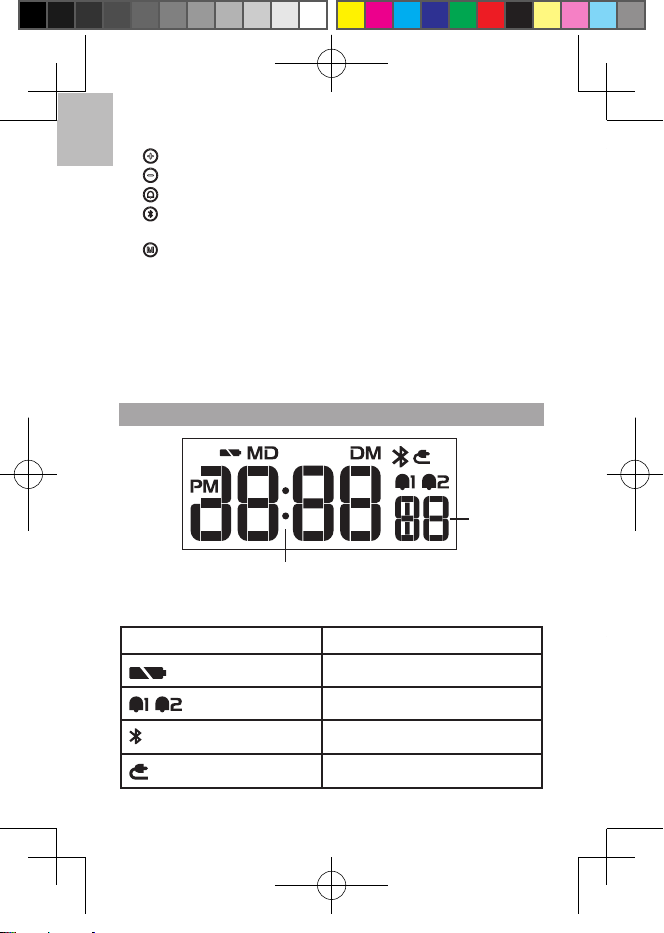
LCD DISPLAY
A. Time / Calendar display.
B. Second / Weekday display.
Symbol Description
Low battery indicator
Alarm indicator
Bluetooth icon
Aux in
CIR600_EN_UM_300103929-00001-10 XD 作认证 R1.indd 2 2017/10/25 下午2:23
Page 3
EN
POWER YOUR CLOCK
INSTALL BATTERY
The device comes with a back-up battery installed. Remove the plastic tab
before using the clock. Replace the battery when displays.
1. Screw off the battery compartment cover.
2. Insert a new CR2025 3 V battery, positive (+) side up, and replace the
battery compartment cover.
3. Press RESET.
NOTE
• Keep button-cell battery away from children. Swallowing a button-cell
battery can be fatal.
CONNECT POWER ADAPTER
Connect the supplied AC/DC power adapter to the DC 12 V, 2.0 A jack on
the rear of the unit and plug into a standard outlet.
NOTE
• The battery is only for back-up use. Always connect the unit to the
power grid source via power adapter.
• When the clock is connected to AC power source, it can charge your
smart device via the USB port.
• Make sure the adapter is not obstructed and is easily accessible to
the unit.
• To completely disconnect from power, unplug adapter from the mains.
SET THE CLOCK TIME
1. Press and hold for 3 seconds to enter the clock time setting mode.
2. Press or repeatedly to adjust settings; press and hold or
to quickly setting.
3. Press to conrm and go to the next setting.
• The setting order is 12/24 hour format > Hour > Minute > Year >
Calendar format (MD/DM) > Month > Day > Weekday language.
CIR600_EN_UM_300103929-00001-10 XD 作认证 R1.indd 3 2017/10/25 下午2:23
Page 4

EN
SNOOZE / STOP THE ALARM
• Press SNOOZE to stop the alarm for 8 minutes. The alarm indicator will
ash.
• Press to cancel snooze function during snooze status.
• When the alarm sounds, press any key except SNOOZE to stop the
alarm. The alarm will reactivate the next scheduled alarm time unless
deactivated.
DIMMER
Turn off all the alarms, press SNOOZE to adjust the backlight:
normal mid dim
BLUETOOTH PAIRING
1. Turn on Bluetooth on your smart device.
2. Open the Bluetooth pairing list on your smart device and select to
connect CIR600. The Bluetooth icon displays steady.
3. If pairing failure, press and hold on the unit for 2 seconds
to enter the Bluetooth pairing mode. The Bluetooth icon ashes and
re-pair.
NOTE
• If the unit is not connected to a device within 5 mintues, the Bluetooth
will automatically turn off.
• To disconnect the unit from your smart device, disconnect it in the
Bluetooth menu of your device.
• Bluetooth wireless technology operates within 10 meters (33 ft) range
and varies if there are physical obstacles, such as a thick wall in
between your smart device and CIR600.
LISTEN TO THE MUSIC
1. Press to select BT or Aux in music.
2. Press or to control sound volume, max volume is 16.
3. Press and hold for 3 seconds to mute, volume is 0.
• Complete each step with 60 seconds or the device will exit the clock
setting mode.
• The language options are English (EN), German (GER), French (FR),
Italian (IT) and Spanish (SP).
ALARM
SETTING THE ALARMS
1. Press and hold for 2 seconds to enter alarm setting mode. The time
digits ash.
2. Press or repeatedly to adjust settings; press and hold or
to quickly setting.
3. Press to conrm and go to the next setting.
ACTIVATING / DEACTIVATING THE ALARM
Press accordingly for desired option:
Time pressing
1
2
3
4 Both alarms off Turn off Alarm 1 and 2
Press and together to review Alarm 1 time.
Press and together to review alarm 2 time.
Alarm on/off Operation
Alarm 1 on
Alarm 2 on
Both alarms
on
Set Alarm 1
Set Alarm 2
Set Alarm 1 and 2
CIR600_EN_UM_300103929-00001-10 XD 作认证 R1.indd 4 2017/10/25 下午2:23
Page 5

EN
SNOOZE / STOP THE ALARM
• Press SNOOZE to stop the alarm for 8 minutes. The alarm indicator will
ash.
• Press to cancel snooze function during snooze status.
• When the alarm sounds, press any key except SNOOZE to stop the
alarm. The alarm will reactivate the next scheduled alarm time unless
deactivated.
DIMMER
Turn off all the alarms, press SNOOZE to adjust the backlight:
normal mid dim
BLUETOOTH PAIRING
1. Turn on Bluetooth on your smart device.
2. Open the Bluetooth pairing list on your smart device and select to
connect CIR600. The Bluetooth icon displays steady.
3. If pairing failure, press and hold on the unit for 2 seconds
to enter the Bluetooth pairing mode. The Bluetooth icon ashes and
re-pair.
NOTE
• If the unit is not connected to a device within 5 mintues, the Bluetooth
will automatically turn off.
• To disconnect the unit from your smart device, disconnect it in the
Bluetooth menu of your device.
• Bluetooth wireless technology operates within 10 meters (33 ft) range
and varies if there are physical obstacles, such as a thick wall in
between your smart device and CIR600.
LISTEN TO THE MUSIC
1. Press to select BT or Aux in music.
2. Press or to control sound volume, max volume is 16.
3. Press and hold for 3 seconds to mute, volume is 0.
CIR600_EN_UM_300103929-00001-10 XD 作认证 R1.indd 5 2017/10/25 下午2:23
Page 6

EN
• When disposing of this product, ensure it is collected separately for
special treatment.
• The contents of this manual may not be reproduced without the
permission of the manufacturer.
NOTE
The technical specications for this product and the contents of
the user manual are subject to change without notice.
NOTE
Features and accessories will not be available in all countries.
For more information, please contact your local retailer. To download an
electronic version of the user manual, please visit
http://global.oregonscientic.com/customerSupport.php.
ABOUT OREGON SCIENTIFIC
Visit our website www.oregonscientic.com to learn more about Oregon
Scientic products.
For any inquiry, please contact our Customer Services at
info@oregonscientic.com.
Oregon Scientic Global Distribution Limited reserves the right to interpret
and construe any contents, terms and provisions in this user manual and
to amend it, at its sole discretion, at any time without prior notice. To the
extent that there is any inconsistency between the English version and
any other language versions, the English version shall prevail.
EU-DECLARATION OF CONFORMITY
Hereby the manufacturer, IDT Technology Limited, declares that the
radio equipment type RESONANCE Clock Speaker (Model: CIR600)
is in compliance with 2014/53/EU Directive. The full text of the EU
Declaration of Conformity is available at the following internet address:
www.oregonscientic.com.
COUNTRIES RED APPROVED COMPLIED
All EU countries, Switzerland
CH
N
and Norway
LISTEN TO AN EXTERNAL AUDIO SOURCE
1. Use a 1/8 (3.5 mm) audio cable (not supplied) to connect the audio
source’s headphone jack to the Aux in jack on your unit.
2. Press to enter AUX IN mode.
3. Use the controls on your connected device to play.
SPECIFICATIONS
Input power 12 V, 2.0 A AC/DC power adapter
Output power 2 x 10 W RMS
USB charging output port 5 V, 1 A
Battery CR2025 (for back-up source)
Bluetooth Version 4.0
L x W x H 200 x 89 x 72.9 mm
(7.9 x 3.5 x 2.9 in)
Weight 628g (1.4 lb)
PRECAUTIONS
• Use only fresh battery of the required size and type.
• Do not dispose old batteries as unsorted municipal waste. Collection of
such waste separately for special treatment is necessary.
• If you do not plan to use the unit for a long time, remove the battery.
Battery can leak chemicals that can damage electronic parts.
• Do not subject the device to excessive force, shock, dust, temperature
or humidity.
• Do not immerse the device in water. If you spill liquid over it, dry it
immediately with a soft, lint-free cloth.
• Do not clean the device with abrasive or corrosive materials.
• Do not tamper with the device’s internal components. Doing so
invalidates the warranty.
• Images shown in this manual may differ from the actual display.
CIR600_EN_UM_300103929-00001-10 XD 作认证 R1.indd 6 2017/10/25 下午2:23
Page 7

EN
• When disposing of this product, ensure it is collected separately for
N
and Norway
special treatment.
• The contents of this manual may not be reproduced without the
permission of the manufacturer.
NOTE
The technical specications for this product and the contents of
the user manual are subject to change without notice.
NOTE
Features and accessories will not be available in all countries.
For more information, please contact your local retailer. To download an
electronic version of the user manual, please visit
http://global.oregonscientic.com/customerSupport.php.
ABOUT OREGON SCIENTIFIC
Visit our website www.oregonscientic.com to learn more about Oregon
Scientic products.
For any inquiry, please contact our Customer Services at
info@oregonscientic.com.
Oregon Scientic Global Distribution Limited reserves the right to interpret
and construe any contents, terms and provisions in this user manual and
to amend it, at its sole discretion, at any time without prior notice. To the
extent that there is any inconsistency between the English version and
any other language versions, the English version shall prevail.
EU-DECLARATION OF CONFORMITY
Hereby the manufacturer, IDT Technology Limited, declares that the
radio equipment type RESONANCE Clock Speaker (Model: CIR600)
is in compliance with 2014/53/EU Directive. The full text of the EU
Declaration of Conformity is available at the following internet address:
www.oregonscientic.com.
CIR600_EN_UM_300103929-00001-10 XD 作认证 R1.indd 7 2017/10/25 下午2:23
COUNTRIES RED APPROVED COMPLIED
All EU countries, Switzerland
CH
Page 8

EN
WARNING
declare that the product
Product No. CIR600
Product Name: RESONANCE Clock Speaker
Manufacturer: IDT Technology Limited
Address: Block C, 9/F, Kaiser Estate,
Phase 1, 41 Man Yue St.,
Hung Hom, Kowloon,
Hong Kong
INFORMATION FOR USERS
Pursuant to and in accordance with Article 14 of the Directive
2012/19/EU of the European Parliament on waste electrical
and electronic equipment (WEEE), and pursuant to and in
accordance with Article 20 of the Directive 2013/56/EU of
the European Parliament on batteries and accumulators and waste
batteries.
The barred symbol of the rubbish bin shown on the equipment indicates
that, at the end of its useful life, the product must be collected separately
from other waste.
Please note that the batteries/rechargeable batteries must be removed
from the equipment before it is given as waste. To remove the batteries/
accumulators refer to the specications in the user manual. Therefore,
any products that have reached the end of their useful life must be given
to waste disposal centers specializing in separate collection of waste
electrical and electronic equipment, or given back to the dealer when
purchasing a new WEEE, pursuant to and in accordance with Article 14 as
implemented in the country.
The adequate separate collection for the subsequent start-up of the
equipment sent to be recycled, treated and disposal of in an environmentally
compatible way contributes to preventing possible negative effects on
the environment and health and optimizes the recycling and reuse of
components making up the apparatus.Abusive disposal of the product by
the user involves application of the administrative sanctions according to
the laws in force.
FCC STATEMENT
This device complies with Part 15 of the FCC Rules. Operation is subject
to the following two conditions: (1) This device may not cause harmful
interference, and (2) This device must accept any interference received,
including interference that may cause undesired operation.
by the party responsible for compliance could void the user’s authority to
operate the equipment.
NOTE
limits for a Class B digital device, pursuant to Part 15 of the FCC Rules.
These limits are designed to provide reasonable protection against
harmful interference in a residential installation.
This equipment generates, uses and can radiate radio frequency energy
and, if not installed and used in accordance with the instructions, may
cause harmful interference to radio communications. However, there is
no guarantee that interference will not occur in a particular installation.
If this equipment does cause harmful interference to radio or television
reception, which can be determined by turning the equipment off and on,
the user is encouraged to try to correct the interference by one or more of
the following measures:
• Reorient or relocate the receiving antenna.
• Increase the separation between the equipment and receiver.
• Connect the equipment into an outlet on a circuit different from that to
• Consult the dealer or an experienced radio / TV technician for help.
Changes or modications to this unit not expressly approved
This equipment has been tested and found to comply with the
which the receiver is connected.
DECLARATION OF CONFORMITY
The following information is not to be used as contact for support or
sales. Please call our customer service number (listed on our website
at www.oregonscientic.com), or on the warranty card for this product)
for all inquiries instead.
We
Name: Oregon Scientic, Inc.
Address: Brea Corporate Park
3020 Saturn St. Suite 200
Brea, CA 92821
Telephone No.: 1-800-853-8883
CIR600_EN_UM_300103929-00001-10 XD 作认证 R1.indd 8 2017/10/25 下午2:23
Page 9

EN
declare that the product
Product No. CIR600
Product Name: RESONANCE Clock Speaker
Manufacturer: IDT Technology Limited
Address: Block C, 9/F, Kaiser Estate,
Phase 1, 41 Man Yue St.,
Hung Hom, Kowloon,
Hong Kong
INFORMATION FOR USERS
Pursuant to and in accordance with Article 14 of the Directive
2012/19/EU of the European Parliament on waste electrical
and electronic equipment (WEEE), and pursuant to and in
accordance with Article 20 of the Directive 2013/56/EU of
the European Parliament on batteries and accumulators and waste
batteries.
The barred symbol of the rubbish bin shown on the equipment indicates
that, at the end of its useful life, the product must be collected separately
from other waste.
Please note that the batteries/rechargeable batteries must be removed
from the equipment before it is given as waste. To remove the batteries/
accumulators refer to the specications in the user manual. Therefore,
any products that have reached the end of their useful life must be given
to waste disposal centers specializing in separate collection of waste
electrical and electronic equipment, or given back to the dealer when
purchasing a new WEEE, pursuant to and in accordance with Article 14 as
implemented in the country.
The adequate separate collection for the subsequent start-up of the
equipment sent to be recycled, treated and disposal of in an environmentally
compatible way contributes to preventing possible negative effects on
the environment and health and optimizes the recycling and reuse of
components making up the apparatus.Abusive disposal of the product by
the user involves application of the administrative sanctions according to
the laws in force.
CIR600_EN_UM_300103929-00001-10 XD 作认证 R1.indd 9 2017/10/25 下午2:23
Page 10

EN
WARNING
Do not ingest the battery, Chemical Burn Hazard(The remote control
supplid with) This product contains a coin/button cell battery. if the coin/
button cell battery is swallowed, it can cause severe internal burns in just
2 hours and can lead to death.
Keep new and used batteries away from children.
If the battery compartment does not close securely, stop using the product
and keep it away from children.
If you think batteries might have been swallowed or placed inside any part
of the body, seek immediate medical attention.
CIR600_EN_UM_300103929-00001-10 XD 作认证 R1.indd 10 2017/10/25 下午2:23
 Loading...