

Page 1

Safety and Care Instructions .............................. 9
Useful reference ............................................... 10
BLE Upper Arm Blood Pressure Monitor
Model: BPU321
User Manual
CONTENTS
Introduction ........................................................ 1
Package contents .............................................. 2
Accessories .............................................. 2
Product view / Key features ............................... 2
Setting up the monitor ........................................ 3
Assemble the unit ..................................... 3
Installing and replacing the batteries ........ 3
Monitor settings .................................................. 3
Positioning the arm cuff…………………………..4
Preparing to take blood pressure measurement.4
Taking a measurement ...................................... 5
Understanding the reading ................................. 5
Display ...................................................... 5
Hypertension ............................................ 6
Irregular heartbeat / Arrhythmia ................ 6
Movement / reading error ......................... 6
Voice announcement ................................ 6
View records ...................................................... 6
Recalling measurements stored
in memory ................................................. 7
Clear records ..................................................... 7
Deleting a single record ............................ 7
Deleting all records ................................... 7
Data transmission .............................................. 8
Manually send data .................................. 8
Unique Device ID ..................................... 8
Application………………………………………….9
Troubleshooting ................................................. 9
About blood pressure .............................. 10
How the blood pressure monitor works ... 11
Specifications ................................................... 11
About Oregon Scientific .................................... 12
Information about the CE Mark ......................... 12
Symbol description(s) ....................................... 12
EU - Declaration of Conformity………………….12
FCC Statement…………………………………13
Blood Pressure Log Book .......................... ……13
INTRODUCTION
Thank you for selecting the Oregon ScientificTM
BLE Upper Arm Blood Pressure Monitor
(BPU321). The BPU321 features multi-language
voice announcement and playback of blood
pressure measurements for added convenience
and has been designed to provide you with many
years of reliable service. The monitor can help
you measure and track the following metrics:
Systolic pressure
Diastolic pressure
Average morning / evening blood pressure
Heart rate
The monitor is able to store up to 100
measurements per user (maximum 2 users) and
equipped with the latest Bluetooth Smart
technology to achieve reliable transmission
linkage with a mobile device or tablet PC that is
with the logo and corresponding
application. From now on, you can easily track
your health on a daily basis.
Readings taken by the blood pressure monitor
are equivalent to those obtained by a trained
observer using the cuff and stethoscope
Page 2
auscultation method. Clinical performance were
successfully done against ANSI/AAMI SP10 and
international protocol, and the B.H.S.(British
Hypertension Society) has rated this product
“recommended for clinical and home use”, the
highest grading available for blood pressure
monitors.
Please keep this manual handy as you
use your new product. It contains practical
step-by-step instructions, as well as technical
specifications and warnings you should know
about.
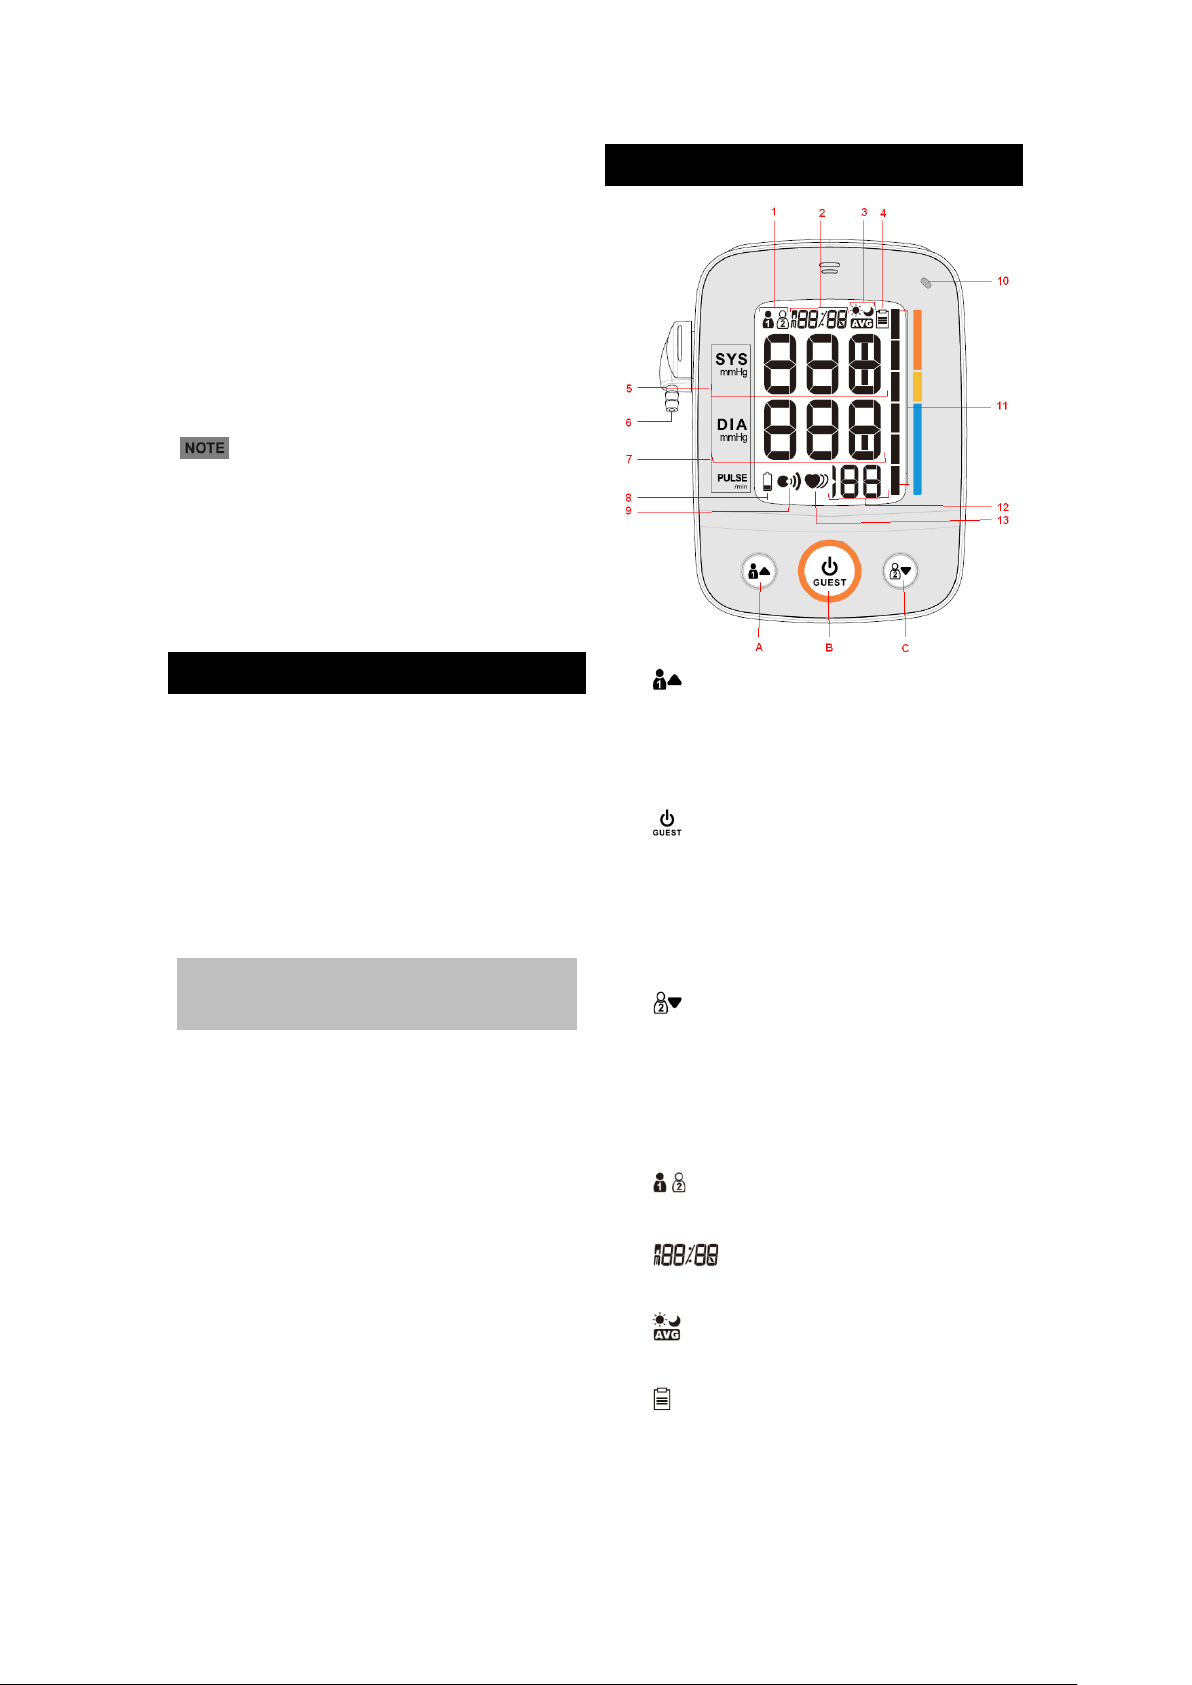
PRODUCT VIEW / KEY FEATURES
PACKAGE CONTENTS
This package should include the following items:
1 x BPU321 BLE Upper Arm Blood Pressure
Monitor
1 x Cuff wrap
1 x Cuff holder
4 x AA (1.5V) batteries
ACCESSORIES – SEPARATE PURCHASE
REQUIRED
This product comes with below optional
accessories which can be purchased separately.
For more information, please contact your local
retailer.﹡
- Replacement Arm cuff
- Storage pouch
- 6V adaptor
﹡Features and accessories will not be available
in all countries.
A. : start taking blood pressure for user 1;
view user 1 measurement records, view
additional / older records; increase value of
the setting; toggle setting options
B. : turn monitor on/off; enter setting mode;
confirm settings; start taking measurement
for guest (no record stored); cancel
measurement; confirm deletion of individual
or all data for user (1 or 2).
C. : start taking blood pressure for user 2;
view user 2 measurement records, view
additional / older records; decrease value of
the setting; toggle setting options
1. / : indicates which user (1 or 2) has been
selected (no icon appears for guest)
2. Pairing status (bLE / Err / donE);
Clock; calendar; date and time stamp
3. : Average morning / evening blood
pressure
4. : memory is full; memory mode selected
5. Systolic pressure
6. Air outlet
7. Diastolic pressure
Page 3
8. : monitor battery low
9. : voice activation
10. Synchronizing status indicator light
11. Blood pressure classification bar
12. Heart rate counter
13. : irregular heart beat detected
SETTING UP THE MONITOR
ASSEMBLE THE UNIT
1. Insert the small end of the air tube into the air
outlet on the monitor.
2. Snap cuff holder into place at the back of the
monitor.
3. Place cuff into holder.
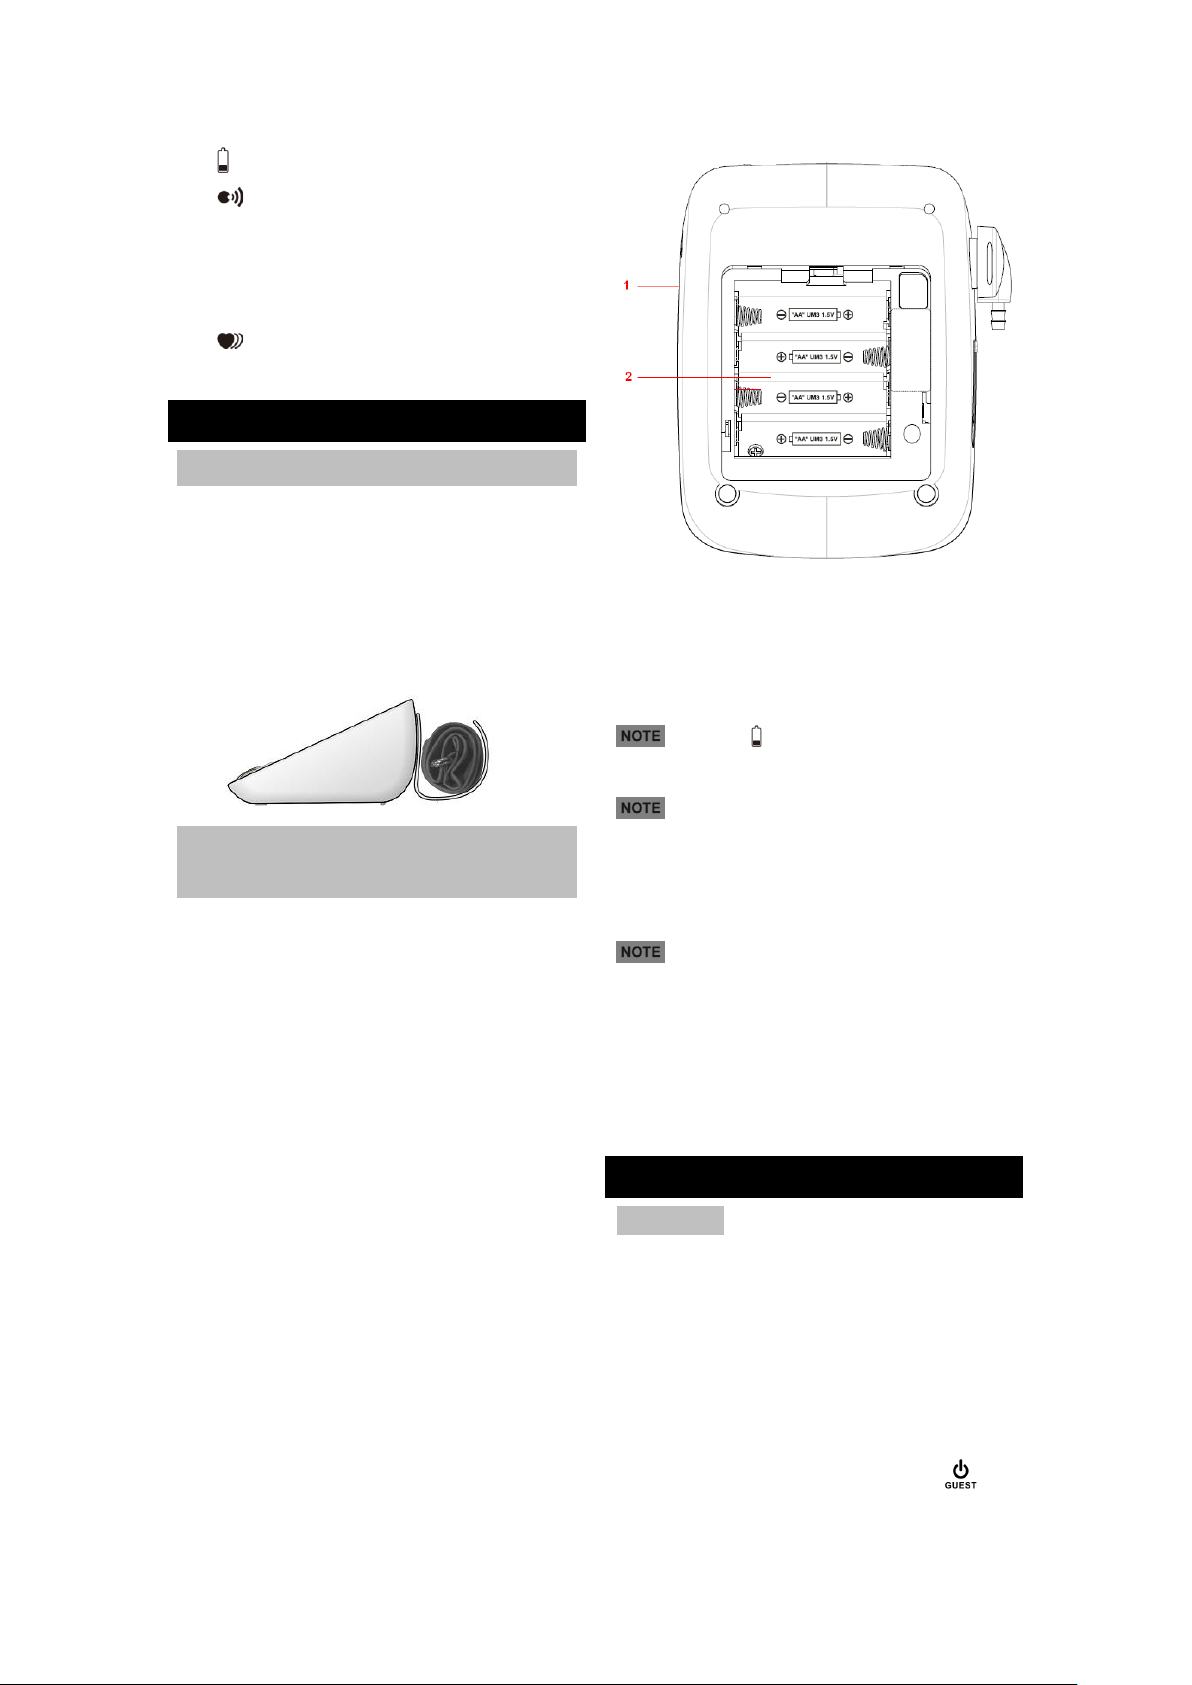
INSTALLING AND REPLACING
THE BATTERIES
This monitor can work with a 6V adaptor which
has to be purchased separately.
1. Slide off the battery cover.
2. Install the batteries by matching the correct
polarities. Always use the correct battery
3. Align the cover flat against the battery
compartment, and then slide it upwards.
Above diagram displays:
1. Adaptor outlet
2. Battery compartment
Flashing indicates monitor batteries are
low.
Replace batteries promptly to ensure
accurate readings. Replace all the batteries at the
same time; it is dangerous to mix old and new
batteries.
Contact your local waste disposal
authority for instructions on how to dispose of
used batteries. Used batteries can be harmful to
the environment, and should not be thrown out
with household trash.
MONITOR SETTINGS
IMPORTANT As blood pressure measurements
are recorded in the memory with date and time
stamp for easy analysis, set the monitor prior to
first use to ensure measurements are correctly
marked.
To set the monitor:
1. When monitor is off, press and hold to
enter setting mode.
Page 4
2. Set the monitor by pressing the following:
Settings
Setting options (Press or
and to confirm)
Date
Year, month, date
Time
Hour format, hour, minute
Audio
function
On / off
Volume control (HI / Lo) when
function enabled
Language:
(En) English
(CH) Putonghua
(Fr) French
(CH HK) Cantonese
(SP) Spanish
Measurement
reminder
alarm*
On / off
ALM 1 time
ALM 2 time
skin.
1. Press to increase value or toggle
options
2. to decrease value or toggle options
3. to confirm
4.
5. The screen display will turn off once
setting has been completed.
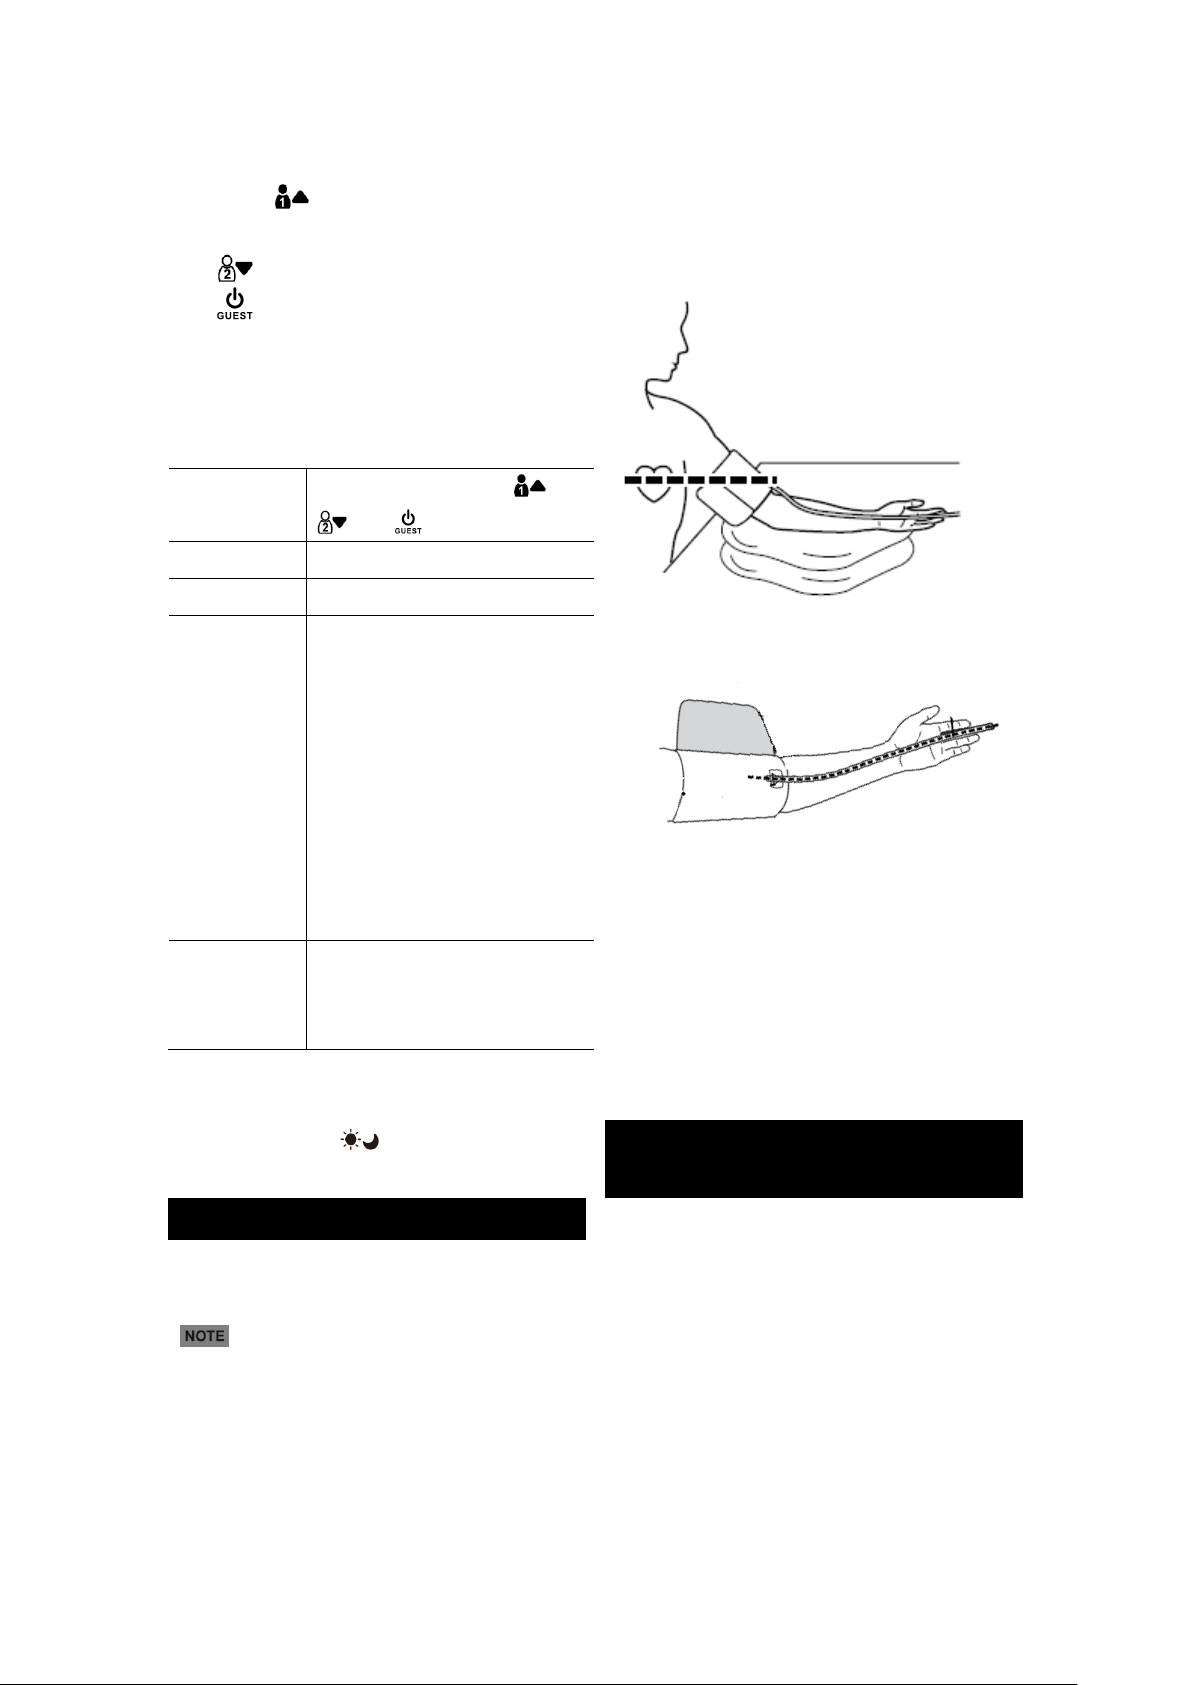
3. Put arm through the cuff loop.
4. Place cuff about an inch (1-2 cm) above your
elbow.
Use cushions or other supports if necessary to
adjust.
*To inform you if the set alarm time falls within the time
frame for calculating average morning / evening blood
pressure, these icons will be displayed.
6.
POSITIONING THE ARM CUFF
Ensure the arm cuff is correctly placed to obtain
an accurate reading.
If your physician has diagnosed you with
poor circulation in your left arm, use your right
arm.
1. Choose the position from which you wish to
measure, sitting or lying down.
2. Roll or push up your sleeve to expose the
The air tube should run down, between the inside
of your forearm and the side of your chest, in line
with your middle finger.
5. Fasten the arm cuff so it fits snugly. If the cuff
is too loose, the measurement will not be
accurate.
PREPARING TO TAKE BLOOD PRESSURE
MEASUREMENT
You can choose to take blood pressure while
sitting or lying down. Below are some helpful tips
for taking a measurement.
Be sure to set the clock before taking your
first measurement, or whenever you replace
the batteries, so that the date and time are
stored in the memory with your history. For
instructions, refer to Monitor Settings
section.
Page 5
It is important to relax when taking your blood
Button
User
Memory
Guest
No records stored
1
Record stored under User 1
2
Record stored under User 2
4. Arm cuff will begin inflating automatically.
pressure. Try to take a 15-minute rest before
you begin.
Do not lean backward or bend your wrist
inward while taking a measurement.
Do not sit cross-legged and avoid talking or
moving your fingers and hand while taking a
measurement. Rapid movements or other
activities may alter your reading.
Wait at least an hour before taking your blood
pressure if you have just eaten a large meal.
Do not smoke or drink alcohol before taking
your blood pressure.
Do not measure your blood pressure if you
are under stress.
Remove all accessories from your arm.
Wait at least 3 minutes between
measurements. This allows your blood
circulation to recover.
For a meaningful comparison, try to measure
under similar conditions. For example, take daily
measurements at approximately the same time,
on the same arm, or as directed by a physician.
TAKING A MEASUREMENT
If you want the monitor to synchronize with the
application of your mobile device. Please do
preparation before starting a measurement.
1. Relax your arm.
Digits will appear on the screen.
5. Once the pressure reaches a certain level, it
will slowly deflate until the results are
displayed on the LCD.
NOTE To stop the measurement process at
any time, press .
6. The monitor automatically attempts to send
the record wirelessly to your mobile device.
If data transmission fails, Err 1 will appear
while a voice prompts.
7. To conserve battery life, monitor will turn off
1 minute after taking a measurement.
Alternatively, press to manually turn off
monitor.
UNDERSTANDING THE READING
For reference material, please refer to Useful
Reference section which can be found at the end
of this manual.
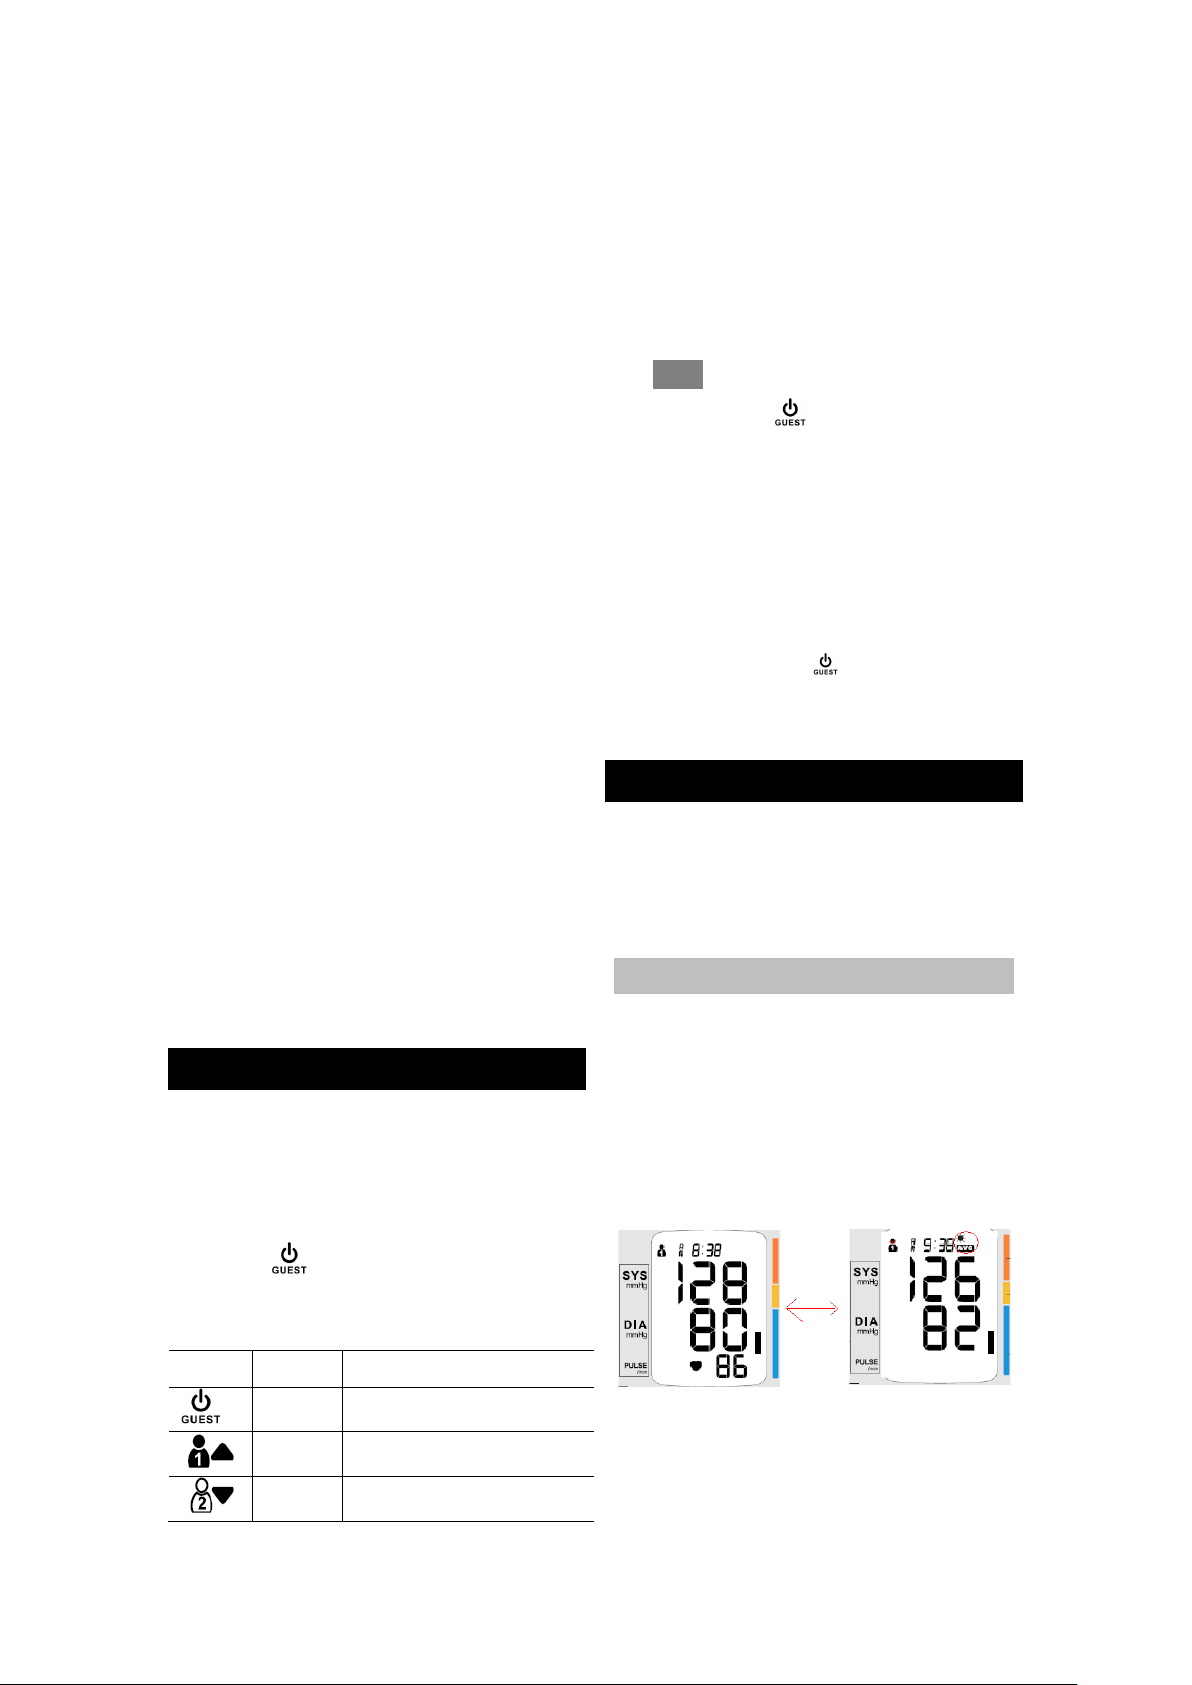
DISPLAY
Current reading & Average morning / evening
reading
If there is an average reading, the screen display
will toggle between current reading and average
morning or evening reading (depending on which
section of the day the current reading was taken).
2. Press to turn on the unit.
3. Select user, then a voice prompts you to sit
in the correct position and to remain still :
Example:
Page 6

Bar
Classification
Reading
Grade 3 Hypertension
High
Grade 2 Hypertension
Grade 1 Hypertension
Slightly high
High Normal
Normal
Normal
Optimal
An irregular heartbeat is one where there is a
variance and the intervals vary.
1. Date / Time stamp (automatically toggles)
2. User selected
3. Systolic pressure
4. Diastolic pressure
5. Heart rate
6. Blood pressure classification segments
7. Hypertension indicator bar
HYPERTENSION
The monitor will visually display by segments
under which WHO classification the
measurement falls under.
If an irregular heart beat has been
detected during the measurement, will be
displayed. We highly recommend you consult
your physician.
MOVEMENT / READING ERROR
If Err 1 is displayed, please loosen the arm cuff
and relax 2-3 minutes before taking another
measurement.
Refer again to Preparing to Take Blood
Pressure Measurement section and
Positioning the Arm Cuff section if required.
IRREGULAR HEARTBEAT / ARRHYTHMIA
Apart from blood pressure and heart rate,
heartbeat is also an indicator of your general
health condition.
With a normal heartbeat, the beats are steady at
regular intervals.
VOICE ANNOUNCEMENT
If audio function is enabled, the following will be
announced:
Measurement results (Systolic, Diastolic,
Heart rate) ;
WHO classification;
Low battery;
Error detection
displays when audio function is enabled.
VIEW RECORDS
This monitor can store up to 100 records per user.
The most recent record (1) is shown first. Each
Page 7

new measurement is assigned to the first (1)
entry in the user record selected. All other
Press or .
records are pushed back one digit (e.g., 2
becomes 3 and so on), and the last record (100)
is dropped from the list.
For average morning / evening blood pressure
readings to be displayed, blood pressure has to
measure for three consecutive days at least twice
in each time period (morning / evening).
For ease of reference, the date and time when
the measurement was taken is shown with each
record.
Memory is kept even when the batteries become
exhausted and subsequently replaced.
RECALLING MEASUREMENTS STORED IN
MEMORY
CLEAR RECORDS
When memory is full, flashes.
Apart from deleting an entire measurement
history, there is also an option to delete the latest
measurement record. This is useful if
measurements have not been accurately
recorded and need to be recorded again.
DELETING A SINGLE RECORD
1. When monitor is off, press or to
select user.
2. Press the corresponding user button
repeatedly ( or ) to navigate to the
record to be deleted.
The most recent record (1) is shown first.
Ensure the monitor is off.
Select user:
Press to view a history of User 1’s
records
Press to view a history of User 2’s
records
View more records for the same user:
Press the corresponding user button
repeatedly ( or ) to see additional
records (average morning / evening if
available or next record).
TIP Press and hold corresponding user button
( or ) to quickly toggle through all the
entries.
To alternate between different user’s records:
3. Press and hold . dEL ONE displays and
flashes.
Press to exit to the deletion mode.
Press and hold again to confirm
deletion.
4. doNE dEL indicates the record has been
deleted.
DELETING ALL RECORDS
1. When monitor is off, press or to
select user.
Page 8

2. Press and hold . dEL ONE will be
Successful
transmission
Unsuccessful
transmission
Description
Meaning
Flashing green
Communicating
Continuous red
No connectivity
recommend users send data to their mobile
device periodically.
displayed.
3. Press or to toggle to dEL ALL
4. Press and hold again to confirm
deletion.
This screen indicates all records have been
successfully deleted and there are no records left
for that user.
When viewing records:
Press and hold or .
8. The screen display will turn off once
synchronization attempt (whether successful
or not) has been completed.
5. Press or to navigate to the
other user’s records.
DATA TRANSMISSION
To help users keep track of their results, the
measurements recorded by the monitor can be
easily uploaded and reviewed
.
For added convenience, the unit is programmed
to send data automatically:
At the same time as taking measurement
After viewing records and unit detects there is
data which was not sent successfully
At midnight everyday.
MANUALLY SEND DATA
To prevent records from being erased, we
Synchronizing status indicator light (located
above the top right corner of the screen)
IMPORTANT During transmission, pressing
does not have any function.
UNIQUE DEVICE ID
Each unit has a unique device ID which can be
found on the device. You can find it on the battery
compartment.
APPLICATION
You can find the instructions in the application or
contact your local retailer of the product.
Page 9

TROUBLESHOOTING
Problem
Symptom
Check This
Remedy
No
power
Display is
dim or will
not light
up
Batteries are
exhausted
Replace
with new
batteries
Batteries
incorrectly
inserted
Reinsert
batteries
Low
batteries
Batteries low
Replace
with new
batteries
Error
message
Err 1
Data
transmission
failed
Move
closer and
Reattempt
to send
data
manually
LIg LOW
External
Measurement
Reminder
battery low
Replace
with new
batteries
other than the wrist or for functions other than
This section includes a list of error messages and
frequently asked questions for problems you may
encounter with your blood pressure monitor. If the
product is not operating as you think it should,
check here before arranging for servicing.
obtaining a blood pressure measurement.
• Do not confuse self-monitoring with
self-diagnosis. This unit allows you to monitor
your blood pressure. Do not begin or end medical
treatment based solely on the measurements of
this device. Consult a physician for treatment
advice.
• If you are taking medication, consult your
physician to determine the most appropriate time
to measure your blood pressure. Never change a
prescribed medication without consulting your
physician.
• This unit is not suitable for continuous
monitoring during medical emergencies or
operations.
• If the cuff pressure exceeds 40 kPa (300
mmHg), the unit will automatically deflate. Should
SAFETY AND CARE INSTRUCTIONS
SAFETY PRECAUTIONS
Please observe the following safety precautions
when setting up and using your blood pressure
monitor.
• This device is intended for adult use only.
• This device is intended for non-invasive
the cuff not deflate when pressures exceeds 40
kPa (300mmHg), detach the cuff from the wrist
and press the button to stop inflation.
• To avoid measurement errors, carefully read
this manual before using the product.
CARING FOR YOUR BLOOD PRESSURE
MONITOR
To ensure you receive the maximum benefit from
using this product, please observe the following
care guidelines.
• When not in use, store the unit in a dry place
away from direct sunlight.
• Do not immerse the unit in water. If it comes in
contact with water, dry it immediately with a soft
lint-free cloth.
• Use a soft, slightly moistened cloth to wipe the
measuring and monitoring of arterial blood
pressure. It is not intended for use on extremities
unit and cuff. Do not use abrasive or corrosive
cleaning agents, as these may cause damage.
Page 10

• Remove the batteries whenever you are
planning to store the unit for a long period of time.
• When replacing batteries, use new batteries as
specified in this user manual. Do not mix new and
old batteries.
• Do not place objects such as stickers on the
wrist cuff or unit, as these may impair the
measurement.
• Do not subject the unit to excessive force,
shock, dust, temperature changes, or humidity.
Such treatment may result in malfunction, a
shorter electronic life span, damaged batteries, or
distorted parts.
• Do not tamper with the internal components.
Doing so will terminate the product warranty and
may cause damage.
• The unit contains no user- serviceable parts.
• If you no longer need to use this product,
Why measure your blood pressure?
Blood pressure measurement can highly reflect
one’s health condition. High blood pressure is
potentially linked to serious illnesses such as
stroke, heart disease and kidney failure. Since
there is no symptom most of the time, many
hypertensive people do not realize they are at risk
until their health is seriously threatened.
What is the standard blood pressure
classification?
The figure illustrates the blood pressure
classification made by World Health Organization
(WHO) and International Society of Hypertension
(ISH) in 1999.
protect the environment by bringing it to your
dealer or designated collection point for proper
disposal.
USEFUL REFERENCE
ABOUT BLOOD PRESSURE
What is blood pressure?
Blood pressure is the force generated by the
blood against the walls of arteries during cardiac
contraction and relaxation (e.g., the pumping
action of the heart).
What are systolic pressure and diastolic
pressure?
When ventricles contract and pump blood out of
the heart, blood pressure reaches its maximum
value. This highest pressure in the cycle is known
as systolic pressure. When the heart relaxes
between heartbeats, the lowest blood pressure is
diastolic pressure.
Reference material: 1999 World Health
Organization - International Society of
Hypertension Guidelines for the management of
hypertension, Journal of Hypertension, 1999,
17(2): 151-183.
This is used as the basis for the coloured
hypertension indication bar to the right of the
screen.
Blood pressure is considered high when
either the diastolic or systolic blood pressure
Page 11

value exceeds the normal range. When a
Application
Measuring method
Oscillometric /
non-invasive
Application
For adult use only
Measurement location
Upper arm
Maximum number of
users
2 and guest
Memory
Maximum 100 per
user
Dimensions
Dimensions
L x W x H
148 x 103 x 75 mm
(5.8 x 4.1 x 3.0 in)
Weight
450g (0.99lb)
Cuff circumference
22-32 cm
Transmission range
6 meters (19.7 feet)
Measuring range
Pressure
30 to 280 mmHg (4.0
to 37.3 kPa)
Pulse
40 to 199 pulse/min
Power
patient’s systolic and diastolic blood
pressures fall into different categories, the
higher category should apply.
Only a physician can tell you your normal
blood pressure range and the point at which
you are at risk. Consult your physician to
obtain these values. If the measurements
taken with these products fall outside the
range, consult your physician.
Why does my blood pressure fluctuate
throughout the day?
Individual blood pressure varies greatly both on a
daily and a seasonal or temperature basis. These
variations may be more pronounced in
hypertensive patients. Normally the blood
pressure rises while at work and is at its lowest
Then it starts inflating the arm cuff to 180mmHg
or higher until it senses that it has blocked your
blood in the artery.
After that, the deflation process starts, during
which time the unit detects pressure oscillations
generated by beat-tobeat pulsatile, which is used
to determine the systolic, mean and diastolic
pressure, and also your pulse rate. Any motion
during this period will result in an incorrect
measurement.
After all readings are determined and displayed
on the LCD, the measurement is finished and the
arm cuff automatically deflates.
SPECIFICATIONS
during sleep.
The graph below illustrates the variations over a
single day with measurement taken every 5
minutes. The thick line represents sleep time. The
rises in blood pressure at 4PM (A in the graph)
and 1 2AM (B in the graph) correspond to an
attack of pain and sexual intercourse (Beven,
Honour & Stott, Clin. Sci. 36:329, 1969).
HOW THE BLOOD PRESSURE MONITOR
WORKS
This product uses the Oscillometric Measuring
method to detect your blood pressure. Before
every measurement, the unit establishes a “zero
pressure” equivalent to the air pressure.
Page 12

Power supply
4 x UM-3 (AA) 1.5V
batteries
6V adaptor (separate
purchase required)
Power save
Auto power off after 1
minute of no key
press or after
synchronisation
attempt
Operating environment
Operation
10°C to 40°C
(50°F to 104°F)
Storage
-20°C to 60°C
(-4°F to 140°F)
Humidity
10% to 83% relative
humidity
The CE mark further indicates that this blood
pressure monitor meets the general requirements
for electronic products as regards to resistance to
electromagnetic interference. Malfunctioning may
however occur in the proximity of extremely
strong electromagnetic fields. In accordance with
the “Ordinance for Operators of Medical
Products”, a technical inspection must be carried
out if this device is used for industrial or
commercial purposes.
SYMBOL DESCRIPTION(S)
Type B Equipment
Reference
ABOUT OREGON SCIENTIFIC
Visit our website (www.oregonscientific.com) to
learn more about Oregon Scientific products.
For any enquiry, please contact our Customer
Services at info@oregonscientific.com.
INFORMATION ABOUT THE CE MARK
This device complies with the European
regulations based on the Medical Products Code,
and bears the CE mark “CE0120”. The device
has been quality inspected according to EU
guideline 93/42/EEC and tested in compliance to
the “EN1060-1 Non-invasive
sphygmomanometers – Part 1, General
EU-DECLARATION OF CONFORMITY
Hereby, Oregon Scientific, declares that this BLE
Upper Arm Blood Pressure Monitor (model:
BPU321) is in compliance with the essential
requirements and other relevant provisions of
Directive 1999/5/EC. A copy of the signed and
dated Declaration of Conformity is available on
request via our Oregon Scientific Customer
Service.
requirements” and “EN1060-3 Non-invasive
sphygmomanometers - Part3: Supplementary
requirements for electromechanical blood
pressure measuring systems”.
Page 13

FCC STATEMENT
Consult the dealer or an experienced radio / TV
This device complies with Part 15 of the FCC
Rules. Operation is subject to the following two
conditions: (1) This device may not cause harmful
interference, and (2) This device must accept any
interference received, including interference that
may cause undesired operation.
WARNING Changes or modifications not
expressly approved by the party responsible for
compliance could void the user's authority to
operate the equipment.
NOTE This equipment has been tested and found
to comply with the limits for a Class B digital
device, pursuant to Part 15 of the FCC Rules.
These limits are designed to provide reasonable
technician for help.
WARNING This equipment complies with FCC
RF radiation exposure limits set forth for an
uncontrolled environment. This equipment should
be installed and operated with a minimum
distance of 20 centimeters between the radiator
and your body.
DECLARATION OF CONFORMITY
The following information is not to be used as
contact for support or sales. Please call our
customer service number (listed on our website at
www.oregonscientific.com), or on the warranty
card for this product) for all inquiries instead.
We
protection against harmful interference in a
residential installation.
This equipment generates, uses and can radiate
radio frequency energy and, if not installed and
used in accordance with the instructions, may
cause harmful interference to radio
communications. However, there is no guarantee
that interference will not occur in a particular
installation. If this equipment does cause harmful
interference to radio or television reception, which
can be determined by turning the equipment off
and on, the user is encouraged to try to correct
the interference by one or more of the following
measures:
Reorient or relocate the receiving antenna.
Increase the separation between the equipment
Name: Oregon Scientific, Inc.
Address: 19861 SW 95th Ave.Tualatin,
Oregon 97062 USA
Telephone No.: 1-800-853-8883
declare that the product
Product No.: BPU 321
Product Name: BLE Upper Arm Blood
Pressure Monitor
Manufacturer: IDT Technology Limited
Address: Block C, 9/F, Kaiser Estate,
Phase 1, 41 Man Yue St.,
Hung Hom, Kowloon,
Hong Kong
is in conformity with Part 15 of the FCC Rules.
and receiver.
Connect the equipment into an outlet on a circuit
different from that to which the receiver is
connected.
Operation is subject to the following two
conditions: 1) This device may not cause harmful
interference. 2) This device must accept any
Page 14

interference received, including interference that
may cause undesired operation.
 Loading...