

Page 1
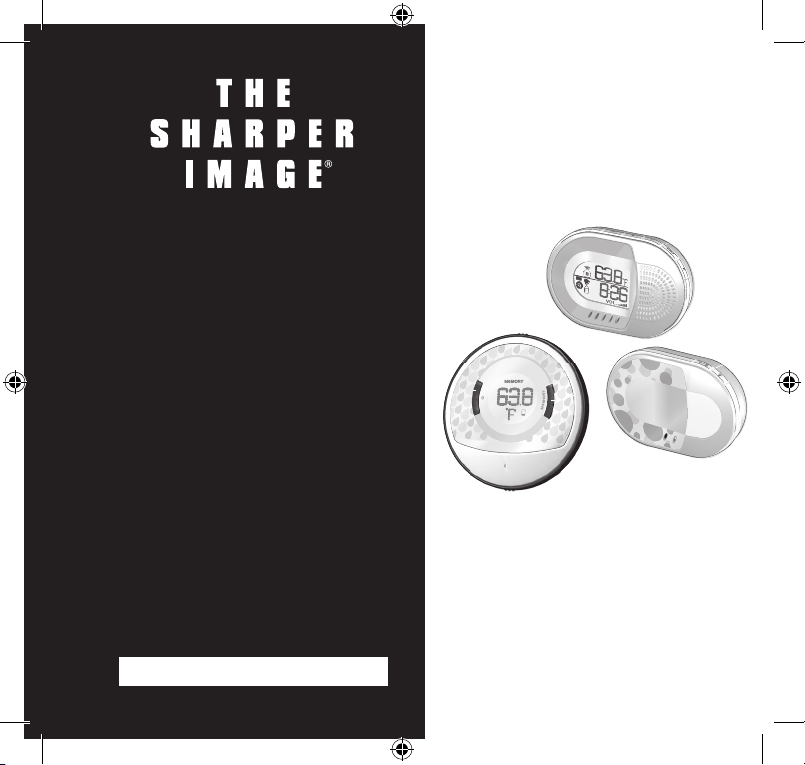
Baby Bath™
Thermometer
+ Wireless Baby
Monitor
OQ005 Instructions
Read and save these instructions.
OQ005 IM_v1 1105-PB 0216.indd 1 2/17/06 1:51:53 PM
Page 2

Table of Contents
Baby Bath™ Thermometer ..........................................................5
This is Not a Toy ........................................................................5
Warnings ...................................................................................5
Precautions ................................................................................6
General Instructions ...................................................................7
Front of the Product ...............................................................
7
Back of the Product
................................................................8
Batteries .................................................................................
9
Power On/Off ........................................................................
9
Basic Functions ....................................................................
10
Technical Specifications ........................................................
13
Baby Monitor with Indoor Temperature ...................................14
Precautions ..............................................................................14
Warnings .................................................................................16
General Instructions .................................................................17
Front View – “Parent” Unit ...................................................
17
OQ005 IM_v1 1105-PB 0216.indd 2 2/17/06 1:51:54 PM
Page 3

Table of Contents
Back View – “Parent” Unit ...................................................18
LCD – “Parent” Unit ............................................................
19
Front View – “Baby” Unit .....................................................
20
Back View – “Baby” Unit .....................................................
21
Power Requirements ............................................................
22
Neck Lanyard – “Parent Unit ................................................
24
Power On/Off ......................................................................
25
Setup ...................................................................................
25
Selecting Channels – “Baby” Unit ........................................
26
Night-Light – “Baby” Unit ....................................................
26
Volume ................................................................................
26
Sound Light Indicators ..........................................................
27
Connection Signal Status ......................................................
27
Lost-Link Alarm ....................................................................
27
Temperature Display ............................................................
28
Clock/Alarm .........................................................................
28
Set Clock/Voice-Activation Sensitivity Level ..........................
28
OQ005 IM_v1 1105-PB 0216.indd 3 2/17/06 1:51:54 PM
Page 4

Table of Contents
Setting the Alarm..................................................................29
Feeding Timer ......................................................................
30
Backlight ..............................................................................
31
Reset ....................................................................................
32
Specifications .......................................................................
32
Statement of FCC Compliance .............................................
34
FCC Label Compliance Statement ........................................
35
OQ005 IM_v1 1105-PB 0216.indd 4 2/17/06 1:51:54 PM
Page 5

This is Not a Toy
Product is tested and is in compliance with toy safety standard
EN71. IT IS NOT meant to be used as A TOY and is not suitable
for children under 3 years.
Please retain this instruction manual for future reference.
Warnings
• This product should only be operated by an adult and should
not be used as a toy for children.
• This product is not intended and should not be used as a re
placement for responsible adult supervision; it only acts as
a support for your child-caring purpose. Any type of liability
beyond statutory warranty regulations or resulting from
improper use of this product and/or use not in accordance
with product warnings, precautions and instructions is excluded.
Baby Bath Thermometer
5
OQ005 IM_v1 1105-PB 0216.indd 5 2/17/06 1:51:54 PM
Page 6

This unit is engineered to provide you with years of satisfactory
service, if you handle it carefully. The following are precautions
that should be observed:
• Do not clean the unit with abrasive or corrosive materials. This
may scratch the plastic parts and corrode the electronic circuit.
• Clean the product thoroughly after each bath. Rinse with warm
water and dry with a soft, dry cloth. Never store the product
when it is wet.
• Do not subject the unit to excessive force, shock, dust or ex
treme temperature or humidity. This may result in malfunction,
shorter electronic lifespan, damaged battery and distorted parts.
• Do not tamper with the unit’s internal components. This will
invalidate the warranty on the unit and may cause unnecessary
damage. The unit contains no user-serviceable parts.
• Only use fresh batteries. Do not mix new and old batteries
together as the old batteries may leak.
Precautions
6
OQ005 IM_v1 1105-PB 0216.indd 6 2/17/06 1:51:54 PM
Page 7

• Due to continuing improvements, actual product may differ
slightly from the product described herein.
• The technical specifications for this product and the contents of
the instruction manual are subject to change without notice.
General Instructions
Front of the Product
1. MEMORY appears on the LCD when you are setting or
displaying a user-defined temperature.
2.
button turns the unit on or off. It also disables the
alarm sound.
Precautions
7
1
2
3
4
5
OQ005 IM_v1 1105-PB 0216.indd 7 2/17/06 1:51:59 PM
Page 8

3. The LCD also shows the temperature in °C or °F.
4. MEMORY button sets the user-defined temperature range.
It also disables the alarm sound.
5. Low-battery indicator
Back of the Product
1. The RESET button returns all the settings to default values.
2. Thermo sensor takes water-temperature readings.
3. °C/°F button selects the temperature unit.
4. Battery compartment holds 2 AAA batteries (included).
Front of the Product
8
1
2
3
4
OQ005 IM_v1 1105-PB 0216.indd 8 2/17/06 1:52:00 PM
Page 9

1. Remove the screws. (When you first remove the product from
its packaging, the screws will already be loose.)
2. Once loose, pull the two sections apart, or to remove the base,
insert a blunt instrument into the groove.
3. Insert 2 AAA batteries (included), ensuring proper +/–
polarities are observed.
4. To close, line up the dot with the groove. The screw holes are
now lined up.
5. Tighten the screws. Ensure the unit is firmly closed to keep
it watertight.
Notes:
•
appears when the batteries are running low.
• To save power, the unit automatically turns off after 30 minutes.
Power On/Off
To turn the unit on and off, press and hold the button for
two seconds.
Batteries
9
OQ005 IM_v1 1105-PB 0216.indd 9 2/17/06 1:52:00 PM
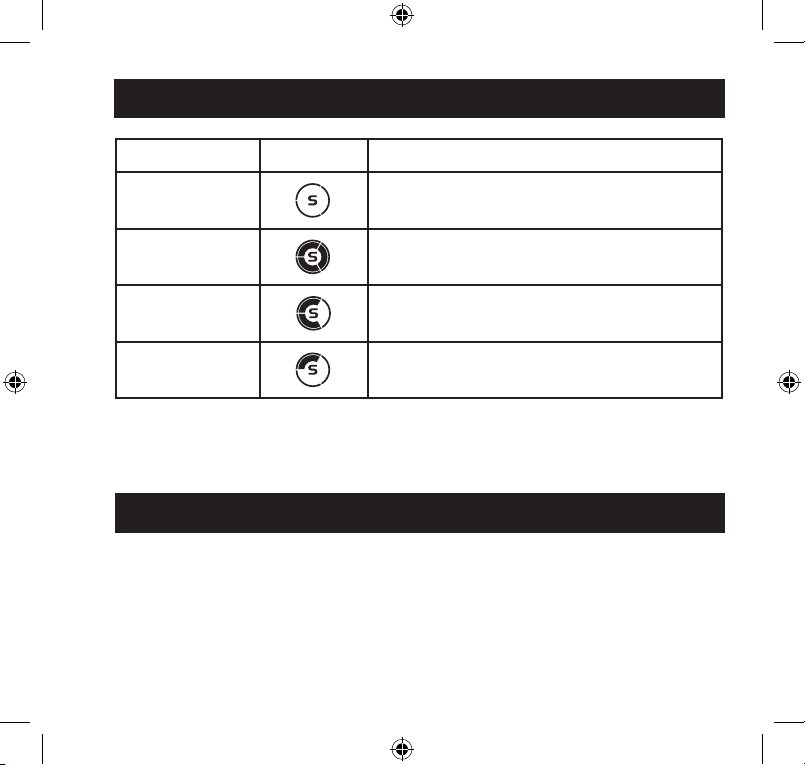
Page 10

Temperature Ranges
To obtain a temperature reading, place the unit in the water. The
unit has three preset temperature ranges to indicate when the
bath water is cold, comfortable or hot.
Comfort
Level
Color Temperature
Range °F
Temperature
Range °C
Cold Red 32.0°F - 89.9°F 0.0°C - 31.9°C
Comfortable Green 90.0°F - 100.0°F 32.0°C - 37.0°C
Hot Red 100.1°F - 122.0°F 37.1°C - 49.9°C
Comfort-Level Backlight
When the temperature changes from one comfort level to
another, the LCD illuminates. For example, green when it falls
within the Comfortable range and red when it is above or below
the Comfortable range.
Hot/Cold Alarm Alert
The unit emits an alarm sound if the temperature is 68°F/20°C or
lower, or 104°F/40°C or higher.
Basic Functions
10
OQ005 IM_v1 1105-PB 0216.indd 10 2/17/06 1:52:00 PM
Page 11

Temperature Unit
To change the display measurement unit, slide the °C/°F switch to
the desired setting.
User-defined Temperature Range
The default comfort temperature range for the baby’s bath water
is 90°F to 100°F (32°C to 37°C). To set a new water-temperature
range to the desired level:
1. Mix the water thoroughly to help ensure the temperature
is even.
2. Press and hold
MEMORY for two seconds.
3. Place the unit in the water, ensuring the thermo sensor on the
base of the unit is submerged in the water. While the unit is
taking a measurement, MEMORY flashes on the display and
the unit beeps for up to 10 seconds. Three short beeps will
sound to confirm the measurement has been stored.
4. The measured temperature appears on the LCD.
Basic Functions
11
OQ005 IM_v1 1105-PB 0216.indd 11 2/17/06 1:52:00 PM
Page 12

Notes:
• To display the user-defined water temperature, press
MEMORY.
• The unit defines the temperature + or – 3.6°F (+ or – 2°C)
of the temperature stored. For example, if the temperature recorded is 80.6°F (27°C), any reading below 77°F (25°C)
appears on the LCD as Cold and any reading above 84.2°F
(29°C) appears on the LCD as Hot.
• The user-defined temperature range can only be set if the water
temperature is between 32°F and 98.6°F (0°C and 37°C). Therefore, if the recorded temperature is 96.8°F (36°C) (the comfort
temperature range is from 93.2°F to 98.6°F (34°C to 37°C). The
unit will show “- -” if the water temperature goes above 98.6°F
(37°C).
• MEMORY always appears on the LCD if the user-defined tem
-
perature range is set. To change the setting again, press and hold
MEMORY. To clear the memory, press RESET.
Basic Functions
12
OQ005 IM_v1 1105-PB 0216.indd 12 2/17/06 1:52:01 PM
Page 13

Type Description
Display Temperature Range 32°F to 122°F (0°C to 50°C)
Temperature Resolution +/– 0.1°C (0.2°F)
Measurement Unit User-selectable °F/°C
Unit Dimensions (H x W x D) Approximately 3" x 3" x 1"
Unit Weight 3.88 ounces
Batteries 2 AAA (UM-4) 1.5V
Technical Specifications
13
OQ005 IM_v1 1105-PB 0216.indd 13 2/17/06 1:52:01 PM
Page 14

Precautions
This unit is engineered to give you years of satisfactory service,
if you handle it carefully. Here are a few precautions:
• Do not immerse the unit in water.
• Do not cover the ventilation holes. Ensure items that are nearby,
such as newspapers, tablecloths, curtains, blankets, beddings,
etc., cannot accidentally cover the ventilation holes.
• Use a soft, slightly moistened cloth to clean the unit. Do not
use abrasive or corrosive cleaning agents, as these may cause
damage.
• Do not subject the product to excessive force, shock, dust,
temperature changes, humidity and direct sunlight for
extended periods.
• Do not tamper with the internal components. This will termi
nate the product warranty and may cause damage. The unit
contains no user-serviceable parts.
Baby Monitor with
Indoor Temperature
14
OQ005 IM_v1 1105-PB 0216.indd 14 2/17/06 1:52:01 PM
Page 15

• Remove the batteries before storing the product for a long time.
Do not mix new and old batteries.
Note: The technical specifications for this product and the
contents of the instruction manual are subject to change
without notice.
CAUTION: To reduce the risk of electric shock, do not expose
this appliance to rain or moisture.
CAUTION: Danger of explosion if battery is incorrectly replaced.
Replace only with the same or equivalent type. Batteries are
supplied by Rickbery, NiMH, 3.6V, 700mAh, 3 AA per pack
with wire.
Note: Please retain this instruction manual for future reference.
Precautions
15
OQ005 IM_v1 1105-PB 0216.indd 15 2/17/06 1:52:01 PM
Page 16

• This product should only be operated by an adult and should
not to be used as a toy for children.
• This product is not intended and should not be used as a
replacement for responsible adult supervision; it only acts as
a support for your child-caring purpose. Any type of liability
beyond statutory warranty regulations or resulting from improper use of this product and/or use not in accordance with
product warnings, precautions and instructions is excluded.
• Please ensure that this product and adapter cable are always
kept out of the reach of your child and at least 3 feet away.
• Never place the baby unit inside the baby crib or near water
(e.g. bathtub, wet basement, etc.).
• For indoor use only.
Warnings
16
OQ005 IM_v1 1105-PB 0216.indd 16 2/17/06 1:52:01 PM
Page 17

Front View – “Parent” Unit
1. : Turns the unit on and off; activates backlight.
2. Sound Light Indicators: Shows the sound level received from
the “baby” unit.
3. +/– : Increases and decreases volume; changes setting value;
activates and disables alarm.
4. MODE: Displays or sets the clock / alarm / voice-activation
sensitivity level.
5.
: Sets and operates the feeding timer.
6. Speaker
General Instructions
17
1
2
3
4
5
6
OQ005 IM_v1 1105-PB 0216.indd 17 2/17/06 1:52:02 PM
Page 18

1. AC Adapter Jack
2. Table Stand
3. RESET Button
4. Lanyard Holes
5. °C/°F Selection
Back View – “Parent” Unit
18
1
2
3
4
5
OQ005 IM_v1 1105-PB 0216.indd 18 2/17/06 1:52:03 PM
Page 19

1. Connection / Signal Icon
2. Low Battery on the “Baby” Unit
3. Battery Status on the “Parent” Unit
4. Voice Activation Sensitivity Level
5. Alarm Icon
6. Feeding Timer Icon
7. Indoor Temperature
8. Clock / Alarm / Timer
9. Volume Level
LCD – “Parent” Unit
19
1
2
3
4
5
6
7
8
9
OQ005 IM_v1 1105-PB 0216.indd 19 2/17/06 1:52:04 PM
Page 20

1. Microphone
2.
/
: Turns the unit on and off; searches for channel.
3.
: Turn the night-light on and off.
4. Night-light
5. LED Indicator: Flashes during data transmission.
Front View – “Baby” Unit
20
1
5
4
3
2
OQ005 IM_v1 1105-PB 0216.indd 20 2/17/06 1:52:05 PM
Page 21

1. AC Adapter Jack
2. Table Stand
3. Battery Compartment
4. RESET Button
Back View – “Baby” Unit
21
1
2
3
4
OQ005 IM_v1 1105-PB 0216.indd 21 2/17/06 1:52:06 PM
Page 22

“Baby” Unit
The adapter should be used at all times. Insert one end of the
adapter into the unit, then plug the other end into a wall outlet.
The 3 AAA (UM-4 1.5V) batteries (purchase separately) are for
backup use only. Before first use, insert the batteries, ensuring
proper +/– polarities are observed.
Power Requirements
22
OQ005 IM_v1 1105-PB 0216.indd 22 2/17/06 1:52:08 PM
Page 23

“Parent” Unit
This unit uses a rechargeable battery pack (3 AAA/UM-4 NiMH).
Insert the rechargeable battery pack by connecting the end of
the wire into the indentation located at the bottom right of the
battery compartment.
To recharge the battery, connect the adapter into the unit, then
plug the other end into a wall outlet.
Power Requirements
23
OQ005 IM_v1 1105-PB 0216.indd 23 2/17/06 1:52:11 PM
Page 24

An animated battery icon indicates that it is charging. steadily
appears when the battery is fully charged. Before first use, charge
the batteries for 12 hours and press RESET. After the first charge,
you only need to charge the unit until the battery icon indicates
that it is fully charged.
Low Battery
Flashes when the “Baby” unit is low. A series of
warning beeps is emitted every minute until the
battery is fully exhausted.
Flashes when the “Parent” unit is low. A series of
warning beeps is emitted every minute until the
battery is fully exhausted.
Note: Press RESET after each battery charge.
Neck Lanyard – “Parent” Unit
For portability, use the neck lanyard. Lanyard holes are located on
the side of the “Parent” unit.
Power Requirements
24
OQ005 IM_v1 1105-PB 0216.indd 24 2/17/06 1:52:12 PM
Page 25

To turn either unit on or off, press and hold .
Setup
1. Insert batteries and plug in adapters.
2. Turn the “Baby” unit on, then turn on the “Parent” unit.
3. Place the two units close to each other for five seconds.
This allows the units to “recognize” each other.
4. Position the units no more than 980 feet (300 meters) from
each other.
For best results:
• Keep the units away from electrical or mechanical objects,
direct sunlight or moisture.
• Do not exceed the 980-foot (300-meter) transmission range
between the two units.
• Minimize obstructions, such as doors, walls and furniture as
those obstructions decrease the transmission range between
the two units.
In order to obtain optimal reception, you may need to experiment with various locations.
Power On/Off
25
OQ005 IM_v1 1105-PB 0216.indd 25 2/17/06 1:52:12 PM
Page 26

If there is interference or transmission trouble between the two
units, press the button on the “Baby” unit.
Night-Light – “Baby” Unit
To turn the night-light on and off, press the button.
Volume
To change the volume (0-5), press the +/– button on the
“Parent” unit.
Notes:
• All the alarm sounds are independent of the volume level.
• You may hear a high-pitched noise if the “Parent” unit is placed
too close to the “Baby” unit. The noise stops once the units are
moved away from each other.
Selecting Channels – “Baby” Unit
26
OQ005 IM_v1 1105-PB 0216.indd 26 2/17/06 1:52:12 PM
Page 27

The sound light indicators on the “Parent” unit can alert you visually to a baby’s sound. The louder the sound received from the
“Baby” unit, the more the lights are on.
Connection Signal Status
The connection icon shows you the status of the signal
between the two units.
Lost
Link
Normal Signal
The icons are animated when the two units are linked.
Lost-Link Alarm
When the “Parent” unit cannot receive data from the “Baby” unit
(due to interference or out-of-range distance), an alarm sounds
and flashes. The temperature reading shows “---.” The alarm
sound only stops when the connection between the two units is
reestablished.
Sound Light Indicators
27
OQ005 IM_v1 1105-PB 0216.indd 27 2/17/06 1:52:13 PM
Page 28

The “Baby” unit measures the surrounding temperature. If “---” is
shown, the “Baby” unit cannot transmit the temperature reading.
Slide the °C/°F switch, located in the battery compartment of the
“Parent” unit, to the desired setting.
Clock/Alarm
To toggle between the clock and the alarm display, press the
MODE button.
Set Clock/Voice-Activation Sensitivity Level
1. To enter Setting mode, press and hold MODE button.
2. To change the setting, press
+ or – button. To scroll through
the numbers quickly, press and hold + or – button.
3. To confirm a setting and move on to the next one, press
MODE. The setting sequence is as follows:
1. 12/24-hour mode 3. Minute
2. Hour 4. Voice-Activation
Sensitivity Level (0-3)
Temperature Display
28
OQ005 IM_v1 1105-PB 0216.indd 28 2/17/06 1:52:13 PM
Page 29
Level Sensitivity
0 Maximum
3 High
2 Medium
1 Low
Note: The voice-activation sensitivity feature increases/decreases
the level of sound the “Parent” unit emits. When set to 0, all
sounds, regardless of level, can be heard on the “Parent” unit.
Setting the Alarm
1. To view alarm display, press MODE.
2. To select alarm on, press
+ or –.
3. To enter the Setting mode, press and hold
MODE.
Set Clock/Voice-Activation Sensitivity Level
29
OQ005 IM_v1 1105-PB 0216.indd 29 2/17/06 1:52:13 PM
Page 30

4. To change the setting, press + or –. To quickly scroll through
the numbers, press and hold + or –.
5. To confirm a setting and move on to the next one, press
MODE. The setting sequence is hours, then minutes.
To Activate or Deactivate the Alarm
When in Alarm display, press + or –. If the alarm is off,
“—” appears.
To Stop the Alarm Sound
Press any button except .
Feeding Timer
The feeding timer is useful to help you develop a feeding routine
for your baby.
To Set the Timer
1. To view the feeding timer display, press the
.
2. To enter the setting mode, press and hold
.
Setting the Alarm
30
OQ005 IM_v1 1105-PB 0216.indd 30 2/17/06 1:52:13 PM
Page 31

3. To increase or decrease the time in 30-minute intervals, press
+ or –. To quickly scroll through the numbers, press and hold
+ or –.
4. To confirm, press .
Timer Functions
• To start/stop/retrieve the last setting, press the
.
• To reset the timer, press and hold
or press RESET.
• To view the clock while the timer is running, press
MODE.
flashes when the timer is in use.
• To turn off the 2-minute alarm that sounds when the timer has
reached 0, press any button except .
Note: If a button is not pressed after one minute when you are in
the Timer Display mode, it returns to the Clock Display mode.
Backlight
To turn the “Parent” unit backlight on for 8 seconds, press the .
Feeding Timer
31
OQ005 IM_v1 1105-PB 0216.indd 31 2/17/06 1:52:14 PM
Page 32

To return either unit to the default settings, insert a blunt stylus
into the RESET hole, located in the battery compartment of
each unit.
Specifications
Type Description
Clock Time 12- or 24-hour format
Alarm 2 minutes
Feeding Timer 30 minutes to 24 hours
RF Frequency 2.4GHz
Transmission Range 980 feet (300 meters)
open area
Temperature Measuring Range 14°F to 122°F (–10°C to 50°C)
Operating Range 32°F to 122°F (0°C to 50°C)
Temperature Unit °C/°F
Reset
32
OQ005 IM_v1 1105-PB 0216.indd 32 2/17/06 1:52:14 PM
Page 33

Power Description
“Baby” Unit 6V DC 200mA AC adapter/
3 x 1.5V UM-4/AAA batteries
“Parent” Unit 6V DC 200mA AC adapter/
3.6V NiMH rechargeable
battery pack
Measurements Description
Dimensions – Both Units
(H x W x D)
Approximately 4" x 21/2" x 2"
(96 x 63 x 40 mm)
Weight – “Parent” Unit 2.4 ounces (68 grams) without
battery
Weight – “Baby” Unit 2.2 ounces (62 grams) without
battery
Specifications
33
OQ005 IM_v1 1105-PB 0216.indd 33 2/17/06 1:52:14 PM
Page 34

FCC Compliance Statement
34
Statement of FCC Compliance
WARNING: Changes or modifications to this unit not expressly
approved by the party responsible for compliance could void the
user’s authority to operate the equipment.
This equipment has been tested and found to comply with the
limits for a Class B digital device, pursuant to Part 15 of the FCC
Rules. These limits are designed to provide reasonable protection against harmful interference in a residential installation. This
equipment generates, uses, and can radiate radio frequency
energy and, if not installed and used in accordance with the
instructions, may cause harmful interference to radio communications. However, there is no guarantee that interference will not
occur in a particular installation.
If this equipment does cause harmful interference to radio or
television reception, which can be determined by turning the
equipment off and on, the user is encouraged to try to correct
the interference by one or more of the following measures:
OQ005 IM_v1 1105-PB 0216.indd 34 2/17/06 1:52:14 PM
Page 35

Page 36

Warranty
What Is Covered
This warranty covers any defects in materials or workmanship, with the exceptions stated below.
How Long Coverage Lasts
This warranty runs for 90 days from the date of original purchase.
What Is Not Covered
This warranty does not cover damage caused by misuse or use other than as intended and described
in the product instruction manual, or loss or damage to batteries or removable parts.
What The Sharper Image Will Do
The Sharper Image will repair any defects in materials or workmanship. In the event repair is not
possible, The Sharper Image will either replace this product with one of similar features and price,
or refund the full purchase price of the product, whichever you prefer.
How to Obtain Service
Return the product and receipt, along with a brief explanation of the problem, to:
T.S.I. - Returns Department
2901-A West 60th Street
Little Rock, AR 72209
If you have questions please feel free to contact our customer service representatives at 1-800-344-5555
or by email at care@web.sharperimage.com.
This warranty gives you specific legal rights, and you may have other legal rights that vary from state to state.
© 2006 Sharper Image Corporation
Sharper Image Corporation
350 The Embarcadero, Sixth Floor
San Francisco, CA 94105-1218
(415) 445-6000
Shop online:
Due to continuing improvements, actual product may differ slightly from the product described herein.
V1 12/05
OQ005 IM_v1 1105-PB 0216.indd 36 2/17/06 1:52:14 PM
 Loading...