

id Systems MVAC24 Users Manual
Quick Start Guide
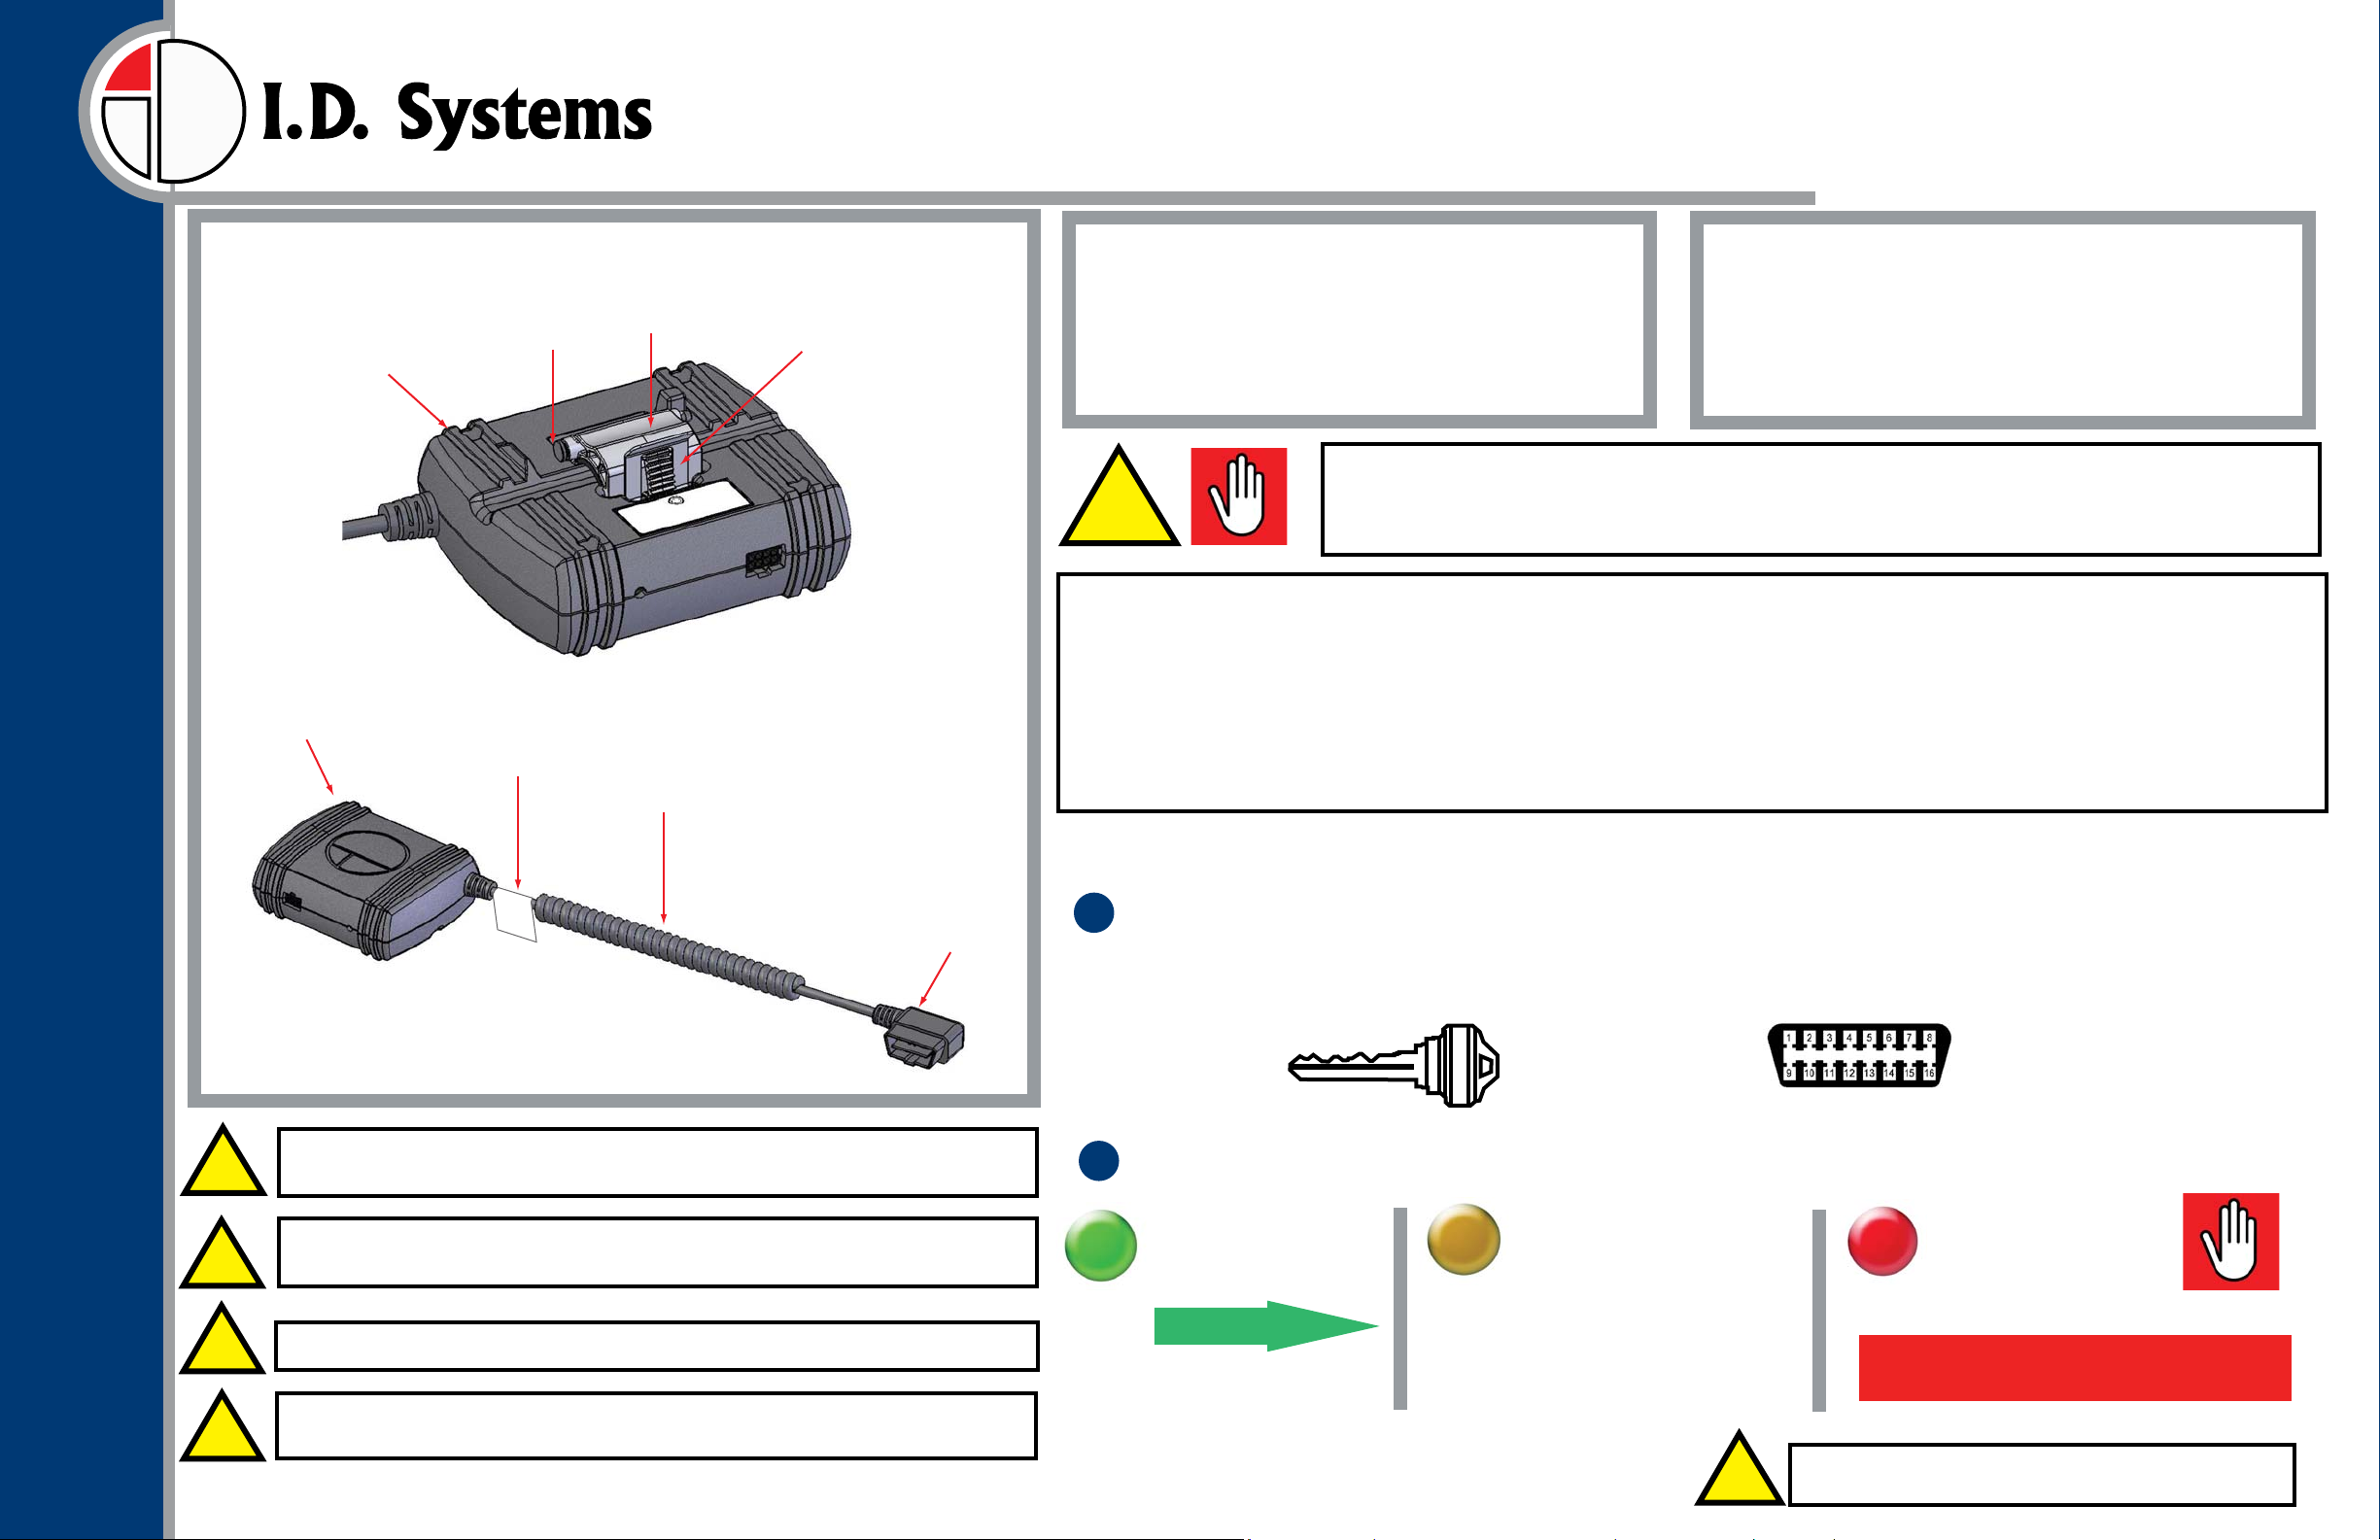
MVAC Description
Locking
Pin
MVAC
MVAC
MVAC Type
Label
Snap
Clamp
Data/Power
Cord
Clamp
Lock
Required Tools
Some tools that may be required for installing the MVAC:
• Portable lighting
• Standard tools for panel removal (if required)
WARNING: IT IS CRITICAL TO VERIFY THAT THE MVAC TYPE (TYPE A/TYPE B) MATCHES THE VEHICLE
MODEL IT IS BEING INSTALLED ON. CONSULT THE APPROVED VEHICLES LIST FOR COMPLETE
!
This device complies with Part 15 of the FCC and RSS-210 of Industry Canada Rule. Operation is subject to the following two conditions:
(1) This Device may not cause harmful interface, and
(2) This device must accept any interference received, including interference that may cause undesired operation.
Note: This equipment has been tested and found to comply with the limits for digital device, pursuant to Part 15 of FCC Rules.
These limits are designed to provide reasonable protection against harmful interference when the equipment is operated in a commercial environment. This equipment generates, uses and can radiate radio frequency energy
and, if not installed and used in accordance with the instructions, may cause harmful interference to radio communications. However, there is no guarantee that interference will not occur in a particular installation. If this
equipment does cause harmful interference to radio or television reception, which can be determined by turning the equipment off and on, the user is encouraged to try correct the interference by one or more of the following
measures:
1.1. Reorient or relocate the receiving antenna.
1.2. Increase the separation between the equipment and receiver.
1.3. Connect the equipment into an outlet on a circuit different from that to which receiver is connected.
1.4. Consult the dealer or experienced radio/TV technician for help.
WARNING
Changes or modifications not expressly approved by the manufacturer could void the user's authority to operate the equipment.
DETAILS ON WHICH MVAC TYPE IS APPROVED FOR THE VEHICLE MODEL BEING INSTALLED. EACH
MVAC WILL BE MARKED AND LABELED ON THE DATA/POWER CORD.
Prior to Installation
Before starting the installation, take a minute to survey the area
underneath and directly behind the dashboard.Select the best
mounting location before you start to work. The harness should be
the appropriate diameter (step 6) and high up behind the
dashboard.
TM
Motor Vehicle Asset Communicator™
System Device
A RentalFleet
WARNING: DO NOT UNDER ANY CIRCUMSTANCES MAKE ANY CONNECTIONS TO THE
!
!
!
!
VEHICLE OTHER THAN THOSE INDICATED IN THE INSTALLATION DOCUMENT
WARNING: ENSURE THAT THE MVAC IS INSTALLED AS PER THE INSTRUCTIONS PROVIDED
AND IS SECURED AGAINST MOVEMENT DURING OPERATION OF THE VEHICLE
WARNING: DO NOT DISCONNECT ANY OF THE VEHICLE’S CABLES
WARNING: DO NOT CONNECT THE MVAC TO THE AIRBAG HARNESS (TYPICALLY YELLOW),
OR THE HIGH VOLTAGE WIRE IN HYBRID VEHICLES (TYPICALLY ORANGE).
093-0000076 Rev 02
Configuring the MVAC Before Installation
OBD
T
y
p
e
A
123 Tice Blvd • Suite 101 • Woodcliff Lake, NJ 07677 • Phone 201.996.9000 • Fax 201.996.9144 • www.id-systems.com
Connector
Insert the key into the ignition and turn the key to the Accessory position so the vehicle will have power.
1
Locate the vehicle’s OBD port. On most models, the OBD port will be located on either side or underneath
the steering column. On some models, the OBD port may be located behind an access panel. Note: If the
OBD port has plug in it, remove the plug and tape it to the wire harness.
Make sure the vehicle’s driver door is open. Plug the MVAC into the vehicle’s OBD connector. Wait for the door
2
to lock and unlock, and then wait for the LED to turn Green.
If the LED turns Green
Move to step 3
If the LED blinks or turns
Amber, remove the MVAC
and place it on a
reprogramming station.
!
OBD port
If the LED turns Red, or
does not light up at all
Place this unit to the side and repeat
Step 2 with a different MVAC
WARNING: ENSURE THAT THE INSTALLED MVAC CANNOT
INTERFERE WITH THE VEHICLE OPERATOR AT ANY TIME
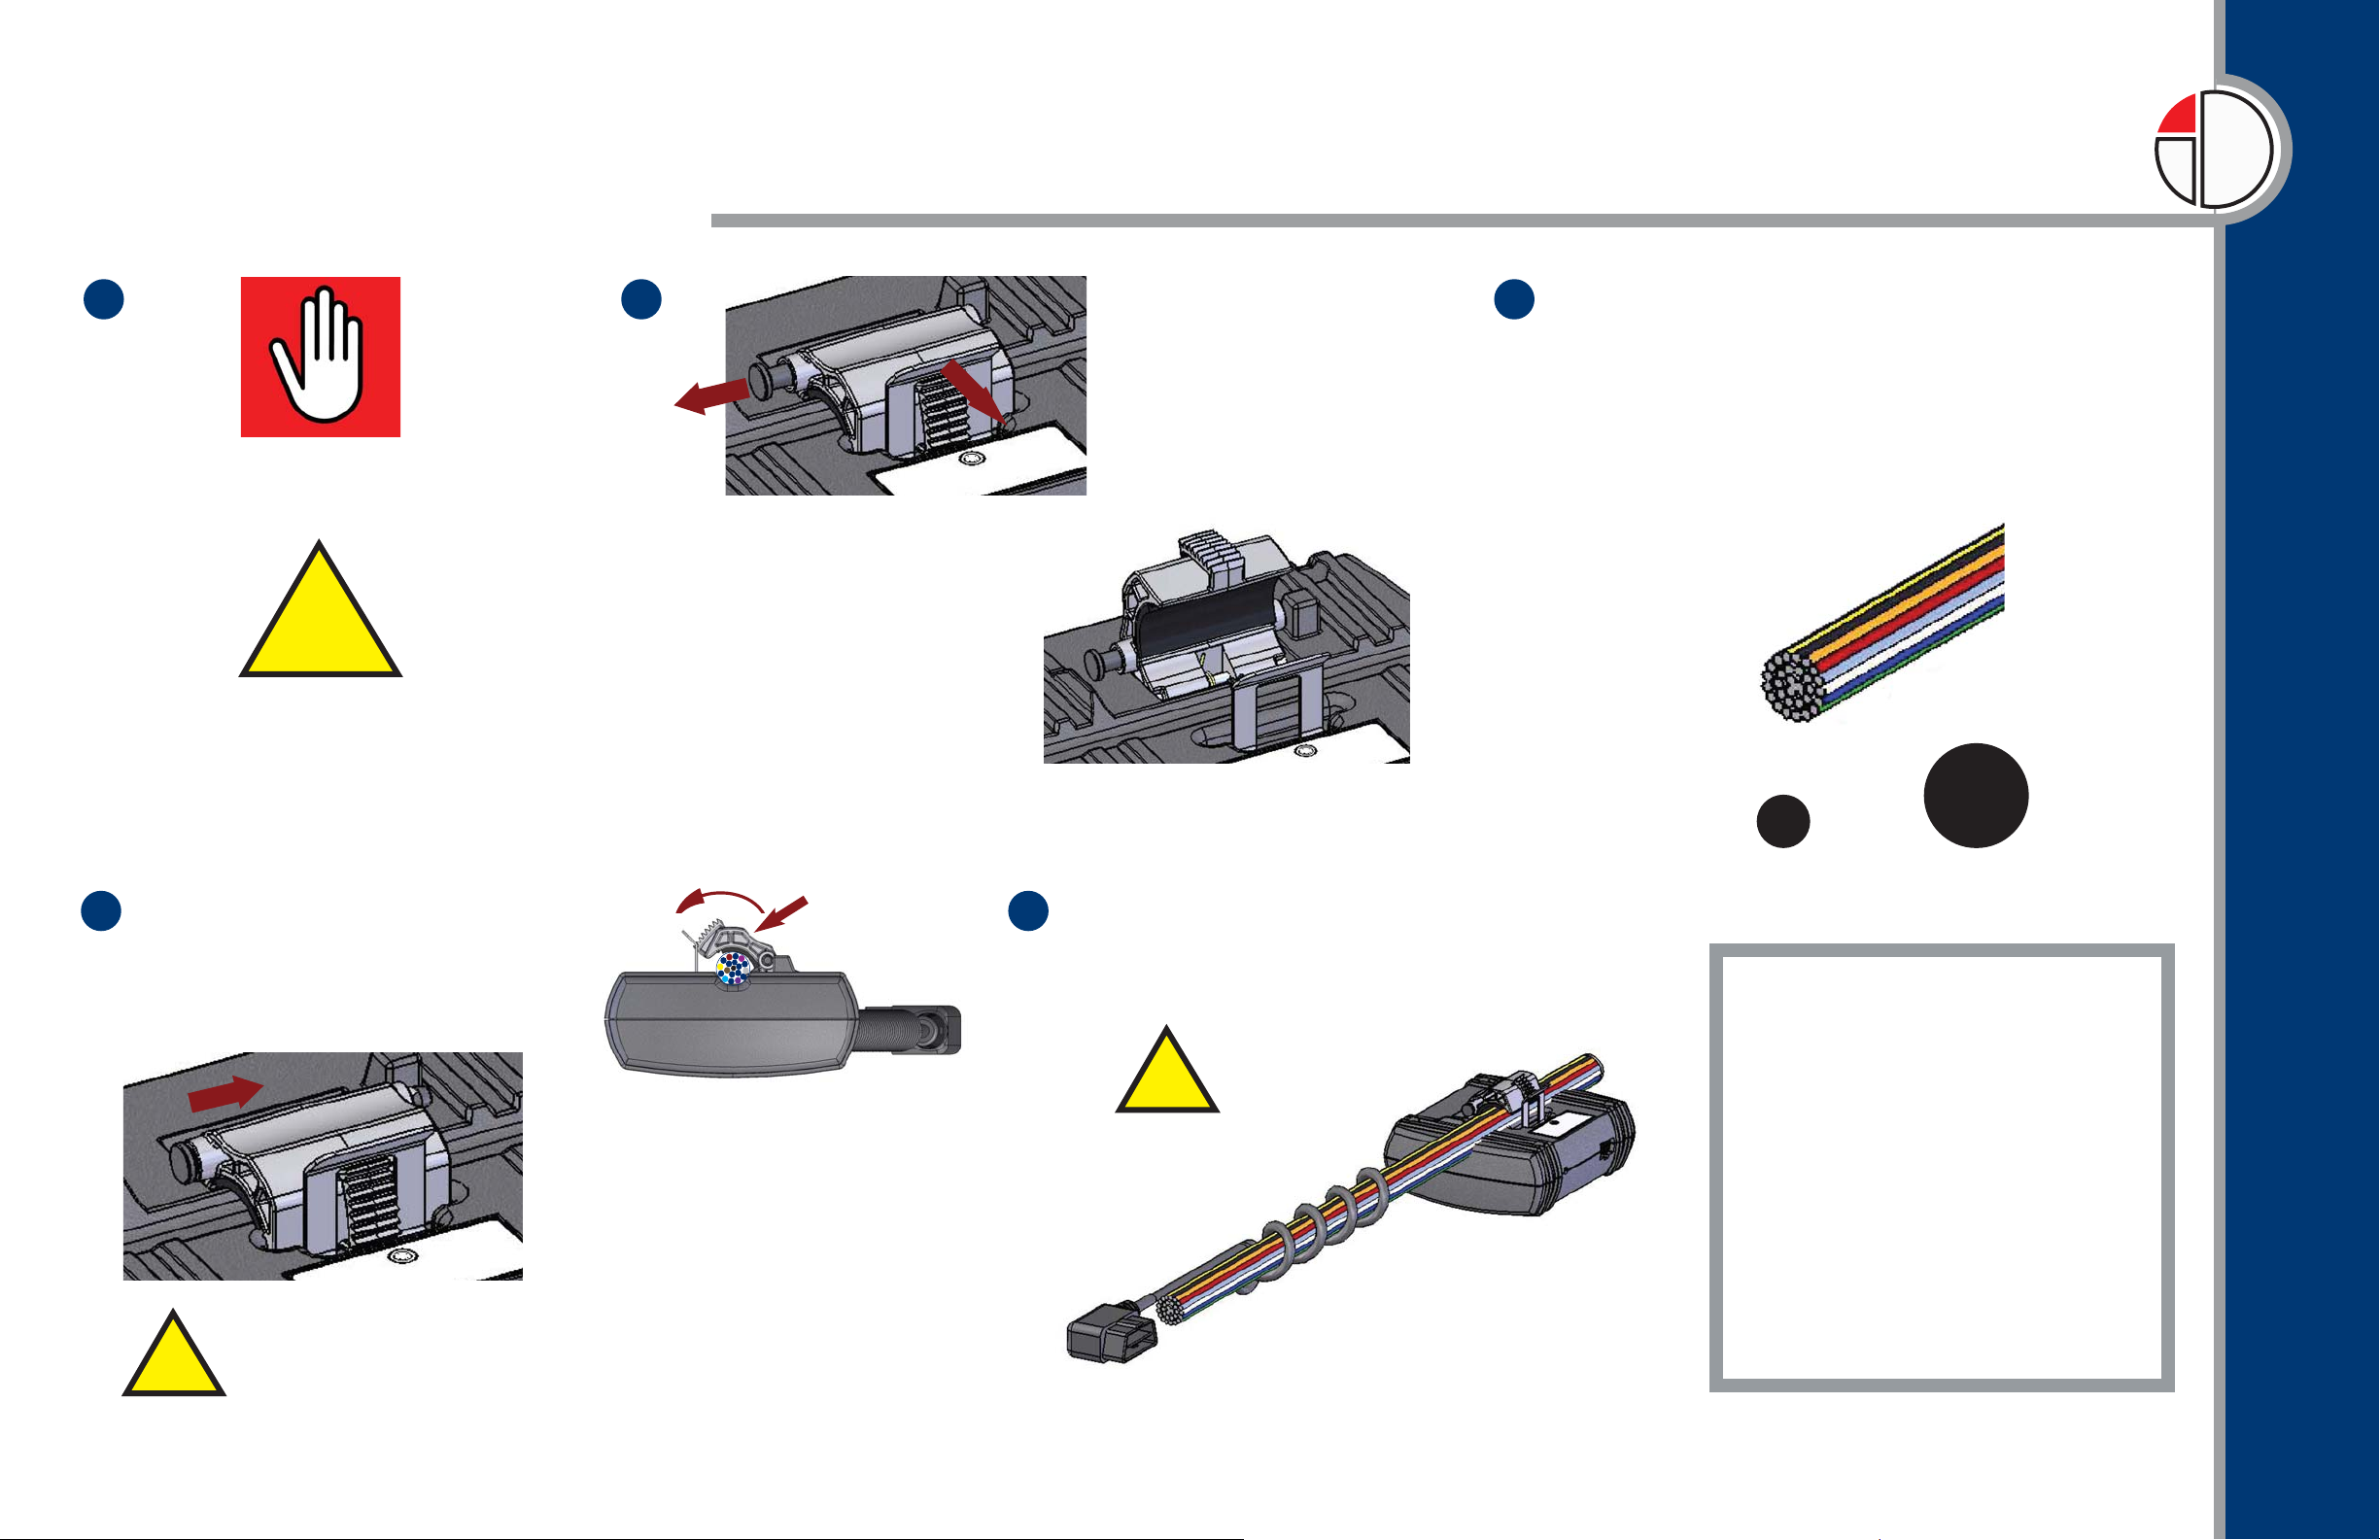
Electrical ConnecƟons (Cont.)
3
Unplug the MVAC from the OBD port.
!
Remove the the key from the ignition.
4
When open, the MVAC
will look like this with the
pin out and the clamp released
Slide back the locking pin
and push back on the
clamp lock to release the
snap clamp.
Find a wire harness for mounting the MVAC within 2 feet
5
of the OBD port. Once installed, the MVAC must NOT interfere
with the driver’s operation of the vehicle (pedals, steering,
etc.). Make sure the weight of the MVAC will not damage or
pull out the cables from their connectors. If the MVAC is
installed against a vehicle surface (e.g. metal plate), verify
that the I.D. Systems logo is facing against the surface, so
that the clip side is visible and accessable after installation.
3/8-inch
actual
3/4-inch
actual
Motor Vehicle Asset Communicator™
Tightly clip the MVAC latch around the
6
cable/wire harness that has a diameter
of ⅜” to ¾”. Make sure the MVAC does
not slide or rub against the wires. If it does,
use a thicker bundle.
Slide the pin back
!
in place to lock the clamp
Push down
NOTE: Secure the MVAC so that it will not cause
rattles, knocks, or vibrations. Carefully avoid
contact or interference with the Park Brake
Mechanism, Steering Knuckles, or any other
moving parts. Avoid areas near heater outlet
vents. If needed, use large nylon cable ties to
mount the MVAC in a safe and secure position.
7
Route the MVAC cord to the OBD port. Wrap the cord
around cables and the OBD port where possible to
ensure it does not interfere with the driver’s operation
of the vehicle. Then plug it into the OBD port.
!
MINIMUM SIZE <--- BUNDLE ---> MAXIMUM SIZE
Removing the Unit from the Vehicle
(refer to install instructions
for image references)
• Remove key from vehicle
• Unplug MVAC from OBD port
• Put the OBD plug taped to the
MVAC harness back into the OBD
port (if it exists)
• Unwrap MVAC cord as required
• Pull back the locking pin
• Open the mounting latch
• Remove MVAC
• Store MVAC for future use
A RentalFleet
TM
System Device
Confidentiality Notice © 2012 I.D. Systems, Inc. All rights reserved. This document contains confidential and/or proprietary information and may be reproduced for internal purposes only. This document may not be
reproduced in part, or shown, or in any way disclosed to any third party, without the express written consent of I.D. Systems, Inc.
093-00000076 Rev 02
 Loading...