

User Manual
Model:Pluto A1
Manufacture:SHENZHEN SUNGWORLD ELECTRONICS CO., LIMITED

Table of Contents
Main Screen 2
Punch Status 3
Administrator Login screen 3
Administrator Option Menu 5
User Management Screen 6
Add User 7
Access Group Management 8
User Role Management 9
Attendance Log Screen 11
Data Management Screen 11
Access Control Management 12
Work Code Management 15
Message Management 16
Settings 17
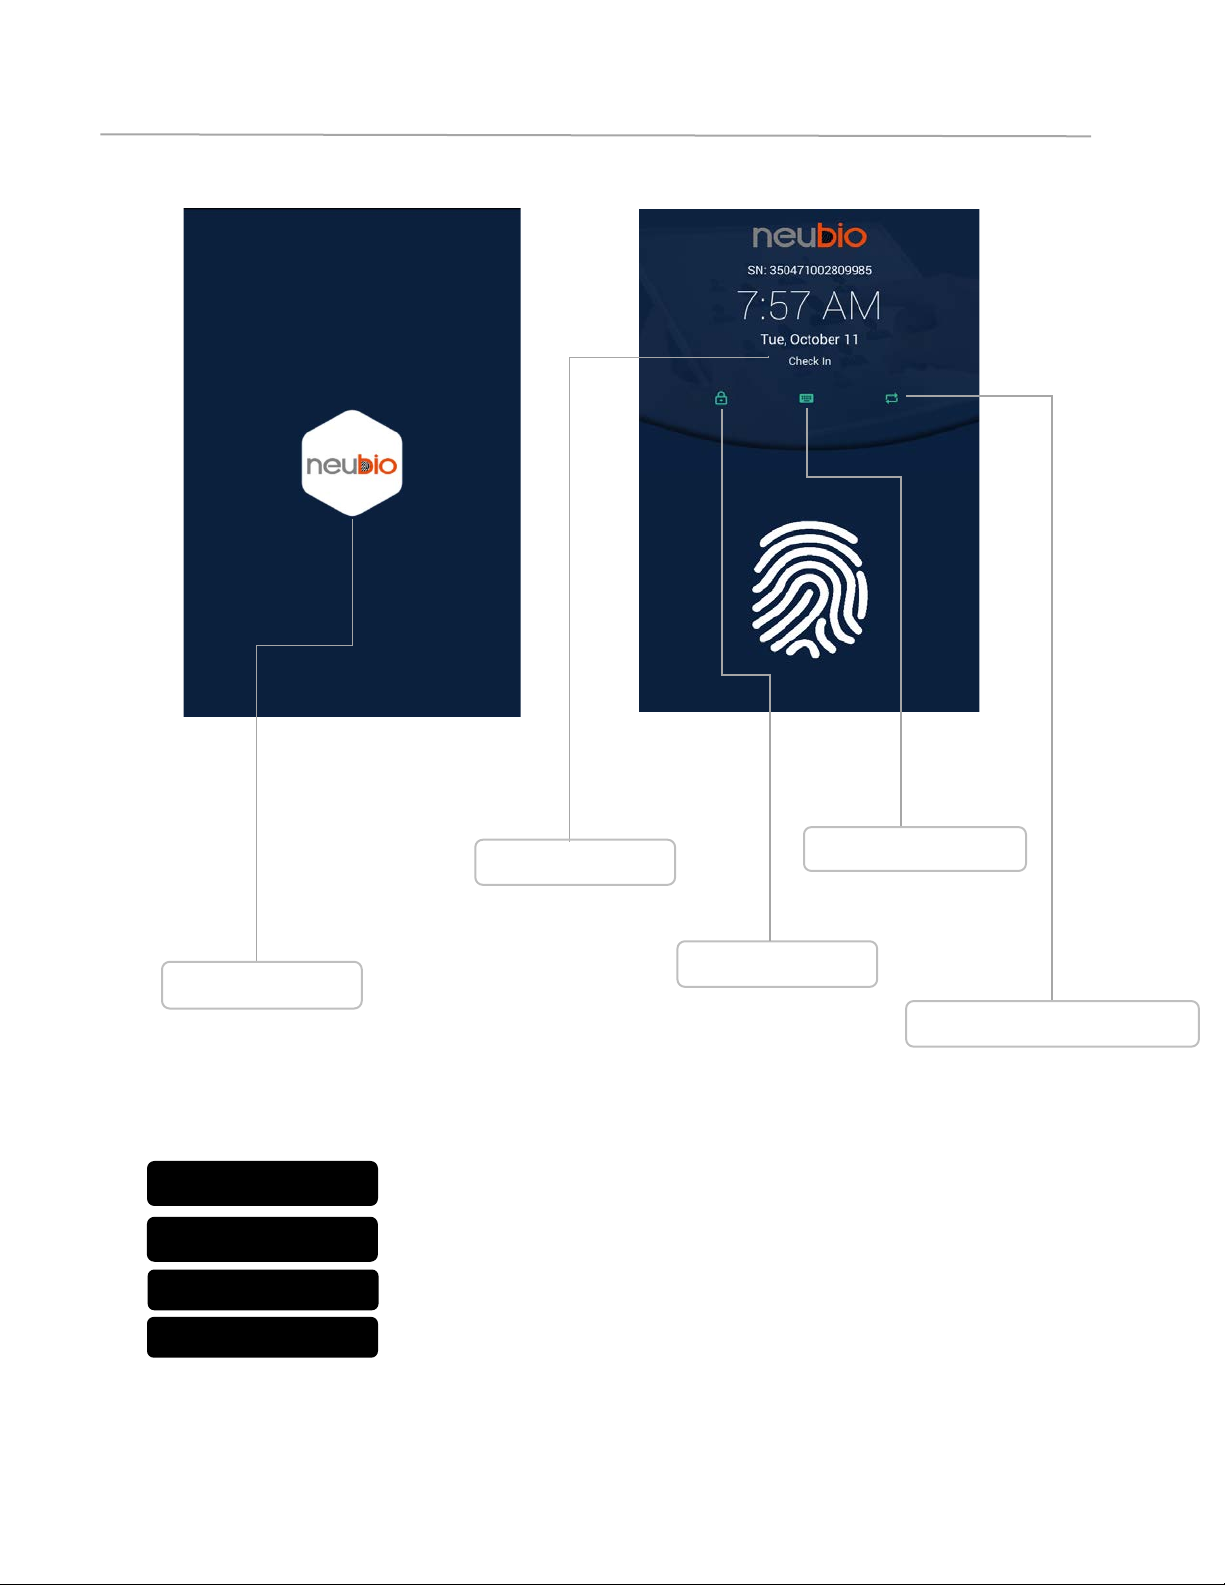
Main Screen
Splash Scree n
Change Punch Status
Admin Unlock
Password Punch
Punch Status
Admin Unlock
Password Punch
Use to unlock main menu, if admin exist, you need to input user pin &
password or finger to unlock menu
If authorized, punch attendance using password
Use to change punch status
Manual Punch Status
Note
User can punch attendance in this mode
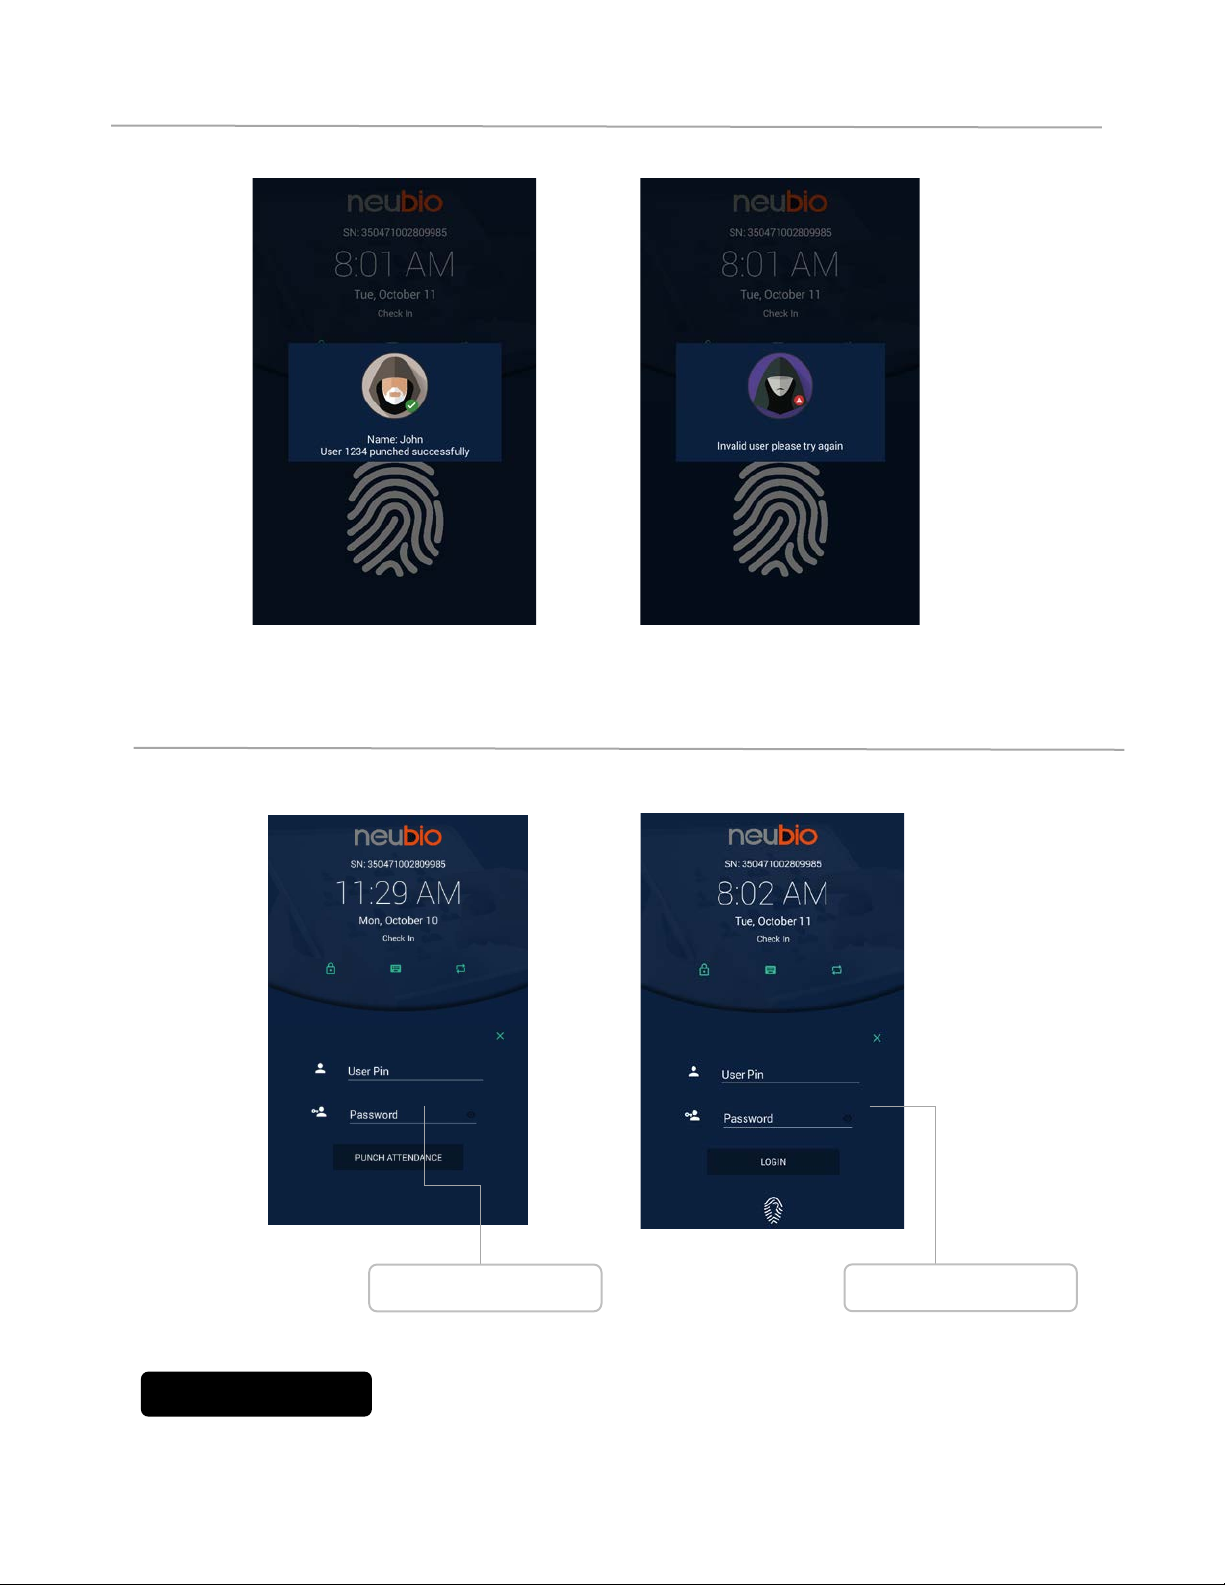
Punch Status
Password Login
Administrator Login Screen
Password Punch
Password
Login
Finger
Login
Note
The Password Login menu occurs only when admin is registered, else
anyone can directly login into the main menu
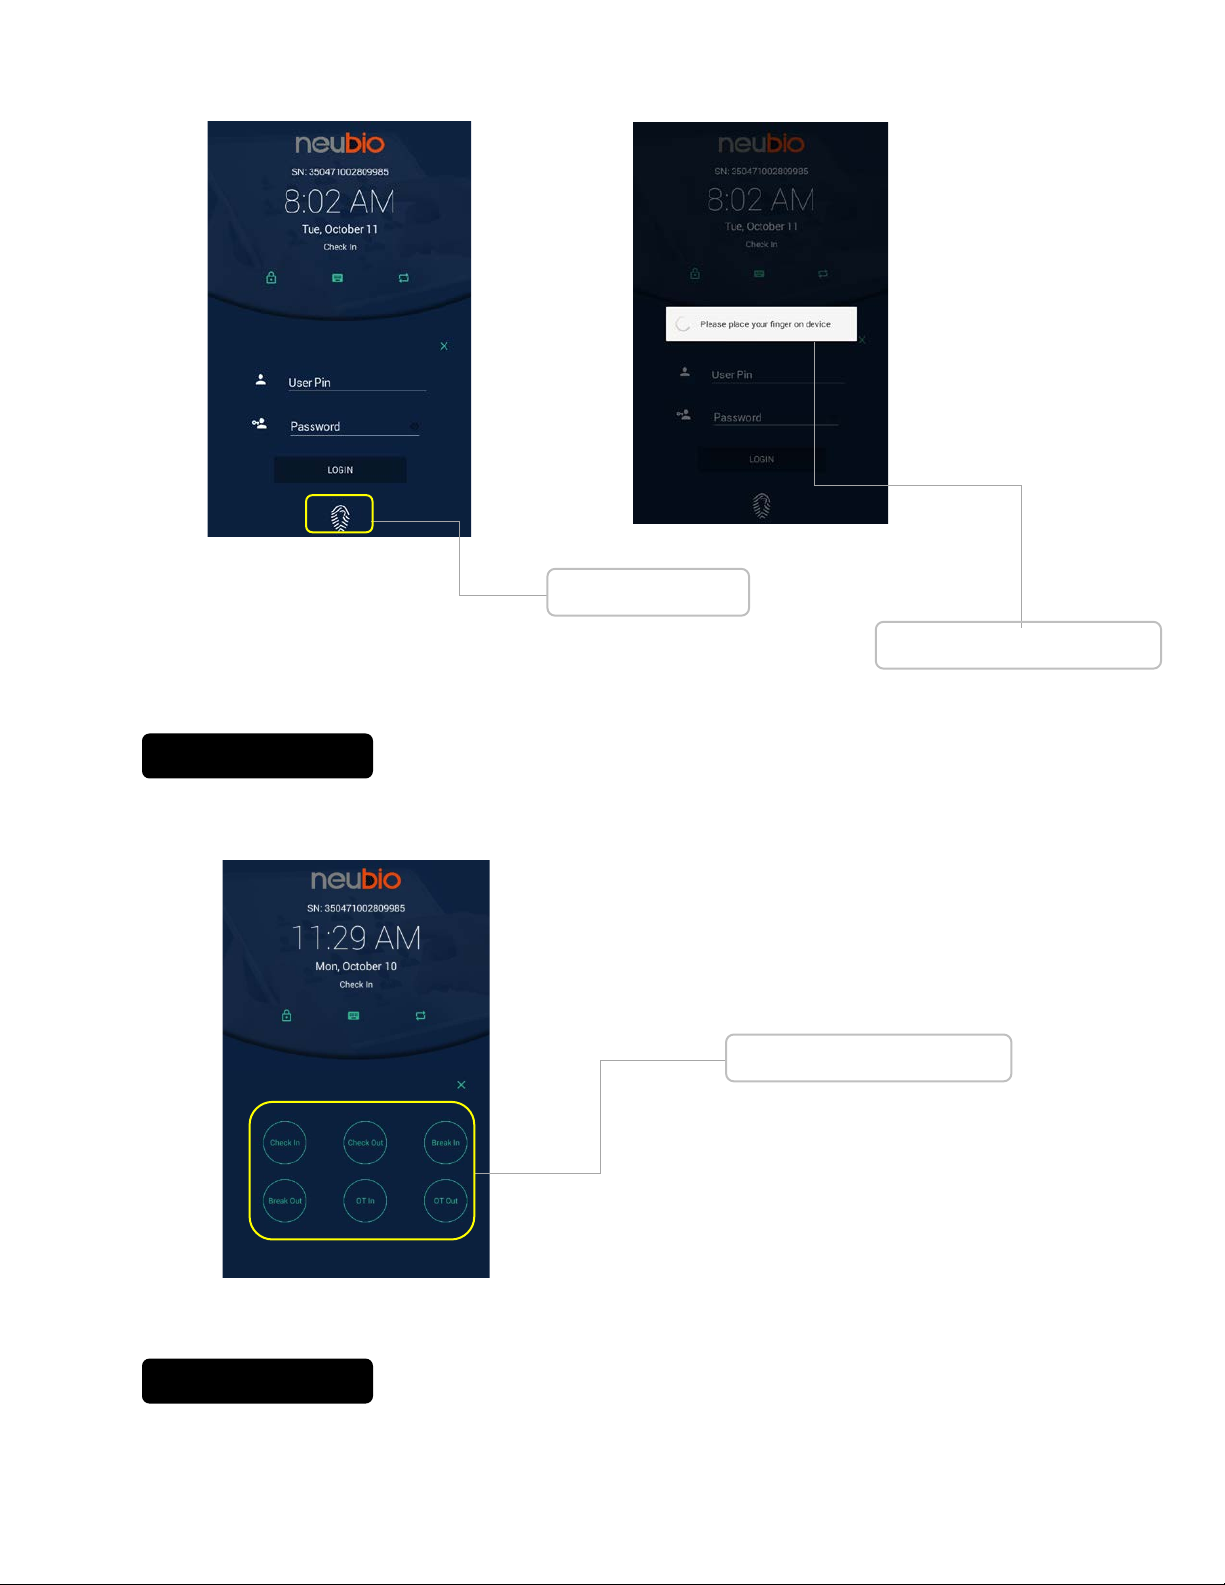
Finger Login
Finger Login M essage
Note
The Finger Login menu occurs only when admin is registered, else
anyone can directly login into the main menu
Manual Punch Status
Note
The above punch status is valid for only one punch, after punch or
timeout status will change to default
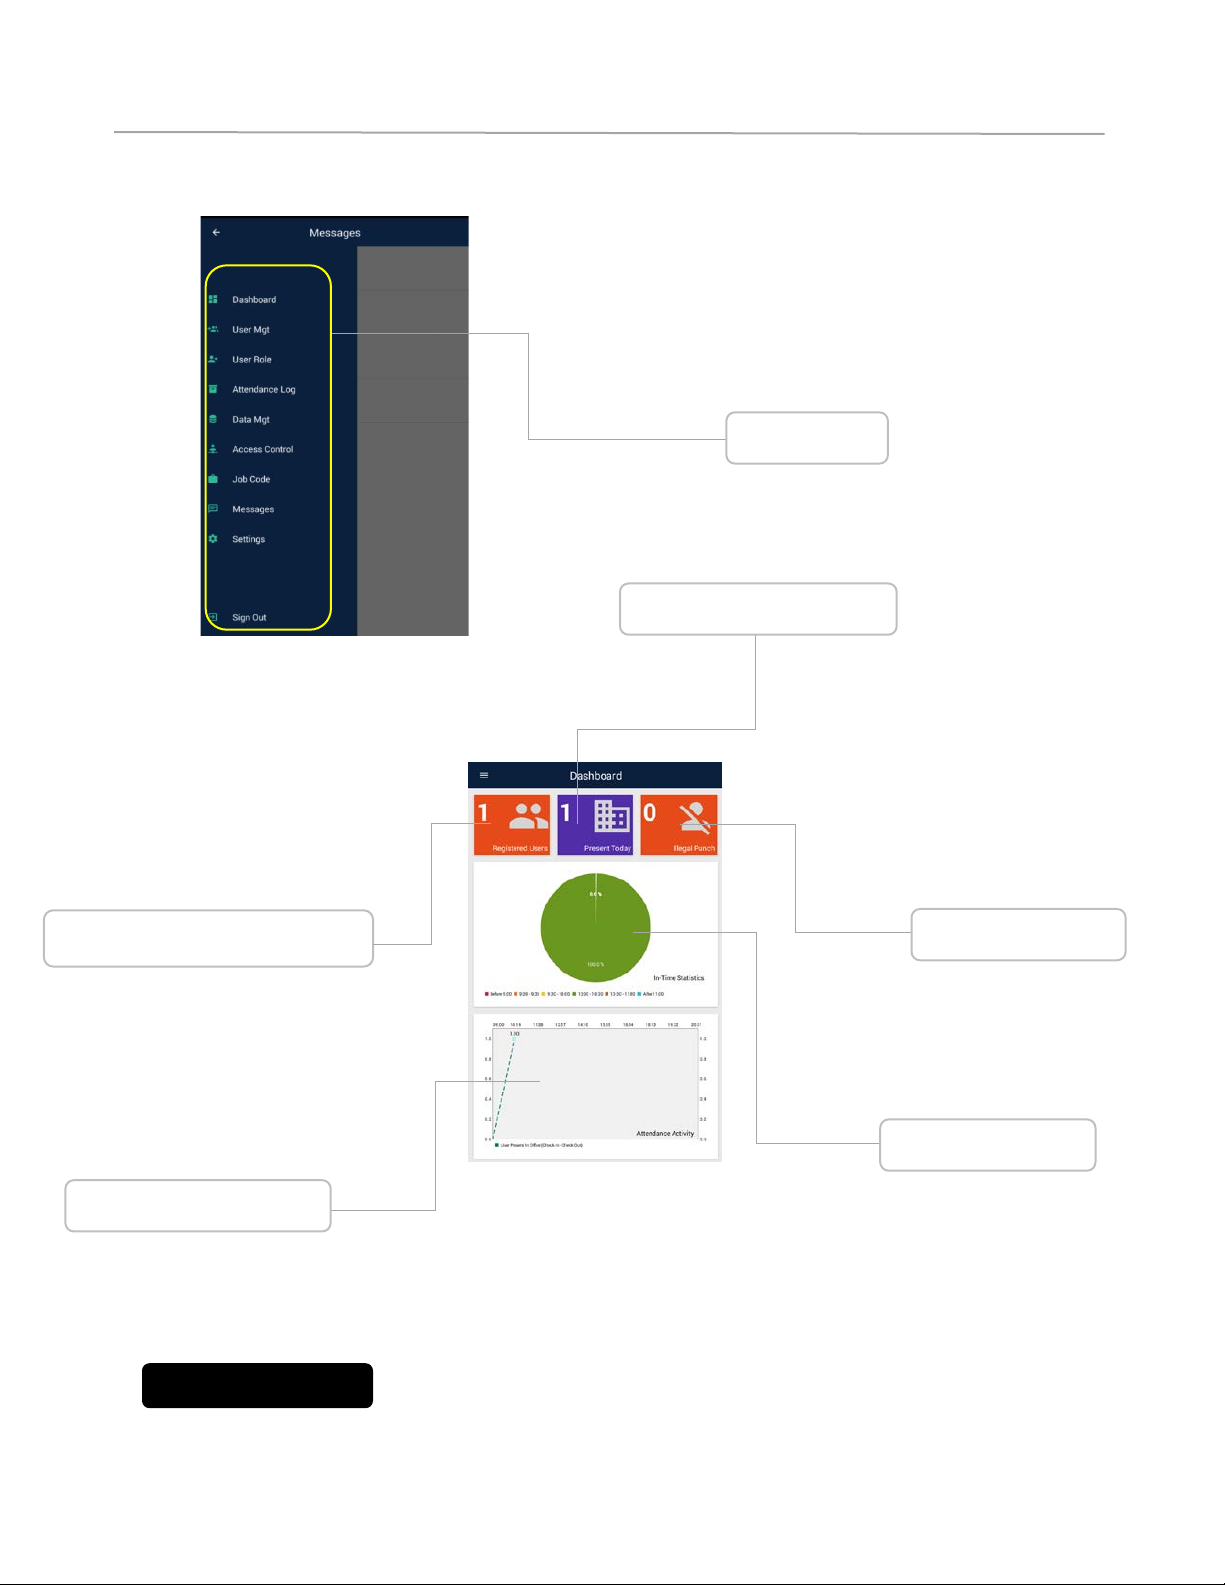
Administrator Option Menu
Indicate Registered Users
Main Menu
User Present T oday
Invalid Punch
Punch Time Interval
In & Out Stats
Invalid punch or illegal punch indicate invalid time period or invalid holiday
Invalid Punch
punch
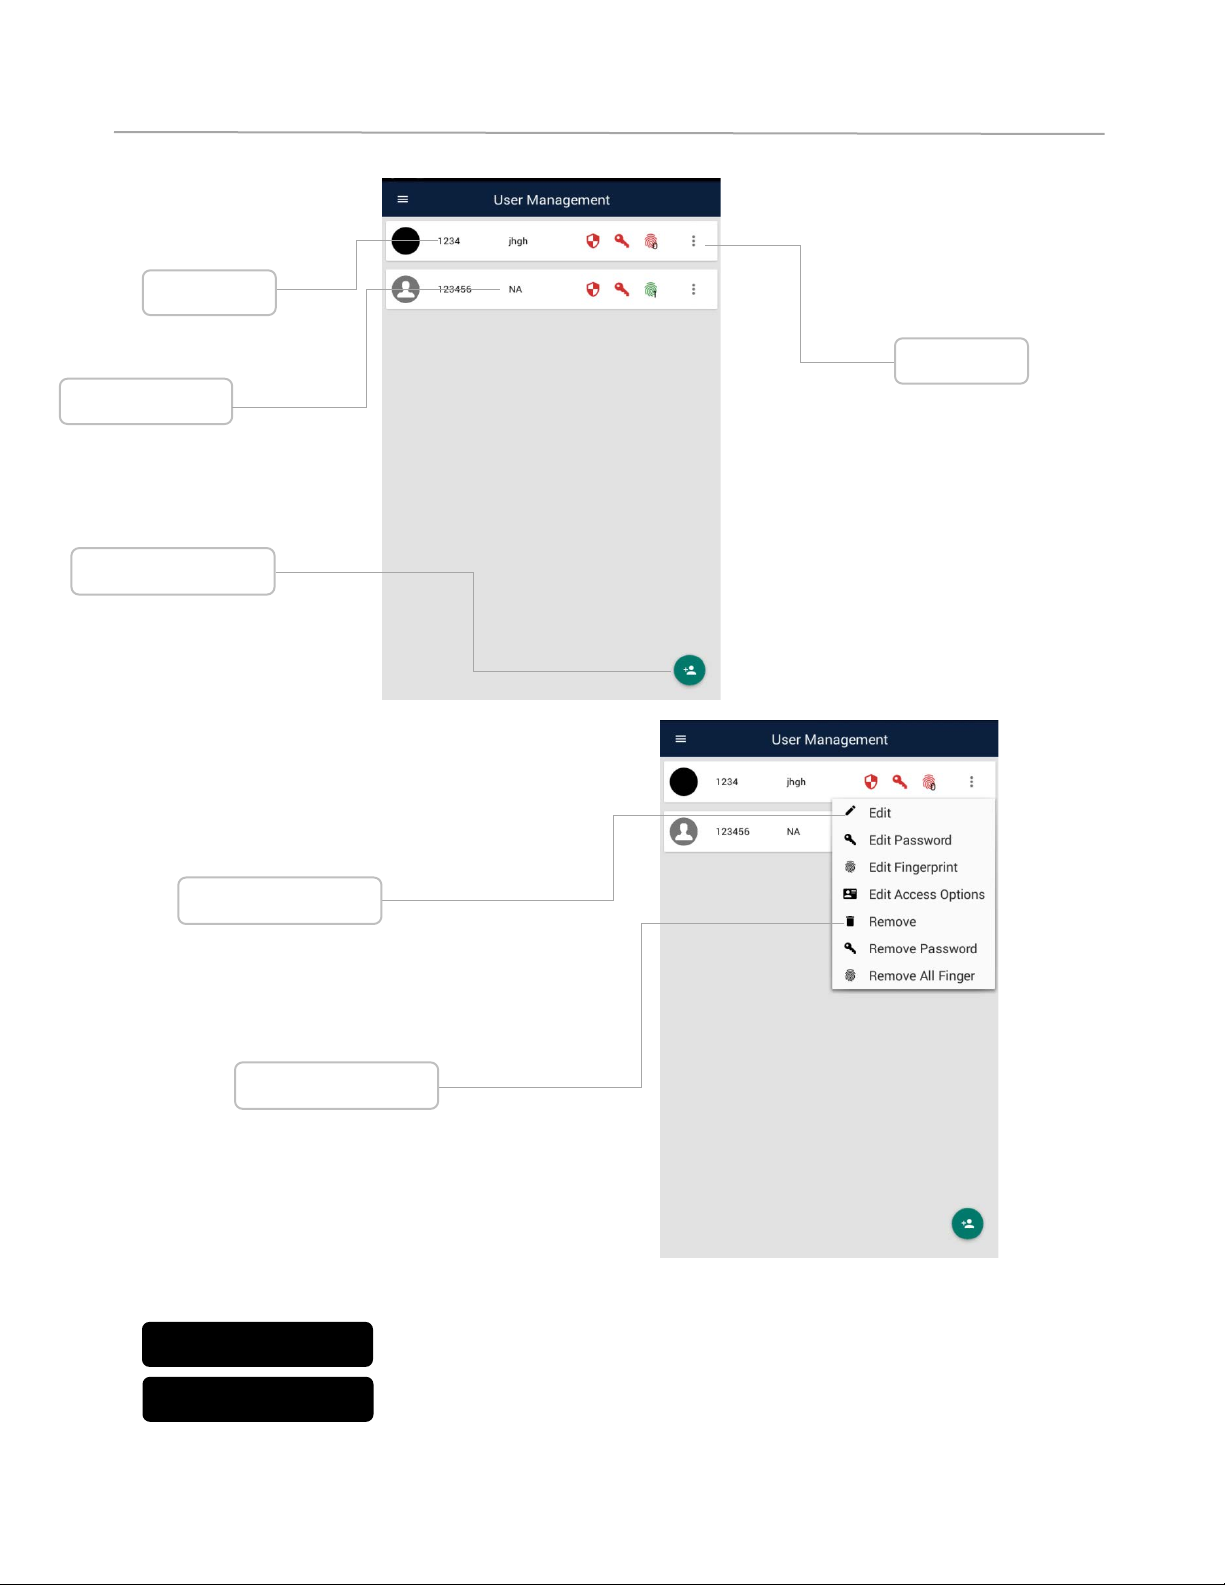
User Management Screen
Settings
User Pin
User Name
Add New User
Edit User Data
Remove Users
Red indicate not applicable;
Remove all finger will erase all the fingers for given user and you have to re-
Remove All Fingers
Note
Green indicate applicable
enroll all the finger
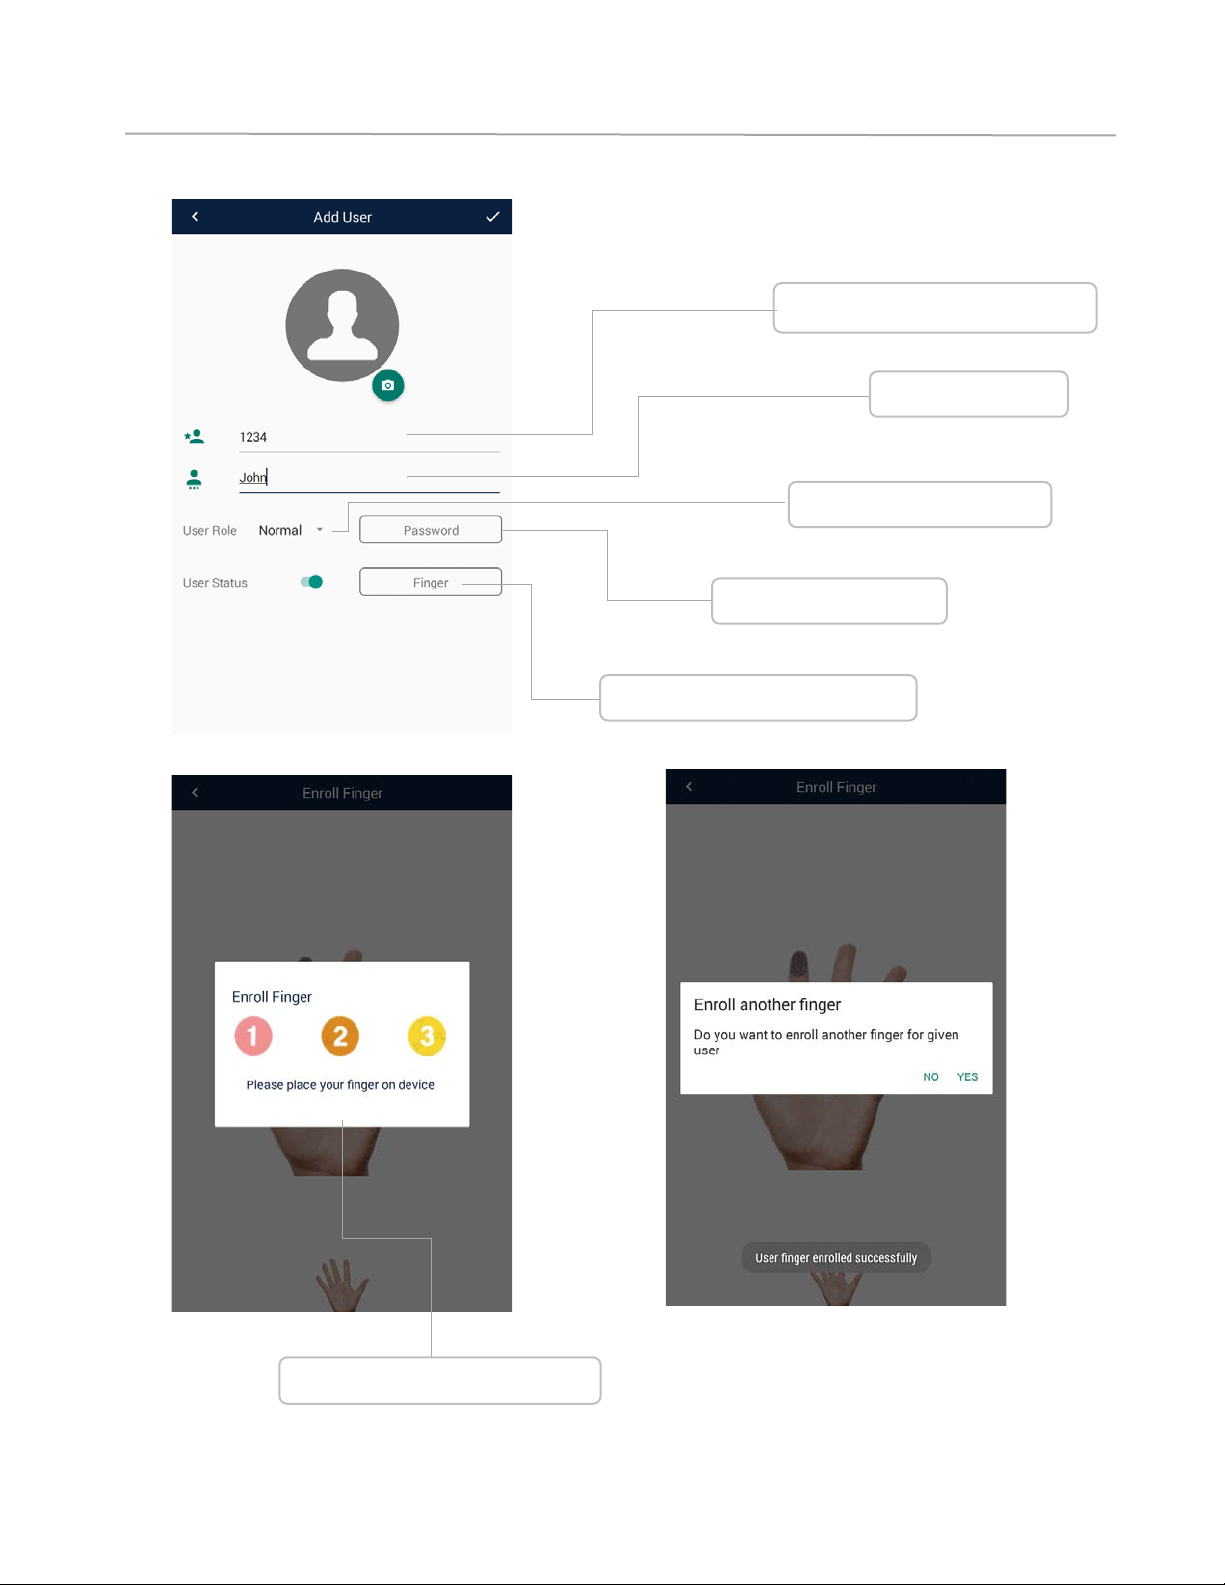
Add User
Enroll Fingers (Max 10)
Enroll Password
User Pin (Numeric only)
User Name
Select User R ole
Enroll Proces s Indicator

Access Group Management
User can be assigned access group
options after registering user,
he/she can be assigned individual
access options or group access
options
Even though group work code is disabled, user can be assigned work code if
Enable Work Code
If group code is enabled and you want to exclude particular user, the option
Disable Group Work
Verfication Mode
Disable Group Work
Note
Code
Code
available.
can be enabled
User can assigned verification mode type, based on the selected verification
mode user has to punch the attendance for example: if password & finger is
selected then user has to punch attendance using both authentication mode
and if successful then punch will be logged
If this option is enabled then timeperiod assigned to the above access group
will be used, if disabled then timeperiod defined above will be use
Access Group is defined for individual users, if want to assign to group of
users u can always use access options from main menu, Maximum six
timeperiod can be assigned per group or user, more details regarding
timeperiod is explained below.

User Role Management
Normal User R ole
Admin User Role
Add Custom Us er Role

Admin and Normal user role are not
editable roles, Admin role is assigned to
user to give full access to the device and
normal role is assigned with no access. You
can also add custom user roles and provide
permission based on your requirement and
assign to any user in user management
menu.
Option to Remove
Custom User Rol e
Update Custom User
Role Permission
User role options only work if admin is defined, if you try remove any
Note
custom defined user role then all user assigned to that user role will be
switched to normal and if no admin is present you cannot access user role
option

Attendance Log Screen
User Pin Filter
Data Filter
Data Management Screen
Verification Mo de
Note
By default, shows log for today’s date

Access Control Management
Max 50-time period are available you can select any defined time period in
Time Period
Example of invalid punch-in
during non-working time
period
user access group or access group. This time-period are used to validate
whether the user as punched in the given time period or it will be
considered as illegal punch
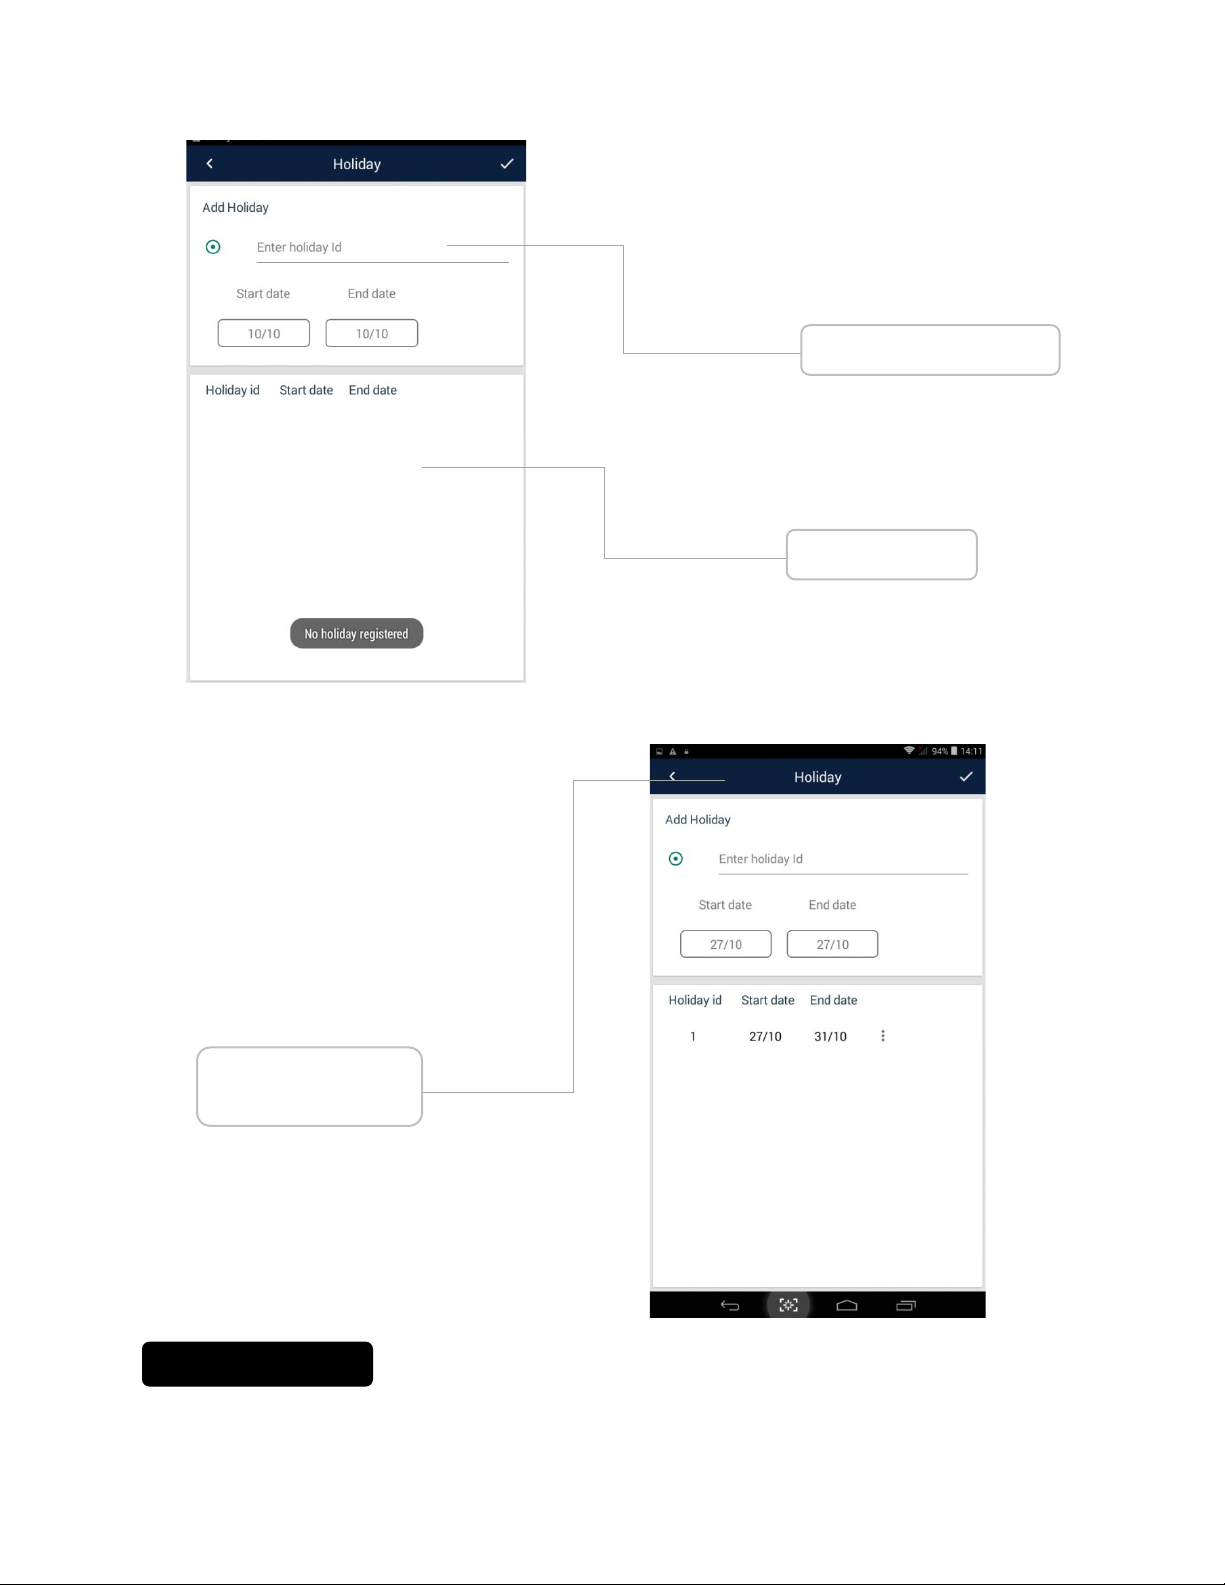
Holiday ID (uni que)
Holiday list
I
.
Example for holiday
period setting
Note
No punch will be considered between the given holiday date and will be
treated as illegal punch

Example for holiday
period setting
As explained in the user
management module you can
either assign common access
group to multiple users or define
individual access options in user
management

Work Code Management
Work Code List
Once Work Code is enabled
then user have to select work
code and task code if define
on every punch

Message Management
Public message can be read by any user during attendance punch, whereas
Public Message
Date/Time to
display message
personal messages are meant for particular user, both the messages will be
available on attendance punch
Example of message
display screen
Message Validity

Settings
Gap b/w to punch
for same user
Show attendance on
threshold for alert
Punch popup on
screen time
logs is full set
Save illegal punch
in database

Default status to
show if auto mode
is off
Default Status is used to show
punch status if auto mode is
disabled, in auto mode you can
select the start time for particular
status and at given the time that
particular status will be used to

Server URL
Finger Enroll
Capacity (max 5000)
Log Storage Capacity
(max 20000)
Available
Attendance L og
Count

Contact
You can use the Tablet PC function to save contact information. You can view or
management your contacts.
NOTICE: SIM card number of records storage capacity and its related
Messaging
You can send or receive SMS and MMS through information function.
Shortcut dial
In the dialer interface, hold the shortcut dial number keys in corresponding list of (2 ~ 9)
can dial a Tablet PC. Number1 key have been preset voice mail shortcut dial.
To stop transmitting the user’s voice.
Using the , Tablet PC memory card as U disk
1. Use USB line will be , Tablet PC connected to the computer. The status bar will show
the notification icon.
2. Open the notice panel.
3. In the notification panel, touch “USB connected”, and then touch "turn on USB storage".
NOTICE :If you in the cell Tablet PC connections to the computer select open USB
storage devices, , Tablet PC will not be able to identify memory CARDS. You will not
be able to use some of the , Tablet PC applications, such as the camera.
WLAN
Provide as far as 300 feet WLAN (100 M) wireless network access range. If you want to
use the , Tablet PC of WLAN, you have to connect to wireless access point or "hot spots".
NOTICE: The availability of WLAN signal coverage and will depend on the quantity,
infrastructure, and other signals penetrate the object and decide.
Open the WLAN and connect to a wireless network
1. Press the Home key, click on Setting-> Wireless & networks.
2. Select WLAN check box, to open Wi-Fi. The Tablet PC will automatically scan can be
used a wireless network.
3. Click on the Wi-Fi settings. Then WLAN network will display a list of WLAN to find the

network of the name and security Settings.
4. Touch one of the WLAN network to connection. When you select open network, , Tablet
PC will be connected to the network. If selected is WEP, WPA/WPA2 encryption network,
it must first corresponding input password, and then the touch connection
Connect to other WLAN networks
1. Wireless and network on the screen, touch the WLAN settings. Find WLAN networks
will be displayed in the WLAN network list.
2. Touch other WLAN networks can be connected to the network.
NOTICE: In addition, the Tablet PC via GPRS Internet. GPRS SIM card in our current
default boot is open, the user can manually select the specific location in "Settings -> SIM
management -> Data connection, touch “Data connection” to close the current SIM card
data connection.
Bluetooth
Turn on Bluetooth or set the Tablet PC can be detected
1. Press the Home key, click on Setting
2. Click on “Wireless & networks”, Then Select “Bluetooth” check box, to open Bluetooth.
The Tablet PC will automatically scan can be used a wireless network. After open, the
status bar will appear Bluetooth (). Touch the "Scan for devices" will begin to scan for
Bluetooth devices within range.
3. Touch Bluetooth Settings, All the equipment will show up in Bluetooth devices list
below.
(Select the check box can be detected, the Tablet PC is set to be detected, so that within
the scope of other Bluetooth devices can find the Tablet PC.)
Important: cell Tablet PCs can detect the longest time for two minutes.
Matching and connecting Bluetooth headset
1. Press the Home key, click on Setting.
2. Click on “Wireless & networks” -> Bluetooth Settings, Then Select Bluetooth check box,
to open Bluetooth. Then your Tablet PC to scan within the scope of the Bluetooth, and will
all find to device display in Bluetooth device list below.
Equipment found below in the list of Bluetooth devices.
Interrupt and the Bluetooth headset connection
1. Press the Home key, click on Setting -> Bluetooth Settings.
2. In the list of Bluetooth devices, touch or tap and hold hands-free headset is connected.
3. Long press and select “Disconnect & un pair”.
Charge the Fingerprint Tablet PC
Before using the device for the first time, you must charge the battery.
1. You can charge the device with a travel adapter or by connecting the device to a PC with a
USB cable.
2. Battery full icon is shown when finished if your device is off.
Notes:
1. Use only qualified factory supplied chargers and cables. The use of unapproved accessories
could damage your Tablet PC or cause the battery to explode.

2. You can directly use the Li-Polymer battery in the pack. Please normally use off the battery and
fully charge the battery for its perfect performance.
3. If the Tablet PC has been shut off for a long time or the battery has been used up, you should
charge the Tablet PC for 3 to 5 minutes then turn on.
4. Normal charge temperature: 0℃ to 40℃.
CE Maintenance
1.Use careful with the earphone maybe excessive sound pressure from earphones and
headphones can cause hearing loss.
2.Risk of explosion if battery is replaced by an incorrect type. Dispose of used batteries
according to the instructions.
3.The product shall only be connected to a USB interface of version USB2.0.
4.Adapter shall be installed near the equipment and shall be easily accessible.
5.EUT Operating temperature range: 0° C to 40° C .
6.Adapter:
The plug considered as disconnect device of adapter
Input: AC 100-240V, 50/ 60Hz, 350mA
Output: 5V 2000mA
7.The device complies with RF specifications when the device used at 0mm from your
your body.
8.To prevent possible hearing damage. Do not listen at high volume levels for long
periods.
Declaration of Conformity
SHENZHEN SUNGWORLD ELECTRONICS CO., LIMITED hereby declares that this
Fingerprint Tablet PC is in compliance with the essential requirements and other relevant
provisions of Directive 1999/5/EC.

FCC Warning
This device complies with part 15 of the FCC Rules. Operation is subject to the condition that this device
does not cause harmful interference.
Any Changes or modifications not expressly approved by the party responsible for compliance could void
the user's authority to operate the equipment.
Note: This equipment has been tested and found to comply with the limits for a Class B digital device,
pursuant to part 15 of the FCC Rules. These limits are designed to provide reasonable protection against
harmful interference in a residential installation. This equipment generates uses and can radiate radio
frequency energy and, if not installed and used in accordance with the instructions, may cause harmful
interference to radio communications. However, there is no guarantee that interference will not occur in a
particular installation. If this equipment does cause harmful interference to radio or television reception,
which can be determined by turning the equipment off and on, the user is encouraged to try to correct the
interference by one or more of the following measures:
-Reorient or relocate the receiving antenna.
-Increase the separation between the equipment and receiver.
-Connect the equipment into an outlet on a circuit different from that to which the receiver is
connected.
-Consult the dealer or an experienced radio/TV technician for help.
Specific Absorption Rate (SAR) information:
This Fingerprint Tablet PC meets the government's requirements for exposure to radio waves. The
guidelines are based on standards that were developed by independent scientific organizations through
periodic and thorough evaluation of scientific studies. The standards include a substantial safety margin
designed to assure the safety of all persons regardless of age or health.
FCC RF Exposure Information and Statement
The SAR limit of USA (FCC) is 1.6 W/kg averaged over one gram of tissue. Device types: Fingerprint
Tablet PC (FCC ID: 2AJFSPLUTO-A1) has also been tested against this SAR limit. The highest SAR
value reported under this standard during product certification for use at body is 0.777W/kg. This device
was tested for typical body-worn operations with the back of the handset kept 0mm from the body. To
maintain compliance with FCC RF exposure requirements, use accessories that maintain a 0mm
separation distance between the user's body and the back of the handset. The use of belt clips, holsters
and similar accessories should not contain metallic components in its assembly. The use of accessories
that do not satisfy these requirements may not comply with FCC RF exposure requirements, and should
be avoided.
Body-worn Operation
This device was tested for typical body-worn operations. To comply with RF exposure requirements, a
minimum separation distance of 0mm must be maintained between the user’s body and the handset,
including the antenna. Third-party belt-clips, holsters, and similar accessories used by this device should
not contain any metallic components. Body-worn accessories that do not meet these requirements may
not comply with RF exposure requirements and should be avoided. Use only the supplied or an approved
antenna.
 Loading...