

Page 1

User Manual
uEye
Cameras
Driver Version 3.32
Status: March 2009
Dimbacher Str. 6-8
D-74182 Obersulm
Fax: +49-(0)7134-96196-99
E-Mail: sales@ids-imaging.com
© 2009 IDS Imaging Development Systems GmbH. All rights reserved.
Page 2

Content
Introduction 6
1
Content
1.1 Copyright
1.2 Preface
1.3 Safety Information
1.4 Operating Environment
1.5 Installation and Maintenance
1.6 EMC Directives
1.7 Trademarks
1.8 Contacting Us
Welcome 9
2
2.1 About this Manual
2.2 What is New in this Version?
General 14
3
6
6
6
6
7
7
8
8
11
12
3.1 System Requirements
3.2 USB uEye SE Driver Compatibility
USB Basics 16
4
4.1 History and Development
4.2 Structure and Topology
4.3 Cabling and Connection
4.4 Data Transmission and Bandwidth
GigE Basics 19
5
5.1 General
5.2 Glossary
Camera Basics 22
6
6.1 Operating Modes
14
15
16
16
17
17
19
20
24
Page 3

Content
Freerun Mode 6.1.1
Trigger Mode 6.1.2
Standby 6.1.3
Applying New Parameters 6.1.4
Image Display Modes 6.1.5
6.2 Sensor
Sensor Sizes 6.2.1
Fill Factors 6.2.2
Color Filter (Bayer Filter) 6.2.3
Shutter Methods 6.2.4
6.3 Camera Parameters
Pixel Clock, Frame Rate, Exposure Time 6.3.1
Gain and Offset 6.3.2
Automatic Image Control 6.3.3
6.4 Reading out Partial Images
Area of Interest (AOI) 6.4.1
Binning 6.4.2
Subsampling 6.4.3
6.5 Digital Input/Output
Digital Input (Trigger) 6.5.1
Digital Output (Flash Strobe) 6.5.2
28
33
36
38
General Purpose I/O 6.5.3
Serial Interface (RS232) 6.5.4
Installation 40
7
7.1 Downloading the Software
7.2 Installing the uEye Drivers
7.3 Uninstalling the uEye Drivers
7.4 Connecting a USB uEye Camera
7.5 Connecting a GigE uEye Camera
Important Notes 7.5.1
Serial Interface (RS232) 7.5.2
Camera Start-up 7.5.3
Camera Initialization 7.5.4
Camera Recognition 7.5.5
40
41
42
43
45
Page 4

Applications 52
8
Content
8.1 uEye Camera Manager
Camera List 8.1.1
Control Center 8.1.2
General Information 8.1.3
Camera Information 8.1.4
Creating a Support File 8.1.5
ETH Network Service 8.1.6
Additional Functions (COM Port) 8.1.7
Automatic ETH Configuration 8.1.8
Starter Firmware Upload 8.1.9
Manual ETH Configuration 8.1.10
Parameters 8.1.11
8.2 uEye Demo
Opening a Camera 8.2.1
Toolbars 8.2.2
Menus 8.2.3
52
65
Dialog Boxes 8.2.4
Properties 8.2.5
8.3 uEye Player
Functionality 8.3.1
Loading an AVI File 8.3.2
Operation Controls 8.3.3
Loop Mode 8.3.4
Video Window and Full Screen Mode 8.3.5
Specifications 116
9
9.1 Sensor Data
CMOS Cameras 9.1.1
CCD Cameras 9.1.2
9.2 Mechanical Specifications
USB uEye SE 9.2.1
USB uEye RE 9.2.2
110
116
156
USB uEye LE 9.2.3
GigE uEye SE 9.2.4
GigE uEye HE 9.2.5
Page 5

Content
Flange Back Distance 9.2.6
Filter Glasses 9.2.7
Ambient Conditions 9.2.8
9.3 Electrical Specifications
USB uEye SE 9.3.1
USB uEye RE 9.3.2
USB uEye LE 9.3.3
GigE uEye SE 9.3.4
GigE uEye HE 9.3.5
9.4 Status LED
USB uEye 9.4.1
GigE uEye 9.4.2
Accessories 215
10
10.1USB uEye SE
10.2USB uEye RE
10.3USB uEye LE
10.4GigE uEye SE
189
212
216
219
222
223
10.5GigE uEye HE
225
Page 6

User Manual uEye Cameras V3.32
1 Introduction
1.1 Copyright
© IDS Imaging Development Systems GmbH. All rights reserved.
IDS Imaging Development Systems GmbH hereby grants the purchaser the right to use the
software.
1.2 Preface
IDS Imaging Development Systems GmbH has taken every possible care in preparing this User
Manual. We however assume no liability for the content, completeness or quality of the information
contained therein. The content of this manual is regularly updated and adapted to reflect the current
status of the software. We furthermore do not guarantee that this product will function without errors,
even if the stated specifications are adhered to.
Under no circumstances can we guarantee that a particular objective can be achieved with the
purchase of this product.
Insofar as permitted under statutory regulations, we assume no liability for direct damage, indirect
damage or damages suffered by third parties resulting from the purchase of this product. In no event
shall any liability exceed the purchase price of the product.
Please note that the content of this User Manual is neither part of any previous or existing
agreement, promise, representation or legal relationship, nor an alteration or amendment thereof. All
obligations of IDS Imaging Development Systems GmbH result from the respective contract of sale,
which also includes the complete and exclusively applicable warranty regulations. These contractual
warranty regulations are neither extended nor limited by the information contained in this User
Manual. Should you require further information on this product, or encounter specific problems that
are not discussed in sufficient detail in the User Manual, please contact your local uEye dealer or
system installer.
All rights reserved. This manual may not be reproduced, transmitted or translated to another
language, either as a whole or in parts, without the prior written permission of IDS Imaging
Development Systems GmbH.
Status: March 2009
1.3 Safety Information
The product must be connected, taken into operation and maintained only by appropriately qualified
personnel.
The error-free and safe operation of this product can only be ensured if it is properly transported,
stored, set up and assembled, and operated and maintained with due care.
1.4 Operating Environment
Please comply with the requirements for the proper use of this product. Failure to do so will render
the warranty void.
Do not subject this product to direct sunlight, moisture or shock. The environmental conditions
specified in chapter Specifications are required.
© 2009 IDS Imaging Development Systems GmbH6
Page 7

1.5 Installation and Maintenance
Product type
EMC immunity
EMC emission
USB uEye SE (CMOS sensors)
*2)
EN 61000-6-2:2005
EN 61000-6-3:2001 + A11:2004
USB uEye SE (CCD sensors)
*1)
EN 61000-6-2:2001
EN 61000-6-4:2001
USB uEye RE (CMOS sensors)
*2)
EN 61000-6-2:2001
EN 61000-6-3:2001 + A11:2004
USB uEye RE (CCD sensors)
*2)
EN 61000-6-2:2001
EN 61000-6-3:2001 + A11:2004
USB uEye LE (CMOS sensors)
*2)
EN 61000-6-2:2005
EN 61000-6-3:2001 + A11:2004
GigE uEye SE (CMOS sensors)
*1)
EN 61000-6-2:2005
EN 61000-6-4:2001
GigE uEye SE (CCD sensors)
*1)
EN 61000-6-2:2005
EN 61000-6-4:2001
GigE uEye HE (CMOS sensors)
*2)
EN 61000-6-2:2005
EN 61000-6-3:2001 + A11:2004
GigE uEye HE (CCD sensors)
*2)
EN 61000-6-2:2005
EN 61000-6-3:2001 + A11:2004
The installation, testing, maintenance and extension of, and any necessary repairs to the system
may be performed only by authorized personnel.
1.6 EMC Directives
IDS Imaging Development Systems GmbH hereby confirms that this product has been developed,
designed and manufactured in compliance with the EC Directive 89/336/EEC (Electromagnetic
Compatibility).
Compliance with the directives is demonstrated by meeting the following standards:
1 Introduction
*1)
This equipment has been tested and found to comply with the limits for a Class A digital device,
pursuant to part 15 of the FCC Rules. These limits are designed to provide reasonable protection
against harmful interference when the equipment is operated in a commercial environment. This
equipment generates, uses, and can radiate radio frequency energy and, if not installed and used in
accordance with the instruction manual, may cause harmful interference to radio communications.
Operation of this equipment in a residential area is likely to cause harmful interference in which case
the user will be required to correct the interference at his own expense.
Modifications not expressly approved by the manufacturer could void the user's authority to operated
the equipment under FCC rules.
*2)
This equipment has been tested and found to comply with the limits for a Class B digital device,
pursuant to part 15 of the FCC Rules. These limits are designed to provide reasonable protection
against harmful interference in a residential installation. This equipment generates, uses and can
radiate radio frequency energy and, if not installed and used in accordance with the instructions,
may cause harmful interference to radio communications. However, there is no guarantee that
interference will not occur in a particular installation. If this equipment does cause harmful
interference to radio or television reception, which can be determined by turning the equipment off
and on, the user is encouraged to try to correct the interference by one or more of the following
measures:
· Reorient or relocate the receiving antenna.
· Increase the separation between the equipment and receiver.
· Connect the equipment into an outlet on a circuit different from that to which the receiver is
connected.
· Consult the dealer or an experienced radio/TV technician for help.
Modifications not expressly approved by the manufacturer could void the user's authority to operated
the equipment under FCC rules.
© 2009 IDS Imaging Development Systems GmbH 7
Page 8

User Manual uEye Cameras V3.32
Address:
IDS Imaging Development Systems GmbH
Dimbacher Str. 6-8
D-74182 Obersulm
Fax:
+49-(0)7134-96196-99
Email:
Sales: sales@ids-imaging.com
Support: support@ids-imaging.com
Internet
http://www.ids-imaging.com
1.7 Trademarks
IDS Imaging Development Systems and uEye are registered trademarks of IDS Imaging
Development Systems GmbH. IBM PC is a registered trademark of International Business Machines
Corporation. Microsoft and Windows are trademarks or registered trademarks of Microsoft
Corporation. All other products or company names mentioned in this manual are used solely for
purposes of identification or description and may be trademarks or registered trademarks of the
respective owners.
1.8 Contacting Us
Visit our web site http://www.ids-imaging.com where you will find all the latest drivers and information
about our software and hardware products. The latest uEye driver is available on our website http://
www.ids-imaging.com.
Please contact your local IDS distributors for first level support in your language. For a list of IDS
distributors worldwide please go to our website and follow the Support link.
© 2009 IDS Imaging Development Systems GmbH8
Page 9

2 Welcome
The USB uEye SE series features a robust metal housing with a
standard mini-B USB 2.0 connector. Connection is additionally
possible via a screw-mounted micro D-sub connector which also
carries the opto-isolated I/O signals. A USB uEye SE variant with
C-mount front flange has been developed for OEMs. The camera
can also be supplied as PCB stack for special applications.
The USB 2.0 interface is meanwhile available in every standard
PC and notebook/laptop and provides a gross bandwidth of 480
Mbps. The camera is connected and powered through the USB
port by just a single cable.
Figure 1: USB uEye SE
CMOS camera
Figure 2: USB uEye RE
The RE variants of the USB uEye cameras are extremely rugged
and thus offer an extended area of application. In conjunction with
the optional lens tubes, these models meet the requirements of
protection classes IP 65 and IP 67. The USB 2.0 and the I/O
signals are connected via two ports of the same protection class.
The USB uEye RE is therefore particularly suited for harsh
environments.
The USB uEye LE series features extremely compact cameras
with high-speed CMOS sensors. The LE models are designed for
professional use in non-industrial applications. Through the use of
the widespread USB 2.0 technology, the cameras can easily be
interfaced with a vast variety of systems. USB uEye LE cameras
are available with a plastic housing with CS-mount lens adapter,
as a board-level version with M12 or M14 lens holder or without a
lens holder.
Figure 3: USB uEye LE variants
Thank you for purchasing a uEye camera from IDS Imaging Development Systems GmbH.
This manual describes the functions and features of the different uEye camera series.
uEye stands for a range of compact and cost-effective cameras for professional use in industrial,
security and non-industrial applications. Equipped with the widely used USB 2.0 and Gigabit
Ethernet ports, they can easily be interfaced with a vast variety of systems. The images are digitized
in the camera and transmitted digitally to the PC. An additional frame grabber is not required.
uEye cameras have state-of-the-art CMOS and CCD sensors. The CMOS models use either the
global or the rolling shutter method; the CCD models use only the global shutter method. uEye
camera resolutions range from 640 x 480 pixels (VGA) to 2560 x 1920 pixels (QSXGA), depending
on the sensor. Further sensor modules will continuously expand the product portfolio. Depending on
the individual model, the uEye cameras are available either as monochrome and color versions, or as
color versions only.
USB uEye SE
2 Welcome
USB uEye RE
USB Eye LE
© 2009 IDS Imaging Development Systems GmbH 9
Page 10

User Manual uEye Cameras V3.32
Figure 4: GigE uEye HE
(standard and 90° variant)
The GigE uEye HE offers a rich set of additional features and
functions compared to the other uEye models. Images can be output
at 12 bits per channel. The integrated FPGA allows calculating color
images in the camera, and various LUT curves can be applied to the
images. An integrated 64 MB image memory and two independent
processor cores ensure fast and reliable data transfer. Many of the
GigE uEye HE's sensors can be operated at increased frame rates.
Additional programmable I/Os and a serial RS232 interface in the
camera open up new possibilities for camera integration.
The Gigabit Ethernet interface provides further advantages: More than
twice the bandwidth of USB 2.0, cable lengths up to 100 m, and
widespread use of this interface. The Gigabit Ethernet interface is
meanwhile available in every standard PC and notebook/laptop and
provides a gross bandwidth of 1000 Mbps.
Die GigE uEye SE is a highly compact Gigabit Ethernet camera.
With a housing barely larger than that of the USB uEye models,
the GigE uEye SE offers all the benefits of the Gigabit Ethernet
technology: High bandwidth, cable lengths up to 100 m, and
widespread use of this interface.
Besides the screw-mounted Gigabit Ethernet port, the camera
provides a 6-pin Hirose connector that carries the power supply
as well as the trigger and flash signals.
Figure 5: GigE uEye SE
For every uEye camera, a comprehensive software package is
available as a free download. In addition to the drivers, this
software package features the uEye Camera Manager, the uEye
Demo application and a Software Development Kit (SDK) for
creating your own uEye programs under Windows 2000, XP and
Vista (32-Bit) as well as Linux. Numerous demo applications
make it easy for you to get started with uEye programming. For
detailed information on programming uEye cameras with the uEye
SDK, please refer to the uEye Programming Manual (PDF file).
The latest uEye software is available for download from our
website at http://www.ueyesetup.com.
Figure 6: uEye Camera Manager
GigE uEye HE
GigE uEye SE
uEye Software
Enjoy your new uEye camera!
© 2009 IDS Imaging Development Systems GmbH10
Page 11

2.1 About this Manual
In these boxes, you will find helpful user information.
In these boxes, you will find important notes and warnings.
This symbol indicates interactive graphics. When you click on an active area in a
graphic, a chapter containing additional information on that area opens automatically.
The uEye User Manual contains all the information you need for operating your uEye camera. The
manual comprises three main parts. The first part provides basic information on USB, Gigabit
Ethernet and camera technology. Please read this chapter to become familiar with the general
functionality of the uEye cameras.
The second part of the manual shows you how to install and use the uEye software.
In the third part, you will find the Specifications: Sensors, which you can use as a reference guide
when integrating the cameras.
Please make sure to read the file named WhatsNew.txt which you will find in the C:\Program
Files\IDS\uEye\Help directory when the installation is completed. This file contains late-breaking
information on new functions and fixed issues.
2 Welcome
© 2009 IDS Imaging Development Systems GmbH 11
Page 12

User Manual uEye Cameras V3.32
New feature
Described in chapter
Extended trigger mode
The continuous trigger mode allows triggering the uEye
repeatedly. The camera no longer has to be made ready for
the next trigger before each image capture.
Operating Modes: Trigger Mode
New information in the manual
Described in chapter
Detailed presentation of all uEye operating modes
Operating Modes
Updated connected load data on every camera model
Specifications: Sensor Data
Wiring diagrams for the inputs/outputs of the USB uEye LE
USB uEye LE: Wiring
New feature
Described in chapter
Support of GigE uEye SE
The uEye driver version 3.31 introduces the new camera
series GigE uEye SE. This manual provides all the
information you need to integrate and use the new camera.
Welcome: GigE uEye SE
GigE uEye SE Specifications
GigE uEye SE Camera
Dimensions
Improved uEye Camera Manager features
uEye Camera Manager
New feature
Described in chapter
Serial interface of the GigE uEye HE
The serial interface (RS232) on the GigE uEye HE allows the
control of peripherals.
Serial Interface (RS232)
Test image function
The camera transmits a selectable test image that you can
use for testing the data transmission.
Camera properties: Test image
Color calculation in the camera (GigE uEye HE only).
The GigE uEye HE can optionally calculate the color data
from raw Bayer format directly in the camera. This reduces
the load on the host computer's CPU. Color correction and
color saturation are continuously adjustable.
Camera properties: Color
LUT/gamma curves in the camera (GigE uEye HE only).
In addition, the GigE uEye HE can apply LUT and gamma
curves to the image directly in the camera in order to adjust
brightness, contrast and color distribution.
Camera properties: LUT/Gamma
Support of 10 and 12 bit sensor data
Some sensors can output images with a color depth of 10 to
12 bits. This data can now be processed by the uEye
software.
Specifications: Sensors
New color formats
Camera properties: Color
2.2 What is New in this Version?
Version 3.32 of the uEye software package includes many new features and enhancements. The
following table gives you an overview of the major new functions. (For more information, please see
the "What is New in this Version" chapter in the uEye Programming Manual V3.32.)
New in Version 3.32
New in Version 3.31
New in Version 3.30
© 2009 IDS Imaging Development Systems GmbH12
Page 13

2 Welcome
uEye driver version 3.30 supports a wide range of new color
formats for all uEye cameras. These include:
o
RGB/BGR 30
o
RGBY
o
Y12
o
YCbCr
o
Enhanced YUV
Subsampling for GigE uEye HE cameras with CCD sensors
The GigE uEye HE can also perform binning and
subsampling for CCD sensors. Binning and subsampling are
supported both in the horizontal and vertical direction, and
allow higher frame rates.
For CMOS sensors, subsampling takes place directly in the
sensor and is supported by all uEye models.
Specifications: Sensors
Full support of Windows Vista (32 Bit)
From driver version 3.30 onwards, all uEye cameras will run
under Windows Vista 32.
System Requirements
Localization of the uEye Camera Manager
The uEye Camera Manager offers new features and now also
supports over 10 languages that can be switched anytime.
Camera Manager
© 2009 IDS Imaging Development Systems GmbH 13
Page 14

User Manual uEye Cameras V3.32
Minimum
Recommended
CPU speed
600 MHz
2.8 GHz
Memory (RAM)
256 MB
512 MB
USB host controller
USB 2.0 high speed (480 Mbps)
USB 2.0 high speed (480 Mbps)
Intel® or NVIDIA® nForce mainboard
chipset
Graphics card
Onboard graphics chip
PCI/PCIe graphics card with
DirectDraw support
DirectX 9.0 or higher
Operating system
Windows 2000 (Service Pack 4)
Windows XP 32 bit (Service Pack 2)
Windows Vista 32 bit
Linux (Kernel 2.6)
Windows XP 32 bit (Service Pack 3)
Windows Vista 32 bit (Service Pack 1)
Linux (Kernel 2.6)
Onboard USB 2.0 ports usually provide significantly better performance than PCI and
PCMCIA USB adapters.
Minimum
Recommended
CPU speed
600 MHz
2.8 GHz
Memory (RAM)
256 MB
512 MB
Network bandwidth
100 Mbps
1000 Mbps
Network card type
---
Intel Pro/1000 GT (PCI)
Intel Pro/1000 PT (PCIe)
Graphics card
Onboard graphics chip
PCI/PCIe graphics card with
DirectDraw support
DirectX 9.0 or higher
Operating system
Windows 2000 (Service Pack 4)
Windows XP 32 bit (Service Pack 2)
Windows Vista 32 bit
Windows XP 32 bit (Service Pack 3)
Windows Vista 32 bit (Service Pack 1)
To ensure optimum performance of the network connection, you need to install the
latest drivers for your network card. We recommend using the drivers of the following
versions:
· Intel® chipsets: version 8.8 or higher
· Realtek chipsets: version 5.7 or higher
3 General
3.1 System Requirements
For operating the uEye cameras, the following system requirements must be met:
USB uEye cameras
GigE uEye cameras
© 2009 IDS Imaging Development Systems GmbH14
Page 15

3.2 USB uEye SE Driver Compatibility
From driver version 3.10 on, only cameras with USB board revision 2.0 or higher are
supported.
Figure 7: USB revision 1.2
(green LED)
Figure 8: USB revision 2.0
(red/green LED)
The optional memory board of the USB uEye SE and USB uEye RE camera series has
been discontinued.
From version 3.30, the functions required to operate the memory board will no longer be
supported in the uEye driver.
The uEye driver version 3.24 that still supports these functions will continue to be available
in the download area of our website at http://www.ids-imaging.com.
Only the following CMOS camera models of the USB uEye SE series are affected:
· UI-121x
· UI-141x
· UI-144x
· UI-154x
· UI-145x
· UI-146x
You can use the USB Hardware Check (see Software Installation) before installing the driver version
3.10 to check whether your camera is supported. In addition, the uEye Camera Manager version 3.10
or above provides information about the compatibility (see Camera Manager ). An incompatible
camera will be displayed as free and not available.
The LED(s) on the back of the camera housing also indicate the USB board version:
3 General
Note on the uEye memory board
© 2009 IDS Imaging Development Systems GmbH 15
Page 16

User Manual uEye Cameras V3.32
Figure 9: USB Topology
The maximum bandwidth of 480 Mbps per USB 2.0 host cannot be exceeded. Therefore,
the maximum possible frame rate will be reduced if image data from multiple USB
cameras is transferred simultaneously.
The available bandwidth might also be decreased when you use hubs or repeaters. You
can reduce the bandwidth required for each camera by lowering the frame rate or the
image size.
4 USB Basics
4.1 History and Development
The Universal Serial Bus (USB) is an interface which enables you to easily connect various devices
to a PC. As all data exchange is controlled by the PC, no additional interface controller is needed.
Further advantages of USB are:
· the PC does not have to be shut down when connecting USB devices (hot plugging)
· USB devices can be supplied with power from the PC
· High bandwidth for data transmission
The USB standard was developed by a group of companies including Compaq, IBM, Intel, and
Microsoft. Version 1.0 was presented in 1995. The slightly faster USB 1.1 standard followed in 1998.
At first, the USB interface was designed to connect peripheral devices such as printers, mice, or
keyboards. With the introduction of USB 2.0 in 2000, the transfer rate increased to 480 Mbps,
making USB 2.0 suitable for connecting devices with higher data volumes (such as mass storage
devices, scanners, or cameras).
4.2 Structure and Topology
USB uses a tree topology and is host-controlled. That means that a PC with host functionality is
mandatory for using USB. Therefore, it is not possible to directly connect two USB devices (with the
exception of USB On-the-go compliant devices). Neither is it possible to connect a camera to a PDA
device.
Theoretically, 127 devices can be connected to a host controller. Using external hubs or repeaters,
even more devices can be connected, and from a greater distance. Provided that a maximum of 5
hubs/repeaters may be daisy-chained, USB devices can be connected in up to seven levels.
© 2009 IDS Imaging Development Systems GmbH16
Page 17

4.3 Cabling and Connection
Figure 10: Basic design of a USB cable
Figure 11: USB
standard-A socket
(four pins)
Figure 12:
USB
standard-B
socket (four
pins)
Figure 13:
USB mini-B
socket (five
pins)
Figure 14: Micro D-Sub
(nine pins)
In order to comply with the specifications, the maximum length of USB 2.0 cables is limited to 5 m.
Longer cables may be connected if you use high-quality material. For cameras of the USB uEye RE
series, IDS offers cables with a length of up to 10 m (see also USB uEye RE Accessories).
The USB bus provides power supply with 5 V and 500 mA max. Many USB devices use the bus
power and do not need external power supply (bus-powered devices).
Cable design
The following illustration shows the basic design of a shielded USB cable:
· D+/D-: data transfer
· +5 V/GND: power supply
4 USB Basics
Connector types
On the PC side, USB 2.0 cables are equipped with a standard A type plug (four pins) and on the
device side either with a standard B plug (four pins) or a mini-B plug (five pins).
In addition, cameras of the USB uEye SE series can be connected to IDS camera cables that use a
nine-pin micro D-Sub screw connector. Besides the USB 2.0 signals, these connectors can also
carry the camera’s digital input/output signals.
4.4 Data Transmission and Bandwidth
© 2009 IDS Imaging Development Systems GmbH 17
The USB 2.0 standard specifies an overall bandwidth of 480 Mbps shared between different
transmission modes. uEye cameras use the USB 2.0 bulk mode for transmitting images. This mode
uses error correction to ensure correct delivery of the image data, but does not guarantee a fixed
bandwidth. To ensure error-free communication with all connected devices at all times, the maximum
bandwidth for payload data is limited to 416 Mbps.
Page 18

User Manual uEye Cameras V3.32
To achieve optimum USB bandwidth, it is important to use a powerful mainboard
chipset. The mainboard chipsets from e.g. Intel® or NVIDIA® provide very good
results.
If you need recommendations on the most appropriate hardware to use, please
contact uEye Support.
Theoretically, up to 50 MB/s of data can be transmitted in this mode, but in practice, this value is
hardly ever reached. A high-performance desktop PC can transmit about 40 MB/s, most notebooks
or embedded PC systems even less than that.
The overall bandwidth can be increased by the use of USB 2.0 expansion cards. These cards are
available for the PCI and PCIe buses and have their own host controller chip.
© 2009 IDS Imaging Development Systems GmbH18
Page 19

5 GigE Basics
Figure 15: Structure of a Cat 5e cable
Figure 16: RJ45 socket
(EU type acc. to
EIA/TIA-568B)
Figure 17: RJ45
socket (US type acc. to
EIA/TIA-568A)
Figure 18:
RJ45 plug
The GigE uEye camera automatically recognizes whether an Ethernet cable with crossed
wiring or straight wiring is connected. The camera adjusts accordingly.
5.1 General
Gigabit Ethernet was developed on the basis of the Fast Ethernet (100 Mbps) standard. In June
1999, the IEEE 802.3ab 1000 Mbps standard was defined by the IEEE (Institute of Electrical and E
lectronics Engineers). Using at least Cat 5e copper cables, transmission rates of 1 Gbps can be
obtained. This makes Gigabit Ethernet 10 times faster than Fast Ethernet. The main advantages of
Gigabit Ethernet include:
· Higher bandwidth, allowing for better network performance and the elimination of bottlenecks
· Full-duplex capability virtually doubles the effective bandwidth
· Low purchasing and operating costs through the use of common hardware
· Full compatibility with the large number of installed Ethernet and Fast Ethernet nodes
· Fast transfer of large amounts of data over the network
5 GigE Basics
For connecting Gigabit Ethernet cables, RJ45 connectors are used. The following illustrations show
schematic views of an RJ45 socket (with cable configuration) and of an RJ45 plug.
© 2009 IDS Imaging Development Systems GmbH 19
Page 20

User Manual uEye Cameras V3.32
5.2 Glossary
UDP
UDP stands for User Datagram Protocol and contains mechanisms that allow applications to easily
send messages to each other. UDP is session-oriented and has no protective measures to guard
against message loss or duplication. The header contains the sender port, the recipient port, the
length of the datagram and a checksum.
Port
Ports are address components used in network protocols to assign data segments to the correct
services (protocols).
Firewall
A firewall is a software or hardware shield that protects a local network or a computer from Internetbased attacks.
Among a firewall's main uses are protection from hacker attacks, computer viruses, trojans, worms
and spyware.
ARP
The Address Resolution Protocol uses network messages, called broadcasts, to determine on which
logical segment of the network the recipient of a packet is located.
The responses to the broadcast contain all the IP addresses of the available subnet and the
associated MAC addresses. Every IP address is stored in an ARP table together with the
associated MAC address. These tables are necessary because the two addresses are independent
of each other and therefore cannot be calculated by means of an algorithm.
Subnet
Subnets are small units of a network. Using subnets makes it easier to manage networks and
increases performance, as connecting devices such as routers or switches can be used to limit data
traffic to specific subnets.
The address is made up of the IP address of the network, the subnet address and the host address.
Switch
The term switch refers to the connecting units in a LAN (Local Area Network). They are used to
connect subnets of the same topology. Contrary to hubs, switches dispatch incoming data packets
only to the specific recipients.
Router
Routers are connection units that connect different networks or LANs.
Hub
A hub is a coupling unit that connects several network units on one line (star topology). Contrary to a
switch, the message of a network member is dispatched to all other network members.
DHCP
The Dynamic Host Configuration Protocol controls the dynamic configuration of IP addresses.
When a workstation which is configured for the use of DHCP is started up on a LAN, it registers with
a server running this service. The server then assigns an available IP address, which is stored locally
so that reassignment is not necessarily required on the next start-up.
© 2009 IDS Imaging Development Systems GmbH20
Page 21

5 GigE Basics
Broadcast
A broadcast is a data packet that is transmitted to all stations on a network. This is done by
sending a data packet to the reserved IP address .255 of a network or subnet (broadcast address).
Heartbeat
Network devices send a heartbeat to signal that they are operational and fully functional. If this
heartbeat signal is not detected, the recipient system assumes that the remote device is no longer
available.
Paired
Paired describes the logical connection of a network camera and a host PC. When a camera and a
host PC are paired, they are exclusively connected. Simultaneous pairing with several host PCs is
not possible.
A request for image data is only possible in paired state.
© 2009 IDS Imaging Development Systems GmbH 21
Page 22

User Manual uEye Cameras V3.32
Figure 19: Block diagram of the CMOS USB uEye SE
6 Camera Basics
Components of the USB uEye SE/RE cameras
The USB uEye SE and RE cameras have a modular structure consisting of the following
components:
· USB board, including:
§ a USB 2.0 interface which controls data traffic between the camera and the host PC
§ a micro-controller which controls the digital inputs and outputs, the pixel clock and the image
size
§ an EEPROM where the camera manufacturer, type, and serial number are stored
a 64-byte memory area can be used freely by the user
· Sensor board. This board includes:
§ the sensor
§ an EEPROM where the camera type is stored
· Timing board (CCD cameras only)
§ The timing board digitizes the analog output signals of the CCD sensor.
Components of the USB uEye LE camera
USB uEye LE cameras are equipped with a PCB containing the following components:
· CMOS sensor
· Sensor EEPROM where the camera type is stored.
· USB 2.0 interface which controls data traffic between the camera and the host PC.
· Micro-controller which controls the digital inputs and outputs, the pixel clock and the image size.
· EEPROM where the camera manufacturer, type, and serial number are stored.
A 64-byte memory area can be used freely by the user.
© 2009 IDS Imaging Development Systems GmbH22
Page 23

6 Camera Basics
Figure 20: Block diagram of the GigE uEye HE
Components of the GigE uEye HE camera
The GigE uEye HE cameras have a modular structure consisting of the following components:
· Gigabit Ethernet board, including:
§ a Gigabit Ethernet interface which controls data traffic between the camera and the host PC
§ an FPGA which controls the camera functions and performs basic image preprocessing
§ a 64-Mbyte memory used for processing image data
· Sensor board. This board includes:
§ the sensor
§ an EEPROM where the camera type is stored
· Timing board (CCD cameras only)
§ The timing board digitizes the analog output signals of the CCD sensor.
© 2009 IDS Imaging Development Systems GmbH 23
Page 24

User Manual uEye Cameras V3.32
The following illustrations show a schematic view of the image capture sequence. The
sensor exposure and readout times and the transmission times depend on the camera
settings. The pre-processing time depends on the API functions you are using (e.g. color
conversion, edge enhancement).
Figure 21: Freerun mode (live mode)
Figure 22: Freerun mode (snap mode)
6.1 Operating Modes
6.1.1 Freerun Mode
In freerun mode, the camera sensor captures one image after another at the set frame rate.
Exposure and readout/transfer of the image data are performed in parallel. This allows the maximum
camera frame rate to be achieved. The frame rate and the exposure time can be set separately. The
captured images can be transferred one by one or continuously to the PC.
If trigger mode is active, you need to disable it before activating freerun mode.
· Single frame mode (snap mode)
The next image exposed by the sensor will be transferred. You cannot use the uEye flash outputs
in this mode.
· Continuous mode (live mode)
Images are captured and transferred continuously. You can use the uEye flash outputs.
)
*
Optional function. The start time and duration of the flash signal are defined by the Flash delay and
Duration parameters (see also Camera Settings: I/O).
© 2009 IDS Imaging Development Systems GmbH24
Page 25

6.1.2 Trigger Mode
In trigger mode, the maximum frame rate is lower than in freerun mode because the
sensors expose and transfer sequentially. The possible frame rate in trigger mode
depends on the exposure time.
Example: At the maximum exposure time, the frame rate is about half as high as in freerun
mode; at the minimum exposure time, the frame rate is about the same.
Figure 23: Hardware trigger mode with continuous image capture
In trigger mode, the sensor is on standby and starts exposing on receipt of a trigger signal. A trigger
event can be initiated by a software command (software trigger) or by an electrical signal via the
camera’s digital input (hardware trigger). For the specifications of the electrical trigger signals, see
the Electrical Specifications chapter.
In the camera properties, choose which trigger mode you want to use:
· Software trigger mode
When this mode is enabled, calling the Snap function triggers the capture of an image, which is
then transferred to the PC. If you call the Live function in this mode, the image capture is triggered
continuously and images are transferred continuously.
· Hardware trigger mode
When this mode is enabled, calling the Snap function makes the camera ready for triggering just
once. When the camera receives an electrical trigger signal, one image is captured and
transferred.
If you call the Live function, the camera is made ready for triggering continuously. An image is
captured and transferred each time an electrical trigger signal is received; the camera is then
ready for triggering again (recommended procedure).
· Freerun synchronization
In this mode, cameras running in freerun mode (live mode, see above) can be synchronized with
an external trigger signal. The cameras still remain in freerun mode. The trigger signal stops and
restarts the current image capture process. You can use this mode to synchronize multiple
cameras that you are operating in the fast live mode. Not all camera models support this mode.
6 Camera Basics
© 2009 IDS Imaging Development Systems GmbH 25
Page 26

User Manual uEye Cameras V3.32
Figure 24: Software trigger mode with continuous image capture
Figure 25: Freerun synchronization with hardware trigger
In standby mode, you can continue to use the camera's digital inputs or outputs.
)
*
Optional function. The start time and duration of the flash signal are defined by the Flash delay and
Duration parameters (see also Camera Settings: I/O).
6.1.3 Standby
uEye cameras can be set to a power-saving standby mode. Standby mode switches off the sensor of
CMOS cameras and the timing board of CCD cameras. The camera remains open in the software.
In standby mode, the camera cools down and the number of hot pixels visible when longer exposure
times are used is reduced.
Standby is the default state when the camera is not open in the software. When you open the
camera or switch to a different mode (freerun or trigger mode), the camera wakes up from standby
mode.
6.1.4 Applying New Parameters
New capture parameters (such as exposure time or gain settings) can be transferred to the camera
via software at any time. Depending on the operating mode, these settings will not always be
© 2009 IDS Imaging Development Systems GmbH26
Page 27

immediately effective for next image, however.
· Freerun mode
In freerun mode, the camera is internally busy with capturing the next image while new parameters
are transmitted to the camera. Depending on the exact time of transmission, new parameters
might only come into effect two or even three images later.
· Trigger mode
In this mode, the camera reverts to idle state between two images. When you change the camera
parameters, the new settings will be applied immediately to the next image (delayed by one
additional image for the UI-122x-C/M or UI-522x-C/M cameras due to the sensor).
6.1.5 Image Display Modes
The uEye driver provides three different modes for the display of captured images: The device
independent Bitmap mode (DIB), DirectDraw BackBuffer mode and DirectDraw Overlay mode.
· Device Independent Bitmap mode (DIB)
In Bitmap mode, images captured by the uEye are written to the random access memory of the
PC. The application software initiates the image display by the graphics card. This may result in a
slightly higher CPU load as compared to the DirectDraw display.
The advantage of Bitmap mode is that it is compatible with all graphics cards and that image data
in the memory is directly accessible. Since Windows controls the image display, the image may
be completely or partly overlapped by any other windows and dialog boxes.
· DirectDraw BackBuffer mode
In this mode, the uEye driver writes the image data to the invisible memory area (back buffer) of
the graphics card. This process runs automatically and does not have to be controlled by the
application software. It requires an installed DirectDraw driver, sufficient memory on the graphics
card and back buffer function support by the graphics card.
For this purpose, graphics cards generally provide better performance than graphics chips
integrated on the mainboard. In DirectDraw mode, the CPU load may be lower than in Bitmap
mode.
· DirectDraw Overlay Surface mode
This mode enables simultaneous display of a live image and overlay data. The video image is
digitized and stored in an invisible memory area (back buffer) of the graphics card. Defining a key
color and drawing that color to the image output window results in the video image being displayed
in all areas of the output window that have this key color. If the key color fills the entire window,
the video image is displayed full-screen. Accordingly, graphics/text data is preserved in all areas
not filled with the key color. This produces a non-destructive overlay. The display is controlled by
the graphics card chip and therefore hardly requires any CPU time. This mode is not supported by
all graphics cards, and often, it can only be used in conjunction with the YUV color mode.
6 Camera Basics
© 2009 IDS Imaging Development Systems GmbH 27
Page 28

User Manual uEye Cameras V3.32
Figure 26: Comparison of different sensor sizes
Figure 27: Using micro lenses to increase the effective fill
factor
6.2 Sensor
6.2.1 Sensor Sizes
The size of a digital camera sensor is usually specified in inches. However, the specified value does
not indicate the actual size of the active sensor area. The sensor size specifications date back to
the formerly used tube systems: The curvature of the imaging surface of the camera tube caused
distortions to the display, reducing the usable capture area of a 1” tube to a rectangle with a diagonal
of 16 mm.
With the introduction of the semiconductor sensor technology, the dimensional specifications were
taken over from tube systems. For this reason, a sensor whose active area diagonal measures 16
mm is specified as a 1-inch sensor. The following illustrations show the most common sensor sizes.
The size of each single sensor cell (pixel) depends on the size of the active sensor area and the
resolution. In general, less pixels over the same sensor area (or a larger sensor area with the same
resolution) will result in greater photosensitivity of the sensor.
6.2.2 Fill Factors
The fill factor is the percentage of the pixel area that is exposed to light during exposure. Ideally this
would be 100%. Since other elements are located on the sensor surface besides the light-sensitive
photodiodes, this value may be reduced to approx. 30 - 50%, depending on the sensor technology.
The use of micro lenses compensates for this and increases the fill factor to 90% or more. Micro
lenses collect the light that falls onto a photocell, thus increasing the useable sensor area.
© 2009 IDS Imaging Development Systems GmbH28
Page 29

Some CMOS sensors have micro lenses offset to the sensor edge. They compensate
for shadows created by obliquely incident light. The use of parallel light causes slight
color variations. These may occur if telecentric stops or lenses with large apertures
whose last optical element is located at a great distance are used. The following
uEye models are equipped with CMOS sensors with offset micro lenses:
· 164x-C and 564x-C
· 155x-C and 555x-C
· 148x-M/C and 548x-M/C
6.2.3 Color Filter (Bayer Filter)
Figure 28: Bayer filter and micro lenses
For technical reasons, digital image sensors can only detect brightness information, but no color
information. To produce color sensors, a color filter is applied to each photocell (pixel). The
arrangement of the color filters is illustrated in the following figure. Two out of every four pixels have a
green filter, one pixel has a red filter and one has a blue filter. This color distribution corresponds to
the color sensitivity of the human eye, and is called the Bayer filter pattern. With the help of the
Bayer pattern the correct brightness and color information can be calculated for each pixel. Full
sensor resolution is retained.
6 Camera Basics
Bayer conversion
A Bayer conversion, also referred to as de-Bayering, is carried out to determine the color information
from the raw sensor data (raw Bayer). By default all uEye cameras transmit the image data to the
PC in raw Bayer format. The PC then uses the functions of the uEye API to convert the image data
to the color format you need for displaying or further processing the data.
GigE uEye cameras additionally allow de-Bayering in the camera. In this case, the color images are
already finished when they are transmitted to the PC. This reduces the load on the computer's CPU
and increases the transmission bandwidth required by the camera.
To convert the colors, a filter mask moves over the image and calculates a color value for each pixel
from the surrounding pixels. The uEye API provides two filter masks that differ in image quality and
CPU load:
· 3x3 filter:
A filter mask of 3x3 pixels is used for conversion. This algorithm has a low load on the CPU. The
filter's averaging function may cause a slight blur. Noise is reduced. This filter is recommended for
image processing tasks.
· 5x5 filter:
A filter mask of 5x5 pixels is used for conversion. This algorithm offers very accurate color
© 2009 IDS Imaging Development Systems GmbH 29
positioning and an increased level of detail. The CPU load is higher than with the 3x3 filter. This
filter is recommended for visualization applications.
Page 30

User Manual uEye Cameras V3.32
Figure 29: Global shutter sensor in live mode
Figure 30: Global shutter sensor in trigger mode
6.2.4 Shutter Methods
The image is recorded in the sensor in four phases:
· Reset pixels of the rows to be exposed
· Exposure of pixel rows
· Charge transfer to sensor
· Data readout
The sensor cells must not be exposed during the readout process. The sensors of the uEye cameras
have no mechanical shutters, but work with electronic shutter methods instead. Depending on the
sensor type, either the rolling shutter method or the global shutter method is used.
Global Shutter
On a global shutter sensor, all pixel rows are reset and then exposed simultaneously. At the end of
the exposure, all rows are simultaneously moved to a darkened area of the sensor. The pixels are
then read out row by row.
Exposing all pixels simultaneously has the advantage that fast-moving objects can be captured
without geometric distortions. Sensors that use the global shutter system are more complex in
design than rolling shutter sensors.
All uEye CCD sensors as well as some CMOS sensors use the global shutter method.
)
*
Optional flash function. The start time and duration are defined by the Flash delay and Duration
parameters (see also Camera Settings: I/O).
© 2009 IDS Imaging Development Systems GmbH30
Page 31

6 Camera Basics
Figure 31: Rolling shutter sensor in live mode
Figure 32: Rolling shutter sensor in live mode with global flash window
Rolling Shutter
With the rolling shutter method, the pixel rows are reset and exposed one row after another. At the
end of the exposure, the lines are read out sequentially. As this results in a time delay between the
exposure of the first and the last sensor rows, captured images of moving objects are distorted.
To counteract this effect, the uEye software provides a Global Flash window where you set the time
by which flash activation is delayed. You can also specify the flash duration. This allows
implementing a global flash functionality which exposes all rows of a rolling shutter sensor
simultaneously.
Rolling shutter sensors offer a higher pixel density compared to global shutter CMOS sensors. The
rolling shutter system is used in uEye cameras with high-resolution CMOS sensors.
)
*
Optional flash function. The start time and duration are defined by the Flash delay and Duration
parameters (see also Camera Settings: I/O).
Rolling Shutter with Global Start
Some rolling shutter sensors also provide a global start mode, which starts exposure of all rows
simultaneously (see illustration). For best results, use a flash for this mode. No light is allowed to fall
on the sensor outside the flash period because otherwise the image brightness will be distributed
unevenly.
© 2009 IDS Imaging Development Systems GmbH 31
Page 32

User Manual uEye Cameras V3.32
Figure 33: Rolling shutter sensor in trigger mode with Global Start function
)
*
Optional flash function. The start time and duration are defined by the Flash delay and Duration
parameters (see also Camera Settings: I/O).
© 2009 IDS Imaging Development Systems GmbH32
Page 33

6.3 Camera Parameters
We recommend not setting the pixel clock any higher than necessary to achieve the
desired frame rate.
An excessive pixel clock can cause transmission errors or delays. If the data is read from
the sensor at a higher speed (high pixel clock), you will also need a faster transmission
over the data connection. Thus, by controlling the pixel clock, you can also influence the
bandwidth required for a camera.
The pixel clock influences the connected load and consequently the temperature inside
the camera.
A signal gain will also result in a noise gain. High gain settings are therefore not
recommended.
We suggest the following gain settings:
1.
Enable the Gain boost function.
2.
If required, adjust the gain setting with the master gain control.
6.3.1 Pixel Clock, Frame Rate, Exposure Time
Pixel clock
The basic parameter for camera timing is the pixel clock. It determines the speed at which the
sensor cells can be read out.
Frame rate
The possible range of settings for the frame rate depends on the currently selected pixel clock. You
can select a lower frame rate without changing the pixel clock. To set a higher frame rate, however,
you need to increase the pixel clock.
6 Camera Basics
Exposure time
The exposure time depends on the currently selected frame rate and is preset to its reciprocal value.
You can select a shorter exposure time without changing the frame rate. To set a longer exposure
time, however, you need to reduce the frame rate.
6.3.2 Gain and Offset
Gain
In digital imaging, a voltage proportional to the amount of incident light is output by the sensor. To
increase image brightness and contrast, this signal can be amplified by an analog gain and offset
before the digitizing process. The results of analog signal processing are usually better than the
results of digital post-processing.
Analog amplification of the read-out pixel values increases overall image brightness and contrast.
Depending on the sensor type, a global gain value for all pixels (master gain) or a separate gain value
for each color (RGB gain) can be set.
Offset
Every digital image sensor has light-insensitive cells next to the active image area. These dark pixels
are used to measure a reference voltage (black level) which is subtracted from the image signal.
© 2009 IDS Imaging Development Systems GmbH 33
This compensates thermally generated voltages on the sensor which would otherwise falsify the
Page 34

User Manual uEye Cameras V3.32
signals.
Normally, the sensor adjusts the black level automatically. If the environment is very bright or if
exposure times are very long, it may be necessary to adjust the black level manually.
6.3.3 Automatic Image Control
The uEye driver provides various options to automatically adjust the image capture parameters to the
lighting situation. These include:
· Auto Exposure Shutter (AES)
· Auto Gain Control (AGC)
· Auto White Balance (AWB)
· Auto Frame Rate (AFR)
The auto functions are used to adjust the average brightness and color rendering of the camera
image to their setpoint values, while trying to keep the frame rate at the highest possible value.
Auto Exposure Shutter (AES)
The control of the average brightness is preferably achieved by adjusting the exposure, i.e. you set
the highest possible exposure time before gain is controlled. Auto Exposure always uses the current
exposure range which results from the selected pixel clock frequency and the frame rate. You can
set separate control range limits for exposure and gain.
Auto Gain Control (AGC)
The auto gain feature controls the camera master gain in a range from 0-100%. You can set
separate control range limits for exposure and gain.
Auto Frame Rate (AFR)
With the exposure control function enabled, you can still change the frame rate manually or
automatically to maintain a dynamic exposure control range. A lower frame rate allows for longer
exposure times, but then the live image display may exhibit jitter. The objective of the automatic
frame rate control is to set the frame rate to an optimum value. This way, in all situations, the
automatic exposure control can use the required control range at the highest possible frame rate.
Auto White Balance (AWB)
Depending on the lighting source, light can have different color temperatures so that the images may
have a color cast. At low color temperatures (e.g. light from incandescent lamps), the white content
is offset towards a red hue. At high color temperatures (e.g. light from fluorescent lamps), the white
content is offset towards a blue hue.
The white balance control feature uses the RGB gain settings of the camera to correct the white
level. This is achieved by adjusting the gain controls within the 0-100% range until the red or blue
channel matches the average brightness of the green channel. In order to manually influence the
color rendering, you can adjust the setpoint values for the red and blue channels relative to the green
channel by using an offset value.
Automatically Disabling the Control Function
You can disable the control functionality automatically once the target value has been reached.
Alternatively, you can keep the control feature enabled so that it responds to deviations from the
target value.
© 2009 IDS Imaging Development Systems GmbH34
Page 35

6 Camera Basics
Control Speed
You can set the auto function speeds in a 0-100% range. This influences the control response times.
High speed (100%) causes a little attenuation of a fast-responding control and vice versa. The control
functions for average brightness and for color rendering use separate speeds. In freerun mode,
maximum every fifth image is evaluated for adjusting. In trigger mode, every image is evaluated.
© 2009 IDS Imaging Development Systems GmbH 35
Page 36

User Manual uEye Cameras V3.32
Figure 34: Camera AOI (Area of Interest)
Please note that, after defining an AOI, the resulting image may be darker if the camera
cannot maintain the originally set exposure time due to the increased frame rate.
6.4 Reading out Partial Images
The camera sensors have defined resolutions which are given as the number of pixels (width x
height). However, for some applications it may be necessary to read out only a selected part of the
sensor area or to reduce the local resolution. For this purpose, the uEye cameras provide various
functions:
· Area of Interest (AOI)
· Binning (combining) pixels
· Subsampling (skipping) pixels
These functions reduce the amount of data to be transferred and thus allow you to increase the
frame rate considerably, depending on the camera model.
6.4.1 Area of Interest (AOI)
Using this function, you can set the size and position of an area of interest (AOI) within an image. In
this case, only data included in this AOI will be read out and transferred to the computer. The
smaller partial image enables the camera to use a higher frame rate.
For the maximum frame rates that can be obtained with a specific camera model using AOI, please
refer to the Specifications: Sensors chapter.
6.4.2 Binning
Binning is a function that averages or adds multiple sensor pixels to obtain a single value. This
reduces the amount of data to be transferred and enables higher camera frame rates. The captured
image has a lower resolution but still the same field of view compared to the full-resolution image.
This mode can be used as a fast preview mode for high-resolution cameras.
Color binning, as performed by most color sensors, combines only pixels of the same color (see
also the Color Filter (Bayer Filter) chapter). For some monochrome sensors, the camera also
performs color binning, resulting in slight artifacts.
Most monochrome sensors and some color sensors combine neighboring Bayer pattern pixels; in
this case, the color information gets lost (mono binning).
With CCD sensors, binning makes the images brighter because the pixel values are added up. With
© 2009 IDS Imaging Development Systems GmbH36
Page 37

CMOS sensors, pixel values are usually averaged; this reduces image noise.
Figure 35: Color binning (2x)
Figure 36: Mono binning (2x)
Figure 37: Color subsampling
(2x)
Figure 38: Mono subsampling
(2x)
Depending on the model, uEye cameras support different binning factors. Binning of horizontal and
vertical pixels can be enabled independently.
The Specifications: Sensors chapter lists the binning methods and factors the individual camera
models support.
6.4.3 Subsampling
6 Camera Basics
Subsampling is a technique that skips multiple sensor pixels when reading out image data. This
reduces the amount of data to be transferred and enables higher camera frame rates. The captured
image has a lower resolution but still the same field of view compared to the full-resolution image.
This mode can be used as a fast preview mode for high-resolution cameras.
Color subsampling as performed by most color sensors skips pixels while maintaining colors (see
illustration). For some monochrome sensors, the camera also performs color subsampling, resulting
in slight artifacts.
Monochrome sensors and some color sensors ignore the Bayer pattern and the color information
gets lost (mono subsampling).
Depending on the model, uEye cameras support different subsampling factors. Subsampling of
horizontal and vertical pixels can be enabled independently.
The Specifications: Sensors chapter lists the subsampling methods and factors supported by each
camera model.
© 2009 IDS Imaging Development Systems GmbH 37
Page 38

User Manual uEye Cameras V3.32
Camera model
Digital inputs
Digital outputs
General purpose I/Os
(GPIOs), Other
USB uEye SE
1 (opto coupler)
1 (opto coupler)
-
USB uEye RE
1 (opto coupler)
1 (opto coupler)
-
USB uEye LE housing
version
---
USB uEye LE board
level version
1 (TTL)
1 (TTL)
2 (TTL)
GigE uEye SE
1 (opto coupler)
1 (opto coupler)
-
GigE uEye HE
1 (opto coupler)
1 (opto coupler)
2 (TTL)
1 RS-232
The delay is due to internal camera switching times and depends on the sensor type and
the parameters that have been set. It is always below 100 µs. You can find the exact values
for each camera in the Specifications: Sensors chapter.
You can optionally set an additional delay (trigger delay).
6.5 Digital Input/Output
Depending on the model, uEye cameras have one or more digital inputs and outputs designed for
different purposes.
6.5.1 Digital Input (Trigger)
In trigger mode, image capture by the uEye cameras can be controlled through external events. For
this purpose, a digital signal must be applied to the camera input.
You can determine whether the camera will respond to the rising or falling edge of the digital signal.
After an internal delay, the sensor is exposed for the defined exposure time. The captured image is
then transferred to the PC.
In case of a triggered image capture, the camera is only ready to process the next trigger signal after
completion of the data transfer to the PC. Trigger events that occur during image exposure or data
transfer are ignored. An internal counter records the number of ignored trigger events and can be
read out from the PC.
You can query the status of the digital input using the software. This enables you to use the input for
other purposes as well.
6.5.2 Digital Output (Flash Strobe)
The digital output can be set statically by software or depending on the exposure time.
In uEye models equipped with an opto-coupler output, it is possible to control a DC voltage which is
applied to the output. This allows controlling a flash, either directly or via a separate flash controller
unit depending on the sensor exposure. In exposure-dependent mode, you can set the delay and
the duration of the flash. By selecting suitable delay and duration settings, you can minimize the
rolling shutter effect (see also Shutter Methods).
© 2009 IDS Imaging Development Systems GmbH38
Page 39

6 Camera Basics
Figure 39: Triggered image capture and flash with delay and duration
The delay is due to internal camera switching times and depends on the sensor type and
the parameters that have been set. It is always below 100 µs. You can find the exact values
for each camera in the Specifications: Sensors chapter. You can set an additional delay
and the duration of the flash signal in the software.
The settings specified for the digital output will be reset in the following situations:
· a GigE uEye camera loses its pairing (i.e. it is closed in the software)
· a USB uEye camera is disconnected from the PC or the PC is powered down
The GPIO settings will be reset when the camera is closed in the software.
6.5.3 General Purpose I/O
Some uEye models have freely programmable General Purpose Inputs/Outputs (GPIO) which can be
programmed as inputs or outputs using the uEye SDK (see also GPIO Specifications).
6.5.4 Serial Interface (RS232) of the GigE uEye HE
Cameras of the GigE uEye HE series are equipped with a serial interface (RS232). It provides
functionality for communication with peripheral devices (e.g. lighting controller, lens controller) or the
serial port of a PC. Before you can send data through the camera's serial interface, one or more
virtual COM ports have to be defined on the PC. Once defined, they can be used for data
communication with appropriate software just like any physical COM port.
To set up and use the serial interface, the Additional functions dialog box is provided in the uEye
Camera Manager. For the serial interface specifications, please refer to the Serial Interface (RS232)
chapter.
© 2009 IDS Imaging Development Systems GmbH 39
Page 40

User Manual uEye Cameras V3.32
Figure 40: uEye Setup - Language selection
Figure 41: uEye setup menu
7 Installation
7.1 Downloading the Software
The latest camera drivers are available for download at www.ueyesetup.com.
Choose your language on the setup start page and follow the download links.
The following options are available:
· Windows Setup (V 3.30)
This download contains the complete setup with drivers for all cameras, the uEye Software
Development Kit (SDK) and the manuals.
· "Driver only" Windows Setup
© 2009 IDS Imaging Development Systems GmbH40
Page 41

7 Installation
To operate a camera with USB board revision 2.0 or earlier, you will need the uEye driver
version 2.40. You can download this driver version from our website at http://www.idsimaging.com.
For further information, see also USB uEye SE Driver Compatibility.
You need administrator privileges to install the software.
This download contains only the drivers for USB and Gigabit Ethernet cameras. The SDK and
manuals are not included.
· USB Bus Checker
The USB bus checker provides information on the USB interfaces available on your system
(Windows only).
· Camera Hardware Check
The USB hardware check displays information on whether a connected camera is compatible with
the new driver versions (Windows only). To use this feature, a uEye driver has to be installed on
your system.
· LINUX (USB uEye)
This download contains the drivers for the USB uEye cameras for Linux (kernel version 2.6)
· Imaging Software Interfaces
Click this link to download individual software interfaces for using the uEye in conjunction with
image processing libraries, such as MVTec HALCON. Please note that all these files are also
included in the Windows Setup (V 3.30) download (see above).
· Manuals
Click this link to access the camera manuals, the uEye Programming Manual and other manuals
for components and tools online as PDF files.
· RMA Form
This link displays a form for returning goods to IDS.
· Support
Click this link to display IDS support information and additional contact data.
7.2 Installing the uEye Drivers
The files are downloaded in ZIP format. They have to be extracted after the download before you can
start installing. Double-click the executable (uEye_3320.exe) to start the installation. The uEye driver
installation is menu-driven. Please follow the instructions of the setup program.
The setup will prompt you to select a setup type. Please choose one of the following options:
© 2009 IDS Imaging Development Systems GmbH 41
Page 42

User Manual uEye Cameras V3.32
Figure 42: Selecting a setup type
Once the software has been installed, the GigE uEye network service is automatically
bound to all local network adapters.
We recommend disabling the network service for all network adapters that will not be used
with the GigE uEye cameras. To disable the network service, open the ETH network
service dialog box in the uEye Camera Manager.
After uninstalling the GigE uEye driver, you will have to restart your computer.
You can only reinstall the driver after restarting the computer.
1.
Complete
Installs all components (recommended).
2.
USB and Gigabit Ethernet
Installs all USB and GigE components except source code and third-party drivers (e.g.
DirectShow or imaging libraries)
3.
USB
Installs all USB components except source code and third-party drivers
4.
Custom
When you choose custom installation, you have to individually select the components you want to
install. Custom installation is recommended only for advanced users.
If you need to make changes to an existing installation, you can do this with the custom
installation.
7.3 Uninstalling the uEye Drivers
To uninstall the uEye drivers, you also use the menu-driven uEye setup program.
Uninstalling the GigE uEye network service
The GigE uEye network service is uninstalled automatically when you uninstall the uEye driver.
© 2009 IDS Imaging Development Systems GmbH42
Page 43

7.4 Connecting a USB uEye Camera
max. 5m
max. 5m
max. 5m
max. 5m
USB2.0-Hub
USB2.0-Hub
Figure 43: Connecting the uEye cameras to a PC
To use maximum bandwidth, we recommend connecting the cameras directly to the USB
2.0 ports on the mainboard. Many USB 2.0 ports on PCI/PCIe cards and the USB 2.0 ports
on the front of the PC mostly supply lower bandwidths.
Please install the software first as described in the Installing the uEye Drivers section.
Connect the USBuEye to the PC, using the USB 2.0 cable. The Windows Plug and Play Manager
recognizes the new hardware.
7 Installation
The uEye cameras can be connected to a USB port either directly or via hubs and repeaters. A wide
range of different hubs and repeaters are available at computer stores or from IDS. The USB 2.0 hubs
being used must be full powered hubs that are able to provide 500 mA per USB port. Low Powered
hubs, in comparison, only supply 100 mA per port, which is not sufficient for uEye cameras.
When the camera has been correctly installed, the LED on the back of the camera lights up green.
The camera is added to the camera list in the uEye Camera Manager.
© 2009 IDS Imaging Development Systems GmbH 43
Page 44

User Manual uEye Cameras V3.32
Figure 44: Connected uEye cameras are listed in the uEye
Camera Manage
If the camera is not listed in the uEye Camera Manager, open the Windows Device
Manager to check whether the camera has been correctly recognized. If recognition was
successful, you will find an entry in the format “uEye UI-xxxx-xx Series” under “Universal
Serial Bus Controllers.” A question mark or exclamation mark before the entry indicates
that camera was not correctly recognized. Disconnect and reconnect the camera. The
camera should now be correctly recognized.
© 2009 IDS Imaging Development Systems GmbH44
Page 45

7.5 Connecting a GigE uEye Camera
Figure 45: Connecting two cameras directly to a PC
Using the GigE uEye camera through a router is not supported.
Figure 46: Connecting a camera to a PC, using switches to extend the
line length
Figure 47: Operating multiple cameras via switch
Please install the software first as described in the Installing the uEye Drivers section.
Check the power supply to the camera. Suitable AC adapters are available as accessories (see
also GigE uEye HE Accessories and GigE uEye SE Accessories). Connect the camera to the PC
either directly or using switches.
Connecting the camera directly to the PC
Using a suitable network cable (e.g. Cat 5e), connect the uEye camera directly to a Gigabit Ethernet
port on your PC. With this connection type, you need a network card for each camera.
Connecting the camera to a PC via switches
7 Installation
The use of switches allows you to extend the line length, as each switch adds a segment. The
maximum cable length for each segment is 100 m.
Connecting multiple cameras to multiple PCs using switches
As soon as one of the cameras is used by a PC, it is visible to other PCs, but no longer available. It
can only be used by a different PC when the existing connection to the first PC has been closed.
If the two PCs are on different subnets, each PC can only work with the cameras that have been
© 2009 IDS Imaging Development Systems GmbH 45
Page 46

User Manual uEye Cameras V3.32
Figure 48: Multiple cameras and PCs networked using a switch
configured for the relevant subnet.
Connecting the camera to a PC behind a firewall
The use of external firewalls between the camera and the host PC is not recommended on image
data networks. If you nonetheless want to use a firewall, please ensure that ports 50000, 50001,
50002 and 50003 are open for the UDP protocol.
The built-in Windows Firewall or personal firewalls installed as software in the host PC usually do not
cause any problems.
© 2009 IDS Imaging Development Systems GmbH46
Page 47

7.5.1 Notes on connecting Gigabit Ethernet cameras
Please read the following notes before setting up GigE uEye cameras:
Network interface card
· To ensure optimum performance of the network connection, you need to install the latest drivers
for your network card.
Cabling
· The cable length of the individual segments must not exceed 100 m.
· The network must be cabled throughout at either 100 Mbps or 1000 Mbps. The use of 1000 Mbps
networks is recommended.
· The data network and the camera network should be cabled separately. We therefore recommend
connecting the GigE uEye cameras by a separate network card.
· Gigabit Ethernet network adapters for PCI slots do not achieve the maximum transfer rate of 114
MB/sec. In real life conditions, the transfer rate on a PCI bus is approx. 80-90 MB/sec.
IP configuration und DHCP
· Before you can use the GigE uEye camera on the network, you need to assign an IP address to
the camera. The IP address is assigned in the uEye Camera Manager (see also uEye Camera
Manager).
· The cameras and the computer must be on the same subnet.
· The network card on the host PC responsible for data transfer to and from the GigE uEye cameras
requires a persistent (fixed) IP address. It cannot obtain an IP address from a DHCP server.
· If a DHCP server is running on the network, you need to ensure when configuring the network card
that the manually assigned address range of the uEye driver is outside the DHCP range.
7 Installation
Advanced settings
· For operating GigE uEye cameras, we recommend setting the value for the receive descriptors of
the network connection to the maximum value. Please note that not all network cards provide this
option.
To set the receive descriptors, select Start ® Settings ® Network Connections. Right-click on the
network connection and choose Properties. Switch to the Advanced tab in the dialog box and click
the Configure... button. You can now set the receive descriptors (Rx/Tx).
· The UDP protocol is required for communication between the GigE uEye cameras and the
computer. Ports 50000 ... 50003 must be open.
7.5.2 Serial Interface (RS232) of the GigE uEye HE
Cameras of the GigE uEye HE series are equipped with a serial interface (RS232). It provides
functionality for communication with peripheral devices (e.g. lighting controller, lens controller) or the
serial port of a PC. Before you can send data through the camera's serial interface, one or more
virtual COM ports have to be defined on the PC. Once defined, they can be used for data
communication with appropriate software just like any physical COM port.
To set up and use the serial interface, the Additional functions dialog box is provided in the uEye
Camera Manager. For the serial interface specifications, please refer to the Serial Interface (RS232)
chapter.
© 2009 IDS Imaging Development Systems GmbH 47
Page 48

User Manual uEye Cameras V3.32
7.5.3 Camera Start-up
When the GigE uEye camera has been connected to the power supply and the network, it loads the
starter firmware stored in the camera's EEPROM. The starter firmware enables the camera to
register on the network and establish a connection to a host PC. As soon as the starter firmware is
loaded, the camera sends a heartbeat broadcast to the network once every second.
In the next step, the camera checks whether a persistent IP address is stored. If it is, the camera
uses the persistent IP address. Otherwise the camera is assigned the IP address 0.0.0.0.
7.5.4 Camera Initialization
As soon as a computer wants to use a camera, it sends a connection request to that camera. When
the camera has signaled that it is available, the system first checks whether the camera has a valid
IP address. If it does not, the computer sends a range of valid IP addresses to the camera. The
camera picks a free IP address, i.e. one that is not yet in use on the network, from these IP
© 2009 IDS Imaging Development Systems GmbH48
Page 49

7 Installation
addresses and notifies the computer that the IP address has been assigned. Then the host PC
transfers the runtime firmware to the camera and the camera is restarted. Transferring the runtime
firmware and restarting the camera may take up to five seconds.
© 2009 IDS Imaging Development Systems GmbH 49
Page 50

User Manual uEye Cameras V3.32
Figure 49: Flowchart of establishing a connection to the GigE uEye HE
*)
Only GigE uEye HE
7.5.5 Camera Recognition
As soon as the camera is connected to a host PC, it cannot connect to any other computer on the
network. When a connection has been successfully established, the host PC also transmits a
heartbeat, which is received and evaluated by the camera. If the heartbeat of the host PC cuts out,
the camera is restarted and the starter firmware loaded. This allows the camera to connect to
another computer on the network.
If the heartbeat of the camera cuts out, the host PC closes the connection and removes the camera
from its camera list. Once this has taken place, the camera is no longer displayed in the Camera
Manager. This process may take up to three heartbeat periods (see above).
© 2009 IDS Imaging Development Systems GmbH50
Page 51

7 Installation
Figure 50: Flowchart of camera recognition for the GigE uEye HE
© 2009 IDS Imaging Development Systems GmbH 51
Page 52

User Manual uEye Cameras V3.32
The uEye Camera Manager is currently only available for Windows operating systems. You
can configure the cameras in Linux by using the uEye SDK.
Figure 51: uEye Camera Manager (basic view)
8 Applications
8.1 uEye Camera Manager
The uEye Camera Manager is the central tool for managing all uEye cameras. It displays information
on the connected uEye USB and GigE uEye cameras and provides options for configuring them.
The uEye Camera Manager can be accessed as follows:
· Start ® All Programs ® IDS ® uEye ® uEye Camera Manager
· Program icon on the desktop or Quick Launch toolbar
· Start ® Control Panel ® uEye Camera Manager
· Camera list
The camera list displays information on the connected uEye cameras.
· Control center
In the control center, you can access the configuration and display detailed information on the
connected uEye cameras.
· In the drop down box, you can choose the language for the uEye Camera
Manager. This setting is saved and remains effective even after you close and reopen the program.
For proper display of Asian languages, the Windows support for East Asian languages has to be
© 2009 IDS Imaging Development Systems GmbH52
Page 53

installed on your system (in Control Panel ® Regional and Language Options).
Figure 52: uEye Camera Manager - Camera list
· Click to close the application; any settings you have made are saved.
· The status box at the bottom of the Camera Manager window indicates the current status of the
selected camera. If it is available, the status message is shown in black. Otherwise, the status
message is shown in red.
If an error has occurred in a camera, a black exclamation mark on a yellow background is shown
next the camera. The status box then indicates the cause of the error and suggests remedies.
8.1.1 Camera List
When a camera is activated (switched on or connected to the PC), it appears in the camera list of
the uEye Camera Manager after a few seconds. A Gigabit Ethernet camera requires a little more
time to start up and be detected by the network than a USB camera.
After deactivating a GigE uEye camera (switching it off or disconnecting it from the network) it takes
approximately three seconds before the camera is removed from the camera list. During this time the
computer waits to see whether it receives another heartbeat signal from the camera.
8 Applications
The data shown in the camera list can be sorted in ascending or descending order by left-clicking on
the respective column header.
· Free/Avail.
Free indicates whether a camera is currently in use.
Avail. (Available) indicates whether a camera can be opened by this computer with the current
setup (computer and camera).
Cameras shown with a red x are currently in use (Free = No) and are not available (Avail. = No).
Cameras shown with an exclamation mark are not in use, but are currently unavailable for various
reasons, such as:
§ The camera is not compatible with the driver. Please update the uEye driver.
§ The IP configuration of the network card is not configured for use of the GigE uEye camera. Please
enter a valid configuration in the Manual ETH Configuration.
§ DHCP (automatic assignment of an IP address) is activated in the IP configuration of the network
card. Please enter a valid configuration in the Manual ETH Configuration.
§ The driver has not properly detected (initialized) the camera. Please disconnect the camera from
the PC and then reconnect it.
§ The camera is currently being removed from the Manager.
§ The camera reports that it is Not operational.
· Type
This column indicates whether the camera is a Gigabit Ethernet (ETH) or a USB camera (USB).
· Cam.ID
The camera ID assigned by the user.
· Dev.ID
Unique device identifier sequentially assigned by the system. Different device IDs are assigned for
USB and Gigabit Ethernet cameras. USB cameras are assigned device IDs from 1 upwards,
Gigabit Ethernet cameras from 1001. After deactivating a uEye camera (switching it off or
disconnecting it from the network), the device ID is no longer valid and can be assigned again by
the system.
· Model
Model name of the camera
· SerNo.
Serial number of the camera.
© 2009 IDS Imaging Development Systems GmbH 53
Page 54

User Manual uEye Cameras V3.32
Figure 53: uEye Camera Manager in Expert mode
8.1.2 Control Center
· Expert mode
When you select the check box, the uEye Camera Manager additionally
displays the Parameters box on the right. There you will find detailed information on the uEye
camera selected in the camera list. The and
buttons are only available in Expert mode and are hidden otherwise
· Automatic parameter refresh
If you select the check box, the data shown in the tree structure
is updated periodically. If the option is disabled, the data in the tree structure is only updated when
a different camera is selected.
All other Control Center buttons are described in detail in the following sections.
8.1.3 General Information
This dialog box provides information on the installed uEye drivers and the available USB controllers
and network adapters.
© 2009 IDS Imaging Development Systems GmbH54
Page 55

8 Applications
Figure 54: uEye Camera Manager - General information
Red: A new driver version is available. It is recommended that you
update the software.
Green: The installed version is up-to-date.
Yellow: The installed version is more recent than the version on the
website.
Gray: A file available on the website has not been installed.
·
Click this button to check whether new drivers are available on the IDS website. You need a
connection to the Internet to use this function. After the version check, the individual files are
highlighted by different background colors in the uEye drivers and 3rd party drivers lists:
·
Click this button to go to the http://www.ueyesetup.com website and download the uEye software
and drivers.
· uEye drivers
This list shows the location and version of the uEye driver files installed on your system.
· 3rd party drivers
This list shows the location and version of the uEye interface files that have been installed on your
system for third-party software.
· USB controller and network adapters
All USB controllers and network adapters that are available in your system are shown in a tree
structure.
© 2009 IDS Imaging Development Systems GmbH 55
Page 56

User Manual uEye Cameras V3.32
Figure 55: uEye Camera Manager –
Camera information
You can only set the camera ID and write to the EEPROM if the camera is marked Free and
Available in the Camera Manager (see also Camera list).
If software accesses the camera through the uEye DirectShow interface, the camera ID
must be in a range from 1 to 8.
A uEye support file is a binary file with the extension .bin. The file contains camera and
driver details that are required for diagnostics by the uEye support team. No personal
computer data or user data is stored in this file.
8.1.4 Camera Information
In the Camera information dialog box, you can assign a unique ID to the selected camera and write
to the user area of the EEPROM. The data you enter is retained in the camera memory even when
the camera is disconnected from the PC or power supply.
· Camera ID
The camera ID identifies a camera in multi-camera operation. You can assign IDs in a range from
1 to 254. The default value for the camera ID is 1. The same ID can be assigned to multiple
cameras. You do not have to assign sequential ID numbers to all connected cameras.
· User EEPROM (max. 64 characters)
Every uEye has a 64-byte user area in its EEPROM (Electrically Erasable and Programmable
Read Only Memory) to which you can write text of your choice.
The Camera information dialog box displays two additional boxes that are for your information only
and cannot be edited:
§ Manufacturer (e.g. IDS GmbH)
§ Date of QC (date of final camera quality test)
8.1.5 Creating a Support File
The button opens the "Save as" dialog box, where you can save the
displayed camera information and additional driver information to a file.
© 2009 IDS Imaging Development Systems GmbH56
Page 57

8.1.6 ETH Network Service
Figure 56: uEye Camera Manager - ETH network service
In this dialog box, you can enable and disable the network service of the GigE uEye camera for
specific network adapters. In addition, network adapters can be assigned a fixed IP address, which
is required for operating the GigE uEye camera.
8 Applications
· Status
Displays information on the status of the GigE uEye network service and the connected network
adapters.
· Network adapter
§ Click the button to disable the GigE uEye network service for a
network adapter. To enable the network service, click the button.
Before you can enable or disable a network adapter, you need to select it in the tree structure of
the dialog box.
We recommend disabling the GigE uEye network service for all network adapters that are not
being used for uEye cameras.
§ In the IP Address and IP Subnetmask input boxes, you can assign a static IP address and a
static IP subnet mask to the selected network adapter. DHCP will be disabled automatically.
8.1.7 Additional Functions (COM Port)
The Additional functions dialog box allows installing virtual COM ports for communication through the
serial interface of the GigE uEye HE camera. The following sections show you how to set up and use
the serial interface.
© 2009 IDS Imaging Development Systems GmbH 57
Page 58

User Manual uEye Cameras V3.32
This feature is only available for GigE uEye HE cameras.
You need administrator privileges to install a virtual COM port.
The GigE uEye HE camera you select in the Camera Manager has to be marked Free and
Available.
Figure 57: uEye Camera Manager - Additional functions
If you want to control more than one GigE uEye HE camera from a PC, each camera
should be assigned a unique port number. If multiple cameras are assigned the same
port number, only the port of the first camera that is opened will be used.
Setting up the serial interface on the GigE uEye HE
Before using the serial interface on the camera, one or more virtual COM ports have to be installed
on the PC. Most systems support up to 255 COM ports; COM1 to COM8 are often assigned
operating system functions by default. You can check the current port assignment in the Device
Manager on your computer. Some older systems may not have more than eight ports; in that case
you will need to assign the GigE uEye HE camera to one of these ports.
· COM port
In the drop down box, select the number of the port you want to install
(default: 100). COM ports in use are marked (used) in the list.
·
Click this button to install the selected virtual COM port.
During the first installation of a virtual COM port, an additional broadcast port with number 255 is
installed. Data sent to this port will be forwarded to all paired cameras.
You can install any number of virtual COM ports on a single system.
·
With this button, you can release a COM port that is marked "used." If the port number has been
saved in that camera, it will be deleted in the camera, too. To release a COM port, select it in the
drop down box and then click this button.
·
Click this button to assign the selected port number to the camera. The port number is saved in
the camera's non-volatile memory and retained even when the camera is switched off. You can
look up the assigned port number in the Camera Manager's expert mode. A COM port number can
also be saved in a camera without a virtual COM port installed on the PC.
© 2009 IDS Imaging Development Systems GmbH58
Page 59

8 Applications
To send data via the serial interfaces of multiple cameras, you can use the broadcast port
with number 255. Before connecting to the broadcast port, ensure that all the cameras that
are to receive the broadcast have been opened.
Before a camera can exchange data with a PC through the virtual COM port, the camera
has to be paired with that PC (see Paired).
To avoid transmission errors, please ensure that both the camera and the receiving end
use the same communication parameters (baud rate, data bits, stop bits, parity). Further
information on the communication parameters is provided in the Specifications: Serial
Interface chapter.
Figure 58: Data transfer through a virtual COM port
Testing the serial interface on the GigE uEye HE
·
Clicking this button opens a dialog box for transferring data through the COM port. The dialog box
is provided as the uEyeComportDemo.exe sample program together with the C++ source code and
is included in the uEye SDK.
This program allows sending ASCII characters to the COM port assigned to a camera. The
characters are output unchanged on the camera's serial port. To check the proper functionality,
you can connect a PC to the camera's serial port and read the transmitted characters on the PC's
COM port.
· Baud
In this drop down box, you can change the data transfer rate of the serial interface.
· Append
This drop down box allows appending the special characters CR (Carriage Return) and LF (Line
Feed) to the ASCII text you want to transmit. Some devices with serial interface require ASCII
strings to be terminated with CR/LF.
· Send file
Using these functions, you can send a file in either direction (output on the camera's virtual COM
port or output on the PC's COM port).
© 2009 IDS Imaging Development Systems GmbH 59
Page 60

User Manual uEye Cameras V3.32
Since the sample program has to open the camera, please make sure the selected
camera is not used by other applications at the same time.
This function is only available for GigE uEye cameras.
The starter firmware determines the start-up behavior of the GigE uEye camera. We
recommend that you do not update the starter firmware unless an older firmware version
causes start-up problems. If you have questions on the current starter firmware, please
contact our technical support (see Contacting Us).
This function is only available for GigE uEye cameras.
This function is only available for GigE uEye cameras.
8.1.8 Automatic ETH Configuration
The button allows configuring a connected GigE uEye camera for automatic
IP address assignment. The function defines a suitable IP address range, which you can change in
the Manual ETH configuration dialog box, if required.At the same time, it deletes the camera's
persistent IP address (i.e. sets it to 0.0.0.0). When the GigE uEye camera is opened by an
application, the function automatically assigns a free IP address to the camera.
8.1.9 Starter Firmware Upload
The button uploads a new version of the starter firmware to the selected
camera. This button is only available in Expert mode and is hidden otherwise.
8.1.10 Manual ETH Configuration
This dialog box allows you to manually set the IP address and subnet mask of a GigE uEye camera.
The button is only available in Expert mode and is hidden otherwise.
© 2009 IDS Imaging Development Systems GmbH60
Page 61
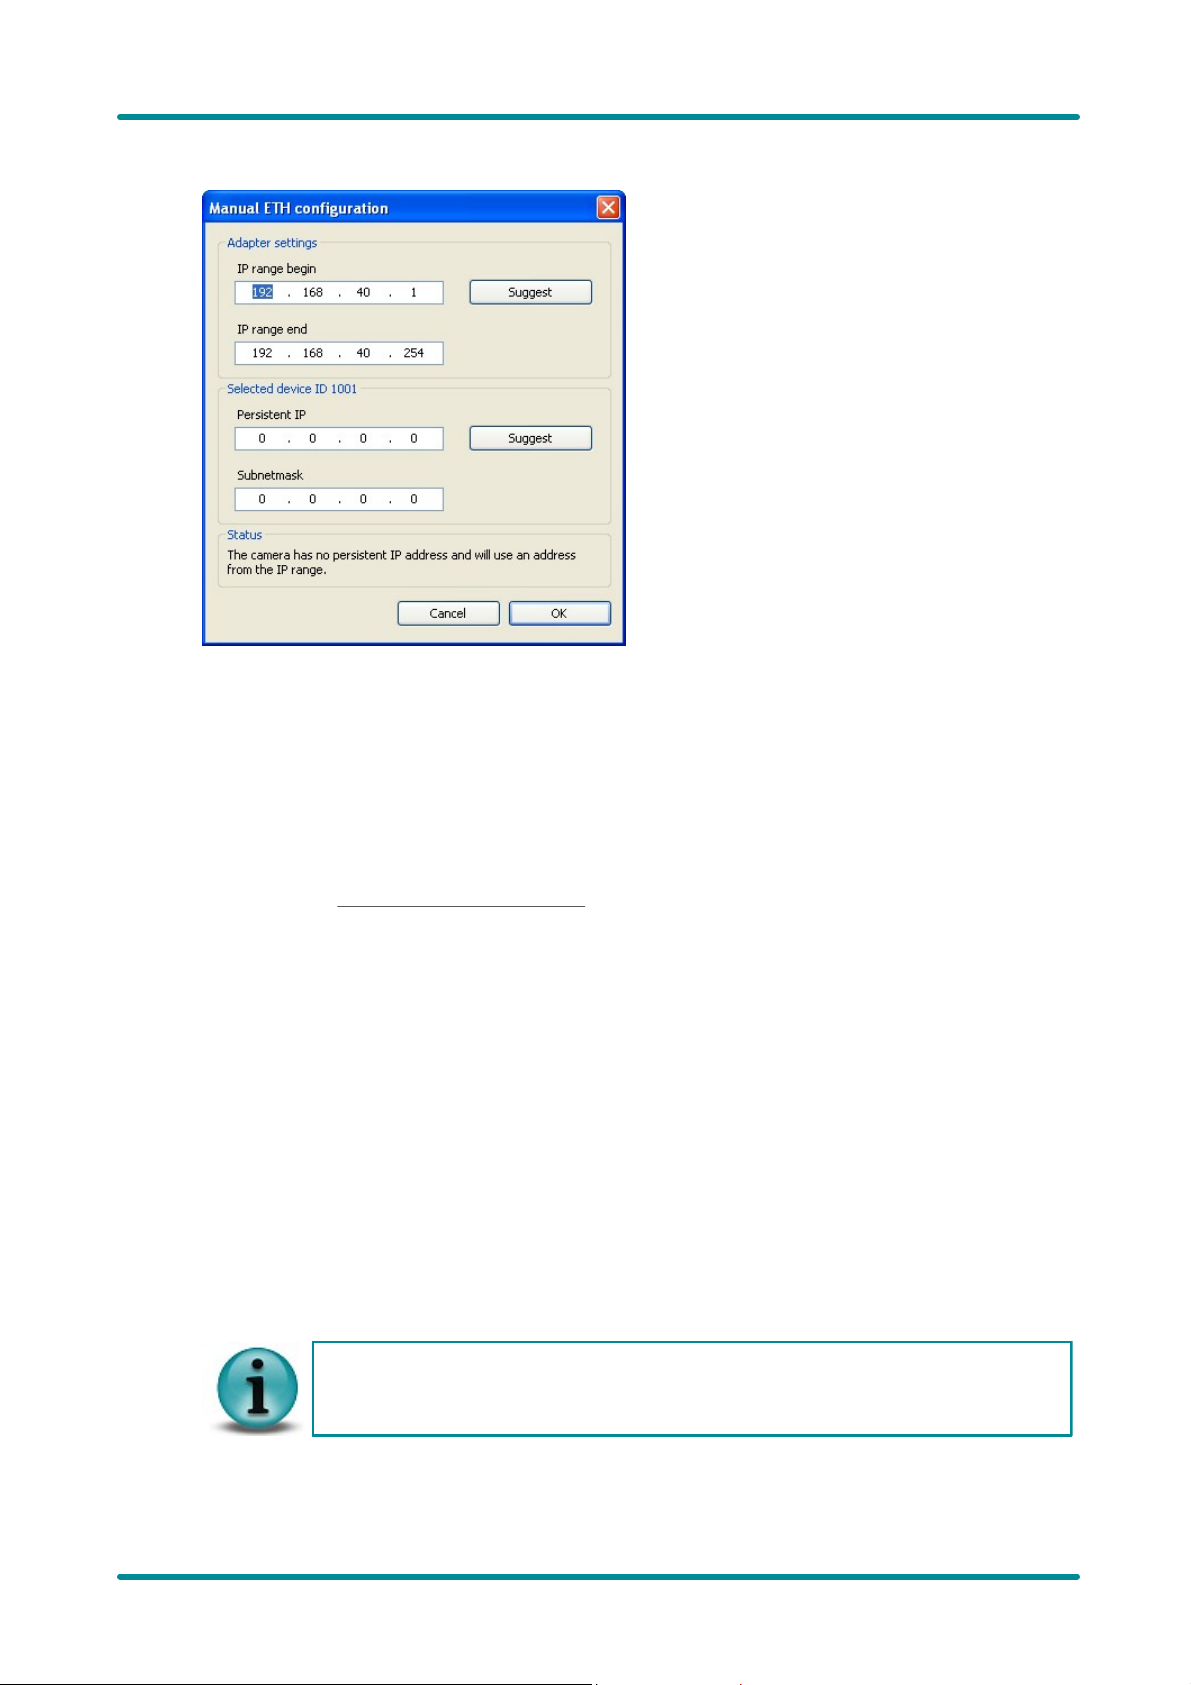
8 Applications
Figure 59: uEye Camera Manager - Manual ETH
configuration
If a DHCP server is running on the network, you need to ensure when configuring the
network adapter that the manually assigned address range of the uEye driver is outside
the DHCP range.
· Adapter settings
Here, you can change the IP configuration of the network adapter to which the selected GigE uEye
camera is connected.
§ IP range begin/end
Defines the IP range from which the uEye driver chooses an address during automatic ETH
configuration. The IP range is not effective if the camera is assigned a persistent IP address.
§ Suggest
Same as the Automatic ETH configuration function.
§ Selected device ID
Here, you can change the IP configuration of the GigE uEye camera.
§ Persistent IP
The entered IP address is permanently saved in the camera when you close the dialog box. The
persistent IP address is retained in the camera memory even when the camera is disconnected
from the power supply. If you connect the camera to a different PC, make sure the persistent IP
address is valid on that computer, as well.
§ Subnet mask
Enter a valid subnet mask for the persistent IP address.
§ Suggest
Selects the first free IP address from the network adapter's range of valid IP addresses. The
function then enters that address in the Persistent IP box and sets the appropriate subnet mask.
The settings made for IP range begin/end in the Adapter Settings box have no influence on the
suggested address.
· Status
This box displays information on the defined IP configuration.
© 2009 IDS Imaging Development Systems GmbH 61
Page 62

User Manual uEye Cameras V3.32
Figure 60: uEye Camera Manager - Parameter list
8.1.11 Parameters
This box displays the parameters of the camera you have selected in the camera list. The
Parameters box is only shown when Expert mode is active.
The parameters are organized in a tree structure. Only the information that applies to the selected
camera is shown. The data displayed in the camera list is not repeated in the Parameters box. The
data shown in the tree structure cannot be changed.
© 2009 IDS Imaging Development Systems GmbH62
Page 63

8 Applications
· USB *)
§ Hub
Indicates which hub and port a USB camera is connected to. In addition, the full path through all
hubs to the USB controller on the computer is displayed.
§ Controller
Indicates the USB controller to which the camera is connected.
· Device
§ Sensor ID *
)
§ General
o
Runtime firmware version **
o
Starter firmware version **
o
User EEPROM
)
)
The first 8 characters of the user area in the EEPROM are displayed (see Camera
Information).
o
COM port number **
)
Number of the virtual COM port stored in the camera's memory (see Serial Interface
(RS232)).
o
Camera temperature **
)
Indicates the camera temperature in degrees Celsius.
o
Device statusflags **
)
Internal camera status flags
o
Control status **
)
Internal camera status flags
§ Hardware **
o
Sensor ID **
o
Image memory size **
§ Network **
o
MAC address
)
)
)
)
Unique MAC network address of the camera
o
Current IP address/Current IP subnetmask
Current IP configuration
o
Persistent IP address/Persistent IP subnetmask
IP configuration stored in the camera's memory
o
IP range begin/IP range end
IP range assigned by the computer. If the IP address is automatically assigned, the camera
accesses this IP range and attempts to find an available IP address within this range.
o
Paired host MAC/Paired host IP
Network data of the paired computer
o
Link
Bandwidth of the camera's network connection
· Local network adapter **
§ General **
o
Designation
)
)
Name of the network adapter
o
DHCP disabled/enabled
o
Number of known devices
Number of devices connected to the computer
o
Number of paired devices
© 2009 IDS Imaging Development Systems GmbH 63
Page 64

User Manual uEye Cameras V3.32
Number of cameras that have been opened by this computer
§ Network **
o
MAC address
Unique network address of the computer
o
IP address/IP subnetmask
Network configuration of the computer
o
IP range begin/IP range end
Address range stored on the computer for automatic assignment of the camera IP address
(see Automatic ETH Configuration)
o
IP range valid
Checks that the IP range stored on the computer is valid. The addresses of the IP range are
valid if they are on the same subnet as the computer.
§ Settings
o
Packet filter **
Determines how incoming uEye data traffic is filtered by the network card. Block UEGET is
preset and cannot be changed.
§ Local driver
o
Min. compatible starter FW **
Minimum required version of the starter firmware
o
Max. compatible starter FW **
Last supported version of the starter firmware
)
)
)
)
*) This information is only displayed for USB uEye cameras
**) This information is only displayed for GigE uEye cameras
© 2009 IDS Imaging Development Systems GmbH64
Page 65

8.2 uEye Demo
uEye Demo is currently only available for Windows operating systems. A version with reduced functionality is available for Linux.
Please note that uEye Demo does not guarantee completeness and operational
reliability in all modes and all computing environments. uEye Demo is supplied with
source code and is intended solely for demonstrating the uEye software library and
camera functionality.
Figure 61: uEye Demo application
The uEye Demo application demonstrates the functionality and performance of the uEye cameras.
The application is part of the free uEye software package that is available for download from our
website.
In uEye Demo, you can access all important camera settings and functions of the uEye
programming library. Apart from controlling and configuring the camera, you can record images as
AVI files and save them as BMP or JPEG files.
8 Applications
uEye Demo can be accessed as follows:
· Start ® All Programs ® IDS ® uEye ® uEye Demo
· Program icon on the desktop or Quick Launch toolbar
© 2009 IDS Imaging Development Systems GmbH 65
Page 66

User Manual uEye Cameras V3.32
Figure 62: Select Camera dialog box
Figure 63: Select camera (cameras in use)
8.2.1 Camera Selection
Select uEye menu ® Open or click the corresponding icon on the General toolbar to select (open) a
connected camera. If only one camera is available, this camera is selected automatically. If more
than one camera is connected, the Select Camera dialog box is displayed.
You can use multiple cameras simultaneously by opening multiple instances of uEye Demo. GigE
uEye cameras that have already been opened or that have not been correctly configured are marked
No in the Available column.
© 2009 IDS Imaging Development Systems GmbH66
Page 67

8.2.2 Toolbars
1
Open camera and start in live mode
2
Open camera
3
Close camera
4
Camera changes to standby mode
5
Save image as bitmap
6
Open the dialog box for AVI Recording
7
Copy image to the Clipboard (only in DIB mode)
8
Test the range of camera functions
9
Select AOI (Area Of Interest)
10
Delete selected AOI
11
Open/close Histogram window
12
Open/close Horizontal Line View window
Displays the color values of a pixel row
13
Open/close Vertical Line View window
Displays the color values of a pixel column
14
Open/close Zoom window
15
Open/close Pixel Peek window
1
Deactivate display
2
Full screen window in overlay or back buffer mode
3
Scale display to window size
4
Display at original size
5
Scale display down to half size
6
Scale display down to quarter size
7
Scale display up to double size
8
Limit max. display frame rate to 30 fps.
The image capture frame rate remains unchanged.
uEye
8 Applications
Display
© 2009 IDS Imaging Development Systems GmbH 67
Page 68

User Manual uEye Cameras V3.32
1
Start/stop live video (freerun mode)
2
Snapshot in freerun mode
3
Snapshot in trigger mode
4
Start/stop continuous triggered capture
1
Automatic brightness control (AES/AGC) on/off
2
Set reference area for automatic brightness control
3
Delete reference area for automatic brightness control
4
Automatic white balance (AWB) on/off
5
Set reference area for automatic white balance
6
Delete reference area for automatic white balance
1
Draw freehand overlay in image
2
Draw overlay line in image
3
Draw overlay circle in image
4
Draw overlay rectangle in image
5
Measure distance
6
Write overlay text in image
7
Clear all drawn elements
8
Timestamp on/off
Capture
Auto Features
Draw
© 2009 IDS Imaging Development Systems GmbH68
Page 69

Status Bar
Figure 64: uEye Demo – Status bar
1
Current cursor position in the Zoom/Pixel Peek window and color values at the cursor position
2
Defined color mode and image resolution
3
Counters
Frames: Transferred images
Display: Displayed images
Missed: Hardware trigger events missed. This counter increments each time a
hardware trigger is received in trigger mode, but the camera is not ready for
image capture
Failed: Transmission errors
Recon.: This counter increments each time the open camera is removed and
reconnected during operation.
4
Status of the current image data transfer (OK/Error)
5
Current frame rate (fps) of the camera
8 Applications
8.2.3 Menus
File
© 2009 IDS Imaging Development Systems GmbH 69
Page 70

User Manual uEye Cameras V3.32
Load image ...
Load bitmap
Save image ...
Save image as bitmap
Record video sequence ...
Opens the Record Dialog box
Load parameters
Load parameters from an ini file or from one of the camera's
parameter sets
Save parameters
Save parameters to an .ini file or to one of the camera's internal
parameter sets
Language
Select a language for the program. When you change the
language, you need to restart uEye Demo to apply the new
setting.
Customize
Opens a dialog box where you can make various settings for
the startup behavior of uEye Demo
Exit
Exit the demo program
Copy Ctrl+C
Copy the displayed image content to the Clipboard. Overlay
data created using the Draw/Measure function is also copied
automatically.
Edit
© 2009 IDS Imaging Development Systems GmbH70
Page 71

View
Render mode
Image display
Disable
Deactivate display
Normal
Display at original size
Fit to window
Scale display to window size
Quarter size
Scale display down to quarter size
Half size
Scale display down to half size
Double size
Scale display up to double size
Mirror up/down
Mirror display on horizontal axis
Show only AOI
AOI is displayed without black border
Line view (horizontal)
Opens the Line view window (row view)
Line view (vertical)
Opens the Line view window (column view)
Histogram
Opens the Histogram window
Zoom window
Opens the Zoom window
Pixel peek window
Opens the Pixel peek window
Waterfall window
Opens the Waterfall window
Log window
Opens the Log window
Capture errors
Opens the Capture errors window
Toolbars
Show/hide toolbars
uEye, View, Capture, Auto Features and Draw/Measure
8 Applications
© 2009 IDS Imaging Development Systems GmbH 71
Page 72

User Manual uEye Cameras V3.32
Initialize
Open camera and show live image
Initialize and stop
Open camera
Standby
The camera changes to standby mode
Close
Close camera
Reset to defaults
Resets all values set in the demo program to the defaults
Live
Live video on/off
Snap
Snapshot from live video
Sync Trigger (Rising Edge)
Triggered snapshot (hardware trigger, rising edge)
Sync Trigger (Falling Edge)
Triggered snapshot (hardware trigger, falling edge)
Trigger snap
Triggered snapshot (software trigger)
Trigger mode ...
Trigger mode on/off; continuous triggered capture
Properties
See Camera Properties
Auto contrast
Activate automatic brightness control
Set new AES/AGC AOI
Define active area for automatic brightness control
Clear AES/AGC AOI
Clear active area defined for automatic brightness control
Auto whitebalance
Activate automatic white balance
Set new AWB AOI
Define active area for automatic white balance
Clear AWB AOI
Clear active area defined for automatic white balance
Set new AOI
After calling Set new AOI, you can select the area to be used as
uEye
© 2009 IDS Imaging Development Systems GmbH72
Page 73

8 Applications
AOI with the mouse
Clear AOI
Resets the area set with Set new AOI
User allocated image
The memory is allocated not via the SDK function
is_SetAllocateImageMem(), but by the application
Sound on transfer failed
Output an acoustic signal if a transmission error occurs
Error report
Errors are displayed in a dialog box
Clear counters
Reset the counters
(see uEye Demo Status Bar)
Copy
Copy the displayed image content to the Clipboard. Overlay
data created using the Draw/Measure function is also copied
automatically.
© 2009 IDS Imaging Development Systems GmbH 73
Page 74

User Manual uEye Cameras V3.32
Select Color
Select color for drawings and text
Geometry
Select line width
Set line width
Circle
Show circles
Show/hide circles
New circle
Draw new circles
Delete circles
Delete circles
Freehand
Show freehand
Show/hide freehand drawings
New freehand
Draw new freehand
Delete freehand
Delete freehand drawing
Line
Show lines
Show/hide lines
New lines
Draw new lines
Delete lines
Delete lines
Rectangle
Show rectangles
Show/hide rectangles
New rectangles
Draw new rectangles
Delete rectangles
Delete rectangles
Measure
Set measuring unit
Set scale
Show measures
Show/hide dimension lines
New measure
New dimension line
Delete measures
Delete all dimension lines
Text
Select font
Select font
Show texts
Show/hide texts
New text
Write new text
Delete text
Delete text
Time stamp
Set timestamp position
Timestamp position
(top left, top right, bottom left, bottom right)
Show timestamp
Show/hide timestamp
Save window
Opens the Save As dialog box. The image is stored with all
drawings, texts, measures and dimension lines
Delete all
Delete all drawings, texts, measures and dimension lines
Draw/Measure
© 2009 IDS Imaging Development Systems GmbH74
Page 75

Help
Hotkeys
Display hotkeys
Figure 65: Hotkeys
About uEye Demo
Display program information
Figure 66: About uEye Demo
8 Applications
© 2009 IDS Imaging Development Systems GmbH 75
Page 76

User Manual uEye Cameras V3.32
Figure 67: File menu – Record video sequence
AVI recording is only possible in the Device Independent Bitmap (DIB) display mode.
8.2.4 Dialog Boxes
Record Dialog
Select File menu ® Record video sequence ... to open the uEye Record Dialog box. This dialog box
provides all the functions you need to create a video file (.avi) from a sequence of images captured
with the uEye. To reduce the file size, the single frames are stored in the AVI container using an
adjustable JPEG compression. It is possible to extract single frames from the AVI file.
AVI capture workflow
Once the AVI file has been created, images transferred from the uEye are placed in a buffer. Then,
the images are compressed and added to the AVI file which is stored on the hard disk. These
operations are not performed in the same thread as the capturing process. If you capture more
images while a compression or write operation is in progress, the new images will be discarded.
Supported color formats
The supported input color formats are RGB32, RGB24, Y8 and raw Bayer. The output file will always
be in RGB24 format, regardless of the input data format. Once the AVI file has been created, the
following parameters of the input image can no longer be changed:
· Color format
· AOI, binning and subsampling
· Show only AOI
Record dialog box
· File
Name of the AVI file opened for recording.
· Max. Frames
If you select this check box, you can set the number of frames after which recording should stop.
· Maximal [MB]
Sets the maximum size for the AVI file. Recording stops when the AVI file reaches the size limit.
© 2009 IDS Imaging Development Systems GmbH76
Page 77

8 Applications
You can edit the entry in this box (default: 1998).
· Current [MB]
Indicates the current size of the AVI file.
· Received
Indicates the number of images transferred by the camera.
· Dropped
Indicates the number of images discarded during compression. A image is dropped if it arrives
while compression is in progress.
· Saved
Indicates the number of images saved to the AVI file.
· Calc. Framerate
If you select this check box, the frame rate of the AVI file is determined automatically during
recording. It can also be set manually. The frame rate value is stored in the AVI file and evaluated
by the movie player. The usual value is 25 or 30 frames per second.
The recording speed of the video depends on the selected color format, the image size and the
compression level of the AVI file as well as the PC performance.
· JPEG Quality
This slider sets the JPEG compression level (1 = lowest quality/highest compression, 100 =
highest quality/lowest compression, default = 75).
· Create.../Close
Click this button to create a new AVI file for recording, and to close the file again when you are
done. If you select an existing AVI file, the file contents will be overwritten during recording.
· Record/Stop
Starts/stops AVI recording.
· Exit
Closes the Record dialog box. A recording in progress is stopped.
© 2009 IDS Imaging Development Systems GmbH 77
Page 78

User Manual uEye Cameras V3.32
Figure 68: View menu - Line view
Horizontal/Vertical Line View
Select View menu ® Line view (horizontal / vertical) to open the Line View windows, which show the
color values of a pixel row or pixel column. The line view always displays 256 values per channel. For
color modes with a bit depth of more than 8 bits, the function evaluates the 8 most significant bits
(MSBs).
© 2009 IDS Imaging Development Systems GmbH78
Page 79

8 Applications
Figure 69: View menu – Histogram window
Histogram
Select View menu ® Histogram to open the Histogram window. This window graphically displays
the frequency distribution of the color values in the image captured by the camera. The histogram
always displays 256 values per channel. For color modes with a bit depth of more than 8 bits, the
function evaluates the 8 most significant bits (MSBs).
The following options are available:
· Channel
With the Red, Green, and Blue check boxes, you can enable or disable the display for each color
channel. Avg. displays the average of each color value.
For monochrome images, the average grayscale value is displayed.
· Outlined
The Outlined check box enables you to toggle the color value display between an area diagram
and a line diagram.
· Logarithmic
If you select this check box, the values are displayed with logarithmic scaling.
· Show Bayer RGB
This function is only available when a color camera is running in Direct raw Bayer mode. If you
select this check box, the histogram represents the individual Bayer color components as red,
green and blue channels.
© 2009 IDS Imaging Development Systems GmbH 79
Page 80

User Manual uEye Cameras V3.32
Figure 70: View menu – Zoom window
Zoom Window
Select View menu ® Zoom window to open the Zoomwindow. This window shows an enlarged view of
the image area at the selected cursor position. Using the slider at the top of the window, you can set
the zoom factor in the range between 0.25 and 20.00. The size of the image area depends on the
selected size of the Zoom window.
If you enable the Pixel Peek check box at the top of the zoom window, the color values at the cursor
position are displayed (see Pixel Peek Window).
To set the cursor position you want to display in the window, place the cursor at that position in the
image, hold the b key and right-click. Alternatively, you can set the image position using the
context menu.
© 2009 IDS Imaging Development Systems GmbH80
Page 81

8 Applications
Figure 71: View menu – Pixel Peek window
Pixel Peek Window
Select View menu ® Pixel peek window to open the Pixel peek window. This window displays the
color values at the selected cursor position and those of the neighboring pixels. The color values at
the cursor position are surrounded by a yellow rectangle. For monochrome images, the grayscale
value is displayed. The window always displays 256 values per channel. For color modes with a bit
depth of more than 8 bits, the function evaluates the 8 most significant bits (MSBs).
If you disable the Pixel Peek check box at the top of the window, the Zoom window is displayed
(see Zoom Window).
To set the cursor position you want to display in the window, place the cursor at that position in the
image, hold the Ctrl key and right-click. Alternatively, you can set the image position using the
context menu.
© 2009 IDS Imaging Development Systems GmbH 81
Page 82

User Manual uEye Cameras V3.32
Figure 72: View menu – Waterfall window
Waterfall Window
Select View menu ® Waterfall window to display the Waterfall window. This window shows how a
selected image line changes over time. For this purpose, the line at the selected cursor position is
copied to the new window. With each new frame, all lines in the Waterfall window are moved one
pixel down, and the new line is added at the top. This results in an image that flows from top to
bottom and is useful for observing short-term image changes.
To set the cursor position you want to monitor in the Waterfall window, place the cursor at that
position in the image, hold the Ctrl key and right-click. Alternatively, you can set the image position
using the context menu.
© 2009 IDS Imaging Development Systems GmbH82
Page 83

8 Applications
Figure 73: View menu – Log window
Log Window
Select View menu ® Log window to display the logged data. The uEye logs events and messages in
this window.
The following options are available:
· Level
With these radio buttons, you choose the logging level (Off, Low, Medium, High). The last level
used is saved when you close the window. The next time you open the log window, logging is
performed at that level.
· Auto Scroll
When you select the Auto Scroll check box, the display automatically scrolls up when new entries
arrive so that the new entries can be read.
· Log Transfer Failed
Select the Log Transfer Failed check box if you want to log transfer errors.
· Clear Window
The Clear Window button deletes the current messages.
· Save
The Save button opens the Windows Save as dialog box, allowing you to save the messages
displayed in the log window in ASCII format (.txt file).
© 2009 IDS Imaging Development Systems GmbH 83
Page 84

User Manual uEye Cameras V3.32
Figure 74: View menu - Capture errors
Error type
Description
#
API no destination memory
There is no destination memory for copying the finished
image.
1
API conversion failed
The current image could not be processed correctly.
2
API image locked
The destination buffers are locked and could not be
written to.
3
DRV out of buffers
No free internal image memory is available to the driver.
The image was discarded.
4
DRV device not ready
The camera is no longer available. It is not possible to
access images that have already been transferred.
5
USB transfer failed
The image was not transferred over the USB bus.
6
DEV timeout
The maximum allowable time for image capturing in the
camera was exceeded.
7
ETH buffer overrun
The sensor transfers more data than the internal camera
memory of the GigE uEye can accommodate.
8
ETH missed images
The GigE uEye camera could neither process nor output
an image captured by the sensor.
9
Capture Errors
Select View menu ® Capture errors on the main menu to display the Capture Errors dialog box.
© 2009 IDS Imaging Development Systems GmbH84
Page 85

8 Applications
#
Possible cause
Remedy
1
Not enough destination memory
allocated or all destination buffers locked
by the application
· Reduce the frame rate so that there is more time to
process the filled destination buffers
2
Internal error during internal processing
of the image
-
3
All destination buffers locked by the
application
· Reduce the frame rate so that there is more time to
process the filled destination buffers
4
The computer takes too long to process
the images in the uEye API (e.g. colour
conversion)
· Reduce the frame rate so that there is more time to
process the filled image memory of the driver
· Disable resource-intensive API image pre-processing
functions (e.g. edge enhancement, colour correction,
choose smaller filter mask for software colour
conversion)
5
The camera was disconnected or closed
-
6
Not enough free bandwidth for image
transfer available on the USB bus
· Reduce the pixel clock frequency
· Operate fewer cameras simultaneously on a USB
bus
· Check the quality of the USB cabling and
components
7
The selected timeout value is too low for
image captre
· Reduce the exposure time
· Increase the timeout
8
The data rate of the sensor is too high
· Reduce the pixel clock frequency
· Reduce the frame rate
· Reduce the AOI
9
The camera's frame rate is too high or
the bandwidth on the network is
insufficient to transfer the image
· Reduce the frame rate
· Increase the value for the receive descriptors in the
network card settings
© 2009 IDS Imaging Development Systems GmbH 85
Page 86

User Manual uEye Cameras V3.32
Figure 75: uEye properties - Camera
8.2.5 Properties
When you select uEye ® Properties from the main menu, a dialog box opens where you can set
the uEye camera parameters. Changes made to camera and image settings here will take effect
immediately.
When you close a camera in uEye Demo, the current settings are written to the Windows Registry.
They will be loaded the next time you open a camera of the same type. To save the settings to the
camera or to an ini file, select File ® Save parameters from the main menu. To load settings, select
the Load parameters option.
Camera
This tab provides parameters for settings the pixel clock frequency, frame rate and exposure time for
your uEye camera (see also Pixel Clock, Frame Rate and Exposure Time).
· Camera peak bandwidth
Maximum required bandwidth in MB/sec (peak load). This value is displayed in red if the available
Gigabit Ethernet bandwidth is exceeded.
· Camera average bandwidth
Required average bandwidth in MB/sec. This value is displayed in red if the available Gigabit
Ethernet bandwidth is exceeded.
The average bandwidth is calculated from the following data: Image size, image format, frame rate,
and interface-related protocol overhead.
· Sensor (max. bandwidth)
Maximum data volume in Mpixels/sec created by the sensor.
© 2009 IDS Imaging Development Systems GmbH86
Page 87

8 Applications
The upper bandwidth limit of a Gigabit Ethernet camera depends on the chipset of the
network card and on the network structure. If transfer errors occur, you need to reduce the
frame rate.
With USB cameras, the upper limit depends on the USB chipset on the mainboard/USB
card and on the number of USB devices connected. If transfer errors occur, reduce the
pixel clock frequency.
· Pixel
Sets the clock rate at which the image data is read from the sensor. Changes to this parameter
affect the frame rate and the exposure time.
Many CMOS sensors allow higher pixel clock frequencies in binning/subsampling mode.
§ Optimum
When you select this check box, the highest possible pixel clock is determined and set
automatically. The optimum pixel clock is the clock rate at which no transfer errors occur during
the time (in seconds) set in the Auto pixel clock test period box. The longer you set the test
period, the more reliable the determined pixel clock becomes. The total time it takes to
automatically set the pixel clock is a bit longer than the test period setting.
· Frame rate (Freerun)
Sets the frame rate in freerun mode. The available frame rate range depends on the pixel clock
setting.
§ Hold
When you select this check box, the frame rate will remain constant if the pixel clock changes.
If the frame rate cannot be maintained, it is set to the nearest possible value.
§ Max
The camera is operated at the maximum frame rate that is possible at the current pixel clock
setting.
§ Auto
Select this check box to activate the Auto Frame Rate function. This function is only available
when Auto Exposure Shutter is enabled.
· Exposure time
Sets the exposure time. The available exposure time range depends on the pixel clock setting and
the frame rate. A low frame rate setting allows long exposure times. A high frame rate setting
reduces the maximum possible exposure time.
§ Hold
When you select this check box, the exposure time will remain constant if the frame rate
changes. If the exposure time cannot be maintained, it is set to the nearest possible value.
§ Max
The camera is operated at the maximum exposure time that is possible at the current frame
rate.
§ Auto
Select this check box to activate the Auto Exposure Shutter function. If the Auto check box is
selected, the exposure time and pixel clock can no longer be adjusted manually. Selecting the
Hold or Max check box deselects the Auto check box.
· Long-term
If you select this check box, you can set an exposure time of up to 10 minutes on many uEye
CCD cameras. This function is only available in trigger mode.
· Default
Click this button to reset all parameters to the model-specific defaults.
© 2009 IDS Imaging Development Systems GmbH 87
Page 88

User Manual uEye Cameras V3.32
Figure 76: uEye properties - Image
Image
On this tab you can set the sensor gain parameters for your uEye camera (see also Gain and Offset
).
· Hardware settings
The following functions control the analog image signal gain and the black level. The analog
adjustments are made directly in the sensor, which achieves better results than image
adjustments via software.
§ Master gain [0 ... 100]
Gain for overall image brightness. Some camera models have no master gain.
Master gain = 100 means maximum gain; the actual factor is displayed. A gain factor of 1x
disables master gain. The maximum possible gain factor depends on the model you are using.
o
Auto
Select this check box to activate the automatic gain control function. Manually changing the
master gain setting disables the Auto function.
o
Gain boost
Additional analog camera hardware gain. The gain factor ranges between 1.5x and 2x, depending
on the camera model.
§ Black level (offset) [0 ... 255]
Offset for the black level of the sensor signal. The sensor adjusts the black level of the pixels
automatically by default. If the environment is very bright, it can be necessary to adjust the
black level manually. High gain may offset the black level. Only an additive offset is possible
(increase of the black level).
o
Auto
The black level is automatically corrected by the sensor (recommended).
§ Red gain [0 ... 100]
© 2009 IDS Imaging Development Systems GmbH88
Page 89

8 Applications
With cameras featuring both master gain and RGB gain, the two gain factors are
multiplied. Very high gain values can be achieved in this way.
If you want to use the RGB sliders for color adjustment, we recommend setting green gain
to 0 and using only red and blue gain.
Amplifies the red color values
§ Green gain [0 ... 100]
Amplifies the green color values
§ Blue gain [0 ... 100]
Amplifies the blue color values
The RGB gain sliders are only enabled for color cameras.
· Edge enhancement
This function activates a software filter that emphasises the edges in the image.
Enabling the Edge enhancement function increases the CPU load during image capture.
· Gamma
This function activates the gamma function and sets the factor for the gamma curve. The gamma
function emphasises dark image areas according to a non-linear curve. When you are using a
GigE uEye HE camera and have activated hardware color calculation, the gamma curve is
calculated in the camera. In all other cases, the gamma curve is calculated in the PC.
§ Hardware sensor gamma
Select this check box to enable gamma correction by the hardware, using a fixed factor. This
function is currently only available for the UI-122X-X/UI-522X-X.
· Default
Click this button to reset all parameters to the model-specific defaults.
© 2009 IDS Imaging Development Systems GmbH 89
Page 90

User Manual uEye Cameras V3.32
Figure 77: uEye properties - Size
Size
On this tab, you can set the image size parameters for your uEye camera (see also Reading out
Partial Images).
· AOI
These parameters allow selecting the size and position of the area of interest.
· Show only AOI
The AOI is displayed without a black border. Internally, the image is managed at the AOI
resolution and not the full sensor resolution. This function saves memory and computing time
when rendering the image.
§ Width
Sets the AOI width.
§ Height
Sets the AOI height.
§ Left
Sets the left-hand position of the AOI.
§ Center
Select this check box to center the AOI horizontally.
§ Top
Sets the top position of the AOI.
§ Center
Select this check box to center the AOI vertically.
· Horizontal format / Vertical format
With these check boxes and radio buttons, you can select the binning and subsampling settings
for the image.
© 2009 IDS Imaging Development Systems GmbH90
Page 91

8 Applications
The Specifications: Sensors chapter shows you which binning and subsampling factors
the individual camera models support.
Some color cameras perform only mono binning/subsampling due to the sensors they
use. If mono binning or subsampling is used in a color camera, the color information will
be lost.
Some monochrome cameras perform only color binning/subsampling due to the sensors
they use. If color binning or subsampling is used in a monochrome camera, image
artefacts might become visible.
§ Normal
Disables binning and subsampling.
§ Mirror left/right / Mirror up/down
Select this check box to flip the image horizontally/vertically. On CMOS camera models, vertical
mirroring is performed directly in the sensor.
§ 2x/3x/4x/5x/6x/8x Binning
These radio buttons allow setting the binning factor. The image resolution is then reduced by the
selected factor. You can use binning to increase the frame rate.
§ 2x/3x/4x/5x/6x/8x/16x Subsampling
These radio buttons allow setting the subsampling factor. The image resolution is then reduced by
the selected factor. You can use subsampling to increase the frame rate.
· Default
Click this button to reset all parameters to the model-specific defaults.
© 2009 IDS Imaging Development Systems GmbH 91
Page 92

User Manual uEye Cameras V3.32
Figure 78: uEye properties - Format
Format
On this tab you can set parameters for the color format and display mode of your uEye camera (see
also Color Filter (Bayer Filter)).
· Pixel format
With these settings you define the target format to which you want to convert the sensor's raw
data (raw Bayer). The Color Formats and Memory Formats chapter in the uEye Programming
Manual provides a detailed list of all uEye color formats and their representation in the memory.
§ Debayering method
With this setting you select the conversion algorithm.
o
Software 3x3
The conversion is performed by software in the PC. A filter mask of 3x3 pixels is used for the
conversion.
o
Software 5x5
The conversion is performed by software in the PC. A filter mask of 5x5 pixels is used for the
conversion.
o
Hardware 3x3
The conversion is performed in the camera. A filter mask of 3x3 pixels is used for the
conversion. This radio button is only available for GigE uEye HE cameras. When you select
hardware de-Bayering, you can also perform the LUT, Gamma and Hotpixel correction
functions directly in the camera.
§ With the format radio buttons you specify the format in which the image data are written to the
memory. The following formats are available:
o
Direct raw bayer (8)
Direct output of the sensor's raw data (8 bits per pixel). If you are using a color camera, the pattern
of the Bayer color filter is visible. With monochrome cameras, raw Bayer corresponds to the
© 2009 IDS Imaging Development Systems GmbH92
Page 93

8 Applications
We recommend 32-bit RGB mode for TrueColor applications. Y8 mode is usually used for
monochrome applications.
The General: Color Formats and Memory Formats chapter in the uEye Programming
Manual shows you in detail how the color formats are represented in the image memory.
grayscale format with the exception of the LUT/gamma curves.
o
Direct raw bayer (12)
Direct output of the sensor's raw data (12 bits per pixel, starting from the least significant bit
(LSB)).
o
Direct raw bayer (16)
Direct output of the sensor's raw data (12 bits per pixel, starting from the most significant bit
(MSB)).
o
Grayscale (8)
Output of a grayscale image to which the LUT/gamma curve has been applied (8 bits per pixel).
o
Grayscale (12)
Output of a grayscale image to which the LUT/gamma curve has been applied (12 bits per pixel,
starting from least significant bit (LSB)).
o
Grayscale (16)
Output of a grayscale image to which the LUT/gamma curve has been applied (12 bits per pixel,
starting from most significant bit (MSB)).
o
RGB15 (5 5 5)
Output of an image converted according to RGB 15 (5 bits per pixel for R, G and B)
o
RGB16 (5 6 5)
Output of an image converted according to RGB 16 (5 bits per pixel for R and G, 6 bits per pixel for
B)
o
RGB24 (8 8 8)
Output of an image converted according to RGB 24 (8 bits per pixel for R, G and B)
o
RGB32 (8 8 8)
Output of an image converted according to RGB 32 (8 bits per pixel for R, G and B, 8 bit padding)
o
RGBY (8 8 8 8)
Output of an image converted according to RGB 24 (8 bits per pixel for R, G and B) and an
additional gray channel (8 bits per pixel)
o
RGB30 (10 10 10)
Output of an image converted according to RGB 30 (10 bits per pixel for R, G and B, 2 bit padding
(MSB = 0))
o
YUV422
Output of an image converted according to YUV (8 bits per pixel for U, Y, V and Y)
o
YCbCr (8 8 8 8)
Output of an image converted according to YUV (8 bits per pixel for Cb, Y, Cr and Y)
· Display mode
With these radio buttons you select the display mode for the image.
§ Device independent (DIB)
The processor actively renders the image. This color format is supported by all graphics
hardware and is recommended for applications that will be used on different PCs.
§ Overlay
© 2009 IDS Imaging Development Systems GmbH 93
Page 94

User Manual uEye Cameras V3.32
The display modes Overlay and Backbuffer are only supported by graphics cards
with DirectDraw functionality.
In this mode the images are written directly to an invisible area of the graphics card, mixed with
overlay image data and displayed by the card without load on the CPU. The mode also allows
rendering in YUV format and scaling the images in real time.
§ Backbuffer (Desktop color)
In this mode the images are written directly to an invisible area (BackBuffer) of the graphics
card and displayed by the card without load on the CPU.
· Default
Click this button to reset all parameters to the model-specific defaults.
© 2009 IDS Imaging Development Systems GmbH94
Page 95

8 Applications
Figure 79: uEye properties - Color
Color
This tab provides color rendering settings for your uEye camera (see also Color Filter (Bayer Filter)).
· Color saturation
This function enables and configures color saturation control.
In the YUV format, color information (i.e. the color difference signals) is provided by the U and V
channels. In the U channel they result from the difference between the proportion of blue and Y
(luminance), in the V channel from the difference between the proportion of red and Y. For the use
in other color formats than YUV, U and V are converted using a driver matrix.
§ Combine
Selecting this check box synchronizes the two Saturation U and Saturation V sliders.
· IR color filter correction matrix
When using color cameras with IR filter glass, you need to set the appropriate color correction
matrix to ensure correct color rendering. The driver detects the IR filter type and sets this value
automatically (Auto button). You can also select the correction matrix manually.
· Sensor color correction
This function corrects the color values of a pixel. The colors are rendered more accurately after the
color crosstalk of the individual Bayer pattern filters has been eliminated by the color correction.
The color correction factor is steplessly adjustable between 0 (no correction) and 1 (full
correction).
Activating the sensor color correction may increase CPU load.
· Default
Click this button to reset all parameters to the model-specific defaults.
© 2009 IDS Imaging Development Systems GmbH 95
Page 96

User Manual uEye Cameras V3.32
This feature is only available for GigE uEye HE cameras.
Figure 80: uEye properties - Hardware LUT
Hardware LUT
This tab provides settings for the hardware LUT curve of the GigE uEye HE camera. Each look-up
table (LUT) for the uEye contains modification values for the image brightness and contrast
parameters. When a LUT is used, each brightness value in the image will be replaced by a value
from the table. LUTs are typically used to enhance the image contrast or the gamma curve.
· Channel
In this drop down box, you can choose whether you want to display the LUT for all channels or just
for red, green or blue.
· Split points
The LUT has 32 knee points by default. Knee points are used for defining the individual sections of
the curve. When you select the Split points check box, each knee point is split into two separate
points. Only the start and end points of each curve section can be defined independently of the
adjacent sections.
· Presets
In this drop down box, you can select and load predefined LUT curves. The following LUT curves
are available:
© 2009 IDS Imaging Development Systems GmbH96
Page 97

8 Applications
Linear
Linear LUT curve without effect
Negative
Predefined LUT, inverts the image
Glow1
Predefined LUT, false-color representation of the image
Glow2
Predefined LUT, false-color representation of the image
Astro1
Predefined LUT, false-color representation of the image
Rainbow1
Predefined LUT, false-color representation of the image
Map1
Predefined LUT, false-color representation of the image
Cold/Hot
Predefined LUT, false-color representation of the image
Sepic
Predefined LUT, uses sepia toning for coloring the image
Only red
Predefined LUT, shows only the red channel of the image
Only green
Predefined LUT, shows only the green channel of the
image
Only blue
Predefined LUT, shows only the blue channel of the
image
· Convert color to gray
When you are using a GigE uEye HE color camera, you can convert the color images to
monochrome in the camera before applying the LUT curve. This setting is recommended if you
want to use a LUT for false-color representation. The images are transferred in RGB format.
· Output
The diagram shows that part of the LUT curve that is selected in the Channel box. You can drag
and drop each knee point of the curve. To draw a smooth curve for the selected channel, left-click
on a blank space next to the curve.
· Mirror X/Y
These buttons allow mirroring the curve about the X and Y axes.
· Load/Save
Click Save to save the current LUT curve to a text file. With Load, you can load a saved LUT curve
from a file.
· Default
Click this button to reset all parameters to the model-specific defaults.
© 2009 IDS Imaging Development Systems GmbH 97
Page 98

User Manual uEye Cameras V3.32
Figure 81: uEye properties - Trigger
Trigger
This tab provides the settings for triggered image capture with your uEye camera (see also Digital
Input (Trigger)).
· Input
§ Status
If you select this check box, the signal level applied at the camera's trigger input is polled and
displayed.
§ Trigger delay
Select this check box to set a delay between the arrival of a software or hardware trigger signal
and the start of exposure.
· Mode
With these radio buttons, you choose which trigger mode you want to activate in the camera:
§ Software
The camera is running in software trigger mode without a signal applied. The images are
captured continuously.
§ Falling edge
The camera captures an image on the falling edge of the signal applied to the trigger input.
§ Rising edge
The camera captures an image on the rising edge of the signal applied to the trigger input.
§ Delay between frames [ms]
In software trigger mode, you can set a time delay between two triggered image captures.
§ Timeout [ms]
Specifies a timeout for the trigger mode. If the camera does not receive a trigger signal within
this time, a timeout message is transmitted and the transmission error counter is incremented.
© 2009 IDS Imaging Development Systems GmbH98
Page 99

· Camera
Please note that the frame rate in trigger mode is always lower than in freerun mode. This
is due to the sequential transmission. First the exposure takes place, then the transfer. A
new exposure can only be performed after the transmission is completed. Therefore, the
freerun mode is faster.
High trigger rates are achieved only with short exposure times and a high pixel clock
setting.
§ Global Start (Trigger Mode)
If you select this check box, all rows of a rolling shutter sensor are exposed simultaneously.
Activating Global Start only makes sense when using a flash. This function is currently
supported by the UI-1480/UI-5480 models.
· Default
Click this button to reset all parameters to the model-specific defaults.
8 Applications
© 2009 IDS Imaging Development Systems GmbH 99
Page 100

User Manual uEye Cameras V3.32
Figure 82: uEye properties - Input/Output
When you are using the uEye's flash function, you need to re-enable the flash (i.e.
disable and then activate it again) whenever you change the pixel clock setting or
horizontal image geometry. This is necessary to newly synchronize the internal
timing settings of the flash output with the start of sensor exposure.
Input/Output
On this tab, you can set the parameters for the flash output and the GPIOs on your uEye camera
(see also Digital Output (Flash Strobe) and General Purpose I/O).
· Flash output
With these radio buttons, you choose which digital output function you want to activate on the
camera:
§ Off
The digital output is disabled.
§ Constant high
The digital output is set to High regardless of the exposure.
§ Constant low
The digital output is set to Low regardless of the exposure.
§ Flash high active (only in trigger mode)
The digital output is set to High during the exposure.
§ Flash low active (only in trigger mode)
The digital output is set to Low during the exposure.
§ Busy
The digital output signalizes whether the camera is ready for the next trigger. This function is not
© 2009 IDS Imaging Development Systems GmbH100
 Loading...